instructions to perform boot from iscsi for dell storage...
TRANSCRIPT
Dell™ PowerEdge™ Systems
Instructions to Perform Boot from
iSCSI for Dell Storage Arrays
w w w . d e l l . c o m | s u p p o r t . d e l l . c o m

Notes and Cautions NOTE: A NOTE indicates important information that helps you make better use of
your computer.
CAUTION: A CAUTION indicates potential damage to hardware or loss of data if instructions are not followed.
____________________
Information in this document is subject to change without notice.© 2007–2008 Dell Inc. All rights reserved.
Reproduction of these materials in any manner whatsoever without the written permission of Dell Inc. is strictly forbidden.
Trademarks used in this text: Dell, the DELL logo, PowerEdge, and PowerVault are trademarks of Dell Inc.; Intel is a registered trademark of Intel Corporation in the United States and/or other countries; Microsoft, Windows, and Windows Server are either trademarks or registered trademarks of Microsoft Corporation in the United States and/or other countries; Broadcom is a registered trademark of Broadcom Corporation; Symantec is a trademark of Symantec Corporation.
Other trademarks and trade names may be used in this document to refer to either the entities claiming the marks and names or their products. Dell Inc. disclaims any proprietary interest in trademarks and trade names other than its own.
September 2008 Rev. A00
Contents
1 Overview . . . . . . . . . . . . . . . . . . . . . . . . . . 7
Pre-Installation Checklist . . . . . . . . . . . . . . . . . 8
Additional Information . . . . . . . . . . . . . . . . . . . 9
Process Flow. . . . . . . . . . . . . . . . . . . . . . . 10
2 Configuring the Dell Storage Array . . . . . . . . . . . . . . . . . . . . . . . . . . . . 13
Configuring the Dell™ PowerVault™ NX1950 Integrated Solution . . . . . . . . . . . . . . . 13
Configuring the PowerVault MD3000i Storage Array . . . . . . . . . . . . . . . . . 14
Configuring the Dell|EMC Storage System . . . . . . . 17
Using Navisphere Manager to Configure the Dell|EMC Storage System . . . . . . . . . . . . . . . . . . . 17
Using Navisphere Express to Configure the Dell|EMC Storage System . . . . . . 18
Contents 3
3 Configuring the Network Adapter . . . . . . . . . . . . . . . . . . . . . . . . . . 19
Configuring the Intel® PRO 1000 Network Adapter . . . . . . . . . . . . . . . . . . . . . 19
Flashing the Intel Firmware . . . . . . . . . . . . . 19
Configuring the Intel iSCSI Boot Menu . . . . . . . 19
Configuring Broadcom® NIC. . . . . . . . . . . . . . . 21
Configuring the Dell BIOS and Broadcom Ctrl-S . . . . . . . . . . . . . . . . . . 21
Configuring the NIC or LOM Ctrl-S Menu . . . . . . . . . . . . . . . . . . . . . 21
4 Creating and Installing an Image to iSCSI Target . . . . . . . . . . . . . . . 25
Imaging Process for Windows Server® 2003 and 2008 . . . . . . . . . . . . . . . . . . 25
Configuring the Host with Windows Server 2003 . . . . . . . . . . . . . . . . . . . . . 26
Configuring the Host with Windows Server 2008 . . . . . . . . . . . . . . . . . . . . . 28
Configuring the Host (Either Windows Server 2003 or Windows Server 2008) . . . . . . . 28
Cloning the Operating System Boot Image from Local Hard drive to the iSCSI LUN . . . . . . . . . . . . . . . . . . 30
Imaging Process for Linux . . . . . . . . . . . . . . . . 31
Direct or Remote Installation for Windows Server 2003 (Intel Only) . . . . . . . . . . . . 31
4 Contents
Direct or Remote Installation for Windows Server 2008 . . . . . . . . . . . . . . . . 36
Installing the Operating System on the iSCSI LUN . . . . . . . . . . . . . . . . . . 36
Direct or Remote Installation for Linux . . . . . . . . . 39
Installation process for RHEL 5.2 (or later) . . . . . . . . . . . . . . . . . . . . . . . 40
Installation process for SLES 10 SP2 (or later) . . . . . . . . . . . . . . . . . . . . . . . 43
Post Installation Configuration . . . . . . . . . . . 45
Known Linux Installation Issues . . . . . . . . . . 45
5 Creating Redundant Paths to a Target (Configuring Multi-Path I/O) . . . . . . . . . . . . . . . . . . . . 47
6 Disk Duplication (Cloning) . . . . . . . . . . . . 53
Cloning Methods for the Dell™ PowerVault™ NX1950 Integrated Solution . . . . . . . 53
Method 1 - Copying and Pasting .vhd Files (Preferred Method) . . . . . . . . . . . . . . 53
Method 2 - Using an Imaging Server . . . . . . . . 54
Booting a New Host from the Image on the PowerVault NX1950 . . . . . . . . . 55
Cloning methods for the PowerVault MD3000i Storage Array . . . . . . . . . . . . . . . . . 55
Method 1 - Using Snapshot Virtual Disks and Virtual Disk Copy (Preferred Method) . . . . . . . . . . . . . . . . . 55
Method 2 - Using Virtual Disk Copy Premium Feature . . . . . . . . . . . . 56
Method 3 - Using an Imaging Server . . . . . . . . 56
Contents 5
Cloning methods for the Dell|EMC Storage System . . . . . . . . . . . . . . . . . . . . . . 57
Method 1 - Preferred Method for Dell|EMC Storage Systems . . . . . . . . . . . . . 57
Method 2 - Using an Imaging Server . . . . . . . . 58
Booting a New Host from the Image on the Dell|EMC Storage System . . . . . . . . . . . . 59
A Troubleshooting . . . . . . . . . . . . . . . . . . . 61
iSCSI Boot BIOS Fails to Detect the iSCSI Target . . . . . . . . . . . . . . . 61
Host Displays a Blue Screen or Continues to Reboot . . . . . . . . . . . . . . . 62
B Configuration Worksheet . . . . . . . . . . . . 63
Index . . . . . . . . . . . . . . . . . . . . . . . . . . . . . . . 65
6 Contents
OverviewThis document provides instructions to configure a Dell™ PowerEdge™ system for booting Microsoft® Windows Server® (2003 or 2008) operating system or Linux (Red Hat Enterprise or SUSE) operating system from a virtual disk in an Internet Small Computer System Interface (iSCSI) storage solution.
NOTE: The steps described in "Direct or Remote Installation for Windows Server 2008" on page 36 are also applicable for a Windows Server 2008 system with the Hyper-V role enabled. Any Hyper-V specific information is noted. Dell supports boot from SAN (Storage Area Network) of the Windows Server 2008 Parent Partition. Hyper-V does not support boot from SAN of virtual machines.
This document covers the following topics:
• "Configuring the Dell Storage Array" on page 13
• "Configuring the Network Adapter" on page 19
• "Creating and Installing an Image to iSCSI Target" on page 25
• "Creating Redundant Paths to a Target (Configuring Multi-Path I/O)" on page 47
• "Disk Duplication (Cloning)" on page 53
NOTE: Throughout this document the terms host and initiator refer to the PowerEdge system that you configure Boot from iSCSI (BFi) on. The terms iSCSI LUN and iSCSI Target refer to the virtual disk in the Dell Storage Array from which you perform the boot.
Overview 7
Pre-Installation ChecklistBefore you start installation, you need to do the following:
• Complete the "Configuration Worksheet" on page 63
• See the following documents:
• Intel PRO Family of Adapters User’s Guide located on the Intel NIC media or on the Dell Support website at support.dell.com
• Broadcom NetXtreme Family of Adapters User’s Guide located on the Broadcom NIC media or on the Dell Support website at support.dell.com
• Update your Dell Storage Array to the latest version referring to the following matrices:
• Dell™ PowerVault™ NX1950 Systems Support Matrix located on the Dell Support website at support.dell.com
• Dell™ PowerVault™ MD3000i Support Matrix located on the Dell Support website at support.dell.com
• Dell|EMC Storage Systems Support Matrix located on the E-Lab Inteoperability Navigator website at elabnavigator.com
• Download and install the latest Current Intel PRO 1000 or Broadcom NetXtreme drivers from the Drivers and Downloads section on the Dell Support website at support.dell.com
• Install Disk imaging software recommended is Symantec™ Ghost v.11 (or later)
• Install Microsoft iSCSI Software Initiator v2.07 or later
8 Overview

Table 1-1 displays the current supported Intel and Broadcom driver or firmware versions.
Additional Information• Network Interface Card (NIC) teaming is not supported for iSCSI NICs
• Virtual LAN (VLAN) tagging is not supported for iSCSI boot with the Microsoft iSCSI Software Initiator.
• iSCSI boot is not supported with IPV6 Networks.
• Redundancy during pre-operating system boot in Linux (RHEL 5.2 and SLES 10 SP2) is not supported at this time. Do not configure a secondary NIC for Linux iSCSI boot in the NIC Option ROM. To configure failover in Linux, see your iSCSI Target user guide to create multiple connections to the operating system iSCSI LUN in the Linux operating system once installation and boot is complete.
• If you are using two NICs, one as primary and the other as the secondary boot NIC, ensure that they are configured to use separate subnets.
• After the host is configured to use Boot from iSCSI (BFi), configure additional paths to the target.
Table 1-1. Supported Intel and Broadcom Driver or Firmware Versions
Network Adapter Firmware Version Driver Family Version
Notes
Broadcom NetXtreme Family of Adapters, NetXtreme II Family of Adapters
3.0.9 (5722)
4.4.1 (5708)
4.4.14 (5709)
4.4.7 (57710)
12.4/T4.4, A00 or later
Intel PRO/1000 Family of Adapters
2.0.8 (W2K3)
2.1.15.2 (W2K8 & Linux)
10.5 or later Intel PRO/1000 iSCSI setup driver version
2.04.0 needed for W2K3 Boot from iSCSI
Overview 9
• Do not log in to ports, the NIC(s) selected for iSCSI boot, that are configured in the iSCSI boot BIOS. These logins are automatically performed through the NIC iSCSI boot firmware table.
• Boot from iSCSI for Clustered Host systems is not supported.
• PowerVault NX1950 does not support Linux initiators.
• PowerVault NX1950 does not support Hyper-V.
Process FlowThe configuration of boot from iSCSI on a Dell PowerEdge system varies depending on the operating system, network adapter (Intel or Broadcom) and the Dell storage array used. The following steps serve as a guideline for the configuration:
1 To configure the Dell Storage Array, see:
a "Configuring the Dell™ PowerVault™ NX1950 Integrated Solution" on page 13
b "Configuring the PowerVault MD3000i Storage Array" on page 14
c "Configuring the Dell|EMC Storage System" on page 17
2 To configure the Network Adapter, see:
a "Configuring the Intel® PRO 1000 Network Adapter" on page 19
b "Configuring Broadcom® NIC" on page 21
3 To create and install an image on the iSCSI Target, select one of the following methods:
• If you have a local hard drive and plan on imaging that operating system to the iSCSI LUN, see:
a "Imaging Process for Windows Server® 2003 and 2008" on page 25
b "Imaging Process for Linux" on page 31
• If you do not have a local hard drive and plan on directly installing the operating system to the iSCSI LUN, see:
a "Direct or Remote Installation for Windows Server 2003 (Intel Only)" on page 31
b "Direct or Remote Installation for Windows Server 2008" on page 36
c "Direct or Remote Installation for Linux" on page 39
10 Overview

4 To create redundant paths to the target from hosts that are configured with boot from iSCSI, see "Creating Redundant Paths to a Target (Configuring Multi-Path I/O)" on page 47.
5 To clone additional iSCSI LUNs, see "Disk Duplication (Cloning)" on page 53.
NOTE: Use these methods to clone additional iSCSI LUNs to boot additional hosts.
Overview 11

12 Overview
Configuring the Dell Storage ArrayThe following sections describe the process of creating the operating system boot image on the virtual disk:
• "Configuring the Dell™ PowerVault™ NX1950 Integrated Solution" on page 13
• "Configuring the PowerVault MD3000i Storage Array" on page 14
• "Configuring the Dell|EMC Storage System" on page 17
Configuring the Dell™ PowerVault™ NX1950 Integrated SolutionIn the Dell PowerVault NX1950 Integrated solution, create a virtual disk, and assign it to the host.
1 Open Microsoft® Unified Data Storage Server Management console, and click Microsoft iSCSI Software Target on the left pane.
2 Create a new target. Right-click iSCSI Targets and follow the instructions on the screen to enter the network name of the iSCSI Qualified Name (IQN) of the host initiator.
Example of an host initiator IQN:
iqn.1984-04.com.dell:server-name
Record the IQN of the host initiator. The host initiator IQN is required to configure Intel® iSCSI boot BIOS.
3 Right-click the new target you created in step 2 and click Create Virtual Disk for iSCSI Target.
The Create Virtual Disk wizard is displayed.
Configuring the Dell Storage Array 13
4 Follow the instructions in the wizard to create a virtual disk and assign it to the host. It is recommended that you use the service tag of the Dell™ PowerEdge™ system and the term boot-LUN in the description field.
NOTE: The capacity of the virtual disk should be equal to or more than the boot partition capacity (only applicable if the host has a local disk that you intend cloning to the iSCSI LUN).
NOTE: Microsoft recommends a minimum system partition size of 40 GB for Windows Server® 2008 installations, depending on system RAM, possible power states and other considerations. For more information, see the Windows Server 2008 website at microsoft.com.
5 Right-click iSCSI Target, click Properties, and record the IQN of the iSCSI Target and the logical unit number (LUN) in the configuration worksheet.
6 On the Dell™ PowerVault™ NX1950 Integrated solution, NIC(s) are configured for iSCSI traffic. To determine the IP address:
a Open the Microsoft iSCSI Software Target.
b Right-click the target list.
c Click Properties, and view the IP address(es) for iSCSI traffic.
Configuring the PowerVault MD3000i Storage Array
1 Manually register a host by performing the following steps:
a Launch the PowerVault Modular Disk Storage Manager, and connect to the PowerVault MD3000i storage array to be used by the host for booting.
b Click Configure, and select Configure Host Access (Manual).
c Enter the name of the host system in the host field. The Select host type drop-down menu appears.
d Select the host type and click Next.
e Click New in the selected iSCSI initiators field.
14 Configuring the Dell Storage Array
f Enter the iSCSI Qualified Name (IQN) of the host initiator in the iSCSI initiator name field. Record this information in "Configuration Worksheet" on page 63.
NOTE: Let the iSCSI Initiator label be set to Default.
Fully qualified IQN format is:
<iqn><yyyy-mm>.com<company name>:<server name>
Example: iqn.1984-04.com.dell:server-name
g Click Add and then, Next.
h Select No, This host will NOT share access to the same virtual disks with other hosts and click Next.
The Confirm Host Definition page appears. Click Finish.
2 Create a virtual disk and assign it to the host by performing the following steps:
a Click Configure and select Create Virtual Disks.
b Create a virtual disk which is of the same size as the boot partition and assign it to the host. Enter the virtual disk capacity.
NOTE: The capacity of the virtual disk should be equal to or more than the boot partition capacity (only applicable if the host has a local disk that you intend cloning to the iSCSI LUN).
NOTE: Microsoft recommends a minimum system partition size of 40 GB for Windows Server 2008 installations, depending on system RAM, possible power states and other considerations. For more information, see the Windows Server 2008 website at microsoft.com.
c Enter a name for the virtual disk.
NOTE: It is recommended that you use the service tag of the PowerEdge system and the term boot-LUN in the description field.
d Select File system in the Virtual Disk I/O characteristics field, and click Next.
e Select Map now and the host you are preparing to boot and click Finish.
NOTE: Record the LUN Number in "Configuration Worksheet" on page 63.
Configuring the Dell Storage Array 15

3 Configure the preferred path for the virtual disk to the appropriate Redundant Array of Independent Disks (RAID) controller by performing the following steps:
NOTE: After creating the virtual disk, assign the preferred path for the virtual disk to the appropriate RAID controller. For systems with only one boot NIC, ensure that you assign the virtual disk to the RAID controller to which the NIC is connected. For systems with two boot NICs, configure the primary path to the RAID controller that the Primary NIC is configured to boot from.
a Click Modify and select the Change Virtual Disk Ownership/Preferred Path option.
b Select the virtual disk and the preferred path, and click Change, if required.
4 Record the IQN of the PowerVault MD3000i storage array in the "Configuration Worksheet" on page 63 by performing the following steps:
a Click iSCSI and select Change Target Identification.
b Record the iSCSI target name.
NOTE: The iSCSI Target Alias cannot be used by a host for booting.
5 Record the iSCSI host port IP addresses of the RAID controllers in the "Configuration Worksheet" on page 63.
6 Click iSCSI and select Configure iSCSI Host Ports.
a Select each iSCSI host port from the drop down list. Record the IP address of the port to which the host system is configured to boot from. This address must be the IP address of the preferred owner of the boot LUN. If the host system has redundant paths, select a port on a controller that is on a separate subnet.
NOTE: If dual storage controllers are configured then the secondary port should be on the other controller.
16 Configuring the Dell Storage Array
Configuring the Dell|EMC Storage SystemThis section provides instructions for configuring the Dell|EMC storage system running either the Navisphere® Manager and the Navisphere Express console.
Using Navisphere Manager to Configure the Dell|EMC Storage System
Perform the following steps to configure storage systems running Navisphere Manager:
1 Log in to Navisphere Manager.
2 Register a host manually by performing the following steps:
a Right-click the storage system, and click Connectivity Status.
The Connectivity Status screen appears.
b Click New.
c In the Create Initiator Record screen, enter the IQN, computer name, and IP address of the host, and select the storage processor (SP) port from the drop-down menu.
NOTE: Fully qualified IQN format is <iqn><yyyy-mm>.com<company name>:<server name>, for example: iqn.1984-04.com.dell:server-name.
d Record the IQN of the host initiator in "Configuration Worksheet" on page 63. The host initiator IQN is required to configure Intel iSCSI boot BIOS.
e Click OK.
3 Create a LUN of the same size as the boot partition. Ensure that the LUN is assigned to the SP from which the primary NIC boots.
NOTE: Microsoft recommends a minimum system partition size of 40 GB for Windows Server 2008 installations, depending on system RAM, possible power states and other considerations. For more information, see the Windows Server 2008 website at microsoft.com.
4 Create a storage group and add both the server and the LUN to the storage group. Record the LUN Number.
Configuring the Dell Storage Array 17
5 Record the IP address and IQN of the SP port from which the server boots. This address must be the IP address of the preferred owner of the boot LUN. Right-click the storage system, select iSCSI, and then click Port Management.
6 Record the IQN and IP Address of the SP port(s) you are mapping to in the NIC iSCSI Boot Menu.
Using Navisphere Express to Configure the Dell|EMC Storage System
Perform the following steps to configure storage systems running Navisphere Express:
1 Log in to Navisphere Express.
2 Register a host manually by performing the following steps:
a Click Connection, and then click New.
b Enter the IQN, computer name, and IP Address of the server. Click Apply.
3 Create a virtual disk of the same size as the boot partition, and assign it to the server. Record the LUN Number in the configuration worksheet.
NOTE: Microsoft recommends a minimum system partition size of 40 GB for Windows Server 2008 installations, depending on system RAM, possible power states and other considerations. For more information, see the Windows Server 2008 website at microsoft.com.
NOTE: The disk pool to which the virtual disk belongs determines the SP that owns the virtual disk. All virtual disks in odd numbered disk pools are owned by SP A and all virtual disks in even numbered disk pools are owned by SP B. If a specific SP needs to own the virtual disk, create the virtual disk in the appropriate disk pool
4 Record the IP Addresses and IQNs of the SP port to which the server connects in "Configuration Worksheet" on page 63. This IP address must be the IP address of the preferred owner of the boot LUN. Perform the following steps:
a Open Navisphere Express, click iSCSI, and then click Port iSCSI Name.
b Choose an SP port on the SP that owns the virtual disk.
c Record the IP Address and IQN of an iSCSI port on the other SP if redundant paths are present. If the storage system only has one SP, enter the other iSCSI port on the same SP.
18 Configuring the Dell Storage Array
Configuring the Network AdapterThe following sections describe the process of configuring network adapters:
• "Configuring the Intel® PRO 1000 Network Adapter" on page 19
• "Configuring Broadcom® NIC" on page 21
Configuring the Intel® PRO 1000 Network Adapter
Flashing the Intel Firmware
Flash the Intel NIC (Network Interface Card) with the iSCSI Boot PROM using the iSCSI DOS utility located in the iSCSI\DOS directory on the Intel NIC media. For more instructions, see the Intel PRO Family of Adapters User’s Guide located on the Intel NIC media.
Boot to a bootable diskette drive or a bootable USB key and run the iSCSI DOS utility using the following commands:
ISCSIUTL -ALL -FLASHENABLE
ISCSIUTL -ALL UP
For additional help, type ISCSIUTL -? at the command prompt.
Configuring the Intel iSCSI Boot Menu
During boot, select <Ctrl><d> when prompted to boot into the Intel iSCSI Boot Setup menu. If the Intel iSCSI Boot Setup menu is not displayed or does not match the configuration, see the section titled "Firmware Setup" in the Intel PRO Family of Adapters User’s Guide located on the Intel NIC media.
1 Configure one NIC as Primary.
2 Enter the host's initiator name, IP address, subnet, and gateway.
3 Enter the Storage Arrays's name (IQN) and IP address.
Configuring the Network Adapter 19
4 Do not change the default port number of 3260. Retain the LUN number as 0, unless you need to change it. Enter the LUN Number recorded in the configuration worksheet.
5 Select OK and save the changes.
6 Repeat step 1 to step 5 to configure a secondary NIC if required. Ensure that the second NIC is set to secondary and the primary and secondary NICs are configured on separate subnets.
NOTE: Do not configure the second NIC if using Linux. At this time, Linux (RHEL 5.2 and SLES 10 SP2) do not support redundancy during pre-operating system boot.
7 Observe the Power-On Self-Test (POST) output to ensure that the iSCSI LUN is detected. If the iSCSI LUN is not detected during POST, halt the process and verify the configuration on the Storage Array and the Intel iSCSI Boot Setup menu.
NOTE: Do not continue if the iSCSI LUN is not detected during POST.
NOTE: It is strongly recommended that you save the iSCSI boot configuration to a file to enable faster recovery when you replace the NIC.
To save the iSCSI boot configuration to a file, perform the following steps:
a Boot to a bootable device.
b Execute the iscsiutl program by typing the following command at the command prompt:
ISCSIUTL -SAVE -FILE <FILENAME> -NIC <#> where the filename is the name of the iSCSI boot configuration file and # is the NIC number.
NOTE: It is recommended that you include the NIC number in the file name. For example, to name the iSCSI boot configuration file of the first NIC use the following command: ISCSIUTL -SAVE -FILE dell1 -NIC 1 where NIC1 is the NIC number for the first NIC. To name the iSCSI boot configuration file of the second NIC use the following command: ISCSIUTL -SAVE -FILE dell2 -NIC 2.
NOTE: ISCSIUTL is part of the iSCSI DOS utility located in the iSCSI\DOS directory on the media that shipped with the Intel NIC.
NOTE: The iscsiutl program identifies each port of a dual-port NIC separately. If you have configured both ports on a dual-port NIC to BFi, run the command for each port.
20 Configuring the Network Adapter
Configuring Broadcom® NIC
Configuring the Dell BIOS and Broadcom Ctrl-S
1 Turn on or reboot the server.
2 Press <F2> to enter BIOS setup during Power-On Self-Test (POST).
3 In BIOS Setup, select Boot Sequence and press <Enter> to access the Boot Sequence menu.
4 In the Boot Sequence menu, arrange the bootable items so that the Network device (iSCSI NIC) is on the top, DVD-ROM device is second and C drive (if there is a local hard drive) is just below.
5 Press <Esc> to exit the Boot Sequence menu.
NOTE: If you are not configuring a LOM, skip to step 9.
6 Select Integrated Devices, and press <Enter>.
7 In the Integrated Devices menu, ensure that the desired NIC is configured with the Enabled with iSCSI Boot setting.
8 Press<Esc> to exit the Integrated Devices Menu.
9 Press <Esc> to exit BIOS Setup. The BIOS exit menu appears.
10 Select Save Changes and Exit to exit BIOS Setup.
Configuring the NIC or LOM Ctrl-S Menu
1 Turn on or reboot the server.
2 In the PXE banner, press <Ctrl><s>. The MBA Configuration Menu appears.
NOTE: If you are configuring a Local area network On Motherboard (LOM), skip to step 4.
3 In the MBA Configuration menu, use the up or down arrow keys to move to the Boot Protocol option. Use the left or right arrow keys to change the Boot Protocol option to iSCSI.
4 Press <Ctrl><k> to access the iSCSI Configuration Utility.
NOTE: If iSCSI boot firmware is not programmed in the NetXtreme network adapter, pressing <Ctrl><k> has no effect.
Configuring the Network Adapter 21

5 In the Main Menu, select General Parameters and set the following parameters:
• TCP/IP parameters via DHCP: Disabled
• iSCSI parameters via DHCP: Disabled
• Challenge Handshake Authentication Protocol (CHAP) Authentication: Disabled
• Protocol (CHAP) Authentication: Disabled
• Boot to iSCSI target: Disabled when installing image; Enabled after cloning or installing image to boot from iSCSI target
• DHCP Vendor ID: BRCM ISAN
• Link Up Delay Time: 0
• Use TCP Timestamp: Disabled
• Target as First HDD: Disabled if using Imaging with Local Disk; Enabled if using Direct or Remote Install
• LUN Busy Retry Count: 0
• Windows HBA Boot Mode: Disabled (applicable for Windows, not Linux)
NOTE: If you have wish to use Offload iSCSI (OIS) to boot, set Windows HBA
Mode to Enabled. You must have a key enabled Broadcom NetXtreme adapter. For additional information, see the Broadcom NetXtreme Family of Adapters User's Guide.
NOTE: To use DHCP for dynamically assigned settings, set the TCP/IP parameters through DHCP and iSCSI parameters through DHCP to Enabled. For additional information, see the Broadcom NetXtreme Family of Adapters User's Guide.
NOTE: Do not enable CHAP at this time. It is recommended that you configure advanced features after connectivity between host and target is established.
6 Press <Esc> to return to the Main Menu.
7 In the Main Menu, select Initiator Parameters and enter values for the following parameters:
• IP Address
• Subnet Mask
• Default Gateway
22 Configuring the Network Adapter

• Primary DNS (optional)
• Secondary DNS (optional)
• iSCSI Name (the iSCSI initiator name to be used by the client system)
8 Press <Esc> to return to the Main Menu
9 In the Main Menu, select 1st Target Parameters and change the following parameters:
• Connect to Enabled
• IP Address (Target IP)
• iSCSI Name (IQN name of Target)
• Boot LUN & TCP Port (if different from default settings)
NOTE: Do not configure anything under 2nd Target Parameters
10 Press <Esc> to return to the Main Menu and select Exit and Save Configuration to exit the NIC/LOM Ctrl-s menu.
11 Press <Esc> to return to the main system BIOS, and press <Ctrl><Alt><Del> to restart the system boot.
NOTE: It is recommended that you save the iSCSI boot configuration to a file to enable faster recovery if you need to replace the NIC. Use the procedure below after you install the operating system on the iSCSI Target LUN and boot from it.
To save the iSCSI boot configuration to a file:
a Boot to a bootable device.
b Execute the ibcfg.exe program from the command prompt by using the following command:
IBCFG -get <FILENAME> -dev <MAC address>
NOTE: It is recommended that you include the NIC number in the file name. For example, to name the iSCSI boot configuration file of the NIC enabled for iSCSI boot, use IBCFG -get dell1 -dev 00:18:8B:FD:F9:1A where 00:18:8B:FD:F9:1A is the MAC address of the iSCSI boot NIC.
NOTE: ibcfg.exe is available on the media that ships with your new replacement NIC. However, it is recommended that you download it from the Dell Support website at support.dell.com to ensure that you have the supported version. This tool is part of the Broadcom DOS utilities provided as part of each major drive release.
Configuring the Network Adapter 23

24 Configuring the Network Adapter
Creating and Installing an Image to iSCSI TargetThe following sections describe the process of creating and installing an image to iSCSI target:
• "Imaging Process for Windows Server® 2003 and 2008" on page 25
• "Imaging Process for Linux" on page 31
• "Direct or Remote Installation for Windows Server 2003 (Intel Only)" on page 31
• "Direct or Remote Installation for Windows Server 2008" on page 36
• "Direct or Remote Installation for Linux" on page 39
NOTE: The following processes assume you have a local hard drive that is used to install the operating system and then image it on the iSCSI LUN.
Imaging Process for Windows Server® 2003 and 2008
NOTE: If you are using an Intel® adapter in the host system, go to the BIOS menu and confirm that the boot order lists the local hard drive before the iSCSI LUN. For Broadcom, the embedded NIC is first in boot order.
Creating and Installing an Image 25
Configuring the Host with Windows Server 2003
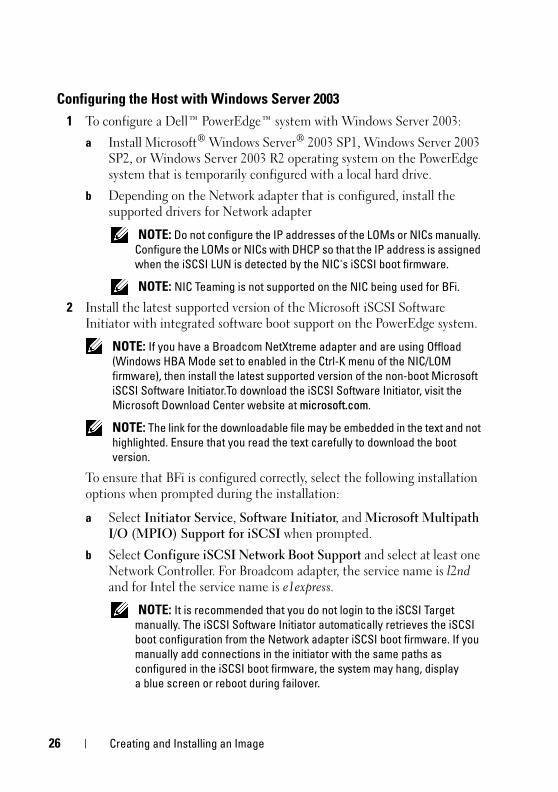
1 To configure a Dell™ PowerEdge™ system with Windows Server 2003:
a Install Microsoft® Windows Server® 2003 SP1, Windows Server 2003 SP2, or Windows Server 2003 R2 operating system on the PowerEdge system that is temporarily configured with a local hard drive.
b Depending on the Network adapter that is configured, install the supported drivers for Network adapter
NOTE: Do not configure the IP addresses of the LOMs or NICs manually. Configure the LOMs or NICs with DHCP so that the IP address is assigned when the iSCSI LUN is detected by the NIC's iSCSI boot firmware.
NOTE: NIC Teaming is not supported on the NIC being used for BFi.
2 Install the latest supported version of the Microsoft iSCSI Software Initiator with integrated software boot support on the PowerEdge system.
NOTE: If you have a Broadcom NetXtreme adapter and are using Offload (Windows HBA Mode set to enabled in the Ctrl-K menu of the NIC/LOM firmware), then install the latest supported version of the non-boot Microsoft iSCSI Software Initiator.To download the iSCSI Software Initiator, visit the Microsoft Download Center website at microsoft.com.
NOTE: The link for the downloadable file may be embedded in the text and not highlighted. Ensure that you read the text carefully to download the boot version.
To ensure that BFi is configured correctly, select the following installation options when prompted during the installation:
a Select Initiator Service, Software Initiator, and Microsoft Multipath I/O (MPIO) Support for iSCSI when prompted.
b Select Configure iSCSI Network Boot Support and select at least one Network Controller. For Broadcom adapter, the service name is l2nd and for Intel the service name is e1express.
NOTE: It is recommended that you do not login to the iSCSI Target manually. The iSCSI Software Initiator automatically retrieves the iSCSI boot configuration from the Network adapter iSCSI boot firmware. If you manually add connections in the initiator with the same paths as configured in the iSCSI boot firmware, the system may hang, display a blue screen or reboot during failover.
26 Creating and Installing an Image
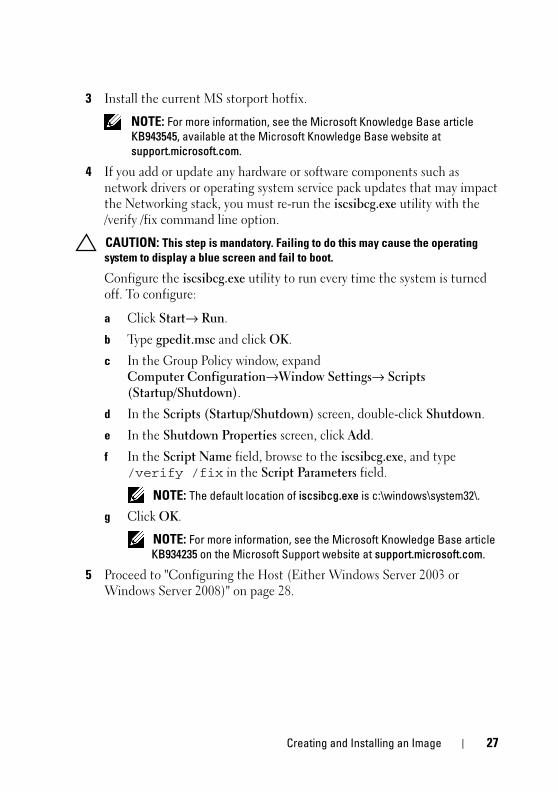
3 Install the current MS storport hotfix.
NOTE: For more information, see the Microsoft Knowledge Base article KB943545, available at the Microsoft Knowledge Base website at support.microsoft.com.
4 If you add or update any hardware or software components such as network drivers or operating system service pack updates that may impact the Networking stack, you must re-run the iscsibcg.exe utility with the /verify /fix command line option.
CAUTION: This step is mandatory. Failing to do this may cause the operating system to display a blue screen and fail to boot.
Configure the iscsibcg.exe utility to run every time the system is turned off. To configure:
a Click Start→ Run.
b Type gpedit.msc and click OK.
c In the Group Policy window, expand Computer Configuration→Window Settings→ Scripts (Startup/Shutdown).
d In the Scripts (Startup/Shutdown) screen, double-click Shutdown.
e In the Shutdown Properties screen, click Add.
f In the Script Name field, browse to the iscsibcg.exe, and type /verify /fix in the Script Parameters field.
NOTE: The default location of iscsibcg.exe is c:\windows\system32\.
g Click OK.
NOTE: For more information, see the Microsoft Knowledge Base article KB934235 on the Microsoft Support website at support.microsoft.com.
5 Proceed to "Configuring the Host (Either Windows Server 2003 or Windows Server 2008)" on page 28.
Creating and Installing an Image 27
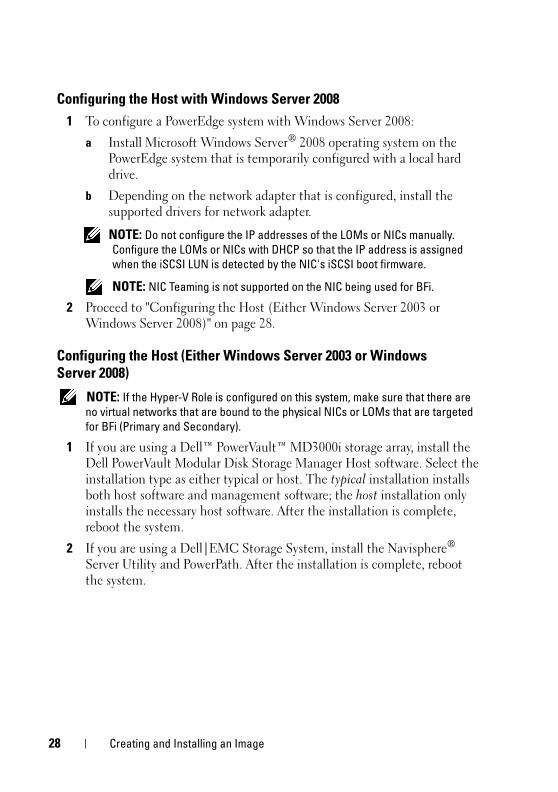
Configuring the Host with Windows Server 2008
1 To configure a PowerEdge system with Windows Server 2008:
a Install Microsoft Windows Server® 2008 operating system on the PowerEdge system that is temporarily configured with a local hard drive.
b Depending on the network adapter that is configured, install the supported drivers for network adapter.
NOTE: Do not configure the IP addresses of the LOMs or NICs manually. Configure the LOMs or NICs with DHCP so that the IP address is assigned when the iSCSI LUN is detected by the NIC's iSCSI boot firmware.
NOTE: NIC Teaming is not supported on the NIC being used for BFi.
2 Proceed to "Configuring the Host (Either Windows Server 2003 or Windows Server 2008)" on page 28.
Configuring the Host (Either Windows Server 2003 or Windows Server 2008)
NOTE: If the Hyper-V Role is configured on this system, make sure that there are no virtual networks that are bound to the physical NICs or LOMs that are targeted for BFi (Primary and Secondary).
1 If you are using a Dell™ PowerVault™ MD3000i storage array, install the Dell PowerVault Modular Disk Storage Manager Host software. Select the installation type as either typical or host. The typical installation installs both host software and management software; the host installation only installs the necessary host software. After the installation is complete, reboot the system.
2 If you are using a Dell|EMC Storage System, install the Navisphere® Server Utility and PowerPath. After the installation is complete, reboot the system.
28 Creating and Installing an Image
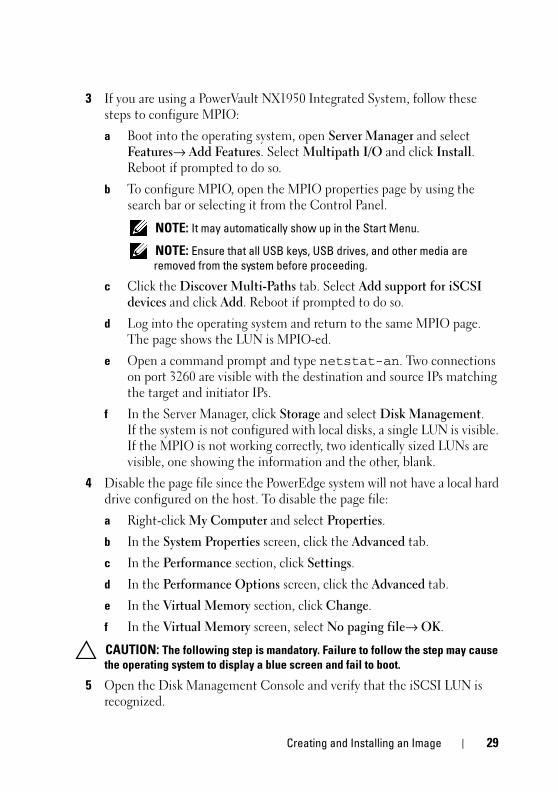
3 If you are using a PowerVault NX1950 Integrated System, follow these steps to configure MPIO:
a Boot into the operating system, open Server Manager and select Features→ Add Features. Select Multipath I/O and click Install. Reboot if prompted to do so.
b To configure MPIO, open the MPIO properties page by using the search bar or selecting it from the Control Panel.
NOTE: It may automatically show up in the Start Menu.
NOTE: Ensure that all USB keys, USB drives, and other media are removed from the system before proceeding.
c Click the Discover Multi-Paths tab. Select Add support for iSCSI devices and click Add. Reboot if prompted to do so.
d Log into the operating system and return to the same MPIO page. The page shows the LUN is MPIO-ed.
e Open a command prompt and type netstat-an. Two connections on port 3260 are visible with the destination and source IPs matching the target and initiator IPs.
f In the Server Manager, click Storage and select Disk Management. If the system is not configured with local disks, a single LUN is visible. If the MPIO is not working correctly, two identically sized LUNs are visible, one showing the information and the other, blank.
4 Disable the page file since the PowerEdge system will not have a local hard drive configured on the host. To disable the page file:
a Right-click My Computer and select Properties.
b In the System Properties screen, click the Advanced tab.
c In the Performance section, click Settings.
d In the Performance Options screen, click the Advanced tab.
e In the Virtual Memory section, click Change.
f In the Virtual Memory screen, select No paging file→ OK.
CAUTION: The following step is mandatory. Failure to follow the step may cause the operating system to display a blue screen and fail to boot.
5 Open the Disk Management Console and verify that the iSCSI LUN is recognized.
Creating and Installing an Image 29
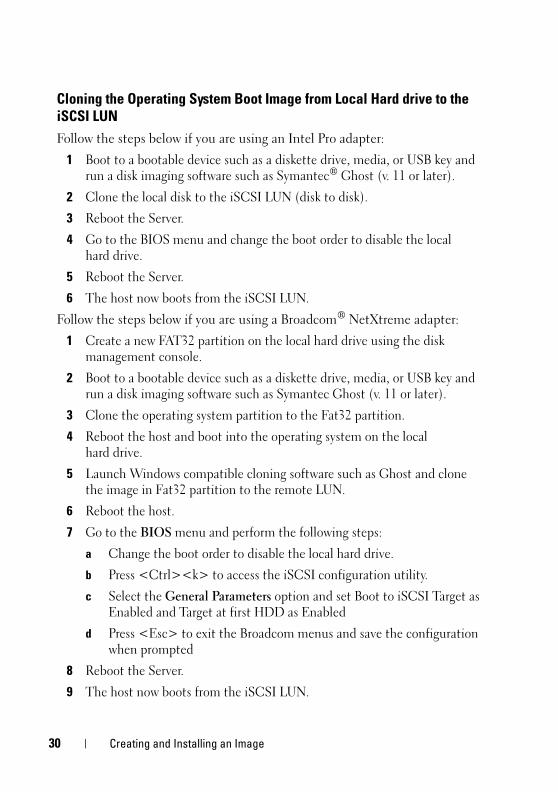
Cloning the Operating System Boot Image from Local Hard drive to the iSCSI LUN
Follow the steps below if you are using an Intel Pro adapter:
1 Boot to a bootable device such as a diskette drive, media, or USB key and run a disk imaging software such as Symantec® Ghost (v. 11 or later).
2 Clone the local disk to the iSCSI LUN (disk to disk).
3 Reboot the Server.
4 Go to the BIOS menu and change the boot order to disable the local hard drive.
5 Reboot the Server.
6 The host now boots from the iSCSI LUN.
Follow the steps below if you are using a Broadcom® NetXtreme adapter:
1 Create a new FAT32 partition on the local hard drive using the disk management console.
2 Boot to a bootable device such as a diskette drive, media, or USB key and run a disk imaging software such as Symantec Ghost (v. 11 or later).
3 Clone the operating system partition to the Fat32 partition.
4 Reboot the host and boot into the operating system on the local hard drive.
5 Launch Windows compatible cloning software such as Ghost and clone the image in Fat32 partition to the remote LUN.
6 Reboot the host.
7 Go to the BIOS menu and perform the following steps:
a Change the boot order to disable the local hard drive.
b Press <Ctrl><k> to access the iSCSI configuration utility.
c Select the General Parameters option and set Boot to iSCSI Target as Enabled and Target at first HDD as Enabled
d Press <Esc> to exit the Broadcom menus and save the configuration when prompted
8 Reboot the Server.
9 The host now boots from the iSCSI LUN.
30 Creating and Installing an Image
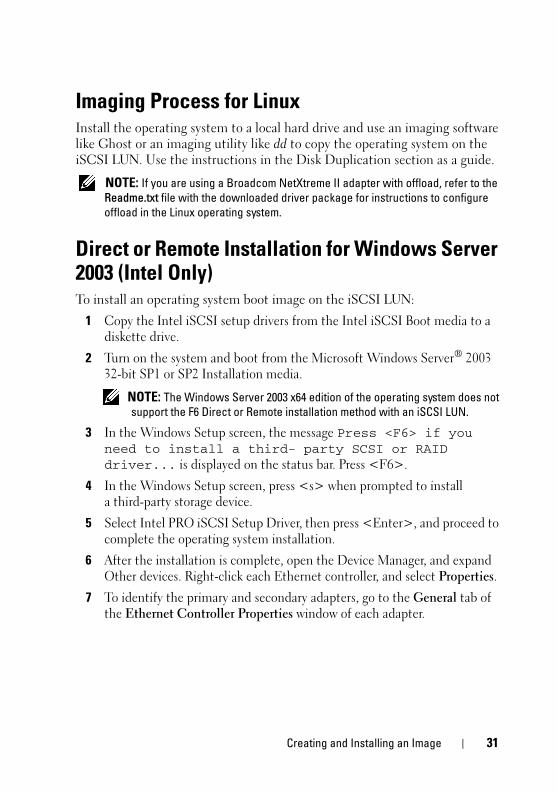
Imaging Process for LinuxInstall the operating system to a local hard drive and use an imaging software like Ghost or an imaging utility like dd to copy the operating system on the iSCSI LUN. Use the instructions in the Disk Duplication section as a guide.
NOTE: If you are using a Broadcom NetXtreme II adapter with offload, refer to the Readme.txt file with the downloaded driver package for instructions to configure offload in the Linux operating system.
Direct or Remote Installation for Windows Server 2003 (Intel Only) To install an operating system boot image on the iSCSI LUN:
1 Copy the Intel iSCSI setup drivers from the Intel iSCSI Boot media to a diskette drive.
2 Turn on the system and boot from the Microsoft Windows Server® 2003 32-bit SP1 or SP2 Installation media.
NOTE: The Windows Server 2003 x64 edition of the operating system does not support the F6 Direct or Remote installation method with an iSCSI LUN.
3 In the Windows Setup screen, the message Press <F6> if you need to install a third- party SCSI or RAID driver... is displayed on the status bar. Press <F6>.
4 In the Windows Setup screen, press <s> when prompted to install a third-party storage device.
5 Select Intel PRO iSCSI Setup Driver, then press <Enter>, and proceed to complete the operating system installation.
6 After the installation is complete, open the Device Manager, and expand Other devices. Right-click each Ethernet controller, and select Properties.
7 To identify the primary and secondary adapters, go to the General tab of the Ethernet Controller Properties window of each adapter.
Creating and Installing an Image 31
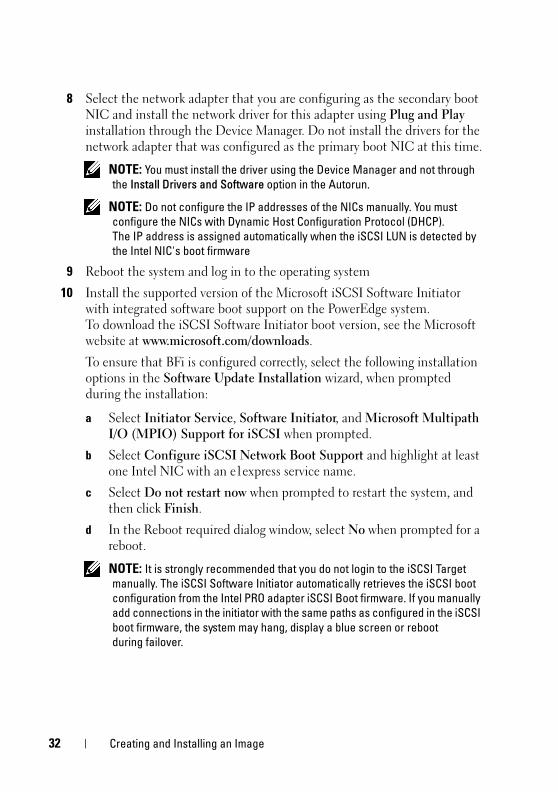
8 Select the network adapter that you are configuring as the secondary boot NIC and install the network driver for this adapter using Plug and Play installation through the Device Manager. Do not install the drivers for the network adapter that was configured as the primary boot NIC at this time.
NOTE: You must install the driver using the Device Manager and not through the Install Drivers and Software option in the Autorun.
NOTE: Do not configure the IP addresses of the NICs manually. You must configure the NICs with Dynamic Host Configuration Protocol (DHCP). The IP address is assigned automatically when the iSCSI LUN is detected by the Intel NIC's boot firmware
9 Reboot the system and log in to the operating system
10 Install the supported version of the Microsoft iSCSI Software Initiator with integrated software boot support on the PowerEdge system. To download the iSCSI Software Initiator boot version, see the Microsoft website at www.microsoft.com/downloads.
To ensure that BFi is configured correctly, select the following installation options in the Software Update Installation wizard, when prompted during the installation:
a Select Initiator Service, Software Initiator, and Microsoft Multipath I/O (MPIO) Support for iSCSI when prompted.
b Select Configure iSCSI Network Boot Support and highlight at least one Intel NIC with an e1express service name.
c Select Do not restart now when prompted to restart the system, and then click Finish.
d In the Reboot required dialog window, select No when prompted for a reboot.
NOTE: It is strongly recommended that you do not login to the iSCSI Target manually. The iSCSI Software Initiator automatically retrieves the iSCSI boot configuration from the Intel PRO adapter iSCSI Boot firmware. If you manually add connections in the initiator with the same paths as configured in the iSCSI boot firmware, the system may hang, display a blue screen or reboot during failover.
32 Creating and Installing an Image
11 Disable the page file since the PowerEdge system will not have a local hard drive configured on the host. To disable the page file:
a Right-click My Computer and select Properties.
b In the System Properties screen, click the Advanced tab.
c In the Performance section, click Settings.
d In the Performance Options screen, click the Advanced tab.
e In the Virtual Memory section, click Change.
f In the Virtual Memory screen, select No paging file→ OK.
12 If you add or update any hardware or software components such as network drivers or operating system service pack updates that may impact the Networking stack, re-run the iscsibcg.exe utility with the /verify/fix command line option.
CAUTION: This step is mandatory. Failing to do this may cause the operating system to display a blue screen and fail to boot.
To configure the iscsibcg.exe utility to run every time the system is turned off:
a Click Start→ Run.
b Type gpedit.msc and click OK.
c In the Group Policy window, expand Computer Configuration→ Window Settings→ Scripts (Startup/Shutdown).
d In the Scripts (Startup/Shutdown) screen, double-click Shutdown.
e In the Shutdown Properties screen, click Add.
f In the Script Name field, browse to iscsibcg.exe (default location, c:\windows\system32\), and then type /verify /fix in the Script Parameters field.
NOTE: The default location of iscsibcg.exe is c:\windows\system32.
g Click OK.
NOTE: For more information, see the Microsoft Knowledge Base article KB934235 on the Microsoft Knowledge Base website at support.microsoft.com/kb.
Creating and Installing an Image 33
13 If you are using a PowerVault MD3000i storage array, install the Dell PowerVault Modular Disk Storage Manager Host software. Select the installation type as either typical or host. The typical installation installs both host software and management software; the host installation only installs the necessary host software. After the installation is complete, reboot the system.
14 If you are using a Dell|EMC Storage System, install the Navisphere Server Utility and PowerPath. After the installation is complete, reboot the system.
15 If you are using a PowerVault NX1950 Integrated System, follow these steps to configure MPIO:
a Boot into the operating system, open Server Manager and select Features→ Add Features. Select Multipath I/O and click Install. Reboot if prompted to do so.
b To configure MPIO, open the MPIO properties page by using the search bar or selecting it from the Control Panel.
NOTE: It may automatically show up in the Start Menu.
NOTE: Ensure that all USB keys, USB drives, CDs and DVDs are removed from the system before proceeding.
c Click the Discover Multi-Paths tab. Select Add support for iSCSI devices and click Add. Reboot if prompted to do so.
d Log into the operating system and return to the same MPIO page. The page shows the LUN is MPIO-ed
e Open a command prompt and type netstat-an. Two connections on port 3260 are visible with the destination and source IPs matching the target and initiator IPs.
f In the Server Manager, click Storage and select Disk Management. If the system is not configured with local disks, a single LUN is visible. If the MPIO is not working correctly, two identically sized LUNs are visible, one showing the information and the other, blank.
34 Creating and Installing an Image
16 Boot into the Intel iSCSI Boot Setup menu and perform the following steps:
NOTE: For more information, see the section titled "Firmware Setup" in the Intel PRO Family of Adapters User’s Guide.
a Select the NIC that you are configuring as the secondary boot NIC and press <s> to configure as Secondary.
b Press <Enter> to display iSCSI port configuration menu. Select iSCSI Boot Configuration, and then press <Enter>.
c Enter the host's initiator's IQN, IP address, subnet, and gateway that you recorded in the "Configuration Worksheet" on page 63.
d Enter the Storage Array (iSCSI Target's) IQN and IP address.
e Do not change the default port number of 3260. Retain the LUN number value as 0, unless you need to change it.
f Select OK, and then press <Enter> to go back to the main menu.
g Select Save Changes and Exit, and then press <Enter> to save the changes.
NOTE: Ensure that the primary NIC and the secondary NIC are configured on separate subnets.
17 Reboot the system and log in to the operating system.
18 Open the Disk Management Console and verify that the iSCSI LUN is recognized.
19 Run the Intel iSCSI utility, iSCSIApp.exe to uninstall the Intel PRO iSCSI setup driver.
20 Reboot the system and log in to operating system.
21 Install network driver for the port that was being used by Intel PRO iSCSI setup driver
22 Reboot the system.
Creating and Installing an Image 35
Direct or Remote Installation for Windows Server 2008You will first need to extract the Intel PRO plug and play drivers or the Broadcom NetXtreme VBD and NDIS drivers from the setup executable file. Use the setup.exe -a command for Intel or the setup.exe /a command for Broadcom on a workstation to extract the drivers from the setup executable file specifying a directory for the extracted files.
NOTE: Make note of the directory structure to which the files are extracted. For example, the Broadcom drivers for Windows Server 2008 x64 are extracted to the following locations:For VBD: /Program Files 64/Broadcom/BDrv5706/VBD For NDIS: /Program Files 64/Broadcom/BDrv5706/W2k8
Copy the driver files to removable media suitable for use during operating system installation, preferably a USB Flash Drive.
NOTE: Performing a remote install using the Broadcom NetXtreme adapter in Offload Mode (hardware initiator) is not supported. Set Windows HBA Mode to Disabled in the Ctrl-K menu of the NIC/LOM firmware. HBA Mode can be enabled after the installation is complete using the software initiator and the Broadcom offload (OIS) drivers are updated in the operating system.
Installing the Operating System on the iSCSI LUN
Perform the following steps to install the operating system on iSCSI LUN:
1 Turn on or reboot the server.
2 Insert the Windows Server 2008 DVD in the DVD drive.
3 Press any key when prompted to boot from the DVD.
4 The Install Windows dialog box appears. Select the appropriate Language, Time, and Keyboard options. Click Next and then, Install Now to continue the installation.
5 The Operating System Selection page appears. Select Full Installation and click Next to continue.
6 The License Agreement screen appears. Read the license agreement and select I accept the license terms to continue with the installation. Click Next.
7 The Installation Type page appears. Select Custom.
36 Creating and Installing an Image
8 Determine if the target LUN is available in the list of drives. If the target LUN is available, proceed to step 15.
9 Insert the removable media containing the drivers for the NIC (Intel PRO Network device or Broadcom NetXtreme adapter)
10 Click Load Driver. The Load Driver dialog box appears.
11 Click Browse. The Browse for Folder dialog box appears.
12 Navigate to the location containing the driver for the Network device and click OK.
NOTE: You will need to install both the VBD (Virtual Bus Driver) & NDIS (Network Driver Interface Specification) driver for the Broadcom NetXtreme adapter.
13 Click Next to load the driver. The available drives list containing the targeted LUN appears.
NOTE: If the list of available drives containing the targeted LUN does not appear, click Refresh. You may have to wait for up to a minute or click Refresh a few times before seeing the drives.
NOTE: If you are using a PowerVault MD3000i storage array, a LUN of size 20 MB and with LUN ID of 31 appears in the list of available iSCSI LUNs. Do not select this LUN. This LUN appears because the MD3000i MPIO driver is not loaded during installation. Once the installation is complete, installing Modular Disk Storage Manager will filter out this LUN from Disk Manager.
14 Select the drive and click Next to start Windows installation.
15 The Windows installer copies and expands files installs features and updates. Once the installation is complete, the server reboots.
16 If you are using a Broadcom NetXtreme adapter, after the server reboots:
a Press <Ctrl><k> to access the iSCSI configuration utility.
b Select the General Parameters option and set Boot to iSCSI Target as Enabled.
c Press <Esc> to exit the Broadcom menus and save the configuration when prompted.
17 The system then boots from the iSCSI LUN and completes Windows setup.
18 Reboot the system and log in to the operating system.
Creating and Installing an Image 37
19 Disable the page file since the PowerEdge system will not have a local hard drive configured on the host. To disable the page file:
a Right-click My Computer and select Properties.
b In the System Properties screen, click the Advanced tab.
c In the Performance section, click Settings.
d In the Performance Options screen, click the Advanced tab.
e In the Virtual Memory section, click Change.
f In the Virtual Memory screen, select No paging file→ OK.
20 If you are using a PowerVault MD3000i storage array, install the Dell PowerVault Modular Disk Storage Manager Host software. Select the installation type as either typical or host. The typical installation installs both host software and management software; the host installation only installs the necessary host software. After the installation is complete, reboot the system.
21 If you are using a Dell|EMC Storage System, install the Navisphere Server Utility and PowerPath. After the installation is complete, reboot the system.
22 If you are using a PowerVault NX1950 Integrated System, follow these steps to configure MPIO:
a Boot into the operating system, open Server Manager and select Features→ Add Features. Select Multipath I/O and click Install. Reboot if prompted to do so.
b To configure MPIO, open the MPIO properties page by using the search bar or selecting it from the Control Panel
NOTE: It may automatically show up in the Start Menu.
NOTE: Ensure that all USB keys, USB drives, CDs and DVDs are removed from the system before proceeding.
c Click the Discover Multi-Paths tab. Select Add support for iSCSI devices and click Add. Reboot if prompted to do so.
38 Creating and Installing an Image
d Log into the OS and return to the same MPIO page. The page shows the LUN is MPIO-ed
e Open a command prompt and type netstat-an. Two connections on port 3260 are visible with the destination and source IPs matching the target and initiator IPs.
f In the Server Manager, click Storage and select Disk Management. If the system is not configured with local disks, a single LUN is visible. If the MPIO is not working correctly, two identically sized LUNs are visible, one showing the information and the other, blank.
23 If you enable the Hyper-V role, then the primary BFi LOM or NIC will automatically be restricted in Hyper-V Virtual Networks. A virtual network cannot be created on this adapter. If a secondary BFi LOM or NIC will be configured, then you must manually avoid selection of that adapter when creating virtual networks.
Direct or Remote Installation for LinuxThe following steps are applicable for RHEL 5.2 (or later) and SLES 10 SP2 (or later) that use iBFT (iSCSI boot firmware table) to perform boot from an iSCSI LUN.
NOTE: This section is not applicable if you are using a PowerVault NX1950 as it does not support Linux initiators.
NOTE: If you are using a Broadcom NetXtreme adapter with offload, direct/remote installing the Linux operating system to the iSCSI LUN will not work since the offload drivers (bnx2i) are not in-kernel. Install the operating system to a local hard drive and use an imaging software like Ghost or an imaging utility like 'dd' to copy the operating system on the iSCSI LUN. Use the instructions in the Disk Duplication section as a guide.
Based on installation type the installation process can be broadly categorized into two types:
• Network based installation
• CD/DVD media based installation
Creating and Installing an Image 39
Installation process for RHEL 5.2 (or later)
Network Based Installation
1 The installer will prompt the user regarding the network interface to use for downloading the installation source.
2 One can enable another NIC port here by using the back button to get I.P. for a different network. This is particularly useful if your iSCSI target LUN is on a different network than your installation source.
3 The network installation can proceed based on the following protocols:
a HTTP
b NFS
c FTP
4 The installer comes to a screen wherein it prompts the user to enter the key.
5 Once the key is registered the screen shows the iSCSI initiator connecting to the target for a brief period before going to a partitioning screen that shows the connected target and the exposed virtual disk from the target.
6 Verify that the NIC (Intel/Broadcom) iSCSI Boot initiator successfully connects to the target.
7 Select the virtual disk and follow the instructions in the Red Hat Linux Installation Guide to complete the installation.
NOTE: If you are using PowerVault MD3000i storage array, a LUN of size 20 MB and with LUN ID of 31 appears in the list of available iSCSI LUNs. Do not select this LUN. This LUN appears because the MD3000i MPP driver is not loaded during installation. Once the installation is complete, installing Modular Disk Storage Manager will filter out this LUN from Disk Manager.
8 To complete the installation, see "Post Installation Configuration" on page 45.
40 Creating and Installing an Image
CD/DVD Media Based Installation
Perform the following steps to install the operating system on iSCSI LUN:
1 Turn on or reboot the server.
2 Insert the Red Hat Enterprise Linux Install Media in the DVD drive.
3 Verify that the NIC (Intel/Broadcom) iSCSI Boot initiator successfully connects to the target.
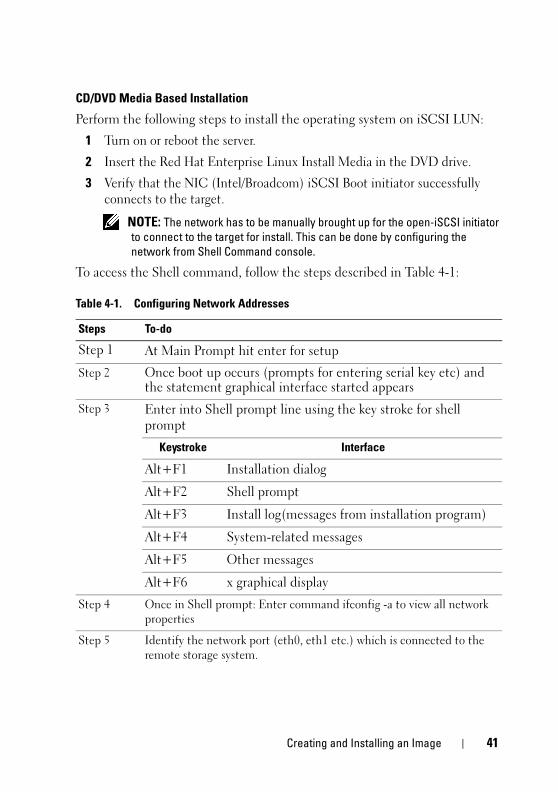
NOTE: The network has to be manually brought up for the open-iSCSI initiator to connect to the target for install. This can be done by configuring the network from Shell Command console.
To access the Shell command, follow the steps described in Table 4-1:
Table 4-1. Configuring Network Addresses
Steps To-do
Step 1 At Main Prompt hit enter for setup
Step 2 Once boot up occurs (prompts for entering serial key etc) and the statement graphical interface started appears
Step 3 Enter into Shell prompt line using the key stroke for shell prompt
Keystroke Interface
Alt+F1 Installation dialog
Alt+F2 Shell prompt
Alt+F3 Install log(messages from installation program)
Alt+F4 System-related messages
Alt+F5 Other messages
Alt+F6 x graphical display
Step 4 Once in Shell prompt: Enter command ifconfig -a to view all network properties
Step 5 Identify the network port (eth0, eth1 etc.) which is connected to the remote storage system.
Creating and Installing an Image 41
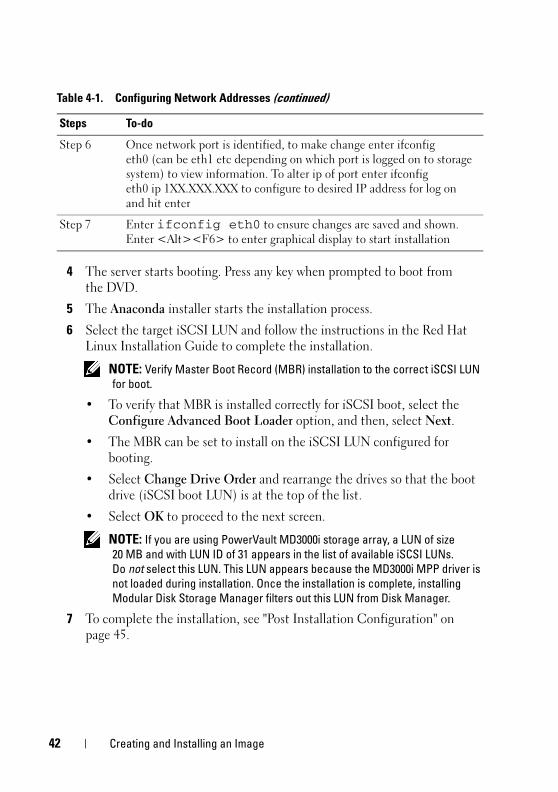
4 The server starts booting. Press any key when prompted to boot from the DVD.
5 The Anaconda installer starts the installation process.
6 Select the target iSCSI LUN and follow the instructions in the Red Hat Linux Installation Guide to complete the installation.
NOTE: Verify Master Boot Record (MBR) installation to the correct iSCSI LUN for boot.
• To verify that MBR is installed correctly for iSCSI boot, select the Configure Advanced Boot Loader option, and then, select Next.
• The MBR can be set to install on the iSCSI LUN configured for booting.
• Select Change Drive Order and rearrange the drives so that the boot drive (iSCSI boot LUN) is at the top of the list.
• Select OK to proceed to the next screen.
NOTE: If you are using PowerVault MD3000i storage array, a LUN of size 20 MB and with LUN ID of 31 appears in the list of available iSCSI LUNs. Do not select this LUN. This LUN appears because the MD3000i MPP driver is not loaded during installation. Once the installation is complete, installing Modular Disk Storage Manager filters out this LUN from Disk Manager.
7 To complete the installation, see "Post Installation Configuration" on page 45.
Step 6 Once network port is identified, to make change enter ifconfig eth0 (can be eth1 etc depending on which port is logged on to storage system) to view information. To alter ip of port enter ifconfig eth0 ip 1XX.XXX.XXX to configure to desired IP address for log on and hit enter
Step 7 Enter ifconfig eth0 to ensure changes are saved and shown. Enter <Alt><F6> to enter graphical display to start installation
Table 4-1. Configuring Network Addresses (continued)
Steps To-do
42 Creating and Installing an Image
Installation process for SLES 10 SP2 (or later)
Network Based Installation
1 The installer prompts the user regarding the network interface to use for downloading the installation source.
2 One can enable another NIC port here by using the back button to get I.P. for a different network. This is particularly useful if your iSCSI target LUN is on a different network than your installation source.
3 The network installation can proceed based on the following protocols:
a HTTP
b NFS
c FTP
4 The installation process will load the networking stack and show the YAST iSCSI target page with the target already connected and the iSCSI LUNs discovered.
5 Verify that the NIC (Intel/Broadcom) iSCSI Boot initiator successfully connects to the target.
6 Select the virtual disk and follow the instructions in the SuSE Linux Enterprise Server Installation Guide to complete the installation.
NOTE: If you are using PowerVault MD3000i storage array, a LUN of size 20 MB and with LUN ID of 31 appears in the list of available iSCSI LUNs. Do Not Select this LUN. This LUN appears because the MD3000i MPP driver is not loaded during installation. Once the installation is complete, installing Modular Disk Storage Manager will filter out this LUN from Disk Manager.
7 To complete the installation, see "Post Installation Configuration" on page 45.
CD/DVD Media Based Installation
Perform the following steps to install the operating system on iSCSI LUN:
1 Turn on or reboot the server.
2 Insert the SuSE Linux Enterprise Server Install Media in the DVD drive.
3 The server starts booting. Press any key when prompted to boot from the DVD.
Creating and Installing an Image 43
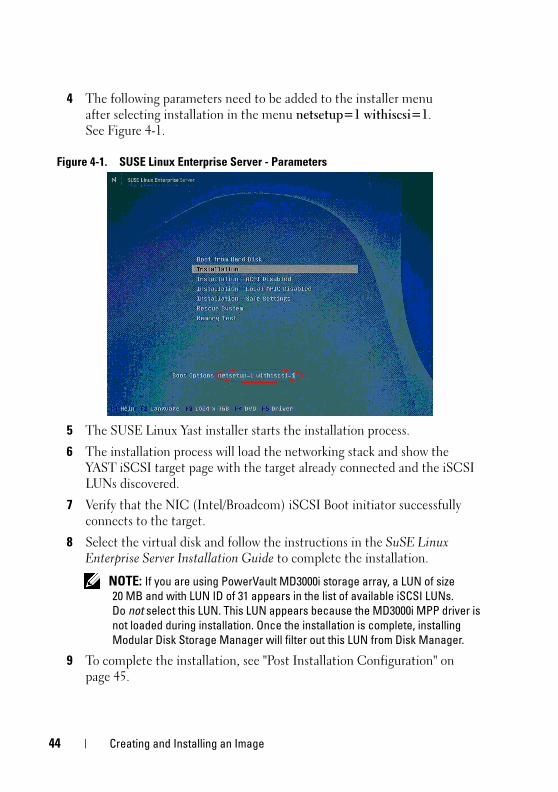
4 The following parameters need to be added to the installer menu after selecting installation in the menu netsetup=1 withiscsi=1. See Figure 4-1.
Figure 4-1. SUSE Linux Enterprise Server - Parameters
5 The SUSE Linux Yast installer starts the installation process.
6 The installation process will load the networking stack and show the YAST iSCSI target page with the target already connected and the iSCSI LUNs discovered.
7 Verify that the NIC (Intel/Broadcom) iSCSI Boot initiator successfully connects to the target.
8 Select the virtual disk and follow the instructions in the SuSE Linux Enterprise Server Installation Guide to complete the installation.
NOTE: If you are using PowerVault MD3000i storage array, a LUN of size 20 MB and with LUN ID of 31 appears in the list of available iSCSI LUNs. Do not select this LUN. This LUN appears because the MD3000i MPP driver is not loaded during installation. Once the installation is complete, installing Modular Disk Storage Manager will filter out this LUN from Disk Manager.
9 To complete the installation, see "Post Installation Configuration" on page 45.
44 Creating and Installing an Image

Post Installation Configuration
If you are using a Broadcom NetXtreme adapter, after the server reboots:
1 Press <Ctrl><k> to access the iSCSI configuration utility.
2 Select the General Parameters option and set Boot to iSCSI Target as Enabled.
3 Press <Esc> to exit the Broadcom menus and save the configuration when prompted.
The system then boots from the iSCSI LUN.
NOTE: CHAP can be configured in SLES10 SP2 using the instructions provided in the "Known Linux Installation Issues" on page 45.
NOTE: If you intend to configure MPIO using the linuxrdac driver, then ensure that all advance configurations like CHAP is completed before installing the driver.
If you are using a PowerVault MD3000i storage array, install the Dell PowerVault Modular Disk Storage Manager Host software. Select the installation type as either typical or host. The typical installation installs both host software and management software; the host installation only installs the necessary host software. After the installation is complete, reboot the system.
If you are using a Dell|EMC Storage System, install the Navisphere Server Utility and PowerPath. After the installation is complete, reboot the system.
Known Linux Installation Issues
1 There is a known bug in RHEL5.2-32 bit installations with certain configuration of target iqn name format wherein the target is not discovered by the RHEL 5.2 initiator stack.
If your target iqn has a name such as iqn.1984-05.com.dell:tgt and the iSCSI initiator in the OS is not able to discover the target, then change the iqn name of the target to a suitable format.
Changing the iqn to something like iqn.1984-05.com.dell:tgt.abc.xyz will solve the discovery problem. A solution for this problem is available in the dell support site as a driver fix.
2 CHAP is not supported during installation on RHEL 5.2 and SLES10 SP2.
Creating and Installing an Image 45
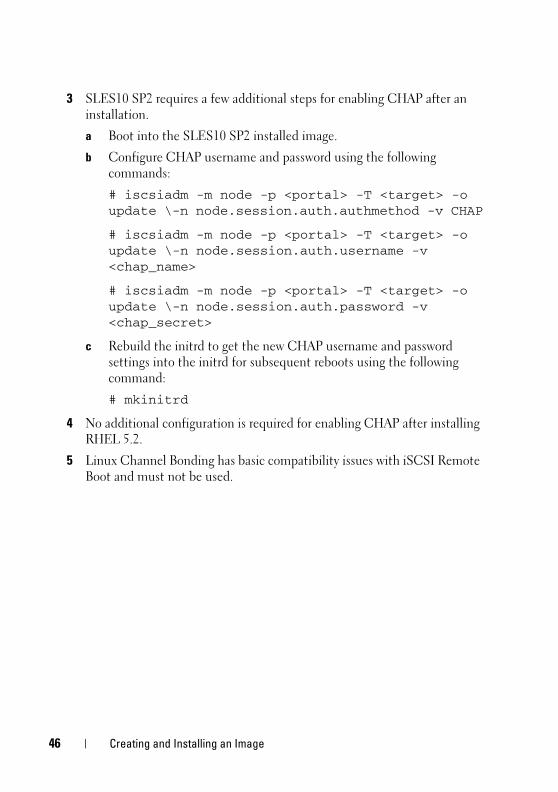
3 SLES10 SP2 requires a few additional steps for enabling CHAP after an installation.
a Boot into the SLES10 SP2 installed image.
b Configure CHAP username and password using the following commands:
# iscsiadm -m node -p <portal> -T <target> -o update \-n node.session.auth.authmethod -v CHAP
# iscsiadm -m node -p <portal> -T <target> -o update \-n node.session.auth.username -v <chap_name>
# iscsiadm -m node -p <portal> -T <target> -o update \-n node.session.auth.password -v <chap_secret>
c Rebuild the initrd to get the new CHAP username and password settings into the initrd for subsequent reboots using the following command:
# mkinitrd
4 No additional configuration is required for enabling CHAP after installing RHEL 5.2.
5 Linux Channel Bonding has basic compatibility issues with iSCSI Remote Boot and must not be used.
46 Creating and Installing an Image
Creating Redundant Paths to a Target (Configuring Multi-Path I/O)
NOTE: Redundancy during Pre-operating system boot in Linux (RHEL 5.2 and SLES 10 SP2) is not supported at this time. Do not configure a secondary NIC for Linux iSCSI boot in the NIC Option ROM. To configure failover in Linux, refer to your iSCSI Target user guide to create multiple connections to the operating system iSCSI LUN in the Linux operating system once installation and boot is complete.
After installing the operating system to the iSCSI LUN, it is recommended that you configure redundant paths to the target from all hosts that are configured with boot from iSCSI. Misconfigured networks or networks under heavy load may interfere with critical communication between the host and the associated boot LUN on the target, causing the system to hang or display a blue screen.
To work-around this issue, configure multiple paths between the host and target.
For best practices, configure a redundant iSCSI network on separate subnets and monitor the network performance.
For more information, see Creating Multipath Connections to Dell iSCSI Storage Arrays available on the Dell Techcenter website at www.dell.com.
NOTE: If the Hyper-V Role is configured on this system, make sure that there are no virtual networks that are bound to the physical NICs or LOMs that will be utilized for the secondary BFi adapter.
For added reliability, multiple network adapters or multiple ports on a single adapter can be used to create redundant paths to a single target. Implementing this solution requires the following:
• Two Network connections: Intel® Pro or Broadcom NetXtreme.
• Two IP addresses on the iSCSI target.
Creating Redundant Paths 47
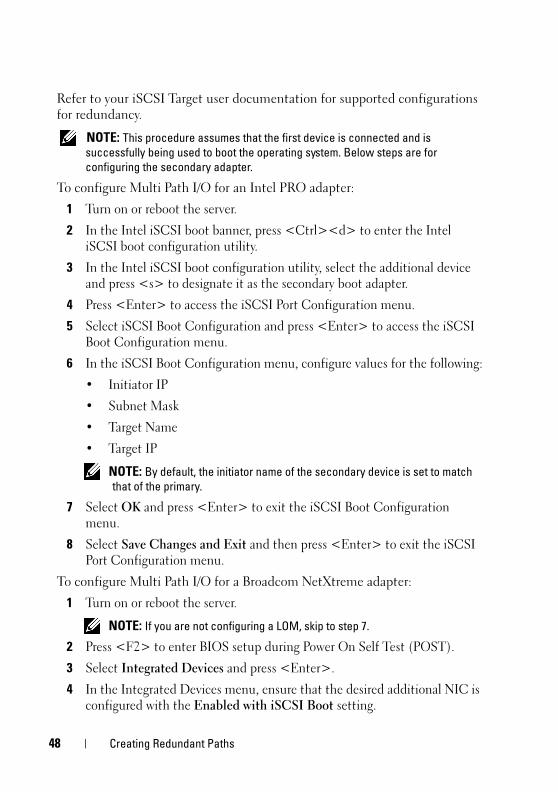
Refer to your iSCSI Target user documentation for supported configurations for redundancy.
NOTE: This procedure assumes that the first device is connected and is successfully being used to boot the operating system. Below steps are for configuring the secondary adapter.
To configure Multi Path I/O for an Intel PRO adapter:
1 Turn on or reboot the server.
2 In the Intel iSCSI boot banner, press <Ctrl><d> to enter the Intel iSCSI boot configuration utility.
3 In the Intel iSCSI boot configuration utility, select the additional device and press <s> to designate it as the secondary boot adapter.
4 Press <Enter> to access the iSCSI Port Configuration menu.
5 Select iSCSI Boot Configuration and press <Enter> to access the iSCSI Boot Configuration menu.
6 In the iSCSI Boot Configuration menu, configure values for the following:
• Initiator IP
• Subnet Mask
• Target Name
• Target IP
NOTE: By default, the initiator name of the secondary device is set to match that of the primary.
7 Select OK and press <Enter> to exit the iSCSI Boot Configuration menu.
8 Select Save Changes and Exit and then press <Enter> to exit the iSCSI Port Configuration menu.
To configure Multi Path I/O for a Broadcom NetXtreme adapter:
1 Turn on or reboot the server.
NOTE: If you are not configuring a LOM, skip to step 7.
2 Press <F2> to enter BIOS setup during Power On Self Test (POST).
3 Select Integrated Devices and press <Enter>.
4 In the Integrated Devices menu, ensure that the desired additional NIC is configured with the Enabled with iSCSI Boot setting.
48 Creating Redundant Paths
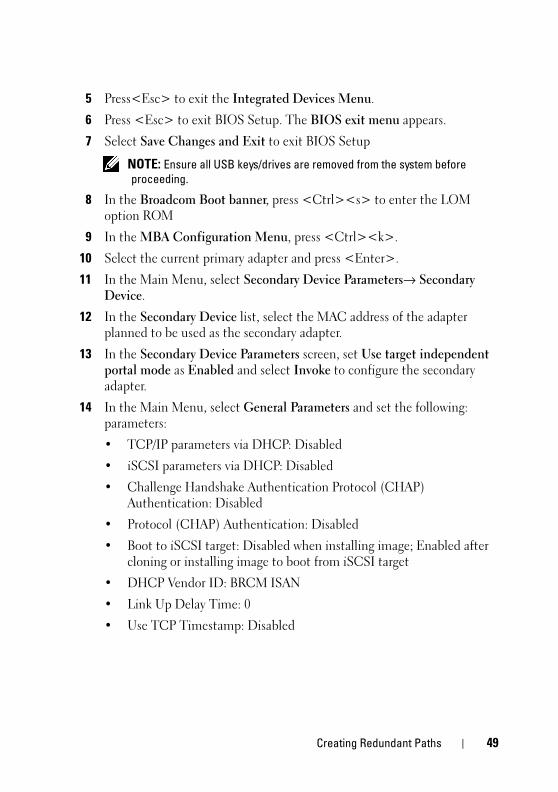
5 Press<Esc> to exit the Integrated Devices Menu.
6 Press <Esc> to exit BIOS Setup. The BIOS exit menu appears.
7 Select Save Changes and Exit to exit BIOS Setup
NOTE: Ensure all USB keys/drives are removed from the system before proceeding.
8 In the Broadcom Boot banner, press <Ctrl><s> to enter the LOM option ROM
9 In the MBA Configuration Menu, press <Ctrl><k>.
10 Select the current primary adapter and press <Enter>.
11 In the Main Menu, select Secondary Device Parameters→ Secondary Device.
12 In the Secondary Device list, select the MAC address of the adapter planned to be used as the secondary adapter.
13 In the Secondary Device Parameters screen, set Use target independent portal mode as Enabled and select Invoke to configure the secondary adapter.
14 In the Main Menu, select General Parameters and set the following: parameters:
• TCP/IP parameters via DHCP: Disabled
• iSCSI parameters via DHCP: Disabled
• Challenge Handshake Authentication Protocol (CHAP) Authentication: Disabled
• Protocol (CHAP) Authentication: Disabled
• Boot to iSCSI target: Disabled when installing image; Enabled after cloning or installing image to boot from iSCSI target
• DHCP Vendor ID: BRCM ISAN
• Link Up Delay Time: 0
• Use TCP Timestamp: Disabled
Creating Redundant Paths 49
• Target as First HDD: Disabled if using Imaging with Local Disk; Enabled if using Direct or Remote Install
• LUN Busy Retry Count: 0
• Windows HBA Boot Mode: Disabled (Only applicable for Windows, not Linux)
NOTE: If you have wish to use Offload iSCSI (OIS) to boot, set Windows HBA Mode to Enabled above. You must have a key enabled Broadcom NetXtreme adapter. For additional information, see the Broadcom NetXtreme User's Guide.
NOTE: To use DHCP for dynamically assigned settings, set the TCP/IP parameters through DHCP and iSCSI parameters through DHCP to Enabled. For additional information, see the Broadcom NetXtreme User's Guide.
NOTE: Do not enable CHAP at this time. It is recommended that you configure advanced features after connectivity between host and target is established.
15 Press <Esc> to return to the main menu.
16 Configure values for the following secondary adapter parameters:
• General Parameters:
• Change TCP/IP parameters to STATIC
• Initiator Parameters:
• IP Address
• Subnet Mask
• Default Gateway
• Primary DNS (optional)
• Secondary DNS (optional)
• iSCSI Name (the iSCSI initiator name to be used by the client system)
17 Press <Esc> to return to the Main Menu.
50 Creating Redundant Paths

18 In the Main Menu, select 1st Target Parameters and change the following:
• Connect to Enabled
• IP Address (Target IP)
• iSCSI Name (IQN name of Target)
• Boot LUN & TCP Port (if different from default settings)
NOTE: Do not configure anything under 2nd Target Parameters
19 Press <Esc> to return to the Main Menu. Select Exit and Save Configuration to exit the NIC/LOM Ctrl-s menu.
20 Press <F4> to save your MBA configuration.
Creating Redundant Paths 51

52 Creating Redundant Paths
Disk Duplication (Cloning)If you intend to create an operating system image to deploy to multiple hosts, run Sysprep prior to cloning the logical unit number (LUN).
You can clone additional iSCSI LUNs so that they can be used to boot additional hosts.
The following sections describe how to clone one iSCSI LUN to additional iSCSI LUNs:
• "Cloning Methods for the Dell™ PowerVault™ NX1950 Integrated Solution" on page 53
• "Cloning methods for the PowerVault MD3000i Storage Array" on page 55
• "Cloning methods for the Dell|EMC Storage System" on page 57
• "Booting a New Host from the Image on the Dell|EMC Storage System" on page 59
Cloning Methods for the Dell™ PowerVault™ NX1950 Integrated Solution
Method 1 - Copying and Pasting .vhd Files (Preferred Method)
After a virtual disk is configured with the operating system boot image, you can copy the virtual disk file (.vhd file) and import it to the iSCSI Target software. Ensure that no additional hosts are connected to the virtual disk and perform the following procedure to import the.vhd file:
1 Configure the host system to boot from the iSCSI LUN.
2 If the host system has a Windows operating system, run Sysprep and turn off the system.
3 Turn off the host.
Disk Duplication 53
4 On the PowerVault NX1950 Integrated solution, use Microsoft® Windows®
Explorer and perform a copy and paste of the virtual hard disk, .vhd file.
5 Rename the new copy with an appropriate name.
6 Use the Microsoft iSCSI Software Target on the PowerVault NX1950 Integrated solution to import a new virtual disk.
7 Create a new iSCSI Target and assign the new virtual disk to the new host.
8 Repeat step 3 to step 7 for each new host.
9 Proceed to "Booting a New Host from the Image on the Dell|EMC Storage System" on page 59.
Method 2 - Using an Imaging Server
This procedure uses an imaging server to clone the boot image of one system that boots from an iSCSI LUN, to multiple iSCSI LUNs. The images on the multiple iSCSI LUNs can then be used to configure BFi on multiple systems. Perform the following steps to clone the boot image:
NOTE: Before you perform the following steps, ensure that the imaging server has an iSCSI connection to the iSCSI target.
1 Configure the host system to Boot from an iSCSI LUN.
2 If the host system has a Windows operating system, run Sysprep and turn off the system.
3 Unassign the iSCSI LUN from the original host system and assign the iSCSI boot LUN to the imaging server.
4 Execute an imaging software such as Ghost, and create an image file of the iSCSI LUN (disk to image).
5 Unassign the original iSCSI LUN from the imaging server.
6 Assign the iSCSI LUN(s) on which you are creating clone(s) to the imaging server.
7 Execute an imaging software and image each iSCSI LUN with the boot image that you created in step 4 (image to disk).
8 Unassign all iSCSI LUNs from the imaging server.
9 Assign each iSCSI LUN to the system that it boots to.
10 Proceed to "Booting a New Host from the Image on the Dell|EMC Storage System" on page 59.
54 Disk Duplication
Booting a New Host from the Image on the PowerVault NX1950
NOTE: This procedure assumes that a .vhd file that has the operating system installed and sysprepped correctly is available for use.
1 On the PowerVault NX1950 Integrated solution, open the Microsoft Unified Data Storage Server Management console and click Microsoft iSCSI Software Target on the left pane.
2 Create a new target. Right-click iSCSI Targets and follow the on-screen instructions to enter the network name of the iSCSI host initiator and IQN of the host initiator.
3 Right-click the new target that you created in step 2. Click Add Existing Virtual Disk to iSCSI Target and follow the on-screen instructions to assign the iSCSI virtual disk to the host.
4 Right-click the iSCSI target, click Properties, and record the IQN of the iSCSI target.
5 Follow the instructions in the "Configuring the Network Adapter" on page 19 to configure the Intel® or Broadcom® adapter.
Cloning methods for the PowerVault MD3000i Storage Array
Method 1 - Using Snapshot Virtual Disks and Virtual Disk Copy (Preferred Method)
1 Configure the host system to boot from an iSCSI LUN.
2 Turn off the system.
3 Use the PowerVault Modular Disk Storage Manager to create a snapshot virtual disk of the source virtual disk.
4 Configure a different system to boot from the snapshot virtual disk.
5 If the host system has a Windows operating system, run Sysprep and turn off the system.
6 Using the Dell PowerVault Modular Disk Storage Manager, create a virtual disk copy of the snapshot virtual disk.
Disk Duplication 55
7 After the virtual disk copy is created, remove the copy pair using the Dell PowerVault Modular Disk Storage Manager.
8 Configure each system to boot from the assigned iSCSI LUN by following the instructions in the "Configuring the Network Adapter" on page 19 to configure the Intel or Broadcom adapter.
NOTE: For more information about creating snapshot virtual disks and virtual disk copy, see the Dell PowerVault Modular Disk Storage Manager User's Guide located on the Dell Support website at support.dell.com.
Method 2 - Using Virtual Disk Copy Premium Feature
1 Configure the host system to boot from an iSCSI LUN.
2 If the host system has a Windows operating system, run Sysprep and turn off the system.
3 Using the Dell PowerVault Modular Disk Storage Manager create a virtual disk copy of the snapshot virtual disk.
4 After the virtual disk copy is created, remove the copy pair using the Dell PowerVault Modular Disk Storage Manager.
5 Configure each system to boot from the assigned iSCSI LUN by following the instructions in the "Configuring the Network Adapter" on page 19 to configure the Intel or Broadcom adapter.
NOTE: For more information about creating snapshot virtual disks and virtual disk copy, see the Dell PowerVault Modular Disk Storage Manager User's Guide located on the Dell Support website at support.dell.com.
Method 3 - Using an Imaging Server
This procedure uses an imaging server to clone the boot image of one system (that boots from an iSCSI LUN) to multiple iSCSI LUNs. The images on the multiple iSCSI LUNs can then be used to configure BFi on multiple systems. Perform the following steps to clone the boot image:
NOTE: Before you perform the following steps, ensure that the imaging server has an iSCSI connection to the iSCSI target.
1 Configure the host system to Boot from an iSCSI LUN.
2 If the host system has a Windows operating system, run Sysprep and turn off the system.
56 Disk Duplication
3 Unassign the iSCSI LUN from the original host system and assign the iSCSI boot LUN to the imaging server.
4 Execute an imaging software such as Ghost and create an image file of the iSCSI LUN (disk to image).
5 Unassign the original iSCSI LUN from the imaging server.
6 Assign the iSCSI LUN(s) on which you are creating clone(s) to the imaging server.
7 Execute an imaging software such as Ghost and image each iSCSI LUN with the boot image that you created in step 4 (image to disk).
8 Unassign all iSCSI LUNs from the imaging server.
9 Assign each iSCSI LUN to the system to which it boots.
10 Configure each system to boot from the assigned iSCSI LUN by following the instructions in the "Configuring the Network Adapter" on page 19 to configure the Intel or Broadcom adapter.
Cloning methods for the Dell|EMC Storage System
Method 1 - Preferred Method for Dell|EMC Storage Systems
After you enable the boot image and SnapView on the first LUN, you can clone and assign it to other hosts. Ensure that no hosts are connected to the first LUN during cloning.
1 Configure the host system to Boot from an iSCSI LUN.
2 If the host system has a Windows operating system, run Sysprep and turn off the system.
3 On the storage system, create SnapView clones of the source LUN and wait until the clones are synchronized.
4 Using Navisphere® Manager, fracture and break the clone relationship.
5 Configure each server to boot from the assigned iSCSI LUN
6 Proceed to "Booting a New Host from the Image on the Dell|EMC Storage System" on page 59.
Disk Duplication 57
Method 2 - Using an Imaging Server
This procedure uses an imaging server to clone the boot image of one system (that boots from an iSCSI LUN) to multiple iSCSI LUNs. The images on the multiple iSCSI LUNs can then be used to configure BFi on multiple systems. Perform the following steps to clone the boot image:
NOTE: Before you perform the following steps, ensure that the imaging server has an iSCSI connection to the iSCSI target.
1 Configure the host system to Boot from an iSCSI LUN.
2 If the host system has a Windows operating system, run Sysprep and turn off the system.
3 Unassign the iSCSI LUN from the original host system and assign the iSCSI boot LUN to the imaging server.
4 Execute an imaging software such as Ghost and create an image file of the iSCSI LUN (disk to image).
5 Unassign the original iSCSI LUN from the imaging server.
6 Assign the iSCSI LUN(s) on which you are creating clone(s) to the imaging server.
7 Execute an imaging software such as Ghost and image each iSCSI LUN with the boot image that you created in step 4 (image to disk).
8 Unassign all iSCSI LUNs from the imaging server.
9 Assign each iSCSI LUN to the system that it boots to.
10 Proceed to "Booting a New Host from the Image on the Dell|EMC Storage System" on page 59.
58 Disk Duplication

Booting a New Host from the Image on the Dell|EMC Storage System After using one of the methods listed above or any third-party software to install the operating system on the iSCSI LUN, follow the steps below to boot a new host from the image.
NOTE: The following procedure applies to storage systems running Navisphere Manager.
1 Open the management program of the storage device and assign the LUN to the host.
2 To manually register a host, right-click the storage system and click Connectivity Status. In the Connectivity Status screen, click New.
In the Create Initiator Record screen, enter the IQN, computer name, and IP address of the host, and select the storage processor (SP) port from the drop-down menu. Click OK.
3 If the host has a secondary boot NIC, configure the NIC to boot from the other iSCSI SP port by selecting the SP, preferably on the peer SP. To configure the second path, choose the host you configured instead of creating a new one.
4 Create a storage group and add both the server and LUN to the storage group. Record the IP address of the SP and the IQN from which the server boots. Expand the Storage System→ Physical→ Enclosure SPE→ SPs→ SP A or SP B→ Front End Ports. Record the IQN and IP address of the SP port(s) you are mapping to in the NIC iSCSI Boot Menu.
5 Configure each system to boot from the assigned iSCSI LUN by following the instructions in the "Configuring the Network Adapter" on page 19 to configure the Intel or Broadcom adapter.
Disk Duplication 59

60 Disk Duplication
Troubleshooting
iSCSI Boot BIOS Fails to Detect the iSCSI Target
If iSCSI Boot BIOS fails to detect the iSCSI target, perform the following troubleshooting steps and try to boot the system from iSCSI:
• Disable the spanning tree protocol on the switch ports on which the iSCSI boot NIC is configured. For information about disabling the spanning tree, see the documentation that shipped with the switch.
• Check for typographic errors in the iSCSI boot settings in Network adapter's configuration menu. The configuration options must match the instructions provided. For more troubleshooting procedures, see the iSCSI boot section in Intel® PRO or Broadcom NetXtreme Family of Adapters User's Guide and the Dell Support website at support.dell.com.
• To eliminate switch problems, test by connecting the initiator to the target directly using a standard Ethernet cable. Do not use a cross-over cable.
• During the operating system installation to the iSCSI LUN, if you receive the error message: Failed to create a new partition on the selected unused space. [Error: 0x80042453], then the initiator connection has been made to the controller that does not own the LUN.
Troubleshooting 61
Host Displays a Blue Screen or Continues to Reboot
If the host displays a blue screen or continues to reboot when you boot from the iSCSI LUN, perform the following:
NOTE: The following procedures are for a new installation.
1 Change the boot order in the BIOS screen to re-enable the local hard drive (if available).
2 Open the iSCSI Software Initiator GUI to ensure that there are no entries in the Discovery tab or in the Persistent Targets tab.
3 Open the disk management console and verify that the iSCSI LUN is recognized.
4 Replicate the operating system boot image from the local hard drive to the iSCSI LUN and then boot from the iSCSI LUN.
62 Troubleshooting
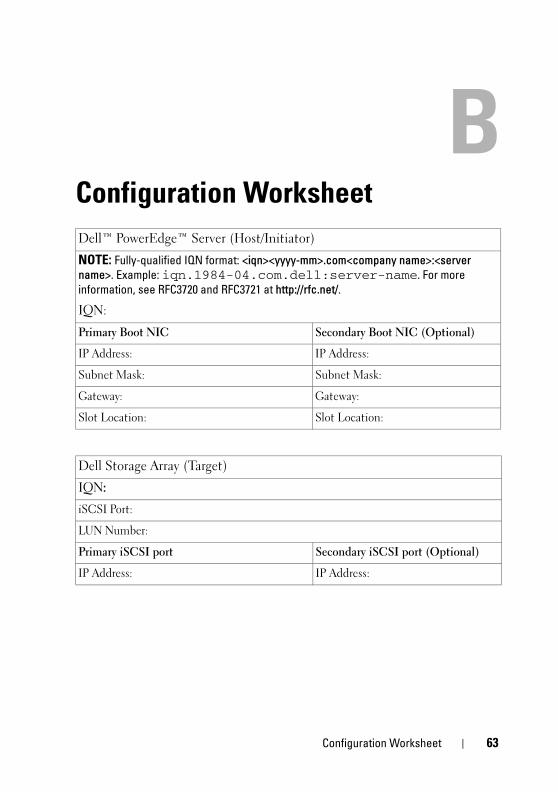
Configuration Worksheet
Dell™ PowerEdge™ Server (Host/Initiator)
NOTE: Fully-qualified IQN format: <iqn><yyyy-mm>.com<company name>:<server
name>. Example: iqn.1984-04.com.dell:server-name. For more information, see RFC3720 and RFC3721 at http://rfc.net/.
IQN:
Primary Boot NIC Secondary Boot NIC (Optional)
IP Address: IP Address:
Subnet Mask: Subnet Mask:
Gateway: Gateway:
Slot Location: Slot Location:
Dell Storage Array (Target)
IQN:
iSCSI Port:
LUN Number:
Primary iSCSI port Secondary iSCSI port (Optional)
IP Address: IP Address:
Configuration Worksheet 63

64 Configuration Worksheet

Index
Symbols
.vhd, 53
Numerics
55624Direct/Remote Install for
Windows Server 2003 (Intel Only), 31
B
BIOS, 61
Boot from iSCSI, 9
Broadcom, 8, 21
C
CHAP, 22
Cloning, 53
D
Dell|EMC, 17
Device Manager, 32
Direct Install, 31
Disk Duplication, 53
E
Ethernet Controller Properties, 31
I
Imaging, 31
Imaging Server, 54
Intel PRO Family of Adapters User’s Guide, 8
Intel® PRO, 19
L
Linux, 39
LUN, 9
M
MPIO, 32
Index 65
N
Navisphere Express, 18
Navisphere Manager, 17
Network Adapter, 19
NetXtreme, 8
P
Plug and Play, 32
POST, 20
PowerVault NX1950, 34
R
Remote Installation, 31
RHEL 5.2, 40
S
SLES 10 SP2, 43
Symantec® Ghost, 30
T
TCP/IP, 22
W
Windows Server 2003, 28
Windows Server 2008, 28
66 Index