instruction manual & warranty - best pool supplies · avenger ® stops and starts ... consult...
TRANSCRIPT
InstructionManual &Warranty
SECTION 1. INTRODUCTIONSECTION 2. ASSEMBLY COMPONENTSSECTION 3. INSTALLATION INSTRUCTIONSSECTION 4. IMPORTANT ADJUSTMENTSSECTION 5. CARING FOR YOUR AVENGERSECTION 6. AVENGER® SPARE PARTSSECTION 7. REPLACING THE DIAPHRAGMSECTION 8. TROUBLESHOOTING GUIDESECTION 9. AVENGER® TWO-YEAR WARRANTYSECTION 10. PURCHASE DETAILSSECTION 11. OWNER REGISTRATION
This product is protected by one or more of the following:
AUST. PATENT APP. 2008902923AUST. DESIGN APP. 11325/2008AUST. DESIGN APP. 11326/2008
AUST. INNOVATION PAT. 2006100934INTERNATIONAL PATENTS PENDING
www.avengerpoolcleaner.comAvenger® and AutoPilot® are registered trademarks
Warranty claims valid only with proof of purchase receipt.
POOL SYSTEMS - AVENGER® INSTRUCTIONS
1. INTRODUCTIONCongratulations on your purchase of the Avenger® High Performance Pool Cleaner.
The Avenger® has been designed to be user friendly and low maintenance providingyears of trouble free service.
Dependable - contains just one internal moving part.Quiet Operation - proven diaphragm technology.Efficient - cleans the walls as well as the floor.Economical - no additional running cost powered by suction from your filtration system.Durable - no nuts, bolts, screws or gears.Performance - AutoPilot® revolutionary steering and buoyancy control.
2. ASSEMBLY COMPONENTS
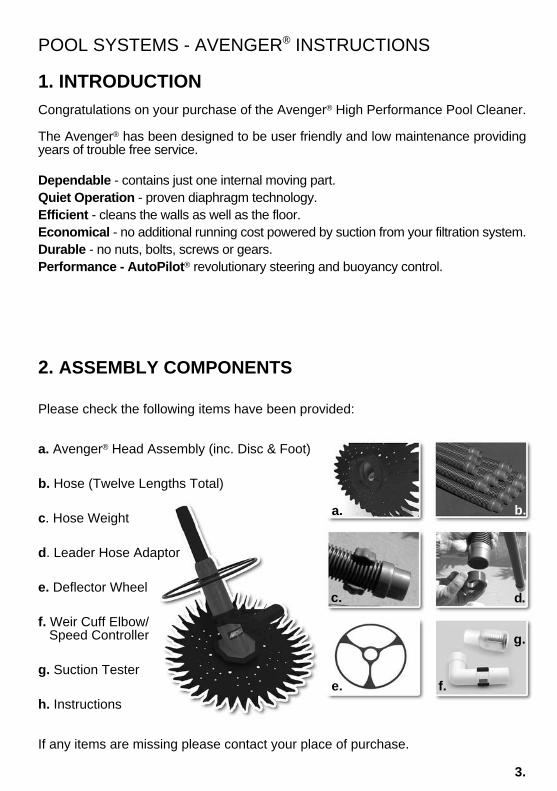
Please check the following items have been provided:
a. Avenger® Head Assembly (inc. Disc & Foot)
b. Hose (Twelve Lengths Total)
c. Hose Weight
d. Leader Hose Adaptor
e. Deflector Wheel
f. Weir Cuff Elbow/ Speed Controller
g. Suction Tester
h. Instructions
If any items are missing please contact your place of purchase.
a.
c.
e.
b.
d.
f.
g.
3.
3. INSTALLATION INSTRUCTIONS
Your Avenger® has been designed for simple installation and low maintenance.
Step 1. Clean or backwash your filter and empty the skimmer basket.
Step 2. Turn off all ancillary equipment such as waterfalls, spa seats and spilloverspas while the Avenger® is operating to ensure maximum performance.Check the main drain opening is plugged (vacuum position) in the skimmerbox and, if applicable, secondary skimmers are closed. Your Avenger® needsgood suction to work correctly. Contact your place of purchase if you havequestions or require advice about ancillary equipment.
Step 3. Unpack your Avenger® near the skimmer box of the pool.
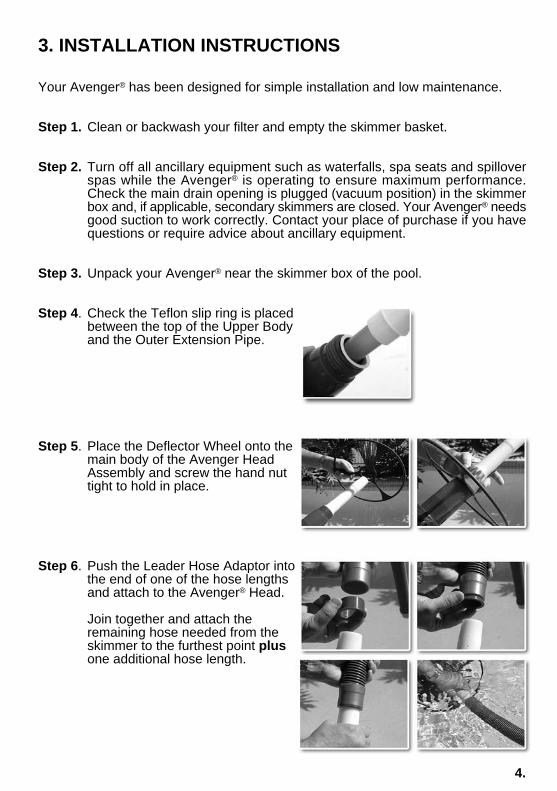
Step 4. Check the Teflon slip ring is placedbetween the top of the Upper Bodyand the Outer Extension Pipe.
Step 5. Place the Deflector Wheel onto themain body of the Avenger HeadAssembly and screw the hand nuttight to hold in place.
Step 6. Push the Leader Hose Adaptor intothe end of one of the hose lengthsand attach to the Avenger® Head.
Join together and attach theremaining hose needed from theskimmer to the furthest point plusone additional hose length.
4.
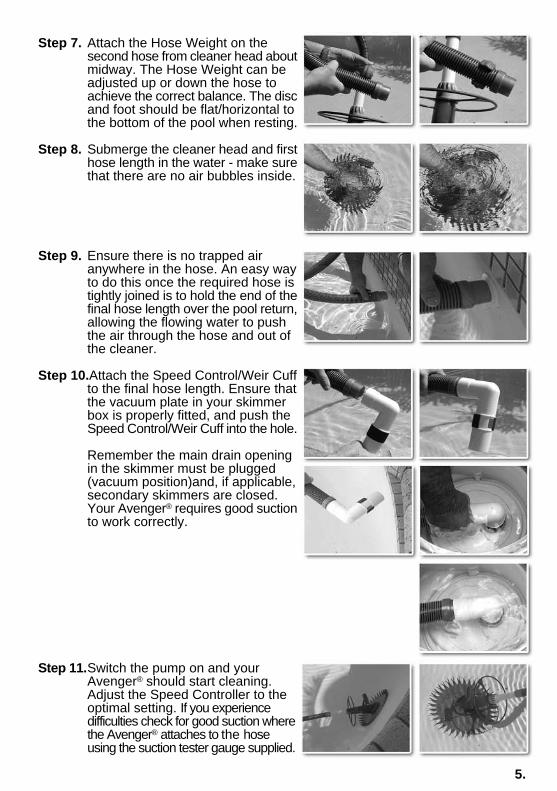
Step 7. Attach the Hose Weight on thesecond hose from cleaner head aboutmidway. The Hose Weight can beadjusted up or down the hose toachieve the correct balance. The discand foot should be flat/horizontal tothe bottom of the pool when resting.
Step 8. Submerge the cleaner head and firsthose length in the water - make surethat there are no air bubbles inside.
Step 9. Ensure there is no trapped airanywhere in the hose. An easy wayto do this once the required hose istightly joined is to hold the end of thefinal hose length over the pool return,allowing the flowing water to pushthe air through the hose and out ofthe cleaner.
Step 10.Attach the Speed Control/Weir Cuffto the final hose length. Ensure thatthe vacuum plate in your skimmerbox is properly fitted, and push theSpeed Control/Weir Cuff into the hole.
Remember the main drain openingin the skimmer must be plugged(vacuum position)and, if applicable,secondary skimmers are closed.Your Avenger® requires good suctionto work correctly.
Step 11.Switch the pump on and yourAvenger® should start cleaning.Adjust the Speed Controller to theoptimal setting. If you experiencedifficulties check for good suction wherethe Avenger® attaches to the hoseusing the suction tester gauge supplied.
5.

4. IMPORTANT ADJUSTMENTSHere are some points to ensure your Avenger® operates at maximum performance.
• Ensure that the Avenger® isproperly balanced. The cleanerat rest should sit flat on the floor ofthe pool. You can adjust the balanceby moving the hose weight up ordown the hose. You may alsofind the best balance without theHose Weight attached.
• Ensure that the Avenger® has thecorrect amount of suction.Adjusting the speed controller variesthe suction to the head of thecleaner, and thus alters its speed.Use the Suction Tester on the endof the hose (instead of the cleaner)to gauge the suction level and adjust the speed controller accordingly.
• Ensure that the Avenger® coversall of the pool. Suction cleanershave no programmed route, andtheir movement depends largely onthe flow of water throughout thepool. Making adjustments to theeyeball returns of the pool canhelp the cleaner cover dead spots, or prevent the cleaner from sticking incorners.
If you encounter any problems with the Avenger® automatic pool cleaner referto the troubleshooting guide prior to contacting your place of purchase.
5. CARING FOR YOUR AVENGER®
Here are some tips for looking after your Avenger®, to ensure that it provides manyyears of faithful service.
• Don’t leave your Avenger® out of the pool in the sun for prolongedperiods. If you take it out of the pool, store it in the shade. Prolongedsummer sun can be detrimental to your Avenger®.
• Store the hose lengths straight. If the cleaner is out of the pool, ensurethat the hose is dismantled and the lengths stored straight. Curling thelengths up can often impress a curled memory into the hose causing itto tangle in the pool and affect your Avenger® operation.
6.

• Take the Avenger® out in unusual circumstances. If your pool is greenand cloudy or if you are going to add any large doses of chemicals orsuperchlorinating, it’s best to take the cleaner out of the pool until it returnsto normal. Unusual chemical balance can severely damage and deteriorateyour Avenger®.
• Remove any sharp objects from the pool by hand. Sharp twigs, nuts,small pool toys, stones and bottle caps can damage the soft diaphragminside. It’s best to remove these type of objects before your Avenger® getsthere first.
Children and pets are responsible for most damage caused to pool cleaners. Pleaseensure your Avenger® is never used as a toy and it will give you years of dependableservice.
7.
6. AVENGER® SPARE PARTS
3
4
5
67
8
9
10
11
171615
14
13
12
1. Hose Sections2. Hose Adaptor3. Inner tube4. Outer tube5. Hand Nut6. Slip Washer7. Bushing8. Upper Body9. Lower Body
10. Diaphragm11a.Blue Foot - Concrete, etc.11b.Yellow Foot - Smooth Surface12. Skirt13. AutoPilot® Assembly14. Deflector Wheel15. Hose Weight16. Suction Test Gauge17. Speed Control Elbow
2
1
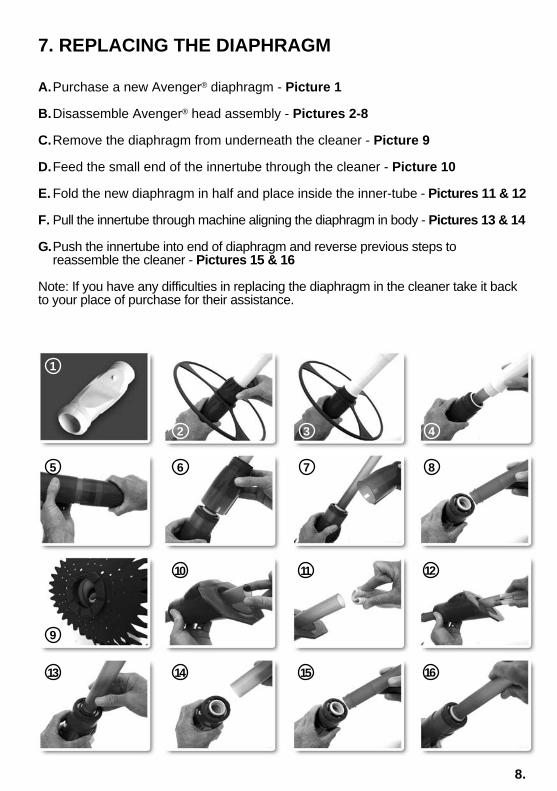
7. REPLACING THE DIAPHRAGM
A.Purchase a new Avenger® diaphragm - Picture 1
B.Disassemble Avenger® head assembly - Pictures 2-8
C.Remove the diaphragm from underneath the cleaner - Picture 9
D.Feed the small end of the innertube through the cleaner - Picture 10
E. Fold the new diaphragm in half and place inside the inner-tube - Pictures 11 & 12
F. Pull the innertube through machine aligning the diaphragm in body - Pictures 13 & 14
G.Push the innertube into end of diaphragm and reverse previous steps toreassemble the cleaner - Pictures 15 & 16
Note: If you have any difficulties in replacing the diaphragm in the cleaner take it backto your place of purchase for their assistance.
1
10 12
2 3 4
6 7 85
9
11
14 161513
8.
8. TROUBLESHOOTING GUIDE
If you encounter any problems with the Avenger® automatic pool cleaner check thefollowing troubleshooting guide prior to seeking assistance from your place of purchase.
PROBLEM POSSIBLE SOLUTIONS
Avenger® stops and starts, • Check that the filter is clean and the pump is switched on. or won’t move at all. • Disengage the safety suction, ensure main drain is plugged.
• Ensure that the vacuum plate is properly installed.• Check the cleaner and hose are free of trapped air.• Check the diaphragm for any damage or blockages.
Avenger® is missing spots • Ensure that the correct amount of hose is installed. in the pool. Try adding or taking away one or two hose lengths.
• Ensure that all the returns are directing water flow towardsthe floor of the pool, adjusting the eyeballs, or using water diverters available at your local pool shop.
• Ensure that hose is straight and untangled.
Avenger® doesn’t climb • Increase the suction using the speed controller.• Ensure the pool water is properly balanced. For example,
High pH and/or lack of chlorine, makes the walls very slippery.• Check float arm is in the correct position.
Note: In pools with a sharp 90 degree wall-to-floor it isunreasonable to expect the cleaner to climb the walls.
Avenger® spends too much • Decrease the suction using the speed controller. time on the walls, and/or • Adjust the hose weight provided towards the cleaner head.. climbs out of the water. • Attach the AutoPilot® float assembly to another position.
Avenger® sticks in corners, • Ensure that the correct amount of hose is installed. under ladders, on lights Try adding or taking away one or two hose lengths. or on pool steps. • Ensure that all the returns are directing water flow towards
the floor of the pool, adjust the eyeballs, or use water diverters available at your local pool shop. Excess water movement on the water surface will hold or push the hose.
• Add optional hose motors and / or replace wheel deflectorwith larger size available from your local pool shop.
That’s it! From all of us at Pool Systems, we wish you all the best for summer aftersummer of hassle free pool cleaning with the Avenger®!
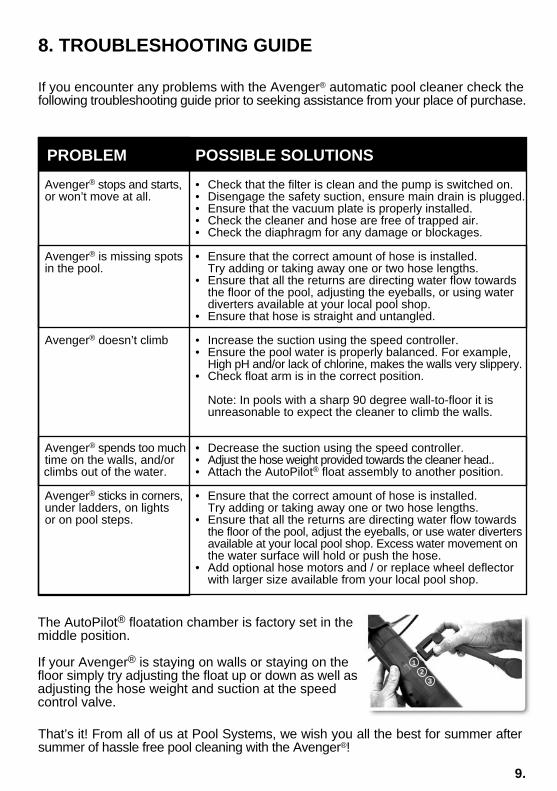
The AutoPilot® floatation chamber is factory set in themiddle position.
If your Avenger® is staying on walls or staying on thefloor simply try adjusting the float up or down as well asadjusting the hose weight and suction at the speedcontrol valve.
12
3
9.
10.
AVENGER® High Performance Pool Cleaner
TWO-YEAR WARRANTYThis Avenger® Automatic Pool Cleaner was carefully inspected before shipment from our warehouse. Uponunpacking, if any parts are missing or found to be defective, please notify your dealer immediately. Pleaseconsult owner's manual for complete instructions on the installation and operation of your Avenger®.
POOL SYSTEMS PTY LTD WARRANTS THE AVENGER® AUTOMATIC POOL CLEANER TO BE FREEFROM DEFECTS IN MATERIALS AND WORKMANSHIP TO THE ORIGINAL PURCHASER FOR APERIOD OF TWO (2) YEARS FROM DATE OF PURCHASE. THE AVENGER® AUTOMATIC POOLCLEANER HOSE IS WARRANTED FOR TWO (2) YEARS AGAINST MANUFACTURING DEFECTS.
THIS LIMITED WARRANTY EXCLUDES THE FOLLOWING:
1. Discolouration of the Avenger® automatic pool cleaner caused by reaction to chemicals used in the poolwater. Discolouration does not affect the operating ability of the Avenger® automatic pool cleaner.Therefore, this limited warranty does not cover the replacement of discoloured parts.
2. Damage to or malfunction of the unit resulting from excess chlorination or improper water chemistry balance.
3. Replacement of parts which fail or become defective as a result of improper installation, negligence,misuse, abuse or tampering by unauthorised repair personnel.
4. Age, pool water imbalance, and improper installation can cause pool liners to become brittle or undulywrinkled. Corrosion of the supporting walls and/or irregularities in the pool base may also cause linerfailure. The use of this product in such an environment is at the pool owner's risk. Therefore, the poolowner hereby releases the manufacturer from any and all claims for damage where these conditions exist.
5. Abrasion to the hose or damage caused by misuse or improper installation.
No claim will be recognised without proof of purchase. Only the original purchaser may submit aclaim under this limited warranty. Purchaser's claims against POOL SYSTEMS Pty. Ltd. shall be limitedto those claims which may be asserted under the limited warranty relating to any manufacturing defect.
To obtain warranty replacement or repair, the unit should be returned, freight prepaid, to the place ofpurchase or directly to: POOL SYSTEMS PTY. LTD. P.O. Box 5225, Brendale, Queensland 4500. Whensubmitting a claim, always supply serial number, evidence of purchase date, retailer and a brief descriptionof the problems/defects encountered. POOL SYSTEMS PTY. LTD. reserves the right to repair or replaceall defective or worn parts covered by this limited warranty and return same to purchaser, freight collect.
POOL SYSTEMS Pty. Ltd. assumes no responsibility for any warranties or representations made by otherIndividuals or businesses beyond the express terms contained in this limited warranty .
This warranty gives you specific legal rights, and you may also have other rights which vary from stateto state. This warranty remains the property of POOL SYSTEMS PTY. LTD.
www.avengerpoolcleaner.comPool Systems Pty LtdABN 68 074 166 975
79 Kremzow Road, Brendale, QLD. 4500www.poolsystems.com.au
Avenger® and AutoPilot® are registered trademarks
© Pool Systems Pty Ltd
9.
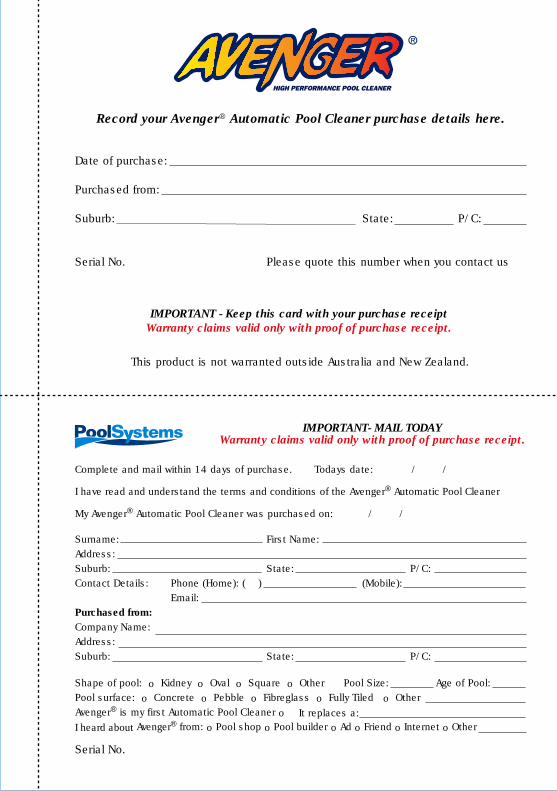
Record your Avenger® Automatic Pool Cleaner purchase details here.
IMPORTANT- MAIL TODAYWarranty claims valid only with proof of purchase receipt.
Date of purchase:
Purchased from:
Suburb: State: P/C:
Serial No. Please quote this number when you contact us
This product is not warranted outside Australia and New Zealand.
IMPORTANT - Keep this card with your purchase receiptWarranty claims valid only with proof of purchase receipt.
Serial No.
Complete and mail within 14 days of purchase. Todays date: / /
I have read and understand the terms and conditions of the Avenger® Automatic Pool Cleaner
My Avenger® Automatic Pool Cleaner was purchased on: / /
Surname: First Name:
Address:
Suburb: State: P/C:
Contact Details: Phone (Home): ( ) (Mobile):
Email:
Purchased from:Company Name:
Address:
Suburb: State: P/C:
Shape of pool: o Kidney o Oval o Square o Other Pool Size: Age of Pool:
Pool surface: o Concrete o Pebble o Fibreglass o Fully Tiled o Other
Avenger® is my first Automatic Pool Cleaner o It replaces a:
I heard about Avenger® from: oPool shop oPool builder oAd oFriend oInternet oOther
AFFIX
STAMP
HERE
Pool Systems Pty LtdP.O. Box 5225Brendale, QLD 4500
Important
Keep this section
of the card with
your purchase
receipt
Important
Complete & mail
within 14 days
of purchase
Warranty claims valid onlywith proof of purchase
receipt.