instruction manual data collector
TRANSCRIPT
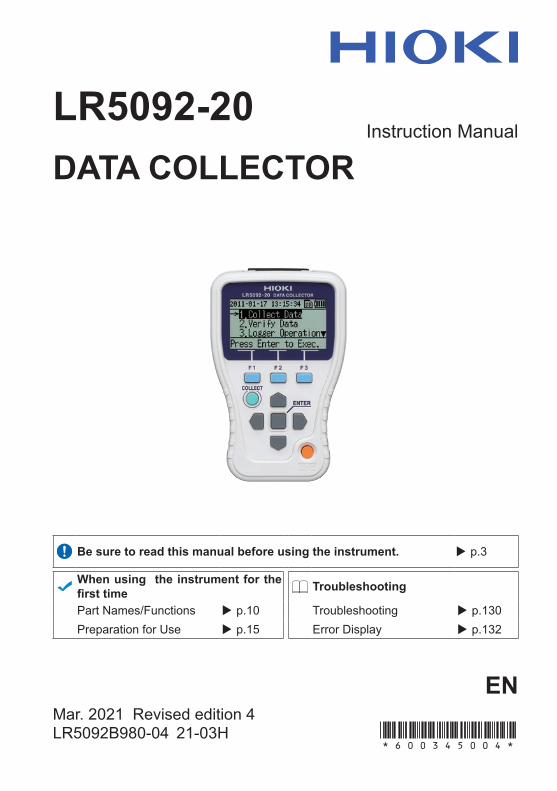
LR5092-20Instruction Manual
DATA COLLECTOR
ENMar. 2021 Revised edition 4LR5092B980-04 21-03H
Be sure to read this manual before using the instrument. p.3
When using the instrument for the first time Troubleshooting
Part Names/Functions p.10 Troubleshooting p.130Preparation for Use p.15 Error Display p.132
HIOKI LR5092B980-04

HIOKI LR5092B980-04
Contents
i
ContentsIntroduction ..............................................................................1Verifying Package Contents....................................................2Safety Information....................................................................3Operating Precautions.............................................................4Preparation for Use to Data Analysis .....................................6
Chapter 1 Overview ___________________________________ 9
1.1 Product Overview and Features ...............................91.2 Part Names/Functions .............................................101.3 Basic Button Operations and
Display Organization ...............................................11
Chapter 2 Preparation for Use _________________________ 15
2.1 Installing (or Replacing) the Battery ......................15Battery Status Indicator......................................................... 16When the logger will not be used for long time .................. 16
2.2 Inserting an SD Card (When Necessary) ...............17SD Memory Cards for which Operation is Guaranteed ...... 18
2.3 Turning the Power On/Off .......................................192.4 Inspection Before Use .............................................20
Chapter 3 Settings (When Necessary)___________________ 21
3.1 Making Settings with the Collector ........................213.2 Settings List .............................................................223.3 Sending Measurement Condition Settings to
Logger ......................................................................263.4 Receiving Measurement Condition Settings
from Logger .............................................................273.5 Verifying Recording/Setting Status of Logger ......283.6 Starting and Stopping Recording on Logger ........29
LR5092B980-04 HIOKI LR5092B980-04
Contents
ii
Chapter 4 Collecting and Browsing Data ________________31
4.1 Collecting Recorded Data of Logger .................... 31One-touch Collection
(Collecting Data Easily by Just Pressing COLLECT Button) 31Selecting the Data Save Destination and Then Performing
Collection ............................................................................... 35
Chapter 5 Data Management___________________________39
5.1 Displaying Data List ............................................... 39Displaying List of Data in Collector Memory ...................... 39Displaying List of Data in SD Memory Card........................ 40File Structure in SD Memory Card ....................................... 41
5.2 Moving Data in Collector Memory to SD Memory Card .......................................................................... 42
5.3 Saving and Importing Setting Conditions ............ 465.4 Clearing Data ........................................................... 49
Clearing Data from Collector Memory ................................. 49Clearing Data from SD Memory Card................................... 51
5.5 Initializing SD Memory Card .................................. 54
Chapter 6 Collector System Settings____________________55
6.1 Displaying and Changing Collector System Settings .................................................................... 55One-touch Collection ............................................................ 55Startup Display ...................................................................... 57Language Setting................................................................... 58Clock Setting.......................................................................... 59
6.2 Performing Self Checks ......................................... 60Firmware................................................................................. 60LCD ......................................................................................... 61Buttons and Buzzers ............................................................. 62SD Card................................................................................... 63
6.3 Initializing the Collector (Restoring to Factory Default State) ..................... 64
HIOKI LR5092B980-04
Contents
iii
Chapter 7 Using the LR5000 Utility Program _____________ 65
7.1 Installing the PC Application Program ..................65LR5000 Utility Program Screens........................................... 69
7.2 Setting the Collector from the LR5000 Utility Program ...........................................72
7.3 Saving Setting Data from the LR5000 Utility Program to the SD Memory Card ...........................83
7.4 Automatically Importing (Saving) Recorded Data to a Computer, and Graph Display ................85
7.5 Manually Importing (Saving) Recorded Data to a Computer, and Graph Display ................................94
7.6 Importing Recorded Data from SD Memory Card to Computer and Displaying Graph ..............97
7.7 Displaying a Graph of Saved Recording Data ....1017.8 Processing Recorded Data ...................................103
Scaling................................................................................... 105Calculating Electric Power .................................................. 106Calculating Energy Cost...................................................... 107Calculating Operating Rate ................................................. 108 Integration............................................................................. 109Calculating Dew-Point Temperature................................... 110Two-Data-Item Arithmetic Calculations ............................. 111Converting Over-Threshold Data Values ........................... 112
7.9 Printing Recorded Data .........................................1137.10 Organizing Data .....................................................114
Copying and Moving Data ................................................... 115Deleting Data ........................................................................ 116Combining Data.................................................................... 117Extracting Data ..................................................................... 118
7.11 Options Settings (LR5000 Utility Program) .........119Changing the Saving Method for Imported Data............... 120Changing the Connection Monitoring Method, and
Logger Settings Displays .................................................... 121
HIOKI LR5092B980-04

Contents
iv
Chapter 8 Specifications_____________________________123
8.1 Main Unit General Specifications ........................ 1238.2 Functions ............................................................... 125
Chapter 9 Maintenance and Service ___________________129
Requesting Repairs ............................................................. 129When the logger will not be used for long time................ 129Lifespan of Backup Battery ................................................ 129
9.1 Cleaning ................................................................. 1299.2 Troubleshooting ................................................... 1309.3 Error Display ......................................................... 1329.4 Disposing of the Logger ...................................... 135
Index _________________________________ index i
HIOKI LR5092B980-04

Introduction1
Thank you for purchasing the HIOKI "Model LR5092-20 Data Collector." To obtain maximum performance from the instrument, please read this manual first, and keep it handy for future reference.
• Microsoft and Excel are either registered trademarks or trademarks of Microsoft Cor-poration in the United States and other countries.
• The SD logo is a trademark of SD-3C, LLC.
Introduction
Trade Marks
Notation
Indicates a prohibited action.
(p. ) Indicates the location of reference information.
Indicates hints on operation and troubleshooting.
* Indicates that descriptive information is provided below.
[ ]Menus, commands, dialogs, buttons in a dialog, and other names on the screen and the keys are indicated in brack-ets.
SET(Bold
characters)
Bold characters within the text indicate operating key labels.
Windows Unless otherwise specified, “Windows” represents Win-dows 7 or Windows 10.
Dialog Dialog box represents a Windows dialog box.
Mouse OperationClick Press and quickly release the left button of the mouse.
Right-click Press and quickly release the right button of the mouse.
Double click Double click: Quickly click the left button of the mouse twice.
DragWhile holding down the left button of the mouse, move the mouse and then release the left button to deposit the cho-sen item in the desired position.
Activate Click on a window on the screen to activate that window.
HIOKI LR5092B980-04
Verifying Package Contents2
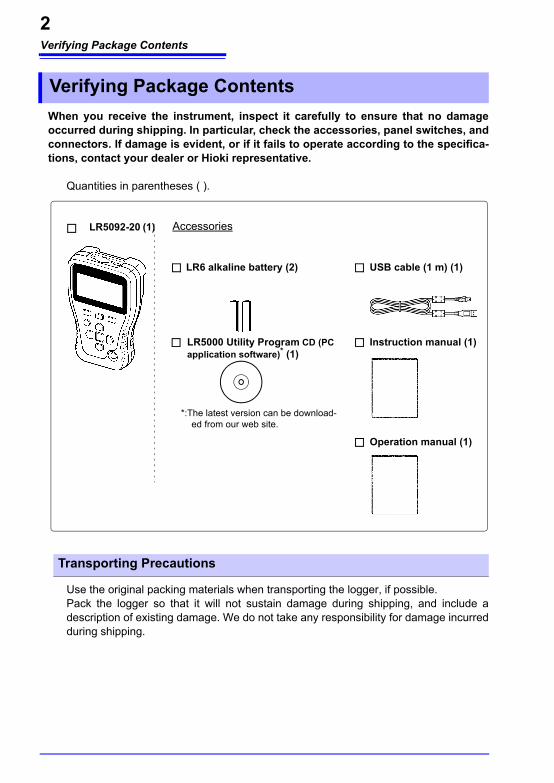
When you receive the instrument, inspect it carefully to ensure that no damage occurred during shipping. In particular, check the accessories, panel switches, and connectors. If damage is evident, or if it fails to operate according to the specifica-tions, contact your dealer or Hioki representative.
Quantities in parentheses ( ).
Use the original packing materials when transporting the logger, if possible.Pack the logger so that it will not sustain damage during shipping, and include a description of existing damage. We do not take any responsibility for damage incurred during shipping.
Verifying Package Contents
LR5092-20 (1)
LR6 alkaline battery (2)
Accessories
USB cable (1 m) (1)
LR5000 Utility Program CD (PC application software)* (1)
*:The latest version can be download-ed from our web site.
Instruction manual (1)
Operation manual (1)
Transporting Precautions
HIOKI LR5092B980-04

Safety Information3
This manual contains information and warnings essential for safe operation of the instrument and for maintaining it in safe operating condition. Before using it, be sure to carefully read the following safety precautions.
Markings on the logger have the following meanings.
Markings on the logger have the following meanings.
Safety Information
This logger is designed to comply with IEC 61010 Safety Standards, and has been thoroughly tested for safety prior to shipment. However, mis-handling during use could result i n injury or death, as well l a s damage to the logger. However, using the logger in a way not described in this manual may negate the provided safety features.Be certain that you understand the instructions and precautions in the manual before use. We disclaim any responsibility for accidents or inju-ries not resulting directly from logger defects.
Safety Symbols
In the manual, the symbol indicates particularly important infor-mation that the user should read before using the instrument.
The symbol printed on the instrument indicates that the user should refer to a corresponding topic in the manual (marked with the
symbol) before using the relevant function.
Indicates the ON side of the power switch.
Indicates the OFF side of the power switch.
Indicates DC (Direct Current).
Symbols for Various Standards
Indicates that the product complies with standards imposed by EU directives.
This symbol indicates that the product conforms to safety regu-lations set out by the EC Directive.
HIOKI LR5092B980-04

Operating Precautions4
The following symbols in this manual indicate the relative importance of cautions and warnings.
Follow these precautions to ensure safe operation and to obtain the full ben-efits of the various functions.
Operating temperature and humidity: 0 to 40°C, 80%RH or less (non-condensating)Storage temperature and humidity: -10 to 50°C, 80%RH or less (non-condensating)
Danger Levels
Indicates that incorrect operation presents an extreme hazard that could result in serious injury or death to the user.
Indicates that incorrect operation presents a significant hazard that could result in serious injury or death to the user.
Indicates that incorrect operation presents a possibility of injury to the user or damage to the instrument.
Indicates advisory items related to performance or correct operation of the instrument.
Operating Precautions
Installation Precautions
Avoid the following locations that could cause an accident or damage to the logger.
Exposed to directsunlightExposed to high tem-perature
In the presence ofcorrosive or explosivegases
Exposed to oil, other chemicals, or solventsExposed to high humidity or condensa-tion
Exposed to strong electromagneticfieldsNear electromagneticradiators
Exposed to high lev-els of particulate dust
Near induction heat-ing systems(e.g., high-frequency induction heating sys-tems and IH cooking utensils)
Subject to vibration
HIOKI LR5092B980-04

Operating Precautions5
Before using the instrument the first time, verify that it operates normally to ensure that the no damage occurred during storage or shipping. If you find any damage, con-tact your dealer or Hioki representative.
Avoiding Collector Damage
To avoid damage to the instrument, protect it from physical shock when transporting and handling. Be especially careful to avoid physical shock from dropping.
CD Handling
• Always hold the disc by the edges, so as not to make fingerprints on the disc or scratch the printing.Never touch the recorded side of the disc. Do not place the disc directly on anything hard.
• Do not wet the disc with volatile alcohol or water, as there is a possibil-ity of the label printing disappearing.
• To write on the disc label surface, use a spirit-based felt pen. Do not use a ball-point pen or hard-tipped pen, because there is a danger of scratching the surface and corrupting the data. Do not use adhesive labels.
• Do not expose the disc directly to the sun's rays, or keep it in condi-tions of high temperature or humidity, as there is a danger of warping, with consequent loss of data.
• To remove dirt, dust, or fingerprints from the disc, wipe with a dry cloth, or use a CD cleaner. Always wipe from the inside to the outside, and do no wipe with circular movements. Never use abrasives or sol-vent cleaners.
• Hioki shall not be held liable for any problems with a computer system that arises from the use of this CD, or for any problem related to the purchase of a Hioki product.
Preliminary Checks
Before using the instrument, make sure that the insulation on the USB cable is undamaged and that no bare conductors are improp-erly exposed. Using the device in such conditions could cause an electric shock, so contact your dealer or Hioki representative for replacements.
HIOKI LR5092B980-04
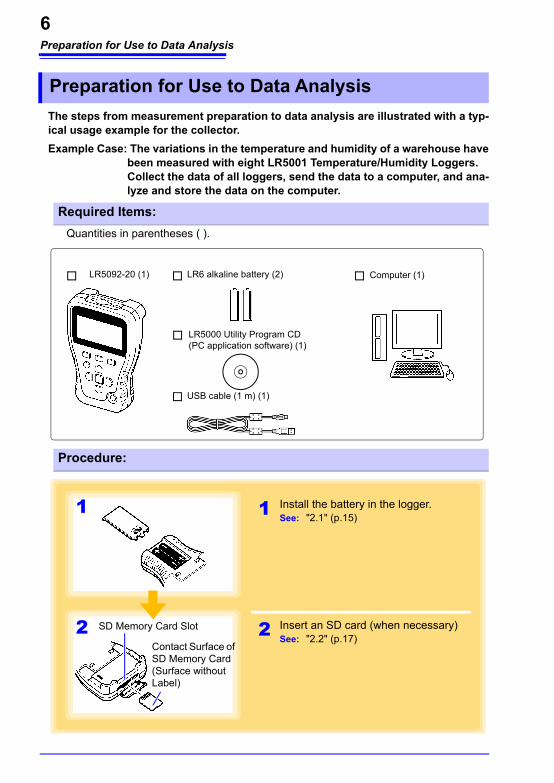
Preparation for Use to Data Analysis6
The steps from measurement preparation to data analysis are illustrated with a typ-ical usage example for the collector.Example Case: The variations in the temperature and humidity of a warehouse have
been measured with eight LR5001 Temperature/Humidity Loggers. Collect the data of all loggers, send the data to a computer, and ana-lyze and store the data on the computer.
Quantities in parentheses ( ).
Preparation for Use to Data Analysis
Required Items:
LR5092-20 (1) LR6 alkaline battery (2)
USB cable (1 m) (1)
Computer (1)
LR5000 Utility Program CD (PC application software) (1)
Procedure:
1 Install the battery in the logger. See: "2.1" (p.15)
2 Insert an SD card (when necessary)See: "2.2" (p.17)
1
2 SD Memory Card Slot
Contact Surface of SD Memory Card (Surface without Label)
HIOKI LR5092B980-04
Preparation for Use to Data Analysis7
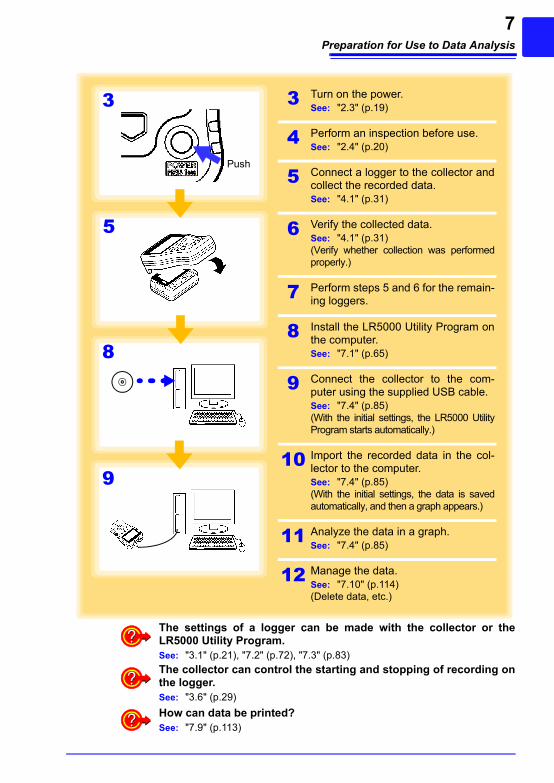
3 Turn on the power.See: "2.3" (p.19)
4 Perform an inspection before use.See: "2.4" (p.20)
5 Connect a logger to the collector and collect the recorded data.See: "4.1" (p.31)
6 Verify the collected data.See: "4.1" (p.31)(Verify whether collection was performed properly.)
7 Perform steps 5 and 6 for the remain-ing loggers.
8 Install the LR5000 Utility Program on the computer.See: "7.1" (p.65)
9 Connect the collector to the com-puter using the supplied USB cable.See: "7.4" (p.85)(With the initial settings, the LR5000 Utility Program starts automatically.)
10 Import the recorded data in the col-lector to the computer.See: "7.4" (p.85)(With the initial settings, the data is saved automatically, and then a graph appears.)
11 Analyze the data in a graph.See: "7.4" (p.85)
12 Manage the data.See: "7.10" (p.114)(Delete data, etc.)
9
8
3
Push
5
The settings of a logger can be made with the collector or the LR5000 Utility Program.See: "3.1" (p.21), "7.2" (p.72), "7.3" (p.83)The collector can control the starting and stopping of recording on the logger.See: "3.6" (p.29)How can data be printed?See: "7.9" (p.113)
HIOKI LR5092B980-04

Preparation for Use to Data Analysis8
HIOKI LR5092B980-04

1.1 Product Overview and Features9
1
Chapter 1 O
verview
3
This instrument is a compact data collector that can set the measurement condi-tions and import the recording data of the LR5000-series loggers.This is useful when you are using multiple loggers.
Overview Chapter 1
1.1 Product Overview and Features
Mange and Browse Data with the LR5000 Utility ProgramThe LR5000 Utility Program is very easy to install. After installation, data management and browsing is easy with auto-start, data display and saving.
Large Display Shows Recorded Data as Numerical Values and a GraphYou can check the recorded data import-ed from a logger on site.
SD Memory Card SupportYou can easily transfer data to a computer.See: "SD Memory Cards for
which Operation is Guaranteed" (p.18)
Measurement Sites
Analysis SiteFor home, office, factory, and warehouse environment measurementsSuitable for ESCO, HACCP, and ISO environmental measure-ments.
or
HIOKI LR5092B980-04

1.2 Part Names/Functions10
1.2 Part Names/Functions
FrontDisplay (p.11)The backlight turns off if no operation is per-formed for approximately 30 seconds.The backlight turns on again when a button is pressed or communication is performed.
Battery Cover (p.15)
F1 buttonExecutes the left F button menu.
F3 buttonExecutes the right F button menu.
Back
Operating Buttons
COLLECT buttonCollects the recorded data from the logger.See: One-touch Collec-
tion (p.31)
POWER buttonPress and hold this button (for approximately 1 second) to turn the power on/off.The power is turned off automat-ically (auto power off) when no operation is performed for ap-proximately 1 minute.
Operating Buttons
IR Port (p.31)Enables communica-tion with the IR port of logger.
USB Port (p.72)Connect a computer using the supplied USB cable.
SD Memory Card Slot (p.17)Insert an SD memory card
F2 buttonExecutes the center F button menu.
Cursor buttonMoves the cursor.
ENTER buttonExecutes the selected menu.
Cursor
F button menus (The menu differs depending on the item.)
HIOKI LR5092B980-04

1.3 Basic Button Operations and Display Organization11
1
Chapter 1 O
verview
3
This section describes the basic button operations and display organization of the collector.
Display
CursorThe cursor can be moved with the cursor buttons.F Button MenusThe menus can be executed with the F buttons.
Battery Status Indicator (p.16)Indicates the battery charge status.
SD Memory Card IndicatorLit when an SD memory card is inserted.See: "2.2 Inserting an SD Card (When Necessary)"
Current DateIndicates the set date that is cur-rently set.See: "Clock Setting" (p.59)
1.3 Basic Button Operations and Display Orga-nization
Basic Button Operations
1 Move the cursor and select menus and
items with the buttons.
2 Execute items with the (ENTER
button) buttons.
And (Or)
Execute F button menus with the F buttons.
HIOKI LR5092B980-04

1.3 Basic Button Operations and Display Organization12
Display Organization
Collect Data Shows the Data Collection display. (p.13)Verify Data Shows the Data Verification display. (p.13)
Logger Operation Shows the Logger Operation/Settings display. (p.13)SD Card Shows the SD Card display. (p.14)
Unit Settings Shows the Collector Settings display. (p.14)
This display is shown for several seconds.
Software version information
Memory Usage Status Display
To Menu display To SD Card display (p.14)
Top Display
This display appears when [Startup Dis-play] is set to [Memory Status].Use the F button to select the next dis-play to show.
This display appears when [Startup Dis-play] is set to [Menu Display].Select and execute a menu to show the corresponding display.
Startup Display (Top Display)
HIOKI LR5092B980-04
1.3 Basic Button Operations and Display Organization13
1
Chapter 1 O
verview
3
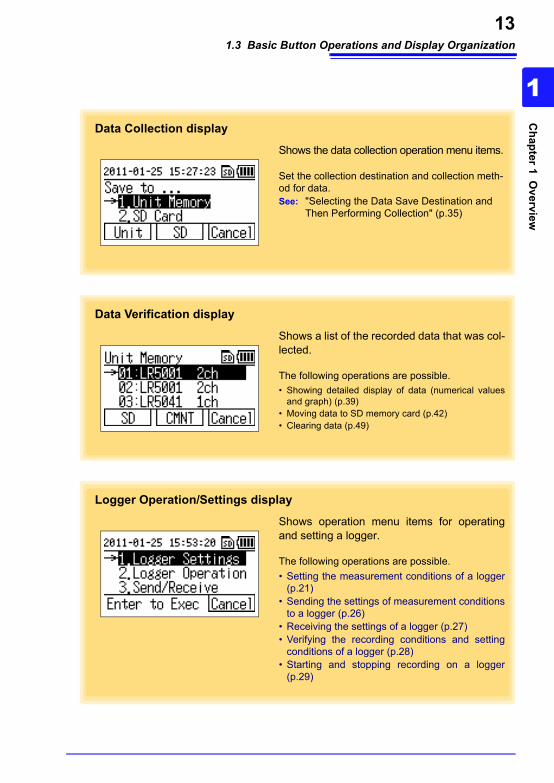
Shows the data collection operation menu items.
Set the collection destination and collection meth-od for data.See: "Selecting the Data Save Destination and
Then Performing Collection" (p.35)
Data Collection display
Shows a list of the recorded data that was col-lected.
The following operations are possible.• Showing detailed display of data (numerical values
and graph) (p.39)• Moving data to SD memory card (p.42)• Clearing data (p.49)
Data Verification display
Shows operation menu items for operating and setting a logger.
The following operations are possible.• Setting the measurement conditions of a logger
(p.21)• Sending the settings of measurement conditions
to a logger (p.26)• Receiving the settings of a logger (p.27)• Verifying the recording conditions and setting
conditions of a logger (p.28)• Starting and stopping recording on a logger
(p.29)
Logger Operation/Settings display
HIOKI LR5092B980-04

1.3 Basic Button Operations and Display Organization14
Shows the data management menu items.
The following operations are possible.• Showing a list of data in an SD memory card (p.39)• Moving data from the collector memory to an SD memory
card (p.42)• Saving the logger setting conditions in the collector to
an SD memory card, or importing logger setting con-ditions from an SD memory card (p.46)
• Clearing individual or all data in an SD memory card (p.49)
• Initializing an SD memory card (p.54)
SD Card display
Shows menu items for the system settings and other settings.
The following operations are possible.• Showing and changing the system settings of the col-
lector (one-touch collection, startup display, language setting, and clock setting) (p.55)
• Performing self checks (p.60)• Initializing the collector (restoring the settings to the
factory default settings) (p.64)
Collector Settings display
HIOKI LR5092B980-04
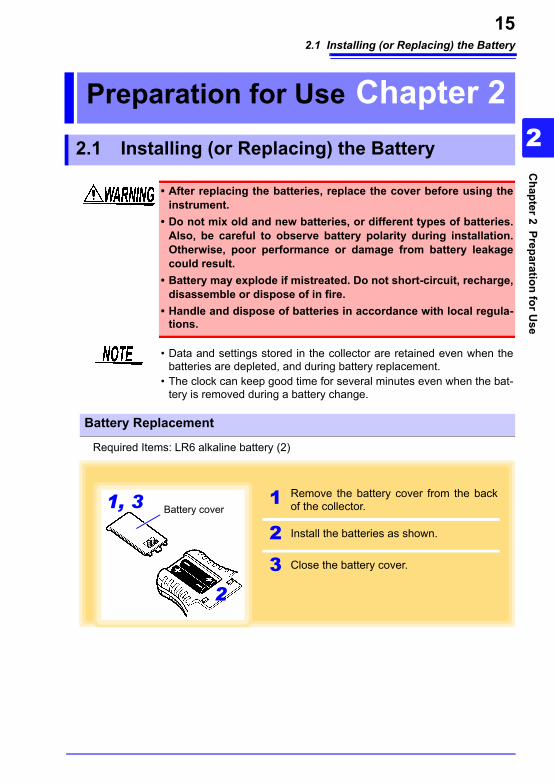
2.1 Installing (or Replacing) the Battery15
2
Chapter 2 Preparation for U
se
3
Required Items: LR6 alkaline battery (2)
Preparation for Use Chapter 22.1 Installing (or Replacing) the Battery
• After replacing the batteries, replace the cover before using the instrument.
• Do not mix old and new batteries, or different types of batteries. Also, be careful to observe battery polarity during installation. Otherwise, poor performance or damage from battery leakage could result.
• Battery may explode if mistreated. Do not short-circuit, recharge, disassemble or dispose of in fire.
• Handle and dispose of batteries in accordance with local regula-tions.
• Data and settings stored in the collector are retained even when the batteries are depleted, and during battery replacement.
• The clock can keep good time for several minutes even when the bat-tery is removed during a battery change.
Battery Replacement
1 Remove the battery cover from the back of the collector.
2 Install the batteries as shown.
3 Close the battery cover.
Battery cover1, 3
2
HIOKI LR5092B980-04
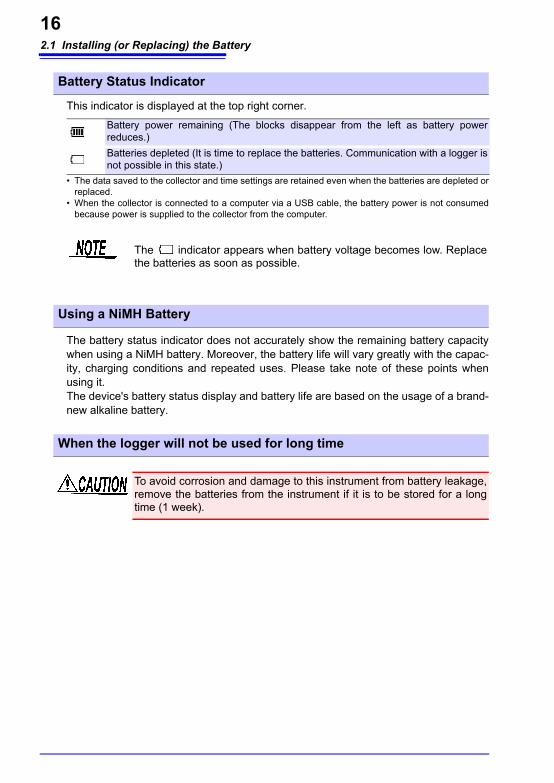
2.1 Installing (or Replacing) the Battery16
This indicator is displayed at the top right corner.
• The data saved to the collector and time settings are retained even when the batteries are depleted or replaced.
• When the collector is connected to a computer via a USB cable, the battery power is not consumed because power is supplied to the collector from the computer.
The battery status indicator does not accurately show the remaining battery capacity when using a NiMH battery. Moreover, the battery life will vary greatly with the capac-ity, charging conditions and repeated uses. Please take note of these points when using it.The device's battery status display and battery life are based on the usage of a brand-new alkaline battery.
Battery Status Indicator
Battery power remaining (The blocks disappear from the left as battery power reduces.)Batteries depleted (It is time to replace the batteries. Communication with a logger is not possible in this state.)
The indicator appears when battery voltage becomes low. Replace the batteries as soon as possible.
Using a NiMH Battery
When the logger will not be used for long time
To avoid corrosion and damage to this instrument from battery leakage, remove the batteries from the instrument if it is to be stored for a long time (1 week).
HIOKI LR5092B980-04

2.2 Inserting an SD Card (When Necessary)17
2
Chapter 2 Preparation for U
se
3
The recording data of a logger can also be collected in not just the collector memory but also in an SD memory card. When you want to collect the data in an SD memory card, insert the SD memory card in the collector.It is also possible to move the data in the collector memory to an SD memory card. (p.42)
2.2 Inserting an SD Card (When Necessary)
• Inserting a SD memory card upsidedown, backwards or in the wrong direction may damage the instrument or the SD memory card.
• Never remove an SD memory card while it is being accessed by the collector. The data in the SD memory card may be corrupted.
• When the collector is using the batteries, the data may not be able to be saved properly if the batteries are depleted during saving. In the worst case, the memory card may be damaged so pay sufficient attention to amount of remaining battery power.
• SD memory cards have a limited life due to using flash memory. If an SD memory card is used for a long time, the storage and import-ing of data will become no longer possible. If this happens, purchase a new SD memory card.
• Hioki will not compensate for the loss of any data stored in an SD memory card regardless of circumstances or cause of the failure or damage that resulted in the loss. Be sure to back up any important data in an SD memory card.
• It is possible to record the Data Logger's recorded data (60,000 data) up to 10000ch (up to 5000 for 2 ch recorded Data Logger of LR5001, etc.) on a 2GB SD memory card. However, avoid using up the total data storage capacity. Accessing the SD memory card from the LR5092 and PC utility program will become extremely slow. It is recommended to regularly delete those data from the SD memory card that have been transferred to the PC.
HIOKI LR5092B980-04

2.2 Inserting an SD Card (When Necessary)18
Required Items: SD memory card (1)
HIOKI Z4001 SD Memory Card 2GBHIOKI Z4003 SD Memory Card 8GBWe strongly recommend using Hioki optional SD memory cards.
How to Insert an SD Memory Card
1 Open the cover of the SD memory card slot.
2 Insert the SD memory card while paying attention to the orientation of the card.
SD Memory Card Slot
Contact Surface of SD Memory Card (Surface without Label)
How to Remove an SD Memory Card
1 Press the SD memory card.(The SD memory card is ejected.)
2 Pull the SD memory card straight out.SD Memory Card Slot
2
1
SD Memory Cards for which Operation is Guaranteed
HIOKI LR5092B980-04
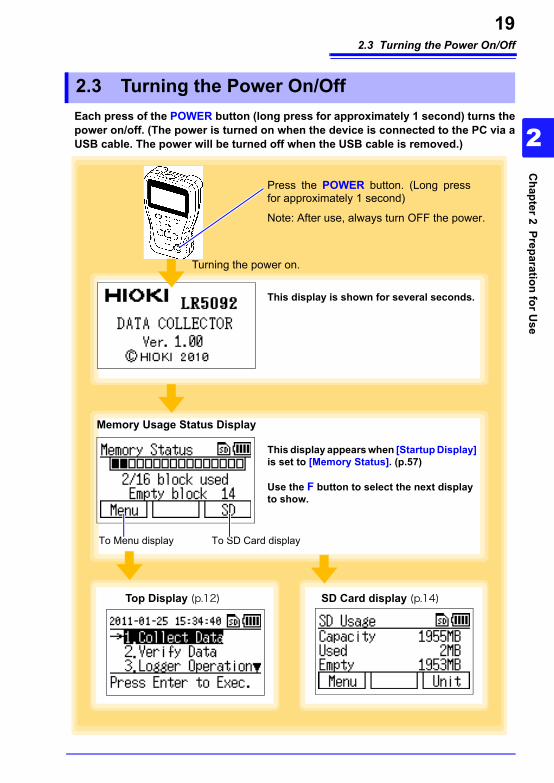
2.3 Turning the Power On/Off19
2
Chapter 2 Preparation for U
se
3
Each press of the POWER button (long press for approximately 1 second) turns the power on/off. (The power is turned on when the device is connected to the PC via a USB cable. The power will be turned off when the USB cable is removed.)
2.3 Turning the Power On/Off
This display is shown for several seconds.
Memory Usage Status Display
To Menu display To SD Card display
Top Display (p.12)
This display appears when [Startup Display] is set to [Memory Status]. (p.57)
Use the F button to select the next display to show.
SD Card display (p.14)
Press the POWER button. (Long press for approximately 1 second)
Note: After use, always turn OFF the power.
Turning the power on.
HIOKI LR5092B980-04
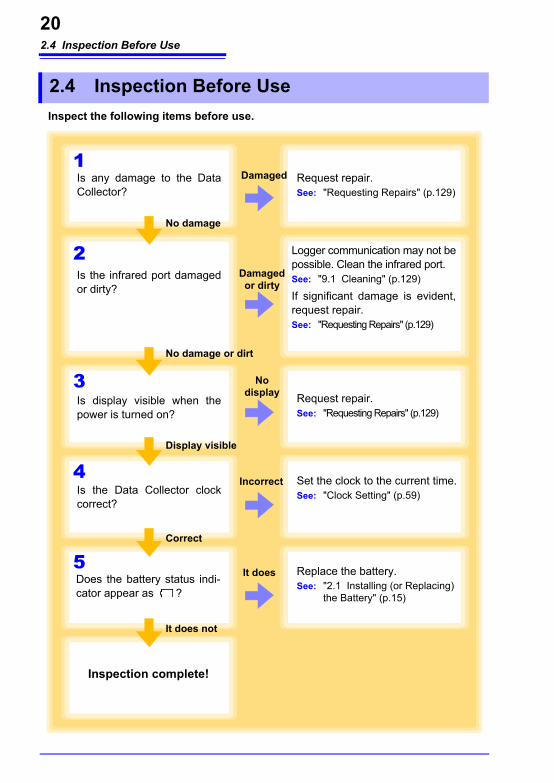
2.4 Inspection Before Use20
Inspect the following items before use.
2.4 Inspection Before Use
1
2
3
4
5
Is any damage to the Data Collector?
No damage
Damaged Request repair.See: "Requesting Repairs" (p.129)
Is the infrared port damaged or dirty?
No damage or dirt
Damaged or dirty
Logger communication may not be possible. Clean the infrared port.See: "9.1 Cleaning" (p.129)If significant damage is evident, request repair.See: "Requesting Repairs" (p.129)
Is display visible when the power is turned on?
Display visible
Nodisplay Request repair.
See: "Requesting Repairs" (p.129)
Is the Data Collector clock correct?
Correct
Incorrect Set the clock to the current time.See: "Clock Setting" (p.59)
Does the battery status indi-cator appear as ?
It does Replace the battery.See: "2.1 Installing (or Replacing)
the Battery" (p.15)
It does not
Inspection complete!
HIOKI LR5092B980-04

3.1 Making Settings with the Collector21
3
Chapter 3 Settings (W
hen Necessary)
3
You can set the measurement conditions of a logger with the collector, and then send the settings to the logger. (This feature is convenient when you want to set the same settings on multiple loggers.) It is also possible to receive the settings of a logger, and then send those settings to a dif-ferent logger. The setting can be made also from the LR5000 Utility Program. (p.72)
This section describes how to make settings with the collector.
Settings (When Necessary) Chapter 3
3.1 Making Settings with the Collector
1 Show the top display.(To return to the top display from another dis-play, select [Back] or [Cancel].)
2 Move the cursor to [Logger Operation],
and then press the button.
3 Move the cursor to [Logger Settings],
and then press the button.
(To return to the top display, press the F3 but-ton.)
4 Move the cursor to the model you want to
set, and then press the button (or F2 button).(To return to the previous display, press the F1 button. To return to the top display, press the F3 button)
5 Move the cursor to the item you want to
set, and then press the button (or F2 button).(To return to the previous display, press the F1 button. To return to the top display, press the F3 button)
6 Use to select the item (use the F1 or F2 button to change the value), and then
press the button (or F3 button).
The setting is changed, and the previous dis-play reappears.
1
2
3
5
6
4
HIOKI LR5092B980-04
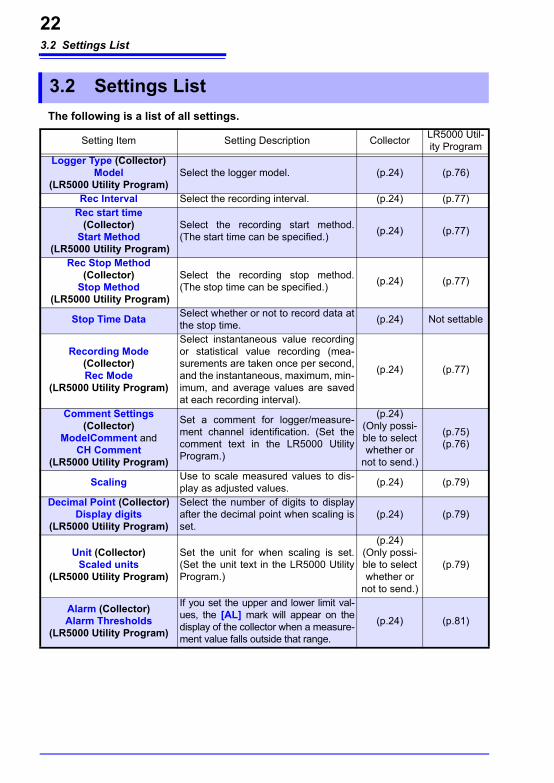
3.2 Settings List22
The following is a list of all settings.
3.2 Settings List
Setting Item Setting Description Collector LR5000 Util-ity Program
Logger Type (Collector)Model
(LR5000 Utility Program)Select the logger model. (p.24) (p.76)
Rec Interval Select the recording interval. (p.24) (p.77)Rec start time
(Collector)Start Method
(LR5000 Utility Program)
Select the recording start method. (The start time can be specified.) (p.24) (p.77)
Rec Stop Method(Collector)
Stop Method (LR5000 Utility Program)
Select the recording stop method. (The stop time can be specified.) (p.24) (p.77)
Stop Time Data Select whether or not to record data at the stop time. (p.24) Not settable
Recording Mode(Collector)Rec Mode
(LR5000 Utility Program)
Select instantaneous value recording or statistical value recording (mea-surements are taken once per second, and the instantaneous, maximum, min-imum, and average values are saved at each recording interval).
(p.24) (p.77)
Comment Settings (Collector)
ModelComment andCH Comment
(LR5000 Utility Program)
Set a comment for logger/measure-ment channel identification. (Set the comment text in the LR5000 Utility Program.)
(p.24)(Only possi-ble to select whether or
not to send.)
(p.75)(p.76)
Scaling Use to scale measured values to dis-play as adjusted values. (p.24) (p.79)
Decimal Point (Collector)Display digits
(LR5000 Utility Program)
Select the number of digits to display after the decimal point when scaling is set.
(p.24) (p.79)
Unit (Collector)Scaled units
(LR5000 Utility Program)
Set the unit for when scaling is set. (Set the unit text in the LR5000 Utility Program.)
(p.24)(Only possi-ble to select whether or
not to send.)
(p.79)
Alarm (Collector)Alarm Thresholds
(LR5000 Utility Program)
If you set the upper and lower limit val-ues, the [AL] mark will appear on the display of the collector when a measure-ment value falls outside that range.
(p.24) (p.81)
HIOKI LR5092B980-04
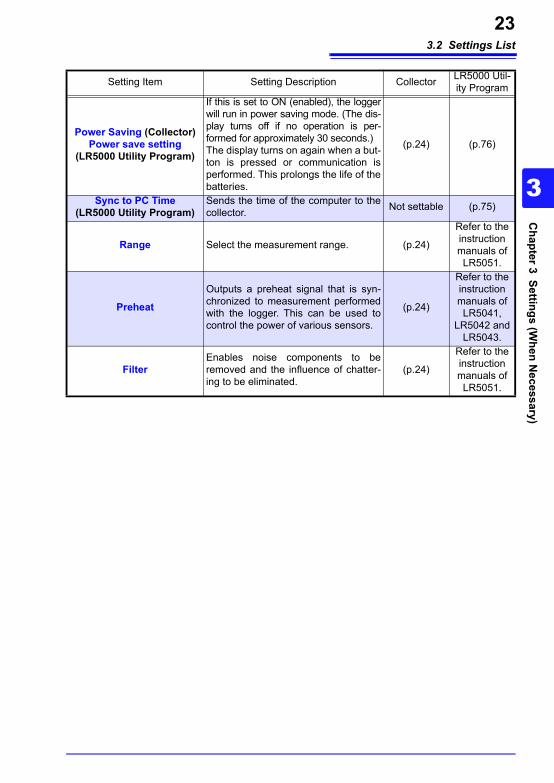
3.2 Settings List23
3
Chapter 3 Settings (W
hen Necessary)
3
Power Saving (Collector)Power save setting
(LR5000 Utility Program)
If this is set to ON (enabled), the logger will run in power saving mode. (The dis-play turns off if no operation is per-formed for approximately 30 seconds.)The display turns on again when a but-ton is pressed or communication is performed. This prolongs the life of the batteries.
(p.24) (p.76)
Sync to PC Time(LR5000 Utility Program)
Sends the time of the computer to the collector. Not settable (p.75)
Range Select the measurement range. (p.24)
Refer to the instruction manuals of LR5051.
PreheatOutputs a preheat signal that is syn-chronized to measurement performed with the logger. This can be used to control the power of various sensors.
(p.24)
Refer to the instruction manuals of LR5041,
LR5042 and LR5043.
FilterEnables noise components to be removed and the influence of chatter-ing to be eliminated.
(p.24)
Refer to the instruction manuals of LR5051.
Setting Item Setting Description Collector LR5000 Util-ity Program
HIOKI LR5092B980-04
3.2 Settings List24
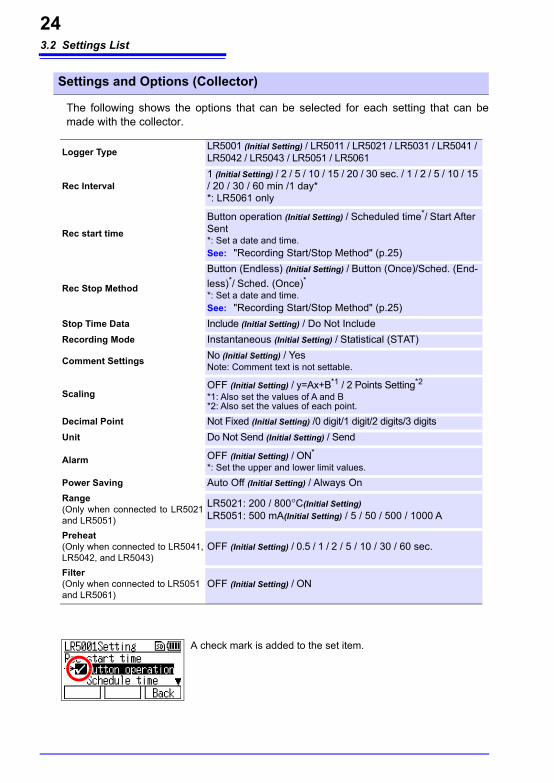
The following shows the options that can be selected for each setting that can be made with the collector.
Settings and Options (Collector)
Logger Type LR5001 (Initial Setting) / LR5011 / LR5021 / LR5031 / LR5041 / LR5042 / LR5043 / LR5051 / LR5061
Rec Interval1 (Initial Setting) / 2 / 5 / 10 / 15 / 20 / 30 sec. / 1 / 2 / 5 / 10 / 15 / 20 / 30 / 60 min /1 day**: LR5061 only
Rec start time
Button operation (Initial Setting) / Scheduled time*/ Start After Sent*: Set a date and time.See: "Recording Start/Stop Method" (p.25)
Rec Stop Method
Button (Endless) (Initial Setting) / Button (Once)/Sched. (End-less)*/ Sched. (Once)**: Set a date and time.See: "Recording Start/Stop Method" (p.25)
Stop Time Data Include (Initial Setting) / Do Not IncludeRecording Mode Instantaneous (Initial Setting) / Statistical (STAT)
Comment Settings No (Initial Setting) / YesNote: Comment text is not settable.
ScalingOFF (Initial Setting) / y=Ax+B*1 / 2 Points Setting*2
*1: Also set the values of A and B*2: Also set the values of each point.
Decimal Point Not Fixed (Initial Setting) /0 digit/1 digit/2 digits/3 digitsUnit Do Not Send (Initial Setting) / Send
Alarm OFF (Initial Setting) / ON*
*: Set the upper and lower limit values.Power Saving Auto Off (Initial Setting) / Always OnRange(Only when connected to LR5021 and LR5051)
LR5021: 200 / 800°C(Initial Setting)LR5051: 500 mA(Initial Setting) / 5 / 50 / 500 / 1000 A
Preheat(Only when connected to LR5041, LR5042, and LR5043)
OFF (Initial Setting) / 0.5 / 1 / 2 / 5 / 10 / 30 / 60 sec.
Filter(Only when connected to LR5051 and LR5061)
OFF (Initial Setting) / ON
A check mark is added to the set item.
HIOKI LR5092B980-04
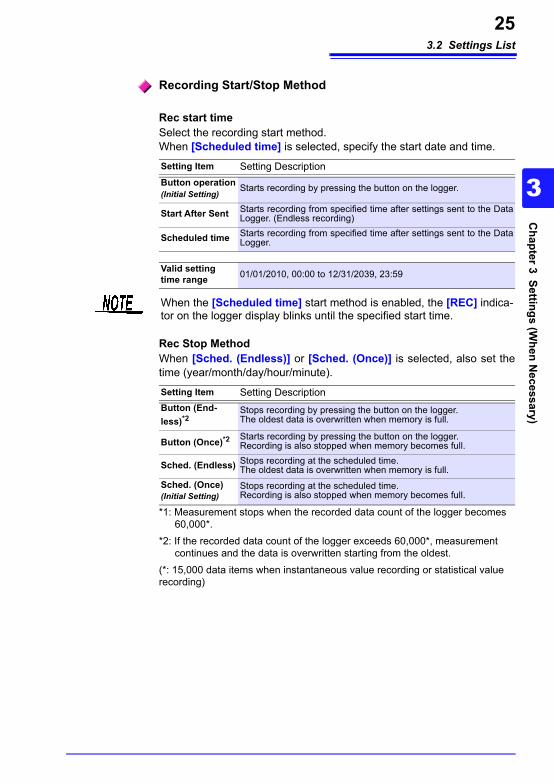
3.2 Settings List25
3
Chapter 3 Settings (W
hen Necessary)
3
Rec start timeSelect the recording start method.When [Scheduled time] is selected, specify the start date and time.
Rec Stop MethodWhen [Sched. (Endless)] or [Sched. (Once)] is selected, also set the time (year/month/day/hour/minute).
*1: Measurement stops when the recorded data count of the logger becomes 60,000*.
*2: If the recorded data count of the logger exceeds 60,000*, measurement continues and the data is overwritten starting from the oldest.
(*: 15,000 data items when instantaneous value recording or statistical value recording)
Recording Start/Stop Method
Setting Item Setting DescriptionButton operation (Initial Setting)
Starts recording by pressing the button on the logger.
Start After Sent Starts recording from specified time after settings sent to the Data Logger. (Endless recording)
Scheduled time Starts recording from specified time after settings sent to the Data Logger.
Valid setting time range 01/01/2010, 00:00 to 12/31/2039, 23:59
When the [Scheduled time] start method is enabled, the [REC] indica-tor on the logger display blinks until the specified start time.
Setting Item Setting DescriptionButton (End-less)*2
Stops recording by pressing the button on the logger.The oldest data is overwritten when memory is full.
Button (Once)*2 Starts recording by pressing the button on the logger.Recording is also stopped when memory becomes full.
Sched. (Endless) Stops recording at the scheduled time. The oldest data is overwritten when memory is full.
Sched. (Once) (Initial Setting)
Stops recording at the scheduled time. Recording is also stopped when memory becomes full.
HIOKI LR5092B980-04
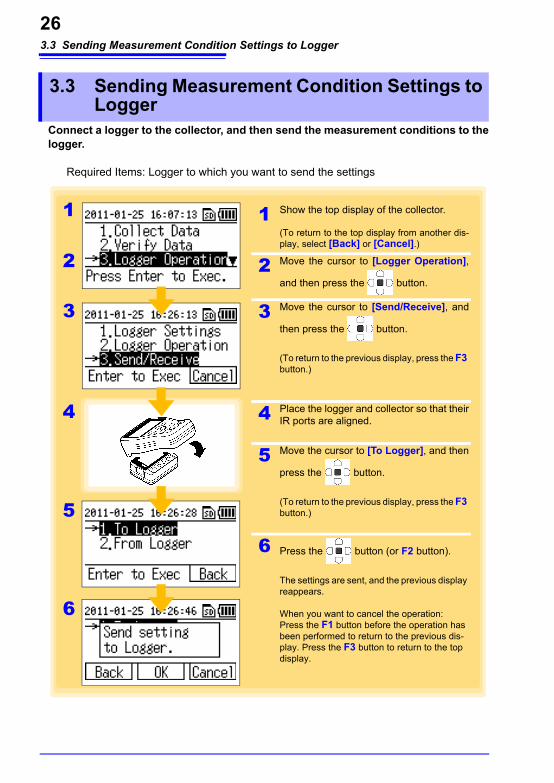
3.3 Sending Measurement Condition Settings to Logger26
Connect a logger to the collector, and then send the measurement conditions to the logger.
Required Items: Logger to which you want to send the settings
3.3 Sending Measurement Condition Settings to Logger
1 Show the top display of the collector.
(To return to the top display from another dis-play, select [Back] or [Cancel].)
2 Move the cursor to [Logger Operation],
and then press the button.
3 Move the cursor to [Send/Receive], and
then press the button.
(To return to the previous display, press the F3 button.)
4 Place the logger and collector so that their IR ports are aligned.
5 Move the cursor to [To Logger], and then
press the button.
(To return to the previous display, press the F3 button.)
6 Press the button (or F2 button).
The settings are sent, and the previous display reappears.
When you want to cancel the operation:Press the F1 button before the operation has been performed to return to the previous dis-play. Press the F3 button to return to the top display.
3
4
5
6
1
2
HIOKI LR5092B980-04
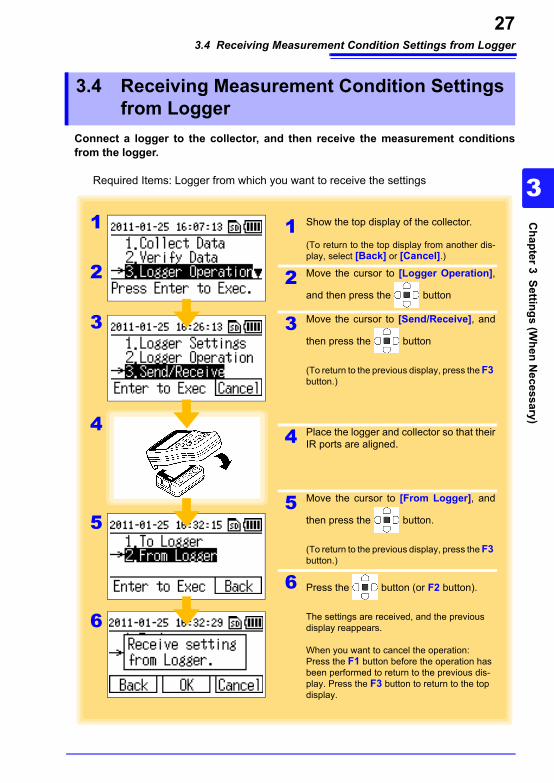
3.4 Receiving Measurement Condition Settings from Logger27
3
Chapter 3 Settings (W
hen Necessary)
3
Connect a logger to the collector, and then receive the measurement conditions from the logger.
Required Items: Logger from which you want to receive the settings
3.4 Receiving Measurement Condition Settings from Logger
1 Show the top display of the collector.
(To return to the top display from another dis-play, select [Back] or [Cancel].)
2 Move the cursor to [Logger Operation],
and then press the button
3 Move the cursor to [Send/Receive], and
then press the button
(To return to the previous display, press the F3 button.)
4 Place the logger and collector so that their IR ports are aligned.
5 Move the cursor to [From Logger], and
then press the button.
(To return to the previous display, press the F3 button.)
6 Press the button (or F2 button).
The settings are received, and the previous display reappears.
When you want to cancel the operation:Press the F1 button before the operation has been performed to return to the previous dis-play. Press the F3 button to return to the top display.
3
4
5
6
1
2
HIOKI LR5092B980-04

3.5 Verifying Recording/Setting Status of Logger28
You can verify the current recording/setting status of the logger.
Required Items: Logger for which you want to verify the recording/setting status
3.5 Verifying Recording/Setting Status of Logger
1 Show the top display of the collector.
(To return to the top display from another dis-play, select [Back] or [Cancel].)
2 Move the cursor to [Logger Operation],
and then press the button
3 Move the cursor to [Logger Operation],
and then press the button
(To return to the previous display, press the F3 button.)
4 Place the logger and collector so that their IR ports are aligned.
5 Move the cursor to [Logger Status], and
then press the button
(To return to the previous display, press the F3 button.)
6 Scroll the display with , and verify
the status.
(To return to the previous display, press the F1 button. To return to the top display, press the F3 but-ton.)
4
5
6
1
2
3
HIOKI LR5092B980-04

3.6 Starting and Stopping Recording on Logger29
3
Chapter 3 Settings (W
hen Necessary)
3
The collector can control the starting and stopping of recording on the logger.
Required Items: The logger for which you want to start/stop recording
3.6 Starting and Stopping Recording on Logger
1 Show the top display of the collector.
(To return to the top display from another dis-play, select [Back] or [Cancel].)
2 Move the cursor to [Logger Operation],
and then press the button
3 Move the cursor to [Logger Operation],
and then press the button
(To return to the previous display, press the F3 button.)
4 Place the logger and collector so that their IR ports are aligned.
5 Move the cursor to [Start Recording] or [Stop Recording], and then press the
button.
(To return to the previous display, press the F3 button.)
6 Press the button (or F2 button).
Recording starts or stops, and the previous display reappears.
When you want to cancel the operation:Press the F1 button before the operation has been performed to return to the previous dis-play. Press the F3 button to return to the top display.
4
5
6
1
2
3
HIOKI LR5092B980-04
3.6 Starting and Stopping Recording on Logger30
HIOKI LR5092B980-04
4.1 Collecting Recorded Data of Logger31
4
Chapter 4 C
ollecting and Brow
sing Data
3
You can collect the recorded data of a logger with the collector, and then browse the data in the form of numerical values or a graph.
You can collect the recorded data of a logger by just pressing the COLLECT button.The save destination differs for a logger for which data is collected for the first time (new logger) and a logger for which data was previously collected (logger with same serial number).
Collecting and Browsing Data Chapter 4
4.1 Collecting Recorded Data of Logger
One-touch Collection (Collecting Data Easily by Just Pressing COLLECT Button)
New logger
Data is saved to the location set for the save destination setting (collec-tor memory or SD memory card) of [Unit Settings]-[One-Touch Coll.]of the top display.See: "One-touch Collection" (p.55)
Logger with same serial number
Data is saved to the location (collector memory or SD memory card) where the previous data was saved (data of logger with same serial number).
HIOKI LR5092B980-04
4.1 Collecting Recorded Data of Logger32
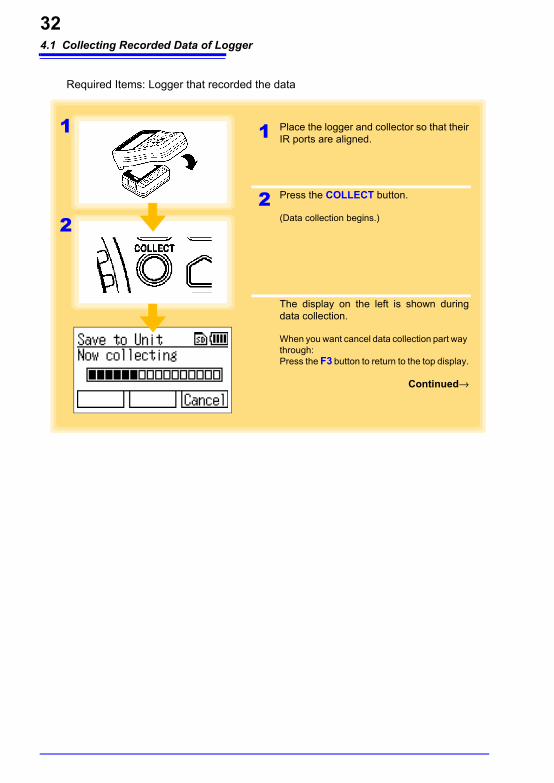
Required Items: Logger that recorded the data
1 Place the logger and collector so that their IR ports are aligned.
2 Press the COLLECT button.
(Data collection begins.)
The display on the left is shown during data collection.
When you want cancel data collection part way through:Press the F3 button to return to the top display.
Continued→
1
2
HIOKI LR5092B980-04
4.1 Collecting Recorded Data of Logger33
4
Chapter 4 C
ollecting and Brow
sing Data
3
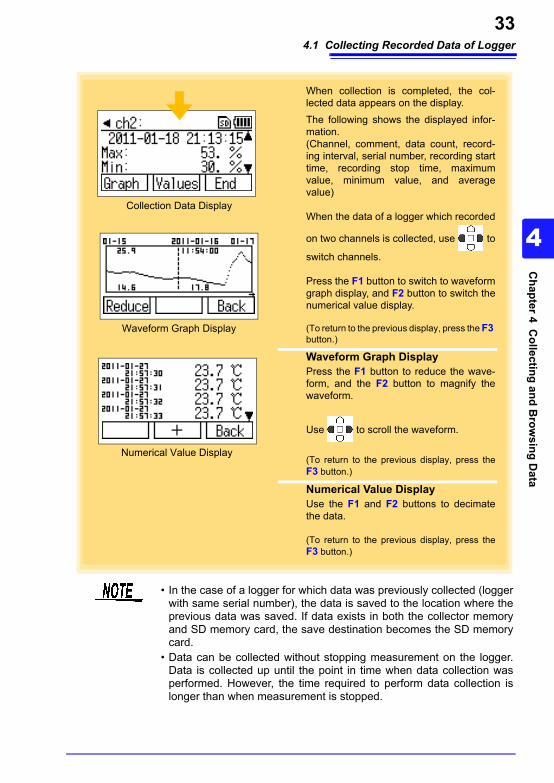
When collection is completed, the col-lected data appears on the display.The following shows the displayed infor-mation.(Channel, comment, data count, record-ing interval, serial number, recording start time, recording stop time, maximum value, minimum value, and average value)
When the data of a logger which recorded
on two channels is collected, use to
switch channels.
Press the F1 button to switch to waveform graph display, and F2 button to switch the numerical value display.
(To return to the previous display, press the F3 button.)
Waveform Graph DisplayPress the F1 button to reduce the wave-form, and the F2 button to magnify the waveform.
Use to scroll the waveform.
(To return to the previous display, press the F3 button.)
Numerical Value DisplayUse the F1 and F2 buttons to decimate the data.
(To return to the previous display, press the F3 button.)
Waveform Graph Display
Numerical Value Display
Collection Data Display
• In the case of a logger for which data was previously collected (logger with same serial number), the data is saved to the location where the previous data was saved. If data exists in both the collector memory and SD memory card, the save destination becomes the SD memory card.
• Data can be collected without stopping measurement on the logger. Data is collected up until the point in time when data collection was performed. However, the time required to perform data collection is longer than when measurement is stopped.
HIOKI LR5092B980-04

4.1 Collecting Recorded Data of Logger34
What should I do if an error message appears?See: "When attempting to collect recorded data:" (p.132)
What happens if collection is performed once during recording and then again after recording is finished?The uncollected data will be collected.
What should be done if communication is interrupted during col-lection?Check whether or not the IR port is scratched or dirty. Check the connection to the logger, and then perform collection again. The uncollected data will be col-lected.
HIOKI LR5092B980-04

4.1 Collecting Recorded Data of Logger35
4
Chapter 4 C
ollecting and Brow
sing Data
3
Each time you perform collection, you can select the data save destination and then collect the recorded data from the logger.Required Items: Logger that recorded the data
Selecting the Data Save Destination and Then Performing Collection
1 Show the top display of the collector.
(To return to the top display from another dis-play, select [Back] or [Cancel].)
2 Place the logger and collector so that their IR ports are aligned.
3 Move the cursor to [Collect Data] and
then press the button.
4 Note: This display may sometimes not appear. (Refer to the note on the next page.)
Select the save destination, and then
press the button.
(Pressing the F1 or F2 button allows you to go to the next display without pressing
the button.)
(To return to the previous display, press the F3 button.)
5 Select the collection method, and then
press the button.
(To return to the previous display, press the F1 button. To return to the previous display, press the F3 button.)
6 Press the button (or F1 button).
When you want to cancel the operation:Press the F3 button before the operation has been performed to return to the top display.
4
5
6
1
2
3
HIOKI LR5092B980-04
4.1 Collecting Recorded Data of Logger36
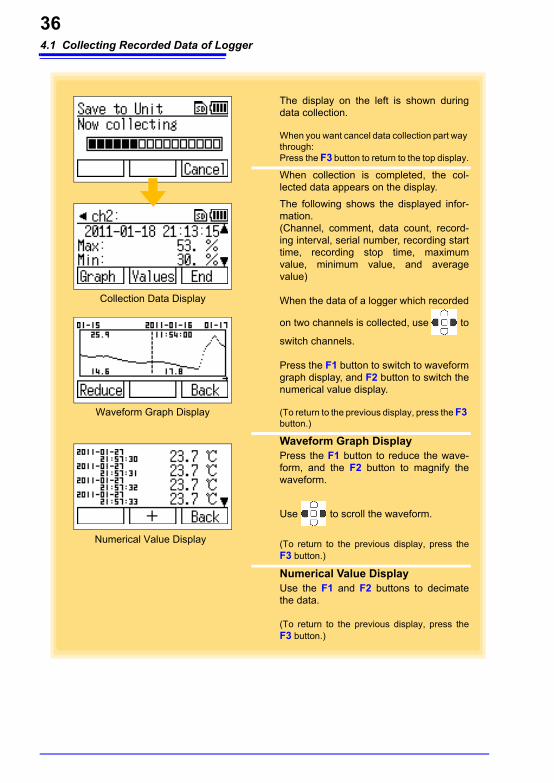
The display on the left is shown during data collection.
When you want cancel data collection part way through:Press the F3 button to return to the top display.
When collection is completed, the col-lected data appears on the display.The following shows the displayed infor-mation.(Channel, comment, data count, record-ing interval, serial number, recording start time, recording stop time, maximum value, minimum value, and average value)
When the data of a logger which recorded
on two channels is collected, use to
switch channels.
Press the F1 button to switch to waveform graph display, and F2 button to switch the numerical value display.
(To return to the previous display, press the F3 button.)
Waveform Graph DisplayPress the F1 button to reduce the wave-form, and the F2 button to magnify the waveform.
Use to scroll the waveform.
(To return to the previous display, press the F3 button.)
Numerical Value DisplayUse the F1 and F2 buttons to decimate the data.
(To return to the previous display, press the F3 button.)
Waveform Graph Display
Numerical Value Display
Collection Data Display
HIOKI LR5092B980-04
4.1 Collecting Recorded Data of Logger37
4
Chapter 4 C
ollecting and Brow
sing Data
3
• In the case of a logger for which data was previously collected (logger with same serial number), the data is saved to the location where the previous data was saved. If data exists in both the collector memory and SD memory card, the save destination becomes the SD memory card.
• Data can be collected without stopping measurement on the logger. Data is collected up until the point in time when data collection was performed. However, the time required to perform data collection is longer than when measurement is stopped.
What should I do if an error message appears?See: "When attempting to collect recorded data:" (p.132)
What happens if collection is performed once during recording and then again after recording is finished?Select whether to collect only uncollected data or all data for the collection method in step "5" (p.35).
What should be done if communication is interrupted during col-lection?Check whether or not the IR port is scratched or dirty. Check the connection to the logger, and then perform collection again. The uncollected data will be col-lected.
HIOKI LR5092B980-04

4.1 Collecting Recorded Data of Logger38
HIOKI LR5092B980-04

5.1 Displaying Data List39
5
Chapter 5 D
ata Managem
ent
3
This section describes how to manage the data saved to the collector memory and SD memory card.
You can display a list of the data saved to the collector memory or SD memory card.
Data Management Chapter 5
5.1 Displaying Data List
Displaying List of Data in Collector Memory
1 Show the top display of the collector.
(To return to the top display from another dis-play, select [Back] or [Cancel].)
2 Move the cursor to [Verify Data], and
then press the button.
The data in the collector memory is listed by model. (Data Verification display)
Use the F button to select [CMNT] to dis-play the data listed by comment set for each logger.
Use the F button to select [SN] to display the data listed by serial number of each logger.
Use the F button to select [Type] to dis-play the data listed by model.
Use the F1 button to select [SD] to dis-play the data in the SD memory card.See: "Model + Serial Number Display" (p.40)
3 Select the data, and then press the
button.
The menu appears.
4 Move the cursor to [Display Data], and
then press the button (or F2 button).
The detailed data appears.See: "Collection Data Display" (p.36)
12
Data Verification display(Model List Display)
Comment List Display
Serial Number List Display
3
4
HIOKI LR5092B980-04

5.1 Displaying Data List40
Displaying List of Data in SD Memory Card
1 Show the top display of the collector.
(To return to the top display from another dis-play, select [Back] or [Cancel].)
2 Move the cursor to [SD Card], and then
press the button.
The menu appears.
3 Move the cursor to [Display List], and
then press the button.
The data is listed by model + serial num-ber of logger.
(Press the F3 button to return to the top display.)
4 Select the Data Logger, and then press
the button or F1 button.
The data of the selected Data Logger is indicated by the recording start date and time.
(Press the F3 button to return to the top display.)
5 Select data, and then press the button.
The menu appears.
(To return to the previous display, press the F1 button. Press the F3 button to return to the top display.)
6 Move the cursor to [Display Data], and
then press the button (or F2 button).
The detailed data appears.See: "Collection Data Display" (p.36)
(To return to the previous display, press the F1 button. Press the F3 button to return to the top display.)
1
2
Recording Number + Recording Start Date and Time Display
3
4
5
6
Model + Serial Number Display
HIOKI LR5092B980-04

5.1 Displaying Data List41
5
Chapter 5 D
ata Managem
ent
3
The following shows the file structure for the data in an SD memory card.
File Structure in SD Memory Card
The latest data will be displayed when data is retrieved over a few times during recording.The retrieved data display screen will switch to the previously-retrieved data
when the and button are pressed simultaneously. (The displayed
data is in units of data retrieved. Pressing the and button simul-
taneously will switch to the next data.)
LRXXXX-123456789(Model + serial number)
LRXXXX-123456790(Model + serial number)
LRXXXX-123456791(Model + serial number)
XXXX-20110501_123050(Recording number + re-cording start date and time)XXXX-20110501_123100(Recording number + re-cording start date and time)XXXX-20110501_123010(Recording number + re-cording start date and time) XXXX-
_20110501_12300.bin(File name.bin)LRXXXX_SET
(Setting conditions file)
XXXX-_20110501_12300.bin
XXXX-_20110501_123050.set
LRXXXX_XXX.set(File name.set)
LR5092_REC
HIOKI LR5092B980-04
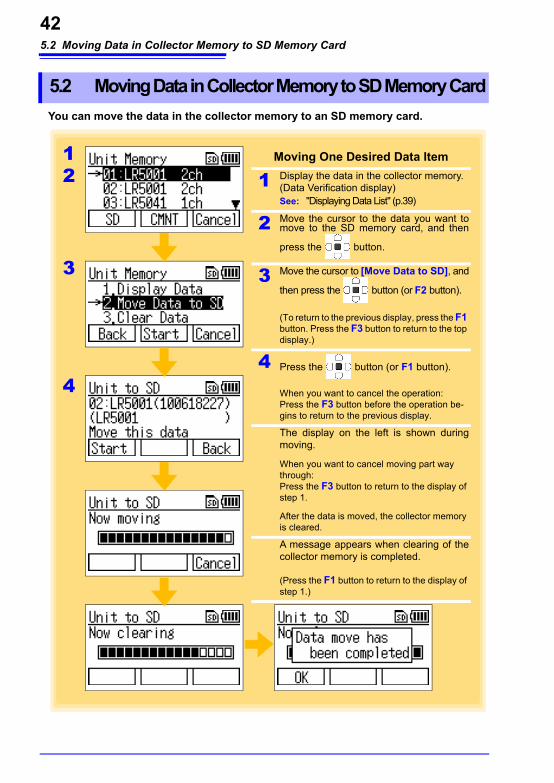
5.2 Moving Data in Collector Memory to SD Memory Card42
You can move the data in the collector memory to an SD memory card.
5.2 Moving Data in Collector Memory to SD Memory Card
Moving One Desired Data Item
1 Display the data in the collector memory. (Data Verification display)See: "Displaying Data List" (p.39)
2 Move the cursor to the data you want to move to the SD memory card, and then
press the button.
3 Move the cursor to [Move Data to SD], and
then press the button (or F2 button).
(To return to the previous display, press the F1 button. Press the F3 button to return to the top display.)
4 Press the button (or F1 button).
When you want to cancel the operation:Press the F3 button before the operation be-gins to return to the previous display.
The display on the left is shown during moving.
When you want to cancel moving part way through:Press the F3 button to return to the display of step 1.
After the data is moved, the collector memory is cleared.
A message appears when clearing of the collector memory is completed.
(Press the F1 button to return to the display of step 1.)
3
4
12
HIOKI LR5092B980-04
5.2 Moving Data in Collector Memory to SD Memory Card43
5
Chapter 5 D
ata Managem
ent
3
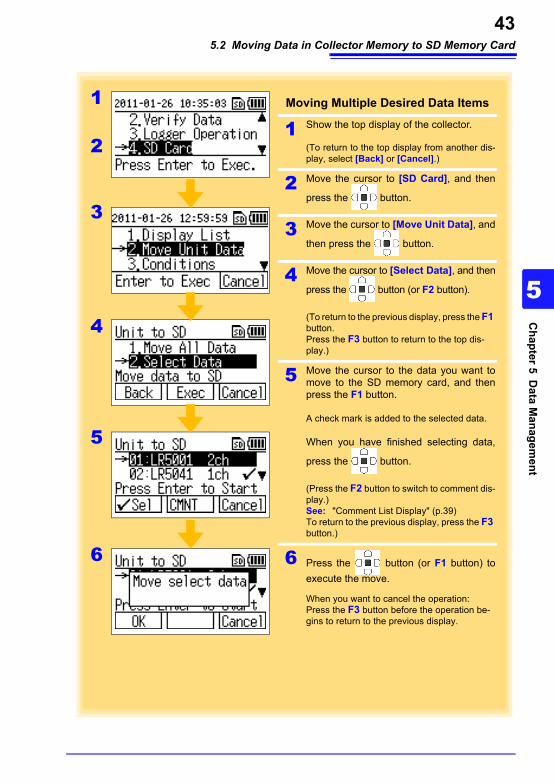
Moving Multiple Desired Data Items
1 Show the top display of the collector.
(To return to the top display from another dis-play, select [Back] or [Cancel].)
2 Move the cursor to [SD Card], and then
press the button.
3 Move the cursor to [Move Unit Data], and
then press the button.
4 Move the cursor to [Select Data], and then
press the button (or F2 button).
(To return to the previous display, press the F1 button. Press the F3 button to return to the top dis-play.)
5 Move the cursor to the data you want to move to the SD memory card, and then press the F1 button.
A check mark is added to the selected data.
When you have finished selecting data,
press the button.
(Press the F2 button to switch to comment dis-play.)See: "Comment List Display" (p.39)To return to the previous display, press the F3 button.)
6 Press the button (or F1 button) to execute the move.
When you want to cancel the operation:Press the F3 button before the operation be-gins to return to the previous display.
3
4
1
2
5
6
HIOKI LR5092B980-04
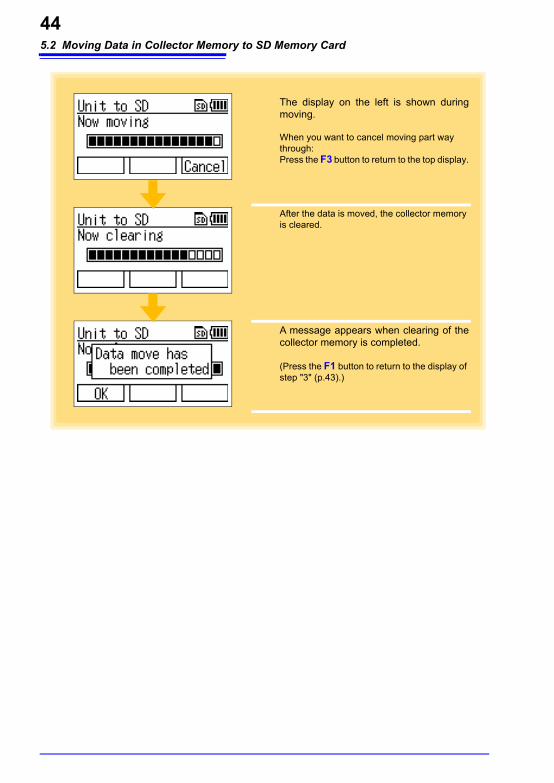
5.2 Moving Data in Collector Memory to SD Memory Card44
The display on the left is shown during moving.
When you want to cancel moving part way through:Press the F3 button to return to the top display.
After the data is moved, the collector memory is cleared.
A message appears when clearing of the collector memory is completed.
(Press the F1 button to return to the display of step "3" (p.43).)
HIOKI LR5092B980-04
5.2 Moving Data in Collector Memory to SD Memory Card45
5
Chapter 5 D
ata Managem
ent
3
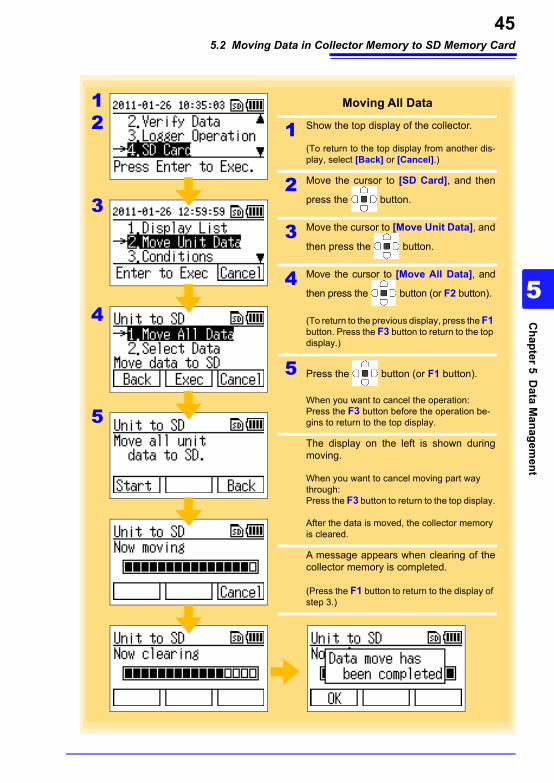
Moving All Data
1 Show the top display of the collector.
(To return to the top display from another dis-play, select [Back] or [Cancel].)
2 Move the cursor to [SD Card], and then
press the button.
3 Move the cursor to [Move Unit Data], and
then press the button.
4 Move the cursor to [Move All Data], and
then press the button (or F2 button).
(To return to the previous display, press the F1 button. Press the F3 button to return to the top display.)
5 Press the button (or F1 button).
When you want to cancel the operation:Press the F3 button before the operation be-gins to return to the top display.
The display on the left is shown during moving.
When you want to cancel moving part way through:Press the F3 button to return to the top display.
After the data is moved, the collector memory is cleared.
A message appears when clearing of the collector memory is completed.
(Press the F1 button to return to the display of step 3.)
3
4
12
5
HIOKI LR5092B980-04
5.3 Saving and Importing Setting Conditions46
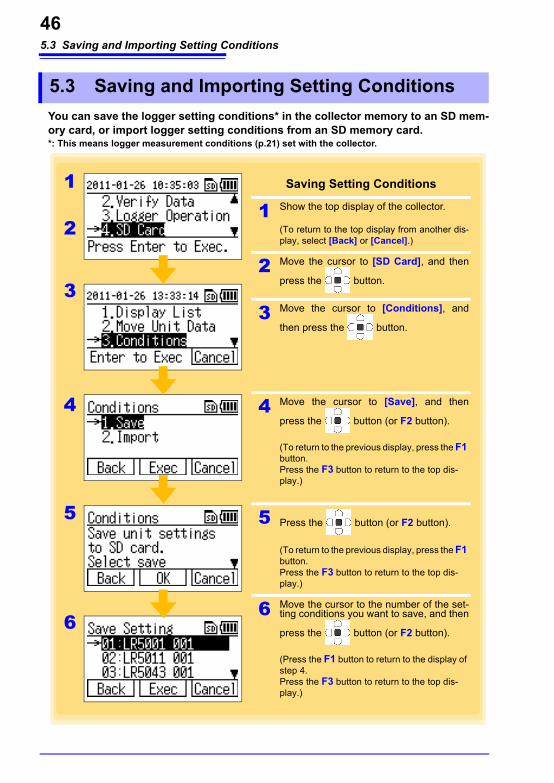
You can save the logger setting conditions* in the collector memory to an SD mem-ory card, or import logger setting conditions from an SD memory card.*: This means logger measurement conditions (p.21) set with the collector.
5.3 Saving and Importing Setting Conditions
Saving Setting Conditions
1 Show the top display of the collector.
(To return to the top display from another dis-play, select [Back] or [Cancel].)
2 Move the cursor to [SD Card], and then
press the button.
3 Move the cursor to [Conditions], and
then press the button.
4 Move the cursor to [Save], and then
press the button (or F2 button).
(To return to the previous display, press the F1 button. Press the F3 button to return to the top dis-play.)
5 Press the button (or F2 button).
(To return to the previous display, press the F1 button. Press the F3 button to return to the top dis-play.)
6 Move the cursor to the number of the set-ting conditions you want to save, and then
press the button (or F2 button).
(Press the F1 button to return to the display of step 4. Press the F3 button to return to the top dis-play.)
3
4
1
2
5
6
HIOKI LR5092B980-04

5.3 Saving and Importing Setting Conditions47
5
Chapter 5 D
ata Managem
ent
3
If setting conditions have already been saved, a comment to confirm whether to overwrite them appears.
Press the button (or F1 button).
(To return to the previous display, press the F3 button.)
When saving is completed, the display of step 4 reappears.
Up to 16 setting conditions can be saved.
HIOKI LR5092B980-04
5.3 Saving and Importing Setting Conditions48
Importing Setting Conditions
1 Show the top display of the collector.
(To return to the top display from another dis-play, select [Back] or [Cancel].)
2 Move the cursor to [SD Card], and then
press the button.
3 Move the cursor to [Conditions], and
then press the button.
4 Move the cursor to [Import], and then
press the button (or F2 button).
(To return to the previous display, press the F1 button. Press the F3 button to return to the top dis-play.)
5 Move the cursor to the number of the set-ting conditions you want to import, and then
press the button (or F1 button).
(Press the F2 button to display the details of the setting conditions. To return to the previous display, press the F3 button.)
Setting Condition DetailsTo return to the previous display, press the F1 button. Press the F3 button to return to the top display.
6 Press the F2 button.
(To return to the previous display, press the F1 button. Press the F3 button to return to the top dis-play.)
3
4
1
2
5
Setting Condition Details
6
HIOKI LR5092B980-04

5.4 Clearing Data49
5
Chapter 5 D
ata Managem
ent
3
You can clear the data from the collector memory or SD memory card.
5.4 Clearing Data
Clearing Data from Collector Memory
Clearing One Desired Data Item
1 Show the list of data in the collector mem-ory. (Data Verification display)See: "Displaying List of Data in Collector
Memory" (p.39)
2 Move the cursor to the data you want to
clear, and then press the button.
3 Move the cursor to [Clear Data], and then
press the button (or F2 button).
(To return to the previous display, press the F1 button. Press the F3 button to return to the top dis-play.)
4 Press the F1 button.
The display for confirming the clearing of data appears.
5 Press the F2 button.
The Clearing Memory display appears.After the data is cleared, the display of step 1 appears.
3
4
12
5
HIOKI LR5092B980-04
5.4 Clearing Data50
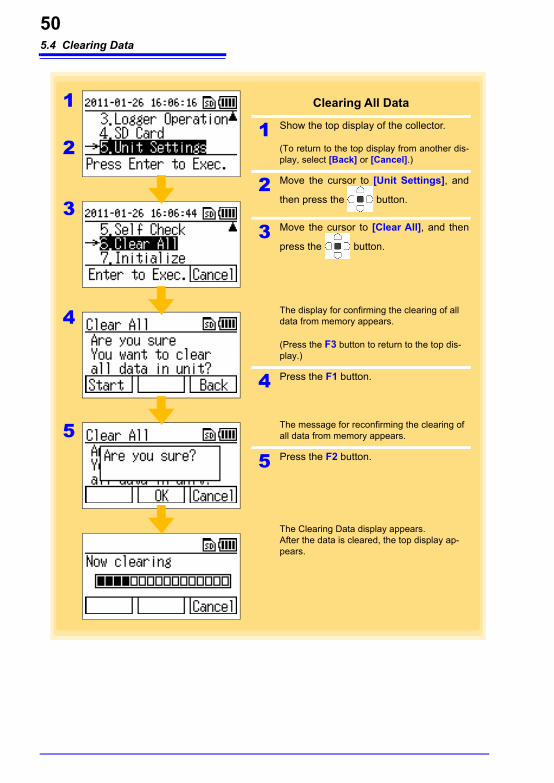
Clearing All Data
1 Show the top display of the collector.
(To return to the top display from another dis-play, select [Back] or [Cancel].)
2 Move the cursor to [Unit Settings], and
then press the button.
3 Move the cursor to [Clear All], and then
press the button.
The display for confirming the clearing of all data from memory appears.
(Press the F3 button to return to the top dis-play.)
4 Press the F1 button.
The message for reconfirming the clearing of all data from memory appears.
5 Press the F2 button.
The Clearing Data display appears.After the data is cleared, the top display ap-pears.
1
3
2
4
5
HIOKI LR5092B980-04

5.4 Clearing Data51
5
Chapter 5 D
ata Managem
ent
3
There are two methods for clearing one desired data item from an SD memory card, and there is one method for clearing all data from an SD memory card.
Clearing Data from SD Memory Card
Clearing One Desired Data Item (Method 1)
1 Display the list of data in the SD memory card.See: "Displaying List of Data in SD Mem-
ory Card" (p.40)
2 Move the cursor to the data you want to
clear, and then press the button.
3 Move the cursor to [Clear Data], and then
press the button (or F2 button).
(To return to the previous display, press the F1 button. Press the F3 button to return to the top dis-play.)
4 Press the F1 button.
The display for confirming the clearing of data appears.
5 Press the F2 button.
The Clearing Memory display appears.After the data is cleared, the display of step 1 appears.
3
4
12
5
HIOKI LR5092B980-04

5.4 Clearing Data52
Clearing One Desired Data Item (Method 2)
1 Show the top display of the collector.
(To return to the top display from another dis-play, select [Back] or [Cancel].)
2 Move the cursor to [SD Card], and then
press the button.
3 Move the cursor to [Clear], and then
press the button.
(Press the F3 button to return to the top dis-play.)
4 Move the cursor to [Clear One(List)], and
then press the button (or F2 but-
ton).
The list of data in the SD card appears.See: For the subsequent procedure, see
"Clearing One Desired Data Item (Method 1)" (p.51).
1
2
3
4
HIOKI LR5092B980-04
5.4 Clearing Data53
5
Chapter 5 D
ata Managem
ent
3
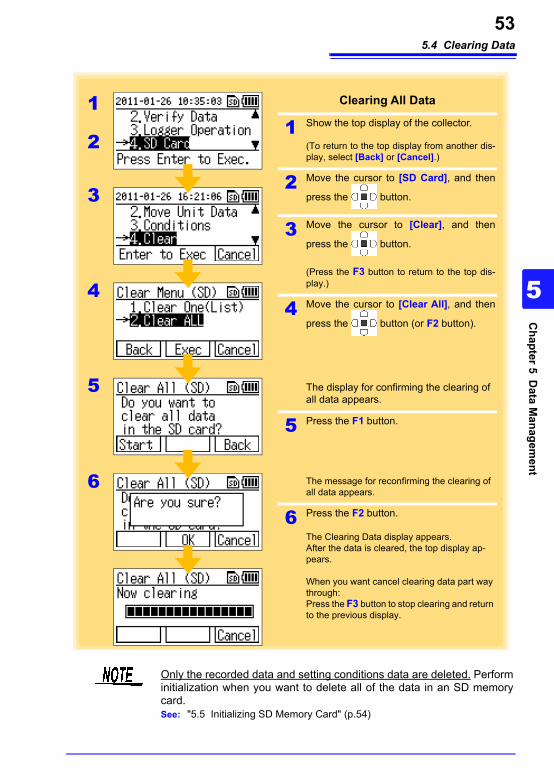
Clearing All Data
1 Show the top display of the collector.
(To return to the top display from another dis-play, select [Back] or [Cancel].)
2 Move the cursor to [SD Card], and then
press the button.
3 Move the cursor to [Clear], and then
press the button.
(Press the F3 button to return to the top dis-play.)
4 Move the cursor to [Clear All], and then
press the button (or F2 button).
The display for confirming the clearing of all data appears.
5 Press the F1 button.
The message for reconfirming the clearing of all data appears.
6 Press the F2 button.
The Clearing Data display appears.After the data is cleared, the top display ap-pears.
When you want cancel clearing data part way through:Press the F3 button to stop clearing and return to the previous display.
1
2
3
5
6
4
Only the recorded data and setting conditions data are deleted. Perform initialization when you want to delete all of the data in an SD memory card.See: "5.5 Initializing SD Memory Card" (p.54)
HIOKI LR5092B980-04
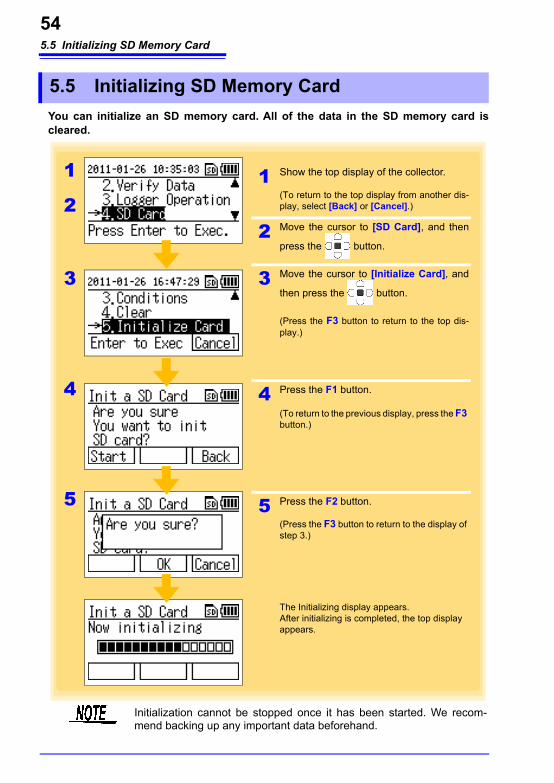
5.5 Initializing SD Memory Card54
You can initialize an SD memory card. All of the data in the SD memory card is cleared.
5.5 Initializing SD Memory Card
1 Show the top display of the collector.
(To return to the top display from another dis-play, select [Back] or [Cancel].)
2 Move the cursor to [SD Card], and then
press the button.
3 Move the cursor to [Initialize Card], and
then press the button.
(Press the F3 button to return to the top dis-play.)
4 Press the F1 button.
(To return to the previous display, press the F3 button.)
5 Press the F2 button.
(Press the F3 button to return to the display of step 3.)
The Initializing display appears.After initializing is completed, the top display appears.
4
1
3
5
2
Initialization cannot be stopped once it has been started. We recom-mend backing up any important data beforehand.
HIOKI LR5092B980-04
6.1 Displaying and Changing Collector System Settings55
6
Chapter 6 C
ollector System Settings
3
This section describes how to display and change the system settings of the col-lector, and perform self checks.
You can display and change the save destination setting of one-touch collection for a new logger.* When data is collected from a logger for which data has been collected previously (logger
with same serial number), the data is saved to the location (collector memory or SD memory card) where the previous collected data was saved regardless of the save destination set-ting of one-touch collection.
The initial setting for the collection destination is [Collector Memory].
Collector System Settings Chapter 6
6.1 Displaying and Changing Collector System Settings
One-touch Collection
What is One-touch Collection?A function that allows you to collect data in the collection destination set for recorded data of a logger by simply pressing the COLLECT button. (p.31)
HIOKI LR5092B980-04

6.1 Displaying and Changing Collector System Settings56
1 Show the top display of the collector.
(To return to the top display from another dis-play, select [Back] or [Cancel].)
2 Move the cursor to [Unit Settings], and
then press the button.
3 Move the cursor to [One-Touch Coll.],
and then press the button.
(Press the F3 button to return to the top dis-play.)
4 Move the cursor to the save destination ([Collector Memory] or [SD Card]), and
then press the button (or F2 but-
ton).
When the collection destination is set, a check mark is added.
(To return to the previous display, press the F1 button. Press the F3 button to return to the top display.)
3
4
1
2
HIOKI LR5092B980-04
6.1 Displaying and Changing Collector System Settings57
6
Chapter 6 C
ollector System Settings
3
You can change the setting for the display that appears at startup (top display).The initial setting is [Menu Display].See:"Display Organization" (p.12)
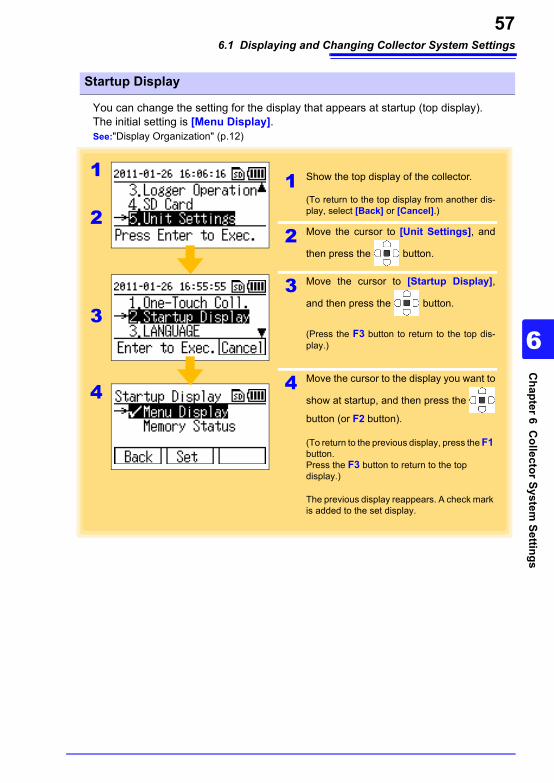
Startup Display
1 Show the top display of the collector.
(To return to the top display from another dis-play, select [Back] or [Cancel].)
2 Move the cursor to [Unit Settings], and
then press the button.
3 Move the cursor to [Startup Display],
and then press the button.
(Press the F3 button to return to the top dis-play.)
4 Move the cursor to the display you want to
show at startup, and then press the
button (or F2 button).
(To return to the previous display, press the F1 button. Press the F3 button to return to the top display.)
The previous display reappears. A check mark is added to the set display.
3
4
1
2
HIOKI LR5092B980-04

6.1 Displaying and Changing Collector System Settings58
You can display and change the language setting for display on the collector.The initial setting is [English].
Language Setting
1 Show the top display of the collector.
(To return to the top display from another dis-play, select [Back] or [Cancel].)
2 Move the cursor to [Unit Settings], and
then press the button.
3 Move the cursor to [LANGUAGE], and
then press the button.
(Press the F3 button to return to the top dis-play.)
4 Move the cursor to the language you want
to set, and then press the button (or
F2 button).
(To return to the previous display, press the F1 button. Press the F3 button to return to the top dis-play.)
The previous display reappears. A check mark is added to the set language.
3
4
1
2
HIOKI LR5092B980-04

6.1 Displaying and Changing Collector System Settings59
6
Chapter 6 C
ollector System Settings
3
You can set the time of the clock displayed on the collector.
Clock Setting
1 Show the top display of the collector.
(To return to the top display from another dis-play, select [Back] or [Cancel].)
2 Move the cursor to [Unit Settings], and
then press the button.
3 Move the cursor to [Clock Setting], and
then press the button.
(Press the F3 button to return to the top dis-play.)
4 Move the cursor to the digit you want to change, and then use the F1 or F2 button to change the number.
(To return to the previous display, press the F3 button.)
5 Press the button.
The time of the clock changes to the set time, and the previous display reappears.
3
4
1
2
• If the time of the clock is not correct, the wrong time will be mistakenly set on the logger and the time information for the collected data or SD memory card files will not be correct, resulting in undesirable conse-quences. Verify the clock display and set the correct time before using the collector.
• If the clock setting is significantly different from the actual time when the power is turned off and then back on again after the clock has been set, the life of the clock backup battery is over. The battery needs to be replaced so contact the place of purchase (dealer) or your nearest Hioki sales office.See:"Requesting Repairs" (p.129)
HIOKI LR5092B980-04

6.2 Performing Self Checks60
You can perform self checks on the collector and SD memory card.
Perform a self check of the firmware of the collector.
6.2 Performing Self Checks
Firmware
1 Show the top display of the collector.
(To return to the top display from another dis-play, select [Back] or [Cancel].)
2 Move the cursor to [Unit Settings], and
then press the button.
3 Move the cursor to [Self Check], and
then press the button.
(Press the F3 button to return to the top dis-play.)
4 Move the cursor to [Firmware], and then
press the button (or F2 button).
(To return to the previous display, press the F1 button. Press the F3 button to return to the top display.)
The display on the left is shown during a firmware self check.
When you want to cancel the self check part way through:To return to the previous display, press the F3 button.
When the self check is completed, the result appears on the right side of the display.
Press the F1 button to return to the display of step 4.
If NG appears, the collector needs to be re-paired.Contact the place of purchase (dealer) or your nearest Hioki sales office.See: "Requesting Repairs" (p.129)
4
1
3
2
HIOKI LR5092B980-04

6.2 Performing Self Checks61
6
Chapter 6 C
ollector System Settings
3
Perform a self check of the LCD of the collector.
LCD
1 Show the top display of the collector.
(To return to the top display from another dis-play, select [Back] or [Cancel].)
2 Move the cursor to [Unit Settings], and
then press the button.
3 Move the cursor to [Self Check], and
then press the button.
(Press the F3 button to return to the top dis-play.)
4 Move the cursor to [LCD], and then press
the button (or F2 button).
(To return to the previous display, press the F1 button. Press the F3 button to return to the top display.)
The display on the left is shown during an LCD self check.
Each press of the button switches
the display.
When the self check is completed, the display of step 4 reappears.
4
1
3
2
If there is an abnormality with the LCD display, submit the collector for repairs. See: "Requesting Repairs" (p.129)
HIOKI LR5092B980-04

6.2 Performing Self Checks62
Perform a self check of the buttons and buzzers of the collector.
Buttons and Buzzers
1 Show the top display of the collector.
(To return to the top display from another dis-play, select [Back] or [Cancel].)
2 Move the cursor to [Unit Settings], and
then press the button.
3 Move the cursor to [Self Check], and
then press the button.
(Press the F3 button to return to the top dis-play.)
4 Move the cursor to [Buttons, Buzzers],
and then press the button (or F2
button).
(To return to the previous display, press the F1 button. Press the F3 button to return to the top display.)
5 Press each button.
When you press a button, verify that the button color on the display changes and that a buzzer sounds.
When you want to cancel the self check part way through:Turn off the power.
When all of the buttons have been pressed and the self check is completed, the display of step 4 reappears.
4
1
3
2
5
If there is an abnormality such as a button does not work, turn off the power and then submit the collector for repairs.See: "Requesting Repairs" (p.129)
HIOKI LR5092B980-04
6.2 Performing Self Checks63
6
Chapter 6 C
ollector System Settings
3
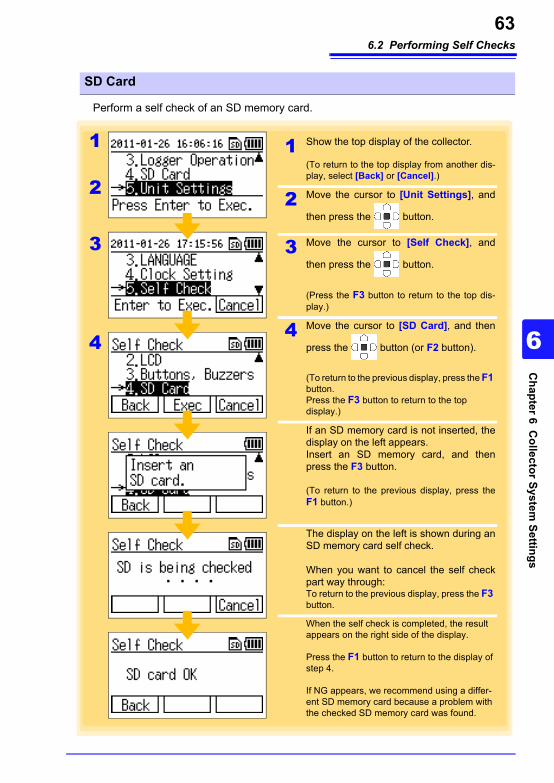
Perform a self check of an SD memory card.
SD Card
1 Show the top display of the collector.
(To return to the top display from another dis-play, select [Back] or [Cancel].)
2 Move the cursor to [Unit Settings], and
then press the button.
3 Move the cursor to [Self Check], and
then press the button.
(Press the F3 button to return to the top dis-play.)
4 Move the cursor to [SD Card], and then
press the button (or F2 button).
(To return to the previous display, press the F1 button. Press the F3 button to return to the top display.)
If an SD memory card is not inserted, the display on the left appears.Insert an SD memory card, and then press the F3 button.
(To return to the previous display, press the F1 button.)
The display on the left is shown during an SD memory card self check.
When you want to cancel the self check part way through:To return to the previous display, press the F3 button.
When the self check is completed, the result appears on the right side of the display.
Press the F1 button to return to the display of step 4.
If NG appears, we recommend using a differ-ent SD memory card because a problem with the checked SD memory card was found.
3
4
1
2
HIOKI LR5092B980-04

6.3 Initializing the Collector (Restoring to Factory Default State)64
You can initialize the collector.
6.3 Initializing the Collector (Restoring to Fac-tory Default State)
1 Show the top display of the collector.
(To return to the top display from another dis-play, select [Back] or [Cancel].)
2 Move the cursor to [Unit Settings], and
then press the button.
3 Move the cursor to [Initialize], and then
press the button.
(Press the F3 button to return to the top dis-play.)
4 Press the F2 button.
(To return to the previous display, press the F1 button. Press the F3 button to return to the top display.)
5 Press the F1 button.
(Press the F3 button to return to the display of step 3.)
After initializing is completed, the top dis-play appears.
4
1
3
5
2
HIOKI LR5092B980-04
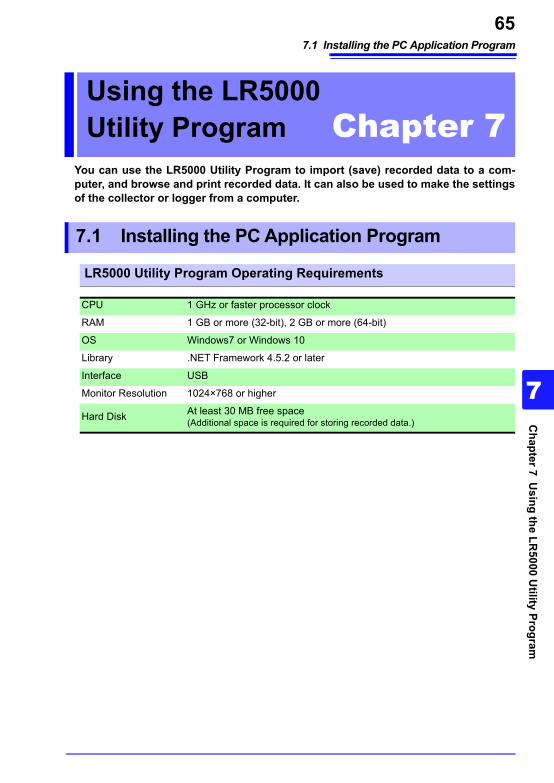
7.1 Installing the PC Application Program65
7
Chapter 7 U
sing the LR5000 U
tility Program
3
You can use the LR5000 Utility Program to import (save) recorded data to a com-puter, and browse and print recorded data. It can also be used to make the settings of the collector or logger from a computer.
Using the LR5000 Utility Program Chapter 7
7.1 Installing the PC Application Program
LR5000 Utility Program Operating Requirements
CPU 1 GHz or faster processor clock
RAM 1 GB or more (32-bit), 2 GB or more (64-bit)
OS Windows7 or Windows 10
Library .NET Framework 4.5.2 or later
Interface USB
Monitor Resolution 1024×768 or higher
Hard Disk At least 30 MB free space(Additional space is required for storing recorded data.)
HIOKI LR5092B980-04

7.1 Installing the PC Application Program66
1. Start the computer.Administrator authority may be required for the installation.
2. Set the included CD to the CD-ROM drive.
3. Click [Start] to display the application list.Click [Windows System] - [File Explorer] to start Explorer.
4. Click [This PC], and then, double-click [CD Drive (D)] drive.
5. Double-click the [english] folder.
6. Double-click [setup.exe] (SET UP file).
Installation Procedure
1
2
3
12
(The extension may not be dis-played.) After the installer starts, follow the instruction to proceed with the installation.
(The extension may not be dis-played.) After the installer starts, follow the instruction to proceed with the installation.
HIOKI LR5092B980-04
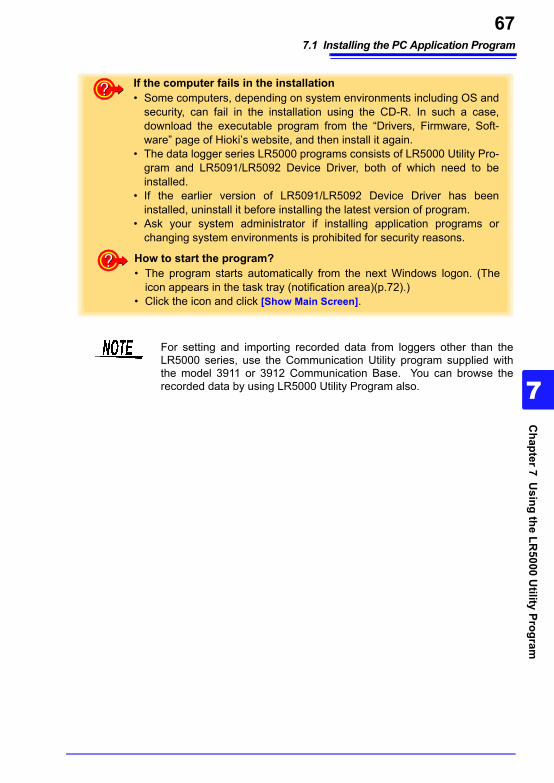
7.1 Installing the PC Application Program67
7
Chapter 7 U
sing the LR5000 U
tility Program
3How to start the program?• The program starts automatically from the next Windows logon. (The
icon appears in the task tray (notification area)(p.72).) • Click the icon and click [Show Main Screen].
If the computer fails in the installation• Some computers, depending on system environments including OS and
security, can fail in the installation using the CD-R. In such a case, download the executable program from the “Drivers, Firmware, Soft-ware” page of Hioki’s website, and then install it again.
• The data logger series LR5000 programs consists of LR5000 Utility Pro-gram and LR5091/LR5092 Device Driver, both of which need to be installed.
• If the earlier version of LR5091/LR5092 Device Driver has been installed, uninstall it before installing the latest version of program.
• Ask your system administrator if installing application programs or changing system environments is prohibited for security reasons.
For setting and importing recorded data from loggers other than the LR5000 series, use the Communication Utility program supplied with the model 3911 or 3912 Communication Base. You can browse the recorded data by using LR5000 Utility Program also.
HIOKI LR5092B980-04

7.1 Installing the PC Application Program68
Follow this procedure to uninstall the LR5000 Utility Program.
Download the latest version of the LR5000 Utility Program from our website (http://www.hioki.com).
The various settings and recorded data will not be deleted when you uninstall or update the software.
Uninstall Procedure
1 Click [Start]-[Settings]. (The [Windows Settings] dialog box appears.)
2 Click [Apps]. (The [Apps & features] screen appears.)
3 Select the [LR5000 Utility Program], and click the [Uninstall] button.
4 Click [Uninstall]. (The program is uninstalled.)
32
4
Version Upgrading
Follow the procedure on the download page to install the latest ver-sion. (The old version is uninstalled automatically.)
HIOKI LR5092B980-04
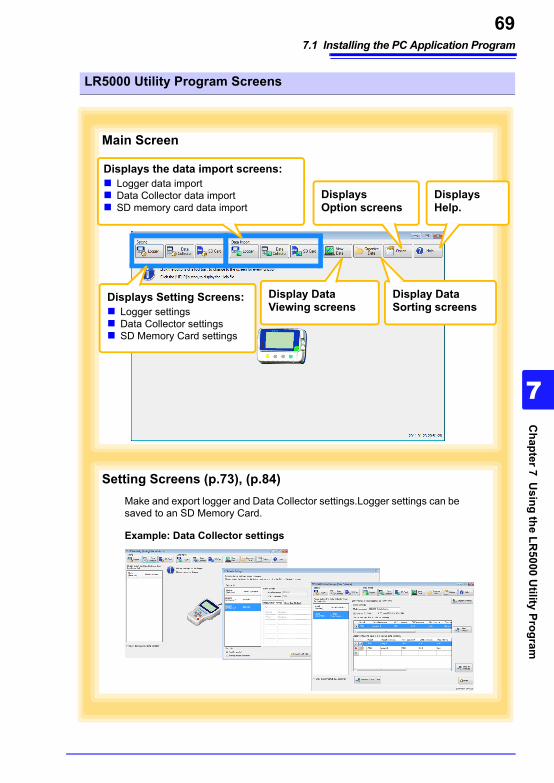
7.1 Installing the PC Application Program69
7
Chapter 7 U
sing the LR5000 U
tility Program
3
LR5000 Utility Program Screens
Main Screen
Displays Setting Screens: Logger settings Data Collector settings SD Memory Card settings
Displays the data import screens: Logger data import Data Collector data import SD memory card data import
Display Data Viewing screens
Display Data Sorting screens
Displays Option screens
Displays Help.
Setting Screens (p.73), (p.84)Make and export logger and Data Collector settings.Logger settings can be saved to an SD Memory Card.
Example: Data Collector settings
HIOKI LR5092B980-04
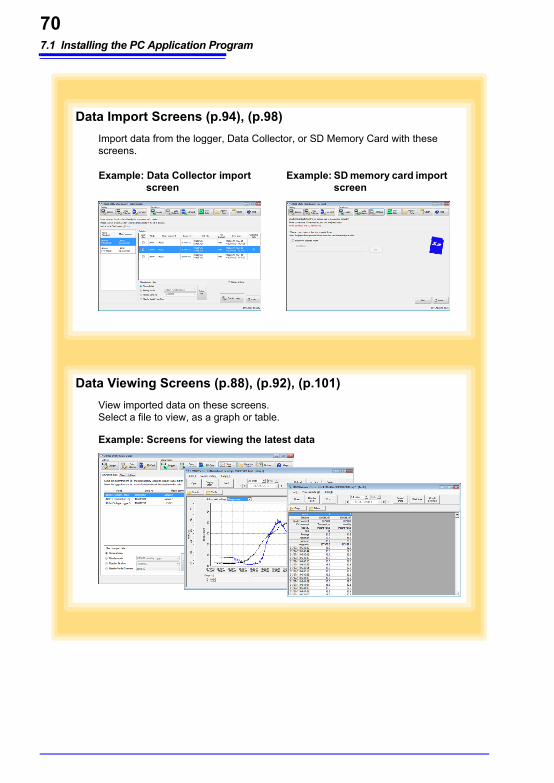
7.1 Installing the PC Application Program70
Data Viewing Screens (p.88), (p.92), (p.101)View imported data on these screens.Select a file to view, as a graph or table.
Example: Screens for viewing the latest data
Data Import Screens (p.94), (p.98)Import data from the logger, Data Collector, or SD Memory Card with these screens.
Example: Data Collector import screen
Example: SD memory card import screen
HIOKI LR5092B980-04
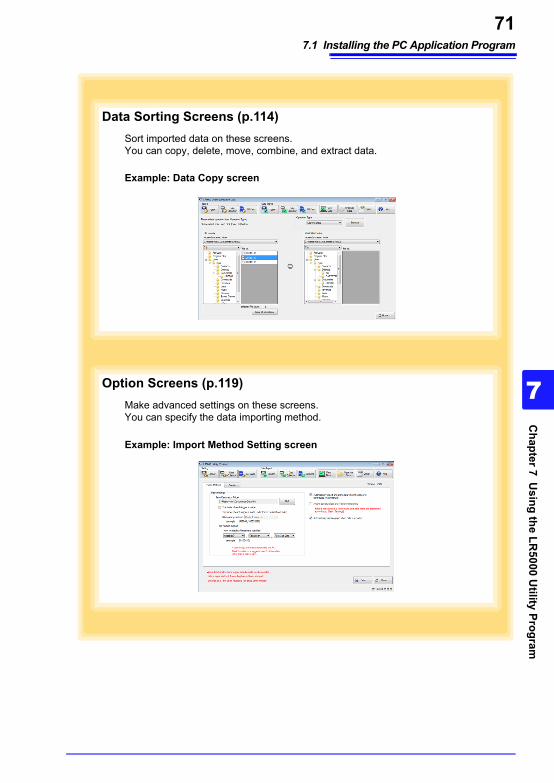
7.1 Installing the PC Application Program71
7
Chapter 7 U
sing the LR5000 U
tility Program
3
Option Screens (p.119)Make advanced settings on these screens.You can specify the data importing method.
Example: Import Method Setting screen
Data Sorting Screens (p.114)Sort imported data on these screens.You can copy, delete, move, combine, and extract data.
Example: Data Copy screen
HIOKI LR5092B980-04
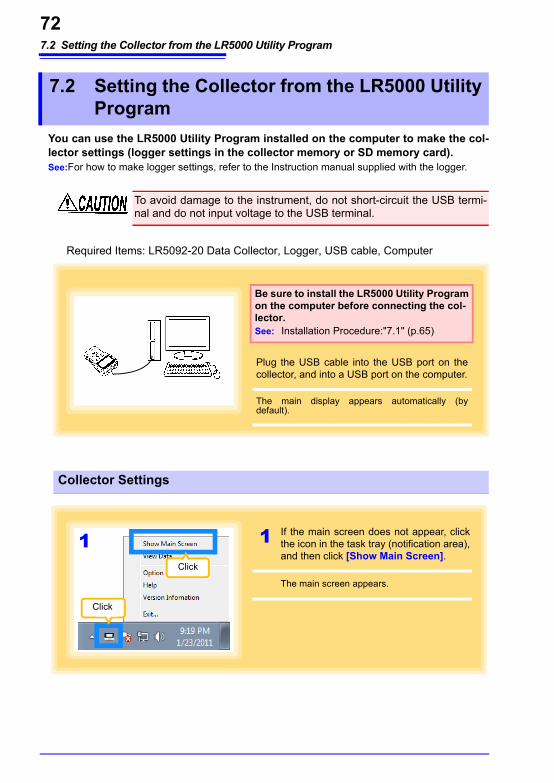
7.2 Setting the Collector from the LR5000 Utility Program72
You can use the LR5000 Utility Program installed on the computer to make the col-lector settings (logger settings in the collector memory or SD memory card).See:For how to make logger settings, refer to the Instruction manual supplied with the logger.
Required Items: LR5092-20 Data Collector, Logger, USB cable, Computer
7.2 Setting the Collector from the LR5000 Utility Program
To avoid damage to the instrument, do not short-circuit the USB termi-nal and do not input voltage to the USB terminal.
Plug the USB cable into the USB port on the collector, and into a USB port on the computer.
The main display appears automatically (by default).
Be sure to install the LR5000 Utility Program on the computer before connecting the col-lector.See: Installation Procedure:"7.1" (p.65)
Collector Settings
1 If the main screen does not appear, click the icon in the task tray (notification area), and then click [Show Main Screen].
The main screen appears.
1
Click
Click
HIOKI LR5092B980-04

7.2 Setting the Collector from the LR5000 Utility Program73
7
Chapter 7 U
sing the LR5000 U
tility Program
3
4
How can the settings of the current data collector be reflected in the setting options?
1. Click the [Import Settings] button at the upper right of screen. (A dialog (p.74) appears.)
2. Select the check boxes of the settings you want to import, and then click the [Import Settings to Computer] button. (The settings are reflected in the setting options.)
2
Click to select.The background color of the selected data collector changes.
3
Setting OptionsNote: The displayed settings are those previously made from
the LR5000 Utility Program, which may be different from the current settings within the Data Collector itself.
Returns to the main screen.
Sets the clock setting of the col-lector connected to the computer to the same time as the clock of the computer.
Select this check box to also display data collectors (that are not connected) to which settings were saved previously in the list.
How can the settings of another logger be saved to the SD memory card?1. Edit the settings in the [Logger settings to save to SD card (in data col-
lector)] list. (p.75)2. Click the [Send All Settings] button.
(*:The settings to be saved to the SD memory card are sent together with the basic settings.)
4
2 For the [Setting], click the [Data Collec-tor] button.
The Data Collector Settings screen appears.(If the Data Collector is not connected, you are prompted to connect it. Connect the Data Collector.)
3 Select the logger from the device list*, and edit the settings. (p.75)
4 Click the [Send Settings] or [Send All Settings] button*.
HIOKI LR5092B980-04

7.2 Setting the Collector from the LR5000 Utility Program74
Select the check boxes of the set-tings you want to import.
1
Click this button.2 Import Settings Dialog Box
HIOKI LR5092B980-04
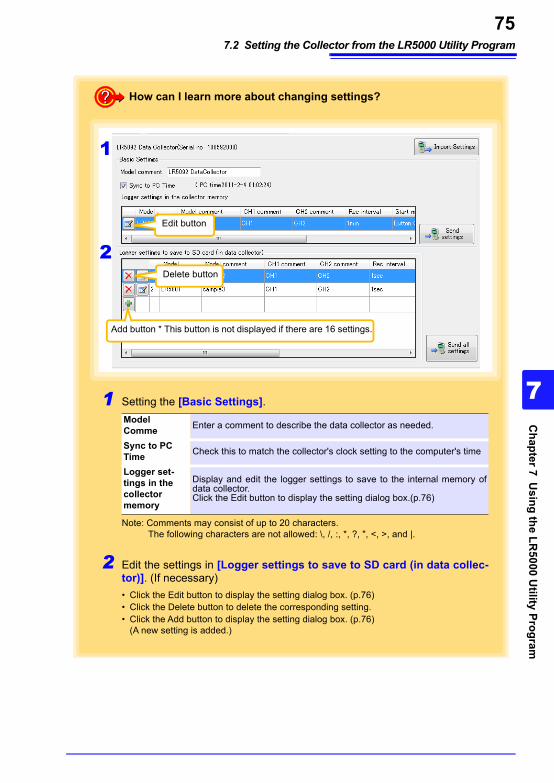
7.2 Setting the Collector from the LR5000 Utility Program75
7
Chapter 7 U
sing the LR5000 U
tility Program
3
How can I learn more about changing settings?
Edit button
Delete button
1 Setting the [Basic Settings].
2 Edit the settings in [Logger settings to save to SD card (in data collec-tor)]. (If necessary)• Click the Edit button to display the setting dialog box. (p.76)• Click the Delete button to delete the corresponding setting.• Click the Add button to display the setting dialog box. (p.76)
(A new setting is added.)
Model Comme Enter a comment to describe the data collector as needed.
Sync to PC Time Check this to match the collector's clock setting to the computer's time
Logger set-tings in the collector memory
Display and edit the logger settings to save to the internal memory of data collector.Click the Edit button to display the setting dialog box.(p.76)
Note: Comments may consist of up to 20 characters. The following characters are not allowed: \, /, :, *, ?, ", <, >, and |.
1
2
Add button * This button is not displayed if there are 16 settings.
HIOKI LR5092B980-04

7.2 Setting the Collector from the LR5000 Utility Program76
1 Select the logger to which you want to save the settings in [Model]. (When adding)
2 Setting the [Basic Settings].
3 Settings on the [Recording Method] tab.
Continued →
Model comment Enter a comment to describe the logger as needed.
Power save setting Enable or disable the power save setting (p.23).
CH1 commentCH2 comment Enter a comment to describe the measurement channel as needed.
Note: Comments may consist of up to 20 characters. The following characters are not allowed: \, /, :, *, ?, ", <, >, and |.
12
Click this tab.
See: P.82
* This is not displayed if the Add button was clicked in "2" (p.75).
3
When you want to know more about how to edit the logger settings:* This section explains editing settings using the LR5001 Humidity Logger as an
example. For details on the setting items of each of the loggers, refer to “Making Settings from the LR5000 Utility Program” in the instruction manuals of the cor-responding loggers.
HIOKI LR5092B980-04

7.2 Setting the Collector from the LR5000 Utility Program77
7
Chapter 7 U
sing the LR5000 U
tility Program
3
Rec intervalSets the recording interval.
Start MethodSelect the recording start method.When [Scheduled Time] is selected, specify the start date and time.
Stop MethodSelect the recording stop method. When [Scheduled Time (Endless)] or [Scheduled Time (One-Time)] is selected, the date and time need to be set.
Rec ModeSelect the recording mode.
See: Statistical recording results in shorter logger battery life.
1/2/5/10/15/20/30 sec., 1/2 /5/10/15/20/30/60 min (1day: for the LR5061 only)
Setting Item Setting DescriptionButton Operation Starts recording by pressing the button on the logger.Start After Sent Starts recording by pressing the [Send Settings] button. Scheduled Time Starts recording at the scheduled time after pressing the [Send Settings] button.
Valid setting time range 01/01/2010, 00:00 to 12/31/2039, 23:59
When the [Scheduled Time] start method is enabled, the [REC] indica-tor on the logger display blinks until the specified start time.
Setting Item Setting DescriptionButton Operation (endless)
Stops recording by pressing the button on the logger.The oldest data is overwritten when memory is full.
Button Operation (one-time)
Stops recording by pressing the button on the logger.Recording also stops when memory becomes full.
Scheduled Time (Endless)
Stops recording at the scheduled time. The oldest data is overwritten when memory is full.
Scheduled Time (One-Time)
Stops recording at the scheduled time. Recording also stops when memory becomes full.
Hold Data at Sched-uled Time
Specify when setting [Scheduled Time (Endless)].Select this check box to record the data at the scheduled time and stop recording.
Setting Item Setting DescriptionInstantaneous The instantaneous value is recorded at each recording interval.
StatisticalMeasurements are taken once per second, and instantaneous, maximum, mini-mum, and average values are recorded at each recording interval. (Up to 15,000 data values can be recorded.)
Statistical recording is not available when the recording interval is set to 1 second.
HIOKI LR5092B980-04
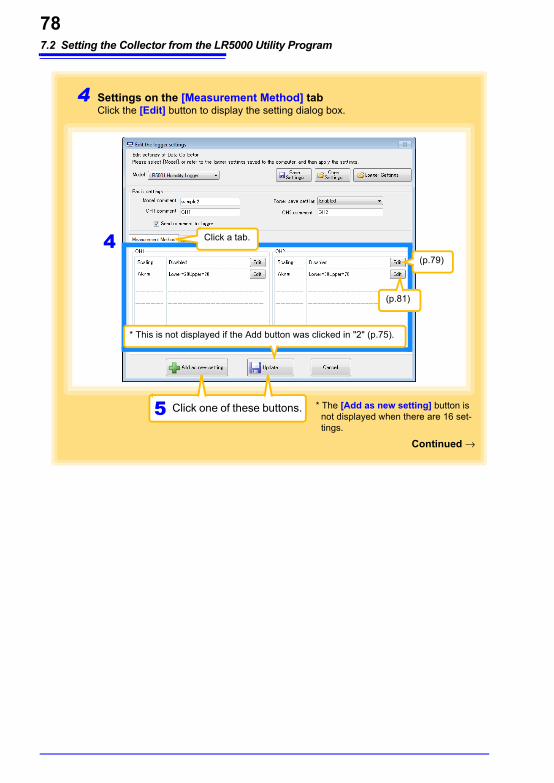
7.2 Setting the Collector from the LR5000 Utility Program78
4 Settings on the [Measurement Method] tabClick the [Edit] button to display the setting dialog box.
4 Click a tab.
Click one of these buttons.5 * The [Add as new setting] button is not displayed when there are 16 set-tings.
Continued →
* This is not displayed if the Add button was clicked in "2" (p.75).
(p.79)
(p.81)
HIOKI LR5092B980-04
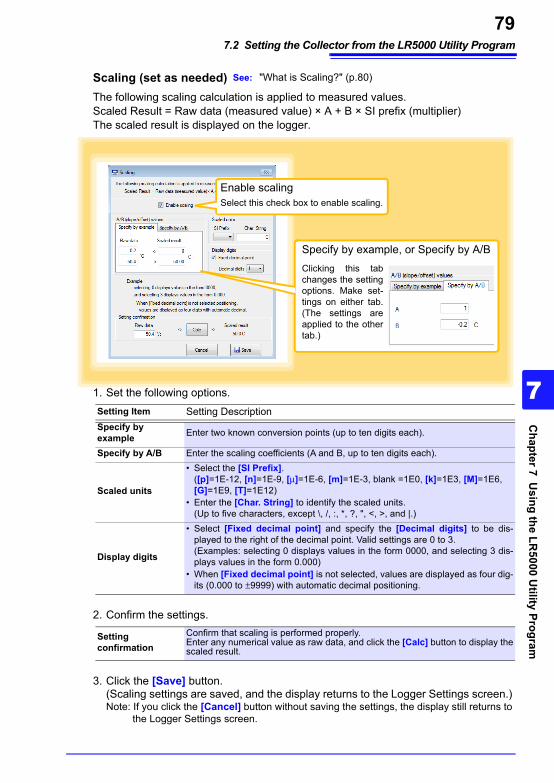
7.2 Setting the Collector from the LR5000 Utility Program79
7
Chapter 7 U
sing the LR5000 U
tility Program
3
Scaling (set as needed)The following scaling calculation is applied to measured values. Scaled Result = Raw data (measured value) × A + B × SI prefix (multiplier)The scaled result is displayed on the logger.
1. Set the following options.
2. Confirm the settings.
3. Click the [Save] button. (Scaling settings are saved, and the display returns to the Logger Settings screen.) Note: If you click the [Cancel] button without saving the settings, the display still returns to
the Logger Settings screen.
See: "What is Scaling?" (p.80)
Enable scalingSelect this check box to enable scaling.
Clicking this tab changes the setting options. Make set-tings on either tab. (The settings are applied to the other tab.)
Specify by example, or Specify by A/B
Setting Item Setting DescriptionSpecify by example Enter two known conversion points (up to ten digits each).
Specify by A/B Enter the scaling coefficients (A and B, up to ten digits each).
Scaled units
• Select the [SI Prefix]. ([p]=1E-12, [n]=1E-9, [μ]=1E-6, [m]=1E-3, blank =1E0, [k]=1E3, [M]=1E6, [G]=1E9, [T]=1E12)
• Enter the [Char. String] to identify the scaled units. (Up to five characters, except \, /, :, *, ?, ", <, >, and |.)
Display digits
• Select [Fixed decimal point] and specify the [Decimal digits] to be dis-played to the right of the decimal point. Valid settings are 0 to 3. (Examples: selecting 0 displays values in the form 0000, and selecting 3 dis-plays values in the form 0.000)
• When [Fixed decimal point] is not selected, values are displayed as four dig-its (0.000 to ±9999) with automatic decimal positioning.
Setting confirmation
Confirm that scaling is performed properly. Enter any numerical value as raw data, and click the [Calc] button to display the scaled result.
HIOKI LR5092B980-04

7.2 Setting the Collector from the LR5000 Utility Program80
Scaling converts actual measurement values to their corresponding values in arbi-trarily determined units for display. It is useful for reconciling the difference between values measured with the logger and those of a reference device. For example, when two points of correspondence are known between values mea-sured with the logger and those of the reference device, select [Specify by example]. (1) When the logger measures 0.2°C the reference device measures 0.0°C, and (2) when the logger measures 50.4°C the reference device measures 50.0°C
Alternatively, when one point of correspondence is known between the logger and ref-erence device, select [Specify by A/B].(1) The logger measures 0.2°C and the reference device measures 0.0°C.
What is Scaling?
50.00.0
0.2 50.4 [°C]Actual measured value (raw data)
(Scaled result)[°C]
-0.2 Offset (coefficient B)
1Slope (coefficient A)
[°C]Since only one point is known, set the slope to "1" and enter the offset only.
[°C]
HIOKI LR5092B980-04
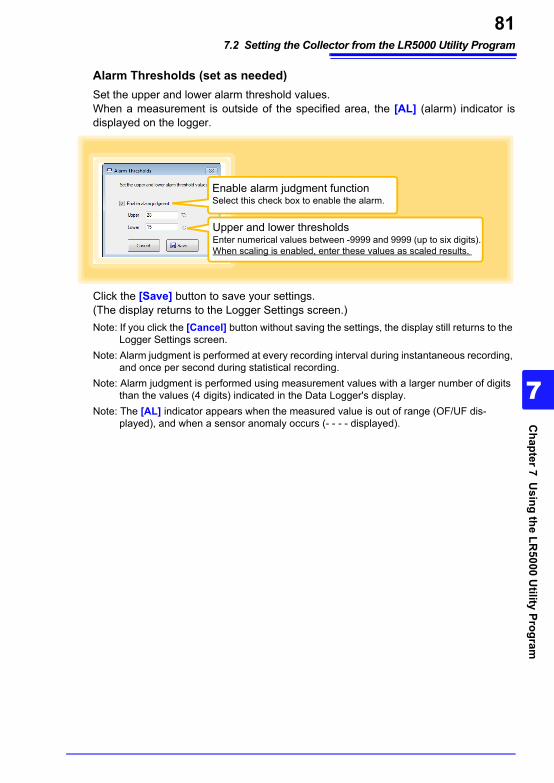
7.2 Setting the Collector from the LR5000 Utility Program81
7
Chapter 7 U
sing the LR5000 U
tility Program
3
Alarm Thresholds (set as needed)Set the upper and lower alarm threshold values.When a measurement is outside of the specified area, the [AL] (alarm) indicator is displayed on the logger.
Click the [Save] button to save your settings. (The display returns to the Logger Settings screen.)Note: If you click the [Cancel] button without saving the settings, the display still returns to the
Logger Settings screen.Note: Alarm judgment is performed at every recording interval during instantaneous recording,
and once per second during statistical recording.Note: Alarm judgment is performed using measurement values with a larger number of digits
than the values (4 digits) indicated in the Data Logger's display.Note: The [AL] indicator appears when the measured value is out of range (OF/UF dis-
played), and when a sensor anomaly occurs (- - - - displayed).
Upper and lower thresholdsEnter numerical values between -9999 and 9999 (up to six digits). When scaling is enabled, enter these values as scaled results.
Enable alarm judgment functionSelect this check box to enable the alarm.
HIOKI LR5092B980-04

7.2 Setting the Collector from the LR5000 Utility Program82
Connect the logger to which you want to send the settings to the collector, and then send the settings.See:"3.3 Sending Measurement Condition Settings to Logger" (p.26)
Other Functions of the Edit Settings Dialog Box
Sending Settings to Logger
Logger SettingsA dialog box appears. (See the diagram be-low.) Refer to the logger settings saved to the computer, and then apply the settings.
Save Settings*Saves settings to a computer file. (The [Send comment to logger] set-ting is not saved.) In the dialog box that appears, specify the location and name of the destina-tion file (extension.conf).
Open Settings*Loads settings from a computer file. In the dialog box that appears, specify the location and name of the saved settings file (extension.conf).
*: Appears only when [Show the settings of the [Save Settings] and [Open Settings] buttons.] is selected on the Options screen.
Select the logger of the settings you want to import.
1
Click.2
Refer to Settings Dialog Box
HIOKI LR5092B980-04
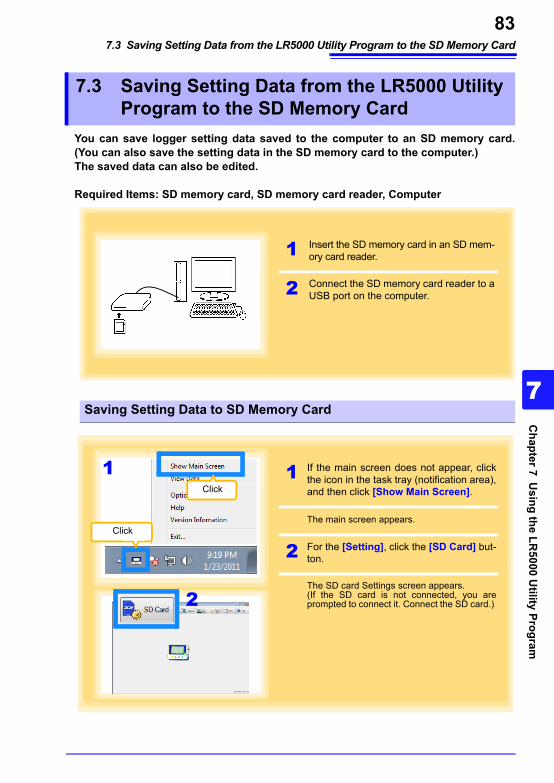
7.3 Saving Setting Data from the LR5000 Utility Program to the SD Memory Card83
7
Chapter 7 U
sing the LR5000 U
tility Program
3
You can save logger setting data saved to the computer to an SD memory card. (You can also save the setting data in the SD memory card to the computer.)The saved data can also be edited.
Required Items: SD memory card, SD memory card reader, Computer
7.3 Saving Setting Data from the LR5000 Utility Program to the SD Memory Card
1 Insert the SD memory card in an SD mem-ory card reader.
2 Connect the SD memory card reader to a USB port on the computer.
Saving Setting Data to SD Memory Card
1 If the main screen does not appear, click the icon in the task tray (notification area), and then click [Show Main Screen].
The main screen appears.
2 For the [Setting], click the [SD Card] but-ton.
The SD card Settings screen appears.(If the SD card is not connected, you are prompted to connect it. Connect the SD card.) 2
1
Click
Click
HIOKI LR5092B980-04
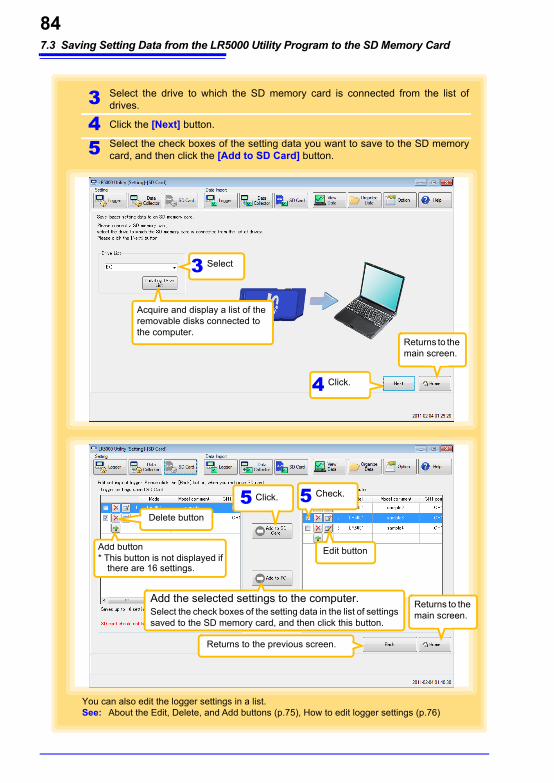
7.3 Saving Setting Data from the LR5000 Utility Program to the SD Memory Card84
3 Select the drive to which the SD memory card is connected from the list of drives.
4 Click the [Next] button.
5 Select the check boxes of the setting data you want to save to the SD memory card, and then click the [Add to SD Card] button.
Returns to the main screen.
Select3
Click.4
Acquire and display a list of the removable disks connected to the computer.
Check.5Click.5
Add the selected settings to the computer.Select the check boxes of the setting data in the list of settings saved to the SD memory card, and then click this button.
You can also edit the logger settings in a list.See: About the Edit, Delete, and Add buttons (p.75), How to edit logger settings (p.76)
Edit buttonAdd button* This button is not displayed if
there are 16 settings.
Delete button
Returns to the main screen.
Returns to the previous screen.
HIOKI LR5092B980-04
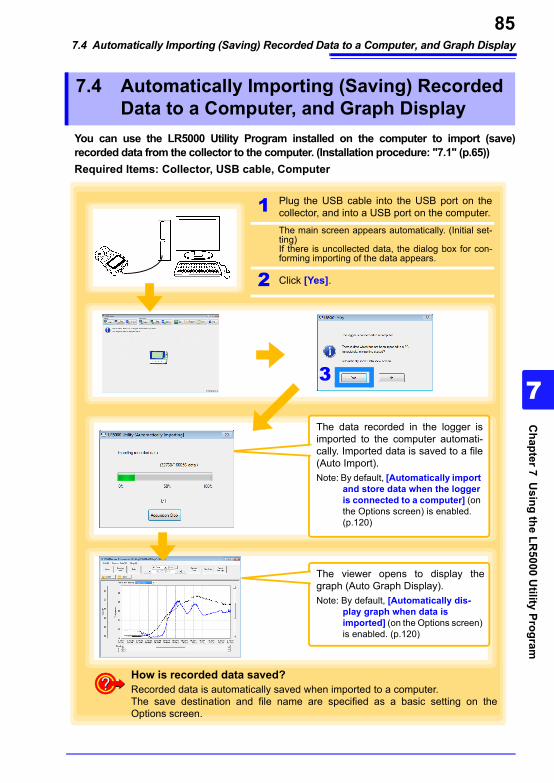
7.4 Automatically Importing (Saving) Recorded Data to a Computer, and Graph Display85
7
Chapter 7 U
sing the LR5000 U
tility Program
3
You can use the LR5000 Utility Program installed on the computer to import (save) recorded data from the collector to the computer. (Installation procedure: "7.1" (p.65))Required Items: Collector, USB cable, Computer
7.4 Automatically Importing (Saving) Recorded Data to a Computer, and Graph Display
The viewer opens to display the graph (Auto Graph Display).Note: By default, [Automatically dis-
play graph when data is imported] (on the Options screen) is enabled. (p.120)
The data recorded in the logger is imported to the computer automati-cally. Imported data is saved to a file (Auto Import).Note: By default, [Automatically import
and store data when the logger is connected to a computer] (on the Options screen) is enabled. (p.120)
How is recorded data saved?Recorded data is automatically saved when imported to a computer. The save destination and file name are specified as a basic setting on the Options screen.
3
1 Plug the USB cable into the USB port on the collector, and into a USB port on the computer.The main screen appears automatically. (Initial set-ting)If there is uncollected data, the dialog box for con-forming importing of the data appears.
2 Click [Yes].
HIOKI LR5092B980-04
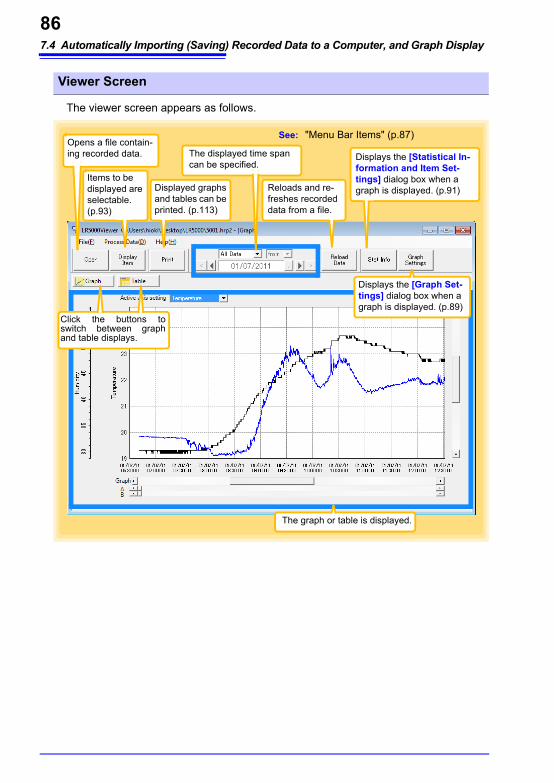
7.4 Automatically Importing (Saving) Recorded Data to a Computer, and Graph Display86
The viewer screen appears as follows.
Viewer Screen
Items to be displayed are selectable. (p.93)
Opens a file contain-ing recorded data.
Displayed graphs and tables can be printed. (p.113)
The displayed time span can be specified.
Reloads and re-freshes recorded data from a file.
Displays the [Statistical In-formation and Item Set-tings] dialog box when a graph is displayed. (p.91)
Click the buttons to switch between graph and table displays.
Displays the [Graph Set-tings] dialog box when a graph is displayed. (p.89)
The graph or table is displayed.
See: "Menu Bar Items" (p.87)
HIOKI LR5092B980-04
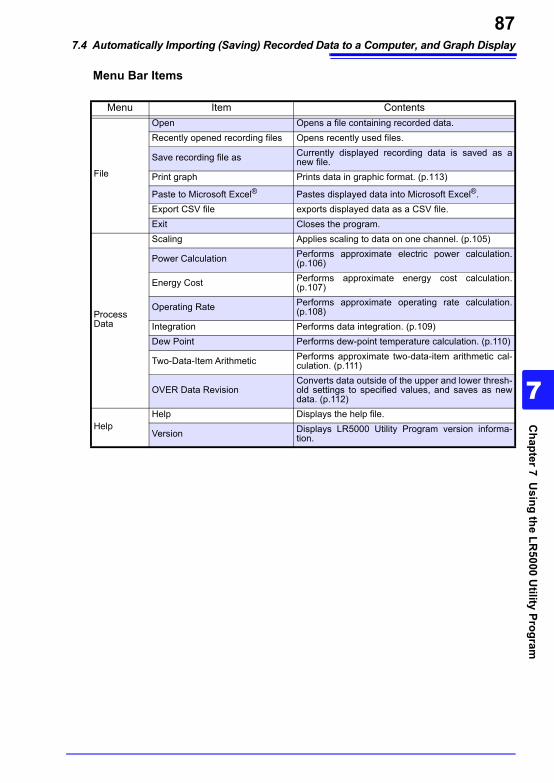
7.4 Automatically Importing (Saving) Recorded Data to a Computer, and Graph Display87
7
Chapter 7 U
sing the LR5000 U
tility Program
3
Menu Bar Items
Menu Item Contents
File
Open Opens a file containing recorded data.Recently opened recording files Opens recently used files.
Save recording file as Currently displayed recording data is saved as a new file.
Print graph Prints data in graphic format. (p.113)
Paste to Microsoft Excel® Pastes displayed data into Microsoft Excel®.Export CSV file exports displayed data as a CSV file.Exit Closes the program.
Process Data
Scaling Applies scaling to data on one channel. (p.105)
Power Calculation Performs approximate electric power calculation. (p.106)
Energy Cost Performs approximate energy cost calculation. (p.107)
Operating Rate Performs approximate operating rate calculation. (p.108)
Integration Performs data integration. (p.109)Dew Point Performs dew-point temperature calculation. (p.110)
Two-Data-Item Arithmetic Performs approximate two-data-item arithmetic cal-culation. (p.111)
OVER Data RevisionConverts data outside of the upper and lower thresh-old settings to specified values, and saves as new data. (p.112)
HelpHelp Displays the help file.
Version Displays LR5000 Utility Program version informa-tion.
HIOKI LR5092B980-04
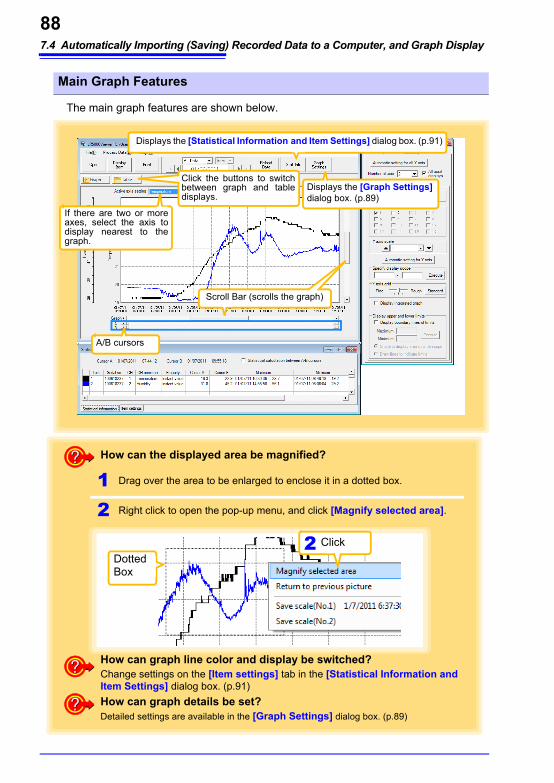
7.4 Automatically Importing (Saving) Recorded Data to a Computer, and Graph Display88
The main graph features are shown below.
Main Graph Features
Displays the [Statistical Information and Item Settings] dialog box. (p.91)
Displays the [Graph Settings] dialog box. (p.89)
A/B cursors
Scroll Bar (scrolls the graph)
If there are two or more axes, select the axis to display nearest to the graph.
Click the buttons to switch between graph and table displays.
How can the displayed area be magnified?
Dotted Box
Click2
1 Drag over the area to be enlarged to enclose it in a dotted box.
2 Right click to open the pop-up menu, and click [Magnify selected area].
How can graph details be set?Detailed settings are available in the [Graph Settings] dialog box. (p.89)
How can graph line color and display be switched?Change settings on the [Item settings] tab in the [Statistical Information and Item Settings] dialog box. (p.91)
HIOKI LR5092B980-04
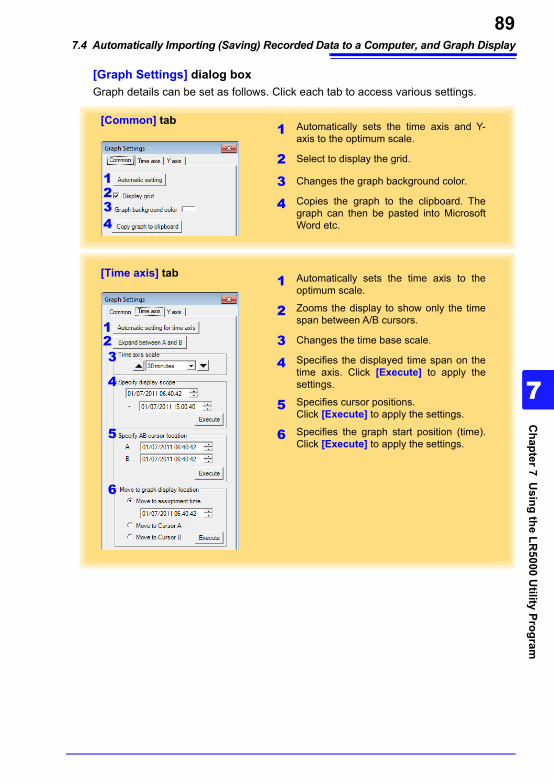
7.4 Automatically Importing (Saving) Recorded Data to a Computer, and Graph Display89
7
Chapter 7 U
sing the LR5000 U
tility Program
3
[Graph Settings] dialog boxGraph details can be set as follows. Click each tab to access various settings.
[Common] tab1 Automatically sets the time axis and Y-
axis to the optimum scale.
2 Select to display the grid.
3 Changes the graph background color.
4 Copies the graph to the clipboard. The graph can then be pasted into Microsoft Word etc.
1234
[Time axis] tab 1 Automatically sets the time axis to the optimum scale.
2 Zooms the display to show only the time span between A/B cursors.
3 Changes the time base scale.
4 Specifies the displayed time span on the time axis. Click [Execute] to apply the settings.
5 Specifies cursor positions. Click [Execute] to apply the settings.
6 Specifies the graph start position (time). Click [Execute] to apply the settings.
123
4
5
6
HIOKI LR5092B980-04
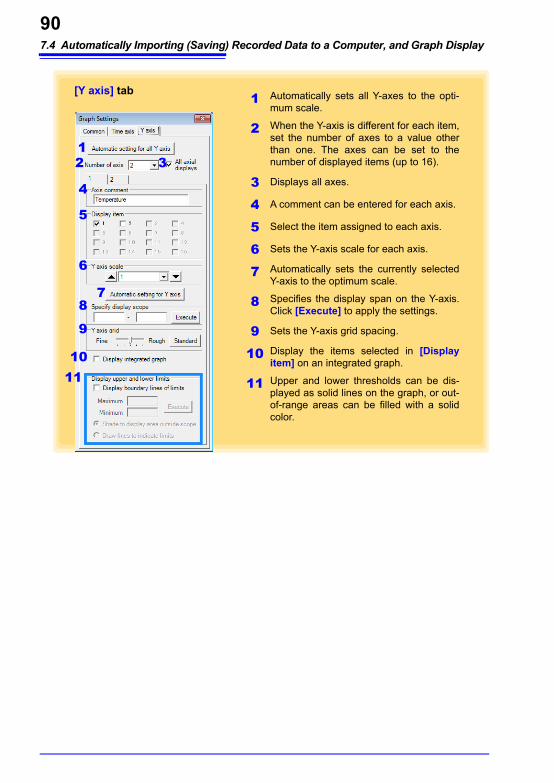
7.4 Automatically Importing (Saving) Recorded Data to a Computer, and Graph Display90
[Y axis] tab 1 Automatically sets all Y-axes to the opti-mum scale.
2 When the Y-axis is different for each item, set the number of axes to a value other than one. The axes can be set to the number of displayed items (up to 16).
3 Displays all axes.
4 A comment can be entered for each axis.
5 Select the item assigned to each axis.
6 Sets the Y-axis scale for each axis.
7 Automatically sets the currently selected Y-axis to the optimum scale.
8 Specifies the display span on the Y-axis. Click [Execute] to apply the settings.
9 Sets the Y-axis grid spacing.
10 Display the items selected in [Display item] on an integrated graph.
11 Upper and lower thresholds can be dis-played as solid lines on the graph, or out-of-range areas can be filled with a solid color.
12
4
5
6
7
3
8
9
1110
HIOKI LR5092B980-04

7.4 Automatically Importing (Saving) Recorded Data to a Computer, and Graph Display91
7
Chapter 7 U
sing the LR5000 U
tility Program
3
[Statistical Information and Item Settings] dialog boxThe following items appear on the [Statistical information] tab.• Item no.• Serial no.• Channel no.• Channel comments• Property (Type of measurement value)• Measured values at A/B cursors• Statistical data• Units
The following items appear on the [Item settings] tab.• Display on/off• Graph line colors and thickness• Bar graph display on/off
[Statistical information] tab
Times at A/B cursors
Select to calculate and display maximum, minimum, average, and integration values between A/B cursors. Integration values are displayed only for integrable items.
[Item settings] tab
HIOKI LR5092B980-04

7.4 Automatically Importing (Saving) Recorded Data to a Computer, and Graph Display92
The main table features are shown below.
Convenient Table FunctionsUse the following operations to scroll the table and copy data to the clipboard.
Main Table Features
Shows the item no., serial no., model com-ment, CH comment, property, measurement units, and average, maximum, minimum, and integration values of all data.
Double click a maximum or minimum numeri-cal value to jump to the relevant cell (or to the first if there are multiple relevant cells).
Time of Recording
Recorded ValuesBlue indicates minimum values, and red indicates maximum values.
Item ContentsPress Ctrl and Home keys simultane-ously Moves to the upper left corner of the table.
Press Ctrl and End keys simultane-ously Moves to the lower right corner of the table.
Home key Scrolls to display the left edge of the table.
End key Scrolls to the right edge of the table.
Press Ctrl and C keys simultaneously Copies the value of the currently selected cell to the clip-board.
HIOKI LR5092B980-04

7.4 Automatically Importing (Saving) Recorded Data to a Computer, and Graph Display93
7
Chapter 7 U
sing the LR5000 U
tility Program
3
Click the [Display Item] button in the viewer to display the [Select Items for Display]screen.
Menu Bar Items
Selecting Items for Display
Click 1 Select up to 600 items for display.
2 Click the [OK] button.
Check1
Click2
Menu Items Contents
Select Items
Add and clear selection of multiple items (display in blue) selected with the mouse.When there are 600 item in the above list, click to select or clear all items.
Select all items (up to 600) of the same property.
Sort Items
Sort by model name, serial no., or model comment.Move blue mouse-selected items up or down.
Restore original order.
HIOKI LR5092B980-04
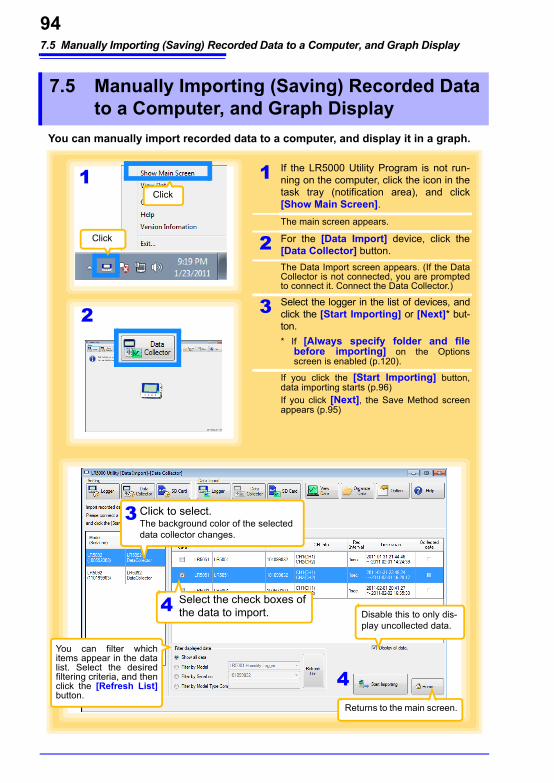
7.5 Manually Importing (Saving) Recorded Data to a Computer, and Graph Display94
You can manually import recorded data to a computer, and display it in a graph.
7.5 Manually Importing (Saving) Recorded Data to a Computer, and Graph Display
1 If the LR5000 Utility Program is not run-ning on the computer, click the icon in the task tray (notification area), and click [Show Main Screen].The main screen appears.
2 For the [Data Import] device, click the [Data Collector] button.The Data Import screen appears. (If the Data Collector is not connected, you are prompted to connect it. Connect the Data Collector.)
3 Select the logger in the list of devices, and click the [Start Importing] or [Next]* but-ton.* If [Always specify folder and file
before importing] on the Options screen is enabled (p.120).
If you click the [Start Importing] button, data importing starts (p.96)If you click [Next], the Save Method screen appears (p.95)
2
Click to select.The background color of the selected data collector changes.
3
4Returns to the main screen.
You can filter which items appear in the data list. Select the desired filtering criteria, and then click the [Refresh List]button.
Select the check boxes of the data to import.4
Disable this to only dis-play uncollected data.
1Click
Click
HIOKI LR5092B980-04
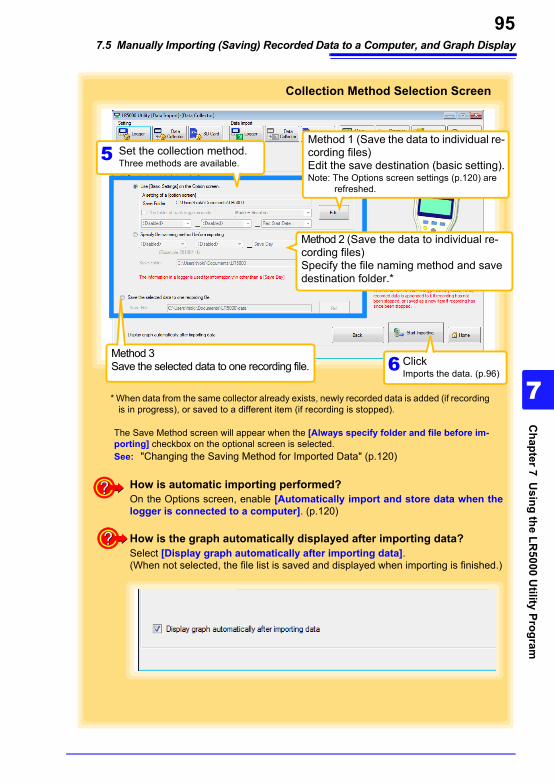
7.5 Manually Importing (Saving) Recorded Data to a Computer, and Graph Display95
7
Chapter 7 U
sing the LR5000 U
tility Program
3
How is automatic importing performed? On the Options screen, enable [Automatically import and store data when the logger is connected to a computer]. (p.120)
Set the collection method.Three methods are available.5
ClickImports the data. (p.96)6
Method 3Save the selected data to one recording file.
Method 2 (Save the data to individual re-cording files)Specify the file naming method and save destination folder.*
* When data from the same collector already exists, newly recorded data is added (if recording is in progress), or saved to a different item (if recording is stopped).
Collection Method Selection Screen
How is the graph automatically displayed after importing data?Select [Display graph automatically after importing data].(When not selected, the file list is saved and displayed when importing is finished.)
Method 1 (Save the data to individual re-cording files)Edit the save destination (basic setting).Note: The Options screen settings (p.120) are
refreshed.
The Save Method screen will appear when the [Always specify folder and file before im-porting] checkbox on the optional screen is selected.See: "Changing the Saving Method for Imported Data" (p.120)
HIOKI LR5092B980-04
7.5 Manually Importing (Saving) Recorded Data to a Computer, and Graph Display96
Screen after importing data
Click the button to display the table.
The Data Collector Settings screen (p.72) appears.
Displays the Data Import screen (p.94).
Returns to the main screen.
Click the button to display the graph.(If there are more than 16 items to display, the display item selection screen appears. Select the items to be displayed in the graph. (p.93)
HIOKI LR5092B980-04
7.6 Importing Recorded Data from SD Memory Card to Computer and Displaying Graph97
7
Chapter 7 U
sing the LR5000 U
tility Program
3
You can use the LR5000 Utility Program installed on the computer to import (save) recorded data from the collector to the computer.(Installation procedure: "7.1" (p.65)Required Items: SD memory card, SD memory card reader, Computer
7.6 Importing Recorded Data from SD Memory Card to Computer and Displaying Graph
1 Insert the SD memory card in an SD memory card reader.
2 Connect the SD memory card reader to a USB port on the computer.
Saving Settings Data to SD Memory Card
1 If the LR5000 Utility Program is not run-ning on the computer, click the icon in the task tray (notification area), and click [Show Main Screen].
The main screen appears.
2 For the [Data Import] device, click the [SD Card] button.
The Data Import screen appears. If the SD memory card is not connected, you are prompted to connect it. Connect the SD mem-ory card.
2
1Click
Click
HIOKI LR5092B980-04
7.6 Importing Recorded Data from SD Memory Card to Computer and Displaying Graph98
3 Click the [Next] button.
4 Select the check boxes of the data you want to import to the computer, and then click the [Start Import] button (or [Next] button*).* If [Always specify folder and file before importing] on the Options screen is
enabled (p.120).If you click the [Start Importing] button, data importing starts (p.96)If you click the [Next] button, the Collection Method Selection screen appears. (p.99)
Returns to the main screen.
Click3
When you want to import data from a specific folder, select the [Import from Specified Fold-er] check box, and then specify the folder.
Select check boxes.
4Click4
Returns to the main screen.
You can filter which items appear in the data list.Select the desired filtering criteria, and then click the [Refresh List] button.
Disable this to only dis-play uncollected data.
Returns to the previous screen.
HIOKI LR5092B980-04
7.6 Importing Recorded Data from SD Memory Card to Computer and Displaying Graph99
7
Chapter 7 U
sing the LR5000 U
tility Program
3
Method 1 (Save to separate recording files)Edit the save destination (basic setting).Note: The Options screen settings (p.120) are
refreshed.
Set the collection methodThree methods are available.5
ClickImport the data. (p.96)6
Method 3Save the selected data to one recording file.
Method 2 (Save to separate recording files)Specify the file naming method and save destination folder.*
* When data from the same logger already exists, newly recorded data is added (if recording is in progress), or saved in a different channel file (if recording is stopped).
Collection Method Selection Screen
How is the graph automatically displayed after importing data?Select [Display graph automatically after importing data].(When not selected, the file list is saved and displayed when importing is finished.)
HIOKI LR5092B980-04
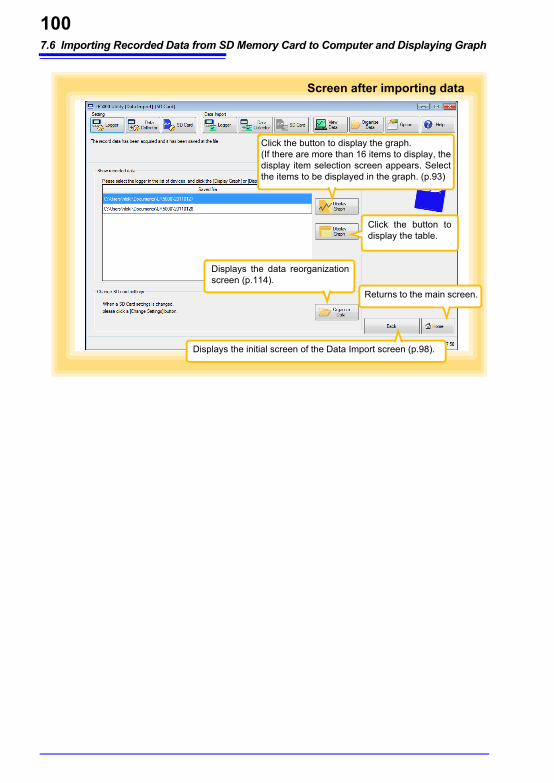
7.6 Importing Recorded Data from SD Memory Card to Computer and Displaying Graph100
Screen after importing data
Click the button to display the table.
Displays the data reorganization screen (p.114).
Displays the initial screen of the Data Import screen (p.98).
Returns to the main screen.
Click the button to display the graph.(If there are more than 16 items to display, the display item selection screen appears. Select the items to be displayed in the graph. (p.93)
HIOKI LR5092B980-04

7.7 Displaying a Graph of Saved Recording Data101
7
Chapter 7 U
sing the LR5000 U
tility Program
3
Use the LR5000 Utility Program to display saved recording data as a graph.
7.7 Displaying a Graph of Saved Recording Data
1 If the Utility Program is not running on the computer, click the icon in the task tray (notification area), and click [View Data].*
The Data View screen appears.The [View latest data] tab shows a list of the loggers with data saved on the computer.
2 Select the logger from the list.
Information about the latest data appears.
3 Click the [Display Graph] button.
The viewer opens to display the graph (p.86).(If there are more than 16 items to display, the display item selection screen appears. Select the items to be displayed in the graph (p.93).
* If the LR5000 Utility Program is run-ning, click [View Data] in the main screen.
1Click
Click
Click to select.The background color of the selected logger changes.
2
3
Information about the latest data
HIOKI LR5092B980-04

7.7 Displaying a Graph of Saved Recording Data102
Other Data Viewing Screen Functions
Filter displayed dataYou can filter which loggers appear in the list. Specify the desired filtering criteria, and click the [Refresh List] button.Note: You can enter up to 20 characters for [Filter by Mod-
el Comment].
Display TableOpens the viewer to display the table of imported (or selected) data.
How can past data be viewed?On the [Search Folders] tab, select the folder and file name to display.
Recently folderThe last ten folders containing data that was displayed as a graph or ta-ble are listed.
Select the drive2
Select the folder3
Select the file4
Click1
HIOKI LR5092B980-04
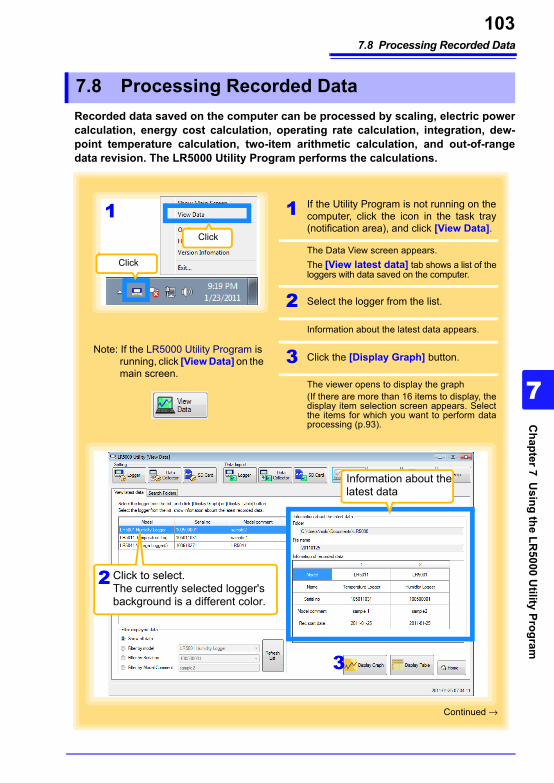
7.8 Processing Recorded Data103
7
Chapter 7 U
sing the LR5000 U
tility Program
3
Recorded data saved on the computer can be processed by scaling, electric power calculation, energy cost calculation, operating rate calculation, integration, dew-point temperature calculation, two-item arithmetic calculation, and out-of-range data revision. The LR5000 Utility Program performs the calculations.
7.8 Processing Recorded Data
Click to select.The currently selected logger's background is a different color.
2
3
Information about the latest data
1
Continued →
1 If the Utility Program is not running on the computer, click the icon in the task tray (notification area), and click [View Data].
The Data View screen appears.The [View latest data] tab shows a list of the loggers with data saved on the computer.
2 Select the logger from the list.
Information about the latest data appears.
3 Click the [Display Graph] button.
The viewer opens to display the graph (If there are more than 16 items to display, the display item selection screen appears. Select the items for which you want to perform data processing (p.93).
Note: If the LR5000 Utility Program is running, click [View Data] on the main screen.
Click
Click
HIOKI LR5092B980-04

7.8 Processing Recorded Data104
[Process Data] Items
4 Click [Process Data] in the menu bar, and select the desired items.
Click
Items Contents SeeScaling Performs scaling on the data of one channel. (p.105)
Power Calculation Performs approximate electric power calculation. (p.106)
Energy Cost Performs approximate energy cost calculation. (p.107)
Operating Rate Performs approximate operating rate calculation. (p.108)
Integration Integrates displayed data. (p.109)
Dew Point Performs dew-point temperature calculation. (p.110)
Two-Data-Item Arithmetic Performs approximate two-data-item arithmetic calculation. (p.111)
OVER Data Revision
Converts data outside of the upper and lower threshold set-tings to specified values, and saves as new data items. (p.112)
HIOKI LR5092B980-04
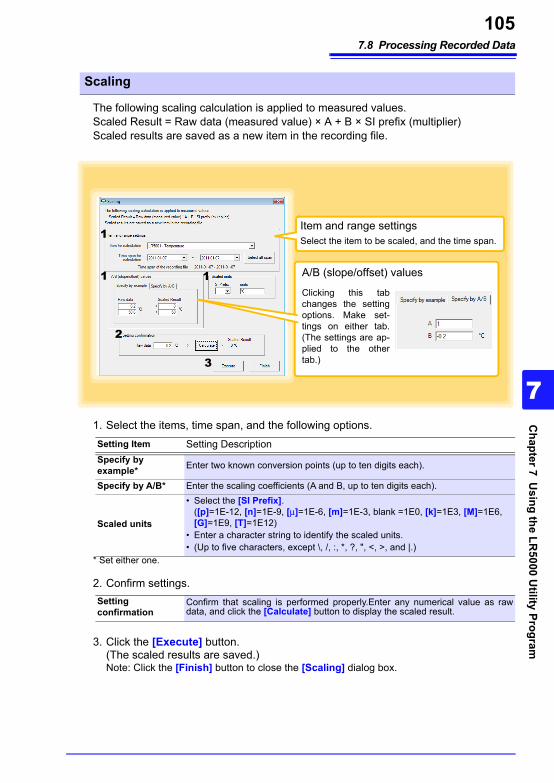
7.8 Processing Recorded Data105
7
Chapter 7 U
sing the LR5000 U
tility Program
3
The following scaling calculation is applied to measured values.Scaled Result = Raw data (measured value) × A + B × SI prefix (multiplier)Scaled results are saved as a new item in the recording file.
1. Select the items, time span, and the following options.
* Set either one.
2. Confirm settings.
3. Click the [Execute] button. (The scaled results are saved.)Note: Click the [Finish] button to close the [Scaling] dialog box.
Scaling
Item and range settingsSelect the item to be scaled, and the time span.
Clicking this tab changes the setting options. Make set-tings on either tab. (The settings are ap-plied to the other tab.)
A/B (slope/offset) values
1
2
3
1 1
Setting Item Setting DescriptionSpecify by example* Enter two known conversion points (up to ten digits each).
Specify by A/B* Enter the scaling coefficients (A and B, up to ten digits each).
Scaled units
• Select the [SI Prefix]. ([p]=1E-12, [n]=1E-9, [μ]=1E-6, [m]=1E-3, blank =1E0, [k]=1E3, [M]=1E6, [G]=1E9, [T]=1E12)
• Enter a character string to identify the scaled units. • (Up to five characters, except \, /, :, *, ?, ", <, >, and |.)
Setting confirmation
Confirm that scaling is performed properly.Enter any numerical value as raw data, and click the [Calculate] button to display the scaled result.
HIOKI LR5092B980-04

7.8 Processing Recorded Data106
Approximate electric power is calculated using current measurement data from a clamp logger.Calculation results are saved as a new item in the recording file.
1. Select the items, time span, and calculation formula to be used.
2. Specify the voltage, power factor, and units.•To save the settings, click the [Register] button. •To apply a registered setting, double click it ("Setting1” in the above screenshot).•To delete a setting, click it then click the [Delete] button.
3. Click the [Execute] button. (Calculation results are saved.)Note: Click the [Finish] button to close the [Power Calculation] dialog box.
Calculating Electric Power
• Electric power calculations are only approximate, so results do not always equal the true electric power value. Use a wattmeter if accu-rate power measurements are required.
• There is no way to confirm that a specified data item is really a current value. Calculation occurs regardless of data type.
Item and range settingsSpecify two measured current values and the time span for calculation.
[Electric Power Type]Choose [1P2W], [1P3W] or [3P3W] to select the appropriate calculation formula.
Calculation formula
1
1
2
3
HIOKI LR5092B980-04

7.8 Processing Recorded Data107
7
Chapter 7 U
sing the LR5000 U
tility Program
3
Approximate energy cost is calculated using current measurement data from a clamp logger.
1. Select the item and time span.
2. Specify the cost per kWh, voltage, and power factor.
3. Click the [Calculate] button. (Electric power consumption and energy cost values are calculated and displayed.)Note: Click the [Finish] button to close the [Energy Cost] dialog box.
Calculating Energy Cost
• Energy cost calculations are only approximate, so results do not always equal the true energy cost.
• There is no way to confirm that a specified data item is really an elec-tric power value. Calculation occurs regardless of data type.
Item and range settingsSpecify the measured current value and the time span for calculation.The time span can also be specified by setting the A/B cursors (p.88) on a graph and selecting [Calculate between A/B cursors].
1
2
3
HIOKI LR5092B980-04
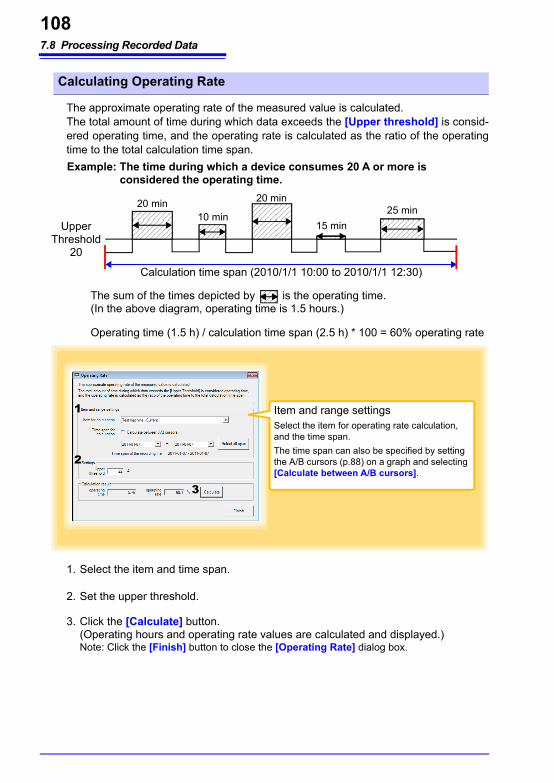
7.8 Processing Recorded Data108
The approximate operating rate of the measured value is calculated.The total amount of time during which data exceeds the [Upper threshold] is consid-ered operating time, and the operating rate is calculated as the ratio of the operating time to the total calculation time span.
1. Select the item and time span.
2. Set the upper threshold.
3. Click the [Calculate] button. (Operating hours and operating rate values are calculated and displayed.) Note: Click the [Finish] button to close the [Operating Rate] dialog box.
Calculating Operating Rate
Item and range settingsSelect the item for operating rate calculation, and the time span.The time span can also be specified by setting the A/B cursors (p.88) on a graph and selecting [Calculate between A/B cursors].
1
2
3
Upper Threshold
20
Example: The time during which a device consumes 20 A or more is considered the operating time.
The sum of the times depicted by is the operating time. (In the above diagram, operating time is 1.5 hours.)
20 min10 min
20 min
15 min25 min
Operating time (1.5 h) / calculation time span (2.5 h) * 100 = 60% operating rate
Calculation time span (2010/1/1 10:00 to 2010/1/1 12:30)
HIOKI LR5092B980-04

7.8 Processing Recorded Data109
7
Chapter 7 U
sing the LR5000 U
tility Program
3
Measurement data can be integrated over a specified time span.Integration results are saved as a new item in the recording file.
1. Select the item and time span.
2. Click the [Execute] button. (Integration results are saved.)Note: Click the [Finish] button to close the [Integration] dialog box.
Integration
Item and range settingsSelect the item to be integrated, and the time span.
1
2
HIOKI LR5092B980-04

7.8 Processing Recorded Data110
Dew-point temperature is calculated from the temperature and humidity measurement data from the logger.Calculation results are saved as a new item in the recording file.
1. Select the items and time span.
2. Click the [Execute] button. (Calculation results are saved.)Note: Click the [Finish] button to close the [Dew Point] dialog box.
Calculating Dew-Point Temperature
• There is no way to confirm that a specified data item is really a tem-perature or humidity value. Dew-point calculation occurs regardless of data type.
• Only the specified temperature and humidity data measured during the specified recording time span is applied to calculations and saved.
• The valid range for calculation input measurement data is -100 to 100 degrees, and 0 to 100% humidity. Values outside of these ranges are replaced with the maximum or minimum value within the valid range.
Item and range settingsSpecify the temperature and humidity values, and the time span for calculation.
1
2
HIOKI LR5092B980-04

7.8 Processing Recorded Data111
7
Chapter 7 U
sing the LR5000 U
tility Program
3
Simple arithmetic operations (+, -, *, and /) can be applied to two data items.Calculation results are saved as a new item in the recording file.
1. Select the items and time span.
2. Select the calculation operator.
3. Click the [Execute] button. (Calculation results are saved.)Note: Click the [Finish] button to close the [Two-Data-Item Arithmetic] dialog box.
Two-Data-Item Arithmetic Calculations
Only the values of data items measured during the specified recording time span are applied to calculations and saved.
Item and range settingsSelect the items for calculation, and the time span.
1
2
3
HIOKI LR5092B980-04
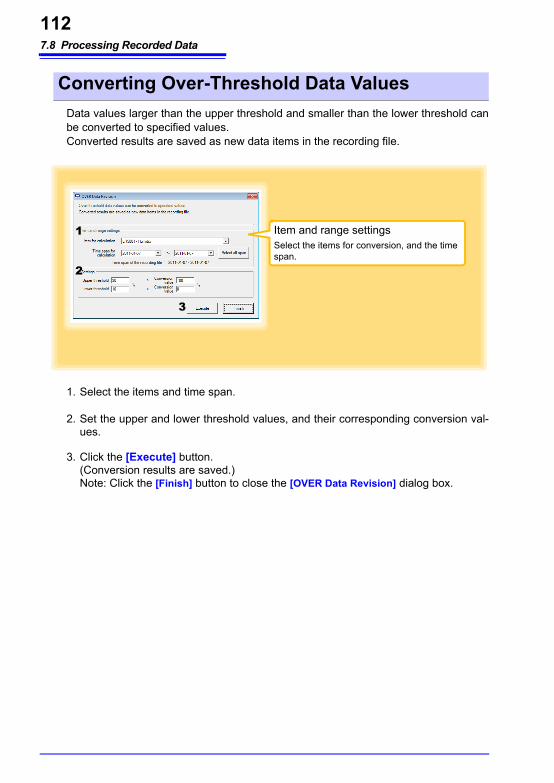
7.8 Processing Recorded Data112
Data values larger than the upper threshold and smaller than the lower threshold can be converted to specified values.Converted results are saved as new data items in the recording file.
1. Select the items and time span.
2. Set the upper and lower threshold values, and their corresponding conversion val-ues.
3. Click the [Execute] button. (Conversion results are saved.) Note: Click the [Finish] button to close the [OVER Data Revision] dialog box.
Converting Over-Threshold Data Values
Item and range settingsSelect the items for conversion, and the time span.
1
2
3
HIOKI LR5092B980-04

7.9 Printing Recorded Data113
7
Chapter 7 U
sing the LR5000 U
tility Program
3
Saved recording data can be printed as a graph. Graphs displayed in the LR5000 Utility Program can be printed on A3, A4, or B4-size paper.With the desired graph displayed, click the [Print] button.See: Graph Display Methods:"7.4" (p.85), "7.5" (p.94), and "7.7" (p.101)
7.9 Printing Recorded Data
Click
Example Graph Printout
How can I print only part of a graph?Specify the time span to print, and click [Print] button. Times that are not displayed are not printed.See: "Viewer Screen" (p.86)
HIOKI LR5092B980-04
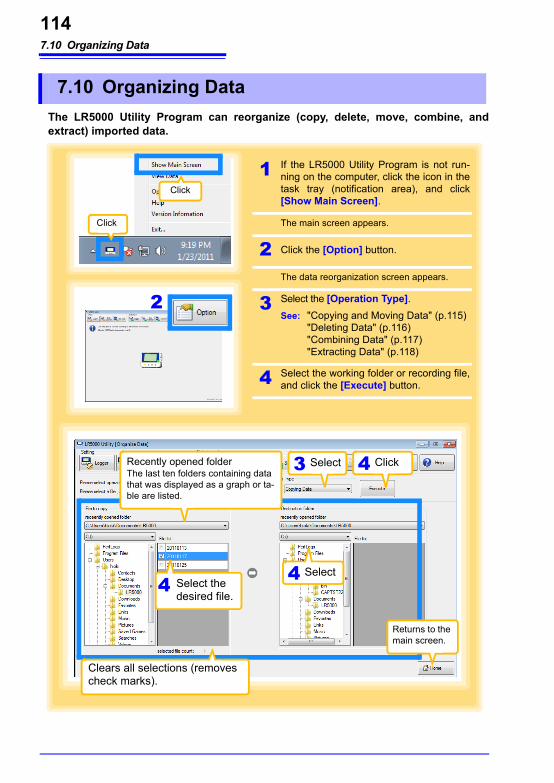
7.10 Organizing Data114
The LR5000 Utility Program can reorganize (copy, delete, move, combine, and extract) imported data.
7.10 Organizing Data
2
Returns to the main screen.
Select3 4 Click
Select4
Recently opened folderThe last ten folders containing data that was displayed as a graph or ta-ble are listed.
Select the desired file.
Clears all selections (removes check marks).
Click
Click
4
1 If the LR5000 Utility Program is not run-ning on the computer, click the icon in the task tray (notification area), and click [Show Main Screen].
The main screen appears.
2 Click the [Option] button.
The data reorganization screen appears.
3 Select the [Operation Type].See: "Copying and Moving Data" (p.115)
"Deleting Data" (p.116) "Combining Data" (p.117) "Extracting Data" (p.118)
4 Select the working folder or recording file, and click the [Execute] button.
HIOKI LR5092B980-04

7.10 Organizing Data115
7
Chapter 7 U
sing the LR5000 U
tility Program
3
The selected logger recording files can be copied or moved to any folder.
Copying and Moving Data
Select the drive.2
Select the folder.3
Select the file. (Up to 100 can be selected.)
4
Select the drive.5
Select [Copying Data] or [Moving Data].
17 Click
Select the folder.6
Example: Copying files in the C:\Users\hioki\Documents\LR5000 folder to the C:\backup folder.
The management format of the PC utility program (LR5000 Utility) will be retained even using this function to copy or move data to the SD mem-ory card. This is different from the format when retrieving to the SD card on the LR5092 (p.41).Data moved or copied to the SD card via the PC utility program will not be recognized on the LR5092.
HIOKI LR5092B980-04

7.10 Organizing Data116
Select and delete logger recording files as follows.
Deleting Data
Select the drive.2
Select the folder.3
Select the file. (Up to 100 can be selected.)
4
Select [Deleting Data].1 5 Click
Example: Deleting files in the C:\Users\hioki\Documents\LR5000 folder.
How can the data in the collector memory be deleted?See: "Clearing Data from Collector Memory" (p.49)
How can the data in the SD memory card be deleted?See: "Clearing Data from SD Memory Card" (p.51)
HIOKI LR5092B980-04
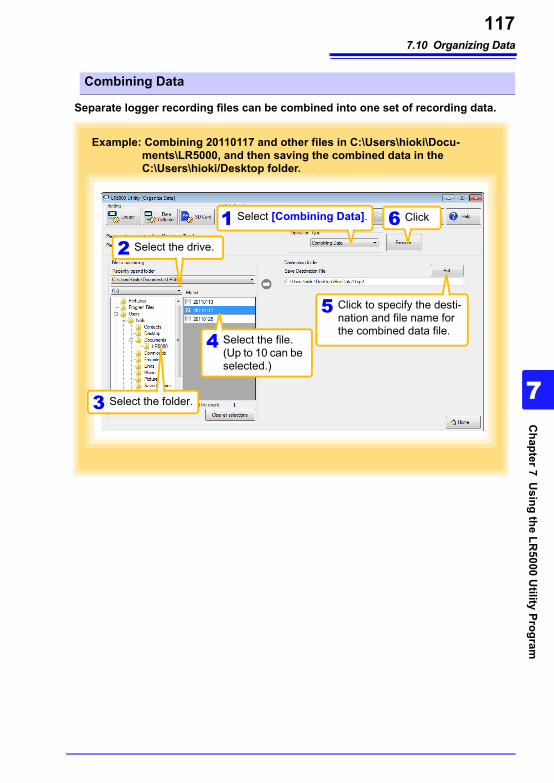
7.10 Organizing Data117
7
Chapter 7 U
sing the LR5000 U
tility Program
3
Separate logger recording files can be combined into one set of recording data.
Combining Data
Select the drive.2
Select the folder.3
Select the file. (Up to 10 can be selected.)
4
Select [Combining Data].1 6 Click
Click to specify the desti-nation and file name for the combined data file.
5
Example: Combining 20110117 and other files in C:\Users\hioki\Docu-ments\LR5000, and then saving the combined data in the C:\Users\hioki/Desktop folder.
HIOKI LR5092B980-04
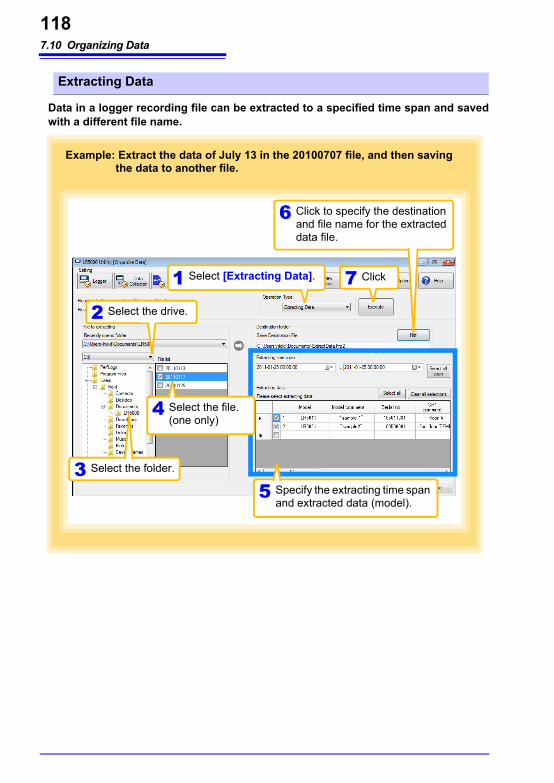
7.10 Organizing Data118
Data in a logger recording file can be extracted to a specified time span and saved with a different file name.
Extracting Data
Select the drive.2
Select the folder.3
Select [Extracting Data].1 7 Click
Click to specify the destination and file name for the extracted data file.
6
Example: Extract the data of July 13 in the 20100707 file, and then saving the data to another file.
Specify the extracting time span and extracted data (model).
5
Select the file. (one only)
4
HIOKI LR5092B980-04
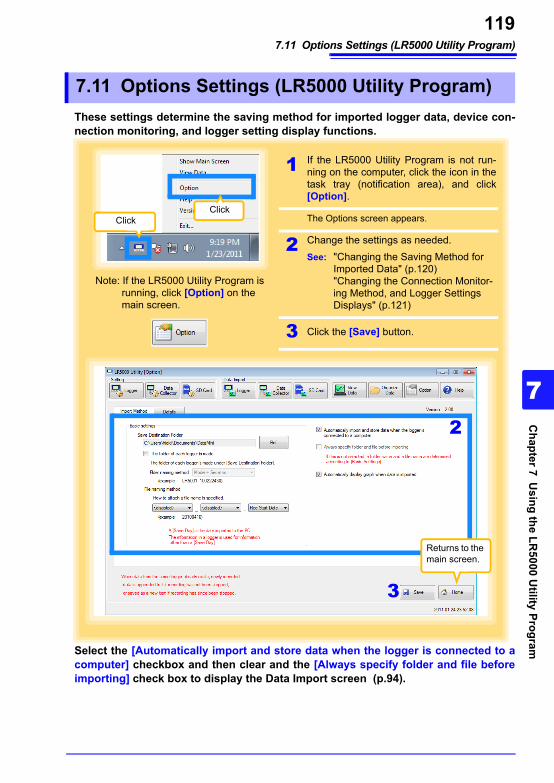
7.11 Options Settings (LR5000 Utility Program)119
7
Chapter 7 U
sing the LR5000 U
tility Program
3
These settings determine the saving method for imported logger data, device con-nection monitoring, and logger setting display functions.
Select the [Automatically import and store data when the logger is connected to a computer] checkbox and then clear and the [Always specify folder and file before importing] check box to display the Data Import screen (p.94).
7.11 Options Settings (LR5000 Utility Program)
Returns to the main screen.
3
2
ClickClick
Note: If the LR5000 Utility Program is running, click [Option] on the main screen.
1 If the LR5000 Utility Program is not run-ning on the computer, click the icon in the task tray (notification area), and click [Option].
The Options screen appears.
2 Change the settings as needed.See: "Changing the Saving Method for
Imported Data" (p.120) "Changing the Connection Monitor-ing Method, and Logger Settings Displays" (p.121)
3 Click the [Save] button.
HIOKI LR5092B980-04

7.11 Options Settings (LR5000 Utility Program)120
The saving method for imported logger data can be changed as follows.
Changing the Saving Method for Imported Data
Click the [Import Method] tab.1Click to specify the save destination folder.2
If you select the check box, select the folder name.
3
How can the save destination folder be changed?
How can the file naming method be changed?
File names can be specified as a combi-nation of up to three of these components:(model name, model comment, serial no., record-ing start day, recording start date and time, and save day)
Set Auto Import and Auto Graph Display functions, if desired.See: P.85 , P.94
HIOKI LR5092B980-04
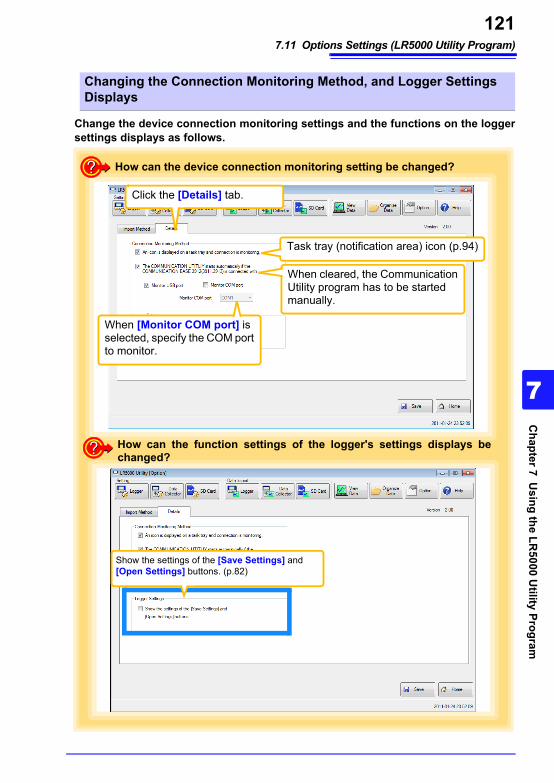
7.11 Options Settings (LR5000 Utility Program)121
7
Chapter 7 U
sing the LR5000 U
tility Program
3
Change the device connection monitoring settings and the functions on the logger settings displays as follows.
Changing the Connection Monitoring Method, and Logger Settings Displays
Task tray (notification area) icon (p.94)
Click the [Details] tab.
When cleared, the Communication Utility program has to be started manually.
How can the device connection monitoring setting be changed?
When [Monitor COM port] is selected, specify the COM port to monitor.
How can the function settings of the logger's settings displays be changed?
Show the settings of the [Save Settings] and [Open Settings] buttons. (p.82)
HIOKI LR5092B980-04
7.11 Options Settings (LR5000 Utility Program)122
HIOKI LR5092B980-04
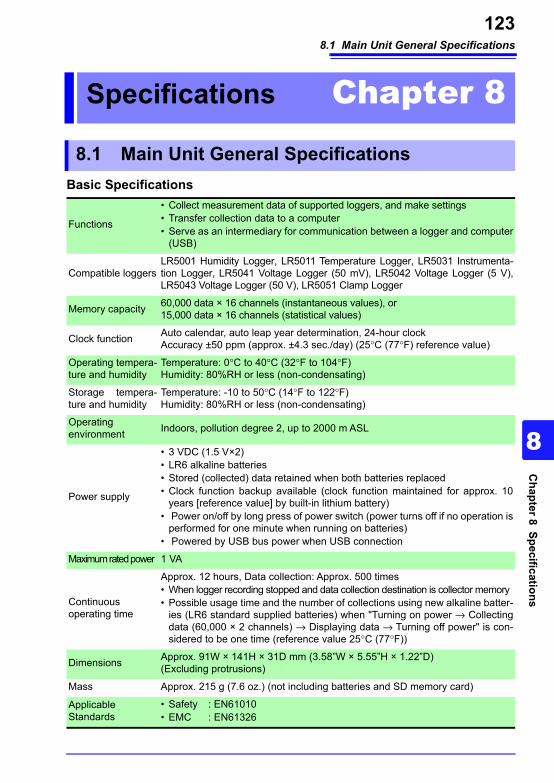
8.1 Main Unit General Specifications123
8
Chapter 8 Specifications
3
Basic Specifications
Specifications Chapter 8
8.1 Main Unit General Specifications
Functions
• Collect measurement data of supported loggers, and make settings• Transfer collection data to a computer• Serve as an intermediary for communication between a logger and computer
(USB)
Compatible loggersLR5001 Humidity Logger, LR5011 Temperature Logger, LR5031 Instrumenta-tion Logger, LR5041 Voltage Logger (50 mV), LR5042 Voltage Logger (5 V), LR5043 Voltage Logger (50 V), LR5051 Clamp Logger
Memory capacity 60,000 data × 16 channels (instantaneous values), or 15,000 data × 16 channels (statistical values)
Clock function Auto calendar, auto leap year determination, 24-hour clockAccuracy ±50 ppm (approx. ±4.3 sec./day) (25°C (77°F) reference value)
Operating tempera-ture and humidity
Temperature: 0°C to 40°C (32°F to 104°F) Humidity: 80%RH or less (non-condensating)
Storage tempera-ture and humidity
Temperature: -10 to 50°C (14°F to 122°F) Humidity: 80%RH or less (non-condensating)
Operating environment Indoors, pollution degree 2, up to 2000 m ASL
Power supply
• 3 VDC (1.5 V×2) • LR6 alkaline batteries• Stored (collected) data retained when both batteries replaced• Clock function backup available (clock function maintained for approx. 10
years [reference value] by built-in lithium battery)• Power on/off by long press of power switch (power turns off if no operation is
performed for one minute when running on batteries)• Powered by USB bus power when USB connection
Maximum rated power 1 VA
Continuous operating time
Approx. 12 hours, Data collection: Approx. 500 times• When logger recording stopped and data collection destination is collector memory• Possible usage time and the number of collections using new alkaline batter-
ies (LR6 standard supplied batteries) when "Turning on power → Collecting data (60,000 × 2 channels) → Displaying data → Turning off power" is con-sidered to be one time (reference value 25°C (77°F))
Dimensions Approx. 91W × 141H × 31D mm (3.58”W × 5.55”H × 1.22”D) (Excluding protrusions)
Mass Approx. 215 g (7.6 oz.) (not including batteries and SD memory card)
Applicable Standards
• Safety : EN61010• EMC : EN61326
HIOKI LR5092B980-04

8.1 Main Unit General Specifications124
Display
External interface
External storage
Logger communication
Product warranty period 3 years
Display text Japanese/English (Factory default setting: Japanese for Japan, English for overseas)
Display Dot-matrix STN LCD (128 × 64 dots)
Dot pitch 0.48W mm × 0.48H mm (0.02”W × 0.02”H)
Backlight LED (Backlight turns off when no operation for 30 seconds)
LCD lifespan MTBF: Approx 50,000 hours (25°C (77°F), 60% RH or less)
USB standard USB 2.0 compliant, Full Speed supported
Connector Mini B series receptacle
Connectable device Computer
Functions
Exchange setting items and data with a computer using the supplied LR5000 Utility Program.• Setting Items:
Clock, logger settings (saved to collector and SD memory card), and logger settings of a connected logger
• Data: Recorded data saved to collector and SD memory card, and recorded data of connected logger
• Data can only be transferred from the collector to the computer• Powered by USB bus power when connected to computer
Communication speed 250,000bps
Slot SD Card Physical Layer System Specification, Version 2.00 compliant1 slot
Card types SD memory card and SDHC supported
Card capacity Up to 32 GB supported
Data formats FAT and FAT32 supported
Stored data Logger setting conditions (binary files)Measurement data (binary files)
Communication method Half-duplex start/stop synchronous infrared serial communication
Communication speed 115,200bps
HIOKI LR5092B980-04
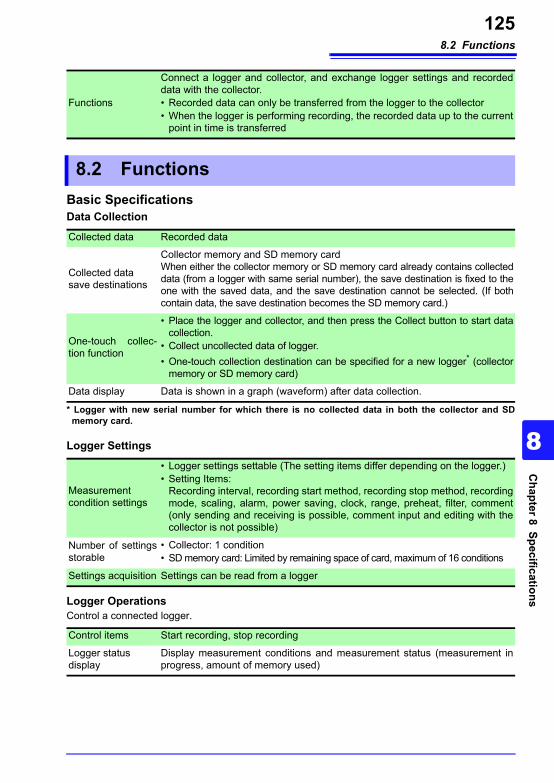
8.2 Functions125
8
Chapter 8 Specifications
3
Basic Specifications
* Logger with new serial number for which there is no collected data in both the collector and SD memory card.
Functions
Connect a logger and collector, and exchange logger settings and recorded data with the collector.• Recorded data can only be transferred from the logger to the collector• When the logger is performing recording, the recorded data up to the current
point in time is transferred
8.2 Functions
Data CollectionCollected data Recorded data
Collected data save destinations
Collector memory and SD memory cardWhen either the collector memory or SD memory card already contains collected data (from a logger with same serial number), the save destination is fixed to the one with the saved data, and the save destination cannot be selected. (If both contain data, the save destination becomes the SD memory card.)
One-touch collec-tion function
• Place the logger and collector, and then press the Collect button to start data collection.
• Collect uncollected data of logger.• One-touch collection destination can be specified for a new logger* (collector
memory or SD memory card)
Data display Data is shown in a graph (waveform) after data collection.
Logger Settings
Measurement condition settings
• Logger settings settable (The setting items differ depending on the logger.)• Setting Items:
Recording interval, recording start method, recording stop method, recording mode, scaling, alarm, power saving, clock, range, preheat, filter, comment (only sending and receiving is possible, comment input and editing with the collector is not possible)
Number of settings storable
• Collector: 1 condition• SD memory card: Limited by remaining space of card, maximum of 16 conditions
Settings acquisition Settings can be read from a logger
Logger OperationsControl a connected logger.
Control items Start recording, stop recording
Logger status display
Display measurement conditions and measurement status (measurement in progress, amount of memory used)
HIOKI LR5092B980-04
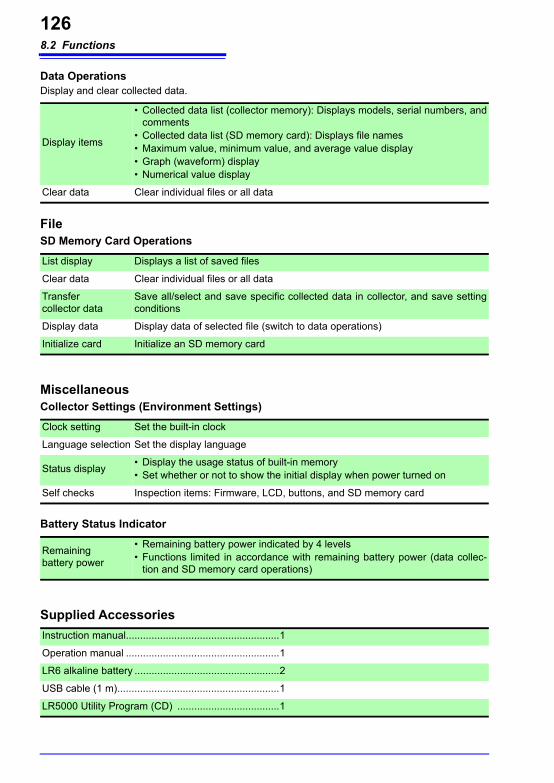
8.2 Functions126
File
Miscellaneous
Supplied Accessories
Data OperationsDisplay and clear collected data.
Display items
• Collected data list (collector memory): Displays models, serial numbers, and comments
• Collected data list (SD memory card): Displays file names• Maximum value, minimum value, and average value display• Graph (waveform) display• Numerical value display
Clear data Clear individual files or all data
SD Memory Card OperationsList display Displays a list of saved files
Clear data Clear individual files or all data
Transfer collector data
Save all/select and save specific collected data in collector, and save setting conditions
Display data Display data of selected file (switch to data operations)
Initialize card Initialize an SD memory card
Collector Settings (Environment Settings)Clock setting Set the built-in clock
Language selection Set the display language
Status display • Display the usage status of built-in memory• Set whether or not to show the initial display when power turned on
Self checks Inspection items: Firmware, LCD, buttons, and SD memory card
Battery Status Indicator
Remaining battery power
• Remaining battery power indicated by 4 levels• Functions limited in accordance with remaining battery power (data collec-
tion and SD memory card operations)
Instruction manual......................................................1
Operation manual ......................................................1
LR6 alkaline battery ...................................................2
USB cable (1 m).........................................................1
LR5000 Utility Program (CD) ....................................1
HIOKI LR5092B980-04
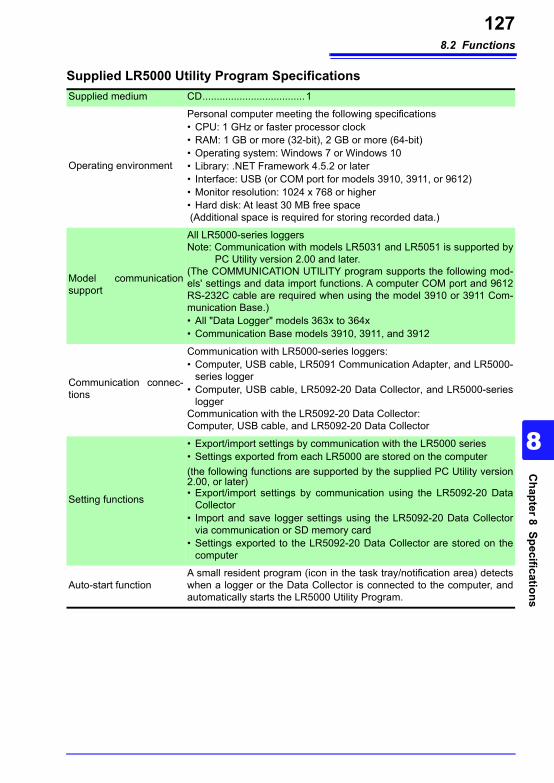
8.2 Functions127
8
Chapter 8 Specifications
3
Supplied LR5000 Utility Program SpecificationsSupplied medium CD....................................1
Operating environment
Personal computer meeting the following specifications• CPU: 1 GHz or faster processor clock• RAM: 1 GB or more (32-bit), 2 GB or more (64-bit)• Operating system: Windows 7 or Windows 10• Library: .NET Framework 4.5.2 or later• Interface: USB (or COM port for models 3910, 3911, or 9612)• Monitor resolution: 1024 x 768 or higher• Hard disk: At least 30 MB free space (Additional space is required for storing recorded data.)
Model communication support
All LR5000-series loggersNote: Communication with models LR5031 and LR5051 is supported by
PC Utility version 2.00 and later.(The COMMUNICATION UTILITY program supports the following mod-els' settings and data import functions. A computer COM port and 9612 RS-232C cable are required when using the model 3910 or 3911 Com-munication Base.)• All "Data Logger" models 363x to 364x• Communication Base models 3910, 3911, and 3912
Communication connec-tions
Communication with LR5000-series loggers:• Computer, USB cable, LR5091 Communication Adapter, and LR5000-
series logger• Computer, USB cable, LR5092-20 Data Collector, and LR5000-series
loggerCommunication with the LR5092-20 Data Collector:Computer, USB cable, and LR5092-20 Data Collector
Setting functions
• Export/import settings by communication with the LR5000 series• Settings exported from each LR5000 are stored on the computer(the following functions are supported by the supplied PC Utility version 2.00, or later)• Export/import settings by communication using the LR5092-20 Data
Collector• Import and save logger settings using the LR5092-20 Data Collector
via communication or SD memory card• Settings exported to the LR5092-20 Data Collector are stored on the
computer
Auto-start functionA small resident program (icon in the task tray/notification area) detects when a logger or the Data Collector is connected to the computer, and automatically starts the LR5000 Utility Program.
HIOKI LR5092B980-04
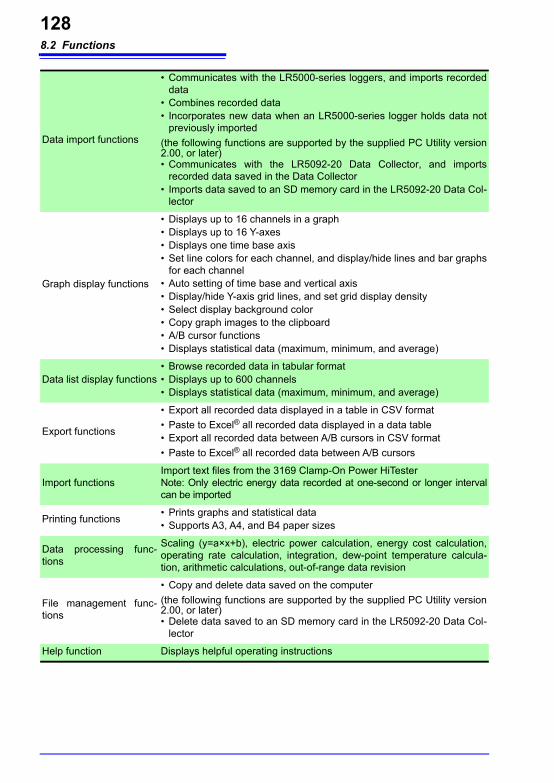
8.2 Functions128
Data import functions
• Communicates with the LR5000-series loggers, and imports recorded data
• Combines recorded data• Incorporates new data when an LR5000-series logger holds data not
previously imported(the following functions are supported by the supplied PC Utility version 2.00, or later)• Communicates with the LR5092-20 Data Collector, and imports
recorded data saved in the Data Collector• Imports data saved to an SD memory card in the LR5092-20 Data Col-
lector
Graph display functions
• Displays up to 16 channels in a graph• Displays up to 16 Y-axes• Displays one time base axis• Set line colors for each channel, and display/hide lines and bar graphs
for each channel• Auto setting of time base and vertical axis• Display/hide Y-axis grid lines, and set grid display density• Select display background color• Copy graph images to the clipboard• A/B cursor functions• Displays statistical data (maximum, minimum, and average)
Data list display functions• Browse recorded data in tabular format• Displays up to 600 channels• Displays statistical data (maximum, minimum, and average)
Export functions
• Export all recorded data displayed in a table in CSV format• Paste to Excel® all recorded data displayed in a data table • Export all recorded data between A/B cursors in CSV format• Paste to Excel® all recorded data between A/B cursors
Import functionsImport text files from the 3169 Clamp-On Power HiTesterNote: Only electric energy data recorded at one-second or longer interval can be imported
Printing functions • Prints graphs and statistical data• Supports A3, A4, and B4 paper sizes
Data processing func-tions
Scaling (y=a×x+b), electric power calculation, energy cost calculation, operating rate calculation, integration, dew-point temperature calcula-tion, arithmetic calculations, out-of-range data revision
File management func-tions
• Copy and delete data saved on the computer(the following functions are supported by the supplied PC Utility version 2.00, or later)• Delete data saved to an SD memory card in the LR5092-20 Data Col-
lector
Help function Displays helpful operating instructions
HIOKI LR5092B980-04

9.1 Cleaning129
9
Chapter 9 M
aintenance and Service
3Use the original packing materials when transporting the instrument, if possible.Pack the instrument so that it will not sustain damage during shipping, and include a description of existing damage. We do not take any responsibility for damage incurred during shipping.
The instrument contains a built-in backup lithium battery, which offers a service life of about ten years. If the date and time deviate substantially when the instrument is switched on, it is the time to replace that battery. Contact your dealer or Hioki repre-sentative.
To clean the instrument, wipe it gently with a soft cloth moistened with water or mild detergent. Never use solvents such as benzene, alcohol, acetone, ether, ketones, thinners or gasoline, as they can deform and discolor the case.
Maintenance and Service Chapter 9Requesting Repairs
When the logger will not be used for long time
To avoid corrosion and damage to this instrument from battery leakage, remove the batteries from the instrument if it is to be stored for a long time (1 week).
Lifespan of Backup Battery
9.1 Cleaning
Wipe the LCD gently with a soft, dry cloth.
HIOKI LR5092B980-04

9.2 Troubleshooting130
If damage is suspected, check the "Before requesting repairs" section before con-tacting your dealer or Hioki representative.
9.2 Troubleshooting
Before requesting repairs
Symptom Check Item or Cause Remedies and References
No indications appear on the display when the POWER button is pressed.
• Are batteries installed?• Did you press and hold the
POWER button?• The power protection element
may be damaged.
• Check that batteries are installed properly.
• Press and hold the POWER button for 1 second.
• Contact the place of purchase or your nearest Hioki sales office because replacement and repairs cannot be performed by customers.
The power does not turn off when the POWER button is pressed.
• Is the collector connected to a computer with a USB cable?
• Did you press and hold the POWER button?
• The power will not turn off if the collec-tor is connected to a computer with a USB cable. The power will be turned off when the USB cable is removed.
• Press and hold the POWER button for 1 second.
The power turned on even though the POWER button was not pressed.
• Is the POWER button in a pressed state?
• Is the collector connected to a computer with a USB cable?
• Check the POWER button.• When the collector is connected to a
computer with a USB cable, the power turns on even if the POWERbutton is not pressed.
Button operation is not possible.
Is one of the buttons in a pressed state? Check the operation buttons.
Cannot collect data from a logger.
• Are the collector and logger placed correctly in position?
• Is the communication IR port dirty or scratched?
• Place them correctly in position.• Clean the IR port. If there is signifi-
cant damage, the collector needs to be repaired. Contact the place of pur-chase or your nearest Hioki sales office.
Cannot save to an SD memory card.
• Is the SD memory card inserted properly?
• Has the SD memory card been initialized?
• Is the write protect tab (LOCK) of the SD memory card in the unlock position?
• Is there not much space left?
See: "2.2 Inserting an SD Card (When Necessary)" (p.17)
See: "5.5 Initializing SD Memory Card" (p.54)
Check the amount of remaining space.
HIOKI LR5092B980-04
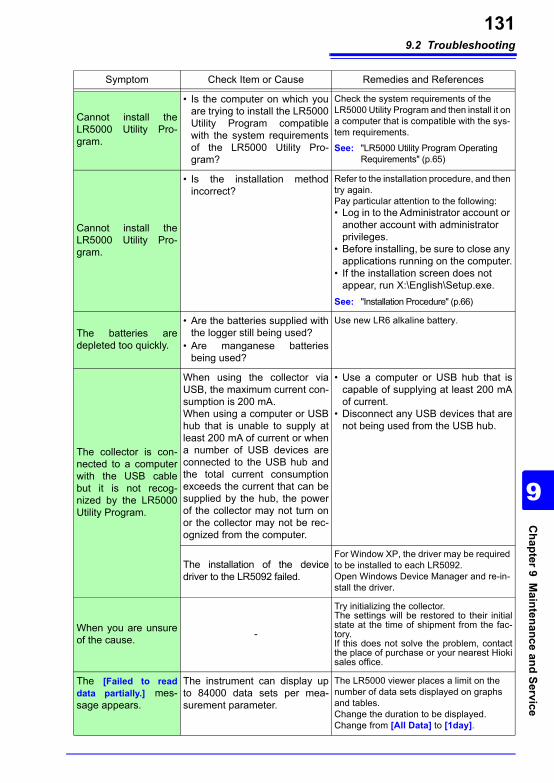
9.2 Troubleshooting131
9
Chapter 9 M
aintenance and Service
3
Cannot install the LR5000 Utility Pro-gram.
• Is the computer on which you are trying to install the LR5000 Utility Program compatible with the system requirements of the LR5000 Utility Pro-gram?
Check the system requirements of the LR5000 Utility Program and then install it on a computer that is compatible with the sys-tem requirements.
See: "LR5000 Utility Program Operating Requirements" (p.65)
Cannot install the LR5000 Utility Pro-gram.
• Is the installation method incorrect?
Refer to the installation procedure, and then try again.Pay particular attention to the following:• Log in to the Administrator account or
another account with administrator privileges.
• Before installing, be sure to close any applications running on the computer.
• If the installation screen does not appear, run X:\English\Setup.exe.
See: "Installation Procedure" (p.66)
The batteries are depleted too quickly.
• Are the batteries supplied with the logger still being used?
• Are manganese batteries being used?
Use new LR6 alkaline battery.
The collector is con-nected to a computer with the USB cable but it is not recog-nized by the LR5000 Utility Program.
When using the collector via USB, the maximum current con-sumption is 200 mA.When using a computer or USB hub that is unable to supply at least 200 mA of current or when a number of USB devices are connected to the USB hub and the total current consumption exceeds the current that can be supplied by the hub, the power of the collector may not turn on or the collector may not be rec-ognized from the computer.
• Use a computer or USB hub that is capable of supplying at least 200 mA of current.
• Disconnect any USB devices that are not being used from the USB hub.
The installation of the device driver to the LR5092 failed.
For Window XP, the driver may be required to be installed to each LR5092.Open Windows Device Manager and re-in-stall the driver.
When you are unsure of the cause. -
Try initializing the collector.The settings will be restored to their initial state at the time of shipment from the fac-tory.If this does not solve the problem, contact the place of purchase or your nearest Hioki sales office.
The [Failed to read data partially.] mes-sage appears.
The instrument can display up to 84000 data sets per mea-surement parameter.
The LR5000 viewer places a limit on the number of data sets displayed on graphs and tables.Change the duration to be displayed.Change from [All Data] to [1day].
Symptom Check Item or Cause Remedies and References
HIOKI LR5092B980-04
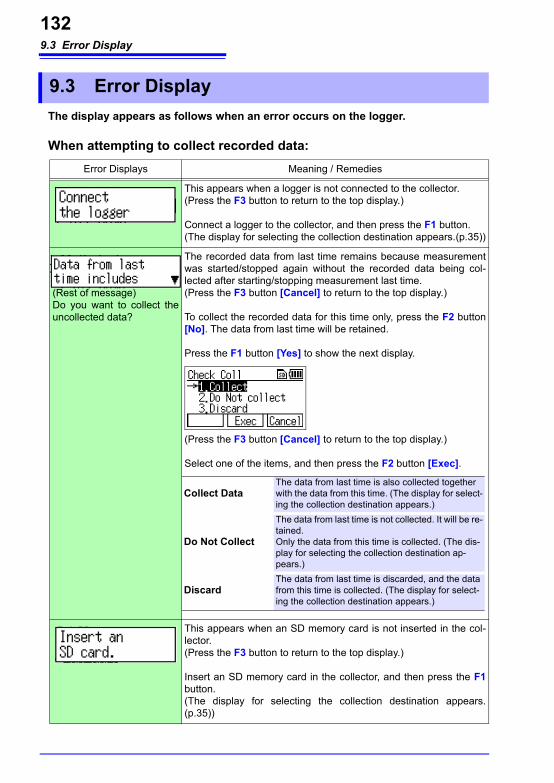
9.3 Error Display132
The display appears as follows when an error occurs on the logger.
When attempting to collect recorded data:
9.3 Error Display
Error Displays Meaning / Remedies
This appears when a logger is not connected to the collector.(Press the F3 button to return to the top display.)
Connect a logger to the collector, and then press the F1 button.(The display for selecting the collection destination appears.(p.35))
(Rest of message)Do you want to collect the uncollected data?
The recorded data from last time remains because measurement was started/stopped again without the recorded data being col-lected after starting/stopping measurement last time.(Press the F3 button [Cancel] to return to the top display.)
To collect the recorded data for this time only, press the F2 button [No]. The data from last time will be retained.
Press the F1 button [Yes] to show the next display.
(Press the F3 button [Cancel] to return to the top display.)
Select one of the items, and then press the F2 button [Exec].
This appears when an SD memory card is not inserted in the col-lector.(Press the F3 button to return to the top display.)
Insert an SD memory card in the collector, and then press the F1button.(The display for selecting the collection destination appears. (p.35))
Collect DataThe data from last time is also collected together with the data from this time. (The display for select-ing the collection destination appears.)
Do Not Collect
The data from last time is not collected. It will be re-tained.Only the data from this time is collected. (The dis-play for selecting the collection destination ap-pears.)
DiscardThe data from last time is discarded, and the data from this time is collected. (The display for select-ing the collection destination appears.)
HIOKI LR5092B980-04

9.3 Error Display133
9
Chapter 9 M
aintenance and Service
3
(Rest of message)process method.
This appears when there is insufficient space in the collector mem-ory.(Press the F3 button [Cancel] to return to the top display.)
Press the F1 button to select the process method. One of the fol-lowing displays appears.
(Press the F3 button [Back] to return to the previous display.)
Select one of the items, and then press the F2 button [Exec]
(Rest of message)Replace the card.
This appears when there is insufficient space in the SD memory card.(Press the F3 button [Cancel] to return to the top display.)
Replace the SD memory card with one that has sufficient space, and then press the F1 button. The display for confirming the start of collection appears.
Error Displays Meaning / Remedies
When new logger When logger for which previous collection history exists
Memory clearThe data is cleared from the collector memory.(The Clear Data display appears. (p.49) Select the data to clear, and then clear it. Perform data collection again after clearing the data.)
Coll. to SDChanges the collection destination to the SD memory card.(The display for confirming the start of collection appears. (p.35))
Move to SDThe data in the collector memory that was collect-ed last time is moved to the SD memory card.(The Move Collector Data display appears. (p.42) Perform data collection again after moving the data.)
Cancel to coll. The top display reappears.
HIOKI LR5092B980-04
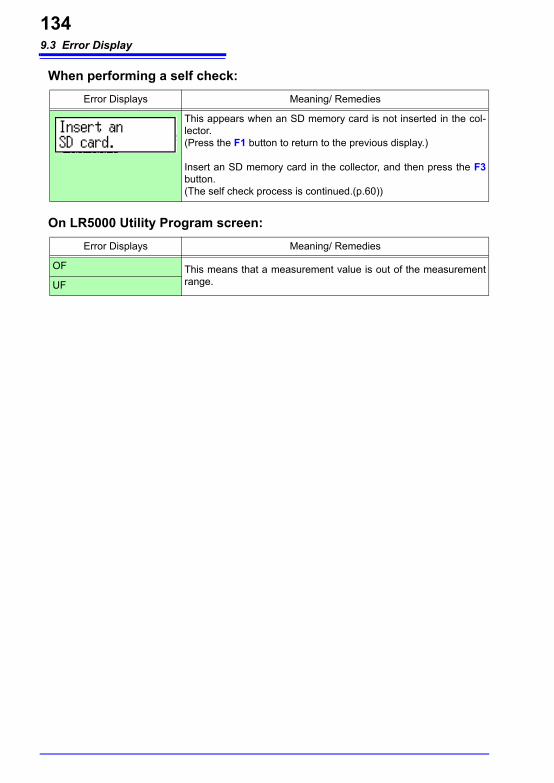
9.3 Error Display134
When performing a self check:
On LR5000 Utility Program screen:
Error Displays Meaning/ Remedies
This appears when an SD memory card is not inserted in the col-lector.(Press the F1 button to return to the previous display.)
Insert an SD memory card in the collector, and then press the F3button.(The self check process is continued.(p.60))
Error Displays Meaning/ Remedies
OF This means that a measurement value is out of the measurement range.UF
HIOKI LR5092B980-04
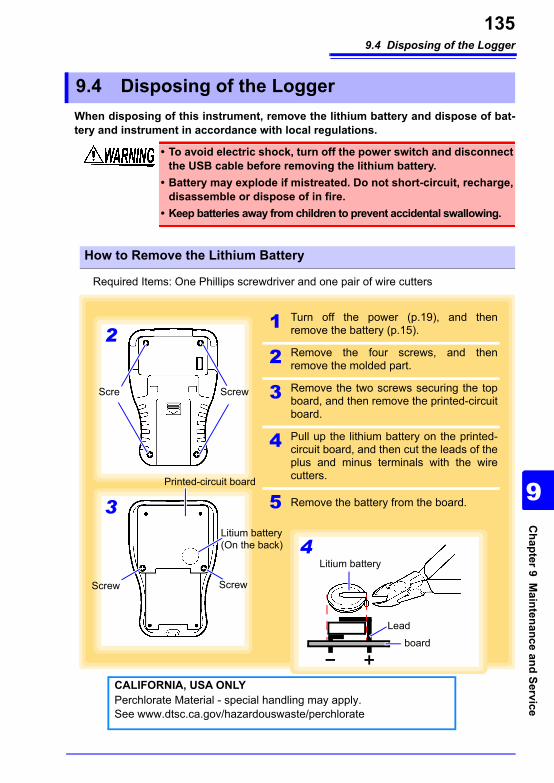
9.4 Disposing of the Logger135
9
Chapter 9 M
aintenance and Service
3
When disposing of this instrument, remove the lithium battery and dispose of bat-tery and instrument in accordance with local regulations.
Required Items: One Phillips screwdriver and one pair of wire cutters
9.4 Disposing of the Logger
• To avoid electric shock, turn off the power switch and disconnect the USB cable before removing the lithium battery.
• Battery may explode if mistreated. Do not short-circuit, recharge, disassemble or dispose of in fire.
• Keep batteries away from children to prevent accidental swallowing.
How to Remove the Lithium Battery
1 Turn off the power (p.19), and then remove the battery (p.15).
2 Remove the four screws, and then remove the molded part.
3 Remove the two screws securing the top board, and then remove the printed-circuit board.
4 Pull up the lithium battery on the printed-circuit board, and then cut the leads of the plus and minus terminals with the wire cutters.
5 Remove the battery from the board.
2
Scre
3
Screw Screw
Screw
Litium battery(On the back)
Leadboard
Litium battery4
Printed-circuit board
CALIFORNIA, USA ONLYPerchlorate Material - special handling may apply.See www.dtsc.ca.gov/hazardouswaste/perchlorate
HIOKI LR5092B980-04
9.4 Disposing of the Logger136
HIOKI LR5092B980-04
IndexIndex i
Inde
AAccessories ................................................. 2AL indicator ...............................................81Alarm ..........................................................24Alarm thresholds .......................................81Auto graph display ....................................85Auto import ........................................85, 120
BBasic button operations ........................... 11Battery status indicator ............................16Before requesting repairs ...................... 130Browsing .................................................... 31
CCalculating dew-point temperature ...... 110Calculating electric power .....................106Calculating energy cost ......................... 107Calculating operating rate .....................108Changing Settings
LR5000 Utilyty Program .......................75Changing the connection monitoring ... 121Changing the saving method ................120Cleaning ...................................................129Clearing ...................................................... 49Clock setting .............................................. 59COLLECT button ...................................... 32Collecting ...................................................31Collection data display items ............33, 36Collection Method Selection Screen ......99Collection method selection screen .......95Collector settings display .........................14Comment Settings ....................................24
DDamage ...................................................130Danger levels .............................................. 4Data collection display .............................13Data List .....................................................39Data management ....................................39Data verification display ........................... 13Date and time ............................................ 77
Decimal Point ........................................... 24Device connection monitoring setting .. 121Display ....................................................... 11Display graph ..............96, 97, 100, 101, 103Display Organization
LR5092 .................................................. 12Disposing ................................................ 135
EEndless Recording ................................... 77
FFeatures ...................................................... 9File structure
SD memory card ................................... 41Filter ........................................................... 24From Logger ............................................. 27
GGraph settings .......................................... 89
HHow can past data be viewed? ............ 102How can the displayed area be magnified? ..................................................................... 88How can the file naming method be changed? ........................................... 120How can the function settings of the logger's settings displays be changed? ................................................................... 121How can the save destination folder be changed? ........................................... 120How can the settings of another logger be saved to the SD memory card? ........ 73How can the settings of the current data collector be reflected in the setting options? ..................................................... 73How is the graph automatically displayed after importing data? ........ 95, 99How to edit the logger settings (LR5000 Utility Program) ........................ 76
Index
xHIOKI LR5092B980-04
IndexIndex ii
IImporting ....................................................85Importing setting conditions .....................48Initializing
Collector .................................................64SD memory card ...................................54
Inspection ...................................................20Installation precautions ..............................4Installing .....................................................65Installing (or replacing) the battery .........15Instantaneous ............................................77Integration ................................................109Integration values .....................................92
LLanguage setting ......................................58Lifespan of backup battery ....................129Lithium battery .........................................135Logger operation/settings display ...........13Logger Settings .........................................21Logger Status ............................................28Logger Type ..............................................24Lower threshold .........................................81LR5000 Utility Program ............................65
Screens ..................................................69Setting .....................................................72Start ........................................................67Uninstall ..................................................68Version upgrading .................................68
MMaintenance ............................................129Markings on the logger ...............................3Memory usage status display ........... 12, 19Model comment .........................................76Mouse operation .........................................1Moving ........................................................42
NNotation ........................................................1Numerical value display .................... 33, 36
OOne-Time Recording ................................77One-touch collection .......................... 31, 55Operating buttons .....................................10Operating precautions ................................4Operating requirements ...........................65
Operation flow ............................................. 6Options settings(LR5000 Utility Program) ................................................................... 119Organizing data ...................................... 114
Combining ........................................... 117Copying ................................................ 115Deleting ................................................ 116Extracting ............................................. 118Moving .................................................. 115
Overview ...................................................... 9
PPackage contents ....................................... 2Part names/Functions .............................. 10POWER button ......................................... 19Power save setting ................................... 76Power Saving ............................................ 24Preheat ...................................................... 24Preliminary checks ..................................... 5Preparation ................................................ 15Printing ..................................................... 113
RRange ........................................................ 24Rec Interval ............................................... 24Rec Start Method ..................................... 25Rec Stop Method ...................................... 25Receiving settings from logger ............... 27Recording interval .................................... 77Recording Mode ................................. 24, 77Recording Start Method .......................... 77Recording Stop Method ........................... 77Requesting repairs ................................. 129Resistered trade marks ............................. 1Restoring to factory default state ........... 64
SSafety information ...................................... 3Safety symbols ........................................... 3Saving setting conditions ......................... 46Scaling .........................................24, 79, 105Sched. (Endless) ...................................... 25Sched. (Once) ........................................... 25Scheduled Time ........................................ 77SD card display ........................................ 14SD memory card ....................................... 97
for shich operation is guaranteed ....... 18Inserting ................................................. 17
HIOKI LR5092B980-04
IndexIndex iii
Inde
Saving setting data (LR5000 Utility Program) .....................83
Self checkButtons and Buzzers ............................62Firmware ................................................60Key, Buzzer ...........................................62LCD ......................................................... 61SD Card ................................................. 63
Self checks ................................................60Sending settings to logger .......................26Service .....................................................129Settings ...................................................... 21Settings (with the Collector) ....................21Settings list ................................................22Show Main Screen .....................94, 97, 114Specifications .......................................... 123Starting and stopping recording .............. 29Starting and stopping recording on logger ......................................................... 29Startup Display ....................................12, 57Statistical Recording ................................77Stop Time Data ......................................... 24Symbols for various standards ................. 3System settings ........................................55
TTo Logger ..................................................26Top display ................................................12Transporting precautions ........................... 2Troubleshooting ......................................130Turning the power on/off ..........................19
UUninstall .....................................................68Unit .............................................................24Upper threshold ........................................81
VVersion upgrading ....................................68Veryfying recording/setting status of logger ......................................................... 28View Data ........................................101, 103Viewer ........................................................86
WWaveform graph display ....................33, 36When the logger will not be used for long time ............................................16, 129
xHIOKI LR5092B980-04

IndexIndex iv
HIOKI LR5092B980-04
HIOKI LR5092B980-04

HIOKI LR5092B980-04

HIOKI LR5092B980-04

HIOKI LR5092B980-04