installing and configuring oracle webcenter content › cd › f23552_01 › 12.2.1.4 › ... ·...
TRANSCRIPT
Oracle® Fusion MiddlewareInstalling and Configuring Oracle WebCenterContent
12c (12.2.1.4.0)E95183-01September 2019

Oracle Fusion Middleware Installing and Configuring Oracle WebCenter Content, 12c (12.2.1.4.0)
E95183-01
Copyright © 2019, 2019, Oracle and/or its affiliates. All rights reserved.
Primary Author: Oracle Corporation
This software and related documentation are provided under a license agreement containing restrictions onuse and disclosure and are protected by intellectual property laws. Except as expressly permitted in yourlicense agreement or allowed by law, you may not use, copy, reproduce, translate, broadcast, modify,license, transmit, distribute, exhibit, perform, publish, or display any part, in any form, or by any means.Reverse engineering, disassembly, or decompilation of this software, unless required by law forinteroperability, is prohibited.
The information contained herein is subject to change without notice and is not warranted to be error-free. Ifyou find any errors, please report them to us in writing.
If this is software or related documentation that is delivered to the U.S. Government or anyone licensing it onbehalf of the U.S. Government, then the following notice is applicable:
U.S. GOVERNMENT END USERS: Oracle programs, including any operating system, integrated software,any programs installed on the hardware, and/or documentation, delivered to U.S. Government end users are"commercial computer software" pursuant to the applicable Federal Acquisition Regulation and agency-specific supplemental regulations. As such, use, duplication, disclosure, modification, and adaptation of theprograms, including any operating system, integrated software, any programs installed on the hardware,and/or documentation, shall be subject to license terms and license restrictions applicable to the programs.No other rights are granted to the U.S. Government.
This software or hardware is developed for general use in a variety of information management applications.It is not developed or intended for use in any inherently dangerous applications, including applications thatmay create a risk of personal injury. If you use this software or hardware in dangerous applications, then youshall be responsible to take all appropriate fail-safe, backup, redundancy, and other measures to ensure itssafe use. Oracle Corporation and its affiliates disclaim any liability for any damages caused by use of thissoftware or hardware in dangerous applications.
Oracle and Java are registered trademarks of Oracle and/or its affiliates. Other names may be trademarks oftheir respective owners.
Intel and Intel Xeon are trademarks or registered trademarks of Intel Corporation. All SPARC trademarks areused under license and are trademarks or registered trademarks of SPARC International, Inc. AMD, Opteron,the AMD logo, and the AMD Opteron logo are trademarks or registered trademarks of Advanced MicroDevices. UNIX is a registered trademark of The Open Group.
This software or hardware and documentation may provide access to or information about content, products,and services from third parties. Oracle Corporation and its affiliates are not responsible for and expresslydisclaim all warranties of any kind with respect to third-party content, products, and services unless otherwiseset forth in an applicable agreement between you and Oracle. Oracle Corporation and its affiliates will not beresponsible for any loss, costs, or damages incurred due to your access to or use of third-party content,products, or services, except as set forth in an applicable agreement between you and Oracle.
Contents
Preface
Audience viii
Documentation Accessibility viii
Related Documents viii
Conventions ix
1 About the Oracle WebCenter Content Installation
Using the Standard Installation Topology as a Starting Point 1-1
About the WebCenter Content Standard Installation Topology 1-1
About Elements in the Standard Installation Topology Illustration 1-3
About Installing Oracle User Messaging Service 1-4
About Oracle WebCenter Content Scale Up 1-4
Using This Document to Extend an Existing Domain 1-4
2 Preparing to Install and Configure Oracle WebCenter Content
Mandatory Steps for Installing WebCenter Content on Windows Operating Systems 2-1
Disabling the 8.3 File Naming Convention on a Windows Operating System 2-2
Downloading Visual C++ Libraries 2-2
Downloading Microsoft .Net Framework 4.x 2-3
Roadmap for Installing and Configuring the Standard Installation Topologies 2-3
Roadmap for Verifying Your System Environment 2-4
Verifying Certification, System, and Interoperability Requirements 2-5
Selecting an Installation User 2-6
About User Permissions 2-6
Understanding Non-Default User Permissions on UNIX Operating Systems 2-8
Verifying that the Installation User has Administrator Privileges on WindowsOperating Systems 2-8
Understanding Directories for Installation and Configuration 2-9
Understanding the Recommended Directory Structure 2-9
About the Oracle Home Directory 2-10
About the Domain Home Directory 2-11
iii

About the Application Home Directory 2-12
Installing Multiple Products in the Same Domain 2-12
Preparing for Shared Storage 2-13
Understanding JDK Requirements for an Oracle Fusion Middleware Installation 2-13
About Database Requirements for an Oracle Fusion Middleware Installation 2-14
Obtaining the Product Distribution 2-14
About Product Distributions 2-14
3 Installing the Oracle WebCenter Content Software
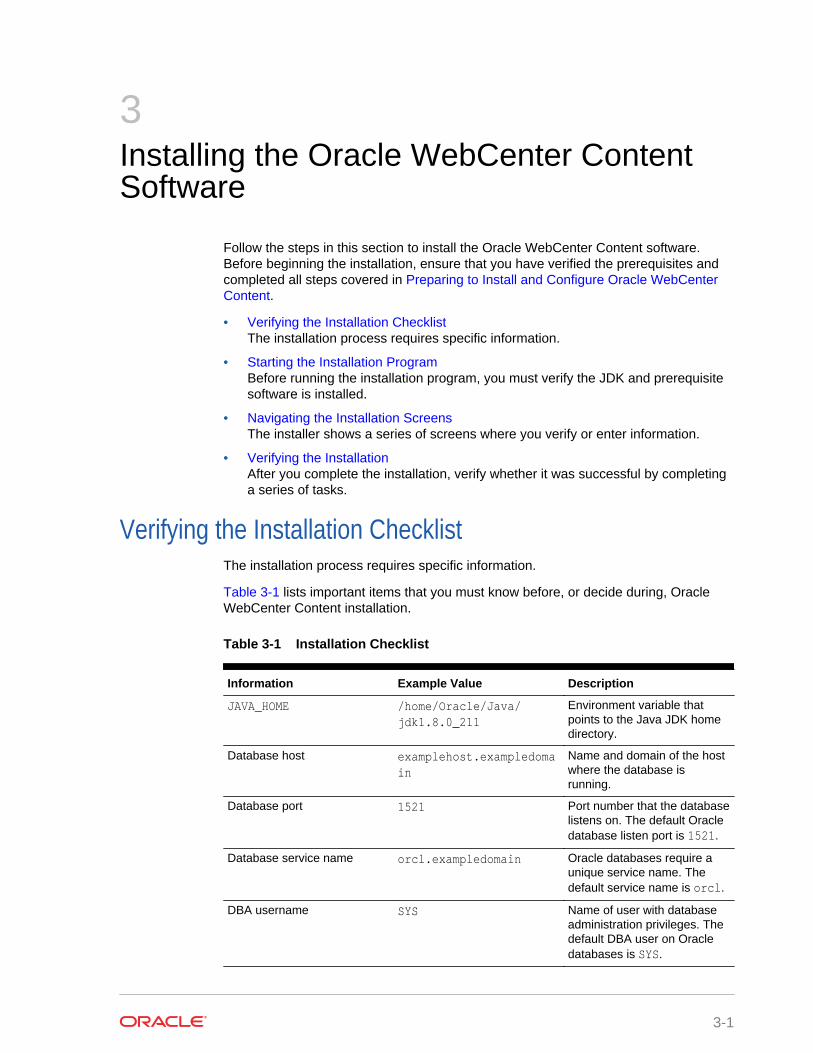
Verifying the Installation Checklist 3-1
Starting the Installation Program 3-2
Navigating the Installation Screens 3-3
Verifying the Installation 3-4
Reviewing the Installation Log Files 3-5
Checking the Directory Structure 3-5
Viewing the Contents of the Oracle Home 3-5
4 Configuring WebCenter Content Domain
Creating the Database Schemas 4-1
Installing and Configuring a Certified Database 4-2
Starting the Repository Creation Utility 4-2
Navigating the Repository Creation Utility Screens to Create Schemas 4-2
Introducing the RCU 4-3
Selecting a Method of Schema Creation 4-3
Providing Database Connection Details 4-3
Specifying a Custom Prefix and Selecting Schemas 4-4
Specifying Schema Passwords 4-5
Completing Schema Creation 4-5
Configuring the Domain 4-6
Starting the Configuration Wizard 4-6
Navigating the Configuration Wizard Screens to Create and Configure theDomain 4-6
Selecting the Domain Type and Domain Home Location 4-8
Selecting Configuration Templates for Oracle WebCenter Content 4-9
Configuring High Availability Options 4-9
Selecting the Application Home Location 4-10
Configuring the Administrator Account 4-11
Specifying the Domain Mode and JDK 4-11
Specifying JDBC Data Sources 4-11
Testing the JDBC Data Source 4-11
iv
Specifying the Database Configuration Type 4-12
Specifying JDBC Component Schema Information 4-13
Testing the JDBC Connections 4-13
Entering Credentials 4-13
Selecting Advanced Configuration 4-14
Configuring the Administration Server Listen Address 4-14
Configuring Node Manager 4-14
Configuring Managed Servers for Oracle WebCenter Content 4-15
Configuring a Cluster for WebCenter Content 4-15
Defining Server Templates 4-16
Configuring Dynamic Servers 4-16
Assigning WebCenter Content Managed Servers to the Cluster 4-16
Configuring Coherence Clusters 4-17
Creating a New WebCenter Content Machine 4-17
Assigning Servers to WebCenter Content Machines 4-18
Virtual Targets 4-18
Partitions 4-19
Reviewing Your Configuration Specifications and Configuring the Domain 4-19
Writing Down Your Domain Home and Administration Server URL 4-19
Starting the Servers 4-19
Starting Node Manager 4-20
Starting the Administration Server 4-20
Starting the Managed Servers 4-21
Oracle WebCenter Content Managed Server Locations (URLs) 4-22
Verifying the Configuration 4-22
Configuring Inbound Refinery Settings (Single Node) 4-22
Inbound Refinery Configuration Page 4-23
Configuring WebCenter Content Settings 4-25
WebCenter Content Configuration Page 4-26
Completing the Imaging Configuration 4-28
Completing the Initial Imaging Configuration 4-29
Configuring the Full-Text Features in the WebCenter Content Repository 4-36
Setting Imaging System Security 4-36
Configuring the Imaging Viewer Cache 4-37
Installing and Configuring AXF BPM and AXF for BPEL 4-39
Configuring Capture 4-53
About Completing the Oracle WebCenter Enterprise Capture Configuration 4-54
Completing the Initial Configuration of Oracle WebCenter EnterpriseCapture 4-54
v
5 Next Steps After Configuring the Domain
Performing Basic Administrative Tasks 5-1
Performing Additional Domain Configuration Tasks 5-2
Preparing Your Environment for High Availability 5-3
Configuring WebCenter Content User Interface on Additional Nodes 5-4
Setting the WebCenter Content User Interface Server Socket Port 5-5
Configuring WebCenter Content User Interface Settings 5-5
Setting Connection Attributes with WLST 5-5
Setting Connection Attributes with Fusion Middleware Control 5-6
Setting Configuration Attributes with WLST 5-6
Setting Configuration Attributes with Fusion Middleware Control 5-7
6 Uninstalling or Reinstalling Oracle WebCenter Content
About Product Uninstallation 6-1
Stopping Oracle Fusion Middleware 6-2
Removing Your Database Schemas 6-2
Uninstalling the Software 6-3
Starting the Uninstall Wizard 6-3
Selecting the Product to Uninstall 6-3
Navigating the Uninstall Wizard Screens 6-4
Removing the Oracle Home Directory Manually 6-4
Removing the Program Shortcuts on Windows Operating Systems 6-4
Removing the Domain and Application Data 6-5
Reinstalling the Software 6-5
A Configuring Content Server
Configuring Records Management in Content Server A-1
About Configuring Oracle iPlanet Web Server as a Web Tier and ConfiguringShared Folders A-3
Configuring the Content Server for Desktop A-3
About Installing and Configuring the Desktop on a Client Workstation A-5
Opening Files from Microsoft Office 2010 Over a Non-SSL Connection A-5
B Inbound Refinery Standalone Topology
Roadmap for Installing and Configuring the Inbound Refinery Standalone Topology B-1
vi
C Installing Libraries and Setting Environment Variables
Installing Libraries on UNIX Platforms C-1
Setting Library Paths in Environment Variables on UNIX Platforms C-3
D Additional Configuration Steps
Converting Vector Graphics and Spreadsheet Text in UNIX D-1
Setting up Fonts on a UNIX System D-2
Setting Up TrueType Fonts on a UNIX System D-2
Installing Fonts for National Language Support on a UNIX System D-3
Reassociating the Identity Store with an External LDAP Authentication Provider D-3
Reassociating the Identity Store with Oracle Internet Directory D-4
Configuring OracleTextSearch for Content Server D-9
Creating a Search Schema and Configuring an External Data Source D-9
Configuring OracleTextSearch for Content Server in a Configuration File D-10
Extracting and Running the Installation File for Desktop Client Software D-11
Using Command-Line Parameters for Automation D-12
Disabling Integrations D-12
Performing Silent Roll-Outs D-13
Configuring Content Server Connections Through the Registry on a WindowsSystem D-14
Creating a Hash Partition to Improve Database Performance D-15
E Updating the JDK After Installing and Configuring an Oracle FusionMiddleware Product
About Updating the JDK Location After Installing an Oracle Fusion MiddlewareProduct E-1
Updating the JDK Location in an Existing Oracle Home E-2
Updating the JDK Location in an Existing Domain Home E-3
vii
Preface
This document describes how to install and configure Oracle WebCenter Content.
• Audience
• Documentation Accessibility
• Related Documents
• ConventionsLearn about the conventions used in this document.
AudienceThis guide is intended for system administrators or application developers who areinstalling and configuring Oracle WebCenter Content. It is assumed that readers arefamiliar with web technologies and have a general understanding of Windows andUNIX platforms.
Documentation AccessibilityFor information about Oracle's commitment to accessibility, visit the OracleAccessibility Program website at http://www.oracle.com/pls/topic/lookup?ctx=acc&id=docacc.
Access to Oracle Support
Oracle customers that have purchased support have access to electronic supportthrough My Oracle Support. For information, visit http://www.oracle.com/pls/topic/lookup?ctx=acc&id=info or visit http://www.oracle.com/pls/topic/lookup?ctx=acc&id=trsif you are hearing impaired.
Related DocumentsRefer to the Oracle Fusion Middleware Library for additional information.
• For Oracle WebCenter Content information, see Oracle WebCenter ContentDocumentation.
• For installation information, see Fusion Middleware Installation Documentation.
• For upgrade information, see Fusion Middleware Upgrade Documentation.
• For administration-related information, see Fusion Middleware AdministrationDocumentation.
• For release-related information, see Fusion Middleware Release Notes.
Preface
viii
ConventionsLearn about the conventions used in this document.
This document uses the following text conventions:
Convention Meaning
boldface Boldface type indicates graphical user interface elements associatedwith an action, or terms defined in text or the glossary.
italic Italic type indicates book titles, emphasis, or placeholder variables forwhich you supply particular values.
monospace Monospace type indicates commands within a paragraph, URLs, codein examples, text that appears on the screen, or text that you enter.
Preface
ix

1About the Oracle WebCenter ContentInstallation
The standard installation for Oracle WebCenter Content described in this guidecreates the standard topology, which represents a sample starting topology for thisproduct.
• Using the Standard Installation Topology as a Starting PointThe standard installation topology is a flexible topology that you can use as astarting point in production environments.
• Using This Document to Extend an Existing DomainThe procedures in this guide describe how to create a new domain. Theassumption is that no other Oracle Fusion Middleware products are installed onyour system.
Using the Standard Installation Topology as a Starting PointThe standard installation topology is a flexible topology that you can use as a startingpoint in production environments.
The information in this guide helps you to create a standard installation topology forOracle WebCenter Content. If required, you can later extend the standard installationtopology to create a secure and highly available production environment, see NextSteps After Configuring the Domain.
The standard installation topology represents a sample topology for this product. It isnot the only topology that this product supports. See About the Standard InstallationTopology in Oracle Fusion Middleware Planning an Installation of Oracle FusionMiddleware.
• About the WebCenter Content Standard Installation TopologyThis topology represents a standard WebLogic Server domain that contains anAdministration Server and a cluster that contains two Managed Servers.
• About Elements in the Standard Installation Topology IllustrationThe standard installation topology typically includes common elements.
• About Installing Oracle User Messaging ServiceOracle User Messaging Service (UMS) is a software technology that enables two-way communication between users and deployed applications.
• About Oracle WebCenter Content Scale UpOracle WebCenter Content supports only one Inbound Refinery Managed Serverper node per domain, and one WebCenter Content Managed Server per node, perdomain.
About the WebCenter Content Standard Installation TopologyThis topology represents a standard WebLogic Server domain that contains anAdministration Server and a cluster that contains two Managed Servers.
1-1
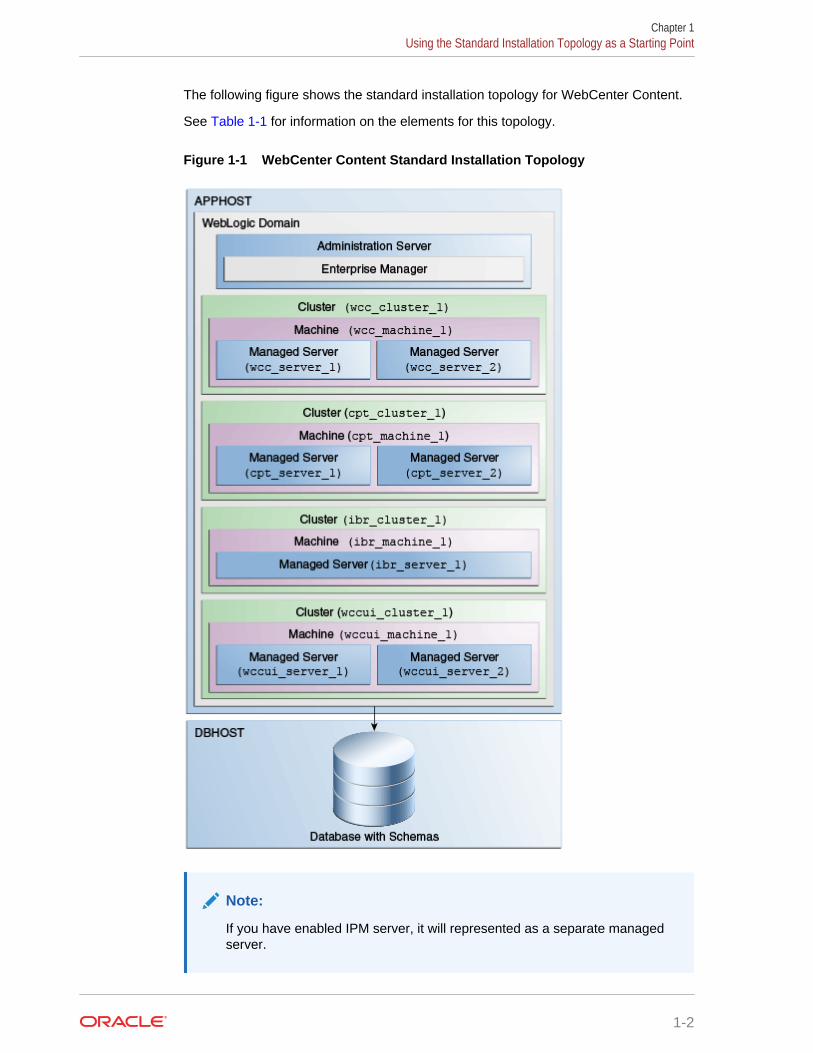
The following figure shows the standard installation topology for WebCenter Content.
See Table 1-1 for information on the elements for this topology.
Figure 1-1 WebCenter Content Standard Installation Topology
Note:
If you have enabled IPM server, it will represented as a separate managedserver.
Chapter 1Using the Standard Installation Topology as a Starting Point
1-2
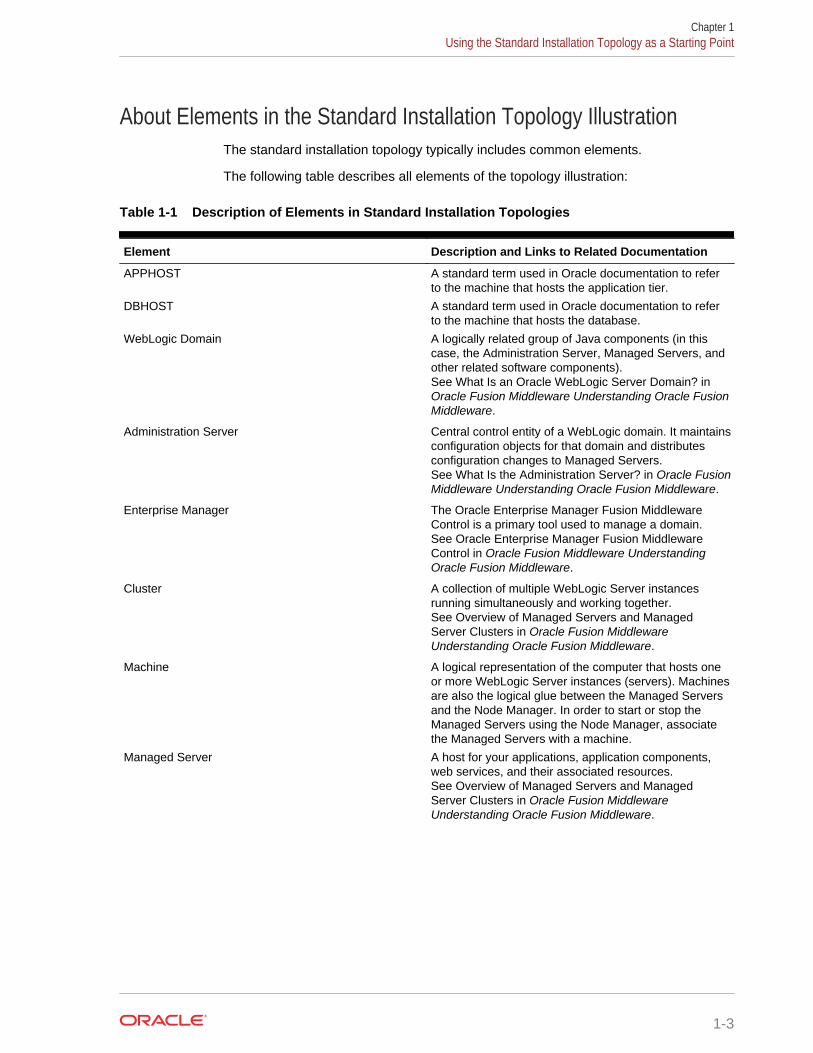
About Elements in the Standard Installation Topology IllustrationThe standard installation topology typically includes common elements.
The following table describes all elements of the topology illustration:
Table 1-1 Description of Elements in Standard Installation Topologies
Element Description and Links to Related Documentation
APPHOST A standard term used in Oracle documentation to referto the machine that hosts the application tier.
DBHOST A standard term used in Oracle documentation to referto the machine that hosts the database.
WebLogic Domain A logically related group of Java components (in thiscase, the Administration Server, Managed Servers, andother related software components).See What Is an Oracle WebLogic Server Domain? inOracle Fusion Middleware Understanding Oracle FusionMiddleware.
Administration Server Central control entity of a WebLogic domain. It maintainsconfiguration objects for that domain and distributesconfiguration changes to Managed Servers.See What Is the Administration Server? in Oracle FusionMiddleware Understanding Oracle Fusion Middleware.
Enterprise Manager The Oracle Enterprise Manager Fusion MiddlewareControl is a primary tool used to manage a domain.See Oracle Enterprise Manager Fusion MiddlewareControl in Oracle Fusion Middleware UnderstandingOracle Fusion Middleware.
Cluster A collection of multiple WebLogic Server instancesrunning simultaneously and working together.See Overview of Managed Servers and ManagedServer Clusters in Oracle Fusion MiddlewareUnderstanding Oracle Fusion Middleware.
Machine A logical representation of the computer that hosts oneor more WebLogic Server instances (servers). Machinesare also the logical glue between the Managed Serversand the Node Manager. In order to start or stop theManaged Servers using the Node Manager, associatethe Managed Servers with a machine.
Managed Server A host for your applications, application components,web services, and their associated resources.See Overview of Managed Servers and ManagedServer Clusters in Oracle Fusion MiddlewareUnderstanding Oracle Fusion Middleware.
Chapter 1Using the Standard Installation Topology as a Starting Point
1-3
Table 1-1 (Cont.) Description of Elements in Standard Installation Topologies
Element Description and Links to Related Documentation
Infrastructure A collection of services that include the following:• Metadata repository (MDS) contains the metadata
for Oracle Fusion Middleware components, such asthe Oracle Application Developer Framework. See What Is the Metadata Repository? in Oracle FusionMiddleware Understanding Oracle FusionMiddleware.
• Oracle Application Developer Framework (OracleADF).
• Oracle Web Services Manager (OWSM).
About Installing Oracle User Messaging ServiceOracle User Messaging Service (UMS) is a software technology that enables two-waycommunication between users and deployed applications.
See Introduction to Oracle User Messaging Service in Oracle Fusion MiddlewareAdministering Oracle User Messaging Service.
UMS is included in the Oracle Fusion Middleware Infrastructure distribution. It installsas part of the Oracle Fusion Middleware Infrastructure standard installation topology,as described in About Installing Oracle User Messaging Service (UMS) in OracleFusion Middleware Installing and Configuring the Oracle Fusion MiddlewareInfrastructure .
UMS runtime components consist of an Oracle Fusion Middleware ConfigurationWizard template and an Oracle Fusion Middleware schema, which is installed into asupported database by using the Repository Creation Utility (RCU).
For development, you can install and use Oracle JDeveloper 12c to developapplications that can take advantage of UMS features. See Introducing OracleJDeveloper in Oracle Fusion Middleware Installing Oracle JDeveloper.
About Oracle WebCenter Content Scale UpOracle WebCenter Content supports only one Inbound Refinery Managed Server pernode per domain, and one WebCenter Content Managed Server per node, perdomain.
You cannot scale up Inbound Refinery or WebCenter Content. To add ManagedServers in a cluster, see Scaling Out a Topology (Machine Scale Out)in the OracleFusion Middleware High Availability Guide to add a Managed Server to a new node.
Using This Document to Extend an Existing DomainThe procedures in this guide describe how to create a new domain. The assumption isthat no other Oracle Fusion Middleware products are installed on your system.
If you have installed and configured other Oracle Fusion Middleware products on yoursystem (for example, Fusion Middleware Infrastructure, with a domain that is up and
Chapter 1Using This Document to Extend an Existing Domain
1-4
running) and wish to extend the same domain to include Oracle WebCenter Content,see Installing Multiple Products in the Same Domain.
Chapter 1Using This Document to Extend an Existing Domain
1-5
2Preparing to Install and Configure OracleWebCenter Content
To prepare for your Oracle WebCenter Content installation, verify that your systemmeets the basic requirements, then obtain the correct installation software.
• Mandatory Steps for Installing WebCenter Content on Windows OperatingSystemsThere are three mandatory procedures that you must run before you install OracleWebCenter Content.
• Roadmap for Installing and Configuring the Standard Installation TopologiesInstalling and configuration standard installation topology requires certain steps.
• Roadmap for Verifying Your System EnvironmentBefore you begin the installation and configuration process, you must verify yoursystem environment.
• Obtaining the Product DistributionYou can obtain the Oracle Fusion Middleware Infrastructure and OracleWebCenter Content distribution on the Oracle Technology Network (OTN).
• About Product DistributionsYou create the initial Oracle WebCenter Content domain using the Oracle FusionMiddleware Infrastructure distribution, which contains both Oracle WebLogicServer software and Oracle Java Required Files (JRF) software.
Mandatory Steps for Installing WebCenter Content onWindows Operating Systems
There are three mandatory procedures that you must run before you install OracleWebCenter Content.
• Disabling the 8.3 File Naming Convention on a Windows Operating SystemBefore you install Oracle WebCenter Content on a Windows Operating System,you must disable the 8.3 file naming convention (maximum 8-character file nameand 3-character extension).
• Downloading Visual C++ LibrariesWebCenter Content and Inbound Refinery require the Visual C++ librariesincluded in Microsoft’s Visual C++ Redistributable Package.
• Downloading Microsoft .Net Framework 4.xThe WinNativeConverter uses vb.Net code, so it requires Microsoft .NETFramework 4.x.
2-1
Disabling the 8.3 File Naming Convention on a Windows OperatingSystem
Before you install Oracle WebCenter Content on a Windows Operating System, youmust disable the 8.3 file naming convention (maximum 8-character file name and 3-character extension).
If the WebCenter Content weblayout directory is on a file system with 8.3 semantics,the legacy 16-bit 8.3 file names conflict with revision labels, causing file loss.
To disable the 8.3 file naming convention on a Windows Operating System:
1. Open the Windows Registry Editor (regedit), and go to the following key:
HKEY_LOCAL_MACHINE/SYSTEM/CurrentControlSet/Control/FileSystem
2. Set the value of the NtfsDisable8dot3NameCreation key to 1.
3. Restart the Windows Operating System to make the change take effect.
Downloading Visual C++ LibrariesWebCenter Content and Inbound Refinery require the Visual C++ libraries included inMicrosoft’s Visual C++ Redistributable Package.
You must download Microsoft Visual C++ 2013 that contain the libraries.
To download the package:
1. Go to the Microsoft Download Center at http://www.microsoft.com/downloads
2. Search for Microsoft Visual C++ 2013 SP1 Redistributable Package (x64) .
3. Download the vcredist_x64.exe file.
4. Search for Microsoft Visual C++ 2013 SP1 Redistributable Package (x86)
5. Download the vcredist_x86.exe file.
It is important to install the correct binary as per the system you are installing on.On a 32 bit machine, only the vcredist_x86.exe is required. On a 64 bit machine,you need to install both vcredist_x86.exe and vcredist_x64.exe.
Note:
For a list of platforms that support PDF Searchable Document OutputFormat, go to the Oracle Fusion Middleware Supported SystemConfigurations page. In the table, on the row Oracle Fusion Middleware12c certifications, select the System Requirements and SupportedPlatforms for WebLogic Server 12c (12.2.1.4.0) (.xls) file.
Chapter 2Mandatory Steps for Installing WebCenter Content on Windows Operating Systems
2-2
Downloading Microsoft .Net Framework 4.xThe WinNativeConverter uses vb.Net code, so it requires Microsoft .NET Framework4.x.
Download Microsoft .NET Framework 4.x at http://www.microsoft.com/downloads
Roadmap for Installing and Configuring the StandardInstallation Topologies
Installing and configuration standard installation topology requires certain steps.
This document has all steps required to install and configure standard installationtopologies. The guide also refers to additional information that you can use if you wantto create a modified version of this topology.
The following table shows the steps required to install and configure the topology.
Table 2-1 Standard Installation Roadmap
Task Description Documentation
Verify your systemenvironment
Before beginning the installation,verify that the minimum systemand network requirements are met.
See Roadmap for Verifying Your System Environment.
Check for anymandatory patchesthat will be requiredbefore or after theinstallation
Review the Oracle FusionMiddleware Infrastructure releasenotes to see if there are anymandatory patches required for thesoftware products you areinstalling.
See Install and Configure in Release Notes for OracleFusion Middleware Infrastructure.
Obtain theappropriatedistributions
Install Oracle Fusion MiddlewareInfrastructure to create the OracleHome for Oracle WebCenterContent
See About Product Distributions.
Determine yourinstallationdirectories
Verify that the installer can accessor create the installer directoriesthat it must access or create. Also,verify that the directories exist onsystems that meet the minimumrequirements.
See What are the Key Oracle Fusion MiddlewareDirectories? in Oracle Fusion MiddlewareUnderstanding Oracle Fusion Middleware.
Install prerequisitesoftware
Install Oracle Fusion MiddlewareInfrastructure to create the Oraclehome directory.
For Oracle Fusion Middleware Infrastructure ,seeInstalling and Configuring the Oracle FusionMiddleware Infrastructure. You only need to perform theinstallation for Infrastructure. You do not need toconfigure a domain for Infrastructure.
Install the software Run the Oracle Universal Installerto install Oracle WebCenterContent.
Installing the software transfers thesoftware to your system andcreates the Oracle home directory.
See Installing the Oracle WebCenter Content Software.
Chapter 2Roadmap for Installing and Configuring the Standard Installation Topologies
2-3
Table 2-1 (Cont.) Standard Installation Roadmap
Task Description Documentation
Select a databaseprofile and reviewany required customvariables.
Before you install requiredschemas in the database, reviewthe information about any customvariables you will need to set forthe Oracle WebCenter Contentschemas.
See About Database Requirements for an OracleFusion Middleware Installation.
Create the schemas Run the Repository Creation Utilityto create the schemas required forconfiguration.
See Creating the Database Schemas.
Create a WebLogicdomain
Use the Configuration Wizard tocreate and configure the WebLogicdomain.
See Configuring the Domain if you are creating thetopology for Oracle WebCenter Content.
Administer andprepare yourdomain for highavailability
Discover additional tools andresources to administer yourdomain and configure your domainto be highly available.
See Next Steps After Configuring the Domain.
Roadmap for Verifying Your System EnvironmentBefore you begin the installation and configuration process, you must verify yoursystem environment.
Table 2-2 identifies important tasks and checks to perform to ensure that yourenvironment is prepared to install and configure Oracle WebCenter Content.
Table 2-2 Roadmap for Verifying Your System Environment
Task Description Documentation
Verify certification and systemrequirements.
Verify that your operating system iscertified and configured forinstallation and configuration.
See Verifying Certification, System,and Interoperability Requirements.
Identify a proper installation user. Verify that the installation user hasthe required permissions to installand configure the software.
See Selecting an Installation User.
Select the installation andconfiguration directories on yoursystem.
Verify that you can create thenecessary directories to install andconfigure the software, according tothe recommended directorystructure.
See Understanding Directories forInstallation and Configuration.
Install a certified JDK. The installation program for thedistribution requires a certified JDKpresent on your system.
See Understanding JDKRequirements for an Oracle FusionMiddleware Installation.
Install and configure a database formid-tier schemas.
To configure your WebLogic domain,you must have access to a certifieddatabase that is configured for theschemas required by OracleWebCenter Content.
See About Database Requirementsfor an Oracle Fusion MiddlewareInstallation.
Chapter 2Roadmap for Verifying Your System Environment
2-4

• Verifying Certification, System, and Interoperability RequirementsOracle recommends that you use the certification matrix and system requirementsdocuments with each other to verify that your environment meets the requirementsfor installation.
• Selecting an Installation UserThe user who installs and configures your system must have the requiredpermissions and privileges.
• Understanding Directories for Installation and ConfigurationDuring the installation and domain configuration process, you must plan onproviding the locations for these directories: Oracle home, Domain home, and theApplication home.
• Understanding JDK Requirements for an Oracle Fusion Middleware InstallationMost Fusion Middleware products are in .jar file format. These distributions donot include a JDK. To run a .jar distribution installer, you must have a certifiedJDK already installed on your system.
• About Database Requirements for an Oracle Fusion Middleware InstallationMany Oracle Fusion Middleware products require database schemas prior toconfiguration. If you do not already have a database where you can install theseschemas, you must install and configure a certified database.
Verifying Certification, System, and Interoperability RequirementsOracle recommends that you use the certification matrix and system requirementsdocuments with each other to verify that your environment meets the requirements forinstallation.
1. Verifying that your environment meets certification requirements:
Make sure that you install your product on a supported hardware and softwareconfiguration. See the certification document for your release on the Oracle FusionMiddleware Supported System Configurations page.
Oracle has tested and verified the performance of your product on all certifiedsystems and environments. Whenever new certifications are released, they areadded to the certification document right away. New certifications can be releasedat any time. Therefore, the certification documents are kept outside thedocumentation libraries and are available on Oracle Technology Network.
2. Using the system requirements document to verify certification:
Oracle recommends that you use the Oracle Fusion Middleware SystemRequirements and Specifications document to verify that the certificationrequirements are met. For example, if the certification document indicates thatyour product is certified for installation on 64-Bit Oracle Linux 6.5, use thisdocument to verify that your system meets the required minimum specifications.These include disk space, available memory, specific platform packages andpatches, and other operating system-specific requirements. System requirementscan change in the future. Therefore, the system requirement documents are keptoutside of the documentation libraries and are available on Oracle TechnologyNetwork.
3. Verifying interoperability among multiple products:
To learn how to install and run multiple Fusion Middleware products from the samerelease or mixed releases with each other, see Oracle Fusion Middleware 12c
Chapter 2Roadmap for Verifying Your System Environment
2-5
Interoperability and Compatibility in Oracle Fusion Middleware UnderstandingInteroperability and Compatibility.
Selecting an Installation UserThe user who installs and configures your system must have the required permissionsand privileges.
• About User PermissionsThe user who installs a Fusion Middleware product owns the files and has certainpermissions on the files.
• Understanding Non-Default User Permissions on UNIX Operating SystemsChanging the default permissions setting reduces the security of the installationand possibly your system. Oracle does not recommend changing defaultpermission settings.
• Verifying that the Installation User has Administrator Privileges on WindowsOperating SystemsTo update the Windows Registry, you must have administrator privileges.
About User PermissionsThe user who installs a Fusion Middleware product owns the files and has certainpermissions on the files.
• Read and write permissions on all non-executable files (forexample, .jar, .properties, or .xml). All other users in the same group as the fileowner have read permissions only.
• Read, write, and execute permissions on all executable files (forexample, .exe, .sh, or .cmd). All other users in the same group as the file ownerhave read and execute permissions only.
This means that someone other than the person who installs the software can use theinstalled binaries in the Oracle home directory to configure a domain or set of FusionMiddleware products.
During configuration, the files generated by the configuration process are owned bythe user who ran the Configuration Wizard. This user has the same permissions asdescribed above for the installation user. However, security-sensitive files are notcreated with group permissions. Only the user that created the domain has read andwrite permissions and can administer the domain.
Consider the following examples:
• Example 1: A Single User Installs the Software and Configures the Domain
This example explains the file permissions where the same user installs thesoftware and configures the domain.
To ensure proper permissions and privileges for all files, Oracle recommends thatthe same owner perform both tasks: install the Oracle Fusion Middleware productand configure the WebLogic Server domain by using the Configuration Wizard.
Chapter 2Roadmap for Verifying Your System Environment
2-6
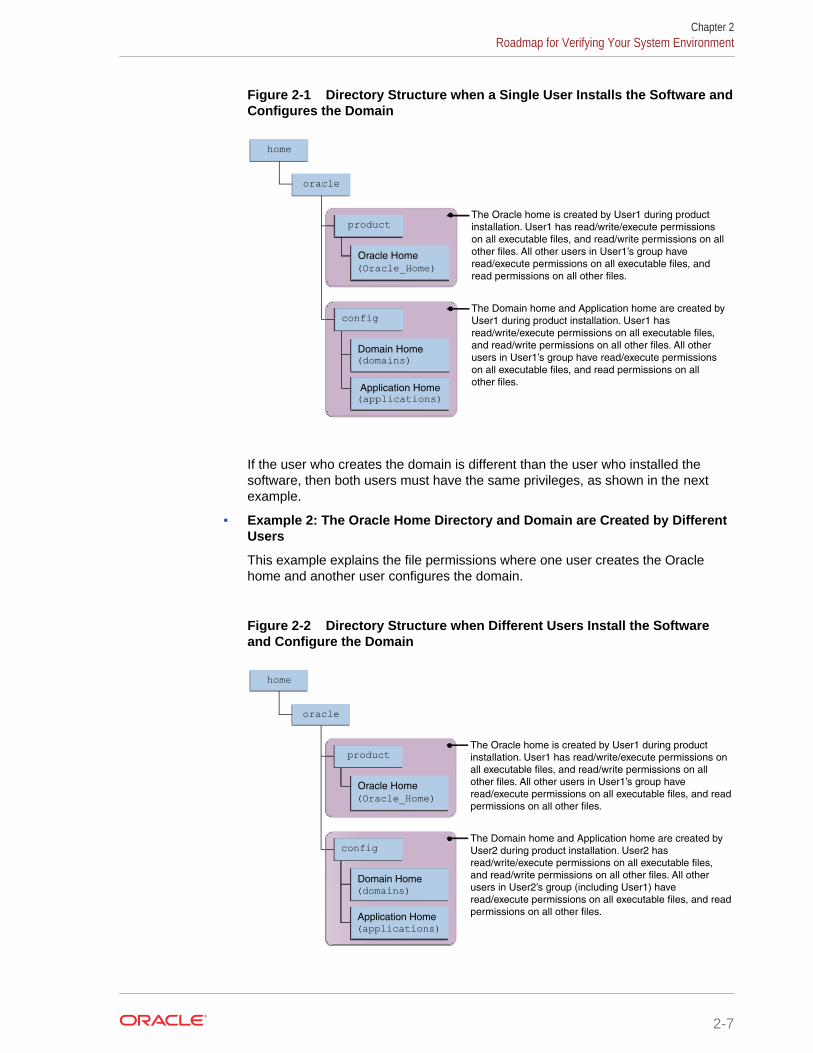
Figure 2-1 Directory Structure when a Single User Installs the Software andConfigures the Domain
The Oracle home is created by User1 during product
installation. User1 has read/write/execute permissions
on all executable files, and read/write permissions on all
other files. All other users in User1’s group have
read/execute permissions on all executable files, and
read permissions on all other files.
product
Oracle Home
(Oracle_Home)
Application Home (applications)
oracle
home
Domain Home(domains)
configThe Domain home and Application home are created by
User1 during product installation. User1 has
read/write/execute permissions on all executable files,
and read/write permissions on all other files. All other
users in User1’s group have read/execute permissions
on all executable files, and read permissions on all
other files.
If the user who creates the domain is different than the user who installed thesoftware, then both users must have the same privileges, as shown in the nextexample.
• Example 2: The Oracle Home Directory and Domain are Created by DifferentUsers
This example explains the file permissions where one user creates the Oraclehome and another user configures the domain.
Figure 2-2 Directory Structure when Different Users Install the Softwareand Configure the Domain
The Oracle home is created by User1 during product
installation. User1 has read/write/execute permissions on
all executable files, and read/write permissions on all
other files. All other users in User1’s group have
read/execute permissions on all executable files, and read
permissions on all other files.
product
Oracle Home
(Oracle_Home)
Application Home (applications)
oracle
home
Domain Home(domains)
configThe Domain home and Application home are created by
User2 during product installation. User2 has
read/write/execute permissions on all executable files,
and read/write permissions on all other files. All other
users in User2’s group (including User1) have
read/execute permissions on all executable files, and read
permissions on all other files.
Chapter 2Roadmap for Verifying Your System Environment
2-7
Note:
Certain domain files do not have group permissions. For example,cwallet.sso.
Consider the following points before you run the installer:
• On UNIX operating systems, Oracle recommends that you set umask to 027 onyour system before you install the software. This ensures that the file permissionsare set properly during installation. Use the following command:
umask 027
You must enter this command in the same terminal window from which you plan torun the product installer.
• On UNIX operating systems, do not run the installation program as a root user. Ifyou run the installer as a root user, the startup validation may fail and you cannotcontinue the installation.
• When you manage a product installation (for example, applying patches or startingmanaged Servers), use the same user ID that you used to install the product.
• On Windows operating systems, you must have administrative privileges to installthe product. See Verifying the Installation User has Administrator Privileges onWindows Operating Systems.
Understanding Non-Default User Permissions on UNIX Operating SystemsChanging the default permissions setting reduces the security of the installation andpossibly your system. Oracle does not recommend changing default permissionsettings.
If other users require access to particular files or executable, consider using the UNIXsudo command (or other similar command) in lieu of changing file permissions.
Refer to your UNIX operating system Administrator's Guide or contact your operatingsystem vendor if you need further assistance.
Verifying that the Installation User has Administrator Privileges on WindowsOperating Systems
To update the Windows Registry, you must have administrator privileges.
By default, users with the administrator privilege sign in to the system with regularprivileges, but can request elevated permissions to perform administrative tasks.
To perform a task with elevated privileges:
1. Find the Command Prompt icon, either from the Start menu or the Windows iconin the lower-left corner.
2. Right-click Command Prompt and select Run as administrator.
This opens a new command prompt window, and all actions performed in thiswindow are done with administrator privileges.
Chapter 2Roadmap for Verifying Your System Environment
2-8
Note:
If you have User Access Control enabled on your system, you may seean additional window asking you to confirm this action. Confirm andcontinue with this procedure.
3. Perform the desired task.
For example, to start the product installer:
For a jar file, enter:
java —jar distribution_name.jar
For an executable (.exe, .bin, or .sh file), enter:
distribution_name.exe
Understanding Directories for Installation and ConfigurationDuring the installation and domain configuration process, you must plan on providingthe locations for these directories: Oracle home, Domain home, and the Applicationhome.
• Understanding the Recommended Directory StructureOracle recommends specific locations for the Oracle Home, Domain Home, andApplication Home.
• About the Oracle Home DirectoryWhen you install any Oracle Fusion Middleware product, you must use an Oraclehome directory.
• About the Domain Home DirectoryThe Domain home is the directory where domains that you configure are created.
• About the Application Home DirectoryThe Application home is the directory where applications for domains youconfigure are created.
• Installing Multiple Products in the Same DomainThere are two methods to install and configure multiple products in one domain.This is also known as extending a domain.
• Preparing for Shared StorageOracle Fusion Middleware allows you to configure multiple WebLogic Serverdomains from a single Oracle home. This allows you to install the Oracle home ina single location on a shared volume and reuse the Oracle home for multiple hostinstallations.
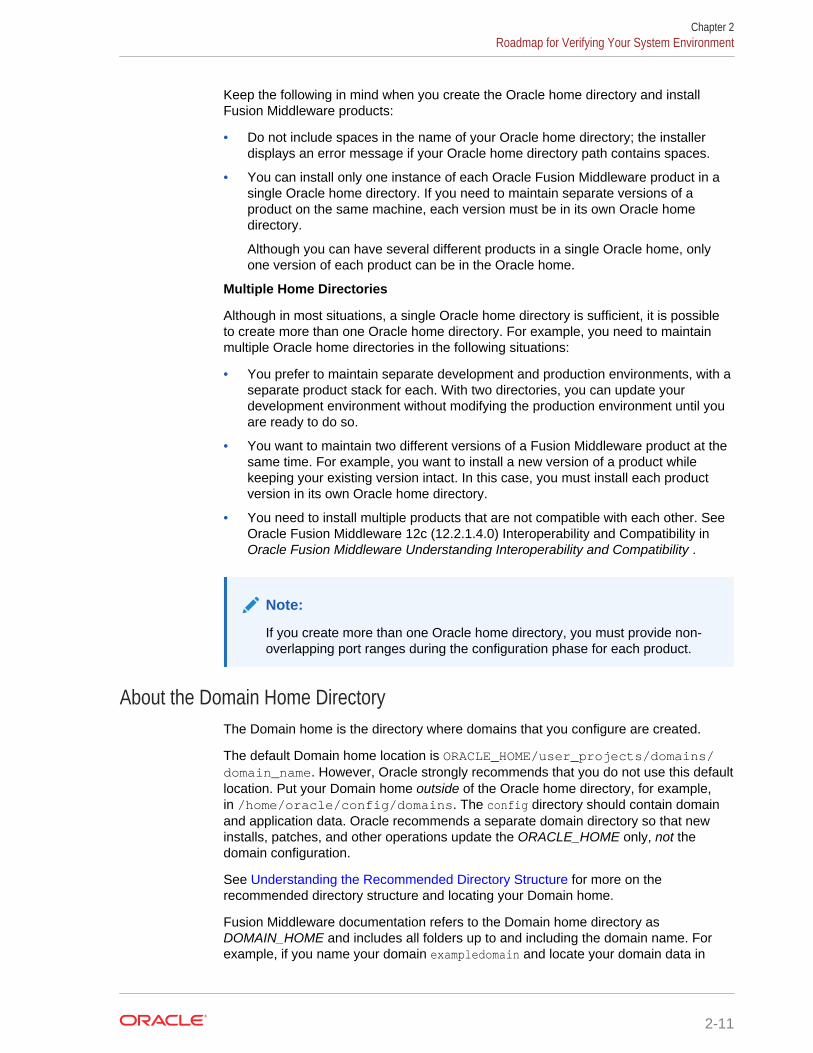
Understanding the Recommended Directory StructureOracle recommends specific locations for the Oracle Home, Domain Home, andApplication Home.
Oracle recommends a directory structure similar to the one shown in Figure 2-3.
Chapter 2Roadmap for Verifying Your System Environment
2-9

Figure 2-3 Recommended Oracle Fusion Middleware Directory Structure
This area contains binary
files laid down by the
product installer. Runtime
processes will not write to
this area.
product
Oracle Home
(Oracle_Home)
Application Home
(applications)
oracle
home
Domain Home
(Domains)
configThis area contains
configuration and
application data created
by user.
A base location (Oracle base) should be established on your system (for example, /home/oracle) and from there, two separate branches should be created. The productdirectory should contain the product binary files and all of the Oracle home directories.The config directory should contain your domain and application data.
Oracle recommends that you do not keep your configuration data anywhereunderneath the Oracle home; if you upgrade your product to another major release,you will be required to create a new Oracle home for binaries. You must also makesure that your configuration data exist in a location to which the binaries in the Oraclehome have access.
The /home/oracle/product (for the Oracle home) and /home/oracle/config (for theapplication and configuration data) directories are used in examples throughout thedocumentation; be sure to replace these directories with the actual directories on yoursystem.
About the Oracle Home DirectoryWhen you install any Oracle Fusion Middleware product, you must use an Oraclehome directory.
This directory is a repository for common files that are used by multiple FusionMiddleware products installed on the same machine. These files ensure that FusionMiddleware operates correctly on your system. They facilitate checking of cross-product dependencies during installation. For this reason, you can consider the Oraclehome directory a central support directory for all Oracle Fusion Middleware productsinstalled on your system.
Fusion Middleware documentation refers to the Oracle home directory asORACLE_HOME.
Oracle Home Considerations
Chapter 2Roadmap for Verifying Your System Environment
2-10
Keep the following in mind when you create the Oracle home directory and installFusion Middleware products:
• Do not include spaces in the name of your Oracle home directory; the installerdisplays an error message if your Oracle home directory path contains spaces.
• You can install only one instance of each Oracle Fusion Middleware product in asingle Oracle home directory. If you need to maintain separate versions of aproduct on the same machine, each version must be in its own Oracle homedirectory.
Although you can have several different products in a single Oracle home, onlyone version of each product can be in the Oracle home.
Multiple Home Directories
Although in most situations, a single Oracle home directory is sufficient, it is possibleto create more than one Oracle home directory. For example, you need to maintainmultiple Oracle home directories in the following situations:
• You prefer to maintain separate development and production environments, with aseparate product stack for each. With two directories, you can update yourdevelopment environment without modifying the production environment until youare ready to do so.
• You want to maintain two different versions of a Fusion Middleware product at thesame time. For example, you want to install a new version of a product whilekeeping your existing version intact. In this case, you must install each productversion in its own Oracle home directory.
• You need to install multiple products that are not compatible with each other. See Oracle Fusion Middleware 12c (12.2.1.4.0) Interoperability and Compatibility inOracle Fusion Middleware Understanding Interoperability and Compatibility .
Note:
If you create more than one Oracle home directory, you must provide non-overlapping port ranges during the configuration phase for each product.
About the Domain Home DirectoryThe Domain home is the directory where domains that you configure are created.
The default Domain home location is ORACLE_HOME/user_projects/domains/domain_name. However, Oracle strongly recommends that you do not use this defaultlocation. Put your Domain home outside of the Oracle home directory, for example,in /home/oracle/config/domains. The config directory should contain domainand application data. Oracle recommends a separate domain directory so that newinstalls, patches, and other operations update the ORACLE_HOME only, not thedomain configuration.
See Understanding the Recommended Directory Structure for more on therecommended directory structure and locating your Domain home.
Fusion Middleware documentation refers to the Domain home directory asDOMAIN_HOME and includes all folders up to and including the domain name. Forexample, if you name your domain exampledomain and locate your domain data in
Chapter 2Roadmap for Verifying Your System Environment
2-11
the /home/oracle/config/domains directory, the documentation would useDOMAIN_HOME to refer to /home/oracle/config/domains/exampledomain.
About the Application Home DirectoryThe Application home is the directory where applications for domains you configureare created.
The default Application home location is ORACLE_HOME/user_projects/applications/domain_name. However, Oracle strongly recommends that you locate your Applicationhome outside of the Oracle home directory; if you upgrade your product to anothermajor release, you must create a new Oracle home for binaries.
See Understanding the Recommended Directory Structure for more on therecommended directory structure and locating your Application home..
Fusion Middleware documentation refers to the Application home directory asAPPLICATION_HOME and includes all folders up to and including the domain name. Forexample, if you name your domain exampledomain and you locate your applicationdata in the /home/oracle/config/applications directory, the documentation usesAPPLICATION_HOME to refer to /home/oracle/config/applications/exampledomain.
Installing Multiple Products in the Same DomainThere are two methods to install and configure multiple products in one domain. Thisis also known as extending a domain.
• Method 1.
Install and configure Product A, including creating the schemas and starting allservers in the domain to verify a successful domain configuration.
This is the method used in all installation guides in the Fusion Middleware library.You can repeat this process for as many products as necessary. It allows you tovalidate one product at a time and add more products incrementally.
To install Product B in the same domain as Product A:
1. Stop all servers to prevent any updates to the domain while you add the newproduct.
See Starting and Stopping Oracle Fusion Middleware in Oracle FusionMiddleware Administering Oracle Fusion Middleware.
2. Follow the instructions in the installation guide for Product B, including creatingthe necessary schemas.
3. Run the Configuration Wizard to configure the domain.
During configuration, the Configuration Wizard automatically detects thecomponents that have been installed and offers you the option to extend theexisting Product A domain to include Product B.
• Method 2.
Install all of the required products, then create the schemas for all of the products.After you create the schemas, configure the domain by using the necessaryproduct templates, then start all the servers.
Chapter 2Roadmap for Verifying Your System Environment
2-12
This method of creating a multi-product domain may be slightly faster than Method1; however, the installation guides in the Fusion Middleware library do not providespecific instructions for this method of domain creation.
See Also:
• To update WebLogic domains, see Updating WebLogic Domains inOracle Fusion Middleware Creating WebLogic Domains Using theConfiguration Wizard.
• For important information regarding the ability of Oracle FusionMiddleware products to function with previous versions of other OracleFusion Middleware, Oracle, or third-party products, see Oracle FusionMiddleware 12c (12.2.1.4.0) Interoperability and Compatibility in OracleFusion Middleware Understanding Interoperability and Compatibility.
Preparing for Shared StorageOracle Fusion Middleware allows you to configure multiple WebLogic Server domainsfrom a single Oracle home. This allows you to install the Oracle home in a singlelocation on a shared volume and reuse the Oracle home for multiple host installations.
If you plan to use shared storage in your environment, see Using Shared Storage inOracle Fusion Middleware High Availability Guide for more information.
Understanding JDK Requirements for an Oracle Fusion MiddlewareInstallation
Most Fusion Middleware products are in .jar file format. These distributions do notinclude a JDK. To run a .jar distribution installer, you must have a certified JDKalready installed on your system.
Make sure that the JDK is installed outside of the Oracle home. If you install the JDKunder the Oracle home, you will encounter problems when you try to perform tasks inthe future. Oracle Universal Installer validates that the Oracle home directory is empty;the install will not progress until you specify an empty directory. Oracle recommendsthat you locate your JDK installation in the /home/oracle/products/jdk directory.
Some products (such as Oracle HTTP Server and Oracle JDeveloper) are availableas platform-specific distributions. Platform-specific distributions have a .bin (forUNIX operating systems) or .exe (for Windows operating systems) installer; in thesecases, a platform-specific JDK is in the distribution and you do not need to install aJDK separately. However, you may need to upgrade this JDK to a more recentversion, depending on the JDK versions that are certified.
Always verify the required JDK version by reviewing the certification information on the Oracle Fusion Middleware Supported System Configurations page. For 12c(12.2.1.4.0), the certified JDK is 1.8.0_211 and later.
To download the required JDK, navigate to the following URL and download the JavaSE JDK:
Chapter 2Roadmap for Verifying Your System Environment
2-13
http://www.oracle.com/technetwork/java/javase/downloads/index.html
About Database Requirements for an Oracle Fusion MiddlewareInstallation
Many Oracle Fusion Middleware products require database schemas prior toconfiguration. If you do not already have a database where you can install theseschemas, you must install and configure a certified database.
To find a certified database for your operating system, see the certification documentfor your release on the Oracle Fusion Middleware Supported System Configurationspage on the Oracle Technology Network (OTN).
To make sure that your database is properly configured for schema creation, seeRepository Creation Utility Requirements in the Oracle Fusion Middleware SystemRequirements and Specifications document.
After your database is properly configured, you use the Repository Creation Utility(RCU) to create product schemas in your database. This tool is available in the Oraclehome for your Oracle Fusion Middleware product. See About the Repository CreationUtility in Oracle Fusion Middleware Creating Schemas with the Repository CreationUtility.
Obtaining the Product DistributionYou can obtain the Oracle Fusion Middleware Infrastructure and Oracle WebCenterContent distribution on the Oracle Technology Network (OTN).
To prepare to install Oracle Fusion Middleware Infrastructure and Oracle WebCenterContent:
1. Enter java -version on the command line to verify that a certified JDK is installedon your system. For 12c (12.2.1.4.0), the certified JDK is 1.8.0_211 and later.
See Understanding JDK Requirements for an Oracle Fusion MiddlewareInstallation.
2. Locate and download the Oracle Fusion Middleware Infrastructure and OracleWebCenter Content software.
See Obtaining Product Distributions in Oracle Fusion Middleware Planning anInstallation of Oracle Fusion Middleware.
About Product DistributionsYou create the initial Oracle WebCenter Content domain using the Oracle FusionMiddleware Infrastructure distribution, which contains both Oracle WebLogic Serversoftware and Oracle Java Required Files (JRF) software.
Oracle JRF software consists of:
• Oracle Web Services Manager
• Oracle Application Development Framework (Oracle ADF)
• Oracle Enterprise Manager Fusion Middleware Control
• Repository Creation Utility (RCU)
Chapter 2Obtaining the Product Distribution
2-14
• Other libraries and technologies required to support Oracle Fusion Middlewareproducts
Installing Oracle Fusion Middleware Infrastructure is a prerequisite to installing OracleWebCenter Content.
Chapter 2About Product Distributions
2-15
3Installing the Oracle WebCenter ContentSoftware
Follow the steps in this section to install the Oracle WebCenter Content software.Before beginning the installation, ensure that you have verified the prerequisites andcompleted all steps covered in Preparing to Install and Configure Oracle WebCenterContent.
• Verifying the Installation ChecklistThe installation process requires specific information.
• Starting the Installation ProgramBefore running the installation program, you must verify the JDK and prerequisitesoftware is installed.
• Navigating the Installation ScreensThe installer shows a series of screens where you verify or enter information.
• Verifying the InstallationAfter you complete the installation, verify whether it was successful by completinga series of tasks.
Verifying the Installation ChecklistThe installation process requires specific information.
Table 3-1 lists important items that you must know before, or decide during, OracleWebCenter Content installation.
Table 3-1 Installation Checklist
Information Example Value Description
JAVA_HOME /home/Oracle/Java/jdk1.8.0_211
Environment variable thatpoints to the Java JDK homedirectory.
Database host examplehost.exampledomain
Name and domain of the hostwhere the database isrunning.
Database port 1521 Port number that the databaselistens on. The default Oracledatabase listen port is 1521.
Database service name orcl.exampledomain Oracle databases require aunique service name. Thedefault service name is orcl.
DBA username SYS Name of user with databaseadministration privileges. Thedefault DBA user on Oracledatabases is SYS.
3-1
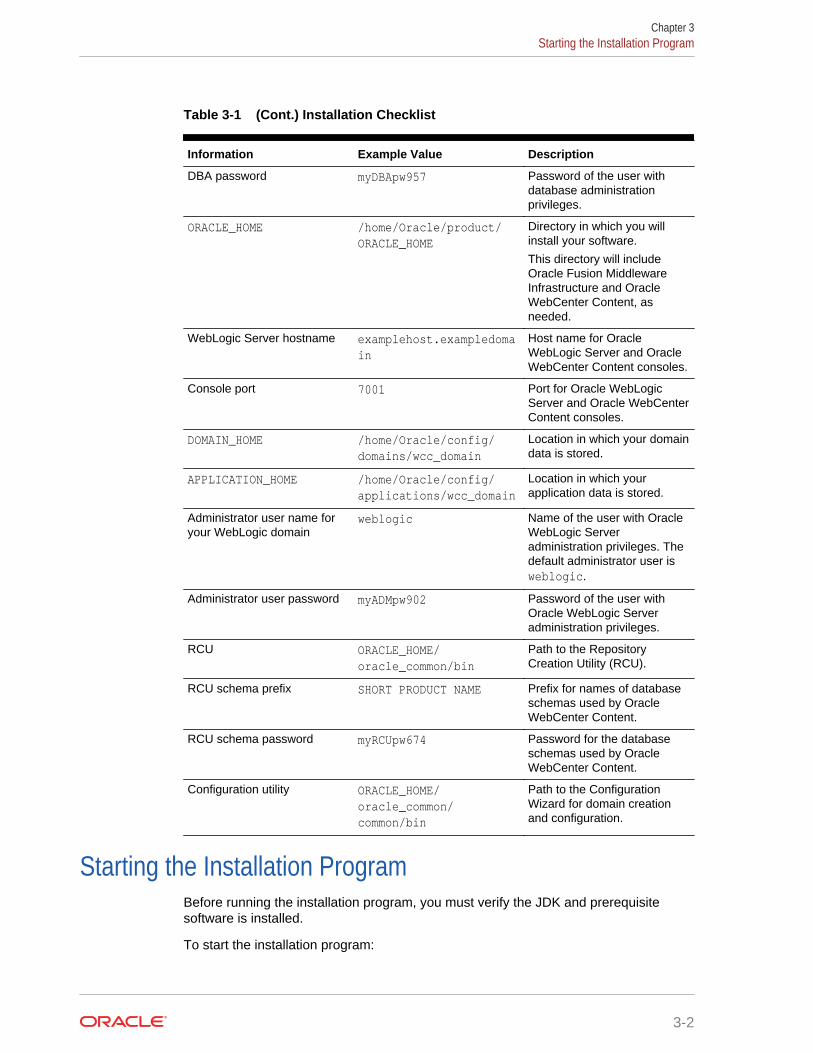
Table 3-1 (Cont.) Installation Checklist
Information Example Value Description
DBA password myDBApw957 Password of the user withdatabase administrationprivileges.
ORACLE_HOME /home/Oracle/product/ORACLE_HOME
Directory in which you willinstall your software.
This directory will includeOracle Fusion MiddlewareInfrastructure and OracleWebCenter Content, asneeded.
WebLogic Server hostname examplehost.exampledomain
Host name for OracleWebLogic Server and OracleWebCenter Content consoles.
Console port 7001 Port for Oracle WebLogicServer and Oracle WebCenterContent consoles.
DOMAIN_HOME /home/Oracle/config/domains/wcc_domain
Location in which your domaindata is stored.
APPLICATION_HOME /home/Oracle/config/applications/wcc_domain
Location in which yourapplication data is stored.
Administrator user name foryour WebLogic domain
weblogic Name of the user with OracleWebLogic Serveradministration privileges. Thedefault administrator user isweblogic.
Administrator user password myADMpw902 Password of the user withOracle WebLogic Serveradministration privileges.
RCU ORACLE_HOME/oracle_common/bin
Path to the RepositoryCreation Utility (RCU).
RCU schema prefix SHORT PRODUCT NAME Prefix for names of databaseschemas used by OracleWebCenter Content.
RCU schema password myRCUpw674 Password for the databaseschemas used by OracleWebCenter Content.
Configuration utility ORACLE_HOME/oracle_common/common/bin
Path to the ConfigurationWizard for domain creationand configuration.
Starting the Installation ProgramBefore running the installation program, you must verify the JDK and prerequisitesoftware is installed.
To start the installation program:
Chapter 3Starting the Installation Program
3-2
1. Sign in to the host system.
2. If you have not already done so, verify that a certified JDK is installed on yoursystem: enter java -version on the command line. For 12c (12.2.1.4.0), thecertified JDK is 1.8.0_211 and later.
For more information about JDK requirements, see Understanding JDKRequirements for an Oracle Fusion Middleware Installation.
3. Verify that you have installed all prerequisite software, such as Oracle FusionMiddleware Infrastructure.
4. Go to the directory where you downloaded the installation program.
5. Start the installation program by running the java executable from the JDKdirectory. For example:
• (UNIX) /home/Oracle/Java/jdk1.8.0_211/bin/java —jarfmw_12.2.1.4.0_wccontent.jar
• (Windows) C:\home\Oracle\Java\jdk1.8.0_211\bin\java -jarfmw_12.2.1.4.0_wccontent.jar
Note:
You can also start the installer in silent mode using a saved response fileinstead of launching the installer screens. For more about silent or commandline installation, see Using the Oracle Universal Installer in Silent Mode inOracle Fusion Middleware Installing Software with the Oracle UniversalInstaller.
When the installation program appears, you are ready to begin the installation.
Navigating the Installation ScreensThe installer shows a series of screens where you verify or enter information.
The following table lists the order in which installer screens appear. If you needadditional help with an installation screen, click Help.
Table 3-2 Oracle WebCenter Content Install Screens
Screen Description
InstallationInventorySetup
On UNIX operating systems, this screen opens if this is the first time you areinstalling any Oracle product on this host. Specify the location where you wantto create your central inventory. Make sure that the operating system groupname selected on this screen has write permissions to the central inventorylocation.
See About the Oracle Central Inventory in Oracle Fusion Middleware InstallingSoftware with the Oracle Universal Installer.This screen does not appear on Windows operating systems.
Welcome Review the information to make sure that you have met all the prerequisites,then click Next.
Chapter 3Navigating the Installation Screens
3-3
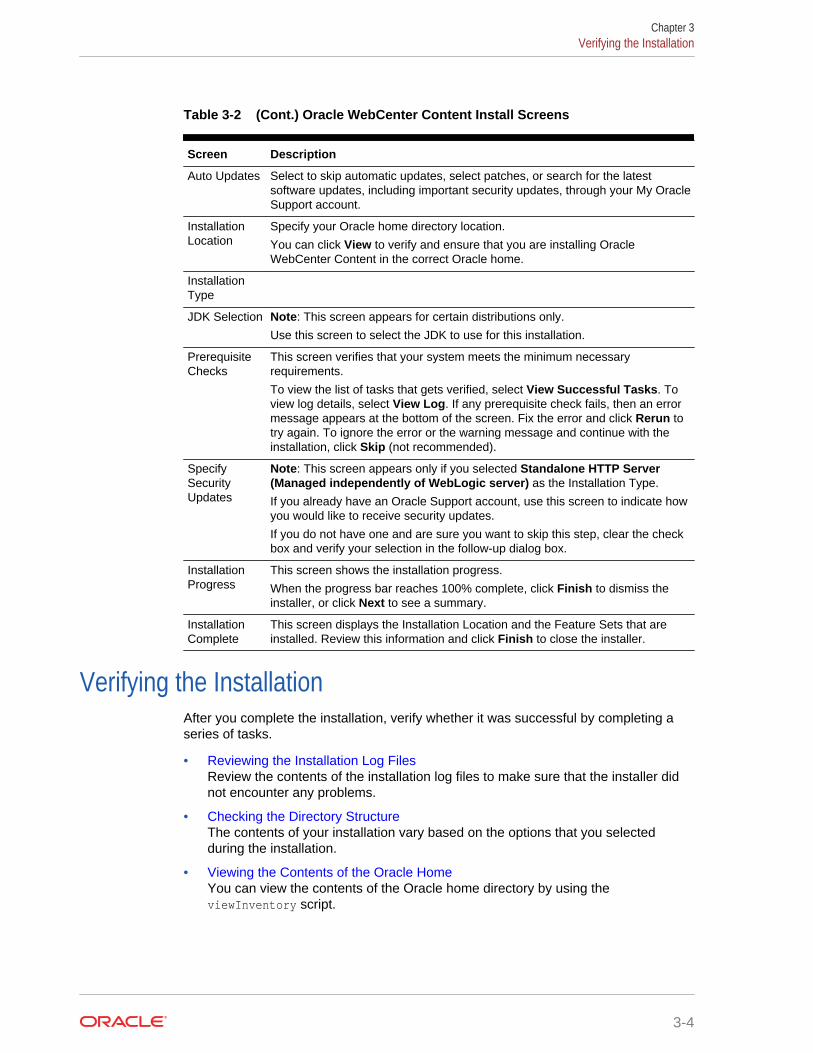
Table 3-2 (Cont.) Oracle WebCenter Content Install Screens
Screen Description
Auto Updates Select to skip automatic updates, select patches, or search for the latestsoftware updates, including important security updates, through your My OracleSupport account.
InstallationLocation
Specify your Oracle home directory location.
You can click View to verify and ensure that you are installing OracleWebCenter Content in the correct Oracle home.
InstallationType
JDK Selection Note: This screen appears for certain distributions only.
Use this screen to select the JDK to use for this installation.
PrerequisiteChecks
This screen verifies that your system meets the minimum necessaryrequirements.
To view the list of tasks that gets verified, select View Successful Tasks. Toview log details, select View Log. If any prerequisite check fails, then an errormessage appears at the bottom of the screen. Fix the error and click Rerun totry again. To ignore the error or the warning message and continue with theinstallation, click Skip (not recommended).
SpecifySecurityUpdates
Note: This screen appears only if you selected Standalone HTTP Server(Managed independently of WebLogic server) as the Installation Type.
If you already have an Oracle Support account, use this screen to indicate howyou would like to receive security updates.
If you do not have one and are sure you want to skip this step, clear the checkbox and verify your selection in the follow-up dialog box.
InstallationProgress
This screen shows the installation progress.
When the progress bar reaches 100% complete, click Finish to dismiss theinstaller, or click Next to see a summary.
InstallationComplete
This screen displays the Installation Location and the Feature Sets that areinstalled. Review this information and click Finish to close the installer.
Verifying the InstallationAfter you complete the installation, verify whether it was successful by completing aseries of tasks.
• Reviewing the Installation Log FilesReview the contents of the installation log files to make sure that the installer didnot encounter any problems.
• Checking the Directory StructureThe contents of your installation vary based on the options that you selectedduring the installation.
• Viewing the Contents of the Oracle HomeYou can view the contents of the Oracle home directory by using theviewInventory script.
Chapter 3Verifying the Installation
3-4

Reviewing the Installation Log FilesReview the contents of the installation log files to make sure that the installer did notencounter any problems.
By default, the installer writes logs files to the Oracle_Inventory_Location/logs (onUNIX operating systems) or Oracle_Inventory_Location\logs (on Windowsoperating systems) directory.
For a description of the log files and where to find them, see Installation Log Files inOracle Fusion Middleware Installing Software with the Oracle Universal Installer.
Checking the Directory StructureThe contents of your installation vary based on the options that you selected duringthe installation.
See What Are the Key Oracle Fusion Middleware Directories? in Oracle FusionMiddleware Understanding Oracle Fusion Middleware.
Viewing the Contents of the Oracle HomeYou can view the contents of the Oracle home directory by using the viewInventoryscript.
See Viewing the Contents of an Oracle Home in Oracle Fusion Middleware InstallingSoftware with the Oracle Universal Installer.
Chapter 3Verifying the Installation
3-5
4Configuring WebCenter Content Domain
After you have installed WebCenter Content, you can configure the domain, which youcan also extend for high availability.
The configuration steps presented here assume that you have completed theinstallation steps covered in:
• Preparing to Install and Configure Oracle WebCenter Content
• Installing the Oracle WebCenter Content Software
Refer to the following sections to create the database schemas, configure a WebLogicdomain, and verify the configuration:
• Creating the Database SchemasBefore you can configure an Oracle WebCenter Content domain, you must installrequired schemas on a certified database for use with this release of OracleFusion Middleware.
• Configuring the DomainUse the Configuration Wizard to create and configure a domain.
• Starting the ServersAfter configuration is complete, start Node Manager, then the WebLogicAdministration Server and Managed Servers.
• Verifying the ConfigurationAfter completing all configuration steps, you can perform additional steps to verifythat your domain is properly configured.
• Configuring Inbound Refinery Settings (Single Node)After you start the Inbound Refinery Managed Servers, configure the settings onthe post-installation configuration screen. In most cases, you can accept thedefault settings.
• Configuring WebCenter Content SettingsYou must complete the WebCenter Content configuration on the post-installationconfiguration page in Content Server.
Creating the Database SchemasBefore you can configure an Oracle WebCenter Content domain, you must installrequired schemas on a certified database for use with this release of Oracle FusionMiddleware.
• Installing and Configuring a Certified DatabaseBefore you create the database schemas, you must install and configure acertified database, and verify that the database is up and running.
• Starting the Repository Creation UtilityStart the Repository Creation Utility (RCU) after you verify that a certified JDK isinstalled on your system.
4-1
• Navigating the Repository Creation Utility Screens to Create SchemasEnter required information in the RCU screens to create the database schemas.
Installing and Configuring a Certified DatabaseBefore you create the database schemas, you must install and configure a certifieddatabase, and verify that the database is up and running.
See About Database Requirements for an Oracle Fusion Middleware Installation.
Starting the Repository Creation UtilityStart the Repository Creation Utility (RCU) after you verify that a certified JDK isinstalled on your system.
To start the RCU:
1. Verify that a certified JDK already exists on your system by running java -version from the command line. For 12c (12.2.1.4.0), the certified JDK is1.8.0_211 and later.
See Understanding JDK Requirements for an Oracle Fusion MiddlewareInstallation.
2. Ensure that the JAVA_HOME environment variable is set to the location of thecertified JDK. For example:
• (UNIX) setenv JAVA_HOME /home/Oracle/Java/jdk1.8.0_211
• (Windows) set JAVA_HOME=C:\home\Oracle\Java\jdk1.8.0_211
3. Change to the following directory:
• (UNIX) ORACLE_HOME/oracle_common/bin
• (Windows) ORACLE_HOME\oracle_common\bin
4. Enter the following command:
• (UNIX) ./rcu
• (Windows) rcu.bat
Navigating the Repository Creation Utility Screens to Create SchemasEnter required information in the RCU screens to create the database schemas.
• Introducing the RCUThe Welcome screen is the first screen that appears when you start the RCU.
• Selecting a Method of Schema CreationUse the Create Repository screen to select a method to create and loadcomponent schemas into the database.
• Providing Database Connection DetailsOn the Database Connection Details screen, provide the database connectiondetails for the RCU to connect to your database.
• Specifying a Custom Prefix and Selecting SchemasYou must enter a custom prefix to group schemas together, then select schemasyou need. You can select the required schema on the Select Components screen.
Chapter 4Creating the Database Schemas
4-2
• Specifying Schema PasswordsOn the Schema Passwords screen, specify how you want to set the schemapasswords on your database, then enter and confirm your passwords.
• Completing Schema CreationNavigate through the remaining RCU screens to complete schema creation.
Introducing the RCUThe Welcome screen is the first screen that appears when you start the RCU.
Click Next.
Selecting a Method of Schema CreationUse the Create Repository screen to select a method to create and load componentschemas into the database.
On the Create Repository screen:
• If you have the necessary permissions and privileges to perform DBA activities onyour database, select System Load and Product Load. This procedure assumesthat you have SYSDBA privileges.
• If you do not have the necessary permissions or privileges to perform DBAactivities in the database, you must select Prepare Scripts for System Load onthis screen. This option generates a SQL script that you can give to your databaseadministrator. See About System Load and Product Load in Oracle FusionMiddleware Creating Schemas with the Repository Creation Utility.
• If the DBA has already run the SQL script for System Load, select PerformProduct Load.
Providing Database Connection DetailsOn the Database Connection Details screen, provide the database connection detailsfor the RCU to connect to your database.
Note:
If you are unsure of the service name for your database, you can obtain itfrom the SERVICE_NAMES parameter in the initialization parameter file of thedatabase. If the initialization parameter file does not contain theSERVICE_NAMES parameter, then the service name is the same as the globaldatabase name, which is specified in the DB_NAME and DB_DOMAINparameters.
For example:
Database Type: Oracle DatabaseConnection String Format: Connection Parameters or ConnectionString
Connection String: examplehost.exampledomain.com:1521:Orcl.exampledomain.com
Chapter 4Creating the Database Schemas
4-3
Host Name: examplehost.exampledomain.comPort: 1521Service Name: Orcl.exampledomain.comUser Name: sysPassword: ******Role: SYSDBA
Click Next to proceed, then click OK in the dialog window that confirms a successfuldatabase connection.
Specifying a Custom Prefix and Selecting SchemasYou must enter a custom prefix to group schemas together, then select schemas youneed. You can select the required schema on the Select Components screen.
Select Create new prefix, specify a custom prefix, then select the WebCenterContent schema. This action automatically selects the following schemas asdependencies:
• Oracle WebCenter Content Server - Complete
• Oracle WebCenter Enterprise Capture
• Oracle WebCenter Content Server - Search Only
• Oracle WebCenter Content: Imaging
The following schemas are selected by default:
• Metadata Services
• Oracle Platform Security Services
• Audit Services
• Audit Services Append
• Audit Services Viewer
Tip:
You must make a note of the custom prefix you choose to enter here; youwill need this later on during the domain creation process.
Chapter 4Creating the Database Schemas
4-4
Note:
If you install WebCenter Content only and select the Oracle WebCenterContent Server - Complete schema (but no other schemas), you mustselect the Metadata Services schema. You must select Metadata Servicesbecause WebCenter Content User Interface requires it.
To create schemas for Imaging, select Oracle WebCenter Content:Imaging, and also select Oracle WebCenter Content Server - Complete touse WebCenter Content as the Imaging repository.
For Oracle Web Services Manager (Oracle WSM) Policy Manager, or forusing Imaging with Oracle SOA Suite, expand AS Common Schemas andselect Metadata Services.
The schema Common Infrastructure Services is also created automatically. It enablesyou to retrieve information from RCU during domain configuration. This schema isgrayed out; you cannot select or deselect it. For more details, see Understanding theService Table Schema in Oracle Fusion Middleware Creating Schemas with theRepository Creation Utility.
The custom prefix logically groups these schemas together for use in this domain only;you must create a unique set of schemas for each domain because schema sharingacross domains is not supported.
Tip:
For more details about custom prefixes, see Understanding Custom Prefixesin Oracle Fusion Middleware Creating Schemas with the Repository CreationUtility.
To organize your schemas in a multi-domain environment, see PlanningYour Schema Creation in Oracle Fusion Middleware Creating Schemas withthe Repository Creation Utility.
Click Next to proceed, then click OK on the dialog window confirming that prerequisitechecking for schema creation was successful.
Specifying Schema PasswordsOn the Schema Passwords screen, specify how you want to set the schemapasswords on your database, then enter and confirm your passwords.
You must make a note of the passwords you set on this screen; you will need themlater on during the domain creation process.
Completing Schema CreationNavigate through the remaining RCU screens to complete schema creation.
On the Map Tablespaces screen, the Encrypt Tablespace check box appears only ifyou enabled Transparent Data Encryption (TDE) in the database (Oracle or Oracle
Chapter 4Creating the Database Schemas
4-5

EBR) when you start the RCU. Select the Encrypt Tablespace check box if you wantto encrypt all new tablespaces that the RCU creates.
When you reach the Completion Summary screen, click Close to dismiss the RCU.
Configuring the DomainUse the Configuration Wizard to create and configure a domain.
For information on other methods to create domains, see Additional Tools for Creating,Extending, and Managing WebLogic Domains in Oracle Fusion Middleware CreatingWebLogic Domains Using the Configuration Wizard.
• Starting the Configuration WizardStart the Configuration Wizard to begin configuring a domain.
• Navigating the Configuration Wizard Screens to Create and Configure the DomainEnter required information in the Configuration Wizard screens to create andconfigure the domain for the topology.
Starting the Configuration WizardStart the Configuration Wizard to begin configuring a domain.
To start the Configuration Wizard:
1. Change to the following directory:
(UNIX) ORACLE_HOME/oracle_common/common/bin
(Windows) ORACLE_HOME\oracle_common\common\bin
where ORACLE_HOME is your 12c (12.2.1.4.0) Oracle home.
2. Enter the following command:
(UNIX) ./config.sh
(Windows) config.cmd
Navigating the Configuration Wizard Screens to Create and Configurethe Domain
Enter required information in the Configuration Wizard screens to create and configurethe domain for the topology.
Note:
You can use this procedure to extend an existing domain. If your needs donot match the instructions in the procedure, be sure to make your selectionsaccordingly, or see the supporting documentation for more details.
• Selecting the Domain Type and Domain Home LocationUse the Configuration Type screen to select a Domain home directory location,optimally outside the Oracle home directory.
Chapter 4Configuring the Domain
4-6
• Selecting Configuration Templates for Oracle WebCenter Content
• Configuring High Availability OptionsUse this screen to configure service migration and persistence settings that affecthigh availability. This screen appears for the first time when you create a clusterthat uses automatic service migration, persistent stores, or both, and allsubsequent clusters that are added to the domain by using the ConfigurationWizard, automatically apply the selected HA options.
• Selecting the Application Home LocationUse the Application Location screen to select the location to store applicationsassociated with your domain, also known as the Application home directory.
• Configuring the Administrator AccountUse the Administrator Account screen to specify the user name and password forthe default WebLogic Administrator account for the domain.
• Specifying the Domain Mode and JDKUse the Domain Mode and JDK screen to specify the domain mode and JavaDevelopment Kit (JDK).
• Specifying JDBC Data SourcesUse this screen to specify JDBC Data Sources.
• Testing the JDBC Data SourceUse this screen to test the data source connections you configured in the previousscreens.
• Specifying the Database Configuration TypeUse the Database Configuration type screen to specify details about the databaseand database schema.
• Specifying JDBC Component Schema InformationUse the JDBC Component Schema screen to verify or specify details about thedatabase schemas.
• Testing the JDBC ConnectionsUse the JDBC Component Schema Test screen to test the data sourceconnections.
• Entering CredentialsUse the Credentials screen to set credentials for each key in the domain.
• Selecting Advanced ConfigurationUse the Advanced Configuration screen to complete the domain configuration.
• Configuring the Administration Server Listen AddressUse the Administration Server screen to select the IP address of the host.
• Configuring Node ManagerUse the Node Manager screen to select the type of Node Manager you want toconfigure, along with the Node Manager credentials.
• Configuring Managed Servers for Oracle WebCenter ContentYou create and configure new Managed Servers on the Managed Servers Screen.
• Configuring a Cluster for WebCenter ContentUse the Clusters screen to create a new cluster.
• Defining Server TemplatesIf you are creating dynamic clusters for a high availability setup, use the ServerTemplates screen to define one or more server templates for domain.
Chapter 4Configuring the Domain
4-7
• Configuring Dynamic ServersIf you are creating dynamic clusters for a high availability setup, use the DynamicServers screen to configure the dynamic servers.
• Assigning WebCenter Content Managed Servers to the ClusterUse the Assign Servers to Clusters screen to assign Managed Servers to a newconfigured cluster. A configured cluster is a cluster you configure manually. Youdo not use this screen if you are configuring a dynamic cluster, a cluster thatcontains one or more generated server instances that are based on a servertemplate.
• Configuring Coherence ClustersUse the Coherence Clusters screen to configure the Coherence cluster.
• Creating a New WebCenter Content MachineUse the Machines screen to create new machines in the domain. A machine isrequired so that Node Manager can start and stop servers.
• Assigning Servers to WebCenter Content MachinesUse the Assign Servers to Machines screen to assign the Administration Serverand Managed Servers to the new machine you just created.
• Virtual TargetsIf you have a WebLogic Server Multitenant (MT) environment, you use the VirtualTargets screen to add or delete virtual targets. For this installation (not aWebLogic Server MT environment), you do not enter any values; just select Next.
• PartitionsThe Partitions screen is used to configure partitions for virtual targets in WebLogicServer Multitenant (MT) environments. Select Next without selecting any options.
• Reviewing Your Configuration Specifications and Configuring the DomainThe Configuration Summary screen shows detailed configuration information forthe domain you are about to create.
• Writing Down Your Domain Home and Administration Server URLThe End of Configuration screen shows information about the domain you justconfigured.
Selecting the Domain Type and Domain Home LocationUse the Configuration Type screen to select a Domain home directory location,optimally outside the Oracle home directory.
Oracle recommends that you locate your Domain home in accordance with thedirectory structure in What Are the Key Oracle Fusion Middleware Directories? inOracle Fusion Middleware Understanding Oracle Fusion Middleware, where theDomain home is located outside the Oracle home directory. This directory structurehelps avoid issues when you need to upgrade or reinstall software.
To specify the Domain type and Domain home directory:
1. On the Configuration Type screen, select Create a new domain.
2. In the Domain Location field, specify your Domain home directory.
For more details about this screen, see Configuration Type in Oracle FusionMiddleware Creating WebLogic Domains Using the Configuration Wizard.
Chapter 4Configuring the Domain
4-8
Selecting Configuration Templates for Oracle WebCenter ContentOn the Templates screen, make sure Create Domain Using Product Templates isselected, then select the following templates:
• Oracle Universal Content Management - Inbound Refinery -12.2.1.4.0[wccontent]
• Oracle Universal Content Management - Content Server - 12.2.1.4.0[wccontent]
Selecting this template automatically selects the following as dependencies:
– Oracle Enterprise Manager - 12.2.1.4.0 [em]
– Oracle JRF - 12.2.1.4.0 [oracle_common]
– WebLogic Coherence Cluster Extension - 12.2.1.4.0 [wlserver]
• Oracle WebCenter Enterprise Capture - 12.2.1.4.0 [wccapture]
• Oracle WebCenter Content - Web UI - 12.2.1.4.0 [wccontent]
• Oracle WebCenter Content: Imaging
Tip:
For more details about options on this screen, see Templates in OracleFusion Middleware Creating WebLogic Domains Using the ConfigurationWizard.
Configuring High Availability OptionsUse this screen to configure service migration and persistence settings that affect highavailability. This screen appears for the first time when you create a cluster that usesautomatic service migration, persistent stores, or both, and all subsequent clusters thatare added to the domain by using the Configuration Wizard, automatically apply theselected HA options.
Enable Automatic Service Migration
Select Enable Automatic Service Migration to enable pinned services to migrateautomatically to a healthy Managed Server for failover. It configures migratable targetdefinitions that are required for automatic service migration and the cluster leasing.Choose one of these cluster leasing options:
• Database Leasing - Managed Servers use a table on a valid JDBC SystemResource for leasing. Requires that the Automatic Migration data source have avalid JDBC System Resource. If you select this option, the Migration Basis isconfigured to Database and the Data Source for Automatic Migration is alsoautomatically configured by the Configuration Wizard. If you have a highavailability database, such as Oracle RAC, to manage leasing information,configure the database for server migration according to steps in High-availabilityDatabase Leasing.
• Consensus Leasing - Managed Servers maintain leasing information in-memory.You use Node Manager to control Managed Servers in a cluster. (All servers that
Chapter 4Configuring the Domain
4-9
are migratable, or which could host a migratable target, must have a NodeManager associated with them.) If you select this option, the Migration Basis isconfigured to Consensus by the Configuration Wizard.
See Leasing for more information on leasing.
See Service Migration for more information on Automatic Service Migration.
JTA Transaction Log Persistence
This section has two options: Default Persistent Store and JDBC TLog Store.
• Default Persistent Store - Configures the JTA Transaction Log store of the serversin the default file store.
• JDBC TLog Store - Configures the JTA Transaction Log store of the servers inJDBC stores.
Oracle recommends that you select JDBC TLog Store. When you complete theconfiguration, you have a cluster where JDBC persistent stores are set up forTransaction logs.
For more details on persistent and TLOG stores, see the following topics in OracleFusion Middleware Developing JTA Applications for Oracle WebLogic Server:
• Using the Default Persistent Store
• Using a JDBC TLOG Store
JMS Service Persistence
A persistent JMS store is a physical repository for storing persistent message dataand durable subscribers. It can be either a disk-based file store or a JDBC-accessibledatabase. You can use a JMS file store for paging of messages to disk when memoryis exhausted.
• JMS File Store - Configures a component to use JMS File Stores. If you select thisoption, you can choose the File Store option in the Advanced ConfigurationScreen to change the settings, if required. In the File Stores screen, you can setfile store names, directories, and synchronous write policies.
• JMS JDBC Store - Configures a component to use JDBC stores for all its JMSservers. When you complete the configuration, you have a cluster and JDBCpersistent stores are configured for the JMS servers.
Selecting the Application Home LocationUse the Application Location screen to select the location to store applicationsassociated with your domain, also known as the Application home directory.
Oracle recommends that you locate your Application home in accordance with thedirectory structure in What Are the Key Oracle Fusion Middleware Directories? inOracle Fusion Middleware Understanding Oracle Fusion Middleware, where theApplication home is located outside the Oracle home directory. This directory structurehelps avoid issues when you need to upgrade or re-install your software.
For more about the Application home directory, see About the Application HomeDirectory.
Chapter 4Configuring the Domain
4-10
For more information about this screen, see Application Location in Oracle FusionMiddleware Creating WebLogic Domains Using the Configuration Wizard.
Configuring the Administrator AccountUse the Administrator Account screen to specify the user name and password for thedefault WebLogic Administrator account for the domain.
Oracle recommends that you make a note of the user name and password that youenter on this screen; you need these credentials later to boot and connect to thedomain's Administration Server.
Specifying the Domain Mode and JDKUse the Domain Mode and JDK screen to specify the domain mode and JavaDevelopment Kit (JDK).
On the Domain Mode and JDK screen:
• Select Production in the Domain Mode field.
• Select the Oracle HotSpot JDK in the JDK field.
For more information about this screen, see Domain Mode and JDK in Oracle FusionMiddleware Creating WebLogic Domains Using the Configuration Wizard.
Specifying JDBC Data SourcesUse this screen to specify JDBC Data Sources.
If you use a DB2 database, you must check system requirements before you select aDB2 driver. See the document Oracle Fusion Middleware System Requirements andSpecifications.
1. Select the default Data Source, mds-WCCUIMDSREPO.
2. Enter values for DBMS/Service, Host Name, Port and Password and Username.
3. Click Next.
Testing the JDBC Data SourceUse this screen to test the data source connections you configured in the previousscreens.
Note:
To test database connections, the database you are connecting to must berunning. If you don’t want to test the connections at this time, do not selectany data sources and click Next to continue.
A green check mark in the Status column indicates a successful test. If you encounterany issues, see the error message in the Connection Result Log section of the screen,fix the problem, then try to test the connection again.
To test the data source:
Chapter 4Configuring the Domain
4-11
1. Select the check box next to the data source you want to test.
2. Select Test Selected Connections.
3. If the test is successful, then click Next. If it fails, click Back, correct the detailsand retest it.
Specifying the Database Configuration TypeUse the Database Configuration type screen to specify details about the database anddatabase schema.
On the Database Configuration type screen, select RCU Data. This option instructsthe Configuration Wizard to connect to the database and Service Table (STB) schemato automatically retrieve schema information for schemas needed to configure thedomain.
Note:
If you select Manual Configuration on this screen, you must manually fill inparameters for your schema on the next screen.
After selecting RCU Data, specify details in the following fields:
Field Description
DBMS/Service Enter the database DBMS name, or service name if you selected aservice type driver.
Example: orcl.exampledomain.com
Host Name Enter the name of the server hosting the database.
Example: examplehost.exampledomain.com
Port Enter the port number on which the database listens.
Example: 1521
Schema Owner
Schema Password
Enter the username and password for connecting to the database'sService Table schema. This is the schema username and passwordentered for the Service Table component on the Schema Passwordsscreen in the RCU (see Specifying Schema Passwords).
The default username is prefix_STB, where prefix is the customprefix that you defined in the RCU.
Click Get RCU Configuration when you finish specifying the database connectioninformation. The following output in the Connection Result Log indicates that theoperation succeeded:
Connecting to the database server...OKRetrieving schema data from database server...OKBinding local schema components with retrieved data...OK
Successfully Done.
Chapter 4Configuring the Domain
4-12
For more information about the schema installed when the RCU is run, see About theService Table Schema in Oracle Fusion Middleware Creating Schemas with theRepository Creation Utility.
See Database Configuration Type in Oracle Fusion Middleware Creating WebLogicDomains Using the Configuration Wizard .
Specifying JDBC Component Schema InformationUse the JDBC Component Schema screen to verify or specify details about thedatabase schemas.
Verify that the values populated on the JDBC Component Schema screen are correctfor all schemas. If you selected RCU Data on the previous screen, the schema tableshould already be populated appropriately.
For high availability environments, see the following sections in Oracle FusionMiddleware High Availability Guide for additional information on configuring datasources for Oracle RAC databases:
• Configuring Active GridLink Data Sources with Oracle RAC
• Configuring Multi Data Sources
See JDBC Component Schema in Oracle Fusion Middleware Creating WebLogicDomains Using the Configuration Wizard for more details about this screen.
Testing the JDBC ConnectionsUse the JDBC Component Schema Test screen to test the data source connections.
A green check mark in the Status column indicates a successful test. If you encounterany issues, see the error message in the Connection Result Log section of the screen,fix the problem, then try to test the connection again.
By default, the schema password for each schema component is the password youspecified while creating your schemas. If you want different passwords for differentschema components, manually edit them in the previous screen (JDBC ComponentSchema) by entering the password you want in the Schema Password column,against each row. After specifying the passwords, select the check box correspondingto the schemas that you changed the password in and test the connection again.
For more information about this screen, see JDBC Component Schema Test in OracleFusion Middleware Creating WebLogic Domains Using the Configuration Wizard.
Entering CredentialsUse the Credentials screen to set credentials for each key in the domain.
The Store Name column shows the credential store associated with each key.
(Optional) You can click Add to enter additional key credentials.
1. Enter the User Name to use for the key.
2. Enter the Password to use for the key.
3. Select Next.
Chapter 4Configuring the Domain
4-13
Selecting Advanced ConfigurationUse the Advanced Configuration screen to complete the domain configuration.
On the Advanced Configuration screen, select:
• Administration Server
Required to properly configure the listen address of the Administration Server.
• Node Manager
Required to configure Node Manager.
• Topology
Required to configure the WebCenter Content Managed Server.
Optionally, select other available options as required for your desired installationenvironment. The steps in this guide describe a standard installation topology, but youmay choose to follow a different path. If your installation requirements extend toadditional options outside the scope of this guide, you may be presented withadditional screens to configure those options. For information about all ConfigurationWizard screens, see Configuration Wizard Screens in Oracle Fusion MiddlewareCreating WebLogic Domains Using the Configuration Wizard.
Configuring the Administration Server Listen AddressUse the Administration Server screen to select the IP address of the host.
Select the drop-down list next to Listen Address and select the IP address of the hostwhere the Administration Server will reside, or use the system name or DNS namethat maps to a single IP address. Do not use All Local Addresses.
Do not specify any server groups for the Administration Server.
Note:
Use the Mozilla Firefox browser to access Internet Protocol Version 6 (IPv6)URLs. You must enter the Global IPv6 address to create a domain andaccess URLs. (You should not use the local IPv6 address.)
Configuring Node ManagerUse the Node Manager screen to select the type of Node Manager you want toconfigure, along with the Node Manager credentials.
Select Per Domain Default Location as the Node Manager type, then specify NodeManager credentials.
For more information about this screen, see Node Manager in Oracle FusionMiddleware Creating WebLogic Domains Using the Configuration Wizard.
For more about Node Manager types, see Node Manager Overview in Oracle FusionMiddleware Administering Node Manager for Oracle WebLogic Server.
Chapter 4Configuring the Domain
4-14
Configuring Managed Servers for Oracle WebCenter ContentYou create and configure new Managed Servers on the Managed Servers Screen.
You create two Managed Servers for each component, with the exception of InboundRefinery.
1. In the Listen Address drop-down list, select the IP address of the host on that theManaged Servers will reside on or use the system name or DNS name that mapsto a single IP address. Do not use All Local Addresses.
2. Select Enable SSL to enable an SSL (https) connection for WebCenter Contentand WebCenter Content User Interface. Revise the SSL Listen Port value asneeded.
3. Leave the Server Groups settings as they appear; the Configuration Wizardassigns the correct server group automatically. A server group ensures that thecorrect services target Managed Servers you are creating.
Server groups target Fusion Middleware applications and services to one or moreservers by mapping defined application service groups to each defined servergroup. You can map a given application service group to multiple server groups ifneeded. Any application services that map to a certain server group areautomatically targeted to all servers assigned to that group. For more informationabout server groups, see Application Service Groups, Server Groups, andApplication Service Mappings in Oracle Fusion Middleware Domain TemplateReference.
4. Click Add and repeat this process to create a second Managed Server for eachcomponent except for Inbound Refinery. For example, cpt_server_2.
You must configure a second Managed Server to configure the standard topologyfor high availability. If you are not creating a highly available environment, then thisstep is optional.
For more about the high availability standard topology, see Understanding theFusion Middleware Standard HA Topology in Oracle Fusion Middleware HighAvailability Guide.
For more information about the next steps to prepare for high availability after yourdomain is configured, see Preparing Your Environment for High Availability.
Examples and procedures in the rest of this document refer to these server names; ifyou choose different names be sure to replace them as needed.
Tip:
For more about options on this screen, see Managed Servers in OracleFusion Middleware Creating WebLogic Domains Using the ConfigurationWizard.
Configuring a Cluster for WebCenter ContentUse the Clusters screen to create a new cluster.
On the Clusters screen:
Chapter 4Configuring the Domain
4-15

1. Click Add.
2. Specify wcc_cluster_1 in the Cluster Name field.
3. Leave the Cluster Address field blank.
Repeat the preceding steps to create three more clusters: cpt_cluster_1,ibr_cluster_1, and wccui_cluster_1.
By default, server instances in a cluster communicate with one another using unicast.If you want to change your cluster communications to use multicast, see Considerations for Choosing Unicast or Multicast in Oracle Fusion MiddlewareAdministering Clusters for Oracle WebLogic Server.
You can also create clusters using Fusion Middleware Control. In this case, you canconfigure cluster communication (unicast or multicast) when you create the newcluster. See Create and configure clusters in Oracle Fusion Middleware OracleWebLogic Server Administration Console Online Help.
For more information about this screen, see Clusters in Oracle Fusion MiddlewareCreating WebLogic Domains Using the Configuration Wizard.
Defining Server TemplatesIf you are creating dynamic clusters for a high availability setup, use the ServerTemplates screen to define one or more server templates for domain.
To continue configuring the domain, click Next.
For steps to create a dynamic cluster for a high availability setup, see Using DynamicClusters in Oracle Fusion Middleware High Availability Guide.
Configuring Dynamic ServersIf you are creating dynamic clusters for a high availability setup, use the DynamicServers screen to configure the dynamic servers.
If you are not configuring a dynamic cluster, click Next to continue configuring thedomain.
Note:
When you create dynamic clusters, keep in mind that after you assign theMachine Name Match Expression, you do not need to create machines foryour dynamic cluster.
To create a dynamic cluster for a high availability setup, see Using Dynamic Clustersin Oracle Fusion Middleware High Availability Guide.
Assigning WebCenter Content Managed Servers to the ClusterUse the Assign Servers to Clusters screen to assign Managed Servers to a newconfigured cluster. A configured cluster is a cluster you configure manually. You do not
Chapter 4Configuring the Domain
4-16
use this screen if you are configuring a dynamic cluster, a cluster that contains one ormore generated server instances that are based on a server template.
For more on configured cluster and dynamic cluster terms, see About DynamicClusters in Oracle Fusion Middleware Understanding Oracle WebLogic Server.
On the Assign Servers to Clusters screen:
1. In the Clusters pane, select the cluster to which you want to assign the ManagedServers; in this case, wcc_cluster_1.
2. In the Servers pane, assign wcc_server_1 to wcc_cluster_1 by doing one of thefollowing:
• Click once on wcc_server_1 to select it, then click the right arrow to move itbeneath the selected cluster (wcc_cluster_1) in the Clusters pane.
• Double-click on wcc_server_1 to move it beneath the selected cluster(wcc_cluster_1) in the Clusters pane.
3. Repeat to assign wcc_server_2 to wcc_cluster_1.
The following image shows a generic example of the Clusters pane after ManagedServers are assigned to clusters.For more information about this screen, see Assign Servers to Clusters in OracleFusion Middleware Creating WebLogic Domains Using the Configuration Wizard.
Configuring Coherence ClustersUse the Coherence Clusters screen to configure the Coherence cluster.
Leave the default port number as the Coherence cluster listen port. After configuration,the Coherence cluster is automatically added to the domain.
Note:
Setting the unicast listen port to 0 creates an offset for the Managed Serverport numbers. The offset is 5000, meaning the maximum allowed value thatyou can assign to a Managed Server port number is 60535, instead of 65535.
See Table 5-2 for more information and next steps for configuring Coherence.
For Coherence licensing information, see Oracle Coherence Products in LicensingInformation.
Creating a New WebCenter Content MachineUse the Machines screen to create new machines in the domain. A machine isrequired so that Node Manager can start and stop servers.
If you plan to create a high availability environment and know the list of machines yourtarget topology requires, you can follow the instructions in this section to create all themachines at this time. For more about scale out steps, see Optional Scale OutProcedure in Oracle Fusion Middleware High Availability Guide.
Chapter 4Configuring the Domain
4-17

To create a new WebCenter Content machine so that Node Manager can start andstop servers:
1. Select the Machine tab (for Windows) or the UNIX Machine tab (for UNIX), thenclick Add to create a new machine.
2. In the Name field, specify a machine name, such as wcc_machine_1.
3. In the Node Manager Listen Address field, select the IP address of the machine inwhich the Managed Servers are being configured.
You must select a specific interface and not localhost. This allows Coherencecluster addresses to be dynamically calculated.
4. Verify the port in the Node Manager Listen Port field.
5. Repeat these steps to add more machines, if required.
Note:
If you are extending an existing domain, you can assign servers to anyexisting machine. It is not necessary to create a new machine unless yoursituation requires it.
For more information about this screen, see Machines in Oracle Fusion MiddlewareCreating WebLogic Domains Using the Configuration Wizard.
Assigning Servers to WebCenter Content MachinesUse the Assign Servers to Machines screen to assign the Administration Server andManaged Servers to the new machine you just created.
On the Assign Servers to Machines screen:
1. In the Machines pane, select the machine to which you want to assign the servers;in this case, wcc_machine_1.
2. In the Servers pane, assign AdminServer to wcc_machine_1 by doing one of thefollowing:
• Click once on AdminServer to select it, then click the right arrow to move itbeneath the selected machine (wcc_machine_1) in the Machines pane.
• Double-click on AdminServer to move it beneath the selected machine(wcc_machine_1) in the Machines pane.
3. Repeat these steps to assign all Managed Servers to their respective machines.
For more information about this screen, see Assign Servers to Machines in OracleFusion Middleware Creating WebLogic Domains Using the Configuration Wizard.
Virtual TargetsIf you have a WebLogic Server Multitenant (MT) environment, you use the VirtualTargets screen to add or delete virtual targets. For this installation (not a WebLogicServer MT environment), you do not enter any values; just select Next.
Chapter 4Configuring the Domain
4-18
For details about this screen, see Virtual Targets in Oracle Fusion MiddlewareCreating WebLogic Domains Using the Configuration Wizard.
Note:
WebLogic Server Multitenant virtual targets are deprecated in WebLogicServer 12.2.1.4.0 and will be removed in the next release.
PartitionsThe Partitions screen is used to configure partitions for virtual targets in WebLogicServer Multitenant (MT) environments. Select Next without selecting any options.
For details about options on this screen, see Partitions in Oracle Fusion MiddlewareCreating WebLogic Domains Using the Configuration Wizard.
Note:
WebLogic Server Multitenant domain partitions are deprecated in WebLogicServer 12.2.1.4.0 and will be removed in the next release.
Reviewing Your Configuration Specifications and Configuring the DomainThe Configuration Summary screen shows detailed configuration information for thedomain you are about to create.
Review each item on the screen and verify that the information is correct. To make anychanges, go back to a screen by clicking the Back button or selecting the screen inthe navigation pane. Domain creation does not start until you click Create.
For more details about options on this screen, see Configuration Summary in OracleFusion Middleware Creating WebLogic Domains Using the Configuration Wizard.
Writing Down Your Domain Home and Administration Server URLThe End of Configuration screen shows information about the domain you justconfigured.
Make a note of the following items because you need them later:
• Domain Location
• Administration Server URL
You need the domain location to access scripts that start Node Manager andAdministration Server, and you need the URL to access the Administration Server.
Click Finish to dismiss the Configuration Wizard.
Starting the ServersAfter configuration is complete, start Node Manager, then the WebLogic AdministrationServer and Managed Servers.
Chapter 4Starting the Servers
4-19
For more information on additional tools you can use to manage your domain, see Overview of Oracle Fusion Middleware Administration Tools in Oracle FusionMiddleware Administering Oracle Fusion Middleware.
• Starting Node Manager
• Starting the Administration Server
• Starting the Managed Servers
• Oracle WebCenter Content Managed Server Locations (URLs)After you start the Managed Servers, use this topic to refer to Oracle WebCenterContent Managed Server locations.
Starting Node ManagerTo start the per-domain Node Manager:
1. Change to the following directory:
• (UNIX) setenv JAVA_HOME /home/Oracle/Java/jdk1.8.0_211
• (Windows) set JAVA_HOME=C:\home\Oracle\Java\jdk1.8.0_211
2. Enter the following command:
• (UNIX) Using nohup and nm.out as an example output file:
nohup ./startNodeManager.sh > LOG_DIR/nm.out&
where LOG_DIR is the location of directory in which you want to store the logfiles.
• (Windows) startNodeManager.cmd
Note:
On Windows operating systems, Oracle recommends that youconfigure Node Manager to run as a startup service. This allowsNode Manager to start up automatically each time the system isrestarted.
See Running Node Manager as a Startup Service in Oracle FusionMiddleware Administering Node Manager for Oracle WebLogicServer.
Starting the Administration ServerTo start the Administration Server:
1. Go to the DOMAIN_HOME/bin directory.
2. Enter the following command:
• (UNIX)
./startWebLogic.sh
• (Windows)
Chapter 4Starting the Servers
4-20
startWebLogic.cmd
If you selected Production Mode on the Domain Mode and JDK screen when youcreated the domain, you see a prompt for the Administrator user login credentials asprovided on the Administrator Account screen.
For more information about starting the Administration Server, see Starting andStopping Administration Server in Oracle Fusion Middleware Administering OracleFusion Middleware.
In production mode, a boot identity file can be created to bypass the need to provide auser name and password when starting the Administration Server. For more bootidentity files, see Creating a Boot Identity File for an Administration Server in OracleFusion Middleware Administering Server Startup and Shutdown for Oracle WebLogicServer.
You can verify that the Administration Server is up and running by accessing theAdministration Server Console. The URL is provided on the End of Configurationscreen (http://administration_server_host:administration_server_port/console). The default Administration Server port number is 7001.
Note:
Make sure that the database hosting your product schemas is up andrunning and accessible by the Administration Server.
For more information about how to use the Administration Console, see GettingStarted Using Oracle WebLogic Server Administration Console in Oracle FusionMiddleware Administering Oracle Fusion Middleware.
Starting the Managed ServersTo start the Managed Servers:
1. Sign in to Oracle Fusion Middleware Control:
http://administration_server_host:administration_server_port/em
The Administration Server host and port number were in the URL on the End ofConfiguration screen (Writing Down Your Domain Home and AdministrationServer URL). The default Administration Server port number is 7001.
The login credentials were provided on the Administrator Account screen(Configuring the Administrator Account).
2. The Enterprise Manager landing page lists the servers configured for this domainand displays their status (such as Running or Shutdown). For a newly configureddomain, only the AdminServer(admin) will be running.
Select the first Managed Server.
3. Next to the WebLogic Server menu, select Start Up.
4. Repeat Steps 3 and 4 to start all Managed Servers.
5. On the main landing page, verify that all the Managed Servers are up and running.
Chapter 4Starting the Servers
4-21
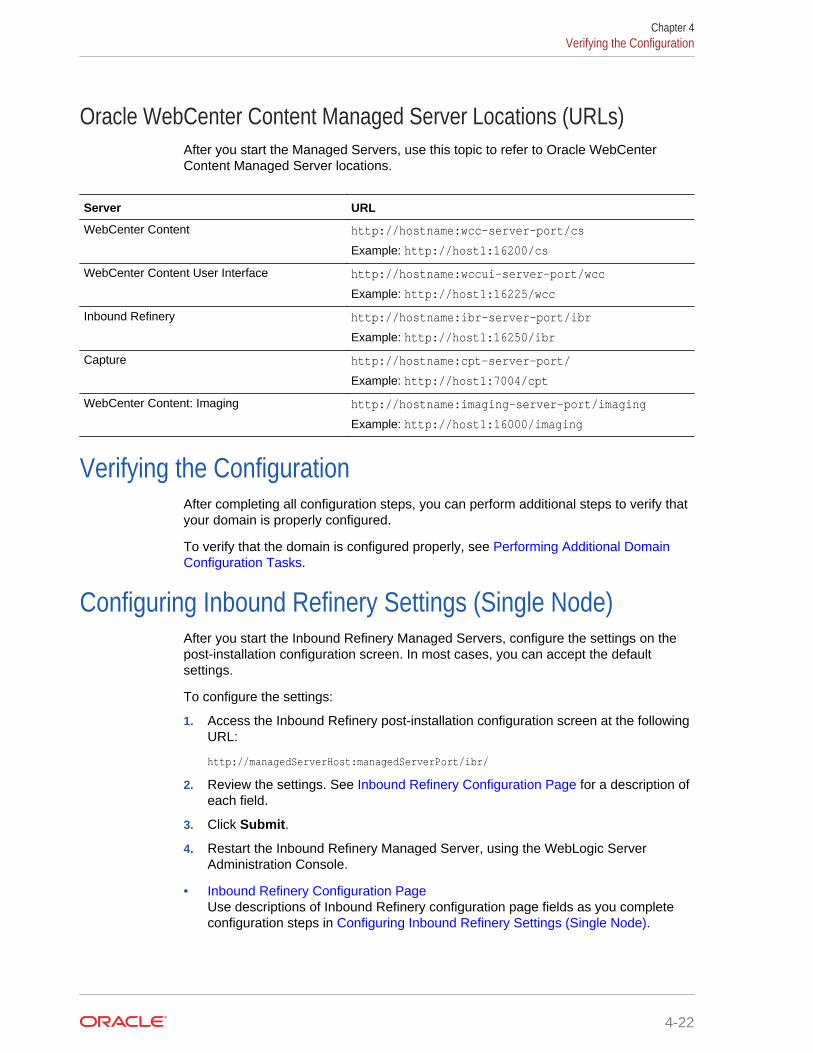
Oracle WebCenter Content Managed Server Locations (URLs)After you start the Managed Servers, use this topic to refer to Oracle WebCenterContent Managed Server locations.
Server URL
WebCenter Content http://hostname:wcc-server-port/cs
Example: http://host1:16200/cs
WebCenter Content User Interface http://hostname:wccui-server-port/wcc
Example: http://host1:16225/wcc
Inbound Refinery http://hostname:ibr-server-port/ibr
Example: http://host1:16250/ibr
Capture http://hostname:cpt-server-port/
Example: http://host1:7004/cpt
WebCenter Content: Imaging http://hostname:imaging-server-port/imaging
Example: http://host1:16000/imaging
Verifying the ConfigurationAfter completing all configuration steps, you can perform additional steps to verify thatyour domain is properly configured.
To verify that the domain is configured properly, see Performing Additional DomainConfiguration Tasks.
Configuring Inbound Refinery Settings (Single Node)After you start the Inbound Refinery Managed Servers, configure the settings on thepost-installation configuration screen. In most cases, you can accept the defaultsettings.
To configure the settings:
1. Access the Inbound Refinery post-installation configuration screen at the followingURL:
http://managedServerHost:managedServerPort/ibr/
2. Review the settings. See Inbound Refinery Configuration Page for a description ofeach field.
3. Click Submit.
4. Restart the Inbound Refinery Managed Server, using the WebLogic ServerAdministration Console.
• Inbound Refinery Configuration PageUse descriptions of Inbound Refinery configuration page fields as you completeconfiguration steps in Configuring Inbound Refinery Settings (Single Node).
Chapter 4Verifying the Configuration
4-22
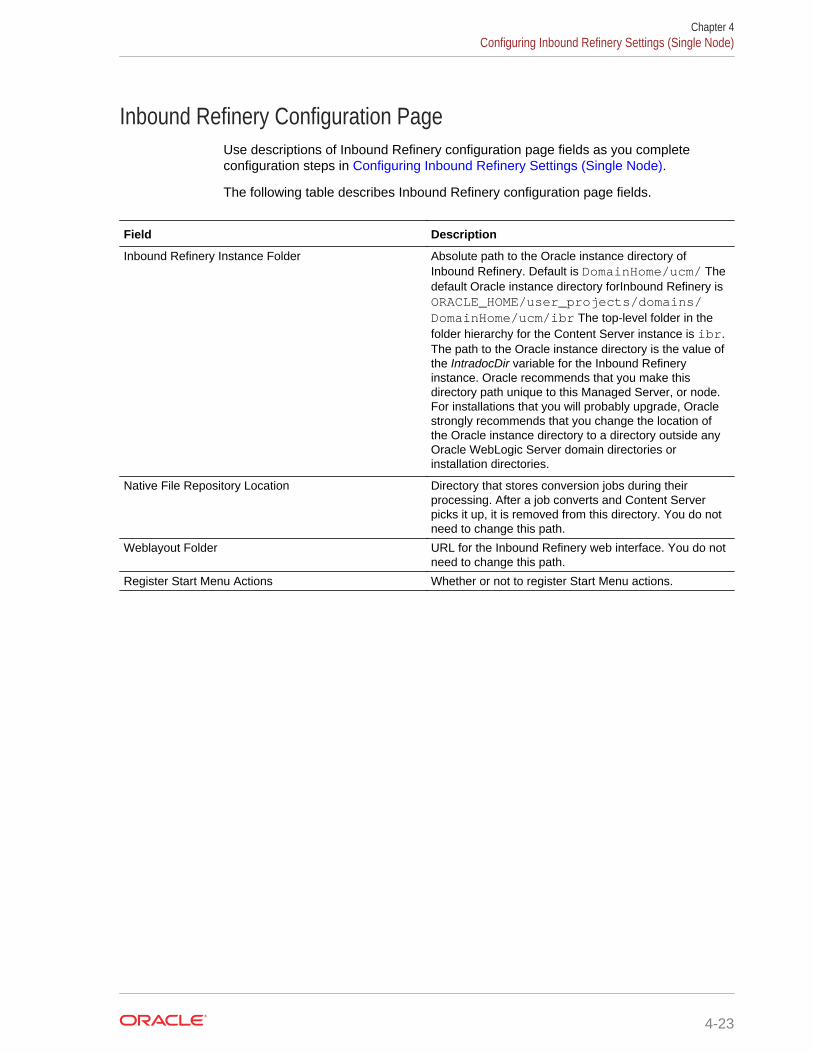
Inbound Refinery Configuration PageUse descriptions of Inbound Refinery configuration page fields as you completeconfiguration steps in Configuring Inbound Refinery Settings (Single Node).
The following table describes Inbound Refinery configuration page fields.
Field Description
Inbound Refinery Instance Folder Absolute path to the Oracle instance directory ofInbound Refinery. Default is DomainHome/ucm/ Thedefault Oracle instance directory forInbound Refinery isORACLE_HOME/user_projects/domains/DomainHome/ucm/ibr The top-level folder in thefolder hierarchy for the Content Server instance is ibr.The path to the Oracle instance directory is the value ofthe IntradocDir variable for the Inbound Refineryinstance. Oracle recommends that you make thisdirectory path unique to this Managed Server, or node.For installations that you will probably upgrade, Oraclestrongly recommends that you change the location ofthe Oracle instance directory to a directory outside anyOracle WebLogic Server domain directories orinstallation directories.
Native File Repository Location Directory that stores conversion jobs during theirprocessing. After a job converts and Content Serverpicks it up, it is removed from this directory. You do notneed to change this path.
Weblayout Folder URL for the Inbound Refinery web interface. You do notneed to change this path.
Register Start Menu Actions Whether or not to register Start Menu actions.
Chapter 4Configuring Inbound Refinery Settings (Single Node)
4-23
Field Description
Server Socket Port Number of the port to call top-level services.To set up a provider from Inbound Refinery back toContent Server, you can leave the default
Server Socket Port value 5555 or change it to anunused port number.Changing this field value also changes theIntradocServerPort entry in ORACLE_HOME/user_projects/domains/DomainHome/ucm/ibr/config/config.cfg
Note:
You must set ServerSocket Port correctly touseInbound Refinery.
Note:
The default port numberfor Node Manager andInbound Refinery is 5555.If both run on the sameserver, you must configurea different port number forNode Manager or InboundRefinery.
Chapter 4Configuring Inbound Refinery Settings (Single Node)
4-24
Field Description
Incoming Socket Connection Address Security Filter Restricts Inbound Refinery access to a computer orcomputers with a specified IP address or addresses.
To enable access from Content Server, enter a value forthis field. For example:
127.0.0.1|0:0:0:0:0:0:0:1|your.server.IP.addressThis value should be the Content Server instance IPaddress of the or instances that will send jobs toInbound Refinery, not the IP address of InboundRefinery. (In a test or demo environment, these IPaddresses could be the same.)
This field accepts wildcards such as 10.*.*.*. You canchange this value by settingSocketHostAddressSecurityFilter inDomainHome/ucm/ibr/config/config.cfg and restartingInbound Refinery.
Note:
To use Inbound Refinery,you must set the IncomingSocket ConnectionAddress Security Filtervalue correctly.
Web Server HTTP/HTTPS Address The name of the web server. (HttpServerAddressproperty).
WebAddress Is HTTPS Whether or not the URL for the web server starts withHTTPS, for a server that has SSL enabled.
Inbound Refinery URL Prefix Relative URL for theInbound Refinery instance.
Server Instance Name Inbound Refinery instance name.
Server Instance Label Instance name shown for Inbound Refinery.
Service Instance Description Inbound Refinery Instance description
Configuring WebCenter Content SettingsYou must complete the WebCenter Content configuration on the post-installationconfiguration page in Content Server.
WebCenter Content shows the configuration page when you first sign in to ManagedServer at http://managedServerHost:managedServerPort/cs
Note:
The domain administrator must be the first user to sign in to the WebCenterContent Managed Server so that they can complete configuration. For moredetails about administration, see Introduction in Oracle Fusion MiddlewareAdministering Oracle WebCenter Content
Chapter 4Configuring WebCenter Content Settings
4-25

To complete WebCenter Content configuration:
1. Start the Administration Server. See Starting the Administration Server.
2. Start the WebCenter Content Managed Server. See Starting the ManagedServers.
3. Go to the Content Server post-installation page at http://managedServerHost:16200/cs/
4. Enter or edit any configuration values you want to change.
You can select a full-text search engine in the FullText Search Option field.Leave the field blank to set up the system as metadata only.
5. Enter a value in Incoming Socket Connection Address Security Filter toenable access from Inbound Refinery. For example:
127.0.0.1|your.server.IP.address|0:0:0:0:0:0:0:1|
This field accepts wildcards such as 10.*.*.* You can change this value later bysetting SocketHostAddressSecurityFilter in DomainHome/ucm/cs/config/config.cfg and restarting WebCenter Content Managed Server.
For Oracle WSM security, the SocketHostAddressSecurityFilter value must beset as follows:
SocketHostAddressSecurityFilter=*.*.*.*|0:0:0:0:0:0:0:1
6. Verify that the Server Socket Port setting is 4444. The Managed Serverconfiguration file stores this value as IntradocServerPort=4444
7. Click Submit.
8. Restart the WebCenter Content Managed Server. See Starting the ManagedServers
• WebCenter Content Configuration PageYou enter or verify values in the WebCenter Content configuration page fields tocompleteWebCenter Content configuration.
• Completing the Imaging ConfigurationYou can complete the initial configuration of Oracle WebCenter Content: Imagingin an Oracle WebLogic Server domain.
• Configuring CaptureThe Capture System Administrator requires system administration privileges toconfigure and monitor an Oracle WebCenter Enterprise Capture systemenvironment. The configuration consists of tasks such as starting the CaptureManaged Server, assigning roles to Capture users in Fusion Middleware Control,and modifying system-level settings through MBeans.
WebCenter Content Configuration PageYou enter or verify values in the WebCenter Content configuration page fields tocompleteWebCenter Content configuration.
You can use descriptions of these fields while completing steps in ConfiguringWebCenter Content Settings
Chapter 4Configuring WebCenter Content Settings
4-26
Field Description
Content Server Instance Folder Absolute path to the Oracle instance directory ofWebCenter Content. Default is DomainHome/ucm/The default Oracle instance directory forInboundRefinery is ORACLE_HOME/user_projects/domains/DomainHome/ucm/cs The top-levelfolder in the folder hierarchy for the Content Serverinstance is cs.The path to the Oracle instance directory is the value ofthe IntradocDir variable for the WebCenter Contentinstance. Oracle recommends that you make thisdirectory path unique to this Managed Server, or node.For installations that you will probably upgrade, Oraclestrongly recommends that you change the location ofthe Oracle instance directory to a directory outside anyOracle WebLogic Server domain directories orinstallation directories.
Native File Repository Location Path to the vault directory for storing native contentchecked into WebCenter Content.
Weblayout Folder Path to the weblayout directory for storing web-viewablerenditions of native and alternate files.
Register Start Menu Actions Whether or not to register Start Menu actions.
Is New Content Server Instance Whether or not theWebCenter Content instance is new.
Server Socket Port Number of the port to call top-level services. Default:5555To set up a provider from Inbound Refinery back toContent Server, you can leave the default
Changing this field value also changes theIntradocServerPort entry inDOMAIN_HOME/ucm/ibr/config/config.cfg
Incoming Socket Connection Address Security Filter Restricts WebCenter Content access to a computer orcomputers with a specified IP address or addresses.
The default value of this field is the local host’s IPaddress, such as 127.0.0.1.
You can specify multiple IP addresses, separated bypipes ( | ). Make sure that there are no spaces on eitherside of the pipe character. For example:
127.0.0.1|0:0:0:0:0:0:0:1|your.server.IP.addressThis field accepts wildcards * for zero or manycharacters, and ? for any one character. (For example,10.10.3.*)
Typically, use the IP Address Filter field only (mostcommoon) or Hostname Filter field, not both.
Web Server HTTP/HTTPS Address Name of the web server. (HttpServerAddressproperty).
WebAddress Is HTTPS Whether or not the URL for the web server starts withHTTPS, for a server that has SSL enabled.
Inbound Refinery URL Prefix Relative URL for theInbound Refinery instance.
Server Instance Name Inbound Refinery instance name.
Server Instance Label Instance name shown for Inbound Refinery.
Service Instance Description Inbound Refinery Instance description
Chapter 4Configuring WebCenter Content Settings
4-27
Field Description
Is Auto Number Enabled Whether or not automatic numbering of WebCenterContentinstances is enabled.
Auto Number Prefix Unique prefix for an WebCenter Content instancenumber, to avoid conflicts among multiple WebCenterContent instances (Auto Number Prefix systemproperty).
FullText Search Option Search engine for full-text search:None: The Oracle Content Server instance usesDATABASE.METADATA as the search engine.
Internal: If using Oracle Database, the WebCenterContent instance uses OracleTextSearch with thesystem database. If using Microsoft SQL Server, it willuse DATABASE.FULLTEXT.
External: The Oracle Content Server instance usesOracleTextSearch with an external provider to an OracleDatabase (not the system database). If you select thisoption, you must enter the Data Source name in theExternal DataSource field.
External DataSource Name of the Data Source, which you must create inOracle WebLogic Server and target to the ManagedServer, using an OCSSEARCH schema created withRepository Creation Utility (RCU).
Completing the Imaging ConfigurationYou can complete the initial configuration of Oracle WebCenter Content: Imaging in anOracle WebLogic Server domain.
This section explains the steps to complete the Imaging configuration.
• Completing the Initial Imaging ConfigurationBefore you complete the configuration of Imaging, your system should haveOracle WebCenter Content installed and configured. Imaging uses WebCenterContent for its repository.
• Configuring the Full-Text Features in the WebCenter Content RepositoryImaging supports two types of full-text searching under WebCenter Content:DATABASE.FULLTEXT and OracleTextSearch. Imaging can use the full-text featuresif you configure full-text searching in the WebCenter Content repository.
• Setting Imaging System SecurityOn a new Imaging system, the first user to log in is automatically granted fullpermissions. Typically, this initial user associates other users or groups, afterwhich the initial user’s permissions are changed or revoked as needed.
• Configuring the Imaging Viewer CacheThe Imaging viewer can cache documents on the server outside of the repositoryto increase rendering speed on the client machine. Security for the cacheddocuments is controlled by authentication for the server on which the documentsare stored.
• Installing and Configuring AXF BPM and AXF for BPELOracle WebCenter Content: AXF for BPM and Oracle Application ExtensionsFramework (AXF) for BPEL are installed automatically with Imaging, and AXF forBPEL is automatically deployed to the Imaging Managed Server.
Chapter 4Configuring WebCenter Content Settings
4-28
Completing the Initial Imaging ConfigurationBefore you complete the configuration of Imaging, your system should have OracleWebCenter Content installed and configured. Imaging uses WebCenter Content for itsrepository.
Your Imaging system uses WebCenter Content 12c as its document repository. Forinformation about configuring WebCenter Content, see Configuring WebCenterContent Domain.
Note:
In a production system, Oracle WebCenter Content applications use anexternal Lightweight Directory Application Protocol (LDAP) authenticationprovider rather than the Oracle WebLogic Server embedded LDAP server,which is part of the default configuration. If you want to reassociate theidentity store for Imaging with an external LDAP authentication provider, it iseasier to do this association before you complete the configuration of theImaging Managed Server and before you connect it to the WebCenterContent 12c repository. For more information, see Reassociating the IdentityStore with an External LDAP Authentication Provider.
The user who logs in first to an Imaging Managed Server is provisioned with fullsecurity throughout the server. When this user first logs in, Imaging provides a userinterface to complete the configuration, including connecting to a repository orrepositories and, optionally, to a workflow server.
If a value is specified in the DefaultSecurityGroup MBean before Imaging security isinitialized, then when the first user logs in, the specified group as well as the userlogging in is given full administrative permissions.
To complete the Imaging configuration, you have to perform all the tasks that apply toyour system:
• Configuring a WebCenter Content Repository for ImagingYou can configure WebCenter Content 12c as the repository for Imaging. You willnot be able to import or upload content to the Imaging system unless you havecreated a repository connection.
• Starting the Imaging Managed Server and Accessing the Web ClientYou can access the Imaging web client after you start the Administration serverand the Imaging and WebCenter Content Managed Servers.
• Connecting to a WebCenter Content RepositoryBefore Imaging can use the WebCenter Content repository, you need to configurea connection to Content Server. You can create a connection to it from Imaging.
• Connecting to a Workflow ServerA connection to a workflow server (Oracle SOA Suite) is required before youimport the definition files. This connection is necessary for your solution to retrieveyour task list. Imaging connects to a workflow server when application fields aremapped to workflow payload elements.
Chapter 4Configuring WebCenter Content Settings
4-29
• Configuring the GDFontPath MBean for a UNIX SystemFor conversions to work correctly on a UNIX operating system, the operatingsystem needs to have TrueType fonts available. If these fonts are not available onyour system, you need to install them. To set the font path on a UNIX operatingsystem, you need to configure the GDFontpath MBean. You can configure itthrough the System MBean Browser in Oracle Enterprise Manager FusionMiddleware Control.
• Setting DISPLAY for the Imaging Viewer in a UNIX Exalogic Environment withSolaris 12cIn an Exalogic environment with Solaris 12c, you need to set the DISPLAYenvironment variable for the Imaging Viewer to work correctly in the basic mode.
• Importing DefinitionsAt this point in the installation process, you can import previously exportedImaging definitions (applications, searches, and inputs).
Configuring a WebCenter Content Repository for ImagingYou can configure WebCenter Content 12c as the repository for Imaging. You will notbe able to import or upload content to the Imaging system unless you have created arepository connection.
• Configuring WebCenter Content 12c to Work with Imaging
• Configuring a File Store Provider for Content Storage
Configuring WebCenter Content 12c to Work with Imaging
WebCenter Content 12c is installed with Oracle WebCenter Content. When aWebCenter Content Managed Server and Imaging Managed Server are configured inan Oracle WebLogic Server domain on the same host machine, the configuration ofWebCenter Content 12c to work with Imaging is automatic.
If WebCenter Content is installed in a domain that is later extended with Imaging, thenWebCenter Content will not be reconfigured to work with Imaging until the next restartof the WebCenter Content Managed Server. In this case, you must restart WebCenterContent before you connect to Oracle WebCenter Content Server from the Imagingweb client, as described in Connecting to a WebCenter Content Repository.
If the WebCenter Content and Imaging Managed Servers are configured to run ondifferent machines, configuring Imaging will not configure WebCenter Content to workwith it. In this case, you must follow the manual configuration steps to configureWebCenter Content.
To configure WebCenter Content 12c manually to work with Imaging:
1. Start the WebCenter Content Managed Server, as described in Starting theManaged Servers.
2. Access Content Server.
3. Enable the IpmRepository component:
a. From the Administration tray or menu, select Admin Server, and then selectComponent Manager.
b. On the Component Manager page, select Integration.
c. Select IpmRepository, and click Update.
Chapter 4Configuring WebCenter Content Settings
4-30

This option is selected by default if the Oracle WebLogic Server domain isconfigured with Fusion Middleware Configuration Wizard. If this option isalready selected, you can close Component Manager without clicking Updateor restarting Content Server.
d. Click OK.
e. Restart Content Server.
If you have already selected IpmRepository, you do not need to restart theserver.
Configuring a File Store Provider for Content Storage
An administrator can configure a file store provider in Content Server 11g to controlhow and where files are stored and managed within Content Server. Instead of storingall content on a single file system, you can use a file store provider to store contentacross multiple file systems as well as within a database. The File Store Providercomponent is installed and enabled by default with WebCenter Content installationand configuration
For Imaging, you should add a file store provider to use instead of the default file storeprovider. Also, you should disable the traditional web layout functionality for the filestore.
You can configure a file store provider for Oracle Database.
If your WebCenter Content installation uses a Microsoft SQL Server or IBM DB2database, do not configure a file store provider. If you are configuring a WebCenterContent Managed Server with one of these databases, you need to disable the filestore provider that is enabled by default for Content Server. See Managing a File StoreSystem in Oracle Fusion Middleware Administering Oracle WebCenter Content
• Configuring a File Store Provider
• Disabling Web Layout Functionality for Imaging
Configuring a File Store ProviderA file store provider can be a combination of any media supported by Content Server.Because the document storage location is not defined by the media that is being usedfor storage, the term volume is used to represent a storage location when anapplication is defined in the Imaging user interface. Imaging connects to a volume thatan administrator defines and configures in Content Server. You cannot use Imaging tocreate or define a volume.
A Content Server administrator can configure a file store provider. See Managing theFile Store Provider in Oracle Fusion Middleware Administering Oracle WebCenterContent
Disabling Web Layout Functionality for ImagingContent Server traditionally uses a weblayout/ directory on a file system to storecontent in a format for viewing in a web browser, even if the main storage volume isset up in a database. This file system store is useful for making content retrieval fasterfor a website or for storing a secondary file that describes the primary content item, butit does not have much use in an Imaging solution. Files copied to a weblayout/directory in an exclusively Imaging solution would never get used, taking upunnecessary storage space. Oracle recommends that you disable the web layoutfunctionality for any file store provider that is configured for use as an Imaging volume.
Chapter 4Configuring WebCenter Content Settings
4-31
Note:
If your Imaging system will use redactions, do not implement Web Layout.Users might be able to see an unredacted version of a document in theweblayout/ directory if Web Layout (IBR) is turned on in an Imaging filestore provider.
An administrator can disable the web layout functionality by selecting the Is WeblessFile Store option on the Add/Edit Storage Rule page for a file store provider in ContentServer. See Adding or Editing a Storage Rule in Oracle Fusion MiddlewareAdministering Oracle WebCenter Content
Starting the Imaging Managed Server and Accessing the Web ClientYou can access the Imaging web client after you start the Administration server andthe Imaging and WebCenter Content Managed Servers.
To access the Imaging web client:
1. Start the Imaging Managed Server, as described Starting the Managed Servers.
Note:
If Oracle WebCenter Content: AXF for BPM is deployed to the domain,proceed to Configuring and Verifying AXF for BPM before you performany configuration on the Imaging server.
2. Access the web client at this URL: http://managedServerHost:16000/imaging. Log in with the administrator user name and password.
Note:
This first user who connects to the Imaging system is registered as theImaging administrator.
Connecting to a WebCenter Content RepositoryBefore Imaging can use the WebCenter Content repository, you need to configure aconnection to Content Server. You can create a connection to it from Imaging.
To connect to a WebCenter Content repository:
1. Open a web browser, and navigate to this website: http://managedServerHost:16000/imaging.
2. Log in with the administrator user name and password.
3. Navigate to the Manage Connections tray and select Create Content ServerConnection from the list.
Chapter 4Configuring WebCenter Content Settings
4-32

4. Enter a name for the connection on the Basic Information page and, optionally, adescription, and then click Next.
5. Change the selections, if required, on the Connection Settings page:
• SSL: Selected for secure SSL communications.
• Server Port: The IDC port of the WebCenter Content instance. By default,4444 for Imaging.
• Use Local Content Server: Selected by default if Content Server is on thesame machine as the Imaging server.
If the servers are not installed on the same machine, configure the ContentServer machine name as part of the Content Server Pool.
6. Click Next.
7. Enter a Connection Security value for the connection.
Select which users and groups should have permission to access, modify, delete,or grant other users access to this connection definition. At least one user or groupmust have the grant access permission.
8. Click Next
9. At the Summary screen, click Submit.
Connecting to a Workflow ServerA connection to a workflow server (Oracle SOA Suite) is required before you importthe definition files. This connection is necessary for your solution to retrieve your tasklist. Imaging connects to a workflow server when application fields are mapped toworkflow payload elements.
To connect, the provider, port, and credential information is passed using WebServices Inspection Language (WSIL). WSIL uses the HTTP protocol and a specificXML format to allow for the discovery of the web service end points on a server.Imaging follows links in the WSIL that meet certain criteria to discover deployedcomposites.
The connection can be to an Oracle Business Process Management (Oracle BPM) orBusiness Process Execution Language (BPEL) server. For Imaging to take advantageof BPM and Oracle BPEL Process Manager within an existing domain, the domainmust be extended with Oracle BPM Suite - 12.2.1.4.0. When Oracle BPM Suite isinstalled, it automatically selects Oracle SOA Suite - 12.2.1.4.0 as its dependency. Ifyou want to use Oracle BPEL Process Manager and not Oracle BPM, you can extendthe domain with an Oracle SOA Suite installation and configuration. See About theOracle SOA Suite and Oracle Business Process Management Installation in OracleFusion Middleware Installing and Configuring Oracle SOA Suite and Business ProcessManagement.
This section describes the procedure to configure a connection to a workflow serverand register the connection in your database. For additional information, see Creatinga Workflow Connection in Administering Oracle WebCenter Content: Imaging.
• Configuring a Connection to a Workflow Server
• Adding the Connection to the Database
Chapter 4Configuring WebCenter Content Settings
4-33
Configuring a Connection to a Workflow Server
If you have installed the Oracle SOA Suite for use with Imaging, such as for AXF forBPM or AXF for BPEL, you need to configure a connection to a workflow server.
To configure a connection to a workflow server:
1. Open a web browser, and navigate to this website: http://managedServerHost:16000/imaging.
2. Log in with the administrator user name and password.
3. Navigate to the Manage Connections tray and select Create WorkflowConnection from the list.
4. Enter a name for the connection on the Basic Information page and, optionally, adescription, and then click Next.
5. Optionally, change one or more of the following selections on the ConnectionSettings page:
• HTTP Front End Address: The front end address of the workflow server,including the listening port, which is http://<server>:8001 for Oracle SOASuite, by default.
• Credential Alias: The credential store key for obtaining user and passwordcredentials for the workflow server.
• Provider: The provider setting can be either the host name or IP address of asingle machine, or a comma-separated list of host names or IP addresses formultiple machines in a cluster. The listening port and transport mechanismshould be included in the setting.
6. Click Test Connection to verify the settings.
7. Click Next.
8. Enter a Connection Security value for the connection.
Select which users and groups should have permission to access, modify, delete,or grant other users access to this connection definition. At least one user or groupmust have the grant access permission.
9. Click Next
10. At the Summary screen, click Submit.
Adding the Connection to the Database
After you have created a workflow connection, enter the name of that connection in theAXF_SOLUTION_ATTRIBUTES table for your solution. For example, the parameter key fora BPEL server is named WORKFLOW_CONNECTION, and the HelloBPEL sample script usesthe connection name test.
Configuring the GDFontPath MBean for a UNIX SystemFor conversions to work correctly on a UNIX operating system, the operating systemneeds to have TrueType fonts available. If these fonts are not available on yoursystem, you need to install them. To set the font path on a UNIX operating system,
Chapter 4Configuring WebCenter Content Settings
4-34
you need to configure the GDFontpath MBean. You can configure it through theSystem MBean Browser in Oracle Enterprise Manager Fusion Middleware Control.
To configure the GDFontPath MBean for a UNIX system:
1. Access the Imaging domain in Fusion Middleware Control by using theURL:http://adminServerHost:adminServerPort/em
For adminServerHost, specify the name of the computer that hosts theAdministration Server for your domain. For adminServerPort, specify the listenport number for the Administration Server. The default number is 7001. Forexample: http://myHost.example.com:7001/em
To log in, provide the user name and password that were specified on theConfigure Administrator User Name and Password screen in the ConfigurationWizard.
2. In the navigation tree on the left, expand WebLogic Domain and the deployeddomain.
3. Right-click IPM_server1, and select System MBean Browser from the menu.
4. In the navigation tree on the System MBean Browser page, under ConfigurationMBeans, close the com.bea folder.
5. Under Application Defined MBeans, expand the oracle.imaging folder.
6. Expand the Server: IPM_server1 and config folders.
7. Click config.
8. Set the value of the GDFontPath attribute to the location of your True Type Fonts(TTF) files; for example: /usr/share/X11/fonts/TTF
For systems on which Oracle WebLogic Server includes a JDK, you can find someTTF files in the JDK/jre/lib/fonts directory.
Some standard font locations on different UNIX platforms follow:
• Solaris SPARC: /usr/openwin/lib/X11/fonts/TrueType
• AIX: /usr/lpp/X11/lib/X11/fonts/TrueType
• HP-UX Itanium: /usr/lib/X11/fonts/TrueType
• Linux: /usr/lib/X11/fonts/TrueType
9. Click Apply.
10. Restart Imaging.
Setting DISPLAY for the Imaging Viewer in a UNIX Exalogic Environment with Solaris 12cIn an Exalogic environment with Solaris 12c, you need to set the DISPLAYenvironment variable for the Imaging Viewer to work correctly in the basic mode.
To set DISPLAY for the Imaging Viewer in a UNIX Exalogic Environment with Solaris12c:
1. Open a new terminal window and run this command:
xhost +
Chapter 4Configuring WebCenter Content Settings
4-35
2. In the Imaging terminal, set the DISPLAY environment variable to the serverwhere Imaging is running and specify the port, in this format:
servername:port
3. Restart Imaging.
Importing DefinitionsAt this point in the installation process, you can import previously exported Imagingdefinitions (applications, searches, and inputs).
For more information, see Exporting and Importing Definitions in Administering OracleWebCenter Content: Imaging.
For additional information about how to import definitions, see Importing DefinitionFiles into Imaging.
Configuring the Full-Text Features in the WebCenter Content RepositoryImaging supports two types of full-text searching under WebCenter Content:DATABASE.FULLTEXT and OracleTextSearch. Imaging can use the full-text features ifyou configure full-text searching in the WebCenter Content repository.
For DATABASE.FULLTEXT systems, after the indexes are rebuilt, nothing needs to bedone on the Imaging side. OracleTextSearch, however, requires that the index berebuilt any time an application with FullText enabled is created, deleted, or hasmodifications that involve field definitions.
For more information on configuring full-text searching, see ConfiguringOracleTextSearch for Content Server.
For additional full-text configuration options, see Configuring the Search Index inOracle Fusion Middleware Administering Oracle WebCenter Content.
After full-text is enabled in WebCenter Content, you will need to create an applicationand check the FullText option on the application. See Configuring System Propertiesin Oracle Fusion Middleware Administering Oracle WebCenter Content.
Setting Imaging System SecurityOn a new Imaging system, the first user to log in is automatically granted fullpermissions. Typically, this initial user associates other users or groups, after whichthe initial user’s permissions are changed or revoked as needed.
Note:
If you configure Imaging for use with Oracle Access Manager, you mustprotect the imaging/faces/ directory. Otherwise, you will not get accessto the Imaging Viewer.
If security provider changes are made after this initial user login to Imaging, take thefollowing steps to reset Imaging system security. For example, if you later change the
Chapter 4Configuring WebCenter Content Settings
4-36
security configuration to point to an Oracle Internet Directory provider or a MicrosoftActive Directory provider, you must reset the Imaging system security.
1. Manually create or migrate users and groups to the new external security provider,using utilities as needed. See Reassociating the Identity Store with an ExternalLDAP Authentication Provider.
2. Run the refreshIPMSecurity() WLST MBean command. See refreshIPMSecurity in WebCenter WLST Command Reference.
Note:
During the refresh, users or groups for whom matching identifyinginformation is not found are ignored. As security changes are made,invalid users or groups are removed from the Imaging database.
Configuring the Imaging Viewer CacheThe Imaging viewer can cache documents on the server outside of the repository toincrease rendering speed on the client machine. Security for the cached documents iscontrolled by authentication for the server on which the documents are stored.
If the server is considered secure, no additional security is necessary. If additionalsecurity is required, you can encrypt cached documents as described in EncryptingCached Documents.
To set the Imaging viewer to use cached documents:
1. Verify that the Imaging Viewer Cache was successfully deployed:
a. In the WebLogic Server Administration Console, click Deployments underDomain Structure.
b. In the imaging-vc row of the Deployments table, confirm that the State valueis Active and the Health value is OK.
If the State or Health value is different for imaging-vc, you need to fix thedeployment, or redeploy the feature before you proceed.
2. Enable viewer caching by setting the ViewerCachePath MBean to the locationwhere the documents must be cached, as described in Configuring theGDFontPath MBean for a UNIX System. For example, to enable caching on anImaging system that runs on a single computer, you can use the relative pathimaging/ViewerCache. If no path is set, then caching of documents is disabled.
Note:
The ViewerCachePath MBean must be set to a location that is availableto all the servers in the cluster. If the directory path is not available to allthe servers, each server will cache documents locally, resulting inmultiple instances of the entire cache.
3. Specify the number of days for documents to remain in the cache location afterbeing viewed, by setting the ViewerCacheDays MBean. Cached documents notviewed within the specified number of days are purged from the cache. If a
Chapter 4Configuring WebCenter Content Settings
4-37
document is viewed within the specified number of days, the ViewerCacheDaystimer for that document is reset. If you set ViewerCacheDays equal to 0 (thedefault), you cannot purge the documents from cache.
4. Set the ViewerCacheEnablePrecache MBean to true to cache documents whenthey are ingested into Imaging (pre-cache) or set the value to false to cachedocuments when they are first called by the viewer.
• Changing the Viewer Cache PathYou can move the viewer cache to a new location if the Imaging server is shutdown and the new location uses the same file hierarchy as the old location.
• Encrypting Cached DocumentsFor additional security, you an configure Imaging to encrypt the cacheddocuments. Encryption makes additional processing necessary to decrypt adocument for viewing, and reduces the rendering speed. Even if you configureImaging to encrypt the cached documents, there is a brief period of time duringcaching when the documents that are generated are not encrypted.
• Disabling Encryption of Cached DocumentsYou can disable the encryption of cached documents by setting the value of theViewerCacheEnableEncryption MBean to false.
Changing the Viewer Cache PathYou can move the viewer cache to a new location if the Imaging server is shut downand the new location uses the same file hierarchy as the old location.
To change the viewer cache path:
1. Shut down the Imaging server.
2. Move the cached files to the new location. Ensure that you preserve the filehierarchy.
3. Set the new path in the ViewerCachePath MBean.
4. Start the Imaging server.
Encrypting Cached DocumentsFor additional security, you an configure Imaging to encrypt the cached documents.Encryption makes additional processing necessary to decrypt a document for viewing,and reduces the rendering speed. Even if you configure Imaging to encrypt the cacheddocuments, there is a brief period of time during caching when the documents that aregenerated are not encrypted.
To enable encryption of cached documents:
1. Add a new password credential to the domain with Oracle Enterprise ManagerFusion Middleware Control:
a. Select the WebLogic Server domain for Oracle WebCenter Content.
b. From the WebLogic Domain menu, select Security, and then Credentials.
c. Select the map oracle.imaging. If there is no map named oracle.imaging,click Create Map, specify oracle.imaging for the map name, and thenselect it.
d. Click Create Key. Name the key viewer.cache, and select the typePassword.
Chapter 4Configuring WebCenter Content Settings
4-38
e. Enter a user name. The user name does not need to exist in any system.
f. Enter a password, confirm it, and then click OK.
2. Enable encryption by setting the ViewerCacheEnableEncryption MBean, asdescribed in Configuring the GDFontPath MBean for a UNIX System.
Note:
The password credential must exist on the domain before you set theViewerCacheEnableEncryption MBean.
Disabling Encryption of Cached DocumentsYou can disable the encryption of cached documents by setting the value of theViewerCacheEnableEncryption MBean to false.
Subsequent calls to the viewer causes unencrypted documents to be cached. You candecrypt and view any encrypted documents that are already in the cache if thepassword credential remains unaltered in the domain.
If you removed or alter the password credential, you must manually purge theencrypted documents that are still cached.
To purge the imaging.jks file:
1. Shut down the Imaging server.
2. Delete the cached files from the cache directory.
3. Delete the imaging.jks file from the cache directory.
4. Start the Imaging server.
Installing and Configuring AXF BPM and AXF for BPELOracle WebCenter Content: AXF for BPM and Oracle Application ExtensionsFramework (AXF) for BPEL are installed automatically with Imaging, and AXF forBPEL is automatically deployed to the Imaging Managed Server.
Before you can deploy AXF for BPM to the Imaging server, you need to create therequired schemas with the Repository Creation Utility. Then when the domain iscreated or extended, you can select AXF for BPM to use it with Imaging.
You can configure either AXF for BPM or AXF for BPEL, or both, to run on the ImagingManaged Server:
• AXF for BPM
The newer AXF for BPM infrastructure takes advantage of the applicationdevelopment and configuration capabilities that are provided by technologies suchas Oracle Business Process Management (Oracle BPM), Oracle ApplicationDevelopment Framework (Oracle ADF), Oracle Metadata Services Repository(Oracle MDS Repository), and Oracle Business Rules to create configurablebusiness components. These business components help administrators toconfigure and develop integration solutions for WebCenter Content businessapplications. See Configuring and Verifying AXF for BPM.
Chapter 4Configuring WebCenter Content Settings
4-39

• AXF for BPEL
You can configure AXF for BPEL to run on the Imaging Managed Server. Theolder AXF for BPEL infrastructure relies on AXF database tables (Imaging tables)as the basis for configuring AXF solutions, commands, and web tools. A solutiondeveloper or solution accelerator can implement and customize these solutions,commands, and tools. See Configuring and Verifying AXF for BPEL.
For additional information about configuring and using AXF for BPM or AXF for BPELand the AXF for BPEL database tables (Imaging tables), see Configuring the BPELImaging Solution in Oracle Fusion Middleware Administering the Application Adaptersfor Oracle WebCenter.
• Configuring and Verifying AXF for BPM
• Configuring and Verifying AXF for BPEL
Configuring and Verifying AXF for BPMBefore you configure AXF for BPM with Imaging, you need to install and configureOracle WebCenter Content and Oracle SOA Suite, and create an AXF schema withthe Repository Creation Utility, as well as schemas for the following components:
• Metadata Services
• Oracle WebCenter Content Server - Complete
• Oracle WebCenter Content: Imaging
• SOA Infrastructure
• User Messaging Service
When you create or extend the WebLogic Server domain, be sure the followingproduct templates are selected:
• Oracle SOA Suite
• Oracle WebCenter Content: AXF for BPM
Note:
If AXF for BPM is on a separate host machine from the Oracle SOASuite Managed Server, you need to extend the domain with Oracle WSMPolicy Manager.
• Oracle WebCenter Content: Imaging
• Oracle Universal Content Management - Content Server (for WebCenterContent)
• Oracle Enterprise Manager
• Oracle BPM Suite
After you create or extend a domain to include AXF for BPM and the components andproducts it depends on, you can configure it to work with Imaging using the WebLogicServer Administration Console, Oracle WebLogic Server Scripting Tool (WLST), andOracle Enterprise Manager Fusion Middleware Control. You can also set upcommunications with Oracle Coherence between AXF for BPM and Imaging servers
Chapter 4Configuring WebCenter Content Settings
4-40
running on multiple domains or machines or to prevent multicast interference betweenAXF for BPM and Imaging in a single domain. See Configuring AXF for BPM.
To verify that you have installed and configured the AXF for BPM infrastructureproperly, AXF for BPM includes the HelloBPM solution, which uses an Oracle BPMprocess to verify the BPM integration. See Verifying the AXF for BPM Installation.
• Configuring AXF for BPM
• Verifying the AXF for BPM Installation
Configuring AXF for BPM
Use the following procedure to configure AXF for BPM with the Imaging server. Youcan set up the Imaging server through the WebLogic Server Administration Console,create foreign JNDI with WLST, and configure the AXF for BPM CSF key throughFusion Middleware Control.
To configure AXF for BPM to work with Imaging Managed Servers that run in a clusteror other distributed configuration, you need to set up communications with OracleCoherence. See Oracle Coherence Communications for Imaging Clusters, MultipleDomains, or Multiple Machines. In a single domain, you can set up communicationswith Oracle Coherence to avoid interference from multicast traffic. See OracleCoherence Communications for a Single Server or Domain.
To configure AXF for BPM:
1. Set up the Imaging server through the WebLogic Server Administration Console:
a. The Administration Server should be running. If not, start the AdministrationServer for your Oracle WebLogic Server domain. See Starting theAdministration Server.
b. Log in to the Administration Console.
c. Under Domain Structure on the left, expand Environment, and clickServers.
d. In the Servers table, click the Imaging server instance, such as IPM_server1.
e. Click the Protocols tab.
If the server is in production mode, click Lock & Edit in the Change Center onthe left before you make changes.
f. Click the HTTP tab and set these values:
• Frontend Host: The name of the host machine for the Imaging server,such as myserver.example.com.
• Frontend HTTP Port: The port number for the Imaging instance, such as16000.
g. Save the changes.
If the server is in production mode, activate changes after you save them,unless you have enabled configuration editing.
2. If the Oracle SOA Suite Managed Server is on a separate host machine fromImaging, set the targeting for the IPMDS and mds-axf data sources to the OracleSOA Suite server:
a. Log in to the Administration Console on the Oracle SOA Suite machine.
Chapter 4Configuring WebCenter Content Settings
4-41
b. Under Domain Structure on the left, expand Services, and click DataSources.
c. Select Generic Data Source from the New menu.
d. Enter jdbc/IPMDS in the JNDI Name field.
e. Select your database type in the Database Type list, and click Next.
f. Configure values for Data Source Properties to match the connection of thesame name on the corresponding Imaging server, including using the sameschema.
g. Test the configuration to ensure everything is valid.
h. Click Finish.
i. On the Configuration tab of the Summary of JDBC Data Sources page, clickIPMDS.
j. Click the Targets tab.
k. Select the name of the Oracle SOA Suite server.
l. Click Save.
m. Return to the Configuration tab on the Summary of JDBC Data Sourcespage, and click mds-axf.
n. Click the Targets tab.
o. Select the name of the Oracle SOA Suite server.
p. Click Save.
3. If the Oracle SOA Suite Managed Server is on a separate host machine fromImaging, create a SOALocalTxDataSource data source on the Imaging server as itis set up on the Oracle SOA Suite server:
a. Log in to the Administration Console on the Imaging machine.
b. Under Domain Structure on the left, expand Services, and click DataSources.
c. On the Configuration tab of the Summary of JDBC Data Sources page,select Generic Data Source from the New menu.
d. In the Name field, specify SOALocalTxDataSource.
e. In the JNDI Name field, specify jdbc/SOALocalTxDataSource.
f. Select your database type in the Database Type list, and click Next.
g. Configure values for Data Source Properties to match the connection of thesame name on the corresponding Oracle SOA Suite server, including usingthe same schema.
h. Test the configuration to ensure everything is valid.
i. Click Next to select targets.
j. Select the name of the Imaging server.
k. Click Finish.
4. Create the foreign JNDI with the Oracle WebLogic Scripting Tool (WLST):
a. Change to the WCC_ORACLE_HOME/axf_bpm/scripts directory.
Chapter 4Configuring WebCenter Content Settings
4-42
b. Edit the create-foreign-JNDI.py script by using a text editor.
c. Set the following variables at the top of the file:
# host to login to for executing scriptvar_host = "" # (-h) WebLogic Server Administration Server host namevar_hostPort = "" # (-p) Administration Server portvar_user = "" # (-u) WebLogic Server User Namevar_credential = "" # (-c) WebLogic Server Password# JNDI settingsvar_jndiURIServer = "" # (-t) JNDI target URI of Oracle SOA Suite hostvar_jndiURIServerPort = "" # (-v) JNDI target URI portvar_serverTargetName = "" # (-s) Managed Server name, for targeting the Imaging servervar_jndiUser = "" # (-n) JNDI user namevar_jndiPassword = "" # (-d) JNDI password
d. Save the file.
e. Run the create-foreign-JNDI.py script against the Imaging server withWLST.
The WebLogic Server should be the only server running when you execute thescript, as follows:
cd WCC_ORACLE_HOME/common/bin./wlst.sh create-foreign-JNDI.py
5. Configure the AXF for BPM CSF key:
a. Log in to Oracle Enterprise Manager Fusion Middleware Control.
b. Navigate to the WebLogic Server domain and right-click the deployed domain(base_domain by default).
c. In the resulting menu, select Security, and then Credentials.
d. Create a new map, specify the map name as oracle.wsm.security.
e. Create a new key:
• Specify a key name, such as ipmadmin.
• Specify a valid administrator user, such as weblogic.
• Specify the password.
• Click OK.
• Oracle Coherence Communications for Imaging Clusters, Multiple Domains, orMultiple Machines
• Oracle Coherence Communications for a Single Server or Domain
Oracle Coherence Communications for Imaging Clusters, Multiple Domains, or Multiple MachinesIf you are configuring AXF for BPM, you should configure communications with OracleCoherence, which AXF for BPM utilizes. By default, the server is set up for clustering
Chapter 4Configuring WebCenter Content Settings
4-43
with the following settings configured in the DOMAIN_HOME/bin/setDomainEnv.shscript:
-Dtangosol.coherence.clusteraddress=224.3.1.99-Dtangosol.coherence.clusterport=3199-Dtangosol.coherence.log=jdk
In an Imaging cluster, you need to set up AXF for BPM communications with OracleCoherence with a unique multicast address and port to avoid unwanted multicasttraffic from interfering with the system. For more information about configuring OracleCoherence in clusters, Using Coherence Clusters in Oracle Fusion MiddlewareDeveloping Applications with Oracle Coherence
Oracle Coherence Communications for a Single Server or Domain
For a single-server or domain installation, you can configure Oracle Coherence toavoid the multicast traffic of other machines by editing the DOMAIN_HOME/bin/setDomainEnv.sh script as follows:
1. Open the DOMAIN_HOME/bin/setDomainEnv.sh script in a text editor.
2. Perform a search for coherence to locate existing settings.
3. Append the following two setting after any existing Oracle Coherence settings; forinstance, after -Dtangosol.coherence.log=jdk:
-Dtangosol.coherence.localhost=127.0.0.1-Dtangosol.coherence.ttl=0
4. Save the settings.
5. Restart any running Managed Servers on the domain for the changes to takeeffect.
Verifying the AXF for BPM Installation
You can verify the AXF for BPM installation and configuration with the HelloBPMsolution, which uses a BPM process. This section describes the procedure to deployand use this solution.
• Configuring the HelloBPM Solution
• Importing Definition Files into Imaging
• Accessing the Solution Administration Page
• Injecting Tasks into Imaging
Configuring the HelloBPM SolutionBefore you can use the HelloBPM solution to validate the installation and configurationof AXF for BPM, you need to deploy and configure the solution on the ImagingManaged Server.
To configure the HelloBPM solution:
1. Set up the database:
a. Change to the WCC_ORACLE_HOME/axf_bpm/scripts directory.
Chapter 4Configuring WebCenter Content Settings
4-44
b. Run the AXF_HELLO_BPM_DATA.sql script while connected to the Imagingdatabase schema as the Imaging database user, with the following threeparameters, which will insert the data necessary to run the HelloBPM solution:
• SOAMachineName:Port
• IPMMachineName:Port
• CSFKEY
2. If the Oracle SOA Suite Managed Server is on a separate host machine fromImaging, you will need to manually deploy the Hello BPM process. Copy theWCC_ORACLE_HOME/axf_bpm/bpm/sca_axfHelloBPM_rev1.0.jar file toDOMAIN_HOME/soa/autodeploy/ prior to starting the Oracle SOA SuiteManaged Server.
3. Start up the remaining servers in the following order:
a. Weblogic Server Administration Server (should already be running)
b. Oracle SOA Suite Managed Server
c. Imaging Managed Server
d. WebCenter Content Managed Server
4. Verify that a URI is set on the deployed process:
a. Log in to Oracle Enterprise Manager Fusion Middleware Control.
b. Navigate to the Oracle SOA Suite Managed Server, then soa-infra(soa_server1), and then default, and click axfHelloBPM.
c. In the Component Metrics section, click SalesQuoteEntry.
d. Click the Administration tab.
e. If a valid URI is not set, create one with these settings:
• Application Name: worklist
• Host Name: The name of the host machine for the server
• HTTP Port: The port of the host machine for the server
• HTTPS Port: The secure port of the host machine for the server, or thedefault value if SSL is not configured
• URI: /workflow/axfSolutionHelloBPM/faces/adf.task-flow?_id=SalesQuoteEntry_TaskFlow&_document=WEB-INF/SalesQuoteEntry_TaskFlow.xml
Importing Definition Files into ImagingYou can import definition files for tasks into the Imaging server through the ImagingInjector.
To import definition files into Imaging:
1. Create the connections:
a. Log in to Imaging as an administrator user, such as ipmadmin.
Chapter 4Configuring WebCenter Content Settings
4-45
Note:
This first user to connect to the Imaging system is registered as theImaging administrator. See Completing the Initial ImagingConfiguration.
b. In the navigation tree on the left, expand Manage Connections.
c. Select Create Content Server Connection from the drop-down menu, andconfigure the connection:
• On the Create Connection: Basic Information page, specify a name for theconnection, and click Next.
• On the Create Connection: Content Server Settings page, specify whetherto use SSL, then specify whether to use a local Content Server (default) orspecify an external server through the Content Server Pool section, andthen click Next.
• On the Create Connection: Security page, add the Administrators groupwith full rights, and click Next.
• Review your settings, and click Submit.
d. Select Create Workflow Connection from the drop-down menu, andconfigure the connection:
• On the Create Connection: Basic Information page, specify a name for theconnection, and click Next.
• On the Create Connection: Workflow Settings page, specify the followinginformation, and then click Next.
HTTP Front End Address: Specify the fully qualified HTTP address forthe Oracle SOA Suite server:
http://managedServerHost:managedServerPort/
Credential Alias: This should be the CSF key name that was specified inStep 5 of Configuring and Verifying AXF for BPM, such as ipmadmin.
Provider: Specify the fully qualified t3 address for the Oracle SOA SuiteServer:
t3://managedServerHost:managedServerPort/
• On the Create Connection: Security page, add the Administratorsgroup with full rights, and click Next.
• Review your settings, and click Submit.
2. Import the definition file, WCC_ORACLE_HOME/axf_bpm/ipm into Imaging, usingthe definition import tool.
For more information on uploading definitions and resolving environmentconfigurations, including the repository connection and BPEL server connection aswell as the security configurations of the applications, see About Imaging inAdministering Oracle WebCenter Content: Imaging.
Chapter 4Configuring WebCenter Content Settings
4-46
a. In the navigation tree on the left, expand Tools.
b. Select Import Definitions.
c. Browse to and select the WCC_ORACLE_HOME/axf_bpm/ipm/HelloBPM.xml file.
d. Click Next.
e. On the Select Definitions step, select Action for HelloBPM Application,HelloBPM Input, and HelloBPM Search.
f. Click Next.
g. On the Validation step, select Choose New for the Application Security field,and select the Administrators group. Also, select the Administrators groupfor the Applications, Document Security, Inputs Security, and SearchesSecurity fields.
h. For the Workflow field, select Workflow Connection.
i. Click Submit.
Accessing the Solution Administration PageBefore you can access the Solution Administration page, you need to set up anaxfadmin group in WebLogic Server and assign your WebLogic Server user name tothis group.
To access administration functions for the solution application:
1. Open the new driver page:
http://machinename:16000/axf/faces/pages/axfadmin.jspx
2. Click the Command Driver link on the left.
3. Use the following values:
a. solutionNamespace: SalesQuoteEntry
b. commandNamespace: StartSalesQuoteEntry
4. Click Execute Request.
5. Click Execute Response.
The Solution Administration page opens. Table 4-1 shows the example parameters forthis page.
Table 4-1 Parameters for the Solution Administration Page
Parameter Value
solutionNamespace SalesQuoteEntry
commandNamespace StartSalesQuoteEntry
Username The user name for the request.
You can access the Business Rule Editor through the Solution Administration pageand use this editor to perform any customizations.
Chapter 4Configuring WebCenter Content Settings
4-47

Injecting Tasks into ImagingAfter you deploy the AXF for BPM process, you can inject tasks into Imaging eitherfrom the content input files, through the Imaging input agent, or from the Oracle SOASuite server, through Oracle Enterprise Manager Fusion Middleware Control.
You can inject tasks into the HelloBPM solution from content input files that areinstalled with the AXF for BPM infrastructure. Injecting tasks through the Imaging inputagent enables you to test solution application changes. If needed, you can modify theinput files to match the HelloBPM workflows.
These content input files are in the following directory with WCC_ORACLE_HOME/axf_bpm/ipm/HelloBPM.xml, the Imaging application definition:
$WCC_ORACLE_HOME/axf_bpm/ipm/
This directory includes three input files:
• TestSalesQuote.pdf
• TestSalesQuote.txt
• TestSalesQuote.xml
The following procedure is based on the assumption that InputDirectory is left withthe default configuration (/IPM/InputAgent/Input).
To inject tasks through the input agent:
1. Copy the PDF and XML files into the DOMAIN_HOME directory, and copy the TXTfile into the DOMAIN_HOME/IPM/InputAgent/Input directory (defaultconfiguration). You also might need to change file permissions so that InputAgenthas access to these files. See Enabling Input Agent in Administering OracleWebCenter Content: Imaging.
Within the specified time interval (15 minutes by default), the input agent picks upthe input files and creates a document with metadata values from the text inputfile, an image from the PDF file, and supporting content from the XML file.
Based on the workflow configuration in place with the HelloBPM solution, a task iscreated for the document that displays in the BPM task list.
2. In the task list, click the newly injected task to view its details in the solutionapplication.
3. As needed, modify the metadata values in the text input file before injecting theinput files again. For example, you might inject a task with missing accountinformation to work with its human task flow.
Configuring and Verifying AXF for BPEL
To configure AXF for BPEL to work with Imaging Managed Servers that run in acluster or other distributed configuration, you need to configure the Java Object Cache(JOC) to be distributed to all of the Managed Servers. See Configuring the Java ObjectCache for AXF for BPEL in Distributed Imaging Managed Servers.
For verification that the AXF for BPEL infrastructure is properly installed, AXF forBPEL includes two simple solutions:
• HelloWorld, a basic solution that returns a Hello string.
Chapter 4Configuring WebCenter Content Settings
4-48
• HelloBpel, a solution that includes a BPEL process to verify the BPEL integration.
• Configuring the Java Object Cache for AXF for BPEL in Distributed ImagingManaged Servers
• Verifying the AXF for BPEL Installation and Configuration with HelloWorld
• Verifying the AXF for BPEL Installation and Configuration with HelloBpel
Configuring the Java Object Cache for AXF for BPEL in Distributed Imaging ManagedServers
For AXF for BPEL in Imaging Managed Servers that run in a cluster, you need toconfigure a Java Object Cache (JOC) to be distributed to all of the Managed Servers.You can use HA Power Tools from the Oracle WebLogic Server AdministrationConsole to configure the JOC for all of the Imaging Managed Servers that run indistributed mode. After configuring the Java Object Cache, restart all affectedManaged Servers for the configurations to take effect.
In the following instructions, MW_HOME represents the path to a Middleware home,where Oracle Fusion Middleware is installed, and DomainHome represents the path tothe Oracle home for an Oracle WebLogic Server domain.
To configure the Java Object Cache for a cluster of distributed Managed Servers:
1. Enable HA Power Tools in the Oracle WebLogic Server Administration Console:
a. Copy the following two WAR files from the MW_HOME/oracle_common/hapowertools directory to the DomainHome/console-ext directory:
• powertools-core.war
• powertools-configurejoc.war
For example:
cd middlewarehomecp oracle_common/hapowertools/powertools-co* user_projects/domains/base_domain/console-ext/
b. Restart the Oracle WebLogic Server Administration Server.
c. Access the Oracle WebLogic Server Administration Console (at http://adminServerHost:adminServerPort/console), and click the name of yourdomain in the left navigation tree.
The HA Power Tools tab appears on the Settings page for the domain.
2. Configure the distributed cache:
a. On the Settings page for your domain in the Administration Console, click theHA Power Tools tab.
b. On the Configure JOC tab, select Configure JOC for Clusters.
c. In the Cluster Name field, select a cluster name from the list.
d. In the Discover Port field, enter the listener port number for the cluster.
e. In the Hosts field, enter the names of all the Managed Server hosts,separated by commas.
f. Click Configure JOC.
Chapter 4Configuring WebCenter Content Settings
4-49
3. Restart the cluster of Managed Servers.
4. Verify the JOC distributed cache mode:
a. From the Middleware home on the host for one of the Managed Servers, runthe CacheWatcher utility, as in the following example:
java -classpath oracle_common/modules/oracle.javacache_11.1.1/cache.jar:oracle_common/modules/oracle.odl_11.1.1/ojdl.jaroracle.ias.cache.CacheUtil watch -config=user_projects/domains/base_domain/config/fmwconfig/servers/IPM_server2/javacache.xml
In this example, the class paths for the two JAR files are relative to the currentdirectory (MW_HOME).
The javacache.xml file is the file used by one of the Imaging servers that isparticipating in the JOC distributed cache. For a distributed Java cache witheither virtual or physical IP addresses, the listener address needs to be set injavacache.xml. Each of the files should contain all the distributor locationentries but only one <listener-address> entry, set to the same portnumber for every cache member, as follows:
<listener-address port="portNumber1" host="hostName1"/> <distributor-location ssl="true" port="portNumber1" host="hostName1"/> <distributor-location ssl="true" port="portNumber1" host="hostName2"/> <distributor-location ssl="true" port="portNumber1" host="hostName3"/> <distributor-location ssl="true" port="portNumber1" host="hostName4"/>
b. Enter the lc command to list the cache information:
INFO: JOC is initialized from oracle.ias.cache.CacheUtil.main, . . .cache> lc
c. In the output from the lc command, check that the Distributor Table shows anentry for each member of the distributed cache.
d. Enter the exit command to stop the CacheWatcher utility.
Verifying the AXF for BPEL Installation and Configuration with HelloWorld
Follow these steps to enable the HelloWorld solution:
1. As user who owns the Imaging schema, run the insertHelloCommand.sql scriptfrom one of the following directories.
• UNIX path:
MW_HOME/WCC_ORACLE_HOME/axf/drivers/HelloWorld/dbscripts
• Windows path:
MW_HOME\WCC_ORACLE_HOME\axf\drivers\HelloWorld\dbscripts
Chapter 4Configuring WebCenter Content Settings
4-50
Note:
For IBM DB2 only, add the following line to beginning of theinsertHelloCommand.sql script before you run it:
CONNECT TO soadb USER am3_ipm USING oracle;
2. Access the driver page of the AXF for BPEL web application using the followingURL:
http://host:port/imaging/faces/Driver.jspx
3. Enter the following values:
• Solution Namespace: HelloWorld
• Command Namespace: Hi
• User Name:jcooper
Note:
This user name is valid only if you are using the application server's built-in jazn.xml security.
4. Click Execute Command.
An AXF for BPEL response should display with a populated Conversation ID. Ifthe response is returned, the AXF for BPEL infrastructure is functioning correctly,and commands can be added and executed.
Verifying the AXF for BPEL Installation and Configuration with HelloBpel
The HelloBpel solution includes a BPEL process and a SQL script to set up theHelloBPEL solution namespace for use by that process. The BPEL process anddatabase script are in the following directories.
• UNIX path:
MW_HOME/WCC_ORACLE_HOME/axf/drivers/HelloBpel
• Windows path:
MW_HOME\WCC_ORACLE_HOME\axf\drivers\HelloBpel
To enable the HelloBpel solution:
1. Run one of the following HelloBPEL SQL scripts:
Chapter 4Configuring WebCenter Content Settings
4-51
• UNIX scripts:
MW_HOME/WCC_ORACLE_HOME/axf/drivers/HelloBpel/dbscripts/oracle/insertHelloBPELData.sql
MW_HOME/WCC_ORACLE_HOME/axf/drivers/HelloBpel/dbscripts/sqlserver-db2/insertHelloBPELData.sql
• Windows scripts:
MW_HOME\WCC_ORACLE_HOME\axf\drivers\HelloBpel\dbscripts\oracle\insertHelloBPELData.sql
MW_HOME\WCC_ORACLE_HOME\axf\drivers\HelloBpel\dbscripts\sqlserver-db2\insertHelloBPELData.sql
If you are using Oracle Database, then run the script from the oracle directory.
If you are using an IBM DB2 or Microsoft SQL Server database, then run the scriptfrom the sqlserver-db2 directory.
For IBM DB2 only, before you run the HelloBPEL SQL script, make the followingchanges to it:
• Add this line to beginning of the script:
CONNECT TO soadb USER am3_ipm USING oracle;
• Change the following line to specify whatever the actual BPEL connection is inthe Imaging Manage Connections section:
Insert into AXF_SOLUTION_ATTRIBUTES (SOLUTION_NAMESPACE,PARAMETER_KEY,PARAMETER_VALUE) values ('HelloBPEL','BPEL_CONNECTION','test');
2. Run the insertHelloBPELData.sql script.
3. With Oracle JDeveloper, open HelloBPEL.jws from following directory:
• UNIX path:
MW_HOME/WCC_ORACLE_HOME/axf/drivers/HelloBpel/bpel
• Windows path:
MW_HOME\WCC_ORACLE_HOME\axf\drivers\HelloBpel\bpel
Deploy the process to your BPEL server. For assistance with this task, consult theJDeveloper documentation.
Chapter 4Configuring WebCenter Content Settings
4-52
Note:
The HelloBPEL sample solution assigns instances to a group namedCalifornia by default. You need to add the California group to themyrealm security realm through the Oracle WebLogic ServerAdministration Console.
If you are using an alternate identity store, such as Oracle InternetDirectory, you can change the group assignment by modifying theHelloBpelHumanTask.task file within JDeveloper before deployment.
4. Access the driver page of the AXF for BPEL web application by using the followingURL:
http://host:port/imaging/faces/Driver.jspx
5. In the AXF Command Driver screen, enter the following values:
• Solution Namespace: HelloBPEL
• Command Namespace: StartHelloBPEL
• User Name: A valid Imaging user; for example, weblogic
The preceding Imaging user needs to be part of a group named California. If thisgroup does not exist, then create it, and add the user to the group.
6. Click Execute Command.
A response should be displayed in the response screen.
7. Click Execute Response, and sign in when prompted.
The AXF Task List screen should be displayed. If there are no tasks in the tasklist, open the BPEL Console, create a new instance of HelloBPELProcess, andrefresh the task list.
Configuring CaptureThe Capture System Administrator requires system administration privileges toconfigure and monitor an Oracle WebCenter Enterprise Capture system environment.The configuration consists of tasks such as starting the Capture Managed Server,assigning roles to Capture users in Fusion Middleware Control, and modifying system-level settings through MBeans.
This appendix explains the configuration tasks in detail.
• About Completing the Oracle WebCenter Enterprise Capture ConfigurationThe Capture System Administrator who performs the installation and initialconfiguration must have system administration permissions, including access toOracle Enterprise Manager Fusion Middleware Control and Oracle WebLogicServer. Before anyone can use Oracle WebCenter Enterprise Capture, a systemadministrator must associate users from the LDAP credential store for theWebLogic Server domain with the Capture roles in Fusion Middleware Control.
• Completing the Initial Configuration of Oracle WebCenter Enterprise CaptureThe Capture System Administrator performs the initial configuration of Capture ina WebLogic Server domain. In addition to starting the Capture Managed Server,
Chapter 4Configuring WebCenter Content Settings
4-53
the configuration steps also include assigning roles to users and modifyingsystem-level settings.
About Completing the Oracle WebCenter Enterprise Capture ConfigurationThe Capture System Administrator who performs the installation and initialconfiguration must have system administration permissions, including access toOracle Enterprise Manager Fusion Middleware Control and Oracle WebLogic Server.Before anyone can use Oracle WebCenter Enterprise Capture, a system administratormust associate users from the LDAP credential store for the WebLogic Server domainwith the Capture roles in Fusion Middleware Control.
The roles CaptureWorkspaceManager, CaptureWorkspaceViewer, and CaptureUserare automatically added to the default WebLogic Server policy store for the domain.The Capture System Administrator can use the file/XML-based policy store, an OracleInternet Directory policy store, or an Oracle Database policy store and manage thepolicy store through Fusion Middleware Control.
Through Fusion Middleware Control, you can also configure system settings andloggers for Capture.
Completing the Initial Configuration of Oracle WebCenter Enterprise CaptureThe Capture System Administrator performs the initial configuration of Capture in aWebLogic Server domain. In addition to starting the Capture Managed Server, theconfiguration steps also include assigning roles to users and modifying system-levelsettings.
• Starting the Capture Managed Server
• Assigning Roles to Capture Users
• Modifying System-Level Settings
Starting the Capture Managed ServerThe first step to complete Capture configuration is to start the Capture ManagedServers.
Assigning Roles to Capture UsersBefore anyone can use Capture, the Capture System Administrator needs to assignusers from the LDAP credential store to the Capture roles in the policy store. You cando this through the Application Roles page in Fusion Middleware Control.
To assign roles to Capture users, see Assigning Capture Roles in Oracle EnterpriseManager in Oracle Fusion Middleware Administering Oracle WebCenter EnterpriseCapture.
Modifying System-Level SettingsYou can modify system-level configuration settings for Capture, including systemproperties and SMTP settings for e-mail, through Fusion Middleware Control. Thesettings on this page configure the Capture MBeans for the domain, which you canalso modify with Oracle WebLogic Scripting Tool (WLST) commands.
Chapter 4Configuring WebCenter Content Settings
4-54
The following WLST commands also enable you to access or modify system-levelsettings:
• listCaptureConfig
• getCaptureConfig
• setCaptureConfig
These are online WLST commands that you can use while connected to theAdministration Server for the domain. To connect, you need to run the wlst.sh scriptfrom the Oracle WebCenter Content home directory.
To modify a Capture system-level setting with a WLST command:
1. Start the Administration Server for your Oracle WebLogic Server domain.
2. Sign in to the Oracle WebLogic Server Administration Server.
3. Navigate to the Oracle WebCenter Content home directory at MW_HOME/WCC_ORACLE_HOME
4. Run WLST.
cd common/bin
./wlst.sh
5. Sign in and then enter a custom Capture command:
wls:/offline> connect() Please enter your username :weblogic Please enter your password : XXXXXXXXXXXXX Please enter your server URL [t3://localhost:7001] :t3://host_name:16401 Connecting to t3://host_name:16401 with userid weblogic ... Successfully connected to Managed Server 'capture_server1' that belongs to domain 'domainName'. wls:/domainName/serverConfig> setCaptureConfig('CaptureSystemID','CAPTURE_02')
Attribute 'CaptureSystemID' changed to "CAPTURE_02' wls:/domainName/serverConfig> exit()
Chapter 4Configuring WebCenter Content Settings
4-55
5Next Steps After Configuring the Domain
After you configure a product domain, there are additional tasks that you may want toperform.
• Performing Basic Administrative TasksAfter you configure your new domain, there are administration tasks that Oraclerecommends you perform on the domain.
• Performing Additional Domain Configuration TasksReview additional configuration tasks you will likely want to perform on a newdomain.
• Preparing Your Environment for High AvailabilityScaling out for high availability requires additional steps.
• Configuring WebCenter Content User Interface on Additional NodesIf you install WebCenter Content User Interface on one node, its configuration iscomplete. However, if you scale out WebCenter Content User Interface to asecond node (in a high availability or enterprise deployment topology, forexample), you must complete additional configuration steps.
• Setting the WebCenter Content User Interface Server Socket PortIf you are scaling out WebCenter Content User Interface you must change theserver socket port.
• Configuring WebCenter Content User Interface SettingsYou set WebCenter Content User Interface connection and configuration settingswith WLST or Fusion Middleware Control.
Performing Basic Administrative TasksAfter you configure your new domain, there are administration tasks that Oraclerecommends you perform on the domain.
The following table lists common administration tasks to perform on your new domain.
Table 5-1 Basic Administration Tasks for a New Domain
Task Description More Information
Getting familiar with FusionMiddleware administration tools
Get familiar with various tools thatyou can use to manage yourenvironment.
See Overview of Oracle FusionMiddleware Administration Tools inOracle Fusion MiddlewareAdministering Oracle FusionMiddleware.
Starting and stopping products andservers
Learn how to start and stop OracleFusion Middleware, including theAdministration Server, ManagedServers, and components.
See Starting and Stopping OracleFusion Middleware in Oracle FusionMiddleware Administering OracleFusion Middleware.
5-1
Table 5-1 (Cont.) Basic Administration Tasks for a New Domain
Task Description More Information
Configuring Secure Sockets Layer(SSL)
Learn how to set up securecommunications between OracleFusion Middleware componentsusing SSL.
See Configuring SSL in OracleFusion Middleware in Oracle FusionMiddleware Administering OracleFusion Middleware.
Monitoring Oracle FusionMiddleware
Learn how to keep track of the statusof Oracle Fusion Middlewarecomponents.
See Monitoring Oracle FusionMiddleware in Oracle FusionMiddleware Administering OracleFusion Middleware.
Understanding Backup andRecovery Procedures
Learn recommended backup andrecovery procedures for OracleFusion Middleware.
See Introducing Backup andRecovery in Oracle FusionMiddleware Administering OracleFusion Middleware.
Performing Additional Domain Configuration TasksReview additional configuration tasks you will likely want to perform on a new domain.
Table 5-2 Additional Domain Configuration Tasks
Task Description More Information
Deploying Applications Learn how to deploy yourapplications to Oracle FusionMiddleware.
See Deploying Applications in OracleFusion Middleware AdministeringOracle Fusion Middleware.
Adding a Web Tier front-end to yourdomain
Oracle Web Tier hosts Web pages(static and dynamic), providessecurity and high performance alongwith built-in clustering, loadbalancing, and failover features. Inparticular, the Web Tier containsOracle HTTP Server.
To install and configure Oracle HTTPServer in the WebLogic Serverdomain, see Configuring OracleHTTP Server in a WebLogic ServerDomain in Oracle Fusion MiddlewareInstalling and Configuring OracleHTTP Server.See also Installing Multiple Productsin the Same Domain for importantinformation.
Chapter 5Performing Additional Domain Configuration Tasks
5-2
Table 5-2 (Cont.) Additional Domain Configuration Tasks
Task Description More Information
Tuning and configuring Coherencefor your topology
The standard installation topologyincludes a Coherence cluster thatcontains storage-enabled ManagedCoherence Servers. Thisconfiguration is a good starting pointfor using Coherence, but dependingupon your specific requirements,consider tuning and reconfiguringCoherence to improve performancein a production environment.
For more information aboutCoherence clusters, see Configuringand Managing Coherence Clusters inOracle Fusion MiddlewareAdministering Clusters for OracleWebLogic Server.For information on tuningCoherence, see Performance Tuningin Oracle Fusion MiddlewareAdministering Oracle Coherence.
For information on storing HTTPsession data in Coherence, see Using Coherence*Web withWebLogic Server in Oracle FusionMiddleware Administering HTTPSession Management with OracleCoherence*Web.
For more about creating anddeploying Coherence applications,see Getting Started in Oracle FusionMiddleware Developing OracleCoherence Applications for OracleWebLogic Server.
Preparing Your Environment for High AvailabilityScaling out for high availability requires additional steps.
Table 5-3 provides a list of tasks to perform if you want to scale out your standardinstallation environment for high availability.
Table 5-3 Tasks Required to Prepare Your Environment for High Availability
Task Description More Information
Scaling out to multiple hostcomputers
To enable high availability, it is important toprovide failover capabilities to another hostcomputer. That way, if one computer goesdown, your environment can continue toserve the consumers of your deployedapplications.
See Scaling Out a Topology(Machine Scale Out) in the OracleFusion Middleware High AvailabilityGuide.
Configuring high availabilityfor your Web Tiercomponents.
If you have added a Web tier front-end, thenyou must configure the Web Tier for highavailability, as well as the WebLogic Serversoftware.
See Configuring High Availability forWeb Tier Components in OracleFusion Middleware High AvailabilityGuide.
Setting up a front-end loadbalancer
A load balancer can be used to distributerequests across servers more evenly.
See Server Load Balancing in aHigh Availability Environment and Configuring Load Balancer VirtualServer Names and Ports in OracleFusion Middleware High AvailabilityGuide.
Chapter 5Preparing Your Environment for High Availability
5-3
Table 5-3 (Cont.) Tasks Required to Prepare Your Environment for High Availability
Task Description More Information
Configuring Node Manager Node Manager enables you to start, shutdown, and restart the Administration Serverand Managed Server instances from aremote location. This document assumesyou have configured a per-domain NodeManager. Review the Node Managerdocumentation, for information on advancedNode Manager configuration options andfeatures.
See Advanced Node ManagerConfiguration in Oracle FusionMiddleware Administering NodeManager for Oracle WebLogicServer.
Configuring WebCenter Content User Interface onAdditional Nodes
If you install WebCenter Content User Interface on one node, its configuration iscomplete. However, if you scale out WebCenter Content User Interface to a secondnode (in a high availability or enterprise deployment topology, for example), you mustcomplete additional configuration steps.
To run WebCenter Content User Interface on additional nodes, you must:
• Enable WebCenter Content User Interface components.
• Set the server socket port to 4444.
To enable WebCenter Content User Interface components:
1. Sign in to WebCenter Content as a WebCenter Content administrator.
2. From the Administration tray or menu, choose Admin Server, then ComponentManager.
3. On the Component Manager page, select all three components under WebCenterContent UI Components:
• AutoSuggestConfig
• DynamicConverter
• FrameworkFolders
4. Click Update then click OK to confirm that you want to enable the components.
5. Restart WebCenter Content. See Starting and Stopping Managed Servers inOracle Fusion Middleware Administering Oracle Fusion Middleware.
Continue to the topic Setting the WebCenter Content User Interface Server SocketPort.
Chapter 5Configuring WebCenter Content User Interface on Additional Nodes
5-4
Setting the WebCenter Content User Interface ServerSocket Port
If you are scaling out WebCenter Content User Interface you must change the serversocket port.
To change the server socket port:
1. Open WCC_DOMAIN/ucm/cs/config/config.cfg
2. Set IntradocServerPort to 4444.
IntradocServerPort=4444
Configuring WebCenter Content User Interface SettingsYou set WebCenter Content User Interface connection and configuration settings withWLST or Fusion Middleware Control.
• Setting Connection Attributes with WLSTYou can use displayRIDCConnection and updateRIDCConnection WLSTcommands to read and update connection properties.
• Setting Connection Attributes with Fusion Middleware ControlInstead of using WLST, you can set connection attributes for WebCenter ContentUser Interface Managed Server with the Fusion Middleware Control SystemMBean Browser.
• Setting Configuration Attributes with WLSTYou can use WLST commands displayWccAdfConfig andupdateWccAdfConfig to read and update WebCenter Content User Interfaceconfiguration parameters.
• Setting Configuration Attributes with Fusion Middleware ControlInstead of using WLST, you can set configuration (WccAdfConfiguration)attributes for WebCenter Content User Interface Managed Server with the FusionMiddleware Control System MBean Browser.
Setting Connection Attributes with WLSTYou can use displayRIDCConnection and updateRIDCConnection WLSTcommands to read and update connection properties.
For example, to update the RIDC connection to the WebCenter Content User InterfaceManaged Server:
1. Run WLST from ORACLE_HOME/oracle_common/common/bin/wlst.sh.
2. Enter wls:/offline> connect() and enter your username and password atthe prompt.
3. Enter the Managed Server URL, for example, t3://localhost:16225
4. Update the RIDC connection to the WebCenter Content User Interface ManagedServer. For example:
Chapter 5Setting the WebCenter Content User Interface Server Socket Port
5-5
wls:/mydomain/serverConfig>updateRIDCConnection('OracleWebCenter Content - WebUI','WccAdfServerConnection',connUrl='idc://contentserver_host:intradoc_port',credUsername='ucm_admin_user')
5. Restart the Managed Server.
Setting Connection Attributes with Fusion Middleware ControlInstead of using WLST, you can set connection attributes for WebCenter Content UserInterface Managed Server with the Fusion Middleware Control System MBeanBrowser.
To set connection attributes through Fusion Middleware Control:
1. Sign in to Fusion Middleware Control for the WebCenter Content User InterfaceManaged Server.
2. In the navigation tree on the left, expand WebLogic Domain, then the WebCenterContent User Interface domain folder, then the cluster name, and then clickManaged Server name.
3. From the WebLogic Domain drop-down menu at the top of the Managed Serverpage, choose System MBean Browser.
4. In the System MBean Browser navigation tree, navigate to theWccAdfServerConnection MBean. To do this, expand Application DefinedMBeans —> oracle.adf.share.connections —> Server: WCCADF_server1 —>Application: Oracle WebCenter Content – Web UI. Expand the MbeanADFConnections then the folder WccConnection.
• Instead of opening up the folder, you can enter the connection nameWccAdfServerConnection in the MBean filtered search.
5. Click the MBean WccAdfServerConnection.
6. In the Attributes tab, select PropConnectionURL. Enter a URL to set up theRIDC connection. Click Apply (top right)
If you leave the PropConnectionSocketTimeout attribute blank, the default (60seconds) becomes the RIDC Connection Socket Timeout value. This value cancreate problems if you download large files that are being converted to TIFF orPDF documents with annotations burned in. You can set the attribute to a largervalue if you have large files.
7. Go back to the ADFConnections page (Application DefinedMBeansoracle.adf.share.connectionsServer: WCCADF_server1Application:Oracle WebCenter Content – Web UIADFConnections).
8. On the Operations tab, click save. Then click Invoke.
9. Restart the WebCenter Content User Interface Managed Server.
Setting Configuration Attributes with WLSTYou can use WLST commands displayWccAdfConfig andupdateWccAdfConfig to read and update WebCenter Content User Interfaceconfiguration parameters.
For example, to use updateWccAdfConfig to update the application’s URL:
Chapter 5Configuring WebCenter Content User Interface Settings
5-6
1. Run WLST from ORACLE_HOME/oracle_common/common/bin/wlst.sh.
2. Enter wls:/offline> connect() and enter your username and password atthe prompt.
3. Enter the Managed Server URL, for example, t3://localhost:16225
4. Update the WebCenter Content User Interface Managed Server. For example:
wls:/mydomain/serverConfig>updateWccAdfConfig('OracleWebCenter Content - Web UI',applicationUrl='idc://contentserver_host:intradoc_port')
5. Restart the WebCenter Content User Interface Managed Server.
Setting Configuration Attributes with Fusion Middleware ControlInstead of using WLST, you can set configuration (WccAdfConfiguration) attributesfor WebCenter Content User Interface Managed Server with the Fusion MiddlewareControl System MBean Browser.
For example, to set the WebCenter Content User Interface application URL:
1. Sign in to Fusion Middleware Control for the WebCenter Content User InterfaceManaged Server.
2. In the navigation tree on the left, expand WebLogic Domain, then the WebCenterContent User Interface domain folder, then the cluster name, and then clickManaged Server name.
3. From the WebLogic Domain drop-down menu at the top of the Managed Serverpage, choose System MBean Browser.
4. In the System MBean Browser navigation tree, navigate to theWccAdfConfiguration MBean. To do this, expand Application Defined MBeans—> oracle.adf.share.config —> Server: WCCADF_server1 —> Application:Oracle WebCenter Content – Web UI. Expand the folder ADFConfig, the MbeanADFConfig , then the folder ADFConfig.
• Instead of opening up a series of folders to reach the MBean, you can enterthe connection name WccAdfConfiguration in the MBean filtered search.
5. Click the MBean WccAdfConfiguration.
6. In the Attributes tab, select ApplicationUrl. In the Value field, enter the baseapplication URL. For example: https://wcc.example.com:16225. ClickApply (top right)
7. Go back to the ADFConfig MBean page (Application Defined MBeans —>oracle.adf.share.config —> Server: WCCADF_server1 —> Application:Oracle WebCenter Content – Web UI —> ADFConfig).
8. On the Operations tab, click save then Invoke.
9. Restart the WebCenter Content User Interface Managed Server.
Chapter 5Configuring WebCenter Content User Interface Settings
5-7
6Uninstalling or Reinstalling OracleWebCenter Content
Follow the instructions in this section to uninstall or reinstall Oracle WebCenterContent.
Oracle recommends that you always use the instructions in this section to remove thesoftware. If you try to remove the software manually, you may encounter problemswhen you try to reinstall the software again at a later time. Following the procedures inthis section ensures that the software is properly removed.
• About Product UninstallationThe Oracle Fusion Middleware uninstaller removes the software from the Oraclehome directory.
• Stopping Oracle Fusion MiddlewareBefore running the Uninstall Wizard, Oracle recommends that you stop all serversand processes associated with the Oracle home you are going to remove.
• Removing Your Database SchemasBefore you remove the Oracle home, Oracle recommends that you run theRepository Creation Utility (RCU) to remove database schemas associated withthis domain.
• Uninstalling the SoftwareFollow the instructions in this section to start the Uninstall Wizard and remove thesoftware.
• Removing the Oracle Home Directory ManuallyAfter you uninstall the software, you must manually remove your Oracle homedirectory and any existing subdirectories that the Uninstall Wizard did not remove.
• Removing the Program Shortcuts on Windows Operating SystemsOn Windows operating systems, you must also manually remove the programshortcuts; the Deinstallation Wizard does not remove them for you.
• Removing the Domain and Application DataAfter you uninstall the software, you must remove the domain and applicationdata.
• Reinstalling the SoftwareYou can reinstall your software into the same Oracle home as a previousinstallation only if you uninstalled the software by following the instructions in thissection, including manually removing the Oracle home directory.
About Product UninstallationThe Oracle Fusion Middleware uninstaller removes the software from the Oracle homedirectory.
The following table summarizes the tasks to uninstall Fusion Middleware products.
6-1
Table 6-1 Roadmap for Product Uninstallation
Task Description Documentation
Stop Oracle Fusion Middleware All servers and processes in yourdomain should be stopped beforerunning the uninstaller.
See Stopping Oracle FusionMiddleware.
Remove your database schemas Run Repository Creation Utility toremove your database schemas.
See Removing Your DatabaseSchemas.
Remove the software Run the product uninstaller toremove Oracle Fusion MiddlewareInfrastructure.
Note that if your Oracle homecontains multiple products, you mustrun the uninstaller multiple times,once for each product.
See Uninstalling the Software.
Remove the Oracle home directory The uninstaller does not remove allfiles and folders from the Oraclehome directory. After the uninstalleris finished, you must manuallyremove the Oracle home to completeyour product removal.
See Removing the Oracle HomeDirectory Manually.
Remove your domain and applicationdata
The uninstaller does not remove datacontained in your Domain home orApplication home directories, even ifthey are located inside the Oraclehome. You must remove thesedirectories manually.
See Removing the Domain andApplication Data.
Stopping Oracle Fusion MiddlewareBefore running the Uninstall Wizard, Oracle recommends that you stop all servers andprocesses associated with the Oracle home you are going to remove.
See Stopping an Oracle Fusion Middleware Environment in Oracle Fusion MiddlewareAdministering Oracle Fusion Middleware.
Removing Your Database SchemasBefore you remove the Oracle home, Oracle recommends that you run the RepositoryCreation Utility (RCU) to remove database schemas associated with this domain.
Each domain has its own set of schemas, uniquely identified by a custom prefix. Formore information about custom prefixes, see About Custom Prefixes in Oracle FusionMiddleware Creating Schemas with the Repository Creation Utility. This set ofschemas cannot be shared with any other domain. For more information aboutcreating schemas with the RCU, see Planning Your Schema Creation in Oracle FusionMiddleware Creating Schemas with the Repository Creation Utility.
If there are multiple sets of schemas on your database, be sure to identify the schemaprefix associated with the domain that you are removing.
For schema removal steps, see Dropping Schemas in Oracle Fusion MiddlewareCreating Schemas with the Repository Creation Utility.
Chapter 6Stopping Oracle Fusion Middleware
6-2
Uninstalling the SoftwareFollow the instructions in this section to start the Uninstall Wizard and remove thesoftware.
If you want to uninstall the product in a silent (command-line) mode, see Running theOracle Universal Installer for Silent Uninstallation in Oracle Fusion MiddlewareInstalling Software with the Oracle Universal Installer.
• Starting the Uninstall Wizard
• Selecting the Product to Uninstall
• Navigating the Uninstall Wizard Screens
Starting the Uninstall WizardTo start the Uninstall Wizard:
1. Change to the following directory:
(UNIX) ORACLE_HOME/oui/bin
(Windows) ORACLE_HOME\oui\bin
2. Enter the following command:
(UNIX) ./deinstall.sh
(Windows) deinstall.cmd
Selecting the Product to UninstallBecause multiple products exist in the Oracle home, ensure that you are uninstallingthe correct product.
After you run the Uninstall Wizard, the Distribution to Uninstall screen opens. From thedropdown menu, select fmw_12.2.1.4.0_wccontent.jar and click Uninstall. Theuninstallation program shows the screens listed in Navigating the Uninstall WizardScreens.
Note:
You can uninstall Oracle Fusion Middleware Infrastructure after you uninstallOracle WebCenter Content software by running the Uninstall Wizard again.Before doing so, make sure that there are no other products using theInfrastructure; those products will no longer function once the Infrastructureis removed. You will not encounter the Distribution to Uninstall screen if noother software depends on Oracle Fusion Middleware Infrastructure. See Uninstalling Oracle Fusion Middleware Infrastructure in Oracle FusionMiddleware Installing and Configuring the Oracle Fusion MiddlewareInfrastructure.
Chapter 6Uninstalling the Software
6-3
Navigating the Uninstall Wizard ScreensThe Uninstall Wizard shows a series of screens to confirm the removal of the software.
If you need help on screen listed in Table 6-2, click Help on the screen.
Table 6-2 Uninstall Wizard Screens and Descriptions
Screen Description
Welcome Introduces you to the product Uninstall Wizard.
Uninstall Summary Shows the Oracle home directory and its contents that are uninstalled. Verify that this is thecorrect directory.
If you want to save these options to a response file, click Save Response File and enterthe response file location and name. You can use the response file later to uninstall theproduct in silent (command-line) mode. See Running the Oracle Universal Installer forSilent Uninstall in Installing Software with the Oracle Universal Installer.Click Deinstall, to begin removing the software.
Uninstall Progress Shows the uninstallation progress.
Uninstall Complete Appears when the uninstallation is complete. Review the information on this screen, thenclick Finish to close the Uninstall Wizard.
Removing the Oracle Home Directory ManuallyAfter you uninstall the software, you must manually remove your Oracle homedirectory and any existing subdirectories that the Uninstall Wizard did not remove.
For example, if your Oracle home directory is /home/Oracle/product/ORACLE_HOME on a UNIX operating system, enter the following commands:
cd /home/Oracle/product rm -rf ORACLE_HOME
On a Windows operating system, if your Oracle home directory is C:\Oracle\Product\ORACLE_HOME, use a file manager window and navigate to the C:\Oracle\Productdirectory. Right-click on the ORACLE_HOME folder and select Delete.
Removing the Program Shortcuts on Windows OperatingSystems
On Windows operating systems, you must also manually remove the programshortcuts; the Deinstallation Wizard does not remove them for you.
To remove the program shortcuts on Windows:
1. Change to the following directory: C:\ProgramData\Microsoft\Windows\Start Menu\Programs\Oracle\ORACLE_HOME\Product
2. If you only have one product installed in your Oracle home, delete theORACLE_HOME directory. If you have multiple products installed in your Oraclehome, delete all products before you delete the ORACLE_HOME directory.
Chapter 6Removing the Oracle Home Directory Manually
6-4
Removing the Domain and Application DataAfter you uninstall the software, you must remove the domain and application data.
To remove the domain and application data:
1. Manually remove your Domain home directory. For example:
On a UNIX operating system, if your Domain home directory is /home/Oracle/config/domains/wcc_domain, enter the following command:
cd /home/Oracle/config/domains
rm -rf wcc_domain
On a Windows operating system, if your Domain home directory is C:\Oracle\Config\domains\wcc_domain, use a file manager window and navigate to the C:\Oracle\Config\domains directory. Right-click on the wcc_domain folder andselect Delete.
2. Manually remove your Application home directory. For example:
On a UNIX operating system, if your Application home directory is /home/Oracle/config/applications/wcc_domain, enter the following commands:
cd /home/Oracle/config/applications
rm -rf wcc_domain
On a Windows operating system, if your Application home directory is C:\Oracle\Config\applications\wcc_domain, use a file manager window and navigate tothe C:\Oracle\Config\applications directory. Right-click on the wcc_domainfolder and select Delete.
3. Back up the domain_registry.xml file in your Oracle home, then edit the file andremove the line associated with the domain that you are removing. For example,to remove the wcc_domain, find the following line and remove it:
<domain location="/home/Oracle/config/domains/wcc_domain"/>
Save and exit the file when you are finished.
Reinstalling the SoftwareYou can reinstall your software into the same Oracle home as a previous installationonly if you uninstalled the software by following the instructions in this section,including manually removing the Oracle home directory.
When you reinstall, you can then specify the same Oracle home as your previousinstallation.
If ODI is installed again in the same location where it was previously deleted, deletethe entire Oracle Home where it was previously installed.
Consider the following cases where the Oracle home is not empty:
• Installing in an existing Oracle home that contains the same feature sets.
The installer warns you that the Oracle home that you specified during installationalready contains the same software you are trying to install.
Chapter 6Removing the Domain and Application Data
6-5
• Installing in an existing, non-empty Oracle home.
For example, suppose you chose to create your Domain home or Applicationhome somewhere inside your existing Oracle home. This data is not removedwhen you uninstall a product, so if you try to reinstall into the same Oracle home,the installer does not allow it. Your options are:
– Uninstall your software from the Oracle home (as this section describes) andthen remove the Oracle home directory. After you uninstall the software andremove the Oracle home directory, you can reinstall and reuse the sameOracle home location. Any domain or application data that was in the Oraclehome must be re-created.
– Select a different Oracle home directory.
Chapter 6Reinstalling the Software
6-6
AConfiguring Content Server
You can configure Content Server for Desktop, Records Management, and OracleiPlanet Web Server.
• Configuring the Content Server for DesktopYou need to make sure the CoreWebdav system component is enabled, beforethe client can use the WebCenter Content Desktop with the Content Server.
• Configuring Records Management in Content ServerIf you are licensed to configure the Records Management in a WebCenter ContentManaged Server, you can configure either a standalone Records Management, auniversal (or fully functional) Records Management, or the Oracle URM Adapter inContent Server after you configure the WebCenter Content Records ManagedServer.
• About Configuring Oracle iPlanet Web Server as a Web Tier and ConfiguringShared FoldersYou can configure the Oracle iPlanet Web Server as a web tier for WebCenterContent. If you are using a cluster of WebCenter Content Managed Servers, youneed to configure a shared file system for the WebCenter Content cluster.
Configuring Records Management in Content ServerIf you are licensed to configure the Records Management in a WebCenter ContentManaged Server, you can configure either a standalone Records Management, auniversal (or fully functional) Records Management, or the Oracle URM Adapter inContent Server after you configure the WebCenter Content Records Managed Server.
• The ContentFolios component is required for access to the Records Managementweb interface. This component is enabled automatically when you configureRecords Management in the Content Server.
• Do not disable the ContentFolios component.
If you don’t want to use Records Management in the Content Server, you can removethe configuration user interface by disabling the RMFeatureConfig component. Beforeyou disable the Records Management and restart the Content Server, you need todelete the Report template files that Records Management installs. You cannot deletethem after Records Management is disabled.To configure Records Management in the Content Server:
1. From the Administration menu, choose Configure Records Settings to go tothe Records Management Setup checklist, then click Configure Installation.
2. On the Enabled Features page, select a Records Management option, and clickSubmit.
• None: No Records Management functionality is configured.
• Standalone: Enables basic Records Management functionality on ContentServer.
A-1
• Universal: Enables full Records Management functionality on Content Server.This includes Physical and External sources.
• Adapter: Enables Universal Content Management Adapter functionality onContent Server.
3. Restart the WebCenter Content Managed Server. See Starting and StoppingManaged Servers.
After you restart the WebCenter Content, Records Management Setup checklistappears.
4. If you selected Adapter, click Register Source on the Enabled Features pagethen enter values for the fields on the Register Source page:
Option Description
Provider Name Outgoing provider used to connect to theRecords Managed Server. You can choosefrom the list of current outgoing providers, oryou can click Add and create one. Theprovider dialog box shows an abbreviatedlist of provider fields.
You can also add providers from the regularProviders page. To view information aboutan existing provider, click Info in the Actioncolumn.
Source Name Name of the external source to be added tothe Records Managed Server. The sourcename is required and cannot containspaces.
Source Table Name Prefix to use for creating database tables.The default value is the source name.
Source Display Name Caption to use for showing the sourcename. Default value is the source name.
5. Click Register.
Before the source is registered, the following tests are run:
• Validate the provider and test the connection to the Records Managed Server.
• Validate the specified source values
Compare the retention schedules of the adapter and the Records Managed Serverto determine if any items in the adapter are missing in the Records server. Beforeyou can register the source, you must resolve any differences on the ImportRetention Schedule page.
The retention schedule needs to be synchronized between the adapter and server.By default, all of the items that need to be resolved will be imported into theRecords server. You will also have the option of deleting any of the items insteadof importing them into the server. Before any items are imported or deleted,backups of retention schedules are made on both the adapter and the Recordsserver, and the backups are checked in to Content Server.
6. After the source is successfully registered, click OK on the confirmation page.
After the source is registered, the Retention Schedule and Upload Content taskwill run in the background.
Appendix AConfiguring Records Management in Content Server
A-2
7. Configure the adapter in the Configuration Wizard:
Table A-1 Adapter Options
Option Description
Configure Custom Fields Page where you enter custom fields on the externalsource. When you add or edit custom fields, you mapthem to existing document metadata fields defined inContent Server. You can use the same name for eachfield as defined in Content Serve, or you can rename thefield. When the content is uploaded to the Recordsserver as external content items, these fields map totheir external field names.
You can configure the following custom fields:
• Add or edit an external custom field• Configure the disposition actions or scheduled
events• View the external source information
Configure Scheduled Times Page where you enter when the scheduled tasks run.You can specify the interval at which the tasks are run(in hours, days, or weeks) and the time of day.
8. From the Records menu, select Configure then Enabled Features.
On the Enabled Features page, you can change the selection of features anddispositions. For the adapter, the features you select cannot be more than thefeatures selected on the Records server..
Note:
If you have changed any features or dispositions, restart the WebCenterContent.
About Configuring Oracle iPlanet Web Server as a Web Tierand Configuring Shared Folders
You can configure the Oracle iPlanet Web Server as a web tier for WebCenterContent. If you are using a cluster of WebCenter Content Managed Servers, you needto configure a shared file system for the WebCenter Content cluster.
Configuring the Content Server for DesktopYou need to make sure the CoreWebdav system component is enabled, before theclient can use the WebCenter Content Desktop with the Content Server.
Additionally, you must enable the following components:
• DesktopIntegrationSuite
• DesktopTag
• FolderStructureArchive
Appendix AAbout Configuring Oracle iPlanet Web Server as a Web Tier and Configuring Shared Folders
A-3
• FrameworkFolders
You can also enable the EmailMetadata, which maps the e-mail message fields to thee-mail metadata fields.
Note:
When you enable the FrameworkFolders component (Folders feature), verifythat the Folders_g component (Contribution Folders feature) is disabled;CoreWebdav will not work correctly with both enabled.
To configure the Content Server for Desktop:
1. Sign in to WebCenter Content as an administrator.
2. In the Content Server Administration menu, select Admin Server then selectComponent Manager. .
3. On the Component Manager page, select Folders to display the Folders categoryof components.
4. Select the following components:
• FrameworkFolders
• DesktopIntegrationSuite
• DesktopTag
• (Optional) EmailMetadata
5. Click Update then click OK to confirm your selections.
6. In the Component Manager page, click advanced component manager.
7. In the Disabled Components box on the Advanced Component Manager page,select FolderStructureArchive, and click Enable.
8. If Folders_g is in the Enabled Components box, select this component and clickthe Disable.
9. Make sure that the CoreWebdav component is enabled:
• Under Category Filters on the Advanced Component Manager page, selectShow System Components.
• If CoreWebdav is not in the Enabled Components box, select CoreWebdav inthe Disabled Components box and click Enable.
10. Restart the Content Server, as Starting and Stopping Managed Servers describes.
See the remaining topics in this section for more on configuration tasks.
• About Installing and Configuring the Desktop on a Client WorkstationWebCenter Content for desktop has a set of embedded applications that helpusers integrate desktop experiences with Content Server, Oracle ContentDatabase, or other WebDAV-based content repositories.
• Opening Files from Microsoft Office 2010 Over a Non-SSL ConnectionBy default, Microsoft Office 2010 will not open files over WebDAV using basicauthentication over a non-SSL connection.
Appendix AConfiguring the Content Server for Desktop
A-4
About Installing and Configuring the Desktop on a Client WorkstationWebCenter Content for desktop has a set of embedded applications that help usersintegrate desktop experiences with Content Server, Oracle Content Database, or otherWebDAV-based content repositories.
These applications provide convenient access to content repositories directly fromMicrosoft Windows Explorer, Microsoft Office applications, and supported e-mailclients (Microsoft Outlook and Lotus Notes).To install Desktop on a client workstation,see Setting Up the Desktop Client Software on Your Computer.
Opening Files from Microsoft Office 2010 Over a Non-SSL ConnectionBy default, Microsoft Office 2010 will not open files over WebDAV using basicauthentication over a non-SSL connection.
You can create the following registry entry and set its value to 2:
HKEY_CURRENT_USER\Software\Microsoft\Office\14.0\Common\Internet\BasicAuthLevel
For more about this task, see the Microsoft Knowledge Base article 2123563 at: Officeapplication opens blank from WebDAV.
Appendix AConfiguring the Content Server for Desktop
A-5
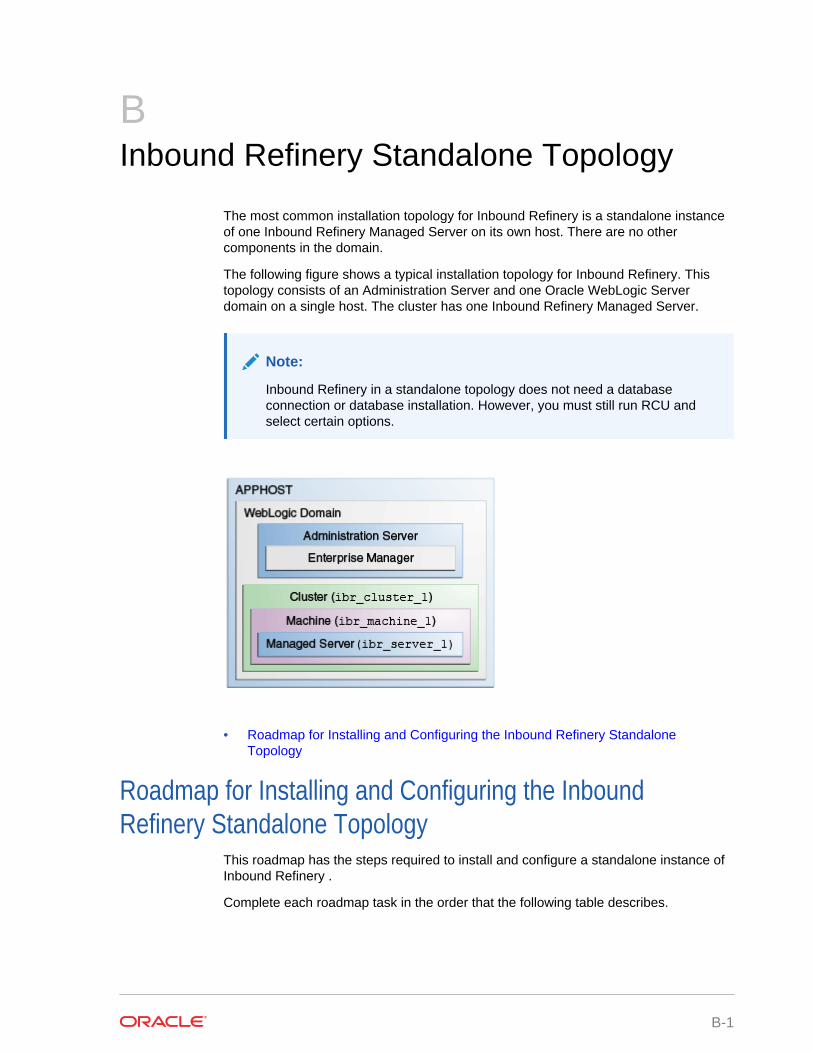
BInbound Refinery Standalone Topology
The most common installation topology for Inbound Refinery is a standalone instanceof one Inbound Refinery Managed Server on its own host. There are no othercomponents in the domain.
The following figure shows a typical installation topology for Inbound Refinery. Thistopology consists of an Administration Server and one Oracle WebLogic Serverdomain on a single host. The cluster has one Inbound Refinery Managed Server.
Note:
Inbound Refinery in a standalone topology does not need a databaseconnection or database installation. However, you must still run RCU andselect certain options.
• Roadmap for Installing and Configuring the Inbound Refinery StandaloneTopology
Roadmap for Installing and Configuring the InboundRefinery Standalone Topology
This roadmap has the steps required to install and configure a standalone instance ofInbound Refinery .
Complete each roadmap task in the order that the following table describes.
B-1
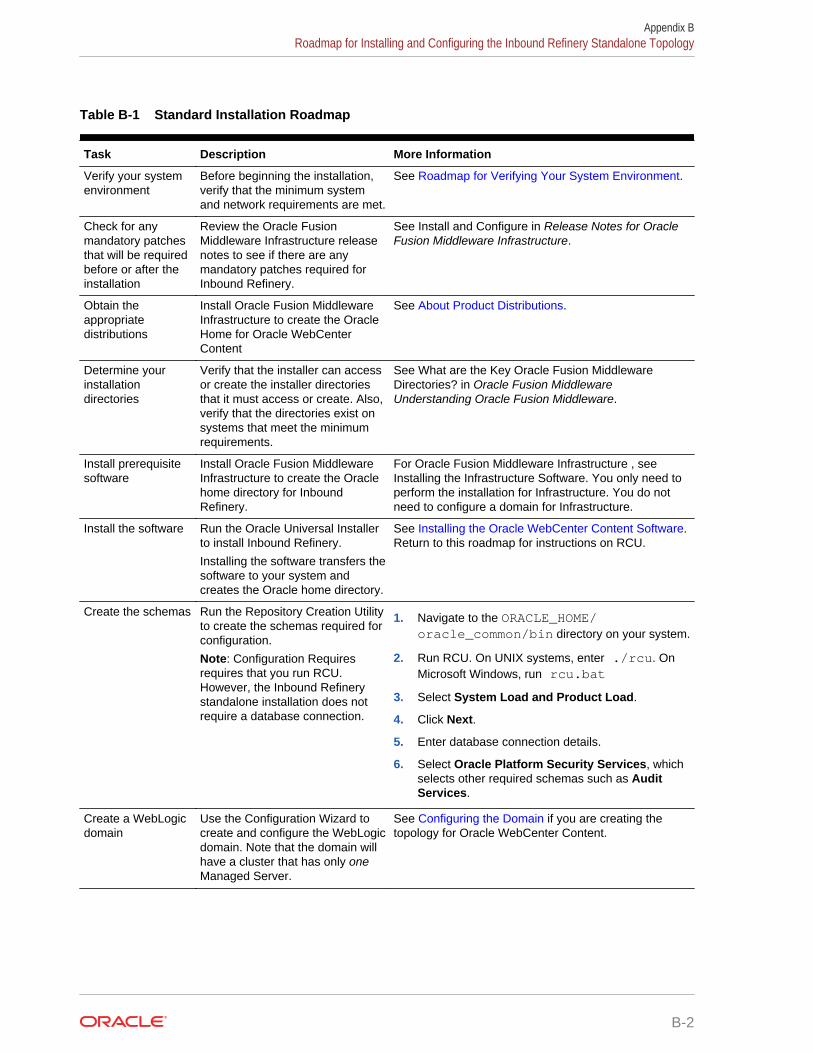
Table B-1 Standard Installation Roadmap
Task Description More Information
Verify your systemenvironment
Before beginning the installation,verify that the minimum systemand network requirements are met.
See Roadmap for Verifying Your System Environment.
Check for anymandatory patchesthat will be requiredbefore or after theinstallation
Review the Oracle FusionMiddleware Infrastructure releasenotes to see if there are anymandatory patches required forInbound Refinery.
See Install and Configure in Release Notes for OracleFusion Middleware Infrastructure.
Obtain theappropriatedistributions
Install Oracle Fusion MiddlewareInfrastructure to create the OracleHome for Oracle WebCenterContent
See About Product Distributions.
Determine yourinstallationdirectories
Verify that the installer can accessor create the installer directoriesthat it must access or create. Also,verify that the directories exist onsystems that meet the minimumrequirements.
See What are the Key Oracle Fusion MiddlewareDirectories? in Oracle Fusion MiddlewareUnderstanding Oracle Fusion Middleware.
Install prerequisitesoftware
Install Oracle Fusion MiddlewareInfrastructure to create the Oraclehome directory for InboundRefinery.
For Oracle Fusion Middleware Infrastructure , see Installing the Infrastructure Software. You only need toperform the installation for Infrastructure. You do notneed to configure a domain for Infrastructure.
Install the software Run the Oracle Universal Installerto install Inbound Refinery.
Installing the software transfers thesoftware to your system andcreates the Oracle home directory.
See Installing the Oracle WebCenter Content Software.Return to this roadmap for instructions on RCU.
Create the schemas Run the Repository Creation Utilityto create the schemas required forconfiguration.
Note: Configuration Requiresrequires that you run RCU.However, the Inbound Refinerystandalone installation does notrequire a database connection.
1. Navigate to the ORACLE_HOME/oracle_common/bin directory on your system.
2. Run RCU. On UNIX systems, enter ./rcu. OnMicrosoft Windows, run rcu.bat
3. Select System Load and Product Load.
4. Click Next.
5. Enter database connection details.
6. Select Oracle Platform Security Services, whichselects other required schemas such as AuditServices.
Create a WebLogicdomain
Use the Configuration Wizard tocreate and configure the WebLogicdomain. Note that the domain willhave a cluster that has only oneManaged Server.
See Configuring the Domain if you are creating thetopology for Oracle WebCenter Content.
Appendix BRoadmap for Installing and Configuring the Inbound Refinery Standalone Topology
B-2
CInstalling Libraries and SettingEnvironment Variables
WebCenter Content, Inbound Refinery, Imaging, and the Imaging Advanced Viewer forclients use Oracle Outside In Technology, which requires certain libraries that are notpart of Oracle WebCenter Content.
Before a WebCenter Content, Inbound Refinery, or Imaging Managed Server isstarted, you need to install the libraries for your platform. For a UNIX platform, youalso need to set an environment variable to reference the libraries in the library pathfor the user who will start the Managed Server.
Note:
The Outside In Technology binaries are 32 bit, so your system needs to becapable of running the 32-bit binaries and have compatible libraries installed.
• Installing Libraries on UNIX PlatformsBefore you start a WebCenter Content, Inbound Refinery, or Imaging ManagedServer, the libraries required for your platform need to be available on yoursystem.
• Setting Library Paths in Environment Variables on UNIX PlatformsBefore Inbound Refinery or the WebCenter Content Dynamic Converter usesOutside In Technology for document and image conversions, the followingenvironment variables must be set for the WebCenter Content Managed Server onthe specified UNIX platforms:
Installing Libraries on UNIX PlatformsBefore you start a WebCenter Content, Inbound Refinery, or Imaging ManagedServer, the libraries required for your platform need to be available on your system.
Many of the required libraries are normally installed on the machine, including the C,math, X11, dynamic loader, and pthreads libraries, among others.
Solaris SPARC 32-bit or 64-bit
/usr/platform/SUNW,Ultra-60/lib/libc_psr.so.1 libICE.so.6 libSM.so.6 libX11.so.4 libXext.so.0 libXm.so.4 libXt.so.4 libc.so.1 libdl.so.1
C-1
libgen.so.1 libm.so.1 libmp.so.2 libnsl.so.1 libpthread.so.1 libsocket.so.1 libthread.so.1
HPUX ia64
libCsup.so.1 libICE.so.1 libSM.so.1 libX11.so.1 libXext.so.1 libXm.so.1 libXp.so.1 libXt.so.1 libc.so.1 libdl.so.1 libm.so.1 libpthread.so.1 libstd_v2.so.1 libuca.so.1 libunwind.so.1
AIX 32-bit
/usr/lib/libC.a(ansi_32.o) /usr/lib/libC.a(shr.o) /usr/lib/libC.a(shr2.o) /usr/lib/libC.a(shr3.o) /usr/lib/libICE.a(shr.o) /usr/lib/libIM.a(shr.o) /usr/lib/libSM.a(shr.o) /usr/lib/libX11.a(shr4.o) /usr/lib/libXext.a(shr.o) /usr/lib/libXi.a(shr.o) /usr/lib/libXm.a(shr_32.o) /usr/lib/libXt.a(shr4.o) /usr/lib/libc.a(shr.o) /usr/lib/libcrypt.a(shr.o) /usr/lib/libgaimisc.a(shr.o) /usr/lib/libgair4.a(shr.o) /usr/lib/libi18n.a(shr.o) /usr/lib/libiconv.a(shr4.o) /usr/lib/libodm.a(shr.o) /usr/lib/libpthreads.a(shr.o) /usr/lib/libpthreads.a(shr_comm.o) /usr/lib/libpthreads.a(shr_xpg5.o) /usr/lib/libpthreads_compat.a(shr.o)
Appendix CInstalling Libraries on UNIX Platforms
C-2
HPUX PA/RISC 32-bit
/lib/libCsup.2 /lib/libCsup_v2.2 /lib/libX11.3 /lib/libXm.4 /lib/libXt.3 /lib/libc.2 /lib/libcl.2 /lib/libm.2 /lib/libstd.2 /lib/libstd_v2.2 /lib/libstream.2 /usr/lib/libCsup.2 /usr/lib/libCsup_v2.2 /usr/lib/libX11.3 /usr/lib/libXm.4 /usr/lib/libXt.3 /usr/lib/libc.2 /usr/lib/libcl.2 /usr/lib/libdld.2 /usr/lib/libisamstub.1 /usr/lib/libm.2 /usr/lib/libstd.2 /usr/lib/libstd_v2.2 /usr/lib/libstream.2 /view/x_r6hp700_1111/vobs/swdev/pvt/r6hp700_1111/X11R6/lib/libICE.2/view/x_r6hp700_1111/vobs/swdev/pvt/r6hp700_1111/X11R6/lib/libSM.2/view/x_r6hp700_1111/vobs/swdev/pvt/r6hp700_1111/X11R6/lib/libX11.3/view/x_r6hp700_1111/vobs/swdev/pvt/r6hp700_1111/X11R6/lib/libXext.3/view/x_r6hp700_1111/vobs/swdev/pvt/r6hp700_1111/X11R6/lib/libXp.2/view/x_r6hp700_1111/vobs/swdev/pvt/r6hp700_1111/X11R6/lib/libXt.3
SUSE Linux
For an SUSE Linux operating system, the file /usr/lib/libstdc++.so.5 is required.You can find this file in the compat-libstdc++ or libstdc++33 package.
Linux variants
For Linux variants, the file /lib/libz.so.1 is required.
Setting Library Paths in Environment Variables on UNIXPlatforms
Before Inbound Refinery or the WebCenter Content Dynamic Converter uses OutsideIn Technology for document and image conversions, the following environmentvariables must be set for the WebCenter Content Managed Server on the specifiedUNIX platforms:
• Environment variables for library paths for Imaging
Appendix CSetting Library Paths in Environment Variables on UNIX Platforms
C-3
– Add the following line to the Inbound Refinery intradoc.cfg file atDomainHome/ucm/ibr/bin
ContentAccessExtraLibDir=/usr/local/packages/gcc-3.4.2/lib
Restart inbound Refinery.
– AIX:
LIBPATH=DomainHome/oracle/imaging/imaging-server
– HP-UX Itanium:
LD_LIBRARY_PATH=DomainHome/oracle/imaging/imaging-server:"$LD_LIBRARY_PATH"
–
• DISPLAY environment variable
On a UNIX operating system running XWindows, when redirecting the display to asystem with suitable graphic capabilities, export DISPLAY to a valid X Serverbefore starting the Imaging or Inbound Refinery Managed Server or theWebCenter Content Dynamic Converter.
Appendix CSetting Library Paths in Environment Variables on UNIX Platforms
C-4
DAdditional Configuration Steps
See the following topics for additional Oracle WebCenter Content configuration steps.
• Converting Vector Graphics and Spreadsheet Text in UNIXDynamic Converter requires access to a running X-Server in UNIX in order toconvert vector graphics and to properly measure text that spans multiple columnsin spreadsheets.
• Setting up Fonts on a UNIX SystemOn a UNIX operating system, you need to make sure TrueType fonts are set upfor Imaging, Inbound Refinery, and WebCenter Content Dynamic Converter. If youare using a language other than English, you also need to set up fonts for nationallanguage support.
• Reassociating the Identity Store with an External LDAP Authentication ProviderIn a production system, Oracle WebCenter Content applications need to use anexternal Lightweight Directory Application Protocol (LDAP) authentication providerrather than the Oracle WebLogic Server embedded LDAP server, which is part ofthe default configuration. You need to reassociate the identity store for yourapplication with one of the following external LDAP authentication providers beforeyou complete the configuration of a Managed Server, before you connect aManaged Server to a repository, and before the first user logs in to the application:
• Configuring OracleTextSearch for Content ServerIf you have a license to use OracleTextSearch (with Oracle Database 11g), thenyou can configure it to use Oracle Text 11g as the primary full-text search enginefor WebCenter Content. Oracle Text 11g offers state-of-the-art indexingcapabilities and provides the underlying search capabilities for Oracle SecureEnterprise Search (Oracle SES). To search auxiliary metadata in OracleWebCenter Content: Records with Oracle Text 11g, you must configure it to useOracleTextSearch as the search engine.
• Extracting and Running the Installation File for Desktop Client SoftwareAfter Oracle WebCenter Content is installed, you can use thedesktop_content_setup.exe command with the /export parameter to extract theDesktop installer files:
• Creating a Hash Partition to Improve Database PerformanceUse a hash partition of the EBATCTITEMS table to minimize the database waitevent enq: HW– contention, which prevents the database from scaling.
Converting Vector Graphics and Spreadsheet Text in UNIXDynamic Converter requires access to a running X-Server in UNIX in order to convertvector graphics and to properly measure text that spans multiple columns inspreadsheets.
Access to a running X-server is required only if the OIT internal rendering engine is notused because of either of the following reasons:
D-1
• The Use X-Windows for Rasterization option is checked on the DynamicConverter configuration page.
• The OIT internal rendering engine isn't supported on the platform being used.
The internal OIT rendering engine is supported in Linux, Solaris Sparc, AIX, and HP-UX RISC.
Setting up Fonts on a UNIX SystemOn a UNIX operating system, you need to make sure TrueType fonts are set up forImaging, Inbound Refinery, and WebCenter Content Dynamic Converter. If you areusing a language other than English, you also need to set up fonts for nationallanguage support.
• Setting Up TrueType Fonts on a UNIX SystemFor Imaging and WebCenter Content Dynamic Converter to work best on a UNIXoperating system, you can set up TrueType fonts on the machine where Imaging,Inbound Refinery, or the Dynamic Converter is running. If these fonts are notavailable on your system, you need to install them. Inbound Refinery and ContentServer default to the TrueType fonts in the JRE, at JAVA_HOME/lib/fonts.
• Installing Fonts for National Language Support on a UNIX SystemFor languages other than English, the following installation steps need to be doneon a UNIX operating system before you start a Managed Server:
Setting Up TrueType Fonts on a UNIX SystemFor Imaging and WebCenter Content Dynamic Converter to work best on a UNIXoperating system, you can set up TrueType fonts on the machine where Imaging,Inbound Refinery, or the Dynamic Converter is running. If these fonts are not availableon your system, you need to install them. Inbound Refinery and Content Server defaultto the TrueType fonts in the JRE, at JAVA_HOME/lib/fonts.
Some standard font locations on different UNIX platforms follow:
• Solaris SPARC: /usr/openwin/lib/X11/fonts/TrueType
• Solaris X64: /usr/openwin/lib/X11/fonts/TrueType
• AIX: /usr/lpp/X11/lib/X11/fonts/TrueType
• HP-UX Itanium: /usr/lib/X11/fonts/TrueType
• HP-UX PARISC64: /usr/lib/X11/fonts/TrueType
• Linux: /usr/lib/X11/fonts/TrueType
To set the path to the font directory in Inbound Refinery::
1. Sign in to Inbound Refinery.
2. Select Conversion Settings, then Third-Party Application Settings, and thenGeneral OutsideIn Filter Options.
3. Click Options
4. Enter the path to the TrueType fonts in the Path to fonts field. For example, /usr/share/x11/fonts/FTP
5. Click Update.
Appendix DSetting up Fonts on a UNIX System
D-2
Installing Fonts for National Language Support on a UNIX SystemFor languages other than English, the following installation steps need to be done on aUNIX operating system before you start a Managed Server:
• Copy MW_HOME/oracle_common/jdk/jre/lib/fonts to the /jre/lib/fontsdirectory in the Sun JDK installation directory for the Middleware home
• Copy MW_HOME/oracle_common/jdk/jre/lib/fonts to the /jre/lib/fontsdirectory in the Oracle JRockit JDK directory for the Middleware home.
Reassociating the Identity Store with an External LDAPAuthentication Provider
In a production system, Oracle WebCenter Content applications need to use anexternal Lightweight Directory Application Protocol (LDAP) authentication providerrather than the Oracle WebLogic Server embedded LDAP server, which is part of thedefault configuration. You need to reassociate the identity store for your applicationwith one of the following external LDAP authentication providers before you completethe configuration of a Managed Server, before you connect a Managed Server to arepository, and before the first user logs in to the application:
• Oracle Internet Directory
• Oracle Virtual Directory
• Oracle Unified Directory
• Third-party LDAP server
For an Imaging application, the user who logs in first to an Imaging Managed Server isprovisioned with full security throughout the server. It is easier to reassociate theidentity store for Imaging with an external LDAP authentication provider before the firstuser logs in, completes the configuration of the Imaging Managed Server, andconnects it to the Oracle WebCenter Content repository.
For a production installation, Oracle Internet Directory (OID) or Oracle Database 11g isrequired for using Oracle WebCenter Enterprise Capture because Capture usesOracle Platform Security Services (OPSS), which works only with Oracle Database forits schema.
For an AXF for BPM application, before you can access the AXF SolutionAdministration page, you need to set up an axfadmin group in the external LDAPauthentication provider and assign the AXF users you want to the group.
For an Oracle IRM application , the Oracle IRM domain gets created the first time auser logs in to the Oracle IRM Management Console. An Oracle IRM domain isdifferent from an Oracle WebLogic Server domain. The first user who logs in to theconsole is made the domain administrator for the Oracle IRM domain. Before youmigrate user data for Oracle IRM, the users need to be in the target LDAP identitystore. If you do not reassociate the identity store with an external LDAP authenticationprovider before the first user logs in to the Oracle IRM console, the general process forreassociating Oracle IRM users and migrating data follows:
1. Back up existing data with the setIRMExportFolder script.
2. Reassociate the identity store with an external LDAP directory.
Appendix DReassociating the Identity Store with an External LDAP Authentication Provider
D-3
3. Verify that all users and groups exist in target LDAP identity store
4. Migrate data with the setIRMImportFolder script.
• Reassociating the Identity Store with Oracle Internet DirectoryYou can reassociate the identity store for an Oracle WebLogic Server domain withOracle Internet Directory and migrate users from the embedded LDAP directory toOracle Internet Directory. The following procedure describes how to reassociatethe identity store with Oracle Internet Directory.
Reassociating the Identity Store with Oracle Internet DirectoryYou can reassociate the identity store for an Oracle WebLogic Server domain withOracle Internet Directory and migrate users from the embedded LDAP directory toOracle Internet Directory. The following procedure describes how to reassociate theidentity store with Oracle Internet Directory.
You can use a similar procedure to reassociate the identity store with other LDAPauthentication providers. Each provider has a specific authenticator type, and only thattype should be configured.
LDAP Authentication Provider Authentication Type
Microsoft AD ActiveDirectoryAuthenticator
SunOne LDAP IPlanetAuthenticator
Directory Server Enterprise Edition (DSEE) IPlanetAuthenticator
Oracle Internet Directory OracleInternetDirectoryAuthenticator
Oracle Virtual Directory OracleVirtualDirectoryAuthenticator
Oracle Unified Directory IPlanetAuthenticator
EDIRECTORY NovellAuthenticator
OpenLDAP OpenLDAPAuthenticator
EmbeddedLDAP DefaultAuthenticator
To reassociate the identity store with Oracle Internet Directory:
1. Ensure that there is no user in Oracle Internet Directory with the same name asthe administrator of the Oracle WebLogic Server domain, which is weblogic bydefault.
2. Set the embedded LDAP provider to SUFFICIENT.
3. For Oracle IRM, sign in to the management console as a user from Oracle InternetDirectory, to be the Oracle IRM domain administrator.
Do not sign in to the management console with the user name of the OracleWebLogic Server domain administrator. The Oracle recommendation is to not usethe weblogic user account as the Oracle IRM administrator user account. If youuse a different account for the Oracle IRM domain administrator, you can use theOracle WebLogic Server domain administrator, weblogic by default, to start andstop Oracle WebLogic Server as well as to alter server settings. If you have aproblem with Oracle Internet Directory, you will not need to fix it before you can domaintenance on Oracle WebLogic Server.
4. For an Oracle IRM Managed Server, if a user has already signed in to the OracleIRM Management Console, you need to run the WebLogic Scripting Tool (WLST)setIRMExportFolder command before identity store reassociation.
Appendix DReassociating the Identity Store with an External LDAP Authentication Provider
D-4
Use this command to set an export folder for exporting the user and group detailsreferenced by Oracle IRM, which uses the export folder path to decide where towrite out the user and group details. The Oracle IRM Managed Server must havewrite access to the folder path. The export folder must exist before you run thesetIRMExportFolder command.
The following example sets /user/irm-data as the export folder:
cd WCC_ORACLE_HOME/common/bin ./wlst.sh > connect('weblogic', 'password', 't3://adminServerHost:adminServerPort')> setIRMExportFolder('/user/irm-data')
In the example, adminServerHost is the host name and adminServerPort is theport number for the Administration Server of the Oracle WebLogic Server domain.
Note:
If SSL is enabled, before you use WLST to connect to the AdministrationServer, you must either append the following parameters to theJVM_ARGS section of the wlst.sh file or set them in theCONFIG_JVM_ARGS environment variable:
-Dweblogic.security.SSL.ignoreHostnameVerification=true-Dweblogic.security.TrustKeyStore=KeyStoreName
KeyStoreName is the name of the keystore in use (DemoTrust for thebuilt-in demonstration certificate). The wlst.sh file is in the binsubdirectory of the common directory in the WebCenter Content Oraclehome directory.
After the Oracle IRM Managed Server picks up this configuration change, normallyright away, it will write out a series of XML documents in the export folder. Thisprocess is complete when a folder named accounts appears under the exportfolder. The accounts folder will contain one or more folders named batchXXX, witheach batch folder containing a set of XML documents that include the user andgroup details. For example:
/user /irm-data /accounts /batch1 user1.xml user2.xml group1.xml
The batch folders are used to ensure that the operating system limit of themaximum number of files in a folder is not exceeded.
Appendix DReassociating the Identity Store with an External LDAP Authentication Provider
D-5
After this process is complete, reset the export folder:
setIRMExportFolder('')
This reset ensures that Oracle IRM does not perform any further data exportingwhen the Managed Server restarts.
5. Configure the Oracle Internet Directory authentication provider:
a. Start the Administration Server for your Oracle WebLogic Server domain.
b. Sign in to the Oracle WebLogic Server Administration Console as the domainadministrator user, at this URL: http://adminServerHost:adminServerPort/console
c. Under Domain Structure on the left, select Security Realms.
d. In the Realms table on the Summary of Security Realms page, click myrealmin the Name column to open the Settings for myrealm page.
e. Click the Providers tab, and then click New under the Authentication Providerstable on the Authentication tab.
f. In the Create a new Authentication Provider dialog box, enter a provider namein the Name field, change the type to OracleInternetDirectoryAuthenticator,and then click OK.
g. In the Authentication Providers table, click Reorder, move the provider you justcreated to the top of the list, and then click OK
h. Click DefaultAuthenticator, change the Control Flag value to OPTIONAL, andthen click Save
i. Click Providers in the breadcrumb trail along the top of the page to navigateback to the Providers tab.
j. Click the name of the authentication provider you just created to navigate tothe Configuration tab for the provider. On the Common tab, change theControl Flag value to SUFFICIENT, and then click Save.
SUFFICIENT means that if a user can be authenticated against OracleInternet Directory, no further authentication is processed.
REQUIRED means that the authentication provider must succeed even ifanother provider already authenticated the user. If the embedded LDAP hasbeen set to OPTIONAL and Oracle Internet Directory has been set toREQUIRED, the embedded LDAP user is no longer valid.
k. Click the Provider Specific tab. Set Provider Specific values in the followingfields, and leave default values in the other fields:
- Host: The host name or IP address of the LDAP server.
- Port: The Oracle Internet Directory Port, 389 by default.
- Principal: The Distinguished Name (DN) of the LDAP user that OracleWebLogic Server should use to connect to the LDAP server; for examplecn=orcladmin
- Credential: The credential used to connect to the LDAP server (usually apassword)
- Confirm Credential: The same value as for the Credential field.
Appendix DReassociating the Identity Store with an External LDAP Authentication Provider
D-6
- User Base DN: The base distinguished name (DN) of the tree in the LDAPdirectory that contains users; for example cn=users,dc=example,dc=com. InOracle Internet Directory, this is the value of the User Search Base attribute,which you can look up in the OIDDAS administration dialog.
- Use Retrieved User Name as Principal: Specifies whether or not the username retrieved from the LDAP server should be used as the Principal value.Select this attribute for Oracle IRM.
— Group Base DN: The base distinguished name (DN) of the tree in the LDAPdirectory that contains groups; for example: cn=groups,dc=example,dc=com. InOracle Internet Directory, this is the value of the Group Search Base attribute,which you can look up in the OIDDAS administration dialog.
Note: Use an exact DN rather than a top-level DN. Using a top-level DN wouldprovide access to all the default users and groups under the DN, giving accessto more users than required by the application.
- Propagate Cause For Login Exception: Propagates exceptions thrown byOracle Internet Directory, like password expired exceptions, to OracleWebLogic Server so they show in the console and the logs. For Oracle IRM,select this attribute in the General area of the tab.
l. Click Save.
6. Restart the Administration Server.
Note: Authentication providers in an Oracle WebLogic Server domain are chained.This means that user authentication needs to run successfully through allauthentication providers. With the Control Flag value set to OPTIONAL for thedefault provider, it is allowed to fail without a server startup or user authenticationfailure.
7. After the server is up again, sign in to the Administration Console again, and clickSecurity Realms under Domain Structure.
8. In the Realms table on the Summary of Security Realms page, click myrealm inthe Name column to open the Settings for myrealm page.
9. Click the Users and Groups tab to see a list of users contained in the configuredauthentication providers, on the Users subtab, and then click the Groups subtab tosee a list of groups. You should see user names from the Oracle Internet Directoryconfiguration, which implicitly verifies that the configuration is working
10. Check that you have switched the security provider successfully, with either orboth of these basic tests:
11. For an Oracle IRM Managed Server, if a user has already signed in to the OracleIRM Management Console, you need to run the setIRMImportFolder WLSTcommand after identity store reassociation. Use this command to set the importfolder to point to the export folder that was set before identity store reassociation.
Note: take a backup of the export folder before performing the import processbecause the import process deletes the contents of the folder during successfulprocessing of the user and group details.
This operation should be performed with only one Managed Server running adeployed Oracle IRM application, to ensure that only one Managed Serverperforms the user and group processing. After the import process is complete, all
Appendix DReassociating the Identity Store with an External LDAP Authentication Provider
D-7
Managed Servers running the Oracle IRM application can be started. Thefollowing example sets /user/irm-data as the import folder:
cd WCC_ORACLE_HOME/common/bin ./wlst.sh > connect('weblogic', 'password', 't3://adminServerHost:adminServerPort')> setIRMImportFolder('/user/irm-data')
After the Oracle IRM Managed Server picks up this configuration change, it willread the contents of the folder and update the global user ID (GUID) values in theOracle IRM system to reflect the values in the new identity store. When a user orgroup has been processed, the import process deletes the corresponding XML file.After the import process is complete, the import folder will be empty:
/user /irm-data
If an error occurs during the processing of a user or group, the import processwrites the error to a file that matches the user or group name. For example, if theuser details in user1.xml cause an error during processing, the import processwrites the error details to the file user1.xml.fail:
/user /irm-data /accounts /batch1 user1.xml user1.xml.fail
If you can fix the error, then rerun the setIRMImportFolder WLST command torerun the import process. For example, if user or group processing fails becausethe user or group does not exist in the new identity store, adding the user or groupto Oracle Internet Directory will fix the error, and you can rerun the import process:
connect('weblogic', 'password', 'adminServerHost:adminServerPort')> setIRMImportFolder('/user/irm-data')
After this process is complete, reset the import folder:
setIRMImportFolder('')
This reset ensures that Oracle IRM does not perform any further data importingwhen the Managed Server restarts.
After the reassociation of the identity store, users in Oracle Internet Directory havethe same rights that their namesakes had in the Oracle WebLogic Serverembedded LDAP server before the migration of user data. For example, if a userexisted in the embedded LDAP server before the migration with the user nameweblogic and an Oracle IRM role of Domain Administrator, then, after migration,the user in Oracle Internet Directory with the user name weblogic would have theOracle IRM role of Domain Administrator.
Appendix DReassociating the Identity Store with an External LDAP Authentication Provider
D-8
Configuring OracleTextSearch for Content ServerIf you have a license to use OracleTextSearch (with Oracle Database 11g), then youcan configure it to use Oracle Text 11g as the primary full-text search engine forWebCenter Content. Oracle Text 11g offers state-of-the-art indexing capabilities andprovides the underlying search capabilities for Oracle Secure Enterprise Search(Oracle SES). To search auxiliary metadata in Oracle WebCenter Content: Recordswith Oracle Text 11g, you must configure it to use OracleTextSearch as the searchengine.
If you have a license to use Oracle SES, you can configure it for use withOracleTextSearch on WebCenter Content and configure Content Server to use OracleSES as its back-end search engine.
OracleTextSearch enables administrators to specify certain metadata fields to beoptimized for the search index as well as to customize additional fields.OracleTextSearch also enables a fast index rebuild and index optimization.
You can set OracleTextSearch on the WebCenter Content postinstallationconfiguration page.
To configure OracleTextSearch for Content Server on the postinstallation configurationpage:
1. Select Internal or External in the FullText Search Option field.
2. If you selected the External option, provide the name of the external data source inthe External DataSource field.
If you have Oracle Database 11g, and you specify Internal for Fulltext Search Option,you do not need to run the Repository Creation Utility (RCU) to create a searchschema.You might want to use an external data source so you can put the search engine onanother system or in another database. Before you can use an external data sourcewith OracleTextSearch, you need to create a search schema in a database other thanthe system database and configure the data source.
• Creating a Search Schema and Configuring an External Data SourceYou might want to use an external data source so you can put the search engineon another system or in another database. Before you can use an external datasource with OracleTextSearch, you need to create a search schema in a databaseother than the system database and configure the data source.
• Configuring OracleTextSearch for Content Server in a Configuration FileIf you did not configure OracleTextSearch on the configuration page for ContentServer or you want to change the configuration, you can configure this searchoption in the DomainHome/ucm/cs/config/config.cfg configuration file for theContent Server instance.
Creating a Search Schema and Configuring an External Data SourceYou might want to use an external data source so you can put the search engine onanother system or in another database. Before you can use an external data sourcewith OracleTextSearch, you need to create a search schema in a database other thanthe system database and configure the data source.
To create a search schema and configure an external data source:
Appendix DConfiguring OracleTextSearch for Content Server
D-9
1. Run RCU to create a search schema (prefix_OCSSEARCH in the database whereyou want the search engine,
2. Create a JDBC data source that points to the search schema. You can use theAdministration Console, WebLogic Scripting Tool Command, or FusionMiddleware Control to create a data source.
3. Use the Administration Console to target the data source to the WebCenterContent Managed Server (UCM_server1 by default).
If you did not configure OracleTextSearch on the configuration page for ContentServer or you want to change the configuration, you can configure this search option inthe DomainHome/ucm/cs/config/config.cfg configuration file for the Content Serverinstance. After changing the search option, you need to restart Content Server andrebuild the search index.
Note:
If you plan to use the WebCenter Content user interface), you may want tooptimize the dOriginalName field for the search index. The WebCenterContent user interface leverages the file name as its primary identifierpresented in the interface. You can sort presentations by file name, which isthe value of the dOriginalName field in Content Server.
By default, Content Server configures only the document title (dDocTitle) as a fieldavailable for searching and sorting. The WebCenter Content user interface, by default,does not use document titles in its displays.
The process of enabling dOriginalName as a new search or sort field requires a fullrebuild of the fulltext index.
Configuring OracleTextSearch for Content Server in a ConfigurationFile
If you did not configure OracleTextSearch on the configuration page for ContentServer or you want to change the configuration, you can configure this search option inthe DomainHome/ucm/cs/config/config.cfg configuration file for the Content Serverinstance.
To configure OracleTextSearch for Content Server in the configuration file:
1. Open the DomainHome/ucm/cs/config/config.cfg file for the Content Serverinstance in a text editor.
2. Set the following values:
SearchIndexerEngineName=OracleTextSearch
IndexerDatabaseProviderName=SystemDatabase
Appendix DConfiguring OracleTextSearch for Content Server
D-10
Note:
• You can specify a separate Oracle Database as the value ofIndexerDatabaseProviderName, instead of SystemDatabase. Thedriver jar ojdbc6.jar is provided by Oracle in the MW_HOME/wlserver_10.3/server/lib directory. Before Oracle Text Search canfunction properly with the separate Oracle Database, however, youneed to manually copy the ojdbc6.jar file from the MW_HOME/wlserver_10.3/server/lib directory to the DomainHome/lib directory.
• OracleTextSearch requires a JDBC driver version of 10.2.0.4 orhigher. The component will not work with older JDBC driver versions.
3. Save the file.
4. Restart Content Server.
5. Rebuild the search index using the Indexer tab of the Repository Manager, locatedunder Administration, in Admin Applets.
Extracting and Running the Installation File for DesktopClient Software
After Oracle WebCenter Content is installed, you can use thedesktop_content_setup.exe command with the /export parameter to extract theDesktop installer files:
desktop_content_setup.exe /export [path]/existing_extraction_directory/
You can specify an existing directory to extract the files into. If you omit the directoryfrom the command, it extracts the files into the current directory.
Note:
If you have an earlier version of Desktop installed, uninstall it before youproceed with the installation.
The desktop_content_setup.exe command extracts three files:
• package.ini
• contentdesktop.msi
• contentdesktop_x64.msi
To install Desktop on a client system, use only one of the MSI files in the Desktopinstaller command. The Desktop client software installers support a number of custominstallation options that can help system administrators roll out the software:
Appendix DExtracting and Running the Installation File for Desktop Client Software
D-11
• Using Command-Line Parameters for AutomationYou can use several command-line parameters to automate part of the installationprocess. If you need to pass any public property to MSI throughdesktop_content_setup.exe, you can do that with the following command:
• Disabling IntegrationsThe Desktop installer provides a number of command-line options to disablespecific software integrations. If the installer detects that an integration can beapplied to existing software on the computer (Microsoft Word, PowerPoint, Excel,and so on), it usually will automatically attempt to install an integration. To preventan integration from being installed for a specific software product, you can disablethat integration using one of these command-line switches:
• Performing Silent Roll-OutsThe Desktop installer enables an administrator to roll out the Desktop clientsoftware to multiple client machines with the help of third-party tools such as SMSor netOctopus, which are capable of executing one executable on many machines.The installer for the Desktop client software supports a silent installation optionthat you can configure with SMS.
• Configuring Content Server Connections Through the Registry on a WindowsSystemYou can add Content Server connections by creating a registry file on a Windowssystem. The file is not included as part of the standard installation files; you mustcreate it.
Using Command-Line Parameters for AutomationYou can use several command-line parameters to automate part of the installationprocess. If you need to pass any public property to MSI throughdesktop_content_setup.exe, you can do that with the following command:
desktop_content_setup.exe /msi ONE_PUBLIC_PROPERTY=public_property_value
Disabling IntegrationsThe Desktop installer provides a number of command-line options to disable specificsoftware integrations. If the installer detects that an integration can be applied toexisting software on the computer (Microsoft Word, PowerPoint, Excel, and so on), itusually will automatically attempt to install an integration. To prevent an integrationfrom being installed for a specific software product, you can disable that integrationusing one of these command-line switches:
• EXPLORER=0
• WORD=0
• POWERPOINT=0
• EXCEL=0
• OUTLOOK=0
• NOTES=0
Use capital letters for the switch names.These switches are only for disabling software integrations. They are not necessary toenable software integrations for applications found on client computers.
Appendix DExtracting and Running the Installation File for Desktop Client Software
D-12
Performing Silent Roll-OutsThe Desktop installer enables an administrator to roll out the Desktop client softwareto multiple client machines with the help of third-party tools such as SMS ornetOctopus, which are capable of executing one executable on many machines. Theinstaller for the Desktop client software supports a silent installation option that youcan configure with SMS.
For silent install, you can use the following command to control the level of userinterface displayed.
desktop_content_setup.exe /s UI=user_interface_level
In the command, user_interface_level can be 1, 2, 3, or 4:.
• 1: No user interface during install.
• 2: Displays only a progress bar during install.
• 3: Presents an install screen with different dialog boxes but doesn’t require userinput to run.
• 4: Runs a fully interactive installer requiring user input.
For example, to silently and selectively disable installing Outlook, PowerPoint, andLotus Notes, the command would be as follows:
desktop_content_setup.exe /s UI=1 /msi OUTLOOK=0 POWERPOINT=0 NOTES=0
You will also need to add the REBOOT=ReallySuppress andMSIRESTARTMANAGERCONTROL=Disable properties to prevent reboots and to prevent anydialogs asking to shut down applications. For example:
desktop_content_setup.exe /s UI=2 /msi OUTLOOK=0 POWERPOINT=0 NOTES=0 REBOOT=ReallySuppress MSIRESTARTMANAGERCONTROL=Disable
The properties after the /msi switch can also be used with the
msiexec
with the MSI files. For example:
start /wait msiexec /i contentdesktop_x64.msi OUTLOOK=0 WORD=0 EXCEL=0 POWERPOINT=0 NOTES=0 REBOOT=ReallySuppress MSIRESTARTMANAGERCONTROL=Disable /l*v DISUpgrade_x64.log /qn
Appendix DExtracting and Running the Installation File for Desktop Client Software
D-13
Configuring Content Server Connections Through the Registry on aWindows System
You can add Content Server connections by creating a registry file on a Windowssystem. The file is not included as part of the standard installation files; you mustcreate it.
Adding servers in a registry file automates the setup process by saving your usersfrom setting up connections on their computers. When you add a server connection inthis manner, the user cannot delete the server connection from their desktop(Windows Explorer, the email client, or any desktop application).
Sample Registry File Entries
The following sample registry file entries are examples for Content Servers instances,WebDAV servers, and Content DB servers, with comments below the code lines. Thesample file registry entries are under HKEY_LOCAL_MACHINE. If you would like the userto run the installer, use HKEY_CURRENT_USER instead of HKEY_LOCAL_MACHINE.
Using HKEY_LOCAL_MACHINE means that users cannot change the ServerAuth orRememberMetaData values because they will not have permission to changeHKEY_LOCAL_MACHINE entries (unless a Windows policy is set to allow this, or the useris an administrator).
REGEDIT4[HKEY_LOCAL_MACHINE\SOFTWARE\Oracle\WebCenter Desktop\Content\WebDAV\Servers\Corporate]"ServerType"="ucm""ServerURL"="http://corporate/cs/idcplg/webdav"
(In this registry entry, the server is a Content Server instance, the display name of theserver is Corporate, and the server WebDAV URL is http://corporate/cs/idcplg/webdav.)
[HKEY_LOCAL_MACHINE\Software\ORACLE\WebCenter Desktop\Content\Shared\Config\Corporate]"HostCgiUrl"="http://corporate/cs/idcplg""ServerAuth"=REG_DWORD:0x00000000 (0) "RememberMetaData"=REG_DWORD:0x00000000 (0)
In this registry entry, the server is a Content Server instance, the name of the server isCorporate, the CGI URL is http://corporate/cs/idcplg, and the user interface URL ishttp://corporate/wcc/faces. Content DB servers and WebDAV servers do not use theseregistry entries.)
[HKEY_LOCAL_MACHINE\SOFTWARE\Oracle\WebCenter Desktop\Content\WebDAV\Servers\Department]"ServerType"="dav""ServerURL"="http://corporate/content/app/explorerPage.jspx""Single Sign-On Url"="http://section/content/app/explorerPage.jspx""Use Single Sign-On"=REG_DWORD:0x00000001 (1)
Appendix DExtracting and Running the Installation File for Desktop Client Software
D-14
(In this registry entry, the server is a WebDAV server, the display name of the server isDepartment, the server WebDAV URL is http://corporate/content/app/explorerPage.jspx, a single sign-on page has been identified, and single sign-on hasbeen implemented.)
[HKEY_LOCAL_MACHINE\SOFTWARE\Oracle\WebCenter Desktop\Content\WebDAV\Servers\Section]"ServerType"="cdb""ServerURL"="http://section/content/dav""Single Sign-On Url"="http://section/content/app/explorerPage.jspx""Use Single Sign-On"=REG_DWORD:0x00000001 (1)
(In this registry entry, the server is a Content DB server, the display name of the serveris Section, the server WebDAV URL is http://section/content/dav, a single sign-onpage has been identified, and single sign-on has been implemented.)
Creating a Hash Partition to Improve Database PerformanceUse a hash partition of the EBATCTITEMS table to minimize the database wait eventenq: HW– contention, which prevents the database from scaling.
This event occurs when many threads are trying to update and add new BLOB itemsto ECBATCHTITEMS, as follows:
table - "UPDATE ECBATCHITEMS SET ECITEMDATA=:1 WHERE ECITEMID=:2"
Creating a hash partition minimizes this contention because different items will be ineight different partitions.
To create a hash partition:
1. Get the definition of the table:
SELECT dbms_metadata.get_ddl('OBJECT TYPE','OBJECT NAME', OWNER') FROM DUAL;
2. Append partitioning syntax to the table definition. The following table definitioncreates a hash partition for the ECBATCHITEMS table:
SQL> create table "CAPCLIENT_CAPTURE"."ECBATCHITEMS2" 2 ( "ECTENNANTID" VARCHAR2(36 CHAR), "ECITEMID" VARCHAR2(36) NOT NULL ENABLE, 3 4 "ECORIGINALITEMID" VARCHAR2(36), 5 "ECORIGINALITEMINDEX" NUMBER(10,0), 6 "ECBARCODES" BLOB, 7 "ECBARCODECOUNT" NUMBER(10,0), 8 "ECSTATUS" VARCHAR2(255), 9 "ECSOURCEFORMAT" VARCHAR2(255), "ECANNOTATION" VARCHAR2(255),10 11 "ECFILELENGTH" NUMBER(19,0),12 "ECDOCUMENTLINKCOUNT" NUMBER(10,0),13 "ECPATCHCODE" NUMBER(10,0),14 "ECENDORSEMENT" VARCHAR2(255),15 "ECSOURCEFILENAME" VARCHAR2(255),
Appendix DCreating a Hash Partition to Improve Database Performance
D-15

16 "ECBATCHID" NUMBER(19,0),17 "ECLASTMODIFIED" NUMBER(19,0),18 "ECITEMDATA" BLOB, PRIMARY KEY ("ECITEMID")) partition by hash(ECITEMID) partitions 8 ;
Appendix DCreating a Hash Partition to Improve Database Performance
D-16
EUpdating the JDK After Installing andConfiguring an Oracle Fusion MiddlewareProduct
Consider that you have a JDK version jdk1.8.0_121 installed on your machine. Whenyou install and configure an Oracle Fusion Middleware product, the utilities, such asConfiguration Wizard (config.sh|exe), OPatch, or RCU point to a default JDK, forexample, jdk1.8.0_121. After some time, Oracle releases a new version of the JDK,say jdk1.8.0_211 that carries security enhancements and bug fixes.From 12c (12.2.1.3.0) onwards, you can upgrade the existing JDK to a newer version,and can have the complete product stack point to the newer version of the JDK.
You can maintain multiple versions of JDK and switch to the required version on needbasis.
• About Updating the JDK Location After Installing an Oracle Fusion MiddlewareProductThe binaries and other metadata and utility scripts in the Oracle home and Domainhome, such as RCU or Configuration Wizard, use a JDK version that was usedwhile installing the software and continue to refer to the same version of the JDK.The JDK path is stored in a variable called JAVA_HOME which is centrally locatedin .globalEnv.properties file inside the ORACLE_HOME/oui directory.
About Updating the JDK Location After Installing an OracleFusion Middleware Product
The binaries and other metadata and utility scripts in the Oracle home and Domainhome, such as RCU or Configuration Wizard, use a JDK version that was used whileinstalling the software and continue to refer to the same version of the JDK. The JDKpath is stored in a variable called JAVA_HOME which is centrally locatedin .globalEnv.properties file inside the ORACLE_HOME/oui directory.
The utility scripts such as config.sh|cmd, launch.sh, or opatch reside in theORACLE_HOME, and when you invoke them, they refer to the JAVA_HOME variablelocated in .globalEnv.properties file. To point these scripts and utilities to the newerversion of JDK, you must update the value of the JAVA_HOME variable inthe .globalEnv.properties file by following the directions listed in Updating the JDKLocation in an Existing Oracle Home .
To make the scripts and files in your Domain home directory point to the newer versionof the JDK, you can follow one of the following approaches:
• Specify the path to the newer JDK on the Domain Mode and JDK screen whilerunning the Configuration Wizard.
For example, consider that you installed Oracle Fusion Middleware Infrastructurewith the JDK version 8u121. So while configuring the WebLogic domain with theConfiguration Assistant, you can select the path to the newer JDK on the Domain
E-1
Mode and JDK screen of the Configuration Wizard. Example: /scratch/jdk/jdk1.8.0_131.
• Manually locate the files that have references to the JDK using grep (UNIX) orfindstr (Windows) commands and update each reference. See Updating theJDK Location in an Existing Domain Home.
Note:
If you install the newer version of the JDK in the same location as theexisting JDK by overwriting the files, then you don’t need to take any action.
• Updating the JDK Location in an Existing Oracle HomeThe getProperty.sh|cmd script displays the value of a variable, such asJAVA_HOME, from the .globalEnv.properties file. The setProperty.sh|cmd scriptis used to set the value of variables, such as OLD_JAVA_HOME or JAVA_HOMEthat contain the locations of old and new JDKs in the .globalEnv.properties file.
• Updating the JDK Location in an Existing Domain HomeYou must search the references to the current JDK, for example jdk1.8.0_121manually, and replace those instances with the location of the new JDK.
Updating the JDK Location in an Existing Oracle HomeThe getProperty.sh|cmd script displays the value of a variable, such asJAVA_HOME, from the .globalEnv.properties file. The setProperty.sh|cmd script isused to set the value of variables, such as OLD_JAVA_HOME or JAVA_HOME thatcontain the locations of old and new JDKs in the .globalEnv.properties file.
The getProperty.sh|cmd and setProperty.sh|cmd scripts are located in the followinglocation:
(UNIX) ORACLE_HOME/oui/bin(Windows) ORACLE_HOME\oui\binWhere, ORACLE_HOME is the directory that contains the products using the currentversion of the JDK, such as jdk1.8.0_121.
To update the JDK location in the .globalEnv.properties file:
1. Use the getProperty.sh|cmd script to display the path of the current JDK from theJAVA_HOME variable. For example:
(UNIX) ORACLE_HOME/oui/bin/getProperty.sh JAVA_HOME(Windows) ORACLE_HOME\oui\bin\getProperty.cmd JAVA_HOMEecho JAVA_HOMEWhere JAVA_HOME is the variable in the .globalEnv.properties file that containsthe location of the JDK.
2. Back up the path of the current JDK to another variable such asOLD_JAVA_HOME in the .globalEnv.properties file by entering the followingcommands:
(UNIX) ORACLE_HOME/oui/bin/setProperty.sh -name OLD_JAVA_HOME-value specify_the_path_of_current_JDK(Windows) ORACLE_HOME\oui\bin\setProperty.cmd -nameOLD_JAVA_HOME -value specify_the_path_of_current_JDK
Appendix EAbout Updating the JDK Location After Installing an Oracle Fusion Middleware Product
E-2
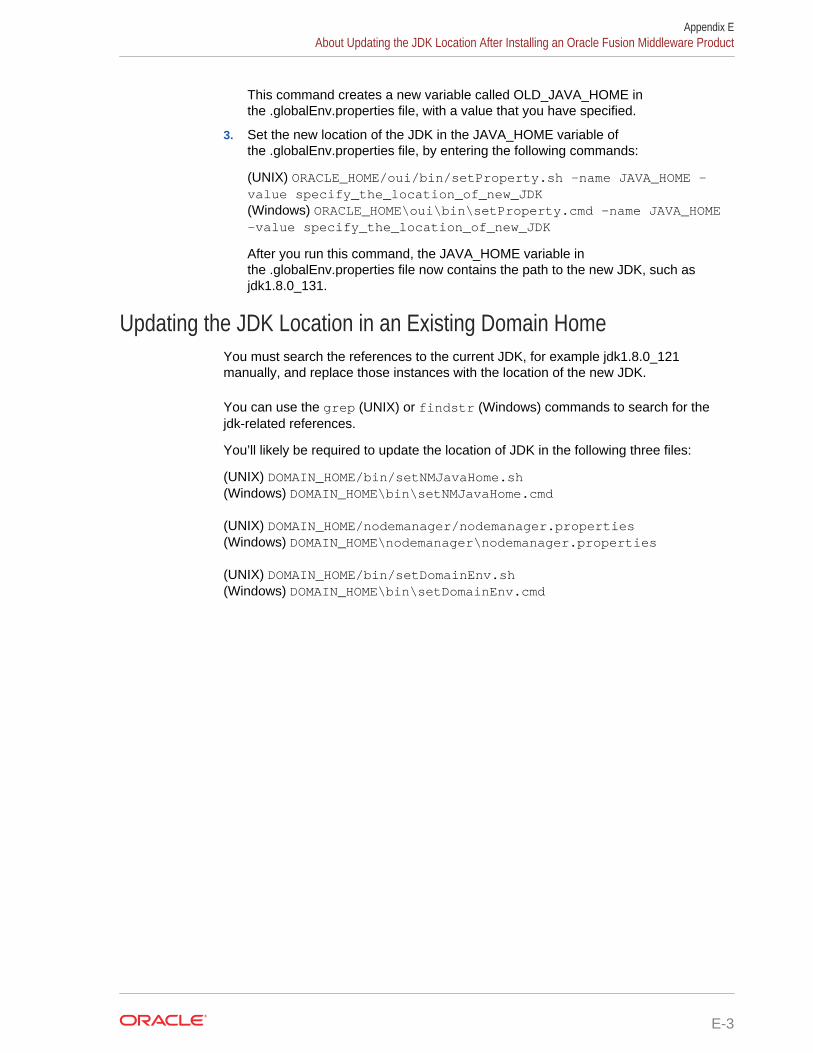
This command creates a new variable called OLD_JAVA_HOME inthe .globalEnv.properties file, with a value that you have specified.
3. Set the new location of the JDK in the JAVA_HOME variable ofthe .globalEnv.properties file, by entering the following commands:
(UNIX) ORACLE_HOME/oui/bin/setProperty.sh -name JAVA_HOME -value specify_the_location_of_new_JDK(Windows) ORACLE_HOME\oui\bin\setProperty.cmd -name JAVA_HOME-value specify_the_location_of_new_JDK
After you run this command, the JAVA_HOME variable inthe .globalEnv.properties file now contains the path to the new JDK, such asjdk1.8.0_131.
Updating the JDK Location in an Existing Domain HomeYou must search the references to the current JDK, for example jdk1.8.0_121manually, and replace those instances with the location of the new JDK.
You can use the grep (UNIX) or findstr (Windows) commands to search for thejdk-related references.
You’ll likely be required to update the location of JDK in the following three files:
(UNIX) DOMAIN_HOME/bin/setNMJavaHome.sh(Windows) DOMAIN_HOME\bin\setNMJavaHome.cmd
(UNIX) DOMAIN_HOME/nodemanager/nodemanager.properties(Windows) DOMAIN_HOME\nodemanager\nodemanager.properties
(UNIX) DOMAIN_HOME/bin/setDomainEnv.sh(Windows) DOMAIN_HOME\bin\setDomainEnv.cmd
Appendix EAbout Updating the JDK Location After Installing an Oracle Fusion Middleware Product
E-3