installation guide for c4d r13
DESCRIPTION
noTRANSCRIPT

INSTALLATION GUIDE
1 MAXON Intallation Guide
Table of Contents
1. Before installing ........................................................................3
2. Installing the application ........................................................4Windows .............................................................................................................................. 4
Current User ...................................................................................................................... 6
All Users .............................................................................................................................. 6
CINEMA 4D (incl. BodyPaint 3D) / BodyPaint 3D ...................................................... 6
NET Render Server (Standalone) .................................................................................. 6
NET Render Client (Standalone) ................................................................................... 6
Libraries, languages and help files ............................................................................... 6
Don’t create Start menu entries ................................................................................... 8
Only for me ........................................................................................................................ 8
For everyone ...................................................................................................................... 8
Creating a desktop shortcut........................................................................................... 8
Mac OS ................................................................................................................................ 9
Current User ...................................................................................................................... 11
All Users .............................................................................................................................. 11
CINEMA 4D (incl. BodyPaint 3D) / BodyPaint 3D ...................................................... 11
NET Render Server (Standalone) .................................................................................. 11
NET Render Client (Standalone) ................................................................................... 11
Libraries, languages and documentation .................................................................... 12
3. Changing application packet ..................................................14
4. Installing NET Render .............................................................14
5. Uninstalling applications ........................................................15Windows .............................................................................................................................. 15
Mac OS ................................................................................................................................ 15
6. The Online Updater..................................................................16So, how does this work? .................................................................................................. 16
Automatic application restart during installation ..................................................... 17
Deleting downloaded archive after successful installation ..................................... 18
Create backup copy before installing ........................................................................... 18
7. Manually installing languages, documentation, updates ....19
2MAXON Installation Guide
8. Tips and Tricks .........................................................................20Missing MAXON License Server serial number(s) ..................................................... 20
Cannot install updates, languages or documentation.............................................. 21
Mobile use of application, single-user license for multiple computers ................ 21
Unattended or Silent Installation .................................................................................. 21
9. Support and Contact ...............................................................22Europe / Germany ............................................................................................................ 22
France .................................................................................................................................. 22
Japan ................................................................................................................................... 22
United Kingdom & Ireland ............................................................................................... 22
United States, Canada, The Americas .......................................................................... 22
3 MAXON Intallation Guide
MAXON Software Installation Guide1. Before installing
Please read the following information before installing the software:
Always read the “Readme US” file before installing the software. This file will inform you of any last-minute changes that have been made. These changes may affect the installation itself. The “Readme US” file can be found on the installation DVD and will also be displayed again during the installation (see below).
Also, please check the contents of the software package prior to installation.
Your software package should contain the following:
• The installation DVD
• The Goodies & Extras DVD
• The Quickstart manual
• Registration information, including your temporary serial number. You must enter this serial number when starting the software for the first time (not applicable to MAXON License Server).
If one of the above items is missing, please contact your CINEMA 4D merchant or MAXON Computer right away. Contact information can be found at the end of this document.
You can also visit us online at www.maxon.net where you can download the newest software updates. If a more current application version or an updated language packet or documentation are available you can download the corresponding file(s) directly (If the computer onto which the application has been installed has internet access, the aforementioned download procedure will not be necessary – this will be done automatically by the Online Updater).
The installation program, which is described below, is located on your installation DVD. The initial start and updating the software is described separately:
2. Installing the application
3. Changing application packet
4. Installing NET Render
5. Uninstalling programs
6. The Online Updater
4MAXON Installation Guide
7. Manually installing languages, documentation, updates
8. Tips and Tricks
9. Support and contact
2. Installing the application
Follow these steps to install the application onto your data carrier:
• Place the installation DVD into your computer’s DVD drive. The DVD’s symbol should appear in your Explorer (Windows) / Finder (Mac) window. If this symbol does not appear, open the DVD manually in the Explorer / Finder.
• Double-click on the “Setup(.exe)” file.
CINEMA 4D, BodyPaint 3D or NET Render will now be installed. Which components will be installed depends on the software package you purchased. This information is included in the registration information you received.
Windows
First you will be asked to select the language in which the installation should take place. After selecting the desired language, click on “OK”.
The minimum system requirements for installing CINEMA 4D R13 onto a Windows system are:
• Windows XP (32/64-bit), Vista (32/64-bit), Windows 7 (32/64-bit)
• Internet Explorer 8 for Windows 7 operating systems
• 1024 of free MB RAM
• AMD or Intel (compatible) processor with SSE2 support
• An OpenGL-capable graphics card (NVIDIA or ATI)
• A screen (monitor) resolution of 1024 x 768 with a minimum of 24-bit color depth
• 4 GB of free hard drive space
Note: If the minimum system requirements are not met an error message will appear and the installation process must be terminated.
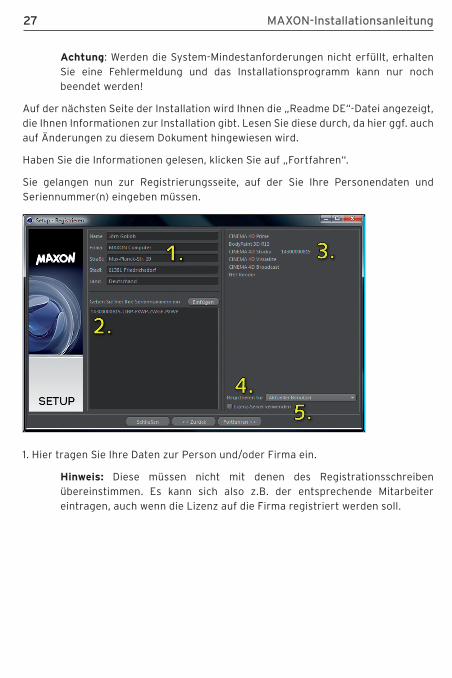
In the next installation step, the “Readme US” file will be displayed. This file contains installation-specific information. Please read this file carefully because it may contain information regarding changes to this installation document, among others.
5 MAXON Intallation Guide
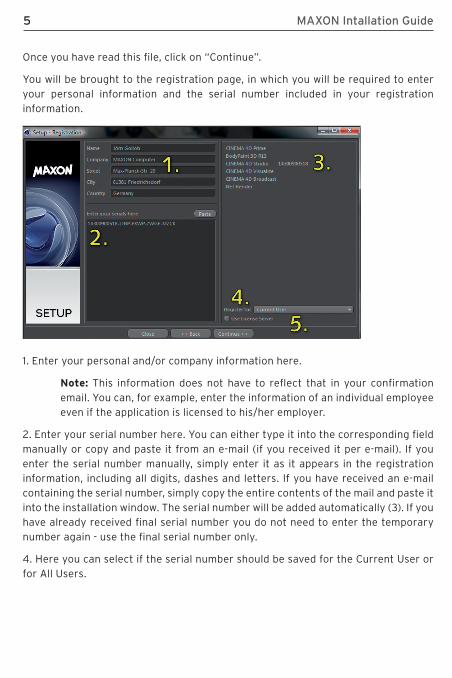
Once you have read this file, click on “Continue”.
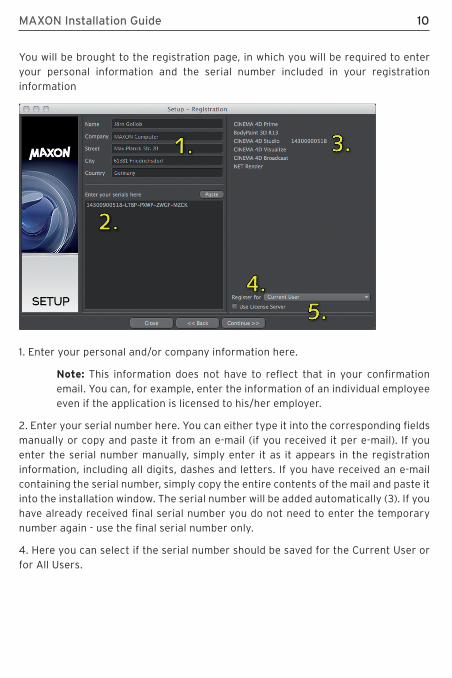
You will be brought to the registration page, in which you will be required to enter your personal information and the serial number included in your registration information.
1. Enter your personal and/or company information here.
Note: This information does not have to reflect that in your confirmation email. You can, for example, enter the information of an individual employee even if the application is licensed to his/her employer.
2. Enter your serial number here. You can either type it into the corresponding field manually or copy and paste it from an e-mail (if you received it per e-mail). If you enter the serial number manually, simply enter it as it appears in the registration information, including all digits, dashes and letters. If you have received an e-mail containing the serial number, simply copy the entire contents of the mail and paste it into the installation window. The serial number will be added automatically (3). If you have already received final serial number you do not need to enter the temporary number again - use the final serial number only.
4. Here you can select if the serial number should be saved for the Current User or for All Users.
6MAXON Installation Guide
Current User
The serial number will only be saved for your (current user’s) use, i.e. only you (current user) and no other user will be able to use the application.
All Users
The serial number will be saved globally on the computer and can be used by you (current user) and any other user.
Tip: The license will be available for all users of a given computer only if the application is installed by the administrator.
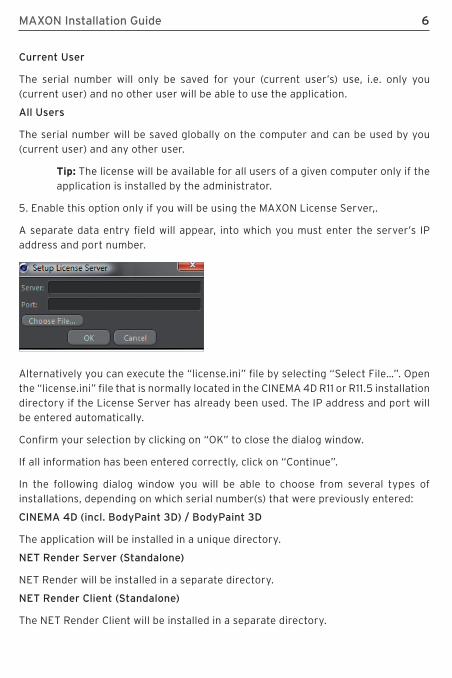
5. Enable this option only if you will be using the MAXON License Server,.
A separate data entry field will appear, into which you must enter the server’s IP address and port number.
Alternatively you can execute the “license.ini” file by selecting “Select File…”. Open the “license.ini” file that is normally located in the CINEMA 4D R11 or R11.5 installation directory if the License Server has already been used. The IP address and port will be entered automatically.
Confirm your selection by clicking on “OK” to close the dialog window.
If all information has been entered correctly, click on “Continue”.
In the following dialog window you will be able to choose from several types of installations, depending on which serial number(s) that were previously entered:
CINEMA 4D (incl. BodyPaint 3D) / BodyPaint 3D
The application will be installed in a unique directory.
NET Render Server (Standalone)
NET Render will be installed in a separate directory.
NET Render Client (Standalone)
The NET Render Client will be installed in a separate directory.
7 MAXON Intallation Guide
Note: The NET Render Client will always be made available for installation.
Libraries, languages and help files
Available languages and/or documentation can be subsequently installed.
Note: Only the documentation that matches the currently used language can be installed. Hence, once you update to a newer version of the application you can no longer install the language or documentation included on your installation DVD. You must download the corresponding language or documentation manually via the Online Updater.
Select the desired type of installation and click on “Continue”.
In the dialog window that follows you can verify which elements will be installed. Elements can be deselected here to keep them from being installed. As a rule, this will not be necessary.
Initially, the application will be installed in English. Any available additional languages or context help files, etc. can be found in the “Optional” tab. If this is not already selected, simply enable the element you want to install by clicking on its check box before continuing with the installation.
Once you have selected all files you wish to install, click on “Install” to continue.
The Software License Agreement will be displayed in the dialog window that follows. In order to continue with the installation of the application you must agree to the terms and conditions of this agreement.
Click on the Print button to print the agreement.
Note: Please read this agreement thoroughly!
If you do not agree with the terms and conditions of this agreement you must terminate the installation process by clicking on “Cancel”. You must then return the software package in its entirety to the merchandiser from whom you purchased the software.
After you have carefully read and agree with the terms and conditions of the Software License Agreement, check the box next to “I have read and accepted the license.”
You may now continue with the installation process.
In the following dialog window you can define a location to which the software should be installed, if and how the software should appear in the Windows start menu, and if a desktop shortcut should be created.
8MAXON Installation Guide
The default installation path is the Windows “Programs” directory. This path can be changed, if desired.
Attention!
When selecting an alternative installation path, the “\CINEMA 4D R13 or \BodyPaint 3D R13” target directory must be entered manually. Otherwise all program elements will lie in the selected directory.
Do not install this version of the application into an existing R12 or BodyPaint R12 directory. This will corrupt both installations!
You can also define whether or not a link should be created in the start menu.
Don’t create Start menu entries
No links will be created in the start menu.
Only for me
Links will only be created in the start menu for the current user’s account.
For everyone
A link will be created in the start menu for all user accounts on that computer.
Creating a desktop shortcut
The “Create Desktop Shortcut” command will create a shortcut on the desktop to the installed elements.
Once you are finished defining your desired options you can click on “Install” to start the actual installation process.
First, all required files will be unzipped and copied onto your hard drive. The installation program will then start anew in order to install the software in accordance with the options you defined.
Note: During installation, additional Microsoft libraries will be installed which are required for Okino PolyTrans. Confirm the installation by clicking on OK.
If the installation was successful you will be informed accordingly.
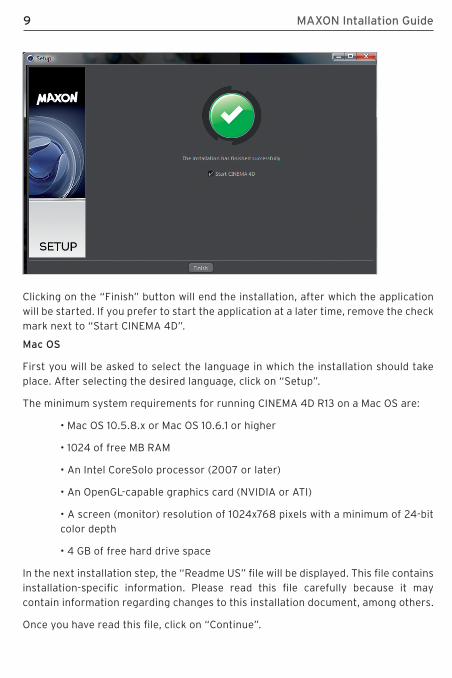
9 MAXON Intallation Guide
Clicking on the “Finish” button will end the installation, after which the application will be started. If you prefer to start the application at a later time, remove the check mark next to “Start CINEMA 4D”.
Mac OS
First you will be asked to select the language in which the installation should take place. After selecting the desired language, click on “Setup”.
The minimum system requirements for running CINEMA 4D R13 on a Mac OS are:
• Mac OS 10.5.8.x or Mac OS 10.6.1 or higher
• 1024 of free MB RAM
• An Intel CoreSolo processor (2007 or later)
• An OpenGL-capable graphics card (NVIDIA or ATI)
• A screen (monitor) resolution of 1024x768 pixels with a minimum of 24-bit color depth
• 4 GB of free hard drive space
In the next installation step, the “Readme US” file will be displayed. This file contains installation-specific information. Please read this file carefully because it may contain information regarding changes to this installation document, among others.
Once you have read this file, click on “Continue”.
10MAXON Installation Guide
You will be brought to the registration page, in which you will be required to enter your personal information and the serial number included in your registration information
1. Enter your personal and/or company information here.
Note: This information does not have to reflect that in your confirmation email. You can, for example, enter the information of an individual employee even if the application is licensed to his/her employer.
2. Enter your serial number here. You can either type it into the corresponding fields manually or copy and paste it from an e-mail (if you received it per e-mail). If you enter the serial number manually, simply enter it as it appears in the registration information, including all digits, dashes and letters. If you have received an e-mail containing the serial number, simply copy the entire contents of the mail and paste it into the installation window. The serial number will be added automatically (3). If you have already received final serial number you do not need to enter the temporary number again - use the final serial number only.
4. Here you can select if the serial number should be saved for the Current User or for All Users.
11 MAXON Intallation Guide
Current User
The serial number will only be saved for your (current user’s) use, i.e. only you (current user) and no other user will be able to use the application.
All Users
The serial number will be saved globally on the computer and can be used by you (current user) and any other user.
Tip: The license will be available for all users of a given computer only if the application is installed by the administrator
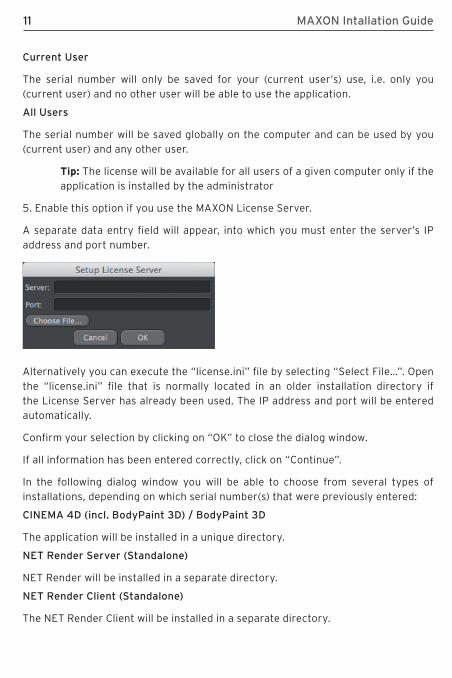
5. Enable this option if you use the MAXON License Server.
A separate data entry field will appear, into which you must enter the server’s IP address and port number.
Alternatively you can execute the “license.ini” file by selecting “Select File…”. Open the “license.ini” file that is normally located in an older installation directory if the License Server has already been used. The IP address and port will be entered automatically.
Confirm your selection by clicking on “OK” to close the dialog window.
If all information has been entered correctly, click on “Continue”.
In the following dialog window you will be able to choose from several types of installations, depending on which serial number(s) that were previously entered:
CINEMA 4D (incl. BodyPaint 3D) / BodyPaint 3D
The application will be installed in a unique directory.
NET Render Server (Standalone)
NET Render will be installed in a separate directory.
NET Render Client (Standalone)
The NET Render Client will be installed in a separate directory.
12MAXON Installation Guide
Note: The NET Render Client will always be made available for installation.
Libraries, languages and documentation
Available languages and/or documentation can be subsequently installed.
Note: Only the documentation that matches the currently used language can be installed. Hence, once you update to a newer version of the application you can no longer install the language or documentation included on your installation DVD. You must download the corresponding language or documentation manually via the Online Updater.
Select the desired type of installation and click on “Continue”.
In the dialog window that follows you can verify which elements will be installed. Elements can be deselected here to keep them from being installed. As a rule, this will not be necessary.
Initially, the application will be installed in English. Any available additional languages or context help files, etc. can be found in the “Optional” tab. If this is not already selected, simply enable the element you want to install by clicking on its check box before continuing with the installation.
Once you have selected all files you wish to install, click on “Install” to continue.
In the following dialog window you will see the Software License Agreement. In order to continue with the installation you must agree to the terms and conditions of this agreement.
Click on the Print button to print the agreement.
Note: Please read this agreement carefully.
If you do not agree with the terms and conditions of this agreement you must terminate the installation process by clicking on “Cancel”. You must then return the software package in its entirety to the merchandiser from whom you purchased the software.
After you have carefully read and agree with the terms and conditions of the Software License Agreement, check the box next to “I have read and accepted the license.”
You may now continue with the installation process by clicking on the “Install” button.
13 MAXON Intallation Guide
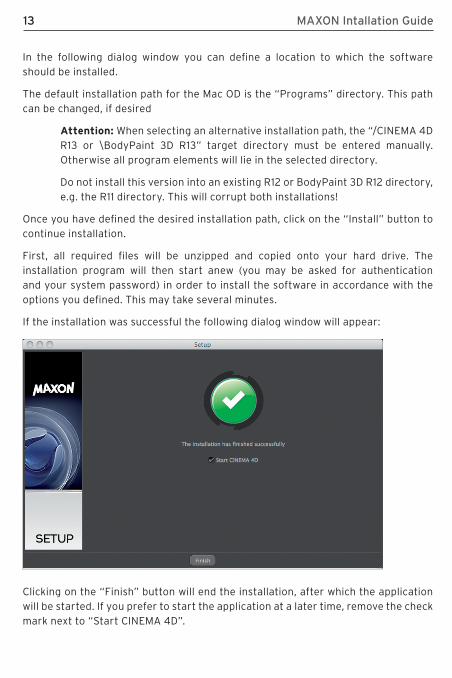
In the following dialog window you can define a location to which the software should be installed.
The default installation path for the Mac OD is the “Programs” directory. This path can be changed, if desired
Attention: When selecting an alternative installation path, the “/CINEMA 4D R13 or \BodyPaint 3D R13” target directory must be entered manually. Otherwise all program elements will lie in the selected directory.
Do not install this version into an existing R12 or BodyPaint 3D R12 directory, e.g. the R11 directory. This will corrupt both installations!
Once you have defined the desired installation path, click on the “Install” button to continue installation.
First, all required files will be unzipped and copied onto your hard drive. The installation program will then start anew (you may be asked for authentication and your system password) in order to install the software in accordance with the options you defined. This may take several minutes.
If the installation was successful the following dialog window will appear:
Clicking on the “Finish” button will end the installation, after which the application will be started. If you prefer to start the application at a later time, remove the check mark next to “Start CINEMA 4D”.

14MAXON Installation Guide
Note: In rare instances you might receive the erroneous prompt that CINEMA 4D has not been installed correctly. Simply open the application directly from the installation folder on your hard drive.
3. Changing application packet
If you want to expand your CINEMA 4D software packet, e.g. upgrade from CINEMA 4D Prime to CINEMA 4D Studio it is not necessary to install the new application in its entirety.
In this instance, all you have to do is start CINEMA 4D, select Personalize... from the Help menu and enter the new serial number. Simply restart the application to activate your new version!
The procedure is different if you have been using BodyPaint 3D R13 and want to switch to CINEMA 4D Studio R13, for example. CINEMA 4D R13 must be installed, as described in point 2 above.
4. Installing NET Render
Proceed as described in point “2” above.
In the dialog window in which you can select the installation type, select “NET Render Server R13” or “NET Render Client R13”.
Note: The NET Render Client will always be made available for installation.
Depending on the option selected a new directory will be created in the default installation path. This directory will be named either “NET Render R13 Server” or “NET Render R13 Client”, respectively.
Attention!
Note that when changing the installation path or target directory, “NET Render R13 Server” and respectively “NET Render R13 Client” must be defined manually. Otherwise the program elements will lie in the selected directory.
DO NOT install NET Render into the CINEMA 4D directory!
Tip: A new installation of NET Render Client is not required on each individual computer that will be used as a client. Simply copy the existing “NET Render R13 Client” installation in its entirety onto each computer you want to use as a client.
15 MAXON Intallation Guide
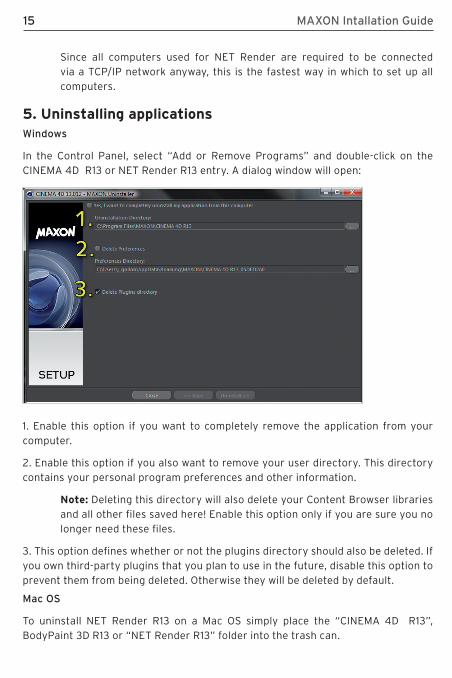
Since all computers used for NET Render are required to be connected via a TCP/IP network anyway, this is the fastest way in which to set up all computers.
5. Uninstalling applicationsWindows
In the Control Panel, select “Add or Remove Programs” and double-click on the CINEMA 4D R13 or NET Render R13 entry. A dialog window will open:
1. Enable this option if you want to completely remove the application from your computer.
2. Enable this option if you also want to remove your user directory. This directory contains your personal program preferences and other information.
Note: Deleting this directory will also delete your Content Browser libraries and all other files saved here! Enable this option only if you are sure you no longer need these files.
3. This option defines whether or not the plugins directory should also be deleted. If you own third-party plugins that you plan to use in the future, disable this option to prevent them from being deleted. Otherwise they will be deleted by default.
Mac OS
To uninstall NET Render R13 on a Mac OS simply place the “CINEMA 4D R13”, BodyPaint 3D R13 or “NET Render R13” folder into the trash can.
16MAXON Installation Guide
Your personal user data can be found on the hard drive under “Macintosh HD / Users / [username] / Library / Preferences / MAXON”. If you also want to delete this information simply drag this folder into the trash can as well.
Note: Deleting this folder will also delete your Content Browser libraries and all files therein.
6. The Online Updater
After the application has been started you may automatically receive a prompt from the Online Updater that new updates, additions, language or help files are available. This will most likely occur if no additional language or documentation files were initially installed.
In order for the Online Updater to work your computer must be connected to the Internet. If you use a firewall, it may have to be reconfigured accordingly.
Note: If your computer is connected with the internet via a password protected proxy server the application must first be configured. To do so, start the application, switch to the Preferences menu (Ctrl/Cmd + e) and enter the name of the proxy server and the port number in the corresponding Communication menu’s input fields.
If your computer is not connected to the Internet or if you are required to dial into the Internet via a password-protected Proxy Server, read point “7” below (“Manually installing updates”).
Note: MAXON Computer takes your privacy seriously!
If you take advantage of the comfort of the Online Updater functionality, neither your personal information nor any information from your computer will be transferred to us.
If you decide not to use the Online Updater it can be disabled in the Preferences menu. Once disabled you will have to manually download all updates (see point “7” below).
So, how does this work?
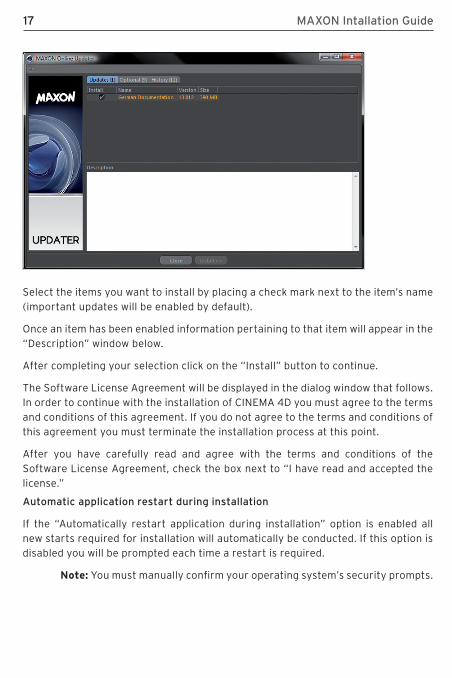
If the Online Updater dialog window opens after CINEMA 4D is started the “Update” tab will display which items are available for update.
17 MAXON Intallation Guide
Select the items you want to install by placing a check mark next to the item’s name (important updates will be enabled by default).
Once an item has been enabled information pertaining to that item will appear in the “Description” window below.
After completing your selection click on the “Install” button to continue.
The Software License Agreement will be displayed in the dialog window that follows. In order to continue with the installation of CINEMA 4D you must agree to the terms and conditions of this agreement. If you do not agree to the terms and conditions of this agreement you must terminate the installation process at this point.
After you have carefully read and agree with the terms and conditions of the Software License Agreement, check the box next to “I have read and accepted the license.”
Automatic application restart during installation
If the “Automatically restart application during installation” option is enabled all new starts required for installation will automatically be conducted. If this option is disabled you will be prompted each time a restart is required.
Note: You must manually confirm your operating system’s security prompts.
18MAXON Installation Guide
Deleting downloaded archive after successful installation
If the “Delete downloaded archive after successful installation” option is enabled, all downloaded files that are no longer needed will be deleted after the update has been successfully installed. Depending on the installation conducted, this can free a great amount of hard disk space.
Create backup copy before installing
If the “Create backup copy before installation” option is enabled your existing installation will be saved before the update is made. The user directory created by the application will be used by default. Enter the location to which you want to save your backup copy in the “Path” field. If an error occurs during the update process (e.g. hard disk error, computer crash, disruption of Internet connection etc.) you will be able to use the backup copy to restore your previous installation. Generally speaking, you should always enable the backup option when installing updates.
Note: The backup copy will consist of a common Zip archive with the name “c4d_backup_[date]_[time].zip”. If this file exceeds 500 MB it will be split into multiple archive files. To unzip these files they must first be moved into a common folder and unzipped in proper order.
For Windows users: In the Explorer window, double-click on each archive individually and drag the contents into a common folder (you can create a new folder for this purpose). If you use a special archiving program, select all corresponding Zip files, right-click on them and select either “Extract to…” (WinZip) or “Extract Here” (7-Zip).
For Mac users: Double-click on the *.bat file that accompanies the Zip archives. This should run the terminal with which the backup file can be restored. If this does not occur, right-click or Cmd+click on the *.bat file, select “Open with / Other…” and select the terminal from the list of system programs.
The files will be restored in a new directory.
Click on “Install” to start downloading the required files. In the dialog window that follows, a progress bar will show how the installation is progressing. If you close this dialog window the installation will continue in the background – the installation will NOT be terminated.
Once all files have been downloaded they will be unzipped. The application and the update process will start. If the automatic restart function (see above) is not enabled you will be prompted to do so.
19 MAXON Intallation Guide
The update files will now be installed and the application will be restarted automatically – if the option is enabled – with all selected updates.
Note: NET Render cannot be updated via the Online Updater!
Updates to CINEMA 4D / BodyPaint 3D will be made available separately. These will also be valid for NET Render. Corresponding information and updates will be made available online at www.maxon.net.
When updating NET Render, both NET Render Client AND NET Render Server must both reflect the same update state.
7. Manually installing languages, documentation, updates
If you computer does not have access to the Internet or if it is running over a password-protected proxy server or if you have disabled the automatic Online Updater function in the Preferences menu, you must install all updates “manually”. NET Render can only be updated manually.
A “c4dupdate” file can be downloaded at www.maxon.net using a computer with Internet access. This file can then be transferred to your offline computer via CD, USB stick or other medium.
To install the update file, start the application (or NET Render Client/Server) and select “Manual Installation…” from the “Help” menu. In the file selection window that opens, navigate to the location to which you saved the update file and open the file.
All subsequent installation steps reflect those of a normal installation process (see point “6” above).
Notes: In order to install the documentation in a specific language (one of the available languages) CINEMA 4D must first be installed in the corresponding language.
A language version that can be used with your version of CINEMA 4D can be recognized by its designation. For example, the language update with the designation “ENGLISH_13.012_20110709_103102.c4dupdate“ can only be used with the CINEMA 4D version R13.012. The English-language help file that corresponds to this version of CINEMA 4D would have the designation “ENGLISH_HELP_13.012_20110709_103102.c4dupdate”.
20MAXON Installation Guide
After installation, CINEMA 4D will run in the language that was just installed and the help files can be accessed. To install the help files, proceed as described above. Make sure you only install the help files that correspond to your operating system: “…MAC.c4dupdate” for Mac OS; “…WIN.c4dupdate” for Windows.
Note 1: If you subsequently install an update it will initially be installed in English by default. You must repeat the manual installation (the Online Updater may automatically prompt you to do this) of the desired language after these items have been installed. Only use the language package that corresponds to your version of CINEMA 4D!
Note 2: If a language is installed by a different user, e.g. the administrator, and subsequently run, the newly installed language must be selected manually in the Preferences menu (Ctrl/Cmd + e).
If a CINEMA 4D R13 update is available on the MAXON web site and you want to install it manually, proceed as described above.
Note: After an update has been installed, the corresponding language package must also be installed!
8. Tips and TricksUnattended or Silent Installation
How can CINEMA 4D be installed on several computers unattended?
This is not possible. CINEMA 4D / BodyPaint 3D must be installed and updated as described above. Subsequently either the entire MAXON directory or only the CINEMA 4D directory can be copied onto other computers over the network.
Tip: The additional Windows C++ libraries are not included in these directories and must be installed on each computer individually.
Missing MAXON License Server serial number
When starting the application a prompt appears stating that the serial number is missing and that the License Server cannot be found.
During installation you indicated that you use the MAXON License Server (MLS), which resulted in a “license.ini” file being created in the installation directory, or your connection to the MLS was interrupted or blocked.
Do not run the MLS, delete the “license.ini” file and enter your personal serial number.
21 MAXON Intallation Guide
However, if you work with the MLS and receive this prompt, make sure the MLS connection to your computer is in tact. If the MLS is not running, start it so it can retrieve a serial number.
Cannot install updates, languages or documentation
The updates have been downloaded from www.maxon.net but the ZIP files are not recognized by the Online Updater or no update files are displayed.
All updates, documentation and language files have the suffix “.c4dupdate” and must first be unzipped before they can be installed.
Mobile use of application, single-user license for multiple computers
Under which circumstances can a single-user license be used on multiple computers without breaching the End User License Agreement?
Install the application on an external hard drive or USB stick (>2GB) instead of your computer’s internal hard drive. You only have to enter your serial number(s) once when starting the application on a new operating system.
22MAXON Installation Guide
9. Support and Contact
If you encounter problems with installation, even after thoroughly reading this installation manual, please contact us at the MAXON office nearest you:
Europe / Germany
MAXON Computer GmbH
Phone.: + (00) 49–6172–5906–0
Fax: + (00) 49–6172–5906–30
E-mail: [email protected]
France
MAXON Centre de Compétence
Phone: + (00) 33–1–46 21 82 22
E-mail: [email protected]
Japan
MAXON Computer Japan
Phone: + (00) 81–3–5759–0530
E-mail: [email protected]
United Kingdom & Ireland
MAXON Computer Ltd.
Phone: + (00) 44–1525–406799
Support: + (00) 44–1525–844969
Fax: + (00) 44–1525–406508
E-mail: [email protected]
United States, Canada, The Americas
MAXON Computer Inc.
Phone: 1–877–ANIMATE
E-mail: [email protected]
23 MAXON-Installationsanleitung
1. Vor der Installation ..................................................................25
2. Programm installieren ............................................................26Windows .............................................................................................................................. 26
Aktueller Benutzer ........................................................................................................... 28
Alle Benutzer ..................................................................................................................... 28
CINEMA 4D (inkl. BodyPaint 3D) / BodyPaint 3D ...................................................... 29
NET Render Server (Standalone) .................................................................................. 29
NET Render Client (Standalone) ................................................................................... 29
Bibliotheken, Sprachen und die Hilfe ........................................................................... 29
Keine Startmenüeinträge erstellen .............................................................................. 30
Nur für mich ....................................................................................................................... 30
Für jeden ............................................................................................................................. 30
Verknüpfung mit dem Desktop erstellen ..................................................................... 31
Mac OS ................................................................................................................................ 32
Aktueller Benutzer ........................................................................................................... 33
Alle Benutzer ..................................................................................................................... 33
CINEMA 4D (inkl. BodyPaint 3D) / BodyPaint 3D ...................................................... 34
NET Render Server (Standalone) .................................................................................. 34
NET Render Client (Standalone) ................................................................................... 34
Bibliotheken, Sprachen und die Hilfe ........................................................................... 34
3. Programmpaket ändern ..........................................................36
4. NET Render installieren ..........................................................37
5. Programm deinstallieren ........................................................37Windows .............................................................................................................................. 37
Mac OS ................................................................................................................................ 38
6. Der Online-Updater .................................................................39Automatischer Applikationsneustart während der Installation ............................. 40
Heruntergeladenes Archiv nach erfolgreicher Installation löschen ..................... 41
Sicherheitskopie vor der Installation erstellen .......................................................... 41
7. Sprachen, Dokumentation und Updates manuell installieren 42Anmerkungen .................................................................................................................... 43
8. Tipps und Tricks ......................................................................43Keine Seriennummer, MAXON-Lizenzserver .............................................................. 44
Keine manuelle Installation von Updates, Sprache oder Dokumentation ........... 44
Das Programm mobil einsetzen, Einzelplatzlizenz auf mehreren Rechnern ...... 44
Unattended- oder Silent-Installation ............................................................................ 44

24MAXON-Installationsanleitung
9. Support und Kontakt ...............................................................45Europa / Deutschland ...................................................................................................... 45
Frankreich ........................................................................................................................... 45
Japan ................................................................................................................................... 45
Großbritannien & Irland .................................................................................................. 45
USA, Kanada, The Americas ........................................................................................... 45
25 MAXON-Installationsanleitung
MAXON Software-Installationsanleitung
1. Vor der Installation
Bevor Sie das Programm installieren, beachten Sie bitte Folgendes:
Lesen Sie sich immer vor der Installation die Datei „Readme DE“ durch, da wir Sie hier über Änderungen in letzter Minute informieren. Diese Änderungen können auch die Installation selbst betreffen. Die Datei befindet sich auf der Installations-DVD und wird nochmals im Installationsprogramm (siehe unten) angezeigt.
Kontrollieren Sie ebenso vor der Installation den Inhalt des Programmpaketes.
Es enthält folgende Bestandteile:
• Die Installations-DVD
• Die Goodies- und Extras-DVD
• Das Quickstart-Handbuch
• Das Registrierungsschreiben mit Ihrer temporären Seriennummern, die Sie zum Starten der Software benötigen (Nicht beim MAXON License Server!).
Fehlt einer der oben genannten Bestandteile, wenden Sie sich bitte umgehend an Ihren Händler oder direkt an MAXON Computer! Unsere Adresse finden Sie am Ende des Dokuments.
Besuchen Sie auch unsere Internet-Seite unter www.maxon.net und informieren sich über Updates zu Ihrer Version. Sollte eine neuere Version des Programms oder eines Sprachpakets oder der Referenzdokumentation verfügbar sein, laden Sie sich die entsprechende(n) Datei(en) vor der Installation herunter. (Wenn der Installationsrechner direkten Zugang zum Internet hat, ist das vorherige Herunterladen nicht notwendig. Der Online-Updater wird das für Sie automatisch übernehmen.)
Auf der Installations-DVD finden Sie das Installationsprogramm, dass im Folgenden der Reihe nach beschrieben wird. Zusätzlich werden der erste Start und das Aktualisieren des Programms beschrieben:
2. Programm installieren
3. Programmpaket ändern
4. NET Render installieren
5. Programme deinstallieren

26MAXON-Installationsanleitung
6. Der Online-Updater
7. Sprache, Dokumentation und Updates manuell installieren
8. Tipps und Tricks
9. Support und Kontakt
2. Programm installieren
Um das Programm auf Ihren Datenträger zu installieren, gehen Sie wie folgt vor:
Legen Sie die Installations-DVD in das Laufwerk Ihres Computers. Das Symbol der DVD sollte nun im Windows Explorer oder dem Mac OS Finder erscheinen.
Öffnen Sie die DVD über den Explorer bzw. Finder, um den Inhalt anzuzeigen, sofern das nicht automatisch geschieht.
Doppelklicken Sie auf die Datei „Setup(.exe)“.
Hiermit installieren Sie CINEMA 4D oder BodyPaint 3D, oder NET Render. Was Sie installieren und benutzen können, entscheidet die von Ihnen erworbene Lizenz, die Sie dem Registrierungsschreiben entnehmen können und bei der Installation eingeben müssen.
Windows
Zuerst erhalten Sie die Sprachauswahl für die Menüführung durch die Installation.
Wählen Sie die gewünschte Sprache aus und bestätigen Sie das mit „OK“.
Die Mindestanforderungen für CINEMA 4D R13 unter Windows sind:
• Windows XP (32/64 Bit), Vista (32/64 Bit), Windows 7 (32/64 Bit)
• Bei Windows 7 ein installierter Internet Explorer 8
• 1.024 MB freies RAM
• Ein AMD- oder Intel-(kompatibler)-Prozessor mit SSE2- Unterstützung
• Eine OpenGL-fähige Grafikkarte (NVIDIA oder ATI)
• Eine Bildschirmauflösung von 1024x768 Pixeln mit 24 Bit Farbtiefe
• 4 GB freier Festplattenplatz
27 MAXON-Installationsanleitung
Achtung: Werden die System-Mindestanforderungen nicht erfüllt, erhalten Sie eine Fehlermeldung und das Installationsprogramm kann nur noch beendet werden!
Auf der nächsten Seite der Installation wird Ihnen die „Readme DE“-Datei angezeigt, die Ihnen Informationen zur Installation gibt. Lesen Sie diese durch, da hier ggf. auch auf Änderungen zu diesem Dokument hingewiesen wird.
Haben Sie die Informationen gelesen, klicken Sie auf „Fortfahren“.
Sie gelangen nun zur Registrierungsseite, auf der Sie Ihre Personendaten und Seriennummer(n) eingeben müssen.
1. Hier tragen Sie Ihre Daten zur Person und/oder Firma ein.
Hinweis: Diese müssen nicht mit denen des Registrationsschreiben übereinstimmen. Es kann sich also z.B. der entsprechende Mitarbeiter eintragen, auch wenn die Lizenz auf die Firma registriert werden soll.

28MAXON-Installationsanleitung
2. Hier geben Sie Ihre Seriennummer ein. Diese können Sie entweder manuell eintippen oder aus einer E-Mail kopieren (soweit Sie diese per E-Mail erhalten haben) und in das Feld einfügen. Geben Sie die Seriennummer händisch ein, genügt es, alle Zahlen, Bindestriche und Buchstaben dem beiliegenden Schreiben zu entnehmen. Haben Sie eine E-Mail mit den Seriennummer erhalten, kopieren Sie einfach den gesamten Nachrichtentext in den Zwischenspeicher und klicken auf den Knopf „Einfügen“. Die Nummer wird dann automatisch unter 3. eingefügt. Haben Sie bereits Ihre finale Seriennummer erhalten, brauchen Sie die temporären auch bei erneuter Installation nicht eingeben. Benutzen Sie in diesem Fall direkt die finale Seriennummer.
4. Hier wählen Sie aus, ob die Seriennummer im System für den „Aktuellen Benutzer“ oder für „Alle Benutzer“ gespeichert wird.
Aktueller Benutzer
Die Seriennummer wird nur für Sie im System gespeichert, d.h. nur Sie und kein anderer Benutzer des Systems können das Programm nutzen.
Alle Benutzer
Die Seriennummer wird global im System gespeichert und ist für Sie und jeden anderen Benutzer des Systems verfügbar.
Tipp: Wird das Programm z.B. vom Andministrator installiert, ist nur so die Lizenz für alle Benutzer des Rechners verfügbar!
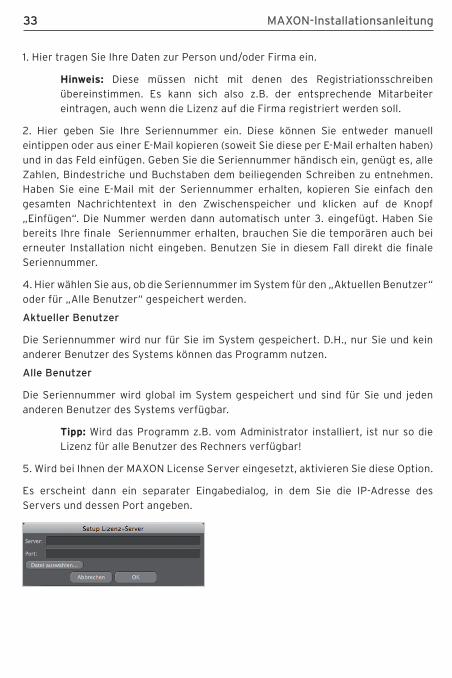
5. Wird bei Ihnen der MAXON License Server eingesetzt, und nur dann, aktivieren Sie diese Option.
Es erscheint dann ein separater Eingabedialog, in dem Sie die IP-Adresse des Servers und dessen Port angeben.
Sie können auch die bereits vorhandene „license.ini“ auslesen lassen, indem Sie auf „Datei auswählen...“ klicken. Über den Windows Explorer öffnen Sie die „license.ini“, die Sie normalerweise in einem älteren CINEMA 4D-Installationsverzeichnis finden können, wenn der Lizenz-Server bereits eingesetzt wurde. Es werden dann automatisch IP-Adresse und Port eingetragen.
Bestätigen Sie den Dialog dann mit „OK“ um ihn zu schließen.
29 MAXON-Installationsanleitung
Haben Sie hier alles korrekt eingegeben, klicken Sie auf „Fortfahren“.
Auf der folgenden Seite werden verschiedene Installationstypen, je nach zuvor eingegebenen Seriennummer(n), angeboten. Sie können wählen zwischen:
CINEMA 4D (inkl. BodyPaint 3D) / BodyPaint 3D
Das Programm wird in ein eigenständiges Verzeichnis installiert.
NET Render Server (Standalone)
Hiermit wird der NET Render Server in ein eigenständiges Verzeichnis installiert.
NET Render Client (Standalone)
Hiermit wird der NET Render Client in ein eigenständiges Verzeichnis installiert.
Hinweis: NET Render Client wird immer zur Installation angeboten, da dieser frei installiert werden kann und darf.
Bibliotheken, Sprachen und die Hilfe
Hiermit können, soweit verfügbar, Sprachen oder die Dokumentation nachträglich installiert werden.
Hinweis: Es kann immer nur die zur Version passende Sprache oder Dokumentation installiert werden. Haben Sie also zwischenzeitlich ein Update auf eine höhere Version installiert, dann können die Sprache oder Dokumentation von der DVD nicht mehr installiert werden! Sie müssen diese dann über den Online-Updater oder manuell installieren.
Wählen Sie den gewünschten Installationstyp und klicken auf „Fortfahren“.
Auf der folgenden Seite können Sie nochmals überprüfen, was genau installiert werden soll.
Zunächst wir das Programm in englischer Sprache installiert. Unter „Optional“ finden Sie zusätzliche Sprachen, z.B. Deutsch, oder die Kontexthilfe für die jeweilige Sprache, soweit verfügbar. Sollte diese nicht schon vorgewählt sein, aktivieren Sie hierzu einfach die gewünschte Option mit einem Häkchen, wenn diese ebenfalls installiert werden soll.
Haben Sie hier Ihre Auswahl getroffen, fahren Sie mit „Installieren“ fort.
Auf der folgenden Seite wird Ihnen der Software-Lizenzvertrag angezeigt, dem Sie zustimmen müssen um as Programm installieren zu können.
30MAXON-Installationsanleitung
Mittels des „Drucken“-Knopfs können Sie sich den Software-Lizenzvertrag auch über Ihren Systtemdrucker ausdrucken lassen.
Achtung: Lesen Sie sich den Vertrag aufmerksam durch!
Stimmen Sie ihm nicht zu, dürfen Sie die Software nicht installieren und brechen diese mit „Abbrechen“ ab!
Geben Sie in diesem Fall die Software und alle zugehörigen Materialien an die Stelle zurück, bei der Sie diese erworben haben.
Nachdem Sie sich den Vertrag aufmerksam durchgelesen und akzeptiert haben, bestätigen Sie dies mit setzen eines Häkchens vor „Ich habe den Lizenztext gelesen und akzeptiert“.
Nun können Sie mit „Installieren“ fortfahren.
Auf der folgenden Seite geben Sie an, wohin das Programm installiert werden soll, ob und wie im Windows Startmenü Einträge erstellt und ob auf den Desktop Verknüpfungen angelegt werden sollen.
Als Standardpfad ist das Windows Programme-Verzeichnis vorgegeben, den Sie hier auch ändern können.
Achtung: Beachten Sie, dass beim Ändern des Installationspfades, der Zielordner „\CINEMA 4D R13 oder \BodyPaint 3D R13“ händisch angegeben werden muss. Anderenfalls liegen alle Programmelemente direkt im ausgewählten Verzeichnis!
Installieren Sie diese Version nicht in ein bereits bestehendes Verzeichnis, z.B. von CINEMA 4D R12 oder BodyPaint 3D R12, da Sie damit dann beide Installationen zerstören würden!
Weiterhin können Sie festlegen, ob bzw. wie Verknüpfungen im Startmenü erstellt werden sollen.
Keine Startmenüeinträge erstellen
Es werden im Startmenü keinerlei Verknüpfungen erstellt.
Nur für mich
Es werden im Startmenü nur für Ihr aktuelles Benutzerkonto Verknüpfungen erstellt.
Für jeden
Es werden im Startmenü für alle Benutzer des Rechners zugängliche Verknüpfungen erstellt.
31 MAXON-Installationsanleitung
Verknüpfung mit dem Desktop erstellen
Mit „Verknüpfungen auf dem Desktop erstellen“ werden entsprechende Verknüpfungen zu den installierten Elementen direkt auf Ihrem Desktop erzeugt.
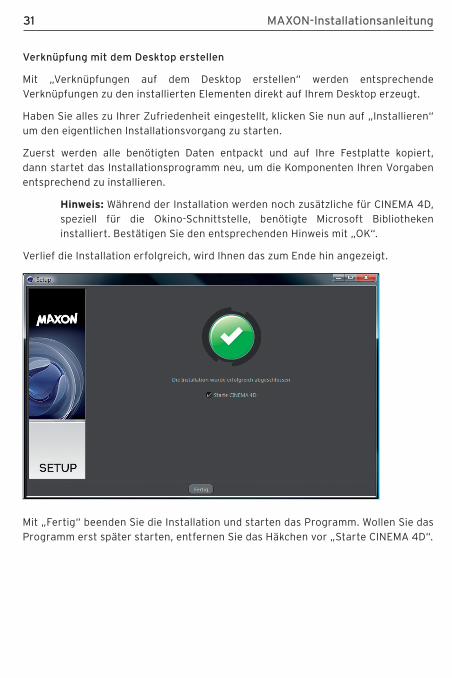
Haben Sie alles zu Ihrer Zufriedenheit eingestellt, klicken Sie nun auf „Installieren“ um den eigentlichen Installationsvorgang zu starten.
Zuerst werden alle benötigten Daten entpackt und auf Ihre Festplatte kopiert, dann startet das Installationsprogramm neu, um die Komponenten Ihren Vorgaben entsprechend zu installieren.
Hinweis: Während der Installation werden noch zusätzliche für CINEMA 4D, speziell für die Okino-Schnittstelle, benötigte Microsoft Bibliotheken installiert. Bestätigen Sie den entsprechenden Hinweis mit „OK“.
Verlief die Installation erfolgreich, wird Ihnen das zum Ende hin angezeigt.
Mit „Fertig“ beenden Sie die Installation und starten das Programm. Wollen Sie das Programm erst später starten, entfernen Sie das Häkchen vor „Starte CINEMA 4D“.
32MAXON-Installationsanleitung
Mac OS
Zuerst erhalten Sie die Sprachauswahl für die Menüführung durch die Installation.
Wählen Sie die gewünschte Sprache aus und klicken Sie dann auf „Setup“.
Die Mindestanforderungen für CINEMA 4D R13 unter Mac OS sind:
• Mac OS 10.5.8 oder Mac OS 10.6.1 oder höher
• 1.024 freies MB RAM
• Ein Intel CoreSolo-Prozessor (ab 2007!)
• Eine OpenGL-fähige Grafikkarte (INVIDIA oder ATI)
• Eine Bildschirmauflösung von 1024x768 Pixeln mit 24 Bit Farbtiefe
• 4 GB freier Festplattenplatz (ohne installierte Hilfe)
Auf der nächsten Seite der Installation wird Ihnen die „Readme DE“-Datei angezeigt, die Ihnen Informationen zur Installation gibt. Lesen Sie diese durch, da hier ggf. auch auf Änderungen zu diesem Dokument hingewiesen wird.
Haben Sie die Informationen gelesen, klicken Sie auf „Fortfahren“.
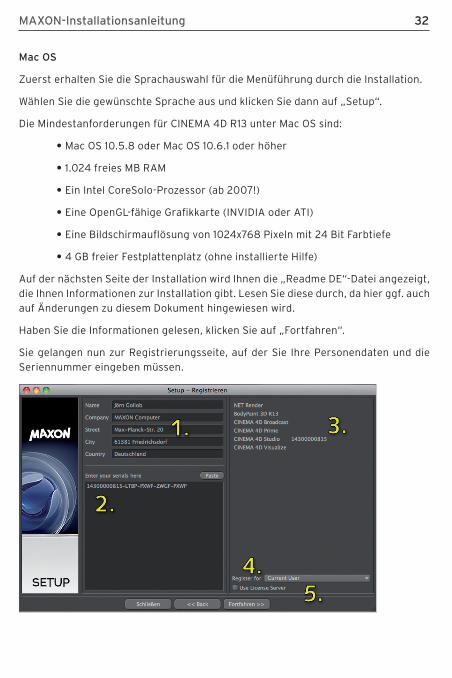
Sie gelangen nun zur Registrierungsseite, auf der Sie Ihre Personendaten und die Seriennummer eingeben müssen.
33 MAXON-Installationsanleitung
1. Hier tragen Sie Ihre Daten zur Person und/oder Firma ein.
Hinweis: Diese müssen nicht mit denen des Registriationsschreiben übereinstimmen. Es kann sich also z.B. der entsprechende Mitarbeiter eintragen, auch wenn die Lizenz auf die Firma registriert werden soll.
2. Hier geben Sie Ihre Seriennummer ein. Diese können Sie entweder manuell eintippen oder aus einer E-Mail kopieren (soweit Sie diese per E-Mail erhalten haben) und in das Feld einfügen. Geben Sie die Seriennummer händisch ein, genügt es, alle Zahlen, Bindestriche und Buchstaben dem beiliegenden Schreiben zu entnehmen. Haben Sie eine E-Mail mit der Seriennummer erhalten, kopieren Sie einfach den gesamten Nachrichtentext in den Zwischenspeicher und klicken auf de Knopf „Einfügen“. Die Nummer werden dann automatisch unter 3. eingefügt. Haben Sie bereits Ihre finale Seriennummer erhalten, brauchen Sie die temporären auch bei erneuter Installation nicht eingeben. Benutzen Sie in diesem Fall direkt die finale Seriennummer.
4. Hier wählen Sie aus, ob die Seriennummer im System für den „Aktuellen Benutzer“ oder für „Alle Benutzer“ gespeichert werden.
Aktueller Benutzer
Die Seriennummer wird nur für Sie im System gespeichert. D.H., nur Sie und kein anderer Benutzer des Systems können das Programm nutzen.
Alle Benutzer
Die Seriennummer wird global im System gespeichert und sind für Sie und jeden anderen Benutzer des Systems verfügbar.
Tipp: Wird das Programm z.B. vom Administrator installiert, ist nur so die Lizenz für alle Benutzer des Rechners verfügbar!
5. Wird bei Ihnen der MAXON License Server eingesetzt, aktivieren Sie diese Option.
Es erscheint dann ein separater Eingabedialog, in dem Sie die IP-Adresse des Servers und dessen Port angeben.
34MAXON-Installationsanleitung
Sie können auch die bereits vorhandene „license.ini“ auslesen lassen, indem Sie auf „Datei auswählen...“ klicken. Über den Mac OS Finder öffnen Sie die „license.ini“, die Sie normalerweise in einem älteren Installationsverzeichnis finden können, wenn denn der Lizenz-Server bereits eingesetzt wurde. Es werden dann automatisch IP-Adresse und Port eingetragen.
Bestätigen Sie den Dialog dann mit „OK“ um ihn zu schließen.
Haben Sie hier alles korrekt eingegeben, klicken Sie auf „Fortfahren“.
Auf der folgenden Seite werden verschiedene Installationstypen, je nach zuvor eingegebenen Seriennummer(n), angeboten. Sie können wählen zwischen:
CINEMA 4D (inkl. BodyPaint 3D) / BodyPaint 3D
Das Programm wird in ein eigenständiges Verzeichnis installiert.
NET Render Server (Standalone)
Hiermit wird der NET Render Server in ein eigenständiges Verzeichnis installiert.
NET Render Client (Standalone)
Hiermit wird der NET Render Client in ein eigenständiges Verzeichnis installiert.
Hinweis: NET Render Client wird immer zur Installation angeboten, da dieser frei installiert werden kann und darf.
Bibliotheken, Sprachen und die Hilfe
Hiermit können Bibliotheken, Sprachen oder die Dokumentation nachträglich installiert werden.
Hinweis: Es kann immer nur die zur Version passende Sprache oder Hilfe installiert werden. Haben Sie also zwischenzeitlich ein Update auf eine höhere Version installiert, dann können die Sprache oder Hilfe von der DVD nicht mehr installiert werden! Sie müssen diese dann über den Online-Updater oder manuell installieren.
Wählen Sie den gewünschten Installationstyp und klicken auf „Fortfahren“.
Auf der folgenden Seite können Sie nochmals überprüfen, was genau installiert werden soll und ggf. Elemente wieder deselektieren. Normalerweise sollte das aber nicht notwendig sein.
35 MAXON-Installationsanleitung
Zunächst wird das Programm in englischer Sprache installiert. Unter „Optional“ finden Sie zusätzliche Sprachen, z.B. Deutsch, oder die Kontexthilfe für die jeweilige Sprache, soweit verfügbar. Sollte diese nicht schon vorgewählt sein, aktivieren Sie hierzu einfach die gewünschte Option mit einem Häkchen, wenn diese ebenfalls installiert werden soll.
Haben Sie hier Ihre Auswahl getroffen, fahren Sie mit „Installieren“ fort.
Auf der folgenden Seite wird Ihnen der Software-Lizenzvertrag angezeigt, dem Sie zustimmen müssen um das Programm installieren zu können.
Mittels des „Drucken“-Knopfs können Sie sich den Software-Lizenzvertrag auch über Ihren Systtemdrucker ausdrucken lassen.
Achtung: Lesen Sie sich den Vertrag aufmerksam durch!
Stimmen Sie ihm nicht zu, dürfen Sie die Software nicht installieren und brechen diese mit „Abbrechen“ ab!
Geben Sie in diesem Fall die Software und alle zugehörigen Materialien an die Stelle zurück, bei der Sie diese erworben haben.
Nach dem Sie sich den Vertrag aufmerksam durchgelesen und akzeptiert haben, bestätigen Sie dies mit setzen eines Häkchens vor „Ich habe den Lizenztext gelesen und akzeptiert“.
Nun können Sie mit „Installieren“ fortfahren.
Auf der folgenden Seite geben Sie an, wohin das Programm installiert werden soll.
Als Standardpfad ist das Mac OS Programme-Verzeichnis vorgegeben, den Sie hier auch ändern können.
Achtung: Beachten Sie, dass beim Ändern des Installationspfades, der Zielordner „/CINEMA 4D R13 oder \BodyPaint 3D R13“ händisch angegeben werden muss. Anderenfalls liegen alle Programmelemente direkt im ausgewählten Verzeichnis!
Installieren Sie diese Version nicht in ein bereits bestehendes Verzeichnis, z.B. von CINEMA 4D R13 oder BodyPaint 3D R13, da Sie damit dann beide Installationen zerstören würden!
Haben Sie den gewünschten Pfad definiert, klicken Sie nun auf „Installieren“ um die Installation zu starten.
36MAXON-Installationsanleitung
Zuerst werden die benötigten Daten entpackt und auf Ihre Festplatte kopiert. Danach startet das Installationsprogramm neu, wobei Sie ggf. sich Authentifizieren und Ihr Systemkennwort angeben müssen, um dann die Komponenten Ihren Vorgaben entsprechend zu installieren, was u.U. einige Minuten dauern kann.
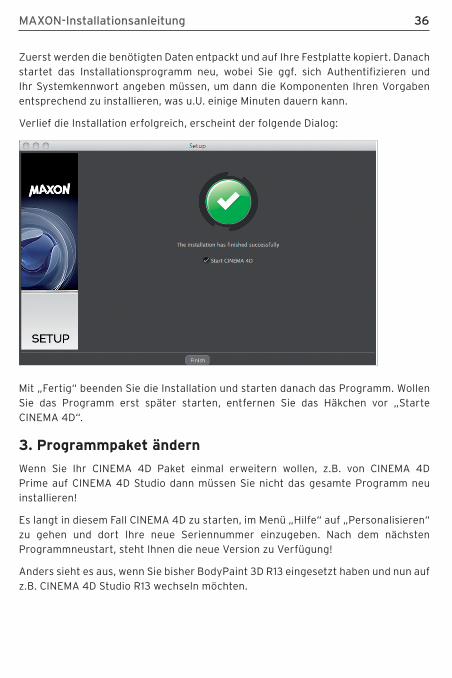
Verlief die Installation erfolgreich, erscheint der folgende Dialog:
Mit „Fertig“ beenden Sie die Installation und starten danach das Programm. Wollen Sie das Programm erst später starten, entfernen Sie das Häkchen vor „Starte CINEMA 4D“.
3. Programmpaket ändern
Wenn Sie Ihr CINEMA 4D Paket einmal erweitern wollen, z.B. von CINEMA 4D Prime auf CINEMA 4D Studio dann müssen Sie nicht das gesamte Programm neu installieren!
Es langt in diesem Fall CINEMA 4D zu starten, im Menü „Hilfe“ auf „Personalisieren“ zu gehen und dort Ihre neue Seriennummer einzugeben. Nach dem nächsten Programmneustart, steht Ihnen die neue Version zu Verfügung!
Anders sieht es aus, wenn Sie bisher BodyPaint 3D R13 eingesetzt haben und nun auf z.B. CINEMA 4D Studio R13 wechseln möchten.
37 MAXON-Installationsanleitung
Hierzu müssen Sie dann nach Erhalt der neuen Seriennummer CINEMA 4D R13 wie unter Punkt 2 beschrieben neu installieren!
4. NET Render installieren
Hier gehen Sie wie oben unter 2. beschrieben vor.
Auf der Seite der Installationstypen wählen Sie entweder „NET Render Server“ oder „NET Render Client“.
Hinweis: NET Render Client wird immer zur Installation angeboten, da dieser frei installiert werden kann und darf.
Je nach gewähltem Typ wird im Standardpfad ein neues Verzeichnis entweder mit Namen „NET Render R13 Server“ oder „NET Render R13 Client“ angelegt.
Achtung: Beachten Sie, dass beim Ändern des Installationspfades der Zielordner „NET Render R13 Server“ bzw. „NET Render R13 Client“ händisch angegeben werden muss. Anderenfalls liegen alle Programmelemente direkt im ausgewählten Verzeichnis!
Installieren Sie NET Render auf keinen Fall in das CINEMA 4D Verzeichnis!
Tipp: Damit Sie nicht auf jedem Computer, der als Client arbeiten soll, NET Render Client einzeln installieren müssen, kopieren Sie einfach eine bestehende komplette „NET Render R13 Client“-Installation auf alle weiteren Rechner.
Da für NET Render alle Rechner sowieso über ein TCP/IP-Netzwerk verbunden sein müssen, ist das der schnellste und einfachste Weg.
5. Programm deinstallierenWindows
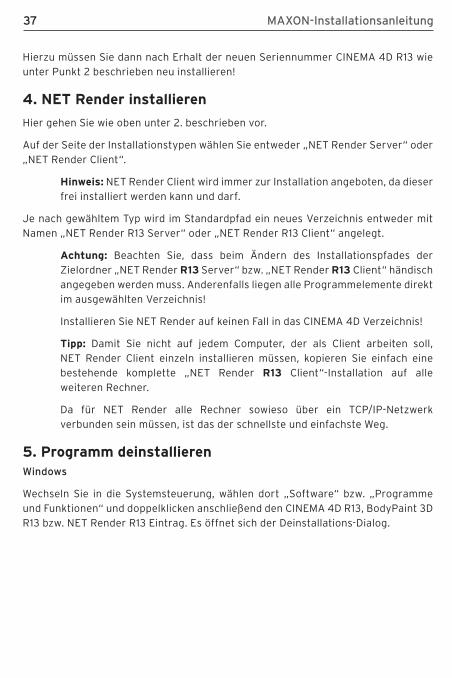
Wechseln Sie in die Systemsteuerung, wählen dort „Software“ bzw. „Programme und Funktionen“ und doppelklicken anschließend den CINEMA 4D R13, BodyPaint 3D R13 bzw. NET Render R13 Eintrag. Es öffnet sich der Deinstallations-Dialog.
38MAXON-Installationsanleitung
1. Aktivieren Sie diesen Punkt, wenn Sie das Programm komplett von Ihrem Rechner entfernen möchten.
2. Aktivieren Sie diese Option, wenn Ihr Benutzerverzeichnis ebenfalls entfernt werden soll. Darin befinden sich u.a. Ihre persönlichen Programmeinstellungen.
Achtung: Mit dem Löschen dieses Verzeichnisses gehen auch Ihre Content-Browser-Bibliotheken und alle anderen Dateien, die Sie hier abgelegt haben, verloren! Aktivieren Sie diese Option also nur, wenn Sie diese Daten wirklich nicht mehr benötigen.
3. Mit dieser Option legen Sie fest, ob bei einer Deinstallation auch das Plugins-Verzeichnis gelöscht werden soll. Besitzen Sie Plugins von Drittherstellern, die Sie weiter auf Ihrem Rechner verbleiben sollen, deaktivieren Sie diese Option. Voreingestellt ist das Löschen aller Plug-Ins.
Mac OS
Um das Programm zu deinstallieren, verschieben Sie den Ordner „CINEMA 4D R13“, „BodyPaint 3D R13“ bzw. „NET Render R13 Server/Client“ einfach in den Papierkorb.
Ihre persönlichen Benutzerdaten finden Sie auf der Festplatte unter „Macintosh HD / Benutzer / [benutzername) / Library / Preferences / MAXON“. Möchten Sie auch diese löschen, schieben Sie dieses Verzeichnis ebenfalls in den Papierkorb.
39 MAXON-Installationsanleitung
Achtung: Mit dem Löschen dieses Verzeichnisses gehen auch Ihre Content-Browser-Bibliotheken und alle anderen Dateien, die Sie hier abgelegt haben, verloren!
6. Der Online-Updater
Nachdem das Programm gestartet wurde, meldet sich u.U. der Online-Updater, dass neue Updates, Zusätze, neue Sprache- oder Hilfedateien verfügbar sind. Das ist insbesondere dann der Fall, wenn weder zusätzliche Sprachen noch die Dokumentationsdateien installiert wurden,
Damit der Online-Updater aktiv werden kann, ist es notwendig, dass Ihr Computer mit dem Internet verbunden und eine evtl. vorhandene Firewall entsprechend konfiguriert ist!
Hinweis: Ist Ihr Rechner mit einem nicht passwortgeschützten Proxy-Server mit dem Internet verbunden, müssen Sie das im Programm zuerst konfigurieren! Hierzu starten Sie das Programm, wechseln in die Programm-Voreinstellungen (Ctrl/Strg + E) und dann zu „Internetverbindung“. Tragen Sie dort den Namen des Proxy-Servers und die Portnummer ein.
Wenn Ihr Computer über keinen Internetzugang verfügt und auch keinen bekommen soll oder wenn Sie sich über einen passwortgeschützten Proxy-Server ins Internet einwählen, lesen Sie gleich bei Punkt 7 „Updates manuell installieren“ weiter!
Hinweis: Datenschutz wird bei uns groß geschrieben!
Wenn Sie den Komfort unserer Update-Server nutzen, werden weder Ihre persönlichen Daten noch Daten Ihres Computers/Systems an uns übermittelt.
Möchten Sie diesen Automatismus aus welchen Gründen auch immer nicht nutzen, deaktivieren Sie ihn in den Programm-Voreinstellungen (Ctrl/Strg + E) unter „Internetverbindung“. Update-Dateien müssen dann aber manuell installiert werden (siehe auch Punkt 7).
Wie funktioniert das nun?
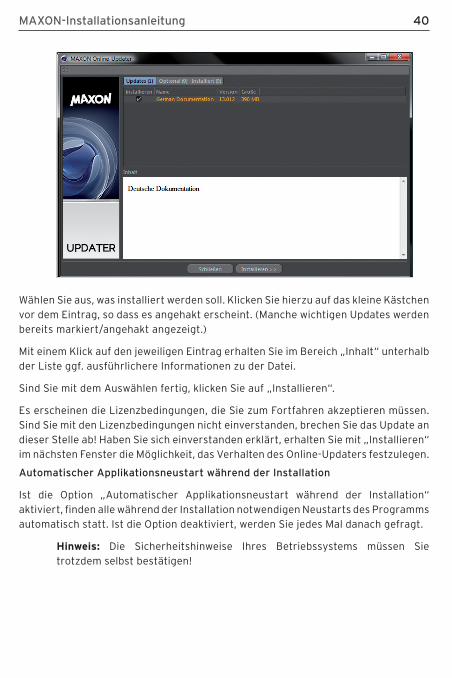
Erscheint nach dem Programmstart der Online-Updater, zeigt er Ihnen im Bereich „Updates“ an welche Elemente installiert werden können.
40MAXON-Installationsanleitung
Wählen Sie aus, was installiert werden soll. Klicken Sie hierzu auf das kleine Kästchen vor dem Eintrag, so dass es angehakt erscheint. (Manche wichtigen Updates werden bereits markiert/angehakt angezeigt.)
Mit einem Klick auf den jeweiligen Eintrag erhalten Sie im Bereich „Inhalt“ unterhalb der Liste ggf. ausführlichere Informationen zu der Datei.
Sind Sie mit dem Auswählen fertig, klicken Sie auf „Installieren“.
Es erscheinen die Lizenzbedingungen, die Sie zum Fortfahren akzeptieren müssen. Sind Sie mit den Lizenzbedingungen nicht einverstanden, brechen Sie das Update an dieser Stelle ab! Haben Sie sich einverstanden erklärt, erhalten Sie mit „Installieren“ im nächsten Fenster die Möglichkeit, das Verhalten des Online-Updaters festzulegen.
Automatischer Applikationsneustart während der Installation
Ist die Option „Automatischer Applikationsneustart während der Installation“ aktiviert, finden alle während der Installation notwendigen Neustarts des Programms automatisch statt. Ist die Option deaktiviert, werden Sie jedes Mal danach gefragt.
Hinweis: Die Sicherheitshinweise Ihres Betriebssystems müssen Sie trotzdem selbst bestätigen!
41 MAXON-Installationsanleitung
Heruntergeladenes Archiv nach erfolgreicher Installation löschen
Ist die Option „Heruntergeladenes Archiv nach erfolgreicher Installation löschen“ aktiviert, werden alle heruntergeladenen, nicht mehr benötigten Dateien nach einem erfolgreichen Update automatisch gelöscht. Je nach Update wird dadurch erheblicher Festplattenplatz freigegeben.
Sicherheitskopie vor der Installation erstellen
Wählen Sie „Sicherheitskopie vor der Installation erstellen“, wenn Sie Ihre bisherige Installation vor dem Update sichern möchten. Tragen Sie unter „Pfad“ den Ort ein, an dem die Sicherheitskopie abgelegt werden soll. Voreintgestellt ist der vom Programm angelegte Benutzerordner. Wenn es während eines Updates zu einem Fehler kommen sollte, Schreibfehler auf Festplatte, Computer-Absturz, Unterbrechung der Internet-Verbindung etc. können Sie den ursprünglichen Zustand wiederherstellen. Grundsätzlich sollten Sie immer die Möglichkeit wahrnehmen, Backups erstellen zu lassen, so auch hier!
Hinweis: Bei der Sicherungskopie handelt es sich um ein herkömmliches Zip-Archiv, welches den Namen „c4d_backup_[datum]_[uhrzeit].zip“ trägt. Sollte es größer als 500 MByte werden, wird es in mehrere Einzelarchive aufgeteilt. Wollen Sie ein solches mehrteiliges Backup wieder herstellen, müssen die einzelnen Archive in ein gemeinsames Verzeichnis unter Aufrechterhaltung der Ordnerstruktur entpackt werden!
Unter Windows doppelklicken Sie im Explorer jedes Archiv einzeln und ziehen den Inhalt jedes Archivs an die (gemeinsame) gewünschte Stelle/den gewünschten Ordner.
Benutzen Sie spezielle Archivierungsprogramme, selektieren Sie alle Zips-Archive eines zusammengehörigen(!) Archivs und wählen aus dem Kontextmenü – rechter Mausklick – z.B. „Extrahieren nach…“ (WinZip) oder „Hier entpacken“ (7-Zip).
Unter Mac OS doppelklicken Sie die *.bat-Datei, die zusätzlich zu den ZIP-Archiven angelegt wurde. Es sollte nun das Terminal starten, welches das Backup wieder herstellt.
Ist das nicht der Fall, klicken Sie mit der rechten Maustaste bzw. Ctrl + Klick auf die *.bat-Datei und wählen „Öffnen mit / Anderem Programm“ und dann aus den Dienstprogrammen das Terminal aus.
Die Dateien werden dann in ein neues Verzeichnis wieder-hergestellt.
42MAXON-Installationsanleitung
Mit „Installieren“ starten Sie den Download der benötigten Dateien. Im folgenden Fenster können Sie den Fortschritt des Downloads verfolgen. Wenn Sie das Fenster schließen, erfolgt der Download weiterhin im Hintergrund. Die Aktion wird nicht abgebrochen!
Sind alle Dateien heruntergeladen, werden sie entpackt, das Programm und die eigentliche Aktualisierung gestartet. Ist das automatische Neustarten nicht aktiviert (siehe oben), werden Sie hierzu aufgefordert.
Die neuen Dateien werden nun installiert und das Programm startet automatisch – sofern aktiviert – in der neuen Version und/oder der neuen Sprache.
Hinweis: NET Render kann nicht über den Online-Updater aktualisiert werden!
Stehen für CINEMA 4D/BodyPaint 3D Updates zu Verfügung, sind diese auch für NET Render gültig. Andernfalls werden diese in gesonderter Form angeboten. Entsprechende Hinweise und Aktualisierungen werden Ihnen zu gegebener Zeit über unsere Webseite www.maxon.net bekannt gegeben.
Beachten Sie im Fall eines Updates, dass Sie sowohl NET Render Client als auch NET Render Server auf den selben Stand bringen!
7. Sprachen, Dokumentation und Updates manuell installieren
Ist Ihr Rechner nicht an das Internet angeschlossen oder befindet er sich hinter einem passwortgeschützten Proxyserver oder haben Sie den automatischen Online-Updater in den Programm-Voreinstellungen deaktiviert, kann er keine Updates, keine weiteren Sprachen oder Dokumentationen anzeigen und installieren. Sie müssen alle diese Programmbestandteile „manuell“ hinzufügen. Auch NET Render kann ausschließlich manuell aktualisiert werden.
Entsprechende „c4dupdate“-Dateien finden Sie im Internet auf den MAXON-Webseiten unter www.maxon.net. Diese Dateien müssen Sie für Ihren Rechner zugänglich machen (z.B. über einen ans Internet angeschlossenen Computer herunterladen und dann auf CD brennen oder USB-Stick kopieren oder auf einen Server im Firmennetz spielen).
Starten Sie dann das Programm (bzw. NET Render Client oder Server). Wählen Sie nun im Hauptmenü „Hilfe > Manuelle Installation> (Englisch: „Help > Manual Installation“)“. Im erscheinenden Dateiauswahlfenster navigieren Sie zu der betreffenden Update-Datei und wählen „Öffnen“.
43 MAXON-Installationsanleitung
Alle folgenden Schritte entsprechen denen eines ganz normalen Updates (siehe Punkt 6 oben).
Anmerkungen
Damit Sie die zu einer Sprache passende Dokumentation (sofern verfügbar) installieren können, muss zunächst die betreffende Sprache installiert sein.
Eine zum Programm passende Sprachversion erkennen Sie anhand der entsprechenden Versionsnummer im Namen, z.B. „GERMAN_13.012_20110709_103102.c4dupdate“. Dieses (deutsche) Sprachpaket kann also nur mit CINEMA 4D R13.012 verwendet werden. Lautet der Dateiname z.B. „GERMAN_HELP_13.012_20110709_103102.c4dupdate“, enthält das Paket die zur (deutschen) Sprache passende (deutsche) Dokumentation.
Nach der Installation läuft CINEMA 4D sofort in der eben installierten Sprache und die Kontext-Hilfe wird verfügbar. Gehen Sie nun bei der Auswahl der Hilfedatei genauso wie eben beschrieben vor. Achten Sie unbedingt darauf, die zu Ihrem Betriebssystem passende Hilfedatei zu installieren, „...MAC.c4dupdate“ für Apple Mac OS und „...WIN.c4dupdate“ für Microsoft Windows.
Hinweis 1: Installieren Sie ein Update, so wird dieses ebenfalls zunächst in englischer Sprache ausgeführt. Führen Sie dann die manuelle Sprachinstallation erneut durch, sofern Sie der Online-Updater nicht sowieso von selbst darauf hinweist. Ist bereits ein Update installiert, verwenden Sie nur das zu dieser neuen Version gehörende Sprachpaket!
Hinweis 2: Wird die Sprache von einem anderen Benutzer, z.B. dem Administrator, installiert und das Programm von Ihnen gestartet, muss die neu installierte Sprache erst manuell in den Programm-Voreinstellungen (Ctrl/Strg + E) ausgewählt werden.
Ist ein Update zu R13 auf der MAXON-Webseite verfügbar und Sie wollen es manuell installieren, gehen Sie wie oben beschrieben vor.
Hinweis: Beachten Sie, dass nach der Installation eines Updates auch das entsprechende zugehörige Sprachpaket installiert werden sollte!
8. Tipps und TricksUnattended- oder Silent-Installation
Ich möchte CINEMA 4D unbeaufsichtigt auf mehrere Computer installieren, wie ist das mit dem Installationsprogramm möglich?
44MAXON-Installationsanleitung
Nein, dass ist so nicht direkt möglich. CINEMA 4D/BodyPaint 3D muss einmalig wie oben beschrieben installiert und aktualisiert werden. Danach kann entweder das gesamte MAXON- oder nur das CINEMA-4D-Verzeichnis einfach per Netzwerk auf die anderen Rechner kopiert werden, da hier alle Programmbestandteile enthalten sind.
Hinweis: Die unter Windows zusätzlichen C++ Bibliotheken sind hier nicht enthalten und müssten auf den anderen Computern, wenn benötigt, nachträglich einzeln installiert werden!
Keine Seriennummer, MAXON-Lizenzserver
Ich erhalte beim Start des Programms die Meldung, dass die Seriennummer fehlt und das der Lizenzserver nicht gefunden wird. Was habe ich falsch gemacht? Sie haben bei der Installation angegeben, dass Sie den MAXON-Lizenz-Server (MLS) verwenden und somit eine „license.ini“ im Installationsverzeichnis erstellt oder die Verbindung zum MLS ist unterbrochen bzw. wird blockiert.
Setzen Sie den MLS nicht ein, löschen Sie einfach diese Datei und geben dann Ihre persönliche Seriennnummer ein.
Arbeiten Sie allerdings über den MLS und bekommen diese Meldung, kontrollieren Sie die Verbindung zu dem Rechner, auf dem der MLS läuft.Läuft der MLS nicht, starten Sie ihn, damit das Programm eine Seriennummer beziehen kann.
Keine manuelle Installation von Updates, Sprache oder Dokumentation
Ich habe mir die Updates von Ihrer Homepage heruntergeladen, diese ZIP-Dateien werden vom Online-Updater aber nicht erkannt bzw. es werden mir keine Updates angezeigt, was mache ich falsch?
Alle Updates, Sprache- und Dokumentationsdateien tragen ausschließlich die Endung „.c4dupdate“ und befinden sich in der ZIP-Datei, die Sie erst entpacken müssen, damit das Update installiert werden kann!
Das Programm mobil einsetzen, Einzelplatzlizenz auf mehreren Rechnern
Ich möchte meine Einzelplatzlizenz auf mehreren Rechnern einsetzen aber laut Software-Lizenzvertrag darf ich das ja nicht, was kann ich da tun?
Installieren Sie das Programm statt auf Ihrer lokalen Festplatte auf eine externe Festplatte oder auf einen USB-Stick (>2GB), da das Programm alle zum Starten notwendigen Daten im eigenen Verzeichnis ablegt. Lediglich beim ersten Start auf einem neuen System müssen Sie einmalig Ihre Seriennummer(n) eingeben!
45 MAXON-Installationsanleitung
9. Support und Kontakt
Sollten Sie trotz dieser Anleitung auf Probleme während der Installation oder darüber hinaus stoßen, nehmen Sie mit uns Kontakt auf:
Europa / Deutschland
MAXON Computer GmbH
Tel.: +49–6172–5906–0
Fax: +49–6172–5906–30
E-Mail: [email protected]
Frankreich
MAXON Centre de Compétence
Tel: +33–1–46 21 82 22
E-Mail: [email protected]
Japan
MAXON Computer Japan
Tel: +81–3–5759–0530
E-Mail: [email protected]
Großbritannien & Irland
MAXON Computer Ltd.
Tel: +44–1525–406799
Support: +44–1525–844969
Fax: +44–1525–406508
E-Mail: [email protected]
USA, Kanada, The Americas
MAXON Computer Inc.
Tel: +1–877–ANIMATE
E-Mail: [email protected]

46MAXON-Installationsanleitung

47 MAXON Intallation Guide
MAXON Computer GmbH • Max-Planck-Str. 20 • 61381 Friedrichsdorf • GermanyTel. +49-(0)6172-5906-0 • Fax +49-(0)6172-5906-30
www.maxon.net