inspecting a house: a guide for buyers, owners, and renovators
TRANSCRIPT


This publication is designed to provide accurate and authoritative informationin regard to the subject matter covered. It is sold with the understanding thatthe publisher is not engaged in rendering legal, accounting, or other profes-sional service. If legal advice or other expert assistance is required, the servicesof a competent professional person should be sought.
Vice President and Publisher: Cynthia A. Zigmund Acquisitions Editor: Mary B. Good and Laurie McGuire Senior Managing Editor: Jack Kiburz Interior Design: Lucy Jenkins Cover Design: Design SolutionsTypesetting: Elizabeth Pitts
© 2004 by Carson Dunlop & Associates Ltd.
Published by Dearborn Trade Publishing A Kaplan Professional Company
All rights reserved. The text of this publication, or any part thereof, may notbe reproduced in any manner whatsoever without written permission from thepublisher.
Printed in the United States of America
04 05 06 10 9 8 7 6 5 4 3 2 1
Library of Congress Cataloging-in-Publication Data
Carson, Alan. Inspecting a house : a guide for buyers, owners, and renovators /
Carson Dunlop & Associates Ltd.—3rd ed. p. cm.
Includes index. ISBN 0-7931-8054-6 (6 × 9 paperback)1. Dwellings—Inspection—Handbooks, manuals, etc. 2. House
buying—Handbooks, manuals, etc. 3. Dwellings—Remodeling—Handbooks, manuals, etc. I. Dunlop, Robert. II. Title.
TH4817 .5 .C37 2004 643′.12—dc22
2003020325
Dearborn Trade books are available at special quantity discounts to use for salespromotions, employee premiums, or educational purposes. Please call our Spe-cial Sales Department to order or for more information at 800-245-2665, [email protected], or write to Dearborn Trade Publishing, 30 South WackerDrive, Suite 2500, Chicago, IL 60606-7481.

This book is dedicated to our parents.


vii
C o n t e n t s
Introduction Some General Advice on Home Inspections ix
P A R T O N E
HOME INSPECTION
1. The Exterior 3
2. The Structure 39
3. The Electrical Service 49
4. The Plumbing 69
5. The Heating System 85
6. The Basement and Crawl Space 107
7. The Interior 123
8. The Insulation 155
9. The Attic 171
P A R T T W O
HOME RENOVATION
10. Planning a Renovation 181
11. The Work Begins 207
Glossary 215Index 219


ix
I n t r o d u c t i o n
SOME GENERAL ADVICE ON HOME INSPECTIONS
A house is the largest single purchase most of us will ever make. Itis not only an investment, but for about 12 hours every day it is also ourenvironment. Why is it then that so many people spend less than 45minutes looking at the home they intend to buy? Most people have theirmechanic check out a used automobile before they will spend $2,500on it. Doesn’t it make sense to check out a house worth many timesthat? We think it does.
While most sellers will not intentionally mislead someone, neitherwill they point out problems unless they are asked specifically to do so.Finding out after you move in that things are not as you thought can befrustrating and expensive. As home inspectors, we have seen new bath-rooms with no piping to any of the fixtures, new electrical outlets withno wires, and great-looking furnaces that don’t heat.
A basic knowledge of how houses work—and what it means whenthey don’t—will help make you a better homebuyer. In this book, we willconcentrate on the fundamentals of the home rather than on the cos-metics. Architectural styles and decorating features are matters of per-sonal preference, and everyone is equally well qualified to judge what isright for him or her. However, most people do not have the ability to en-sure that their new home will be structurally sound and keep them safe,warm, and dry. Things such as a safe, adequately sized electrical systemand reliable plumbing are often taken for granted by people who lackthe knowledge to evaluate them. This book is designed to give you thatknowledge.
If a home inspection company is going to do the evaluation, try tobe present while it is being performed. You can then ask pertinent ques-tions and have any defects pointed out, so that you will have a betterunderstanding of the problems.

x Introduction
The inspection can be conducted prior to putting in an offer, orafter your offer to purchase has been accepted, if there is a clause in itthat states it is conditional on a satisfactory inspection. The conditionshould be worded in such a way that the final decision rests with youand not the home inspection company. In fairness to the seller, the con-dition in the offer should have a time limitation so that the inspectionis carried out promptly. Some homesellers have an inspection per-formed before the house is listed for sale. This gives prospective buyersa chance to learn about the condition of the house before they make anoffer to buy it.
If you are performing the inspection yourself, read Chapters 1through 9 in this book in advance. Then on the day you inspect thehouse, use the checklists at the end of each chapter to help you make anote of strengths and weaknesses. You will see that we suggest beginningyour inspection with the outside of the property. In addition to the in-formation you will gain about the exterior components of the house,such as roofing, brickwork, etc., you will pick up some clues about whatis happening inside the house. From the outside, you can determine thelocation of the electrical panel in the basement by noting where thewires outside pass through the wall. You will know if the house is heatedwith oil from the fill lines; you will know that there is at least some gal-vanized piping in the house if the outside faucets are galvanized. Fromthe outside, you can also spot some problems or symptoms: land slopingtowards a house will increase the chances of the house having a wet base-ment, as will poor roof drainage, while exterior cracks will indicate thepossibility of interior damage or movement. (For this reason, the loca-tion of any exterior cracks should be noted and the interior checked forcorresponding damage.)
Inside the house, it is best to start in the basement if there is one,for this is where the nuts and bolts of the house are. On your way downto the basement, it is a good idea to turn up the thermostat a few de-grees. That way you will be able to see the furnace while it is operating.The unfinished basement is where you will see the visible componentsof the structure: the foundation walls, beams, and joists. You will usuallyfind the furnace, ductwork, electrical panel, exposed wiring, waterheater, and piping here.
Just as you will pick up things on the outside of the house to followup in the basement, you will find things in the basement that will give

Introduction xi
you clues about what to look for in the rest of the house. Structural de-fects noted outdoors or in the basement have to be followed up throughthe house. Termination points of all the systems should be checked.Each room should have a functional heating supply, adequate electricaloutlets, and doors and windows that open and close properly. Plumbingfixtures should be operable and fireplaces should be checked. Thereshould be adequate closet and storage space, and the house layoutshould work well.
The location of the attic access hatch should be found. Dependingon the roof configuration, some houses have more than one attic andothers have none. You should at least poke your head into the attic tolook for roof leaks, condensation, insulation, ventilation, pests, and thevisible structural components.
While the condition of a house is an important part of buying ahome, it is only one part. Remember to keep things in perspective. Ahouse that needs $20,000 worth of improvements may be a great invest-ment if it is priced $30,000 below market value.
Once you find a house that fits all of your criteria, arrange an ap-pointment to inspect it. Let the real estate agent and seller know that youwill be in the house one-and-a-half to two-and-a-half hours. You will needto take some equipment on the inspection. A pair of binoculars will helpyou look at the roof and chimney. To check for rotten or termite-infestedwood, bring a sharp probe. A measuring tape will help determine joistsizes and spans. Where the plumbing is painted, a magnet can help iden-tify galvanized piping. An electrical tester will be useful in evaluatingthe wiring. If you are going to open the electrical panel, bring severalscrewdrivers. You may need a stepladder to get into the attic, and astrong-beam f lashlight, of course, once you get up there. There is verylittle doubt that you will get dirty, so be sure to wear old clothes.
Try to put your emotions aside and be objective while performingthe inspection. Admiring the fireplace mantle is fun, but distracting. Ifthe seller is in the house, do not point out the f laws to him. No one ap-preciates being told his house is not fit to live in. If you plan to changethe house, do not discuss your plans while the seller is in the room. Morethan one sale has been aborted because the seller didn’t want to sell tosomeone who was going to “ruin” his home.
As you go through the house, concentrate on the major areas: thestructure, roofing, plumbing, heating, wiring, windows, kitchens, and

xii Introduction
bathrooms. Do not attempt to make notes of every minor f law. Nohome will be perfect, and it is important not to lose sight of the forestfor the trees.
At the conclusion of the inspection, it is usually helpful to take onelast walk through the house, ensuring that all the pieces of the puzzlehave been put together. By reviewing the information you have col-lected, a clear picture of the condition of the house should develop.Adding this to the other homebuying parameters should put you in aposition to make an educated buying decision. Remember, there is nosuch thing as too much information. One more thing: Did you turndown the thermostat?

P a r t O n e
HOME INSPECTIONS


C h a p t e r
3
1
THE EXTERIOR
The exterior of a house provides afirst, and often lasting, impression of a property. Unfortunately, manybuyers spend only enough time looking at the outside to develop thatgeneral impression. The exterior not only reveals a good deal about theoverall quality of construction and maintenance, but also providesclues to problems that may be found on the inside. Consequently, aninspection should always begin on the outside and end with one lastwalk around the exterior.
Your inspection should start even before the house is in view. Theneighborhood should be evaluated for pluses such as schools, shopping,transportation, recreational facilities, and overall landscaping. Minusessuch as nearby factories, railroad tracks, heavy traffic routes, and vacantlots should also be considered. It is a good idea to find out whether thereare plans for undeveloped land, for these could change the character ofthe neighborhood. Should resale potential be a major concern, localreal estate professionals can often provide good advice about the stylesand locations of houses most likely to hold or increase their value.
Develop a feel for the neighborhood. Look at other houses on thestreet. Are they the same general type and with the same quality as thehouse you are considering? Is the degree of maintenance and exterior

4 In specting a House
landscaping consistent with your plans? Many real estate experts saythat the location is by far the most important consideration when buy-ing a property. It is often said that it is wiser to buy one of the cheaperhouses on a street and then improve it to add value, than to buy one ofthe most expensive houses, which cannot be cost-effectively improved.
Also look for trends in the general topography of the land. Is thehouse at the top of a hill? On a side hill lot? In a low-lying area likely tocollect water runoff? A house situated on a hillside can be susceptibleto excessive building settlement. A house located in a valley is morelikely to have f looding problems.
LANDSCAPING
Upon arriving at the house, look first at the lot itself. Trees gener-ally add value to a property and may help to heat and cool the house.Deciduous trees on the south and west sides shade the building duringthe summer months yet allow beneficial solar heat gain during the win-ter. Evergreens on the north side of a building serve as a windbreak toreduce winter heat loss. Look at the condition of the trees. Dead treesmay be expensive to remove, especially where access is difficult. Treelimbs overhanging a building can cause damage to the roof and gutters.The abrasive action of branches and leaves on a roof membrane is con-siderable. Leaves and twigs can clog gutters, causing them to deterio-rate rapidly. Branches should be trimmed well away from the building.
Where large trees are close to the building, roots may damage foun-dation walls and clog drainage pipes or plumbing lines. Some kinds oftrees—willows, poplars, and cedars, for example—require large amountsof water and their presence may indicate a high water table. Some treesthat grow very quickly, such as poplars, aspens, willows, and elms, cancause settling problems in houses by withdrawing moisture from the soilbelow the foundations. This problem is most severe in areas with claysoil where considerable swelling and shrinkage occurs with changes inmoisture content.
Look at the surface drainage immediately adjacent to the building.It is important that the ground slopes down from the house to preventrainwater pooling against the exterior foundation walls. Wet basementsare often the result of improper exterior grading. Look for a slope of atleast one inch per foot for the first six feet away from the building.

The Exterior 5
Where one section of the yard slopes toward the house, it may be neces-sary to create a swale (a gentle trough), as shown in Figure 1.1, that al-lows water to drain away from the building. Driveways, sidewalks, andpatios should also slope down from the house. Incorrect sloping onthese hard surfaces may be more serious because very little water is ab-sorbed. Poor-draining soils, such as clays, also present more problemsthan sandy soils. Sometimes houses are too close together to enjoy opti-mum drainage. In this case, a V-shaped depression is desirable betweenthe houses.
Many homes have a perimeter drainage pipe system around the bot-tom of the foundation walls to collect water standing outside the base-ment. If the house is more than 25 years old, however, chances are goodthat the drainage pipe is nonexistent or has been broken or clogged.Thus, on older houses, grading is particularly important.
Look at features such as fences, porches, and decks. Are they ingood repair? Will they require frequent maintenance? Look closely atthe wood/soil contact areas for evidence of rot or termite attack. Checkthe lawns and gardens. A yard with some bare patches may not be a
FIGURE 1.1 Swales

6 In specting a House
problem, although a very uneven surface may have to be worked exten-sively to yield an attractive lawn. Look at retaining walls, which areexpensive to rebuild. These walls should lean slightly into a hill ratherthan away from it. Also, look near the bottom of the walls for openings(weep holes) that allow water to escape from behind the walls.
GARAGES
Garages should be looked at from both a functional and an aes-thetic viewpoint. Verify that the garage is large enough for your needsand that the garage door is operable. Check the roof for leaks andwood-frame garages for rot and termite activity. Also assess the appear-ance of the garage. When in poor repair, it will detract from the desir-ability and value of the entire property. And if the garage has to bereplaced, this can be an expensive project.
Attached garages commonly found on modern homes are very con-venient, but they can pose a safety hazard because carbon monoxidefumes from an automobile can enter the house. In an attached garage,one should look for a gasproof wall and ceiling covering on the garageand a fireproof door into the house. There should also be a step up fromthe garage into the house or, at the very least, a curb at the doorway. Allgarages should have a f loor drain or a slope to allow water to run out ofthe garage.
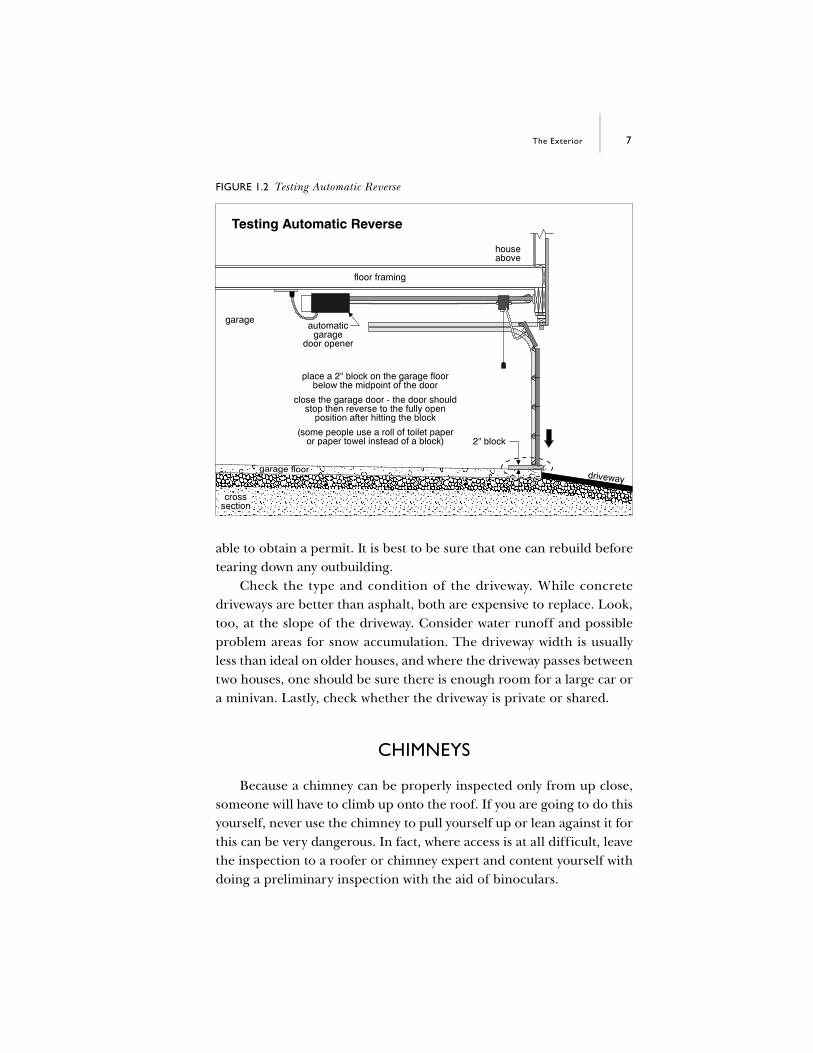
The garage door is usually the largest moving component in ahouse. The door should open smoothly, with a minimum amount ofeffort. If properly adjusted, the door will stay halfway open when it islet go in that position. Motorized garage door openers should be testedto make sure that they function properly. The opener should stop andreverse direction if it encounters an obstacle, such as a two-inch blockof wood (see Figure 1.2). Keep one hand on the release cord while per-forming this test; an improperly adjusted opener may damage the door,or the opener itself, if it does not reverse in time. Newer openers alsouse an electric eye near the bottom of the door to sense objects block-ing the path of the door.
Outside sheds are generally considered assets, although they, too,should be examined. Check with local zoning regulations if you are plan-ning to add or move any structure. Often you must obtain a building per-mit for garages and sheds, and for a number of reasons you may not be
The Exterior 7
able to obtain a permit. It is best to be sure that one can rebuild beforetearing down any outbuilding.
Check the type and condition of the driveway. While concretedriveways are better than asphalt, both are expensive to replace. Look,too, at the slope of the driveway. Consider water runoff and possibleproblem areas for snow accumulation. The driveway width is usuallyless than ideal on older houses, and where the driveway passes betweentwo houses, one should be sure there is enough room for a large car ora minivan. Lastly, check whether the driveway is private or shared.
CHIMNEYS
Because a chimney can be properly inspected only from up close,someone will have to climb up onto the roof. If you are going to do thisyourself, never use the chimney to pull yourself up or lean against it forthis can be very dangerous. In fact, where access is at all difficult, leavethe inspection to a roofer or chimney expert and content yourself withdoing a preliminary inspection with the aid of binoculars.
FIGURE 1.2 Testing Automatic Reverse
Testing Automatic Reverse

8 In specting a House
From the ground, binoculars will allow you to assess the generalcondition of the chimney. Keep in mind that a neglected chimney canpose a safety hazard and should be repaired promptly. If you see gaps inthe mortar, repointing (scraping out the loose mortar and adding new)
will be necessary. Missing bricks or a leaning chimney may mean thatthe chimney will have to be torn down and rebuilt. In some cases, youwill notice that the brickwork is covered with a skim coat of cement(parging). This is a short-term solution that covers up rather than curesthe problem of missing bricks or loose mortar. The parging often devel-ops cracks that allow water in behind. Freeze/thaw action will cause theparging to break down quickly.
A cap, usually made of concrete, should be provided at the top ofthe chimney. This prevents water from entering the masonry there. Acracked cap will allow moisture into the brickwork, which will lead torapid deterioration. The cap should overhang the brick to allow waterto drop off the chimney cap rather than to run down the side of thebrick.
Look closely at the f lashing (a material, usually metal, which coversthe joint between the roof and chimney). This is a common area for leak-age and, while not an expensive area to repair, can cause considerabledamage if unattended. A good f lashing job usually employs a metal suchas galvanized steel while roofing cement or tar alone indicates a low-quality job. Wide chimneys present more problems because of the largevalleys formed between the upper sides of the chimneys and the roof.Where chimneys are more than 30 inches wide, saddles, or crickets,should be provided (see Figure 1.3). These are def lectors that preventwater or snow accumulation in the valley behind the chimney.
Check the chimney height in relation to the building. A chimneyshould be at least three feet tall and two feet higher than anything withinten feet horizontally. If you are climbing onto the roof, look down thef lues to verify that they are clean and open. Where two or more f luesare in one chimney, make sure they are separated. In old unlined chim-neys, the brick between the f lues is often missing near the top. Wherea f lue liner is provided, it should extend at least two inches above thecap.
Finally, note the number and location of chimney f lues. A separatef lue is usually required for each furnace or fireplace. Many older houseswere built with one f lue serving two fireplaces or a stove and a fireplace.

The Exterior 9
When looking at attached or row houses, be careful not to count theneighbor’s f lue as your own. Often, two f lues travel up one chimney onthe center wall between the houses, each f lue serving the furnace fromone house. An unused chimney can be removed down to the roof levelto reduce maintenance and repair costs. Many older houses have a chim-ney that once served a wood stove in the kitchen. This is very often notin use and can easily be removed.
Chimneys can be expensive to repair or rebuild, particularly if theyare high or if access is difficult. Scaffolding may have to be erected,which adds to the cost. Save yourself unexpected repair or replacementcost by checking the chimney before you buy.
ROOFS
Roof coverings fulfill three functions on most houses. First, theyprevent moisture from penetrating into the top of the house. Second,the overhang on the roof helps protect exterior walls from becomingexcessively wet. Third, the roofing system should be aesthetically appeal-ing, consistent with the architecture of the house.
FIGURE 1.3 Chimney Saddle Flashings
Chimney Saddle Flashings

10 In specting a House
It is often impractical for a potential buyer to get up on a roof, butmost sloped roofs can be seen relatively well from ground level with bin-oculars. We will discuss the various roofing materials individually laterin this section. First, however, certain common points should be checkedwith any roof covering.
The weakest areas on any roof are at changes in direction or mate-rials. Look closely where chimneys, vents, plumbing stacks, and televi-sion antennas penetrate the roof membrane. Roof edges and roof/wallintersections should also receive particular attention. Valleys createdwhere different roof angles come together are other problem areas. Af lashing of either metal or roll roofing is typically used. Look at thecondition of the f lashing and the point where the f lashing goes underthe shingles. People walking on the roof often cause damage by step-ping on the f lashing. It is usually better to walk on the shingles, wher-ever possible.
An important roofing term is pitch. The pitch, or slope, of a roof(see Figure 1.4) is measured by the number of feet of vertical rise forevery 12 feet of horizontal run. Thus, a “4-in-12 roof” would be one thatrises 4 feet vertically for every 12 horizontal feet.
FIGURE 1.4 Roof Slopes
Roof Slopes
The Exterior 11
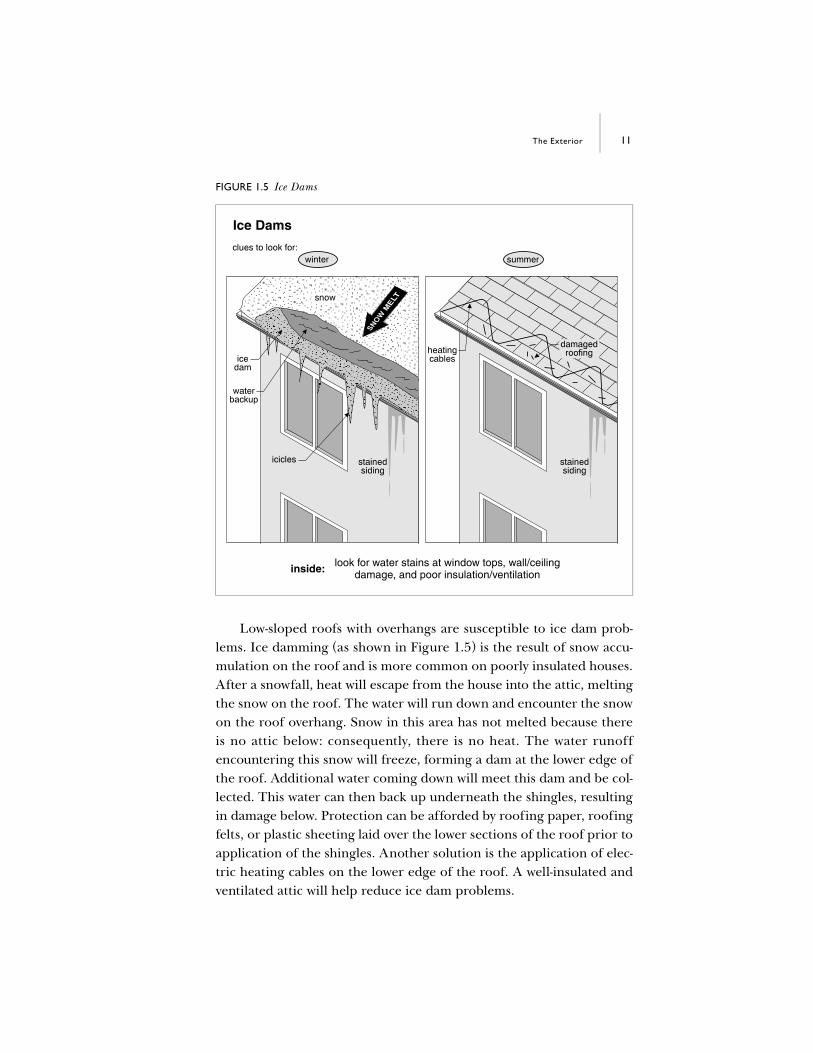
Low-sloped roofs with overhangs are susceptible to ice dam prob-lems. Ice damming (as shown in Figure 1.5) is the result of snow accu-mulation on the roof and is more common on poorly insulated houses.After a snowfall, heat will escape from the house into the attic, meltingthe snow on the roof. The water will run down and encounter the snowon the roof overhang. Snow in this area has not melted because thereis no attic below: consequently, there is no heat. The water runoffencountering this snow will freeze, forming a dam at the lower edge ofthe roof. Additional water coming down will meet this dam and be col-lected. This water can then back up underneath the shingles, resultingin damage below. Protection can be afforded by roofing paper, roofingfelts, or plastic sheeting laid over the lower sections of the roof prior toapplication of the shingles. Another solution is the application of elec-tric heating cables on the lower edge of the roof. A well-insulated andventilated attic will help reduce ice dam problems.
FIGURE 1.5 Ice Dams
Ice Dams
look for water stains at window tops, wall/ceilingdamage, and poor insulation/ventilationinside:

12 In specting a House
Asphalt Shingles
Asphalt shingles are the most common type of roofing used acrossNorth America over the past 40 years. Asphalt shingles are used bothon new houses and as retrofit material on older homes (see Figure 1.6).The shingle itself is comprised of fiberglass, paper, or felt impregnatedwith asphalt and covered with small granules. The mineral granulesref lect the ultraviolet rays of the sun, preventing breakdown of the as-phalt. Most modern shingles last approximately 15 years, althoughhigher-quality shingles can last 25 years.
Several clues show up when an asphalt roof is wearing out. Watchfor missing granules, which appear as bare spots on the shingles. A largeaccumulation of granules in the gutters also indicates that the roof isgetting old. Shingles that buckle in the middle or curl at the edges havevery little life remaining. Torn or missing shingles mean that immediaterepairs are necessary.
Because of exposure to the sun, the south and west sides of a roofage more rapidly. Also, the bottom shingles, which receive more waterrunoff than do upper sections, tend to wear out first. Look closely, then,
FIGURE 1.6 Typical Asphalt Shingle Application—Showing Metal Drip Edge
Typical Asphalt Shingle Application—Showing Metal Drip Edge
bottom (shown here)

The Exterior 13
at the lower shingles on the south and west sides of the roof. As men-tioned earlier, the abrasive action of overhanging tree limbs can alsodamage a roof, so be on the lookout for this situation.
The minimum pitch for most shingle roofs is 4-in-12. Make sure theslope is at least this much. Special “low slope” shingles can be used downto 2-in-12, but these are not common. On roofs with a pitch of less than2-in-12, asphalt shingles should never be used.
Where reroofing is necessary, it is important to determine howmany layers of shingles are on the roof. Ideally, no more than two layersof roofing material should be provided. Additional materials result inan uneven surface and, more important, excessive weight on the roofframing members. By looking at the edges of a roof, it is usually possibleto determine how many layers of shingles there are. If there are alreadytwo layers or more, the roof should be stripped prior to reroofing. Thiswill also provide an opportunity to examine the roof boards below andmake any necessary repairs.
Slates
Slate roofs are found primarily on older houses and, because oftheir cost, are not widely used in modern construction. Slate shingles areheavy, brittle, and may be many colors, depending on where they arequarried. These roofs are considered high quality and can last 100 yearsor more, with good maintenance. Good slates deteriorate only slightlybecause of freeze/thaw action, but they are susceptible to mechanicaldamage. The most common problem is rusting of the nails holding theslates in place. As the nails rust, the slates slip out of position, allowingwater to penetrate the roofing system. Additional water accelerates therusting of adjacent nails and the roof begins to deteriorate quickly.
Generally considered aesthetically pleasing, a slate roof will oftenadd value to a property. However, slate roofs do require a good deal ofregular attention and are costly to maintain. Slate roof maintenanceand repair are generally not for the do-it-yourselfer.
Look carefully for broken or missing slates that have slipped out ofposition. Low-quality slates will be f laking off in layers. Again, it is im-portant to examine all joints in the roofing system including the valleysand ridges. If only a few slates require resecuring or replacing, the roofcan probably be repaired. If more than 15 to 20 have been damaged or
14 In specting a House
are missing, it may be best to provide a new roof surface. Where a slateroof can be saved, it is generally worthwhile to do so. Where a completenew roof is necessary, the slate roof is usually replaced with asphalt shin-gles. A word of caution: Do not walk on slate roofs. A slate roof is typi-cally very steep with a pitch of 6-in-12, or more. Slates are very slipperyand, if the nails are badly rusted, can easily be dislodged by the pressureof the footsteps. Slate roofs should be examined from the ground withbinoculars or from an adjacent roof.
Wood Shingles and Shakes
Whether redwood, cedar, or pine, wood roof coverings are made ofmachine-cut shingles of uniform shape and thickness, or rough hand-split shakes of varying dimensions. While very attractive, wood roofs areless common than asphalt shingles because of their cost. They are alsoprohibited in some places because they are fire hazards, unless the woodhas been chemically treated. Well-maintained, properly installed woodroofs can last 39 to 50 years; however, the newer practice of installingwood roofs over plywood sheathing can reduce their life to as little as 10years. This reduced life span is caused by the lack of air circulation onthe underside of the roof, which the older, spaced sheathing allowed.The reduced air circulation does not allow the wood roof to dry outproperly. The pitch should not be less than 4-in-12, and, generally speak-ing, the steeper the roof, the more weatherproof it will be and thelonger it will last.
While not as weathertight as asphalt roofing, wood shingles doswell when wet, to provide a tighter seal. In addition to looking for split,cupped, curled (as shown in Figure 1.7), or missing shingles, one shouldlook for evidence of rot, particularly on the lower shingles. The northor shaded sides of a roof do not dry as quickly and are more prone torot. Sometimes a moss or a fungus can be seen, which is evidence of ex-cessive moisture. The moss can force the shingles apart, allowing wind-driven rain to penetrate the roofing system. Look for good attic ventila-tion, which will help the wood dry quickly after a rain.
Repair is usually only practical where a few isolated shingles needreplacement. A deteriorated wood shingle roof can often be coveredwith one layer of asphalt shingles. Wood shakes should be stripped prior

The Exterior 15
to reroofing, because of the uneven surface created by the roof overlay.Again, where possible, avoid walking on a wood roof.
Wood shingles are also often used as a siding material where theyhave a longer life than on a roof because of the better weatherproofnessafforded by the vertical installation and the protection from wettingprovided by the roof overhang.
Fiber Cement Shingles
These high-quality shingles are made of a mixture of portlandcement and asbestos fiber or another type of fiber. They are muchmore expensive than asphalt shingles and thus less commonly used.Better-quality shingles have a higher fiber content. While the shinglesare brittle and susceptible to mechanical damage, they have a high fireresistance and a life expectancy of up to 50 years.
Fiber cement shingles are applied on roofs with a pitch of 3-in-12or more. Difficulties include broken, cracked, and missing shingles andproblems at the joints. Replacement, again, is usually with asphalt shin-gles and should be done after stripping the roof. Fiber cement shinglesare also used as a siding and can provide a very durable surface.
FIGURE 1.7 Curling, Cupping, and Splitting Wood Shingles
Cutting, Cupping, and Splitting Wood Shingles

16 In specting a House
Selvage or Roll Roofing
This material is made of papers or felts, impregnated with asphaltand covered with stone granules, not unlike asphalt shingles. It comes inrolls, typically 19 to 36 inches wide. The material is laid in strips andnailed to the roofing boards. This is a low-quality roof covering with anormal life expectancy of five to ten years. It is frequently found onporches, garages, and small additions. When examining roll roofing,look for missing granules, evidence of buckling, lifted seams, and ex-posed nail heads. The seams and nail heads should be covered with tarto prevent leakage at these points. This material is sometimes used on af lat roof, although it still provides a low-quality roof with a short lifeexpectancy.
Built-Up Roofs
A high-quality f lat roof covering is a built-up roof system (see Fig-ure 1.8) sometimes called a tar and gravel roof. This system consists ofseveral layers of roofing felts (paper impregnated with asphalt) laid inan overlapping membrane with coats of asphalt between. A final coat
FIGURE 1.8 Built-Up Roofing Membrane—4-Ply
Built-Up Roofing Membrane—4-Ply
-
-

The Exterior 17
of asphalt is applied, then covered with a gravel topping. The felts andasphalt provide the waterproof membrane and the gravel ref lects thesun’s rays, protects the roof from mechanical damage, and improvesfire resistance.
The roof may consist of two, three, four, or five plies and with agood installation may have a life expectancy of 15 to 20 years. Becauseof the many steps involved, there is considerable potential for error inthe construction of f lat roof coverings. They are expensive to install andcan be high-maintenance areas. Leaks in a f lat roof are often difficult tolocate, although, as with other roofs, the joints are the weakest areas.
The term flat roof is somewhat misleading, for all roofs should slopeslightly to allow water runoff. When inspecting a f lat roof, look for areaswhere water may pond, because this will shorten the life considerably.Bubbles, blisters, and splits in the membrane indicate that repairs willsoon be needed. Where the gravel is missing, and the membrane is ex-posed, deterioration will be rapid. The maximum slope for a gravel-covered built-up roof is usually three in twelve. Steeper slopes will resultin a loss of gravel and cold f low of the asphalt.
Sometimes a built-up roof system is applied without the protectivegravel layer. This is not a good situation and the life expectancy of theroof is significantly reduced. Should the membrane be in reasonablygood condition, it is possible to pour a f lood coat of asphalt and addthe gravel.
Where a wood deck has been laid over a f lat roof, it will not be nec-essary to add gravel. In this situation, the wood decking will protect themembrane. However, when a deck has been installed, try to get a goodlook at the roofing below. When that membrane wears out, it will beexpensive to lift up the entire wood deck to make repairs.
As with other roof systems, one should not apply a new roof over oldones indiscriminately. The weight of a built-up roof is considerable. Alsowater is often trapped in the old roof membrane. A new covering willseal in that moisture. On a hot day, the water will evaporate and can bub-ble the new roof as it tries to escape. While small repairs can often beundertaken by the homeowner, replacing a f lat roof is not usually agood project for the amateur.

18 In specting a House
Modified Bitumen
Many newer f lat roofs are covered with a polymer-modified asphaltmembrane, often called rubberized asphalt. This material comes inrolls and is usually either torched down or mopped to the roof usinghot asphalt. The membrane may be protected from the sun using gran-ules similar to those on asphalt shingles, silver-colored ref lective paint,or nothing at all. In some areas, it is common to install these roofs witha single layer of membrane; in other areas, a double layer is typical.
Modified bitumen roofs are also considered high-quality systems. Inmany cases, roof replacement is needed because of defects in the instal-lation or the f lashings, not because of failure of the material itself. Mod-ified bitumen membranes often last 15-to-20 years.
Specialty Roofing Materials
Several specialty roofs are available and a number of new materialsare always under development. Some of the more common systems willbe touched on here.
A Spanish tile or clay tile roof is attractive and long-lasting, but itis expensive to install and to maintain. The tiles are brittle and very sus-ceptible to mechanical damage.
Metal roofs are used on both sloped and f lat roofs. A sloped metalroof can be a series of ribbed metal panels or metal shingles. The metalsused include galvanized steel and various tin alloys. This type of roofingis more common in rural areas and is susceptible to rusting, particularlyat the joints. Flat metal roofs are usually painted and are quite durableif kept covered.
Concrete tile roofs with life expectancies of 50 years and more arepopular in some areas. This roofing system is designed to look likeSpanish tile and is suitable for sloped roofs. Because the concrete tileis very heavy, the roof structure must be designed specifically to carrythe additional load.
There are several single-ply roofing membranes, usually in sheetform, which are used on both f lat and sloped roofs. Some of thesematerials are rubber-based while others are plastic.

The Exterior 19
REROOFING
Where reroofing is necessary, it is important to determine howmany layers of roofing are present. As discussed, no more than two lay-ers should be provided. Stripping a roof prior to resurfacing typicallyincreases an already expensive job 30 to 50 percent, although in somecases the cost can be doubled.
GUTTERS AND DOWNSPOUTS
The gutter and downspout system is designed to collect rainwaterand melted snow from the roof and discharge it to a safe location. Typ-ically, water is directed underground into a storm sewer or onto the lawnsurface well away from the house. A splash block should be providedwhere the downspout discharges onto the lawn to prevent erosion, andthe discharge point should be at least six feet from the building.
While gutters and downspouts are relatively inexpensive to installand maintain, they can cause serious damage if neglected. Many wetbasement problems result from downspouts that deposit water in onespot immediately adjacent to the house. Improperly aligned gutters cancollect water and allow it to back up, damaging the woodwork of theroof and the eaves. Soil erosion problems are also common where gut-ters are in disrepair or are missing.
Gutters should be sized in accordance with the roof area (see Figure1.9). While four-inch-wide systems are common, five-inch gutters usuallyperform much better for a slightly increased cost. Downspouts shouldbe provided every 30 to 40 feet along the gutters. On steep roofs, splashguards may be needed at the bottom of roof valleys to prevent waterovershooting the gutters. The gutters should slope towards the down-spouts so that water can drain completely. The gutters must also be keptclear of debris because water trapped by leaves, for example, will accel-erate deterioration of the gutter. Screening is available that, if properlyinstalled and maintained, can be effective in keeping gutters clear.

20 In specting a House
Types of Gutters
Galvanized gutters are still the most common kind, although theyneed to be painted every three to five years. Unless exceptionally wellmaintained, galvanized gutters and downspouts last approximately 20years. Ideally, they should be painted on the inside as well as on the out-side and bare metal must be appropriately primed before painting.There are also enameled steel and vinyl-coated steel gutters, which donot require regular painting. These, of course, are slightly more expen-sive than the bare metal ones.
Aluminum gutters are competitive with galvanized gutters in termsof cost. The baked-on enamel finish does not require regular painting.Another advantage is that they can readily be formed and cut to lengthon-site, reducing the number of joints. Aluminum does not rust as gal-vanized steel does, but the aluminum is not as strong. Aluminum guttersare susceptible to damage from ladders leaned against them. Leaking atthe seams is also a common problem, but one that is easily overcome.
FIGURE 1.9 Gutter and Downspout Installation
Gutter and Downspout Installation

The Exterior 21
The joint sealer should be a f lexible compound that can move with theexpansion and contraction of the metal. Under normal circumstances,aluminum gutters should last 20 to 30 years.
Copper gutters are probably the best available and can last the life-time of the house. Typically, they are not painted and thus turn thecharacteristic green or brown of oxidized copper. Copper gutters areseveral times more expensive than galvanized or aluminum ones andare not commonly used residentially today.
If the house has copper gutters and downspouts, particular atten-tion should be given to keeping gutters clear and properly aligned.When copper gutters are painted, it is difficult to distinguish them fromgalvanized steel. Scratching away some of the paint and oxidizationshould show a shiny copper finish. Alternatively, a magnet can be usedto determine what type the gutters are. Galvanized steel will attract amagnet, but copper and aluminum will not.
Wood gutters are sometimes found on older houses and may evenbe integral to the roofing system. Usually found on houses of superiorquality, these can provide very good service if well maintained. Ifallowed to deteriorate, however, they can be very expensive to repair orreplace. Some wood gutters are lined with lead or copper, which in-creases their durability.
Plastic gutters are made of the newest material available. Many plas-tic gutter systems are geared to the do-it-yourselfer. Their light weight,ease of connection, and low maintenance make this a very appealing al-ternative for the home handyman. On the other hand, plastic gutters areavailable in a limited range of colors and the plastic may become brittlein the winter and subject to splitting. Plastic gutters are also easily dam-aged by the weight of a person climbing a ladder. Another concern isthat the material’s high coefficient of expansion may lead to seam prob-lems over time.
Inspection
When inspecting, ensure that gutters are provided where neces-sary, including on porches, f lat roofs, and dormers. If in doubt whethergutters are necessary in one area, check similar houses on the street fora pattern.

22 In specting a House
To check for leakage problems, look for debris accumulation in thegutters and for evidence of leaks (see Figure 1.10) such as rust on theunderside of the gutters. Watch for discoloration of the eaves or exteriorwalls. Dark streaks on the outside of the gutters, or fascia boards, indi-cate overf lowing water. Check that the gutters slope slightly to the down-spouts. If possible, look at the inside of the gutters for evidence of rustor other deterioration. If rusting problems are minor, or small holes arenoted, a number of patching materials, such as roofing cement, will helpextend the life of the gutters.
Check for adequate downspouts, keeping in mind the area of theroof served by each length of gutter. Follow the downspouts to gradelevel and determine where the water is discharged. Tap the downspoutsto see if they are clogged. When underground piping leading to stormsewers is blocked or broken, it may be easiest to redirect the water ontothe lawn using a splash block.
While gutters and downspouts should not weigh heavily in the buy-ing decision, they may be the source of serious problems and do indi-cate the quality of general maintenance.
FIGURE 1.10 Gutters—Common Reasons for Leakage
Gutters—Common Reasons for Leakage

The Exterior 23
Exterior Wall Finishes
A good exterior finish acts as a weatherproof skin on a house. Itshould provide a low maintenance surface that is attractive and consis-tent with the style of the home. A good exterior finish should alsobreathe, allowing evaporated moisture to pass through the wall. Mosthouses are either solid masonry or wood-frame construction. In solidmasonry, the structural members may also form the exterior finish.This is true in brick walls, concrete walls, and stone walls. In most othercases, the exterior finish, or siding, is applied over the wood frame anddoes not figure significantly in the structural integrity.
On wood-frame construction, a sheathing (see Figure 1.11) is at-tached to the two-by-four or two-by-six wood studs. For many years, thissheathing was wooden boards nailed onto the studs covered with tar pa-per or house wrap. More recently, the sheathing consists of fiberboardwith a surface coating of tar. This sheathing provides a subsurface towhich the siding can be secured. It also adds to the weatherproofness of
FIGURE 1.11 Wall Assemblies
Wall Assemblies
building paperor house wrap
(e.g.,
(e.g.,

24 In specting a House
the house and enhances structural rigidity to some degree. The sheath-ing should breathe to allow the passage of water vapor. In some modernconstruction, sheathing may be plywood, waferboard, or rigid insula-tion board. As energy efficiency becomes more important, this practicewill probably become more common.
Some of the materials commonly used for siding include brick,lumber, wood shingles, and shakes, plywood, particleboard, stucco,asphalt shingles, insulbrick, fiber cement shingles, artificial stone, alu-minum, vinyl, and steel. When inspecting an exterior wall finish, keepin mind that its weatherproofness is most important. Look for weak-ness at joints, such as windows and door openings, and along the topand bottom of walls. Look at outside corners and other areas wheremechanical damage is likely. Ensure that the protective coating present(for example, paint or stain) is in good condition and covers the entiresurface. Look closely below windows. Surface tension causes water tocollect here and deterioration will often be most noticeable in this area.
Siding materials such as wood are susceptible to moisture damageand should not be carried down to grade level. These sidings shouldterminate at least eight inches above the ground.
Condensation Problems
Condensation problems within exterior walls can occur during thewinter months. Warm, moist air from inside the house enters the wallcavity. As colder surfaces are encountered close to the outer skin, theair will deposit its moisture on whatever surface is available. Vapor dif-fusion also contributes to the problem. Here, no air movement is nec-essary. A difference in vapor pressures can cause moisture within thehouse to migrate into the wall system. Again, condensation is the result.Ventilated exterior siding materials help reduce wall condensationproblems. Vaportight skins worsen the situation.
Condensation problems show up on wood siding as blistered orpeeling paint and rotting wood. Masonry may spall (crumble or f lake)
as a result of freeze/thaw action. Sidings, such as steel, aluminum, andvinyl, may not show any evidence of a problem behind the wall. This,of course, is the least desirable situation for damage can go unnoticedfor some time.

The Exterior 25
A newly insulated wall may be very susceptible to condensationdamage, particularly if a good vapor barrier has not been provided onthe warm side of the insulation. Here the exterior siding, which usedto be heated by the air in the house, becomes a cold surface on whichcondensation can readily form. The insulation also reduces the naturalventilation in the wall cavity.
Preventive or corrective actions are fairly simple if the problem is di-agnosed early. Interior wall surfaces can be covered with a vapor-barrierpaint, and air leakage into the walls can be reduced by caulking and seal-ing interruptions in the interior wall surface. Exterior surfaces can alsobe better ventilated to carry away the moisture before it condenses.
Brick
Brick on the outside of a house may constitute part of solid masonryconstruction or may be a veneer over a wood frame (see Figure 1.12).Look for gaps in the mortar between the bricks. Gaps are often most no-ticeable in areas where water has passed over the brick for some time,eroding the mortar. Check, too, for openings between the brick and thewood framing around doors and windows. Look closely at the top of thebrick where the roof or eaves come in contact. Once again, we are look-ing for a weatherproof seal at these joints.
Moisture trapped behind the brick can lead to spalling. Mortarjoints should ideally be slightly recessed with a concave surface. Wheremortar is missing, or crumbling, it will have to be chiseled out andreplaced (repointed).
Examine a brick wall for evidence of settling or sloping, or the wallpulling away from the framing. These can be very serious problemsrequiring reconstruction of the entire wall. Look closely at cracks in thebrickwork. While diagonal hairline cracks above and below windowsusually are not serious, cracks that go through the wall to the inside, orwhich widen to one-quarter inch or more, can be. Cracks that have beenrepaired several times are another clue to trouble. Refer to Chapter 2for comments on masonry cracking.
Old brick walls with many coats of paint or a heavy accumulationof dirt are often sandblasted. This is usually bad for the brick and theresults may be severe spalling and rapid deterioration. Glazed bricksare like a loaf of bread. The outer crust is very hard, but the inner part

26 In specting a House
is relatively soft. When the crust is removed by sandblasting, the brickbecomes very soft and porous. In some cases, sealants such as siliconeare applied to the brick after sandblasting. This attempt to stop waterpenetration into the brick can cause problems. Moisture coming frominside the house can be trapped behind this plastic skin on the outersurface of the brick where it can freeze, expand, and lead to even morerapid deterioration. An alternative to sandblasting is chemical clean-ing. This often is more satisfactory and, generally speaking, is easier onthe brickwork.
Vines on a wall can lead to damage for the vines tend to trap waternear the surface of the wall. Damage to the mortar may occur over aperiod of time. The deterioration is generally slow, however, and notusually a major problem. It should be understood that with vegetationimmediately adjacent to wall surfaces, insects and pests find easy accessinto a house.
A brick wall in disrepair can be covered with a new siding material.Stucco is often used with satisfactory results. It is important, however,
FIGURE 1.12 Veneer versus Solid Masonry
Veneer versus Solid Masonry

The Exterior 27
to ensure that damage to the brick below will not be progressive—thatis, that it will not continue to deteriorate under the new siding.
Stucco
Stucco is essentially a mixture of sand, lime, and cement that is trow-eled onto a wall over wood or wire lath in two or three coats. It may beapplied over masonry or frame walls (see Figure 1.13). Usually it is pos-sible to tell what the stucco is applied over by tapping the wall. Stuccoover masonry sounds much more solid than stucco does over wood-frame walls. Stucco finishes can be painted many colors and some havea stone aggregate embedded in the surface for aesthetic reasons. Stuccoapplied over frame tends to show more hairline cracking caused by themovement of the wood framing. Cracks that appear in stucco must bepromptly repaired. Otherwise, water gets behind the stucco causingrapid deterioration of the lath, sheathing, and framing. Once again,
FIGURE 1.13 Stucco—Three-Coat Process
Stucco—Three-Coat Processfor application on wood-frame walls

28 In specting a House
look for weaknesses at joints and intersections. Looks can be deceivingwith stucco: A wall that seems to be in poor repair may only need minorpatching and a new coat of paint. Where wood is used as a surface ma-terial with stucco, as in a Tudor-style home, make sure the wood issound. Water allowed to collect, especially at end grains or on horizon-tal wood edges, can cause damage not only to the wood on the surface,but to the substructures behind.
While damaged areas of the stucco can be repaired, it is difficult tomatch texture and color. Often an entire wall has to be repainted afterpatching. Be careful to use a stucco mix similar to the one that is inplace. Dissimilar mixes used in patches may lead to chronic cracking asa result of differential rates of expansion and contraction.
Synthetic Stucco
There is a new type of stucco that is quite different from hard-coatstucco. This stucco is commonly part of Exterior Insulating FinishingSystems (EIFS). An EIFS wall (see Figure 1.14) consists of a wood-framed wall, which is sheathed in the normal fashion. Sheets of poly-styrene insulation are fastened to the wall. A glass fiber mesh is appliedto the insulation and a base coat of polymer-modified stucco is sprayedor troweled on. This layer is much thinner than conventional stucco.When this has dried, the finish coat of stucco is applied. The two layersof stucco together are approximately ³⁄₁₆ -inch thick.
This material was originally designed for use in dry climates, suchas the American Southwest. In wetter climates, this material is some-what controversial. While the surface of the material is quite water-proof, penetrations through the walls often leak, allowing water to getbehind the stucco. Once behind the stucco, the water is often trapped,which can cause rot inside the wall. Newer installations may allow fordrainage of this water. Unfortunately, one cannot determine the true ex-tent of any damage without removing the wall finishes. It is very impor-tant to inspect around all windows, doors, and other penetrations toensure that they are completely sealed against water penetration.
Across North America, there have been cases of banks refusingmortgages on EIFS homes, restrictions on the installation of EIFS, andclass-action lawsuits launched against manufacturers of EIFS. Needlessto say, it is best to find out the history of this material in your area. If

The Exterior 29
the house you are considering has an EIFS exterior finish, you can alsoobtain a specialist’s evaluation.
Boards
Boards may be installed horizontally (such as clapboard) as shownin Figure 1.15, vertically (board and batten), or diagonally (tongue andgroove). Unless highly weather-resistant woods such as cedar are used,these walls require a paint or stain. It is usually necessary to reapplythese protective coatings every three to five years. After repainting sev-eral times, it will be necessary to strip off all the paint, for thick coat-ings can provide a vapor barrier leading to condensation problems.
Look for cracked, warped, and missing boards. In addition to theusual weak areas, check for exposed end grains, which will absorb mois-ture readily. As discussed earlier, wood siding should terminate at leasteight inches above grade level. A common problem with wood siding is
FIGURE 1.14 Synthetic Stucco (EIFS)
Synthetic Stucco (EIFS)
,

30 In specting a House
FIGURE 1.15 Horizontal Wood Siding
Horizontal Wood Siding

The Exterior 31
rust streaking from nails used to hold the siding on. The use of im-proper nails can spoil the appearance of a complete wall system. Thenailing pattern for boards is important. It is possible to fix the boards tothe sheathing with too many nails, preventing the natural expansion ofthe boards. This can lead to premature splitting.
Shingles and Shakes
Often made of cedar, these siding materials are similar to roofingshingles and shakes. They are a good-quality siding material, if properlyinstalled and maintained. They can be left natural, stained, or painted.Check for knots, loose, and shifted shingles, or shingles that havecracked and broken off at the edges. Look for evidence of moss, fun-gus, or other signs of rot, particularly at the bottom of wall sections.
Wood Panels
Composition materials, such as plywood, chipboard, and wafer-board, can be used satisfactorily outside. However, they are not usuallyconsidered high-quality finishes, and a small f law may result in a largeunsightly problem. These sidings can be subject to warping and buck-ling and the layers of the plywood may separate (delaminate). Manysheet goods, such as plywood, do not breathe well and can lead to con-densation problems. Once again, exposed edges may absorb waterquickly.
Asphalt Shingles and Insulbrick Siding
These low-cost and reasonably durable siding materials becamepopular in the 1940s. The imitation brick pattern, often referred to asinsulbrick, is not generally considered eye-pleasing. Today, it is oftenreplaced simply by covering it with a new siding. Look for the samesigns of wear as with asphalt shingles on roofs. Again, the bottom of thewall is a potentially weak area and, ideally, a metal f lashing shoulddirect water away from the bottom of the shingles. When repairs arenecessary, it is very difficult to match colors. Insulbrick siding is becom-ing harder to find even for patching purposes.

32 In specting a House
Aluminum and Steel Siding
Presently popular as replacement sidings, these materials are rela-tively inexpensive to install and need little maintenance. They come inseveral styles (see Figure 1.16), including traditional horizontal clap-board and vertical board. Sometimes the aluminum is vinyl-covered.Depending on the siding itself, and on the installation technique, alu-minum or steel siding may not breathe well. A good installation in-cludes a backer board that helps the metal resist denting. Insulatedaluminum siding is not cost-effective in some climates, for the amountof insulation added is relatively small in relation to the added cost.
Individual panels can be replaced, although it may be difficult tomatch colors because of weathering. Some sidings can be painted fairlysuccessfully with specialty paint, but then this becomes a regular main-tenance item. Aluminum is also commonly used to cover wood soffitsand fascia and to replace galvanized gutters.
FIGURE 1.16 Metal and Vinyl Siding
Metal and Vinyl Siding
steel siding can look like aluminum sidingand have a prepainted finish
it may even have a vinyl coating
older steel siding often had patternssuch as brick or stone pressed into it
aluminum sidingcan come in theform of boards,
sheets, panels, orshingles
the prepaintedfinish can be
scratched to revealthe relatively soft
aluminumunderneath
the color in vinylsiding goes right
through thematerial soscratching it won’t reveala different
color beneath

The Exterior 33
Fiber Cement Shingles or Sheet Siding
Fiber cement shingles or sheet goods are made of the same materialas the roofing shingles, although they may be somewhat thinner. This isa reasonably good-quality siding material and can be painted any color.This material is brittle but, generally speaking, quite durable. When in-specting it, look for evidence of broken or cracked shingles.
Vinyl
This product has also become very popular, competing successfullywith metal siding. This material can be torn or punctured, and, in somecases, is susceptible to fading problems if proper plastic mixes are notused.
WINDOWS
While there are several different types and qualities of windows,defective windows in a house can be a source of major inconvenienceand expense. Windows in disrepair contribute to heat loss, uncomfort-able drafts, poor ventilation, and damage to interior and exterior fin-ishes. Because window sizes are not standardized for the most part,repair or replacement is almost always a custom job involving highcosts. A complete set of new windows can easily cost more than a roofor heating system can.
Windows should be inspected from both the exterior and the inte-rior. On the exterior, examine the quality of the fit between the windowframe and the wall system. Caulking should be provided here. A dripcap at the top of the window frame will direct water away from the win-dow and prevent it from forming a pond at the top of the frame. Also,look for a good slope on the windowsills so that water does not collectagainst the bottom of the window. On the underside of the sill shouldbe a groove that will prevent water from running along the underside ofthe sill back to the wall surface. Check for the presence of storm win-dows on all windows, either fixed or operable, unless additional glazing(more than one pane of glass) has been provided. Look for deteriora-tion of the sashes or frames and for damage to screens. Putty that is

34 In specting a House
loose or missing will require maintenance, and broken or cracked panesof glass must be replaced.
Note the orientation of windows, for this will affect heating costs.South windows allow the warming winter sunlight in. With west win-dows, the house becomes hot during the summer months. North andeast windows can be areas of high heat loss, depending on prevailingwinds.
Look particularly closely at basement windows. Often storm win-dows are nonexistent here and frames are frequently damaged by mois-ture. If the basement windows are below grade, there should be awindow well (see Figure 1.17) that allows light in and prevents moisturebuildup. Look for wood frames on basement windows in direct contactwith soil, which could lead to accelerated deterioration of the wood,and in areas where termites are a problem, can provide easy access intothe house for these insects.
Window wells should be drained to allow water to discharge. Typi-cally, a French drain comprised of gravel is provided. Where drainageis poor, a plastic dome cover often can be fitted over the window wellto direct water away from the window. This, however, prevents outsideventilation when opening the basement windows.
FIGURE 1.17 Window Well
Window Well

The Exterior 35
Expect some imperfections when inspecting windows for very fewhouses have a complete and perfect set. Look rather for trends of recur-ring deficiencies when going from window to window. Do not clutteryour thinking by attempting to note every minor deficiency. We willtalk more about windows in Chapter 7.
EXTERIOR DOORS
It may be helpful to think of exterior doors as windows without glassor with very small panes of glass. A door is essentially a hole in your ex-terior wall, presenting all the problems associated with constructionjoints and heat loss.
Front doors are generally part of the architecture of the house andshould contribute to the overall effect. Unless the door is an insulatedcore type, however, it should be provided with a storm door in cold cli-mates. The need for a storm door is somewhat reduced when the houselayout includes an interior vestibule with a second door. Storm doorshelp reduce air infiltration and better-quality doors do not camouf lagethe appeal of the primary door. Storm doors may be made of wood ormetal and often double as screen doors, either with a self-storing screenor a replaceable glass insert in the center of the door. Weatherstrippingon both the storm and primary door should be well maintained.
Wood exterior doors are available in a wide variety of qualities,including everything from the solid door to a hollow-core, veneer door.The two common styles are a f lush type and a rail and stile or paneltype. A panel door has raised horizontal, vertical, or diagonal membersbracketing recessed panels. Metal doors are available in several stylesas well. These doors usually have insulated cores and do not requirestorms.
Check the width and height of the front door. It should be no lessthan 32 inches wide and 80 inches high. Generally, larger doors indi-cate better houses and one can develop a feel for the overall quality justby looking at the original front door.

36 In specting a House
Locking Mechanisms
Security is a consideration here. When purchasing a resale home,it is often impossible to know whether all keys for existing door lockshave been obtained; therefore, it is generally considered prudent tochange the locks. In some cases, it is better to add a lock than to sacri-fice a high-quality piece of door hardware. Note the location of win-dowpanes in the door in relation to interior locking mechanisms. If thewindow is too close to the lock, it will be easy to break the pane andopen the door.
SUMMARY
The house exterior often receives less attention than it should. Manyoutside repairs are put off until they become major expenses. Some ofthe most costly work includes the following: regrading a yard to improvedrainage if much of it is concrete, asphalt, or patio stone; rebuilding adilapidated garage; rebuilding tall chimneys; replacing roof coverings(especially if the old covering is removed first); repointing large areas ofmasonry walls; replacing exterior sidings; and adding storm windows.Any of these jobs can run well in excess of $1,000.

The Exterior 37
CHECKLIST: The Exterior
Landscaping
1. General land slope?
2. Dead trees?
3. Deteriorated fences, porches, decks, or patios?
4. Retaining walls leaning?
5. Garage and driveway condition?
Chimneys
1. How many?
2. Number of flues?
3. Location?
4. Adequate height?
5. Leaning?
6. Mortar condition?
7. Flashing condition?
Roofs
1. Type?
2. Age?
3. Condition?
4. Gutters:Complete?Sloped properly? Leaks? Discharge where?

38 In specting a House
Exterior Wall Finishes
1. General condition?
2. Cracks?
3. Weatherproof?
4. Paint or stain needed?
5. Mortar condition?
Windows
6. Storms provided?
7. Caulking and putty condition?
8. Sill slope and condition?
9. Basement window wells:Clear? Drains? Condition?
Doors
1. Storm provided?
2. Door condition?
3. Weatherstripping?
4. Locking mechanism?

C h a p t e r
39
2
THE STRUCTURE
When assessing the structure of ahome, it is best to break the structural components into two categories:the exterior structural components and the interior components.
THE EXTERIOR STRUCTURE
The exterior components include the footings on which the foun-dation walls rest (see Figure 2.1), the foundation walls on which theexterior walls sit, and the exterior walls.
The Footings
Unless the level of the basement f loor has been altered, you prob-ably will never get a chance to see the footings for they are underneaththe basement walls below the level of the f loor. The footings are simplypads, roughly twice the width of the foundation walls, on which thewalls sit. Their function is to spread the concentrated load of the foun-dation walls over a larger area to help prevent the house from settling.The footings, which are usually made of concrete, should lie on undis-turbed soil.

40 In specting a House
Sometimes, because of soil conditions or an improperly sized foot-ing, the soil under the footing compresses, resulting in a sinking foot-ing. When this happens, a section of the building will settle or sinkmore rapidly than the rest of the house (see Figure 2.2). This will resultin cracks in the basement walls that can extend all the way up the exte-rior walls of the house. This is a very serious problem that may be ex-pensive or impossible to solve.
The Foundation Walls
The foundation walls are usually made of stone, brick, concreteblock, or poured concrete. If the basement is unfinished, you will beable to check the walls for cracks. Moisture penetration, which is alsoobvious, will be discussed later in Chapter 6.
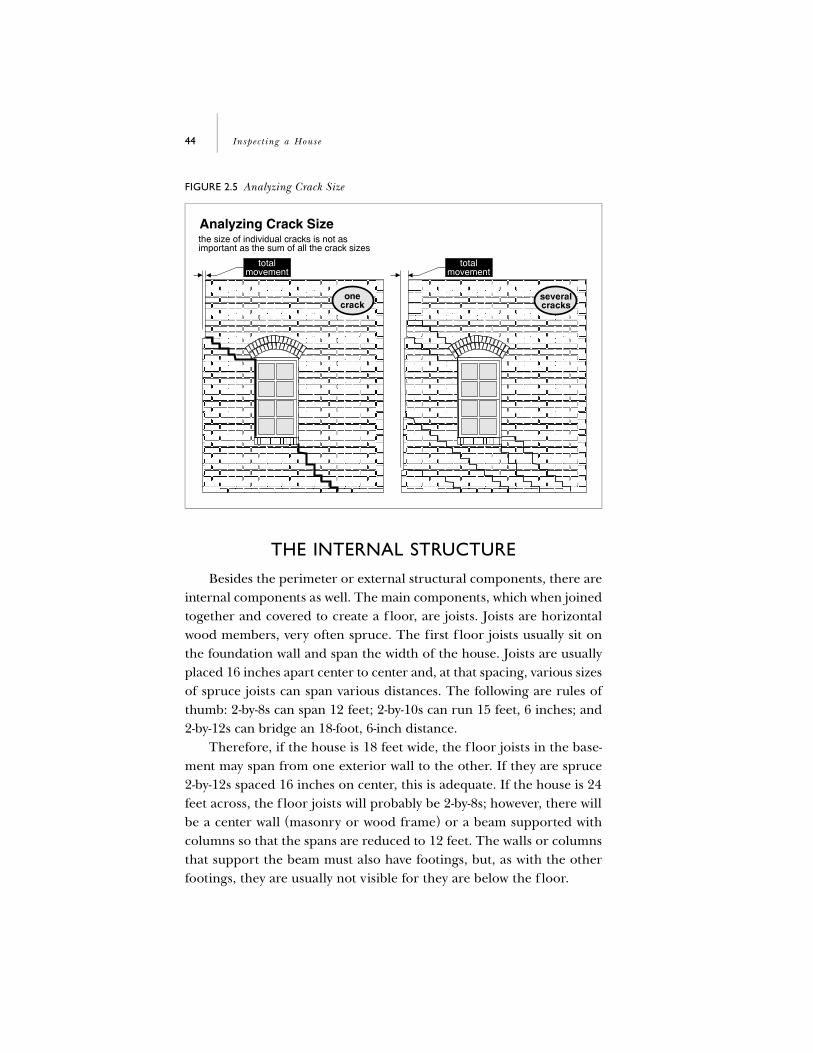
Different types of cracks occur in foundations. Some of them are se-rious while others are not. Look for cracks that display significant dif-ferential movement. Hairline cracks are not important, but larger cracks(one-quarter of an inch or more) should be studied carefully. It is impor-
FIGURE 2.1 Overview of House Structure
Overview of House Structure

The Structure 41
tant to note the direction of movement, whether it is in one, two, orthree planes. Usually, the more planes of movement, the more seriousthe crack. It is also important to try to determine whether the movementhas stopped or is continuing. On older buildings, this is easier becausethere are more clues. A crack sometimes shows a history of repeatedpatching, repeated painting, etc. If the paint is old and has not cracked,then odds are that the movement has stopped.
Any significant crack noted in the basement should be followed upthrough the house and should be viewed from the exterior as well.
The Exterior Walls
Sitting on the foundation walls are the exterior walls of the house.They are usually wood frame with some type of exterior siding or solidmasonry. Solid masonry walls (as shown in Figure 2.3) are typically twobricks thick. Usually the two layers are tied together by laying bricks“sideways” so that they interlock the inner and outer layers. This appearsas a regular pattern in every sixth or seventh row of bricks. When look-ing at the outside wall, these rows appear to have short bricks becauseall that is visible is the end of the brick. Another way to connect two lay-ers of bricks is by using mechanical fasteners. This is not common,though, and almost impossible to detect by visual examination.
FIGURE 2.2 Types of Settlement
Types of Settlement

42 In specting a House
Wood-frame walls usually consist of 2-by-4 vertical members calledstuds, which are placed 16 inches apart. In older housing, a framingtechnique known as balloon framing was used. In balloon framing, thef loors of the house were hung from the studs, which were continuousfrom the foundations up to the roof. Platform framing, used more com-monly today, is different because each f loor level is built as a platform,then the walls are built and erected in sections, resting on the platform.After the walls are constructed, another platform for the next f loor isbuilt and the process repeats itself. There are pros and cons to bothmethods, but neither is considered far superior.
The outside of the studs is sheathed with one of several materialsand then the exterior siding is installed. Brick veneer (see Figure 2.4) isreal brick; however, only one layer of brick, which is not a structuralcomponent, is fastened to the framing with metal ties that are not visi-ble. As a result, there are no rows of short bricks (bricks turned side-ways) in the wall. Usually, there is a space between the brick veneer andthe sheathing. The mortar is left out of the vertical spaces between every
FIGURE 2.3 Solid Masonry Walls
Solid Masonry Wallscross-sectional view

The Structure 43
fourth brick at the bottom of the wall to allow any moisture that may ac-cumulate between the brick and the sheathing to drain. Sometimeswicks (short pieces of rope) are installed to draw water out of this cavity.
Inspection
When viewing the exterior wall of a house, it is important to lookfor movement. This movement may manifest itself in cracks (see Figure2.5), bowing walls, or walls out of plumb or out of square. Look at wallsfrom various angles. Scan walls, following mortar joints or any otherhorizontal line that can be picked up, to look for unusual movement.
If walls are sinking or moving, this is a serious structural problem,which sometimes can be corrected by underpinning foundations; how-ever, this is a very expensive proposition. If you suspect serious struc-tural problems with the footings, foundations, or exterior wall systems,and are still interested in the house, it is best to call in an expert.
FIGURE 2.4 Brick Veneer Wall
Brick Veneer Wall
44 In specting a House
THE INTERNAL STRUCTURE
Besides the perimeter or external structural components, there areinternal components as well. The main components, which when joinedtogether and covered to create a f loor, are joists. Joists are horizontalwood members, very often spruce. The first f loor joists usually sit onthe foundation wall and span the width of the house. Joists are usuallyplaced 16 inches apart center to center and, at that spacing, various sizesof spruce joists can span various distances. The following are rules ofthumb: 2-by-8s can span 12 feet; 2-by-10s can run 15 feet, 6 inches; and2-by-12s can bridge an 18-foot, 6-inch distance.
Therefore, if the house is 18 feet wide, the f loor joists in the base-ment may span from one exterior wall to the other. If they are spruce2-by-12s spaced 16 inches on center, this is adequate. If the house is 24feet across, the f loor joists will probably be 2-by-8s; however, there willbe a center wall (masonry or wood frame) or a beam supported withcolumns so that the spans are reduced to 12 feet. The walls or columnsthat support the beam must also have footings, but, as with the otherfootings, they are usually not visible for they are below the f loor.
FIGURE 2.5 Analyzing Crack Size
Analyzing Crack Size

The Structure 45
It is important to check joist spans and spacing to determine theirsuitability (see Figure 2.6). If joists are overspanned, f loors are liable tobe springy and, with time, quite likely to sag in the center. If the houseis older, keep in mind that the house has stood the test of time. If f loorshave not sagged in 50 years, regardless of joist spans, it is unlikely thatthey are going to begin to sag now unless something has changed.
While on this point, it should be mentioned that this test of timeholds true for most structural components of a house. Many old de-signs and techniques are considered unorthodox today; however, ifthere has been no movement of a component in 50 years, and nothinghas changed, it is unlikely that there will be any future movement.
After looking at the joists, look at the center beam and columns. Be-cause of various house designs, some houses have none while otherhouses have one, two, or three beams. Check for sagging of beams be-tween the columns and for column movement. The beams can be woodor steel. Columns can be wood, steel, brick, concrete block, or pouredconcrete.
Look for structural supports that have been added since the origi-nal construction. If there are any, further investigation will be necessary.They may have been installed only to compensate for a heavy piece of
FIGURE 2.6 Common Causes of Cracked Joists
Common Causes of Cracked Joists

46 In specting a House
furniture or a rattling china cabinet, or there may have been an attemptto rectify a serious structural problem.
Besides properly sizing the wooden structural components, it is nec-essary to determine whether their structural integrity has been violatedby rot or insect attack.
Rot
Rot is a fungus that attacks wood. The term dry rot is misleading, forall rot needs moisture to grow. While investigating the basement, lookfor damp areas or areas that have been damp for reasonably long peri-ods of time. Check the wood members in these areas very closely. Takealong an ice pick, or another sharp object, so that any wood that is sus-pect can be probed to determine the extent of damage.
Termites
Of all the wood-boring insects, none does more damage than ter-mites. Rather than just living in the wood as most wood-boring insectsdo, termites actually eat wood. Subterranean termites build nests in thesoil, which provides a constant source of moisture for them. Becausetheir skin is very thin, they dehydrate very quickly if exposed to the ele-ments. Therefore, subterranean termites live in a protected environ-ment and do not expose themselves to the drying effects of the air. Tocross sections of concrete or steel in search of wood, termites build“shelter tubes.” Initial tubes are usually small, only about one-quarter ofan inch wide, and are constructed of sand and soil cemented togetherwith secretions from the termites. The presence of these tubes usuallyis the first evidence of termite infestation. Dampwood and drywood ter-mites do not need these shelter tubes and can be more difficult to find.Once inside a piece of wood, subterranean termites tend to eat with thegrain. The galleries that they create contain specks of excrement andearth called frass. These galleries, parallel to the grain, and the frass in-side, help to recognize termite damage. Termites seldom eat throughthe outer edges of the lumber, so it is important to probe the wood witha sharp object.
Because most termites prefer damp or rotted wood, search for ter-mites and rot in the same area. Termites also tend to enter housesthrough wood in direct contact with the soil. The bottom of basement

The Structure 47
stairs and wooden posts in the basement are prime areas for entry.Some old houses are built on wood piers or with sill plates directly incontact with the soil. These conditions are most common in houseswith crawl spaces.
To remove subterranean termites from a house requires chemicaltreatment. Chemicals are injected into the soil through the basementwalls and f loors to provide a chemical barrier. The treatment typicallylasts 10 to 25 years, depending on the pesticide used. In row housing, itis important to treat the entire building to prevent the entry of termitesfrom next door. It is also necessary to break all wood/soil contact in thehouse. In some cases, this is a minor job, but in others this means resup-porting the entire structure—a very costly undertaking. Dampwood anddrywood termite infestations are generally treated by tenting and fumi-gating the house.
If termites are discovered in the house you are inspecting, it is notnecessarily the end of the world. If caught early on, termites can beeffectively stopped without doing much damage. On the other hand,advanced termite attack can virtually destroy a house.
While other wood-boring insects can damage a house, few can causeas much damage as termites. However, in your inspection, evidence ofdamage by carpenter ants, powder post beetles, wharf borers, and wee-vils should be noted.
SUMMARY
The single most serious problem in a house is the failure of footingsand/or foundations. If the building is settling, corrective action can beprohibitively expensive. If the movement has stopped, no repairs maybe necessary unless perfectly level f loors are important.
Sagging f loor joists generally do not indicate major difficulties andrepairs often are optional. Replacing individual damaged componentssuch as a joist, beam, or column is often less expensive than most peopleexpect.
Termites and rot can do serious structural damage. However, theearly stages of attack can be readily detected, and corrective actiontaken, usually at moderate cost. If the damage is extensive, consider get-ting some professional advice.

48 In specting a House
CHECKLIST— The Structure
1. Foundation wall cracks?
2. Interior or exterior wall cracking?
3. Active movement?
4. Joist size adequate?
5. Beams and columns adequate?
6. Rot or termite damage?
7. Sloping floors?
8. Sagging floors?
9. Walls out of plumb?
10. Doorjambs out of square?
C h a p t e r
49
3
THE ELECTRICAL SERVICE
The electrical service in a house istypically one of the least understood and most often abused systems.Electrical faults cause a tremendous number of home fires every year.Furthermore, inadequate electrical service is a major inconvenienceand detracts from the overall comfort and usability of a home.
Electricity can be looked at in two segments. First, consider theamount of power coming into a home. This is called the size, capacity,or amperage of the service. Second, the bulk electricity brought into thehouse must be distributed to end-use areas throughout the house. Thisis accomplished by using branch circuits of various sizes.
It may be helpful to think of electricity as behaving much like water.The amount of water available from a faucet depends on the size of thepipe feeding the faucet. It also depends on the amount of pressurepushing the water through the piping. In an electrical system, the sizeof the wire can be thought of as the size of the pipe. The diameter ofthe wire determines the capacity of the wire. The pressure forcing thewater through pipes is measured in pounds per square inch. In electric-ity, the pressure is measured in volts. The amount of water that passesthrough a pipe is considered in terms of gallons per minute. With elec-tricity, this is analogous to amperes or amps (current).

50 In specting a House
Electricity for a house is supplied from the electric cables in thestreet. In older neighborhoods, these wires are run overhead on poles,while in newer neighborhoods the wires may be run underground.Electricity for a house is obtained by tapping into these wires and run-ning either an overhead or underground line into the house. Typically,three wires are run, providing 240-volt service (see Figure 3.1). If onlytwo wires are provided, this usually indicates 120-volt service. Old 120-volt services are generally considered inadequate and unsafe for mostmodern lifestyles. Most houses are provided with a nominal 240-voltservice and, apart from minor f luctuations, there is very little choice inthe amount of electrical pressure available.
The overhead cables should not be located close to tree branchesand should not be easily reached from porches, balconies, or decks.
FIGURE 3.1 120/240 Volts
120/240 Volts

The Electrical Service 51
THE SIZE OF THE SERVICE
The electrical capacity of any house is determined by the size of theconductors leading from the street into the building. Because of thevarious types of cable and the different thicknesses of insulation, it isdifficult to visually judge the ampacity of the incoming wire. Later wewill talk more about how we can determine the size of the electrical ser-vice. First, let’s look at the common ones.
The 30-amp service still exists in some older homes. This is generallyconsidered unacceptable and, while a few homes do operate satisfacto-rily with this, some lifestyle compromises are required.
The 60-amp electrical service is commonly found in houses built be-fore 1960. This service is of marginal capacity for most modern house-holds. Depending on the size of house and the electrical load, a 60-ampservice may prove adequate. Where major appliances are electricallypowered, however, this service is often inadequate. For example, if thestove, water heater, and clothes dryer are all electric, the load intro-duced by these major appliances and the ordinary household appliancesmay overtax the 60-amp service. If electric central air-conditioning isadded, 100-amp service will almost certainly be required. The numberof people and rooms in a house also affect the electrical demand. A gen-eral recommendation with regard to a house with 60-amp service is tolive with it for a few months to determine your specific requirements. Ifthe service is inadequate, convert to 100-amp service. In some areas, in-surance companies consider 60-amp services as old and undersized.These insurers may not offer coverage on homes with 60-amp services,or they may charge higher premiums.
The 100-amp service is provided in most modern homes and pro-vides adequate power for most average-size (three-bedroom) dwellings.One exception would be an electrically heated house (which requiresgreater supply). Multifamily dwellings, of course, require special consid-eration.
The 200-amp service is used in large single-family residences andsmall, multifamily dwellings. Also, houses that are electrically heatedvery often are provided with 100-amp electrical supply for the heatingsystem and 100-amps for the normal household requirements.
In various areas, intermediate size services are provided. For exam-ple, 70-amp, 125-amp, and 150-amp services are installed. If it is neces-

52 In specting a House
sary to upgrade the electrical service, the expense is less than mostpeople anticipate. Remember, this involves changing only the wire fromthe street to the house. One exception is where underground serviceinto the house is provided and the conduit enclosing the cables is sosmall that larger cables cannot be introduced. The existing conduitmust be excavated and replaced with a larger one. In any case, upgrad-ing the size of the electrical service involves no changes to the wiringthat distributes electricity within the house.
HOW TO DETERMINE SERVICE SIZE
As discussed, the amount of electricity is determined by the size ofthe service entrance cables (see Figure 3.2). Also, it is very difficult totell how big these wires are simply by looking at them. As soon as thesewires enter the house, they must pass through a main disconnect switch,which is provided with fuses or a circuit breaker. With few exceptions,
FIGURE 3.2 Determining Service Size by the Service Entrance Wires
Determining Service Size by the Service Entrance Wires

The Electrical Service 53
the size of the fuses or circuit breaker can be determined readily, andthis should indicate the size of the electrical service (see Figure 3.3).
Where two cartridge-type fuses are provided in one disconnectswitch, the size (number of amps) written on each fuse should be thesame. This number indicates the electrical service capacity. Thus, two100-amp fuses represent 100-amp service. Two 60-amp fuses represent60-amp service. This is the best way to determine the size of the incom-ing service. However, one point is stressed: The fuses are not usually vis-ible without opening a cover panel. This cover panel may be sealed bythe local utility and, if this is the case, the seal should not be broken. Ifthe panel can be opened, do this with the greatest caution. Regardlessof whether the main disconnect switch is on or off, there is enough elec-tricity in this box to kill. Nothing within the box should be touched. Someoneexperienced should do this, such as an electrician.
Where the main disconnect is a circuit breaker, the size is written orstamped on the breaker handle itself and it is not necessary to open thepanel to check the size.
FIGURE 3.3 Determining Service Size by the Main Disconnect
Determining Service Size by the Main Disconnect

54 In specting a House
A number of fallacies exist about how the size of an electrical ser-vice can be determined. Many people say that the rating stamped on thefront of the disconnect or distribution of boxes will indicate the size ofthe service. This is not the case! These readings indicate the maximumallowable service entering these boxes and are restrictions imposed bythe manufacturer of the boxes. Sometimes it is said that adding up thenumber of fuses and multiplying by 15, or adding up the rating of allthe fuses, will indicate the electrical service. Again, this is not true andthere is no fixed relationship between the size of the service and thenumber or size of the fuses.
The rating on the electric meter is simply a maximum allowabledetermined by the meter manufacturer. In some cases, 100-amp metersare located on houses with 200-amp service. At times, it is maintainedthat where the meter is on the outside of the house, the service is atleast 100-amps. Again, this is not the case.
The size of the electrical conduit running down the outside of thehouse is occasionally used as a measuring stick for the size of the elec-trical service. This, too, is an inconclusive measure of the capacity. Thesize of the conduit usually ref lects only the size of the conduit the elec-trician had at the time of installation. Many cases are found where largeconduits capable of carrying 200-amp wires are, in fact, housing wiressuitable for only 60-amps.
One other misconception is that if the electrical service panel is atthe front of the house, it has been upgraded to at least 100-amps. Again,this is not a reliable indicator.
Following are the cable sizes commonly used with the basic 30-, 60-,100-, and 200-amp services. Where the size of the cable can be deter-mined from the printing on the sheathing, this will determine what typeof electrical service is provided.
Conductor Size(United States)
Conductor Size(Canada)
Service Size Copper Aluminum Copper Aluminum
For 30-amp service #10 #8 #10 #8 For 60-amp service # 6 #6 # 6 #6 For 100-amp service # 4 #2 # 3 #2 For 200-amp service #00 or 2/0 #0000 or 4/0 #000 or 3/0 250MCM

The Electrical Service 55
From this chart it can be seen that copper and aluminum wires ofdifferent sizes are capable of carrying the same amount of electricity.This is because copper is a better electrical conductor.
One last note: Although the main service entrance cables and asso-ciated fuses or circuit breakers are installed by an electrician, in somecases the fuse sizing may be inappropriate. Where this is the case, onewill get a false reading of the actual electrical capacity of the system. Itis very difficult for anyone but an electrical contractor or inspector todetermine this.
GROUNDING
The electrical system should be grounded, using a wire connectedeither to the plumbing system or to ground rods (as shown in Figure3.4). This grounding wire provides an emergency path for electricity inthe case of a malfunction of an electrical appliance or a short circuit.The ground wire provides an easy route for electricity to take. With a
FIGURE 3.4 Grounding Equipment
Grounding Equipment

56 In specting a House
properly grounded system, the electricity will be led harmlessly to theearth.
Look for a wire that leads from the main disconnect switch to theplumbing system or rods sunk into the ground. The following chartshows the size of copper ground wire required for various service sizes.Aluminum ground wires should be one size larger.
In the United States, if the connection is to a ground rod, 6-gaugewire is the largest size required.
In some cases, plumbing has been changed and the grounding wirehas not been reconnected. If there is a water meter on the system, theground wire must be connected on the street side of the water meter ora jumper wire must bypass the meter providing a continuous electricalpath to ground.
In houses that do not have a municipal water supply system, thesupply piping cannot be used as a grounding vehicle.
DISTRIBUTION THROUGHOUT THE HOUSE
Once electricity is available inside the house, it is distributed througha number of branch circuits to areas where it will be used. One reasonthe electricity is broken up into small branch circuits is that if there is amalfunction and subsequent blowing of a fuse or tripping of a circuitbreaker, all electric power and lighting will not be lost in the house. Also,the smaller wiring required in branch circuits is less expensive and easierto work with than are the larger cables. Minimum requirements for mostmodern houses include two 240-volt circuits and sixteen 120-volt circuits.(Most light fixtures and electrical outlets will be 120-volt, while heavy-duty appliances such as stoves, clothes dryers, water heaters, and centralair-conditioning systems will be 240-volt.)
Each 120-volt circuit typically uses a 14-gauge copper wire that isprotected by a 15-amp circuit breaker or fuse. The 240-volt circuits em-ploy larger wires that are protected by larger fuses or breakers.
Wire Gauge Service Size (USA)
#8 Up to 125 amp #6 Up to 175 amp#4 Up to 200 amp

The Electrical Service 57
Fuses and circuit breakers are necessary because wire has no meansof protecting itself from overheating when too much current is allowedto pass through. This is unlike a water pipe, which can restrict the f lowthrough the pipe by the frictional forces that offer resistance. An elec-trical appliance that is operating satisfactorily has enough resistance toelectrical f low to prevent the wire from overheating. When the appli-ance malfunctions, or short circuits, however, that resistance is lost anda tremendous amount of electricity is allowed to pass through the wire.This will lead to overheating, melting insulation, sparks, and eventuallya fire. A fuse or circuit breaker acts as a safety valve that shuts off thecircuit when too much electricity is passed through. The fuse or breakermay be considered the brain of the electrical system, causing an emer-gency shutdown.
A fuse is a one-time safety device that must be replaced once it hasblown. A circuit breaker is a switching device that can be reset subse-quent to being tripped. Consequently, circuit breakers are considered
FIGURE 3.5 Fuse Types
Fuse Types
medium cartridgefuse – 35 to 60 amps
(same size)
small cartridgefuse – 15 to 30 amps
(same size)

58 In specting a House
more convenient. Furthermore, because circuit breakers are not oftenreplaced by the homeowner, there is less chance that an incorrectlysized breaker will be installed. Unfortunately, the insulated, cylindricalglass, screw-in fuses are physically interchangeable over a 15- to 30-ampsize range (see Figure 3.5). Thus, it is very easy for someone to replacea blown 15-amp fuse with a 30-amp fuse. As discussed, this will not pro-vide overcurrent protection for the standard 14-gauge wire.
Safety devices that can prevent overfusing are known as fuse adapt-ers or fuse rejectors. When placed in a fuse block, they limit the size ofthe fuse that can be screwed in. Certain adapters allow no more than15-amp fuses and others allow nothing larger than 20-amp fuses.
Some people maintain that circuit breakers are not as safe as fusesfor a breaker switch can become stuck in the open position. This canbe overcome by operating the breakers manually from time to time. Amonthly checking routine is often recommended. Fuses, too, may havemanufacturing defects by which a fuse rated at 15 amps will, in fact, notblow at the designed rate of current f low. Because a fuse is a one-timedevice, each fuse cannot be tested as it is produced without destroyingit. According to most people, the convenience and safety of circuitbreakers make them a more desirable alternative.
CHECKING THE FUSE BOXOR CIRCUIT BREAKER PANEL
If you have a fuse box, look at the number of fuses in the panel andnote their size (see Figure 3.6). This is clearly marked on the fuse. If thehouse has an electric stove and an electric clothes dryer, there will betwo sets of large fuses. These fuses are usually not the screw-in type andare referred to as cartridge fuses. A stove would typically use 2, 40-ampcartridge-type fuses and a clothes dryer 2, 30-amp fuses. There may beas few as 2, 15-amp fuses and as many as 40 or 50. However, 16 is a com-mon number and the minimum acceptable for an average-size (three-bedroom) house. Sometimes fuses will be provided, but not connected.In other cases, there is room in the panel for additional fuses (and,therefore, more circuits).
If your house has a circuit breaker panel instead of a fuse box, checkthe number of switches (breakers) and the amperage marked on them.As discussed previously, if the house has an electric stove and electric

The Electrical Service 59
clothes dryer, there should be 2 switches marked 40 amp and 2 marked30 amp. There should also be at least 16 switches labeled 15 amp.
A complete electrical investigation involves removing the cover onthe fuse box or circuit breaker panel. Unless you are familiar with elec-tricity, however, don’t do this yourself because all wiring within the boxis live. If the cover is removed, though, it is possible to compare the sizeof the wire to the size of the fuse or circuit breaker protecting it. Thechart that follows indicates proper protection for various sizes andtypes of wire.
FIGURE 3.6 Typical Arrangement of Panel Wires
Wire Gauge Fuse or Breaker Rating Copper Aluminum
For 15-amp fuses #14 #12 For 20-amp fuses #12 #10 For 25-amp fuses #10 #10 For 30-amp fuses #10 # 8 For 40-amp fuses # 8 # 6
Typical Arrangement of Panel Wires
-
-

60 In specting a House
If you are inspecting this yourself, make sure that all fuses or break-ers are properly sized. Sometimes it is difficult to determine the size ofthe wiring. Often it is written on the sheathing on the cable, which canbe read outside the fuse box or panel. It may also be helpful to carry asample length of each size of wire for comparison.
Look for evidence of overheating, burned insulation, or arcing. Ahumming noise or burned insulation smell are danger signs that shouldbe followed up by a qualified electrician. Loose connections and wiresnot secured to a terminal also indicate problems. Rust in the box orpanel should be further investigated and the source of the moistureeliminated.
Note whether all of the fuse or breaker terminals are occupied. Ifthere is room for more circuits, this will reduce the cost of expandingthe system.
When the cover is replaced, there should be no open holes that al-low contact with live components. Circuits that are not in use should befilled with fuses or covers designed for this use. Check the point wherethe cables pass through the wall of the distribution box where there areoften signs of mechanical damage to the cables.
WIRING THROUGHOUT THE HOUSE
The electrical cables running from the box may be in rigid metalconduits, f lexible metal conduits, or nonmetallic sheathed cable. Thenonmetallic sheathing may be cloth, paper, or plastic. Most moderncables contain a black and a white conductor (see Figure 3.7), each pro-vided with its own insulation within the cable. There is also a groundwire, which is typically uninsulated. The black and white wires, whenconnected to electrical fixtures, complete the circuit. The ground wire,as discussed previously, provides an emergency safety route for theelectricity. Some of the older cable, which contains a black and a whiteconductor, will not have a ground wire. In this case, individual recepta-cles will not be grounded.
The oldest wire used residentially is commonly referred to as knob-and-tube. It is readily identified by the white ceramic insulators that sup-port the wire where it changes direction (knobs) and passes throughwood members (tubes) as shown in Figure 3.8. With this type, the twowires run separately, usually insulated with cloth. This wiring has not
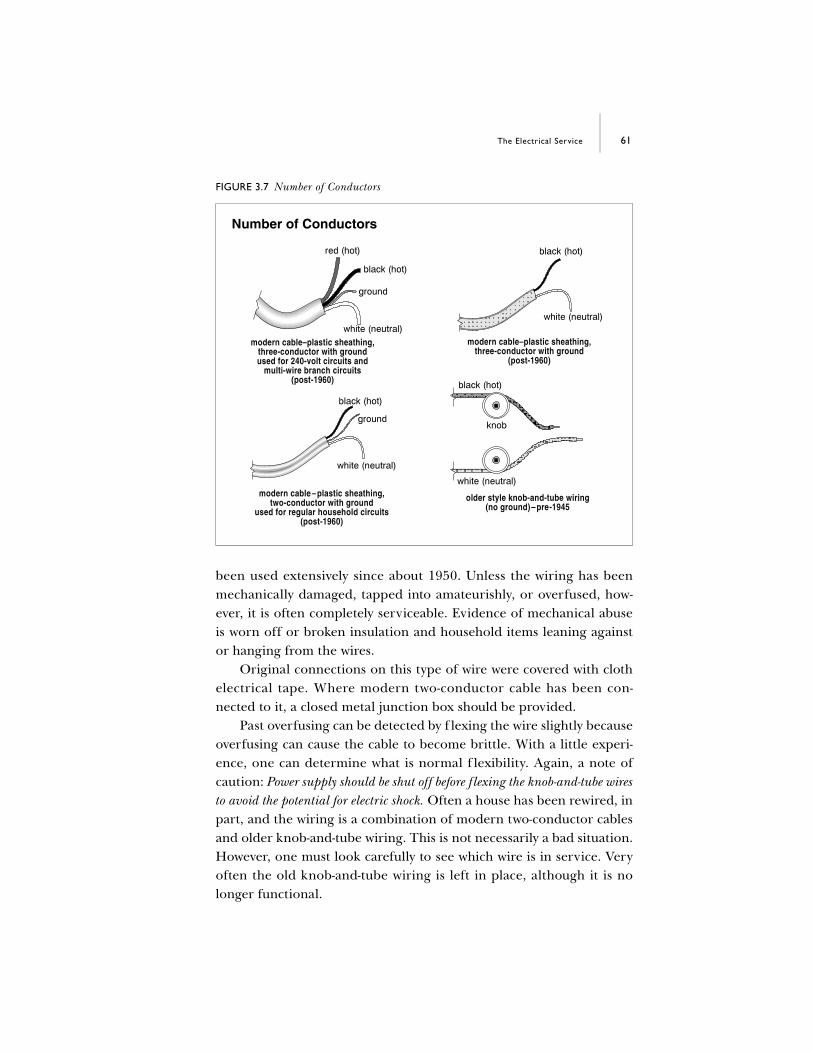
The Electrical Service 61
been used extensively since about 1950. Unless the wiring has beenmechanically damaged, tapped into amateurishly, or overfused, how-ever, it is often completely serviceable. Evidence of mechanical abuseis worn off or broken insulation and household items leaning againstor hanging from the wires.
Original connections on this type of wire were covered with clothelectrical tape. Where modern two-conductor cable has been con-nected to it, a closed metal junction box should be provided.
Past overfusing can be detected by f lexing the wire slightly becauseoverfusing can cause the cable to become brittle. With a little experi-ence, one can determine what is normal f lexibility. Again, a note ofcaution: Power supply should be shut off before flexing the knob-and-tube wiresto avoid the potential for electric shock. Often a house has been rewired, inpart, and the wiring is a combination of modern two-conductor cablesand older knob-and-tube wiring. This is not necessarily a bad situation.However, one must look carefully to see which wire is in service. Veryoften the old knob-and-tube wiring is left in place, although it is nolonger functional.
FIGURE 3.7 Number of Conductors
Number of Conductors
modern cable–plastic sheathing,three-conductor with groundused for 240-volt circuits and
multi-wire branch circuits(post-1960)
modern cable–plastic sheathing,two-conductor with ground
used for regular household circuits(post-1960)
modern cable–plastic sheathing,three-conductor with ground
(post-1960)
older style knob-and-tube wiring(no ground)–pre-1945

62 In specting a House
As with 60-amp services, many insurance companies are reluctantto insure homes with old knob-and-tube wiring and will charge higherpremiums, if they will insure the home at all.
Regardless of its type, wiring should be well supported at regularintervals. It is better to run the wiring through holes drilled in thejoists rather than on the joist surfaces. Sometimes when cable is pulledthrough holes in wood members, however, the insulation can be dam-aged. Look for evidence of this. Wiring should not be run on exposedwall, f loor, or ceiling surfaces and, generally speaking, should be pro-tected from mechanical damage, within practical limits.
Check the quality of connections at wire junctions and at fixtures;a metal junction box should be provided. In many cases, covers are leftoff boxes or connections are made without a box. An old light fixturewith the lightbulb itself supported by the electric wiring is not consid-ered sound and should be replaced.
As you walk through the house, note the number of electrical out-lets in each room and in the hallways. In modern homes an outlet is
FIGURE 3.8 Knob-and-Tube Wiring
Knob-and-Tube Wiring

The Electrical Service 63
provided for every 12 feet of wall space in most rooms. That means, a10-by-12-foot room should have approximately 4 receptacles. There isusually 1 outlet for every 15 feet of hallway. A person should not haveto reach more than 3 feet horizontally along the kitchen counter to findan outlet. There should be at least 1 outlet in every bathroom, locatedas far away from the bathtub or shower as is practical. Most modernhouses also have at least 1 outdoor electrical receptacle.
If you have an electric stove or clothes dryer, check whether wiringhas been provided for these appliances. Because many houses have gasstoves and clothes dryers, heavy-duty electrical circuits will have to beadded.
Older houses will not have the full complement of electric supply;however, wholesale upgrading is often unnecessary. Where there arefew outlets, it may be necessary to add one in each room. Generally, youshould live in a house for a number of months before deciding exactlywhere to add electrical outlets.
A representative sample of electrical outlets can be tested using acircuit analyzer or tester. These inexpensive devices are available in mosthardware stores. The tester will indicate whether an outlet is poweredand whether it is wired correctly.
FIGURE 3.9 Ground Fault Interrupter
Ground Fault Interrupter

64 In specting a House
On new installations, electrical outlets in bathrooms, on exteriorwalls, and sometimes in kitchens should be Ground Fault Interruptingtype units (see Figure 3.9). These special outlets provide very sensitiveovercurrent protection devices. In the event of even a minor groundfault, the unit will trip. This type of installation is readily identified by atest button on the outlet itself or on the circuit breaker at the panel.
Most older electrical outlets have two slots to receive standard two-prong electrical plugs. Modern electrical receptacles have a third U-shaped slot to receive the grounding plug found on some modern appli-ances. This third slot should be connected to a ground wire, provided inthe cable, which eventually is grounded at the plumbing system as de-scribed previously. The circuit tester will tell you whether or not theground protection has, in fact, been provided. The U-ground recepta-cles do provide additional protection only when a three-prong plug isconnected to it. Most typical electrical appliances have only two prongsand no grounding protection is afforded. Thus, replacement of the two-prong receptacles and ungrounded cable is often not cost-effective. Add-ing new U-ground receptacles connected to the older ungrounded cableprovides no additional protection. This arrangement may lead to a falsesense of security. A ground wire is not necessary if the appliances are
FIGURE 3.10 Stairway Lighting
Stairway Lighting

The Electrical Service 65
double insulated. These appliances, even when used with a two-prong sys-tem, will be safe.
Notice the number and location of light fixtures and switches. Manyold houses have few overhead lights. Lighting for stairwells should beoperable from switches at the top and bottom of the stairwell (see Fig-ure 3.10). Lighting around the furnace and other service areas in thebasement is a must. Lighting in clothes closets usually indicates a high-quality home.
Where wiring is run on the building exterior (e.g., to a porch light),the wire should be enclosed in a waterproof conduit or should be spe-cifically approved for outdoor use.
ALUMINUM WIRING
Most house wiring is copper, although aluminum was used exten-sively in some parts of the country from the mid-1960s through the mid-1970s. Initially, aluminum wiring was considered desirable because ofits low cost. Aluminum wire is not as good an electrical conductor ascopper, but this was recognized initially and larger wire was used.
Some problems with aluminum have since been identified. Becausealuminum is very soft, electricians must take greater care when workingwith it than with copper. Aluminum has a higher coefficient of thermalexpansion than copper does. This means that when the aluminum wireheats up as current passes through, it tends to expand more than a cop-per wire will. Correspondingly, when the wire cools off, it shrinks morethan copper does. The result is movement of the wire at its terminal con-nections. Aluminum wiring is said to “creep” out from under a terminalscrew connection because of this repeated expansion and contraction.
All metals oxidize or rust to some degree. Fortunately, the oxidethat forms on copper is electrically conductive and no problems are pre-sented. Less fortunately, the oxides of aluminum are poor electrical con-ductors and resistance to electrical f low can be caused by a coating ofoxide on the aluminum. Incidentally, the oxide on aluminum is not red,but a whitish color. The oxide found on copper is green.
The oxide forms on an aluminum surface that is exposed to the air.The combination of the poor electrical conductivity of the aluminumoxide and the fact that new metal is regularly exposed by the expansionand contraction can lead to high resistance and overheating at electri-cal terminals.

66 In specting a House
When aluminum wiring was initially introduced, some of theseproblems were not recognized. Within a few years, concern was ex-pressed and electrical connectors were redesigned. Special connectorsdesignated CUAL (see Figure 3.11) were manufactured for such thingsas distribution panels, circuit breaker blocks, fuse blocks, wire nuts, andelectrical receptacles. The improvements worked well in all areas exceptfor the electrical receptacles. Further revision was made to the outletsand the designation was changed to CO/ALR. This revision proved sat-isfactory. When aluminum wiring is found, look for these special out-lets. In some areas, switches must also be CO/ALR. One other solutionthat works for retrofit in some cases is to connect a short length of cop-per wire to the aluminum and then secure the copper wire to a standardreceptacle. The copper/aluminum connection should be made with anappropriately designated CUAL connector or a proprietary systemcalled Copalum. Different jurisdictions allow different methods, so findout what is accepted in your area.
Aluminum wire can usually be spotted by reading the informationon the outside of the cable. The word Aluminum or Alum will be indi-cated somewhere. If the cable is not visible, you can check by removingthe cover plate from an electrical outlet. If an aluminum conductor is
FIGURE 3.11 CUAL Designation
CUAL Designation

The Electrical Service 67
noted, remember to look on the front of the outlet for the CO/ALR des-ignation.
SUMMARY
The electrical system is one of the most important in a housebecause of the hazards posed by faulty wiring. Upgrading the capacityof the service involves working outside the house for the most part.Upgrading is not considered a major expense (usually it costs less than$1,500 for a 100-amp service). Rewiring an entire house is expensive,but rarely necessary. If a house is to be gutted and renovated, rewiringis relatively easy. Where the electrician has to work around wall andceiling finishes, the cost increases significantly. Adding circuits and/orreceptacles and making minor repairs are small jobs from a cost stand-point, but important where safety may be compromised. The presenceof aluminum wiring need not be a major concern. With good installa-tion and the proper connectors, there should be no problem. Providingthe proper connectors on a retrofit basis is not usually a major expense.

68 In specting a House
CHECKLIST— The Electrical Service
1. Size of service?
2. Proper grounding?
3. Fuse or circuit breakers?
4. Fuse or circuit breaker sizes?
5. Number of circuits?
6. Distribution wire: old or new?
7. Adequately supported?
8. Open connections?
9. Aluminum wiring?
10. Sufficient number of outlets throughout the house?
11. Overhead light fixtures where necessary?

C h a p t e r
69
4
THE PLUMBING
The plumbing system in a house iscomposed of several components: a water source, distribution piping, adrainage system, venting, fixtures, and, finally, a waste-disposal system.
WATER SOURCE
In urban areas, water is usually supplied by the municipality via wa-ter mains in the street. This should be verified, however, for some sub-urban areas still rely on well water. Rural homes usually rely on wells.There are two different types of wells: deep and shallow. Wells less than25 feet in depth are considered shallow, while deeper wells can be up toseveral hundred feet. The depth of the well depends on the water table.Deeper wells tend to be less vulnerable to contamination; however, re-gardless of the type of well, water samples should be tested by the localhealth authorities.
Several different types of pumps can be used in conjunction withwells (see Figure 4.1). There are older-style reciprocating or pistonpumps, and more modern jet centrifugal pumps and submersible cen-trifugal pumps. Submersible pumps are located within the well itself

70 In specting a House
and are typically used in deep wells. Surface pumps can be located atthe top of the well in a well house or within the basement area of thehouse itself. If the pump is outdoors, precautions must be taken toensure that the pump does not freeze.
In conjunction with the pump is a storage pressure tank (see Figure4.2). This tank can vary in size from holding just a few gallons to severalhundred gallons. The tank serves a dual purpose. It not only storeswater, but it acts as a means of providing steady water pressure. Becausewater is relatively incompressible, a portion of the tank should be filledwith air. The air is easily compressible and when there is a demand forwater within the house, the air pressure within the storage tank pro-vides the pressure to force the water out. In this manner, the pressurein the tank slowly reduces as the air expands. When the pressure getsto the lower limit of the pressure switch, the pump is reactivated toforce more water into the tank, which compresses the air once again.As time passes, the air within the tank gets absorbed into the water andeventually the tank becomes waterlogged. When this happens, the tank
FIGURE 4.1 Types of Pumps
Types of Pumps

The Plumbing 71
is full of water. Any demand for water within the house will drop pres-sure in the tank very quickly and cause the pump to come on and offrepeatedly. This is a minor problem that can be rectified by drainingwater from, and adding more air into, the tank. The pump and tankshould be checked for leaks and any obvious signs of deterioration.
If the water supply to the house is provided by the municipality, thepipe feeding water into the building is usually found near the exteriorwalls in the basement. Typically, it is at the front of the house comingup through the basement f loor. Near the point of entry into the house,should be a main shutoff valve and, in some cases, also a water meter(see Figure 4.3). Ideally, the main valve will have a waste, or bleed, valvethat can be used to drain the supply plumbing system. Depending onthe age of the house, the pipe leading in from the street may be any oneof several materials and sizes. In very old homes, the pipe may be madeof lead. Lead pipe is easily identified by the large ball type connectionat the joints and by its soft grayish color and texture. This pipe can be
FIGURE 4.2 Pressure Tank Components and Pump Controls
Pressure Tank Components and Pump Controls

72 In specting a House
easily scored with a pocketknife, which will expose a shiny surface. If theincoming pipe is lead, the water should be tested by the local authoritiesfor lead content. Galvanized steel and copper are the other most com-monly used materials and they will be dealt with further in the distribu-tion section of this chapter.
On newer, average-size (three-bedroom) homes, the incoming pipeis commonly three-quarters of an inch. On older homes, it is usuallyone-half-inch piping, and on some very old homes, it is three-eighths ofan inch. Larger homes sometimes have one-inch and even one-and-one-half-inch supply piping.
Generally, the condition of the pipe up to the property line is theresponsibility of the municipality. Beyond the property line, it is theresponsibility of the homeowner.
FIGURE 4.3 Main Shutoff Valve—Stop and Waste
Main Shutoff Valve—Stop and Waste
shutoff

The Plumbing 73
DISTRIBUTION PIPING
Past the shutoff valve and the water meter, the piping starts supply-ing water to the various fixtures within the house. Usually, the first fix-ture to be supplied is the water heater. From the water heater, thepiping generally runs in tandem (hot- and cold-water pipes) to the var-ious fixtures throughout the house. Typically, the pipes are spaced fourto six inches apart to prevent the hot water from warming the cold andvice versa.
The water heater is commonly powered by electricity, natural gas,or oil. In some municipalities, the vast majority of the units are rentedfrom the local electric or gas companies. If this is the case, there is usu-ally a rental sticker on the unit and its condition is not a major concern.A small rental fee is included on your utilities bill.
Water heaters have an average life expectancy of 10 to 12 years. Ifthe unit is not rented, it should be inspected carefully for leakage andrust at the seams and at the piping connections.
Gas- or oil-f ired hot water heaters typically have between a 30-gallon and 40-gallon capacity. This size of heater should provide ade-quate hot water for a family of four. Electrically heated units often havea somewhat larger capacity because of their slower recovery rate.
The supply piping within the house is usually made of galvanizedsteel, copper, or plastic. Plastic piping is not allowed in many jurisdic-tions and only allowed on cold-water piping in others. It is sometimesinstalled without the authorization of the local authorities. If plasticsupply piping is encountered, this should be investigated.
Galvanized steel supply piping (see Figure 4.4) has not been in-stalled in houses for the past 40 to 50 years. This piping is easily identi-f ied by its threaded joints. Depending on the water used, and thefrequency of use, galvanized piping has an average life expectancy of 40to 50 years, so any that you see will likely be reaching the end of its life.It tends to rust from the inside out. The rust usually starts to appear onthe outside of the pipe at the threaded connections where the pipe isthinnest. The internal diameter of the pipe decreases with age as rustand scale build up within the pipe. The hot-water piping tends to dete-riorate more quickly than the cold deteriorates because the elevatedtemperatures accelerate the rusting process. The horizontal sections ofpipe, commonly located in the basement, also rust more quickly. This

74 In specting a House
reduction in the size of the inner diameter of the pipe results in low wa-ter pressure. The pipe eventually rusts through and leaks.
Copper supply piping has a much longer life span. It usually laststhe lifetime of the house. (Certain types of acidic water, however, candeteriorate copper piping at an accelerated rate.) Copper piping can beidentified by its soldered joints—there are no threads. Sometimes whensupply piping has been painted, it is difficult to ascertain what type ofpipe it is. It may be wise to carry a magnet, which will be attracted tothe galvanized pipe, but not to copper.
Replacing older galvanized supply piping with copper is veryexpensive, so try to determine how much galvanized pipe remains.Inspect all visible sections of piping. The largest portions of the pipecan usually be seen in the basement (if it is unfinished). It is very com-mon for homeowners to replace sections of galvanized piping as itwears out. Therefore, if you see some copper piping, do not assumethat it is all copper. Each line must be followed. It is not uncommon tosee a pipe change from copper to galvanized and back again severaltimes during its run through a house. The horizontal sections of pipethat tend to wear out more quickly are often replaced prior to the ver-
FIGURE 4.4 Galvanized Steel Pipe
Galvanized Steel Piperusting of galvanized pipe can greatly reduce waterpressure and will eventually cause leaks as rust createsholes in the pipe walls.
problems are likely to occur soonest on pipes carrying hotwater, horizontal pipes, and at threaded (thinner) sections

The Plumbing 75
tical runs. This is partially because the horizontal sections are readilyaccessible in the basement while the vertical sections are usually buriedwithin walls. It is also common to find hot-water piping replaced by cop-per while the cold-water piping remains galvanized. Piping should beinspected in bathrooms, kitchens, and laundry areas, as well as in thebasement.
The exposed cold-water piping is often wrapped with insulation toprevent condensation.
Copper piping should be supported with copper or plastic hangers.If another type of metallic hanger is used, localized rusting usuallyoccurs where the dissimilar metals contact one another. Localized rust-ing also occurs at the connection of galvanized to copper pipe.
DRAINAGE SYSTEM
Drainage piping can be made of copper, ABS and PVC plastic,lead, galvanized steel, or cast iron. It is not uncommon to find severaldifferent types of drainage pipe used within a single house. Unlike thesupply piping, where the water comes in under pressure, all water mustexit from the drainage piping by gravity. Consequently, the pipes musthave a reasonable slope.
PVC plastic piping has been commonly used in houses since the1960s. This piping has a good track record; however, its life expectancyis not known. All indications are that it should last almost indefinitely.The single biggest drawback to plastic piping is that it tends to be noisy.Depending on the location of the main stack, loud water-rushing noisescan be heard through the walls when a toilet is f lushed.
Copper waste plumbing has all the virtues of copper supply piping.It is usually found in more expensive homes and in homes built imme-diately before plastic piping became common. Many older homes havea combination of drainage piping. The main waste stacks were generallymade of cast iron. It is not uncommon to find cast-iron stacks in homesthat are 80 to 100 years old with the pipe still in very good condition.Occasionally, pinhole leaks develop in this pipe; however, because thepipe is not under pressure, these holes are easily repaired with a rubberpatch and a metal clamp.
Lead waste plumbing, commonly found in older homes, is usuallyrestricted to the smaller lines running from fixtures to the main stack,

76 In specting a House
although it was also used for larger waste lines running from toilets tothe main stack. Because the water in contact with the pipe is runningout of the house, there is no health hazard. However, lead waste pipingcan cause problems and inconvenience for it is difficult, if not impossi-ble, to repair. Furthermore, because of its softness, it is easily deformedand therefore subject to mechanical damage. The first piece of leadwaste piping commonly found during an inspection is below the laun-dry tubs in the basement.
Galvanized waste plumbing was commonly used in older homes onthe vent piping for the waste plumbing system. Because these sectionsof pipe usually contain no water (only vapor), the rough, rusted insideof the pipe poses no serious problems. Waste venting pipes are larger indiameter than supply pipes and therefore rust-closure or rust-perfora-tion problems are not typically encountered.
VENTING
For the waste plumbing system to function, it must be properlyvented. If it isn’t, water can be siphoned out of the traps below plumb-ing fixtures, allowing sewer gases to escape into the house.
The most obvious venting for the plumbing system is the continua-tion of the main waste stack up through the attic and the roof. Depend-ing on the configuration of the plumbing system within the house,there may be more than one waste stack. Smaller vent pipes from vari-ous plumbing fixtures throughout the house usually tie into the mainstack at some point above the level of the highest fixture within thehouse (see Figure 4.5). Because of the piping configuration and thewall finishes below the fixtures, much of the vent piping cannot beseen. Trying to determine its adequacy is very difficult. However, youshould look for certain things. Generally, a stack vent should protrudethrough the roof approximately over the area of each toilet. Where aplumbing fixture is not close to a main stack, check the attic. A ventpipe above this fixture should run across the attic, joining the mainstack. Some plumbing fixtures, because of their location, are difficultto vent. Sinks located in islands in the middle of kitchen areas shouldbe studied carefully to determine if venting has been provided.

The Plumbing 77
The location of the stacks protruding through the roof is impor-tant. Because the odors emitted from the stacks are unpleasant, it isbest not to have stacks located near windows or roof decks.
The height and size of the stack are also important. In cold cli-mates, the warm moist air rising up the stack tends to condense on theinside of the pipe where it protrudes above the roof. If the stack is highenough, frost could completely close the pipe, which would result in anunventilated plumbing system. Vent pipes are usually three or fourinches in diameter where they protrude above the roof and should pro-trude no more than a foot.
FIXTURES
Every plumbing fixture within the house should be tested. Thedrains and undersides of all sinks should be inspected for leakage. Therate of drainage from fixtures should be checked. The caulking and tilework around bathtub enclosures should be thoroughly investigated.
FIGURE 4.5 Vent Terminology
Vent Terminology

78 In specting a House
Water pressure within the house should also be tested (see Figure4.6). Turn on the cold-water tap in the sink of the highest bathroom inthe house. With the cold-water tap wide open, the cold water faucet atthe bathtub should also be opened wide and the pressure drop at thesink should be noted. With the cold water faucets shut off, the sameprocedure should be followed for the hot-water taps. Two things shouldbe noted: the actual drop in water pressure at the sink when the bath-tub faucet is opened and the relative drop in water pressure at the sinkbetween the hot- and cold-water pipes.
If the pressure drop is excessive, but nearly identical on the hot-and cold-water systems, the problem lies within the common plumbingupstream of the hot-water heater or evenly rusted galvanized plumbingthroughout. If the pressure drop is more on one system than on theother, this indicates pressure problems within the piping of that partic-ular section of the system. As further confirmation of your observa-
FIGURE 4.6 Pressure Decreases with Height
Pressure Decreases with Height

The Plumbing 79
tions, it is best to f low the hot-water tap at the sink and the cold-watertap at the bathtub and vice versa to note the effect on the water pres-sure at the sink. If the water pressure at the sink is greatly affected, therestriction in the piping is in the common portion of the system.
This information can be correlated with what you have alreadyobserved about the location and amount of older galvanized pipe. Asignificant drop in water pressure indicates immediate replacement ofthe older pipe is necessary. This can be an expensive proposition. If,however, the pressure drop is not appreciable, and no leaks or rustyjoints were noted during your visual inspection of the pipes, there areprobably several years of life remaining in the pipes. Sometimes, waterpressure problems are a result of undersized rather than corroded pip-ing. Because all the water coming out of the faucets enters through onepipe, this pipe should ideally be larger than the pipes used downstreamof the water heater when there is a hot- and cold-water pipe. In otherwords, the pipe upstream of the hot-water heater is carrying both thehot and the cold water, although the hot water has not yet become hot!Sometimes, this pressure drop can be rectified by simply increasing thediameter of this section of piping. Low water pressure can also becaused by an obstruction in the pipe, a partially closed valve, or a poorcity water supply.
When inspecting the general interior finish of the house, try to cor-relate the location of water stains, if any, on interior walls and ceilingswith the plumbing system. Sometimes what is thought to be a roof leakis damage resulting from a plumbing leak.
WASTE DISPOSAL SYSTEMS
In most municipalities, the waste plumbing is connected to sanitarysewers. The waste plumbing line simply exits below the basement f loorand leads out to a larger pipe in the street. Obviously, a visual inspec-tion of this section of the plumbing system is not possible.
The most common problem associated with this section of theplumbing system is a sewer backup. Several situations can cause a back-up. For instance, there may be an inherent design problem in the entiresewage system in the area in which the house is located. In cases of thistype, more waste enters the sewage system than can be carried away.Consequently, sewage water backs up through f loor drains in the base-

80 In specting a House
ments of houses. It can sometimes be difficult to determine whether thissituation has occurred in the past and, more important, whether it is arecurring problem. Sometimes information can be gained from the sell-er, neighbors, or the municipality. Admittedly, information from thesesources is often inconclusive.
Waste plumbing problems can also be more localized. They can berestricted to the main waste pipe for the house, as opposed to a regionalproblem. In this case, the problem is usually caused by a blocked or bro-ken drainage pipe. Blockage can result from debris entering the wastesystem via f loor drains and other plumbing fixtures, or it can be causedby roots from various trees and shrubbery. Drainage piping can also be-come broken by roots, frost heaving, or shifting of the pipe.
During the course of an inspection, there is no absolute means oftesting the adequacy of the waste system. All that can be done is to f lowan appreciable amount of water and note any backup. Evidence of prob-lems may be found by looking at the clean-out cap on the main wastestack. If it has been recently opened, try to find out why.
Blocked drainage pipes can most often be corrected by a plumberwith an eel or auger. A crushed drainage pipe requires digging down tothe pipe to make the necessary repairs. While digging is obviously moreexpensive, a good plumber can usually locate the break and repair itwithout doing severe damage to the property or pocketbook.
SEPTIC SYSTEMS
In rural areas and in some suburban areas, waste disposal is handledby a septic system. A septic system consists of two major components: atank (see Figure 4.7) and a disposal field. The tank is a watertight con-tainer usually made of concrete. It serves as a holding tank to allow sol-ids that will not dissolve to settle to the bottom of the tank. Lightermaterials that f loat are also held in the tank. The heavy solids are knownas sludge and the lighter materials are known as scum. Within the tank,some of the solids are decomposed and are converted to a liquid. Theliquid is discharged from the tank into the disposal field.
Disposal fields are also known as leaching beds (see Figure 4.8), tilebeds, soil absorption fields, or drain fields. They consist of a networkof perforated or open jointed pipes in trenches below the ground sur-face that allow the liquid waste (known as eff luent) to percolate into the

The Plumbing 81
soil. The size of the leaching bed depends on the ability of the soil toabsorb the eff luent.
When inspecting a septic system, look for damp areas over theleaching bed and septic tank. Also note any objectionable smells. Whenthe septic system fails, the porosity of the leaching bed is lost and canno longer absorb more eff luent. Consequently, the eff luent rises to thesurface. When a leaching bed becomes plugged, a new leaching areamust be built. One should ensure that there is sufficient room for a newarea. With proper maintenance, a septic leaching area should last 20 to30 years.
If possible, try to determine how frequently the septic tank has beencleaned of sludge. It should be inspected annually and cleaned everythree to five years. If the tank is allowed to fill with sludge, solid wastewill get into the leaching bed and plug it prematurely. This will probablyresult in eff luent coming to the surface. If the system is completelyplugged, and a significant amount of water is f lowed within the houseduring the inspection, the lowest plumbing fixture in the house mayback up.
FIGURE 4.7 Septic Tank
Septic Tank(two compartment)

82 In specting a House
It is also important to determine the distance between a well andthe septic tank and disposal system. Because the eff luent that is dis-charged from the leaching field is far from pure, the well should be atleast 50 feet from the septic tank and 100 feet from the disposal field.
SUMMARY
The most common major plumbing problem is worn-out galvanizedsupply piping. It is expensive to replace all the supply lines in a house.The cost is greater where the plumbing is covered by interior finishes.
Waste plumbing is not usually a source of major expense. Failedsections can be replaced on an as-needed basis. Similarly, venting defi-ciencies do not often result in expensive repairs. Replacing fixtures andremodeling kitchens and bathrooms can be the most expensive plumb-ing-related work. This is particularly true if fixtures are to be added orrelocated.
A septic system is very costly to replace, particularly if there is nogood location for a new tile bed.
FIGURE 4.8 Tile Beds
Tile Beds

The Plumbing 83
CHECKLIST— The Plumbing
Water Supply: Private or public?
Private: Well location? Pump type and condition? Tank size and condition? Short cycling of pump?
Public: Lead pipe from street to house? Shutoff valve?
Distribution Piping
Copper or galvanized? Size of main to hot-water heater?
Water heater: Electric? Oil? Gas? Size? Rental? Copper or plastic hangers for copper pipe?
Drainage and Venting
Lead waste pipe? Evidence of leakage? Pipe condition? Traps below fixtures? Fixtures line up close to main vent? Fixtures work properly? Water pressure adequate?
Waste Disposal: Private or public?
Public: Evidence of sewer backup? Clean-out on main stack recently opened?
Private: Age of septic system? Damp areas over the tile bed or tank? Odors? Room for a new tile bed? Separation between supply well and septic system?


C h a p t e r
85
5
THE HEATING SYSTEM
Many different types of heatingsystems are available residentially. Systems are classified by both thefuel they use and the medium they use to distribute the heat. Oil, nat-ural gas, electricity, or solar energy can be used as fuel. Air, water, elec-tric wiring, or sometimes steam can be used to distribute the heat.Different combinations of fuels and distribution systems are available;however, the warm-air furnace, the hot-water boiler, and electric heat-ing are the most common.
WARM-AIR FURNACES
Warm-air furnaces are usually heated by oil or gas. While oil andgas furnaces may look somewhat different, they have several compo-nents in common. One such component is the heat exchanger. Thef lame itself and the by-products of combustion, such as water vapor,carbon monoxide, carbon dioxide, as well as sulfur, do not come indirect contact with the air used to heat the house (see Figure 5.1).Instead, the furnace has a heat exchanger. Heat exchangers come inmany shapes and sizes, but, essentially, their purpose is to transfer the

86 In specting a House
heat from the f lame and hot gases to the air used to heat the house.The fuel is burned inside the heat exchanger, which is usually made ofsteel or cast iron. The distribution air is then allowed to pass across theoutside of the heat exchanger to pick up the heat generated on theinside and distribute it throughout the house.
The heat exchanger is the most critical component of the furnace.If it should develop a leak by cracking or rusting through, then theproducts of combustion can leak through into the heat distribution sys-tem and come out of the air registers in the house. If enough leakageoccurs, it results in odors and soot buildup, mostly visible around theregisters. While heat exchangers can sometimes be replaced, it is moreoften necessary to replace the entire furnace.
FIGURE 5.1 Heat Exchanger Heat Flow
Heat Exchanger Heat Flowin forced-air gas furnace
heat from the ribbonburners flows up the
inside of the heatexchanger
after emerging fromthe top of the heat
exchanger, it ischanneled into the
vent connector(and ultimatelyto the chimney)

The Heating System 87
Furnace Efficiencies
Conventional furnaces have an operating efficiency of about 80percent. This means that about 20 percent of the heat is lost up thechimney. Considering the additional losses of maintaining the pilotlight and warm air from the house going up the chimney when the fur-nace is off and during start-up and cooldown, the seasonal efficiency istypically 55 to 65 percent. These furnaces are no longer sold.
Midefficiency furnaces use vent dampers or induced draft fans andintermittent pilot lights to reduce the off-cycle losses. Efficiencies forthese furnaces are typically 78 to 82 percent. In new installations, fur-naces must be at least midefficiency.
High-efficiency furnaces have been around since the early 1980s.These furnaces condense the exhaust in an effort to get as much heat aspossible out of the fuel. These units claim efficiencies of 85 to 95 per-cent. Although the cost to heat the house drops when a high-efficiencyfurnace is installed, this is often offset by the higher installation cost, aswell as higher maintenance bills.
The life span of this new generation of efficient furnaces is not yetknown, for they are still relatively new. These furnaces are more tech-nically advanced than are their conventional efficiency predecessors.There are numerous fans, switches, relays, and circuit boards that didnot exist on furnaces 25 years ago. Many of these midefficiency andhigh-efficiency furnaces have been redesigned several times in the past15 years because of problems with less-than-perfect maintenance orinstallation.
The Distribution System
Besides the heat-generating section of the furnace, there is also adistribution system. Modern furnaces are forced-air systems (see Figure5.2). This means a fan blows or forces the air across the heat exchanger,through the ductwork in the house, and into the various rooms throughregisters. The suction side of the fan is connected to return air duct-work, which draws air back out of the rooms to the furnace to be redis-tributed as warm air.
Older systems, called gravity furnaces, have no fan and rely on theprinciple that warm air will rise through the ductwork, forcing thecolder, heavier air back to the furnace to be heated. These systems are

88 In specting a House
far less efficient and rely on large, usually circular, ductwork to distrib-ute the heat from a centrally located furnace known as an octopus(because of its huge ducts going off in all directions and looking muchlike a large mechanical octopus).
The distribution arrangement for either type of system, forced-airor gravity, should have ductwork that terminates in every room. Ideally,the supply air grilles should be located near exterior walls, preferablybelow windows, to provide the most heat to the coolest area of theroom. On gravity systems, and early forced-air systems, this is often notthe case for it involves the use of more ductwork.
Return air grilles to take the air back to the furnace should be plen-tiful (one per room located on the opposite side of the room from thesupply air register), but seldom are, except in more expensive installa-tions. They are quite often found centrally located on the first f loor. In
FIGURE 5.2 House Air Flow
House Air Flow

The Heating System 89
this case, it is important to have bedroom doors undercut by an inch orso to allow air to escape from the room and go back to the furnace. Oth-erwise, rooms with closed doors tend to get cold.
Inspection
If possible, test the furnace at the time of your inspection. Simplyturn up the thermostat and see that the unit responds. On a forced-airsystem, the fan may take a few minutes to start (it waits for the furnace toget up to temperature). Listen for unusual noises and excessive vibration.
Look for rust, dirt, exposed poorly connected wiring, and generalmechanical condition. A good percentage of furnace blowers have thedate of manufacture stamped on the unit near an arrow showing thedirection of rotation. While it is possible that the blower has beenreplaced, odds are good that this date represents the approximate dateof manufacture of the furnace. Forced-air furnaces have an average lifeexpectancy of 20 to 30 years. Octopus-style furnaces are, for the mostpart, obsolete. If you find one, plan on installing a new furnace andsome new distribution ductwork in the near future.
Because forced-air furnaces physically move the air around thehouse, they are well suited to providing central humidification, elec-tronic air cleaning, and air-conditioning.
Humidifying Systems
Central humidifiers are relatively inexpensive pieces of equipmentthat, when attached to a forced-air furnace, can add humidity to the airduring dry winter months. There are many shapes and sizes, but twobasic types are most common. The least expensive is the externallymounted drum-type (as shown in Figure 5.3). The unit is attached to theoutside of the return-air ductwork with a bypass duct connected to thesupply-air ductwork. It consists of a motor-operated drum, made of anabsorbent material, which rotates in a tray of water where the water levelis controlled by a f loat valve. The motor, which is controlled by a humi-distat, rotates the drum only when the humidity levels are low. These hu-midifiers are often neglected and mineral deposits from the water clogup the tray and pads. Deposits also tend to clog the shutoff valve so thatit does not completely turn off. The tray then overf lows and water dripsdown onto the furnace ductwork. If the humidifier is mounted above

90 In specting a House
the furnace, the leakage can damage the heat exchanger or other com-ponents inside the furnace. This causes rusting and premature failureof the furnace.
A more desirable type of humidifier is the trickle type (see Figure5.4). This consists of an electrically controlled water valve, which allowswater to trickle down through a metal mesh pad. Air from the furnaceis passed through this pad, where it picks up humidity. Excess water iscollected and drained out of the unit through a small pipe. Because nowater sits stagnant inside the humidifier, there is less opportunity forbacteria to grow. Regardless of which type of unit is used, it should beinspected carefully for leakage.
Electronic Air Cleaners
Electronic air filters clean the air to a much greater extent thanconventional mechanical filters do. The unit is usually located on thereturn-air ductwork at a point where it meets the furnace. The unit has
FIGURE 5.3 Humidifier above Heat Exchanger
Humidifier above Heat Exchanger
;

The Heating System 91
a preliminary mechanical filter to remove large pieces of debris. Thesmaller particles that get through the filter are electrically charged andthen collected on plates of opposite polarity. Most units are equippedwith test switches that should be checked. If functioning properly, acrackling noise will be heard. All units require regular maintenanceand cleaning. Therefore, it is advisable to obtain the operating andmaintenance book from the seller.
CENTRAL AIR-CONDITIONING
Central air-conditioning is a common feature on forced-air fur-naces. Residential air-conditioning systems are usually composed of twoseparate sections (see Figure 5.5). One section—the evaporator coil—islocated inside the ductwork immediately above the furnace. The refrig-erant enters the coil in the ductwork in a liquid state and draws heatfrom the air to boil the liquid and turn it into a gas. This reduction in
FIGURE 5.4 Trickle Humidifier
Trickle Humidifier

92 In specting a House
air temperature also causes condensation on the coil, reducing humid-ity levels. The condensate is collected in a tray and allowed to drain outof the unit. The condensate drain line usually runs down the outside ofthe furnace to a nearby f loor drain.
The other half of the unit is located outdoors, if it is an air-cooledsystem. This section consists of a compressor and a condenser coil,which converts the refrigerant gas back into a liquid state by compress-ing it and allowing it to give off heat to the outdoors. A compressor hasan average life of 10 to 15 years. It is the heart of the system.
Some systems are water-cooled rather than air-cooled. In this case,the unit containing the condenser and compressor is usually located in-doors near the furnace. Rather than giving off heat to the outdoors, theheat is removed by water. The units tend to last longer for they are notsubjected to the elements and extreme temperatures. However, the wa-ter used for cooling is usually domestic water that goes down the drain.The water has to be paid for—which increases the expense of operation—and cannot be reused except for such things as watering lawns.
FIGURE 5.5 Air-Conditioning—Schematic of System
Air-Conditioning—Schematic of System

The Heating System 93
Systems with outside compressors should not be tested when tem-peratures are below 60°F (15°C) for this can cause severe damage to theunit. It is best to get permission from the owner to test either type ofunit because difficulties can arise with units that have been shut downfor several months.
When testing air-conditioning systems, simply set thermostat con-trols for cooling. Check for cool air from the registers and warm air fromthe outside condenser unit. On water systems, listen for water runningthrough the unit and down the drain. Also, check for unusual noisesfrom the compressor and the fan unit. Even under normal circum-stances, some units are quite noisy, so it is a good idea to listen to theneighbor’s unit as well as your own.
In houses with hot-water heat, sometimes an independent air-condi-tioning system is installed in the attic and ductwork is run through theattic space and down the walls. This ductwork must be insulated. Atticunits should also be contained in a drip pan to prevent water damage tothe ceilings if the condensate line should get plugged. These unitsshould be tested for excessive noise and vibration.
There are also some independent air-conditioners that have noducts. These units are mounted on the interior walls of the home andlook like high-quality window-mounted air-conditioners. These ductlesssystems are connected to outside coils that are similar to those used forconventional systems. There may be one or several of these units in ahome, placed in strategic areas.
HEAT PUMPS
Heat pumps are quite popular in some areas of North America, de-pending on the climate. A heat pump is a central air-conditioning sys-tem that cools the house in the summer and can be used to add heat tothe house during the heating season. This is essentially accomplished byreversing the refrigerant f low through the air-conditioning system. Dur-ing relatively mild weather, a heat pump can be a very efficient systemfor adding heat to a house. As the weather becomes colder, however, aheat pump alone cannot supply sufficient heat for a home. A furnace orelectric baseboard heaters are still needed in addition to a heat pump.
Under normal circumstances, the heat pump is set to shut off at acertain temperature (usually around the freezing point) and the fur-

94 In specting a House
nace takes over. Electric furnaces allow simultaneous operation of boththe furnace and heat pump, while gas or oil furnaces must run alone.
Generally speaking, a heat pump may be considered cost-effectivein mild climates if an air-conditioning system is to be provided in anycase. While heat pumps are more expensive than air-conditioning sys-tems, the added cost may be recouped in a reasonable time, dependingon several factors.
The life expectancy of a heat pump compressor is similar to that ofan air-conditioning compressor. Many heat pump compressors are in-stalled inside the home, which protects them from extremes in weather.On the other hand, heat pumps are expected to operate more than air-conditioners, for they provide heat as well. A 10- to 20-year life span isprojected (see Figure 5.6).
The inspection procedures for a heat pump are similar to those foran air-conditioning system. A heat pump should not be operated in the
FIGURE 5.6 Typical Compressor Life
Typical Compressor Life

The Heating System 95
cooling mode at temperatures below 65°F (18°C) nor should it be oper-ated in the heating mode at temperatures above 60°F (15°C).
HOT-WATER HEATING SYSTEMS
Hot-water heating systems (also known as hydronic heating) arecommon in older houses. As with warm-air systems, the most commonfuels are gas and oil. Many older hot-water furnaces (boilers) were oncecoal-fired or wood-fired, but have since been converted to a more con-venient fuel. As with warm-air systems, the boiler has a heat exchangerto transfer the heat generated within the furnace to the water (see Fig-ure 5.7). Again, the heat exchanger is the most critical component ofthe boiler. If it develops a crack or a hole, water will leak into the com-bustion chamber. Depending on the type of boiler, there may be a largeaccess door into the combustion area or there may be only a small ob-servation port. If possible, look inside the combustion area for wateraccumulation or rust stains from a leak. When looking inside, also
FIGURE 5.7 How Boilers Work
How Boilers Work
heat is released into theroom through radiators,baseboards, converters,or radiant heating pipesburied in the finishes.

96 In specting a House
check the condition of the refractory material in the firebox. The re-fractory material is a type of brick designed for high temperatures. Itdeteriorates with time and eventually needs rebuilding. If you cannotlook inside, listen for hissing noises from boiling droplets of water im-mediately after the boiler has shut off. If there is a leak in the heat ex-changer, the heating plant will most likely have to be replaced.
If at all possible, try to establish the age of the unit. Older cast-ironboilers were originally designed for coal. These large heavy boilers maybe circular or rectangular and are usually assembled in sections. Some-times the entire boiler is wrapped with insulation to keep the heat inside.They have an average life of 35 to 50 years. Unlike other types of heatingsystems that seem to fail like clockwork within a given time span, how-ever, many cast-iron boilers remain in service for 70 or 80 years. Theirefficiency, however, tends to decrease with age. Scale and rust that buildup on the heat exchanger inhibit the f low of heat from the f lame to thewater. Therefore, even though the unit has not failed, if it is over 50 or60 years old, it might be wise to replace it simply to gain the efficiency ofa new unit. Older cast-iron boilers have an average efficiency rating inthe neighborhood of 60 percent. More conventional late-model hot-water boilers have efficiencies in the 80 percent range. Some new typesof boilers coming onto the market claim a 95 percent efficiency rating.
During the 1940s and 1950s, hot-water boilers were undergoingchanges. Steel boilers became popular and both steel and cast-iron boil-ers became more compact and were enclosed in sheet metal covers. Thelife expectancy of a steel boiler is somewhat less than that of cast iron—20 to 35 years for old units and 15 to 25 years for the newer, lighterunits. If it is not possible to determine whether the heat exchanger iscast iron or steel, note the name and model number and check with themanufacturer.
A third type of hot-water boiler became popular through the 1960sand 1970s. This boiler, which is enclosed in a very compact metal cab-inet, has a copper heat exchanger. Because of a rapid transfer of heatfrom the f lame to the water, only a small heat exchanger is needed. Thelife expectancy of these is 15 to 25 years.
Also associated with boilers are various limit switches and safetydevices. These devices sense water temperature, f lue gas temperature,water levels, etc., to ensure the safe operation of the boiler. It is beyondthe scope of this book to deal adequately with the various types ofsafety equipment on heating systems.

The Heating System 97
The Distribution System
Many older heating systems rely on gravity to distribute the water.Warm water, which is relatively light, simply rises through the pipes tothe radiators forcing the colder, heavier water back to the boiler (seeFigure 5.8). On all new hot-water systems, circulating pumps are pro-vided. These pumps can also be added to older boilers on a retrofitbasis. Rather than relying on the water to travel by gravity, the pumpscirculate the water through the heating system. Whether the water isdistributed by gravity or with a pump, an expansion tank is included inthe system. This tank, which is partially filled with air, allows the waterto expand as it is heated.
The distribution piping for the hot-water system should be lookedat closely. Quite often distribution pipes are insulated in the basementarea to prevent excessive heat loss from the pipes before they get to theradiators. Most distribution piping problems occur at the connection
FIGURE 5.8 Closed Hydronic System
Closed Hydronic System

98 In specting a House
to the radiators and not in the piping itself. However, the pipes are verycostly to replace and should be inspected carefully for rust and leakage.
The heating pipes terminate at radiators or convectors. Radiatorsare usually made of cast iron and are very heavy, and they give off rel-atively even heat because of their mass. A control valve on the piping atthe radiator allows the heat to be regulated by adjusting the amount ofhot water f lowing through the radiator. A smaller air bleed valve at thetop of the radiator allows the release of any air trapped in the system.Air in a radiator will prevent hot water from entering the unit. Occa-sionally, the radiators themselves leak, but most problems are associ-ated with sticky or leaking control valves and bleed valves. On anindividual basis, they are not costly to repair, but it can become expen-sive if most valves need work.
Convectors are usually found in newer homes and tend to give offheat more efficiently through thin metal fins. The heating is more cycli-cal for the units do not retain much heat when the boiler is not on.Besides checking the valves, look for damaged fins, which will reduceefficiency.
As with forced-air heat, make sure there is a sufficient number ofradiators or convectors throughout the house. Ideally, there should beat least one per room. It should be located by an exterior wall below awindow, if possible. If one or two cool areas are noted, electric base-board heaters can usually be added inexpensively.
FORCED-AIR HEATING VERSUS HOT-WATER HEATING
Forced-air heating is not inherently better than hot-water heatingand vice versa. Both furnaces and boilers have advantages relative toeach other.
Advantages of Forced-Air Heating
1. A forced-air heating system is more versatile than a hot-watersystem. The same distribution system can be used to cool, clean,humidify, and dehumidify the air. With hot-water heating sys-tems, this is not possible.

The Heating System 99
2. Forced-air heating systems generally have lower installationcosts than do hot-water heating systems.
3. Forced-air systems generally have lower maintenance costs. 4. Warm-air heating systems tend to respond faster. If the house is
cool, a warm-air system will bring it up to temperature veryquickly. Hot-water systems are slower to respond.
5. Within each room, forced-air systems take up less space. A heat-ing register located on the f loor or the wall does not interferewith the furniture layout as much as a radiator or convectordoes.
6. If the heating system should fail, there is no danger of freezingheating pipes as there is with a hot-water system.
7. During renovation work, it is much easier to relocate a warm-airregister and its associated ductwork than to relocate a radiator.
Advantages of Hot-Water Heating
1. While warm-air systems tend to respond faster, they are alsomore cyclical. The temperature within the house tends to riseand fall as the furnace goes on and off. The heat retention of alarge cast-iron radiator dampens this cycling effect so that theheat from a hot-water system is much more even.
2. While forced-air systems take less space within a given room, theyrequire more space (in basements and within walls and f loors)
for ductwork than hot-water heating systems take for piping. 3. Hot-water heating systems tend to be quieter than forced-air sys-
tems, which make more noise as the ductwork expands and con-tracts. Fans on forced-air heating systems can also be noisy.
4. On some forced-air systems, the movement of the air from theregisters creates drafts within the house. No real air movementis experienced with a hot-water system, with the exception ofslow convection of the heat given off by the radiators.
5. It may be easier to extend a hot-water system because pipes areeasier to add and the capacity of the system is generally largerand can accept a heavier load.
6. While hot-water systems do have higher installation costs, theyhave longer life expectancies as well.

100 In specting a House
7. When a forced-air system fails, products of combustion fromthe unit may get into the main air stream of the house. Thisproblem is eliminated with the use of hot-water piping.
ELECTRIC HEATING
There are many ways to use electricity to heat a house. One way isto use a forced-air furnace, as described earlier. Instead of a f lame anda heat exchanger, electric resistance wires are used. Because there are noproducts of combustion, the wires can sit right in the air stream abovethe blower, eliminating the need for a heat exchanger. Electric forced-air furnaces have longer life expectancies than fuel-fired furnaces; how-ever, components such as heating wires, fans, and blowers may have tobe replaced for they wear out. Electric furnaces have another advantageover coal oil, or gas furnaces because they do not require chimneys (seeFigure 5.9).
FIGURE 5.9 Equivalent Furnaces
Equivalent Furnaces

The Heating System 101
The most common form of electric heat is baseboard resistanceheaters. Electric baseboard heaters should be located on exterior walls,preferably below windows (see Figure 5.10). Units are usually individu-ally controlled by a dial right on the heater or by wall-mounted thermo-stats. The wall-mounted thermostat is preferred because it is moreconvenient. It can be a real nuisance to reach the control mounted righton a baseboard unit.
Each unit should be checked for proper operation. If one or two donot work, it isn’t a serious problem for they are not particularly expen-sive items. In that sense, baseboard heat is advantageous because allyour eggs are not in one basket (as with an expensive furnace) but ratherspread throughout the house.
Because the number of units necessary to provide heat varies be-cause of climate and building insulation, no rule of thumb can be given;however, you should note rooms that do not have any heaters or thatneed more units.
FIGURE 5.10 Best Location for Electric Heaters
Best Location for Electric Heaters
the coolest spots in a room tend tobe at floor level by outside walls(particularly below windows), soelectric heaters are best located
in these areas

102 In specting a House
Advantages of Electric Baseboard Heat
1. There is no distribution network as such, simply wires requiringlittle space.
2. There is no single major component to fail. 3. Individual thermostats provide good control of temperature,
room by room. 4. There is no risk from products of combustion within the house. 5. There is no need for a chimney. 6. The system is not susceptible to damage by freezing. 7. Electric baseboard heat is quick to respond. 8. Electric heating is very quiet. 9. It has a low installation cost.
Disadvantages of Electric Baseboard Heat
1. There is no ability to cool, humidify, and clean the air, for thereis no ductwork system.
2. Historically, electric heating has been more expensive thanother systems to operate.
3. A larger electrical system is required.
Some houses are heated electrically with radiant ceiling panels.These panels consist of resistance wiring embedded in the ceiling dur-ing installation or installed in prewired panels (see Figure 5.11). Radiantheating has advantages because there are no obvious heating sources inthe room to interfere with furniture layout. However, it does have somedrawbacks. Because radiant ceiling heating can be considered much likethe radiant heating you receive when sitting out in the sunlight, areas inthe shade tend to be rather cool. This phenomenon can occur when sit-ting at a large table, for example. The area under the table will be “inthe shade” and so it will be significantly cooler.
The second and perhaps greater disadvantage with radiant ceilingpanels is that they are difficult to repair. If one of the wires provesfaulty and there is a break in the circuit, it is hard to isolate the problemto make the necessary repairs. In that sense, it is also very difficult toinspect a system of this type when you are performing a prepurchaseanalysis. All you can do is turn on the units and attempt to feel the heat.

The Heating System 103
The surface temperature of the ceiling will be somewhat higher thanthe temperature in the room.
Radiant ceiling panels can also be installed using hot-water pipes asopposed to electric wires. The same principle applies, except that a leakin the system is much easier to detect than a broken electric wire. Unfor-tunately, there is also more potential for damage to furniture and roomfinishes.
Radiant heat, either electric or hot water, can also be installed inthe f loor. Once again, locating defects can be difficult, especially if thesystem is embedded in a concrete f loor.
SUMMARY
This chapter has touched on the most common types of heatingsystems, although there are many more variations, from gas-fired wallfurnaces to hot-water radiant f loor heating to steam boilers. You maywant to talk with local specialists if you come across a type of heatingsystem that you are not familiar with.
FIGURE 5.11 Electric Radiant Heat—Ceilings
Electric Radiant Heat—Ceilings

104 In specting a House
Obviously, the heating system is an important component of thehouse. The heating plant itself, whether a warm-air furnace or hot-water boiler, is expensive to replace. Problems with the distribution net-work are less likely; however, the adequacy of the distribution networkshould be analyzed. While there are pros and cons to the various typesof heating systems, none is a clear-cut winner. Therefore, the type ofsystem within the house should not be a major concern.

The Heating System 105
CHECKLIST— The Heating System
Warm-Air Furnaces
1. Gravity or forced?
2. Age?
3. Fuel?
4. Condition?
5. Adequate distribution?
6. Humidifier leakage?
7. Central air-conditioning: Type? Age? Condition? Noise?
8. Heat pumps: Age? Condition? Noise?
9. Electronic air filter?
Hot-Water Boiler
1. Circulating pump?
2. Age?
3. Fuel?
4. Condition?
5. Adequate distribution?
6. Radiator condition: Valves? Leakage?
7. Convector condition: Fins? Valves? Leakage?
Electric Baseboard Heat
1. Condition of each unit?
2. Adequate number of units?


C h a p t e r
107
6
THE BASEMENT ANDCRAWL SPACE
Dampness or water in basementsand crawl spaces is the source of great frustration for homeowners. Be-cause it is not an unusual problem and can be complicated to address,you’ll want to inspect carefully for this issue and understand its causes,implications, and solutions when making a purchase decision.
WET BASEMENTS
Water can find its way into the basement from two primary sources(see Figure 6.1). The first is surface water, which includes rain runoffand melted snow. The second is subsurface water (groundwater) froma high-water table or an underground spring or stream.
The first is by far the most common source of wet basements andthe one most readily prevented. Subsurface water problems are oftendifficult to resolve, but, fortunately, they are fairly rare.
Evidence of Water Problems
Most basements with moisture problems are not wet all the time.Consequently, you will have to look for clues in the basement (see Fig-

108 In specting a House
ure 6.2). One of the best clues is whether valuables are stored directlyon the basement f loor. If wooden furniture and cardboard boxes, forinstance, have been sitting on the f loor for some time and show no evi-dence of damage, this is a good indication that the basement is rela-tively dry. If, on the other hand, everything is raised on wood planks orplatforms, one may be justifiably suspicious.
Unfinished basement walls also provide clues. Look for waterstains or paint that has peeled, particularly on the lower section of thewalls. Sometimes a white powdery crystal is found on the walls. Thiseff lorescence is a salt deposit left by the water that evaporates from thewall surface. The salts have been dissolved by the water as it passesthrough the foundation wall. This is an indication of water seepage, butmay not represent a severe leakage problem. Be on the lookout forother clues. If the basement has recently been painted, concentrate onout-of-the-way areas.
Check for water stains or rust under the stairs, below furnaces andwater heaters, behind laundry tubs, in cupboards and cold-storage
FIGURE 6.1 Causes of Wet Basement Problems
Causes of Wet Basement Problems

The Basement and Crawl Space 109
rooms. A word of caution about rust around furnaces: Be careful not toconfuse the rust caused by a leaking humidifier with the rust from wateron the f loor. Water from a humidifier will produce vertical streaking orrusting down one side of the furnace. Water on the f loor will attack onlythe bottom of the furnace, but on all sides.
Where wood is found near f loor level, such as at the bottom ofstairs or posts, look for water stains and rot. A probe may be useful inthis investigation. The joint between the f loor and the wall is anothercommon leakage point that should be checked.
Where the basement is finished, look at the bottom of paneling fordark streaks, rot, mold and mildew, or deformation of the wallboard.Rust around nail heads and electrical outlets are other signs. Staining andrusting may also appear behind and below electric baseboard heaters.
White eff lorescence may be noted between f loor tiles, indicatingwater below the f loor. If a wood subf loor has been laid, walk the entiref loor and watch for soft or springy areas. These, too, may mean watertrouble below. If the f loor is carpeted, a musty odor may be a clue thatwater problems have been experienced.
FIGURE 6.2 Wet Basement Clues—Part 1
Wet Basement Clues—Part 1

110 In specting a House
If the foundation walls are poured concrete, look for vertical rustystreaks. They generally indicate water leakage through the holes left bythe form tie-rods that were inserted when the wall was put up. (Whena concrete wall is erected, rods are used to hold forms in place. Whenthe rods are removed, holes are left in the wall.) These holes should bepatched with concrete or hydraulic cement, preferably from the outsideas well as the inside.
Most cracking in basement f loors is not a major problem. It issometimes because of water below the f loor, but usually does not affectthe structural integrity of the house. If the water below is removed, theprocess is usually arrested. Sometimes, however, soil can settle or beeroded from below the concrete, creating an unsafe condition. Tap thef loor and listen for a hollow sound. With a little practice, you will beable to identify an underf loor soil problem. (See Figure 6.3 for moreclues about wet basements.)
FIGURE 6.3 Wet Basement Clues—Part 2
Wet Basement Clues—Part 2
-

The Basement and Crawl Space 111
Causes and Solutions
In many cities, some evidence of moisture penetration can befound in almost every house. As discussed, the culprit is usually surfacewater. While there are a multitude of remedies available, the best solu-tion is to eliminate the problem at the source. If you can keep waterfrom collecting around the basement walls, you should be able to pre-vent leakage. You can accomplish this by ensuring that the land adjacentto the building slopes down away from the house. As discussed in Chap-ter 1, the land should slope down approximately one inch per foot forthe first six feet away from the building (see Figure 6.4). All surfaces,including lawns, gardens, driveways, patios, and sidewalks, should beincluded in this slope. If the property hasn’t been landscaped in thisway, correcting the slope of the land can be a relatively expensive prop-osition. This is particularly true where patios, sidewalks, and drivewayshave to be reworked.
FIGURE 6.4 Control Surface Water
Control Surface Water
/

112 In specting a House
If there appear to be water problems, you should also check the gut-ters and downspouts. Again, we talked about this system in Chapter 1.Collecting the water from the roof system and discharging it into a lo-calized area outside the foundation wall almost always leads to moistureproblems in the basement. The first thing is to ensure that all the roofwater is being collected. Gutters may have to be cleaned, realigned, re-paired, replaced, or added. Second, downspouts must either carry thewater into a house waste system or discharge it several feet away fromthe house.
In many city homes, built from the 1940s onward, drainage tile hasbeen laid around the base of the foundation walls outside the house.This tile may be a red-orange clay tile or a perforated plastic pipe. Thedrainage system is designed to prevent water from standing in the soiloutside the foundation wall. Water enters the pipe at joints between thesections of clay tile or through the holes in the plastic pipe. The tile iscovered with gravel to allow water to reach the tile easily and enter thedrainage system. The water collected is discharged into a sewer systemor a sump from which it may be pumped away from the building.
These drainage systems are valuable, but they do not compensatefor poor grading or inadequate gutters and downspouts. In manyhouses 25 years old or more, the tile is broken or clogged with soil and/or tree roots. Water from a partially fouled tile system outside three ofthe foundation walls can all end up at the fourth wall where the tile isclogged. This can aggravate rather than relieve moisture problems inthe basement. In some cases, it is necessary to dig down to the base ofthe foundation walls to repair an existing drainage system, or to addone if none is found. This is only necessary, however, where the above-grade solutions we have previously discussed are not effective.
Basement windows can allow water to enter, too. Poorly arrangedwindows at or below grade will allow rainwater and melted snow toseep in. Look closely at window frames and at wall areas immediatelybelow. Evidence of water will show up as staining, eff lorescence, orpaint peeling on the walls and as discoloration or rot on the windowframes. Incidentally, this area is highly susceptible to termite infesta-tion, so remember to look for the shelter tubes or wood damage.
Where the bottom of the basement window is at or below grade, awindow well may be necessary (see Figure 6.5). The well should be largeenough to permit light passing through the window and allow easy

The Basement and Crawl Space 113
access for cleaning both the well and the window. A concrete or corru-gated steel shell is commonly used to form the well, although chemi-cally treated lumber is sometimes employed successfully.
To drain the well, usually a vertical pipe filled with gravel dis-charges into the foundation drainage tile or to a dry well (a large vol-ume of gravel below grade that allows water to collect and percolateslowly into the soil). Where a solid drainage pipe has been provided,the ground level in the window well should not be lower than the topof the drainage pipe, otherwise water will not f low into the pipe. Wherecoarse soils are found, no additional drainage may be necessary. How-ever, the base of the well should slope away from the house.
Although window wells should be kept free of debris, they are oftenneglected. In some cases, the well drainage system is blocked and mois-ture problems appear despite the presence of the well. The easiest solu-tion may be to install a clear plastic dome cover over the well to preventwater accumulation. This allows light to pass through, but does preventbasement ventilation.
FIGURE 6.5 Drain Problems
Drain Problems
pressure-treated woodwindow well

114 In specting a House
Another cause of dampness in basements is a poorly arranged out-side stairwell. A drain should be provided in a landing at the base of thestairwell. A six-inch door threshold will help prevent water and snowfrom getting in around the door. Anything less can result in problems.Look at the bottom of the basement door for signs of water damage.Open the basement door and take a good look at the stairwell. Crackingand heaving caused by frost action are common problems. Rebuilding adamaged basement stairwell is a difficult and expensive chore. Thereshould be a hand railing on the stairs, but often there isn’t.
Sometimes one very distinct waterline can be seen in the basement.Where this well-defined stain is noted and there is no other evidence ofwater damage, it is possible that a one-time f lood has occurred. This maybe the result of a laundry tub overf lowing, a leak in the water pipes, asewer backup, a ruptured water heater or boiler, or some other incident.Sometimes this can be explained by the previous owner and should notnecessarily be cause for alarm.
Other Basement Features
A basement should have a f loor drain and the f loor should slopetoward it. Where possible, check that there is water in the trap by look-ing straight down the drain. If no water is seen, the trap may be crackedor broken. It is also possible that the water in the trap has just evapo-rated. Pour a bucket of water down the drain; if no water stays in thetrap, minor repairs will be necessary.
On newer houses, a trap primer (see Figure 6.6) is often provided.This is a small hose, usually plastic, that is connected to a faucet that isused regularly. The other end of the hose discharges into the drain abovethe trap. For example, where laundry tubs are provided in the basement,a hose is often connected to the cold-water tap. When the tap is open, wa-ter f lows into the f loor drain, replenishing any water that has evaporatedfrom the trap.
If a laundry area is located in the basement, f low some water intothe tubs. Many of the older concrete tubs with lead waste piping leak inat least one place. Faucets may be inoperative, or the supply piping maybe badly deteriorated. A second set of faucets with threaded ends canbe used to connect a washing machine. An ordinary 120-volt electricaloutlet is adequate to power the washer. Look for a heavy-duty electric

The Basement and Crawl Space 115
supply or a gas hookup for a clothes dryer. If a clothes dryer is in place,it should be vented to the exterior.
A sump pump may also be found in the basement. This pump islocated in a sump or pit below the basement f loor level and is designedto remove water from around basement walls and below the basementf loor (see Figure 6.7). Sometimes gutter and downspout water is alsohandled by a sump pump. Most often provided where the water table ishigh during the spring or where there are no storm sewers, sump pumpscan also be used to get rid of water inside the house. A f loor drain maycarry water into the sump from a malfunctioning washing machine,leaking pipes, etc. The pump may discharge into a ditch at the front ofthe property, onto the lawn surface, or into a dry well below grade. Inany case, the water should be carried well away from the building beforeit is released.
The pump is usually controlled by a f loat valve and can be operatedby lifting the f loat. However, this should only be done if there is water
FIGURE 6.6 Trap Primer
Trap Primer
the trap primer is typically a 3/8″ diameter plastictube attached to a fixture (e.g., laundry tub)

116 In specting a House
in the sump that can be pumped! The pump should start and the waterlevel should drop. Make sure the pump shuts down automatically. Checkthe electrical connections to a sump pump, which are often poor.
An auxiliary pump that is powered by the pressure of the water inthe supply plumbing is sometimes added. This type of pump is used inthe case of an electrical failure or a malfunction of the electric pump.You can readily identify it by the connection to the water supply plumb-ing in the house and a lack of electrical wiring. It can be tested by open-ing the water supply valve to the pump. This type of pump, sometimesreferred to as an ejector pump, is also activated by a f loat valve.
Finished Basements
Sometimes an unfinished basement can be improved to add livingspace and value to a home. In some cases, a basement apartment canbe created. If you have plans for the basement, consider these basicrequirements. The ceiling height should be at least seven feet over mostof the area to be finished. Windows should be provided, both for light
FIGURE 6.7 Why Is There a Sump Pump in the Basement?
Why Is There a Sump Pump in the Basement?

The Basement and Crawl Space 117
and ventilation. The furnace and mechanical room will have to be par-titioned off. It may be necessary to extend the heating system, if it hasadequate capacity. Alternatively, electric resistance baseboard heaterscan be added. These are relatively inexpensive to install, but electricheat may be expensive to operate.
If an apartment is planned, check municipal requirements thor-oughly. Requirements for height, windows, fire separations, fire exits,and local zoning are only some of the areas that should be investigated.In many jurisdictions, air cannot be transferred from one living unit toanother through heating ductwork. This prevents simply extending aforced-air heating system to warm a basement. In some locales, the base-ment must have some area at grade level to be usable as a living area.The size of the electrical service should also be considered. A heavierservice and/or separate meters may be necessary.
Where basement height is inadequate, it may be possible to lowerthe basement f loor (see Figure 6.8). This, however, should be done withthe assistance of a professional. Depending on the additional depth
FIGURE 6.8 Lowering Basement Floors—Bench Footing
Lowering Basement Floors—Bench Footing

118 In specting a House
needed, problems may be encountered with footings or with the wasteplumbing system. Below most foundation walls and support posts arethe footings, or pads, which help spread the load and keep the buildingfrom sinking. If the f loor is lowered indiscriminately, these footings canbe broken off or undermined. This may seriously compromise the sup-port for the building. Often the f loor is lowered in the central areasonly, leaving a ledge around the walls. This configuration is sometimesreferred to as a Dutch wall or a bench footing. In some homes, the wasteplumbing pipes run just under the basement f loor with a very gentleslope toward the street sewer. Lowering the basement f loor level can ne-cessitate running this pipe inside the room area. Again, professional ad-vice should be sought before beginning work.
If you are inspecting a house with a basement apartment, it is wiseto have your lawyer verify its acceptability.
CRAWL SPACES
Some houses do not have full basements. There may be a partialbasement plus a crawl space or only a crawl space. This area is accessiblefrom the basement, from a trapdoor in the f loor above, or from outsidethe building. The crawl space is perhaps the most difficult area to inspectin a house, because of lack of space; it is also among the most important.As discussed in Chapter 2, it is necessary to check the foundations andframing members for evidence of structural problems. Heating duct-work and plumbing pipes that run through the crawl space may be rustedor disconnected. Electrical wiring should also be followed and examinedvisually, where possible.
The depth of the crawl space should be at least two feet, and prefer-ably more, to facilitate access. The crawl space f loor is often earth, al-though it may be gravel, wood, or concrete. Sometimes shallow crawlspaces are provided with trenches, allowing access to the mechanical sys-tems. This is a less desirable arrangement. Where the crawl space f looris earth, look for a vapor barrier of plastic sheeting or roll roofing cov-ering the f loor surface (see Figure 6.9). This will prevent moisture frommigrating upwards from the soil into the crawl space. Where there is novapor barrier, look very closely for signs of rot in wood components ofthe crawl space.

The Basement and Crawl Space 119
Two philosophies commonly are employed for crawl space insula-tion. The first is to consider the crawl space as the outdoors. Here theunderside of the f loors above should be insulated (to approximately R-26) as discussed in Chapter 8. The insulation should be fitted into thejoist spaces of the f loor and should be well secured in place. Usingchicken wire mesh is very satisfactory. The vapor barrier should be onthe upper, or warm side, of the insulation. Insulation should also be pro-vided on any basement wall and access panel adjacent to the crawl space.
Where this approach is used, good cross ventilation should be pro-vided, allowing at least a square foot of vent area for every 500 squarefeet of crawl space. This ventilation is maintained summer and winter.
If heating and plumbing supply lines run through an unheatedcrawl space, they should be insulated as well. This prevents heat lossfrom the ductwork and freezing in the plumbing. During the summer,this also helps minimize condensation. The vapor barrier on this insu-lation should be applied externally.
FIGURE 6.9 Cover Crawl Space Floor
Cover Crawl Space Floor
a crawl space with anuncovered earth floor can
contribute a very significantamount of moisture to the
house environmentequivalent to several gallons
crawl space
don’tventilate
crawlspace

120 In specting a House
The second philosophy is to consider the crawl space as part of thehouse and heat it as such. This involves insulating the perimeter walls ofthe crawl space (to R-8 or R-12 as discussed in Chapter 8). The insula-tion can be added to the interior or exterior of the crawl space walls.The vapor barrier, if any is needed, again is applied on the warm side ofthe insulation. Heating the crawl space eliminates the need to insulatethe heating and plumbing lines running through the area. However, ven-tilation and a vapor barrier over an earth f loor are still required. Theventilation is kept open during the summer and blocked off (and insu-lated) during the winter.
Where no insulation is found in the crawl space, it is usually easiestto adopt the second technique and add insulation from the exterior.
SUMMARY
The major concern in a basement is usually moisture. In most cases,problems can be cured inexpensively by outdoor work. Where this is notthe case, however, the solution may be very costly. It is sometimes nec-essary to excavate around the entire perimeter of the building and adddrainage tile—one of the most expensive home repairs.
In areas with a high-water table, the chances of having a wet base-ment are greatly increased. Furthermore, the solution to the problemmay be considerably more costly. Basement walls and f loors are gener-ally waterproofed rather than dampproofed. Any failure in the water-proofing usually necessitates digging. A sump pump system is oftenused to collect and discharge water standing outside the basement. Thisarrangement may be satisfactory if the problem is occasional and nottoo severe. However, where you find a sump pump and/or evidence ofextensive moisture problems, it is best to investigate further. Profes-sional building inspectors and municipal building officials may be ableto help. Try to find out whether a high-water table does exist and, if so,whether it is a constant or intermittent condition. It may be wise to movevery slowly on a house with this type of problem.

The Basement and Crawl Space 121
CHECKLIST— The Basement and Crawl Space
Signs of Moisture
1. Valuables stored directly on floor?
2. Paint peeling or water stains on walls?
3. Efflorescence on walls or floors?
4. Rust around furnaces, water heaters, laundry tubs, etc.?
5. Stained or rotted wood at floor level?
6. Rust around nail heads and electrical outlets near floor?
7. Wood subfloor springy?
8. Carpet musty?
9. Floor hollow below concrete?
Basement Windows
1. Evidence of leakage?
2. Wood rotted around frame?
3. Window well clean?
4. Good drainage?
5. Storm on window?
Exterior Basement Stairwell
1. Six-inch door threshold?
2. Drain in landing?
3. Railing on stairwell?
4. Condition of stairs and retaining wall?

122 In specting a House
General
1. Floor drain?
2. Floor slope toward drain?
3. Laundry tubs leak?
4. Electricity or gas for clothes dryer?
Sump Pump
1. Why present?
2. Condition?
3. Operable?
4. Discharges where?
Finished Basements
1. Height?
2. Windows?
3. Ventilation?
4. Exits?
Crawl Spaces
1. Structural problems: Rot? Termites?
2. Foundations?
3. Access?
4. Insulation?
5. Ventilation?
6. Vapor barrier?

C h a p t e r
123
7
THE INTERIOR
On one hand, the interior finishof a house is one of the easiest items to inspect because it is somethingfamiliar. On the other hand, it is also one of the most difficult becauseit is very hard to remain objective. During the interior inspection, avoidthinking about owning the house or decorating it. The more detachedyou can remain during the inspection, the better off you will be in thelong run.
Certain components of interiors are common to all rooms. In thefollowing pages, these will be discussed generally; however, each com-ponent should be inspected in every room. Specific items found in onlyone or two rooms, or specialty rooms, will be discussed at the end ofthis chapter.
WALL AND CEILING FINISHES
A careful examination should be made of all the interior wall andceiling finishes throughout the house. Interior wall finishes are normallymade of plaster over some type of lath, or drywall. It is sometimes diffi-cult to determine which is which in a finished home. Generally, houses
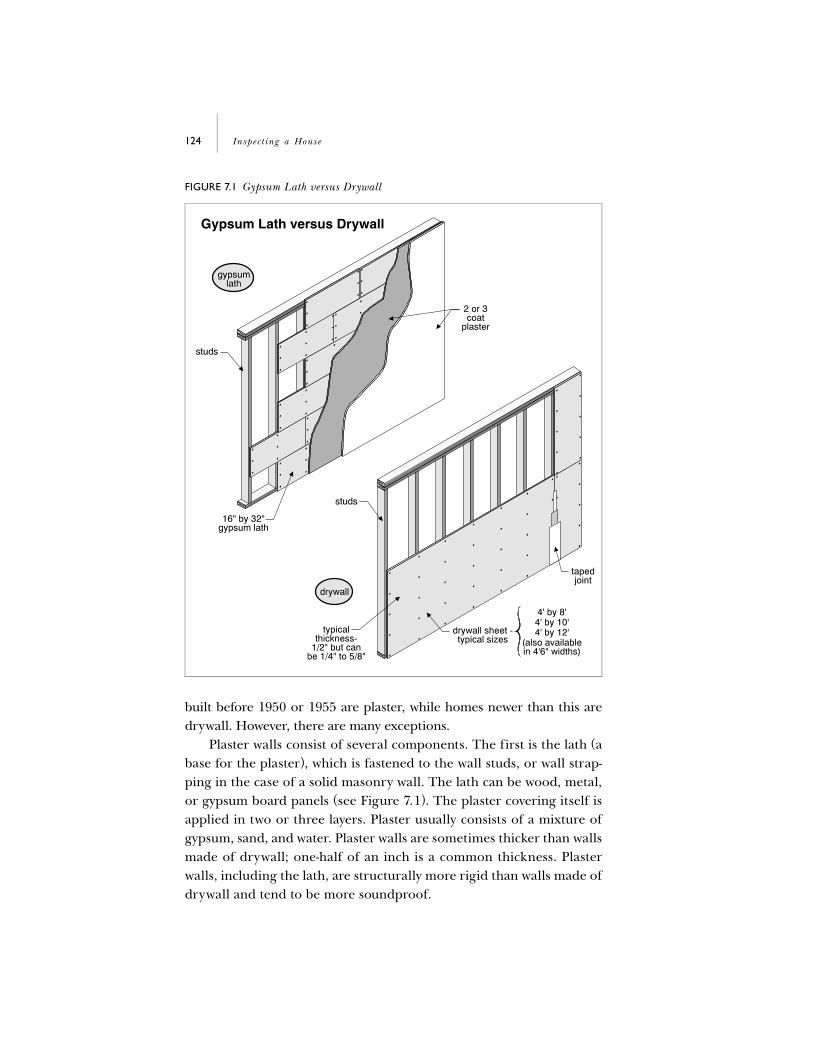
124 In specting a House
built before 1950 or 1955 are plaster, while homes newer than this aredrywall. However, there are many exceptions.
Plaster walls consist of several components. The first is the lath (abase for the plaster), which is fastened to the wall studs, or wall strap-ping in the case of a solid masonry wall. The lath can be wood, metal,or gypsum board panels (see Figure 7.1). The plaster covering itself isapplied in two or three layers. Plaster usually consists of a mixture ofgypsum, sand, and water. Plaster walls are sometimes thicker than wallsmade of drywall; one-half of an inch is a common thickness. Plasterwalls, including the lath, are structurally more rigid than walls made ofdrywall and tend to be more soundproof.
FIGURE 7.1 Gypsum Lath versus Drywall
Gypsum Lath versus Drywall

The Interior 125
Minor cracks or damage to plaster walls should not be a major con-cern; however, walls and ceilings should be inspected carefully for plas-ter separating from the lath below. This will create a bulging or spongysurface. Repairs to this type of wall surface can be costly.
Drywall, or plaster board as it is commonly known, is essentially amanufactured plaster wall with a paper finish. It is available in sheetsof various sizes and thicknesses. Sheets are typically four feet wide andcome in common lengths of eight, ten, and twelve feet. The most com-mon thicknesses of drywall are three-eighths, one-half, and five-eighthsof an inch. Three-eighths drywall is commonly used for resurfacingexisting damaged walls. It is considered too thin to be used on its own.In standard house construction, one-half-inch drywall is used; five-eighths-inch drywall is usually reserved for more expensive construc-tion. Drywall is sometimes glued, but generally it is fastened to wallstuds and ceiling joists with special nails or screws. The edges of thepanels are slightly tapered to create a depression at the joints. Thejoints then are filled with a compound and a paper tape. After painting,the seams should not be visible.
In new construction, a phenomenon known as nail popping is quitecommon (see Figure 7.2). This occurs when the lumber that is used inbuilding walls and ceilings dries and shrinks, forcing the nail heads out.This is easily remedied and should not be a major concern; however,excessive nail popping throughout a house may indicate a lower-than-average quality construction. As with plaster walls, minor cracking athigh-stress areas around windows and doors is usual and should not beconsidered serious.
Acoustic ceiling tiles of various dimensions are commonly foundon the ceilings of older homes and in finished basements. These mate-rials are typically installed by home handymen who lack the expertiseto drywall or plaster properly. On ceilings of older homes, tiles usuallyindicate a deteriorated plaster ceiling above, or an attempt to lower theceiling height for whatever reason (some people feel that high ceilingswaste too much heat, while others lowered their ceilings in an attemptto modernize their homes).
Inexpensive wood paneling is also normally installed by the homehandyman, as well as by the large-scale development builder. Often thepaneling is very thin. If this is the case, it should be installed over dry-

126 In specting a House
wall or plaster. Frequently it is not. Push firmly on the wall between studspaces to determine if some type of backing material has been provided.
During your inspection of walls and ceilings, look for stains and tryto determine the origin of the moisture. Stains are most commonlycaused by roof leaks, plumbing leaks, or condensation. If staining or wa-ter damage is noted, try to determine whether the leakage is still activeor the quality of the repair work.
Be sure to inspect the ceiling and wall finishes in all closets. Often,defects are repaired within various rooms, but not in closets. Sometimesmore information can be gained about the history of the house fromcloset spaces than from anywhere else in the interior.
FIGURE 7.2 Nail Pop Mechanism
Nail Pop Mechanism
screws hold 3 timesbetter than nails, willnot pop, and are less
likely to tear the paperdrywall surface
The Interior 127
FLOORS
Floors should be carefully inspected with two thoughts in mind: thelevelness of the f loor and the f loor covering.
Some people are more sensitive to unevenness than others. Whetherthis is something you normally notice or not, you should make a con-scious effort to note how level f loors are when you’re walking acrossthem. This is sometimes difficult, depending on the amount of furniturein the room and the f loor finish. A deep-pile carpeted f loor tends to lookand feel more level than a hardwood or tile f loor does (a trick commonlyused by renovators). Most minor f loor slopes do not indicate seriousproblems. They are a result of warpage, shrinkage, or minor settling ofthe f loor system. Houses are like people; they sag in the middle whenthey get older. Generally, if the f loor systems in the house all slope to-wards the center, or towards the midspan of the f loor joists, this is not aserious problem. If the f loor systems slope towards one side or one endof the house, however, this may indicate more serious structural prob-lems. Take note of any major sloping of f loors, and return to the f loorlevel below to check for causes. Refer to Chapter 2 for a discussion ofstructural issues.
Wood f loors often squeak. This can be caused by a poorly fastenedsubf loor or the result of slight movement of the hardwood finish.Squeaky f loors are usually difficult to eliminate; sometimes, however, thesubf looring can be resecured or shimmed from below. Shims are simplywedges that can be driven into the space between the subf loor and thef loor joists to stiffen up the f loor and prevent movement. If the squeak-ing is a result of loose hardwood f looring that is shifting slightly, the an-noyance can sometimes be reduced by sprinkling a dry lubricant, such astalcum powder, onto the f loor and working it into the joints. Squeakyf loors generally do not indicate any structural problems and, except thatthey’re annoying and inconvenient, they should not be a concern.
Hardwood f looring is generally considered a high-quality f loor fin-ish. Depending on the thickness of the f looring strips, a marred andstained hardwood f loor can be sanded and refinished, often with excel-lent results. Clues to the thickness of a f loor covering can often bepicked up at cuts through the f loor. Perhaps the easiest place to deter-mine this is at heating registers. If you lift out the grille cover, you canoften tell how thick the f loor is. Hardwood f loors in one or two areas

128 In specting a House
of a house do not indicate hardwood throughout. Often in older homesthe first f loor was hardwood while the upper f loors had softer f loor-ing, such as pine. In areas with wall-to-wall carpeting, do not assumethere is hardwood below. Pick up clues wherever you can. Again, thef loor registers are a good place to start.
Most exposed f loor surfaces are installed over a subf loor. This sub-f loor can be made of plywood, chipboard, or softwood boards (see Fig-ure 7.3). In most cases, the softwood subf loor was laid at right anglesto the f loor joists. The hardwood strips were then laid at right anglesto the subf loor, which means the hardwood strips usually run in thesame direction as the f loor joists. Sometimes, this information can bevaluable in trying to determine the framing of the house when analyz-ing structural problems. A note of caution here: Occasionally, the sub-f looring is installed diagonally to increase the rigidity of the house andto allow hardwood strip f looring to be laid in either direction. If thebasement is unfinished, this can be determined from below.
FIGURE 7.3 Types of Subf looring
Types of Subflooring

The Interior 129
Carpeting as well as resilient f loor tiles or sheets can vary in qualitydramatically. Look for obvious signs of wear in high-traffic areas.
WINDOWS
There are many different styles of windows installed in homes (seeFigure 7.4). Unfortunately, quality varies as much as style. We will dis-cuss some of the common window types, dealing with the materials typ-ically used and the problems associated with each.
Single- and Double-Hung Windows
These traditional windows consist of sashes that move vertically intheir frames. When closed, the inner window occupies the lower half ofthe frame and the outer window the upper half. When both the top andbottom sashes can open, this is a double-hung window. Only the bottomhalf opens on a single-hung window.
Locking hardware joins the top of the lower sash to the bottom ofthe upper sash. When opened, the windows are held in place by a coun-terweight and sash cord system, a spring-type guide, or simply a frictionhold.
The window sashes and frames may be wood, aluminum, steel, vinyl,or a combination of materials. Unless they are well-weatherstripped, dou-ble-hung windows can be loose systems, and unless the glass is double-glazed (two panes of glass with an air space between), they require stormwindows. The typically broad outer sills should be properly sloped to al-low rainwater to drain away from the window. Incorrect sloping will trapwater and may damage the sill and the wall system below.
It is not unusual to find these windows rendered inoperable by anumber of coats of paint. The sash cord, pulley, and counterweight sys-tem that holds the window open is often nonfunctional because of bro-ken sash cords or jammed pulleys (see Figure 7.5). When the sash cordis broken, the window can still be opened, but it must be propped up.Repairing old wood windows may take time and effort, but they are usu-ally worth the trouble. If maintained properly, these windows can lastthe life of the house.

130 In specting a House
FIGURE 7.4 Window Types
Window Types

The Interior 131
Casement Windows
Typically, these windows are hinged on one side and swing outward.Reverse casement windows are also side-hinged, but swing inward. Theyare usually operated by a crank or lever mechanism. Sashes are com-monly made of wood, steel, or aluminum. Snugly fitting casement win-dows can be very weatherproof, but because of the casement windowsswing, exterior storm windows and screens can be a problem. Stormwindows are sometimes piggybacked onto the sashes, but this is a less-than-ideal arrangement. Usually, it is better to provide interior storms.Some modern casement windows can be opened on a pivot to facilitatecleaning both sides of the window from the inside.
Horizontal Sliders
These windows are common in new, modestly priced homes. Thesashes and frames are often aluminum or vinyl, although wood is usedon higher-quality windows. They have few moving parts and usually can
FIGURE 7.5 Watch for Faulty Windows
Watch for Faulty Windows

132 In specting a House
be removed easily for cleaning. In some cases, the panes have no sashesand the glass rests directly on the guides. This type allows a good dealof air leakage. Horizontal sliding windows are usually installed with pri-maries, storm windows, and screens in three separate tracks. Many ofthese windows seem to be particularly susceptible to condensation prob-lems. The bottom of the track should be provided with slots or holes toallow moisture to drain to the exterior. Proper drainage also includes anappropriate slope on the sill.
Awning Windows
This window is similar to a casement because it swings out, but it ishinged at the top. Reverse awning windows that swing inward are alsoavailable which swing inward. These are common installations in base-ments. Once again, they are operated typically by a crank or lever.Awning windows are often found below large, fixed picture windowsand serve primarily as ventilators. Once again, fitting exterior stormwindows is difficult and interior storms are generally considered prefer-able. Sash and frame materials are most often wood. Hopper windowsare similar, except they are hinged at the bottom.
Fixed Windows
Fixed windows often take the form of large picture windows andprovide additional light, but no ventilation. If located on a south wall,these windows can contribute to passive solar heating. The winter suncan add a good deal of warmth to a house as sunlight passes throughlarge windows. Fixed windows, too, require storm windows unless theyare double- or triple-glazed. Frames may be wood, vinyl, or metal. Thereis often no sash, with the glass resting directly on the frame.
It has become popular in some areas to renovate houses, removingthe original double-hung windows and replacing them with fixed double-glazed windows. This eliminates the need for storm windows, screens,and operating hardware, but the house may be difficult to ventilate. Nat-ural cross ventilation should be available at each f loor level.

The Interior 133
Jalousie Windows
These windows consist of many small awning windows, one overlap-ping the next in a vertical array. Several long, narrow panes of glass arelaid horizontally in the frame, which is usually metal. When closed, thepanes (which have no sashes) overlap each other. These windows are notweathertight and do not generally perform well in colder climates. Theycan, however, be a very effective means of obtaining good ventilation.
Double- and Triple-Glazed Windows
Glazing refers to the glass itself (see Figure 7.6). For instance, adouble-glazed window is two panes of glass thick. Similarly, a triple-glazed window contains three panes of glass. The panes are separatedby an air space. Double- or triple-glazed windows typically do not havestorms. However, if they are the operable type, they must be providedwith screens. On multiglazed windows, the screens are typically left inplace year-round. In some high-quality installations, the screens are theroll-up type and can be hidden from sight.
FIGURE 7.6 Glazing Types
Glazing Types
often has stormwindow, screen,or combination

134 In specting a House
The space between the panes of glass in some double- and triple-glazed windows is sealed, while in others the space is vented. The sealedtype is very good in principle, but in practice the seal is difficult to main-tain. When the seal is lost, condensation problems occur between thepanes, and the window must be replaced. Very often a desiccant (dryingagent) is installed when the window is manufactured. This helps reducemoisture problems on a small scale. To distinguish between the ventedand sealed types, look for vent holes between the panes of glass.
Window Materials
Many different materials are used for window sashes and each hasadvantages. Wood sashes are reasonably good thermal insulators anddo not generally contribute to condensation problems. They providea sturdy sash and, if properly maintained, can last indefinitely. Theyare, however, susceptible to weathering damage on the exterior and ifallowed to deteriorate are expensive to repair.
Metal sashes such as aluminum and steel are fairly durable if anod-ized or covered with a baked-on enamel finish, but if unprotected, bothmetals will oxidize. Metal window sashes are susceptible to condensa-tion problems for they are good thermal conductors. In fact, these met-als are several hundred times more thermally conductive than wood.Some metal sashes are thermally broken so that their conductivity isinterrupted.
Vinyl sashes are fairly durable and usually do not require regularmaintenance. They are also good thermal insulators (although not asgood as wood). Their overall strength is somewhat less than that ofsome other sash materials. High-quality installations may employ awood sash with a vinyl covering, thus enhancing the strength and dura-bility of the wood with the low maintenance of the vinyl.
Storm Windows
Unless the primary windows are double- or triple-glazed, storm win-dows are generally considered necessary. There are two main benefits ofa storm window: One is reducing air f low through gaps in the window sys-tem. The other is reducing heat loss through the glass. The dead air thatis trapped between the two panes of glass acts as an insulator. However,the insulating value of storm windows is sometimes overstated. While a

The Interior 135
single-glazed window has a thermal resistance of approximately R-1, asingle-glazed window plus storm will have a resistance of about R-2. Triple-glazing will result in an R value of approximately 3. When compared to amodern wall insulation standard of R-12 to R-20, the storm window pro-vides little protection against heat loss in this fashion. Supposedly, triple-glazed windows on a retrofit basis have a payback period in excess of15 years.
Storm windows do provide an additional seal, reducing air infiltra-tion. In this way, heat loss is effectively reduced. One problem with ex-terior storm windows, however, is that they can provide too good a seal.When the seal on the storm window is tighter than the seal on the pri-mary, the storm can be susceptible to condensation problems. In this sit-uation, the warm moist air in the house leaks past the warm primarywindow and comes in contact with the colder surface of the storm. Be-cause the temperature is much lower, the air’s ability to retain its mois-ture is reduced and condensation forms on the cold storm surface. Bothto prevent the storm seal from being too tight and to allow any conden-sation to drain to the exterior, many storm windows are provided withvent holes at the bottom.
Where interior storms are installed, similar problems can arise whenan outer primary window fits more tightly than does an inner storm. Inboth cases, the problem can be overcome by improving the seal on theinner window or reducing the seal on the outer window.
Another advantage of using storms is higher inside humidity levelswithout condensation problems. Higher humidity levels during the win-ter months add to the comfort of the home. When the outside tempera-ture is 0°F (-18°C), indoor humidity can be as high as 40 percent in ahouse with storm windows. When there are no storm windows, humiditylevels as low as 15 percent can cause problems under the same conditions.
Older types of storm windows on the exterior have no screens andmust be removed every spring and reinstalled every fall. This can be abig job on two- and three-story houses. For this reason, interior stormsare generally considered more workable, unless a self-storing storm isused. A common type of self-storing storm is the aluminum combina-tion storm. Typically, there is an upper and a lower pane of glass and ascreen. The screen occupies the lower half of the window and one paneof glass occupies the upper half. The second pane of glass can be low-ered to provide a continuous storm window or can be raised to allowair through the screened section.

136 In specting a House
Skylights
Skylights are popular additions to older houses. They can improveappearance, lighting, and even ventilation. They can be installed on f lator sloped roofs, and the panes can be glass or plastic. The plastic ishighly resistant to breakage, but is susceptible to scratches. Skylights canbe fixed or operable, with an opening skylight considerably more ex-pensive. Single-, double-, and triple-glazed units are available, but onlythe latter two are satisfactory.
Skylight frames can be metal, wood, plastic, or a combination ofthese. Metal frames without a thermal break between the inner and outersurfaces can suffer condensation problems. These difficulties are aggra-vated by single-glazing and by placing a skylight in a room with high hu-midity, such as a bathroom.
Skylights have a reputation for leaking that is somewhat undeserved.Leaks are usually the result of a poor installation, and rarely a failure ofthe unit itself. Poor installations, however, are quite common, so lookclosely for evidence of leakage. Sometimes the seal between panes of theskylight will fail, resulting in condensation between the panes.
Inspection
In all cases, windows must be checked for operation. While replac-ing primary windows is often not necessary, the cost of repairs and re-building can be significant when you multiply the number of windowsthat need repair by the cost of the repairs.
On homes with single-glazed windows, storm windows are usually in-stalled. Most of the older wooden storm windows have been replacedwith aluminum units. These aluminum storms usually contain screens.Again, keep track of how many single-glazed windows are without storms.Providing a complete set of storm windows for a house is a costly project.
Where double- or triple-glazing is found, watch for condensation be-tween the panes. This may mean the window will have to be replaced.
Look for evidence of leakage around skylights. This is very com-mon on both f lat- and sloped-roof installations. Also check to see thatthe skylight is at least double-glazed. Look for condensation problemsboth between and below the panes.

The Interior 137
Check the hardware on all the windows. It is not uncommon to findit so badly covered with paint that the locking mechanisms do not work.Plastic hardware on less expensive windows tends to break off. Quiteoften much of the window hardware is broken or missing.
Examine the wall surface below windows. Sometimes windowsillsare sloped incorrectly, resulting in water f lowing down the inside wallsurface and damaging it. This problem is most common at the cornersof the windows so pull back the curtains and take a good look.
DOORS
Exterior doors should be solid or of panel construction. At least oneexterior door should be large enough so moving large objects in and outof the house is possible. Both interior and exterior doors should be in-spected for the quality of hardware.
Every door in the house should be opened and closed. Doorjambsshould be checked for squareness. Even if the door fits properly, lookcarefully to see if the top or bottom of the door has been shaved toaccommodate movement of the door frame. Doorjambs in partitionwalls tend to be more out of square than jambs in bearing walls are. Nor-mally, bearing walls run at right angles to the f loor joists. Most partitionwalls run parallel to the f loor joists. Therefore, the entire weight of thepartition wall rests on a single or doubled-up joist that tends to sag withage. As discussed earlier, this is not a serious problem; however, if adoorjamb in a bearing wall has moved significantly, this probably indi-cates a structural problem.
Many new homes have steel exterior doors. These doors are usuallyfilled with insulation (see Figure 7.7). Normally, there are no problemswith high-quality metal doors; however, metal doors tend to warp whenthe difference between inside and outside temperatures is extreme. Thecolder side of the door can contract while the warmer side expands,which causes the door to bow. Metal doors also present problems as thehouse settles. While it is relatively easy to shave a wooden door, modify-ing a metal door to compensate for movement of the door frame ismore difficult. Many metal doors have plastic decorative trim fastenedto the metal panels. With a good-quality storm door in place, and thesun shining on the door, the temperature build-up between the stormand the insulated metal door can be extreme. This can twist or warp the

138 In specting a House
plastic trim and create an unsightly situation. Some metal door manu-facturers do not recommend using storm doors in conjunction withtheir doors. Storm doors, however, on other types of exterior doors area good idea.
ELECTRICAL CONNECTIONS IN ROOMS
While inspecting the interior of a house, note the electrical equip-ment within each room. Each room should have an adequate numberof electrical outlets. Present standards call for outlets to be spaced sothat one can be reached within six feet of any point on the wall. Manyolder homes and poorly renovated homes have a shortage of electricaloutlets. If this is the case, remedying this situation can be expensive.
A small electrical tester that plugs into outlets can be purchasedfrom most electrical supply stores. This tester will indicate whether the
FIGURE 7.7 Door Cores
Door Cores

The Interior 139
outlet is properly wired and grounded. It is not uncommon to find three-prong electrical outlets connected to older, two-conductor wire withouta ground. In some rooms, this does not pose a serious problem for mostof the electrical appliances that will be plugged in (lamps, clocks, etc.)
do not have a ground pin. In kitchens, laundry areas, and work rooms,however, electrical outlets must be properly grounded. Computers andother home office equipment generally require grounded outlets aswell.
Light switches should also be tested and overhead light fixturesshould be noted and checked. The location of light switches is also impor-tant. Far too often, a switch is located on the wrong side of the doorwayso that a person has to go around the door to use the switch. More detailson electrical outlets, switches, and lights can be found in Chapter 3.
HEATING SOURCE
A heating source should be established within each room. Depend-ing on the type of heating system used in the house, each room shouldbe equipped with at least one supply air register, radiator, electric base-board heater, or radiant heating panel. Ideally, heating supply unitsshould be located on exterior walls below windows. With forced-air sys-tems, note the number and location of return air ducts. In high-qualityhousing, a return air grille, or grilles, are located within each room. Inolder houses, and lower-quality houses, there are few return air grilles.In rooms such as bedrooms, where doors are commonly closed, thereshould be a one-inch space below the bottom of the door if no return airgrille has been provided within the room. This will allow some move-ment of air throughout the home.
SPECIALTY FEATURES
Besides all of the components discussed previously that are com-monly found in every room of the house, certain pieces of equipmentare limited to one or two rooms.

140 In specting a House
FIGURE 7.8 Masonry Fireplace Components
Masonry Fireplace Components

The Interior 141
Fireplaces
Except for the relatively new, prefabricated fireplaces that aredesigned to collect heat from the fire and direct it into the house, mostwood-burning f ireplaces should not be considered a heat source.Because of their design, some fireplaces produce a negative amount ofheat. In other words, more heat is taken from the house than is added.
When inspecting a fireplace, look for several things (see Figure 7.8).Fireplaces can smoke for several reasons. The size of the fireplace open-ing can be too large for the cross-sectional area of the f lue; the propor-tions of the firebox itself can be wrong, or the chimney height andlocation can be incorrect, to name but a few. Proper fireplace design istoo complicated a subject to deal with at any length in a book of thisscope. However, one of the best ways to determine whether a fireplacewill smoke or not is to look for smoke deposits on the front of the fire-place, under the mantle, or on the ceiling above. Even if a unit doessmoke, relatively inexpensive methods of reducing or eliminating thisproblem are available. These include raising the level of the hearth toreduce the size of the opening for the fireplace, installing glass doors onthe fireplace, or placing a draft cap on the top of the chimney.
Besides smoking fireplaces, other things should be considered. Thefirebrick in the firebox should be carefully inspected for cracked brickor missing mortar. Voids in this surface can create potential fire haz-ards. Look for an operable damper. Without a damper, a significantamount of heat can be lost through the unit.
Perhaps the most overlooked concern when inspecting fireplaces isan adequate number of f lues. Chimneys can contain only one or severalf lues. A f lue is simply a channel within the chimney. Only one majorpiece of equipment can be connected to each f lue. Often, because ofmodifications within the house, or past building practices when theimportance of one appliance per f lue was not always recognized, twoor more pieces of equipment were connected to a single f lue. The mostcommon situation is a two-f lue chimney with a furnace connected to itin the basement, a fireplace connected to it on the first f loor, and a sec-ond fireplace connected to it in the master bedroom immediatelyabove. In this case, one of the two fireplaces should not be used for thiswill disrupt the proper performance of one of the other pieces ofequipment. During an inspection, it is often difficult to determinewhich unit is connected to which f lue. This will have to be determined

142 In specting a House
by more extensive testing at a later date. Obviously, one of the two fire-places will be inoperable. Also check for the presence of a chimney.Some nonfunctional, decorative fireplaces look so authentic that it iseasy to assume that they work. If there is no chimney within a reason-able distance of this fireplace on the exterior of the building, the fire-place is probably not connected to anything.
Wood stoves are often added to homes to supplement heating suchareas as additions or basements. A wood stove can radiate a lot of heat,so it is important the stove is not close to combustible materials. Com-bustible materials can include stored firewood, furniture and woodf loor, wall and ceiling framing. Drywall over wood wall studs is notenough to protect the wood from drying out to the point that it couldburn. Very often, heat shields are needed to improve an existing instal-lation. The proper clearances (see Figure 7.9) are usually noted on adata plate attached to the wood stove. If this information is not avail-
FIGURE 7.9 Clearances for Unlisted Wood Stoves
Clearances for Unlisted Wood Stoves

The Interior 143
able, refer to local codes. It is not unusual for codes to specify a stovebe placed a minimum of four feet from walls and five feet from ceilings.This is an important issue and should not be overlooked.
Gas fireplaces are common in many areas and can throw off a lotof heat. If the gas is turned on, be sure to test these fireplaces. A gasfireplace can be controlled by a wall switch, gas valve, thermostat, orremote control.
Staircases
Staircases should be carefully inspected for their structural integ-rity. Because the framing around the staircase is often the most difficultframing in the house, it is not uncommon for construction mistakes tobe made that result in sagging staircases or stairs pulling away fromwalls. Look for signs of movement and try to determine the severity ofany such movement. If the structural problem is not easily analyzed,bring in an expert. Check for a proper handrail (see Figure 7.10) and beprepared to install a handrail if one is not present. On more ornate stair-cases, carefully inspect the balusters (vertical spindles that hold up therailing) to ensure that they are all in place. Duplicating a broken or miss-ing one can be an expensive proposition.
Closets
As mentioned previously, the condition of the interior finish withina closet can often provide a lot of information. In addition to possiblygiving a history of the house’s movement and any roof or plumbingleaks, one of the closets usually contains the access hatch to the attic. Be-sides their physical condition, the number and size of closets through-out the house should be noted. Many older houses lack closet space.
Kitchens
Kitchens should be thoroughly inspected for they are one of themost expensive rooms to redesign or refurbish. Generally, in this bookwe are concentrating more on the individual components of a houseand on their condition rather than dealing with the arrangement of thehouse. In a kitchen, however, layout is paramount. This room must belarge enough to accommodate your needs and it must work well. The

144 In specting a House
placement of the sink, stove, and refrigerator is critical. Ideally, thesethree items should be placed so that they form a triangle with an unin-terrupted path from one corner to another. Besides the traffic f lowwithin the kitchen, the location of the kitchen within the house is alsoimportant. A kitchen tends to be one of the focal points and thereforeits proximity to the living room, dining room, and family room is veryimportant.
If the appliances will be conveyed with the property, be sure to testthem. The cost of a new stove and refrigerator is never a pleasant real-ization, but it is usually worse when it is combined with all the othercosts of moving. The other major kitchen appliance to consider is a dish-washer. Is there one present? If not, is there room for one without sacri-
FIGURE 7.10 Handrails and Guards
Handrails and Guards

The Interior 145
ficing too much storage space? The amount of storage space and thequality of the cabinetry should be noted. Kitchen cabinets can be veryexpensive.
Water pressure should be checked in the kitchen. Also check thecondition of the sink, the counters (see Figure 7.11), and the piping be-low, both supply and drainage. If a dishwasher is to be installed, it is bestlocated near the sink. Will the present plumbing arrangement accom-modate this?
Also note the presence of electrical outlets. In older homes, and evenin some newer homes, there is a shortage of outlets. Outlets in thekitchen should be properly grounded, and in modern homes there maybe ground fault interrupters. Ideally, these outlets should either be on 20-amp circuits or, where allowed, they should be “split” receptacles. Thismeans that the upper receptacle on the outlet and the lower receptacleon the outlet are on separate circuits. This prevents excessive blowing offuses. Outlets can be examined by removing the cover and checking the
FIGURE 7.11 Counter Problems
Counter Problems

146 In specting a House
wire connections. If the small metal bridge, usually located on either sideof the outlet joining the metal back plates behind each of the terminalscrews, is broken and removed, the outlet has been split for there is nocontinuity between the top and bottom terminal on either side. To avoidan electrical shock, conduct this inspection with the power off, or havean electrician check this.
Also check for the presence of an exhaust fan above the stove orrange top. There are two basic types: one that exhausts air to the outsideand one that filters air through a charcoal unit and recirculates it. Whilefans that discharge air to the outside are less energy-efficient, they arestill preferable to the other type. Fans that recirculate the air have agrille that is located near the top of the unit at the front and that blowsthe air back into the room. This type of fan is commonly found on aninterior, rather than exterior, wall. Exhaust fans that vent to the exteriorare usually found on exterior walls and a vent should be present on theoutside of the house in the corresponding location.
Bathrooms
Besides the kitchen, bathrooms should also be inspected thoroughly.Determine the size, number, and location of bathrooms to see if theymeet your needs. When you are inspecting a bathroom, look carefully foractive or past leaks. Try to correlate these leaks with water stains or dam-age to ceilings and walls in rooms below. Leaks can originate in the supplypiping itself, at the plumbing faucets, drainage piping, the connection ofdrainage piping to fixtures, and from overf lows in bathtubs and sinks. Ifthere is any question about the type of supply piping in the house, or theextent of its replacement, clues can often be picked up in the bathroom.Usually, the piping itself is visible and, when it is not, obvious repairs totile and plaster work may indicate replacement. Thoroughly inspect andtest every fixture in each bathroom. Sinks should be examined for chips,cracks, or stains. Test the sink faucets for leakage and proper operation.Water pressure should be checked, as discussed in Chapter 4. The cup-board doors below the sink should be opened to expose the plumbingwhile the faucets are running. Check to ensure that the sink drains prop-erly, the waste plumbing does not leak, there is a proper overf low on thesink, and that there is proper venting to prevent siphoning of water outof the trap. Sometimes the presence of proper venting is hard to deter-mine. Be more suspicious of S traps than P traps. These traps derive their
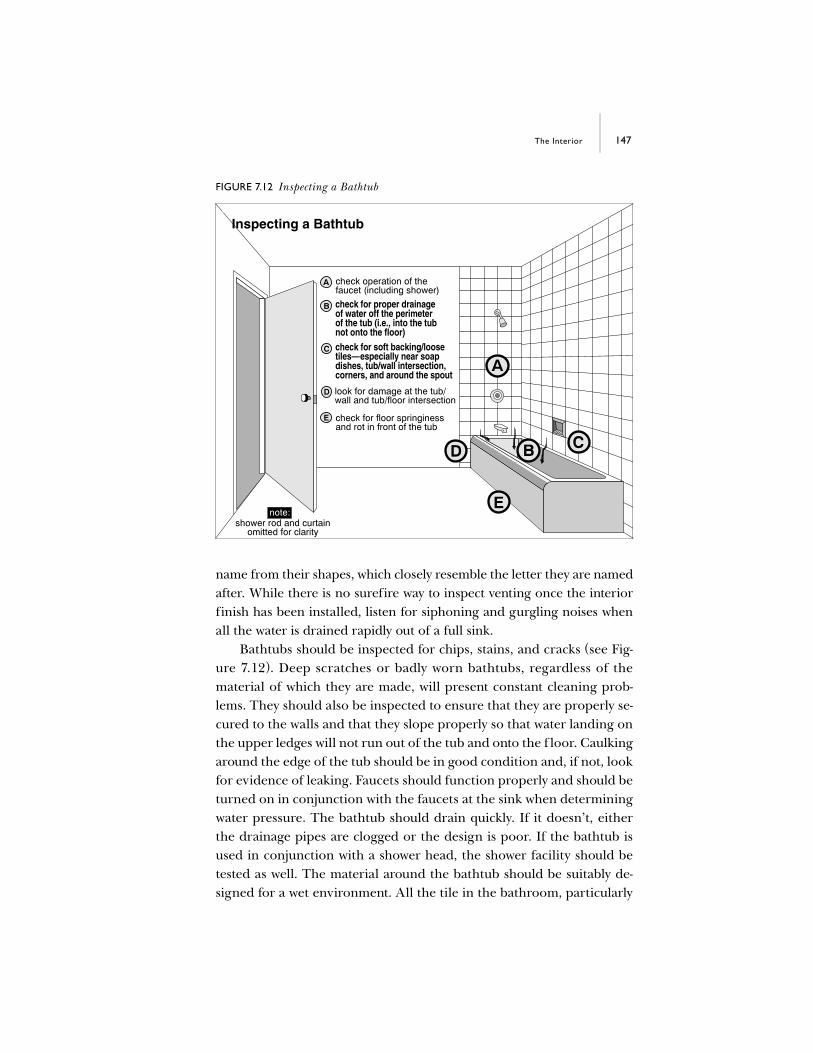
The Interior 147
name from their shapes, which closely resemble the letter they are namedafter. While there is no surefire way to inspect venting once the interiorfinish has been installed, listen for siphoning and gurgling noises whenall the water is drained rapidly out of a full sink.
Bathtubs should be inspected for chips, stains, and cracks (see Fig-ure 7.12). Deep scratches or badly worn bathtubs, regardless of thematerial of which they are made, will present constant cleaning prob-lems. They should also be inspected to ensure that they are properly se-cured to the walls and that they slope properly so that water landing onthe upper ledges will not run out of the tub and onto the f loor. Caulkingaround the edge of the tub should be in good condition and, if not, lookfor evidence of leaking. Faucets should function properly and should beturned on in conjunction with the faucets at the sink when determiningwater pressure. The bathtub should drain quickly. If it doesn’t, eitherthe drainage pipes are clogged or the design is poor. If the bathtub isused in conjunction with a shower head, the shower facility should betested as well. The material around the bathtub should be suitably de-signed for a wet environment. All the tile in the bathroom, particularly
FIGURE 7.12 Inspecting a Bathtub
Inspecting a Bathtub
check for proper drainageof water off the perimeterof the tub (i.e., into the tubnot onto the floor)check for soft backing/loosetiles—especially near soapdishes, tub/wall intersection,corners, and around the spout

148 In specting a House
the tile around the bathtub, should be carefully inspected for loose,cracked, or missing tiles. The grout between the tiles should also be ingood condition. Many newer installations use one-, two-, or three-pieceplastic enclosures. Grout joints are not an issue with these enclosures,but with any type of wall, the condition of the caulking around the edgesis critical. Check the caulking at all the edges of the walls and at thepoints where the faucets protrude through the wall.
Glass doors on bathtubs or shower enclosures should be safetyglass or plastic, should open and close easily, and should provide agood, watertight seal. The rubber strip at the bottom of a shower dooris often damaged or missing completely.
Shower stalls, particularly if they are entirely tiled, are often proneto water leakage. This leakage sometimes occurs at the connection ofthe drain to the f loor as well as at the seams between the walls and thef loor. It is usually impossible to determine what type of shower pan hasbeen installed underneath a tile f loor; however, excessive caulkingaround any of the seams in the shower stall may indicate leakage prob-lems. Light fixtures in shower stalls should be properly designed for usein a damp environment.
Toilets often leak at the seal between the toilet bowl and the f loor.A toilet that can be rocked slightly from side to side may have a damagedor deformed seal (see Figure 7.13). While this is not an insurmountableproblem, leakage over a long period of time can cause significant rot tothe f loor in this area. Constant condensation problems on the outsideof the tank can do the same. In addition to checking that the toilet issecurely mounted to the f loor, also make sure that the tank is securelyfixed to the bowl. Toilets should be carefully inspected for cracks, andthe f lushing mechanism and f loat valve should be checked to ensureproper operation. Usually, these mechanisms are relatively easy to re-pair or replace. While looking inside the tank, check for a manufac-turer’s date. This is usually located on the tank near the water line or onthe underside of the lid. If you are reasonably sure that this toilet is theoriginal fixture, this date will help establish the age of the house.
Another important feature in a bathroom is an exhaust fan. Whilean exhaust fan is not required when there is a window, a fan always helpsto eliminate odors and reduce humidity within the room. High humidityleads to condensation problems that, in turn, can lead to rot. If there isan exhaust fan in the bathroom, be sure it discharges to the outdoors.

The Interior 149
An exhaust fan discharging into an attic space can create severe conden-sation problems in the attic.
You may feel somewhat embarrassed poking around under sinksand f lushing toilets, but keep in mind that a house is a large investmentand you have a right to know how well its major components function.
SUMMARY
Although you may find numerous minor deficiencies during yourinspection of the interior, do not be too alarmed. Repairs to walls,f loors, and ceilings are usually cosmetic in nature and are not expensive.Do not worry too much about specifics, but look for trends indicatingpoor workmanship. If what you can see has been poorly done, odds arethat what you can’t see has been done in a similar fashion. Concentrateon bathrooms, the kitchen, and windows. These are the most expensiveareas of the interior.
FIGURE 7.13 Loose Toilet
Loose Toilet

150 In specting a House
CHECKLIST— The Interior
Walls and Ceilings
1. Structural cracks?
2. Cosmetic cracks?
3. Plaster: Spongy? Bulging? Pulling away from lath?
4. Moisture damage?
5. Nail popping on drywall?
6. Ceilings lowered?
7. Wood paneling: Thin? Poorly supported?
Floors
1. Sloping?
2. Sagging?
3. Springy?
4. Squeaky?
5. Condition of finish on floor material? (Especially in high-traffic areas)
Windows
1. Type?
2. Operable?
3. Storms?
4. Double- or triple-glazed?
5. Sash and frame condition?
6. Glass condition?
7. Hardware?
8. Leakage?
9. Condensation?
The Interior 151
Skylights
1. Plastic?
2. Scratched?
3. Condensation?
4. Leakage?
Doors
1. Operable?
2. Hardware?
3. Jambs square (evidence of settling)?
Electrical
1. Number and location of outlets per room?
2. Operable?
3. Overhead light fixture?
Heating Source
1. Register or radiator in each room?
2. Return air grilles: Number? Location?
Fireplaces
1. Separate chimney flue?
2. Smoke on mantel or ceiling above fireplace?
3. Condition of firebox?
4. Damper: Inoperable? Operable?
Staircases
1. Sagging?
2. Pulling away from walls?
3. Damaged stairs?

152 In specting a House
4. Handrail? Condition?
5. Balusters? Condition?
Closets
1. Wall and ceiling cracks?
2. Water damage?
3. Door operable?
4. Hardware?
5. Size?
6. Number?
7. Attic access hatch?
Kitchens
1. Work triangle? (Sink, stove, refrigerator)
2. Adequate work area?
3. Condition of counters?
4. Adequate cupboard space?
5. Condition of cupboards?
6. Traffic flow?
7. Condition of appliances? (If conveyed with property)
8. Sink: Water pressure? Leakage below?
9. Adequate electrical outlets above counters?
10. Split receptacles?
11. Exhaust fan: Discharged to exterior? Recirculating type? Operable?
The Interior 153
Bathrooms
1. Size?
2. Number?
3. Location?
4. Contributing to water stains below?
5. Evidence of pipe changeover from galvanized to copper?
6. Fixtures operable?
7. Electrical outlet?
8. Exhaust fan: Operable? Discharging to exterior?
9. Water pressure?
10. Drainage?
11. Leakage below fixtures?
12. Shower head: Present? Operable?
13. Condition of joint between bathtub and tile?


C h a p t e r
155
8
THE INSULATION
Home insulation has become moreimportant with rising energy costs and the questionable reliability of en-ergy supplies. Regardless of the energy source for the house—oil, naturalgas, or electricity—a well-insulated home will be less expensive to heat andmore comfortable to live in.
A brief discussion of how heat is lost should be helpful in under-standing insulation. Heat can be transferred in three ways: conduction,convection, and radiation. Conduction is the direct transfer of heatbetween two bodies touching each other. For example, when you pickup an ice cube, your hand becomes cold. Heat is f lowing from yourhand to the ice by conduction. Convection is the transfer of heat by airmovement. Consider a pocket of air that is warm. This air is lighter thanthe cool air around it, so it will rise carrying its heat with it. By convec-tion, heat is moved from one location to another. This is why warm airin a house tries to escape through the attic, taking with it the warmthin the house. Radiation is the movement of heat by waves. One body canradiate heat to another without touching it and without air transportingthe heat. The sun warming the earth is one example of this. An ovenbroiler cooking a steak is another example.

156 In specting a House
Insulation is designed to minimize the transfer of heat. All insulat-ing materials take advantage of one special property that air has: Air isa poor thermal conductor (and conversely a good thermal insulator).Heat loss through air by conduction is very small. There is a problem,however. Air is very good at moving heat by convection. Insulation pre-vents air from doing this by trapping the air in little pockets and hold-ing it in place. This is why insulating materials are very light; they aremade up largely of small air pockets.
One problem still remains. As discussed, heat can radiate throughair quite easily. Insulation, then, also has to provide a barrier againstradiation. In general, the materials that prevent light radiation alsoprevent heat radiation. Prevention of heat loss by radiation is thusaccomplished by using the solid materials that make up the insulation.
INSULATING VALUES
Generally, the thicker the insulation, the better it can do its job.This is, of course, because more air is held in place. However, we canalso compare the performance of equal thicknesses of different insula-tions. The performance indicator used is the R-value of the insulation.This is a measure of the material’s resistance to heat transfer, or its ther-mal resistance (see Figure 8.1). For example, one inch of a given type ofinsulation has an R-value of approximately 3. Thus, six inches of insula-tion would provide a total R-value of 18. Another insulation may havean R-value of 5 per inch. Six inches of this material would yield an insu-lation value of R-30. We can see, then, that some materials are more ef-fective insulators than others. Several types of insulation and theirinsulating value per inch are detailed in the chart later in this chapter.
FORMS OF INSULATION
Insulations come in different forms, each with applications towhich they are best suited. The four basic forms are loose-fill insulation(which can be poured or blown), batt or blanket-type insulation, rigidboard, and foamed-in-place insulation (see Figure 8.2).
Loose-fill insulation is good for getting into small or irregularlyshaped areas. It can also be blown or poured into wall cavities where

The Insulation 157
gravity will carry it throughout the coverage area. Loose-fill insulationis often installed by the homeowner. A separate vapor barrier must beprovided.
The batt or blanket-form of insulation is relatively easy to handleand can be installed between wall studs during new construction or laidbetween ceiling joists in an existing attic space. This material, too, canbe easily installed by the homeowner when adequate working space isavailable.
Rigid board insulation has some structural strength and is com-monly applied on exterior wall or roof surfaces just underneath the sid-ing or roof membrane. This board-type insulation can also be useful onbasement walls where a wallboard or paneling can be applied directlyto the insulation surface without wood framing. Some types of thisboard insulation are highly moisture-resistant and can be used on exte-rior walls below grade. No vapor barrier is needed with most rigidboard insulations.
The foamed-in-place insulations are used where access is difficult.Holes are drilled into the wall and a liquid is mixed and blown into the
FIGURE 8.1 R-Value per Inch
R-Value per Inch

158 In specting a House
cavity, then a chemical reaction creates a foam that hardens in place, fill-ing the cavity. Generally considered a last resort, this method is usuallyexpensive, and the number of homes with foamed-in-place insulation isrelatively small. One type of insulation that was commonly used for thisapplication was Urea Formaldehyde Foam Insulation (UFFI). The saleof UFFI was prohibited in the United States in 1982, but the law wasstruck down in 1983. UFFI was banned in Canada in 1980 and the banstill stands today. The controversy resulted from suspicions that healthproblems may be associated with the insulation. Modern evidence sug-gests that, in fact, no health risks are inherent in UFFI-insulated homes.A stigma still surrounds urea formaldehyde, which may have an effecton property values. The presence of this insulation is often difficult to
FIGURE 8.2 Forms of Insulation
Forms of Insulation

The Insulation 159
verify. Testing laboratories will perform examinations to identify this in-sulation material. Many real estate transactions include clauses address-ing this particular problem.
TYPES OF INSULATION
Each type of insulation has advantages and disadvantages. Theideal insulator would possess a high R-value per inch, and it would becompletely resistant to moisture, fire, mildew, fungus, and vermin. Itwould be easy to work with and would pose no health hazard or discom-fort. Its life expectancy would be indefinite. Needless to say, none of theinsulation materials available has all of these properties.
Glass fiber insulation is one of the most common types available andis made from threads of glass. It is available in batt or blanket form aswell as in loose fill. It is a fairly good insulator, but if compressed, itloses a good deal of its insulating value. It is resistant to moisture, mil-dew, fungus, and vermin, and is generally considered noncombustible.It is, however, a skin irritant, and inhaling small shreds of glass fiber canbe dangerous.
Mineral fiber is similar to glass fiber except that rock or slag is usedto form the wool-like texture. Its insulating value is comparable to glassfiber and it is similarly resistant to fire and rot. Furthermore, it is lessirritating to work with than glass fiber is. Again, this material is suscep-tible to compaction, if loaded.
Cellulose fiber is essentially paper, finely shredded, that is treatedwith chemicals to make it somewhat resistant to moisture, fire, rot, andvermin. It is usually blown, but can also be poured or batts. Because ofits relatively low cost, this material is very popular at present. Cellulosefiber is less prone to compacting than some of the other loose fill types,but it will absorb water, which will lead to deterioration.
Vermiculite is a mineral substance made from mica. This insulationis available as loose fill and can often be identified by the small rectan-gular shape of the individual pieces. Vermiculite is relatively expensiveand is subject to damage by moisture. It is, however, noncombustible.Some vermiculite contains asbestos, so take care when disturbing thistype of insulation.

160 In specting a House
Wood shavings or wood wool insulation should be treated with fire-retardant chemicals and can be made moisture-resistant. Where readilyavailable, this insulation often provides good value.
Polystyrene insulation poses a fire hazard and should not be exposedto the building interior. This is available in board form or as loose fill.If applied on interior walls or ceilings, it should be covered with at leastone-half-inch drywall or plaster. While this material has a good R-valueper inch of thickness, it is often somewhat more expensive than othertypes. No vapor barrier is required with the rigid boards. Extruded poly-styrene has a smooth appearance to it, while expanded polystyrene ismade up of little beads.
Isocyanate, polyisocyanate, and polyicynene are foamed-in-place insula-tions that are often used in new construction to fill wall and f loor cav-ities before interior or exterior finishes are applied. These materialscannot be blown into existing, enclosed cavities.
Foamed-in-place urea formaldehyde foam insulation is no longer incommon use, as discussed previously. This insulation is used in othercountries, but at present it is a controversial material.
Phenolic foam board is a good insulator and is highly resistant to mostof the enemies of insulation that were discussed. It has the disadvan-tage of being somewhat expensive. A separate vapor barrier is required.
Different insulations, then, are best suited for different jobs. Factorsconsidered in the application of insulation are R-value, cost, ease of ap-plication, and health hazards, as well as resistance to water, fire, mildew,fungus, and vermin. In some cases, structural integrity is desirable.
AMOUNTS OF INSULATION
The amount of insulation that is required depends, of course, onthe climate. The values mentioned here (see Figure 8.3) apply to thenorthern half of North America. Local building authorities can tell youwhat is required in your area.
Unheated attic spaces should be insulated to between R-25 and R-40. The insulation is typically applied directly over the attic f loor.
In most houses, there is no need to heat the attic area and its tem-perature should approach the outdoor temperature. Where verticalwall surfaces are in a roof or attic space, and one side is heated, an insu-lation value of approximately R-20 is recommended.

The Insulation 161
Where no attic exists and the room ceiling is also the roof line, in-sulation values of R-20 are recommended. Roughly R-20 to R-30 valuedinsulation is applicable for f loors over unheated porches or garages.
Exterior wall insulation should be at least R-12. In new houses thisinsulation is often R-20.
Basement wall insulation should be at least R-8 if more than half ofthe basement is below grade. The insulation should be at least R-12(treated then as a normal exterior wall) if more than half of the base-ment is above grade.
Where a crawl space is to be heated, the perimeter walls of thecrawl space should be insulated to at least R-8. Again, if more than halfof the crawl space is above grade, R-12 would be appropriate. Where acrawl space is to remain unheated, the f loor of the room above shouldbe insulated to approximately R-26.
The construction materials used in exterior walls have some insu-lating value, but it is surprisingly low. For example, one brick has an R-value of less than 0.5. A four-inch concrete block has an R-value of 0.75.
FIGURE 8.3 Recommended Insulation Levels
Recommended Insulation Levels

162 In specting a House
Exterior sheathing is worth about R-1.0 to R-1.5. An uninsulated airspace between two-by-four-inch studs in a frame wall has an R-value ofless than 1.0. A ¹⁄₂ -inch-thick drywall panel (gypsum board) providesapproximately R-0.3.
Uninsulated wood-frame or masonry wall systems have R-valuesranging between 3 and 5 for the most part. When compared with therecommended minimum value of R-12 for an exterior wall, the needfor insulation becomes apparent.
VAPOR BARRIERS
A vapor barrier should always be provided on the warm side ofinsulation (see Figure 8.4). With the exception of some rigid insulationboards that are moistureproof, most insulation requires vapor barriers.
FIGURE 8.4 Vapor Barrier Location
Vapor Barrier Location

The Insulation 163
The vapor barrier is designed to prevent moisture inside the housefrom getting into the insulation and wall system. Moisture not onlyreduces the effectiveness of insulation (water is a good thermal conduc-tor), but can also damage the building materials.
INSPECTION
When inspecting a house, try to identify the types of insulationused and, by noting the thickness, determine the R-value from thischart.
The Attic
The most important area to inspect for insulation is the attic, whereheat loss can be the greatest. Attic insulation can usually be examinedby viewing the attic from a hatch in a hall or closet on the level below.(A word of caution here: It’s best to check with the owner first. In somecases, loose-fill insulation has been added from above and if the accesshatch is opened, a good deal of insulation may end up in the roombelow.)
As discussed, the type and thickness of the insulation should benoted so you can calculate the R-value. Look for uneven or missinginsulation. Also, check for insulation and weatherstripping on theaccess hatch cover.
R-Values for Different Insulating Materials
Material Approximate R-value per inch Fiberglass (loose fill) 3.0 Fiberglass (batt) 3.2 Cellulose fiber (loose fill) 3.5 Mineral wool (loose fill) 3.1 Vermiculite (loose fill) 2.4 Expanded polystyrene board 4.0 Extruded polystyrene board 5.0 Polyurethane (foamed-in-place) 6.0 Isocyanate (foamed-in-place) 4.3 Wood shavings (loose fill) 2.4 Phenolic board 8.0
164 In specting a House
Very often you will find two different types of insulation. For exam-ple, there may be three inches of original mineral wool covered by sixinches of cellulose fiber. If this is the case, add the R-values for eachlayer of insulation together.
Where different types of insulation have been installed, there shouldbe no vapor barrier between the two. This will trap moisture within theinsulation. (If a vapor barrier is noted, it can be slashed to allow warm,moist air to pass through.) There should, however, be a vapor barrier be-low all of the insulation. This vapor barrier may be kraft paper fixed tothe underside of the insulation batt, a sheet of clear plastic (polyethyl-ene), tar paper, or aluminum foil. If no vapor barrier has been provided,it is difficult to lift up all the insulation and add one. An alternative so-lution is to cover the ceilings below with a paint designed specifically asa vapor barrier. Aluminum paints, marine varnishes, and oil-based paintswill also work to some extent. It’s helpful as well to caulk openings in ceil-ings from below to prevent moisture escaping into the attic.
While handling the insulation, you will have noticed whether ornot it is damp. If so, it is important to ascertain the source of the damp-ness. It might be caused by condensation, a leak in the roof, or waterbackup due to ice damming. For a discussion of these problems, turnto Chapter 1.
Insulation should not cover any recessed light fixtures or exhaustfan motors. Heat can build up around these items, creating a fire haz-ard. Insulation should be kept three inches away from such fixtures.
Some houses have more than one attic and access should be gainedto all of them if possible. A strong light is necessary to view the entireattic from the access hatch. It is usually not safe to walk in the atticspace. It’s very easy to put your foot through a plaster or drywalled ceil-ing—a stunt not likely to endear you to the owner of the house.
Where There Is No Attic
A house with a f lat roof or a cathedral ceiling has no attic space. Ifthis is the case and the house is old, chances are the roof cavity wasnever insulated. But if you notice plugs on the ceiling or on the roofcovering, this probably means that insulation has been blown in. Inmost cases, though, you won’t be able to check this insulation.

The Insulation 165
The most common method of upgrading a house with no attic is toblow insulation into the roof cavity (see Figure 8.5). This cavity is oftennot deep enough to add the recommended R-20 insulation and to leaveadequate room above the venting. Even if there is sufficient space, it’salmost impossible to introduce the insulation evenly, leaving a continu-ous vented area above.
FIGURE 8.5 Insulating Flat (and Cathedral) Roofs
Insulating Flat (and Cathedral) Roofs

166 In specting a House
When homeowners retrofit a f lat roof or cathedral ceiling, theysometimes sacrifice ventilation altogether and completely fill the roofcavity with insulation. In this situation, particular attention must bepaid to establishing a good vapor barrier.
If the f lat roof membrane must be replaced, it may be better to in-sulate above the roof boards (see Figure 8.6). Rigid board insulation isoften used for this application. The old roof covering is removed, insu-lation is added, and a new roof membrane is installed. A variation ofthis approach involves putting the insulation above the roof coveringand adding gravel on top. In either of these applications, the roof space
FIGURE 8.6 Evidence of Insulation Added
Evidence of Insulation Added
plugged holesin ceilings, roofcoverings, orfascia board

The Insulation 167
between the ceiling and roof boards is heated and no ventilation shouldbe provided.
Exterior Walls
Exterior wall insulation is difficult to check except around wallopenings. Sometimes by removing the cover plates on electrical outletsor light switches, you can see the insulation. Care should be taken, how-ever, that nothing inside the electrical box is touched. In solid masonryconstruction, there often is no wall insulation. Where two courses ofbrick are covered on the interior by wood strapping and lath and plas-ter, there is no room to provide insulation cost-effectively.
Basement Walls
Basement wall insulation can readily be examined in an unfinishedbasement. On new houses, insulation is sometimes found only down totwo feet below grade level. It is often economical to add insulation allthe way down to basement f loor level. Where the basement walls arepaneled, again, look carefully around wall openings and at electricaloutlets. In some cases, basement wall insulation has been provided onthe exterior of the house and may not be visible.
AIR LEAKAGE
One of the greatest causes of heat loss in many houses is air leak-age. When a house is not well sealed, the cold winter air finds its wayinto the house. This infiltration of cold air can be greatly reduced bycaulking (see Figure 8.7) and weatherstripping doors, windows, andother openings. This is an inexpensive and effective way to reduce heat-ing costs.
SUMMARY
It is important to understand that many old houses will not be insu-lated to the levels recommended here. However, this is not a sufficientreason to reject an older house. In many areas, government grants aregiven to homeowners who upgrade their home insulation.

168 In specting a House
There is a limit, however, to how far one can practically upgradeinsulation. The law of diminishing returns comes into play, and oneshould consider the payback period in reduced heating costs againstthe initial cost of installation. The presence or absence of insulation isnot usually a determining factor in the buying decision.
FIGURE 8.7 Caulking—Indoors or Out?
Caulking—Indoors or Out?
The Insulation 169
CHECKLIST— The Insulation
1. Type?
2. Amount?
3. R-value?
4. Vapor barrier?
5. Ventilation?


C h a p t e r
171
9
THE ATTIC
Before you buy any house, youshould inspect the attic very carefully. Some houses have more than oneattic and access should be gained to all of them if possible. You can usu-ally view the attic through a hatch in one of the second-f loor closets.Remember to make sure the attic hasn’t been insulated from above withloose-fill insulation (which will rain down on you when you open thehatch) and to bring a strong light with you.
INSULATION
For a complete discussion of attic insulation, turn to Chapter 8.
VENTILATION
Even where a vapor barrier has been provided under insulation,some moisture will enter the attic. With good ventilation, this moisturecan be removed before it condenses. A well-ventilated attic will haveopenings at the top and bottom, allowing good air movement through-
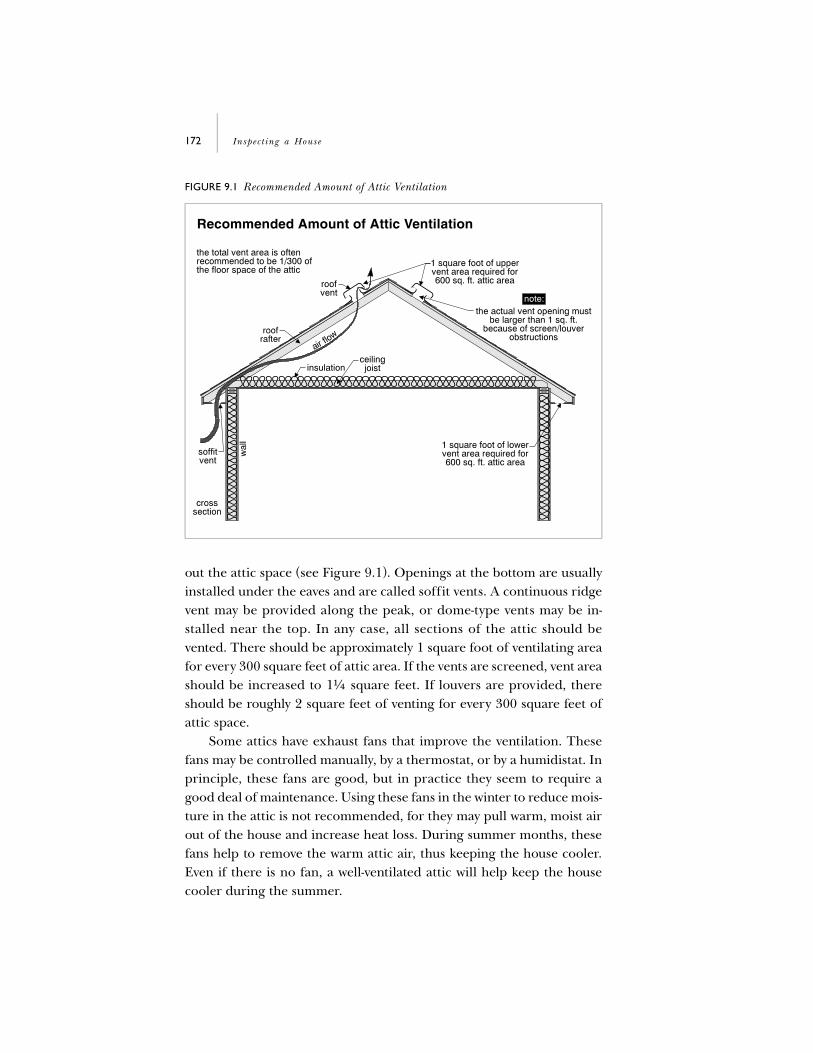
172 In specting a House
out the attic space (see Figure 9.1). Openings at the bottom are usuallyinstalled under the eaves and are called soffit vents. A continuous ridgevent may be provided along the peak, or dome-type vents may be in-stalled near the top. In any case, all sections of the attic should bevented. There should be approximately 1 square foot of ventilating areafor every 300 square feet of attic area. If the vents are screened, vent areashould be increased to 1¹⁄₄ square feet. If louvers are provided, thereshould be roughly 2 square feet of venting for every 300 square feet ofattic space.
Some attics have exhaust fans that improve the ventilation. Thesefans may be controlled manually, by a thermostat, or by a humidistat. Inprinciple, these fans are good, but in practice they seem to require agood deal of maintenance. Using these fans in the winter to reduce mois-ture in the attic is not recommended, for they may pull warm, moist airout of the house and increase heat loss. During summer months, thesefans help to remove the warm attic air, thus keeping the house cooler.Even if there is no fan, a well-ventilated attic will help keep the housecooler during the summer.
FIGURE 9.1 Recommended Amount of Attic Ventilation
Recommended Amount of Attic Ventilation

The Attic 173
Some attic fans also remove air directly from the house. This isaccomplished by opening hatches in the ceiling and drawing warm airup out of the house. These fans are often very powerful and some pre-cautions must be taken before operating them. The fireplace dampershould be closed. If the damper is open, soot and ash may be drawninto the house from the chimney. Also, the furnace should not be oper-ating. In some cases, the f lame of a furnace burner has been drawn outof the firebox and has destroyed the burner assembly. It is even possibleto draw furnace exhaust gases into the house, which is a serious threatto life safety. It is best not to operate these fans at all during the winter.
Where an attic fan is provided, loose-fill insulation may not be ap-propriate. The attic fan may be able to pick up the insulating materialand exhaust it! It is best to provide an insulated cover for the fan duringthe winter.
Where vents are installed in gable end walls, look for birds’ nests,beehives, and other obstructions that will restrict air f low. Check to seethat screening on vents is intact to keep birds and animals out. Makesure soffit vents have not been covered with insulation. You should beable to see daylight at these vents.
VENTILATION WHERE THERE IS NO ATTIC
Good ventilation is more difficult to achieve in a house with a f latroof or a cathedral ceiling. Because there is less room in the roof spacefor air movement, the venting requirements are higher. Two square feetof ventilating area should be available for every 300 square feet of roofarea. Vent areas should be increased to 2¹⁄₂ and 4¹⁄₂ square feet forscreening and louvers, respectively. Unless provided on initial construc-tion, it is difficult to achieve this ventilation between the insulation andthe roof deck.
MOISTURE PROBLEMS IN ATTICS AND ROOF SPACES
To determine if there is excessive moisture in an attic, touch theinsulation to see if it is damp. Look at the underside of the roof boardsand rafters for the black discoloration that indicates mildew. Rust

174 In specting a House
around roofing nails and other metal projections also indicates exces-sive moisture.
If there is a moisture problem, it will probably come from one ofthree sources. The first is condensation, most likely caused by poor ven-tilation. The second is a leak in the roof membrane. The third is waterbackup as a result of ice damming. (See Chapter 1.) By keeping in mindthe ways in which water can enter an attic, you can determine the causeof the problem.
If condensation is the culprit, the moisture problems will be rela-tively uniform across the roof surface. Evidence of dampness, such asrusted nails and mildew, may be more pronounced near the peak andless noticeable near any vents.
Where leakage is the problem, water staining of the wood will belocalized. Water may enter near the top and follow one or two raftersdown to the ceiling, but it does not usually spread horizontally. Areaswhere leakage may be expected include chimney and plumbing ventpenetrations, and at valleys and changes of roof direction.
Ice damming will result in water stains on the lower sections of theroof only. The problem is usually continuous along the length of theattic. If ice damming is the problem, woodwork on the eaves may alsoshow some deterioration.
Moisture problems in houses where there are no attics are often dif-ficult to trace. Evidence of problems within the roof space may showup as staining on the ceiling finish below. This may be most noticeablearound light fixtures or around the heads of the nails holding the ceil-ing finish in place. Difficulties may also be indicated by a sagging ceil-ing. The cause may be leakage or condensation and it may be best toget some help from a specialist.
EXHAUST FANS
Where bathroom or kitchen exhaust fans have been noted in thehouse (see Figure 9.2), make sure they do not discharge their warm,moist air into the attic space. Exhaust ductwork should extend throughwalls or through the attic, directing the air to the outside. Where ductsare metallic and the distance through the attic space is several feet, itmay be necessary to insulate the ductwork to prevent condensation fromforming on the inside of the duct walls.

The Attic 175
ROOF FRAMING
The roof framing should also be examined when you are in theattic. Look for sagging or cracking in the rafters. Depending on the sizeand shape of the roof, there may be collar ties (horizontal wood mem-bers secured to the midpoints of rafters on opposite sides of the roof).These keep the rafters from sagging. There may also be knee walls ordwarf walls to keep the rafters from sagging.
If the house was built during the past 30 years, the roof framing maybe a truss system. A truss is a prefabricated wood triangle with diagonaland/or vertical bracing inside the triangle. The bottom of the truss
FIGURE 9.2 Exhaust Fan Conditions
Exhaust Fan Conditions
duct leaky, damaged,disconnected, or missing
weather hood missing,damaged, or loose

176 In specting a House
forms the ceiling and the top two sides form the roof lines. Trusses allowgreater spans for roofing systems, but do restrict storage areas. Trussesshould not be cut to accommodate other building components, norshould the interior braces be removed.
Watch for rot or buckling of the roof boards. In older homes, thesewill be planks; in modern homes, plywood or waferboard is used. Wherecondensation problems have existed for some time, plywood roofsheathing may be coming apart (delaminating). Excessive moisture willdestroy the glue holding the layers together and the integrity of thesheathing will be lost. If this situation is noted, expensive repairs may benecessary.
ELECTRICAL WIRING
Look carefully at any electrical wiring in the attic. Any wire connec-tions should be made in metal junction boxes. It is not good practice torun wiring across the top of ceiling joists. If insulation is added, thiswiring may be concealed from view. People walking in the attic or lay-ing roof boards as a walkway may pinch the wiring and create a danger-ous situation without realizing it. It is better to run the wiring throughthe ceiling joists.
SUMMARY
Most attic problems are moisture related, and once they are identi-fied, they are not usually expensive to correct. If unattended, however,the resulting damage to interior finishes and structural members canbe significant.

The Attic 177
CHECKLIST— The Attic
1. Ventilation?
2. Attic exhaust fan operable?
3. Where do kitchen and bathroom exhaust fans discharge?
4. Evidence of moisture caused by condensation, leakage, or ice damming?
5. Framing condition?
6. Electrical wiring: Enclosed in boxes? Run on surface of joists? Recessed light fixtures kept free of insulation?


P a r t T w o
HOMERENOVATION


C h a p t e r
181
10
PLANNING ARENOVATION
Whether you are renovating yourjust-purchased house or the familiar home you’ve occupied for manyyears, the task can be daunting. Taking the time to carefully plan yourhome improvement project can mean the difference between a highlyfrustrating experience and a highly satisfying one.
ESTABLISHING A MASTER PLAN
With any home improvement, the most important steps are thosetaken before the physical work begins. The time to make your mistakesis while you are discussing the project around the kitchen table, or whilethe work is on paper. A disturbing number of projects get out of handboth from a cost and work-f low standpoint because changes or addi-tions, caused by poor planning, are required during the renovation.
We recommend a problem-solving approach during the planningprocess. The first step is to identify all the problems in the house. Whatareas of the house simply don’t work? Have each family member gothrough a day in his or her mind, trying to spot all the unsatisfactory sit-uations. Deficiencies usually fall into four areas: a lack of space, a poor

182 In specting a House
layout with awkward traffic patterns, house systems in poor repair, andunsatisfactory aesthetics. Very often one problem is so prominent thatothers are not even considered until the project is completed. At thatpoint, the second most serious problem becomes the major source ofcomplaint. A well-planned renovation can solve many problems simulta-neously. It is best to list the problems in order of priority. You may notbe able to afford to cure all the ills in the first project, so this will helpyou decide where to trim if necessary.
When renovations are considered, one solution usually comes im-mediately to mind. You may think, We need another bedroom for thenew baby. However, there are usually several possible solutions to anyproblem and the most obvious may not be the best. Remember, too, thatthere is generally more than one problem to be solved and we are look-ing for the best answer to the greatest number of problems. If a familyis growing and another bedroom is needed, for example, perhaps theanswer is a new master bedroom addition for the parents, with the babytaking over the existing room. If the original master bedroom is small,this solution will solve two problems simultaneously. It might even solvethree problems if a second bathroom is added as part of the master bed-room suite. The important thing is to keep an open mind until all thepossibilities have been considered.
When searching for more space, there are several ways to go. Youcan push walls outward, raise the roof, add a dormer, or finish an atticor basement area. Sometimes a room can even be found in existing liv-ing space that is currently wasted. Look in all directions for expansionpossibilities.
When considering additions or renovations, it is tempting to pic-ture the final product and concentrate on the interior finishes and fur-nishings. These, after all, are the areas that your guests will see and thatwill be the most admired. However, these are probably the least impor-tant areas of the project for they can (and probably will) be readilychanged. It is much more difficult to get into the walls after the fact toupgrade the insulation, add an electrical outlet, or change the locationof a heating register. The point here is to consider the basics before thecosmetics. Be sure the functional components make it possible to fullyenjoy the new space. Many new bathrooms have to be broken up toreplace old galvanized plumbing that should have been changed whenthe renovations were undertaken. Where funds are limited, it is proba-

Planning a Renovation 183
bly best to compromise on finish (perhaps leaving some areas to be fin-ished later) and to ensure you get all the space that you will need. Thedisruption of a major addition should only be experienced once in alifetime.
Try to work the project to take best advantage of existing situations.For example, if you are opening up an attic and are going to include abathroom, where should it be placed? It makes sense to line it up verti-cally with a bathroom immediately below, because there already is sup-ply and waste plumbing up to that level. This type of thinking can savea good deal of money and time.
Because people change houses every four or five years, on average,it is wise to consider the improvements that add maximum value to yourstyle of house, even if you have no intention of moving. Plans have a wayof changing. Walk through the neighborhood, talk to your friends, con-sider what attracted you to the house, and determine what features aregenerally popular over the long term. Different areas have differingstyles; local real estate agents can often provide good input about whatimprovements will add the most value.
If you do not plan to sell in the near future, be wary of fads. Manyhome improvements are popular for only a short time and may not addlasting value. Laundry chutes were considered a luxury for some time,but now that people are moving laundry facilities to the second f loor, achute may only be wasted space. In areas where rehabilitation is popular,sliding glass doors, for example, may be in vogue one year and woodenFrench doors the next. Generally speaking, the improvements that havethe highest returns are modernized bathrooms and kitchens, or projectsthat add a bedroom, bathroom, or family room to the house. It is impor-tant that additions and improvements be consistent with the style andcharacter of the home. For example, a Victorian-style house with a mod-ern ranch-style addition will look somewhat odd.
Be wary of overimproving the property. Again, a real estate agentcan help advise what renovations may be appropriate. While saunasand whirlpools may be quite suitable in one area, they may not add con-siderable value in others. Remember that location is paramount in realestate, and that the best house on the street will probably not commandas high a price as it might deserve.
An old axiom is to buy the lowest-priced house and upgrade it. Thereturn on your investment is usually greatest in this situation.

184 In specting a House
In summary, the planning stage is all-important, and a planningchecklist is recommended, in which all existing components of thehouse are considered and possible changes to improve deficient areasare thoroughly investigated. This is the time to move slowly, talk to lotsof people, look at the future, and, above all, remain f lexible.
SETTING A BUDGET
Concurrent with the planning process, it is necessary to establish abudget figure. The most important thing is to decide how much you canafford to spend. Working from this figure, you can determine what kindof project to undertake. While this is difficult to do if you are unfamiliarwith renovation costs, ballpark figures can be obtained from contrac-tors and from neighbors and friends who have had similar work done.It is important to include all the costs involved. Remember that a majorproject may mean you have to move out of the house for a period oftime. Consider the cost of relocation, hotel, or apartment expenses fora short time, or the carrying charges involved in temporarily owningtwo homes. Consider any interest charges on money borrowed, or theopportunity cost lost on moneys spent. Include building permit fees,fees required to have plans drawn up, insurance costs, property taxes,the fee for a survey of the property, any demolition costs, and storagecosts for items such as furniture.
It is wise to leave a contingency for the unexpected. Very few projectscome in under budget, and not a great many more make it exactly onbudget. Furthermore, because you are dealing with an existing structure,there is usually some difficulty in matching new work to old. Additionalcosts sometimes become necessary when old wall finishes are torn downand deteriorated conditions are found inside. We recommend that a 5percent slush fund be established. The temptation to avoid this is great,but consider it seriously.
Budgeting should not only be done with money, but with time aswell. Particularly if you are interested in doing some of the work your-self, you must be realistic and determine exactly how much time youhave to work on the project. Putting in a full day’s work, then cominghome to a do-it-yourself project while keeping a family together andmaintaining any kind of a social life is a tall order. It is no wonder thatconstruction debris is often referred to as “divorce dust.” There are

Planning a Renovation 185
many “six-week projects” that are still under way two years after the start-ing date.
Even if the work is not performed by the homeowner, the projectcan be quite lengthy. For example, to add a second story to a bungalow,professionals will require at least three months to complete the project.This assumes a smooth work f low with no interruptions caused byweather, supply problems, strikes, etc.
Having set some type of realistic budget figure and having left acontingency, you must find a way to mesh the master plan with the bud-get. Unless you have considerable experience and confidence in yourability to estimate the cost of the project, it is wise to get some outsidehelp.
MAKING THINGS HAPPEN
After you have established a plan that identifies the changes to bemade, and after a budget is set, there are four general directions that canbe taken. The first may be to engage an architect or a designer to pro-vide assistance throughout the project. This consultant can get involvedfairly early in the planning stages, follow through to the completed work-ing drawings, help apply for permits, hire the contractors, and supervisethe work. A consultant can also be engaged for any portion of this pro-cess.
The second alternative is to seek out a general contractor who mayor may not be able to help with the design and the preparation of work-ing drawings. He or she will usually take care of getting building per-mits and hiring and overseeing the subcontractors. He or she will alsoprovide site supervision through the project.
The third option is to act as your own general contractor, hiringsubcontractors at your discretion, and orchestrating their activities.
The last path is the do-it-yourself approach. In this case, the onlyoutsiders involved in your project will be the municipal authorities whowill have to approve your plans and inspect your work, and the supplierswho are providing you with materials.
Needless to say, there is room to work between these four distinctpaths, and everyone must establish the correct blend for himself or her-self. Each approach has its own advantages and disadvantages. Let’slook at each more closely.

186 In specting a House
CONSULTANTS
Architects, architectural technologists, interior designers, and de-signers will all be referred to as consultants for the purposes of this sec-tion. Essentially, we are talking about people who have educationalbackgrounds and experience in planning and executing residential im-provement projects. These are people who do not get involved with con-tracting the work directly, but who operate as liaisons between thecontractors and the customer. The fees of these people vary accordingly,depending on their background.
Architects are perhaps the most expensive, and a true architect willbe a member of a recognized architectural association. While certainlywell qualified for working on residential improvements, most architectsdo not specialize in residential renovations. They spend a good deal oftime at school, ensuring that buildings will be structurally sound, safe,and comfortable to occupy and aesthetically pleasing. Many prefer toconcentrate on the aesthetics, striving for a satisfying appearance.
Because many houses are similar, and there are usually space andbudget limitations, some architects do not involve themselves at all withresidential work. Architectural-type services are none the less necessaryfor many homeowners, however, and people such as architectural tech-nologists, designers, and others in the field help to fill this need. Manyof these people are completely qualified to work in residential renova-tion and many, in fact, specialize in this area. Very often, the costs aresomewhat less if you use this type of individual rather than an architect.
The consultant is available to provide assistance at any or all stagesof the project. He or she will work on an hourly fee or, alternatively, ona percentage of the entire project. Incidentally, fees do vary and it is cer-tainly appropriate to ask about fees before hiring anyone—even for apreliminary interview. The steps involved in completing a project areas follows and, as discussed, the consultant can help with any or all ofthese steps:
1. Prepare initial sketches and design drawings. 2. Prepare final working drawings and specifications. 3. Obtain building permits and variances as required. 4. Prepare tender and award contract. 5. Provide site supervision, authorize payment, and inspect as nec-
essary.

Planning a Renovation 187
Typically, the fees for completing step one would be 4 to 6 percentof the overall project. Payment of 10 to 12 percent of the overall projectwould typically include preparation of the working drawings and obtain-ing the permits. To follow the project through, providing supervisionand inspection, the fees may range from 13 to 18 percent.
If you engage a consultant, it is important that he or she have all theinformation necessary to do a good job. He or she must know your bud-get to be able to help mesh the budget with your master plan. He or shemay want to revise or refine your master plan, and he or she may ruleout some of the things you have included. Do not be alarmed by this. Itis part of what you are paying him or her to do. Listen carefully to his orher comments and advice, but if he or she has ruled out something thatyou feel particularly strongly about, do not sacrifice that component ofthe project. It is, after all, you who will be living with the finished prod-uct. It is often very helpful to have photographs, or illustrations frommagazines, of rooms that you like, so that the consultant can get a feelfor your tastes and preferences. He or she should be aware of construc-tion materials and products available, and his or her assistance here canbe invaluable.
Initial Sketches and Design Drawings
Typically, the consultant will prepare some initial sketches based onyour discussions. At first, he or she may not have a fix on your tastes sothis may be a period of change for both of you. Tell him or her what youwant, and if you are not satisfied with his or her sketches, let him or herknow.
It is also important that at this stage the major family members (usu-ally husband and wife) both be present at meetings. It is crucial to avoidmisunderstandings. Time misspent is expensive for the homeowner andfrustrating for all concerned.
Working Drawings and Specifications
Once a design is prepared that appears satisfactory to all parties,the next step is to prepare the final working drawings and specifica-tions. If it is apparent at this stage that zoning bylaw variations will have

188 In specting a House
to be applied for, this can be done now to save time. At this stage youshould have an approximate cost for the project, but this will have toremain f lexible.
The preparation of the final working drawings and specificationswill include the final cost estimate. These drawings are prepared in sucha way that a contractor will be able to complete the project relying onthe drawings and specifications. Sufficient detail should be provided sothat the contractors do not have to make major decisions on-site. Equallyimportant, the type and model number of components are specified.The consultant helps the owner determine such things as plumbing fix-tures, door and window type, hardware quality, f loor, wall, and ceilingfinishes, light fixtures, etc. These components should be included in thespecifications, and the contractor need only refer to these to know ex-actly what is to be provided. If the designer knows that some productswill be difficult to obtain, or that there will be a considerable lag be-tween order date and supply date, the process can be accelerated here.
Building Permits and Awarding the Contract
Once the drawings and specifications have been approved by theowner, application for a building permit is made. At the same time, atender is submitted to a number of contractors for quotations. The con-sultant should be able to identify contractors qualified to undertake thework. Several quotations are usually solicited, with six or seven being atypical number, depending on the size of the project. The quotations arereviewed and compared by the consultant and owner, and ultimately thecontract is awarded by the owner. Another advantage in using a consult-ant is that contractors usually prefer to deal with someone knowledge-able, and this is ref lected in their quotations. They know that they won’thave to explain the difference between a stud and a joist to the client.
One of the major advantages of dealing with a consultant is that youwill have a complete set of drawings and specifications. As a result, youknow exactly what you are going to end up with. Equally important, allthe contractors will be quoting on exactly the same project and will nothave to speculate about what you want. Without a complete set of draw-ings and specifications, it is almost impossible to compare quotations,for what the owner sees in his or her mind as the finished product willinvariably be different from what each contractor sees.

Planning a Renovation 189
Supervising the Work
After the contract is awarded and the work is to begin, the consult-ant will drop in from time to time to supervise the on-site work. If prob-lems are encountered, he or she will be able to act as an arbitrator.Changes should be channeled through the consultant; additions ordeletions to the project should be discussed. The consultant helps toauthorize payment to the contractor at appropriate stages, and ensuresthat the quality of workmanship is satisfactory. The finished project isinspected at the completion date and usually, again, just before the war-ranty expires.
Choosing a Consultant
Obviously, a decision to employ a consultant throughout the projectinvolves a long-term working relationship. It is completely acceptable tospeak to several consultants before deciding who is most appropriate.The selection is sometimes difficult, but you can start with some of thebasic sources. Friends or acquaintances who have had work done, andwho have been satisfied, are a good place to start. Bear in mind, how-ever, that just because a friend has had a satisfactory working relation-ship with a consultant is no guarantee that you will as well. It is also agood idea to look at your friend’s project. It is possible that the type orquality of the project is unsatisfactory to you, or perhaps it is a good dealmore sophisticated than you had in mind.
Associations of architects, designers, and related professionals maybe able to provide names of people active in this type of work. In somecases, the junior members of large architectural firms get involved inrenovations, and they, too, can be contacted. It is important to look atprevious work, either by visiting the project or by looking at photo-graphs.
Equally important is your ability to establish a good working rela-tionship with a consultant. The more he or she knows about your pref-erences and lifestyle, the better he will be able to serve you.
In summary, using a consultant has several advantages. First, his orher creative ability should be an asset in any home improvement. Sec-ond, his or her knowledge and experience with residential construction,zoning bylaws, contractors, and the availability of materials should help
190 In specting a House
make the work go smoothly. The preparation of drawings and specifica-tions ensures that you know what you are getting and facilitates gettingcompetitive quotations from the contractors. Employing a third partyalso simplifies things, for you are essentially dealing with one person forall of the questions, decisions, and problems you may have. Chances aregood that the project will be completed near the target date.
The principal disadvantage of working with a consultant is the costinvolved and the fact that, in a sense, all your eggs are in one basket. Ifthe consultant does not meet your expectations, or cannot establish agood rapport with you, the project becomes much more difficult. Gen-erally, the larger and more complex the project and the less experiencethe homeowner has, the more sense it makes to engage a professionalconsultant throughout.
GENERAL CONTRACTORS
A general contractor is a small businessperson who very often con-cerns herself with residential improvements. She is a “general” contrac-tor in the sense that she deals with a large number of trades and iscapable of providing a number of services. A general contractor may op-erate as a broker, hiring the appropriate subcontractors for each individ-ual job. Alternatively, she may have some crews of the commonly usedtradespeople on staff. Depending on the job, she may hire additionalsubcontractors as necessary.
The general contractor usually marks up the cost of the job quotedto her by the subcontractor anywhere from 10 to 50 percent. For this fee,she will obtain the subcontractors, direct their work, and take responsi-bility for the results.
Contractors who specialize in renovation work are in a tough, com-petitive business. Every job is a custom project that requires a good dealof versatility and f lexibility from the tradespeople. It is often difficultto match new work to old and many surprises are hidden under old wallcoverings.
Many general contractors are former tradespeople who may possessfew management skills. Some do not fully understand the difference be-tween markup and margin and, consequently, many jobs are under-quoted. To end up with a 33 percent gross profit margin, a contractormust mark up her costs by 50 percent. For example, if her cost to com-
Planning a Renovation 191
plete a job is $1,000, and she marks it up 50 percent, the total job will be$1,500 to the customer. This leaves the contractor with a gross profit of$500 or 33 percent. A significant number of general contractors end upworking essentially for wages, or going out of business altogether.
The typical general contractor can be characterized as overworkedand underpaid. Her business is one that is very difficult to schedule.During the winter months there is very little activity, and during thesummer months she is often deluged with work. Her manpower needsare difficult to estimate, and when she wants to hire subcontractors,many other general contractors are also trying to secure the services ofgood subcontractors.
The estimating procedures of most general contractors are some-what informal. Stories about quotations on large residential projectsprovided on the back of cigarette packages are well known. On theother hand, it should be understood that the blame does not always restwith the general contractor. Perhaps this type of submission is appropri-ate, when the only drawings the contractor has to work from are thoseprovided on a matchbook cover. In any case, the opportunity for misun-derstanding and for underestimating or overestimating is tremendous.
Another problem for a general contractor is working around her cli-ent. Very often the family remains in the house during a project and thisis more difficult for the workers. Tradespeople working on a project areno different from anyone else. They don’t like to have another personlooking over their shoulders, giving them advice or asking questions.
It is difficult to judge the performance of a general contractor as theproject progresses. For many of the tasks, there is no clearly definedright or wrong way to proceed. Again, because every circumstance is dif-ferent, there is very little standardization.
What are the advantages of working with a general contractor? First,she is less costly than dealing with a consultant throughout the project.The homeowner, again, only deals with one person who takes responsi-bility for all the subtrades’ work. The general contractor also has thecontacts and presumably can engage good tradespeople with whom shehas some type of working relationship. The tradespeople may be morelikely to do good work for the general contractor because future busi-ness is usually available from her. This is often not the case working at aone-time job for a homeowner. The general contractor is also able toplan and schedule the work so that it f lows smoothly. She is able to act

192 In specting a House
as a referee in any disagreement between the owner and the subcontrac-tor. Many general contractors also offer a guarantee, which may be im-portant should things go wrong. And if the contractor is a well-knownand respected firm, it may make it easier to get a construction loan.
The disadvantages? Generally speaking, she is not a specialist indesign and the preparation of drawings and specifications. While shewill have experience in obtaining building permits, she may not havethe background to foresee all of the problems, As discussed, it is toughto get competitive quotes from a general contractor without knowingexactly what the project is. Most of these people are not eager to do alot of design work when preparing a quotation for a job they may notget. With a general contractor, there is often no assurance that the sub-contractors are being paid, and dissatisfied subcontractors have beenknown to come directly to an owner asking for payment. This can cre-ate a difficult situation. General contractors do not provide impartialsupervision. Their interest is in getting the job done on time and onbudget, and the temptation to cut corners is obviously there.
Working with a general contractor is usually best for people whoknow exactly what they want from the project and have prepared work-ing drawings and specifications, either by themselves or with the assis-tance of a professional. People using general contractors should eithershop among several firms or should be very comfortable with the firmthey engage. The owner should know enough about building construc-tion to be able to evaluate and discuss the workmanship as the projectcarries on. The owner should also understand construction contractsand the liabilities and responsibilities of the various parties.
SUBCONTRACTORS
Subcontractors are individual tradespeople, usually with one spe-cial skill. Carpenters, electricians, and plumbers, among others, fit intothis category. These tradespeople are available directly to homeownersor to general contractors. In many cases, subcontractors work closelywith one or more general contractors. On a particular job, a subcontrac-tor may quote the same job through two or more general contractors.
Most subcontractors work under the same hardships as generalcontractors do, but scheduling and organizing different trades is not aproblem for them. Subcontractors rarely get involved with significant

Planning a Renovation 193
design or planning work, and usually are less involved with obtainingpermits, unless they are for specialized trades. Some subcontractorsoperate slightly outside their field on small jobs where hiring an addi-tional trade may not be justified. For example, many plumbers have toperform minor framing work to make the house accommodate theplumbing piping.
The advantage of dealing with a subcontractor is that the supervi-sory and administrative fees of the general contractor are eliminated.You also have the opportunity to select your subcontractors individuallyand, for people who have good contacts in the trades, this may be im-portant. And when dealing with a subcontractor, the owner is able to en-sure that payments are made appropriately and to the correct people.
The disadvantages include having to shop for a number of reliablepeople instead of one and being responsible for your own schedulingand arrangement of work. There is no outside supervision, and the bur-den lies with the homeowner. Also, arranging municipal inspections isoften a job for the homeowner in this case. When problems are encoun-tered, one subcontractor will often blame another for the failure. It isthen difficult to establish responsibility, and the owner is often left lessthan satisfied.
Homeowners who use subcontractors typically have a good deal ofexperience and ability in working with and managing tradespeople.They need a good understanding of construction for they will be doingtheir own scheduling and supervision. A great deal of free time is re-quired of the homeowner acting as his own general contractor. No mat-ter how well qualified the owner is, it is typical for the subcontractor toprovide less service to the owner than to a general contractor. As men-tioned previously, a subcontractor is more likely to meet a deadline fora general contractor who will give him business in the immediate futurethan for a homeowner who, at best, may give him future referrals.
DOING IT YOURSELF
This approach can be the most rewarding or the most frustrating ofall. The true do-it-yourselfer can plan, budget, design, secure buildingpermits, order materials, and complete the work. Not only is moneysaved, but often the results are equal to or better than those achieved bythe average tradesperson. An additional benefit is derived by those who

194 In specting a House
truly enjoy doing the work; for these people a do-it-yourself project canbe a recreation. Another advantage is the built-in supervisory capacityof the homeowner. The amateur often has more patience and takesmore pride in his work because he knows that he will have to live withwhatever mistakes are made. Also, because he is not working at anhourly rate, he may be more inclined to back up and do work again thatwas not completed satisfactorily the first time around. The do-it-your-selfer also has absolute control over the finances, and no disputes to ar-bitrate. And he is better able to shop carefully, and exhaustively, forspecialized materials, such as a particular molding, old doors, or a cer-tain ceramic tile.
There are, however, some drawbacks to being a do-it-yourselfer. Fewindividuals are completely skilled at all building trades. It is often notwise for the owner to attempt to learn a new skill while working on hishome. It is possible that by the time he masters the trade, the work onhis house will be finished and he will have made all his mistakes in theonly piece of work he will ever do. What is worse, he will have to live withthose mistakes. The owner should be realistic when evaluating his skills.
Different areas of work will generate different savings for the owner.While the labor costs and contractor’s profits are eliminated by the do-it-yourselfer, this may or may not be a significant percentage of the totaljob. Doing the labor-intensive work can yield significant savings. This in-cludes such tasks as demolition, concrete work, painting, and cleanup.For other jobs such as framing and f looring installation, material costsmay represent 50 percent of the cost or more. Here, of course, the sav-ings for the do-it-yourselfer are less. The chart provided here indicatesthe material-labor breakdown for a number of common trades. The con-tractors’ markup is calculated at 50 percent, yielding a 33 percent profitmargin.
Some work requires special equipment to which the amateur maynot have access. Even if the equipment is available, an individual notfamiliar with it can get into trouble. A power sander used to take downa softwood f loor is difficult to operate without damaging the f loor.Scaffolding can be rented to work on high buildings, but that does notmean a person will be comfortable or safe using it.
Another consideration is time. The homeowner should be realisticin his commitment to the project. Holding a full-time job, spending timeworking on a project, and keeping a family together can be very difficult

Planning a Renovation 195
in a house under renovation. The enthusiasm carried through the plan-ning process and into the first month or two of the project often waneswith a change in season, when the novelty wears off, or when the end isnot in sight.
The do-it-yourselfer must allow for interruptions caused by theweather, unavailable materials, strikes, financial pressures, family emer-gencies, and unforeseen construction problems. Few and far betweenare those people who overestimate the time required to complete aproject. This includes the contractors who do it for a living. The idea ofa home improvement project is to make a house a better one in which tolive and to increase its value. An unfinished job does neither. Contrac-tors are not usually eager to finish work started by someone else.
Typical Renovation Costs:Breakdown of Material versus Labor
% Material % Labor
% Contractor’s
Margin
Demolition or tear out — 67 33 Excavation — 67 33 Grading (topsoil added) 47 20 33 Sodding 43 24 33 Concrete work (floor slabs,
footings, etc.)32 35 33
Masonry work (brick or block) 28 39 33 Parging (with ¹⁄₂-inch cement,
two coats)34 33 33
Stucco wall finish (exterior) 20 47 33 Floor framing 49 18 33 Remove and replace subflooring 38 29 33 Wall framing 35 32 33 Wall sheathing 46 21 33 Roof framing 45 22 33 Roof sheathing 46 21 33 Asphalt shingle or roll roofing, cedar
shingles or shakes40 27 33
Note: Applies to simple roofs only. For dormers, valleys, two-story and three-story houses, and steep pitches, the labor percentage increases.
Downspouts 38 29 33 Exterior wood or aluminum trim 40 27 33 Wood deck 50 17 33 Wood siding 53 14 33 Aluminum siding 43 24 33 Sliding glass doors (exterior) 55 12 33 Wood doors (exterior) 50 27 33

196 In specting a House
ZONING BYLAWS, BUILDING CODES, AND PERMITS
When changes are planned for a residence, local building officialsare usually interested. Their concern is, first, that what you are buildingis structurally sound and safe; and second, that you do not create prob-lems for your neighbors. For most renovations, you will have to submityour plans for approval to secure a building permit. Prior to issuing a per-mit, plans are checked for code compliance (structural integrity, safety,etc.) and for zoning bylaw compliance (protecting your neighbors).
Issuing permits for renovation work is often difficult for the author-ities. Many existing structures were built before bylaws or building codeswere established and, consequently, do not comply. These buildings areoften referred to as legal nonconforming. When making changes to an ex-isting building, it is difficult to join new conforming work and oldernonconforming buildings. Although a neighbor’s rights may have beenslightly violated by the old structure, this does not justify worsening thesituation.
Many municipalities establish special committees to which an ownercan apply for a bylaw variance if she has been refused a permit. Often,the neighbors are solicited and if they have no objections, the work isapproved. Variances are not usually available from building code re-quirements.
Typical Renovation Costs:Breakdown of Material versus Labor (Continued)
% Material % Labor
% Contractor’s
Margin
Windows 49 28 33 Plumbing (new piping and fixtures) 20-25 47-42 33 Heating (new furnace or boiler) 41-48 26-19 33 Furnace humidifier 25 42 33 Electrical work 15-20 52-47 33 Insulation 40 27 33 Drywall 26 41 33 Plywood paneling 33 34 33 Interior wood moldings and trim 37 30 33 Cabinet work 56 11 33 Carpeting 57 10 33 Painting 8-15 59-52 33

Planning a Renovation 197
Zoning bylaws are different from area to area and even from lot tolot in the same municipality. Therefore, you must be careful when plan-ning work. If a neighbor has added a sun room to his kitchen, this doesnot mean that you can, even if your houses and lot sizes are the same.Bylaws regulate such things as the height of the building; distances fromthe front, side, and back property lines; the portion of your lot that canbe covered by buildings; the ratio of living area in your house to the areaof the lot; parking requirements; and the number of dwelling units in abuilding. Because other factors may come into play, it is always best tocheck first with the authorities.
The building code dictates such things as foundation wall type andsize, the size and span of f loor and ceiling joists, material type and in-stallation technique for interior and exterior finishes, doors, and win-dows. The applicable code may be a federal, provincial, state, ormunicipal document.
Heating, plumbing, and electrical systems can be dealt with in thebuilding code or through a separate code.
Sometimes it is difficult to know whether a building permit isneeded. Generally speaking, alterations affecting the structure willrequire a permit. For example, relocating a nonbearing partition wallusually does not require a permit. However, removing all or part of abearing wall does. A permit is needed to add a window or a staircase,or to change the roof line. In some cases, a demolition permit may benecessary to remove an existing structure. If the plumbing system is tobe changed, a plumbing permit may be needed. Adding a kitchen, bath-room, sauna, or laundry area will require a plumbing permit. Remod-eling a bathroom may not necessitate a permit if the plumbing fixtureswill be left where they are. An electrical permit is usually obtained ifyou are adding to the electrical service. For instance, an additional out-let or light fixture should not be installed without a permit. Replacinga defective outlet or fixture would not require a permit. Occasionally,it is necessary to move a wall with wiring inside. If the wall is moved sothat the wiring is closer to the supply than it was (so that no new wireis needed), you may not need a permit. If the wall is moved away fromthe supply (so that you have to add a new length of wire), you will needa permit. A heating permit is usually needed if a furnace is replaced ormajor changes in the distribution system are undertaken.

198 In specting a House
The important point is to check with the authorities at the outsetto determine what is allowed. For the most part, these people are inter-ested in improving the community and will provide all the assistancethey can.
If permits are required, allow sufficient time for them to be issued.Where you will need a variance, increase that time. It is not unusual forpermits to take several weeks to be issued. Find out how much the per-mits cost and include these figures in your budget.
Whether or not a permit is required, you should make sure youknow where your property lines are. If you have a survey of the lot, thismay be all you need. If you don’t have a survey, one can be made. It isalmost as important that your neighbors agree on the location of theproperty lines. Even if your neighbor is wrong, he may be able to delaywork on your project while the dispute is straightened out.
Associated with building permits are inspections. It is to youradvantage to have these inspections performed, and you should assistthe authorities by notifying them when the project is ready for inspec-tion. This will help protect you and should prevent problems after thework is completed. If you are a do-it-yourselfer, inspections are equallyimportant.
THE CONTRACT
Whenever general contractors or subcontractors are engaged, andwhether or not a consultant is working with you, it is important to havea complete and clear contract. Two types of contracts are commonlyemployed: the fixed-price contract and the cost-plus contract.
The fixed-price contract is one with a set figure for the entire job.This allows the owner to know her costs before work starts and thus pro-vides her with some security. Most home improvement projects are un-dertaken on this basis. One drawback is that the price usually includesa contingency for the contractor in case he has made any errors in hisestimating. Another problem with this approach is that if the contractorhas underquoted, he may be pressured to cut corners and to work outquick solutions to the unforeseen problems that always arise. He maypush his crews to finish quickly, often sacrificing quality.
The cost-plus contract is one in which an hourly fee is set over andabove the contractor’s fixed costs. This way the contingency is not

Planning a Renovation 199
required by the contractor and the customer does not pay for it. In thiscircumstance, the contractor is not forced to rush his work and, theo-retically, a higher-quality finished product may be enjoyed. The obvi-ous danger, however, is that the workers may not progress at even amoderate pace, and the crews may be pulled off a cost-plus job to finisha fixed-price project more quickly. As a result, not many contracts arenegotiated on this basis.
The drawings and specifications should be part of either type ofcontract. The specifications should be as detailed and as accurate aspossible. For example, brand names, model numbers, and colors shouldbe specified wherever possible. The type, thickness, and grade of woodshould be stated. Finish materials should also be clearly identified. If youjust indicate drywall, the contractor can choose ³⁄₈ -inch-, ¹⁄₂ -inch-, or ⁵⁄₈ -inch-thick drywall; he can use waterproof or nonwaterproof drywall; hecan glue it on, nail it on, or screw it on. It is a good idea to look at yourdrawings and specifications, pretending you are trying to minimizecosts within the parameters of these documents. Each place you have achoice, select the least expensive material or method. Then you must de-cide whether the finished product will be what you want.
Where new work is to join old (brick walls, for example), colors andmaterials should fit together well. This may be handled with a state-ment such as “Items to match existing as closely as possible, and be sub-ject to customer or consultant approval prior to installation.”
There is a limit to how detailed the specifications should be. Thetradespeople should not be told how to do their jobs. Overspecifyingwill make contractors nervous, and this is usually ref lected in their quo-tations. A fine line must be drawn, and only with experience will yoube able to determine what is appropriate. Here, again, a consultant canbe very helpful.
Contracts are available in many forms and it may be useful to pickup a sample from a construction association or architect in your munic-ipality. Or take a look at the one in this chapter. This will give you anindication of what is usually included. A number of the areas are stan-dardized and should be common to all contracts. Some of the highlightswill be presented here.
Any good contract should contain a starting and completion datefor the work. Many contractors are reluctant to commit themselves to acompletion date, but a target should be established. Some owners like

200 In specting a House
to include a penalty clause that would come into play if the project is notcompleted on time. Most builders will not work on this basis, althoughsome may agree, if there is also a bonus clause for early completion.
The payment schedule should be spelled out in the contract. Ifmoney is to be held back from each payment, this should be clearlystated. Getting off on the wrong foot because of a payment misunder-standing is unfortunate and unnecessary.
The contractor’s guarantee should also be part of the contract. Ameans for canceling the contract by either party and a way to handlechanges should be included. If a consultant is involved, his role shouldbe explained. The contractor may be required to show proof of work-ers’ compensation and liability insurance.
A binding contract must be signed by all the owners of the houseand usually by an officer of the contracting firm. A salesperson’s signa-ture generally is not adequate. It is good practice to have your lawyerlook at the contract before you sign. You should also check with yourinsurance agent to determine whether your house insurance will beaffected and also to discuss increasing the amount of coverage. Presum-ably you are adding to the value of the building.
A contract often does not seem necessary at the outset when every-one is getting along well and enthusiastic about the project. And manycontractors will be quite happy to work without formal documents.When problems arise, however, it is important to have a written agree-ment to fall back on. Good builders know that the contract also pro-tects them from unreasonable clients.

Planning a Renovation 201
ABC GENERAL CONTRACTING
123 4th StreetTownville, New York
CONSTRUCTION CONTRACT
Contract Date _______________Home Telephone ________________Office Telephone _________________
The undersigned agrees to furnish materials, tools, equipment, andsupplies and to execute in a substantial workmanlike manner accordingto accepted trade practices on the property described as the followingwork:
The following contract documents form part of this agreement:
(Working drawings and specifications listed here)
The following items are specifically excluded from this agreement andare to be furnished by others or treated as additional work:
Allowances—The following amounts are included as allowances for theitems listed. In the event that costs are less than the allowance, the dif-ference shall be credited to the Owner. In the event that costs aregreater, the Contractor shall be reimbursed for the excess.
Light Fixtures and Chimes $ Other $ Finish Hardware $ Other $ Bath Accessories $ Other $
Finish hardware is interpreted to include all knobs, pulls, hinges,catches, locks, drawer slides, accessories, or other items that are nor-mally installed subsequent to final painting.
Light fixtures are interpreted to include only those fixtures that are sur-face mounted. Bath accessories are interpreted to include medicinecabinets, towel bars, paper holders, soap dishes, etc.

202 In specting a House
PAYMENT
Subject to a holdback of ____ percent, the Owner shall:
A: Make monthly payments to the Contractor, on account, of the con-tract price, based on the proportion of work completed.
B: Within 15 days of the date of substantial completion, make full pay-ment, less allowances for outstanding work and applicable hold-backs.
C: Within 15 days of the total completion and expiry of all liens, makefull payment.
Contractor agrees to commence work on or about and to diligently pur-sue work through to completion (with extra time allowed per para-graph 16 on the reverse side hereof).
Completion to be approximately ___________________
Special remarks:
Because of market f luctuations in lumber and other material costs,the Contractor reserves the right to make adjustments at the time ofmonthly billing based on current material quotations received fromsuppliers.
In view of changing labor and material conditions, this contract is sub-ject to review unless accepted in writing and this or other mutuallyacceptable agreement signed within 30 days of contract date.
By ________________________Contractor’s Licence No. ________________________Salesman’s Licence No. ________________________
Acceptance ___________________________Contractor is authorized to proceed with the work listed in this contractaccording to the terms and conditions on the reverse side hereof, whichare acknowledged as part of this agreement.

Planning a Renovation 203
Accepted ________________________Accepted ________________________Date ________________________
TERMS AND CONDITIONS
1. Extra Work During progress of construction, the Owner may order extra work.
The amount for such extra work shall be determined in advance, if pos-sible, or may be charged for at actual cost of labor and material plus 20percent for Contractor’s overhead and fee. All sums for extras shall bedue and payable upon completion of each extra. 2. Matching Material
Contractor calls attention of the Owner to the limitations of match-ing plaster, stucco, concrete, masonry, and roofing materials, and whileContractor shall make every effort to match existing materials, texture,colors, and planes, exact duplication is not promised. Owner to approvematerials prior to installation. 3. Electrical Service
Unless specifically included, electrical work contemplates no changeto existing service panel other than the addition of circuit breakers orfuse blocks to distribute electric current to new outlets. Cost incurred inchanging point of service, main switch, or meter that may be requiredby inspector or serving utility shall be paid to the Contractor by theOwner the same as any other extra. Changes to existing wiring in areasundisturbed by alterations not included. 4. Filled Ground, Rock, or Springs
In event filled ground is encountered or rock (or any other materialnot removable by ordinary hand tools), Owner shall pay cost plus 20percent of Contractor’s fee. If springs are encountered, they will bedealt with at Owner’s expense after discussion with Owner. 5. Property Lines
Owner shall furnish, at own expense, all surveys of property andassume all responsibility for accuracy of markers unless otherwiseagreed. 6. Conduits, Pipes, Ducts
Unless specifically indicated, agreed price does not include rerout-ing of vents, pipes, ducts, or wiring conduits that may be discovered inremoval of walls or cutting of openings in walls.

204 In specting a House
7. Access to Work Areas Owner shall grant free access to work areas for workers and vehi-
cles, and shall allow areas for storage of materials and rubbish. Owneragrees to keep driveways clear and available for movement and parkingof trucks during normal work hours. Contractor and workers shall notbe expected to keep gates closed for animals or children. Contractorshall protect adequately the property and adjacent property, subject tothis contract, but shall not be responsible for damage to driveways,walks, lawns, trees, and shrubs by movement of trucks unless caused byContractor’s gross negligence. 8. Requirements of Public Bodies
Any changes, alterations, or extras from the drawings or specifica-tions that may be required by any public body, utility, or inspector shallconstitute an extra and shall be paid for the same as any other extra. 9. Materials Removed—Rubbish
All materials removed from structures in the course of alterationsshall be disposed of by Contractor except those items designated byOwner prior to commencement of construction.
All construction rubbish is to be removed by Contractor at termi-nation of work and premises left in neat broom-clean condition. 10. Insurance
Prior to commencement of construction, Owner shall have Contrac-tor listed as loss-payee on fire and comprehensive insurance policy bymeans of endorsement and shall furnish waiver of subrogation for fireand those items covered under comprehensive policy including vandal-ism, or shall purchase separate policy to protect Contractor’s interests.In event Owner fails to do so, Contractor may procure such insuranceand Owner agrees to reimburse Contractor in cash for the cost thereof.Contractor shall carry at his own expense workers’ compensation andpublic liability insurance at least to the minimum requirements of exist-ing laws. 11. Toilet Facilities
Owner agrees to make toilet facilities available to all workers orcompensate Contractor for cost of rented units. 12. Permits
Contractor shall obtain and pay for all permits required by govern-ment bodies unless otherwise specified. Owner shall secure and pay forapproval of groups, or organizations, society or association, wherever

Planning a Renovation 205
such approval is required by covenant. Owner shall secure and pay foreasements or other necessary property interests for permanent struc-tures or permanent changes in existing facilities. 13. Cancellation of Agreement
In event of cancellation of this agreement by the Owner prior tocommencement of construction, the Contractor is to receive compen-sation from the Owner for all expenses incurred to that date plus 5 per-cent of the contract price as liquidated damages and not as a penalty. 14. Underground Pipes
Contractor shall be not held responsible for damage to, or remov-ing of, pipes, sprinkler lines, water, or sewage disposal systems or con-duits in areas of excavation, grading, paving, or construction. 15. Damage to Property
Contractor shall not be held responsible for damage caused byOwner or Owner’s agent or Owner’s employees, act of God, soil slip-page, earthquake, fire, riot, or civil commotion or acts of public enemy. 16. Extra Time
Contractor agrees to diligently pursue work through to completion,but shall not be responsible for delays for any of the following reasons:acts of neglect or omissions of Owner or Owner’s employees or Owner’sagent, acts of God, stormy or inclement weather, strikes, lockouts, boy-cotts, or other labor union activities, extra work ordered by Owner, actsof public enemy, riots or civil commotion, inability to secure materialsthrough regular recognized channels, imposition of government prior-ity or allocation of materials, failure of Owner to make payments whendue, or delays caused by inspections, or changes ordered by inspectorsof government bodies concerned. 17. Licensing
Contractor informs Owner that he is licensed under the laws andstatutes of the area of jurisdiction. 18. Protection of Owner’s Property
Owner agrees to remove or to protect any personal property, insideand out, including shrubs and f lowers that cannot be protected ade-quately by Contractor, and Contractor shall not be held responsible fordamage to or loss of said items.

206 In specting a House
19. Termination of the Contract A: By Owner: If the Contractor fails to execute the work properly, or otherwise
fails to substantially comply with the contract requirements, the Ownermay terminate the Contractor’s right to continue with all or part of thework, or may terminate the contract by providing written notice thereof.The Contractor shall be entitled to payment for all work satisfactorilycompleted prior to termination date. The Contractor’s obligation forthe work completed, with respect to guarantee, etc., will remain in forceafter termination.
B: By Contractor: If the Owner fails to pay the Contractor amounts due him, or other-
wise fails to substantially comply with the contract requirements, theContractor may terminate the contract by providing written noticethereof. The Contractor shall be entitled to payment for all work satis-factorily completed prior to termination date. The Contractor’s obliga-tion for the work completed, with respect to guarantee, etc., will remainin force after termination. 20. Contract
The Owner shall not sign the contract in blank and is entitled to acopy at the time he signs it. 21. Sign
Contractor is authorized to display his sign until completion ofwork. 22. Guarantee
Work covered by this contract, including change orders issued un-der this contract, is guaranteed for one year following substantial com-pletion, provided manufactured items are covered by manufacturer’sguarantee, and further provided final payment is received in full within15 days from final billing. Contractor shall not be liable for damages re-sulting from the use after installation of the mechanical or plumbingequipment specified herein.

C h a p t e r
207
11
THE WORK BEGINS
You will have spent a great deal oftime so far talking, planning, budgeting, drawing, getting permits, andawarding contracts, but the house still looks the same. At this stage, youare finally ready to get things under way. If everything has been han-dled correctly so far, this will be a time blended with large parts of sat-isfaction and small parts of anguish. If you have not prepared properly,the mix is likely to be somewhat different.
Before the workers arrive, you should have the house rules laid out.How will the workers get into the house? Front door and through theliving room or back door? Where will their truck be parked? Is thereheavy equipment to be brought in? Where will the garbage bin beplaced? If they are excavating, where will the earth be dumped? It maynot be easy protecting your landscaping or getting your car out of thegarage. These things have to be established before any damage is done.
Will you make a washroom available to the workers? If so, your guesttowels may not be appropriate. Is there a good place for the tradespeo-ple to eat their lunch? It will help if you make waste disposal easy forthem. It is a nice gesture to offer coffee and doughnuts, but be carefulnot to get too friendly with the workers. They are, after all, working foryou and you should maintain a businesslike relationship.

208 In specting a House
You should know who will be in charge of the project, and an areain the house there should be designated as your communication depot.All your questions and comments should be directed to the person incharge through this command post. If you are working with a consult-ant, he will usually be the liaison.
Difficult as it may be to accept, the general contractor does not usu-ally oversee your project eight hours a day. You may not see him regu-larly, and a written message left at the communication post will be thebest way to get in touch.
Insist on a daily cleanup program. The first day will set the tone ofthe project, so be firm just once and you should be in good shapethroughout. If the workers are doing something incorrectly, or if youhave a question, resist the temptation to speak directly to the tradesper-son. Remember, all your communications should be through one per-son. If a major mistake is clearly being made, such as knocking downthe wrong wall or putting a window in the wrong room, however, by allmeans stop the work and call for help.
SUPERVISION
Even if a consultant is providing site supervision, you should visitthe job regularly, daily if possible. It is your house and if things are notthe way you want them, now is the time to change them. You will alsohave a better idea of how things are put together and where they arelocated when the job is finished. This may stand you in good stead laterwith maintenance problems or future improvements. Incidentally, asthings begin to take shape, everything will look smaller than it did onpaper. Don’t panic, this impression is usually reversed by the time fur-nishings are in place.
Make sure the municipal inspections are made at the appropriatetimes. Contractors do not like to wait for inspectors, and if the work goeson without inspections, contractors are not usually concerned. Inspec-tors will not ordinarily demand that walls be opened up to inspect whatthey cannot see. However, good management and timing keeps life sim-pler for everyone.

The Work Begins 209
SEQUENCE OF OPERATIONS
A renovation project, large or small, is a complex operation, and aproper sequence must be followed to produce a smooth f low. We willlook brief ly at the steps involved and try to decide why they must bedone in this order.
First, we must look outside. If the job is anything less than a totalgutting of the house, it is important that the building be kept weather-proof. It is an absolute crime to have your newly finished bedroom ceil-ing ruined by a tiny roof leak. If the house is to be gutted and redone,the roof is usually left as is until all the vents and chimneys penetrateit, then the roof is resurfaced before the interior finishes are applied.
The demolition work comes next: removing wall and ceiling fin-ishes, tearing down walls and pulling apart kitchens and bathrooms.This will be your first opportunity to see what order the contractor canmaintain and how well he cleans up the site.
The structural work is next. New walls, f loors, doorways, stairs, andopenings are created. This is the skeletal work. The initial buildinginspection is conducted at this stage.
Heating comes next with ductwork or piping tucked in between thestud spaces and f loor joists. Plumbing is roughed in next with the pip-ing placed between the framing members and the heating distributionductwork. Fixtures are not usually in place at this point, with the possi-ble exception of the bathtub. Electrical work follows with the wiringinstalled for present and future uses. Wires are left unfinished at theirtermination points until wall and ceiling finishes are applied.
The reason heating, plumbing, and wiring are dealt with in thatorder is that the wiring is more f lexible than the plumbing, which, inturn, is more f lexible than the heating. These systems are now ready forthe initial inspection.
The new windows and doors can be added at this point. Insulationcan be fitted in as well. Plumbing, heating, and electrical people under-standably try to avoid working in insulated walls.
We are now ready for the interior wall and ceiling finishes to beadded. As long as the exterior is protected from the weather, outdoorwork can be completed at any time, weather permitting.

210 In specting a House
Finish carpentry and cabinetwork, as well as wood trim, are addednext. Kitchen cupboards, tile work, closets, and countertops are fin-ished at this point.
The plumbers, heating contractors, and electricians come back tocomplete their systems. Fixtures are installed and tested, and final in-spection of the work of these tradespeople is conducted.
Decorating is undertaken, with f loor finishes added, door hardwareinstalled, and the last touches applied. This brings the project to an endand everything should be perfect.
At this stage, disappointment can set in. While you are scrutinizingthe work, f laws leap out at you. There are a hundred things that are notright or that could have been done slightly better. You have paid a lot ofmoney, why didn’t the workers take just a little more time? This is a goodtime to go for a walk through a new subdivision. Chances are you willfind houses there are not perfect either. It begins to become apparentthat your job will not be quite as good as it looked on paper. But under-standing that no renovation project is f lawless should help console you.
You can negotiate with your contractor, and with the help of a con-sultant agree on what f laws are to be corrected. Certain things are clear-cut, but others, which are a question of workmanship, are difficult toidentify specifically as defects. You will probably have to trade off onsome of your improvement and repair expectations. Keep in mind, how-ever, that no one will ever look at your house as closely as you are look-ing at it now. Once you move your furniture in, it will not be exposed tosuch close examination.
In short, prepare yourself for something less than 100 percent. Aimfor perfection by all means, but be realistic in your expectations. Foryou, every piece of work in the house is exciting and important; however,for the tradespeople, it is just another day at work and they, after all, willnot be living in the house.
One last thing before you say good-bye to the contractor. Make surethat you have all the warranties or guarantees for new appliances or fix-tures. The contractor will have no use for them and you should keepthem on file. You will also want to keep a set of working drawings andspecifications on file. Make sure you get a set.

The Work Begins 211
PAYING FOR THE WORK
One of the most common mistakes made by homeowners during arenovation project is to pay too much money up front. The payment isthe only trump card you hold, and it is the best way to ensure that thegame is played properly and completely. If you have paid in advance,and difficulties arise, you will find yourself negotiating from a positionof weakness rather than strength.
Large Projects
Large projects are expected to take several months. Many contrac-tors will ask for a large down payment before work is started and will tellyou that this is how they do business. Be very careful at this point. Unlessmaterials are unusually expensive or have to be ordered well in advance,with a large deposit, you should not put down a large percentage of themoney. Many contractors do not pay cash for their supplies and shouldnot be heavily burdened by getting materials to the job. Typically, a 10percent down payment would be maximum. Also ensure that an appro-priate receipt is received. The contract should spell out the paymentschedule.
The next payment should be made after materials are on-site andthe first stages of the work have been satisfactorily completed. If thework is not right, do not make a payment. Each payment should repre-sent an appropriate proportion of the project, less a predeterminedholdback. The holdback is for mechanics’ liens that will be discussedshortly.
The payment calculation works this way. For instance, after twoweeks, 20 percent of the work is completed to your satisfaction. If thecontract amount is $10,000, the payment is $2,000 less 10 percent (typ-ical) holdback. The payment then is $1,800 ($2,000 × 90% =). Thisapproach is carried through the project. For example, when the projectis 80 percent complete, you will have paid $7,200 ($10,000 × 80% ×90%). At the completion of the work, you will have paid $9,000, the full$10,000 contract amount less the 10 percent holdback. This amount istypically withheld for approximately 40 days to protect against mechan-ics’ liens.

212 In specting a House
A lien is a claim against your property by someone who has sup-plied materials or performed work in it. The question of liens is a some-what confusing and complicated issue, and in many areas there is nocomplete agreement on its meaning. The concept arose as a method ofproviding suppliers and subcontractors with some protection whenthey supplied materials or did work on a house. For example, an ownerengages a general contractor, who, in turn, hires a subcontractor. Thesubcontractor does the work, the owner pays the general contractor,but the general contractor doesn’t pay the subcontractor. The subcon-tractor is in a difficult position. He has put his materials and labor intothe house, but has no contractual relationship with the owner.
If the general contractor is uncooperative, or cannot be located,the situation is unsatisfactory for everyone. Thus, it was decided that ifsomeone provided work or materials, he could stake a claim on the sub-ject property if he was not paid. Although the time may vary in differ-ent areas, the supplier or subcontractor typically has 40 days aftercompleting his work to register a lien. A house with a lien outstandingis very difficult to sell. As a result of this protection for the subtrades,the owner can be put in a delicate position. He may pay the generalcontractor in good faith only to discover that the general contractor hasfailed to pay the subcontractor. Contracts between general contractorsand subcontractors are often loose or nonexistent. If the subcontractorputs a lien on the property, he has a legal claim to part of the value ofthe house. Even though you have paid for the work!
A partial solution is to hold back approximately 10 percent fromeach payment. It is important that you do not make payments in full upto the point where 90 percent of the work is complete, then withholdthe balance. This protects neither you nor the subcontractor. For exam-ple, the first subcontractor who worked on the project may have beenthe contractor who poured the concrete. His work may have been com-pleted within the first two or three days of the project. If the generalcontractor is paid in full for this work and the subcontractor puts a lienon the property, the owner has nothing left from the funds allocated tothis part of the project. If the general contractor abandons the projectwith 90 percent payment and 90 percent of the work completed, theowner has no protection against liens. Another problem is that by notholding back 10 percent from the first payment, the owner may forfeithis right to hold back anything from future payments.

The Work Begins 213
The 10 percent holdback figure is somewhat arbitrary and may ormay not be enough to pay off a subcontractor. It could just as easily beestablished at 20 percent. This is now a tool used to protect an owner,even though it was designed originally to protect the subcontractor.
Before making the final payment of 10 percent, verify that the timelimit for subcontractors to register a lien has expired and that there are,in fact, no liens against the property. One final word about holdbacks.Many experts recommend that holdbacks toward the end of the projectshould be proportionately greater than those made earlier. For somereason, it is common for owners to have difficulty getting the last of thework finished. If another contractor is brought in to complete the job,it is likely to be expensive. Remember, the only motivator the owner hasis the money he has not paid. One of the reasons a lawyer should lookat the contract is that he will be able to advise on holdbacks and lienrequirements. Interpretations and procedures may vary from place toplace and it is best to get professional advice at the outset.
The completion date of the project itself is often difficult to deter-mine. Most contracts refer to a “substantial completion date.” This is thedate that starts the clock on the 40 days the subcontractors have to placetheir liens. It is also the beginning of the contractor’s guarantee period(usually one year). This is defined as the day on which work is substan-tially complete. This sounds like a poor definition, and it is. In practice,this date is considered the one on which all work is finished except forminor touch-up or repair. The renovation should be habitable and theonly outstanding work of consequence should be the result of forces be-yond the control of the contractor. For example, if the owner haschanged his mind about the light fixtures he wants and the new fixturesare not immediately available, the contractor is not at fault. If, however,the originally specified bathroom faucets are imported and take twomonths to arrive but the contractor didn’t order them until two weeksbefore they were needed, the contract is probably not substantially com-pleted until they arrive and are installed.
It is usually to the contractor’s advantage to declare the substantialcompletion date as early as he can so that he can be paid as soon as pos-sible. The owner may try to delay the date to postpone his payments.Again, a consultant can be of assistance here.
If difficulties are experienced in getting the work finished, theowner can notify the contractor that he is soliciting quotations from

214 In specting a House
other contractors to complete the work. He advises the contractor thatunless action is taken by a given date, a new contract will be awarded.The cancellation clause in the original contract should, of course, bereferred to.
Smaller Projects
Renovations that are expected to take days to weeks to completerequire a different approach. The bulk of the materials required tocomplete the project are often ordered and delivered immediately. Asa result, payment is usually made in larger chunks. A 30 percent downpayment may be expected, with another 30 percent to be paid whilework is in progress. A final 30 percent should be paid when the work issubstantially complete, while 10 percent should be kept as a holdback.The second 30 percent may be paid when the work is one-half to two-thirds complete, or when the subtradespeople need their first or sec-ond payment. Whatever is decided, make sure that the contract clearlyspells out the timing of payments.
SUMMARY
A renovation is a complex undertaking. The potential for problemsis tremendous, and even with all the correct steps taken, things can anddo go wrong. The renovation business is a difficult one, and both thecontractors and owners need all the protection they can get. The largerthe job and the less knowledgeable the owner, the more outside helphe will need.
The most important thing is to be honest with yourself. Look real-istically at your budget, your knowledge of construction, your skills, andyour time. If you can take advantage of your strengths and get help withyour weaknesses, the chances of success are good. Keep in mind thatthis should be an enjoyable experience, before, during, and after theactual work.

215
G l o s s a r y
ampere (amp) A unit defining the rate of f low of electricity (a unit ofcurrent).
beam A horizontal structural component, usually wood or steel, that istypically supported by a foundation wall or column. A beam is gen-erally used to support f loor joists.
blower A device shaped like a squirrel cage and found in a furnace orair-conditioning unit. It serves as a fan to blow conditioned airthrough the ductwork of a house.
caulk To fill seams and joints with a f lexible durable substance (caulk-ing) to make them watertight and to reduce air leakage.
circuit breaker An automatic switch used in a panel box that disconnectsthe f low of electrical current whenever the circuit is overloaded.The breaker may be reset when the problem is solved.
collar ties Horizontal framing members in an attic used to tie roofrafters together and stiffen the roof.
column A pillar or post usually supporting a beam. compressor The component of an air-conditioning or heat-pump sys-
tem that forces refrigerant to travel through the system and alsochanges a low-pressure vapor to a high-pressure vapor. It is usuallylocated outdoors.
concrete The finished or hardened product after cement, sand, gravel,and water are mixed.
condensate The water that drips from a cooling coil on an air-condi-tioning system and f lows to a drain.
condenser The portion of an air-conditioning system that cools hotrefrigerant vapor to the point where it becomes a liquid. It is usu-ally located outdoors.
course On a roof, this is a continuous or level row of shingles. In a ma-sonry wall, it is a row of bricks or stones.
efflorescence A white powdery substance that appears on masonry wallsurfaces. It is composed of soluble salts that have been brought tothe wall surface by water seepage.

216 Glossary
evaporator The portion of an air-conditioning system installed in theductwork above a furnace. Its function is to cause liquid to expandsuddenly into a gas, thus causing an evaporation and cooling effect.Heat is drawn from the air passing over the evaporator.
fascia A board that is nailed vertically to the lower ends of roof rafters.Visible from the building exterior, it is sometimes used to supportthe gutters.
flashing Sheet metal or other material used around chimneys, project-ing pipes, or in roof valleys to prevent water from entering at joints.
flue An enclosed passageway within a chimney for carrying off smokeand gases.
footing An enlargement at the bottom of a wall or column for the pur-pose of spreading the weight over a larger area. It is usually madeof concrete.
fuse An electrical device that interrupts the f low of electrical currentwhen the circuit is overloaded. Unlike a circuit breaker, a fuse mustbe replaced once it has blown.
gable The vertical triangular section of a wall formed by two converg-ing roof lines.
grade The ground level around a building. gutter The trough at the bottom of the roof that collects rainwater.
Also known as an eaves trough. heat exchanger A device by which heat is exchanged from one heat-car-
rying medium to another without contact between the two media. jamb An upright piece of wood forming the side of a door or window
opening. joists Parallel boards placed on edge and used to support f loor and
ceiling loads. Typically, they are two-by-eights or two-by-tens. knee wall A wall that acts as a brace by supporting roof rafters at an
intermediate position along their length. lath A backing for plaster walls that is fastened to the frame of a build-
ing. Lath is typically made of wood, metal, or gypsum board. masonry Building materials such as brick, concrete blocks, structural
clay tiles, and stone. In some areas, cement, stucco, and plaster arealso classified as masonry.
nail popping A f law common to drywall finishes. The nail head pro-trudes through the surface of the drywall as a result of wood shrink-age.
parging A coat of cement applied to a masonry wall. It helps to preventfoundation walls from leaking.

Glossary 217
pointing (also known as repointing or tuckpointing) The filling of openmortar joints. Removal and replacement of deteriorated mortarfrom between masonry joints.
ponding The accumulation of rainwater in a depression on a f lat roof. R-value A designation for insulation, denoting its resistance to the
transfer of heat. The higher the R-value, the better the insulation. rafters A series of structural roof members, made of wood, which sup-
port the roof. Typically, these are two-by-fours or two-by-sixes. sheathing A covering, usually wooden boards or plywood, fastened over
a building’s exterior studs or rafters. soffit The visible underside of a roof overhang or eave. square One hundred square feet of applied roofing material. studs Wood or metal vertical structural members forming walls and
partitions, normally two-by-fours or two-by-sixes. subfloor Boards or plywood laid on joists. The finished f loor is laid
over this. valley The angle formed by the meeting of two sides of a sloped roof. vapor barrier A waterproof material placed on the warm side of insula-
tion to prevent moisture from migrating into the insulation. vent stack A vertical vent pipe protruding through the roof to carry
away sewer gases from the plumbing system, and to prevent siphon-ing of traps by drawing air into the waste system.
volt A measure of electrical pressure or potential. watt A measure of electrical power (amperes × volts = watts).


219
I n d e x
A Acoustic ceiling tiles, 125 Air cleaners, electronic, 90–91 Air-conditioning, 91–93, 92 Air leakage, 167, 168 Aluminum wiring, 65–67 Apartment (basement), 117 Appliances
clothes dryer, 114–15 dishwasher, 144–45 electrical service and, 63, 64–65 washing machine, 115
Architects, 186 Asphalt
rubberized, 18 shingles, 12, 12–13
Attics, 171–77 checklist, 177 insulation, 160, 163–64 moisture problems, 173–74 ventilation, 171–73, 172
B Balloon framing, 42 Basement(s), 107–18, 120–21
checklist, 121–22 drainage and, 4, 5 finished, 109, 116–18, 122 insulation of, 167 lowering the f loor, 117–18 stairwell, 114, 121 sump pumps, 115–16, 116, 120 termite infestation in, 46–47 trap primer, 115 wet basements, 107–18, 108,
109, 110, 111, 113, 120–21 windows, 34, 112, 121, 132
Bathroom(s), 146–49, 153 bathtubs, 77, 147–48 exhaust fans and, 148–49, 174 toilets, 148, 149
Batt/blanket-type insulation, 156, 157. See also Insulation
Bench footing, 118 Board and batten, 29 Boilers, 95. See also Heating system(s) Brick
brick veneer, 25–27, 42–43, 43 fireplace components, 140 solid masonry walls, 41–42, 42
Building codes, 196–97 Building permits, 196–98
C Cabinets, 145 Cap (chimney), 8 Carpeting, 129 Casement windows, 131, 130 Caulking, 25, 33, 148, 167, 168 Ceiling finishes. See Wall and ceiling
finishes Cellulose fiber insulation, 159. See
also Insulation Central air-conditioning, 91–93 Chimneys, 7–9
checklist, 37 saddle f lashings, 9
Circuit breakers, 56–60 Clapboard, 29, 30 Closets, 126, 143, 152 Clothes dryer, 114–15 CO/ALR, 66 Collar ties, 175 Compressors, 94 Computer equipment, 139
220 Index
Condensation, 126, 174 exterior walls, 24–25, 29 skylights and, 136 storm windows and, 135 toilets and, 148
Conduction, 155 Contract, renovation, 198–206 Contractors
general, 185, 190–92, 208 guarantees, 200, 210 paying, 211–14 subcontractors, 192–93
Convection, 155 Convectors, 98. See also Heating
system(s) Copalum, 66 Copper supply piping, 74–75 Cost-plus contract, 198–99 Crawl spaces, 47, 118–21, 119, 122,
161 Crickets, 8 CUAL designation, 66
D Decks, 5 Demolition work, 209 Dishwasher, 144–45 Doors, 35–36, 137–38
checklists, 38, 151 door cores, 138 garage, 6, 7 locking mechanisms, 36 storm doors, 35
Downspouts. See Gutters and downspouts
Drainage drainage fields, 80 drainage system, 75–76 drainage tile, 112 driveways and, 7 f lat roofs and, 17
Drip cap, 33 Driveways, 5, 7, 111 Dryer (clothes), 115 Dry rot, 46 Drywall, 123–25 Dutch wall, 118
E Ejector pump, 116 Electrical service, 49–68
aluminum wiring, 65–67, 66 attics and, 176 checking fuse box/circuit
breaker panel, 58–60, 59 checklist, 68 distribution, 56–58, 57 electrical connection in rooms,
138–39, 151 grounding, 55, 55–56 outlets, 62–64, 138–39, 145 permits for changing, 197 renovation work and, 209 size of, 51–55, 52, 53 wiring throughout the house,
60–65, 61, 62, 63, 64 Energy efficiency
see also Insulation exterior wall finishes and, 24 furnaces and, 87
Erosion, 19 Exhaust fans, 146, 172, 174, 175 Exterior, 3–38
checklist, 37–38 chimneys, 7–9, 37 doors, 35–36, 38 garages, 6–7 gutters and downspouts, 19–22 landscaping, 4–6, 37 roofs, 9–19, 37 wall finishes, 23–33, 38 windows, 33–35, 38
Exterior Insulating Finishing Systems (EIFS), 28–29, 29
F Fences, 5 Fiber cement shingles, 33 Filters, air, 90–91 Fireplace(s), 140, 140, 141–43, 151 Fire safety
electrical service and, 49, 60 insulation and, 164 wood shingled roofs and, 14
Fixed-price contract, 198 Fixtures, plumbing, 77–79, 146
Index 221
Flashings, 8, 9, 10 Floors, 127–29
checklist, 150 hardwood, 127 squeaking, 127 subf looring, 128
Flues, 8–9, 141 Foamed-in-place insulation, 157–58,
160. See also Insulation Footings, 39–40 Forced-air systems, 87, 98–99.
See also Heating system(s) Foundation(s)
damage to, 4 drainage and, 5 footings, 39–40 walls, 40–41
Frass, 46 Fungus, 14, 46 Furnaces. See under Heating
system(s) Fuses, 57, 57–60
G Galvanized steel supply piping,
73–74, 74 Garages, 6–7, 7
garage door openers, 6, 7 roofing materials, 16
Gardens, 5 General contractors, 185, 190–92,
200 paying, 211–14
Glass fiber insulation, 159. See also Insulation
Glazing, 133, 133–34 Gravity furnaces, 87–88 Ground fault interrupter, 63, 64 Gutters and downspouts, 4, 19–22,
112, 115 inspection, 21–22 installation, 20 leakage, 22 types of gutters, 20–21
H Heat exchanger, 85–86, 86 Heating system(s), 85–105
building permits and, 197 checklist, 105 distribution system, 87–89 electric, 100–103, 101, 103, 105 electronic air cleaners, 90–91 equivalent furnaces, 100 forced-air versus hot-water,
98–100 furnace efficiencies, 87 heating source, 139, 151 heat pumps, 93–95, 94 hot-water heating, 95–98, 97,
105 house air f low, 88 humidifying systems, 89–90, 90,
91 inspection, 89 renovation work and, 209 warm-air furnaces, 85–91, 86,
88, 105 window orientation and, 34
Heat pumps, 93–95 Holdbacks, 211–13 Humidifying systems, 89–90, 90, 91 Humidity, storm windows and, 135 Hydronic heating, 95–98. See also
Heating system(s)
I Ice dams, 11, 174 Insect damage, 46–47 Insulation, 155–69
air leakage, 167–68, 168 amounts of, 160–62, 161 attic, 163–64, 173 basement walls, 167 checklist, 169 condensation damage and, 25 of crawl space, 119–20 evidence of added, 166 exterior walls, 167 f lat and cathedral roofs,
164–66, 165 forms of, 156–59, 158 ice dams and, 11, 174 insulating values, 156, 157 renovation work and, 209 R-value, 156, 157 types of, 159–60

222 Index
Insulation, continuedvapor barriers, 118–20, 162–63,
164 wiring and, 62
Insulbrick, 31–32 Isocyanate/polyisocyanate/
polyicynene, 160. See also Insulation
J–K Jalousie windows, 133 Joists, 44–45, 45 Kitchen(s), 143–46, 152
exhaust fans, 146, 174 kitchen counter problems, 145
Knob-and-tube wire, 60–61, 62
L Landscaping, 4–6, 111
checklist, 37 swales, 5
Laundry tubs, 114 Lawns, 5–6, 111 Leaching beds, 80 Lead pipe, 71–72 Leakage
chimneys and, 8 f lat roof coverings and, 17 gutters and, 21–22, 22 plumbing, 79
Legal nonconforming, 196 Liens, 211–12 Locks
doors, 36 windows, 137
Loose-fill insulation, 156–57. See also Insulation
M–N Mechanics’ liens, 211–12 Mineral fiber insulation, 159. See also
Insulation Nail popping, 125, 126 Neighborhood inspection, 3–4
O–P Outlets, 138–39, 145 Overimprovements, 183 Paneling, 125
Parging, 8 Patios, 5, 111 Permits, 196–98 Phenolic foam board, 160. See also
Insulation Pitch (roof), 10, 13, 14, 15 Plaster, 124–25 Platform framing, 42 Plumbing, 4, 69–83
checklist, 83 distribution piping, 73–75, 74,
83 drainage system, 75–76, 83 fixtures, 77–79 leaks, 146 permit, 197 renovation work and, 209, 210 septic systems, 80–82, 81, 82 venting, 76–77, 77, 83 waste disposal systems, 79–80,
83 water pressure, 78, 145, 146 water source, 69–72, 70, 71, 72,
83 Polystyrene insulation, 160. See also
Insulation Porches, 5, 16 Pumps, 69–70, 70 PVC plastic piping, 75
R Radiant ceiling panels, 102–3 Radiation, 155–56 Radiators, 98. See also Heating
system(s) Renovation(s), 181–206, 207–14
awarding the contract, 188 budget, 184–85 consultants, 186–90 contract, 198–206 costs, 195–96 daily cleanup, 208 designs, 187–88 doing it yourself, 185, 193–96 general contractors, 185,
190–92, 200 inspections and, 198, 208 master plan, 181–84 payment for, 211–14

Index 223
permits, 188, 197–98 sequence of operations, 209–10 subcontractors, 192–93 supervision of, 208 zoning/codes, 196–98
Repointing, 25 Retaining walls, 6 Rigid board insulation, 157. See also
Insulation Roofs/roofing, 9–19
asphalt shingles, 12, 12–13 built-up, 16, 16–17 checklist, 37 fiber cement shingles, 15 f lat roofs, 17, 18, 173 garage, 6 ice dams, 11 modified bitumen, 18 moisture problems, 173–74 pitch, 10, 13, 14, 15 renovation and, 209 reroofing, 13, 19 roof framing, 175–76 selvage or roll roofing, 16 slates, 13–14 slopes, 10 specialty materials for, 18 tar and gravel, 16–17 wood shingles and shakes,
14–15, 15 Rot, 5, 6, 176 R-value
insulation, 156, 157 windows, 134–35
S Saddles, 8 Safety considerations
attached garages, 6 electrical service and, 49, 60, 61,
67 exhaust fans and, 173 insulation and, 164 wood shingles, 14
Salt deposits, 108 Sandblasting, 26 Security issues, 36 Selvage/roll roofing, 16 Septic systems, 80–82, 81, 82
Sewers, 79–80 Sheathing, 23–24 Sheds, 6–8 Shingles
asphalt, 12, 12–13 fiber cement, 15 wood, 14–15, 15
Sidewalks, 5 Siding
aluminum and steel, 32, 32insulbrick, 31 moisture damage and, 24–25 sheet, 33 vinyl, 32, 33 wood, 31
Skylights, 136, 151 Slates, 13–14 Soffit vents, 172, 173 Soil absorption fields, 80 Soils, drainage and, 5 Spalling, 25, 26 Spanish tile, 18 Splash block, 19 Stairwells/stairways, 143, 144,
151–52 basement, 114, 121 handrails and guards, 143, 144 lighting, 64, 65
Storage pressure tank, 70, 71 Storm windows, 33–34, 134–35 Structure, exterior, 39–44
analyzing crack size, 44 checklist, 48 exterior walls, 41–43 footings, 39–40 foundation walls, 40–41 inspection, 43–44 overview of, 40 settlement, 41
Structure, interior, 44–47 checklist, 48 cracked joists, 45 rot, 46 termites, 46–47
Stucco, 27–29 Studs, 42 Subcontractors, 192–93 Subf looring, 128 Substantial completion date, 213

224 Index
Sump pumps, 115–16, 116, 120 Surface drainage, 4–5 Swales, 5 Synthetic stucco, 28–29
T Termites, 5, 6, 46–47 Tile beds, 80–81, 82 Toilets, 76 Tongue and groove, 29 Topography, 4 Trap primer, 114, 115 Trees, 4 Truss system, 175–76
U–V Urea Formaldehyde Foam
Insulation, 158–59, 160 Vapor barriers, 118–20, 162–63, 164 Ventilation
in absence of attic, 173 attic, 171–73, 172
Venting, 76–77, 77 Vermiculite insulation, 159. See also
Insulation Vinyl siding, 33
W Walls, exterior, 23–33, 41–43
aluminum and vinyl siding, 32, 32–33
asphalt shingles and insulbrick siding, 31
boards, 29–31, 30 brick, 25–27, 26 brick veneer, 43 checklist, 38 condensation problems, 24–25 fiber cement shingles/sheet
siding, 33 insulation, 161, 167 shingles and shakes, 31 solid masonry, 41, 42 stucco, 27, 27–29, 29
vine growth on, 26–27 vinyl, 33 wall assemblies, 23 wood panels, 31
Walls, interior vapor-barrier paint, 25 wall and ceiling finishes,
123–26, 124 Warranties, 210 Washing machine, 115 Waste disposal systems, 79–80 Waste plumbing, 75–76 Water heater, 73 Water pressure, 78, 78, 145, 146 Water source, 69–72, 70, 71, 72 Weatherproofing, 24
brick exteriors and, 25 weatherstripping, 167
Windows, 33–35, 129–37 awning, 132 basement, 112, 121 casement, 131 checklist, 38, 150 double- and triple-glazed, 133,
133–34 faulty, 131 fixed, 132 horizontal sliders, 131–32 inspection of, 136–37 jalousie, 133 materials for, 134 single- and double-hung, 129 skylights, 136, 151 storm, 134–35 types of, 130 window well, 34, 112–13
Wood shavings/wood wool insulation, 160. See also Insulation
Wood stoves, 142, 142–43
Y–Z Yards, 5–6 Zoning, 196–97
garages and sheds, 6–7


