initiating a course proposal - cuyahoga community … · initiating a course proposal ... use for...
TRANSCRIPT
Office of Curriculum Development
987-4892 or 987-4794
CURRICUNET Help Tip Initiating and Editing a Course proposal
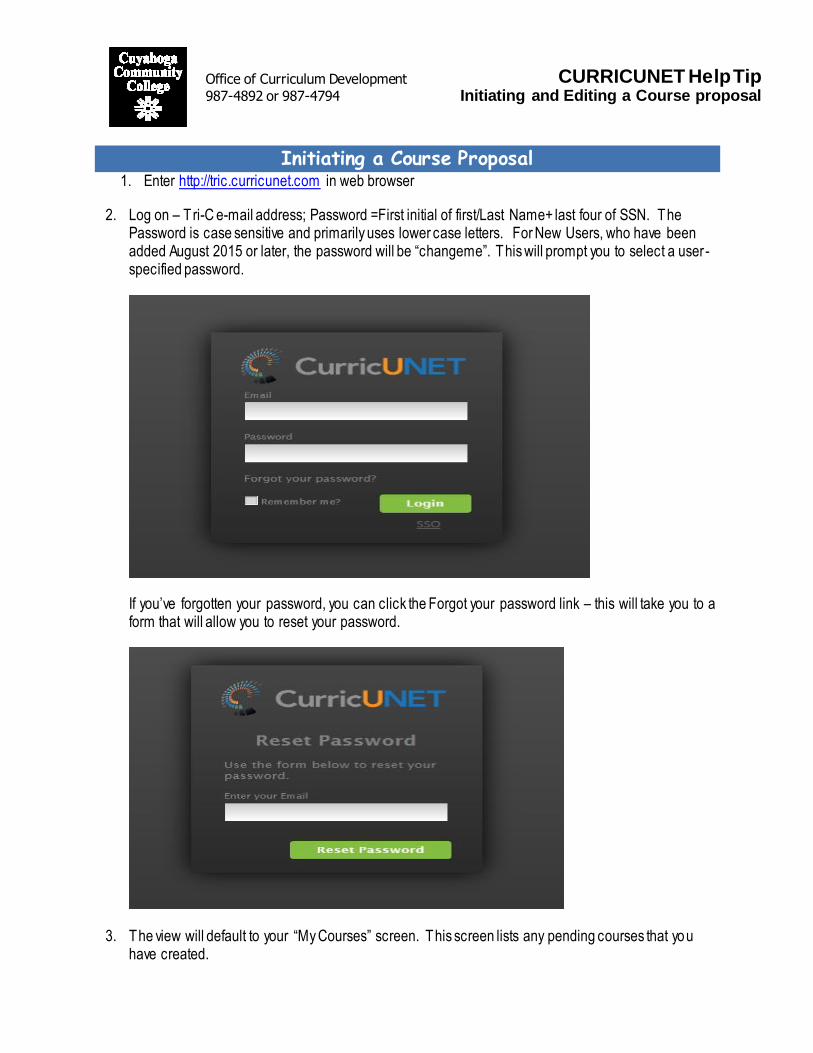
Initiating a Course Proposal 1. Enter http://tric.curricunet.com in web browser
2. Log on – T ri-C e-mail address; Password =First initial of first/Last Name+ last four of SSN. The Password is case sensitive and primarily uses lower case letters. For New Users, who have been added August 2015 or later, the password will be “changeme”. This will prompt you to select a user -specified password.
If you’ve forgotten your password, you can click the Forgot your password link – this will take you to a form that will allow you to reset your password.
3. The view will default to your “My Courses” screen. This screen lists any pending courses that you have created.

Office of Curriculum Development
987-4892 or 987-4794
CURRICUNET Help Tip Initiating and Editing a Course proposal
4. Click Create Proposal, from the Navigation bar at the top of the screen .
5. The Create Proposal Screen will appear. Select from the Proposal Type Drop Down box. Proposal
Types are a combination of the type of proposal & the campus that is initiating the proposal (i.e. Course Revision – Single Campus; Course Revision – Multi-Campus Discipline). Click the Next Step button.
6. If you are submitting a new course, this will take you to the Create Course Proposal Screen. Select the appropriate discipline from the Subject drop down box. Enter an appropriate course number (contact curriculum office X4892 for assistance in identifying an available course number), course title, and a brief course description. Note, these fields can be edited if needed as you continue to create the proposed new course. Go to Step 9.
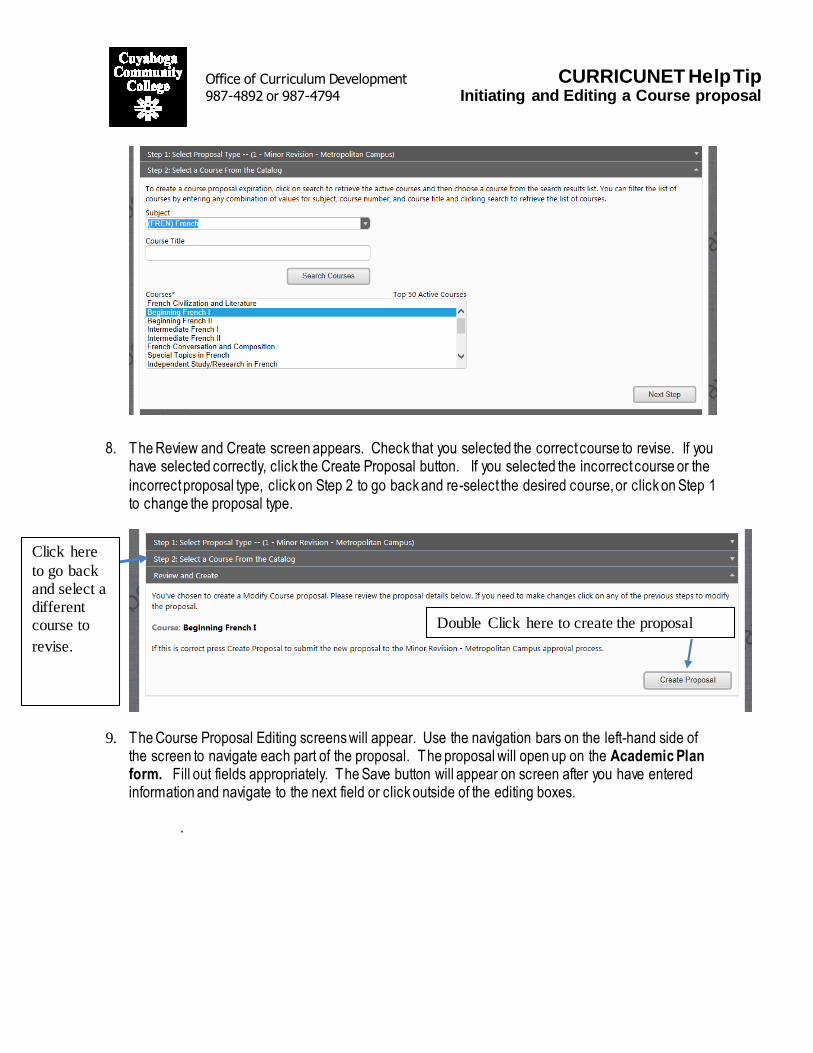
7. If you are submitting a course revision, the Next Step button will take you to the “Select a course from the catalog” screen. This allows you to copy an existing course to revise. You can select a subject code or enter the course title, and click search courses. A list of the Top 50 active courses that match your criteria will appear. Click on the course you wish to revise and click Next Step.
2. Select from the Proposal
Type Drop Down box.
3. Click the Next Step Button.
1. Click the Create Proposal Button
Office of Curriculum Development
987-4892 or 987-4794
CURRICUNET Help Tip Initiating and Editing a Course proposal
8. The Review and Create screen appears. Check that you selected the correct course to revise. If you have selected correctly, click the Create Proposal button. If you selected the incorrect course or the
incorrect proposal type, click on Step 2 to go back and re-select the desired course, or click on Step 1 to change the proposal type.
9. The Course Proposal Editing screens will appear. Use the navigation bars on the left-hand side of the screen to navigate each part of the proposal. The proposal will open up on the Academic Plan form. Fill out fields appropriately. The Save button will appear on screen after you have entered information and navigate to the next field or click outside of the editing boxes.
.
Click here
to go back and select a different course to
revise.
Double Click here to create the proposal
Office of Curriculum Development
987-4892 or 987-4794
CURRICUNET Help Tip Course Checklist & Academic Plan
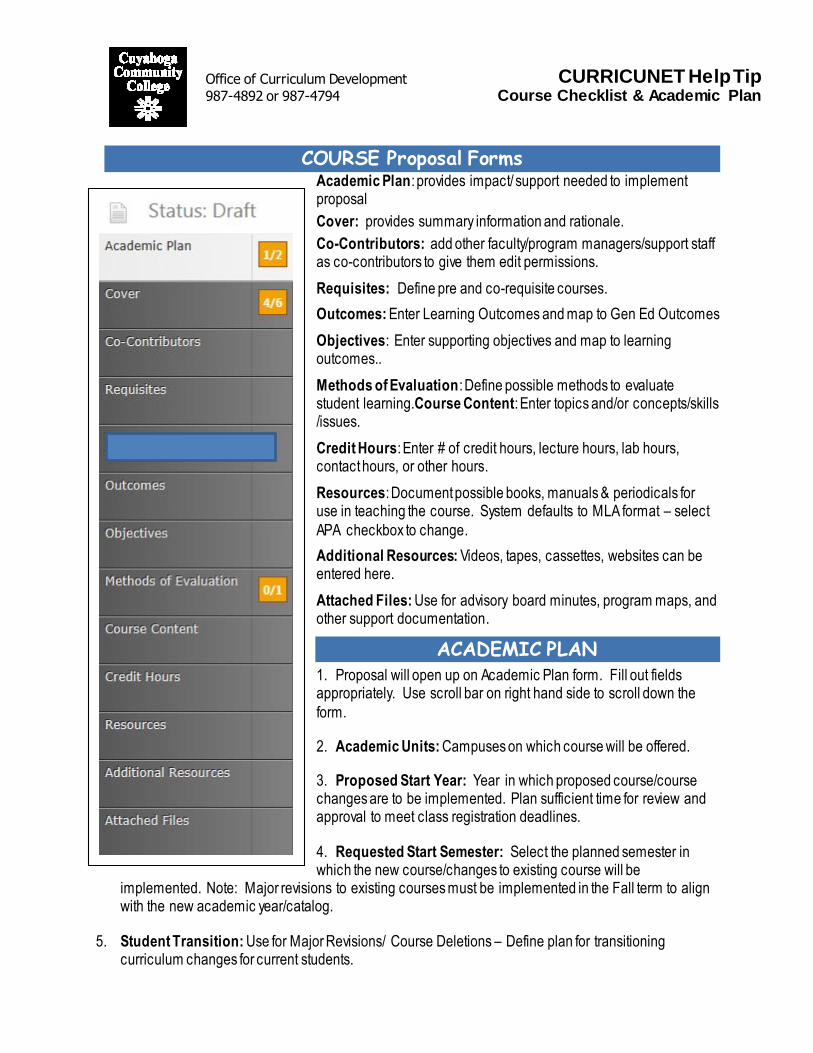
COURSE Proposal Forms Academic Plan: provides impact/ support needed to implement proposal
Cover: provides summary information and rationale.
Co-Contributors: add other faculty/program managers/support staff as co-contributors to give them edit permissions.
Requisites: Define pre and co-requisite courses.
Outcomes: Enter Learning Outcomes and map to Gen Ed Outcomes
Objectives: Enter supporting objectives and map to learning outcomes..
Methods of Evaluation: Define possible methods to evaluate student learning.Course Content: Enter topics and/or concepts/skills /issues.
Credit Hours: Enter # of credit hours, lecture hours, lab hours, contact hours, or other hours.
Resources: Document possible books, manuals & periodicals for use in teaching the course. System defaults to MLA format – select
APA checkbox to change.
Additional Resources: Videos, tapes, cassettes, websites can be entered here.
Attached Files: Use for advisory board minutes, program maps, and other support documentation.
ACADEMIC PLAN 1. Proposal will open up on Academic Plan form. Fill out fields appropriately. Use scroll bar on right hand side to scroll down the
form.
2. Academic Units: Campuses on which course will be offered.
3. Proposed Start Year: Year in which proposed course/course changes are to be implemented. Plan sufficient time for review and approval to meet class registration deadlines.
4. Requested Start Semester: Select the planned semester in which the new course/changes to existing course will be
implemented. Note: Major revisions to existing courses must be implemented in the Fall term to align with the new academic year/catalog.
5. Student Transition: Use for Major Revisions/ Course Deletions – Define plan for transitioning curriculum changes for current students.
Office of Curriculum Development
987-4892 or 987-4794
CURRICUNET Help Tip Course Checklist & Academic Plan
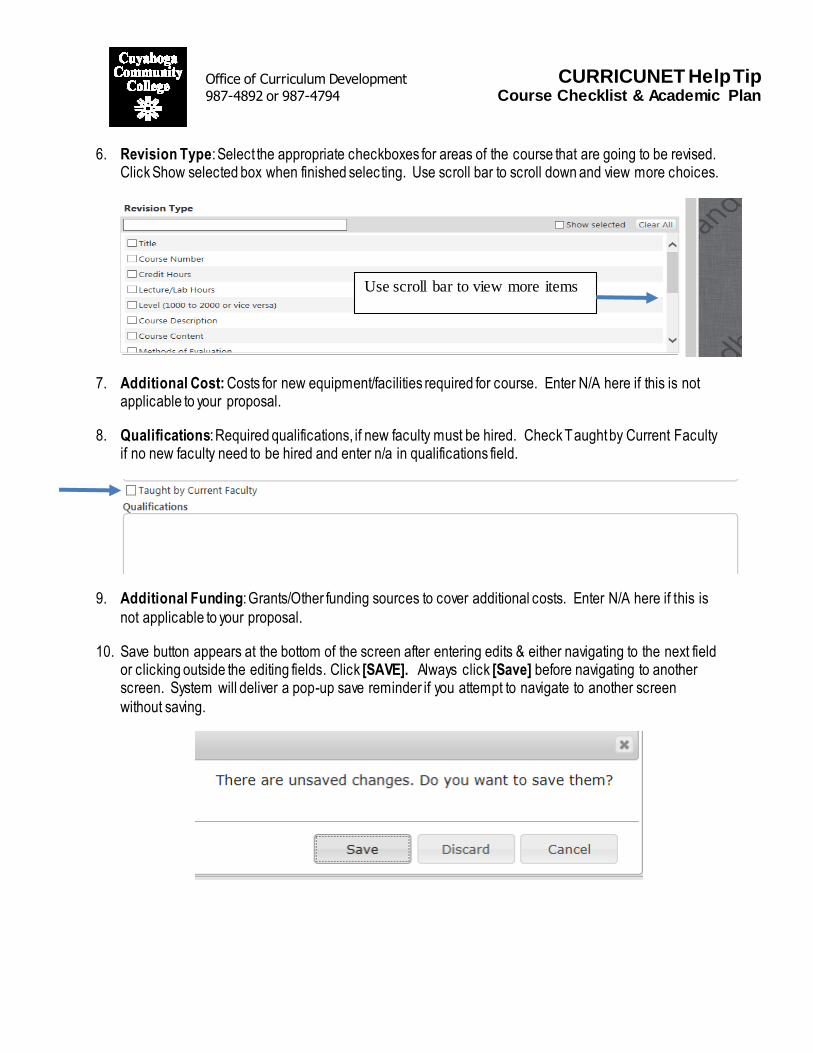
6. Revision Type: Select the appropriate checkboxes for areas of the course that are going to be revised.
Click Show selected box when finished selec ting. Use scroll bar to scroll down and view more choices.
7. Additional Cost: Costs for new equipment/facilities required for course. Enter N/A here if this is not applicable to your proposal.
8. Qualifications: Required qualifications, if new faculty must be hired. Check Taught by Current Faculty if no new faculty need to be hired and enter n/a in qualifications field.
9. Additional Funding: Grants/Other funding sources to cover additional costs. Enter N/A here if this is
not applicable to your proposal.
10. Save button appears at the bottom of the screen after entering edits & either navigating to the next field or clicking outside the editing fields. Click [SAVE]. Always click [Save] before navigating to another screen. System will deliver a pop-up save reminder if you attempt to navigate to another screen
without saving.
Use scroll bar to view more items

Office of Curriculum Development
987-4892 or 987-4794
CURRICUNET Help Tip Cover
COVER
1. Click Cover from Navigation bar on left hand side of screen.
2. *Course Number: Contact Curriculum Office for an appropriate number when developing a new
course.
3. *Course Title: Avoid abbreviations and acronyms if possible, unless course focuses on a particular program, (example: AutoCAD, or NetWare). Full Course title appears in College Catalog and on Official Course Outline. COURSE TITLE CHANGES ALSO REQUIRE THE COURSE NUMBER TO BE CHANGED.
4. Short Title: Limited to 30 characters; appears on transcripts. SHORT TITLE CANNOT BE CHANGED ON CURRENT COURSES UNLESS A COURSE NUMBER CHANGE IS PROPOSED.
5. *Course Description: Appears in College Catalog; use precise and concise statements; avoid phrases such as “This course will teach” or “Students will learn.” See below course description before it was put into "catalog language":
Course designed for science majors interested in a career in biotechnology. History and fundamental principles of biotechnology, including molecular biological, genetic, and immunological foundations are covered. Theory and practice of recombinant DNA methodologies are highlighted. Past, present and promising future applications of
biotechnology are discussed. Ethical, political, and economic impacts of biotechnology, including patents, are presented.
Course description after it was put into catalog language:
Designed for science majors interested in biotechnology career. History and fundamental principles of biotechnology, including molecular biological, genetic, and immunological
foundations. Theory and practice of recombinant DNA methodologies highlighted. Past, present and promising future applications of biotechnology. Ethical, political, and economic impacts of biotechnology, including patents, presented.
6. *Comments: Any additional information initiator wants to provide to reviewer/approvers. Enter N/A here if this is not applicable to your proposal.
7. Campus: Enter campus where course will be offered. Note, if this was populated on Academic Plan screen, data will display on Cover screen. This field can be edited from either the Academic Plan or the Cover screen.

Office of Curriculum Development
987-4892 or 987-4794
CURRICUNET Help Tip Cover
8. Course Equivalency: For Major Revisions (courses being renumbered), click the Course Equivalency
checkbox and in the Equivalency Text field, indicate whether or not the current course will be equivalent to the revised course for grade repeat. For Course Deletions, indicate if a new course will be equivalent to deleted course for grade repeat. For courses with no equivalent, indicate the last semester in which the course will need to be scheduled. (i.e. needs to offer through Summer 2013).
This field can be left blank for minor course revisions (no course number change).
9. Proposed Start Year: Year in which proposed course/course changes are to be implemented. Plan sufficient time for review and approval to meet class registration deadlines. This field can also be
populated from the Academic Plan screen. Data will display here if information has already been entered via the Academic Plan screen.
10. Requested Start Semester: Select the planned semester in which the new course/changes to existing course will be implemented. Note: Major revisions to existing courses must be implemented in
the Fall term to align with the new academic year/catalog. his field can also be populated from the Academic Plan screen. Data will display here if information has already been entered via the Academic Plan screen.
11. Rationale: This is a required field. Provide explanation of why course is needed; include evidence from any surveys/sources indicating economic need in the community. For a Course Revision, provide
an explanation of why course needs to be revised, include any evidence that justifies change and in case of a prerequisite change, why new prerequisites will better prepare students for enrollment in this course. Below is an example of a rationale for a prerequisite change request:
ESL-1120: Proposed prerequisite: ESL-1020 ESL Basic Reading and Writing; and ESL-1110 ESL Grammar and Communication I or concurrent enrollment.
Rationale: Students need the knowledge gained from ESL-1020 to succeed in ESL-1120. Students need to master the concepts and skills taught in ESL-1110 either prior to enrolling in ESL-1120 or at the same time as they are enrolled in ESL-1120 in order to master the concepts and skills taught in ESL-1120. Students can succeed in mastering
the concepts and skills taught in ESL-1120 without having taken ESL-1130 Speaking ESL as a second language. This would give more flexibility to students needing a split or a part-time schedule, allowing them to enroll and succeed in ESL coursework.

Office of Curriculum Development
987-4892 or 987-4794
CURRICUNET Help Tip Cover
This rationale includes the justification for the courses that are being proposed as required prerequisites and the explanation for why a course that is currently required is being removed. It is
very important to address both of these issues in the rationale when modifying prerequisites.
12. Is Honors: Click the “Is Honors” checkbox for proposed new honors courses/revisions to existing honors courses. This will notify faculty who have been assigned the role of “honors faculty” of the proposal and allow them the opportunity to comment on the proposal .
13. Click [Save]. Always click [Save] before navigating to another screen. Save button appears at the bottom of the screen after entering edits & either navigating to the next field or clicking outside the editing fields.
*For new course proposals, these fields initially appear on the Create a Course screen. They can then be edited from the Cover page.

Office of Curriculum Development
987-4892 or 987-4794
CURRICUNET Help Tip Adding a Co-Contributor
Adding a Co-Contributor
1. Click the Co-Contributors button from the navigation bar on the left-hand side of the screen.
2. Scroll down to locate the user you wish to add as a co-contributor.
3. Click the check box next to the user(s)’ name.
4. Click the Show selected checkbox at the top of the screen.
5. Click the Save button.
2. Click show selected box after
selecting co-contributors.
1. Click checkbox for each person you wish to add as co-contributor.
3. Click Save button.

Office of Curriculum Development
987-4892 or 987-4794
CURRICUNET Help Tip Entering Prerequisites
ENTERING PREREQUISITES AND COREQUISITES
1. Click Requisites from Course Navigation Menu. To Add a New prerequisite, click Add New Item
button from top right hand side of screen.
2. The Requisite entry fields will appear.
3. Requisite Type: Select Prereq if there is a required prerequisite or co-requisite. Select None if there are no required prerequisites.
4. Type of Pre/Corequisite: Select Prereq if there is a required prerequisite or co-requisite. Select
Advisory if there is only a recommended prerequisite (this will not be encoded into Banner for prerequisite checking, but will be published with the Course Description on the public website and in the catalog as recommended). Select None if there is no required prerequisite.
5. Subject: Select the appropriate subject of the prerequisite course
6. Requisite Course: Select the appropriate Course from the drop down.
Click Add New Item button to add a new
prerequisite
Office of Curriculum Development
987-4892 or 987-4794
CURRICUNET Help Tip Entering Prerequisites
7. Condition: For courses with multiple prerequisites, select appropriate Condition from drop down box
to appear after course listing (i.e. or, and, or concurrent enrollment, and, etc.…).
8. Enter “C” in the minimum grade. This is the College standard. Honors courses only may require a grade of “B” or higher in the standard course as a prerequisite.
9. Select appropriate Enrollment Limitation (Apprenticeship, Admission to Program or None) from drop down box.
10. Use Additional Requisite Information field to list phrases such as “Concurrent enrollment in,” “Eligibility for” or “Departmental approval: Admission to Program” when appropriate. Note, anything entered here will appear after the Condition field.
11. Click [Save]. Repeat process until all prerequisite courses have been added. .
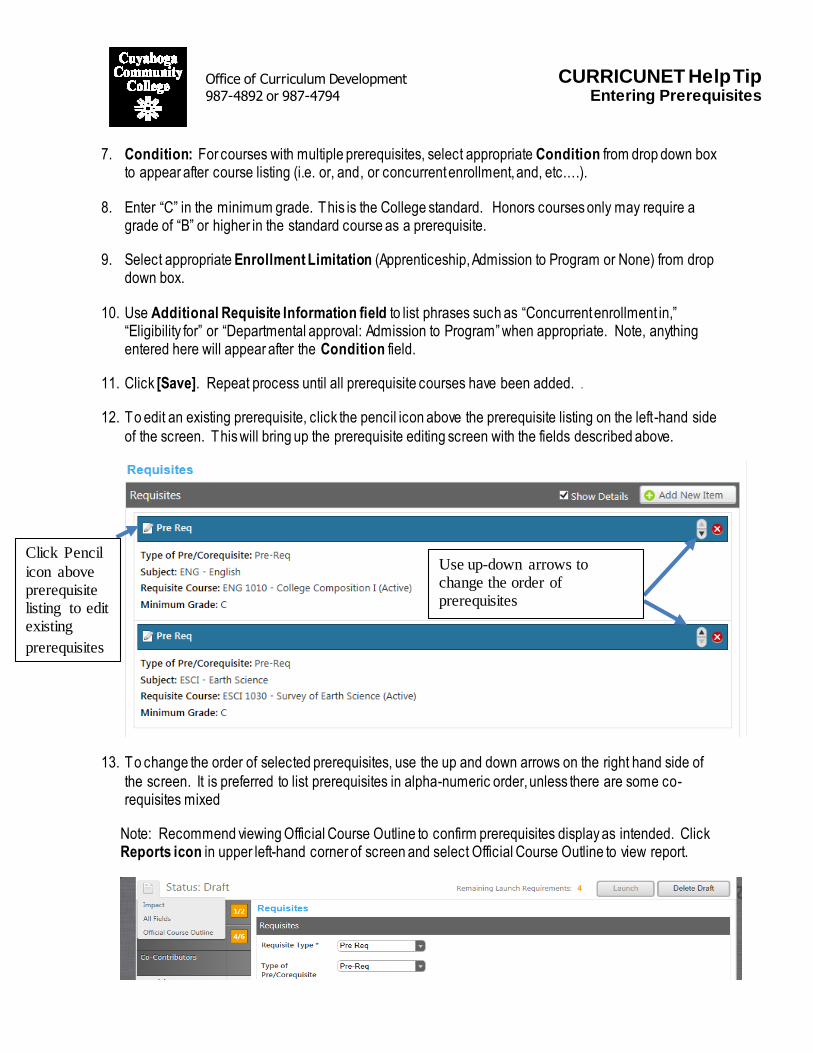
12. To edit an existing prerequisite, click the pencil icon above the prerequisite listing on the left-hand side
of the screen. This will bring up the prerequisite editing screen with the fields described above.
13. To change the order of selected prerequisites, use the up and down arrows on the right hand side of
the screen. It is preferred to list prerequisites in alpha-numeric order, unless there are some co-requisites mixed
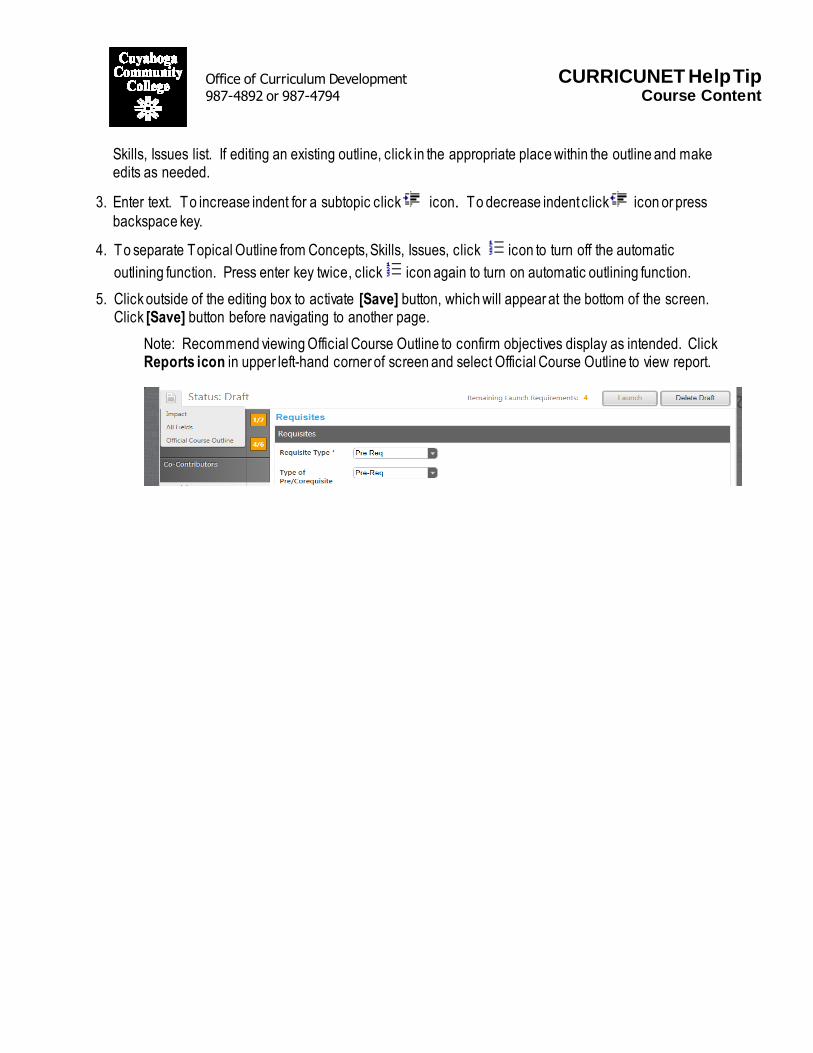
Note: Recommend viewing Official Course Outline to confirm prerequisites display as intended. Click Reports icon in upper left-hand corner of screen and select Official Course Outline to view report.
Use up-down arrows to change the order of prerequisites
Click Pencil
icon above prerequisite listing to edit existing
prerequisites

Office of Curriculum Development
987-4892 or 987-4794
CURRICUNET Help Tip Course Outcomes Entry & Mapping
OUTCOMES ENTRY AND MAPPING
1. Click Outcomes link from Course Navigation Menu on left hand side of screen.
2. To add a new outcome, click the Add New Item button in the upper right hand corner of the screen. Enter the course outcome in the Outcome Text field. Map the course outcome to any
appropriate General Education Outcomes (GEO) by clicking the checkbox next to the desired GEO. Note: Courses should only be mapped to General Education Outcomes if all sections of the course will require an appropriate assignment that can be submitted for assessment of the selected GEO. Click the [Save] button at the bottom of the screen.
Click Add New Item button to add a
course outcome.
To Map to a Gen Ed
Outcome, click in appropriate
check box.
Enter course outcome in
Outcomes text
box.
Office of Curriculum Development
987-4892 or 987-4794
CURRICUNET Help Tip Course Outcomes Entry & Mapping
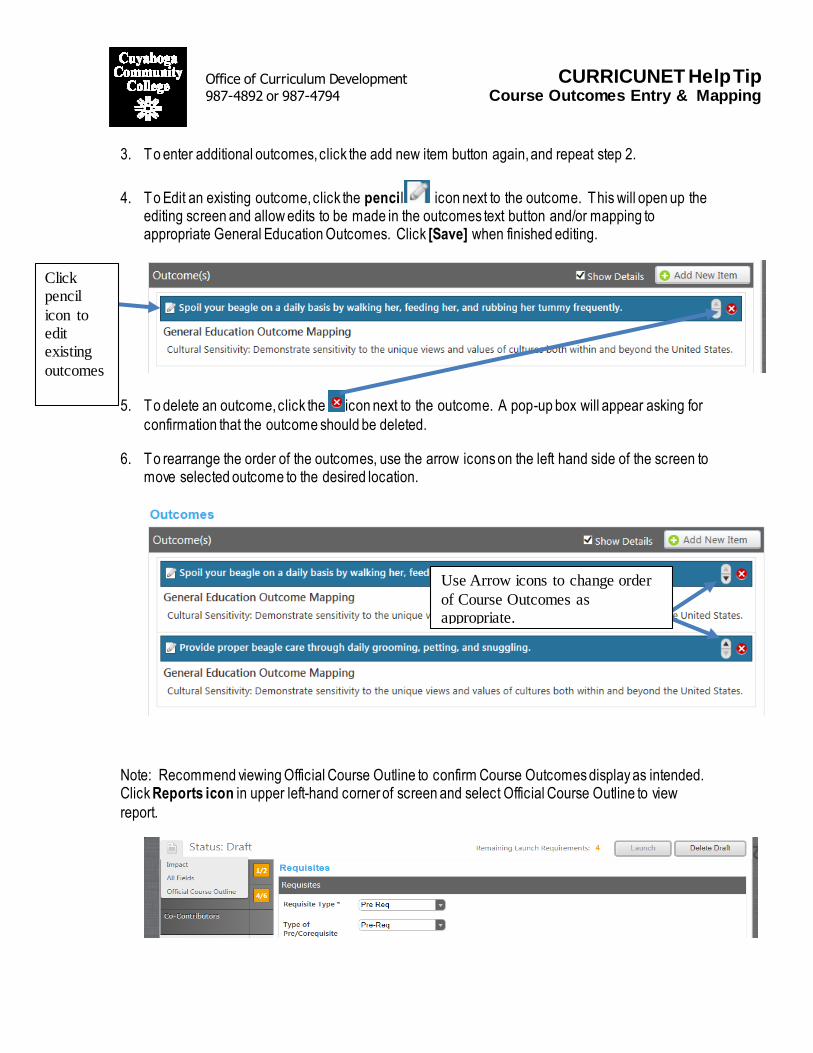
3. To enter additional outcomes, click the add new item button again, and repeat step 2.
4. To Edit an existing outcome, click the pencil icon next to the outcome. This will open up the editing screen and allow edits to be made in the outcomes text button and/or mapping to appropriate General Education Outcomes. Click [Save] when finished editing.
5. To delete an outcome, click the icon next to the outcome. A pop-up box will appear asking for
confirmation that the outcome should be deleted.
6. To rearrange the order of the outcomes, use the arrow icons on the left hand side of the screen to move selected outcome to the desired location.
Note: Recommend viewing Official Course Outline to confirm Course Outcomes display as intended. Click Reports icon in upper left-hand corner of screen and select Official Course Outline to view
report.
Click pencil
icon to edit existing
outcomes
Use Arrow icons to change order
of Course Outcomes as appropriate.
Office of Curriculum Development
987-4892 or 987-4794
CURRICUNET Help Tip Entering Prerequisites
COURSE OBJECTIVES ENTRY & MAPPING
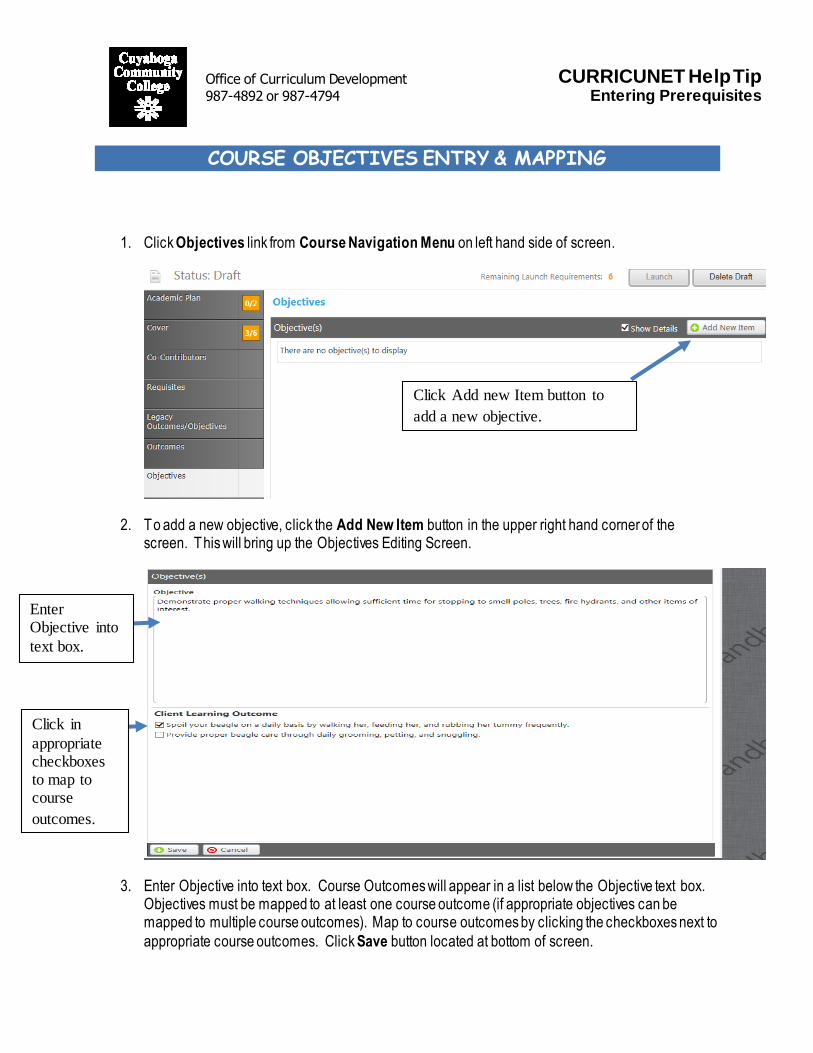
1. Click Objectives link from Course Navigation Menu on left hand side of screen.
2. To add a new objective, click the Add New Item button in the upper right hand corner of the screen. This will bring up the Objectives Editing Screen.
3. Enter Objective into text box. Course Outcomes will appear in a list below the Objective text box. Objectives must be mapped to at least one course outcome (if appropriate objectives can be mapped to multiple course outcomes). Map to course outcomes by clicking the checkboxes next to
appropriate course outcomes. Click Save button located at bottom of screen.
Click Add new Item button to
add a new objective.
Enter Objective into
text box.
Click in
appropriate checkboxes to map to course
outcomes.

Office of Curriculum Development
987-4892 or 987-4794
CURRICUNET Help Tip Entering Prerequisites
4. To edit an existing objective (including mapping to a new outcome/changing the mapping to
existing outcomes), click the pencil icon on the left hand side of the screen next to the objective. This will bring up the Objective editing screen, that allows changes to be made to the objective & the mapping to course outcomes. Click Save button at bottom of screen when edits
are complete.
5. To delete an existing objective, click the icon on the right hand side of the screen. next to the objective to be removed.
6. To change the order of the objectives, use the up/down arrow icons on the right hand side of the
screen next to each objective.
Note: Recommend viewing Official Course Outline to confirm objectives display as intended. Click Reports icon in upper left-hand corner of screen and select Official Course Outline to view report.
Use up-down arrow icons to rearrange order of objectives as needed
Click Pencil icon to edit existing
outcomes.
Office of Curriculum Development 987-4892 or 987-4794
CURRICUNET Help Tip Methods of Evaluation
Methods of Evaluation
Use the Methods of Evaluation screen to enter Assessment Tasks used to evaluate student learning and the course outcomes have been achieved. Assessment tasks are what students are asked to do (projects, demonstrations, presentations) to show their understanding and their skill. Note, faculty are not limited to the assessment tasks listed on the Official Course Outline nor are they required to use all assessment tasks listed. Assessment tasks listed here are suggestions for faculty teaching the course.
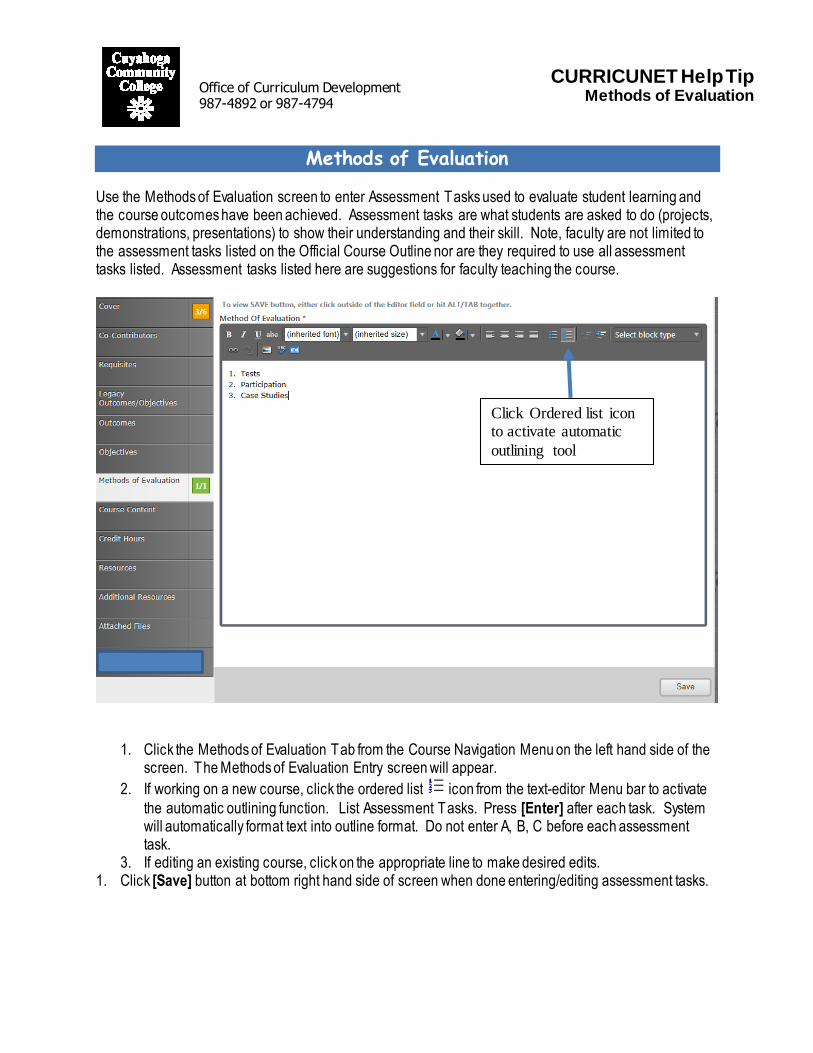
1. Click the Methods of Evaluation Tab from the Course Navigation Menu on the left hand side of the
screen. The Methods of Evaluation Entry screen will appear.
2. If working on a new course, click the ordered list icon from the text-editor Menu bar to activate
the automatic outlining function. List Assessment Tasks. Press [Enter] after each task. System will automatically format text into outline format. Do not enter A, B, C before each assessment task.
3. If editing an existing course, click on the appropriate line to make desired edits. 1. Click [Save] button at bottom right hand side of screen when done entering/editing assessment tasks.
Click Ordered list icon to activate automatic
outlining tool

Office of Curriculum Development
987-4892 or 987-4794
CURRICUNET Help Tip Course Content
TIPS FOR DEVELOPING COURSE CONTENT
CADRE looks for the Course Content area to include sufficient detail to ensure consistency in the delivery of the curriculum.
ENG-1010 and IT -1010 are samples of good outline formats that have recently passed CADRE. MARS-2220 is an example of a course that uses Concepts, Skills, Issues to document the course content.
Course content can be documented using a topical outline, a list of concept, skills, and issues OR BOTH.
Capitalize the first letter of the first word. All other letters are lowercase.
Spell out acronyms the first time and include the acronym next to it. Later use the acronym only. For Outlines:
There should be a minimum of two items per level (i.e. If there is a 1 there should always be at
least a 2, etc.)
Do NOT use periods at the end of each line The depth of the outline should be sufficient that another faculty member would know what level of detail needs to be taught. The other factor that would also provide guidance are the outcomes and objectives –
there should be a good match between the outcomes and objectives and the course content.
ENTERING COURSE CONTENT
1. Click Course Content link from Course Navigation Menu on left hand side of screen.
2. If working on a new course, click the ordered list icon from the text-editor Menu bar to activate the
automatic outlining function. Enter Concepts, Skills, Issues and/or Topical Outline. Note: If including both Concepts, Skills, Issues and a Topical Outline, the Topical Outline should follow the Concepts,
Office of Curriculum Development
987-4892 or 987-4794
CURRICUNET Help Tip Course Content
Skills, Issues list. If editing an existing outline, click in the appropriate place within the outline and make edits as needed.
3. Enter text. To increase indent for a subtopic click icon. To decrease indent click icon or press
backspace key.
4. To separate Topical Outline from Concepts, Skills, Issues, click icon to turn off the automatic
outlining function. Press enter key twice, click icon again to turn on automatic outlining function.
5. Click outside of the editing box to activate [Save] button, which will appear at the bottom of the screen. Click [Save] button before navigating to another page.
Note: Recommend viewing Official Course Outline to confirm objectives display as intended. Click Reports icon in upper left-hand corner of screen and select Official Course Outline to view report.
Academic and Student Affairs Office of Curriculum Development 987-4892 or 987-4794
CURRICUNET Help Tip Credit Hours
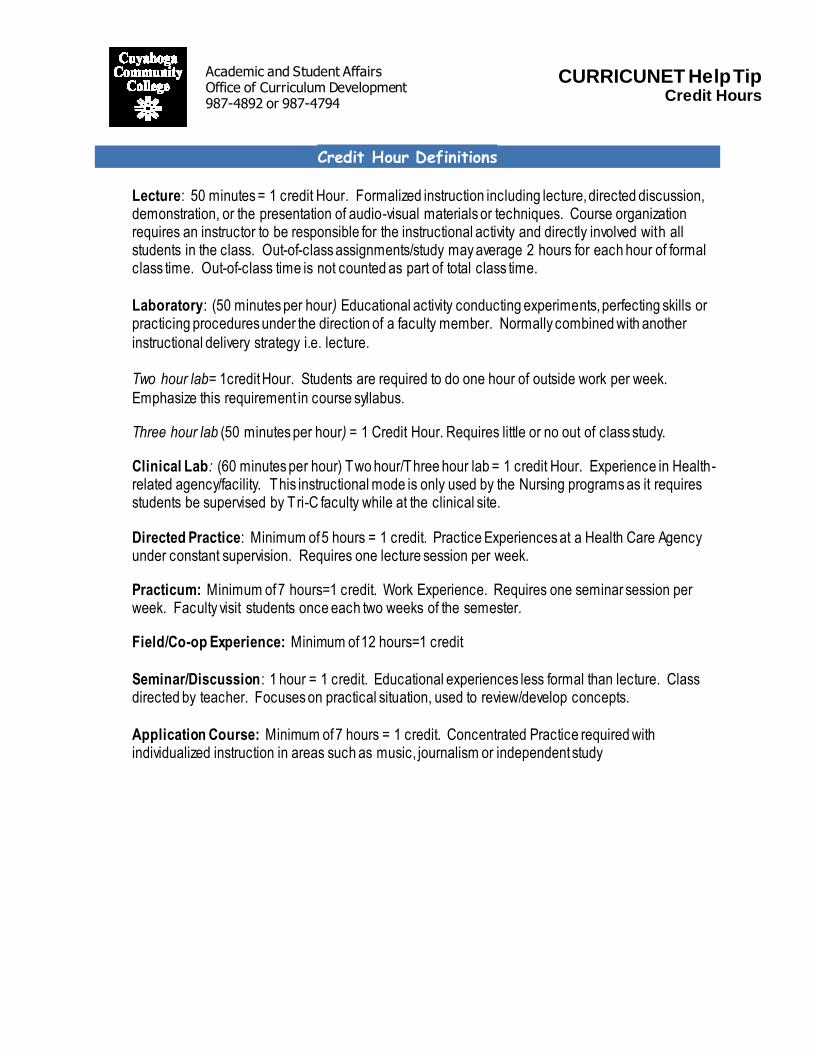
Credit Hour Definitions
Lecture: 50 minutes = 1 credit Hour. Formalized instruction including lecture, directed discussion, demonstration, or the presentation of audio-visual materials or techniques. Course organization requires an instructor to be responsible for the instructional activity and directly involved with all students in the class. Out-of-class assignments/study may average 2 hours for each hour of formal class time. Out-of-class time is not counted as part of total class time.
Laboratory: (50 minutes per hour) Educational activity conducting experiments, perfecting skills or practicing procedures under the direction of a faculty member. Normally combined with another
instructional delivery strategy i.e. lecture.
Two hour lab= 1credit Hour. Students are required to do one hour of outside work per week.
Emphasize this requirement in course syllabus.
Three hour lab (50 minutes per hour) = 1 Credit Hour. Requires little or no out of class study.
Clinical Lab: (60 minutes per hour) Two hour/Three hour lab = 1 credit Hour. Experience in Health-related agency/facility. This instructional mode is only used by the Nursing programs as it requires students be supervised by Tri-C faculty while at the clinical site.
Directed Practice: Minimum of 5 hours = 1 credit. Practice Experiences at a Health Care Agency under constant supervision. Requires one lecture session per week.
Practicum: Minimum of 7 hours=1 credit. Work Experience. Requires one seminar session per week. Faculty visit students once each two weeks of the semester.
Field/Co-op Experience: Minimum of 12 hours=1 credit
Seminar/Discussion: 1 hour = 1 credit. Educational experiences less formal than lecture. Class directed by teacher. Focuses on practical situation, used to review/develop concepts.
Application Course: Minimum of 7 hours = 1 credit. Concentrated Practice required with individualized instruction in areas such as music, journalism or independent study
Academic and Student Affairs Office of Curriculum Development 987-4892 or 987-4794
CURRICUNET Help Tip Credit Hours
Entering Credit Hours
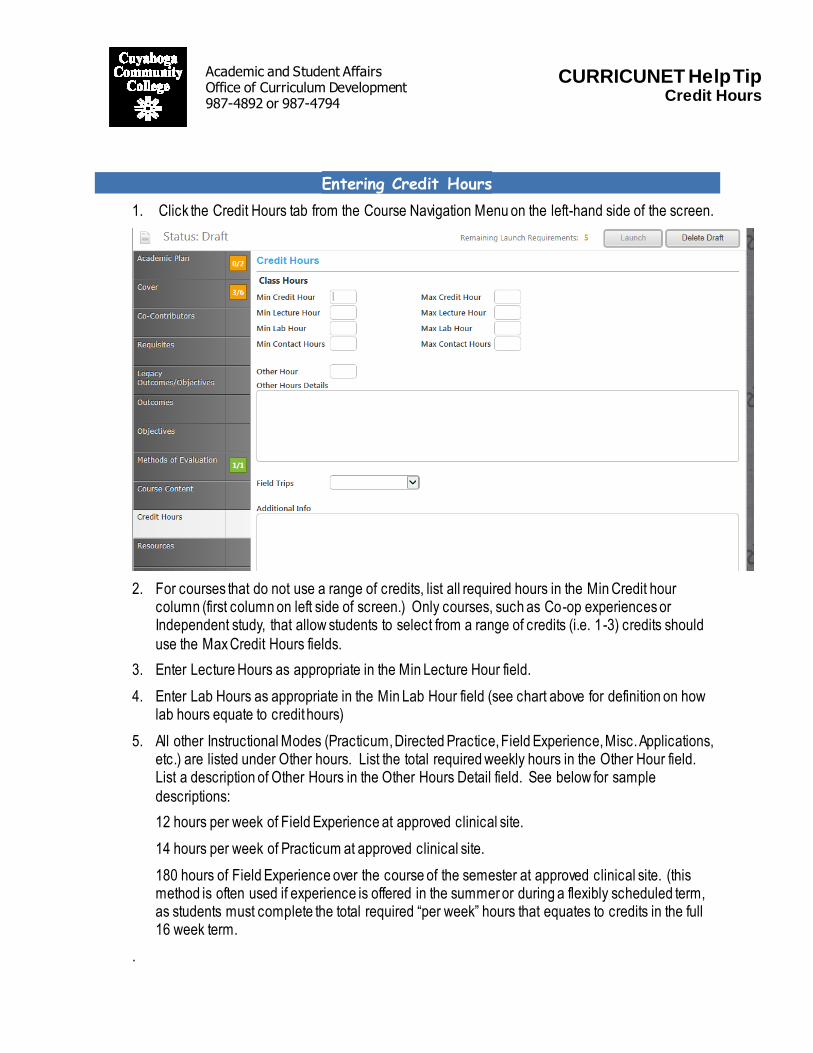
1. Click the Credit Hours tab from the Course Navigation Menu on the left-hand side of the screen.
2. For courses that do not use a range of credits, list all required hours in the Min Credit hour column (first column on left side of screen.) Only courses, such as Co-op experiences or Independent study, that allow students to select from a range of credits (i.e. 1-3) credits should
use the Max Credit Hours fields.
3. Enter Lecture Hours as appropriate in the Min Lecture Hour field.
4. Enter Lab Hours as appropriate in the Min Lab Hour field (see chart above for definition on how lab hours equate to credit hours)
5. All other Instructional Modes (Practicum, Directed Practice, Field Experience, Misc. Applications, etc.) are listed under Other hours. List the total required weekly hours in the Other Hour field. List a description of Other Hours in the Other Hours Detail field. See below for sample
descriptions:
12 hours per week of Field Experience at approved clinical site.
14 hours per week of Practicum at approved clinical site.
180 hours of Field Experience over the course of the semester at approved clinical site. (this method is often used if experience is offered in the summer or during a flexibly scheduled term, as students must complete the total required “per week” hours that equates to credits in the full 16 week term.
.
Office of Curriculum Development
987-4892 or 987-4794
CURRICUNET Help Tip Course Content
Entering Resources
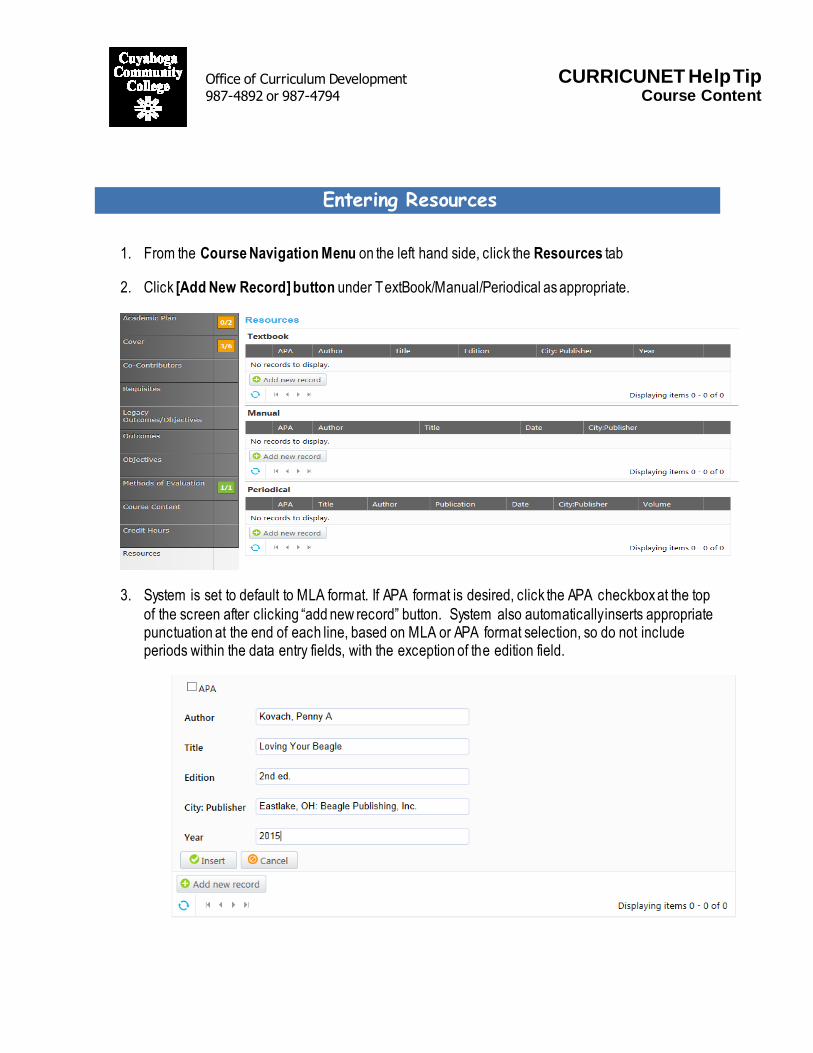
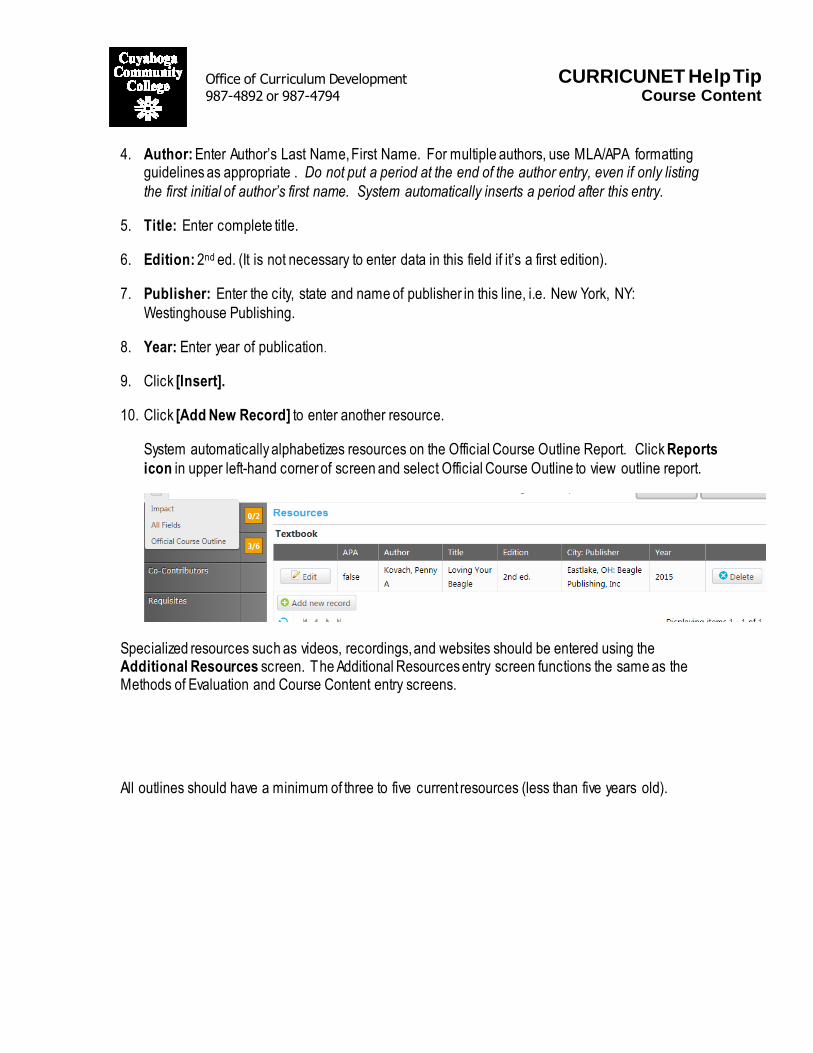
1. From the Course Navigation Menu on the left hand side, click the Resources tab
2. Click [Add New Record] button under TextBook/Manual/Periodical as appropriate.
3. System is set to default to MLA format. If APA format is desired, click the APA checkbox at the top
of the screen after clicking “add new record” button. System also automatically inserts appropriate punctuation at the end of each line, based on MLA or APA format selection, so do not include periods within the data entry fields, with the exception of the edition field.
Office of Curriculum Development
987-4892 or 987-4794
CURRICUNET Help Tip Course Content
4. Author: Enter Author’s Last Name, First Name. For multiple authors, use MLA/APA formatting guidelines as appropriate . Do not put a period at the end of the author entry, even if only listing
the first initial of author’s first name. System automatically inserts a period after this entry.
5. Title: Enter complete title.
6. Edition: 2nd ed. (It is not necessary to enter data in this field if it’s a first edition).
7. Publisher: Enter the city, state and name of publisher in this line, i.e. New York, NY:
Westinghouse Publishing.
8. Year: Enter year of publication.
9. Click [Insert].
10. Click [Add New Record] to enter another resource.
System automatically alphabetizes resources on the Official Course Outline Report. Click Reports
icon in upper left-hand corner of screen and select Official Course Outline to view outline report.
Specialized resources such as videos, recordings, and websites should be entered using the Additional Resources screen. The Additional Resources entry screen functions the same as the Methods of Evaluation and Course Content entry screens.
All outlines should have a minimum of three to five current resources (less than five years old).

Office of Curriculum Development
987-4892 or 987-4794
CURRICUNET Help Tip Attach Files
Attach Files
The Attach files feature should be used to attach advisory committee minutes required for new technical courses and programs, evidence of transferability required for new liberal arts courses, and any other supporting documentation. Scanned documents can be attached. If you do not have access to a scanner, work with the Curriculum Office to scan and attach documents.
1. From the Course Navigation Menu on left hand side, click Attach Files tab.
2. Click the [Select] button to browse for files. Browse for and select desired file. Repeat to select multiple files.
3. Once all desired files have been selected, click the Upload files button to attach the files to the
proposal. System will attach files and links to View the attached files will appear on screen.
Click Select button to browse for files to attach
to proposal. Repeat to select multiple files.
Click Upload files when down selecting files to
attach. Files will appear
below with links to view.
Office of Curriculum Development
216-987-4892 or 216-987-4794
CURRICUNET Help Tip Submitting a Proposal
24
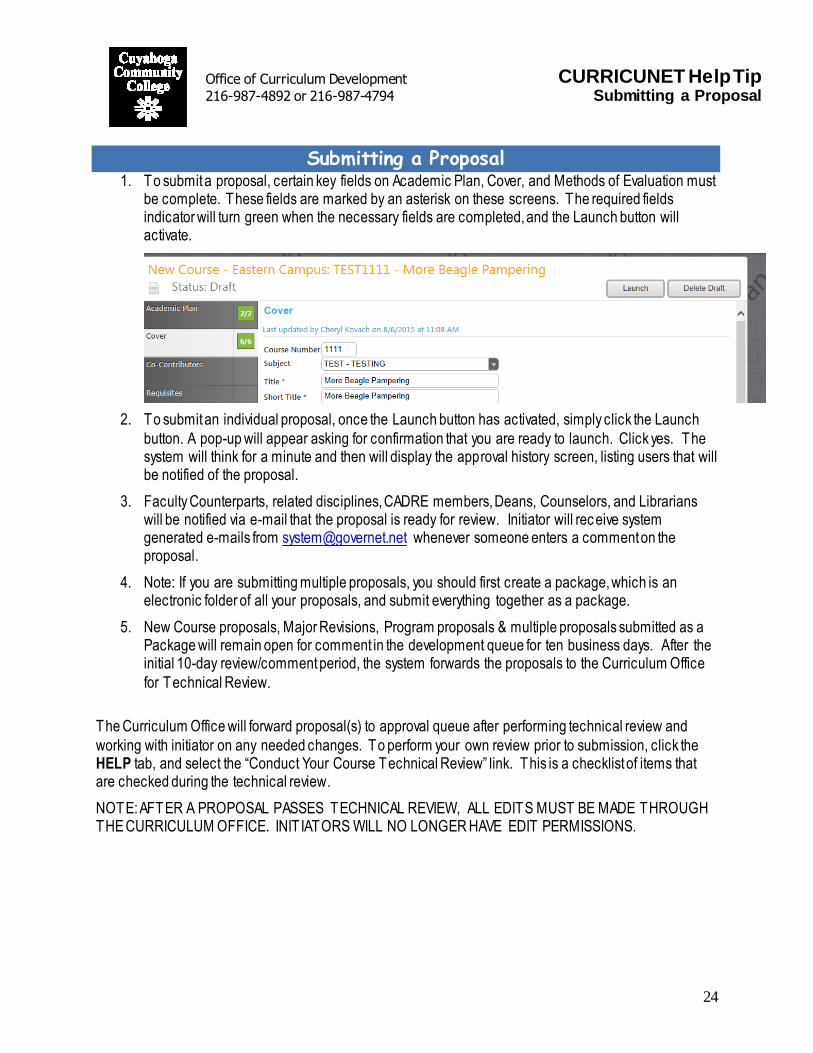
Submitting a Proposal 1. To submit a proposal, certain key fields on Academic Plan, Cover, and Methods of Evaluation must
be complete. These fields are marked by an asterisk on these screens. The required fields indicator will turn green when the necessary fields are completed, and the Launch button will activate.
2. To submit an individual proposal, once the Launch button has activated, simply click the Launch
button. A pop-up will appear asking for confirmation that you are ready to launch. Click yes. The system will think for a minute and then will display the approval history screen, listing users that will be notified of the proposal.
3. Faculty Counterparts, related disciplines, CADRE members, Deans, Counselors, and Librarians will be notified via e-mail that the proposal is ready for review. Initiator will receive system generated e-mails from [email protected] whenever someone enters a comment on the proposal.
4. Note: If you are submitting multiple proposals, you should first create a package, which is an electronic folder of all your proposals, and submit everything together as a package.
5. New Course proposals, Major Revisions, Program proposals & multiple proposals submitted as a Package will remain open for comment in the development queue for ten business days. After the initial 10-day review/comment period, the system forwards the proposals to the Curriculum Office
for Technical Review.
The Curriculum Office will forward proposal(s) to approval queue after performing technical review and
working with initiator on any needed changes. To perform your own review prior to submission, click the HELP tab, and select the “Conduct Your Course Technical Review” link. This is a checklist of items that are checked during the technical review.
NOTE: AFTER A PROPOSAL PASSES TECHNICAL REVIEW, ALL EDITS MUST BE MADE THROUGH THE CURRICULUM OFFICE. INIT IATORS WILL NO LONGER HAVE EDIT PERMISSIONS.