implementation and best practice - dbafox.com · technical report windows server 2012 remote...
TRANSCRIPT

Technical Report
Windows Server 2012 Remote Desktop Services on NetApp Storage Implementation and Best Practice Rob Briggs
March 2013 | TR-4134i

2 Windows Server 2012 Remote Desktop Services on NetApp Storage © 2013 NetApp, Inc. All Rights Reserved.
TABLE OF CONTENTS
1 Introduction ........................................................................................................................................... 5
1.1 Using this Document .......................................................................................................................................5
1.2 Solutions .........................................................................................................................................................5
2 Overview ................................................................................................................................................ 5
2.1 Windows Server 2012 RDS Technical Overview ............................................................................................5
2.2 Windows Server 2012 RDS Key Features and Benefits .................................................................................5
2.2.1 Great User Experience ...................................................................................................................................5
2.2.2 Lower Cost Deployments ................................................................................................................................6
2.2.3 Great IT Pro Experience .................................................................................................................................7
2.2.4 Summary.........................................................................................................................................................7
2.3 NetApp Storage Overview...............................................................................................................................7
2.3.1 Benefits of Using NetApp Storage ..................................................................................................................7
2.3.2 Storage Sizing Best Practices .........................................................................................................................8
3 Infrastructure Installation and Configuration for RDS (Non-HA) ................................................... 10
3.1 Setup Active Directory, DNS and DHCP ....................................................................................................... 11
3.2 Setup Management Server ........................................................................................................................... 11
3.3 Setup RD Virtualization Host Server ............................................................................................................. 11
3.4 Create the RDS Mangement Server Base Virtual Machines ......................................................................... 12
3.5 Setup RD Session Host Server (Optional) .................................................................................................... 12
3.6 Set Up RD Gateway Server (Optional) ......................................................................................................... 12
3.7 Perform Standard VDI Deployment ............................................................................................................... 13
3.8 Perform VDI Post Standard Deployment Configuration Steps ...................................................................... 13
3.8.1 Configure Local Security Groups on RDS Role Servers ............................................................................... 13
3.8.1.1 Configure Local Security Groups on the RD Connection Broker ........................................................... 13
3.8.1.2 Configure Local Security Groups on the Other RDS Servers ................................................................ 14
3.8.2 Configure Storage for VDI VMs and User Profile Disks ................................................................................ 14
3.8.2.1 Configure Local Storage for Exported VDI Template VMs on the RD Management Server
(RDMGMT1) ................................................................................................................................................. 14
3.8.2.2 Setup a SMB Share for User Profile Disks on the RD Management Server (RDMGMT1) ..................... 15
3.8.2.3 Configure Local Storage for VDI VMs on the RD Virtualization Host Server (RDVH1) .......................... 15
3.9 Review and Configure the RDS Deployment Properties ............................................................................... 16
4 Infrastructure Installation and Configuration for RDS (HA) ........................................................... 16
4.1 Setup Active Directory, DNS, and DHCP ...................................................................................................... 16
4.2 Networking .................................................................................................................................................... 16

3 Windows Server 2012 Remote Desktop Services on NetApp Storage © 2013 NetApp, Inc. All Rights Reserved.
4.3 Clustering ...................................................................................................................................................... 18
4.4 Windows Server 2012 RDS Infrastructure HA Considerations...................................................................... 18
4.5 Setup Shared Storage for the VDI Environment ........................................................................................... 19
4.6 Setup Management Servers ......................................................................................................................... 19
4.7 Setup RD Virtualization Host Servers ........................................................................................................... 19
4.8 Create the RDS/VDI Management Server Base VMs ................................................................................... 20
4.9 Setup the RD Session Host Servers (Optional) ............................................................................................ 21
4.10 Setup the RD Gateway Server (Optional) ..................................................................................................... 21
4.11 Perform VDI Standard Deployment ............................................................................................................... 21
4.12 Perform VDI Poststandard Deployment Configuration Steps ........................................................................ 21
4.12.1 Configure Local Security Group on RDS Role Servers ........................................................................... 22
4.12.1.1 Configure Local Security Group on the RD Connection Broker Server ................................................ 22
4.12.1.2 Configure Local Security Group on other RDS Servers ....................................................................... 22
4.12.2 Configure Storage for VDI VMs and User Profile Disks .......................................................................... 23
4.12.2.1 Configure Local Storage for Exported VDI Template VMs on the RD Management Server
(RDMGMT1) ................................................................................................................................................. 23
4.12.2.2 Setup a SMB Share for User Profile Disks on the RDS Management Server (RDMGMT1) ................ 23
4.12.2.3 Configure Local Storage for VDI VMs on the RD Virtualization Host Server (RDVH1) ........................ 24
4.13 Review and Configure RDS Deployment Properties ..................................................................................... 24
5 Standard VDI Based RDS Deployment Procedures ........................................................................ 25
6 Standard Session Based RDS Deployment Properties .................................................................. 30
7 Review and Configure the RDS Deployment Properties ................................................................ 35
7.1 Create VDI Client VM Templates .................................................................................................................. 39
8 Create a Pooled Managed Virtual Desktop Collection .................................................................... 40
9 Create a Personal Managed Virtual Desktop Collection................................................................. 49
10 Create a Session Virtualization Collection ...................................................................................... 58
11 Publish RemoteApp Programs .......................................................................................................... 66
12 Infrastructure Operational Procedures ............................................................................................ 69
12.1 Update a Managed Virtual Desktop Collection .............................................................................................. 69
13 Configure Shared and Local Storage on NetApp Array ................................................................. 72
13.1 Creating NetApp Fibre Channel Initiator Groups ........................................................................................... 72
13.2 Creating a NetApp Volume and LUN ............................................................................................................ 73

4 Windows Server 2012 Remote Desktop Services on NetApp Storage © 2013 NetApp, Inc. All Rights Reserved.
Appendix .................................................................................................................................................... 75
GPU Requirements for RemoteFX in Windows Server 2012................................................................................ 75
General Server 2012 Installation Steps Windows ................................................................................................. 75
Windows 8 Client Configuration Steps ................................................................................................................. 80
Windows 7 Client Configuration Steps ................................................................................................................. 80
References ................................................................................................................................................. 81
Version History ......................................................................................................................................... 81
LIST OF TABLES
Table 1) Windows Server 2012 RDS management server number one VMs for non-HA solution. .............................. 12
Table 2) Local security groups on RDS servers ........................................................................................................... 13
Table 3) Local security groups on RD Connection Broker server. ................................................................................ 14
Table 4) Local security groups on other RDS servers. ................................................................................................. 14
Table 5) Windows Server 2012 RDS management server unit VMs for HA solution. ................................................... 20
Table 6) Local security groups on RD Connection Broker server. ................................................................................ 22
Table 7) Local security groups on other RDS servers. ................................................................................................. 22
LIST OF FIGURES
Figure 1) Windows Server 2012 RDS Infrastructure Non-HA ....................................................................................... 10
Figure 2) RDS Management Unit – Network Architecture ............................................................................................ 17
Figure 3) RDS Scale Unit – Network Architecture ........................................................................................................ 18
Figure 4) Creating Fibre Channel Initiator Groups ........................................................................................................ 72
Figure 5) Creating Volume and LUNs .......................................................................................................................... 73

5 Windows Server 2012 Remote Desktop Services on NetApp Storage © 2013 NetApp, Inc. All Rights Reserved.
1 Introduction
This document is a guide describing technical details and best practices for implementing Microsoft® Windows Server 2012 Remote Desktop Services (RDS) on NetApp® storage. It was derived from a proof of concept environment using generic “white box” servers and NetApp storage.
1.1 Using this Document This document has been created to apply to the widest possible audience. Where appropriate, for instructional purposes, prescriptive examples have been included. The infrastructure guidelines provided in this document are suggestions and might not align exactly with the customer’s infrastructure and requirements. The aim of the document is to simplify the common configuration steps where possible.
The intent of the author is to update this document as new best practice procedures are discovered or determined. In addition, updates will be added as new automation procedures are developed.
Note: Please reference Version History, at the end of this document, to ensure you are working from the most current version of the document.
1.2 Solutions
Reference the following customer ready solutions for use as a base infrastructure to build a RDS
deployment:
TR-4137 “FlexPod Express with Microsoft Windows Server 2012 Hyper-V – Implementation
Guide”
2 Overview
2.1 Windows Server 2012 RDS Technical Overview
As this section describes, RDS is a collection of independent role services that support various remoting
scenarios.
RDS supports remoting from both sessions on a Remote Desktop Session Host (RDSH) server and VMs
on a Remote Desktop Virtualization Host (RDVH) server. Connections to the RemoteApp and VMs hosted
on these servers may be stored in an RDP file or displayed using the publishing features of Remote
Desktop Web Access (RD Web Access).
RDS can deliver virtual sessions or virtual machines (VMs):
Session Virtualization. Using a RDSH, Windows Server® 2012 creates separate sessions for each user
on a single server. Sessions can deliver full desktops or RemoteApp programs. If a user starts more than
one RemoteApp from the same server (the default behavior), all RemoteApp programs will run in the
same session.
Virtual Desktop Infrastructure (VDI). Users connect to VMs. A VM can be assigned (personal) or
unassigned (part of a pool).
Sessions are the lowest cost deployment option, followed by VM pools, and then by personal VMs.
2.2 Windows Server 2012 RDS Key Features and Benefits
2.2.1 Great User Experience To the end user, using RDS should be like using a physical desktop—only better. Windows Server 2012 includes these improvements to the user experience:
6 Windows Server 2012 Remote Desktop Services on NetApp Storage © 2013 NetApp, Inc. All Rights Reserved.
Unification of the remoting experience. All features of RDP are available to both sessions and
VMs, providing a consistent user experience.
WAN performance improvements. The RDP version 8 network protocol performs well even over
high-latency connections, such as satellite links. Through the use of progressive download, H.264
encoding for video compression, and UDP as needed to reduce networking overhead, RDP can
display bandwidth-intensive content such as video over high-latency networks. RemoteFX over
WAN provides automatic detection of network conditions and transport over UDP.
Simplified connection. Users can connect to their personal collection of VMs and RemoteApp
programs assigned to them by logging in with their e-mail address and password.
Improved user personalization. User profile disks allow users to preserve user personalization
settings across session collections and pooled virtual desktop collections—even for settings not
stored in a user profile. This feature is available for both sessions and VMs.
More integrated local and remote experience. In Windows Server 2012, RDS supports remoting
of a broad range of USB devices (such as an all-in-one printer, a scanner, a biometric reader, a
Webcam, or a VoIP headset) from both sessions and VMs. RDP now also supports Aero Glass UI
remoting in sessions, even when more than one monitor is connected to the client device.
Support for multitouch and gesture remoting. Use multipoint touchscreens and tablets even
when connecting to a session or VM.
Simplified login process. Windows Server 2008 R2 supported Web-based single-sign-on for
RemoteApp programs so that a user could provide credentials just once to authenticate to any
RemoteApp provided in any farm. In Windows Server 2012 this support has been extended to
include VMs assigned to a user.
Evenly distributed allocation of resources to everyone on a RDSH server. VMs are isolated from
each other, but in session virtualization scenarios, sessions all compete for the same server
resources. In Windows Server 2012, processor time, disk I/O cycles, and network are all shared
evenly among all sessions on a RDSH server so no single user can consume all resources.
Concurrent reconnection. One advantage of RDS is that you can disconnect from your workspace
and then reconnect from another location. In Windows Server 2012, you can disconnect, go home,
and then reconnect to the RemoteApp programs and VMs that you were using all at once, saving
time as you restore your work environment.
2.2.2 Lower Cost Deployments Cost is an important factor in a successful deployment, especially a VDI deployment. Windows Server 2012 reduces both the capital and operational expenditures of VDI by providing the following:
Support for multiple storage options. Use locally attached storage with live migration
functionality between host computers for pooled virtual desktops. Personal virtual desktops can
use SMB-based central storage or clustered shared volumes (CSVs).
Automated pooled virtual desktop management. Deploy and manage pooled virtual desktops
centrally by using a virtual desktop template. RDS installs any changes, such as new applications or
updates, in the virtual desktop template and then recreates the pooled virtual desktops from the
template.
7 Windows Server 2012 Remote Desktop Services on NetApp Storage © 2013 NetApp, Inc. All Rights Reserved.
Highly available RD Connection Broker. The RD Connection Broker can be clustered in an active-
active configuration to improve deployment scalability and uptime.
Personal desktop patching. Patch personal desktop VMs while they are running, or let RD
Connection Broker wake them to apply patches.
2.2.3 Great IT Pro Experience Windows Server 2012 simplifies deployment and reduces management costs with these powerful features:
Improved management and deployment experience. Both sessions and VMs benefit from the
management and deployment improvements in Windows Server 2012 with the new tolls based on
Server Manager.
Centralized administration console. Administer groups of servers, configure your RemoteApp
programs, manage your virtual desktops, and add servers from one centralized console. Existing
consoles, such as RemoteApp Manager and RDSH configuration, have been removed and most-
used functionality moved to the central console.
Scenario-based deployments. Choose the type of deployment you want (session virtualization or
VDI), and the scenario-based installation will install the required role services to support it.
Simplified evaluation. Speed up testing by choosing a quick deployment scenario to install the
required role services to support a session virtualization or VDI deployment with all RDS roles
deployed on one server.
Centralized RemoteApp publishing. Publish and manage RemoteApp programs, session-based
desktops, and virtual desktops from a centralized console. You can get a historic view of resource
assignments, change published resources for any given collection, and edit properties of published
resources.
Simplified management Interface. In Windows Server 2012, the RDS management UI displays
commonly used features. Those used less often are managed from group policy or from the RDS
Windows PowerShell™ provider.
2.2.4 Summary Windows Server 2012 RDS provides a unified administrative experience for configuring RemoteApp programs and managing virtual desktops. In addition to the deployment and configuration improvements for administrators, RDS also benefits remote users by preserving their personalization settings and enhancing their remote graphics and video experiences.
2.3 NetApp Storage Overview
2.3.1 Benefits of Using NetApp Storage Planning your storage implementation should take into account that VDI environments are extremely I/O intensive. IOPS range from majority reads to majority writes depending on the system state. When in a boot storm, the storage back end will see a steady increase in read IOPS. When in production, heavy write IOPS might be noticed, especially during high end-user workloads. NetApp recommends sizing the storage for high IOPS with small I/O sizing.
NetApp provides a scalable, unified storage and data management solution for VDI. The unique benefits of the NetApp solution are:

8 Windows Server 2012 Remote Desktop Services on NetApp Storage © 2013 NetApp, Inc. All Rights Reserved.
Storage efficiency: Significant cost savings with multiple levels of storage efficiency for all the virtual machine data components. These storage efficiencies include:
NetApp thin provisioning. a way of logically presenting more storage to hosts than physically
available.
NetApp FlexClone®. provides hardware-assisted rapid creation of space-efficient, writable, point-
in-time images of individual files, LUNs, or flexible volumes.
NetApp deduplication. saves space on primary storage by removing redundant copies of blocks
within a volume.
Performance: Enhanced user experience with transparent read and write I/O optimization that strongly complements NetApp's storage efficiency capabilities. NetApp provides performance enhancements with:
NetApp transparent storage cache sharing. allows customers to benefit from storage efficiency
and at the same time significantly increase I/O performance.
NetApp Flash Cache™. increases the amount of available cache to help reduce virtual desktop
storm activities and drastically improves read I/O.
NetApp write optimization. optimize write operations in RAID-DP®.
NetApp flexible volumes and aggregates. allow the performance and capacity to be shared by all
desktops in the volume or aggregate.
Data protection: Enhanced protection of both the virtual desktop operating system data and the user data, with very low overhead for both cost and operations. Superior NetApp data protection is achieved with RAID-DP. NetApp RAID-DP is an advanced RAID technology that provides the default RAID level on all storage systems. RAID-DP protects against the simultaneous loss of two drives in a single RAID group. It is very economical to deploy; the overhead with default RAID groups is a mere 12.5%. This level of resiliency and storage efficiency makes data residing on RAID-DP safer than data residing on RAID 5 and more cost effective than RAID 10.
2.3.2 Storage Sizing Best Practices NetApp storage best practices specifically focused for Microsoft Hyper-V™ virtualization:
Fixed-size virtual disk (VHD): It is a NetApp best practice to use thin-provisioned fixed-size VHDs throughout an enterprise virtual environment. Refer to TR-3483: “Thin Provisioning in a NetApp SAN or IP SAN Enterprise Environment” for more information on how to create thin-provisioned VHDs. Engineers have discovered that there are substantial performance hits when using dynamic VHDs in a SAN environment due to block-level misalignment. Refer to TR-3747: “Best Practices for File System Alignment in Virtual Environments” for more information regarding this issue.
In this document, and for this solution, we recommend using Microsoft’s new virtual disk format, VHDx. This new virtual disk format alleviates the misalignment issues inherent in the VHD format. For the installation guidance notes are made, where applicable, for utilizing the VHDx format.
Static memory for VDI virtual machines: It is a NetApp best practice to use Hyper-V static memory assignments for each VDI virtual machine where possible. Microsoft has confirmed that the Hyper-V dynamic memory allocation process, when set below a virtual machine’s normal usage, causes 3% to 5% paging in the guest. These memory swaps are written to the VM’s virtual disk, which is located on NetApp LUNs. These added IOPS dramatically decrease VDI density levels for an overall solution. Where Hyper-V dynamic memory is required, storage must be sized in accordance with a higher IOPS profile. Microsoft Windows Server 2012 now has a startup memory value for dynamic memory. This helps to mitigate this phenomenon somewhat.
Thin provisioning and storage efficiencies: It is a NetApp best practice to use thin provisioning and storage efficiencies on all volumes and LUNs within a VDI environment. Storage savings of up to 90%

9 Windows Server 2012 Remote Desktop Services on NetApp Storage © 2013 NetApp, Inc. All Rights Reserved.
have been captured during recent proof of concept testing of NetApp VDI solutions. This provides for a faster, more nimble, and more flexible environment for customers.
Cluster/no cluster? It is a NetApp best practice to use Hyper-V failover clustering for all infrastructure virtual machines. These include Active Directory®, SQL Server®, and RDS components. However, for pooled (stateless) VDI, it is a NetApp best practice to not cluster the Hyper-V VDI hosts. This topic can be a hotly debated one. Implement per customer request, but NetApp leads with infrastructure/clustered and VDI hosts/nonclustered.
Storage estimation for deploying VDI solutions on NetApp includes the following:
Gather essential solution requirements
Perform performance-based and capacity-based storage estimation
Get recommendations on storage system physical and logical configuration
Gather Essential Solution Requirements
The first step of the storage sizing process is to gather the solution requirements. This is essential to size the storage system correctly in terms of the model and the number of required NetApp storage controllers, type and quantity of disk spindles, software features, and general configuration recommendations.
The main storage sizing elements are:
Total number of virtual desktop machines. Number of virtual desktops for which the system has
to be designed (for example, 2,000 virtual desktops).
The types and percentage of different types of desktops being deployed. Will the environment
utilize pooled, persistent or session based virtual desktops? What percentage of each?
Size per virtual machine. What are the size requirements for C: Drive (main VHDx) and User-
Profile disks (VHDx)? Also take into account differencing disks (VHDx) used for subsequent
management upgrades.
Virtual machine OS. What Operating System will be used for Virtual Desktops? What percentage
of each?
Worker workload profile. type of applications on the virtual machine, IOPS requirements, read-
write ratio, if known.
Number of years for which the storage growth has to be considered. What is the expected life-
cycle?
Disaster recovery/business continuance requirements. What are the DR requirements for the
customer?
Use of SMB 3.0. NetApp strongly recommends storing user profile data on SMB 3.0 shares. By
using SMB 3.0 shares, companies can more efficiently manage and protect the user data and
eliminate the need to back up the virtual desktops.
Performance-Based and Capacity-Based Storage Estimation Processes
There are two important considerations for sizing storage for VDI. The storage system should be able to meet both the performance and capacity requirements of the project and be scalable to account for future growth.
The steps for calculating these storage requirements are:
1. Determine storage sizing building block

10 Windows Server 2012 Remote Desktop Services on NetApp Storage © 2013 NetApp, Inc. All Rights Reserved.
2. Perform detailed performance estimation
3. Perform detailed capacity estimation
4. Obtain recommendations on the storage system physical and logical configuration
Getting Recommendations on Storage System Physical and Logical Configuration
After determining the total capacity and performance requirements, contact your local NetApp technical resource to determine the appropriate storage system configuration. Provide the total capacity and performance requirements to the NetApp SE and obtain appropriate storage system configuration. If required, NetApp can help you in each phase of the process discussed earlier. NetApp has detailed sizing tools specific to VDI that can help architect deployments of any scale. The tools are designed to factor in all the NetApp storage efficiency and performance acceleration components discussed earlier.
This step also involves planning the logical architecture (the total number of template and the associated FlexClone volumes that should be provisioned per aggregate). The recommendation is to provision fewer large aggregates over more, smaller aggregates. The advantages to larger aggregates are that the I/O has more disks across which to write, therefore increasing the performance of all volumes contained within the aggregate. Based on the estimated volume size from the capacity calculations section earlier, determine the number of template and associated FlexClone volumes that can be hosted in the largest possible aggregate. It is also a good idea to leave some room to grow the aggregates to handle situations when unexpected growth occurs. Also, disable scheduled aggregate Snapshot™ copies and set the aggregate snap reserve to zero. Make sure the data disk in the aggregate satisfies the performance requirements for the proposed number of virtual machines for volumes to be hosted in the aggregate.
3 Infrastructure Installation and Configuration for RDS (Non-HA)
This section describes the installation and configuration of the various software components required to build out the RDS infrastructure in a non–high availability (non-HA) environment. It is prescriptive to a certain level so that an RDS environment can be built out quickly with little to no hassle. Included are example computer and Active Directory names. Replace these as necessary.
Figure 1 shows a Non-HA RDS solution. It was derived from a Proof of Concept deployment.
Figure 1) Windows Server 2012 RDS Infrastructure Non-HA

11 Windows Server 2012 Remote Desktop Services on NetApp Storage © 2013 NetApp, Inc. All Rights Reserved.
3.1 Setup Active Directory, DNS and DHCP
1. Set up an Active Directory domain controller and create a domain named Contoso.local or use an
existing AD domain.
Note: If an existing domain is used, substitute the existing domain name wherever the Contoso.local domain name is mentioned in the installation and configuration procedures.
2. Make sure that DNS and DHCP services are available for all servers and clients that are included in
the RDS environment.
Note: The servers and clients that are included in this RDS solution must be updated with the latest available OS patches. Patching can be accomplished using the Internet using Windows® update, or an alternative patching method can be used (for example, WSUS).
3.2 Setup Management Server
1. Install the Windows Server 2012 OS as described in the appendix.
2. Set the computer name to RDMGMT1.
3. Configure a static IP address.
4. Add the Hyper-V role using Server Manager.
5. Join the server to the Contoso.local domain.
6. Configure a Hyper-V virtual network switch as follows:
Switch type: External
Switch name: RDS Virtual
3.3 Setup RD Virtualization Host Server
1. Install a GPU card in the server (optional).
Note: See appendix for GPU hardware and software requirements.
2. Install the Windows Server 2012 OS as described in the appendix.
3. Set the computer name to RDVH1.
4. Configure a static IP address.
5. Join the server to the Contoso.local domain.
6. Add the Hyper-V role using Server Manager.
7. Configure a Hyper-V virtual network switch as follows:
Switch type: External
Switch name: RDS Virtual
8. Install the GPU card driver software (optional).
Be sure to use an appropriate Windows Server 2012 driver for the GPU card.
See appendix for GPU driver software requirements.
9. Add the RD virtualization host role using Server Manager.

12 Windows Server 2012 Remote Desktop Services on NetApp Storage © 2013 NetApp, Inc. All Rights Reserved.
3.4 Create the RDS Mangement Server Base Virtual Machines
Create the base VMs with the virtual resources listed in Table 1.
Table 1) Windows Server 2012 RDS management server number one VMs for non-HA solution.
Host Name
Description Disk vCPUs Dynamic Memory Min/Max
vNIC Required or
Optional
RDWA1 RD Web Access Server 60GB
Dynamic VHDx
2 2GB/4GB 1 Required
RDCB1 RD Connection Broker 60GB
Dynamic VHDx
2 2GB/8GB 1 Required
RDLS1 RD license server 20GB
Dynamic VHDx
1 1GB/4GB 1 Optional
1. Install and configure each VM in Table 1 as follows:
a. Install the Windows Server 2012 OS as described in the appendix.
b. Set the computer name as indicated in Table 1.
c. Configure a static IP address.
d. Join the VM to the Contoso.local domain.
3.5 Setup RD Session Host Server (Optional)
1. Install a GPU card in the server (optional).
Note: See appendix for GPU card hardware and software requirements.
2. Install the Windows Server 2012 OS as described in the appendix.
3. Configure a static IP address.
4. Join the server to the Contoso.local domain.
5. Install the GPU card driver software (optional).
Be sure to use an appropriate Windows Server 2012 driver for the GPU card.
See appendix for GPU driver software requirements.
6. Add the Desktop Experience feature using Server Manager.
Note: The Desktop Experience feature is added by selecting the Add Roles and Features Wizard User Interface and Infrastructure Desktop Experience checkbox in Server Manager.
3.6 Set Up RD Gateway Server (Optional)
1. Install the Windows Server 2012 OS as described in the appendix.
2. Set the computer name to RDGW1.
3. Configure a static IP address.
13 Windows Server 2012 Remote Desktop Services on NetApp Storage © 2013 NetApp, Inc. All Rights Reserved.
4. Join the server to the Contoso.local domain.
3.7 Perform Standard VDI Deployment Refer to Section 5 of this document to perform a standard VDI deployment.
Note: The procedure to perform the VDI standard deployment for a non-HA environment is essentially the same as for the HA environment, with the following exceptions:
Depending on whether high availability is required, more servers will be added to the deployment
(for example, RDWA1, RDWA2, RDCB1, RDCB2, RDLS1, RDLS2, RDGW1, and RDGW2).
An HA environment requires at least one RD licensing server, where a non-HA environment does
not.
3.8 Perform VDI Post Standard Deployment Configuration Steps This section describes steps that are required to complete the configuration after the RDS standard deployment process completes.
Note: After completing the tasks described in this section, the VDI infrastructure will be ready to create virtual desktop collections (for example, pooled or personal VDI VM collections).
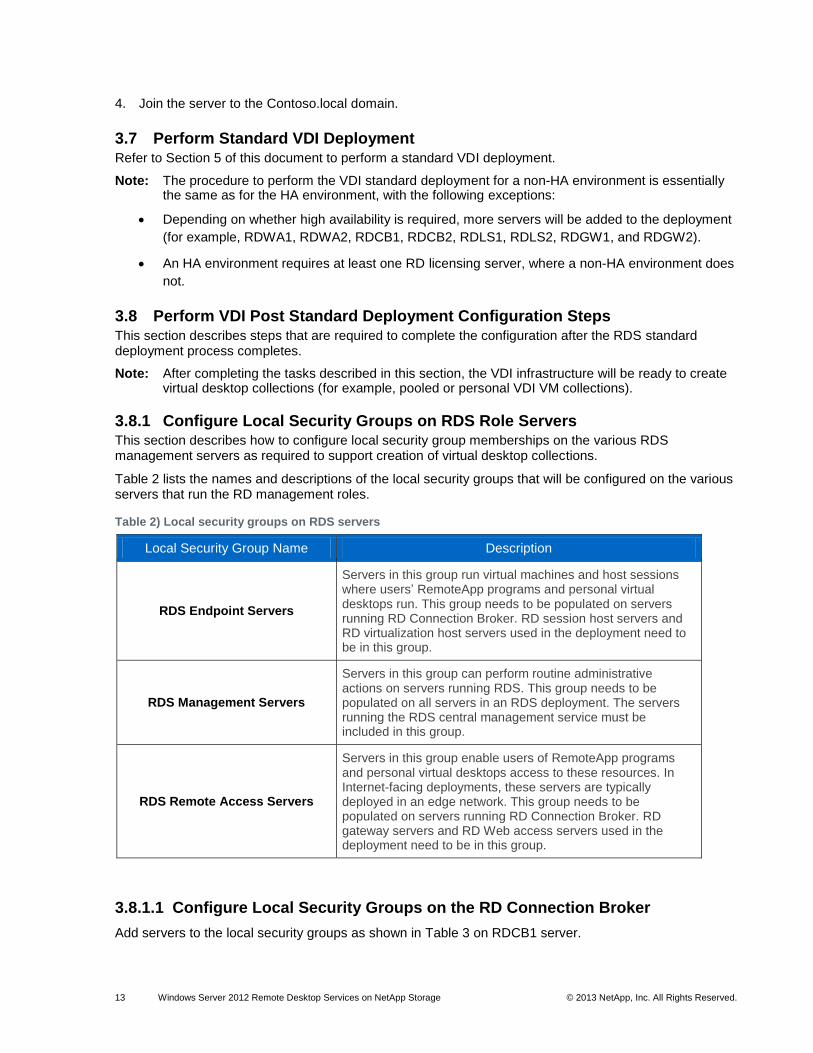
3.8.1 Configure Local Security Groups on RDS Role Servers This section describes how to configure local security group memberships on the various RDS management servers as required to support creation of virtual desktop collections.
Table 2 lists the names and descriptions of the local security groups that will be configured on the various servers that run the RD management roles.
Table 2) Local security groups on RDS servers
Local Security Group Name Description
RDS Endpoint Servers
Servers in this group run virtual machines and host sessions where users’ RemoteApp programs and personal virtual desktops run. This group needs to be populated on servers running RD Connection Broker. RD session host servers and RD virtualization host servers used in the deployment need to be in this group.
RDS Management Servers
Servers in this group can perform routine administrative actions on servers running RDS. This group needs to be populated on all servers in an RDS deployment. The servers running the RDS central management service must be included in this group.
RDS Remote Access Servers
Servers in this group enable users of RemoteApp programs and personal virtual desktops access to these resources. In Internet-facing deployments, these servers are typically deployed in an edge network. This group needs to be populated on servers running RD Connection Broker. RD gateway servers and RD Web access servers used in the deployment need to be in this group.
3.8.1.1 Configure Local Security Groups on the RD Connection Broker
Add servers to the local security groups as shown in Table 3 on RDCB1 server.
14 Windows Server 2012 Remote Desktop Services on NetApp Storage © 2013 NetApp, Inc. All Rights Reserved.
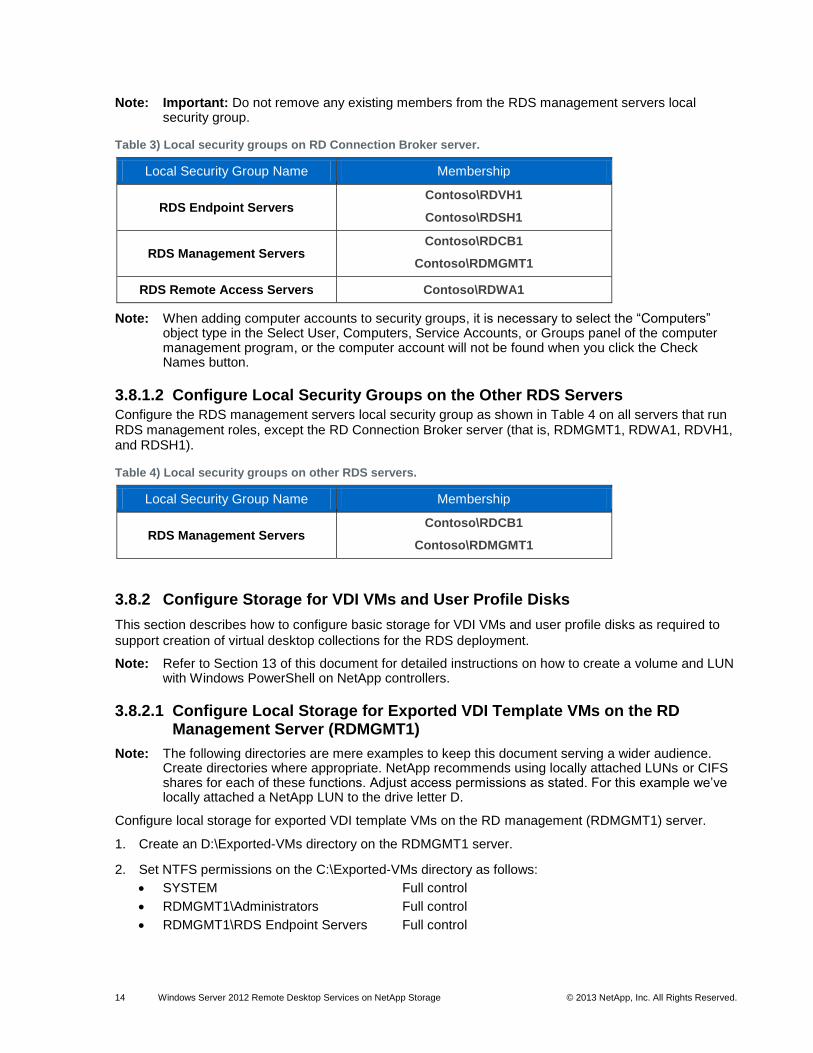
Note: Important: Do not remove any existing members from the RDS management servers local security group.
Table 3) Local security groups on RD Connection Broker server.
Local Security Group Name Membership
RDS Endpoint Servers Contoso\RDVH1
Contoso\RDSH1
RDS Management Servers Contoso\RDCB1
Contoso\RDMGMT1
RDS Remote Access Servers Contoso\RDWA1
Note: When adding computer accounts to security groups, it is necessary to select the “Computers” object type in the Select User, Computers, Service Accounts, or Groups panel of the computer management program, or the computer account will not be found when you click the Check Names button.
3.8.1.2 Configure Local Security Groups on the Other RDS Servers Configure the RDS management servers local security group as shown in Table 4 on all servers that run RDS management roles, except the RD Connection Broker server (that is, RDMGMT1, RDWA1, RDVH1, and RDSH1).
Table 4) Local security groups on other RDS servers.
Local Security Group Name Membership
RDS Management Servers Contoso\RDCB1
Contoso\RDMGMT1
3.8.2 Configure Storage for VDI VMs and User Profile Disks
This section describes how to configure basic storage for VDI VMs and user profile disks as required to
support creation of virtual desktop collections for the RDS deployment.
Note: Refer to Section 13 of this document for detailed instructions on how to create a volume and LUN with Windows PowerShell on NetApp controllers.
3.8.2.1 Configure Local Storage for Exported VDI Template VMs on the RD Management Server (RDMGMT1)
Note: The following directories are mere examples to keep this document serving a wider audience. Create directories where appropriate. NetApp recommends using locally attached LUNs or CIFS shares for each of these functions. Adjust access permissions as stated. For this example we’ve locally attached a NetApp LUN to the drive letter D.
Configure local storage for exported VDI template VMs on the RD management (RDMGMT1) server.
1. Create an D:\Exported-VMs directory on the RDMGMT1 server.
2. Set NTFS permissions on the C:\Exported-VMs directory as follows:
SYSTEM Full control
RDMGMT1\Administrators Full control
RDMGMT1\RDS Endpoint Servers Full control

15 Windows Server 2012 Remote Desktop Services on NetApp Storage © 2013 NetApp, Inc. All Rights Reserved.
3. Share the D:\Exported-VMs directory on the RDMGMT1 server as \\RDMGMT1\Exported-VMs with
the following share permissions:
Administrator Read/write
Administrators Owner
RDS Endpoint Servers Read/write
3.8.2.2 Setup a SMB Share for User Profile Disks on the RD Management Server (RDMGMT1)
Note: The following directories are mere examples to keep this document serving a wider audience. Create directories where appropriate. NetApp recommends using locally attached LUNs or CIFS shares for each of these functions. Adjust access permissions as stated. For this example we’ve locally attached a NetApp LUN to the drive letter D.
1. Create a D:\UserProfileDisks directory on the RDMGMT1 server.
2. Set NTFS permissions on the D:\UserProfileDisks directory as follows:
Everyone Read and execute, list folder contents, read
SYSTEM Full control
RDMGMT1\Administrators Full control
RDMGMT1\RDS Endpoint Servers Full control
3. Share the D:\UserProfileDisks directory on the RDMGMT1 server as \\RDMGMT1\UserProfileDisks
with the following share permissions:
Administrator Read/write
Administrators Owner
Everyone Read
RDS Endpoint Servers Read/write
3.8.2.3 Configure Local Storage for VDI VMs on the RD Virtualization Host Server (RDVH1)
Note: The following directories are mere examples to keep this document serving a wider audience. Create directories where appropriate. NetApp recommends using locally attached LUNs or CIFS shares for each of these functions. Adjust access permissions as stated. For this example we’ve locally attached a NetApp LUN to the drive letter D.
16 Windows Server 2012 Remote Desktop Services on NetApp Storage © 2013 NetApp, Inc. All Rights Reserved.
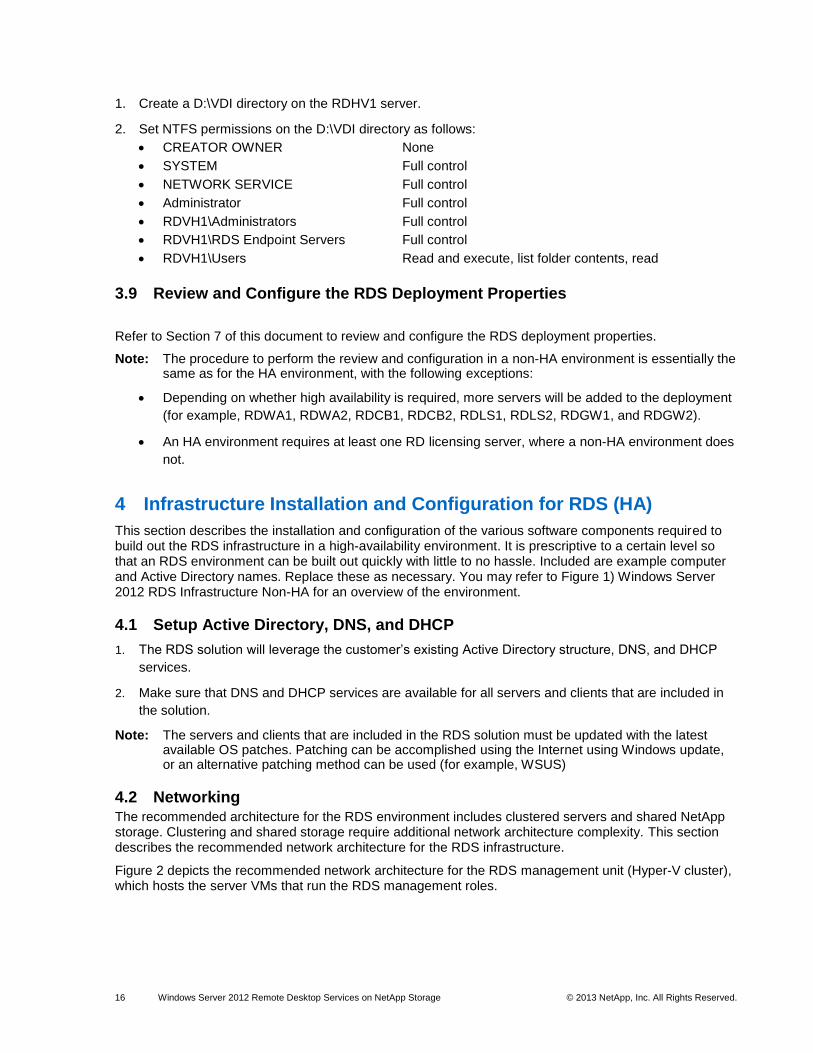
1. Create a D:\VDI directory on the RDHV1 server.
2. Set NTFS permissions on the D:\VDI directory as follows:
CREATOR OWNER None
SYSTEM Full control
NETWORK SERVICE Full control
Administrator Full control
RDVH1\Administrators Full control
RDVH1\RDS Endpoint Servers Full control
RDVH1\Users Read and execute, list folder contents, read
3.9 Review and Configure the RDS Deployment Properties
Refer to Section 7 of this document to review and configure the RDS deployment properties.
Note: The procedure to perform the review and configuration in a non-HA environment is essentially the same as for the HA environment, with the following exceptions:
Depending on whether high availability is required, more servers will be added to the deployment
(for example, RDWA1, RDWA2, RDCB1, RDCB2, RDLS1, RDLS2, RDGW1, and RDGW2).
An HA environment requires at least one RD licensing server, where a non-HA environment does
not.
4 Infrastructure Installation and Configuration for RDS (HA)
This section describes the installation and configuration of the various software components required to build out the RDS infrastructure in a high-availability environment. It is prescriptive to a certain level so that an RDS environment can be built out quickly with little to no hassle. Included are example computer and Active Directory names. Replace these as necessary. You may refer to Figure 1) Windows Server 2012 RDS Infrastructure Non-HA for an overview of the environment.
4.1 Setup Active Directory, DNS, and DHCP
1. The RDS solution will leverage the customer’s existing Active Directory structure, DNS, and DHCP
services.
2. Make sure that DNS and DHCP services are available for all servers and clients that are included in
the solution.
Note: The servers and clients that are included in the RDS solution must be updated with the latest available OS patches. Patching can be accomplished using the Internet using Windows update, or an alternative patching method can be used (for example, WSUS)
4.2 Networking
The recommended architecture for the RDS environment includes clustered servers and shared NetApp storage. Clustering and shared storage require additional network architecture complexity. This section describes the recommended network architecture for the RDS infrastructure.
Figure 2 depicts the recommended network architecture for the RDS management unit (Hyper-V cluster), which hosts the server VMs that run the RDS management roles.

17 Windows Server 2012 Remote Desktop Services on NetApp Storage © 2013 NetApp, Inc. All Rights Reserved.
Figure 2) RDS Management Unit – Network Architecture
The following networks are included in the RDS management unit network architecture:
Host management network. Used by administrators to log on to the Hyper-V servers using RDP.
Cluster network. Used for Hyper-V failover cluster communication.
Live migration network. Used for Hyper-V live migration communication.
Public network. Provides communication between the RDS server VMs, VDI client VMs, and RD session host servers.
Storage network. Used to provide NetApp shared storage to the Hyper-V server.

18 Windows Server 2012 Remote Desktop Services on NetApp Storage © 2013 NetApp, Inc. All Rights Reserved.
Figure 3 depicts the recommended network architecture for the RDS scale unit (Hyper-V cluster), which hosts the VDI guest VMs.
Figure 3) RDS Scale Unit – Network Architecture
Note: The RDS scale unit (Hyper-V cluster) uses the same networks as the RDS management unit.
4.3 Clustering Ideally, the RDS environment should leverage Hyper-V failover clustering to provide a highly available (HA) RDS infrastructure. Leveraging clustering for the environment is recommended by NetApp, but is not required.
4.4 Windows Server 2012 RDS Infrastructure HA Considerations
This section describes RDS infrastructure high-availability (HA) architecture considerations.
Connection Broker HA. Support for Connection Broker active-active load balancing and failover
is built into Windows Sever 2012. The Connection Broker’s SQL Server database can be hosted
on a SQL Server cluster if desired.
RD virtualization host HA. Support for multiple RD virtualization hosts is built into Windows
Server 2012. The RDVH hosts can be members of a Hyper-V cluster to provide HA for VDI VMs.
19 Windows Server 2012 Remote Desktop Services on NetApp Storage © 2013 NetApp, Inc. All Rights Reserved.
RD session host HA. Support for multiple RD session hosts is built into Windows Server 2012.
RD session host VMs can be members of a Hyper-V failover cluster to provide HA for session
hosts.
RD Web access HA. Multiple RD Web access servers can be load balanced with Windows NLB
or a physical load-balancing appliance. RD Web access server VMs can be members of a Hyper-
V failover cluster to provide HA for RD Web access servers.
RD gateway HA. Multiple RD gateway servers can be load balanced with Windows NLB or a
physical load-balancing appliance. RD gateway server VMs can be members of a Hyper-V
failover cluster to provide HA for RD gateway servers.
RD licensing HA. Support for multiple RD licensing servers is built into Windows Server 2012.
RD licensing server VMs can be members of a Hyper-V failover cluster to provide HA for RD
licensing servers.
Hyper-V VM storage HA. Shared storage for Hyper-V VMs should be provided by a NetApp
attached LUN.
User profile disk storage HA. HA storage for Windows Server 2012 RDS user profile disks
should be provided by an SMB file share hosted on either a NetApp CIFS volume or a NetApp
attached LUN.
4.5 Setup Shared Storage for the VDI Environment Refer to Section 13 of this document for detailed instructions on setting up a CSV for establishing a Hyper-V failover cluster between the servers RDMGMT1 and RDMGMT2.
4.6 Setup Management Servers
This section describes how to set up the two Hyper-V servers that form the RDS/VDI management unit.
1. Connect the required networks to the two servers.
2. Configure CSV storage.
3. Install Windows Server 2012 as described in the appendix.
4. Set the computer names to RDMGMT1 and RDMGMT2.
5. Configure static IP addresses.
6. Add the Hyper-V role using Server Manager.
7. Join the servers to the Contoso.local domain.
8. Configure a Hyper-V virtual network switch as follows:
Switch type: External
Switch name: RDS Virtual
4.7 Setup RD Virtualization Host Servers
1. Install a GPU card in each server (optional).
Note: See appendix for GPU hardware and software requirements.
Note: It is recommended to install a GPU card in the RD virtualization host servers if the VDI workload will be graphically intensive such as 3D image rendering.
2. Install Windows Server 2012 as described in the appendix.
3. Set the computer name to RDVH.

20 Windows Server 2012 Remote Desktop Services on NetApp Storage © 2013 NetApp, Inc. All Rights Reserved.
4. Configure static IP addresses.
5. Join the server to the Contoso.local domain.
6. Add the Hyper-V role using Server Manager.
7. Configure a Hyper-V virtual network switch as follows:
Switch type: External
Switch name: RDS Virtual
8. Install the GPU card driver software (optional).
Be sure to use an appropriate Windows Server 2012 driver for the GPU card.
See appendix for GPU driver software requirements.
9. Add the RD virtualization host role using Server Manager.
4.8 Create the RDS/VDI Management Server Base VMs
Create the base VMs with the virtual resources listed in Table 5.
Table 5) Windows Server 2012 RDS management server unit VMs for HA solution.
Host Name
Description Disk vCPUs Dynamic Memory Min/Max
vNIC Required or
Optional
RDWA1 RD Web Access Server 60GB
Dynamic VHDx
2 2GB/4GB 1 Required
RDWA2 RD Web Access Server 60GB
Dynamic VHDx
2 2GB/4GB 1 Optional
RDCB1 RD Connection Broker 60GB
Dynamic VHDx
2 2GB/8GB 1 Required
RDCB2 RD Connection Broker 60GB
Dynamic VHDx
2 2GB/8GB 1 Optional
RDLS1 RD license server 20GB
Dynamic VHDx
1 1GB/4GB 1 Required
RDLS2 RD license server 20GB
Dynamic VHDx
1 1GB/4GB 1 Optional
RDGW1 RD Web Access Server 60GB
Dynamic VHDx
2 2GB/4GB 1 Optional
RDGW2 RD Web Access Server 60GB
Dynamic VHDx
2 2GB/4GB 1 Optional
1. Install and configure on each VM in Table 5 as follows:
a. Install Windows Server 2012 as described in the appendix.

21 Windows Server 2012 Remote Desktop Services on NetApp Storage © 2013 NetApp, Inc. All Rights Reserved.
b. Set the computer name as indicated in Table 5.
c. Configure a static IP address.
d. Join the VM to the Contoso.local domain.
4.9 Setup the RD Session Host Servers (Optional)
1. Install a GPU card in each server (optional).
Note: See appendix for GPU card hardware and software requirements.
Note: It is recommended to install a GPU card in the RD virtualization host servers if the VDI workload will be graphically intensive such as 3D image rendering.
2. Install Windows Server 2012 as described in the appendix.
3. Set the computer names to RDSH1 and RDSH2.
4. Configure a static IP addresses.
5. Join the servers to the Contoso.local domain.
6. Install the GPU card driver software (optional).
Be sure to use an appropriate Windows Server 2012 driver for the GPU card.
See appendix for GPU driver software requirements.
7. Add the Desktop Experience feature using Server Manager.
Note: The Desktop Experience feature is added by selecting the Add Roles and Features Wizard User Interface and Infrastructure Desktop Experience checkbox in Server Manager
4.10 Setup the RD Gateway Server (Optional)
Note: To enable secure remote access to the VDI POC environment it is necessary to add an RD gateway server to the existing environment, create or procure an SSL certificate for the RD gateway server, locate the RD gateway server in a perimeter network, and configure the required port rules on one or more network firewalls. These details are beyond the scope of this document.
Refer to the following document for details regarding how to enable secure remote access using an RD
gateway server: RD Gateway Deployment in a Perimeter Network and Firewall Rules
4.11 Perform VDI Standard Deployment
Refer to Section 5 of this document to perform a standard VDI deployment.
Note: The procedure to perform the VDI standard deployment for an HA environment is essentially the same as for the non-HA environment, with the following exceptions:
Depending on whether high availability is required, more servers will be added to the deployment
(for example, RDWA1, RDWA2, RDCB1, RDCB2, RDLS1, RDLS2, RDGW1, and RDGW2).
An HA environment requires at least one RD licensing server, where a non-HA environment does
not.
4.12 Perform VDI Poststandard Deployment Configuration Steps This section describes steps that are required to complete the configuration of how to configure the VDI deployment options after the RDS standard deployment process completes.
Note: After completing the tasks described in this section, the VDI infrastructure will be ready to create virtual desktop collections (for example, pooled or personal VDI VM collections).
22 Windows Server 2012 Remote Desktop Services on NetApp Storage © 2013 NetApp, Inc. All Rights Reserved.
4.12.1 Configure Local Security Group on RDS Role Servers This section describes how to configure local security group memberships on the various RDS management servers as required to support creation of virtual desktop collections.
Reference Table 2) Local security groups on RDS servers for a description of these roles.
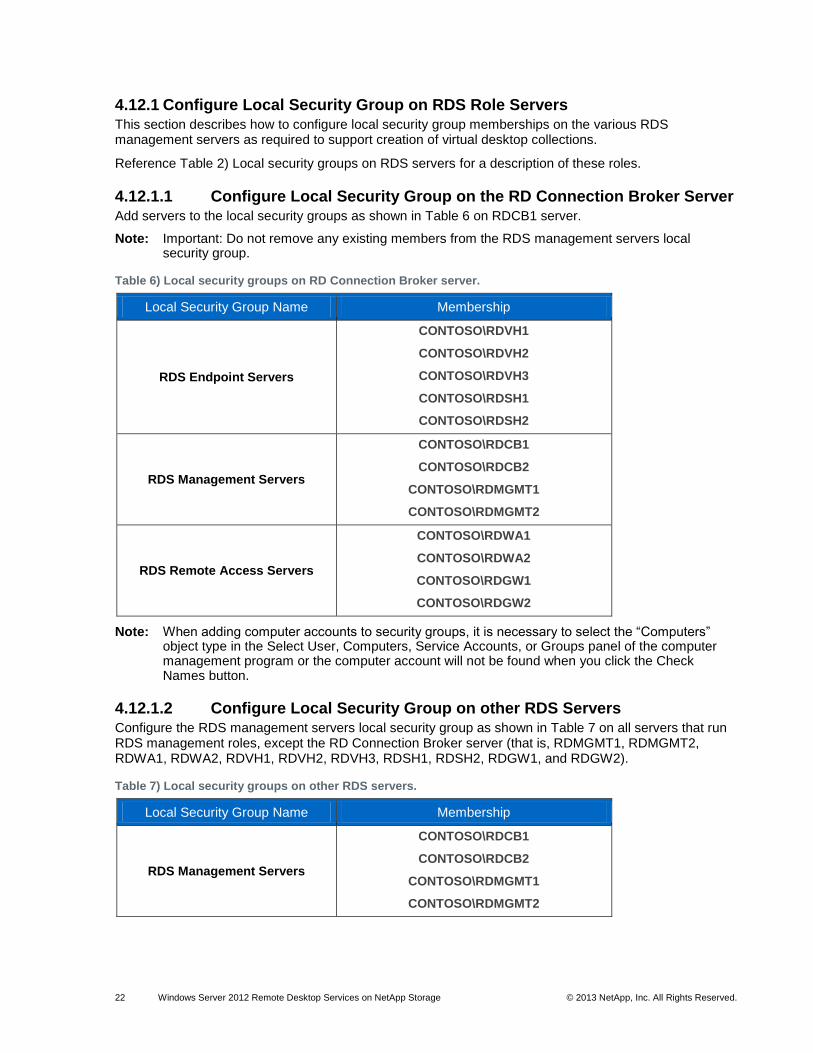
4.12.1.1 Configure Local Security Group on the RD Connection Broker Server Add servers to the local security groups as shown in Table 6 on RDCB1 server.
Note: Important: Do not remove any existing members from the RDS management servers local security group.
Table 6) Local security groups on RD Connection Broker server.
Local Security Group Name Membership
RDS Endpoint Servers
CONTOSO\RDVH1
CONTOSO\RDVH2
CONTOSO\RDVH3
CONTOSO\RDSH1
CONTOSO\RDSH2
RDS Management Servers
CONTOSO\RDCB1
CONTOSO\RDCB2
CONTOSO\RDMGMT1
CONTOSO\RDMGMT2
RDS Remote Access Servers
CONTOSO\RDWA1
CONTOSO\RDWA2
CONTOSO\RDGW1
CONTOSO\RDGW2
Note: When adding computer accounts to security groups, it is necessary to select the “Computers” object type in the Select User, Computers, Service Accounts, or Groups panel of the computer management program or the computer account will not be found when you click the Check Names button.
4.12.1.2 Configure Local Security Group on other RDS Servers Configure the RDS management servers local security group as shown in Table 7 on all servers that run RDS management roles, except the RD Connection Broker server (that is, RDMGMT1, RDMGMT2, RDWA1, RDWA2, RDVH1, RDVH2, RDVH3, RDSH1, RDSH2, RDGW1, and RDGW2).
Table 7) Local security groups on other RDS servers.
Local Security Group Name Membership
RDS Management Servers
CONTOSO\RDCB1
CONTOSO\RDCB2
CONTOSO\RDMGMT1
CONTOSO\RDMGMT2

23 Windows Server 2012 Remote Desktop Services on NetApp Storage © 2013 NetApp, Inc. All Rights Reserved.
4.12.2 Configure Storage for VDI VMs and User Profile Disks This section describes how to configure basic storage for VDI VMs and user profile disks as required to support creation of virtual desktop collections for the RDS deployment.
Note: Refer to Section 13 of this document for detailed instructions on how to create a volume and LUN with Windows PowerShell on NetApp controllers.
4.12.2.1 Configure Local Storage for Exported VDI Template VMs on the RD Management Server (RDMGMT1)
Note: The following directories are mere examples to keep this document serving a wider audience. Create directories where appropriate. NetApp recommends using locally attached LUNs or CIFS shares for each of these functions. Adjust access permissions as stated. For this example we’ve locally attached a NetApp LUN to the drive letter D.
1. Create a D:\Exported-VMs directory on the RDMGMT1 server.
2. Set NTFS permissions on the D:\Exported-VMs directory as follows:
SYSTEM Full control
RDMGMT1\Administrators Full control
RDMGMT1\RDS Endpoint Servers Full control
3. Share the D:\Exported-VMs directory on the RDMGMT1 server as \\RDMGMT1\Exported-VMs with
the following share permissions:
Administrator Read/write
Administrators Owner
RDS Endpoint Servers Read/write
4.12.2.2 Setup a SMB Share for User Profile Disks on the RDS Management Server (RDMGMT1)
Note: The following directories are mere examples to keep this document serving a wider audience. Create directories where appropriate. NetApp recommends using locally attached LUNs or CIFS shares for each of these functions. Adjust access permissions as stated. For this example we’ve locally attached a NetApp LUN to the drive letter D.
1. Create a D:\UserProfileDisks directory on the RDMGMT1 server.
2. Set NTFS permissions on the D:\UserProfileDisks directory as follows:
Everyone Read and execute, list folder contents, read
SYSTEM Full control
RDMGMT1\Administrators Full control
RDMGMT1\RDS Endpoint Servers Full control
3. Share the D:\UserProfileDisks directory on the RDMGMT1 server as \\RDMGMT1\UserProfileDisks
with the following share permissions:
Administrator Read/write
Administrators Owner
Everyone Read
RDS Endpoint Servers Read/write

24 Windows Server 2012 Remote Desktop Services on NetApp Storage © 2013 NetApp, Inc. All Rights Reserved.
4.12.2.3 Configure Local Storage for VDI VMs on the RD Virtualization Host Server (RDVH1)
Note: The following directories are mere examples to keep this document serving a wider audience. Create directories where appropriate. NetApp recommends using locally attached LUNs or CIFS shares for each of these functions. Adjust access permissions as stated. For this example we’ve locally attached a NetApp LUN to the drive letter D.
1. Create a D:\VDI directory on the RDHV1 server.
2. Set NTFS permissions on the D:\VDI directory as follows:
CREATOR OWNER None
SYSTEM Full control
NETWORK SERVICE Full control
Administrator Full control
RDVH1\Administrators Full control
RDVH1\RDS Endpoint Servers Full control
RDVH1\Users Read and execute, list folder contents, read
4.13 Review and Configure RDS Deployment Properties
Refer to Section 7 of this document to review and configure the RDS deployment properties.
Note: The procedure to perform the review and configuration in an HA environment is essentially the same as for the non-HA environment, with the following exceptions:
Depending on whether high availability is required, more servers will be added to the deployment
(for example, RDWA1, RDWA2, RDCB1, RDCB2, RDLS1, RDLS2, RDGW1, and RDGW2).
An HA environment requires at least one RD licensing server, where a non-HA environment does
not.

25 Windows Server 2012 Remote Desktop Services on NetApp Storage © 2013 NetApp, Inc. All Rights Reserved.
5 Standard VDI Based RDS Deployment Procedures
This section describes how to use the Server Manager Add Roles and Features Wizard to perform an RDS scenario-based standard deployment to deploy a virtual desktop infrastructure across multiple servers.
Perform the following steps on the RDMGMT1 management server computer.
1. Select Add roles and features.
2. Add the RDVH1, RDCB1, and RDWA1
servers to list of selected computers.
Note: If secure remote access is required, then add the RDGW1 server as well.
3. Click OK.
4. For Before you begin, click Next.

26 Windows Server 2012 Remote Desktop Services on NetApp Storage © 2013 NetApp, Inc. All Rights Reserved.
5. For Select installation type, select RDS
scenario-based installation.
6. Click Next.
7. For Select deployment type, select
Standard Deployment.
8. Click Next.
9. For Select deployment scenario, select
Virtual Desktop Infrastructure.
10. Select Next.

27 Windows Server 2012 Remote Desktop Services on NetApp Storage © 2013 NetApp, Inc. All Rights Reserved.
11. For Review role services, click Next.
12. For Specify RD Connection Broker server,
select the RDCB1 server.
13. Click Next.
14. For Specify RD Web Access server, select
the RDWA1 server.
15. Click Next.
28 Windows Server 2012 Remote Desktop Services on NetApp Storage © 2013 NetApp, Inc. All Rights Reserved.
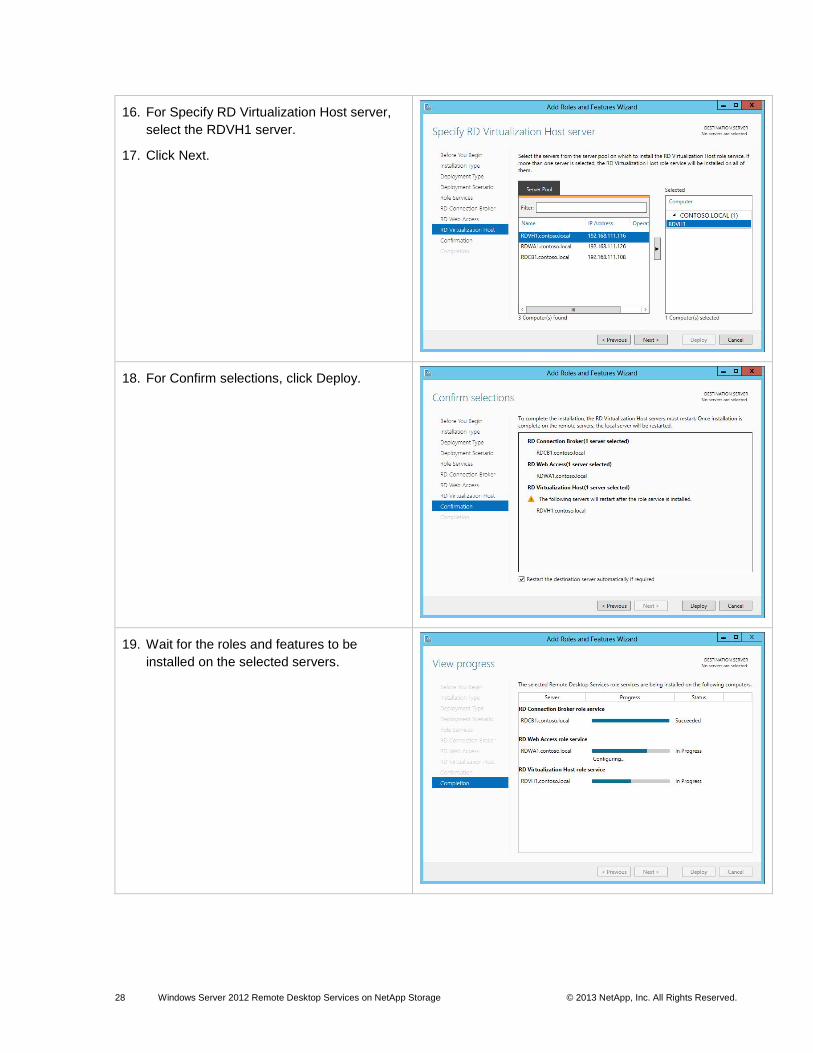
16. For Specify RD Virtualization Host server,
select the RDVH1 server.
17. Click Next.
18. For Confirm selections, click Deploy.
19. Wait for the roles and features to be
installed on the selected servers.
29 Windows Server 2012 Remote Desktop Services on NetApp Storage © 2013 NetApp, Inc. All Rights Reserved.
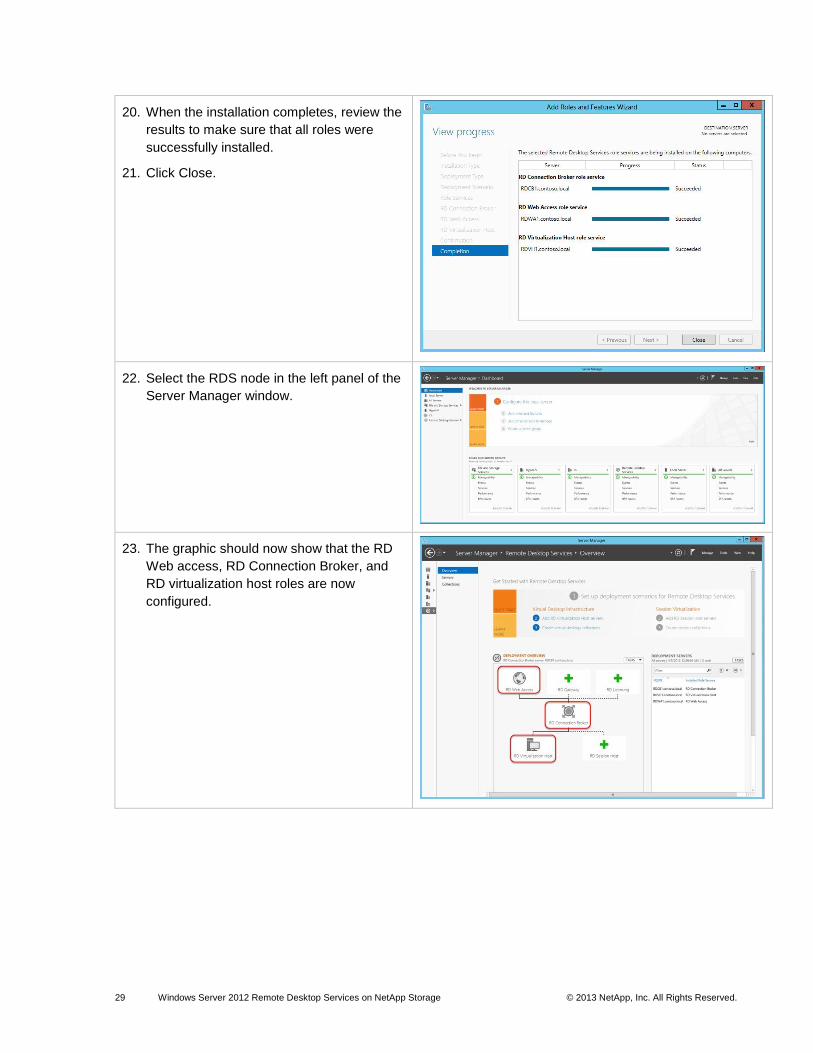
20. When the installation completes, review the
results to make sure that all roles were
successfully installed.
21. Click Close.
22. Select the RDS node in the left panel of the
Server Manager window.
23. The graphic should now show that the RD
Web access, RD Connection Broker, and
RD virtualization host roles are now
configured.

30 Windows Server 2012 Remote Desktop Services on NetApp Storage © 2013 NetApp, Inc. All Rights Reserved.
6 Standard Session Based RDS Deployment Properties
This section describes how to add the RD session host to the existing RDS deployment.
Note: To add an RD session host server to an existing VDI infrastructure deployment, it is necessary to run-through the RDS scenario-based deployment wizard again.
Perform the following steps on the RDMGMT1 management server computer.
1. Open the Server Manager program.
2. Select Remote Desktop Services in the left
panel.
3. Click Add roles and features.
4. For Before you begin, click Next.

31 Windows Server 2012 Remote Desktop Services on NetApp Storage © 2013 NetApp, Inc. All Rights Reserved.
5. For Select installation type, select RDS
scenario-based installation.
6. Click Next.
7. For Select deployment type, select
Standard deployment.
8. Click Next.
9. For Select deployment scenario, select
Session virtualization.
10. Click Next.

32 Windows Server 2012 Remote Desktop Services on NetApp Storage © 2013 NetApp, Inc. All Rights Reserved.
11. For Review role services, click Next.
12. For Specify RD Connection Broker server,
make sure that the RDCB1 server is
selected.
13. Click Next.
14. For Specify RD Web Access server, make
sure that the RDWA1 server is selected.
15. Click Next.

33 Windows Server 2012 Remote Desktop Services on NetApp Storage © 2013 NetApp, Inc. All Rights Reserved.
16. For Specify RS Session Host servers,
select the RDSH1 server.
17. Click Next.
18. For Confirm selections, select the “Restart
the destination server automatically if
required” checkbox.
19. Click Deploy.
20. Wait for the software installation and
configuration to complete.
34 Windows Server 2012 Remote Desktop Services on NetApp Storage © 2013 NetApp, Inc. All Rights Reserved.
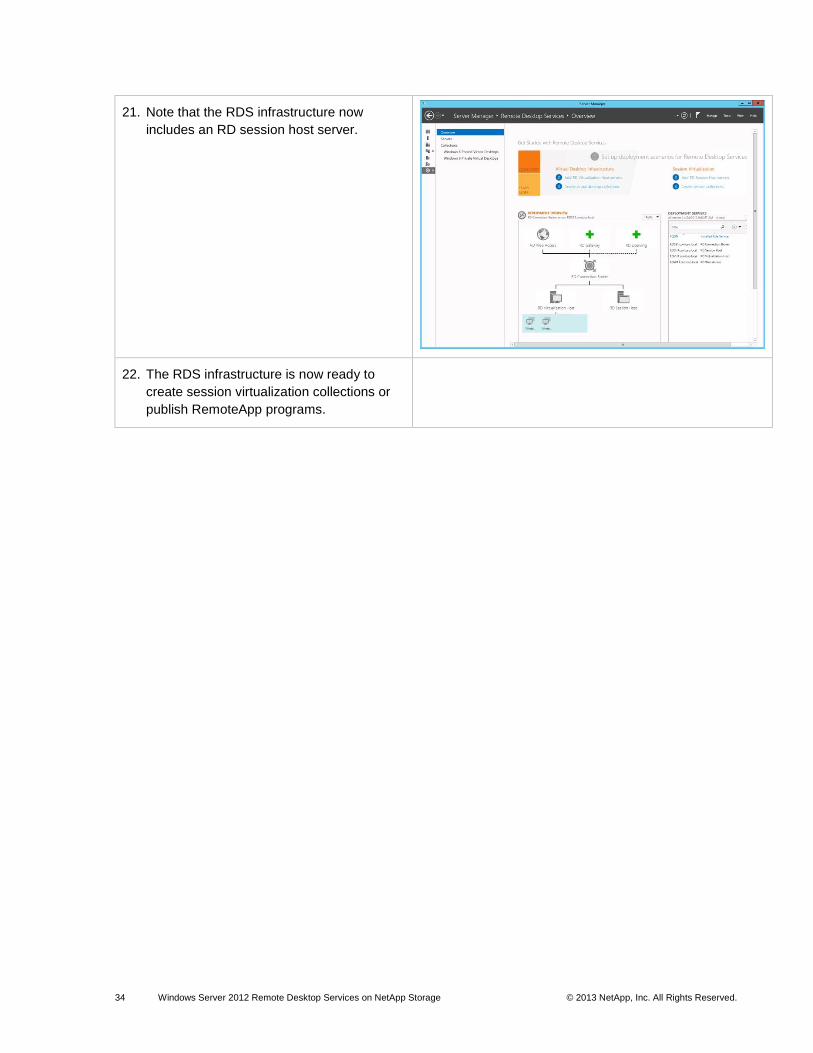
21. Note that the RDS infrastructure now
includes an RD session host server.
22. The RDS infrastructure is now ready to
create session virtualization collections or
publish RemoteApp programs.

35 Windows Server 2012 Remote Desktop Services on NetApp Storage © 2013 NetApp, Inc. All Rights Reserved.
7 Review and Configure the RDS Deployment Properties
This section describes how to use the Server Manager to further define the deployment properties for the Remote Desktop Services environment.
Perform the following steps on the RDMGMT1 management server computer.
1. Open the Server Manager program.
2. In the upper-right corner of the Deployment
Overview windows, select Tasks Edit
Deployment Properties.
36 Windows Server 2012 Remote Desktop Services on NetApp Storage © 2013 NetApp, Inc. All Rights Reserved.
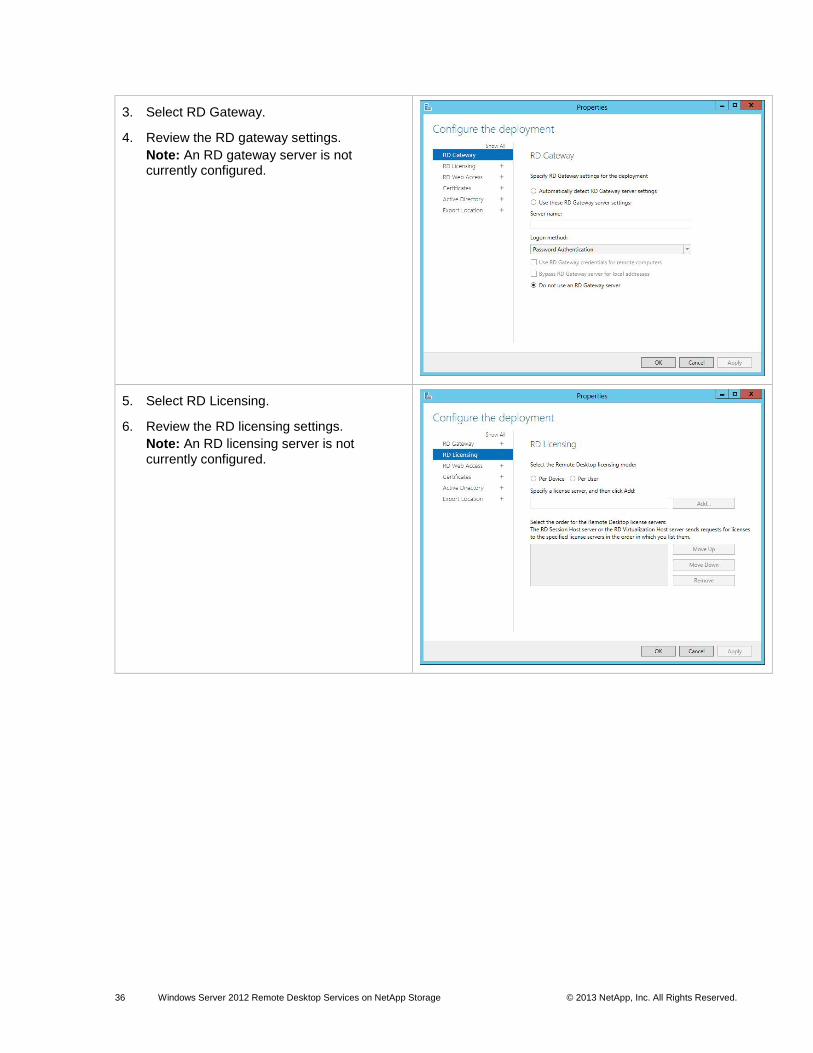
3. Select RD Gateway.
4. Review the RD gateway settings.
Note: An RD gateway server is not currently configured.
5. Select RD Licensing.
6. Review the RD licensing settings.
Note: An RD licensing server is not currently configured.

37 Windows Server 2012 Remote Desktop Services on NetApp Storage © 2013 NetApp, Inc. All Rights Reserved.
7. Select RD Web Access.
8. Review the RD Web access settings.
9. Select Certificates.
10. Review the certificates settings.
Note: Certificates are not currently configured.

38 Windows Server 2012 Remote Desktop Services on NetApp Storage © 2013 NetApp, Inc. All Rights Reserved.
11. Select Active Directory.
12. Click the down arrow at the end of the
Organizational Unit field.
13. Select the Computers OU.
Note: See the warning message that the Computers OU is not yet configured to support automatic creation of virtual desktops.
14. Click Apply to configure the Computers OU.
39 Windows Server 2012 Remote Desktop Services on NetApp Storage © 2013 NetApp, Inc. All Rights Reserved.
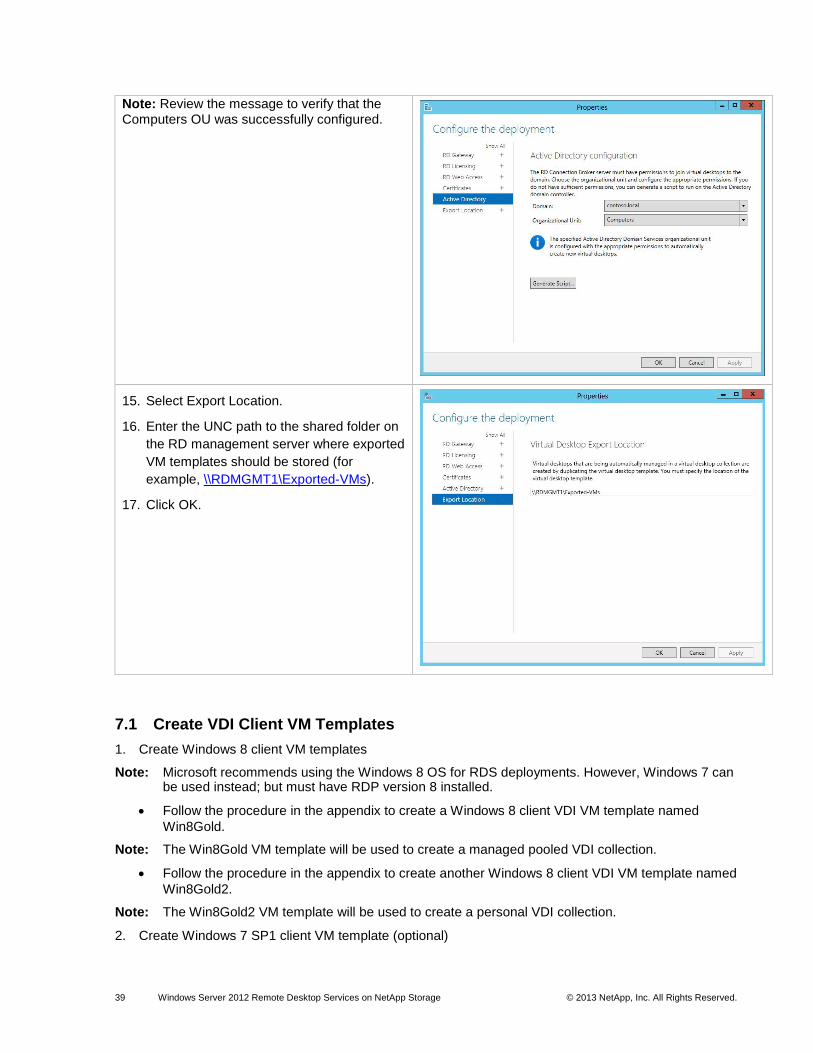
Note: Review the message to verify that the Computers OU was successfully configured.
15. Select Export Location.
16. Enter the UNC path to the shared folder on
the RD management server where exported
VM templates should be stored (for
example, \\RDMGMT1\Exported-VMs).
17. Click OK.
7.1 Create VDI Client VM Templates
1. Create Windows 8 client VM templates
Note: Microsoft recommends using the Windows 8 OS for RDS deployments. However, Windows 7 can be used instead; but must have RDP version 8 installed.
Follow the procedure in the appendix to create a Windows 8 client VDI VM template named
Win8Gold.
Note: The Win8Gold VM template will be used to create a managed pooled VDI collection.
Follow the procedure in the appendix to create another Windows 8 client VDI VM template named
Win8Gold2.
Note: The Win8Gold2 VM template will be used to create a personal VDI collection.
2. Create Windows 7 SP1 client VM template (optional)

40 Windows Server 2012 Remote Desktop Services on NetApp Storage © 2013 NetApp, Inc. All Rights Reserved.
Note: A Windows 7 SP1 VM template is only needed if Windows 7 VMs will be deployed.
Follow the guidelines in the appendix to create a Windows 7 VM template named Win7Gold.
8 Create a Pooled Managed Virtual Desktop Collection
This section describes how to create a pooled managed virtual desktop collection containing Windows 8 VDI VMs.
Note: Pooled VDI VMs are shared by all users who have permission to access the pooled virtual desktop collection. When a user logs into a pooled virtual desktop collection, the user is routed to an available VM in the pool. When the user logs off of the pooled VM, the VM reverts to the original state as it was before the user logged on. All changes that were made to the VM while the user was logged on are discarded. User profile disks can be used to retain the state of the user environment between login sessions to pooled VMs. User profile disks are limited to a single pooled VM collection.
Perform the following steps on the RDMGMT1 management server computer.
1. Open the Server Manager program.
2. Select Create virtual desktop collection.
3. For Before you begin, click Next.
41 Windows Server 2012 Remote Desktop Services on NetApp Storage © 2013 NetApp, Inc. All Rights Reserved.
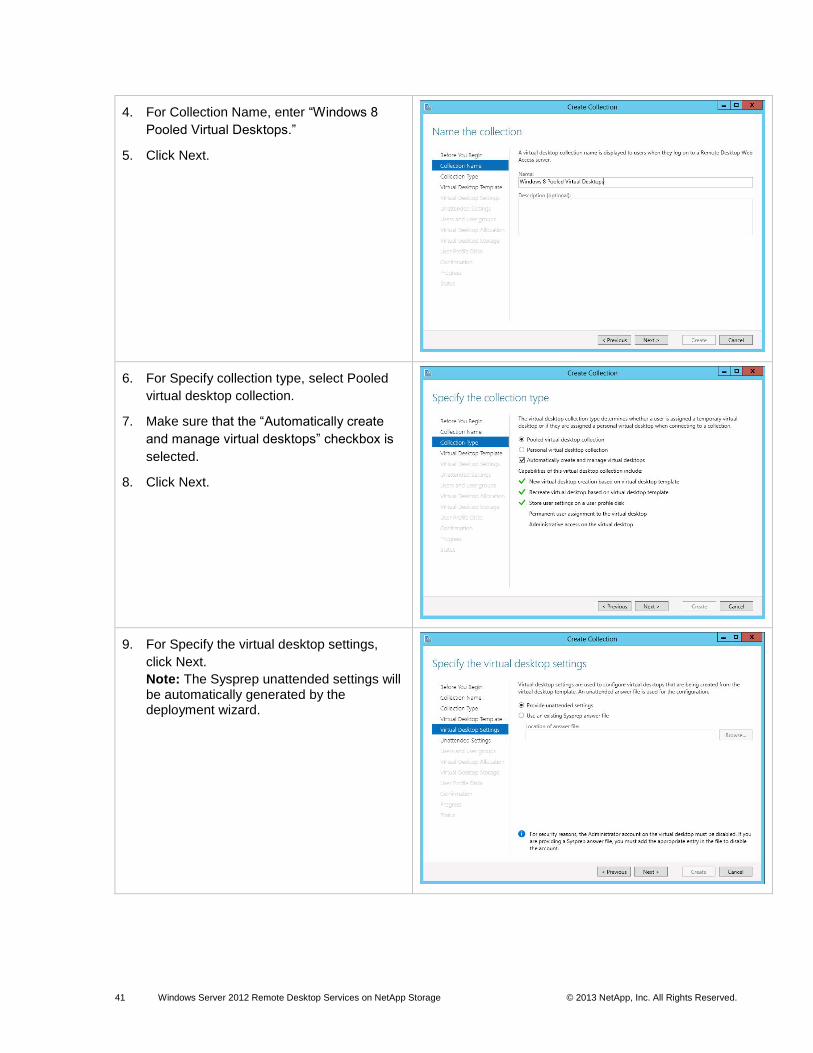
4. For Collection Name, enter “Windows 8
Pooled Virtual Desktops.”
5. Click Next.
6. For Specify collection type, select Pooled
virtual desktop collection.
7. Make sure that the “Automatically create
and manage virtual desktops” checkbox is
selected.
8. Click Next.
9. For Specify the virtual desktop settings,
click Next.
Note: The Sysprep unattended settings will be automatically generated by the deployment wizard.

42 Windows Server 2012 Remote Desktop Services on NetApp Storage © 2013 NetApp, Inc. All Rights Reserved.
10. For Specify unattended settings, enter the
local administrator account password to use
when creating the new VMs.
11. Confirm the password.
12. Click Next.
13. For Specify users and collection size, adjust
the number of virtual desktops to be
created as desired (the default is 2).
Note: Microsoft recommends a limit of 500 virtual desktops per Connection Broker.
14. For Prefix, enter “Win8-Pooled-.”
15. Click Next.
43 Windows Server 2012 Remote Desktop Services on NetApp Storage © 2013 NetApp, Inc. All Rights Reserved.
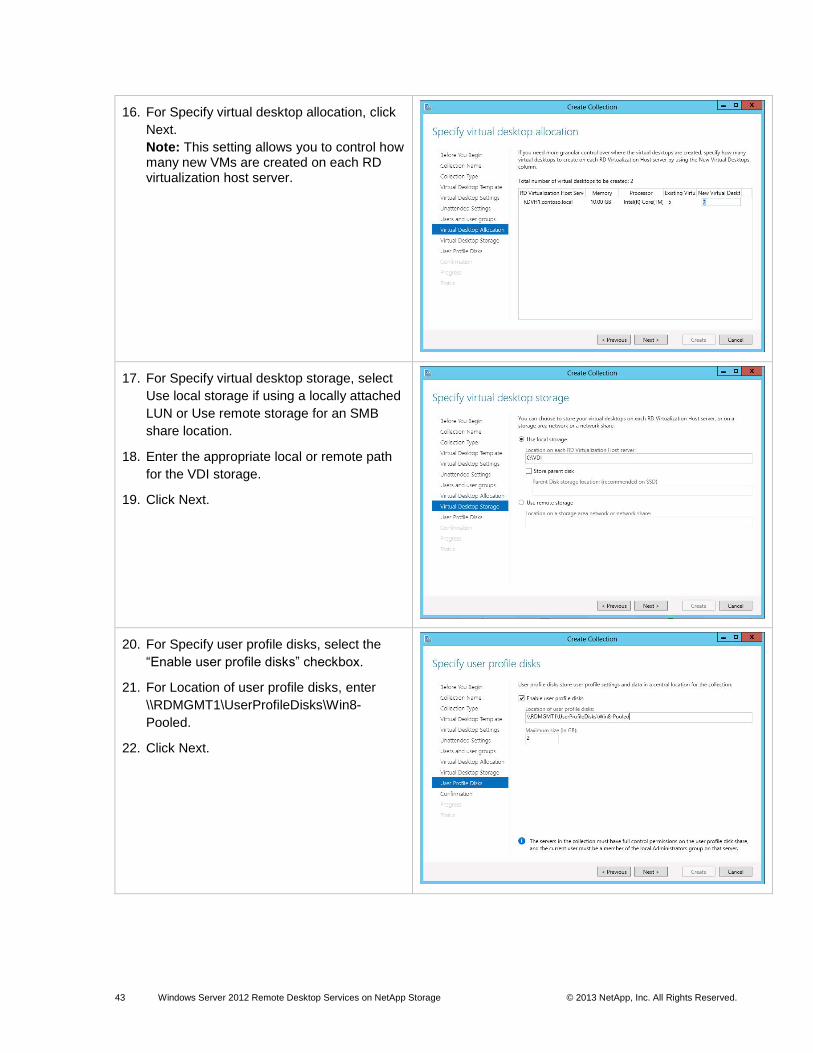
16. For Specify virtual desktop allocation, click
Next.
Note: This setting allows you to control how many new VMs are created on each RD virtualization host server.
17. For Specify virtual desktop storage, select
Use local storage if using a locally attached
LUN or Use remote storage for an SMB
share location.
18. Enter the appropriate local or remote path
for the VDI storage.
19. Click Next.
20. For Specify user profile disks, select the
“Enable user profile disks” checkbox.
21. For Location of user profile disks, enter
\\RDMGMT1\UserProfileDisks\Win8-
Pooled.
22. Click Next.
44 Windows Server 2012 Remote Desktop Services on NetApp Storage © 2013 NetApp, Inc. All Rights Reserved.
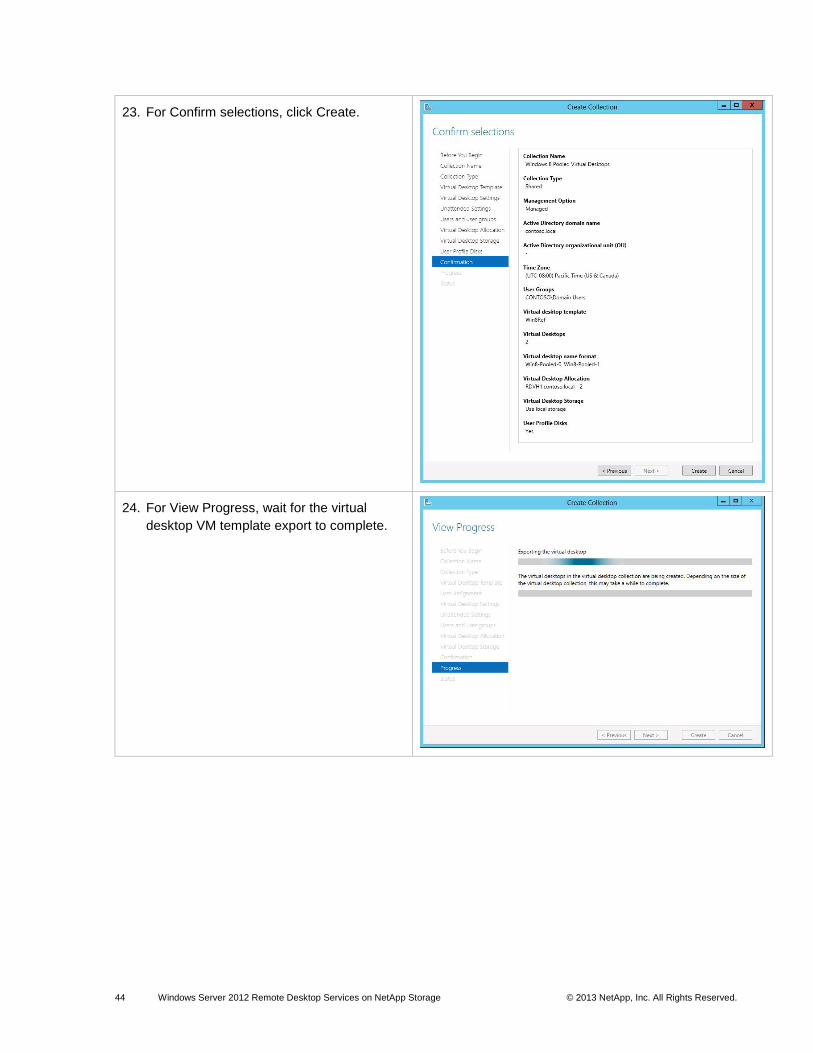
23. For Confirm selections, click Create.
24. For View Progress, wait for the virtual
desktop VM template export to complete.
45 Windows Server 2012 Remote Desktop Services on NetApp Storage © 2013 NetApp, Inc. All Rights Reserved.
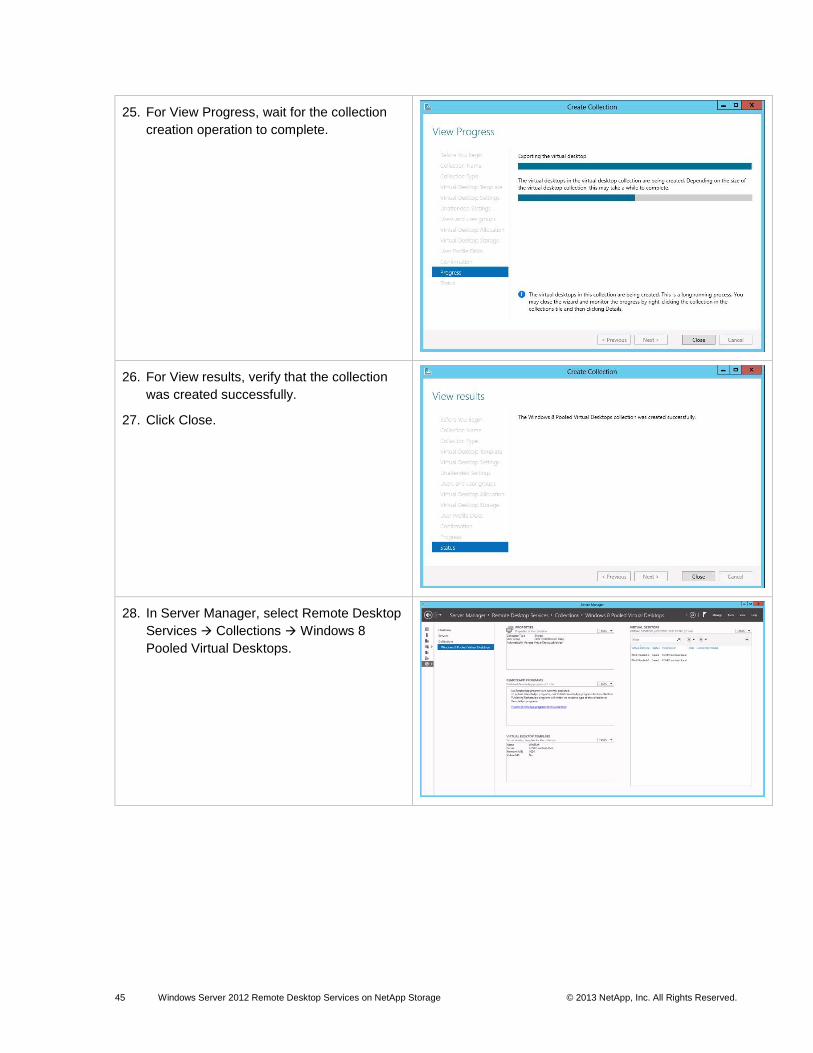
25. For View Progress, wait for the collection
creation operation to complete.
26. For View results, verify that the collection
was created successfully.
27. Click Close.
28. In Server Manager, select Remote Desktop
Services Collections Windows 8
Pooled Virtual Desktops.
46 Windows Server 2012 Remote Desktop Services on NetApp Storage © 2013 NetApp, Inc. All Rights Reserved.
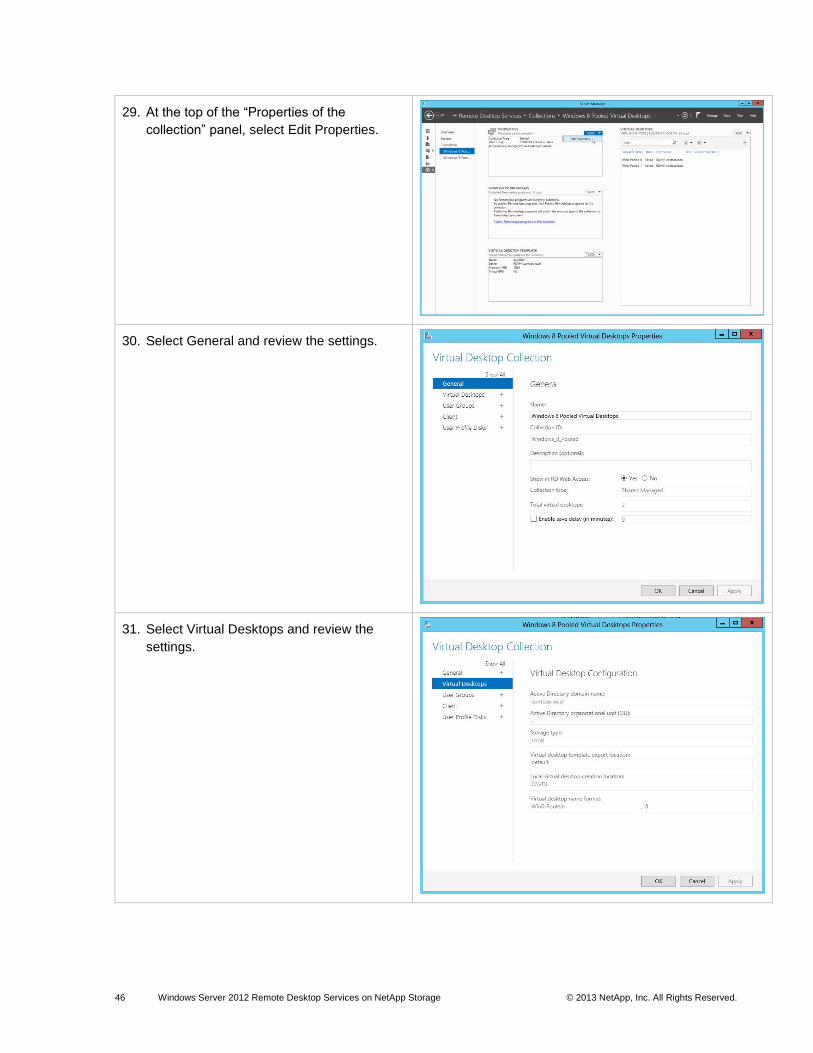
29. At the top of the “Properties of the
collection” panel, select Edit Properties.
30. Select General and review the settings.
31. Select Virtual Desktops and review the
settings.

47 Windows Server 2012 Remote Desktop Services on NetApp Storage © 2013 NetApp, Inc. All Rights Reserved.
32. Select User Groups.
33. Adjust the groups that can access the
collection as needed.
34. Select Client.
35. Adjust the client settings as needed.

48 Windows Server 2012 Remote Desktop Services on NetApp Storage © 2013 NetApp, Inc. All Rights Reserved.
36. Select User Profile Disks.
37. Adjust the user profile disk settings as
needed.
38. Click OK.
39. The RDS infrastructure is now ready to test
user access to pooled managed virtual
desktops from client PCs.

49 Windows Server 2012 Remote Desktop Services on NetApp Storage © 2013 NetApp, Inc. All Rights Reserved.
9 Create a Personal Managed Virtual Desktop Collection
This section describes how to create a personal managed virtual desktop collection containing Windows 8 VDI VMs.
Note: Private VDI VMs are assigned to individual users who have permission to access the personal virtual desktop collection. Users can either be preassigned by an administrator to a personal VM or can be automatically assigned to a personal VM the first time the user accessed the personal virtual desktop collection. All changes that the user while logged into a personal VDI VM persist between login sessions.
Perform the following steps on the RDMGMT1 management server computer.
1. Open the Server Manager program.
2. For Before you begin, click Next.
50 Windows Server 2012 Remote Desktop Services on NetApp Storage © 2013 NetApp, Inc. All Rights Reserved.
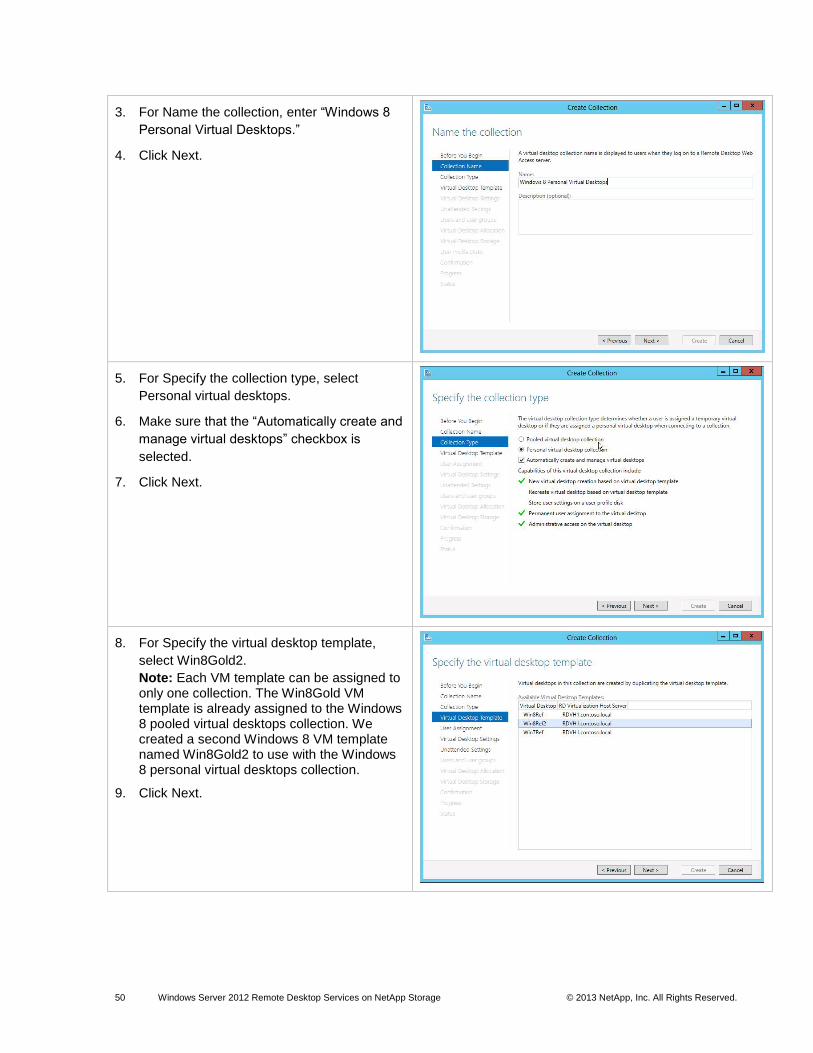
3. For Name the collection, enter “Windows 8
Personal Virtual Desktops.”
4. Click Next.
5. For Specify the collection type, select
Personal virtual desktops.
6. Make sure that the “Automatically create and
manage virtual desktops” checkbox is
selected.
7. Click Next.
8. For Specify the virtual desktop template,
select Win8Gold2.
Note: Each VM template can be assigned to only one collection. The Win8Gold VM template is already assigned to the Windows 8 pooled virtual desktops collection. We created a second Windows 8 VM template named Win8Gold2 to use with the Windows 8 personal virtual desktops collection.
9. Click Next.

51 Windows Server 2012 Remote Desktop Services on NetApp Storage © 2013 NetApp, Inc. All Rights Reserved.
10. For User Assignment, select the “Add the
user account to the local administrators
group on the virtual desktop.”
Note: Adding the user to the local administrators group was a good idea for the purposes of this documentation; however, it might not be appropriate for a production deployment.
11. Click Next.
12. For Specify the virtual desktop settings, click
Next.
Note: The Sysprep unattended settings will be automatically generated by the deployment wizard.
13. For Specify unattended settings, enter the
Local Administrator account password to use
when creating the new VMs.

52 Windows Server 2012 Remote Desktop Services on NetApp Storage © 2013 NetApp, Inc. All Rights Reserved.
14. Confirm the password.
15. Click Next.
16. For Specify users and collection size, adjust
the number of virtual desktops to be created
as desired (the default is 2).
17. For Prefix, enter “Win8-Personal-.”
18. Click Next.
19. For Specify virtual desktop allocation, click
Next.
Note: This setting allows you to control how many new VMs are created on each RD virtualization host server.

53 Windows Server 2012 Remote Desktop Services on NetApp Storage © 2013 NetApp, Inc. All Rights Reserved.
20. For Specify virtual desktop storage, select
Use local storage if using a locally attached
LUN or Use remote storage for an SMB
share location.
21. Enter the appropriate local or remote path for
the VDI storage.
22. Click Next.
23. For Confirm selections, click Create.

54 Windows Server 2012 Remote Desktop Services on NetApp Storage © 2013 NetApp, Inc. All Rights Reserved.
24. For View Progress, wait for the virtual
desktop VM template export to complete.
25. For View Progress, wait for the collection
creation operation to complete.
26. For View results, verify that the collection
was created successfully.
27. Click Close.

55 Windows Server 2012 Remote Desktop Services on NetApp Storage © 2013 NetApp, Inc. All Rights Reserved.
28. In Server Manager, select Remote Desktop
Services Collections Windows 8
Personal Virtual Desktops.
29. At the top of the “Properties of the collection”
panel, select Edit Properties.
30. Select General and review the settings.

56 Windows Server 2012 Remote Desktop Services on NetApp Storage © 2013 NetApp, Inc. All Rights Reserved.
31. Select Virtual Desktops and review the
settings.
32. Select User Groups.
33. Adjust the groups that can access the
collection as needed.

57 Windows Server 2012 Remote Desktop Services on NetApp Storage © 2013 NetApp, Inc. All Rights Reserved.
34. Select Client.
35. Adjust the client settings as needed.
36. The RDS infrastructure is now ready to test
user access to personal managed virtual
desktops from client PCs.

58 Windows Server 2012 Remote Desktop Services on NetApp Storage © 2013 NetApp, Inc. All Rights Reserved.
10 Create a Session Virtualization Collection
This section describes how to create a session virtualization collection to manage user desktop sessions that are hosted on RD session host servers (also known as terminal servers).
Multiple hosted desktop sessions run concurrently on an RD session host server that is shared by multiple users. Hosted user sessions are isolated from each other. User profile disks can be used to retain the state of the user environment between login sessions to hosted desktop sessions. User profile disks are limited to a single session virtualization collection.
Perform the following steps on the RDMGMT1 management server computer.
1. Open the Server Manager program.
2. Select Remote Desktop Services.
3. Select Create session collection.

59 Windows Server 2012 Remote Desktop Services on NetApp Storage © 2013 NetApp, Inc. All Rights Reserved.
4. For Before you begin, click Next.
5. For Name the Collection, enter “Session
Virtualization Collection.”
6. For Specify RD Session Host servers, select
the RDSH1 server.
7. Click Next.
Note: In Windows Server 2012, session hosting and RemoteApp publishing are mutually exclusive. A session virtualization collection can be used to publish hosted desktop sessions or publish RemoteApp programs; however, a session virtualization collection cannot be used to publish hosted desktop sessions and publish RemoteApp programs at the same time. Since an RD session host server can belong to only one collection, then an RD session host server can be used to host desktop sessions or host RemoteApp programs; however, an RD session host server cannot be used to host desktop sessions and RemoteApp programs at the same time.

60 Windows Server 2012 Remote Desktop Services on NetApp Storage © 2013 NetApp, Inc. All Rights Reserved.
8. For Specify user groups, click Next.
9. For Specify user profile disks, make sure that
the “Enable user profile disks” checkbox is
selected.
10. For Location of user profile disks, enter
\\RDMGMT1\UserProfileDisks\Sessions.
11. Click Next.
Note: User profile disks can be used with pooled virtual desktops and with session hosting; however, a user profile disk can be assigned to only one collection. So, each collection must be configured with a unique user profile disk path.
12. For Confirm selections, click Create.

61 Windows Server 2012 Remote Desktop Services on NetApp Storage © 2013 NetApp, Inc. All Rights Reserved.
13. For View Progress, wait for the session
virtualization collection creation process to
complete.
14. For View Progress, confirm that the
collection creation process completed
successfully.
15. Click Close.
16. The Server Manager window now includes
the session virtualization collection.

62 Windows Server 2012 Remote Desktop Services on NetApp Storage © 2013 NetApp, Inc. All Rights Reserved.
17. Select Remote Desktop Services
Collections Session Virtualization
Collection.
18. At the top of the “Properties of the collection”
panel, select Edit Properties.
19. Select General and review the settings.
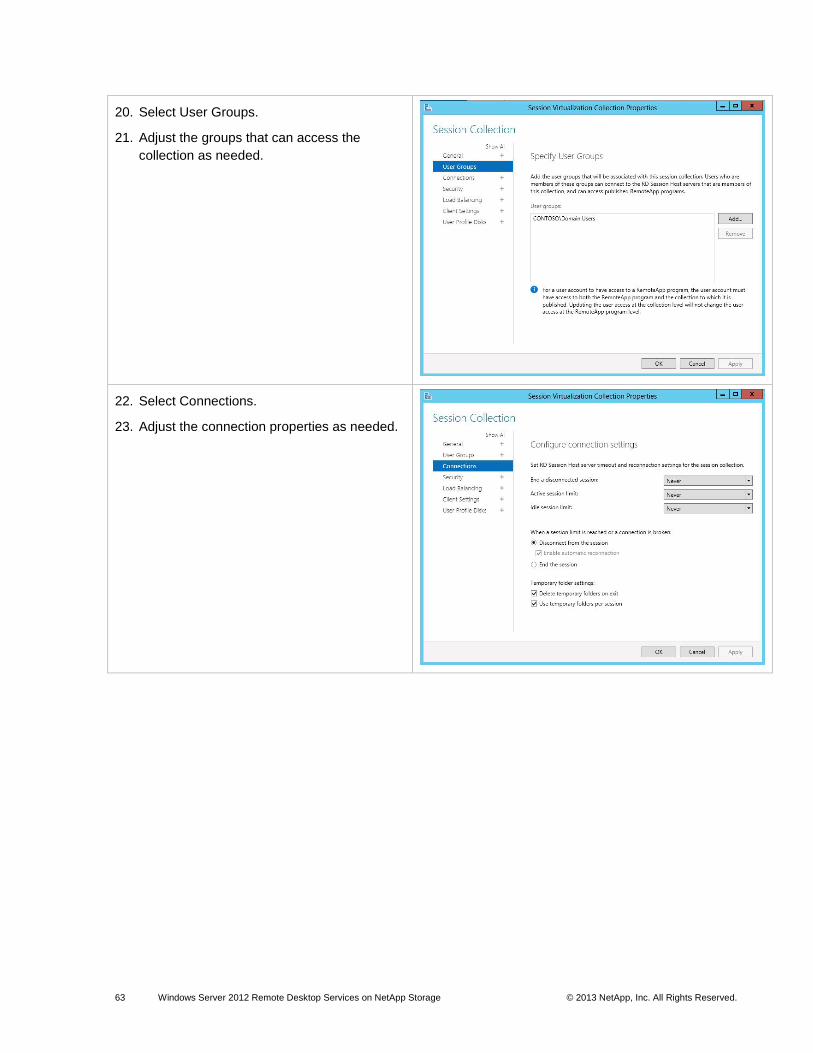
63 Windows Server 2012 Remote Desktop Services on NetApp Storage © 2013 NetApp, Inc. All Rights Reserved.
20. Select User Groups.
21. Adjust the groups that can access the
collection as needed.
22. Select Connections.
23. Adjust the connection properties as needed.
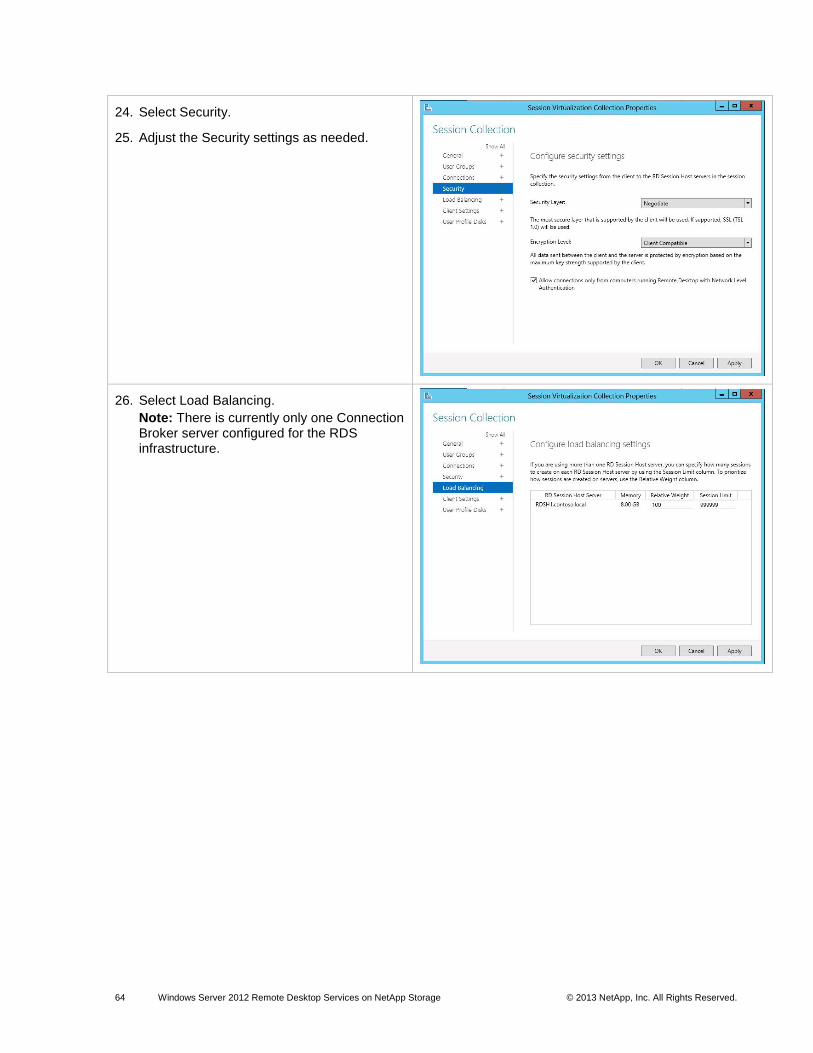
64 Windows Server 2012 Remote Desktop Services on NetApp Storage © 2013 NetApp, Inc. All Rights Reserved.
24. Select Security.
25. Adjust the Security settings as needed.
26. Select Load Balancing.
Note: There is currently only one Connection Broker server configured for the RDS infrastructure.
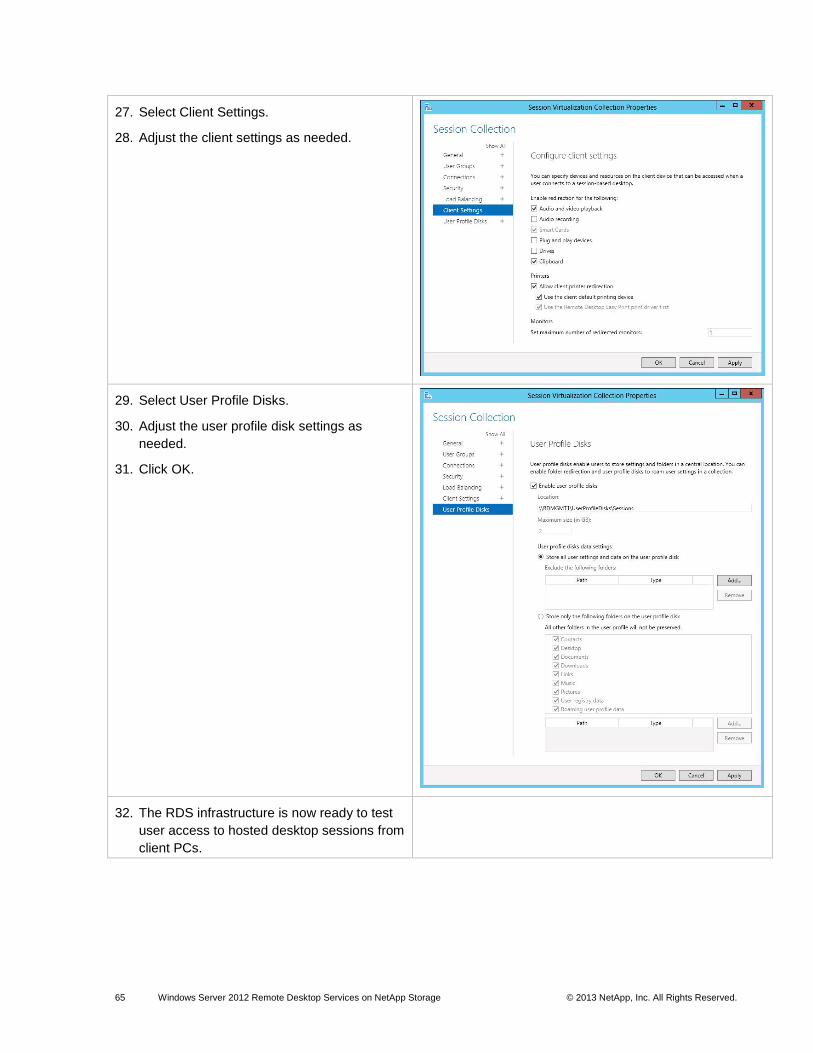
65 Windows Server 2012 Remote Desktop Services on NetApp Storage © 2013 NetApp, Inc. All Rights Reserved.
27. Select Client Settings.
28. Adjust the client settings as needed.
29. Select User Profile Disks.
30. Adjust the user profile disk settings as
needed.
31. Click OK.
32. The RDS infrastructure is now ready to test
user access to hosted desktop sessions from
client PCs.

66 Windows Server 2012 Remote Desktop Services on NetApp Storage © 2013 NetApp, Inc. All Rights Reserved.
11 Publish RemoteApp Programs
This section describes how to publish RemoteApp programs that are hosted on one more RD session host servers (also known as terminal servers).
In Windows Server 2012, session hosting and RemoteApp publishing are mutually exclusive. A session virtualization collection can be used to publish hosted desktop sessions or publish RemoteApp programs; however, a session virtualization collection cannot be used to publish hosted desktop sessions and publish RemoteApp programs at the same time. Since an RD session host server can belong to only one collection, then an RD session host server can be used to host desktop sessions or host RemoteApp programs; however, an RD session host server cannot be used to host desktop sessions and RemoteApp programs at the same time.
Perform the following steps on the RDMGMT1 management server computer.
1. Open the Server Manager program.
2. Select Remote Desktop Services.
3. At the top of the RemoteApp Programs
panel, select Tasks Publish RemoteApp
Programs.
4. For select RemoteApp programs, wait for the
list of available programs to be enumerated.
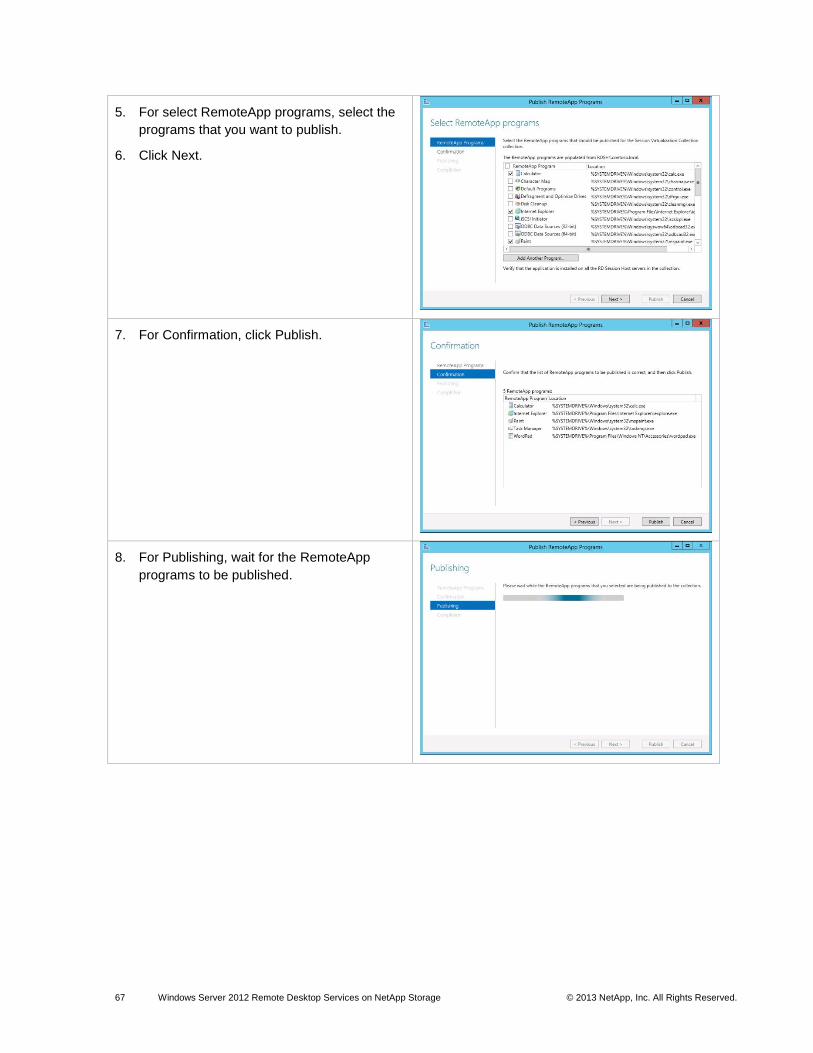
67 Windows Server 2012 Remote Desktop Services on NetApp Storage © 2013 NetApp, Inc. All Rights Reserved.
5. For select RemoteApp programs, select the
programs that you want to publish.
6. Click Next.
7. For Confirmation, click Publish.
8. For Publishing, wait for the RemoteApp
programs to be published.

68 Windows Server 2012 Remote Desktop Services on NetApp Storage © 2013 NetApp, Inc. All Rights Reserved.
9. For Completions, click Close.
10. Note that the RemoteApp Programs panel
now lists the published programs.
11. The RDS infrastructure is now ready to test
user access to RemoteApp programs from
client PCs.

69 Windows Server 2012 Remote Desktop Services on NetApp Storage © 2013 NetApp, Inc. All Rights Reserved.
12 Infrastructure Operational Procedures
This section describes any critical activity that might need to occur after initial installation and configuration, such as key operational procedures.
12.1 Update a Managed Virtual Desktop Collection This section describes how to update all the VMs in a pooled virtual desktop collection.
This procedure requires shutting down and rebuilding all pooled VMs in a pooled virtual desktop collection. All of the VMs in the collection can be rebuilt at the same time, or VMs can be rebuilt automatically when users log off of the VMs.
Perform the following steps on the RDMGMT1 management server computer.
1. Open the Server Manager program.
2. Select Remote Desktop Services.
3. Select the Windows 8 Pooled Virtual
Desktops collection.
4. At the top of the Virtual Desktop Template
panel, select Tasks Recreate All Virtual
Desktops.

70 Windows Server 2012 Remote Desktop Services on NetApp Storage © 2013 NetApp, Inc. All Rights Reserved.
5. For Specify virtual desktop template, click
Next.
6. For Specify user logoff policy, adjust the user
logoff policies as needed.
Note: All of the VMs in the collection can be shut down and rebuilt at the same time, which forces all users to log off at the specified time (for example, at a scheduled time during a maintenance window), or VMs can be rebuilt automatically when users log off of the VMs.
7. Click Next.
8. For Confirmation, verify that the settings are
correct.
9. Click Create.

71 Windows Server 2012 Remote Desktop Services on NetApp Storage © 2013 NetApp, Inc. All Rights Reserved.
10. For View Progress, wait for the VMs in the
collection to be recreated.
Note: If no users are logged into the VMs, the VM recreation occurs immediately.
11. For View Results, verify that the collection
update operation completed successfully.
12. Click Close.
13. The RDS infrastructure is now ready for end
users to access pooled managed virtual
desktops again.
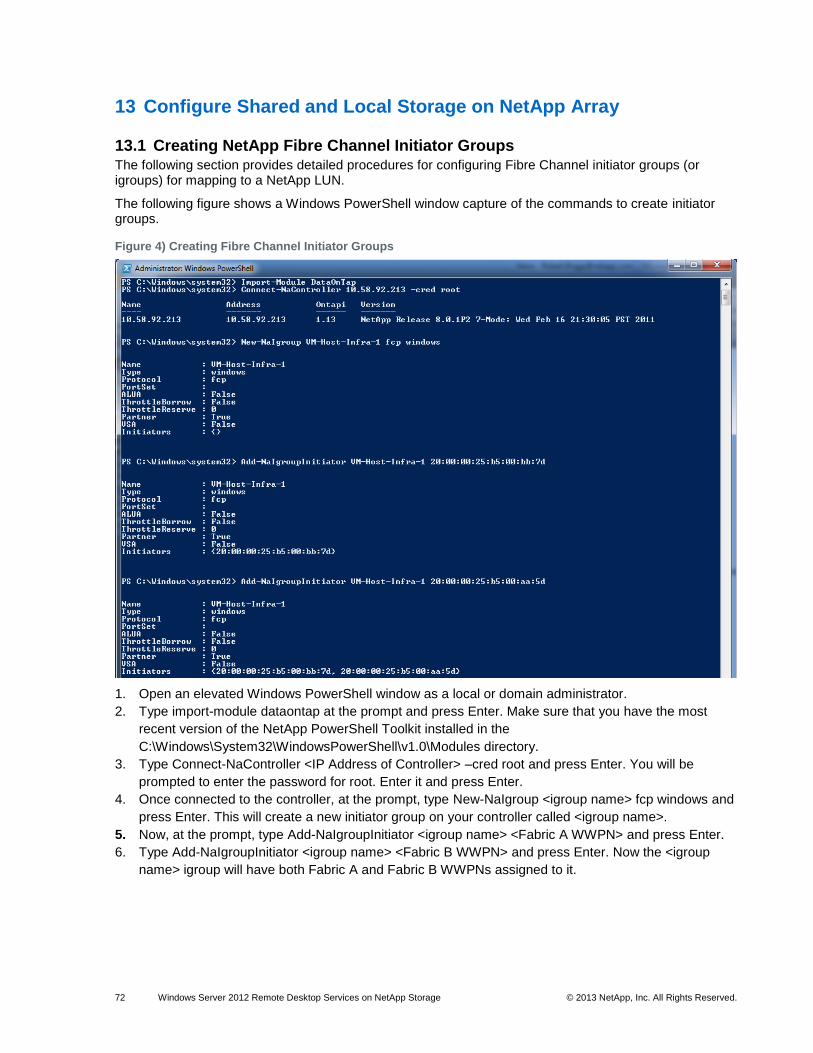
72 Windows Server 2012 Remote Desktop Services on NetApp Storage © 2013 NetApp, Inc. All Rights Reserved.
13 Configure Shared and Local Storage on NetApp Array
13.1 Creating NetApp Fibre Channel Initiator Groups The following section provides detailed procedures for configuring Fibre Channel initiator groups (or igroups) for mapping to a NetApp LUN.
The following figure shows a Windows PowerShell window capture of the commands to create initiator groups.
Figure 4) Creating Fibre Channel Initiator Groups
1. Open an elevated Windows PowerShell window as a local or domain administrator.
2. Type import-module dataontap at the prompt and press Enter. Make sure that you have the most
recent version of the NetApp PowerShell Toolkit installed in the
C:\Windows\System32\WindowsPowerShell\v1.0\Modules directory.
3. Type Connect-NaController <IP Address of Controller> –cred root and press Enter. You will be
prompted to enter the password for root. Enter it and press Enter.
4. Once connected to the controller, at the prompt, type New-NaIgroup <igroup name> fcp windows and
press Enter. This will create a new initiator group on your controller called <igroup name>.
5. Now, at the prompt, type Add-NaIgroupInitiator <igroup name> <Fabric A WWPN> and press Enter.
6. Type Add-NaIgroupInitiator <igroup name> <Fabric B WWPN> and press Enter. Now the <igroup
name> igroup will have both Fabric A and Fabric B WWPNs assigned to it.
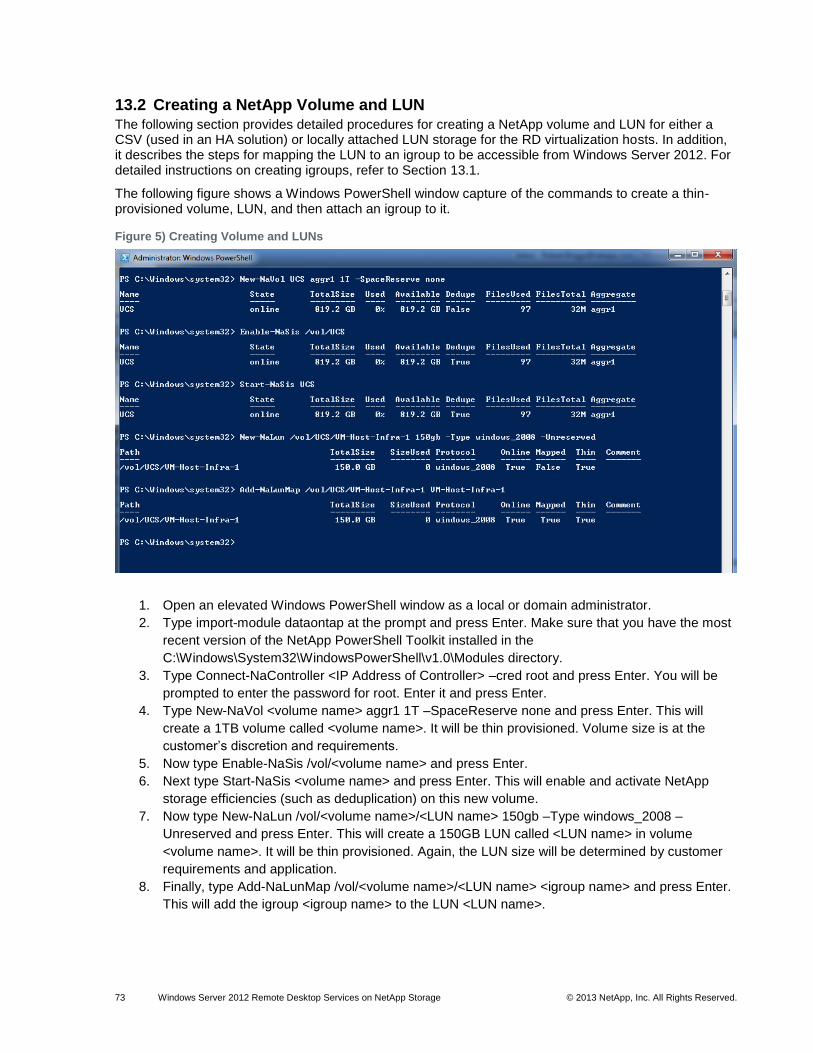
73 Windows Server 2012 Remote Desktop Services on NetApp Storage © 2013 NetApp, Inc. All Rights Reserved.
13.2 Creating a NetApp Volume and LUN The following section provides detailed procedures for creating a NetApp volume and LUN for either a CSV (used in an HA solution) or locally attached LUN storage for the RD virtualization hosts. In addition, it describes the steps for mapping the LUN to an igroup to be accessible from Windows Server 2012. For detailed instructions on creating igroups, refer to Section 13.1.
The following figure shows a Windows PowerShell window capture of the commands to create a thin-provisioned volume, LUN, and then attach an igroup to it.
Figure 5) Creating Volume and LUNs
1. Open an elevated Windows PowerShell window as a local or domain administrator.
2. Type import-module dataontap at the prompt and press Enter. Make sure that you have the most
recent version of the NetApp PowerShell Toolkit installed in the
C:\Windows\System32\WindowsPowerShell\v1.0\Modules directory.
3. Type Connect-NaController <IP Address of Controller> –cred root and press Enter. You will be
prompted to enter the password for root. Enter it and press Enter.
4. Type New-NaVol <volume name> aggr1 1T –SpaceReserve none and press Enter. This will
create a 1TB volume called <volume name>. It will be thin provisioned. Volume size is at the
customer’s discretion and requirements.
5. Now type Enable-NaSis /vol/<volume name> and press Enter.
6. Next type Start-NaSis <volume name> and press Enter. This will enable and activate NetApp
storage efficiencies (such as deduplication) on this new volume.
7. Now type New-NaLun /vol/<volume name>/<LUN name> 150gb –Type windows_2008 –
Unreserved and press Enter. This will create a 150GB LUN called <LUN name> in volume
<volume name>. It will be thin provisioned. Again, the LUN size will be determined by customer
requirements and application.
8. Finally, type Add-NaLunMap /vol/<volume name>/<LUN name> <igroup name> and press Enter.
This will add the igroup <igroup name> to the LUN <LUN name>.

74 Windows Server 2012 Remote Desktop Services on NetApp Storage © 2013 NetApp, Inc. All Rights Reserved.
The LUN will now be presented to the physical machine with the Fibre Channel WWPN associated with
the igroup you mapped to this LUN. Return to your server and refresh disk manager.

75 Windows Server 2012 Remote Desktop Services on NetApp Storage © 2013 NetApp, Inc. All Rights Reserved.
Appendix
GPU Requirements for RemoteFX in Windows Server 2012
When RemoteFX v1 released in Windows 7 SP1 early in 2011, Microsoft introduced a set of technologies
for a rich PC-like experience for VDI. It was the first place where Microsoft emphasized/introduced host-
side remoting, a render-capture-encode pipeline, a highly efficient GPU-based encode, throttling based
on client activity, and a DirectX-enabled virtual GPU. All these ideas proliferate more in Windows 8 and
Windows Server 2012 and provide a basis for future innovations.
As users get started, there are some key requirements to share. For example, in WS08 R2 SP1, a SLAT-
enabled CPU is required. For Windows Server 2012, a WDDM 1.2 DX11 GPU is also required to be in the
host. The best recommendation is to use a GPU listed in the SP1 AQ (Additional Qualification, Logo)
program for RemoteFX. From the set of AQ GPUs supported in v1, select from those that support
DirectX11.
Note: Check the GPU card manufacturer’s Web site to see if a Windows Server 2012 driver is available to download for your GPU card.
The following guides provide assistance with the steps to enable RemoteFX:
Checklist: RemoteFX Installation Prerequisites
Understand and Troubleshoot Remote Desktop Services Desktop Virtualization in Windows Server “8”
Beta
General Server 2012 Installation Steps Windows
This section provides general procedures for the installation of the Windows Server 2012 OS. These
general installation procedures can be used to build servers and clients. However, the customer might
have specific configuration requirements for deployment of Windows Server and client operating systems
in a production environment (for example, security settings, GPOs, and so on).
This section outlines the general steps toward installing Windows Server 2012 data center for systems
involved in the RDS environment.
Perform the following steps on the Windows Server 2012 computers applicable to this scenario.
Make sure that the physical server or VM is provisioned with sufficient hardware resources: at a minimum, 2GB of RAM, a single hard drive, and one network Interface.
The server might need to be joined to the correct organizational unit in Active Directory so that it receives appropriate group policy and delegated administration. The computer account for the server can be precreated in Active Directory within the correct OU, or it can be moved postjoin; both activities will require an Active Directory administrator’s cooperation.

76 Windows Server 2012 Remote Desktop Services on NetApp Storage © 2013 NetApp, Inc. All Rights Reserved.
1. Within the server or VM, boot from the
Windows Server 2012 ISO DVD.
2. Configure the language, time zone, and
keyboard details.
3. Click Install now.
4. Select the version of Windows Server 2012 to
install. Server Core is the default, but you
should install the full GUI version during the
RDP engagements.

77 Windows Server 2012 Remote Desktop Services on NetApp Storage © 2013 NetApp, Inc. All Rights Reserved.
5. Accept the license terms and click Next.
6. Select a Custom Install to install the server
without retaining any settings that might be
present already.
7. Select the drive on which to install Windows
Server 2012.
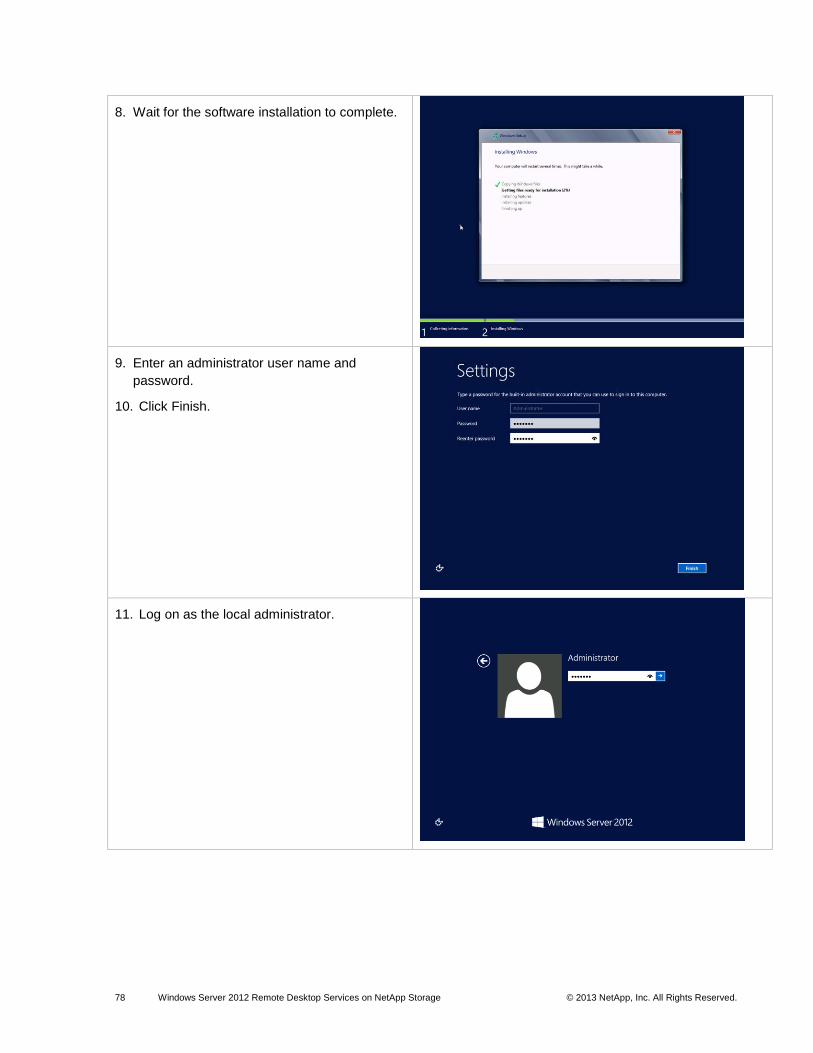
78 Windows Server 2012 Remote Desktop Services on NetApp Storage © 2013 NetApp, Inc. All Rights Reserved.
8. Wait for the software installation to complete.
9. Enter an administrator user name and
password.
10. Click Finish.
11. Log on as the local administrator.
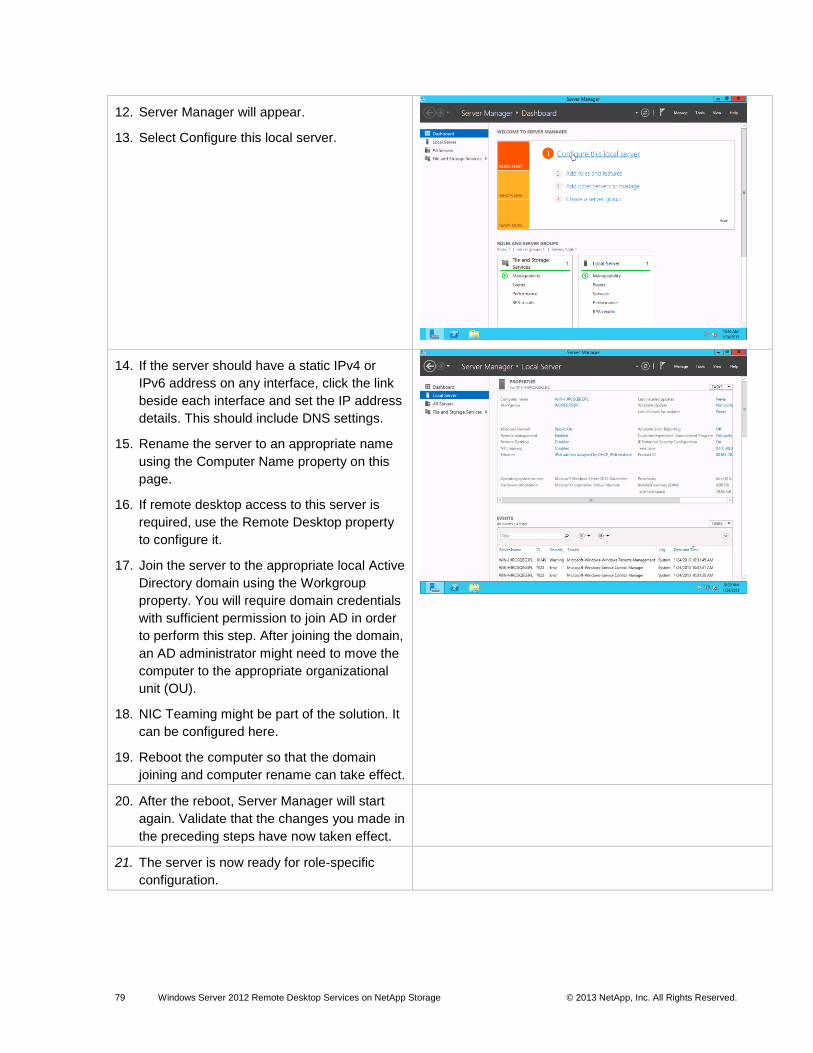
79 Windows Server 2012 Remote Desktop Services on NetApp Storage © 2013 NetApp, Inc. All Rights Reserved.
12. Server Manager will appear.
13. Select Configure this local server.
14. If the server should have a static IPv4 or
IPv6 address on any interface, click the link
beside each interface and set the IP address
details. This should include DNS settings.
15. Rename the server to an appropriate name
using the Computer Name property on this
page.
16. If remote desktop access to this server is
required, use the Remote Desktop property
to configure it.
17. Join the server to the appropriate local Active
Directory domain using the Workgroup
property. You will require domain credentials
with sufficient permission to join AD in order
to perform this step. After joining the domain,
an AD administrator might need to move the
computer to the appropriate organizational
unit (OU).
18. NIC Teaming might be part of the solution. It
can be configured here.
19. Reboot the computer so that the domain
joining and computer rename can take effect.
20. After the reboot, Server Manager will start
again. Validate that the changes you made in
the preceding steps have now taken effect.
21. The server is now ready for role-specific
configuration.
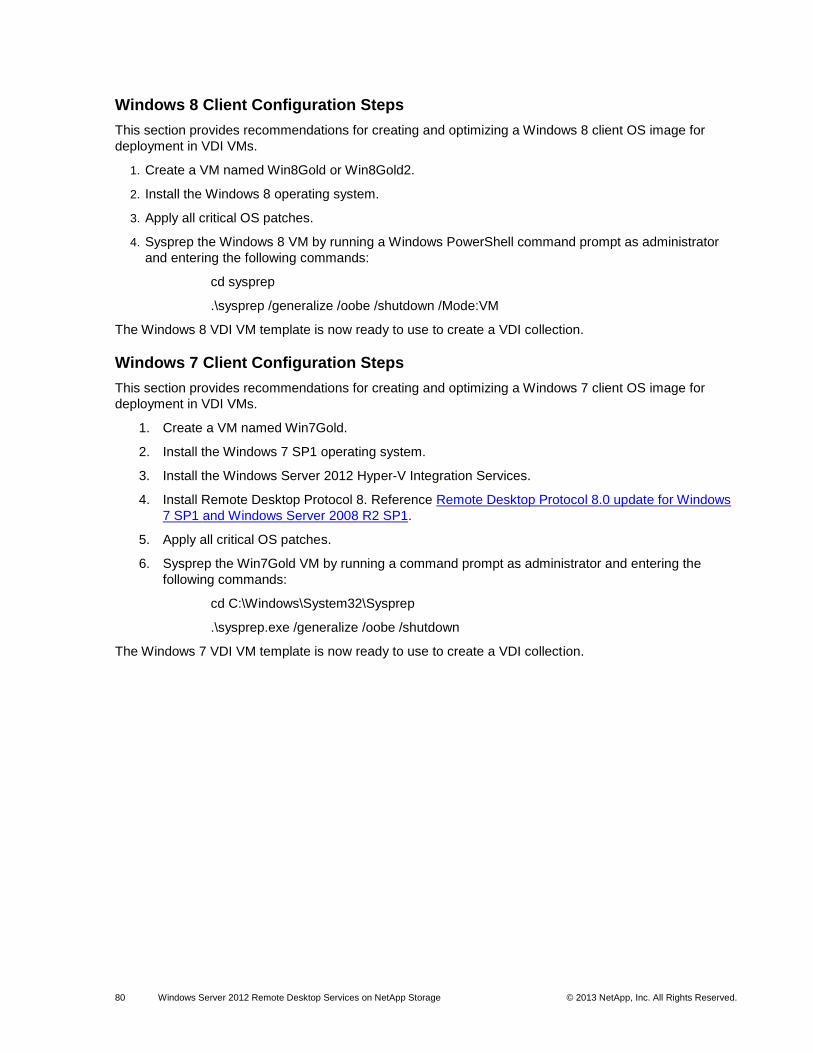
80 Windows Server 2012 Remote Desktop Services on NetApp Storage © 2013 NetApp, Inc. All Rights Reserved.
Windows 8 Client Configuration Steps
This section provides recommendations for creating and optimizing a Windows 8 client OS image for
deployment in VDI VMs.
1. Create a VM named Win8Gold or Win8Gold2.
2. Install the Windows 8 operating system.
3. Apply all critical OS patches.
4. Sysprep the Windows 8 VM by running a Windows PowerShell command prompt as administrator
and entering the following commands:
cd sysprep
.\sysprep /generalize /oobe /shutdown /Mode:VM
The Windows 8 VDI VM template is now ready to use to create a VDI collection.
Windows 7 Client Configuration Steps
This section provides recommendations for creating and optimizing a Windows 7 client OS image for
deployment in VDI VMs.
1. Create a VM named Win7Gold.
2. Install the Windows 7 SP1 operating system.
3. Install the Windows Server 2012 Hyper-V Integration Services.
4. Install Remote Desktop Protocol 8. Reference Remote Desktop Protocol 8.0 update for Windows
7 SP1 and Windows Server 2008 R2 SP1.
5. Apply all critical OS patches.
6. Sysprep the Win7Gold VM by running a command prompt as administrator and entering the
following commands:
cd C:\Windows\System32\Sysprep
.\sysprep.exe /generalize /oobe /shutdown
The Windows 7 VDI VM template is now ready to use to create a VDI collection.

81 Windows Server 2012 Remote Desktop Services on NetApp Storage © 2013 NetApp, Inc. All Rights Reserved.
References
The following references were used in this TR: N/A at this time.
Version History
Version Date Document Version History
Version 1.0 March 2013 Initial Document Release
Version 1.1 June 2013 Minor update
NetApp provides no representations or warranties regarding the accuracy, reliability, or serviceability of any information or recommendations provided in this publication, or with respect to any results that may be obtained by the use of the information or observance of any recommendations provided herein. The information in this document is distributed AS IS, and the use of this information or the implementation of any recommendations or techniques herein is a customer’s responsibility and depends on the customer’s ability to evaluate and integrate them into the customer’s operational environment. This document and the information contained herein may be used solely in connection with the NetApp products discussed in this document.
© 2013 NetApp, Inc. All rights reserved. No portions of this document may be reproduced without prior written consent of NetApp, Inc. Specifications are subject to change without notice. NetApp, the NetApp logo, Go further, faster, xxx, and xxx are trademarks or registered trademarks of NetApp, Inc. in the United States and/or other countries. All other brands or products are trademarks or registered trademarks of their respective holders and should be treated as such. TR-4134i-0313
Refer to the Interoperability Matrix Tool (IMT) on the NetApp Support site to validate that the exact product and feature versions described in this document are supported for your specific environment. The NetApp IMT defines the product components and versions that can be used to construct configurations that are supported by NetApp. Specific results depend on each customer's installation in accordance with published specifications.