ilya efimov acoustic guitar strum
TRANSCRIPT

All Right Reserved © Ilya Efimov 2011
ILYA EFIMOV ACOUSTIC GUITAR
THE STRUM!User`s manual
ILY
A E
FIM
OV
Ac
OU
ST
Ic G
UIT
AR
ST
RU
M
About About
All Right Reserved © Ilya Efimov 2011
The Strum is a sample-based fully functional totally new formation module to
imitate guitar musical accompaniment. Using out library you will save a lot of time
and money as you will not need to hire a professional guitar player to record the
sound.
Out Strum will not impose any limitations on your creative work, is easy and
convenient in terms of use.
To add guitar accompaniment you will just need to choose the style and
press keys on the midi-keyboard. You can play simple and complicated chords in
any arrangement as convenient to you. The Strum will do everything itself.
The library does not know only easy chords; it’s familiar with a great variety of al-
ternating and added tones. Each of 33 chord variations that can be recognized
by out instrument has 4 positions. Altogether our library consists of 1584 TABs. If you
don’t like any of the TABs you can edit it or create one of your own. Any chord,
even the most complicated or fantastic can be created and saved for use inside
the library or on your HDD.
Our unique system – Round Robin for Chord is used in the library. It is a com-
plex system that helps to exclude an exact replica of a strum chord. The attack style,
Pick noise variation, velocity of each string and Strum time (the time between at-
tacks of each string during playing the chord) are also changed in a random way.
The Strum has many styles. Altogether you can use 320 sells for patterns, 240 of which
we made ready for your fast and easy access. You can easily edit any style of cre-
ate your own. The whole editing process is visualized and easily understandable
from the first introduction to our library. Styles, patterns and chords can be saved
inside the instrument or separately on your HDD.
For easy and fast switching between styles during working process you can
chose patterns for your arrangement and compile them into songs.
Apart from the listed above, in our library you can find a variety of interesting
options such as Reverb effects, Delay, EQ, Compressor and 20 presets to save you
personal settings of those effects;
Stereo Double track options that will give you an opportunity to imitate 2 gui-
tars playing, and other settings to adjust the sound and style according to your
taste.

ILY
A E
FIM
OV
Ac
OU
ST
Ic G
UIT
AR
ST
RU
M
FeaturesFeatures
All Right Reserved © Ilya Efimov 2011
3000 samples, 44,1 Hz \24 bit, stereo
14 velocity layers for each notes\17 frets on the each string with a
round-robin algorithm.
Chord recognition from a MIDI keyboard or sequencer
More than 30 techniques for chord strumming
Auto and Manual strumming
250 factory and 70 custom patterns for auto strumming
Pattern editing
Pattern and Chord Export\Import options
No limitations for chord tablature Editing
Double track options
Different FX and Noises
Sound effects: Reverb, EQ, Compressor, Delay, Stereo Width
♪
♪
♪
♪
♪
♪
♪
♪
♪
♪
♪
♪
You cannot use the “Libraries” tab to “Add Library” for this product. Only encod-ed and locked “Powered-By-Kontakt” libraries are loaded through the “Libraries” window.
In NI KONTAKT browser enter the folder in which you installed 'Ilya Efimov Acoustic Guitar' and load patch Ilya Efimov Acoustic Guitar Strum.nki.
If you use a typical size of the buffer preloading in Kontakt, this library will use 350 MB of RAM.
ILY
A E
FIM
OV
Ac
OU
ST
Ic G
UIT
AR
ST
RU
M
InstallationInstallation
All Right Reserved © Ilya Efimov 2011
The installation of Ilya Efimov Acoustic Guitar Strum is divided into two steps.
1. Unpack files downloaded files to any folder (for example you can create new folder 'Ilya Efimov Acoustic Guitar' on your HDD for data). (PC users should download UNRAR from http://www.win-rar.com/download.html. MAC users
should downloaded from http://www.unrarx.com/)
The library is protected by the watermark !!!
Each user receives a unique copy !
2. Unpack your unique files and put them in the same folder (e.g. "Ilya Efimov Acoustic Guitar")
ILY
A E
FIM
OV
Ac
OU
ST
Ic G
UIT
AR
ST
RU
M
All Right Reserved © Ilya Efimov 2011
Getting startedGetting started
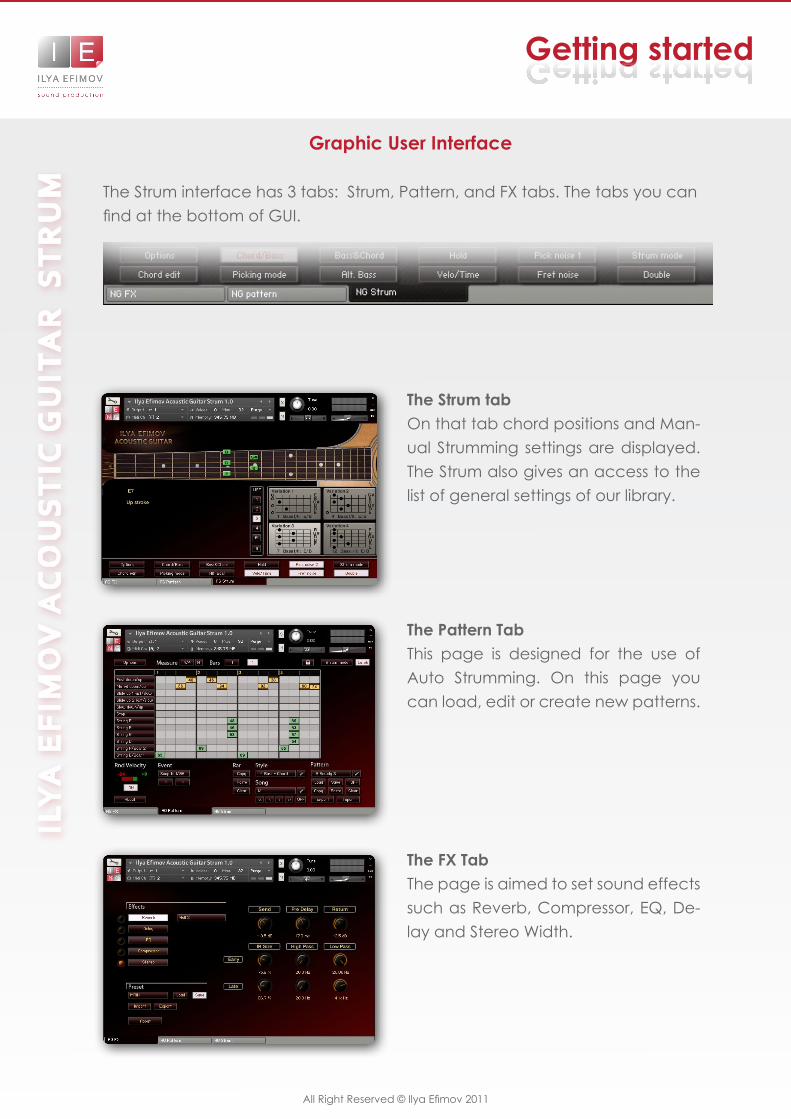
Graphic User Interface
The Strum interface has 3 tabs: Strum, Pattern, and FX tabs. The tabs you can find at the bottom of GUI.
The Strum tabOn that tab chord positions and Man-ual Strumming settings are displayed. The Strum also gives an access to the list of general settings of our library.
The Pattern TabThis page is designed for the use of Auto Strumming. On this page you can load, edit or create new patterns.
The FX TabThe page is aimed to set sound effects such as Reverb, Compressor, EQ, De-lay and Stereo Width.
ILY
A E
FIM
OV
Ac
OU
ST
Ic G
UIT
AR
ST
RU
M
All Right Reserved © Ilya Efimov 2011
Chord recognition
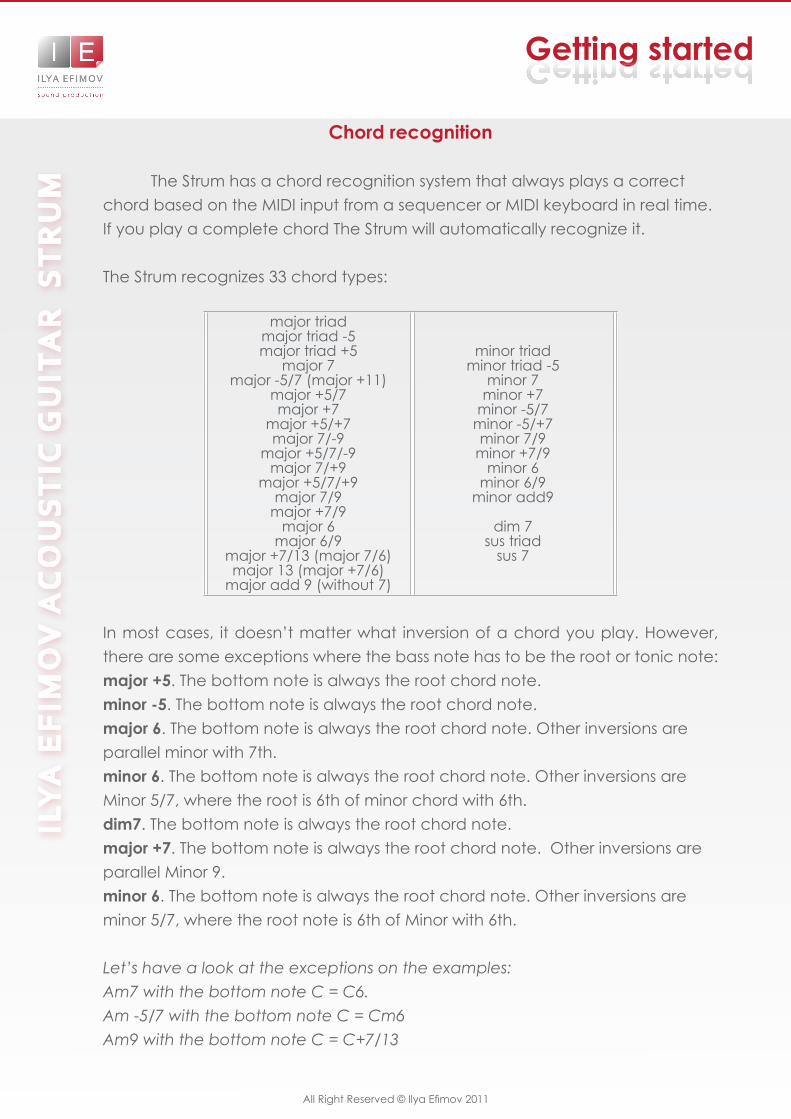
The Strum has a chord recognition system that always plays a correct chord based on the MIDI input from a sequencer or MIDI keyboard in real time. If you play a complete chord The Strum will automatically recognize it.
The Strum recognizes 33 chord types:
major triad major triad -5major triad +5
major 7major -5/7 (major +11)
major +5/7major +7
major +5/+7major 7/-9
major +5/7/-9major 7/+9
major +5/7/+9major 7/9
major +7/9major 6
major 6/9major +7/13 (major 7/6)major 13 (major +7/6)
major add 9 (without 7)
minor triadminor triad -5
minor 7minor +7
minor -5/7 minor -5/+7minor 7/9
minor +7/9minor 6
minor 6/9minor add9
dim 7sus triad
sus 7
In most cases, it doesn’t matter what inversion of a chord you play. However, there are some exceptions where the bass note has to be the root or tonic note: major +5. The bottom note is always the root chord note.minor -5. The bottom note is always the root chord note.major 6. The bottom note is always the root chord note. Other inversions are parallel minor with 7th.minor 6. The bottom note is always the root chord note. Other inversions are Minor 5/7, where the root is 6th of minor chord with 6th. dim7. The bottom note is always the root chord note. major +7. The bottom note is always the root chord note. Other inversions are parallel Minor 9.minor 6. The bottom note is always the root chord note. Other inversions are minor 5/7, where the root note is 6th of Minor with 6th.
Let’s have a look at the exceptions on the examples: Am7 with the bottom note C = C6.Am -5/7 with the bottom note C = Cm6Am9 with the bottom note C = C+7/13
Getting startedGetting started
ILY
A E
FIM
OV
Ac
OU
ST
Ic G
UIT
AR
ST
RU
M
All Right Reserved © Ilya Efimov 2011
Getting startedGetting started
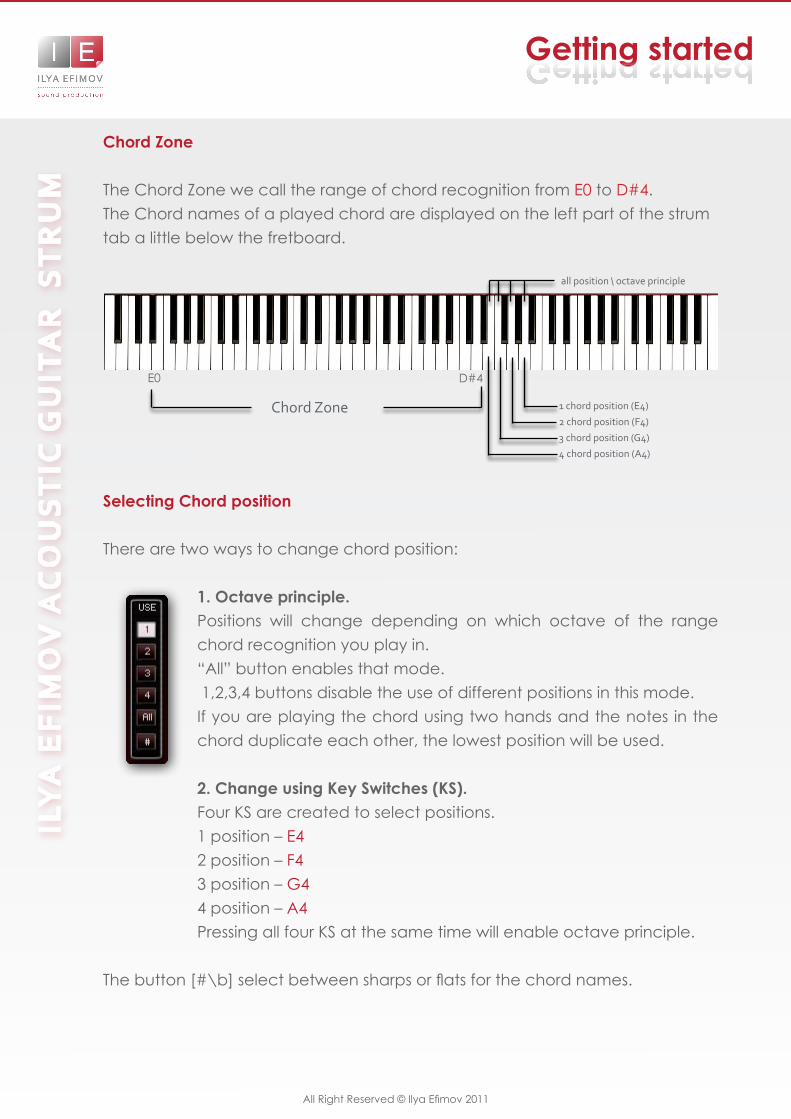
Chord Zone
The Chord Zone we call the range of chord recognition from E0 to D#4. The Chord names of a played chord are displayed on the left part of the strum tab a little below the fretboard.
Selecting Chord position
There are two ways to change chord position:
1. Octave principle. Positions will change depending on which octave of the range chord recognition you play in. “All” button enables that mode. 1,2,3,4 buttons disable the use of different positions in this mode. If you are playing the chord using two hands and the notes in the chord duplicate each other, the lowest position will be used.
2. Change using Key Switches (KS). Four KS are created to select positions. 1 position – E42 position – F43 position – G44 position – A4Pressing all four KS at the same time will enable octave principle.
The button [#\b] select between sharps or flats for the chord names.
E0
chord Zone
D#4
1 chord position (E4)
2 chord position (F4)
3 chord position (G4)
4 chord position (A4)
all position \ octave principle
ILY
A E
FIM
OV
Ac
OU
ST
Ic G
UIT
AR
ST
RU
M
All Right Reserved © Ilya Efimov 2011
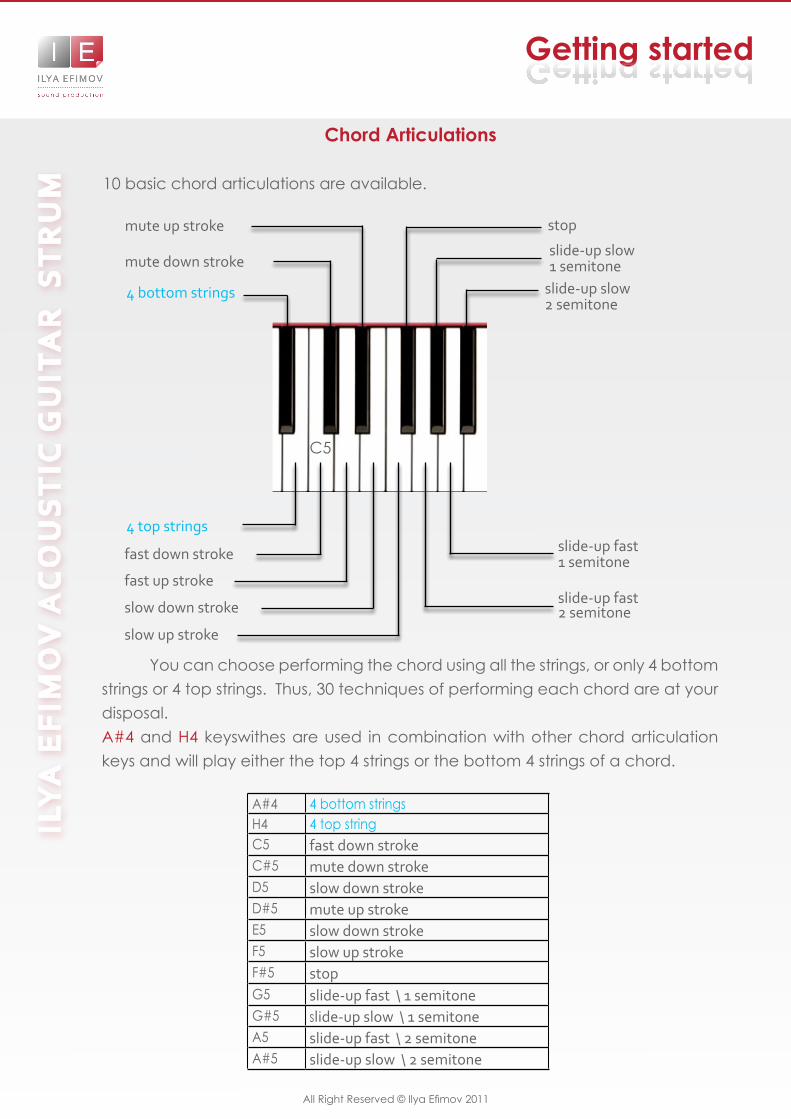
You can choose performing the chord using all the strings, or only 4 bottom strings or 4 top strings. Thus, 30 techniques of performing each chord are at your disposal. A#4 and H4 keyswithes are used in combination with other chord articulation keys and will play either the top 4 strings or the bottom 4 strings of a chord.
Chord Articulations
10 basic chord articulations are available.
Getting startedGetting started
A#4 4 bottom stringsH4 4 top stringC5 fast down strokeC#5 mute down strokeD5 slow down strokeD#5 mute up strokeE5 slow down strokeF5 slow up strokeF#5 stopG5 slide-up fast \ 1 semitoneG#5 slide-up slow \ 1 semitoneA5 slide-up fast \ 2 semitoneA#5 slide-up slow \ 2 semitone
mute up stroke
mute down stroke
slide-up fast 1 semitone
slide-up fast 2 semitone
fast down stroke
4 bottom strings
4 top strings
slow down stroke
slow up stroke
fast up stroke
slide-up slow 2 semitone
slide-up slow 1 semitone
stop
C5

ILY
A E
FIM
OV
Ac
OU
ST
Ic G
UIT
AR
ST
RU
M
All Right Reserved © Ilya Efimov 2011
Strum mode. Manual strumming
Go to Strum tab. The image of the guitar fret board occupies the main part of the interface. While playing the chord each of them is shown on the fret board with color markers. On the left side of the Strum Tab chord name and stroke types are displayed.
On the right side of GUI you will see 4 tablatures. Those 4 pictures display 4 possible positions of the taken chord. The mode used is shown on the highlighted picture.Using Patter Mode\ Strum Mode button you can switch into a Manual Strumming Mode.
Manual strummingManual strumming
You can imitate guitar accompaniment in two ways: in the manual and automatic modes. In the automatic mode [Pattern mode] choose only the pattern to hear the required accompaniment while pressing chords. In this case only the chords are recorded into the sequencer, like into Pad. In the manual mode [Strum mode] you can play and record the guitar ac-companiment manually into your sequencer, changing chords and using chord articulations. Round-Robin Chord System is used in our library, which guarantees that the sound of each chord will be different from the previous one that will help to avoid mechanical repetition.
ILY
A E
FIM
OV
Ac
OU
ST
Ic G
UIT
AR
ST
RU
M
All Right Reserved © Ilya Efimov 2011
Manual strummingManual strumming
When Strum Mode is activated you can play chords in chord zone, differ-ent variants of chord articulations in articulation zone on the MIDI-keyboard.
You can toggle between up/down strokes within the chord zone when you play the chord notes legato.
Example: Play a C and E to trigger a C chord. Now hold the E key and retrigger the C key to play an up stroke. Now hold the C key and retrigger the E key to play a down stroke. As long as you play legato you can toggle between up and down strokes.
If a chord is played for the first time it will be a down stroke. If the chord is repeated it will be played as up stroke.
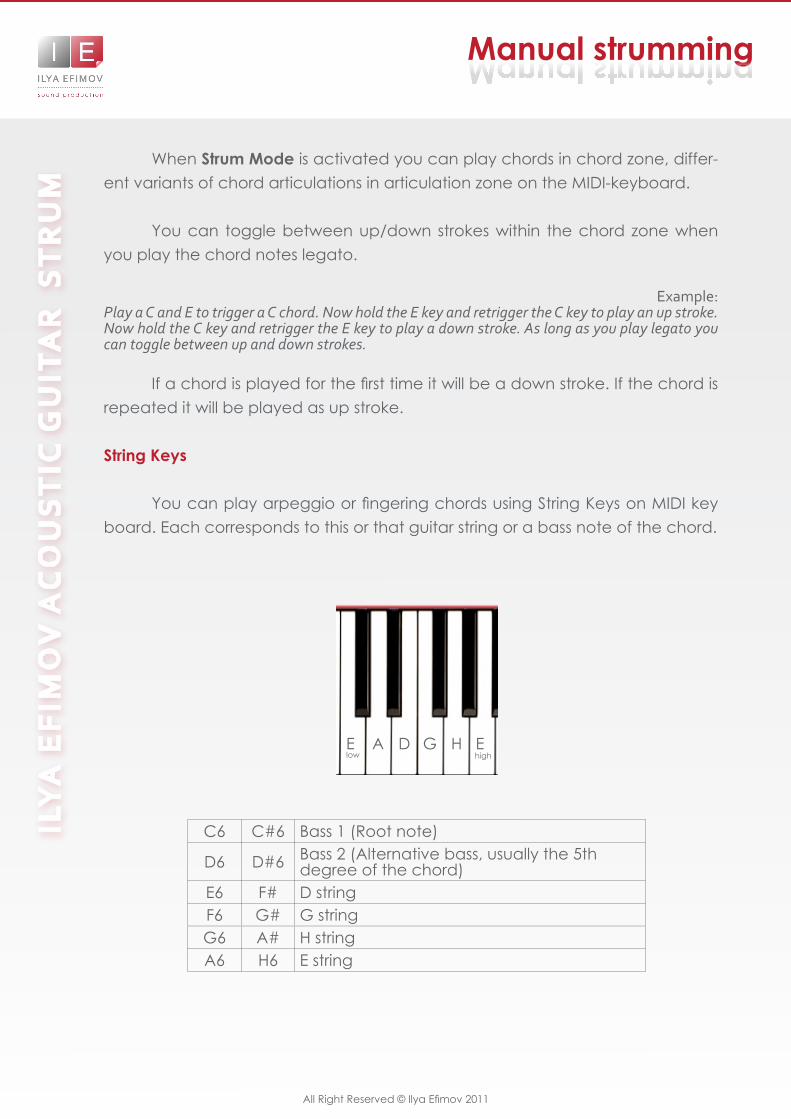
String Keys
You can play arpeggio or fingering chords using String Keys on MIDI key board. Each corresponds to this or that guitar string or a bass note of the chord.
Elow high
A D G H E
C6 C#6 Bass 1 (Root note)
D6 D#6 Bass 2 (Alternative bass, usually the 5th degree of the chord)
E6 F# D stringF6 G# G stringG6 A# H stringA6 H6 E string
ILY
A E
FIM
OV
Ac
OU
ST
Ic G
UIT
AR
ST
RU
M
All Right Reserved © Ilya Efimov 2011
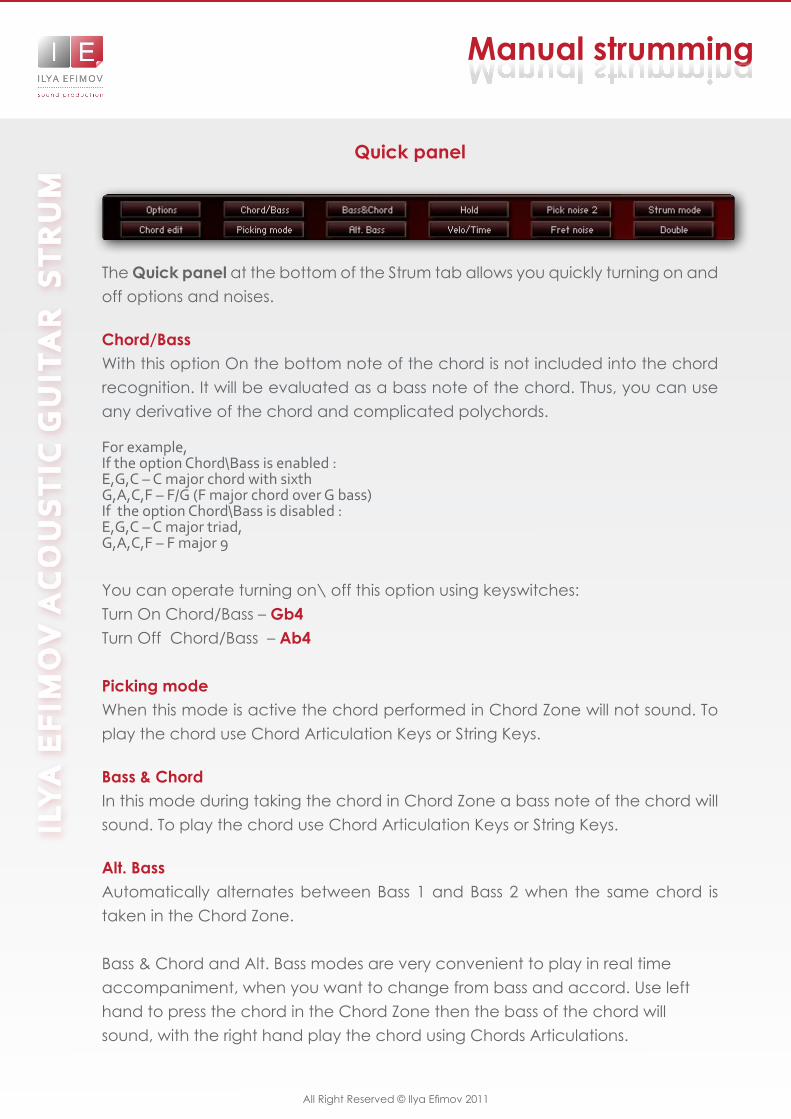
Quick panel
The Quick panel at the bottom of the Strum tab allows you quickly turning on and off options and noises.
Chord/BassWith this option On the bottom note of the chord is not included into the chord recognition. It will be evaluated as a bass note of the chord. Thus, you can use any derivative of the chord and complicated polychords.
For example, If the option chord\Bass is enabled : E,G,c – c major chord with sixth G,A,c,F – F/G (F major chord over G bass)If the option chord\Bass is disabled :E,G,c – c major triad,G,A,c,F – F major 9
You can operate turning on\ off this option using keyswitches:Turn On Chord/Bass – Gb4Turn Off Chord/Bass – Ab4
Picking modeWhen this mode is active the chord performed in Chord Zone will not sound. To play the chord use Chord Articulation Keys or String Keys.
Bass & ChordIn this mode during taking the chord in Chord Zone a bass note of the chord will sound. To play the chord use Chord Articulation Keys or String Keys.
Alt. BassAutomatically alternates between Bass 1 and Bass 2 when the same chord is taken in the Chord Zone.
Bass & Chord and Alt. Bass modes are very convenient to play in real time accompaniment, when you want to change from bass and accord. Use left hand to press the chord in the Chord Zone then the bass of the chord will sound, with the right hand play the chord using Chords Articulations.
Manual strummingManual strumming

ILY
A E
FIM
OV
Ac
OU
ST
Ic G
UIT
AR
ST
RU
M
All Right Reserved © Ilya Efimov 2011
Options page
Double track section
Setting the guitar sounding with the double-tracking recording technique mode.
Time knobThere is a knob to control the delay of the left channel.
OptionsOptions
HoldThis option sustains the chord when the hand is taken away from the key board. Actually substitutes the Sustain Pedal in Manual strum mode. Any chord change will not result in the note overlapping.
Velo/TimeActivates the speed dependency of the strum on velocityPick NoiseEnables\Disables the pick noise during strumming the chordStrum modeSwitches into a Manual Strum ModeDoubleEnables the guitar sounding with the double-tracking recording technique mode. Option pageOpens the page in the detailed settings of certain options.Edit chordEditing a chord and bass notes.
ILY
A E
FIM
OV
Ac
OU
ST
Ic G
UIT
AR
ST
RU
M
All Right Reserved © Ilya Efimov 2011
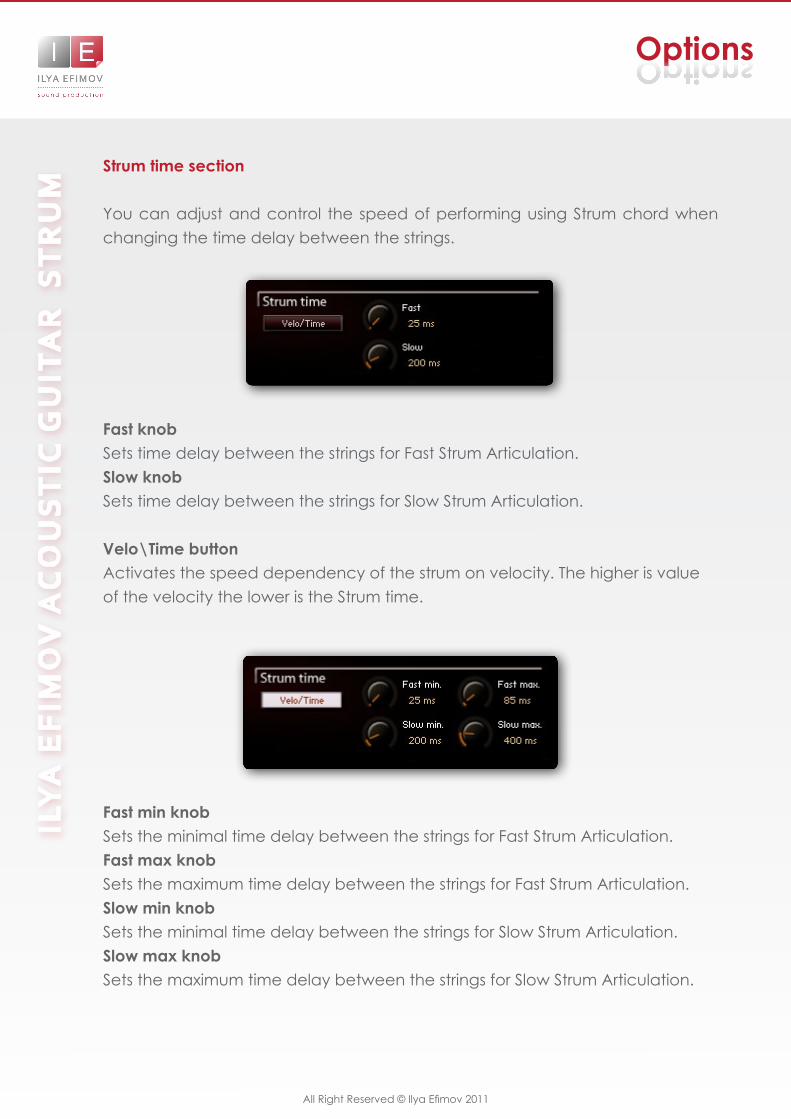
Strum time section
You can adjust and control the speed of performing using Strum chord when changing the time delay between the strings.
Fast knobSets time delay between the strings for Fast Strum Articulation. Slow knobSets time delay between the strings for Slow Strum Articulation.
Velo\Time buttonActivates the speed dependency of the strum on velocity. The higher is value of the velocity the lower is the Strum time.
Fast min knobSets the minimal time delay between the strings for Fast Strum Articulation. Fast max knobSets the maximum time delay between the strings for Fast Strum Articulation.Slow min knob Sets the minimal time delay between the strings for Slow Strum Articulation. Slow max knobSets the maximum time delay between the strings for Slow Strum Articulation.
OptionsOptions

ILY
A E
FIM
OV
Ac
OU
ST
Ic G
UIT
AR
ST
RU
M
All Right Reserved © Ilya Efimov 2011
Pick Noise
Enables\Disables the pick noise during strumming the chord.
Pick noise button enables this option.You can select one of two variations of the sound and set the volume. Pick 1/Pick 2 buttons switch between Pick noise 1 and Pick noise 2. The button name will correspond the selected FX.
Fret Noise
Scratching of the left hand fingers of the guitarists along strings. This FX come out when chord is changed. You can also control the volume of this noise and the frequency of its appearance with the help of controlling knobs.
Vol. knobScratching sound volumeFreq knobFrequency of random noises appearances
OptionsOptions
ILY
A E
FIM
OV
Ac
OU
ST
Ic G
UIT
AR
ST
RU
M
All Right Reserved © Ilya Efimov 2011
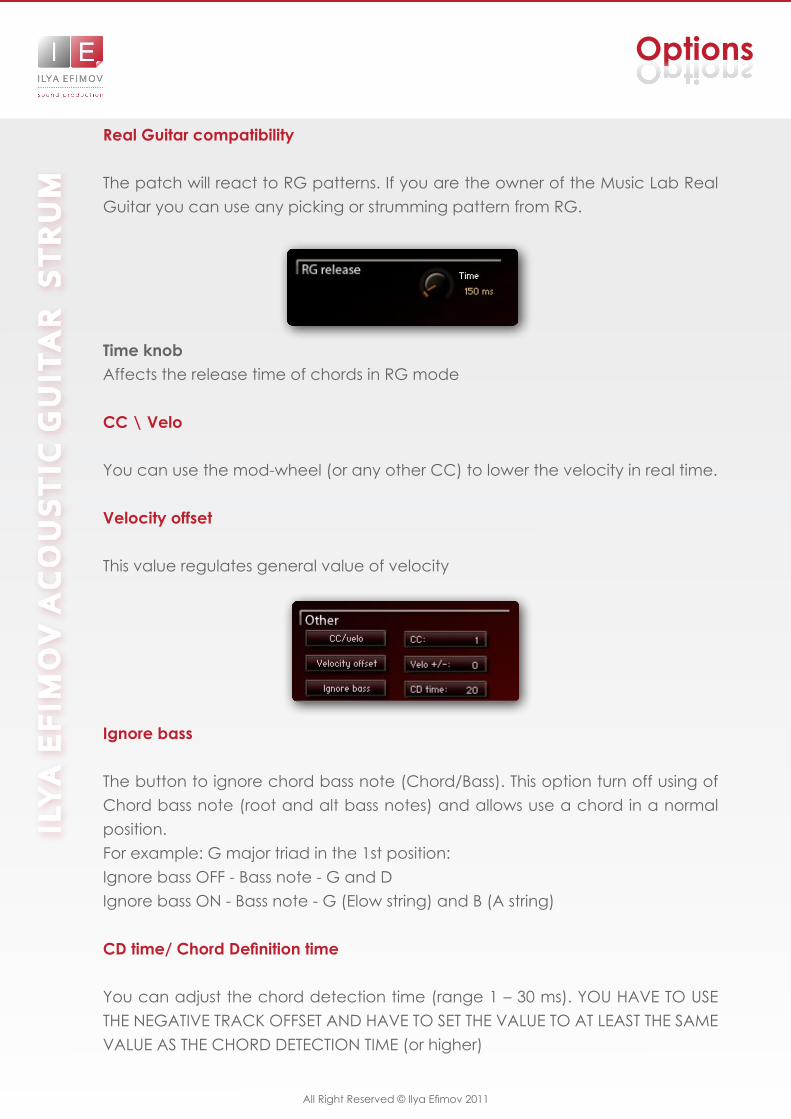
Real Guitar compatibility
The patch will react to RG patterns. If you are the owner of the Music Lab Real Guitar you can use any picking or strumming pattern from RG.
Time knob Affects the release time of chords in RG mode
CC \ Velo
You can use the mod-wheel (or any other CC) to lower the velocity in real time.
Velocity offset
This value regulates general value of velocity
Ignore bass
The button to ignore chord bass note (Chord/Bass). This option turn off using of Chord bass note (root and alt bass notes) and allows use a chord in a normal position.For example: G major triad in the 1st position: Ignore bass OFF - Bass note - G and DIgnore bass ON - Bass note - G (Elow string) and B (A string)
CD time/ Chord Definition time
You can adjust the chord detection time (range 1 – 30 ms). YOU HAVE TO USE THE NEGATIVE TRACK OFFSET AND HAVE TO SET THE VALUE TO AT LEAST THE SAME VALUE AS THE CHORD DETECTION TIME (or higher)
OptionsOptions

ILY
A E
FIM
OV
Ac
OU
ST
Ic G
UIT
AR
ST
RU
M
All Right Reserved © Ilya Efimov 2011
Pattern mode. Auto strumming
In this section we will examine fast usage functions for prepared patterns. A separate section of this manual is devoted separately to editing patterns.
To start using The Strum in the Pattern Mode you need: 1. Turn on the Pattern mode2. Select a pattern3. Press any chord on MIDI key board
Please, notice that you should play the chord 10-20 ms. prior for its correct sound-ing. If you want to make Quantize in your sequencer, you have to use the nega-tive track offset and have to set the value to at least the same value as the Chord Detection time (Option page)Pattern Mode\Strum Mode This button turns on the Pattern Mode. If Pattern Mode is enables the Strum will start as soon as you play a note or start the sequencer. Any speed changes in the sequencer will match to the speed change of the Strum accompaniment. The Strum will halt when you stop the se-quencer. You can stop playing the pattern with MIDI-keyboard keyswitch H -1.You can also switch between Pattern Mode and Strum Mode using the key C0.If velocity > 64 will turn the pattern mode ONIf velocity =< 64 will turn the strum mode ON
Pattern modePattern mode
ILY
A E
FIM
OV
Ac
OU
ST
Ic G
UIT
AR
ST
RU
M
All Right Reserved © Ilya Efimov 2011
Pattern modePattern mode
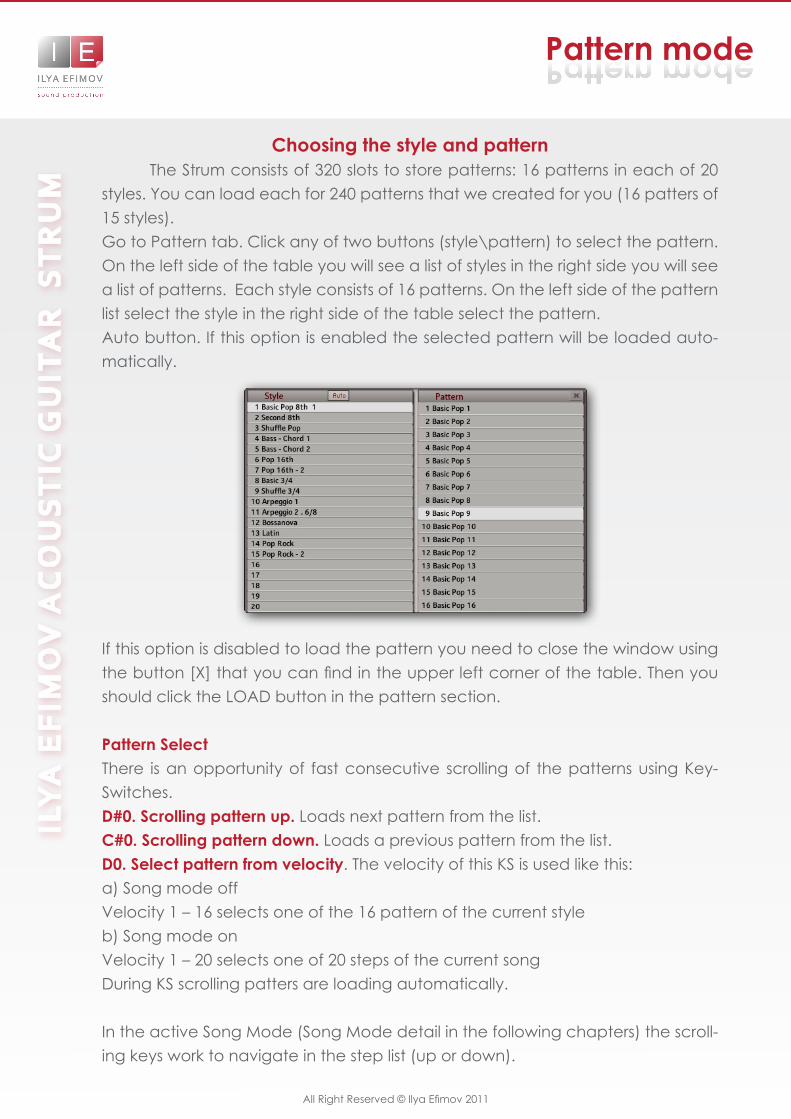
Choosing the style and pattern
The Strum consists of 320 slots to store patterns: 16 patterns in each of 20 styles. You can load each for 240 patterns that we created for you (16 patters of 15 styles).Go to Pattern tab. Click any of two buttons (style\pattern) to select the pattern.On the left side of the table you will see a list of styles in the right side you will see a list of patterns. Each style consists of 16 patterns. On the left side of the pattern list select the style in the right side of the table select the pattern. Auto button. If this option is enabled the selected pattern will be loaded auto-matically.
If this option is disabled to load the pattern you need to close the window using the button [X] that you can find in the upper left corner of the table. Then you should click the LOAD button in the pattern section.
Pattern SelectThere is an opportunity of fast consecutive scrolling of the patterns using Key-Switches. D#0. Scrolling pattern up. Loads next pattern from the list. C#0. Scrolling pattern down. Loads a previous pattern from the list. D0. Select pattern from velocity. The velocity of this KS is used like this:a) Song mode offVelocity 1 – 16 selects one of the 16 pattern of the current styleb) Song mode onVelocity 1 – 20 selects one of 20 steps of the current songDuring KS scrolling patters are loading automatically.
In the active Song Mode (Song Mode detail in the following chapters) the scroll-ing keys work to navigate in the step list (up or down).
ILY
A E
FIM
OV
Ac
OU
ST
Ic G
UIT
AR
ST
RU
M
LatchIf this option is active the pattern will continue playing the last chord even if you release all chord keys.
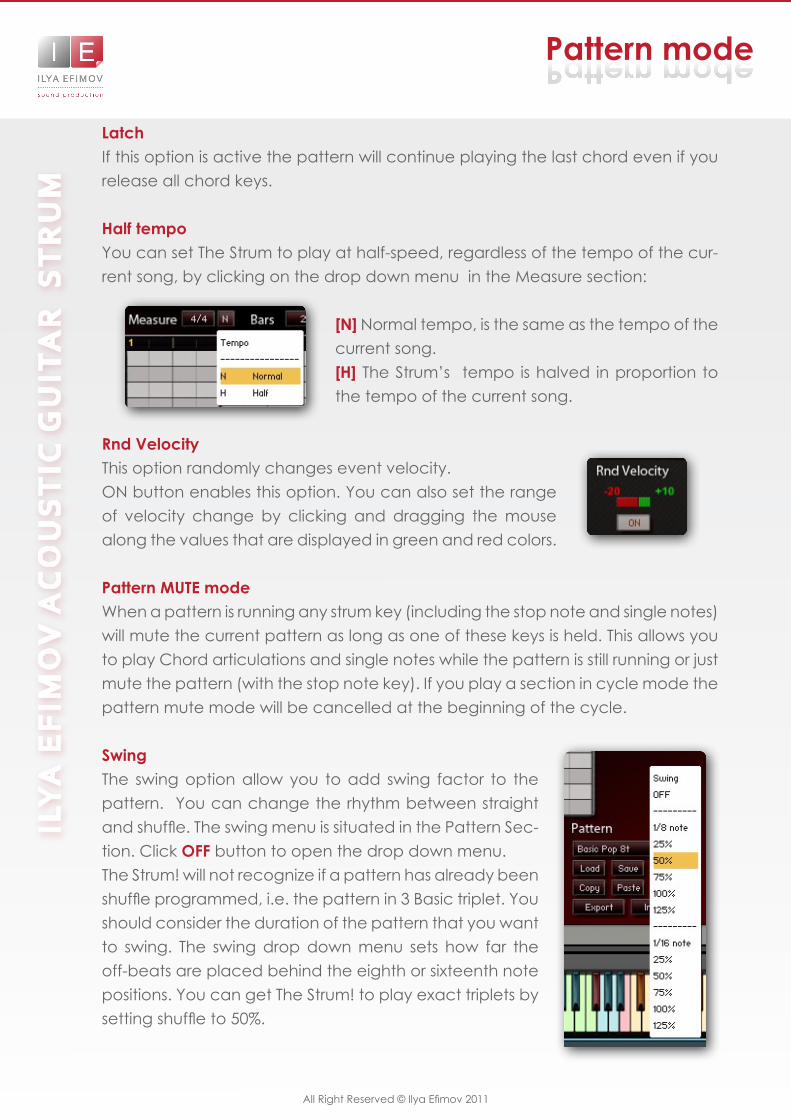
Half tempoYou can set The Strum to play at half-speed, regardless of the tempo of the cur-rent song, by clicking on the drop down menu in the Measure section:
[N] Normal tempo, is the same as the tempo of the current song.[H] The Strum’s tempo is halved in proportion to the tempo of the current song.
Rnd VelocityThis option randomly changes event velocity.ON button enables this option. You can also set the range of velocity change by clicking and dragging the mouse along the values that are displayed in green and red colors.
Pattern MUTE mode When a pattern is running any strum key (including the stop note and single notes) will mute the current pattern as long as one of these keys is held. This allows you to play Chord articulations and single notes while the pattern is still running or just mute the pattern (with the stop note key). If you play a section in cycle mode the pattern mute mode will be cancelled at the beginning of the cycle.
SwingThe swing option allow you to add swing factor to the pattern. You can change the rhythm between straight and shuffle. The swing menu is situated in the Pattern Sec-tion. Click OFF button to open the drop down menu. The Strum! will not recognize if a pattern has already been shuffle programmed, i.e. the pattern in 3 Basic triplet. You should consider the duration of the pattern that you want to swing. The swing drop down menu sets how far the off-beats are placed behind the eighth or sixteenth note positions. You can get The Strum! to play exact triplets by setting shuffle to 50%.
Pattern modePattern mode
All Right Reserved © Ilya Efimov 2011
ILY
A E
FIM
OV
Ac
OU
ST
Ic G
UIT
AR
ST
RU
M
All Right Reserved © Ilya Efimov 2011
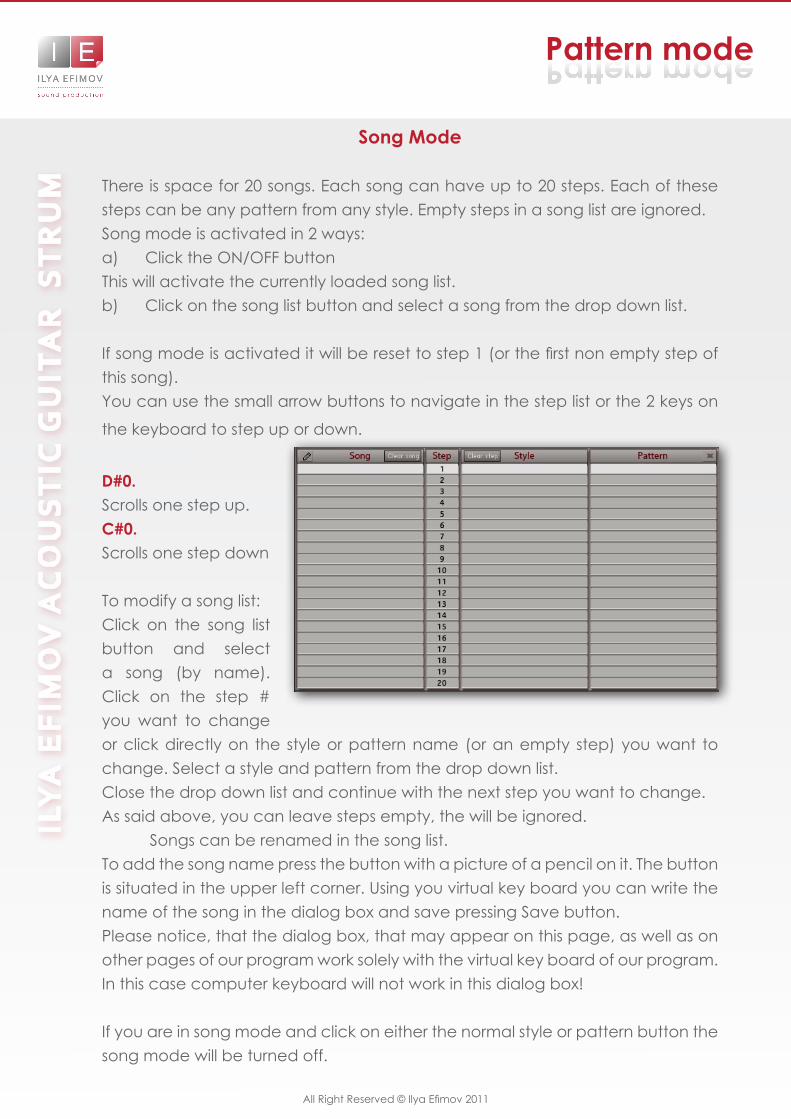
Song Mode
There is space for 20 songs. Each song can have up to 20 steps. Each of these steps can be any pattern from any style. Empty steps in a song list are ignored.Song mode is activated in 2 ways:a) Click the ON/OFF buttonThis will activate the currently loaded song list.b) Click on the song list button and select a song from the drop down list.
If song mode is activated it will be reset to step 1 (or the first non empty step of this song).You can use the small arrow buttons to navigate in the step list or the 2 keys on
the keyboard to step up or down.
D#0. Scrolls one step up.C#0. Scrolls one step down
To modify a song list:Click on the song list button and select a song (by name). Click on the step # you want to change or click directly on the style or pattern name (or an empty step) you want to change. Select a style and pattern from the drop down list.Close the drop down list and continue with the next step you want to change.As said above, you can leave steps empty, the will be ignored. Songs can be renamed in the song list.To add the song name press the button with a picture of a pencil on it. The button is situated in the upper left corner. Using you virtual key board you can write the name of the song in the dialog box and save pressing Save button. Please notice, that the dialog box, that may appear on this page, as well as on other pages of our program work solely with the virtual key board of our program. In this case computer keyboard will not work in this dialog box!
If you are in song mode and click on either the normal style or pattern button the song mode will be turned off.
Pattern modePattern mode
ILY
A E
FIM
OV
Ac
OU
ST
Ic G
UIT
AR
ST
RU
M
All Right Reserved © Ilya Efimov 2011
Pattern editing
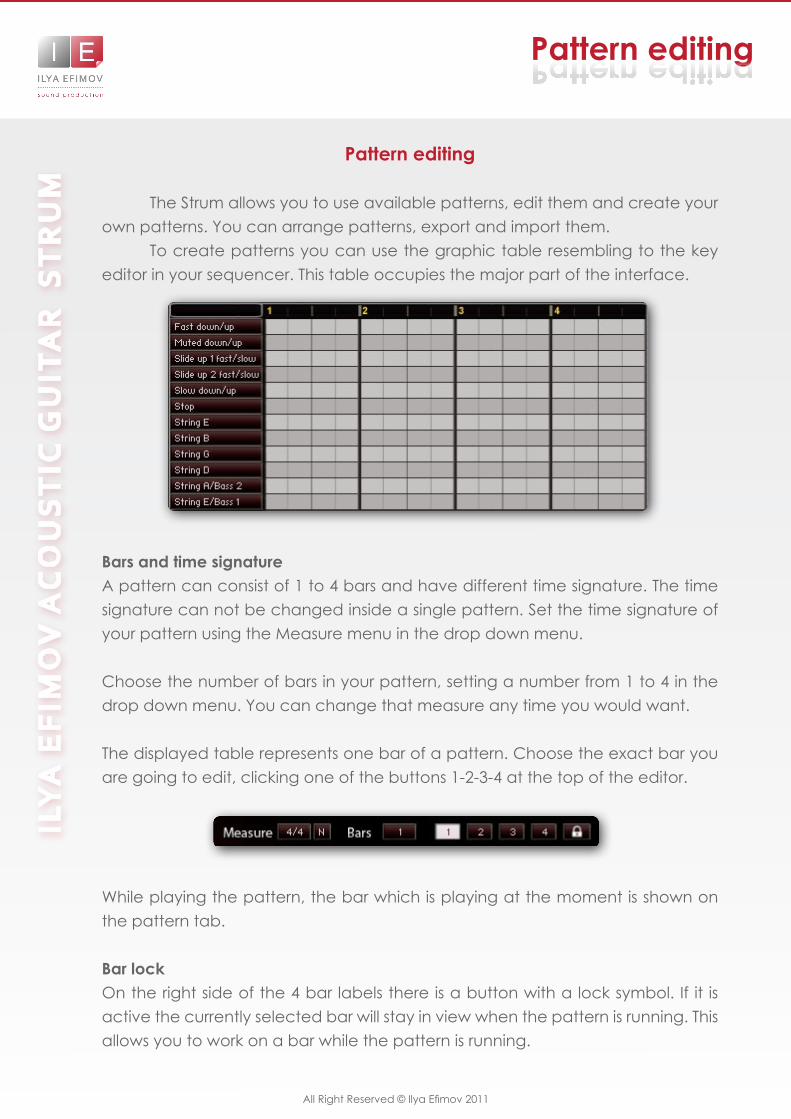
The Strum allows you to use available patterns, edit them and create your own patterns. You can arrange patterns, export and import them. To create patterns you can use the graphic table resembling to the key editor in your sequencer. This table occupies the major part of the interface.
Bars and time signatureA pattern can consist of 1 to 4 bars and have different time signature. The time signature can not be changed inside a single pattern. Set the time signature of your pattern using the Measure menu in the drop down menu.
Choose the number of bars in your pattern, setting a number from 1 to 4 in the drop down menu. You can change that measure any time you would want.
The displayed table represents one bar of a pattern. Choose the exact bar you are going to edit, clicking one of the buttons 1-2-3-4 at the top of the editor.
While playing the pattern, the bar which is playing at the moment is shown on the pattern tab.
Bar lockOn the right side of the 4 bar labels there is a button with a lock symbol. If it is active the currently selected bar will stay in view when the pattern is running. This allows you to work on a bar while the pattern is running.
Pattern editingPattern editing
ILY
A E
FIM
OV
Ac
OU
ST
Ic G
UIT
AR
ST
RU
M
All Right Reserved © Ilya Efimov 2011
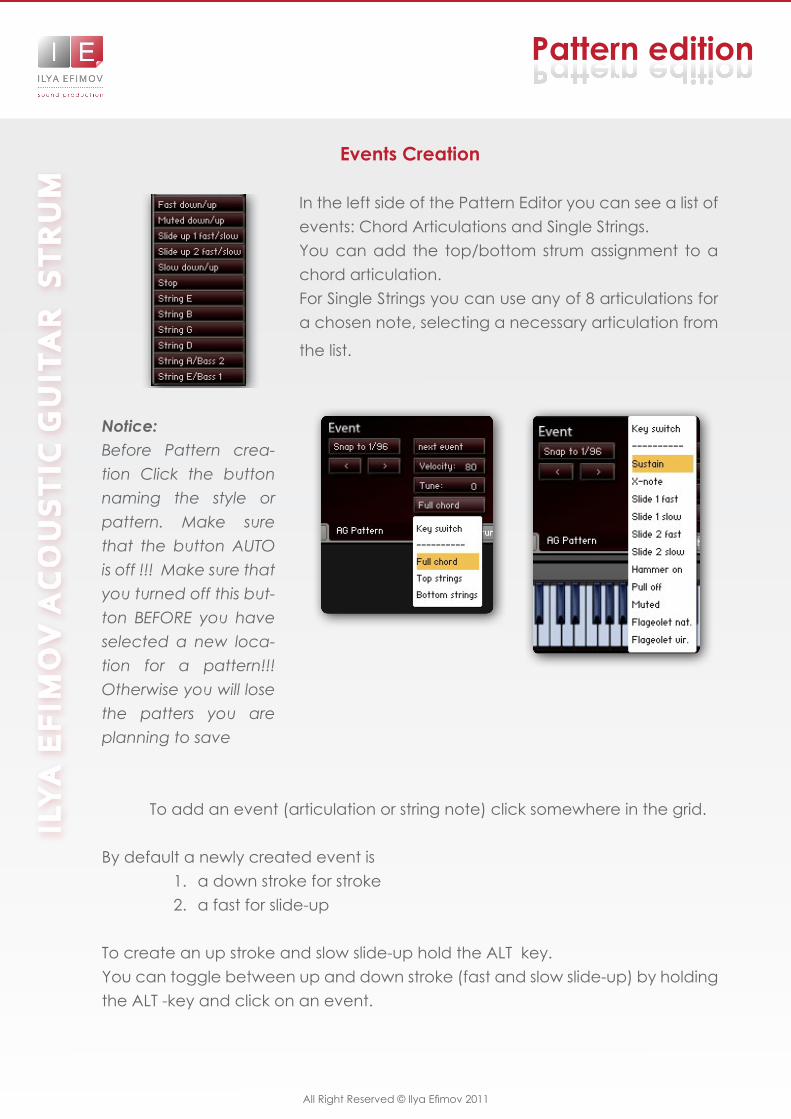
Events Creation
In the left side of the Pattern Editor you can see a list of events: Chord Articulations and Single Strings.You can add the top/bottom strum assignment to a chord articulation. For Single Strings you can use any of 8 articulations for a chosen note, selecting a necessary articulation from
the list.
Notice:Before Pattern crea-tion Click the button naming the style or pattern. Make sure that the button AUTO is off !!! Make sure that you turned off this but-ton BEFORE you have selected a new loca-tion for a pattern!!! Otherwise you will lose the patters you are planning to save
To add an event (articulation or string note) click somewhere in the grid.
By default a newly created event is 1. a down stroke for stroke2. a fast for slide-up
To create an up stroke and slow slide-up hold the ALT key. You can toggle between up and down stroke (fast and slow slide-up) by holding the ALT -key and click on an event.
Pattern editionPattern edition
ILY
A E
FIM
OV
Ac
OU
ST
Ic G
UIT
AR
ST
RU
M
All Right Reserved © Ilya Efimov 2011
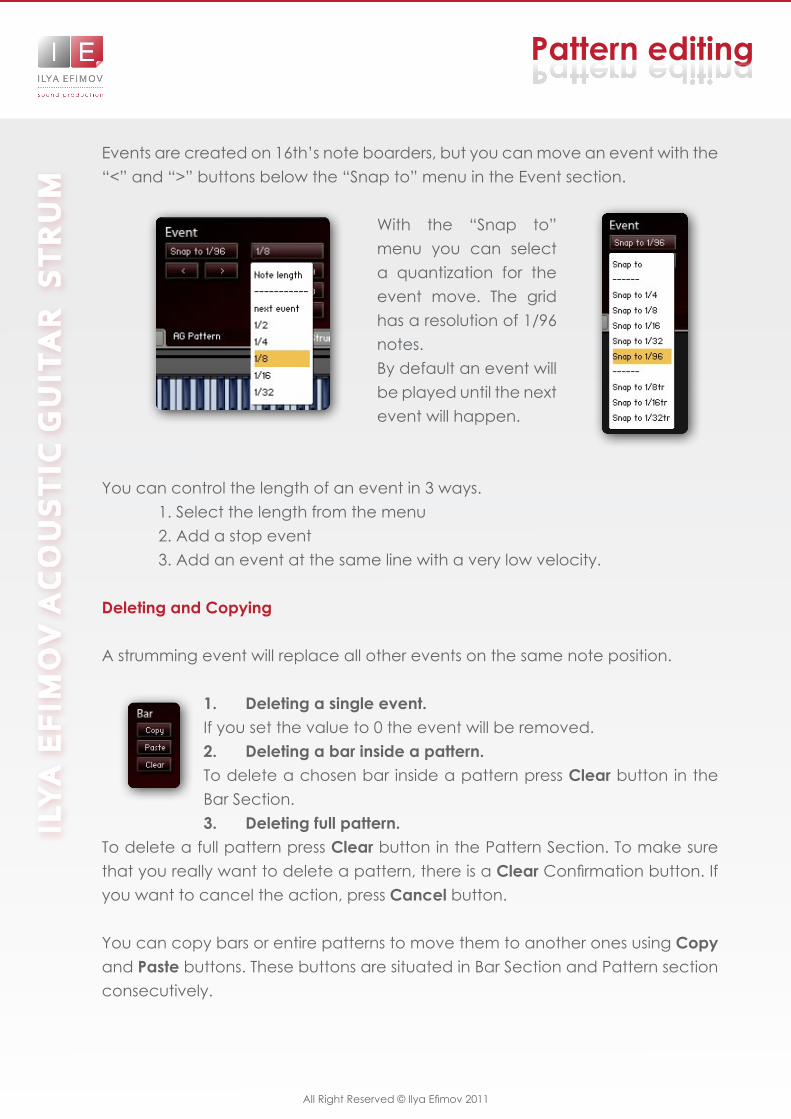
Events are created on 16th’s note boarders, but you can move an event with the “<” and “>” buttons below the “Snap to” menu in the Event section.
With the “Snap to” menu you can select a quantization for the event move. The grid has a resolution of 1/96 notes. By default an event will be played until the next event will happen.
You can control the length of an event in 3 ways.1. Select the length from the menu2. Add a stop event3. Add an event at the same line with a very low velocity.
Deleting and Copying
A strumming event will replace all other events on the same note position.
1. Deleting a single event. If you set the value to 0 the event will be removed.2. Deleting a bar inside a pattern.To delete a chosen bar inside a pattern press Clear button in the Bar Section. 3. Deleting full pattern.
To delete a full pattern press Clear button in the Pattern Section. To make sure that you really want to delete a pattern, there is a Clear Confirmation button. If you want to cancel the action, press Cancel button.
You can copy bars or entire patterns to move them to another ones using Copy and Paste buttons. These buttons are situated in Bar Section and Pattern section consecutively.
Pattern editingPattern editing
ILY
A E
FIM
OV
Ac
OU
ST
Ic G
UIT
AR
ST
RU
M
All Right Reserved © Ilya Efimov 2011
Pattern Saving
Click the button naming the style or pattern. Make sure that the button AUTO is OFF !!! Make sure that you turned off this button BEFORE you have selected a new location for a pattern! Otherwise you will lose the patters you are planning to save.
Choose an empty preset where you want to store your new pattern in the Style Column and an empty preset in a Pattern Column. Close the Pattern table. Click the Save button. If you are sure press the Save button again or press the button Cancel if you don’t want to save the pattern.
NoticeYou can save your pattern into any slot. None of the patters are protected from re-saving. To return to the default style you should import our styles that are available in the Data folder.
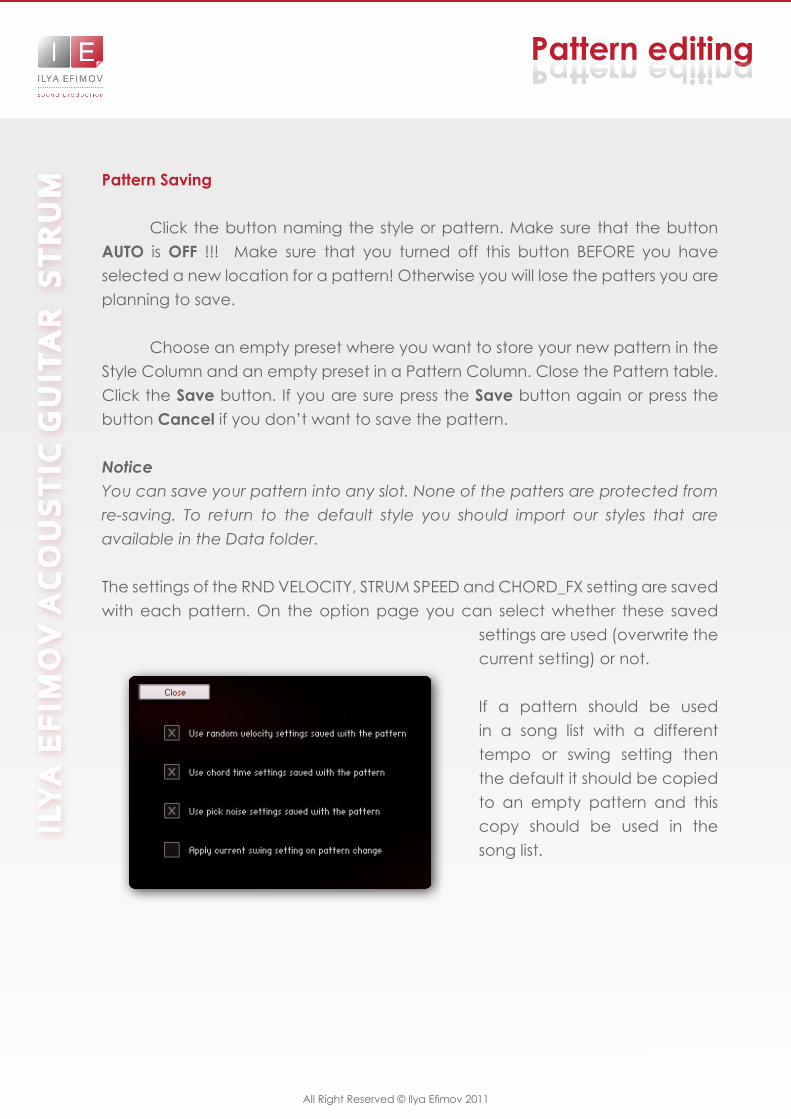
The settings of the RND VELOCITY, STRUM SPEED and CHORD_FX setting are saved with each pattern. On the option page you can select whether these saved
settings are used (overwrite the current setting) or not.
If a pattern should be used in a song list with a different tempo or swing setting then the default it should be copied to an empty pattern and this copy should be used in the song list.
Pattern editingPattern editing
ILY
A E
FIM
OV
Ac
OU
ST
Ic G
UIT
AR
ST
RU
M
All Right Reserved © Ilya Efimov 2011
Import - Export Styles
You can export and import a style, containing all the patterns and pattern names into your HDD on your computer. Only the currently selected Style will be exported. There is currently no option to export/import a single pattern. Each style is its own data file and can only exported/imported complete. You can’t import a style file into a different location. I.e. if you export the style #1 you can only import into #1 regardless which name you have used to save the file.
Pattern name.
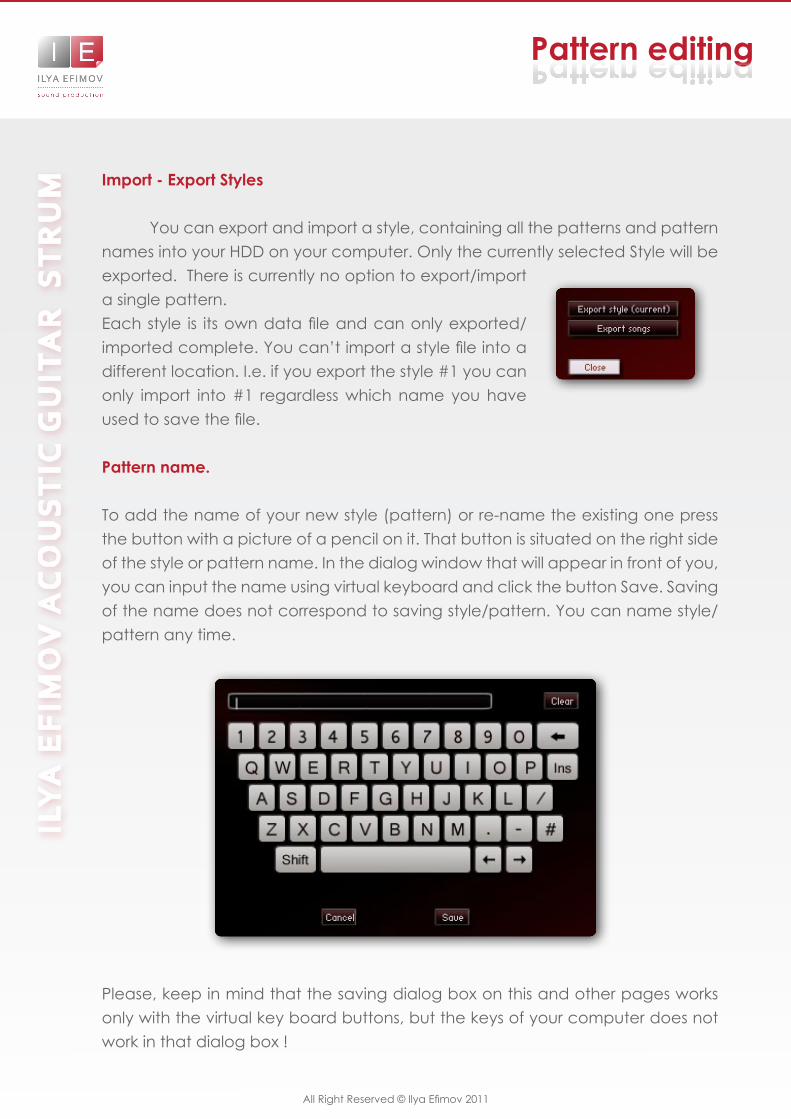
To add the name of your new style (pattern) or re-name the existing one press the button with a picture of a pencil on it. That button is situated on the right side of the style or pattern name. In the dialog window that will appear in front of you, you can input the name using virtual keyboard and click the button Save. Saving of the name does not correspond to saving style/pattern. You can name style/pattern any time.
Please, keep in mind that the saving dialog box on this and other pages works only with the virtual key board buttons, but the keys of your computer does not work in that dialog box !
Pattern editingPattern editing
ILY
A E
FIM
OV
Ac
OU
ST
Ic G
UIT
AR
ST
RU
M
All Right Reserved © Ilya Efimov 2011
Chord editing
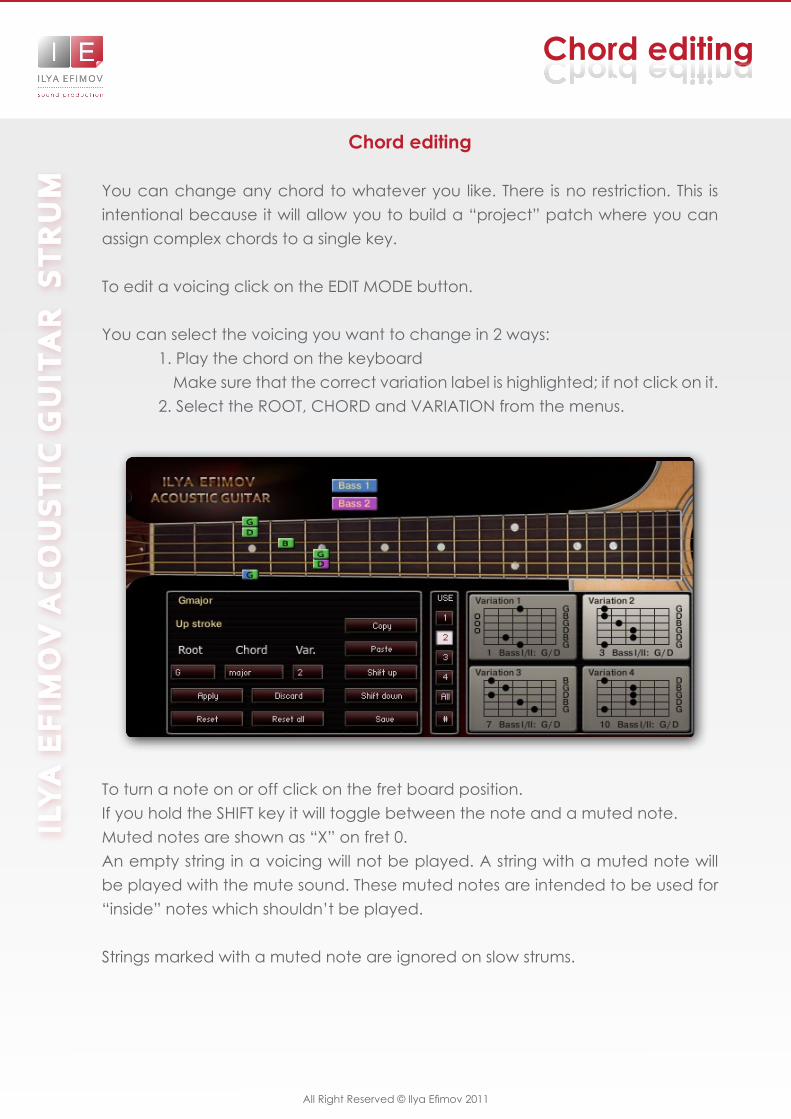
You can change any chord to whatever you like. There is no restriction. This is intentional because it will allow you to build a “project” patch where you can assign complex chords to a single key.
To edit a voicing click on the EDIT MODE button.
You can select the voicing you want to change in 2 ways:1. Play the chord on the keyboard Make sure that the correct variation label is highlighted; if not click on it.2. Select the ROOT, CHORD and VARIATION from the menus.
To turn a note on or off click on the fret board position.If you hold the SHIFT key it will toggle between the note and a muted note.Muted notes are shown as “X” on fret 0.An empty string in a voicing will not be played. A string with a muted note will be played with the mute sound. These muted notes are intended to be used for “inside” notes which shouldn’t be played.
Strings marked with a muted note are ignored on slow strums.
Chord editingChord editing
ILY
A E
FIM
OV
Ac
OU
ST
Ic G
UIT
AR
ST
RU
M
All Right Reserved © Ilya Efimov 2011
Chord editingChord editing
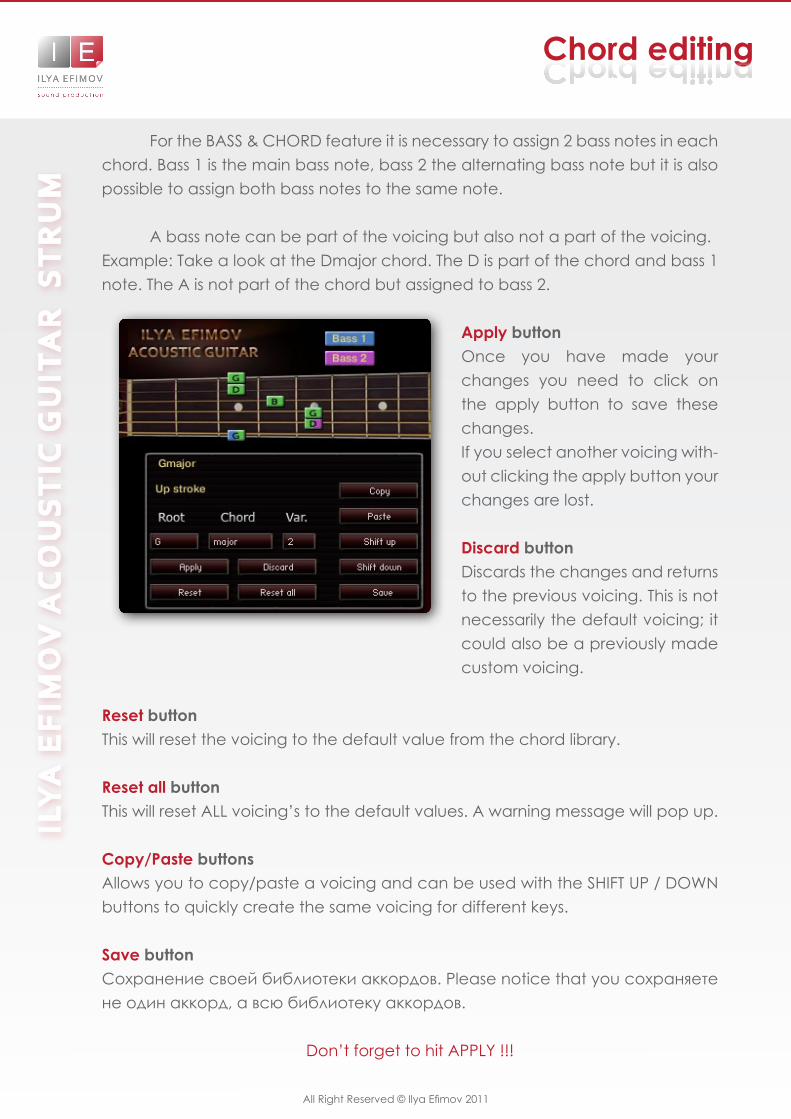
For the BASS & CHORD feature it is necessary to assign 2 bass notes in each chord. Bass 1 is the main bass note, bass 2 the alternating bass note but it is also possible to assign both bass notes to the same note.
A bass note can be part of the voicing but also not a part of the voicing. Example: Take a look at the Dmajor chord. The D is part of the chord and bass 1 note. The A is not part of the chord but assigned to bass 2.
Apply buttonOnce you have made your changes you need to click on the apply button to save these changes.If you select another voicing with-out clicking the apply button your changes are lost.
Discard buttonDiscards the changes and returns to the previous voicing. This is not necessarily the default voicing; it could also be a previously made custom voicing.
Reset buttonThis will reset the voicing to the default value from the chord library.
Reset all buttonThis will reset ALL voicing’s to the default values. A warning message will pop up.
Copy/Paste buttonsAllows you to copy/paste a voicing and can be used with the SHIFT UP / DOWN buttons to quickly create the same voicing for different keys.
Save buttonСохранение своей библиотеки аккордов. Please notice that you сохраняете не один аккорд, а всю библиотеку аккордов.
Don’t forget to hit APPLY !!!
ILY
A E
FIM
OV
Ac
OU
ST
Ic G
UIT
AR
ST
RU
M
EffectsEffects
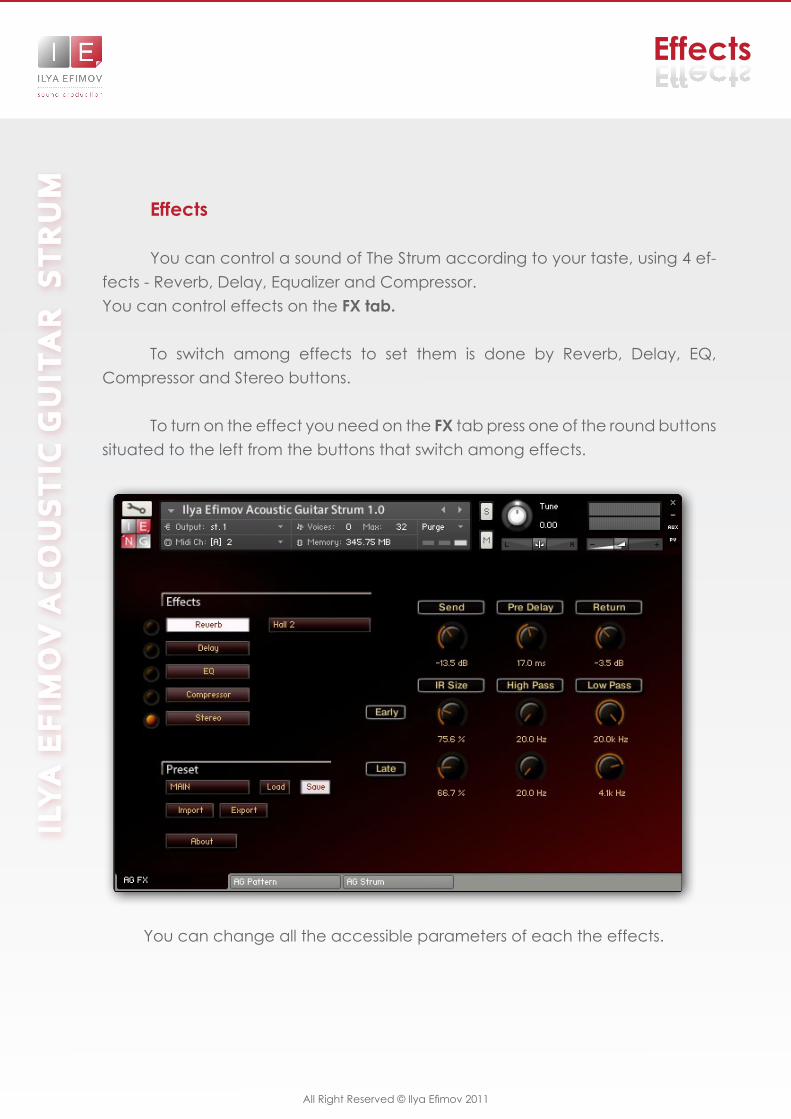
Effects
You can control a sound of The Strum according to your taste, using 4 ef-fects - Reverb, Delay, Equalizer and Compressor.You can control effects on the FX tab.
To switch among effects to set them is done by Reverb, Delay, EQ, Compressor and Stereo buttons.
To turn on the effect you need on the FX tab press one of the round buttons situated to the left from the buttons that switch among effects.
You can change all the accessible parameters of each the effects.
All Right Reserved © Ilya Efimov 2011
ILY
A E
FIM
OV
Ac
OU
ST
Ic G
UIT
AR
ST
RU
M
EffectsEffects
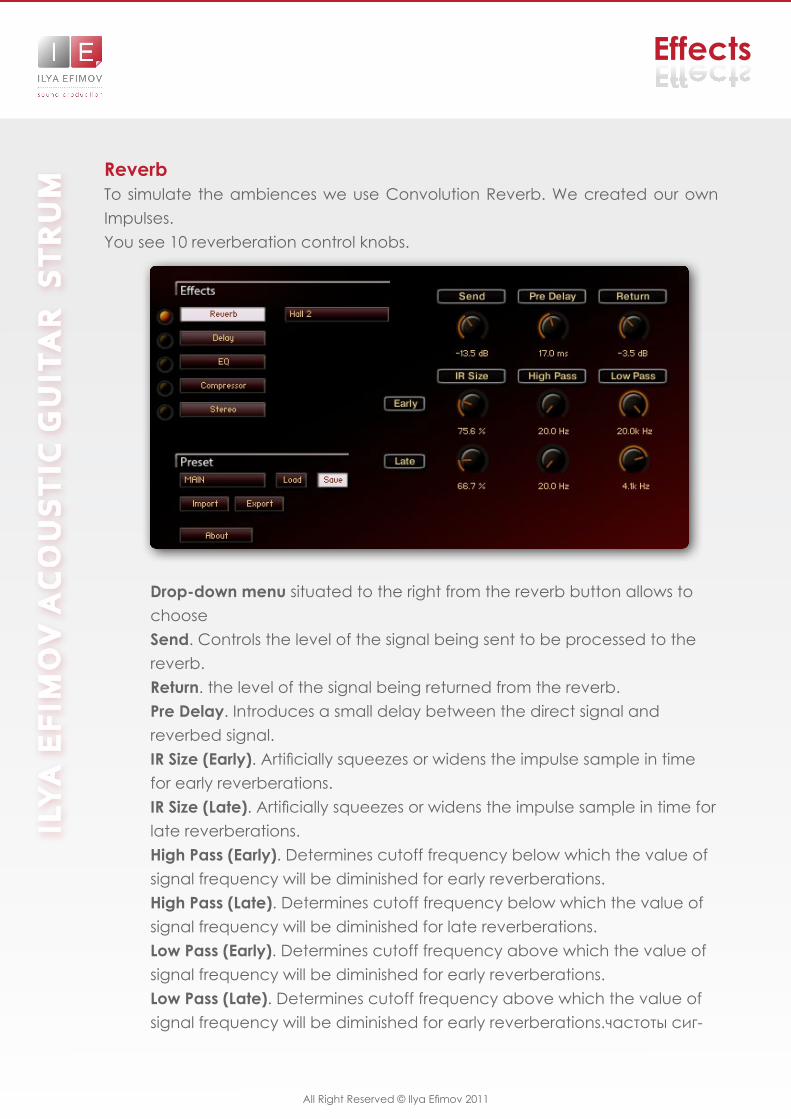
ReverbTo simulate the ambiences we use Convolution Reverb. We created our own Impulses. You see 10 reverberation control knobs.
Drop-down menu situated to the right from the reverb button allows to choose Send. Controls the level of the signal being sent to be processed to the reverb.Return. the level of the signal being returned from the reverb.Pre Delay. Introduces a small delay between the direct signal and reverbed signal.IR Size (Early). Artificially squeezes or widens the impulse sample in time for early reverberations. IR Size (Late). Artificially squeezes or widens the impulse sample in time for late reverberations.High Pass (Early). Determines cutoff frequency below which the value of signal frequency will be diminished for early reverberations.High Pass (Late). Determines cutoff frequency below which the value of signal frequency will be diminished for late reverberations.Low Pass (Early). Determines cutoff frequency above which the value of signal frequency will be diminished for early reverberations.Low Pass (Late). Determines cutoff frequency above which the value of signal frequency will be diminished for early reverberations.частоты сиг-
All Right Reserved © Ilya Efimov 2011
ILY
A E
FIM
OV
Ac
OU
ST
Ic G
UIT
AR
ST
RU
M
EffectsEffects
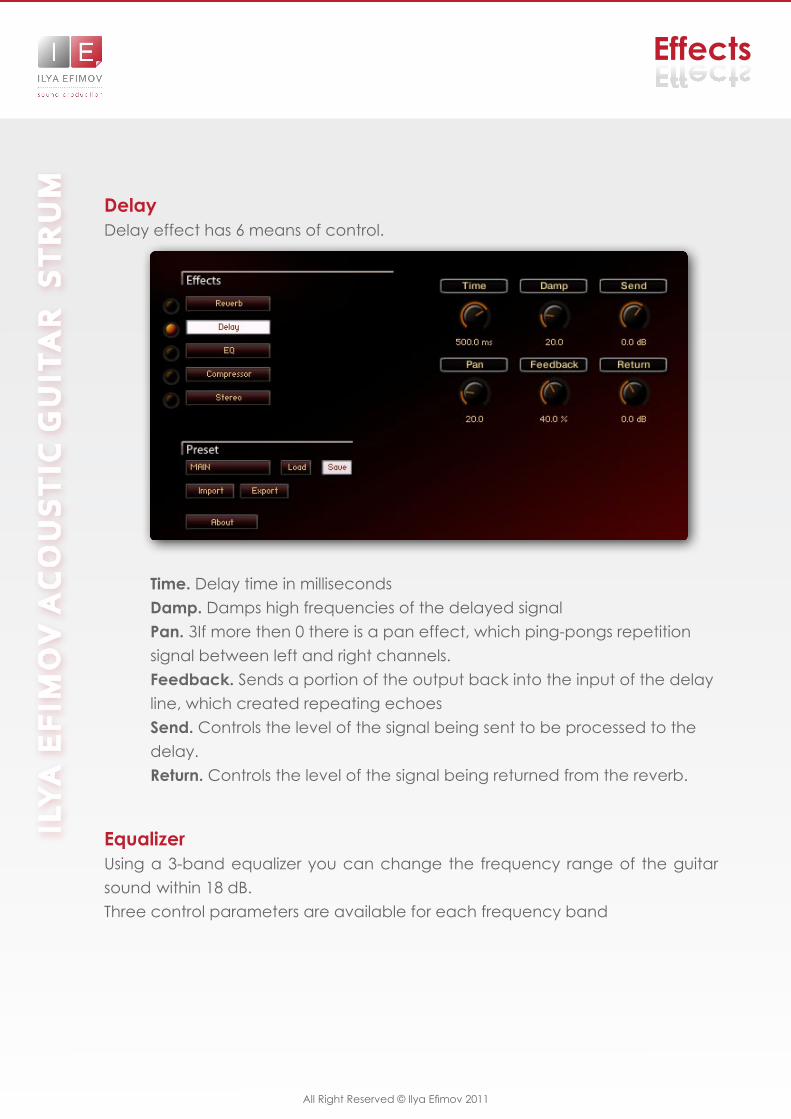
DelayDelay effect has 6 means of control.
EqualizerUsing a 3-band equalizer you can change the frequency range of the guitar sound within 18 dB. Three control parameters are available for each frequency band
Time. Delay time in millisecondsDamp. Damps high frequencies of the delayed signalPan. ЗIf more then 0 there is a pan effect, which ping-pongs repetition signal between left and right channels.Feedback. Sends a portion of the output back into the input of the delay line, which created repeating echoesSend. Controls the level of the signal being sent to be processed to the delay.Return. Controls the level of the signal being returned from the reverb.
All Right Reserved © Ilya Efimov 2011
ILY
A E
FIM
OV
Ac
OU
ST
Ic G
UIT
AR
ST
RU
M
EffectsEffects
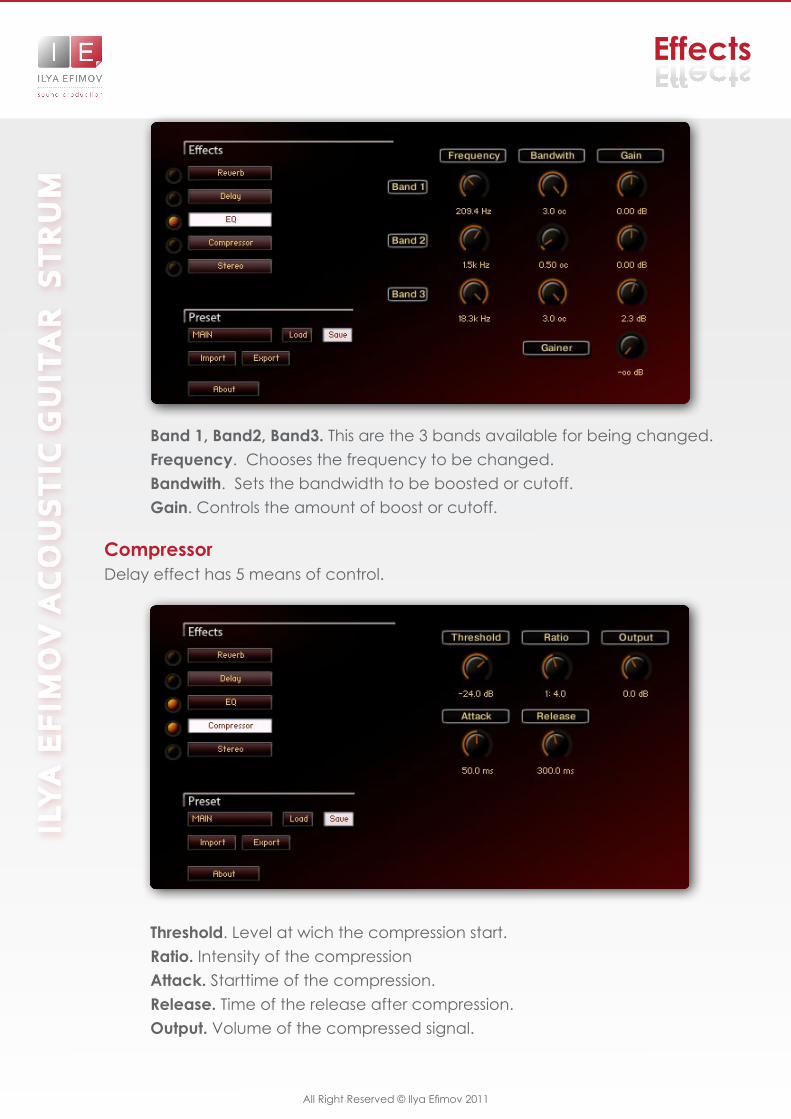
Band 1, Band2, Band3. This are the 3 bands available for being changed.Frequency. Chooses the frequency to be changed.Bandwith. Sets the bandwidth to be boosted or cutoff.Gain. Controls the amount of boost or cutoff.
CompressorDelay effect has 5 means of control.
Threshold. Level at wich the compression start.Ratio. Intensity of the compressionAttack. Starttime of the compression.Release. Time of the release after compression.Output. Volume of the compressed signal.
All Right Reserved © Ilya Efimov 2011
ILY
A E
FIM
OV
Ac
OU
ST
Ic G
UIT
AR
ST
RU
M
EffectsEffects
Global presets
The drop-down menu is visible on the FX tab. It consists of 10 factory presets and 10 empty presets.
To load the presets choose some Preset on the drop-down menu and press the LOAD button.
To save presets choose some preset on the drop-down menu and press the SAVE button.
Also you can import and export your settings to presets on HDD.
All Right Reserved © Ilya Efimov 2011
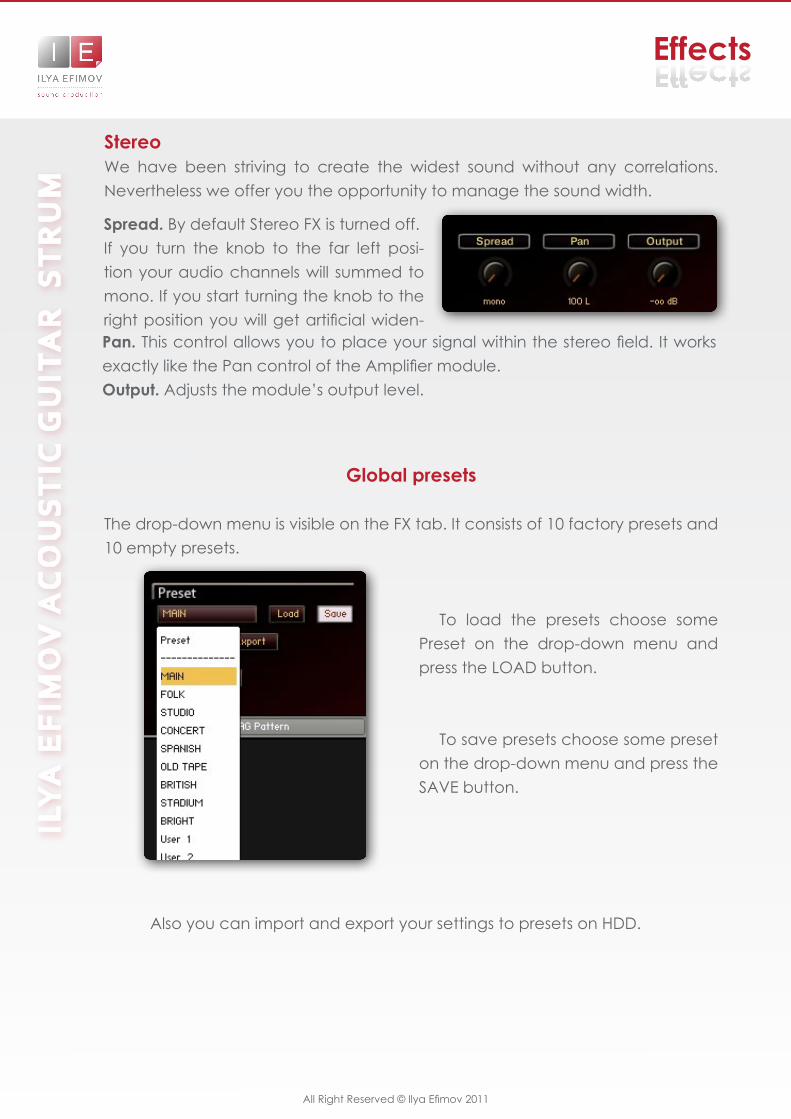
StereoWe have been striving to create the widest sound without any correlations. Nevertheless we offer you the opportunity to manage the sound width.
Spread. By default Stereo FX is turned off. If you turn the knob to the far left posi-tion your audio channels will summed to mono. If you start turning the knob to the right position you will get artificial widen-Pan. This control allows you to place your signal within the stereo field. It works exactly like the Pan control of the Amplifier module.Output. Adjusts the module’s output level.
ILY
A E
FIM
OV
Ac
OU
ST
Ic G
UIT
AR
CreditsCredits
Credits
Producer by Ilya EfimovRecorded at Alexandr Rusanov Studio
Recording engineer by Ilya EfimovScript by Günter Hirscher
GUI Design by Vera Cheportuzova and Ilya EfimovMix and Presets: Ilya Efimov and Anatoly Machulenko
Manual design by Ilya Efimov
Special thanks to:
Gunter HirscherAlexandr RusanovEugeny Kondakov
Dmitry KalyabinMaxim Rybakov
Anatoly MachulenkoEvgenia Cherobim
Vera CheportuzovaOlga FilippovaIgor Durachkin
Sergey Pervov (aka Vosk)Anton SchwarzElena Moiseeva
All Right Reserved © Ilya Efimov 2011