icefaces developer’s guide
TRANSCRIPT

Developer’s GuideVersion 1.8

Copyright
Copyright 2005-2009. ICEsoft Technologies, Inc. All rights reserved.
The content in this guide is protected under copyright law even if it is not distributed with software that includes an end user license agreement.
The content of this guide is furnished for informational use only, is subject to change without notice, and should not be construed as a commitment by ICEsoft Technologies, Inc.
ICEsoft Technologies, Inc. assumes no responsibility or liability for any errors or inaccuracies that may appear in the informational content contained in this guide.
ICEfaces is a registered trademark of ICEsoft Technologies, Inc.
Sun, Sun Microsystems, the Sun logo, Solaris and Java are trademarks or registered trademarks of Sun Microsystems, Inc. in the United States and in other countries.
All other trademarks mentioned herein are the property of their respective owners.
ICEsoft Technologies, Inc. Suite 200, 1717 10th Street NW Calgary, Alberta, Canada T2M 4S2
Toll Free: 1-877-263-3822 (USA and Canada) Telephone: 1-403-663-3322 Fax:1-403-663-3320
For additional information, please visit the ICEfaces website: http://www.icefaces.org
ICEfaces Developer’s Guide v1.8
March 2009
About this Guide
The ICEfaces® Developer’s Guide is your manual to developing ICEfaces applications. By reading through this guide, you will:
• Gain a basic understanding of what ICEfaces is and what it can do for you.
• Understand key concepts related to the ICEfaces Rich Web Presentation Environment.
• Examine the details of the ICEfaces architecture.
• Access reference information for the following:
— ICEfaces system configuration
— JSF Page Markup
— Java API reference
— JavaScript API reference
— Custom Component TLD
• Learn to use advanced ICEfaces development features.
For more information about ICEfaces, visit the ICEfaces website at:
http://www.icefaces.org
In this guide...
This guide contains the following chapters organized to assist you with developing ICEfaces applications:
Chapter 1: Introduction to ICEfaces — Provides an overview of ICEfaces describing its key features and capabilities.
Chapter 2: ICEfaces System Architecture — Describes the basic ICEfaces architecture and how it plugs into the standard JSF framework.
Chapter 3: Key Concepts — Explores some of the key concepts and mechanisms that ICEfaces brings to the application developer.
Chapter 4: ICEfaces Reference Information — Provides additional reference information for ICEfaces implementations.
Chapter 5: Advanced Topics — Introduces several ICEfaces advanced topics, such as server-initiated rendering, drag and drop, effects, Portlets, Push Server, Seam integration, Spring Framework integration, and Direct-to-DOM renderers.
ICEfaces Developer’s Guide v1.8 iii
Appendix A: ICEfaces Library/App. Server Dependencies — Shows the ICEfaces library dependencies.
Appendix B: ICEfaces Configuration Parameter Overview — Contains tables listing all ICEfaces parameters with their respective default values, along with brief notes on the parameter’s usage.
Prerequisites
ICEfaces applications are JavaServer Faces (JSF) applications, and as such, the only prerequisite to working with ICEfaces is that you must be familiar with JSF application development. For more information on Java Platform, Enterprise Edition (JEE), which JSF is a sub-component of, please refer to http://java.sun.com/javaee/ .
Additional JSF resources can be found on the icefaces.org website.
ICEfaces Documentation
You can find the following additional ICEfaces documentation at the ICEfaces website (http://documentation.icefaces.org):
• ICEfaces Release Notes — Contains information about the new features and bug fixes included in this ICEfaces release. In addition, important time-saving Known Issues and detailed information about supported browsers, application servers, portal containers, and IDEs can also be found in this document.
• ICEfaces Getting Started Guide — Includes information to help you configure your environment to run sample applications and a tutorial designed to help you get started as quickly as possible using ICEfaces technology.
ICEfaces Technical Support
For more information about ICEfaces, visit the ICEfaces Technical Support page at:
http://support.icefaces.org/
ICEfaces Developer’s Guide v1.8 iv
Contents
Copyright . . . . . . . . . . . . . . . . . . . . . . . . . . . . . . . . . . . . . ii
About this Guide . . . . . . . . . . . . . . . . . . . . . . . . . . . . . . iii
Chapter 1 Introduction to ICEfaces . . . . . . . . . . . . . . . . . . . . . . . . . 1
Chapter 2 ICEfaces System Architecture . . . . . . . . . . . . . . . . . . . . . 3
Chapter 3 Key Concepts. . . . . . . . . . . . . . . . . . . . . . . . . . . . . . . . . . . 5Direct-to-DOM Rendering . . . . . . . . . . . . . . . . . . . . . . . . . . . 6
Incremental, In-place Page Updates . . . . . . . . . . . . . . . . . . . 8
Synchronous and Asynchronous Updates . . . . . . . . . . . . . . . . 9
Connection Management . . . . . . . . . . . . . . . . . . . . . . . . . . 11
Server-initiated Rendering (Ajax Push) . . . . . . . . . . . . . . . . 12
Partial Submit – Intelligent Form Processing . . . . . . . . . . . . 13
Components and Styling . . . . . . . . . . . . . . . . . . . . . . . . . . 15Cascading Style Sheets (CSS) Styling . . . . . . . . . . . . . . 15Other Custom Components . . . . . . . . . . . . . . . . . . . . . 16
Drag and Drop . . . . . . . . . . . . . . . . . . . . . . . . . . . . . . . . . 17
Effects . . . . . . . . . . . . . . . . . . . . . . . . . . . . . . . . . . . . . . . 18Browser-Invoked Effects . . . . . . . . . . . . . . . . . . . . . . . 18
Concurrent DOM Views . . . . . . . . . . . . . . . . . . . . . . . . . . . 19
Integrating ICEfaces With Existing Applications . . . . . . . . . . 21JSP Inclusion . . . . . . . . . . . . . . . . . . . . . . . . . . . . . . . 21JSF Integration . . . . . . . . . . . . . . . . . . . . . . . . . . . . . 21
Facelets . . . . . . . . . . . . . . . . . . . . . . . . . . . . . . . . . . . . . . 22
Chapter 4 ICEfaces Reference Information . . . . . . . . . . . . . . . . . .23JSP Markup Reference . . . . . . . . . . . . . . . . . . . . . . . . . . . . 24
Java API Reference . . . . . . . . . . . . . . . . . . . . . . . . . . . . . . 25
JavaScript API Reference . . . . . . . . . . . . . . . . . . . . . . . . . . 26Partial and Full Submit . . . . . . . . . . . . . . . . . . . . . . . . 26View Removal . . . . . . . . . . . . . . . . . . . . . . . . . . . . . . 27Bridge Connection Status Events . . . . . . . . . . . . . . . . . 27
Configuration Reference . . . . . . . . . . . . . . . . . . . . . . . . . . 29
vICEfaces Developer’s Guide v1.8
Contents (continued)
Configuring faces-config.xml . . . . . . . . . . . . . . . . . . . . 29Configuring web.xml . . . . . . . . . . . . . . . . . . . . . . . . . 29
Components Reference . . . . . . . . . . . . . . . . . . . . . . . . . . . 34ICEfaces Component Suite . . . . . . . . . . . . . . . . . . . . . 34Standard JSF Components . . . . . . . . . . . . . . . . . . . . . 34Apache MyFaces Tomahawk Components . . . . . . . . . . 35
ICEfaces Component Suite . . . . . . . . . . . . . . . . . . . . . . . . . 36Common Attributes . . . . . . . . . . . . . . . . . . . . . . . . . . 36Enhanced Standard Components . . . . . . . . . . . . . . . . . 39ICEfaces Custom Components . . . . . . . . . . . . . . . . . . 39Styling the ICEfaces Component Suite . . . . . . . . . . . . . 41ICEfaces Focus Management . . . . . . . . . . . . . . . . . . . 43
ICEfaces Library Dependencies . . . . . . . . . . . . . . . . . . . . . . 46ICEfaces Runtime Dependencies . . . . . . . . . . . . . . . . . 46ICEfaces Component Runtime Dependencies . . . . . . . . 46ICEfaces Facelets Support . . . . . . . . . . . . . . . . . . . . . 47ICEfaces Compile-time (Build) Dependencies . . . . . . . . 47ICEfaces Ant Build Script Support . . . . . . . . . . . . . . . . 47ICEfaces Sample Applications and Tutorials . . . . . . . . . 48Sun JSF 1.1 RI Runtime . . . . . . . . . . . . . . . . . . . . . . . 48Sun JSF 1.2 RI Runtime . . . . . . . . . . . . . . . . . . . . . . . 48Apache MyFaces JSF 1.1 Runtime . . . . . . . . . . . . . . . . 48
Chapter 5 Advanced Topics . . . . . . . . . . . . . . . . . . . . . . . . . . . . . . .49Server-initiated Rendering (Ajax Push) APIs . . . . . . . . . . . . 50
PersistentFacesState.render() . . . . . . . . . . . . . . . . . . . 50Rendering Considerations . . . . . . . . . . . . . . . . . . . . . . 51SessionRenderer . . . . . . . . . . . . . . . . . . . . . . . . . . . . 52RenderManager API . . . . . . . . . . . . . . . . . . . . . . . . . . 53Rendering Exceptions . . . . . . . . . . . . . . . . . . . . . . . . . 53Server-initiated Rendering Architecture . . . . . . . . . . . . 54
The DisposableBean Interface . . . . . . . . . . . . . . . . . . . . . . 61
State Saving . . . . . . . . . . . . . . . . . . . . . . . . . . . . . . . . . . . 62JSF Default State Manager . . . . . . . . . . . . . . . . . . . . . 62View Root State Manager . . . . . . . . . . . . . . . . . . . . . . 62
ICEfaces Developer’s Guide v1.8 vi
Contents (continued)
Single Copy State Manager . . . . . . . . . . . . . . . . . . . . . 63
Optimizing Server Memory Consumption . . . . . . . . . . . . . . . 64State Saving . . . . . . . . . . . . . . . . . . . . . . . . . . . . . . . 64DOM Compression . . . . . . . . . . . . . . . . . . . . . . . . . . . 64String Handling . . . . . . . . . . . . . . . . . . . . . . . . . . . . . 64
Connection Management . . . . . . . . . . . . . . . . . . . . . . . . . . 66Asynchronous Heartbeating . . . . . . . . . . . . . . . . . . . . 66Managing Connection Status . . . . . . . . . . . . . . . . . . . . 67Managing Redirection . . . . . . . . . . . . . . . . . . . . . . . . . 68
Optimizing Asynchronous Communications for Scalability . . . 70GlassFish . . . . . . . . . . . . . . . . . . . . . . . . . . . . . . . . . 71Jetty 6 . . . . . . . . . . . . . . . . . . . . . . . . . . . . . . . . . . . 72Tomcat 6 and JBoss 4.2 . . . . . . . . . . . . . . . . . . . . . . . 72
Push Server . . . . . . . . . . . . . . . . . . . . . . . . . . . . . . . . . . . 74Single-Point-of-Contact . . . . . . . . . . . . . . . . . . . . . . . 74Asynchronous Request Processing . . . . . . . . . . . . . . . . 75Configuration . . . . . . . . . . . . . . . . . . . . . . . . . . . . . . 75
Using ICEfaces in Clustered Environments . . . . . . . . . . . . . . 77
Developing Portlets with ICEfaces . . . . . . . . . . . . . . . . . . . . 78ICEfaces Portlet Configuration . . . . . . . . . . . . . . . . . . . 78Using the Portlet API . . . . . . . . . . . . . . . . . . . . . . . . . 80Portlet Styles . . . . . . . . . . . . . . . . . . . . . . . . . . . . . . . 82Supported Portal Implementations . . . . . . . . . . . . . . . 83Using Ajax Push in Portlets . . . . . . . . . . . . . . . . . . . . . 84Development and Deployment Considerations . . . . . . . 85Running the ICEfaces Sample Portlets . . . . . . . . . . . . . 89
JBoss Seam Integration . . . . . . . . . . . . . . . . . . . . . . . . . . . 91Resources . . . . . . . . . . . . . . . . . . . . . . . . . . . . . . . . . 91Getting Started . . . . . . . . . . . . . . . . . . . . . . . . . . . . . 92Bypassing Seam Interceptors . . . . . . . . . . . . . . . . . . . 92Using Server-initiated Rendering . . . . . . . . . . . . . . . . . 92Using the File Upload (ice:inputFile) Component . . . . . . 96
Spring Web Flow Integration . . . . . . . . . . . . . . . . . . . . . . . 97Getting Started . . . . . . . . . . . . . . . . . . . . . . . . . . . . . 97
ICEfaces Developer’s Guide v1.8 vii
Contents (continued)
Configuring Spring Applications to Work with ICEfaces . 97
Creating Drag and Drop Features . . . . . . . . . . . . . . . . . . . 104Creating a Draggable Panel . . . . . . . . . . . . . . . . . . . 104Adding Drag Events . . . . . . . . . . . . . . . . . . . . . . . . . 104Setting the Event dragValue and dropValue . . . . . . . . 105Event Masking . . . . . . . . . . . . . . . . . . . . . . . . . . . . . 106
Adding and Customizing Effects . . . . . . . . . . . . . . . . . . . . 107Creating a Simple Effect . . . . . . . . . . . . . . . . . . . . . . 107Modifying the Effect . . . . . . . . . . . . . . . . . . . . . . . . . 107
Appendix A ICEfaces Library/App. Server Dependencies . . . . . . . . . .110
Appendix B ICEfaces Configuration Parameter Overview. . . . . . . . . .114
Index . . . . . . . . . . . . . . . . . . . . . . . . . . . . . . . . . . . . . . 120
ICEfaces Developer’s Guide v1.8 viii
ixICEfaces Developer’s Guide v1.8
List of Figures
Figure 1: ICEfaces-enabled JSF Application .................................................................. 1
Figure 2: ICEfaces Architecture ................................................................................... 3
Figure 3: Direct-to-DOM Rendering ............................................................................. 6
Figure 4: Direct-to-DOM Rendering Via Ajax Bridge ...................................................... 7
Figure 5: Incremental Update with Direct-to-DOM Rendering ........................................ 8
Figure 6: Synchronous Updates................................................................................... 9
Figure 7: Asynchronous Update with Direct-to-DOM Rendering.................................... 10
Figure 8: Server-initiated Rendering Architecture........................................................ 12
Figure 9: Partial Submit Based on OnBlur................................................................... 13
Figure 10: Drag and Drop Concept ............................................................................ 17
Figure 11: CSS Directory Structure ............................................................................ 42
Figure 12: Low-level Server-initiated Rendering.......................................................... 51
Figure 13: Group Renderers...................................................................................... 55
Figure 14: Connection State Error ............................................................................. 68
Figure 15: ICEfaces with Push Server ........................................................................ 74
Figure 16: Servlet Container Library/Application Server Dependencies........................ 111
Figure 17: J2EE 1.4 Servers Library/Application Server Dependencies ........................ 112
Figure 18: JEE 5 Servers Library/Application Server Dependencies............................. 113
Chapter 1 Introduction to ICEfaces
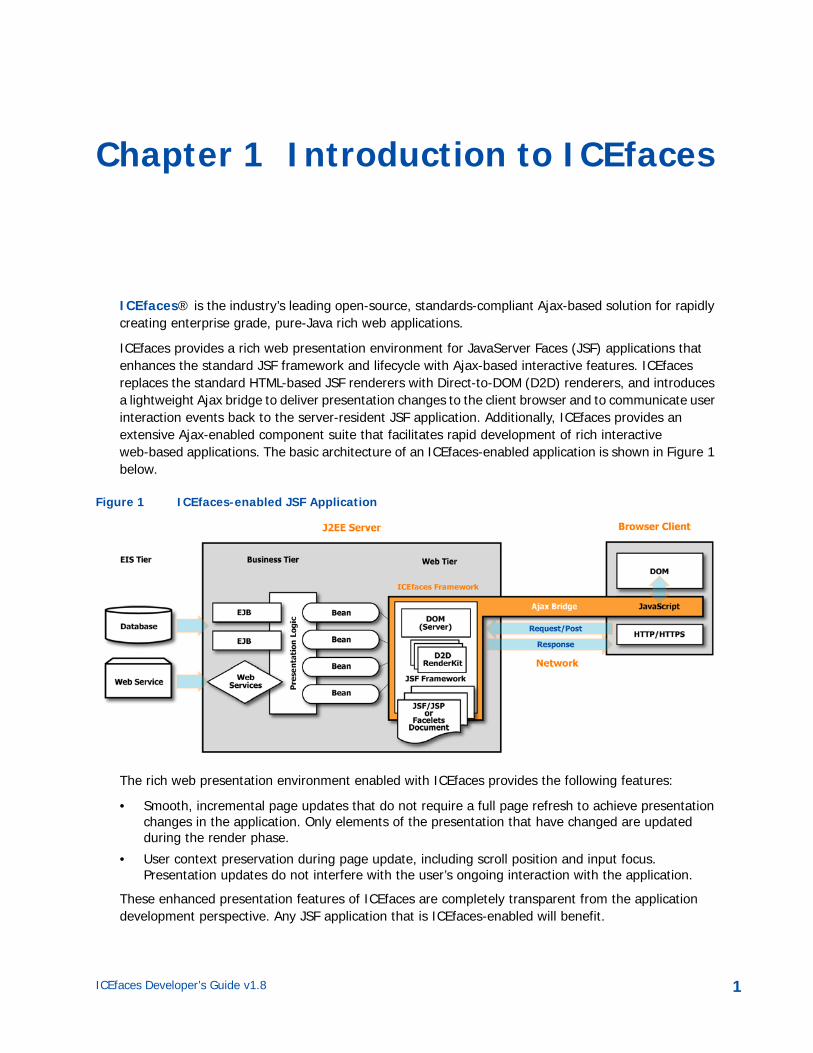
ICEfaces® is the industry’s leading open-source, standards-compliant Ajax-based solution for rapidly creating enterprise grade, pure-Java rich web applications.
ICEfaces provides a rich web presentation environment for JavaServer Faces (JSF) applications that enhances the standard JSF framework and lifecycle with Ajax-based interactive features. ICEfaces replaces the standard HTML-based JSF renderers with Direct-to-DOM (D2D) renderers, and introduces a lightweight Ajax bridge to deliver presentation changes to the client browser and to communicate user interaction events back to the server-resident JSF application. Additionally, ICEfaces provides an extensive Ajax-enabled component suite that facilitates rapid development of rich interactive web-based applications. The basic architecture of an ICEfaces-enabled application is shown in Figure 1 below.
Figure 1 ICEfaces-enabled JSF Application
The rich web presentation environment enabled with ICEfaces provides the following features:
• Smooth, incremental page updates that do not require a full page refresh to achieve presentation changes in the application. Only elements of the presentation that have changed are updated during the render phase.
• User context preservation during page update, including scroll position and input focus. Presentation updates do not interfere with the user’s ongoing interaction with the application.
These enhanced presentation features of ICEfaces are completely transparent from the application development perspective. Any JSF application that is ICEfaces-enabled will benefit.
ICEfaces Developer’s Guide v1.8 1
Introduction to ICEfaces
Beyond these transparent presentation features, ICEfaces introduces additional rich presentation features that the JSF developer can leverage to further enhance the user experience. Specifically, the developer can incorporate these features:
• Intelligent form processing through a technique called Partial Submit. Partial Submit automatically submits a form for processing based on some user-initiated event, such as tabbing between fields in a form. The automatic submission is partial, in that only partial validation of the form will occur (empty fields are marked as not required). Using this mechanism, the application can react intelligently as the user interacts with the form.
• Server-initiated asynchronous presentation update (Ajax Push). Standard JSF applications can only deliver presentation changes in response to a user-initiated event, typically some type of form submit. ICEfaces introduces a trigger mechanism that allows the server-resident application logic to push presentation changes to the client browser in response to changes in the application state. This enables application developers to design systems that deliver data to the user in a near-real-time asynchronous fashion.
ICEfaces Developer’s Guide v1.8 2
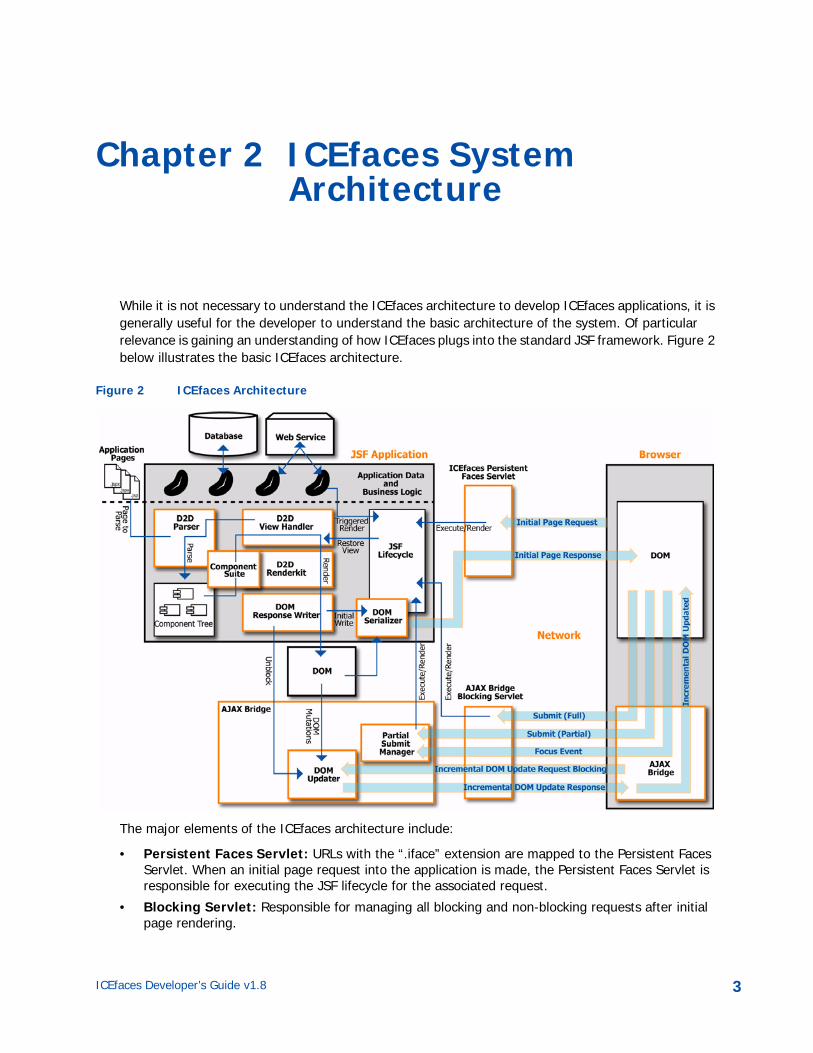
Chapter 2 ICEfaces System Architecture
While it is not necessary to understand the ICEfaces architecture to develop ICEfaces applications, it is generally useful for the developer to understand the basic architecture of the system. Of particular relevance is gaining an understanding of how ICEfaces plugs into the standard JSF framework. Figure 2 below illustrates the basic ICEfaces architecture.
Figure 2 ICEfaces Architecture
The major elements of the ICEfaces architecture include:
• Persistent Faces Servlet: URLs with the “.iface” extension are mapped to the Persistent Faces Servlet. When an initial page request into the application is made, the Persistent Faces Servlet is responsible for executing the JSF lifecycle for the associated request.
• Blocking Servlet: Responsible for managing all blocking and non-blocking requests after initial page rendering.
ICEfaces Developer’s Guide v1.8 3
ICEfaces System Architecture
• D2D ViewHandler: Responsible for establishing the Direct-to-DOM rendering environment, including initialization of the DOM Response Writer. The ViewHandler also invokes the Parser for initial page parsing into a JSF component tree.
• D2D Parser: Responsible for assembling a component tree from a JSP Document. The Parser executes the JSP tag processing lifecycle in order to create the tree, but does this once only for each page. The standard JSP compilation and parsing process is not supported under ICEfaces.
• D2D RenderKit: Responsible for rendering a component tree into the DOM via the DOM Response Writer during a standard JSF render pass.
• DOM Response Writer: Responsible for writing into the DOM. Also initiates DOM serialization for first rendering, and unblocks the DOM Updater for incremental DOM updates.
• DOM Serializer: Responsible for serializing the DOM for initial page response.
• DOM Updater: Responsible for assembling DOM mutations into a single incremental DOM update. Updater blocks on incremental DOM update requests until render pass is complete, and DOM Response Writer performs an unblock.
• Component Suite: Provides a comprehensive set of rich JSF components that leverage Ajax features of the bridge and provide the basic building blocks for ICEfaces applications.
• Client-side Ajax Bridge: Responsible for ongoing DOM update request generation and response processing. Also responsible for focus management and submit processing.
ICEfaces Developer’s Guide v1.8 4
Chapter 3 Key Concepts
The JSF application framework provides the foundation for any ICEfaces application. As such, an ICEfaces application page is composed of a JSF component tree that represents the presentation for that page, and the backing beans that contain the application data model and business logic. All standard JSF mechanisms such as validation, conversion, and event processing are available to the ICEfaces application developer, and the standard JSF lifecycle applies. The following sections explore some of the key concepts and mechanisms that ICEfaces brings to the application developer.
ICEfaces Developer’s Guide v1.8 5
Key Concepts
Direct-to-DOM Rendering
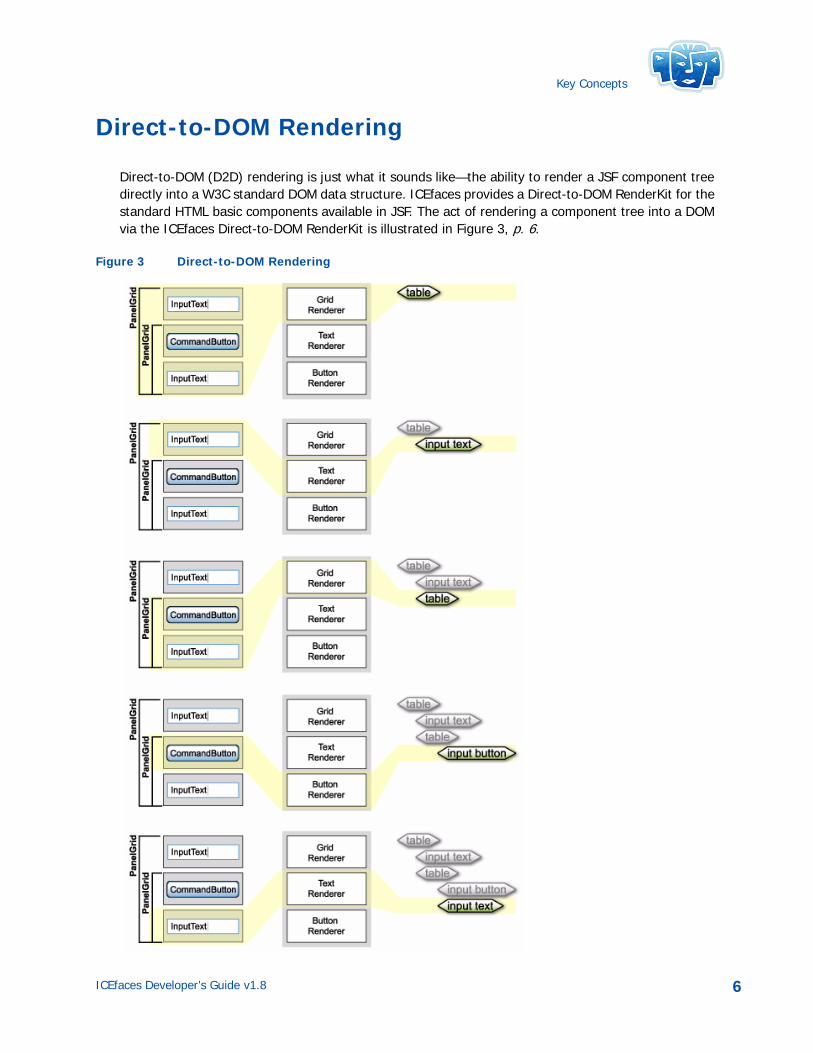
Direct-to-DOM (D2D) rendering is just what it sounds like—the ability to render a JSF component tree directly into a W3C standard DOM data structure. ICEfaces provides a Direct-to-DOM RenderKit for the standard HTML basic components available in JSF. The act of rendering a component tree into a DOM via the ICEfaces Direct-to-DOM RenderKit is illustrated in Figure 3, p. 6.
Figure 3 Direct-to-DOM Rendering
ICEfaces Developer’s Guide v1.8 6
Key Concepts
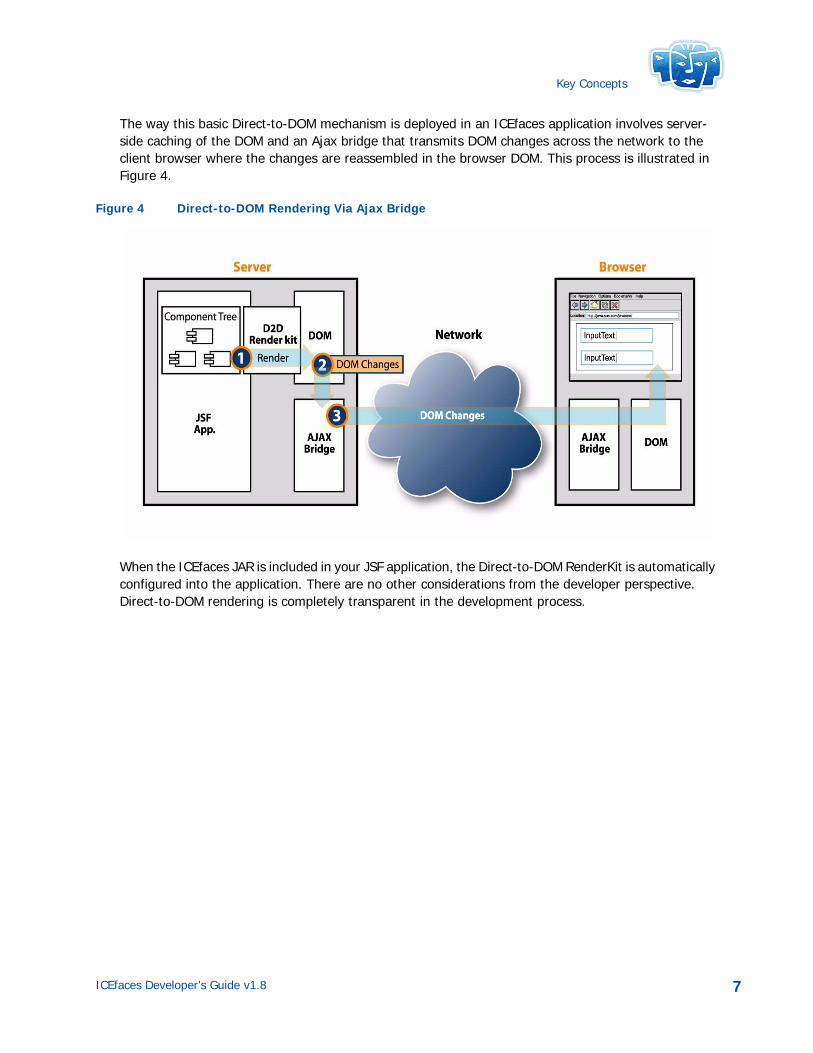
The way this basic Direct-to-DOM mechanism is deployed in an ICEfaces application involves server-side caching of the DOM and an Ajax bridge that transmits DOM changes across the network to the client browser where the changes are reassembled in the browser DOM. This process is illustrated in Figure 4.
Figure 4 Direct-to-DOM Rendering Via Ajax Bridge
When the ICEfaces JAR is included in your JSF application, the Direct-to-DOM RenderKit is automatically configured into the application. There are no other considerations from the developer perspective. Direct-to-DOM rendering is completely transparent in the development process.
ICEfaces Developer’s Guide v1.8 7
Key Concepts
Incremental, In-place Page Updates
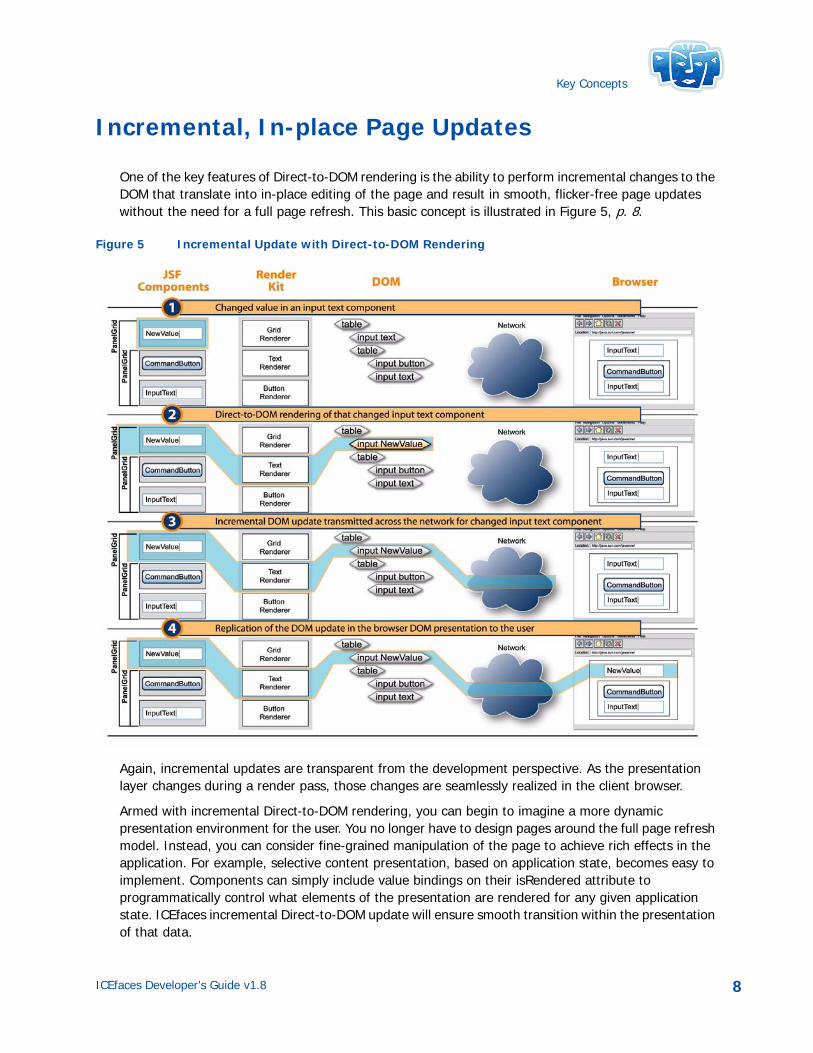
One of the key features of Direct-to-DOM rendering is the ability to perform incremental changes to the DOM that translate into in-place editing of the page and result in smooth, flicker-free page updates without the need for a full page refresh. This basic concept is illustrated in Figure 5, p. 8.
Figure 5 Incremental Update with Direct-to-DOM Rendering
Again, incremental updates are transparent from the development perspective. As the presentation layer changes during a render pass, those changes are seamlessly realized in the client browser.
Armed with incremental Direct-to-DOM rendering, you can begin to imagine a more dynamic presentation environment for the user. You no longer have to design pages around the full page refresh model. Instead, you can consider fine-grained manipulation of the page to achieve rich effects in the application. For example, selective content presentation, based on application state, becomes easy to implement. Components can simply include value bindings on their isRendered attribute to programmatically control what elements of the presentation are rendered for any given application state. ICEfaces incremental Direct-to-DOM update will ensure smooth transition within the presentation of that data.
ICEfaces Developer’s Guide v1.8 8
Key Concepts
Synchronous and Asynchronous Updates
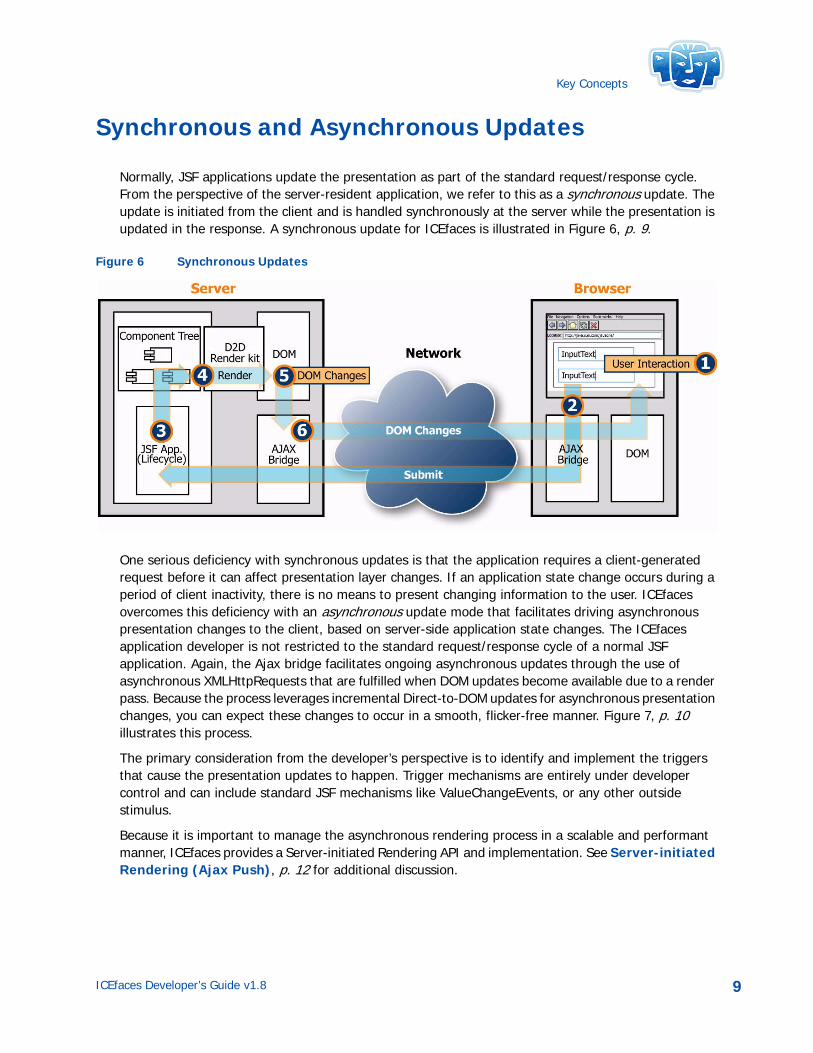
Normally, JSF applications update the presentation as part of the standard request/response cycle. From the perspective of the server-resident application, we refer to this as a synchronous update. The update is initiated from the client and is handled synchronously at the server while the presentation is updated in the response. A synchronous update for ICEfaces is illustrated in Figure 6, p. 9.
Figure 6 Synchronous Updates
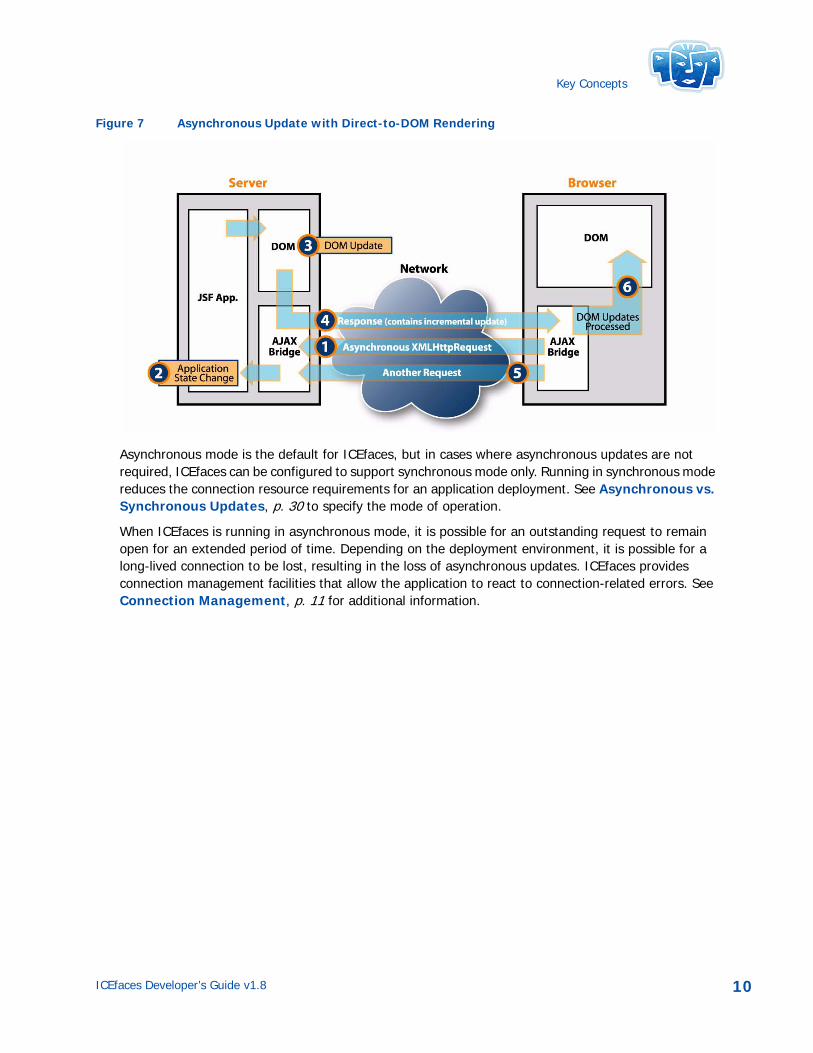
One serious deficiency with synchronous updates is that the application requires a client-generated request before it can affect presentation layer changes. If an application state change occurs during a period of client inactivity, there is no means to present changing information to the user. ICEfaces overcomes this deficiency with an asynchronous update mode that facilitates driving asynchronous presentation changes to the client, based on server-side application state changes. The ICEfaces application developer is not restricted to the standard request/response cycle of a normal JSF application. Again, the Ajax bridge facilitates ongoing asynchronous updates through the use of asynchronous XMLHttpRequests that are fulfilled when DOM updates become available due to a render pass. Because the process leverages incremental Direct-to-DOM updates for asynchronous presentation changes, you can expect these changes to occur in a smooth, flicker-free manner. Figure 7, p. 10 illustrates this process.
The primary consideration from the developer’s perspective is to identify and implement the triggers that cause the presentation updates to happen. Trigger mechanisms are entirely under developer control and can include standard JSF mechanisms like ValueChangeEvents, or any other outside stimulus.
Because it is important to manage the asynchronous rendering process in a scalable and performant manner, ICEfaces provides a Server-initiated Rendering API and implementation. See Server-initiated Rendering (Ajax Push), p. 12 for additional discussion.
ICEfaces Developer’s Guide v1.8 9
Key Concepts
Figure 7 Asynchronous Update with Direct-to-DOM Rendering
Asynchronous mode is the default for ICEfaces, but in cases where asynchronous updates are not required, ICEfaces can be configured to support synchronous mode only. Running in synchronous mode reduces the connection resource requirements for an application deployment. See Asynchronous vs. Synchronous Updates, p. 30 to specify the mode of operation.
When ICEfaces is running in asynchronous mode, it is possible for an outstanding request to remain open for an extended period of time. Depending on the deployment environment, it is possible for a long-lived connection to be lost, resulting in the loss of asynchronous updates. ICEfaces provides connection management facilities that allow the application to react to connection-related errors. See Connection Management, p. 11 for additional information.
ICEfaces Developer’s Guide v1.8 10

Key Concepts
Connection Management
Client/server connectivity is a key requirement for ICEfaces applications to function. For this reason, ICEfaces provides connection heartbeating and status monitoring facilities in the client-side Ajax bridge, and a Connection Status component to convey connection status information to the user interface. Additionally, ICEfaces provides the ability to automatically redirect to an error page when the connection is lost. See Connection Management, p. 66 for details on configuring connection management, and ICEfaces Custom Components, p. 39 for additional information on the Connection Status component.
ICEfaces Developer’s Guide v1.8 11
Key Concepts
Server-initiated Rendering (Ajax Push)
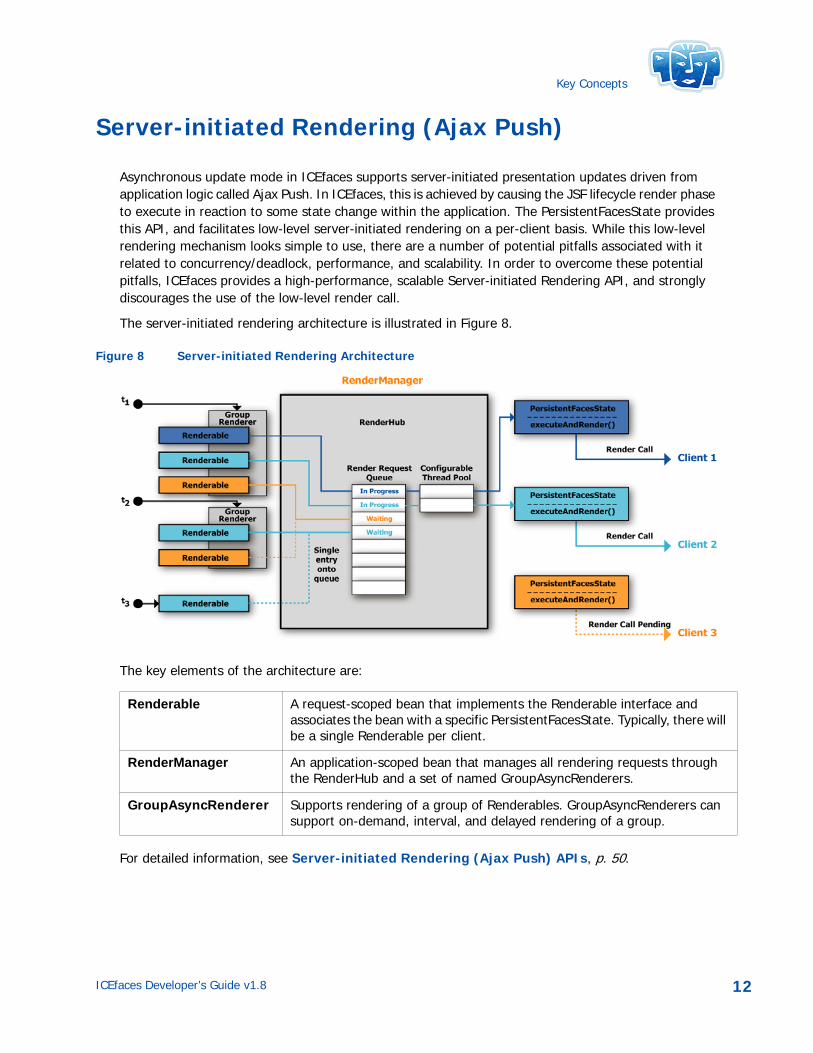
Asynchronous update mode in ICEfaces supports server-initiated presentation updates driven from application logic called Ajax Push. In ICEfaces, this is achieved by causing the JSF lifecycle render phase to execute in reaction to some state change within the application. The PersistentFacesState provides this API, and facilitates low-level server-initiated rendering on a per-client basis. While this low-level rendering mechanism looks simple to use, there are a number of potential pitfalls associated with it related to concurrency/deadlock, performance, and scalability. In order to overcome these potential pitfalls, ICEfaces provides a high-performance, scalable Server-initiated Rendering API, and strongly discourages the use of the low-level render call.
The server-initiated rendering architecture is illustrated in Figure 8.
Figure 8 Server-initiated Rendering Architecture
The key elements of the architecture are:
For detailed information, see Server-initiated Rendering (Ajax Push) APIs, p. 50.
Renderable A request-scoped bean that implements the Renderable interface and associates the bean with a specific PersistentFacesState. Typically, there will be a single Renderable per client.
RenderManager An application-scoped bean that manages all rendering requests through the RenderHub and a set of named GroupAsyncRenderers.
GroupAsyncRenderer Supports rendering of a group of Renderables. GroupAsyncRenderers can support on-demand, interval, and delayed rendering of a group.
ICEfaces Developer’s Guide v1.8 12
Key Concepts
Partial Submit – Intelligent Form Processing
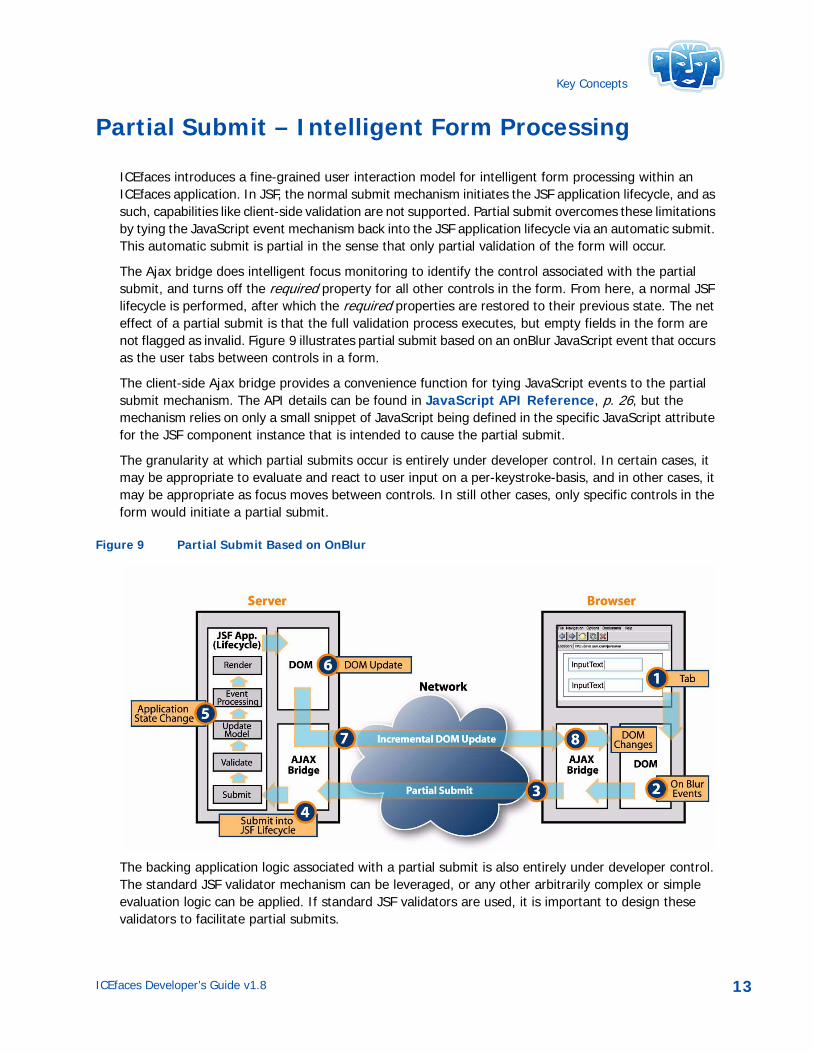
ICEfaces introduces a fine-grained user interaction model for intelligent form processing within an ICEfaces application. In JSF, the normal submit mechanism initiates the JSF application lifecycle, and as such, capabilities like client-side validation are not supported. Partial submit overcomes these limitations by tying the JavaScript event mechanism back into the JSF application lifecycle via an automatic submit. This automatic submit is partial in the sense that only partial validation of the form will occur.
The Ajax bridge does intelligent focus monitoring to identify the control associated with the partial submit, and turns off the required property for all other controls in the form. From here, a normal JSF lifecycle is performed, after which the required properties are restored to their previous state. The net effect of a partial submit is that the full validation process executes, but empty fields in the form are not flagged as invalid. Figure 9 illustrates partial submit based on an onBlur JavaScript event that occurs as the user tabs between controls in a form.
The client-side Ajax bridge provides a convenience function for tying JavaScript events to the partial submit mechanism. The API details can be found in JavaScript API Reference, p. 26, but the mechanism relies on only a small snippet of JavaScript being defined in the specific JavaScript attribute for the JSF component instance that is intended to cause the partial submit.
The granularity at which partial submits occur is entirely under developer control. In certain cases, it may be appropriate to evaluate and react to user input on a per-keystroke-basis, and in other cases, it may be appropriate as focus moves between controls. In still other cases, only specific controls in the form would initiate a partial submit.
Figure 9 Partial Submit Based on OnBlur
The backing application logic associated with a partial submit is also entirely under developer control. The standard JSF validator mechanism can be leveraged, or any other arbitrarily complex or simple evaluation logic can be applied. If standard JSF validators are used, it is important to design these validators to facilitate partial submits.
ICEfaces Developer’s Guide v1.8 13

Key Concepts
The Address Form demo from the ICEfaces samples illustrates a couple of different mechanisms that can be leveraged under a partial submit. Standard validators are attached to City, State, and ZIP input fields to catch invalid entries, but inter-field evaluation on the {City:State:ZIP}-tuple is also performed. Using valueChangedEvents associated with these input controls, it is possible to do inter-field analysis and morph the form based on current input. For example, entering a valid City will cause the State input control to change from an input text control to a select-one-of-many controls containing only the States that have a matching City.
ICEfaces Developer’s Guide v1.8 14
Key Concepts
Components and Styling
JSF is a component-based architecture, and as such, JSF application User Interfaces are constructed from a set of nested components. The JSF specification includes a number of standard components, but also provides for adding custom components to the JSF runtime environment. This extensible component architecture is leveraged in ICEfaces to support the standard components as well as several collections of custom components.
From the developer’s perspective, a component is represented with a tag in a JSF page, and the tag library descriptor (TLD) for that tag defines a component class, and a renderer class for the component. At runtime, TLDs configured into the web application are parsed, and assembled into a RenderKit, the default for JSF being the html_basic RenderKit. ICEfaces utilizes the html_basic RenderKit but replaces standard HTML renderers with Direct-to-DOM renderers.
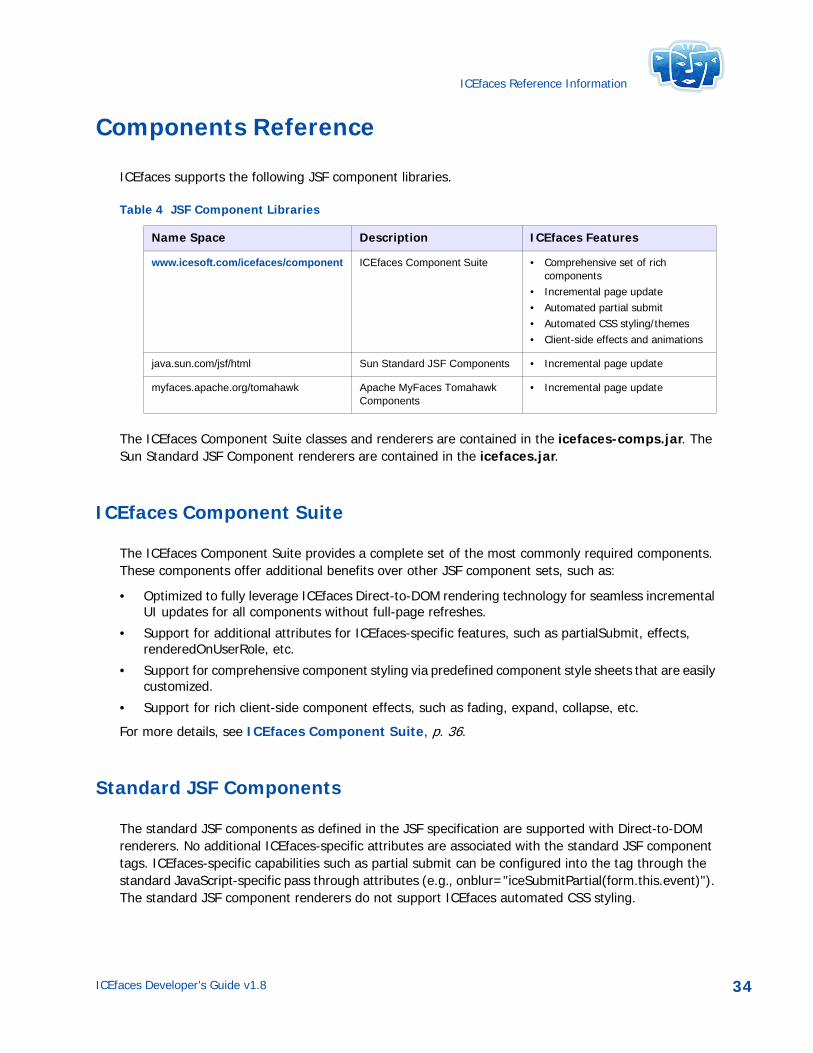
Table 1 identifies the component libraries (name spaces) that ICEfaces supports.
Table 1 ICEfaces-supported Component Libraries.
See Components Reference, p. 34 for more information on using the component libraries with ICEfaces.
Cascading Style Sheets (CSS) Styling
The purpose of Cascading Style Sheets (CSS) is to separate style from markup. ICEfaces encourages and supports this approach in the ICEfaces Component Suite by supporting automated component styling based on common CSS class definitions. This means that when the ICEfaces Component Suite is used to develop applications, those applications can be quickly and consistently re-skinned with a different look by replacing the CSS with a new CSS. More information about styling the ICEfaces Component Suite can be found in Styling the ICEfaces Component Suite, p. 41.
Name Space Description ICEfaces Features
www.icesoft.com/icefaces/component ICEfaces Component Suite • Comprehensive set of rich components
• Incremental page update• Automated partial submit• Automated CSS styling/
themes• Client-side effects and animations
java.sun.com/jsf/html Sun Standard JSF Components • Incremental page update
myfaces.apache.org/tomahawk Apache MyFaces Tomahawk Components
• Incremental page update
ICEfaces Developer’s Guide v1.8 15

Key Concepts
Other Custom Components
ICEfaces adheres to the extensible component architecture of JSF, and therefore supports inclusion of other custom components. Most existing custom components that use HTML-based renderers should integrate seamlessly into an ICEfaces application. However, if the component renderer incorporates significant JavaScript in its implementation or relies on Ajax techniques itself for its functionality, the likelihood of a conflict between the component JavaScript and the ICEfaces Bridge JavaScript is high, and can result in unpredictable behavior.
The most effective way to incorporate a new component into an ICEfaces application is to develop a standard JSF custom component that uses the ResponseWriter mechanism to render HTML markup. For an example of such a component, refer to the ice:inputText component renderer implementation, which can be found in the following file in the ICEfaces source distribution bundle: icefaces/core/src/com/icesoft/faces/renderkit/dom_html_basic/InputTextRenderer.java
ICEfaces Developer’s Guide v1.8 16
Key Concepts
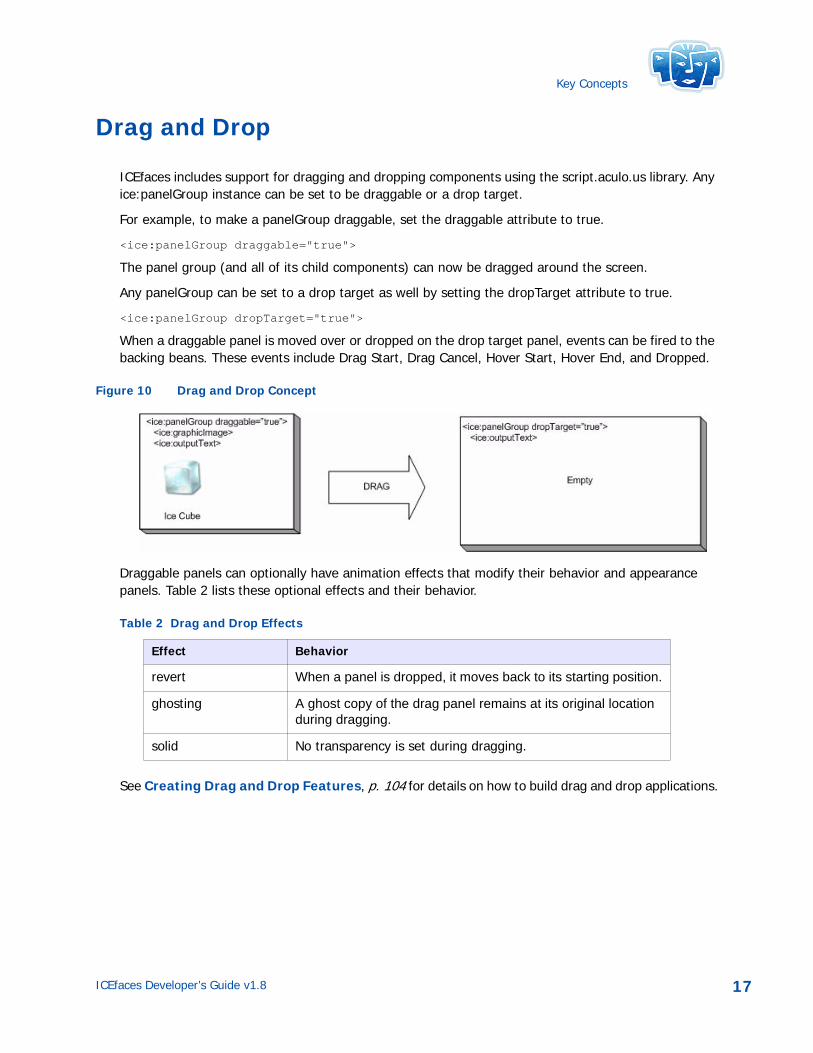
Drag and Drop
ICEfaces includes support for dragging and dropping components using the script.aculo.us library. Any ice:panelGroup instance can be set to be draggable or a drop target.
For example, to make a panelGroup draggable, set the draggable attribute to true.
<ice:panelGroup draggable="true">
The panel group (and all of its child components) can now be dragged around the screen.
Any panelGroup can be set to a drop target as well by setting the dropTarget attribute to true.
<ice:panelGroup dropTarget="true">
When a draggable panel is moved over or dropped on the drop target panel, events can be fired to the backing beans. These events include Drag Start, Drag Cancel, Hover Start, Hover End, and Dropped.
Figure 10 Drag and Drop Concept
Draggable panels can optionally have animation effects that modify their behavior and appearance panels. Table 2 lists these optional effects and their behavior.
Table 2 Drag and Drop Effects
See Creating Drag and Drop Features, p. 104 for details on how to build drag and drop applications.
Effect Behavior
revert When a panel is dropped, it moves back to its starting position.
ghosting A ghost copy of the drag panel remains at its original location during dragging.
solid No transparency is set during dragging.
ICEfaces Developer’s Guide v1.8 17
Key Concepts
Effects
ICEfaces uses the script.aculo.us library to provide animation effects. Effects can be easily invoked on components using the effect attribute. The value of the effect attribute is a value binding expression to a backing bean which returns the effect to invoke.
<ice:outputText effect="#{bean.messageEffect}"/>
Effects can be customized by modifying the properties of the effect object being used. For example, the effect duration could be changed. For more information, refer to Adding and Customizing Effects, p. 107.
Browser-Invoked Effects
Effects can also be tied to browser events, such as onmouseover.
<ice:outputText onmouseovereffect="#{bean.mouseOverEffect}"/>
These effects will be invoked each time the mouse moves over the outputText component.
See Adding and Customizing Effects, p. 107 for details on how to add effects in your ICEfaces application.
ICEfaces Developer’s Guide v1.8 18
Key Concepts
Concurrent DOM Views
By default, each ICEfaces user can have only one dynamically updated page per web application. In this configuration, a single DOM is maintained for each user session. Reloading an ICEfaces page synchronizes the browser to the server-side DOM. Opening a new browser window into the same application, however, leads to page corruption as DOM updates may be applied unpredictably to either window.
To allow multiple windows for a single application, concurrent DOM views must be enabled. See Configuring web.xml, p. 29 to configure the web.xml file for concurrent DOM views.
With concurrent DOM views enabled, each browser window is distinctly identified with a view number and DOM updates will be correctly applied to the appropriate window. This introduces some important considerations for the application data model. Managed beans in session scope can now be shared across multiple views simultaneously. This may be the desired scope for some states, but typically, presentation-related state is more appropriately kept in request scope. For example:
<managed-bean> <managed-bean-name>BoxesCheckedBean</managed-bean-name> <managed-bean-class>com.mycompany.BoxesCheckedBean</managed-bean-class> <managed-bean-scope>request</managed-bean-scope>
</managed-bean>
Note: The ICEfaces request scope is typically longer lived than the request scope for non-dynamic applications. An ICEfaces request begins with the initial page request and remains active through user interactions with that page (such user interactions would normally each require a new request). One consideration is that new browser windows and page reloads of the same browser window are both regarded as new requests. Therefore, it is important to implement the dynamic aspects of the ICEfaces application so that asynchronous notifications are applied to all active requests and not just the initial one.
For applications that do not make use of Concurrent DOM views and require request scope to last only for the duration of a single user event, “standard request scope” must be enabled. See Configuring web.xml, p. 29 to configure the web.xml file for “standard request scope”.
Table 3 shows a summary of the Managed Bean Scope.
Table 3 Managed Bean Scope
State Managed Bean Scope
none For transient data.
request For typical view-related state, request-scope beans will persist through most user interaction but not through view changes. This is the recommended scope for ICEfaces applications that make use of multiple windows.
session For state that must be shared across views.
application For state that must be shared across users.
ICEfaces Developer’s Guide v1.8 19

Key Concepts
If concurrent DOM views is configured, and multiple windows are created by the user, ICEfaces uses a single blocking connection to deliver asynchronous updates to all views in the session. This ensures that all views remain current without exceeding the maximum connection limit implemented in the browser. When views are destroyed by the user, it may be necessary to release view-specific resources such as threads or database connections. A listener mechanism has been added to support this.
See The DisposableBean Interface, p. 61 for details.
ICEfaces Developer’s Guide v1.8 20

Key Concepts
Integrating ICEfaces With Existing Applications
JSP Inclusion
ICEfaces can be easily integrated with existing JSP-based applications through the dynamic JSP inclusion mechanism. Once you have developed a standalone page with the desired ICEfaces dynamic content, simply include that page into your existing JSP page with the following statement:
<jsp:include page="/content.iface" />
Note: Navigation (such as hyperlinks) from the embedded ICEfaces content will cause the entire page to be reloaded, but other interaction with the application will be incrementally updated in-place on the page.
Included ICEfaces pages must contain a <body> tag as the current implementation uses this tag as a marker. The contents of the <body> tag is precisely the content that is dynamically inserted into the including page. This restriction will be removed in a future release.
While using dynamic include is a suitable way to embed ICEfaces content into an existing non-ICEfaces JSP page, using dynamic include to embed content within an ICEfaces JSP page is not recommended. To include the content of one ICEfaces JSP in another ICEfaces JSP, the static inclusion syntax should be used:
For JSP:
<%@ include file="relativeURL" %>
For JSPX:
<jsp:directive.include file="relativeURL" />
JSF Integration
In most cases, the goal of adding ICEfaces to a JSF application will be to transform the entire application into an Ajax application, but there may be reasons for converting only parts over to ICEfaces. To handle some pages with ICEfaces and other pages with the JSF default mechanism, add the ICEfaces Servlet mappings for the ".iface" extension (as described in Configuration Reference, p. 29 of this document) but do not remove the “Faces Servlet” mapping or Servlet initialization. Pages served through the default Faces Servlet are to be handled without ICEfaces. Then, to ensure that Direct-to-DOM renderers are applied to ICEfaces pages only, include “just-ice.jar” rather than “icefaces.jar” in your web application libraries. This .jar file contains a version of ICEfaces configured with a ViewHandler that will process only those pages with a “.iface” extension and a RenderKit that will not override the standard JSF components (such as <h:commandLink />) with Direct-to-DOM renderers. In this configuration, ICEfaces pages must contain only standard core JSF tags (“f:” tags) and ICEfaces tags (“ice:” tags).
ICEfaces Developer’s Guide v1.8 21

Key Concepts
Facelets
Facelets is an emerging standard and open source implementation, which provides a templating environment for JSF and eliminates the need for JSP processing. ICEfaces has been integrated with Facelets so the ICEfaces developers can take advantage of its capabilities. You can learn more about Facelet development at:
https://facelets.dev.java.net/
Refer to Steps 6 and 7 in Chapter 4, ICEfaces Tutorial: The TimeZone Application, of the ICEfaces Getting Started Guide for details on how to port an existing ICEfaces application to run with Facelets, and how to leverage Facelet templating to implement ICEfaces applications.
ICEfaces Developer’s Guide v1.8 22

Chapter 4 ICEfaces Reference Information
This chapter includes additional information for the following:
• JSP Markup Reference
• Java API Reference
• JavaScript API Reference
• Configuration Reference
• Components Reference
• ICEfaces Component Suite
• ICEfaces Library Dependencies
ICEfaces Developer’s Guide v1.8 23
ICEfaces Reference Information
JSP Markup Reference
ICEfaces supports the JavaServer Faces JSP Document syntax, but does not process these documents via the standard JSP compilation/execution cycle. Instead, ICEfaces parses input documents directly, and assembles a JSF component tree by executing the given tags. This approach allows precise adherence to the ordering of JSF and XHTML content in the input document, thereby making the JSP Document syntax more suitable to web designers. Since Direct-to-DOM rendering makes use of a server-side DOM containing the output of the current page, it is necessary that the input document be readily represented as a DOM. This requires that the input be well-formed XML, which is the expected case for JSP Documents, but may not be adhered to in certain JSP pages. To handle JSP pages, ICEfaces converts them into JSP documents on the fly, performing a small set of transformations aimed at well-formedness (such as converting “<br>” to “<br/>”), before passing the document to the parser.
While parsing documents directly does resolve ordering problems currently present with JSP and JSF, some restrictions are introduced:
• Well-formed XHTML markup is recommended; the conversion process can only repair simple well-formedness errors. In particular, the JSP namespace must be declared (as shown below) in order for a JSP document to parse properly.xmlns:jsp="http://java/sun.com/JSP/Page"
• JSP directives, JSP expressions and inline Java code are all ignored.
• Custom JSP tags are not supported in general as ICEfaces only executes JSP tags initially to assemble the JSF component tree (JSF tags with complex processing may also not function as expected).
• ICEfaces supports the following JSP inclusion mechanisms:
— <%@ include %> and <jsp:directive.include />: The contents of the given file will be included in the input prior to parsing. This is currently the recommended inclusion mechanism with this ICEfaces release.
— <jsp:include />: The ICEfaces parser initiates a local HTTP request to perform dynamic inclusion. The current session is preserved, but otherwise the inclusion shares no state with the including page. If possible, use static inclusion with the current ICEfaces Release.
• Deprecated XHTML tags may create unexpected results in certain browsers, and should be avoided. Page authors should use style sheets to achieve stylistic and formatting effects rather than using deprecated XHTML presentation elements. In particular, the <font> tag is known to cause issues in certain browsers.
• To produce a non-breaking space in output use “&nbsp;” instead of “ ”.
ICEfaces Developer’s Guide v1.8 24
ICEfaces Reference Information
Java API Reference
Refer to the ICEfaces SDK API included with this release. The API can also be found at:
http://documentation.icefaces.org/
Refer to the ICEfaces components API included with this release. The API can also be found at:
http://documentation.icefaces.org/
The javadoc can also be found in the docs directory of this release.
ICEfaces Developer’s Guide v1.8 25
ICEfaces Reference Information
JavaScript API Reference
This section contains information for the following:
• Partial and Full Submit
• View Removal
Partial and Full Submit
The ICEfaces Ajax bridge provides a couple of JavaScript functions that developers may find useful in certain situations. The functions are:
• iceSubmit(form, component, event)
• iceSubmitPartial(form, component, event)
The parameters for each are:
form: The form that is being submitted.
component: The component that is triggering the submit.
event: The event that is being handled by the component.
In most cases, the components provided with ICEfaces render out and use these functions appropriately for the common use cases. For example, if you use the commandButton component, the rendered output from the component binds the iceSubmit function to the button’s onClick() handler. For components that support the partialSubmit attribute, like the commandButton, setting the partialSubmit attribute to true causes the renderer to bind the iceSubmitPartial function instead. See Table 5, p. 36 for a list of components that support the partialSubmit attribute.
However, there may be situations where the common usage does not apply or where you would simply like to customize the behavior of the component. In those cases, you can use the bridge functions yourself to change how or when the form submission is done.
For example, suppose you have a login page where you have a couple of input fields and a login button. Perhaps you would like the login button to stay disabled until you have values for both the username and the password. However, the default partial submit behavior is bound to onBlur, so the button cannot be enabled until the user tabs out of the password field. It is more intuitive to have the login button enabled after any text is typed in. This can be done like this:
<h:inputSecret id="password" value="#{login.password}"onkeyup="setFocus('');iceSubmitPartial(form,this,event); return false;"redisplay="true" />
Rather than set the partialSubmit attribute to true, which would cause the component to call iceSubmitPartial in onBlur, you can directly call the iceSubmitPartial function in the handler that best suits your application design.
ICEfaces Developer’s Guide v1.8 26
ICEfaces Reference Information
View Removal
Under normal circumstances ICEfaces automatically handles disposal of server-side state associated with a view when that view is closed in the browser. However, in certain portal environments portlets can be removed dynamically from the page without triggering a full page refresh. In this situation, ICEfaces needs to be notified about the portlet removal to properly dispose the view corresponding to the portlet instance. Failure to do so could result in the view being retained until the user session expires or is terminated.
To facilitate timely view disposal in these cases, ICEfaces provides the disposeOnViewRemoval public Javascript function that should be invoked by the portal container before it removes the portlet instance from the page. The function takes only one parameter which has to be a Javascript string representing the ID of an element that is the parent of the HTML fragment rendered by ICEfaces.
For example, if the the element with id="A" is the parent element rendered by the portal and the element with id="B" is the ice:portlet container (div) rendered by ICEfaces, the portal container will have to render a script tag that will wire-up the listener that will invoke ICEfaces’ public function disposeOnViewRemoval when the view is closed by the user. In this example, onPortletRemove is just a fictitious function that registers the callback invoked on portlet removal, which is invoked by the portal container when the user closes the view (this function should be replaced with portal specific code by the implementor).
<div id="A"> <script type="text/javascript">onPortletRemove(function() { disposeOnViewRemoval('A');}); </script> .... .... <div id="B"> .... .... </div> .... ....</div>
Bridge Connection Status Events
The ICEfaces Ajax bridge supports a set of callback APIs that can be used to implement custom JavaScript behaviors in response to bridge connection management events. These functions are:
• Ice.onSendReceive(id, sendCallback, receiveCallback)
• Ice.onAsynchronousReceive(id, callback)
• Ice.onServerError(id, callback) Note: The onServerError callback function must provide an argument to receive the body of the error page content.
• Ice.onSessionExpired(id, callback)
• Ice.onConnectionTrouble(id, callback)
ICEfaces Developer’s Guide v1.8 27
ICEfaces Reference Information
• Ice.onConnectionLost(id, callback)
The parameters used are described in the following table:
By implementing these JavaScript callbacks application developers can create custom indicators and reactions for these events. For example, to show a JavaScript alert popup on session expiry this is what is needed:
<body id="document:body"> <script type="text/javascript"> Ice.onSessionExpired('document:body', function() { alert('Session has expired!'); }); </script>
Parameter Description
id the identifier of an element that is the parent or the child of the element owning the bridge instance (most of the time is the ‘body’ element)
callback callback invoked when event occurs
sendCallback callback invoked when the request is initiated
receiveCallback callback invoked when response is received
ICEfaces Developer’s Guide v1.8 28

ICEfaces Reference Information
Configuration Reference
This section explains some of the main configurations that should be considered when using ICEfaces, but is not comprehensive. For a complete overview of all the available ICEfaces configuration parameters, see Appendix B ICEfaces Configuration Parameter Overview, p. 114.
Configuring faces-config.xml
The icefaces.jar file contains a faces-config.xml file that configures the ICEfaces extensions. Specifically, the configuration file registers the Direct-to-DOM renderers. There is no need for the developer to modify the ICEfaces faces-config.xml.
Configuring web.xml
Servlet Registration and MappingsThe application’s web.xml file must include necessary Servlet registration and mappings.
The ICEfaces Servlets are registered as follows:
<servlet><servlet-name>Persistent Faces Servlet</servlet-name><servlet-class> com.icesoft.faces.webapp.xmlhttp.PersistentFacesServlet
</servlet-class><load-on-startup> 1 </load-on-startup>
</servlet>
<servlet><servlet-name>Blocking Servlet</servlet-name><servlet-class>com.icesoft.faces.webapp.xmlhttp.BlockingServlet</servlet-class><load-on-startup> 1 </load-on-startup>
</servlet>
The Servlet mappings are established as follows:
<servlet-mapping><servlet-name>Faces Servlet</servlet-name><url-pattern>*.jspx</url-pattern>
</servlet-mapping>
<servlet-mapping><servlet-name>Persistent Faces Servlet</servlet-name><url-pattern>*.iface</url-pattern>
</servlet-mapping>
<servlet-mapping><servlet-name>Persistent Faces Servlet</servlet-name><url-pattern>/xmlhttp/*</url-pattern>
</servlet-mapping>
<servlet-mapping>
ICEfaces Developer’s Guide v1.8 29
ICEfaces Reference Information
<servlet-name>Blocking Servlet</servlet-name><url-pattern>/block/*</url-pattern>
</servlet-mapping>
Defining the Context Listener This is a not a parameter, per se, but a listener that is typically configured by default because it sits in icefaces.jar/META-INF/include.tld as:
<listener> <listener-class> com.icesoft.faces.util.event.servlet.ContextEventRepeater </listener-class> </listener>
The ContextEventRepeater implements both the HttpSessionListener and ServletContextListener interfaces and was designed to forward servlet events to different parts of the ICEfaces framework. These events are typically of interest for gracefully and/or proactively keeping track of valid sessions and allowing for orderly shut down.
Application servers that don’t support configuring listeners this way may need to include this listener in their web.xml document:
<listener> <listener-class> com.icesoft.faces.util.event.servlet.ContextEventRepeater </listener-class> </listener>
Asynchronous vs. Synchronous UpdatesBy default, ICEfaces runs in asynchronous update mode, which provides support for ICEfaces unique server-initiated rendering (Ajax Push) capabilities. However, many applications do not require the full capabilities provided by asynchronous update mode. In these cases, it is recommended that synchronous update mode be configured.
Synchronous update mode can be enabled application-wide using the ICEfaces context parameter, com.icesoft.faces.synchronousUpdate. Typically this is set in the web.xml file of your web application as follows.
<context-param><param-name>com.icesoft.faces.synchronousUpdate</param-name><param-value>true</param-value>
</context-param>
There is no advantage to using asynchronous update mode for applications that do not use server-initiated rendering, and there are additional resource requirements associated with its use. See Optimizing Asynchronous Communications for Scalability, p. 70. Synchronous update mode should be used if your application does NOT use the ICEfaces server-initiated rendering features. When synchronous update mode is configured, monitoring and maintaining continuous connections to the server is not required. Instead, a connection is created for each user-initiated request, just as with any non-ICEfaces web-application.
ICEfaces Developer’s Guide v1.8 30
ICEfaces Reference Information
Note: When deploying multiple asynchronous ICEfaces applications to the same application server/host-name, it is necessary to also deploy the ICEfaces Push Server. Refer to Push Server, p. 74. for more information.
Concurrent ViewsTo allow multiple windows for a single application, concurrent DOM views must be enabled. This is set through the ICEfaces context parameter, com.icesoft.faces.concurrentDOMViews. Typically, this is set in the web.xml file of your web application:
<context-param><param-name>com.icesoft.faces.concurrentDOMViews</param-name> <param-value>true</param-value>
</context-param>
Standard Request ScopeTo cause request scope to last only for the duration of a single user event, “standard request scope” must be enabled. This is set through the ICEfaces context parameter, com.icesoft.faces.standardRequestScope.
Typically this is set in the web.xml file of your web application:
<context-param><param-name>com.icesoft.faces.standardRequestScope</param-name><param-value>true</param-value>
</context-param>
Redirect on JavaScript BlockedSome browsers are configured to block JavaScript interpretation or some browsers cannot interpret JavaScript content. For these instances, ICEFaces can be configured to redirect the browser to a custom error page.
This feature can be turned on application-wide using the ICEfaces context parameter, com.icesoft.faces.javascriptBlockedRedirectURI.
<context-param><param-name>com.icesoft.faces.javascriptBlockedRedirectURI</param-name><param-value>...custom error page URL....</param-value>
</context-param>
If not specified, by default the server will send an HTTP error code ‘403 - Javascript not enabled’. This is to avoid any ambiguity, since the accessed page would be rendered but any interaction with it would be impossible.
ICEfaces Developer’s Guide v1.8 31

ICEfaces Reference Information
Compressing ResourcesResources such as JavaScript and CSS files can be compressed when sent to the browser, improving application load time in certain deployments. The configuration works independently from the web-server configuration.
By default, ICEfaces will compress key resources. This may cause problems in configurations whereby another component is also configured to compress resources, such as certain portal containers. If necessary, you can disable it using the ICEfaces context parameter, com.icesoft.faces.compressResources.
<context-param><param-name>com.icesoft.faces.compressResources</param-name><param-value>false</param-value>
</context-param>
Further customization of ICEfaces resource compression behavior is possible, such as specifying specific file types to be compressed. For more information, see the compressResources and compressResourcesExclusions configuration parameters in Appendix B ICEfaces Configuration Parameter Overview, p. 114.
Busy Indicator By default, ICEfaces presents a busy indictor (hourglass cursor) and blocks user-interface events via the mouse while a submit or partial-submit is being processed.This feature provides the user with a visual indication that the application is busy and also prevents them from triggering additional submits while the previous submit is being processed. This prevents users from “chaining” multiple user interface events/submits while results from previous events are pending, which could result in confusing application behavior as the user-interface lags and then “catches” up with the user interactions.
This feature can be disabled by specifying the following configuration parameter in the web.xml file of your web application:
<context-param> <param-name>com.icesoft.faces.blockUIOnSubmit</param-name> <param-value>false</context-param>
</context-param>
Further customization of ICEfaces Ajax bridge behaviors is possible, such as implementing a custom busy indicator in JavaScript for your application. For more information, see Bridge Connection Status Events, p. 27.
File Upload
Applications that use the ice:fileUpload component must configure the upload servlet:
<!-- file upload Servlet --> <servlet> <servlet-name>uploadServlet</servlet-name> <servlet-class> com.icesoft.faces.component.inputfile.FileUploadServlet
ICEfaces Developer’s Guide v1.8 32
ICEfaces Reference Information
</servlet-class> <load-on-startup> 1 </load-on-startup> </servlet>
The maximum file upload size can be specified in the web.xml file of your web application as follows:
<context-param> <param-name>com.icesoft.faces.uploadMaxFileSize</param-name> <param-value>1048576</param-value></context-param>
If not specified the default value for file upload is 10485760 bytes (10 megabytes).
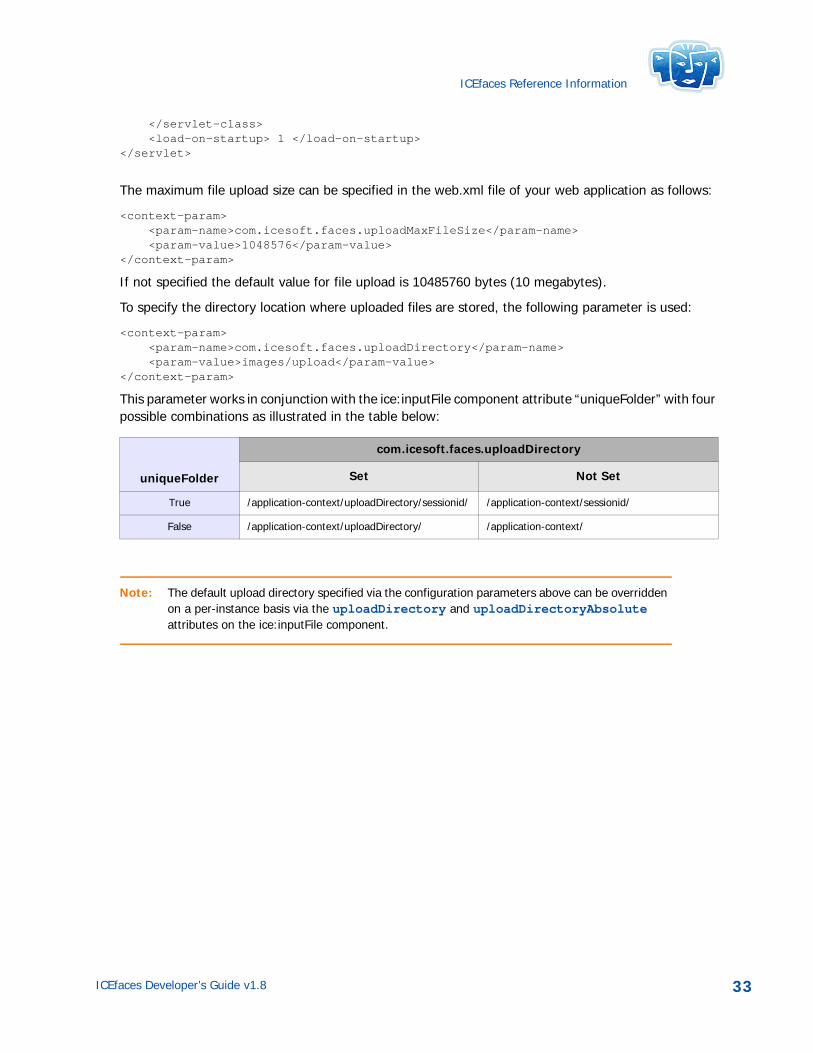
To specify the directory location where uploaded files are stored, the following parameter is used:
<context-param> <param-name>com.icesoft.faces.uploadDirectory</param-name> <param-value>images/upload</param-value></context-param>
This parameter works in conjunction with the ice:inputFile component attribute “uniqueFolder” with four possible combinations as illustrated in the table below:
Note: The default upload directory specified via the configuration parameters above can be overridden on a per-instance basis via the uploadDirectory and uploadDirectoryAbsolute attributes on the ice:inputFile component.
uniqueFolder
com.icesoft.faces.uploadDirectory
Set Not Set
True /application-context/uploadDirectory/sessionid/ /application-context/sessionid/
False /application-context/uploadDirectory/ /application-context/
ICEfaces Developer’s Guide v1.8 33
ICEfaces Reference Information
Components Reference
ICEfaces supports the following JSF component libraries.
Table 4 JSF Component Libraries
The ICEfaces Component Suite classes and renderers are contained in the icefaces-comps.jar. The Sun Standard JSF Component renderers are contained in the icefaces.jar.
ICEfaces Component Suite
The ICEfaces Component Suite provides a complete set of the most commonly required components. These components offer additional benefits over other JSF component sets, such as:
• Optimized to fully leverage ICEfaces Direct-to-DOM rendering technology for seamless incremental UI updates for all components without full-page refreshes.
• Support for additional attributes for ICEfaces-specific features, such as partialSubmit, effects, renderedOnUserRole, etc.
• Support for comprehensive component styling via predefined component style sheets that are easily customized.
• Support for rich client-side component effects, such as fading, expand, collapse, etc.
For more details, see ICEfaces Component Suite, p. 36.
Standard JSF Components
The standard JSF components as defined in the JSF specification are supported with Direct-to-DOM renderers. No additional ICEfaces-specific attributes are associated with the standard JSF component tags. ICEfaces-specific capabilities such as partial submit can be configured into the tag through the standard JavaScript-specific pass through attributes (e.g., onblur="iceSubmitPartial(form.this.event)"). The standard JSF component renderers do not support ICEfaces automated CSS styling.
Name Space Description ICEfaces Features
www.icesoft.com/icefaces/component ICEfaces Component Suite • Comprehensive set of rich components
• Incremental page update• Automated partial submit• Automated CSS styling/themes• Client-side effects and animations
java.sun.com/jsf/html Sun Standard JSF Components • Incremental page update
myfaces.apache.org/tomahawk Apache MyFaces Tomahawk Components
• Incremental page update
ICEfaces Developer’s Guide v1.8 34
ICEfaces Reference Information
In certain cases it may not be desirable to have the ICEfaces Direct-to-DOM renderers replace the standard HTML renderers for the “h:” components, such as when you have complete JSF pages that are based on the standard “h:” component functionality and you do not want ICEfaces processing these pages. It is possible to configure ICEfaces to correctly support this scenario using the “just-ice.jar”. Refer to JSF Integration, p. 21 for more information.
Apache MyFaces Tomahawk Components
It is possible to integrate MyFaces Tomahawk components with ICEfaces and ICEfaces Component Suite Components on the same page. Any Tomahawk components used with ICEfaces will benefit from incremental UI updates. All other aspects of using the Tomahawk components will remain the same. For detailed information on using the MyFaces Tomahawk components with ICEfaces, refer to this related ICEfaces Knowledge Base article, Status of ICEfaces Support for MyFaces Tomahawk Components, which can be found on the ICEsoft Online Support Center (http://support.icesoft.com).
ICEfaces Developer’s Guide v1.8 35
ICEfaces Reference Information
ICEfaces Component Suite
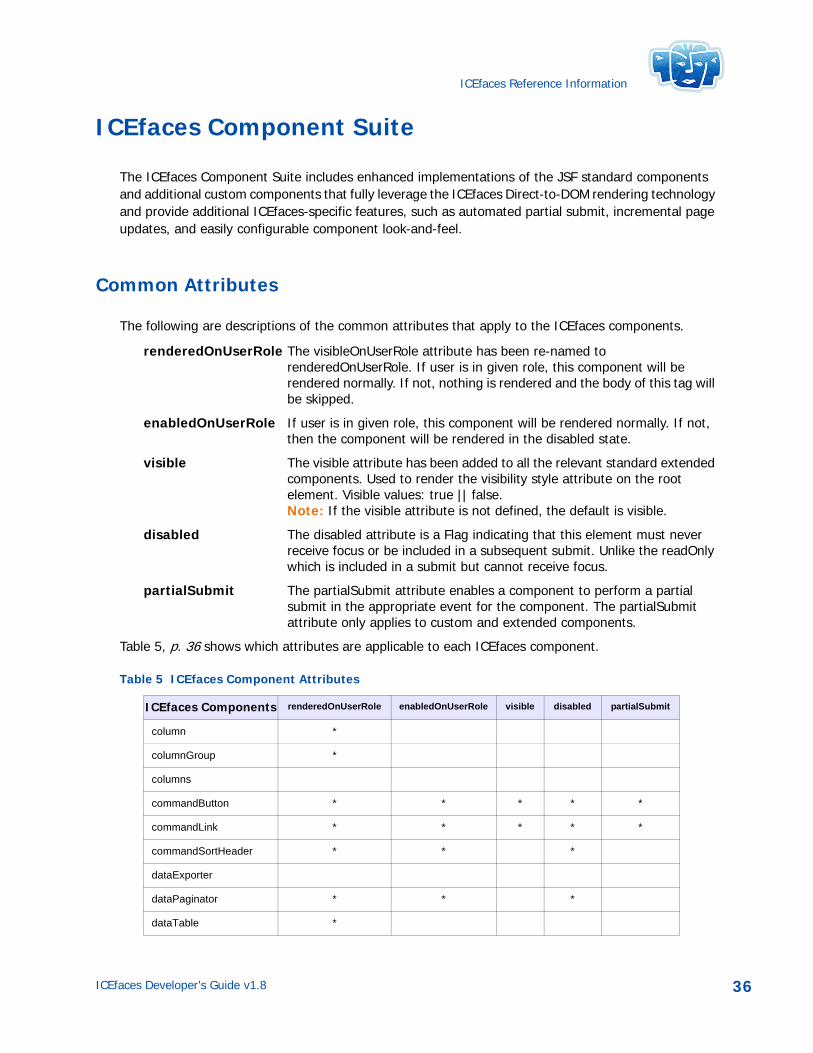
The ICEfaces Component Suite includes enhanced implementations of the JSF standard components and additional custom components that fully leverage the ICEfaces Direct-to-DOM rendering technology and provide additional ICEfaces-specific features, such as automated partial submit, incremental page updates, and easily configurable component look-and-feel.
Common Attributes
The following are descriptions of the common attributes that apply to the ICEfaces components.
renderedOnUserRole The visibleOnUserRole attribute has been re-named to renderedOnUserRole. If user is in given role, this component will be rendered normally. If not, nothing is rendered and the body of this tag will be skipped.
enabledOnUserRole If user is in given role, this component will be rendered normally. If not, then the component will be rendered in the disabled state.
visible The visible attribute has been added to all the relevant standard extended components. Used to render the visibility style attribute on the root element. Visible values: true || false. Note: If the visible attribute is not defined, the default is visible.
disabled The disabled attribute is a Flag indicating that this element must never receive focus or be included in a subsequent submit. Unlike the readOnly which is included in a submit but cannot receive focus.
partialSubmit The partialSubmit attribute enables a component to perform a partial submit in the appropriate event for the component. The partialSubmit attribute only applies to custom and extended components.
Table 5, p. 36 shows which attributes are applicable to each ICEfaces component.
Table 5 ICEfaces Component Attributes
ICEfaces Components renderedOnUserRole enabledOnUserRole visible disabled partialSubmit
column *
columnGroup *
columns
commandButton * * * * *
commandLink * * * * *
commandSortHeader * * *
dataExporter
dataPaginator * * *
dataTable *
ICEfaces Developer’s Guide v1.8 36
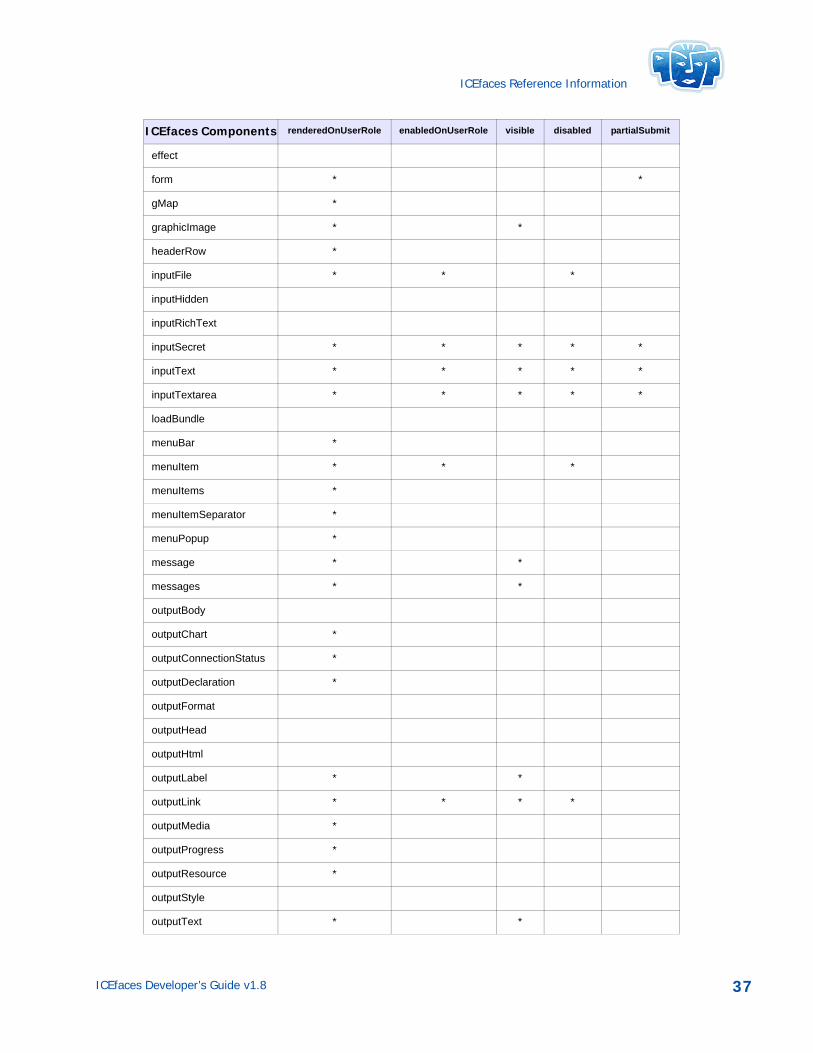
ICEfaces Reference Information
effect
form * *
gMap *
graphicImage * *
headerRow *
inputFile * * *
inputHidden
inputRichText
inputSecret * * * * *
inputText * * * * *
inputTextarea * * * * *
loadBundle
menuBar *
menuItem * * *
menuItems *
menuItemSeparator *
menuPopup *
message * *
messages * *
outputBody
outputChart *
outputConnectionStatus *
outputDeclaration *
outputFormat
outputHead
outputHtml
outputLabel * *
outputLink * * * *
outputMedia *
outputProgress *
outputResource *
outputStyle
outputText * *
ICEfaces Components renderedOnUserRole enabledOnUserRole visible disabled partialSubmit
ICEfaces Developer’s Guide v1.8 37
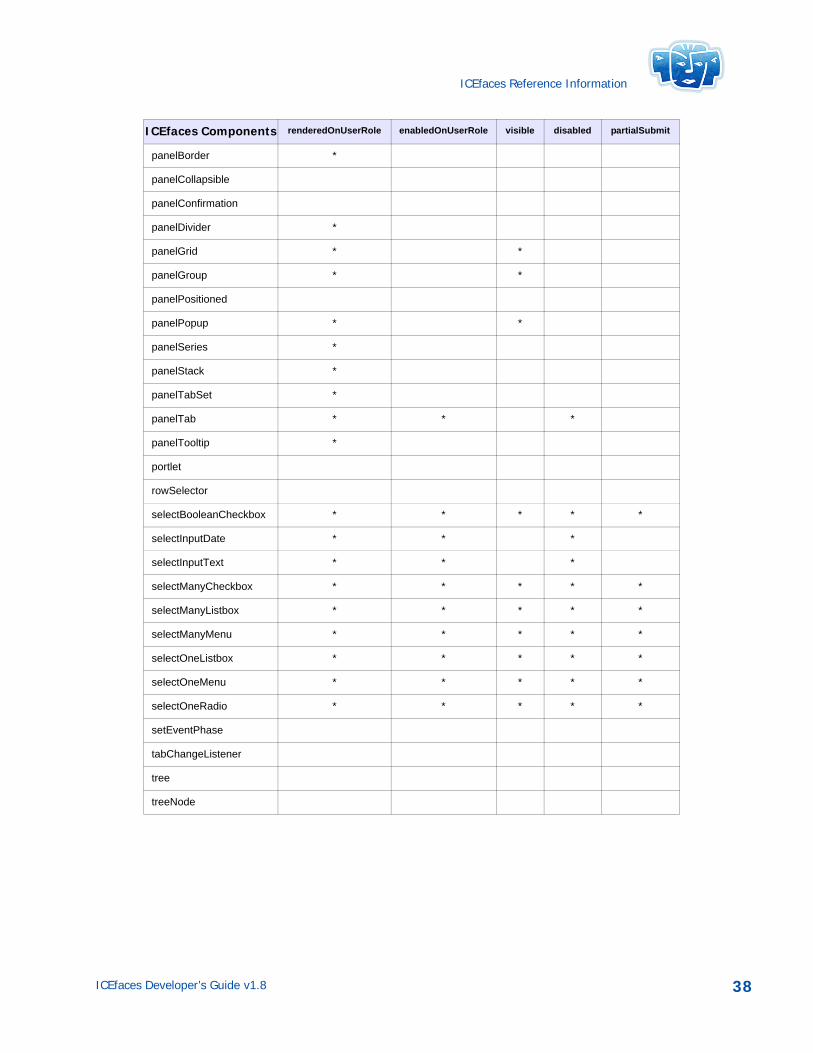
ICEfaces Reference Information
panelBorder *
panelCollapsible
panelConfirmation
panelDivider *
panelGrid * *
panelGroup * *
panelPositioned
panelPopup * *
panelSeries *
panelStack *
panelTabSet *
panelTab * * *
panelTooltip *
portlet
rowSelector
selectBooleanCheckbox * * * * *
selectInputDate * * *
selectInputText * * *
selectManyCheckbox * * * * *
selectManyListbox * * * * *
selectManyMenu * * * * *
selectOneListbox * * * * *
selectOneMenu * * * * *
selectOneRadio * * * * *
setEventPhase
tabChangeListener
tree
treeNode
ICEfaces Components renderedOnUserRole enabledOnUserRole visible disabled partialSubmit
ICEfaces Developer’s Guide v1.8 38
ICEfaces Reference Information
Enhanced Standard Components
The standard JSF components have been enhanced to support ICEfaces partial page rendering, partialSubmit of editable components, and the ability to enable or disable and show or hide components based on user role.
The enhanced standard components included in the ICEfaces Component Suite are:
• commandButton
• commandLink
• dataTable
— column
• form
• graphicImage
• inputHidden
• inputSecret
• inputText
• inputTextarea
• message
• messages
• outputFormat
• outputLabel
• outputLink
• outputMedia
• outputText
• panelGrid
• panelGroup
• selectBooleanCheckbox
• selectManyCheckbox
• selectManyListbox
• selectManyMenu
• selectOneListbox
• selectOneMenu
• selectOneRadio
ICEfaces Custom Components
The ICEfaces Component Suite also includes a set of custom components that fully leverage the ICEfaces Direct-to-DOM rendering technology.
The following custom components are provided:
• dataExporter
ICEfaces Developer’s Guide v1.8 39
ICEfaces Reference Information
• dataTable
— column
— columnGroup (new)
— columns
— commandSortHeader
— dataPaginator
— headerRow (new)
— rowSelector
• effect
• gMap
— gMapControl
— gMapDirection
— gMapGeoXml
— gMapLatLng
— gMaplatLngs
— gMapMarker
• inputFile
• inputRichText
• loadBundle
• menuBar
— menuItem
— menuItems
— menuItemSeparator
• menuPopup
• outputBody
• outputChart
• outputConnectionStatus
• outputDeclaration
• outputFormat
• outputHead
• outputHtml
• outputProgress
• outputResource
• outputStyle
• panelBorder
• panelCollapsible
• panelConfirmation
• panelDivider
ICEfaces Developer’s Guide v1.8 40
ICEfaces Reference Information
• panelGroup
• panelPositioned
• panelPopup
• panelSeries
• panelStack
• panelTabSet
— panelTab
• panelTooltip
• portlet
• selectInputDate
• selectInputText
• setEventPhase
• tree
— treeNode
For more information about the ICEfaces Component Suite, see the following resources:
• ICEfaces Component Showcase demo
• ICEfaces Component Suite TLD (taglib)
Styling the ICEfaces Component Suite
The ICEfaces Component Suite fully supports consistent component styling via a set of predefined CSS style classes and associated images. Changing the component styles for a web application developed with the ICEfaces Component Suite is as simple as changing the CSS used.
A set of predefined style sheets are available to be used as-is, or customized to meet the specific requirements of the application. There are four predefined ICEfaces style sheets included:
• rime.css
• rime-portlet.css (for use when developing ICEfaces portlets)
• xp.css
• xp-portlet.css (for use when developing ICEfaces portlets)
• royale.css
These style sheets provide definitions for all style classes used in the ICEfaces Component Suite. The ICEfaces Component Suite renderers will render default style class attributes based on the style classes defined in the active style sheets. In order to use these style classes, page developers must specify a style sheet in their page.
Developers may also create their own custom style sheet based on a predefined ICEfaces style sheet. If the style class names match those defined in the ICEfaces style sheets, the ICEfaces components will use the specified styles by default, without the need to specify the style class names explicitly on each component.
ICEfaces Developer’s Guide v1.8 41

ICEfaces Reference Information
Note: The default CSS class names associated with each component are listed in the component’s TLD (taglib) description.
The three predefined themes included with ICEfaces each consist of a stylesheet and an image directory. In addition, the Rime and XP themes also include alternate stylesheets (rime-portlet.css and xp-portlet.css) for use when developing ICEfaces portlets.
Figure 11, p. 42 shows an example of the CSS directory structure.
Figure 11 CSS Directory Structure
To use a predefined theme style sheet with an ICEfaces application, all the page developer needs to do is add the desired CSS link to the page. This can be accomplished in one of two ways:
1. Use the ICEfaces ice:outputStyle component (recommended):
• Rime
<ice:outputStyle href="./xmlhttp/css/rime/rime.css"/>
• XP
<ice:outputStyle href="./xmlhttp/css/xp/xp.css"/>
• Royale
<ice:outputStyle href="./xmlhttp/css/royale/royale.css">
2. Add a standard HTML link tag to the document:
• Rime
<link rel="stylesheet" type="text/css" href="./xmlhttp/css/rime/rime.css" />
• XP
<link rel="stylesheet" type="text/css" href="./xmlhttp/css/xp/xp.css" />
• Royale
<link rel="stylesheet" type="text/css" href="./xmlhttp/css/royale/royale.css" />
The ice:outputStyle component has the following advantages over the HTML link tag:
• Automatically includes browser-specific variants of the main style sheet in the page to adapt the theme styling to account for differences in each browser’s CSS support. See the TLD (taglib) documentation for the ice:outputStyle component for details.
ICEfaces Developer’s Guide v1.8 42
ICEfaces Reference Information
• Provides the ability to dynamically change the theme style sheet at runtime via a value binding on the component’s href attribute.<ice:outputStyle href="#{styleBean.activeTheme}" />
Note: In the examples above, the ./xmlhttp/css/xp/ path specifies the location of the predefined theme resources in the icefaces.jar file. If you wish to use a custom theme, simply specify an alternative location for the theme .css file in the href attribute.
The resource files for the theme styles can be found in the “resources” directory of the ICEfaces bundle.
ICEfaces Focus Management
ICEfaces provides two mechanisms for programatically setting the focus to a specific component on a page:
• value-binding on the ice:outputBody component, and
• component-binding using the ICEfaces Focus Management API.
Controlling Focus with the ice:outputBody ComponentThe ice:outputBody component provides a focus attribute which can be used to statically or dynamically set the client focus on a specific component. Setting the focus attribute value to the id or the clientId of the component to give focus will move the client browser focus to that component in the page during the next render immediately following the setting of the focus attribute value. Using this mechanism avoids the need for component binding, and provides a straightforward means of setting application focus as required.
Note: The focus is only set on the client during the render directly following a value change on the focus attribute.
Note: To set the initial focus on the page, the component to be focused must be rendered during the first render call.
Controlling Focus Using the ICEfaces Focus Management APITo use the ICEfaces Focus Management API in your application, you must use component bindings in your application’s web pages.
The ICEfaces Focus Management API consists of a single method, requestFocus(). This method is used to communicate a component focus request from the application to the client browser.
ICEfaces Developer’s Guide v1.8 43
ICEfaces Reference Information
All focusable ICEfaces Component Suite components support the requestFocus() method.
In the following examples, the ice:inputText is bound to an HtmlInputText instance named westText in the application backing bean.
Example application page:
<ice:inputText value="West" binding="#{focusBean.westText}" />
Example application backing bean:
import com.icesoft.faces.component.ext.HtmlInputText; private HtmlInputText westText = null; public HtmlInputText getWestText() { return westText; }
public void setWestText(HtmlInputText westText) { this.westText = westText; }
In the following examples, the requestFocus calls are made in a valueChangeListener which is also implemented in the application’s backing bean.
Note: The component bindings must be visible to the valueChangeListener.
Example application page:
<ice:selectOneRadio value="#{focusBean.selectedText}"styleClass="selectOneMenu" valueChangeListener="#{focusBean.selectedTextChanged}"partialSubmit="true">
<f:selectItem itemValue="#{focusBean.NORTH}" itemLabel="North" /><f:selectItem itemValue="#{focusBean.WEST}" itemLabel="West" /><f:selectItem itemValue="#{focusBean.CENTER}" itemLabel="Center" /><f:selectItem itemValue="#{focusBean.EAST}" itemLabel="East" /><f:selectItem itemValue="#{focusBean.SOUTH}" itemLabel="South" />
</ice:selectOneRadio>
Example application backing bean:
public void selectedTextChanged(ValueChangeEvent event) { selectedText = event.getNewValue().toString();
if (selectedText.equalsIgnoreCase(NORTH)) { this.northText.requestFocus(); } else if (selectedText.equalsIgnoreCase(WEST)){ this.westText.requestFocus(); } else if (selectedText.equalsIgnoreCase(CENTER)) { this.centerText.requestFocus();
ICEfaces Developer’s Guide v1.8 44

ICEfaces Reference Information
} else if (selectedText.equalsIgnoreCase(EAST)){ this.eastText.requestFocus(); } else if (selectedText.equalsIgnoreCase(SOUTH)) { this.southText.requestFocus(); }
}
ICEfaces Developer’s Guide v1.8 45
ICEfaces Reference Information
ICEfaces Library Dependencies
Combinations of the following JARs are required to use ICEfaces at runtime.
Note: The exact combination of JARs required varies depending on the application server you intend to deploy your ICEfaces application into, and also the specific configuration you choose to use for your application (that is, Facelets, JSP, icefaces.jar vs. just-ice.jar, etc.).
See Appendix A ICEfaces Library/App. Server Dependencies, p. 110 for detailed information on which libraries are required to use ICEfaces with various application servers.
ICEfaces Runtime Dependencies
The following JARs are required to use ICEfaces:
• backport-util-concurrent.jar
• commons-beanutils.jar
• commons-collections.jar
• commons-digester.jar
• commons-fileupload.jar
• commons-logging.jar
• commons-logging-api.jar
• el-api.jar
• Fastinfoset.jar (required only if “com.icesoft.faces.compressDOM=true” )
• grizzly-compat.jar (required if using GlassFish Grizzly ARP functions)
• icefaces.jar (incl. std. JSF comp. support) OR just-ice.jar (without std. JSF comp. support)
• icefaces-comps.jar
• xercesImpl.jar
• xml-apis.jar
ICEfaces Component Runtime Dependencies
• acegi-security-1.0.1.jar OR spring-security-core-2.0.3.jar (required only if component security features are used)
• jxl.jar (required only if the Excel format is used with ice:dataExporter)
• krysalis-jCharts-1.0.1-alpha-1.jar (required only if outputChart component used)
ICEfaces Developer’s Guide v1.8 46
ICEfaces Reference Information
ICEfaces Facelets Support
The following files are required if using Facelets with ICEfaces:
• el-ri.jar
• icefaces-facelets.jar
ICEfaces Compile-time (Build) Dependencies
The following files are only required to compile/build ICEfaces itself and for this reason are only included in the ICEfaces source-code distribution bundle.
• catalina-comet.jar
• freemarker-2.3.14-jar
• grizzly-comet.jar
• jetty-util-6.0.1.jar
• jms.jar
• jsf-metadata.jar
• org.springframework.beans-2.5.4.A.jar
• org.springframework.context-2.5.4.A.jar
• org.springframework.core-2.5.4.A.jar
• org.springframework.web-2.5.4.A.jar
• org.springframework.webflow-2.0.3.RELEASE.jar
• org.springframework.binding-2.0.3.RELEASE.jar
• portlet.jar
• tlddoc.jar
ICEfaces Ant Build Script Support
The following files are required to use Ant scripts included with ICEfaces:
• Apache Ant (v1.6.3 or greater, not included)
• catalina-ant.jar
• jasper-runtime.jar
• jasper-compiler.jar
ICEfaces Developer’s Guide v1.8 47
ICEfaces Reference Information
ICEfaces Sample Applications and Tutorials
The following files are required to compile and run some of the tutorials and example applications included with this release:
• jsp-api.jar
• jstl.jar (timezone1, only)
• servlet-api.jar (generally included with app. server)
Sun JSF 1.1 RI Runtime
• jsf-api.jar
• jsf-impl.jar
Sun JSF 1.2 RI Runtime
• jsf-api-1.2.jar
• jsf-impl.1.2.jar
Apache MyFaces JSF 1.1 Runtime
• commons-discovery.jar
• commons-el.jar
• commons-lang.jar
• myfaces-api.jar
• myfaces-impl.jar
ICEfaces Developer’s Guide v1.8 48
Chapter 5 Advanced Topics
This chapter describes several advanced features using ICEfaces. You can use these sections as a guide to help you advance your use of ICEfaces:
• Server-initiated Rendering (Ajax Push) APIs
• The DisposableBean Interface
• State Saving
• Optimizing Server Memory Consumption
• Connection Management
• Optimizing Asynchronous Communications for Scalability
• Push Server
• Using ICEfaces in Clustered Environments
• Developing Portlets with ICEfaces
• JBoss Seam Integration
• Spring Web Flow Integration
• Creating Drag and Drop Features
• Adding and Customizing Effects
ICEfaces Developer’s Guide v1.8 49
Advanced Topics
Server-initiated Rendering (Ajax Push) APIs
One of the unique and powerful features of ICEfaces is the ability to trigger updates to the client’s user interface based on dynamic state changes within the application. Using APIs provided by the ICEfaces framework, it is possible for the application developer to request updates for one or more clients when the application state changes in a relevant way.
ICEfaces provides two different rendering APIs for application developers to choose from:
• RenderManager
• SessionRenderer
The two APIs serve slightly different needs. The RenderManager API, which has been a part of ICEfaces since its inception, is a powerful and flexible API that developers can use for fine-grained control of Ajax Push requests. The SessionRendering API, introduced in ICEfaces v1.8, is simpler and more focused on providing easy access to Ajax Push. Both APIs are built on top of the same rendering infrastructure allowing the developer to switch from one to the other with confidence as requirements change.
PersistentFacesState.render()
Before we discuss the RenderManager and SessionRenderer APIs in more detail, you will need to understand some lower-level concepts. At the most basic level, server-initiated rendering relies on the PersistentFacesState. Each client that interacts with an ICEfaces application can be referenced with a unique PersistentFacesState.
For example, if you had a request-scoped JSF managed bean called User, you would do something like this:
public class User {
private PersistentFacesState state; public User() { state = PersistentFacesState.getInstance(); } }
Once you have the reference to the PersistentFacesState, you can then use it to initiate a render call whenever the state of the application requires it. The method to use is executeAndRender():
state.executeAndRender();
The executeAndRender() method runs all phases of the JSF life-cycle. When this is done, the ICEfaces framework detects any changes that should be sent to the client, packages them up, and sends them on their way. The PersistentFacesState also exposes separate execute() and render() methods but executeAndRender() is the recommended API to ensure PhaseListeners are executed for all phases. This is critical with some third party frameworks (such as, Seam).
Figure 12, p. 51 illustrates the use of the low-level render() API.
ICEfaces Developer’s Guide v1.8 50
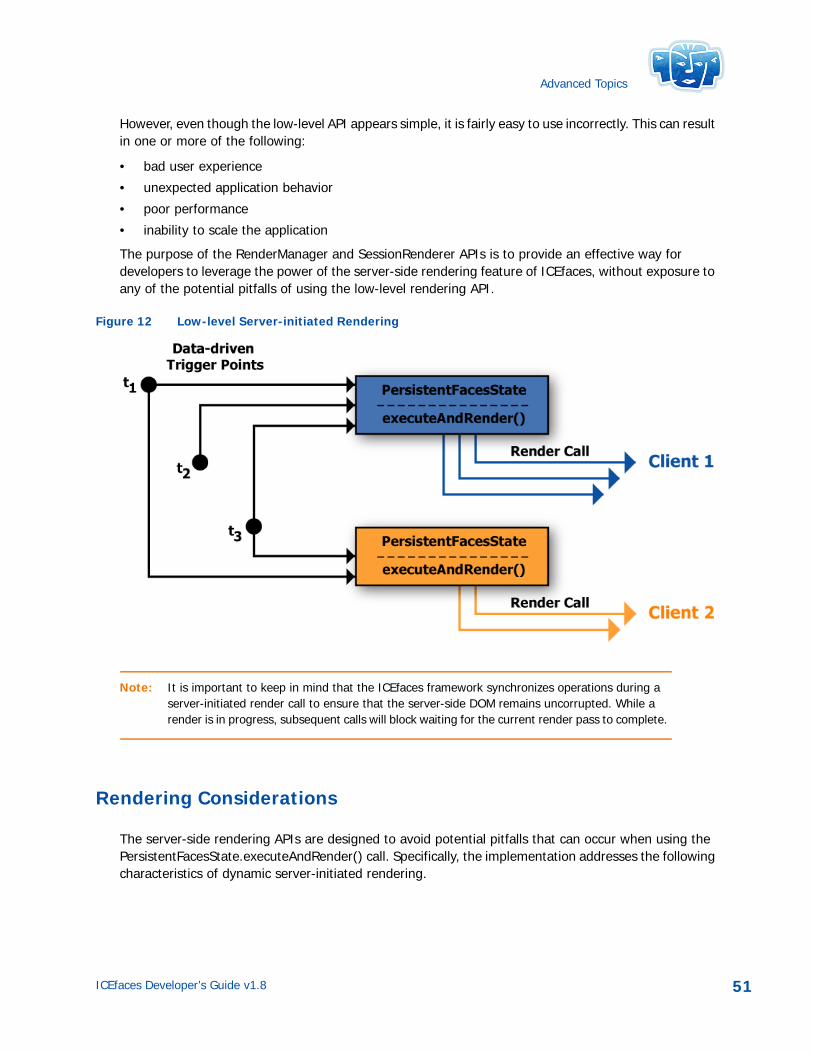
Advanced Topics
However, even though the low-level API appears simple, it is fairly easy to use incorrectly. This can result in one or more of the following:
• bad user experience
• unexpected application behavior
• poor performance
• inability to scale the application
The purpose of the RenderManager and SessionRenderer APIs is to provide an effective way for developers to leverage the power of the server-side rendering feature of ICEfaces, without exposure to any of the potential pitfalls of using the low-level rendering API.
Figure 12 Low-level Server-initiated Rendering
Note: It is important to keep in mind that the ICEfaces framework synchronizes operations during a server-initiated render call to ensure that the server-side DOM remains uncorrupted. While a render is in progress, subsequent calls will block waiting for the current render pass to complete.
Rendering Considerations
The server-side rendering APIs are designed to avoid potential pitfalls that can occur when using the PersistentFacesState.executeAndRender() call. Specifically, the implementation addresses the following characteristics of dynamic server-initiated rendering.
ICEfaces Developer’s Guide v1.8 51
Advanced Topics
ConcurrencyIt is highly recommended to only call the executeAndRender() method from a separate thread to avoid deadlock and other potential problems. For example, client updates can be induced from regular interaction with the user interface. This type of interaction goes through the normal JSF life cycle, including the render phase. Calling a server-initiated render from the same thread that is currently calling a render (based on user interaction) can lead to unexpected application behavior. The Server-initiated rendering implementation in ICEfaces uses a thread pool to address concurrency issues and to provide bounded thread usage in large-scale deployments.
PerformanceCalling the executeAndRender() method is relatively expensive so you want to ensure that you only call it when required. This is an important consideration if your application can update its state in several different places. You may find yourself sprinkling render calls throughout the code. Done incorrectly, this can lead to render calls being queued up unnecessarily and more render calls executing than actually needed. The issue is compounded with the number of clients, as application state changes may require the executeAndRender() method to be called on multiple users—potentially all the currently active users of the application. In these cases, it is additionally imperative that only the minimum number of render calls be executed. The Server-initiated Rendering implementation in ICEfaces coalesces render requests to ensure that the minimum number of render calls are executed despite multiple concurrent render requests being generated in the application.
ScalabilityConcurrency and performance issues both directly influence scalability. As mentioned, server-side render calls should be called in a separate thread within the web application. However, creating one or more separate threads for every potential user of the system can adversely affect scalability. As the number of users goes up, thread context switching can adversely affect performance. And since rendering is expensive, too many/frequent render calls can overwhelm the server CPU(s), reducing the number of users that your application can support. The Server-initiated Rendering implementation in ICEfaces uses a thread pool for rendering, bounds thread usage in the application, and facilitates application performance tuning for large-scale deployments.
SessionRenderer
The key motivation for the SessionRenderer API is simplicity — to make Ajax Push features as accessible and effortless as possible. Specifically, the key advantages for the application developer are:
• there are no interfaces to implement
• there are no exception callbacks to deal with
• no cleanup code is required
• group management is easier
The trade-off for the simplicity is a bit less flexibility. Specifically:
ICEfaces Developer’s Guide v1.8 52
Advanced Topics
• no scheduled render calls (interval, delay)
• all views for the current session are rendered
• not currently suitable for failover
As a testament to its simplicity, the SessionRenderer API is small and self-explanatory:
SessionRenderer.addCurrentSession(String groupName); SessionRenderer.removeCurrentSession(String groupName); SessionRenderer.render(String groupName);
The addCurrentSession and removeCurrentSession methods are used to manage group membership and leverage the user’s session to determine the currently active view. Render groups are maintained using unique String names. A group can contain one or many different sessions and sessions can be in one or more groups. Calling the render method with the appropriate group name will render all the members of that group. For example, in the constructor of one of your backing beans you could add the current session to a named group:
SessionRenderer.addCurrentSession("chatRoomA");
Then, whenever an update relevant to that group needs to be pushed out, you would simply call:
SessionRenderer.render("chatRoomA");
You can also use a default group name for all active sessions that would update all registered sessions:
SessionRenderer.render(SessionRenderer.ALL_SESSIONS);
The work of cleaning up group membership when beans go out of scope or when exceptions are generated during a render pass is handled automatically.
RenderManager API
The RenderManager API for doing Ajax Push is suitable if your rendering needs are a bit more sophisticated or require some additional flexibility. When using this API, you can achieve these benefits:
• different rendering strategies (on demand, interval, delay)
• more fine-grained control over which view gets rendered
• use of request or session-scoped beans
• support for fail-over deployments with certain conditions
Refer to Using ICEfaces in Clustered Environments, p. 77 for details.
Of course, with added features and control comes some additional complexity. The following sections give more of a background on the technical details of doing Ajax Push and how to use the RenderManager API for implementing Ajax Push in your application.
Rendering Exceptions
Server-initiated rendering does not always succeed, and can fail for a variety of reasons including recoverable causes, such as a slow client failing to accept recent page updates, and unrecoverable
ICEfaces Developer’s Guide v1.8 53

Advanced Topics
causes, such as an attempt to render a view with no valid session. Rendering failure is reported to the application by the following exceptions:
RenderingExceptionThe RenderingException exception is thrown whenever rendering does not succeed. In this state, the client has not received the recent set of updates, but may or may not be able to receive updates in the future. The application should consider different strategies for TransientRenderingException and FatalRenderingException subclasses.
TransientRenderingExceptionThe TransientRenderingException exception is thrown whenever rendering does not succeed, but may succeed in the future. This is typically due to the client being heavily loaded or on a slow connection. In this state, the client will not be able to receive updates until it refreshes the page, and the application should consider a back-off strategy on rendering requests with the particular client.
FatalRenderingExceptionThe FatalRenderingException exception is thrown whenever rendering does not succeed and is typically due to the client no longer being connected (such as the session being expired). In this state, the client will not be able to receive updates until it reconnects, and the server should clean up any resources associated with the particular client.
Server-initiated Rendering Architecture
The server-initiated rendering architecture is illustrated in Figure 13.
ICEfaces Developer’s Guide v1.8 54
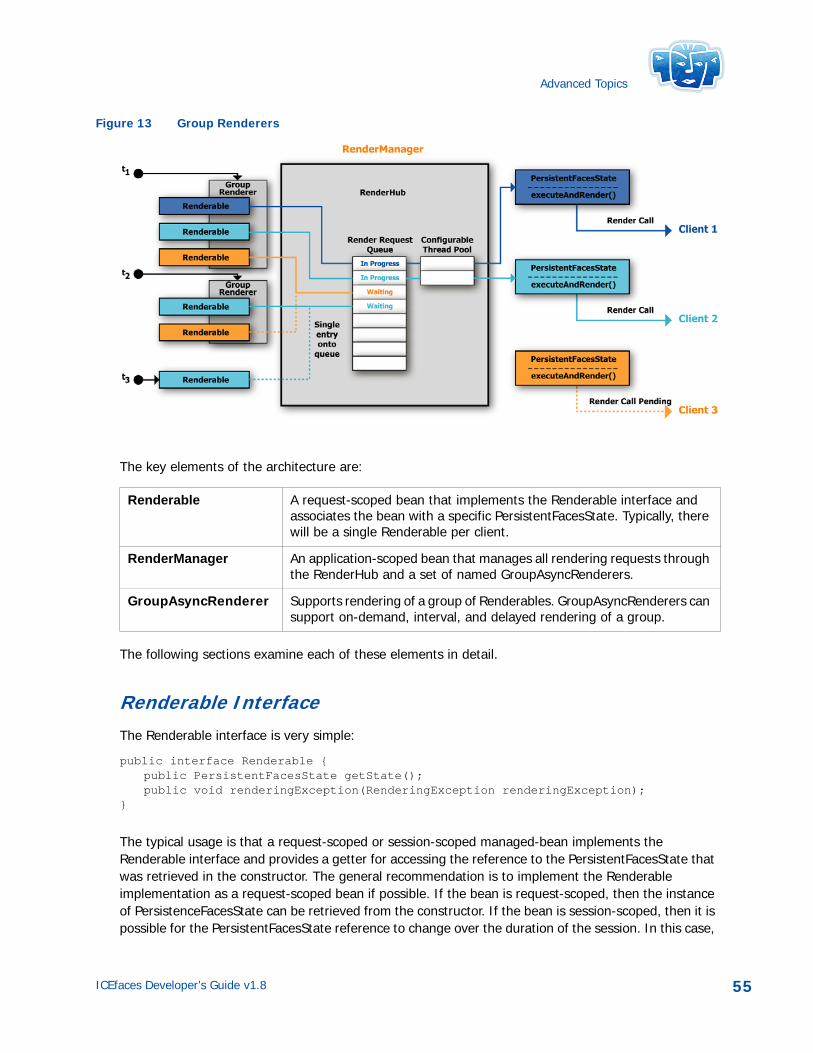
Advanced Topics
Figure 13 Group Renderers
The key elements of the architecture are:
The following sections examine each of these elements in detail.
Renderable InterfaceThe Renderable interface is very simple:
public interface Renderable { public PersistentFacesState getState(); public void renderingException(RenderingException renderingException);
}
The typical usage is that a request-scoped or session-scoped managed-bean implements the Renderable interface and provides a getter for accessing the reference to the PersistentFacesState that was retrieved in the constructor. The general recommendation is to implement the Renderable implementation as a request-scoped bean if possible. If the bean is request-scoped, then the instance of PersistenceFacesState can be retrieved from the constructor. If the bean is session-scoped, then it is possible for the PersistentFacesState reference to change over the duration of the session. In this case,
Renderable A request-scoped bean that implements the Renderable interface and associates the bean with a specific PersistentFacesState. Typically, there will be a single Renderable per client.
RenderManager An application-scoped bean that manages all rendering requests through the RenderHub and a set of named GroupAsyncRenderers.
GroupAsyncRenderer Supports rendering of a group of Renderables. GroupAsyncRenderers can support on-demand, interval, and delayed rendering of a group.
ICEfaces Developer’s Guide v1.8 55

Advanced Topics
the state should be retrieved from the constructor as well as from any valid getter methods that appear on the relevant pages. This ensures that the reference to the state is always the current one.
Since the rendering is all done via a thread pool, the interface also defines a callback for any RenderingExceptions that occur during the render call. Modifying our earlier example of a User class, assuming it is request-scoped, it now looks like this:
public class User implements Renderable {
private PersistentFacesState state;
public User() { state = PersistentFacesState.getInstance();
}
public PersistentFacesState getState(){ return state;
}
public void renderingException(RenderingException renderingException){ //Logic for handling rendering exceptions can differ depending //on the application.
} }
Now that the User can be referred to as a Renderable, you can use instances of User with the RenderManager and/or the various implementations of GroupAsyncRenderers.
RenderManager ClassThere should only be a single RenderManager per ICEfaces application. The easiest way to ensure this with JSF is to create an application-scoped, managed-bean in the faces-config.xml configuration file and pass the reference into one or more of your managed beans. To continue our example, you could create a RenderManager and provide a reference to each User by setting up the following in the faces-config.xml file.
<managed-bean> <managed-bean-name>renderMgr</managed-bean-name> <managed-bean-class> com.icesoft.faces.async.render.RenderManager
</managed-bean-class> <managed-bean-scope>application</managed-bean-scope>
</managed-bean>
<managed-bean> <managed-bean-name>user</managed-bean-name> <managed-bean-class>com.icesoft.app.User
</managed-bean-class> <managed-bean-scope>request</managed-bean-scope> <managed-property> <property-name>renderManager</property-name> <value>#{renderMgr}</value>
</managed-property>
ICEfaces Developer’s Guide v1.8 56
Advanced Topics
</managed-bean>
The User class needs a setter method to accommodate this:
public class User implements Renderable {
private PersistentFacesState state; private RenderManager renderManager;
public User() { state = PersistentFacesState.getInstance();
}
public PersistentFacesState getState(){ return state;
}
public void renderingException(RenderingException renderingException){ //Logic for handling rendering exceptions can differ depending //on the application.
}
public void setRenderManager( RenderManager renderManager ){ this.renderManager = renderManager;
}
}
Once you have a reference to the RenderManager, you can request a render to be directly performed on instances that implement the Renderable interface.
renderManager.requestRender( aRenderable );
GroupAsyncRenderer ImplementationsBeing able to render individual users in a safe and scalable manner is useful for many types of applications. However, what if you want to request a render for a group or all users of an application? As an example, consider a chat application or a chat component in your application. There could be many users in the same chat group and any update to the chat transcript should result in all users getting notified.
To handle group rendering requests in a scalable fashion, the Rendering API provides implementations of the GroupAsyncRenderer base class. There are currently three implementations of GroupAsyncRenderer you can use. Each implementation allows you to add and remove Renderable instances from their collection.
• OnDemandRenderer - When requestRender() method is called, it goes through each Renderable in its collection and requests an immediate render call.
• IntervalRenderer - Once you get the initial reference to the IntervalRenderer, you set the desired interval and then call the requestRender() method which requests a render call on all the Renderables at the specified interval.
ICEfaces Developer’s Guide v1.8 57
Advanced Topics
• DelayRenderer - Calls a single render on all the members of the collection at some future point in time.
The best way to get one of the GroupAsyncRenderer implementations is to use one of the methods provided by the RenderManager:
RenderManager.getOnDemandRenderer(String name); RenderManager.getIntervalRenderer(String name); RenderManager.getDelayRenderer(String name);
As you can see, a GroupAsyncRenderer has a name, which the RenderManager uses to track each GroupAsyncRenderer so that each request using the unique name returns the same instance. That way, it is easy to get a reference to the same renderer from different parts of your application.
To expand our previous example of a User, we can augment our code to use a named GroupAsyncRenderer that can be called on demand when a stock update occurs. In the example code, we are using a fictitious stockEventListener method to listen for events that indicate a stock has changed. The trigger for this event should be from a thread outside the normal operation of the application. An EJB MessageBean receiving a JMS message would be a typical example.
When this event occurs, we’ll call requestRender() on the GroupAsyncRenderer. Every user that is a member of that group will have a render call executed. We’ll also add a member variable and getter for storing and retrieving the highest stock.
public class User implements Renderable, DisposableBean {
private PersistentFacesState state; private RenderManager renderManager; private OnDemandRenderer stockGroup;private String highestStock;
public User() { state = PersistentFacesState.getInstance();
}
public PersistentFacesState getState(){ return state;
}
public void renderingException(RenderingException renderingException){ //Logic for handling rendering exceptions can differ depending //on the application. Here if we have a problem, we'll just remove//our Renderable from the render group so that there are no further//attempts to render this user.stockGroup.remove(this);
}
public void setRenderManager( RenderManager renderManager ){ this.renderManager = renderManager; stockGroup = renderManager.getOnDemandRenderer( "stockGroup" );stockGroup.add(this);
}
public void stockEventListener( StockEvent event ){
ICEfaces Developer’s Guide v1.8 58
Advanced Topics
if( event instanceof StockValueChangedEvent ){highestStock = calculateHighestStock(); stockGroup.requestRender();
}}
public String getHighestStock(){return hightestStock;
}}
As a final recommendation, in order to properly clean up Renderables and group renderers in your application, you should consider implementing the DisposableBean interface. For more details on implementing DisposableBeans, see The DisposableBean Interface, p. 61. Continuing with our previous example, our UserBean would look like this:
public class User implements Renderable {
private PersistentFacesState state; private RenderManager renderManager; private OnDemandRenderer stockGroup;private String highestStock;
public User() { state = PersistentFacesState.getInstance();
}
public PersistentFacesState getState(){ return state;
}
public void renderingException(RenderingException renderingException){ //Logic for handling rendering exceptions can differ depending //on the application. Here if we have a problem, we'll just remove//our Renderable from the render group so that there are no further//attempts to render this user.stockGroup.remove(this);
}
public void setRenderManager( RenderManager renderManager ){ this.renderManager = renderManager; stockGroup = renderManager.getOnDemandRenderer( "stockGroup" );stockGroup.add(this);
}
public void stockEventListener( StockEvent event ){ if( event instanceof StockValueChangedEvent ){highestStock = calculateHighestStock(); stockGroup.requestRender();
}}
ICEfaces Developer’s Guide v1.8 59

Advanced Topics
public String getHighestStock(){return hightestStock;
}
public void dispose() throws Exception { stockGroup.remove(this); }
}
ICEfaces Developer’s Guide v1.8 60
Advanced Topics
The DisposableBean Interface
Managed beans, particularly session and request scoped beans, can have references to resources that may need to be specifically dealt with when the beans go out of scope. Therefore, it can be useful to know when this occurs. There is nothing in the current JSF API to help with this and, if you can’t use annotations or some other injection solution for your beans, then it can be difficult to address the clean up of these resources.
To help with this, the ICEfaces framework provides an interface called com.icesoft.faces.context.DisposableBean.
Note: The previously recommended solution for this was the com.icesoft.faces.context.ViewListener interface. The ViewListener interface is now deprecated in favor of the DisposableBean interface. While ViewListener could be applied more broadly (i.e., to non-bean classes), it was more difficult to use and worked in more restricted situations.
The interface provides a single method:
void dispose() throws Exception;
To use it, implement the DisposableBean interface on your managed bean and then in the dispose() method, do any clean up necessary when the bean goes out of scope. Here is an very simple example of a managed bean that implements the DisposableBean interface:
package com.icesoft.faces.example;
import com.icesoft.faces.context.DisposableBean;
public class UserBean implements DisposableBean {
public UserBean() { //resources create or acquired }
public void dispose() throws Exception { //resources cleaned up }}
Note: Currently, the DisposableBean works only if the user leaves the application entirely, or if the user navigates within the application by clicking an anchor tag or by redirection. This mechanism does not work if the user submits a postback and the view is changed by evaluating a navigation rule.
For further examples using the DisposableBean interface, check out the ICEfaces Tutorial code and the Auction Monitor sample application. The DisposableBean interface is frequently used in conjunction with the Renderable interface when doing Ajax Push. For more information about Ajax Push, see Server-initiated Rendering (Ajax Push) APIs, p. 50.
ICEfaces Developer’s Guide v1.8 61

Advanced Topics
State Saving
The purpose of state saving in JSF is to persist the component tree and the state of those components so that they can be easily retrieved and, if possible, re-used as the user navigates between the various views in the application. In JSF, state saving is always active. By default, state saving is performed on the server, where the information is stored in the session. But JSF also provides the option of client-side state saving where the serialized state is sent to the client in each response and returned, if available, with each request. ICEfaces now fully supports server-side state saving. Client-side state saving is not supported and will throw an error if configured.
Server-side state saving is also necessary in a failover environment where the component structure and state are saved in the session, which is duplicated across the cluster nodes. The actual mechanism for this is specific to the application server that you are using and strategies that it provides. The state is restored, rather than freshly constructed, on a new node if failover occurs between user requests. ICEfaces provides different strategies for state saving depending on your requirements. The specifics of the different available state saving options are discussed in the sections that follow.
JSF Default State Manager
With this strategy, ICEfaces simply relies on the built-in state saving provided by the JSF implementation being used. From a memory perspective, this is potentially the least efficient solution depending on how the JSF implementation handles state saving.
For example, in the JSF reference implementation, state information is currently stored in a map of logical views with each logical view associated with a map of actual views. The maximum size of these maps is 15, which means that a total of 225 views can potentially be stored at any one time. The map sizes are configurable using context parameters. You can refer to the JSF reference implementation documentation for further details.
This behavior is not optimal for ICEfaces and is not recommended. Because ICEfaces does not support the operation of the browser’s back button, the map of actual views is unnecessary and the use of a pool of maps for the views is also unnecessary. Hence, we have created the following implementations:
• ViewRootStateManagerImpl
• SingleCopyStateManagerImpl
View Root State Manager
With ICEfaces, the ViewRootStateManagerImpl state manager implementation is the default implementation. It is automatically configured in icefaces.jar/META-INF/faces-config.xml so there is no need to adjust the configuration of your application. It is the recommended state saving strategy for all ICEfaces applications that are not configured for a failover environment. With this implementation, rather than iterate through the component tree to save state, the view root reference is simply kept in between responses and restored on the next request. It is the most performant and memory efficient
ICEfaces Developer’s Guide v1.8 62
Advanced Topics
option. Instances of UIComponent are not serializable, however, and this solution is not adaptable to an environment where session duplication is configured.
Note: Prior to the ICEfaces v1.8 release, ICEfaces used a context parameter, doJSFStateManagement, to turn state saving on and off. This only enabled a pseudo version of real state saving for the purpose of supporting the Seam framework. The real state saving was always a derivative of the view root state saving implementation. As of ICEfaces v1.8, state saving is now always considered to be “on” and only the implementation varies, so doJSFStateManagement is no longer supported.
Single Copy State Manager
ICEfaces includes a custom state manager implementation called SingleCopyStateManagerImpl that stores component states in the same way as the default implementation in the reference implementation. The difference is that it only ever stores a single copy of the state per view rather than a large map of maps. Because it uses the same state saving logic, it is highly compatible and, because it only saves a single copy, uses less memory than the default implementation. This is the recommended state saving strategy to use for applications that are configured for session persistence and failover. While we do not yet support seamless POST operations through failover, this setting will eventually be necessary for that feature.
You can configure your application to use this state manager implementation by adding the following to your application’s faces-config.xml file:
<application> <state-manager> com.icesoft.faces.application.SingleCopyStateManagerImpl </state-manager></application>
ICEfaces Developer’s Guide v1.8 63
Advanced Topics
Optimizing Server Memory Consumption
Making the best use of memory in a web application can depend on a variety of different factors and has to be balanced against the effects on performance. The ICEfaces framework has a number of different ways to influence memory usage, many of which can be configured to best suit the characteristics of your particular application.
State Saving
The choice of state saving implementation can have a dramatic impact on performance. Refer to State Saving, p. 62, for more information
DOM Compression
One of the features of ICEfaces is Direct-to-DOM rendering, a strategy which uses a server-side copy of the client’s DOM tree to generate the initial response as well as to compare and generate differences in order to calculate incremental page updates. While this has many advantages, the fact that the DOM remains in memory between requests has implications for memory usage. To that end, ICEfaces has an option to serialize and compress the DOM between requests. By default, this feature is turned off, but it can be activated by setting the following configuration parameter in your web.xml file:
<context-param> <param-name>com.icesoft.faces.compressDOM</param-name> <param-value>true</param-value> </context-param>
The impact of the memory savings will depend on the nature of your application. If you have pages that comprise large DOMs, something typically found in applications that are designed towards a “single-view” architecture, then the savings are likely to be more significant. There is, of course, a small performance impact to compress and decompress the DOM.
Note: When specifying “com.icesoft.faces.compressDOM=true”, the Fastinfoset.jar library (available in the /icefaces/libs/ directory) must be included in your project classpath.
String Handling
String handling and manipulation is a big part of JSF and ICEfaces. Therefore, it is important to consider the impact of creating String objects, particularly if the same strings are used repeatedly. For example, strings that are used for the various component attributes — JSF client IDs, CSS class names, expression language bindings, etc. — need to be dealt with efficiently so that they do not use more memory than is necessary while still remaining performant.
ICEfaces Developer’s Guide v1.8 64
Advanced Topics
Given these constraints, ICEfaces makes use of bounded string pools based on the LRU (least recently used) algorithm to store values for commonly and repeatedly used strings. We currently provide 4 logically separate String pools, whose initial size is configurable through context parameters. These parameters are:
• com.icesoft.faces.clientIdPoolMaxSize
• com.icesoft.faces.cssNamePoolMaxSize
• com.icesoft.faces.elPoolMaxSize
• com.icesoft.faces.xhtmlPoolMaxSize
The default size for each pool is 95000. To change the default value for one or more of these parameters, you would add an entry to your web.xml file that looks like this:
<context-param> <param-name>com.icesoft.faces.clientIdPoolMaxSize</param-name> <param-value>50000</param-value> </context-param>
While the default size provides a good general fit for most applications, the optimal settings for your application will depend on the nature of your application. Applications will fewer, smaller, and simpler pages could benefit from a smaller pool size, whereas applications with larger or more complex pages may want to set the pool size higher.
Detailed reference information on these and other ICEfaces configuration parameters can be found in Appendix B ICEfaces Configuration Parameter Overview, p. 114.
ICEfaces Developer’s Guide v1.8 65
Advanced Topics
Connection Management
ICEfaces provides the following advanced connection management features:
• Asynchronous Heartbeating
• Managing Connection Status
• Managing Redirection
Asynchronous Heartbeating
When configured for asynchronous communications mode (default), ICEfaces employs an asynchronous connection management scheme to provide robust asynchronous communications capability. Asynchronous connection management provides the following key capabilities:
• Asynchronous connection health monitoring via a configurable heartbeat mechanism. The asynchronous heartbeat mechanism monitors the health of the Asynchronous connection and also prevents network infrastucture from terminating an otherwise idle connection, possibly resulting in lost or delayed asynchronous updates to the browser.
• Transparent asynchronous connection recovery. In the event that an asynchronous connection is lost, the ICEfaces bridge will automatically attempt to recover the connection in a manner transparent to the application.
Note: When debugging, heartbeating can be toggled on and off from the client browser using the following keyboard sequence: CTR+SHIFT+. (that is, press the Control and Shift keys and then type a period (“.”)).
ICEfaces can optionally be used in a standard synchronous connection mode that does not require monitoring and maintaining continuous connections to the server. Instead, it creates a connection for each user-initiated request, just as with any non-ICEfaces web-application. For details, see Asynchronous vs. Synchronous Updates, p. 30.
Asynchronous heartbeat is configured in the application web.xml file using the context parameters in the code examples below, where heartbeatInterval defines the time in milliseconds between heartbeat messages. The default value is 50000 (50 seconds).
<context-param><param-name>com.icesoft.faces.heartbeatInterval</param-name><param-value>50000</param-value>
</context-param>
In the following code example, heartbeatTimeout defines how long, in milliseconds, that the heartbeat monitor will wait for a response prior to timing out. If a heartbeat times out, the connection will be placed in a “caution” state while the bridge attempts to recover the connection. The default value is 30000 (30 seconds).
<context-param><param-name>com.icesoft.faces.heartbeatTimeout</param-name>
ICEfaces Developer’s Guide v1.8 66
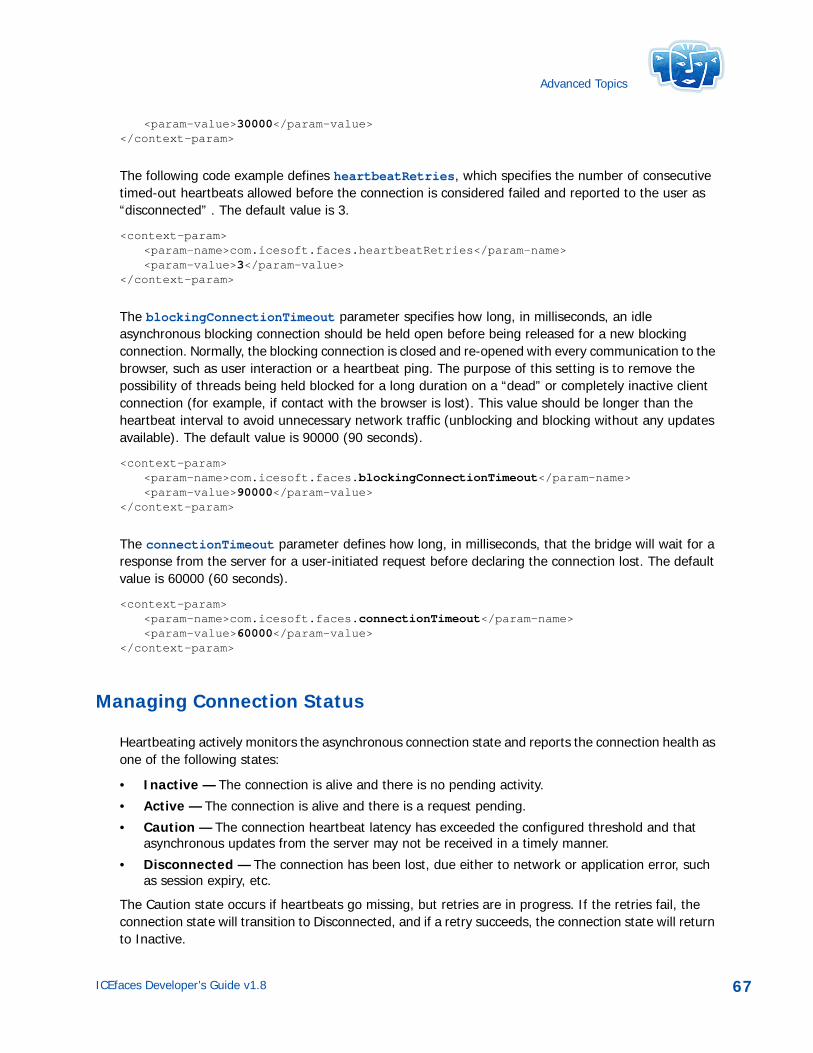
Advanced Topics
<param-value>30000</param-value></context-param>
The following code example defines heartbeatRetries, which specifies the number of consecutive timed-out heartbeats allowed before the connection is considered failed and reported to the user as “disconnected” . The default value is 3.
<context-param><param-name>com.icesoft.faces.heartbeatRetries</param-name><param-value>3</param-value>
</context-param>
The blockingConnectionTimeout parameter specifies how long, in milliseconds, an idle asynchronous blocking connection should be held open before being released for a new blocking connection. Normally, the blocking connection is closed and re-opened with every communication to the browser, such as user interaction or a heartbeat ping. The purpose of this setting is to remove the possibility of threads being held blocked for a long duration on a “dead” or completely inactive client connection (for example, if contact with the browser is lost). This value should be longer than the heartbeat interval to avoid unnecessary network traffic (unblocking and blocking without any updates available). The default value is 90000 (90 seconds).
<context-param><param-name>com.icesoft.faces.blockingConnectionTimeout</param-name><param-value>90000</param-value>
</context-param>
The connectionTimeout parameter defines how long, in milliseconds, that the bridge will wait for a response from the server for a user-initiated request before declaring the connection lost. The default value is 60000 (60 seconds).
<context-param><param-name>com.icesoft.faces.connectionTimeout</param-name><param-value>60000</param-value>
</context-param>
Managing Connection Status
Heartbeating actively monitors the asynchronous connection state and reports the connection health as one of the following states:
• Inactive — The connection is alive and there is no pending activity.
• Active — The connection is alive and there is a request pending.
• Caution — The connection heartbeat latency has exceeded the configured threshold and that asynchronous updates from the server may not be received in a timely manner.
• Disconnected — The connection has been lost, due either to network or application error, such as session expiry, etc.
The Caution state occurs if heartbeats go missing, but retries are in progress. If the retries fail, the connection state will transition to Disconnected, and if a retry succeeds, the connection state will return to Inactive.
ICEfaces Developer’s Guide v1.8 67
Advanced Topics
The outputConnectionStatus component in the ICEfaces Component Suite supports all four states, so applications can incorporate visual indicators for connection status to end-users. If the outputConnectionStatus component is not present on a page and a Disconnected state occurs, ICEfaces displays a modal dialog on the page indicating the error state as shown in Figure 14.
Figure 14 Connection State Error
By default, if the outputConnectionStatus component is present on the page, it will indicate the connection lost status itself and will not display the modal error dialog. If you would like to display the modal error dialog even when the outputConnectionStatus component is being used, you may specify this using the showPopupOnDisconnect attribute on the outputConnectionStatus component.
The JavaScript Ajax bridge also supports a set of callback APIs for common connection management events that can be used to implement custom status indicators and reactions, etc. to events. See Bridge Connection Status Events, p. 27 for details.
Managing Redirection
Redirect on Connection LostWhen a connection is lost, ICEFaces can be configured to redirect the browser to a custom error page. This feature can be turned on application-wide using the ICEfaces context parameter, com.icesoft.faces.connectionLostRedirectURI.
<context-param><param-name>com.icesoft.faces.connectionLostRedirectURI</param-name><param-value>...custom error page URL....</param-value>
</context-param>
If not specified, the default ‘Connection Lost’ overlay will be rendered or if the status component is present, the ‘Connection Lost’ icon.
Redirect on Session Expiry When a user session expires, ICEFaces can be configured to redirect the browser to a specific page. This feature can be turned on application-wide using the ICEfaces context parameter, com.icesoft.faces.sessionExpiredRedirectURI.
<context-param> <param-name>com.icesoft.faces.sessionExpiredRedirectURI</param-name> <param-value>...custom page URL....</param-value>
</context-param>
ICEfaces Developer’s Guide v1.8 68

Advanced Topics
If not specified, the default ‘Session Expired’ overlay will be rendered or if the ice:outputConnectionStatus component is present, the ‘Session Expired’ icon.
Note: An ice:outputConnectionStatus component must be present on the page for the connectionLostRedirectURI parameter to function as expected.
Note: The automatic redirection features are only supported when ICEfaces is used in asynchronous communications mode (default).
ICEfaces Developer’s Guide v1.8 69
Advanced Topics
Optimizing Asynchronous Communications for Scalability
The traditional servlet Request/Response I/O model, supported by the majority of JEE application servers, consumes one thread per connection for the entire duration of the Request-Response lifecycle. When using ICEfaces in asynchronous update mode in this scenario, a thread is effectively consumed on the server to maintain the asynchronous connection for each client browser connected to the server. In addition, user interaction will result in another transient request-response cycle occurring, which in turn will temporarily consume another thread on the server, resulting in up to two server threads being required to support each ICEfaces user. In practice, the number is something between one and two threads per user, depending on the frequency of interaction by the user. While this does not typically pose a problem when the number of concurrent users is relatively low (<100), it can become an issue when larger numbers of concurrent users must be supported. There are two established solutions to this limitation:
1. Increase the size of the server thread-pool used for servicing servlet requests. For example, Tomcat 5.5 uses a default thread pool size of 150 threads. Testing has shown that this is enough to support 100 plus concurrent ICEfaces users in asynchronous update mode. However, by increasing the Tomcat thread pool to a larger size (for example, 500 or 1,000), a much larger number of concurrent users can be supported. The limiting factor in this scenario is the number of threads that the hardware and software platform can effectively support. Depending on the capabilities of your server, increasing the thread-pool size is often all that is required to meet the scalabilty requirements of many applications.
2. Leverage servers that support Asynchronous Request Processing (ARP). Another approach that utilizes the available resources much more efficiently is to leverage ARP techniques for asynchronous communications supported by an ever-growing number of application servers. ARP implementations leverage non-blocking I/O (NIO) techniques to provide support for highly scalable asynchronous communications. In the ARP scenario, a thread-pool is used to service the asynchronous requests. When a request is received, a thread is temporarily allocated to service the request and is released to the pool while the application server processes the request and creates a response. When a response is ready, a thread is again allocated from the pool to send the response to the browser. ICEfaces asynchronous connections are often idle for relatively long periods of time between the request and the response while the connection waits for an asynchronous update on the server. For this reason, ARP is particularily well-suited for use with asynchronous ICEfaces applications and can provide scalability in terms of concurrent asynchronous users that is far greater than the traditional servlet I/O model on the same hardware.
ICEfaces can optionally support ARP configurations for the following servers:
• GlassFish v2, v3
• Jetty 6.1
• Tomcat 6 and JBoss 4.2
ICEfaces Developer’s Guide v1.8 70
Advanced Topics
GlassFish
GlassFish provides an asynchronous request processing (ARP) facility called “Grizzly” that ICEfaces can leverage to provide more efficient asynchronous communications to applications utilizing asynchronous update mode.
Note: GlassFish V2 Update Release 1 (UR1) or later is required for ICEfaces Grizzly support.
To configure ICEfaces to use Grizzly:
1. For GlassFish V2, add the cometSupport property to the http-listener in (for example) domains/domain1/config/domain.xml:
<http-listener acceptor-threads="1" address="0.0.0.0" blocking-enabled="false" default-virtual-server="server"enabled="true"family="inet" id="http-listener-1" port="8080" security-enabled="false" server-name=""xpowered-by="true">
<property name="cometSupport" value="true"/></http-listener>
For GlassFish V3, add the cometSupport property to the http-listener in (for example) glassfish/domains/domain1/config/domain.xml:
<http-listener default-virtual-server="server" server-name="" address="0.0.0.0" port="8080" id="http-listener-1"><property name="cometSupport" value="true" /> </http-listener>
ICEfaces will now auto-detect GlassFish plus Grizzly and will try to use the ARP capabilities of Grizzly if they are enabled. To disable using the ARP facilities of GlassFish Grizzly, the com.icesoft.faces.useARP property can be set to false inside the web.xml.
If this auto-configuration fails, ICEfaces will revert to using the traditional Thread Blocking async IO mechanism. You can verify that ICEfaces is using the Grizzly ARP mechanism by reviewing the ICEfaces log file (at INFO level). The following log messages may be present.
GlassFish ARP available: true Adapting to GlassFish ARP environment Failed to add Comet handler... (if ARP configuration fails only) Falling back to Thread Blocking environment (if ARP configuration fails only)
ICEfaces Developer’s Guide v1.8 71
Advanced Topics
Jetty 6
The Jetty servlet container provides an asynchronous request processing (ARP) facility called “Continuations” that ICEfaces can leverage to provide more efficient asynchronous communications to applications utilizing asynchronous update mode.
When running in a Jetty container, ICEfaces automatically detects the presence of the Continuations API via reflection and self-configures to use it by default. To disable the use of Continuations when using Jetty, the following ICEfaces configuration parameter can be specified in the web.xml file:
<context-param> <param-name>com.icesoft.faces.useARP</param-name> <param-value>false</param-value> </context-param>
Note: The previous Jetty-specific com.icesoft.faces.useJettyContinuations configuration parameter can still be used, but it has been deprecated.
Tomcat 6 and JBoss 4.2
Beginining with Tomcat 6.0, the Tomcat servlet container supports an optional non-blocking IO (NIO) facililty that ICEfaces can leverage to provide more efficient asynchronous communications to applications utilizing asynchronous update mode. JBoss 4.2 installations that utilize the default Tomcat 6.0 servlet container can also benefit from this configuration.
To configure Tomcat 6 to use the NIO connector:
1. Add the following configuration to the Tomcat ../conf/server.xml file:
<Connector port="8080" protocol="org.apache.coyote.http11.Http11NioProtocol" connectionTimeout="60000" redirectPort="8443" />
2. The TomcatPushServlet must also be specifically configured in the ICEfaces web.xml file:
<servlet> <servlet-name>Tomcat Push Servlet</servlet-name> <servlet-class> com.icesoft.faces.webapp.http.servlet.TomcatPushServlet </servlet-class> <load-on-startup> 1 </load-on-startup> </servlet>
<servlet-mapping> <servlet-name>Tomcat Push Servlet</servlet-name> <url-pattern>/block/receive-updated-views/*</url-pattern> </servlet-mapping>
ICEfaces Developer’s Guide v1.8 72
Advanced Topics
Known IssueThere is a known issue with JBoss 4.2 where the default JBoss ReplyHeaderFilter will fail with the above configuration. A work-around is to disable the ReplyHeaderFilter using the following configuration change in the ../server/default/deploy/jboss-web.deployer/conf/web.xml file.
Replace the following code:
<filter-mapping> <filter-name>CommonHeadersFilter</filter-name> <url-pattern>/*</url-pattern> </filter-mapping>
With the following:
<filter-mapping> <filter-name>CommonHeadersFilter</filter-name> <url-pattern>/</url-pattern> </filter-mapping>
This will disable the filter; however, since it only adds JBoss branding to the HTTP headers this is likely acceptable.
ICEfaces Developer’s Guide v1.8 73
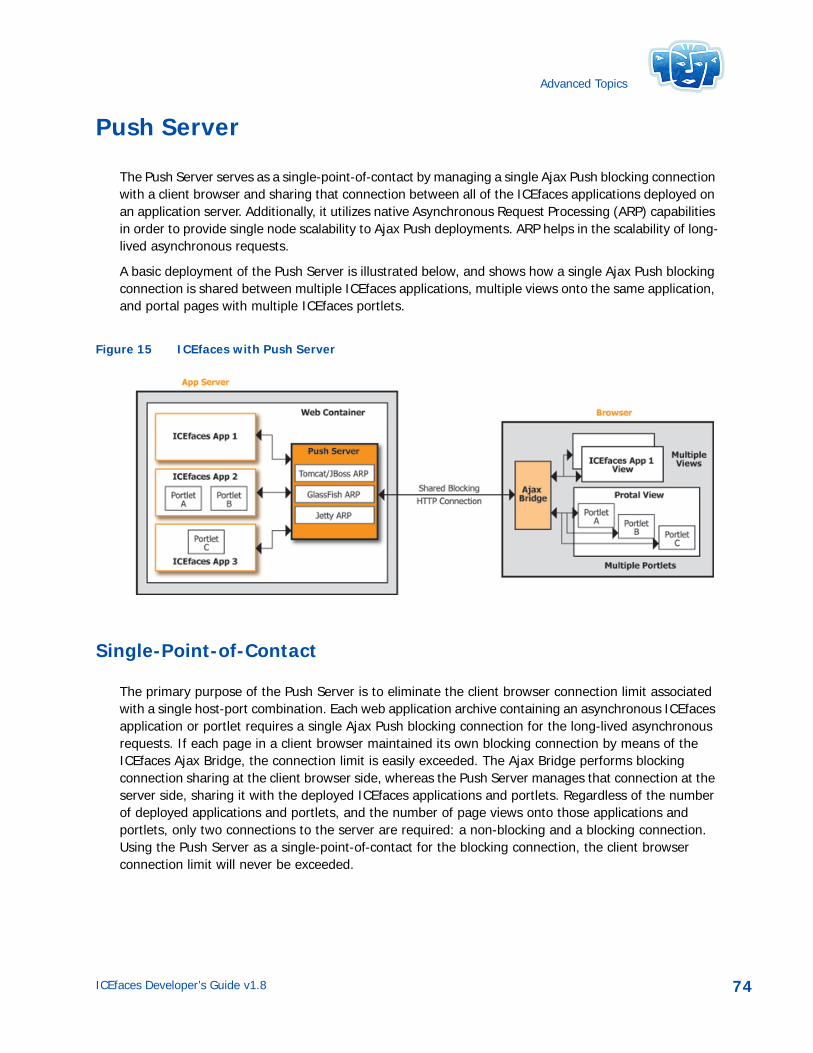
Advanced Topics
Push Server
The Push Server serves as a single-point-of-contact by managing a single Ajax Push blocking connection with a client browser and sharing that connection between all of the ICEfaces applications deployed on an application server. Additionally, it utilizes native Asynchronous Request Processing (ARP) capabilities in order to provide single node scalability to Ajax Push deployments. ARP helps in the scalability of long-lived asynchronous requests.
A basic deployment of the Push Server is illustrated below, and shows how a single Ajax Push blocking connection is shared between multiple ICEfaces applications, multiple views onto the same application, and portal pages with multiple ICEfaces portlets.
Figure 15 ICEfaces with Push Server
Single-Point-of-Contact
The primary purpose of the Push Server is to eliminate the client browser connection limit associated with a single host-port combination. Each web application archive containing an asynchronous ICEfaces application or portlet requires a single Ajax Push blocking connection for the long-lived asynchronous requests. If each page in a client browser maintained its own blocking connection by means of the ICEfaces Ajax Bridge, the connection limit is easily exceeded. The Ajax Bridge performs blocking connection sharing at the client browser side, whereas the Push Server manages that connection at the server side, sharing it with the deployed ICEfaces applications and portlets. Regardless of the number of deployed applications and portlets, and the number of page views onto those applications and portlets, only two connections to the server are required: a non-blocking and a blocking connection. Using the Push Server as a single-point-of-contact for the blocking connection, the client browser connection limit will never be exceeded.
ICEfaces Developer’s Guide v1.8 74
Advanced Topics
Asynchronous Request Processing
The nature of Ajax Push requires a blocking connection per client session. In the standard Servlet model, this results in each blocking connection occupying its own thread during the entire request/response lifecycle. With the usage of long-lived requests, this mechanism does not scale well under the standard Servlet model. Most application servers overcome this deficiency in the Servlet specification by augmenting the web container with an ARP mechanism capable of freeing up threads for the duration of the blocking period of blocking requests. The Push Server automatically detects and utilizes the native ARP mechanism in the application server if one exists, in order for Ajax Push to scale well in a single node deployment. The following open source application servers are supported:
• GlassFish - ARP provided through Grizzly
• Jetty - ARP provided through Continuations
Configuration
In most cases, the Push Server does not require any specific configuration. It is implemented as a web application that should be deployed together with any asynchronous ICEfaces applications or portlets. Additionally, no configuration of these applications and portlets is required. During application startup, the ICEfaces application(s) will automatically detect the Push Server and self-configure to use it to manage the blocking connections associated with Ajax Push.
The Push Server is packaged in the push-server.war file, located in the .../icefaces/push-server/ directory.
In the following specific case it is necessary to manually configure the Push Server:
If the application server is configured to use a custom (non-default) port number AND
• The application server does not support at least the Servlet 2.4 specification (J2EE 1.4+, J2SE 1.3+) OR
• A portal server is being used.
In this case the local IP address of the application/portal server and the port number must be specified using the following configuration parameters in the web.xml files of both the ICEfaces application(s) and the push-server.war:
• com.icesoft.faces.localAddress
• com.icesoft.faces.localPort
In addition, it is possible to override the default auto-detection of the Push Server using the com.icesoft.faces.blockingRequestHandler configuration parameter. This parameter can be specified in the application/portlet web.xml file using one of the following values:
• auto-detect
The ICEfaces application will try to auto-detect the Push Server, as described previously. If the Push Server is not found, ICEfaces will use its built-in push mechanism. This is the default value.
• push-server
ICEfaces Developer’s Guide v1.8 75
Advanced Topics
The ICEfaces application will try to use the Push Server. If the Push Server cannot be found a WARNing message will be logged and the ICEfaces application will fallback to the built-in ICEfaces Push mechanism.
• icefaces
The ICEfaces application will not use the Push Server (even if it is present), but will use the built-in ICEfaces Push mechanism instead.
Note: ICEfaces will log INFO level messages confirming which Push configuration is being used. It is recommended that you review the log files to confirm that the desired configuration is being used successfully at deployment time.
Note: If there is the possibility of multiple Push applications being deployed to the same server (including future deployments), it is recommended that the Push Server also be deployed to that server. Even though accessing a single ICEfaces asynchronous application from a browser will function correctly without the Push Server, making a habit of deploying the push-server.war along with your ICEfaces applications will avoid any issues if a second asynchronous ICEfaces application is deployed at a later time. By default ICEfaces is configured for asynchronous mode. See Asynchronous vs. Synchronous Updates, p. 30, for details.
ICEfaces Developer’s Guide v1.8 76
Advanced Topics
Using ICEfaces in Clustered Environments
Application server clustering is a common deployment technique used to provide Java EE-based web applications with high levels of scalability and availability. ICEfaces is Java EE compliant, and as such, fully supports clustered deployments with the following features:
• Clustered loadsharing with session affinity for highly scalable deployments
• Failover support based on JSF state saving and session replication for high-availability deployments
While these features can be achieved using standard Java EE clustering techniques, supporting Ajax Push in clustered environments introduces additional complexities. To begin with, Ajax Push render requests need to be propagated to all nodes in the cluster, so that all clients to the application receive all necessary updates. Also, management of the Ajax Push blocking connections must be coordinated across the cluster. The Enterprise Push Server addresses these complexities, and makes clustered deployments of Ajax Push application straightforward to achieve.
An overview of the Enterprise Push Server is available from the ICEfaces.org website. For more detailed information on the Enterprise Push Server, contact ICEsoft Product Support.
ICEfaces Developer’s Guide v1.8 77

Advanced Topics
Developing Portlets with ICEfaces
ICEfaces provides the same benefits to portlets as it does to web applications. This section describes how to use ICEfaces for portlet development.
ICEfaces Portlet Configuration
The current specification for enterprise Java portlets is JSR 168, which details the portlet-specific APIs that are supported by the portal container as well as the configuration artifacts that are required. In addition, vendors implementing JSR 168 typically have their own custom configuration options. The instructions in this section outline both the general and vendor-specific requirements for developing and deploying ICEfaces-powered portlets.
JSF Portlet BridgeBecause ICEfaces is an extension to JavaServer Faces (JSF), the typical way to run standard JSF-powered portlets in a compliant portal is to use a bridge. There are currently several different bridges to choose from as well as a group working to standardize an interface for JSF portlet bridges to follow (JSR 301).
The problem with current bridge implementations is that they vary in how they adapt to the JSF implementation as well as the portal implementations they work with. This makes the portability of JSF portlets a challenge. Each bridge also hooks into the JSF implementation in ways that are currently incompatible with ICEfaces. If you are developing ICEfaces portlets, do not include a JSF portlet bridge library.
The portlet.xmlWith portlets, the main configuration document is the portlet.xml file where one or more portlets are declared along with their specific configuration information. For a comprehensive discussion of the contents of the portlet.xml file, refer to the portlet specification (JSR 168). For developing ICEfaces applications, you only need to be concerned with a couple of important settings: <portlet-class> and <init-param>.
Note: In the following example, boldface text is used only to call attention to the relevant settings in the code example.
The following is a sample code snippet of a portlet declaration with the specific ICEfaces information added:
... <portlet> <portlet-name>toggleMessage</portlet-name> <display-name>Toggle Message</display-name>
ICEfaces Developer’s Guide v1.8 78
Advanced Topics
<portlet-class> com.icesoft.faces.webapp.http.portlet.MainPortlet </portlet-class> <init-param> <name>com.icesoft.faces.portlet.viewPageURL</name> <value>/toggle.iface</value> </init-param> </portlet> ...
The <portlet class> is the fully qualified class name of the class that implements the Portlet interface. ICEfaces has its own portlet, which could be considered a bridge of sorts, that handles incoming calls from the portal container and passes them on to the ICEfaces framework. You must use this portlet or a subclass of this portlet as the <portlet-class> value. The <init-param> setting uses a key of com.icesoft.faces.portlet.viewPageURL. The value of this parameter is the initial view that the portlet displays on the initial render pass. It is important to use the .iface extension to ensure that the request is properly handled by the ICEfaces framework. The parameters for the other portlet modes are com.icesoft.faces.portlet.editPageURL and com.icesoft.faces.portlet.helpPageURL.
Note: The parameter names for the supported portlet modes have changed to be more descriptive and consistent with other ICEfaces parameters. The old ones, com.icesoft.faces.VIEW, com.icesoft.faces.EDIT, and com.icesoft.faces.HELP, are still supported, but have been deprecated. You should use the following new parameters for current and future portlet development: com.icesoft.faces.portlet.viewPageURL com.icesoft.faces.portlet.editPageURL com.icesoft.faces.portlet.helpPageURL
The <ice:portlet> ComponentICEfaces provides a portlet component that you should use to wrap around the entire content of your portlet. It is implemented as a NamingContainer so that it can apply the portlet namespace as the top level of the JSF ID hierarchy. Doing this makes the ID hierarchy more efficient and helps the ICEfaces framework uniquely identify components on the page, which is important when more than one ICEfaces portlet is running.
To use the portlet component, add it as the top-level component of your content. For example, the following is an ICEfaces page that toggles a message on and off. You can see that the portlet component is wrapped around the actual content of what we want to see in the portlet.
<f:view xmlns:h=”http://java.sun.com/jsf/html” xmlns:f=”http://java.sun.com/jsf/core” xmlns:ice=”http://www.icesoft.com/icefaces/component”> <ice:portlet> <ice:form> <ice:panelGrid columns=”2”> <ice:outputText value=”Message:” /> <ice:outputText value=”#{test.message}” /> <ice:commandButton value=”Toggle” actionListener=”#{test.toggle}”/> </ice:panelGrid>
ICEfaces Developer’s Guide v1.8 79
Advanced Topics
</ice:form> </ice:portlet> </f:view>
The ICEfaces portlet component is designed to behave unobtrusively in a regular web application. It is fairly common practice for developers to run their portlets as a web application to speed development and to check for portlet specific issues. In a portal container, the <ice:portlet> is rendered as a <div> element with an ID attribute set to the portlet instance’s unique namespace. In a web application, the portlet namespace is not available so the component simply renders out as a <div> with an ID attribute that is automatically generated by the JSF framework. Because it is a NamingContainer, the ID of the <ice:portlet> component will be prefixed to the client ID of the nested sub-components.
Setting com.icesoft.faces.concurrentDOMViewsThis guide documents a context parameter called, com.icesoft.faces.concurrentDOMViews. It is set in the web.xml file as follows:
<context-param> <param-name>com.icesoft.faces.concurrentDOMViews</param-name> <param-value>true</param-value></context-param>
In a normal web application, setting this to true indicates that ICEfaces should support multiple views for a single web application and tells the ICEfaces framework to treat each view separately. Typically this is enabled when you want to use multiple windows of a single browser instance to concurrently view an ICEfaces application. In a portlet environment, the framework needs to treat the separate portlets on a single portal page as distinct views so it is almost always necessary (and therefore safest) to have this parameter set to true.
Using the Portlet API
Configuring your portlet is half the battle but, as a developer, you'll likely want to access the Portlet API to do a few things.
ExternalContextThe JSF API was designed to support access to both the Servlet API (for web applications) as well as the Portlet API by exposing an abstract class called the ExternalContext. In your code, you get access to the ExternalContext as follows:
FacesContext facesContext = FacesContext.getCurrentInstance();ExternalContext externalContext = facesContext.getExternalContext();
ICEfaces Developer’s Guide v1.8 80

Advanced Topics
AttributesOnce you have a reference to the ExternalContext, you can access information from the Portlet API. The ExternalContext API provides methods to get information in a way that is independent of the environment that it is running in. For example, to access request attributes, you can do the following:
Map requestMap = externalContext.getRequestMap(); String uri = (String)requestMap.get("javax.servlet.include.request_uri");
The requestMap contains all the attributes associated with the request. Check the ExternalContext JavaDoc to see what is provided by the rest of the API as some methods state specifically what they do differently in a portlet environment as compared to a servlet environment.
PortletConfigIf you need to access the PortletConfig, you can use the requestMap. From there, you can retrieve information specific to the current portlet’s configuration:
PortletConfig portletConfig = (PortletConfig)requestMap.get("javax.portlet.config");String portletName = portletConfig.getPortletName();String view = portletConfig.getInitParameter("com.icesoft.faces.VIEW");
PortletRequest, PortletResponseYou can directly access copies of the PortletRequest and PortletResponse objects using the ExternalContext:
PortletRequest portletReq = (PortletRequest)externalContext.getRequest();PortletResponse portletRes = (PortletResponse)externalContext.getResponse();
PortletSessionYou can use the ExternalContext object to access the portlet session for storing and retrieving session attributes.
PortletSession portletSession = (PortletSession)externalContext().getSession(false);
Attributes in the PortletSession object can be stored in different scopes. The default is PORTLET_SCOPE, which means the attributes are only visible to the individual portlet. The other option is APPLICATION_SCOPE where the attributes are visible to all the portlets. By default in a portal environment, when you define a session-scoped managed bean in JSF, the scope is PORTLET_SCOPE. For example, the following calls are equivalent:
Object portletAttribute = portletSession.getAttribute(key); Object portletAttribute = portletSession.getAttribute
(key, PortletSession.PORTLET_SCOPE);
If you want to store and retrieve attributes that are visible to multiple portlets, which can be useful when doing Ajax Push, you should ensure that you use the application scope parameter:
ICEfaces Developer’s Guide v1.8 81

Advanced Topics
Object applicationAttribute = portletSession.getAttribute(key, PortletSession.APPLICATION_SCOPE);
PortletPreferencesOnce you have the PortletRequest, you can access the PortletPreferences which can be used to get and set preferences:
PortletPreferences prefs = portletReq.getPreferences();try { prefs.setValue("prefKey", "prefVal"); prefs.store();} catch (ReadOnlyException e) { e.printStackTrace();} catch (IOException e) { e.printStackTrace();} catch (ValidatorException e) { e.printStackTrace();
Portlet Styles
The JSR 168 specification also documents a base set of common styles that should be applied to specific page elements. By documenting these style names, portlets can be developed that adhere to a portal container’s overall “theme-ing” strategy. For example, the style, portlet-form-button, is a style name that is used to determine the style of the text on a button. When running in a portlet environment, ICEfaces extended components render the portlet specific style classes by default. If you don’t want these styles rendered out for your portlet, you can specify the following context parameter in the web.xml file and set it to false.
<context-param> <param-name>com.icesoft.faces.portlet.renderStyles</param-name> <param-value>false</param-value></context-param>
However, because the portlet specification does not cover every rich component that is offered by ICEfaces (e.g., calendar), it is possible that some components may not match the current theme of the portal page.
Additionally, ICEfaces provides themes of its own (see Styling the ICEfaces Component Suite, p. 41). These stylesheets were designed with web applications in mind. For portlet developers, ICEfaces also provides a portlet-friendly version of the xp.css stylesheet. The xp-portlet.css stylesheet can be easily added to your portlet by including the following component.
<ice:outputStyle href="./xmlhttp/css/xp/xp-portlet.css" />
ICEfaces Developer’s Guide v1.8 82
Advanced Topics
Supported Portal Implementations
ICEfaces currently supports the following portal implementations:
• Liferay Portal
• JBoss Portal
• WebLogic Portal
• Apache Jetspeed-2
• Apache Pluto
The process of developing and deploying portlets to the various portal containers is vendor-specific so you should be familiar with the platform you are using. If you have questions, consult the portal vendor’s documentation for additional help. Issues that are specific to ICEfaces running on a specific portal implementation are covered in the following sections.
Liferay PortalLiferay uses JavaScript to enhance both the developer and user experience. Portlet users can drag and drop portlets on the page without requiring a full page refresh. For the developer, Liferay makes it easy to hot deploy and load portlets dynamically, which can be a big advantage in speeding up the development cycle. However, deploying ICEfaces portlets in this manner can be problematic because the JavaScript that ICEfaces relies on may not get executed properly. Because the portal container is in control of the page, the ICEfaces JavaScript bridge (the client portion of the ICEfaces framework) is not the only JavaScript code on the page. Once the portal page has been loaded, the bridge’s window.onload() logic won’t get executed unless there is a full page refresh.
Fortunately, Liferay provides configuration parameters that allow the developer to specify that a full render pass is required. Doing this ensures that the ICEfaces bridge is properly initiated. The required parameters, render-weight and ajaxable, are specified in the liferay-portlet.xml configuration file. They are added to the portlet section as shown in this snippet:
<portlet> <portlet-name>clock</portlet-name> <instanceable>true</instanceable> <render-weight>1</render-weight> <ajaxable>false</ajaxable></portlet>
Note: In the above example, boldface text is used only to call attention to the relevant parameters in the code example.
By setting these parameters, you ensure that a full-page refresh is done when the portlet is added to the portal page which, in turn, ensures that the ICEfaces JavaScript bridge is initialized correctly.
JBoss PortalNo specific parameters are required to run ICEfaces portlets in JBoss Portal.
ICEfaces Developer’s Guide v1.8 83
Advanced Topics
WebLogic PortalNo specific parameters are required to run ICEfaces portlets in WebLogic Portal.
Apache Jetspeed-2There is a browser-specific issue when running ICEfaces portals on Jetspeed-2 which is related to parsing cookie paths. The problem prevents Firefox from working properly. To solve it, you should modify [jetspeed-root]/conf/server.xml and add the emptySessionPath="true" attribute to the <Connector> element. It should look something like this:
<Connector port="8080" maxHttpHeaderSize="8192" maxThreads="150" minSpareThreads="25" maxSpareThreads="75" enableLookups="false" redirectPort="8443" acceptCount="100" connectionTimeout="20000" disableUploadTimeout="true" emptySessionPath="true"/>
This attribute is set by default in other Tomcat-based portals like JBoss Portal and Apache Pluto.
Apache PlutoNo specific parameters are required to run ICEfaces portlets in Apache Pluto.
Using Ajax Push in Portlets
By default, Ajax Push is active in ICEfaces. The configuration parameter that controls this is com.icesoft.faces.synchronousUpdate. If you don’t need server-initiated rendering, then you should set this parameter to true by adding the following to your web.xml file:
<context-param> <param-name>com.icesoft.faces.synchronousUpdate</param-name> <param-value>true</param-value> </context-param>
If you are using Ajax Push then you can set the parameter to false, or just leave it out altogether.
ICEfaces Developer’s Guide v1.8 84
Advanced Topics
Development and Deployment Considerations
To maximize the successful development and deployment of ICEfaces portlets, consider these tips and suggestions:
Mixing Portlet TechnologiesThe sheer size and complexity of the matrix of portlet technology combinations makes it difficult to test and/or document every combination. While it is possible to deploy ICEfaces portlets on the same portal page as portlets built without ICEfaces, you should consider the following sections.
Static PortletsWe define static portlets as portlets that are built using more traditional technologies and without Ajax. These portlets follow the usual portlet lifecycle in that, when an action is taken on one portlet, a render is performed on all of the portlets on the page and a full-page refresh is triggered. If you mix ICEfaces portlets on a portal page with these traditional portlets, you’ll get the behavior of the lowest common denominator. What this means is that if you interact with a static portlet, the regular lifecycle is engaged and all the portlets will re-render which triggers a page refresh. This behavior can undermine the benefits of using ICEfaces in your portlet development. If possible, you should consider porting the static portlets to use ICEfaces.
Dynamic PortletsSeveral web development products, libraries, and component suites allow you to build rich, interactive portlets. Other products that use Ajax techniques (client-side, server-side, JSF, etc.) will have their own JavaScript libraries. JSF-based solutions can hook into the implementation in incompatible ways.
While running portlets built with these other technologies may work, there is a definite possibility of conflict with ICEfaces. While ICEfaces strives to co-exist with these other offerings, you can increase your chances of successfully building your project by reducing the complexity of your architecture. This can mean going with a single technology throughout or perhaps constraining a single portal page to a single technology.
ICEfaces With and Without Ajax PushIt is possible to combine synchronous and asynchronous ICEfaces portlets on a single portal page without any kind of additional configuration, as long as the asynchronous ICEfaces portlets are deployed from the same .war file. However, if the asynchronous ICEfaces portlets running on a single page are deployed in different .war files, you will need to configure the Push Server on the portal as well. Refer to Push Server, p. 74, for more information. The required configuration depends on the portal implementation being used.
Note: All ICEfaces portlets on the same portal page are required to use the same version of ICEfaces.
ICEfaces Developer’s Guide v1.8 85
Advanced Topics
Portlet Deployment – Same or Separate ArchiveIt is possible to deploy individual ICEfaces portlets in separate web archives (.war files) as well as bundling several ICEfaces portlets into a single archive. There are considerations for each. If multiple ICEfaces portlets are bundled together in a single archive, they gain the ability to share some common state and, using Ajax Push, benefit from a form of inter-portlet communication. However, these portlets also share a single set of configuration files (web.xml, portlet.xml, etc.) so it’s important to understand the implications.
Shared faces-config.xmlThe faces-config.xml file is the JSF configuration file used to describe managed beans, navigation, and other JSF-related features. Deploying multiple JSF portlets in a single archive means that all the portlets will share the same configuration. However, each portlet will, in essence get a copy of that configuration. This is an important distinction for the scope of managed beans and bean inter-dependencies.
Application-scoped beans are visible across all the portlets in the archive (as you would expect) and this can be useful if all the portlets need to share some common state. Application-scoped beans, together with Ajax Push, can be used to do a form of inter-portlet communication.
Session-scoped beans are scoped to the portlet session (rather than the user session) which means that each portlet gets its own instance. You can store information in the global user session so that it is available to all the portlets in a single user’s session by using the Portal API and specifying the application scope.
Request-scoped beans are scoped to the requests for the individual portlet. Because ICEfaces directly handles all its own Ajax traffic bypassing the portal container, it can be easy to make incorrect assumptions about the number of beans being created and the relationship between them.
For example, consider the following set of managed JSF beans:
<managed-bean> <managed-bean-name>app</managed-bean-name> <managed-bean-class>com.icesoft.example.AppBean</managed-bean-class> <managed-bean-scope>application</managed-bean-scope></managed-bean>
<managed-bean> <managed-bean-name>sess</managed-bean-name> <managed-bean-class>com.icesoft.example.SessionBean</managed-bean-class> <managed-bean-scope>session</managed-bean-scope> <managed-property> <property-name>appBean</property-name> <value>#{app}</value> </managed-property></managed-bean>
<managed-bean> <managed-bean-name>req</managed-bean-name> <managed-bean-class>com.icesoft.example.RequestBean</managed-bean-class> <managed-bean-scope>request</managed-bean-scope> <managed-property> <property-name>sessionBean</property-name>
ICEfaces Developer’s Guide v1.8 86
Advanced Topics
<value>#{sess}</value> </managed-property></managed-bean>
Now let’s assume we have two portlets, A and B, declared in the .war file and actively deployed on the page. The application-scoped bean is only created once and that single instance is referenced by both portlets. A single, separate session bean is created for each portlet. A separate request bean instance for each portlet is created for each request. Confusion occurs if the developer assumes that the session and request beans for portlet A can reference or see the session and request beans for portlet B. Even though we have a single faces-config.xml file, each portlet essentially uses its own copy of the configuration and other than the application-scoped beans, does not share any reference to each other’s beans.
If your portlets don’t need to share state for any meaningful reason, then it is probably better to deploy them in separate archives. If, for some other reason, they are deployed in the same archive, take care to manage the JSF configuration.
Inter-Portlet Communication (IPC)The use of Ajax Push allows portlets to be updated based on server-side events that change the state of the current view. This can be a powerful feature that can also be leveraged to do a form of inter-portlet communication (IPC) in certain configurations.
IPC is only mentioned in the Portlet 1.0 spec (JSR 168) but is formally defined in the Portlet 2.0 specification (JSR 286). It is architected as an Event/Listener model. However, it is possible to use the ICEfaces Ajax Push mechanism to update portlets based on changes to the underlying model.
The way to do this currently with ICEfaces is to:
• Deploy the portlets that need to communicate in the same archive (.war file).
• Use application-scoped beans to manage shared state between the portlets.
• Use the ICEfaces Ajax Push feature to trigger client updates when the shared state changes.
For an example of how to do this, review the sample ICEfaces Chat portlet.
ActionRequest and ActionResponseThe standard way for a portlet to change the state of its underlying model is via an ActionRequest. The portlet developer generates interactive controls like buttons and links using the Portlet API. When the user of the portlet interacts with those controls, the portal container can interpret the incoming request as an ActionRequest and process it accordingly.
Currently, all interactive types of actions are handled by the ICEfaces framework directly, and are therefore never handled by the portal container. In other words, ActionRequests are never really issued. While this is transparent to the developer, it does lead to certain restrictions. The API for the ActionResponse includes methods for setting the mode of the portlet as well as the state of the portlet window programmatically. Because ICEfaces bypasses the portal container for these types of requests, the ActionRequest and ActionResponse instances are not available to the portlet developer.
A future release of ICEfaces may deal with this situation but, for now, this is how it impacts the portlet developer.
ICEfaces Developer’s Guide v1.8 87
Advanced Topics
Portlet Modes and NavigationThe portlet specification defines some standard modes that a portlet can support (VIEW, EDIT, HELP) and allows portal developers and/or portlet developers to potentially add their own. The impact of not being able to change portlet modes programmatically is that it becomes possible to have JSF navigation rules change the current view to a known mode without the portal container knowing about it. For example, you could allow a user to click a button that takes them from the EDIT mode back to the VIEW mode via JSF navigation rules. But because ICEfaces does this without going through the portal container, the portal container does not know the mode has changed and since the portlet developer cannot access the ActionResponse API, there is no way to let it know.
Some suggestions for dealing with this are:
• Portlet windows typically provide a title bar with icons for switching between supported modes. The icons issue requests to the portal container to switch modes. If possible, use the icons rather than JSF navigation to switch nodes.
• ICEfaces is designed to provide a rich UI experience. It is often possible to design an application or portlet to avoid navigation altogether using other user interface techniques liked tabbed panels to present different views of the data. Consider modifying your interface to take advantage of this.
Window StatesPortlet windows can also be in various states (e.g., MINIMIZED). As with portlet modes, we recommend using the title bar icons to control these states rather than trying to adjust them programmatically.
Request AttributesA unique aspect of the ICEfaces framework is that, due to the use of Ajax techniques, requests can be “long-lived”— somewhere between request and session scope. To maintain the long-lived nature of these types of requests, the ICEfaces framework needs to maintain request-based information during Ajax communications. To maintain this data, ICEfaces makes use of the standard servlet and portlet APIs to get and store things like attributes in its own internal structures. The PortletRequest API provides a couple of different ways to retrieve request attributes:
java.lang.Object getAttribute(java.lang.String name)java.util.Enumeration getAttributeNames()
Unfortunately, there is an issue with certain portal containers where the getAttributeNames() method does not return the same set of attributes that can be retrieved with calls to getAttributeName(String name). In order for ICEfaces to ensure that all the required attributes are maintained for all Ajax requests, some request attributes need to be formally specified by the developer so that ICEfaces can copy them.
The ICEfaces framework maintains all the attributes that are specified in the JSR 168 specification (javax.servlet.include.*, javax.portlet.*). For attributes that are specific to the portal container, ICEfaces provides a mechanism for the developer to add them. Custom request attributes can be specified as space separated strings in com.icesoft.faces.portlet.hiddenAttributes context parameter. For example, to add Liferay’s custom THEME_DISPLAY attribute so that it is properly maintained during Ajax requests, you would have the following context parameter set in your web.xml file:
ICEfaces Developer’s Guide v1.8 88
Advanced Topics
<context-param> <param-name>com.icesoft.faces.portlet.hiddenAttributes</param-name> <param-value>THEME_DISPLAY</param-value> </context-param>
Note: The parameter name for the custom attribute has changed to be more descriptive and consistent with other ICEfaces parameters. The old parameter, com.icesoft.faces.hiddenPortletAttributes, is still supported but has been deprecated. You should use the new parameter, com.icesoft.faces.portlet.hiddenAttributes, for current and future portlet development.
As noted, additional attributes can be added to the context parameter as long as they are separated by spaces.
Custom SolutionsIf the portal vendor provides a client-side or server-side mechanism for handling these scenarios, then you have the option of using those. However, committing to these APIs probably means giving up the ability to run the portlet as a plain web application or running the portlet on a different portal platform. You can decide whether the trade-off is acceptable.
Running the ICEfaces Sample Portlets
In the binary installation of ICEfaces, pre-built sample applications and their sources can be found at:
[install_dir]/icefaces/samples/
Samples that have been specifically developed as portlets can be found at:
[install_dir]/icefaces/samples/portlet/
If you downloaded the source code distribution of ICEfaces, then you can build all the samples by running:
ant
from the following directory:
[install_dir]/icefaces/
The default build of the portlet samples is Liferay running on Tomcat 6.0. However, additional portlet targets are available. Use “ant help” to see the list of available portlet container targets.
ant -p
Deploying portlet .war files to a supported portal container varies from vendor to vendor. Refer to the documentation for your platform on how to deploy the portlet archive.
ICEfaces Developer’s Guide v1.8 89

Advanced Topics
Component ShowcaseThe Component Showcase application is a useful way to see ICEfaces components in action as well as providing useful coding examples. We also provide a build of Component Showcase that can be deployed in a portal container. Each individual component demo has been configured as a separate portlet that can be added and removed from a portal page. The demo can be used to illustrate how to configure ICEfaces portlets as well as demonstrate working examples of the ICEfaces components running inside a portal.
ChatThe ICEfaces Chat Portlet example is a very simple application that shows how to use the Ajax Push features of ICEfaces to update multiple portlets on a page. In this case, you can open two separate instances of the chat portlet on a single page and chat between them, watching them both update as messages are sent.
ICEfaces Developer’s Guide v1.8 90
Advanced Topics
JBoss Seam Integration
JBoss Seam is a middleware technology that integrates JSF with EJB3. It can vastly reduce the amount of XML configuration required to develop applications. For more information on Seam, see http://www.seamframework.org/.
For jboss-seam-2.x, the latest version of ICEfaces is always used for the ICEfaces example within the Seam distribution bundle. Seam-gen also defaults to this version, which is stored on the jboss-seam repository along with Maven2 Project Object Models (POMs) for the ICEfaces JARs. With seam-gen you may also specify a particular ICEfaces version you have downloaded (refer to the seam-gen help).
Resources
The following additional resources are available if you are developing Seam applications with ICEfaces:
• Using ICEfaces with JBoss Seam: ICEfaces Knowledge Base category. Refer to the Knowledge Base for the latest information on using ICEfaces with Seam.
• JBoss Seam Integration: ICEfaces Forum. This forum contains discussions related to using ICEfaces with JBoss Seam applications.
ICEfaces Developer’s Guide v1.8 91
Advanced Topics
Getting Started
The simplest way to produce a working ICEfaces/Seam application is to use the seam-gen utility that is distributed with any jboss-seam-2.x distribution bundle. A basic seam/ICEfaces project is created with the “new-project” target. Refer to the documentation for the other available targets for seam-gen. A hotel booking example, enhanced with ICEfaces, is also distributed with the jboss-seam distribution packages in the examples folder. This example demonstrates the conversational context and the ability to switch between conversations using a Seam/ICEfaces integration in an EAR deployment.
A seam-comp-showcase is also available for download at http://downloads.icefaces.org/. Several versions are available depending on which ICEfaces version you are using. Both ICEfaces and Seam are rapidly evolving, so newer versions of the application will be made available to take advantage of what they have to offer. Several Ant targets that create a WAR deployment for various application servers for any of the versions for 1.7.0 and newer, including targets for portlets, are available as well. Refer to the readme files in these packages for instructions.
JSF 1.2 specifications - for jboss-seam-2.0.x or 2.1x
For JSF 1.2 specifications (using Sun JSF 1.2 RI JARs), the modules (JARs) of an EAR deployment no longer need to be defined and the JARs can just be included in the META-INF\lib directory (other than jboss-seam.jar which goes in the root of an EAR). See the examples or generate an application using seam-gen (jboss-seam-2.0.x). Only one version of faces-config.xml is required. Ensure that no other facelet view handler other than D2DFaceletViewHandler is used, unless you are using jsf-delegation.
Bypassing Seam Interceptors
For performance reasons, be sure to use the annotation @BypassInterceptors on any methods which access a property for an Ajax-enabled component. For example, the read only property for an <ice:inputText> component would have this annotation above the getReadOnly() and the setter. This disables much of the overhead of Seam, including transaction management.
Using Server-initiated Rendering
Asynchronous ConfigurationTo use the RenderManager you must configure the application for Asynchronous execution mode. The web.xml should contain the following configuration.
<context-param><param-name>com.icesoft.faces.synchronousUpdate</param-name><param-value>false</param-value>
</context-param>
ICEfaces Developer’s Guide v1.8 92
Advanced Topics
Note: You should use Synchronous update mode (synchronousUpdate=true) if your application does NOT use the ICEfaces server-initiated rendering feature.
Prior to ICEfaces v1.6, ICEfaces application developers could use JSF to instantiate the application scope RenderManager and cause this instance to be initialized via a property setter on their state bean for initiating an IntervalRenderer, or some similar mechanism for triggering a render portion of the JSF lifecycle. This still works, but as of v1.6, developers can now configure Seam to load the RenderManager as a named component, and can use injection to pass the RenderManager instance to their beans.
Render Manager as Named ComponentTo get the RenderManager to be loaded as a named Seam component, add the following line to the components.xml file:
<component scope="APPLICATION" auto-create="true" name="renderManager" class="com.icesoft.faces.async.render.RenderManager" />
This is effectively the same as using JSF to create a managed bean instance. There are a couple of ways to gain access to the RenderManager via injection:
1. Declare the RenderManager with the @In Seam annotation.
@Inprivate RenderManager renderManager;
2. Declare the setter property with the @In annotation.
@Inpublic void setRenderManager(RenderManager x) {
renderManager = x;}
Using RenderManager For an example of how to use OnDemandRenderer, a simple version of seam-auctionMonitor is available for download at http://downloads.icefaces.org. Review the readme file for instructions on how to build and deploy. A simpler API for Ajax Push is available in ICEfaces v1.8. Refer to SessionRenderer, p. 52 .
Using OnDemandRenderer or IntervalRenderer requires you to implement Renderable in your backing bean. The SessionRenderer requires none of this and only requires a few lines of code.
The following is an example of how to use IntervalRenderer with Seam and ICEfaces. To use this, put an el reference on your facelets page to this bean and the properties #{timer.currentTime} to see the clock running:
@Name("timer")@Scope(ScopeType.PAGE)public class TimerBeanImpl implements Renderable [See NOTE 1 below.]private DateFormat dateFormatter;@Inprivate RenderManager renderManager;
ICEfaces Developer’s Guide v1.8 93
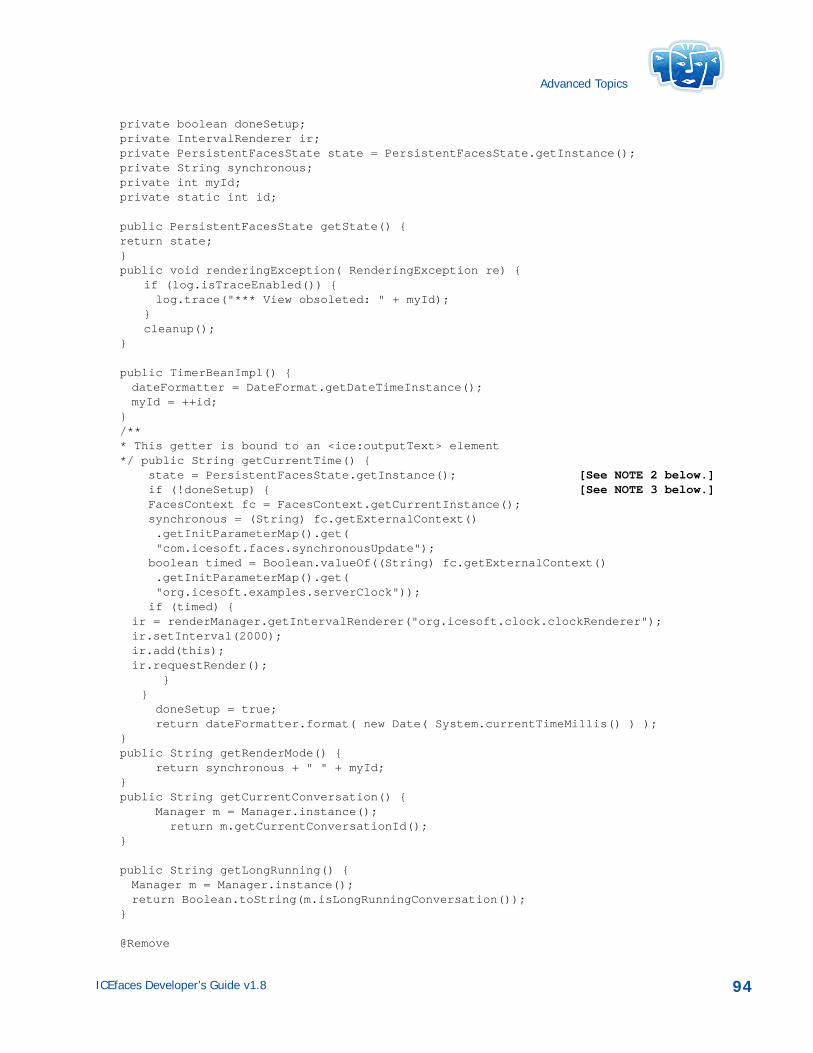
Advanced Topics
private boolean doneSetup;private IntervalRenderer ir;private PersistentFacesState state = PersistentFacesState.getInstance();private String synchronous;private int myId;private static int id;
public PersistentFacesState getState() {return state;}public void renderingException( RenderingException re) {
if (log.isTraceEnabled()) {log.trace("*** View obsoleted: " + myId);
}cleanup();
}
public TimerBeanImpl() {dateFormatter = DateFormat.getDateTimeInstance();myId = ++id;
}/*** This getter is bound to an <ice:outputText> element*/ public String getCurrentTime() { state = PersistentFacesState.getInstance(); [See NOTE 2 below.] if (!doneSetup) { [See NOTE 3 below.] FacesContext fc = FacesContext.getCurrentInstance(); synchronous = (String) fc.getExternalContext()
.getInitParameterMap().get("com.icesoft.faces.synchronousUpdate");
boolean timed = Boolean.valueOf((String) fc.getExternalContext().getInitParameterMap().get("org.icesoft.examples.serverClock"));
if (timed) {ir = renderManager.getIntervalRenderer("org.icesoft.clock.clockRenderer");ir.setInterval(2000);ir.add(this);ir.requestRender();
} } doneSetup = true; return dateFormatter.format( new Date( System.currentTimeMillis() ) );}public String getRenderMode() { return synchronous + " " + myId;}public String getCurrentConversation() { Manager m = Manager.instance(); return m.getCurrentConversationId();}
public String getLongRunning() {Manager m = Manager.instance();return Boolean.toString(m.isLongRunningConversation());
}
@Remove
ICEfaces Developer’s Guide v1.8 94
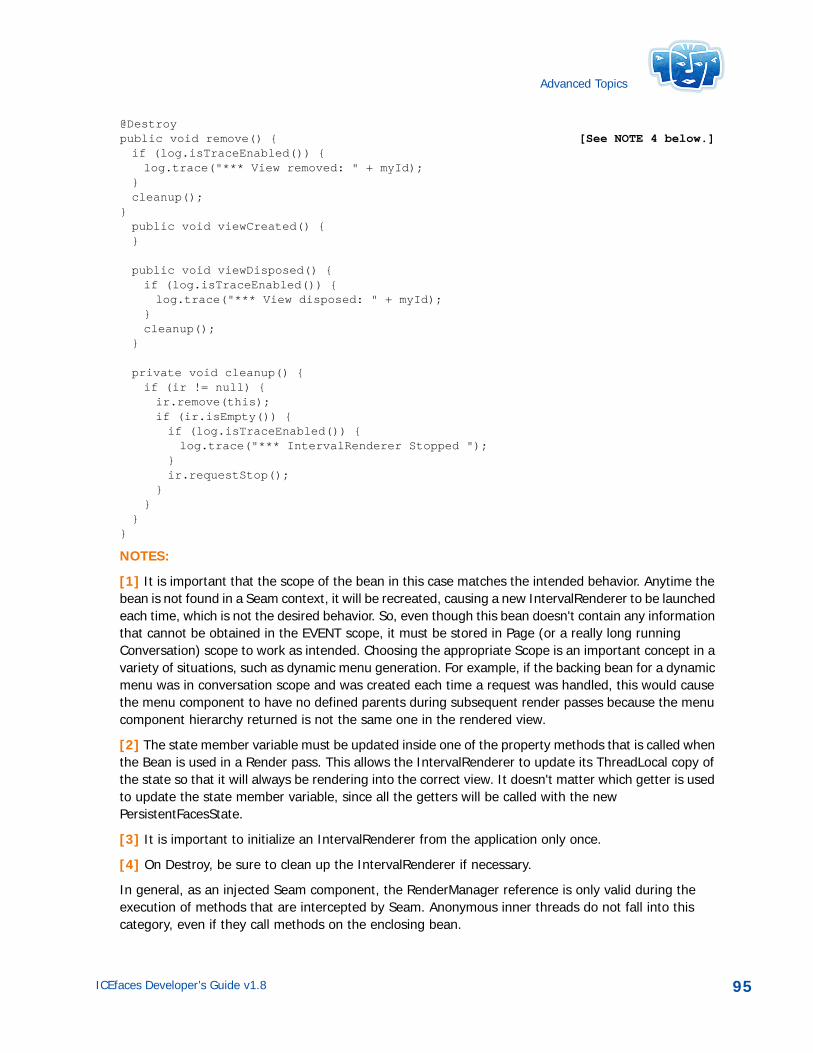
Advanced Topics
@Destroypublic void remove() { [See NOTE 4 below.]if (log.isTraceEnabled()) {log.trace("*** View removed: " + myId);
}cleanup();
}public void viewCreated() {}
public void viewDisposed() {if (log.isTraceEnabled()) {log.trace("*** View disposed: " + myId);
}cleanup();
}
private void cleanup() {if (ir != null) {ir.remove(this);if (ir.isEmpty()) {if (log.isTraceEnabled()) {log.trace("*** IntervalRenderer Stopped ");
}ir.requestStop();
}}
}}
NOTES:
[1] It is important that the scope of the bean in this case matches the intended behavior. Anytime the bean is not found in a Seam context, it will be recreated, causing a new IntervalRenderer to be launched each time, which is not the desired behavior. So, even though this bean doesn't contain any information that cannot be obtained in the EVENT scope, it must be stored in Page (or a really long running Conversation) scope to work as intended. Choosing the appropriate Scope is an important concept in a variety of situations, such as dynamic menu generation. For example, if the backing bean for a dynamic menu was in conversation scope and was created each time a request was handled, this would cause the menu component to have no defined parents during subsequent render passes because the menu component hierarchy returned is not the same one in the rendered view.
[2] The state member variable must be updated inside one of the property methods that is called when the Bean is used in a Render pass. This allows the IntervalRenderer to update its ThreadLocal copy of the state so that it will always be rendering into the correct view. It doesn't matter which getter is used to update the state member variable, since all the getters will be called with the new PersistentFacesState.
[3] It is important to initialize an IntervalRenderer from the application only once.
[4] On Destroy, be sure to clean up the IntervalRenderer if necessary.
In general, as an injected Seam component, the RenderManager reference is only valid during the execution of methods that are intercepted by Seam. Anonymous inner threads do not fall into this category, even if they call methods on the enclosing bean.
ICEfaces Developer’s Guide v1.8 95
Advanced Topics
Using the File Upload (ice:inputFile) Component
The ICEfaces FileUploadServlet is anomalous in that it does not initiate a JSF lifecycle while it is processing the file upload. While it is processing, the FileUploadServlet is calling the progress method on an object implementing the InputBean interface, to keep the upload progress bar current. In a non-Seam JSF application, these relationships are managed by JSF.
When running in a Seam application, for each push that indicates progress, the Seam interceptors are bypassed, so injected values are not available. If you use injected objects, it is important that you save attributes in a constructor to ensure they are available for each Ajax Push of the progress monitor. Each version of ICEfaces has seen improvement for this component, so make sure you review the latest seam-comp-showcase for the version of ICEfaces that you are using.
Seam and Component-bindingIt is important to note that component-binding must be done differently using Seam because the regular JSF lifecycle has the binding evaluated before the Seam contexts are available. Refer to the seam-comp-showcase for the component showing dataPaginator for an example of how to do component binding with Seam and ICEfaces.
ICEfaces Developer’s Guide v1.8 96
Advanced Topics
Spring Web Flow Integration
The Spring Framework is a full-stack Java/JEE application framework focusing on increased development productivity while improving application testability and quality. For more information on Spring Framework, see http://www.springframework.org.
Getting Started
The easiest way to produce a working ICEfaces/Spring Web Flow application is to check out the demonstration application available from http://anonsvn.icefaces.org/repo/projects/swf-booking-icefaces/trunk/swf-booking-icefaces. The build process is explained in the readme.txt included with the project. This application is based on the original Spring Booking demonstration application, and consists of a simple Web Flow example coupled with ICEfaces components. Using the build mechanism in place from the Spring examples allows Ivy to resolve any JAR dependencies.
Configuring Spring Applications to Work with ICEfaces
Generally speaking, Spring Web Flow applications are about managing state change and managing navigation through the web application. ICEfaces can certainly work in this environment, but ICEfaces brings Ajax technology to web applications simply, without exposure to verbose JavaScript. Using partial submits, you can increase the functionality of a given page and expose more business logic without the need for the same amount of cumbersome full-page navigation states in the application. Any single page can now be enhanced with features, such as autocomplete, with values fetched from the Server, or server-based business rules for calculating intermediate costs.
The good news is that requests to the server made by ICEfaces components don’t change or affect the state of the current Web Flow State as long as the interaction doesn’t return a navigation result that is the same as the result defined for the Spring Web Flow. This means that you can add a component to the page and go about increasing functionality without worrying about inadvertently changing the application’s behavior.
Primarily, the changes to a Spring application to work with ICEfaces consist of:
• Changing the default Spring variable resolver to the following, as per the <variable-resolver>org.springframework.web.jsf.DelegatingVariableResolver</variable-resolver>. This allows defining beans defined in a Web Flow to be accessed during a JSF lifecycle. The opposite, defining beans used by Spring in the faces-config file, defeats other aspects of Spring configuration.
• Changing web.xml to point to ICEfaces Servlets, and additionally defining a listener that allows access to Session scoped beans. This is required because the entrance into the JSF lifecycle is done through ICEfaces servlets, and not the Spring DispatcherServlet.
• Changing the JSP pages to include the ICEfaces taglib definitions and optionally using ICEfaces components to enhance page functionality.
ICEfaces Developer’s Guide v1.8 97
Advanced Topics
Changes to webflow-config.xml There are some concepts necessary for correctly configuring the always-redirect-on-pause configuration parameter. The Spring resource is an excellent starting point: http://www.ervacon.com/products/swf/tips/tip4.html
There are certain applications that can benefit from ICEFaces AJAX navigation. In this type of configuration, interaction is done via POST requests, but the response contains the updates to the page. If navigation occurs, then the new page contents are fully rendered in the response and redirects are not necessary. We don’t recommend this type of interaction for applications where duplicate POSTing of details is an issue but it does have applications.
The downside to setting the always-redirect-on-pause setting to false in ICEFaces is that without redirects, the Flow execution key isn't inserted into the URL in the nav bar. This means that reloading the page will restart the Flow.
The default for Spring Web Flow is to consider always-redirect-on-pause=true. Add the following always-redirect-on-pause attribute to webflow-config.xml for ICEFaces POST->Response behavior:
<!-- Executes flows: the central entry point into the Spring Web Flow system--> <webflow:flow-executor id="flowExecutor"> <webflow:flow-execution-attributes> <webflow:always-redirect-on-pause value="false" /> </webflow:flow-execution-attributes> <webflow:flow-execution-listeners> <webflow:listener ref="jpaFlowExecutionListener" /> <webflow:listener ref="securityFlowExecutionListener" />
</webflow:flow-execution-listeners>
Changes to web.xml The following is the web.xml file from the downloadable example application:
<?xml version="1.0" encoding="ISO-8859-1"?><web-app xmlns="http://java.sun.com/xml/ns/j2ee"xmlns:xsi="http://www.w3.org/2001/XMLSchema-instance"xsi:schemaLocation="http://java.sun.com/xml/ns/j2ee
http://java.sun.com/xml/ns/j2ee/web-app_2_4.xsd"version="2.4">
<!-- The master configuration file for this Spring web application -->
<context-param><param-name>contextConfigLocation</param-name><param-value>/WEB-INF/config/web-application-config.xml
</param-value></context-param>
<!-- Use JSF view templates saved as *.xhtml, for use with Facelets --><context-param><param-name>javax.faces.DEFAULT_SUFFIX</param-name>
ICEfaces Developer’s Guide v1.8 98
Advanced Topics
<param-value>.xhtml</param-value></context-param>
<!-- Enables special Facelets debug output during development --> <context-param> <param-name>facelets.DEVELOPMENT</param-name> <param-value>true</param-value> </context-param> <!-- Causes Facelets to refresh templates during development --> <context-param> <param-name>facelets.REFRESH_PERIOD</param-name> <param-value>1</param-value> </context-param>
<!-- Enables Spring Security --> <filter>
<filter-name>springSecurityFilterChain</filter-name> <filter-class> org.springframework.web.filter.DelegatingFilterProxy </filter-class> </filter>
<filter-mapping> <filter-name>springSecurityFilterChain</filter-name> <url-pattern>/*</url-pattern> </filter-mapping>
<!-- Loads the Spring web application context --><listener><listener-class>
org.springframework.web.context.ContextLoaderListener </listener-class></listener>
<!-- Serves static resource content from .jar files such as spring-faces.jar --><servlet><servlet-name>Resources Servlet</servlet-name><servlet-class>org.springframework.js.resource.ResourceServlet</servlet-class><load-on-startup>0</load-on-startup>
</servlet>
<servlet> <servlet-name>SpringWebFlowInstantiationServlet</servlet-name> <servlet-class> com.icesoft.faces.webapp.http.servlet.SpringWebFlowInstantiationServlet </servlet-class> <init-param> <param-name>contextConfigLocation</param-name> <param-value> /WEB-INF/config/web-application-config.xml </param-value> </init-param> <load-on-startup> 1 </load-on-startup> </servlet> <!-- Map all /resources requests to the Resource Servlet for handling -->
ICEfaces Developer’s Guide v1.8 99
Advanced Topics
<servlet-mapping><servlet-name>Resources Servlet</servlet-name><url-pattern>/resources/*</url-pattern>
</servlet-mapping>
<!-- The front controller of this Spring Web application, responsible for handling all application requests --><servlet><servlet-name>Spring MVC Dispatcher Servlet</servlet-name><servlet-class>org.springframework.web.servlet.DispatcherServlet</servlet-class><init-param><param-name>contextConfigLocation</param-name><param-value></param-value>
</init-param><load-on-startup>2</load-on-startup>
</servlet>
<!-- Map all /spring requests to the Dispatcher Servlet for handling --><servlet-mapping><servlet-name>Spring MVC Dispatcher Servlet</servlet-name><url-pattern>/pages/*</url-pattern>
</servlet-mapping>
<!-- Just here so the JSF implementation can initialize, *not* used at runtime --><servlet><servlet-name>Faces Servlet</servlet-name><servlet-class>javax.faces.webapp.FacesServlet</servlet-class><load-on-startup>1</load-on-startup>
</servlet>
<!-- Just here so the JSF implementation can initialize --><servlet-mapping><servlet-name>Faces Servlet</servlet-name><url-pattern>*.faces</url-pattern>
</servlet-mapping>
<welcome-file-list><welcome-file>index.html</welcome-file>
</welcome-file-list>
<!-- Icesoft specific config --> <!-- Specifies to the ICEfaces framework whether to support multiple views of a single application from the same browser. When running in a Portlet environment, this parameter must be set to true. --> <context-param> <param-name>com.icesoft.faces.concurrentDOMViews</param-name> <param-value>true</param-value> </context-param>
<context-param><param-name>javax.faces.STATE_SAVING_METHOD</param-name><param-value>server</param-value>
</context-param>
<context-param> <param-name>com.icesoft.faces.synchronousUpdate</param-name>
ICEfaces Developer’s Guide v1.8 100
Advanced Topics
<param-value>false</param-value> </context-param>
<context-param> <param-name>com.sun.faces.validateXml</param-name> <param-value>true</param-value> </context-param>
<context-param> <param-name>com.prime.facestrace.DISABLE_TRACE</param-name> <param-value>true</param-value> </context-param>
<context-param> <param-name>com.icesoft.faces.standardRequestScope</param-name> <param-value>true</param-value> </context-param>
<context-param> <param-name>com.icesoft.faces.uploadDirectory</param-name> <param-value>upload</param-value> </context-param>
<listener> <listener-class> com.icesoft.faces.util.event.servlet.ContextEventRepeater </listener-class> </listener><listener><listener-class>com.sun.faces.application.WebappLifecycleListener
</listener-class></listener>
<!-- file upload Servlet --> <servlet> <servlet-name>uploadServlet</servlet-name> <servlet-class> com.icesoft.faces.component.inputfile.FileUploadServlet </servlet-class> <load-on-startup> 1 </load-on-startup> </servlet>
<servlet> <servlet-name>Persistent Faces Servlet</servlet-name> <servlet-class> com.icesoft.faces.webapp.xmlhttp.PersistentFacesServlet </servlet-class> <load-on-startup> 1 </load-on-startup> </servlet>
<servlet> <servlet-name>Blocking Servlet</servlet-name> <servlet-class> com.icesoft.faces.webapp.xmlhttp.BlockingServlet </servlet-class>
ICEfaces Developer’s Guide v1.8 101
Advanced Topics
<load-on-startup> 1 </load-on-startup> </servlet>
<servlet-mapping> <servlet-name>Persistent Faces Servlet</servlet-name> <url-pattern>*.xhtml</url-pattern> </servlet-mapping>
<servlet-mapping> <servlet-name>Persistent Faces Servlet</servlet-name> <url-pattern>/xmlhttp/*</url-pattern> </servlet-mapping>
<servlet-mapping> <servlet-name>Persistent Faces Servlet</servlet-name> <url-pattern>/spring/*</url-pattern> </servlet-mapping>
<servlet-mapping> <servlet-name>Blocking Servlet</servlet-name> <url-pattern>/block/*</url-pattern> </servlet-mapping>
<session-config> <session-timeout>30</session-timeout> </session-config>
</web-app>
Notes on web.xml • ICEfaces servlets handle all requests from the browser.
• Synchronous request handling with concurrent DOM views are disabled.
Changes to faces-config.xml <?xml version="1.0"?><!DOCTYPE faces-config PUBLIC "-//Sun Microsystems, Inc.//DTD JavaServer Faces Config 1.0//EN" "http://java.sun.com/dtd/web-facesconfig_1_0.dtd">
<faces-config><application>
<view-handler> com.sun.facelets.FaceletViewHandler </view-handler>
<view-handler> com.icesoft.faces.facelets.D2DFaceletViewHandler
</view-handler><variable-resolver>
org.springframework.web.jsf.DelegatingVariableResolver </variable-resolver></application>
ICEfaces Developer’s Guide v1.8 102
Advanced Topics
</faces-config>
In this file, be sure to have the appropriate JSF variable resolver specified. See the Spring Framework 2.1 reference Section 15.3, Integrating with JavaServer Faces.
Known Issues
Server-initiated RenderingUsing server-initiated rendering can cause problems with regard to Web Flow states. When a server-initiated render operation starts, the Web Flow executor key is retrieved from the UIViewRoot, and the Web Flow state is resumed. This is okay, and works properly, but it does cause problems if the Web Flow has reached a terminal state. In this case, the Web Flow cannot be resumed.
There might be several server-initiated rendering scenarios for your application. Currently, it is difficult to know when a page transition occurs as part of a partial submit; hence, it is difficult to know precisely when to stop the server-initiated rendering if the page transitions to a Web Flow terminal state.
Consider an example of an application with an outputText component displaying the time on the bottom of the page every 5 seconds. This type of component would be easy to add to a footer, so it is included on every page of the application. This would cause problems in the Web Flow sellitems demonstration application because when the application winds up in the shipping cost summary page, the Web Flow has reached a terminal state. If the ticking clock is still updating at this time, this will cause exceptions when it tries to restore the Web Flow as part of the server-initiated rendering pass.
The DisposableBean interface (and the deprecated ViewListener interface) allow the server-initiated rendering code to know when the user leaves a particular view. For more information on the DisposableBean interface, refer to The DisposableBean Interface, p. 61.
Spring Web Flow 2.0.5In Spring Web Flow 2.0.5, there is a known issue with ICEFaces ViewHandler delegation. To use ICEFaces with Spring Web Flow 2.0.5, use the following faces-config.xml file contents:
<application> <view-handler> com.sun.facelets.FaceletViewHandler </view-handler> <view-handler> com.icesoft.faces.facelets.D2DFaceletViewHandler </view-handler> <view-handler> org.springframework.faces.webflow.FlowViewHandler </view-handler>
<variable-resolver>org.springframework.web.jsf.DelegatingVariableResolver
</variable-resolver> </application>
This will cause two instances of the FlowViewHandler to be instantiated, but they will not collide.
ICEfaces Developer’s Guide v1.8 103
Advanced Topics
Creating Drag and Drop Features
This tutorial guides you though creating an application that uses Drag and Drop.
For more information about building and deploying your project, refer to the tutorials in Chapter 4 of the ICEfaces Getting Started Guide.
Creating a Draggable Panel
The dragdrop1 directory contains an empty project, with a single .jspx file in the dragdrop1/web folder. dragDrop.jsp is empty aside from the basic code needed for an ICEFaces application.
1. Begin by adding a form.
<ice:form>
Note: All drag and drop panels must be in a form.
2. Inside the form, add a group panel and set the draggable attribute to true. The following example shows you how to do this and also has some added style information to give the panel a default size.
<ice:form><ice:panelGroup style="z-index:10;width:200px;height:60px;background:
#ddd;border:2px solid black; cursor:move;" draggable="true">
</ice:panelGroup></ice:form>
3. Deploy the application.
http://localhost:8080/dragdrop1
To display the drag feature, click on the grey box to drag it around the screen.
Adding Drag Events
In the dragdrop1/src/com/icesoft/tutorial/ directory you will find the class, DragDropBean, which is an empty class. The class is mapped to the name dragDropBean in faces-config.xml.
1. Add a listener that will receive Drag events from the panel and a String property to display the value to the DragDropBean class.
private String dragPanelMessage = "Test";
public void setDragPanelMessage(String s){ dragPanelMessage = s; } public String getDragPanelMessage(){
ICEfaces Developer’s Guide v1.8 104
Advanced Topics
return dragPanelMessage; } public void dragPanelListener(DragEvent dragEvent){ dragPanelMessage = "DragEvent = " + DragEvent.getEventName(dragEvent.getEventType()); }
2. In the dragDrop.jspx, set the dragListener attribute to point to dragPanelListener and output the message.
<ice:panelGroup style="z-index:10;width:200px;height:60px; background:#ddd;border:2px solid black;cursor:move;" draggable="true" dragListener="#{dragDropBean.dragPanelListener}">
<ice:outputText value="#{dragDropBean.dragPanelMessage}"/></ice:panelGroup>
3. Deploy the application.
http://localhost:8080/dragdrop1
Now when you drag the panel around, the message changes. When you start to drag, the event is dragging; when released, it is drag_cancel.
There are five Drag and Drop Event types.
4. To see the other messages, add a new group panel with the dropTarget attribute set to true. Add the panel below the draggable panel, but within the same form.
<ice:panelGroup style="z-index:0;width:250px;height:100px; background:#FFF;border:2px solid black;"dropTarget="true">
</ice:panelGroup>
5. Deploy the application.
http://localhost:8080/dragdrop1
Now when you drag the panel over the dropTarget panel, the messages will change.
Setting the Event dragValue and dropValue
Panels have a dragValue and a dropValue, which can be passed in Drag and Drop events.
Event Type Effect
Dragging A panel is being dragged.
Drag Cancel Panel has been dropped, but not on a drop target.
Dropped Panel has been dropped on a drop target.
Hover Start Panel is hovering over a drop target.
Hover End Panel has stopped hovering over a drop target.
ICEfaces Developer’s Guide v1.8 105
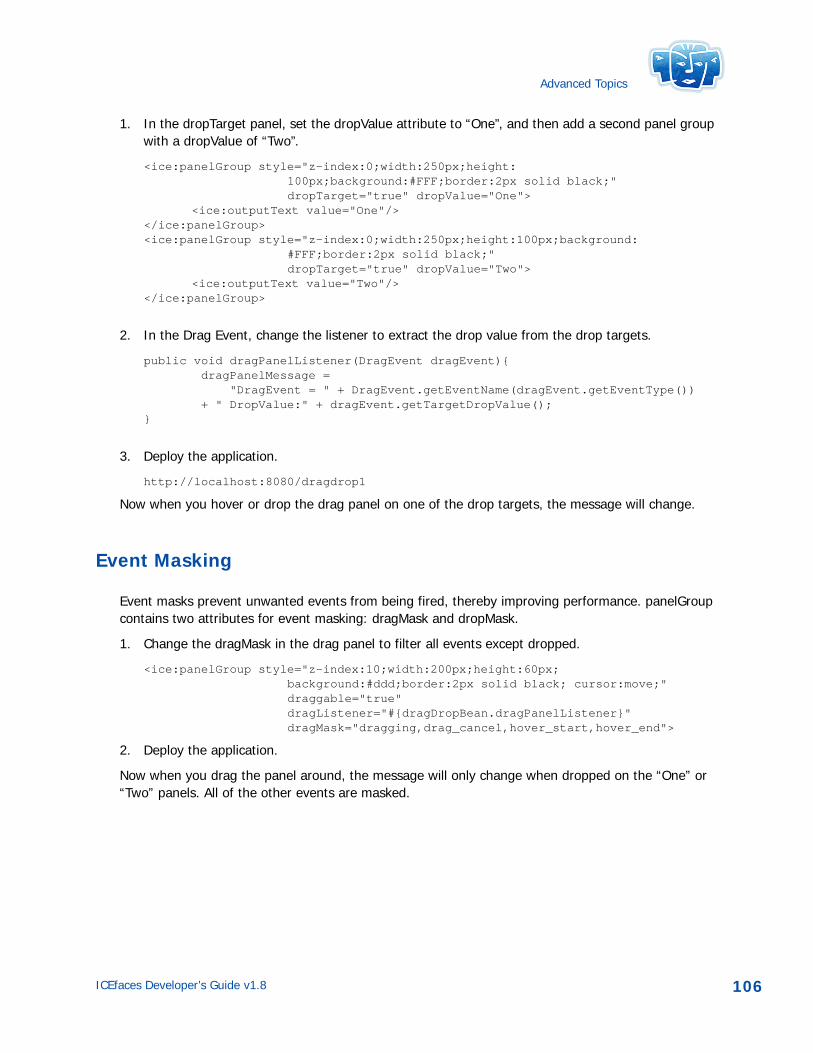
Advanced Topics
1. In the dropTarget panel, set the dropValue attribute to “One”, and then add a second panel group with a dropValue of “Two”.
<ice:panelGroup style="z-index:0;width:250px;height:100px;background:#FFF;border:2px solid black;"dropTarget="true" dropValue="One">
<ice:outputText value="One"/></ice:panelGroup><ice:panelGroup style="z-index:0;width:250px;height:100px;background:
#FFF;border:2px solid black;"dropTarget="true" dropValue="Two">
<ice:outputText value="Two"/></ice:panelGroup>
2. In the Drag Event, change the listener to extract the drop value from the drop targets.
public void dragPanelListener(DragEvent dragEvent){ dragPanelMessage = "DragEvent = " + DragEvent.getEventName(dragEvent.getEventType()) + " DropValue:" + dragEvent.getTargetDropValue(); }
3. Deploy the application.
http://localhost:8080/dragdrop1
Now when you hover or drop the drag panel on one of the drop targets, the message will change.
Event Masking
Event masks prevent unwanted events from being fired, thereby improving performance. panelGroup contains two attributes for event masking: dragMask and dropMask.
1. Change the dragMask in the drag panel to filter all events except dropped.
<ice:panelGroup style="z-index:10;width:200px;height:60px; background:#ddd;border:2px solid black; cursor:move;" draggable="true" dragListener="#{dragDropBean.dragPanelListener}"dragMask="dragging,drag_cancel,hover_start,hover_end">
2. Deploy the application.
Now when you drag the panel around, the message will only change when dropped on the “One” or “Two” panels. All of the other events are masked.
ICEfaces Developer’s Guide v1.8 106
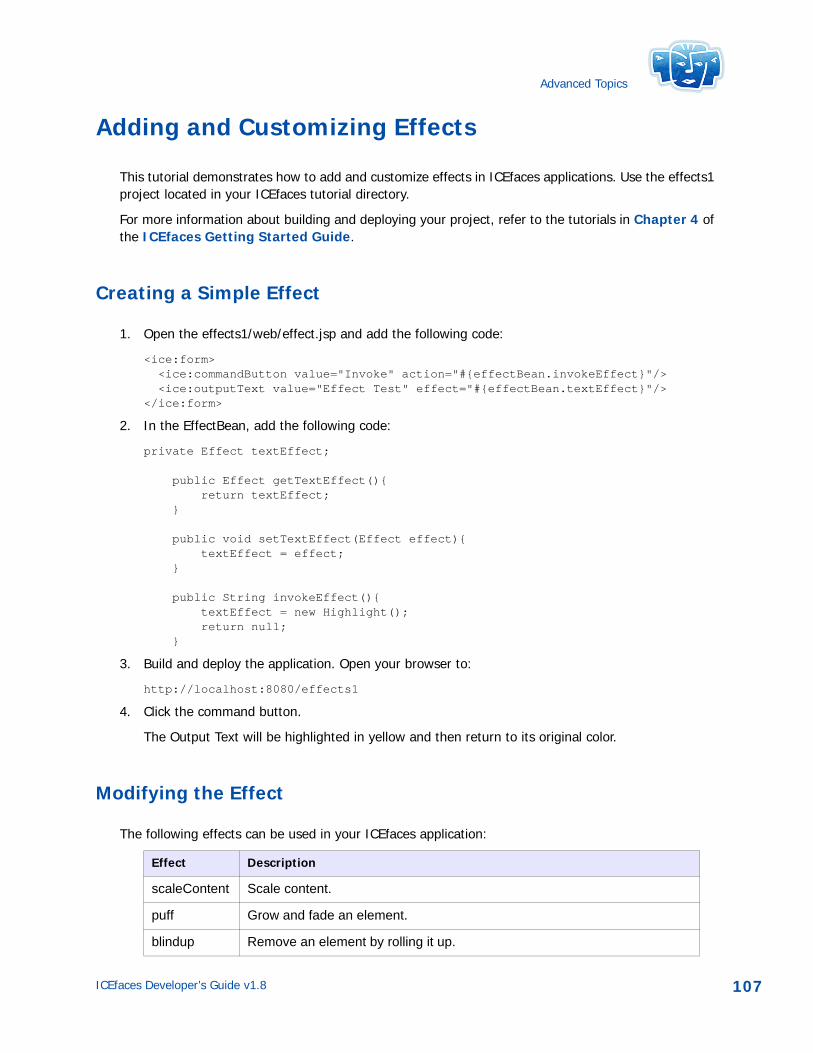
Advanced Topics
Adding and Customizing Effects
This tutorial demonstrates how to add and customize effects in ICEfaces applications. Use the effects1 project located in your ICEfaces tutorial directory.
For more information about building and deploying your project, refer to the tutorials in Chapter 4 of the ICEfaces Getting Started Guide.
Creating a Simple Effect
1. Open the effects1/web/effect.jsp and add the following code:
<ice:form> <ice:commandButton value="Invoke" action="#{effectBean.invokeEffect}"/> <ice:outputText value="Effect Test" effect="#{effectBean.textEffect}"/></ice:form>
2. In the EffectBean, add the following code:
private Effect textEffect; public Effect getTextEffect(){ return textEffect; } public void setTextEffect(Effect effect){ textEffect = effect; } public String invokeEffect(){ textEffect = new Highlight(); return null; }
3. Build and deploy the application. Open your browser to:
http://localhost:8080/effects1
4. Click the command button.
The Output Text will be highlighted in yellow and then return to its original color.
Modifying the Effect
The following effects can be used in your ICEfaces application:
Effect Description
scaleContent Scale content.
puff Grow and fade an element.
blindup Remove an element by rolling it up.
ICEfaces Developer’s Guide v1.8 107
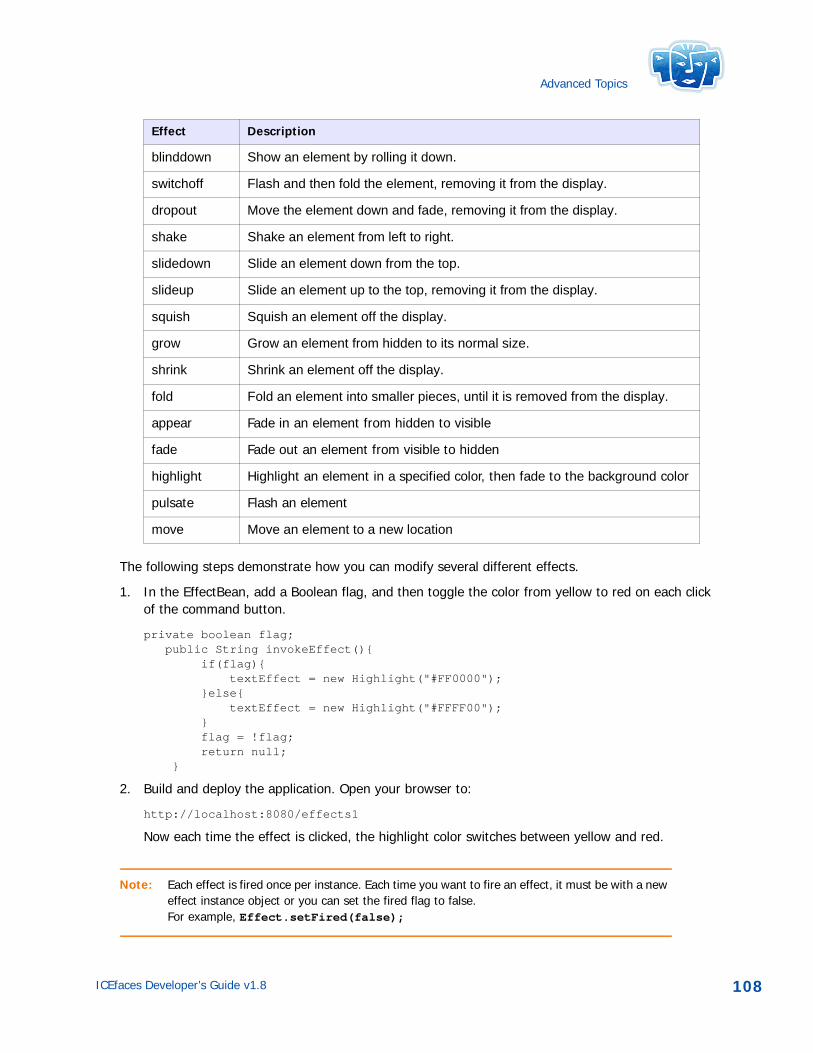
Advanced Topics
The following steps demonstrate how you can modify several different effects.
1. In the EffectBean, add a Boolean flag, and then toggle the color from yellow to red on each click of the command button.
private boolean flag; public String invokeEffect(){ if(flag){ textEffect = new Highlight("#FF0000"); }else{ textEffect = new Highlight("#FFFF00"); } flag = !flag; return null; }
2. Build and deploy the application. Open your browser to:
http://localhost:8080/effects1
Now each time the effect is clicked, the highlight color switches between yellow and red.
Note: Each effect is fired once per instance. Each time you want to fire an effect, it must be with a new effect instance object or you can set the fired flag to false. For example, Effect.setFired(false);
blinddown Show an element by rolling it down.
switchoff Flash and then fold the element, removing it from the display.
dropout Move the element down and fade, removing it from the display.
shake Shake an element from left to right.
slidedown Slide an element down from the top.
slideup Slide an element up to the top, removing it from the display.
squish Squish an element off the display.
grow Grow an element from hidden to its normal size.
shrink Shrink an element off the display.
fold Fold an element into smaller pieces, until it is removed from the display.
appear Fade in an element from hidden to visible
fade Fade out an element from visible to hidden
highlight Highlight an element in a specified color, then fade to the background color
pulsate Flash an element
move Move an element to a new location
Effect Description
ICEfaces Developer’s Guide v1.8 108
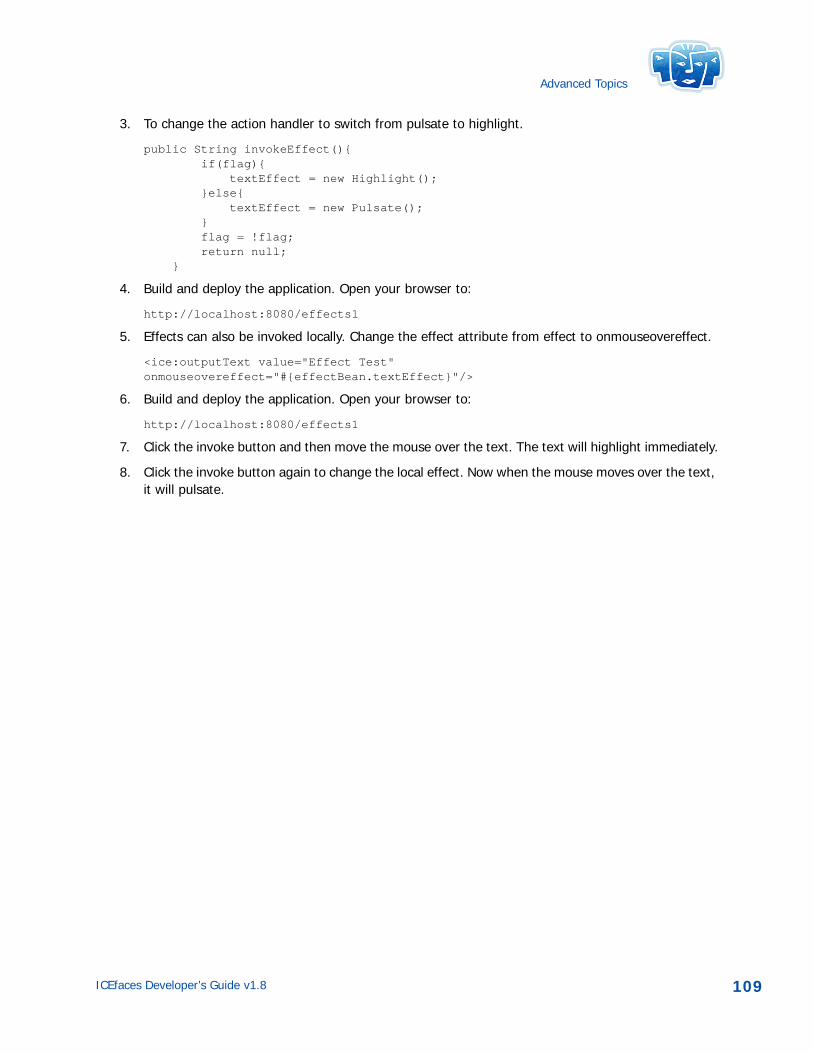
Advanced Topics
3. To change the action handler to switch from pulsate to highlight.
public String invokeEffect(){ if(flag){ textEffect = new Highlight(); }else{ textEffect = new Pulsate(); } flag = !flag; return null; }
4. Build and deploy the application. Open your browser to:
http://localhost:8080/effects1
5. Effects can also be invoked locally. Change the effect attribute from effect to onmouseovereffect.
<ice:outputText value="Effect Test" onmouseovereffect="#{effectBean.textEffect}"/>
6. Build and deploy the application. Open your browser to:
http://localhost:8080/effects1
7. Click the invoke button and then move the mouse over the text. The text will highlight immediately.
8. Click the invoke button again to change the local effect. Now when the mouse moves over the text, it will pulsate.
ICEfaces Developer’s Guide v1.8 109
Appendix A ICEfaces Library/App. Server Dependencies
Note: Some application servers, such as OC4J and WebSphere, may require a specific server configuration when used with ICEfaces. See the Application Server Deployment Guides in the ICEfaces knowledge-base for details.
This section contains Library/Application Server Dependencies Matrices for the following:
• Servlet Container
• J2EE 1.4 Servers
• JEE 5 Servers
ICEfaces Developer’s Guide v1.8 110
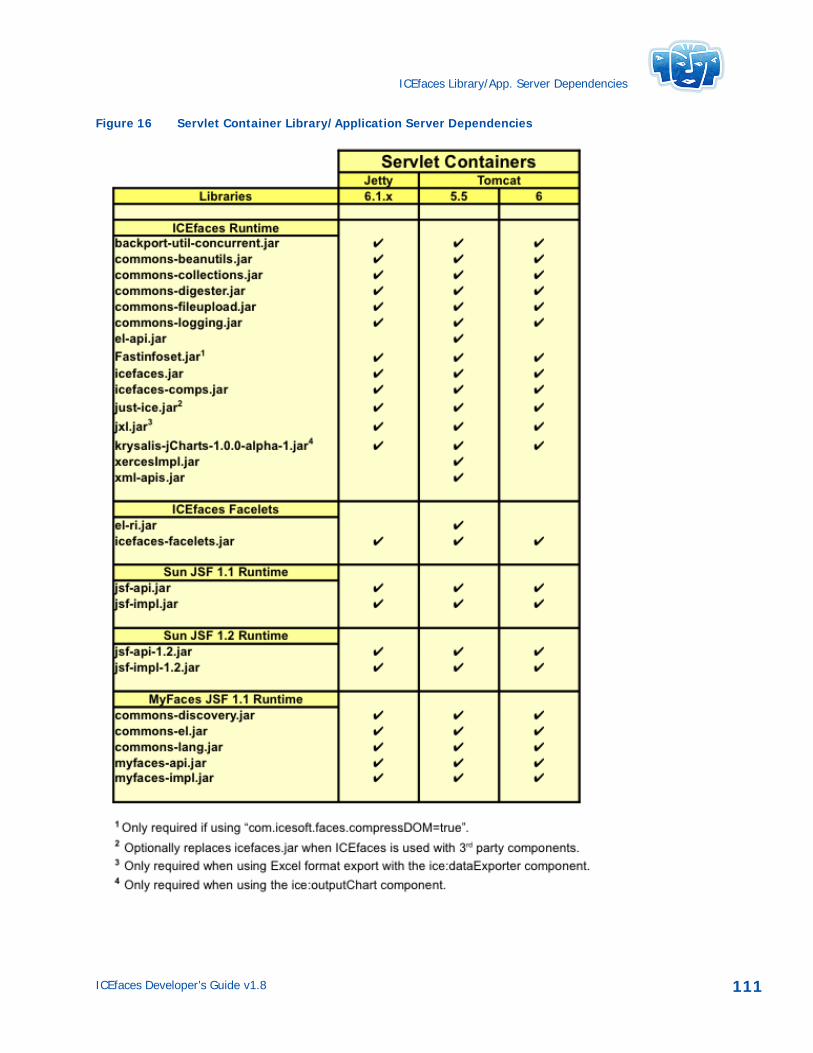
ICEfaces Library/App. Server Dependencies
Figure 16 Servlet Container Library/Application Server Dependencies
ICEfaces Developer’s Guide v1.8 111
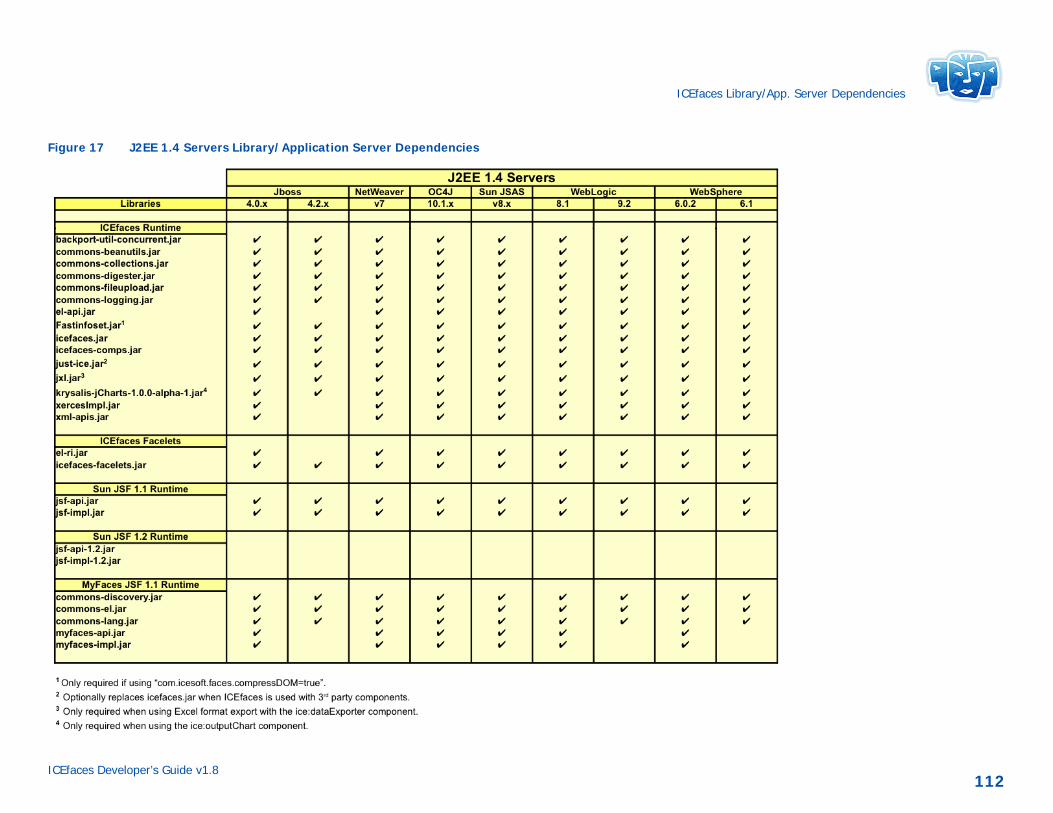
y/App. Server Dependencies
ICEfaces Develo112
Figure 17 J
ICEfaces Librar
per’s Guide v1.8
2EE 1.4 Servers Library/Application Server Dependencies
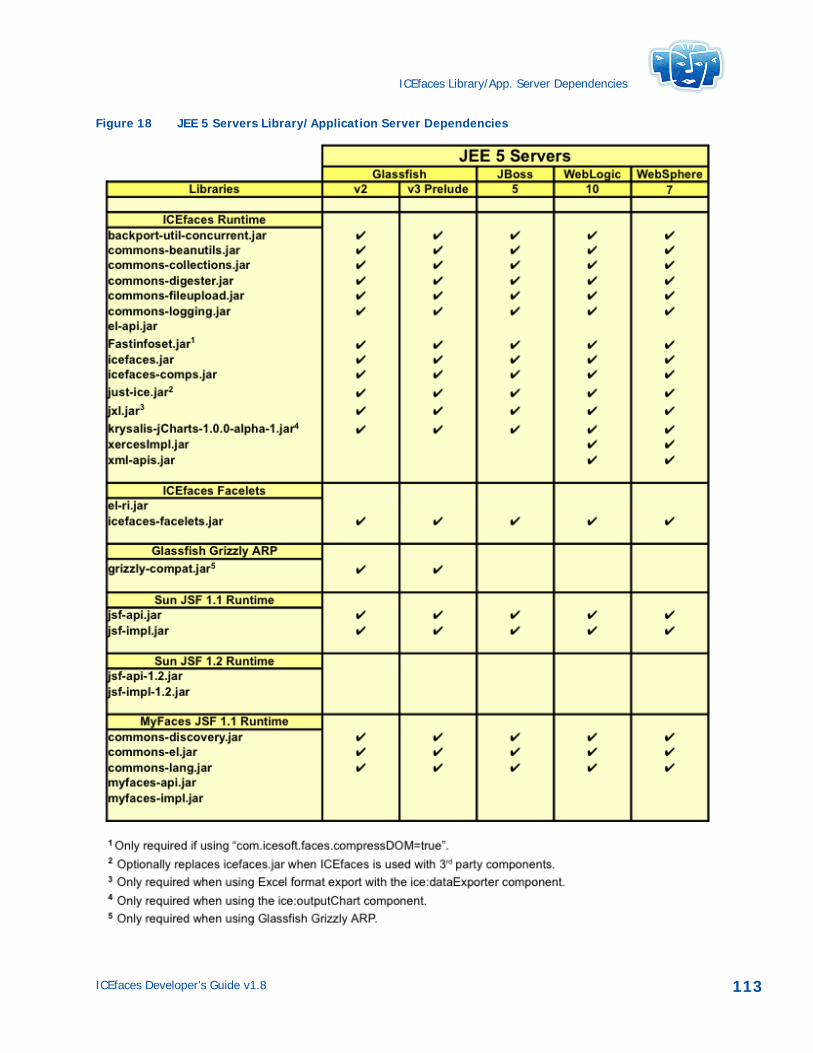
ICEfaces Library/App. Server Dependencies
Figure 18 JEE 5 Servers Library/Application Server Dependencies
ICEfaces Developer’s Guide v1.8 113
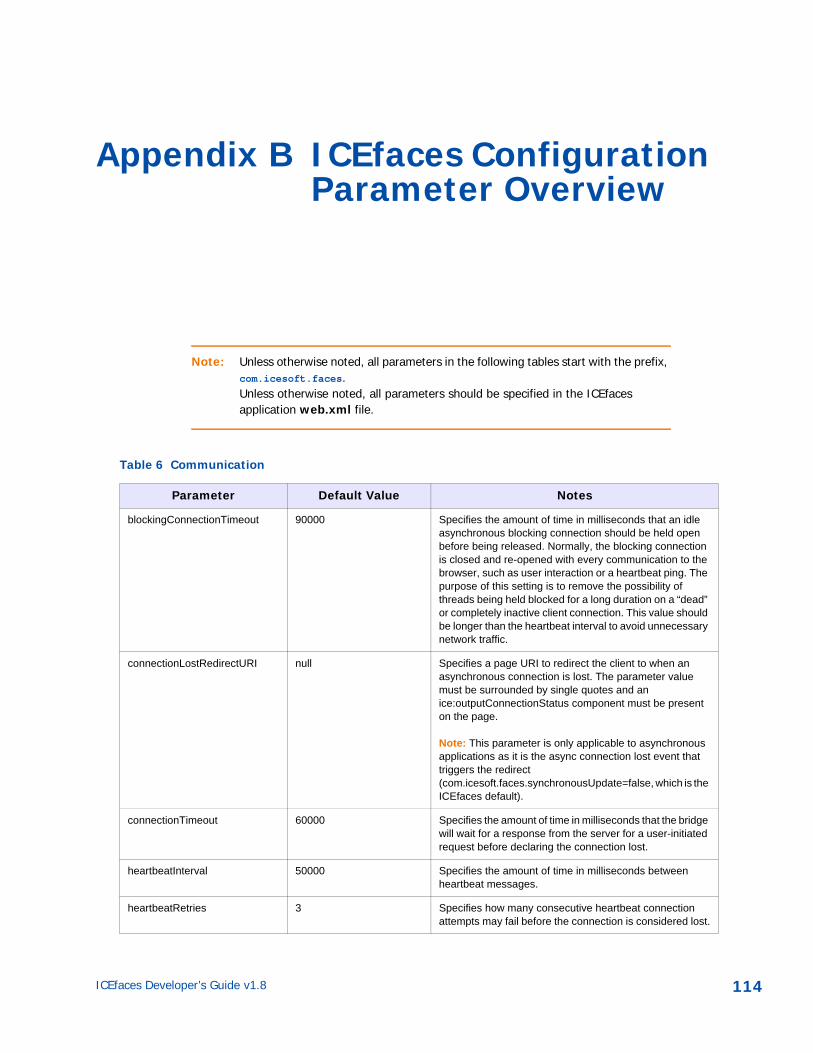
Appendix B ICEfaces Configuration Parameter Overview
Note: Unless otherwise noted, all parameters in the following tables start with the prefix, com.icesoft.faces. Unless otherwise noted, all parameters should be specified in the ICEfaces application web.xml file.
Table 6 Communication
Parameter Default Value Notes
blockingConnectionTimeout 90000 Specifies the amount of time in milliseconds that an idle asynchronous blocking connection should be held open before being released. Normally, the blocking connection is closed and re-opened with every communication to the browser, such as user interaction or a heartbeat ping. The purpose of this setting is to remove the possibility of threads being held blocked for a long duration on a “dead” or completely inactive client connection. This value should be longer than the heartbeat interval to avoid unnecessary network traffic.
connectionLostRedirectURI null Specifies a page URI to redirect the client to when an asynchronous connection is lost. The parameter value must be surrounded by single quotes and an ice:outputConnectionStatus component must be present on the page.
Note: This parameter is only applicable to asynchronous applications as it is the async connection lost event that triggers the redirect (com.icesoft.faces.synchronousUpdate=false, which is the ICEfaces default).
connectionTimeout 60000 Specifies the amount of time in milliseconds that the bridge will wait for a response from the server for a user-initiated request before declaring the connection lost.
heartbeatInterval 50000 Specifies the amount of time in milliseconds between heartbeat messages.
heartbeatRetries 3 Specifies how many consecutive heartbeat connection attempts may fail before the connection is considered lost.
ICEfaces Developer’s Guide v1.8 114
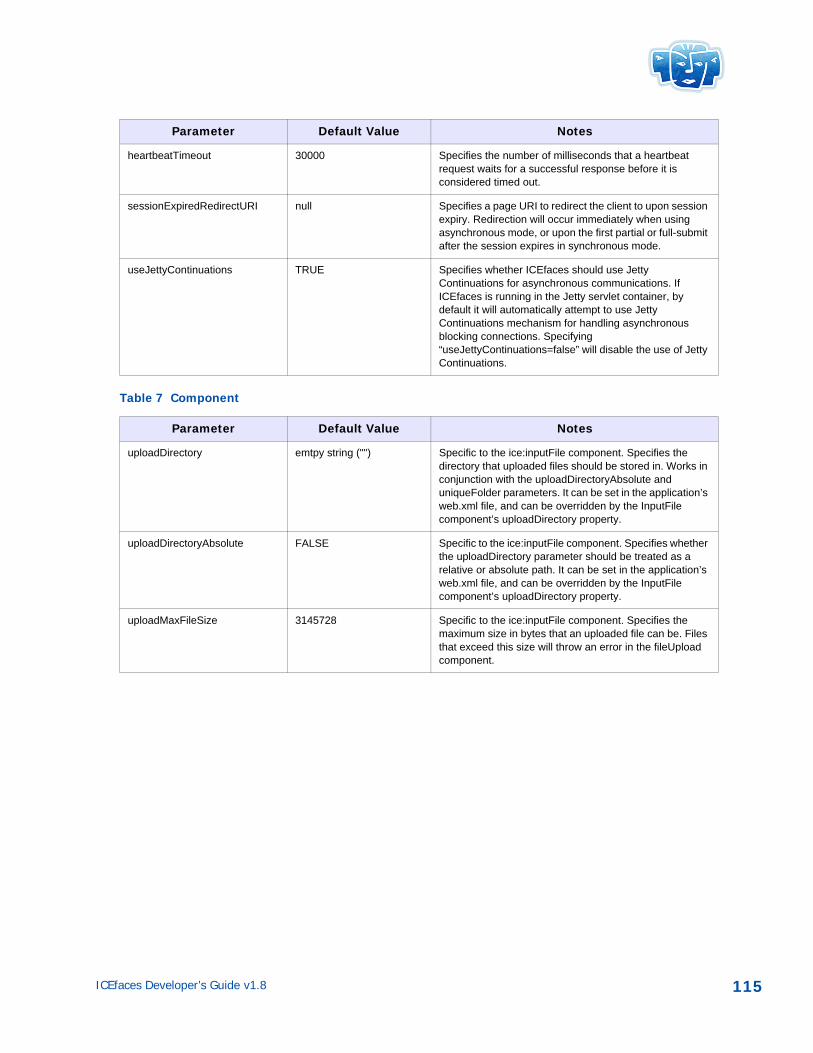
Table 7 Component
heartbeatTimeout 30000 Specifies the number of milliseconds that a heartbeat request waits for a successful response before it is considered timed out.
sessionExpiredRedirectURI null Specifies a page URI to redirect the client to upon session expiry. Redirection will occur immediately when using asynchronous mode, or upon the first partial or full-submit after the session expires in synchronous mode.
useJettyContinuations TRUE Specifies whether ICEfaces should use Jetty Continuations for asynchronous communications. If ICEfaces is running in the Jetty servlet container, by default it will automatically attempt to use Jetty Continuations mechanism for handling asynchronous blocking connections. Specifying “useJettyContinuations=false” will disable the use of Jetty Continuations.
Parameter Default Value Notes
Parameter Default Value Notes
uploadDirectory emtpy string ("") Specific to the ice:inputFile component. Specifies the directory that uploaded files should be stored in. Works in conjunction with the uploadDirectoryAbsolute and uniqueFolder parameters. It can be set in the application’s web.xml file, and can be overridden by the InputFile component’s uploadDirectory property.
uploadDirectoryAbsolute FALSE Specific to the ice:inputFile component. Specifies whether the uploadDirectory parameter should be treated as a relative or absolute path. It can be set in the application’s web.xml file, and can be overridden by the InputFile component’s uploadDirectory property.
uploadMaxFileSize 3145728 Specific to the ice:inputFile component. Specifies the maximum size in bytes that an uploaded file can be. Files that exceed this size will throw an error in the fileUpload component.
ICEfaces Developer’s Guide v1.8 115
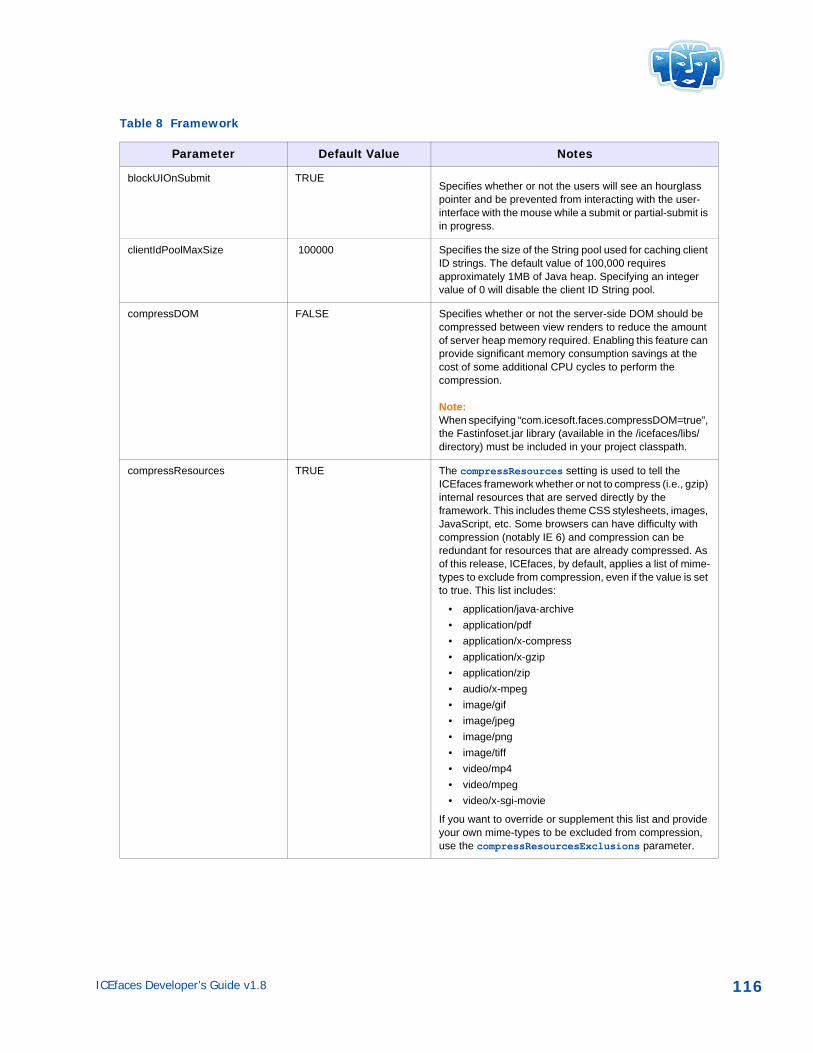
Table 8 Framework
Parameter Default Value Notes
blockUIOnSubmit TRUESpecifies whether or not the users will see an hourglass pointer and be prevented from interacting with the user-interface with the mouse while a submit or partial-submit is in progress.
clientIdPoolMaxSize 100000 Specifies the size of the String pool used for caching client ID strings. The default value of 100,000 requires approximately 1MB of Java heap. Specifying an integer value of 0 will disable the client ID String pool.
compressDOM FALSE Specifies whether or not the server-side DOM should be compressed between view renders to reduce the amount of server heap memory required. Enabling this feature can provide significant memory consumption savings at the cost of some additional CPU cycles to perform the compression.
Note: When specifying “com.icesoft.faces.compressDOM=true”, the Fastinfoset.jar library (available in the /icefaces/libs/ directory) must be included in your project classpath.
compressResources TRUE The compressResources setting is used to tell the ICEfaces framework whether or not to compress (i.e., gzip) internal resources that are served directly by the framework. This includes theme CSS stylesheets, images, JavaScript, etc. Some browsers can have difficulty with compression (notably IE 6) and compression can be redundant for resources that are already compressed. As of this release, ICEfaces, by default, applies a list of mime-types to exclude from compression, even if the value is set to true. This list includes:
• application/java-archive • application/pdf • application/x-compress • application/x-gzip • application/zip • audio/x-mpeg • image/gif • image/jpeg • image/png • image/tiff • video/mp4 • video/mpeg • video/x-sgi-movie
If you want to override or supplement this list and provide your own mime-types to be excluded from compression, use the compressResourcesExclusions parameter.
ICEfaces Developer’s Guide v1.8 116
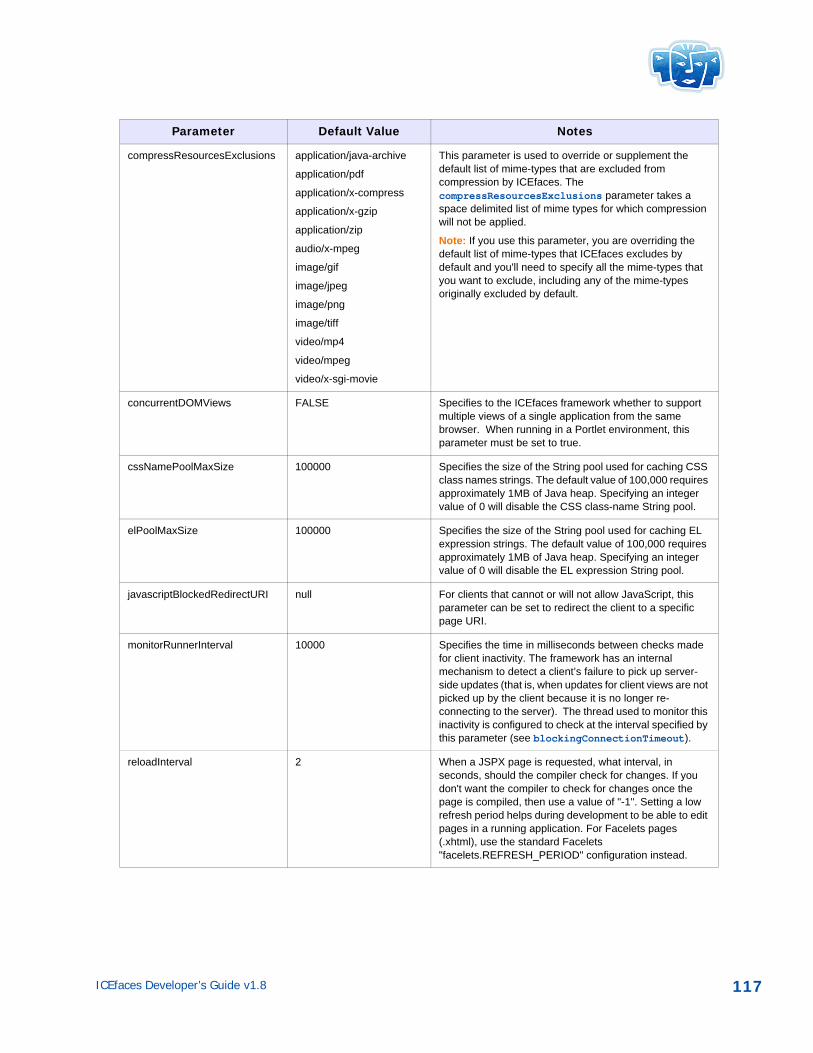
compressResourcesExclusions application/java-archive
application/pdf
application/x-compress
application/x-gzip
application/zip
audio/x-mpeg
image/gif
image/jpeg
image/png
image/tiff
video/mp4
video/mpeg
video/x-sgi-movie
This parameter is used to override or supplement the default list of mime-types that are excluded from compression by ICEfaces. The compressResourcesExclusions parameter takes a space delimited list of mime types for which compression will not be applied.
Note: If you use this parameter, you are overriding the default list of mime-types that ICEfaces excludes by default and you'll need to specify all the mime-types that you want to exclude, including any of the mime-types originally excluded by default.
concurrentDOMViews FALSE Specifies to the ICEfaces framework whether to support multiple views of a single application from the same browser. When running in a Portlet environment, this parameter must be set to true.
cssNamePoolMaxSize 100000 Specifies the size of the String pool used for caching CSS class names strings. The default value of 100,000 requires approximately 1MB of Java heap. Specifying an integer value of 0 will disable the CSS class-name String pool.
elPoolMaxSize 100000 Specifies the size of the String pool used for caching EL expression strings. The default value of 100,000 requires approximately 1MB of Java heap. Specifying an integer value of 0 will disable the EL expression String pool.
javascriptBlockedRedirectURI null For clients that cannot or will not allow JavaScript, this parameter can be set to redirect the client to a specific page URI.
monitorRunnerInterval 10000 Specifies the time in milliseconds between checks made for client inactivity. The framework has an internal mechanism to detect a client’s failure to pick up server-side updates (that is, when updates for client views are not picked up by the client because it is no longer re-connecting to the server). The thread used to monitor this inactivity is configured to check at the interval specified by this parameter (see blockingConnectionTimeout).
reloadInterval 2 When a JSPX page is requested, what interval, in seconds, should the compiler check for changes. If you don't want the compiler to check for changes once the page is compiled, then use a value of "-1". Setting a low refresh period helps during development to be able to edit pages in a running application. For Facelets pages (.xhtml), use the standard Facelets "facelets.REFRESH_PERIOD" configuration instead.
Parameter Default Value Notes
ICEfaces Developer’s Guide v1.8 117
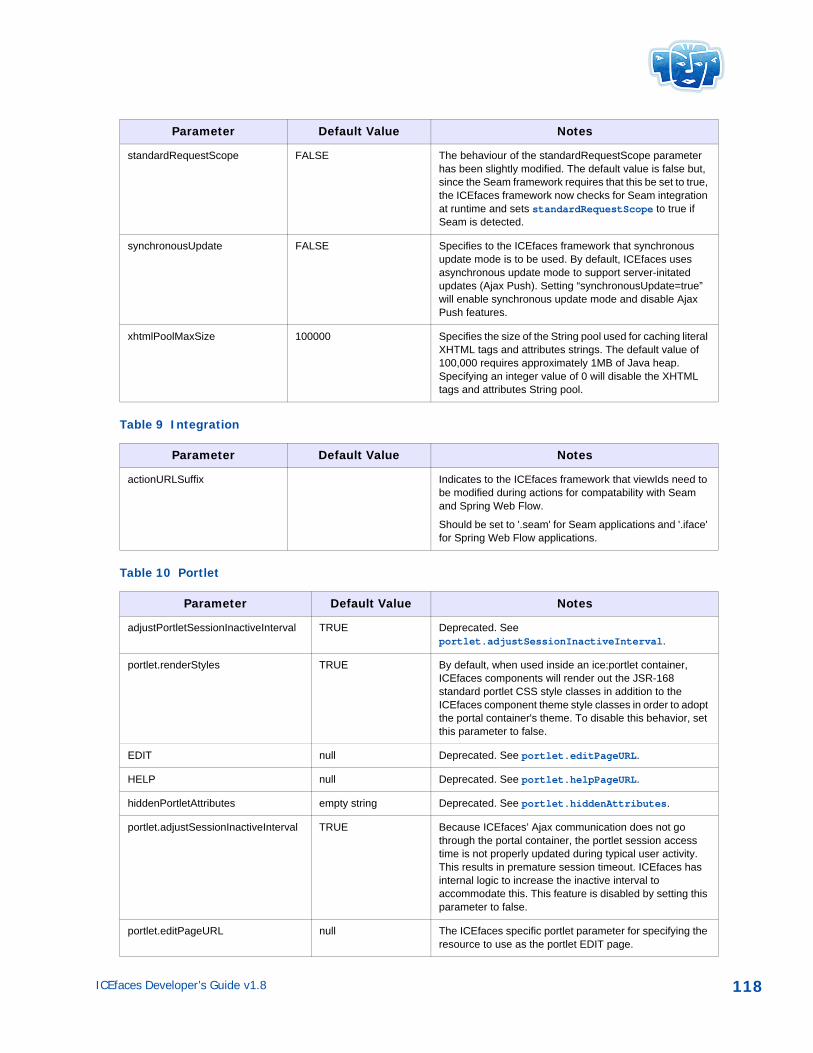
Table 9 Integration
Table 10 Portlet
standardRequestScope FALSE The behaviour of the standardRequestScope parameter has been slightly modified. The default value is false but, since the Seam framework requires that this be set to true, the ICEfaces framework now checks for Seam integration at runtime and sets standardRequestScope to true if Seam is detected.
synchronousUpdate FALSE Specifies to the ICEfaces framework that synchronous update mode is to be used. By default, ICEfaces uses asynchronous update mode to support server-initated updates (Ajax Push). Setting “synchronousUpdate=true” will enable synchronous update mode and disable Ajax Push features.
xhtmlPoolMaxSize 100000 Specifies the size of the String pool used for caching literal XHTML tags and attributes strings. The default value of 100,000 requires approximately 1MB of Java heap. Specifying an integer value of 0 will disable the XHTML tags and attributes String pool.
Parameter Default Value Notes
Parameter Default Value Notes
actionURLSuffix Indicates to the ICEfaces framework that viewIds need to be modified during actions for compatability with Seam and Spring Web Flow.
Should be set to '.seam' for Seam applications and '.iface' for Spring Web Flow applications.
Parameter Default Value Notes
adjustPortletSessionInactiveInterval TRUE Deprecated. See portlet.adjustSessionInactiveInterval.
portlet.renderStyles TRUE By default, when used inside an ice:portlet container, ICEfaces components will render out the JSR-168 standard portlet CSS style classes in addition to the ICEfaces component theme style classes in order to adopt the portal container's theme. To disable this behavior, set this parameter to false.
EDIT null Deprecated. See portlet.editPageURL.
HELP null Deprecated. See portlet.helpPageURL.
hiddenPortletAttributes empty string Deprecated. See portlet.hiddenAttributes.
portlet.adjustSessionInactiveInterval TRUE Because ICEfaces’ Ajax communication does not go through the portal container, the portlet session access time is not properly updated during typical user activity. This results in premature session timeout. ICEfaces has internal logic to increase the inactive interval to accommodate this. This feature is disabled by setting this parameter to false.
portlet.editPageURL null The ICEfaces specific portlet parameter for specifying the resource to use as the portlet EDIT page.
ICEfaces Developer’s Guide v1.8 118
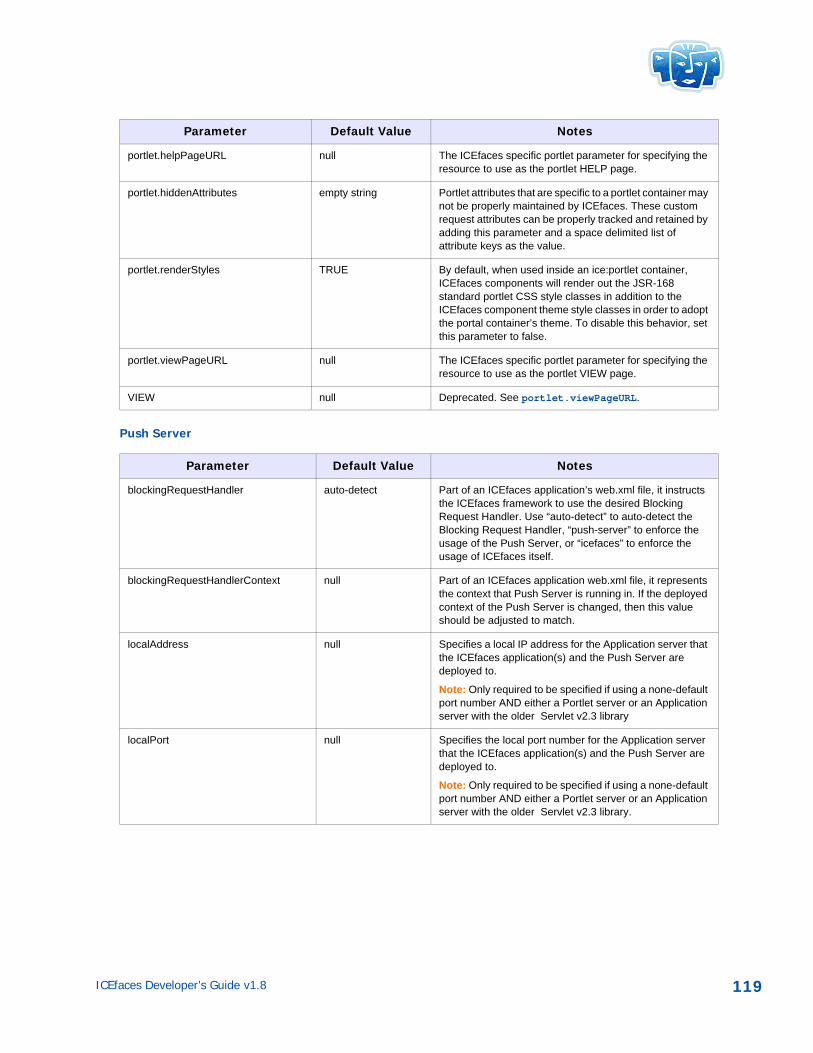
Push Server
portlet.helpPageURL null The ICEfaces specific portlet parameter for specifying the resource to use as the portlet HELP page.
portlet.hiddenAttributes empty string Portlet attributes that are specific to a portlet container may not be properly maintained by ICEfaces. These custom request attributes can be properly tracked and retained by adding this parameter and a space delimited list of attribute keys as the value.
portlet.renderStyles TRUE By default, when used inside an ice:portlet container, ICEfaces components will render out the JSR-168 standard portlet CSS style classes in addition to the ICEfaces component theme style classes in order to adopt the portal container’s theme. To disable this behavior, set this parameter to false.
portlet.viewPageURL null The ICEfaces specific portlet parameter for specifying the resource to use as the portlet VIEW page.
VIEW null Deprecated. See portlet.viewPageURL.
Parameter Default Value Notes
Parameter Default Value Notes
blockingRequestHandler auto-detect Part of an ICEfaces application’s web.xml file, it instructs the ICEfaces framework to use the desired Blocking Request Handler. Use “auto-detect” to auto-detect the Blocking Request Handler, “push-server” to enforce the usage of the Push Server, or “icefaces” to enforce the usage of ICEfaces itself.
blockingRequestHandlerContext null Part of an ICEfaces application web.xml file, it represents the context that Push Server is running in. If the deployed context of the Push Server is changed, then this value should be adjusted to match.
localAddress null Specifies a local IP address for the Application server that the ICEfaces application(s) and the Push Server are deployed to.
Note: Only required to be specified if using a none-default port number AND either a Portlet server or an Application server with the older Servlet v2.3 library
localPort null Specifies the local port number for the Application server that the ICEfaces application(s) and the Push Server are deployed to.
Note: Only required to be specified if using a none-default port number AND either a Portlet server or an Application server with the older Servlet v2.3 library.
ICEfaces Developer’s Guide v1.8 119
Index
AAjax
bridge 1, 4, 7solution 1
Ajax bridge 9, 13Ajax Push 2, 12, 30, 50, 52, 53, 61, 81, 84, 85, 86, 87, 90, 93,
96animation 18API 25
ICEfaces Focus Management 43Server-initiated Rendering 9, 12, 50
architecture 1, 3ARP. See Asynchronous Request Processing.asynchronous
heartbeating 66presentation 2updates 9
Asynchronous Request Processing 74asynchronous updates 30
Bbacking bean 5
CCascading Style Sheets. See CSS.component library 36–43component reference 34components
custom 39enhanced standard 39ICEfaces Component Suite 36ICEfaces custom 39tree 24
compressing resources 32concurrent DOM view 19
configuring 31enabling 19
configuration reference 29connection lost 68connection management 11, 66conversion 5, 24CSS 15, 41, 42Custom JSP tags 24customization 41
DD2D. See Direct-to-DOM.Direct-to-DOM 1, 6–8, 29
rendering 4, 6, 7, 10, 24drag and drop 17, 104dynamic content 21dynamic inclusion 24
Eeffects 18, 107
browser-invoked 18creating 107drag and drop 17modifying 107
elements 3event masking 106event processing 5extensions 29
FFacelets 22faces-config.xml 29features 2, 66
ICEfaces Developer’s Guide v1.8 120
drag and drop 17, 104effects 17, 18, 107
focus management 43focus request 43form processing 2, 13, 14
GGlassFish 46, 70, 71, 75
Hheartbeating 66
IICEfaces
architecture 3Component Suite 36, 39, 41elements 3features 2
incremental updates 8inline Java code 24in-place updates 8, 21integrating
applications 21
JJava API reference 25JavaScript blocked 31JavaServer Faces. See JSF.JBoss Seam 22, 78Jetty 75JSF
application 1component tree 5, 6framework 3, 5mechanisms 5validator 13
JSPcustom tags 24document syntax 24expressions 24inclusion 21inclusion mechanisms 24integration 21namespace 24
JSP markup reference 24
Kkey concepts 5
Mmanaged beans 19
scope 19multiple views 19
Ppartial submit 13partial submit technique 2Persistent Faces Servlet 3portal
Apache Pluto 84JBoss 83Liferay 83Weblogic 84
portletsdeveloping 78
Push Server 74
Rredirection, managing 68references
configuration 29Java API 25JSP markup 24
RenderManager class 56resource, compressing 32rich web 2rich web application 1Rime theme 42rime.css 41rime-portlet.css 41royale.css 41
SSeam
integration 91
ICEfaces Developer’s Guide v1.8 121
JBoss 22RenderManager component 93
server-initiatedupdate 2
server-initiated rendering 9, 12, 50, 92servlet mappings 29servlet registration 29Single-Point-of-Contact 74single-Point-of-Contact 74Spring Framework
integration 97style sheets 24, 42styling 41synchronous updates 9, 30
Ttrigger mechanisms. See server-initiated rendering.
Uupdates
asynchronous vs.synchronous 30
Vvalidation 5ViewHandler 4
WW3C standard 6well-formed XHTML 24well-formed XML 24
XXHTML
tags 24well-formed 24
XMLwell-formed 24
XP theme 42xp.css 41xp-portlet.css 41
ICEfaces Developer’s Guide v1.8 122