ibusiness banking user guide - business banking,...
TRANSCRIPT

getting started account information payment files local admin
iBusiness Banking User Guide
payments file download

02
User Guide Version 15 – November 2014
The information in this User Guide is believed to be accurate, but the Bank makes no warranty, representation or guarantee of any kind in relation to the material in this User Guide, including, but not limited to, any implied warranties of merchantability and fitness for a particular purpose or for any errors or omissions.
COPYRIGHT NOTICE
No part of this User Guide or the Website may be reproduced, stored in a retrieval system or transmitted, in any form or by any means, photocopying, recording or otherwise, without prior written consent of AIB. No liability for any possible infringement of third party intellectual property right is assumed with respect to the use of this User Guide. The content of this User Guide, the Website and the features described therein are subject to change by the Bank.
Copyright © 2009 Allied Irish Banks, p.l.c. All rights reserved. All products or services, mentioned in this User Guide or the Website, are covered by the trademarks, service marks or product names as designated by the companies who market those products. There is no intention to transfer any intellectual property rights under this User Guide, the Website or in the Agreement. You must not delete any proprietary notices, trademarks, product names or service marks appearing on any materials furnished to you in connection with iBusiness Banking, the Agreement and the Services, and you must comply with any instructions issued by the Bank in connection with the protection of these materials. The information content graphics, text and images, buttons, trademarks, trade names and logos (the ‘Material’) contained in the iBusiness Banking Website and the User Guide are protected by copyright and other intellectual property laws, international laws and international treaties and are not in any way transferred under the Agreement. You are granted a limited non-exclusive non-transferable licence solely for your own internal use to refer to, bookmark or point to any page within the iBusiness Banking Website, provided, however, that all copyright, trademark and other proprietary notices are left intact.
about this guide...
This User Guide details how to use iBusiness Banking. It provides reference information, including an overview of the features of iBusiness Banking, and should be read in conjunction with the Terms and Conditions of Use and your agreement with the Bank as a whole. This User Guide is intended for use by all Customers and Users of iBusiness Banking and should be also used in conjunction with the Online Help Facility. Where we refer to ‘you’ in the User Guide, it can mean you, the Customer, or you, the User, depending on the context.
Allied Irish Banks, p.l.c. is regulated by the Central Bank of Ireland.

03
steps to help...
If you need any assistance using iBusiness Banking, we provide a number of different ways to help you.
Where can I get assistance for using iBusiness Banking?
structure of user guide…
In order to help you find the information you need quickly, the User Guide is divided into two sections:
• about… – Provides information to help you understand the relevant function.
• how to… – Provides step-by-step instructions on how to carry out the various tasks on iBB.
STEP 4: iBusiness Banking Operations
Contact iBusiness Banking Operations.
STEP 1: User Guides
The User Guides explain each function of iBusiness Banking. Simply refer to the relevant guide and section.
STEP 2: Online Help
Online help provides you with step-by-step instructions, along with all other relevant information to help you use iBusiness Banking.
STEP 3: Local Administrator
Contact your Local Administrator, who may be able to help you and answer your query.
contact details
AIB,
iBusiness Banking,
1 Adelaide Road,
Dublin 2.
Telephone: 0818 72 00 00
International Customers: + 353 1 641 4889
Fax: + 353 1 608 9454
Email: [email protected]
Hours of Support: 08:30 – 17:30 Business Days
Note:
To assist the Bank in addressing your query, you must provide such information and details as requested by the Bank in respect of the query.
Please also note that all telephone communications between iBusiness Banking and customers may be recorded for security and training purposes. This will assist us in ensuring that our support gives you as much help as possible in addition to giving you added security.

04
contents…about…• Payments Page 06• Payment Basics Page 06• Cut-Off Times Page 10• Domestic Payment Options Page 11• Payment File Options Page 13• International Payment Options Page 14• Payment Currencies Page 15• What Payment Screen to use Page 16
• Debiting an AIBGB or FTB Account Page 20• Charges associated with International Payments Page 21• Payment Screens – Fields and Actions explained Page 22• Template Payments Page 28• Outgoing Payment Log Page 30• Incoming Payment Log Page 32• Payments ‘Pending Authorisation’ Page 34• Beneficiary Management Screen Page 36
how to…• Create a Domestic Account Transfer Page 39• Create a Bill Payment Page 40• Create a Domestic Urgent Interbank (Same Day
Value) Payment Page 41• Create a Domestic Third Party (IBAN) Payment Page 42• Create a Domestic Account Transfer FX Page 43• Create a Third Party FX Payment Page 44• Create a Paylink Payment – Standard and Urgent Page 45• Create a Paylink Euro Payment – Standard and Urgent Page 46• Add Forward Contract Rates and Dealer
Rates Details Page 47• Create an Open Domestic Payment Page 48• Create an Open International Payment Page 49• Templates – Create, View and Delete Page 50• Templates – Edit and Query Page 51• Payments ‘Pending Authorisation’ – Authorise
Payments Page 52• Payments ‘Pending Authorisation’ – Edit, View
and Cancel Page 53
• Outgoing Payments Log – Carry out a Query Page 54• Incoming Payments Log Page 55• Incoming and Outgoing Payment Log – Export
query results Page 56• Outgoing Payment Log – Edit, View and Cancel Page 57• Incoming and Outgoing Payment Log – View
Transaction Details and View Status Details Page 58• Beneficiary Management – Create a Domestic
Beneficiary Page 59• Beneficiary Management – Create an International
Beneficiary with IBAN and BIC Page 60• Beneficiary Management – Create an International
Beneficiary with Account No. and NSC Page 61• Beneficiary Management – Authorise, View, Edit
and Delete a Beneficiary Page 62• Digipass – Create a One Time Code (OTC) and a
Transaction Data Signature (TDS) Page 63• Open an ‘.out’ file Page 64
abou
t…ho
w t
o…

05
what’s in this section…?In this section, you will find details and descriptions about the following topics:
• Payments
• Payment Basics
• Cut-off times
• Domestic Payment Options
• International Payment Options
• Payment Currencies
• What Payment Screen to use
• Debiting an AIB GB or FTB Account
• Charges associated with International Payments
• Payment Screens – Fields and Actions explained
• Template Payments
• Incoming Payments Log
• Outgoing Payments Log
• Payments ‘Pending Authorisation’
• Beneficiary Management
We recommend that you read this section as it provides you with useful information which will help you get the most from iBusiness Banking.
abou
t…

06
iBusiness Banking offers a range of payment options which allow you to manage your payments easily and quickly. This section details all you need to know in order to get the most from the Payment functionality. Depending on the iBusiness Banking package which you have chosen, certain payment options may not be available. For more information on the different payment types available, including payment charges, cut-off times and execution timeframe, please select the Payment Information link on the side menu on iBusiness Banking or go to www.aib.ie/ibb
PAYMENT BASICS
The following section covers the basics in relation to payments and will assist you in understanding payments on iBusiness Banking.
‘DOMESTIC’ V ‘INTERNATIONAL’ PAYMENTS – What is the difference?
As a general rule (with a few exceptions), the following applies:
• Domestic Payments: Payments at debit of your ROI accounts and crediting your own accounts, or crediting the accounts of Third Parties, within ROI.
• International Payments: Payments at debit of your ROI accounts and crediting a Third Party account outside of ROI in any currency, or crediting an account within ROIin any currency other than EUR.
What accounts can be debited and what accounts can be credited?
The following table identifies the accounts which can be debited and credited for payments on iBusiness Banking. The credit accounts are divided into accounts owned by you and accounts owned by Third Parties.
PAYMENTS
Debit Accounts Credit Accounts
• AIB ROI Branch Accounts – These are your accounts held in an AIB ROI branch.• AIB Currency Accounts (With NSC of 930067) – These are currency accounts e.g. USD, JPY.• AIB Sterling Current Accounts (With NSC of 238590).
For certain customers, the following account types can be debited:• AIB GB Branch Accounts* – These are your accounts held in an AIB GB branch• First Trust Branch Accounts* – These are your accounts held in a First Trust branch.Note: Payments made from the above accounts cannot be forward dated or warehoused.
* Please see section ‘Debiting an AIBGB and FTB Account’ on page 20.
YOUR BANK ACCOUNTS• AIB ROI Branch Accounts – These are your accounts held in an AIB ROI branch.• AIB Currency Accounts (With NSC of 930067) – These are currency accounts e.g. USD, JPY.• AIB Sterling Current Accounts (With NSC of 238590).
THIRD PARTY BANK ACCOUNTS• Third Party Branch accounts held in AIB ROI – Accounts of Third Parties which are held in AIB ROI.• Third Party Currency accounts with an NSC of 930067 – Currency accounts of Third Parties.• Third Party Sterling Current Accounts (With NSC of 238590) – Sterling Current Accounts of Third Parties.• Third Party Account held in other financial institutions within Ireland – E.g. Bank of Ireland,
Ulster Bank, etc.• Third Party International Bank Accounts – International Bank Accounts of Third Parties.

07
What payment options to use
iBusiness Banking offers a number of payment screens. The screen that you will use for a particular payment will depend on a number of factors. These include:
• The account you are debiting.
• The account you are crediting.
• The currency of your payment.
• Whether the payment is urgent or not.
• What account details you are using for the Beneficiary e.g. Account Number and NSC or IBAN and BIC.
Please see ‘Domestic Payment Options’ and ‘International Payment Options’ for more details.
Beneficiary Account Information
When you are crediting an account, we need the bank account details of the credit account. For account transfers, i.e. transfers between your own accounts registered on iBusiness Banking, we already have the information. For transfers to Third Party bank accounts, we need you to provide us with the Beneficiary Bank Account Details. This can come in different forms and this is discussed in more detail below. Beneficiary Account Information format
The following table provides an explanation of the potential components of Beneficiary Information.
Data Description
Account Number The ‘Account Number’ is the number used by the account holding bank to identify the account. In the UK, the format of the account number will be 8 digits long e.g. 23443678. In other countries, the format may differ from country to country.
NSC The ‘NSC’ is the code assigned to identify the bank branch where the account is located. Used with the ‘Account Number’, this will identify where the account is held. In the UK, the format of the NSC will be a six digit code e.g. 930089.
IBAN – International Bank Account Number
The International Bank Account Number (IBAN) is a standardised European bank account number. By 1st February 2014, the IBAN will be the sole payment account identifier for electronic national and international credit transfers and direct debits in Euro within the EU The format of an IBAN may differ from country to country. An example of an Irish IBAN is ‘IE64AIBK93136512345678’.
BIC The BIC is a unique identification code for a specific financial institution. BIC codes consist of either 8 or 11 alphanumeric characters. BIC for AIB Bank ROI is AIBKIE2D.
The combinations of Beneficiary Account information used will be dependent on the account type and can also be affected by the payment currency and destination of the beneficiary bank. The next section looks at the various combinations and when they are used.

08
DOMESTIC PAYMENTS – Beneficiary Account Information Used
The following table identifies the Domestic Third Party Payments options available, and the account information combination that can be used.
Payment Information Used
Domestic Third Party (IBAN) • IBAN of the Beneficiary, and,
• BIC of the Beneficiary Bank.
Domestic Urgent Interbank (Same Day Value)
• IBAN of the Beneficiary and BIC of the Beneficiary Bank(For euro payments)
• Bank Account Number of the Beneficiary and NSC ofthe Beneficiary Bank (For GBP payments)
Domestic Third Party FX • IBAN of the Beneficiary and BIC of the Beneficiary Bank
or
• Bank Account Number of the Beneficiary and NSC ofthe Beneficiary Bank (For GBP payments)
INTERNATIONAL PAYMENTS – Beneficiary Account Information Used
The following table identifies the International Third Party Payments and the account information combination that can be used, the combination may be determined by the destination of your payments.
Payment Information Used
Paylink Standard/Urgent • IBAN of the Beneficiary, and,
• BIC of the Beneficiary Bank.
or
• Bank Account Number of the Beneficiary, and,
• NSC of the Beneficiary Bank, and
• BIC of the Beneficiary Bank.
or
• Bank Account Number of the Beneficiary, and,
• NSC of the Beneficiary Bank, and
• Full Beneficiary Bank Name and Address.
Paylink Euro Standard/Urgent
• IBAN of the Beneficiary, and,
• BIC of the Beneficiary Bank.

09
Adding Beneficiary Account Information to a payment
When you are creating a Third Party payment, you must specify the account details of the Third Party bank account. On iBusiness Banking, this can be done in two ways:
• Select from a pre-authorised list of Beneficiaries. This is known as a ‘Closed’ payment.
• Enter in the details manually on the payment screen. This is known as an ‘Open’ payment. This allows a User to make a payment to a new Beneficiary that has notbeen pre-authorised by your Company.
CLOSED PAYMENTS – Selecting from a pre-authorised list of Beneficiaries.
iBusiness Banking allows you to set up a list of pre-authorised Beneficiary details. This is done through the ‘Beneficiaries’ option and is available to Users with the relevant access. Once a Beneficiary’s details have been created and fully authorised, they will be available for selection in the ‘Beneficiary Details’ section of a Third Party payment.
Using the ‘Beneficiaries’ options, you can add two types of Beneficiaries i.e. ‘Domestic Beneficiaries’ and ‘International Beneficiaries’. Depending on the Beneficiary type, and the account information used, this will affect the payment screen where the Beneficiary’s details can be selected.
Beneficiary Type Information Used Payment Screen
Domestic Beneficiary • IBAN of the Beneficiary, and,• BIC of the Beneficiary Bank.• Full Beneficiary Bank Name and Address.
• Third Party (IBAN)• Urgent Interbank (Same Day Value) EUR payments• Third Party FX
Domestic Beneficiary • Bank Account Number of the Beneficiary, and,• NSC of the Beneficiary Bank.• Full Beneficiary Bank Name and Address.
• Urgent Interbank (Same Day Value) UK payments• Third Party FX
International Beneficiary • IBAN of the Beneficiary, and,• BIC of the Beneficiary Bank.
or• Bank Account Number of the Beneficiary, and,• NSC of the Beneficiary Bank, and• BIC of the Beneficiary Bank.
or• Bank Account Number of the Beneficiary, and,• NSC of the Beneficiary Bank, and• Full Beneficiary Bank Name and Address.
• Paylink – Standard and Urgent
International Beneficiary • IBAN of the Beneficiary, and,• BIC of the Beneficiary Bank.• Full Beneficiary Bank Name and Address.
• Paylink Euro – Standard and Urgent*
* REMEMBER: Even though all International Beneficiaries will be available for selection on the Paylink Euro screen, you must use combination of IBAN and BIC for this typeof payment.

10
OPEN PAYMENTS – Entering Beneficiary details on the payment screen.
On Third Party Payments, you can select the ‘Open Payment’ option. This allows the payment creator to key in the Beneficiary details on the payment screen instead of selecting from the pre-authorised list of Beneficiaries. The information required to setup a Beneficiary is also required when entering Beneficiary details on a payment screen.
IMPORTANT NOTE: Access to the ‘Open Payment’ option on payment screens is limited and is not granted to any User as default access. If you would like a User to have access to the ‘Open Payment’ option, you should contact iBusiness Banking Operations. As this access allows a payment creator to add Beneficiary details directly to a third party payment, we recommend that this option be only granted when absolutely necessary.
CUT-OFF TIMES
In relation to payments, there are ‘cut-off times’ which you should be familiar with. These cut-off times will affect payments in two main ways:
• When a payment can be made.
• The execution timeframe of a payment.
The table below describes the main cut-off times.
Cut-Off Time Details
Payment Cut-off Times What it means – There are a number of payment types on iBusiness Banking. Some of these payments can only be sent for processing between certain hours of the day e.g. a Paylink payment can only be sent for processing between 8.00 and 16.00. Please see ‘Domestic Payment Types’ and ‘International Payment Types’ section for full details of payment cut-off times.
What is the effect of this cut-off time? If you want to make a payment you must do so before that cut-off time on the Requested Debit Date to ensure that it will be sent for processing on that date. Payments authorised after the cut off times will not be sent for processing until the next business day. e.g. a Paylink payment must be authorised on iBB before 16.00 for it to be sent for processing that day. If the payment is authorised at any time after 16:00 iBB will warehouse this payment and will send it for processing on the next business day.
NOTE: When we say ‘make a payment’, we mean authorise on iBusiness Banking and send for processing.
Currency Cut-off Times What it means – A ‘currency cut-off’ time is a point of time during the day, at which trading in a particular currency under that days date ends, and any trading in that currency after that point, will be under the next business day’s date. This is to allow for recording of trade deals and settlement of accounts.
What is the effect of this cut-off time? The effect of this cut off time will be on the execution timeframe of the payment.
Additional Information For further information on cut-off times and payment execution times, please select the PAYMENT INFORMATION option on the side menu on iBusiness Banking.
Note: Certain payments cannot be warehoused. If the payment debits an AIBGB or an FTB account or credits a SETTLEMENT account it is not possible to authorise these payments after the relevant cut-off times.

11DOMESTIC PAYMENT OPTIONS
Payment Type DescriptionPayment
Cut-Off TimesPayment Execution
Timeframe
Account Transfer Allows you to transfer funds between your AIB ROI Accounts.
Between your AIB euro Currency Accounts (NSC of 93-00-67) and your AIB ROI euro Accounts.
• 19:15
• 16.00
For details relating to the payment execution timeframes, along with fees and exchange rates, please select ‘Payment Information’ on the side menu on iBusiness Banking.
NOTE: Transactions originated through iBusiness Banking attract automated transaction charges. You can obtain details of transaction charges from the related information section on the Domestic Payments information page or from your local branch. Please also refer to the ‘Business Fees and Charges’ brochure.
Third Party IBAN Allows you to transfer funds: From your AIB ROI Accounts to Third Party AIB Bank ROI Accounts.
• 19:15
From your AIB ROI Accounts to Third Party Accounts in other financial institutions, within Ireland.
• 12:00
From your AIB Euro Currency Accounts (NSC of 930067) to Third Party AIB ROI euro Accounts.
• 16.00
From your AIB Euro Currency Accounts (NSC of 930067) to Third Party AIB Euro Currency Accounts (NSC of 930067).
• 16.00
Bill Payment Allows you to transfer funds for credit of bill payments to utility companies. You can specify a date up to 90 days in advance. From this date, please allow one business day for the payment to reach the biller.
• 00:00 (Midnight)

12DOMESTIC PAYMENT OPTIONS
Payment Type DescriptionPayment
Cut-Off TimesPayment Execution
Timeframe
Urgent Interbank (Same Day Value) Allows you to transfer funds as:
ROI Inter-Bank Same Day Value Payments From your AIB ROI Accounts in Euro to Third Party Accounts in other financial institutions within Ireland.
Outgoing UK Interbank Payments From your AIB Sterling Current Account (NSC of 23-85-90) in Sterling only to Accounts in other Banks in the UK. You must use a valid UK NSC and Account number. NSC must be reachable within either the FPS or CHAPS clearing systems.
• 15.00
• 14.00
For details relating to the payment execution timeframes, along with fees and exchange rates, please select ‘Payment Information’ on the side menu on iBusiness Banking.
NOTE: Transactions originated through iBusiness Banking attract automated transaction charges. You can obtain details of transaction charges from the related information section on the Domestic Payments information page or from your local branch. Please also refer to the ‘Business Fees and Charges’ brochure.
Account Transfer FX * Allows you to transfer funds between your AIB ROI Accounts and your AIB Currency Accounts (NSC of 930067) non-euro or your AIB Sterling Current Accounts (NSC of 23-85-90)
– Funds transferred from your AIB ROI Account or AIB Currency Accounts(NSC 93-00-67) or your AIB Sterling Current Accounts (NSC 23-85-90) to an AIBSterling Current Account (NSC 23-85-90) must be in the currency of the creditaccount.
– Funds transferred from your AIB Sterling Current Account (NSC 23-85-90) to yourAIB ROI or AIB Currency Account (NSC 93-00-67) must be in the currency of thecredit account.
• 16.00
Third Party FX Allows you to transfer funds:
From your AIB ROI Account to Third Party AIB Currency Accounts (NSC of 93-00-67) or Third Party AIB Sterling Current Accounts (NSC 23-85-90)
Note: Funds transferred from your AIB ROI Account to a Third Party Sterling Current Account (NSC 23-85-90) must be in Sterling (GBP)
From your AIB Currency Accounts (NSC 93-00-67) non-euro or your AIB Sterling Current Accounts (23-85-90) to a Third Party AIB ROI Account or Currency Accounts non-euro NSC (93-00-67) or Third Party AIB Sterling Current Accounts NSC (23-85-90)
Note: Funds transferred from these accounts to a Third Party Sterling Current Account (NSC 23-85-90) must be in Sterling (GBP) and funds transferred from your Sterling Current Account (NSC 23-85-90) to a Third Party AIB ROI Account must be in the currency of the credit account.
• 16.00
* Please see separate section on access to AIB GB and First Trust Bank Accounts.

13PAYMENT FILE OPTIONS
Payment Type DescriptionWhen can Payment Files be submitted?
Cut-off time for transactions to be processed next
Business Day.
Payment Files Payment Files allow you to initiate bulk files containing SEPA Direct Debits (SDD), SEPA Credit Transfers (SCT) and Multi-Currency (MCY) payments.
See Payment Files User Guide for information on Payment File submission.
See Payment Files User Guide for information on cut-off times.

14INTERNATIONAL PAYMENT OPTIONS
Payment Type DescriptionPayment
Cut-Off TimesPayment Execution Timeframe
Paylink – Standard or Urgent • Allows you to make standard and urgent International Payments in majorcurrencies to most destinations worldwide
Note: Payments debiting your Sterling Current Accounts (NSC of 238590) cannot be made using the Paylink option. Please use the Domestic ‘Urgent Interbank’ – Same Day Value payment option
• 16.00 For details relating to the payment execution timeframes, along with fees and exchange rates, please select ‘Payment Information’ on the side menu.
Paylink Euro – Standard
Paylink Euro – Urgent
• Allows you to make International Payments in EURO to SEPA Zone* destinations ona standard basis.
• Allows you to make International Payments in EURO to SEPA Zone* destinations onan Urgent basis
Note: For full list of SEPA Zone destinations please see www.aib.ie/sepa.
• 00:00 (Midnight)
• 16.00
NOTE: Transactions originated through iBusiness Banking attract automated transaction charges. You can obtain details of transaction charges from the related information section on the International Payments information page or from your local branch. Please also refer to the ‘Schedule of International Transaction Charges’ brochure.
PAYLINK STANDARD and URGENT – Payment Execution Timeframe
When a Paylink Standard is made, the minimum execution (value) cycle is two business days. However, for certain currencies, shorter minimum execution cycles are available. These payments can be made by selecting the ‘Urgent’ option on the Paylink screen.
For further information on execution (value) cycle of payments, including currency cut-off times, please select the Payment Information option on the side menu on iBusiness Banking.

15PAYMENT CURRENCIES
PAYMENT SCREENS: Account Transfer FX, Third Party FX and Paylink (using Standard option)
Currency Description Currency Description Currency Description
EUR Euro INR Indian Rupee SAR Saudi Arabian Riyal
AED United Arab Emirates (UAE) Dirham JPY Japanese Yen SEK Swedish Kroner
AUD Australian Dollar KWD Kuwaiti Dinar SGD Singapore Dollar
CAD Canadian Dollar THB Thai Baht
CHF Swiss Franc MXN Mexican Peso TRY Turkish Lira
CZK Czech Koruna NOK Norwegian Kroner USD United States Dollar
DKK Danish Krone NZD New Zealand Dollar ZAR South African Rand
GBP Pound Sterling OMR Omani Rial
HKD Hong Kong Dollar PHP Philippine Peso
HUF Hungarian Forint PLN Polish Zloty
ILS Israeli Shekel QAR Qatari Rial
PAYMENT SCREENS: Paylink (using Urgent option)
Currency Description Currency Description Currency Description
CAD Canadian Dollar EUR Euro PLN Polish Zloty
CHF Swiss Franc GBP Pound Sterling SEK Swedish Kroner
CZK Czech Koruna HUF Hungarian Forint USD United States Dollar
DKK Danish Krone NOK Norwegian Kroner
PAYMENT SCREENS : Urgent Interbank (Same Day Value) – ROI Interbank
Currency Description
EUR Euro
PAYMENT SCREENS: Urgent Interbank (Same Day Value) – Outgoing UK Interbank
Currency Description
GBP Pound Sterling
Payments can be made on iBusiness Banking in a number of currencies. The table below lists the currencies available and the payment screens that they appear on.

16MAXIMUM PAYMENT AMOUNTS
There is a maximum payment amount in respect of payments you may seek to make from all (not each) of your accounts on a particular business day. If you are part of a Group, then the maximum amount is from all (not each) of the accounts held by the Group. This shall not take into account transfers between the accounts of any one member of the Group (but will include a transfer between accounts of two Group members).
Any payment made on a non-business day will be taken into account as if made on the next business day for the purpose of determining whether your maximum amount has been exceeded.
We may, at our absolute discretion, notify you with immediate effect of any increase or decrease in your maximum payments amount, whether you are part of a Group or not, and any specific term that might be applicable to such amount.
To assist you in selecting the correct payment screen for your transaction, simply follow the steps outlined below.
STEP 1: Identify the account you want to debit. On iBusiness Banking, you can debit the following accounts:
• An AIB ROI Branch Account which is registered on iBusiness Banking.
• A Currency Account with an NSC of 930067.
• Sterling Current Account with an NSC of 238590
• For users who have access to AIB GB or FTB Accounts, please see ‘Debiting AIB GB and FTB Accounts’ section on Page 19.
STEP 2: Decide on where you want to transfer the funds to. You have the following options:
Your own accounts which are registered on iBusiness Banking
• AIB ROI Branch Account
• Currency Account with an NSC of 930067.
• Sterling Current Account with an NSC of 238590
Third Party Accounts
• A Branch Bank Account of a Third Party held in AIB Bank or another financial institution within Ireland.
• A Currency Account of a Third Party held in AIB. This will have an NSC of 930067.
• Sterling Current Account of a Third Party with an NSC of 238590
• An International Bank Account of a Third Party held in Northern Ireland, Great Britain or internationally.
STEP 3: Decide on the currency.
With the debit and credit account details, simply use the tables below to identify the correct payment screen to use.
WHAT PAYMENT SCREEN TO USE

17
I am Debiting... I am Crediting... Currency Payment Screen to use
My AIB Branch Account in ROI My AIB Branch Account in ROI EUR Domestic Account Transfer
My Currency Account with an NSC of 930067 CCY of Credit Account
Domestic Account Transfer FX
My Sterling Current Account with an NSC of 238590 GBP Only Domestic Account Transfer FX
A Branch Bank Account of a Third Party held in AIB Bank or another financial institution within Ireland
EUR Option 1: Domestic Third Party IBAN Where payment is a Third Party Payment, using IBAN and BIC for the Beneficiary Information.
Option 2: Domestic Urgent Inter Bank (Same Day Value) – Where the payment is to an account and same day value is required using BIC & IBAN.
A Branch Bank Account of a Third Party held in another financial institution within Ireland
ANY excl. EUR Paylink – Standard or Urgent
A Currency Account of a Third Party held in AIB. This will have an NSC of 930067 ANY excl. EUR Domestic Third Party FX
A Sterling Current Account of a Third Party held in AIB. This will have an NSC of 238590
GBP Only Domestic Third Party FX
An AIB GB Bank Account Any excl. EUR Paylink – Standard or Urgent Paylink Euro – Standard or Urgent (EUR only)
An FTB Bank Account ANY excl. EUR Paylink – Standard or Urgent Paylink Euro – Standard or Urgent (EUR only)
An International Account ANY excl. EUR Paylink – Standard or Urgent Paylink Euro – Standard or Urgent (EUR only)

18
I am Debiting... I am Crediting... Currency Payment Screen to use
A Sterling Current Account with a NSC of 238590
My AIB Branch Account in ROI EUR Domestic Account Transfer FX
My Currency Accounts with an NSC of 930067. CCY of Credit Account
Domestic Account Transfer FX
My Sterling Current Accounts with an NSC of 238590 GBP Domestic Account Transfer FX
A Branch Bank Account of a Third Party held in AIB Bank. EUR Domestic Third Party FX
A Branch Bank Account of a Third Party held in another financial institution within Ireland.
EUR Domestic Account Transfer FX and Domestic Third Party IBAN – you must first transfer the funds to your Branch Account using the Domestic Account Transfer FX screen. You can then use the Domestic Third Party IBAN screen to transfer the funds to the account of the Third Party.
A Third Party Sterling Current Account held in AIB with an NSC of 238590 GBP Domestic Third Party FX
A Third Party Currency Account held in AIB with an NSC of 930067 CCY of Credit Account
Domestic Third Party FX
An AIB GB Bank Account GBP Domestic Urgent Interbank (Same Day Value)
An FTB Bank Account GBP Domestic Urgent Interbank (Same Day Value)
An account with another Bank in the UK with a valid UK NSC which is reachable within either the FPS or CHAPS clearing systems
GBP Domestic Urgent Interbank (Same Day Value)

19
I am Debiting... I am Crediting... Currency Payment Screen to use
A Currency Account with an NSC of 930067
(NOTE: When debiting a Euro Currency Account, see further options below.)
My AIB Branch Account in ROI EUR Domestic Account Transfer FX
My Currency Accounts with an NSC of 930067 CCY of Credit Account
Domestic Account Transfer FX
My Sterling Current Accounts with an NSC of 238590 GBP Domestic Account Transfer FX
A Branch Bank Account of a Third Party held in AIB Bank. ANY Domestic Account Transfer FX and Domestic Third Party FX – you must first transfer the funds to your Branch Accountusing the Domestic Account Transfer FX screen. You can then use the Domestic Third Party FX screen to transfer the funds to the account of the Third Party
A Branch Bank Account of a Third Party held in another financial institution within Ireland.
ANY excl. EUR Paylink – Standard or Urgent
A Currency Account of a Third Party held in AIB with an NSC of 930067. CCY of Credit Account
Domestic Third Party FX
A Sterling (GBP) Account of a Third Party held in AIB with an NSC of 238590 GBP Domestic Third Party FX
An AIB GB Bank Account ANY Paylink – Standard or Urgent
An FTB Bank Account ANY Paylink – Standard or Urgent
An International Account ANY Paylink – Standard or Urgent
I am Debiting... I am Crediting... Currency Payment Screen to use
A Euro Currency Account with an NSC of 930067
A Branch Bank Account of a Third Party held in AIB Bank using Beneficiary Account Information of IBAN and BIC.
EUR Domestic Third Party IBAN
A Euro Currency Account with an IBAN (containing an NSC of 930067) and AIB’s BIC (AIBKIE2D).
EUR Domestic Third Party IBAN
My Euro Currency Accounts with an NSC of 930067 or My branch account in ROI. EUR Domestic Account Transfer
A Branch Bank Account of a Third Party held in another financial Institution within Ireland.
EUR Domestic Account Transfer and Domestic Third Party IBAN – You must first transfer the funds to your Branch accountusing the Domestic Account Transfer screen. You can then use the Domestic Third Party IBAN screen to transfer the funds to the account of a Third Party

20DEBITING AIB GB AND FTB ACCOUNTS
I am Debiting... I am Crediting... Currency Payment Screen to useWhen can I make this Payment?
Payment Execution timeframe
An AIB GB Account or a FTB Account
My AIB GB Account GBP Domestic Account Transfer FX • 06:30 to 02:55 NOTE: IF you have access to Allied Irish Bank (GB) or First Trust Bank accounts on iBusiness Banking, you can obtain details of the account Terms and Conditions and transaction fees and charges from your local branch. Alternatively, you can visit www.aibgb.co.uk or www.firsttrust.co.uk
My FTB Account GBP Domestic Account Transfer FX • 06:30 to 02:55
My 238590 Account GBP Domestic Account Transfer FX • 06:30 to 02:55
Third Party AIB GB Account GBP Domestic Third Party FX • 06:30 to 02:55
Third Party AIB FTB Account GBP Domestic Third Party FX • 06:30 to 02:55
Third Party 238590 Account GBP Domestic Third Party FX • 06:30 to 02:55
Third Party – UK Bank Account GBP Domestic Third Party FX • 09:31 to 15:45
An AIB ROI Account Any Paylink (Standard/Urgent) • 08:01 to 16:00
Other ROI Bank Account Any Paylink (Standard/Urgent) • 08:01 to 16:00
International Bank Account Any Paylink (Standard/Urgent) • 08:01 to 16:00
Certain clients will have the ability to debit AIB GB and FTB Bank Accounts. The following table identifies payment options available when debiting an AIB GB or FTB Bank Account.

21CHARGES ASSOCIATED WITH INTERNATIONAL PAYMENTS
The costs of making an international payment (Paylink and Paylink Euro) are incurred on both the sender (ordering party) and receiver (beneficiary) side of the transfer. The overall cost is based on AIB’s charge and the charges of other banks involved in the transfer e.g. intermediary (agent) banks and the beneficiary / receiver’s bank. The cost of an international payment may be charged either to the sender or is shared by both parties.
The charging options available to AIB customers are detailed in the table below.
Charging options on iBusiness Banking
AIB Fees Paid By: Other Fees Paid By: Impact on you Comment
Ordering Party Beneficiary This is referred to as the ‘Shared’ charging option. This is where you opt to pay the AIB charge and the beneficiary pays the charges of all other banks. These intermediary and/or beneficiary bank charges may be deducted from the payment amount before it is credited to the beneficiary/receiver’s account.
This is the most frequently used charging option. It is also the legal default charging option for the Paylink Euro payment product. An Intermediary Bank may not deduct its charges or fees from the payment amount for any payment in an EEA currency executed within the EEA using this charging option.
Ordering Party Ordering Party This is referred to as the ‘Sender’ charging option. You opt to pay the AIB charge and the charges of all other banks.
If you select this charging option, your account will be debited with the AIB charges initially and with all other bank(s) charges when notification is received from the bank(s) involved. This could be some weeks later. Please note that the charges of intermediary (agent) banks and/or the beneficiary bank may be higher than similar charges applied in Ireland with no maximum limit.
NOTE: The most frequently used charging option is ‘Shared’ charging option. This is where you pay the AIB charge and the beneficiary pays the charges of all other banks. Our recommendation is that, as far as practical, AIB customers should choose the ‘Shared’ charging option. This is recommended because the Beneficiary of a payment is usually in a better position to influence charges applied on the receiving side. For more information on AIB’s International payment products please refer to www.aib.ie/ibb.

22PAYMENT SCREENS – FIELDS AND ACTIONS EXPLAINED
Field Payment Screen Details
Debit Account Selection All payment screens You select the debit account for the payment by selecting the account from the ACCOUNT dropdown. When you access a payment screen, the debit account will default to the previously selected account. To change it, select the required account from the ACCOUNT dropdown. The name and account details of the selected account will be displayed in the ‘From Account Details’ section.
Debit Narrative All payment screens This allows you to enter in a Narrative which will appear on your statement. You can enter up to 18 alpha/numeric characters.
‘Standard’ and ‘Urgent’ checkboxes.
Paylink Paylink Euro
When you are making a Paylink or a Paylink Euro payment, you must select one of these options. The selection will affect the payment execution time. For more details on payment execution times, select the PAYMENT INFORMATION option on the side menu on iBusiness Banking.
In order to help you understand payments, the following sections provide explanations and descriptions of the various fields and contents of the payment screens. The payment screen is divided into three main sections. They are:
• From Account Details section
• Beneficiary Details section
• Payment Details section
‘From Account Details’section
This part of the payment allows you to select the account which is going to be debited for the payment. There are three main inputs required here and these are detailed in the table below.
Account Transfer FXPaylink

23
Field Payment Screen Details
Name All payment screens
This dropdown will either contain a list of your own accounts, when the transfer is an internal account transfer, or a list of Beneficiaries where your payment is a Third party payment. The Beneficiary’s details can be added in the ‘BENEFICIARIES’ option.
• Account Transfer and Account Transfer FX: NAME dropdown will contain a list of your accounts registered on iBusiness Banking.• Urgent Interbank (Same Day Value) and Third Party FX: NAME dropdown will contain a list of Domestic Beneficiaries which have been created using
Account Number and NSC for GBP payments and will contain a list of Domestic Beneficiaries which have been created using BIC and IBAN for EURpayments.
• Third Party IBAN: NAME dropdown will contain a list of Domestic Beneficiaries which have been created using IBAN and BIC details.• Bill Payment: NAME dropdown will contain a list of Utilities which have been set up by the Local Administrator.• Paylink/Paylink Euro: NAME dropdown will contain a list of International Beneficiaries.
Get Details All Third Party Payments
The GET DETAILS option will display the details of the selected Beneficiary. If a Beneficiary is selected, and you do not select GET DETAILS, the system will automatically get the details, when an action is selected e.g. Authorise.IMPORTANT NOTE: If you select a Beneficiary and then GET DETAILS, the details of the select Beneficiary will be displayed on the screen. If you subsequently select a different Beneficiary, do not select GET DETAILS, and then select an action, iBusiness Banking will use the details of the newly selected Beneficiary for the payment, and not the details displayed on screen.
Open Payment All Third Party Payments
The Open Payment option, where available, allows the User to key in Beneficiary Account details on the payment screen instead of selecting a pre-authorised Beneficiary from the NAME dropdown. This option is only available to Users where we have received a specific request from you to grant this access. For more details, see ‘how to….Create an Open Payment’.IMPORTANT NOTE: As this option allows a Payment Creator to key in Beneficiary Details on the payments screen and make payments to third party accounts, we recommend that this option is only granted to the User when necessary.
‘Beneficiary Details’ section
This section allows you to select, or enter, details of the Beneficiary Bank Account. This can be one of your accounts registered on iBusiness Banking or a Third Party Bank Account. Depending on the payment type, the information required here will be different:
• Where the transfer is between your own accounts, you will select the account details of one of your other accounts.
• Where the transfer is to a Third Party Bank Account, you will select the beneficiary details from a dropdown.
Paylink
Account Transfer
Bill Payment

24
Field Payment Screen Details
Originator Ref All payment screens
The Originator Ref allows you to enter a narrative that will be sent with the payment instructions. This narrative may appear on any payment notification that the Beneficiary may receive and may appear on their Bank Statement. This is dependent on the receiving Bank’s ability to handle such details. Where the payment is a transfer between your own accounts, the Originator Ref will appear on the statement of the credit account.The length of the Originator Ref will be dependent on the payment type:
• Domestic Payments: You can enter in 18 alphanumeric characters.
• International Payments (Paylink Euro Standard): You can enter in four lines of 35 alphanumeric characters.
Originator ID Third Party IBAN Paylink Euro Standard
This optional field can be used by the originator to provide an identification reference that enables the beneficiary to identify the party that sent the payment. This identification reference is agreed between the originator and beneficiary. This reference will be passed unaltered to the beneficiary, who can use it to quickly identify that he has received funds from a particular customer. The Originator ID can be used by the Beneficiary to update his debtor’s ledger.
Beneficiary ID Third Party IBAN Paylink Euro Standard
This optional field can be used by the originator to provide an identification code that identifies the beneficiary, normally within the originator’s systems. This identification reference is agreed between the originator and the beneficiary. This reference will be passed unaltered to the beneficiary. The Beneficiary ID can be used by the originator to update his creditor’s ledger.
Additional Information
Account Transfer Third Party IBAN PaylinkPaylink Euro
Additional information allows you to enter 4 lines of 35 characters that will travel with the payment.
‘Payment Details’ section
This section allows you to enter the amount of the payment, select currency (where applicable) and give fee instructions.
Account Transfer FXPaylink
Urgent Interbank

25
Field Payment Screen Details
Amount All paymentscreens
The Amount field allows you to enter the amount of the payment.
Requested Debit Date
All payments screens
This is the date on which we will begin to process your payment. If the date selected is a non-business day then we will start to process your payment on the next business day.
Currency Dropdown
Account Transfer FXThird Party FXPaylink Standardand Urgent
This dropdown allows you to select the currency of the payment. For a list of currencies available in the dropdown, see table of Payment Currencies on Page 15. The default currency for all other payments is EUR.
Tick to make equivalent currency payment
Account Transfer FXThird Party FXPaylink Standardand Urgent
This option will be available where the currency of the debit account and the currency of the payment are different. If you select this checkbox, you will make the payment in the equivalent of the currency of the account you are debiting.For example, if the account you are debiting is in GBP, and you have entered 1,000 in the ‘Amount’ field and selected USD from the currency dropdown, the following two scenarios are available:
• If you select the Tick to make equivalent currency payment checkbox, the payment amount will be 1,000 GBP, converted to USD at the current rateof exchange.
• If you don’t select the Tick to make equivalent currency payment checkbox, the payment amount is 1,000 USD. Debited at the current rate ofexchange.
AIB Fees paid by: Other Fees paid by:
Paylink Standard and Urgent
This allows you to specify the charging instructions for the International Payment. Valid options are:• AIB Fees paid by: Ordering Party Other fees paid by: Beneficiary (Known as ‘Shared’ charging option)
• AIB Fees paid by: Ordering Party Other fees paid by: Ordering Party (Known as ‘Sender’ charging option)
For Paylink Euro, the default setting for charges is ‘Shared’ i.e. AIB fees paid by Ordering Party and other fees paid by Beneficiary.
Please see section ‘Charges associated with International Payments’ for more details.
Forward Contract Account Transfer FXThird Party FXPaylink Standardand Urgent
This option allows you to make drawdowns from Forward Contracts which you may have entered into.
A Forward Contract is a contract entered into by you, the Customer, with AIB. It is a commitment to purchase a certain amount of a particular currency, at a particular rate, between two dates. The Customer may draw down on this contract between those dates and in variable amounts. When a Customer draws down a forward contract in iBusiness Banking, the contract number is required for validation purposes. (For further details on Forward Contracts, please contact your branch).
Dealer Rate Account Transfer FXThird Party FXPaylink Standardand Urgent
This option allows you to enter a Dealer’s Rate and Reference which may have been issued to you.
A Dealer Rate is a rate of exchange that is issued to you at a particular time by a dealer. The rate of exchange given will be accompanied by a reference code, which validates the particular rate of exchange given. This reference code must be entered when completing a Dealer Rate transaction on iBusiness Banking.
IMPORTANT NOTE: All payments in excess of €70,000.00, or an equivalent amount in a different currency, that require a currency conversion must have a Dealer’s Rate and Reference, and/or a Forward Contract rate and reference, entered, before the payment will be processed. If your payment contains a Dealer Rate and the payment fails, the Dealer Rate is still valid. If you need to cancel the Dealer Rate, you should contact the AIB Staff that you obtained the Dealer Rate from immediately. Depending on the exchange rates at the time of cancellation, this may result in a gain or loss to you.

26
Closed Third Party Payments And All Account Transfers
Action Outcome
Authorise • A Payment Confirmation page will be displayed with the payment contents. You should confirm the Payment Details on this screen.
• In order to confirm your payment, you must enter a One Time Code (OTC) from your Digipass.
• When you have entered the One Time Code, you select ‘Confirm’ to confirm authorisation of the payment. The payment will be sent for processing. If the payment requires a second authorisation, then it will be sent to the Payments ‘Pending Authorisation’ to await the second authorisation.
• If you select ‘Cancel’ from the payment confirmation screen, this will cancel payment authorisation. However, a payment record will still be created and is sent to the Payments ‘Pending Authorisation’ to await authorisation.
Save forAuthorisation
• The payment is created and is sent to the Payments ‘Pending Authorisation’ to await authorisation.
Hold • Payment is placed on hold so that it can be ‘Saved for Authorisation’ or ‘Authorised’ at a later stage. You must complete the payment screen before selecting ‘Hold’. Payments which have been ‘held’ can be accessed in the ‘Payments Log’ and can only be viewed by the user who created it, until the status is updated to one other than ‘held’.
Save as Template • Payment details are saved as a Template payment and can be accessed by selecting PAYMENTS on the side menu on iBusiness Banking. Payment Amount, Payment Date, Forward Contract Details and Dealer Rates will not be saved as part of the payment.
Reset • The screen is refreshed and any entered data will be erased.
Payment Actions
Once you have entered details of a payment, you select an ‘action’ in order to proceed to the next step of payment creation or authorisation. The actions buttons available to a User will be dependent on the access level which has been granted to that User.
NOTE: For Third Party Payments, the outcome of selecting an action will differ depending on whether the payment is a ‘Closed’ Payment or an ‘Open’ Payment:
• Closed Payment: User selects beneficiary details from the dropdown list of pre-authorised Beneficiaries.
• Open Payment: User enters in beneficiary details on the payment screen.
27
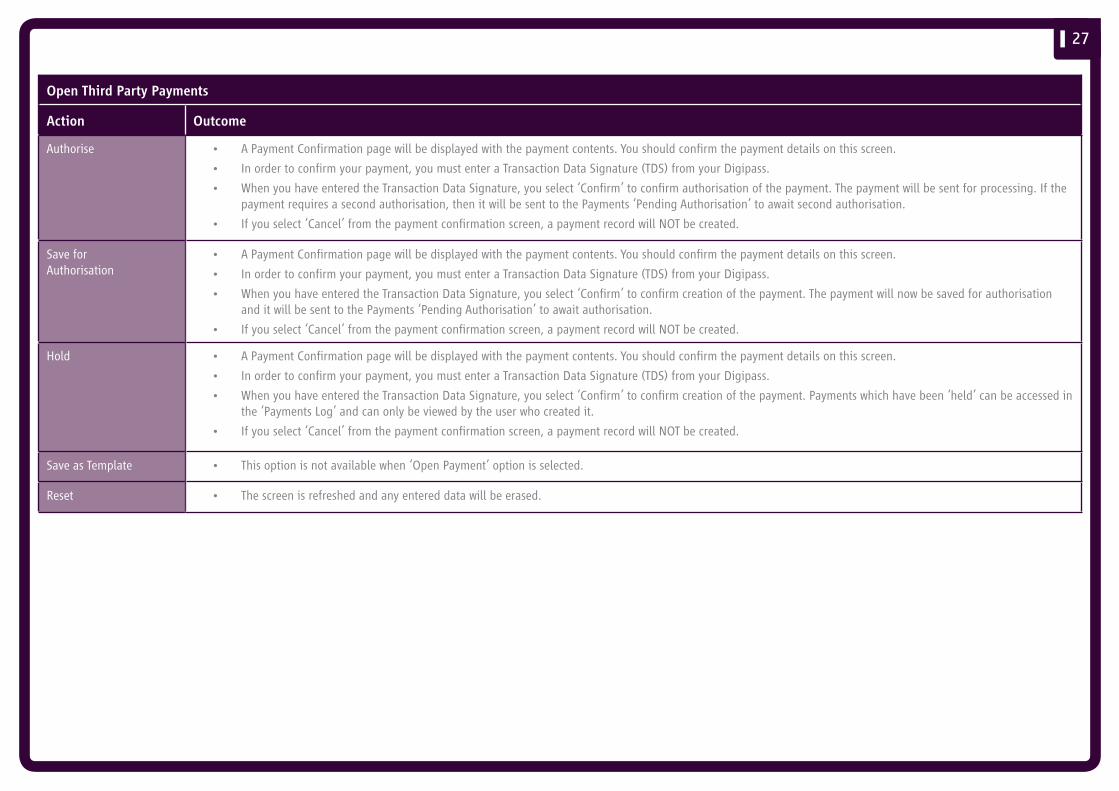
Open Third Party Payments
Action Outcome
Authorise • A Payment Confirmation page will be displayed with the payment contents. You should confirm the payment details on this screen.
• In order to confirm your payment, you must enter a Transaction Data Signature (TDS) from your Digipass.
• When you have entered the Transaction Data Signature, you select ‘Confirm’ to confirm authorisation of the payment. The payment will be sent for processing. If thepayment requires a second authorisation, then it will be sent to the Payments ‘Pending Authorisation’ to await second authorisation.
• If you select ‘Cancel’ from the payment confirmation screen, a payment record will NOT be created.
Save forAuthorisation
• A Payment Confirmation page will be displayed with the payment contents. You should confirm the payment details on this screen.
• In order to confirm your payment, you must enter a Transaction Data Signature (TDS) from your Digipass.
• When you have entered the Transaction Data Signature, you select ‘Confirm’ to confirm creation of the payment. The payment will now be saved for authorisationand it will be sent to the Payments ‘Pending Authorisation’ to await authorisation.
• If you select ‘Cancel’ from the payment confirmation screen, a payment record will NOT be created.
Hold • A Payment Confirmation page will be displayed with the payment contents. You should confirm the payment details on this screen.
• In order to confirm your payment, you must enter a Transaction Data Signature (TDS) from your Digipass.
• When you have entered the Transaction Data Signature, you select ‘Confirm’ to confirm creation of the payment. Payments which have been ‘held’ can be accessed inthe ‘Payments Log’ and can only be viewed by the user who created it.
• If you select ‘Cancel’ from the payment confirmation screen, a payment record will NOT be created.
Save as Template • This option is not available when ‘Open Payment’ option is selected.
Reset • The screen is refreshed and any entered data will be erased.

28TEMPLATE PAYMENTS
OVERVIEW
The ‘Template Payment’ screen displays all the Payment Templates which have been created by Users. Template Payments are payment screens where all the payment details, required to make the payment, have been pre-filled. Example: If you make regular payments to a certain supplier, you can set up a Template Payment with the supplier’s details entered. When you wish to make a payment to that supplier, simply select the template and enter the amount.
HOW TO CREATE A PAYMENT TEMPLATE
Access the relevant payment screen, enter the payment details and then select ‘Save as Template’. The template will be displayed on the Template Payments screen. You can create templates for all payment types. NOTE: The following information is not saved with the payment template and must be entered when creating a payment from a Template; Payment Amount, Date, Forward Contract details or Dealer Rate details.
MAIN SCREEN
The Template Payment screen displays all templates which have been created by Users. The most recently created Template will be displayed at the top of the list.
The following details are displayed for each template:
• From Account: Name of the debit account on the Template.
• Beneficiary: Name of the credit account.
• Payment Type: Payment type used when creating the Template.
SORT PAYMENTS
You can sort Templates which are displayed on the Template Payments screen. Simply select the column by which you want to sort and click the title of the column to sort Templates in ascending order. Click the column title again to sort in descending order.
Template Payments

29
ACTIONS
The following table describes the list of actions on the Template Payments screen. Please refer to the ‘how to…’ section for step-by-step instructions.
Action What you can do
Create Payment Allows you to create a payment from a Template.
View Template Allows you to view a selected Template.
Edit Template Allows you to edit details of a Template.
Delete Allows you to delete a Template.
Query Allows you to carry out a query and search for certain types of Templates.
Refresh Allows you to refresh details on screen and display an up-to-date list of Templates.

30OUTGOING PAYMENTS LOGS
OVERVIEW
The ‘Outgoing Payments Log’ displays all payments which have been created by all Users in your Company. This screen provides an up-to-date status of the payment so you can see if a payment has been processed to completion.
MAIN SCREEN
The outgoing payments are displayed with the most recent payment created displayed at the top of the list. Use the scroll bars to scroll to the right to view further payment details.
The following details are displayed for each payment:
• From Account: Name of the account which was debited.
• Beneficiary: Name of the credit account.
• Amount: Amount of the payment.
• Ccy: Currency of the payment.
• Status: Identifies the current status of the payment. See table below for definition ofvarious statuses.
• Requested Debit Date: Identifies the date your payment will begin processing.
• Payment Type: Identifies the Payment Type.
• Last updated on: Specifies the date of the last update to the payment.
• Last updated by: Specifies the User ID who last updated the payment.
• AIB Reference No: When a payment is processed successfully by AIB, a unique paymentreference will be issued. This can be used to identify the payment should there be any queries.
SORT PAYMENTS
You can sort payments which are displayed on the Outgoing Payment Log. Simply select the column by which you want to sort and click the title of the column to sort payments in ascending order. Click the column title again to sort in descending order.
You can print details of this screen by selecting the PRINT option. When you are printing from the Outgoing Payment Log, we recommend that you print in Landscape. This option can be selected in your printer preferences.
NOTE: The Outgoing Payment Log will only display details of the last User who updated the payment. If you wish to view a full audit trail of amendments to outgoing payments, you should view the Audit Trail (if this option is available to you). A record of Payments on the Outgoing Payment Log is held for up to 180 days.
Outgoing Payment Log Screen

31
ACTIONS
The following list gives an overview of what can be done. Please refer to the ‘how to…’ section for step-by-step instructions.
PAYMENT STATUS
Action What you can do
Query Allows you to search for payments based on entered criteria.
View Allows you to view a selected payment.
Edit Allows you to edit a payment which has not yet been fully authorised. Only Users with ‘Create Payment’ functionality will be able to edit a payment from this screen.
Cancel Allows you to cancel a payment which has not yet been fully authorised.
Status Details Where a payment has failed, the status details will provide a reason for failure.
Transactions Details Provides transaction details of the payment e.g. debit account, rate used, charges etc.
Export Allows you to export the results of a payment query. The details will be exported to an ‘.out’ file. This file can then be opened in any application that can open ‘.out’ e.g. Microsoft Excel.
Refresh This will refresh the payments on screen to provide an up-to-date display of payments and the status of these payments.
More The Payments log screen displays the 60 most recent payments. When the ‘More’ action is active, this means that further payments can be viewed. Select this option to view additional 60 payments. As long as there are more payments to be viewed, this option will be active.
Status Description
Awaiting Authorisation Payment has been created and must be authorised by a User with relevant access before it can be sent to AIB for processing.
Awaiting Authorisation 2 Payment requires a second authorisation by a User with relevant access before it can be sent to AIB for processing. This status will only be applicable to clients which have opted to have dual authorisation or a payment threshold limit.
Re-send The payment could not be sent to AIB for technical reasons. The payment must be re-authorised by a Payment Authoriser before it can be sent to AIB for processing. Where two authorisations are required, the payment must be authorised again by two Payment Authorisers.
Held A User has created a payment and selected the ‘Hold’ action. Only the User who has ‘held’ the payment will be able to see the payment, until it has been updated to another status.
Being Processed The payment has been sent and received by AIB and is currently being processed.
Complete The payment has been successfully processed by AIB.NOTE: • Your account may not yet be debited when the status of the payment is ‘Complete’. This may happen at a later stage in the payment cycle. • The Beneficiary account may not yet be credited. Depending on the payment type, this may take a number of days.
Rejected The payment has been rejected. Select payment, then ‘Status Details’ to view further details. Contact iBB Operations for further information.
Cancelled Payment instruction has been cancelled by you.
Returned The payment has been returned. Contact iBB operations for further information.
Forward Dated The payment has been scheduled to start to process on a particular requested debit date in the future.

32INCOMING PAYMENT LOGS
OVERVIEW
The ‘Incoming Payments Log’ displays all payments which have been received into your Company accounts.
MAIN SCREEN
The Incoming payments are displayed with the most recent payment received displayed at the top of the list. Use the scroll bars to scroll to the right to view further payment details.
The following details are displayed for each incoming payment:
• Account Name: Name of the account which was credited.
• Amount: Amount of the payment received.
• Ccy: Currency of the payment.
• Date: Date the incoming payments were received by AIB.
• Senders Name: Name of the sender of the payment.
• AIB Reference No: When a payment is processed successfully by AIB, a unique payment reference will be issued. This can be used to identify the payment should there be any queries.
• Credit Account: IBAN of the account which was credited.
SORT PAYMENTS
You can sort payments which are displayed on the Incoming Payments Log. Simply select the column by which you want to sort and click the title of the column to sort payments in ascending order. Click the column title again to sort in descending order.
You can print details of this screen by selecting the PRINT option. When you are printing from the Incoming Payments Log, we recommend that you print in Landscape. This option can be selected in your printer preferences.
Incoming Payment Log Screen

33
ACTIONS
The following list gives an overview of what can be done. Please refer to the ‘how to…’ section for step-by-step instructions.
Action What you can do
Query Allows you to search for payments based on entered criteria.
Transactions Details Provides transaction details of the payment e.g. credit account, rate used, charges etc.
Export Allows you to export the results of a payment query. The details will be exported to an ‘.out’ file. This file can then be opened in any application that can open ‘.out’ e.g. Microsoft Excel.
Refresh This will refresh the payments on screen to provide an up-to-date display of payments and the status of these payments.

34PAYMENTS ‘PENDING AUTHORISATION’
OVERVIEW
The Payments ‘Pending Authorisation’ screen displays all payments which are awaiting authorisation. When a payment has been created and ‘Saved for Authorisation’, the payment is displayed here until it is fully authorised.
MAIN SCREEN
The payments are displayed with the most recent payment created displayed at the top of the list. Use the scroll bars to scroll to the right to view further details on the payment.
The following details are displayed for each payment:
• From Account: Name of the account which was debited.
• Beneficiary: Name of the credit account.
• Amount: Amount of the payment.
• Ccy: Currency of the payment.
• Status: Identifies the current status of the payment.
• Requested Debit Date: Identifies the date your payment will begin processing.
• Payment Type: Identifies the Payment Type
• Last updated on: Specifies the date of the last update to the payment.
• Last updated by: Specifies the User ID who last updated the payment.
The ‘Payment(s) selected’ field will display the number of payments selected at any one time.
SORT PAYMENTS
You can sort the payments which are displayed on the Payments ‘Pending Authorisation’. Simply select the column by which you want to sort, and click the title of the column to sort payments in ascending order. Click the column title again to sort in descending order.
You can print the details of this screen by selecting the PRINT option. When you are printing from the Payments ‘Pending Authorisation’, we recommend that you print in Landscape. This option can be selected in your printer preferences.
Payments ‘Pending

35
ACTIONS
The following list gives an overview of what can be done. Please refer to the ‘how to…’ section for step by step instructions.
PAYMENT STATUS
Action What you can do
Authorise Allows you authorise payments which are awaiting authorisation.
View Allows you to view a selected payment.
Edit Allows you to edit a payment which has not yet been fully authorised. Only Users with ‘Create Payment’ functionality will be able to edit a payment from this screen.
Cancel Allows you to cancel a payment which has not yet been fully authorised.
Refresh This will refresh the payments on screen to provide an up to date display of payments and the status of these payments.
Status Description
Awaiting Authorisation Payment has been created and must be authorised by a User with relevant access before it can be sent to AIB for processing.
Awaiting Authorisation 2 Payment requires a second authorisation by a User with relevant access before it can be sent to AIB for processing. This status will only be applicable to Companies which have opted to have dual authorisation or a payment threshold limit.
Re-send The payment could not be sent to AIB for technical reasons. The payment must be re-authorised by a Payment Authoriser before it can be sent to AIB for processing. Where two authorisations are required, the payment must be authorised again by two Payment Authorisers.

36BENEFICIARY MANAGEMENT SCREEN
OVERVIEW
The ‘Beneficiary Management’ screen allows you to manage the Beneficiaries which will be available for selection on payment screens. There are two types of Beneficiaries which can be created:
• Domestic Beneficiary – Beneficiary details will be available for selection on Domestic payments.
• International Beneficiary – Beneficiary details will be available for selection on International payments.
MAIN SCREEN
The ‘Beneficiary Management’ screen displays a list of beneficiaries which have been created. You can search for a Beneficiary by entering the full name, or the first few characters of the Beneficiary name, in the search field and selecting ‘Search’. You should leave the field blank if you want to display all Beneficiaries.
The following details are displayed for each Beneficiary:
• Beneficiary Name: Name of the Beneficiary.
• Status: Status of the Beneficiary.
• Updated on: Date when the Beneficiary was last updated.
• Updated by: USER ID of User who last updated the Beneficiary.
SORT BENEFICIARIES
You can sort the Beneficiaries which are displayed on the Beneficiary Management screen. Simply select the column by which you want to sort, and click the title of the column to sort the Beneficiaries in ascending order. Click the column title again to sort in descending order.
ACCESS RIGHTS
Users can create a Beneficiary if they have been granted the ‘Create all Payments’ User Group. Users can authorise Beneficiary set-up if they have been granted the ‘Authorise All Payments’ User Group.
NOTE: Where you have asked to have ‘Dual Validation’, this will mean that all Beneficiary set-ups will require dual authorisation.
Beneficiary Management Screen

37
ACTIONS
The following list gives an overview of what can be done. Please refer to the ‘how to…..’ section for step by step instructions.
BENEFICIARY STATUS
Action What you can do
Create Domestic Allows you to enter details of a Domestic Beneficiary for use in Domestic Payments.
Create International Allows you to enter details of an International Beneficiary for use in International Payments.
View Allows you to view details of a Beneficiary.
Edit Allows you to edit the details of a Beneficiary. NOTE: Only details of Beneficiaries which are awaiting authorisation can be edited. Where the Beneficiary is fully authorised, the details cannot be edited.
Delete Allows you to delete a Beneficiary’s details. Once deleted, the details will not be available for selection on the relevant payment screen.
Authorise Allows a User with relevant access to authorise a Beneficiary set-up.
Refresh Allows the user to refresh the screen to display the most up to date list of Beneficiaries.
Status Description
Fully Authorised The Beneficiary set-up is fully authorised and the details are available for selection on the relevant payment screens.
Awaiting Authorisation The Beneficiary details have been created and must be authorised before the details can be used in payments.
Awaiting Authorisation 2 The Beneficiary details have been created and authorised once. However, you have selected to have Dual Authorisation and this will mean that Beneficiary set up will require a second authorisation.

38
what’s in this section…?In this section, you will find step by step instructions on how to:
• Create a Domestic Account Transfer Page 39 • Create a Bill Payment Page 40 • Create a Domestic Urgent Interbank (Same Day Value) Payment Page 41 • Create a Domestic Third Party (IBAN) Payment Page 42 • Create a Domestic Account Transfer FX Page 43 • Create a Third Party FX Payment Page 44 • Create a Paylink Payment – Standard and Urgent Page 45 • Create a Paylink Euro Payment – Standard and Urgent Page 46 • Add Forward Contract Rates and Dealer Rates Page 47 • Create an Open Domestic Payment Page 48 • Create an Open International Payment Page 49 • Templates – Create, View and Delete Page 50 • Templates – Edit and Query Page 51 • Payments ‘Pending Authorisation’ – Authorise Payments Page 52 • Payments ‘Pending Authorisation’ – Edit, View and Cancel Page 53 • Outgoing Payments Log – Carry out a Query Page 54 • Incoming Payments Log Page 55 • Incoming and Outgoing Payments Log – Export query results Page 56 • Outgoing Payments Log – Edit, View And Cancel a Payment Page 57 • Incoming and Outgoing Payments Log – View Transaction Details and View Status Details Page 58 • Create a Domestic Beneficiary Page 59 • Create an International Beneficiary using IBAN and BIC Page 60 • Create an International Beneficiary using Account No. and NSC Page 61 • Beneficiary Management – Authorise, View and Edit and Delete Beneficiary Page 62 • Digipass – Create a One Time Code (OTC) and a Transaction Data Signature (TDS) Page 63 • Open an ‘.out’ file Page 64 ho
w t
o…

39how Create a Domestic Account Transfer
1. To access the Domestic Account Transfer screen, select Account Transfer under PAYMENTS on the side menu.
The Domestic Account Transfer screen will be displayed.
2. Select the account to be debited for the payment from the ACCOUNT dropdown.
3. Enter a narrative in the Debit Narrative field, if required.
4. Select the account to be credited from the Name dropdown.
5. Enter a narrative in the Originator Ref field, if required.
6. Enter information in the Additional Information fields, if required. (This is an optional field to enter up to 140 characters of remittance information)
7. Enter the amount of payment in the Amount field.
8. Enter the requested debit date of the payment in the Requested Debit Date field.
9. Select an action from the action line. For all actions, except for Authorise, a confirmation message will be displayed.
Where Authorise has been selected, a payment confirmation page will be displayed.
10. Confirm details of the payment.
11. When you have confirmed the payment details, generate a One Time Code (OTC) on your Digipass and enter it into the One Time Code field.
12. Select Confirm to confirm your payment.
A success message will be displayed to confirm payment authorisation. Select OK to return to a blank payment screen.
1
2
9
34
5
10
11
12
78
6

40how Create a Bill Payment
1. To access the Bill Payment screen, select Bill Payment under PAYMENTS on the side menu.
The Bill Payment screen will be displayed.
2. Select the account to be debited for the payment from the ACCOUNT dropdown.
3. Select the Bill Utility to be credited from the Name dropdown.
4. Select Get Details to display the details of the Utility.
5. Enter the amount of payment in the Amount field.
6. Enter the requested debit date of the payment in the Requested Debit Date field.
7. Select an action from the action line. For all actions, except for Authorise and Reset, a confirmation message will be displayed.
Where Authorise has been selected, a payment confirmation page will be displayed.
8. Confirm details of the payment.
9. When you have confirmed the payment details, generate a One Time Code (OTC) on your Digipass and enter it into the One Time Code field.
10. Select Confirm to confirm your payment.
A success message will be displayed to confirm payment authorisation. Select OK to return to a blank payment screen.
NOTE: You can make payments to the following Utility Companies on the Bill Payment screen. • Vodafone • Bord Gais
• Eircom • MasterCard
• O2 • UPC
• ESB • VISA
1 3
2
7
4
8
9
10
5
6

41how Create a Domestic Urgent Interbank (Same Day Value) Payment
1. To access the Urgent Interbank (Same Day Value) screen, select Urgent Interbank under PAYMENTS on the side menu.
The Urgent Interbank (Same Day Value) screen will be displayed.
2. Select the account to be debited for the payment from the ACCOUNT dropdown.
Note : The Currency EUR/GBP will be populated with the currency of the debit account from the ‘Account ‘ drop-down list.
3. Enter a narrative in the Debit Narrative field, if required.
4. Select the Beneficiary account to be credited from the Name dropdown.
Note : Domestic Beneficiaries which have been set up using an IBAN and BIC will be displayed in the dropdown for Euro payment only, UK beneficiary’s set up for GBP payments will continue to be displayed in NSC and Account Number.
5. Select Get Details to display the account details of the Beneficiary.
6. Where available, you can select Open Payment option to key in the Beneficiary details on screen. See Page 10 for more details.
7. Enter a narrative in the Originator Ref field, if required.
8. Enter the amount of payment in the Amount field.
9. Enter the requested debt date of the payment in the Requested Debit Date field.
10. Select an action from the action line. For all actions, except for Authorise and Reset, a confirmation message will be displayed.
Where Authorise has been selected, a payment confirmation page will be displayed.
11. Confirm details of the payment.
12. When you have confirmed the payment details, generate a One Time Code (OTC) on your Digipass and enter it into the One Time Code field.
13. Select Confirm to confirm your payment.
A success message will be displayed to confirm payment authorisation.
1
2
10
3
11
12
13
7
89
4 5 6

42how Create a Domestic Third Party (IBAN) Payment
1. To access the Domestic Third Party (IBAN) screen, select Third Party (IBAN) under PAYMENTS on the side menu.
The Domestic Third Party (IBAN) screen will be displayed.
2. Select the account to be debited for the payment from the ACCOUNT dropdown.
3. Enter in a narrative in the Debit Narrative field, if required.
4. Select the Beneficiary account to be credited from the Name dropdown. Only Domestic Beneficiaries which have been set up using an IBAN and BIC will be displayed in the dropdown.
5. Select Get Details to display the account details of the Beneficiary.
6. Where available, you can select Open Payment option to key in the Beneficiary details on screen. See page 10 for more details.
7. If required, enter details in the following fields (see page 24 for more details):
• Originator Ref • Originator ID • Beneficiary ID
8. Enter information in the Additional Information fields, if required. (This is an optional field to enter up to 140 characters of remittance information)
9. Enter the amount of payment in the Amount field.
10. Enter the requested debit date of the payment in the Requested Debit Date field.
11. Select an action from the action line. For all actions, except for Authorise and Reset, a confirmation message will be displayed.
Where Authorise has been selected, a payment confirmation page will be displayed.
12. Confirm details of the payment.
13. When you have confirmed the payment details, generate a One Time Code (OTC) on your Digipass and enter it into the One Time Code field.
14. Select Confirm to confirm your payment.
1
2
11
3
7
12
13
14
910
8
4 5 6

43how Create a Domestic Account Transfer FX
1. To access the Domestic Account Transfer FX screen, select Account Transfer FX under PAYMENTS on the side menu.
The Domestic Account Transfer FX screen will be displayed.
2. Select the account to be debited for the payment from the ACCOUNT dropdown.
3. Enter a narrative in the Debit Narrative field, if required.
4. Select the account to be credited from the Name dropdown.
5. Enter a narrative in the Originator Ref field, if required.
6. Enter the amount of payment in the Amount field.
7. Select the currency of the payment from the currency dropdown.
8. If required, select the Tick to make equivalent currency payment.
9. Enter the requested debit date of the payment in the Requested Debit Date field.
10. If required, select the Forward Contract Rate and/or Dealer Rate options to key in details. Please see Page 47 for details on entering this information.
11. Select an action from the action line. For all actions, except for Authorise and Reset, a confirmation message will be displayed.
Where Authorise has been selected, a payment confirmation page will be displayed.
12. Confirm details of the payment.
13. When you have confirmed the payment details, generate a One Time Code (OTC) on your Digipass and enter it into the One Time Code field.
14. Select Confirm to confirm your payment.
A success message will be displayed to confirm payment authorisation. Select OK to return to a blank payment screen.
1
6
10
7 8
2
11
34
5
9
12
1314

44how Create a Third Party FX Payment
1. To access the Third Party FX screen, select Third Party FX under PAYMENTS on the side menu.
The Third Party FX screen will be displayed.
2. Select the account to be debited for the payment from the ACCOUNT dropdown.
3. Enter a narrative in the Debit Narrative field, if required.
4. Select the Beneficiary account to be credited from the Name dropdown.
5. Select Get Details to display the account details of the Beneficiary.
6. Where available, you can select Open Payment option to key in the Beneficiary details on screen. See Page 10 for more details.
7. Enter a narrative in the Originator Ref field, if required.
8. Enter the amount of payment in the Amount field.
9. Select the currency of the payment from the currency dropdown.
10. If required, select the Tick to make equivalent currency payment.
11. Enter the requested debit date of the payment in the Requested Debit Date field.
12. If required, select the Forward Contract Rate and/or Dealer Rate options to key in details. Please see Page 47 for details on entering this information.
13. Select an action from the action line. For all actions, except for Authorise and Reset, a confirmation message will be displayed.
Where Authorise has been selected, a payment confirmation page will be displayed.
14. Confirm details of the payment.
15. When you have confirmed the payment details, generate a One Time Code (OTC) on your Digipass and enter it into the One Time Code field.
16. Select Confirm to confirm your payment.
2
14
13
4 5 67
1213
118
9
10
1516

45how Create a Paylink Payment – Standard and Urgent
We would recommend that you read the relevant ‘about…’ sections in relation to International Payments.
1. To access the Paylink screen, select Paylink under PAYMENTS on the side menu.
The Paylink screen will be displayed.
2. Select the account to be debited for the payment from the ACCOUNT dropdown.
3. Enter a narrative in the Debit Narrative field, if required.
4. Select execution timeframe option for payment i.e. Standard or Urgent.
5. Select the Beneficiary account to be credited from the Name dropdown.
6. Select Get Details to display the account details of the Beneficiary.
7. Where available, you can select Open Payment option to key in the Beneficiary details on screen. See Page 10 for more details.
8. Enter a narrative in the Additional Information field, if required. You can enter four lines of 35 alphanumeric characters.
9. Enter the amount of payment in the Amount field.
10. Select the currency of the payment from the currency dropdown.
11. If required, select the Tick to make equivalent currency payment.
12. Enter the requested debit date of the payment in the Requested Debit Date field.
13. Select the fee payment options for the payment.
14. If required, select the Forward Contract Rate and/or Dealer Rate options to key in details. Please see Page 47 for details on entering this information.
15. Select an action from the action line. For all actions, except for Authorise, a confirmation message will be displayed.
16. Confirm details of the payment.
17. When you have confirmed the payment details, generate a One Time Code (OTC) on your Digipass and enter it into the One Time Code field. Select Confirm to confirm your payment.
A success message will be displayed to confirm payment authorisation. Select OK to return to a blank payment screen.
1 3
12
4
2
8
16
17
9 11
10
13
5 6 7
1415

46how Create a Paylink Euro Payment – Standard and Urgent
We would recommend that you read the relevant ‘about…’ sections in relation to International Payments.
1. To access the Paylink Euro screen, select the Paylink Euro option under PAYMENTS on the side menu.
The Paylink Euro screen will be displayed.
2. Select the account to be debited for the payment from the ACCOUNT dropdown.
3. Enter a narrative in the Debit Narrative field, if required.
4. Select execution timeframe option for payment i.e. Standard or Urgent.
5. Select the Beneficiary account to be credited from the Name dropdown.
IMPORTANT: IBAN and BIC must be used.
6. Select Get Details to display the account details of the Beneficiary.
7. Where available, you can select Open Payment option to key in the Beneficiary details on screen. See page 10 for more details.
8. If required, enter details in the following fields for Paylink Euro Standard payments only (see page 24 for more details):
• Originator Ref • Originator ID • Beneficiary ID
9. Enter information in the Additional Information fields, if required. (This is an optional field to enter up to 140 characters of remittance information)
10. Enter the amount of payment in the Amount field.
NOTE: Payment currency default is EUR. Fee charging defaults to ‘Shared’.
11. Enter the requested debit date of the payment in the Requested Debit Date field.
12. Select an action from the action line. For all actions, except for Authorise and Reset, a confirmation message will be displayed.
Where Authorise has been selected, a payment confirmation page will be displayed.
13. Confirm details of the payment.
14. When you have confirmed the payment details, generate a One Time Code (OTC) on your Digipass and enter it into the One Time Code field.
15. Select Confirm to confirm your payment.
A success message will be displayed to confirm payment authorisation. Select OK to return to a blank payment screen.
1 3
4
2
5
1415
76
8
9
1011
12
13

47how Add Forward Contract Rates and Dealer Rates Details
ADDING FORWARD CONTRACT DETAILS
1. Select the Forward Contract Rate option on the relevant Payment screen.
The Forward Contract Rate Details input fields will be displayed.
2. For each Forward Contract to be used in the payment, enter a Forward Contract Reference in the Reference field. You should omit the prefix e.g. ‘FX’/’ or’FC/’ and enter the numeric value only.
NOTE: The reference will have been provided to you separately by the Bank.
3. For each Forward Contract to be used, enter a rate in the Rate field.
4. For each Forward Contract to be used, enter the amount that you wish to drawdown from the contract in the Amount field.
Once you have entered the details, you can complete your payment.
NOTE: If your payment fails, the amount of the Forward Contract used and its rate are still valid. They can be used in resending the payment or on other future payments.
ADDING DEALER RATE INFORMATION
1. Select the Dealer Rate option on the relevant Payment screen.
The Dealer Rate Details input fields will be displayed.
2. In the Dealer Reference field, enter the reference code for the rate. This will have been issued to you separately by an AIB Staff member.
3. Enter the issued exchange rate in the Rate field.
IMPORTANT: If your payment contains a Dealer Rate and the payment fails, the Dealer Rate is still valid. If you need to cancel the Dealer Rate, you should contact the AIB Staff member that you obtained the Dealer Rate from immediately. Depending on the exchange rates at the time of cancellation, this may result in a gain or loss to you. Payments that use a Dealer Rate should only be forward dated up to two business days in advance.
1
1
23
2 3 4

48how Create an Open Domestic Payment
1. Select a Third Party (IBAN) or Urgent Interbank (Same Day Value) Domestic payment option on the side menu.
2. Select the Open Payment option.
Input field will be displayed to enter the details of the Beneficiary.
NOTE: For certain payment types, there will also be the option to select an NSC checkbox on the Urgent Interbank (Same Day Value) payment screen for GBP payments. Select this option to use NSC and Account Number details for the UK Beneficiary.
3. Enter the Beneficiary details. The following information will be required:
– Name: Name of the Beneficiary.
– Address: Address of the Beneficiary. A minimum two lines of the Address is required.
Depending on option selected, the following account information will be required:
Option 1
– BIC: BIC of the Beneficiary’s Bank.
– IBAN: IBAN of the Beneficiary.
Option 2 (UK payments only – via Urgent Interbank Same Day Value)
– NSC: NSC of the Beneficiary’s Bank.
– Account No.: Account Number of the Beneficiary.
4. Once you have entered the details, you can complete your payment.
5. Once all details have been entered, select an action to complete the payment.
NOTE: When you select Authorise or Save for Authorisation, you will be required to enter a Transaction Data Signature. See ‘how to …create a Transaction Data Signature (TDS)’. You cannot ‘Save as Template’ a payment where the ‘Open Payment’ option has been selected.
NOTE: Any Beneficiary details entered will not be saved on the Beneficiary List.
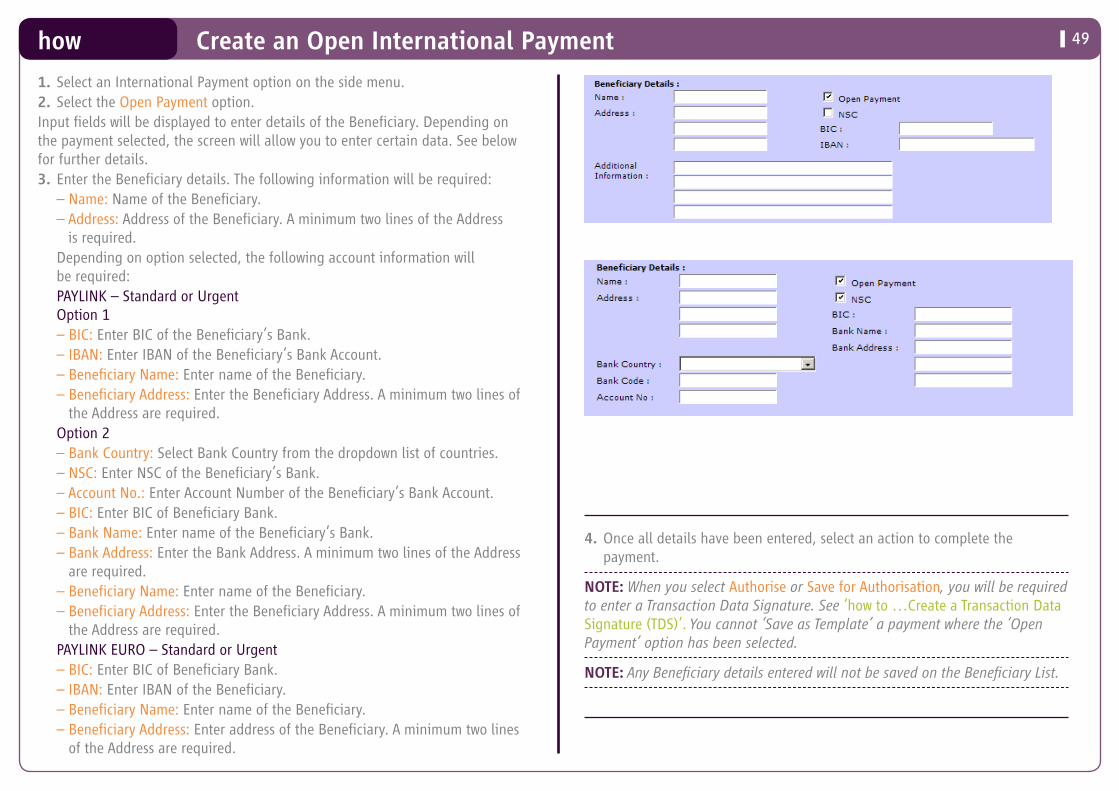
49how Create an Open International Payment
1. Select an International Payment option on the side menu.2. Select the Open Payment option.Input fields will be displayed to enter details of the Beneficiary. Depending on the payment selected, the screen will allow you to enter certain data. See below for further details.3. Enter the Beneficiary details. The following information will be required: – Name: Name of the Beneficiary. – Address: Address of the Beneficiary. A minimum two lines of the Address
is required. Depending on option selected, the following account information will
be required: PAYLINK – Standard or Urgent
Option 1 – BIC: Enter BIC of the Beneficiary’s Bank. – IBAN: Enter IBAN of the Beneficiary’s Bank Account. – Beneficiary Name: Enter name of the Beneficiary. – Beneficiary Address: Enter the Beneficiary Address. A minimum two lines of
the Address are required. Option 2 – Bank Country: Select Bank Country from the dropdown list of countries. – NSC: Enter NSC of the Beneficiary’s Bank. – Account No.: Enter Account Number of the Beneficiary’s Bank Account. – BIC: Enter BIC of Beneficiary Bank. – Bank Name: Enter name of the Beneficiary’s Bank. – Bank Address: Enter the Bank Address. A minimum two lines of the Address
are required. – Beneficiary Name: Enter name of the Beneficiary. – Beneficiary Address: Enter the Beneficiary Address. A minimum two lines of
the Address are required. PAYLINK EURO – Standard or Urgent – BIC: Enter BIC of Beneficiary Bank. – IBAN: Enter IBAN of the Beneficiary. – Beneficiary Name: Enter name of the Beneficiary. – Beneficiary Address: Enter address of the Beneficiary. A minimum two lines
of the Address are required.
4. Once all details have been entered, select an action to complete the payment.
NOTE: When you select Authorise or Save for Authorisation, you will be required to enter a Transaction Data Signature. See ‘how to …Create a Transaction Data Signature (TDS)’. You cannot ‘Save as Template’ a payment where the ‘Open Payment’ option has been selected.
NOTE: Any Beneficiary details entered will not be saved on the Beneficiary List.

50how Templates – Create a Payment, View a Template and Delete a Template
CREATE A PAYMENT FROM A TEMPLATE
1. To access the Template Payments screen, select PAYMENTS.
The Template Payments screen will be displayed.
2. To create a payment from a Template, select the Template from the list.
3. Select Create Payment.
The selected Template Payment screen will be displayed.
4. Enter any further details, including the payment amount and currency, where necessary.
5. Once you have entered all the details, select an action to complete the payment.
NOTE: See ‘Payment Actions’ on Page 26 for more details.
VIEW A TEMPLATE
1. Select a Template from the Template Payments screen.
2. Select View Template.
The selected Template will be displayed in view mode.
3. Select Close to return to the Template Payments screen.
DELETE A TEMPLATE
1. Select the Template to be deleted from the Template Payments screen.
2. Select Delete.
A Delete Succeeded message will be displayed.
3. Select OK to return to the Template Payments screen.
Create a Payment from a Template.
1
32
4
5
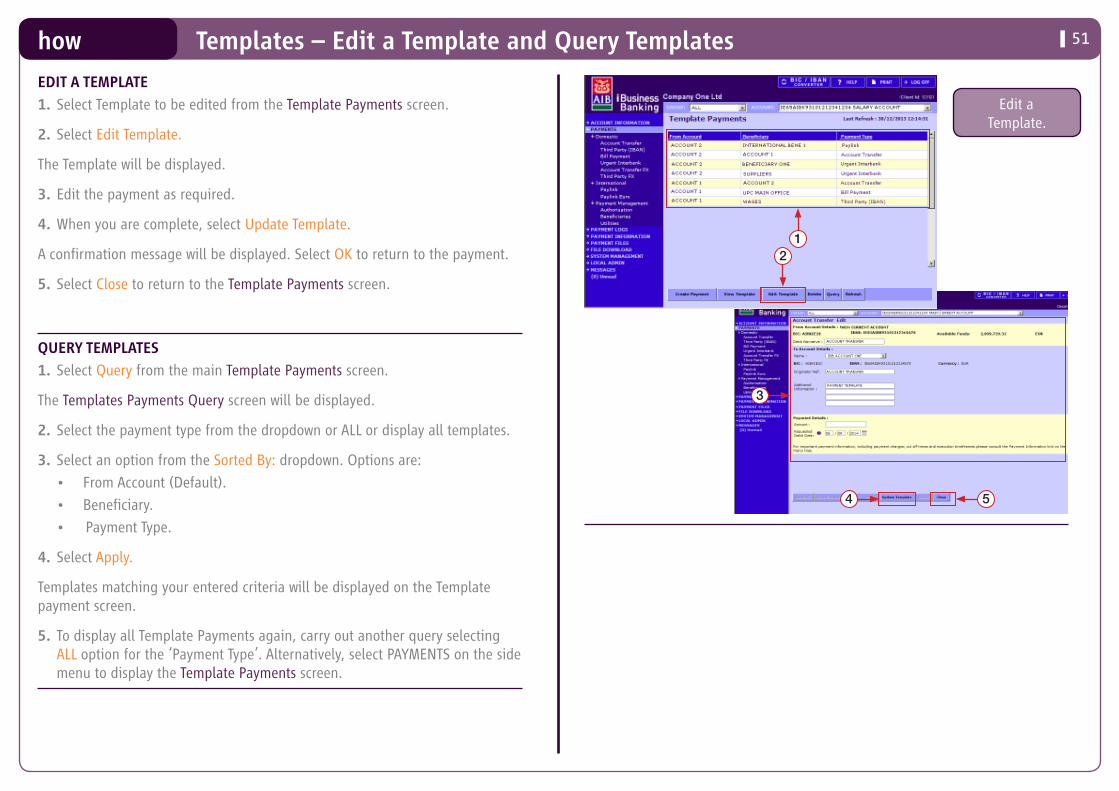
51how Templates – Edit a Template and Query Templates
EDIT A TEMPLATE
1. Select Template to be edited from the Template Payments screen.
2. Select Edit Template.
The Template will be displayed.
3. Edit the payment as required.
4. When you are complete, select Update Template.
A confirmation message will be displayed. Select OK to return to the payment.
5. Select Close to return to the Template Payments screen.
QUERY TEMPLATES
1. Select Query from the main Template Payments screen.
The Templates Payments Query screen will be displayed.
2. Select the payment type from the dropdown or ALL or display all templates.
3. Select an option from the Sorted By: dropdown. Options are:
• From Account (Default).
• Beneficiary.
• Payment Type.
4. Select Apply.
Templates matching your entered criteria will be displayed on the Template payment screen.
5. To display all Template Payments again, carry out another query selecting ALL option for the ‘Payment Type’. Alternatively, select PAYMENTS on the side menu to display the Template Payments screen.
Edit aTemplate.
21
3
4 5
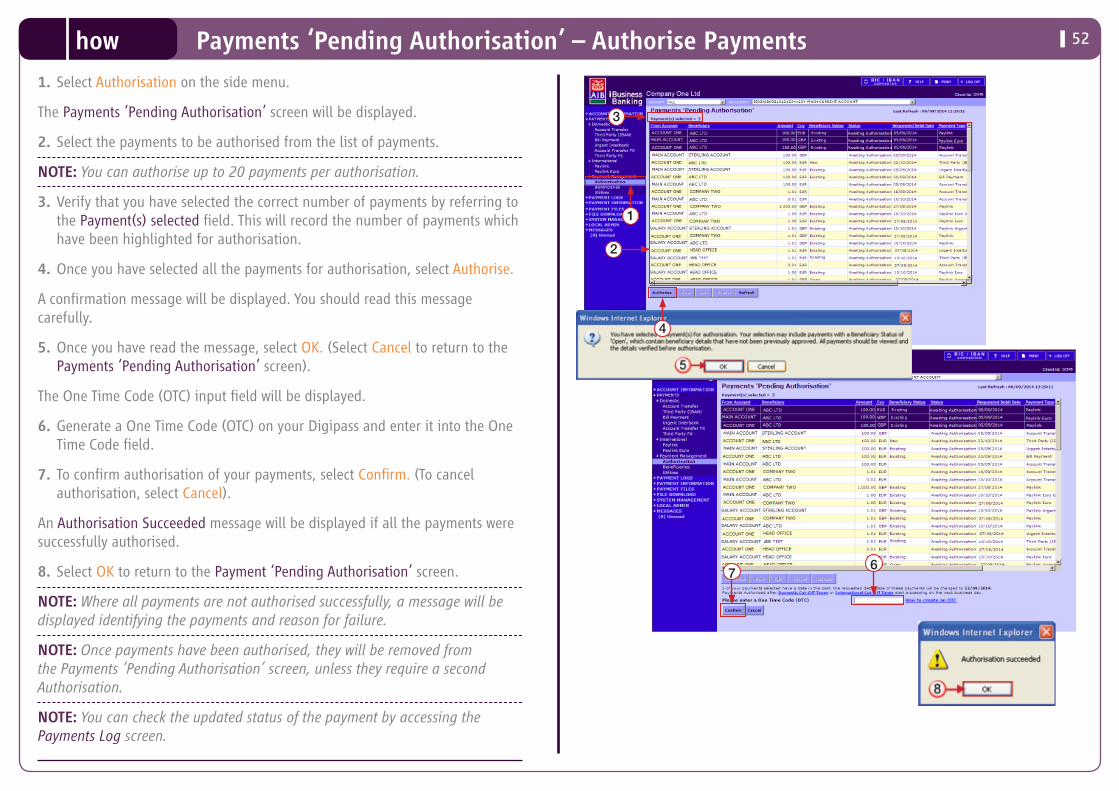
52how Payments ‘Pending Authorisation’ – Authorise Payments
1. Select Authorisation on the side menu.
The Payments ‘Pending Authorisation’ screen will be displayed.
2. Select the payments to be authorised from the list of payments.
NOTE: You can authorise up to 20 payments per authorisation.
3. Verify that you have selected the correct number of payments by referring to the Payment(s) selected field. This will record the number of payments which have been highlighted for authorisation.
4. Once you have selected all the payments for authorisation, select Authorise.
A confirmation message will be displayed. You should read this message carefully.
5. Once you have read the message, select OK. (Select Cancel to return to the Payments ‘Pending Authorisation’ screen).
The One Time Code (OTC) input field will be displayed.
6. Generate a One Time Code (OTC) on your Digipass and enter it into the One Time Code field.
7. To confirm authorisation of your payments, select Confirm. (To cancel authorisation, select Cancel).
An Authorisation Succeeded message will be displayed if all the payments were successfully authorised.
8. Select OK to return to the Payment ‘Pending Authorisation’ screen.
NOTE: Where all payments are not authorised successfully, a message will be displayed identifying the payments and reason for failure.
NOTE: Once payments have been authorised, they will be removed from the Payments ‘Pending Authorisation’ screen, unless they require a second Authorisation.
NOTE: You can check the updated status of the payment by accessing the Payments Log screen.
1
4
3
2
67

53how Payments ‘Pending Authorisation’ – Edit, View and Cancel a Payment
EDIT A PAYMENT
1. Select the payment to be edited from the list of payments on screen.
2. Select Edit.
The Payment Edit screen will be displayed.
3. Edit the payment as required.
4. When complete, select an action.
NOTE: If Authorise is selected, you will be required to enter a One Time Code.
5. Select Close to return to the Payments ‘Pending Authorisation’ screen.
VIEW A PAYMENT
1. Select the payment to be viewed on the Payments ‘Pending Authorisation’ screen.
2. Select View.
The Payment View screen will be displayed.
3. Select Close to return to the Payments ‘Pending Authorisation’ screen.
CANCEL A PAYMENT
1. Select the payment to be cancelled on the Payments ‘Pending Authorisation’ screen.
2. Select Cancel.
A Cancel Confirmation message will be displayed.
3. Select OK to confirm cancellation.
A Cancel Succeeded message will be displayed.
4. Select OK to return to the Payments ‘Pending Authorisation’ screen.
Edit aPayment.
1
2
4
3
5

54how Outgoing Payments Log – Carry out a Query
1. Select Outgoing Payments on the side menu.
The Outgoing Payments Log screen will be displayed.
2. Select Query action.
The Outgoing Payment Query screen will be displayed.
3. Enter the search criteria for your query. You can select from the following search criteria:
• Status: Search for payments with a certain status. • Search By Date: Select from the radio buttons whether your search
should focus on the ‘Requested Debit Date’ of the payment or the ‘Last Updated On’ date of the payment.
• Search From Date: Enter a date range for your query. • From Amount: Enter payment amounts to specify a value range.
(Default setting is ‘ALL’) • AIB Reference No: Enter the reference number of the payment ensuring
that the payment would have been created in the date range specified. (Default setting is ‘ALL’)
• Beneficiary: Select from a list of Beneficiaries to search for payments to a certain Beneficiary. (Default setting is ‘ALL’)
• From Account: Select an account from the dropdown to search for payments that were debited from a certain account. (Default setting is ‘ALL’)
• Payment Type: Search for a specific payment type. (Default setting is ‘ALL’) • Payment Currency: Search for payments in a certain currency. (Default
setting is ‘ALL’) • Updated by: Search for payments that were last updated by a certain
User. (Default setting is ‘ALL’) • Sorted By: Select the way in which you want your results to be sorted.4. When you have entered all your search criteria, select Apply.
The results of your payment query will be displayed on the Outgoing Payments Log screen. You can export your query results.
To return to the main Outgoing Payments Log screen, select Outgoing Payments on the side menu.
NOTE: The maximum number of payments that can be returned in any one query is 120. If your query has more than 120 payments in the results, a message will be displayed to advise you to refine your search.
1
2
3
4

55how Incoming Payments Log
1. Select Incoming Payments on the side menu. The Incoming Payments log query screen will be displayed.
2. To perform a search query you must select your accounts from the “To Accounts” list, click the down arrow button and the accounts selected will be populated in the Search Accounts box.
3. There is a limit of 5 accounts that can be selected from the “To Accounts” list for any one query.
4. To deselect accounts from the ‘Search Accounts’ box, please select the account and click on the up arrow button.
5. Enter the remaining search criteria:
• Search From Date: Enter a date range for your query.
• From Amount: Enter payment amounts to specify a value range.
• AIB Reference No: Enter the reference number of the payment ensuring that the payment would have been created in the date range specified.
• Sorted By: Select the way in which you want your results to be sorted.
6. When you have entered all your search criteria, select Apply.
The results of your payment query will be displayed on the Incoming Payments Log screen. You can export your query results.
To return to the main Incoming Payments Log query screen, select Incoming Payments.
NOTE: The maximum number of payments that can be returned in any one query is the first 150 incoming payments. If your query has more than 150 payments in the results you will need to refine your query selection to view any further payments.
1
2
3
2 4
5
6

56how Incoming & Outgoing Payments Log – Export Query Results
Once you have carried out a payment query on either the Incoming Payment Log or the Outgoing Payments Log query screens, you can export your results.
1. From the query results screen, select Export.
Depending on whether you are exporting your incoming or outgoing payment logs, the relevant Payments Log Export screen will be displayed. The File Format will default to Comma Separated Variable.
2. Enter a file name in the File Name input field, ensuring you have the ‘.out’ extension.
3. When complete, select Export Now.
A File Download pop-up will be displayed.
4. Select Save.
The Save As pop-up will be displayed.
5. Select the location where you want to save the file.
6. Amend file name if necessary.
7. Select Save to save your file to the selected location.
When the file has downloaded, a Download Complete pop-up will be displayed.
8. Select Close to close this pop-up.
NEXT STEPS: Now that you have downloaded the file, you can open this file in any software that opens ‘.out’ files. See ‘how to…Open an ‘.out’ file.
1
1
2
2
3

57how Outgoing Payments Log – Edit, View and Cancel a Payment
EDIT A PAYMENT
1. Select the payment to be edited from the list of payments on screen.
2. Select Edit.
The Payment Edit screen will be displayed.
3. Edit the payment as required.
4. When complete, select an action.
NOTE: If Authorise is selected, you will be required to enter a One Time Code.
5. Select Close to return to the Outgoing Payments Log screen.
VIEW A PAYMENT
1. Select the payment to be viewed on the Outgoing Payments Log screen.
2. Select View.
The Payment View screen will be displayed.
3. Select Close to return to the Outgoing Payments Log screen.
CANCEL A PAYMENT
1. Select the payment to be cancelled on the Outgoing Payments Log screen.
2. Select Cancel.
A Cancel Confirmation message will be displayed.
3. Select OK to confirm cancellation.
A Cancel Succeeded message will be displayed.
4. Select OK to return to the Outgoing Payments Log screen
HINT
• MORE: When More is active, select to view additional payments.
• PRINT: Don’t forget you can print the payments on the Payments Log by selecting the Print option at the top of the screen. We recommend that you print in LANDSCAPE orientation. Select this option in your printer preferences.
Edit aPayment.
1
4
3
5

58how Incoming & Outgoing Payments Log – View Transaction Details and View Status Details
VIEW TRANSACTIONS DETAILS – Incoming and Outgoing Payments
1. Select a payment from the list of either your incoming or outgoing payments.
2. Select Transactions Details.
The Transaction Details for the payment will be displayed.
3. Select OK to return to the Incoming or Outgoing Payments Log screen.
NOTE: For Outgoing International Payments, the Transaction Details screen will be updated once the payment has been processed.
VEW STATUS DETAILS – Outgoing Payments Only
1. Select a payment with a status of ‘Failed’ on the Payments Log screen.
2. Select Status Details.
The Status Details pop-up will be displayed.
3. Select Close to return to the Payments Log screen.
3
2
1

59
1. Select the Create Domestic option onthe Beneficiary Management screen.
The Create Domestic Beneficiary screen will be displayed.
2. Enter the name and address of the Beneficiary in the Name and Address field. At least 2 lines of the address are required.
NOTE: Each Beneficiary must have a unique name. If you need to set the same Beneficiary up more than once, you must differentiate the name e.g. A Supplier 1, A Suppler two, etc.
3. Enter the BIC and IBAN account details of the Beneficiary. You can enter NSC and Account No. for UK beneficiaries only by selecting the NSC check box.
NOTE: Where you use a BIC and IBAN, these details will be available for selection under the following payment screens:
• Domestic Third Party IBAN
• Domestic Urgent Interbank(Same Day Value) – Euro payments only
• Domestic Third Party FX
When you use NSC and Account Number, these details will be available for selection under the following payment screen:
• Domestic Urgent Interbank (Same Day Value) – GBP payments only
• Domestic Third Party FX
NOTE: When an NSC is used, this will be checked for validity. Only UK NSCs are accepted using the NSC tickbox.
4. When you have entered all the Beneficiary details, select Authorise or Save for Authorisation.
The related authorisation screen will be displayed. You will be required to enter a Transaction Data Signature for the account details you have added.
5. Generate a Transaction Data Signature using the account details used. See how to….Create a Transaction Data Signature TDS’.
6. Enter the TDS in the TDS input field.
7. When complete, select Confirm. (Select Cancel to cancel Beneficiary creation. Any entered details will not be saved).
A confirmation message for your action will be displayed. Select OK to return to the main Beneficiary Management Screen.
Where the Beneficiary was saved for authorisation, the status of the Beneficiary will be Awaiting Authorisation. Where the Beneficiary was authorised, the status will be updated to Fully Authorised unless a second authorisation is required. In this case, the status of the beneficiary will be Awaiting Authorisation 2
how Create a Domestic Beneficiary
67
4
2
3

60
1. Select Create International on the Beneficiary Management screen.
The Create International Beneficiary screen will be displayed.
The IBAN and BIC fields will be displayed.
2. Enter the name and address of the Beneficiary in the Name and Address field. At least two lines of the address are required. Then enter the IBAN and BIC details.
NOTE: Each Beneficiary must have a unique name. If you need to set the same Beneficiary up more than once, e.g. with different account details, you must differentiate the name e.g. A Supplier 1, A Suppler 2, etc.
3. When you have entered all the Beneficiary details, select Authorise or Save for Authorisation.
The related authorisation screen will be displayed. You will be required to enter a Transaction Data Signature for the account details you have added.
4. Generate a Transaction Data Signature using the account details used. See ‘how to….Create a Transaction Data Signature TDS’.
5. Enter the TDS in the TDS input field.
6. When complete, select Confirm. (Select Cancel to cancel Beneficiary creation. Any entered details will not be saved)
A confirmation message for your action will be displayed. Select OK to return to the main Beneficiary Management Screen.
Where the Beneficiary was saved for authorisation, the status of the Beneficiary will be Awaiting Authorisation. Where the Beneficiary was authorised, the status will be updated to Fully Authorised unless a second authorisation is required. In this case, the status of the Beneficiary will be Awaiting Authorisation 2.
how Create an International Beneficiary using IBAN and BIC
56
3
2

61
1. Select Create International option on the Beneficiary Management screen.
The Create International Beneficiary screen will be displayed.
2. Select the NSC tickbox
3. Enter the details of the Beneficiary.
NOTE: Each Beneficiary must have a unique name. If you need to set the same Beneficiary up more than once e.g. with different account details, you must differentiate the name e.g. A Supplier 1, A Suppler 2, etc.
4. When you have entered all the Beneficiary details, select Authorise or Save for Authorisation.
The action authorisation screen will be displayed. You will be required to enter a Transaction Data Signature for the account details you have added.
5. Generate a Transaction Data Signature using the account details used. See ‘how to….Create a Transaction Data Signature TDS’.
6. Enter the TDS in the TDS input field.
7. When complete, select Confirm. (Select Cancel to cancel Beneficiary creation. Any entered details will not be saved)
A confirmation message for your action will be displayed. Select OK to return to the main Beneficiary Management Screen.
Where the Beneficiary was saved for authorisation, the status of the Beneficiary will be Awaiting Authorisation. Where the Beneficiary was authorised, the status will be updated to Fully Authorised unless a second authorisation is required. In this case, the status of the Beneficiary will be Awaiting Authorisation 2.
Create an International Beneficiary using Account No. and NSChow
67
2
3
4

62
AUTHORISE A BENEFICIARY
1. Select the Beneficiary to be authorised from the Beneficiary Management screen. The status of the Beneficiary selected should be ‘Awaiting Authorisation’ or ‘Awaiting Authorisation 2’.
2. Select Authorise.
The Authorise Beneficiary screen will be displayed. Confirm the details of the Beneficiary to be authorised.
3. To authorise, generate a One Time Code (OTC) using your Digipass.
4. Enter the One Time Code (OTC) in the One Time Code field.
5. Select Confirm to confirm authorisation. (Select Cancel to cancel authorisation)
An authorisation confirmation message will be displayed. Select OK to return to the main Beneficiary Management screen. The status of the Beneficiary will be updated to ‘Fully Authorised’ or ‘Awaiting Authorisation 2’ if a 2nd authorisation is required.
VIEW A BENEFICIARY
1. Select the Beneficiary to be viewed from the Beneficiary Management screen.
2. Select View.
The View Beneficiary Screen will be displayed.
3. Once you have viewed the Beneficiary, select Cancel to return to the Beneficiary Management screen.
EDIT A BENEFICIARY
Only Beneficiaries with a status of ‘Awaiting Authorisation’ and ‘Awaiting Authorisation 2’ can be edited. Beneficiaries which are fully authorised cannot be edited.
1. Select the Beneficiary to be edited from the Beneficiary Management screen.
2. Select Edit.
The Edit Beneficiary screen will be displayed.
3. Edit the Beneficiary details as required.
4. When you have entered all the Beneficiary details, select Authorise or Save for Authorisation.
The authorisation screen will be displayed. You will be required to enter a Transaction Data Signature for the account details you have added.
5. Generate a Transaction Data Signature for the account details used. See ‘how to….Create a Transaction Data Signature TDS’.
6. Enter the TDS in the TDS input field.
7. When complete, select Confirm. (Select Cancel to cancel Beneficiary edit. Any modified details will not be saved)
8. A confirmation message will be displayed. Select OK to return to the Beneficiary Management screen.
DELETE A BENEFICARY
1. Select the Beneficiary to be deleted from the Beneficiary Management List.
2. Select Delete.
The Delete Confirmation screen will be displayed.
3. Generate a One Time Code (OTC) using your Digipass and enter the One Time Code (OTC) field.
Beneficiary Management – Authorise, View, Edit and Delete a Beneficiaryhow
63
To confirm certain actions on iBusiness Banking, you will be requested to enter a ‘One Time Code (OTC)’ or a ‘Transaction Data Signature (TDS)’ from your Digipass. The following section describes how to generate these codes on your Digipass.
HOW TO CREATE A ONE TIME CODE (OTC)
1. Power on your Digipass using the ON button.
2. Enter your 4 digit PIN.
3. Select the Enter button.
4. Select the OTC (One Time Code) button once.
A 6 digit OTC code will be displayed on your Digipass.
5. Enter the 6 digit Code into the OTC field beside the Please enter your One Time Code (OTC) on the iBusiness Banking confirmation screen.
6. Select an action to complete the task. Options are: Confirm – Action is confirmed and sent for processing. Cancel – Action is cancelled and you will be returned to the previous screen.
HOW TO CREATE A TRANSACTION DATA SIGNATURE (TDS)
1. Power on your Digipass using the ON button.
2. Enter your 4 digit PIN.
3. Select the Enter button.
4. Select the TDS (Transaction Data Signature) button once.
TDS1 = is displayed on your Digipass.
5. Enter the first six characters (alpha and/or numeric) of the Beneficiary’s NSC or BIC, as specified on the iBusiness Banking screen.
NOTE: To enter an ‘alpha’ character, press the relevant number key repeatedly until the desired character is displayed e.g. to enter the alpha character ‘F’, press the ‘3’ button on your Digipass four times. If the next alpha/numeric character is located on the same key, wait until the cursor appears to enter in the next character.
6. Select the Enter button.
TDS2 = is displayed on your Digipass.
7. Enter the first 6 characters of the Beneficiary’s Account Number or IBAN.
8. Select the Enter button.
TDS3 = is displayed on your Digipass.
9. Select the Enter button again.
The 8 digit TDS code will be displayed on your Digipass.
10. Enter the 8 digit Code into the TDS field beside the Please enter your Transaction Data Signature (TDS) on the iBusiness Banking confirmation screen.
11. Select an action to complete the task. Options are: Confirm – Action is confirmed and sent for processing.
Digipass – Create a One Time Code (OTC) and a Transaction Data Signature (TDS)how
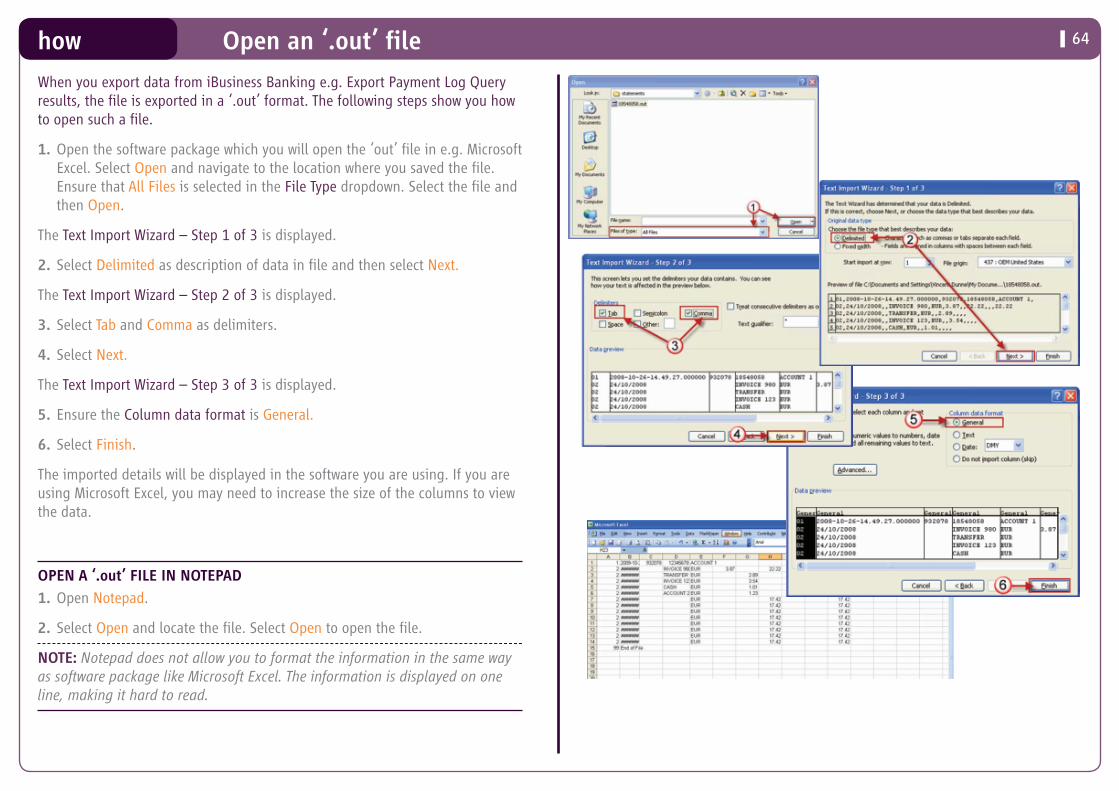
64
When you export data from iBusiness Banking e.g. Export Payment Log Query results, the file is exported in a ‘.out’ format. The following steps show you how to open such a file.
1. Open the software package which you will open the ‘out’ file in e.g. Microsoft Excel. Select Open and navigate to the location where you saved the file. Ensure that All Files is selected in the File Type dropdown. Select the file and then Open.
The Text Import Wizard – Step 1 of 3 is displayed.
2. Select Delimited as description of data in file and then select Next.
The Text Import Wizard – Step 2 of 3 is displayed.
3. Select Tab and Comma as delimiters.
4. Select Next.
The Text Import Wizard – Step 3 of 3 is displayed.
5. Ensure the Column data format is General.
6. Select Finish.
The imported details will be displayed in the software you are using. If you are using Microsoft Excel, you may need to increase the size of the columns to view the data.
OPEN A ‘.out’ FILE IN NOTEPAD
1. Open Notepad.
2. Select Open and locate the file. Select Open to open the file.
NOTE: Notepad does not allow you to format the information in the same way as software package like Microsoft Excel. The information is displayed on one line, making it hard to read.
Open an ‘.out’ filehow

AIB600-IBB-PaymentsGuide 01/14