i3projector wi plus manual eng
TRANSCRIPT
i3PROJECTORWi PLUS LASER CURTAIN QUICK SETUP GUIDE
1
3
3a
3b
3c
Light Curtain Plate
Light Curtain Cap
Interactive Cable (DC power)
3d
3e
Light Curtain
LAN
4
4a
4b 4c
4d
i Plus Module
*36.8Z
M06G00
1-A*
P/N
36.
8ZM
06G
001-
A
2
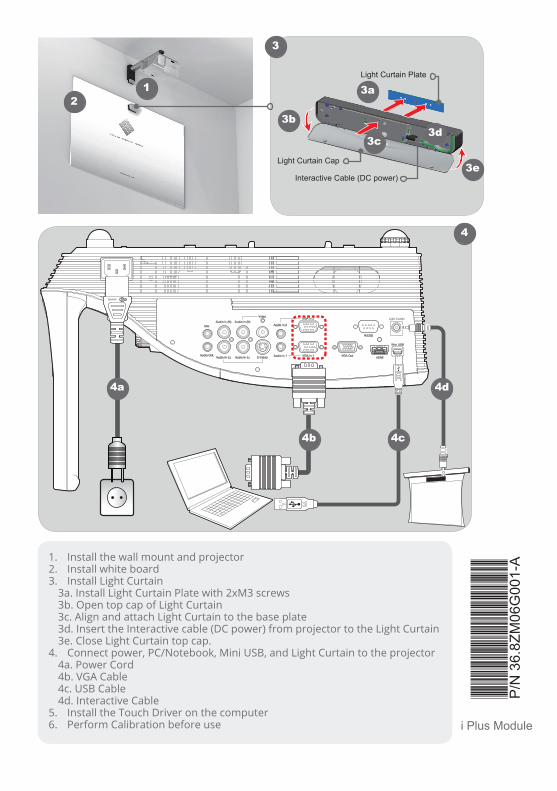
1. Install the wall mount and projector2. Install white board3. Install Light Curtain
3a. Install Light Curtain Plate with 2xM3 screws3b. Open top cap of Light Curtain 3c. Align and attach Light Curtain to the base plate3d. Insert the Interactive cable (DC power) from projector to the Light Curtain3e. Close Light Curtain top cap.
4. Connect power, PC/Notebook, Mini USB, and Light Curtain to the projector4a. Power Cord4b. VGA Cable4c. USB Cable4d. Interactive Cable
5. Install the Touch Driver on the computer6. Perform Calibration before use
3i3PROJECTOR Wi PLUS laser curtain manual
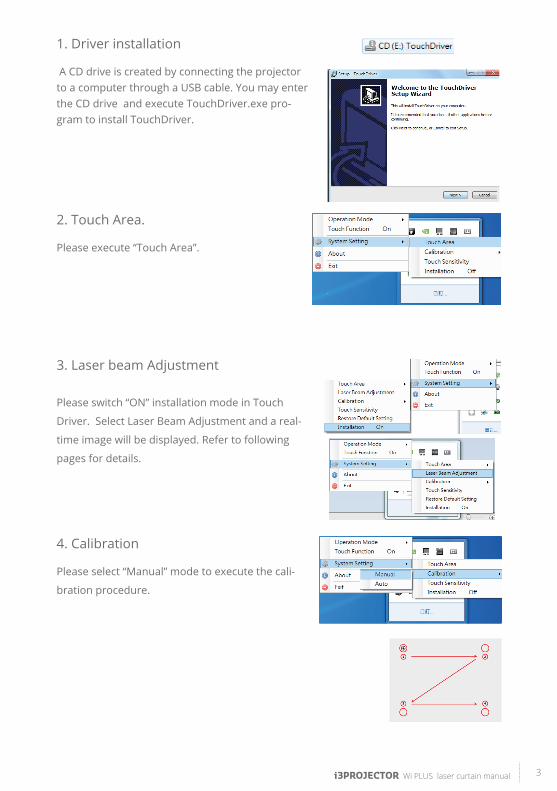
1. Driver installation
A CD drive is created by connecting the projector to a computer through a USB cable. You may enter the CD drive and execute TouchDriver.exe pro-gram to install TouchDriver.
2. Touch Area.
Please execute “Touch Area”.
3. Laser beam Adjustment
Please switch “ON” installation mode in Touch
Driver. Select Laser Beam Adjustment and a real-
time image will be displayed. Refer to following
pages for details.
4. Calibration
Please select “Manual” mode to execute the cali-
bration procedure.
4
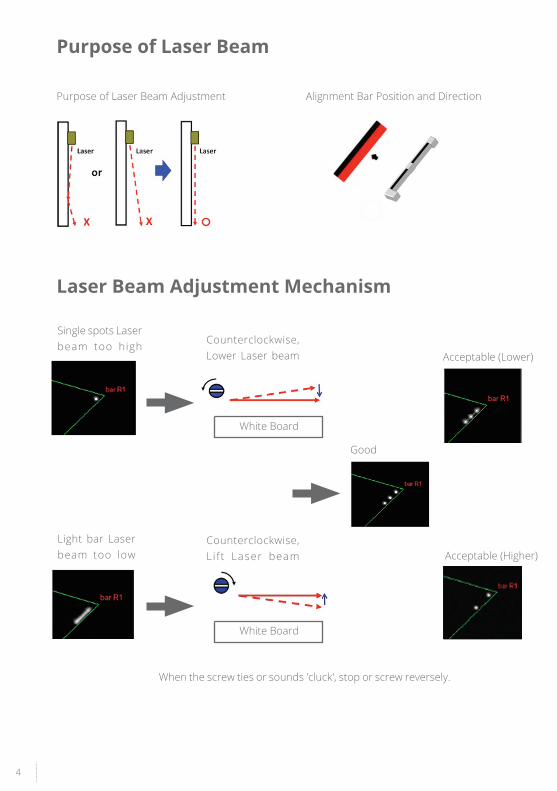
Purpose of Laser Beam
Purpose of Laser Beam Adjustment Alignment Bar Position and Direction
Laser Beam Adjustment Mechanism
Counterclockwise, Lower Laser beam
White Board
Single spots Laser beam too high
Light bar Laser beam too low
Counterclockwise, L i f t Laser beam
When the screw ties or sounds 'cluck', stop or screw reversely.
White Board
Good
Acceptable (Lower)
Acceptable (Higher)
5i3PROJECTOR Wi PLUS laser curtain manual
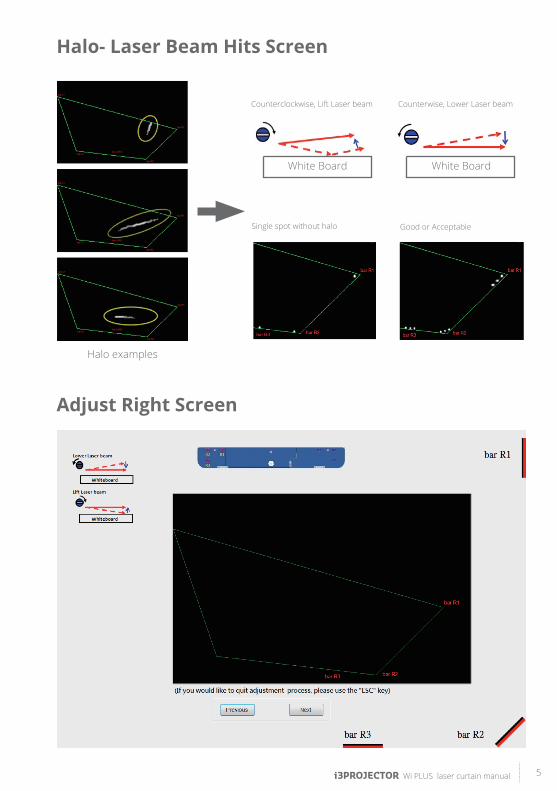
Halo- Laser Beam Hits Screen
Halo examples
Counterclockwise, Lift Laser beam Counterwise, Lower Laser beam
White BoardWhite Board
Single spot without halo Good or Acceptable
Adjust Right Screen
6
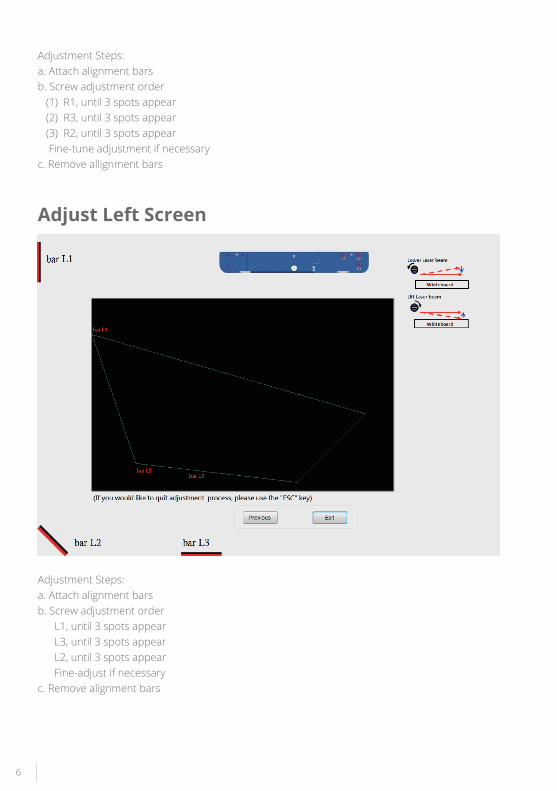
Adjustment Steps:a. Attach alignment barsb. Screw adjustment order (1) R1, until 3 spots appear (2) R3, until 3 spots appear (3) R2, until 3 spots appear Fine-tune adjustment if necessaryc. Remove allignment bars
Adjust Left Screen
Adjustment Steps:a. Attach alignment barsb. Screw adjustment order L1, until 3 spots appear L3, until 3 spots appear L2, until 3 spots appear Fine-adjust if necessaryc. Remove alignment bars
7i3PROJECTOR Wi PLUS laser curtain manual
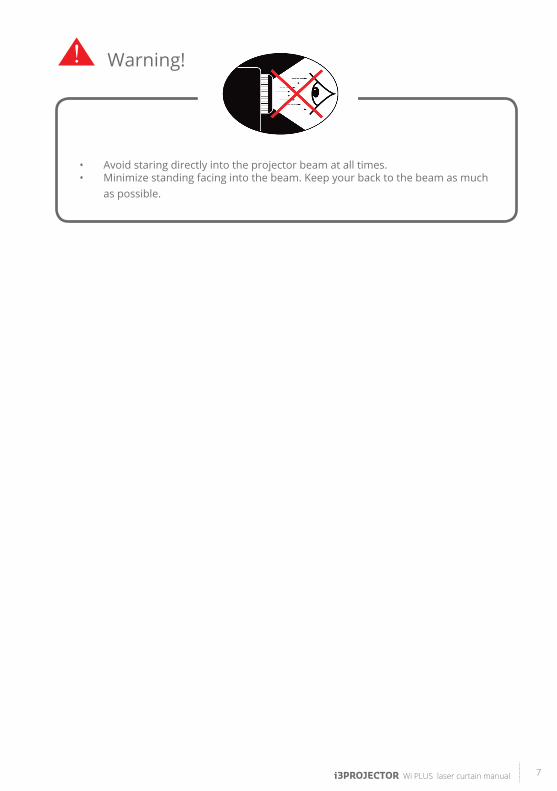
• Avoid staring directly into the projector beam at all times. • Minimize standing facing into the beam. Keep your back to the beam as much
as possible.
Warning!
AUTHORISED RESELLER
BELGIUM-LUXEMBOURGNijverheidslaan 60
8540 Deerlijk
Belgium
T +32 (0)56 313 415
F +32 (0)56 313 688
NETHERLANDSDuwboot 91
3991 CG Houten
Netherlands
T +31 (0)30 6379387
F +31 (0)30 2547927
GERMANYLohrheidestraße 72
44866 Bochum
Germany
T +49 (0) 2327 960 50-0
F +49 (0) 2327 960 50-50
SCANDINAVIALollandsvej 16
5500 Middelfart
Danmark
T +45 64 41 04 90
F +45 64 41 17 47
USA549 Ionia Ave. SW
Grand Rapids, MI 49503
USA
T +616-451-7800
F +616-451-9698
FRANCEParc d’activités de la Vallée
de l’Escaut Waka 1, n° 9
59264 Onnaing France
T +33 (0)3 27 45 60 60
F +33 (0)3 27 45 60 70