hpe zero downtime administrator's guide
TRANSCRIPT

HPE Data ProtectorSoftware Version: 9.07
Zero Downtime Administrator's Guide
Document Release Date: June 2016Software Release Date: June 2016
Legal Notices
WarrantyThe only warranties for Hewlett Packard Enterprise Development LP products and services are set forth in the express warranty statements accompanying such products and services. Nothing herein should be construed as constituting an additional warranty. HPE shall not be liable for technical or editorial errors or omissions contained herein.
The information contained herein is subject to change without notice.
Restricted Rights LegendConfidential computer software. Valid license from HPE required for possession, use or copying. Consistent with FAR 12.211 and 12.212, Commercial Computer Software, Computer Software Documentation, and Technical Data for Commercial Items are licensed to the U.S. Government under vendor's standard commercial license.
Copyright Notice© Copyright 2016 Hewlett Packard Enterprise Development LP
Trademark NoticesAdobe™ is a trademark of Adobe Systems Incorporated.
Microsoft® and Windows® are U.S. registered trademarks of Microsoft Corporation.
UNIX® is a registered trademark of The Open Group.
This product includes an interface of the 'zlib' general purpose compression library, which is Copyright © 1995-2002 Jean-loup Gailly and Mark Adler.
Documentation UpdatesThe title page of this document contains the following identifying information:
l Software Version number, which indicates the software version. l Document Release Date, which changes each time the document is updated. l Software Release Date, which indicates the release date of this version of the software.
To check for recent updates or to verify that you are using the most recent edition of a document, go to: https://softwaresupport.hp.com
This site requires that you register for an HPE Passport and sign in. To register for an HPE Passport ID, go to: https://hpp12.passport.hp.com/hppcf/createuser.do
Or click the Register link at the top of the HPE Software Support page.
You will also receive updated or new editions if you subscribe to the appropriate product support service. Contact your HPE sales representative for details.
SupportVisit the HPE Software Support Online web site at: https://softwaresupport.hp.com
This web site provides contact information and details about the products, services, and support that HPE Software offers.
HPE Software online support provides customer self-solve capabilities. It provides a fast and efficient way to access interactive technical support tools needed to manage your business. As a valued support customer, you can benefit by using the support web site to:
Zero Downtime Administrator's Guide
HPE Data Protector (9.07) Page 2 of 271
l Search for knowledge documents of interest l Submit and track support cases and enhancement requests l Download software patches l Manage support contracts l Look up HPE support contacts l Review information about available services l Enter into discussions with other software customers l Research and register for software training
Most of the support areas require that you register as an HPE Passport user and sign in. Many also require a support contract. To register for an HPE Passport ID, go to:
https://hpp12.passport.hp.com/hppcf/createuser.do
To find more information about access levels, go to:
https://softwaresupport.hp.com/web/softwaresupport/access-levels
HPE Software Solutions Now accesses the HPESW Solution and Integration Portal Web site. This site enables you to explore HPE Product Solutions to meet your business needs, includes a full list of Integrations between HPE Products, as well as a listing of ITIL Processes. The URL for this Web site is http://h20230.www2.hp.com/sc/solutions/index.jsp
Zero Downtime Administrator's Guide
HPE Data Protector (9.07) Page 3 of 271

Contents
Part 1: HPE P4000 SAN Solutions 12Chapter 1: Configuration 13
Introduction 13Prerequisites 13Limitations 13
Configuring the integration 14CIMOM provider connection configuration 14
Chapter 2: Backup 15
Chapter 3: Restore 16
Chapter 4: Troubleshooting 17Before you begin 17Checks and verifications 17
Part 2: HPE P6000 EVA Disk Array Family 18Chapter 5: Configuration and maintenance 19
Introduction 19Prerequisites 19Limitations 20
ZDB database – SMISDB 21Configuring the integration 22
Setting login information for the SMI-S P6000 EVA Array provider 23P6000 EVA disk group pairs configuration file 23HPE CA P6000 EVA HOME configuration file 24Configuration of the backup system 25Use of mirrorclones for zero downtime backup 25
Maintaining the integration 26Querying the SMISDB 27Checking the SMISDB for consistency 27Purging the SMISDB 27Deleting replicas and the associated SMISDB entries 28Excluding and including sessions 28
Chapter 6: Backup 29Introduction 29
Snapshot types 30Snapshot sources 30ZDB types 30Replica creation and reuse 31Replica storage redundancy levels 32ZDB in HPE CA+BC P6000 EVA environments 33
HPE CA+BC P6000 EVA ZDB scenarios 34
HPE Data Protector (9.07) Page 4 of 271
ZDB in HP-UX LVM mirroring environments 38Creating backup specifications 40Backup options 44
Chapter 7: Restore 55Introduction 55Standard restore 55Instant recovery 55
Instant recovery methods 56Switching the disks 57Copying replica data and retaining the source volume 57Copying replica data without retaining the source volume 58
Instant recovery procedure 59Instant recovery using the GUI 59Instant recovery using the CLI 62
Instant recovery options 62Instant recovery in HPE CA+BC P6000 EVA configurations 66Instant recovery and LVM mirroring 66
Method 1 – instant recovery with reducing and extending the mirrors 66Method 2 – instant recovery with splitting and merging the mirrors 67
Instant recovery in a cluster 68
Chapter 8: Troubleshooting 69Before you begin 69Checks and verifications 69Backup problems 69Instant recovery problems 74
Part 3: HPE P9000 XP Disk Array Family 77Chapter 9: Configuration and maintenance 78
Introduction 78Prerequisites 78Limitations 80
ZDB database – XPDB 80Configuring the integration 81
Command device handling 82Configuring the user authentication data 83
User authentication data and the XPDB 84Configuration procedure 84
P9000 XP LDEV exclude file 84Automatic configuration of the backup system 86
Maintaining the integration 86
Chapter 10: Backup 87Introduction 87
ZDB types 87Replica types 87
Zero Downtime Administrator's Guide
HPE Data Protector (9.07) Page 5 of 271
Backup concepts 88Creating backup specifications 88Backup options 92
Chapter 11: Restore 101Introduction 101Standard restore 101Split mirror restore 102
Split mirror restore procedure 103Split mirror restore options 104Split mirror restore in a cluster 107
HPE Serviceguard procedure 107Instant recovery 107
Instant recovery procedure 108Instant recovery using the GUI 108Instant recovery using the CLI 110
Instant recovery options 110Instant recovery and LVM mirroring 111Instant recovery in a cluster 111
Chapter 12: Troubleshooting 112Before you begin 112Checks and verifications 112General problems 112Backup problems 113Split mirror restore problems 116Instant recovery problems 116
Part 4: HPE 3PAR StoreServ Storage 118Chapter 13: Configuration 119
Introduction 119Prerequisites 119Limitations 120
Configuring the integration 121CIMOM provider connection configuration 121
Connection configuration data 121Configuration procedure 122
Chapter 14: Backup 123ZDB types 123ZDB for HPE 3PAR Remote Copy environments 124
Supported HPE 3PAR Remote Copy Configurations 124HPE 3PAR Remote Copy Modes 124HPE ZDB 3PAR Remote Copy scenarios 126Limitations 128
ZDB in HP-UX LVM mirroring environments 128Creating the backup specification 128
Zero Downtime Administrator's Guide
HPE Data Protector (9.07) Page 6 of 271

Backup options 131
Chapter 15: Restore 138Instant recovery 138
Instant recovery methods 139Instant recovery procedure 139
Instant recovery using the GUI 139Instant recovery using the CLI 141
Instant recovery options 141Instant Recovery for 3PAR Remote Copy environments 142
Introduction 142Prerequisites 142Overview 143Supported Remote Copy Configurations for Instant Recovery 143
Configuration I – local HPE 3PAR Remote Copy Replica 143Configuration II – remote HPE 3PAR Remote Copy Replica 144
Instant recovery in HPE 3PAR Remote Copy environments 145Identifying the current configuration 146Performing failover 147Modifying or removing the Remote Copy group 147Performing instant recovery 148Rebuilding the Remote Copy group 148
Chapter 16: Troubleshooting 149Before you begin 149Checks and verifications 149Backup problems 149Restore problems 154Instant recovery problems 154
Part 5: EMC Symmetrix 156Chapter 17: Configuration 157
Introduction 157EMC Symmetrix database file and Data Protector EMC log file 158
EMC Symmetrix database file 158Data Protector EMC log file 158
Configuring the integration 158Creating Data Protector EMC database file 159Rebuilding EMC Symmetrix database file 159Automatic configuration of backup system 160
Chapter 18: Backup 161Introduction 161
ZDB types 161Backup concepts 161Backup in LVM mirroring configurations 161
Creating backup specifications 162
Zero Downtime Administrator's Guide
HPE Data Protector (9.07) Page 7 of 271
Backup options 164Backup disk usage 166Testing backed up data 167
EMC test options 167Checking your restored data 168
Chapter 19: Restore 169Introduction 169Standard restore 169Split mirror restore 170
Split mirror restore procedure 170Split mirror restore options 171Split mirror restore in a cluster 173
HPE Serviceguard procedure 174
Chapter 20: Troubleshooting 175Before you begin 175Checks and verifications 175Backup problems 175
Error messages 178Split mirror restore problems 180
Error messages 182Recovery using the EMC agent 184
Part 6: NetApp Storage 186Chapter 21: Configuration 187
Introduction 187Prerequisites 187Limitations 188ZDB database - SMISDB 188
Configuring the integration 189Connection configuration data 189Configuration procedure 189
Chapter 22: Backup 191Creating backup specification 191Backup options 193
Chapter 23: Restore 198
Chapter 24: Troubleshooting 199Before you begin 199Checks and verifications 199
Part 7: EMC VNX Family 200Chapter 25: Configuration 201
Introduction 201Prerequisites 201
Zero Downtime Administrator's Guide
HPE Data Protector (9.07) Page 8 of 271

Limitations 202ZDB database - SMISDB 202
Configuring the integration 203Connection configuration data 203Configuration procedure 203
Chapter 26: Backup 205Creating backup specification 205Backup options 207
Chapter 27: Restore 212
Chapter 28: Troubleshooting 213Before you begin 213Checks and verifications 213
Part 8: EMC VMAX Family 214Chapter 29: Configuration 215
Introduction 215Prerequisites 215Limitations 216ZDB database - SMISDB 217
Configuring the integration 217Connection configuration data 217Configuration procedure 217
Chapter 30: Backup 219Backup concepts 219
Creating backup specification 219Backup options 222
Chapter 31: Restore 226
Chapter 32: Troubleshooting 227Before you begin 227Checks and verifications 227
Appendix 228Scheduling ZDB sessions 228
Starting interactive ZDB sessions 228Using the GUI 229Using the CLI 229
Alternate paths support 229
Cluster configurations 230Client on the application system in a cluster, Cell Manager in a cluster 231
Limitations 231Cell Manager on the backup system in a cluster 232
Limitations 232
Zero Downtime Administrator's Guide
HPE Data Protector (9.07) Page 9 of 271

Cell Manager and client on the application system in a cluster 233Limitations 233
Client on the application system in a cluster, Cell Manager not in a cluster 234Client on the application system in a cluster, Cell Manager on the backup system in a cluster 235
Limitations 235EMC GeoSpan for Microsoft Cluster Service 236
Scenarios 236
Instant recovery in a cluster 237Vertias Cluster Volume Manager 237HPE Serviceguard 238
Procedure 238Microsoft Cluster Server 239
Instant recovery for in CA+BC configurations 240Introduction 240Prerequisites 240Overview 240Supported instant recovery configurations 241
Configuration I – local HPE Business Copy P6000 EVA 241Configuration II – remote HPE Business Copy P6000 EVA 242
Instant recovery in HPE CA+BC P6000 EVA environments 243Step 1: Identifying the current configuration 244Step 2: Performing failover 247Step 3: Modifying or removing the HPE CA P6000 EVA link 247Step 4: Performing instant recovery 247Step 5: Rebuilding the HPE CA P6000 EVA link (optional) 248
ZDB omnirc options 248Common ZDB options 248P6000 EVA Array and 3PAR StoreServ Storage specific options 250
Example 250P9000 XP Array specific options 255EMC specific options 257
User scenarios - examples of ZDB options 258P6000 EVA Array integration 258
Example 1 258Example 2 258Example 3 259
P9000 XP Array integration 259Example 1 259Example 2 259Example 3 260Example 4 260Conflicting Options 260
EMC integration 261Example 1 261
Zero Downtime Administrator's Guide
HPE Data Protector (9.07) Page 10 of 271

Example 2 261
Backup system mount point creation 261Filesystem and Microsoft Exchange Server backup 261Application and disk image backup 262
Applications on filesystems 262Applications on disk images + disk image backup 263
EMC Symmetrix—obtaining disk configuration data 264Example 1 264Example 2 266
Additional information for troubleshooting 268HP-UX systems 268Windows systems 269
Send Documentation Feedback 270
Zero Downtime Administrator's Guide
HPE Data Protector (9.07) Page 11 of 271

HPE Data Protector (9.07)
Page 12 of 271
Part 1: HPE P4000 SAN SolutionsThis part describes how to configure the Data Protector HPE P4000 SAN Solutions integration. For information on how to perform zero downtime backup and instant recovery using the HPE P4000 SAN Solutions integration, see the HPE Data Protector Integration Guide for Microsoft Volume Shadow Copy Service.

Chapter 1: Configuration
IntroductionThis chapter describes the configuration of the Data Protector HPE P4000 SAN Solutions integration.
Prerequisites l Obtain or install:
P4000 SAN Solutions licenses and components: l HPE P4000 SAN/iQ software.
l HPE P4000 Virtual SAN Appliance Software / HPE P4000 Centralized Management Console.
l HPE P4000 SAN Solutions DSM (Device Specific Module) for MPIO.
For installation instructions, see the HPE P4000 SAN Solutions documentation. For information on supported product versions, see the latest support matrices at http://support.openview.hp.com/selfsolve/manuals.Data Protector licenses and components: l Appropriate zero downtime backup extension and instant recovery extension licenses-to-use
(LTU).
l HPE P4000 Agent on the application system and the backup system.
For licensing information and installation and upgrade instructions, see the HPE Data Protector Installation Guide.
l Make sure the same operating system version is installed on the application system and the backup system.
l If the application system and the backup system reside in a Data Protector cell with secured clients, ensure that access between both systems is allowed in both directions.
l Source volumes must be created and presented to the application system and the backup system.For additional prerequisites for using HPE P4000 SAN Solutions with the Data Protector Microsoft Volume Shadow Copy Service integration, see the HPE Data Protector Integration Guide for Microsoft Volume Shadow Copy Service.
Limitations l In cluster environments, the backup system must not be in the same cluster with the application
system. Additionally, the backup system cannot be the cluster virtual server, it can only be a cluster node.
HPE Data Protector (9.07) Page 13 of 271

For information on either of the following items, see the HPE Data Protector Product Announcements, Software Notes, and References:
l General Data Protector and integration-specific limitations l Supported platforms and integrations l Supported backup and connectivity topologies
Configuring the integrationBefore you start with the configuration, make sure the prerequisites listed in "Configuration " on the previous page are fulfilled.
To be able to use the Data Protector HPE P4000 SAN Solutions integration with a storage system of the HPE P4000 SAN Solutions family, you must perform the mandatory configuration step. In this step, you need to provide the Data Protector HPE P4000 Agent the data which the ZDB agent will use to establish connection to a Common Information Model Object Manager (CIMOM) provider of your choice.
CIMOM provider connection configurationIn order to be able to connect to a CIMOM provider, the Data Protector HPE P4000 Agent needs the following information:
l Fully qualified domain name or IP address of the system where the CIMOM service is runningIn case the system has multiple IP addresses configured, the address by which the system can be accessed by the Data Protector ZDB agent should be used.
l Whether the connection uses Secure Sockets Layer (SSL) l Port number of the port on which the CIMOM service is accepting requests l Username and password
This data must belong to a user account which has administrative privileges on the P4000 SAN Solutions storage system.
This information should be provided for each CIMOM provider that the Data Protector HPE P4000 Agent should connect to. Once added, the connection configuration data for a particular CIMOM provider is stored in a separate configuration file located on the Cell Manager in the directory:
Windows systems: Data_Protector_program_data\server\db80\smisdb\p4000\login
UNIX systems: /var/opt/omni/server/db80/smisdb/p4000/login
To add the connection configuration data, use the Data Protector omnidbp4000 command. With omnidbp4000, you can also update or remove the configuration data, list the contents of the configuration files, and check if the connection to a particular CIMOM provider can be established. For these purposes, the omnidbp4000 command provides the basic options --add, --remove, --list, and --check. For command syntax and usage examples, see the omnidbp4000 reference page in the HPE Data Protector Command Line Interface Reference or the omnidbp4000 man page.
Zero Downtime Administrator's GuideChapter 1: Configuration
HPE Data Protector (9.07) Page 14 of 271

Chapter 2: Backup Zero downtime backup sessions that involve a storage system of the HPE P4000 SAN Solutions family can only be initiated through the Data Protector Microsoft Volume Shadow Copy Service integration.
For information about the supported configurations, ZDB types and replication techniques available on this storage system family, and storage system-specific ZDB considerations, see the HPE Data Protector Concepts Guide.
For additional storage system-specific ZDB considerations, procedure for configuring ZDB backup specifications, and instructions for running ZDB sessions, see the HPE Data Protector Integration Guide for Microsoft Volume Shadow Copy Service.
HPE Data Protector (9.07) Page 15 of 271
Chapter 3: Restore Instant recovery sessions that involve a storage system of the HPE P4000 SAN Solutions family can only be initiated through the Data Protector Microsoft Volume Shadow Copy Service integration.
For information on replica handling during instant recovery, description of the instant recovery process, and storage system-specific instant recovery considerations, see the HPE Data Protector Concepts Guide.
For additional storage system-specific instant recovery considerations and instructions for running instant recovery sessions, see the HPE Data Protector Integration Guide for Microsoft Volume Shadow Copy Service.
HPE Data Protector (9.07) Page 16 of 271
Chapter 4: Troubleshooting
Before you beginThis chapter lists general checks and verifications that you may need to perform when you encounter problems with the P4000 SAN Solutions integration. For general Data Protector troubleshooting information, see the HPE Data Protector Troubleshooting Guide.
l Ensure that the latest official Data Protector patches are installed. For information on how to verify this, see the HPE Data Protector Help index: “patches”.
l For general Data Protector and integration-specific limitations, as well as recognized issues and workarounds, see the HPE Data Protector Product Announcements, Software Notes, and References.
l For an up-to-date list of supported versions, platforms, and other information, see http://support.openview.hp.com/selfsolve/manuals.
Checks and verifications l On the application and backup systems, examine system errors logged into the debug.log file
residing in the Data Protector log files directory.
HPE Data Protector (9.07) Page 17 of 271

HPE Data Protector (9.07)
Page 18 of 271
Part 2: HPE P6000 EVA Disk Array FamilyThis part describes how to configure the Data Protector HPE P6000 EVA Disk Array Family integration, how to perform zero downtime backup and instant recovery using the HPE P6000 EVA Disk Array Family integration, and how to resolve the integration-specific Data Protector problems.

Chapter 5: Configuration and maintenance
IntroductionThis chapter describes the configuration of the Data Protector HPE P6000 EVA Disk Array Family integration. It also provides information on the ZDB database and on how to maintain the integration.
Prerequisites
l Obtain or install:P6000 EVA Array licenses and components: l HPE Command View (CV) EVA and Virtual Controller Software (VCS or XCS).
For installation instructions, see the SMI-S P6000 EVA Array provider and VCS or XCS documentation. For information on supported product versions, see the latest support matrices at http://support.openview.hp.com/selfsolve/manuals.
l HPE Continuous Access (CA) P6000 EVA and/or HPE Business Copy (BC) P6000 EVA license and microcode.
l HP-UX systems: HP-UX MirrorDisk/UX software license.This license is required to enable mirroring functionality on HP-UX LVM.
l An appropriate multi-path device management software.The software must be installed on the application system and the backup system.HP-UX systems: HPE Secure Path (HP-UX)On HP-UX 11.31 systems, the multi-path device management software is not required since the operating system has native device multi-pathing capability.Linux systems: HPE Device Mapper Multipath Enablement Kit for HPE Disk Arrays 4.2.0 or newer versionTo configure the installed multi-path device management software:
i. Start the multipath daemon and run the following command to configure the daemon so that it gets started during system startup:
Red Hat Enterprise Linux: chkconfig multipathd onSUSE Linux Enterprise Server: chkconfig boot.multipath on
ii. Prevent the multipath device management software from queuing for unavailable disk volumes by modifying its configuration file.
Add the following line into the defaults section of the file /etc/multipath.conf: no_path_retry fail
HPE Data Protector (9.07) Page 19 of 271
Ensure that this no_path_retry parameter value is not overridden by analogous entries in the device sections of the same file in which the corresponding P6000 EVA Array storage systems are configured.
iii. Ensure that the correct preferred names are used for pathnames that are referencing the same device for physical volumes as they are used in device-mapper multipathing.
Open the lvm.conf file, residing in the /etc/lvm/ directory, and set the following variable: preferred_names = [ "^/dev/mpath/", "^/dev/mapper/mpath", "^/dev/[hs]d" ]
Windows systems: HPE MPIO Full Featured DSM (Device Specific Module) for HPE P6000 EVA Disk Array Family
l A license for controlling the P6000 EVA Array storage system.
l SANworks Snapshot licenses.
Data Protector licenses and components: l Appropriate zero downtime backup extension and instant recovery extension licenses-to-use
(LTU).
l HPE P6000 / HPE 3PAR SMI-S Agent on the application system and the backup system.
For installation and upgrade instructions and licensing information, see the HPE Data Protector Installation Guide.
l Make sure the same operating system version is installed on the application system and the backup system.
l If the application system and the backup system reside in a Data Protector cell with secured clients, ensure that access between both systems is allowed in both directions.
l Verify that the backup system is listed inside Command View EVA. l Using Command View EVA, create source volumes and present them to the application system.
Prerequisites for Windows systems
l On Windows Server 2003 and Windows Server 2008 systems, disable the operating system option Automatic mounting of new volumes. In the Command Prompt window, run the command mountvol /N.
l Do not manually mount target volumes that were created by Data Protector.For additional prerequisites for using HPE P6000 EVA Disk Array Family with the Data Protector Microsoft Volume Shadow Copy Service integration, see the HPE Data Protector Integration Guide for Microsoft Volume Shadow Copy Service.
Limitations
l In server clusters, the backup system cannot be the cluster virtual system, it can only be a physical cluster node.For other limitations on clusters, see "Cluster configurations" on page 230.
l In zero downtime backup sessions using multisnapping, only two snapshot types are supported by default: standard snapshot and snapclone. For information if your P6000 EVA Array environment
Zero Downtime Administrator's GuideChapter 5: Configuration and maintenance
HPE Data Protector (9.07) Page 20 of 271
supports multisnapping using vsnaps, see your Command View (CV) documentation. For instructions on how to enable support for the vsnap snapshot type in multisnapping ZDB sessions in Data Protector, contact HPE technical support.
For information on either of the following items, see the HPE Data Protector Product Announcements, Software Notes, and References:
l general Data Protector and integration-specific limitations l supported platforms and integrations l supported backup and connectivity topologiesFor information on supported configurations, see the HPE Data Protector Concepts Guide.
ZDB database – SMISDB ZDB database for the Data Protector HPE P6000 EVA Disk Array Family integration is referred to as SMISDB. It keeps information about:
l Management systems on which Command View EVA runs. For each system, the following is stored: l Hostname as recognized in the IP network.
l Port number through which the HPEP6000 / HPE 3PAR SMI-S Agent communicates with the SMI-S P6000 EVA Array provider. For non-SSL connections, the default port is 5988. For SSL connections, the default port is 5989.
l User name and encoded password for the SMI-S P6000 EVA Array provider login.
l Policies for redirecting the creation of snapclones and mirrorclones into specific disk groups. l Information about the home (HPE CA+BC P6000 EVA configurations). l Replicas (groups of target volumes created in different backup sessions) kept on the disk array. For
each target volume, the information includes: l ID of the ZDB session that produced the target volume
l Time when the session was performed
l Name of the backup specification used in the session
l Name, ID, and WWN of the target volume created in the session
l Name and ID of the P6000 EVA Array storage system on which the target volume resides
l Snapshot type used for the replica (vsnap, standard snapshot, snapclone) and the type of source volumes of which the snapshots were created (original volume, mirrorclone)
l ID of the source volume used in the session
l IR flag (indicating that the target volume can be used for instant recovery)
Zero Downtime Administrator's GuideChapter 5: Configuration and maintenance
HPE Data Protector (9.07) Page 21 of 271
l Purge flag (indicating that the target volume is marked for deletion)
l Storage redundancy level (Vraid type) of the target volume
l Exclusion flag (indicating that the replica is not involved in the replica set rotation and cannot be used for instant recovery)
l Names of the application and backup systems involved in the session
This information is written to the SMISDB when a replica is created, and is deleted from the database when a replica is deleted.
l Retained source volumes flag (after the instant recovery session, if the corresponding instant recovery option was selected).
l Mirrorclones created by Data Protector (tracked similarly as the replicas which cannot be used for instant recovery and are excluded from use).
SMISDB resides on the Cell Manager in:
Windows systems: Data_Protector_program_data\server\db80\smisdb
UNIX systems: /var/opt/omni/server/db80/smisdb
Configuring the integration Before you start with the configuration, make sure the prerequisites listed in "Introduction" on page 19 are fulfilled. In addition, do the following:
HPE BC P6000 EVA configurations: Connect the application and backup systems to the same P6000 EVA Array storage system. For ZDB to tape or ZDB to disk+tape, attach a backup device to the backup system.
For more information about HPE BC P6000 EVA configurations, see the HPE Data Protector Concepts Guide.
Combined (HPE CA+BC P6000 EVA) configurations: For this configuration, you need at least two P6000 EVA Array storage systems located at different sites (with at least one HPE CA P6000 EVA license, to set up the HPE CA P6000 EVA links between the arrays, and at least one HPE BC P6000 EVA license on the array where the replicas will be created).
Connect the application system to the P6000 EVA Array storage system containing source volumes (local disk array), and the backup system to the P6000 EVA Array storage system containing target volumes (remote disk array). Connect a backup device to the backup system.
For more information about HPE CA+BC P6000 EVA configurations, see "ZDB in HPE CA+BC P6000 EVA environments" on page 33 and the HPE Data Protector Concepts Guide.
HP-UX LVM mirroring configurations: Group the physical volumes of a volume group into physical volume groups (PVGs). Each PVG may contain physical volumes from one or more P6000 EVA Array storage systems. All logical volumes in a volume group must be created with the PVG-strict allocation policy. Consequently, the mirrors will be created on different PVGs.
Before you run a backup, ensure that the mirrors of logical volumes involved in the backup are consistent. You can achieve this by running the vgsync command. Alternatively, specify the vgsync
Zero Downtime Administrator's GuideChapter 5: Configuration and maintenance
HPE Data Protector (9.07) Page 22 of 271
command in the pre-exec option in the backup specification. Consequently, Data Protector automatically runs the command before the replica is created.
For more information about LVM mirroring configurations, see "ZDB in HP-UX LVM mirroring environments" on page 38 and the HPE Data Protector Concepts Guide. For more information about LVM mirroring, see the document Managing Systems and Workgroups: A Guide for HP-UX System Administrators.
To configure the integration:
l Provide the login information for the SMI-S P6000 EVA Array provider running on a management system. See "Setting login information for the SMI-S P6000 EVA Array provider" below.
l If desired, set disk group pairs. See "P6000 EVA disk group pairs configuration file" below. l For HPE CA+BC P6000 EVA configurations, set the home disk array. For details, see "HPE CA
P6000 EVA HOME configuration file" on the next page. If the home is not set, the HPE P6000 / HPE 3PAR SMI-S Agent considers the configuration to be non-failover. In this case, replicas will always be created on the disk array remote to the current source.
Setting login information for the SMI-S P6000 EVA Array providerBefore starting ZDB sessions, provide login information for the SMI-S P6000 EVA Array provider running on a management system.
To set, delete, list, or check the login information, use the omnidbsmis command. For command syntax and examples, see the omnidbsmis reference page in the HPE Data Protector Command Line Interface Reference or the omnidbsmis man page.
If a failover from the active to the standby management system happens, proceed as follows:
l If standby and failed management systems have the same hostname, no action is needed. l If standby and failed management systems have different hostnames, remove the failed system
from the Data Protector configuration, and then add the new management system.If your SMI-S P6000 EVA Array provider is using non-default port numbers for SSL and non-SSL connections, enter the settings in the SMISDB database accordingly (use omnidbsmis).
To verify the configuration of SMI-S P6000 EVA Array provider, run omnidbsmis -ompasswd -check [-host ClientName]. It is recommended to run this command before backup and instant recovery sessions to check if the SMI-S P6000 EVA Array provider is operational and available on the network.
P6000 EVA disk group pairs configuration fileYou can create snapclones and mirrorclones in a different disk group from that of the source volumes (original virtual disks). In this way, you help to reduce potential application performance degradation, since different physical disks are used for the source volumes and the replica. Note that standard snapshots and vsnaps are always created in the disk group of their source volumes whether the latter are original volumes or mirrorclones.
To set disk group pairs, use the omnidbsmis command. For command syntax and examples of manipulating the disk group pairs configuration file, see the omnidbsmis man page. The file template is as follows.
Zero Downtime Administrator's GuideChapter 5: Configuration and maintenance
HPE Data Protector (9.07) Page 23 of 271

# # HPE Data Protector A.09.00 # # P6000 EVA SMI-S disk group pairs configuration file # # Syntax: #"EVA Node World Wide Name": "Working DG1", "Backup DG1" #"EVA Node World Wide Name": "Working DG2", "Backup DG2" # # Example: # "500508B101007000": "dg1", "dg2" # # # # End of file
Note: After the instant recovery session that uses the instant recovery method of switching the disks, the disk group of the former target volumes becomes the disk group of the new source volumes. In cases where characteristics of the two disk groups differ, the application system performance may be affected.
HPE CA P6000 EVA HOME configuration fileThis section is only applicable if you perform ZDB in HPE CA+BC P6000 EVA configurations.
Due to HPE P6000 EVA Disk Array Family hardware limitations, the concept of a defined home disk array does not exist within the HPE P6000 EVA Disk Array Family. The HPE P6000 / HPE 3PAR SMI-S Agent introduces this concept with the static HPE CA P6000 EVA HOME configuration file. By setting the home disk array, you influence the Data Protector behavior in case of a failover. For more information, see "ZDB in HPE CA+BC P6000 EVA environments" on page 33.
To create an P6000 EVA HOME configuration file template and put it into its default location (Data_Protector_program_data\server\db80\smisdb or /var/opt/omni/server/db80/smisdb), use the omnidbsmis command. This command is also used to upload the configuration file after editing (using an ASCII text editor like Notepad on Windows or VI on UNIX) back into its configuration directory. You can also list the DR groups with a specified P6000 EVA Array acting as a home and check if a specified DR group is part of an HPE CA+BC P6000 EVA configuration. For command syntax and examples, see the omnidbsmis man page.
File template
# # HPE Data Protector A.09.00 # # P6000 EVA SMI-S Continuous Access HOME configuration file # # Syntax: # [EVA WWN] # DRGroup1,DRGroup2 # DRGroup3
Zero Downtime Administrator's GuideChapter 5: Configuration and maintenance
HPE Data Protector (9.07) Page 24 of 271
# # Example: # [50001FE15005DC00] # "DRGroup 001" # # # # End of file
Configuration of the backup systemAs part of a ZDB session, Data Protector performs necessary configuration steps, such as configuring volume groups, filesystems, mount points on the backup system. Data Protector can either create the same volume group structure on the backup system as it is on the application system and mounts the volumes to such mount points, or it can mount the volumes to the mount points specified in the backup specification.
For more information on creation of mount points on the backup system, see the HPE Data Protector Concepts Guide.
Before running backup sessions, ensure that the host representing the backup system is configured on the P6000 EVA Array storage system. If it is not, configure it manually. If the hostname on the P6000 EVA Array storage system is different from the network hostname, use the omnirc options EVA_HOSTNAMEALIASES to define the backup system object name.
Cluster environment:
If the backup system is a cluster virtual server, configure host objects using Command View in such a way that only one cluster node is configured in one host object. Additionally, set the option EVA_HOSTNAMEALIASES to the appropriate host object on each cluster node.
For more information on the option, see "ZDB omnirc options" on page 248.
Use of mirrorclones for zero downtime backupSpecific firmware revisions of disk arrays of the HPE P6000 EVA Disk Array Family support mirrorcloning, a special type of local replication. A mirrorclone is a dynamic replica of a storage volume, which is kept updated with changes made to the original storage volume via a local replication link. Replication between the original storage volume and its mirrorclone can be suspended and later re-established. For each storage volume, a single mirrorclone can be created on the disk array. Mirrorclones can be further replicated. As a result, mirrorclone snapshots are created – either standard snapshots or vsnaps. Each mirrorclone can have several snapshots attached and they can only be of the same type. For more information on the snapshot types, see "Snapshot types" on page 30.
Mirrorclone is one of the snapshot sources available for zero downtime backup in Data Protector. If selected in a ZDB backup specification, snapshots of mirrorclones of the selected storage volumes are created in the corresponding ZDB sessions, rather than snapshots of the storage volumes themselves. See "Creation of a standard snapshot of a mirrorclone " below.
Creation of a standard snapshot of a mirrorclone
Zero Downtime Administrator's GuideChapter 5: Configuration and maintenance
HPE Data Protector (9.07) Page 25 of 271

The advantage of this approach is in further shortening the backup window during which performance of the application using the source volumes for its data storage is affected. Mirrorclones can be created in advance using Command View EVA. However, if they do not exist yet when a ZDB session starts, but mirrorclone is selected as the snapshot source in the ZDB backup specification, they are automatically created by the HPE P6000 / HPE 3PAR SMI-S Agent at the beginning of the session. For more information on the snapshot sources, see "Snapshot sources" on page 30. For information on creating mirrorclones outside Data Protector, see the HPE P6000 EVA Disk Array Family documentation.
In Data Protector instant recovery sessions, data from the mirrorclone snapshots is restored directly to the corresponding original volumes. See "Instant recovery using a standard snapshot of a mirrorclone " below.
Instant recovery using a standard snapshot of a mirrorclone
You can delete mirrorclones that were created by Data Protector using the omnidbsmis command. For more information, see "Deleting replicas and the associated SMISDB entries" on page 28.
Maintaining the integration Maintenance tasks are divided into the following categories:
Zero Downtime Administrator's GuideChapter 5: Configuration and maintenance
HPE Data Protector (9.07) Page 26 of 271
l Querying information. See "Querying the SMISDB" below. l Checking consistency. See "Checking the SMISDB for consistency" below. l Deleting backup sessions. See "Purging the SMISDB" below and "Deleting replicas and the
associated SMISDB entries" on the next page. l Excluding and including ZDB sessions. See "Excluding and including sessions" on the next page
Querying the SMISDBUsing the omnidbsmis command, you can list:
l all available zero downtime backup (ZDB) sessions l all ZDB sessions based on a specific ZDB backup specification l all ZDB sessions that are excluded from the replica set rotation l obsolete volumes marked for purging l disk group redirection configuration l sets of retained source volumes, kept for forensic purposes after instant recovery l details on a specific successful ZDB session and a report about all ZDB sessions based on a
specific ZDB backup specificationFor HPE CA+BC P6000 EVA configurations, you can list data replication (DR) groups with a specified P6000 EVA Array acting as home. You can also check if a specified DR group is defined to be part of the HPE CA+BC P6000 EVA HOME configuration in this cell.
For command syntax and examples, see the HPE Data Protector Command Line Interface Reference or the omnidbsmis man page.
Checking the SMISDB for consistencyData Protector can check the persistent data in the SMISDB against the P6000 EVA Array storage system and list the differences. Note that the check operation cannot detect whether the P6000 EVA Array configuration is correct or if the SMI-S P6000 EVA Array provider is currently operational. It just compares the saved data against the actual setup. This may provide misleading results, if the Command View EVA environment is not operating properly. If you use the results for an actual cleanup, verify the configuration first. The check operation also checks the entries which should be purged.
To check the SMISDB for consistency, use the omnidbsmis command. For details, see the HPE Data Protector Command Line Interface Reference or the omnidbsmis man page.
Purging the SMISDBDuring purge (normally started at the beginning of the backup session for the selected backup specification), the HPE P6000 / HPE 3PAR SMI-S Agent attempts to delete storage volumes marked for purging. You can also run the SMISDB purge manually using the omnidbsmis command. For details, see the HPE Data Protector Command Line Interface Reference or the omnidbsmis man page.
Zero Downtime Administrator's GuideChapter 5: Configuration and maintenance
HPE Data Protector (9.07) Page 27 of 271

Deleting replicas and the associated SMISDB entriesUsing the omnidbsmis command, you can delete:
l A specific ZDB session (and the replica created in it), identified by the session ID. l ZDB sessions based on a specific ZDB backup specification (and the replicas created in them),
identified by the ZDB backup specification name. l A specific pseudo-ZDB session that tracks mirrorclone creation performed by Data Protector (and
the mirrorclones created in it), identified by the ID of the associated “regular” ZDB session.In all cases, you can either remove the corresponding replica (target volumes) or the mirrorclones from the disk array as well as delete the session information about them (the associated entries) from the SMISDB, or delete only the session information from the SMISDB.
Regardless of the chosen deletion scope, you cannot perform instant recovery using the affected replica after deletion, because the associated information is missing from the SMISDB.
For details, see the HPE Data Protector Command Line Interface Reference or the omnidbsmis man page.
Excluding and including sessionsAfter a backup session, you can leave the replica mounted on the backup system for other purposes than backup (replica set rotation) and instant recovery. For example, you can use such replica for database replication.
However, the intended use time for these replicas may exceed the time that is allowed by the current active rotation scheme, in which Data Protector automatically recycles the oldest replica. In such cases, you can exclude a session (a replica) from use (the replica set rotation and possibility to perform instant recovery) and thus preserve all target volumes of the replica.
Once you exclude a replica, the session that created the replica will not be used for replica set rotation, cannot be used for instant recovery, and cannot be deleted using the Data Protector CLI. To use an excluded session in an instant recovery or to delete the target volumes created in this session, you must first include the replica.
Excluding or including sessions can be triggered from the CLI for an individual backup session. To exclude a session from use (the replica set rotation and possibility to perform instant recovery), use the omnidbsmis command.
Using the omnidbsmis command, you can:
l Exclude a session (the option -exclude) l Include a session (the option -include) l List all excluded sessions (the options -session —excluded)For details, see the HPE Data Protector Command Line Interface Reference or the omnidbsmis man page.
Zero Downtime Administrator's GuideChapter 5: Configuration and maintenance
HPE Data Protector (9.07) Page 28 of 271

Chapter 6: Backup
Introduction This chapter describes configuring a filesystem and disk image ZDB sessions using the Data Protector GUI.
You should be familiar with the HPE P6000 EVA Disk Array Family concepts and procedures and basic Data Protector ZDB and instant recovery functionality. See the HPE P6000 EVA Disk Array Family documentation and the HPE Data Protector Concepts Guide.
Limitations
l The backup fails if you try to create a replica of a particular snapshot type and a replica of a different snapshot type (more specifically, standard snapshot or vsnap) for the same source volumes already exists. You must delete the existing replicas first. Snapclones are an exception. They do not block the creation of other snapshot types.
l Only one snapshot type for target volumes can be created during a ZDB session. l When cloning process for a source volume is in progress, another snapshot (any type) of that source
volume cannot be created. l You cannot back up replicas (target volumes from existing and currently recorded backup sessions). l If you perform ZDB in HPE Continuous Access + Business Copy (CA+BC) P6000 EVA
environments, note that the objects belonging to each specific data replication (DR) group are omitted from the ZDB session if: l the DR group write history log (DR group log) is in a state other than “not in use”.
l the DR group is in the “suspended” state.
l the DR group is in the “failsafe-locked” mode.
If a DR group write mode is “asynchronous”, the HPE P6000 / HPE 3PAR SMI-S Agent switches the mode into “synchronous” before starting ZDB. In this case, after ZDB is completed, the mode is reset to “asynchronous”.
l If there is not enough space for a standard snapshot or snapclone creation, the session fails.
Considerations
l If you do not select all of the filesystems on the disk for backup, Data Protector does not check if there are any filesystems that are not included in the backup specification and creates a replica of the entire disk. During instant recovery, the entire disk is restored and overrides also the filesystems that are not included in the backup specification, resulting in a possible data loss.
l If the source disks selected in a zero downtime backup specification are located on more than one P6000 EVA Array storage system, Data Protector will perform multisnapping for each unit separately, provided that it is not backing up the Oracle Server data in ASM configurations and multisnapping is not enforced by the omnirc option SMISA_ENFORCE_MULTISNAP.
HPE Data Protector (9.07) Page 29 of 271
For more information on the backup-related considerations, see the HPE Data Protector Concepts Guide. For detailed information on the backup-related problems and possible workarounds, see "Backup problems" on page 69.
Snapshot typesData Protector supports the following snapshot types:
l snapshot with pre-allocation of disk space (standard snapshot). l snapshot without pre-allocation of disk space (virtually capacity-free snapshot or shortly vsnap). l complete copy of the source volume (the virtual disk containing original data), which is independent
of the source volume (snapclone).You can select the snapshot type in the GUI when creating a ZDB backup specification. For more information on snapshot types, see the HPE Data Protector Concepts Guide.
Note: The snapclone snapshot type can only be used when the snapshot source selected in the ZDB backup specification is original volume.
Additionally, with the standard snapshot and snapclone types of snapshots, Data Protector supports multisnapping. Multisnapping is simultaneous creation of target volumes so that the backup data is consistent not only on each individual target volume, but also across all the volumes that constitute a snapshot.
Snapshot sourcesData Protector can replicate the following kinds of storage volumes which are supported with disk arrays of the HPE P6000 EVA Disk Array Family:
l ordinary storage volume (original volume)This term refers to a storage volume on which original data resides and which is presented to the application system.
l mirrorcloneThis term refers to a mirrorclone of a storage volume on which original data resides. Mirrorclone is a particular type of local replication copy that can be created for a storage volume residing on a P6000 EVA Array. For more information on mirrorclones, see "Use of mirrorclones for zero downtime backup" on page 25.In a particular ZDB backup specification, when the selected snapshot source is mirrorclone, the only available snapshot types are standard snapshot and vsnap.Additionally, in the above circumstances, if mirrorclones of the selected storage volumes do not exist yet when the corresponding ZDB session is started, Data Protector automatically creates them first. Automatic mirrorclone creation may prolong the first ZDB session started for such a ZDB backup specification. To prevent this, create mirrorclones of the original volumes in advance using Command View EVA.
ZDB typesUsing the P6000 EVA Array integration, you can perform:
Zero Downtime Administrator's GuideChapter 6: Backup
HPE Data Protector (9.07) Page 30 of 271

l ZDB to diskThe replica produced is kept on a disk array until reused. This replica becomes part of the replica set and can be used for instant recovery.ZDB to disk is performed if the option Track the replica for instant recovery is selected in a ZDB backup specification, and To disk is selected when running/scheduling a backup.
l ZDB to tapeThe replica produced is streamed to backup media, typically tape, according to the tape backup type you have selected (Full, Incr, Incr1-9).This replica is deleted after backup if the option Keep the replica after the backup is cleared for the backup specification. If this option is selected, the replica remains on a disk array until reused and becomes part of the replica set. However, it cannot be used for instant recovery.
l ZDB to disk+tapeThe replica produced is kept on a disk array until reused and is also streamed to backup media according to the tape backup type you have selected (Full, Incr, Incr1-9). This replica becomes part of the replica set and can be used for instant recovery.ZDB to disk+tape is performed if the option Track the replica for instant recovery is selected in a ZDB backup specification, and To disk+tape is selected when running/scheduling a backup.
For more information on the ZDB types, see the HPE Data Protector Concepts Guide.
Replica creation and reuse
On UNIX systems, the HPE P6000 / HPE3PAR SMI-S Agent identifies physical volumes, the volume group, and all logical volumes residing on it. This enables replication of the entire volume group on the array. On Windows systems, the HPE P6000 / HPE 3PAR SMI-S Agent identifies partitions on a physical volume and entire disk is replicated. As a best practice, backup objects, such as filesystems or raw devices, from all logical volumes in a volume group and all partitions on physical volumes should be included in the backup. This helps in ensuring proper handling of filesystems and mount points during backup and restore.
A new replica is created and added to the replica set when:
l ZDB to tape is performed, in which Keep the replica after the backup is selected, but the specified Number of replicas rotated is not reached.
l ZDB to disk or ZDB to disk+tape is performed (Track the replica for instant recovery selected), and the specified Number of replicas rotated is not reached.
The oldest replica in the set is deleted first and then the new one is created when:
l ZDB to tape is performed in which Keep the replica after the backup is selected and the specified Number of replicas rotated is reached.
l ZDB to disk or ZDB to disk+tape is performed and the specified Number of replicas rotated is reached.
If the oldest replica needs to be deleted, target volumes of the oldest replica are reused for creation of a new replica. Before such reuse, the target volumes are first converted into containers whenever the following prerequisites are fulfilled:
Zero Downtime Administrator's GuideChapter 6: Backup
HPE Data Protector (9.07) Page 31 of 271
l the target volumes are standard snapshots (provided that the current ZDB session uses multisnapping), vsnaps (provided that the current ZDB session uses multisnapping), or snapclones
l the target volumes have the same size, storage redundancy level, and disk group location as required by the current ZDB session
If the option Keep the replica after the backup is not selected, the replica and therefore all target volumes created during the backup session are deleted.
Note that for standard snapshots and snapclones, the number of replicas rotated has a significant impact on the amount of the required storage space. You should consider this storage requirement when defining your backup environment and/or backup policy.
Replica storage redundancy levelsThe HPE P6000 EVA Disk Array Family implements nested (hybrid) storage redundancy (RAID) technology, referred to as Vraid. P6000 EVA Array storage systems support creation of snapshots and snapclones which have a different storage redundancy level (Vraid type) than their source storage volumes. Of the supported Vraid types, Vraid1 consumes the most storage space, followed by Vraid6, Vraid5, and finally Vraid0.
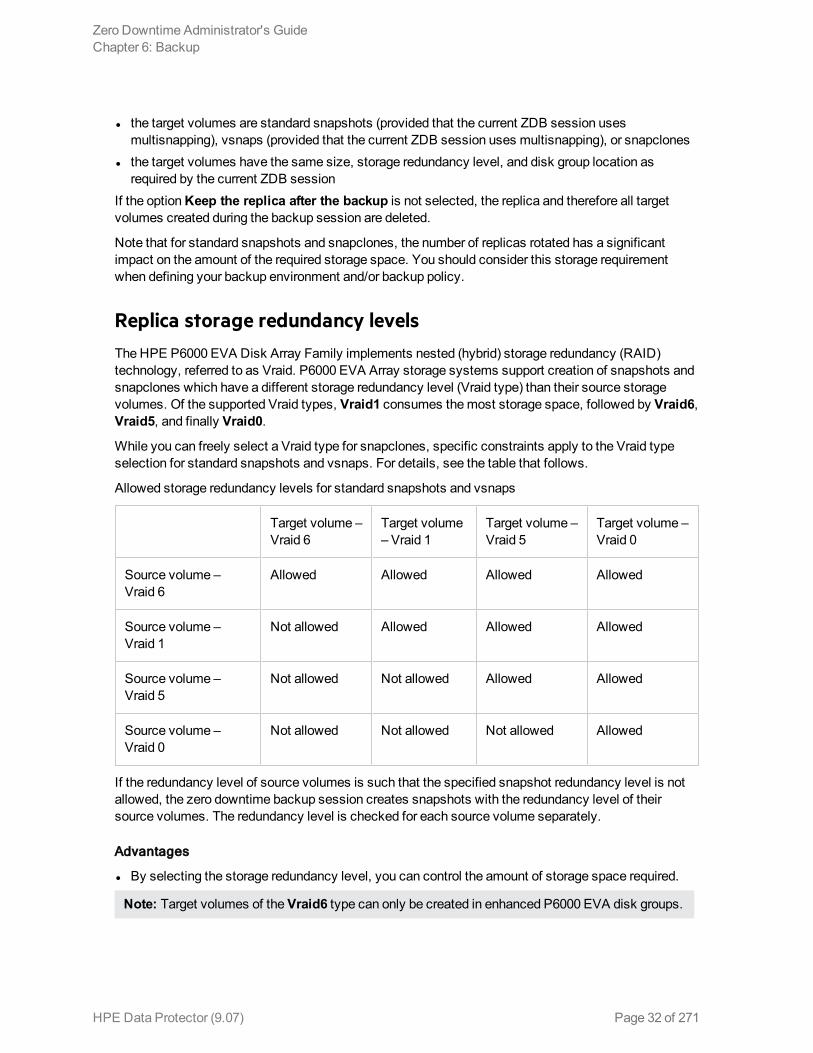
While you can freely select a Vraid type for snapclones, specific constraints apply to the Vraid type selection for standard snapshots and vsnaps. For details, see the table that follows.
Allowed storage redundancy levels for standard snapshots and vsnaps
Target volume – Vraid 6
Target volume – Vraid 1
Target volume – Vraid 5
Target volume – Vraid 0
Source volume – Vraid 6
Allowed Allowed Allowed Allowed
Source volume – Vraid 1
Not allowed Allowed Allowed Allowed
Source volume – Vraid 5
Not allowed Not allowed Allowed Allowed
Source volume – Vraid 0
Not allowed Not allowed Not allowed Allowed
If the redundancy level of source volumes is such that the specified snapshot redundancy level is not allowed, the zero downtime backup session creates snapshots with the redundancy level of their source volumes. The redundancy level is checked for each source volume separately.
Advantages
l By selecting the storage redundancy level, you can control the amount of storage space required.
Note: Target volumes of the Vraid6 type can only be created in enhanced P6000 EVA disk groups.
Zero Downtime Administrator's GuideChapter 6: Backup
HPE Data Protector (9.07) Page 32 of 271

In the Data Protector ZDB sessions during which mirrorclones are automatically created, the storage redundancy level of the source volumes (original volumes) is used for the mirrorclones. The storage redundancy level selected in the ZDB backup specification only applies to the target volumes.
ZDB in HPE CA+BC P6000 EVA environmentsThe P6000 EVA Array storage system containing source volumes is known as a local (source) disk array, while the P6000 EVA Array storage system on which the replicas are created is a remote (destination) disk array. The mirrored source and target volumes constitute a copy set.
Data replication is always initiated from a local to a remote array. It is executed over a logical grouping of P6000 EVA virtual disks, known as a data replication (DR) group. A DR group can contain up to eight copy sets and share a common HPE CA P6000 EVA log. Data replication control is always maintained at a DR group level.
The data backed up in HPE CA+BC P6000 EVA configurations can be restored using either instant recovery or the standard Data Protector restore from tape procedure. After backup to tape, you can choose to keep replicas on the array for purposes other than instant recovery (by selecting Keep the replica after the backup in the backup specification).
DR group write history log (DR group log) states
If data replication is not possible, for example, due to the broken connection between the local disk array and the remote disk array, new data and changes to the existing data on the application system are written to the DR group log which resides on the local disk array. Each DR group configured on the disk array has its own DR group log.
During the logging process, the status of the DR group logs for the source virtual disks is set to “logging”. After the connection between the disk arrays is re-established, the contents of the DR group log are merged with the contents of the corresponding destination virtual disks on the remote disk array, so that the data redundancy is restored. For the duration of this activity, the status of the involved DR group logs is set to “merging”. After the merge is complete, the status is set back to “not in use”.
If the interruption of data replication is long-lasting, the storage space reserved for the DR group logs may run out. In this case, logs cannot hold all the changes. After the connection between the arrays is re-established, all original data in the involved DR groups has to be copied over. During this operation, the DR group log status is set to “copying”, and is re-set to “not in use” after the operation is complete.
DR groups with the DR group log state other than “not in use” are excluded from backup.
DR group states
DR group states are “normal/good”, “warning/attention”, “severe/failure”, and “unknown”. Data consistency is only guaranteed when a DR group is in the “normal/good” or “warning/attention” state. DR groups that are found in other states are excluded from the backup session.
DR group modes
DR group modes are as follows:
l Suspend
Zero Downtime Administrator's GuideChapter 6: Backup
HPE Data Protector (9.07) Page 33 of 271
This mode indicates that data replication is suspended and changes to the existing data are written to the log space until the replication is resumed. In the “suspend” mode, the DR group log state is set to “logging”.DR groups in such mode are excluded from backup.
l FailoverThis mode indicates that the replication direction is reversed after a failover.
l Failsafe-lockedWhen a DR group is in this mode, write/read access to the source DR group is blocked due to the broken connection between the local disk array and the remote disk array. DR groups found in such a mode are excluded from the backup session.
HPE CA+BC P6000 EVA ZDB scenarios
The HPE P6000 / HPE 3PAR SMI-S Agent introduces the concept of a home disk array, which is defined inside a static HPE CA P6000 EVA HOME configuration file. By setting the home disk array using the omnidbsmis command and specifying HPECA P6000 EVA failover handling options in the backup specification, you influence the Data Protector behavior in case of a failover. The information about home is stored in SMISDB and is used by the HPE P6000 / HPE3PAR SMI-S Agent to determine the state of a DR group (ideal or failed over).
If you intend to maintain the replica location after a failover, you must set the home disk array before creating a ZDB backup specification. If you intend to follow the replication direction, setting home is optional. For more information, see "HPE CA P6000 EVA HOME configuration file" on page 24 and the omnidbsmis man page.
To enable proper replication handling after a failover, make sure the disk array you set as home is also your source disk array (the disk array acting as source at the time of the first ZDB session).
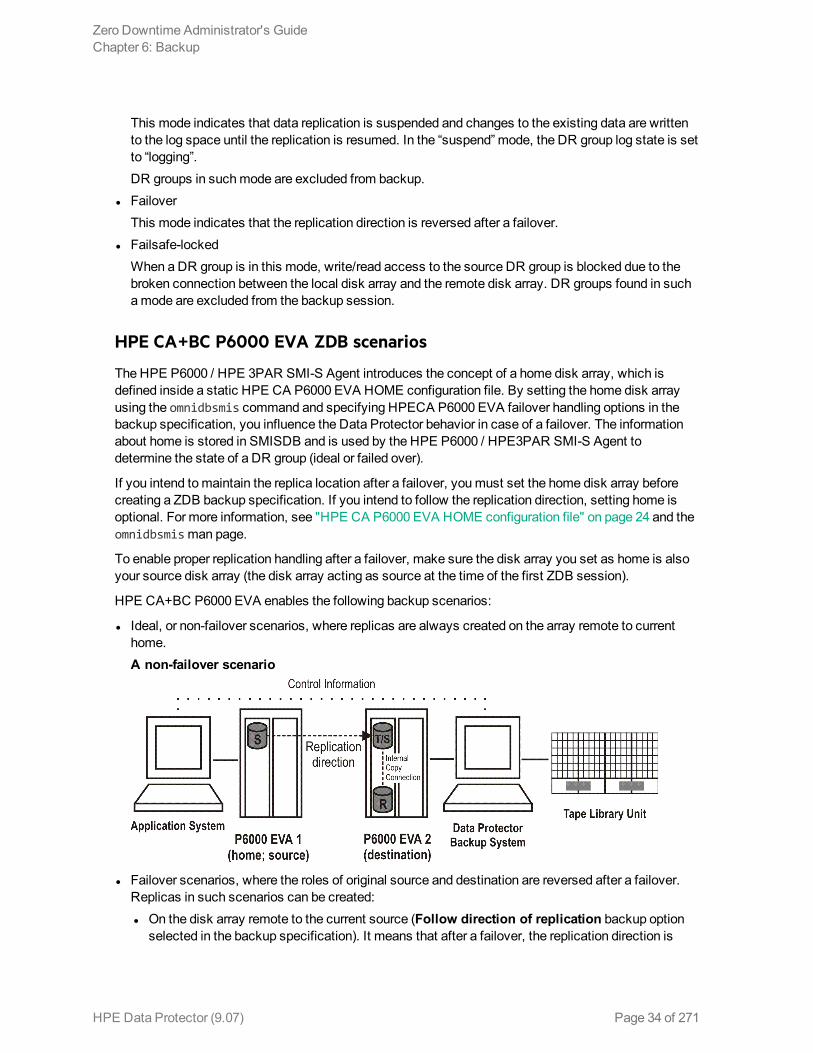
HPE CA+BC P6000 EVA enables the following backup scenarios:
l Ideal, or non-failover scenarios, where replicas are always created on the array remote to current home. A non-failover scenario
l Failover scenarios, where the roles of original source and destination are reversed after a failover. Replicas in such scenarios can be created: l On the disk array remote to the current source (Follow direction of replication backup option
selected in the backup specification). It means that after a failover, the replication direction is
Zero Downtime Administrator's GuideChapter 6: Backup
HPE Data Protector (9.07) Page 34 of 271
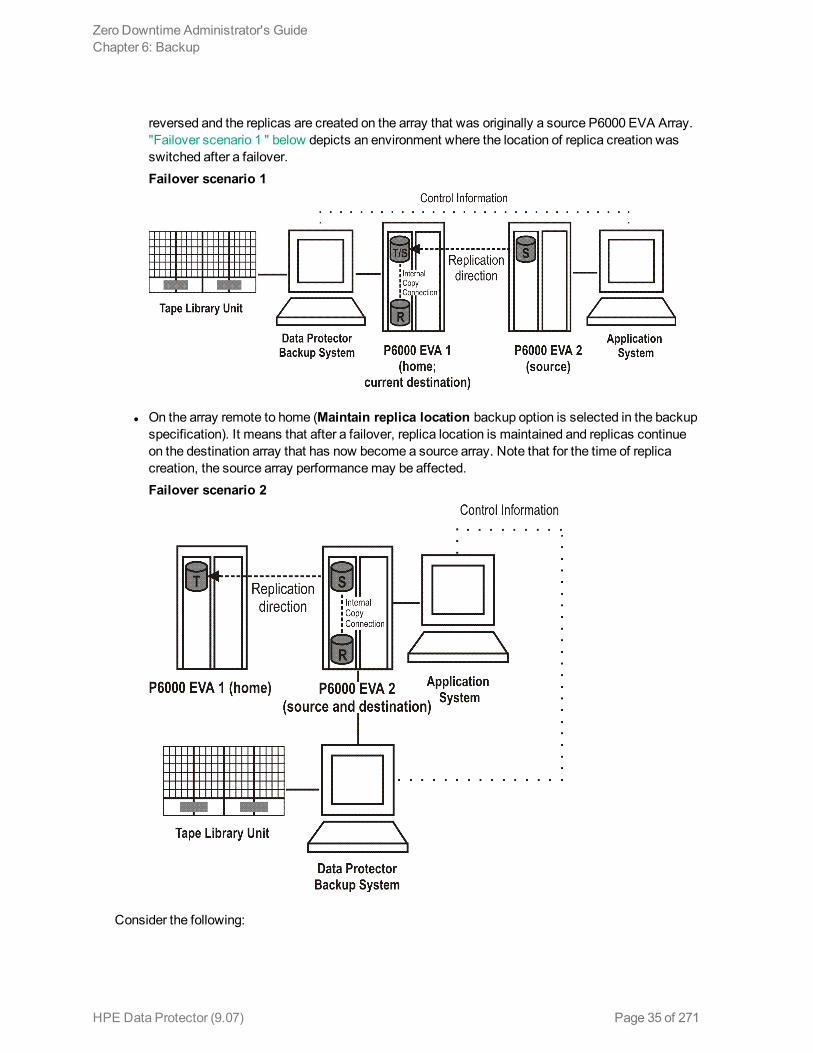
reversed and the replicas are created on the array that was originally a source P6000 EVA Array. "Failover scenario 1 " below depicts an environment where the location of replica creation was switched after a failover.Failover scenario 1
l On the array remote to home (Maintain replica location backup option is selected in the backup specification). It means that after a failover, replica location is maintained and replicas continue on the destination array that has now become a source array. Note that for the time of replica creation, the source array performance may be affected.Failover scenario 2
Consider the following:
Zero Downtime Administrator's GuideChapter 6: Backup
HPE Data Protector (9.07) Page 35 of 271
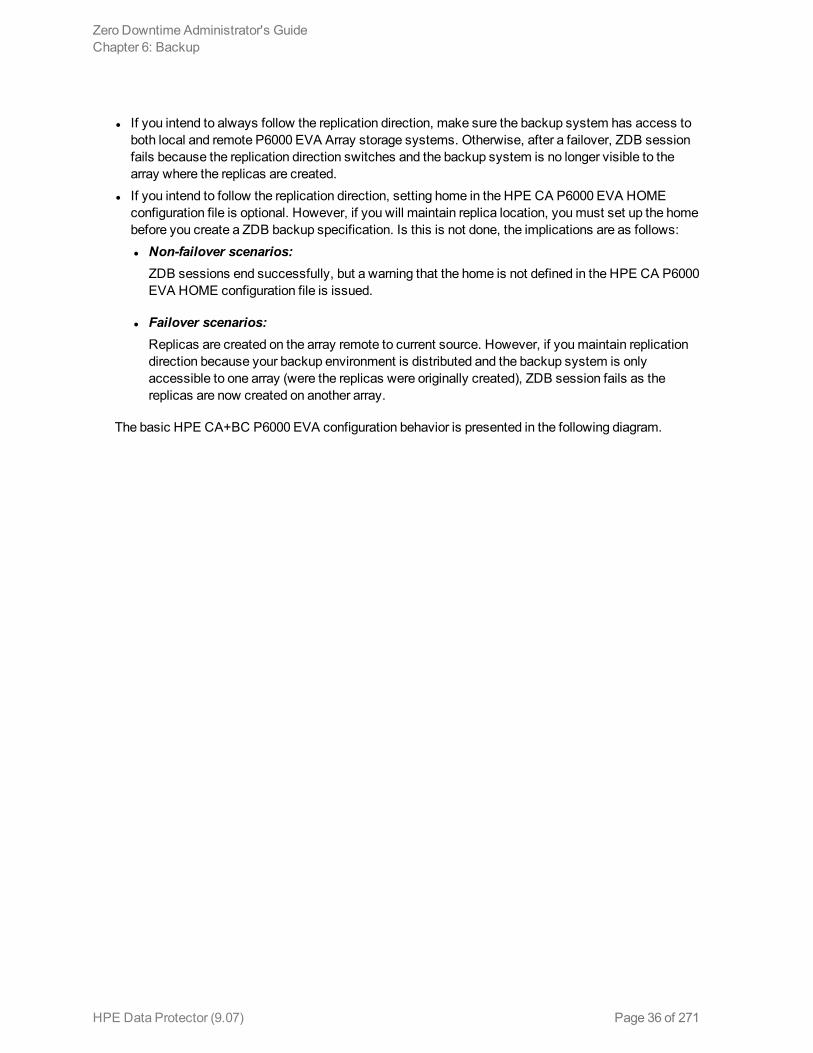
l If you intend to always follow the replication direction, make sure the backup system has access to both local and remote P6000 EVA Array storage systems. Otherwise, after a failover, ZDB session fails because the replication direction switches and the backup system is no longer visible to the array where the replicas are created.
l If you intend to follow the replication direction, setting home in the HPE CA P6000 EVA HOME configuration file is optional. However, if you will maintain replica location, you must set up the home before you create a ZDB backup specification. Is this is not done, the implications are as follows: l Non-failover scenarios:
ZDB sessions end successfully, but a warning that the home is not defined in the HPE CA P6000 EVA HOME configuration file is issued.
l Failover scenarios:Replicas are created on the array remote to current source. However, if you maintain replication direction because your backup environment is distributed and the backup system is only accessible to one array (were the replicas were originally created), ZDB session fails as the replicas are now created on another array.
The basic HPE CA+BC P6000 EVA configuration behavior is presented in the following diagram.
Zero Downtime Administrator's GuideChapter 6: Backup
HPE Data Protector (9.07) Page 36 of 271

HPE CA+BC P6000 EVA configuration behavior
Replica set rotation
In the HPE CA+BC P6000 EVA non-failover scenarios, replicas are always created on the array remote to home. If the existing replica count (on the array where new replicas are ) exceeds the specified number of replicas rotated, the oldest replica is deleted and the new one is created in its place (ensuring the maximum number of replicas is always within the defined rotation set).
In the HPE CA+BC P6000 EVA failover scenarios, replicas are created either on:
l The array remote to current source (or on the home disk array) l The array remote to homeIn the first case, the number of replicas in a rotation set is only checked on the current destination array. The replicas created on the current source, which was a destination before a failover, are ignored. Therefore, there are situations when two replica sets are created on both the source and destination arrays.
In the second case, replica set rotation verification happens in a normal way.
Zero Downtime Administrator's GuideChapter 6: Backup
HPE Data Protector (9.07) Page 37 of 271

Note: Replica rotation set is only created if you select the option Keep the replica after the backup and specify Number of replicas rotated. Without these options specified, the replica is deleted from the array after the backup to tape is completed.
For more information about replica set rotation, see the HPE Data Protector Concepts Guide.
ZDB in HP-UX LVM mirroring environmentsYour HP-UX LVM mirroring environment should be configured as follows:
l All logical volumes inside a volume group must be created with the PVG-strict allocation policy. Consequently, the mirrors will be created on different PVGs.
l As a best practice, different PVGs should be located on separate arrays. Consequently, mirrors are created on separate arrays.
l At least one PVG must contain a consistent mirror copy for all logical volumes of the volume group.During a backup, Data Protector first checks the status of all mirror copies (see "Checking the mirrors " on the next page). Out of all consistent mirror copies (mirrors without stale extents), one is backed up, preferably the one residing on a different array than the first mirror copy. If such a mirror copy does not exist, the first mirror copy is backed up. If the ZDB_LVM_PREFERRED_PVG omnirc option is set, the mirror copy residing in the PVG specified in the option is backed up, provided that this mirror copy does not have stale extents. Otherwise, another mirror copy is selected for backup according to the algorithm described above.
For more information on the ZDB_LVM_PREFERRED_PVG omnirc option, see "ZDB omnirc options" on page 248.
Zero Downtime Administrator's GuideChapter 6: Backup
HPE Data Protector (9.07) Page 38 of 271

Checking the mirrors
Zero Downtime Administrator's GuideChapter 6: Backup
HPE Data Protector (9.07) Page 39 of 271
Data in replicas created using LVM mirroring can be restored in instant recovery sessions or sessions performing standard restore from tape.
Creating backup specifications
Considerations
l Consider all limitations that apply to the Data Protector P6000 EVA Array integration. See the HPE Data Protector Product Announcements, Software Notes, and References, the HPE Data Protector Concepts Guide, and the limitation list in "Introduction" on page 19.
l If original volume is selected as the snapshot source in the ZDB backup specification, and mirrorclones of the selected storage volumes exist on the disk array when a corresponding ZDB session is started, the session fails.
l If mirrorclone is selected as the snapshot source in the ZDB backup specification, and mirrorclones of the selected storage volumes already exist when a corresponding ZDB session is started, the mirrorclones should not be presented to any system for the session to succeed.
Procedure
To create a ZDB backup specification for a disk array of the HPE P6000 EVA Disk Array Family using the Data Protector GUI (Data Protector Manager), follow the steps:
1. In the Context List, select Backup. 2. In the Scoping Pane, expand Backup Specifications. Right-click Filesystem (for both object
types: filesystem and disk image) and click Add Backup.The Create New Backup dialog box appears.In the Filesystem pane, select the Blank Filesystem Backup template or some other template which you might have created. For information on templates, see the HPE Data Protector Help index: “backup templates”.Select Snapshot or split mirror backup as Backup type and HPE P6000 EVASMI-S as Sub type. For description of options, press F1.Click OK.
3. Under Client systems, select Application system and Backup system. If the application system is part of a server cluster, select the virtual server.
4. Under Replication mode, select the P6000 EVA Array configuration. If you select HPE Continuous Access P6000 EVA + HPE Business Copy P6000 EVA, also specify a choice for Replica handling during failover scenarios. For details about handling replica set rotation in HPE CA+BC P6000 EVA configurations, see "HPE CA+BC P6000 EVA ZDB scenarios" on page 34.
Zero Downtime Administrator's GuideChapter 6: Backup
HPE Data Protector (9.07) Page 40 of 271

P6000 EVA Array backup options
5. Under Snapshot management options, select the desired Snapshot source, Snapshot type, and Redundancy level.
Tip: For ZDB to disk+tape and ZDB to tape, and when snapclone is selected as the snapshot type, select Delay the tape backup by a maximum of n minutes if the snapclones are not fully created. In this case, backup to tape starts when the cloning process finishes, but not later than after the specified number of minutes. This helps prevent degradation of the application system performance during backup by reducing the concurrent load on the disk array.
6. If you have selected Mirrorclone as the snapshot source, under Mirrorclone synchronization handling, specify the options for handling local replication links between original volumes and mirrorclones during ZDB sessions. For information, see "Backup options " on page 44 or press F1.
7. Under Replica management options, specify a value for Number of replicas rotated. The number of standard snapshots or vsnaps that can exist for a specific source volume is limited by the target P6000 EVA Array storage system. The GUI does not limit the number of replicas rotated, but the session fails if the disk array-specific limit is exceeded.ZDB to disk, ZDB to disk+tape:Select the option Track the replica for instant recovery to enable instant recovery.
Note: You can choose a ZDB-to-disk session or a ZDB-to-disk+tape session by selecting an appropriate value for the Split mirror/snapshot backup option when running or scheduling a ZDB session based on this ZDB backup specification. See "Scheduling ZDB sessions" on
Zero Downtime Administrator's GuideChapter 6: Backup
HPE Data Protector (9.07) Page 41 of 271

page 228.
ZDB to tape:Leave the option Track the replica for instant recovery cleared.To preserve the replica on the disk array after the ZDB session, leave the option Keep the replica after the backup selected. To remove the replica after the session, clear this option.
8. Specify other zero downtime backup options as desired. For information, see "Backup options " on page 44 or press F1.Click Next.
9. Select the desired backup objects.Filesystem backup: Expand the application system and select the objects to be backed up. Note that all drive letters or mount points that reside on the system are displayed. You must select only the objects that reside on the disk array, otherwise the ZDB session will fail.To ensure that instant recovery succeeds and the environment is consistent after instant recovery, select all volumes on a disk (Windows systems) or all logical volumes of a volume group (UNIX systems) to be backed up. Even if you do not select an entire disk or volume group, the backup will succeed, but instant recovery may experience issues during configuration check of the environment. The configuration check can be disabled by clearing the option Check the data configuration consistency in the GUI or not specifying the option -check_config in the CLI when preparing for an instant recovery session. If this option is cleared (GUI) or not specified (CLI), the entire disk or volume group will be overwritten during instant recovery.Click Next.Disk image backup: Click Next.
10. Select devices. Click Properties to set device concurrency, media pool, and preallocation policy. For descriptions of these options, click Help.To create additional copies (mirrors) of the backup image, specify the desired number of mirrors by clicking Add mirror or Remove mirror. Select separate devices for the backup image and each mirror.For information on object mirroring, see the HPE Data Protector Help index: “object mirroring”.
Note: Object mirroring and object copying are not supported for ZDB to disk.
Click Next. 11. In the Backup Specification Options group box, click Advanced and then the HPE P6000 EVA
SMI-S tab to open the P6000 EVA Array backup options pane.You can specify Application system options and modify all other options, except Application system and Backup system (note that you can change them after you save the ZDB backup specification). See "Backup options " on page 44 or press F1.In the Filesystem Options group box, click Advanced and specify filesystem options as desired. For information, press F1.Windows systems: To configure a ZDB backup specification for incremental ZDB sessions, select the Do not use archive attribute filesystem option in the WinFS Options pane to enhance the incremental ZDB behavior. For details, see "Backup options " on page 44.
Zero Downtime Administrator's GuideChapter 6: Backup
HPE Data Protector (9.07) Page 42 of 271
Click Next. 12. Following the wizard, open the scheduler to schedule the ZDB sessions. For more information,
see "Scheduling ZDB sessions" on page 228 or press F1.Click Next.
13. In the Backup Object Summary page, specify additional options.Filesystem backup: You can modify options for the listed objects by right-clicking an object and then clicking Properties. For information on the object properties, press F1.Disk image backup: Follow the steps: a. Click Manual add to add disk image objects. b. Select Disk image object and click Next. c. Select the client system. Optionally, enter the description for your object. Click Next. d. Specify General Object Options and Advanced Object Options. For information on these
options, press F1. e. In the Disk Image Object Options window, specify disk image sections.
Windows systems:Use the format
\\.\PHYSICALDRIVE#
where # is the current number of the disk to be backed up.For information on how to identify current disk numbers (physical drive numbers), see the HPE Data Protector Help index: “disk image backups”.UNIX systems:Specify a disk image section:
/dev/rdsk/Filename, for example: /dev/rdsk/c2t0d0On HP-UX 11.31 systems, the new naming system can be used:
/dev/rdisk/disk#, for example /dev/rdisk/disk2Specify a raw logical volume section:
/dev/vgnumber/rlvolNumber, for example: /dev/vg01/rlvol1To ensure that instant recovery succeeds and the environment is consistent after instant recovery, select all volumes on a disk (Windows systems) or all logical volumes of a volume group (UNIX systems) to be backed up. Even if you do not select an entire disk or volume group, the backup will succeed, but instant recovery may experience issues during configuration check of the environment.The configuration check can be disabled by clearing the option Check the data configuration consistency in the GUI or not specifying the option -check_config in the CLI when preparing for an instant recovery session. If this option is cleared (GUI) or not specified (CLI), the entire disk or volume group will be overwritten during instant recovery.
f. Click Finish.Click Next.
14. Save your ZDB backup specification.For information on scheduling ZDB sessions and starting interactive ZDB sessions, see "Scheduling ZDB sessions" on page 228.
Zero Downtime Administrator's GuideChapter 6: Backup
HPE Data Protector (9.07) Page 43 of 271
Note: Backup preview is not supported.
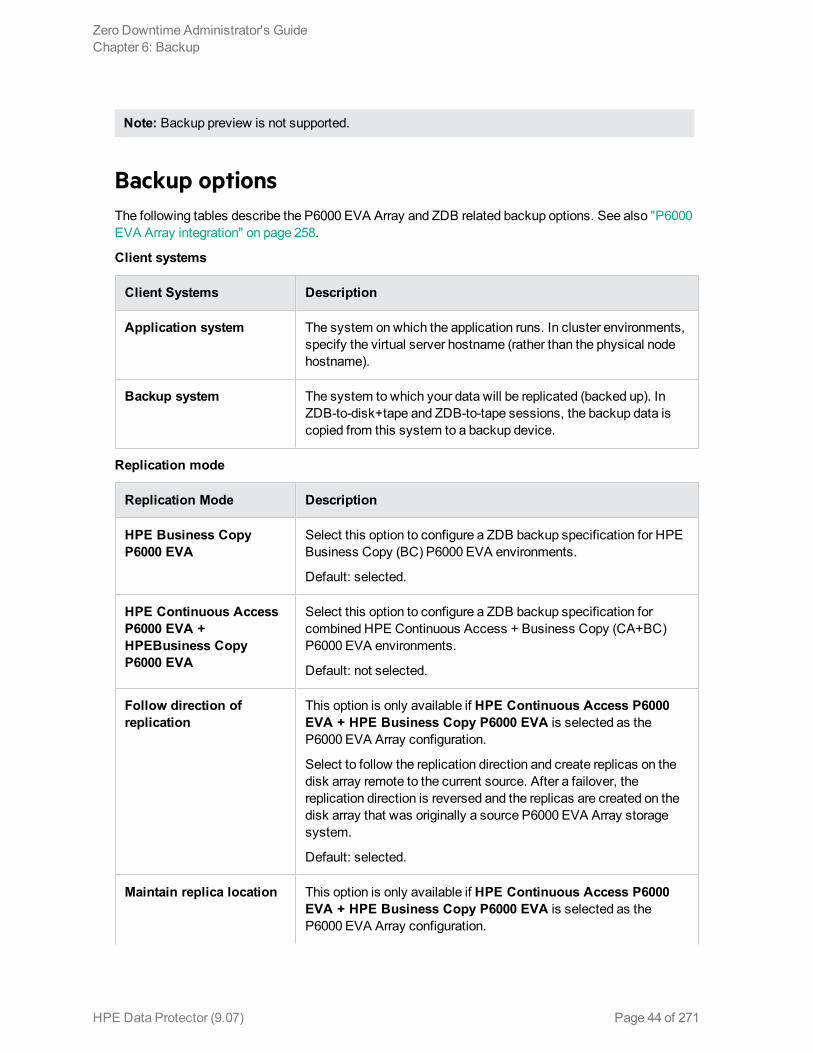
Backup options The following tables describe the P6000 EVA Array and ZDB related backup options. See also "P6000 EVA Array integration" on page 258.
Client systems
Client Systems Description
Application system The system on which the application runs. In cluster environments, specify the virtual server hostname (rather than the physical node hostname).
Backup system The system to which your data will be replicated (backed up). In ZDB-to-disk+tape and ZDB-to-tape sessions, the backup data is copied from this system to a backup device.
Replication mode
Replication Mode Description
HPE Business Copy P6000 EVA
Select this option to configure a ZDB backup specification for HPE Business Copy (BC) P6000 EVA environments.
Default: selected.
HPE Continuous Access P6000 EVA + HPEBusiness Copy P6000 EVA
Select this option to configure a ZDB backup specification for combined HPE Continuous Access + Business Copy (CA+BC) P6000 EVA environments.
Default: not selected.
Follow direction of replication
This option is only available if HPE Continuous Access P6000 EVA + HPE Business Copy P6000 EVA is selected as the P6000 EVA Array configuration.
Select to follow the replication direction and create replicas on the disk array remote to the current source. After a failover, the replication direction is reversed and the replicas are created on the disk array that was originally a source P6000 EVA Array storage system.
Default: selected.
Maintain replica location This option is only available if HPE Continuous Access P6000 EVA + HPE Business Copy P6000 EVA is selected as the P6000 EVA Array configuration.
Zero Downtime Administrator's GuideChapter 6: Backup
HPE Data Protector (9.07) Page 44 of 271
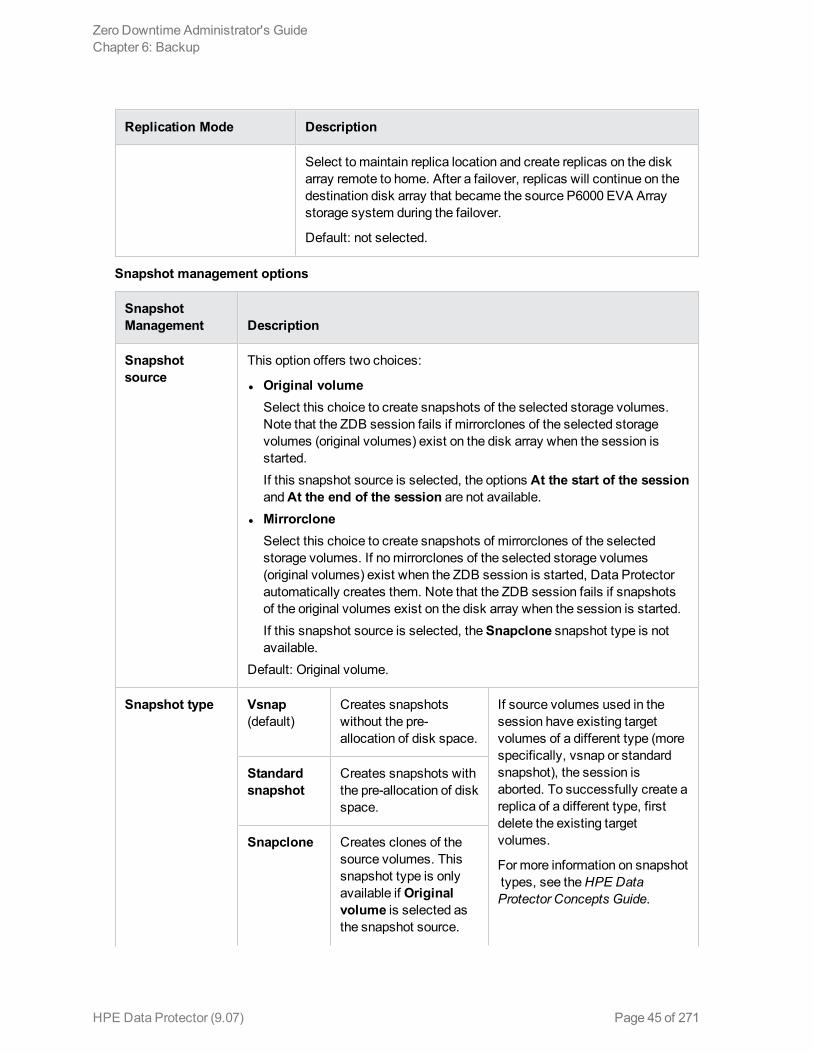
Replication Mode Description
Select to maintain replica location and create replicas on the disk array remote to home. After a failover, replicas will continue on the destination disk array that became the source P6000 EVA Array storage system during the failover.
Default: not selected.
Snapshot management options
Snapshot Management Description
Snapshot source
This option offers two choices:
l Original volumeSelect this choice to create snapshots of the selected storage volumes. Note that the ZDB session fails if mirrorclones of the selected storage volumes (original volumes) exist on the disk array when the session is started.If this snapshot source is selected, the options At the start of the session and At the end of the session are not available.
l MirrorcloneSelect this choice to create snapshots of mirrorclones of the selected storage volumes. If no mirrorclones of the selected storage volumes (original volumes) exist when the ZDB session is started, Data Protector automatically creates them. Note that the ZDB session fails if snapshots of the original volumes exist on the disk array when the session is started.If this snapshot source is selected, the Snapclone snapshot type is not available.
Default: Original volume.
Snapshot type Vsnap (default)
Creates snapshots without the pre-allocation of disk space.
If source volumes used in the session have existing target volumes of a different type (more specifically, vsnap or standard snapshot), the session is aborted. To successfully create a replica of a different type, first delete the existing target volumes.
For more information on snapshot types, see the HPE Data Protector Concepts Guide.
Standard snapshot
Creates snapshots with the pre-allocation of disk space.
Snapclone Creates clones of the source volumes. This snapshot type is only available if Original volume is selected as the snapshot source.
Zero Downtime Administrator's GuideChapter 6: Backup
HPE Data Protector (9.07) Page 45 of 271
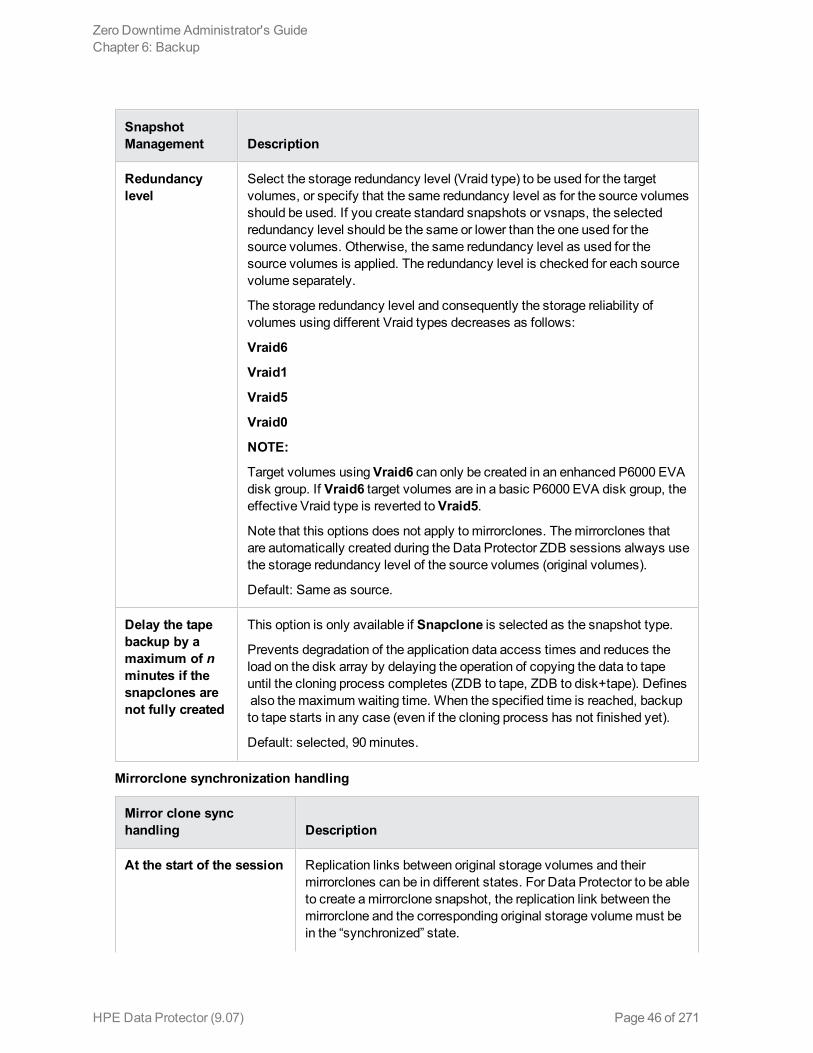
Snapshot Management Description
Redundancy level
Select the storage redundancy level (Vraid type) to be used for the target volumes, or specify that the same redundancy level as for the source volumes should be used. If you create standard snapshots or vsnaps, the selected redundancy level should be the same or lower than the one used for the source volumes. Otherwise, the same redundancy level as used for the source volumes is applied. The redundancy level is checked for each source volume separately.
The storage redundancy level and consequently the storage reliability of volumes using different Vraid types decreases as follows:
Vraid6
Vraid1
Vraid5
Vraid0
NOTE:
Target volumes using Vraid6 can only be created in an enhanced P6000 EVA disk group. If Vraid6 target volumes are in a basic P6000 EVA disk group, the effective Vraid type is reverted to Vraid5.
Note that this options does not apply to mirrorclones. The mirrorclones that are automatically created during the Data Protector ZDB sessions always use the storage redundancy level of the source volumes (original volumes).
Default: Same as source.
Delay the tape backup by a maximum of n minutes if the snapclones are not fully created
This option is only available if Snapclone is selected as the snapshot type.
Prevents degradation of the application data access times and reduces the load on the disk array by delaying the operation of copying the data to tape until the cloning process completes (ZDB to tape, ZDB to disk+tape). Defines also the maximum waiting time. When the specified time is reached, backup to tape starts in any case (even if the cloning process has not finished yet).
Default: selected, 90 minutes.
Mirrorclone synchronization handling
Mirror clone sync handling Description
At the start of the session Replication links between original storage volumes and their mirrorclones can be in different states. For Data Protector to be able to create a mirrorclone snapshot, the replication link between the mirrorclone and the corresponding original storage volume must be in the “synchronized” state.
Zero Downtime Administrator's GuideChapter 6: Backup
HPE Data Protector (9.07) Page 46 of 271
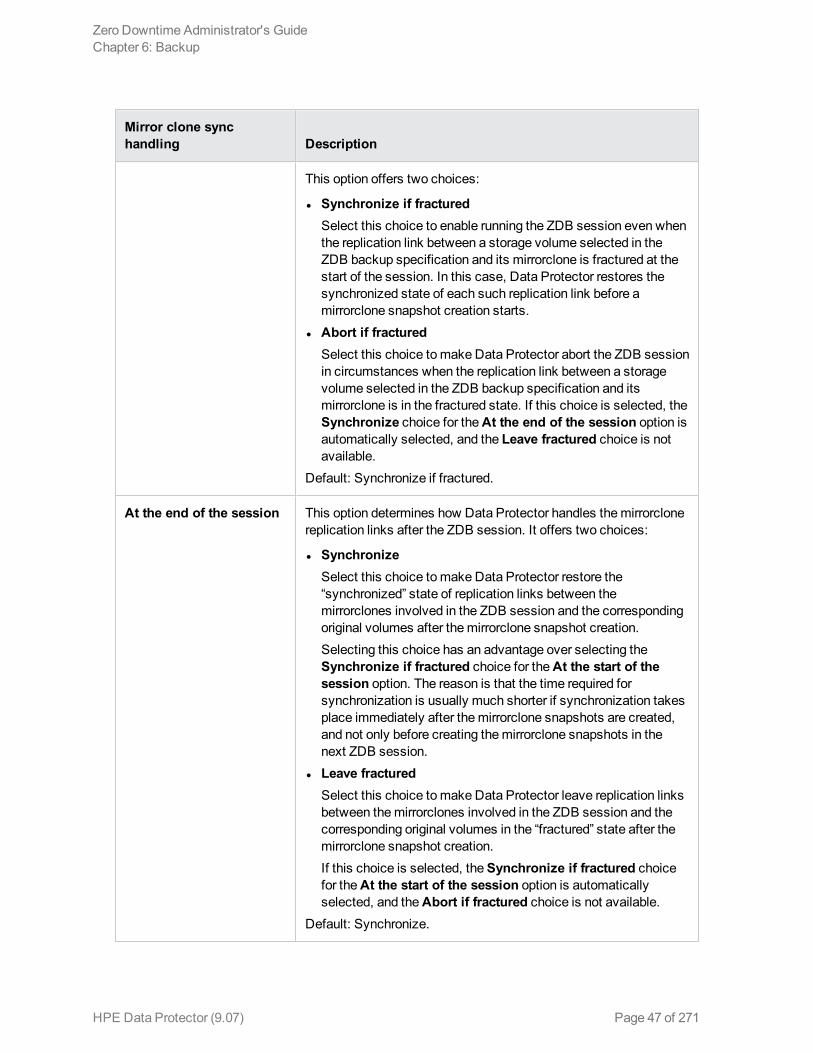
Mirror clone sync handling Description
This option offers two choices:
l Synchronize if fracturedSelect this choice to enable running the ZDB session even when the replication link between a storage volume selected in the ZDB backup specification and its mirrorclone is fractured at the start of the session. In this case, Data Protector restores the synchronized state of each such replication link before a mirrorclone snapshot creation starts.
l Abort if fracturedSelect this choice to make Data Protector abort the ZDB session in circumstances when the replication link between a storage volume selected in the ZDB backup specification and its mirrorclone is in the fractured state. If this choice is selected, the Synchronize choice for the At the end of the session option is automatically selected, and the Leave fractured choice is not available.
Default: Synchronize if fractured.
At the end of the session This option determines how Data Protector handles the mirrorclone replication links after the ZDB session. It offers two choices:
l SynchronizeSelect this choice to make Data Protector restore the “synchronized” state of replication links between the mirrorclones involved in the ZDB session and the corresponding original volumes after the mirrorclone snapshot creation.Selecting this choice has an advantage over selecting the Synchronize if fractured choice for the At the start of the session option. The reason is that the time required for synchronization is usually much shorter if synchronization takes place immediately after the mirrorclone snapshots are created, and not only before creating the mirrorclone snapshots in the next ZDB session.
l Leave fracturedSelect this choice to make Data Protector leave replication links between the mirrorclones involved in the ZDB session and the corresponding original volumes in the “fractured” state after the mirrorclone snapshot creation.If this choice is selected, the Synchronize if fractured choice for the At the start of the session option is automatically selected, and the Abort if fractured choice is not available.
Default: Synchronize.
Zero Downtime Administrator's GuideChapter 6: Backup
HPE Data Protector (9.07) Page 47 of 271
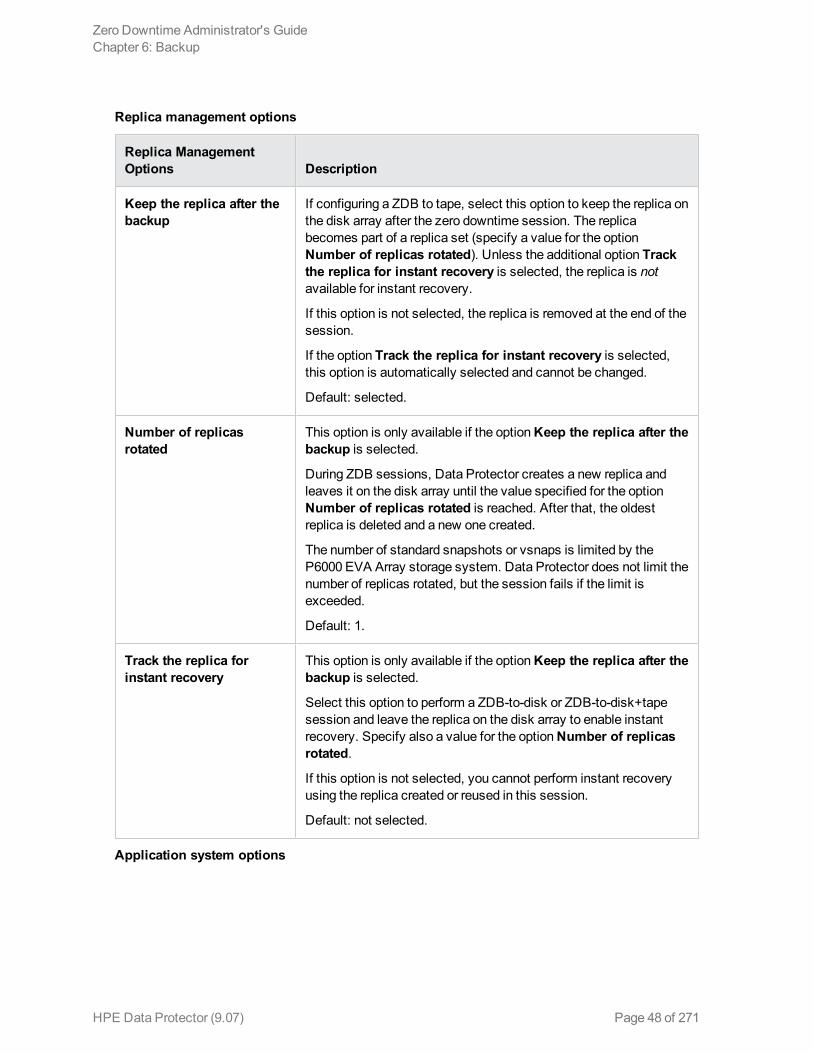
Replica management options
Replica Management Options Description
Keep the replica after the backup
If configuring a ZDB to tape, select this option to keep the replica on the disk array after the zero downtime session. The replica becomes part of a replica set (specify a value for the option Number of replicas rotated). Unless the additional option Track the replica for instant recovery is selected, the replica is not available for instant recovery.
If this option is not selected, the replica is removed at the end of the session.
If the option Track the replica for instant recovery is selected, this option is automatically selected and cannot be changed.
Default: selected.
Number of replicas rotated
This option is only available if the option Keep the replica after the backup is selected.
During ZDB sessions, Data Protector creates a new replica and leaves it on the disk array until the value specified for the option Number of replicas rotated is reached. After that, the oldest replica is deleted and a new one created.
The number of standard snapshots or vsnaps is limited by the P6000 EVA Array storage system. Data Protector does not limit the number of replicas rotated, but the session fails if the limit is exceeded.
Default: 1.
Track the replica for instant recovery
This option is only available if the option Keep the replica after the backup is selected.
Select this option to perform a ZDB-to-disk or ZDB-to-disk+tape session and leave the replica on the disk array to enable instant recovery. Specify also a value for the option Number of replicas rotated.
If this option is not selected, you cannot perform instant recovery using the replica created or reused in this session.
Default: not selected.
Application system options
Zero Downtime Administrator's GuideChapter 6: Backup
HPE Data Protector (9.07) Page 48 of 271
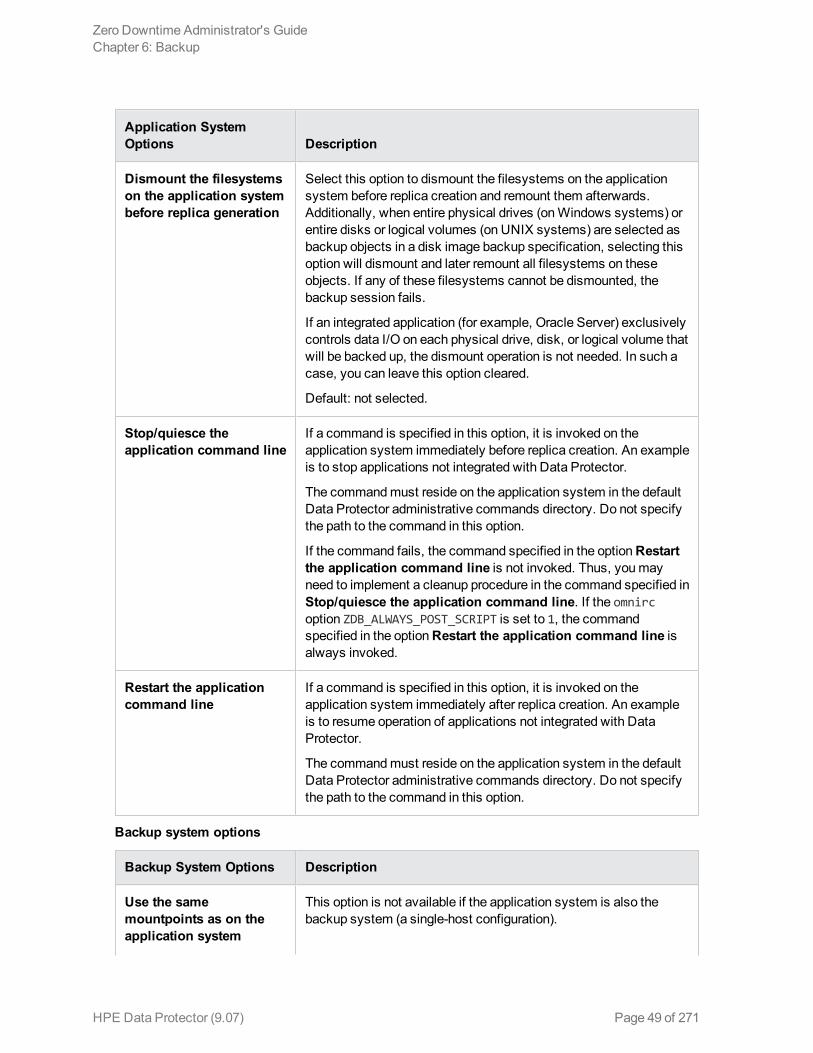
Application System Options Description
Dismount the filesystems on the application system before replica generation
Select this option to dismount the filesystems on the application system before replica creation and remount them afterwards. Additionally, when entire physical drives (on Windows systems) or entire disks or logical volumes (on UNIX systems) are selected as backup objects in a disk image backup specification, selecting this option will dismount and later remount all filesystems on these objects. If any of these filesystems cannot be dismounted, the backup session fails.
If an integrated application (for example, Oracle Server) exclusively controls data I/O on each physical drive, disk, or logical volume that will be backed up, the dismount operation is not needed. In such a case, you can leave this option cleared.
Default: not selected.
Stop/quiesce the application command line
If a command is specified in this option, it is invoked on the application system immediately before replica creation. An example is to stop applications not integrated with Data Protector.
The command must reside on the application system in the default Data Protector administrative commands directory. Do not specify the path to the command in this option.
If the command fails, the command specified in the option Restart the application command line is not invoked. Thus, you may need to implement a cleanup procedure in the command specified in Stop/quiesce the application command line. If the omnirc option ZDB_ALWAYS_POST_SCRIPT is set to 1, the command specified in the option Restart the application command line is always invoked.
Restart the application command line
If a command is specified in this option, it is invoked on the application system immediately after replica creation. An example is to resume operation of applications not integrated with Data Protector.
The command must reside on the application system in the default Data Protector administrative commands directory. Do not specify the path to the command in this option.
Backup system options
Backup System Options Description
Use the same mountpoints as on the application system
This option is not available if the application system is also the backup system (a single-host configuration).
Zero Downtime Administrator's GuideChapter 6: Backup
HPE Data Protector (9.07) Page 49 of 271
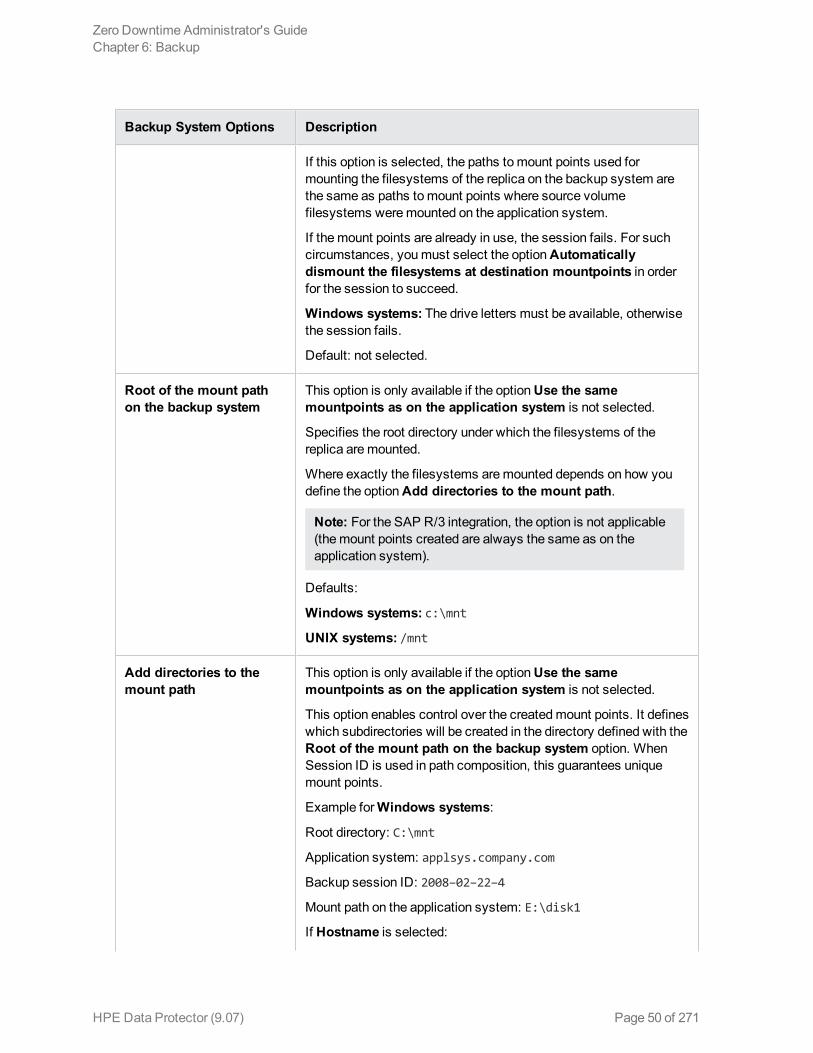
Backup System Options Description
If this option is selected, the paths to mount points used for mounting the filesystems of the replica on the backup system are the same as paths to mount points where source volume filesystems were mounted on the application system.
If the mount points are already in use, the session fails. For such circumstances, you must select the option Automatically dismount the filesystems at destination mountpoints in order for the session to succeed.
Windows systems: The drive letters must be available, otherwise the session fails.
Default: not selected.
Root of the mount path on the backup system
This option is only available if the option Use the same mountpoints as on the application system is not selected.
Specifies the root directory under which the filesystems of the replica are mounted.
Where exactly the filesystems are mounted depends on how you define the option Add directories to the mount path.
Note: For the SAP R/3 integration, the option is not applicable (the mount points created are always the same as on the application system).
Defaults:
Windows systems: c:\mnt
UNIX systems: /mnt
Add directories to the mount path
This option is only available if the option Use the same mountpoints as on the application system is not selected.
This option enables control over the created mount points. It defines which subdirectories will be created in the directory defined with the Root of the mount path on the backup system option. When Session ID is used in path composition, this guarantees unique mount points.
Example for Windows systems:
Root directory: C:\mnt
Application system: applsys.company.com
Backup session ID: 2008–02–22–4
Mount path on the application system: E:\disk1
If Hostname is selected:
Zero Downtime Administrator's GuideChapter 6: Backup
HPE Data Protector (9.07) Page 50 of 271
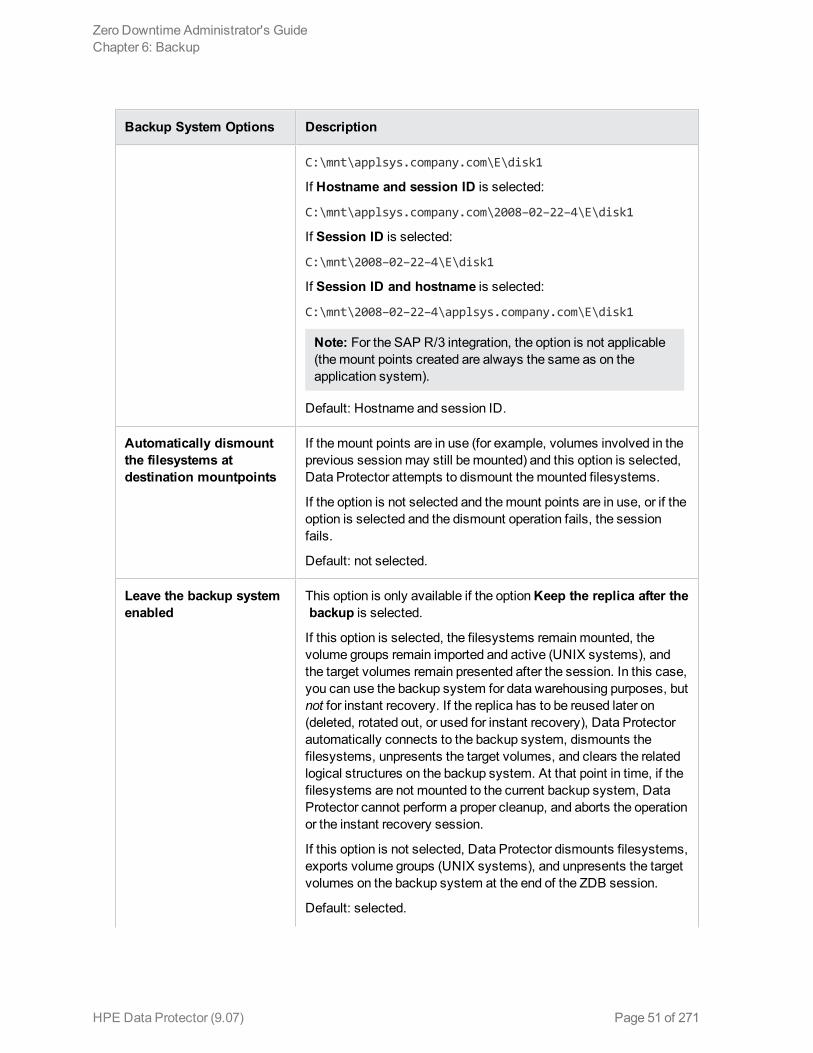
Backup System Options Description
C:\mnt\applsys.company.com\E\disk1
If Hostname and session ID is selected:
C:\mnt\applsys.company.com\2008–02–22–4\E\disk1
If Session ID is selected:
C:\mnt\2008–02–22–4\E\disk1
If Session ID and hostname is selected:
C:\mnt\2008–02–22–4\applsys.company.com\E\disk1
Note: For the SAP R/3 integration, the option is not applicable (the mount points created are always the same as on the application system).
Default: Hostname and session ID.
Automatically dismount the filesystems at destination mountpoints
If the mount points are in use (for example, volumes involved in the previous session may still be mounted) and this option is selected, Data Protector attempts to dismount the mounted filesystems.
If the option is not selected and the mount points are in use, or if the option is selected and the dismount operation fails, the session fails.
Default: not selected.
Leave the backup system enabled
This option is only available if the option Keep the replica after the backup is selected.
If this option is selected, the filesystems remain mounted, the volume groups remain imported and active (UNIX systems), and the target volumes remain presented after the session. In this case, you can use the backup system for data warehousing purposes, but not for instant recovery. If the replica has to be reused later on (deleted, rotated out, or used for instant recovery), Data Protector automatically connects to the backup system, dismounts the filesystems, unpresents the target volumes, and clears the related logical structures on the backup system. At that point in time, if the filesystems are not mounted to the current backup system, Data Protector cannot perform a proper cleanup, and aborts the operation or the instant recovery session.
If this option is not selected, Data Protector dismounts filesystems, exports volume groups (UNIX systems), and unpresents the target volumes on the backup system at the end of the ZDB session.
Default: selected.
Zero Downtime Administrator's GuideChapter 6: Backup
HPE Data Protector (9.07) Page 51 of 271
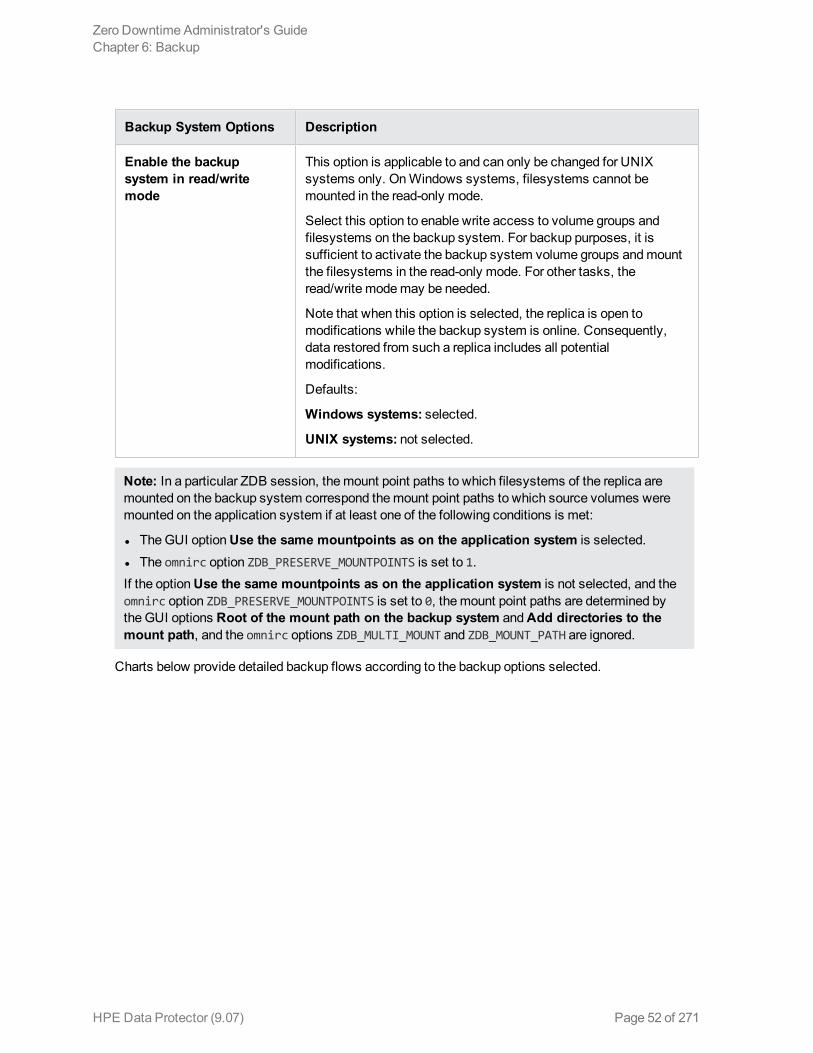
Backup System Options Description
Enable the backup system in read/write mode
This option is applicable to and can only be changed for UNIX systems only. On Windows systems, filesystems cannot be mounted in the read-only mode.
Select this option to enable write access to volume groups and filesystems on the backup system. For backup purposes, it is sufficient to activate the backup system volume groups and mount the filesystems in the read-only mode. For other tasks, the read/write mode may be needed.
Note that when this option is selected, the replica is open to modifications while the backup system is online. Consequently, data restored from such a replica includes all potential modifications.
Defaults:
Windows systems: selected.
UNIX systems: not selected.
Note: In a particular ZDB session, the mount point paths to which filesystems of the replica are mounted on the backup system correspond the mount point paths to which source volumes were mounted on the application system if at least one of the following conditions is met:
l The GUI option Use the same mountpoints as on the application system is selected. l The omnirc option ZDB_PRESERVE_MOUNTPOINTS is set to 1.If the option Use the same mountpoints as on the application system is not selected, and the omnirc option ZDB_PRESERVE_MOUNTPOINTS is set to 0, the mount point paths are determined by the GUI options Root of the mount path on the backup system and Add directories to the mount path, and the omnirc options ZDB_MULTI_MOUNT and ZDB_MOUNT_PATH are ignored.
Charts below provide detailed backup flows according to the backup options selected.
Zero Downtime Administrator's GuideChapter 6: Backup
HPE Data Protector (9.07) Page 52 of 271
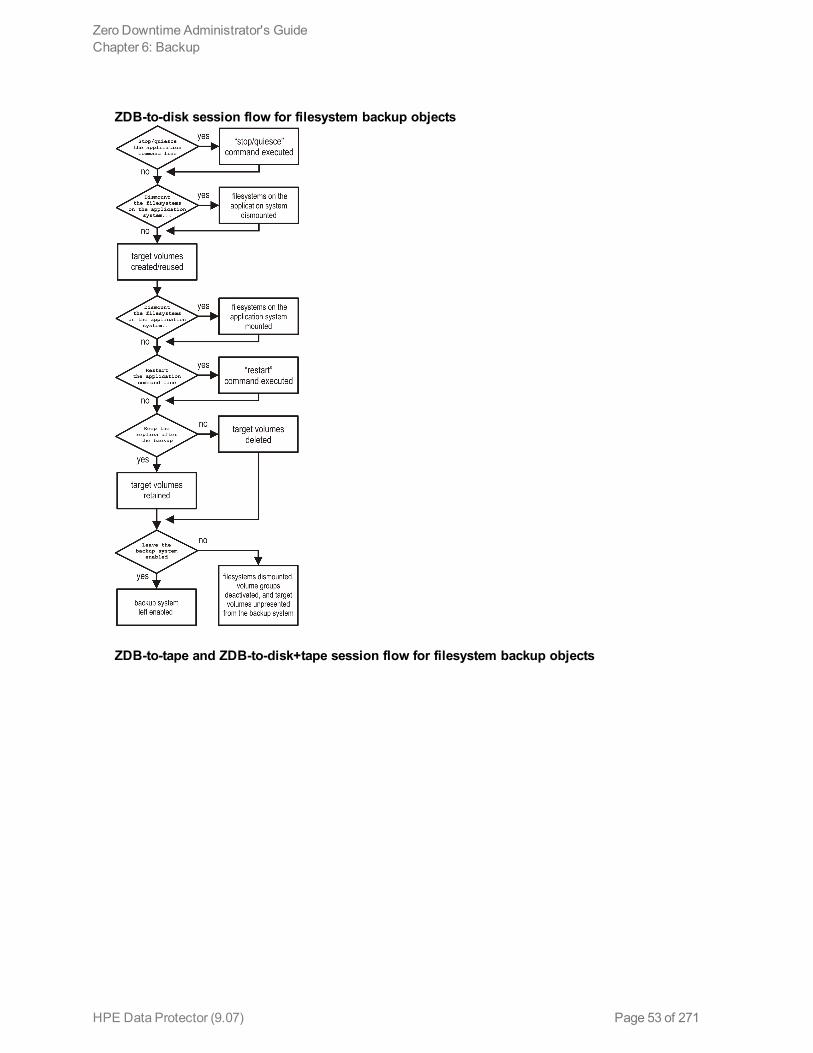
ZDB-to-disk session flow for filesystem backup objects
ZDB-to-tape and ZDB-to-disk+tape session flow for filesystem backup objects
Zero Downtime Administrator's GuideChapter 6: Backup
HPE Data Protector (9.07) Page 53 of 271
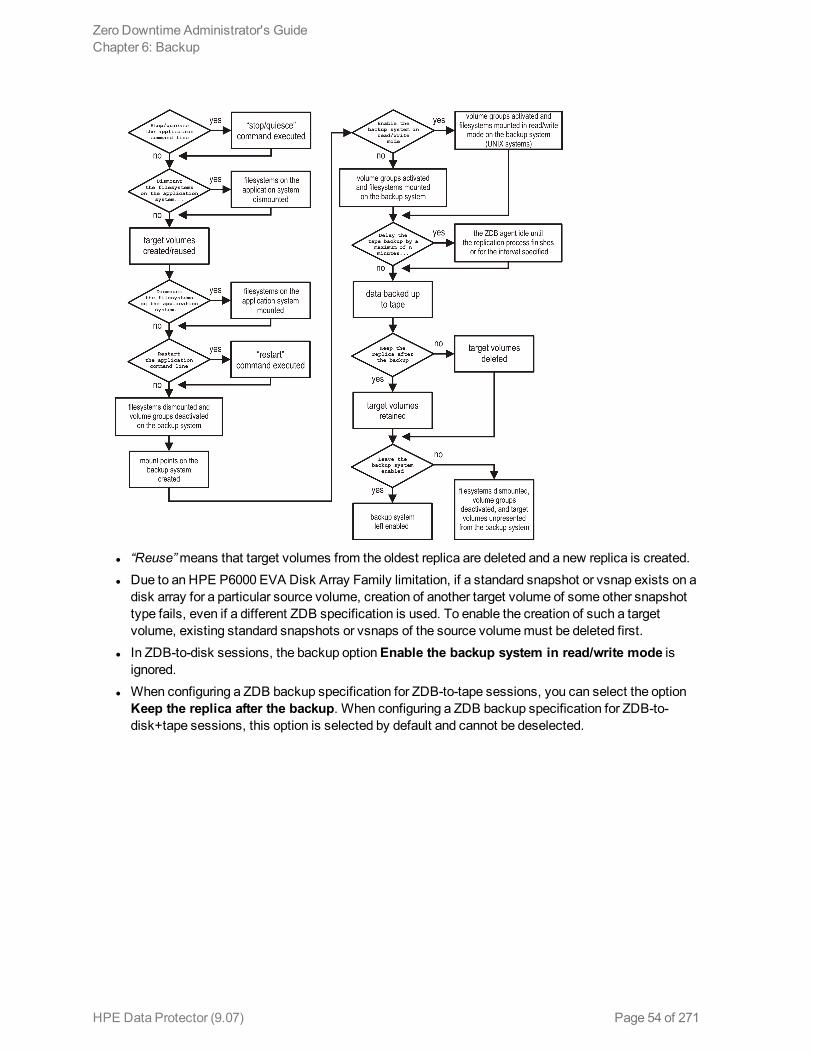
l “Reuse” means that target volumes from the oldest replica are deleted and a new replica is created. l Due to an HPE P6000 EVA Disk Array Family limitation, if a standard snapshot or vsnap exists on a
disk array for a particular source volume, creation of another target volume of some other snapshot type fails, even if a different ZDB specification is used. To enable the creation of such a target volume, existing standard snapshots or vsnaps of the source volume must be deleted first.
l In ZDB-to-disk sessions, the backup option Enable the backup system in read/write mode is ignored.
l When configuring a ZDB backup specification for ZDB-to-tape sessions, you can select the option Keep the replica after the backup. When configuring a ZDB backup specification for ZDB-to-disk+tape sessions, this option is selected by default and cannot be deselected.
Zero Downtime Administrator's GuideChapter 6: Backup
HPE Data Protector (9.07) Page 54 of 271
Chapter 7: Restore
IntroductionThis chapter describes configuring and running a filesystem or disk image restore of the data backed up using the P6000 EVA Array integration. The sections describe restore procedures using the Data Protector GUI and CLI.
The data backed up in a ZDB session can be stored on a disk array only (ZDB to disk), on backup media only (ZDB to tape), or at both locations (ZDB to disk+tape).
Available restore types are:
l Restore from backup media on a LAN (standard restore). See "Standard restore" below. l Instant recovery. See "Restore " above.Restore types
Standard restore Instant recovery
ZDB to disk N/A Yes
ZDB to disk+tape Yes Yes
ZDB to tape Yes N/A
Standard restoreData backed up in ZDB-to-tape and ZDB-to-disk+tape sessions can be restored from the backup media to the application system. For more information on this restore type, see the HPE Data Protector Help index: “restore”.
Tip: You can improve the data transfer rate by connecting a backup device directly to the application system. For information on configuring backup devices, see the HPE Data Protector Help index: “backups devices: configuring”. For information on performing a restore using another device, see the HPE Data Protector Help index: “selecting, devices for restore”.
Instant recovery Instant recovery restores data directly from a replica to source volumes, without involving a backup device. All data in the replica is restored, including filesystems or other objects which were not explicitly selected for backup. For instant recovery concepts, see the HPE Data Protector Concepts Guide.
You can perform instant recovery using:
HPE Data Protector (9.07) Page 55 of 271
l The Data Protector GUISee "Instant recovery using the GUI" on page 59.
l The Data Protector CLISee "Instant recovery using the CLI" on page 62.
The number of replicas available for instant recovery is limited by the value of the option Number of replicas rotated, which determines the size of the replica set. You can view these replicas in the GUI in the Instant Recovery context by expanding Restore Sessions. Replicas are identified by the backup specification name and the session ID. Other information, such as time when the replica was created, is also provided. Alternately, you can use the Data Protector command omnidbsmis to list sessions. For more information, see the HPE Data Protector Command Line Interface Reference or the omnidbsmis man page.
When instant recovery starts, Data Protector disables the application system. This includes dismounting filesystems and deactivating or exporting volume groups (UNIX). Before this is done, filesystems’ and volume groups’ status is checked, and only mounted filesystems are dismounted and active volume groups are deactivated or exported. At the end of the session, volume groups are reactivated and dismounted filesystems are mounted to the same mount points as were used during backup.
Limitations
l Instant recovery fails in the following situations: l The source volumes do not exist on the disk array any more.
l The source volumes are not presented to the application system.
l If the current configuration of the participating volumes (on Windows systems) or volume groups (on UNIX systems) is different from the volume/volume group configuration that existed at the time of the ZDB session and which was recorded in the SMISDB.
l After instant recovery, restored filesystems are mounted to the same mount points or drive letters on the application system as they were at the backup time, but these mount points or drive letters have other filesystems mounted.
l While an instant recovery session is in progress, you cannot perform a zero downtime backup session that involves the source volumes to which the data is being restored.
For the P6000 EVA Array instant recovery-related limitations and considerations, see the HPE Data Protector Product Announcements, Software Notes, and References and the HPE Data Protector Concepts Guide.
Instant recovery methodsDepending on the snapshot type of the selected replica and the instant recovery options you select in the GUI or CLI, instant recovery can be performed using one of the following methods:
l by switching the disksThis instant recovery method (also referred to as the “switch” method) is available only for replicas which consist of snapclones.
Zero Downtime Administrator's GuideChapter 7: Restore
HPE Data Protector (9.07) Page 56 of 271
l by copying replica data and retaining the source volumesThis instant recovery method (also referred to as the “copy-back” method) is available for replicas of any snapshot type.
l by copying replica data without retaining the source volumesThis instant recovery method (also referred to as the “copy-back” method) is available for replicas of any snapshot type.
Switching the disks
With this instant recovery method, the source volumes are unpresented and the target volumes (replica from the selected session) are presented in the place of the source volumes. During this action, which is called identity exchange, information such as the volume names and comments are also exchanged between the source and target volumes. You can select to retain the old source volumes. However, you cannot retain the replica and cannot perform another instant recovery using the same backup data.
This method may change the physical location of the application data in production. After instant recovery, target volumes become the source volumes, therefore, the performance characteristics of the replica now become the characteristics of the application data. The application starts using the physical disks that were previously used for storing backup data.
Advantages
l Instant recovery is very fast, regardless of the amount of data that was backed up. l The old source volumes can be retained after instant recovery.
Disadvantages
l It is not possible to perform another instant recovery using the same backup data, because the target volumes have become the new source volumes.
l If a replica to be used for instant recovery belongs to a different disk group than its source volumes, the disk group of the replica becomes the disk group of the source volumes after the instant recovery session. In this case, depending on the target disk group characteristics, the source storage volume performance may decrease.
l Storage reliability of the source storage volumes may decrease if the replica to be used for instant recovery has a lower redundancy level.
To perform this type of instant recovery, select the option Switch to the replica in the Data Protector GUI.
Copying replica data and retaining the source volume
With this instant recovery method, the process depends on the snapshot type used for the target volumes:
l If the target volumes are standard snapshots or vsnaps, new snapshots of the source volumes are created inside the same P6000 EVA disk group first, and the source volumes are overwritten with data from the existing replica afterwards. Original data is retained in the newly created snapshots.
l If the target volumes are snapclones, containers are created in the disk group of the source volumes first, the data from the existing replica is restored to the containers, and finally the source volumes are switched with the containers.
Zero Downtime Administrator's GuideChapter 7: Restore
HPE Data Protector (9.07) Page 57 of 271
The replica is also retained in the replica set and another instant recovery using the same backup data can be run.
Note: If snapshots of mirrorclones were created in the ZDB session, during instant recovery, data from mirrorclone snapshots is restored directly to the corresponding original volumes.
Advantages
l Another instant recovery using the same backup data is possible. l The old source volumes are retained after instant recovery. l The performance characteristics of the restored volumes remain the same. This is because the
physical disks and the characteristics of the source storage volumes (size, storage redundancy level) do not change.
Disadvantages
l Instant recovery is not as fast as with the "switching the disks" method. l Instant recovery requires additional storage space in the disk group of the source volumes. l When a replica that consists of standard snapshots or vsnaps is used, if newer replicas than the
selected replica exist in the replica set, the instant recovery process lasts longer because not only the source volumes, but all newer replicas must be updated during the session as well.
To perform this type of instant recovery, select the options Copy replica data to the source location and Retain source for forensics in the Data Protector GUI.
Copying replica data without retaining the source volume
With this instant recovery method, the source volumes are directly overwritten with data from the replica. If the replica consists of snapclones, the source volumes are converted into containers before being overwritten. The source volumes are not retained and if the instant recovery session fails, the original application data residing on the source volumes is lost.
The replica is retained in the replica set and another instant recovery using the same backup data can be run.
Note: If snapshots of mirrorclones were created in the ZDB session, during instant recovery, data from mirrorclone snapshots is restored directly to the corresponding original volumes.
Advantages
l Another instant recovery using the same backup data is possible. l The performance characteristics of the restored volumes remain the same. This is because the
physical disks and the characteristics of the source storage volumes (size, storage redundancy level) do not change.
l No additional storage space is required for instant recovery.
Disadvantages
l Instant recovery is not as fast as with the "switching the disks" method. l Data in the source volumes is lost during instant recovery.
Zero Downtime Administrator's GuideChapter 7: Restore
HPE Data Protector (9.07) Page 58 of 271
l If the instant recovery session fails, the original data in the source volumes to be restored is lost. l When a replica that consists of standard snapshots or vsnaps is used, if newer replicas than the
selected replica exist in the replica set, the instant recovery process lasts longer because not only the source volumes, but all newer replicas must be updated during the session as well.
To perform this type of instant recovery, select the option Copy replica data to the source location and clear the option Retain source for forensics in the Data Protector GUI.
Instant recovery procedure
Prerequisites
l Target volumes used in an instant recovery session should not be presented to any system other than the backup system. You can make Data Protector automatically remove any disallowed target volume presentations by selecting the option Force the removal of all replica presentations in the GUI or by specifying the omnir option -force_prp_replica in the CLI.
l If a disk image backup with filesystems mounted on the selected disks was performed, manually dismount the filesystems on the disks to be restored before disk image instant recovery. If the option Check the data configuration consistency is cleared in the GUI or the omnir option -check_config is not specified in the CLI, the disks are dismounted automatically. In any case, re-mount the filesystems back after instant recovery.
l In HPE Continuous Access + Business Copy (CA+BC) P6000 EVA environments, if the source volumes are included in a data replication (DR) group, instant recovery requires prior manipulation of the DR group and other steps that need to be followed before and after the instant recovery session. For details, see "Instant recovery for in CA+BC configurations" on page 240.
Considerations
l If mirrorclones were used in the corresponding zero downtime backup session, in an instant recovery session the data from the replica is restored directly to the original volumes.
Instant recovery using the GUI
Follow the steps:
1. In the Context List, select Instant Recovery. 2. In the Results Area, select the backup session (replica) from which you want to perform the
recovery. This can be done by selecting: l Backup session ID and name (in the Scoping Pane, expand Restore Sessions and select a
session from the list of ZDB-to-disk and ZDB-to-disk+tape sessions)
l Backup object type (Filesystem, Disk Image, SAP R/3, ...) and backup session name and ID: i. In the Scoping Pane, expand Restore Objects.
Backed up object types are displayed. ii. Expand the object type you want to restore.
All available backup specification used in ZDB-to-disk or ZDB-to-disk+tape sessions for the selected object type are displayed.
Zero Downtime Administrator's GuideChapter 7: Restore
HPE Data Protector (9.07) Page 59 of 271

iii. Expand the backup specification containing the replica set. Available sessions IDs (replicas) are displayed.
Zero Downtime Administrator's GuideChapter 7: Restore
HPE Data Protector (9.07) Page 60 of 271
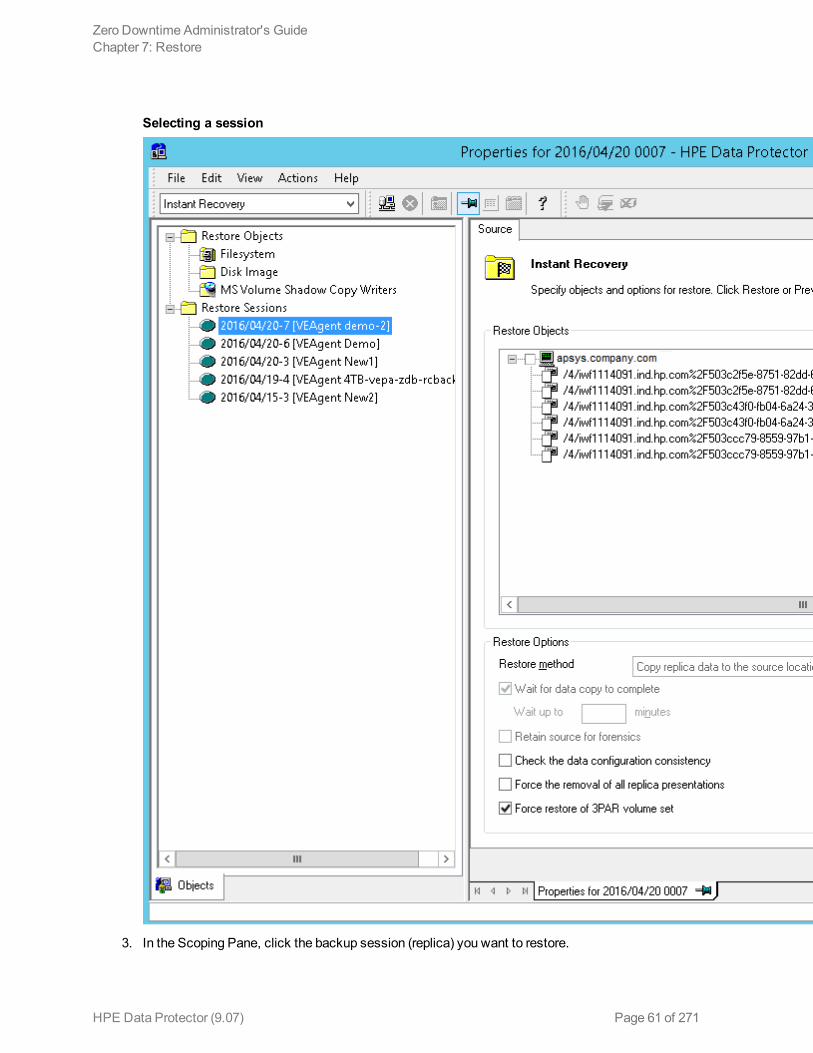
Selecting a session
3. In the Scoping Pane, click the backup session (replica) you want to restore.
Zero Downtime Administrator's GuideChapter 7: Restore
HPE Data Protector (9.07) Page 61 of 271
The application system and its mount points or drive letters representing source volumes backed up during the selected session are displayed. Note that on UNIX all logical volumes inside a volume group and on Windows all partitions on a disk were backed up and if you did not select them all, they are not displayed here.
4. Check the selection box next to the application system to select the session for restore. You cannot select sub-components because instant recovery restores the complete replica.
5. Specify other instant recovery options as desired. For information, see "Selecting a session " on the previous page and "Instant recovery options" below, or press F1.
6. Click Restore to start the instant recovery session or Preview to start the instant recovery preview.
You cannot use the Data Protector GUI to perform instant recovery using backup data crated in a ZDB-to-disk+tape session after the media used in the session has been exported or overwritten. In such circumstances, use the Data Protector CLI instead. Note that the backup media must not be exported or overwritten even after an object copy session.
Instant recovery using the CLI
1. List all available ZDB-to-disk or ZDB-to-disk+tape sessions (identified by the session ID):
omnidbsmis -list -session -ir
From the output, select the backup session you want to restore. 2. Run the following command:
omnir -host ClientName -session SessionID -instant_restore [INSTANT_RECOVERY_OPTIONS]
where the meaning of the options is as follows:
ClientName Application system name.
SessionID Backup session ID ("List all available ZDB-to-disk or ZDB-to-disk+tape sessions (identified by the session ID):" above of this procedure).
For INSTANT_RECOVERY_OPTIONS, see "Instant recovery options " below.For details, see the HPE Data Protector Command Line Interface Reference or the omnidbsmis and omnir man pages.
Instant recovery optionsInstant recovery options
Data Protector GUI/CLI
Function
Restore method Copy replica data to the source location / -copyback
Select this method to copy the replica data of the specified ZDB session to the original storage as follows:
l With the Retain source for forensics option
Zero Downtime Administrator's GuideChapter 7: Restore
HPE Data Protector (9.07) Page 62 of 271

Data Protector GUI/CLI
Function
selected in the GUI or with the option -leave_source specified in the CLI, the process depends on the snapshot type used for the target volumes.If the target volumes are standard snapshots or vsnaps, new snapshots of the source volumes are created inside their P6000 EVA disk group first, the data from the existing replica is restored to the source volumes afterwards. Original data is retained in the newly created snapshots.If the target volumes are snapclones, containers are created in the disk group of the source volumes first, the data from the existing replica is restored to the containers, and finally the source volumes are switched with the containers.
l With the Retain source for forensics option not selected in the GUI or with the option -no_leave_source specified in the CLI, the data from the existing replica is restored to the source volumes without prior operations.
Caution: If the instant recovery session fails, a data loss on the source volumes may occur.
Note: If mirrorclones were used in the corresponding zero downtime backup session, the term “source volumes” as used in both described cases refers to the original volumes, not the mirrorclones.
After the instant recovery session, the replica is not deleted from the replica set, and the information about it is not deleted from the SMISDB. Therefore, the replica is available for another instant recovery session until it is rotated out from the replica set or deleted manually.
This instant recovery method takes about as much time as the replica creation did, but the storage redundancy level is preserved and the source volumes remain in their P6000 EVA disk group.
Default (GUI): selected
Switch to the replica / -switch
This method can only be selected if the target volumes created in the corresponding zero downtime backup session are snapclones.
Zero Downtime Administrator's GuideChapter 7: Restore
HPE Data Protector (9.07) Page 63 of 271
Data Protector GUI/CLI
Function
Select this method to switch the target volumes of the specified ZDB session with the corresponding source volumes. Identifiers (WWNs) of the source volumes are assigned to the target volumes and these volumes are presented in the place of the source volumes. This action is called identity exchange. After the instant recovery session, the replica is not available for another instant recovery session, and the information about it is deleted from the SMISDB. Unless the option Retain source for forensics is selected in the GUI or unless the option -leave_source is specified in the CLI, the source volumes are removed.
This instant recovery method is much faster than the method of copying replica data, since no data needs to be copied. However, after the instant recovery session, the new source volumes may have a lower storage redundancy level and may be located in a different P6000 EVA disk group.
Default (GUI): not selected.
Wait for the replica to complete / wait_clonecopy n
This option is only available if Copy replica data to the source location is selected as the restore method in the GUI or the option -copyback is specified in the CLI.
Before the actual data copy operation, storage space is allocated for replica restoration. Although the copy of the replica is only virtual at that time, it is immediately available for use. In the background, however, a process is still copying data from the replica to the source location (the replica normalization process). This copy process may degrade the disk array performance, and indirectly the application system performance as well. To reduce a potential performance degradation, select this option to make Data Protector wait for the copy to complete before proceeding with the session. In the GUI, you can set the maximum delay with the option Wait up to n minutes.
Additionally, you can control the copy process by setting appropriate omnirc option. See "P6000 EVA Array and 3PAR StoreServ Storage specific options" on page 250.
Default (GUI): not selected.
Wait up to n minutes
This option is only available if the option Wait for the replica to complete is selected.
This option defines the maximum time that Data Protector waits for the
Zero Downtime Administrator's GuideChapter 7: Restore
HPE Data Protector (9.07) Page 64 of 271

Data Protector GUI/CLI
Function
replica data to be copied to the source location before proceeding with the instant recovery session. If the copy process completes before the time period expires, the session continues immediately.
Default (GUI): 60 minutes.
Retain source for forensics / -leave_source | —no_leave_source
If this option is selected in the GUI or the -leave_source option is specified in the CLI, Data Protector preserves original data from the source volumes on the disk array after instant recovery. The original data resides in the source volume snapshots in the same P6000 EVA disk group as the source volumes. For example, you can use this option to investigate why the original data got corrupted.
If this option is not selected in the GUI or the -no_leave_source option is specified in the CLI, the source volumes are either overwritten with data from the replica (with the “copy-back” instant recovery method) or deleted (with the “switch” instant recovery method) during the instant recovery session. In case of the “copy-back” instant recovery method in which the replica used consists of snapclones, the source volumes are converted into containers before being overwritten, provided that the source and target volumes match in size, redundancy level, and belong to the same P6000 EVA disk group.
CAUTION:
If you decide to perform instant recovery by copying replica data and not to preserve source volumes after the session (the option Copy replica data to the source location is selected and the option Retain source for forensics is cleared), and then the instant recovery session fails, a data loss on the source volumes may occur.
Default (GUI): selected.
Check the data configuration consistency / -check_config | —no_check_config
If this option is selected in the GUI or the -check_config option is specified in the CLI, Data Protector performs a sanity check and a comparison of current volume group configuration of the volume groups participating in the instant recovery session and the volume group configuration information kept in the SMISDB after the corresponding zero downtime backup session. If the sanity check fails or the volume group configuration has changed since the zero downtime backup session, the instant recovery session aborts.
Additionally, if the "switch" restore method is chosen and this option is selected for an instant recovery session, and storage redundancy levels of a particular target volume in the replica and its corresponding source volume differ, the session fails.
MC/ServiceGuard clusters: When performing instant recovery to some other node than the one from which data was backed up, you must select
Zero Downtime Administrator's GuideChapter 7: Restore
HPE Data Protector (9.07) Page 65 of 271
Data Protector GUI/CLI
Function
this option in the GUI or specify the -check_config option in the CLI. In such circumstances, the current volume group configuration on the node to which data is to be restored differs from the volume group configuration kept in the SMISDB. Consequently, the SMISDB volume group configuration data is replaced by the current volume group configuration data on the node to which data is to be restored, and the instant recovery session succeeds.
Default (GUI): selected.
Force the removal of all replica presentations / -force_prp_replica
If this option is selected in the GUI or specified in the CLI, and a target volume containing data to be restored is presented to a system other than the backup system, the HPE P6000 / HPE 3PAR SMI-S Agent removes such presentation. If the option is not selected in the GUI or not specified in the CLI, the instant recovery session fails in such circumstances.
If this option is selected in the GUI or specified in the CLI, and any target volume containing data to be restored is presented to the backup system, but cannot be dismounted in an operating system-compliant way, the HPE P6000 / HPE 3PAR SMI-S Agent performs a forced dismount. If the option is not selected in the GUI or not specified in the CLI, the instant recovery session fails in such circumstances.
Default (GUI): not selected.
Instant recovery in HPE CA+BC P6000 EVA configurationsYou can perform instant recovery to restore the data backed up in HPE CA+BC P6000 EVA configurations. For detailed information, see "Instant recovery for in CA+BC configurations" on page 240.
Instant recovery and LVM mirroring
Method 1 – instant recovery with reducing and extending the mirrors
Using this method, you reduce the mirrors to include only the PVG from which the backup was taken. Instant recovery is performed after the volume is reduced, and then the logical volume is mirrored again to include all PVGs.
Caution: Before reducing the mirrors, verify that the mirror which is being reduced is the correct one. Otherwise, depending on the restore options selected, irrecoverable loss of data may happen. It is recommended to record and verify mirroring settings and the output of lvdisplay and vgdisplay commands.
Zero Downtime Administrator's GuideChapter 7: Restore
HPE Data Protector (9.07) Page 66 of 271
1. Reduce the mirrors using the lvreduce command. Only the mirror copy that was backed up should remain.
Example
If the VG01 volume group contains a logical volume lvol1, which contains the disks /dev/dsk/c12t0d0 and /dev/dsk/c12t0d1 (belonging to PVG-2), and /dev/dsk/c15t0d0 and /dev/dsk/c15t0d1 (belonging to PVG-1), reduce the volume to contain only disks from PVG-2:lvreduce -m 0 /dev/vg01/lvol1 /dev/dsk/c15t0d0
lvreduce -m 0 /dev/vg01/lvol2 /dev/dsk/c15t0d1
You can also check the output using the lvdisplay command. 2. Perform instant recovery using the Data Protector GUI or CLI. For instructions, see "Instant
recovery procedure" on page 59.
Note: If the option Check the data configuration consistency option is selected in the GUI or the option -check_config is specified in the CLI, instant recovery fails, as the configuration of the volume group changed. Therefore, clear (GUI) or do not specify (CLI) this option before instant recovery.
3. Extend the mirror to include PVG-1 in the logical volume. The mirror is created again to include both volume groups.
Example
To extend the logical volume to contain two mirrors as in the original setup, execute:
lvextend -m 1 /dev/vg01/lvol1 /dev/dsk/c15t0d0
lvextend -m 1 /dev/vg01/lvol1 /dev/dsk/c15t0d1
This way, lvol1 contains the disks /dev/dsk/c15t0d0 and lvol2 contains the disks /dev/dsk/c15t0d1 as a mirrored copy.
Method 2 – instant recovery with splitting and merging the mirrors
This method uses the splitting functionality of LVM mirroring. Logical volumes are first split to create backup volumes. These backup volumes can be overwritten by the data from the replica created. Later, the backup volumes are merged back.
Caution: Before splitting the mirrors, verify that the mirror which is being split is the correct one. Otherwise, irrecoverable loss of data may happen. It is recommended to record mirroring settings and the output of lvdisplay and vgdisplay commands.
1. Split the mirrors using the lvsplit command. Specify the group where the replica will not be restored by checking vgdisplay and lvdisplay outputs. After the split, volumes in the PVGs are no longer in the mirror, and their backup copies are present.
Example
A volume group VG01 contains logical volumes lvol1 and lvol2, which contain the disks belonging to PVG-1 and PVG-2. To split the logical volume to contain the disks from PVG-2 only, execute:
lvsplit -s back -g PVG1 /dev/vg01/lvol1 /dev/vg01/lvol2
Zero Downtime Administrator's GuideChapter 7: Restore
HPE Data Protector (9.07) Page 67 of 271
The disks from PGV-1 are split and a new logical volume with the suffix back is created. This logical (backup) volume can be accessed at /dev/vg01/lvol1back and /dev/vg01/lvol2back.You can check this using the vgdisplay command, which shows that another pair of logical volumes is now present in the volume group vg01. Similarly, the lvdisplay command shows that the physical disks from PVG-1 are no longer part of lvol1 (they belong to lvol1back).
2. Perform instant recovery using the Data Protector GUI or CLI. For instructions, see "Instant recovery procedure" on page 59.
Note: If the option Check the data configuration consistency option is selected in the GUI or the option -check_config is specified in the CLI, instant recovery fails, as the configuration of the volume group changed. Therefore, clear (GUI) or do not specify (CLI) this option before instant recovery.
3. Merge the mirrors back to their original logical volume using the lvmerge command (the newly created logical volumes, which are merged back, have the back suffix). This way, the mirror is created again to include both volume groups.
Example
The logical volume lvol1 was split before instant recovery. After instant recovery, execute:lvmerge /dev/vg01/lvol1back /dev/vg01/lvol1
lvmerge /dev/vg01/lvol2back /dev/vg01/lvol2
Instant recovery in a clusterFor information on instant recovery with an application running on or a filesystems residing in MC/ServiceGuard or Microsoft server cluster, see "Cluster configurations" on page 230.
Zero Downtime Administrator's GuideChapter 7: Restore
HPE Data Protector (9.07) Page 68 of 271
Chapter 8: Troubleshooting
Before you beginThis chapter lists general checks and verifications plus problems you may encounter when using the P6000 EVA Array integration. For general Data Protector troubleshooting information, see the HPE Data Protector Troubleshooting Guide.
l Ensure that the latest official Data Protector patches are installed. For information on how to verify this, see the HPE Data Protector Help index: “patches”.
l For general Data Protector and integration-specific limitations, as well as recognized issues and workarounds, see the HPE Data Protector Product Announcements, Software Notes, and References.
l For an up-to-date list of supported versions, platforms, and other information, see http://support.openview.hp.com/selfsolve/manuals.
Checks and verifications l On the application and backup systems, examine system errors logged into debug.log file residing
in the default Data Protector log files directory.
Backup problems
Problem
You cannot select the HPE P6000 EVA SMI-S mode in the Data Protector user interface when creating a ZDB backup specification
Action
Check that the HPE P6000 / HPE 3PAR SMI-S Agent integration module is installed on the application system and the backup system. To do that, open the cell_info file located on the Cell Manager in the following directory:
Windows systems: Data_Protector_program_data\Config\server\cell\cell_info
UNIX systems: /etc/opt/omni/server/cell/cell_info
File contents should look similar to the following:
-host "sap002.company.com" -os "HPs800 hp-ux-11.00" -cc A.09.00 -da A.09.00 -ma A.09.00 -SMISA A.09.00
HPE Data Protector (9.07) Page 69 of 271
Problem
The HPE P6000 / HPE 3PAR SMI-S Agent fails to connect to the Cell Manager and retrieve configuration data
[Major] Cannot connect to the Cell Server. (Insufficient permissions. Access denied.)
The HPE P6000 / HPE 3PAR SMI-S Agent is always started as an administrator’s process on the application and backup systems. Therefore, the user who starts it must be the member of admin or operator user groups.
Action
Using the GUI, check if the user is a member of admin or operator user groups. If not, add the user to one of these groups. In addition, ensure that administrators from both the application and backup systems belong to Data Protector admin or operator.
Problem
On an HP-UX system, the HPE P6000 / HPE 3PAR SMI-S Agent fails to communicate with the HPE SMI-S P6000 EVA Array provider using SSL
[Warning]
The SSL connection to the P6000 EVA Array SMI-S provider has failed. The error description returned is: SSL Exception: Random seed file required
On HP-UX systems, Pegasus libraries require the random number generator pseudo device for its SSL-based communication with the SMI-S P6000 EVA Array provider. If the pseudo device is not present, the warning appears.
Action
1. Install the pseudo device in /dev/random on the HP-UX backup system. 2. Re-run the session.
Problem
On Linux systems, hp_rescan fails to resolve P6000 EVA Array 3PAR storage volumes during a scan of SCSI devices
The following error is displayed:
[Major] From: [email protected] "SMISA" Time: 10/26/2013 4:27:18 AM
Failed to resolve a storage volume on the host.
Action
Data Protector uses hp_rescan script from the Fibreutils for HPE Storage Fibre Channel Host Bus Adapter for Linux (HPE fibreutils package).
Zero Downtime Administrator's GuideChapter 8: Troubleshooting
HPE Data Protector (9.07) Page 70 of 271
1. Verify that you have installed the correct HPE fibreutils package for your Linux distribution.Run the following command:
rpm -qa | grep -i fibreutils
Example output
fibreutils-2.3-7.x86_64
If you have installed it, ensure that it is the correct version supported for your Linux distribution. If your system is running an unsupported version, either uninstall it or update it to a supported version.
The supported version of the HPE fibreutils package for your Linux distribution can be obtained from: http://support.hp.com.
Problem
No HPE SMI-S CIMOM login entries are configured within SMISDB
Action
Add an HPE SMI-S CIMOM login information to SMISDB:
omnidbsmis -ompasswd -add ClientName [-ssl] [-port PortNumber] [-user Username] [-passwd Password]
Problem
On a UNIX system, ZDB sessions stop responding for a long time during the resolving of the backup objects on the application system
When resolving the backup objects on the application system, Data Protector sends SCSI inquiries to identify the vendor-specific details of the virtual disk to be replicated. If this virtual disk belongs to a DR group that is in the “failsafe-locked” mode, SCSI inquiries do not return at all. As a result, the session stops responding.
Action
1. Abort the session and stop the ZDB agent processes that stopped responding on the application system.
2. Identify the root cause for the “failsafe-locked” mode of the DR group and fix it by bringing the DR group back into normal operational mode.
Problem
On the application system, dismounting a filesystem fails
Action
Ensure that no other processes use the filesystem to be dismounted. If Stop/quiesce the application command line was specified, check that it stops all processes using the filesystem.
Problem
On a Windows system, replica cannot be mounted to the target location on the backup system
Zero Downtime Administrator's GuideChapter 8: Troubleshooting
HPE Data Protector (9.07) Page 71 of 271
[Major] Filesystem \\.\Volume{9640da9a-6f36-11d7-bd7a-000347add7ba} could not be mounted to C:\mnt. ([145] The directory is not empty.).
When a backup with nested mountpoint objects is run, replica cannot be mounted to the target mountpoint location on the backup system if cleaning of the target mountpoint location fails.
Action
On the backup system, manually empty the directory where filesystems are to be mounted or select the backup option Automatically dismount the filesystems at destination mountpoints. If you choose manual action, and leave the default root mount path c:\mnt in the ZDB backup specification, you should empty the mnt directory.
Problem
On a Windows Server 2003 system, the HPE P6000 / HPE 3PAR SMI-S Agent fails to resolve filesystem objects during the backup system preparation
[Major] Resolving of filesystem G:\ failed. (Details unknown.) [Minor] Preparation of the backup system failed.
The HPE P6000 / HPE 3PAR SMI-S Agent, after presenting a replicated disk and finishing rescan, starts searching filesystem volumes attached to this disk. However, on some Windows Server 2003 systems, more time is needed to recognize filesystem volumes and make them available for mount operations. As a result of this delay, the HPE P6000 / HPE 3PAR SMI-S Agent fails to resolve filesystem objects on the backup system.
Action
Enable volume rescan retries with a defined delay period as follows:
1. On the backup system, set ZDB_VOLUMESCAN_RETRIES and ZDB_POST_RESCAN_DELAYomnirc options to moderately higher values (defaults are 5 retries and 30 seconds delay time).
2. Restart the backup session.
Problem
Data Protector fails to delete a replica from the replica set in a cluster environment
A ZDB session reports the following major error and message:
[Major]
Resolving of storage volume TargetVolumeID has failed. ... [Normal] Some disks are still in use. They will be moved in purge bucket.
This error may occur in a cluster environment with the backup system which is a cluster virtual server. In such circumstances, after a failover, new backup sessions cannot rotate out the replicas on the
Zero Downtime Administrator's GuideChapter 8: Troubleshooting
HPE Data Protector (9.07) Page 72 of 271

active node because the presentations match the passive node. The replicas to be removed are marked with the purge flag in the SMISDB, and you are advised to delete such replicas.
Action
To delete the replicas with the purge flag from the disk array and the SMISDB, perform one of the following actions:
l Manually delete all storage volumes that are marked for purging by running:
omnidbsmis –purge [-force] –host ClientName
where hostname is the name of the node on which you want to perform the purge operation.
Use the -force option to remove the volumes marked for purging even if they are presented to a system.
l Perform manual failover and run another ZDB session. The session will delete all the volumes marked for purging on the new active node.
Problem
On an HP-UX system, backup session freezes during either preparation or resuming of the backup system
One of the following messages appears:
[Normal] Starting drive discovery routine.
[Normal] Resuming the backup system.
During the backup system preparation, Data Protector adds new devices to the Secure Path control and runs device scanning. When resuming the backup system, Data Protector removes devices from the Secure Path control and runs device scanning.
If some other process runs Secure Path commands or device scanning at the same time (during either preparation or resumption), the session may freeze. To identify this problem, run the ps -ef command several times on the backup system and check if any ioscan or spmgr processes persist in the output.
Action
Abort the backup session and stop the hanging ioscan and spmgr processes.
If processes cannot be stopped, restart the backup system and clean it up manually:
1. On the backup system, run spmgr display to display the target volumes (created in the failed session) left under the Secure Path control.
2. Remove such target volumes from the Secure Path control using spmgr delete. 3. Run spmgr update, and then follow reported instructions to make changes persistent across
system restart processes. 4. Using the SMI-S P6000 EVA Array provider user interface, delete all presentations attached to
removed target volumes.
Problem
Data Protector zero downtime backup session fails while resolving the source volumes
Zero Downtime Administrator's GuideChapter 8: Troubleshooting
HPE Data Protector (9.07) Page 73 of 271
On a Windows system, after a new Continuous Access (CA) link is created for a source volume, the ZBD sessions that involve this volume fail. The root cause of the problem is inability to resolve the newly created CA link, because the SMI-S P6000 EVA Array provider cache is not up to date. You must explicitly refresh the provider cache before invoking the ZDB session.
Action
Perform any of the following steps before restarting the session:
l On the EVA command view system, run the following command:
CLIRefreshTool.bat
The default installation directory of the command is C:\Program Files\Hewlett-Packard\SMI-S\CXWSCimom\bin.
l On the EVA command view system, restart the SMI-S P6000 EVA Array provider by restarting the HP StorageWorks CIM Object Manager service.
l Wait for 30 minutes to allow for the SMI-S P6000 EVA Array provider cache to get updated.
Problem
On Linux systems, a backup to LVM volumes fails.
The option Leave the backup system enabled was selected for the backup. The following error message is displayed:
[Major] From: [email protected] "SMISA" Time: 12/06/2013 1:06:26 PM
It is possible that duplicated LVM UUIDs and/or names will appear on the backup system.
Session will abort.
Action
Set the lvm.conf file parameters properly. For more information, see the "Prerequisites" on page 19.
Problem
A warning message is displayed in the Windows event logs when using the SMI-S P6000 EVA Array with two or more number of replicas rotated, and Keep the replica after the backup and Leave backup system enabled options selected.
Action
No action is required as this warning does not have a negative impact on the backup. The warning message appears when two or more number of replicas are rotated, and Keep the replica after the backup and Leave backup system enabled options are selected.
Instant recovery problems
Problem
Instant recovery fails
Zero Downtime Administrator's GuideChapter 8: Troubleshooting
HPE Data Protector (9.07) Page 74 of 271

The problem may occur if the option Force the removal of all replica presentations is not selected and a target volume from the selected replica is presented to some system other than the backup system or the target volume cannot be dismounted.
Action
Select the option Force the removal of all replica presentations and restart the instant recovery session.
Problem
On a Windows system, instant recovery to a different cluster node fails
[Major] Filesystem volume_name could not be dismounted from drive_letter ([2] The system cannot find the file specified.). [Critical] Failed to disable the application system. [Critical] Failed to resolve objects for Instant Recovery.
On Windows systems, the automatic preparation of the application system cannot match clustered volumes from one cluster node to the volumes on another node.
Action
Disable the automatic preparation of the application system:
1. On the application system, enable the ZDB_IR_MANUAL_AS_PREPARATION options (see "Appendix" on page 228) and manually dismount the volumes to be restored.
2. Start instant recovery. 3. After instant recovery, manually mount restored volumes.
Problem
On a Windows system, CA+BC instant recovery fails
[Major]
From: [email protected] "SMISA" Time: 11/6/2013 12:25:32 PMSuccessfully resolved a data replication group Storage volume : 50014380013BD520\\Virtual Disks\DPQA\iwf1112071_DR1\ACTIVE Group name : <DR Group name> [Major]
From: [email protected] "SMISA" Time: 11/6/2013 12:25:32 PM [236:7437] A storage volume is in a data replication group. Restore is not possible.
On a Windows system, after a new Continuous Access (CA) link is removed for a source volume, the ZBD sessions that involve this volume fail. The root cause of the problem is the inability to resolve that the volumes was recently removed from the DR group, because the SMI-S P6000 EVA Array provider cache is not up to date. You must explicitly refresh the provider cache before invoking the ZDB session.
Zero Downtime Administrator's GuideChapter 8: Troubleshooting
HPE Data Protector (9.07) Page 75 of 271
Action
Perform any of the following steps before restarting the session:
l On the EVA command view system, run the following command:
CLIRefreshTool.bat
The default installation directory of the command is C:\Program Files\Hewlett-Packard\SMI-S\CXWSCimom\bin.
l On the EVA command view system, restart the SMI-S P6000 EVA Array provider by restarting the HP StorageWorks CIM Object Manager service.
l Wait for 30 minutes to allow for the SMI-S P6000 EVA Array provider cache to get updated.
Zero Downtime Administrator's GuideChapter 8: Troubleshooting
HPE Data Protector (9.07) Page 76 of 271

HPE Data Protector (9.07)
Page 77 of 271
Part 3: HPE P9000 XP Disk Array FamilyThis part describes how to configure the Data Protector HPE P9000 XP Disk Array Family integration, how to perform zero downtime backup and instant recovery using the HPE P9000 XP Disk Array Family integration, and how to resolve the integration-specific Data Protector problems.
Chapter 9: Configuration and maintenance
IntroductionThis chapter describes the configuration of the Data Protector HPE P9000 XP Disk Array Family (HPE P9000 XP Disk Array Family) integration. It also provides information on the ZDB database and on how to maintain the integration.
Prerequisites
l Obtain or install:P9000 XP Array components: l RAID Manager Library on the application system and the backup system.
RAID Manager Library is disk array firmware-dependent. For information on which version of RAID Manager Library to use, see the latest support matrices at http://support.openview.hp.com/selfsolve/manuals. For installation instructions, see the RAID Manager Library documentation.Note that snapshots are supported only by the disk array microcode 50-04-20 and newer versions, and only by RAID Manager Library 01.15.00 and newer versions.To enable Data Protector to use a disk array through a command device which is operating in the user authentication mode (available only with specific disk array models), you must use a specific RAID Manager Library version. For the version number and additional information, see the latest support matrices at http://support.openview.hp.com/selfsolve/manuals.
l HPE Continuous Access (CA) P9000 XP and/or HPE Business Copy (BC) P9000 XP license and microcode.
l An appropriate multi-path device management software.The software must be installed on the application system and the backup system.HP-UX systems: HPE Secure Path (HP-UX)On HP-UX 11.31 systems, the multi-path device management software is not required since the operating system has native device multi-pathing capability.Linux systems: HPE Device Mapper Multipath Enablement Kit for HPE Disk Arrays 4.2.0 or newer versionTo configure the installed multi-path device management software:
i. Start the multipath daemon. ii. Execute the following command to configure the daemon so that it gets started during
system startup:
HPE Data Protector (9.07) Page 78 of 271

Red Hat Enterprise Linux: chkconfig multipathd onSUSE Linux Enterprise Server: chkconfig boot.multipath on
Windows systems: HPE MPIO Full Featured DSM (Device Specific Module) for HPE P9000 XP Disk Array Family
Data Protector licenses and components: l Appropriate zero downtime backup extension and instant recovery extension licenses-to-use
(LTU).
l HPE P9000 XP Agent on the application system and the backup system.
For installation and upgrade instructions and licensing information, see the HPE Data Protector Installation Guide.
l Make sure that the same operating system version is installed on the application system and the backup system.
l If the application system and the backup system reside in a Data Protector cell with secured clients, ensure that access between both systems is allowed in both directions.
l Make sure the SAN environment and the P9000 XP Array storage systems are properly configured: l Primary volumes (P-VOLs) are available to the application system.
l Secondary volumes (S-VOLs) of the desired type (mirror, snapshot storage volume) are available to the backup system.
l A pair relationship is defined between both sets of volumes (LDEVs) with HPE P9000 XP Remote Web Console (formerly known as HPE Command View XP).
l LUNs are assigned to the respective ports.
l On HP-UX 11.31 systems, if you use VxVM disk groups, enable the legacy Device Special Files format.
Prerequisites for Linux systems
l For each configured S-VOL, follow the steps: a. Put the corresponding LDEV pair into the SUSPENDED state, that is, suspend the pair
relationships between the S-VOL and its P-VOL. b. If multiple S-VOLs are in a pair relationship with its P-VOL, change the UUID of the S-VOL by
executing the command pvchange -u PVName on the backup system, where PVName is the LVM physical volume name of the S-VOL.
Prerequisites for HP-UX
From Data Protector 9.05 onwards, only for SSEA backups, it is required to have LVM on HP-UX updated to the latest OS patch where “lvmadm” command is present. Hence, HPUX must be “HP-UX 11iv3 March 2008” or newer.
Zero Downtime Administrator's GuideChapter 9: Configuration and maintenance
HPE Data Protector (9.07) Page 79 of 271
Prerequisites for Windows systems
l On Windows Server 2003 and Windows Server 2008 systems, disable the operating system option Automatic mounting of new volumes. In the Command Prompt window, execute the command mountvol /N.
l Do not manually mount target volumes that were created by Data Protector.For additional prerequisites for using HPE P9000 XP Disk Array Family with the Data Protector Microsoft Volume Shadow Copy Service integration, see the HPE Data Protector Integration Guide for Microsoft Volume Shadow Copy Service.
Limitations l In cluster environments, the backup system must not be in the same cluster with the application
system. Additionally, the backup system cannot be the cluster virtual server, it can only be a cluster node.
l Zero downtime backup using snapshots is only supported in HPE Business Copy (BC) P9000 XP and HPE Continuous Access + Business Copy (CA+BC) P9000 XP configurations.
l Instant recovery is only supported in HPE Business Copy (BC) P9000 XP configurations. l Using split mirror restore, you can only restore filesystems and disk images backed up in HPE
Business Copy (BC) P9000 XP configurations, including their single-host (BC1) implementations. Other Data Protector backup object types are not supported.
For information on any of the following items, see the HPE Data Protector Product Announcements, Software Notes, and References:
l General Data Protector and integration-specific limitations l Supported platforms and integrations l Supported backup and connectivity topologiesFor information on supported configurations, see the HPE Data Protector Concepts Guide.
ZDB database – XPDBZDB database for the Data Protector HPE P9000 XP Disk Array Family integration is referred to as XPDB. It keeps information about:
l LDEV pairs that are split (put into the SUSPENDED state). This information includes: l ID of the ZDB session that involved handling the LDEV pair.
l LDEV, volume group, and filesystem configuration.
l CRC information calculated during the session.
l IR flag (indicating that the target volume can be used for instant recovery)
l Filesystem and volume management system information.
Zero Downtime Administrator's GuideChapter 9: Configuration and maintenance
HPE Data Protector (9.07) Page 80 of 271
The information is written to the XPDB when a LDEV pair is put into the SUSPENDED state, and is deleted from the XPDB when a LDEV pair is resynchronized (is put into the PAIR state). During resynchronization, prior version of data is overwritten.
Volume group configuration and the CRC information stored in XPDB is compared to the volume group configuration and the CRC information obtained during an instant recovery session. If these items do not match, the session fails.
Objects and their configuration during backup and restore sessions are kept in the XPDB for replica set rotation and instant recovery. Only the LDEV pairs tracked in the XPDB can be used for instant recovery.
XPDB resides on the Cell Manager in:
Windows systems: Data_Protector_program_data\server\db80\xpdb
UNIX systems: /var/opt/omni/server/db80/xpdb
Configuring the integrationBefore you start with the configuration, make sure the prerequisites listed in "Introduction" on page 78 are fulfilled. In addition, do the following:
Solaris systems: Run the Sun format utility to label and format the paired LDEVs (on both the application system and the backup systems). For information, see the HPE Disk Array XP Operating System Configuration Guide: Sun Solaris.
HPE BC P9000 XP configurations: Connect the application system and the backup system to the same disk array unit.
When using first-level mirrors or snapshot volumes, primary LDEVs (P-VOLs) must be connected to the application system and the paired secondary LDEVs (S-VOLs) must be connected to the backup system.
HPE CA P9000 XP configurations: Connect the application system to the Main Control Unit (MCU), and the backup system to the Remote Control Unit (RCU). ESCON links provide communication links between the P9000 XP Array MCU and RCU.
Main LDEVs (P-VOLs) must be connected to the application system and have paired disks (S-VOLs) assigned. Paired LDEVs (S-VOLs) in the remote disk array must be connected to the backup system.
Combined (HPE CA+BC P9000 XP) configurations: Connect the application system to the MCU, and the backup system to the RCU.
Main LDEVs (P-VOLs) must be paired to remote volumes in the RCU (S-VOLs). S-VOLs also function as HPE BC P9000 XP primary volumes (P-VOLs) and must be paired to local copies (HPE BC P9000 XP S-VOLs):
l Windows systems: Connect only HPE BC P9000 XP S-VOLs to the backup system. l HP-UX systems: Connect only HPE BC P9000 XP S-VOLs to the backup system. If HPE CA
P9000 XPS-VOLs are connected as well, special care must be taken if /etc/lvmtab is lost in this configuration: use vgscan to recreate the volume groups and vgreduce to delete potentially added pvlinks to the S-VOLs. Re-import or re-create the volume groups to ensure the configuration is correct.
l Linux systems: Connect only HPE BC P9000 XP S-VOLs to the backup system.
Zero Downtime Administrator's GuideChapter 9: Configuration and maintenance
HPE Data Protector (9.07) Page 81 of 271
HP-UX LVM mirroring: Use the physical volume groups mirroring of LDEVs to ensure that each logical volume is mirrored to an LDEV on a different I/O bus. This arrangement is called PVG-strict mirroring. Disk hardware must be already configured, so that each secondary LDEV is connected to the system on a different bus (not the bus used for the primary LDEV).
1. Create the volume group with the LDEVs that have S-VOLs assigned using vgcreate. LVM mirror primary volumes must be the LDEVs that have their S-VOLs.
2. Extend the volume group with LDEVs that have no S-VOLs assigned using vgextend. LVM mirror secondary volumes must be the LDEVs that have no S-VOLs.
Note: When using LVM mirroring with the SSEA integration, the devices in the logical volume can also be non-XP devices, such as IBM or EVA.
For more information on LVM mirroring, see the document Managing Systems and Workgroups: A Guide for HP-UX System Administrators.
To configure the integration:
l Set the P9000 XP Array command devices. See "Command device handling" below. l If needed, set the P9000 XP LDEV exclude file. See "P9000 XP LDEV exclude file" on page 84. l To enable zero downtime backup and instant recovery sessions that involve a disk array which is
operating in the user authentication mode, configure the user authentication data. See "Configuring the user authentication data" on the next page.
Command device handlingHPE P9000 XP Disk Array Family command devices are dedicated volumes in the disk arrays which act as the interface between management applications and the storage systems. They cannot be used for data storage and only accept requests for operations that are then executed by the disk arrays. A command device is needed and used by any process requiring access to a P9000 XP Array. Data about all command devices detected by Data Protector is stored in the XPDB for the purpose of avoiding concurrent overallocation of each particular command device.
Whenever a ZDB session is started, the Data Protector HPE P9000 XP Agent queries the XPDB for a list of command devices, and updates it if needed. When the first ZDB session is started, the HPE P9000 XP Agent generates a list of command devices connected to every application and backup system in the cell. All subsequent sessions automatically update the list if the configuration of command devices has changed.
Every command device is assigned an instance number (starting from 301) and the system name (hostname) having access to it. If a command device can be accessed from more than one system, the HPE P9000 XP Agent recognizes that the command device is assigned to another system; such a command device-hostname combination gets the next available instance number.
Thus, every P9000 XP Array storage system attached to the application and backup systems has a list of command devices and systems having access to them (together with an instance number).
Below is an example of command device entries in the XPDB:
Serial#CU:Ldev(LDEV)InstSystem ====================================================== 3537100:67(103)301application.system1.com 3537100:67(103)302backup.system.com
Zero Downtime Administrator's GuideChapter 9: Configuration and maintenance
HPE Data Protector (9.07) Page 82 of 271
3537200:68(104)301application.system2.com 3537300:69(105)301application.system3.com
To be able to control which command device and instance number should be used on a specific system, you can disable the automatic update of the command device list in the XPDB. To disable the automatic update:
1. Set the SSEA_QUERY_STORED_CMDDEVS omnirc option to 1. 2. Use the omnidbxp command to manually add, list, remove, and update the command devices.
For the command syntax and examples, see the HPE Data Protector Command Line Interface Reference or the omnidbxp man page
If you decide to disable the automatic update, the initial list of command devices is still created in the XPDB during the first ZDB session. For subsequent backup sessions, the Data Protector HPE P9000 XP Agent behavior is as follows:
l Whenever an application system or a backup system needs access to the P9000 XP Array storage system during a session, it uses the first assigned command device with the instance number from the list.
l If the command device fails, the next device from the list is used. l If all devices fail, the session fails. l If successful, the command device is used by the system until the end of the session, and the list of
command devices is used for all consecutive sessions.
Configuring the user authentication dataSpecific disk array models of the HPE P9000 XP Disk Array Family provide increased security with authorization verification that involves user and resource groups, roles, and user authenticity verification. Authorization verification is enabled by a special operating mode called user authentication mode. When an application, for example the Data Protector HPE P9000 XP Agent, communicates with a disk array which is operating in this mode, the application must supply appropriate user credentials in order for queries and modifications of the disk array configuration or its resources to succeed. On the disk arrays on which the conventional operating mode is still available for compatibility reasons, the user authentication mode is disabled by default.
Authorization system of a disk array on which the user authentication mode is available defines a fixed set of roles that belong to different task groups: security-related, storage-related, and maintenance-related tasks. It assigns a particular subset of roles and a particular set of resource groups to each user group. While there are several preconfigured user groups, which can be used immediately, you can easily create additional ones. Each disk array user account can belong to multiple user groups. Similarly, each user group can have multiple resource groups assigned, and each resource group can belong to multiple user groups. Each time an application attempts to start a specific operation on a specific resource of the disk array, the authorization system first determines the user account based on the supplied user credentials. It then checks if any user group the user account belongs to is allowed to perform the operation on the resource. If user credentials are not supplied, the disk array always rejects to execute the operation.
The operating mode setting is actually a command device property. For example, if a particular backward compatible disk array has two command devices configured, one can operate in the conventional mode and the other in the user authentication mode. It therefore depends on the
Zero Downtime Administrator's GuideChapter 9: Configuration and maintenance
HPE Data Protector (9.07) Page 83 of 271

configuration of the command device used whether the application should supply user credentials to successfully start the requested operation.
For more information on using the HPE P9000 XP Disk Array Family authorization system, see the HPE P9000 Remote Web Console User Guide and other parts of the HPE P9000 XP Disk Array Family documentation set.
User authentication data and the XPDB
To enable the HPE P9000 XP Agent to perform zero downtime backup (ZDB) and instant recovery (IR) sessions using a command device for which the user authentication mode is enabled, you must add appropriate user credentials to the ZDB database (XPDB) in advance. The credentials must belong to a disk array user account which has the Local Copy, the Remote Copy, or both roles assigned, depending on the HPE P9000 XP Disk Array Family configuration. The HPE P9000 XP Agent then reads the credentials from the XPDB each time such a ZDB or IR session is started. User credentials are bound to a specific disk array serial number. For each particular serial number, you can add user credentials of a single disk array user account. To add and manage user credentials in the XPDB, use the Data Protector omnidbxp command.
Configuration procedure
To properly add the required user credentials for a specific disk array that will be involved in the ZDB and IR sessions, follow the steps:
1. Identify the serial number of the disk array. 2. Identify which disk array volumes (LDEVs) will be involved in the ZDB and IR sessions. 3. Identify which disk array user group has been granted adequate access to all volumes that you
identified in the previous step 4. Choose a disk array user account that belongs to the disk array user group from the previous step.
Identify and write down its user name and password that you will need in the next step. 5. Using the omnidbxp -user -add command, add the user name and password that you acquired
in the previous step to the XPDB, providing the disk array serial number you identified in step 1 of this procedure.
For command syntax and usage examples, see the omnidbxp reference page in the HPE Data Protector Command Line Interface Reference or the omnidbxp man page.
6. Using the omnidbxp -user -check command, verify that the HPE P9000 XP Agent can connect to the disk array using the configured user authentication data.
For more information on performing other tasks related to management of user credentials in the XPDB, see the omnidbxp reference page in the HPE Data Protector Command Line Interface Reference or the omnidbxp man page.
P9000 XP LDEV exclude fileYou can reserve certain LDEVs for purposes other than Data Protector backup and restore. A session is aborted if the participating replica contains an excluded LDEV.
Disabled secondary LDEVs (S-VOLs) are listed in the P9000 XPLDEV exclude file on the Cell Manager:
Zero Downtime Administrator's GuideChapter 9: Configuration and maintenance
HPE Data Protector (9.07) Page 84 of 271
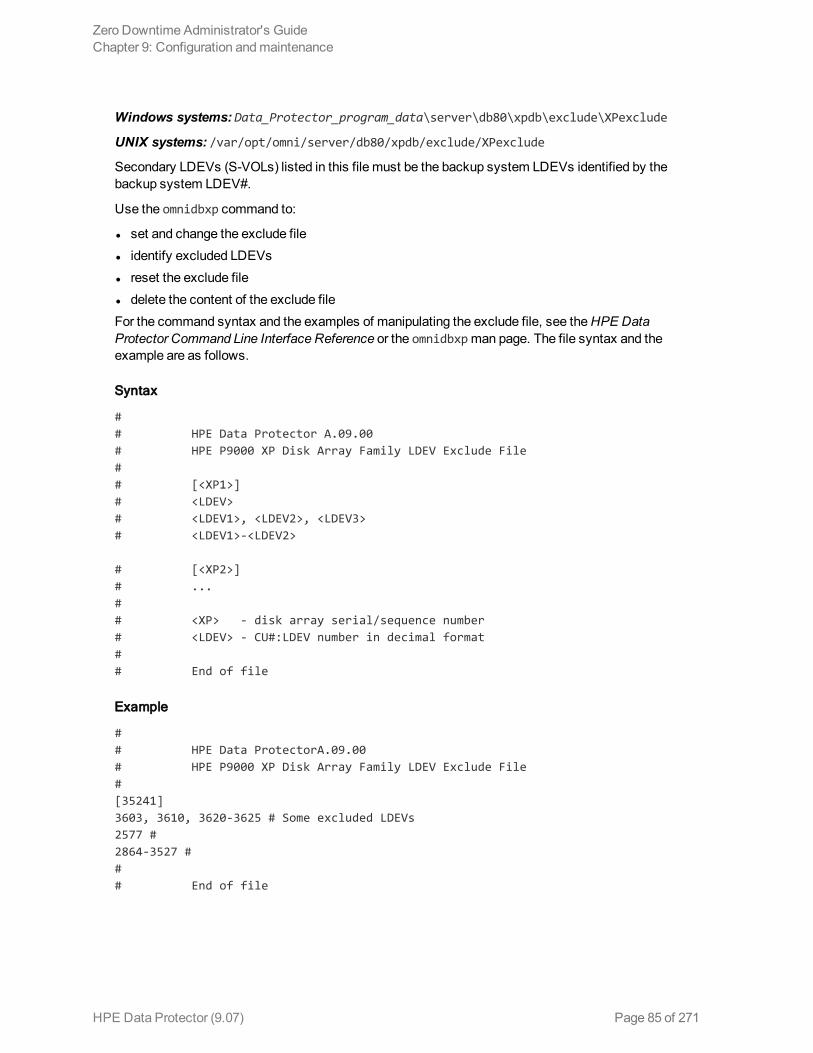
Windows systems: Data_Protector_program_data\server\db80\xpdb\exclude\XPexclude
UNIX systems: /var/opt/omni/server/db80/xpdb/exclude/XPexclude
Secondary LDEVs (S-VOLs) listed in this file must be the backup system LDEVs identified by the backup system LDEV#.
Use the omnidbxp command to:
l set and change the exclude file l identify excluded LDEVs l reset the exclude file l delete the content of the exclude fileFor the command syntax and the examples of manipulating the exclude file, see the HPE Data Protector Command Line Interface Reference or the omnidbxp man page. The file syntax and the example are as follows.
Syntax
# # HPE Data Protector A.09.00 # HPE P9000 XP Disk Array Family LDEV Exclude File # # [<XP1>] # <LDEV> # <LDEV1>, <LDEV2>, <LDEV3> # <LDEV1>-<LDEV2> # [<XP2>] # ... # # <XP> - disk array serial/sequence number # <LDEV> - CU#:LDEV number in decimal format # # End of file
Example
# # HPE Data ProtectorA.09.00 # HPE P9000 XP Disk Array Family LDEV Exclude File # [35241] 3603, 3610, 3620-3625 # Some excluded LDEVs 2577 # 2864-3527 # # # End of file
Zero Downtime Administrator's GuideChapter 9: Configuration and maintenance
HPE Data Protector (9.07) Page 85 of 271

Automatic configuration of the backup systemWhen you start a ZDB session, Data Protector performs necessary configuration steps, such as configuring volume groups and filesystems on the backup system. Based on the volume group, filesystem, and mount point configuration on the application system, Data Protector creates the same volume group and filesystem structure on the backup system and mounts these filesystems during a ZDB-to-tape or ZDB-to-disk+tape session.
For more information on the backup system mountpoint creation, see "Appendix" on page 228.
Maintaining the integrationMaintenance tasks include querying the information kept in XPDB, in particular:
l available zero downtime backup sessions l backup system LDEVs involved in a particular session l backup system LDEVs stored in the XPDB l XPDB information about particular LDEV pairs
You can retrieve the information stored in the XPDB using the omnidbxp command. For the command syntax and usage examples, see the HPE Data Protector Command Line Interface Reference or the omnidbxp man page.
Zero Downtime Administrator's GuideChapter 9: Configuration and maintenance
HPE Data Protector (9.07) Page 86 of 271
Chapter 10: Backup
IntroductionThis chapter describes configuring filesystem and disk image ZDB using the Data Protector GUI.
You should be familiar with the HPE P9000 XP Disk Array Family concepts and procedures and basic Data Protector ZDB and instant recovery functionality. See the HPE P9000 XP Disk Array Family documentation and the HPE Data Protector Concepts Guide.
ZDB typesUsing the P9000 XP Array integration, you can perform:
l ZDB to diskThe replica produced is kept on a disk array until reused. This replica becomes part of the replica set and can be used for instant recovery.ZDB to disk is performed if the option Track the replica for instant recovery is selected in a ZDB backup specification, and To disk is selected when running/scheduling a backup.ZDB to disk is only possible using the HPEBC P9000 XP configuration.
l ZDB to tapeThe replica produced is streamed to backup media, typically tape, according to the tape backup type you have selected (Full, Incr, Incr1-9).This replica is deleted after backup if the option Keep the replica after the backup is not selected in a ZDB backup specification. If this option is selected, the replica remains on a disk array until reused and becomes part of the replica set. However, it cannot be used for instant recovery.
l ZDB to disk+tapeThe replica produced is kept on a disk array until reused and is also streamed to backup media according to the tape backup type you have selected (Full, Incr, Incr1-9). This replica becomes part of the replica set and can be used for instant recovery.ZDB to disk+tape is performed when the option Track the replica for instant recovery is selected in a ZDB backup specification, and To disk+tape is selected when running/scheduling a backup.ZDB to disk+tape is only possible using the HPE BC P9000 XP configuration.
Replica typesUsing the P9000 XP Array integration, you can create the following replica types:
l split mirrorThis replica type is supported by all disk array models of the HPE P9000 XP Disk Array Family that are officially supported by Data Protector.
l snapshot
HPE Data Protector (9.07) Page 87 of 271

This replica type is supported by specific P9000 XP disk array microcode versions and specific RAID Manager Library versions only. For details, see the prerequisite list in "Introduction" on page 78.
You cannot directly select a replica type when configuring a Data Protector ZDB backup specification. You must chose the replica type in advance when creating secondary LDEVs (S-VOLs) with HPE P9000 XP Remote Web Console (formerly known as HPE Command View XP). During ZDB sessions, the Data Protector HPE P9000 XP Agent always uses the S-VOLs (the target volumes specified in the ZDB backup specification) in the same way, regardless of their type – mirror or snapshot storage volume. Thus, you can even create replica sets of which specific replicas are mirror copies and others are snapshots.
In general, both replica types are available for all ZDB types, for instant recovery, and for split mirror restore. However, a specific limitation applies to the HPE Continuous Access (CA) P9000 XP configurations. See the limitation list in "Introduction" on page 78.
Backup conceptsP9000 XP Array zero downtime backup consists of two phases:
1. The data from P-VOLs presented to the application system is synchronized with the S-VOLs presented to the backup system.During this phase, the synchronization is performed on the level of participating volume groups (UNIX systems) or disks (Windows systems). Therefore, if multiple filesystems/disk images are configured in the same volume group or on the same disk, the entire volume group or disk (all filesystems or disk images in the group or on the disk) is synchronized to the backup system regardless of the objects selected for backup.
2. Synchronized backup system data is backed up to a backup device.During this phase, only the objects selected for backup are backed up.
Note: With ZDB to disk, the second phase does not occur. Backed up data can only be restored using instant recovery.
This concept enables a restore of selected objects for a split mirror restore and restore from backup media on LAN, but not for instant recovery.
With instant recovery, the links from the application to backup system are not synchronized before the restore, whereas with a split mirror restore they are, thus enabling the restore of selected objects by establishing the current state of the application system data on the backup system, and then restoring selected objects to the backup system and resynchronizing the backup system to the application system.
Creating backup specifications
Considerations
l Consider all limitations that apply to the Data Protector P9000 XP Array integration. See the HPE Data Protector Product Announcements, Software Notes, and References, the HPE Data Protector Concepts Guide, and the limitation list in "Introduction" on page 78.
Zero Downtime Administrator's GuideChapter 10: Backup
HPE Data Protector (9.07) Page 88 of 271

Procedure
To create a ZDB backup specification for a disk array of the HPE P9000 XP Disk Array Family using the Data Protector GUI (Data Protector Manager), follow the steps:
1. In the Context List, select Backup. 2. In the Scoping Pane, expand Backup Specifications. Right-click Filesystem (for both object
types: filesystem and disk image) and click Add Backup.The Create New Backup dialog box appears.In the Filesystem pane, select the Blank Filesystem Backup template or some other template which you might have created. For information on templates, see the HPE Data Protector Help index: “backup templates”.Select Snapshot or split mirror backup as Backup type and HPE P9000 XP as Sub type. For descriptions of options, press F1.Click OK.
3. Under Client systems, select Application system and Backup system. If the application system is part of a server cluster, select the virtual server.
4. Under Mirror type, select the P9000 XP Array configuration, and specify a value for MU number(s). The maximum number of replicas that can be created for the same source volumes is different for mirror copies and snapshots. Both limitations are imposed by the P9000 XP Array storage system.P9000 XP Array backup options
5. Under Replica management options, select the desired options.ZDB to disk, ZDB to disk+tape:Select the option Track the replica for instant recovery to enable instant recovery.
Note: You can choose a ZDB-to-disk session or a ZDB-to-disk+tape session by selecting an
Zero Downtime Administrator's GuideChapter 10: Backup
HPE Data Protector (9.07) Page 89 of 271
appropriate value for the Split mirror/snapshot backup option when running or scheduling a ZDB session based on this ZDB backup specification. See "Scheduling ZDB sessions" on page 228.
ZDB to tape:Leave the option Track the replica for instant recovery cleared.To preserve the replica on the disk array after the ZDB session, leave the option Keep the replica after the backup selected. To remove the replica after the session, clear this option.
6. Under At the start of the session and At the end of the session, specify how states of the source volumes and the corresponding target volumes are handled during zero downtime backup sessions.
7. Specify other zero downtime backup options as desired. For information, see "Backup options " on page 92 or press F1.
8. Select the desired backup objects.Filesystem backup: Expand the application system and select the objects to be backed up. Note that all drive letters or mount points that reside on the system are displayed. You must select only the objects that reside on the disk array, otherwise the ZDB session will fail.To ensure that instant recovery succeeds and the environment is consistent after instant recovery, select all volumes on a disk (Windows systems) or all logical volumes of a volume group (UNIX systems) to be backed up. Even if you do not select an entire disk or volume group, the backup will succeed, but instant recovery may experience issues during configuration check of the environment. The configuration check can be disabled by clearing the option Check the data configuration consistency in the GUI or not specifying the option -check_config in the CLI when preparing for an instant recovery session. If this option is cleared (GUI) or not specified (CLI), the entire disk or volume group will be overwritten during instant recovery.Click Next.Disk image backup: Click Next.
9. Select devices. Click Properties to set device concurrency, media pool, and preallocation policy. For information on these options, click Help.To create additional copies (mirrors) of backup, specify the desired number of mirrors by clicking Add mirror or Remove mirror. Select separate devices for the backup image and each mirror.For information on object mirroring, see the HPE Data Protector Help index: “object mirroring”.
Note: Object mirroring and object copying are not supported for ZDB to disk.
Click Next. 10. In the Backup Specification Options group box, click Advanced and then the HPE P9000 XP tab
to open the P9000 XP Array backup options pane.You can specify Application system options and modify all other options, except Application system and Backup system (note that you can change them after you save the ZDB backup specification). See "Backup options " on page 92 or press F1.In the Filesystem Options group box, click Advanced and specify filesystem options as desired. For information, press F1.
Zero Downtime Administrator's GuideChapter 10: Backup
HPE Data Protector (9.07) Page 90 of 271
Windows systems: To configure a ZDB backup specification for incremental ZDB sessions, select the Do not use archive attribute filesystem option in the WinFS Options pane to enhance the incremental ZDB behavior. For details, see "Backup options " on the next pageClick Next.
11. Following the wizard, open the scheduler to schedule the ZDB sessions. For more information, see "Scheduling ZDB sessions" on page 228 or press F1.Click Next.
12. In the Backup Object Summary page, specify additional options.Filesystem backup: You can modify options for the listed objects by right-clicking an object and then clicking Properties. For information on the object properties, press F1.Disk image backup: Follow the steps: a. Click Manual add to add disk image objects. b. Select Disk image object and click Next. c. Select the client system. Optionally, enter the description for your object. Click Next. d. Specify General Object Options and Advanced Object Options. For information on these
options, press F1. e. In the Disk Image Object Options window, specify disk image sections.
Windows systems:Use the format
\\.\PHYSICALDRIVE#
where # is the current number of the disk to be backed up.For information on how to identify current disk numbers (physical drive numbers), see the HPE Data Protector Help index: “disk image backups”.HP-UX and Solaris systems:Specify a disk image section:
/dev/rdsk/filename, for example: /dev/rdsk/c2t0d0On HP-UX 11.31 systems, the new naming system can be used:
/dev/rdisk/disk#, for example /dev/rdisk/disk2Specify a raw logical volume section:
/dev/vgnumber/rlvolNumber, for example: /dev/vg01/rlvol1Linux systems:Specify a disk image section:
/dev/Filename, for example: /dev/dm-10To ensure that instant recovery succeeds and the environment is consistent after instant recovery, select all volumes on a disk (Windows systems) or all logical volumes of a volume group (UNIX systems) to be backed up. Even if you do not select an entire disk or volume group, the backup will succeed, but instant recovery may experience issues during configuration check of the environment. The configuration check can be disabled by clearing the option Check the data configuration consistency in the GUI or not specifying the option -check_config in the CLI when preparing for an instant recovery session. If this option is cleared (GUI) or not specified (CLI), the entire disk or volume group will be overwritten during
Zero Downtime Administrator's GuideChapter 10: Backup
HPE Data Protector (9.07) Page 91 of 271

instant recovery. f. Click Finish.Click Next.
13. Save your ZDB backup specification.For information on scheduling ZDB sessions and starting interactive ZDB sessions, see "Scheduling ZDB sessions" on page 228.
Note: Backup preview is not supported.
Backup options The following tables describe the P9000 XP Array and ZDB related backup options. See also "P9000 XP Array integration" on page 259.
Client systems
Application system The system on which the application runs. In cluster environments, specify the virtual server hostname (rather than the physical node hostname).
Backup system The system to which your data will be replicated (backed up). In ZDB-to-disk+tape and ZDB-to-tape sessions, the backup data is copied from this system to a backup device.
Mirror type
HPE Business Copy P9000 XP
Select this option to configure a ZDB backup specification for the HPE P9000 XP Disk Array Family configuration HPE Business Copy P9000 XP.
Default: selected.
HPE Continuous Access P9000 XP
Select this option to configure a ZDB backup specification for the HPE P9000 XP Disk Array Family configuration HPE Continuous Access P9000 XP.
Default: not selected.
Combined (HPE Continuous Access P9000 XP + HPE Business Copy P9000 XP)
Select this option to configure a ZDB backup specification for the HPE P9000 XP Disk Array Family combined configuration HPE Continuous Access P9000 XP + HPE Business Copy P9000 XP.
Default: not selected.
MU number(s) This option is only available if the HPE P9000 XP Disk Array Family configuration HPE Business Copy P9000 XP is selected.
Zero Downtime Administrator's GuideChapter 10: Backup
HPE Data Protector (9.07) Page 92 of 271
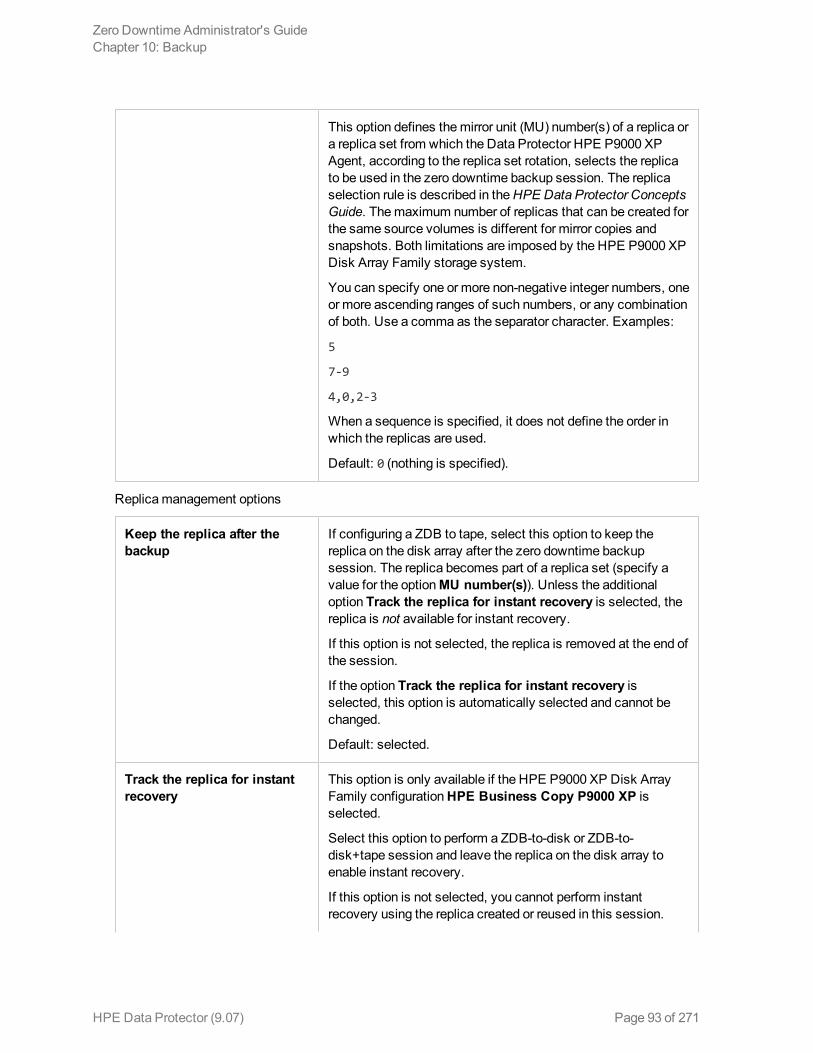
This option defines the mirror unit (MU) number(s) of a replica or a replica set from which the Data Protector HPE P9000 XP Agent, according to the replica set rotation, selects the replica to be used in the zero downtime backup session. The replica selection rule is described in the HPE Data Protector Concepts Guide. The maximum number of replicas that can be created for the same source volumes is different for mirror copies and snapshots. Both limitations are imposed by the HPE P9000 XP Disk Array Family storage system.
You can specify one or more non-negative integer numbers, one or more ascending ranges of such numbers, or any combination of both. Use a comma as the separator character. Examples:
5
7-9
4,0,2-3
When a sequence is specified, it does not define the order in which the replicas are used.
Default: 0 (nothing is specified).
Replica management options
Keep the replica after the backup
If configuring a ZDB to tape, select this option to keep the replica on the disk array after the zero downtime backup session. The replica becomes part of a replica set (specify a value for the option MU number(s)). Unless the additional option Track the replica for instant recovery is selected, the replica is not available for instant recovery.
If this option is not selected, the replica is removed at the end of the session.
If the option Track the replica for instant recovery is selected, this option is automatically selected and cannot be changed.
Default: selected.
Track the replica for instant recovery
This option is only available if the HPE P9000 XP Disk Array Family configuration HPE Business Copy P9000 XP is selected.
Select this option to perform a ZDB-to-disk or ZDB-to-disk+tape session and leave the replica on the disk array to enable instant recovery.
If this option is not selected, you cannot perform instant recovery using the replica created or reused in this session.
Zero Downtime Administrator's GuideChapter 10: Backup
HPE Data Protector (9.07) Page 93 of 271

Caution: If you select this option, do not manually resynchronize the affected mirrors and do not empty the volumes used for snapshot storage. Otherwise, instant recovery will not be possible.
Default: not selected.
At the start of the session
Synchronize the disks if not already synchronized
On the P9000 XP Array, primary volumes (source volumes) and their corresponding secondary volumes (target volumes) must be in the PAIR state to enable Data Protector zero downtime backup: mirrors must be synchronized and volumes to be used for snapshot storage must be empty.
This option is automatically selected and cannot be changed if the option Prepare the next mirror disk for backup (resynchronize) is cleared.
If this option is selected, all volumes of the replica to be used in the current ZDB session are put into the PAIR state with the corresponding source volumes at the start of the session: mirrors are resynchronized and volumes to be used for snapshot storage are made empty.
Default: selected.
Abort the session if the mirror disks are not already synchronized
Available only if the option Prepare the next mirror disk for backup (resynchronize) is selected.
The option is only applicable if at least one volume of the replica to be used in the current ZDB session is a mirror (or mirror copy). In the opposite case, Data Protector treats as if the option Synchronize the disks if not already synchronized is selected instead.
If this option is selected and at least one volume of the replica to be used in the current ZDB session is not in the PAIR state with the corresponding source volume, the session fails.
Default: not selected.
At the end of the session
Prepare the next mirror disk for backup (resynchronize)
This option is only applicable if at least one volume of the replica to be used in the next ZDB session is a mirror (or mirror copy). In the opposite case, Data Protector behaves as if the option is not selected.
If this option is selected, all volumes of the replica to be used in the next ZDB session are put into the PAIR state with the
Zero Downtime Administrator's GuideChapter 10: Backup
HPE Data Protector (9.07) Page 94 of 271

corresponding source volumes at the end of the current ZDB session: mirrors are resynchronized and volumes to be used for snapshot storage are made empty.
If this option is not selected, the volumes of the replica to be used in the next ZDB session are left intact at the end of the current ZDB session.
If this option is not selected, the Synchronize the disks if not already synchronized option is automatically selected, and the Abort the session if the mirror disks are not already synchronized option is not available.
Default: selected.
Application system options
Dismount the filesystems on the application system
Select this option to dismount the filesystems on the application system before replica creation and remount them afterwards. Additionally, when entire physical drives (on Windows systems) or entire disks or logical volumes (on UNIX systems) are selected as backup objects in a disk image backup specification, selecting this option will dismount and later remount all filesystems on these objects. If any of these filesystems cannot be dismounted, the backup session fails.
If an integrated application (for example, Oracle Server) exclusively controls the data I/O on each physical drive, disk, or logical volume that will be backed up, the dismount operation is not needed. In such a case, you can leave this option cleared.
Default: not selected.
Stop/quiesce the application command line
If a command is specified in this option, it is invoked on the application system immediately before replica creation. An example is to stop applications not integrated with Data Protector.
The command must reside on the application system in the default Data Protector administrative commands directory. Do not specify the path to the command in this option.
If the command fails, the command specified in the option Restart the application command line is not invoked. Thus, you may need to implement a cleanup procedure in the command specified in Stop/quiesce the application command line. If the omnirc option ZDB_ALWAYS_POST_SCRIPT is set to 1, the command specified in the option Restart the application command line is always invoked.
Restart the application If a command is specified in this option, it is invoked on the
Zero Downtime Administrator's GuideChapter 10: Backup
HPE Data Protector (9.07) Page 95 of 271
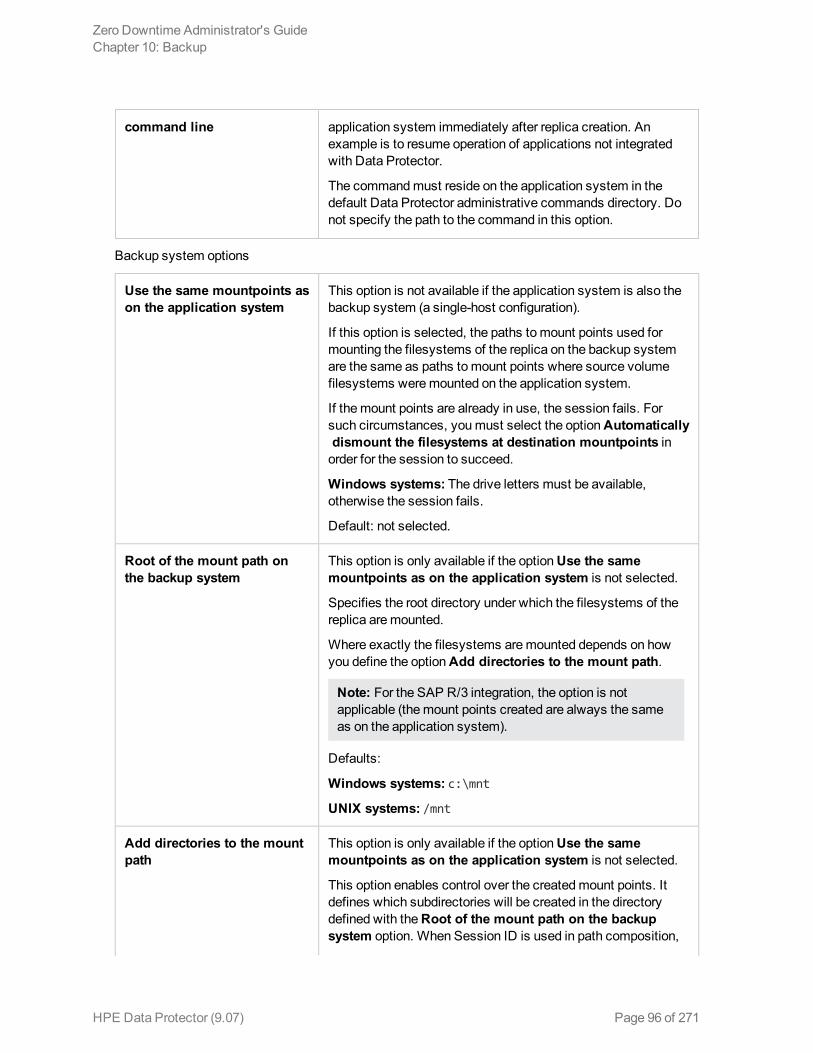
command line application system immediately after replica creation. An example is to resume operation of applications not integrated with Data Protector.
The command must reside on the application system in the default Data Protector administrative commands directory. Do not specify the path to the command in this option.
Backup system options
Use the same mountpoints as on the application system
This option is not available if the application system is also the backup system (a single-host configuration).
If this option is selected, the paths to mount points used for mounting the filesystems of the replica on the backup system are the same as paths to mount points where source volume filesystems were mounted on the application system.
If the mount points are already in use, the session fails. For such circumstances, you must select the option Automatically dismount the filesystems at destination mountpoints in order for the session to succeed.
Windows systems: The drive letters must be available, otherwise the session fails.
Default: not selected.
Root of the mount path on the backup system
This option is only available if the option Use the same mountpoints as on the application system is not selected.
Specifies the root directory under which the filesystems of the replica are mounted.
Where exactly the filesystems are mounted depends on how you define the option Add directories to the mount path.
Note: For the SAP R/3 integration, the option is not applicable (the mount points created are always the same as on the application system).
Defaults:
Windows systems: c:\mnt
UNIX systems: /mnt
Add directories to the mount path
This option is only available if the option Use the same mountpoints as on the application system is not selected.
This option enables control over the created mount points. It defines which subdirectories will be created in the directory defined with the Root of the mount path on the backup system option. When Session ID is used in path composition,
Zero Downtime Administrator's GuideChapter 10: Backup
HPE Data Protector (9.07) Page 96 of 271
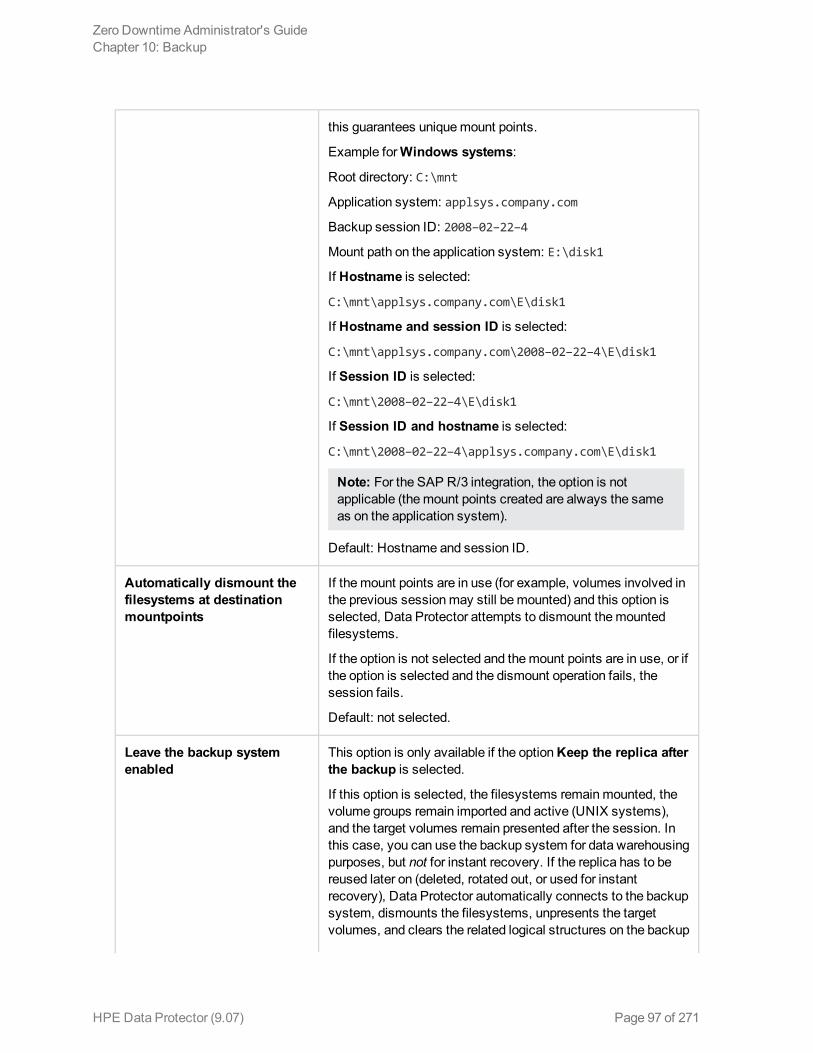
this guarantees unique mount points.
Example for Windows systems:
Root directory: C:\mnt
Application system: applsys.company.com
Backup session ID: 2008–02–22–4
Mount path on the application system: E:\disk1
If Hostname is selected:
C:\mnt\applsys.company.com\E\disk1
If Hostname and session ID is selected:
C:\mnt\applsys.company.com\2008–02–22–4\E\disk1
If Session ID is selected:
C:\mnt\2008–02–22–4\E\disk1
If Session ID and hostname is selected:
C:\mnt\2008–02–22–4\applsys.company.com\E\disk1
Note: For the SAP R/3 integration, the option is not applicable (the mount points created are always the same as on the application system).
Default: Hostname and session ID.
Automatically dismount the filesystems at destination mountpoints
If the mount points are in use (for example, volumes involved in the previous session may still be mounted) and this option is selected, Data Protector attempts to dismount the mounted filesystems.
If the option is not selected and the mount points are in use, or if the option is selected and the dismount operation fails, the session fails.
Default: not selected.
Leave the backup system enabled
This option is only available if the option Keep the replica after the backup is selected.
If this option is selected, the filesystems remain mounted, the volume groups remain imported and active (UNIX systems), and the target volumes remain presented after the session. In this case, you can use the backup system for data warehousing purposes, but not for instant recovery. If the replica has to be reused later on (deleted, rotated out, or used for instant recovery), Data Protector automatically connects to the backup system, dismounts the filesystems, unpresents the target volumes, and clears the related logical structures on the backup
Zero Downtime Administrator's GuideChapter 10: Backup
HPE Data Protector (9.07) Page 97 of 271
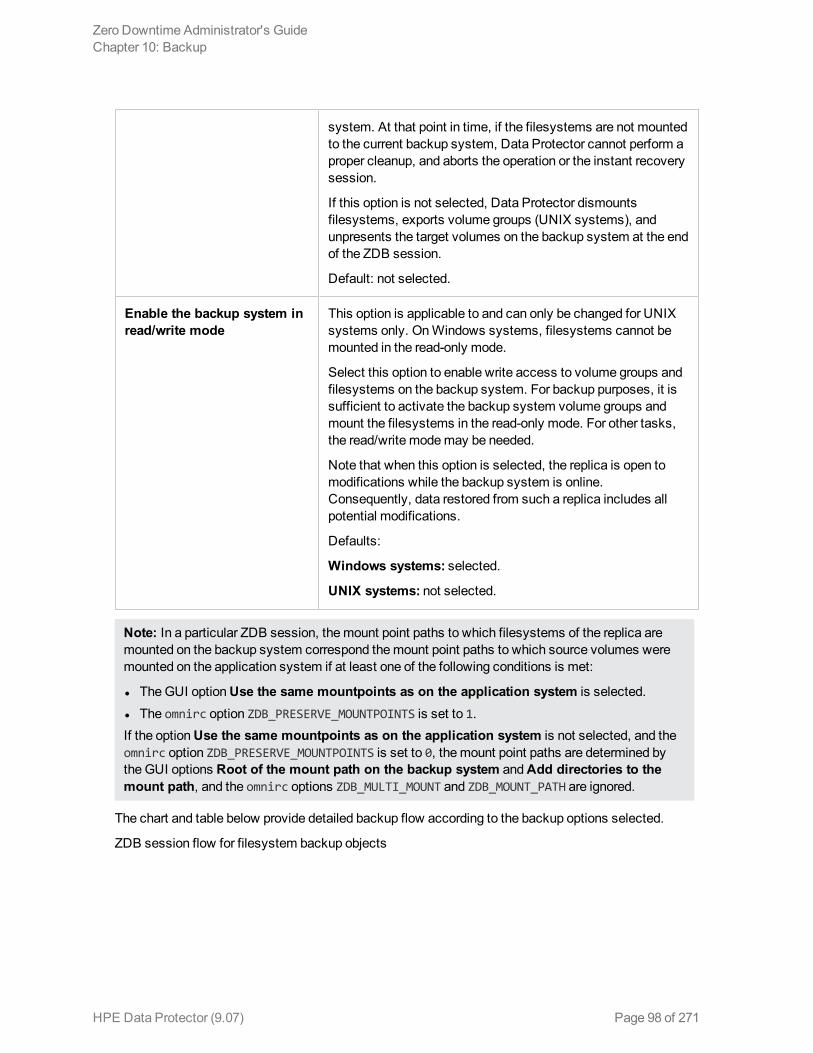
system. At that point in time, if the filesystems are not mounted to the current backup system, Data Protector cannot perform a proper cleanup, and aborts the operation or the instant recovery session.
If this option is not selected, Data Protector dismounts filesystems, exports volume groups (UNIX systems), and unpresents the target volumes on the backup system at the end of the ZDB session.
Default: not selected.
Enable the backup system in read/write mode
This option is applicable to and can only be changed for UNIX systems only. On Windows systems, filesystems cannot be mounted in the read-only mode.
Select this option to enable write access to volume groups and filesystems on the backup system. For backup purposes, it is sufficient to activate the backup system volume groups and mount the filesystems in the read-only mode. For other tasks, the read/write mode may be needed.
Note that when this option is selected, the replica is open to modifications while the backup system is online. Consequently, data restored from such a replica includes all potential modifications.
Defaults:
Windows systems: selected.
UNIX systems: not selected.
Note: In a particular ZDB session, the mount point paths to which filesystems of the replica are mounted on the backup system correspond the mount point paths to which source volumes were mounted on the application system if at least one of the following conditions is met:
l The GUI option Use the same mountpoints as on the application system is selected. l The omnirc option ZDB_PRESERVE_MOUNTPOINTS is set to 1.If the option Use the same mountpoints as on the application system is not selected, and the omnirc option ZDB_PRESERVE_MOUNTPOINTS is set to 0, the mount point paths are determined by the GUI options Root of the mount path on the backup system and Add directories to the mount path, and the omnirc options ZDB_MULTI_MOUNT and ZDB_MOUNT_PATH are ignored.
The chart and table below provide detailed backup flow according to the backup options selected.
ZDB session flow for filesystem backup objects
Zero Downtime Administrator's GuideChapter 10: Backup
HPE Data Protector (9.07) Page 98 of 271
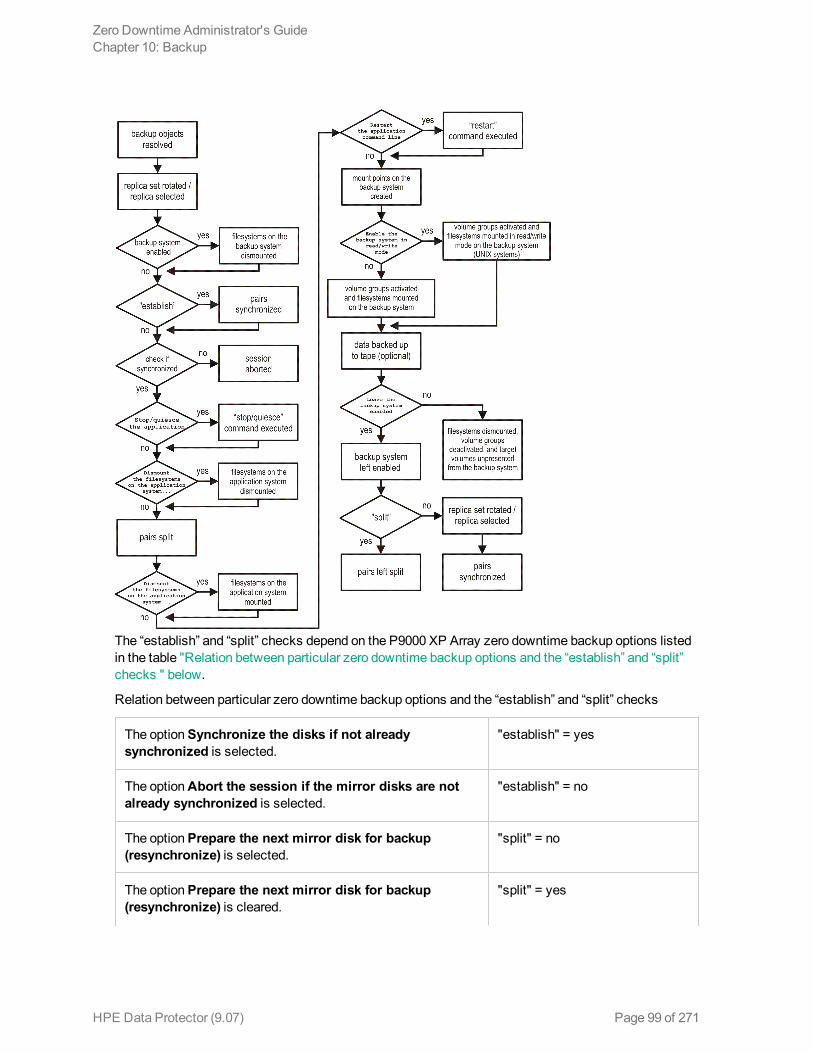
The “establish” and “split” checks depend on the P9000 XP Array zero downtime backup options listed in the table "Relation between particular zero downtime backup options and the “establish” and “split” checks " below.
Relation between particular zero downtime backup options and the “establish” and “split” checks
The option Synchronize the disks if not already synchronized is selected.
"establish" = yes
The option Abort the session if the mirror disks are not already synchronized is selected.
"establish" = no
The option Prepare the next mirror disk for backup (resynchronize) is selected.
"split" = no
The option Prepare the next mirror disk for backup (resynchronize) is cleared.
"split" = yes
Zero Downtime Administrator's GuideChapter 10: Backup
HPE Data Protector (9.07) Page 99 of 271

No value or a single number is specified for the option MU number(s) or the option Keep the replica after the backup is selected.
"split" = yes
Zero Downtime Administrator's GuideChapter 10: Backup
HPE Data Protector (9.07) Page 100 of 271
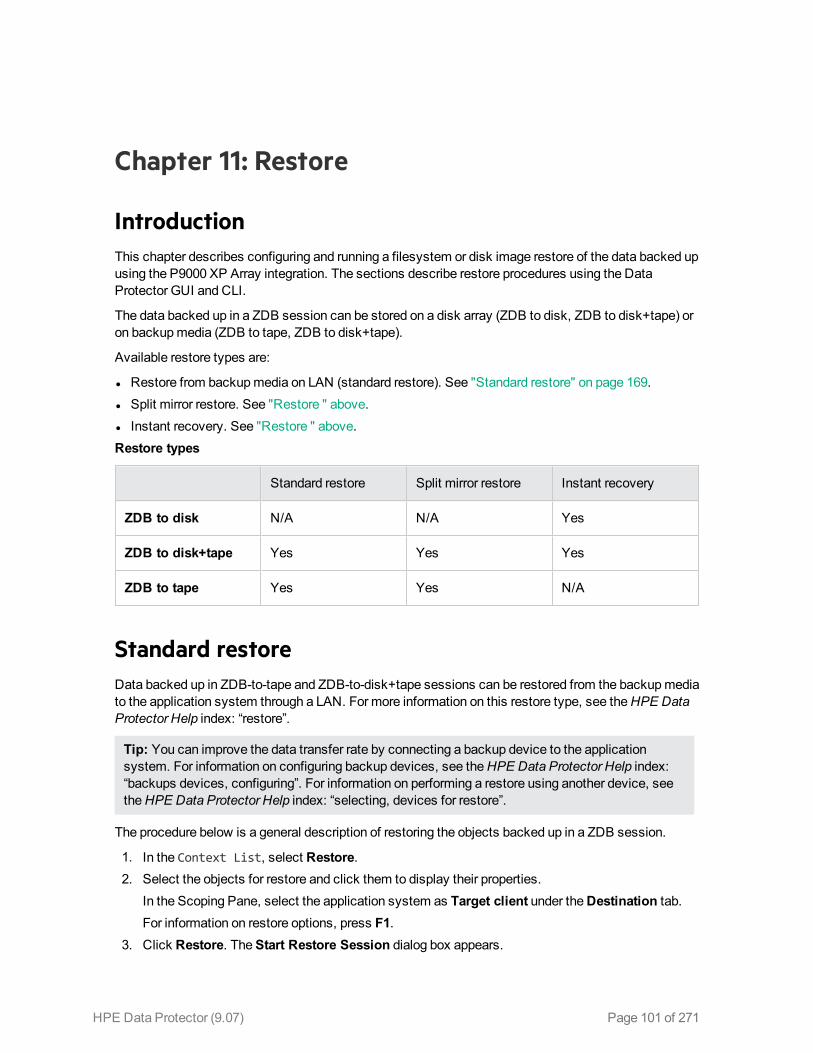
Chapter 11: Restore
IntroductionThis chapter describes configuring and running a filesystem or disk image restore of the data backed up using the P9000 XP Array integration. The sections describe restore procedures using the Data Protector GUI and CLI.
The data backed up in a ZDB session can be stored on a disk array (ZDB to disk, ZDB to disk+tape) or on backup media (ZDB to tape, ZDB to disk+tape).
Available restore types are:
l Restore from backup media on LAN (standard restore). See "Standard restore" on page 169. l Split mirror restore. See "Restore " above. l Instant recovery. See "Restore " above.Restore types
Standard restore Split mirror restore Instant recovery
ZDB to disk N/A N/A Yes
ZDB to disk+tape Yes Yes Yes
ZDB to tape Yes Yes N/A
Standard restoreData backed up in ZDB-to-tape and ZDB-to-disk+tape sessions can be restored from the backup media to the application system through a LAN. For more information on this restore type, see the HPE Data Protector Help index: “restore”.
Tip: You can improve the data transfer rate by connecting a backup device to the application system. For information on configuring backup devices, see the HPE Data Protector Help index: “backups devices, configuring”. For information on performing a restore using another device, see the HPE Data Protector Help index: “selecting, devices for restore”.
The procedure below is a general description of restoring the objects backed up in a ZDB session.
1. In the Context List, select Restore. 2. Select the objects for restore and click them to display their properties.
In the Scoping Pane, select the application system as Target client under the Destination tab.For information on restore options, press F1.
3. Click Restore. The Start Restore Session dialog box appears.
HPE Data Protector (9.07) Page 101 of 271
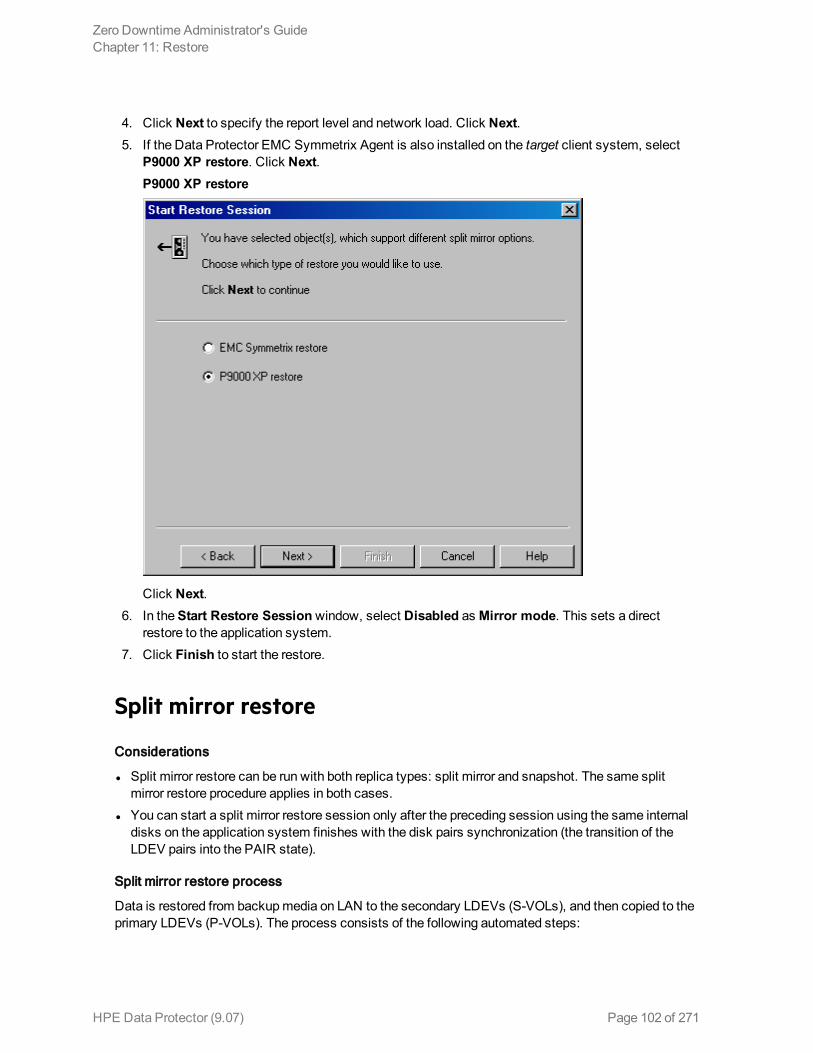
4. Click Next to specify the report level and network load. Click Next. 5. If the Data Protector EMC Symmetrix Agent is also installed on the target client system, select
P9000 XP restore. Click Next.P9000 XP restore
Click Next. 6. In the Start Restore Session window, select Disabled as Mirror mode. This sets a direct
restore to the application system. 7. Click Finish to start the restore.
Split mirror restore
Considerations
l Split mirror restore can be run with both replica types: split mirror and snapshot. The same split mirror restore procedure applies in both cases.
l You can start a split mirror restore session only after the preceding session using the same internal disks on the application system finishes with the disk pairs synchronization (the transition of the LDEV pairs into the PAIR state).
Split mirror restore process
Data is restored from backup media on LAN to the secondary LDEVs (S-VOLs), and then copied to the primary LDEVs (P-VOLs). The process consists of the following automated steps:
Zero Downtime Administrator's GuideChapter 11: Restore
HPE Data Protector (9.07) Page 102 of 271
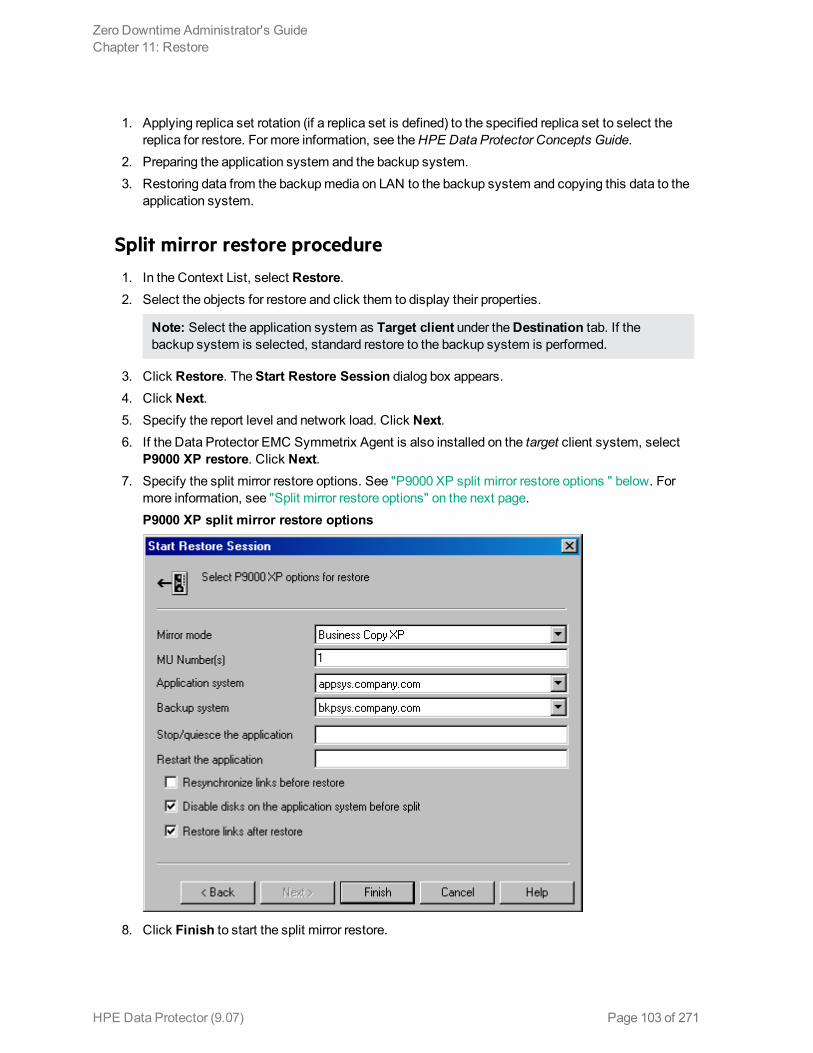
1. Applying replica set rotation (if a replica set is defined) to the specified replica set to select the replica for restore. For more information, see the HPE Data Protector Concepts Guide.
2. Preparing the application system and the backup system. 3. Restoring data from the backup media on LAN to the backup system and copying this data to the
application system.
Split mirror restore procedure 1. In the Context List, select Restore. 2. Select the objects for restore and click them to display their properties.
Note: Select the application system as Target client under the Destination tab. If the backup system is selected, standard restore to the backup system is performed.
3. Click Restore. The Start Restore Session dialog box appears. 4. Click Next. 5. Specify the report level and network load. Click Next. 6. If the Data Protector EMC Symmetrix Agent is also installed on the target client system, select
P9000 XP restore. Click Next. 7. Specify the split mirror restore options. See "P9000 XP split mirror restore options " below. For
more information, see "Split mirror restore options" on the next page.P9000 XP split mirror restore options
8. Click Finish to start the split mirror restore.
Zero Downtime Administrator's GuideChapter 11: Restore
HPE Data Protector (9.07) Page 103 of 271
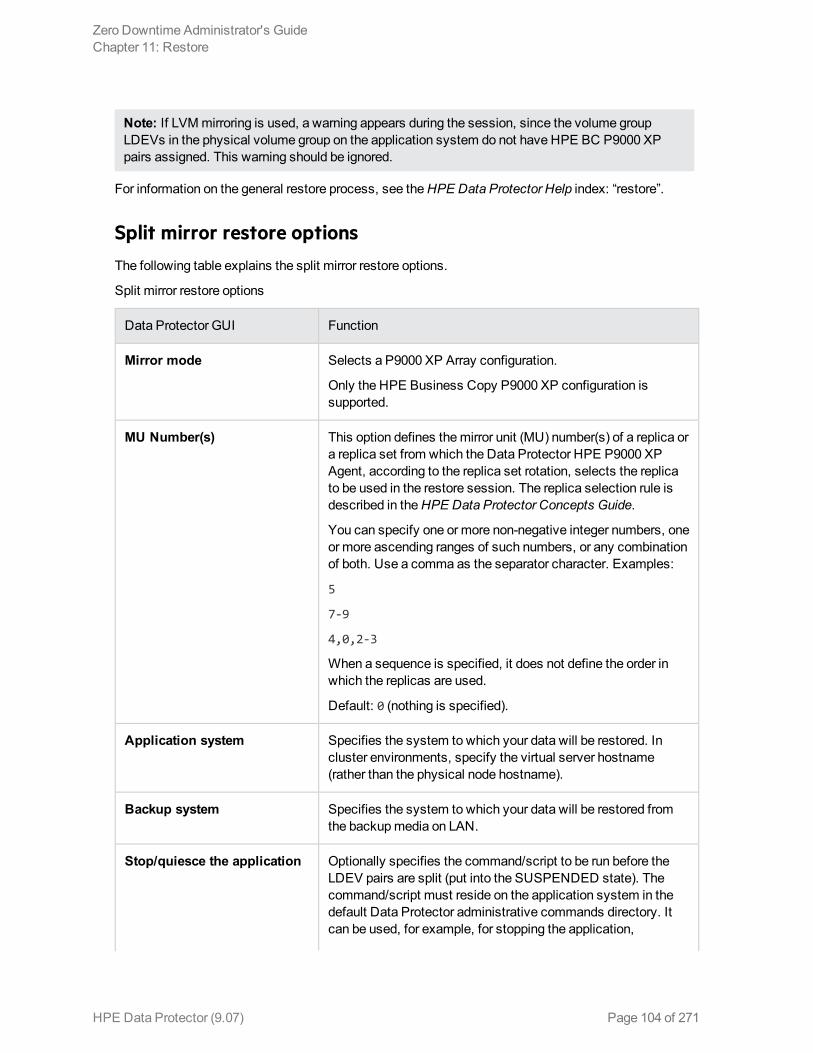
Note: If LVM mirroring is used, a warning appears during the session, since the volume group LDEVs in the physical volume group on the application system do not have HPE BC P9000 XP pairs assigned. This warning should be ignored.
For information on the general restore process, see the HPE Data Protector Help index: “restore”.
Split mirror restore optionsThe following table explains the split mirror restore options.
Split mirror restore options
Data Protector GUI Function
Mirror mode Selects a P9000 XP Array configuration.
Only the HPE Business Copy P9000 XP configuration is supported.
MU Number(s) This option defines the mirror unit (MU) number(s) of a replica or a replica set from which the Data Protector HPE P9000 XP Agent, according to the replica set rotation, selects the replica to be used in the restore session. The replica selection rule is described in the HPE Data Protector Concepts Guide.
You can specify one or more non-negative integer numbers, one or more ascending ranges of such numbers, or any combination of both. Use a comma as the separator character. Examples:
5
7-9
4,0,2-3
When a sequence is specified, it does not define the order in which the replicas are used.
Default: 0 (nothing is specified).
Application system Specifies the system to which your data will be restored. In cluster environments, specify the virtual server hostname (rather than the physical node hostname).
Backup system Specifies the system to which your data will be restored from the backup media on LAN.
Stop/quiesce the application Optionally specifies the command/script to be run before the LDEV pairs are split (put into the SUSPENDED state). The command/script must reside on the application system in the default Data Protector administrative commands directory. It can be used, for example, for stopping the application,
Zero Downtime Administrator's GuideChapter 11: Restore
HPE Data Protector (9.07) Page 104 of 271
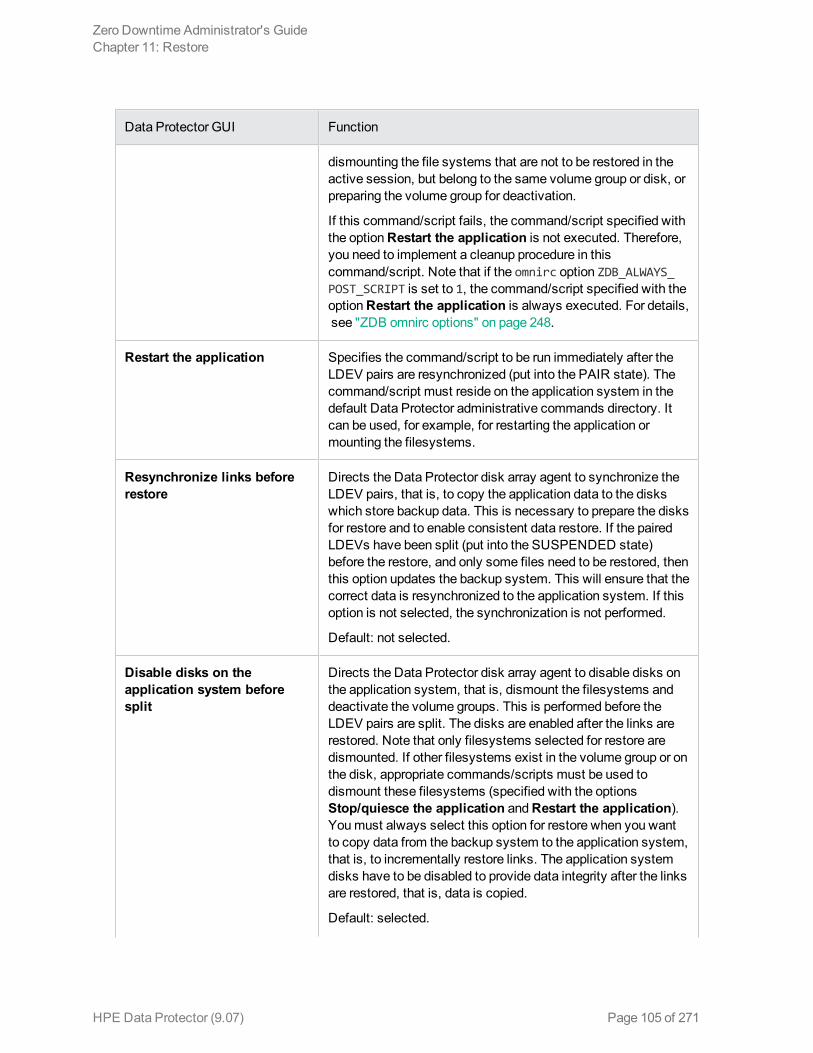
Data Protector GUI Function
dismounting the file systems that are not to be restored in the active session, but belong to the same volume group or disk, or preparing the volume group for deactivation.
If this command/script fails, the command/script specified with the option Restart the application is not executed. Therefore, you need to implement a cleanup procedure in this command/script. Note that if the omnirc option ZDB_ALWAYS_POST_SCRIPT is set to 1, the command/script specified with the option Restart the application is always executed. For details, see "ZDB omnirc options" on page 248.
Restart the application Specifies the command/script to be run immediately after the LDEV pairs are resynchronized (put into the PAIR state). The command/script must reside on the application system in the default Data Protector administrative commands directory. It can be used, for example, for restarting the application or mounting the filesystems.
Resynchronize links before restore
Directs the Data Protector disk array agent to synchronize the LDEV pairs, that is, to copy the application data to the disks which store backup data. This is necessary to prepare the disks for restore and to enable consistent data restore. If the paired LDEVs have been split (put into the SUSPENDED state) before the restore, and only some files need to be restored, then this option updates the backup system. This will ensure that the correct data is resynchronized to the application system. If this option is not selected, the synchronization is not performed.
Default: not selected.
Disable disks on the application system before split
Directs the Data Protector disk array agent to disable disks on the application system, that is, dismount the filesystems and deactivate the volume groups. This is performed before the LDEV pairs are split. The disks are enabled after the links are restored. Note that only filesystems selected for restore are dismounted. If other filesystems exist in the volume group or on the disk, appropriate commands/scripts must be used to dismount these filesystems (specified with the options Stop/quiesce the application and Restart the application). You must always select this option for restore when you want to copy data from the backup system to the application system, that is, to incrementally restore links. The application system disks have to be disabled to provide data integrity after the links are restored, that is, data is copied.
Default: selected.
Zero Downtime Administrator's GuideChapter 11: Restore
HPE Data Protector (9.07) Page 105 of 271
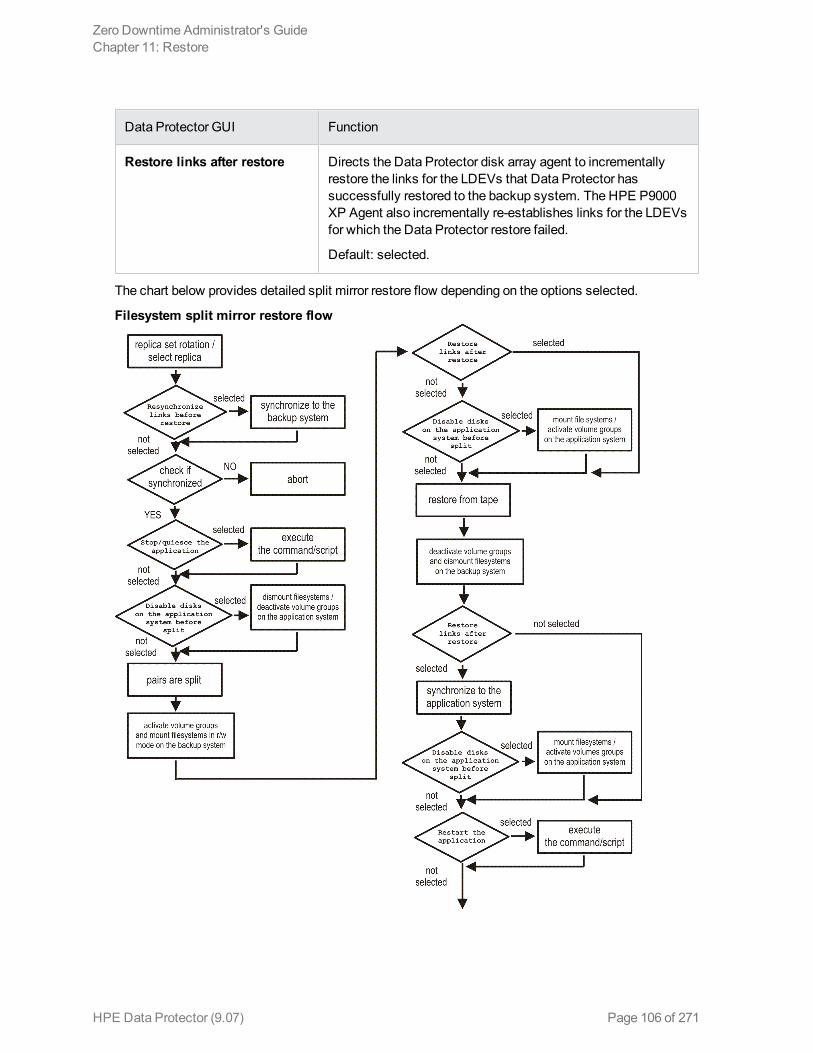
Data Protector GUI Function
Restore links after restore Directs the Data Protector disk array agent to incrementally restore the links for the LDEVs that Data Protector has successfully restored to the backup system. The HPE P9000 XP Agent also incrementally re-establishes links for the LDEVs for which the Data Protector restore failed.
Default: selected.
The chart below provides detailed split mirror restore flow depending on the options selected.
Filesystem split mirror restore flow
Zero Downtime Administrator's GuideChapter 11: Restore
HPE Data Protector (9.07) Page 106 of 271
Split mirror restore in a clusterSplit mirror restore in configurations with the application system in HPEServiceguard or a Microsoft server cluster requires additional steps.
HPE Serviceguard procedure
1. Stop the filesystem cluster package:
cmhaltpkg ApplicationPackageName
This stops filesystem services and dismounts the mirrored volume group filesystem. 2. Deactivate the mirrored volume group from cluster mode and activate it in normal mode:
vgchange -c n /dev/mirror_vg_name
vgchange -q n -a y /dev/mirror_vg_name
3. Mount the mirrored volume group filesystem:
mount /dev/mirror_vg_name /lv_name /mountpoint
4. Start split mirror restore. For details, see "Split mirror restore procedure" on page 170.When specifying the application system, specify the hostname of the application system node on which the mirrored volume group was activated in the normal mode ("Deactivate the mirrored volume group from cluster mode and activate it in normal mode:" above of this procedure).
5. After the restore, dismount the mirrored volume group filesystem:
umount /mountpoint
6. Deactivate the mirrored volume group in normal mode and activate it in cluster mode:
vgchange -a n /dev/mirror_vg_name
vgchange -c y /dev/mirror_vg_name
7. Start the filesystem cluster package:
cmrunpkg ApplicationPackageName
Instant recovery Instant recovery restores data directly from a replica to the source volumes, without involving a backup device. All data (entire volume group on UNIX systems or entire disk on Windows systems) in the replica is restored. For instant recovery concepts, see the HPE Data Protector Concepts Guide.
You can perform instant recovery using the Data Protector GUI (see "Instant recovery using the GUI" on the next page) or CLI (see "Instant recovery using the CLI" on page 110).
Considerations
l Only first-level mirrors or snapshot volumes can be used for instant recovery. Second-level (cascading) mirrors and snapshot volumes are not supported.
l Instant recovery can be run with both replica types: split mirror and snapshot. The same instant recovery procedure applies in both cases.
Zero Downtime Administrator's GuideChapter 11: Restore
HPE Data Protector (9.07) Page 107 of 271
l When instant recovery starts, Data Protector disables the application system. This includes dismounting filesystems and exporting volume groups (on UNIX systems only). Before this is done, filesystems’ and volume groups’ status is checked, and only mounted filesystems and imported volume groups are dismounted and exported. At the end of the session, dismounted filesystems are mounted and exported volume groups are imported to the same mount points as were used during backup.
l You cannot start several instant recovery sessions using the same disk on the application system at once. A session can be started only after the preceding session using the same source volume on the application system finishes synchronization.
After instant recovery, restored filesystems are mounted to the same mount points/drive letters as they were at the backup time. If these mount points/drive letters have other filesystems mounted, these filesystems are automatically dismounted before instant recovery, and the restored filesystems are mounted afterwards.
For more information about P9000 XP Array instant recovery considerations and limitations, see the HPE Data Protector Product Announcements, Software Notes, and References and the HPE Data Protector Concepts Guide.
Instant recovery does not recover databases or applications. It only synchronizes the primary LDEVs on the application system with the secondary LDEVs on the backup system. To recover a database or application data, you need to perform additional steps.
Prior to instant recovery, Data Protector:
l checks the volume group configuration (on UNIX systems only) l verifies the replicaThese steps assure that data in the replica has been left intact after the replica was created. If either of these steps fails, the instant recovery session fails.
Once the replica is restored, it can be left unchanged or resynchronized, depending on the selected instant recovery options. For information, see "Instant recovery options" on page 110.
Instant recovery procedure
Prerequisites
l Before performing a disk image instant recovery, manually dismount the disks before the instant recovery, and re-mount them afterwards.
Instant recovery using the GUI
1. In the Context List, select Instant Recovery. 2. Select the backup session whose replica you want to use for instant recovery. This can be done
by selecting: l a zero downtime backup session ID and the corresponding ZDB backup specification name:
In the Scoping Pane, expand Restore Sessions and select the session from a list of ZDB-to-disk and ZDB-to-disk+tape sessions.
Zero Downtime Administrator's GuideChapter 11: Restore
HPE Data Protector (9.07) Page 108 of 271
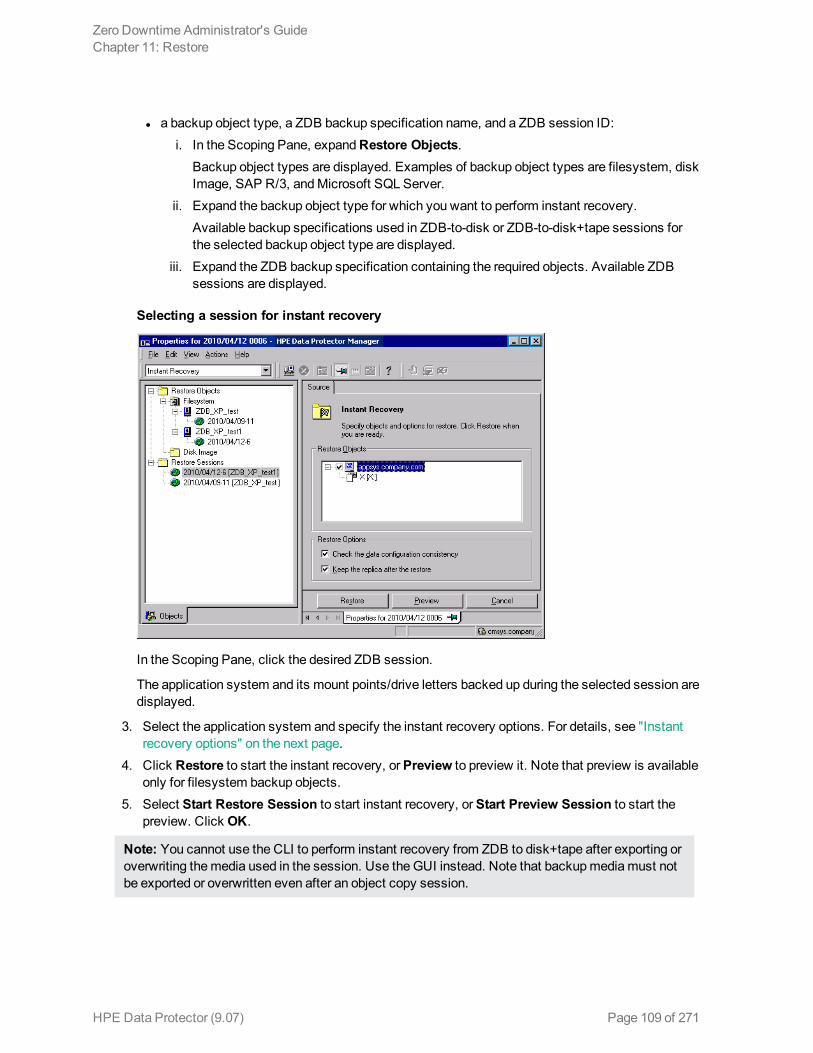
l a backup object type, a ZDB backup specification name, and a ZDB session ID: i. In the Scoping Pane, expand Restore Objects.
Backup object types are displayed. Examples of backup object types are filesystem, disk Image, SAP R/3, and Microsoft SQL Server.
ii. Expand the backup object type for which you want to perform instant recovery.Available backup specifications used in ZDB-to-disk or ZDB-to-disk+tape sessions for the selected backup object type are displayed.
iii. Expand the ZDB backup specification containing the required objects. Available ZDB sessions are displayed.
Selecting a session for instant recovery
In the Scoping Pane, click the desired ZDB session.
The application system and its mount points/drive letters backed up during the selected session are displayed.
3. Select the application system and specify the instant recovery options. For details, see "Instant recovery options" on the next page.
4. Click Restore to start the instant recovery, or Preview to preview it. Note that preview is available only for filesystem backup objects.
5. Select Start Restore Session to start instant recovery, or Start Preview Session to start the preview. Click OK.
Note: You cannot use the CLI to perform instant recovery from ZDB to disk+tape after exporting or overwriting the media used in the session. Use the GUI instead. Note that backup media must not be exported or overwritten even after an object copy session.
Zero Downtime Administrator's GuideChapter 11: Restore
HPE Data Protector (9.07) Page 109 of 271
Instant recovery using the CLI
1. List all available ZDB-to-disk and ZDB-to-disk+tape sessions, identified by the session ID:
omnidbxp -ir -session -list
From the output, select the backup session whose replica you want to use for instant recovery. 2. Execute:
omnir -host ClientName -session SessionID -instant_restore [INSTANT_RECOVERY_OPTIONS]
where the meaning of the options is as follows:
ClientName
The application system name.
SessionID The backup session ID ("List all available ZDB-to-disk and ZDB-to-disk+tape sessions, identified by the session ID:" above of this procedure).
For INSTANT_RECOVERY_OPTIONS, see "Instant recovery options " below.For further details, see the HPE Data Protector Command Line Interface Reference or the omnidbxp and omnir man pages.
Instant recovery optionsInstant recovery options
Data Protector GUI/CLI Function
Check the data configuration consistency/ -check_config
If this option is selected in the GUI or specified in the CLI, the current configuration of the participating volume groups is compared with the volume group configuration as it was during the ZDB session and which is stored in the XPDB. If the configuration has changed since the ZDB session, the instant recovery session aborts. Additionally, the CRC information for the selected LDEV pairs stored in the XPDB is compared to the current CRC information. If the items compared do not match, the instant recovery session aborts. A RAID Manager Library flag, which is set whenever the selected secondary LDEV is accessed/changed by any process (including non-Data Protector processes) is checked. If the flag is set, the session fails with an appropriate warning.
HPE Serviceguard clusters: When instant recovery is performed to some other node than the one from where the volumes were backed up, the current volume group configuration on the target node is different from the volume group configuration kept in the XPDB. In such a case, the XPDB volume group configuration data is
Zero Downtime Administrator's GuideChapter 11: Restore
HPE Data Protector (9.07) Page 110 of 271
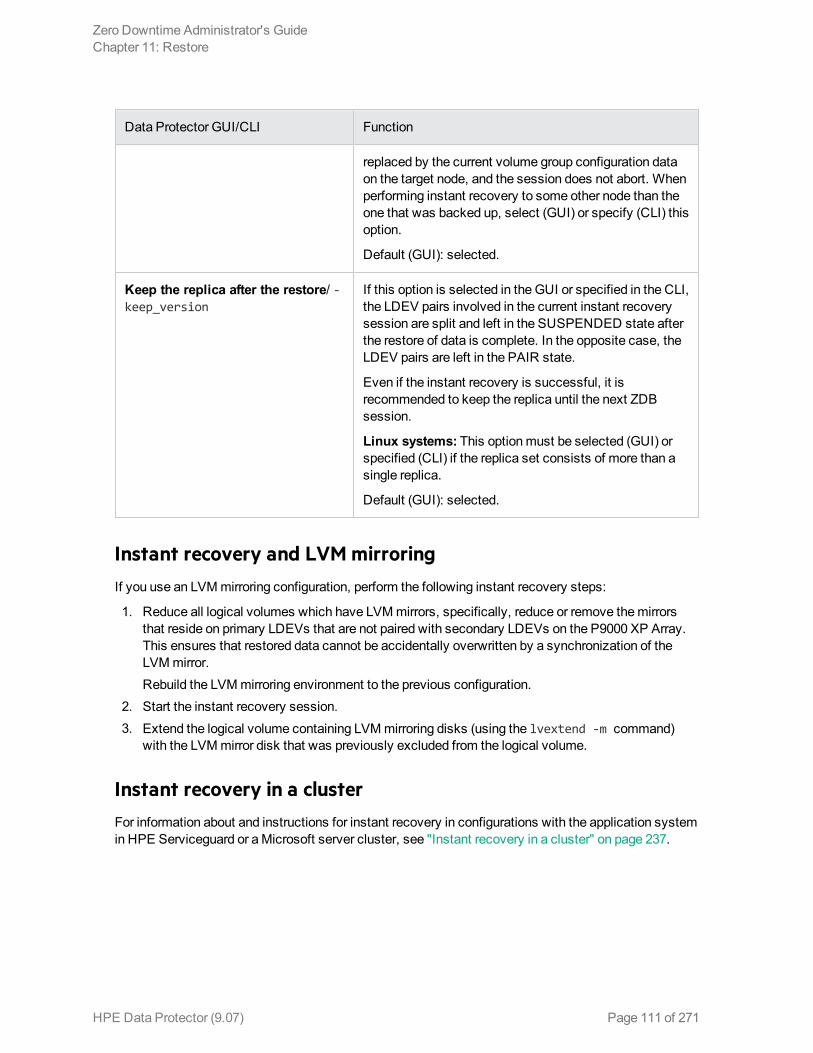
Data Protector GUI/CLI Function
replaced by the current volume group configuration data on the target node, and the session does not abort. When performing instant recovery to some other node than the one that was backed up, select (GUI) or specify (CLI) this option.
Default (GUI): selected.
Keep the replica after the restore/ -keep_version
If this option is selected in the GUI or specified in the CLI, the LDEV pairs involved in the current instant recovery session are split and left in the SUSPENDED state after the restore of data is complete. In the opposite case, the LDEV pairs are left in the PAIR state.
Even if the instant recovery is successful, it is recommended to keep the replica until the next ZDB session.
Linux systems: This option must be selected (GUI) or specified (CLI) if the replica set consists of more than a single replica.
Default (GUI): selected.
Instant recovery and LVM mirroringIf you use an LVM mirroring configuration, perform the following instant recovery steps:
1. Reduce all logical volumes which have LVM mirrors, specifically, reduce or remove the mirrors that reside on primary LDEVs that are not paired with secondary LDEVs on the P9000 XP Array. This ensures that restored data cannot be accidentally overwritten by a synchronization of the LVM mirror.Rebuild the LVM mirroring environment to the previous configuration.
2. Start the instant recovery session. 3. Extend the logical volume containing LVM mirroring disks (using the lvextend -m command)
with the LVM mirror disk that was previously excluded from the logical volume.
Instant recovery in a clusterFor information about and instructions for instant recovery in configurations with the application system in HPE Serviceguard or a Microsoft server cluster, see "Instant recovery in a cluster" on page 237.
Zero Downtime Administrator's GuideChapter 11: Restore
HPE Data Protector (9.07) Page 111 of 271
Chapter 12: Troubleshooting
Before you beginThis chapter lists general checks and verifications plus problems you may encounter when using the P9000 XP Array integration. For general Data Protector troubleshooting information, see the HPE Data Protector Troubleshooting Guide.
l Ensure that the latest official Data Protector patches are installed. For information on how to verify this, see the HPE Data Protector Help index: “patches”.
l For general Data Protector and integration-specific limitations, as well as recognized issues and workarounds, see the HPE Data Protector Product Announcements, Software Notes, and References.
l For an up-to-date list of supported versions, platforms, and other information, see http://support.openview.hp.com/selfsolve/manuals.
Checks and verifications l On the application and backup systems, examine system errors logged into the debug.log file
residing in the default Data Protector log files directory. l Ensure that RAID Manager Library is correctly installed on the application system and the backup
system and is accessible by the HPE P9000 XP Agent, that is, listed in the library path.
General problems
Problem
A process stops responding when attempting to read data from a secondary LDEV (SVOL) in the PAIR state
When a secondary LDEV (S-VOL) is presented to the backup system, the LDEV pair it belongs to is in the PAIR state, and a process attempts to read the data from the secondary LDEV, the process stops responding. If such a problem occurs, all other processes attempting to read the data from such a secondary LDEV, for example the pvscan command, are affected, too.
Action
Unpresent the secondary LDEV from the backup system or unzone them.
Caution: Under the described circumstances, you should not try to restart the backup system before resolving the issue. Doing so may result in a data loss due to corruption of the involved file system. If the file system is corrupt, the backup system may even not be able to start up.
HPE Data Protector (9.07) Page 112 of 271
Backup problems
Problem
You cannot select the HPE P9000 XP mode in the Data Protector user interface when creating a ZDB backup specification
Action
Check that the HPE P9000 XP Agent integration module is installed on the application and backup systems. To do that, open the cell_info file located on the Cell Manager in the following directory:
Windows systems: Data_Protector_program_data\Config\server\cell\cell_info
UNIX systems: /etc/opt/omni/server/cell/cell_info
File contents should look similar to:
-host "sap001.company.com" -os "HPs800 hp-ux-11.10" -cc A.09.00 -da A.09.00 -ssea A.09.00
-host "sap002.company.com" -os "HPs800 hp-ux-11.10" -cc A.09.00 -da A.09.00 -ma A.09.00 -ssea A.09.00
Problem
On the application system, dismounting of a filesystem fails
Action
In the Stop/quiesce the application command line or Stop/quiesce the application script, stop all processes using the filesystem.
Use appropriate operating system tools or utilities to get a list of processes that are using the filesystem in order to identify any processes that lock the filesystem. For example, lsof on HP-UX.
Problem
On the backup system, mounting of a filesystem fails
Action
Check that the mountpoint directory exists on the backup system and that it is writable. On Windows Server 2003 and Windows Server 2008 systems, if the option Automatically dismount the file systems on the application system is selected, check if any processes are locking the filesystem.
Problem
Pair synchronization fails (the split fails)
To successfully split the pair, the HPE P9000 XP Agent first checks its status. Pairs can only be split (in PSUS/SSUS status) after they are synchronized (in PAIR status). HPEP9000 XP Agent checks the status of links after every 2 seconds and retries 10 times.
Zero Downtime Administrator's GuideChapter 12: Troubleshooting
HPE Data Protector (9.07) Page 113 of 271
Action
Increase the time frame for synchronization by setting SSEA_SYNC_RETRY and SSEA_SYNC_SLEEP_TIME options.
For more information, see "Appendix" on page 228.
Problem
P-VOL has no paired S-VOL
Action
Check the P9000 XP Array configuration as follows:
HPE BC P9000 XP: All P-VOLs on the application system must have associated HPE BC P9000 XP S-VOLs on the backup system.
HPE CA P9000 XP: All P-VOLs on the application system must have associated HPE CA P9000 XP S-VOLs on the backup system.
HPE CA+BC P9000 XP: All P-VOLs on the application system must have associated HPE CA P9000 XP S-VOLs on the backup system and all S/P-VOLs must have HPE BC P9000 XPS-VOLs.
Problem
Invalid pair state of LDEVs
Action
Check the link state. If the link is split, use the Prepare/resync the mirror disks at the start of the backup option.
Configure and start RAID Manager P9000 XP instances manually. You can get a list of LDEVs from the backup session report. Alternatively, with newer models of the HPE P9000 XP Disk Array Family, you can use also HPE P9000 XP Remote Web Console (formerly known as HPE Command View XP).
Problem
Missing details for a specific LDEV/MU# are reported
[Warning] From: SSEA@machine_app.company.com "" Time: 17.10.2008. 10:41:27 Failed to get a BC pair for LDEV 55, MU# 1 in RAID 35371. (Details unknown.) [Normal] From: SSEA@machine_app.company.com "" Time: 17.10.2008. 10:41:27 Resolving of backup objects on the application system completed. [Normal] From: SSEA@machine_bu.company.com "" Time: 17.10.2008. 10:41:27 Resolving backup objects on the backup system. [Critical] From: SSEA@machine_bu.company.com "" Time: 17.10.2008. 10:41:29 Resolving of backup objects on the backup system failed.
Zero Downtime Administrator's GuideChapter 12: Troubleshooting
HPE Data Protector (9.07) Page 114 of 271
Action
1. In the backup specification, specify an existing and configured LDEV/MU# on the backup system, or ensure that LDEV/MU# stated in the output is not set in the P9000 XP LDEV exclude file.
2. Restart the session.
Problem
Filesystems not resolved on the backup system
On Windows systems, in some initial configurations filesystems may not be resolved on the backup system. The filesystems do not show up at all, even after a manual pair or split operation is performed on the disk array.
Action
Using the device manager, remove the problematic disks from the disk array and rescan the backup system.
Problem
During a zero downtime backup session, when a second replica is selected from the replica set specified by the ZDB backup specification option MU number(s), the session fails
If more than one replica is specified in the ZDB backup specification option MU number(s), and a ZDB session is run which, according to the replica selection rule, selects the second or any subsequent replica, the session fails.
Action
The problem may be related to the duplicate disk signatures assigned to the target volumes by the Windows operating system.
Perform the following:
1. Unpresent all involved target volumes from the backup system. 2. On the backup system, clean the Registry.
Windows Server 2003: Run the Scrubber utility by invoking the scrubber2003 command. You can download Scrubber from the website http://support.microsoft.com/kb/277222/.
Windows Server 2008: Run the DiskPart utility by invoking the diskpart command. Inside the DiskPart shell, execute the command automount scrub.
3. Put all involved P-VOL - S-VOL pairs into the SUSPENDED state. 4. Present the target volumes to the backup system. 5. Start the ZDB session once again.
Problem
A warning message is displayed in the Windows event logs when using the P9000 XP Array with two or more MU number(s).
If two or more MU number(s) are used with P9000 XP Array, a warning message is displayed in the Windows event logs.
Zero Downtime Administrator's GuideChapter 12: Troubleshooting
HPE Data Protector (9.07) Page 115 of 271
Action
No action is required as this warning does not have a negative impact on the backup. The warning message appears when more than one mirror of the same disk is present on a Windows system.
Split mirror restore problems
Problem
Session fails with the following message:
[Major] From: [email protected] "" Time: 17.10.2008. 11:06:46 Filesystem /dev/bc_nested/hfs could not be dismounted from
/BC/fs/HFS/usr/sbin/vgchange -a n /dev/bc_nested [Major] From: [email protected] "" Time: 17.10.2008. 11:06:47 [224:8]Volume group /dev/bc_nested could not be deactivated.
Action
Ensure that the filesystem/volume group is not in use (you are positioned in the filesystem mountpoint directory), and then restart the session.
Problem
LDEV pair is in “STAT_COPY” state when split mirror restore starts, and the session fails with:
[Critical] From: [email protected] "" Time: 16.10.2008. 17:25:00 The following BC pairs have an invalid status for the requested operation: SEQ# LDEV Port TID LUN MU# Status SEQ# LDEV ----------------------------------------------------- 35371 00A8h ( 168) CL1-D 1 3 0 STAT_COPY 35371 01A5h ( 421) 35371 00A8h ( 168) CL1-D 1 3 0 STAT_COPY 35371 01A6h ( 422) ----------------------------------------------------- [Critical] From: [email protected] "" Time: 16.10.2008. 17:25:00 Failed to resolve objects for Instant Recovery.
Action
Wait until the LDEV pair is in “PAIR” or “PSUS/SSUS” status, and then restart the session.
Instant recovery problems
Problem
LDEV pair is in “STAT_COPY” state when split mirror restore starts, and the session fails with:
Zero Downtime Administrator's GuideChapter 12: Troubleshooting
HPE Data Protector (9.07) Page 116 of 271
[Critical] From: [email protected] "" Time: 16.10.2008. 17:25:00 The following BC pairs have an invalid status for the requested operation: SEQ# LDEV Port TID LUN MU# Status SEQ# LDEV ----------------------------------------------------- 35371 00A8h ( 168) CL1-D 1 3 0 STAT_COPY 35371 01A5h ( 421) 35371 00A8h ( 168) CL1-D 1 3 0 STAT_COPY 35371 01A6h ( 422) ----------------------------------------------------- [Critical] From: [email protected] "" Time: 16.10.2008. 17:25:00 Failed to resolve objects for Instant Recovery.
Action
Wait until the LDEV pair is in “PAIR” or “PSUS/SSUS” status, and then restart the session.
Zero Downtime Administrator's GuideChapter 12: Troubleshooting
HPE Data Protector (9.07) Page 117 of 271

HPE Data Protector (9.07)
Page 118 of 271
Part 4: HPE 3PAR StoreServ StorageThis part describes how to configure the Data Protector HPE 3PAR StoreServ Storage integration, and how to perform zero downtime backup and instant recovery using the HPE 3PAR StoreServ Storage integration through native storage system support built-in in the Data Protector HPE P6000 / HPE 3PAR SMI-S Agent. For information on how to perform zero downtime backup and instant recovery using the HPE 3PAR StoreServ Storage integration through the Data Protector Microsoft Volume Shadow Copy Service integration, see the HPE Data Protector Integration Guide for Microsoft Volume Shadow Copy Service.

Chapter 13: Configuration
IntroductionThis chapter lists prerequisites and limitations of the Data Protector HPE 3PAR StoreServ Storage integration when implemented with the Data Protector HPE P6000 / HPE 3PAR SMI-S Agent, and configuration steps that should be followed when the integration is implemented with either of the supporting Data Protector integration agents: HPE 3PAR VSS Agent or HPE P6000 / HPE 3PAR SMI-S Agent.
Prerequisites l Obtain or install:
Data Protector licenses and components: l Appropriate zero downtime backup extension and instant recovery extension licenses-to-use
(LTU).
l HPE P6000 / HPE 3PAR SMI-S Agent installed on both the application system and the backup system.
l An appropriate multi-path device management software.The software must be installed on the application system and the backup system.HP-UX systems: HPE Secure PathOn HP-UX 11.31 systems, the multi-path device management software is not required since the operating system has native device multi-pathing capability.Linux systems: HPE Device Mapper Multipath Enablement Kit for HPE Disk Arrays 4.2.0 or newer version.To configure the installed multi-path device management software:
i. Start the multipath daemon and run the following command to configure the daemon so that it gets started during system startup:
Red Hat Enterprise Linux: chkconfig multipathd onSUSE Linux Enterprise Server: chkconfig boot.multipath on
ii. Prevent the multipath device management software from queuing for unavailable disk volumes by modifying its configuration file.
Add the following line into the defaults section of the file /etc/multipath.conf: no_path_retry fail
Ensure that this no_path_retry parameter value is not overridden by analogous entries in the device sections of the same file in which the corresponding HPE 3PAR storage systems are configured.
HPE Data Protector (9.07) Page 119 of 271

iii. Ensure that the correct preferred names are used for pathnames that are referencing the same device for physical volumes as they are used in device-mapper multipathing.
Open the lvm.conf file, residing in the /etc/lvm/ directory, and set the following variable:preferred_names = [ "^/dev/mpath/", "^/dev/mapper/mpath", "^/dev/[hs]d" ]
Windows systems: Microsoft MPIO configured for HPE 3PAR Storage. For more information, see the HPE 3PAR Windows Implementation guidelines.
For licensing information and installation and upgrade instructions, see the HPE Data Protector Installation Guide.
l Make sure the same operating system version is installed on both the application system and the backup system.
l If the application system and the backup system reside in a Data Protector cell with secured clients, ensure that access between both systems is allowed in both directions.
l Connect a storage system of the HPE 3PAR StoreServ Storage family to the application and backup systems through the SAN. The backup system must be connected to the same SAN as the storage system of the HPE 3PAR StoreServ Storage family.
l Source volumes must have snapshot space (copy space) in a storage system's Common Provisioning Group (CPG) associated with.
l You can specify a disk image section in two ways: the first way selects a particular volume, and the second way selects an entire disk. In case of ZDB, you must use the second way: l \\.\DriveLetter:, for example: \\.\E:
Note: When a drive letter is specified for the volume name, the volume is not being locked during the backup. A volume that is not mounted or mounted as an NTFS folder cannot be used for disk image backup.
l \\.\PHYSICALDRIVE#, where # is the current number of the disk you want to back up. For example: \\.\PHYSICALDRIVE3
Limitations l In cluster environments, the backup system must not be in the same cluster with the application
system. Additionally, the backup system cannot be the cluster virtual server, it can only be a cluster node.
l If replica is tracked for instant recovery, the volumes that are made active by applying either the "Host set" or the "Port presents" VLUN template types, cannot be used as source volumes.
For information on either of the following items, see the HPE Data Protector Product Announcements, Software Notes, and References:
l General Data Protector and integration-specific limitations l Supported platforms and integrations l Supported backup and connectivity topologies
Zero Downtime Administrator's GuideChapter 13: Configuration
HPE Data Protector (9.07) Page 120 of 271

Configuring the integrationBefore you start with the configuration, make sure the prerequisites listed in "Introduction" on page 119 (for HPE P6000 / HPE 3PAR SMI-S Agent) or in the HPE Data Protector Integration Guide for Microsoft Volume Shadow Copy Service (for HPE 3PAR VSS Agent) are fulfilled.
To prepare the Data Protector HPE 3PAR StoreServ Storage integration for use with a storage system of the HPE 3PAR StoreServ Storage family, you must perform the mandatory configuration step. In this step, you need to provide a Data Protector HPE 3PAR StoreServ Storage integration agent the data which the agent will use to establish connection to a Common Information Model Object Manager (CIMOM) provider of your choice. To integrate with this storage system family, Data Protector can use HPE3PAR VSS Agent and P6000 / HPE 3PAR SMI-S Agent (hereafter both referred to as Data Protector HPE 3PAR StoreServ Storage integration agent).
CIMOM provider connection configurationThe connection configuration data includes user credentials that you must add to the ZDB database (the 3PAR StoreServ part of SMISDB) in advance, before running Data Protector instant recovery (IR) sessions. The credentials are bound to a specific application system in the Data Protector cell. The Data Protector HPE 3PAR StoreServ Storage integration agent then reads the credentials from the ZDB database each time a zero downtime backup or instant recovery session for data residing on a 3PAR StoreServ system is started.
Connection configuration data
To be able to connect to a CIMOM provider and perform zero downtime backup or instant recovery sessions, the Data Protector HPE 3PAR StoreServ Storage integration agent needs the following information:
l Fully qualified domain name or IP address of the system where the CIMOM service is runningIn case the system has multiple IP addresses configured, the address by which the system can be accessed by the Data Protector ZDB agent should be used.
l Whether the connection uses Secure Sockets Layer (SSL) l Port number of the port on which the CIMOM service is accepting requests l Username and password
These credentials must belong to a 3PAR StoreServ system user account with the Edit privilege level in the following 3PAR StoreServ system virtual domains, depending on the effective disk array configuration: l Domain of the application system and the source volumes—When the source volumes and the
application system belong to a specific domain
l All domains of a domain set—When the application system and the source volumes belong to this domain set
l All existing domains—When the application system and the source volumes do not belong to any domain
Zero Downtime Administrator's GuideChapter 13: Configuration
HPE Data Protector (9.07) Page 121 of 271
For more information on using the HPE 3PAR StoreServ Storage authorization system, see the HPE 3PAR StoreServ Storage documentation.
The above information should be provided in advance for each CIMOM provider that the Data Protector HPE 3PAR StoreServ Storage integration agent should connect to. It is stored in the HPE 3PAR StoreServ Storage part of the SMISDB.
Configuration procedure
To add the required user credentials for an application system where the CIMOM service is running, use the Data Protector omnidbzdb command. Follow the steps:
1. Identify the source volumes that will be involved in the ZDB-to-disk or ZDB-to-disk+tape sessions.
2. Identify the 3PAR StoreServ system virtual domains or domain set to which the application system and the source volumes belong.
3. Choose a disk array user account that has a proper privilege level on the corresponding domains. Identify and write down its username and password that you will need in the next step.
4. Using the omnidbzdb --diskarray 3PAR --ompasswd --add command , add the username and password that you acquired in the previous step to the ZDB database, providing the name of the application system you identified in "Identify the source volumes that will be involved in the ZDB-to-disk or ZDB-to-disk+tape sessions." above of this procedure.
For command syntax and usage examples, see the omnidbzdb reference page in the HPE Data Protector Command Line Interface Reference or the omnidbzdb man page.
5. Using the omnidbzdb --diskarray P10000 --ompasswd --check command (for HPE 3PAR VSS Agent) or the omnidbzdb --diskarray 3PAR --ompasswd --check command (for HPE 3PAR VSS Agent or HPE P6000 / HPE 3PAR SMI-S Agent), verify that the Data Protector HPE 3PAR StoreServ Storage integration agent can connect to the disk array using the configured user authentication data.
Tip: For each application system, you can add user credentials of multiple disk array user accounts. When several are configured for the same system, the Data Protector HPE 3PAR StoreServ Storage integration agent checks user accounts in alphabetical order and uses the first account with Edit privilege level on the application system and the source volumes.
For information on performing other tasks related to management of user credentials in the ZDB database, see the omnidbzdb reference page in the HPE Data Protector Command Line Interface Reference or the omnidbzdb man page.
Zero Downtime Administrator's GuideChapter 13: Configuration
HPE Data Protector (9.07) Page 122 of 271
Chapter 14: Backup Zero downtime backup sessions that involve a storage system of the HPE 3PAR StoreServ Storage family can be initiated:
l Through the Data Protector Microsoft Volume Shadow Copy Service integration — if the application and backup systems are running on a Windows operating system, and have the Data Protector HPE P6000 / HPE 3PAR SMI-S Agent installed
l Natively — if the application and backup systems are running on Windows or UNIX operating system and have the Data Protector HPE P6000 / HPE 3PAR SMI-S Agent installed
For information about the supported configurations, ZDB types and replication techniques available on this storage system family, and storage system-specific ZDB considerations, see the HPE Data Protector Concepts Guide.
For additional storage system-specific ZDB considerations, procedure for configuring ZDB backup specifications, and instructions for running ZDB sessions, see the HPE Data Protector Integration Guide for Microsoft Volume Shadow Copy Service.
ZDB typesUsing the HPE 3PAR StoreServ Storage integration through the Data Protector HPE P6000 / HPE 3PAR SMI-S Agent, you can perform all zero downtime backup types:
l ZDB to diskThe replica produced is kept on a disk array until reused. This replica becomes part of the replica set and can be used for instant recovery.ZDB to disk is performed if the option Track the replica for instant recovery is selected in a ZDB backup specification, and To disk is selected when running/scheduling a backup.
l ZDB to tapeThe replica produced is streamed to backup media, typically tape, according to the tape backup type you have selected (Full, Incr, Incr1-9).This replica is deleted after backup if the option Keep the replica after the backup is cleared for the backup specification. If this option is selected, the replica remains on a disk array until reused and becomes part of the replica set. However, it cannot be used for instant recovery.
l ZDB to disk+tapeThe replica produced is kept on a disk array until reused and is also streamed to backup media according to the tape backup type you have selected (Full, Incr, Incr1-9). This replica becomes part of the replica set and can be used for instant recovery.ZDB to disk+tape is performed if the option Track the replica for instant recovery is selected in a ZDB backup specification, and To disk+tape is selected when running/scheduling a backup.
For more information on the ZDB types, see the HPE Data Protector Concepts Guide.
HPE Data Protector (9.07) Page 123 of 271
ZDB for HPE 3PAR Remote Copy environmentsHPE 3PAR Remote Copy Software provides enterprise and cloud data centers with autonomic replication and disaster recovery technology that allows the protection and sharing of data from any application simply, efficiently, and affordably.
In the Remote Copy environments, the 3PAR storage system containing source volumes is known as a local (primary) disk array, while the 3PAR storage system on which the replicas are created is a remote (secondary) disk array. The mirrored source and target volumes constitute a copy set. Remote copy configurations are based on the relationship between a pair of storage systems, known as the remote copy pair. Within a remote copy pair, the primary storage system is the system that holds the volumes that are copied to the backup storage system.
Data Protector allows you to perform zero downtime backups of the 3PAR Remote Copy replica. The data backed up in HPE 3PAR remote copy configurations can be restored using either instant recovery or the standard Data Protector restore from tape procedure.
Supported HPE 3PAR Remote Copy Configurations
3PAR Remote Copy Configuration Supported by Data Protector
1-to-1 Yes
N-to-1 No
1-to-N No
Data Protector supports the 1-to-1 configuration only. A 1-to-1 remote copy configuration consists of a single remote copy pair. Both unidirectional and bidirectional 1-to-1 configurations.
For more information on 1-to-1 configurations, see the HPE 3PAR Remote Copy Software User Guide.
HPE 3PAR Remote Copy ModesData Protector supports Synchronous and Periodic modes. The modes supported are briefly explained below.
Synchronous Mode
When remote-copy volume groups operate in synchronous mode, a host write must be committed to both the primary and the backup storage systems before the primary array acknowledges the host write. Remote copy in synchronous mode is illustrated below.
Zero Downtime Administrator's GuideChapter 14: Backup
HPE Data Protector (9.07) Page 124 of 271

Periodic Mode
When remote-copy volume groups operate in periodic mode, the host sends a write request to the primary system. As soon as the data is written into cache on the primary system, HPE 3PAR Remote Copy acknowledges the host write. Remote copy in period mode is illustrated below. The data will be synchronized to the backup system during the scheduled periodic time interval, or during the manual sync operation.
In the periodic mode, before creating the replica, the sync operation is triggered to sync the data between the primary and secondary storage volumes. If the sync operation is not complete within specified duration of time, backup of the volume is ignored.
Zero Downtime Administrator's GuideChapter 14: Backup
HPE Data Protector (9.07) Page 125 of 271
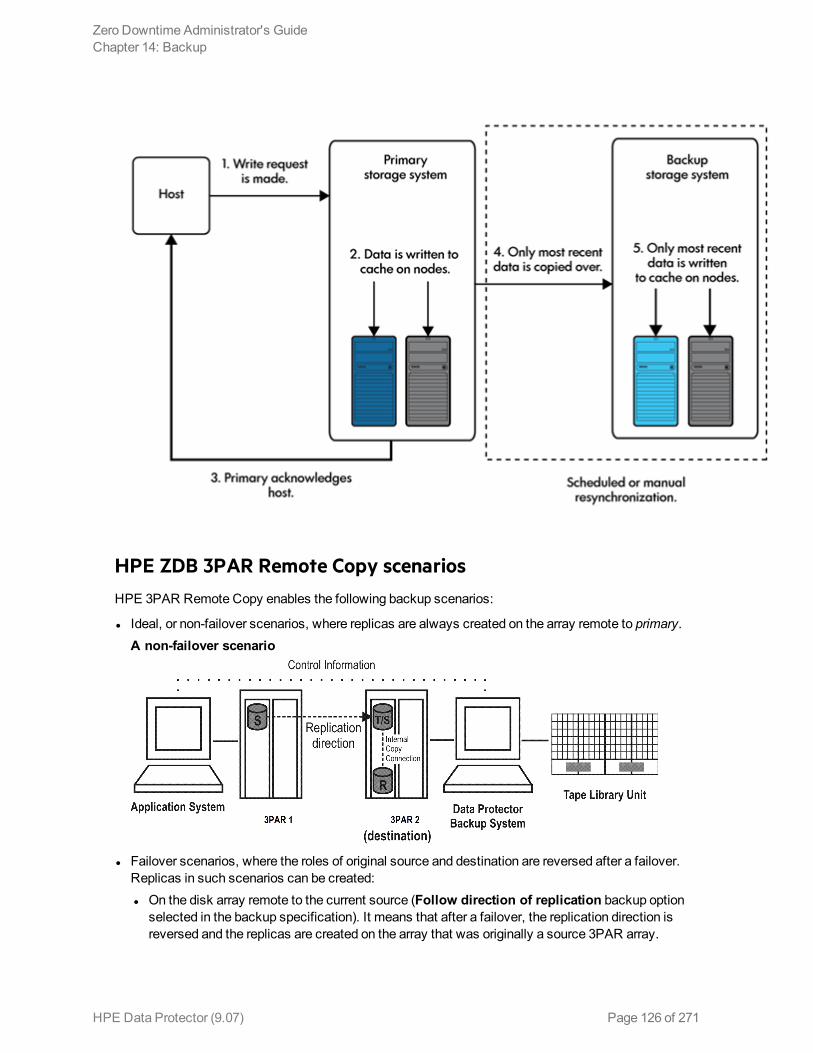
HPE ZDB 3PAR Remote Copy scenariosHPE 3PAR Remote Copy enables the following backup scenarios:
l Ideal, or non-failover scenarios, where replicas are always created on the array remote to primary. A non-failover scenario
l Failover scenarios, where the roles of original source and destination are reversed after a failover. Replicas in such scenarios can be created: l On the disk array remote to the current source (Follow direction of replication backup option
selected in the backup specification). It means that after a failover, the replication direction is reversed and the replicas are created on the array that was originally a source 3PAR array.
Zero Downtime Administrator's GuideChapter 14: Backup
HPE Data Protector (9.07) Page 126 of 271

"Failover scenario 1 " below depicts an environment where the location of replica creation was switched after a failover.Failover scenario 1
l On the array remote to primary (Maintain replica location backup option is selected in the backup specification). It means that after a failover, replica location is maintained and replicas continue on the destination array that has now become a source array. Note that for the time of replica creation, the source array performance may be affected.Failover scenario 2
Consider the following:
l If you intend to always follow the replication direction, make sure the backup system has access to both local and remote 3PAR array storage systems. Otherwise, after a failover, ZDB session fails
Zero Downtime Administrator's GuideChapter 14: Backup
HPE Data Protector (9.07) Page 127 of 271
because the replication direction switches and the backup system is no longer visible to the array where the replicas are created.
Replica set rotation
In the HPE 3PAR Remote Copy non-failover scenarios, replicas are always created on the array remote to primary. If the existing replica count (on the array where new replicas are ) exceeds the specified number of replicas rotated, the oldest replica is deleted and the new one is created in its place (ensuring the maximum number of replicas is always within the defined rotation set).
In the HPE 3PAR Remote Copy failover scenarios, replicas are created either on:
l The array remote to current source (or on the primary disk array) l The array remote to primaryIn the first case, the number of replicas in a rotation set is only checked on the current destination array. The replicas created on the current source, which was a destination before a failover, are ignored. Therefore, there are situations when two replica sets are created on both the source and destination arrays.
In the second case, replica set rotation verification happens in a normal way.
Note: Replica rotation set is only created if you select the option Keep the replica after the backup and specify Number of replicas rotated. Without these options specified, the replica is deleted from the array after the backup to tape is completed.
For more information about replica set rotation, see the HPE Data Protector Concepts Guide.
Limitations l Consider all the limitations that apply to the Data ProtectorHPE 3PAR StoreServ Storage
integration. See the HPE Data Protector Product Announcements, Software Notes, and References, the HPE Data Protector Concepts Guide, and the limitations list in "Introduction" on page 119.
l The selected volumes are backed up only if the remote copy group is in the Start state. l If a switchover operation is performed on the 3PAR remote copy groups, the roles of primary and
secondary array are reversed. Data Protector does not consider this as a remote copy group failover, and continues to create the replica on the secondary array even after the switchover operation.
ZDB in HP-UX LVM mirroring environmentsFor more information, see "ZDB in HP-UX LVM mirroring environments" on page 38.
Creating the backup specificationThis section guides you through the process of configuring a ZDB backup specification for backing up data that resides on a storage system of the HPE 3PAR StoreServ Storage family.
Zero Downtime Administrator's GuideChapter 14: Backup
HPE Data Protector (9.07) Page 128 of 271
Data Protector 3PAR Remote Copy Omnirc Variables
Data Protector performs a periodic sync operation before the backup is executed. This periodic sync may take more time if your arrays span across different data centers. Therefore, you can use the below omnirc variables to set the wait time, and retry count for the periodic sync operations. Note that if the sync is not completed, the backup session may be aborted.
l ZDB_WAIT_FOR_PERIODIC_SYNC_TO_COMPLETE l This variable sets the time period for the remote copy group periodic sync to complete.
l Default value: 300 seconds, for Windows and Linux.
l ZDB_WAIT_FOR_PERIODIC_SYNC_RETRY_COUNT l This variable sets the number of retries to check the status of the remote copy periodic sync
completion.
l Default value: 1
Procedure
1. In the Context List, select Backup. 2. In the Scoping Pane, expand Backup Specifications. Right-click Filesystem (for both object
types: filesystem and disk image) and click Add Backup.The Create New Backup dialog box appears.In the Filesystem pane, select the Blank Filesystem Backup template or some other template which you might have created. For information on templates, see the HPE Data Protector Help index: “backup templates”.Select Snapshot or split mirror backup as Backup type and HPE 3PAR as Sub type. For description of options, press F1.Click OK.
3. Under Client systems, select Application system and Backup system. If the application system is part of a server cluster, select the virtual server.Under Replication mode, select HPE 3PAR Local Copy or HPE 3PAR Remote Copy, based on your requirements. If you select HPE 3PAR Remote Copy, specify the choice for replica handling during failover scenarios. See Backup Options for more information. Under Snapshot management options, Virtual copy is preselected for the snapshot type and cannot be changed.
Zero Downtime Administrator's GuideChapter 14: Backup
HPE Data Protector (9.07) Page 129 of 271
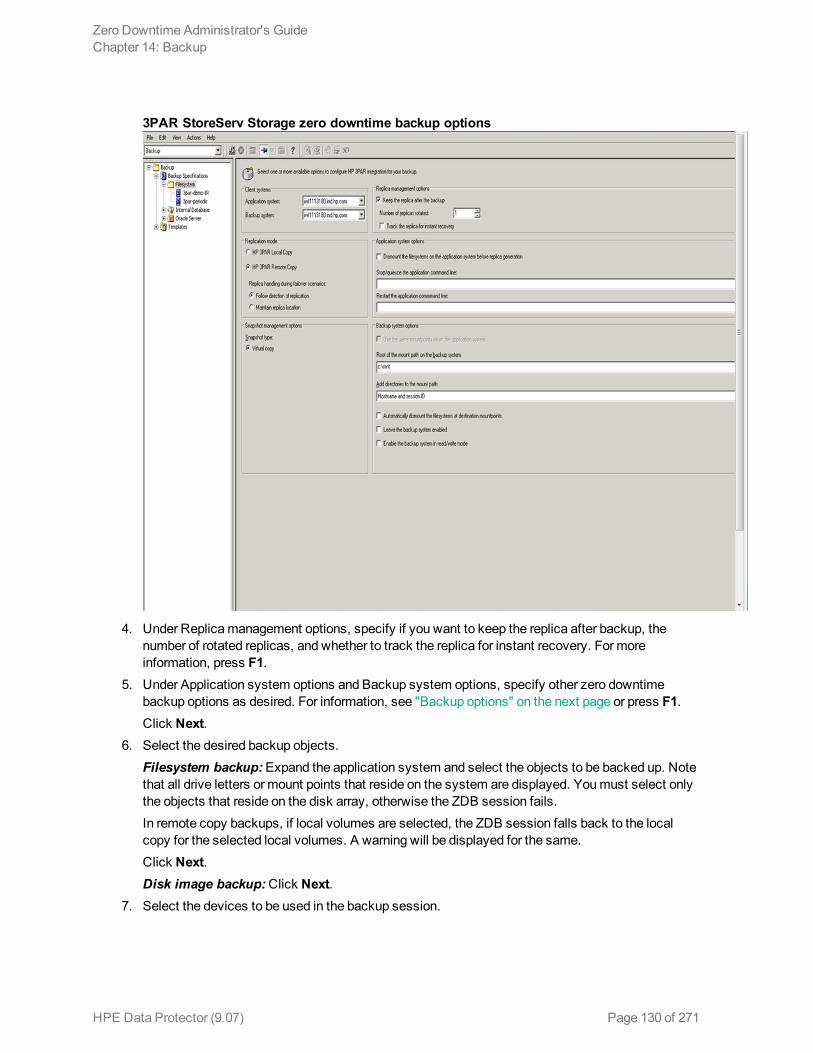
3PAR StoreServ Storage zero downtime backup options
4. Under Replica management options, specify if you want to keep the replica after backup, the number of rotated replicas, and whether to track the replica for instant recovery. For more information, press F1.
5. Under Application system options and Backup system options, specify other zero downtime backup options as desired. For information, see "Backup options" on the next page or press F1.Click Next.
6. Select the desired backup objects.Filesystem backup: Expand the application system and select the objects to be backed up. Note that all drive letters or mount points that reside on the system are displayed. You must select only the objects that reside on the disk array, otherwise the ZDB session fails.In remote copy backups, if local volumes are selected, the ZDB session falls back to the local copy for the selected local volumes. A warning will be displayed for the same. Click Next.Disk image backup: Click Next.
7. Select the devices to be used in the backup session.
Zero Downtime Administrator's GuideChapter 14: Backup
HPE Data Protector (9.07) Page 130 of 271
To create additional copies (mirrors) of the backup image, specify the desired number of mirrors by clicking Add mirror or Remove mirror. Select separate devices for the backup image and each mirror.For information on object mirroring, see the HPE Data Protector Help index: “object mirroring”.Click Next.
8. In the Backup Specification Options group box, click Advanced and then the HPE3PAR tab to open the options pane with HPE 3PAR StoreServ Storage specific backup options.You can specify Application system options and modify all other options, except Application system and Backup system (note that you can change them after you save the ZDB backup specification). See "Backup options" below or press F1.Click Next.
9. Following the wizard, open the scheduler to schedule the ZDB sessions. For more information, see "Appendix" on page 228 or press F1.Click Next.
10. In the Backup Object Summary page, specify additional options.Filesystem backup: You can modify options for the listed objects by right-clicking an object and then clicking Properties. For information on the object properties, press F1.Disk image backup: Follow the steps: a. Click Manual add to add disk image objects. b. Select Disk image object and click Next. c. Select the client system. Optionally, enter the description for your object. Click Next. d. Specify General Object Options and Advanced Object Options. For information on these
options, press F1. e. In the Disk Image Object Options window, specify disk image or raw logical volume sections.
Specify a disk image section:
/dev/rdsk/Filename, for example: /dev/rdsk/c2t0d0On HP-UX 11.31 systems, the new naming system can be used:
/dev/rdisk/disk#, for example /dev/rdisk/disk2Specify a raw logical volume section:
/dev/vgnumber/rlvolNumber, for example: /dev/vg01/rlvol1 f. Click Finish.Click Next.
11. Save your ZDB backup specification.
Backup optionsThe following tables describe the ZDB-related backup options that you can modify when configuring ZDB backup specifications that include storage systems of the HPE 3PAR StoreServ Storage family.
Client systems
Zero Downtime Administrator's GuideChapter 14: Backup
HPE Data Protector (9.07) Page 131 of 271
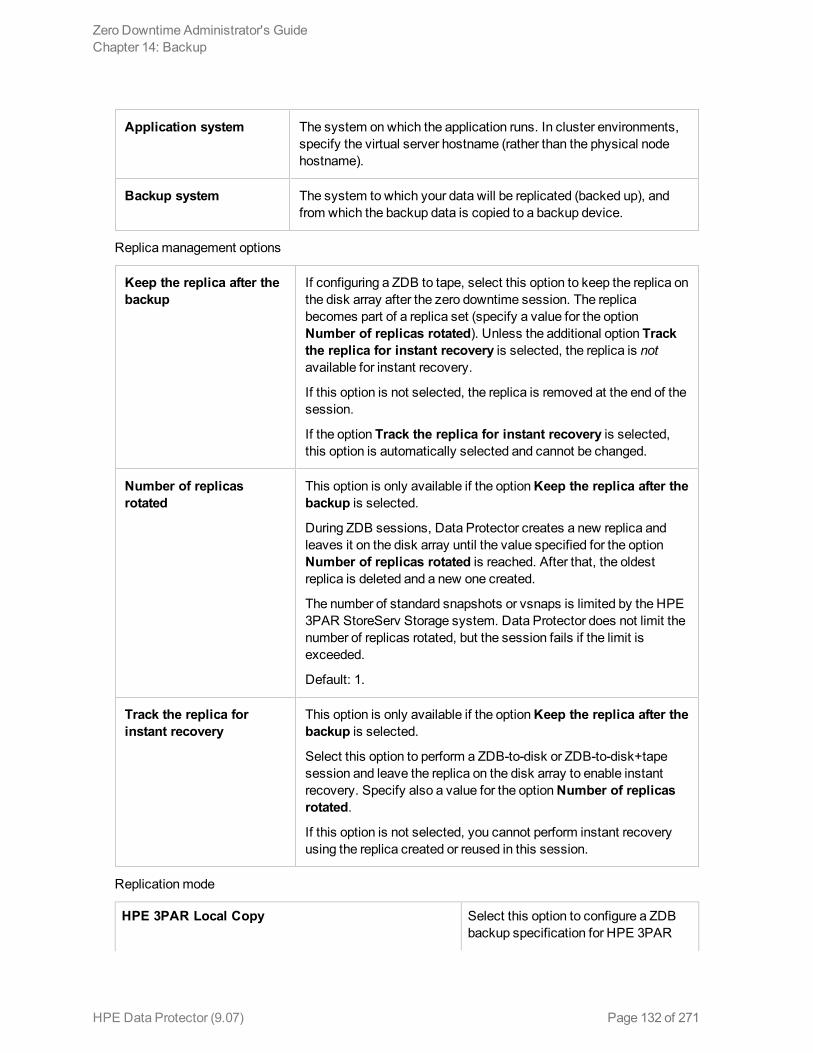
Application system The system on which the application runs. In cluster environments, specify the virtual server hostname (rather than the physical node hostname).
Backup system The system to which your data will be replicated (backed up), and from which the backup data is copied to a backup device.
Replica management options
Keep the replica after the backup
If configuring a ZDB to tape, select this option to keep the replica on the disk array after the zero downtime session. The replica becomes part of a replica set (specify a value for the option Number of replicas rotated). Unless the additional option Track the replica for instant recovery is selected, the replica is not available for instant recovery.
If this option is not selected, the replica is removed at the end of the session.
If the option Track the replica for instant recovery is selected, this option is automatically selected and cannot be changed.
Number of replicas rotated
This option is only available if the option Keep the replica after the backup is selected.
During ZDB sessions, Data Protector creates a new replica and leaves it on the disk array until the value specified for the option Number of replicas rotated is reached. After that, the oldest replica is deleted and a new one created.
The number of standard snapshots or vsnaps is limited by the HPE 3PAR StoreServ Storage system. Data Protector does not limit the number of replicas rotated, but the session fails if the limit is exceeded.
Default: 1.
Track the replica for instant recovery
This option is only available if the option Keep the replica after the backup is selected.
Select this option to perform a ZDB-to-disk or ZDB-to-disk+tape session and leave the replica on the disk array to enable instant recovery. Specify also a value for the option Number of replicas rotated.
If this option is not selected, you cannot perform instant recovery using the replica created or reused in this session.
Replication mode
HPE 3PAR Local Copy Select this option to configure a ZDB backup specification for HPE 3PAR
Zero Downtime Administrator's GuideChapter 14: Backup
HPE Data Protector (9.07) Page 132 of 271
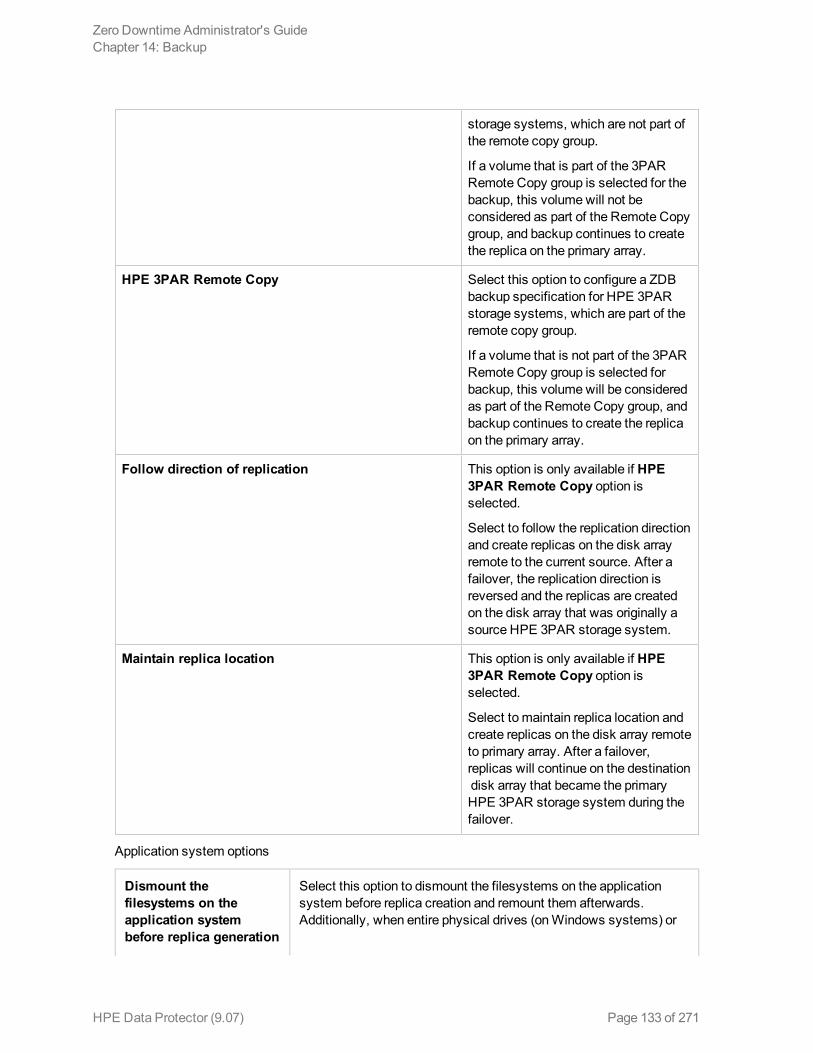
storage systems, which are not part of the remote copy group.
If a volume that is part of the 3PAR Remote Copy group is selected for the backup, this volume will not be considered as part of the Remote Copy group, and backup continues to create the replica on the primary array.
HPE 3PAR Remote Copy Select this option to configure a ZDB backup specification for HPE 3PAR storage systems, which are part of the remote copy group.
If a volume that is not part of the 3PAR Remote Copy group is selected for backup, this volume will be considered as part of the Remote Copy group, and backup continues to create the replica on the primary array.
Follow direction of replication This option is only available if HPE 3PAR Remote Copy option is selected.
Select to follow the replication direction and create replicas on the disk array remote to the current source. After a failover, the replication direction is reversed and the replicas are created on the disk array that was originally a source HPE 3PAR storage system.
Maintain replica location This option is only available if HPE 3PAR Remote Copy option is selected.
Select to maintain replica location and create replicas on the disk array remote to primary array. After a failover, replicas will continue on the destination disk array that became the primary HPE 3PAR storage system during the failover.
Application system options
Dismount the filesystems on the application system before replica generation
Select this option to dismount the filesystems on the application system before replica creation and remount them afterwards. Additionally, when entire physical drives (on Windows systems) or
Zero Downtime Administrator's GuideChapter 14: Backup
HPE Data Protector (9.07) Page 133 of 271
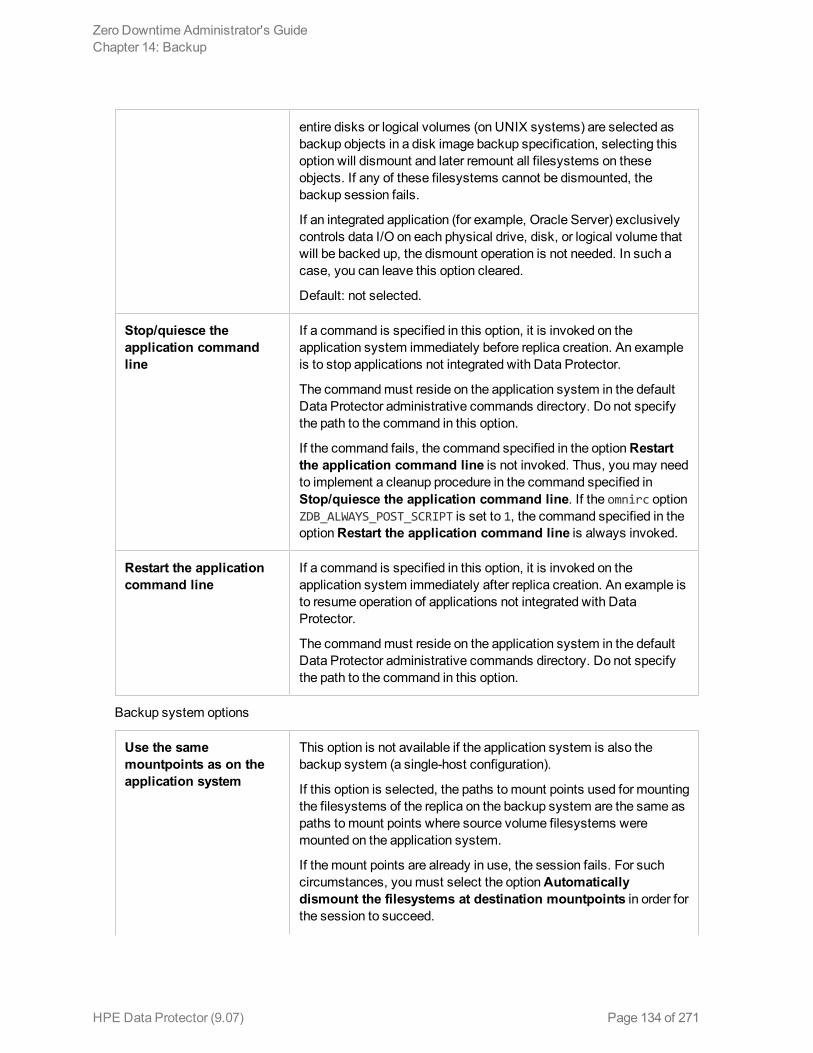
entire disks or logical volumes (on UNIX systems) are selected as backup objects in a disk image backup specification, selecting this option will dismount and later remount all filesystems on these objects. If any of these filesystems cannot be dismounted, the backup session fails.
If an integrated application (for example, Oracle Server) exclusively controls data I/O on each physical drive, disk, or logical volume that will be backed up, the dismount operation is not needed. In such a case, you can leave this option cleared.
Default: not selected.
Stop/quiesce the application command line
If a command is specified in this option, it is invoked on the application system immediately before replica creation. An example is to stop applications not integrated with Data Protector.
The command must reside on the application system in the default Data Protector administrative commands directory. Do not specify the path to the command in this option.
If the command fails, the command specified in the option Restart the application command line is not invoked. Thus, you may need to implement a cleanup procedure in the command specified in Stop/quiesce the application command line. If the omnirc option ZDB_ALWAYS_POST_SCRIPT is set to 1, the command specified in the option Restart the application command line is always invoked.
Restart the application command line
If a command is specified in this option, it is invoked on the application system immediately after replica creation. An example is to resume operation of applications not integrated with Data Protector.
The command must reside on the application system in the default Data Protector administrative commands directory. Do not specify the path to the command in this option.
Backup system options
Use the same mountpoints as on the application system
This option is not available if the application system is also the backup system (a single-host configuration).
If this option is selected, the paths to mount points used for mounting the filesystems of the replica on the backup system are the same as paths to mount points where source volume filesystems were mounted on the application system.
If the mount points are already in use, the session fails. For such circumstances, you must select the option Automatically dismount the filesystems at destination mountpoints in order for the session to succeed.
Zero Downtime Administrator's GuideChapter 14: Backup
HPE Data Protector (9.07) Page 134 of 271
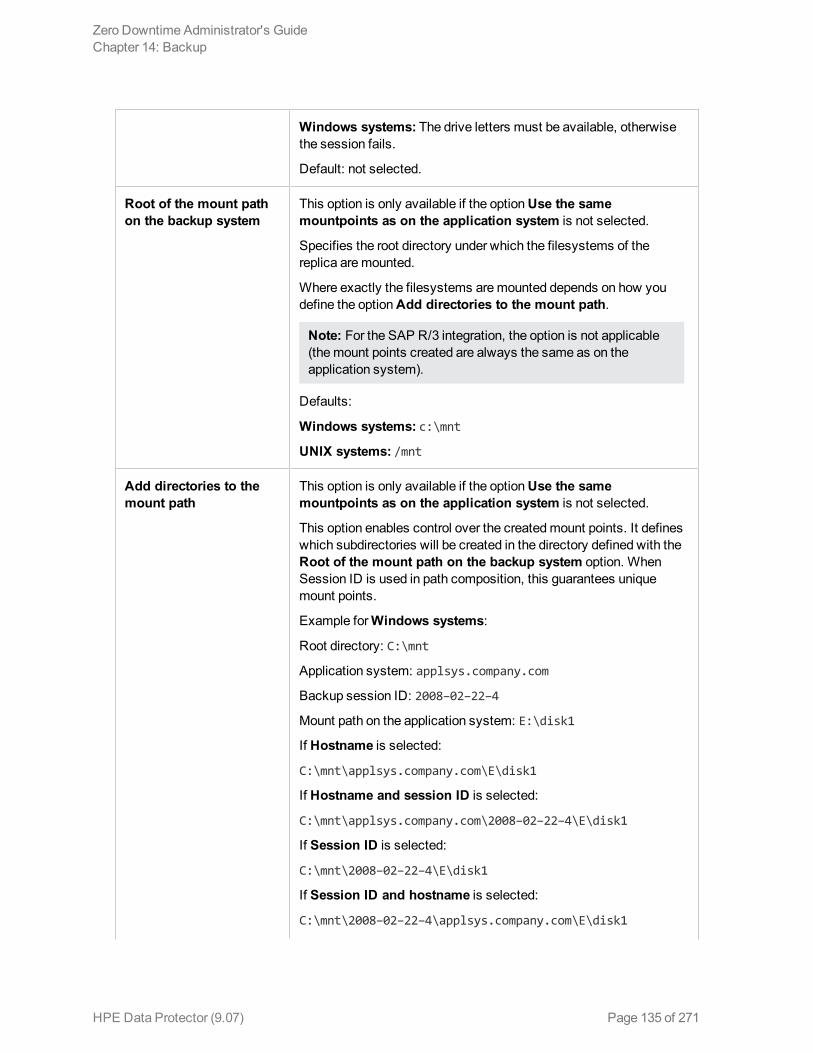
Windows systems: The drive letters must be available, otherwise the session fails.
Default: not selected.
Root of the mount path on the backup system
This option is only available if the option Use the same mountpoints as on the application system is not selected.
Specifies the root directory under which the filesystems of the replica are mounted.
Where exactly the filesystems are mounted depends on how you define the option Add directories to the mount path.
Note: For the SAP R/3 integration, the option is not applicable (the mount points created are always the same as on the application system).
Defaults:
Windows systems: c:\mnt
UNIX systems: /mnt
Add directories to the mount path
This option is only available if the option Use the same mountpoints as on the application system is not selected.
This option enables control over the created mount points. It defines which subdirectories will be created in the directory defined with the Root of the mount path on the backup system option. When Session ID is used in path composition, this guarantees unique mount points.
Example for Windows systems:
Root directory: C:\mnt
Application system: applsys.company.com
Backup session ID: 2008–02–22–4
Mount path on the application system: E:\disk1
If Hostname is selected:
C:\mnt\applsys.company.com\E\disk1
If Hostname and session ID is selected:
C:\mnt\applsys.company.com\2008–02–22–4\E\disk1
If Session ID is selected:
C:\mnt\2008–02–22–4\E\disk1
If Session ID and hostname is selected:
C:\mnt\2008–02–22–4\applsys.company.com\E\disk1
Zero Downtime Administrator's GuideChapter 14: Backup
HPE Data Protector (9.07) Page 135 of 271

NOTE:
For the SAP R/3 integration, the option is not applicable (the mount points created are always the same as on the application system).
Default: Hostname and session ID.
Automatically dismount the filesystems at destination mountpoints
If the mount points are in use (for example, volumes involved in the previous session may still be mounted) and this option is selected, Data Protector attempts to dismount the mounted filesystems.
If the option is not selected and the mount points are in use, or if the option is selected and the dismount operation fails, the session fails.
Default: not selected.
Leave the backup system enabled
This option is only available if the option Keep the replica after the backup is selected.
If this option is selected, the filesystems remain mounted, the volume groups remain imported and active (UNIX systems), and the target volumes remain presented after the session. In this case, you can use the backup system for data warehousing purposes, but not for instant recovery. If the replica has to be reused later on (deleted, rotated out, or used for instant recovery), Data Protector automatically connects to the backup system, dismounts the filesystems, unpresents the target volumes, and clears the related logical structures on the backup system. At that point in time, if the filesystems are not mounted to the current backup system, Data Protector cannot perform a proper cleanup, and aborts the operation or the instant recovery session.
If this option is not selected, Data Protector dismounts filesystems, exports volume groups (UNIX systems), and unpresents the target volumes on the backup system at the end of the ZDB session.
Enable the backup system in read/write mode
This option is applicable to and can only be changed for UNIX systems only. On Windows systems, filesystems cannot be mounted in the read-only mode.
Select this option to enable write access to volume groups and filesystems on the backup system. For backup purposes, it is sufficient to activate the backup system volume groups and mount the filesystems in the read-only mode. For other tasks, the read/write mode may be needed.
Note that when this option is selected, the replica is open to modifications while the backup system is online. Consequently, data restored from such a replica includes all potential modifications.
Defaults:
Windows systems: selected.
Zero Downtime Administrator's GuideChapter 14: Backup
HPE Data Protector (9.07) Page 136 of 271
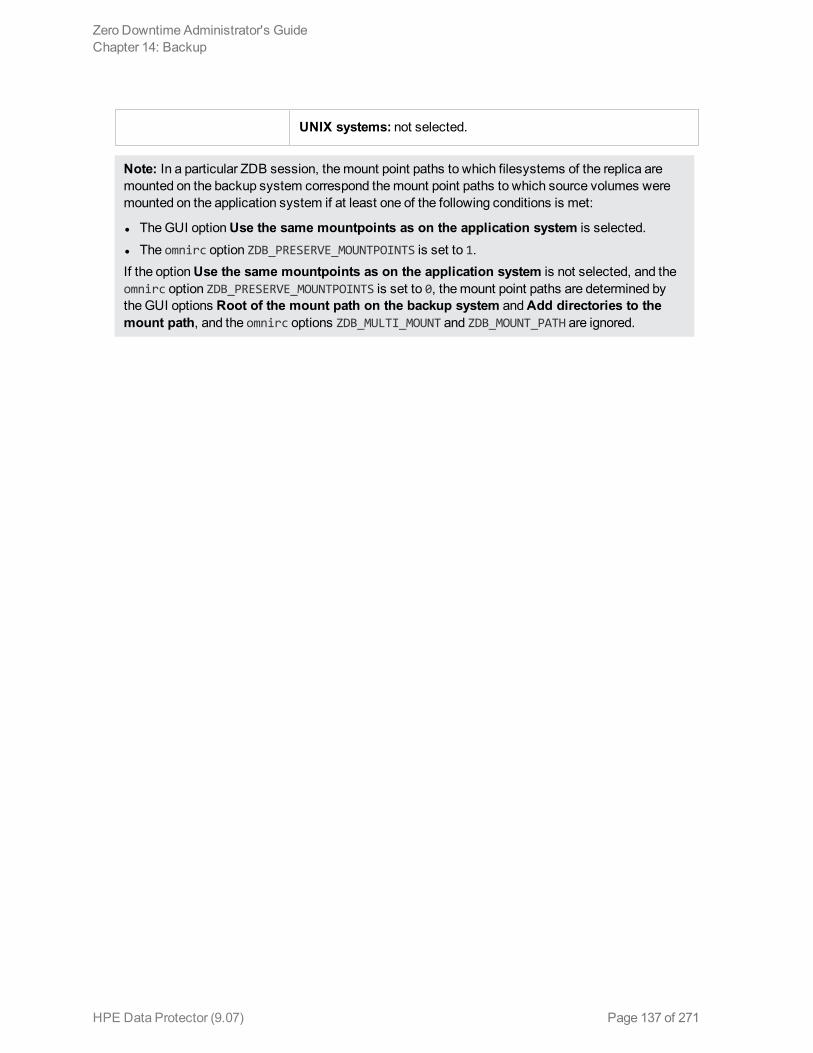
UNIX systems: not selected.
Note: In a particular ZDB session, the mount point paths to which filesystems of the replica are mounted on the backup system correspond the mount point paths to which source volumes were mounted on the application system if at least one of the following conditions is met:
l The GUI option Use the same mountpoints as on the application system is selected. l The omnirc option ZDB_PRESERVE_MOUNTPOINTS is set to 1.If the option Use the same mountpoints as on the application system is not selected, and the omnirc option ZDB_PRESERVE_MOUNTPOINTS is set to 0, the mount point paths are determined by the GUI options Root of the mount path on the backup system and Add directories to the mount path, and the omnirc options ZDB_MULTI_MOUNT and ZDB_MOUNT_PATH are ignored.
Zero Downtime Administrator's GuideChapter 14: Backup
HPE Data Protector (9.07) Page 137 of 271
Chapter 15: Restore Instant recovery sessions that involve a HPE 3PAR StoreServ Storage system can be initiated natively using the HPE 3PAR StoreServ Storage integration, or through the Data Protector Microsoft Volume Shadow Copy Service integration using the 3PAR VSS Agent, provided that the corresponding zero downtime backup sessions were also initiated through this integration.
For information on replica handling during instant recovery, description of the instant recovery process, and storage system-specific instant recovery considerations, see the HPE Data Protector Concepts Guide and the HPE Data Protector Help index: “instant recovery: process overview”.
For additional storage system-specific instant recovery considerations and instructions for running instant recovery sessions using the Data Protector Microsoft Volume Shadow Copy Service integration, see the HPE Data Protector Integration Guide for Microsoft Volume Shadow Copy Service.
Instant recoveryInstant recovery restores data directly from a replica to source volumes, without involving a backup device. All data in the replica is restored, including filesystems or other objects which were not explicitly selected for backup. For instant recovery concepts, see the HPE Data Protector Concepts Guide.
You can perform instant recovery using:
l The Data Protector GUISee "Instant recovery using the GUI" on the next page.
l The Data Protector CLISee "Instant recovery using the CLI" on page 141.
The number of replicas available for instant recovery is limited by the value of the option Number of replicas rotated, which determines the size of the replica set. You can view these replicas in the GUI in the Instant Recovery context by expanding Restore Sessions. Replicas are identified by the backup specification name and the session ID. Other information, such as time when the replica was created, is also provided. Alternately, you can use the Data Protector command omnidbzdb to list sessions. For more information, see the HPE Data Protector Command Line Interface Reference or the omnidbzdb man page.
When instant recovery starts, Data Protector disables the application system. This includes dismounting filesystems and deactivating or exporting volume groups (UNIX). Before this is done, filesystems’ and volume groups’ status is checked, and only mounted filesystems are dismounted and active volume groups are deactivated or exported. At the end of the session, volume groups are reactivated and dismounted filesystems are mounted to the same mount points as were used during backup.
HPE Data Protector (9.07) Page 138 of 271

Limitations
l Instant recovery fails in the following situations: l The source volumes do not exist on the disk array any more.
l The source volumes are not presented to the application system.
l If the current configuration of the participating volumes (on Windows systems) or volume groups (on UNIX systems) is different from the volume/volume group configuration that existed at the time of the ZDB session and which was recorded in the SMISDB.
l After instant recovery, restored filesystems are mounted to the same mount points or drive letters on the application system as they were at the backup time, but these mount points or drive letters have other filesystems mounted.
l While an instant recovery session is in progress, you cannot perform a zero downtime backup session that involves the source volumes to which the data is being restored.
For the HPE 3PAR StoreServ Storage instant recovery-related limitations and considerations, see the HPE Data Protector Product Announcements, Software Notes, and References and the HPE Data Protector Concepts Guide.
Instant recovery methodsWith HPE 3PAR StoreServ Storage, instant recovery can be performed using the "copy-back" method, which copies replica data without retaining the source volumes.
With this instant recovery method, the source volumes are directly overwritten with data from the replica. 3PAR does not allow to continue before restore is completed. The restore process runs until finished or aborted. The source volumes are not retained and if the instant recovery session fails, the original application data residing on the source volumes is lost.
Instant recovery procedure
Prerequisites
l Target volumes used in an instant recovery session should not be presented to any system. You can make Data Protector automatically remove any disallowed target volume presentations by selecting the option Force the removal of all replica presentations in the GUI or by specifying the omnir option -force_prp_replica in the CLI.
l If a disk image backup with filesystems mounted on the selected disks was performed, manually dismount the filesystems on the disks to be restored before disk image instant recovery. If the option Check the data configuration consistency is cleared in the GUI or the omnir option -check_config is not specified in the CLI, the disks are dismounted automatically. In any case, re-mount the filesystems back after instant recovery.
Instant recovery using the GUI
Follow the steps:
Zero Downtime Administrator's GuideChapter 15: Restore
HPE Data Protector (9.07) Page 139 of 271
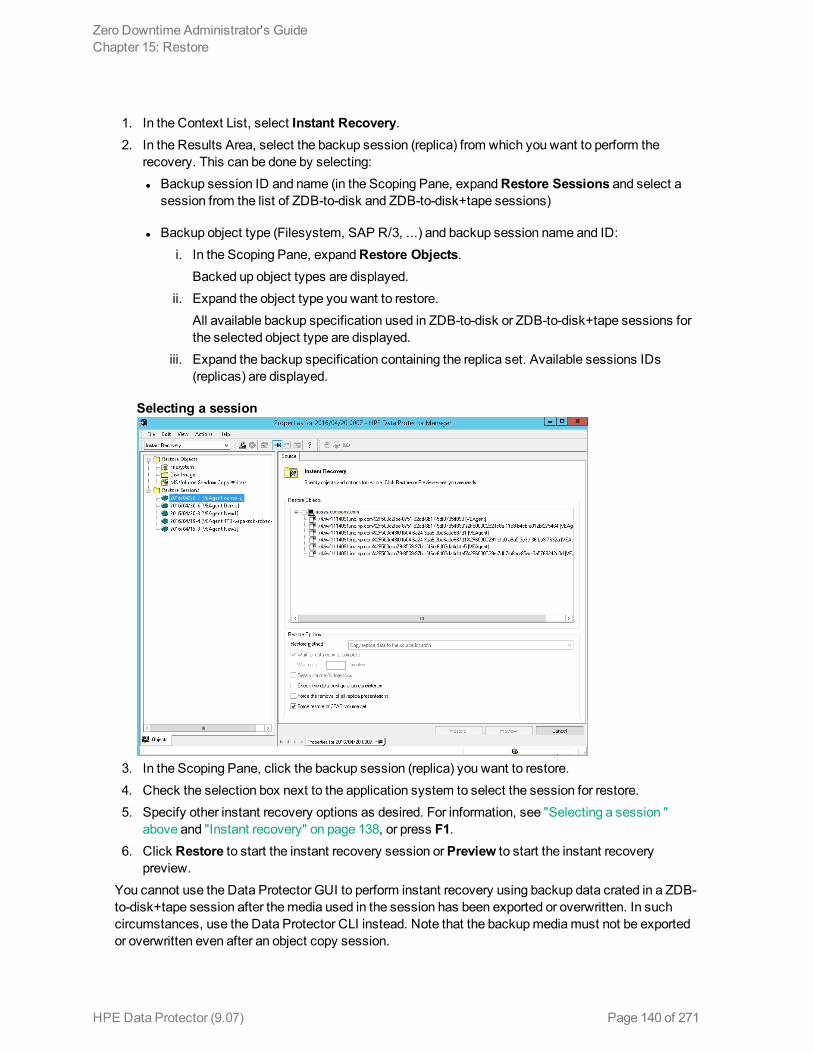
1. In the Context List, select Instant Recovery. 2. In the Results Area, select the backup session (replica) from which you want to perform the
recovery. This can be done by selecting: l Backup session ID and name (in the Scoping Pane, expand Restore Sessions and select a
session from the list of ZDB-to-disk and ZDB-to-disk+tape sessions)
l Backup object type (Filesystem, SAP R/3, ...) and backup session name and ID: i. In the Scoping Pane, expand Restore Objects.
Backed up object types are displayed. ii. Expand the object type you want to restore.
All available backup specification used in ZDB-to-disk or ZDB-to-disk+tape sessions for the selected object type are displayed.
iii. Expand the backup specification containing the replica set. Available sessions IDs (replicas) are displayed.
Selecting a session
3. In the Scoping Pane, click the backup session (replica) you want to restore. 4. Check the selection box next to the application system to select the session for restore. 5. Specify other instant recovery options as desired. For information, see "Selecting a session "
above and "Instant recovery" on page 138, or press F1. 6. Click Restore to start the instant recovery session or Preview to start the instant recovery
preview.You cannot use the Data Protector GUI to perform instant recovery using backup data crated in a ZDB-to-disk+tape session after the media used in the session has been exported or overwritten. In such circumstances, use the Data Protector CLI instead. Note that the backup media must not be exported or overwritten even after an object copy session.
Zero Downtime Administrator's GuideChapter 15: Restore
HPE Data Protector (9.07) Page 140 of 271
Instant recovery using the CLI
1. List all available ZDB-to-disk or ZDB-to-disk+tape sessions (identified by the session ID):
omnidbzdb --list --session --ir
From the output, select the backup session you want to restore. 2. Run the following command:
omnir -host ClientName -session SessionID -instant_restore [INSTANT_RECOVERY_OPTIONS]
where the meaning of the options is as follows:
ClientName Application system name.
SessionID Backup session ID
For INSTANT_RECOVERY_OPTIONS, see "Instant recovery options " below.For details, see the HPE Data Protector Command Line Interface Reference or the omnidbzdb and omnir man pages.
Instant recovery optionsInstant recovery options
Data ProtectorGUI/CLI
Function
Copy replica data to the source location / -copyback
This is the only available method with HPE 3PAR StoreServ Storage. It copies the replica data of the specified ZDB session to the original storage.
Caution: If the instant recovery session fails, a data loss on the source volumes may occur.
After the instant recovery session, the replica is not deleted from the replica set, and the information about it is not deleted from the SMISDB. Therefore, the replica is available for another instant recovery session until it is rotated out from the replica set or deleted manually.
This instant recovery method takes about as much time as the replica creation did, but the storage redundancy level is preserved and the source volumes remain in their disk group.
Wait for the replica to complete / -wait_clonecopy
This option always enabled as HPE 3PAR StoreServ Storage does not allow creating presentations while copying data to the source location. Instant recovery session cannot continue before copy-back has finished and presentations cannot be created while restore is in progress.
Check the data If this option is selected in the GUI or the -check_config option is specified
Zero Downtime Administrator's GuideChapter 15: Restore
HPE Data Protector (9.07) Page 141 of 271

Data ProtectorGUI/CLI
Function
configuration consistency / -check_config | —no_check_config
in the CLI, Data Protector performs a sanity check and a comparison of current volume group configuration of the volume groups participating in the instant recovery session and the volume group configuration information kept in the SMISDB after the corresponding zero downtime backup session. If the sanity check fails or the volume group configuration has changed since the zero downtime backup session, the instant recovery session aborts.
MC/ServiceGuard clusters: When performing instant recovery to some other node than the one from which data was backed up, you must select this option in the GUI or specify the -check_config option in the CLI. In such circumstances, the current volume group configuration on the node to which data is to be restored differs from the volume group configuration kept in the SMISDB. Consequently, the SMISDB volume group configuration data is replaced by the current volume group configuration data on the node to which data is to be restored, and the instant recovery session succeeds.
Force the removal of all replica presentations / -force_prp_replica
If this option is selected in the GUI or specified in the CLI, and a target volume containing data to be restored is presented to a system, the HPE P6000 / HPE 3PAR SMI-S Agent removes such presentation. If the option is not selected in the GUI or not specified in the CLI, the instant recovery session fails in such circumstances.
Force restore of 3PAR volume set / -force_restore_volset
If this option is selected in the GUI or specified in the CLI, and a source volume (a member of the volume set) is exported to the application host using volume set, the HPE P6000 / HPE 3PAR SMI-S Agent removes all volumes that are part of the volume set presentation during instant recovery and adds them back after the restore completes. If the option is not selected in the GUI or not specified in the CLI, the instant recovery session fails in such circumstances.
Note that if this option is selected during remove presentation, none of the volumes part of the volume set can be accessed.
Instant Recovery for 3PAR Remote Copy environments
IntroductionThis section describes the steps to be followed for executing the instant recovery procedure in 3PAR Remote Copy environments of the 3PAR storage systems using Data Protector.
PrerequisitesYou should be familiar with the following:
Zero Downtime Administrator's GuideChapter 15: Restore
HPE Data Protector (9.07) Page 142 of 271
l HPE Data Protector Concepts Guide l HPE storage management appliance (SMA) documentation l HPE 3PAR storage systems documentation l Failover or cluster-failover documentation
OverviewInstant recovery restores data directly from a replica to source volumes, without involving a backup device.
For general information on instant recovery, see the HPE Data Protector Zero Downtime Backup Concepts Guide and HPE Data Protector Zero Downtime Backup Administrator's Guide.
The following sections outline different 3PAR remote copy configurations, and the steps you need to follow for a successful instant recovery.
Supported Remote Copy Configurations for Instant Recovery The manual steps needed to prepare the environment for instant recovery differ depending on th 3PAR remote copy configurations.
Identifying the setup depends on the following environment information:
l The current site for the source side of any remote copy groups that include the source storage volumes
l Whether the remote copy or target storage volumes are on the same array as the source storage volumes (primary), or on the remote side of the DR group (secondary)
From this information, there are two possible configurations:
l Configuration I – HPE 3PAR remote copy replica is on the local side of the HPE remote copy group l Configuration II – HPE 3PAR remote copy replica is on the remote side of the HPE remote copy
group
Configuration I – local HPE 3PAR Remote Copy Replica
Replicas on the local site
Zero Downtime Administrator's GuideChapter 15: Restore
HPE Data Protector (9.07) Page 143 of 271
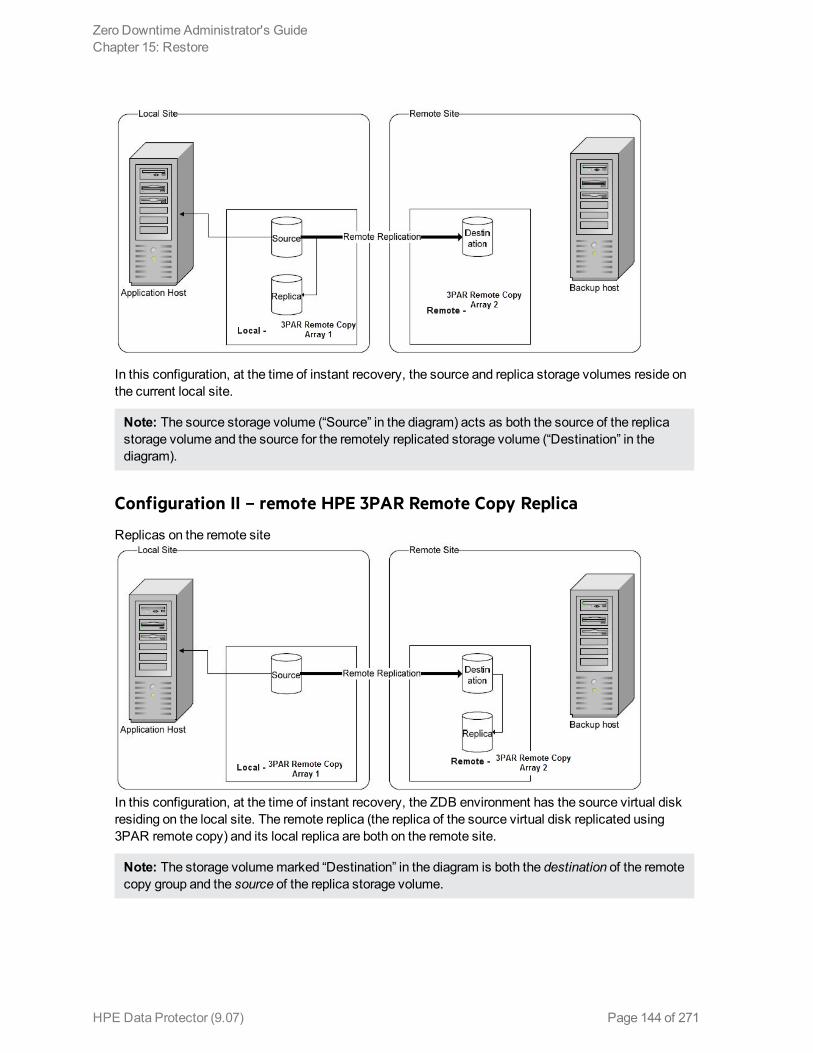
In this configuration, at the time of instant recovery, the source and replica storage volumes reside on the current local site.
Note: The source storage volume (“Source” in the diagram) acts as both the source of the replica storage volume and the source for the remotely replicated storage volume (“Destination” in the diagram).
Configuration II – remote HPE 3PAR Remote Copy Replica
Replicas on the remote site
In this configuration, at the time of instant recovery, the ZDB environment has the source virtual disk residing on the local site. The remote replica (the replica of the source virtual disk replicated using 3PAR remote copy) and its local replica are both on the remote site.
Note: The storage volume marked “Destination” in the diagram is both the destination of the remote copy group and the source of the replica storage volume.
Zero Downtime Administrator's GuideChapter 15: Restore
HPE Data Protector (9.07) Page 144 of 271
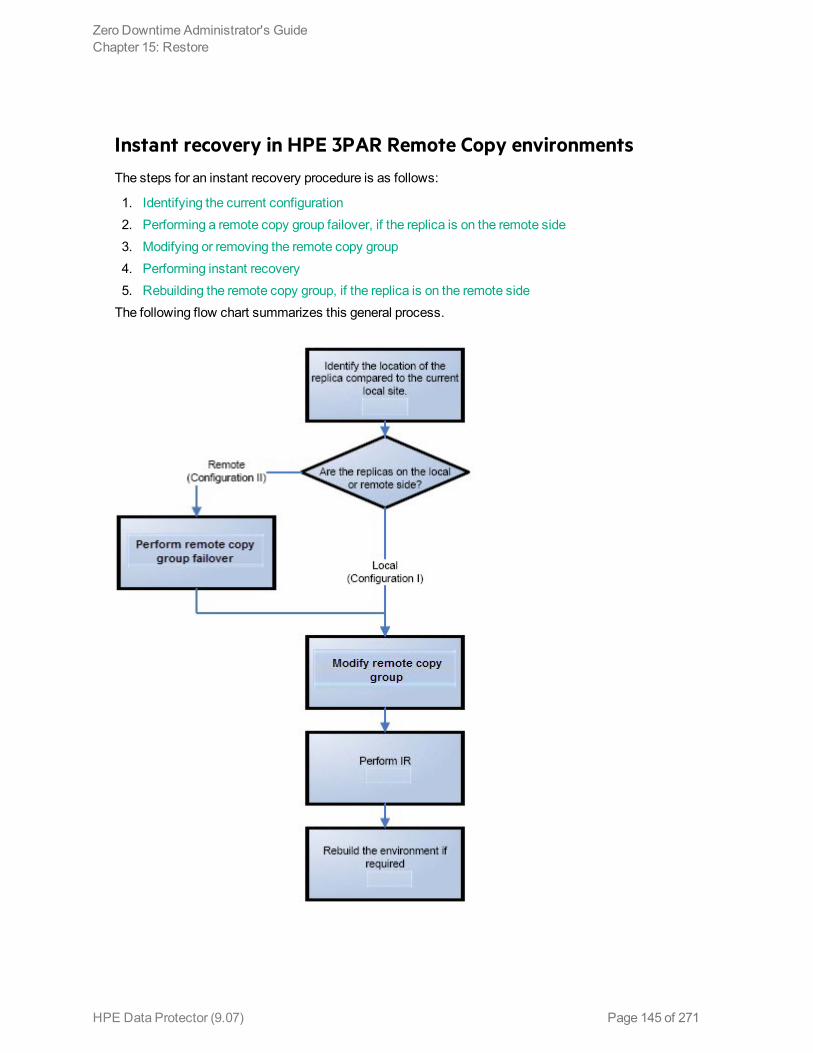
Instant recovery in HPE 3PAR Remote Copy environmentsThe steps for an instant recovery procedure is as follows:
1. Identifying the current configuration 2. Performing a remote copy group failover, if the replica is on the remote side 3. Modifying or removing the remote copy group 4. Performing instant recovery 5. Rebuilding the remote copy group, if the replica is on the remote side
The following flow chart summarizes this general process.
Zero Downtime Administrator's GuideChapter 15: Restore
HPE Data Protector (9.07) Page 145 of 271
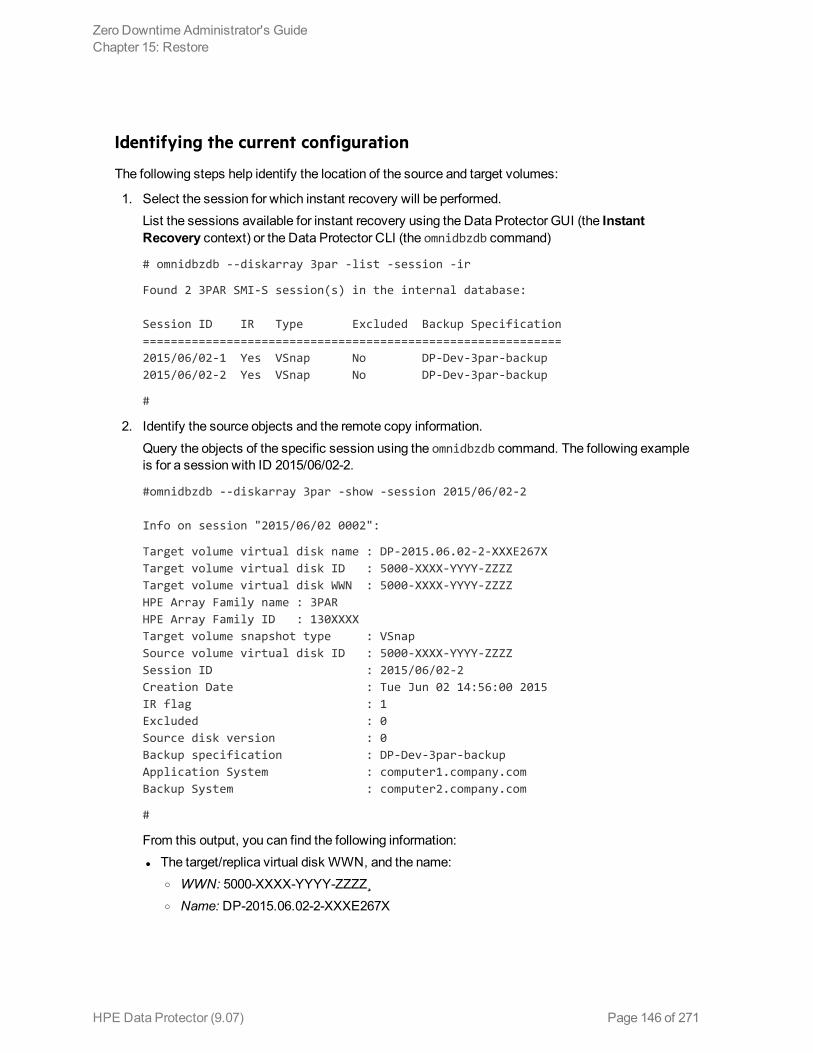
Identifying the current configuration
The following steps help identify the location of the source and target volumes:
1. Select the session for which instant recovery will be performed.List the sessions available for instant recovery using the Data Protector GUI (the Instant Recovery context) or the Data Protector CLI (the omnidbzdb command)
# omnidbzdb --diskarray 3par -list -session -ir
Found 2 3PAR SMI-S session(s) in the internal database: Session ID IR Type Excluded Backup Specification ============================================================ 2015/06/02-1 Yes VSnap No DP-Dev-3par-backup 2015/06/02-2 Yes VSnap No DP-Dev-3par-backup
#
2. Identify the source objects and the remote copy information.
Query the objects of the specific session using the omnidbzdb command. The following example is for a session with ID 2015/06/02-2.
#omnidbzdb --diskarray 3par -show -session 2015/06/02-2 Info on session "2015/06/02 0002":
Target volume virtual disk name : DP-2015.06.02-2-XXXE267X Target volume virtual disk ID : 5000-XXXX-YYYY-ZZZZ Target volume virtual disk WWN : 5000-XXXX-YYYY-ZZZZ HPE Array Family name : 3PAR HPE Array Family ID : 130XXXX Target volume snapshot type : VSnap Source volume virtual disk ID : 5000-XXXX-YYYY-ZZZZ Session ID : 2015/06/02-2 Creation Date : Tue Jun 02 14:56:00 2015 IR flag : 1 Excluded : 0 Source disk version : 0 Backup specification : DP-Dev-3par-backup Application System : computer1.company.com Backup System : computer2.company.com
#
From this output, you can find the following information: l The target/replica virtual disk WWN, and the name:
o WWN: 5000-XXXX-YYYY-ZZZZ¸ o Name: DP-2015.06.02-2-XXXE267X
Zero Downtime Administrator's GuideChapter 15: Restore
HPE Data Protector (9.07) Page 146 of 271
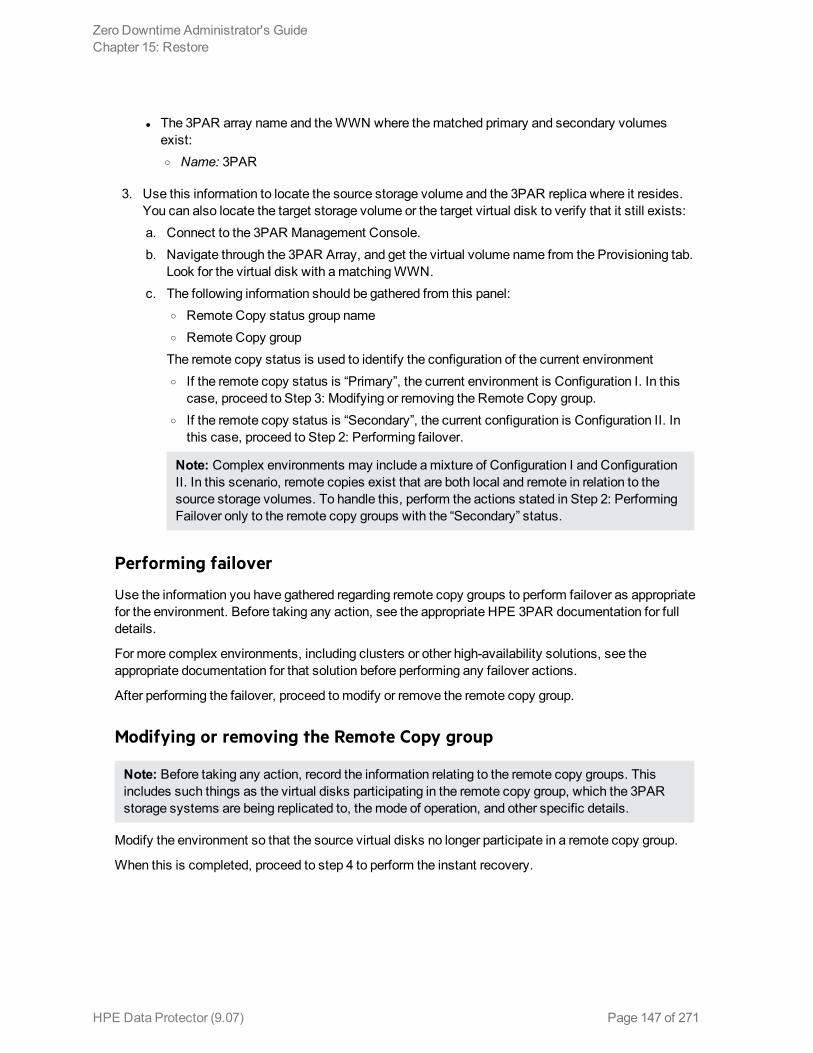
l The 3PAR array name and the WWN where the matched primary and secondary volumes exist: o Name: 3PAR
3. Use this information to locate the source storage volume and the 3PAR replica where it resides. You can also locate the target storage volume or the target virtual disk to verify that it still exists: a. Connect to the 3PAR Management Console. b. Navigate through the 3PAR Array, and get the virtual volume name from the Provisioning tab.
Look for the virtual disk with a matching WWN. c. The following information should be gathered from this panel:
o Remote Copy status group name o Remote Copy groupThe remote copy status is used to identify the configuration of the current environment o If the remote copy status is “Primary”, the current environment is Configuration I. In this
case, proceed to Step 3: Modifying or removing the Remote Copy group. o If the remote copy status is “Secondary”, the current configuration is Configuration II. In
this case, proceed to Step 2: Performing failover.
Note: Complex environments may include a mixture of Configuration I and Configuration II. In this scenario, remote copies exist that are both local and remote in relation to the source storage volumes. To handle this, perform the actions stated in Step 2: Performing Failover only to the remote copy groups with the “Secondary” status.
Performing failover
Use the information you have gathered regarding remote copy groups to perform failover as appropriate for the environment. Before taking any action, see the appropriate HPE 3PAR documentation for full details.
For more complex environments, including clusters or other high-availability solutions, see the appropriate documentation for that solution before performing any failover actions.
After performing the failover, proceed to modify or remove the remote copy group.
Modifying or removing the Remote Copy group
Note: Before taking any action, record the information relating to the remote copy groups. This includes such things as the virtual disks participating in the remote copy group, which the 3PAR storage systems are being replicated to, the mode of operation, and other specific details.
Modify the environment so that the source virtual disks no longer participate in a remote copy group.
When this is completed, proceed to step 4 to perform the instant recovery.
Zero Downtime Administrator's GuideChapter 15: Restore
HPE Data Protector (9.07) Page 147 of 271
Performing instant recovery
Using the Data Protector GUI or CLI, perform instant recovery with the selected session. This should complete successfully with the appropriately reconfigured environment. For more information, see Instant recovery procedure.
When this has been completed, optionally proceed to rebuilding the remote copy group.
Rebuilding the Remote Copy group
If the replica is on the remote side (Configuration II), return the new source virtual disks to the specific remote copy groups. Using the information you recorded in step 3 regarding the environment and specific remote copy groups, either rebuild or recreate the remote copy groups.
Note: Ensure that you use the newly-recovered storage volumes for this rebuild of the 3PAR remote copy groups. These storage volumes should have the same names and the WWNs as the storage volumes used previously. However, as these are different virtual disks, the UUIDs will be different from those used by the application system before for the virtual disks.
For more details, see the 3PAR user documentation. You may also need to perform additional steps to bring the environment to the same initial state, including failing over the 3PAR remote copy groups, to return operation to the correct 3PAR storage systems and application servers.
Zero Downtime Administrator's GuideChapter 15: Restore
HPE Data Protector (9.07) Page 148 of 271

Chapter 16: Troubleshooting
Before you beginThis chapter lists general checks and verifications that you may need to perform when you encounter problems with the HPE 3PAR StoreServ Storage integration. For general Data Protector troubleshooting information, see the HPE Data Protector Troubleshooting Guide. For VSS-specific Data Protector troubleshooting information, see the HPE Data Protector Integration Guide for Microsoft Volume Shadow Copy Service.
l Ensure that the latest official Data Protector patches are installed. For information on how to verify this, see the HPE Data Protector Help index: “patches”.
l For general Data Protector and integration-specific limitations, as well as recognized issues and workarounds, see the HPE Data Protector Product Announcements, Software Notes, and References.
l For an up-to-date list of supported versions, platforms, and other information, see http://support.openview.hp.com/selfsolve/manuals.
Checks and verifications l On the application and backup systems, examine system errors logged into the debug.log file
residing in the default Data Protector log files directory.
Backup problems
Problem
You cannot select the HPE 3PAR sub type in the Data Protector user interface when creating a ZDB backup specification
Action
Check that the HPE P6000 / HPE 3PAR SMI-S Agent integration module is installed on the application system and the backup system. To do that, open the cell_info file located on the Cell Manager in the following directory:
Windows systems: Data_Protector_program_data\Config\server\cell\cell_info
UNIX systems: /etc/opt/omni/server/cell/cell_info
File contents should look similar to the following:
-host "sap002.company.com" -os "HPs800 hp-ux-11.00" -cc A.09.00 -da A.09.00 -ma A.09.00 -SMISA A.09.00
HPE Data Protector (9.07) Page 149 of 271
Problem
The HPE P6000 / HPE 3PAR SMI-S Agent fails to connect to the Cell Manager and retrieve configuration data
[Major] Cannot connect to the Cell Server. (Insufficient permissions. Access denied.)
The HPE P6000 / HPE 3PAR SMI-S Agent is always started as an administrator’s process on the application and backup systems. Therefore, the user who starts it must be the member of admin or operator user groups.
Action
Using the GUI, check if the user is a member of admin or operator user groups. If not, add the user to one of these groups. In addition, ensure that administrators from both the application and backup systems belong to Data Protector admin or operator.
Problem
On an HP-UX system, the HPE P6000 / HPE 3PAR SMI-S Agent fails to communicate with the array provider using SSL
[Warning] The SSL connection to the SMI-S provider has failed. The error description returned is: SSL Exception: Random seed file required
On HP-UX systems, Pegasus libraries require the random number generator pseudo device for its SSL-based communication with the SMI-S provider. If the pseudo device is not present, the warning appears.
Action
1. Install the pseudo device in /dev/random on the HP-UX backup system. 2. Re-run the session.
Problem
No HPE SMI-S CIMOM login entries are configured within SMISDB
Action
Add an HPE SMI-S CIMOM login information to SMISDB:
omnidbzdb --diskarray 3PAR --ompasswd --add ClientName [--ssl] [--port PortNumber] [--user Username] [--passwd Password]
Problem
On a UNIX system, ZDB sessions stop responding for a long time during the resolving of the backup objects on the application system
Zero Downtime Administrator's GuideChapter 16: Troubleshooting
HPE Data Protector (9.07) Page 150 of 271
When resolving the backup objects on the application system, Data Protector sends SCSI inquiries to identify the vendor-specific details of the virtual disk to be replicated. If this virtual disk belongs to a DR group that is in the “failsafe-locked” mode, SCSI inquiries do not return at all. As a result, the session stops responding.
Action
1. Abort the session and stop the ZDB agent processes that stopped responding on the application system.
2. Identify the root cause for the “failsafe-locked” mode of the DR group and fix it by bringing the DR group back into normal operational mode.
Problem
On the application system, dismounting a filesystem fails
Action
Ensure that no other processes use the filesystem to be dismounted. If Stop/quiesce the application command line was specified, check that it stops all processes using the filesystem.
Problem
On a Windows system, replica cannot be mounted to the target location on the backup system
[Major] Filesystem \\.\Volume{9640da9a-6f36-11d7-bd7a-000347add7ba} could not be mounted to C:\mnt. ([145] The directory is not empty.).
When a backup with nested mountpoint objects is run, replica cannot be mounted to the target mountpoint location on the backup system if cleaning of the target mountpoint location fails.
Action
On the backup system, manually empty the directory where filesystems are to be mounted or select the backup option Automatically dismount the filesystems at destination mountpoints. If you choose manual action, and leave the default root mount path c:\mnt in the ZDB backup specification, you should empty the mnt directory.
Problem
Data Protector fails to delete a replica from the replica set in a cluster environment
A ZDB session reports the following major error and message:
[Major]
Resolving of storage volume TargetVolumeID has failed. ...[Normal] Some disks are still in use. They will be moved in purge bucket.
This error may occur in a cluster environment with the backup system which is a cluster virtual server. In such circumstances, after a failover, new backup sessions cannot rotate out the replicas on the
Zero Downtime Administrator's GuideChapter 16: Troubleshooting
HPE Data Protector (9.07) Page 151 of 271
active node because the presentations match the passive node. The replicas to be removed are marked with the purge flag in the SMISDB, and you are advised to delete such replicas.
Action
To delete the replicas with the purge flag from the disk array and the SMISDB, perform one of the following actions:
l Manually delete all storage volumes that are marked for purging by running:
omnidbzdb --diskarray 3PAR -–purge [--force] –-host ClientName
where ClientName is the name of the node on which you want to perform the purge operation.
Use the -force option to remove the volumes marked for purging even if they are presented to a system.
l Perform manual failover and run another ZDB session. The session will delete all the volumes marked for purging on the new active node.
Problem
On an HP-UX system, backup session freezes during either preparation or resuming of the backup system
One of the following messages appears:
[Normal] Starting drive discovery routine.
[Normal] Resuming the backup system.
During the backup system preparation, Data Protector adds new devices to the Secure Path control and runs device scanning. When resuming the backup system, Data Protector removes devices from the Secure Path control and runs device scanning.
If some other process runs Secure Path commands or device scanning at the same time (during either preparation or resumption), the session may freeze. To identify this problem, run the ps -ef command several times on the backup system and check if any ioscan or spmgr processes persist in the output.
Action
Abort the backup session and stop the hanging ioscan and spmgr processes.
If processes cannot be stopped, restart the backup system and clean it up manually:
1. On the backup system, run spmgr display to display the target volumes (created in the failed session) left under the Secure Path control.
2. Remove such target volumes from the Secure Path control using spmgr delete. 3. Run spmgr update, and then follow reported instructions to make changes persistent across
system restart processes. 4. Using the HPE 3PAR Management Console, delete all presentations attached to removed target
volumes.
Problem
On Linux systems, a backup to LVM volumes fails.
Zero Downtime Administrator's GuideChapter 16: Troubleshooting
HPE Data Protector (9.07) Page 152 of 271
The option Leave the backup system enabled was selected for the backup. The following error message is displayed:
[Major] From: [email protected] "SMISA" Time: 12/06/2013 1:06:26 PM
It is possible that duplicated LVM UUIDs and/or names will appear on the backup system.
Session will abort.
Action
Set the lvm.conf file parameters properly. For more information, see the "Prerequisites" on page 119.
Problem
The 3PAR ZDB remote copy periodic backup fails.
The 3PAR remote copy periodic backup of some of the storage volumes fails with the following error message:
[Major] From: SMISA@hostname "SMISA" Time: Date Time
Skipping the backup of storage volume as Remote Copy group sync operation in progress.
Group name : 3PAR remote-copy-group name
Storage volume : 3PAR remote-copy-group storage volume name
Action
l If a manual sync operation is still in progress when the backup is started, then wait for the manual sync operation to complete, and then start the ZDB backup.
l If the sync operation initiated by Data Protector does not complete in the specified time period, increase the wait-time for the sync operation in the ZDB_WAIT_FOR_PERIODIC_SYNC_TO_COMPLETE and the ZDB_WAIT_FOR_PERIODIC_SYNC_RETRY_COUNT variables.
Problem
The 3PAR ZDB remote copy backup fails.
The 3PAR remote copy backup of some of the storage volumes fails with the following error message:
[Major] From: SMISA@hostname "SMISA" Time: Date Time>
Skipping the backup of storage volume as remote copy group is in stopped state.
Group name : 3PAR remote-copy-group name
Storage volume : 3PAR remote-copy-group storage volume name
Action
The 3PAR remote copy group is in the Stopped state. Start the remote copy group and run the backup.
Zero Downtime Administrator's GuideChapter 16: Troubleshooting
HPE Data Protector (9.07) Page 153 of 271

Restore problems
Problem
On the Unix or Linux operating system, after the successful ZDB raw disk image restore, the data is not visible.
Action
Re-mount the volumes, and check again for the data.
Example: umount/<disk mountpoint name> and mount/<disk mountpoint name>
Instant recovery problems
Problem
Instant recovery fails
The problem may occur if the option Force the removal of all replica presentations is not selected and a target volume from the selected replica is presented to some system other than the backup system or the target volume cannot be dismounted.
Action
Select the option Force the removal of all replica presentations and restart the instant recovery session.
Problem
On a Windows system, instant recovery to a different cluster node fails
[Major] Filesystem volume_name could not be dismounted from drive_letter ([2] The system cannot find the file specified.). [Critical] Failed to disable the application system. [Critical] Failed to resolve objects for Instant Recovery.
On Windows systems, the automatic preparation of the application system cannot match clustered volumes from one cluster node to the volumes on another node.
Action
Disable the automatic preparation of the application system:
1. On the application system, enable the ZDB_IR_MANUAL_AS_PREPARATION options (see "Appendix" on page 228) and manually dismount the volumes to be restored.
Zero Downtime Administrator's GuideChapter 16: Troubleshooting
HPE Data Protector (9.07) Page 154 of 271
2. Start instant recovery. 3. After instant recovery, manually mount restored volumes.
Problem
The 3PAR ZDB remote copy group instant recovery fails
3PAR ZDB remote copy group instant recovery fails with the following error message:
[Minor] From: SMISA@hostname "SMISA" Time: Date Time
A SMI-S call to the array did not behave as expected.
Failed volume: DP-201X.XX.01-1-0XXXCDXXX
Returned message: Error calling provider to present volume 5XXX2ACXXXXXXXBX: Invalid parameter for promote snapshot volume: RW parent (3PAR remote copy group storage volume name) is involved in a remote copy group
Action
Remove the storage volume that is part of the 3PAR remote copy group, and start the instant recovery.
Problem
The 3PAR ZDB local instant recovery fails
The 3PAR ZDB local instant recovery fails with the following error message:
[Minor] From: SMISA@hostname "SMISA" Time: Date Time
A SMI-S call to the array did not behave as expected.
Failed volume: DP-201X.XX.01-1-0XXXCDXXX
Returned message: Error calling provider to present volume 5XXX2ACXXXXXXXBX: Invalid parameter for promote snapshot volume: RW parent (3PAR remote copy group storage volume name) is involved in a remote copy group
Action
Remove the storage volume that is part of the 3PAR remote copy group, and start the local 3PAR ZDB instant recovery.
Zero Downtime Administrator's GuideChapter 16: Troubleshooting
HPE Data Protector (9.07) Page 155 of 271
HPE Data Protector (9.07)
Page 156 of 271
Part 5: EMC SymmetrixThis part describes how to configure the Data Protector EMC Symmetrix integration, how to perform zero downtime backup and instant recovery using the EMC Symmetrix integration, and how to resolve the integration-specific Data Protector problems.
Chapter 17: Configuration
IntroductionThis chapter describes the configuration of the Data Protector EMC Symmetrix (EMC) integration.
It also provides information on the EMC Symmetrix database file and Data Protector EMC log file.
Prerequisites
l Install:EMC licenses and components: l EMC Solution Enabler
l EMC Symmetrix TimeFinder or EMC Symmetrix Remote Data Facility (SRDF) microcode and license.
Data Protector licenses and components: l Appropriate zero downtime backup extension and instant recovery extension licenses-to-use
(LTU).
l EMC Symmetrix Agent.
For installation instructions, see the HPE Data Protector Installation Guide. l You should be familiar with:
l EMC command-line interface
l Logical Volume Manager concepts
l Make sure the omnirc variables on both the application and backup hosts are set to:LD_LIBRARY_PATH=/usr/lib/hpux64
SHLIB_PATH=/usr/lib/hpux64
DYNAMIC_PATH=/usr/lib/hpux64
LIBPATH=/usr/lib/hpux64
l Make sure the same operating system (and its version) is installed on the application and backup systems.
l If the application system and the backup system reside in a Data Protector cell with secured clients, ensure that access between both systems is allowed in both directions.
l Connect EMC to the application and backup systems.See the HPE Data Protector Product Announcements, Software Notes, and References for:
l General Data Protector and integration-specific limitations l Supported platforms and integrations
HPE Data Protector (9.07) Page 157 of 271

l Supported backup and connectivity topologiesFor information on supported configurations, see the HPE Data Protector Concepts Guide.
EMC Symmetrix database file and Data Protector EMC log file
EMC Symmetrix database fileEMC Symmetrix database file contains the physical configuration information of SCSI parameters that define your storage complex. It is located in:
Windows systems: symapi_home\db\symapi_db.bin
HP-UX systems: /var/symapi/db/symapi_db.bin
Data Protector EMC log fileEMC log file keeps information about objects, devices, and device groups. It is located in:
Windows systems: Data_Protector_home\Config\client\tmp\emc
HP-UX systems: /var/opt/omni/tmp/emc
on the application and backup systems. Log files are named as R1_session_name.log or R2_session_name.log, where session_name is composed of the sessionID, the forward slashes “/” replaced with dashes “-.” For example:
R1_2013-09-13-3.log
R2_2013-09-13-3.log
The log contains:
l Resolved EMC configuration (mapping to EMC devices). l Created and deleted device groups, and the devices added to device groups. l Operations on device groups (splitting links, incremental establish, incremental restore, ...). l Status of backup and restore objects.Check both log files if you encounter any problems. The logs can also be useful if you leave the links split after backup/restore.
Configuring the integration Before you start with the configuration, make sure the prerequisites listed in "Configuring the integration " above are fulfilled. In addition, do the following:
Symmetrix Remote Data Facility (SRDF) configurations: Connect the application system to Application (R1) Symmetrix, and the backup system - to Backup (R2) Symmetrix.
Zero Downtime Administrator's GuideChapter 17: Configuration
HPE Data Protector (9.07) Page 158 of 271
Main Source (R1) Devices must be connected to the application system and have paired disks assigned. Paired Target (R2) Devices in the remote disk array must be connected to the backup system.
TimeFinder configurations: Connect the application and backup systems to the same disk array.
Standard Devices must be connected to the application system and have paired disks assigned. BCV Devices must be connected to the backup system.
Combined SRDF+TimeFinder configurations: Connect the application system to Application (R1) Symmetrix, and the backup system - to Backup (R2) Symmetrix.
Main Source (R1) Devices must be paired to Target (R2) Devices in Backup (R2) Symmetrix. Backup (R2) Symmetrix Target (R2) Devices also function as TimeFinder Standard Devices. They must be paired to BCV (R2) Devices.
It is recommended that only TimeFinder BCV (R2) Devices be connected to the backup system. If SRDF Target (R2) Devices are connected as well, /etc/lvmtab may get lost in this configuration. To ensure the configuration is correct, re-create volume groups using vgscan, and delete potentially added pvlinks to SRDF Target (R2) Devices using vgreduce.
To configure the integration:
l Create the Data Protector EMC database file. See "Creating Data Protector EMC database file" below.
l If needed, rebuild the EMC Symmetrix database file. See "Rebuilding EMC Symmetrix database file" below.
Creating Data Protector EMC database fileData Protector EMC database file, used to store configuration information, is the same as the EMC Symmetrix database file. Create this file:
l Prior to starting Data Protector backups l Each time your disk configuration changes
Alternately, you can set the Run discovery of Symmetrix environment option in the backup specification. However, this operation may be time-consuming because it checks disk configuration through low-level SCSI commands.
To create the Data Protector EMC database file, execute:
Windows systems: Data_Protector_home\bin\syma -init
HP-UX systems: /opt/omni/lbin/syma -init
This command creates the Data Protector\Config\Client\EMC\symm.bin (Windows) or /var/opt/omni/client/emc/symm.bin (HP-UX) Data Protector EMC database file on both the application and backup systems.
Rebuilding EMC Symmetrix database fileRebuild the EMC Symmetrix database file with the current information about physical devices connected through SCSI buses to your system if:
Zero Downtime Administrator's GuideChapter 17: Configuration
HPE Data Protector (9.07) Page 159 of 271
l Your configuration changes l You run the first command-line sessionTo scan the hardware and rebuild the database, execute:
symcfg discover
This command scans all SCSI buses on the system (not only those connected to EMC arrays).
To display the contents of the EMC Symmetrix database file, execute:
l syminq -sym (displays all EMC devices). l symbcv list dev (lists all BCV devices configured on EMC). l symrdf list (lists all RDF disk devices known to the system).See "EMC Symmetrix—obtaining disk configuration data" on page 264 for more information.
Automatic configuration of backup systemWhen you start a ZDB session, Data Protector performs necessary configuration steps, such as configuring volume groups and filesystems on the backup system. Based on the volume group, filesystem, and mount point configuration on the application system, Data Protector creates the same volume group and filesystem structure on the backup system and mounts these filesystems during ZDB sessions.
For more information on the mountpoint creation, see the HPE Data Protector Concepts Guide.
Zero Downtime Administrator's GuideChapter 17: Configuration
HPE Data Protector (9.07) Page 160 of 271
Chapter 18: Backup
IntroductionThis chapter describes configuring a filesystem or disk image ZDB using the Data Protector GUI.
You should be familiar with the EMC concepts and procedures and basic Data Protector ZDB functionality. See the EMC-related documentation and the HPE Data Protector Concepts Guide.
ZDB typesThe only supported ZDB type is ZDB to tape.
With ZDB to tape, mirrors are created, and data from the replica is moved to backup media according to the tape backup type you have selected (Full, Incr, Incr1-9).
If the option Re-establish links after backup is not selected, the replica remains on a disk array until reused in the next backup session using the same EMC device pairs.
If the option Re-establish links after backup is selected, the replica is synchronized with the original after backup.
See the HPE Data Protector Concepts Guide for more information on ZDB-to-tape process.
Backup conceptsEMC backup consists of two phases:
1. Application system data gets synchronized to the backup system.During this phase, the synchronization is performed on the level of participating volume groups (HP-UX) or disks (Windows). Therefore, if multiple filesystems/disk images are configured in the same volume group or on the same disk, the whole volume group or disk (all filesystems or disk images in this volume group or on disk) is synchronized to the backup system regardless of the objects selected for backup.
2. Synchronized backup system data is backed up to a backup device.During this phase, only the objects selected for backup are backed up.
Such a concept enables the restore of selected objects (filesystems or disk images) for a split mirror restore and for a restore from backup media on LAN (filesystems, disk images or application objects).
With a split mirror restore, the links from the application to the backup system are synchronized before the restore, thus enabling the restore of the selected objects by establishing the current state of the application system data on the backup system, and then restoring the selected objects to the backup system, and finally resynchronizing the backup system to the application system.
Backup in LVM mirroring configurationsConsider the following:
HPE Data Protector (9.07) Page 161 of 271

l Only the physical volumes that contain the logical volumes selected for backup will be considered for replication.
Example
l A Volume Group (VG01) is made up of two physical volumes (PV1 and PV2)
l VG01 has two logical volumes (lvol1 and lvol2)
l The lvol1 has its logical extents on PV1, and lvol2 - on PV2
l A backup object belonging to lvol1 is selected in the backup specification
PV1 will be selected for replication.
Creating backup specificationsBefore you begin, consider all limitations regarding the EMC integration. For more information, see the HPE Data Protector Product Announcements, Software Notes, and References and the HPE Data Protector Concepts Guide.
1. In the Context List, select Backup. 2. In the Scoping Pane, expand Backup and Backup Specifications. Right-click Filesystem, and
click Add Backup.The Create New Backup dialog box appears.In the Filesystem pane, select the Blank Filesystem Backup template or some other template which you might have created. For information on templates, see the HPE Data Protector Help index: “backup templates”.Select Split mirror backup as Backup type and EMC Symmetrix as Sub type. See the HPE Data Protector Help for options’ descriptions. Click OK.
3. Under Client systems, select Application system and Backup system. Also, specify the desired EMC configuration - TimeFinder, SRDF, or Combined (SRDF + TimeFinder).See "Backup options" on page 164 for information on options. In EMC GeoSpan for Microsoft Cluster Service environments, select the backup system for the active node and specify the TimeFinder configuration.After a failover, select the backup system for the currently active node and save the backup specification.Click Next.
4. Filesystem backup: Expand the application system and select the objects to be backed up. Note that all drive letters or mount points that reside on the system are displayed. You must select only objects that reside on the disk array, otherwise the backup session fails.Click Next.Disk image backup: Click Next.
5. Select devices. Click Properties to set the device concurrency, media pool, and preallocation policy. For more information on these options, click Help.
Zero Downtime Administrator's GuideChapter 18: Backup
HPE Data Protector (9.07) Page 162 of 271
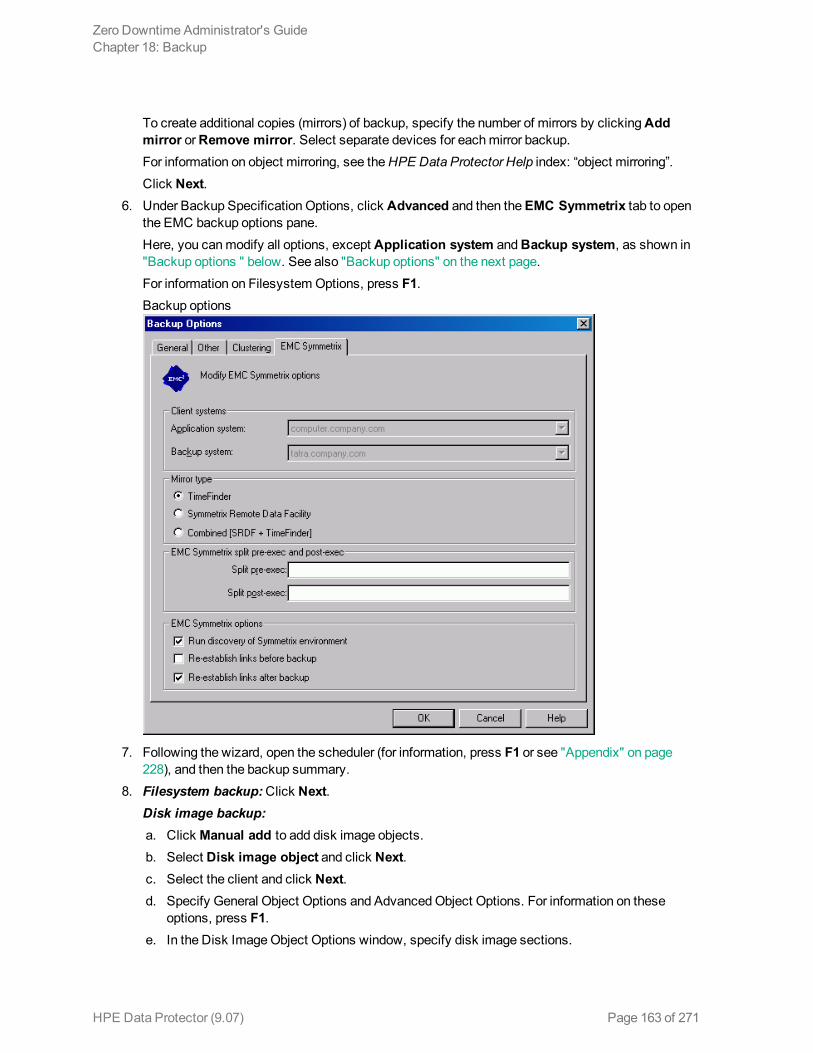
To create additional copies (mirrors) of backup, specify the number of mirrors by clicking Add mirror or Remove mirror. Select separate devices for each mirror backup.For information on object mirroring, see the HPE Data Protector Help index: “object mirroring”.Click Next.
6. Under Backup Specification Options, click Advanced and then the EMC Symmetrix tab to open the EMC backup options pane.Here, you can modify all options, except Application system and Backup system, as shown in "Backup options " below. See also "Backup options" on the next page.For information on Filesystem Options, press F1.Backup options
7. Following the wizard, open the scheduler (for information, press F1 or see "Appendix" on page 228), and then the backup summary.
8. Filesystem backup: Click Next.Disk image backup: a. Click Manual add to add disk image objects. b. Select Disk image object and click Next. c. Select the client and click Next. d. Specify General Object Options and Advanced Object Options. For information on these
options, press F1. e. In the Disk Image Object Options window, specify disk image sections.
Zero Downtime Administrator's GuideChapter 18: Backup
HPE Data Protector (9.07) Page 163 of 271
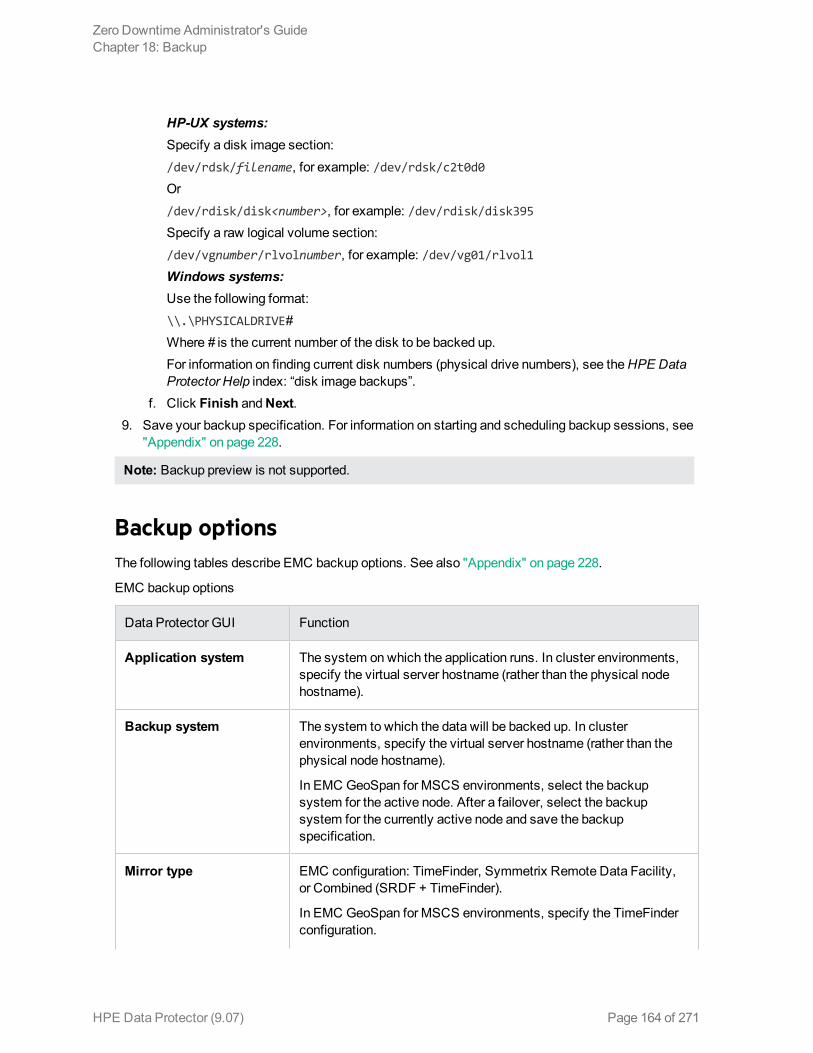
HP-UX systems:Specify a disk image section:
/dev/rdsk/filename, for example: /dev/rdsk/c2t0d0Or
/dev/rdisk/disk<number>, for example: /dev/rdisk/disk395Specify a raw logical volume section:
/dev/vgnumber/rlvolnumber, for example: /dev/vg01/rlvol1Windows systems:Use the following format:
\\.\PHYSICALDRIVE# Where # is the current number of the disk to be backed up.For information on finding current disk numbers (physical drive numbers), see the HPE Data Protector Help index: “disk image backups”.
f. Click Finish and Next. 9. Save your backup specification. For information on starting and scheduling backup sessions, see
"Appendix" on page 228.
Note: Backup preview is not supported.
Backup optionsThe following tables describe EMC backup options. See also "Appendix" on page 228.
EMC backup options
Data Protector GUI Function
Application system The system on which the application runs. In cluster environments, specify the virtual server hostname (rather than the physical node hostname).
Backup system The system to which the data will be backed up. In cluster environments, specify the virtual server hostname (rather than the physical node hostname).
In EMC GeoSpan for MSCS environments, select the backup system for the active node. After a failover, select the backup system for the currently active node and save the backup specification.
Mirror type EMC configuration: TimeFinder, Symmetrix Remote Data Facility, or Combined (SRDF + TimeFinder).
In EMC GeoSpan for MSCS environments, specify the TimeFinder configuration.
Zero Downtime Administrator's GuideChapter 18: Backup
HPE Data Protector (9.07) Page 164 of 271

Data Protector GUI Function
Split pre-exec Create the optional Split pre-exec command in default Data Protector administrative commands directory on the application system. This command is executed on the application system before the split and is mainly used to stop applications not integrated with Data Protector.
If Split pre-exec fails, Split post-exec is also not executed. Therefore, you need to implement a cleanup procedure in Split pre-exec.
If the ZDB_ALWAYS_POST_SCRIPT omnirc option is set to 1, Split post-exec is always executed if set (default is 0). See "Appendix" on page 228 for more information.
Backup session is not aborted if the command set by Split pre-exec is not executed.
Split post-exec Create the optional Split post-exec command in default Data Protector administrative commands directory on the application system. This command is executed on the application system after split and is mainly used to restart applications not integrated with Data Protector.
Run discovery of Symmetrix environment
Builds/re-builds the Data Protector EMC database on both the application and backup systems. See "Configuration " on page 157 for more information.
Default: selected.
Re-establish links before backup
Synchronizes disks before backup to maintain data integrity (may be necessary if you disabled Re-establish links after backup or used EMC commands that left the links split).
Default: not selected.
Re-establish links after backup
Re-establishes links between the application and mirrored devices after backup. If this option is disabled, the links remain split after backup (in this case, you can use the mirrored devices on the backup system).
Default: selected.
The chart and table below provide detailed backup flow according to the backup options selected.
Filesystem split mirror backup flow
Zero Downtime Administrator's GuideChapter 18: Backup
HPE Data Protector (9.07) Page 165 of 271

The “establish” and “split” checks depend on the following EMC backup options:
The Re-establish links after backup option is selected
split = YES
The Re-establish links before backup option is selected
establish = YES
The Re-establish links after backup option is not selected
split = NO
The Re-establish links before backup option is not selected
establish = NO
Backup disk usageIf mirrored devices are not re-established after backup, they still contain the last version of backed up data. You can use these mirrored devices to quickly restore or view your data.
Note: Data can only be restored using EMC device mirroring facilities.
Zero Downtime Administrator's GuideChapter 18: Backup
HPE Data Protector (9.07) Page 166 of 271
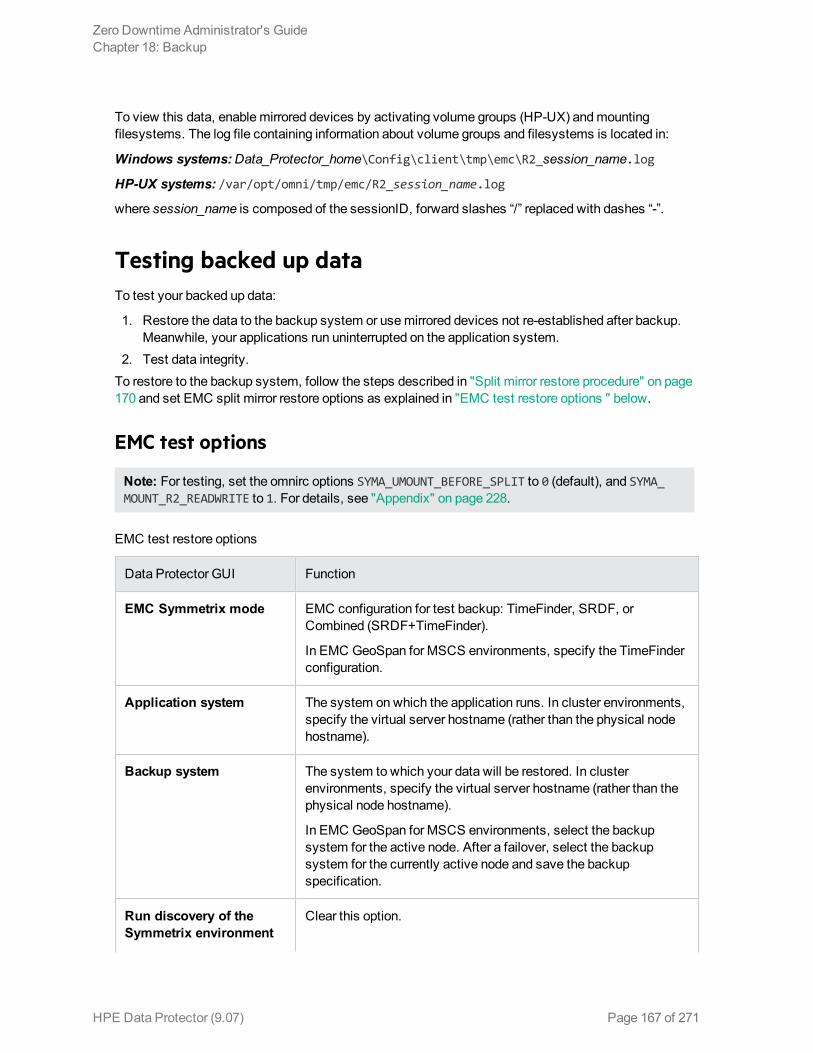
To view this data, enable mirrored devices by activating volume groups (HP-UX) and mounting filesystems. The log file containing information about volume groups and filesystems is located in:
Windows systems: Data_Protector_home\Config\client\tmp\emc\R2_session_name.log
HP-UX systems: /var/opt/omni/tmp/emc/R2_session_name.log
where session_name is composed of the sessionID, forward slashes “/” replaced with dashes “-”.
Testing backed up dataTo test your backed up data:
1. Restore the data to the backup system or use mirrored devices not re-established after backup. Meanwhile, your applications run uninterrupted on the application system.
2. Test data integrity.To restore to the backup system, follow the steps described in "Split mirror restore procedure" on page 170 and set EMC split mirror restore options as explained in "EMC test restore options " below.
EMC test options
Note: For testing, set the omnirc options SYMA_UMOUNT_BEFORE_SPLIT to 0 (default), and SYMA_MOUNT_R2_READWRITE to 1. For details, see "Appendix" on page 228.
EMC test restore options
Data Protector GUI Function
EMC Symmetrix mode EMC configuration for test backup: TimeFinder, SRDF, or Combined (SRDF+TimeFinder).
In EMC GeoSpan for MSCS environments, specify the TimeFinder configuration.
Application system The system on which the application runs. In cluster environments, specify the virtual server hostname (rather than the physical node hostname).
Backup system The system to which your data will be restored. In cluster environments, specify the virtual server hostname (rather than the physical node hostname).
In EMC GeoSpan for MSCS environments, select the backup system for the active node. After a failover, select the backup system for the currently active node and save the backup specification.
Run discovery of the Symmetrix environment
Clear this option.
Zero Downtime Administrator's GuideChapter 18: Backup
HPE Data Protector (9.07) Page 167 of 271
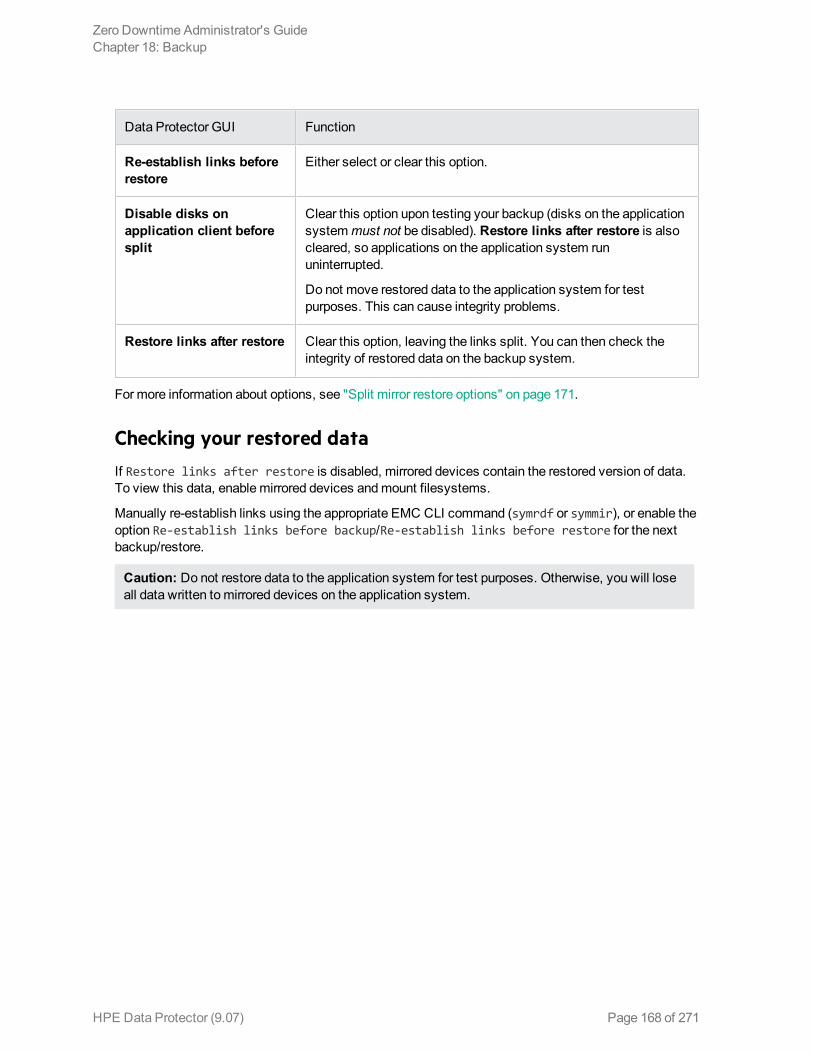
Data Protector GUI Function
Re-establish links before restore
Either select or clear this option.
Disable disks on application client before split
Clear this option upon testing your backup (disks on the application system must not be disabled). Restore links after restore is also cleared, so applications on the application system run uninterrupted.
Do not move restored data to the application system for test purposes. This can cause integrity problems.
Restore links after restore Clear this option, leaving the links split. You can then check the integrity of restored data on the backup system.
For more information about options, see "Split mirror restore options" on page 171.
Checking your restored dataIf Restore links after restore is disabled, mirrored devices contain the restored version of data. To view this data, enable mirrored devices and mount filesystems.
Manually re-establish links using the appropriate EMC CLI command (symrdf or symmir), or enable the option Re-establish links before backup/Re-establish links before restore for the next backup/restore.
Caution: Do not restore data to the application system for test purposes. Otherwise, you will lose all data written to mirrored devices on the application system.
Zero Downtime Administrator's GuideChapter 18: Backup
HPE Data Protector (9.07) Page 168 of 271

Chapter 19: Restore
IntroductionThis chapter describes configuring and running a filesystem or disk image restore of the data backed up using the EMC integration. The sections describe restore procedures using the Data Protector GUI.
Available restore types are:
l Restore from backup media on LAN (standard restore). See "Standard restore" below. l Split mirror restore. See "Split mirror restore" on the next page.
Standard restoreData is restored from the backup media to the application system through a LAN. Only selected backed up objects are restored. For more information on this restore type, see the HPE Data Protector Help index: “restore”.
Tip: You can improve the data transfer rate by connecting a backup device to the application system. For information on configuring backup devices, see the HPE Data Protector Help index: “backups devices: configuring”. For information on performing a restore using another device, see the HPE Data Protector Help index: “selecting, devices for restore”.
The procedure below is a general description of restoring the objects backed up in a ZDB session.
1. In the Context List, select Restore. 2. Select the objects for restore and click them to display their properties.
In the Scoping Pane, select the application system as Target client under the Destination tab.For information on restore options, press F1.
3. Click Restore. The Start Restore Session dialog box appears. 4. Click Next to specify the report level and network load. Click Next. 5. In the Start Backup Session window, select Disabled as EMC Symmetrix mode. This sets a
restore from backup media on LAN. See "Restore from backup media on LAN " on the next page.
HPE Data Protector (9.07) Page 169 of 271
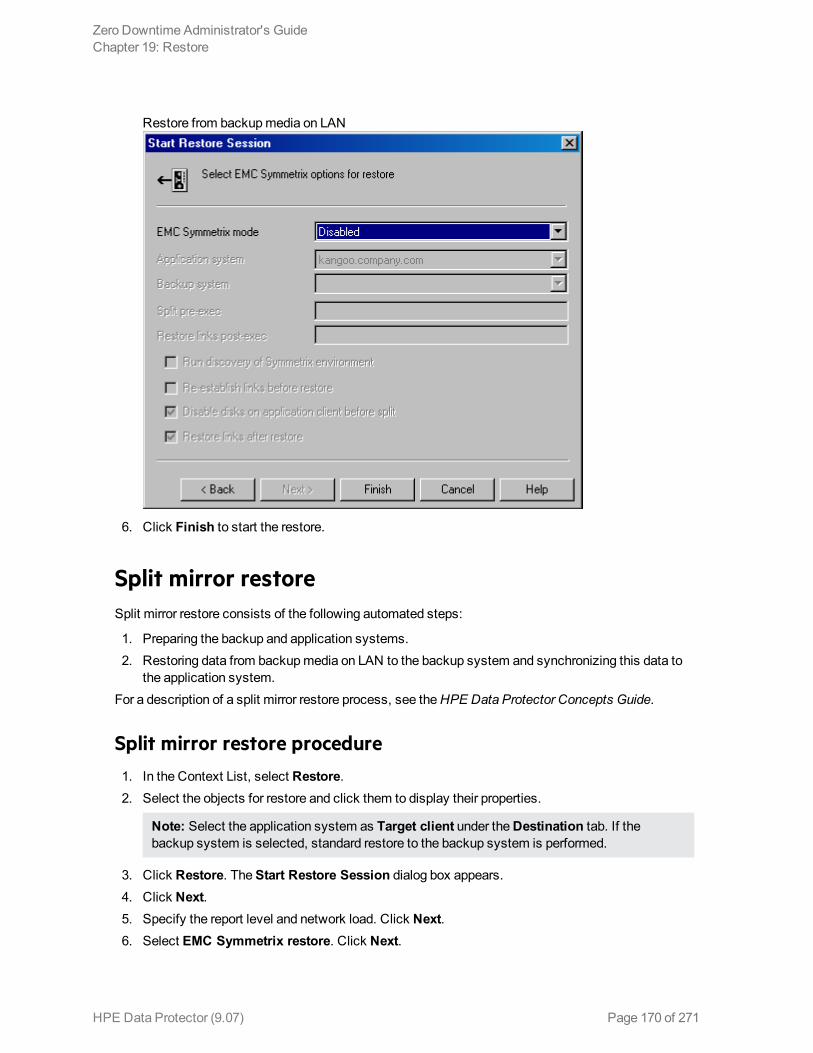
Restore from backup media on LAN
6. Click Finish to start the restore.
Split mirror restoreSplit mirror restore consists of the following automated steps:
1. Preparing the backup and application systems. 2. Restoring data from backup media on LAN to the backup system and synchronizing this data to
the application system.For a description of a split mirror restore process, see the HPE Data Protector Concepts Guide.
Split mirror restore procedure 1. In the Context List, select Restore. 2. Select the objects for restore and click them to display their properties.
Note: Select the application system as Target client under the Destination tab. If the backup system is selected, standard restore to the backup system is performed.
3. Click Restore. The Start Restore Session dialog box appears. 4. Click Next. 5. Specify the report level and network load. Click Next. 6. Select EMC Symmetrix restore. Click Next.
Zero Downtime Administrator's GuideChapter 19: Restore
HPE Data Protector (9.07) Page 170 of 271
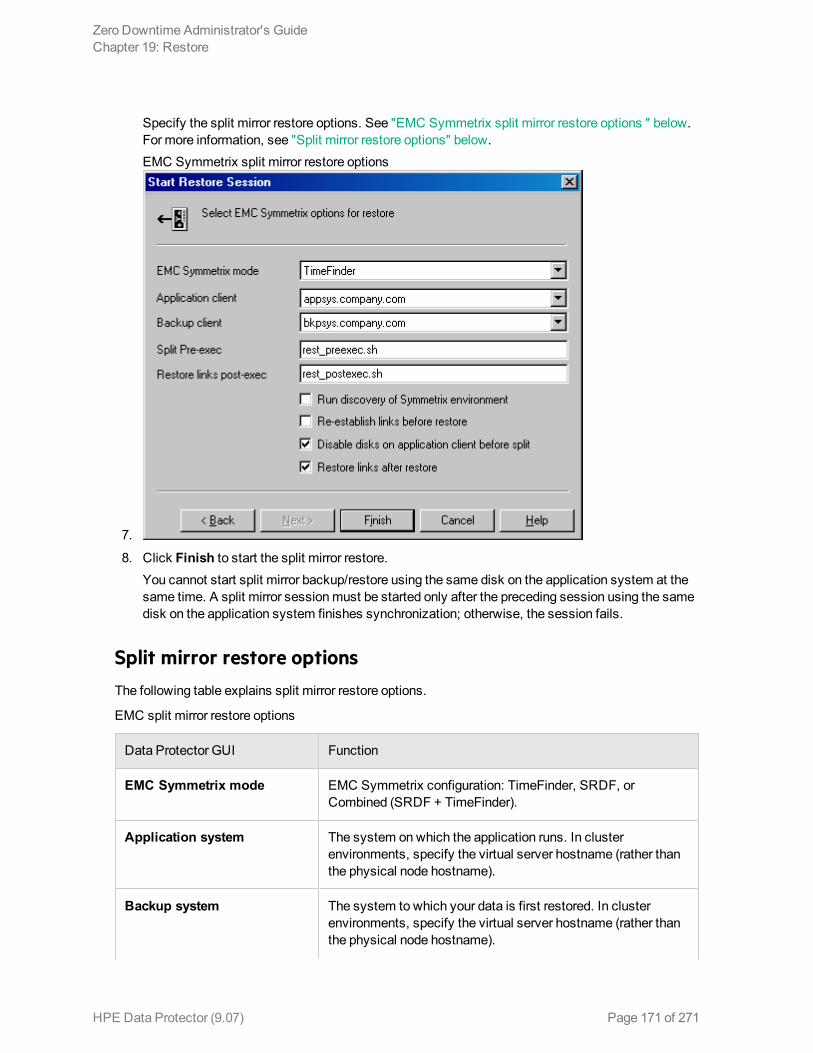
7.
Specify the split mirror restore options. See "EMC Symmetrix split mirror restore options " below. For more information, see "Split mirror restore options" below.EMC Symmetrix split mirror restore options
8. Click Finish to start the split mirror restore.You cannot start split mirror backup/restore using the same disk on the application system at the same time. A split mirror session must be started only after the preceding session using the same disk on the application system finishes synchronization; otherwise, the session fails.
Split mirror restore optionsThe following table explains split mirror restore options.
EMC split mirror restore options
Data Protector GUI Function
EMC Symmetrix mode EMC Symmetrix configuration: TimeFinder, SRDF, or Combined (SRDF + TimeFinder).
Application system The system on which the application runs. In cluster environments, specify the virtual server hostname (rather than the physical node hostname).
Backup system The system to which your data is first restored. In cluster environments, specify the virtual server hostname (rather than the physical node hostname).
Zero Downtime Administrator's GuideChapter 19: Restore
HPE Data Protector (9.07) Page 171 of 271

Data Protector GUI Function
Split pre-exec Specify the Split pre-exec command, executed before the split. Create the command the default Data Protector administrative commands directory on the application system. This command can be used to stop applications and dismounting filesystems (HP-UX only) that are not to be restored in the active session, and are mounted to the volume groups that will be restored in the same session. This prepares volume groups for de-activation.
Restore session is not aborted if the command set by this option is not executed.
If Split pre-exec fails, Restore links post-exec (see below) is also not executed. Therefore, you need to implement a cleanup procedure in Restore links post-exec.
If the ZDB_ALWAYS_POST_SCRIPT omnirc option is set to 1, Restore links post-exec is always executed if set (default is 0). See "Appendix" on page 228 for more information.
Restore links post-exec Specify the Restore links post-exec command, executed after the links are restored. Create the command in the default Data Protector commands directory on the application system. It is used to remount filesystems (HP-UX only) and restart applications.
Do not use this command to enable applications if you disabled Re-establish links after restore. Applications using restored disks must not be restarted until the links are manually established.
Run discovery of Symmetrix environment
Builds/re-builds the Data Protector EMC database on both the application and backup systems. See "Configuration " on page 157 for more information.
Default: not selected.
Re-establish links before restore
Synchronizes split disks (moves data to backup disks) thus preparing disks for restore.
Default: not selected.
Disable disks on application client before split
Disables disks on the application system by dismounting filesystems and de-activating volume groups (HP-UX) before the split. The disks are enabled after restore.
Always select this option when you want to move data from the backup to the application system, that is, to incrementally restore links. Application system disks must be disabled to provide data integrity after restore.
Zero Downtime Administrator's GuideChapter 19: Restore
HPE Data Protector (9.07) Page 172 of 271
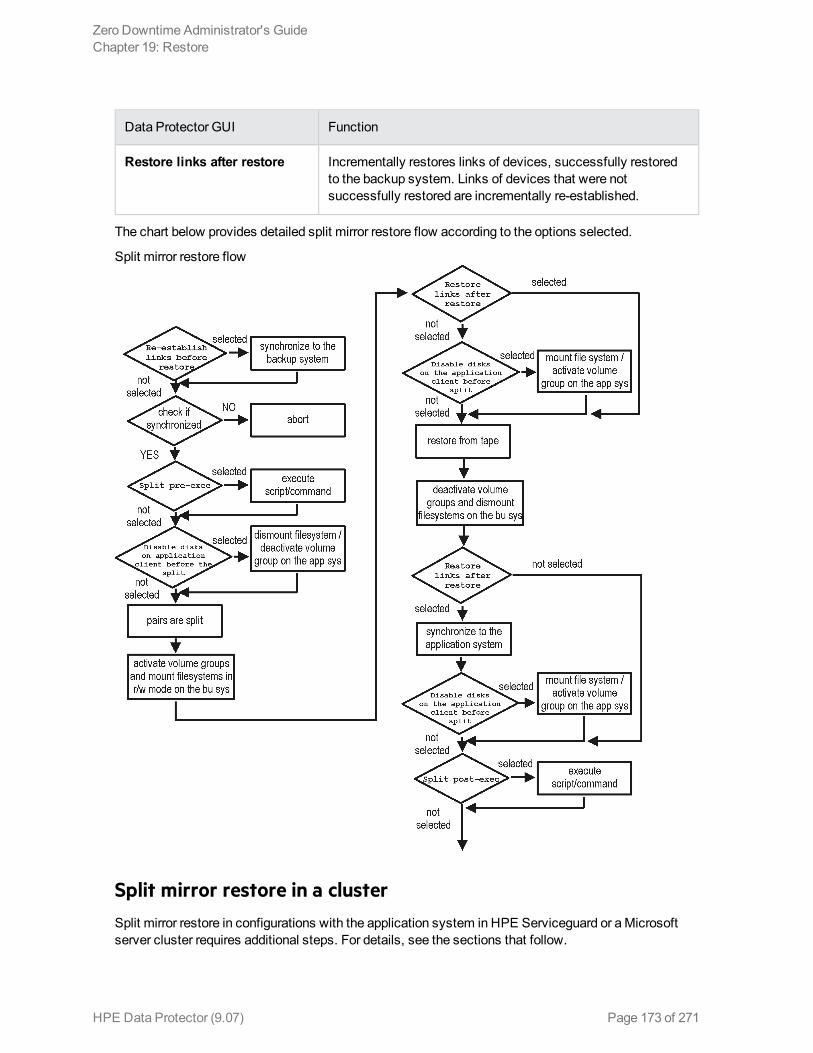
Data Protector GUI Function
Restore links after restore Incrementally restores links of devices, successfully restored to the backup system. Links of devices that were not successfully restored are incrementally re-established.
The chart below provides detailed split mirror restore flow according to the options selected.
Split mirror restore flow
Split mirror restore in a clusterSplit mirror restore in configurations with the application system in HPE Serviceguard or a Microsoft server cluster requires additional steps. For details, see the sections that follow.
Zero Downtime Administrator's GuideChapter 19: Restore
HPE Data Protector (9.07) Page 173 of 271
HPE Serviceguard procedure
1. Stop the filesystem cluster package:
cmhaltpkg ApplicationPackageName
This stops filesystem services and dismounts the mirrored volume group filesystem. 2. Deactivate the mirrored volume group from the cluster mode and activate it in the normal mode:
vgchange -c n /dev/mirror_vg_name
vgchange -q n -a y /dev/mirror_vg_name
3. Mount the mirrored volume group filesystem:
mount /dev/mirror_vg_name /lv_name /mountpoint
4. Start split mirror restore (see "Split mirror restore procedure" on page 170).When specifying the application system, specify the hostname of the application system node on which the mirrored volume group was activated in the normal mode ("Deactivate the mirrored volume group from the cluster mode and activate it in the normal mode:" above of this procedure).
5. After restore, dismount the mirrored volume group filesystem:
umount /mountpoint
6. Deactivate the mirrored volume group in the normal mode and activate it in the cluster mode:
vgchange -a n /dev/mirror_vg_name
vgchange -c y /dev/mirror_vg_name
7. Start the filesystem cluster package:
cmrunpkg ApplicationPackageName
Zero Downtime Administrator's GuideChapter 19: Restore
HPE Data Protector (9.07) Page 174 of 271

Chapter 20: Troubleshooting
Before you beginThis chapter lists general checks and verifications, and problems you may encounter when using the EMC integration. For general Data Protector troubleshooting information, see the HPE Data Protector Troubleshooting Guide.
l Ensure that the latest official Data Protector patches are installed. For information on how to verify this, see the HPE Data Protector Help index: “patches”.
l For general Data Protector and integration-specific limitations, as well as recognized issues and workarounds, see the HPE Data Protector Product Announcements, Software Notes, and References.
l For an up-to-date list of supported versions, platforms, and other information, see http://support.openview.hp.com/selfsolve/manuals.
Checks and verifications l On the application and backup systems, examine system errors reported in the debug.log file
residing in the default Data Protector log files directory.
Backup problems
Problem
You cannot select EMC mode in the Data Protector GUI when creating a backup specification
Action
Check that the EMC Symmetrix Agent integration module is installed on the application and backup systems. To do that, open the cell info file located on the Cell Manager in the following directory:
Windows Systems: Data_Protector_program_data\Config\server\cell\cell_info
UNIX system: /etc/opt/omni/server/cell/cell_info
File contents should look similar to the following:
-host "hpsap001.bbn.hp.com" -os "HP s800 hp-ux-11.00" -cc A.09.00 -da A.09.00 -emc A.09.00 -host "hpsap002.bbn.hp.com" -os "HP s800 hp-ux-11.00" -cc A.09.00 -da A.09.00 -ma A.09.00 -emc A.09.00
Problem
On the application system, dismounting a filesystem fails
HPE Data Protector (9.07) Page 175 of 271
Action
In Split pre-exec script, stop all processes using the filesystem.
Problem
Disks synchronization fails (split fails)
To successfully split the disks, EMC Agent first checks the status of the links. Links can only be split after all devices are synchronized. EMC Agent checks the status of links every 30 seconds and retries 15 times.
Action
Increase the time frame for synchronization by setting SYMA_SYNC_RETRY and SYMA_SLEEP_FOR_SYNC omnirc options.
See "Appendix" on page 228 for more information.
Problem
EMC device is not part of a BCV pair
Action
If the TimeFinder or SRDF + TimeFinder configuration is used, check that all backup disks on the application system have an associated BCV device on the backup system.
Problem
Device group cannot be created
Action
Check if any of the previous sessions was improperly stopped, and run EMC Agent recovery for this session on the backup system. See "Recovery using the EMC agent" on page 184 for instructions.
Problem
Adding a device into a device group/associating BCV to a device group fails
Action
Check if any of the previous backups was improperly stopped, and run EMC Agent recovery for this session on the backup system. See "Recovery using the EMC agent" on page 184 for instructions.
Problem
Volume group on the backup system cannot be de-activated
Action
Stop the processes that run on the volume group filesystem.
Zero Downtime Administrator's GuideChapter 20: Troubleshooting
HPE Data Protector (9.07) Page 176 of 271
Problem
Rebuilding the Data Protector EMC database fails
Action
Execute a discovery from:
Windows systems: Data_Protector_home\bin\syma -init
UNIX systems: /opt/omni/lbin/syma -init
on both the application and backup systems. If the operation succeeds, disable the Run discovery of Symmetrix environment option and restart the backup.
If discovery fails, execute the symcfg discover command.
Problem
Resolving an object fails
Action
Check the EMC Agent log file on the application system and ensure that all objects logged into this file are created on the mirrored EMC devices.
Problem
Invalid link state on the EMC device
Action
Check the link state. If it is split, set the Re-establish links before backup option.
Problem
Preparation of the backup system fails when VxVM is used
This problem may be caused by the following:
l If a backup specification involves VxVM volume groups, EMC arrays do not support I/O on a BCV device in a synchronized state.
l The information about volume groups is not added to the VxVM configuration.
Action
1. Check if any backup objects in the backup specification belong to VxVM disk groups. 2. If there are objects belonging to VxVM volume groups, proceed as follows:
a. Check if a BCV is visible on the backup system. b. Check the synchronization state of the BCV devices. If the BCV devices are synchronized,
split them. c. Execute vxdisk scandisks. d. Re-establish the mirror.
Zero Downtime Administrator's GuideChapter 20: Troubleshooting
HPE Data Protector (9.07) Page 177 of 271
Error messagesThis section provides information on error messages.
Message
[Major] From: SYMA@Backup (R2) System "" Time: 04/03/13 09:18:34 [223:324] SYMA-R2 Could not add device 048 from Symmetrix 000282600317 to device group SYMA_REG_2013-03-04-2_0. (SYMAPI-The device is already a member of a device group)
One of previous sessions failed.
Actions
l Run a recovery of the failed session to create a consistent environment. l Check that the /var directory is not full (if it is full, EMC Agent does not have enough space to write
its record into the file; the session then fails). Clean the directory and restart the session.
Message
[Major] From: SYMA@Application (R1) System "" Time: 11/03/13 15:06:22 [223:193] SYMA-R2 Could not activate volume group /dev/tf1_fs2_b
Backup volume group is not deactivated or there is a problem with configuration.
Actions
l Run the same backup with debug on, and then check the EMC Agent R2 debug file on the backup system for LVM error messages.
l Try to split links and activate the backup volume group manually. If this is not done, the backup may fail with an error [223:193].
Message
[Major] From: SYMA@Application (R1) System "" Time: 3/31/13 11:32:58 AM [223:406] Failed to initialize the SYMAPI session (SYMAPI-The version of the symapi library is too old; please upgrade to a newer version of SYMAPI)
Action
Check the EMC Solution Enabler version.
Message
[Major] From: SYMA@Application (R1) System "" Time: 6/30/13 10:57:00 AM [223:408] Failed to re-sync Symmetrix database. (SYMAPI-No Symmetrix devices were found)
Action
Run the same session with the option Run discovery of Symmetrix environment.
Zero Downtime Administrator's GuideChapter 20: Troubleshooting
HPE Data Protector (9.07) Page 178 of 271
Message
[Major] From: SYMA@Application (R1) System "" Time: 3/31/13 2:17:43 PM [223:407] Failed to rescan host devices and rebuild Symmetrix database SYMAPI-Error opening the gatekeeper device for communication to the
Symmetrix)
Actions
l Execute symcfg discover. If the problem persists, check the pseudo-devices file. l If the device you want to use as a gatekeeper or BCV device is accessed through the HP-PB (NIO)
SCSI bus controller, create pseudo-devices for all gatekeepers and BCV devices. l See README file in /var/symapi/config/README.pseudo_devices.
Message
[Major] From: SYMA@Backup (R2) System "" Time: 5/11/13 12:01:11 PM [223:335] SYMA-R2 Failed to synchronize SRDF links in device group SYMA_RDF2_2013-05-11-21_0 before backup. (SYMAPI-The operation failed because another process has an exclusive lock on a locally-attached
Symmetrix) [Major] From: SYMA@Backup (R2) System "" Time: 5/11/13 12:01:13 PM SYMA-R2 Invalid SRDF link state of device 000 from Symmetrix 000282600317 (links state=103)
Devices are not synchronized.
Action
Manually establish the links or use the option Establish Links Before Backup. If the problem persists, execute:
symrdf -g Dg_name establish -bypass
Caution: See the symrdf man page about the bypass option before executing this command.
Message
[Major] From: SYMA@twingo "" Time: 6/7/13 1:08:30 PM [223:301] SYMA-R2 Device 006 from Symmetrix 000182600287 is not part of a BCV pair
Actions
l Check backup options in the backup specification. l Check the configuration in the backup specification.
Message
[Major] From: SYMA@Backup (R2) System "" Time: 8/4/13 3:26:27 PM SYMA-R2 Invalid SRDF link state of device 001 from Symmetrix
Zero Downtime Administrator's GuideChapter 20: Troubleshooting
HPE Data Protector (9.07) Page 179 of 271
000282600317 (links state=103) [Major] From: SYMA@Backup (R2) System "" Time: 8/4/13 3:26:28 PM [223:361] SYMA-R2 Split of links(s), which belong to the object /dev/rdsk/c1t8d0, has failed. (Unexpected state of rdf link)
Connection between EMC R1 and R2 devices is not established.
Action
Run the same session with the option Re-establish links before backup.
Message
[Major] From: SYMA@Backup (R2) System "" Time: 8/30/13 11:37:12 AM [223:125] SYMA-R2 Resolving of object /RDF/fs/HFS has failed (Volume group is not deactivated)
Volume group on the backup system is still activated.
Action
On the backup system, split the links and deactivate the backup volume group. Re-establish the links manually, or select the option Re-establish links before backup in the backup specification.
Split mirror restore problems
Problem
Deactivating volume groups during restore fails (HP-UX only)
Action
In the Split pre-exec script, stop all processes using the affected volume groups and dismount all filesystems created on these volume groups that are not to be restored in the current session.
Problem
Disks synchronization fails (split fails)
To successfully split the disks, EMC Agent first checks the status of the links. Links can only be split after all devices are synchronized. EMC Agent checks the status of links every 30 seconds and retries 15 times.
Action
Increase the time frame for synchronization by setting SYMA_SYNC_RETRY and SYMA_SLEEP_FOR SYNC omnirc options.
See "Appendix" on page 228 for more information.
Problem
EMC device is not part of a BCV pair
Zero Downtime Administrator's GuideChapter 20: Troubleshooting
HPE Data Protector (9.07) Page 180 of 271

Action
If the TimeFinder or SRDF + TimeFinder configuration is used, check that all backup disks on the application system have an associated BCV device on the backup system.
Problem
Device group cannot be created
Action
Check if any of the previous sessions was improperly stopped, and run EMC Agent recovery for this session on the backup system. See "Recovery using the EMC agent" on page 184 for instructions.
Problem
Adding a device into a device group/associating BCV to a device group fails
Action
Check if any of the previous backups was improperly stopped, and run EMC Agent recovery for this session on the backup system. See "Recovery using the EMC agent" on page 184 for instructions.
Problem
Rebuilding the Data Protector EMC database fails
Action
Run a discovery from:
Windows systems: Data_Protector_home\bin\syma -init
UNIX systems: /opt/omni/lbin/syma -init
on both the application and backup systems. If the operation succeeds, disable the Run discovery of Symmetrix environment option and restart the backup.
If discovery fails, execute the symcfg -discover command.
Problem
Resolving an object fails
Action
Check the EMC Agent log file on the application system and ensure that all objects logged into this file are created on the mirrored EMC devices.
Problem
Invalid link state on the EMC device
Action
Check the state of the link. If it is split, set the Re-establish links before backup option.
Zero Downtime Administrator's GuideChapter 20: Troubleshooting
HPE Data Protector (9.07) Page 181 of 271

Error messagesThis section provides information on error messages.
Message
[Major] From: SYMA@Backup (R2) System "" Time: 04/03/13 09:18:34 [223:324] SYMA-R2 Could not add device 048 from Symmetrix 00028260031 to device group SYMA_REG_2013-03-04-2_0. (SYMAPI-The device is already a member of a device group)
One of previous sessions failed.
Actions
l Run a recovery of the failed session to create a consistent environment. l Check that the /var directory is not full (if it is full, EMC Agent does not have enough space to write
its record into the file; the session then fails). Clean the directory and restart the session.
Message
[Major] From: SYMA@Application (R1) System "" Time: 11/03/13 15:06:22 [223:193] SYMA-R2 Could not activate volume group /dev/tf1_fs2_b
Backup volume group is not deactivated or there is a problem with configuration.
Actions
l Run the same backup with debug on, and then check the EMC Agent R2 debug file on the backup system for LVM error messages.
l Try to split links and activate the backup volume group manually. If this is not done, the backup may fail with an error [223:193].
Message
[Major] From: SYMA@Application (R1) System "" Time: 3/31/13 11:32:58 AM [223:406] Failed to initialize the SYMAPI session (SYMAPI-The version of the symapi library is too old; please upgrade to a newer version of SYMAPI)
Action
Check the EMC Solution Enabler version.
Message
[Major] From: SYMA@Application (R1) System "" Time: 6/30/13 10:57:00 AM [223:408] Failed to re-sync Symmetrix database. (SYMAPI-No Symmetrix devices were found)
Action
Run the same session with the option Run discovery of Symmetrix environment.
Zero Downtime Administrator's GuideChapter 20: Troubleshooting
HPE Data Protector (9.07) Page 182 of 271

Message
[Major] From: SYMA@Application (R1) System "" Time: 3/31/13 2:17:43 PM [223:407] Failed to rescan host devices and rebuild Symmetrix database SYMAPI-Error opening the gatekeeper device for communication to the Symmetrix)
Actions
l Try to execute symcfg discover. If the problem persists, check the pseudo-devices file. l If the device you want to use as a gatekeeper or BCV device is accessed through the HP-PB (NIO)
SCSI bus controller, create pseudo-devices for all gatekeepers and BCV devices. l See README file in /var/symapi/config/README.pseudo_devices.
Message
[Major] From: SYMA@Backup (R2) System "" Time: 5/11/13 12:01:11 PM [223:335] SYMA-R2 Failed to synchronize SRDF links in device group SYMA_RDF2_2013-05-11-21_0 before backup. (SYMAPI-The operation failed because another process has an exclusive lock on a locally-attached Symmetrix) [Major] From: SYMA@Backup (R2) System "" Time: 5/11/13 12:01:13 PM SYMA-R2 Invalid SRDF link state of device 000 from Symmetrix 000282600317 (links state=103)
Devices are not synchronized.
Action
Manually establish links or use the option Re-establish Links Before Restore. If the problem persists, execute:
symrdf -g Dg_name establish -bypass
Caution: See the symrdf man page about the bypass option before executing this command.
Message
[Major] From: SYMA@twingo "" Time: 6/7/13 1:08:30 PM [223:301] SYMA-R2 Device 006 from Symmetrix 000182600287 is not part of a BCV pair
Actions
Check the restore options.
Message
[Major] From: SYMA@Backup (R2) System "" Time: 8/4/13 3:26:27 PM SYMA-R2 Invalid SRDF link state of device 001 from Symmetrix 000282600317 (links state=103) [Major] From: SYMA@Backup (R2) System "" Time: 8/4/13 3:26:28 PM
Zero Downtime Administrator's GuideChapter 20: Troubleshooting
HPE Data Protector (9.07) Page 183 of 271
[223:361] SYMA-R2 Split of links(s), which belong to the object /dev/rdsk/c1t8d0, has failed. (Unexpected state of rdf link)
Connection between EMC R1 and R2 devices is not established.
Action
Run the same session with the option Re-establish links before restore.
Message
[Major] From: SYMA@Backup (R2) System "" Time: 8/30/13 11:37:12 AM [223:360] SYMA-R2 Resolving of object /RDF/fs/HFS has failed (Volume group is not deactivated)
Volume group on the backup system is still activated.
Action
l On the backup system, split the links and deactivate the backup volume group. Re-establish the links manually or select the option Re-establish links before restore in the backup specification.
Recovery using the EMC agentIf a backup or other operation did not finish successfully, the EMC environment is left in an undefined state, for example, with links split, device groups not deleted in the Data Protector EMC database file, filesystems on the backup system mounted, volume groups on the backup system activated, and so on.
In this case, invoke the EMC Agent (SYMA) recovery command to recover the environment. Information about EMC Agent objects, device groups, and volume groups is logged in the EMC Agent recovery files:
Windows systems:
Data_Protector_home\Config\Emc\symmR1.rec
Data_Protector_home\Config\Emc\symmR2.rec
HP-UX systems:
/var/opt/omni/emc/symmR1.rec
/var/opt/omni/emc/symmR2.rec
When a record is entered, it is marked as valid. If the session is not successful, the record is marked as invalid. Invalid records are automatically deleted when the EMC Agent recovery file exceeds a certain value, by default, SYMA_REC_FILE_LIMIT = 102400 bytes.
To recover the environment, invoke the following command that re-establish links and delete device groups. Next split mirror backup or split mirror restore will dismount filesystems and de-activate volume groups on the backup system.
Zero Downtime Administrator's GuideChapter 20: Troubleshooting
HPE Data Protector (9.07) Page 184 of 271

l On the application system:
Windows systems: Data_Protector_home\bin\syma -r1 -session sessionID -recoveryHP-UX systems: /opt/omni/lbin/syma -r1 -session sessionID -recovery
l On the backup system:
Windows systems: Data_Protector_home\bin\syma -no_r1 -session sessionID -recovery [-split] HP-UX systems: /opt/omni/lbin/syma -no_r1 -session sessionID -recovery [-split]You can obtain sessionID from the Data Protector GUI as shown in "Obtaining session ID " below.
Obtaining session ID
The split option disables synchronization of links.
This command reads the recovery file and recovers the state of the environment before the session.
Note: Do not edit or restore the EMC Agent recovery file.
Zero Downtime Administrator's GuideChapter 20: Troubleshooting
HPE Data Protector (9.07) Page 185 of 271

HPE Data Protector (9.07)
Page 186 of 271
Part 6: NetApp StorageThis part describes how to configure the Data Protector NetApp Storage integration, how to perform zero downtime backup using the NetApp Storage system, and how to resolve the integration-specific Data Protector problems.
Chapter 21: Configuration
IntroductionThis chapter describes the configuration of the Data Protector NetApp Storage integration. It also provides information on the Data Protector ZDB database and lists prerequisites and limitations.
Prerequisites l Make sure the same operating system version is installed on both the application system and the
backup system. l If the application system and the backup system reside in a Data Protector cell with secured clients,
ensure that access between both systems is allowed in both directions. l Connect a NetApp storage system to the application and backup systems through the SAN. l Source volumes must have enough space for snapshots and clones NetApp Storage licenses and components
l Obtain FC/FCoE license for accessing LUNs on the NetApp storage system. l Obtain SANworks Snapshot licenses. l Enable the httpd admin access or SSL encrypted admin connection, or both by running the following
commands on the NetApp console:
netapp1> options httpd.admin.enable onnetapp1> httpd.admin.ssl.enable on
l Make sure that the names of Initiator Groups on the NetApp storage system are the same as the fully-qualified domain names of the systems they represent.
l Make sure that an appropriate multi-path device management is installed on the application system and the backup system.Linux systems: HPE Device Mapper Multipath Enablement Kit for HPE Disk Arrays 4.2.0 or newer version.To configure the installed multi-path device management software: a. Start the multipath daemon and run the following command to configure the daemon so that it
gets started during system startup:
Red Hat Enterprise Linux: chkconfig multipathd onSUSE Linux Enterprise Server: chkconfig boot.multipath on
b. Prevent the multipath device management software from queuing for unavailable disk volumes by modifying its configuration file. In the defaults section of the file /etc/multipath.conf file, add the following line:
no_path_retry fail
HPE Data Protector (9.07) Page 187 of 271
Ensure that this no_path_retry parameter value is not overridden by equivalent entries in the device sections of the same file in which the corresponding NetApp storage systems are configured.
c. Ensure that the correct preferred names are used for pathnames that are referencing the same device for physical volumes as they are used in device-mapper multipathing.
Open the lvm.conf file, residing in the /etc/lvm/ directory, and set the following variable:preferred_names = [ "^/dev/mpath/", "^/dev/mapper/mpath", "^/dev/[hs]d" ]
Windows systems: Microsoft MPIO configured for NetApp Storage Provider. For more information, see the NetApp documentation.
Data Protector licenses and components:
l An appropriate zero downtime backup extension for non–HPE Storage Arrays licenses-to-use (LTU).
l The NetApp Storage Provider component installed on both the application system and the backup system.
For licensing information and installation and upgrade instructions, see the HPE Data Protector Installation Guide.
Prerequisites for Windows systems
l On Windows Server 2003 and Windows Server 2008 systems, disable the operating system option Automatic mounting of new volumes. In the Command Prompt window, run the command mountvol /N.
l Do not manually mount target volumes that were created by Data Protector.
Limitations l In cluster environments, the backup system must not be in the same cluster with the application
system. Additionally, the backup system cannot be the cluster virtual server, it can only be a cluster node.
l Instant recovery is not supported.For information on the following items, see the HPE Data Protector Product Announcements, Software Notes, and References:
l General Data Protector and integration-specific limitations l Supported platforms and integrations l Supported backup and connectivity topologies
ZDB database - SMISDBZDB database for the Data Protector NetApp Storage integration is referred to as SMISDB. It keeps information about NetApp storage systems. For each system, the following is stored:
l Hostname as recognized in the IP network. l User name and encoded password for the NetApp Storage Provider loginSMISDB resides on the Cell Manager in:
Zero Downtime Administrator's GuideChapter 21: Configuration
HPE Data Protector (9.07) Page 188 of 271

Windows systems: Data_Protector_program_data\server\db80\smisdb
UNIX systems: /var/opt/omni/server/db80/smisdb
Configuring the integrationBefore you start with the configuration, make sure the prerequisites listed in "Introduction" are fulfilled.
To integrate with the NetApp storage system, Data Protector uses the NetApp Storage Provider. This plug-in enables NetAPP storage support within the Data Protector ZDB (SMI-S) agent. To configure the Data Protector NetApp Storage integration, provide the data that the Data Protector ZDB agent will use to establish connection to a NetApp storage system of your choice.
The connection configuration data includes user credentials that you must add to the ZDB database (the NetApp part of SMISDB). The credentials are bound to a specific application system in the Data Protector cell. The Data Protector ZDB agent then reads the credentials from the ZDB database each time a zero downtime backup for data residing on a NetApp storage system is started.
Connection configuration data
To be able to connect to a NetApp storage system and perform zero downtime backup sessions, the Data Protector ZDB agent needs the following information:
l Fully qualified domain name or IP address of the system where the NetApp Storage Provider residesIf the system has multiple IP addresses, use the address by which the Data Protector ZDB agent can access the system.
l Whether the connection uses Secure Sockets Layer (SSL) l Username and password
These credentials must belong to the NetApp storage system Administrator account. For more information on using the NetApp authorization system and on NetApp user groups, see the NetApp documentation.
You need to provide the above information to enable connection between the Data Protector ZDB agent and the NetApp Storage system. It is stored in the NetApp part of the SMISDB.
Configuration procedure
To establish connection to the NetApp storage system, use the Data Protector omnidbzdb command. Follow the steps:
1. Select the NetApp storage system user account that has a proper privilege level on the corresponding domains. Identify and write down its username and password, which you will need in the next step.
2. Use the omnidbzdb command to establish connection to the NetApp storage system and to add the username and password that you acquired in the previous step to the ZDB database. Run the following command:
omnidbzdb --diskarray ArrayFamily --ompasswd --add ClientName --user UserName --passwd password where:ArrayFamily - NetApp
Zero Downtime Administrator's GuideChapter 21: Configuration
HPE Data Protector (9.07) Page 189 of 271
ClientName - fully qualified domain name of the NetApp storage systemUserName and password - user credentials that you acquired in the previous stepFor example:
omnidbzdb --diskarray NetApp --ompasswd --add netappstorage.company.com --user Administrator --passwd pwd
For command syntax and usage examples, see the omnidbzdb reference page in the HPE Data Protector Command Line Interface Reference or the omnidbzdb man page.
3. Using the omnidbzdb --diskarray NetApp --ompasswd --check command, verify that the Data Protector NetApp Storage Provider can connect to the NetApp storage system using the configured user authentication data.
Tip: For each application system, you can add user credentials of multiple NetApp Storage user accounts. When several are configured for the same system, the Data Protector ZDB agent checks user accounts in alphabetical order and uses the first account with Edit privilege level on the application system and the source volumes.
For information on performing other tasks related to management of user credentials in the ZDB database, see the omnidbzdb reference page in the HPE Data Protector Command Line Interface Reference or the omnidbzdb man page.
Zero Downtime Administrator's GuideChapter 21: Configuration
HPE Data Protector (9.07) Page 190 of 271

Chapter 22: Backup This chapter describes configuration of a filesystem or disk image ZDB using the Data Protector GUI.
With the NetApp Storage Provider integration, you can perform the zero downtime backup of the ZDB to tape type only. For more information on the ZDB types, see the HPE Data Protector Concepts Guide.
You should be familiar with the NetApp storage concepts and procedures and basic Data Protector ZDB functionality. See the NetApp storage-related documentation and the HPE Data Protector Concepts Guide.
For information on the supported configurations, ZDB types and replication techniques available on this storage system, and storage system-specific ZDB considerations, see the HPE Data Protector Concepts Guide.
Creating backup specification
Limitations
l Only one snapshot type for target volumes can be created during a ZDB session. l When cloning process for a source volume is in progress, another snapshot (any type) of that source
volume cannot be created. l You cannot back up replicas (target volumes from existing and currently recorded backup sessions). l If there is not enough space for a fully allocated replica creation, the session fails.
Considerations
l Consider all limitations that apply to the Data Protector NetApp Storage integration. See the HPE Data Protector Product Announcements, Software Notes, and References, the HPE Data Protector Concepts Guide, and the limitation list in "Configuration ".
Procedure
To create a ZDB backup specification for a NetApp storage using the Data Protector GUI (Data Protector Manager), follow the steps:
1. In the Context List, select Backup. 2. In the Scoping Pane, expand Backup Specifications. Right-click Filesystem (for both object
types: filesystem and disk image) and click Add Backup.The Create New Backup dialog box appears.In the Filesystem pane, select the Blank Filesystem Backup template or some other available template. For information on templates, see the HPE Data Protector Help index: “backup templates”.Select Snapshot or split mirror backup as Backup type and Storage Provider as Sub type. For description of options, press F1.
HPE Data Protector (9.07) Page 191 of 271
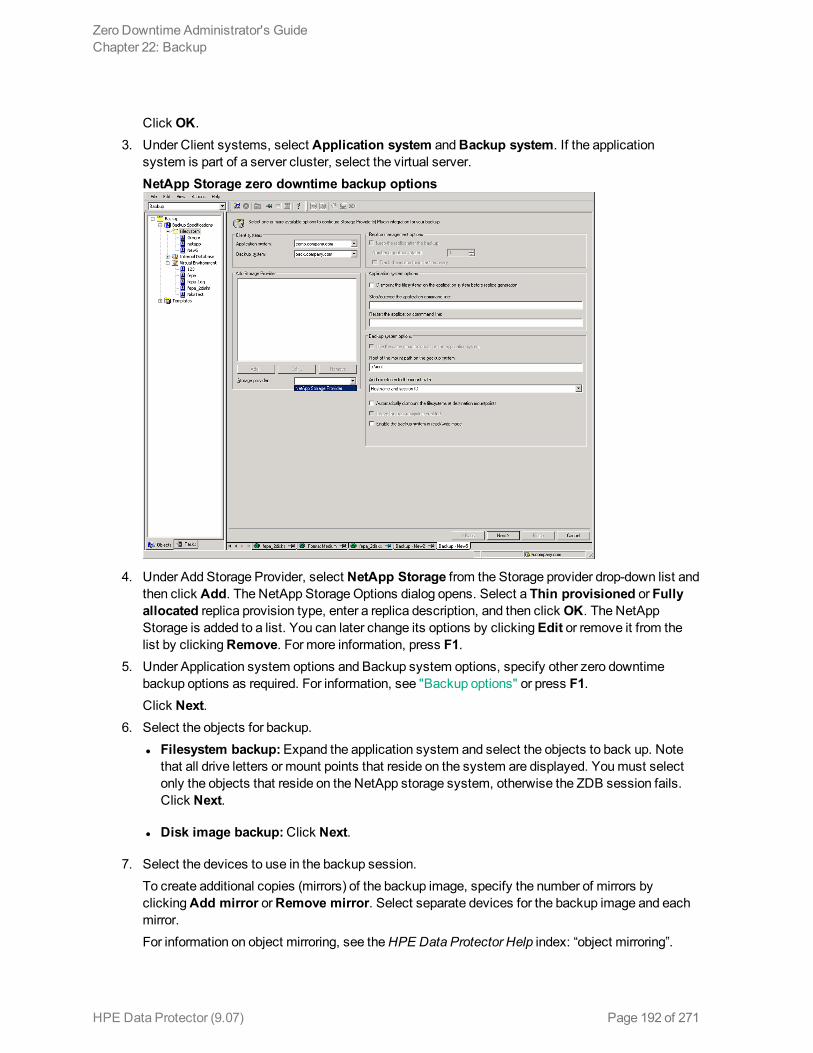
Click OK. 3. Under Client systems, select Application system and Backup system. If the application
system is part of a server cluster, select the virtual server.NetApp Storage zero downtime backup options
4. Under Add Storage Provider, select NetApp Storage from the Storage provider drop-down list and then click Add. The NetApp Storage Options dialog opens. Select a Thin provisioned or Fully allocated replica provision type, enter a replica description, and then click OK. The NetApp Storage is added to a list. You can later change its options by clicking Edit or remove it from the list by clicking Remove. For more information, press F1.
5. Under Application system options and Backup system options, specify other zero downtime backup options as required. For information, see "Backup options" or press F1.Click Next.
6. Select the objects for backup. l Filesystem backup: Expand the application system and select the objects to back up. Note
that all drive letters or mount points that reside on the system are displayed. You must select only the objects that reside on the NetApp storage system, otherwise the ZDB session fails. Click Next.
l Disk image backup: Click Next.
7. Select the devices to use in the backup session.To create additional copies (mirrors) of the backup image, specify the number of mirrors by clicking Add mirror or Remove mirror. Select separate devices for the backup image and each mirror.For information on object mirroring, see the HPE Data Protector Help index: “object mirroring”.
Zero Downtime Administrator's GuideChapter 22: Backup
HPE Data Protector (9.07) Page 192 of 271

Click Next. 8. In the Backup Specification Options group box, click Advanced and then the Storage Provider
tab to open the options pane with NetApp storage specific backup options.You can specify Application system options and modify all other options, except Application system and Backup system (note that you can change them after you save the ZDB backup specification). See "Backup " on page 191 or press F1.Click Next.
9. Schedule the ZDB sessions. For more information, see "Appendix" on page 228 or press F1.Click Next.
10. In the Backup Object Summary page, specify additional options. l Filesystem backup: To modify options for the listed objects, right-click an object and then
clickProperties. For information on the object properties, press F1.
l Disk image backup: Follow the steps:
i. Click Manual add to add disk image objects. ii. Select Disk image object and click Next. iii. Select the client system. Optionally, enter the description for your object. Click Next. iv. Specify General Object Options and Advanced Object Options. For information on these
options, press F1. v. In the Disk Image Object Options window, specify disk image or raw logical volume
sections.Specify a disk image section:
/dev/rdsk/Filename, for example: /dev/rdsk/c2t0d0Specify a raw logical volume section:
/dev/vgnumber/rlvolNumber, for example: /dev/vg01/rlvol1 vi. Click Finish.
Click Next. 11. Save your ZDB backup specification.
Backup optionsThe following tables describe the ZDB-related backup options that you can modify when configuring ZDB backup specifications that include storage systems of the NetApp Storage family.
Client systems
Application system The system on which the application runs. In cluster environments, specify the virtual server hostname (rather than the physical node hostname).
Backup system The system to which your data will be replicated (backed up), and from which the backup data is copied to a backup device.
Zero Downtime Administrator's GuideChapter 22: Backup
HPE Data Protector (9.07) Page 193 of 271

NetApp storage replica provision options
Thin provisioned Select this replica provision type to provision more storage on a LUN than is currently available on the volume, thus increasing the capacity utilization of that volume. It allows free space sharing between LUNs and enables LUNs to consume only the space they actually use.
With thin provisioning, you can present more storage space to the backup system connected to the NetApp storage than is actually available to provide the storage you need at any given time.
Fully allocated Select this replica provision type to enable space-reserved LUNs and snapshot copies have pre-allocated space that can be continually overwritten. This guaranteed space is not available to any other LUNs or snapshot copies within the volume.
Application system options
Dismount the filesystems on the application system before replica generation
Select this option to dismount the filesystems on the application system before replica creation and remount them afterwards. Additionally, when entire physical drives (on Windows systems) or entire disks or logical volumes (on UNIX systems) are selected as backup objects in a disk image backup specification, selecting this option will dismount and later remount all filesystems on these objects. If any of these filesystems cannot be dismounted, the backup session fails.
If an integrated application exclusively controls data I/O on each physical drive, disk, or logical volume that will be backed up, the dismount operation is not needed. In such a case, you can leave this option cleared.
Default: not selected.
Stop/quiesce the application command line
If a command is specified in this option, it is invoked on the application system immediately before replica creation. An example is to stop applications not integrated with Data Protector.
The command must reside on the application system in the default Data Protector administrative commands directory. Do not specify the path to the command in this option.
If the command fails, the command specified in the option Restart the application command line is not invoked. Thus, you may need to implement a cleanup procedure in the command specified in Stop/quiesce the application command line. If the omnirc option ZDB_ALWAYS_POST_SCRIPT is set to 1, the command specified in the option Restart the application command line is always invoked.
Restart the application If a command is specified in this option, it is invoked on the
Zero Downtime Administrator's GuideChapter 22: Backup
HPE Data Protector (9.07) Page 194 of 271
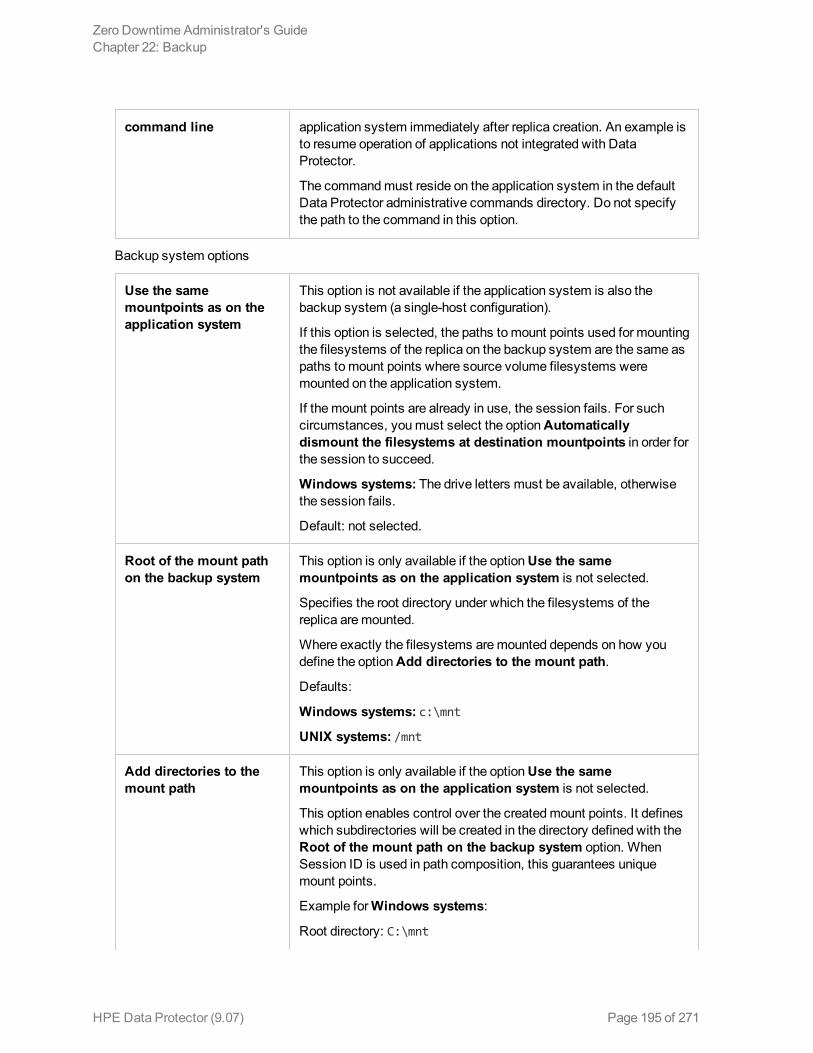
command line application system immediately after replica creation. An example is to resume operation of applications not integrated with Data Protector.
The command must reside on the application system in the default Data Protector administrative commands directory. Do not specify the path to the command in this option.
Backup system options
Use the same mountpoints as on the application system
This option is not available if the application system is also the backup system (a single-host configuration).
If this option is selected, the paths to mount points used for mounting the filesystems of the replica on the backup system are the same as paths to mount points where source volume filesystems were mounted on the application system.
If the mount points are already in use, the session fails. For such circumstances, you must select the option Automatically dismount the filesystems at destination mountpoints in order for the session to succeed.
Windows systems: The drive letters must be available, otherwise the session fails.
Default: not selected.
Root of the mount path on the backup system
This option is only available if the option Use the same mountpoints as on the application system is not selected.
Specifies the root directory under which the filesystems of the replica are mounted.
Where exactly the filesystems are mounted depends on how you define the option Add directories to the mount path.
Defaults:
Windows systems: c:\mnt
UNIX systems: /mnt
Add directories to the mount path
This option is only available if the option Use the same mountpoints as on the application system is not selected.
This option enables control over the created mount points. It defines which subdirectories will be created in the directory defined with the Root of the mount path on the backup system option. When Session ID is used in path composition, this guarantees unique mount points.
Example for Windows systems:
Root directory: C:\mnt
Zero Downtime Administrator's GuideChapter 22: Backup
HPE Data Protector (9.07) Page 195 of 271
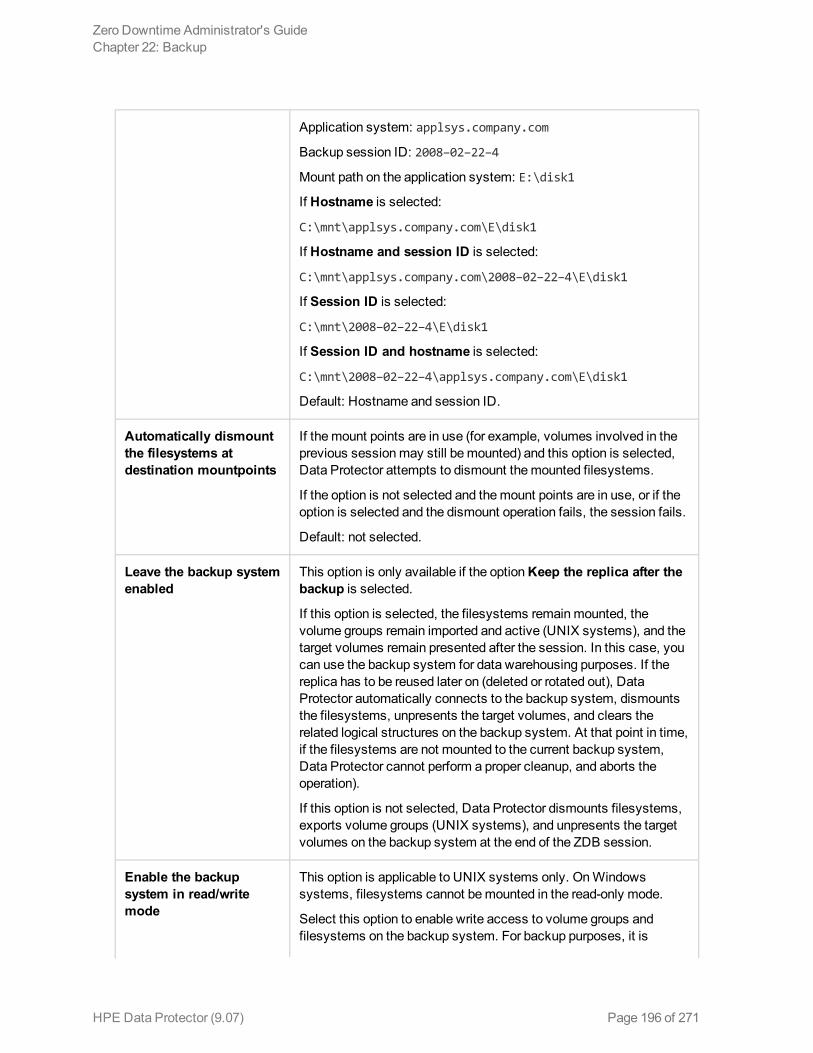
Application system: applsys.company.com
Backup session ID: 2008–02–22–4
Mount path on the application system: E:\disk1
If Hostname is selected:
C:\mnt\applsys.company.com\E\disk1
If Hostname and session ID is selected:
C:\mnt\applsys.company.com\2008–02–22–4\E\disk1
If Session ID is selected:
C:\mnt\2008–02–22–4\E\disk1
If Session ID and hostname is selected:
C:\mnt\2008–02–22–4\applsys.company.com\E\disk1
Default: Hostname and session ID.
Automatically dismount the filesystems at destination mountpoints
If the mount points are in use (for example, volumes involved in the previous session may still be mounted) and this option is selected, Data Protector attempts to dismount the mounted filesystems.
If the option is not selected and the mount points are in use, or if the option is selected and the dismount operation fails, the session fails.
Default: not selected.
Leave the backup system enabled
This option is only available if the option Keep the replica after the backup is selected.
If this option is selected, the filesystems remain mounted, the volume groups remain imported and active (UNIX systems), and the target volumes remain presented after the session. In this case, you can use the backup system for data warehousing purposes. If the replica has to be reused later on (deleted or rotated out), Data Protector automatically connects to the backup system, dismounts the filesystems, unpresents the target volumes, and clears the related logical structures on the backup system. At that point in time, if the filesystems are not mounted to the current backup system, Data Protector cannot perform a proper cleanup, and aborts the operation).
If this option is not selected, Data Protector dismounts filesystems, exports volume groups (UNIX systems), and unpresents the target volumes on the backup system at the end of the ZDB session.
Enable the backup system in read/write mode
This option is applicable to UNIX systems only. On Windows systems, filesystems cannot be mounted in the read-only mode.
Select this option to enable write access to volume groups and filesystems on the backup system. For backup purposes, it is
Zero Downtime Administrator's GuideChapter 22: Backup
HPE Data Protector (9.07) Page 196 of 271

sufficient to activate the backup system volume groups and mount the filesystems in the read-only mode. For other tasks, the read/write mode may be needed.
Note that when this option is selected, the replica is open to modifications while the backup system is online. Consequently, data restored from such a replica includes all potential modifications.
Defaults:
Windows systems: selected.
UNIX systems: not selected.
Note: In a ZDB session, the mount points, to which filesystems of the replica are mounted on the backup system, are the same as the moun tpoints to which source volumes were mounted on the application system, if at least one of the following conditions is met:
l The GUI option Use the same mountpoints as on the application system is selected. l The omnirc option ZDB_PRESERVE_MOUNTPOINTS is set to 1.If the option Use the same mountpoints as on the application system is not selected, and the omnirc option ZDB_PRESERVE_MOUNTPOINTS is set to 0, the mount points are determined by the GUI options Root of the mount path on the backup system and Add directories to the mount path, while the omnirc options ZDB_MULTI_MOUNT and ZDB_MOUNT_PATH are ignored.
Zero Downtime Administrator's GuideChapter 22: Backup
HPE Data Protector (9.07) Page 197 of 271
Chapter 23: Restore This chapter describes configuring and running a filesystem or disk image restore of the data backed up using the Data Protector NetApp Storage integration.
The data backed up in a ZDB session using NetApp Storage can be stored on backup media only (ZDB to tape).
Data backed up in ZDB-to-tape sessions can be restored from the backup media to the application system. For more information on this restore type, see the HPE Data Protector Help index: “restore”.
Tip: You can improve the data transfer rate by connecting a backup device directly to the application system. For information on configuring backup devices, see the HPE Data Protector Help index: “backups devices: configuring”. For information on performing a restore using another device, see the HPE Data Protector Help index: “selecting, devices for restore”.
HPE Data Protector (9.07) Page 198 of 271

Chapter 24: Troubleshooting
Before you beginThis chapter lists general checks and verifications that you may need to perform when you encounter problems with the Data Protector NetApp Storage integration. For general Data Protector troubleshooting information, see the HPE Data Protector Troubleshooting Guide.
l Ensure that the latest official Data Protector patches are installed. For information on how to verify this, see the HPE Data Protector Help index: “patches”.
l For general Data Protector and integration-specific limitations, as well as recognized issues and workarounds, see the HPE Data Protector Product Announcements, Software Notes, and References.
l For an up-to-date list of supported versions, platforms, and other information, see http://support.openview.hp.com/selfsolve/manuals.
Checks and verifications l On the application and backup systems, examine system errors logged into the debug.log file residing in
the Data Protector log files directory.
HPE Data Protector (9.07) Page 199 of 271

HPE Data Protector (9.07)
Page 200 of 271
Part 7: EMC VNX FamilyThis part describes how to configure the Data Protector EMC VNX Family integration, how to perform zero downtime backup using the EMC VNX storage system, and how to resolve the integration-specific Data Protector problems.
Chapter 25: Configuration
IntroductionThis chapter describes configuration of the Data Protector EMC VNX Family integration, lists prerequisites and limitations of the integration.
Data Protector EMC VNX Family integration supports VNX Snapshots, which are vsnaps based on redirect-on-write technology. Redirect-on-write enables much better performance compared to copy-on-write technology by writing new data blocks to a new area on the source volume without writing the old data blocks to a another volume first.
To know more about EMC VNX Family disk arrays and VNX Snapshots, see the EMC VNX documentation.
Prerequisites l Make sure the same operating system version is installed on both the application system and the
backup system. l If the application system and the backup system reside in a Data Protector cell with secured clients,
ensure that access between both systems is allowed in both directions. l Connect your EMC VNX storage system to the application and backup systems through the SAN. l Make sure source volumes have enough space for snapshots and clones. EMC VNX licenses and components
l Install naviseccli (Navisphere Secure Command Line Utility) on backup client. l Change security level on backup client to low using the naviseccli utility:
naviseccli security -certificate -setlevel low
l Make sure that the names of storage groups on the EMC VNX storage system are the same as the fully-qualified domain names of the systems they represent.
l Make sure that an appropriate multi-path device management is installed on the application system and the backup system.Linux systems: HPE Device Mapper Multipath Enablement Kit for HPE Disk Arrays 4.2.0 or newer version.To configure the installed multi-path device management software: a. Start the multipath daemon and run the following command to configure the daemon so that it
gets started during system startup:
Red Hat Enterprise Linux: chkconfig multipathd onSUSE Linux Enterprise Server: chkconfig boot.multipath on
b. Prevent the multipath device management software from queuing for unavailable disk volumes by modifying its configuration file. In the defaults section of the file /etc/multipath.conf file, add the following line:
Zero Downtime Administrator's GuideChapter 25: Configuration
HPE Data Protector (9.07) Page 201 of 271
no_path_retry fail
Ensure that this no_path_retry parameter value is not overridden by equivalent entries in the device sections of the same file in which the corresponding EMC VNX storage systems are configured.
c. Ensure that the correct preferred names are used for pathnames that are referencing the same device for physical volumes as they are used in device-mapper multipathing.
Open the lvm.conf file, residing in the /etc/lvm/ directory, and set the following variable:preferred_names = [ "^/dev/mpath/", "^/dev/mapper/mpath", "^/dev/[hs]d" ]
Windows systems: Microsoft MPIO configured for EMC VNX Storage Provider. For more information, see the EMC VNX Family documentation.
Data Protector licenses and components:
l An appropriate zero downtime backup extension for non–HPE Storage Arrays licenses-to-use (LTU).
l The EMC VNX Storage Provider component installed on both the application system and the backup system.
For licensing information and installation and upgrade instructions, see the HPE Data Protector Installation Guide.
Prerequisites for Windows systems
l On Windows Server 2003 and Windows Server 2008 systems, disable the operating system option Automatic mounting of new volumes. In the Command Prompt window, run the command mountvol /N.
l Do not manually mount target volumes that were created by Data Protector.
Limitations l In cluster environments, the backup system must not be in the same cluster with the application
system. Additionally, the backup system cannot be the cluster virtual server, it can only be a cluster node.
l Instant recovery is not supported. l SnapView Snapshot is not supported.For information on the following items, see the HPE Data Protector Product Announcements, Software Notes, and References:
l General Data Protector and integration-specific limitations l Supported platforms and integrations l Supported backup and connectivity topologies
ZDB database - SMISDBZDB database for the Data Protector EMC VNX Family integration is referred to as SMISDB. It keeps information about EMC VNX storage systems. For each system, the following is stored:
Zero Downtime Administrator's GuideChapter 25: Configuration
HPE Data Protector (9.07) Page 202 of 271
l Hostname as recognized in the IP network. l User name and encoded password for the EMC VNX Storage Provider loginSMISDB resides on the Cell Manager in:
Windows systems: Data_Protector_program_data\server\db80\smisdb
UNIX systems: /var/opt/omni/server/db80/smisdb
Configuring the integrationBefore you start with the configuration, make sure the prerequisites listed in "Introduction" are fulfilled.
To integrate with the EMC VNX storage system, Data Protector uses the EMC VNX Storage Provider. This plug-in enables EMC VNX storage support within the Data Protector ZDB (SMI-S) agent. To configure the Data Protector EMC VNX Family integration, provide the data that the Data Protector ZDB agent will use to establish connection to an EMC VNX storage system of your choice.
The connection configuration data includes user credentials that you must add to the ZDB database (the EMC VNX part of SMISDB). The credentials are bound to a specific application system in the Data Protector cell. The Data Protector ZDB agent then reads the credentials from the ZDB database each time a zero downtime backup for data residing on an EMC VNX storage system is started.
Connection configuration data
To be able to connect to an EMC VNX storage system and perform zero downtime backup, the Data Protector ZDB agent needs the following information:
l Fully qualified domain name or IP address of the system where the EMC VNX Storage Provider residesIf the system has multiple IP addresses, use the address by which the Data Protector ZDB agent can access the system.
l Username and passwordThese credentials must belong to the EMC VNX storage system Administrator account. For more information on using the EMC VNX storage authorization system and on EMC VNX user groups, see the EMC VNX Family documentation.
You need to provide the above information to enable connection between the Data Protector ZDB agent and the EMC VNX storage system. It is stored in the EMC VNX part of the SMISDB.
Configuration procedure
To establish connection to the EMC VNX storage system, use the Data Protector omnidbzdb command. Follow the steps:
1. Select the EMC VNX storage system user account that has a proper privilege level on the corresponding domains. Identify and write down its username and password, which you will need in the next step.
2. Use the omnidbzdb command to establish connection to the EMC VNX storage system and to add the username and password that you acquired in the previous step to the ZDB database. Run
Zero Downtime Administrator's GuideChapter 25: Configuration
HPE Data Protector (9.07) Page 203 of 271
the following command:
omnidbzdb --diskarray ArrayFamily --ompasswd --add ClientName --user UserName --passwd password where:ArrayFamily - EMCVNXClientName - fully qualified domain name or an IP address of the EMC VNX storage systemUserName and password - user credentials that you acquired in the previous stepFor example:
omnidbzdb --diskarray EMCVNX --ompasswd --add vnxstorage.company.com --user vnxadmin --passwd pwd
For command syntax and usage examples, see the omnidbzdb reference page in the HPE Data Protector Command Line Interface Reference or the omnidbzdb man page.
3. Using the omnidbzdb --diskarray EMCVNX --ompasswd --check command, verify that the Data Protector EMC VNX Storage Provider can connect to the EMC VNX storage system using the configured user authentication data.
Tip: For each application system, you can add user credentials of multiple EMC VNX user accounts. When several are configured for the same system, the Data Protector ZDB agent checks user accounts in alphabetical order and uses the first account with Edit privilege level on the application system and the source volumes.
For information on performing other tasks related to management of user credentials in the ZDB database, see the omnidbzdb reference page in the HPE Data Protector Command Line Interface Reference or the omnidbzdb man page.
Zero Downtime Administrator's GuideChapter 25: Configuration
HPE Data Protector (9.07) Page 204 of 271
Chapter 26: Backup This chapter describes configuration of a filesystem and disk image ZDB using the Data Protector GUI.
With the EMC VNX Storage Provider integration, you can perform the backup of the ZDB to tape type only. For more information on the ZDB types, see the HPE Data Protector Concepts Guide.
You should be familiar with the EMC VNX storage concepts and basic Data Protector ZDB functionality. See the EMC VNX Family storage-related documentation and the HPE Data Protector Concepts Guide.
For information on the supported configurations, ZDB types and replication techniques available on this storage system, and storage system-specific ZDB considerations, see the HPE Data Protector Concepts Guide.
Creating backup specification
Limitations
l The only supported ZDB type is ZDB to tape. l Only one snapshot type for target volumes can be created during a ZDB session. l When cloning process for a source volume is in progress, another snapshot (any type) of that source
volume cannot be created. l You cannot back up replicas (target volumes from existing and currently recorded backup sessions). l If there is not enough space for a fully allocated replica creation, the session fails.
Considerations
l Consider all limitations that apply to the Data Protector EMC VNX Family integration. See the HPE Data Protector Product Announcements, Software Notes, and References, the HPE Data Protector Concepts Guide, and the limitation list in "Configuration ".
Procedure
To create a ZDB backup specification for an EMC VNX storage using the Data Protector GUI (Data Protector Manager), follow the steps:
1. In the Context List, select Backup. 2. In the Scoping Pane, expand Backup Specifications. Right-click Filesystem (for both object
types: filesystem and disk image) and click Add Backup.The Create New Backup dialog box appears.In the Filesystem pane, select the Blank Filesystem Backup template or some other available template. For information on templates, see the HPE Data Protector Help index: “backup templates”.Select Snapshot or split mirror backup as Backup type and Storage Provider(s) Plugin as Sub type. For description of options, press F1.
Zero Downtime Administrator's GuideChapter 26: Backup
HPE Data Protector (9.07) Page 205 of 271
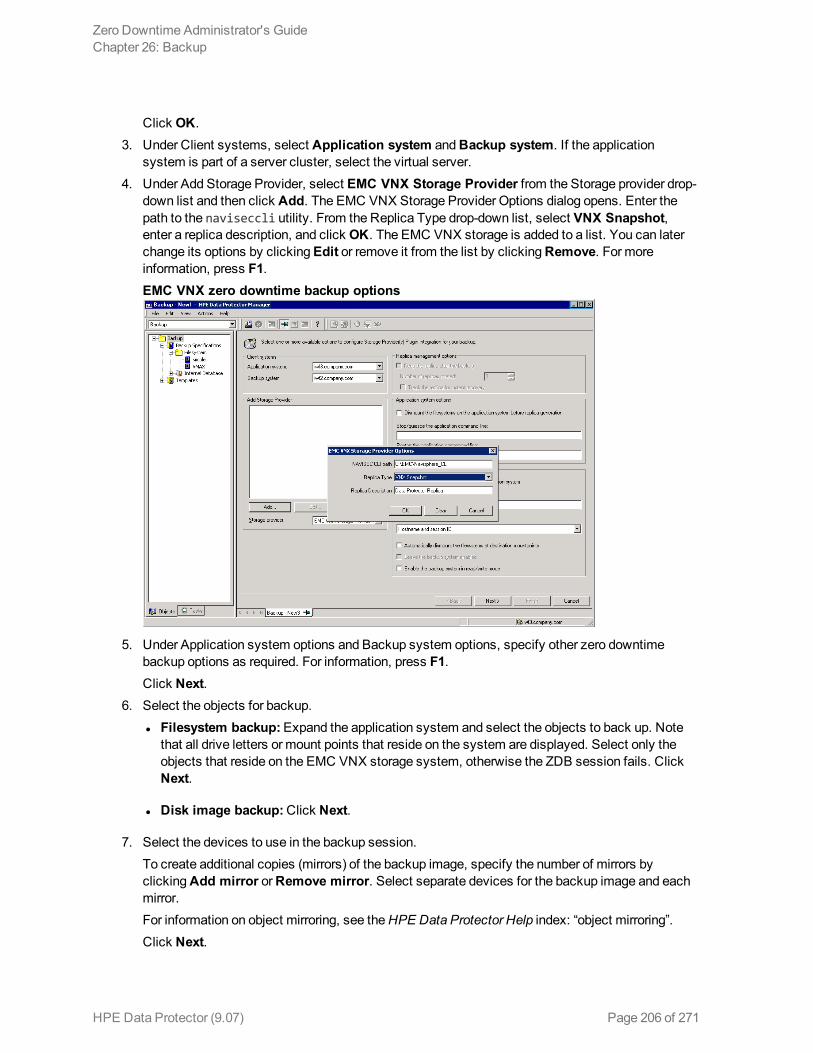
Click OK. 3. Under Client systems, select Application system and Backup system. If the application
system is part of a server cluster, select the virtual server. 4. Under Add Storage Provider, select EMC VNX Storage Provider from the Storage provider drop-
down list and then click Add. The EMC VNX Storage Provider Options dialog opens. Enter the path to the naviseccli utility. From the Replica Type drop-down list, select VNX Snapshot, enter a replica description, and click OK. The EMC VNX storage is added to a list. You can later change its options by clicking Edit or remove it from the list by clicking Remove. For more information, press F1.EMC VNX zero downtime backup options
5. Under Application system options and Backup system options, specify other zero downtime backup options as required. For information, press F1.Click Next.
6. Select the objects for backup. l Filesystem backup: Expand the application system and select the objects to back up. Note
that all drive letters or mount points that reside on the system are displayed. Select only the objects that reside on the EMC VNX storage system, otherwise the ZDB session fails. Click Next.
l Disk image backup: Click Next.
7. Select the devices to use in the backup session.To create additional copies (mirrors) of the backup image, specify the number of mirrors by clicking Add mirror or Remove mirror. Select separate devices for the backup image and each mirror.For information on object mirroring, see the HPE Data Protector Help index: “object mirroring”.Click Next.
Zero Downtime Administrator's GuideChapter 26: Backup
HPE Data Protector (9.07) Page 206 of 271
8. In the Backup Specification Options group box, click Advanced and then the Storage Provider tab to open the options pane with EMC VNX specific backup options.You can specify Application system options and modify all other options, except Application system and Backup system (note that you can change them after you save the ZDB backup specification).Click Next.
9. Schedule the ZDB sessions. For more information, press F1.Click Next.
10. In the Backup Object Summary page, specify additional options. l Filesystem backup: To modify options for the listed objects, right-click an object and then
click Properties. For information on the object properties, press F1.
l Disk image backup: Follow the steps:
i. Click Manual add to add disk image objects. ii. Select Disk image object and click Next. iii. Select the client system. Optionally, enter the description for your object. Click Next. iv. Specify General Object Options and Advanced Object Options. For information on these
options, press F1. v. In the Disk Image Object Options window, specify disk image or raw logical volume
sections.Specify a disk image section:
/dev/rdsk/Filename, for example: /dev/rdsk/c2t0d0Specify a raw logical volume section:
/dev/vgnumber/rlvolNumber, for example: /dev/vg01/rlvol1 vi. Click Finish.
Click Next. 11. Save your ZDB backup specification.
Backup optionsThe following tables describe the ZDB-related backup options that you can modify when configuring ZDB backup specifications that include storage systems of the EMC VNX Family.
Client systems
Application system The system on which the application runs. In cluster environments, specify the virtual server hostname (rather than the physical node hostname).
Backup system The system to which your data will be replicated (backed up), and from which the backup data is copied to a backup device.
EMC VNX storage replica type options
Zero Downtime Administrator's GuideChapter 26: Backup
HPE Data Protector (9.07) Page 207 of 271

VNX Snapshot VNX Snapshots are thin provisioned, which means that more storage on a LUN is provisioned than is currently available on the volume. This allows you to present more storage space to the backup system connected to the storage than is actually available.
Application system options
Dismount the filesystems on the application system before replica generation
Select this option to dismount the filesystems on the application system before replica creation and remount them afterwards. Additionally, when entire physical drives (on Windows systems) or entire disks or logical volumes (on UNIX systems) are selected as backup objects in a disk image backup specification, selecting this option will dismount and later remount all filesystems on these objects. If any of these filesystems cannot be dismounted, the backup session fails.
If an integrated application exclusively controls data I/O on each physical drive, disk, or logical volume that will be backed up, the dismount operation is not needed. In such a case, you can leave this option cleared.
Default: not selected.
Stop/quiesce the application command line
If a command is specified in this option, it is invoked on the application system immediately before replica creation. An example is to stop applications not integrated with Data Protector.
The command must reside on the application system in the default Data Protector administrative commands directory. Do not specify the path to the command in this option.
If the command fails, the command specified in the option Restart the application command line is not invoked. Thus, you may need to implement a cleanup procedure in the command specified in Stop/quiesce the application command line. If the omnirc option ZDB_ALWAYS_POST_SCRIPT is set to 1, the command specified in the option Restart the application command line is always invoked.
Restart the application command line
If a command is specified in this option, it is invoked on the application system immediately after replica creation. An example is to resume operation of applications not integrated with Data Protector.
The command must reside on the application system in the default Data Protector administrative commands directory. Do not specify the path to the command in this option.
Backup system options
Use the same mountpoints as on the
This option is not available if the application system is also the backup system (a single-host configuration).
Zero Downtime Administrator's GuideChapter 26: Backup
HPE Data Protector (9.07) Page 208 of 271
application system If this option is selected, the paths to mount points used for mounting the filesystems of the replica on the backup system are the same as paths to mount points where source volume filesystems were mounted on the application system.
If the mount points are already in use, the session fails. For such circumstances, you must select the option Automatically dismount the filesystems at destination mountpoints in order for the session to succeed.
Windows systems: The drive letters must be available, otherwise the session fails.
Default: not selected.
Root of the mount path on the backup system
This option is only available if the option Use the same mountpoints as on the application system is not selected.
Specifies the root directory under which the filesystems of the replica are mounted.
Where exactly the filesystems are mounted depends on how you define the option Add directories to the mount path.
Defaults:
Windows systems: c:\mnt
UNIX systems: /mnt
Add directories to the mount path
This option is only available if the option Use the same mountpoints as on the application system is not selected.
This option enables control over the created mount points. It defines which subdirectories will be created in the directory defined with the Root of the mount path on the backup system option. When Session ID is used in path composition, this guarantees unique mount points.
Example for Windows systems:
Root directory: C:\mnt
Application system: applsys.company.com
Backup session ID: 2008–02–22–4
Mount path on the application system: E:\disk1
If Hostname is selected:
C:\mnt\applsys.company.com\E\disk1
If Hostname and session ID is selected:
C:\mnt\applsys.company.com\2008–02–22–4\E\disk1
If Session ID is selected:
Zero Downtime Administrator's GuideChapter 26: Backup
HPE Data Protector (9.07) Page 209 of 271
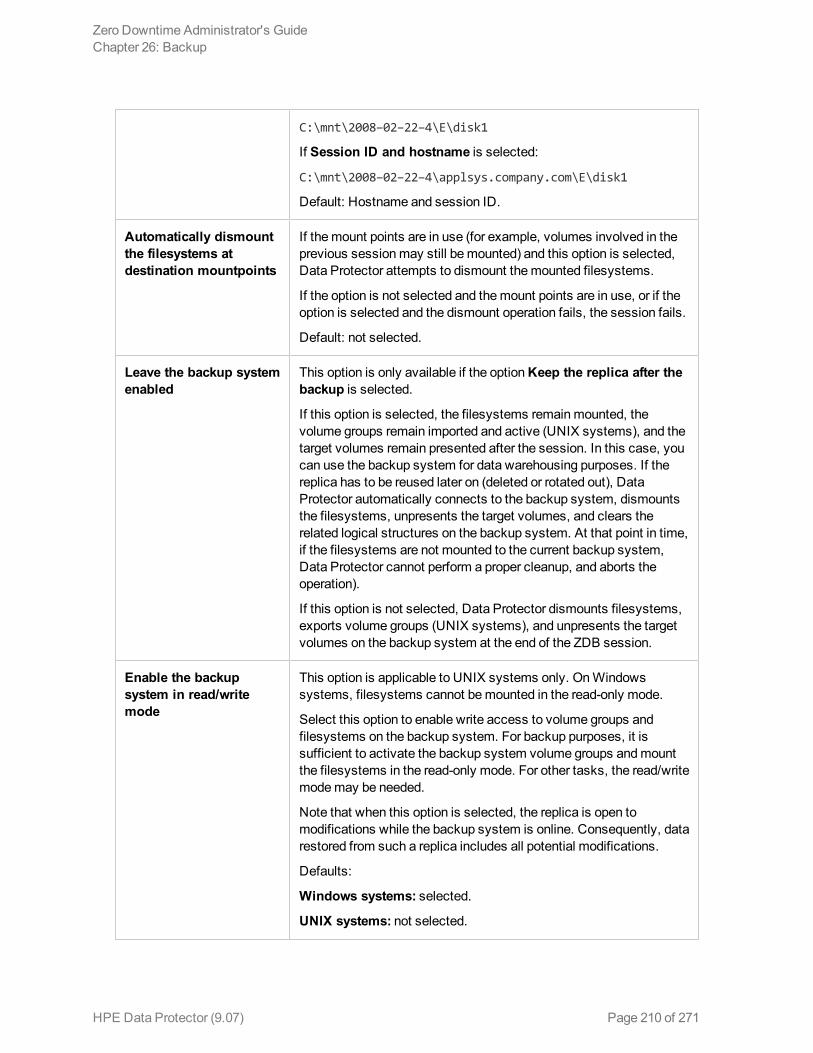
C:\mnt\2008–02–22–4\E\disk1
If Session ID and hostname is selected:
C:\mnt\2008–02–22–4\applsys.company.com\E\disk1
Default: Hostname and session ID.
Automatically dismount the filesystems at destination mountpoints
If the mount points are in use (for example, volumes involved in the previous session may still be mounted) and this option is selected, Data Protector attempts to dismount the mounted filesystems.
If the option is not selected and the mount points are in use, or if the option is selected and the dismount operation fails, the session fails.
Default: not selected.
Leave the backup system enabled
This option is only available if the option Keep the replica after the backup is selected.
If this option is selected, the filesystems remain mounted, the volume groups remain imported and active (UNIX systems), and the target volumes remain presented after the session. In this case, you can use the backup system for data warehousing purposes. If the replica has to be reused later on (deleted or rotated out), Data Protector automatically connects to the backup system, dismounts the filesystems, unpresents the target volumes, and clears the related logical structures on the backup system. At that point in time, if the filesystems are not mounted to the current backup system, Data Protector cannot perform a proper cleanup, and aborts the operation).
If this option is not selected, Data Protector dismounts filesystems, exports volume groups (UNIX systems), and unpresents the target volumes on the backup system at the end of the ZDB session.
Enable the backup system in read/write mode
This option is applicable to UNIX systems only. On Windows systems, filesystems cannot be mounted in the read-only mode.
Select this option to enable write access to volume groups and filesystems on the backup system. For backup purposes, it is sufficient to activate the backup system volume groups and mount the filesystems in the read-only mode. For other tasks, the read/write mode may be needed.
Note that when this option is selected, the replica is open to modifications while the backup system is online. Consequently, data restored from such a replica includes all potential modifications.
Defaults:
Windows systems: selected.
UNIX systems: not selected.
Zero Downtime Administrator's GuideChapter 26: Backup
HPE Data Protector (9.07) Page 210 of 271
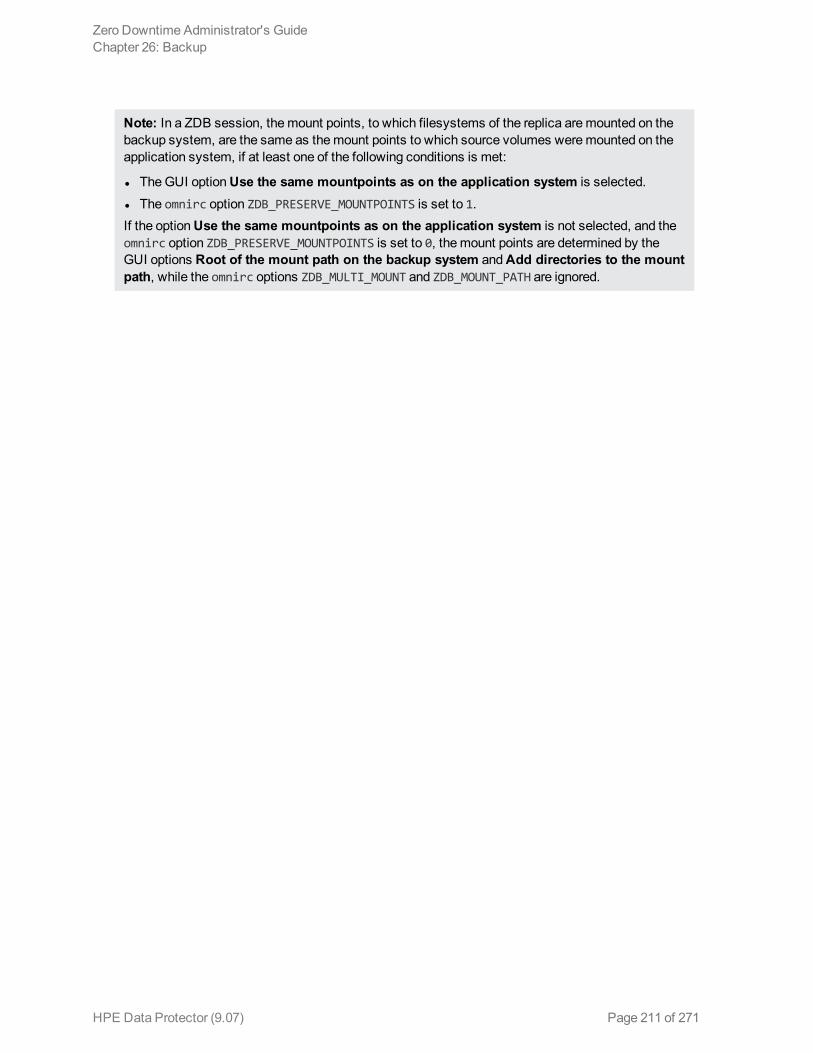
Note: In a ZDB session, the mount points, to which filesystems of the replica are mounted on the backup system, are the same as the mount points to which source volumes were mounted on the application system, if at least one of the following conditions is met:
l The GUI option Use the same mountpoints as on the application system is selected. l The omnirc option ZDB_PRESERVE_MOUNTPOINTS is set to 1.If the option Use the same mountpoints as on the application system is not selected, and the omnirc option ZDB_PRESERVE_MOUNTPOINTS is set to 0, the mount points are determined by the GUI options Root of the mount path on the backup system and Add directories to the mount path, while the omnirc options ZDB_MULTI_MOUNT and ZDB_MOUNT_PATH are ignored.
Zero Downtime Administrator's GuideChapter 26: Backup
HPE Data Protector (9.07) Page 211 of 271
Chapter 27: Restore This chapter describes configuring and running a filesystem or disk image restore of the data backed up using the Data Protector EMC VNX Family integration.
The data backed up in a ZDB session using EMC VNX storage can be stored on backup media only (ZDB to tape).
Data backed up in ZDB-to-tape sessions can be restored from the backup media to the application system. For more information on this restore type, see the HPE Data Protector Help index: “restore”.
Tip: You can improve the data transfer rate by connecting a backup device directly to the application system. For information on configuring backup devices, see the HPE Data Protector Help index: “backups devices: configuring”. For information on performing a restore using another device, see the HPE Data Protector Help index: “selecting, devices for restore”.
Zero Downtime Administrator's GuideChapter 27: Restore
HPE Data Protector (9.07) Page 212 of 271
Chapter 28: Troubleshooting
Before you beginThis chapter lists general checks and verifications that you may need to perform when you encounter problems with the Data Protector EMC VNX Family integration. For general Data Protector troubleshooting information, see the HPE Data Protector Troubleshooting Guide.
l Ensure that the latest official Data Protector patches are installed. For information on how to verify this, see the HPE Data Protector Help index: “patches”.
l For general Data Protector and integration-specific limitations, as well as recognized issues and workarounds, see the HPE Data Protector Product Announcements, Software Notes, and References.
l For an up-to-date list of supported versions, platforms, and other information, see http://support.openview.hp.com/selfsolve/manuals.
Checks and verifications l On the application and backup systems, examine system errors logged into the debug.log file
residing in the Data Protector log files directory.
Zero Downtime Administrator's GuideChapter 28: Troubleshooting
HPE Data Protector (9.07) Page 213 of 271
HPE Data Protector (9.07)
Page 214 of 271
Part 8: EMC VMAX FamilyThis part describes how to configure the Data Protector EMC VMAX Family integration, how to perform zero downtime backup using the EMC VMAX storage system, and how to resolve the integration-specific Data Protector problems.
Chapter 29: Configuration
IntroductionThis chapter describes configuration of the Data Protector EMC VMAX Family integration, lists prerequisites and limitations of the integration.
Data Protector EMC VMAX Family integration supports TimeFinder/Clone and TimeFinder VP Snap types. From the perspective of Data Protector, both EMC VMAX snapshot types are vsnaps.
To know more about EMC VMAX Family disk arrays and supported snapshot types, see the EMC VMAX documentation.
Prerequisites l Make sure the same operating system version is installed on both the application system and the
backup system. l If the application system and the backup system reside in a Data Protector cell with secured clients,
ensure that access between both systems is allowed in both directions. l Connect your EMC VMAX storage system to the application and backup systems through the SAN. l Make sure source volumes have enough space for snapshots and clones. l Make sure that the names of storage groups on the EMC VMAX storage system are the same as the
fully-qualified domain names of the systems they represent, while having the dots replaced with underscores.
l Make sure the omnirc options on both the application and the backup clients are set to:
LD_LIBRARY_PATH=/usr/lib/hpux64
SHLIB_PATH=/usr/lib/hpux64
DYNAMIC_PATH=/usr/lib/hpux64
LIBPATH=/usr/lib/hpux64
EMC VMAX licenses and components
l Install the EMC Solution Enabler. The symcli command interface is also installed along. l EMC TimeFinder microcode and license l Make sure that an appropriate multi-path device management is installed on the application system
and the backup system.Linux systems: HPE Device Mapper Multipath Enablement Kit for HPE Disk Arrays 4.2.0 or newer version.To configure the installed multi-path device management software: a. Start the multipath daemon and run the following command to configure the daemon so that it
gets started during system startup:
Red Hat Enterprise Linux: chkconfig multipathd on
Zero Downtime Administrator's GuideChapter 29: Configuration
HPE Data Protector (9.07) Page 215 of 271

SUSE Linux Enterprise Server: chkconfig boot.multipath on b. Prevent the multipath device management software from queuing for unavailable disk volumes
by modifying its configuration file. In the defaults section of the file /etc/multipath.conf file, add the following line:
no_path_retry fail
Ensure that this no_path_retry parameter value is not overridden by equivalent entries in the device sections of the same file in which the corresponding EMC VMAX storage systems are configured.
c. Ensure that the correct preferred names are used for pathnames that are referencing the same device for physical volumes as they are used in device-mapper multipathing.
Open the lvm.conf file, residing in the /etc/lvm/ directory, and set the following variable:preferred_names = [ "^/dev/mpath/", "^/dev/mapper/mpath", "^/dev/[hs]d" ]
Windows systems: Microsoft MPIO configured for EMC VMAX Storage Provider. For more information, see the EMC VMAX Family documentation.
Data Protector licenses and components:
l An appropriate zero downtime backup extension for non–HPE Storage Arrays licenses-to-use (LTU).
l The EMC VMAX Storage Provider component installed on both the application system and the backup system.
l EMC VMAX pluginFor licensing information and installation and upgrade instructions, see the HPE Data Protector Installation Guide.
Prerequisites for Windows systems
l On Windows Server 2003 and Windows Server 2008 systems, disable the operating system option Automatic mounting of new volumes. In the Command Prompt window, run the command mountvol /N.
l Do not manually mount target volumes that were created by Data Protector.
Limitations l In cluster environments, the backup system must not be in the same cluster with the application
system. Additionally, the backup system cannot be the cluster virtual server, it can only be a cluster node.
l Instant recovery is not supported. l TimeFinder/Snap snapshot type is not supported. l TimeFinder/Consistency Groups are not supported.For information on the following items, see the HPE Data Protector Product Announcements, Software Notes, and References:
l General Data Protector and integration-specific limitations l Supported platforms and integrations l Supported backup and connectivity topologies
Zero Downtime Administrator's GuideChapter 29: Configuration
HPE Data Protector (9.07) Page 216 of 271

ZDB database - SMISDBZDB database for the Data Protector EMC VMAX Family integration is referred to as SMISDB. It keeps information about EMC VMAX storage systems. For each system, the following is stored:
l Hostname as recognized in the IP network. l User name and encoded password for the EMC VMAX Storage Provider loginSMISDB resides on the Cell Manager in:
Windows systems: Data_Protector_program_data\server\db80\smisdb
UNIX systems: /var/opt/omni/server/db80/smisdb
Configuring the integrationBefore you start with the configuration, make sure the prerequisites listed in "Introduction" are fulfilled.
To integrate with the EMC VMAX storage system, Data Protector uses the EMC VMAX Storage Provider. This plug-in enables EMC VMAX storage support within the Data Protector ZDB (SMI-S) agent. To configure the Data Protector EMC VMAX Family integration, provide the data that the Data Protector ZDB agent will use to establish connection to an EMC VMAX storage system of your choice.
The connection configuration data includes user credentials that you must add to the ZDB database (the EMC VMAX part of SMISDB). The credentials are bound to a specific application system in the Data Protector cell. The Data Protector ZDB agent then reads the credentials from the ZDB database each time a zero downtime backup for data residing on an EMC VMAX storage system is started.
Connection configuration dataTo be able to connect to an EMC VMAX storage system and perform zero downtime backup, the Data Protector ZDB agent needs the following information:
l Fully qualified domain name or IP address of the system where the EMC VMAX Storage Provider residesIf the system has multiple IP addresses, use the address by which the Data Protector ZDB agent can access the system.
l Username and passwordThese credentials must belong to the EMC VMAX storage system Administrator account. For more information on using the EMC VMAX storage authorization system and on EMC VMAX user groups, see the EMC VMAX Family documentation.
You need to provide the above information to enable connection between the Data Protector ZDB agent and the EMC VMAX storage system. It is stored in the EMC VMAX part of the SMISDB.
Configuration procedureTo establish connection to the EMC VMAX storage system, use the Data Protector omnidbzdb command. Follow the steps:
Zero Downtime Administrator's GuideChapter 29: Configuration
HPE Data Protector (9.07) Page 217 of 271
1. Select the EMC VMAX storage system user account that has a proper privilege level on the corresponding domains. Identify and write down its username and password, which you will need in the next step.
2. Use the omnidbzdb command to establish connection to the EMC VMAX storage system and to add the username and password that you acquired in the previous step to the ZDB database. Run the following command:
omnidbzdb --diskarray ArrayFamily --ompasswd --add ClientName --user UserName --passwd password
where:ArrayFamily - EMCVMAXClientName - fully qualified domain name or an IP address of the EMC VMAX storage systemUserName and password - user credentials that you acquired in the previous stepFor example:
omnidbzdb --diskarray EMCVMAX --ompasswd --add vmaxstorage.company.com --user vmaxadmin --passwd pwd
For command syntax and usage examples, see the omnidbzdb reference page in the HPE Data Protector Command Line Interface Reference or the omnidbzdb man page.
3. Using the omnidbzdb --diskarray EMCVMAX --ompasswd --check command, verify that the Data Protector EMC VMAX Storage Provider can connect to the EMC VMAX storage system using the configured user authentication data.
Tip: For each application system, you can add user credentials of multiple EMC VMAX user accounts. When several are configured for the same system, the Data Protector ZDB agent checks user accounts in alphabetical order and uses the first account with Edit privilege level on the application system and the source volumes.
For information on performing other tasks related to management of user credentials in the ZDB database, see the omnidbzdb reference page in the HPE Data Protector Command Line Interface Reference or the omnidbzdb man page.
Zero Downtime Administrator's GuideChapter 29: Configuration
HPE Data Protector (9.07) Page 218 of 271
Chapter 30: Backup This chapter describes configuration of a filesystem or disk image ZDB using the Data Protector GUI.
With the EMC VMAX Storage Provider integration, you can perform the backup of the ZDB to tape type only. For more information on the ZDB types, see the HPE Data Protector Concepts Guide.
You should be familiar with the EMC VMAX storage concepts and basic Data Protector ZDB functionality. See the EMC VMAX Family storage-related documentation and the HPE Data Protector Concepts Guide.
For information on the supported configurations, ZDB types and replication techniques available on this storage system, and storage system-specific ZDB considerations, see the HPE Data Protector Concepts Guide.
Backup conceptsEMC VMAX backup consists of two phases:
1. Application system data gets synchronized to the backup system.During this phase, the synchronization is performed on the level of participating volume groups or disks. Therefore, if multiple filesystems/disk images are configured in the same volume group or on the same disk, the whole volume group or disk (all filesystems or disk images in this volume group or on disk) is synchronized to the backup system regardless of the objects selected for backup.
2. Synchronized backup system data is backed up to a backup device.During this phase, only the objects selected for backup are backed up.
Creating backup specification
Limitations
l The only supported ZDB type is ZDB to tape. l Only one snapshot type for target volumes can be created during a ZDB session. l When cloning process for a source volume is in progress, another snapshot (any type) of that source
volume cannot be created. l You cannot back up replicas (target volumes from existing and currently recorded backup sessions). l If there is not enough space for a fully allocated replica creation, the session fails.
Considerations
l Consider all limitations that apply to the Data Protector EMC VMAX Family integration. See the HPE Data Protector Product Announcements, Software Notes, and References, the HPE Data Protector Concepts Guide, and the limitation list in "Configuration ".
Zero Downtime Administrator's GuideChapter 30: Backup
HPE Data Protector (9.07) Page 219 of 271
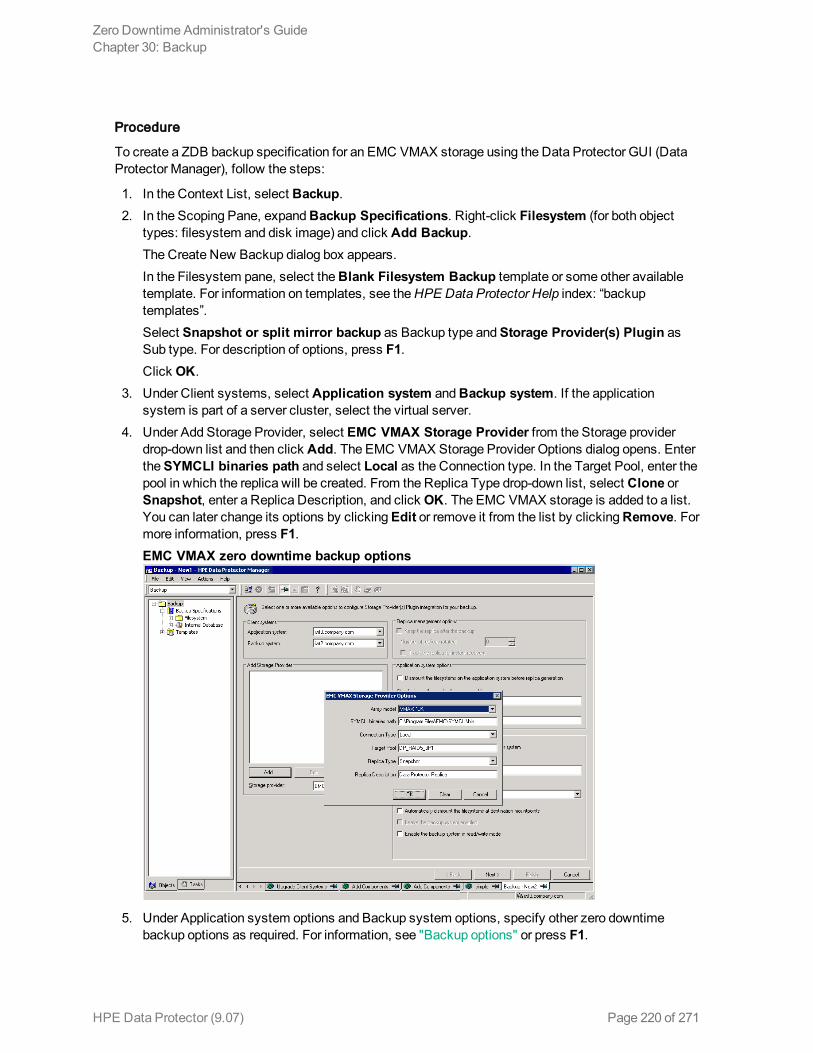
Procedure
To create a ZDB backup specification for an EMC VMAX storage using the Data Protector GUI (Data Protector Manager), follow the steps:
1. In the Context List, select Backup. 2. In the Scoping Pane, expand Backup Specifications. Right-click Filesystem (for both object
types: filesystem and disk image) and click Add Backup.The Create New Backup dialog box appears.In the Filesystem pane, select the Blank Filesystem Backup template or some other available template. For information on templates, see the HPE Data Protector Help index: “backup templates”.Select Snapshot or split mirror backup as Backup type and Storage Provider(s) Plugin as Sub type. For description of options, press F1.Click OK.
3. Under Client systems, select Application system and Backup system. If the application system is part of a server cluster, select the virtual server.
4. Under Add Storage Provider, select EMC VMAX Storage Provider from the Storage provider drop-down list and then click Add. The EMC VMAX Storage Provider Options dialog opens. Enter the SYMCLI binaries path and select Local as the Connection type. In the Target Pool, enter the pool in which the replica will be created. From the Replica Type drop-down list, select Clone or Snapshot, enter a Replica Description, and click OK. The EMC VMAX storage is added to a list. You can later change its options by clicking Edit or remove it from the list by clicking Remove. For more information, press F1.EMC VMAX zero downtime backup options
5. Under Application system options and Backup system options, specify other zero downtime backup options as required. For information, see "Backup options" or press F1.
Zero Downtime Administrator's GuideChapter 30: Backup
HPE Data Protector (9.07) Page 220 of 271
Click Next. 6. Select the objects for backup.
l Filesystem backup: Expand the application system and select the objects to back up. Note that all drive letters or mount points that reside on the system are displayed. Select only the objects that reside on the EMC VMAX storage system, otherwise the ZDB session fails. Click Next.
l Disk image backup: Click Next.
7. Select the devices to use in the backup session.To create additional copies (mirrors) of the backup image, specify the number of mirrors by clicking Add mirror or Remove mirror. Select separate devices for the backup image and each mirror.For information on object mirroring, see the HPE Data Protector Help index: “object mirroring”.Click Next.
8. In the Backup Specification Options group box, click Advanced and then the Storage Provider tab to open the options pane with EMC VMAX specific backup options.You can specify Application system options and modify all other options, except Application system and Backup system.Click Next.
9. Schedule the ZDB sessions. For more information, press F1.Click Next.
10. In the Backup Object Summary page, specify additional options. l Filesystem backup: To modify options for the listed objects, right-click an object and then
click Properties. For information on the object properties, press F1.
l Disk image backup: Follow the steps:
i. Click Manual add to add disk image objects. ii. Select Disk image object and click Next. iii. Select the client system. Optionally, enter the description for your object. Click Next. iv. Specify General Object Options and Advanced Object Options. For information on these
options, press F1. v. In the Disk Image Object Options window, specify disk image or raw logical volume
sections.Specify a disk image section:
/dev/rdsk/Filename, for example: /dev/rdsk/c2t0d0Specify a raw logical volume section:
/dev/vgnumber/rlvolNumber, for example: /dev/vg01/rlvol1 vi. Click Finish.
Click Next. 11. Save your ZDB backup specification.
Zero Downtime Administrator's GuideChapter 30: Backup
HPE Data Protector (9.07) Page 221 of 271
Backup optionsThe following tables describe the ZDB-related backup options that you can modify when configuring ZDB backup specifications that include storage systems of the EMC VMAX Family.
Client systems
Application system The system on which the application runs. In cluster environments, specify the virtual server hostname (rather than the physical node hostname).
Backup system The system to which your data will be replicated (backed up), and from which the backup data is copied to a backup device.
EMC VMAX storage replica type options
Clone TimeFinder/Clone. Local point-in-time copy of a VMAX device, allows up to 16 active clones of a single device.
Snapshot TimeFinder VP Snap. Creates a snap for Virtual Pool devices and allows up to 32 VP snaps ser source volume to be created.
Application system options
Dismount the filesystems on the application system before replica generation
Select this option to dismount the filesystems on the application system before replica creation and remount them afterwards. Additionally, when entire physical drives (on Windows systems) or entire disks or logical volumes (on UNIX systems) are selected as backup objects in a disk image backup specification, selecting this option will dismount and later remount all filesystems on these objects. If any of these filesystems cannot be dismounted, the backup session fails.
If an integrated application exclusively controls data I/O on each physical drive, disk, or logical volume that will be backed up, the dismount operation is not needed. In such a case, you can leave this option cleared.
Default: not selected.
Stop/quiesce the application command line
If a command is specified in this option, it is invoked on the application system immediately before replica creation. An example is to stop applications not integrated with Data Protector.
The command must reside on the application system in the default Data Protector administrative commands directory. Do not specify the path to the command in this option.
If the command fails, the command specified in the option Restart
Zero Downtime Administrator's GuideChapter 30: Backup
HPE Data Protector (9.07) Page 222 of 271
the application command line is not invoked. Thus, you may need to implement a cleanup procedure in the command specified in Stop/quiesce the application command line. If the omnirc option ZDB_ALWAYS_POST_SCRIPT is set to 1, the command specified in the option Restart the application command line is always invoked.
Restart the application command line
If a command is specified in this option, it is invoked on the application system immediately after replica creation. An example is to resume operation of applications not integrated with Data Protector.
The command must reside on the application system in the default Data Protector administrative commands directory. Do not specify the path to the command in this option.
Backup system options
Use the same mountpoints as on the application system
This option is not available if the application system is also the backup system (a single-host configuration).
If this option is selected, the paths to mount points used for mounting the filesystems of the replica on the backup system are the same as paths to mount points where source volume filesystems were mounted on the application system.
If the mount points are already in use, the session fails. For such circumstances, you must select the option Automatically dismount the filesystems at destination mountpoints in order for the session to succeed.
Windows systems: The drive letters must be available, otherwise the session fails.
Default: not selected.
Root of the mount path on the backup system
This option is only available if the option Use the same mountpoints as on the application system is not selected.
Specifies the root directory under which the filesystems of the replica are mounted.
Where exactly the filesystems are mounted depends on how you define the option Add directories to the mount path.
Defaults:
Windows systems: c:\mnt
UNIX systems: /mnt
Add directories to the mount path
This option is only available if the option Use the same mountpoints as on the application system is not selected.
This option enables control over the created mount points. It defines
Zero Downtime Administrator's GuideChapter 30: Backup
HPE Data Protector (9.07) Page 223 of 271

which subdirectories will be created in the directory defined with the Root of the mount path on the backup system option. When Session ID is used in path composition, this guarantees unique mount points.
Example for Windows systems:
Root directory: C:\mnt
Application system: applsys.company.com
Backup session ID: 2008–02–22–4
Mount path on the application system: E:\disk1
If Hostname is selected:
C:\mnt\applsys.company.com\E\disk1
If Hostname and session ID is selected:
C:\mnt\applsys.company.com\2008–02–22–4\E\disk1
If Session ID is selected:
C:\mnt\2008–02–22–4\E\disk1
If Session ID and hostname is selected:
C:\mnt\2008–02–22–4\applsys.company.com\E\disk1
Default: Hostname and session ID.
Automatically dismount the filesystems at destination mountpoints
If the mount points are in use (for example, volumes involved in the previous session may still be mounted) and this option is selected, Data Protector attempts to dismount the mounted filesystems.
If the option is not selected and the mount points are in use, or if the option is selected and the dismount operation fails, the session fails.
Default: not selected.
Leave the backup system enabled
This option is only available if the option Keep the replica after the backup is selected.
If this option is selected, the filesystems remain mounted, the volume groups remain imported and active (UNIX systems), and the target volumes remain presented after the session. In this case, you can use the backup system for data warehousing purposes. If the replica has to be reused later on (deleted or rotated out), Data Protector automatically connects to the backup system, dismounts the filesystems, unpresents the target volumes, and clears the related logical structures on the backup system. At that point in time, if the filesystems are not mounted to the current backup system, Data Protector cannot perform a proper cleanup, and aborts the operation).
If this option is not selected, Data Protector dismounts filesystems,
Zero Downtime Administrator's GuideChapter 30: Backup
HPE Data Protector (9.07) Page 224 of 271

exports volume groups (UNIX systems), and unpresents the target volumes on the backup system at the end of the ZDB session.
Enable the backup system in read/write mode
This option is applicable to UNIX systems only. On Windows systems, filesystems cannot be mounted in the read-only mode.
Select this option to enable write access to volume groups and filesystems on the backup system. For backup purposes, it is sufficient to activate the backup system volume groups and mount the filesystems in the read-only mode. For other tasks, the read/write mode may be needed.
Note that when this option is selected, the replica is open to modifications while the backup system is online. Consequently, data restored from such a replica includes all potential modifications.
Defaults:
Windows systems: selected.
UNIX systems: not selected.
Note: In a ZDB session, the mount points, to which filesystems of the replica are mounted on the backup system, are the same as the mount points to which source volumes were mounted on the application system, if at least one of the following conditions is met:
l The GUI option Use the same mountpoints as on the application system is selected. l The omnirc option ZDB_PRESERVE_MOUNTPOINTS is set to 1.If the option Use the same mountpoints as on the application system is not selected, and the omnirc option ZDB_PRESERVE_MOUNTPOINTS is set to 0, the mount points are determined by the GUI options Root of the mount path on the backup system and Add directories to the mount path, while the omnirc options ZDB_MULTI_MOUNT and ZDB_MOUNT_PATH are ignored.
Zero Downtime Administrator's GuideChapter 30: Backup
HPE Data Protector (9.07) Page 225 of 271

Chapter 31: Restore This chapter describes configuring and running a filesystem or disk image restore of the data backed up using the Data Protector EMC VMAX Family integration.
The data backed up in a ZDB session using EMC VMAX storage can be stored on backup media only (ZDB to tape).
Data backed up in ZDB-to-tape sessions can be restored from the backup media to the application system. For more information on this restore type, see the HPE Data Protector Help index: “restore”.
Tip: You can improve the data transfer rate by connecting a backup device directly to the application system. For information on configuring backup devices, see the HPE Data Protector Help index: “backups devices: configuring”. For information on performing a restore using another device, see the HPE Data Protector Help index: “selecting, devices for restore”.
Zero Downtime Administrator's GuideChapter 31: Restore
HPE Data Protector (9.07) Page 226 of 271

Chapter 32: Troubleshooting
Before you beginThis chapter lists general checks and verifications that you may need to perform when you encounter problems with the Data Protector EMC VMAX Family integration. For general Data Protector troubleshooting information, see the HPE Data Protector Troubleshooting Guide.
l Ensure that the latest official Data Protector patches are installed. For information on how to verify this, see the HPE Data Protector Help index: “patches”.
l For general Data Protector and integration-specific limitations, as well as recognized issues and workarounds, see the HPE Data Protector Product Announcements, Software Notes, and References.
l For an up-to-date list of supported versions, platforms, and other information, see http://support.openview.hp.com/selfsolve/manuals.
Checks and verifications l On the application and backup systems, examine system errors logged into the debug.log file
residing in the Data Protector log files directory.
Zero Downtime Administrator's GuideChapter 32: Troubleshooting
HPE Data Protector (9.07) Page 227 of 271

Appendix
Scheduling ZDB sessionsTo schedule a filesystem or disk image ZDB, create a new or modify an existing backup specification. For detailed steps, see the HPE Data Protector Help index: “scheduling backups on specific dates and times”.
For general information on scheduling, see the HPE Data Protector Help index: “scheduled backups”.
Scheduling ZDB to disk/disk+tape
Starting interactive ZDB sessions
Prerequisites
l In a Microsoft Cluster Service configuration, if a cluster resource disk is to be backed up, it should not be in a maintenance mode before the backup.
HPE Data Protector (9.07) Page 228 of 271
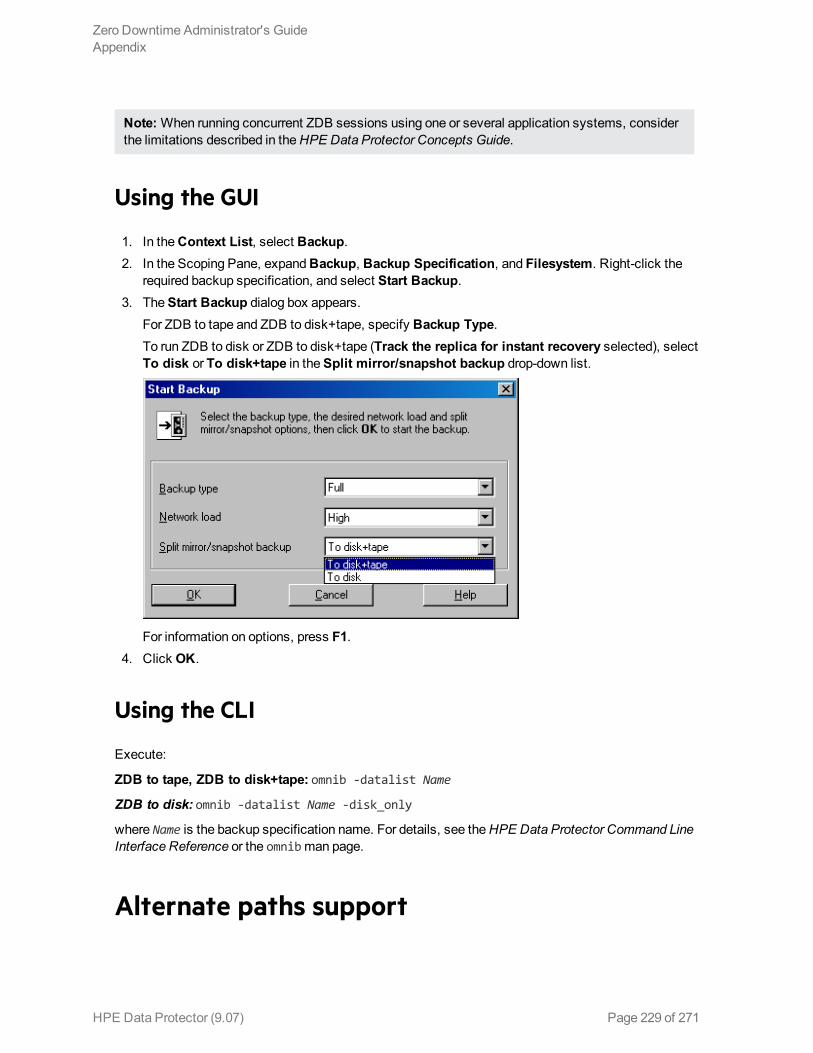
Note: When running concurrent ZDB sessions using one or several application systems, consider the limitations described in the HPE Data Protector Concepts Guide.
Using the GUI
1. In the Context List, select Backup. 2. In the Scoping Pane, expand Backup, Backup Specification, and Filesystem. Right-click the
required backup specification, and select Start Backup. 3. The Start Backup dialog box appears.
For ZDB to tape and ZDB to disk+tape, specify Backup Type.To run ZDB to disk or ZDB to disk+tape (Track the replica for instant recovery selected), select To disk or To disk+tape in the Split mirror/snapshot backup drop-down list.
For information on options, press F1. 4. Click OK.
Using the CLI
Execute:
ZDB to tape, ZDB to disk+tape: omnib -datalist Name
ZDB to disk: omnib -datalist Name -disk_only
where Name is the backup specification name. For details, see the HPE Data Protector Command Line Interface Reference or the omnib man page.
Alternate paths support
Zero Downtime Administrator's GuideAppendix
HPE Data Protector (9.07) Page 229 of 271
For systems with multiple host adapters and connections to a disk array, the multi-path device management solution performs dynamic load balancing and monitors each path to ensure that the I/O subsystem completes its transactions. If a path between a disk array and a server fails, alternate path software automatically switches to an alternate path, removing the failed path from I/O rotation without data loss. Failover is transparent to applications, so they continue unaffected.
Note: On UNIX systems, the multi-path device management software used for the Data Protector HPE P6000 EVA Disk Array Family integration to import volume groups on the backup system should be limited to the maximum supported number of paths.
Note: On HP-UX 11.31 systems, the multi-path device management software is not supported since the operating system has native device multi-pathing capability.
For information on which multi-path device management solutions are supported by specific Data Protector ZDB agents and disk array models, see the latest support matrices at http://support.openview.hp.com/selfsolve/manuals.
With the HPE P9000 XP Disk Array Family, you can control AutoPath load balancing using the OB2AUTOPATH_BALANCING_POLICY omnirc option (by default, AutoPath Round Robin load balancing policy is used). For more information, see "ZDB omnirc options" on page 248.
When using AutoPath, consider the following:
l During a ZDB-to-tape session, if a failover to an alternate path occurs and the AutoPath Shortest Queue Length load balancing is set, the session completes with errors.
l If a failover to an alternate path occurs during disk image backup without using raw logical volumes (rlvols), the session completes with errors. If rlvols are used, the session completes successfully.
Note: When using a disk array of the HPE P6000 EVA Disk Array Family together with the multi-path device management software HPE Secure Path, load balancing as configured by HPE Secure Path is used; you cannot change the load balancing policy using Data Protector.
Cluster configurationsData Protector ZDB agents support:
l HPE Serviceguard (on HP-UX systems) with all disk array models supported by Data Protector l Veritas Cluster (on Solaris systems) with disk arrays of the HPE P6000 EVA Disk Array Family and
the HPE P9000 XP Disk Array Family l Microsoft Cluster Server (on Windows systems) with disk arrays of the HPE P6000 EVA Disk Array
Family and the HPE P9000 XP Disk Array Family l EMC GeoSpan for Microsoft Cluster Service (on Windows systems) with EMC Symmetrix disk
arraysIf the application system is in a server cluster, the backup system must be outside this cluster: it may run in a different cluster or may not be part of a cluster at all.
If the backup system is running in a server cluster, target volumes on this system must not be configured as cluster resources.
Zero Downtime Administrator's GuideAppendix
HPE Data Protector (9.07) Page 230 of 271

If a failover to the remote site happens, the disk array configuration changes from the combined HPE CA+BC P9000 XP (HPE P9000 XP Disk Array Family) or SRDF+TimeFinder (EMC Symmetrix) to HPE BC P9000 XP (HPE P9000 XP Disk Array Family) or TimeFinder (EMC Symmetrix). This means that the next ZDB session can no longer start automatically, so the ZDB backup specification must be updated to reflect the configuration change.
For more information on cluster support, see the HPE Data Protector Product Announcements, Software Notes, and References and the HPE Data Protector Help index: “cluster”.
Sections below discuss supported ZDB cluster configurations.
"Client on the application system in a cluster " on page 235 through "EMC GeoSpan for Microsoft Cluster Service " on page 237 illustrate Data Protector application backup disk array configurations and scenarios. For filesystem and disk image backup, only a Data Protector ZDB agent is needed; an application database and binaries are not installed as presented in the figures. On Windows systems, to perform zero downtime backup and instant recovery using Microsoft Volume Shadow Copy Service, the Data Protector component MS Volume Shadow Copy Integration must be installed.
Note: For applications in a cluster, use a floating IP address rather than a static one. This allows a successful backup to start even after a local failover.
Client on the application system in a cluster, Cell Manager in a clusterCell Manager is installed in a cluster on any system that is not a backup or application system.
Scenarios
l Application failover during backup: session fails and must be restarted manually. l Application failover before backup: session completes successfully. l Cell Manager failover during backup: failed session is automatically restarted, provided the option
Restart backup of all objects is selected. l Cell Manager failover before backup: session completes successfully.
Limitations l Not supported in Veritas Cluster.Install:
l On the application system on all cluster nodes on local disks: application binaries, Data Protector integration software component, Data Protector ZDB agent.
l On the application system cluster shared disk: application database. Note that this shared disk must be on a disk array.
l On any system cluster shared disk: Cell Manager. l On the backup system on local disks: Data Protector integration software component, Data
Protector ZDB agent, Data Protector General Media Agent.Client on the application system in a cluster, Cell Manager in a cluster
Zero Downtime Administrator's GuideAppendix
HPE Data Protector (9.07) Page 231 of 271

Cell Manager on the backup system in a cluster
Scenarios
l Cell Manager failover during backup: session is automatically restarted, provided the option Restart backup of all objects is selected.
l Cell Manager failover in between backups: session completes successfully.
Limitations l Not supported in Veritas Cluster.Install:
l On the application system: application binaries, Data Protector integration software component, Data Protector ZDB agent.
l On the application system cluster shared disk: application database. Note that this shared disk must be a disk array replicated disk.
l On the backup system cluster shared disk: Cell Manager. Note that this shared disk must be a disk array replicated disk.
Zero Downtime Administrator's GuideAppendix
HPE Data Protector (9.07) Page 232 of 271
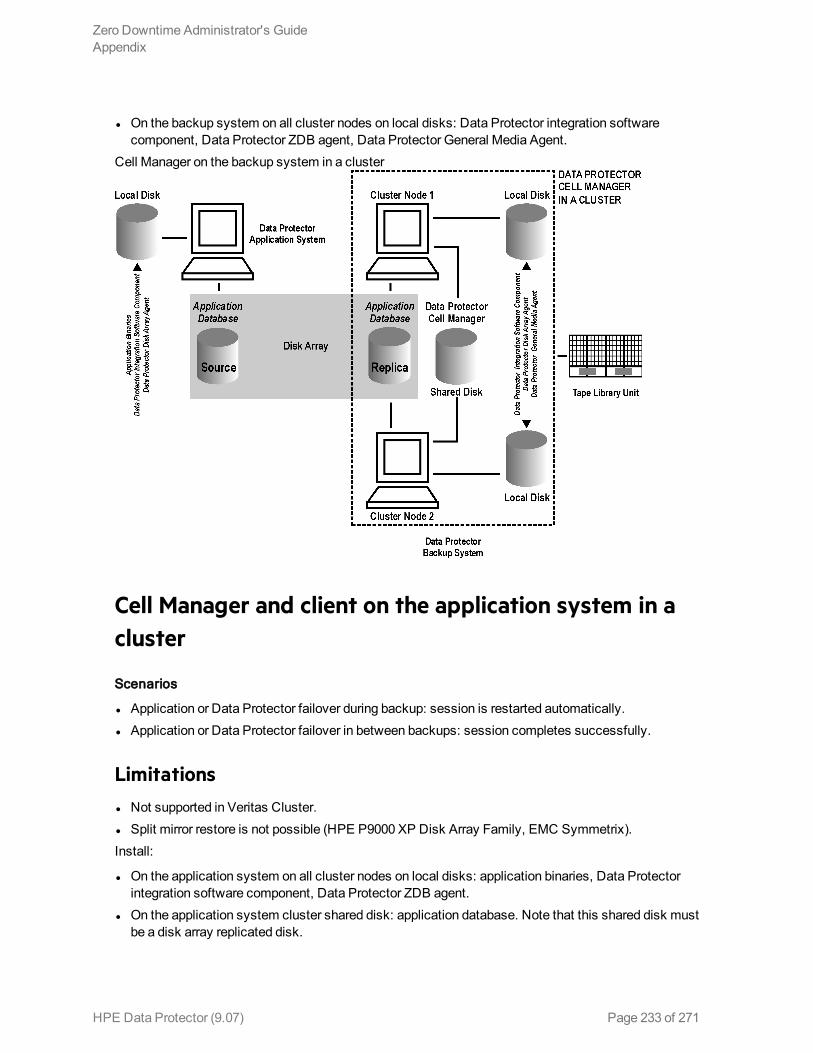
l On the backup system on all cluster nodes on local disks: Data Protector integration software component, Data Protector ZDB agent, Data Protector General Media Agent.
Cell Manager on the backup system in a cluster
Cell Manager and client on the application system in a cluster
Scenarios
l Application or Data Protector failover during backup: session is restarted automatically. l Application or Data Protector failover in between backups: session completes successfully.
Limitations l Not supported in Veritas Cluster. l Split mirror restore is not possible (HPE P9000 XP Disk Array Family, EMC Symmetrix).Install:
l On the application system on all cluster nodes on local disks: application binaries, Data Protector integration software component, Data Protector ZDB agent.
l On the application system cluster shared disk: application database. Note that this shared disk must be a disk array replicated disk.
Zero Downtime Administrator's GuideAppendix
HPE Data Protector (9.07) Page 233 of 271

l On the application system cluster shared disk: Cell Manager. l On the backup system on local disks: Data Protector integration software component, Data
Protector ZDB agent, Data Protector General Media Agent. l Configure Cell Manager cluster’s critical resources in the same cluster group/package as those for
the application being backed up.Cell Manager and client on the application system in a cluster
Client on the application system in a cluster, Cell Manager not in a cluster
Scenarios
l Application failover during backup: session fails and must be restarted manually. l Application failover in between backups: session completes successfully.Install:
l On the application system on all cluster nodes on local disks: application binaries, Data Protector integration software component, Data Protector ZDB agent.
l On the application system cluster shared disk: application database. Note that this shared disk must be on a disk array.
l On the backup system on local disks: Data Protector integration software component, Data Protector ZDB agent, Data Protector General Media Agent.
Zero Downtime Administrator's GuideAppendix
HPE Data Protector (9.07) Page 234 of 271
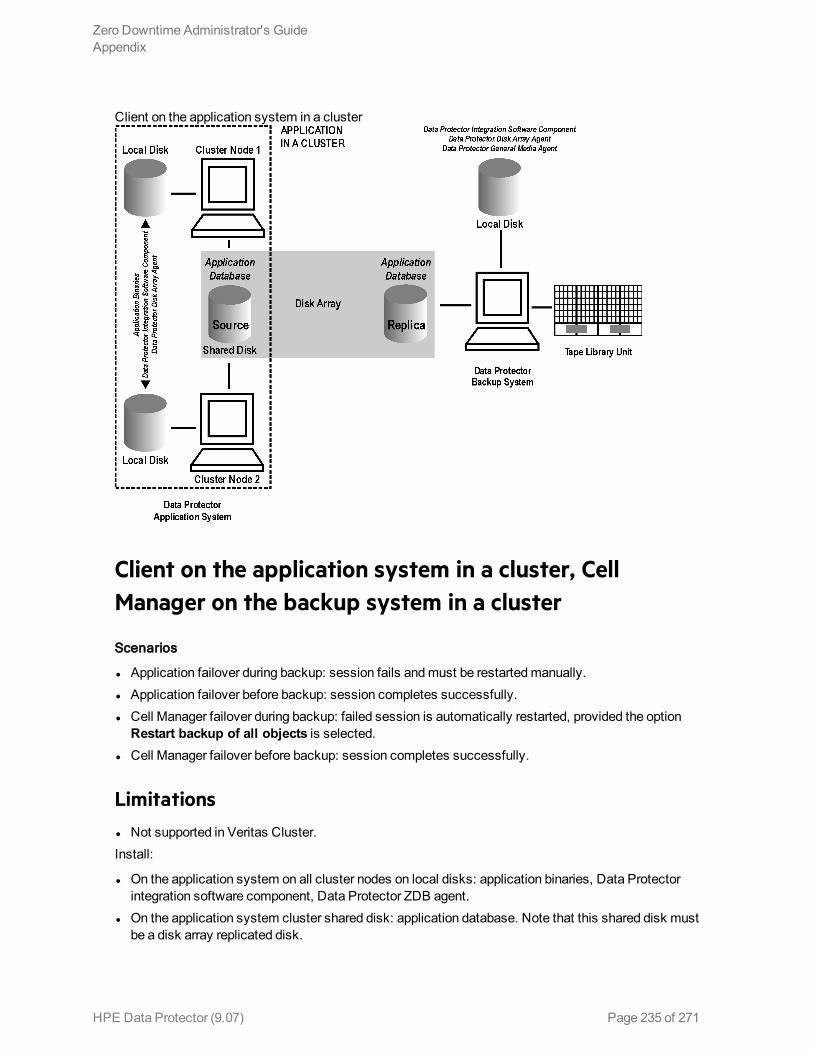
Client on the application system in a cluster
Client on the application system in a cluster, Cell Manager on the backup system in a cluster
Scenarios
l Application failover during backup: session fails and must be restarted manually. l Application failover before backup: session completes successfully. l Cell Manager failover during backup: failed session is automatically restarted, provided the option
Restart backup of all objects is selected. l Cell Manager failover before backup: session completes successfully.
Limitations l Not supported in Veritas Cluster.Install:
l On the application system on all cluster nodes on local disks: application binaries, Data Protector integration software component, Data Protector ZDB agent.
l On the application system cluster shared disk: application database. Note that this shared disk must be a disk array replicated disk.
Zero Downtime Administrator's GuideAppendix
HPE Data Protector (9.07) Page 235 of 271
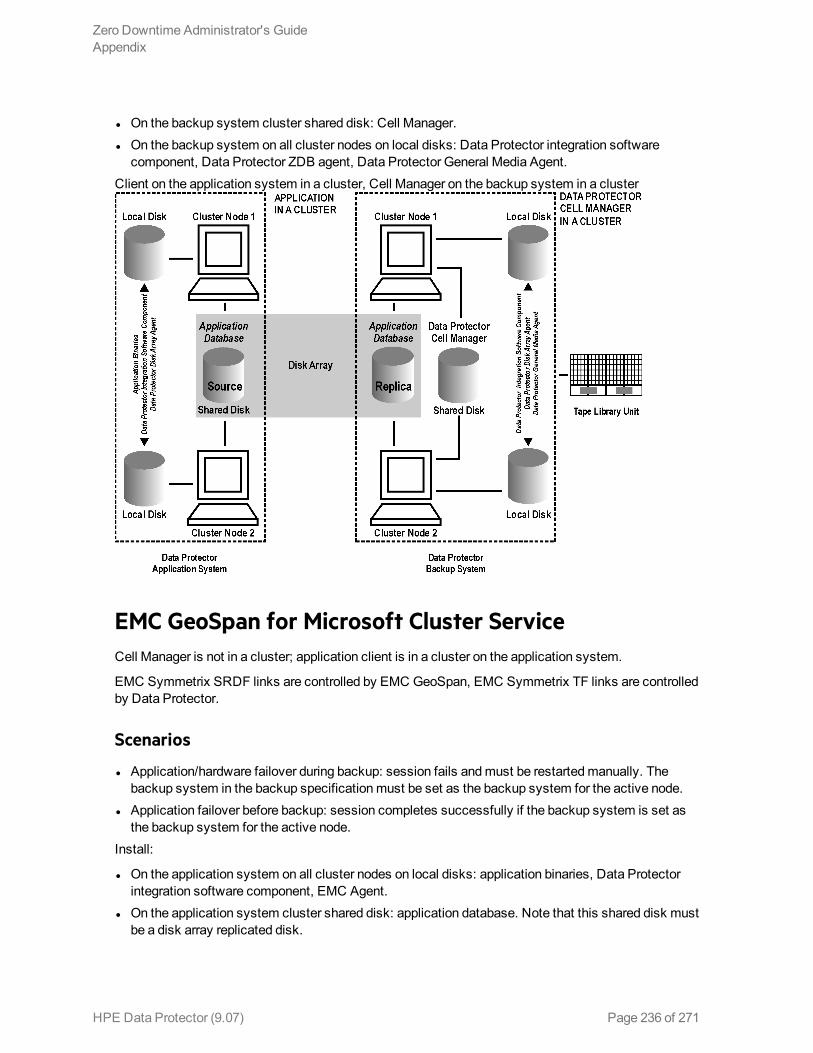
l On the backup system cluster shared disk: Cell Manager. l On the backup system on all cluster nodes on local disks: Data Protector integration software
component, Data Protector ZDB agent, Data Protector General Media Agent.Client on the application system in a cluster, Cell Manager on the backup system in a cluster
EMC GeoSpan for Microsoft Cluster ServiceCell Manager is not in a cluster; application client is in a cluster on the application system.
EMC Symmetrix SRDF links are controlled by EMC GeoSpan, EMC Symmetrix TF links are controlled by Data Protector.
Scenarios
l Application/hardware failover during backup: session fails and must be restarted manually. The backup system in the backup specification must be set as the backup system for the active node.
l Application failover before backup: session completes successfully if the backup system is set as the backup system for the active node.
Install:
l On the application system on all cluster nodes on local disks: application binaries, Data Protector integration software component, EMC Agent.
l On the application system cluster shared disk: application database. Note that this shared disk must be a disk array replicated disk.
Zero Downtime Administrator's GuideAppendix
HPE Data Protector (9.07) Page 236 of 271
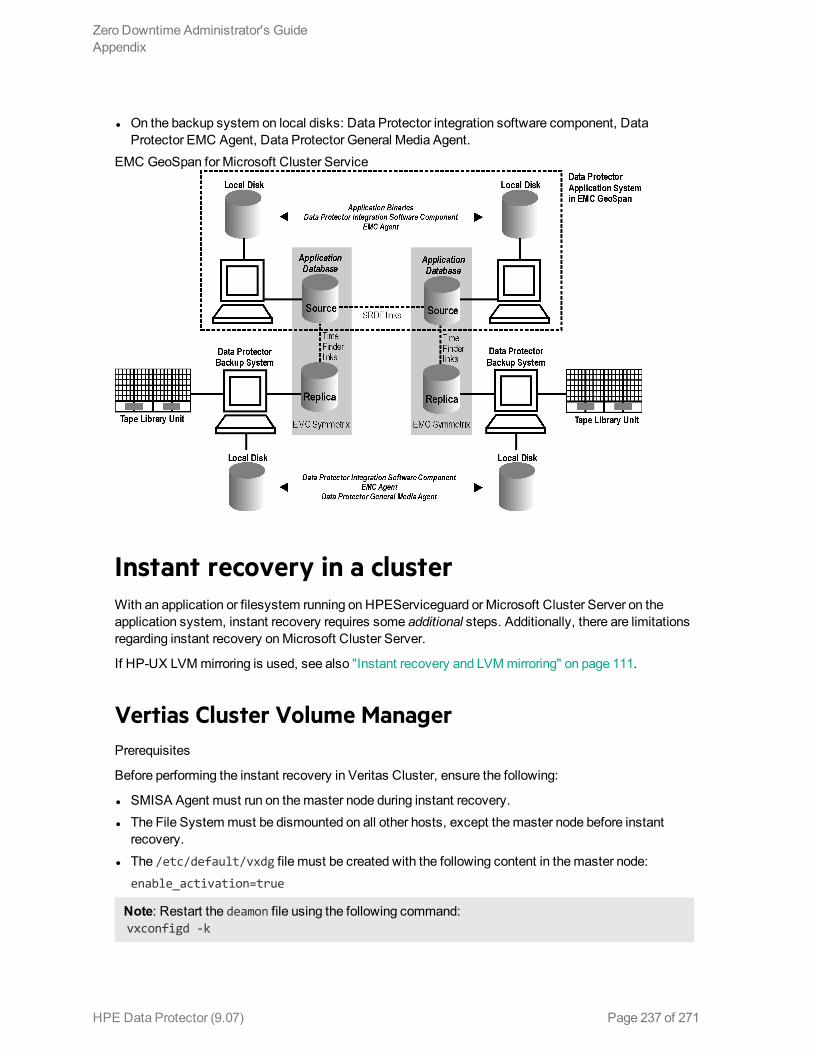
l On the backup system on local disks: Data Protector integration software component, Data Protector EMC Agent, Data Protector General Media Agent.
EMC GeoSpan for Microsoft Cluster Service
Instant recovery in a clusterWith an application or filesystem running on HPEServiceguard or Microsoft Cluster Server on the application system, instant recovery requires some additional steps. Additionally, there are limitations regarding instant recovery on Microsoft Cluster Server.
If HP-UX LVM mirroring is used, see also "Instant recovery and LVM mirroring" on page 111.
Vertias Cluster Volume ManagerPrerequisites
Before performing the instant recovery in Veritas Cluster, ensure the following:
l SMISA Agent must run on the master node during instant recovery. l The File System must be dismounted on all other hosts, except the master node before instant
recovery. l The /etc/default/vxdg file must be created with the following content in the master node:
enable_activation=true
Note: Restart the deamon file using the following command: vxconfigd -k
Zero Downtime Administrator's GuideAppendix
HPE Data Protector (9.07) Page 237 of 271
HPE Serviceguard
Procedure
1. Stop the application cluster package:
cmhaltpkg ApplicationPackageName
2. In the shell script for starting, shutting down and monitoring the database, comment the lines that monitor application processes (by putting # at the beginning of the line).
Oracle example
#set -A MONITOR_PROCESSES ora_pmon_${SID_NAME} ora_dbw0_${SID_NAME} ora_ckpt_${SID_NAME} ora_smon_${SID_NAME} ora_lgwr_${SID_NAME} ora_reco_${SID_NAME} ora_arc0_${SID_NAME}
This shuts down the application (database) running in the cluster without causing a failover. 3. Restart the application cluster package:
cmrunpkg ApplicationPackageName
4. Shut down the application (database). 5. Start instant recovery. For instructions, see:
l "Instant recovery procedure" on page 59 (P6000 EVA Array)
l "Instant recovery procedure" on page 108 (P9000 XP Array)
When performing instant recovery to the node other than that backed up, select the Check the data configuration consistency instant recovery option.
6. When the session finished, stop the application cluster package:
cmhaltpkg ApplicationPackageName
7. Uncomment the lines (delete #) commented in "In the shell script for starting, shutting down and monitoring the database, comment the lines that monitor application processes (by putting # at the beginning of the line)." above of this procedure to re-enable an application failover.
8. Restart the application cluster package:
cmrunpkg ApplicationPackageName
9. After instant recovery, recover the database. For detailed procedures, see the database documentation.
Note: After resynchronization with the application system finishes, enable replicated volume groups on the application system in the exclusive mode by setting the ZDB_IR_VGCHANGE_A omnirc option on the application system to vgchange -a e. For more information, see "ZDB omnirc options" on page 248.
Zero Downtime Administrator's GuideAppendix
HPE Data Protector (9.07) Page 238 of 271
Microsoft Cluster Server
Limitations
l Instant recovery of a cluster quorum disk is not supported because the cluster service must never lose the connection with the quorum disk, which happens during instant recovery (when disks are unpresented).
l In the configuration where a local disk is mounted to a cluster resource disk, instant recovery of a such disk is not supported.
l Any target cluster disk resource must be owned by the currently active node. Instant recovery is not supported if the disk resource is owned by the non-active node.
l Instant recovery of combination of cluster and non-cluster disks is not supported.
Considerations
l In a Microsoft Cluster Server environment, disks are distinguished by their disk signature. Because two disks cannot have the same signature, the operating system dynamically changes the signature once it detects the replica on the backup system. During the instant recovery procedure, Data Protector restores the disk signature to ensure that the recovered disk will have the same signature as the original disk on the application system. Data Protector will display notifications, informing you about the changed signature.
Prerequisites
l On Windows Server 2008 systems, before running an instant recovery session, you need to bring the original disks online.
Procedure
1. Using the Cluster Administrator utility or Cluster CLI, take the application cluster resource offline. For detailed instructions, see the Microsoft Cluster Server documentation.
2. Shut down the application (database). 3. Start instant recovery. For instructions, see:
l "Instant recovery procedure" on page 59 (P6000 EVA Array)
l "Instant recovery procedure" on page 108 (P9000 XP Array)
4. Restart the application (database). 5. Recover the database. For detailed procedures, see the database documentation. 6. Using the Cluster Administrator utility or CLI, put the application cluster resource online.
Zero Downtime Administrator's GuideAppendix
HPE Data Protector (9.07) Page 239 of 271

Instant recovery for in CA+BC configurations
IntroductionThis section describes the steps to be followed for executing instant recovery in HPE Continuous Access + Business Copy (CA+BC) P6000 EVA environments of the HPE P6000 EVA Disk Array Family using Data Protector.
The section gives details of the following:
l The different situations where HPE CA+BC P6000 EVA impacts instant recovery l Instant recovery concepts l HPE CA+BC P6000 EVA configurations supported for instant recovery l How to plan and perform instant recovery in HPE CA+BC P6000 EVA configurations
PrerequisitesYou should be familiar with the following:
l HPE Data Protector Concepts Guide l HPE storage management appliance (SMA) documentation l HPE P6000 EVA Disk Array Family documentation l Failover or cluster-failover documentation, such as the HPE Cluster Extension EVA user guide
OverviewWith instant recovery, lost or corrupted data (or rather, the whole volumes containing it) is replaced with known good data. This good data resides on whole storage volumes, or virtual disks, which have been created previously as an HPE BC P6000 EVA during a ZDB. These replicated target volumes are used for restores internally within the array, involving no other backup medium or device.
The general SMISA instant recovery flow is as follows:
1. The application system is prepared for restore by dismounting filesystems and taking volume groups offline.
2. Source volumes are masked or unpresented from the application system. 3. The identities of each matched pair of source and target storage volumes are exchanged. This
involves the WWN, the name, and the comments of each volume. 4. The exchanged storage volume is unmasked or presented to the application system. 5. Volume groups are put online and filesystems remounted.
Each source storage volume that is backed up using ZDB has a matching target storage volume in the replica.
Zero Downtime Administrator's GuideAppendix
HPE Data Protector (9.07) Page 240 of 271

Note: To enable instant recovery, each pair of matched replica and source storage volumes must reside on the same disk array. This is required for a valid exchange of identities (step 3 in the general instant recovery flow above).
However, when a source volume is attached to a DR group and so participates in remote replication, the P6000 EVA Array does not allow the WWN of that virtual disk to be modified. Therefore, to prepare your environment for instant recovery and successfully recover your data, you need to carry out the following steps:
1. Manually prepare the storage volumes and the storage environment for instant recovery, as described in "Instant recovery in HPE CA+BC P6000 EVA environments" on page 243.
2. Perform instant recovery with the Data Protector HPE P6000 / HPE 3PAR SMI-S Agent. 3. Optionally, return the storage volumes and storage environment to the state they were in before
instant recovery.The following sections outline different HPE CA+BC P6000 EVA configurations and the manual steps you need to follow for successful instant recovery.
Supported instant recovery configurationsThe manual steps needed to prepare the environment for instant recovery and bring it back after instant recovery differ depending on the current configuration of HPE CA+BC P6000 EVA or DR group connections.
Identifying the setup depends on the following environment information:
l The current site for the source side of any DR groups that include the source storage volumes l Whether the HPE BC P6000 EVA or target storage volumes are on the same array as the source
storage volumes (local), or on the remote side of the DR group (remote)From this information, there are two possible configurations:
l Configuration I – HPE Business Copy P6000 EVA is on the local side of the HPE CA P6000 EVA link
l Configuration II – HPE Business Copy P6000 EVA is on the remote side of the HPE CA P6000 EVA link
Configuration I – local HPE Business Copy P6000 EVAReplicas on the local site
Zero Downtime Administrator's GuideAppendix
HPE Data Protector (9.07) Page 241 of 271

In this configuration, at the time of instant recovery, the source and replica storage volumes reside on the current local site.
Note: The source storage volume (“Source” in the diagram) acts as both the source of the replica storage volume and the source for the remotely replicated storage volume (“Destination” in the diagram).
The configuration may be a result of any of the following:
l Performing an HPE BC P6000 EVA backup of a volume that is remotely replicated at backup time. l Adding remote replication to a storage volume that was previously backed up by an HPE BC P6000
EVA backup. l Performing an HPE CA+BC P6000 EVA backup with the HPE BC P6000 EVA on the current local
site.
Configuration II – remote HPE Business Copy P6000 EVAReplicas on the remote site
Zero Downtime Administrator's GuideAppendix
HPE Data Protector (9.07) Page 242 of 271

In this configuration, at the time of instant recovery, the customer environment has the source virtual disk residing on the local site. The remote replica (the replica of the source virtual disk replicated using HPE CA P6000 EVA) and its local replica are both on the remote site.
Note: The storage volume marked “Destination” in the diagram is both the destination of the remote replication link and the source of the replica storage volume.
Such a configuration may be a result of any of the following:
l Performing an HPE BC P6000 EVA backup of a storage volume that is remotely replicated, and then failing over the environment.
l Adding remote replication to a volume that was previously backed up by an HPE BC P6000 EVA backup, and then failing over the environment.
l Performing an HPE CA+BC P6000 EVA backup with the HPE BC P6000 EVA on the current remote site.
Instant recovery in HPE CA+BC P6000 EVA environmentsThe initial steps of preparation for instant recovery are as follows:
1. Understand the current configuration of the environment. 2. Optionally, perform a DR group failover. 3. Modify the DR group so that the source storage volumes involved in restore no longer participate
in the DR group.The following flow chart summarizes this general process.
General instant recovery flow in HPE CA+BC P6000 EVA environments
Zero Downtime Administrator's GuideAppendix
HPE Data Protector (9.07) Page 243 of 271
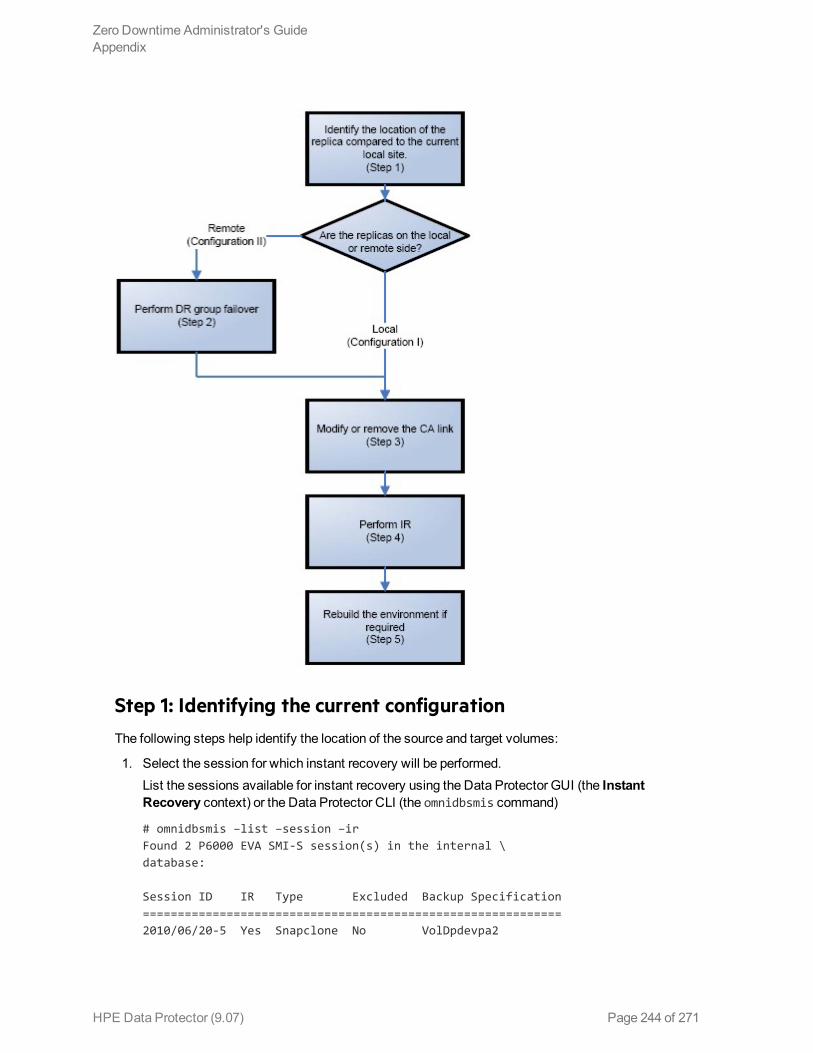
Step 1: Identifying the current configurationThe following steps help identify the location of the source and target volumes:
1. Select the session for which instant recovery will be performed.List the sessions available for instant recovery using the Data Protector GUI (the Instant Recovery context) or the Data Protector CLI (the omnidbsmis command)
# omnidbsmis –list –session –ir Found 2 P6000 EVA SMI-S session(s) in the internal \ database: Session ID IR Type Excluded Backup Specification ============================================================ 2010/06/20-5 Yes Snapclone No VolDpdevpa2
Zero Downtime Administrator's GuideAppendix
HPE Data Protector (9.07) Page 244 of 271
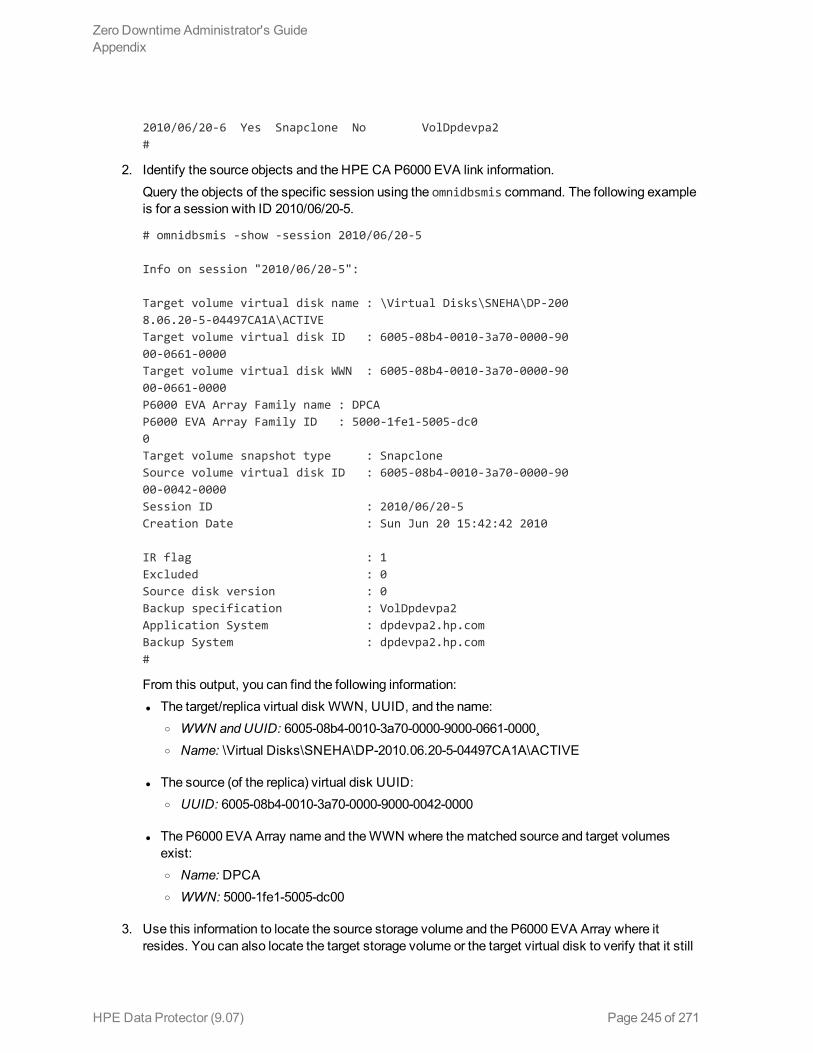
2010/06/20-6 Yes Snapclone No VolDpdevpa2 #
2. Identify the source objects and the HPE CA P6000 EVA link information.
Query the objects of the specific session using the omnidbsmis command. The following example is for a session with ID 2010/06/20-5.
# omnidbsmis -show -session 2010/06/20-5 Info on session "2010/06/20-5": Target volume virtual disk name : \Virtual Disks\SNEHA\DP-200 8.06.20-5-04497CA1A\ACTIVE Target volume virtual disk ID : 6005-08b4-0010-3a70-0000-90 00-0661-0000 Target volume virtual disk WWN : 6005-08b4-0010-3a70-0000-90 00-0661-0000 P6000 EVA Array Family name : DPCA P6000 EVA Array Family ID : 5000-1fe1-5005-dc0 0 Target volume snapshot type : Snapclone Source volume virtual disk ID : 6005-08b4-0010-3a70-0000-90 00-0042-0000 Session ID : 2010/06/20-5 Creation Date : Sun Jun 20 15:42:42 2010 IR flag : 1 Excluded : 0 Source disk version : 0 Backup specification : VolDpdevpa2 Application System : dpdevpa2.hp.com Backup System : dpdevpa2.hp.com #
From this output, you can find the following information: l The target/replica virtual disk WWN, UUID, and the name:
o WWN and UUID: 6005-08b4-0010-3a70-0000-9000-0661-0000¸ o Name: \Virtual Disks\SNEHA\DP-2010.06.20-5-04497CA1A\ACTIVE
l The source (of the replica) virtual disk UUID: o UUID: 6005-08b4-0010-3a70-0000-9000-0042-0000
l The P6000 EVA Array name and the WWN where the matched source and target volumes exist: o Name: DPCA o WWN: 5000-1fe1-5005-dc00
3. Use this information to locate the source storage volume and the P6000 EVA Array where it resides. You can also locate the target storage volume or the target virtual disk to verify that it still
Zero Downtime Administrator's GuideAppendix
HPE Data Protector (9.07) Page 245 of 271

exists: a. Connect to the Storage Management Appliance or any other CV EVA management host that
manages the specific P6000 EVA Array storage system. b. Browse through the Virtual Disk folder until the virtual disk with a matching UUID is found.
In the following figure, the source virtual disk with a UUID of 6005-08b4-0010-3a70-0000-9000-0042-0000 has been located:Locating the source virtual disk
c. Select the Data Replication tab to identify HPE CA P6000 EVA link properties for this virtual disk. The following information should be gathered from this panel: o DR group name o DR modeChecking the DR mode
The DR mode is used to identify the configuration of the current environment: o If the DR mode is “Source”, the current environment is Configuration I – local HPE
Business Copy P6000 EVA. In this case, proceed to "Step 3: Modifying or removing the HPE CA P6000 EVA link" on the next page.
o If the DR mode is “Destination”, the current configuration is Configuration II – remote
Zero Downtime Administrator's GuideAppendix
HPE Data Protector (9.07) Page 246 of 271

HPEBusiness Copy P6000 EVA. In this case, proceed to "Step 2: Performing failover" below.
Note: Complex environments may include a mixture of Configuration I and Configuration II. In this scenario, business copies exist that are both local and remote in relation to the source storage volumes. To handle this, perform the actions stated in Step 2: Performing Failover only to the DR groups with the “Destination” DR mode.
Step 2: Performing failoverUse the information you have gathered regarding DR groups to perform failover as appropriate for the environment. For simple environments, this may include interactions with CV EVA or HPE CA P6000 EVA GUI, as well as some configuration steps on the application system. Before taking such actions, see the appropriate documentation for full details.
For more complex environments, including clusters or other high-availability solutions, see the appropriate documentation for that solution before performing any failover actions.
After performing the failover, proceed to step 3 to modify or remove the HPE CA P6000 EVA link.
Step 3: Modifying or removing the HPE CA P6000 EVA link
Note: Before taking any action, record the information relating to the DR groups. This includes such things as the virtual disks participating in the DR group, which P6000 EVA Array storage systems are being replicated to, the mode of operation, and other specific details.
Modify the environment so that the source virtual disks no longer participate in a DR group. You can do this is either of two ways:
l Reduce the DR group by removing each source virtual disk. Do this if the environment is complex and simplifying the DR groups will make it easier to reconfigure the environment.
l Delete the DR group completely. Do this if the HPE CA P6000 EVA links are no longer needed or are easily reconfigurable.
For details of these methods, see the CV EVA user documentation or other specific documentation.
In the case of a DR group reduction, there may only be source storage volumes inside the DR group. A DR group must always have at least one virtual disk participating. In this case, it is advisable to create a temporary virtual disk and add it to the DR group. With this temporary storage volume, all source storage volumes may be removed from the DR group, and the DR group will still persist.
When this has been completed, proceed to step 4 to perform the instant recovery.
Step 4: Performing instant recoveryUsing the Data Protector GUI or CLI, perform instant recovery with the selected session. This should complete successfully with the appropriately reconfigured environment.
When this has been completed, optionally proceed to rebuilding the HPE CA P6000 EVA link.
Zero Downtime Administrator's GuideAppendix
HPE Data Protector (9.07) Page 247 of 271
Step 5: Rebuilding the HPE CA P6000 EVA link (optional)If required, return the new source virtual disks to the specific DR groups. Using the information you recorded in step 3 regarding the environment and specific DR groups, either rebuild or recreate the DR groups.
Note: Ensure that you use the newly-recovered storage volumes for this rebuild of the HPE CA P6000 EVA links. These storage volumes should have the same names and the WWNs as the storage volumes used previously. However, as these are different virtual disks, the UUIDs will be different from those used by the application system before for the virtual disks.
For details, see the CV EVA documentation. You may also need to perform additional steps to bring the environment to the same initial state, including failing over the HPE CA P6000 EVA links again, to return operation to the correct P6000 EVA Array storage systems and application servers.
ZDB omnirc optionsTo customize operation of the ZDB agents, you can set the omnirc options on the application system and the backup system. Changes to the options in the omnirc file on a particular system do not affect the agents that are already running on the system at the moment the changes are made. For information on the omnirc file, see the HPE Data Protector Troubleshooting Guide or the HPE Data Protector Help index: “omnirc”. Instructions on how to set the options are provided in the file itself.
Common ZDB optionsThis section explains omnirc options that can be set for all ZDB agents.
ZDB_PRESERVE_MOUNTPOINTS: Determines, together with ZDB_MULTI_MOUNT and ZDB_MOUNT_PATH, the mount point creation on the backup system.
If ZDB_PRESERVE_MOUNTPOINTS is set to 0 (default value), the mount point for a backed up filesystem is created as follows:
l When ZDB_MULTI_MOUNT is set to 1: l P6000 EVA Array:
BU_MOUNT_PATH/Application_System_Name/Mount_Point_Name_on_Application_System_SessionID
l P9000 XP Array:BU_MOUNT_PATH/Application_System_Name/Mount_Point_Name_on_Application_System_LDEV_MU#
l When ZDB_MULTI_MOUNT is set to 0 or not set:BU_MOUNT_PATH/Application_System_Name/Mount_Point_Name_on_Application_System
where BU_MOUNT_PATH corresponds to one of the following locations on a Data Protector client:
Zero Downtime Administrator's GuideAppendix
HPE Data Protector (9.07) Page 248 of 271
l With ZDB_MOUNT_PATH set: ZDB_MOUNT_PATH l With ZDB_MOUNT_PATH not set:
l Windows Server 2008: Data_Protector_program_data\tmp
l Other Windows system: Data_Protector_home\tmp
l UNIX systems: /var/opt/omni/tmp
If ZDB_PRESERVE_MOUNTPOINTS is set to 1, the mount point for a backed up filesystem is created on the backup system at:
l Windows systems: \Mount_Point_Name_on_Application_System or Drive_Letter_on_Application_System:\
l UNIX systems: /Mount_Point_Name_on_Application_SystemFor zero downtime backup of disk images, Oracle 8/9/10 databases, SAP R/3 databases, and Microsoft SQL Server 2000 databases, Data Protector adopts that ZDB_PRESERVE_MOUNTPOINTS is set to 1, and ignores its override and the options ZDB_MULTI_MOUNT and ZDB_MOUNT_PATH.
ZDB_MULTI_MOUNT: Determines, together with ZDB_PRESERVE_MOUNTPOINTS and ZDB_MOUNT_PATH, the mount point creation on the backup system.
ZDB_MULTI_MOUNT is ignored if ZDB_PRESERVE_MOUNTPOINTS is set to 1.
If ZDB_MULTI_MOUNT is set to 1 (default value), SessionID (P6000 EVA Array) or LDEV MU# (P9000 XP Array) is appended at the end of the mount point path, thus enabling every group of mount points for one replica in the replica set to be mounted to their own mount points.
If ZDB_MULTI_MOUNT is set to 0, the selected group of mount points for one replica in the replica set is mounted to the same mount points.
With EMC Symmterix, this option is ignored and Data Protector adopts that it is set to 0.
ZDB_MOUNT_PATH: Determines, together with ZDB_PRESERVE_MOUNTPOINTS and ZDB_MULTI_MOUNT, the mount point creation on the backup system.
ZDB_MOUNT_PATH is ignored if ZDB_PRESERVE_MOUNTPOINTS is set to 1.
By default, this option is not set. In this case, the first part of the mount point path is defined as:
Windows Server 2008, Windows Server 2012: Data_Protector_program_data\tmp
Other Windows systems: Data_Protector_home\tmp
UNIX systems: /var/opt/omni/tmp
To set this option, specify the first part of the mount point path.
Note: If the option Use the same mountpoints as on the application system is not selected in the GUI, the option ZDB_MOUNT_PATH is ignored and values of the ZDB options Root of the mount path on the backup system and Add directories to the mount path specified in the Data Protector GUI are used for mount point creation in the ZDB session instead.
ZDB_ALWAYS_POST_SCRIPT: By default, the command specified in the option Restart the application command line is not executed if the command specified in the option Stop/quiesce the application command line fails.
Zero Downtime Administrator's GuideAppendix
HPE Data Protector (9.07) Page 249 of 271

If this option is set to 1, the command specified in the option Restart the application command line is always executed.
Default: 0.
ZDB_IR_VGCHANGE: On HP-UX platform, determines the mode in which replicated volume groups on the application system are activated after restore. The option can be set on the application system only.
Note: This option is not supported on EMC.
Select from the following modes:
l Exclusive: ZDB_IR_VGCHANGE_A=vgchange -a e l Shared: ZDB_IR_VGCHANGE_A=vgchange -a s l Normal (default): ZDB_IR_VGCHANGE_A=vgchange -q n -a yUse exclusive mode to enable instant recovery if an application/filesystem runs in the HPEServiceguard cluster on the application system.
ZDB_IR_MANUAL_AS_PREPARATION: To manually prepare the application system for instant recovery (dismounting filesystems and disabling volume groups), set this option to 1. After instant recovery, manually enable volume groups and mount filesystems again.
Use this option also if automatic preparation of the application system fails because the application data configuration changed after backup. For example, if a failover to a secondary cluster node occurred between backup and instant recovery, Data Protector may have difficulty matching the secondary node resources to resources that existed on the primary node during backup.
Default: 0.
P6000 EVA Array and 3PAR StoreServ Storage specific optionsThis section explains P6000 EVA Array and 3PAR StoreServ Storage specific omnirc options.
Besides the 3PAR_MSGWAITING_INTERVAL and 3PAR_COPYBACKSTS_QUERY_INTERVAL, the following options apply to the 3PAR StoreServ Storage: ZDB_VOLUMESCAN_RETRIES, ZDB POST_RESCAN_INIT_DELAY, ZDB_LVM_PREFERRED_PVG, SMISA_MSGWAITING_INTERVAL, SMISA_FORCE_DISMOUNT, ZDB_DONOT_PRESENT_DISKS, ZDB_SKIP_LOCK_AT_DISMOUNT, ZDB_SMISA_LVM_MIRRORING_DISABLED, SMISA_CHECKFORABORT_DELAY, EVA_CIMOM_CONNECTION_TIMEOUT, EVA_CIMOM_QUERY_RETRIES, EVA_CIMOM_QUERY_INTERVAL.
See also "Common ZDB options" on page 248.
EVA_HOSTNAMEALIASES: Allows a given ID to match the P6000 EVA Array host objects.
Default: no hostnames specified. To add more hostnames to the search, specify hostname object names for this option.
Example
Your backup host is represented within CV EVA by:
Zero Downtime Administrator's GuideAppendix
HPE Data Protector (9.07) Page 250 of 271

l /Hosts/Backup hosts/MyHost_Port1
l /Hosts/Backup hosts/MyHost_Port2
To force P6000 EVA Array client to find these host objects, set:
EVA_HOSTNAMEALIASES=MyHost_Port1,MyHost_Port2
EVA_MSGWAITING_INTERVAL: Determines the time interval between messages reporting the snapclone creation progress (monitored during ZDB-to-tape and ZDB-to-disk+tape sessions immediately after the backup system preparation). The backup option Delay the tape backup by a maximum of n minutes if the snapclones are not fully created must be selected.
Default: 10 minutes.
EVA_CLONECREATION_QUERY_INTERVAL: Determines the time interval between queries checking the snapclone creation progress (appears during ZDB-to-tape and ZDB-to-disk+tape sessions immediately after backup system preparation). The backup option Delay the tape backup by a maximum of n minutes if the snapclones are not fully created must be selected. A shorter time interval ensures that snapclone completion is detected more promptly, but also increases the load on the P6000 EVA Array storage system.
Default: 5 minutes.
3PAR_MSGWAITING_INTERVAL: See EVA_MSGWAITING_INTERVAL
3PAR_COPYBACKSTS_QUERY_INTERVAL: Determines the time interval between status checks.
ZDB_VOLUMESCAN_RETRIES: During the backup system preparation, the system is scanned for new filesystem volumes. This option determines the number of scans required to identify the new volumes.
The option is only applicable on Windows.
Default: 5 retries. If scanning takes longer (a known problem on Windows Server 2003), increase the default setting.
ZDB_POST_RESCAN_INIT_DELAY: During the backup system preparation, the system is scanned for new filesystem volumes. This option sets the time period to wait before initiating next scan of new filesystem volumes.
The option is only applicable on Windows.
Default: 30 seconds.
ZDB_LVM_PREFERRED_PVG: With HP-UX LVM mirroring, determines the physical volume group (PVG) to be selected for HPE BC P6000 EVApair replication. Data Protector checks the value of this option when at least one logical volume identified as a backup object is mirrored.
The option format is as follows:
ZDB_LVM_PREFERRED_PVG=VGNAME1:PVG_NAME;VGNAME2:PVG_NAME; ...
For example, if three volume groups are participating in backup, you can define the following in your application system configuration file:
ZDB_LVM_PREFERRED_PVG=/dev/vg01:PVG-0;/vgAppln1:PVG-1; /dev/vgAppln2:PVG-1
When the backup objects are from the volume group /dev/vg01, the HPE P6000 / HPE 3PAR SMI-S Agent applies the mirror selection rules and prefers PVG-0 over any other valid PVG defined for if when the same disk array is used. On other disk array, any valid PVG will be used.
Zero Downtime Administrator's GuideAppendix
HPE Data Protector (9.07) Page 251 of 271

ZDB_SMISA_LVM_MIRRORING_DISABLED: Determines if the LVM mirroring is enabled or not.
Default: 0 (LVM mirroring enabled). Possible: 0|1.
EVACA_QUERY_INTERVAL: Determines the time interval (in minutes) between queries of the P6000 EVA Array storage system for checking the progress of the logging and/or copying process on HPE CA+BC P6000 EVA. Such querying occurs during a ZDB-to-tape session immediately after backup system resolving.
Default: 5 minutes.
EVACA_WAIT_FOR_NORMAL_STATE: Determines if the HPE P6000 / HPE 3PAR SMI-S Agent has to wait for the DR group write history log (DR group log) to move out of the “logging”, ”copying”, or ”merging” state back to the “not in use” state. With this option set, the DR group log state is monitored for the time period set by EVACA_LOGGINGSTATE_TIMEOUT, EVACA_COPYSTATE_TIMEOUT, or EVACA_MERGINGSTATE_TIMEOUT. If at the end of the period the DR group log state has not returned to “not in use”, the backup for the objects belonging to that DR group is aborted.
Default: 0 (not set). Possible: 0|1.
EVACA_WAIT_FOR_NORMAL_STATE_TIMEOUT: Determines the time interval (in minutes) to wait for the DR group write history log (DR group log) found in the “logging”, ”copying”, or ”merging” state to move to the “not in use” state. After the timeout, the backup process skips the objects belonging to DR groups whose log is a state other than “not in use”, and continues with backup of other objects specified in a ZDB backup specification. The option is only considered when EVACA_WAIT_FOR_NORMAL_STATE is set to 1.
Default: 15 minutes.
EVACA_LOGGINGSTATE_TIMEOUT: Determines the time interval (in minutes) to wait for the DR group write history log (DR group log) found in the “logging” state to move to the “not in use” state. After the timeout, backup process skips the objects belonging to DR groups whose log is in the “logging” state, and continues with backup of other objects specified in a ZDB backup specification.
Default: 10 minutes.
EVACA_MSGWAITING_INTERVAL: Determines the time interval (in minutes) between messages that report the progress of the logging and/or copying process on HPE CA+BC P6000 EVA. This progress is monitored during a ZDB-to-tape session immediately after backup system resolving.
Default: 10 minutes.
EVACA_COPYSTATE_TIMEOUT: Determines the time interval (in minutes) after which the backup process stops waiting for the DR group write history log (DR group log) found in the “copying” state to move to the “not in use” state. Backup process skips the source virtual disks (in case of the source virtual disks backup) or the destination virtual disks (in case of the destination virtual disks backup) belonging to the DR groups whose log is in the “copying” state, and continues with backup of other objects specified in a ZDB backup specification.
Default: 15 minutes.
EVACA_MERGINGSTATE_TIMEOUT: Determines the time interval (in minutes) after which the backup process stops waiting for the DR group write history log (DR group log) found in the “merging” state to move to the “not in use” state. Backup process skips the source virtual disks (in case of the source virtual disks backup) or the destination virtual disks (in case of the destination virtual disks backup) belonging to the DR groups whose log is in the “merging” state, and continues with backup of other objects specified in a ZDB backup specification.
Zero Downtime Administrator's GuideAppendix
HPE Data Protector (9.07) Page 252 of 271
Default: 15 minutes.
SMISA_BACKUPPREPARE_RETRY: Determines the number of the HPE P6000 / HPE 3PAR SMI-S Agent queries checking for completion of container allocation or creation and setting the write cache policy on the source volumes to the write-through mode during zero downtime backup sessions. If the operations do not complete by the time the last query is made, the HPE P6000 / HPE 3PAR SMI-S Agent aborts the currently running session.
Default: 10 queries.
SMISA_BACKUPPREPARE_DELAY: Determines the interval (specified in seconds) between the HPE P6000 / HPE 3PAR SMI-S Agent queries checking for completion of container allocation or creation and setting write cache policy on the source volumes to the write-through mode during zero downtime backup sessions.
Default: 120 seconds.
SMISA_CONTAINERCREATION_RETRY: Determines the number of the HPE P6000 / HPE 3PAR SMI-S Agent queries checking for completion of container allocation or creation during instant recovery sessions. If the operation does not complete by the time the last query is made, the HPE P6000 / HPE 3PAR SMI-S Agent aborts the currently running session.
Default: 10 queries.
SMISA_CONTAINERCREATION_DELAY: Determines the interval (specified in seconds) between the HPE P6000 / HPE 3PAR SMI-S Agent queries checking for completion of container allocation or creation during instant recovery sessions.
Default: 120 seconds.
SMISA_MSGWAITING_INTERVAL: Determines the interval (specified in seconds) between session messages reporting the progress of container allocation or creation during zero downtime backup and instant recovery sessions, between session messages reporting the progress of setting the write cache policy on the source volumes to the write-through mode during zero downtime backup sessions, and between session messages reporting the progress of deleting storage volumes from the disk array.
Default: 300 seconds.
SMISA_CHECKFORABORT_DELAY: Many operations that the HPE P6000 / HPE 3PAR SMI-S Agent triggers are long-lasting. During the wait for their completion, the agent periodically checks whether an abort request was issued. This option determines the interval (specified in seconds) between each pair of checks for the abort request.
Default: 2 seconds.
SMISA_FORCE_DISMOUNT: On Windows Server 2008 systems, determines whether the Data Protector HPE P6000 / HPE 3PAR SMI-S Agent performs forced dismount of the volumes which are locked by the Windows system processes and cannot be dismounted using the ordinary dismount operation. You can enable forced dismount operation by setting this option to 1.
Default: 0 (disabled). Possible: 0| 1.
ZDB_DONOT_PRESENT_DISKS: During ZDB-to-disk sessions, if this option is set to 1, the HPE P6000 / HPE 3PAR SMI-S Agent does not present volumes to the backup system. ZDB-to-disk+tape and ZDB-to-tape sessions are not affected by the option.
Default: 0 (disabled). Possible: 0| 1.
Zero Downtime Administrator's GuideAppendix
HPE Data Protector (9.07) Page 253 of 271
ZDB_SKIP_LOCK_AT_DISMOUNT: On Windows systems, the HPE P6000 / HPE 3PAR SMI-S Agent locks the volumes on the application system prior to dismounting them. If this option is set to 1, the volumes do not get locked. Other operating systems are not affected by the option.
Default: 0 (disabled). Possible: 0| 1.
EVA_CIMOM_CONNECTION_TIMEOUT: Determines the interval (specified in seconds) for which the HPE P6000 / HPE 3PAR SMI-S Agent waits for a response to an outstanding request from the CIMOM.
Default: 900 seconds.
EVA_CIMOM_QUERY_RETRIES: CIMOM operations include communication over the network and may fail unexpectedly. This option determines the maximum number of retried attempts the HPE P6000 / HPE 3PAR SMI-S Agent performs if the CIMOM returns an unexpected response.
Default: 10 attempts.
EVA_CIMOM_QUERY_INTERVAL: Determines the interval (specified in seconds) between each pair of attempts, whose maximum number is defined by EVA_CIMOM_QUERY_RETRIES.
Default: 10 seconds.
SMISA_ENFORCE_MULTISNAP: Determines how Data Protector behaves in either of the following cases:
l multisnapping is not supported by the current P6000 EVA Array configuration l disk array limitation on the number of source disks that can be involved in multisnapping is exceeded l source disks are located on more than one P6000 EVA Array storage system
If multisnapping is enforced by SMISA_ENFORCE_MULTISNAP, the zero downtime backup session is aborted.
If multisnapping is not enforced, Data Protector creates target volumes sequentially (in the first case) or attempts to create target volumes with several multisnapping operations instead of only one (in the other two cases).
Note that SMISA_ENFORCE_MULTISNAP should not be used to enforce multisnapping in zero downtime backup sessions for backing up the Oracle Server data in ASM configurations, since the HPE P6000 / HPE 3PAR SMI-S Agent detects such sessions automatically.
Default: 0 (multisnapping not enforced). Possible: 0| 1.
SMISA_WAIT_MIRRORCLONE_PENDING_TIMEOUT: Determines the time period (specified in minutes) for which the HPE P6000 / HPE 3PAR SMI-S Agent waits for the mirrorclone link to transition from some other state into the synchronized state. If the time period expires before the mirrorclone link gets into the synchronized state, the HPE P6000 / HPE 3PAR SMI-S Agent aborts the session. The option affects only the zero downtime backup sessions for which the selected snapshot source is mirrorclone.
Default: 60 minutes.
SMISA_WAIT_MIRRORCLONE_PENDING_RETRY: Determines the interval (specified in seconds) between each pair of checks of the mirrorclone link state when waiting for the link to transition into the synchronized state. The option affects only the zero downtime backup sessions for which the selected snapshot source is mirrorclone.
Default: 30 seconds.
Zero Downtime Administrator's GuideAppendix
HPE Data Protector (9.07) Page 254 of 271

P9000 XP Array specific optionsThis section explains P9000 XP Array-specific omnirc options.
See also "Common ZDB options" on page 248.
ZDB_BACKUP_VG_EXIST: On HP-UX platform, for systems configured with multiple HBAs and connections to a disk array, the alternate paths solution performs dynamic load balancing. By default, during preparation for backup and restore, Data Protector creates a volume group with the disk on the first HBA as the primary path.
To disable volume group autoconfiguration on the backup host and load balance the data across multiple paths manually, set this option to 1. The existing backup volume group will be used in the next backup or restore session.
Note: If this option is set, volume groups are not removed from /etc/lvmtab on the backup system after each backup. For more information, see "Backup options " on page 92.
Default: 0.
OB2AUTOPATH_BALANCING_POLICY: Determines the HPE AutoPath load balancing policy used.
AutoPath provides enhanced data availability for systems configured with multiple host adapters and connections to a disk array. When several alternate paths are available, AutoPath dynamically balances data load between the alternate paths to achieve optimum performance.
Possible values are:
l 0 [none] – No policy l 1 [RR] – Round Robin policy (default) l 2 [SQL] – Shortest Queue Length policy
During a ZDB-to-tape session, if the AutoPath Shortest Queue Length load balance policy is set and failover to an alternate path occurs, the session is aborted.
l 3 [SST] – Shortest Service Time policyFor more information, see the AutoPath documentation.
SSEA_SPLIT_REPORT_RATE: During the split, the HPE P9000 XP Agent checks the status of mirrored disks within an interval determined by SSEA_SPLIT_SLEEP_TIME for the number of times determined by SSEA_SPLIT_RETRY.
SSEA_SPLIT_REPORT_RATE determines the frequency of displaying the mirrored disks’ status to the Data Protector Monitor. For example, if SSEA_SPLIT_SLEEP_TIME is 2 seconds and SSEA_SPLIT_REPORT_RATE is 5, the status is displayed for every fifth check (every 10 seconds).
Default: 5.
SSEA_SPLIT_RETRY: During the split, the HPE P9000 XP Agent checks the mirrored disks’ status within an interval determined by SSEA_SPLIT_SLEEP_TIME. SSEA_SPLIT_RETRY determines the number of retries for the checks. If there is no progress after that, the split is aborted.
Default: 120 retries.
Zero Downtime Administrator's GuideAppendix
HPE Data Protector (9.07) Page 255 of 271
SSEA_SPLIT_SLEEP_TIME: During the split, the HPE P9000 XP Agent checks the mirrored disks status for the number of times determined by SSEA_SPLIT_RETRY. SSEA_SPLIT_SLEEP_TIME determines the time interval between the status checks.
Default: 2 seconds.
SSEA_SYNC_REPORT_RATE: During the disks’ resynchronization, the HPE P9000 XP Agent checks the mirrored disks’ status within an interval determined by SSEA_SYNC_SLEEP_TIME for the number of times determined by SSEA_SYNC_RETRY.
SSEA_SYNC_REPORT_RATE determines the rate of displaying the mirrored disks status. For example, if SSEA_SYNC_SLEEP_TIME is 5 seconds and SSEA_SPLIT_REPORT_RATE is 2, the status is displayed for every second check (every 10 seconds).
Default: 2.
SSEA_SYNC_RETRY: During the disks’ resynchronization, the HPE P9000 XP Agent checks the mirrored disks’ status within an interval specified by SSEA_SYNC_SLEEP_TIME. SSEA_SYNC_RETRY determines the number of retries for these checks. If there is no progress after that, the resynchronization is aborted.
Default: 10 retries.
SSEA_SYNC_SLEEP_TIME: During the disks’ resynchronization, the HPE P9000 XPAgent checks the mirrored disks’ status for the number of times determined by SSEA_SYNC_RETRY. SSEA_SYNC_SLEEP_TIME determines the time interval between the status checks.
Default: 5 seconds.
SSEA_WAIT_PAIRS_PROPER_STATUS: All disk pairs must be in proper status (either STAT_PSUS/SSUS or STAT_PAIR) before a process continues. This option determines the maximum waiting period for disk pairs to change to proper status.
SMB_SCAN_RDSK_TIMEOUT: On Windows, during backup system preparation, the system is scanned for new devices. When new devices are detected, they appear on the backup system as new physical drives. This option sets the maximum time (in seconds) for which a ZDB Agent on the backup system waits for a new physical drive to appear.
Default: 30 seconds. Usually, it is sufficient, unless there are configuration problems on the backup system.
SMB_SCAN_FOR_VOLUME_TIMEOUT: On Windows, sets the maximum time (in seconds) for which a ZDB Agent on the backup system waits for new volumes to appear on the backup system. This happens after a physical drive is detected during backup system preparation.
Default: 300 seconds. Usually, it is sufficient, unless there are configuration problems on the backup system.
Default: 120 minutes.
SSEA_FORCE_DISMOUNT: On Windows Server 2008 systems, determines whether the HPE P9000 XP Agent will perform forced dismount of the volumes which are locked by the Windows system processes and cannot be dismounted using the ordinary dismount operation. You can enable forced dismount operation by setting this option to 1.
Default: 0 (disabled). Possible: 0| 1.
MAXIMUM_HOST_LOCKING_RETRY: The HPE P9000 XP Agent will lock the backup system during the backup system preparation. The lock operation may fail due to concurrent ZDB sessions or
Zero Downtime Administrator's GuideAppendix
HPE Data Protector (9.07) Page 256 of 271

similar actions. This option determines the maximum number of attempts by the HPE P9000 XP Agent at locking the backup system.
Default: 60 attempts.
SSEA_ATTACH_RETRY: Prior to manipulating volumes on a disk array, the HPE P9000 XP Agent must connect to an appropriate command device. In case of a problem with the SAN connectivity, establishing such a connection may fail. This option determines the number of attempts made by the HPEP9000 XP Agent at connecting to the command device.
Default: 5 attempts.
SSEA_ATTACH_SLEEP_TIME: Determines the interval (specified in seconds) between each pair of attempts of HPE P9000 XP Agent at connecting to the command device.
Default: 10 seconds.
EMC specific optionsThis section explains EMC-specific omnirc options.
See also "Common ZDB options" on page 248.
SYMA_LOCK_RETRY, SYMA_SLEEP_FOR_LOCK: Each time EMC Agent calls the WideSky library, it initiates the WideSky session, which locks the EMC Symmetrix database file. Other sessions must wait to get the lock.
Default: 15 retries, 30 seconds sleep time.
SYMA_SYNC_RETRY, SYMA_SLEEP_FOR_SYNC: To successfully split the disks, EMC Agent first checks the links’ status (links can be split only after all devices are synchronized).
Default: 15 retries, 30 seconds sleep time.
These two options are also used for incremental restore of device groups. EMC Agent starts the incremental restore only when there are no write pending tracks to devices in the restore device group.
Default: 15 retries; checking the number of write pending track - every 30 seconds.
SYMA_REC_FILE_LIMIT: Invalid records are automatically deleted when the EMC Agent recovery file exceeds a certain size.
Default: 102400 bytes.
SYMA_MOUNT_R2_READWRITE:
Determines the mode in which volume groups and filesystems are activated and mounted:
l 0: read-only mode (default) l 1: read/write modeFor backup, it is sufficient to activate volume groups and filesystems in read-only mode. If you use the mirror for DSS or other tasks after backup, this may not be sufficient.
SYMA_UMOUNT_BEFORE_SPLIT:
Determines whether filesystems on the application system are dismounted before the split:
Zero Downtime Administrator's GuideAppendix
HPE Data Protector (9.07) Page 257 of 271
l 0: not dismounted (default) l 1: dismounted before the split, remounted after (to ensure filesystem data is consistent)A filesystem does not have a stop I/O to flush data from the filesystem cache to disk and stop I/O during the split. The only way to back up filesystems in split mirror mode is to dismount the mount point on the application system. If applications run on the filesystem, they control I/O to the disk. In this case, it is not necessary to dismount the filesystem before the split.
User scenarios - examples of ZDB optionsThis section gives examples of backup policies with appropriate ZDB options.
P6000 EVA Array integration
Example 1ZDB to tape must be performed once a day (during the night). During the day, three copies must be available for instant recovery.
To implement such policy:
l Select Track the replica for instant recovery. l Set Number of replicas rotated to 3. l Select the desired snapshot source. l Select the desired snapshot type. l Select Same as source for the redundancy level.The following option is selected automatically:
l Keep the replica after the backupThen, schedule the ZDB backup specification to start three ZDB-to-disk sessions during the day and one ZDB-to-disk+tape session during the night.
Example 2ZDB to tape must be performed every three hours. Replicas created are used for data mining (not for instant recovery) for the time period of three hours.
To implement such policy:
l Clear Track the replica for instant recovery. l Select Keep the replica after the backup. l Set Number of replicas rotated to 1. l Select the desired snapshot source. l Select the desired snapshot type. l Select Leave the backup system enabled.
Zero Downtime Administrator's GuideAppendix
HPE Data Protector (9.07) Page 258 of 271
l On UNIX systems, optionally select Enable the backup system in read/write mode. l Set the omnirc option ZDB_ORA_INCLUDE_CF_OLF to 1. For more information, see the HPE Data
Protector Zero Downtime Backup Integration Guide.Then, schedule the ZDB backup specification to start one ZDB-to-tape session every three hours.
Example 3ZDB to tape must be performed every three hours. The replica created must be available for instant recovery for 12 hours.
To implement such policy:
l Select Track the replica for instant recovery. l Set Number of replicas rotated to 4. l Select the desired snapshot source. l Select the desired snapshot type. l Select Same as source for the redundancy level.The following option is selected automatically:
l Keep the replica after the backupThen, schedule the ZDB backup specification to start eight ZDB-to-disk+tape sessions every three hours.
P9000 XP Array integration
Example 1A replica set is configured, with all replicas available for instant recovery. The next replica must be prepared according to replica set rotation after zero downtime backup and forcibly synchronized before the next zero downtime backup.
To implement such policy, select the following options:
l Track the replica for instant recovery l Synchronize the disks if not already synchronized l Prepare the next mirror disks for the backup (resynchronize)The following option is selected automatically:
l Keep the replica after the backup
Example 2A replica set is configured, with all replicas available for offline data processing after the ZDB session. The next replica must be prepared according to replica set rotation after the zero downtime backup, and the next ZDB session must be aborted if data processing is not finished.
Zero Downtime Administrator's GuideAppendix
HPE Data Protector (9.07) Page 259 of 271
Note: This example assumes that offline data processing involves splitting links before data processing and resynchronizing links afterwards.
To implement such policy, select the following options:
l Keep the replica after the backup l Abort the session if the mirror disks are not synchronized l Prepare the next mirror disks for the backup (resynchronize) l Leave the backup system enabled
Example 3A replica set is configured, with versions on replicas available for on-demand offline data processing (links are split on demand and the backup system is prepared for offline data processing manually), but not for instant recovery. The replica must be prepared at the start of a ZDB session.
To implement such policy:
l Select Synchronize the disks if not already synchronized. l Clear Keep the replica after the backup.
Example 4A single replica is configured, with the version on the replica available for offline data processing. The replica must be prepared at the start of a ZDB session.
To implement such policy, select the following options:
l Keep the replica after the backup l Synchronize the disks if not already synchronized l Leave the backup system enabled
Conflicting OptionsIf a single replica is configured and the following options are selected, the second option is ignored, since the replica to be kept is at the same time the replica to be prepared for the next zero downtime backup:
l Keep the replica after the backup l Prepare the next mirror disks for the backup (resynchronize)
Note: A conflict may also occur when a replica set is configured, depending on the replica set selection and the P9000 XP LDEV exclude file.
Zero Downtime Administrator's GuideAppendix
HPE Data Protector (9.07) Page 260 of 271
EMC integration
Example 1After zero downtime backup, the replica must be discarded and prepared for the next zero downtime backup at the end of the ZDB session.
To implement such backup policy:
l Select Re-establish links after backup. l Do not select Re-establish links before backup.
Example 2After zero downtime backup, the replica must be used for offline data processing and prepared at the start of the next ZDB session.
To implement such backup policy:
l Select Re-establish links before backup. l Do not select Re-establish links after backup.
Backup system mount point creationData Protector disk array integrations support configurations where multiple application systems are connected to a disk array and one system (the backup system) is responsible for backing up these applications. Local, remote, or remote plus local replication configuration (if supported on a particular array) can be used for ZDB in such a configuration. For more information on supported configurations, see the HPE Data Protector Concepts Guide.
Each application system uses its own original storage, from which replicas are created; in case of ZDB to tape and ZDB to disk+tape, filesystems are mounted on the backup system.
Filesystem and Microsoft Exchange Server backupTo perform a concurrent backup of multiple application systems, the mount points assigned to the filesystems in the original storage do not need to be different for each application system. The backup of the Microsoft Exchange Server application is performed as filesystem backup. With filesystem backup, Data Protector, during a ZDB session, creates or reuses unique mount points on the backup system. Data Protector then mounts filesystems to these mount points.
Backup system mount point creation: filesystem and Microsoft Exchange Server backup
Zero Downtime Administrator's GuideAppendix
HPE Data Protector (9.07) Page 261 of 271
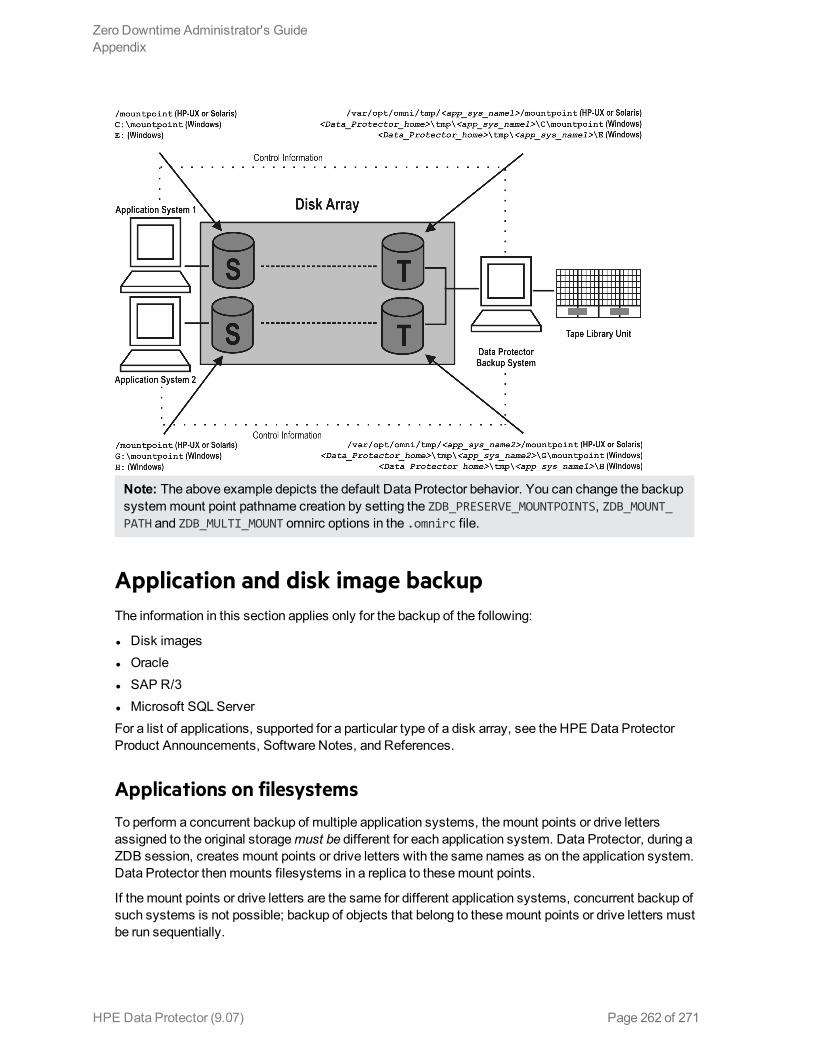
Note: The above example depicts the default Data Protector behavior. You can change the backup system mount point pathname creation by setting the ZDB_PRESERVE_MOUNTPOINTS, ZDB_MOUNT_PATH and ZDB_MULTI_MOUNT omnirc options in the .omnirc file.
Application and disk image backupThe information in this section applies only for the backup of the following:
l Disk images l Oracle l SAP R/3 l Microsoft SQL ServerFor a list of applications, supported for a particular type of a disk array, see the HPE Data Protector Product Announcements, Software Notes, and References.
Applications on filesystemsTo perform a concurrent backup of multiple application systems, the mount points or drive letters assigned to the original storage must be different for each application system. Data Protector, during a ZDB session, creates mount points or drive letters with the same names as on the application system. Data Protector then mounts filesystems in a replica to these mount points.
If the mount points or drive letters are the same for different application systems, concurrent backup of such systems is not possible; backup of objects that belong to these mount points or drive letters must be run sequentially.
Zero Downtime Administrator's GuideAppendix
HPE Data Protector (9.07) Page 262 of 271
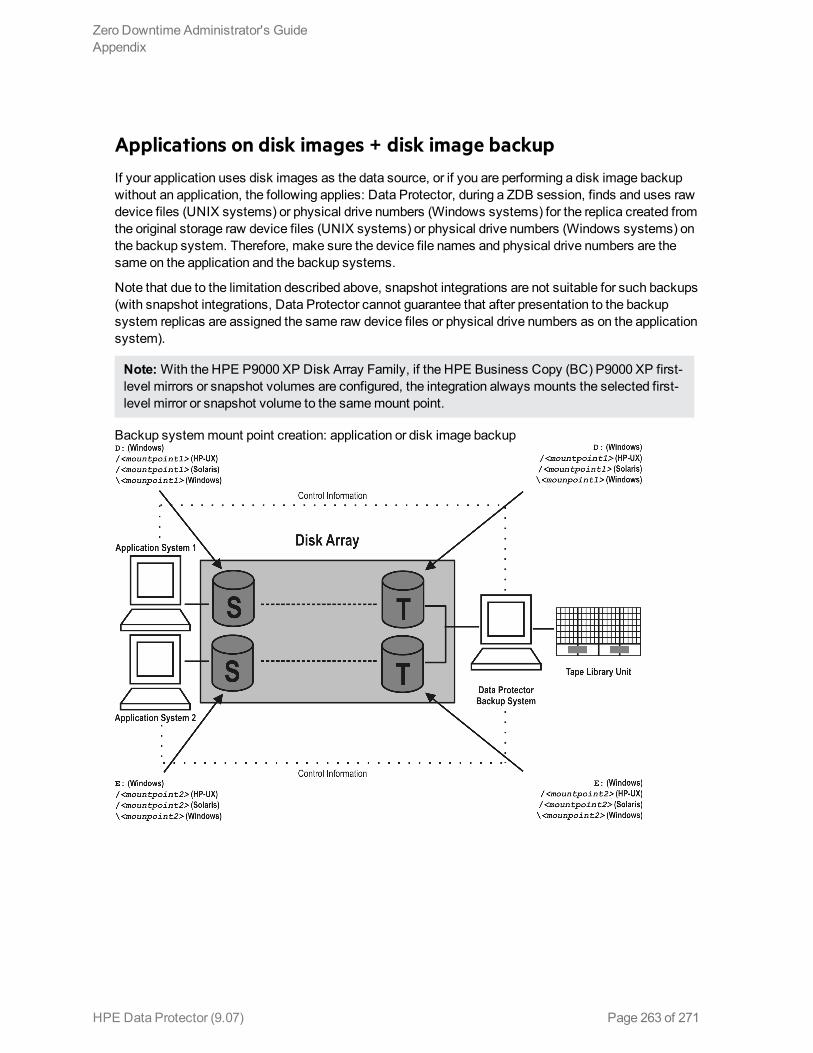
Applications on disk images + disk image backupIf your application uses disk images as the data source, or if you are performing a disk image backup without an application, the following applies: Data Protector, during a ZDB session, finds and uses raw device files (UNIX systems) or physical drive numbers (Windows systems) for the replica created from the original storage raw device files (UNIX systems) or physical drive numbers (Windows systems) on the backup system. Therefore, make sure the device file names and physical drive numbers are the same on the application and the backup systems.
Note that due to the limitation described above, snapshot integrations are not suitable for such backups (with snapshot integrations, Data Protector cannot guarantee that after presentation to the backup system replicas are assigned the same raw device files or physical drive numbers as on the application system).
Note: With the HPE P9000 XP Disk Array Family, if the HPE Business Copy (BC) P9000 XP first-level mirrors or snapshot volumes are configured, the integration always mounts the selected first-level mirror or snapshot volume to the same mount point.
Backup system mount point creation: application or disk image backup
Zero Downtime Administrator's GuideAppendix
HPE Data Protector (9.07) Page 263 of 271

EMC Symmetrix—obtaining disk configuration dataObtaining disk information is necessary during installation and configuration. The examples below describe choosing and checking EMC devices (disks) for the correct connection type (TimeFinder, SRDF, SRDF+TimeFinder).
To check if the EMC configuration is correct, execute:
l syminq to display disk type (blank, R1, R2, or BCV). l symbcv list to display SLD-BCV pairs. l symrdf list to display RDF1 - RDF2 pairs.
Example 1The application system is connected to Primary (R1) Symmetrix and the backup system to Secondary (R2) Symmetrix. Disks 008 and 009 on the application system can be used for SRDF or SRDF+TimeFinder. To verify the configuration:
1. Execute syminq on the application system and search for disk numbers in the Ser Num column.
Device Product Device
Name Type Vendor ID Rev Ser Num Cap (kB)
HP-UX systems:/dev/rdsk/c1t9d1Or/dev/rdisk/disk425Windows systems:\\.\PHYSICALDRIVE1
R1 EMC SYMMETRIX 5264 87008150 2817120
HP-UX systems:/dev/rdsk/c1t9d2Or/dev/rdisk/disk426Windows systems:\\.\PHYSICALDRIVE2
R1 EMC SYMMETRIX 5264 87009150 2817120
From the Type column, you see that the disks are R1 (required for SRDF and SRDF+TimeFinder). 2. To check if the disks have the same serial number on the backup system, execute symrdf list
on the backup system.
Zero Downtime Administrator's GuideAppendix
HPE Data Protector (9.07) Page 264 of 271

Local device view
Status modes RDF states
Sym Dev
Rdev RDF Typ:D
SA RA LNK
Mode Dom ACp
R1 Inv Tracks
R2 Inv Tracks
Dev Rdev Pair
008 008 R2:1 RW WD RW
SYN DIS OFF
0 0 WD RW Synch
009 009 R2:1 RW WD RW
SYN DIS OFF
0 0 WD RW Synch
You see from the first two columns that the disks have the same numbers on both hosts. 3. Query additional information by executing syminq and look for disks 008 and 009. 4. If you have SRDF+TimeFinder:
a. Execute symbcv list on the backup system to find associated BCVs.
BCV device Standard device Status
Physical Sym RDF Att.
Inv. Tracks
Physical Sym Inv Tracks
BCV<=>STD
HP-UX systems:c1t8d0Ordisk395Windows systems:DRIVE5
038 + 0 HP-UX systems:c1t1d0Ordisk496Windows systems:Not Visible
008 0 Synch
HP-UX systems:c1t8d1Ordisk396Windows systems:DRIVE6
039 + 0 HP-UX systems:c1t1d1Ordisk497Windows systems:Not Visible
009 0 Synch
You can see which BCV belongs to which SLD. The first four columns contain information about BCVs, the last four about SLDs.
b. To ensure that the disks are correct, execute syminq on the backup system and search for BCVs under disk numbers 038 and 039. The disk you find should be BCV.
Zero Downtime Administrator's GuideAppendix
HPE Data Protector (9.07) Page 265 of 271
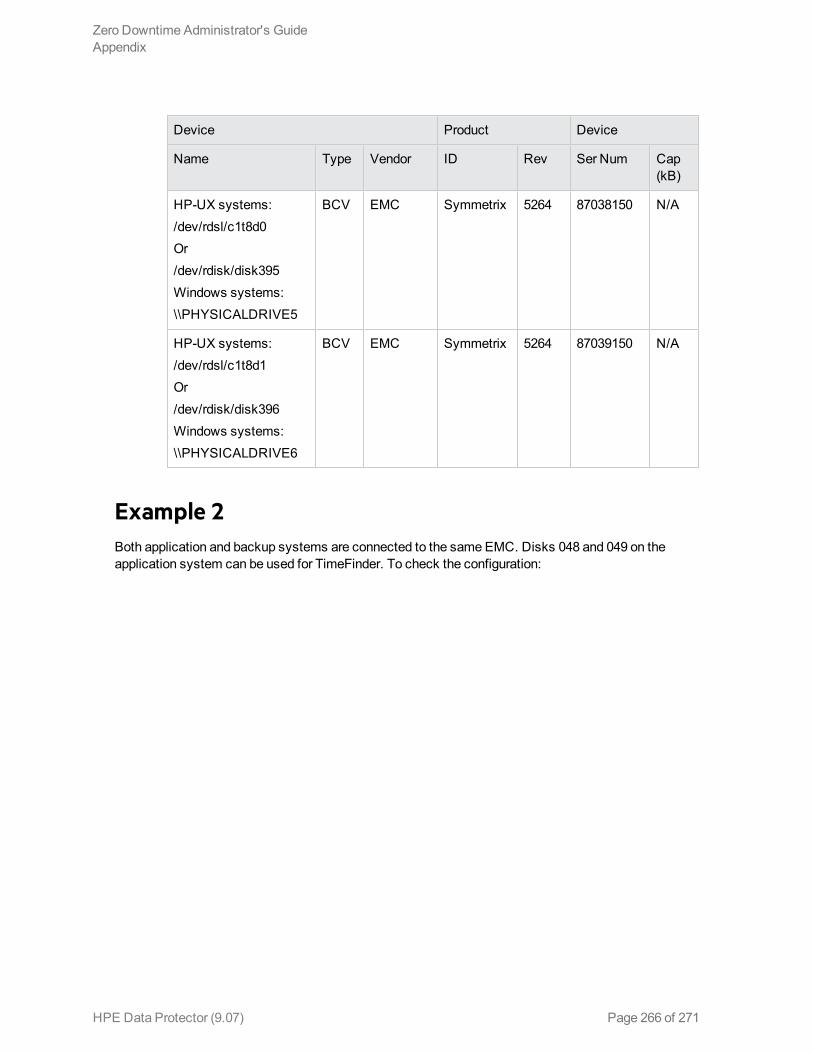
Device Product Device
Name Type Vendor ID Rev Ser Num Cap (kB)
HP-UX systems:/dev/rdsl/c1t8d0Or/dev/rdisk/disk395Windows systems:\\PHYSICALDRIVE5
BCV EMC Symmetrix 5264 87038150 N/A
HP-UX systems:/dev/rdsl/c1t8d1Or/dev/rdisk/disk396Windows systems:\\PHYSICALDRIVE6
BCV EMC Symmetrix 5264 87039150 N/A
Example 2Both application and backup systems are connected to the same EMC. Disks 048 and 049 on the application system can be used for TimeFinder. To check the configuration:
Zero Downtime Administrator's GuideAppendix
HPE Data Protector (9.07) Page 266 of 271
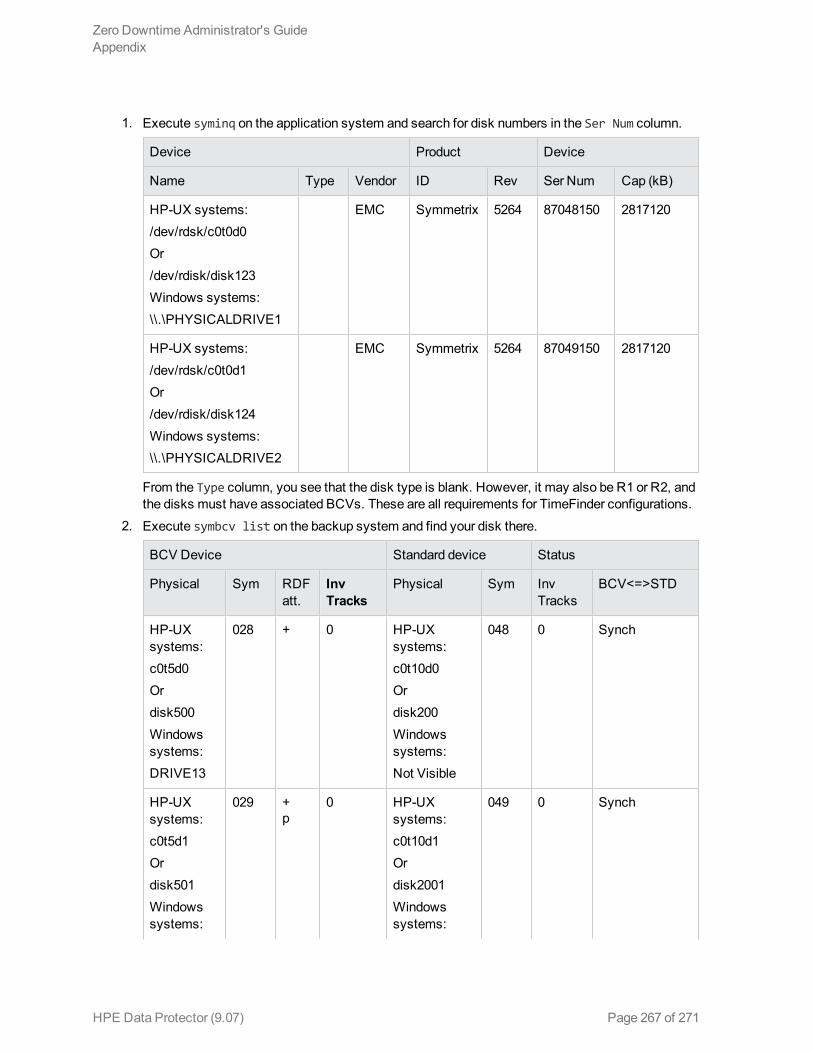
1. Execute syminq on the application system and search for disk numbers in the Ser Num column.
Device Product Device
Name Type Vendor ID Rev Ser Num Cap (kB)
HP-UX systems:/dev/rdsk/c0t0d0Or/dev/rdisk/disk123Windows systems:\\.\PHYSICALDRIVE1
EMC Symmetrix 5264 87048150 2817120
HP-UX systems:/dev/rdsk/c0t0d1Or/dev/rdisk/disk124Windows systems:\\.\PHYSICALDRIVE2
EMC Symmetrix 5264 87049150 2817120
From the Type column, you see that the disk type is blank. However, it may also be R1 or R2, and the disks must have associated BCVs. These are all requirements for TimeFinder configurations.
2. Execute symbcv list on the backup system and find your disk there.
BCV Device Standard device Status
Physical Sym RDF att.
Inv Tracks
Physical Sym Inv Tracks
BCV<=>STD
HP-UX systems:c0t5d0Ordisk500Windows systems:DRIVE13
028 + 0 HP-UX systems:c0t10d0Ordisk200Windows systems:Not Visible
048 0 Synch
HP-UX systems:c0t5d1Ordisk501Windows systems:
029 +p
0 HP-UX systems:c0t10d1Ordisk2001Windows systems:
049 0 Synch
Zero Downtime Administrator's GuideAppendix
HPE Data Protector (9.07) Page 267 of 271
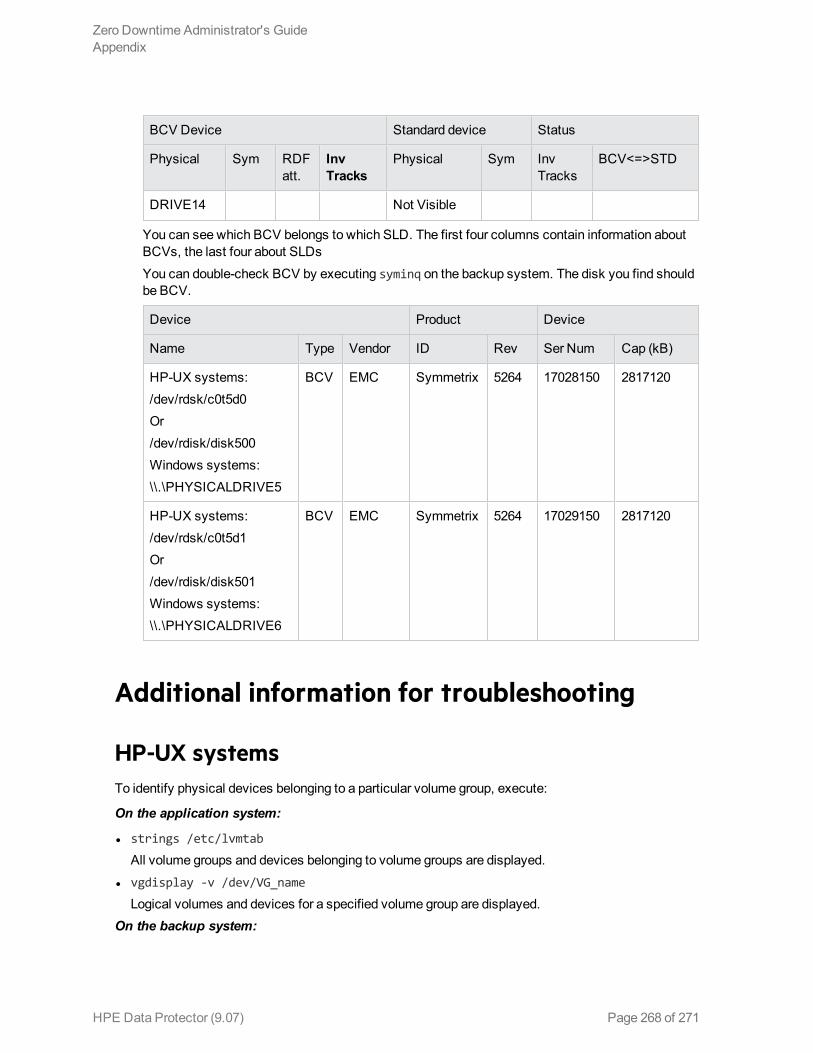
BCV Device Standard device Status
Physical Sym RDF att.
Inv Tracks
Physical Sym Inv Tracks
BCV<=>STD
DRIVE14 Not Visible
You can see which BCV belongs to which SLD. The first four columns contain information about BCVs, the last four about SLDs
You can double-check BCV by executing syminq on the backup system. The disk you find should be BCV.
Device Product Device
Name Type Vendor ID Rev Ser Num Cap (kB)
HP-UX systems:/dev/rdsk/c0t5d0Or/dev/rdisk/disk500Windows systems:\\.\PHYSICALDRIVE5
BCV EMC Symmetrix 5264 17028150 2817120
HP-UX systems:/dev/rdsk/c0t5d1Or/dev/rdisk/disk501Windows systems:\\.\PHYSICALDRIVE6
BCV EMC Symmetrix 5264 17029150 2817120
Additional information for troubleshooting
HP-UX systemsTo identify physical devices belonging to a particular volume group, execute:
On the application system:
l strings /etc/lvmtab
All volume groups and devices belonging to volume groups are displayed. l vgdisplay -v /dev/VG_name
Logical volumes and devices for a specified volume group are displayed.On the backup system:
Zero Downtime Administrator's GuideAppendix
HPE Data Protector (9.07) Page 268 of 271

l /usr/symcli/bin/symdg list
Device group names and additional information about devices is displayed. l /usr/symcli/bin/symdg show DgName
Detailed information about devices and associated BCVs is displayed.
Windows systemsExecute symntctl with additional parameters to get information about disks, signatures, and drives. For more information, see the EMC documentation.
On the backup system, execute:
l symdg list to display device group names and additional information about devices. l symdg show DgName to display detailed information about devices and associated BCVs.
Zero Downtime Administrator's GuideAppendix
HPE Data Protector (9.07) Page 269 of 271

Send Documentation FeedbackIf you have comments about this document, you can contact the documentation team by email. If an email client is configured on this system, click the link above and an email window opens with the following information in the subject line:
Feedback on Zero Downtime Administrator's Guide (Data Protector 9.07)
Just add your feedback to the email and click send.
If no email client is available, copy the information above to a new message in a web mail client, and send your feedback to [email protected].
We appreciate your feedback!
HPE Data Protector (9.07) Page 270 of 271