how to write a laboratory report - parkway schools lab report.pdf · wku university physics...
TRANSCRIPT

WKU University Physics Laboratory I-3 How to Write a Lab Report
How to Write a Laboratory Report
For each experiment you will submit a laboratory report. Laboratory reports are to be turned in at the beginning of
the lab period, one week following the completion of the experiment. As a general rule, lab reports will not be
accepted late. The laboratory report is to be used to express in a written form the purpose, methods employed,
results obtained and conclusions reached in your experiment. It should be very neat, concise and complete. It
should be prepared using a word processor for the text, spreadsheet software for tables, and graphing software for
graphs.
Sample Laboratory Report
On the pages that follow a sample laboratory report is shown. The large numbers shown on the report correspond to
numbers in parentheses in the discussion that follows. This sample report is to be used only as a general guide.
Your laboratory instructor may have additional specific instructions and requirements for your laboratory reports.
Each report should be clearly identified with (1) a title, (2) your name and the name(s) of your partners, (3) the
date the experiment was performed, and (4) an abstract. The abstract should be a very brief overview of the goals
and the main results of the experiment. If a known physical quantity was measured in the experiment then you
should state the numerical value of the result that you obtained for that quantity and also state how close your result
was to the expected result. It would be a good practice to write the abstract last, after you have written the
remainder of the experiment.
In a section entitled Description of Experiment (5) you should describe the purpose of the experiment, the physics
principles that are studied, and the procedures that were employed to complete the experiment. It is not necessary
(in fact it is undesirable) to give a step-by-step account of your activities in the experiment. Rather you should
summarize the main techniques that you used to get to your final result. It may be helpful to include a sketch of the
experimental geometry (6). This can be done by hand or can be cut and pasted into your report.
You must have a section entitled Data and Analysis (7) in which you list and describe the raw experimental data
collected during the experiment. Include any tables, graphs, results of best fits etc. as is appropriate. Describe how
quantities were calculated from your raw data. If it is necessary to show a formula employed during the experiment
then you may simply leave some space and write the equation in by hand as is shown by Equation 3 in the sample
lab report.
Finally, you should have a section entitled Results and Conclusions (8) in which you state the main result(s) of the
experiment and compare your result(s) to the accepted or theoretical value(s) (if available) by computing a percent
discrepancy. State what you consider to be the most likely causes of these discrepancies. If possible discuss these
potential reasons for error quantitatively by calculating (or estimating) how much effect each source of uncertainty
may have on the final result. An example of this type of reasoning is shown in the sample lab report at (9).
Data Tables (10) may be incorporated inline into your lab report or may be placed at the end (as in the example) if
it is more convenient. Data tables should be identified with a descriptive header. Each column should have a
heading that describes the physical quantity that is recorded in the column. The column heading should also show
the units of the physical quantity and the uncertainty in the quantity (if known). Numerical values recorded in the
table should be rounded to the appropriate number of significant digits
Graphs (11) may be incorporated inline into your lab report or may be placed at the end (as in the example) if it is
more convenient. Graphs should be prepared on the computer. You should adhere to the following guidelines when
preparing a graph.
1. Title – Every graph should have a title which identifies the graph by a number (i.e. Graph 1) along with
some descriptive text that tells exactly what is plotted (i.e. Velocity vs. Time) and perhaps the purpose
of the graph (i.e. Determination of Acceleration and Initial Velocity).
2. Axes and Axes Labels – Both axes should be labeled with descriptive text that tells the name of the
physical quantity that is plotted on that axis and the units of that physical quantity (i.e. Velocity (cm/s)).
Numerical values of the physical quantity should be printed at the major tick marks.
3. Size and Clarity – All graphs should be printed at a size that is sufficiently large so that the information
can be easily read. Typically this means to make your graphs occupy most of the printed page. Choose

WKU University Physics Laboratory I-4 How to Write a Lab Report
axes limits so that the region of interest occupies most of the graph. Choose font sizes that are
sufficiently large to be easily readable.
4. Graph Modes – You should adjust the graph mode so that individual data points are shown with some
form of marker or with dots. Data values should never be connected with a jagged line. Show
relationships that represent the best fit to data using lines with no markers.
5. Annotation – Whenever a best fit is performed on a graph, the results of the fit should be clearly
displayed on the graph. In the case of a linear fit one should show the values of the slope and the y-
intercept. Be sure to include also the associated uncertainties and units. It is a good idea to include a
measure of the goodness of fit (either the chi-squared value or the linear correlation coefficient – both
discussed later) on the graph. Also, if possible, describe the physical significance of the slope and
intercept as is done in the graph above. Finally, be sure to place your name (and your partner’s names if
appropriate) and the date on the graph.
6. Uncertainty Bars – Whenever the uncertainties of individual data values are known they should be
represented on the graph with uncertainty bars (often called error bars) as is shown in the above graph.
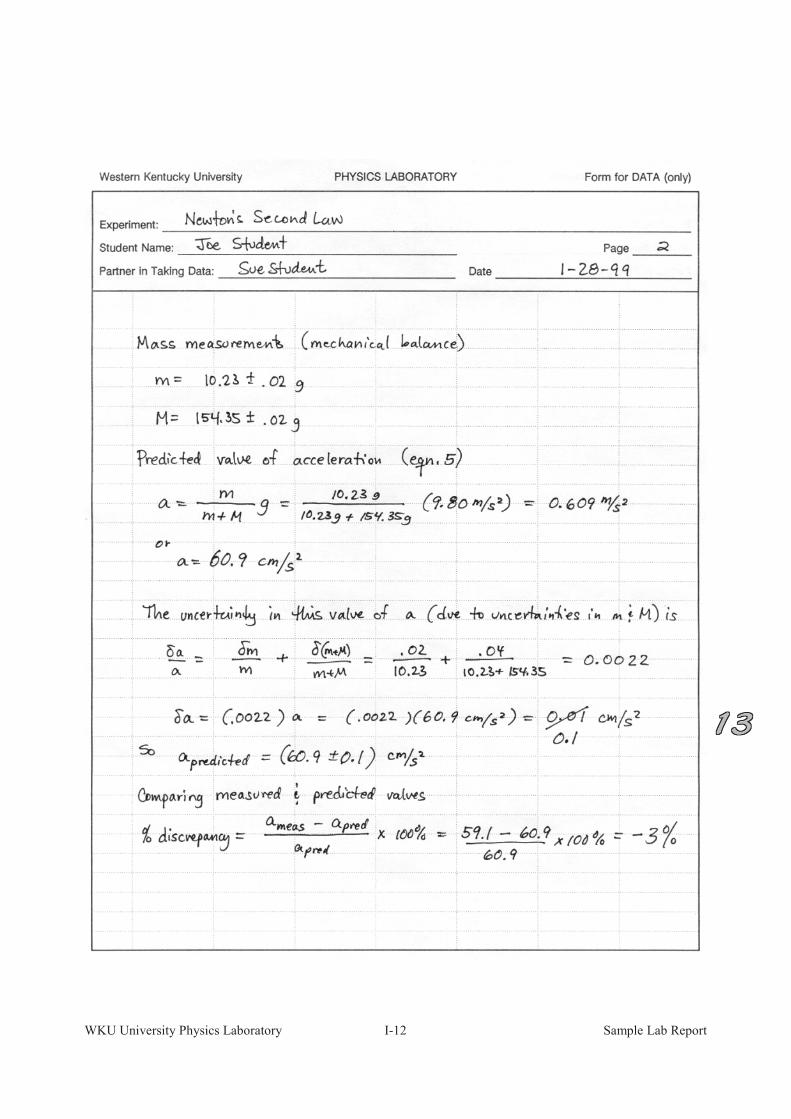
At the end of the laboratory report staple your DATA Sheets (12) that you used during the laboratory period to
record important data and results. Here you should show an example of each calculation that is used throughout the
experiment. You will want to write the equation that was used and then show the use of the equation with numerical
values substituted into it. If you make a mistake then simply cross out the suspected error and write the correct
result as is shown near (13).

WKU University Physics Laboratory I-5 Sample Lab Report
Newton’s Second Law
Joe StudentPartner: Sue Student
January 27, 2000
Abstract
The position of a system of two masses was recorded as a function of time using a
spark-timer apparatus. Using these data the instantaneous velocity was
approximated by calculating the average velocity over 1/30 second time intervals.
The acceleration of the system, which was calculated from the slope of a graph of
velocity versus time, was 59.1 ± 1.5 cm/s2. The value of the acceleration
predicted using Newton’s Second Law was 60.9 ± 0.1 cm/s2. The discrepancy
between these two values for the acceleration of the mass was only 3%.

WKU University Physics Laboratory I-6 Sample Lab Report
Newton’s Second Law
Description of Experiment
In this experiment we verified Newton’s Second Law by measuring the acceleration of a system
subject to a net external force. Newton’s second law states that the acceleration a of an object is directly
proportional to the net force acting on the object and inversely proportional to the object’s mass m.
Newton’s second law can be expressed as an equation using
amFnet =. (1)
The unbalanced force was supplied by a mass falling in the earth’s gravitational field as is shown in
Figure 1. Mass M rested on a smooth horizontal air track and was attached to mass m by a light tape
passing over a pulley. When the system was released M was pulled along the track by the force supplied
by the suspended mass m. The air track and pulley had small openings through which jets of air were
ejected to create a nearly frictionless surface. The two masses were connected by a very light recording
tape on which marks are made every 1/60 second by a spark timer.
Figure 1 –Geometry for Newton’s Second Law Experiment
We ignored the friction in the pulley as well as the friction between the mass and the air track. Also, the
mass of the string was assumed to be negligible. With these assumptions Newton’s second law was

WKU University Physics Laboratory I-7 Sample Lab Report
applied to m and M. The resulting system of equations were solved to eliminate the tension in the string
yielding
gMm
ma
+= (2)
for the predicted value of the acceleration of this system.
We measured the velocity of M by measuring the distance between marks on the tape and dividing
by the time interval that occurred between the creation of the marks. A graph of velocity versus time was
made. The slope of this linear graph was the constant acceleration of the system. This result was
compared to the value predicted from Newton’s second law given by Equation 2.
Data and Analysis
The masses of the system shown in Figure 1 were determined to be m = 10.23 ± 0.02 g and M =
154.35 ± 0.02 g using a mechanical balance. The position of the marks on the spark tape were measured
using a meter stick and recorded to the nearest 0.02 cm in Data Table I. This table also shows the
velocity at each twelfth dot which was estimated using the formula for average velocity
(3)
where ∆xi is the displacement between previous and successive dots and ∆ti is the corresponding time
(2/60 s = 1/30 s). The total elapsed time (ti) required for the mass to move from the zeroth dot to the ith
dot was determined knowing that the dots were separated in time by 1/60 second.
Results and Conclusion
Graph I shows a plot of the velocity versus time. The slope of this graph is the experimental value of
the acceleration of the system. Using a least-squares fitting package, the acceleration was found to be
aexp = slope = (59.1 ± 1.5) cm/s2.
The value of the acceleration predicted by substituting measured values of the masses and g = 980 cm/s2
into equation (2) was (60.9 ± 0.1) cm/s2. The percent discrepancy between the two values is only -3.0%.

WKU University Physics Laboratory I-8 Sample Lab Report
The good agreement between the measured value of the acceleration of the system and the value predicted
by Newton’s provides justification for the validity of Newton’s second law.
Much of the difference between the measured and predicted values of acceleration can be attributed
to uncertainties in the measurements in the distance between dots. This measurement uncertainty is on
the order of ±0.02 cm. The displacement is then, using worse case propagation of error, uncertain by an
amount ±0.04 cm. The uncertainty in the velocity calculated from equation (6) is then ±1.2 cm/s. For a
typical velocity measurement this uncertainty is on the order of 2% accounting for most of the
discrepancy. Additional sources of uncertainty include incorrect location of dots on the paper because the
sparks may not be always perpendicular to the tape and friction along the air track and in the pulley.

WKU University Physics Laboratory I-9 Sample Lab Report
Data Table IPosition and Velocity of Falling Mass as Function of Time
Dot Number Total Time Total Time Position Displacement Time Change Velocity
i ti ( ?/60 sec) ti (sec) xi (cm) ∆xi (cm) ∆ti (s) vi (cm/s)
± 0.02 cm ± 0.04 cm ± 1.2 cm/s
11 11/60 0.183 15.78
12 12/60 0.200 16.39 1.24 2/60 37.2
13 13/60 0.217 17.02
23 23/60 0.383 24.33
24 24/60 0.400 25.16 1.67 2/60 50.1
25 25/60 0.417 26.00
35 35/60 0.583 35.26
36 36/60 0.600 36.28 2.04 2/60 61.2
37 37/60 0.617 37.30
47 47/60 0.783 48.52
48 48/60 0.800 49.76 2.51 2/60 75.3
49 49/60 0.817 51.03
59 59/60 0.983 64.25
60 60/60 1.000 65.61 2.79 2/60 83.7
61 61/60 1.017 67.04
71 71/60 1.183 82.22
72 72/60 1.200 83.82 3.23 2/60 96.9
73 73/60 1.217 85.45

WKU University Physics Laboratory I-10 Sample Lab Report

WKU University Physics Laboratory I-11 Sample Lab Report
WKU University Physics Laboratory I-12 Sample Lab Report