‘how to’ – princess theme - cake decorating and ... · pdf filethe paste...
TRANSCRIPT

1
‘How To’
Princess Theme (2011/12 Catalogue)
1. Glitter Heart Ring Cupcakes
2. Crown Cupcakes
3. Daisy Ring Cupcakes
4. Princess Face Cupcakes
5. Hearts Cookies
6. Princess Dress Cookies
7. Hearts Crispy Cakes
8. Birthday Princess Cake
9. Princess Doll Cake

2
Cupcake Recipe (makes 12 to 14 cupcakes)
175g self raising flour
175g butter or margarine (softened)
175g caster sugar
1½ tsp baking powder
3 medium eggs
Sieve
Bowl
Cupcake tray
Electric whisk
Cooling rack
Baking cases
1. Preheat the oven to 180°C, 160°C fan, gas mark 4. Line tray with baking cases
2. Sift the flour and baking powder into a large bowl, then add the butter, caster
sugar and eggs. Beat together until well mixed, for approximately 2 minutes.
3. Half fill individual cases with mixture and bake for 20 – 25 minutes or until the tops
spring back when pressed with your finger.
4. Remove cakes from tray and place on cooling rack to cool completely.
Butter Icing
300g icing sugar
150g butter (softened)
1 tbsp milk
1 tsp Vanilla Essence
Food colour (optional)
If using butter icing, you can use a palette knife to spread it over each of the
cupcakes, having a peaked or smooth effect, alternatively, you could use a
piping bag or nozzle to achieve a piped effect.

3
Sugarpaste Icing
For a level top to your cake, you will need to slice the peak off to give a flat finish.
Knead a tennis ball sized piece of sugarpaste in your hand for a few minutes, until
the paste becomes pliable like warm plasticine, and mould into a disk shape.
If colouring, place a pea sized amount of colour in the centre of the disk and fold the
sides in, encasing the colour. Continue to fold the sides in onto the colour, until you
achieve a consistent colour. Add gradually until you achieve your desired strength of
colour.
Dust your work surface with a little icing sugar and roll out the sugarpaste, using a
lightly dusted rolling pin, ensuring that the paste does not stick to the work surface.
Using a round cutter, slightly smaller than the top of your cupcakes, cut out a circle to
cover each cupcake.
Use a small amount of butter icing to fix the circle to your cake.
Glacé Icing
600g icing sugar
6 tbsp water (or 3 tbsp water & 3 tbsp lemon juice)
Food colour (optional)
Glacé icing can be applied by spooning 1-2 teaspoons onto the centre of the
cupcake and allowing the icing to naturally spread over the cake.
Cookie Dough Recipe
You will need:
250g butter, softened
140g caster sugar
1 egg yolk
2 tsp vanilla extract
300g plain flour
Rolling pin
1. Mix the butter and sugar in a large bowl with a wooden spoon.
2. Add the egg yolk and vanilla and beat to combine.
4
3. Sift in the flour and stir until the mixture is well combined - you might need to
get your hands in at the end to give everything a really good mix and press
the dough together.
4. Roll out the dough using a floured rolling pin on a floured board.
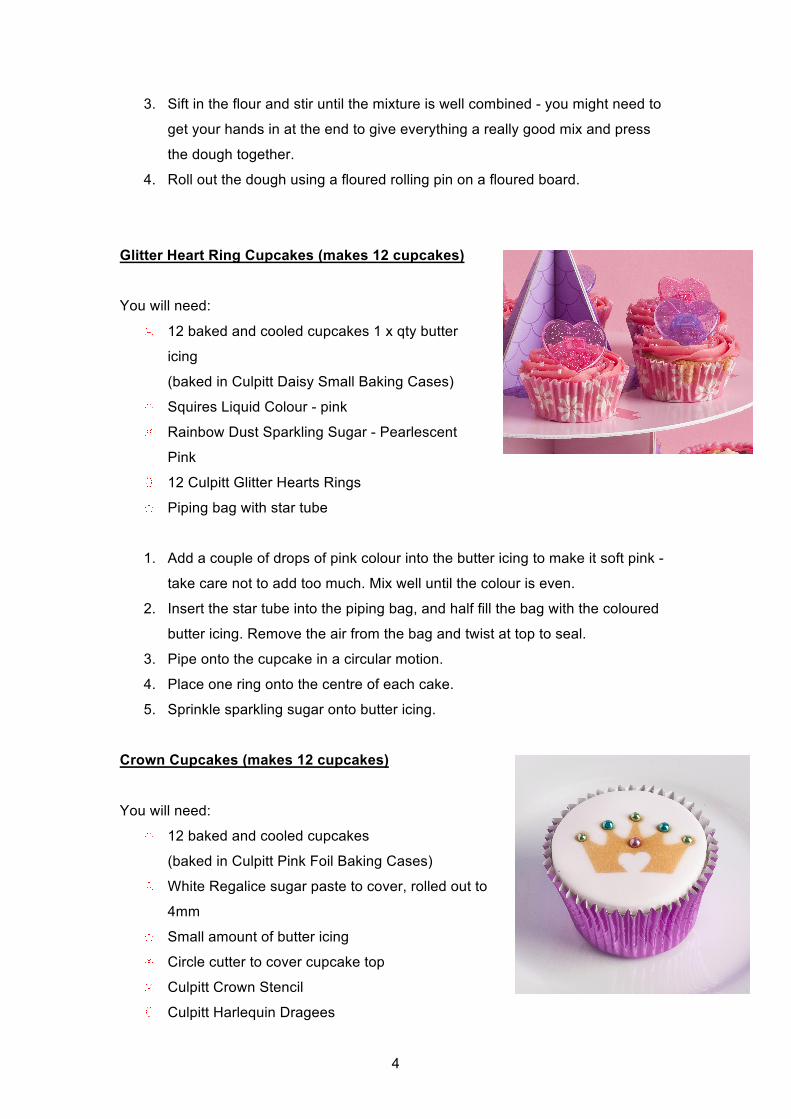
Glitter Heart Ring Cupcakes (makes 12 cupcakes)
You will need:
12 baked and cooled cupcakes 1 x qty butter
icing
(baked in Culpitt Daisy Small Baking Cases)
Squires Liquid Colour - pink
Rainbow Dust Sparkling Sugar - Pearlescent
Pink
12 Culpitt Glitter Hearts Rings
Piping bag with star tube
1. Add a couple of drops of pink colour into the butter icing to make it soft pink -
take care not to add too much. Mix well until the colour is even.
2. Insert the star tube into the piping bag, and half fill the bag with the coloured
butter icing. Remove the air from the bag and twist at top to seal.
3. Pipe onto the cupcake in a circular motion.
4. Place one ring onto the centre of each cake.
5. Sprinkle sparkling sugar onto butter icing.
Crown Cupcakes (makes 12 cupcakes)
You will need:
12 baked and cooled cupcakes
(baked in Culpitt Pink Foil Baking Cases)
White Regalice sugar paste to cover, rolled out to
4mm
Small amount of butter icing
Circle cutter to cover cupcake top
Culpitt Crown Stencil
Culpitt Harlequin Dragees

5
PME Lustre Spray - gold
Palette knife
PME3 Ball Tool
1. Cut discs to cover cupcakes with white sugar paste.
2. Mask the edges of the paste disc, place the crown stencil centrally on the
paste disc.
3. Spray the lustre spray evenly, keeping the stencil in place for a few moments
until dry.
4. Making an indentation using the ball tool to the tips and centre of the crown,
apply the dragees into the indentations using a small dot of edible glue.
Daisy Ring Cupcakes (makes 12 cupcakes)
You will need:
12 baked and cooled cupcakes
(baked in Culpitt Pink Foil Cupcake Cases)
1 x qty butter icing
Squires Liquid Colour - pink
Rainbow Dust Sparkling Sugar - Pearlescent Green
12 Culpitt Daisy Rings
Piping bag with star tube
1 x pk12 Culpitt Princess Cupcake Wraps
1. Add a couple of drops of pink colour into the butter icing to make it soft pink -
take care not to add too much. Mix well until the colour is even.
2. Insert the star tube into the piping bag, and half fill the bag with the coloured
butter icing. Remove the air from the bag and twist at top to seal.
3. Pipe onto the cupcake in a circular motion.
4. Place one ring onto the centre of each cake.
5. Sprinkle sparkling sugar onto butter icing.
6. Assemble cupcake wraps and place a finished cake inside each one.

6
Princess Face Cupcakes (makes 12 cupcakes)
You will need:
12 baked and cooled cupcakes
(baked in Culpitt Pink Plain Cupcake Cases)
1 x qty butter icing
Squires Liquid Colour - red
Culpitt Pearl Dragees, Culpitt Pearl Pink Drageees
or Culpitt Mini Sugar Flowers, to decorate
12 Culpitt Princess Sugar Decorations
Piping bag with star tube
1 x pk12 Culpitt White Hearts Cupcake Wraps
1. Add a couple of drops of red colour into the butter icing to make it soft pink -
take care not to add too much. Mix well until the colour is even.
2. Insert the star tube into the piping bag, and half fill the bag with the coloured
butter icing. Remove the air from the bag and twist at top to seal.
3. Pipe onto the cupcake in a circular motion.
4. Roll the edges of the top of the cake in dragees or mini flowers to create a
border.
5. Place one princess sugar decoration onto the centre of each cake.
6. Assemble cupcake wraps and place a finished cake inside each one.

7
Hearts Cookies
You will need:
1 qty cookie dough
9cm heart cookie cutter
Small qty butter icing
Squires Liquid Colour – red
Culpitt Pink Pearl Dragees
Rainbow Dust Sparkling Sugar - Pearlescent Pink
Culpitt Double Hearts Sugar Decorations
Piping bag and fine round tube
1. Preheat the oven to 180°C, 160°C fan, gas mark 4. Lightly grease a baking
sheet.
2. Cut out cookies using a 9cm heart cutter, place on greased baking sheet.
3. Bake for 12 – 15 mins until golden
4. Place on a wire tray to cool.
5. Decorate a third of the cookies in each of the following:
a. Pipe a fine heart approximately 1cm from the edge, and carefully
placing pink pearl dragees to create a heart shape
b. Fixing with a small amount of butter icing, place three heart sugar
decorations down the centre of the cookie, alternating the colours
c. Mix a small amount of butter icing with a small amount of red colour to
make a soft pink, and spread evenly onto the cookie to 1cm from the
edge. Sprinkle sparkling sugar onto butter icing
Princess Dress Cookies
You will need:
1 qty cookie dough
Autumn Carpenter Mini Wedding Cookie
Cutter and Texture Set
White Regalice sugar paste,
rolled out to 3mm
Squires Kitchen Dusting Colours – rose, violet and brilliant gold

8
Fine dusting brush
Fine paint brush
Squires Edible Glue
PME lustre spray – pearl
1. Preheat the oven to 180°C, 160°C fan, gas mark 4. Lightly grease a baking
sheet.
2. Cut out cookies using the dress cutter, place on greased baking sheet.
3. Bake for 12 – 15 mins until golden.
4. Place on a wire tray to cool completely.
5. Cut out white sugar paste using the same cutter as the cookies, use the
matching embossers from the set to create the patterns (4 designs). Fix to
cookie using edible glue.
6. Decorate by brushing on dusting colours, picking out the detail as shown, and
finish with pearl lustre spray.
Hearts Crispy Cakes
You will need:
45g butter or margarine
300g (about 40) regular
marshmallows
200g miniature marshmallows
180g rice crispies
Heart shaped cutters
Squires Kitchen Real Fruit
Fondant Icing – raspberry
Rainbow Dust Sparkling Sugar - Pearlescent Pink
Culpitt Double Hearts Sugar Decorations
1. Melt the butter in a large saucepan over a low heat. Add the
marshmallows and stir until everything's completely melted, then
remove from the heat.

9
2. Next add the rice crispies and stir until well coated.
3. Using a buttered spatula, press the mixture evenly into a 13" x 9" x 2"
greased baking tray.
4. Whilst still slightly warm, cut out heart shapes using cutters, and allow
to cool before decorating.
5. When cool, drizzle with raspberry fondant icing and decorate to your
taste using pearlescent pink sparkling sugar and sugar decorations.
Birthday Princess Cake
You will need:
10” Round Cake
Butter icing to cover cake
Shell Pink Regalice Sugar Paste,
rolled out to cover cake
(see Culpitt guide – ‘Covering a
cake with Sugarpaste’ for help)
1 x 12” round cake board
1 x 10” round cake board
1 sheet of Culpitt ’All Over Print’ sugar sheets – Hearts & Flowers
Babe Pink Pique Edge ribbon 13mm to wrap around cake board
Princess Pretty DecoSet
Rainbow Dust Sparkling Sugar - Pearlescent Pink
Rainbow Dust Sparkling Sugar –Red
Culpitt Pink Metallic Dragees
Squires Kitchen Sugar Diamonds
Pink Sugar Florist Paste
Windsor Clikstix – groovy letters upper and lower case
Culpitt Flower Heart Diamante Brooch
PME Lustre Spray Pink
PME Heart Ejector Cutter 10mm
Circle Cutter 30mm
PME3 Ball Tool

10
1. Roll out some shell pink sugar paste to approximately 2mm, and fix to the top
of the cake board using edible glue and trim to size using a sharp knife
2. Fix a length of pink pique edged ribbon around the board using a glue stick
3. Place cake onto the 10” cake board, hold in place with a ring of butter icing
4. Cover cake with a thin layer of butter icing, using a palette knife and cover
with shell pink sugar paste (see Culpitt guide – ‘Covering a cake with
Sugarpaste’ for help)
5. Texture the surface of the covered cake using a clean, stiff brush
6. Place covered cake centrally on the board, held by a ring of butter icing
7. Cut strips of All Over Print Sugar to 70mm wide. Use circle cutter to shape
scalloped edge along one side.
8. Use heart ejector cutter to cut a heart shape at an equal distance between
the lowest point of the scallop and the base. Put cut out hearts aside to
decorate top.
9. Join strips to create a continuous strip around the cake. Fix to cake using
edible glue. Cut strips to size.
10. Sprinkle sparkling sugar into heart cut outs, alternating between pink and red.
11. Using a PME ball tool, make indentations into the paste at the upper points of
the printed sugar. Apply small dots of edible glue and decorate with alternate
edible diamonds and metallic pink dragees.
12. Mould a rectangular pillow shape in professional pink sugar paste, spray with
pink lustre spray.
13. Arrange pillow, tiara, mirror and bracelet on top of cake, leaving room for the
‘Birthday Princess’ lettering. Place brooch on top of pillow.
14. Roll out pink sugar florist paste to approximately 2mm, and cut out letters
using clikstix. Arrange on cake and fix using edible glue.
15. Arrange cut out hearts to decorate.

11
Princess Doll Cake
You will need;
Sponge cake baked in Wilton Wonder Mould
Pan (includes doll set)
Butter icing to cover cake
8” round cake board
Professional Pink Regalice Sugar Paste
Shell Pink Regalice Sugar Paste
White Regalice Sugar Paste
Culpitt Princess Castle Cake Stand
1 sheet of Culpitt ’All Over Print’ sugar sheets – Pink Polka
1 sheet of Culpitt ’All Over Print’ sugar sheets – Butterflies
PME Lustre Spray - Gold
PME Lustre Spray – Pink
Culpitt Dragees – Pink Pearl
Autumn Carpenter Butterflies Cookie Cutter and Texture Set
Autumn Carpenter Mini Wedding Cookie Cutter and Texture Set
Squires Kitchen SFP Sugar Flower Paste – Pale Pink
Rainbow Dust Sparkling Sugar - Pearlescent Pink
Rainbow Dust Sparkling Sugar – Metallic Gold
Heart cutter
Culpitt Lily Cutter
1. Bake cake in greased Wonder Mould Pan (you could use the Victoria Sponge
recipe from Culpitt website
http://www.sugarcraftandcakedecorating.com/how-to.php)
2. Turn out onto a wire tray and cool.
3. When completely cool, place onto an 8” cake board, and fix with a ring of
butter cream.
4. Cover cake and edges of board with butter icing and then cover both with
Professional Pink sugar paste (see Culpitt guide – ‘Covering a cake with
Sugarpaste’ for help)

12
5. Mark approximately 1/4 segment of cake to front of dress. Brush on edible
glue, and cover with pink sparkling sugar.
6. Using the lily cutter, cut out shapes from paste as follows:
a. Large – 4x Hearts and Flowers printed sugar, 2x Professional Pink
sugar paste (rolled out and edged with gold sparkling sugar)
b. Medium – 4x Pink Polka printed sugar, 2x Shell Pink sugar paste
(rolled out)
c. Small – 4x white (rolled out and sprayed gold), 6x white
7. Working from the base of the skirt, using edible glue, layer both sides of the
front panel as follows:
2x large Hearts and Flowers petals, 1x pink, gold edged petal, 2x Pink Polka
petals, 2x pink sugar paste petals, 2x gold sprayed petals.
This should fill the distance from the base of the cake to the top of the skirt.
8. Insert the doll pic to the centre of the top of the cake.
9. Cut a strip of rolled out shell pink sugar flower paste30mm wide by 100mm
long, spray with pink lustre spray and fix securely around the doll’s back with
royal icing. Support until dry.
10. Cut a heart shape from rolled out shell pink sugar paste, and add texture
using the embosser from the Mini Wedding Cookie Cutter and Texture Set.
Spray with pink lustre spray. Fix with edible glue to front of doll to create
bodice of dress.
11. Carefully cut the tip from one end of each of the small white petals, and
arrange around the doll’s waist, with the flat end to the waist. Fix with edible
glue.
12. Fix pink pearl dragees around doll’s waist to cover joins, and carefully attach
a ring of dragees around doll’s neck to create necklace.
13. Using large cutter from Butterfly Cookie Cutter and Texture Set, cut out shape
from pink sugar flower paste, and texture both sides. Mould by shaping wings
into a ‘V’ shape, and spray with pink lustre spray. Allow to set before fixing to
back of doll using royal icing. Support in place until completely dry and royal
icing is set.