how to format and upload your kindle book
DESCRIPTION
This document is a step by step how to format and upload your kindle book to amazon. It covers a few vital things that you want to make sure you to avoid formatting issues. The steps are easy to follow all you have to do is follow and publish.TRANSCRIPT
EzKindlePublishing.com Page 1
Kindle Publishing Guidelines
Material Needed
Your manuscript in Word
KDP.amazon.com account
How To Work On This:
Set some time aside to work on this, preferable 50min time increments, turn
off your cell and remove all distractions
You can use the countdown timer at e.ggtimer.com
Create your to do list and break down every activity that you have to do, so
that you don’t spend time thinking what’s next
example:
o Create kdp.amazon.com account
o Research Keywords for Ebook
o What category is my book in
o Write description for book using at least 4 keywords
o Create Ebook cover
Find designer
o Format Ebook
These Guidelines were created using Microsoft word 2010
What’s covered in this PDF
1. Formatting Tips
a. How to Insert Indents at the Beginning of Paragraphs
b. How to Insert Empty Space Between Paragraphs
c. How to Insert A Page Break Between Chapters:
i. Show/Hide Feature
d. How to Format Headers For Chapters
e. Formatting the Font size
f. How To Build the Front Matter of Your Kindle Book
i. Title Page
ii. Copy Right Page
g. How To Build Your Table Of Content
i. Identify your chapter headings and set your headline style
EzKindlePublishing.com Page 2
ii. Insert your Table of Contents near the beginning of the word
document
iii. Bookmarking Your Table Of Content for Kindle
2. Kindle Book Covers
3. Getting Your Manuscript Ready
a. Converting Your Manuscript Into HTML
b. How To Upload Your Kindle Book On Amazon KDP
c. Preview Your Kindle Book Before Publishing
Tips For Formatting
The number one mistake new digital publishers make is assuming formatted material
will translate to Kindle as “what you see is what you get.” This can be further from
the truth. This guideline will help you avoid common mistakes in the as your prepare
to publish your Kindle book.
How to Insert Indents at the Beginning of Paragraphs
Avoid using tabs or spaces to indent paragraphs. Follow the directions below to set
“first line” indents (for paragraphs) in Microsoft word.
Step 1: Click on the page layout tab at the top of the screen
Step 2: Look for the paragraph section and click the button resembling arrow
which will then open a dialogue box called Paragraph.
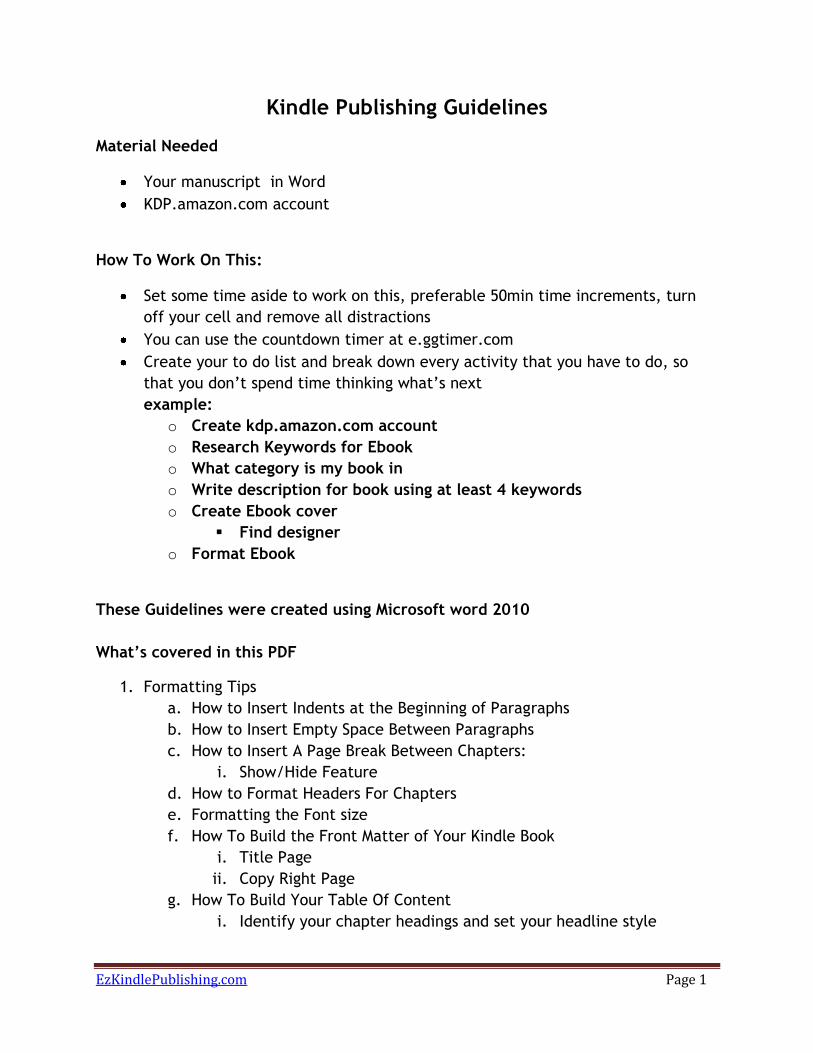
Step 3: In the dialogue screen, locate the “Indentation” section, and set
“Special” to “First Time” and “By” to your preferred indent.
The setting recommended is shown in the image below:
How to Insert Empty Space Between Paragraphs:
If you want to have a space between paragraph most people will insert a “return”
EzKindlePublishing.com Page 3
between the 2 paragraphs. Issue with this technique is that you cannot be sure that
the space between paragraphs will appear correctly on kindle platforms. Instead, set
you paragraph spacing in Word as follows:
Step 1: Open your word document and click on “Page Layout” tab
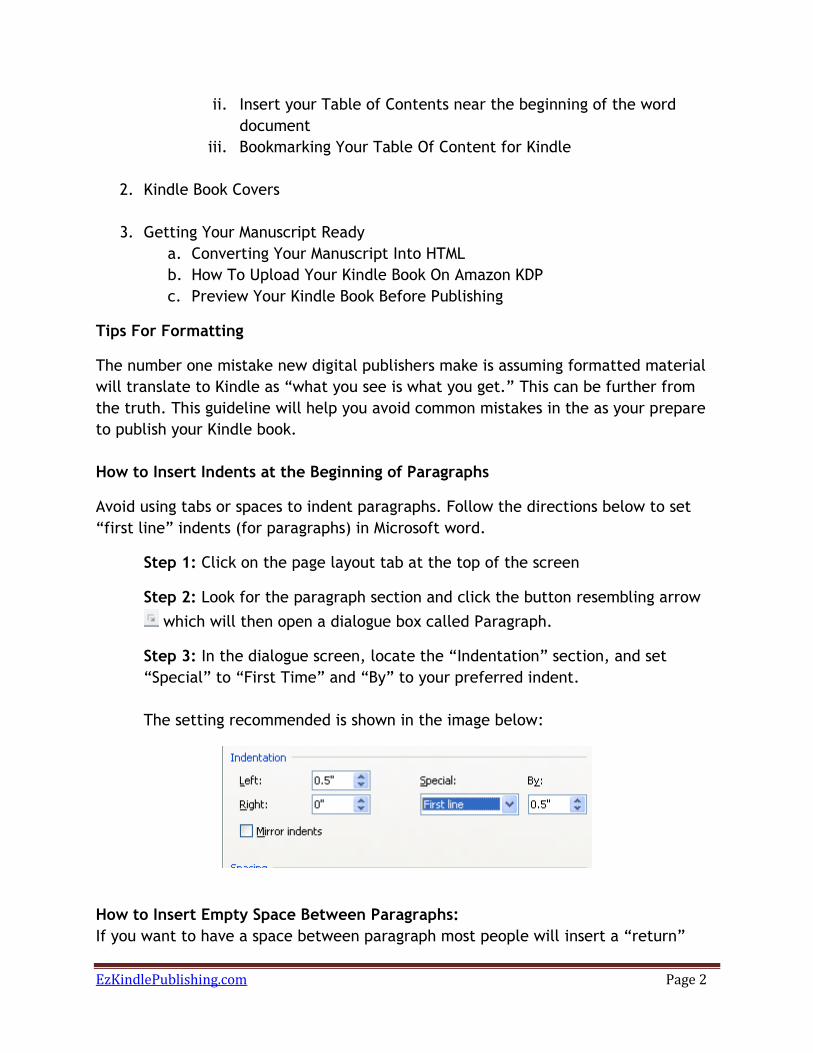
Step 2: In the “Paragraph” section locate the “indent section”
Step 3: Next to word “After” you can enter the value of your preferred space
after a paragraph.
See image below showing you where to do this:
How to Insert A Page Break Between Chapters:
One reason you want to enter a page break at the end of every chapter is to prevent
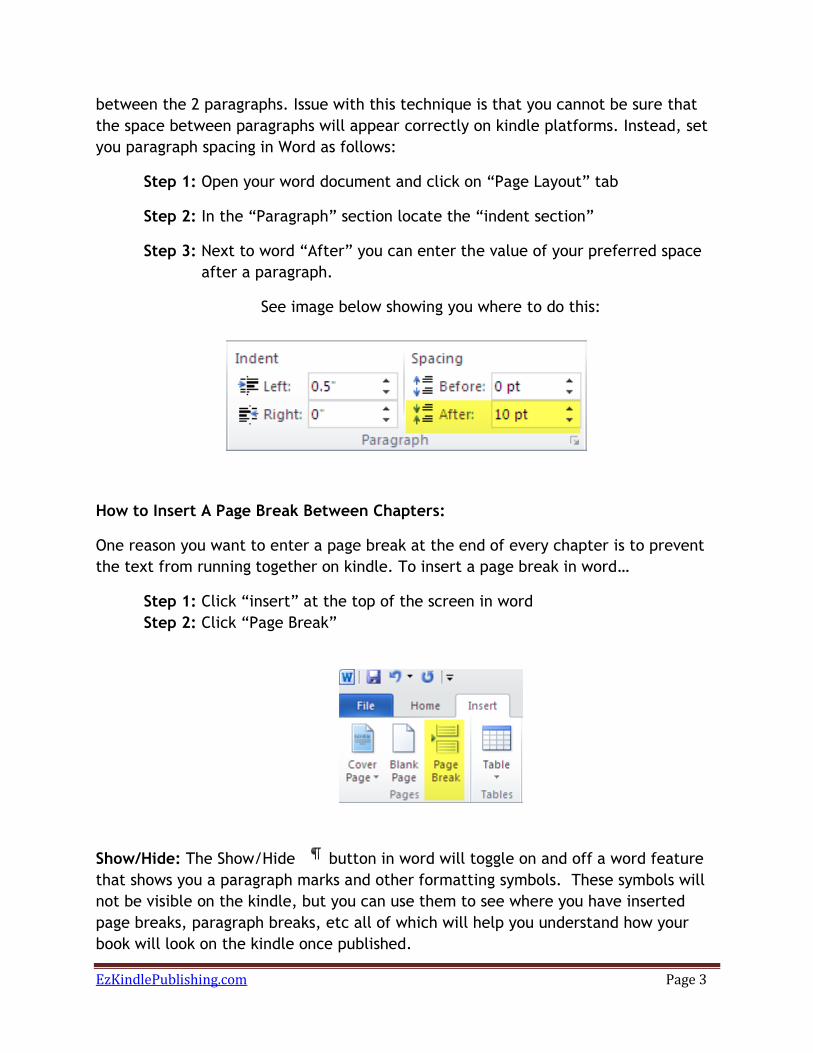
the text from running together on kindle. To insert a page break in word…
Step 1: Click “insert” at the top of the screen in word
Step 2: Click “Page Break”
Show/Hide: The Show/Hide button in word will toggle on and off a word feature
that shows you a paragraph marks and other formatting symbols. These symbols will
not be visible on the kindle, but you can use them to see where you have inserted
page breaks, paragraph breaks, etc all of which will help you understand how your
book will look on the kindle once published.
EzKindlePublishing.com Page 4
Do not use headers and footers: Headers, such as title and chapter, and footers,
such as page number, will not display on kindle as intended: avoid using them
How to Format Headers For Chapters: Use the “Heading 1” Feature from word:
Kindle supports easy navigation within your kindle book for the reader if you highlight
chapter titles (e.g. Chapter 1: He Climbed The Tree) and kindle will set them to a “
Heading” value as shown below.
Step 1: In your manuscript, highlight the chapter title with your mouse
Step 2: Click on the “ Home” tab
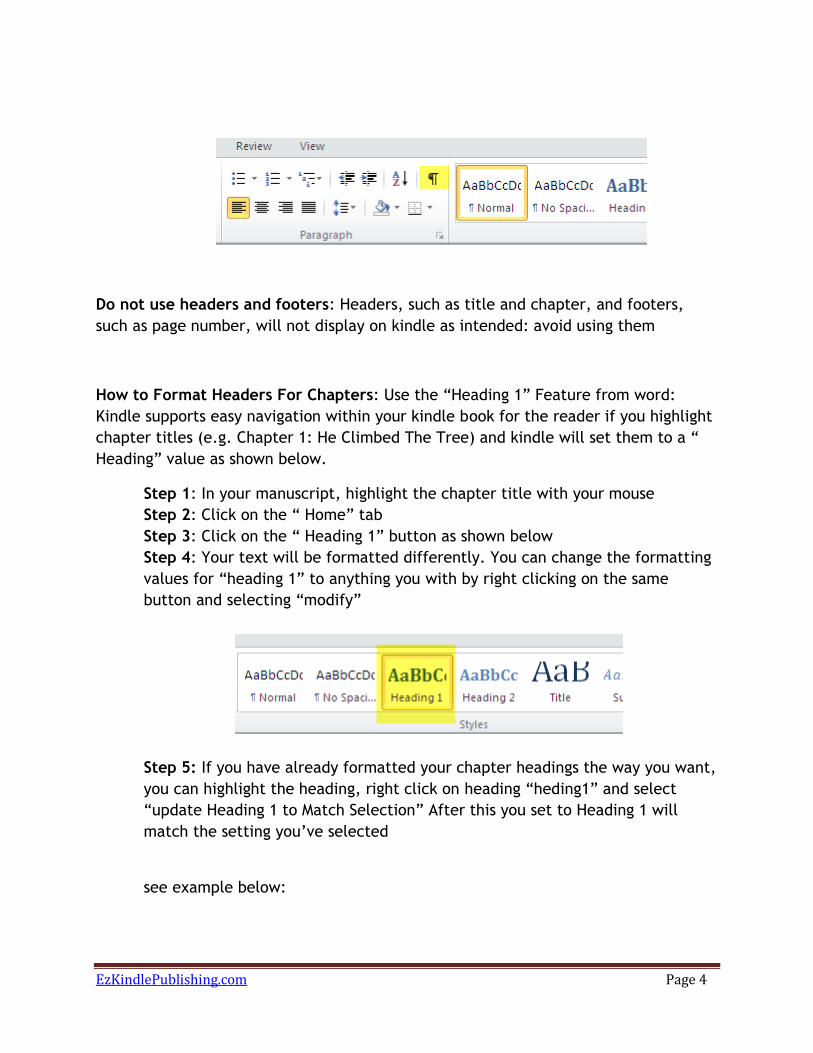
Step 3: Click on the “ Heading 1” button as shown below
Step 4: Your text will be formatted differently. You can change the formatting
values for “heading 1” to anything you with by right clicking on the same
button and selecting “modify”
Step 5: If you have already formatted your chapter headings the way you want,
you can highlight the heading, right click on heading “heding1” and select
“update Heading 1 to Match Selection” After this you set to Heading 1 will
match the setting you’ve selected
see example below:

EzKindlePublishing.com Page 5
Chapter 1: Creating Your To Do List
Create your to do list and break down every activity that you have to do, so that you
don’t spend time thinking what’s next.
Formatting the Font size: A great feature with the Kindle reader is it’s ability to
reconfigure the text size and margins as you read the book. Because of this, you may
wish to avoid utilizing font size to add emphasis.
How to Build the Front Matter for Your Kindle Book: The Front matter is the beginning
pages of a book, which may include a Title Page, Copyright Page, Dedication Page , Preface
or Prologue. At a minimum your front matter should include a Title Page. Below are
some tips to make your front matter look stylish and professional.
Title Page: The first page in your manuscript document should be your title page (you
will upload your cover page, an image, separately when you publish your Kindle book)
Your title page should be centered with the book title on top and the author name
underneath.
Step 1: Center the text: Avoid using spaces or tabs to center the text. Rather,
from word’s navigation bar use the “center” functionality to center the text.
Step 2: Insert a page break after the title
o Click insert at the top of the screen in word
o Click page break
Step 3: Here is an example what it should looks like

EzKindlePublishing.com Page 6
A Tale of Two Cities
By Charles Dickens
- Insert Page Break Here -
Copy Right Page: The copyright page normally follows the title page. It should also be
centered with a page break after it, as shown below.
Text copy right 2012 George Kairu
All Right Reserved
- Insert Page Break Here –
How To Build Your Table Of Content
In a kindle book, the Table of Content (TOC) allows readers to jump to pre-
determined places in the book by simply clicking on links embedded in the text. As a
page numbers are not applicable in a Kindle Book (page counts change with the text
size a reader chooses), a functional Table of Content is one of the features Kindle
readers rely on and expect
Kindle reader will recognize a properly implemented Table Of Content in Word. If
your Kindle Kook is in Word, follow the steps below to ensure your table of
contents works properly on kindle.
Identify your chapter headings and set your headline style
Step 1: Highlight the first chapter Title in your book with your mouse
Step 2: Click on the “Home” Tab
Step 3: Your Chapter title will be formatted differently. You can change the
formatting values for “Heading 1” to anything you wish by right clicking on the
same button and selecting “Modify”
Step 4: If you have already formatted your chapter headings to what you want
them to look like, you can highlight the first one, right-click in “Heading 1” and
select “Update Heading 1 To match Selection.”
Step 5: Once you have set your chapter heading style, identify the rest of the
chapter headings by repeating the first 2 steps above for each one
EzKindlePublishing.com Page 7
Insert your Table of Contents near the beginning of the word document
Step 1: Left click once where you want your table of content to appear. This
should come just after your front matter - title page.
Step 2: Type “ Table of Contents” and press Enter
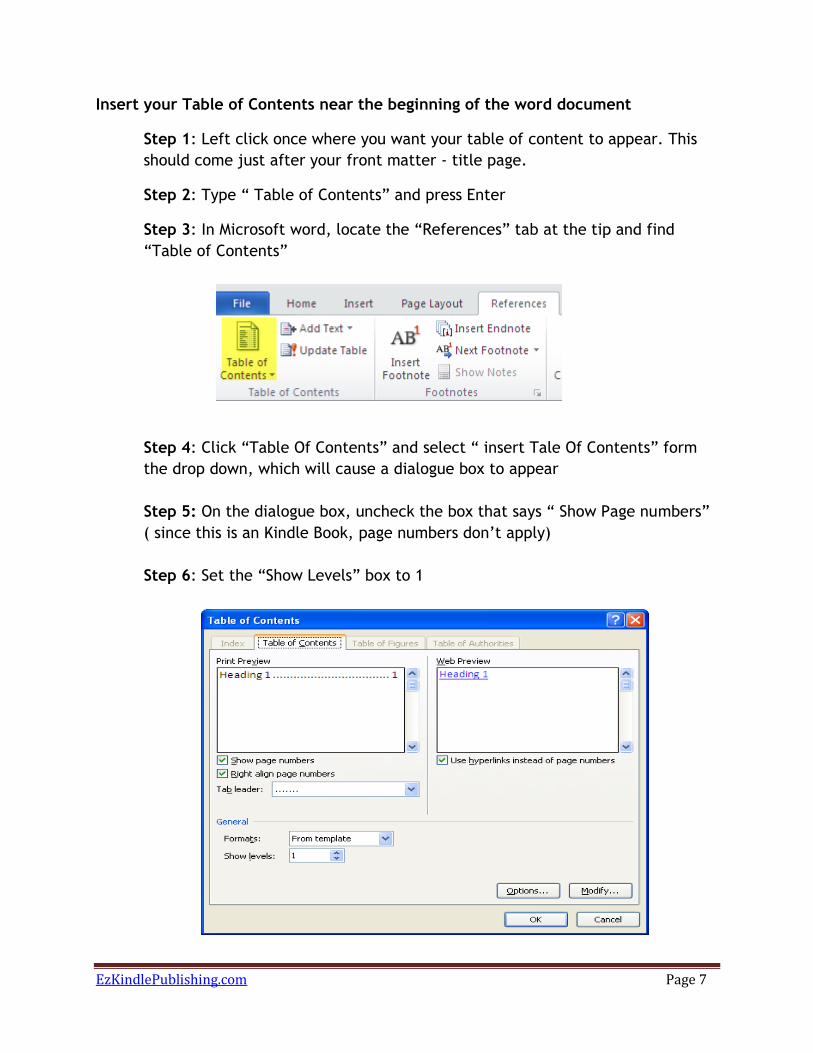
Step 3: In Microsoft word, locate the “References” tab at the tip and find
“Table of Contents”
Step 4: Click “Table Of Contents” and select “ insert Tale Of Contents” form
the drop down, which will cause a dialogue box to appear
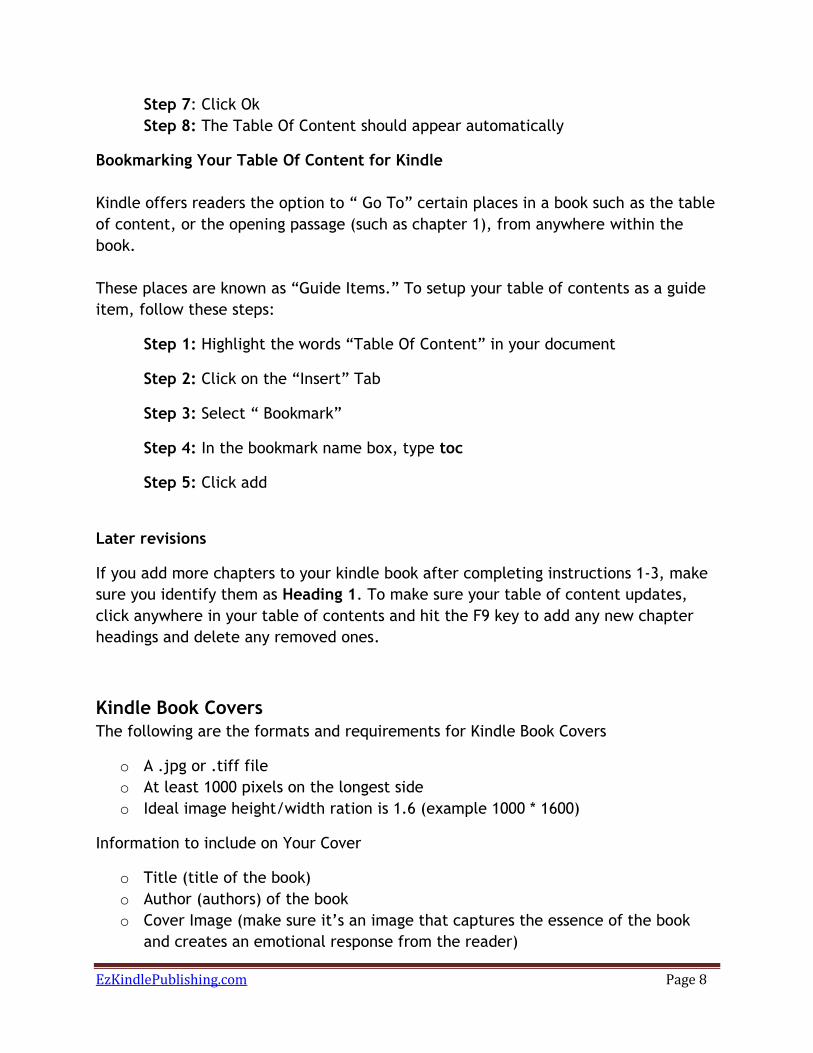
Step 5: On the dialogue box, uncheck the box that says “ Show Page numbers”
( since this is an Kindle Book, page numbers don’t apply)
Step 6: Set the “Show Levels” box to 1
EzKindlePublishing.com Page 8
Step 7: Click Ok
Step 8: The Table Of Content should appear automatically
Bookmarking Your Table Of Content for Kindle
Kindle offers readers the option to “ Go To” certain places in a book such as the table
of content, or the opening passage (such as chapter 1), from anywhere within the
book.
These places are known as “Guide Items.” To setup your table of contents as a guide
item, follow these steps:
Step 1: Highlight the words “Table Of Content” in your document
Step 2: Click on the “Insert” Tab
Step 3: Select “ Bookmark”
Step 4: In the bookmark name box, type toc
Step 5: Click add
Later revisions
If you add more chapters to your kindle book after completing instructions 1-3, make
sure you identify them as Heading 1. To make sure your table of content updates,
click anywhere in your table of contents and hit the F9 key to add any new chapter
headings and delete any removed ones.
Kindle Book Covers
The following are the formats and requirements for Kindle Book Covers
o A .jpg or .tiff file
o At least 1000 pixels on the longest side
o Ideal image height/width ration is 1.6 (example 1000 * 1600)
Information to include on Your Cover
o Title (title of the book)
o Author (authors) of the book
o Cover Image (make sure it’s an image that captures the essence of the book
and creates an emotional response from the reader)
EzKindlePublishing.com Page 9
Finished Covers: save your .jpg or .tiff file on your computer but don’t include it in
your manuscript. Covers must be uploaded separately from the manuscript.
Getting Your Manuscript Ready
Converting Your Manuscript Into HTML
Save your word document as a “Filtered HMTL Document” To do this, just follow
these steps:
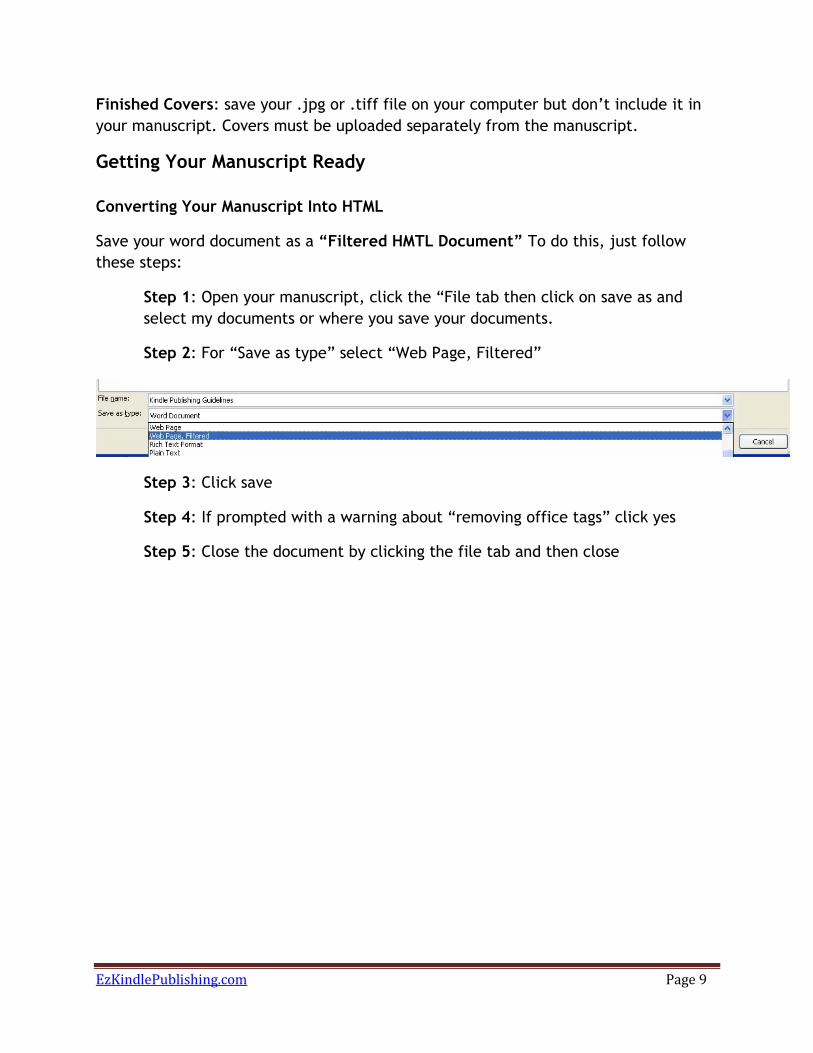
Step 1: Open your manuscript, click the “File tab then click on save as and
select my documents or where you save your documents.
Step 2: For “Save as type” select “Web Page, Filtered”
Step 3: Click save
Step 4: If prompted with a warning about “removing office tags” click yes
Step 5: Close the document by clicking the file tab and then close
EzKindlePublishing.com Page 10
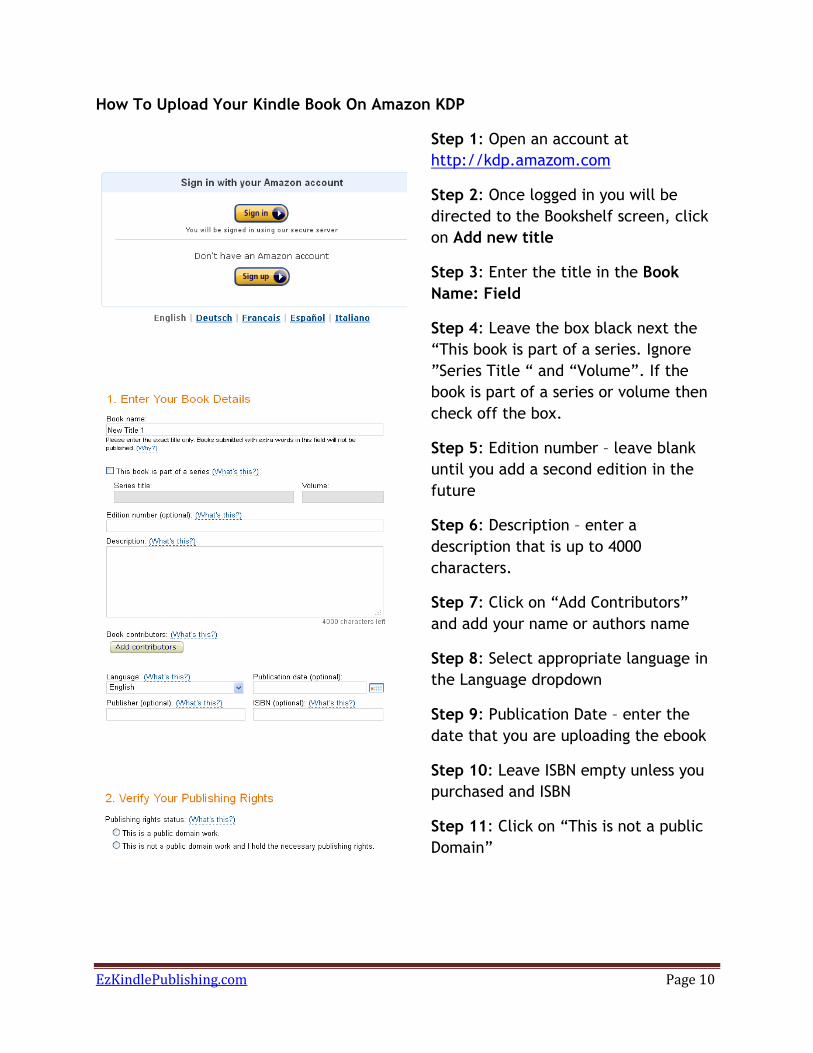
How To Upload Your Kindle Book On Amazon KDP
Step 1: Open an account at
http://kdp.amazom.com
Step 2: Once logged in you will be
directed to the Bookshelf screen, click
on Add new title
Step 3: Enter the title in the Book
Name: Field
Step 4: Leave the box black next the
“This book is part of a series. Ignore
”Series Title “ and “Volume”. If the
book is part of a series or volume then
check off the box.
Step 5: Edition number – leave blank
until you add a second edition in the
future
Step 6: Description – enter a
description that is up to 4000
characters.
Step 7: Click on “Add Contributors”
and add your name or authors name
Step 8: Select appropriate language in
the Language dropdown
Step 9: Publication Date – enter the
date that you are uploading the ebook
Step 10: Leave ISBN empty unless you
purchased and ISBN
Step 11: Click on “This is not a public
Domain”
EzKindlePublishing.com Page 11
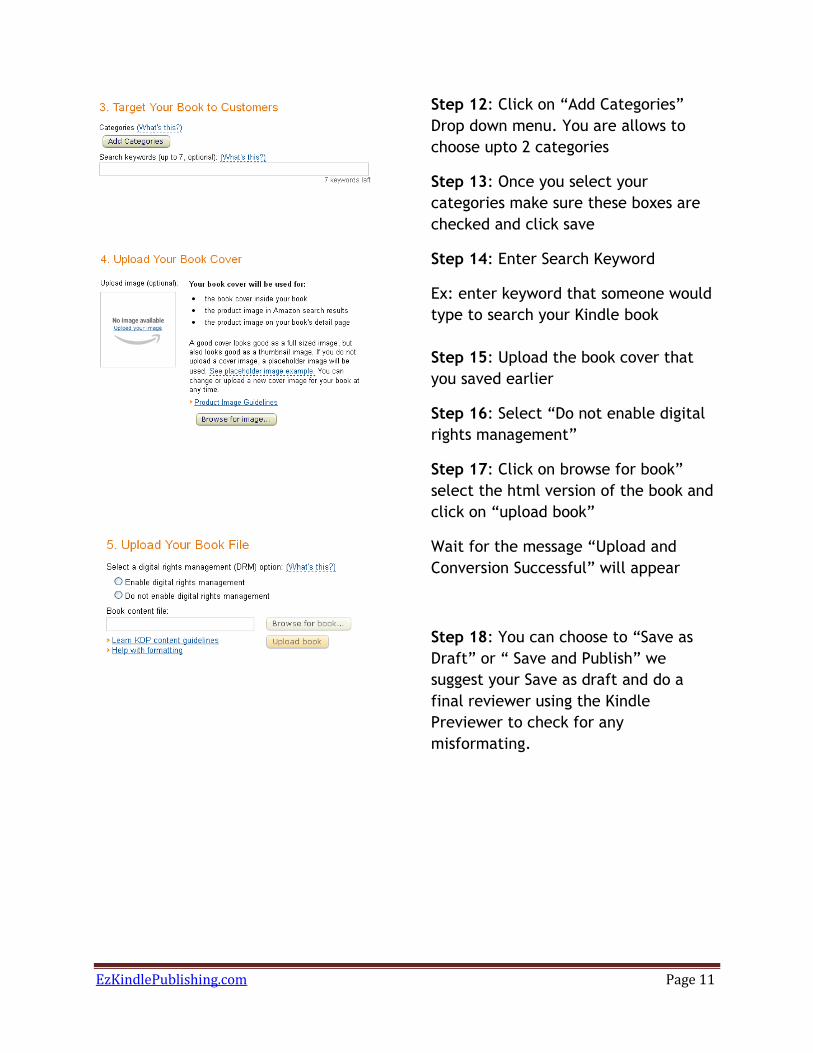
Step 12: Click on “Add Categories”
Drop down menu. You are allows to
choose upto 2 categories
Step 13: Once you select your
categories make sure these boxes are
checked and click save
Step 14: Enter Search Keyword
Ex: enter keyword that someone would
type to search your Kindle book
Step 15: Upload the book cover that
you saved earlier
Step 16: Select “Do not enable digital
rights management”
Step 17: Click on browse for book”
select the html version of the book and
click on “upload book”
Wait for the message “Upload and
Conversion Successful” will appear
Step 18: You can choose to “Save as
Draft” or “ Save and Publish” we
suggest your Save as draft and do a
final reviewer using the Kindle
Previewer to check for any
misformating.
EzKindlePublishing.com Page 12
Preview Your Kindle Book Before Publishing
In order to preview your Kindle book you need to download the Kindle Previewer.
Here’s how to do this:
Step 1: Visit this url on Amazon.com
http://www.amazon.com/gp/feature.html/?docId=1000765261
Choose the option that applies to you
Step 2: Agree to the Terms of Use
Step 3: Save previewer to your computer and follow installation instructions
Step 4: Once installed open the previewer tool (this will be found Start All
Programs Amazon Previewer
Step 5: Click previewer and this will open the previewer tool on your computer
Step 6: Go to KDP page where you uploaded your book and click on download
book
Here is a check list for what you should look for
□ Review front Matter(title page, dedication, copy right inforation0
□ Table Of Content linking table works
□ Proof read your content
□ Make sure there are no misspellings and formatting issues
□ Check kindle book presentation across several devices
o In previewer select “devices” from the drop-down menu
o Select the device which you would like the Previewer to emulate
o Don’t be surprised if the reading experience is different on each device
Making Changes
If changes need to be made, make the necessary changes and re-upload book.
1. Go to HTML file of the book on your computer
2. Right click, scroll over “open with” and select Microsoft word
3. Make any edits needed
4. Save under new title
5. Click Save as (adjust “save as type” field to: Web page, Filtered)
6. Close the file
7. Re-upload revised content
EzKindlePublishing.com Page 13
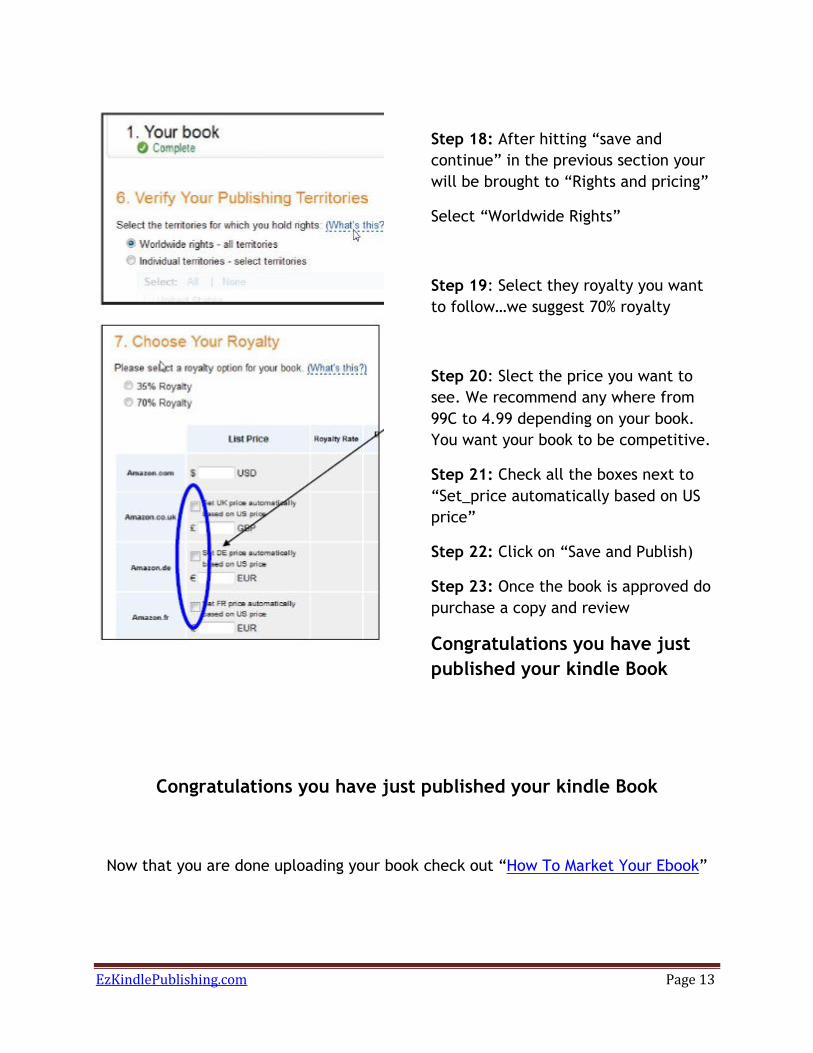
Step 18: After hitting “save and
continue” in the previous section your
will be brought to “Rights and pricing”
Select “Worldwide Rights”
Step 19: Select they royalty you want
to follow…we suggest 70% royalty
Step 20: Slect the price you want to
see. We recommend any where from
99C to 4.99 depending on your book.
You want your book to be competitive.
Step 21: Check all the boxes next to
“Set_price automatically based on US
price”
Step 22: Click on “Save and Publish)
Step 23: Once the book is approved do
purchase a copy and review
Congratulations you have just
published your kindle Book
Congratulations you have just published your kindle Book
Now that you are done uploading your book check out “How To Market Your Ebook”