halloween projects 2012
TRANSCRIPT
www.babylock.comwww.designersgallerysoftware.com
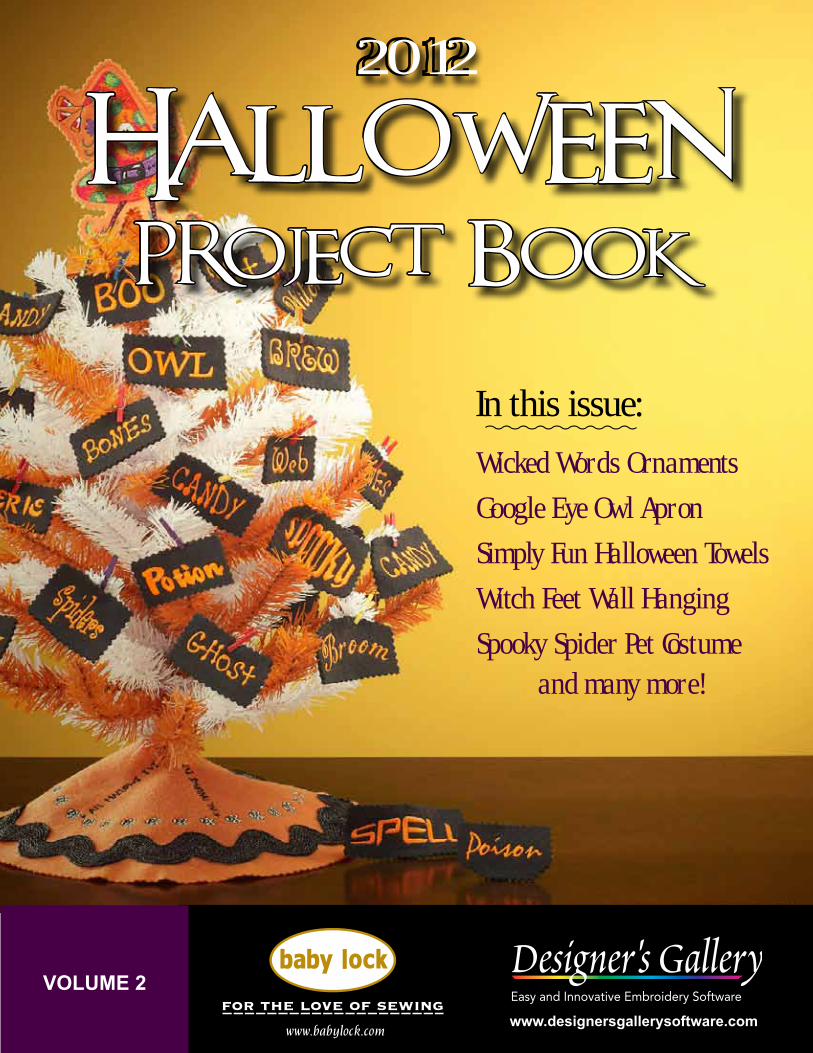
2012
Halloween Project Book
VOLUME 2
Wicked Words Ornaments
Google Eye Owl Apron
Simply Fun Halloween Towels
Witch Feet Wall Hanging
Spooky Spider Pet Costume and many more!
In this issue:
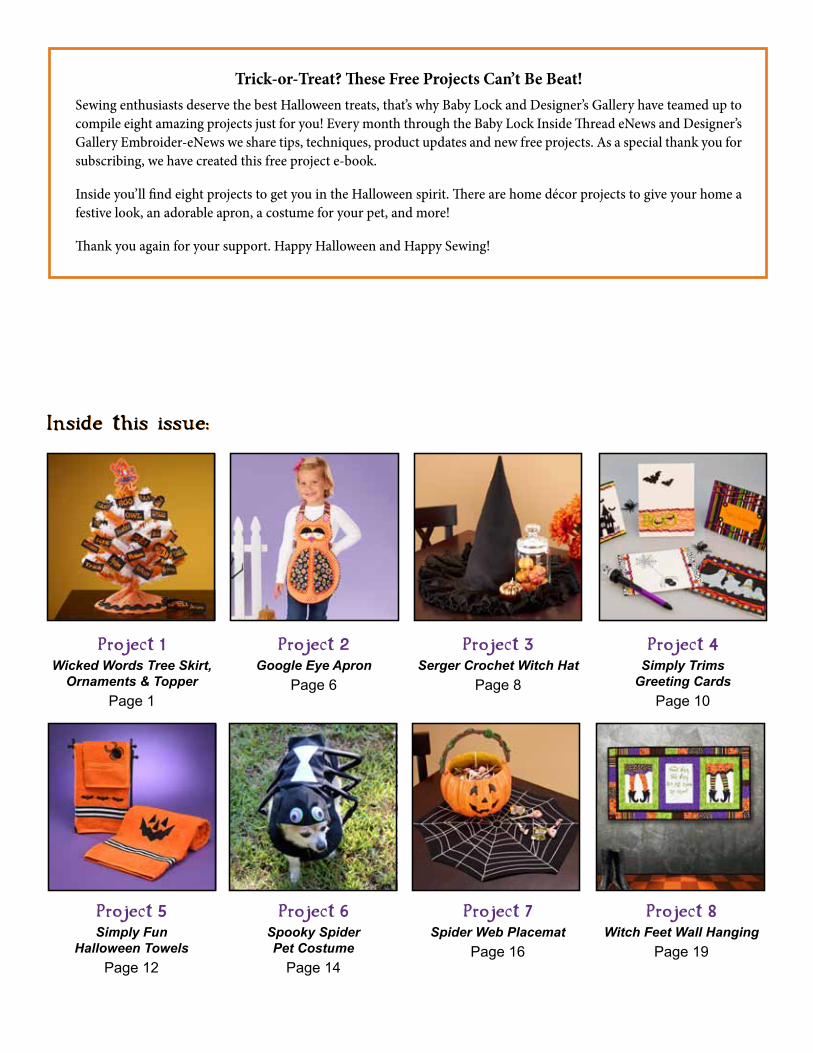
Inside this issue:Inside this issue:
Project 1Wicked Words Tree Skirt,
Ornaments & Topper
Page 1
Project 5Simply Fun
Halloween Towels
Page 12
Project 2Google Eye Apron
Page 6
Project 6Spooky Spider Pet Costume
Page 14
Project 3Serger Crochet Witch Hat
Page 8
Project 7Spider Web Placemat
Page 16
Project 4Simply Trims
Greeting Cards
Page 10
Project 8Witch Feet Wall Hanging
Page 19
Trick-or-Treat? These Free Projects Can’t Be Beat!Sewing enthusiasts deserve the best Halloween treats, that’s why Baby Lock and Designer’s Gallery have teamed up to compile eight amazing projects just for you! Every month through the Baby Lock Inside Thread eNews and Designer’s Gallery Embroider-eNews we share tips, techniques, product updates and new free projects. As a special thank you for subscribing, we have created this free project e-book.
Inside you’ll find eight projects to get you in the Halloween spirit. There are home décor projects to give your home a festive look, an adorable apron, a costume for your pet, and more!
Thank you again for your support. Happy Halloween and Happy Sewing!

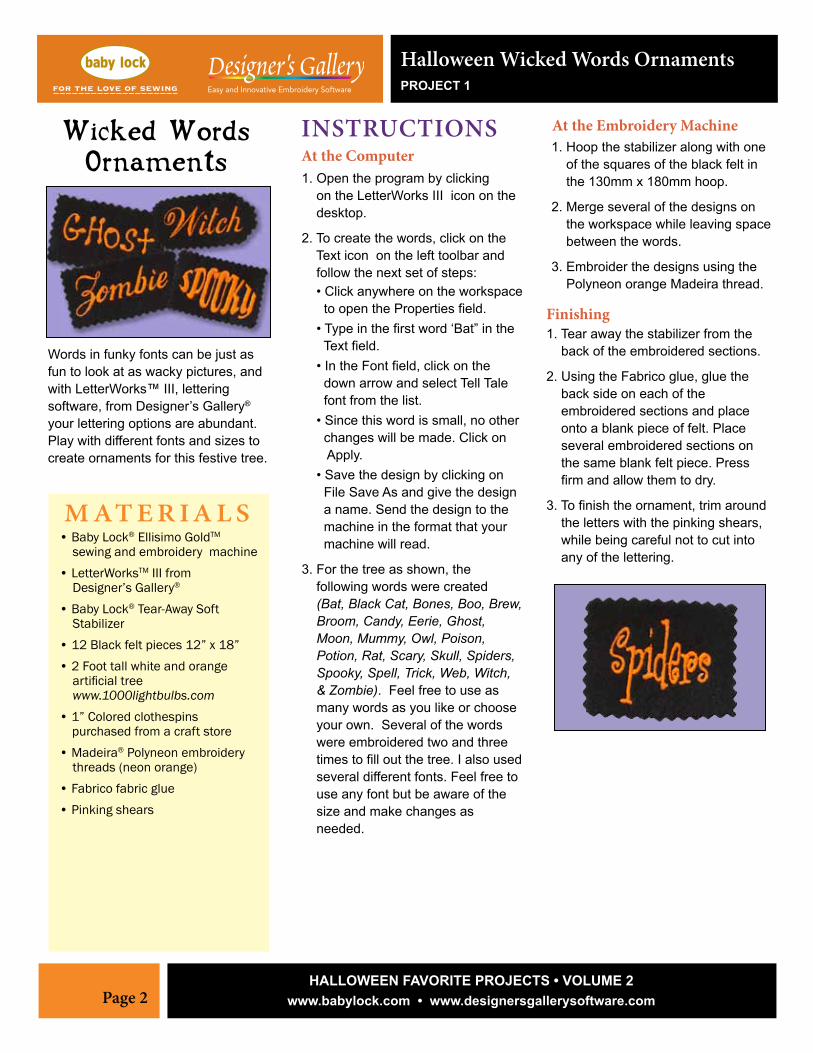
Halloween Wicked Words OrnamentsPROJECT 1
By Diane KronSoftware and Embroidery Project Manager
Skill Level: Beginner
HalloweenWicked WordsOrnaments,Tree Skirt &
Topper
Page 1HALLOWEEN FAVORITE PROJECTS • VOLUME 2
www.babylock.com • www.designersgallerysoftware.com
Page 2HALLOWEEN FAVORITE PROJECTS • VOLUME 2
www.babylock.com • www.designersgallerysoftware.com
Halloween Wicked Words OrnamentsPROJECT 1
INSTRUCTIONSAt the Computer
Finishing
At the Embroidery Machine
1. Tear away the stabilizer from the back of the embroidered sections.
2. Using the Fabrico glue, glue the back side on each of the embroidered sections and place onto a blank piece of felt. Place several embroidered sections on the same blank felt piece. Press firm and allow them to dry.
3. To finish the ornament, trim around the letters with the pinking shears, while being careful not to cut into any of the lettering.
1. Hoop the stabilizer along with one of the squares of the black felt in the 130mm x 180mm hoop.
2. Merge several of the designs on the workspace while leaving space between the words.
3. Embroider the designs using the Polyneon orange Madeira thread.
1. Open the program by clicking on the LetterWorks III icon on the desktop.
2. To create the words, click on the Text icon on the left toolbar and follow the next set of steps: • Click anywhere on the workspace to open the Properties field.
• Type in the first word ‘Bat” in the Text field.
• In the Font field, click on the down arrow and select Tell Tale font from the list.
• Since this word is small, no other changes will be made. Click on Apply.
• Save the design by clicking on File Save As and give the design a name. Send the design to the machine in the format that your machine will read.
3. For the tree as shown, the following words were created (Bat, Black Cat, Bones, Boo, Brew, Broom, Candy, Eerie, Ghost, Moon, Mummy, Owl, Poison, Potion, Rat, Scary, Skull, Spiders, Spooky, Spell, Trick, Web, Witch, & Zombie). Feel free to use as many words as you like or choose your own. Several of the words were embroidered two and three times to fill out the tree. I also used several different fonts. Feel free to use any font but be aware of the size and make changes as needed.
M AT E R I A L S• Baby Lock® Ellisimo GoldTM sewing and embroidery machine • LetterWorksTM III from Designer’s Gallery®
• Baby Lock® Tear-Away Soft Stabilizer• 12 Black felt pieces 12” x 18”• 2 Foot tall white and orange artificial tree www.1000lightbulbs.com• 1” Colored clothespins purchased from a craft store• Madeira® Polyneon embroidery threads (neon orange) • Fabrico fabric glue• Pinking shears
Wicked WordsOrnaments
Words in funky fonts can be just as fun to look at as wacky pictures, and with LetterWorks™ III, lettering software, from Designer’s Gallery® your lettering options are abundant. Play with different fonts and sizes to create ornaments for this festive tree.
INSTRUCTIONSAt the Computer
• Click on the Hoop field again and this time, click on Fit Hoop. This will resize the design to fit in the selected hoop.
• Save the design by clicking on File Save As and give the design a name. Send the design to the machine in the format that your machine will read.
3. To create the second design that will make up the tree skirt, follow the next set of steps:
• Click on New page on the top ribbon.
• Click on Open Design from the same ribbon.
• Retrieve design number Hallow113 from the Halloween Parade design collection.
• Place the 200mm x 200mm hoop on the workspace.
• Select the design.
• Click on the Home tab then Circular Copy.
• In the Circular Copy field, next to the Count, place five designs.
• Set the Scale at 69% and click OK. This will send the design to the workspace.
1. Open the program by clicking on the MasterWorks III icon on the desktop.
2. To create the first part of the design for the tree skirt, follow the next set of steps:
• Click on Open design on the top ribbon as shown below.
• Retrieve design number PO10104 (skull and crossbones) from the Mini Emblems design collection.
• Click on Tools then click on Circular Copy.
• In the Circular Copy field, increase the count to 24. The size will be displayed in the bottom right corner.
• Click OK to send the designs to the workspace. • Click on the down arrow under the Hoop field and click on Select Hoop. Click on the 200mm x 200mm hoop.
M AT E R I A L S• Baby Lock® Elisimo Gold® sewing and embroidery ma-chine • MasterWorksTM III from Designer’s Gallery®
• Amazing Designs® Mini Emblems design collection (ADC-108)• Amazing Designs® Halloween Parade design collection (ADP-53J)• Baby Lock® Tear-Away Soft Stabilizer• Orange felt section cut into a 16” square• 13” Round ruler (Sewing Revolution) or a protractor to draw a 13” circle for a template• Madeira® black and white embroidery threads • 1 package of large rick rack trim• Pinking shears• Water soluble marking pen
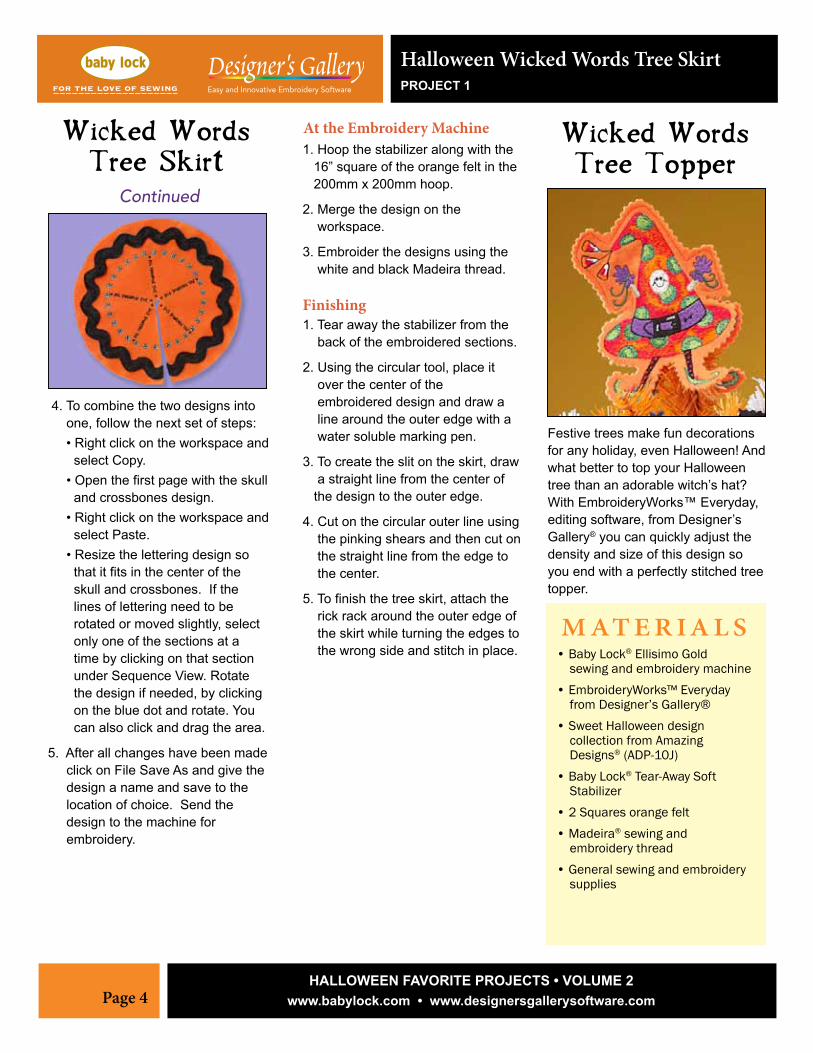
Wicked WordsTree Skirt
A Halloween tree needs a Halloween tree skirt! You can create the perfect designs for your décor with MasterWorks™ II, digitizing software, from Designer’s Gallery®. Combine two spooky designs to create one ideal embellishment for your tree skirt.
Halloween Wicked Words OrnamentsPROJECT 1
Page 3HALLOWEEN FAVORITE PROJECTS • VOLUME 2
www.babylock.com • www.designersgallerysoftware.com
Instructions continued on next page
Page 4HALLOWEEN FAVORITE PROJECTS • VOLUME 2
www.babylock.com • www.designersgallerysoftware.com
Halloween Wicked Words Tree SkirtPROJECT 1
Finishing
At the Embroidery Machine
1. Tear away the stabilizer from the back of the embroidered sections.
2. Using the circular tool, place it over the center of the embroidered design and draw a line around the outer edge with a water soluble marking pen.
3. To create the slit on the skirt, draw a straight line from the center of the design to the outer edge.
4. Cut on the circular outer line using the pinking shears and then cut on the straight line from the edge to the center.
5. To finish the tree skirt, attach the rick rack around the outer edge of the skirt while turning the edges to the wrong side and stitch in place.
1. Hoop the stabilizer along with the 16” square of the orange felt in the 200mm x 200mm hoop.
2. Merge the design on the workspace.
3. Embroider the designs using the white and black Madeira thread.
4. To combine the two designs into one, follow the next set of steps:
• Right click on the workspace and select Copy.
• Open the first page with the skull and crossbones design.
• Right click on the workspace and select Paste.
• Resize the lettering design so that it fits in the center of the skull and crossbones. If the lines of lettering need to be rotated or moved slightly, select only one of the sections at a time by clicking on that section under Sequence View. Rotate the design if needed, by clicking on the blue dot and rotate. You can also click and drag the area.
5. After all changes have been made click on File Save As and give the design a name and save to the location of choice. Send the design to the machine for embroidery.
Wicked WordsTree Skirt
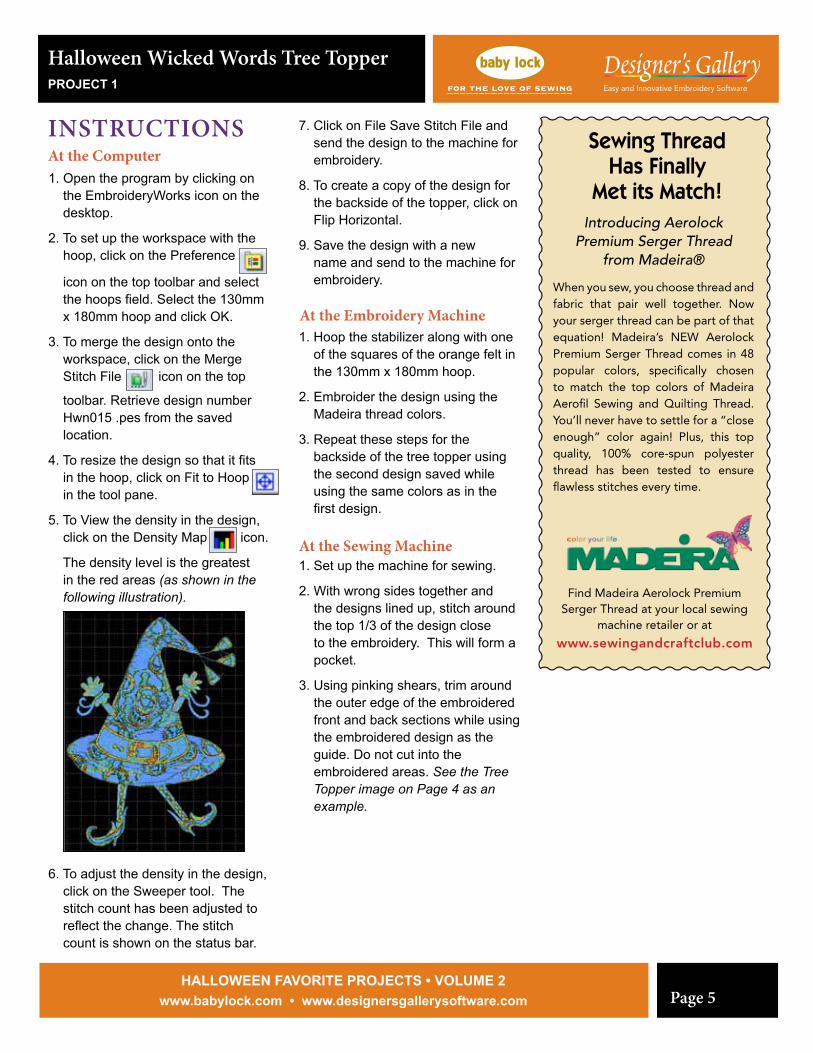
Wicked WordsTree Topper
Continued
Festive trees make fun decorations for any holiday, even Halloween! And what better to top your Halloween tree than an adorable witch’s hat? With EmbroideryWorks™ Everyday,editing software, from Designer’s Gallery® you can quickly adjust the density and size of this design so you end with a perfectly stitched tree topper.
M AT E R I A L S• Baby Lock® Ellisimo Gold sewing and embroidery machine• EmbroideryWorks™ Everyday from Designer’s Gallery®• Sweet Halloween design collection from Amazing Designs® (ADP-10J) • Baby Lock® Tear-Away Soft Stabilizer• 2 Squares orange felt• Madeira® sewing and embroidery thread• General sewing and embroidery supplies
1. Open the program by clicking on the EmbroideryWorks icon on the desktop.
2. To set up the workspace with the hoop, click on the Preference
icon on the top toolbar and select the hoops field. Select the 130mm x 180mm hoop and click OK.
3. To merge the design onto the workspace, click on the Merge Stitch File icon on the top
toolbar. Retrieve design number Hwn015 .pes from the saved location.
4. To resize the design so that it fits in the hoop, click on Fit to Hoop in the tool pane.
5. To View the density in the design, click on the Density Map icon.
The density level is the greatest in the red areas (as shown in the following illustration).
6. To adjust the density in the design, click on the Sweeper tool. The stitch count has been adjusted to reflect the change. The stitch count is shown on the status bar.
At the Sewing Machine
At the Embroidery Machine
1. Set up the machine for sewing.
2. With wrong sides together and the designs lined up, stitch around the top 1/3 of the design close to the embroidery. This will form a pocket.
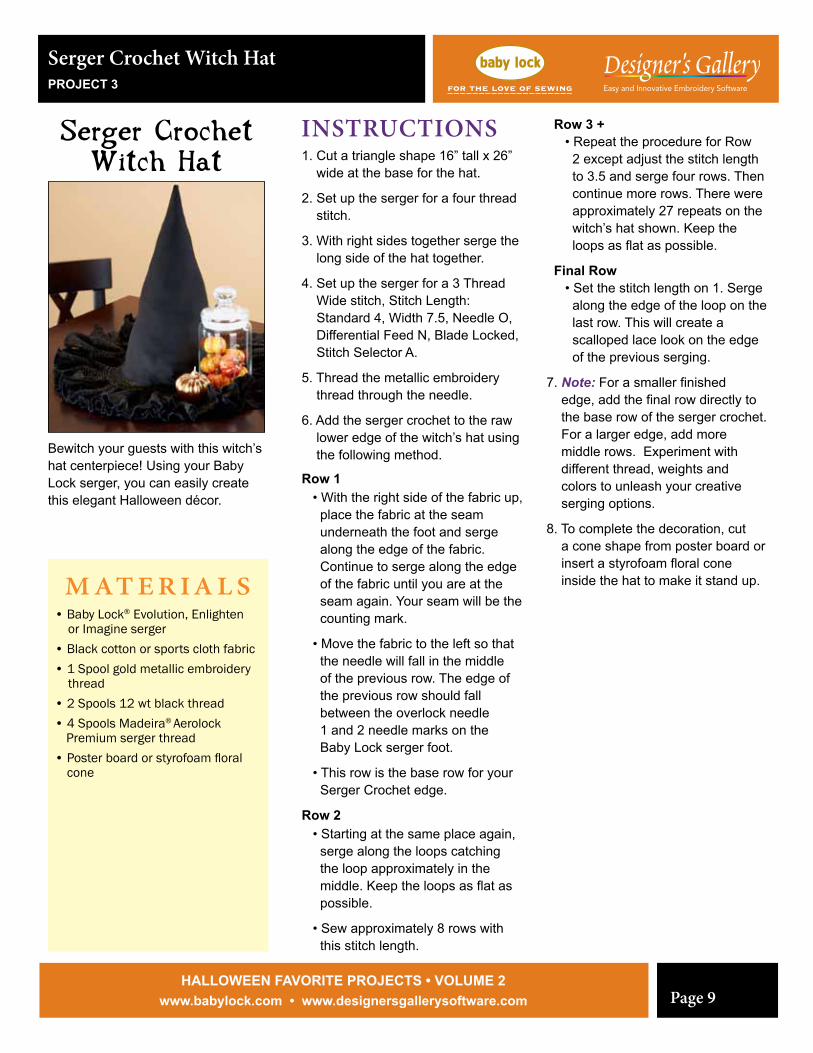
3. Using pinking shears, trim around the outer edge of the embroidered front and back sections while using the embroidered design as the guide. Do not cut into the embroidered areas. See the Tree Topper image on Page 4 as an example.
1. Hoop the stabilizer along with one of the squares of the orange felt in the 130mm x 180mm hoop.
2. Embroider the design using the Madeira thread colors.
3. Repeat these steps for the backside of the tree topper using the second design saved while using the same colors as in the first design.
INSTRUCTIONSAt the Computer
7. Click on File Save Stitch File and send the design to the machine for embroidery.
8. To create a copy of the design for the backside of the topper, click on Flip Horizontal.
9. Save the design with a new name and send to the machine for embroidery.
Halloween Wicked Words Tree TopperPROJECT 1
Page 5HALLOWEEN FAVORITE PROJECTS • VOLUME 2
www.babylock.com • www.designersgallerysoftware.com
Sewing Thread Has Finally
Met its Match!Introducing Aerolock
Premium Serger Thread from Madeira®
When you sew, you choose thread and fabric that pair well together. Now your serger thread can be part of that equation! Madeira’s NEW Aerolock Premium Serger Thread comes in 48 popular colors, specifically chosen to match the top colors of Madeira Aerofil Sewing and Quilting Thread. You’ll never have to settle for a “close enough” color again! Plus, this top quality, 100% core-spun polyester thread has been tested to ensure flawless stitches every time.
Find Madeira Aerolock Premium Serger Thread at your local sewing
machine retailer or at
www.sewingandcraftclub.com
Page 6HALLOWEEN FAVORITE PROJECTS • VOLUME 2
www.babylock.com • www.designersgallerysoftware.com
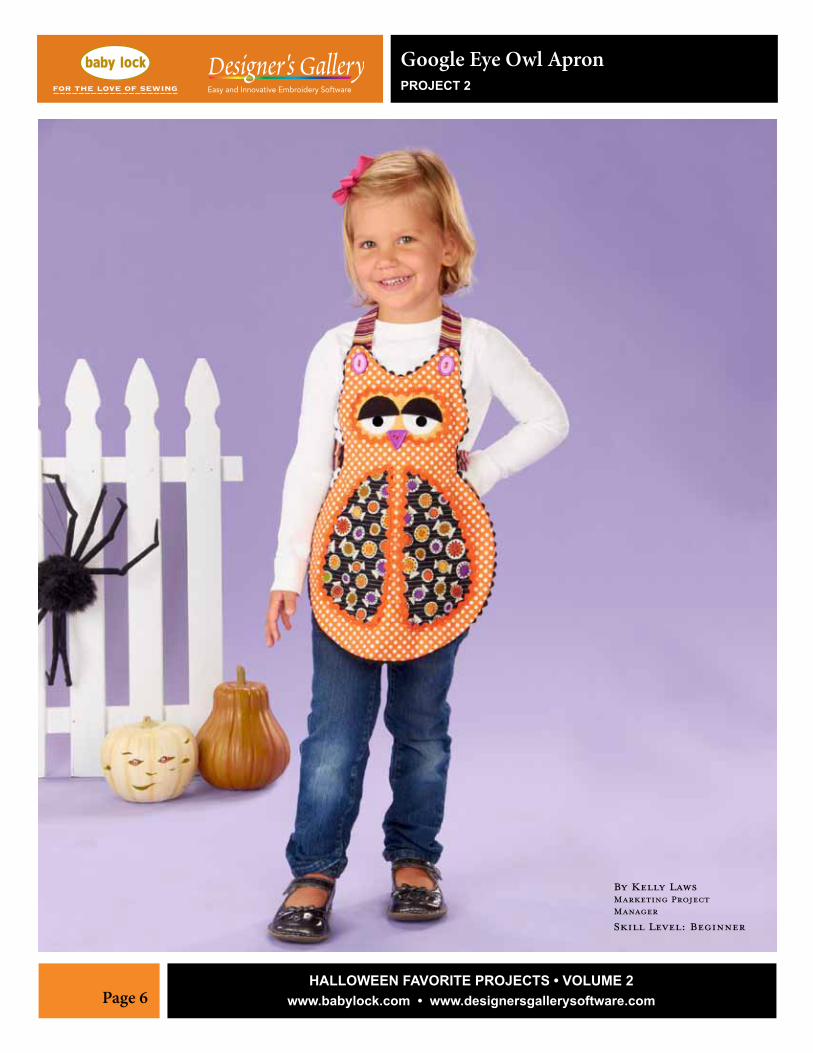
Google Eye Owl ApronPROJECT 2
By Kelly LawsMarketing Project Manager
Skill Level: Beginner
Page 7HALLOWEEN FAVORITE PROJECTS • VOLUME 2
www.babylock.com • www.designersgallerysoftware.com
INSTRUCTIONS1. Following the basic cutting directions from the apron pattern cut out the body, straps, wings and face mask.
2. For the eyes cut the largest circle from the white felt.
3. Cut four eyelid shapes from the black fabric instead of two as directed in the pattern.
4. Using a scant quarter inch and Madeira Aerofil thread, sew the straight edge of the eyelids together. Turn right side out and press.
5. On the face mask piece layer the white felt eye pieces and the black eyelids. Skipping the pupils at this time.
6. Appliqué the round edges of the eyelid down leaving the straight seamed edge loose from the white felt. This will allow the google eyes to be inserted after the stitching.
7. Continue the basic construction as directed in the McCall’s pattern.
8. For the rick rack look for trims specially packaged for the Halloween season. Often you can find season items that have added metallic or even glow in the dark accents. You can also add your own glow in the dark accents to ordinary trim or rick rack. Thread the machine with Madeira Glow in the dark thread and stitch the rick rack down using a decorative stitch built-in to your machine.
9. Once the apron appliqué is complete, use a buttonhole foot and a zigzag stitch to attach the beak triangle button and the oval buttons for the straps.
10. Slide the google eyes in place under the eyelids. Once you are satisfied with the location of the google eyes, glue in place using washable fabric glue.
M AT E R I A L S• Baby Lock® sewing machine • Hoot Owl Apron from McCall’s pattern 6373 • 1/2 Yard orange Halloween dot or mini print fabric for the main apron• 1/2 Yard stripe fabric for tie straps• 1/4 Yard Halloween candy print for wing pockets• Gold fabric remnant for face mask• Black fabric remnant for eyelids• White felt remnant for eyes• Madeira® Aerofil thread to match fabrics• Madeira® Glow-in-the-dark thread• Rick rack trim • 2 large 1” purple oval buttons for straps• 1 large 1” to 1 1/2” triangle button for beak• 2 large 1” google eyes• Fabric Glue
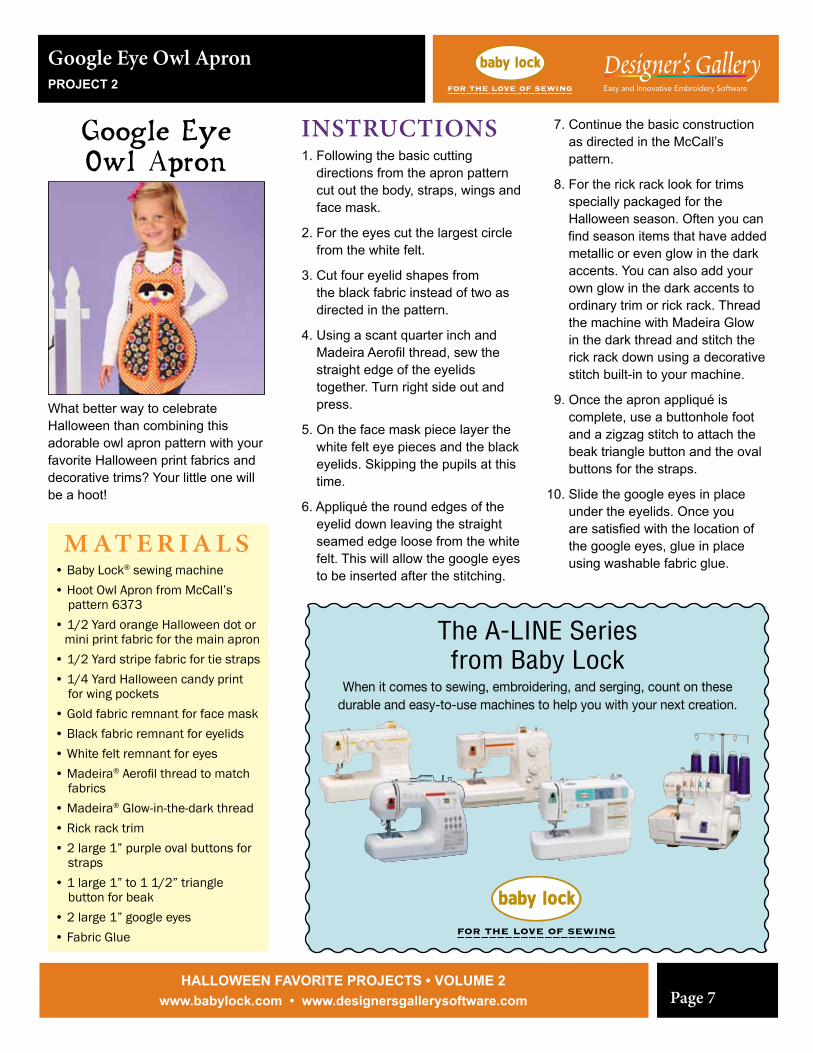
Google EyeOwl Apron
What better way to celebrate Halloween than combining this adorable owl apron pattern with your favorite Halloween print fabrics and decorative trims? Your little one will be a hoot!
Google Eye Owl Apron PROJECT 2
The A-LINE Seriesfrom Baby Lock
When it comes to sewing, embroidering, and serging, count on these durable and easy-to-use machines to help you with your next creation.
Page 8HALLOWEEN FAVORITE PROJECTS • VOLUME 2
www.babylock.com • www.designersgallerysoftware.com
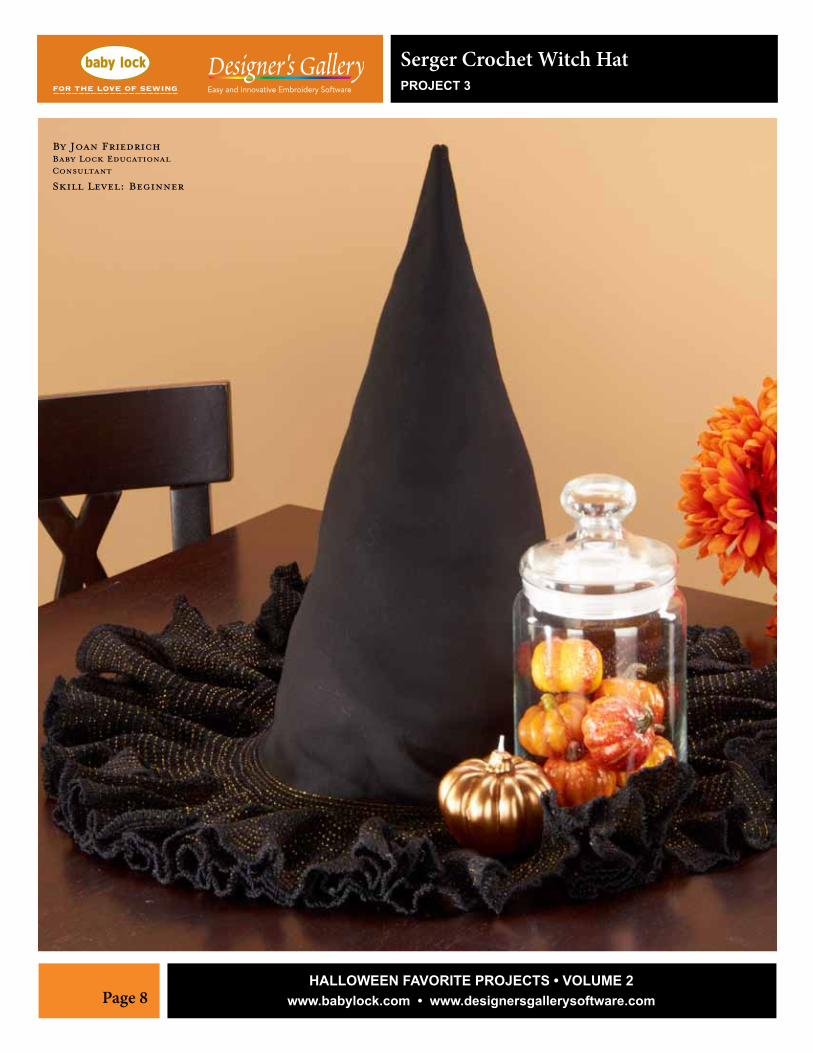
Serger Crochet Witch HatPROJECT 3
By Joan FriedrichBaby Lock Educational Consultant
Skill Level: Beginner
Page 9HALLOWEEN FAVORITE PROJECTS • VOLUME 2
www.babylock.com • www.designersgallerysoftware.com
INSTRUCTIONS1. Cut a triangle shape 16” tall x 26” wide at the base for the hat.
2. Set up the serger for a four thread stitch.
3. With right sides together serge the long side of the hat together.
4. Set up the serger for a 3 Thread Wide stitch, Stitch Length: Standard 4, Width 7.5, Needle O, Differential Feed N, Blade Locked, Stitch Selector A.
5. Thread the metallic embroidery thread through the needle.
6. Add the serger crochet to the raw lower edge of the witch’s hat using the following method.
Row 1 • With the right side of the fabric up, place the fabric at the seam underneath the foot and serge along the edge of the fabric. Continue to serge along the edge of the fabric until you are at the seam again. Your seam will be the counting mark.
• Move the fabric to the left so that the needle will fall in the middle of the previous row. The edge of the previous row should fall between the overlock needle 1 and 2 needle marks on the Baby Lock serger foot.
• This row is the base row for your Serger Crochet edge.
Row 2 • Starting at the same place again, serge along the loops catching the loop approximately in the middle. Keep the loops as flat as possible.
• Sew approximately 8 rows with this stitch length.
Row 3 + • Repeat the procedure for Row 2 except adjust the stitch length to 3.5 and serge four rows. Then continue more rows. There were approximately 27 repeats on the witch’s hat shown. Keep the loops as flat as possible.
Final Row • Set the stitch length on 1. Serge along the edge of the loop on the last row. This will create a scalloped lace look on the edge of the previous serging.
7. Note: For a smaller finished edge, add the final row directly to the base row of the serger crochet. For a larger edge, add more middle rows. Experiment with different thread, weights and colors to unleash your creative serging options.
8. To complete the decoration, cut a cone shape from poster board or insert a styrofoam floral cone inside the hat to make it stand up.M AT E R I A L S
• Baby Lock® Evolution, Enlighten or Imagine serger• Black cotton or sports cloth fabric• 1 Spool gold metallic embroidery thread• 2 Spools 12 wt black thread • 4 Spools Madeira® Aerolock Premium serger thread• Poster board or styrofoam floral cone
Serger Crochet Witch Hat
Bewitch your guests with this witch’s hat centerpiece! Using your Baby Lock serger, you can easily create this elegant Halloween décor.
Serger Crochet Witch HatPROJECT 3
Page 10HALLOWEEN FAVORITE PROJECTS • VOLUME 2
www.babylock.com • www.designersgallerysoftware.com
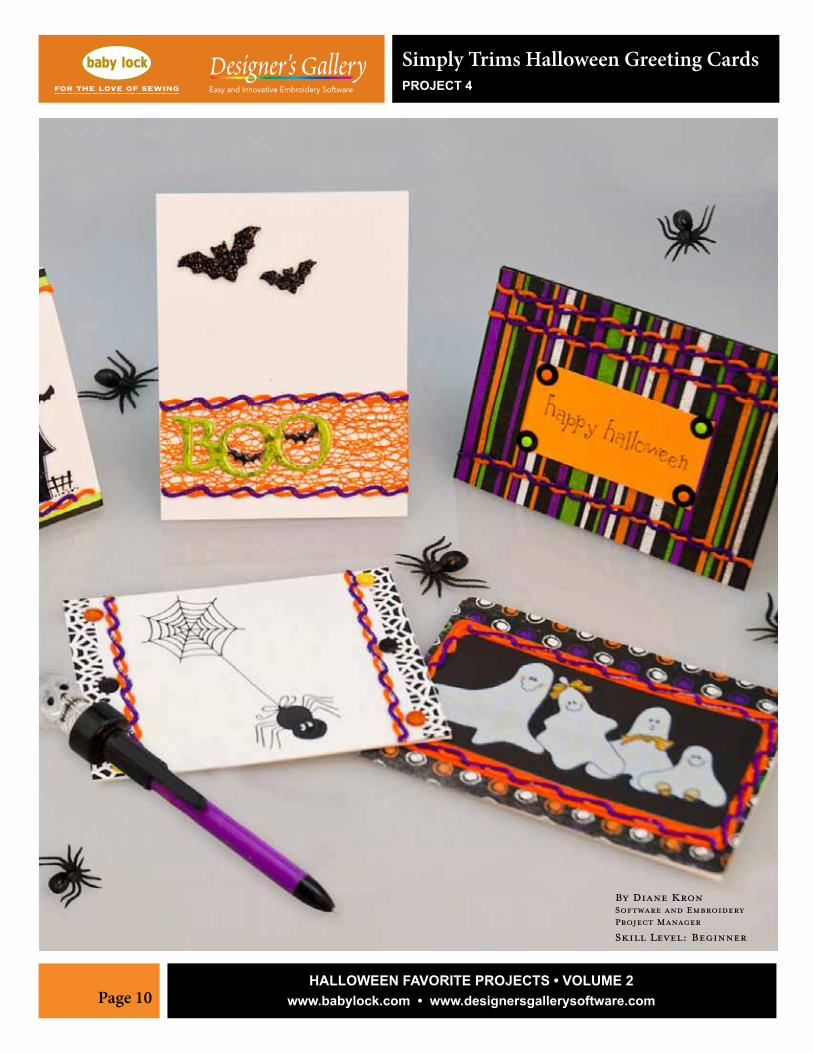
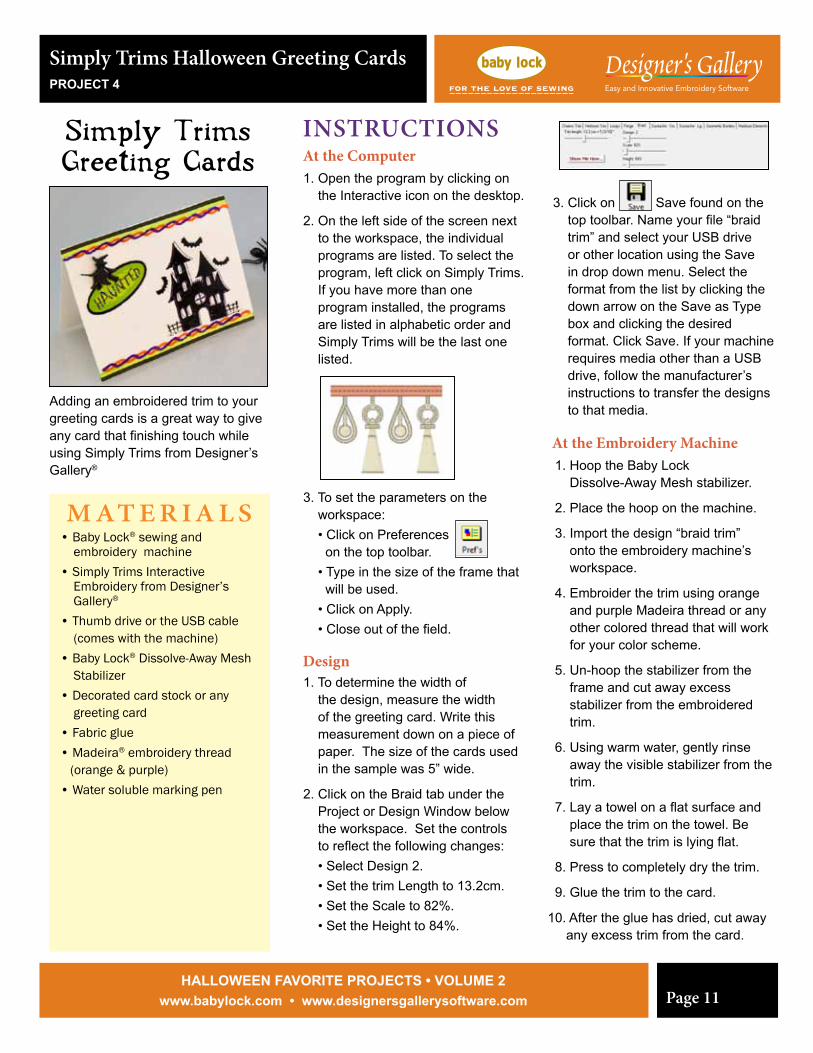
Simply Trims Halloween Greeting CardsPROJECT 4
By Diane KronSoftware and Embroidery Project Manager
Skill Level: Beginner
Page 11HALLOWEEN FAVORITE PROJECTS • VOLUME 2
www.babylock.com • www.designersgallerysoftware.com
INSTRUCTIONSAt the Computer
At the Embroidery Machine
Design
3. Click on Save found on the top toolbar. Name your file “braid trim” and select your USB drive or other location using the Save in drop down menu. Select the format from the list by clicking the down arrow on the Save as Type box and clicking the desired format. Click Save. If your machine requires media other than a USB drive, follow the manufacturer’s instructions to transfer the designs to that media.
1. Open the program by clicking on the Interactive icon on the desktop.
2. On the left side of the screen next to the workspace, the individual programs are listed. To select the program, left click on Simply Trims. If you have more than one program installed, the programs are listed in alphabetic order and Simply Trims will be the last one listed.
3. To set the parameters on the workspace:
• Click on Preferences on the top toolbar.
• Type in the size of the frame that will be used.
• Click on Apply.
• Close out of the field.
1. Hoop the Baby Lock Dissolve-Away Mesh stabilizer.
2. Place the hoop on the machine.
3. Import the design “braid trim” onto the embroidery machine’s workspace.
4. Embroider the trim using orange and purple Madeira thread or any other colored thread that will work for your color scheme.
5. Un-hoop the stabilizer from the frame and cut away excess stabilizer from the embroidered trim.
6. Using warm water, gently rinse away the visible stabilizer from the trim.
7. Lay a towel on a flat surface and place the trim on the towel. Be sure that the trim is lying flat.
8. Press to completely dry the trim.
9. Glue the trim to the card.
10. After the glue has dried, cut away any excess trim from the card.
1. To determine the width of the design, measure the width of the greeting card. Write this measurement down on a piece of paper. The size of the cards used in the sample was 5” wide.
2. Click on the Braid tab under the Project or Design Window below the workspace. Set the controls to reflect the following changes:
• Select Design 2.
• Set the trim Length to 13.2cm.
• Set the Scale to 82%.
• Set the Height to 84%.
M AT E R I A L S• Baby Lock® sewing and embroidery machine • Simply Trims Interactive Embroidery from Designer’s Gallery®
• Thumb drive or the USB cable (comes with the machine)• Baby Lock® Dissolve-Away Mesh Stabilizer• Decorated card stock or any greeting card• Fabric glue• Madeira® embroidery thread (orange & purple)• Water soluble marking pen
Simply TrimsGreeting Cards
Adding an embroidered trim to your greeting cards is a great way to give any card that finishing touch while using Simply Trims from Designer’s Gallery®
Simply Trims Halloween Greeting CardsPROJECT 4
Page 12HALLOWEEN FAVORITE PROJECTS • VOLUME 2
www.babylock.com • www.designersgallerysoftware.com
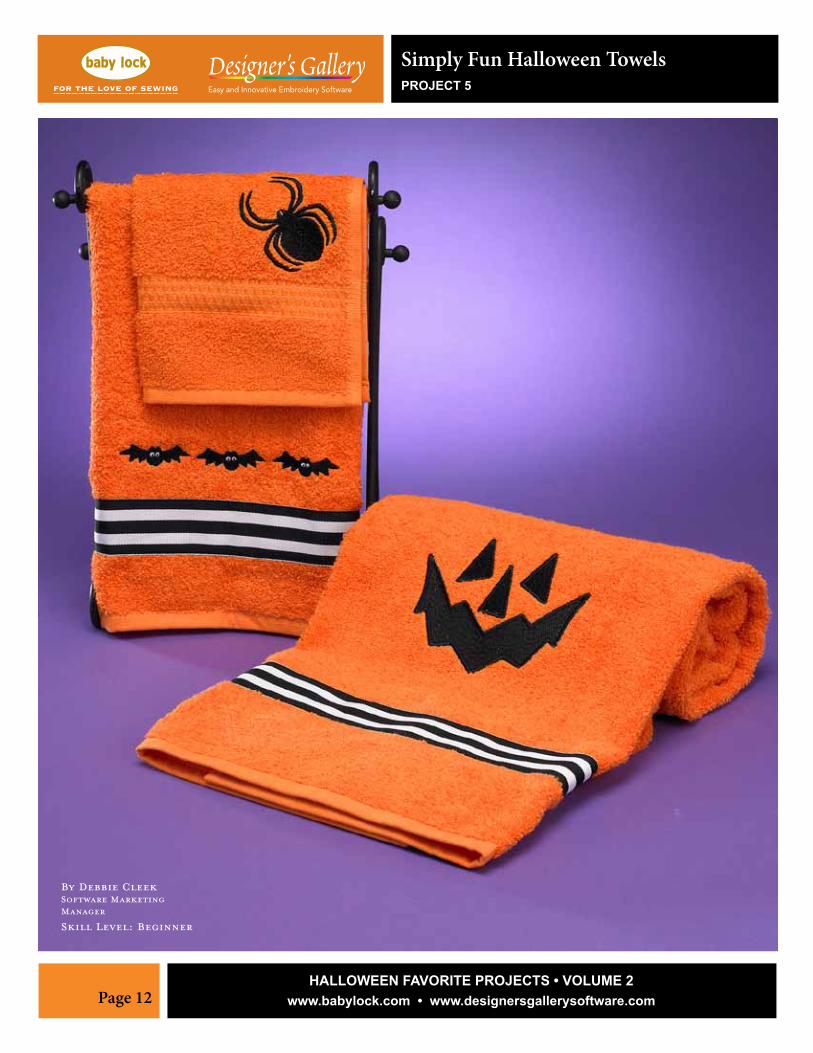
Simply Fun Halloween TowelsPROJECT 5
By Debbie CleekSoftware Marketing Manager
Skill Level: Beginner
Page 13HALLOWEEN FAVORITE PROJECTS • VOLUME 2
www.babylock.com • www.designersgallerysoftware.com
INSTRUCTIONSAt the Computer1. Browse the design collections and locate designs PLH119, PLH120 and PLH121.
2. Set up your machine for embroidery.
3. Load the PLH120 design onto your machine. Hoop the tear-away stabilizer in the appropriate hoop and spray with temporary spray adhesive (some designs in this collection require the 130mm x 180mm hoop).
4. Attach the bath towel to the stabilizer, centering it in the hoop just above the border stripe. Layer a piece of Hydro-Melt Embroidery Topping on top.
5. Stitch the design. Remove from hoop and tear away the excess stabilizer.
6. Repeat these steps to stitch the other designs onto the hand towel and wash cloth.
7. Cut a piece of ribbon the width of the towel + 1”. Pin this to the bottom of the towel, tucking the cut ends at each edge of the towel.
8. Set up your machine for straight stitch sewing.
9. Using a straight stitch, sew along the top and bottom edge of the ribbon to attach it to the towel. Repeat this for the hand towel.
These towels are ready to hang or take to the party for the bewitching hostess!
M AT E R I A L S• Baby Lock® Ellure Plus or machine with a 130mm x 180mm embroidery field • Patrick Lose’s Happy Halloween collection—ADP-89 • 3-piece bath towel set • 1 Spool 1-1/2” wide black and white ribbon • Baby Lock® Rinse Away Tear Away stabilizer • Baby Lock® Hydro-Melt Embroidery Topping • Temporary spray adhesive • Small and medium hoops • Air Erasable Fabric Marker Ruler • Small Scissors • Assortment of Madeira® embroidery thread
Simply FunHalloween Towels
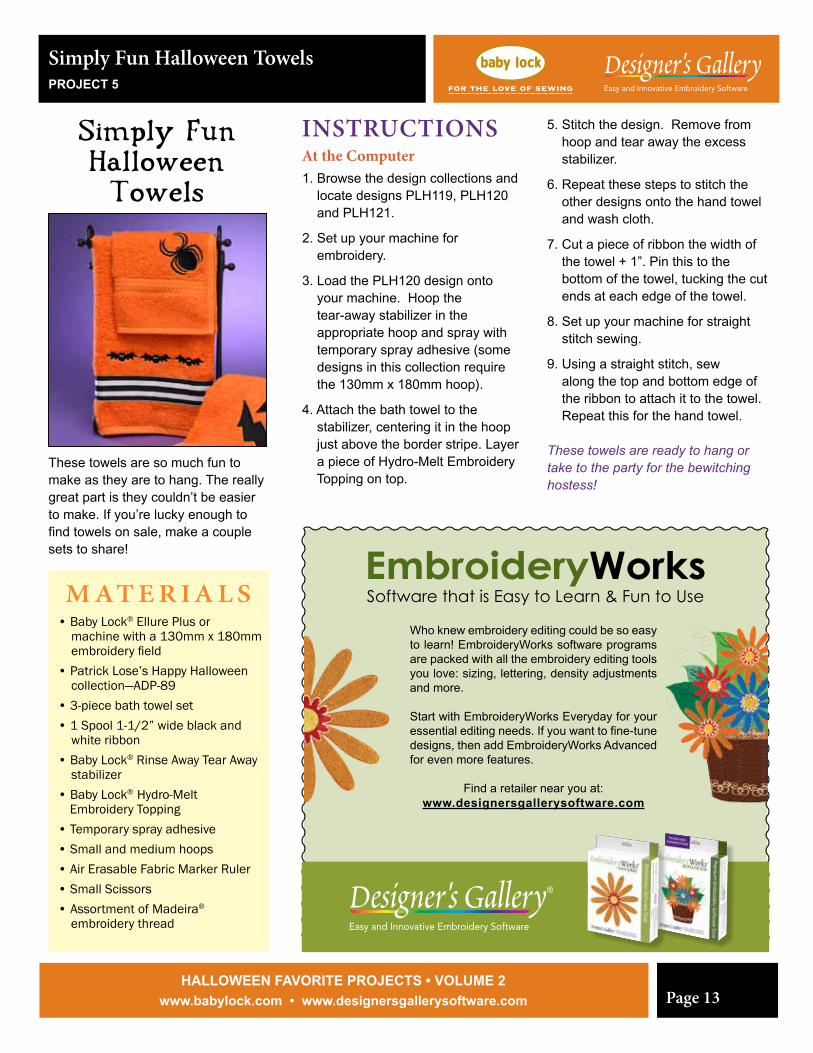
These towels are so much fun to make as they are to hang. The really great part is they couldn’t be easier to make. If you’re lucky enough to find towels on sale, make a couple sets to share!
Simply Fun Halloween Towels PROJECT 5
Who knew embroidery editing could be so easy to learn! EmbroideryWorks software programs are packed with all the embroidery editing tools you love: sizing, lettering, density adjustments and more.
Start with EmbroideryWorks Everyday for your essential editing needs. If you want to fine-tune designs, then add EmbroideryWorks Advanced for even more features.
Find a retailer near you at: www.designersgallerysoftware.com
EmbroideryWorksSoftware that is Easy to Learn & Fun to Use
Page 14HALLOWEEN FAVORITE PROJECTS • VOLUME 2
www.babylock.com • www.designersgallerysoftware.com
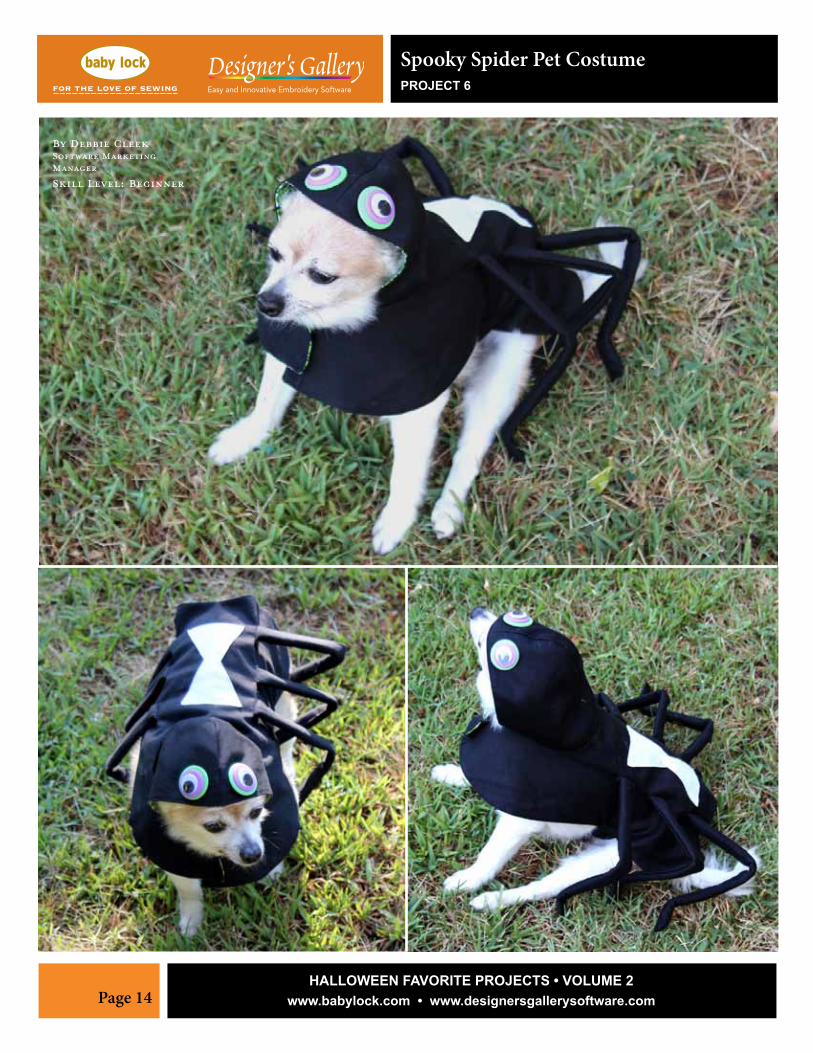
Spooky Spider Pet CostumePROJECT 6
By Debbie CleekSoftware Marketing Manager
Skill Level: Beginner
INSTRUCTIONS1. Cut out and assemble coat per pattern instructions. Omit the belt and belt-loops.
2. From the white felt square, cut out a simple hour glass shape. The size of the hour glass will depend on the size of the coat.
3. From the remaining coat fabric, cut 6 strips of fabric 3” x 12”
4. From the batting, cut 6 strips off batting 3” x 10”.
5. Cut the pieces of floral wire down to 9”.
6. To turn the coat into a spider costume, fold the fabric strips in half lengthwise, right-sides together.
7. Using a ½” seam, sew along one short end and down the length of the fabric. Trim the seam, clip the corners and turn right side out. Repeat this for the remaining fabric strips.
8. Working with the batting and floral wire, wrap each wire with a piece of the batting.
9. Insert the batting wrapped wire into the sewn fabric strips. There will be one strip remaining. Press this strip so it is flat. On the end that is closed, sew the loop piece of the hook and loop tape. This will be the closure for the costume.
10. Using your pet as your model, slip the costume over your pet and mark the placement for the closure strip.
11. Align the raw edge of the strip with the edge of the costume where you marked it and sew it to the costume using a ½” seam. Fold the strip down away from the costume and top stitch ¼” from the fold.
12. Sew the hook piece of the tape to the coat to match the location of the strip.
13. Using a pin or chalk marker, mark the placement for the legs, 3 on each side.
14. Sew the legs to the costume the same way the closure strip was attached by placing the raw edge on the placement mark with the length of the leg away from the edge of the costume. Fold the leg down toward the edge of the costume and top stitch ¼” from the fold.
15. To create the eyes, layer the buttons, with the large on the bottom and the wiggle eye on top and sew onto the hood of the costume, one on each side of the center of the hood.
M AT E R I A L S• Baby Lock® sewing machine • Madiera® Aerofil Sewing Thread• Kwik Sew Pattern #3207 or similar pattern• Fabric per pattern recommendation for desired size• ¼ to ½ Yard additional fabric for the legs (amount will depend on the size)• ¼ to ½ Yard thin batting for the legs (amount will depend on the size)• 1 White Felt Square• 2 - ¾” Sew-on wiggle eyes• 2 - 1 ½” buttons (2-hole buttons work best)• 2 - 1” buttons• 3” Piece of sew-on hook and loop tape• 6 Pieces of 16-18 gauge floral stem wire• Wire cutters• Ruler• Scissors• Pins
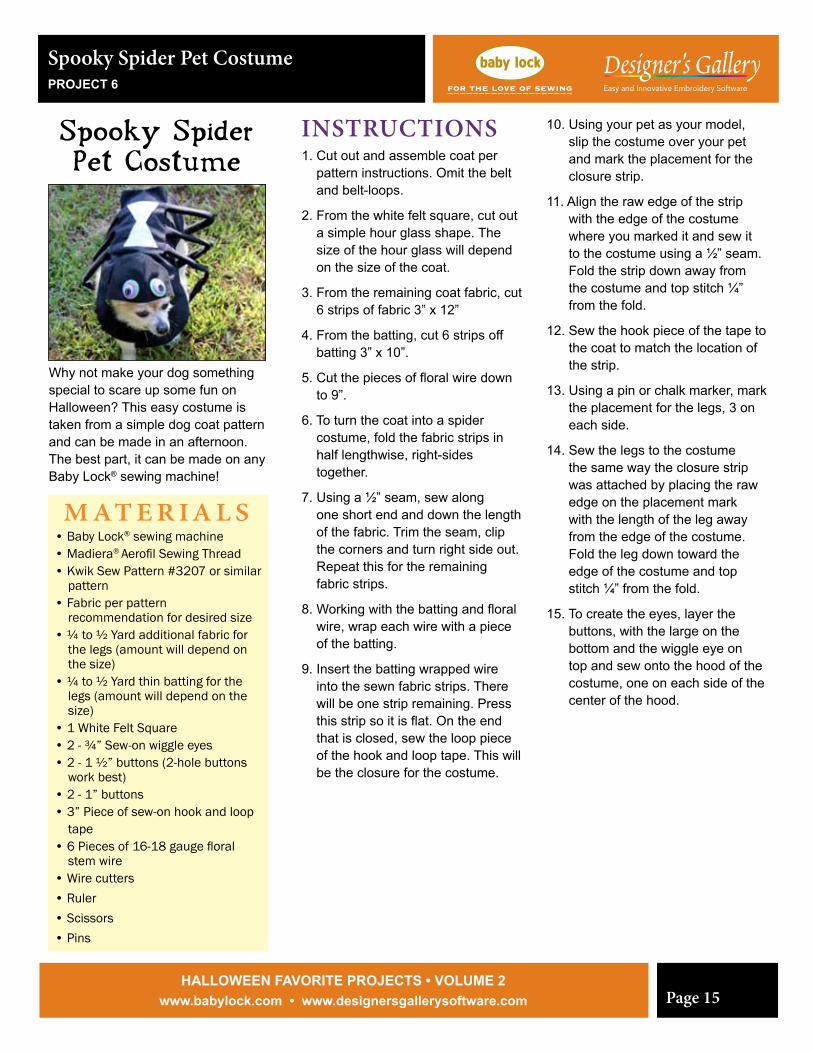
Spooky SpiderPet Costume
Why not make your dog something special to scare up some fun on Halloween? This easy costume is taken from a simple dog coat pattern and can be made in an afternoon. The best part, it can be made on any Baby Lock® sewing machine!
Spooky Spider Pet CostumePROJECT 6
Page 15HALLOWEEN FAVORITE PROJECTS • VOLUME 2
www.babylock.com • www.designersgallerysoftware.com
Page 16HALLOWEEN FAVORITE PROJECTS • VOLUME 2
www.babylock.com • www.designersgallerysoftware.com
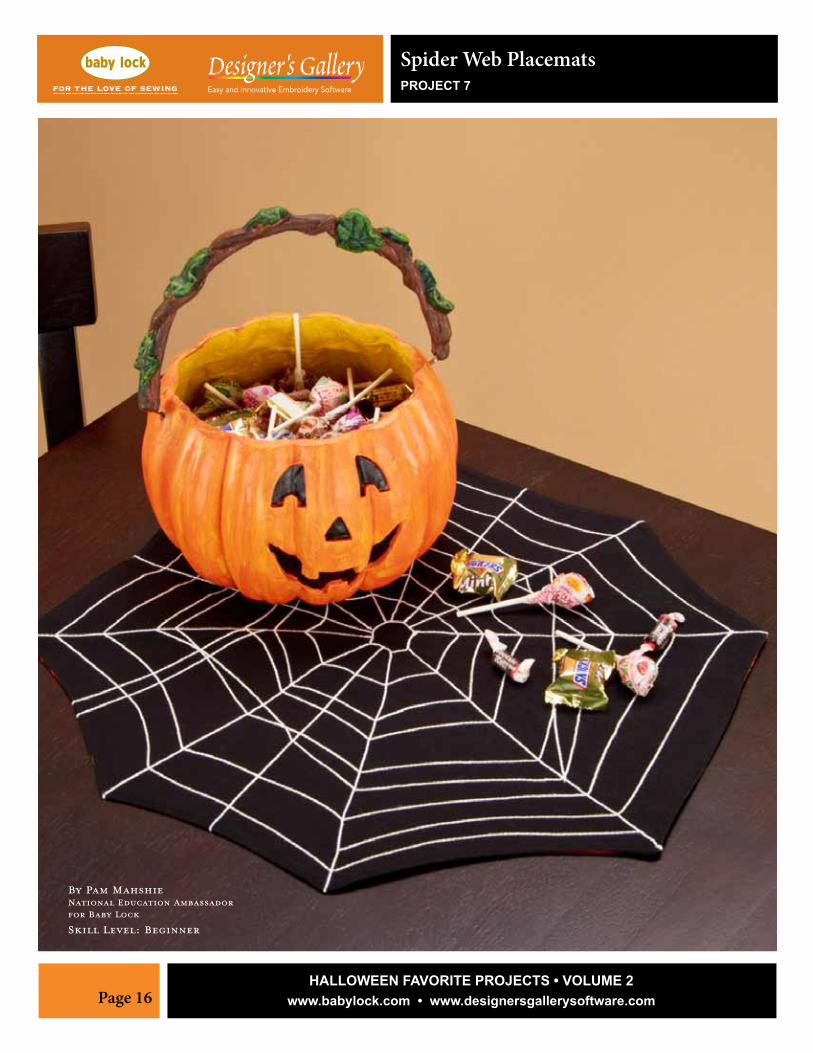
Spider Web PlacematsPROJECT 7
By Pam MahshieNational Education Ambassador for Baby Lock
Skill Level: Beginner
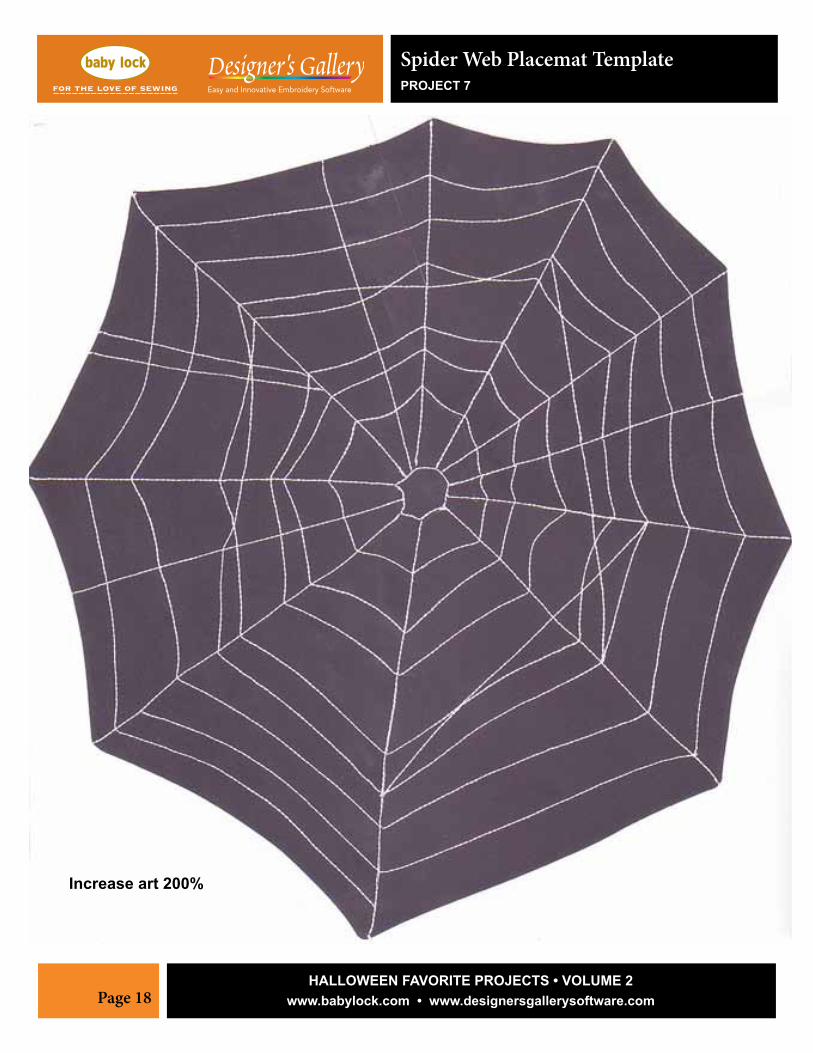
INSTRUCTIONS1. Trace the web design onto the fusible interfacing using the marking pen or pencil. This will be on the wrong side of your project and tracing needs to be bold or dark lines.
2. Fuse the traced interfacing to the wrong side of the black kona cotton fabric
3. Wind the bobbin with the decorative thread and replace the bobbin case with the Alternate bobbin-work grey bobbin case.
4. Select a straight stitch and increase stitch length to a minimum of 3.0 this will vary depending on the weight of the thread you use.
Tip: Test your stitch on a scrap fabric before starting on your project.
5. You will be stitching on the wrong side of the fabric. Start stitching in the middle of the web and work your way to the outer edges. Start with a longer bobbin thread and pull it to the top side of the fabric hold the decorative thread and start stitching
6. After stitching is complete change back to regular bobbin case and place black Aerofil thread in the bobbin and thread the machine with the same black thread for construction.
7. Place right sides together of lining and the stitched place mat.
8. Stitch around the placemat following the outside edge of the fabric as a guide. Remember to leave an opening. Trim the seams and clip the curves, turn right side out. Press and top stitch the opening closed.
Note: For a spooky fun Halloween effect try stitching using a glow-in-the-dark thread.
M AT E R I A L S• Baby Lock® sewing machine with alternate bobbin work bobbin case (grey)• 1 Yard black Kona® cotton • 1 Yard Halloween fabric for lining• 1 Spool 12 wt Sulky® or Madeira® Decora 6 White thread• 1 Spool white Madeira® Aerofil sewing thread• 1 Spool black Madeira® Aerofil sewing thread• 2 Yards iron-on interfacing• Marking pen or pencil
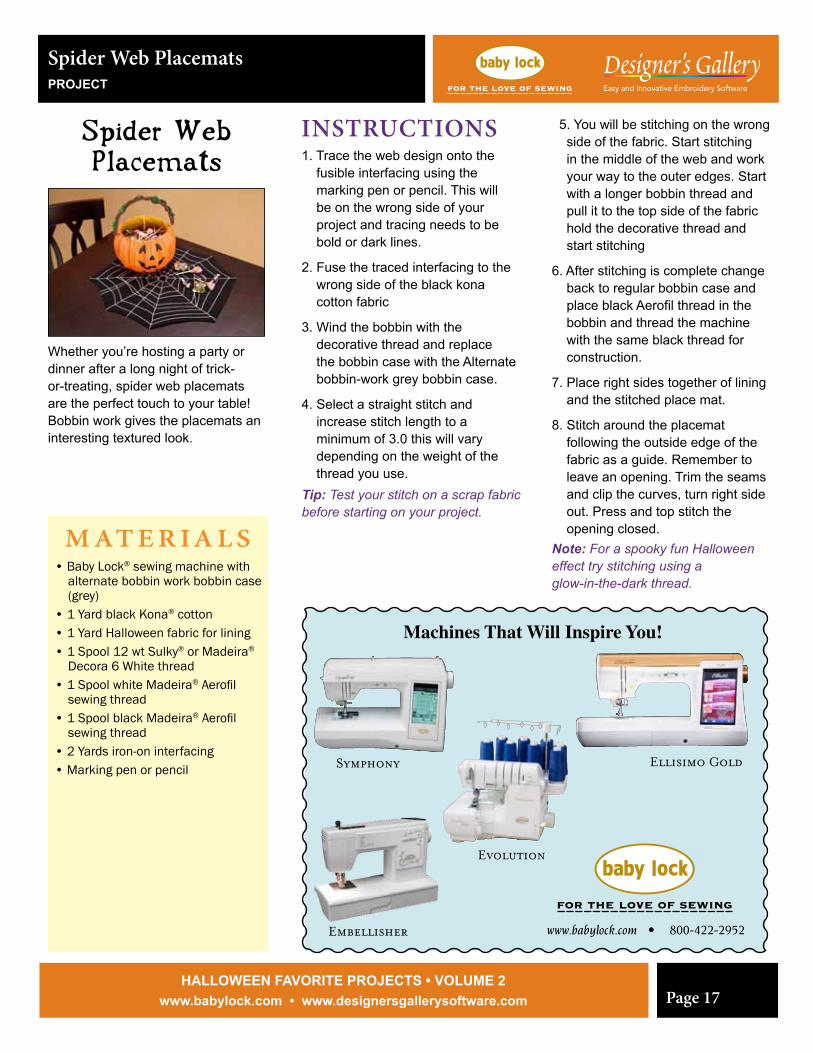
Spider WebPlacemats
Whether you’re hosting a party or dinner after a long night of trick-or-treating, spider web placemats are the perfect touch to your table! Bobbin work gives the placemats an interesting textured look.
Spider Web PlacematsPROJECT
Page 17HALLOWEEN FAVORITE PROJECTS • VOLUME 2
www.babylock.com • www.designersgallerysoftware.com
www.babylock.com • 800-422-2952
Ellisimo Gold
Embellisher
Symphony
Evolution
Machines That Will Inspire You!
Page 18HALLOWEEN FAVORITE PROJECTS • VOLUME 2
www.babylock.com • www.designersgallerysoftware.com
Spider Web Placemat TemplatePROJECT 7
Increase art 200%
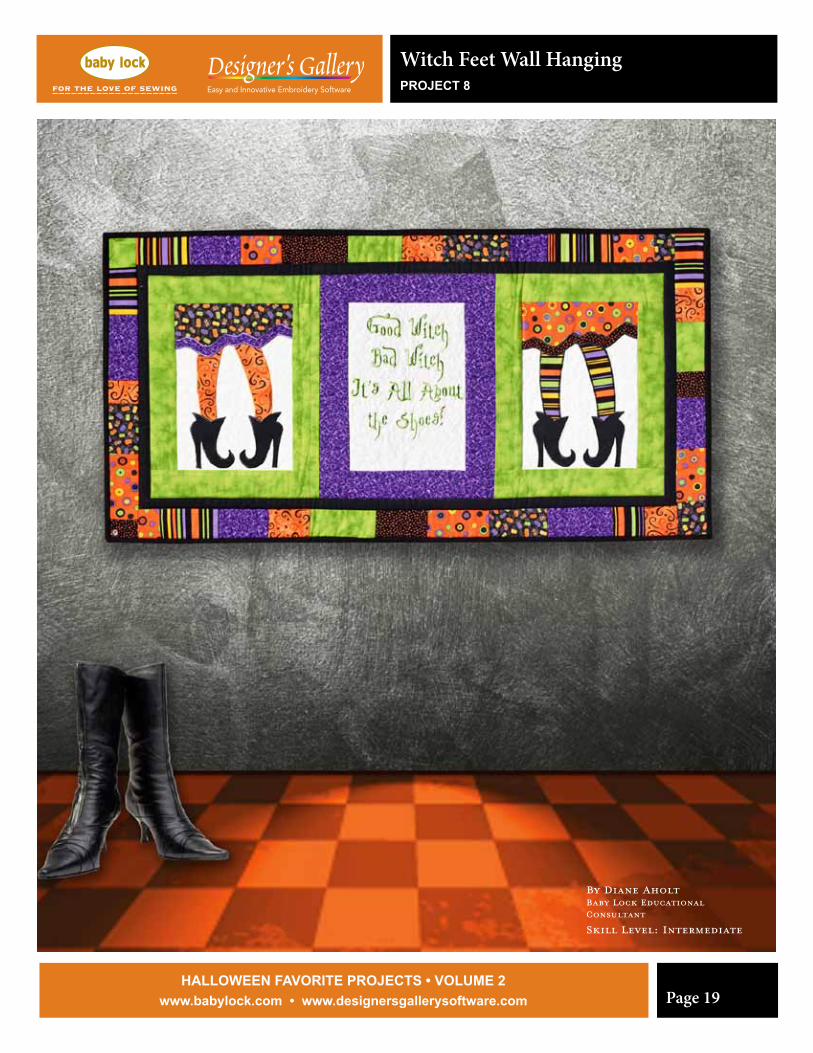
Witch Feet Wall HangingPROJECT 8
By Diane AholtBaby Lock Educational Consultant
Skill Level: Intermediate
Page 19HALLOWEEN FAVORITE PROJECTS • VOLUME 2
www.babylock.com • www.designersgallerysoftware.com

INSTRUCTIONS1. Set the machine up for sewing and thread with the all-purpose thread.
2. Following the “Which Witch” quilt pattern, complete two appliqué witch blocks.
3. Open Designer’s Gallery LetterWorks and select the Parry Hotter font.
4. Program in the wording “Good Witch Bad Witch It’s All About the Shoes.” to fit into a 5” x 7” frame.
5. Save the design and transfer it to the embroidery machine.
6. Hoop the stabilizer and fabric and embroider the wording for the center block of the wall hanging.
7. Once the three center blocks have been created add a border to each block. Cut 2 ½” strips from the green fabric and the purple fabric.
8. Connect the three center blocks together using a 1/4” seam allowance.
13. To finish the quilt bind the edges with black fabric using your preferred binding techniques or method.
9. Cut 1” strips from the black fabric and add a small accent border to all four sides.
10. From the fat quarters cut strips 2 ½” wide x 2 ½ to 4” in length. Cut a few green and purple strips 2 1/2” wide also.
11. Sew the small strips together into a long strip. Use this patchwork strip to add an outer border to all four sides.
12. Layer the backing, batting and binding and quilt the layers together as desired. A combination of stitch-in-the ditch and stippling techniques were used for the example shown.
M AT E R I A L S• Baby Lock® Ellure sewing and embroidery machine• Designer’s Gallery® LetterWorks III• Assorted Spools embroidery thread• Madeira® Aerofil all-purpose thread to match fabrics• “Which Witch” pattern from Crazy Old Ladies Quilt Pattern (crazyoldladiesquilts.blogspot.com)• Baby Lock® Cut-Away stabilizer• 1 Yard black cotton for the backing and border• ¼ Yard white for background• ½ Yard purple cotton• ½ Yard green cotton• Fat quarter in the following colors: - Orange dot - Orange swirl - Multicolor mini print - Multicolor stripe - Black and orange dot
Witch Feet Wall Hanging
This wickedly playful wall hanging will look great in any room! Use Designer’s Gallery® LetterWorksTM III,lettering software, to add a fun phrase and make this project stand out in your home.
DesignersGallerySoftware.com
Witch Feet Wall HangingPROJECT 8
It’s Not Always What You Say, It’s How You Say It!
You create the sentiment, LetterWorks III software will add the style. Express yourself with multi-line text, 165 fonts and the ability to import True Type Fonts from your PC. LetterWorks III includes plenty of options to make every gift from the heart.
Page 20HALLOWEEN FAVORITE PROJECTS • VOLUME 2
www.babylock.com • www.designersgallerysoftware.com

We hope you enjoy your Halloween Projects Volume 2. Watch for more volumes coming soon.
Collect and sew them all!
vs.AirThreading
TheirThreading
Why settle for an “almost as good” serger when you can own the real thing, a Baby Lock? Only Baby Lock can deliver on the promise of
superior threading and ease of use, where others cannot.
Remember, if it doesn’t say ExtraordinAirTM or Jet-Air ThreadingTM, it’s nothing but a substitute.
www.babylock.com
www.babylock.com
800-422-2952
Accept No Substitutes
www.designersgallerysoftware.com
Beautiful, high-quality designs every month for all your embroidery projects!
www.amazingdesigns.com
YOur Suite Dreams with Koala
With Koala Studios, your suite dreams will come true. All Koala Studios are made in America and customized to your unique desires. Add extra palettes for a larger workspace, and even choose a comfortable height for your studio. Plus, with studios of all sizes and add-ons for extra storage, Koala has everything you need to complete your ideal sewing suite. Ask your local Koala retailer for a copy of the new Dream Studio Planner and design your room before ever making a purchase. Visit www.mykoalastudio.com for your FREE Dream Studio Planner and to start planning your dream sewing room today.
Visit sewingandcraftclub.com to learn more about Koala Studios today.
www.sewingandcraftclub.com
*With Outback Leaf Extension folded down add 3/4” to D
7
The materials provided are intended to assist you in visualizing your Koala Dream Studio and while effort has been made to accurately scale the dimensions of each Koala Studio
piece, no warranty is made as to the accuracy or reliability of the materials provided.
Doo
r - 3
” W
Doo
r - 3
” W
Studio Base70” W x 21-3/4” D
Studio Base70” W x 21-3/4” D
:L
Right Notions Palette26” W x 15-3/4” D
:L
Left Fabric Palette26” W x 15-3/4” D Studio Base70” W x 21-3/4” D
:L
Left Fabric Palette26” W x 15-3/4” D Studio Base70” W x 21-3/4” D
:L
Right Notions Palette26” W x 15-3/4” D
Studio Base70” W x 21-3/4” D
:L
Right Notions Palette15-3/4” W x 26” D
Studio Base70” W x 21-3/4” D
Studio Base70” W x 21-3/4” D:L
Left Fabric Palette15-3/4” W x 26“ D
:L
Right Notions Palette15-3/4” W x 26” D
Studio Base70” W x 21-3/4” D:L
Left Fabric Palette15-3/4” W x 26“ D
70” Width Models - QuiltMate Plus IV, QuiltPro Plus IV and DualMate Plus IV
Doo
r - 3
” W
Doo
r - 3
” W
Doo
r - 3
” W
Doo
r - 3
” W
Cub Plus IV LH/ RH
www.sewingandcraftclub.com
1
The materials provided are intended to assist you in visualizing your Koala Dream Studio and while effort has been made to accurately scale the dimensions of each Koala Studio piece, no warranty is made as to the accuracy or reliability of the materials provided.
*With Outback Leaf Extension folded down add 3/4” to D
:L
Right Notions Palette26” W x 15-3/4” D
Studio Base35-1/4” W x 21-3/4” D
Cub Plus IV RH
:L
Left Fabric Palette26” W x 15-3/4” D
Studio Base35-1/4” W x 21-3/4” D
Cub Plus IV LH
Studio Base
35-1/4” W x 21-3/4” D
Cub Plus IV LHCub Plus IV RH
Studio Base35-1/4” W x 21-3/4” D
Cub Plus IV LH
Doo
r - 3
” W
Studio Base35-1/4” W x 21-3/4” D
Cub Plus IV RH
Doo
r - 3
” W
Studio Base35-1/4” W x 21-3/4” D
Cub Plus IV LH
Doo
r - 3
” W
OutBack Leaf Extension
(optional)35-1/4” W x 23-3/4” D
Studio Base35-1/4” W x 21-3/4” D
Cub Plus IV RH
Doo
r - 3
” W
OutBack Leaf Extension
(optional)35-1/4” W x 23-3/4” D
Studio Base35-1/4” W x 21-3/4” D
Cub Plus IV LH
:L Left Fabric Palette
15-3/4” W x 26“ D
Studio Base35-1/4” W x 21-3/4” D
Cub Plus IV LH
OutBack Leaf Extension
(optional)35-1/4” W x 23-3/4” D
:L Left Fabric Palette
15-3/4” W x 26“ D
:L
Right Notions Palette26” W x 15-3/4” D
Studio Base35-1/4” W x 21-3/4” D
Cub Plus IV LH
OutBack Leaf Extension
(optional)35-1/4” W x 23-3/4” D
Studio Base35-1/4” W x 21-3/4” D
Cub Plus IV RH
:L
Right Notions Palette
15-3/4” W x 26” D
Studio Base35-1/4” W x 21-3/4” D
Cub Plus IV RH
OutBack Leaf Extension
(optional)35-1/4” W x 23-3/4” D
:L
Right Notions Palette
15-3/4” W x 26” D
Studio Base35-1/4” W x 21-3/4” D
Cub Plus IV LH
OutBack Leaf Extension
(optional)35-1/4” W x 23-3/4” D
:L
Left Fabric Palette26” W x 15-3/4” D