gtk v1.2 tutorial - xlb.esxlb.es/gtk-tutorial.pdf · gtk v1.2 tutorial tony gale ian main ,...
TRANSCRIPT
GTK v1.2 Tutorial
Tony Gale <[email protected]> Ian Main <[email protected]>, February 21st, 1999
This is a tutorial on how to use GTK (the GIMP Toolkit) through its C interface.
Contents
1 Introduction 7
2 Getting Started 8
2.1 Hello World in GTK . . . . . . . . . . . . . . . . . . . . . . . . . . . . . . . . . . . . . . . . . 10
2.2 Compiling Hello World . . . . . . . . . . . . . . . . . . . . . . . . . . . . . . . . . . . . . . . . 12
2.3 Theory of Signals and Callbacks . . . . . . . . . . . . . . . . . . . . . . . . . . . . . . . . . . 12
2.4 Events . . . . . . . . . . . . . . . . . . . . . . . . . . . . . . . . . . . . . . . . . . . . . . . . . 13
2.5 Stepping Through Hello World . . . . . . . . . . . . . . . . . . . . . . . . . . . . . . . . . . . 16
3 Moving On 18
3.1 Data Types . . . . . . . . . . . . . . . . . . . . . . . . . . . . . . . . . . . . . . . . . . . . . . 18
3.2 More on Signal Handlers . . . . . . . . . . . . . . . . . . . . . . . . . . . . . . . . . . . . . . . 19
3.3 An Upgraded Hello World . . . . . . . . . . . . . . . . . . . . . . . . . . . . . . . . . . . . . . 19
4 Packing Widgets 21
4.1 Theory of Packing Boxes . . . . . . . . . . . . . . . . . . . . . . . . . . . . . . . . . . . . . . . 21
4.2 Details of Boxes . . . . . . . . . . . . . . . . . . . . . . . . . . . . . . . . . . . . . . . . . . . . 22
4.3 Packing Demonstration Program . . . . . . . . . . . . . . . . . . . . . . . . . . . . . . . . . . 23
4.4 Packing Using Tables . . . . . . . . . . . . . . . . . . . . . . . . . . . . . . . . . . . . . . . . . 28
4.5 Table Packing Example . . . . . . . . . . . . . . . . . . . . . . . . . . . . . . . . . . . . . . . 30
5 Widget Overview 32
5.1 Casting . . . . . . . . . . . . . . . . . . . . . . . . . . . . . . . . . . . . . . . . . . . . . . . . 32
5.2 Widget Hierarchy . . . . . . . . . . . . . . . . . . . . . . . . . . . . . . . . . . . . . . . . . . . 33
5.3 Widgets Without Windows . . . . . . . . . . . . . . . . . . . . . . . . . . . . . . . . . . . . . 35
6 The Button Widget 35
6.1 Normal Buttons . . . . . . . . . . . . . . . . . . . . . . . . . . . . . . . . . . . . . . . . . . . . 35
6.2 Toggle Buttons . . . . . . . . . . . . . . . . . . . . . . . . . . . . . . . . . . . . . . . . . . . . 38
6.3 Check Buttons . . . . . . . . . . . . . . . . . . . . . . . . . . . . . . . . . . . . . . . . . . . . 39
6.4 Radio Buttons . . . . . . . . . . . . . . . . . . . . . . . . . . . . . . . . . . . . . . . . . . . . 39

CONTENTS 2
7 Adjustments 41
7.1 Creating an Adjustment . . . . . . . . . . . . . . . . . . . . . . . . . . . . . . . . . . . . . . . 41
7.2 Using Adjustments the Easy Way . . . . . . . . . . . . . . . . . . . . . . . . . . . . . . . . . . 42
7.3 Adjustment Internals . . . . . . . . . . . . . . . . . . . . . . . . . . . . . . . . . . . . . . . . . 42
8 Range Widgets 44
8.1 Scrollbar Widgets . . . . . . . . . . . . . . . . . . . . . . . . . . . . . . . . . . . . . . . . . . . 44
8.2 Scale Widgets . . . . . . . . . . . . . . . . . . . . . . . . . . . . . . . . . . . . . . . . . . . . . 44
8.2.1 Creating a Scale Widget . . . . . . . . . . . . . . . . . . . . . . . . . . . . . . . . . . . 44
8.2.2 Functions and Signals (well, functions, at least) . . . . . . . . . . . . . . . . . . . . . . 45
8.3 Common Functions . . . . . . . . . . . . . . . . . . . . . . . . . . . . . . . . . . . . . . . . . 45
8.3.1 Setting the Update Policy . . . . . . . . . . . . . . . . . . . . . . . . . . . . . . . . . . 46
8.3.2 Getting and Setting Adjustments . . . . . . . . . . . . . . . . . . . . . . . . . . . . . . 46
8.4 Key and Mouse bindings . . . . . . . . . . . . . . . . . . . . . . . . . . . . . . . . . . . . . . . 46
8.4.1 Vertical Range Widgets . . . . . . . . . . . . . . . . . . . . . . . . . . . . . . . . . . . 47
8.4.2 Horizontal Range Widgets . . . . . . . . . . . . . . . . . . . . . . . . . . . . . . . . . . 47
8.5 Example . . . . . . . . . . . . . . . . . . . . . . . . . . . . . . . . . . . . . . . . . . . . . . . . 47
9 Miscellaneous Widgets 52
9.1 Labels . . . . . . . . . . . . . . . . . . . . . . . . . . . . . . . . . . . . . . . . . . . . . . . . . 52
9.2 Arrows . . . . . . . . . . . . . . . . . . . . . . . . . . . . . . . . . . . . . . . . . . . . . . . . . 55
9.3 The Tooltips Widget . . . . . . . . . . . . . . . . . . . . . . . . . . . . . . . . . . . . . . . . . 57
9.4 Progress Bars . . . . . . . . . . . . . . . . . . . . . . . . . . . . . . . . . . . . . . . . . . . . 59
9.5 Dialogs . . . . . . . . . . . . . . . . . . . . . . . . . . . . . . . . . . . . . . . . . . . . . . . . 65
9.6 Pixmaps . . . . . . . . . . . . . . . . . . . . . . . . . . . . . . . . . . . . . . . . . . . . . . . 66
9.7 Rulers . . . . . . . . . . . . . . . . . . . . . . . . . . . . . . . . . . . . . . . . . . . . . . . . . 73
9.8 Statusbars . . . . . . . . . . . . . . . . . . . . . . . . . . . . . . . . . . . . . . . . . . . . . . . 76
9.9 Text Entries . . . . . . . . . . . . . . . . . . . . . . . . . . . . . . . . . . . . . . . . . . . . . . 78
9.10 Spin Buttons . . . . . . . . . . . . . . . . . . . . . . . . . . . . . . . . . . . . . . . . . . . . . 81
9.11 Combo Box . . . . . . . . . . . . . . . . . . . . . . . . . . . . . . . . . . . . . . . . . . . . . . 88
9.12 Color Selection . . . . . . . . . . . . . . . . . . . . . . . . . . . . . . . . . . . . . . . . . . . . 90
9.13 File Selections . . . . . . . . . . . . . . . . . . . . . . . . . . . . . . . . . . . . . . . . . . . . . 93
10 Container Widgets 95
10.1 The EventBox . . . . . . . . . . . . . . . . . . . . . . . . . . . . . . . . . . . . . . . . . . . . 95
10.2 The Alignment widget . . . . . . . . . . . . . . . . . . . . . . . . . . . . . . . . . . . . . . . . 96
10.3 Fixed Container . . . . . . . . . . . . . . . . . . . . . . . . . . . . . . . . . . . . . . . . . . . 97
10.4 Layout Container . . . . . . . . . . . . . . . . . . . . . . . . . . . . . . . . . . . . . . . . . . . 99
10.5 Frames . . . . . . . . . . . . . . . . . . . . . . . . . . . . . . . . . . . . . . . . . . . . . . . . 100
CONTENTS 3
10.6 Aspect Frames . . . . . . . . . . . . . . . . . . . . . . . . . . . . . . . . . . . . . . . . . . . . 102
10.7 Paned Window Widgets . . . . . . . . . . . . . . . . . . . . . . . . . . . . . . . . . . . . . . . 103
10.8 Viewports . . . . . . . . . . . . . . . . . . . . . . . . . . . . . . . . . . . . . . . . . . . . . . 106
10.9 Scrolled Windows . . . . . . . . . . . . . . . . . . . . . . . . . . . . . . . . . . . . . . . . . . 107
10.10Button Boxes . . . . . . . . . . . . . . . . . . . . . . . . . . . . . . . . . . . . . . . . . . . . . 109
10.11Toolbar . . . . . . . . . . . . . . . . . . . . . . . . . . . . . . . . . . . . . . . . . . . . . . . . 112
10.12Notebooks . . . . . . . . . . . . . . . . . . . . . . . . . . . . . . . . . . . . . . . . . . . . . . . 119
11 CList Widget 124
11.1 Creating a GtkCList widget . . . . . . . . . . . . . . . . . . . . . . . . . . . . . . . . . . . . . 124
11.2 Modes of operation . . . . . . . . . . . . . . . . . . . . . . . . . . . . . . . . . . . . . . . . . . 125
11.3 Working with titles . . . . . . . . . . . . . . . . . . . . . . . . . . . . . . . . . . . . . . . . . . 125
11.4 Manipulating the list itself . . . . . . . . . . . . . . . . . . . . . . . . . . . . . . . . . . . . . . 126
11.5 Adding rows to the list . . . . . . . . . . . . . . . . . . . . . . . . . . . . . . . . . . . . . . . . 128
11.6 Setting text and pixmaps in the cells . . . . . . . . . . . . . . . . . . . . . . . . . . . . . . . . 128
11.7 Storing data pointers . . . . . . . . . . . . . . . . . . . . . . . . . . . . . . . . . . . . . . . . . 130
11.8 Working with selections . . . . . . . . . . . . . . . . . . . . . . . . . . . . . . . . . . . . . . . 130
11.9 The signals that bring it together . . . . . . . . . . . . . . . . . . . . . . . . . . . . . . . . . . 131
11.10A GtkCList example . . . . . . . . . . . . . . . . . . . . . . . . . . . . . . . . . . . . . . . . . 131
12 Tree Widget 134
12.1 Creating a Tree . . . . . . . . . . . . . . . . . . . . . . . . . . . . . . . . . . . . . . . . . . . . 134
12.2 Adding a Subtree . . . . . . . . . . . . . . . . . . . . . . . . . . . . . . . . . . . . . . . . . . . 135
12.3 Handling the Selection List . . . . . . . . . . . . . . . . . . . . . . . . . . . . . . . . . . . . . 135
12.4 Tree Widget Internals . . . . . . . . . . . . . . . . . . . . . . . . . . . . . . . . . . . . . . . . 136
12.4.1 Signals . . . . . . . . . . . . . . . . . . . . . . . . . . . . . . . . . . . . . . . . . . . . . 137
12.4.2 Functions and Macros . . . . . . . . . . . . . . . . . . . . . . . . . . . . . . . . . . . . 137
12.5 Tree Item Widget . . . . . . . . . . . . . . . . . . . . . . . . . . . . . . . . . . . . . . . . . . . 139
12.5.1 Signals . . . . . . . . . . . . . . . . . . . . . . . . . . . . . . . . . . . . . . . . . . . . . 140
12.5.2 Functions and Macros . . . . . . . . . . . . . . . . . . . . . . . . . . . . . . . . . . . . 141
12.6 Tree Example . . . . . . . . . . . . . . . . . . . . . . . . . . . . . . . . . . . . . . . . . . . . . 142
13 Menu Widget 145
13.1 Manual Menu Creation . . . . . . . . . . . . . . . . . . . . . . . . . . . . . . . . . . . . . . . . 146
13.2 Manual Menu Example . . . . . . . . . . . . . . . . . . . . . . . . . . . . . . . . . . . . . . . 148
13.3 Using GtkItemFactory . . . . . . . . . . . . . . . . . . . . . . . . . . . . . . . . . . . . . . . . 151
13.4 Item Factory Example . . . . . . . . . . . . . . . . . . . . . . . . . . . . . . . . . . . . . . . . 151

CONTENTS 4
14 Text Widget 153
14.1 Creating and Configuring a Text box . . . . . . . . . . . . . . . . . . . . . . . . . . . . . . . . 153
14.2 Text Manipulation . . . . . . . . . . . . . . . . . . . . . . . . . . . . . . . . . . . . . . . . . . 154
14.3 Keyboard Shortcuts . . . . . . . . . . . . . . . . . . . . . . . . . . . . . . . . . . . . . . . . . 155
14.3.1 Motion Shortcuts . . . . . . . . . . . . . . . . . . . . . . . . . . . . . . . . . . . . . . . 155
14.3.2 Editing Shortcuts . . . . . . . . . . . . . . . . . . . . . . . . . . . . . . . . . . . . . . . 156
14.3.3 Selection Shortcuts . . . . . . . . . . . . . . . . . . . . . . . . . . . . . . . . . . . . . . 156
14.4 A GtkText Example . . . . . . . . . . . . . . . . . . . . . . . . . . . . . . . . . . . . . . . . . 156
15 Undocumented Widgets 159
15.1 Calendar . . . . . . . . . . . . . . . . . . . . . . . . . . . . . . . . . . . . . . . . . . . . . . . . 160
15.2 CTree . . . . . . . . . . . . . . . . . . . . . . . . . . . . . . . . . . . . . . . . . . . . . . . . . 160
15.3 Curves . . . . . . . . . . . . . . . . . . . . . . . . . . . . . . . . . . . . . . . . . . . . . . . . . 160
15.4 Drawing Area . . . . . . . . . . . . . . . . . . . . . . . . . . . . . . . . . . . . . . . . . . . . . 160
15.5 Font Selection Dialog . . . . . . . . . . . . . . . . . . . . . . . . . . . . . . . . . . . . . . . . . 160
15.6 Gamma Curve . . . . . . . . . . . . . . . . . . . . . . . . . . . . . . . . . . . . . . . . . . . . 160
15.7 Image . . . . . . . . . . . . . . . . . . . . . . . . . . . . . . . . . . . . . . . . . . . . . . . . . 160
15.8 Packer . . . . . . . . . . . . . . . . . . . . . . . . . . . . . . . . . . . . . . . . . . . . . . . . . 160
15.9 Plugs and Sockets . . . . . . . . . . . . . . . . . . . . . . . . . . . . . . . . . . . . . . . . . . 160
15.10Preview . . . . . . . . . . . . . . . . . . . . . . . . . . . . . . . . . . . . . . . . . . . . . . . . 160
16 Setting Widget Attributes 160
17 Timeouts, IO and Idle Functions 161
17.1 Timeouts . . . . . . . . . . . . . . . . . . . . . . . . . . . . . . . . . . . . . . . . . . . . . . . 161
17.2 Monitoring IO . . . . . . . . . . . . . . . . . . . . . . . . . . . . . . . . . . . . . . . . . . . . 161
17.3 Idle Functions . . . . . . . . . . . . . . . . . . . . . . . . . . . . . . . . . . . . . . . . . . . . . 162
18 Advanced Event and Signal Handling 162
18.1 Signal Functions . . . . . . . . . . . . . . . . . . . . . . . . . . . . . . . . . . . . . . . . . . . 162
18.1.1 Connecting and Disconnecting Signal Handlers . . . . . . . . . . . . . . . . . . . . . . 162
18.1.2 Blocking and Unblocking Signal Handlers . . . . . . . . . . . . . . . . . . . . . . . . . 163
18.1.3 Emitting and Stopping Signals . . . . . . . . . . . . . . . . . . . . . . . . . . . . . . . 164
18.2 Signal Emission and Propagation . . . . . . . . . . . . . . . . . . . . . . . . . . . . . . . . . . 164
19 Managing Selections 165
19.1 Overview . . . . . . . . . . . . . . . . . . . . . . . . . . . . . . . . . . . . . . . . . . . . . . . 165
19.2 Retrieving the selection . . . . . . . . . . . . . . . . . . . . . . . . . . . . . . . . . . . . . . . 165
19.3 Supplying the selection . . . . . . . . . . . . . . . . . . . . . . . . . . . . . . . . . . . . . . . 168

CONTENTS 5
20 glib 170
20.1 Definitions . . . . . . . . . . . . . . . . . . . . . . . . . . . . . . . . . . . . . . . . . . . . . . . 171
20.2 Doubly Linked Lists . . . . . . . . . . . . . . . . . . . . . . . . . . . . . . . . . . . . . . . . . 172
20.3 Singly Linked Lists . . . . . . . . . . . . . . . . . . . . . . . . . . . . . . . . . . . . . . . . . . 173
20.4 Memory Management . . . . . . . . . . . . . . . . . . . . . . . . . . . . . . . . . . . . . . . . 174
20.5 Timers . . . . . . . . . . . . . . . . . . . . . . . . . . . . . . . . . . . . . . . . . . . . . . . . . 174
20.6 String Handling . . . . . . . . . . . . . . . . . . . . . . . . . . . . . . . . . . . . . . . . . . . . 175
20.7 Utility and Error Functions . . . . . . . . . . . . . . . . . . . . . . . . . . . . . . . . . . . . . 176
21 GTK’s rc Files 177
21.1 Functions For rc Files . . . . . . . . . . . . . . . . . . . . . . . . . . . . . . . . . . . . . . . . 177
21.2 GTK’s rc File Format . . . . . . . . . . . . . . . . . . . . . . . . . . . . . . . . . . . . . . . . 177
21.3 Example rc file . . . . . . . . . . . . . . . . . . . . . . . . . . . . . . . . . . . . . . . . . . . . 179
22 Writing Your Own Widgets 181
22.1 Overview . . . . . . . . . . . . . . . . . . . . . . . . . . . . . . . . . . . . . . . . . . . . . . . 181
22.2 The Anatomy Of A Widget . . . . . . . . . . . . . . . . . . . . . . . . . . . . . . . . . . . . . 181
22.3 Creating a Composite widget . . . . . . . . . . . . . . . . . . . . . . . . . . . . . . . . . . . . 182
22.3.1 Introduction . . . . . . . . . . . . . . . . . . . . . . . . . . . . . . . . . . . . . . . . . 182
22.3.2 Choosing a parent class . . . . . . . . . . . . . . . . . . . . . . . . . . . . . . . . . . . 182
22.3.3 The header file . . . . . . . . . . . . . . . . . . . . . . . . . . . . . . . . . . . . . . . . 183
22.3.4 The _get_type() function. . . . . . . . . . . . . . . . . . . . . . . . . . . . . . . . . . 184
22.3.5 The _class_init() function . . . . . . . . . . . . . . . . . . . . . . . . . . . . . . . . 185
22.3.6 The _init() function. . . . . . . . . . . . . . . . . . . . . . . . . . . . . . . . . . . . . 187
22.3.7 And the rest... . . . . . . . . . . . . . . . . . . . . . . . . . . . . . . . . . . . . . . . . 187
22.4 Creating a widget from scratch. . . . . . . . . . . . . . . . . . . . . . . . . . . . . . . . . . . 189
22.4.1 Introduction . . . . . . . . . . . . . . . . . . . . . . . . . . . . . . . . . . . . . . . . . 189
22.4.2 Displaying a widget on the screen . . . . . . . . . . . . . . . . . . . . . . . . . . . . . 190
22.4.3 The origins of the Dial Widget . . . . . . . . . . . . . . . . . . . . . . . . . . . . . . . 190
22.4.4 The Basics . . . . . . . . . . . . . . . . . . . . . . . . . . . . . . . . . . . . . . . . . . 190
22.4.5 gtk_dial_realize() . . . . . . . . . . . . . . . . . . . . . . . . . . . . . . . . . . . . 195
22.4.6 Size negotiation . . . . . . . . . . . . . . . . . . . . . . . . . . . . . . . . . . . . . . . . 196
22.4.7 gtk_dial_expose() . . . . . . . . . . . . . . . . . . . . . . . . . . . . . . . . . . . . . 197
22.4.8 Event handling . . . . . . . . . . . . . . . . . . . . . . . . . . . . . . . . . . . . . . . . 198
22.4.9 Possible Enhancements . . . . . . . . . . . . . . . . . . . . . . . . . . . . . . . . . . . 203
22.5 Learning More . . . . . . . . . . . . . . . . . . . . . . . . . . . . . . . . . . . . . . . . . . . . 203
23 Scribble, A Simple Example Drawing Program 203
23.1 Overview . . . . . . . . . . . . . . . . . . . . . . . . . . . . . . . . . . . . . . . . . . . . . . . 204
CONTENTS 6
23.2 Event Handling . . . . . . . . . . . . . . . . . . . . . . . . . . . . . . . . . . . . . . . . . . . . 204
23.3 The DrawingArea Widget, And Drawing . . . . . . . . . . . . . . . . . . . . . . . . . . . . . . 207
23.4 Adding XInput support . . . . . . . . . . . . . . . . . . . . . . . . . . . . . . . . . . . . . . . 210
23.4.1 Enabling extended device information . . . . . . . . . . . . . . . . . . . . . . . . . . . 211
23.4.2 Using extended device information . . . . . . . . . . . . . . . . . . . . . . . . . . . . . 212
23.4.3 Finding out more about a device . . . . . . . . . . . . . . . . . . . . . . . . . . . . . . 213
23.4.4 Further sophistications . . . . . . . . . . . . . . . . . . . . . . . . . . . . . . . . . . . 214
24 Tips For Writing GTK Applications 215
25 Contributing 215
26 Credits 216
27 Tutorial Copyright and Permissions Notice 216
A GTK Signals 217
A.1 GtkObject . . . . . . . . . . . . . . . . . . . . . . . . . . . . . . . . . . . . . . . . . . . . . . 217
A.2 GtkWidget . . . . . . . . . . . . . . . . . . . . . . . . . . . . . . . . . . . . . . . . . . . . . . 217
A.3 GtkData . . . . . . . . . . . . . . . . . . . . . . . . . . . . . . . . . . . . . . . . . . . . . . . 220
A.4 GtkContainer . . . . . . . . . . . . . . . . . . . . . . . . . . . . . . . . . . . . . . . . . . . . 220
A.5 GtkCalendar . . . . . . . . . . . . . . . . . . . . . . . . . . . . . . . . . . . . . . . . . . . . . 220
A.6 GtkEditable . . . . . . . . . . . . . . . . . . . . . . . . . . . . . . . . . . . . . . . . . . . . . 221
A.7 GtkTipsQuery . . . . . . . . . . . . . . . . . . . . . . . . . . . . . . . . . . . . . . . . . . . . 222
A.8 GtkCList . . . . . . . . . . . . . . . . . . . . . . . . . . . . . . . . . . . . . . . . . . . . . . . 222
A.9 GtkNotebook . . . . . . . . . . . . . . . . . . . . . . . . . . . . . . . . . . . . . . . . . . . . . 223
A.10 GtkList . . . . . . . . . . . . . . . . . . . . . . . . . . . . . . . . . . . . . . . . . . . . . . . . 223
A.11 GtkMenuShell . . . . . . . . . . . . . . . . . . . . . . . . . . . . . . . . . . . . . . . . . . . . 223
A.12 GtkToolbar . . . . . . . . . . . . . . . . . . . . . . . . . . . . . . . . . . . . . . . . . . . . . . 223
A.13 GtkTree . . . . . . . . . . . . . . . . . . . . . . . . . . . . . . . . . . . . . . . . . . . . . . . . 224
A.14 GtkButton . . . . . . . . . . . . . . . . . . . . . . . . . . . . . . . . . . . . . . . . . . . . . . 224
A.15 GtkItem . . . . . . . . . . . . . . . . . . . . . . . . . . . . . . . . . . . . . . . . . . . . . . . 224
A.16 GtkWindow . . . . . . . . . . . . . . . . . . . . . . . . . . . . . . . . . . . . . . . . . . . . . 224
A.17 GtkHandleBox . . . . . . . . . . . . . . . . . . . . . . . . . . . . . . . . . . . . . . . . . . . . 224
A.18 GtkToggleButton . . . . . . . . . . . . . . . . . . . . . . . . . . . . . . . . . . . . . . . . . . 225
A.19 GtkMenuItem . . . . . . . . . . . . . . . . . . . . . . . . . . . . . . . . . . . . . . . . . . . . 225
A.20 GtkListItem . . . . . . . . . . . . . . . . . . . . . . . . . . . . . . . . . . . . . . . . . . . . . 225
A.21 GtkTreeItem . . . . . . . . . . . . . . . . . . . . . . . . . . . . . . . . . . . . . . . . . . . . . 225
A.22 GtkCheckMenuItem . . . . . . . . . . . . . . . . . . . . . . . . . . . . . . . . . . . . . . . . . 225
A.23 GtkInputDialog . . . . . . . . . . . . . . . . . . . . . . . . . . . . . . . . . . . . . . . . . . . 226

1. Introduction 7
A.24 GtkColorSelection . . . . . . . . . . . . . . . . . . . . . . . . . . . . . . . . . . . . . . . . . . 226
A.25 GtkStatusBar . . . . . . . . . . . . . . . . . . . . . . . . . . . . . . . . . . . . . . . . . . . . 226
A.26 GtkCTree . . . . . . . . . . . . . . . . . . . . . . . . . . . . . . . . . . . . . . . . . . . . . . . 226
A.27 GtkCurve . . . . . . . . . . . . . . . . . . . . . . . . . . . . . . . . . . . . . . . . . . . . . . . 226
A.28 GtkAdjustment . . . . . . . . . . . . . . . . . . . . . . . . . . . . . . . . . . . . . . . . . . . 227
B GDK Event Types 227
C Code Examples 234
C.1 Tictactoe . . . . . . . . . . . . . . . . . . . . . . . . . . . . . . . . . . . . . . . . . . . . . . . 234
C.1.1 tictactoe.h . . . . . . . . . . . . . . . . . . . . . . . . . . . . . . . . . . . . . . . . . . . 234
C.1.2 tictactoe.c . . . . . . . . . . . . . . . . . . . . . . . . . . . . . . . . . . . . . . . . . . . 235
C.1.3 ttt test.c . . . . . . . . . . . . . . . . . . . . . . . . . . . . . . . . . . . . . . . . . . . 238
C.2 GtkDial . . . . . . . . . . . . . . . . . . . . . . . . . . . . . . . . . . . . . . . . . . . . . . . . 239
C.2.1 gtkdial.h . . . . . . . . . . . . . . . . . . . . . . . . . . . . . . . . . . . . . . . . . . . . 239
C.2.2 gtkdial.c . . . . . . . . . . . . . . . . . . . . . . . . . . . . . . . . . . . . . . . . . . . . 240
C.3 Scribble . . . . . . . . . . . . . . . . . . . . . . . . . . . . . . . . . . . . . . . . . . . . . . . . 251
D List Widget 254
D.1 Signals . . . . . . . . . . . . . . . . . . . . . . . . . . . . . . . . . . . . . . . . . . . . . . . . . 255
D.2 Functions . . . . . . . . . . . . . . . . . . . . . . . . . . . . . . . . . . . . . . . . . . . . . . . 256
D.3 Example . . . . . . . . . . . . . . . . . . . . . . . . . . . . . . . . . . . . . . . . . . . . . . . . 257
D.4 List Item Widget . . . . . . . . . . . . . . . . . . . . . . . . . . . . . . . . . . . . . . . . . . . 262
D.5 Signals . . . . . . . . . . . . . . . . . . . . . . . . . . . . . . . . . . . . . . . . . . . . . . . . . 263
D.6 Functions . . . . . . . . . . . . . . . . . . . . . . . . . . . . . . . . . . . . . . . . . . . . . . . 263
D.7 Example . . . . . . . . . . . . . . . . . . . . . . . . . . . . . . . . . . . . . . . . . . . . . . . . 263
1 Introduction
GTK (GIMP Toolkit) is a library for creating graphical user interfaces. It is licensed using the LGPL license,so you can develop open software, free software, or even commercial non-free software using GTK withouthaving to spend anything for licenses or royalties.
It’s called the GIMP toolkit because it was originally written for developing the General Image ManipulationProgram (GIMP), but GTK has now been used in a large number of software projects, including the GNUNetwork Object Model Environment (GNOME) project. GTK is built on top of GDK (GIMP Drawing Kit)which is basically a wrapper around the low-level functions for accessing the underlying windowing functions(Xlib in the case of X windows). The primary authors of GTK are:
• Peter Mattis [email protected]
• Spencer Kimball [email protected]
• Josh MacDonald [email protected]

2. Getting Started 8
GTK is essentially an object oriented application programmers interface (API). Although written completelyin C, it is implemented using the idea of classes and callback functions (pointers to functions).
There is also a third component called glib which contains a few replacements for some standard calls, as wellas some additional functions for handling linked lists etc. The replacement functions are used to increaseGTK’s portability, as some of the functions implemented here are not available or are nonstandard on otherunixes such as g strerror(). Some also contain enhancements to the libc versions, such as g malloc that hasenhanced debugging utilities.
This tutorial describes the C interface to GTK. There are GTK bindings for many other languages includingC++, Guile, Perl, Python, TOM, Ada95, Objective C, Free Pascal, and Eiffel. If you intend to use anotherlanguage’s bindings to GTK, look at that binding’s documentation first. In some cases that documentationmay describe some important conventions (which you should know first) and then refer you back to thistutorial. There are also some cross-platform APIs (such as wxWindows and V) which use GTK as one oftheir target platforms; again, consult their documentation first.
If you’re developing your GTK application in C++, a few extra notes are in order. There’s a C++ bindingto GTK called GTK–, which provides a more C++-like interface to GTK; you should probably look intothis instead. If you don’t like that approach for whatever reason, there are two alternatives for using GTK.First, you can use only the C subset of C++ when interfacing with GTK and then use the C interface asdescribed in this tutorial. Second, you can use GTK and C++ together by declaring all callbacks as staticfunctions in C++ classes, and again calling GTK using its C interface. If you choose this last approach,you can include as the callback’s data value a pointer to the object to be manipulated (the so-called ”this”value). Selecting between these options is simply a matter of preference, since in all three approaches youget C++ and GTK. None of these approaches requires the use of a specialized preprocessor, so no matterwhat you choose you can use standard C++ with GTK.
This tutorial is an attempt to document as much as possible of GTK, but it is by no means complete. Thistutorial assumes a good understanding of C, and how to create C programs. It would be a great benefit forthe reader to have previous X programming experience, but it shouldn’t be necessary. If you are learningGTK as your first widget set, please comment on how you found this tutorial, and what you had troublewith. Note that there is also a C++ API for GTK (GTK–) in the works, so if you prefer to use C++, youshould look into this instead. There are also Objective C, ADA, Guile and other language bindings available,but I don’t follow these.
This document is a ’work in progress’. Please look for updates on http://www.gtk.org/ http://www.gtk.org/.
I would very much like to hear of any problems you have learning GTK from this document, and wouldappreciate input as to how it may be improved. Please see the section on 25 for further information.
2 Getting Started
The first thing to do of course, is download the GTK source and install it. You can always get thelatest version from ftp.gtk.org in /pub/gtk. You can also view other sources of GTK information onhttp://www.gtk.org/ http://www.gtk.org/. GTK uses GNU autoconf for configuration. Once untar’d, type./configure –help to see a list of options.
Th GTK source distribution also contains the complete source to all of the examples used in this tutorial,along with Makefiles to aid compilation.
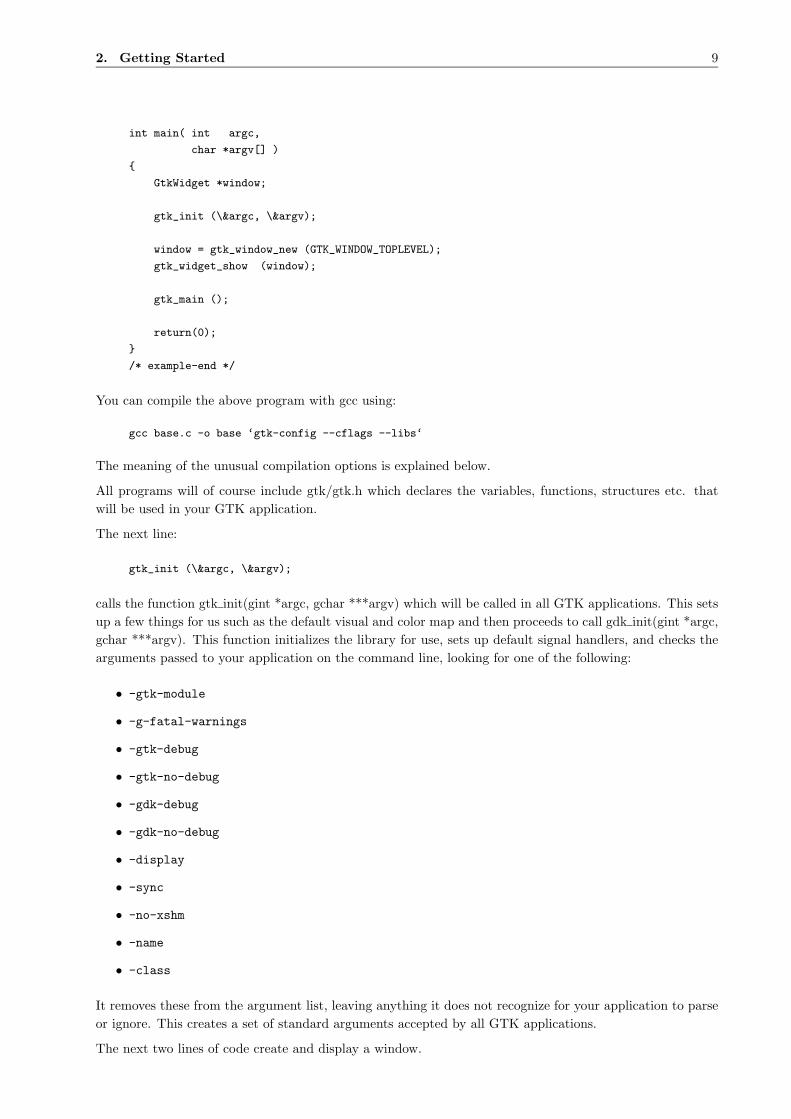
To begin our introduction to GTK, we’ll start with the simplest program possible. This program will createa 200x200 pixel window and has no way of exiting except to be killed using the shell.
/* example-start base base.c */
#include <gtk/gtk.h>
2. Getting Started 9
int main( int argc,
char *argv[] )
{
GtkWidget *window;
gtk_init (\&argc, \&argv);
window = gtk_window_new (GTK_WINDOW_TOPLEVEL);
gtk_widget_show (window);
gtk_main ();
return(0);
}
/* example-end */
You can compile the above program with gcc using:
gcc base.c -o base ‘gtk-config --cflags --libs‘
The meaning of the unusual compilation options is explained below.
All programs will of course include gtk/gtk.h which declares the variables, functions, structures etc. thatwill be used in your GTK application.
The next line:
gtk_init (\&argc, \&argv);
calls the function gtk init(gint *argc, gchar ***argv) which will be called in all GTK applications. This setsup a few things for us such as the default visual and color map and then proceeds to call gdk init(gint *argc,gchar ***argv). This function initializes the library for use, sets up default signal handlers, and checks thearguments passed to your application on the command line, looking for one of the following:
• -gtk-module
• -g-fatal-warnings
• -gtk-debug
• -gtk-no-debug
• -gdk-debug
• -gdk-no-debug
• -display
• -sync
• -no-xshm
• -name
• -class
It removes these from the argument list, leaving anything it does not recognize for your application to parseor ignore. This creates a set of standard arguments accepted by all GTK applications.
The next two lines of code create and display a window.

2. Getting Started 10
window = gtk_window_new (GTK_WINDOW_TOPLEVEL);
gtk_widget_show (window);
The GTK WINDOW TOPLEVEL argument specifies that we want the window to undergo window managerdecoration and placement. Rather than create a window of 0x0 size, a window without children is set to200x200 by default so you can still manipulate it.
The gtk widget show() function lets GTK know that we are done setting the attributes of this widget, andthat it can display it.
The last line enters the GTK main processing loop.
gtk_main ();
gtk main() is another call you will see in every GTK application. When control reaches this point, GTKwill sleep waiting for X events (such as button or key presses), timeouts, or file IO notifications to occur. Inour simple example however, events are ignored.
2.1 Hello World in GTK
Now for a program with a widget (a button). It’s the classic hello world a la GTK.
/* example-start helloworld helloworld.c */
#include <gtk/gtk.h>
/* This is a callback function. The data arguments are ignored
* in this example. More on callbacks below. */
void hello( GtkWidget *widget,
gpointer data )
{
g_print ("Hello World\n");
}
gint delete_event( GtkWidget *widget,
GdkEvent *event,
gpointer data )
{
/* If you return FALSE in the "delete_event" signal handler,
* GTK will emit the "destroy" signal. Returning TRUE means
* you don’t want the window to be destroyed.
* This is useful for popping up ’are you sure you want to quit?’
* type dialogs. */
g_print ("delete event occurred\n");
/* Change TRUE to FALSE and the main window will be destroyed with
* a "delete_event". */
return(TRUE);
}
/* Another callback */
void destroy( GtkWidget *widget,
gpointer data )
{
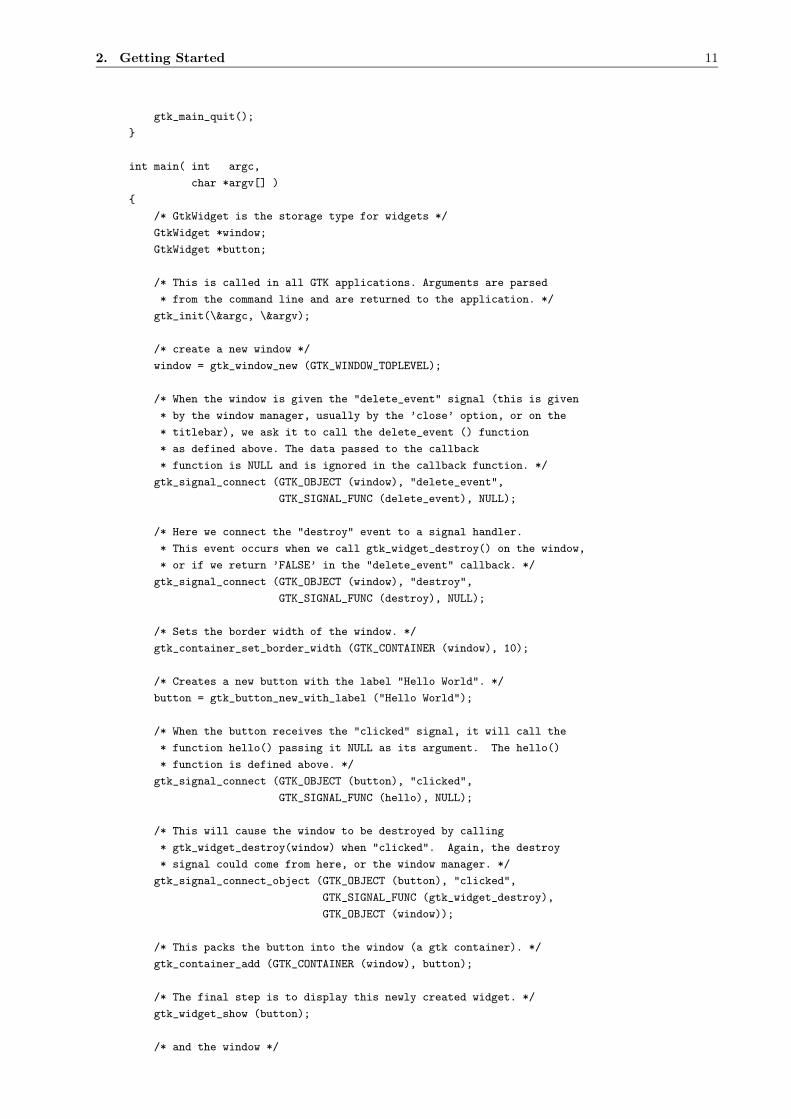
2. Getting Started 11
gtk_main_quit();
}
int main( int argc,
char *argv[] )
{
/* GtkWidget is the storage type for widgets */
GtkWidget *window;
GtkWidget *button;
/* This is called in all GTK applications. Arguments are parsed
* from the command line and are returned to the application. */
gtk_init(\&argc, \&argv);
/* create a new window */
window = gtk_window_new (GTK_WINDOW_TOPLEVEL);
/* When the window is given the "delete_event" signal (this is given
* by the window manager, usually by the ’close’ option, or on the
* titlebar), we ask it to call the delete_event () function
* as defined above. The data passed to the callback
* function is NULL and is ignored in the callback function. */
gtk_signal_connect (GTK_OBJECT (window), "delete_event",
GTK_SIGNAL_FUNC (delete_event), NULL);
/* Here we connect the "destroy" event to a signal handler.
* This event occurs when we call gtk_widget_destroy() on the window,
* or if we return ’FALSE’ in the "delete_event" callback. */
gtk_signal_connect (GTK_OBJECT (window), "destroy",
GTK_SIGNAL_FUNC (destroy), NULL);
/* Sets the border width of the window. */
gtk_container_set_border_width (GTK_CONTAINER (window), 10);
/* Creates a new button with the label "Hello World". */
button = gtk_button_new_with_label ("Hello World");
/* When the button receives the "clicked" signal, it will call the
* function hello() passing it NULL as its argument. The hello()
* function is defined above. */
gtk_signal_connect (GTK_OBJECT (button), "clicked",
GTK_SIGNAL_FUNC (hello), NULL);
/* This will cause the window to be destroyed by calling
* gtk_widget_destroy(window) when "clicked". Again, the destroy
* signal could come from here, or the window manager. */
gtk_signal_connect_object (GTK_OBJECT (button), "clicked",
GTK_SIGNAL_FUNC (gtk_widget_destroy),
GTK_OBJECT (window));
/* This packs the button into the window (a gtk container). */
gtk_container_add (GTK_CONTAINER (window), button);
/* The final step is to display this newly created widget. */
gtk_widget_show (button);
/* and the window */

2. Getting Started 12
gtk_widget_show (window);
/* All GTK applications must have a gtk_main(). Control ends here
* and waits for an event to occur (like a key press or
* mouse event). */
gtk_main ();
return(0);
}
/* example-end */
2.2 Compiling Hello World
To compile use:
gcc -Wall -g helloworld.c -o helloworld ‘gtk-config --cflags‘ \
‘gtk-config --libs‘
This uses the program gtk-config, which comes with gtk. This program ’knows’ what compiler switchesare needed to compile programs that use gtk. gtk-config -cflags will output a list of include directoriesfor the compiler to look in, and gtk-config -libs will output the list of libraries for the compiler to linkwith and the directories to find them in. In the aboce example they could have been combined into a singleinstance, such as ‘gtk-config –cflags –libs‘.
Note that the type of single quote used in the compile command above is significant.
The libraries that are usually linked in are:
• The GTK library (-lgtk), the widget library, based on top of GDK.
• The GDK library (-lgdk), the Xlib wrapper.
• The gmodule library (-lgmodule), which is used to load run time extensions.
• The glib library (-lglib), containing miscellaneous functions, only g print() is used in this particularexample. GTK is built on top of glib so you will always require this library. See the section on 20 fordetails.
• The Xlib library (-lX11) which is used by GDK.
• The Xext library (-lXext). This contains code for shared memory pixmaps and other X extensions.
• The math library (-lm). This is used by GTK for various purposes.
2.3 Theory of Signals and Callbacks
Before we look in detail at helloworld , we’ll discuss signals and callbacks. GTK is an event driven toolkit,which means it will sleep in gtk main until an event occurs and control is passed to the appropriate function.
This passing of control is done using the idea of ”signals”. When an event occurs, such as the press of amouse button, the appropriate signal will be ”emitted” by the widget that was pressed. This is how GTKdoes most of its useful work. There are a set of signals that all widgets inherit, such as ”destroy”, and thereare signals that are widget specific, such as ”toggled” on a toggle button.
To make a button perform an action, we set up a signal handler to catch these signals and call the appropriatefunction. This is done by using a function such as:

2. Getting Started 13
gint gtk_signal_connect( GtkObject *object,
gchar *name,
GtkSignalFunc func,
gpointer func_data );
Where the first argument is the widget which will be emitting the signal, and the second, the name of thesignal you wish to catch. The third is the function you wish to be called when it is caught, and the fourth,the data you wish to have passed to this function.
The function specified in the third argument is called a ”callback function”, and should generally be of theform:
void callback_func( GtkWidget *widget,
gpointer callback_data );
Where the first argument will be a pointer to the widget that emitted the signal, and the second, a pointerto the data given as the last argument to the gtk signal connect() function as shown above.
Note that the above form for a signal callback function declaration is only a general guide, as some widgetspecific signals generate different calling parameters. For example, the GtkCList ”select row” signal providesboth row and column parameters.
Another call used in the helloworld example, is:
gint gtk_signal_connect_object( GtkObject *object,
gchar *name,
GtkSignalFunc func,
GtkObject *slot_object );
gtk signal connect object() is the same as gtk signal connect() except that the callback function only usesone argument, a pointer to a GTK object. So when using this function to connect signals, the callbackshould be of the form:
void callback_func( GtkObject *object );
Where the object is usually a widget. We usually don’t setup callbacks for gtk signal connect object however.They are usually used to call a GTK function that accepts a single widget or object as an argument, as isthe case in our helloworld example.
The purpose of having two functions to connect signals is simply to allow the callbacks to have a differentnumber of arguments. Many functions in the GTK library accept only a single GtkWidget pointer as anargument, so you want to use the gtk signal connect object() for these, whereas for your functions, you mayneed to have additional data supplied to the callbacks.
2.4 Events
In addition to the signal mechanism described above, there are a set of events that reflect the X eventmechanism. Callbacks may also be attached to these events. These events are:
• event
• button press event
• button release event
• motion notify event

2. Getting Started 14
• delete event
• destroy event
• expose event
• key press event
• key release event
• enter notify event
• leave notify event
• configure event
• focus in event
• focus out event
• map event
• unmap event
• property notify event
• selection clear event
• selection request event
• selection notify event
• proximity in event
• proximity out event
• drag begin event
• drag request event
• drag end event
• drop enter event
• drop leave event
• drop data available event
• other event
In order to connect a callback function to one of these events, you use the function gtk signal connect, asdescribed above, using one of the above event names as the name parameter. The callback function for eventshas a slightly different form than that for signals:
void callback_func( GtkWidget *widget,
GdkEvent *event,
gpointer callback_data );
GdkEvent is a C union structure whose type will depend upon which of the above events has occurred. Inorder for us to tell which event has been issued each of the possible alternatives has a type parameter whichreflects the event being issued. The other components of the event structure will depend upon the type ofthe event. Possible values for the type are:
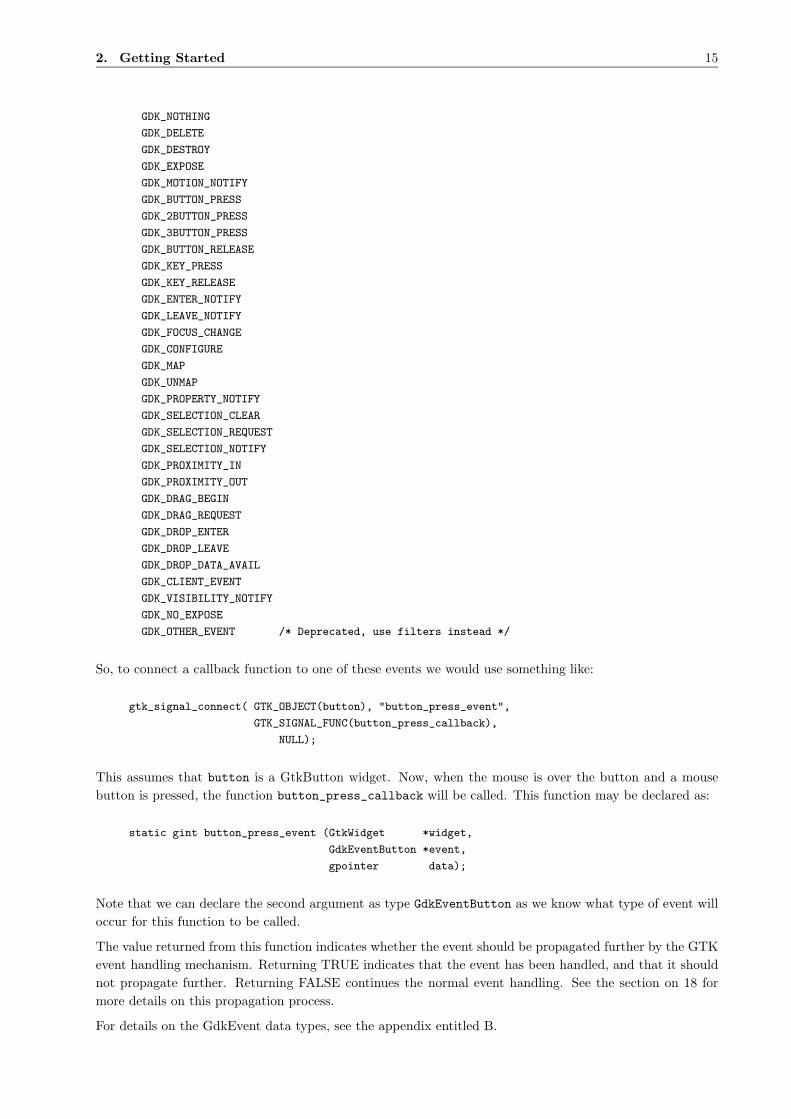
2. Getting Started 15
GDK_NOTHING
GDK_DELETE
GDK_DESTROY
GDK_EXPOSE
GDK_MOTION_NOTIFY
GDK_BUTTON_PRESS
GDK_2BUTTON_PRESS
GDK_3BUTTON_PRESS
GDK_BUTTON_RELEASE
GDK_KEY_PRESS
GDK_KEY_RELEASE
GDK_ENTER_NOTIFY
GDK_LEAVE_NOTIFY
GDK_FOCUS_CHANGE
GDK_CONFIGURE
GDK_MAP
GDK_UNMAP
GDK_PROPERTY_NOTIFY
GDK_SELECTION_CLEAR
GDK_SELECTION_REQUEST
GDK_SELECTION_NOTIFY
GDK_PROXIMITY_IN
GDK_PROXIMITY_OUT
GDK_DRAG_BEGIN
GDK_DRAG_REQUEST
GDK_DROP_ENTER
GDK_DROP_LEAVE
GDK_DROP_DATA_AVAIL
GDK_CLIENT_EVENT
GDK_VISIBILITY_NOTIFY
GDK_NO_EXPOSE
GDK_OTHER_EVENT /* Deprecated, use filters instead */
So, to connect a callback function to one of these events we would use something like:
gtk_signal_connect( GTK_OBJECT(button), "button_press_event",
GTK_SIGNAL_FUNC(button_press_callback),
NULL);
This assumes that button is a GtkButton widget. Now, when the mouse is over the button and a mousebutton is pressed, the function button_press_callback will be called. This function may be declared as:
static gint button_press_event (GtkWidget *widget,
GdkEventButton *event,
gpointer data);
Note that we can declare the second argument as type GdkEventButton as we know what type of event willoccur for this function to be called.
The value returned from this function indicates whether the event should be propagated further by the GTKevent handling mechanism. Returning TRUE indicates that the event has been handled, and that it shouldnot propagate further. Returning FALSE continues the normal event handling. See the section on 18 formore details on this propagation process.
For details on the GdkEvent data types, see the appendix entitled B.

2. Getting Started 16
2.5 Stepping Through Hello World
Now that we know the theory behind this, lets clarify by walking through the example helloworld program.
Here is the callback function that will be called when the button is ”clicked”. We ignore both the widgetand the data in this example, but it is not hard to do things with them. The next example will use the dataargument to tell us which button was pressed.
void hello( GtkWidget *widget,
gpointer data )
{
g_print ("Hello World\n");
}
The next callback is a bit special. The ”delete event” occurs when the window manager sends this event tothe application. We have a choice here as to what to do about these events. We can ignore them, make somesort of response, or simply quit the application.
The value you return in this callback lets GTK know what action to take. By returning TRUE, we let itknow that we don’t want to have the ”destroy” signal emitted, keeping our application running. By returningFALSE, we ask that ”destroy” is emitted, which in turn will call our ”destroy” signal handler.
gint delete_event( GtkWidget *widget,
GdkEvent *event,
gpointer data )
{
g_print ("delete event occurred\n");
return (TRUE);
}
Here is another callback function which causes the program to quit by calling gtk main quit(). This functiontells GTK that it is to exit from gtk main when control is returned to it.
void destroy( GtkWidget *widget,
gpointer data )
{
gtk_main_quit ();
}
I assume you know about the main() function... yes, as with other applications, all GTK applications willalso have one of these.
int main( int argc,
char *argv[] )
{
This next part, declares a pointer to a structure of type GtkWidget. These are used below to create a windowand a button.
GtkWidget *window;
GtkWidget *button;
Here is our gtk init again. As before, this initializes the toolkit, and parses the arguments found on thecommand line. Any argument it recognizes from the command line, it removes from the list, and modifiesargc and argv to make it look like they never existed, allowing your application to parse the remainingarguments.

2. Getting Started 17
gtk_init (\&argc, \&argv);
Create a new window. This is fairly straight forward. Memory is allocated for the GtkWidget *windowstructure so it now points to a valid structure. It sets up a new window, but it is not displayed until we callgtk widget show(window) near the end of our program.
window = gtk_window_new (GTK_WINDOW_TOPLEVEL);
Here is an example of connecting a signal handler to an object, in this case, the window. Here, the ”destroy”signal is caught. This is emitted when we use the window manager to kill the window (and we return FALSEin the ”delete event” handler), or when we use the gtk widget destroy() call passing in the window widgetas the object to destroy. By setting this up, we handle both cases with a single call. Here, it just calls thedestroy() function defined above with a NULL argument, which quits GTK for us.
The GTK OBJECT and GTK SIGNAL FUNC are macros that perform type casting and checking for us,as well as aid the readability of the code.
gtk_signal_connect (GTK_OBJECT (window), "destroy",
GTK_SIGNAL_FUNC (destroy), NULL);
This next function is used to set an attribute of a container object. This just sets the window so it has ablank area along the inside of it 10 pixels wide where no widgets will go. There are other similar functionswhich we will look at in the section on 16
And again, GTK CONTAINER is a macro to perform type casting.
gtk_container_set_border_width (GTK_CONTAINER (window), 10);
This call creates a new button. It allocates space for a new GtkWidget structure in memory, initializes it,and makes the button pointer point to it. It will have the label ”Hello World” on it when displayed.
button = gtk_button_new_with_label ("Hello World");
Here, we take this button, and make it do something useful. We attach a signal handler to it so when itemits the ”clicked” signal, our hello() function is called. The data is ignored, so we simply pass in NULL tothe hello() callback function. Obviously, the ”clicked” signal is emitted when we click the button with ourmouse pointer.
gtk_signal_connect (GTK_OBJECT (button), "clicked",
GTK_SIGNAL_FUNC (hello), NULL);
We are also going to use this button to exit our program. This will illustrate how the ”destroy” signalmay come from either the window manager, or our program. When the button is ”clicked”, same as above,it calls the first hello() callback function, and then this one in the order they are set up. You may haveas many callback functions as you need, and all will be executed in the order you connected them. Be-cause the gtk widget destroy() function accepts only a GtkWidget *widget as an argument, we use thegtk signal connect object() function here instead of straight gtk signal connect().
gtk_signal_connect_object (GTK_OBJECT (button), "clicked",
GTK_SIGNAL_FUNC (gtk_widget_destroy),
GTK_OBJECT (window));
This is a packing call, which will be explained in depth later on. But it is fairly easy to understand. Itsimply tells GTK that the button is to be placed in the window where it will be displayed. Note that a GTKcontainer can only contain one widget. There are other widgets, that are described later, which are designedto layout multiple widgets in various ways.

3. Moving On 18
gtk_container_add (GTK_CONTAINER (window), button);
Now we have everything set up the way we want it to be. With all the signal handlers in place, and thebutton placed in the window where it should be, we ask GTK to ”show” the widgets on the screen. Thewindow widget is shown last so the whole window will pop up at once rather than seeing the window popup, and then the button form inside of it. Although with such a simple example, you’d never notice.
gtk_widget_show (button);
gtk_widget_show (window);
And of course, we call gtk main() which waits for events to come from the X server and will call on thewidgets to emit signals when these events come.
gtk_main ();
And the final return. Control returns here after gtk quit() is called.
return 0;
Now, when we click the mouse button on a GTK button, the widget emits a ”clicked”signal. In order for us touse this information, our program sets up a signal handler to catch that signal, which dispatches the functionof our choice. In our example, when the button we created is ”clicked”, the hello() function is called witha NULL argument, and then the next handler for this signal is called. This calls the gtk widget destroy()function, passing it the window widget as its argument, destroying the window widget. This causes thewindow to emit the ”destroy” signal, which is caught, and calls our destroy() callback function, which simplyexits GTK.
Another course of events, is to use the window manager to kill the window. This will cause the ”delete event”to be emitted. This will call our ”delete event” handler. If we return TRUE here, the window will be left asis and nothing will happen. Returning FALSE will cause GTK to emit the ”destroy” signal which of course,calls the ”destroy” callback, exiting GTK.
Note that these signals are not the same as the Unix system signals, and are not implemented using them,although the terminology is almost identical.
3 Moving On
3.1 Data Types
There are a few things you probably noticed in the previous examples that need explaining. The gint, gcharetc. that you see are typedefs to int and char respectively. This is done to get around that nasty dependencyon the size of simple data types when doing calculations.
A good example is ”gint32” which will be typedef’d to a 32 bit integer for any given platform, whether itbe the 64 bit alpha, or the 32 bit i386. The typedefs are very straight forward and intuitive. They are alldefined in glib/glib.h (which gets included from gtk.h).
You’ll also notice the ability to use GtkWidget when the function calls for a GtkObject. GTK is an objectoriented design, and a widget is an object.
3. Moving On 19
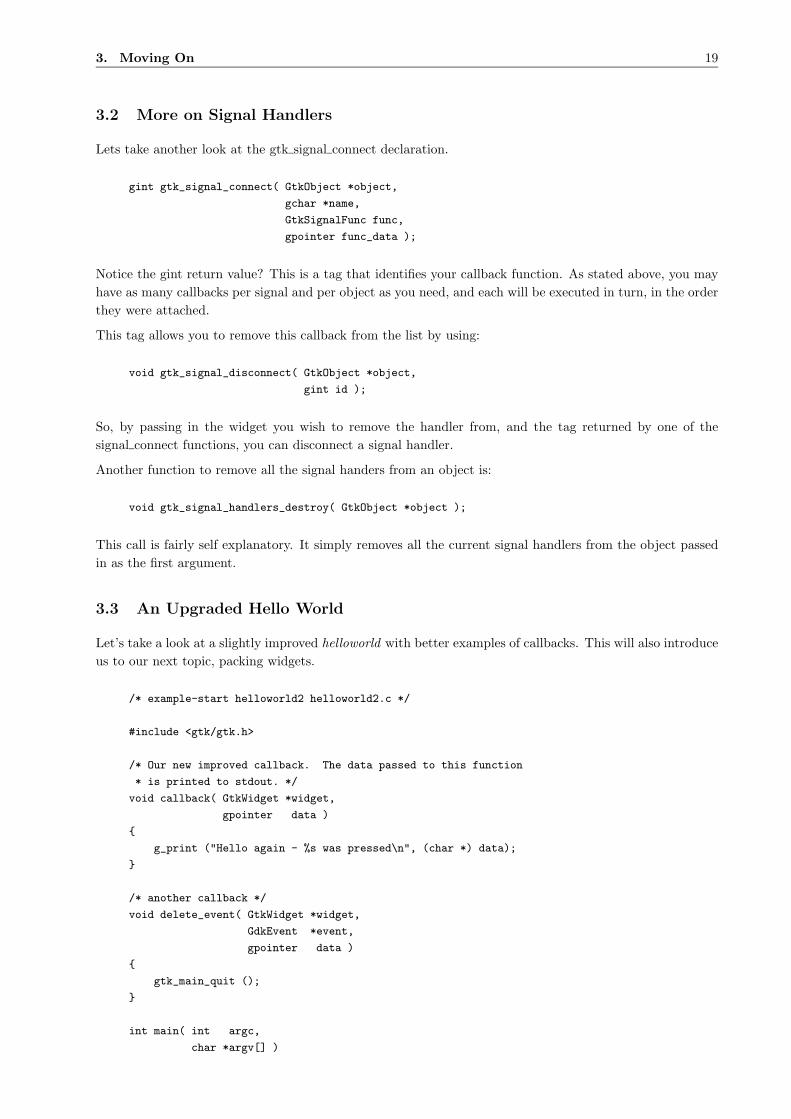
3.2 More on Signal Handlers
Lets take another look at the gtk signal connect declaration.
gint gtk_signal_connect( GtkObject *object,
gchar *name,
GtkSignalFunc func,
gpointer func_data );
Notice the gint return value? This is a tag that identifies your callback function. As stated above, you mayhave as many callbacks per signal and per object as you need, and each will be executed in turn, in the orderthey were attached.
This tag allows you to remove this callback from the list by using:
void gtk_signal_disconnect( GtkObject *object,
gint id );
So, by passing in the widget you wish to remove the handler from, and the tag returned by one of thesignal connect functions, you can disconnect a signal handler.
Another function to remove all the signal handers from an object is:
void gtk_signal_handlers_destroy( GtkObject *object );
This call is fairly self explanatory. It simply removes all the current signal handlers from the object passedin as the first argument.
3.3 An Upgraded Hello World
Let’s take a look at a slightly improved helloworld with better examples of callbacks. This will also introduceus to our next topic, packing widgets.
/* example-start helloworld2 helloworld2.c */
#include <gtk/gtk.h>
/* Our new improved callback. The data passed to this function
* is printed to stdout. */
void callback( GtkWidget *widget,
gpointer data )
{
g_print ("Hello again - %s was pressed\n", (char *) data);
}
/* another callback */
void delete_event( GtkWidget *widget,
GdkEvent *event,
gpointer data )
{
gtk_main_quit ();
}
int main( int argc,
char *argv[] )

3. Moving On 20
{
/* GtkWidget is the storage type for widgets */
GtkWidget *window;
GtkWidget *button;
GtkWidget *box1;
/* This is called in all GTK applications. Arguments are parsed
* from the command line and are returned to the application. */
gtk_init (\&argc, \&argv);
/* Create a new window */
window = gtk_window_new (GTK_WINDOW_TOPLEVEL);
/* This is a new call, this just sets the title of our
* new window to "Hello Buttons!" */
gtk_window_set_title (GTK_WINDOW (window), "Hello Buttons!");
/* Here we just set a handler for delete_event that immediately
* exits GTK. */
gtk_signal_connect (GTK_OBJECT (window), "delete_event",
GTK_SIGNAL_FUNC (delete_event), NULL);
/* Sets the border width of the window. */
gtk_container_set_border_width (GTK_CONTAINER (window), 10);
/* We create a box to pack widgets into. This is described in detail
* in the "packing" section. The box is not really visible, it
* is just used as a tool to arrange widgets. */
box1 = gtk_hbox_new(FALSE, 0);
/* Put the box into the main window. */
gtk_container_add (GTK_CONTAINER (window), box1);
/* Creates a new button with the label "Button 1". */
button = gtk_button_new_with_label ("Button 1");
/* Now when the button is clicked, we call the "callback" function
* with a pointer to "button 1" as its argument */
gtk_signal_connect (GTK_OBJECT (button), "clicked",
GTK_SIGNAL_FUNC (callback), (gpointer) "button 1");
/* Instead of gtk_container_add, we pack this button into the invisible
* box, which has been packed into the window. */
gtk_box_pack_start(GTK_BOX(box1), button, TRUE, TRUE, 0);
/* Always remember this step, this tells GTK that our preparation for
* this button is complete, and it can now be displayed. */
gtk_widget_show(button);
/* Do these same steps again to create a second button */
button = gtk_button_new_with_label ("Button 2");
/* Call the same callback function with a different argument,
* passing a pointer to "button 2" instead. */
gtk_signal_connect (GTK_OBJECT (button), "clicked",
GTK_SIGNAL_FUNC (callback), (gpointer) "button 2");

4. Packing Widgets 21
gtk_box_pack_start(GTK_BOX(box1), button, TRUE, TRUE, 0);
/* The order in which we show the buttons is not really important, but I
* recommend showing the window last, so it all pops up at once. */
gtk_widget_show(button);
gtk_widget_show(box1);
gtk_widget_show (window);
/* Rest in gtk_main and wait for the fun to begin! */
gtk_main ();
return(0);
}
/* example-end */
Compile this program using the same linking arguments as our first example. You’ll notice this time thereis no easy way to exit the program, you have to use your window manager or command line to kill it. Agood exercise for the reader would be to insert a third ”Quit” button that will exit the program. You mayalso wish to play with the options to gtk box pack start() while reading the next section. Try resizing thewindow, and observe the behavior.
Just as a side note, there is another useful define for gtk window new() - GTK WINDOW DIALOG. Thisinteracts with the window manager a little differently and should be used for transient windows.
4 Packing Widgets
When creating an application, you’ll want to put more than one widget inside a window. Our first helloworldexample only used one widget so we could simply use a gtk container add call to ”pack” the widget into thewindow. But when you want to put more than one widget into a window, how do you control where thatwidget is positioned? This is where packing comes in.
4.1 Theory of Packing Boxes
Most packing is done by creating boxes as in the example above. These are invisible widget containers thatwe can pack our widgets into which come in two forms, a horizontal box, and a vertical box. When packingwidgets into a horizontal box, the objects are inserted horizontally from left to right or right to left dependingon the call used. In a vertical box, widgets are packed from top to bottom or vice versa. You may use anycombination of boxes inside or beside other boxes to create the desired effect.
To create a new horizontal box, we use a call to gtk hbox new(), and for vertical boxes, gtk vbox new().Thegtk box pack start() and gtk box pack end() functions are used to place objects inside of these containers.The gtk box pack start() function will start at the top and work its way down in a vbox, and pack left toright in an hbox. gtk box pack end() will do the opposite, packing from bottom to top in a vbox, and rightto left in an hbox. Using these functions allow us to right justify or left justify our widgets and may bemixed in any way to achieve the desired effect. We will use gtk box pack start() in most of our examples.An object may be another container or a widget. In fact, many widgets are actually containers themselves,including the button, but we usually only use a label inside a button.
By using these calls, GTK knows where you want to place your widgets so it can do automatic resizing andother nifty things. There’s also a number of options as to how your widgets should be packed. As you canimagine, this method gives us a quite a bit of flexibility when placing and creating widgets.

4. Packing Widgets 22
4.2 Details of Boxes
Because of this flexibility, packing boxes in GTK can be confusing at first. There are a lot of options, andit’s not immediately obvious how they all fit together. In the end however, there are basically five differentstyles.
Each line contains one horizontal box (hbox) with several buttons. The call to gtk box pack is shorthandfor the call to pack each of the buttons into the hbox. Each of the buttons is packed into the hbox the sameway (i.e. same arguments to the gtk box pack start() function).
This is the declaration of the gtk box pack start function.
void gtk_box_pack_start( GtkBox *box,
GtkWidget *child,
gint expand,
gint fill,
gint padding );
The first argument is the box you are packing the object into, the second is the object. The objects will allbe buttons for now, so we’ll be packing buttons into boxes.
The expand argument to gtk box pack start() and gtk box pack end() controls whether the widgets are laidout in the box to fill in all the extra space in the box so the box is expanded to fill the area alloted to it(TRUE). Or the box is shrunk to just fit the widgets (FALSE). Setting expand to FALSE will allow you todo right and left justification of your widgets. Otherwise, they will all expand to fit into the box, and thesame effect could be achieved by using only one of gtk box pack start or gtk box pack end.
The fill argument to the gtk box pack functions control whether the extra space is allocated to the objectsthemselves (TRUE), or as extra padding in the box around these objects (FALSE). It only has an effect ifthe expand argument is also TRUE.
When creating a new box, the function looks like this:
GtkWidget *gtk_hbox_new (gint homogeneous,
gint spacing);
The homogeneous argument to gtk hbox new (and the same for gtk vbox new) controls whether each objectin the box has the same size (i.e. the same width in an hbox, or the same height in a vbox). If it is set, theexpand argument to the gtk box pack routines is always turned on.
What’s the difference between spacing (set when the box is created) and padding (set when elements arepacked)? Spacing is added between objects, and padding is added on either side of an object. The followingfigure should make it clearer:

4. Packing Widgets 23
Here is the code used to create the above images. I’ve commented it fairly heavily so hopefully you won’thave any problems following it. Compile it yourself and play with it.
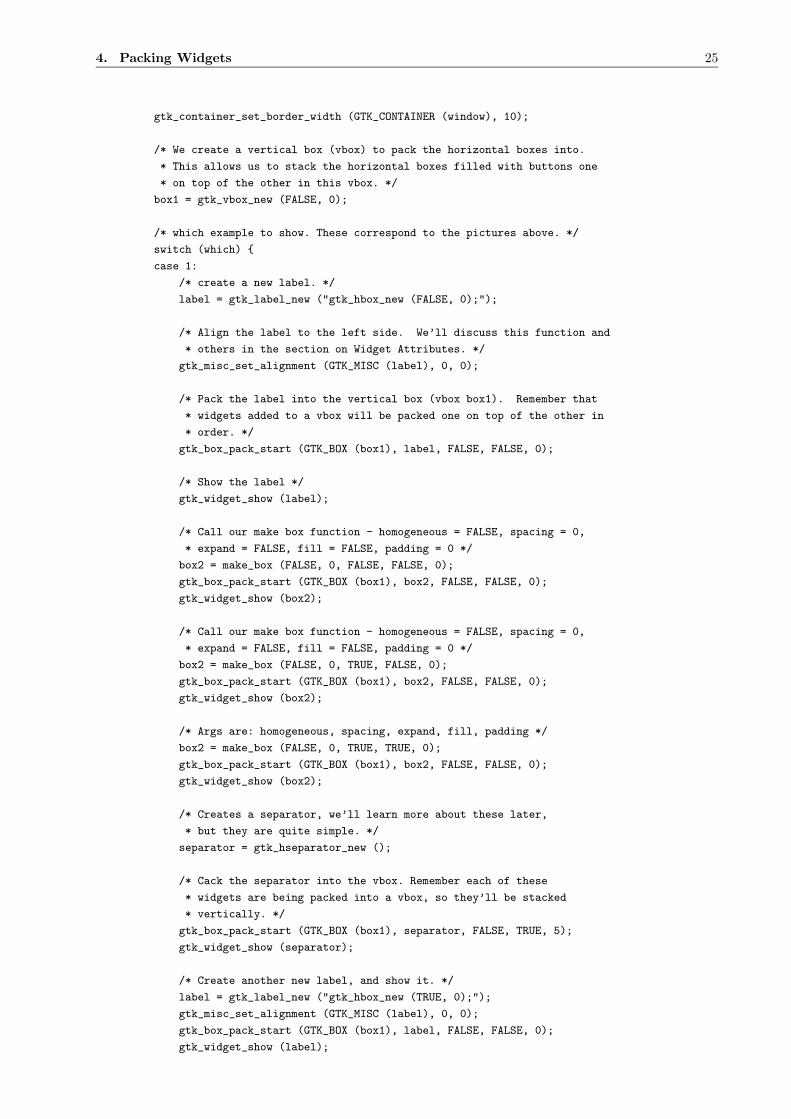
4.3 Packing Demonstration Program
/* example-start packbox packbox.c */
#include <stdio.h>
#include "gtk/gtk.h"
void delete_event( GtkWidget *widget,
GdkEvent *event,
gpointer data )
{
gtk_main_quit ();
}
/* Make a new hbox filled with button-labels. Arguments for the
* variables we’re interested are passed in to this function.
* We do not show the box, but do show everything inside. */
GtkWidget *make_box( gint homogeneous,
gint spacing,
gint expand,
gint fill,
gint padding )
{
GtkWidget *box;
GtkWidget *button;
char padstr[80];
/* Create a new hbox with the appropriate homogeneous
* and spacing settings */
box = gtk_hbox_new (homogeneous, spacing);
/* Create a series of buttons with the appropriate settings */
button = gtk_button_new_with_label ("gtk_box_pack");
gtk_box_pack_start (GTK_BOX (box), button, expand, fill, padding);
gtk_widget_show (button);
button = gtk_button_new_with_label ("(box,");
gtk_box_pack_start (GTK_BOX (box), button, expand, fill, padding);
gtk_widget_show (button);
button = gtk_button_new_with_label ("button,");
gtk_box_pack_start (GTK_BOX (box), button, expand, fill, padding);
gtk_widget_show (button);
4. Packing Widgets 24
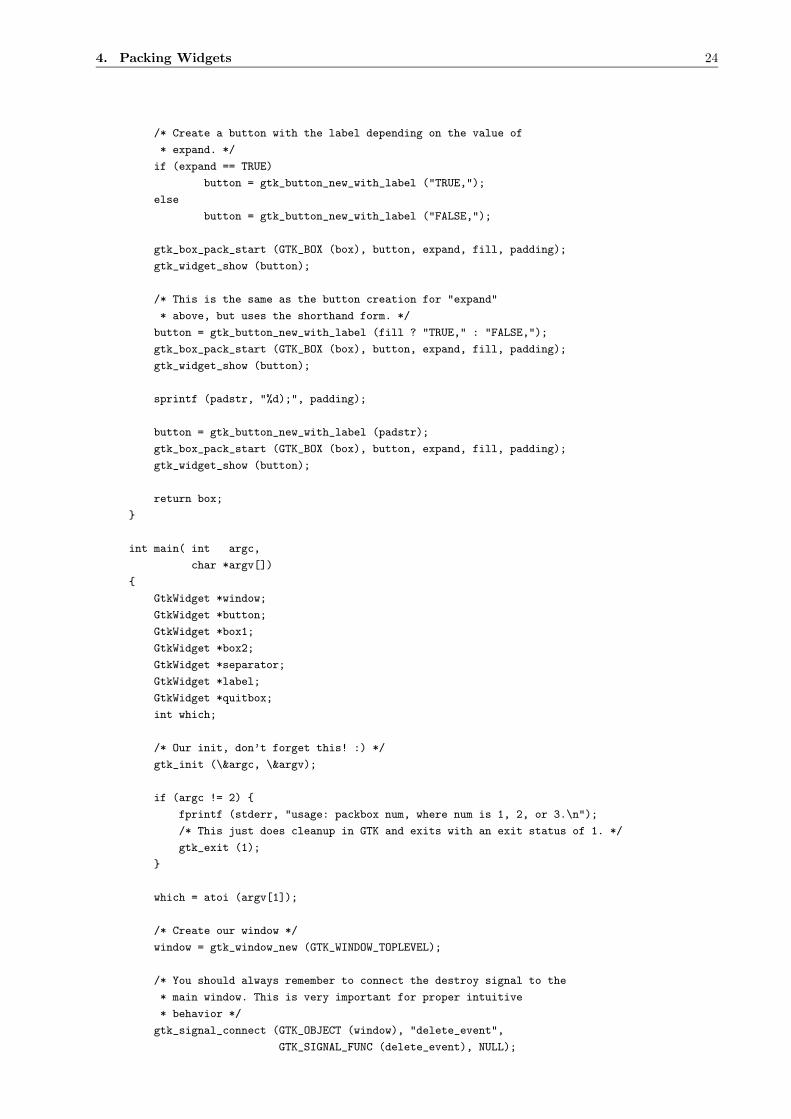
/* Create a button with the label depending on the value of
* expand. */
if (expand == TRUE)
button = gtk_button_new_with_label ("TRUE,");
else
button = gtk_button_new_with_label ("FALSE,");
gtk_box_pack_start (GTK_BOX (box), button, expand, fill, padding);
gtk_widget_show (button);
/* This is the same as the button creation for "expand"
* above, but uses the shorthand form. */
button = gtk_button_new_with_label (fill ? "TRUE," : "FALSE,");
gtk_box_pack_start (GTK_BOX (box), button, expand, fill, padding);
gtk_widget_show (button);
sprintf (padstr, "%d);", padding);
button = gtk_button_new_with_label (padstr);
gtk_box_pack_start (GTK_BOX (box), button, expand, fill, padding);
gtk_widget_show (button);
return box;
}
int main( int argc,
char *argv[])
{
GtkWidget *window;
GtkWidget *button;
GtkWidget *box1;
GtkWidget *box2;
GtkWidget *separator;
GtkWidget *label;
GtkWidget *quitbox;
int which;
/* Our init, don’t forget this! :) */
gtk_init (\&argc, \&argv);
if (argc != 2) {
fprintf (stderr, "usage: packbox num, where num is 1, 2, or 3.\n");
/* This just does cleanup in GTK and exits with an exit status of 1. */
gtk_exit (1);
}
which = atoi (argv[1]);
/* Create our window */
window = gtk_window_new (GTK_WINDOW_TOPLEVEL);
/* You should always remember to connect the destroy signal to the
* main window. This is very important for proper intuitive
* behavior */
gtk_signal_connect (GTK_OBJECT (window), "delete_event",
GTK_SIGNAL_FUNC (delete_event), NULL);
4. Packing Widgets 25
gtk_container_set_border_width (GTK_CONTAINER (window), 10);
/* We create a vertical box (vbox) to pack the horizontal boxes into.
* This allows us to stack the horizontal boxes filled with buttons one
* on top of the other in this vbox. */
box1 = gtk_vbox_new (FALSE, 0);
/* which example to show. These correspond to the pictures above. */
switch (which) {
case 1:
/* create a new label. */
label = gtk_label_new ("gtk_hbox_new (FALSE, 0);");
/* Align the label to the left side. We’ll discuss this function and
* others in the section on Widget Attributes. */
gtk_misc_set_alignment (GTK_MISC (label), 0, 0);
/* Pack the label into the vertical box (vbox box1). Remember that
* widgets added to a vbox will be packed one on top of the other in
* order. */
gtk_box_pack_start (GTK_BOX (box1), label, FALSE, FALSE, 0);
/* Show the label */
gtk_widget_show (label);
/* Call our make box function - homogeneous = FALSE, spacing = 0,
* expand = FALSE, fill = FALSE, padding = 0 */
box2 = make_box (FALSE, 0, FALSE, FALSE, 0);
gtk_box_pack_start (GTK_BOX (box1), box2, FALSE, FALSE, 0);
gtk_widget_show (box2);
/* Call our make box function - homogeneous = FALSE, spacing = 0,
* expand = FALSE, fill = FALSE, padding = 0 */
box2 = make_box (FALSE, 0, TRUE, FALSE, 0);
gtk_box_pack_start (GTK_BOX (box1), box2, FALSE, FALSE, 0);
gtk_widget_show (box2);
/* Args are: homogeneous, spacing, expand, fill, padding */
box2 = make_box (FALSE, 0, TRUE, TRUE, 0);
gtk_box_pack_start (GTK_BOX (box1), box2, FALSE, FALSE, 0);
gtk_widget_show (box2);
/* Creates a separator, we’ll learn more about these later,
* but they are quite simple. */
separator = gtk_hseparator_new ();
/* Cack the separator into the vbox. Remember each of these
* widgets are being packed into a vbox, so they’ll be stacked
* vertically. */
gtk_box_pack_start (GTK_BOX (box1), separator, FALSE, TRUE, 5);
gtk_widget_show (separator);
/* Create another new label, and show it. */
label = gtk_label_new ("gtk_hbox_new (TRUE, 0);");
gtk_misc_set_alignment (GTK_MISC (label), 0, 0);
gtk_box_pack_start (GTK_BOX (box1), label, FALSE, FALSE, 0);
gtk_widget_show (label);

4. Packing Widgets 26
/* Args are: homogeneous, spacing, expand, fill, padding */
box2 = make_box (TRUE, 0, TRUE, FALSE, 0);
gtk_box_pack_start (GTK_BOX (box1), box2, FALSE, FALSE, 0);
gtk_widget_show (box2);
/* Args are: homogeneous, spacing, expand, fill, padding */
box2 = make_box (TRUE, 0, TRUE, TRUE, 0);
gtk_box_pack_start (GTK_BOX (box1), box2, FALSE, FALSE, 0);
gtk_widget_show (box2);
/* Another new separator. */
separator = gtk_hseparator_new ();
/* The last 3 arguments to gtk_box_pack_start are:
* expand, fill, padding. */
gtk_box_pack_start (GTK_BOX (box1), separator, FALSE, TRUE, 5);
gtk_widget_show (separator);
break;
case 2:
/* Create a new label, remember box1 is a vbox as created
* near the beginning of main() */
label = gtk_label_new ("gtk_hbox_new (FALSE, 10);");
gtk_misc_set_alignment (GTK_MISC (label), 0, 0);
gtk_box_pack_start (GTK_BOX (box1), label, FALSE, FALSE, 0);
gtk_widget_show (label);
/* Args are: homogeneous, spacing, expand, fill, padding */
box2 = make_box (FALSE, 10, TRUE, FALSE, 0);
gtk_box_pack_start (GTK_BOX (box1), box2, FALSE, FALSE, 0);
gtk_widget_show (box2);
/* Args are: homogeneous, spacing, expand, fill, padding */
box2 = make_box (FALSE, 10, TRUE, TRUE, 0);
gtk_box_pack_start (GTK_BOX (box1), box2, FALSE, FALSE, 0);
gtk_widget_show (box2);
separator = gtk_hseparator_new ();
/* The last 3 arguments to gtk_box_pack_start are:
* expand, fill, padding. */
gtk_box_pack_start (GTK_BOX (box1), separator, FALSE, TRUE, 5);
gtk_widget_show (separator);
label = gtk_label_new ("gtk_hbox_new (FALSE, 0);");
gtk_misc_set_alignment (GTK_MISC (label), 0, 0);
gtk_box_pack_start (GTK_BOX (box1), label, FALSE, FALSE, 0);
gtk_widget_show (label);
/* Args are: homogeneous, spacing, expand, fill, padding */
box2 = make_box (FALSE, 0, TRUE, FALSE, 10);
gtk_box_pack_start (GTK_BOX (box1), box2, FALSE, FALSE, 0);
gtk_widget_show (box2);
/* Args are: homogeneous, spacing, expand, fill, padding */
box2 = make_box (FALSE, 0, TRUE, TRUE, 10);

4. Packing Widgets 27
gtk_box_pack_start (GTK_BOX (box1), box2, FALSE, FALSE, 0);
gtk_widget_show (box2);
separator = gtk_hseparator_new ();
/* The last 3 arguments to gtk_box_pack_start are: expand, fill, padding. */
gtk_box_pack_start (GTK_BOX (box1), separator, FALSE, TRUE, 5);
gtk_widget_show (separator);
break;
case 3:
/* This demonstrates the ability to use gtk_box_pack_end() to
* right justify widgets. First, we create a new box as before. */
box2 = make_box (FALSE, 0, FALSE, FALSE, 0);
/* Create the label that will be put at the end. */
label = gtk_label_new ("end");
/* Pack it using gtk_box_pack_end(), so it is put on the right
* side of the hbox created in the make_box() call. */
gtk_box_pack_end (GTK_BOX (box2), label, FALSE, FALSE, 0);
/* Show the label. */
gtk_widget_show (label);
/* Pack box2 into box1 (the vbox remember ? :) */
gtk_box_pack_start (GTK_BOX (box1), box2, FALSE, FALSE, 0);
gtk_widget_show (box2);
/* A separator for the bottom. */
separator = gtk_hseparator_new ();
/* This explicitly sets the separator to 400 pixels wide by 5 pixels
* high. This is so the hbox we created will also be 400 pixels wide,
* and the "end" label will be separated from the other labels in the
* hbox. Otherwise, all the widgets in the hbox would be packed as
* close together as possible. */
gtk_widget_set_usize (separator, 400, 5);
/* pack the separator into the vbox (box1) created near the start
* of main() */
gtk_box_pack_start (GTK_BOX (box1), separator, FALSE, TRUE, 5);
gtk_widget_show (separator);
}
/* Create another new hbox.. remember we can use as many as we need! */
quitbox = gtk_hbox_new (FALSE, 0);
/* Our quit button. */
button = gtk_button_new_with_label ("Quit");
/* Setup the signal to destroy the window. Remember that this will send
* the "destroy" signal to the window which will be caught by our signal
* handler as defined above. */
gtk_signal_connect_object (GTK_OBJECT (button), "clicked",
GTK_SIGNAL_FUNC (gtk_main_quit),
GTK_OBJECT (window));
/* Pack the button into the quitbox.
* The last 3 arguments to gtk_box_pack_start are:
* expand, fill, padding. */
gtk_box_pack_start (GTK_BOX (quitbox), button, TRUE, FALSE, 0);

4. Packing Widgets 28
/* pack the quitbox into the vbox (box1) */
gtk_box_pack_start (GTK_BOX (box1), quitbox, FALSE, FALSE, 0);
/* Pack the vbox (box1) which now contains all our widgets, into the
* main window. */
gtk_container_add (GTK_CONTAINER (window), box1);
/* And show everything left */
gtk_widget_show (button);
gtk_widget_show (quitbox);
gtk_widget_show (box1);
/* Showing the window last so everything pops up at once. */
gtk_widget_show (window);
/* And of course, our main function. */
gtk_main ();
/* Control returns here when gtk_main_quit() is called, but not when
* gtk_exit is used. */
return(0);
}
/* example-end */
4.4 Packing Using Tables
Let’s take a look at another way of packing - Tables. These can be extremely useful in certain situations.
Using tables, we create a grid that we can place widgets in. The widgets may take up as many spaces as wespecify.
The first thing to look at of course, is the gtk table new function:
GtkWidget *gtk_table_new( gint rows,
gint columns,
gint homogeneous );
The first argument is the number of rows to make in the table, while the second, obviously, is the number ofcolumns.
The homogeneous argument has to do with how the table’s boxes are sized. If homogeneous is TRUE, thetable boxes are resized to the size of the largest widget in the table. If homogeneous is FALSE, the size of atable boxes is dictated by the tallest widget in its same row, and the widest widget in its column.
The rows and columns are laid out from 0 to n, where n was the number specified in the call to gtk table new.So, if you specify rows = 2 and columns = 2, the layout would look something like this:
0 1 2
0+----------+----------+
| | |
1+----------+----------+
| | |
2+----------+----------+
Note that the coordinate system starts in the upper left hand corner. To place a widget into a box, use thefollowing function:

4. Packing Widgets 29
void gtk_table_attach( GtkTable *table,
GtkWidget *child,
gint left_attach,
gint right_attach,
gint top_attach,
gint bottom_attach,
gint xoptions,
gint yoptions,
gint xpadding,
gint ypadding );
Where the first argument (”table”) is the table you’ve created and the second (”child”) the widget you wishto place in the table.
The left and right attach arguments specify where to place the widget, and how many boxes to use. If youwant a button in the lower right table entry of our 2x2 table, and want it to fill that entry ONLY, left attachwould be = 1, right attach = 2, top attach = 1, bottom attach = 2.
Now, if you wanted a widget to take up the whole top row of our 2x2 table, you’d use left attach = 0,right attach = 2, top attach = 0, bottom attach = 1.
The xoptions and yoptions are used to specify packing options and may be bitwise OR’ed together to allowmultiple options.
These options are:
• GTK FILL - If the table box is larger than the widget, and GTK FILL is specified, the widget willexpand to use all the room available.
• GTK SHRINK - If the table widget was allocated less space then was requested (usually by the userresizing the window), then the widgets would normally just be pushed off the bottom of the windowand disappear. If GTK SHRINK is specified, the widgets will shrink with the table.
• GTK EXPAND - This will cause the table to expand to use up any remaining space in the window.
Padding is just like in boxes, creating a clear area around the widget specified in pixels.
gtk table attach() has a LOT of options. So, there’s a shortcut:
void gtk_table_attach_defaults( GtkTable *table,
GtkWidget *widget,
gint left_attach,
gint right_attach,
gint top_attach,
gint bottom_attach );
The X and Y options default to GTK FILL | GTK EXPAND, and X and Y padding are set to 0. The restof the arguments are identical to the previous function.
We also have gtk table set row spacing() and gtk table set col spacing(). This places spacing between therows at the specified row or column.
void gtk_table_set_row_spacing( GtkTable *table,
gint row,
gint spacing );
and

4. Packing Widgets 30
void gtk_table_set_col_spacing ( GtkTable *table,
gint column,
gint spacing );
Note that for columns, the space goes to the right of the column, and for rows, the space goes below the row.
You can also set a consistent spacing of all rows and/or columns with:
void gtk_table_set_row_spacings( GtkTable *table,
gint spacing );
And,
void gtk_table_set_col_spacings( GtkTable *table,
gint spacing );
Note that with these calls, the last row and last column do not get any spacing.
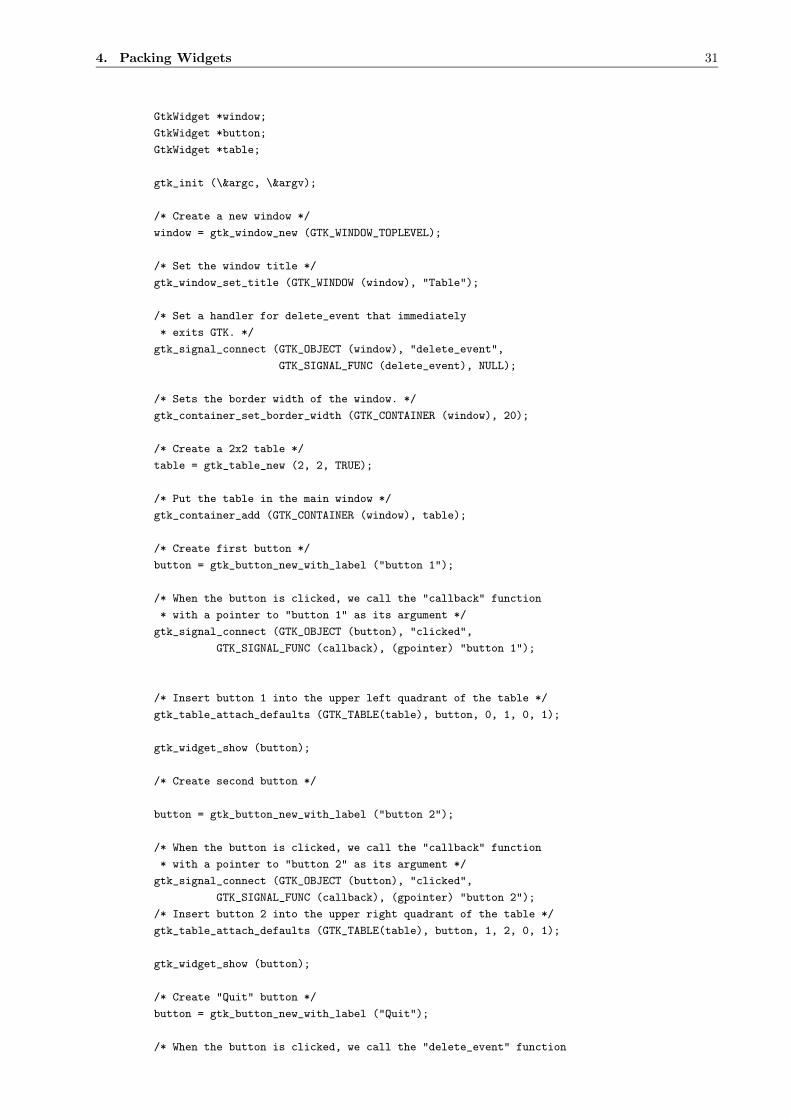
4.5 Table Packing Example
Here we make a window with three buttons in a 2x2 table. The first two buttons will be placed in the upperrow. A third, quit button, is placed in the lower row, spanning both columns. Which means it should looksomething like this:
Here’s the source code:
/* example-start table table.c */
#include <gtk/gtk.h>
/* Our callback.
* The data passed to this function is printed to stdout */
void callback( GtkWidget *widget,
gpointer data )
{
g_print ("Hello again - %s was pressed\n", (char *) data);
}
/* This callback quits the program */
void delete_event( GtkWidget *widget,
GdkEvent *event,
gpointer data )
{
gtk_main_quit ();
}
int main( int argc,
char *argv[] )
{
4. Packing Widgets 31
GtkWidget *window;
GtkWidget *button;
GtkWidget *table;
gtk_init (\&argc, \&argv);
/* Create a new window */
window = gtk_window_new (GTK_WINDOW_TOPLEVEL);
/* Set the window title */
gtk_window_set_title (GTK_WINDOW (window), "Table");
/* Set a handler for delete_event that immediately
* exits GTK. */
gtk_signal_connect (GTK_OBJECT (window), "delete_event",
GTK_SIGNAL_FUNC (delete_event), NULL);
/* Sets the border width of the window. */
gtk_container_set_border_width (GTK_CONTAINER (window), 20);
/* Create a 2x2 table */
table = gtk_table_new (2, 2, TRUE);
/* Put the table in the main window */
gtk_container_add (GTK_CONTAINER (window), table);
/* Create first button */
button = gtk_button_new_with_label ("button 1");
/* When the button is clicked, we call the "callback" function
* with a pointer to "button 1" as its argument */
gtk_signal_connect (GTK_OBJECT (button), "clicked",
GTK_SIGNAL_FUNC (callback), (gpointer) "button 1");
/* Insert button 1 into the upper left quadrant of the table */
gtk_table_attach_defaults (GTK_TABLE(table), button, 0, 1, 0, 1);
gtk_widget_show (button);
/* Create second button */
button = gtk_button_new_with_label ("button 2");
/* When the button is clicked, we call the "callback" function
* with a pointer to "button 2" as its argument */
gtk_signal_connect (GTK_OBJECT (button), "clicked",
GTK_SIGNAL_FUNC (callback), (gpointer) "button 2");
/* Insert button 2 into the upper right quadrant of the table */
gtk_table_attach_defaults (GTK_TABLE(table), button, 1, 2, 0, 1);
gtk_widget_show (button);
/* Create "Quit" button */
button = gtk_button_new_with_label ("Quit");
/* When the button is clicked, we call the "delete_event" function
5. Widget Overview 32
* and the program exits */
gtk_signal_connect (GTK_OBJECT (button), "clicked",
GTK_SIGNAL_FUNC (delete_event), NULL);
/* Insert the quit button into the both
* lower quadrants of the table */
gtk_table_attach_defaults (GTK_TABLE(table), button, 0, 2, 1, 2);
gtk_widget_show (button);
gtk_widget_show (table);
gtk_widget_show (window);
gtk_main ();
return 0;
}
/* example-end */
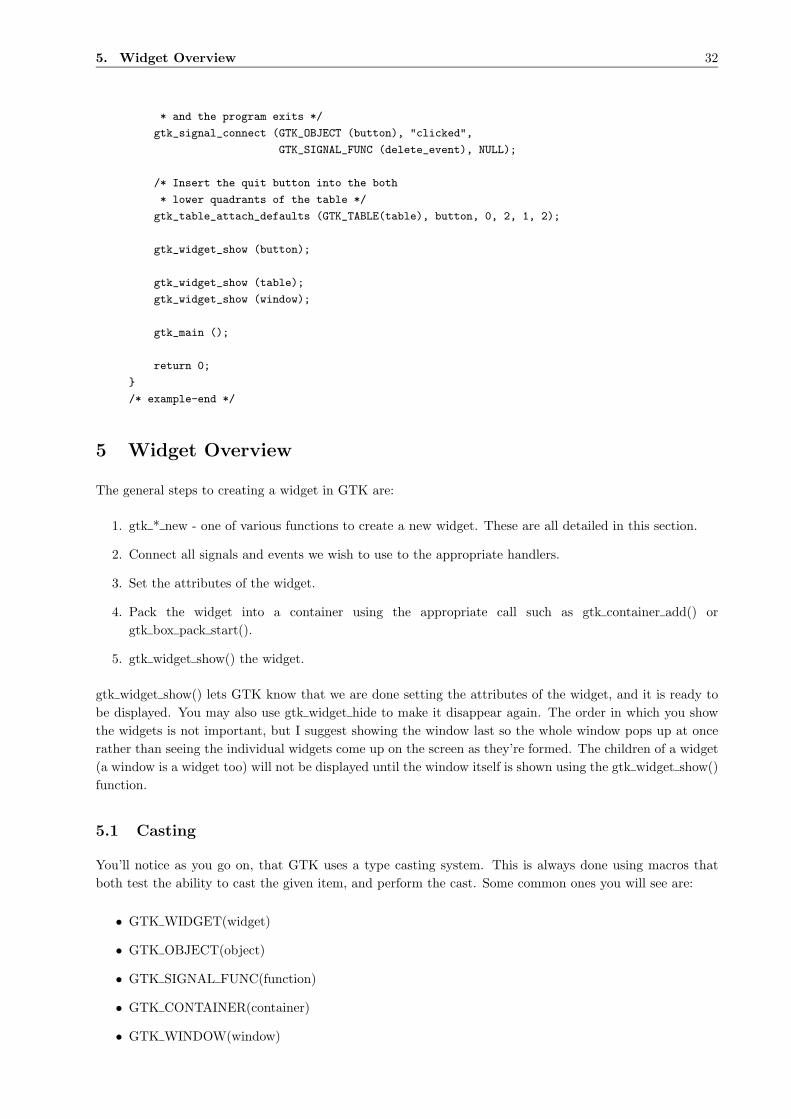
5 Widget Overview
The general steps to creating a widget in GTK are:
1. gtk * new - one of various functions to create a new widget. These are all detailed in this section.
2. Connect all signals and events we wish to use to the appropriate handlers.
3. Set the attributes of the widget.
4. Pack the widget into a container using the appropriate call such as gtk container add() orgtk box pack start().
5. gtk widget show() the widget.
gtk widget show() lets GTK know that we are done setting the attributes of the widget, and it is ready tobe displayed. You may also use gtk widget hide to make it disappear again. The order in which you showthe widgets is not important, but I suggest showing the window last so the whole window pops up at oncerather than seeing the individual widgets come up on the screen as they’re formed. The children of a widget(a window is a widget too) will not be displayed until the window itself is shown using the gtk widget show()function.
5.1 Casting
You’ll notice as you go on, that GTK uses a type casting system. This is always done using macros thatboth test the ability to cast the given item, and perform the cast. Some common ones you will see are:
• GTK WIDGET(widget)
• GTK OBJECT(object)
• GTK SIGNAL FUNC(function)
• GTK CONTAINER(container)
• GTK WINDOW(window)

5. Widget Overview 33
• GTK BOX(box)
These are all used to cast arguments in functions. You’ll see them in the examples, and can usually tell whento use them simply by looking at the function’s declaration.
As you can see below in the class hierarchy, all GtkWidgets are derived from the GtkObject base class. Thismeans you can use a widget in any place the function asks for an object - simply use the GTK OBJECT()macro.
For example:
gtk_signal_connect( GTK_OBJECT(button), "clicked",
GTK_SIGNAL_FUNC(callback_function), callback_data);
This casts the button into an object, and provides a cast for the function pointer to the callback.
Many widgets are also containers. If you look in the class hierarchy below, you’ll notice that many widgetsderive from the GtkContainer class. Any one of these widgets may be used with the GTK CONTAINERmacro to pass them to functions that ask for containers.
Unfortunately, these macros are not extensively covered in the tutorial, but I recommend taking a lookthrough the GTK header files. It can be very educational. In fact, it’s not difficult to learn how a widgetworks just by looking at the function declarations.
5.2 Widget Hierarchy
For your reference, here is the class hierarchy tree used to implement widgets.
GtkObject
+GtkWidget
| +GtkMisc
| | +GtkLabel
| | | +GtkAccelLabel
| | | ‘GtkTipsQuery
| | +GtkArrow
| | +GtkImage
| | ‘GtkPixmap
| +GtkContainer
| | +GtkBin
| | | +GtkAlignment
| | | +GtkFrame
| | | | ‘GtkAspectFrame
| | | +GtkButton
| | | | +GtkToggleButton
| | | | | ‘GtkCheckButton
| | | | | ‘GtkRadioButton
| | | | ‘GtkOptionMenu
| | | +GtkItem
| | | | +GtkMenuItem
| | | | | +GtkCheckMenuItem
| | | | | | ‘GtkRadioMenuItem
| | | | | ‘GtkTearoffMenuItem
| | | | +GtkListItem
| | | | ‘GtkTreeItem
| | | +GtkWindow
| | | | +GtkColorSelectionDialog
| | | | +GtkDialog

5. Widget Overview 34
| | | | | ‘GtkInputDialog
| | | | +GtkDrawWindow
| | | | +GtkFileSelection
| | | | +GtkFontSelectionDialog
| | | | ‘GtkPlug
| | | +GtkEventBox
| | | +GtkHandleBox
| | | +GtkScrolledWindow
| | | ‘GtkViewport
| | +GtkBox
| | | +GtkButtonBox
| | | | +GtkHButtonBox
| | | | ‘GtkVButtonBox
| | | +GtkVBox
| | | | +GtkColorSelection
| | | | ‘GtkGammaCurve
| | | ‘GtkHBox
| | | +GtkCombo
| | | ‘GtkStatusbar
| | +GtkCList
| | | ‘GtkCTree
| | +GtkFixed
| | +GtkNotebook
| | | ‘GtkFontSelection
| | +GtkPaned
| | | +GtkHPaned
| | | ‘GtkVPaned
| | +GtkLayout
| | +GtkList
| | +GtkMenuShell
| | | +GtkMenuBar
| | | ‘GtkMenu
| | +GtkPacker
| | +GtkSocket
| | +GtkTable
| | +GtkToolbar
| | ‘GtkTree
| +GtkCalendar
| +GtkDrawingArea
| | ‘GtkCurve
| +GtkEditable
| | +GtkEntry
| | | ‘GtkSpinButton
| | ‘GtkText
| +GtkRuler
| | +GtkHRuler
| | ‘GtkVRuler
| +GtkRange
| | +GtkScale
| | | +GtkHScale
| | | ‘GtkVScale
| | ‘GtkScrollbar
| | +GtkHScrollbar
| | ‘GtkVScrollbar
| +GtkSeparator
| | +GtkHSeparator
| | ‘GtkVSeparator
6. The Button Widget 35
| +GtkPreview
| ‘GtkProgress
| ‘GtkProgressBar
+GtkData
| +GtkAdjustment
| ‘GtkTooltips
‘GtkItemFactory
5.3 Widgets Without Windows
The following widgets do not have an associated window. If you want to capture events, you’ll have to usethe GtkEventBox. See the section on the 10.1 widget.
GtkAlignment
GtkArrow
GtkBin
GtkBox
GtkImage
GtkItem
GtkLabel
GtkPixmap
GtkScrolledWindow
GtkSeparator
GtkTable
GtkAspectFrame
GtkFrame
GtkVBox
GtkHBox
GtkVSeparator
GtkHSeparator
We’ll further our exploration of GTK by examining each widget in turn, creating a few simple functionsto display them. Another good source is the testgtk.c program that comes with GTK. It can be found ingtk/testgtk.c.
6 The Button Widget
6.1 Normal Buttons
We’ve almost seen all there is to see of the button widget. It’s pretty simple. There are however two waysto create a button. You can use the gtk button new with label() to create a button with a label, or usegtk button new() to create a blank button. It’s then up to you to pack a label or pixmap into this new button.To do this, create a new box, and then pack your objects into this box using the usual gtk box pack start,and then use gtk container add to pack the box into the button.
Here’s an example of using gtk button new to create a button with a picture and a label in it. I’ve brokenup the code to create a box from the rest so you can use it in your programs. There are further examples ofusing pixmaps later in the tutorial.
/* example-start buttons buttons.c */
#include <gtk/gtk.h>

6. The Button Widget 36
/* Create a new hbox with an image and a label packed into it
* and return the box. */
GtkWidget *xpm_label_box( GtkWidget *parent,
gchar *xpm_filename,
gchar *label_text )
{
GtkWidget *box1;
GtkWidget *label;
GtkWidget *pixmapwid;
GdkPixmap *pixmap;
GdkBitmap *mask;
GtkStyle *style;
/* Create box for xpm and label */
box1 = gtk_hbox_new (FALSE, 0);
gtk_container_set_border_width (GTK_CONTAINER (box1), 2);
/* Get the style of the button to get the
* background color. */
style = gtk_widget_get_style(parent);
/* Now on to the xpm stuff */
pixmap = gdk_pixmap_create_from_xpm (parent->window, \&mask,
\&style->bg[GTK_STATE_NORMAL],
xpm_filename);
pixmapwid = gtk_pixmap_new (pixmap, mask);
/* Create a label for the button */
label = gtk_label_new (label_text);
/* Pack the pixmap and label into the box */
gtk_box_pack_start (GTK_BOX (box1),
pixmapwid, FALSE, FALSE, 3);
gtk_box_pack_start (GTK_BOX (box1), label, FALSE, FALSE, 3);
gtk_widget_show(pixmapwid);
gtk_widget_show(label);
return(box1);
}
/* Our usual callback function */
void callback( GtkWidget *widget,
gpointer data )
{
g_print ("Hello again - %s was pressed\n", (char *) data);
}
int main( int argc,
char *argv[] )
{
/* GtkWidget is the storage type for widgets */
GtkWidget *window;
GtkWidget *button;

6. The Button Widget 37
GtkWidget *box1;
gtk_init (\&argc, \&argv);
/* Create a new window */
window = gtk_window_new (GTK_WINDOW_TOPLEVEL);
gtk_window_set_title (GTK_WINDOW (window), "Pixmap’d Buttons!");
/* It’s a good idea to do this for all windows. */
gtk_signal_connect (GTK_OBJECT (window), "destroy",
GTK_SIGNAL_FUNC (gtk_exit), NULL);
gtk_signal_connect (GTK_OBJECT (window), "delete_event",
GTK_SIGNAL_FUNC (gtk_exit), NULL);
/* Sets the border width of the window. */
gtk_container_set_border_width (GTK_CONTAINER (window), 10);
gtk_widget_realize(window);
/* Create a new button */
button = gtk_button_new ();
/* Connect the "clicked" signal of the button to our callback */
gtk_signal_connect (GTK_OBJECT (button), "clicked",
GTK_SIGNAL_FUNC (callback), (gpointer) "cool button");
/* This calls our box creating function */
box1 = xpm_label_box(window, "info.xpm", "cool button");
/* Pack and show all our widgets */
gtk_widget_show(box1);
gtk_container_add (GTK_CONTAINER (button), box1);
gtk_widget_show(button);
gtk_container_add (GTK_CONTAINER (window), button);
gtk_widget_show (window);
/* Rest in gtk_main and wait for the fun to begin! */
gtk_main ();
return(0);
}
/* example-end */
The xpm label box function could be used to pack xpm’s and labels into any widget that can be a container.
The Button widget has the following signals:
• pressed
• released
• clicked

6. The Button Widget 38
• enter
• leave
6.2 Toggle Buttons
Toggle buttons are derived from normal buttons and are very similar, except they will always be in one oftwo states, alternated by a click. They may be depressed, and when you click again, they will pop back up.Click again, and they will pop back down.
Toggle buttons are the basis for check buttons and radio buttons, as such, many of the calls used for togglebuttons are inherited by radio and check buttons. I will point these out when we come to them.
Creating a new toggle button:
GtkWidget *gtk_toggle_button_new( void );
GtkWidget *gtk_toggle_button_new_with_label( gchar *label );
As you can imagine, these work identically to the normal button widget calls. The first creates a blanktoggle button, and the second, a button with a label widget already packed into it.
To retrieve the state of the toggle widget, including radio and check buttons, we use a GTK macro as shownin our example below. This tests the state of the toggle in a callback. The signal of interest emitted to usby toggle buttons (the toggle button, check button, and radio button widgets), is the ”toggled” signal. Tocheck the state of these buttons, set up a signal handler to catch the toggled signal, and use the macro todetermine its state. The callback will look something like:
void toggle_button_callback (GtkWidget *widget, gpointer data)
{
if (GTK_TOGGLE_BUTTON (widget)->active)
{
/* If control reaches here, the toggle button is down */
} else {
/* If control reaches here, the toggle button is up */
}
}
void gtk_toggle_button_set_active( GtkToggleButton *toggle_button,
gint state );
The above call can be used to set the state of the toggle button, and its children the radio and check buttons.Passing in your created button as the first argument, and a TRUE or FALSE for the second state argumentto specify whether it should be down (depressed) or up (released). Default is up, or FALSE.
Note that when you use the gtk toggle button set active() function, and the state is actually changed, itcauses the ”clicked” signal to be emitted from the button.
void gtk_toggle_button_toggled (GtkToggleButton *toggle_button);
This simply toggles the button, and emits the ”toggled” signal.

6. The Button Widget 39
6.3 Check Buttons
Check buttons inherent many properties and functions from the the toggle buttons above, but look a littledifferent. Rather than being buttons with text inside them, they are small squares with the text to the rightof them. These are often used for toggling options on and off in applications.
The two creation functions are similar to those of the normal button.
GtkWidget *gtk_check_button_new( void );
GtkWidget *gtk_check_button_new_with_label ( gchar *label );
The new with label function creates a check button with a label beside it.
Checking the state of the check button is identical to that of the toggle button.
6.4 Radio Buttons
Radio buttons are similar to check buttons except they are grouped so that only one may be se-lected/depressed at a time. This is good for places in your application where you need to select from ashort list of options.
Creating a new radio button is done with one of these calls:
GtkWidget *gtk_radio_button_new( GSList *group );
GtkWidget *gtk_radio_button_new_with_label( GSList *group,
gchar *label );
You’ll notice the extra argument to these calls. They require a group to perform their duty properly. Thefirst call to gtk radio button new with label or gtk radio button new with label should pass NULL as thefirst argument. Then create a group using:
GSList *gtk_radio_button_group( GtkRadioButton *radio_button );
The important thing to remember is that gtk radio button group must be called for each new button addedto the group, with the previous button passed in as an argument. The result is then passed into the call togtk radio button new or gtk radio button new with label. This allows a chain of buttons to be established.The example below should make this clear.
You can shorten this slightly by using the following syntax, which removes the need for a variable to holdthe list of buttons. This form is used in the example to create the third button:
button2 = gtk_radio_button_new_with_label(
gtk_radio_button_group (GTK_RADIO_BUTTON (button1)),
"button2");
It is also a good idea to explicitly set which button should be the default depressed button with:
void gtk_toggle_button_set_active( GtkToggleButton *toggle_button,
gint state );
This is described in the section on toggle buttons, and works in exactly the same way.
The following example creates a radio button group with three buttons.

6. The Button Widget 40
/* example-start radiobuttons radiobuttons.c */
#include <gtk/gtk.h>
#include <glib.h>
void close_application( GtkWidget *widget,
GdkEvent *event,
gpointer data )
{
gtk_main_quit();
}
int main( int argc,
char *argv[] )
{
GtkWidget *window = NULL;
GtkWidget *box1;
GtkWidget *box2;
GtkWidget *button;
GtkWidget *separator;
GSList *group;
gtk_init(\&argc,\&argv);
window = gtk_window_new (GTK_WINDOW_TOPLEVEL);
gtk_signal_connect (GTK_OBJECT (window), "delete_event",
GTK_SIGNAL_FUNC(close_application),
NULL);
gtk_window_set_title (GTK_WINDOW (window), "radio buttons");
gtk_container_set_border_width (GTK_CONTAINER (window), 0);
box1 = gtk_vbox_new (FALSE, 0);
gtk_container_add (GTK_CONTAINER (window), box1);
gtk_widget_show (box1);
box2 = gtk_vbox_new (FALSE, 10);
gtk_container_set_border_width (GTK_CONTAINER (box2), 10);
gtk_box_pack_start (GTK_BOX (box1), box2, TRUE, TRUE, 0);
gtk_widget_show (box2);
button = gtk_radio_button_new_with_label (NULL, "button1");
gtk_box_pack_start (GTK_BOX (box2), button, TRUE, TRUE, 0);
gtk_widget_show (button);
group = gtk_radio_button_group (GTK_RADIO_BUTTON (button));
button = gtk_radio_button_new_with_label(group, "button2");
gtk_toggle_button_set_active (GTK_TOGGLE_BUTTON (button), TRUE);
gtk_box_pack_start (GTK_BOX (box2), button, TRUE, TRUE, 0);
gtk_widget_show (button);
button = gtk_radio_button_new_with_label(
gtk_radio_button_group (GTK_RADIO_BUTTON (button)),
"button3");
gtk_box_pack_start (GTK_BOX (box2), button, TRUE, TRUE, 0);
gtk_widget_show (button);

7. Adjustments 41
separator = gtk_hseparator_new ();
gtk_box_pack_start (GTK_BOX (box1), separator, FALSE, TRUE, 0);
gtk_widget_show (separator);
box2 = gtk_vbox_new (FALSE, 10);
gtk_container_set_border_width (GTK_CONTAINER (box2), 10);
gtk_box_pack_start (GTK_BOX (box1), box2, FALSE, TRUE, 0);
gtk_widget_show (box2);
button = gtk_button_new_with_label ("close");
gtk_signal_connect_object (GTK_OBJECT (button), "clicked",
GTK_SIGNAL_FUNC(close_application),
GTK_OBJECT (window));
gtk_box_pack_start (GTK_BOX (box2), button, TRUE, TRUE, 0);
GTK_WIDGET_SET_FLAGS (button, GTK_CAN_DEFAULT);
gtk_widget_grab_default (button);
gtk_widget_show (button);
gtk_widget_show (window);
gtk_main();
return(0);
}
/* example-end */
7 Adjustments
GTK+ has various widgets that can be visually adjusted by the user using the mouse or the keyboard, suchas the range widgets, described in the 8 section. There are also a few widgets that display some adjustableportion of a larger area of data, such as the text widget and the viewport widget.
Obviously, an application needs to be able to react to changes the user makes in range widgets. One way todo this would be to have each widget emit its own type of signal when its adjustment changes, and eitherpass the new value to the signal handler, or require it to look inside the widget’s data structure in order toascertain the value. But you may also want to connect the adjustments of several widgets together, so thatadjusting one adjusts the others. The most obvious example of this is connecting a scrollbar to a panningviewport or a scrolling text area. If each widget has its own way of setting or getting the adjustment value,then the programmer may have to write their own signal handlers to translate between the output of onewidget’s signal and the ”input” of another’s adjustment setting function.
GTK+ solves this problem using the GtkAdjustment object, which is a way for widgets to store and passadjustment information in an abstract and flexible form. The most obvious use of GtkAdjustment is to storethe configuration parameters and values of range widgets, such as scrollbars and scale controls. However,since GtkAdjustments are derived from GtkObject, they have some special powers beyond those of normaldata structures. Most importantly, they can emit signals, just like widgets, and these signals can be used notonly to allow your program to react to user input on adjustable widgets, but also to propagate adjustmentvalues transparently between adjustable widgets.
7.1 Creating an Adjustment
You create an adjustment using:
GtkObject *gtk_adjustment_new( gfloat value,

7. Adjustments 42
gfloat lower,
gfloat upper,
gfloat step_increment,
gfloat page_increment,
gfloat page_size );
The value argument is the initial value you want to give to the adjustment, usually corresponding to thetopmost or leftmost position of an adjustable widget. The lower argument specifies the lowest value whichthe adjustment can hold. The step_increment argument specifies the ”smaller” of the two incrementsby which the user can change the value, while the page_increment is the ”larger” one. The page_size
argument usually corresponds somehow to the visible area of a panning widget. The upper argument is usedto represent the bottom most or right most coordinate in a panning widget’s child. Therefore it is not alwaysthe largest number that value can take, since the page_size of such widgets is usually non-zero.
7.2 Using Adjustments the Easy Way
The adjustable widgets can be roughly divided into those which use and require specific units for thesevalues and those which treat them as arbitrary numbers. The group which treats the values as arbitrarynumbers includes the range widgets (scrollbars and scales, the progress bar widget, and the spin buttonwidget). These widgets are all the widgets which are typically ”adjusted” directly by the user with the mouseor keyboard. They will treat the lower and upper values of an adjustment as a range within which the usercan manipulate the adjustment’s value. By default, they will only modify the value of an adjustment.
The other group includes the text widget, the viewport widget, the compound list widget, and the scrolledwindow widget. All of these widgets use pixel values for their adjustments. These are also all widgets whichare typically ”adjusted” indirectly using scrollbars. While all widgets which use adjustments can either createtheir own adjustments or use ones you supply, you’ll generally want to let this particular category of widgetscreate its own adjustments. Usually, they will eventually override all the values except the value itself inwhatever adjustments you give them, but the results are, in general, undefined (meaning, you’ll have to readthe source code to find out, and it may be different from widget to widget).
Now, you’re probably thinking, since text widgets and viewports insist on setting everything except the valueof their adjustments, while scrollbars will only touch the adjustment’s value, if you share an adjustmentobject between a scrollbar and a text widget, manipulating the scrollbar will automagically adjust the textwidget? Of course it will! Just like this:
/* creates its own adjustments */
text = gtk_text_new (NULL, NULL);
/* uses the newly-created adjustment for the scrollbar as well */
vscrollbar = gtk_vscrollbar_new (GTK_TEXT(text)->vadj);
7.3 Adjustment Internals
Ok, you say, that’s nice, but what if I want to create my own handlers to respond when the user adjusts arange widget or a spin button, and how do I get at the value of the adjustment in these handlers? To answerthese questions and more, let’s start by taking a look at struct _GtkAdjustment itself:
struct _GtkAdjustment
{
GtkData data;
gfloat lower;
gfloat upper;
gfloat value;

7. Adjustments 43
gfloat step_increment;
gfloat page_increment;
gfloat page_size;
};
The first thing you should know is that there aren’t any handy-dandy macros or accessor functions for gettingthe value out of a GtkAdjustment, so you’ll have to (horror of horrors) do it like a real C programmer.Don’t worry - the GTK_ADJUSTMENT (Object) macro does run-time type checking (as do all the GTK+type-casting macros, actually).
Since, when you set the value of an adjustment, you generally want the change to be reflected by everywidget that uses this adjustment, GTK+ provides this convenience function to do this:
void gtk_adjustment_set_value( GtkAdjustment *adjustment,
gfloat value );
As mentioned earlier, GtkAdjustment is a subclass of GtkObject just like all the various widgets, and thus itis able to emit signals. This is, of course, why updates happen automagically when you share an adjustmentobject between a scrollbar and another adjustable widget; all adjustable widgets connect signal handlers totheir adjustment’s value_changed signal, as can your program. Here’s the definition of this signal in struct
_GtkAdjustmentClass:
void (* value_changed) (GtkAdjustment *adjustment);
The various widgets that use the GtkAdjustment object will emit this signal on an adjustment wheneverthey change its value. This happens both when user input causes the slider to move on a range widget, aswell as when the program explicitly changes the value with gtk_adjustment_set_value(). So, for example,if you have a scale widget, and you want to change the rotation of a picture whenever its value changes, youwould create a callback like this:
void cb_rotate_picture (GtkAdjustment *adj, GtkWidget *picture)
{
set_picture_rotation (picture, adj->value);
...
and connect it to the scale widget’s adjustment like this:
gtk_signal_connect (GTK_OBJECT (adj), "value_changed",
GTK_SIGNAL_FUNC (cb_rotate_picture), picture);
What about when a widget reconfigures the upper or lower fields of its adjustment, such as when a useradds more text to a text widget? In this case, it emits the changed signal, which looks like this:
void (* changed) (GtkAdjustment *adjustment);
Range widgets typically connect a handler to this signal, which changes their appearance to reflect the change- for example, the size of the slider in a scrollbar will grow or shrink in inverse proportion to the differencebetween the lower and upper values of its adjustment.
You probably won’t ever need to attach a handler to this signal, unless you’re writing a new type of rangewidget. However, if you change any of the values in a GtkAdjustment directly, you should emit this signalon it to reconfigure whatever widgets are using it, like this:
gtk_signal_emit_by_name (GTK_OBJECT (adjustment), "changed");
Now go forth and adjust!

8. Range Widgets 44
8 Range Widgets
The category of range widgets includes the ubiquitous scrollbar widget and the less common ”scale” widget.Though these two types of widgets are generally used for different purposes, they are quite similar in functionand implementation. All range widgets share a set of common graphic elements, each of which has its ownX window and receives events. They all contain a ”trough” and a ”slider” (what is sometimes called a”thumbwheel” in other GUI environments). Dragging the slider with the pointer moves it back and forthwithin the trough, while clicking in the trough advances the slider towards the location of the click, eithercompletely, or by a designated amount, depending on which mouse button is used.
As mentioned in 7 above, all range widgets are associated with an adjustment object, from which theycalculate the length of the slider and its position within the trough. When the user manipulates the slider,the range widget will change the value of the adjustment.
8.1 Scrollbar Widgets
These are your standard, run-of-the-mill scrollbars. These should be used only for scrolling some otherwidget, such as a list, a text box, or a viewport (and it’s generally easier to use the scrolled window widgetin most cases). For other purposes, you should use scale widgets, as they are friendlier and more featureful.
There are separate types for horizontal and vertical scrollbars. There really isn’t much to sayabout these. You create them with the following functions, defined in <gtk/gtkhscrollbar.h> and<gtk/gtkvscrollbar.h>:
GtkWidget *gtk_hscrollbar_new( GtkAdjustment *adjustment );
GtkWidget *gtk_vscrollbar_new( GtkAdjustment *adjustment );
and that’s about it (if you don’t believe me, look in the header files!). The adjustment argument caneither be a pointer to an existing GtkAdjustment, or NULL, in which case one will be created for you.Specifying NULL might actually be useful in this case, if you wish to pass the newly-created adjustment tothe constructor function of some other widget which will configure it for you, such as a text widget.
8.2 Scale Widgets
Scale widgets are used to allow the user to visually select and manipulate a value within a specific range.You might want to use a scale widget, for example, to adjust the magnification level on a zoomed previewof a picture, or to control the brightness of a colour, or to specify the number of minutes of inactivity beforea screensaver takes over the screen.
8.2.1 Creating a Scale Widget
As with scrollbars, there are separate widget types for horizontal and vertical scale widgets. (Most pro-grammers seem to favour horizontal scale widgets). Since they work essentially the same way, there’sno need to treat them separately here. The following functions, defined in <gtk/gtkvscale.h> and<gtk/gtkhscale.h>, create vertical and horizontal scale widgets, respectively:
GtkWidget *gtk_vscale_new( GtkAdjustment *adjustment );
GtkWidget *gtk_hscale_new( GtkAdjustment *adjustment );
The adjustment argument can either be an adjustment which has already been created withgtk_adjustment_new(), or NULL, in which case, an anonymous GtkAdjustment is created with all of its

8. Range Widgets 45
values set to 0.0 (which isn’t very useful in this case). In order to avoid confusing yourself, you probablywant to create your adjustment with a page_size of 0.0 so that its upper value actually corresponds to thehighest value the user can select. (If you’re already thoroughly confused, read the section on 7 again for anexplanation of what exactly adjustments do and how to create and manipulate them).
8.2.2 Functions and Signals (well, functions, at least)
Scale widgets can display their current value as a number beside the trough. The default behaviour is toshow the value, but you can change this with this function:
void gtk_scale_set_draw_value( GtkScale *scale,
gint draw_value );
As you might have guessed, draw_value is either TRUE or FALSE, with predictable consequences for eitherone.
The value displayed by a scale widget is rounded to one decimal point by default, as is the value field in itsGtkAdjustment. You can change this with:
void gtk_scale_set_digits( GtkScale *scale,
gint digits );
where digits is the number of decimal places you want. You can set digits to anything you like, but nomore than 13 decimal places will actually be drawn on screen.
Finally, the value can be drawn in different positions relative to the trough:
void gtk_scale_set_value_pos( GtkScale *scale,
GtkPositionType pos );
The argument pos is of type GtkPositionType, which is defined in <gtk/gtkenums.h>, and can take oneof the following values:
• GTK POS LEFT
• GTK POS RIGHT
• GTK POS TOP
• GTK POS BOTTOM
If you position the value on the ”side” of the trough (e.g. on the top or bottom of a horizontal scale widget),then it will follow the slider up and down the trough.
All the preceding functions are defined in <gtk/gtkscale.h>.
8.3 Common Functions
The GtkRange widget class is fairly complicated internally, but, like all the ”base class” widgets, most ofits complexity is only interesting if you want to hack on it. Also, almost all of the functions and signals itdefines are only really used in writing derived widgets. There are, however, a few useful functions that aredefined in <gtk/gtkrange.h> and will work on all range widgets.

8. Range Widgets 46
8.3.1 Setting the Update Policy
The ”update policy” of a range widget defines at what points during user interaction it will change the value
field of its GtkAdjustment and emit the ”value changed” signal on this GtkAdjustment. The update policies,defined in <gtk/gtkenums.h> as type enum GtkUpdateType, are:
• GTK UPDATE POLICY CONTINUOUS - This is the default. The ”value changed” signal is emittedcontinuously, i.e. whenever the slider is moved by even the tiniest amount.
• GTK UPDATE POLICY DISCONTINUOUS - The ”value changed” signal is only emitted once theslider has stopped moving and the user has released the mouse button.
• GTK UPDATE POLICY DELAYED - The ”value change” signal is emitted when the user releasesthe mouse button, or if the slider stops moving for a short period of time.
The update policy of a range widget can be set by casting it using the GTK_RANGE (Widget) macro andpassing it to this function:
void gtk_range_set_update_policy( GtkRange *range,
GtkUpdateType policy) ;
8.3.2 Getting and Setting Adjustments
Getting and setting the adjustment for a range widget ”on the fly” is done, predictably, with:
GtkAdjustment* gtk_range_get_adjustment( GtkRange *range );
void gtk_range_set_adjustment( GtkRange *range,
GtkAdjustment *adjustment );
gtk_range_get_adjustment() returns a pointer to the adjustment to which range is connected.
gtk_range_set_adjustment() does absolutely nothing if you pass it the adjustment that range is alreadyusing, regardless of whether you changed any of its fields or not. If you pass it a new GtkAdjustment, it willunreference the old one if it exists (possibly destroying it), connect the appropriate signals to the new one,and call the private function gtk_range_adjustment_changed(), which will (or at least, is supposed to...)recalculate the size and/or position of the slider and redraw if necessary. As mentioned in the section onadjustments, if you wish to reuse the same GtkAdjustment, when you modify its values directly, you shouldemit the ”changed” signal on it, like this:
gtk_signal_emit_by_name (GTK_OBJECT (adjustment), "changed");
8.4 Key and Mouse bindings
All of the GTK+ range widgets react to mouse clicks in more or less the same way. Clicking button-1 inthe trough will cause its adjustment’s page_increment to be added or subtracted from its value, and theslider to be moved accordingly. Clicking mouse button-2 in the trough will jump the slider to the point atwhich the button was clicked. Clicking any button on a scrollbar’s arrows will cause its adjustment’s valueto change step_increment at a time.
It may take a little while to get used to, but by default, scrollbars as well as scale widgets can take thekeyboard focus in GTK+. If you think your users will find this too confusing, you can always disable thisby unsetting the GTK CAN FOCUS flag on the scrollbar, like this:

8. Range Widgets 47
GTK_WIDGET_UNSET_FLAGS (scrollbar, GTK_CAN_FOCUS);
The key bindings (which are, of course, only active when the widget has focus) are slightly different betweenhorizontal and vertical range widgets, for obvious reasons. They are also not quite the same for scale widgetsas they are for scrollbars, for somewhat less obvious reasons (possibly to avoid confusion between the keysfor horizontal and vertical scrollbars in scrolled windows, where both operate on the same area).
8.4.1 Vertical Range Widgets
All vertical range widgets can be operated with the up and down arrow keys, as well as with the Page Up
and Page Down keys. The arrows move the slider up and down by step_increment, while Page Up and Page
Down move it by page_increment.
The user can also move the slider all the way to one end or the other of the trough using the keyboard. Withthe GtkVScale widget, this is done with the Home and End keys, whereas with the GtkVScrollbar widget,this is done by typing Control-Page Up and Control-Page Down.
8.4.2 Horizontal Range Widgets
The left and right arrow keys work as you might expect in these widgets, moving the slider back and forthby step_increment. The Home and End keys move the slider to the ends of the trough. For the GtkHScalewidget, moving the slider by page_increment is accomplished with Control-Left and Control-Right,while for GtkHScrollbar, it’s done with Control-Home and Control-End.
8.5 Example
This example is a somewhat modified version of the ”range controls” test from testgtk.c. It basically putsup a window with three range widgets all connected to the same adjustment, and a couple of controls foradjusting some of the parameters mentioned above and in the seciton on adjustments, so you can see howthey affect the way these widgets work for the user.
/* example-start rangewidgets rangewidgets.c */
#include <gtk/gtk.h>
GtkWidget *hscale, *vscale;
void cb_pos_menu_select( GtkWidget *item,
GtkPositionType pos )
{
/* Set the value position on both scale widgets */
gtk_scale_set_value_pos (GTK_SCALE (hscale), pos);
gtk_scale_set_value_pos (GTK_SCALE (vscale), pos);
}
void cb_update_menu_select( GtkWidget *item,
GtkUpdateType policy )
{
/* Set the update policy for both scale widgets */
gtk_range_set_update_policy (GTK_RANGE (hscale), policy);
gtk_range_set_update_policy (GTK_RANGE (vscale), policy);
}
void cb_digits_scale( GtkAdjustment *adj )

8. Range Widgets 48
{
/* Set the number of decimal places to which adj->value is rounded */
gtk_scale_set_digits (GTK_SCALE (hscale), (gint) adj->value);
gtk_scale_set_digits (GTK_SCALE (vscale), (gint) adj->value);
}
void cb_page_size( GtkAdjustment *get,
GtkAdjustment *set )
{
/* Set the page size and page increment size of the sample
* adjustment to the value specified by the "Page Size" scale */
set->page_size = get->value;
set->page_increment = get->value;
/* Now emit the "changed" signal to reconfigure all the widgets that
* are attached to this adjustment */
gtk_signal_emit_by_name (GTK_OBJECT (set), "changed");
}
void cb_draw_value( GtkToggleButton *button )
{
/* Turn the value display on the scale widgets off or on depending
* on the state of the checkbutton */
gtk_scale_set_draw_value (GTK_SCALE (hscale), button->active);
gtk_scale_set_draw_value (GTK_SCALE (vscale), button->active);
}
/* Convenience functions */
GtkWidget *make_menu_item( gchar *name,
GtkSignalFunc callback,
gpointer data )
{
GtkWidget *item;
item = gtk_menu_item_new_with_label (name);
gtk_signal_connect (GTK_OBJECT (item), "activate",
callback, data);
gtk_widget_show (item);
return(item);
}
void scale_set_default_values( GtkScale *scale )
{
gtk_range_set_update_policy (GTK_RANGE (scale),
GTK_UPDATE_CONTINUOUS);
gtk_scale_set_digits (scale, 1);
gtk_scale_set_value_pos (scale, GTK_POS_TOP);
gtk_scale_set_draw_value (scale, TRUE);
}
/* makes the sample window */
void create_range_controls( void )
{
GtkWidget *window;
GtkWidget *box1, *box2, *box3;

8. Range Widgets 49
GtkWidget *button;
GtkWidget *scrollbar;
GtkWidget *separator;
GtkWidget *opt, *menu, *item;
GtkWidget *label;
GtkWidget *scale;
GtkObject *adj1, *adj2;
/* Standard window-creating stuff */
window = gtk_window_new (GTK_WINDOW_TOPLEVEL);
gtk_signal_connect (GTK_OBJECT (window), "destroy",
GTK_SIGNAL_FUNC(gtk_main_quit),
NULL);
gtk_window_set_title (GTK_WINDOW (window), "range controls");
box1 = gtk_vbox_new (FALSE, 0);
gtk_container_add (GTK_CONTAINER (window), box1);
gtk_widget_show (box1);
box2 = gtk_hbox_new (FALSE, 10);
gtk_container_set_border_width (GTK_CONTAINER (box2), 10);
gtk_box_pack_start (GTK_BOX (box1), box2, TRUE, TRUE, 0);
gtk_widget_show (box2);
/* calue, lower, upper, step_increment, page_increment, page_size */
/* Note that the page_size value only makes a difference for
* scrollbar widgets, and the highest value you’ll get is actually
* (upper - page_size). */
adj1 = gtk_adjustment_new (0.0, 0.0, 101.0, 0.1, 1.0, 1.0);
vscale = gtk_vscale_new (GTK_ADJUSTMENT (adj1));
scale_set_default_values (GTK_SCALE (vscale));
gtk_box_pack_start (GTK_BOX (box2), vscale, TRUE, TRUE, 0);
gtk_widget_show (vscale);
box3 = gtk_vbox_new (FALSE, 10);
gtk_box_pack_start (GTK_BOX (box2), box3, TRUE, TRUE, 0);
gtk_widget_show (box3);
/* Reuse the same adjustment */
hscale = gtk_hscale_new (GTK_ADJUSTMENT (adj1));
gtk_widget_set_usize (GTK_WIDGET (hscale), 200, 30);
scale_set_default_values (GTK_SCALE (hscale));
gtk_box_pack_start (GTK_BOX (box3), hscale, TRUE, TRUE, 0);
gtk_widget_show (hscale);
/* Reuse the same adjustment again */
scrollbar = gtk_hscrollbar_new (GTK_ADJUSTMENT (adj1));
/* Notice how this causes the scales to always be updated
* continuously when the scrollbar is moved */
gtk_range_set_update_policy (GTK_RANGE (scrollbar),
GTK_UPDATE_CONTINUOUS);
gtk_box_pack_start (GTK_BOX (box3), scrollbar, TRUE, TRUE, 0);
gtk_widget_show (scrollbar);
box2 = gtk_hbox_new (FALSE, 10);
gtk_container_set_border_width (GTK_CONTAINER (box2), 10);
8. Range Widgets 50
gtk_box_pack_start (GTK_BOX (box1), box2, TRUE, TRUE, 0);
gtk_widget_show (box2);
/* A checkbutton to control whether the value is displayed or not */
button = gtk_check_button_new_with_label("Display value on scale widgets");
gtk_toggle_button_set_active (GTK_TOGGLE_BUTTON (button), TRUE);
gtk_signal_connect (GTK_OBJECT (button), "toggled",
GTK_SIGNAL_FUNC(cb_draw_value), NULL);
gtk_box_pack_start (GTK_BOX (box2), button, TRUE, TRUE, 0);
gtk_widget_show (button);
box2 = gtk_hbox_new (FALSE, 10);
gtk_container_set_border_width (GTK_CONTAINER (box2), 10);
/* An option menu to change the position of the value */
label = gtk_label_new ("Scale Value Position:");
gtk_box_pack_start (GTK_BOX (box2), label, FALSE, FALSE, 0);
gtk_widget_show (label);
opt = gtk_option_menu_new();
menu = gtk_menu_new();
item = make_menu_item ("Top",
GTK_SIGNAL_FUNC(cb_pos_menu_select),
GINT_TO_POINTER (GTK_POS_TOP));
gtk_menu_append (GTK_MENU (menu), item);
item = make_menu_item ("Bottom", GTK_SIGNAL_FUNC (cb_pos_menu_select),
GINT_TO_POINTER (GTK_POS_BOTTOM));
gtk_menu_append (GTK_MENU (menu), item);
item = make_menu_item ("Left", GTK_SIGNAL_FUNC (cb_pos_menu_select),
GINT_TO_POINTER (GTK_POS_LEFT));
gtk_menu_append (GTK_MENU (menu), item);
item = make_menu_item ("Right", GTK_SIGNAL_FUNC (cb_pos_menu_select),
GINT_TO_POINTER (GTK_POS_RIGHT));
gtk_menu_append (GTK_MENU (menu), item);
gtk_option_menu_set_menu (GTK_OPTION_MENU (opt), menu);
gtk_box_pack_start (GTK_BOX (box2), opt, TRUE, TRUE, 0);
gtk_widget_show (opt);
gtk_box_pack_start (GTK_BOX (box1), box2, TRUE, TRUE, 0);
gtk_widget_show (box2);
box2 = gtk_hbox_new (FALSE, 10);
gtk_container_set_border_width (GTK_CONTAINER (box2), 10);
/* Yet another option menu, this time for the update policy of the
* scale widgets */
label = gtk_label_new ("Scale Update Policy:");
gtk_box_pack_start (GTK_BOX (box2), label, FALSE, FALSE, 0);
gtk_widget_show (label);
opt = gtk_option_menu_new();
menu = gtk_menu_new();

8. Range Widgets 51
item = make_menu_item ("Continuous",
GTK_SIGNAL_FUNC (cb_update_menu_select),
GINT_TO_POINTER (GTK_UPDATE_CONTINUOUS));
gtk_menu_append (GTK_MENU (menu), item);
item = make_menu_item ("Discontinuous",
GTK_SIGNAL_FUNC (cb_update_menu_select),
GINT_TO_POINTER (GTK_UPDATE_DISCONTINUOUS));
gtk_menu_append (GTK_MENU (menu), item);
item = make_menu_item ("Delayed",
GTK_SIGNAL_FUNC (cb_update_menu_select),
GINT_TO_POINTER (GTK_UPDATE_DELAYED));
gtk_menu_append (GTK_MENU (menu), item);
gtk_option_menu_set_menu (GTK_OPTION_MENU (opt), menu);
gtk_box_pack_start (GTK_BOX (box2), opt, TRUE, TRUE, 0);
gtk_widget_show (opt);
gtk_box_pack_start (GTK_BOX (box1), box2, TRUE, TRUE, 0);
gtk_widget_show (box2);
box2 = gtk_hbox_new (FALSE, 10);
gtk_container_set_border_width (GTK_CONTAINER (box2), 10);
/* A GtkHScale widget for adjusting the number of digits on the
* sample scales. */
label = gtk_label_new ("Scale Digits:");
gtk_box_pack_start (GTK_BOX (box2), label, FALSE, FALSE, 0);
gtk_widget_show (label);
adj2 = gtk_adjustment_new (1.0, 0.0, 5.0, 1.0, 1.0, 0.0);
gtk_signal_connect (GTK_OBJECT (adj2), "value_changed",
GTK_SIGNAL_FUNC (cb_digits_scale), NULL);
scale = gtk_hscale_new (GTK_ADJUSTMENT (adj2));
gtk_scale_set_digits (GTK_SCALE (scale), 0);
gtk_box_pack_start (GTK_BOX (box2), scale, TRUE, TRUE, 0);
gtk_widget_show (scale);
gtk_box_pack_start (GTK_BOX (box1), box2, TRUE, TRUE, 0);
gtk_widget_show (box2);
box2 = gtk_hbox_new (FALSE, 10);
gtk_container_set_border_width (GTK_CONTAINER (box2), 10);
/* And, one last GtkHScale widget for adjusting the page size of the
* scrollbar. */
label = gtk_label_new ("Scrollbar Page Size:");
gtk_box_pack_start (GTK_BOX (box2), label, FALSE, FALSE, 0);
gtk_widget_show (label);
adj2 = gtk_adjustment_new (1.0, 1.0, 101.0, 1.0, 1.0, 0.0);
gtk_signal_connect (GTK_OBJECT (adj2), "value_changed",
GTK_SIGNAL_FUNC (cb_page_size), adj1);
scale = gtk_hscale_new (GTK_ADJUSTMENT (adj2));
gtk_scale_set_digits (GTK_SCALE (scale), 0);

9. Miscellaneous Widgets 52
gtk_box_pack_start (GTK_BOX (box2), scale, TRUE, TRUE, 0);
gtk_widget_show (scale);
gtk_box_pack_start (GTK_BOX (box1), box2, TRUE, TRUE, 0);
gtk_widget_show (box2);
separator = gtk_hseparator_new ();
gtk_box_pack_start (GTK_BOX (box1), separator, FALSE, TRUE, 0);
gtk_widget_show (separator);
box2 = gtk_vbox_new (FALSE, 10);
gtk_container_set_border_width (GTK_CONTAINER (box2), 10);
gtk_box_pack_start (GTK_BOX (box1), box2, FALSE, TRUE, 0);
gtk_widget_show (box2);
button = gtk_button_new_with_label ("Quit");
gtk_signal_connect_object (GTK_OBJECT (button), "clicked",
GTK_SIGNAL_FUNC(gtk_main_quit),
NULL);
gtk_box_pack_start (GTK_BOX (box2), button, TRUE, TRUE, 0);
GTK_WIDGET_SET_FLAGS (button, GTK_CAN_DEFAULT);
gtk_widget_grab_default (button);
gtk_widget_show (button);
gtk_widget_show (window);
}
int main( int argc,
char *argv[] )
{
gtk_init(\&argc, \&argv);
create_range_controls();
gtk_main();
return(0);
}
/* example-end */
9 Miscellaneous Widgets
9.1 Labels
Labels are used a lot in GTK, and are relatively simple. Labels emit no signals as they do not have anassociated X window. If you need to catch signals, or do clipping, use the 10.1 widget.
To create a new label, use:
GtkWidget *gtk_label_new( char *str );
Where the sole argument is the string you wish the label to display.
To change the label’s text after creation, use the function:

9. Miscellaneous Widgets 53
void gtk_label_set_text( GtkLabel *label,
char *str );
Where the first argument is the label you created previously (cast using the GTK LABEL() macro), andthe second is the new string.
The space needed for the new string will be automatically adjusted if needed. You can produce multi-linelabels by putting line breaks in the label string.
To retrieve the current string, use:
void gtk_label_get( GtkLabel *label,
char **str );
Where the first argument is the label you’ve created, and the second, the return for the string. Do not freethe return string, as it is used internally by GTK.
The label text can be justified using:
void gtk_label_set_justify( GtkLabel *label,
GtkJustification jtype );
Values for jtype are:
• GTK JUSTIFY LEFT
• GTK JUSTIFY RIGHT
• GTK JUSTIFY CENTER (the default)
• GTK JUSTIFY FILL
The label widget is also capable of line wrapping the text automatically. This can be activated using:
void gtk_label_set_line_wrap (GtkLabel *label,
gboolean wrap);
The <//wrap/ argument takes a TRUE or FALSE value.
If you want your label underlined, then you can set a pattern on the label:
void gtk_label_set_pattern (GtkLabel *label,
const gchar *pattern);
The pattern argument indicates how the underlining should look. It consists of a string of underscore andspace characters. An underscore indicates that the corresponding character in the label should be underlined.For example, the string
"__ __"
would underline the first two characters and eigth and ninth characters.
Below is a short example to illustrate these functions. This example makes use of the Frame widget to betterdemonstrate the label styles. You can ignore this for now as the 10.5 widget is explained later on.
9. Miscellaneous Widgets 54
/* example-start label label.c */
#include <gtk/gtk.h>
int main( int argc,
char *argv[] )
{
static GtkWidget *window = NULL;
GtkWidget *hbox;
GtkWidget *vbox;
GtkWidget *frame;
GtkWidget *label;
/* Initialise GTK */
gtk_init(\&argc, \&argv);
window = gtk_window_new (GTK_WINDOW_TOPLEVEL);
gtk_signal_connect (GTK_OBJECT (window), "destroy",
GTK_SIGNAL_FUNC(gtk_main_quit),
NULL);
gtk_window_set_title (GTK_WINDOW (window), "Label");
vbox = gtk_vbox_new (FALSE, 5);
hbox = gtk_hbox_new (FALSE, 5);
gtk_container_add (GTK_CONTAINER (window), hbox);
gtk_box_pack_start (GTK_BOX (hbox), vbox, FALSE, FALSE, 0);
gtk_container_set_border_width (GTK_CONTAINER (window), 5);
frame = gtk_frame_new ("Normal Label");
label = gtk_label_new ("This is a Normal label");
gtk_container_add (GTK_CONTAINER (frame), label);
gtk_box_pack_start (GTK_BOX (vbox), frame, FALSE, FALSE, 0);
frame = gtk_frame_new ("Multi-line Label");
label = gtk_label_new ("This is a Multi-line label.\nSecond line\n" \
"Third line");
gtk_container_add (GTK_CONTAINER (frame), label);
gtk_box_pack_start (GTK_BOX (vbox), frame, FALSE, FALSE, 0);
frame = gtk_frame_new ("Left Justified Label");
label = gtk_label_new ("This is a Left-Justified\n" \
"Multi-line label.\nThird line");
gtk_label_set_justify (GTK_LABEL (label), GTK_JUSTIFY_LEFT);
gtk_container_add (GTK_CONTAINER (frame), label);
gtk_box_pack_start (GTK_BOX (vbox), frame, FALSE, FALSE, 0);
frame = gtk_frame_new ("Right Justified Label");
label = gtk_label_new ("This is a Right-Justified\nMulti-line label.\n" \
"Fourth line, (j/k)");
gtk_label_set_justify (GTK_LABEL (label), GTK_JUSTIFY_RIGHT);
gtk_container_add (GTK_CONTAINER (frame), label);
gtk_box_pack_start (GTK_BOX (vbox), frame, FALSE, FALSE, 0);
vbox = gtk_vbox_new (FALSE, 5);
gtk_box_pack_start (GTK_BOX (hbox), vbox, FALSE, FALSE, 0);
frame = gtk_frame_new ("Line wrapped label");
label = gtk_label_new ("This is an example of a line-wrapped label. It " \

9. Miscellaneous Widgets 55
"should not be taking up the entire " /* big space to test spac-
ing */\
"width allocated to it, but automatically " \
"wraps the words to fit. " \
"The time has come, for all good men, to come to " \
"the aid of their party. " \
"The sixth sheik’s six sheep’s sick.\n" \
" It supports multiple paragraphs correctly, " \
"and correctly adds "\
"many extra spaces. ");
gtk_label_set_line_wrap (GTK_LABEL (label), TRUE);
gtk_container_add (GTK_CONTAINER (frame), label);
gtk_box_pack_start (GTK_BOX (vbox), frame, FALSE, FALSE, 0);
frame = gtk_frame_new ("Filled, wrapped label");
label = gtk_label_new ("This is an example of a line-wrapped, filled label. " \
"It should be taking "\
"up the entire width allocated to it. " \
"Here is a seneance to prove "\
"my point. Here is another sentence. "\
"Here comes the sun, do de do de do.\n"\
" This is a new paragraph.\n"\
" This is another newer, longer, better " \
"paragraph. It is coming to an end, "\
"unfortunately.");
gtk_label_set_justify (GTK_LABEL (label), GTK_JUSTIFY_FILL);
gtk_label_set_line_wrap (GTK_LABEL (label), TRUE);
gtk_container_add (GTK_CONTAINER (frame), label);
gtk_box_pack_start (GTK_BOX (vbox), frame, FALSE, FALSE, 0);
frame = gtk_frame_new ("Underlined label");
label = gtk_label_new ("This label is underlined!\n"
"This one is underlined in quite a funky fashion");
gtk_label_set_justify (GTK_LABEL (label), GTK_JUSTIFY_LEFT);
gtk_label_set_pattern (GTK_LABEL (label),
"_________________________ _ _________ _ ______ __ _______ ___");
gtk_container_add (GTK_CONTAINER (frame), label);
gtk_box_pack_start (GTK_BOX (vbox), frame, FALSE, FALSE, 0);
gtk_widget_show_all (window);
gtk_main ();
return(0);
}
/* example-end */
9.2 Arrows
The Arrow widget draws an arrowhead, facing in a number of possible directions and having a number ofpossible styles. It can be very useful when placed on a button in many applications.
There are only two functions for manipulating an Arrow widget:
GtkWidget *gtk_arrow_new( GtkArrowType arrow_type,
GtkShadowType shadow_type );

9. Miscellaneous Widgets 56
void gtk_arrow_set( GtkArrow *arrow,
GtkArrowType arrow_type,
GtkShadowType shadow_type );
The first creates a new arrow widget with the indicated type and appearance. The second allows these valuesto be altered retrospectively. The arrow_type argument may take one of the following values:
• GTK ARROW UP
• GTK ARROW DOWN
• GTK ARROW LEFT
• GTK ARROW RIGHT
These values obviously indicate the direction in which the arrow will point. The shadow_type argumentmay take one of these values:
• GTK SHADOW IN
• GTK SHADOW OUT (the default)
• GTK SHADOW ETCHED IN
• GTK SHADOW ETCHED OUT
Here’s a brief example to illustrate their use.
/* example-start arrow arrow.c */
#include <gtk/gtk.h>
/* Create an Arrow widget with the specified parameters
* and pack it into a button */
GtkWidget *create_arrow_button( GtkArrowType arrow_type,
GtkShadowType shadow_type )
{
GtkWidget *button;
GtkWidget *arrow;
button = gtk_button_new();
arrow = gtk_arrow_new (arrow_type, shadow_type);
gtk_container_add (GTK_CONTAINER (button), arrow);
gtk_widget_show(button);
gtk_widget_show(arrow);
return(button);
}
int main( int argc,
char *argv[] )
{
/* GtkWidget is the storage type for widgets */
GtkWidget *window;

9. Miscellaneous Widgets 57
GtkWidget *button;
GtkWidget *box;
/* Initialize the toolkit */
gtk_init (\&argc, \&argv);
/* Create a new window */
window = gtk_window_new (GTK_WINDOW_TOPLEVEL);
gtk_window_set_title (GTK_WINDOW (window), "Arrow Buttons");
/* It’s a good idea to do this for all windows. */
gtk_signal_connect (GTK_OBJECT (window), "destroy",
GTK_SIGNAL_FUNC (gtk_main_quit), NULL);
/* Sets the border width of the window. */
gtk_container_set_border_width (GTK_CONTAINER (window), 10);
/* Create a box to hold the arrows/buttons */
box = gtk_hbox_new (FALSE, 0);
gtk_container_set_border_width (GTK_CONTAINER (box), 2);
gtk_container_add (GTK_CONTAINER (window), box);
/* Pack and show all our widgets */
gtk_widget_show(box);
button = create_arrow_button(GTK_ARROW_UP, GTK_SHADOW_IN);
gtk_box_pack_start (GTK_BOX (box), button, FALSE, FALSE, 3);
button = create_arrow_button(GTK_ARROW_DOWN, GTK_SHADOW_OUT);
gtk_box_pack_start (GTK_BOX (box), button, FALSE, FALSE, 3);
button = create_arrow_button(GTK_ARROW_LEFT, GTK_SHADOW_ETCHED_IN);
gtk_box_pack_start (GTK_BOX (box), button, FALSE, FALSE, 3);
button = create_arrow_button(GTK_ARROW_RIGHT, GTK_SHADOW_ETCHED_OUT);
gtk_box_pack_start (GTK_BOX (box), button, FALSE, FALSE, 3);
gtk_widget_show (window);
/* Rest in gtk_main and wait for the fun to begin! */
gtk_main ();
return(0);
}
/* example-end */
9.3 The Tooltips Widget
These are the little text strings that pop up when you leave your pointer over a button or other widget fora few seconds. They are easy to use, so I will just explain them without giving an example. If you want tosee some code, take a look at the testgtk.c program distributed with GTK.
Widgets that do not receieve events (widgets that do not have their own window) will not work with tooltips.
The first call you will use creates a new tooltip. You only need to do this once for a set of tooltips as theGtkTooltip object this function returns can be used to create multiple tooltips.

9. Miscellaneous Widgets 58
GtkTooltips *gtk_tooltips_new( void );
Once you have created a new tooltip, and the widget you wish to use it on, simply use this call to set it:
void gtk_tooltips_set_tip( GtkTooltips *tooltips,
GtkWidget *widget,
const gchar *tip_text,
const gchar *tip_private );
The first argument is the tooltip you’ve already created, followed by the widget you wish to have this tooltippop up for, and the text you wish it to say. The last argument is a text string that can be used as anidentifier when using GtkTipsQuery to implement context sensitive help. For now, you can set it to NULL.
Here’s a short example:
GtkTooltips *tooltips;
GtkWidget *button;
.
.
.
tooltips = gtk_tooltips_new ();
button = gtk_button_new_with_label ("button 1");
.
.
.
gtk_tooltips_set_tip (tooltips, button, "This is button 1", NULL);
There are other calls that can be used with tooltips. I will just list them with a brief description of whatthey do.
void gtk_tooltips_enable( GtkTooltips *tooltips );
Enable a disabled set of tooltips.
void gtk_tooltips_disable( GtkTooltips *tooltips );
Disable an enabled set of tooltips.
void gtk_tooltips_set_delay( GtkTooltips *tooltips,
gint delay );
Sets how many milliseconds you have to hold your pointer over the widget before the tooltip will pop up.The default is 500 milliseconds (half a second).
void gtk_tooltips_set_colors( GtkTooltips *tooltips,
GdkColor *background,
GdkColor *foreground );
Set the foreground and background color of the tooltips.
And that’s all the functions associated with tooltips. More than you’ll ever want to know :-)

9. Miscellaneous Widgets 59
9.4 Progress Bars
Progress bars are used to show the status of an operation. They are pretty easy to use, as you will see withthe code below. But first lets start out with the calls to create a new progress bar.
There are two ways to create a progress bar, one simple that takes no arguments, and one that takes aGtkAdjustment object as an argument. If the former is used, the progress bar creates its own adjustmentobject.
GtkWidget *gtk_progress_bar_new( void );
GtkWidget *gtk_progress_bar_new_with_adjustment( GtkAdjustment *adjustment );
The second method has the advantage that we can use the adjustment object to specify our own rangeparameters for the progress bar.
The adjustment of a progress object can be changed dynamically using:
void gtk_progress_set_adjustment( GtkProgress *progress,
GtkAdjustment *adjustment );
Now that the progress bar has been created we can use it.
void gtk_progress_bar_update( GtkProgressBar *pbar,
gfloat percentage );
The first argument is the progress bar you wish to operate on, and the second argument is the amount’completed’, meaning the amount the progress bar has been filled from 0-100%. This is passed to thefunction as a real number ranging from 0 to 1.
GTK v1.2 has added new functionality to the progress bar that enables it to display its value in differentways, and to inform the user of its current value and its range.
A progress bar may be set to one of a number of orientations using the function
void gtk_progress_bar_set_orientation( GtkProgressBar *pbar,
GtkProgressBarOrientation orientation );
Where the orientation argument may take one of the following values to indicate the direction in whichthe progress bar moves:
• GTK PROGRESS LEFT TO RIGHT
• GTK PROGRESS RIGHT TO LEFT
• GTK PROGRESS BOTTOM TO TOP
• GTK PROGRESS TOP TO BOTTOM
When used as a measure of how far a process has progressed, the GtkProgressBar can be set to display itsvalue in either a continuous or discrete mode. In continuous mode, the progress bar is updated for eachvalue. In discrete mode, the progress bar is updated in a number of discrete blocks. The number of blocksis also configurable.
The style of a progress bar can be set using the following function.
void gtk_progress_bar_set_bar_style( GtkProgressBar *pbar,
GtkProgressBarStyle style );

9. Miscellaneous Widgets 60
The style parameter can take one of two values:
• GTK PROGRESS CONTINUOUS
• GTK PROGRESS DISCRETE
The number of discrete blocks can be set by calling
void gtk_progress_bar_set_discrete_blocks( GtkProgressBar *pbar,
guint blocks );
As well as indicating the amount of progress that has occured, the progress bar may be set to just indicatethat there is some activity. This can be useful in situations where progress cannot be measured against avalue range. Activity mode is not effected by the bar style that is described above, and overrides it.Thismode is selected by the following function.
void gtk_progress_set_activity_mode( GtkProgress *progress,
guint activity_mode );
The step size of the activity indicator, and the number of blocks are set using the following functions.
void gtk_progress_bar_set_activity_step( GtkProgressBar *pbar,
guint step );
void gtk_progress_bar_set_activity_blocks( GtkProgressBar *pbar,
guint blocks );
When in continuous mode, the progress bar can also display a configurable text string within its trough,using the following function.
void gtk_progress_set_format_string( GtkProgress *progress,
gchar *format);
The format argument is similiar to one that would be used in a C printf statement. The following directivesmay be used within the format string:
• %p - percentage
• %v - value
• %l - lower range value
• %u - upper range value
The displaying of this text string can be toggled using:
void gtk_progress_set_show_text( GtkProgress *progress,
gint show_text );
The show_text argument is a boolean TRUE/FALSE value. The appearance of the text can be modifiedfurther using:
void gtk_progress_set_text_alignment( GtkProgress *progress,
gfloat x_align,
gfloat y_align );

9. Miscellaneous Widgets 61
The x_align and y_align arguments take a value between 0.0 and 1.0. Their value indicates the position ofthe text string within the trough. Values of 0.0 for both would place the string in the top left hand corner;values of 0.5 (the default) centres the text, and values of 1.0 places the text in the lower right hand corner.
The current text setting of a progress object can be retrieved using the current or a specified adjustmentvalue using the following two functions. The character string returned by these functions should be freedby the application (using the g free() function). These functions return the formatted string that would bedisplayed within the trough.
gchar *gtk_progress_get_current_text( GtkProgress *progress );
gchar *gtk_progress_get_text_from_value( GtkProgress *progress,
gfloat value );
There is yet another way to change the range and value of a progress object using the following function:
void gtk_progress_configure( GtkProgress *progress,
gfloat value,
gfloat min,
gfloat max );
This function provides quite a simple interface to the range and value of a progress object.
The remaining functions can be used to get and set the current value of a progess object in various typesand formats:
void gtk_progress_set_percentage( GtkProgress *progress,
gfloat percentage );
void gtk_progress_set_value( GtkProgress *progress,
gfloat value );
gfloat gtk_progress_get_value( GtkProgress *progress );
gfloat gtk_progress_get_current_percentage( GtkProgress *progress );
gfloat gtk_progress_get_percentage_from_value( GtkProgress *progress,
gfloat value );
These functions are pretty self explanatory. The last function uses the the adjustment of the specified progessobject to compute the percentage value of the given range value.
Progress Bars are usually used with timeouts or other such functions (see section on 17) to give the illusionof multitasking. All will employ the gtk progress bar update function in the same manner.
Here is an example of the progress bar, updated using timeouts. This code also shows you how to reset theProgress Bar.
/* example-start progressbar progressbar.c */
#include <gtk/gtk.h>
typedef struct _ProgressData {
GtkWidget *window;
GtkWidget *pbar;
int timer;
} ProgressData;

9. Miscellaneous Widgets 62
/* Update the value of the progress bar so that we get
* some movement */
gint progress_timeout( gpointer data )
{
gfloat new_val;
GtkAdjustment *adj;
/* Calculate the value of the progress bar using the
* value range set in the adjustment object */
new_val = gtk_progress_get_value( GTK_PROGRESS(data) ) + 1;
adj = GTK_PROGRESS (data)->adjustment;
if (new_val > adj->upper)
new_val = adj->lower;
/* Set the new value */
gtk_progress_set_value (GTK_PROGRESS (data), new_val);
/* As this is a timeout function, return TRUE so that it
* continues to get called */
return(TRUE);
}
/* Callback that toggles the text display within the progress
* bar trough */
void toggle_show_text( GtkWidget *widget,
ProgressData *pdata )
{
gtk_progress_set_show_text (GTK_PROGRESS (pdata->pbar),
GTK_TOGGLE_BUTTON (widget)->active);
}
/* Callback that toggles the activity mode of the progress
* bar */
void toggle_activity_mode( GtkWidget *widget,
ProgressData *pdata )
{
gtk_progress_set_activity_mode (GTK_PROGRESS (pdata->pbar),
GTK_TOGGLE_BUTTON (widget)->active);
}
/* Callback that toggles the continuous mode of the progress
* bar */
void set_continuous_mode( GtkWidget *widget,
ProgressData *pdata )
{
gtk_progress_bar_set_bar_style (GTK_PROGRESS_BAR (pdata->pbar),
GTK_PROGRESS_CONTINUOUS);
}
/* Callback that toggles the discrete mode of the progress
* bar */
void set_discrete_mode( GtkWidget *widget,
ProgressData *pdata )
{

9. Miscellaneous Widgets 63
gtk_progress_bar_set_bar_style (GTK_PROGRESS_BAR (pdata->pbar),
GTK_PROGRESS_DISCRETE);
}
/* Clean up allocated memory and remove the timer */
void destroy_progress( GtkWidget *widget,
ProgressData *pdata)
{
gtk_timeout_remove (pdata->timer);
pdata->timer = 0;
pdata->window = NULL;
g_free(pdata);
gtk_main_quit();
}
int main( int argc,
char *argv[])
{
ProgressData *pdata;
GtkWidget *align;
GtkWidget *separator;
GtkWidget *table;
GtkAdjustment *adj;
GtkWidget *button;
GtkWidget *check;
GtkWidget *vbox;
gtk_init (\&argc, \&argv);
/* Allocate memory for the data that is passwd to the callbacks */
pdata = g_malloc( sizeof(ProgressData) );
pdata->window = gtk_window_new (GTK_WINDOW_TOPLEVEL);
gtk_window_set_policy (GTK_WINDOW (pdata->window), FALSE, FALSE, TRUE);
gtk_signal_connect (GTK_OBJECT (pdata->window), "destroy",
GTK_SIGNAL_FUNC (destroy_progress),
pdata);
gtk_window_set_title (GTK_WINDOW (pdata->window), "GtkProgressBar");
gtk_container_set_border_width (GTK_CONTAINER (pdata->window), 0);
vbox = gtk_vbox_new (FALSE, 5);
gtk_container_set_border_width (GTK_CONTAINER (vbox), 10);
gtk_container_add (GTK_CONTAINER (pdata->window), vbox);
gtk_widget_show(vbox);
/* Create a centering alignment object */
align = gtk_alignment_new (0.5, 0.5, 0, 0);
gtk_box_pack_start (GTK_BOX (vbox), align, FALSE, FALSE, 5);
gtk_widget_show(align);
/* Create a GtkAdjusment object to hold the range of the
* progress bar */
adj = (GtkAdjustment *) gtk_adjustment_new (0, 1, 150, 0, 0, 0);
/* Create the GtkProgressBar using the adjustment */
pdata->pbar = gtk_progress_bar_new_with_adjustment (adj);

9. Miscellaneous Widgets 64
/* Set the format of the string that can be displayed in the
* trough of the progress bar:
* %p - percentage
* %v - value
* %l - lower range value
* %u - upper range value */
gtk_progress_set_format_string (GTK_PROGRESS (pdata->pbar),
"%v from [%l-%u] (=%p%%)");
gtk_container_add (GTK_CONTAINER (align), pdata->pbar);
gtk_widget_show(pdata->pbar);
/* Add a timer callback to update the value of the progress bar */
pdata->timer = gtk_timeout_add (100, progress_timeout, pdata->pbar);
separator = gtk_hseparator_new ();
gtk_box_pack_start (GTK_BOX (vbox), separator, FALSE, FALSE, 0);
gtk_widget_show(separator);
/* rows, columns, homogeneous */
table = gtk_table_new (2, 3, FALSE);
gtk_box_pack_start (GTK_BOX (vbox), table, FALSE, TRUE, 0);
gtk_widget_show(table);
/* Add a check button to select displaying of the trough text */
check = gtk_check_button_new_with_label ("Show text");
gtk_table_attach (GTK_TABLE (table), check, 0, 1, 0, 1,
GTK_EXPAND | GTK_FILL, GTK_EXPAND | GTK_FILL,
5, 5);
gtk_signal_connect (GTK_OBJECT (check), "clicked",
GTK_SIGNAL_FUNC (toggle_show_text),
pdata);
gtk_widget_show(check);
/* Add a check button to toggle activity mode */
check = gtk_check_button_new_with_label ("Activity mode");
gtk_table_attach (GTK_TABLE (table), check, 0, 1, 1, 2,
GTK_EXPAND | GTK_FILL, GTK_EXPAND | GTK_FILL,
5, 5);
gtk_signal_connect (GTK_OBJECT (check), "clicked",
GTK_SIGNAL_FUNC (toggle_activity_mode),
pdata);
gtk_widget_show(check);
separator = gtk_vseparator_new ();
gtk_table_attach (GTK_TABLE (table), separator, 1, 2, 0, 2,
GTK_EXPAND | GTK_FILL, GTK_EXPAND | GTK_FILL,
5, 5);
gtk_widget_show(separator);
/* Add a radio button to select continuous display mode */
button = gtk_radio_button_new_with_label (NULL, "Continuous");
gtk_table_attach (GTK_TABLE (table), button, 2, 3, 0, 1,
GTK_EXPAND | GTK_FILL, GTK_EXPAND | GTK_FILL,
5, 5);
gtk_signal_connect (GTK_OBJECT (button), "clicked",
GTK_SIGNAL_FUNC (set_continuous_mode),

9. Miscellaneous Widgets 65
pdata);
gtk_widget_show (button);
/* Add a radio button to select discrete display mode */
button = gtk_radio_button_new_with_label(
gtk_radio_button_group (GTK_RADIO_BUTTON (button)),
"Discrete");
gtk_table_attach (GTK_TABLE (table), button, 2, 3, 1, 2,
GTK_EXPAND | GTK_FILL, GTK_EXPAND | GTK_FILL,
5, 5);
gtk_signal_connect (GTK_OBJECT (button), "clicked",
GTK_SIGNAL_FUNC (set_discrete_mode),
pdata);
gtk_widget_show (button);
separator = gtk_hseparator_new ();
gtk_box_pack_start (GTK_BOX (vbox), separator, FALSE, FALSE, 0);
gtk_widget_show(separator);
/* Add a button to exit the program */
button = gtk_button_new_with_label ("close");
gtk_signal_connect_object (GTK_OBJECT (button), "clicked",
(GtkSignalFunc) gtk_widget_destroy,
GTK_OBJECT (pdata->window));
gtk_box_pack_start (GTK_BOX (vbox), button, FALSE, FALSE, 0);
/* This makes it so the button is the default. */
GTK_WIDGET_SET_FLAGS (button, GTK_CAN_DEFAULT);
/* This grabs this button to be the default button. Simply hitting
* the "Enter" key will cause this button to activate. */
gtk_widget_grab_default (button);
gtk_widget_show(button);
gtk_widget_show (pdata->window);
gtk_main ();
return(0);
}
/* example-end */
9.5 Dialogs
The Dialog widget is very simple, and is actually just a window with a few things pre-packed into it for you.The structure for a Dialog is:
struct GtkDialog
{
GtkWindow window;
GtkWidget *vbox;
GtkWidget *action_area;
};
9. Miscellaneous Widgets 66
So you see, it simply creates a window, and then packs a vbox into the top, then a separator, and then anhbox for the ”action area”.
The Dialog widget can be used for pop-up messages to the user, and other similar tasks. It is really basic,and there is only one function for the dialog box, which is:
GtkWidget *gtk_dialog_new( void );
So to create a new dialog box, use,
GtkWidget *window;
window = gtk_dialog_new ();
This will create the dialog box, and it is now up to you to use it. you could pack a button in the action areaby doing something like this:
button = ...
gtk_box_pack_start (GTK_BOX (GTK_DIALOG (window)->action_area),
button, TRUE, TRUE, 0);
gtk_widget_show (button);
And you could add to the vbox area by packing, for instance, a label in it, try something like this:
label = gtk_label_new ("Dialogs are groovy");
gtk_box_pack_start (GTK_BOX (GTK_DIALOG (window)->vbox),
label, TRUE, TRUE, 0);
gtk_widget_show (label);
As an example in using the dialog box, you could put two buttons in the action area, a Cancel button andan Ok button, and a label in the vbox area, asking the user a question or giving an error etc. Then youcould attach a different signal to each of the buttons and perform the operation the user selects.
If the simple functionality provided by the default vertical and horizontal boxes in the two areas does’t giveyou enough control for your application, then you can simply pack another layout widget into the boxesprovided. For example, you could pack a table into the vertical box.
9.6 Pixmaps
Pixmaps are data structures that contain pictures. These pictures can be used in various places, but mostvisibly as icons on the X-Windows desktop, or as cursors.
A pixmap which only has 2 colors is called a bitmap, and there are a few additional routines for handlingthis common special case.
To understand pixmaps, it would help to understand how X-windows works. Under X-windows, applicationsdo not need to be running on the same computer that is interacting with the user. Instead, the variousapplications, called ”clients”, all communicate with a program which displays the graphics and handles thekeyboard and mouse. This program which interacts directly with the user is called a ”display server” or ”Xserver.” Since the communication might take place over a network, it’s important to keep some informationwith the X server. Pixmaps, for example, are stored in the memory of the X server. This means that oncepixmap values are set, they don’t need to keep getting transmitted over the network; instead a command issent to ”display pixmap number XYZ here.” Even if you aren’t using X-windows with GTK currently, usingconstructs such as Pixmaps will make your programs work acceptably under X-windows.
To use pixmaps in GTK, we must first build a GdkPixmap structure using routines from the GDK layer.Pixmaps can either be created from in-memory data, or from data read from a file. We’ll go through eachof the calls to create a pixmap.

9. Miscellaneous Widgets 67
GdkPixmap *gdk_bitmap_create_from_data( GdkWindow *window,
gchar *data,
gint width,
gint height );
This routine is used to create a single-plane pixmap (2 colors) from data in memory. Each bit of the datarepresents whether that pixel is off or on. Width and height are in pixels. The GdkWindow pointer is to thecurrent window, since a pixmap resources are meaningful only in the context of the screen where it is to bedisplayed.
GdkPixmap *gdk_pixmap_create_from_data( GdkWindow *window,
gchar *data,
gint width,
gint height,
gint depth,
GdkColor *fg,
GdkColor *bg );
This is used to create a pixmap of the given depth (number of colors) from the bitmap data specified. fg
and bg are the foreground and background color to use.
GdkPixmap *gdk_pixmap_create_from_xpm( GdkWindow *window,
GdkBitmap **mask,
GdkColor *transparent_color,
const gchar *filename );
XPM format is a readable pixmap representation for the X Window System. It is widely used and manydifferent utilities are available for creating image files in this format. The file specified by filename mustcontain an image in that format and it is loaded into the pixmap structure. The mask specifies which bits ofthe pixmap are opaque. All other bits are colored using the color specified by transparent color. An exampleusing this follows below.
GdkPixmap *gdk_pixmap_create_from_xpm_d( GdkWindow *window,
GdkBitmap **mask,
GdkColor *transparent_color,
gchar **data );
Small images can be incorporated into a program as data in the XPM format. A pixmap is created usingthis data, instead of reading it from a file. An example of such data is
/* XPM */
static const char * xpm_data[] = {
"16 16 3 1",
" c None",
". c #000000000000",
"X c #FFFFFFFFFFFF",
" ",
" ...... ",
" .XXX.X. ",
" .XXX.XX. ",
" .XXX.XXX. ",
" .XXX..... ",
" .XXXXXXX. ",
" .XXXXXXX. ",

9. Miscellaneous Widgets 68
" .XXXXXXX. ",
" .XXXXXXX. ",
" .XXXXXXX. ",
" .XXXXXXX. ",
" .XXXXXXX. ",
" ......... ",
" ",
" "};
When we’re done using a pixmap and not likely to reuse it again soon, it is a good idea to release the resourceusing gdk pixmap unref(). Pixmaps should be considered a precious resource.
Once we’ve created a pixmap, we can display it as a GTK widget. We must create a GTK pixmap widgetto contain the GDK pixmap. This is done using
GtkWidget *gtk_pixmap_new( GdkPixmap *pixmap,
GdkBitmap *mask );
The other pixmap widget calls are
guint gtk_pixmap_get_type( void );
void gtk_pixmap_set( GtkPixmap *pixmap,
GdkPixmap *val,
GdkBitmap *mask );
void gtk_pixmap_get( GtkPixmap *pixmap,
GdkPixmap **val,
GdkBitmap **mask);
gtk pixmap set is used to change the pixmap that the widget is currently managing. Val is the pixmapcreated using GDK.
The following is an example of using a pixmap in a button.
/* example-start pixmap pixmap.c */
#include <gtk/gtk.h>
/* XPM data of Open-File icon */
static const char * xpm_data[] = {
"16 16 3 1",
" c None",
". c #000000000000",
"X c #FFFFFFFFFFFF",
" ",
" ...... ",
" .XXX.X. ",
" .XXX.XX. ",
" .XXX.XXX. ",
" .XXX..... ",
" .XXXXXXX. ",
" .XXXXXXX. ",
" .XXXXXXX. ",
" .XXXXXXX. ",
9. Miscellaneous Widgets 69
" .XXXXXXX. ",
" .XXXXXXX. ",
" .XXXXXXX. ",
" ......... ",
" ",
" "};
/* when invoked (via signal delete_event), terminates the application.
*/
void close_application( GtkWidget *widget, GdkEvent *event, gpointer data ) {
gtk_main_quit();
}
/* is invoked when the button is clicked. It just prints a message.
*/
void button_clicked( GtkWidget *widget, gpointer data ) {
printf( "button clicked\n" );
}
int main( int argc, char *argv[] )
{
/* GtkWidget is the storage type for widgets */
GtkWidget *window, *pixmapwid, *button;
GdkPixmap *pixmap;
GdkBitmap *mask;
GtkStyle *style;
/* create the main window, and attach delete_event signal to terminating
the application */
gtk_init( \&argc, \&argv );
window = gtk_window_new( GTK_WINDOW_TOPLEVEL );
gtk_signal_connect( GTK_OBJECT (window), "delete_event",
GTK_SIGNAL_FUNC (close_application), NULL );
gtk_container_set_border_width( GTK_CONTAINER (window), 10 );
gtk_widget_show( window );
/* now for the pixmap from gdk */
style = gtk_widget_get_style( window );
pixmap = gdk_pixmap_create_from_xpm_d( window->window, \&mask,
\&style->bg[GTK_STATE_NORMAL],
(gchar **)xpm_data );
/* a pixmap widget to contain the pixmap */
pixmapwid = gtk_pixmap_new( pixmap, mask );
gtk_widget_show( pixmapwid );
/* a button to contain the pixmap widget */
button = gtk_button_new();
gtk_container_add( GTK_CONTAINER(button), pixmapwid );
gtk_container_add( GTK_CONTAINER(window), button );
gtk_widget_show( button );
gtk_signal_connect( GTK_OBJECT(button), "clicked",
GTK_SIGNAL_FUNC(button_clicked), NULL );

9. Miscellaneous Widgets 70
/* show the window */
gtk_main ();
return 0;
}
/* example-end */
To load a file from an XPM data file called icon0.xpm in the current directory, we would have created thepixmap thus
/* load a pixmap from a file */
pixmap = gdk_pixmap_create_from_xpm( window->window, \&mask,
\&style->bg[GTK_STATE_NORMAL],
"./icon0.xpm" );
pixmapwid = gtk_pixmap_new( pixmap, mask );
gtk_widget_show( pixmapwid );
gtk_container_add( GTK_CONTAINER(window), pixmapwid );
A disadvantage of using pixmaps is that the displayed object is always rectangular, regardless of the image.We would like to create desktops and applications with icons that have more natural shapes. For example,for a game interface, we would like to have round buttons to push. The way to do this is using shapedwindows.
A shaped window is simply a pixmap where the background pixels are transparent. This way, when thebackground image is multi-colored, we don’t overwrite it with a rectangular, non-matching border aroundour icon. The following example displays a full wheelbarrow image on the desktop.
/* example-start wheelbarrow wheelbarrow.c */
#include <gtk/gtk.h>
/* XPM */
static char * WheelbarrowFull_xpm[] = {
"48 48 64 1",
" c None",
". c #DF7DCF3CC71B",
"X c #965875D669A6",
"o c #71C671C671C6",
"O c #A699A289A699",
"+ c #965892489658",
"@ c #8E38410330C2",
"# c #D75C7DF769A6",
"$ c #F7DECF3CC71B",
"% c #96588A288E38",
"\& c #A69992489E79",
"* c #8E3886178E38",
"= c #104008200820",
"- c #596510401040",
"; c #C71B30C230C2",
": c #C71B9A699658",
"> c #618561856185",
", c #20811C712081",
"< c #104000000000",
"1 c #861720812081",
"2 c #DF7D4D344103",
"3 c #79E769A671C6",

9. Miscellaneous Widgets 71
"4 c #861782078617",
"5 c #41033CF34103",
"6 c #000000000000",
"7 c #49241C711040",
"8 c #492445144924",
"9 c #082008200820",
"0 c #69A618611861",
"q c #B6DA71C65144",
"w c #410330C238E3",
"e c #CF3CBAEAB6DA",
"r c #71C6451430C2",
"t c #EFBEDB6CD75C",
"y c #28A208200820",
"u c #186110401040",
"i c #596528A21861",
"p c #71C661855965",
"a c #A69996589658",
"s c #30C228A230C2",
"d c #BEFBA289AEBA",
"f c #596545145144",
"g c #30C230C230C2",
"h c #8E3882078617",
"j c #208118612081",
"k c #38E30C300820",
"l c #30C2208128A2",
"z c #38E328A238E3",
"x c #514438E34924",
"c c #618555555965",
"v c #30C2208130C2",
"b c #38E328A230C2",
"n c #28A228A228A2",
"m c #41032CB228A2",
"M c #104010401040",
"N c #492438E34103",
"B c #28A2208128A2",
"V c #A699596538E3",
"C c #30C21C711040",
"Z c #30C218611040",
"A c #965865955965",
"S c #618534D32081",
"D c #38E31C711040",
"F c #082000000820",
" ",
" .XoO ",
" +@#$%o\& ",
" *=-;#::o+ ",
" >,<12#:34 ",
" 45671#:X3 ",
" +89<02qwo ",
"e* >,67;ro ",
"ty> 459@>+\&\& ",
"$2u+ ><ipas8* ",
"%$;=* *3:.Xa.dfg> ",
"Oh$;ya *3d.a8j,Xe.d3g8+ ",
" Oh$;ka *3d$a8lz,,xxc:.e3g54 ",
" Oh$;kO *pd$%svbzz,sxxxxfX..\&wn> ",
" Oh$@mO *3dthwlsslszjzxxxxxxx3:td8M4 ",

9. Miscellaneous Widgets 72
" Oh$@g\& *3d$XNlvvvlllm,mNwxxxxxxxfa.:,B* ",
" Oh$@,Od.czlllllzlmmqV@V#V@fxxxxxxxf:%j5\& ",
" Oh$1hd5lllslllCCZrV#r#:#2AxxxxxxxxxcdwM* ",
" OXq6c.%8vvvllZZiqqApA:mq:Xxcpcxxxxxfdc9* ",
" 2r<6gde3bllZZrVi7S@SV77A::qApxxxxxxfdcM ",
" :,q-6MN.dfmZZrrSS:#riirDSAX@Af5xxxxxfevo",
" +A26jguXtAZZZC7iDiCCrVVii7Cmmmxxxxxx%3g",
" *#16jszN..3DZZZZrCVSA2rZrV7Dmmwxxxx\&en",
" p2yFvzssXe:fCZZCiiD7iiZDiDSSZwwxx8e*>",
" OA1<jzxwwc:$d%NDZZZZCCCZCCZZCmxxfd.B ",
" 3206Bwxxszx%et.eaAp77m77mmmf3\&eeeg* ",
" @26MvzxNzvlbwfpdettttttttttt.c,n\& ",
" *;16=lsNwwNwgsvslbwwvccc3pcfu<o ",
" p;<69BvwwsszslllbBlllllllu<5+ ",
" OS0y6FBlvvvzvzss,u=Blllj=54 ",
" c1-699Blvlllllu7k96MMMg4 ",
" *10y8n6FjvllllB<166668 ",
" S-kg+>666<M<996-y6n<8* ",
" p71=4 m69996kD8Z-66698\&\& ",
" \&i0ycm6n4 ogk17,0<6666g ",
" N-k-<> >=01-kuu666> ",
" ,6ky\& \&46-10ul,66, ",
" Ou0<> o66y<ulw<66\& ",
" *kk5 >66By7=xu664 ",
" <<M4 466lj<Mxu66o ",
" *>> +66uv,zN666* ",
" 566,xxj669 ",
" 4666FF666> ",
" >966666M ",
" oM6668+ ",
" *4 ",
" ",
" "};
/* When invoked (via signal delete_event), terminates the application */
void close_application( GtkWidget *widget, GdkEvent *event, gpointer data ) {
gtk_main_quit();
}
int main (int argc, char *argv[])
{
/* GtkWidget is the storage type for widgets */
GtkWidget *window, *pixmap, *fixed;
GdkPixmap *gdk_pixmap;
GdkBitmap *mask;
GtkStyle *style;
GdkGC *gc;
/* Create the main window, and attach delete_event signal to terminate
* the application. Note that the main window will not have a titlebar
* since we’re making it a popup. */
gtk_init (\&argc, \&argv);
window = gtk_window_new( GTK_WINDOW_POPUP );
gtk_signal_connect (GTK_OBJECT (window), "delete_event",
GTK_SIGNAL_FUNC (close_application), NULL);
gtk_widget_show (window);

9. Miscellaneous Widgets 73
/* Now for the pixmap and the pixmap widget */
style = gtk_widget_get_default_style();
gc = style->black_gc;
gdk_pixmap = gdk_pixmap_create_from_xpm_d( window->window, \&mask,
\&style->bg[GTK_STATE_NORMAL],
WheelbarrowFull_xpm );
pixmap = gtk_pixmap_new( gdk_pixmap, mask );
gtk_widget_show( pixmap );
/* To display the pixmap, we use a fixed widget to place the pixmap */
fixed = gtk_fixed_new();
gtk_widget_set_usize( fixed, 200, 200 );
gtk_fixed_put( GTK_FIXED(fixed), pixmap, 0, 0 );
gtk_container_add( GTK_CONTAINER(window), fixed );
gtk_widget_show( fixed );
/* This masks out everything except for the image itself */
gtk_widget_shape_combine_mask( window, mask, 0, 0 );
/* show the window */
gtk_widget_set_uposition( window, 20, 400 );
gtk_widget_show( window );
gtk_main ();
return(0);
}
/* example-end */
To make the wheelbarrow image sensitive, we could attach the button press event signal to make it dosomething. The following few lines would make the picture sensitive to a mouse button being pressed whichmakes the application terminate.
gtk_widget_set_events( window,
gtk_widget_get_events( window ) |
GDK_BUTTON_PRESS_MASK );
gtk_signal_connect( GTK_OBJECT(window), "button_press_event",
GTK_SIGNAL_FUNC(close_application), NULL );
9.7 Rulers
Ruler widgets are used to indicate the location of the mouse pointer in a given window. A window can have avertical ruler spanning across the width and a horizontal ruler spanning down the height. A small triangularindicator on the ruler shows the exact location of the pointer relative to the ruler.
A ruler must first be created. Horizontal and vertical rulers are created using
GtkWidget *gtk_hruler_new( void ); /* horizontal ruler */
GtkWidget *gtk_vruler_new( void ); /* vertical ruler */
Once a ruler is created, we can define the unit of measurement. Units of measure for rulers can beGTK PIXELS, GTK INCHES or GTK CENTIMETERS. This is set using

9. Miscellaneous Widgets 74
void gtk_ruler_set_metric( GtkRuler *ruler,
GtkMetricType metric );
The default measure is GTK PIXELS.
gtk_ruler_set_metric( GTK_RULER(ruler), GTK_PIXELS );
Other important characteristics of a ruler are how to mark the units of scale and where the position indicatoris initially placed. These are set for a ruler using
void gtk_ruler_set_range( GtkRuler *ruler,
gfloat lower,
gfloat upper,
gfloat position,
gfloat max_size );
The lower and upper arguments define the extent of the ruler, and max size is the largest possible numberthat will be displayed. Position defines the initial position of the pointer indicator within the ruler.
A vertical ruler can span an 800 pixel wide window thus
gtk_ruler_set_range( GTK_RULER(vruler), 0, 800, 0, 800);
The markings displayed on the ruler will be from 0 to 800, with a number for every 100 pixels. If instead wewanted the ruler to range from 7 to 16, we would code
gtk_ruler_set_range( GTK_RULER(vruler), 7, 16, 0, 20);
The indicator on the ruler is a small triangular mark that indicates the position of the pointer relative to theruler. If the ruler is used to follow the mouse pointer, the motion notify event signal should be connectedto the motion notify event method of the ruler. To follow all mouse movements within a window area, wewould use
#define EVENT_METHOD(i, x) GTK_WIDGET_CLASS(GTK_OBJECT(i)->klass)->x
gtk_signal_connect_object( GTK_OBJECT(area), "motion_notify_event",
(GtkSignalFunc)EVENT_METHOD(ruler, motion_notify_event),
GTK_OBJECT(ruler) );
The following example creates a drawing area with a horizontal ruler above it and a vertical ruler to the leftof it. The size of the drawing area is 600 pixels wide by 400 pixels high. The horizontal ruler spans from7 to 13 with a mark every 100 pixels, while the vertical ruler spans from 0 to 400 with a mark every 100pixels. Placement of the drawing area and the rulers is done using a table.
/* example-start rulers rulers.c */
#include <gtk/gtk.h>
#define EVENT_METHOD(i, x) GTK_WIDGET_CLASS(GTK_OBJECT(i)->klass)->x
#define XSIZE 600
#define YSIZE 400
/* This routine gets control when the close button is clicked */

9. Miscellaneous Widgets 75
void close_application( GtkWidget *widget, GdkEvent *event, gpointer data ) {
gtk_main_quit();
}
/* The main routine */
int main( int argc, char *argv[] ) {
GtkWidget *window, *table, *area, *hrule, *vrule;
/* Initialize GTK and create the main window */
gtk_init( \&argc, \&argv );
window = gtk_window_new( GTK_WINDOW_TOPLEVEL );
gtk_signal_connect (GTK_OBJECT (window), "delete_event",
GTK_SIGNAL_FUNC( close_application ), NULL);
gtk_container_set_border_width (GTK_CONTAINER (window), 10);
/* Create a table for placing the ruler and the drawing area */
table = gtk_table_new( 3, 2, FALSE );
gtk_container_add( GTK_CONTAINER(window), table );
area = gtk_drawing_area_new();
gtk_drawing_area_size( (GtkDrawingArea *)area, XSIZE, YSIZE );
gtk_table_attach( GTK_TABLE(table), area, 1, 2, 1, 2,
GTK_EXPAND|GTK_FILL, GTK_FILL, 0, 0 );
gtk_widget_set_events( area, GDK_POINTER_MOTION_MASK |
GDK_POINTER_MOTION_HINT_MASK );
/* The horizontal ruler goes on top. As the mouse moves across the
* drawing area, a motion_notify_event is passed to the
* appropriate event handler for the ruler. */
hrule = gtk_hruler_new();
gtk_ruler_set_metric( GTK_RULER(hrule), GTK_PIXELS );
gtk_ruler_set_range( GTK_RULER(hrule), 7, 13, 0, 20 );
gtk_signal_connect_object( GTK_OBJECT(area), "motion_notify_event",
(GtkSignalFunc)EVENT_METHOD(hrule,
motion_notify_event),
GTK_OBJECT(hrule) );
/* GTK_WIDGET_CLASS(GTK_OBJECT(hrule)->klass)->motion_notify_event, */
gtk_table_attach( GTK_TABLE(table), hrule, 1, 2, 0, 1,
GTK_EXPAND|GTK_SHRINK|GTK_FILL, GTK_FILL, 0, 0 );
/* The vertical ruler goes on the left. As the mouse moves across
* the drawing area, a motion_notify_event is passed to the
* appropriate event handler for the ruler. */
vrule = gtk_vruler_new();
gtk_ruler_set_metric( GTK_RULER(vrule), GTK_PIXELS );
gtk_ruler_set_range( GTK_RULER(vrule), 0, YSIZE, 10, YSIZE );
gtk_signal_connect_object( GTK_OBJECT(area), "motion_notify_event",
(GtkSignalFunc)
GTK_WIDGET_CLASS(GTK_OBJECT(vrule)->klass)->
motion_notify_event,
GTK_OBJECT(vrule) );
gtk_table_attach( GTK_TABLE(table), vrule, 0, 1, 1, 2,
GTK_FILL, GTK_EXPAND|GTK_SHRINK|GTK_FILL, 0, 0 );
/* Now show everything */
gtk_widget_show( area );
9. Miscellaneous Widgets 76
gtk_widget_show( hrule );
gtk_widget_show( vrule );
gtk_widget_show( table );
gtk_widget_show( window );
gtk_main();
return(0);
}
/* example-end */
9.8 Statusbars
Statusbars are simple widgets used to display a text message. They keep a stack of the messages pushedonto them, so that popping the current message will re-display the previous text message.
In order to allow different parts of an application to use the same statusbar to display messages, the statusbarwidget issues Context Identifiers which are used to identify different ’users’. The message on top of the stackis the one displayed, no matter what context it is in. Messages are stacked in last-in-first-out order, notcontext identifier order.
A statusbar is created with a call to:
GtkWidget *gtk_statusbar_new( void );
A new Context Identifier is requested using a call to the following function with a short textual descriptionof the context:
guint gtk_statusbar_get_context_id( GtkStatusbar *statusbar,
const gchar *context_description );
There are three functions that can operate on statusbars:
guint gtk_statusbar_push( GtkStatusbar *statusbar,
guint context_id,
gchar *text );
void gtk_statusbar_pop( GtkStatusbar *statusbar)
guint context_id );
void gtk_statusbar_remove( GtkStatusbar *statusbar,
guint context_id,
guint message_id );
The first, gtk statusbar push, is used to add a new message to the statusbar. It returns a Message Identifier,which can be passed later to the function gtk statusbar remove to remove the message with the given Messageand Context Identifiers from the statusbar’s stack.
The function gtk statusbar pop removes the message highest in the stack with the given Context Identifier.
The following example creates a statusbar and two buttons, one for pushing items onto the statusbar, andone for popping the last item back off.
/* example-start statusbar statusbar.c */
#include <gtk/gtk.h>
#include <glib.h>

9. Miscellaneous Widgets 77
GtkWidget *status_bar;
void push_item (GtkWidget *widget, gpointer data)
{
static int count = 1;
char buff[20];
g_snprintf(buff, 20, "Item %d", count++);
gtk_statusbar_push( GTK_STATUSBAR(status_bar), GPOINTER_TO_INT(data), buff);
return;
}
void pop_item (GtkWidget *widget, gpointer data)
{
gtk_statusbar_pop( GTK_STATUSBAR(status_bar), GPOINTER_TO_INT(data) );
return;
}
int main (int argc, char *argv[])
{
GtkWidget *window;
GtkWidget *vbox;
GtkWidget *button;
gint context_id;
gtk_init (\&argc, \&argv);
/* create a new window */
window = gtk_window_new(GTK_WINDOW_TOPLEVEL);
gtk_widget_set_usize( GTK_WIDGET (window), 200, 100);
gtk_window_set_title(GTK_WINDOW (window), "GTK Statusbar Example");
gtk_signal_connect(GTK_OBJECT (window), "delete_event",
(GtkSignalFunc) gtk_exit, NULL);
vbox = gtk_vbox_new(FALSE, 1);
gtk_container_add(GTK_CONTAINER(window), vbox);
gtk_widget_show(vbox);
status_bar = gtk_statusbar_new();
gtk_box_pack_start (GTK_BOX (vbox), status_bar, TRUE, TRUE, 0);
gtk_widget_show (status_bar);
context_id = gtk_statusbar_get_context_id(
GTK_STATUSBAR(status_bar), "Statusbar example");
button = gtk_button_new_with_label("push item");
gtk_signal_connect(GTK_OBJECT(button), "clicked",
GTK_SIGNAL_FUNC (push_item), GINT_TO_POINTER(context_id) );
gtk_box_pack_start(GTK_BOX(vbox), button, TRUE, TRUE, 2);
gtk_widget_show(button);
button = gtk_button_new_with_label("pop last item");
gtk_signal_connect(GTK_OBJECT(button), "clicked",
9. Miscellaneous Widgets 78
GTK_SIGNAL_FUNC (pop_item), GINT_TO_POINTER(context_id) );
gtk_box_pack_start(GTK_BOX(vbox), button, TRUE, TRUE, 2);
gtk_widget_show(button);
/* always display the window as the last step so it all splashes on
* the screen at once. */
gtk_widget_show(window);
gtk_main ();
return 0;
}
/* example-end */
9.9 Text Entries
The Entry widget allows text to be typed and displayed in a single line text box. The text may be set withfunction calls that allow new text to replace, prepend or append the current contents of the Entry widget.
There are two functions for creating Entry widgets:
GtkWidget *gtk_entry_new( void );
GtkWidget *gtk_entry_new_with_max_length( guint16 max );
The first just creates a new Entry widget, whilst the second creates a new Entry and sets a limit on thelength of the text within the Entry.
There are several functions for altering the text which is currently within the Entry widget.
void gtk_entry_set_text( GtkEntry *entry,
const gchar *text );
void gtk_entry_append_text( GtkEntry *entry,
const gchar *text );
void gtk_entry_prepend_text( GtkEntry *entry,
const gchar *text );
The function gtk entry set text sets the contents of the Entry widget, replacing the current contents. Thefunctions gtk entry append text and gtk entry prepend text allow the current contents to be appended andprepended to.
The next function allows the current insertion point to be set.
void gtk_entry_set_position( GtkEntry *entry,
gint position );
The contents of the Entry can be retrieved by using a call to the following function. This is useful in thecallback functions described below.
gchar *gtk_entry_get_text( GtkEntry *entry );
The value returned by this function is used internally, and must not be freed using either free() or g free()
If we don’t want the contents of the Entry to be changed by someone typing into it, we can change itseditable state.

9. Miscellaneous Widgets 79
void gtk_entry_set_editable( GtkEntry *entry,
gboolean editable );
The function above allows us to toggle the editable state of the Entry widget by passing in a TRUE orFALSE value for the editable argument.
If we are using the Entry where we don’t want the text entered to be visible, for example when a passwordis being entered, we can use the following function, which also takes a boolean flag.
void gtk_entry_set_visibility( GtkEntry *entry,
gboolean visible );
A region of the text may be set as selected by using the following function. This would most often be usedafter setting some default text in an Entry, making it easy for the user to remove it.
void gtk_entry_select_region( GtkEntry *entry,
gint start,
gint end );
If we want to catch when the user has entered text, we can connect to the activate or changed signal.Activate is raised when the user hits the enter key within the Entry widget. Changed is raised when the textchanges at all, e.g. for every character entered or removed.
The following code is an example of using an Entry widget.
/* example-start entry entry.c */
#include <gtk/gtk.h>
void enter_callback(GtkWidget *widget, GtkWidget *entry)
{
gchar *entry_text;
entry_text = gtk_entry_get_text(GTK_ENTRY(entry));
printf("Entry contents: %s\n", entry_text);
}
void entry_toggle_editable (GtkWidget *checkbutton,
GtkWidget *entry)
{
gtk_entry_set_editable(GTK_ENTRY(entry),
GTK_TOGGLE_BUTTON(checkbutton)->active);
}
void entry_toggle_visibility (GtkWidget *checkbutton,
GtkWidget *entry)
{
gtk_entry_set_visibility(GTK_ENTRY(entry),
GTK_TOGGLE_BUTTON(checkbutton)->active);
}
int main (int argc, char *argv[])
{
GtkWidget *window;
GtkWidget *vbox, *hbox;
GtkWidget *entry;

9. Miscellaneous Widgets 80
GtkWidget *button;
GtkWidget *check;
gtk_init (\&argc, \&argv);
/* create a new window */
window = gtk_window_new(GTK_WINDOW_TOPLEVEL);
gtk_widget_set_usize( GTK_WIDGET (window), 200, 100);
gtk_window_set_title(GTK_WINDOW (window), "GTK Entry");
gtk_signal_connect(GTK_OBJECT (window), "delete_event",
(GtkSignalFunc) gtk_exit, NULL);
vbox = gtk_vbox_new (FALSE, 0);
gtk_container_add (GTK_CONTAINER (window), vbox);
gtk_widget_show (vbox);
entry = gtk_entry_new_with_max_length (50);
gtk_signal_connect(GTK_OBJECT(entry), "activate",
GTK_SIGNAL_FUNC(enter_callback),
entry);
gtk_entry_set_text (GTK_ENTRY (entry), "hello");
gtk_entry_append_text (GTK_ENTRY (entry), " world");
gtk_entry_select_region (GTK_ENTRY (entry),
0, GTK_ENTRY(entry)->text_length);
gtk_box_pack_start (GTK_BOX (vbox), entry, TRUE, TRUE, 0);
gtk_widget_show (entry);
hbox = gtk_hbox_new (FALSE, 0);
gtk_container_add (GTK_CONTAINER (vbox), hbox);
gtk_widget_show (hbox);
check = gtk_check_button_new_with_label("Editable");
gtk_box_pack_start (GTK_BOX (hbox), check, TRUE, TRUE, 0);
gtk_signal_connect (GTK_OBJECT(check), "toggled",
GTK_SIGNAL_FUNC(entry_toggle_editable), entry);
gtk_toggle_button_set_active(GTK_TOGGLE_BUTTON(check), TRUE);
gtk_widget_show (check);
check = gtk_check_button_new_with_label("Visible");
gtk_box_pack_start (GTK_BOX (hbox), check, TRUE, TRUE, 0);
gtk_signal_connect (GTK_OBJECT(check), "toggled",
GTK_SIGNAL_FUNC(entry_toggle_visibility), entry);
gtk_toggle_button_set_active(GTK_TOGGLE_BUTTON(check), TRUE);
gtk_widget_show (check);
button = gtk_button_new_with_label ("Close");
gtk_signal_connect_object (GTK_OBJECT (button), "clicked",
GTK_SIGNAL_FUNC(gtk_exit),
GTK_OBJECT (window));
gtk_box_pack_start (GTK_BOX (vbox), button, TRUE, TRUE, 0);
GTK_WIDGET_SET_FLAGS (button, GTK_CAN_DEFAULT);
gtk_widget_grab_default (button);
gtk_widget_show (button);
gtk_widget_show(window);
gtk_main();

9. Miscellaneous Widgets 81
return(0);
}
/* example-end */
9.10 Spin Buttons
The Spin Button widget is generally used to allow the user to select a value from a range of numeric values.It consists of a text entry box with up and down arrow buttons attached to the side. Selecting one of thebuttons causes the value to ’spin’ up and down the range of possible values. The entry box may also beedited directly to enter a specific value.
The Spin Button allows the value to have zero or a number of decimal places and to be incre-mented/decremented in configurable steps. The action of holding down one of the buttons optionally resultin an acceleration of change in the value according to how long it is depressed.
The Spin Button uses an 7 object to hold information about the range of values that the spin button cantake. This makes for a powerful Spin Button widget.
Recall that an adjustment widget is created with the following function, which illustrates the informationthat it holds:
GtkObject *gtk_adjustment_new( gfloat value,
gfloat lower,
gfloat upper,
gfloat step_increment,
gfloat page_increment,
gfloat page_size );
These attributes of an Adjustment are used by the Spin Button in the following way:
• value: initial value for the Spin Button
• lower: lower range value
• upper: upper range value
• step_increment: value to increment/decrement when pressing mouse button 1 on a button
• page_increment: value to increment/decrement when pressing mouse button 2 on a button
• page_size: unused
Additionally, mouse button 3 can be used to jump directly to the upper or lower values when used to selectone of the buttons. Lets look at how to create a Spin Button:
GtkWidget *gtk_spin_button_new( GtkAdjustment *adjustment,
gfloat climb_rate,
guint digits );
The climb_rate argument take a value between 0.0 and 1.0 and indicates the amount of acceleration thatthe Spin Button has. The digits argument specifies the number of decimal places to which the value willbe displayed.
A Spin Button can be reconfigured after creation using the following function:
void gtk_spin_button_configure( GtkSpinButton *spin_button,
GtkAdjustment *adjustment,
gfloat climb_rate,
guint digits );
9. Miscellaneous Widgets 82
The spin_button argument specifies the Spin Button widget that is to be reconfigured. The other argumentsare as specified above.
The adjustment can be set and retrieved independantly using the following two functions:
void gtk_spin_button_set_adjustment( GtkSpinButton *spin_button,
GtkAdjustment *adjustment );
GtkAdjustment *gtk_spin_button_get_adjustment( GtkSpinButton *spin_button );
The number of decimal places can also be altered using:
void gtk_spin_button_set_digits( GtkSpinButton *spin_button,
guint digits) ;
The value that a Spin Button is currently displaying can be changed using the following function:
void gtk_spin_button_set_value( GtkSpinButton *spin_button,
gfloat value );
The current value of a Spin Button can be retrieved as either a floating point or integer value with thefollowing functions:
gfloat gtk_spin_button_get_value_as_float( GtkSpinButton *spin_button );
gint gtk_spin_button_get_value_as_int( GtkSpinButton *spin_button );
If you want to alter the value of a Spin Value relative to its current value, then the following function canbe used:
void gtk_spin_button_spin( GtkSpinButton *spin_button,
GtkSpinType direction,
gfloat increment );
The direction parameter can take one of the following values:
• GTK SPIN STEP FORWARD
• GTK SPIN STEP BACKWARD
• GTK SPIN PAGE FORWARD
• GTK SPIN PAGE BACKWARD
• GTK SPIN HOME
• GTK SPIN END
• GTK SPIN USER DEFINED
This function packs in quite a bit of functionality, which I will attempt to clearly explain. Many of thesesettings use values from the Adjustment object that is associated with a Spin Button.
GTK SPIN STEP FORWARD and GTK SPIN STEP BACKWARD change the value of the Spin Buttonby the amount specified by increment, unless increment is equal to 0, in which case the value is changedby the value of step_increment in theAdjustment.

9. Miscellaneous Widgets 83
GTK SPIN PAGE FORWARD and GTK SPIN PAGE BACKWARD simply alter the value of the SpinButton by increment.
GTK SPIN HOME sets the value of the Spin Button to the bottom of the Adjustments range.
GTK SPIN END sets the value of the Spin Button to the top of the Adjustments range.
GTK SPIN USER DEFINED simply alters the value of the Spin Button by the specified amount.
We move away from functions for setting and retreving the range attributes of the Spin Button now, andmove onto functions that effect the appearance and behaviour of the Spin Button widget itself.
The first of these functions is used to constrain the text box of the Spin Button such that it may only containa numric value. This prevents a user from typing anything other than numeric values into the text box of aSpin Button:
void gtk_spin_button_set_numeric( GtkSpinButton *spin_button,
gboolean numeric );
You can set whether a Spin Button will wrap around between the upper and lower range values with thefollowing function:
void gtk_spin_button_set_wrap( GtkSpinButton *spin_button,
gboolean wrap );
You can set a Spin Button to round the value to the nearest step_increment, which is set within theAdjustment object used with the Spin Button. This is accomplished with the following function:
void gtk_spin_button_set_snap_to_ticks( GtkSpinButton *spin_button,
gboolean snap_to_ticks );
The update policy of a Spin Button can be changed with the following function:
void gtk_spin_button_set_update_policy( GtkSpinButton *spin_button,
GtkSpinButtonUpdatePolicy policy );
The possible values of policy are either GTK UPDATE ALWAYS or GTK UPDATE IF VALID.
These policies affect the behavior of a Spin Button when parsing inserted text and syncing it’s value withthe values of the Adjustment.
In the case of GTK UPDATE IF VALID the Spin Button only value gets changed if the text input is anumeric value that is within the range specified by the Adjustment. Otherwise the text is reset to thecurrent value.
In case of GTK UPDATE ALWAYS we ignore errors while converting text into a numeric value.
The appearance of the buttons used in a Spin Button can be changed using the following function:
void gtk_spin_button_set_shadow_type( GtkSpinButton *spin_button,
GtkShadowType shadow_type );
As usual, the shadow_type can be one of:
• GTK SHADOW IN
• GTK SHADOW OUT
• GTK SHADOW ETCHED IN

9. Miscellaneous Widgets 84
• GTK SHADOW ETCHED OUT
Finally, you can explicitly request that a Spin Button update itself:
void gtk_spin_button_update( GtkSpinButton *spin_button );
It’s example time again.
/* example-start spinbutton spinbutton.c */
#include <gtk/gtk.h>
static GtkWidget *spinner1;
void toggle_snap( GtkWidget *widget,
GtkSpinButton *spin )
{
gtk_spin_button_set_snap_to_ticks (spin, GTK_TOGGLE_BUTTON (widget)->active);
}
void toggle_numeric( GtkWidget *widget,
GtkSpinButton *spin )
{
gtk_spin_button_set_numeric (spin, GTK_TOGGLE_BUTTON (widget)->active);
}
void change_digits( GtkWidget *widget,
GtkSpinButton *spin )
{
gtk_spin_button_set_digits (GTK_SPIN_BUTTON (spinner1),
gtk_spin_button_get_value_as_int (spin));
}
void get_value( GtkWidget *widget,
gpointer data )
{
gchar buf[32];
GtkLabel *label;
GtkSpinButton *spin;
spin = GTK_SPIN_BUTTON (spinner1);
label = GTK_LABEL (gtk_object_get_user_data (GTK_OBJECT (widget)));
if (GPOINTER_TO_INT (data) == 1)
sprintf (buf, "%d", gtk_spin_button_get_value_as_int (spin));
else
sprintf (buf, "%0.*f", spin->digits,
gtk_spin_button_get_value_as_float (spin));
gtk_label_set_text (label, buf);
}
int main( int argc,
char *argv[] )
{
GtkWidget *window;
GtkWidget *frame;

9. Miscellaneous Widgets 85
GtkWidget *hbox;
GtkWidget *main_vbox;
GtkWidget *vbox;
GtkWidget *vbox2;
GtkWidget *spinner2;
GtkWidget *spinner;
GtkWidget *button;
GtkWidget *label;
GtkWidget *val_label;
GtkAdjustment *adj;
/* Initialise GTK */
gtk_init(\&argc, \&argv);
window = gtk_window_new (GTK_WINDOW_TOPLEVEL);
gtk_signal_connect (GTK_OBJECT (window), "destroy",
GTK_SIGNAL_FUNC (gtk_main_quit),
NULL);
gtk_window_set_title (GTK_WINDOW (window), "Spin Button");
main_vbox = gtk_vbox_new (FALSE, 5);
gtk_container_set_border_width (GTK_CONTAINER (main_vbox), 10);
gtk_container_add (GTK_CONTAINER (window), main_vbox);
frame = gtk_frame_new ("Not accelerated");
gtk_box_pack_start (GTK_BOX (main_vbox), frame, TRUE, TRUE, 0);
vbox = gtk_vbox_new (FALSE, 0);
gtk_container_set_border_width (GTK_CONTAINER (vbox), 5);
gtk_container_add (GTK_CONTAINER (frame), vbox);
/* Day, month, year spinners */
hbox = gtk_hbox_new (FALSE, 0);
gtk_box_pack_start (GTK_BOX (vbox), hbox, TRUE, TRUE, 5);
vbox2 = gtk_vbox_new (FALSE, 0);
gtk_box_pack_start (GTK_BOX (hbox), vbox2, TRUE, TRUE, 5);
label = gtk_label_new ("Day :");
gtk_misc_set_alignment (GTK_MISC (label), 0, 0.5);
gtk_box_pack_start (GTK_BOX (vbox2), label, FALSE, TRUE, 0);
adj = (GtkAdjustment *) gtk_adjustment_new (1.0, 1.0, 31.0, 1.0,
5.0, 0.0);
spinner = gtk_spin_button_new (adj, 0, 0);
gtk_spin_button_set_wrap (GTK_SPIN_BUTTON (spinner), TRUE);
gtk_spin_button_set_shadow_type (GTK_SPIN_BUTTON (spinner),
GTK_SHADOW_OUT);
gtk_box_pack_start (GTK_BOX (vbox2), spinner, FALSE, TRUE, 0);
vbox2 = gtk_vbox_new (FALSE, 0);
gtk_box_pack_start (GTK_BOX (hbox), vbox2, TRUE, TRUE, 5);
label = gtk_label_new ("Month :");

9. Miscellaneous Widgets 86
gtk_misc_set_alignment (GTK_MISC (label), 0, 0.5);
gtk_box_pack_start (GTK_BOX (vbox2), label, FALSE, TRUE, 0);
adj = (GtkAdjustment *) gtk_adjustment_new (1.0, 1.0, 12.0, 1.0,
5.0, 0.0);
spinner = gtk_spin_button_new (adj, 0, 0);
gtk_spin_button_set_wrap (GTK_SPIN_BUTTON (spinner), TRUE);
gtk_spin_button_set_shadow_type (GTK_SPIN_BUTTON (spinner),
GTK_SHADOW_ETCHED_IN);
gtk_box_pack_start (GTK_BOX (vbox2), spinner, FALSE, TRUE, 0);
vbox2 = gtk_vbox_new (FALSE, 0);
gtk_box_pack_start (GTK_BOX (hbox), vbox2, TRUE, TRUE, 5);
label = gtk_label_new ("Year :");
gtk_misc_set_alignment (GTK_MISC (label), 0, 0.5);
gtk_box_pack_start (GTK_BOX (vbox2), label, FALSE, TRUE, 0);
adj = (GtkAdjustment *) gtk_adjustment_new (1998.0, 0.0, 2100.0,
1.0, 100.0, 0.0);
spinner = gtk_spin_button_new (adj, 0, 0);
gtk_spin_button_set_wrap (GTK_SPIN_BUTTON (spinner), FALSE);
gtk_spin_button_set_shadow_type (GTK_SPIN_BUTTON (spinner),
GTK_SHADOW_IN);
gtk_widget_set_usize (spinner, 55, 0);
gtk_box_pack_start (GTK_BOX (vbox2), spinner, FALSE, TRUE, 0);
frame = gtk_frame_new ("Accelerated");
gtk_box_pack_start (GTK_BOX (main_vbox), frame, TRUE, TRUE, 0);
vbox = gtk_vbox_new (FALSE, 0);
gtk_container_set_border_width (GTK_CONTAINER (vbox), 5);
gtk_container_add (GTK_CONTAINER (frame), vbox);
hbox = gtk_hbox_new (FALSE, 0);
gtk_box_pack_start (GTK_BOX (vbox), hbox, FALSE, TRUE, 5);
vbox2 = gtk_vbox_new (FALSE, 0);
gtk_box_pack_start (GTK_BOX (hbox), vbox2, TRUE, TRUE, 5);
label = gtk_label_new ("Value :");
gtk_misc_set_alignment (GTK_MISC (label), 0, 0.5);
gtk_box_pack_start (GTK_BOX (vbox2), label, FALSE, TRUE, 0);
adj = (GtkAdjustment *) gtk_adjustment_new (0.0, -10000.0, 10000.0,
0.5, 100.0, 0.0);
spinner1 = gtk_spin_button_new (adj, 1.0, 2);
gtk_spin_button_set_wrap (GTK_SPIN_BUTTON (spinner1), TRUE);
gtk_widget_set_usize (spinner1, 100, 0);
gtk_box_pack_start (GTK_BOX (vbox2), spinner1, FALSE, TRUE, 0);
vbox2 = gtk_vbox_new (FALSE, 0);
gtk_box_pack_start (GTK_BOX (hbox), vbox2, TRUE, TRUE, 5);
label = gtk_label_new ("Digits :");
gtk_misc_set_alignment (GTK_MISC (label), 0, 0.5);
gtk_box_pack_start (GTK_BOX (vbox2), label, FALSE, TRUE, 0);
9. Miscellaneous Widgets 87
adj = (GtkAdjustment *) gtk_adjustment_new (2, 1, 5, 1, 1, 0);
spinner2 = gtk_spin_button_new (adj, 0.0, 0);
gtk_spin_button_set_wrap (GTK_SPIN_BUTTON (spinner2), TRUE);
gtk_signal_connect (GTK_OBJECT (adj), "value_changed",
GTK_SIGNAL_FUNC (change_digits),
(gpointer) spinner2);
gtk_box_pack_start (GTK_BOX (vbox2), spinner2, FALSE, TRUE, 0);
hbox = gtk_hbox_new (FALSE, 0);
gtk_box_pack_start (GTK_BOX (vbox), hbox, FALSE, TRUE, 5);
button = gtk_check_button_new_with_label ("Snap to 0.5-ticks");
gtk_signal_connect (GTK_OBJECT (button), "clicked",
GTK_SIGNAL_FUNC (toggle_snap),
spinner1);
gtk_box_pack_start (GTK_BOX (vbox), button, TRUE, TRUE, 0);
gtk_toggle_button_set_active (GTK_TOGGLE_BUTTON (button), TRUE);
button = gtk_check_button_new_with_label ("Numeric only input mode");
gtk_signal_connect (GTK_OBJECT (button), "clicked",
GTK_SIGNAL_FUNC (toggle_numeric),
spinner1);
gtk_box_pack_start (GTK_BOX (vbox), button, TRUE, TRUE, 0);
gtk_toggle_button_set_active (GTK_TOGGLE_BUTTON (button), TRUE);
val_label = gtk_label_new ("");
hbox = gtk_hbox_new (FALSE, 0);
gtk_box_pack_start (GTK_BOX (vbox), hbox, FALSE, TRUE, 5);
button = gtk_button_new_with_label ("Value as Int");
gtk_object_set_user_data (GTK_OBJECT (button), val_label);
gtk_signal_connect (GTK_OBJECT (button), "clicked",
GTK_SIGNAL_FUNC (get_value),
GINT_TO_POINTER (1));
gtk_box_pack_start (GTK_BOX (hbox), button, TRUE, TRUE, 5);
button = gtk_button_new_with_label ("Value as Float");
gtk_object_set_user_data (GTK_OBJECT (button), val_label);
gtk_signal_connect (GTK_OBJECT (button), "clicked",
GTK_SIGNAL_FUNC (get_value),
GINT_TO_POINTER (2));
gtk_box_pack_start (GTK_BOX (hbox), button, TRUE, TRUE, 5);
gtk_box_pack_start (GTK_BOX (vbox), val_label, TRUE, TRUE, 0);
gtk_label_set_text (GTK_LABEL (val_label), "0");
hbox = gtk_hbox_new (FALSE, 0);
gtk_box_pack_start (GTK_BOX (main_vbox), hbox, FALSE, TRUE, 0);
button = gtk_button_new_with_label ("Close");
gtk_signal_connect_object (GTK_OBJECT (button), "clicked",
GTK_SIGNAL_FUNC (gtk_widget_destroy),
GTK_OBJECT (window));
gtk_box_pack_start (GTK_BOX (hbox), button, TRUE, TRUE, 5);
gtk_widget_show_all (window);

9. Miscellaneous Widgets 88
/* Enter the event loop */
gtk_main ();
return(0);
}
/* example-end */
9.11 Combo Box
The combo box is another fairly simple widget that is really just a collection of other widgets. From theusers point of view, the widget consists of a text entry box and a pull down menu from which the user canselect one of a set of predefined entries. Alternatively, the user can type a different option directly into thetext box.
The following extract from the structure that defines a Combo Box identifies several of the components:
struct _GtkCombo {
GtkHBox hbox;
GtkWidget *entry;
GtkWidget *button;
GtkWidget *popup;
GtkWidget *popwin;
GtkWidget *list;
... };
As you can see, the Combo Box has two principle parts that you really care about: an entry and a list.
First off, to create a combo box, use:
GtkWidget *gtk_combo_new( void );
Now, if you want to set the string in the entry section of the combo box, this is done by manipulating theentry widget directly:
gtk_entry_set_text(GTK_ENTRY(GTK_COMBO(combo)->entry), "My String.");
To set the values in the popdown list, one uses the function:
void gtk_combo_set_popdown_strings( GtkCombo *combo,
GList *strings );
Before you can do this, you have to assemble a GList of the strings that you want. GList is a linked listimplementation that is part of 20, a library supporing GTK. For the moment, the quick and dirty explanationis that you need to set up a GList pointer, set it equal to NULL, then append strings to it with
GList *g_list_append( GList *glist,
gpointer data );
It is important that you set the initial GList pointer to NULL. The value returned from the g list appendfunction must be used as the new pointer to the GList.
Here’s a typical code segment for creating a set of options:

9. Miscellaneous Widgets 89
GList *glist=NULL;
glist = g_list_append(glist, "String 1");
glist = g_list_append(glist, "String 2");
glist = g_list_append(glist, "String 3");
glist = g_list_append(glist, "String 4");
gtk_combo_set_popdown_strings( GTK_COMBO(combo), glist) ;
At this point you have a working combo box that has been set up. There are a few aspects of its behaviorthat you can change. These are accomplished with the functions:
void gtk_combo_set_use_arrows( GtkCombo *combo,
gint val );
void gtk_combo_set_use_arrows_always( GtkCombo *combo,
gint val );
void gtk_combo_set_case_sensitive( GtkCombo *combo,
gint val );
gtk_combo_set_use_arrows() lets the user change the value in the entry using the up/down arrow keys.This doesn’t bring up the list, but rather replaces the current text in the entry with the next list entry (upor down, as your key choice indicates). It does this by searching in the list for the item corresponding to thecurrent value in the entry and selecting the previous/next item accordingly. Usually in an entry the arrowkeys are used to change focus (you can do that anyway using TAB). Note that when the current item isthe last of the list and you press arrow-down it changes the focus (the same applies with the first item andarrow-up).
If the current value in the entry is not in the list, then the function of gtk_combo_set_use_arrows() isdisabled.
gtk_combo_set_use_arrows_always() similarly allows the use the the up/down arrow keys to cycle throughthe choices in the dropdown list, except that it wraps around the values in the list, completely disabling theuse of the up and down arrow keys for changing focus.
gtk_combo_set_case_sensitive() toggles whether or not GTK searches for entries in a case sensitivemanner. This is used when the Combo widget is asked to find a value from the list using the current entry inthe text box. This completion can be performed in eother a case sensitive or insensitive manner, dependingupon the use of this function. The Combo widget can also simply complete the current entry if the userpresses the key combination MOD-1 and ’Tab’. MOD-1 is often mapped to the ’Alt’ key. Note, howeverthat some Window managers also use this key combination, which will override it’s use within GTK.
Now that we have a combo box, tailored to look and act how we want it, all that remains is be-ing able to get data from the combo box. This is relatively straight forward. The majority of thetime, all you are going to care about getting data from is the entry. The entry is accessed simply byGTK ENTRY(GTK COMBO(combo)->entry). The two principle things that you are going to want to dowith it are attach to the activate signal, which indicates that the user has pressed the Return or Enterkey,and read the text. The first is accomplished using something like:
gtk_signal_connect(GTK_OBJECT(GTK_COMB(combo)->entry), "activate",
GTK_SIGNAL_FUNC (my_callback_function), my_data);
Getting the text at any arbitrary time is accomplished by simply using the entry function:
gchar *gtk_entry_get_text(GtkEntry *entry);

9. Miscellaneous Widgets 90
Such as:
char *string;
string = gtk_entry_get_text(GTK_ENTRY(GTK_COMBO(combo)->entry));
That’s about all there is to it. There is a function
void gtk_combo_disable_activate(GtkCombo *combo);
that will disable the activate signal on the entry widget in the combo box. Personally, I can’t think of whyyou’d want to use it, but it does exist.
9.12 Color Selection
The color selection widget is, not surprisingly, a widget for interactive selection of colors. This compositewidget lets the user select a color by manipulating RGB (Red, Green, Blue) and HSV (Hue, Saturation,Value) triples. This is done either by adjusting single values with sliders or entries, or by picking the desiredcolor from a hue-saturation wheel/value bar. Optionally, the opacity of the color can also be set.
The color selection widget currently emits only one signal, ”color changed”, which is emitted wheneverthe current color in the widget changes, either when the user changes it or if it’s set explicitly throughgtk color selection set color().
Lets have a look at what the color selection widget has to offer us. The widget comes in two flavours:gtk color selection and gtk color selection dialog.
GtkWidget *gtk_color_selection_new( void );
You’ll probably not be using this constructor directly. It creates an orphan GtkColorSelection widget whichyou’ll have to parent yourself. The GtkColorSelection widget inherits from the GtkVBox widget.
GtkWidget *gtk_color_selection_dialog_new( const gchar *title );
This is the most common color selection constructor. It creates a GtkColorSelectionDialog, which inheritsfrom a GtkDialog. It consists of a GtkFrame containing a GtkColorSelection widget, a GtkHSeparatorand a GtkHBox with three buttons, ”Ok”, ”Cancel” and ”Help”. You can reach these buttons by accessingthe ”ok button”, ”cancel button” and ”help button” widgets in the GtkColorSelectionDialog structure, (i.e.GTK COLOR SELECTION DIALOG(colorseldialog)->ok button).
void gtk_color_selection_set_update_policy( GtkColorSelection *colorsel,
GtkUpdateType policy );
This function sets the update policy. The default policy is GTK UPDATE CONTINUOUS which meansthat the current color is updated continuously when the user drags the sliders or presses the mouse and dragsin the hue-saturation wheel or value bar. If you experience performance problems, you may want to set thepolicy to GTK UPDATE DISCONTINUOUS or GTK UPDATE DELAYED.
void gtk_color_selection_set_opacity( GtkColorSelection *colorsel,
gint use_opacity );
The color selection widget supports adjusting the opacity of a color (also known as the alpha channel).This is disabled by default. Calling this function with use opacity set to TRUE enables opacity. Likewise,use opacity set to FALSE will disable opacity.

9. Miscellaneous Widgets 91
void gtk_color_selection_set_color( GtkColorSelection *colorsel,
gdouble *color );
You can set the current color explicitly by calling this function with a pointer to an array of colors(gdouble). The length of the array depends on whether opacity is enabled or not. Position 0 containsthe red component, 1 is green, 2 is blue and opacity is at position 3 (only if opacity is enabled, seegtk color selection set opacity()). All values are between 0.0 and 1.0.
void gtk_color_selection_get_color( GtkColorSelection *colorsel,
gdouble *color );
When you need to query the current color, typically when you’ve received a ”color changed” signal, youuse this function. Color is a pointer to the array of colors to fill in. See the gtk color selection set color()function for the description of this array.
Here’s a simple example demonstrating the use of the GtkColorSelectionDialog. The program displays awindow containing a drawing area. Clicking on it opens a color selection dialog, and changing the color inthe color selection dialog changes the background color.
/* example-start colorsel colorsel.c */
#include <glib.h>
#include <gdk/gdk.h>
#include <gtk/gtk.h>
GtkWidget *colorseldlg = NULL;
GtkWidget *drawingarea = NULL;
/* Color changed handler */
void color_changed_cb (GtkWidget *widget, GtkColorSelection *colorsel)
{
gdouble color[3];
GdkColor gdk_color;
GdkColormap *colormap;
/* Get drawingarea colormap */
colormap = gdk_window_get_colormap (drawingarea->window);
/* Get current color */
gtk_color_selection_get_color (colorsel,color);
/* Fit to a unsigned 16 bit integer (0..65535) and
* insert into the GdkColor structure */
gdk_color.red = (guint16)(color[0]*65535.0);
gdk_color.green = (guint16)(color[1]*65535.0);
gdk_color.blue = (guint16)(color[2]*65535.0);
/* Allocate color */
gdk_color_alloc (colormap, \&gdk_color);
/* Set window background color */

9. Miscellaneous Widgets 92
gdk_window_set_background (drawingarea->window, \&gdk_color);
/* Clear window */
gdk_window_clear (drawingarea->window);
}
/* Drawingarea event handler */
gint area_event (GtkWidget *widget, GdkEvent *event, gpointer client_data)
{
gint handled = FALSE;
GtkWidget *colorsel;
/* Check if we’ve received a button pressed event */
if (event->type == GDK_BUTTON_PRESS \&\& colorseldlg == NULL)
{
/* Yes, we have an event and there’s no colorseldlg yet! */
handled = TRUE;
/* Create color selection dialog */
colorseldlg = gtk_color_selection_dialog_new("Select background color");
/* Get the GtkColorSelection widget */
colorsel = GTK_COLOR_SELECTION_DIALOG(colorseldlg)->colorsel;
/* Connect to the "color_changed" signal, set the client-data
* to the colorsel widget */
gtk_signal_connect(GTK_OBJECT(colorsel), "color_changed",
(GtkSignalFunc)color_changed_cb, (gpointer)colorsel);
/* Show the dialog */
gtk_widget_show(colorseldlg);
}
return handled;
}
/* Close down and exit handler */
void destroy_window (GtkWidget *widget, gpointer client_data)
{
gtk_main_quit ();
}
/* Main */
gint main (gint argc, gchar *argv[])
{
GtkWidget *window;
9. Miscellaneous Widgets 93
/* Initialize the toolkit, remove gtk-related commandline stuff */
gtk_init (\&argc,\&argv);
/* Create toplevel window, set title and policies */
window = gtk_window_new (GTK_WINDOW_TOPLEVEL);
gtk_window_set_title (GTK_WINDOW(window), "Color selection test");
gtk_window_set_policy (GTK_WINDOW(window), TRUE, TRUE, TRUE);
/* Attach to the "delete" and "destroy" events so we can exit */
gtk_signal_connect (GTK_OBJECT(window), "delete_event",
(GtkSignalFunc)destroy_window, (gpointer)window);
gtk_signal_connect (GTK_OBJECT(window), "destroy",
(GtkSignalFunc)destroy_window, (gpointer)window);
/* Create drawingarea, set size and catch button events */
drawingarea = gtk_drawing_area_new ();
gtk_drawing_area_size (GTK_DRAWING_AREA(drawingarea), 200, 200);
gtk_widget_set_events (drawingarea, GDK_BUTTON_PRESS_MASK);
gtk_signal_connect (GTK_OBJECT(drawingarea), "event",
(GtkSignalFunc)area_event, (gpointer)drawingarea);
/* Add drawingarea to window, then show them both */
gtk_container_add (GTK_CONTAINER(window), drawingarea);
gtk_widget_show (drawingarea);
gtk_widget_show (window);
/* Enter the gtk main loop (this never returns) */
gtk_main ();
/* Satisfy grumpy compilers */
return(0);
}
/* example-end */
9.13 File Selections
The file selection widget is a quick and simple way to display a File dialog box. It comes complete with Ok,Cancel, and Help buttons, a great way to cut down on programming time.
To create a new file selection box use:
GtkWidget *gtk_file_selection_new( gchar *title );
To set the filename, for example to bring up a specific directory, or give a default filename, use this function:

9. Miscellaneous Widgets 94
void gtk_file_selection_set_filename( GtkFileSelection *filesel,
gchar *filename );
To grab the text that the user has entered or clicked on, use this function:
gchar *gtk_file_selection_get_filename( GtkFileSelection *filesel );
There are also pointers to the widgets contained within the file selection widget. These are:
• dir list
• file list
• selection entry
• selection text
• main vbox
• ok button
• cancel button
• help button
Most likely you will want to use the ok button, cancel button, and help button pointers in signaling theiruse.
Included here is an example stolen from testgtk.c, modified to run on its own. As you will see, there isnothing much to creating a file selection widget. While in this example the Help button appears on thescreen, it does nothing as there is not a signal attached to it.
/* example-start filesel filesel.c */
#include <gtk/gtk.h>
/* Get the selected filename and print it to the console */
void file_ok_sel (GtkWidget *w, GtkFileSelection *fs)
{
g_print ("%s\n", gtk_file_selection_get_filename (GTK_FILE_SELECTION (fs)));
}
void destroy (GtkWidget *widget, gpointer data)
{
gtk_main_quit ();
}
int main (int argc, char *argv[])
{
GtkWidget *filew;
gtk_init (\&argc, \&argv);
/* Create a new file selection widget */
filew = gtk_file_selection_new ("File selection");
gtk_signal_connect (GTK_OBJECT (filew), "destroy",
(GtkSignalFunc) destroy, \&filew);

10. Container Widgets 95
/* Connect the ok_button to file_ok_sel function */
gtk_signal_connect (GTK_OBJECT (GTK_FILE_SELECTION (filew)->ok_button),
"clicked", (GtkSignalFunc) file_ok_sel, filew );
/* Connect the cancel_button to destroy the widget */
gtk_signal_connect_object (GTK_OBJECT (GTK_FILE_SELECTION
(filew)->cancel_button),
"clicked", (GtkSignalFunc) gtk_widget_destroy,
GTK_OBJECT (filew));
/* Lets set the filename, as if this were a save dialog, and we are giving
a default filename */
gtk_file_selection_set_filename (GTK_FILE_SELECTION(filew),
"penguin.png");
gtk_widget_show(filew);
gtk_main ();
return 0;
}
/* example-end */
10 Container Widgets
10.1 The EventBox
Some GTK widgets don’t have associated X windows, so they just draw on their parents. Because of this,they cannot receive events and if they are incorrectly sized, they don’t clip so you can get messy overwritingetc. If you require more from these widgets, the EventBox is for you.
At first glance, the EventBox widget might appear to be totally useless. It draws nothing on the screen andresponds to no events. However, it does serve a function - it provides an X window for its child widget. Thisis important as many GTK widgets do not have an associated X window. Not having an X window savesmemory and improves performance, but also has some drawbacks. A widget without an X window cannotreceive events, and does not perform any clipping on its contents. Although the name EventBox emphasizesthe event-handling function, the widget can also be used for clipping. (and more, see the example below).
To create a new EventBox widget, use:
GtkWidget *gtk_event_box_new( void );
A child widget can then be added to this EventBox:
gtk_container_add( GTK_CONTAINER(event_box), child_widget );
The following example demonstrates both uses of an EventBox - a label is created that is clipped to a smallbox, and set up so that a mouse-click on the label causes the program to exit. Resizing the window revealsvarying amounts of the label.
/* example-start eventbox eventbox.c */
#include <gtk/gtk.h>
int
main (int argc, char *argv[])

10. Container Widgets 96
{
GtkWidget *window;
GtkWidget *event_box;
GtkWidget *label;
gtk_init (\&argc, \&argv);
window = gtk_window_new (GTK_WINDOW_TOPLEVEL);
gtk_window_set_title (GTK_WINDOW (window), "Event Box");
gtk_signal_connect (GTK_OBJECT (window), "destroy",
GTK_SIGNAL_FUNC (gtk_exit), NULL);
gtk_container_set_border_width (GTK_CONTAINER (window), 10);
/* Create an EventBox and add it to our toplevel window */
event_box = gtk_event_box_new ();
gtk_container_add (GTK_CONTAINER(window), event_box);
gtk_widget_show (event_box);
/* Create a long label */
label = gtk_label_new ("Click here to quit, quit, quit, quit, quit");
gtk_container_add (GTK_CONTAINER (event_box), label);
gtk_widget_show (label);
/* Clip it short. */
gtk_widget_set_usize (label, 110, 20);
/* And bind an action to it */
gtk_widget_set_events (event_box, GDK_BUTTON_PRESS_MASK);
gtk_signal_connect (GTK_OBJECT(event_box), "button_press_event",
GTK_SIGNAL_FUNC (gtk_exit), NULL);
/* Yet one more thing you need an X window for ... */
gtk_widget_realize (event_box);
gdk_window_set_cursor (event_box->window, gdk_cursor_new (GDK_HAND1));
gtk_widget_show (window);
gtk_main ();
return(0);
}
/* example-end */
10.2 The Alignment widget
The alignment widget allows you to place a widget within its window at a position and size relative to thesize of the Alignment widget itself. For example, it can be very useful for centering a widget within thewindow.
There are only two functions associated with the Alignment widget:

10. Container Widgets 97
GtkWidget* gtk_alignment_new( gfloat xalign,
gfloat yalign,
gfloat xscale,
gfloat yscale );
void gtk_alignment_set( GtkAlignment *alignment,
gfloat xalign,
gfloat yalign,
gfloat xscale,
gfloat yscale );
The first function creates a new Alignment widget with the specified parameters. The second function allowsthe alignment paramters of an exisiting Alignment widget to be altered.
All four alignment parameters are floating point numbers which can range from 0.0 to 1.0. The xalign andyalign arguments affect the position of the widget placed within the Alignment widget. The xscale andyscale arguments effect the amount of space allocated to the widget.
A child widget can be added to this Alignment widget using:
gtk_container_add( GTK_CONTAINER(alignment), child_widget );
For an example of using an Alignment widget, refer to the example for the 9.4 widget.
10.3 Fixed Container
The Fixed container allows you to place widgets at a fixed position within it’s window, relative to it’s upperleft hand corner. The position of the widgets can be changed dynamically.
There are only three functions associated with the fixed widget:
GtkWidget* gtk_fixed_new( void );
void gtk_fixed_put( GtkFixed *fixed,
GtkWidget *widget,
gint16 x,
gint16 y );
void gtk_fixed_move( GtkFixed *fixed,
GtkWidget *widget,
gint16 x,
gint16 y );
The function gtk_fixed_new allows you to create a new Fixed container.
gtk_fixed_put places widget in the container fixed at the position specified by x and y.
gtk_fixed_move allows the specified widget to be moved to a new position.
The following example illustrates how to use the Fixed Container.
/* example-start fixed fixed.c */
#include <gtk/gtk.h>
/* I’m going to be lazy and use some global variables to
* store the position of the widget within the fixed

10. Container Widgets 98
* container */
gint x=50;
gint y=50;
/* This callback function moves the button to a new position
* in the Fixed container. */
void move_button( GtkWidget *widget,
GtkWidget *fixed )
{
x = (x+30)%300;
y = (y+50)%300;
gtk_fixed_move( GTK_FIXED(fixed), widget, x, y);
}
int main( int argc,
char *argv[] )
{
/* GtkWidget is the storage type for widgets */
GtkWidget *window;
GtkWidget *fixed;
GtkWidget *button;
gint i;
/* Initialise GTK */
gtk_init(\&argc, \&argv);
/* Create a new window */
window = gtk_window_new (GTK_WINDOW_TOPLEVEL);
gtk_window_set_title(GTK_WINDOW(window), "Fixed Container");
/* Here we connect the "destroy" event to a signal handler */
gtk_signal_connect (GTK_OBJECT (window), "destroy",
GTK_SIGNAL_FUNC (gtk_main_quit), NULL);
/* Sets the border width of the window. */
gtk_container_set_border_width (GTK_CONTAINER (window), 10);
/* Create a Fixed Container */
fixed = gtk_fixed_new();
gtk_container_add(GTK_CONTAINER(window), fixed);
gtk_widget_show(fixed);
for (i = 1 ; i <= 3 ; i++) {
/* Creates a new button with the label "Press me" */
button = gtk_button_new_with_label ("Press me");
/* When the button receives the "clicked" signal, it will call the
* function move_button() passing it the Fixed Containter as its
* argument. */
gtk_signal_connect (GTK_OBJECT (button), "clicked",
GTK_SIGNAL_FUNC (move_button), fixed);
/* This packs the button into the fixed containers window. */
gtk_fixed_put (GTK_FIXED (fixed), button, i*50, i*50);
/* The final step is to display this newly created widget. */
gtk_widget_show (button);

10. Container Widgets 99
}
/* Display the window */
gtk_widget_show (window);
/* Enter the event loop */
gtk_main ();
return(0);
}
/* example-end */
10.4 Layout Container
The Layout container is similar to the Fixed container except that it implements an infinite (where infinityis less than 2^32) scrolling area. Xwindows has a limitation where windows can be at most 32767 pixels wideor tall. The Layout container gets around this limitation by doing some exotic stuff using window and bitgravities, so that you can have smooth scrolling even when you have many child widgets in your scrollingarea.
A Layout container is created using:
GtkWidget *gtk_layout_new( GtkAdjustment *hadjustment,
GtkAdjustment *vadjustment );
As you can see, you can optionally specify the Adjustment objects that the Layout widget will use for it’sscrolling.
You can add and move widgets in the Layout container using the following two functions:
void gtk_layout_put( GtkLayout *layout,
GtkWidget *widget,
gint x,
gint y );
void gtk_layout_move( GtkLayout *layout,
GtkWidget *widget,
gint x,
gint y );
The size of the Layout container can be set using the next function:
void gtk_layout_set_size( GtkLayout *layout,
guint width,
guint height );
Layout containers are one of the very few widgets in the GTK widget set that actively repaint themselveson screen as they are changed using the above functions (the vast majority of widgets queue requests whichare then processed when control returns to the gtk_main() function).
When you want to make a large number of changes to a Layout container, you can use the following twofunctions to disable and re-enable this repainting functionality:
void gtk_layout_freeze( GtkLayout *layout );
void gtk_layout_thaw( GtkLayout *layout );

10. Container Widgets 100
The final four functions for use with Layout widgets are for manipulating the horizontal and vertical adjust-ment widgets:
GtkAdjustment* gtk_layout_get_hadjustment( GtkLayout *layout );
GtkAdjustment* gtk_layout_get_vadjustment( GtkLayout *layout );
void gtk_layout_set_hadjustment( GtkLayout *layout,
GtkAdjustment *adjustment );
void gtk_layout_set_vadjustment( GtkLayout *layout,
GtkAdjustment *adjustment);
10.5 Frames
Frames can be used to enclose one or a group of widgets with a box which can optionally be labelled. Theposition of the label and the style of the box can be altered to suit.
A Frame can be created with the following function:
GtkWidget *gtk_frame_new( const gchar *label );
The label is by default placed in the upper left hand corner of the frame. A value of NULL for the label
argument will result in no label being displayed. The text of the label can be changed using the next function.
void gtk_frame_set_label( GtkFrame *frame,
const gchar *label );
The position of the label can be changed using this function:
void gtk_frame_set_label_align( GtkFrame *frame,
gfloat xalign,
gfloat yalign );
xalign and yalign take values between 0.0 and 1.0. xalign indicates the position of the label along thetop horizontal of the frame. yalign is not currently used. The default value of xalign is 0.0 which placesthe label at the left hand end of the frame.
The next function alters the style of the box that is used to outline the frame.
void gtk_frame_set_shadow_type( GtkFrame *frame,
GtkShadowType type);
The type argument can take one of the following values:
• GTK SHADOW NONE
• GTK SHADOW IN
• GTK SHADOW OUT
• GTK SHADOW ETCHED IN (the default)
• GTK SHADOW ETCHED OUT
The following code example illustrates the use of the Frame widget.

10. Container Widgets 101
/* example-start frame frame.c */
#include <gtk/gtk.h>
int main( int argc,
char *argv[] )
{
/* GtkWidget is the storage type for widgets */
GtkWidget *window;
GtkWidget *frame;
GtkWidget *button;
gint i;
/* Initialise GTK */
gtk_init(\&argc, \&argv);
/* Create a new window */
window = gtk_window_new (GTK_WINDOW_TOPLEVEL);
gtk_window_set_title(GTK_WINDOW(window), "Frame Example");
/* Here we connect the "destroy" event to a signal handler */
gtk_signal_connect (GTK_OBJECT (window), "destroy",
GTK_SIGNAL_FUNC (gtk_main_quit), NULL);
gtk_widget_set_usize(window, 300, 300);
/* Sets the border width of the window. */
gtk_container_set_border_width (GTK_CONTAINER (window), 10);
/* Create a Frame */
frame = gtk_frame_new(NULL);
gtk_container_add(GTK_CONTAINER(window), frame);
/* Set the frames label */
gtk_frame_set_label( GTK_FRAME(frame), "GTK Frame Widget" );
/* Align the label at the right of the frame */
gtk_frame_set_label_align( GTK_FRAME(frame), 1.0, 0.0);
/* Set the style of the frame */
gtk_frame_set_shadow_type( GTK_FRAME(frame), GTK_SHADOW_ETCHED_OUT);
gtk_widget_show(frame);
/* Display the window */
gtk_widget_show (window);
/* Enter the event loop */
gtk_main ();
return(0);
}
/* example-end */

10. Container Widgets 102
10.6 Aspect Frames
The aspect frame widget is like a frame widget, except that it also enforces the aspect ratio (that is, theratio of the width to the height) of the child widget to have a certain value, adding extra space if necessary.This is useful, for instance, if you want to preview a larger image. The size of the preview should vary whenthe user resizes the window, but the aspect ratio needs to always match the original image.
To create a new aspect frame use:
GtkWidget *gtk_aspect_frame_new( const gchar *label,
gfloat xalign,
gfloat yalign,
gfloat ratio,
gint obey_child);
xalign and yalign specify alignment as with Alignment widgets. If obey_child is true, the aspect ratio ofa child widget will match the aspect ratio of the ideal size it requests. Otherwise, it is given by ratio.
To change the options of an existing aspect frame, you can use:
void gtk_aspect_frame_set( GtkAspectFrame *aspect_frame,
gfloat xalign,
gfloat yalign,
gfloat ratio,
gint obey_child);
As an example, the following program uses an AspectFrame to present a drawing area whose aspect ratiowill always be 2:1, no matter how the user resizes the top-level window.
/* example-start aspectframe aspectframe.c */
#include <gtk/gtk.h>
int
main (int argc, char *argv[])
{
GtkWidget *window;
GtkWidget *aspect_frame;
GtkWidget *drawing_area;
gtk_init (\&argc, \&argv);
window = gtk_window_new (GTK_WINDOW_TOPLEVEL);
gtk_window_set_title (GTK_WINDOW (window), "Aspect Frame");
gtk_signal_connect (GTK_OBJECT (window), "destroy",
GTK_SIGNAL_FUNC (gtk_main_quit), NULL);
gtk_container_set_border_width (GTK_CONTAINER (window), 10);
/* Create an aspect_frame and add it to our toplevel window */
aspect_frame = gtk_aspect_frame_new ("2x1", /* label */
0.5, /* center x */
0.5, /* center y */
2, /* xsize/ysize = 2 */
FALSE /* ignore child’s aspect */);
gtk_container_add (GTK_CONTAINER(window), aspect_frame);

10. Container Widgets 103
gtk_widget_show (aspect_frame);
/* Now add a child widget to the aspect frame */
drawing_area = gtk_drawing_area_new ();
/* Ask for a 200x200 window, but the AspectFrame will give us a 200x100
* window since we are forcing a 2x1 aspect ratio */
gtk_widget_set_usize (drawing_area, 200, 200);
gtk_container_add (GTK_CONTAINER(aspect_frame), drawing_area);
gtk_widget_show (drawing_area);
gtk_widget_show (window);
gtk_main ();
return 0;
}
/* example-end */
10.7 Paned Window Widgets
The paned window widgets are useful when you want to divide an area into two parts, with the relative sizeof the two parts controlled by the user. A groove is drawn between the two portions with a handle that theuser can drag to change the ratio. The division can either be horizontal (HPaned) or vertical (VPaned).
To create a new paned window, call one of:
GtkWidget *gtk_hpaned_new (void);
GtkWidget *gtk_vpaned_new (void);
After creating the paned window widget, you need to add child widgets to its two halves. To do this, usethe functions:
void gtk_paned_add1 (GtkPaned *paned, GtkWidget *child);
void gtk_paned_add2 (GtkPaned *paned, GtkWidget *child);
gtk_paned_add1() adds the child widget to the left or top half of the paned window. gtk_paned_add2()
adds the child widget to the right or bottom half of the paned window.
A paned widget can be changed visually using the following two functions.
void gtk_paned_set_handle_size( GtkPaned *paned,
guint16 size);
void gtk_paned_set_gutter_size( GtkPaned *paned,
guint16 size);
The first of these sets the size of the handle and the second sets the size of the gutter that is between thetwo parts of the paned window.
As an example, we will create part of the user interface of an imaginary email program. A window is dividedinto two portions vertically, with the top portion being a list of email messages and the bottom portion thetext of the email message. Most of the program is pretty straightforward. A couple of points to note: textcan’t be added to a Text widget until it is realized. This could be done by calling gtk_widget_realize(),but as a demonstration of an alternate technique, we connect a handler to the ”realize” signal to add the text.

10. Container Widgets 104
Also, we need to add the GTK_SHRINK option to some of the items in the table containing the text windowand its scrollbars, so that when the bottom portion is made smaller, the correct portions shrink instead ofbeing pushed off the bottom of the window.
/* example-start paned paned.c */
#include <gtk/gtk.h>
/* Create the list of "messages" */
GtkWidget *
create_list (void)
{
GtkWidget *scrolled_window;
GtkWidget *list;
GtkWidget *list_item;
int i;
char buffer[16];
/* Create a new scrolled window, with scrollbars only if needed */
scrolled_window = gtk_scrolled_window_new (NULL, NULL);
gtk_scrolled_window_set_policy (GTK_SCROLLED_WINDOW (scrolled_window),
GTK_POLICY_AUTOMATIC,
GTK_POLICY_AUTOMATIC);
/* Create a new list and put it in the scrolled window */
list = gtk_list_new ();
gtk_scrolled_window_add_with_viewport (
GTK_SCROLLED_WINDOW (scrolled_window), list);
gtk_widget_show (list);
/* Add some messages to the window */
for (i=0; i<10; i++) {
sprintf(buffer,"Message #%d",i);
list_item = gtk_list_item_new_with_label (buffer);
gtk_container_add (GTK_CONTAINER(list), list_item);
gtk_widget_show (list_item);
}
return scrolled_window;
}
/* Add some text to our text widget - this is a callback that is invoked
when our window is realized. We could also force our window to be
realized with gtk_widget_realize, but it would have to be part of
a hierarchy first */
void
realize_text (GtkWidget *text, gpointer data)
{
gtk_text_freeze (GTK_TEXT (text));
gtk_text_insert (GTK_TEXT (text), NULL, \&text->style->black, NULL,
"From: [email protected]\n"
"To: [email protected]\n"

10. Container Widgets 105
"Subject: Made it!\n"
"\n"
"We just got in this morning. The weather has been\n"
"great - clear but cold, and there are lots of fun sights.\n"
"Sojourner says hi. See you soon.\n"
" -Path\n", -1);
gtk_text_thaw (GTK_TEXT (text));
}
/* Create a scrolled text area that displays a "message" */
GtkWidget *
create_text (void)
{
GtkWidget *table;
GtkWidget *text;
GtkWidget *hscrollbar;
GtkWidget *vscrollbar;
/* Create a table to hold the text widget and scrollbars */
table = gtk_table_new (2, 2, FALSE);
/* Put a text widget in the upper left hand corner. Note the use of
* GTK_SHRINK in the y direction */
text = gtk_text_new (NULL, NULL);
gtk_table_attach (GTK_TABLE (table), text, 0, 1, 0, 1,
GTK_FILL | GTK_EXPAND,
GTK_FILL | GTK_EXPAND | GTK_SHRINK, 0, 0);
gtk_widget_show (text);
/* Put a HScrollbar in the lower left hand corner */
hscrollbar = gtk_hscrollbar_new (GTK_TEXT (text)->hadj);
gtk_table_attach (GTK_TABLE (table), hscrollbar, 0, 1, 1, 2,
GTK_EXPAND | GTK_FILL, GTK_FILL, 0, 0);
gtk_widget_show (hscrollbar);
/* And a VScrollbar in the upper right */
vscrollbar = gtk_vscrollbar_new (GTK_TEXT (text)->vadj);
gtk_table_attach (GTK_TABLE (table), vscrollbar, 1, 2, 0, 1,
GTK_FILL, GTK_EXPAND | GTK_FILL | GTK_SHRINK, 0, 0);
gtk_widget_show (vscrollbar);
/* Add a handler to put a message in the text widget when it is realized */
gtk_signal_connect (GTK_OBJECT (text), "realize",
GTK_SIGNAL_FUNC (realize_text), NULL);
return table;
}
int
main (int argc, char *argv[])
{
GtkWidget *window;
GtkWidget *vpaned;
GtkWidget *list;
GtkWidget *text;

10. Container Widgets 106
gtk_init (\&argc, \&argv);
window = gtk_window_new (GTK_WINDOW_TOPLEVEL);
gtk_window_set_title (GTK_WINDOW (window), "Paned Windows");
gtk_signal_connect (GTK_OBJECT (window), "destroy",
GTK_SIGNAL_FUNC (gtk_main_quit), NULL);
gtk_container_set_border_width (GTK_CONTAINER (window), 10);
gtk_widget_set_usize (GTK_WIDGET(window), 450, 400);
/* create a vpaned widget and add it to our toplevel window */
vpaned = gtk_vpaned_new ();
gtk_container_add (GTK_CONTAINER(window), vpaned);
gtk_paned_set_handle_size (GTK_PANED(vpaned),
10);
gtk_paned_set_gutter_size (GTK_PANED(vpaned),
15);
gtk_widget_show (vpaned);
/* Now create the contents of the two halves of the window */
list = create_list ();
gtk_paned_add1 (GTK_PANED(vpaned), list);
gtk_widget_show (list);
text = create_text ();
gtk_paned_add2 (GTK_PANED(vpaned), text);
gtk_widget_show (text);
gtk_widget_show (window);
gtk_main ();
return 0;
}
/* example-end */
10.8 Viewports
It is unlikely that you will ever need to use the Viewport widget directly. You are much more likely to usethe 10.9 widget which itself uses the Viewport.
A viewport widget allows you to place a larger widget within it such that you can view a part of it at a time.It uses 7 to define the area that is currently in view.
A Viewport is created with the function
GtkWidget *gtk_viewport_new( GtkAdjustment *hadjustment,
GtkAdjustment *vadjustment );
As you can see you can specify the horizontal and vertical Adjustments that the widget is to use when youcreate the widget. It will create it’s own if you pass NULL as the value of the arguments.
You can get and set the adjustments after the widget has been created using the following four functions:
GtkAdjustment *gtk_viewport_get_hadjustment (GtkViewport *viewport );
GtkAdjustment *gtk_viewport_get_vadjustment (GtkViewport *viewport );
void gtk_viewport_set_hadjustment( GtkViewport *viewport,
10. Container Widgets 107
GtkAdjustment *adjustment );
void gtk_viewport_set_vadjustment( GtkViewport *viewport,
GtkAdjustment *adjustment );
The only other viewport function is used to alter its appearance:
void gtk_viewport_set_shadow_type( GtkViewport *viewport,
GtkShadowType type );
Possible values for the type parameter are:
• GTK SHADOW NONE,
• GTK SHADOW IN,
• GTK SHADOW OUT,
• GTK SHADOW ETCHED IN,
• GTK SHADOW ETCHED OUT
10.9 Scrolled Windows
Scrolled windows are used to create a scrollable area inside a real window. You may insert any type of widgetinto a scrolled window, and it will be accessible regardless of the size by using the scrollbars.
The following function is used to create a new scrolled window.
GtkWidget *gtk_scrolled_window_new( GtkAdjustment *hadjustment,
GtkAdjustment *vadjustment );
Where the first argument is the adjustment for the horizontal direction, and the second, the adjustment forthe vertical direction. These are almost always set to NULL.
void gtk_scrolled_window_set_policy( GtkScrolledWindow *scrolled_window,
GtkPolicyType hscrollbar_policy,
GtkPolicyType vscrollbar_policy );
This sets the policy to be used with respect to the scrollbars. The first argument is the scrolled windowyou wish to change. The second sets the policy for the horizontal scrollbar, and the third the policy for thevertical scrollbar.
The policy may be one of GTK POLICY AUTOMATIC, or GTK POLICY ALWAYS.GTK POLICY AUTOMATIC will automatically decide whether you need scrollbars, whereasGTK POLICY ALWAYS will always leave the scrollbars there.
You can then place your object into the scrolled window using the following function.
void gtk_scrolled_window_add_with_viewport( GtkScrolledWindow *scrolled_window,
GtkWidget *child);
Here is a simple example that packs 100 toggle buttons into a scrolled window. I’ve only commented on theparts that may be new to you.

10. Container Widgets 108
/* example-start scrolledwin scrolledwin.c */
#include <gtk/gtk.h>
void destroy(GtkWidget *widget, gpointer data)
{
gtk_main_quit();
}
int main (int argc, char *argv[])
{
static GtkWidget *window;
GtkWidget *scrolled_window;
GtkWidget *table;
GtkWidget *button;
char buffer[32];
int i, j;
gtk_init (\&argc, \&argv);
/* Create a new dialog window for the scrolled window to be
* packed into. A dialog is just like a normal window except it has a
* vbox and a horizontal separator packed into it. It’s just a shortcut
* for creating dialogs */
window = gtk_dialog_new ();
gtk_signal_connect (GTK_OBJECT (window), "destroy",
(GtkSignalFunc) destroy, NULL);
gtk_window_set_title (GTK_WINDOW (window), "GtkScrolledWindow example");
gtk_container_set_border_width (GTK_CONTAINER (window), 0);
gtk_widget_set_usize(window, 300, 300);
/* create a new scrolled window. */
scrolled_window = gtk_scrolled_window_new (NULL, NULL);
gtk_container_set_border_width (GTK_CONTAINER (scrolled_window), 10);
/* the policy is one of GTK_POLICY AUTOMATIC, or GTK_POLICY_ALWAYS.
* GTK_POLICY_AUTOMATIC will automatically decide whether you need
* scrollbars, whereas GTK_POLICY_ALWAYS will always leave the scrollbars
* there. The first one is the horizontal scrollbar, the second,
* the vertical. */
gtk_scrolled_window_set_policy (GTK_SCROLLED_WINDOW (scrolled_window),
GTK_POLICY_AUTOMATIC, GTK_POLICY_ALWAYS);
/* The dialog window is created with a vbox packed into it. */
gtk_box_pack_start (GTK_BOX (GTK_DIALOG(window)->vbox), scrolled_window,
TRUE, TRUE, 0);
gtk_widget_show (scrolled_window);
/* create a table of 10 by 10 squares. */
table = gtk_table_new (10, 10, FALSE);
/* set the spacing to 10 on x and 10 on y */
gtk_table_set_row_spacings (GTK_TABLE (table), 10);
gtk_table_set_col_spacings (GTK_TABLE (table), 10);
/* pack the table into the scrolled window */
gtk_scrolled_window_add_with_viewport (

10. Container Widgets 109
GTK_SCROLLED_WINDOW (scrolled_window), table);
gtk_widget_show (table);
/* this simply creates a grid of toggle buttons on the table
* to demonstrate the scrolled window. */
for (i = 0; i < 10; i++)
for (j = 0; j < 10; j++) {
sprintf (buffer, "button (%d,%d)\n", i, j);
button = gtk_toggle_button_new_with_label (buffer);
gtk_table_attach_defaults (GTK_TABLE (table), button,
i, i+1, j, j+1);
gtk_widget_show (button);
}
/* Add a "close" button to the bottom of the dialog */
button = gtk_button_new_with_label ("close");
gtk_signal_connect_object (GTK_OBJECT (button), "clicked",
(GtkSignalFunc) gtk_widget_destroy,
GTK_OBJECT (window));
/* this makes it so the button is the default. */
GTK_WIDGET_SET_FLAGS (button, GTK_CAN_DEFAULT);
gtk_box_pack_start (GTK_BOX (GTK_DIALOG (window)->action_area), button, TRUE, TRUE, 0);
/* This grabs this button to be the default button. Simply hitting
* the "Enter" key will cause this button to activate. */
gtk_widget_grab_default (button);
gtk_widget_show (button);
gtk_widget_show (window);
gtk_main();
return(0);
}
/* example-end */
Try playing with resizing the window. You’ll notice how the scrollbars react. You may also wish to use thegtk widget set usize() call to set the default size of the window or other widgets.
10.10 Button Boxes
Button Boxes are a convenient way to quickly layout a group of buttons. They come in both horizontal andvertical flavours. You create a new Button Box with one of the following calls, which create a horizontal orvertical box, respectively:
GtkWidget *gtk_hbutton_box_new( void );
GtkWidget *gtk_vbutton_box_new( void );
The only attributes pertaining to button boxes effect how the buttons are layed out. You can change thespacing between the buttons with:
void gtk_hbutton_box_set_spacing_default( gint spacing );

10. Container Widgets 110
void gtk_vbutton_box_set_spacing_default( gint spacing );
Similarly, the current spacing values can be queried using:
gint gtk_hbutton_box_get_spacing_default( void );
gint gtk_vbutton_box_get_spacing_default( void );
The second attribute that we can access effects the layour of the buttons within the box. It is set using oneof:
void gtk_hbutton_box_set_layout_default( GtkButtonBoxStyle layout );
void gtk_vbutton_box_set_layout_default( GtkButtonBoxStyle layout );
The layout argument can take one of the following values:
• GTK BUTTONBOX DEFAULT STYLE
• GTK BUTTONBOX SPREAD
• GTK BUTTONBOX EDGE
• GTK BUTTONBOX START
• GTK BUTTONBOX END
The current layout setting can be retrieved using:
GtkButtonBoxStyle gtk_hbutton_box_get_layout_default( void );
GtkButtonBoxStyle gtk_vbutton_box_get_layout_default( void );
Buttons are added to a Button Box using the usual function:
gtk_container_add( GTK_CONTAINER(button_box), child_widget );
Here’s an example that illustrates all the different layout settings for Button Boxes.
/* example-start buttonbox buttonbox.c */
#include <gtk/gtk.h>
/* Create a Button Box with the specified parameters */
GtkWidget *create_bbox (gint horizontal,
char* title,
gint spacing,
gint child_w,
gint child_h,
gint layout)
{
GtkWidget *frame;
GtkWidget *bbox;
GtkWidget *button;
10. Container Widgets 111
frame = gtk_frame_new (title);
if (horizontal)
bbox = gtk_hbutton_box_new ();
else
bbox = gtk_vbutton_box_new ();
gtk_container_set_border_width (GTK_CONTAINER (bbox), 5);
gtk_container_add (GTK_CONTAINER (frame), bbox);
/* Set the appearance of the Button Box */
gtk_button_box_set_layout (GTK_BUTTON_BOX (bbox), layout);
gtk_button_box_set_spacing (GTK_BUTTON_BOX (bbox), spacing);
gtk_button_box_set_child_size (GTK_BUTTON_BOX (bbox), child_w, child_h);
button = gtk_button_new_with_label ("OK");
gtk_container_add (GTK_CONTAINER (bbox), button);
button = gtk_button_new_with_label ("Cancel");
gtk_container_add (GTK_CONTAINER (bbox), button);
button = gtk_button_new_with_label ("Help");
gtk_container_add (GTK_CONTAINER (bbox), button);
return(frame);
}
int main( int argc,
char *argv[] )
{
static GtkWidget* window = NULL;
GtkWidget *main_vbox;
GtkWidget *vbox;
GtkWidget *hbox;
GtkWidget *frame_horz;
GtkWidget *frame_vert;
/* Initialize GTK */
gtk_init( \&argc, \&argv );
window = gtk_window_new (GTK_WINDOW_TOPLEVEL);
gtk_window_set_title (GTK_WINDOW (window), "Button Boxes");
gtk_signal_connect (GTK_OBJECT (window), "destroy",
GTK_SIGNAL_FUNC(gtk_main_quit),
NULL);
gtk_container_set_border_width (GTK_CONTAINER (window), 10);
main_vbox = gtk_vbox_new (FALSE, 0);
gtk_container_add (GTK_CONTAINER (window), main_vbox);
frame_horz = gtk_frame_new ("Horizontal Button Boxes");
gtk_box_pack_start (GTK_BOX (main_vbox), frame_horz, TRUE, TRUE, 10);
vbox = gtk_vbox_new (FALSE, 0);

10. Container Widgets 112
gtk_container_set_border_width (GTK_CONTAINER (vbox), 10);
gtk_container_add (GTK_CONTAINER (frame_horz), vbox);
gtk_box_pack_start (GTK_BOX (vbox),
create_bbox (TRUE, "Spread (spacing 40)", 40, 85, 20, GTK_BUTTONBOX_SPREAD),
TRUE, TRUE, 0);
gtk_box_pack_start (GTK_BOX (vbox),
create_bbox (TRUE, "Edge (spacing 30)", 30, 85, 20, GTK_BUTTONBOX_EDGE),
TRUE, TRUE, 5);
gtk_box_pack_start (GTK_BOX (vbox),
create_bbox (TRUE, "Start (spacing 20)", 20, 85, 20, GTK_BUTTONBOX_START),
TRUE, TRUE, 5);
gtk_box_pack_start (GTK_BOX (vbox),
create_bbox (TRUE, "End (spacing 10)", 10, 85, 20, GTK_BUTTONBOX_END),
TRUE, TRUE, 5);
frame_vert = gtk_frame_new ("Vertical Button Boxes");
gtk_box_pack_start (GTK_BOX (main_vbox), frame_vert, TRUE, TRUE, 10);
hbox = gtk_hbox_new (FALSE, 0);
gtk_container_set_border_width (GTK_CONTAINER (hbox), 10);
gtk_container_add (GTK_CONTAINER (frame_vert), hbox);
gtk_box_pack_start (GTK_BOX (hbox),
create_bbox (FALSE, "Spread (spacing 5)", 5, 85, 20, GTK_BUTTONBOX_SPREAD),
TRUE, TRUE, 0);
gtk_box_pack_start (GTK_BOX (hbox),
create_bbox (FALSE, "Edge (spacing 30)", 30, 85, 20, GTK_BUTTONBOX_EDGE),
TRUE, TRUE, 5);
gtk_box_pack_start (GTK_BOX (hbox),
create_bbox (FALSE, "Start (spacing 20)", 20, 85, 20, GTK_BUTTONBOX_START),
TRUE, TRUE, 5);
gtk_box_pack_start (GTK_BOX (hbox),
create_bbox (FALSE, "End (spacing 20)", 20, 85, 20, GTK_BUTTONBOX_END),
TRUE, TRUE, 5);
gtk_widget_show_all (window);
/* Enter the event loop */
gtk_main ();
return(0);
}
/* example-end */
10.11 Toolbar
Toolbars are usually used to group some number of widgets in order to simplify customization of their lookand layout. Typically a toolbar consists of buttons with icons, labels and tooltips, but any other widget canalso be put inside a toolbar. Finally, items can be arranged horizontally or vertically and buttons can be

10. Container Widgets 113
displayed with icons, labels or both.
Creating a toolbar is (as one may already suspect) done with the following function:
GtkWidget *gtk_toolbar_new( GtkOrientation orientation,
GtkToolbarStyle style );
where orientation may be one of:
GTK_ORIENTATION_HORIZONTAL
GTK_ORIENTATION_VERTICAL
and style one of:
GTK_TOOLBAR_TEXT
GTK_TOOLBAR_ICONS
GTK_TOOLBAR_BOTH
The style applies to all the buttons created with the ‘item’ functions (not to buttons inserted into toolbaras separate widgets).
After creating a toolbar one can append, prepend and insert items (that means simple buttons) into thetoolbar. To describe an item we need a label text, a tooltip text, a private tooltip text, an icon for thebutton and a callback function for it. For example, to append or prepend an item you may use the followingfunctions:
GtkWidget *gtk_toolbar_append_item( GtkToolbar *toolbar,
const char *text,
const char *tooltip_text,
const char *tooltip_private_text,
GtkWidget *icon,
GtkSignalFunc callback,
gpointer user_data );
GtkWidget *gtk_toolbar_prepend_item( GtkToolbar *toolbar,
const char *text,
const char *tooltip_text,
const char *tooltip_private_text,
GtkWidget *icon,
GtkSignalFunc callback,
gpointer user_data );
If you want to use gtk toolbar insert item, the only additional parameter which must be specified is theposition in which the item should be inserted, thus:
GtkWidget *gtk_toolbar_insert_item( GtkToolbar *toolbar,
const char *text,
const char *tooltip_text,
const char *tooltip_private_text,
GtkWidget *icon,
GtkSignalFunc callback,
gpointer user_data,
gint position );
To simplify adding spaces between toolbar items, you may use the following functions:

10. Container Widgets 114
void gtk_toolbar_append_space( GtkToolbar *toolbar );
void gtk_toolbar_prepend_space( GtkToolbar *toolbar );
void gtk_toolbar_insert_space( GtkToolbar *toolbar,
gint position );
While the size of the added space can be set globally for a whole toolbar with the function:
void gtk_toolbar_set_space_size( GtkToolbar *toolbar,
gint space_size) ;
If it’s required, the orientation of a toolbar and its style can be changed ‘on the fly’ using the followingfunctions:
void gtk_toolbar_set_orientation( GtkToolbar *toolbar,
GtkOrientation orientation );
void gtk_toolbar_set_style( GtkToolbar *toolbar,
GtkToolbarStyle style );
void gtk_toolbar_set_tooltips( GtkToolbar *toolbar,
gint enable );
Where orientation is one of GTK ORIENTATION HORIZONTAL or GTK ORIENTATION VERTICAL.The style is used to set appearance of the toolbar items by using one of GTK TOOLBAR ICONS,GTK TOOLBAR TEXT or GTK TOOLBAR BOTH.
To show some other things that can be done with a toolbar, let’s take the following program (we’ll interruptthe listing with some additional explanations):
#include <gtk/gtk.h>
#include "gtk.xpm"
/* This function is connected to the Close button or
* closing the window from the WM */
void delete_event (GtkWidget *widget, GdkEvent *event, gpointer data)
{
gtk_main_quit ();
}
The above beginning seems for sure familiar to you if it’s not your first GTK program. There is one additionalthing though, we include a nice XPM picture to serve as an icon for all of the buttons.
GtkWidget* close_button; /* This button will emit signal to close
* application */
GtkWidget* tooltips_button; /* to enable/disable tooltips */
GtkWidget* text_button,
* icon_button,
* both_button; /* radio buttons for toolbar style */
GtkWidget* entry; /* a text entry to show packing any widget into
* toolbar */
In fact not all of the above widgets are needed here, but to make things clearer I put them all together.

10. Container Widgets 115
/* that’s easy... when one of the buttons is toggled, we just
* check which one is active and set the style of the toolbar
* accordingly
* ATTENTION: our toolbar is passed as data to callback ! */
void radio_event (GtkWidget *widget, gpointer data)
{
if (GTK_TOGGLE_BUTTON (text_button)->active)
gtk_toolbar_set_style(GTK_TOOLBAR ( data ), GTK_TOOLBAR_TEXT);
else if (GTK_TOGGLE_BUTTON (icon_button)->active)
gtk_toolbar_set_style(GTK_TOOLBAR ( data ), GTK_TOOLBAR_ICONS);
else if (GTK_TOGGLE_BUTTON (both_button)->active)
gtk_toolbar_set_style(GTK_TOOLBAR ( data ), GTK_TOOLBAR_BOTH);
}
/* even easier, just check given toggle button and enable/disable
* tooltips */
void toggle_event (GtkWidget *widget, gpointer data)
{
gtk_toolbar_set_tooltips (GTK_TOOLBAR ( data ),
GTK_TOGGLE_BUTTON (widget)->active );
}
The above are just two callback functions that will be called when one of the buttons on a toolbar is pressed.You should already be familiar with things like this if you’ve already used toggle buttons (and radio buttons).
int main (int argc, char *argv[])
{
/* Here is our main window (a dialog) and a handle for the handlebox */
GtkWidget* dialog;
GtkWidget* handlebox;
/* Ok, we need a toolbar, an icon with a mask (one for all of
the buttons) and an icon widget to put this icon in (but
we’ll create a separate widget for each button) */
GtkWidget * toolbar;
GdkPixmap * icon;
GdkBitmap * mask;
GtkWidget * iconw;
/* this is called in all GTK application. */
gtk_init (\&argc, \&argv);
/* create a new window with a given title, and nice size */
dialog = gtk_dialog_new ();
gtk_window_set_title ( GTK_WINDOW ( dialog ) , "GTKToolbar Tutorial");
gtk_widget_set_usize( GTK_WIDGET ( dialog ) , 600 , 300 );
GTK_WINDOW ( dialog ) ->allow_shrink = TRUE;
/* typically we quit if someone tries to close us */
gtk_signal_connect ( GTK_OBJECT ( dialog ), "delete_event",
GTK_SIGNAL_FUNC ( delete_event ), NULL);
/* we need to realize the window because we use pixmaps for
* items on the toolbar in the context of it */
gtk_widget_realize ( dialog );
/* to make it nice we’ll put the toolbar into the handle box,

10. Container Widgets 116
* so that it can be detached from the main window */
handlebox = gtk_handle_box_new ();
gtk_box_pack_start ( GTK_BOX ( GTK_DIALOG(dialog)->vbox ),
handlebox, FALSE, FALSE, 5 );
The above should be similar to any other GTK application. Just initialization of GTK, creating the windowetc.. There is only one thing that probably needs some explanation: a handle box. A handle box is justanother box that can be used to pack widgets in to. The difference between it and typical boxes is that itcan be detached from a parent window (or, in fact, the handle box remains in the parent, but it is reduced toa very small rectangle, while all of its contents are reparented to a new freely floating window). It is usuallynice to have a detachable toolbar, so these two widgets occur together quite often.
/* toolbar will be horizontal, with both icons and text, and
* with 5pxl spaces between items and finally,
* we’ll also put it into our handlebox */
toolbar = gtk_toolbar_new ( GTK_ORIENTATION_HORIZONTAL,
GTK_TOOLBAR_BOTH );
gtk_container_set_border_width ( GTK_CONTAINER ( toolbar ) , 5 );
gtk_toolbar_set_space_size ( GTK_TOOLBAR ( toolbar ), 5 );
gtk_container_add ( GTK_CONTAINER ( handlebox ) , toolbar );
/* now we create icon with mask: we’ll reuse it to create
* icon widgets for toolbar items */
icon = gdk_pixmap_create_from_xpm_d ( dialog->window, \&mask,
\&dialog->style->white, gtk_xpm );
Well, what we do above is just a straight-forward initialization of the toolbar widget and creation of aGDK pixmap with its mask. If you want to know something more about using pixmaps, refer to GDKdocumentation or to the 9.6 section earlier in this tutorial.
/* our first item is <close> button */
iconw = gtk_pixmap_new ( icon, mask ); /* icon widget */
close_button =
gtk_toolbar_append_item ( GTK_TOOLBAR (toolbar), /* our toolbar */
"Close", /* button label */
"Closes this app", /* this button’s tooltip */
"Private", /* tooltip private info */
iconw, /* icon widget */
GTK_SIGNAL_FUNC (delete_event), /* a signal */
NULL );
gtk_toolbar_append_space ( GTK_TOOLBAR ( toolbar ) ); /* space after item */
In the above code you see the simplest case: adding a button to toolbar. Just before appending a new item,we have to construct a pixmap widget to serve as an icon for this item; this step will have to be repeated foreach new item. Just after the item we also add a space, so the following items will not touch each other. Asyou see gtk toolbar append item returns a pointer to our newly created button widget, so that we can workwith it in the normal way.
/* now, let’s make our radio buttons group... */
iconw = gtk_pixmap_new ( icon, mask );
icon_button = gtk_toolbar_append_element(
GTK_TOOLBAR(toolbar),
GTK_TOOLBAR_CHILD_RADIOBUTTON, /* a type of element */
NULL, /* pointer to widget */
"Icon", /* label */

10. Container Widgets 117
"Only icons in toolbar", /* tooltip */
"Private", /* tooltip private string */
iconw, /* icon */
GTK_SIGNAL_FUNC (radio_event), /* signal */
toolbar); /* data for signal */
gtk_toolbar_append_space ( GTK_TOOLBAR ( toolbar ) );
Here we begin creating a radio buttons group. To do this we use gtk toolbar append element. In fact, usingthis function one can also add simple items or even spaces (type = GTK TOOLBAR CHILD SPACE orGTK TOOLBAR CHILD BUTTON). In the above case we start creating a radio group. In creating otherradio buttons for this group a pointer to the previous button in the group is required, so that a list of buttonscan be easily constructed (see the section on 6.4 earlier in this tutorial).
/* following radio buttons refer to previous ones */
iconw = gtk_pixmap_new ( icon, mask );
text_button =
gtk_toolbar_append_element(GTK_TOOLBAR(toolbar),
GTK_TOOLBAR_CHILD_RADIOBUTTON,
icon_button,
"Text",
"Only texts in toolbar",
"Private",
iconw,
GTK_SIGNAL_FUNC (radio_event),
toolbar);
gtk_toolbar_append_space ( GTK_TOOLBAR ( toolbar ) );
iconw = gtk_pixmap_new ( icon, mask );
both_button =
gtk_toolbar_append_element(GTK_TOOLBAR(toolbar),
GTK_TOOLBAR_CHILD_RADIOBUTTON,
text_button,
"Both",
"Icons and text in toolbar",
"Private",
iconw,
GTK_SIGNAL_FUNC (radio_event),
toolbar);
gtk_toolbar_append_space ( GTK_TOOLBAR ( toolbar ) );
gtk_toggle_button_set_active(GTK_TOGGLE_BUTTON(both_button),TRUE);
In the end we have set the state of one of the buttons manually (otherwise they all stay in active state,preventing us from switching between them).
/* here we have just a simple toggle button */
iconw = gtk_pixmap_new ( icon, mask );
tooltips_button =
gtk_toolbar_append_element(GTK_TOOLBAR(toolbar),
GTK_TOOLBAR_CHILD_TOGGLEBUTTON,
NULL,
"Tooltips",
"Toolbar with or without tips",
"Private",
iconw,
GTK_SIGNAL_FUNC (toggle_event),
toolbar);

10. Container Widgets 118
gtk_toolbar_append_space ( GTK_TOOLBAR ( toolbar ) );
gtk_toggle_button_set_active(GTK_TOGGLE_BUTTON(tooltips_button),TRUE);
A toggle button can be created in the obvious way (if one knows how to create radio buttons already).
/* to pack a widget into toolbar, we only have to
* create it and append it with an appropriate tooltip */
entry = gtk_entry_new ();
gtk_toolbar_append_widget( GTK_TOOLBAR (toolbar),
entry,
"This is just an entry",
"Private" );
/* well, it isn’t created within thetoolbar, so we must still show it */
gtk_widget_show ( entry );
As you see, adding any kind of widget to a toolbar is simple. The one thing you have to remember is that thiswidget must be shown manually (contrary to other items which will be shown together with the toolbar).
/* that’s it ! let’s show everything. */
gtk_widget_show ( toolbar );
gtk_widget_show (handlebox);
gtk_widget_show ( dialog );
/* rest in gtk_main and wait for the fun to begin! */
gtk_main ();
return 0;
}
So, here we are at the end of toolbar tutorial. Of course, to appreciate it in full you need also this nice XPMicon, so here it is:
/* XPM */
static char * gtk_xpm[] = {
"32 39 5 1",
". c none",
"+ c black",
"@ c #3070E0",
"# c #F05050",
"$ c #35E035",
"................+...............",
"..............+++++.............",
"............+++++@@++...........",
"..........+++++@@@@@@++.........",
"........++++@@@@@@@@@@++........",
"......++++@@++++++++@@@++.......",
".....+++@@@+++++++++++@@@++.....",
"...+++@@@@+++@@@@@@++++@@@@+....",
"..+++@@@@+++@@@@@@@@+++@@@@@++..",
".++@@@@@@+++@@@@@@@@@@@@@@@@@@++",
".+#+@@@@@@++@@@@+++@@@@@@@@@@@@+",
".+##++@@@@+++@@@+++++@@@@@@@@$@.",
".+###++@@@@+++@@@+++@@@@@++$$$@.",
".+####+++@@@+++++++@@@@@+@$$$$@.",
".+#####+++@@@@+++@@@@++@$$$$$$+.",

10. Container Widgets 119
".+######++++@@@@@@@++@$$$$$$$$+.",
".+#######+##+@@@@+++$$$$$$@@$$+.",
".+###+++##+##+@@++@$$$$$$++$$$+.",
".+###++++##+##+@@$$$$$$$@+@$$@+.",
".+###++++++#+++@$$@+@$$@++$$$@+.",
".+####+++++++#++$$@+@$$++$$$$+..",
".++####++++++#++$$@+@$++@$$$$+..",
".+#####+++++##++$$++@+++$$$$$+..",
".++####+++##+#++$$+++++@$$$$$+..",
".++####+++####++$$++++++@$$$@+..",
".+#####++#####++$$+++@++++@$@+..",
".+#####++#####++$$++@$$@+++$@@..",
".++####++#####++$$++$$$$$+@$@++.",
".++####++#####++$$++$$$$$$$$+++.",
".+++####+#####++$$++$$$$$$$@+++.",
"..+++#########+@$$+@$$$$$$+++...",
"...+++########+@$$$$$$$$@+++....",
".....+++######+@$$$$$$$+++......",
"......+++#####+@$$$$$@++........",
".......+++####+@$$$$+++.........",
".........++###+$$$@++...........",
"..........++##+$@+++............",
"...........+++++++..............",
".............++++..............."};
10.12 Notebooks
The NoteBook Widget is a collection of ’pages’ that overlap each other, each page contains different infor-mation. This widget has become more common lately in GUI programming, and it is a good way to showblocks of similar information that warrant separation in their display.
The first function call you will need to know, as you can probably guess by now, is used to create a newnotebook widget.
GtkWidget *gtk_notebook_new( void );
Once the notebook has been created, there are a number of functions that operate on the notebook widget.Let’s look at them individually.
The first one we will look at is how to position the page indicators. These page indicators or ’tabs’ as theyare referred to, can be positioned in four ways: top, bottom, left, or right.
void gtk_notebook_set_tab_pos( GtkNotebook *notebook,
GtkPositionType pos );
GtkPostionType will be one of the following, which are pretty self explanatory:
• GTK POS LEFT
• GTK POS RIGHT
• GTK POS TOP
• GTK POS BOTTOM

10. Container Widgets 120
GTK POS TOP is the default.
Next we will look at how to add pages to the notebook. There are three ways to add pages to the NoteBook.Let’s look at the first two together as they are quite similar.
void gtk_notebook_append_page( GtkNotebook *notebook,
GtkWidget *child,
GtkWidget *tab_label );
void gtk_notebook_prepend_page( GtkNotebook *notebook,
GtkWidget *child,
GtkWidget *tab_label );
These functions add pages to the notebook by inserting them from the back of the notebook (append), orthe front of the notebook (prepend). child is the widget that is placed within the notebook page, andtab_label is the label for the page being added. The child widget must be created separately, and istypically a set of options setout witin one of the other container widgets, such as a table.
The final function for adding a page to the notebook contains all of the properties of the previous two, butit allows you to specify what position you want the page to be in the notebook.
void gtk_notebook_insert_page( GtkNotebook *notebook,
GtkWidget *child,
GtkWidget *tab_label,
gint position );
The parameters are the same as append and prepend except it contains an extra parameter, position.This parameter is used to specify what place this page will be inserted into.
Now that we know how to add a page, lets see how we can remove a page from the notebook.
void gtk_notebook_remove_page( GtkNotebook *notebook,
gint page_num );
This function takes the page specified by page_num and removes it from the widget pointed to by notebook.
To find out what the current page is in a notebook use the function:
gint gtk_notebook_get_current_page( GtkNotebook *notebook );
These next two functions are simple calls to move the notebook page forward or backward. Simply providethe respective function call with the notebook widget you wish to operate on. Note: when the NoteBook iscurrently on the last page, and gtk notebook next page is called, the notebook will wrap back to the firstpage. Likewise, if the NoteBook is on the first page, and gtk notebook prev page is called, the notebookwill wrap to the last page.
void gtk_notebook_next_page( GtkNoteBook *notebook );
void gtk_notebook_prev_page( GtkNoteBook *notebook );
This next function sets the ’active’ page. If you wish the notebook to be opened to page 5 for example, youwould use this function. Without using this function, the notebook defaults to the first page.
void gtk_notebook_set_page( GtkNotebook *notebook,
gint page_num );

10. Container Widgets 121
The next two functions add or remove the notebook page tabs and the notebook border respectively.
void gtk_notebook_set_show_tabs( GtkNotebook *notebook,
gboolean show_tabs);
void gtk_notebook_set_show_border( GtkNotebook *notebook,
gboolean show_border );
The next function is useful when the you have a large number of pages, and the tabs don’t fit on the page.It allows the tabs to be scrolled through using two arrow buttons.
void gtk_notebook_set_scrollable( GtkNotebook *notebook,
gboolean scrollable );
show_tabs, show_border and scrollable can be either TRUE or FALSE.
Now lets look at an example, it is expanded from the testgtk.c code that comes with the GTK distribution.This small program creates a window with a notebook and six buttons. The notebook contains 11 pages,added in three different ways, appended, inserted, and prepended. The buttons allow you rotate the tabpositions, add/remove the tabs and border, remove a page, change pages in both a forward and backwardmanner, and exit the program.
/* example-start notebook notebook.c */
#include <gtk/gtk.h>
/* This function rotates the position of the tabs */
void rotate_book (GtkButton *button, GtkNotebook *notebook)
{
gtk_notebook_set_tab_pos (notebook, (notebook->tab_pos +1) %4);
}
/* Add/Remove the page tabs and the borders */
void tabsborder_book (GtkButton *button, GtkNotebook *notebook)
{
gint tval = FALSE;
gint bval = FALSE;
if (notebook->show_tabs == 0)
tval = TRUE;
if (notebook->show_border == 0)
bval = TRUE;
gtk_notebook_set_show_tabs (notebook, tval);
gtk_notebook_set_show_border (notebook, bval);
}
/* Remove a page from the notebook */
void remove_book (GtkButton *button, GtkNotebook *notebook)
{
gint page;
page = gtk_notebook_get_current_page(notebook);
gtk_notebook_remove_page (notebook, page);
/* Need to refresh the widget --
This forces the widget to redraw itself. */
gtk_widget_draw(GTK_WIDGET(notebook), NULL);

10. Container Widgets 122
}
void delete (GtkWidget *widget, GtkWidget *event, gpointer data)
{
gtk_main_quit ();
}
int main (int argc, char *argv[])
{
GtkWidget *window;
GtkWidget *button;
GtkWidget *table;
GtkWidget *notebook;
GtkWidget *frame;
GtkWidget *label;
GtkWidget *checkbutton;
int i;
char bufferf[32];
char bufferl[32];
gtk_init (\&argc, \&argv);
window = gtk_window_new (GTK_WINDOW_TOPLEVEL);
gtk_signal_connect (GTK_OBJECT (window), "delete_event",
GTK_SIGNAL_FUNC (delete), NULL);
gtk_container_set_border_width (GTK_CONTAINER (window), 10);
table = gtk_table_new(3,6,FALSE);
gtk_container_add (GTK_CONTAINER (window), table);
/* Create a new notebook, place the position of the tabs */
notebook = gtk_notebook_new ();
gtk_notebook_set_tab_pos (GTK_NOTEBOOK (notebook), GTK_POS_TOP);
gtk_table_attach_defaults(GTK_TABLE(table), notebook, 0,6,0,1);
gtk_widget_show(notebook);
/* Lets append a bunch of pages to the notebook */
for (i=0; i < 5; i++) {
sprintf(bufferf, "Append Frame %d", i+1);
sprintf(bufferl, "Page %d", i+1);
frame = gtk_frame_new (bufferf);
gtk_container_set_border_width (GTK_CONTAINER (frame), 10);
gtk_widget_set_usize (frame, 100, 75);
gtk_widget_show (frame);
label = gtk_label_new (bufferf);
gtk_container_add (GTK_CONTAINER (frame), label);
gtk_widget_show (label);
label = gtk_label_new (bufferl);
gtk_notebook_append_page (GTK_NOTEBOOK (notebook), frame, label);
}
/* Now lets add a page to a specific spot */

10. Container Widgets 123
checkbutton = gtk_check_button_new_with_label ("Check me please!");
gtk_widget_set_usize(checkbutton, 100, 75);
gtk_widget_show (checkbutton);
label = gtk_label_new ("Add page");
gtk_notebook_insert_page (GTK_NOTEBOOK (notebook), checkbutton, label, 2);
/* Now finally lets prepend pages to the notebook */
for (i=0; i < 5; i++) {
sprintf(bufferf, "Prepend Frame %d", i+1);
sprintf(bufferl, "PPage %d", i+1);
frame = gtk_frame_new (bufferf);
gtk_container_set_border_width (GTK_CONTAINER (frame), 10);
gtk_widget_set_usize (frame, 100, 75);
gtk_widget_show (frame);
label = gtk_label_new (bufferf);
gtk_container_add (GTK_CONTAINER (frame), label);
gtk_widget_show (label);
label = gtk_label_new (bufferl);
gtk_notebook_prepend_page (GTK_NOTEBOOK(notebook), frame, label);
}
/* Set what page to start at (page 4) */
gtk_notebook_set_page (GTK_NOTEBOOK(notebook), 3);
/* Create a bunch of buttons */
button = gtk_button_new_with_label ("close");
gtk_signal_connect_object (GTK_OBJECT (button), "clicked",
GTK_SIGNAL_FUNC (delete), NULL);
gtk_table_attach_defaults(GTK_TABLE(table), button, 0,1,1,2);
gtk_widget_show(button);
button = gtk_button_new_with_label ("next page");
gtk_signal_connect_object (GTK_OBJECT (button), "clicked",
(GtkSignalFunc) gtk_notebook_next_page,
GTK_OBJECT (notebook));
gtk_table_attach_defaults(GTK_TABLE(table), button, 1,2,1,2);
gtk_widget_show(button);
button = gtk_button_new_with_label ("prev page");
gtk_signal_connect_object (GTK_OBJECT (button), "clicked",
(GtkSignalFunc) gtk_notebook_prev_page,
GTK_OBJECT (notebook));
gtk_table_attach_defaults(GTK_TABLE(table), button, 2,3,1,2);
gtk_widget_show(button);
button = gtk_button_new_with_label ("tab position");
gtk_signal_connect (GTK_OBJECT (button), "clicked",
(GtkSignalFunc) rotate_book,
GTK_OBJECT(notebook));
gtk_table_attach_defaults(GTK_TABLE(table), button, 3,4,1,2);
gtk_widget_show(button);
button = gtk_button_new_with_label ("tabs/border on/off");
11. CList Widget 124
gtk_signal_connect (GTK_OBJECT (button), "clicked",
(GtkSignalFunc) tabsborder_book,
GTK_OBJECT (notebook));
gtk_table_attach_defaults(GTK_TABLE(table), button, 4,5,1,2);
gtk_widget_show(button);
button = gtk_button_new_with_label ("remove page");
gtk_signal_connect (GTK_OBJECT (button), "clicked",
(GtkSignalFunc) remove_book,
GTK_OBJECT(notebook));
gtk_table_attach_defaults(GTK_TABLE(table), button, 5,6,1,2);
gtk_widget_show(button);
gtk_widget_show(table);
gtk_widget_show(window);
gtk_main ();
return(0);
}
/* example-end */
Hopefully this helps you on your way with creating notebooks for your GTK applications.
11 CList Widget
The GtkCList widget has replaced the GtkList widget (which is still available).
The GtkCList widget is a multi-column list widget that is capable of handling literally thousands of rows ofinformation. Each column can optionally have a title, which itself is optionally active, allowing us to bind afunction to its selection.
11.1 Creating a GtkCList widget
Creating a GtkCList is quite straightforward, once you have learned about widgets in general. It providesthe almost standard two ways, that is the hard way, and the easy way. But before we create it, there is onething we should figure out beforehand: how many columns should it have?
Not all columns have to be visible and can be used to store data that is related to a certain cell in the list.
GtkWidget *gtk_clist_new ( gint columns );
GtkWidget *gtk_clist_new_with_titles( gint columns,
gchar *titles[] );
The first form is very straight forward, the second might require some explanation. Each column can havea title associated with it, and this title can be a label or a button that reacts when we click on it. If we usethe second form, we must provide pointers to the title texts, and the number of pointers should equal thenumber of columns specified. Of course we can always use the first form, and manually add titles later.
Note: the GtkCList widget does not have its own scrollbars and should be placed within a GtkScrolledWin-dow widget if your require this functionality. This is a change from the GTK 1.0 implementation.

11. CList Widget 125
11.2 Modes of operation
There are several attributes that can be used to alter the behaviour of a GtkCList. First there is
void gtk_clist_set_selection_mode( GtkCList *clist,
GtkSelectionMode mode );
which, as the name implies, sets the selection mode of the GtkCList. The first argument is the GtkCListwidget, and the second specifies the cell selection mode (they are defined in gtkenums.h). At the time of thiswriting, the following modes are available to us:
• GTK SELECTION SINGLE - The selection is either NULL or contains a GList pointer for a singleselected item.
• GTK SELECTION BROWSE - The selection is NULL if the list contains no widgets or insensitiveones only, otherwise it contains a GList pointer for one GList structure, and therefore exactly one listitem.
• GTK SELECTION MULTIPLE - The selection is NULL if no list items are selected or a GList pointerfor the first selected item. That in turn points to a GList structure for the second selected item andso on. This is currently the default for the GtkCList widget.
• GTK SELECTION EXTENDED - The selection is always NULL.
Others might be added in later revisions of GTK.
We can also define what the border of the GtkCList widget should look like. It is done through
void gtk_clist_set_shadow_type( GtkCList *clist,
GtkShadowType border );
And the possible values for the second argument are
• GTK SHADOW NONE
• GTK SHADOW IN
• GTK SHADOW OUT
• GTK SHADOW ETCHED IN
• GTK SHADOW ETCHED OUT
11.3 Working with titles
When you create a GtkCList widget, you will also get a set of title buttons automatically. They live in thetop of the CList window, and can act either as normal buttons that respond to being pressed, or they canbe passive, in which case they are nothing more than a title. There are four different calls that aid us insetting the status of the title buttons.
void gtk_clist_column_title_active( GtkCList *clist,
gint column );
void gtk_clist_column_title_passive( GtkCList *clist,
gint column );
void gtk_clist_column_titles_active( GtkCList *clist );
void gtk_clist_column_titles_passive( GtkCList *clist );

11. CList Widget 126
An active title is one which acts as a normal button, a passive one is just a label. The first two calls above willactivate/deactivate the title button above the specific column, while the last two calls activate/deactivateall title buttons in the supplied clist widget.
But of course there are those cases when we don’t want them at all, and so they can be hidden and shownat will using the following two calls.
void gtk_clist_column_titles_show( GtkCList *clist );
void gtk_clist_column_titles_hide( GtkCList *clist );
For titles to be really useful we need a mechanism to set and change them, and this is done using
void gtk_clist_set_column_title( GtkCList *clist,
gint column,
gchar *title );
Note that only the title of one column can be set at a time, so if all the titles are known from the beginning,then I really suggest using gtk clist new with titles (as described above) to set them. Saves you codingtime, and makes your program smaller. There are some cases where getting the job done the manual way isbetter, and that’s when not all titles will be text. GtkCList provides us with title buttons that can in factincorporate whole widgets, for example a pixmap. It’s all done through
void gtk_clist_set_column_widget( GtkCList *clist,
gint column,
GtkWidget *widget );
which should require no special explanation.
11.4 Manipulating the list itself
It is possible to change the justification for a column, and it is done through
void gtk_clist_set_column_justification( GtkCList *clist,
gint column,
GtkJustification justification );
The GtkJustification type can take the following values:
• GTK JUSTIFY LEFT - The text in the column will begin from the left edge.
• GTK JUSTIFY RIGHT - The text in the column will begin from the right edge.
• GTK JUSTIFY CENTER - The text is placed in the center of the column.
• GTK JUSTIFY FILL - The text will use up all available space in the column. It is normally done byinserting extra blank spaces between words (or between individual letters if it’s a single word). Muchin the same way as any ordinary WYSIWYG text editor.
The next function is a very important one, and should be standard in the setup of all GtkCList widgets.When the list is created, the width of the various columns are chosen to match their titles, and since this isseldom the right width we have to set it using
11. CList Widget 127
void gtk_clist_set_column_width( GtkCList *clist,
gint column,
gint width );
Note that the width is given in pixels and not letters. The same goes for the height of the cells in thecolumns, but as the default value is the height of the current font this isn’t as critical to the application.Still, it is done through
void gtk_clist_set_row_height( GtkCList *clist,
gint height );
Again, note that the height is given in pixels.
We can also move the list around without user interaction, however, it does require that we know what weare looking for. Or in other words, we need the row and column of the item we want to scroll to.
void gtk_clist_moveto( GtkCList *clist,
gint row,
gint column,
gfloat row_align,
gfloat col_align );
The gfloat row align is pretty important to understand. It’s a value between 0.0 and 1.0, where 0.0 meansthat we should scroll the list so the row appears at the top, while if the value of row align is 1.0, the rowwill appear at the bottom instead. All other values between 0.0 and 1.0 are also valid and will place therow between the top and the bottom. The last argument, gfloat col align works in the same way, though 0.0marks left and 1.0 marks right instead.
Depending on the application’s needs, we don’t have to scroll to an item that is already visible to us. Sohow do we know if it is visible? As usual, there is a function to find that out as well.
GtkVisibility gtk_clist_row_is_visible( GtkCList *clist,
gint row );
The return value is is one of the following:
• GTK VISIBILITY NONE
• GTK VISIBILITY PARTIAL
• GTK VISIBILITY FULL
Note that it will only tell us if a row is visible. Currently there is no way to determine this for a column.We can get partial information though, because if the return is GTK VISIBILITY PARTIAL, then some ofit is hidden, but we don’t know if it is the row that is being cut by the lower edge of the listbox, or if therow has columns that are outside.
We can also change both the foreground and background colors of a particular row. This is useful for markingthe row selected by the user, and the two functions that is used to do it are
void gtk_clist_set_foreground( GtkCList *clist,
gint row,
GdkColor *color );
void gtk_clist_set_background( GtkCList *clist,
gint row,
GdkColor *color );
Please note that the colors must have been previously allocated.

11. CList Widget 128
11.5 Adding rows to the list
We can add rows in three ways. They can be prepended or appended to the list using
gint gtk_clist_prepend( GtkCList *clist,
gchar *text[] );
gint gtk_clist_append( GtkCList *clist,
gchar *text[] );
The return value of these two functions indicate the index of the row that was just added. We can insert arow at a given place using
void gtk_clist_insert( GtkCList *clist,
gint row,
gchar *text[] );
In these calls we have to provide a collection of pointers that are the texts we want to put in the columns.The number of pointers should equal the number of columns in the list. If the text argument is NULL, thenthere will be no text in the columns of the row. This is useful, for example, if we want to add pixmapsinstead (something that has to be done manually).
Also, please note that the numbering of both rows and columns start at 0.
To remove an individual row we use
void gtk_clist_remove( GtkCList *clist,
gint row );
There is also a call that removes all rows in the list. This is a lot faster than calling gtk clist remove oncefor each row, which is the only alternative.
void gtk_clist_clear( GtkCList *clist );
There are also two convenience functions that should be used when a lot of changes have to be made to thelist. This is to prevent the list flickering while being repeatedly updated, which may be highly annoying tothe user. So instead it is a good idea to freeze the list, do the updates to it, and finally thaw it which causesthe list to be updated on the screen.
void gtk_clist_freeze( GtkCList * clist );
void gtk_clist_thaw( GtkCList * clist );
11.6 Setting text and pixmaps in the cells
A cell can contain a pixmap, text or both. To set them the following functions are used.
void gtk_clist_set_text( GtkCList *clist,
gint row,
gint column,
gchar *text );
void gtk_clist_set_pixmap( GtkCList *clist,
gint row,

11. CList Widget 129
gint column,
GdkPixmap *pixmap,
GdkBitmap *mask );
void gtk_clist_set_pixtext( GtkCList *clist,
gint row,
gint column,
gchar *text,
guint8 spacing,
GdkPixmap *pixmap,
GdkBitmap *mask );
It’s quite straightforward. All the calls have the GtkCList as the first argument, followed by the row andcolumn of the cell, followed by the data to be set. The spacing argument in gtk clist set pixtext is thenumber of pixels between the pixmap and the beginning of the text.
To read back the data, we instead use
gint gtk_clist_get_text( GtkCList *clist,
gint row,
gint column,
gchar **text );
gint gtk_clist_get_pixmap( GtkCList *clist,
gint row,
gint column,
GdkPixmap **pixmap,
GdkBitmap **mask );
gint gtk_clist_get_pixtext( GtkCList *clist,
gint row,
gint column,
gchar **text,
guint8 *spacing,
GdkPixmap **pixmap,
GdkBitmap **mask );
It isn’t necessary to read it all back in case you aren’t interested. Any of the pointers that are meant forreturn values (all except the clist) can be NULL. So if we want to read back only the text from a cell thatis of type pixtext, then we would do the following, assuming that clist, row and column already exist:
gchar *mytext;
gtk_clist_get_pixtext(clist, row, column, \&mytext, NULL, NULL, NULL);
There is one more call that is related to what’s inside a cell in the clist, and that’s
GtkCellType gtk_clist_get_cell_type( GtkCList *clist,
gint row,
gint column );
which returns the type of data in a cell. The return value is one of
• GTK CELL EMPTY
• GTK CELL TEXT

11. CList Widget 130
• GTK CELL PIXMAP
• GTK CELL PIXTEXT
• GTK CELL WIDGET
There is also a function that will let us set the indentation, both vertical and horizontal, of a cell. Theindentation value is of type gint, given in pixels, and can be both positive and negative.
void gtk_clist_set_shift( GtkCList *clist,
gint row,
gint column,
gint vertical,
gint horizontal );
11.7 Storing data pointers
With a GtkCList it is possible to set a data pointer for a row. This pointer will not be visible for the user,but is merely a convenience for the programmer to associate a row with a pointer to some additional data.
The functions should be fairly self-explanatory by now
void gtk_clist_set_row_data( GtkCList *clist,
gint row,
gpointer data );
void gtk_clist_set_row_data_full( GtkCList *clist,
gint row,
gpointer data,
GtkDestroyNotify destroy );
gpointer gtk_clist_get_row_data( GtkCList *clist,
gint row );
gint gtk_clist_find_row_from_data( GtkCList *clist,
gpointer data );
11.8 Working with selections
There are also functions available that let us force the (un)selection of a row. These are
void gtk_clist_select_row( GtkCList *clist,
gint row,
gint column );
void gtk_clist_unselect_row( GtkCList *clist,
gint row,
gint column );
And also a function that will take x and y coordinates (for example, read from the mousepointer), and mapthat onto the list, returning the corresponding row and column.
gint gtk_clist_get_selection_info( GtkCList *clist,
gint x,
gint y,
gint *row,
gint *column );

11. CList Widget 131
When we detect something of interest, it might be movement of the pointer, a click somewhere in the list,we can read the pointer coordinates and find out where in the list the pointer is. Cumbersome? Luckily,there is a simpler way...
11.9 The signals that bring it together
As with all other widgets, there are a few signals that can be used. The GtkCList widget is derived fromthe GtkContainer widget, and so has all the same signals, but also the adds following:
• select row - This signal will send the following information, in order: GtkCList *clist, gint row, gintcolumn, GtkEventButton *event
• unselect row - When the user unselects a row, this signal is activated. It sends the same informationas select row
• click column - Send GtkCList *clist, gint column
So if we want to connect a callback to select row, the callback function would be declared like this
void select_row_callback(GtkWidget *widget,
gint row,
gint column,
GdkEventButton *event,
gpointer data);
The callback is connected as usual with
gtk_signal_connect(GTK_OBJECT( clist),
"select_row"
GTK_SIGNAL_FUNC(select_row_callback),
NULL);
11.10 A GtkCList example
/* example-start clist clist.c */
#include <gtk/gtk.h>
/* User clicked the "Add List" button. */
void button_add_clicked( gpointer data )
{
int indx;
/* Something silly to add to the list. 4 rows of 2 columns each */
gchar *drink[4][2] = { { "Milk", "3 Oz" },
{ "Water", "6 l" },
{ "Carrots", "2" },
{ "Snakes", "55" } };
/* Here we do the actual adding of the text. It’s done once for
* each row.
*/
for ( indx=0 ; indx < 4 ; indx++ )
gtk_clist_append( (GtkCList *) data, drink[indx]);

11. CList Widget 132
return;
}
/* User clicked the "Clear List" button. */
void button_clear_clicked( gpointer data )
{
/* Clear the list using gtk_clist_clear. This is much faster than
* calling gtk_clist_remove once for each row.
*/
gtk_clist_clear( (GtkCList *) data);
return;
}
/* The user clicked the "Hide/Show titles" button. */
void button_hide_show_clicked( gpointer data )
{
/* Just a flag to remember the status. 0 = currently visible */
static short int flag = 0;
if (flag == 0)
{
/* Hide the titles and set the flag to 1 */
gtk_clist_column_titles_hide((GtkCList *) data);
flag++;
}
else
{
/* Show the titles and reset flag to 0 */
gtk_clist_column_titles_show((GtkCList *) data);
flag--;
}
return;
}
/* If we come here, then the user has selected a row in the list. */
void selection_made( GtkWidget *clist,
gint row,
gint column,
GdkEventButton *event,
gpointer data )
{
gchar *text;
/* Get the text that is stored in the selected row and column
* which was clicked in. We will receive it as a pointer in the
* argument text.
*/
gtk_clist_get_text(GTK_CLIST(clist), row, column, \&text);
/* Just prints some information about the selected row */
g_print("You selected row %d. More specifically you clicked in "
"column %d, and the text in this cell is %s\n\n",
row, column, text);

11. CList Widget 133
return;
}
int main( int argc,
gchar *argv[] )
{
GtkWidget *window;
GtkWidget *vbox, *hbox;
GtkWidget *clist;
GtkWidget *button_add, *button_clear, *button_hide_show;
gchar *titles[2] = { "Ingredients", "Amount" };
gtk_init(\&argc, \&argv);
window=gtk_window_new(GTK_WINDOW_TOPLEVEL);
gtk_widget_set_usize(GTK_WIDGET(window), 300, 150);
gtk_window_set_title(GTK_WINDOW(window), "GtkCList Example");
gtk_signal_connect(GTK_OBJECT(window),
"destroy",
GTK_SIGNAL_FUNC(gtk_main_quit),
NULL);
vbox=gtk_vbox_new(FALSE, 5);
gtk_container_set_border_width(GTK_CONTAINER(vbox), 5);
gtk_container_add(GTK_CONTAINER(window), vbox);
gtk_widget_show(vbox);
/* Create the GtkCList. For this example we use 2 columns */
clist = gtk_clist_new_with_titles( 2, titles);
/* When a selection is made, we want to know about it. The callback
* used is selection_made, and its code can be found further down */
gtk_signal_connect(GTK_OBJECT(clist), "select_row",
GTK_SIGNAL_FUNC(selection_made),
NULL);
/* It isn’t necessary to shadow the border, but it looks nice :) */
gtk_clist_set_shadow_type (GTK_CLIST(clist), GTK_SHADOW_OUT);
/* What however is important, is that we set the column widths as
* they will never be right otherwise. Note that the columns are
* numbered from 0 and up (to 1 in this case).
*/
gtk_clist_set_column_width (GTK_CLIST(clist), 0, 150);
/* Add the GtkCList widget to the vertical box and show it. */
gtk_box_pack_start(GTK_BOX(vbox), clist, TRUE, TRUE, 0);
gtk_widget_show(clist);
/* Create the buttons and add them to the window. See the button
* tutorial for more examples and comments on this.
*/
hbox = gtk_hbox_new(FALSE, 0);
gtk_box_pack_start(GTK_BOX(vbox), hbox, FALSE, TRUE, 0);
gtk_widget_show(hbox);

12. Tree Widget 134
button_add = gtk_button_new_with_label("Add List");
button_clear = gtk_button_new_with_label("Clear List");
button_hide_show = gtk_button_new_with_label("Hide/Show titles");
gtk_box_pack_start(GTK_BOX(hbox), button_add, TRUE, TRUE, 0);
gtk_box_pack_start(GTK_BOX(hbox), button_clear, TRUE, TRUE, 0);
gtk_box_pack_start(GTK_BOX(hbox), button_hide_show, TRUE, TRUE, 0);
/* Connect our callbacks to the three buttons */
gtk_signal_connect_object(GTK_OBJECT(button_add), "clicked",
GTK_SIGNAL_FUNC(button_add_clicked),
(gpointer) clist);
gtk_signal_connect_object(GTK_OBJECT(button_clear), "clicked",
GTK_SIGNAL_FUNC(button_clear_clicked),
(gpointer) clist);
gtk_signal_connect_object(GTK_OBJECT(button_hide_show), "clicked",
GTK_SIGNAL_FUNC(button_hide_show_clicked),
(gpointer) clist);
gtk_widget_show(button_add);
gtk_widget_show(button_clear);
gtk_widget_show(button_hide_show);
/* The interface is completely set up so we show the window and
* enter the gtk_main loop.
*/
gtk_widget_show(window);
gtk_main();
return(0);
}
/* example-end */
12 Tree Widget
The purpose of tree widgets is to display hierarchically-organized data. The GtkTree widget itself is avertical container for widgets of type GtkTreeItem. GtkTree itself is not terribly different from GtkList- both are derived directly from GtkContainer, and the GtkContainer methods work in the same way onGtkTree widgets as on GtkList widgets. The difference is that GtkTree widgets can be nested within otherGtkTree widgets. We’ll see how to do this shortly.
The GtkTree widget has its own window, and defaults to a white background, as does GtkList. Also, mostof the GtkTree methods work in the same way as the corresponding GtkList ones. However, GtkTree is notderived from GtkList, so you cannot use them interchangeably.
12.1 Creating a Tree
A GtkTree is created in the usual way, using:
GtkWidget *gtk_tree_new( void );
Like the GtkList widget, a GtkTree will simply keep growing as more items are added to it, as well as whensubtrees are expanded. For this reason, they are almost always packed into a GtkScrolledWindow. You

12. Tree Widget 135
might want to use gtk widget set usize() on the scrolled window to ensure that it is big enough to see thetree’s items, as the default size for GtkScrolledWindow is quite small.
Now that you have a tree, you’ll probably want to add some items to it. 12.5 below explains the gory detailsof GtkTreeItem. For now, it’ll suffice to create one, using:
GtkWidget *gtk_tree_item_new_with_label( gchar *label );
You can then add it to the tree using one of the following (see 12.4.2 below for more options):
void gtk_tree_append( GtkTree *tree,
GtkWidget *tree_item );
void gtk_tree_prepend( GtkTree *tree,
GtkWidget *tree_item );
Note that you must add items to a GtkTree one at a time - there is no equivalent to gtk list * items().
12.2 Adding a Subtree
A subtree is created like any other GtkTree widget. A subtree is added to another tree beneath a tree item,using:
void gtk_tree_item_set_subtree( GtkTreeItem *tree_item,
GtkWidget *subtree );
You do not need to call gtk widget show() on a subtree before or after adding it to a GtkTreeItem. However,you must have added the GtkTreeItem in question to a parent tree before calling gtk tree item set subtree().This is because, technically, the parent of the subtree is not the GtkTreeItem which ”owns” it, but ratherthe GtkTree which holds that GtkTreeItem.
When you add a subtree to a GtkTreeItem, a plus or minus sign appears beside it, which the user can clickon to ”expand” or ”collapse” it, meaning, to show or hide its subtree. GtkTreeItems are collapsed by default.Note that when you collapse a GtkTreeItem, any selected items in its subtree remain selected, which maynot be what the user expects.
12.3 Handling the Selection List
As with GtkList, the GtkTree type has a selection field, and it is possible to control the behaviour of thetree (somewhat) by setting the selection type using:
void gtk_tree_set_selection_mode( GtkTree *tree,
GtkSelectionMode mode );
The semantics associated with the various selection modes are described in the section on the GtkListwidget. As with the GtkList widget, the ”select child”, ”unselect child” (not really - see 12.4.1 below for anexplanation), and ”selection changed”signals are emitted when list items are selected or unselected. However,in order to take advantage of these signals, you need to know which GtkTree widget they will be emitted by,and where to find the list of selected items.
This is a source of potential confusion. The best way to explain this is that though all GtkTree widgets arecreated equal, some are more equal than others. All GtkTree widgets have their own X window, and cantherefore receive events such as mouse clicks (if their GtkTreeItems or their children don’t catch them first!).

12. Tree Widget 136
However, to make GTK SELECTION SINGLE and GTK SELECTION BROWSE selection types behavein a sane manner, the list of selected items is specific to the topmost GtkTree widget in a hierarchy, knownas the ”root tree”.
Thus, accessing the selectionfield directly in an arbitrary GtkTree widget is not a good idea unless youknow it’s the root tree. Instead, use the GTK TREE SELECTION (Tree) macro, which gives the root tree’sselection list as a GList pointer. Of course, this list can include items that are not in the subtree in questionif the selection type is GTK SELECTION MULTIPLE.
Finally, the ”select child” (and ”unselect child”, in theory) signals are emitted by all trees, but the ”selec-tion changed” signal is only emitted by the root tree. Consequently, if you want to handle the ”select child”signal for a tree and all its subtrees, you will have to call gtk signal connect() for every subtree.
12.4 Tree Widget Internals
The GtkTree’s struct definition looks like this:
struct _GtkTree
{
GtkContainer container;
GList *children;
GtkTree* root_tree; /* owner of selection list */
GtkWidget* tree_owner;
GList *selection;
guint level;
guint indent_value;
guint current_indent;
guint selection_mode : 2;
guint view_mode : 1;
guint view_line : 1;
};
The perils associated with accessing the selection field directly have already been mentioned. Theother important fields of the struct can also be accessed with handy macros or class functions.GTK TREE IS ROOT TREE (Tree) returns a boolean value which indicates whether a tree is the roottree in a GtkTree hierarchy, while GTK TREE ROOT TREE (Tree) returns the root tree, an object of typeGtkTree (so, remember to cast it using GTK WIDGET (Tree) if you want to use one of the gtk widget *()functions on it).
Instead of directly accessing the children field of a GtkTree widget, it’s probably best to cast it usingGTK CONTAINER (Tree), and pass it to the gtk container children() function. This creates a duplicate ofthe original list, so it’s advisable to free it up using g list free() after you’re done with it, or to iterate on itdestructively, like this:
children = gtk_container_children (GTK_CONTAINER (tree));
while (children) {
do_something_nice (GTK_TREE_ITEM (children->data));
children = g_list_remove_link (children, children);
}
The tree_owner field is defined only in subtrees, where it points to the GtkTreeItem widget which holdsthe tree in question. The level field indicates how deeply nested a particular tree is; root trees have level0, and each successive level of subtrees has a level one greater than the parent level. This field is set onlyafter a GtkTree widget is actually mapped (i.e. drawn on the screen).

12. Tree Widget 137
12.4.1 Signals
void selection_changed( GtkTree *tree );
This signal will be emitted whenever the selection field of a GtkTree has changed. This happens when achild of the GtkTree is selected or deselected.
void select_child( GtkTree *tree,
GtkWidget *child );
This signal is emitted when a child of the GtkTree is about to get selected. This happens on calls togtk tree select item(), gtk tree select child(), on all button presses and calls to gtk tree item toggle() andgtk item toggle(). It may sometimes be indirectly triggered on other occasions where children get added toor removed from the GtkTree.
void unselect_child (GtkTree *tree,
GtkWidget *child);
This signal is emitted when a child of the GtkTree is about to get deselected. As of GTK+ 1.0.4, this seems toonly occur on calls to gtk tree unselect item() or gtk tree unselect child(), and perhaps on other occasions,but not when a button press deselects a child, nor on emission of the ”toggle” signal by gtk item toggle().
12.4.2 Functions and Macros
guint gtk_tree_get_type( void );
Returns the ‘GtkTree’ type identifier.
GtkWidget* gtk_tree_new( void );
Create a new GtkTree object. The new widget is returned as a pointer to a GtkWidget object. NULL isreturned on failure.
void gtk_tree_append( GtkTree *tree,
GtkWidget *tree_item );
Append a tree item to a GtkTree.
void gtk_tree_prepend( GtkTree *tree,
GtkWidget *tree_item );
Prepend a tree item to a GtkTree.
void gtk_tree_insert( GtkTree *tree,
GtkWidget *tree_item,
gint position );
Insert a tree item into a GtkTree at the position in the list specified by position.
void gtk_tree_remove_items( GtkTree *tree,
GList *items );

12. Tree Widget 138
Remove a list of items (in the form of a GList *) from a GtkTree. Note that removing an item from a treedereferences (and thus usually) destroys it and its subtree, if it has one, and all subtrees in that subtree. Ifyou want to remove only one item, you can use gtk container remove().
void gtk_tree_clear_items( GtkTree *tree,
gint start,
gint end );
Remove the items from position start to position end from a GtkTree. The same warning about dereferenc-ing applies here, as gtk tree clear items() simply constructs a list and passes it to gtk tree remove items().
void gtk_tree_select_item( GtkTree *tree,
gint item );
Emits the ”select item” signal for the child at position item, thus selecting the child (unless you unselect itin a signal handler).
void gtk_tree_unselect_item( GtkTree *tree,
gint item );
Emits the ”unselect item” signal for the child at position item, thus unselecting the child.
void gtk_tree_select_child( GtkTree *tree,
GtkWidget *tree_item );
Emits the ”select item” signal for the child tree_item, thus selecting it.
void gtk_tree_unselect_child( GtkTree *tree,
GtkWidget *tree_item );
Emits the ”unselect item” signal for the child tree_item, thus unselecting it.
gint gtk_tree_child_position( GtkTree *tree,
GtkWidget *child );
Returns the position in the tree of child, unless child is not in the tree, in which case it returns -1.
void gtk_tree_set_selection_mode( GtkTree *tree,
GtkSelectionMode mode );
Sets the selection mode, which can be one of GTK SELECTION SINGLE (the default),GTK SELECTION BROWSE, GTK SELECTION MULTIPLE, or GTK SELECTION EXTENDED.This is only defined for root trees, which makes sense, since the root tree ”owns” the selection. Setting it forsubtrees has no effect at all; the value is simply ignored.
void gtk_tree_set_view_mode( GtkTree *tree,
GtkTreeViewMode mode );
Sets the ”view mode”, which can be either GTK TREE VIEW LINE (the default) orGTK TREE VIEW ITEM. The view mode propagates from a tree to its subtrees, and can’t be setexclusively to a subtree (this is not exactly true - see the example code comments).
The term ”view mode” is rather ambiguous - basically, it controls the way the highlight is drawn when one ofa tree’s children is selected. If it’s GTK TREE VIEW LINE, the entire GtkTreeItem widget is highlighted,while for GTK TREE VIEW ITEM, only the child widget (i.e. usually the label) is highlighted.

12. Tree Widget 139
void gtk_tree_set_view_lines( GtkTree *tree,
guint flag );
Controls whether connecting lines between tree items are drawn. flag is either TRUE, in which case theyare, or FALSE, in which case they aren’t.
GtkTree *GTK_TREE (gpointer obj);
Cast a generic pointer to ‘GtkTree *’.
GtkTreeClass *GTK_TREE_CLASS (gpointer class);
Cast a generic pointer to ‘GtkTreeClass*’.
gint GTK_IS_TREE (gpointer obj);
Determine if a generic pointer refers to a ‘GtkTree’ object.
gint GTK_IS_ROOT_TREE (gpointer obj)
Determine if a generic pointer refers to a ‘GtkTree’ object and is a root tree. Though this will accept anypointer, the results of passing it a pointer that does not refer to a GtkTree are undefined and possiblyharmful.
GtkTree *GTK_TREE_ROOT_TREE (gpointer obj)
Return the root tree of a pointer to a ‘GtkTree’ object. The above warning applies.
GList *GTK_TREE_SELECTION( gpointer obj)
Return the selection list of the root tree of a ‘GtkTree’ object. The above warning applies here, too.
12.5 Tree Item Widget
The GtkTreeItem widget, like GtkListItem, is derived from GtkItem, which in turn is derived from GtkBin.Therefore, the item itself is a generic container holding exactly one child widget, which can be of any type.The GtkTreeItem widget has a number of extra fields, but the only one we need be concerned with is thesubtree field.
The definition for the GtkTreeItem struct looks like this:
struct _GtkTreeItem
{
GtkItem item;
GtkWidget *subtree;
GtkWidget *pixmaps_box;
GtkWidget *plus_pix_widget, *minus_pix_widget;
GList *pixmaps; /* pixmap node for this items color depth */
guint expanded : 1;
};

12. Tree Widget 140
The pixmaps_box field is a GtkEventBox which catches clicks on the plus/minus symbol which controlsexpansion and collapsing. The pixmaps field points to an internal data structure. Since you can always obtainthe subtree of a GtkTreeItem in a (relatively) type-safe manner with the GTK TREE ITEM SUBTREE(Item) macro, it’s probably advisable never to touch the insides of a GtkTreeItem unless you really knowwhat you’re doing.
Since it is directly derived from a GtkItem it can be treated as such by using the GTK ITEM (TreeItem)macro. A GtkTreeItem usually holds a label, so the convenience function gtk list item new with label() isprovided. The same effect can be achieved using code like the following, which is actually copied verbatimfrom gtk tree item new with label():
tree_item = gtk_tree_item_new ();
label_widget = gtk_label_new (label);
gtk_misc_set_alignment (GTK_MISC (label_widget), 0.0, 0.5);
gtk_container_add (GTK_CONTAINER (tree_item), label_widget);
gtk_widget_show (label_widget);
As one is not forced to add a GtkLabel to a GtkTreeItem, you could also add a GtkHBox or a GtkArrow,or even a GtkNotebook (though your app will likely be quite unpopular in this case) to the GtkTreeItem.
If you remove all the items from a subtree, it will be destroyed and unparented, unless you reference itbeforehand, and the GtkTreeItem which owns it will be collapsed. So, if you want it to stick around, dosomething like the following:
gtk_widget_ref (tree);
owner = GTK_TREE(tree)->tree_owner;
gtk_container_remove (GTK_CONTAINER(tree), item);
if (tree->parent == NULL){
gtk_tree_item_expand (GTK_TREE_ITEM(owner));
gtk_tree_item_set_subtree (GTK_TREE_ITEM(owner), tree);
}
else
gtk_widget_unref (tree);
Finally, drag-n-drop does work with GtkTreeItems. You just have to make sure that the GtkTreeItemyou want to make into a drag item or a drop site has not only been added to a GtkTree, but that eachsuccessive parent widget has a parent itself, all the way back to a toplevel or dialog window, when you callgtk widget dnd drag set() or gtk widget dnd drop set(). Otherwise, strange things will happen.
12.5.1 Signals
GtkTreeItem inherits the ”select”, ”deselect”, and ”toggle” signals from GtkItem. In addition, it adds twosignals of its own, ”expand” and ”collapse”.
void select( GtkItem *tree_item );
This signal is emitted when an item is about to be selected, either after it has been clicked on by the user,or when the program calls gtk tree item select(), gtk item select(), or gtk tree select child().
void deselect( GtkItem *tree_item );
This signal is emitted when an item is about to be unselected, either after it has been clicked on by the user,or when the program calls gtk tree item deselect() or gtk item deselect(). In the case of GtkTreeItems, it isalso emitted by gtk tree unselect child(), and sometimes gtk tree select child().
12. Tree Widget 141
void toggle( GtkItem *tree_item );
This signal is emitted when the program calls gtk item toggle(). The effect it has when emitted on aGtkTreeItem is to call gtk tree select child() (and never gtk tree unselect child()) on the item’s parent tree,if the item has a parent tree. If it doesn’t, then the highlight is reversed on the item.
void expand( GtkTreeItem *tree_item );
This signal is emitted when the tree item’s subtree is about to be expanded, that is, when the user clicks onthe plus sign next to the item, or when the program calls gtk tree item expand().
void collapse( GtkTreeItem *tree_item );
This signal is emitted when the tree item’s subtree is about to be collapsed, that is, when the user clicks onthe minus sign next to the item, or when the program calls gtk tree item collapse().
12.5.2 Functions and Macros
guint gtk_tree_item_get_type( void );
Returns the ‘GtkTreeItem’ type identifier.
GtkWidget* gtk_tree_item_new( void );
Create a new GtkTreeItem object. The new widget is returned as a pointer to a GtkWidget object. NULLis returned on failure.
GtkWidget* gtk_tree_item_new_with_label (gchar *label);
Create a new GtkTreeItem object, having a single GtkLabel as the sole child. The new widget is returnedas a pointer to a GtkWidget object. NULL is returned on failure.
void gtk_tree_item_select( GtkTreeItem *tree_item );
This function is basically a wrapper around a call to gtk item select (GTK ITEM (tree item)) which willemit the select signal.
void gtk_tree_item_deselect( GtkTreeItem *tree_item );
This function is basically a wrapper around a call to gtk item deselect (GTK ITEM (tree item)) which willemit the deselect signal.
void gtk_tree_item_set_subtree( GtkTreeItem *tree_item,
GtkWidget *subtree );
This function adds subtree to tree item, showing it if tree item is expanded, or hiding it if tree item iscollapsed. Again, remember that the tree item must have already been added to a tree for this to work.
void gtk_tree_item_remove_subtree( GtkTreeItem *tree_item );
This removes all of tree item’s subtree’s children (thus unreferencing and destroying it, any of its children’ssubtrees, and so on...), then removes the subtree itself, and hides the plus/minus sign.

12. Tree Widget 142
void gtk_tree_item_expand( GtkTreeItem *tree_item );
This emits the ”expand” signal on tree item, which expands it.
void gtk_tree_item_collapse( GtkTreeItem *tree_item );
This emits the ”collapse” signal on tree item, which collapses it.
GtkTreeItem *GTK_TREE_ITEM (gpointer obj)
Cast a generic pointer to ‘GtkTreeItem*’.
GtkTreeItemClass *GTK_TREE_ITEM_CLASS (gpointer obj)
Cast a generic pointer to ‘GtkTreeItemClass’.
gint GTK_IS_TREE_ITEM (gpointer obj)
Determine if a generic pointer refers to a ‘GtkTreeItem’ object.
GtkWidget GTK_TREE_ITEM_SUBTREE (gpointer obj)
Returns a tree item’s subtree (obj should point to a ‘GtkTreeItem’ object).
12.6 Tree Example
This is somewhat like the tree example in testgtk.c, but a lot less complete (although much better com-mented). It puts up a window with a tree, and connects all the signals for the relevant objects, so you cansee when they are emitted.
/* example-start tree tree.c */
#include <gtk/gtk.h>
/* for all the GtkItem:: and GtkTreeItem:: signals */
static void cb_itemsignal (GtkWidget *item, gchar *signame)
{
gchar *name;
GtkLabel *label;
/* It’s a GtkBin, so it has one child, which we know to be a
label, so get that */
label = GTK_LABEL (GTK_BIN (item)->child);
/* Get the text of the label */
gtk_label_get (label, \&name);
/* Get the level of the tree which the item is in */
g_print ("%s called for item %s->%p, level %d\n", signame, name,
item, GTK_TREE (item->parent)->level);
}
/* Note that this is never called */
static void cb_unselect_child (GtkWidget *root_tree, GtkWidget *child,
GtkWidget *subtree)

12. Tree Widget 143
{
g_print ("unselect_child called for root tree %p, subtree %p, child %p\n",
root_tree, subtree, child);
}
/* Note that this is called every time the user clicks on an item,
whether it is already selected or not. */
static void cb_select_child (GtkWidget *root_tree, GtkWidget *child,
GtkWidget *subtree)
{
g_print ("select_child called for root tree %p, subtree %p, child %p\n",
root_tree, subtree, child);
}
static void cb_selection_changed (GtkWidget *tree)
{
GList *i;
g_print ("selection_change called for tree %p\n", tree);
g_print ("selected objects are:\n");
i = GTK_TREE_SELECTION(tree);
while (i){
gchar *name;
GtkLabel *label;
GtkWidget *item;
/* Get a GtkWidget pointer from the list node */
item = GTK_WIDGET (i->data);
label = GTK_LABEL (GTK_BIN (item)->child);
gtk_label_get (label, \&name);
g_print ("\t%s on level %d\n", name, GTK_TREE
(item->parent)->level);
i = i->next;
}
}
int main (int argc, char *argv[])
{
GtkWidget *window, *scrolled_win, *tree;
static gchar *itemnames[] = {"Foo", "Bar", "Baz", "Quux",
"Maurice"};
gint i;
gtk_init (\&argc, \&argv);
/* a generic toplevel window */
window = gtk_window_new (GTK_WINDOW_TOPLEVEL);
gtk_signal_connect (GTK_OBJECT(window), "delete_event",
GTK_SIGNAL_FUNC (gtk_main_quit), NULL);
gtk_container_set_border_width (GTK_CONTAINER(window), 5);
/* A generic scrolled window */
scrolled_win = gtk_scrolled_window_new (NULL, NULL);
gtk_scrolled_window_set_policy (GTK_SCROLLED_WINDOW (scrolled_win),
GTK_POLICY_AUTOMATIC,
GTK_POLICY_AUTOMATIC);

12. Tree Widget 144
gtk_widget_set_usize (scrolled_win, 150, 200);
gtk_container_add (GTK_CONTAINER(window), scrolled_win);
gtk_widget_show (scrolled_win);
/* Create the root tree */
tree = gtk_tree_new();
g_print ("root tree is %p\n", tree);
/* connect all GtkTree:: signals */
gtk_signal_connect (GTK_OBJECT(tree), "select_child",
GTK_SIGNAL_FUNC(cb_select_child), tree);
gtk_signal_connect (GTK_OBJECT(tree), "unselect_child",
GTK_SIGNAL_FUNC(cb_unselect_child), tree);
gtk_signal_connect (GTK_OBJECT(tree), "selection_changed",
GTK_SIGNAL_FUNC(cb_selection_changed), tree);
/* Add it to the scrolled window */
gtk_scrolled_window_add_with_viewport (GTK_SCROLLED_WINDOW(scrolled_win),
tree);
/* Set the selection mode */
gtk_tree_set_selection_mode (GTK_TREE(tree),
GTK_SELECTION_MULTIPLE);
/* Show it */
gtk_widget_show (tree);
for (i = 0; i < 5; i++){
GtkWidget *subtree, *item;
gint j;
/* Create a tree item */
item = gtk_tree_item_new_with_label (itemnames[i]);
/* Connect all GtkItem:: and GtkTreeItem:: signals */
gtk_signal_connect (GTK_OBJECT(item), "select",
GTK_SIGNAL_FUNC(cb_itemsignal), "select");
gtk_signal_connect (GTK_OBJECT(item), "deselect",
GTK_SIGNAL_FUNC(cb_itemsignal), "deselect");
gtk_signal_connect (GTK_OBJECT(item), "toggle",
GTK_SIGNAL_FUNC(cb_itemsignal), "toggle");
gtk_signal_connect (GTK_OBJECT(item), "expand",
GTK_SIGNAL_FUNC(cb_itemsignal), "expand");
gtk_signal_connect (GTK_OBJECT(item), "collapse",
GTK_SIGNAL_FUNC(cb_itemsignal), "collapse");
/* Add it to the parent tree */
gtk_tree_append (GTK_TREE(tree), item);
/* Show it - this can be done at any time */
gtk_widget_show (item);
/* Create this item’s subtree */
subtree = gtk_tree_new();
g_print ("-> item %s->%p, subtree %p\n", itemnames[i], item,
subtree);
/* This is still necessary if you want these signals to be called
for the subtree’s children. Note that selection_change will be
signalled for the root tree regardless. */
gtk_signal_connect (GTK_OBJECT(subtree), "select_child",
GTK_SIGNAL_FUNC(cb_select_child), subtree);
gtk_signal_connect (GTK_OBJECT(subtree), "unselect_child",
GTK_SIGNAL_FUNC(cb_unselect_child), subtree);
/* This has absolutely no effect, because it is completely ignored

13. Menu Widget 145
in subtrees */
gtk_tree_set_selection_mode (GTK_TREE(subtree),
GTK_SELECTION_SINGLE);
/* Neither does this, but for a rather different reason - the
view_mode and view_line values of a tree are propagated to
subtrees when they are mapped. So, setting it later on would
actually have a (somewhat unpredictable) effect */
gtk_tree_set_view_mode (GTK_TREE(subtree), GTK_TREE_VIEW_ITEM);
/* Set this item’s subtree - note that you cannot do this until
AFTER the item has been added to its parent tree! */
gtk_tree_item_set_subtree (GTK_TREE_ITEM(item), subtree);
for (j = 0; j < 5; j++){
GtkWidget *subitem;
/* Create a subtree item, in much the same way */
subitem = gtk_tree_item_new_with_label (itemnames[j]);
/* Connect all GtkItem:: and GtkTreeItem:: signals */
gtk_signal_connect (GTK_OBJECT(subitem), "select",
GTK_SIGNAL_FUNC(cb_itemsignal), "select");
gtk_signal_connect (GTK_OBJECT(subitem), "deselect",
GTK_SIGNAL_FUNC(cb_itemsignal), "deselect");
gtk_signal_connect (GTK_OBJECT(subitem), "toggle",
GTK_SIGNAL_FUNC(cb_itemsignal), "toggle");
gtk_signal_connect (GTK_OBJECT(subitem), "expand",
GTK_SIGNAL_FUNC(cb_itemsignal), "expand");
gtk_signal_connect (GTK_OBJECT(subitem), "collapse",
GTK_SIGNAL_FUNC(cb_itemsignal), "collapse");
g_print ("-> -> item %s->%p\n", itemnames[j], subitem);
/* Add it to its parent tree */
gtk_tree_append (GTK_TREE(subtree), subitem);
/* Show it */
gtk_widget_show (subitem);
}
}
/* Show the window and loop endlessly */
gtk_widget_show (window);
gtk_main();
return 0;
}
/* example-end */
13 Menu Widget
There are two ways to create menus, there’s the easy way, and there’s the hard way. Both have their uses,but you can usually use the itemfactory (the easy way). The ”hard” way is to create all the menus usingthe calls directly. The easy way is to use the gtk item factory calls. This is much simpler, but there areadvantages and disadvantages to each approach.
The itemfactory is much easier to use, and to add new menus to, although writing a few wrapper functionsto create menus using the manual method could go a long way towards usability. With the itemfactory, it isnot possible to add images or the character ’/’ to the menus.

13. Menu Widget 146
13.1 Manual Menu Creation
In the true tradition of teaching, we’ll show you the hard way first. :)
There are three widgets that go into making a menubar and submenus:
• a menu item, which is what the user wants to select, e.g. ’Save’
• a menu, which acts as a container for the menu items, and
• a menubar, which is a container for each of the individual menus.
This is slightly complicated by the fact that menu item widgets are used for two different things. They areboth the widgets that are packed into the menu, and the widget that is packed into the menubar, which,when selected, activates the menu.
Let’s look at the functions that are used to create menus and menubars. This first function is used to createa new menubar.
GtkWidget *gtk_menu_bar_new( void );
This rather self explanatory function creates a new menubar. You use gtk container add to pack this into awindow, or the box pack functions to pack it into a box - the same as buttons.
GtkWidget *gtk_menu_new( void );
This function returns a pointer to a new menu, it is never actually shown (with gtk widget show), it is justa container for the menu items. Hopefully this will become more clear when you look at the example below.
The next two calls are used to create menu items that are packed into the menu (and menubar).
GtkWidget *gtk_menu_item_new( void );
and
GtkWidget *gtk_menu_item_new_with_label( const char *label );
These calls are used to create the menu items that are to be displayed. Remember to differentiate betweena ”menu” as created with gtk menu new and a ”menu item” as created by the gtk menu item new functions.The menu item will be an actual button with an associated action, whereas a menu will be a containerholding menu items.
The gtk menu new with label and gtk menu new functions are just as you’d expect after reading about thebuttons. One creates a new menu item with a label already packed into it, and the other just creates a blankmenu item.
Once you’ve created a menu item you have to put it into a menu. This is done using the functiongtk menu append. In order to capture when the item is selected by the user, we need to connect to theactivate signal in the usual way. So, if we wanted to create a standard File menu, with the options Open,Save and Quit the code would look something like:
file_menu = gtk_menu_new (); /* Don’t need to show menus */
/* Create the menu items */
open_item = gtk_menu_item_new_with_label ("Open");
save_item = gtk_menu_item_new_with_label ("Save");
quit_item = gtk_menu_item_new_with_label ("Quit");

13. Menu Widget 147
/* Add them to the menu */
gtk_menu_append (GTK_MENU (file_menu), open_item);
gtk_menu_append (GTK_MENU (file_menu), save_item);
gtk_menu_append (GTK_MENU (file_menu), quit_item);
/* Attach the callback functions to the activate signal */
gtk_signal_connect_object (GTK_OBJECT (open_items), "activate",
GTK_SIGNAL_FUNC (menuitem_response),
(gpointer) "file.open");
gtk_signal_connect_object (GTK_OBJECT (save_items), "activate",
GTK_SIGNAL_FUNC (menuitem_response),
(gpointer) "file.save");
/* We can attach the Quit menu item to our exit function */
gtk_signal_connect_object (GTK_OBJECT (quit_items), "activate",
GTK_SIGNAL_FUNC (destroy),
(gpointer) "file.quit");
/* We do need to show menu items */
gtk_widget_show (open_item);
gtk_widget_show (save_item);
gtk_widget_show (quit_item);
At this point we have our menu. Now we need to create a menubar and a menu item for the File entry, towhich we add our menu. The code looks like this:
menu_bar = gtk_menu_bar_new ();
gtk_container_add (GTK_CONTAINER (window), menu_bar);
gtk_widget_show (menu_bar);
file_item = gtk_menu_item_new_with_label ("File");
gtk_widget_show (file_item);
Now we need to associate the menu with file_item. This is done with the function
void gtk_menu_item_set_submenu( GtkMenuItem *menu_item, GtkWidget *submenu );
So, our example would continue with
gtk_menu_item_set_submenu (GTK_MENU_ITEM (file_item), file_menu);
All that is left to do is to add the menu to the menubar, which is accomplished using the function
void gtk_menu_bar_append( GtkMenuBar *menu_bar, GtkWidget *menu_item );
which in our case looks like this:
gtk_menu_bar_append (GTK_MENU_BAR (menu_bar), file_item);
If we wanted the menu right justified on the menubar, such as help menus often are, we can use the followingfunction (again on file_item in the current example) before attaching it to the menubar.
void gtk_menu_item_right_justify( GtkMenuItem *menu_item );
13. Menu Widget 148
Here is a summary of the steps needed to create a menu bar with menus attached:
• Create a new menu using gtk menu new()
• Use multiple calls to gtk menu item new() for each item you wish to have on your menu. And usegtk menu append() to put each of these new items on to the menu.
• Create a menu item using gtk menu item new(). This will be the root of the menu, the text appearinghere will be on the menubar itself.
• Use gtk menu item set submenu() to attach the menu to the root menu item (the one created in theabove step).
• Create a new menubar using gtk menu bar new. This step only needs to be done once when creatinga series of menus on one menu bar.
• Use gtk menu bar append() to put the root menu onto the menubar.
Creating a popup menu is nearly the same. The difference is that the menu is not posted ‘automatically’ bya menubar, but explicitly by calling the function gtk menu popup() from a button-press event, for example.Take these steps:
• Create an event handling function. It needs to have the prototype
static gint handler (GtkWidget *widget, GdkEvent *event);
and it will use the event to find out where to pop up the menu.
• In the event handler, if the event is a mouse button press, treat event as a button event (which it is)and use it as shown in the sample code to pass information to gtk menu popup().
• Bind that event handler to a widget with
gtk_signal_connect_object (GTK_OBJECT (widget), "event", GTK_SIGNAL_FUNC (handler),
GTK_OBJECT (menu));
where widget is the widget you are binding to, handler is the handling function, and menu is a menucreated with gtk menu new(). This can be a menu which is also posted by a menu bar, as shown inthe sample code.
13.2 Manual Menu Example
That should about do it. Let’s take a look at an example to help clarify.
/* example-start menu menu.c */
#include <gtk/gtk.h>
static gint button_press (GtkWidget *, GdkEvent *);
static void menuitem_response (gchar *);
int main( int argc,
char *argv[] )
{
GtkWidget *window;
GtkWidget *menu;

13. Menu Widget 149
GtkWidget *menu_bar;
GtkWidget *root_menu;
GtkWidget *menu_items;
GtkWidget *vbox;
GtkWidget *button;
char buf[128];
int i;
gtk_init (\&argc, \&argv);
/* create a new window */
window = gtk_window_new (GTK_WINDOW_TOPLEVEL);
gtk_widget_set_usize (GTK_WIDGET (window), 200, 100);
gtk_window_set_title (GTK_WINDOW (window), "GTK Menu Test");
gtk_signal_connect (GTK_OBJECT (window), "delete_event",
(GtkSignalFunc) gtk_main_quit, NULL);
/* Init the menu-widget, and remember -- never
* gtk_show_widget() the menu widget!!
* This is the menu that holds the menu items, the one that
* will pop up when you click on the "Root Menu" in the app */
menu = gtk_menu_new ();
/* Next we make a little loop that makes three menu-entries for "test-menu".
* Notice the call to gtk_menu_append. Here we are adding a list of
* menu items to our menu. Normally, we’d also catch the "clicked"
* signal on each of the menu items and setup a callback for it,
* but it’s omitted here to save space. */
for (i = 0; i < 3; i++)
{
/* Copy the names to the buf. */
sprintf (buf, "Test-undermenu - %d", i);
/* Create a new menu-item with a name... */
menu_items = gtk_menu_item_new_with_label (buf);
/* ...and add it to the menu. */
gtk_menu_append (GTK_MENU (menu), menu_items);
/* Do something interesting when the menuitem is selected */
gtk_signal_connect_object (GTK_OBJECT (menu_items), "activate",
GTK_SIGNAL_FUNC (menuitem_response), (gpointer) g_strdup (buf));
/* Show the widget */
gtk_widget_show (menu_items);
}
/* This is the root menu, and will be the label
* displayed on the menu bar. There won’t be a signal handler attached,
* as it only pops up the rest of the menu when pressed. */
root_menu = gtk_menu_item_new_with_label ("Root Menu");
gtk_widget_show (root_menu);
/* Now we specify that we want our newly created "menu" to be the menu
* for the "root menu" */

13. Menu Widget 150
gtk_menu_item_set_submenu (GTK_MENU_ITEM (root_menu), menu);
/* A vbox to put a menu and a button in: */
vbox = gtk_vbox_new (FALSE, 0);
gtk_container_add (GTK_CONTAINER (window), vbox);
gtk_widget_show (vbox);
/* Create a menu-bar to hold the menus and add it to our main window */
menu_bar = gtk_menu_bar_new ();
gtk_box_pack_start (GTK_BOX (vbox), menu_bar, FALSE, FALSE, 2);
gtk_widget_show (menu_bar);
/* Create a button to which to attach menu as a popup */
button = gtk_button_new_with_label ("press me");
gtk_signal_connect_object (GTK_OBJECT (button), "event",
GTK_SIGNAL_FUNC (button_press), GTK_OBJECT (menu));
gtk_box_pack_end (GTK_BOX (vbox), button, TRUE, TRUE, 2);
gtk_widget_show (button);
/* And finally we append the menu-item to the menu-bar -- this is the
* "root" menu-item I have been raving about =) */
gtk_menu_bar_append (GTK_MENU_BAR (menu_bar), root_menu);
/* always display the window as the last step so it all splashes on
* the screen at once. */
gtk_widget_show (window);
gtk_main ();
return(0);
}
/* Respond to a button-press by posting a menu passed in as widget.
*
* Note that the "widget" argument is the menu being posted, NOT
* the button that was pressed.
*/
static gint button_press (GtkWidget *widget, GdkEvent *event)
{
if (event->type == GDK_BUTTON_PRESS) {
GdkEventButton *bevent = (GdkEventButton *) event;
gtk_menu_popup (GTK_MENU (widget), NULL, NULL, NULL, NULL,
bevent->button, bevent->time);
/* Tell calling code that we have handled this event; the buck
* stops here. */
return TRUE;
}
/* Tell calling code that we have not handled this event; pass it on. */
return FALSE;
}
/* Print a string when a menu item is selected */
13. Menu Widget 151
static void menuitem_response (gchar *string)
{
printf ("%s\n", string);
}
/* example-end */
You may also set a menu item to be insensitive and, using an accelerator table, bind keys to menu functions.
13.3 Using GtkItemFactory
Now that we’ve shown you the hard way, here’s how you do it using the gtk item factory calls.
13.4 Item Factory Example
Here is an example using the GTK item factory.
/* example-start menu itemfactory.c */
#include <gtk/gtk.h>
#include <strings.h>
/* Obligatory basic callback */
static void print_hello( GtkWidget *w,
gpointer data )
{
g_message ("Hello, World!\n");
}
/* This is the GtkItemFactoryEntry structure used to generate new menus.
Item 1: The menu path. The letter after the underscore indicates an
accelerator key once the menu is open.
Item 2: The accelerator key for the entry
Item 3: The callback function.
Item 4: The callback action. This changes the parameters with
which the function is called. The default is 0.
Item 5: The item type, used to define what kind of an item it is.
Here are the possible values:
NULL -> "<Item>"
"" -> "<Item>"
"<Title>" -> create a title item
"<Item>" -> create a simple item
"<CheckItem>" -> create a check item
"<ToggleItem>" -> create a toggle item
"<RadioItem>" -> create a radio item
<path> -> path of a radio item to link against
"<Separator>" -> create a separator
"<Branch>" -> create an item to hold sub items (optional)
"<LastBranch>" -> create a right justified branch
*/
static GtkItemFactoryEntry menu_items[] = {
{ "/_File", NULL, NULL, 0, "<Branch>" },
{ "/File/_New", "<control>N", print_hello, 0, NULL },
{ "/File/_Open", "<control>O", print_hello, 0, NULL },

13. Menu Widget 152
{ "/File/_Save", "<control>S", print_hello, 0, NULL },
{ "/File/Save _As", NULL, NULL, 0, NULL },
{ "/File/sep1", NULL, NULL, 0, "<Separator>" },
{ "/File/Quit", "<control>Q", gtk_main_quit, 0, NULL },
{ "/_Options", NULL, NULL, 0, "<Branch>" },
{ "/Options/Test", NULL, NULL, 0, NULL },
{ "/_Help", NULL, NULL, 0, "<LastBranch>" },
{ "/_Help/About", NULL, NULL, 0, NULL },
};
void get_main_menu( GtkWidget *window,
GtkWidget **menubar )
{
GtkItemFactory *item_factory;
GtkAccelGroup *accel_group;
gint nmenu_items = sizeof (menu_items) / sizeof (menu_items[0]);
accel_group = gtk_accel_group_new ();
/* This function initializes the item factory.
Param 1: The type of menu - can be GTK_TYPE_MENU_BAR, GTK_TYPE_MENU,
or GTK_TYPE_OPTION_MENU.
Param 2: The path of the menu.
Param 3: A pointer to a gtk_accel_group. The item factory sets up
the accelerator table while generating menus.
*/
item_factory = gtk_item_factory_new (GTK_TYPE_MENU_BAR, "<main>",
accel_group);
/* This function generates the menu items. Pass the item factory,
the number of items in the array, the array itself, and any
callback data for the the menu items. */
gtk_item_factory_create_items (item_factory, nmenu_items, menu_items, NULL);
/* Attach the new accelerator group to the window. */
gtk_accel_group_attach (accel_group, GTK_OBJECT (window));
if (menubar)
/* Finally, return the actual menu bar created by the item factory. */
*menubar = gtk_item_factory_get_widget (item_factory, "<main>");
}
int main( int argc,
char *argv[] )
{
GtkWidget *window;
GtkWidget *main_vbox;
GtkWidget *menubar;
gtk_init (\&argc, \&argv);
window = gtk_window_new (GTK_WINDOW_TOPLEVEL);
gtk_signal_connect (GTK_OBJECT (window), "destroy",
GTK_SIGNAL_FUNC (gtk_main_quit),
"WM destroy");

14. Text Widget 153
gtk_window_set_title (GTK_WINDOW(window), "Item Factory");
gtk_widget_set_usize (GTK_WIDGET(window), 300, 200);
main_vbox = gtk_vbox_new (FALSE, 1);
gtk_container_border_width (GTK_CONTAINER (main_vbox), 1);
gtk_container_add (GTK_CONTAINER (window), main_vbox);
gtk_widget_show (main_vbox);
get_main_menu (window, \&menubar);
gtk_box_pack_start (GTK_BOX (main_vbox), menubar, FALSE, TRUE, 0);
gtk_widget_show (menubar);
gtk_widget_show (window);
gtk_main ();
return(0);
}
/* example-end */
For now, there’s only this example. An explanation and lots ’o’ comments will follow later.
14 Text Widget
The Text widget allows multiple lines of text to be displayed and edited. It supports both multi-colored andmulti-font text, allowing them to be mixed in any way we wish. It also has a wide set of key based textediting commands, which are compatible with Emacs.
The text widget supports full cut-and-paste facilities, including the use of double- and triple-click to selecta word and a whole line, respectively.
14.1 Creating and Configuring a Text box
There is only one function for creating a new Text widget.
GtkWidget *gtk_text_new( GtkAdjustment *hadj,
GtkAdjustment *vadj );
The arguments allow us to give the Text widget pointers to Adjustments that can be used to track theviewing position of the widget. Passing NULL values to either or both of these arguments will cause thegtk text new function to create its own.
void gtk_text_set_adjustments( GtkText *text,
GtkAdjustment *hadj,
GtkAdjustment *vadj );
The above function allows the horizontal and vertical adjustments of a text widget to be changed at anytime.
The text widget will not automatically create its own scrollbars when the amount of text to be displayed istoo long for the display window. We therefore have to create and add them to the display layout ourselves.
vscrollbar = gtk_vscrollbar_new (GTK_TEXT(text)->vadj);
gtk_box_pack_start(GTK_BOX(hbox), vscrollbar, FALSE, FALSE, 0);
gtk_widget_show (vscrollbar);

14. Text Widget 154
The above code snippet creates a new vertical scrollbar, and attaches it to the vertical adjustment of thetext widget, text. It then packs it into a box in the normal way.
Note, currently the GtkText widget does not support horizontal scrollbars.
There are two main ways in which a Text widget can be used: to allow the user to edit a body of text, orto allow us to display multiple lines of text to the user. In order for us to switch between these modes ofoperation, the text widget has the following function:
void gtk_text_set_editable( GtkText *text,
gint editable );
The editable argument is a TRUE or FALSE value that specifies whether the user is permitted to editthe contents of the Text widget. When the text widget is editable, it will display a cursor at the currentinsertion point.
You are not, however, restricted to just using the text widget in these two modes. You can toggle the editablestate of the text widget at any time, and can insert text at any time.
The text widget wraps lines of text that are too long to fit onto a single line of the display window. Itsdefault behaviour is to break words across line breaks. This can be changed using the next function:
void gtk_text_set_word_wrap( GtkText *text,
gint word_wrap );
Using this function allows us to specify that the text widget should wrap long lines on word boundaries. Theword_wrap argument is a TRUE or FALSE value.
14.2 Text Manipulation
The current insertion point of a Text widget can be set using
void gtk_text_set_point( GtkText *text,
guint index );
where index is the position to set the insertion point.
Analogous to this is the function for getting the current insertion point:
guint gtk_text_get_point( GtkText *text );
A function that is useful in combination with the above two functions is
guint gtk_text_get_length( GtkText *text );
which returns the current length of the Text widget. The length is the number of characters that are withinthe text block of the widget, including characters such as carriage-return, which marks the end of lines.
In order to insert text at the current insertion point of a Text widget, the function gtk text insert is used,which also allows us to specify background and foreground colors and a font for the text.
void gtk_text_insert( GtkText *text,
GdkFont *font,
GdkColor *fore,
GdkColor *back,
const char *chars,
gint length );

14. Text Widget 155
Passing a value of NULL in as the value for the foreground color, background colour or font will result in thevalues set within the widget style to be used. Using a value of -1 for the length parameter will result in thewhole of the text string given being inserted.
The text widget is one of the few within GTK that redraws itself dynamically, outside of the gtk mainfunction. This means that all changes to the contents of the text widget take effect immediately. This maybe undesirable when performing multiple changes to the text widget. In order to allow us to perform multipleupdates to the text widget without it continuously redrawing, we can freeze the widget, which temporarilystops it from automatically redrawing itself every time it is changed. We can then thaw the widget after ourupdates are complete.
The following two functions perform this freeze and thaw action:
void gtk_text_freeze( GtkText *text );
void gtk_text_thaw( GtkText *text );
Text is deleted from the text widget relative to the current insertion point by the following two functions.The return value is a TRUE or FALSE indicator of whether the operation was successful.
gint gtk_text_backward_delete( GtkText *text,
guint nchars );
gint gtk_text_forward_delete ( GtkText *text,
guint nchars );
If you want to retrieve the contents of the text widget, then the macro GTK_TEXT_INDEX(t, index) allowsyou to retrieve the character at position index within the text widget t.
To retrieve larger blocks of text, we can use the function
gchar *gtk_editable_get_chars( GtkEditable *editable,
gint start_pos,
gint end_pos );
This is a function of the parent class of the text widget. A value of -1 as end_pos signifies the end of thetext. The index of the text starts at 0.
The function allocates a new chunk of memory for the text block, so don’t forget to free it with a call tog free when you have finished with it.
14.3 Keyboard Shortcuts
The text widget has a number of pre-installed keyboard shortcuts for common editing, motion and selectionfunctions. These are accessed using Control and Alt key combinations.
In addition to these, holding down the Control key whilst using cursor key movement will move the cursorby words rather than characters. Holding down Shift whilst using cursor movement will extend the selection.
14.3.1 Motion Shortcuts
• Ctrl-A Beginning of line
• Ctrl-E End of line
• Ctrl-N Next Line

14. Text Widget 156
• Ctrl-P Previous Line
• Ctrl-B Backward one character
• Ctrl-F Forward one character
• Alt-B Backward one word
• Alt-F Forward one word
14.3.2 Editing Shortcuts
• Ctrl-H Delete Backward Character (Backspace)
• Ctrl-D Delete Forward Character (Delete)
• Ctrl-W Delete Backward Word
• Alt-D Delete Forward Word
• Ctrl-K Delete to end of line
• Ctrl-U Delete line
14.3.3 Selection Shortcuts
• Ctrl-X Cut to clipboard
• Ctrl-C Copy to clipboard
• Ctrl-V Paste from clipboard
14.4 A GtkText Example
/* example-start text text.c */
/* text.c */
#include <stdio.h>
#include <gtk/gtk.h>
void text_toggle_editable (GtkWidget *checkbutton,
GtkWidget *text)
{
gtk_text_set_editable(GTK_TEXT(text),
GTK_TOGGLE_BUTTON(checkbutton)->active);
}
void text_toggle_word_wrap (GtkWidget *checkbutton,
GtkWidget *text)
{
gtk_text_set_word_wrap(GTK_TEXT(text),
GTK_TOGGLE_BUTTON(checkbutton)->active);
}
void close_application( GtkWidget *widget, gpointer data )
{
gtk_main_quit();

14. Text Widget 157
}
int main (int argc, char *argv[])
{
GtkWidget *window;
GtkWidget *box1;
GtkWidget *box2;
GtkWidget *hbox;
GtkWidget *button;
GtkWidget *check;
GtkWidget *separator;
GtkWidget *table;
GtkWidget *vscrollbar;
GtkWidget *text;
GdkColormap *cmap;
GdkColor colour;
GdkFont *fixed_font;
FILE *infile;
gtk_init (\&argc, \&argv);
window = gtk_window_new (GTK_WINDOW_TOPLEVEL);
gtk_widget_set_usize (window, 600, 500);
gtk_window_set_policy (GTK_WINDOW(window), TRUE, TRUE, FALSE);
gtk_signal_connect (GTK_OBJECT (window), "destroy",
GTK_SIGNAL_FUNC(close_application),
NULL);
gtk_window_set_title (GTK_WINDOW (window), "Text Widget Example");
gtk_container_set_border_width (GTK_CONTAINER (window), 0);
box1 = gtk_vbox_new (FALSE, 0);
gtk_container_add (GTK_CONTAINER (window), box1);
gtk_widget_show (box1);
box2 = gtk_vbox_new (FALSE, 10);
gtk_container_set_border_width (GTK_CONTAINER (box2), 10);
gtk_box_pack_start (GTK_BOX (box1), box2, TRUE, TRUE, 0);
gtk_widget_show (box2);
table = gtk_table_new (2, 2, FALSE);
gtk_table_set_row_spacing (GTK_TABLE (table), 0, 2);
gtk_table_set_col_spacing (GTK_TABLE (table), 0, 2);
gtk_box_pack_start (GTK_BOX (box2), table, TRUE, TRUE, 0);
gtk_widget_show (table);
/* Create the GtkText widget */
text = gtk_text_new (NULL, NULL);
gtk_text_set_editable (GTK_TEXT (text), TRUE);
gtk_table_attach (GTK_TABLE (table), text, 0, 1, 0, 1,
GTK_EXPAND | GTK_SHRINK | GTK_FILL,
GTK_EXPAND | GTK_SHRINK | GTK_FILL, 0, 0);
gtk_widget_show (text);

14. Text Widget 158
/* Add a vertical scrollbar to the GtkText widget */
vscrollbar = gtk_vscrollbar_new (GTK_TEXT (text)->vadj);
gtk_table_attach (GTK_TABLE (table), vscrollbar, 1, 2, 0, 1,
GTK_FILL, GTK_EXPAND | GTK_SHRINK | GTK_FILL, 0, 0);
gtk_widget_show (vscrollbar);
/* Get the system colour map and allocate the colour red */
cmap = gdk_colormap_get_system();
colour.red = 0xffff;
colour.green = 0;
colour.blue = 0;
if (!gdk_color_alloc(cmap, \&colour)) {
g_error("couldn’t allocate colour");
}
/* Load a fixed font */
fixed_font = gdk_font_load ("-misc-fixed-medium-r-*-*-*-140-*-*-*-*-*-*");
/* Realizing a widget creates a window for it,
* ready for us to insert some text */
gtk_widget_realize (text);
/* Freeze the text widget, ready for multiple updates */
gtk_text_freeze (GTK_TEXT (text));
/* Insert some coloured text */
gtk_text_insert (GTK_TEXT (text), NULL, \&text->style->black, NULL,
"Supports ", -1);
gtk_text_insert (GTK_TEXT (text), NULL, \&colour, NULL,
"colored ", -1);
gtk_text_insert (GTK_TEXT (text), NULL, \&text->style->black, NULL,
"text and different ", -1);
gtk_text_insert (GTK_TEXT (text), fixed_font, \&text->style->black, NULL,
"fonts\n\n", -1);
/* Load the file text.c into the text window */
infile = fopen("text.c", "r");
if (infile) {
char buffer[1024];
int nchars;
while (1)
{
nchars = fread(buffer, 1, 1024, infile);
gtk_text_insert (GTK_TEXT (text), fixed_font, NULL,
NULL, buffer, nchars);
if (nchars < 1024)
break;
}
fclose (infile);
}
/* Thaw the text widget, allowing the updates to become visible */

15. Undocumented Widgets 159
gtk_text_thaw (GTK_TEXT (text));
hbox = gtk_hbutton_box_new ();
gtk_box_pack_start (GTK_BOX (box2), hbox, FALSE, FALSE, 0);
gtk_widget_show (hbox);
check = gtk_check_button_new_with_label("Editable");
gtk_box_pack_start (GTK_BOX (hbox), check, FALSE, FALSE, 0);
gtk_signal_connect (GTK_OBJECT(check), "toggled",
GTK_SIGNAL_FUNC(text_toggle_editable), text);
gtk_toggle_button_set_active(GTK_TOGGLE_BUTTON(check), TRUE);
gtk_widget_show (check);
check = gtk_check_button_new_with_label("Wrap Words");
gtk_box_pack_start (GTK_BOX (hbox), check, FALSE, TRUE, 0);
gtk_signal_connect (GTK_OBJECT(check), "toggled",
GTK_SIGNAL_FUNC(text_toggle_word_wrap), text);
gtk_toggle_button_set_active(GTK_TOGGLE_BUTTON(check), FALSE);
gtk_widget_show (check);
separator = gtk_hseparator_new ();
gtk_box_pack_start (GTK_BOX (box1), separator, FALSE, TRUE, 0);
gtk_widget_show (separator);
box2 = gtk_vbox_new (FALSE, 10);
gtk_container_set_border_width (GTK_CONTAINER (box2), 10);
gtk_box_pack_start (GTK_BOX (box1), box2, FALSE, TRUE, 0);
gtk_widget_show (box2);
button = gtk_button_new_with_label ("close");
gtk_signal_connect (GTK_OBJECT (button), "clicked",
GTK_SIGNAL_FUNC(close_application),
NULL);
gtk_box_pack_start (GTK_BOX (box2), button, TRUE, TRUE, 0);
GTK_WIDGET_SET_FLAGS (button, GTK_CAN_DEFAULT);
gtk_widget_grab_default (button);
gtk_widget_show (button);
gtk_widget_show (window);
gtk_main ();
return(0);
}
/* example-end */
15 Undocumented Widgets
These all require authors! :) Please consider contributing to our tutorial.
If you must use one of these widgets that are undocumented, I strongly suggest you take a look at theirrespective header files in the GTK distribution. GTK’s function names are very descriptive. Once you havean understanding of how things work, it’s not difficult to figure out how to use a widget simply by looking atits function declarations. This, along with a few examples from others’ code, and it should be no problem.
When you do come to understand all the functions of a new undocumented widget, please consider writinga tutorial on it so others may benefit from your time.

16. Setting Widget Attributes 160
15.1 Calendar
15.2 CTree
15.3 Curves
15.4 Drawing Area
15.5 Font Selection Dialog
15.6 Gamma Curve
15.7 Image
15.8 Packer
15.9 Plugs and Sockets
15.10 Preview
16 Setting Widget Attributes
This describes the functions used to operate on widgets. These can be used to set style, padding, size etc.
(Maybe I should make a whole section on accelerators.)
void gtk_widget_install_accelerator( GtkWidget *widget,
GtkAcceleratorTable *table,
gchar *signal_name,
gchar key,
guint8 modifiers );
void gtk_widget_remove_accelerator ( GtkWidget *widget,
GtkAcceleratorTable *table,
gchar *signal_name);
void gtk_widget_activate( GtkWidget *widget );
void gtk_widget_set_name( GtkWidget *widget,
gchar *name );
gchar *gtk_widget_get_name( GtkWidget *widget );
void gtk_widget_set_sensitive( GtkWidget *widget,
gint sensitive );
void gtk_widget_set_style( GtkWidget *widget,
GtkStyle *style );
GtkStyle *gtk_widget_get_style( GtkWidget *widget );
GtkStyle *gtk_widget_get_default_style( void );
void gtk_widget_set_uposition( GtkWidget *widget,

17. Timeouts, IO and Idle Functions 161
gint x,
gint y );
void gtk_widget_set_usize( GtkWidget *widget,
gint width,
gint height );
void gtk_widget_grab_focus( GtkWidget *widget );
void gtk_widget_show( GtkWidget *widget );
void gtk_widget_hide( GtkWidget *widget );
17 Timeouts, IO and Idle Functions
17.1 Timeouts
You may be wondering how you make GTK do useful work when in gtk main. Well, you have severaloptions. Using the following functions you can create a timeout function that will be called every ”interval”milliseconds.
gint gtk_timeout_add( guint32 interval,
GtkFunction function,
gpointer data );
The first argument is the number of milliseconds between calls to your function. The second argument isthe function you wish to have called, and the third, the data passed to this callback function. The returnvalue is an integer ”tag” which may be used to stop the timeout by calling:
void gtk_timeout_remove( gint tag );
You may also stop the timeout function by returning zero or FALSE from your callback function. Obviouslythis means if you want your function to continue to be called, it should return a non-zero value, i.e. TRUE.
The declaration of your callback should look something like this:
gint timeout_callback( gpointer data );
17.2 Monitoring IO
A nifty feature of GDK (the library that underlies GTK), is the ability to have it check for data on a filedescriptor for you (as returned by open(2) or socket(2)). This is especially useful for networking applications.The function:
gint gdk_input_add( gint source,
GdkInputCondition condition,
GdkInputFunction function,
gpointer data );
Where the first argument is the file descriptor you wish to have watched, and the second specifies what youwant GDK to look for. This may be one of:
• GDK INPUT READ - Call your function when there is data ready for reading on your file descriptor.

18. Advanced Event and Signal Handling 162
• GDK INPUT WRITE - Call your function when the file descriptor is ready for writing.
As I’m sure you’ve figured out already, the third argument is the function you wish to have called when theabove conditions are satisfied, and the fourth is the data to pass to this function.
The return value is a tag that may be used to stop GDK from monitoring this file descriptor using thefollowing function.
void gdk_input_remove( gint tag );
The callback function should be declared as:
void input_callback( gpointer data,
gint source,
GdkInputCondition condition );
Where source and condition are as specified above.
17.3 Idle Functions
What if you have a function you want called when nothing else is happening ?
gint gtk_idle_add( GtkFunction function,
gpointer data );
This causes GTK to call the specified function whenever nothing else is happening.
void gtk_idle_remove( gint tag );
I won’t explain the meaning of the arguments as they follow very much like the ones above. The functionpointed to by the first argument to gtk idle add will be called whenever the opportunity arises. As with theothers, returning FALSE will stop the idle function from being called.
18 Advanced Event and Signal Handling
18.1 Signal Functions
18.1.1 Connecting and Disconnecting Signal Handlers
guint gtk_signal_connect( GtkObject *object,
const gchar *name,
GtkSignalFunc func,
gpointer func_data );
guint gtk_signal_connect_after( GtkObject *object,
const gchar *name,
GtkSignalFunc func,
gpointer func_data );
guint gtk_signal_connect_object( GtkObject *object,
const gchar *name,
GtkSignalFunc func,
GtkObject *slot_object );
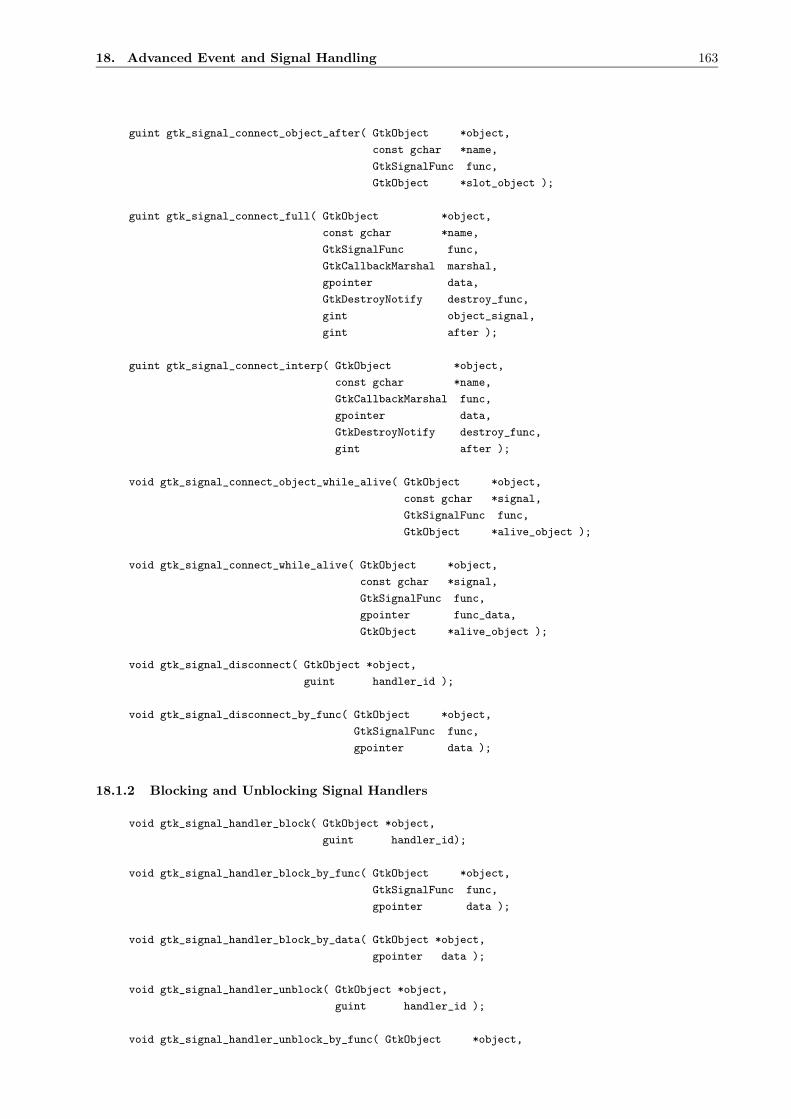
18. Advanced Event and Signal Handling 163
guint gtk_signal_connect_object_after( GtkObject *object,
const gchar *name,
GtkSignalFunc func,
GtkObject *slot_object );
guint gtk_signal_connect_full( GtkObject *object,
const gchar *name,
GtkSignalFunc func,
GtkCallbackMarshal marshal,
gpointer data,
GtkDestroyNotify destroy_func,
gint object_signal,
gint after );
guint gtk_signal_connect_interp( GtkObject *object,
const gchar *name,
GtkCallbackMarshal func,
gpointer data,
GtkDestroyNotify destroy_func,
gint after );
void gtk_signal_connect_object_while_alive( GtkObject *object,
const gchar *signal,
GtkSignalFunc func,
GtkObject *alive_object );
void gtk_signal_connect_while_alive( GtkObject *object,
const gchar *signal,
GtkSignalFunc func,
gpointer func_data,
GtkObject *alive_object );
void gtk_signal_disconnect( GtkObject *object,
guint handler_id );
void gtk_signal_disconnect_by_func( GtkObject *object,
GtkSignalFunc func,
gpointer data );
18.1.2 Blocking and Unblocking Signal Handlers
void gtk_signal_handler_block( GtkObject *object,
guint handler_id);
void gtk_signal_handler_block_by_func( GtkObject *object,
GtkSignalFunc func,
gpointer data );
void gtk_signal_handler_block_by_data( GtkObject *object,
gpointer data );
void gtk_signal_handler_unblock( GtkObject *object,
guint handler_id );
void gtk_signal_handler_unblock_by_func( GtkObject *object,

18. Advanced Event and Signal Handling 164
GtkSignalFunc func,
gpointer data );
void gtk_signal_handler_unblock_by_data( GtkObject *object,
gpointer data );
18.1.3 Emitting and Stopping Signals
void gtk_signal_emit( GtkObject *object,
guint signal_id,
... );
void gtk_signal_emit_by_name( GtkObject *object,
const gchar *name,
... );
void gtk_signal_emitv( GtkObject *object,
guint signal_id,
GtkArg *params );
void gtk_signal_emitv_by_name( GtkObject *object,
const gchar *name,
GtkArg *params );
guint gtk_signal_n_emissions( GtkObject *object,
guint signal_id );
guint gtk_signal_n_emissions_by_name( GtkObject *object,
const gchar *name );
void gtk_signal_emit_stop( GtkObject *object,
guint signal_id );
void gtk_signal_emit_stop_by_name( GtkObject *object,
const gchar *name );
18.2 Signal Emission and Propagation
Signal emission is the process wherby GTK runs all handlers for a specific object and signal.
First, note that the return value from a signal emission is the return value of the last handler executed. Sinceevent signals are all of type GTK RUN LAST, this will be the default (GTK supplied) default handler, unlessyou connect with gtk signal connect after().
The way an event (say GTK BUTTON PRESS) is handled, is:
• Start with the widget where the event occured.
• Emit the generic ”event” signal. If that signal handler returns a value of TRUE, stop all processing.
• Otherwise, emit a specific, ”button press event” signal. If that returns TRUE, stop all processing.
• Otherwise, go to the widget’s parent, and repeat the above steps.
• Contimue until some signal handler returns TRUE, or until the top-level widget is reached.
Some consequences of the above are:
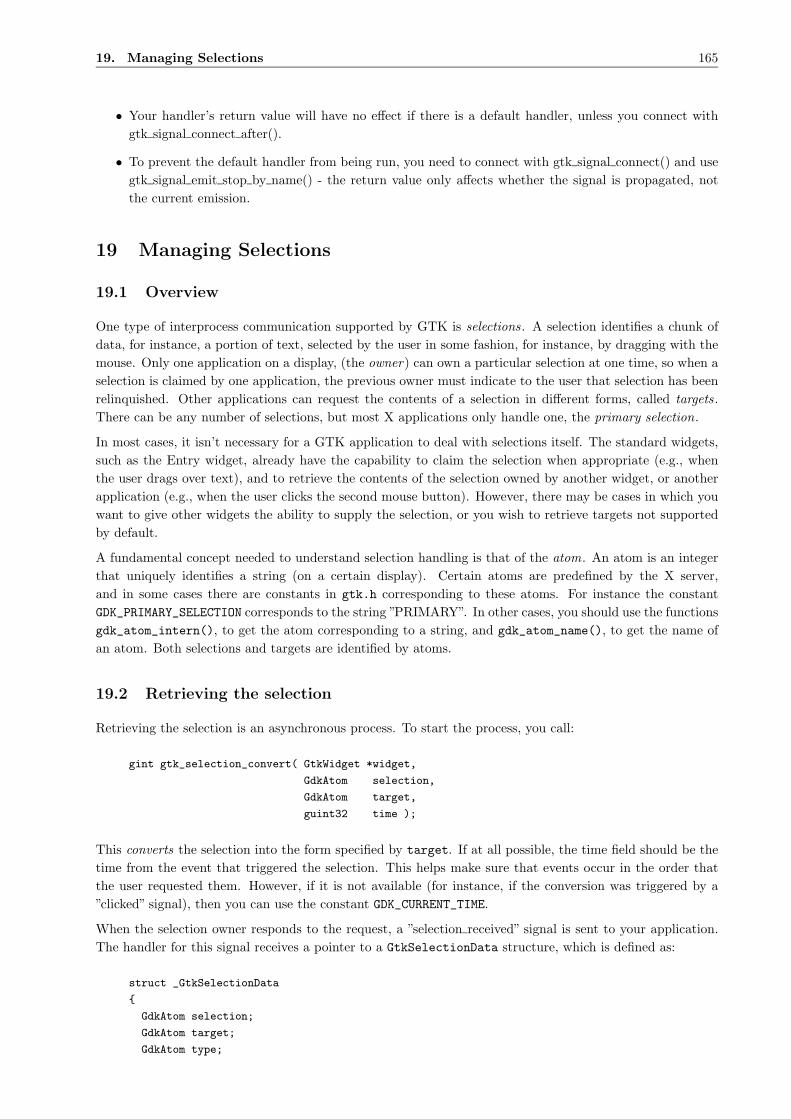
19. Managing Selections 165
• Your handler’s return value will have no effect if there is a default handler, unless you connect withgtk signal connect after().
• To prevent the default handler from being run, you need to connect with gtk signal connect() and usegtk signal emit stop by name() - the return value only affects whether the signal is propagated, notthe current emission.
19 Managing Selections
19.1 Overview
One type of interprocess communication supported by GTK is selections. A selection identifies a chunk ofdata, for instance, a portion of text, selected by the user in some fashion, for instance, by dragging with themouse. Only one application on a display, (the owner) can own a particular selection at one time, so when aselection is claimed by one application, the previous owner must indicate to the user that selection has beenrelinquished. Other applications can request the contents of a selection in different forms, called targets.There can be any number of selections, but most X applications only handle one, the primary selection.
In most cases, it isn’t necessary for a GTK application to deal with selections itself. The standard widgets,such as the Entry widget, already have the capability to claim the selection when appropriate (e.g., whenthe user drags over text), and to retrieve the contents of the selection owned by another widget, or anotherapplication (e.g., when the user clicks the second mouse button). However, there may be cases in which youwant to give other widgets the ability to supply the selection, or you wish to retrieve targets not supportedby default.
A fundamental concept needed to understand selection handling is that of the atom. An atom is an integerthat uniquely identifies a string (on a certain display). Certain atoms are predefined by the X server,and in some cases there are constants in gtk.h corresponding to these atoms. For instance the constantGDK_PRIMARY_SELECTION corresponds to the string ”PRIMARY”. In other cases, you should use the functionsgdk_atom_intern(), to get the atom corresponding to a string, and gdk_atom_name(), to get the name ofan atom. Both selections and targets are identified by atoms.
19.2 Retrieving the selection
Retrieving the selection is an asynchronous process. To start the process, you call:
gint gtk_selection_convert( GtkWidget *widget,
GdkAtom selection,
GdkAtom target,
guint32 time );
This converts the selection into the form specified by target. If at all possible, the time field should be thetime from the event that triggered the selection. This helps make sure that events occur in the order thatthe user requested them. However, if it is not available (for instance, if the conversion was triggered by a”clicked” signal), then you can use the constant GDK_CURRENT_TIME.
When the selection owner responds to the request, a ”selection received” signal is sent to your application.The handler for this signal receives a pointer to a GtkSelectionData structure, which is defined as:
struct _GtkSelectionData
{
GdkAtom selection;
GdkAtom target;
GdkAtom type;

19. Managing Selections 166
gint format;
guchar *data;
gint length;
};
selection and target are the values you gave in your gtk_selection_convert() call. type is an atomthat identifies the type of data returned by the selection owner. Some possible values are ”STRING”, a stringof latin-1 characters, ”ATOM”, a series of atoms, ”INTEGER”, an integer, etc. Most targets can only returnone type. format gives the length of the units (for instance characters) in bits. Usually, you don’t care aboutthis when receiving data. data is a pointer to the returned data, and length gives the length of the returneddata, in bytes. If length is negative, then an error occurred and the selection could not be retrieved. Thismight happen if no application owned the selection, or if you requested a target that the application didn’tsupport. The buffer is actually guaranteed to be one byte longer than length; the extra byte will always bezero, so it isn’t necessary to make a copy of strings just to null terminate them.
In the following example, we retrieve the special target ”TARGETS”, which is a list of all targets into whichthe selection can be converted.
/* example-start selection gettargets.c */
#include <gtk/gtk.h>
void selection_received (GtkWidget *widget,
GtkSelectionData *selection_data,
gpointer data);
/* Signal handler invoked when user clicks on the "Get Targets" button */
void
get_targets (GtkWidget *widget, gpointer data)
{
static GdkAtom targets_atom = GDK_NONE;
/* Get the atom corresponding to the string "TARGETS" */
if (targets_atom == GDK_NONE)
targets_atom = gdk_atom_intern ("TARGETS", FALSE);
/* And request the "TARGETS" target for the primary selection */
gtk_selection_convert (widget, GDK_SELECTION_PRIMARY, targets_atom,
GDK_CURRENT_TIME);
}
/* Signal handler called when the selections owner returns the data */
void
selection_received (GtkWidget *widget, GtkSelectionData *selection_data,
gpointer data)
{
GdkAtom *atoms;
GList *item_list;
int i;
/* **** IMPORTANT **** Check to see if retrieval succeeded */
if (selection_data->length < 0)
{
g_print ("Selection retrieval failed\n");
return;
}

19. Managing Selections 167
/* Make sure we got the data in the expected form */
if (selection_data->type != GDK_SELECTION_TYPE_ATOM)
{
g_print ("Selection \"TARGETS\" was not returned as atoms!\n");
return;
}
/* Print out the atoms we received */
atoms = (GdkAtom *)selection_data->data;
item_list = NULL;
for (i=0; i<selection_data->length/sizeof(GdkAtom); i++)
{
char *name;
name = gdk_atom_name (atoms[i]);
if (name != NULL)
g_print ("%s\n",name);
else
g_print ("(bad atom)\n");
}
return;
}
int
main (int argc, char *argv[])
{
GtkWidget *window;
GtkWidget *button;
gtk_init (\&argc, \&argv);
/* Create the toplevel window */
window = gtk_window_new (GTK_WINDOW_TOPLEVEL);
gtk_window_set_title (GTK_WINDOW (window), "Event Box");
gtk_container_set_border_width (GTK_CONTAINER (window), 10);
gtk_signal_connect (GTK_OBJECT (window), "destroy",
GTK_SIGNAL_FUNC (gtk_exit), NULL);
/* Create a button the user can click to get targets */
button = gtk_button_new_with_label ("Get Targets");
gtk_container_add (GTK_CONTAINER (window), button);
gtk_signal_connect (GTK_OBJECT(button), "clicked",
GTK_SIGNAL_FUNC (get_targets), NULL);
gtk_signal_connect (GTK_OBJECT(button), "selection_received",
GTK_SIGNAL_FUNC (selection_received), NULL);
gtk_widget_show (button);
gtk_widget_show (window);
gtk_main ();
return 0;

19. Managing Selections 168
}
/* example-end */
19.3 Supplying the selection
Supplying the selection is a bit more complicated. You must register handlers that will be called when yourselection is requested. For each selection/target pair you will handle, you make a call to:
void gtk_selection_add_handler( GtkWidget *widget,
GdkAtom selection,
GdkAtom target,
GtkSelectionFunction function,
GtkRemoveFunction remove_func,
gpointer data );
widget, selection, and target identify the requests this handler will manage. remove_func, if not NULL,will be called when the signal handler is removed. This is useful, for instance, for interpreted languageswhich need to keep track of a reference count for data.
The callback function has the signature:
typedef void (*GtkSelectionFunction)( GtkWidget *widget,
GtkSelectionData *selection_data,
gpointer data );
The GtkSelectionData is the same as above, but this time, we’re responsible for filling in the fields type,format, data, and length. (The format field is actually important here - the X server uses it to figure outwhether the data needs to be byte-swapped or not. Usually it will be 8 - i.e. a character - or 32 - i.e. a.integer.) This is done by calling the function:
void gtk_selection_data_set( GtkSelectionData *selection_data,
GdkAtom type,
gint format,
guchar *data,
gint length );
This function takes care of properly making a copy of the data so that you don’t have to worry about keepingit around. (You should not fill in the fields of the GtkSelectionData structure by hand.)
When prompted by the user, you claim ownership of the selection by calling:
gint gtk_selection_owner_set( GtkWidget *widget,
GdkAtom selection,
guint32 time );
If another application claims ownership of the selection, you will receive a ”selection clear event”.
As an example of supplying the selection, the following program adds selection functionality to a togglebutton. When the toggle button is depressed, the program claims the primary selection. The only targetsupported (aside from certain targets like ”TARGETS” supplied by GTK itself), is the ”STRING” target.When this target is requested, a string representation of the time is returned.
/* example-start selection setselection.c */
#include <gtk/gtk.h>

19. Managing Selections 169
#include <time.h>
/* Callback when the user toggles the selection */
void
selection_toggled (GtkWidget *widget, gint *have_selection)
{
if (GTK_TOGGLE_BUTTON(widget)->active)
{
*have_selection = gtk_selection_owner_set (widget,
GDK_SELECTION_PRIMARY,
GDK_CURRENT_TIME);
/* if claiming the selection failed, we return the button to
the out state */
if (!*have_selection)
gtk_toggle_button_set_active (GTK_TOGGLE_BUTTON(widget), FALSE);
}
else
{
if (*have_selection)
{
/* Before clearing the selection by setting the owner to NULL,
we check if we are the actual owner */
if (gdk_selection_owner_get (GDK_SELECTION_PRIMARY) == widget->window)
gtk_selection_owner_set (NULL, GDK_SELECTION_PRIMARY,
GDK_CURRENT_TIME);
*have_selection = FALSE;
}
}
}
/* Called when another application claims the selection */
gint
selection_clear (GtkWidget *widget, GdkEventSelection *event,
gint *have_selection)
{
*have_selection = FALSE;
gtk_toggle_button_set_active (GTK_TOGGLE_BUTTON(widget), FALSE);
return TRUE;
}
/* Supplies the current time as the selection. */
void
selection_handle (GtkWidget *widget,
GtkSelectionData *selection_data,
gpointer data)
{
gchar *timestr;
time_t current_time;
current_time = time (NULL);
timestr = asctime (localtime(\¤t_time));
/* When we return a single string, it should not be null terminated.
That will be done for us */
gtk_selection_data_set (selection_data, GDK_SELECTION_TYPE_STRING,
8, timestr, strlen(timestr));

20. glib 170
}
int
main (int argc, char *argv[])
{
GtkWidget *window;
GtkWidget *selection_button;
static int have_selection = FALSE;
gtk_init (\&argc, \&argv);
/* Create the toplevel window */
window = gtk_window_new (GTK_WINDOW_TOPLEVEL);
gtk_window_set_title (GTK_WINDOW (window), "Event Box");
gtk_container_set_border_width (GTK_CONTAINER (window), 10);
gtk_signal_connect (GTK_OBJECT (window), "destroy",
GTK_SIGNAL_FUNC (gtk_exit), NULL);
/* Create a toggle button to act as the selection */
selection_button = gtk_toggle_button_new_with_label ("Claim Selection");
gtk_container_add (GTK_CONTAINER (window), selection_button);
gtk_widget_show (selection_button);
gtk_signal_connect (GTK_OBJECT(selection_button), "toggled",
GTK_SIGNAL_FUNC (selection_toggled), \&have_selection);
gtk_signal_connect (GTK_OBJECT(selection_button), "selection_clear_event",
GTK_SIGNAL_FUNC (selection_clear), \&have_selection);
gtk_selection_add_handler (selection_button, GDK_SELECTION_PRIMARY,
GDK_SELECTION_TYPE_STRING,
selection_handle, NULL);
gtk_widget_show (selection_button);
gtk_widget_show (window);
gtk_main ();
return 0;
}
/* example-end */
20 glib
glib is a lower-level library that provides many useful definitions and functions available for use when creatingGDK and GTK applications. These include definitions for basic types and their limits, standard macros,type conversions, byte order, memory allocation, warnings and assertions, message logging, timers, stringutilities, hook functions, a lexical scanner, dynamic loading of modules, and automatic string completion. Anumber of data structures (and their related operations) are also defined, including memory chunks, doubly-linked lists, singly-linked lists, hash tables, strings (which can grow dynamically), string chunks (groups ofstrings), arrays (which can grow in size as elements are added), balanced binary trees, N-ary trees, quarks

20. glib 171
(a two-way association of a string and a unique integer identifier), keyed data lists (lists of data elementsaccessible by a string or integer id), relations and tuples (tables of data which can be indexed on any numberof fields), and caches.
A summary of some of glib’s capabilities follows; not every function, data structure, or operation is coveredhere. For more complete information about the glib routines, see the glib documentation. One source of glibdocumentation is http://www.gtk.org/ http://www.gtk.org/.
If you are using a language other than C, you should consult your language’s binding documentation. Insome cases your language may have equivalent functionality built-in, while in other cases it may not.
20.1 Definitions
Definitions for the extremes of many of the standard types are:
G_MINFLOAT
G_MAXFLOAT
G_MINDOUBLE
G_MAXDOUBLE
G_MINSHORT
G_MAXSHORT
G_MININT
G_MAXINT
G_MINLONG
G_MAXLONG
Also, the following typedefs. The ones left unspecified are dynamically set depending on the architecture.Remember to avoid counting on the size of a pointer if you want to be portable! E.g., a pointer on an Alphais 8 bytes, but 4 on Intel 80x86 family CPUs.
char gchar;
short gshort;
long glong;
int gint;
char gboolean;
unsigned char guchar;
unsigned short gushort;
unsigned long gulong;
unsigned int guint;
float gfloat;
double gdouble;
long double gldouble;
void* gpointer;
gint8
guint8
gint16
guint16
gint32
guint32
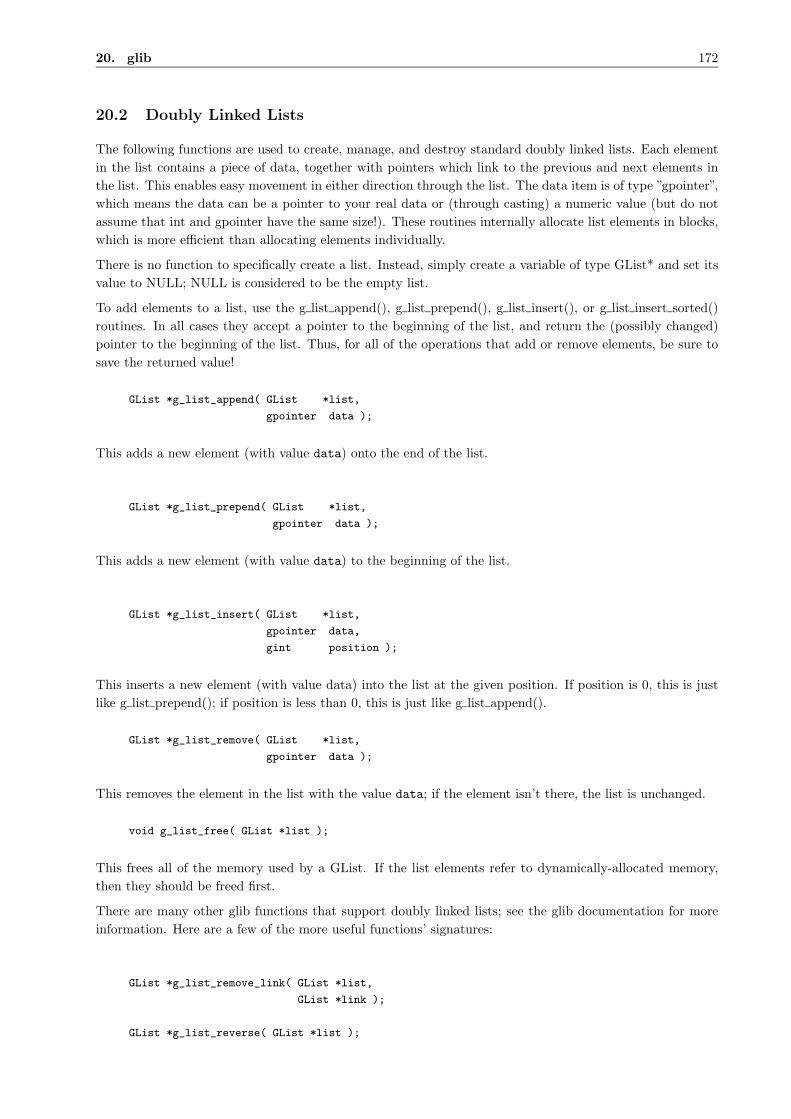
20. glib 172
20.2 Doubly Linked Lists
The following functions are used to create, manage, and destroy standard doubly linked lists. Each elementin the list contains a piece of data, together with pointers which link to the previous and next elements inthe list. This enables easy movement in either direction through the list. The data item is of type ”gpointer”,which means the data can be a pointer to your real data or (through casting) a numeric value (but do notassume that int and gpointer have the same size!). These routines internally allocate list elements in blocks,which is more efficient than allocating elements individually.
There is no function to specifically create a list. Instead, simply create a variable of type GList* and set itsvalue to NULL; NULL is considered to be the empty list.
To add elements to a list, use the g list append(), g list prepend(), g list insert(), or g list insert sorted()routines. In all cases they accept a pointer to the beginning of the list, and return the (possibly changed)pointer to the beginning of the list. Thus, for all of the operations that add or remove elements, be sure tosave the returned value!
GList *g_list_append( GList *list,
gpointer data );
This adds a new element (with value data) onto the end of the list.
GList *g_list_prepend( GList *list,
gpointer data );
This adds a new element (with value data) to the beginning of the list.
GList *g_list_insert( GList *list,
gpointer data,
gint position );
This inserts a new element (with value data) into the list at the given position. If position is 0, this is justlike g list prepend(); if position is less than 0, this is just like g list append().
GList *g_list_remove( GList *list,
gpointer data );
This removes the element in the list with the value data; if the element isn’t there, the list is unchanged.
void g_list_free( GList *list );
This frees all of the memory used by a GList. If the list elements refer to dynamically-allocated memory,then they should be freed first.
There are many other glib functions that support doubly linked lists; see the glib documentation for moreinformation. Here are a few of the more useful functions’ signatures:
GList *g_list_remove_link( GList *list,
GList *link );
GList *g_list_reverse( GList *list );
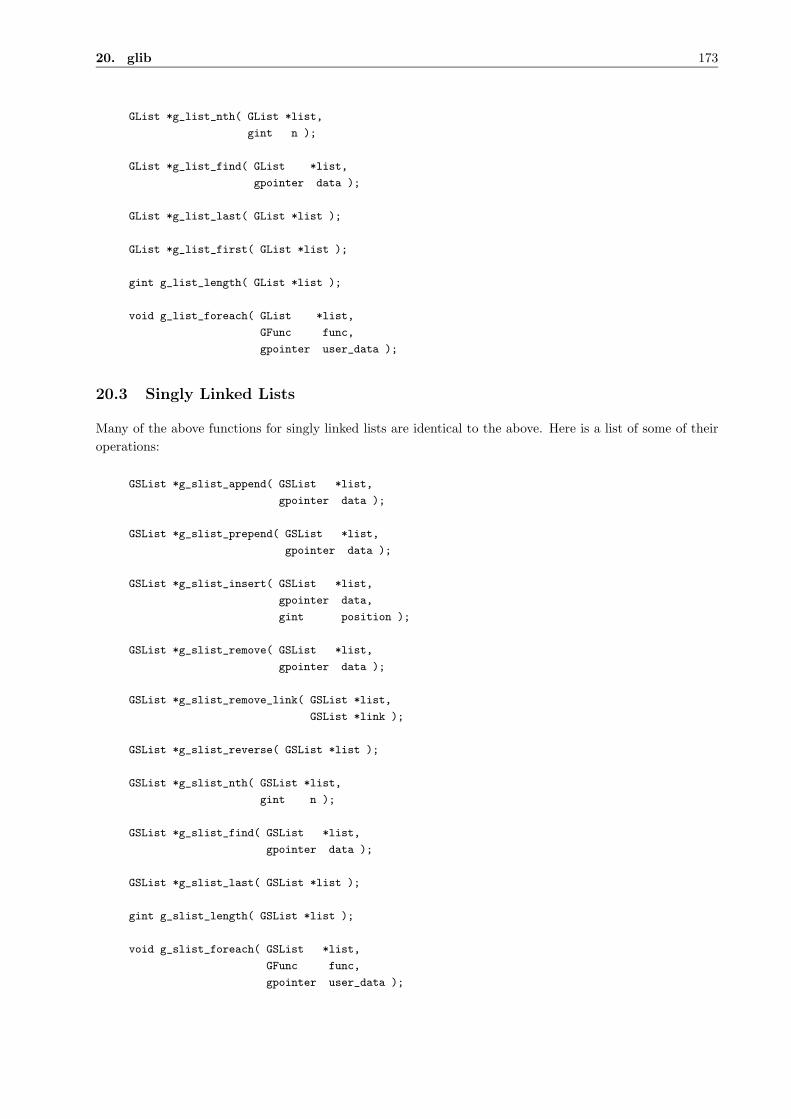
20. glib 173
GList *g_list_nth( GList *list,
gint n );
GList *g_list_find( GList *list,
gpointer data );
GList *g_list_last( GList *list );
GList *g_list_first( GList *list );
gint g_list_length( GList *list );
void g_list_foreach( GList *list,
GFunc func,
gpointer user_data );
20.3 Singly Linked Lists
Many of the above functions for singly linked lists are identical to the above. Here is a list of some of theiroperations:
GSList *g_slist_append( GSList *list,
gpointer data );
GSList *g_slist_prepend( GSList *list,
gpointer data );
GSList *g_slist_insert( GSList *list,
gpointer data,
gint position );
GSList *g_slist_remove( GSList *list,
gpointer data );
GSList *g_slist_remove_link( GSList *list,
GSList *link );
GSList *g_slist_reverse( GSList *list );
GSList *g_slist_nth( GSList *list,
gint n );
GSList *g_slist_find( GSList *list,
gpointer data );
GSList *g_slist_last( GSList *list );
gint g_slist_length( GSList *list );
void g_slist_foreach( GSList *list,
GFunc func,
gpointer user_data );

20. glib 174
20.4 Memory Management
gpointer g_malloc( gulong size );
This is a replacement for malloc(). You do not need to check the return value as it is done for you in thisfunction. If the memory allocation fails for whatever reasons, your applications will be terminated.
gpointer g_malloc0( gulong size );
Same as above, but zeroes the memory before returning a pointer to it.
gpointer g_realloc( gpointer mem,
gulong size );
Relocates ”size” bytes of memory starting at ”mem”. Obviously, the memory should have been previouslyallocated.
void g_free( gpointer mem );
Frees memory. Easy one. If mem is NULL it simply returns.
void g_mem_profile( void );
Dumps a profile of used memory, but requires that you add #define MEM PROFILE to the top ofglib/gmem.c and re-make and make install.
void g_mem_check( gpointer mem );
Checks that a memory location is valid. Requires you add #define MEM CHECK to the top of gmem.c andre-make and make install.
20.5 Timers
Timer functions can be used to time operations (e.g. to see how much time has elapsed). First, you create anew timer with g timer new(). You can then use g timer start() to start timing an operation, g timer stop()to stop timing an operation, and g timer elapsed() to determine the elapsed time.
GTimer *g_timer_new( void );
void g_timer_destroy( GTimer *timer );
void g_timer_start( GTimer *timer );
void g_timer_stop( GTimer *timer );
void g_timer_reset( GTimer *timer );
gdouble g_timer_elapsed( GTimer *timer,
gulong *microseconds );

20. glib 175
20.6 String Handling
glib defines a new type called a GString, which is similar to a standard C string but one that grows automati-cally. Its string data is null-terminated. What this gives you is protection from buffer overflow programmingerrors within your program. This is a very important feature, and hence I recommend that you make use ofGStrings. GString itself has a simple public definition:
struct GString
{
gchar *str; /* Points to the string’s current \0-terminated value. */
gint len; /* Current length */
};
As you might expect, there are a number of operations you can do with a GString.
GString *g_string_new( gchar *init );
This constructs a GString, copying the string value of init into the GString and returning a pointer to it.NULL may be given as the argument for an initially empty GString.
void g_string_free( GString *string,
gint free_segment );
This frees the memory for the given GString. If free_segment is TRUE, then this also frees its characterdata.
GString *g_string_assign( GString *lval,
const gchar *rval );
This copies the characters from rval into lval, destroying the previous contents of lval. Note that lval will belengthened as necessary to hold the string’s contents, unlike the standard strcpy() function.
The rest of these functions should be relatively obvious (the c versions accept a character instead of astring):
GString *g_string_truncate( GString *string,
gint len );
GString *g_string_append( GString *string,
gchar *val );
GString *g_string_append_c( GString *string,
gchar c );
GString *g_string_prepend( GString *string,
gchar *val );
GString *g_string_prepend_c( GString *string,
gchar c );
void g_string_sprintf( GString *string,
gchar *fmt,
20. glib 176
...);
void g_string_sprintfa ( GString *string,
gchar *fmt,
... );
20.7 Utility and Error Functions
gchar *g_strdup( const gchar *str );
Replacement strdup function. Copies the original strings contents to newly allocated memory, and returnsa pointer to it.
gchar *g_strerror( gint errnum );
I recommend using this for all error messages. It’s much nicer, and more portable than perror() or others.The output is usually of the form:
program name:function that failed:file or further description:strerror
Here’s an example of one such call used in our hello world program:
g_print("hello_world:open:%s:%s\n", filename, g_strerror(errno));
void g_error( gchar *format, ... );
Prints an error message. The format is just like printf, but it prepends ”** ERROR **: ” to your message,and exits the program. Use only for fatal errors.
void g_warning( gchar *format, ... );
Same as above, but prepends ”** WARNING **: ”, and does not exit the program.
void g_message( gchar *format, ... );
Prints ”message: ” prepended to the string you pass in.
void g_print( gchar *format, ... );
Replacement for printf().
And our last function:
gchar *g_strsignal( gint signum );
Prints out the name of the Unix system signal given the signal number. Useful in generic signal handlingfunctions.
All of the above are more or less just stolen from glib.h. If anyone cares to document any function, just sendme an email!

21. GTK’s rc Files 177
21 GTK’s rc Files
GTK has its own way of dealing with application defaults, by using rc files. These can be used to set thecolors of just about any widget, and can also be used to tile pixmaps onto the background of some widgets.
21.1 Functions For rc Files
When your application starts, you should include a call to:
void gtk_rc_parse( char *filename );
Passing in the filename of your rc file. This will cause GTK to parse this file, and use the style settings forthe widget types defined there.
If you wish to have a special set of widgets that can take on a different style from others, or any other logicaldivision of widgets, use a call to:
void gtk_widget_set_name( GtkWidget *widget,
gchar *name );
Passing your newly created widget as the first argument, and the name you wish to give it as the second.This will allow you to change the attributes of this widget by name through the rc file.
If we use a call something like this:
button = gtk_button_new_with_label ("Special Button");
gtk_widget_set_name (button, "special button");
Then this button is given the name ”special button” and may be addressed by name in the rc file as ”specialbutton.GtkButton”. < −−−V erifyME!
The example rc file below, sets the properties of the main window, and lets all children of that main windowinherit the style described by the ”main button” style. The code used in the application is:
window = gtk_window_new (GTK_WINDOW_TOPLEVEL);
gtk_widget_set_name (window, "main window");
And then the style is defined in the rc file using:
widget "main window.*GtkButton*" style "main_button"
Which sets all the GtkButton widgets in the ”main window” to the ”main buttons” style as defined in the rcfile.
As you can see, this is a fairly powerful and flexible system. Use your imagination as to how best to takeadvantage of this.
21.2 GTK’s rc File Format
The format of the GTK file is illustrated in the example below. This is the testgtkrc file from the GTKdistribution, but I’ve added a few comments and things. You may wish to include this explanation yourapplication to allow the user to fine tune his application.
There are several directives to change the attributes of a widget.

21. GTK’s rc Files 178
• fg - Sets the foreground color of a widget.
• bg - Sets the background color of a widget.
• bg pixmap - Sets the background of a widget to a tiled pixmap.
• font - Sets the font to be used with the given widget.
In addition to this, there are several states a widget can be in, and you can set different colors, pixmaps andfonts for each state. These states are:
• NORMAL - The normal state of a widget, without the mouse over top of it, and not being pressed etc.
• PRELIGHT - When the mouse is over top of the widget, colors defined using this state will be in effect.
• ACTIVE - When the widget is pressed or clicked it will be active, and the attributes assigned by thistag will be in effect.
• INSENSITIVE - When a widget is set insensitive, and cannot be activated, it will take these attributes.
• SELECTED - When an object is selected, it takes these attributes.
When using the ”fg” and ”bg” keywords to set the colors of widgets, the format is:
fg[<STATE>] = { Red, Green, Blue }
Where STATE is one of the above states (PRELIGHT, ACTIVE etc), and the Red, Green and Blue arevalues in the range of 0 - 1.0, { 1.0, 1.0, 1.0 } being white. They must be in float form, or they will registeras 0, so a straight ”1” will not work, it must be ”1.0”. A straight ”0” is fine because it doesn’t matter if it’snot recognized. Unrecognized values are set to 0.
bg pixmap is very similar to the above, except the colors are replaced by a filename.
pixmap path is a list of paths separated by ”:”’s. These paths will be searched for any pixmap you specify.
The font directive is simply:
font = "<font name>"
Where the only hard part is figuring out the font string. Using xfontsel or similar utility should help.
The ”widget class” sets the style of a class of widgets. These classes are listed in the widget overview on theclass hierarchy.
The ”widget” directive sets a specifically named set of widgets to a given style, overriding any style set for thegiven widget class. These widgets are registered inside the application using the gtk widget set name() call.This allows you to specify the attributes of a widget on a per widget basis, rather than setting the attributesof an entire widget class. I urge you to document any of these special widgets so users may customize them.
When the keyword parent is used as an attribute, the widget will take on the attributes of its parent in theapplication.
When defining a style, you may assign the attributes of a previously defined style to this new one.
style "main_button" = "button"
{
font = "-adobe-helvetica-medium-r-normal--*-100-*-*-*-*-*-*"
bg[PRELIGHT] = { 0.75, 0, 0 }
}

21. GTK’s rc Files 179
This example takes the ”button” style, and creates a new ”main button” style simply by changing the fontand prelight background color of the ”button” style.
Of course, many of these attributes don’t apply to all widgets. It’s a simple matter of common sense really.Anything that could apply, should.
21.3 Example rc file
# pixmap_path "<dir 1>:<dir 2>:<dir 3>:..."
#
pixmap_path "/usr/include/X11R6/pixmaps:/home/imain/pixmaps"
#
# style <name> [= <name>]
# {
# <option>
# }
#
# widget <widget_set> style <style_name>
# widget_class <widget_class_set> style <style_name>
# Here is a list of all the possible states. Note that some do not apply to
# certain widgets.
#
# NORMAL - The normal state of a widget, without the mouse over top of
# it, and not being pressed etc.
#
# PRELIGHT - When the mouse is over top of the widget, colors defined
# using this state will be in effect.
#
# ACTIVE - When the widget is pressed or clicked it will be active, and
# the attributes assigned by this tag will be in effect.
#
# INSENSITIVE - When a widget is set insensitive, and cannot be
# activated, it will take these attributes.
#
# SELECTED - When an object is selected, it takes these attributes.
#
# Given these states, we can set the attributes of the widgets in each of
# these states using the following directives.
#
# fg - Sets the foreground color of a widget.
# fg - Sets the background color of a widget.
# bg_pixmap - Sets the background of a widget to a tiled pixmap.
# font - Sets the font to be used with the given widget.
#
# This sets a style called "button". The name is not really important, as
# it is assigned to the actual widgets at the bottom of the file.
style "window"
{
#This sets the padding around the window to the pixmap specified.
#bg_pixmap[<STATE>] = "<pixmap filename>"
bg_pixmap[NORMAL] = "warning.xpm"
}

21. GTK’s rc Files 180
style "scale"
{
#Sets the foreground color (font color) to red when in the "NORMAL"
#state.
fg[NORMAL] = { 1.0, 0, 0 }
#Sets the background pixmap of this widget to that of its parent.
bg_pixmap[NORMAL] = "<parent>"
}
style "button"
{
# This shows all the possible states for a button. The only one that
# doesn’t apply is the SELECTED state.
fg[PRELIGHT] = { 0, 1.0, 1.0 }
bg[PRELIGHT] = { 0, 0, 1.0 }
bg[ACTIVE] = { 1.0, 0, 0 }
fg[ACTIVE] = { 0, 1.0, 0 }
bg[NORMAL] = { 1.0, 1.0, 0 }
fg[NORMAL] = { .99, 0, .99 }
bg[INSENSITIVE] = { 1.0, 1.0, 1.0 }
fg[INSENSITIVE] = { 1.0, 0, 1.0 }
}
# In this example, we inherit the attributes of the "button" style and then
# override the font and background color when prelit to create a new
# "main_button" style.
style "main_button" = "button"
{
font = "-adobe-helvetica-medium-r-normal--*-100-*-*-*-*-*-*"
bg[PRELIGHT] = { 0.75, 0, 0 }
}
style "toggle_button" = "button"
{
fg[NORMAL] = { 1.0, 0, 0 }
fg[ACTIVE] = { 1.0, 0, 0 }
# This sets the background pixmap of the toggle_button to that of its
# parent widget (as defined in the application).
bg_pixmap[NORMAL] = "<parent>"
}
style "text"
{
bg_pixmap[NORMAL] = "marble.xpm"
fg[NORMAL] = { 1.0, 1.0, 1.0 }
}
style "ruler"
{
font = "-adobe-helvetica-medium-r-normal--*-80-*-*-*-*-*-*"
}

22. Writing Your Own Widgets 181
# pixmap_path "~/.pixmaps"
# These set the widget types to use the styles defined above.
# The widget types are listed in the class hierarchy, but could probably be
# just listed in this document for the users reference.
widget_class "GtkWindow" style "window"
widget_class "GtkDialog" style "window"
widget_class "GtkFileSelection" style "window"
widget_class "*Gtk*Scale" style "scale"
widget_class "*GtkCheckButton*" style "toggle_button"
widget_class "*GtkRadioButton*" style "toggle_button"
widget_class "*GtkButton*" style "button"
widget_class "*Ruler" style "ruler"
widget_class "*GtkText" style "text"
# This sets all the buttons that are children of the "main window" to
# the main_button style. These must be documented to be taken advantage of.
widget "main window.*GtkButton*" style "main_button"
22 Writing Your Own Widgets
22.1 Overview
Although the GTK distribution comes with many types of widgets that should cover most basic needs, theremay come a time when you need to create your own new widget type. Since GTK uses widget inheritanceextensively, and there is already a widget that is close to what you want, it is often possible to make a usefulnew widget type in just a few lines of code. But before starting work on a new widget, check around firstto make sure that someone has not already written it. This will prevent duplication of effort and keep thenumber of GTK widgets out there to a minimum, which will help keep both the code and the interface ofdifferent applications consistent. As a flip side to this, once you finish your widget, announce it to the worldso other people can benefit. The best place to do this is probably the gtk-list.
Complete sources for the example widgets are available at the place you got this tutorial, or from:
http://www.gtk.org/ otaylor/gtk/tutorial/
22.2 The Anatomy Of A Widget
In order to create a new widget, it is important to have an understanding of how GTK objects work. Thissection is just meant as a brief overview. See the reference documentation for the details.
GTK widgets are implemented in an object oriented fashion. However, they are implemented in standard C.This greatly improves portability and stability over using current generation C++ compilers; however, it doesmean that the widget writer has to pay attention to some of the implementation details. The informationcommon to all instances of one class of widgets (e.g., to all Button widgets) is stored in the class structure.There is only one copy of this in which is stored information about the class’s signals (which act like virtualfunctions in C). To support inheritance, the first field in the class structure must be a copy of the parent’sclass structure. The declaration of the class structure of GtkButtton looks like:
struct _GtkButtonClass
{
GtkContainerClass parent_class;
22. Writing Your Own Widgets 182
void (* pressed) (GtkButton *button);
void (* released) (GtkButton *button);
void (* clicked) (GtkButton *button);
void (* enter) (GtkButton *button);
void (* leave) (GtkButton *button);
};
When a button is treated as a container (for instance, when it is resized), its class structure can be cast toGtkContainerClass, and the relevant fields used to handle the signals.
There is also a structure for each widget that is created on a per-instance basis. This structure has fieldsto store information that is different for each instance of the widget. We’ll call this structure the objectstructure. For the Button class, it looks like:
struct _GtkButton
{
GtkContainer container;
GtkWidget *child;
guint in_button : 1;
guint button_down : 1;
};
Note that, similar to the class structure, the first field is the object structure of the parent class, so that thisstructure can be cast to the parent class’s object structure as needed.
22.3 Creating a Composite widget
22.3.1 Introduction
One type of widget that you may be interested in creating is a widget that is merely an aggregate of otherGTK widgets. This type of widget does nothing that couldn’t be done without creating new widgets, butprovides a convenient way of packaging user interface elements for reuse. The FileSelection and ColorSelectionwidgets in the standard distribution are examples of this type of widget.
The example widget that we’ll create in this section is the Tictactoe widget, a 3x3 array of toggle buttonswhich triggers a signal when all three buttons in a row, column, or on one of the diagonals are depressed.
22.3.2 Choosing a parent class
The parent class for a composite widget is typically the container class that holds all of the elements ofthe composite widget. For example, the parent class of the FileSelection widget is the Dialog class. Sinceour buttons will be arranged in a table, it might seem natural to make our parent class the GtkTableclass. Unfortunately, this turns out not to work. The creation of a widget is divided among two functions- a WIDGETNAME_new() function that the user calls, and a WIDGETNAME_init() function which does thebasic work of initializing the widget which is independent of the arguments passed to the _new() function.Descendent widgets only call the _init function of their parent widget. But this division of labor doesn’twork well for tables, which when created, need to know the number of rows and columns in the table. Unlesswe want to duplicate most of the functionality of gtk_table_new() in our Tictactoe widget, we had bestavoid deriving it from GtkTable. For that reason, we derive it from GtkVBox instead, and stick our tableinside the VBox.

22. Writing Your Own Widgets 183
22.3.3 The header file
Each widget class has a header file which declares the object and class structures for that widget, along withpublic functions. A couple of features are worth pointing out. To prevent duplicate definitions, we wrap theentire header file in:
#ifndef __TICTACTOE_H__
#define __TICTACTOE_H__
.
.
.
#endif /* __TICTACTOE_H__ */
And to keep C++ programs that include the header file happy, in:
#ifdef __cplusplus
extern "C" {
#endif /* __cplusplus */
.
.
.
#ifdef __cplusplus
}
#endif /* __cplusplus */
Along with the functions and structures, we declare three standard macros in our header file, TICTAC-
TOE(obj), TICTACTOE_CLASS(klass), and IS_TICTACTOE(obj), which cast a pointer into a pointer to theobject or class structure, and check if an object is a Tictactoe widget respectively.
Here is the complete header file:
/* tictactoe.h */
#ifndef __TICTACTOE_H__
#define __TICTACTOE_H__
#include <gdk/gdk.h>
#include <gtk/gtkvbox.h>
#ifdef __cplusplus
extern "C" {
#endif /* __cplusplus */
#define TICTACTOE(obj) GTK_CHECK_CAST (obj, tictactoe_get_type (), Tictactoe)
#define TICTACTOE_CLASS(klass) GTK_CHECK_CLASS_CAST (klass, tictac-
toe_get_type (), TictactoeClass)
#define IS_TICTACTOE(obj) GTK_CHECK_TYPE (obj, tictactoe_get_type ())
typedef struct _Tictactoe Tictactoe;
typedef struct _TictactoeClass TictactoeClass;
struct _Tictactoe
{
GtkVBox vbox;

22. Writing Your Own Widgets 184
GtkWidget *buttons[3][3];
};
struct _TictactoeClass
{
GtkVBoxClass parent_class;
void (* tictactoe) (Tictactoe *ttt);
};
guint tictactoe_get_type (void);
GtkWidget* tictactoe_new (void);
void tictactoe_clear (Tictactoe *ttt);
#ifdef __cplusplus
}
#endif /* __cplusplus */
#endif /* __TICTACTOE_H__ */
22.3.4 The _get_type() function.
We now continue on to the implementation of our widget. A core function for every widget is the functionWIDGETNAME_get_type(). This function, when first called, tells GTK about the widget class, and gets anID that uniquely identifies the widget class. Upon subsequent calls, it just returns the ID.
guint
tictactoe_get_type ()
{
static guint ttt_type = 0;
if (!ttt_type)
{
GtkTypeInfo ttt_info =
{
"Tictactoe",
sizeof (Tictactoe),
sizeof (TictactoeClass),
(GtkClassInitFunc) tictactoe_class_init,
(GtkObjectInitFunc) tictactoe_init,
(GtkArgSetFunc) NULL,
(GtkArgGetFunc) NULL
};
ttt_type = gtk_type_unique (gtk_vbox_get_type (), \&ttt_info);
}
return ttt_type;
}
The GtkTypeInfo structure has the following definition:
struct _GtkTypeInfo
{
gchar *type_name;
guint object_size;

22. Writing Your Own Widgets 185
guint class_size;
GtkClassInitFunc class_init_func;
GtkObjectInitFunc object_init_func;
GtkArgSetFunc arg_set_func;
GtkArgGetFunc arg_get_func;
};
The fields of this structure are pretty self-explanatory. We’ll ignore the arg_set_func and arg_get_func
fields here: they have an important, but as yet largely unimplemented, role in allowing widget options tobe conveniently set from interpreted languages. Once GTK has a correctly filled in copy of this structure, itknows how to create objects of a particular widget type.
22.3.5 The _class_init() function
The WIDGETNAME_class_init() function initializes the fields of the widget’s class structure, and sets up anysignals for the class. For our Tictactoe widget it looks like:
enum {
TICTACTOE_SIGNAL,
LAST_SIGNAL
};
static gint tictactoe_signals[LAST_SIGNAL] = { 0 };
static void
tictactoe_class_init (TictactoeClass *class)
{
GtkObjectClass *object_class;
object_class = (GtkObjectClass*) class;
tictactoe_signals[TICTACTOE_SIGNAL] = gtk_signal_new ("tictactoe",
GTK_RUN_FIRST,
object_class->type,
GTK_SIGNAL_OFFSET (TictactoeClass, tictactoe),
gtk_signal_default_marshaller, GTK_TYPE_NONE, 0);
gtk_object_class_add_signals (object_class, tictactoe_signals, LAST_SIGNAL);
class->tictactoe = NULL;
}
Our widget has just one signal, the tictactoe signal that is invoked when a row, column, or diagonal iscompletely filled in. Not every composite widget needs signals, so if you are reading this for the first time,you may want to skip to the next section now, as things are going to get a bit complicated.
The function:
gint gtk_signal_new( const gchar *name,
GtkSignalRunType run_type,
GtkType object_type,
gint function_offset,
GtkSignalMarshaller marshaller,

22. Writing Your Own Widgets 186
GtkType return_val,
guint nparams,
...);
Creates a new signal. The parameters are:
• name: The name of the signal.
• run_type: Whether the default handler runs before or after user handlers. Usually this will beGTK_RUN_FIRST, or GTK_RUN_LAST, although there are other possibilities.
• object_type: The ID of the object that this signal applies to. (It will also apply to that objectsdescendents)
• function_offset: The offset within the class structure of a pointer to the default handler.
• marshaller: A function that is used to invoke the signal handler. For signal handlers that have noarguments other than the object that emitted the signal and user data, we can use the pre-suppliedmarshaller function gtk_signal_default_marshaller.
• return_val: The type of the return val.
• nparams: The number of parameters of the signal handler (other than the two default ones mentionedabove)
• ...: The types of the parameters.
When specifying types, the GtkType enumeration is used:
typedef enum
{
GTK_TYPE_INVALID,
GTK_TYPE_NONE,
GTK_TYPE_CHAR,
GTK_TYPE_BOOL,
GTK_TYPE_INT,
GTK_TYPE_UINT,
GTK_TYPE_LONG,
GTK_TYPE_ULONG,
GTK_TYPE_FLOAT,
GTK_TYPE_DOUBLE,
GTK_TYPE_STRING,
GTK_TYPE_ENUM,
GTK_TYPE_FLAGS,
GTK_TYPE_BOXED,
GTK_TYPE_FOREIGN,
GTK_TYPE_CALLBACK,
GTK_TYPE_ARGS,
GTK_TYPE_POINTER,
/* it’d be great if the next two could be removed eventually */
GTK_TYPE_SIGNAL,
GTK_TYPE_C_CALLBACK,
GTK_TYPE_OBJECT
} GtkFundamentalType;

22. Writing Your Own Widgets 187
gtk_signal_new() returns a unique integer identifier for the signal, that we store in the tictactoe_signalsarray, which we index using an enumeration. (Conventionally, the enumeration elements are the signalname, uppercased, but here there would be a conflict with the TICTACTOE() macro, so we called it TICTAC-TOE_SIGNAL instead.
After creating our signals, we need to tell GTK to associate our signals with the Tictactoe class. We do thatby calling gtk_object_class_add_signals(). We then set the pointer which points to the default handlerfor the ‘tictactoe’ signal to NULL, indicating that there is no default action.
22.3.6 The _init() function.
Each widget class also needs a function to initialize the object structure. Usually, this function has the fairlylimited role of setting the fields of the structure to default values. For composite widgets, however, thisfunction also creates the component widgets.
static void
tictactoe_init (Tictactoe *ttt)
{
GtkWidget *table;
gint i,j;
table = gtk_table_new (3, 3, TRUE);
gtk_container_add (GTK_CONTAINER(ttt), table);
gtk_widget_show (table);
for (i=0;i<3; i++)
for (j=0;j<3; j++)
{
ttt->buttons[i][j] = gtk_toggle_button_new ();
gtk_table_attach_defaults (GTK_TABLE(table), ttt->buttons[i][j],
i, i+1, j, j+1);
gtk_signal_connect (GTK_OBJECT (ttt->buttons[i][j]), "toggled",
GTK_SIGNAL_FUNC (tictactoe_toggle), ttt);
gtk_widget_set_usize (ttt->buttons[i][j], 20, 20);
gtk_widget_show (ttt->buttons[i][j]);
}
}
22.3.7 And the rest...
There is one more function that every widget (except for base widget types like GtkBin that cannot beinstantiated) needs to have - the function that the user calls to create an object of that type. This is con-ventionally called WIDGETNAME_new(). In some widgets, though not for the Tictactoe widgets, this functiontakes arguments, and does some setup based on the arguments. The other two functions are specific to theTictactoe widget.
tictactoe_clear() is a public function that resets all the buttons in the widget to the up position. Notethe use of gtk_signal_handler_block_by_data() to keep our signal handler for button toggles from beingtriggered unnecessarily.
tictactoe_toggle() is the signal handler that is invoked when the user clicks on a button. It checks to seeif there are any winning combinations that involve the toggled button, and if so, emits the ”tictactoe” signal.
GtkWidget*
tictactoe_new ()

22. Writing Your Own Widgets 188
{
return GTK_WIDGET ( gtk_type_new (tictactoe_get_type ()));
}
void
tictactoe_clear (Tictactoe *ttt)
{
int i,j;
for (i=0;i<3;i++)
for (j=0;j<3;j++)
{
gtk_signal_handler_block_by_data (GTK_OBJECT(ttt->buttons[i][j]), ttt);
gtk_toggle_button_set_active (GTK_TOGGLE_BUTTON (ttt->buttons[i][j]),
FALSE);
gtk_signal_handler_unblock_by_data (GTK_OBJECT(ttt->buttons[i][j]), ttt);
}
}
static void
tictactoe_toggle (GtkWidget *widget, Tictactoe *ttt)
{
int i,k;
static int rwins[8][3] = { { 0, 0, 0 }, { 1, 1, 1 }, { 2, 2, 2 },
{ 0, 1, 2 }, { 0, 1, 2 }, { 0, 1, 2 },
{ 0, 1, 2 }, { 0, 1, 2 } };
static int cwins[8][3] = { { 0, 1, 2 }, { 0, 1, 2 }, { 0, 1, 2 },
{ 0, 0, 0 }, { 1, 1, 1 }, { 2, 2, 2 },
{ 0, 1, 2 }, { 2, 1, 0 } };
int success, found;
for (k=0; k<8; k++)
{
success = TRUE;
found = FALSE;
for (i=0;i<3;i++)
{
success = success \&\&
GTK_TOGGLE_BUTTON(ttt->buttons[rwins[k][i]][cwins[k][i]])->active;
found = found ||
ttt->buttons[rwins[k][i]][cwins[k][i]] == widget;
}
if (success \&\& found)
{
gtk_signal_emit (GTK_OBJECT (ttt),
tictactoe_signals[TICTACTOE_SIGNAL]);
break;
}
}
}
And finally, an example program using our Tictactoe widget:

22. Writing Your Own Widgets 189
#include <gtk/gtk.h>
#include "tictactoe.h"
/* Invoked when a row, column or diagonal is completed */
void
win (GtkWidget *widget, gpointer data)
{
g_print ("Yay!\n");
tictactoe_clear (TICTACTOE (widget));
}
int
main (int argc, char *argv[])
{
GtkWidget *window;
GtkWidget *ttt;
gtk_init (\&argc, \&argv);
window = gtk_window_new (GTK_WINDOW_TOPLEVEL);
gtk_window_set_title (GTK_WINDOW (window), "Aspect Frame");
gtk_signal_connect (GTK_OBJECT (window), "destroy",
GTK_SIGNAL_FUNC (gtk_exit), NULL);
gtk_container_set_border_width (GTK_CONTAINER (window), 10);
/* Create a new Tictactoe widget */
ttt = tictactoe_new ();
gtk_container_add (GTK_CONTAINER (window), ttt);
gtk_widget_show (ttt);
/* And attach to its "tictactoe" signal */
gtk_signal_connect (GTK_OBJECT (ttt), "tictactoe",
GTK_SIGNAL_FUNC (win), NULL);
gtk_widget_show (window);
gtk_main ();
return 0;
}
22.4 Creating a widget from scratch.
22.4.1 Introduction
In this section, we’ll learn more about how widgets display themselves on the screen and interact with events.As an example of this, we’ll create an analog dial widget with a pointer that the user can drag to set thevalue.

22. Writing Your Own Widgets 190
22.4.2 Displaying a widget on the screen
There are several steps that are involved in displaying on the screen. After the widget is created with a callto WIDGETNAME_new(), several more functions are needed:
• WIDGETNAME_realize() is responsible for creating an X window for the widget if it has one.
• WIDGETNAME_map() is invoked after the user calls gtk_widget_show(). It is responsible for makingsure the widget is actually drawn on the screen (mapped). For a container class, it must also makecalls to map()> functions of any child widgets.
• WIDGETNAME_draw() is invoked when gtk_widget_draw() is called for the widget or one of its ancestors.It makes the actual calls to the drawing functions to draw the widget on the screen. For containerwidgets, this function must make calls to gtk_widget_draw() for its child widgets.
• WIDGETNAME_expose() is a handler for expose events for the widget. It makes the necessary calls tothe drawing functions to draw the exposed portion on the screen. For container widgets, this functionmust generate expose events for its child widgets which don’t have their own windows. (If they havetheir own windows, then X will generate the necessary expose events)
You might notice that the last two functions are quite similar - each is responsible for drawing the widgeton the screen. In fact many types of widgets don’t really care about the difference between the two. Thedefault draw() function in the widget class simply generates a synthetic expose event for the redrawn area.However, some types of widgets can save work by distinguishing between the two functions. For instance, ifa widget has multiple X windows, then since expose events identify the exposed window, it can redraw onlythe affected window, which is not possible for calls to draw().
Container widgets, even if they don’t care about the difference for themselves, can’t simply use the defaultdraw() function because their child widgets might care about the difference. However, it would be wasteful toduplicate the drawing code between the two functions. The convention is that such widgets have a functioncalled WIDGETNAME_paint() that does the actual work of drawing the widget, that is then called by thedraw() and expose() functions.
In our example approach, since the dial widget is not a container widget, and only has a single window,we can take the simplest approach and use the default draw() function and only implement an expose()
function.
22.4.3 The origins of the Dial Widget
Just as all land animals are just variants on the first amphibian that crawled up out of the mud, Gtk widgetstend to start off as variants of some other, previously written widget. Thus, although this section is entitled‘Creating a Widget from Scratch’, the Dial widget really began with the source code for the Range widget.This was picked as a starting point because it would be nice if our Dial had the same interface as the Scalewidgets which are just specialized descendents of the Range widget. So, though the source code is presentedbelow in finished form, it should not be implied that it was written, deus ex machina in this fashion. Also,if you aren’t yet familiar with how scale widgets work from the application writer’s point of view, it wouldbe a good idea to look them over before continuing.
22.4.4 The Basics
Quite a bit of our widget should look pretty familiar from the Tictactoe widget. First, we have a header file:
/* GTK - The GIMP Toolkit
* Copyright (C) 1995-1997 Peter Mattis, Spencer Kimball and Josh MacDonald

22. Writing Your Own Widgets 191
*
* This library is free software; you can redistribute it and/or
* modify it under the terms of the GNU Library General Public
* License as published by the Free Software Foundation; either
* version 2 of the License, or (at your option) any later version.
*
* This library is distributed in the hope that it will be useful,
* but WITHOUT ANY WARRANTY; without even the implied warranty of
* MERCHANTABILITY or FITNESS FOR A PARTICULAR PURPOSE. See the GNU
* Library General Public License for more details.
*
* You should have received a copy of the GNU Library General Public
* License along with this library; if not, write to the Free
* Software Foundation, Inc., 675 Mass Ave, Cambridge, MA 02139, USA.
*/
#ifndef __GTK_DIAL_H__
#define __GTK_DIAL_H__
#include <gdk/gdk.h>
#include <gtk/gtkadjustment.h>
#include <gtk/gtkwidget.h>
#ifdef __cplusplus
extern "C" {
#endif /* __cplusplus */
#define GTK_DIAL(obj) GTK_CHECK_CAST (obj, gtk_dial_get_type (), GtkDial)
#define GTK_DIAL_CLASS(klass) GTK_CHECK_CLASS_CAST (klass, gtk_dial_get_type (), GtkDialClass)
#define GTK_IS_DIAL(obj) GTK_CHECK_TYPE (obj, gtk_dial_get_type ())
typedef struct _GtkDial GtkDial;
typedef struct _GtkDialClass GtkDialClass;
struct _GtkDial
{
GtkWidget widget;
/* update policy (GTK_UPDATE_[CONTINUOUS/DELAYED/DISCONTINUOUS]) */
guint policy : 2;
/* Button currently pressed or 0 if none */
guint8 button;
/* Dimensions of dial components */
gint radius;
gint pointer_width;
/* ID of update timer, or 0 if none */
guint32 timer;
/* Current angle */
gfloat angle;

22. Writing Your Own Widgets 192
/* Old values from adjustment stored so we know when something changes */
gfloat old_value;
gfloat old_lower;
gfloat old_upper;
/* The adjustment object that stores the data for this dial */
GtkAdjustment *adjustment;
};
struct _GtkDialClass
{
GtkWidgetClass parent_class;
};
GtkWidget* gtk_dial_new (GtkAdjustment *adjustment);
guint gtk_dial_get_type (void);
GtkAdjustment* gtk_dial_get_adjustment (GtkDial *dial);
void gtk_dial_set_update_policy (GtkDial *dial,
GtkUpdateType policy);
void gtk_dial_set_adjustment (GtkDial *dial,
GtkAdjustment *adjustment);
#ifdef __cplusplus
}
#endif /* __cplusplus */
#endif /* __GTK_DIAL_H__ */
Since there is quite a bit more going on in this widget, than the last one, we have more fields in the datastructure, but otherwise things are pretty similar.
Next, after including header files, and declaring a few constants, we have some functions to provide infor-mation about the widget and initialize it:
#include <math.h>
#include <stdio.h>
#include <gtk/gtkmain.h>
#include <gtk/gtksignal.h>
#include "gtkdial.h"
#define SCROLL_DELAY_LENGTH 300
#define DIAL_DEFAULT_SIZE 100
/* Forward declarations */
[ omitted to save space ]
/* Local data */
static GtkWidgetClass *parent_class = NULL;
guint
gtk_dial_get_type ()
{

22. Writing Your Own Widgets 193
static guint dial_type = 0;
if (!dial_type)
{
GtkTypeInfo dial_info =
{
"GtkDial",
sizeof (GtkDial),
sizeof (GtkDialClass),
(GtkClassInitFunc) gtk_dial_class_init,
(GtkObjectInitFunc) gtk_dial_init,
(GtkArgSetFunc) NULL,
(GtkArgGetFunc) NULL,
};
dial_type = gtk_type_unique (gtk_widget_get_type (), \&dial_info);
}
return dial_type;
}
static void
gtk_dial_class_init (GtkDialClass *class)
{
GtkObjectClass *object_class;
GtkWidgetClass *widget_class;
object_class = (GtkObjectClass*) class;
widget_class = (GtkWidgetClass*) class;
parent_class = gtk_type_class (gtk_widget_get_type ());
object_class->destroy = gtk_dial_destroy;
widget_class->realize = gtk_dial_realize;
widget_class->expose_event = gtk_dial_expose;
widget_class->size_request = gtk_dial_size_request;
widget_class->size_allocate = gtk_dial_size_allocate;
widget_class->button_press_event = gtk_dial_button_press;
widget_class->button_release_event = gtk_dial_button_release;
widget_class->motion_notify_event = gtk_dial_motion_notify;
}
static void
gtk_dial_init (GtkDial *dial)
{
dial->button = 0;
dial->policy = GTK_UPDATE_CONTINUOUS;
dial->timer = 0;
dial->radius = 0;
dial->pointer_width = 0;
dial->angle = 0.0;
dial->old_value = 0.0;
dial->old_lower = 0.0;
dial->old_upper = 0.0;
dial->adjustment = NULL;
}

22. Writing Your Own Widgets 194
GtkWidget*
gtk_dial_new (GtkAdjustment *adjustment)
{
GtkDial *dial;
dial = gtk_type_new (gtk_dial_get_type ());
if (!adjustment)
adjustment = (GtkAdjustment*) gtk_adjustment_new (0.0, 0.0, 0.0, 0.0, 0.0, 0.0);
gtk_dial_set_adjustment (dial, adjustment);
return GTK_WIDGET (dial);
}
static void
gtk_dial_destroy (GtkObject *object)
{
GtkDial *dial;
g_return_if_fail (object != NULL);
g_return_if_fail (GTK_IS_DIAL (object));
dial = GTK_DIAL (object);
if (dial->adjustment)
gtk_object_unref (GTK_OBJECT (dial->adjustment));
if (GTK_OBJECT_CLASS (parent_class)->destroy)
(* GTK_OBJECT_CLASS (parent_class)->destroy) (object);
}
Note that this init() function does less than for the Tictactoe widget, since this is not a composite widget,and the new() function does more, since it now has an argument. Also, note that when we store a pointerto the Adjustment object, we increment its reference count, (and correspondingly decrement when we nolonger use it) so that GTK can keep track of when it can be safely destroyed.
Also, there are a few function to manipulate the widget’s options:
GtkAdjustment*
gtk_dial_get_adjustment (GtkDial *dial)
{
g_return_val_if_fail (dial != NULL, NULL);
g_return_val_if_fail (GTK_IS_DIAL (dial), NULL);
return dial->adjustment;
}
void
gtk_dial_set_update_policy (GtkDial *dial,
GtkUpdateType policy)
{
g_return_if_fail (dial != NULL);
g_return_if_fail (GTK_IS_DIAL (dial));
dial->policy = policy;
22. Writing Your Own Widgets 195
}
void
gtk_dial_set_adjustment (GtkDial *dial,
GtkAdjustment *adjustment)
{
g_return_if_fail (dial != NULL);
g_return_if_fail (GTK_IS_DIAL (dial));
if (dial->adjustment)
{
gtk_signal_disconnect_by_data (GTK_OBJECT (dial->adjustment), (gpointer) dial);
gtk_object_unref (GTK_OBJECT (dial->adjustment));
}
dial->adjustment = adjustment;
gtk_object_ref (GTK_OBJECT (dial->adjustment));
gtk_signal_connect (GTK_OBJECT (adjustment), "changed",
(GtkSignalFunc) gtk_dial_adjustment_changed,
(gpointer) dial);
gtk_signal_connect (GTK_OBJECT (adjustment), "value_changed",
(GtkSignalFunc) gtk_dial_adjustment_value_changed,
(gpointer) dial);
dial->old_value = adjustment->value;
dial->old_lower = adjustment->lower;
dial->old_upper = adjustment->upper;
gtk_dial_update (dial);
}
22.4.5 gtk_dial_realize()
Now we come to some new types of functions. First, we have a function that does the work of creating theX window. Notice that a mask is passed to the function gdk_window_new() which specifies which fields ofthe GdkWindowAttr structure actually have data in them (the remaining fields will be given default values).Also worth noting is the way the event mask of the widget is created. We call gtk_widget_get_events()to retrieve the event mask that the user has specified for this widget (with gtk_widget_set_events(), andadd the events that we are interested in ourselves.
After creating the window, we set its style and background, and put a pointer to the widget in the user datafield of the GdkWindow. This last step allows GTK to dispatch events for this window to the correct widget.
static void
gtk_dial_realize (GtkWidget *widget)
{
GtkDial *dial;
GdkWindowAttr attributes;
gint attributes_mask;
g_return_if_fail (widget != NULL);
g_return_if_fail (GTK_IS_DIAL (widget));
GTK_WIDGET_SET_FLAGS (widget, GTK_REALIZED);
dial = GTK_DIAL (widget);

22. Writing Your Own Widgets 196
attributes.x = widget->allocation.x;
attributes.y = widget->allocation.y;
attributes.width = widget->allocation.width;
attributes.height = widget->allocation.height;
attributes.wclass = GDK_INPUT_OUTPUT;
attributes.window_type = GDK_WINDOW_CHILD;
attributes.event_mask = gtk_widget_get_events (widget) |
GDK_EXPOSURE_MASK | GDK_BUTTON_PRESS_MASK |
GDK_BUTTON_RELEASE_MASK | GDK_POINTER_MOTION_MASK |
GDK_POINTER_MOTION_HINT_MASK;
attributes.visual = gtk_widget_get_visual (widget);
attributes.colormap = gtk_widget_get_colormap (widget);
attributes_mask = GDK_WA_X | GDK_WA_Y | GDK_WA_VISUAL | GDK_WA_COLORMAP;
widget->window = gdk_window_new (widget->parent->window, \&attributes, attributes_mask);
widget->style = gtk_style_attach (widget->style, widget->window);
gdk_window_set_user_data (widget->window, widget);
gtk_style_set_background (widget->style, widget->window, GTK_STATE_ACTIVE);
}
22.4.6 Size negotiation
Before the first time that the window containing a widget is displayed, and whenever the layout of thewindow changes, GTK asks each child widget for its desired size. This request is handled by the function,gtk_dial_size_request(). Since our widget isn’t a container widget, and has no real constraints on itssize, we just return a reasonable default value.
static void
gtk_dial_size_request (GtkWidget *widget,
GtkRequisition *requisition)
{
requisition->width = DIAL_DEFAULT_SIZE;
requisition->height = DIAL_DEFAULT_SIZE;
}
After all the widgets have requested an ideal size, the layout of the window is computed and each child widgetis notified of its actual size. Usually, this will at least as large as the requested size, but if for instance, theuser has resized the window, it may occasionally be smaller than the requested size. The size notification ishandled by the function gtk_dial_size_allocate(). Notice that as well as computing the sizes of somecomponent pieces for future use, this routine also does the grunt work of moving the widgets X window intothe new position and size.
static void
gtk_dial_size_allocate (GtkWidget *widget,
GtkAllocation *allocation)
{
GtkDial *dial;
g_return_if_fail (widget != NULL);
g_return_if_fail (GTK_IS_DIAL (widget));
g_return_if_fail (allocation != NULL);

22. Writing Your Own Widgets 197
widget->allocation = *allocation;
if (GTK_WIDGET_REALIZED (widget))
{
dial = GTK_DIAL (widget);
gdk_window_move_resize (widget->window,
allocation->x, allocation->y,
allocation->width, allocation->height);
dial->radius = MAX(allocation->width,allocation->height) * 0.45;
dial->pointer_width = dial->radius / 5;
}
}
.
22.4.7 gtk_dial_expose()
As mentioned above, all the drawing of this widget is done in the handler for expose events. There’s notmuch to remark on here except the use of the function gtk_draw_polygon to draw the pointer with threedimensional shading according to the colors stored in the widget’s style.
static gint
gtk_dial_expose (GtkWidget *widget,
GdkEventExpose *event)
{
GtkDial *dial;
GdkPoint points[3];
gdouble s,c;
gdouble theta;
gint xc, yc;
gint tick_length;
gint i;
g_return_val_if_fail (widget != NULL, FALSE);
g_return_val_if_fail (GTK_IS_DIAL (widget), FALSE);
g_return_val_if_fail (event != NULL, FALSE);
if (event->count > 0)
return FALSE;
dial = GTK_DIAL (widget);
gdk_window_clear_area (widget->window,
0, 0,
widget->allocation.width,
widget->allocation.height);
xc = widget->allocation.width/2;
yc = widget->allocation.height/2;
/* Draw ticks */
for (i=0; i<25; i++)
{

22. Writing Your Own Widgets 198
theta = (i*M_PI/18. - M_PI/6.);
s = sin(theta);
c = cos(theta);
tick_length = (i%6 == 0) ? dial->pointer_width : dial->pointer_width/2;
gdk_draw_line (widget->window,
widget->style->fg_gc[widget->state],
xc + c*(dial->radius - tick_length),
yc - s*(dial->radius - tick_length),
xc + c*dial->radius,
yc - s*dial->radius);
}
/* Draw pointer */
s = sin(dial->angle);
c = cos(dial->angle);
points[0].x = xc + s*dial->pointer_width/2;
points[0].y = yc + c*dial->pointer_width/2;
points[1].x = xc + c*dial->radius;
points[1].y = yc - s*dial->radius;
points[2].x = xc - s*dial->pointer_width/2;
points[2].y = yc - c*dial->pointer_width/2;
gtk_draw_polygon (widget->style,
widget->window,
GTK_STATE_NORMAL,
GTK_SHADOW_OUT,
points, 3,
TRUE);
return FALSE;
}
22.4.8 Event handling
The rest of the widget’s code handles various types of events, and isn’t too different from what would befound in many GTK applications. Two types of events can occur - either the user can click on the widgetwith the mouse and drag to move the pointer, or the value of the Adjustment object can change due to someexternal circumstance.
When the user clicks on the widget, we check to see if the click was appropriately near the pointer, andif so, store then button that the user clicked with in the button field of the widget structure, and graball mouse events with a call to gtk_grab_add(). Subsequent motion of the mouse causes the value of thecontrol to be recomputed (by the function gtk_dial_update_mouse). Depending on the policy that hasbeen set, ”value changed” events are either generated instantly (GTK_UPDATE_CONTINUOUS), after a delayin a timer added with gtk_timeout_add() (GTK_UPDATE_DELAYED), or only when the button is released(GTK_UPDATE_DISCONTINUOUS).
static gint
gtk_dial_button_press (GtkWidget *widget,
GdkEventButton *event)
{
22. Writing Your Own Widgets 199
GtkDial *dial;
gint dx, dy;
double s, c;
double d_parallel;
double d_perpendicular;
g_return_val_if_fail (widget != NULL, FALSE);
g_return_val_if_fail (GTK_IS_DIAL (widget), FALSE);
g_return_val_if_fail (event != NULL, FALSE);
dial = GTK_DIAL (widget);
/* Determine if button press was within pointer region - we
do this by computing the parallel and perpendicular distance of
the point where the mouse was pressed from the line passing through
the pointer */
dx = event->x - widget->allocation.width / 2;
dy = widget->allocation.height / 2 - event->y;
s = sin(dial->angle);
c = cos(dial->angle);
d_parallel = s*dy + c*dx;
d_perpendicular = fabs(s*dx - c*dy);
if (!dial->button &&
(d_perpendicular < dial->pointer_width/2) &&
(d_parallel > - dial->pointer_width))
{
gtk_grab_add (widget);
dial->button = event->button;
gtk_dial_update_mouse (dial, event->x, event->y);
}
return FALSE;
}
static gint
gtk_dial_button_release (GtkWidget *widget,
GdkEventButton *event)
{
GtkDial *dial;
g_return_val_if_fail (widget != NULL, FALSE);
g_return_val_if_fail (GTK_IS_DIAL (widget), FALSE);
g_return_val_if_fail (event != NULL, FALSE);
dial = GTK_DIAL (widget);
if (dial->button == event->button)
{
gtk_grab_remove (widget);
dial->button = 0;
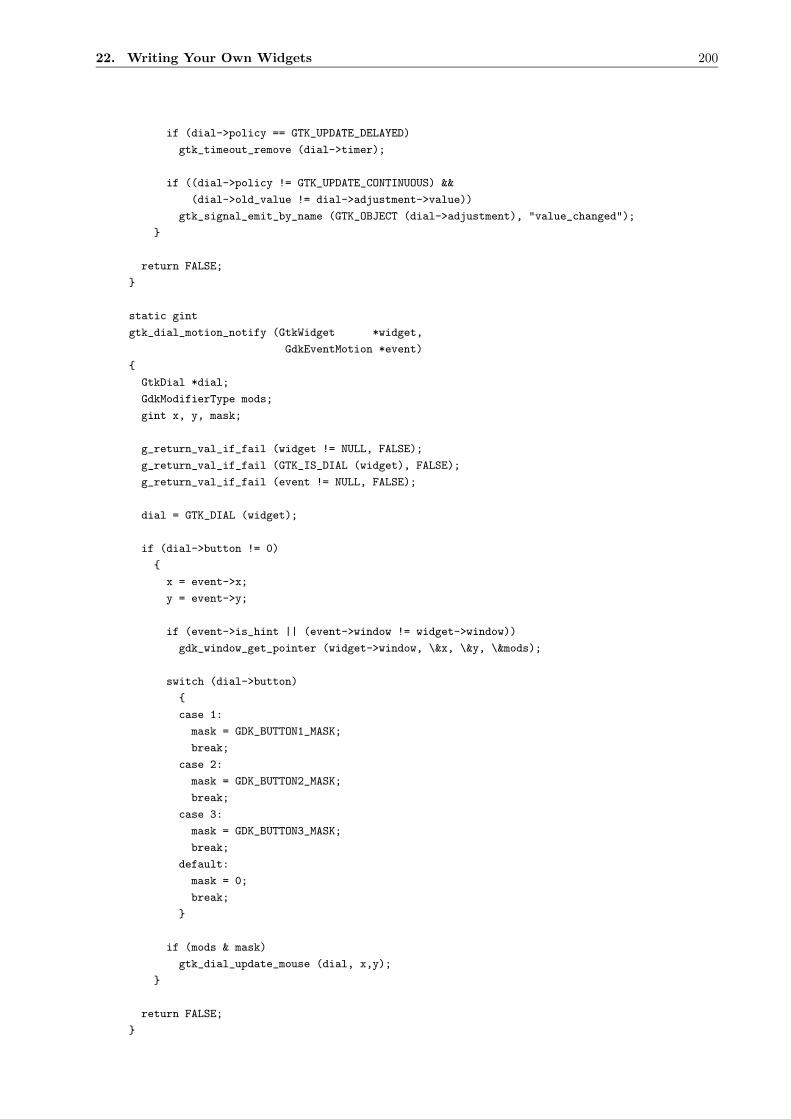
22. Writing Your Own Widgets 200
if (dial->policy == GTK_UPDATE_DELAYED)
gtk_timeout_remove (dial->timer);
if ((dial->policy != GTK_UPDATE_CONTINUOUS) &&
(dial->old_value != dial->adjustment->value))
gtk_signal_emit_by_name (GTK_OBJECT (dial->adjustment), "value_changed");
}
return FALSE;
}
static gint
gtk_dial_motion_notify (GtkWidget *widget,
GdkEventMotion *event)
{
GtkDial *dial;
GdkModifierType mods;
gint x, y, mask;
g_return_val_if_fail (widget != NULL, FALSE);
g_return_val_if_fail (GTK_IS_DIAL (widget), FALSE);
g_return_val_if_fail (event != NULL, FALSE);
dial = GTK_DIAL (widget);
if (dial->button != 0)
{
x = event->x;
y = event->y;
if (event->is_hint || (event->window != widget->window))
gdk_window_get_pointer (widget->window, \&x, \&y, \&mods);
switch (dial->button)
{
case 1:
mask = GDK_BUTTON1_MASK;
break;
case 2:
mask = GDK_BUTTON2_MASK;
break;
case 3:
mask = GDK_BUTTON3_MASK;
break;
default:
mask = 0;
break;
}
if (mods & mask)
gtk_dial_update_mouse (dial, x,y);
}
return FALSE;
}
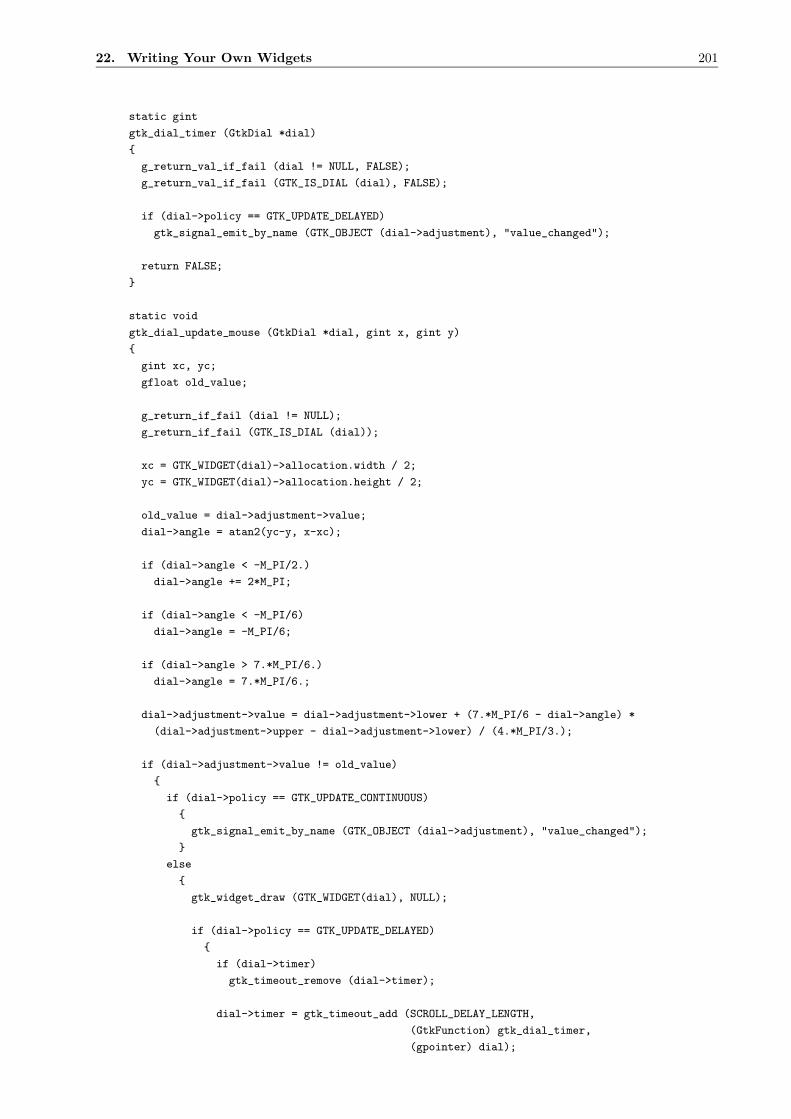
22. Writing Your Own Widgets 201
static gint
gtk_dial_timer (GtkDial *dial)
{
g_return_val_if_fail (dial != NULL, FALSE);
g_return_val_if_fail (GTK_IS_DIAL (dial), FALSE);
if (dial->policy == GTK_UPDATE_DELAYED)
gtk_signal_emit_by_name (GTK_OBJECT (dial->adjustment), "value_changed");
return FALSE;
}
static void
gtk_dial_update_mouse (GtkDial *dial, gint x, gint y)
{
gint xc, yc;
gfloat old_value;
g_return_if_fail (dial != NULL);
g_return_if_fail (GTK_IS_DIAL (dial));
xc = GTK_WIDGET(dial)->allocation.width / 2;
yc = GTK_WIDGET(dial)->allocation.height / 2;
old_value = dial->adjustment->value;
dial->angle = atan2(yc-y, x-xc);
if (dial->angle < -M_PI/2.)
dial->angle += 2*M_PI;
if (dial->angle < -M_PI/6)
dial->angle = -M_PI/6;
if (dial->angle > 7.*M_PI/6.)
dial->angle = 7.*M_PI/6.;
dial->adjustment->value = dial->adjustment->lower + (7.*M_PI/6 - dial->angle) *
(dial->adjustment->upper - dial->adjustment->lower) / (4.*M_PI/3.);
if (dial->adjustment->value != old_value)
{
if (dial->policy == GTK_UPDATE_CONTINUOUS)
{
gtk_signal_emit_by_name (GTK_OBJECT (dial->adjustment), "value_changed");
}
else
{
gtk_widget_draw (GTK_WIDGET(dial), NULL);
if (dial->policy == GTK_UPDATE_DELAYED)
{
if (dial->timer)
gtk_timeout_remove (dial->timer);
dial->timer = gtk_timeout_add (SCROLL_DELAY_LENGTH,
(GtkFunction) gtk_dial_timer,
(gpointer) dial);

22. Writing Your Own Widgets 202
}
}
}
}
Changes to the Adjustment by external means are communicated to our widget by the ‘changed’ and‘value changed’ signals. The handlers for these functions call gtk_dial_update() to validate the argu-ments, compute the new pointer angle, and redraw the widget (by calling gtk_widget_draw()).
static void
gtk_dial_update (GtkDial *dial)
{
gfloat new_value;
g_return_if_fail (dial != NULL);
g_return_if_fail (GTK_IS_DIAL (dial));
new_value = dial->adjustment->value;
if (new_value < dial->adjustment->lower)
new_value = dial->adjustment->lower;
if (new_value > dial->adjustment->upper)
new_value = dial->adjustment->upper;
if (new_value != dial->adjustment->value)
{
dial->adjustment->value = new_value;
gtk_signal_emit_by_name (GTK_OBJECT (dial->adjustment), "value_changed");
}
dial->angle = 7.*M_PI/6. - (new_value - dial->adjustment->lower) * 4.*M_PI/3. /
(dial->adjustment->upper - dial->adjustment->lower);
gtk_widget_draw (GTK_WIDGET(dial), NULL);
}
static void
gtk_dial_adjustment_changed (GtkAdjustment *adjustment,
gpointer data)
{
GtkDial *dial;
g_return_if_fail (adjustment != NULL);
g_return_if_fail (data != NULL);
dial = GTK_DIAL (data);
if ((dial->old_value != adjustment->value) ||
(dial->old_lower != adjustment->lower) ||
(dial->old_upper != adjustment->upper))
{
gtk_dial_update (dial);
dial->old_value = adjustment->value;
dial->old_lower = adjustment->lower;
dial->old_upper = adjustment->upper;
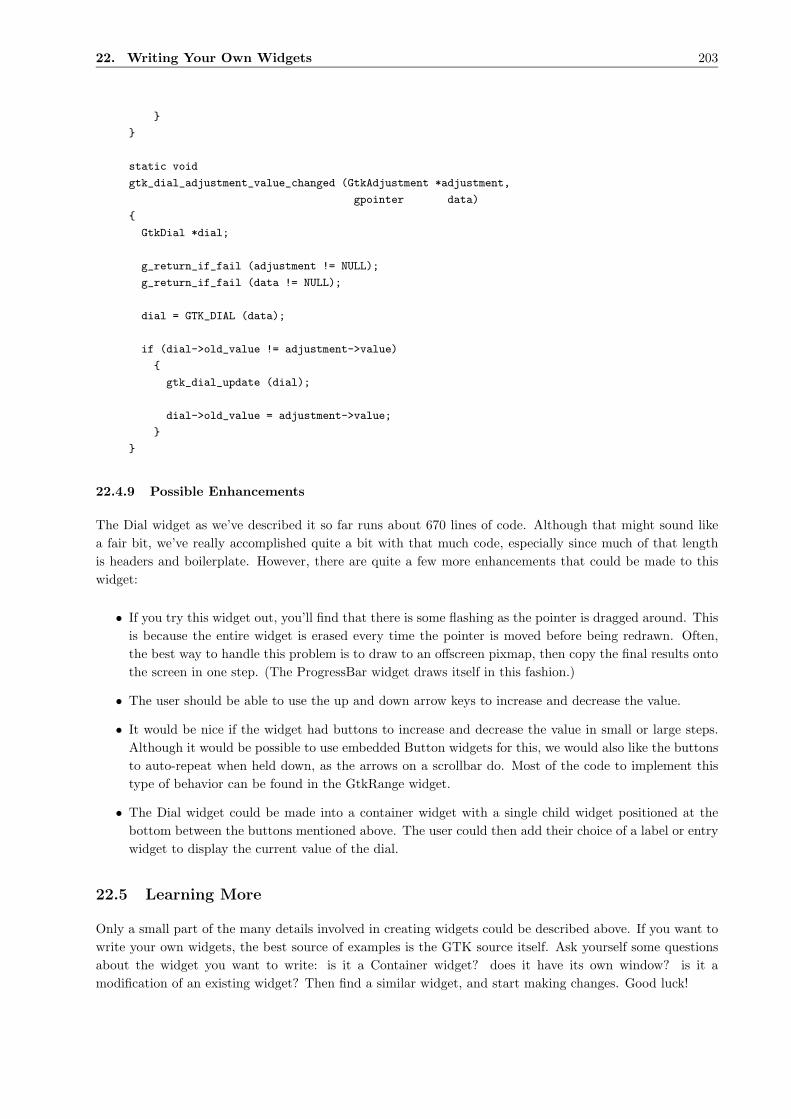
22. Writing Your Own Widgets 203
}
}
static void
gtk_dial_adjustment_value_changed (GtkAdjustment *adjustment,
gpointer data)
{
GtkDial *dial;
g_return_if_fail (adjustment != NULL);
g_return_if_fail (data != NULL);
dial = GTK_DIAL (data);
if (dial->old_value != adjustment->value)
{
gtk_dial_update (dial);
dial->old_value = adjustment->value;
}
}
22.4.9 Possible Enhancements
The Dial widget as we’ve described it so far runs about 670 lines of code. Although that might sound likea fair bit, we’ve really accomplished quite a bit with that much code, especially since much of that lengthis headers and boilerplate. However, there are quite a few more enhancements that could be made to thiswidget:
• If you try this widget out, you’ll find that there is some flashing as the pointer is dragged around. Thisis because the entire widget is erased every time the pointer is moved before being redrawn. Often,the best way to handle this problem is to draw to an offscreen pixmap, then copy the final results ontothe screen in one step. (The ProgressBar widget draws itself in this fashion.)
• The user should be able to use the up and down arrow keys to increase and decrease the value.
• It would be nice if the widget had buttons to increase and decrease the value in small or large steps.Although it would be possible to use embedded Button widgets for this, we would also like the buttonsto auto-repeat when held down, as the arrows on a scrollbar do. Most of the code to implement thistype of behavior can be found in the GtkRange widget.
• The Dial widget could be made into a container widget with a single child widget positioned at thebottom between the buttons mentioned above. The user could then add their choice of a label or entrywidget to display the current value of the dial.
22.5 Learning More
Only a small part of the many details involved in creating widgets could be described above. If you want towrite your own widgets, the best source of examples is the GTK source itself. Ask yourself some questionsabout the widget you want to write: is it a Container widget? does it have its own window? is it amodification of an existing widget? Then find a similar widget, and start making changes. Good luck!

23. Scribble, A Simple Example Drawing Program 204
23 Scribble, A Simple Example Drawing Program
23.1 Overview
In this section, we will build a simple drawing program. In the process, we will examine how to handle mouseevents, how to draw in a window, and how to do drawing better by using a backing pixmap. After creatingthe simple drawing program, we will extend it by adding support for XInput devices, such as drawing tablets.GTK provides support routines which makes getting extended information, such as pressure and tilt, fromsuch devices quite easy.
23.2 Event Handling
The GTK signals we have already discussed are for high-level actions, such as a menu item being selected.However, sometimes it is useful to learn about lower-level occurrences, such as the mouse being moved, ora key being pressed. There are also GTK signals corresponding to these low-level events. The handlers forthese signals have an extra parameter which is a pointer to a structure containing information about theevent. For instance, motion events handlers are passed a pointer to a GdkEventMotion structure which looks(in part) like:
struct _GdkEventMotion
{
GdkEventType type;
GdkWindow *window;
guint32 time;
gdouble x;
gdouble y;
...
guint state;
...
};
type will be set to the event type, in this case GDK_MOTION_NOTIFY, window is the window in which theevent occurred. x and y give the coordinates of the event, and state specifies the modifier state when theevent occurred (that is, it specifies which modifier keys and mouse buttons were pressed.) It is the bitwiseOR of some of the following:
GDK_SHIFT_MASK
GDK_LOCK_MASK
GDK_CONTROL_MASK
GDK_MOD1_MASK
GDK_MOD2_MASK
GDK_MOD3_MASK
GDK_MOD4_MASK
GDK_MOD5_MASK
GDK_BUTTON1_MASK
GDK_BUTTON2_MASK
GDK_BUTTON3_MASK
GDK_BUTTON4_MASK
GDK_BUTTON5_MASK
As for other signals, to determine what happens when an event occurs we call gtk_signal_connect(). Butwe also need let GTK know which events we want to be notified about. To do this, we call the function:
void gtk_widget_set_events (GtkWidget *widget,
gint events);
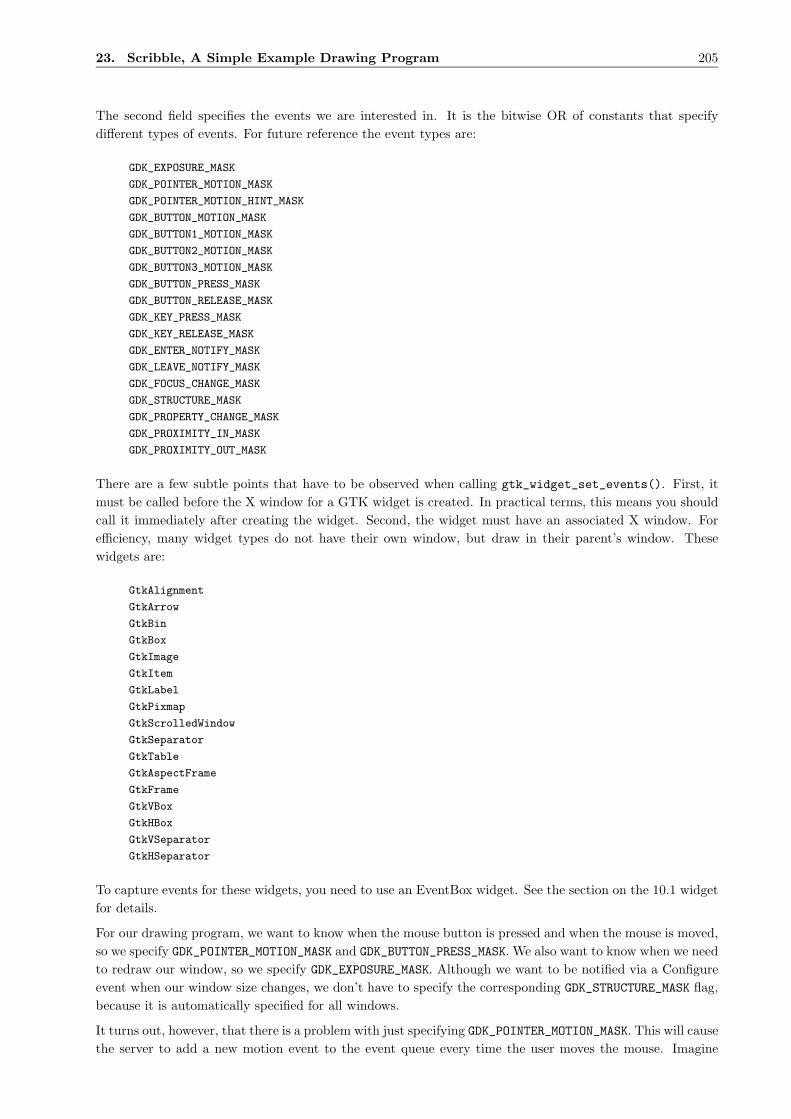
23. Scribble, A Simple Example Drawing Program 205
The second field specifies the events we are interested in. It is the bitwise OR of constants that specifydifferent types of events. For future reference the event types are:
GDK_EXPOSURE_MASK
GDK_POINTER_MOTION_MASK
GDK_POINTER_MOTION_HINT_MASK
GDK_BUTTON_MOTION_MASK
GDK_BUTTON1_MOTION_MASK
GDK_BUTTON2_MOTION_MASK
GDK_BUTTON3_MOTION_MASK
GDK_BUTTON_PRESS_MASK
GDK_BUTTON_RELEASE_MASK
GDK_KEY_PRESS_MASK
GDK_KEY_RELEASE_MASK
GDK_ENTER_NOTIFY_MASK
GDK_LEAVE_NOTIFY_MASK
GDK_FOCUS_CHANGE_MASK
GDK_STRUCTURE_MASK
GDK_PROPERTY_CHANGE_MASK
GDK_PROXIMITY_IN_MASK
GDK_PROXIMITY_OUT_MASK
There are a few subtle points that have to be observed when calling gtk_widget_set_events(). First, itmust be called before the X window for a GTK widget is created. In practical terms, this means you shouldcall it immediately after creating the widget. Second, the widget must have an associated X window. Forefficiency, many widget types do not have their own window, but draw in their parent’s window. Thesewidgets are:
GtkAlignment
GtkArrow
GtkBin
GtkBox
GtkImage
GtkItem
GtkLabel
GtkPixmap
GtkScrolledWindow
GtkSeparator
GtkTable
GtkAspectFrame
GtkFrame
GtkVBox
GtkHBox
GtkVSeparator
GtkHSeparator
To capture events for these widgets, you need to use an EventBox widget. See the section on the 10.1 widgetfor details.
For our drawing program, we want to know when the mouse button is pressed and when the mouse is moved,so we specify GDK_POINTER_MOTION_MASK and GDK_BUTTON_PRESS_MASK. We also want to know when we needto redraw our window, so we specify GDK_EXPOSURE_MASK. Although we want to be notified via a Configureevent when our window size changes, we don’t have to specify the corresponding GDK_STRUCTURE_MASK flag,because it is automatically specified for all windows.
It turns out, however, that there is a problem with just specifying GDK_POINTER_MOTION_MASK. This will causethe server to add a new motion event to the event queue every time the user moves the mouse. Imagine

23. Scribble, A Simple Example Drawing Program 206
that it takes us 0.1 seconds to handle a motion event, but the X server queues a new motion event every0.05 seconds. We will soon get way behind the users drawing. If the user draws for 5 seconds, it will take usanother 5 seconds to catch up after they release the mouse button! What we would like is to only get onemotion event for each event we process. The way to do this is to specify GDK_POINTER_MOTION_HINT_MASK.
When we specify GDK_POINTER_MOTION_HINT_MASK, the server sends us a motion event the first time thepointer moves after entering our window, or after a button press or release event. Subsequent motion eventswill be suppressed until we explicitly ask for the position of the pointer using the function:
GdkWindow* gdk_window_get_pointer (GdkWindow *window,
gint *x,
gint *y,
GdkModifierType *mask);
(There is another function, gtk_widget_get_pointer() which has a simpler interface, but turns out not tobe very useful, since it only retrieves the position of the mouse, not whether the buttons are pressed.)
The code to set the events for our window then looks like:
gtk_signal_connect (GTK_OBJECT (drawing_area), "expose_event",
(GtkSignalFunc) expose_event, NULL);
gtk_signal_connect (GTK_OBJECT(drawing_area),"configure_event",
(GtkSignalFunc) configure_event, NULL);
gtk_signal_connect (GTK_OBJECT (drawing_area), "motion_notify_event",
(GtkSignalFunc) motion_notify_event, NULL);
gtk_signal_connect (GTK_OBJECT (drawing_area), "button_press_event",
(GtkSignalFunc) button_press_event, NULL);
gtk_widget_set_events (drawing_area, GDK_EXPOSURE_MASK
| GDK_LEAVE_NOTIFY_MASK
| GDK_BUTTON_PRESS_MASK
| GDK_POINTER_MOTION_MASK
| GDK_POINTER_MOTION_HINT_MASK);
We’ll save the ”expose event” and ”configure event” handlers for later. The ”motion notify event” and ”but-ton press event” handlers pretty simple:
static gint
button_press_event (GtkWidget *widget, GdkEventButton *event)
{
if (event->button == 1 \&\& pixmap != NULL)
draw_brush (widget, event->x, event->y);
return TRUE;
}
static gint
motion_notify_event (GtkWidget *widget, GdkEventMotion *event)
{
int x, y;
GdkModifierType state;
if (event->is_hint)
gdk_window_get_pointer (event->window, \&x, \&y, \&state);
else
{
23. Scribble, A Simple Example Drawing Program 207
x = event->x;
y = event->y;
state = event->state;
}
if (state \& GDK_BUTTON1_MASK \&\& pixmap != NULL)
draw_brush (widget, x, y);
return TRUE;
}
23.3 The DrawingArea Widget, And Drawing
We know turn to the process of drawing on the screen. The widget we use for this is the DrawingAreawidget. A drawing area widget is essentially an X window and nothing more. It is a blank canvas in whichwe can draw whatever we like. A drawing area is created using the call:
GtkWidget* gtk_drawing_area_new (void);
A default size for the widget can be specified by calling:
void gtk_drawing_area_size (GtkDrawingArea *darea,
gint width,
gint height);
This default size can be overridden, as is true for all widgets, by calling gtk_widget_set_usize(), and that,in turn, can be overridden if the user manually resizes the the window containing the drawing area.
It should be noted that when we create a DrawingArea widget, we are, completely responsible for drawingthe contents. If our window is obscured then uncovered, we get an exposure event and must redraw whatwas previously hidden.
Having to remember everything that was drawn on the screen so we can properly redraw it can, to say theleast, be a nuisance. In addition, it can be visually distracting if portions of the window are cleared, thenredrawn step by step. The solution to this problem is to use an offscreen backing pixmap. Instead of drawingdirectly to the screen, we draw to an image stored in server memory but not displayed, then when the imagechanges or new portions of the image are displayed, we copy the relevant portions onto the screen.
To create an offscreen pixmap, we call the function:
GdkPixmap* gdk_pixmap_new (GdkWindow *window,
gint width,
gint height,
gint depth);
The window parameter specifies a GDK window that this pixmap takes some of its properties from. width
and height specify the size of the pixmap. depth specifies the color depth, that is the number of bits perpixel, for the new window. If the depth is specified as -1, it will match the depth of window.
We create the pixmap in our ”configure event”handler. This event is generated whenever the window changessize, including when it is originally created.
/* Backing pixmap for drawing area */
static GdkPixmap *pixmap = NULL;
23. Scribble, A Simple Example Drawing Program 208
/* Create a new backing pixmap of the appropriate size */
static gint
configure_event (GtkWidget *widget, GdkEventConfigure *event)
{
if (pixmap)
gdk_pixmap_unref(pixmap);
pixmap = gdk_pixmap_new(widget->window,
widget->allocation.width,
widget->allocation.height,
-1);
gdk_draw_rectangle (pixmap,
widget->style->white_gc,
TRUE,
0, 0,
widget->allocation.width,
widget->allocation.height);
return TRUE;
}
The call to gdk_draw_rectangle() clears the pixmap initially to white. We’ll say more about that in amoment.
Our exposure event handler then simply copies the relevant portion of the pixmap onto the screen (wedetermine the area we need to redraw by using the event->area field of the exposure event):
/* Redraw the screen from the backing pixmap */
static gint
expose_event (GtkWidget *widget, GdkEventExpose *event)
{
gdk_draw_pixmap(widget->window,
widget->style->fg_gc[GTK_WIDGET_STATE (widget)],
pixmap,
event->area.x, event->area.y,
event->area.x, event->area.y,
event->area.width, event->area.height);
return FALSE;
}
We’ve now seen how to keep the screen up to date with our pixmap, but how do we actually draw interestingstuff on our pixmap? There are a large number of calls in GTK’s GDK library for drawing on drawables. Adrawable is simply something that can be drawn upon. It can be a window, a pixmap, or a bitmap (a black andwhite image). We’ve already seen two such calls above, gdk_draw_rectangle() and gdk_draw_pixmap().The complete list is:
gdk_draw_line ()
gdk_draw_rectangle ()
gdk_draw_arc ()
gdk_draw_polygon ()
gdk_draw_string ()
gdk_draw_text ()
gdk_draw_pixmap ()
gdk_draw_bitmap ()
gdk_draw_image ()

23. Scribble, A Simple Example Drawing Program 209
gdk_draw_points ()
gdk_draw_segments ()
See the reference documentation or the header file <gdk/gdk.h> for further details on these functions.These functions all share the same first two arguments. The first argument is the drawable to draw upon,the second argument is a graphics context (GC).
A graphics context encapsulates information about things such as foreground and background color and linewidth. GDK has a full set of functions for creating and modifying graphics contexts, but to keep thingssimple we’ll just use predefined graphics contexts. Each widget has an associated style. (Which can bemodified in a gtkrc file, see the section GTK’s rc file.) This, among other things, stores a number of graphicscontexts. Some examples of accessing these graphics contexts are:
widget->style->white_gc
widget->style->black_gc
widget->style->fg_gc[GTK_STATE_NORMAL]
widget->style->bg_gc[GTK_WIDGET_STATE(widget)]
The fields fg_gc, bg_gc, dark_gc, and light_gc are indexed by a parameter of type GtkStateType whichcan take on the values:
GTK_STATE_NORMAL,
GTK_STATE_ACTIVE,
GTK_STATE_PRELIGHT,
GTK_STATE_SELECTED,
GTK_STATE_INSENSITIVE
For instance, the for GTK_STATE_SELECTED the default foreground color is white and the default backgroundcolor, dark blue.
Our function draw_brush(), which does the actual drawing on the screen, is then:
/* Draw a rectangle on the screen */
static void
draw_brush (GtkWidget *widget, gdouble x, gdouble y)
{
GdkRectangle update_rect;
update_rect.x = x - 5;
update_rect.y = y - 5;
update_rect.width = 10;
update_rect.height = 10;
gdk_draw_rectangle (pixmap,
widget->style->black_gc,
TRUE,
update_rect.x, update_rect.y,
update_rect.width, update_rect.height);
gtk_widget_draw (widget, \&update_rect);
}
After we draw the rectangle representing the brush onto the pixmap, we call the function:
void gtk_widget_draw (GtkWidget *widget,
GdkRectangle *area);

23. Scribble, A Simple Example Drawing Program 210
which notifies X that the area given by the area parameter needs to be updated. X will eventually generatean expose event (possibly combining the areas passed in several calls to gtk_widget_draw()) which willcause our expose event handler to copy the relevant portions to the screen.
We have now covered the entire drawing program except for a few mundane details like creating the mainwindow. The complete source code is available from the location from which you got this tutorial, or from:
http://www.gtk.org/ otaylor/gtk/tutorial/
23.4 Adding XInput support
It is now possible to buy quite inexpensive input devices such as drawing tablets, which allow drawing witha much greater ease of artistic expression than does a mouse. The simplest way to use such devices is simplyas a replacement for the mouse, but that misses out many of the advantages of these devices, such as:
• Pressure sensitivity
• Tilt reporting
• Sub-pixel positioning
• Multiple inputs (for example, a stylus with a point and eraser)
For information about the XInput extension, see the XInput-HOWTO.
If we examine the full definition of, for example, the GdkEventMotion structure, we see that it has fields tosupport extended device information.
struct _GdkEventMotion
{
GdkEventType type;
GdkWindow *window;
guint32 time;
gdouble x;
gdouble y;
gdouble pressure;
gdouble xtilt;
gdouble ytilt;
guint state;
gint16 is_hint;
GdkInputSource source;
guint32 deviceid;
};
pressure gives the pressure as a floating point number between 0 and 1. xtilt and ytilt can take onvalues between -1 and 1, corresponding to the degree of tilt in each direction. source and deviceid specifythe device for which the event occurred in two different ways. source gives some simple information aboutthe type of device. It can take the enumeration values.
GDK_SOURCE_MOUSE
GDK_SOURCE_PEN
GDK_SOURCE_ERASER
GDK_SOURCE_CURSOR
deviceid specifies a unique numeric ID for the device. This can be used to find out further information aboutthe device using the gdk_input_list_devices() call (see below). The special value GDK_CORE_POINTER isused for the core pointer device. (Usually the mouse.)
23. Scribble, A Simple Example Drawing Program 211
23.4.1 Enabling extended device information
To let GTK know about our interest in the extended device information, we merely have to add a single lineto our program:
gtk_widget_set_extension_events (drawing_area, GDK_EXTENSION_EVENTS_CURSOR);
By giving the value GDK_EXTENSION_EVENTS_CURSOR we say that we are interested in extension events, butonly if we don’t have to draw our own cursor. See the section 23.4.4 below for more information aboutdrawing the cursor. We could also give the values GDK_EXTENSION_EVENTS_ALL if we were willing to drawour own cursor, or GDK_EXTENSION_EVENTS_NONE to revert back to the default condition.
This is not completely the end of the story however. By default, no extension devices are enabled. We needa mechanism to allow users to enable and configure their extension devices. GTK provides the InputDialogwidget to automate this process. The following procedure manages an InputDialog widget. It creates thedialog if it isn’t present, and raises it to the top otherwise.
void
input_dialog_destroy (GtkWidget *w, gpointer data)
{
*((GtkWidget **)data) = NULL;
}
void
create_input_dialog ()
{
static GtkWidget *inputd = NULL;
if (!inputd)
{
inputd = gtk_input_dialog_new();
gtk_signal_connect (GTK_OBJECT(inputd), "destroy",
(GtkSignalFunc)input_dialog_destroy, \&inputd);
gtk_signal_connect_object (GTK_OBJECT(GTK_INPUT_DIALOG(inputd)->close_button),
"clicked",
(GtkSignalFunc)gtk_widget_hide,
GTK_OBJECT(inputd));
gtk_widget_hide ( GTK_INPUT_DIALOG(inputd)->save_button);
gtk_widget_show (inputd);
}
else
{
if (!GTK_WIDGET_MAPPED(inputd))
gtk_widget_show(inputd);
else
gdk_window_raise(inputd->window);
}
}
(You might want to take note of the way we handle this dialog. By connecting to the ”destroy” signal, wemake sure that we don’t keep a pointer to dialog around after it is destroyed - that could lead to a segfault.)
The InputDialog has two buttons ”Close” and ”Save”, which by default have no actions assigned to them. Inthe above function we make ”Close” hide the dialog, hide the ”Save” button, since we don’t implement savingof XInput options in this program.
23. Scribble, A Simple Example Drawing Program 212
23.4.2 Using extended device information
Once we’ve enabled the device, we can just use the extended device information in the extra fields of theevent structures. In fact, it is always safe to use this information since these fields will have reasonabledefault values even when extended events are not enabled.
Once change we do have to make is to call gdk_input_window_get_pointer() instead ofgdk_window_get_pointer. This is necessary because gdk_window_get_pointer doesn’t return the extendeddevice information.
void gdk_input_window_get_pointer( GdkWindow *window,
guint32 deviceid,
gdouble *x,
gdouble *y,
gdouble *pressure,
gdouble *xtilt,
gdouble *ytilt,
GdkModifierType *mask);
When calling this function, we need to specify the device ID as well as the window. Usually, we’ll get the de-vice ID from the deviceid field of an event structure. Again, this function will return reasonable values whenextension events are not enabled. (In this case, event->deviceid will have the value GDK_CORE_POINTER).
So the basic structure of our button-press and motion event handlers, doesn’t change much - we just needto add code to deal with the extended information.
static gint
button_press_event (GtkWidget *widget, GdkEventButton *event)
{
print_button_press (event->deviceid);
if (event->button == 1 \&\& pixmap != NULL)
draw_brush (widget, event->source, event->x, event->y, event->pressure);
return TRUE;
}
static gint
motion_notify_event (GtkWidget *widget, GdkEventMotion *event)
{
gdouble x, y;
gdouble pressure;
GdkModifierType state;
if (event->is_hint)
gdk_input_window_get_pointer (event->window, event->deviceid,
\&x, \&y, \&pressure, NULL, NULL, \&state);
else
{
x = event->x;
y = event->y;
pressure = event->pressure;
state = event->state;
}
if (state \& GDK_BUTTON1_MASK \&\& pixmap != NULL)
draw_brush (widget, event->source, x, y, pressure);
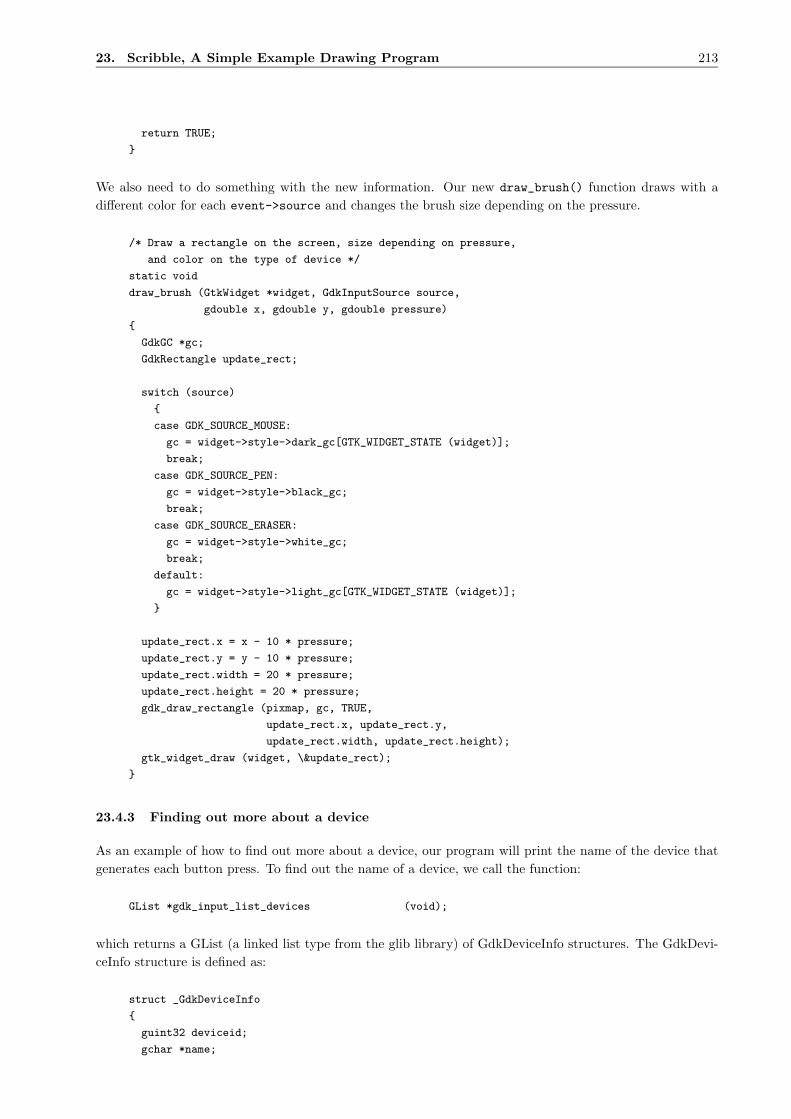
23. Scribble, A Simple Example Drawing Program 213
return TRUE;
}
We also need to do something with the new information. Our new draw_brush() function draws with adifferent color for each event->source and changes the brush size depending on the pressure.
/* Draw a rectangle on the screen, size depending on pressure,
and color on the type of device */
static void
draw_brush (GtkWidget *widget, GdkInputSource source,
gdouble x, gdouble y, gdouble pressure)
{
GdkGC *gc;
GdkRectangle update_rect;
switch (source)
{
case GDK_SOURCE_MOUSE:
gc = widget->style->dark_gc[GTK_WIDGET_STATE (widget)];
break;
case GDK_SOURCE_PEN:
gc = widget->style->black_gc;
break;
case GDK_SOURCE_ERASER:
gc = widget->style->white_gc;
break;
default:
gc = widget->style->light_gc[GTK_WIDGET_STATE (widget)];
}
update_rect.x = x - 10 * pressure;
update_rect.y = y - 10 * pressure;
update_rect.width = 20 * pressure;
update_rect.height = 20 * pressure;
gdk_draw_rectangle (pixmap, gc, TRUE,
update_rect.x, update_rect.y,
update_rect.width, update_rect.height);
gtk_widget_draw (widget, \&update_rect);
}
23.4.3 Finding out more about a device
As an example of how to find out more about a device, our program will print the name of the device thatgenerates each button press. To find out the name of a device, we call the function:
GList *gdk_input_list_devices (void);
which returns a GList (a linked list type from the glib library) of GdkDeviceInfo structures. The GdkDevi-ceInfo structure is defined as:
struct _GdkDeviceInfo
{
guint32 deviceid;
gchar *name;

23. Scribble, A Simple Example Drawing Program 214
GdkInputSource source;
GdkInputMode mode;
gint has_cursor;
gint num_axes;
GdkAxisUse *axes;
gint num_keys;
GdkDeviceKey *keys;
};
Most of these fields are configuration information that you can ignore unless you are implemented XInputconfiguration saving. The we are interested in here is name which is simply the name that X assigns to thedevice. The other field that isn’t configuration information is has_cursor. If has_cursor is false, then wewe need to draw our own cursor. But since we’ve specified GDK_EXTENSION_EVENTS_CURSOR, we don’t haveto worry about this.
Our print_button_press() function simply iterates through the returned list until it finds a match, thenprints out the name of the device.
static void
print_button_press (guint32 deviceid)
{
GList *tmp_list;
/* gdk_input_list_devices returns an internal list, so we shouldn’t
free it afterwards */
tmp_list = gdk_input_list_devices();
while (tmp_list)
{
GdkDeviceInfo *info = (GdkDeviceInfo *)tmp_list->data;
if (info->deviceid == deviceid)
{
printf("Button press on device ’%s’\n", info->name);
return;
}
tmp_list = tmp_list->next;
}
}
That completes the changes to ‘XInputize’ our program. As with the first version, the complete source isavailable at the location from which you got this tutorial, or from:
http://www.gtk.org/ otaylor/gtk/tutorial/
23.4.4 Further sophistications
Although our program now supports XInput quite well, it lacks some features we would want in a full-featured application. First, the user probably doesn’t want to have to configure their device each time theyrun the program, so we should allow them to save the device configuration. This is done by iterating throughthe return of gdk_input_list_devices() and writing out the configuration to a file.
To restore the state next time the program is run, GDK provides functions to change device configuration:
gdk_input_set_extension_events()

24. Tips For Writing GTK Applications 215
gdk_input_set_source()
gdk_input_set_mode()
gdk_input_set_axes()
gdk_input_set_key()
(The list returned from gdk_input_list_devices() should not be modified directly.) An example of do-ing this can be found in the drawing program gsumi. (Available from http://www.msc.cornell.edu/ otay-lor/gsumi/) Eventually, it would be nice to have a standard way of doing this for all applications. Thisprobably belongs at a slightly higher level than GTK, perhaps in the GNOME library.
Another major omission that we have mentioned above is the lack of cursor drawing. Platforms otherthan XFree86 currently do not allow simultaneously using a device as both the core pointer and directlyby an application. See the XInput-HOWTO <http://www.msc.cornell.edu/ otaylor/xinput/XInput-
HOWTO.html> for more information about this. This means that applications that want to support thewidest audience need to draw their own cursor.
An application that draws its own cursor needs to do two things: determine if the current device needs acursor drawn or not, and determine if the current device is in proximity. (If the current device is a drawingtablet, it’s a nice touch to make the cursor disappear when the stylus is lifted from the tablet. When thedevice is touching the stylus, that is called ”in proximity.”) The first is done by searching the device list, aswe did to find out the device name. The second is achieved by selecting ”proximity out” events. An exampleof drawing one’s own cursor is found in the ’testinput’ program found in the GTK distribution.
24 Tips For Writing GTK Applications
This section is simply a gathering of wisdom, general style guidelines and hints to creating good GTKapplications. Currently this section is very short, but hopefully it will get longer in future editions of thistutorial.
Use GNU autoconf and automake! They are your friends :) Automake examines C files, determines how theydepend on each other, and generates a Makefile so the files can be compiled in the correct order. Autoconfpermits automatic configuration of software installation, handling a large number of system quirks to increaseportability. I am planning to make a quick intro on them here.
When writing C code, use only C comments (beginning with ”/*” and ending with ”*/”), and don’t useC++-style comments (”//”). Although many C compilers understand C++ comments, others don’t, and theANSI C standard does not require that C++-style comments be processed as comments.
25 Contributing
This document, like so much other great software out there, was created for free by volunteers. If you areat all knowledgeable about any aspect of GTK that does not already have documentation, please considercontributing to this document.
If you do decide to contribute, please mail your text to Tony Gale, [email protected]. Also, be aware that theentirety of this document is free, and any addition by you provide must also be free. That is, people mayuse any portion of your examples in their programs, and copies of this document may be distributed at willetc.
Thank you.

26. Credits 216
26 Credits
I would like to thank the following for their contributions to this text.
• Bawer Dagdeviren, [email protected] for the menus tutorial.
• Raph Levien, [email protected] for hello world ala GTK, widget packing, and general all around wisdom.He’s also generously donated a home for this tutorial.
• Peter Mattis, [email protected] for the simplest GTK program.. and the ability to make it :)
• Werner Koch [email protected] for converting the original plain text to SGML, and the widgetclass hierarchy.
• Mark Crichton [email protected] for the menu factory code, and the table packingtutorial.
• Owen Taylor [email protected] for the EventBox widget section (and the patch to the distro). He’salso responsible for the selections code and tutorial, as well as the sections on writing your own GTKwidgets, and the example application. Thanks a lot Owen for all you help!
• Mark VanderBoom [email protected] for his wonderful work on the Notebook, Progress Bar,Dialogs, and File selection widgets. Thanks a lot Mark! You’ve been a great help.
• Tim Janik [email protected] for his great job on the Lists Widget. His excellent work on automaticallyextracting the widget tree and signal information from GTK. Thanks Tim :)
• Rajat Datta [email protected] for the excellent job on the Pixmap tutorial.
• Michael K. Johnson [email protected] for info and code for popup menus.
• David Huggins-Daines [email protected] for the Range Widgets and Tree Widget sections.
• Stefan Mars [email protected] for the GtkCList section.
• David A. Wheeler [email protected] for portions of the text on glib and various tutorial fixups andimprovements. The glib text was in turn based on material developed by Damon Chaplin DAChap-
And to all of you who commented and helped refine this document.
Thanks.
27 Tutorial Copyright and Permissions Notice
The GTK Tutorial is Copyright (C) 1997 Ian Main.
Copyright (C) 1998-1999 Tony Gale.
Permission is granted to make and distribute verbatim copies of this manual provided the copyright noticeand this permission notice are preserved on all copies.
Permission is granted to copy and distribute modified versions of this document under the conditions forverbatim copying, provided that this copyright notice is included exactly as in the original, and that theentire resulting derived work is distributed under the terms of a permission notice identical to this one.
Permission is granted to copy and distribute translations of this document into another language, under theabove conditions for modified versions.

A. GTK Signals 217
If you are intending to incorporate this document into a published work, please contact the maintainer, andwe will make an effort to ensure that you have the most up to date information available.
There is no guarantee that this document lives up to its intended purpose. This is simply provided as afree resource. As such, the authors and maintainers of the information provided within can not make anyguarantee that the information is even accurate.
A GTK Signals
As GTK is an object oriented widget set, it has a hierarchy of inheritance. This inheritance mechanismapplies for signals. Therefore, you should refer to the widget hierarchy tree when using the signals listed inthis section.
A.1 GtkObject
void GtkObject::destroy (GtkObject *,
gpointer);
A.2 GtkWidget
void GtkWidget::show (GtkWidget *,
gpointer);
void GtkWidget::hide (GtkWidget *,
gpointer);
void GtkWidget::map (GtkWidget *,
gpointer);
void GtkWidget::unmap (GtkWidget *,
gpointer);
void GtkWidget::realize (GtkWidget *,
gpointer);
void GtkWidget::unrealize (GtkWidget *,
gpointer);
void GtkWidget::draw (GtkWidget *,
ggpointer,
gpointer);
void GtkWidget::draw-focus (GtkWidget *,
gpointer);
void GtkWidget::draw-default (GtkWidget *,
gpointer);
void GtkWidget::size-request (GtkWidget *,
ggpointer,
gpointer);
void GtkWidget::size-allocate (GtkWidget *,
ggpointer,
gpointer);
void GtkWidget::state-changed (GtkWidget *,
GtkStateType,
gpointer);
void GtkWidget::parent-set (GtkWidget *,
GtkObject *,
gpointer);
void GtkWidget::style-set (GtkWidget *,
GtkStyle *,

A. GTK Signals 218
gpointer);
void GtkWidget::add-accelerator (GtkWidget *,
gguint,
GtkAccelGroup *,
gguint,
GdkModifierType,
GtkAccelFlags,
gpointer);
void GtkWidget::remove-accelerator (GtkWidget *,
GtkAccelGroup *,
gguint,
GdkModifierType,
gpointer);
gboolean GtkWidget::event (GtkWidget *,
GdkEvent *,
gpointer);
gboolean GtkWidget::button-press-event (GtkWidget *,
GdkEvent *,
gpointer);
gboolean GtkWidget::button-release-event (GtkWidget *,
GdkEvent *,
gpointer);
gboolean GtkWidget::motion-notify-event (GtkWidget *,
GdkEvent *,
gpointer);
gboolean GtkWidget::delete-event (GtkWidget *,
GdkEvent *,
gpointer);
gboolean GtkWidget::destroy-event (GtkWidget *,
GdkEvent *,
gpointer);
gboolean GtkWidget::expose-event (GtkWidget *,
GdkEvent *,
gpointer);
gboolean GtkWidget::key-press-event (GtkWidget *,
GdkEvent *,
gpointer);
gboolean GtkWidget::key-release-event (GtkWidget *,
GdkEvent *,
gpointer);
gboolean GtkWidget::enter-notify-event (GtkWidget *,
GdkEvent *,
gpointer);
gboolean GtkWidget::leave-notify-event (GtkWidget *,
GdkEvent *,
gpointer);
gboolean GtkWidget::configure-event (GtkWidget *,
GdkEvent *,
gpointer);
gboolean GtkWidget::focus-in-event (GtkWidget *,
GdkEvent *,
gpointer);
gboolean GtkWidget::focus-out-event (GtkWidget *,
GdkEvent *,
gpointer);
gboolean GtkWidget::map-event (GtkWidget *,
GdkEvent *,

A. GTK Signals 219
gpointer);
gboolean GtkWidget::unmap-event (GtkWidget *,
GdkEvent *,
gpointer);
gboolean GtkWidget::property-notify-event (GtkWidget *,
GdkEvent *,
gpointer);
gboolean GtkWidget::selection-clear-event (GtkWidget *,
GdkEvent *,
gpointer);
gboolean GtkWidget::selection-request-event (GtkWidget *,
GdkEvent *,
gpointer);
gboolean GtkWidget::selection-notify-event (GtkWidget *,
GdkEvent *,
gpointer);
void GtkWidget::selection-get (GtkWidget *,
GtkSelectionData *,
gguint,
gpointer);
void GtkWidget::selection-received (GtkWidget *,
GtkSelectionData *,
gguint,
gpointer);
gboolean GtkWidget::proximity-in-event (GtkWidget *,
GdkEvent *,
gpointer);
gboolean GtkWidget::proximity-out-event (GtkWidget *,
GdkEvent *,
gpointer);
void GtkWidget::drag-begin (GtkWidget *,
GdkDragContext *,
gpointer);
void GtkWidget::drag-end (GtkWidget *,
GdkDragContext *,
gpointer);
void GtkWidget::drag-data-delete (GtkWidget *,
GdkDragContext *,
gpointer);
void GtkWidget::drag-leave (GtkWidget *,
GdkDragContext *,
gguint,
gpointer);
gboolean GtkWidget::drag-motion (GtkWidget *,
GdkDragContext *,
ggint,
ggint,
gguint,
gpointer);
gboolean GtkWidget::drag-drop (GtkWidget *,
GdkDragContext *,
ggint,
ggint,
gguint,
gpointer);
void GtkWidget::drag-data-get (GtkWidget *,
GdkDragContext *,

A. GTK Signals 220
GtkSelectionData *,
gguint,
gguint,
gpointer);
void GtkWidget::drag-data-received (GtkWidget *,
GdkDragContext *,
ggint,
ggint,
GtkSelectionData *,
gguint,
gguint,
gpointer);
gboolean GtkWidget::client-event (GtkWidget *,
GdkEvent *,
gpointer);
gboolean GtkWidget::no-expose-event (GtkWidget *,
GdkEvent *,
gpointer);
gboolean GtkWidget::visibility-notify-event (GtkWidget *,
GdkEvent *,
gpointer);
void GtkWidget::debug-msg (GtkWidget *,
GtkString *,
gpointer);
A.3 GtkData
void GtkData::disconnect (GtkData *,
gpointer);
A.4 GtkContainer
void GtkContainer::add (GtkContainer *,
GtkWidget *,
gpointer);
void GtkContainer::remove (GtkContainer *,
GtkWidget *,
gpointer);
void GtkContainer::check-resize (GtkContainer *,
gpointer);
GtkDirectionType GtkContainer::focus (GtkContainer *,
GtkDirectionType,
gpointer);
void GtkContainer::set-focus-child (GtkContainer *,
GtkWidget *,
gpointer);
A.5 GtkCalendar
void GtkCalendar::month-changed (GtkCalendar *,
gpointer);
void GtkCalendar::day-selected (GtkCalendar *,
gpointer);
void GtkCalendar::day-selected-double-click (GtkCalendar *,
gpointer);

A. GTK Signals 221
void GtkCalendar::prev-month (GtkCalendar *,
gpointer);
void GtkCalendar::next-month (GtkCalendar *,
gpointer);
void GtkCalendar::prev-year (GtkCalendar *,
gpointer);
void GtkCalendar::next-year (GtkCalendar *,
gpointer);
A.6 GtkEditable
void GtkEditable::changed (GtkEditable *,
gpointer);
void GtkEditable::insert-text (GtkEditable *,
GtkString *,
ggint,
ggpointer,
gpointer);
void GtkEditable::delete-text (GtkEditable *,
ggint,
ggint,
gpointer);
void GtkEditable::activate (GtkEditable *,
gpointer);
void GtkEditable::set-editable (GtkEditable *,
gboolean,
gpointer);
void GtkEditable::move-cursor (GtkEditable *,
ggint,
ggint,
gpointer);
void GtkEditable::move-word (GtkEditable *,
ggint,
gpointer);
void GtkEditable::move-page (GtkEditable *,
ggint,
ggint,
gpointer);
void GtkEditable::move-to-row (GtkEditable *,
ggint,
gpointer);
void GtkEditable::move-to-column (GtkEditable *,
ggint,
gpointer);
void GtkEditable::kill-char (GtkEditable *,
ggint,
gpointer);
void GtkEditable::kill-word (GtkEditable *,
ggint,
gpointer);
void GtkEditable::kill-line (GtkEditable *,
ggint,
gpointer);
void GtkEditable::cut-clipboard (GtkEditable *,
gpointer);
void GtkEditable::copy-clipboard (GtkEditable *,

A. GTK Signals 222
gpointer);
void GtkEditable::paste-clipboard (GtkEditable *,
gpointer);
A.7 GtkTipsQuery
void GtkTipsQuery::start-query (GtkTipsQuery *,
gpointer);
void GtkTipsQuery::stop-query (GtkTipsQuery *,
gpointer);
void GtkTipsQuery::widget-entered (GtkTipsQuery *,
GtkWidget *,
GtkString *,
GtkString *,
gpointer);
gboolean GtkTipsQuery::widget-selected (GtkTipsQuery *,
GtkWidget *,
GtkString *,
GtkString *,
GdkEvent *,
gpointer);
A.8 GtkCList
void GtkCList::select-row (GtkCList *,
ggint,
ggint,
GdkEvent *,
gpointer);
void GtkCList::unselect-row (GtkCList *,
ggint,
ggint,
GdkEvent *,
gpointer);
void GtkCList::row-move (GtkCList *,
ggint,
ggint,
gpointer);
void GtkCList::click-column (GtkCList *,
ggint,
gpointer);
void GtkCList::resize-column (GtkCList *,
ggint,
ggint,
gpointer);
void GtkCList::toggle-focus-row (GtkCList *,
gpointer);
void GtkCList::select-all (GtkCList *,
gpointer);
void GtkCList::unselect-all (GtkCList *,
gpointer);
void GtkCList::undo-selection (GtkCList *,
gpointer);
void GtkCList::start-selection (GtkCList *,
gpointer);

A. GTK Signals 223
void GtkCList::end-selection (GtkCList *,
gpointer);
void GtkCList::toggle-add-mode (GtkCList *,
gpointer);
void GtkCList::extend-selection (GtkCList *,
GtkScrollType,
ggfloat,
gboolean,
gpointer);
void GtkCList::scroll-vertical (GtkCList *,
GtkScrollType,
ggfloat,
gpointer);
void GtkCList::scroll-horizontal (GtkCList *,
GtkScrollType,
ggfloat,
gpointer);
void GtkCList::abort-column-resize (GtkCList *,
gpointer);
A.9 GtkNotebook
void GtkNotebook::switch-page (GtkNotebook *,
ggpointer,
gguint,
gpointer);
A.10 GtkList
void GtkList::selection-changed (GtkList *,
gpointer);
void GtkList::select-child (GtkList *,
GtkWidget *,
gpointer);
void GtkList::unselect-child (GtkList *,
GtkWidget *,
gpointer);
A.11 GtkMenuShell
void GtkMenuShell::deactivate (GtkMenuShell *,
gpointer);
void GtkMenuShell::selection-done (GtkMenuShell *,
gpointer);
void GtkMenuShell::move-current (GtkMenuShell *,
GtkMenuDirectionType,
gpointer);
void GtkMenuShell::activate-current (GtkMenuShell *,
gboolean,
gpointer);
void GtkMenuShell::cancel (GtkMenuShell *,
gpointer);

A. GTK Signals 224
A.12 GtkToolbar
void GtkToolbar::orientation-changed (GtkToolbar *,
ggint,
gpointer);
void GtkToolbar::style-changed (GtkToolbar *,
ggint,
gpointer);
A.13 GtkTree
void GtkTree::selection-changed (GtkTree *,
gpointer);
void GtkTree::select-child (GtkTree *,
GtkWidget *,
gpointer);
void GtkTree::unselect-child (GtkTree *,
GtkWidget *,
gpointer);
A.14 GtkButton
void GtkButton::pressed (GtkButton *,
gpointer);
void GtkButton::released (GtkButton *,
gpointer);
void GtkButton::clicked (GtkButton *,
gpointer);
void GtkButton::enter (GtkButton *,
gpointer);
void GtkButton::leave (GtkButton *,
gpointer);
A.15 GtkItem
void GtkItem::select (GtkItem *,
gpointer);
void GtkItem::deselect (GtkItem *,
gpointer);
void GtkItem::toggle (GtkItem *,
gpointer);
A.16 GtkWindow
void GtkWindow::set-focus (GtkWindow *,
ggpointer,
gpointer);
A.17 GtkHandleBox
void GtkHandleBox::child-attached (GtkHandleBox *,
GtkWidget *,
gpointer);

A. GTK Signals 225
void GtkHandleBox::child-detached (GtkHandleBox *,
GtkWidget *,
gpointer);
A.18 GtkToggleButton
void GtkToggleButton::toggled (GtkToggleButton *,
gpointer);
A.19 GtkMenuItem
void GtkMenuItem::activate (GtkMenuItem *,
gpointer);
void GtkMenuItem::activate-item (GtkMenuItem *,
gpointer);
A.20 GtkListItem
void GtkListItem::toggle-focus-row (GtkListItem *,
gpointer);
void GtkListItem::select-all (GtkListItem *,
gpointer);
void GtkListItem::unselect-all (GtkListItem *,
gpointer);
void GtkListItem::undo-selection (GtkListItem *,
gpointer);
void GtkListItem::start-selection (GtkListItem *,
gpointer);
void GtkListItem::end-selection (GtkListItem *,
gpointer);
void GtkListItem::toggle-add-mode (GtkListItem *,
gpointer);
void GtkListItem::extend-selection (GtkListItem *,
GtkEnum,
ggfloat,
gboolean,
gpointer);
void GtkListItem::scroll-vertical (GtkListItem *,
GtkEnum,
ggfloat,
gpointer);
void GtkListItem::scroll-horizontal (GtkListItem *,
GtkEnum,
ggfloat,
gpointer);
A.21 GtkTreeItem
void GtkTreeItem::collapse (GtkTreeItem *,
gpointer);
void GtkTreeItem::expand (GtkTreeItem *,
gpointer);

A. GTK Signals 226
A.22 GtkCheckMenuItem
void GtkCheckMenuItem::toggled (GtkCheckMenuItem *,
gpointer);
A.23 GtkInputDialog
void GtkInputDialog::enable-device (GtkInputDialog *,
ggint,
gpointer);
void GtkInputDialog::disable-device (GtkInputDialog *,
ggint,
gpointer);
A.24 GtkColorSelection
void GtkColorSelection::color-changed (GtkColorSelection *,
gpointer);
A.25 GtkStatusBar
void GtkStatusbar::text-pushed (GtkStatusbar *,
gguint,
GtkString *,
gpointer);
void GtkStatusbar::text-popped (GtkStatusbar *,
gguint,
GtkString *,
gpointer);
A.26 GtkCTree
void GtkCTree::tree-select-row (GtkCTree *,
GtkCTreeNode *,
ggint,
gpointer);
void GtkCTree::tree-unselect-row (GtkCTree *,
GtkCTreeNode *,
ggint,
gpointer);
void GtkCTree::tree-expand (GtkCTree *,
GtkCTreeNode *,
gpointer);
void GtkCTree::tree-collapse (GtkCTree *,
ggpointer,
gpointer);
void GtkCTree::tree-move (GtkCTree *,
GtkCTreeNode *,
GtkCTreeNode *,
GtkCTreeNode *,
gpointer);
void GtkCTree::change-focus-row-expansion (GtkCTree *,
GtkCTreeExpansionType,
gpointer);

B. GDK Event Types 227
A.27 GtkCurve
void GtkCurve::curve-type-changed (GtkCurve *,
gpointer);
A.28 GtkAdjustment
void GtkAdjustment::changed (GtkAdjustment *,
gpointer);
void GtkAdjustment::value-changed (GtkAdjustment *,
gpointer);
B GDK Event Types
The follwing data types are passed into event handlers by GTK+. For each data type listed, the signals thatuse this data type are listed.
• GdkEvent
– drag end event
• GdkEventType
• GdkEventAny
– delete event
– destroy event
– map event
– unmap event
– no expose event
• GdkEventExpose
– expose event
• GdkEventNoExpose
• GdkEventVisibility
• GdkEventMotion
– motion notify event
• GdkEventButton
– button press event
– button release event
• GdkEventKey
– key press event
– key release event
• GdkEventCrossing
– enter notify event

B. GDK Event Types 228
– leave notify event
• GdkEventFocus
– focus in event
– focus out event
• GdkEventConfigure
– configure event
• GdkEventProperty
– property notify event
• GdkEventSelection
– selection clear event
– selection request event
– selection notify event
• GdkEventProximity
– proximity in event
– proximity out event
• GdkEventDragBegin
– drag begin event
• GdkEventDragRequest
– drag request event
• GdkEventDropEnter
– drop enter event
• GdkEventDropLeave
– drop leave event
• GdkEventDropDataAvailable
– drop data available event
• GdkEventClient
– client event
• GdkEventOther
– other event
The data type GdkEventType is a special data type that is used by all the other data types as an indicatorof the data type being passed to the signal handler. As you will see below, each of the event data structureshas a member of this type. It is defined as an enumeration type as follows:

B. GDK Event Types 229
typedef enum
{
GDK_NOTHING = -1,
GDK_DELETE = 0,
GDK_DESTROY = 1,
GDK_EXPOSE = 2,
GDK_MOTION_NOTIFY = 3,
GDK_BUTTON_PRESS = 4,
GDK_2BUTTON_PRESS = 5,
GDK_3BUTTON_PRESS = 6,
GDK_BUTTON_RELEASE = 7,
GDK_KEY_PRESS = 8,
GDK_KEY_RELEASE = 9,
GDK_ENTER_NOTIFY = 10,
GDK_LEAVE_NOTIFY = 11,
GDK_FOCUS_CHANGE = 12,
GDK_CONFIGURE = 13,
GDK_MAP = 14,
GDK_UNMAP = 15,
GDK_PROPERTY_NOTIFY = 16,
GDK_SELECTION_CLEAR = 17,
GDK_SELECTION_REQUEST = 18,
GDK_SELECTION_NOTIFY = 19,
GDK_PROXIMITY_IN = 20,
GDK_PROXIMITY_OUT = 21,
GDK_DRAG_BEGIN = 22,
GDK_DRAG_REQUEST = 23,
GDK_DROP_ENTER = 24,
GDK_DROP_LEAVE = 25,
GDK_DROP_DATA_AVAIL = 26,
GDK_CLIENT_EVENT = 27,
GDK_VISIBILITY_NOTIFY = 28,
GDK_NO_EXPOSE = 29,
GDK_OTHER_EVENT = 9999 /* Deprecated, use filters instead */
} GdkEventType;
The other event type that is different from the others is GdkEvent itself. This is a union of all the other datatypes, which allows it to be cast to a specific event data type within a signal handler.
So, the event data types are defined as follows:
struct _GdkEventAny
{
GdkEventType type;
GdkWindow *window;
gint8 send_event;
};
struct _GdkEventExpose
{
GdkEventType type;
GdkWindow *window;
gint8 send_event;
GdkRectangle area;
gint count; /* If non-zero, how many more events follow. */
};
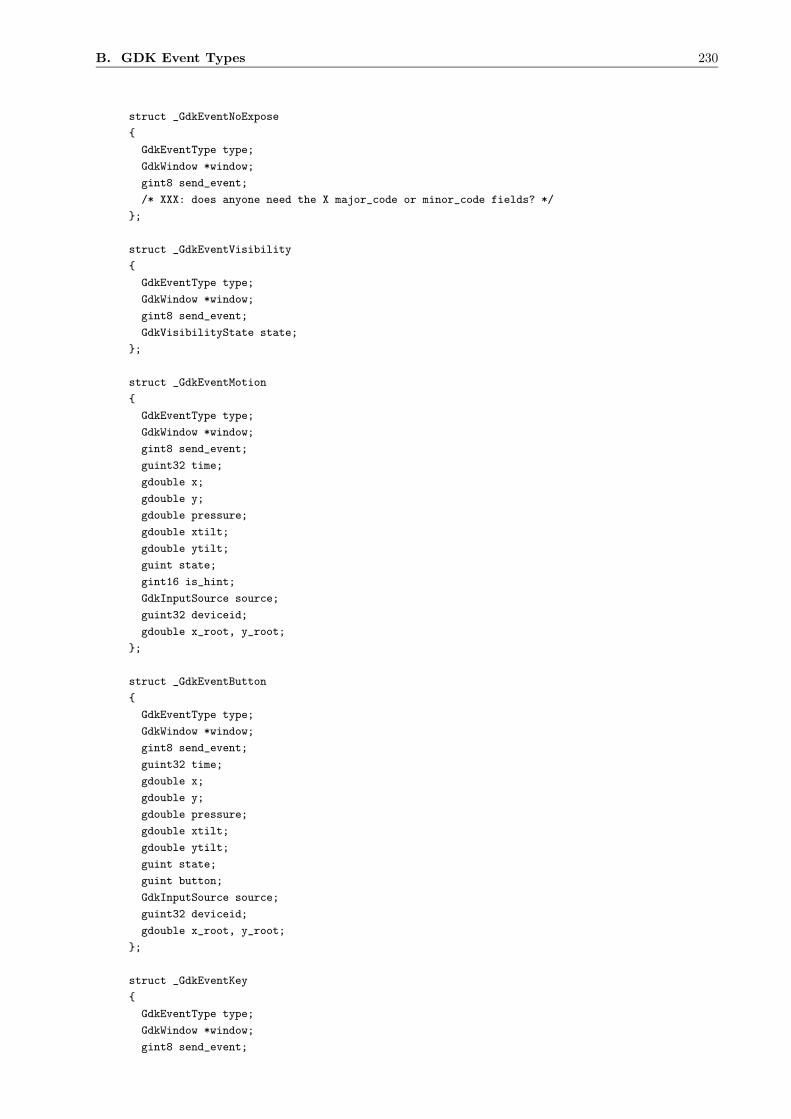
B. GDK Event Types 230
struct _GdkEventNoExpose
{
GdkEventType type;
GdkWindow *window;
gint8 send_event;
/* XXX: does anyone need the X major_code or minor_code fields? */
};
struct _GdkEventVisibility
{
GdkEventType type;
GdkWindow *window;
gint8 send_event;
GdkVisibilityState state;
};
struct _GdkEventMotion
{
GdkEventType type;
GdkWindow *window;
gint8 send_event;
guint32 time;
gdouble x;
gdouble y;
gdouble pressure;
gdouble xtilt;
gdouble ytilt;
guint state;
gint16 is_hint;
GdkInputSource source;
guint32 deviceid;
gdouble x_root, y_root;
};
struct _GdkEventButton
{
GdkEventType type;
GdkWindow *window;
gint8 send_event;
guint32 time;
gdouble x;
gdouble y;
gdouble pressure;
gdouble xtilt;
gdouble ytilt;
guint state;
guint button;
GdkInputSource source;
guint32 deviceid;
gdouble x_root, y_root;
};
struct _GdkEventKey
{
GdkEventType type;
GdkWindow *window;
gint8 send_event;
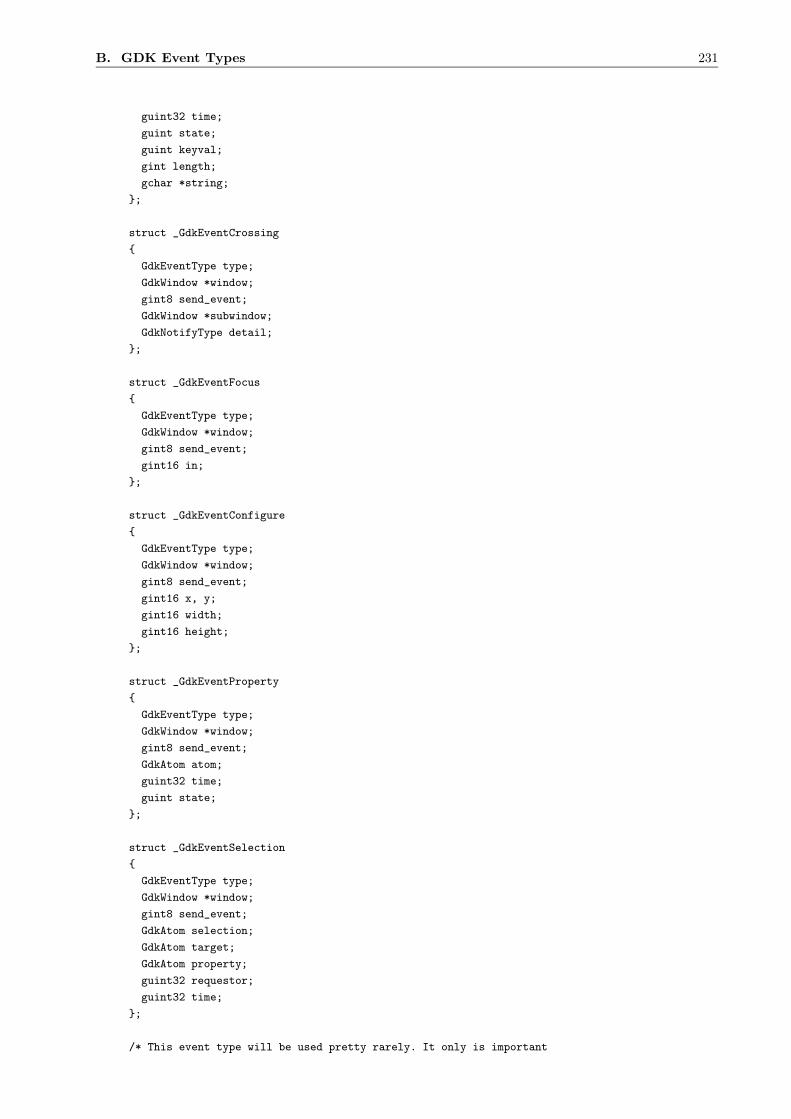
B. GDK Event Types 231
guint32 time;
guint state;
guint keyval;
gint length;
gchar *string;
};
struct _GdkEventCrossing
{
GdkEventType type;
GdkWindow *window;
gint8 send_event;
GdkWindow *subwindow;
GdkNotifyType detail;
};
struct _GdkEventFocus
{
GdkEventType type;
GdkWindow *window;
gint8 send_event;
gint16 in;
};
struct _GdkEventConfigure
{
GdkEventType type;
GdkWindow *window;
gint8 send_event;
gint16 x, y;
gint16 width;
gint16 height;
};
struct _GdkEventProperty
{
GdkEventType type;
GdkWindow *window;
gint8 send_event;
GdkAtom atom;
guint32 time;
guint state;
};
struct _GdkEventSelection
{
GdkEventType type;
GdkWindow *window;
gint8 send_event;
GdkAtom selection;
GdkAtom target;
GdkAtom property;
guint32 requestor;
guint32 time;
};
/* This event type will be used pretty rarely. It only is important

B. GDK Event Types 232
for XInput aware programs that are drawing their own cursor */
struct _GdkEventProximity
{
GdkEventType type;
GdkWindow *window;
gint8 send_event;
guint32 time;
GdkInputSource source;
guint32 deviceid;
};
struct _GdkEventDragRequest
{
GdkEventType type;
GdkWindow *window;
gint8 send_event;
guint32 requestor;
union {
struct {
guint protocol_version:4;
guint sendreply:1;
guint willaccept:1;
guint delete_data:1; /* Do *not* delete if link is sent, only
if data is sent */
guint senddata:1;
guint reserved:22;
} flags;
glong allflags;
} u;
guint8 isdrop; /* This gdk event can be generated by a couple of
X events - this lets the app know whether the
drop really occurred or we just set the data */
GdkPoint drop_coords;
gchar *data_type;
guint32 timestamp;
};
struct _GdkEventDragBegin
{
GdkEventType type;
GdkWindow *window;
gint8 send_event;
union {
struct {
guint protocol_version:4;
guint reserved:28;
} flags;
glong allflags;
} u;
};
struct _GdkEventDropEnter
{
GdkEventType type;
GdkWindow *window;

B. GDK Event Types 233
gint8 send_event;
guint32 requestor;
union {
struct {
guint protocol_version:4;
guint sendreply:1;
guint extended_typelist:1;
guint reserved:26;
} flags;
glong allflags;
} u;
};
struct _GdkEventDropLeave
{
GdkEventType type;
GdkWindow *window;
gint8 send_event;
guint32 requestor;
union {
struct {
guint protocol_version:4;
guint reserved:28;
} flags;
glong allflags;
} u;
};
struct _GdkEventDropDataAvailable
{
GdkEventType type;
GdkWindow *window;
gint8 send_event;
guint32 requestor;
union {
struct {
guint protocol_version:4;
guint isdrop:1;
guint reserved:25;
} flags;
glong allflags;
} u;
gchar *data_type; /* MIME type */
gulong data_numbytes;
gpointer data;
guint32 timestamp;
GdkPoint coords;
};
struct _GdkEventClient
{
GdkEventType type;
GdkWindow *window;
gint8 send_event;
GdkAtom message_type;
gushort data_format;
union {

C. Code Examples 234
char b[20];
short s[10];
long l[5];
} data;
};
struct _GdkEventOther
{
GdkEventType type;
GdkWindow *window;
gint8 send_event;
GdkXEvent *xevent;
};
C Code Examples
Below are the code examples that are used in the above text which are not included in complete formelsewhere.
C.1 Tictactoe
C.1.1 tictactoe.h
/* example-start tictactoe tictactoe.h */
/* GTK - The GIMP Toolkit
* Copyright (C) 1995-1997 Peter Mattis, Spencer Kimball and Josh MacDonald
*
* This library is free software; you can redistribute it and/or
* modify it under the terms of the GNU Library General Public
* License as published by the Free Software Foundation; either
* version 2 of the License, or (at your option) any later version.
*
* This library is distributed in the hope that it will be useful,
* but WITHOUT ANY WARRANTY; without even the implied warranty of
* MERCHANTABILITY or FITNESS FOR A PARTICULAR PURPOSE. See the GNU
* Library General Public License for more details.
*
* You should have received a copy of the GNU Library General Public
* License along with this library; if not, write to the
* Free Software Foundation, Inc., 59 Temple Place - Suite 330,
* Boston, MA 02111-1307, USA.
*/
#ifndef __TICTACTOE_H__
#define __TICTACTOE_H__
#include <gdk/gdk.h>
#include <gtk/gtkvbox.h>
#ifdef __cplusplus
extern "C" {
#endif /* __cplusplus */

C. Code Examples 235
#define TICTACTOE(obj) GTK_CHECK_CAST (obj, tictactoe_get_type (), Tictactoe)
#define TICTACTOE_CLASS(klass) GTK_CHECK_CLASS_CAST (klass, tictac-
toe_get_type (), TictactoeClass)
#define IS_TICTACTOE(obj) GTK_CHECK_TYPE (obj, tictactoe_get_type ())
typedef struct _Tictactoe Tictactoe;
typedef struct _TictactoeClass TictactoeClass;
struct _Tictactoe
{
GtkVBox vbox;
GtkWidget *buttons[3][3];
};
struct _TictactoeClass
{
GtkVBoxClass parent_class;
void (* tictactoe) (Tictactoe *ttt);
};
guint tictactoe_get_type (void);
GtkWidget* tictactoe_new (void);
void tictactoe_clear (Tictactoe *ttt);
#ifdef __cplusplus
}
#endif /* __cplusplus */
#endif /* __TICTACTOE_H__ */
/* example-end */
C.1.2 tictactoe.c
/* example-start tictactoe tictactoe.c */
/* GTK - The GIMP Toolkit
* Copyright (C) 1995-1997 Peter Mattis, Spencer Kimball and Josh MacDonald
*
* This library is free software; you can redistribute it and/or
* modify it under the terms of the GNU Library General Public
* License as published by the Free Software Foundation; either
* version 2 of the License, or (at your option) any later version.
*
* This library is distributed in the hope that it will be useful,
* but WITHOUT ANY WARRANTY; without even the implied warranty of
* MERCHANTABILITY or FITNESS FOR A PARTICULAR PURPOSE. See the GNU
* Library General Public License for more details.
*
* You should have received a copy of the GNU Library General Public
* License along with this library; if not, write to the
* Free Software Foundation, Inc., 59 Temple Place - Suite 330,

C. Code Examples 236
* Boston, MA 02111-1307, USA.
*/
#include "gtk/gtksignal.h"
#include "gtk/gtktable.h"
#include "gtk/gtktogglebutton.h"
#include "tictactoe.h"
enum {
TICTACTOE_SIGNAL,
LAST_SIGNAL
};
static void tictactoe_class_init (TictactoeClass *klass);
static void tictactoe_init (Tictactoe *ttt);
static void tictactoe_toggle (GtkWidget *widget, Tictactoe *ttt);
static gint tictactoe_signals[LAST_SIGNAL] = { 0 };
guint
tictactoe_get_type ()
{
static guint ttt_type = 0;
if (!ttt_type)
{
GtkTypeInfo ttt_info =
{
"Tictactoe",
sizeof (Tictactoe),
sizeof (TictactoeClass),
(GtkClassInitFunc) tictactoe_class_init,
(GtkObjectInitFunc) tictactoe_init,
(GtkArgSetFunc) NULL,
(GtkArgGetFunc) NULL
};
ttt_type = gtk_type_unique (gtk_vbox_get_type (), \&ttt_info);
}
return ttt_type;
}
static void
tictactoe_class_init (TictactoeClass *class)
{
GtkObjectClass *object_class;
object_class = (GtkObjectClass*) class;
tictactoe_signals[TICTACTOE_SIGNAL] = gtk_signal_new ("tictactoe",
GTK_RUN_FIRST,
object_class->type,
GTK_SIGNAL_OFFSET (TictactoeClass,
tictactoe),
gtk_signal_default_marshaller,
GTK_TYPE_NONE, 0);

C. Code Examples 237
gtk_object_class_add_signals (object_class, tictactoe_signals, LAST_SIGNAL);
class->tictactoe = NULL;
}
static void
tictactoe_init (Tictactoe *ttt)
{
GtkWidget *table;
gint i,j;
table = gtk_table_new (3, 3, TRUE);
gtk_container_add (GTK_CONTAINER(ttt), table);
gtk_widget_show (table);
for (i=0;i<3; i++)
for (j=0;j<3; j++)
{
ttt->buttons[i][j] = gtk_toggle_button_new ();
gtk_table_attach_defaults (GTK_TABLE(table), ttt->buttons[i][j],
i, i+1, j, j+1);
gtk_signal_connect (GTK_OBJECT (ttt->buttons[i][j]), "toggled",
GTK_SIGNAL_FUNC (tictactoe_toggle), ttt);
gtk_widget_set_usize (ttt->buttons[i][j], 20, 20);
gtk_widget_show (ttt->buttons[i][j]);
}
}
GtkWidget*
tictactoe_new ()
{
return GTK_WIDGET ( gtk_type_new (tictactoe_get_type ()));
}
void
tictactoe_clear (Tictactoe *ttt)
{
int i,j;
for (i=0;i<3;i++)
for (j=0;j<3;j++)
{
gtk_signal_handler_block_by_data (GTK_OBJECT(ttt->buttons[i][j]), ttt);
gtk_toggle_button_set_active (GTK_TOGGLE_BUTTON (ttt->buttons[i][j]),
FALSE);
gtk_signal_handler_unblock_by_data (GTK_OBJECT(ttt->buttons[i][j]), ttt);
}
}
static void
tictactoe_toggle (GtkWidget *widget, Tictactoe *ttt)
{
int i,k;
static int rwins[8][3] = { { 0, 0, 0 }, { 1, 1, 1 }, { 2, 2, 2 },
{ 0, 1, 2 }, { 0, 1, 2 }, { 0, 1, 2 },

C. Code Examples 238
{ 0, 1, 2 }, { 0, 1, 2 } };
static int cwins[8][3] = { { 0, 1, 2 }, { 0, 1, 2 }, { 0, 1, 2 },
{ 0, 0, 0 }, { 1, 1, 1 }, { 2, 2, 2 },
{ 0, 1, 2 }, { 2, 1, 0 } };
int success, found;
for (k=0; k<8; k++)
{
success = TRUE;
found = FALSE;
for (i=0;i<3;i++)
{
success = success \&\&
GTK_TOGGLE_BUTTON(ttt->buttons[rwins[k][i]][cwins[k][i]])->active;
found = found ||
ttt->buttons[rwins[k][i]][cwins[k][i]] == widget;
}
if (success \&\& found)
{
gtk_signal_emit (GTK_OBJECT (ttt),
tictactoe_signals[TICTACTOE_SIGNAL]);
break;
}
}
}
/* example-end */
C.1.3 ttt test.c
/* example-start tictactoe ttt_test.c */
#include <gtk/gtk.h>
#include "tictactoe.h"
void
win (GtkWidget *widget, gpointer data)
{
g_print ("Yay!\n");
tictactoe_clear (TICTACTOE (widget));
}
int
main (int argc, char *argv[])
{
GtkWidget *window;
GtkWidget *ttt;
gtk_init (\&argc, \&argv);
window = gtk_window_new (GTK_WINDOW_TOPLEVEL);
gtk_window_set_title (GTK_WINDOW (window), "Aspect Frame");

C. Code Examples 239
gtk_signal_connect (GTK_OBJECT (window), "destroy",
GTK_SIGNAL_FUNC (gtk_exit), NULL);
gtk_container_set_border_width (GTK_CONTAINER (window), 10);
ttt = tictactoe_new ();
gtk_container_add (GTK_CONTAINER (window), ttt);
gtk_widget_show (ttt);
gtk_signal_connect (GTK_OBJECT (ttt), "tictactoe",
GTK_SIGNAL_FUNC (win), NULL);
gtk_widget_show (window);
gtk_main ();
return 0;
}
/* example-end */
C.2 GtkDial
C.2.1 gtkdial.h
/* example-start gtkdial gtkdial.h */
/* GTK - The GIMP Toolkit
* Copyright (C) 1995-1997 Peter Mattis, Spencer Kimball and Josh MacDonald
*
* This library is free software; you can redistribute it and/or
* modify it under the terms of the GNU Library General Public
* License as published by the Free Software Foundation; either
* version 2 of the License, or (at your option) any later version.
*
* This library is distributed in the hope that it will be useful,
* but WITHOUT ANY WARRANTY; without even the implied warranty of
* MERCHANTABILITY or FITNESS FOR A PARTICULAR PURPOSE. See the GNU
* Library General Public License for more details.
*
* You should have received a copy of the GNU Library General Public
* License along with this library; if not, write to the
* Free Software Foundation, Inc., 59 Temple Place - Suite 330,
* Boston, MA 02111-1307, USA.
*/
#ifndef __GTK_DIAL_H__
#define __GTK_DIAL_H__
#include <gdk/gdk.h>
#include <gtk/gtkadjustment.h>
#include <gtk/gtkwidget.h>
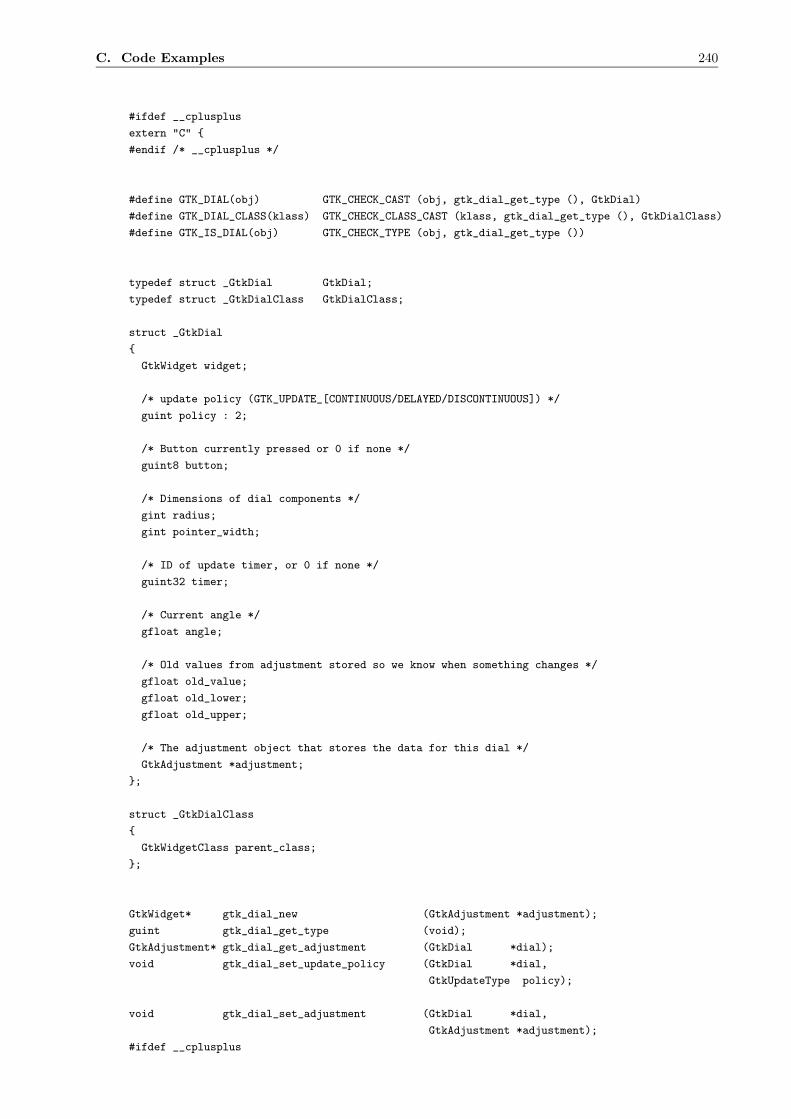
C. Code Examples 240
#ifdef __cplusplus
extern "C" {
#endif /* __cplusplus */
#define GTK_DIAL(obj) GTK_CHECK_CAST (obj, gtk_dial_get_type (), GtkDial)
#define GTK_DIAL_CLASS(klass) GTK_CHECK_CLASS_CAST (klass, gtk_dial_get_type (), GtkDialClass)
#define GTK_IS_DIAL(obj) GTK_CHECK_TYPE (obj, gtk_dial_get_type ())
typedef struct _GtkDial GtkDial;
typedef struct _GtkDialClass GtkDialClass;
struct _GtkDial
{
GtkWidget widget;
/* update policy (GTK_UPDATE_[CONTINUOUS/DELAYED/DISCONTINUOUS]) */
guint policy : 2;
/* Button currently pressed or 0 if none */
guint8 button;
/* Dimensions of dial components */
gint radius;
gint pointer_width;
/* ID of update timer, or 0 if none */
guint32 timer;
/* Current angle */
gfloat angle;
/* Old values from adjustment stored so we know when something changes */
gfloat old_value;
gfloat old_lower;
gfloat old_upper;
/* The adjustment object that stores the data for this dial */
GtkAdjustment *adjustment;
};
struct _GtkDialClass
{
GtkWidgetClass parent_class;
};
GtkWidget* gtk_dial_new (GtkAdjustment *adjustment);
guint gtk_dial_get_type (void);
GtkAdjustment* gtk_dial_get_adjustment (GtkDial *dial);
void gtk_dial_set_update_policy (GtkDial *dial,
GtkUpdateType policy);
void gtk_dial_set_adjustment (GtkDial *dial,
GtkAdjustment *adjustment);
#ifdef __cplusplus

C. Code Examples 241
}
#endif /* __cplusplus */
#endif /* __GTK_DIAL_H__ */
/* example-end */
C.2.2 gtkdial.c
/* example-start gtkdial gtkdial.c */
/* GTK - The GIMP Toolkit
* Copyright (C) 1995-1997 Peter Mattis, Spencer Kimball and Josh MacDonald
*
* This library is free software; you can redistribute it and/or
* modify it under the terms of the GNU Library General Public
* License as published by the Free Software Foundation; either
* version 2 of the License, or (at your option) any later version.
*
* This library is distributed in the hope that it will be useful,
* but WITHOUT ANY WARRANTY; without even the implied warranty of
* MERCHANTABILITY or FITNESS FOR A PARTICULAR PURPOSE. See the GNU
* Library General Public License for more details.
*
* You should have received a copy of the GNU Library General Public
* License along with this library; if not, write to the
* Free Software Foundation, Inc., 59 Temple Place - Suite 330,
* Boston, MA 02111-1307, USA.
*/
#include <math.h>
#include <stdio.h>
#include <gtk/gtkmain.h>
#include <gtk/gtksignal.h>
#include "gtkdial.h"
#define SCROLL_DELAY_LENGTH 300
#define DIAL_DEFAULT_SIZE 100
/* Forward declarations */
static void gtk_dial_class_init (GtkDialClass *klass);
static void gtk_dial_init (GtkDial *dial);
static void gtk_dial_destroy (GtkObject *object);
static void gtk_dial_realize (GtkWidget *widget);
static void gtk_dial_size_request (GtkWidget *widget,
GtkRequisition *requisition);
static void gtk_dial_size_allocate (GtkWidget *widget,
GtkAllocation *allocation);
static gint gtk_dial_expose (GtkWidget *widget,
GdkEventExpose *event);
static gint gtk_dial_button_press (GtkWidget *widget,
GdkEventButton *event);
static gint gtk_dial_button_release (GtkWidget *widget,
GdkEventButton *event);
static gint gtk_dial_motion_notify (GtkWidget *widget,

C. Code Examples 242
GdkEventMotion *event);
static gint gtk_dial_timer (GtkDial *dial);
static void gtk_dial_update_mouse (GtkDial *dial, gint x, gint y);
static void gtk_dial_update (GtkDial *dial);
static void gtk_dial_adjustment_changed (GtkAdjustment *adjustment,
gpointer data);
static void gtk_dial_adjustment_value_changed (GtkAdjustment *adjustment,
gpointer data);
/* Local data */
static GtkWidgetClass *parent_class = NULL;
guint
gtk_dial_get_type ()
{
static guint dial_type = 0;
if (!dial_type)
{
GtkTypeInfo dial_info =
{
"GtkDial",
sizeof (GtkDial),
sizeof (GtkDialClass),
(GtkClassInitFunc) gtk_dial_class_init,
(GtkObjectInitFunc) gtk_dial_init,
(GtkArgSetFunc) NULL,
(GtkArgGetFunc) NULL,
};
dial_type = gtk_type_unique (gtk_widget_get_type (), \&dial_info);
}
return dial_type;
}
static void
gtk_dial_class_init (GtkDialClass *class)
{
GtkObjectClass *object_class;
GtkWidgetClass *widget_class;
object_class = (GtkObjectClass*) class;
widget_class = (GtkWidgetClass*) class;
parent_class = gtk_type_class (gtk_widget_get_type ());
object_class->destroy = gtk_dial_destroy;
widget_class->realize = gtk_dial_realize;
widget_class->expose_event = gtk_dial_expose;
widget_class->size_request = gtk_dial_size_request;
widget_class->size_allocate = gtk_dial_size_allocate;
widget_class->button_press_event = gtk_dial_button_press;
widget_class->button_release_event = gtk_dial_button_release;

C. Code Examples 243
widget_class->motion_notify_event = gtk_dial_motion_notify;
}
static void
gtk_dial_init (GtkDial *dial)
{
dial->button = 0;
dial->policy = GTK_UPDATE_CONTINUOUS;
dial->timer = 0;
dial->radius = 0;
dial->pointer_width = 0;
dial->angle = 0.0;
dial->old_value = 0.0;
dial->old_lower = 0.0;
dial->old_upper = 0.0;
dial->adjustment = NULL;
}
GtkWidget*
gtk_dial_new (GtkAdjustment *adjustment)
{
GtkDial *dial;
dial = gtk_type_new (gtk_dial_get_type ());
if (!adjustment)
adjustment = (GtkAdjustment*) gtk_adjustment_new (0.0, 0.0, 0.0,
0.0, 0.0, 0.0);
gtk_dial_set_adjustment (dial, adjustment);
return GTK_WIDGET (dial);
}
static void
gtk_dial_destroy (GtkObject *object)
{
GtkDial *dial;
g_return_if_fail (object != NULL);
g_return_if_fail (GTK_IS_DIAL (object));
dial = GTK_DIAL (object);
if (dial->adjustment)
gtk_object_unref (GTK_OBJECT (dial->adjustment));
if (GTK_OBJECT_CLASS (parent_class)->destroy)
(* GTK_OBJECT_CLASS (parent_class)->destroy) (object);
}
GtkAdjustment*
gtk_dial_get_adjustment (GtkDial *dial)
{
g_return_val_if_fail (dial != NULL, NULL);
g_return_val_if_fail (GTK_IS_DIAL (dial), NULL);
C. Code Examples 244
return dial->adjustment;
}
void
gtk_dial_set_update_policy (GtkDial *dial,
GtkUpdateType policy)
{
g_return_if_fail (dial != NULL);
g_return_if_fail (GTK_IS_DIAL (dial));
dial->policy = policy;
}
void
gtk_dial_set_adjustment (GtkDial *dial,
GtkAdjustment *adjustment)
{
g_return_if_fail (dial != NULL);
g_return_if_fail (GTK_IS_DIAL (dial));
if (dial->adjustment)
{
gtk_signal_disconnect_by_data (GTK_OBJECT (dial->adjustment),
(gpointer) dial);
gtk_object_unref (GTK_OBJECT (dial->adjustment));
}
dial->adjustment = adjustment;
gtk_object_ref (GTK_OBJECT (dial->adjustment));
gtk_signal_connect (GTK_OBJECT (adjustment), "changed",
(GtkSignalFunc) gtk_dial_adjustment_changed,
(gpointer) dial);
gtk_signal_connect (GTK_OBJECT (adjustment), "value_changed",
(GtkSignalFunc) gtk_dial_adjustment_value_changed,
(gpointer) dial);
dial->old_value = adjustment->value;
dial->old_lower = adjustment->lower;
dial->old_upper = adjustment->upper;
gtk_dial_update (dial);
}
static void
gtk_dial_realize (GtkWidget *widget)
{
GtkDial *dial;
GdkWindowAttr attributes;
gint attributes_mask;
g_return_if_fail (widget != NULL);
g_return_if_fail (GTK_IS_DIAL (widget));
GTK_WIDGET_SET_FLAGS (widget, GTK_REALIZED);
dial = GTK_DIAL (widget);

C. Code Examples 245
attributes.x = widget->allocation.x;
attributes.y = widget->allocation.y;
attributes.width = widget->allocation.width;
attributes.height = widget->allocation.height;
attributes.wclass = GDK_INPUT_OUTPUT;
attributes.window_type = GDK_WINDOW_CHILD;
attributes.event_mask = gtk_widget_get_events (widget) |
GDK_EXPOSURE_MASK | GDK_BUTTON_PRESS_MASK |
GDK_BUTTON_RELEASE_MASK | GDK_POINTER_MOTION_MASK |
GDK_POINTER_MOTION_HINT_MASK;
attributes.visual = gtk_widget_get_visual (widget);
attributes.colormap = gtk_widget_get_colormap (widget);
attributes_mask = GDK_WA_X | GDK_WA_Y | GDK_WA_VISUAL | GDK_WA_COLORMAP;
widget->window = gdk_window_new (widget->parent->window,
\&attributes,
attributes_mask);
widget->style = gtk_style_attach (widget->style, widget->window);
gdk_window_set_user_data (widget->window, widget);
gtk_style_set_background (widget->style, widget->window, GTK_STATE_ACTIVE);
}
static void
gtk_dial_size_request (GtkWidget *widget,
GtkRequisition *requisition)
{
requisition->width = DIAL_DEFAULT_SIZE;
requisition->height = DIAL_DEFAULT_SIZE;
}
static void
gtk_dial_size_allocate (GtkWidget *widget,
GtkAllocation *allocation)
{
GtkDial *dial;
g_return_if_fail (widget != NULL);
g_return_if_fail (GTK_IS_DIAL (widget));
g_return_if_fail (allocation != NULL);
widget->allocation = *allocation;
dial = GTK_DIAL (widget);
if (GTK_WIDGET_REALIZED (widget))
{
gdk_window_move_resize (widget->window,
allocation->x, allocation->y,
allocation->width, allocation->height);
}
dial->radius = MIN(allocation->width,allocation->height) * 0.45;
dial->pointer_width = dial->radius / 5;
}

C. Code Examples 246
static gint
gtk_dial_expose (GtkWidget *widget,
GdkEventExpose *event)
{
GtkDial *dial;
GdkPoint points[3];
gdouble s,c;
gdouble theta;
gint xc, yc;
gint tick_length;
gint i;
g_return_val_if_fail (widget != NULL, FALSE);
g_return_val_if_fail (GTK_IS_DIAL (widget), FALSE);
g_return_val_if_fail (event != NULL, FALSE);
if (event->count > 0)
return FALSE;
dial = GTK_DIAL (widget);
gdk_window_clear_area (widget->window,
0, 0,
widget->allocation.width,
widget->allocation.height);
xc = widget->allocation.width/2;
yc = widget->allocation.height/2;
/* Draw ticks */
for (i=0; i<25; i++)
{
theta = (i*M_PI/18. - M_PI/6.);
s = sin(theta);
c = cos(theta);
tick_length = (i%6 == 0) ? dial->pointer_width : dial->pointer_width/2;
gdk_draw_line (widget->window,
widget->style->fg_gc[widget->state],
xc + c*(dial->radius - tick_length),
yc - s*(dial->radius - tick_length),
xc + c*dial->radius,
yc - s*dial->radius);
}
/* Draw pointer */
s = sin(dial->angle);
c = cos(dial->angle);
points[0].x = xc + s*dial->pointer_width/2;
points[0].y = yc + c*dial->pointer_width/2;
points[1].x = xc + c*dial->radius;

C. Code Examples 247
points[1].y = yc - s*dial->radius;
points[2].x = xc - s*dial->pointer_width/2;
points[2].y = yc - c*dial->pointer_width/2;
gtk_draw_polygon (widget->style,
widget->window,
GTK_STATE_NORMAL,
GTK_SHADOW_OUT,
points, 3,
TRUE);
return FALSE;
}
static gint
gtk_dial_button_press (GtkWidget *widget,
GdkEventButton *event)
{
GtkDial *dial;
gint dx, dy;
double s, c;
double d_parallel;
double d_perpendicular;
g_return_val_if_fail (widget != NULL, FALSE);
g_return_val_if_fail (GTK_IS_DIAL (widget), FALSE);
g_return_val_if_fail (event != NULL, FALSE);
dial = GTK_DIAL (widget);
/* Determine if button press was within pointer region - we
do this by computing the parallel and perpendicular distance of
the point where the mouse was pressed from the line passing through
the pointer */
dx = event->x - widget->allocation.width / 2;
dy = widget->allocation.height / 2 - event->y;
s = sin(dial->angle);
c = cos(dial->angle);
d_parallel = s*dy + c*dx;
d_perpendicular = fabs(s*dx - c*dy);
if (!dial->button \&\&
(d_perpendicular < dial->pointer_width/2) \&\&
(d_parallel > - dial->pointer_width))
{
gtk_grab_add (widget);
dial->button = event->button;
gtk_dial_update_mouse (dial, event->x, event->y);
}
return FALSE;
}

C. Code Examples 248
static gint
gtk_dial_button_release (GtkWidget *widget,
GdkEventButton *event)
{
GtkDial *dial;
g_return_val_if_fail (widget != NULL, FALSE);
g_return_val_if_fail (GTK_IS_DIAL (widget), FALSE);
g_return_val_if_fail (event != NULL, FALSE);
dial = GTK_DIAL (widget);
if (dial->button == event->button)
{
gtk_grab_remove (widget);
dial->button = 0;
if (dial->policy == GTK_UPDATE_DELAYED)
gtk_timeout_remove (dial->timer);
if ((dial->policy != GTK_UPDATE_CONTINUOUS) \&\&
(dial->old_value != dial->adjustment->value))
gtk_signal_emit_by_name (GTK_OBJECT (dial->adjustment),
"value_changed");
}
return FALSE;
}
static gint
gtk_dial_motion_notify (GtkWidget *widget,
GdkEventMotion *event)
{
GtkDial *dial;
GdkModifierType mods;
gint x, y, mask;
g_return_val_if_fail (widget != NULL, FALSE);
g_return_val_if_fail (GTK_IS_DIAL (widget), FALSE);
g_return_val_if_fail (event != NULL, FALSE);
dial = GTK_DIAL (widget);
if (dial->button != 0)
{
x = event->x;
y = event->y;
if (event->is_hint || (event->window != widget->window))
gdk_window_get_pointer (widget->window, \&x, \&y, \&mods);
switch (dial->button)
{
case 1:
mask = GDK_BUTTON1_MASK;

C. Code Examples 249
break;
case 2:
mask = GDK_BUTTON2_MASK;
break;
case 3:
mask = GDK_BUTTON3_MASK;
break;
default:
mask = 0;
break;
}
if (mods \& mask)
gtk_dial_update_mouse (dial, x,y);
}
return FALSE;
}
static gint
gtk_dial_timer (GtkDial *dial)
{
g_return_val_if_fail (dial != NULL, FALSE);
g_return_val_if_fail (GTK_IS_DIAL (dial), FALSE);
if (dial->policy == GTK_UPDATE_DELAYED)
gtk_signal_emit_by_name (GTK_OBJECT (dial->adjustment),
"value_changed");
return FALSE;
}
static void
gtk_dial_update_mouse (GtkDial *dial, gint x, gint y)
{
gint xc, yc;
gfloat old_value;
g_return_if_fail (dial != NULL);
g_return_if_fail (GTK_IS_DIAL (dial));
xc = GTK_WIDGET(dial)->allocation.width / 2;
yc = GTK_WIDGET(dial)->allocation.height / 2;
old_value = dial->adjustment->value;
dial->angle = atan2(yc-y, x-xc);
if (dial->angle < -M_PI/2.)
dial->angle += 2*M_PI;
if (dial->angle < -M_PI/6)
dial->angle = -M_PI/6;
if (dial->angle > 7.*M_PI/6.)
dial->angle = 7.*M_PI/6.;
dial->adjustment->value = dial->adjustment->lower + (7.*M_PI/6 - dial->angle) *

C. Code Examples 250
(dial->adjustment->upper - dial->adjustment->lower) / (4.*M_PI/3.);
if (dial->adjustment->value != old_value)
{
if (dial->policy == GTK_UPDATE_CONTINUOUS)
{
gtk_signal_emit_by_name (GTK_OBJECT (dial->adjustment),
"value_changed");
}
else
{
gtk_widget_draw (GTK_WIDGET(dial), NULL);
if (dial->policy == GTK_UPDATE_DELAYED)
{
if (dial->timer)
gtk_timeout_remove (dial->timer);
dial->timer = gtk_timeout_add (SCROLL_DELAY_LENGTH,
(GtkFunction) gtk_dial_timer,
(gpointer) dial);
}
}
}
}
static void
gtk_dial_update (GtkDial *dial)
{
gfloat new_value;
g_return_if_fail (dial != NULL);
g_return_if_fail (GTK_IS_DIAL (dial));
new_value = dial->adjustment->value;
if (new_value < dial->adjustment->lower)
new_value = dial->adjustment->lower;
if (new_value > dial->adjustment->upper)
new_value = dial->adjustment->upper;
if (new_value != dial->adjustment->value)
{
dial->adjustment->value = new_value;
gtk_signal_emit_by_name (GTK_OBJECT (dial->adjustment), "value_changed");
}
dial->angle = 7.*M_PI/6. - (new_value - dial->adjustment->lower) *
4.*M_PI/3. /
(dial->adjustment->upper - dial->adjustment->lower);
gtk_widget_draw (GTK_WIDGET(dial), NULL);
}
static void
gtk_dial_adjustment_changed (GtkAdjustment *adjustment,

C. Code Examples 251
gpointer data)
{
GtkDial *dial;
g_return_if_fail (adjustment != NULL);
g_return_if_fail (data != NULL);
dial = GTK_DIAL (data);
if ((dial->old_value != adjustment->value) ||
(dial->old_lower != adjustment->lower) ||
(dial->old_upper != adjustment->upper))
{
gtk_dial_update (dial);
dial->old_value = adjustment->value;
dial->old_lower = adjustment->lower;
dial->old_upper = adjustment->upper;
}
}
static void
gtk_dial_adjustment_value_changed (GtkAdjustment *adjustment,
gpointer data)
{
GtkDial *dial;
g_return_if_fail (adjustment != NULL);
g_return_if_fail (data != NULL);
dial = GTK_DIAL (data);
if (dial->old_value != adjustment->value)
{
gtk_dial_update (dial);
dial->old_value = adjustment->value;
}
}
/* example-end */
C.3 Scribble
/* example-start scribble-simple scribble-simple.c */
/* GTK - The GIMP Toolkit
* Copyright (C) 1995-1997 Peter Mattis, Spencer Kimball and Josh MacDonald
*
* This library is free software; you can redistribute it and/or
* modify it under the terms of the GNU Library General Public
* License as published by the Free Software Foundation; either
* version 2 of the License, or (at your option) any later version.
*
* This library is distributed in the hope that it will be useful,
* but WITHOUT ANY WARRANTY; without even the implied warranty of
* MERCHANTABILITY or FITNESS FOR A PARTICULAR PURPOSE. See the GNU

C. Code Examples 252
* Library General Public License for more details.
*
* You should have received a copy of the GNU Library General Public
* License along with this library; if not, write to the
* Free Software Foundation, Inc., 59 Temple Place - Suite 330,
* Boston, MA 02111-1307, USA.
*/
#include <gtk/gtk.h>
/* Backing pixmap for drawing area */
static GdkPixmap *pixmap = NULL;
/* Create a new backing pixmap of the appropriate size */
static gint
configure_event (GtkWidget *widget, GdkEventConfigure *event)
{
if (pixmap)
gdk_pixmap_unref(pixmap);
pixmap = gdk_pixmap_new(widget->window,
widget->allocation.width,
widget->allocation.height,
-1);
gdk_draw_rectangle (pixmap,
widget->style->white_gc,
TRUE,
0, 0,
widget->allocation.width,
widget->allocation.height);
return TRUE;
}
/* Redraw the screen from the backing pixmap */
static gint
expose_event (GtkWidget *widget, GdkEventExpose *event)
{
gdk_draw_pixmap(widget->window,
widget->style->fg_gc[GTK_WIDGET_STATE (widget)],
pixmap,
event->area.x, event->area.y,
event->area.x, event->area.y,
event->area.width, event->area.height);
return FALSE;
}
/* Draw a rectangle on the screen */
static void
draw_brush (GtkWidget *widget, gdouble x, gdouble y)
{
GdkRectangle update_rect;
update_rect.x = x - 5;
update_rect.y = y - 5;
update_rect.width = 10;

C. Code Examples 253
update_rect.height = 10;
gdk_draw_rectangle (pixmap,
widget->style->black_gc,
TRUE,
update_rect.x, update_rect.y,
update_rect.width, update_rect.height);
gtk_widget_draw (widget, \&update_rect);
}
static gint
button_press_event (GtkWidget *widget, GdkEventButton *event)
{
if (event->button == 1 \&\& pixmap != NULL)
draw_brush (widget, event->x, event->y);
return TRUE;
}
static gint
motion_notify_event (GtkWidget *widget, GdkEventMotion *event)
{
int x, y;
GdkModifierType state;
if (event->is_hint)
gdk_window_get_pointer (event->window, \&x, \&y, \&state);
else
{
x = event->x;
y = event->y;
state = event->state;
}
if (state \& GDK_BUTTON1_MASK \&\& pixmap != NULL)
draw_brush (widget, x, y);
return TRUE;
}
void
quit ()
{
gtk_exit (0);
}
int
main (int argc, char *argv[])
{
GtkWidget *window;
GtkWidget *drawing_area;
GtkWidget *vbox;
GtkWidget *button;
gtk_init (\&argc, \&argv);
window = gtk_window_new (GTK_WINDOW_TOPLEVEL);

C. Code Examples 254
gtk_widget_set_name (window, "Test Input");
vbox = gtk_vbox_new (FALSE, 0);
gtk_container_add (GTK_CONTAINER (window), vbox);
gtk_widget_show (vbox);
gtk_signal_connect (GTK_OBJECT (window), "destroy",
GTK_SIGNAL_FUNC (quit), NULL);
/* Create the drawing area */
drawing_area = gtk_drawing_area_new ();
gtk_drawing_area_size (GTK_DRAWING_AREA (drawing_area), 200, 200);
gtk_box_pack_start (GTK_BOX (vbox), drawing_area, TRUE, TRUE, 0);
gtk_widget_show (drawing_area);
/* Signals used to handle backing pixmap */
gtk_signal_connect (GTK_OBJECT (drawing_area), "expose_event",
(GtkSignalFunc) expose_event, NULL);
gtk_signal_connect (GTK_OBJECT(drawing_area),"configure_event",
(GtkSignalFunc) configure_event, NULL);
/* Event signals */
gtk_signal_connect (GTK_OBJECT (drawing_area), "motion_notify_event",
(GtkSignalFunc) motion_notify_event, NULL);
gtk_signal_connect (GTK_OBJECT (drawing_area), "button_press_event",
(GtkSignalFunc) button_press_event, NULL);
gtk_widget_set_events (drawing_area, GDK_EXPOSURE_MASK
| GDK_LEAVE_NOTIFY_MASK
| GDK_BUTTON_PRESS_MASK
| GDK_POINTER_MOTION_MASK
| GDK_POINTER_MOTION_HINT_MASK);
/* .. And a quit button */
button = gtk_button_new_with_label ("Quit");
gtk_box_pack_start (GTK_BOX (vbox), button, FALSE, FALSE, 0);
gtk_signal_connect_object (GTK_OBJECT (button), "clicked",
GTK_SIGNAL_FUNC (gtk_widget_destroy),
GTK_OBJECT (window));
gtk_widget_show (button);
gtk_widget_show (window);
gtk_main ();
return 0;
}
/* example-end */

D. List Widget 255
D List Widget
NOTE: The GtkList widget has been superseded by the GtkCList widget. It is detailed here just forcompleteness.
The GtkList widget is designed to act as a vertical container for widgets that should be of the type GtkLis-tItem.
A GtkList widget has its own window to receive events and its own background color which is usually white.As it is directly derived from a GtkContainer it can be treated as such by using the GTK CONTAINER(List)macro, see the GtkContainer widget for more on this. One should already be familiar with the usage of aGList and its related functions g list *() to be able to use the GtkList widget to it full extent.
There is one field inside the structure definition of the GtkList widget that will be of greater interest to us,this is:
struct _GtkList
{
...
GList *selection;
guint selection_mode;
...
};
The selection field of a GtkList points to a linked list of all items that are currently selected, or NULL if theselection is empty. So to learn about the current selection we read the GTK LIST()->selection field, but donot modify it since the internal fields are maintained by the gtk list *() functions.
The selection mode of the GtkList determines the selection facilities of a GtkList and therefore the contentsof the GTK LIST()->selection field. The selection mode may be one of the following:
• GTK SELECTION SINGLE - The selection is either NULL or contains a GList pointer for a singleselected item.
• GTK SELECTION BROWSE - The selection is NULL if the list contains no widgets or insensitiveones only, otherwise it contains a GList pointer for one GList structure, and therefore exactly one listitem.
• GTK SELECTION MULTIPLE - The selection is NULL if no list items are selected or a GList pointerfor the first selected item. That in turn points to a GList structure for the second selected item andso on.
• GTK SELECTION EXTENDED - The selection is always NULL.
The default is GTK SELECTION MULTIPLE.
D.1 Signals
void selection_changed( GtkList *list );
This signal will be invoked whenever the selection field of a GtkList has changed. This happens when a childof the GtkList got selected or deselected.
void select_child( GtkList *list,
GtkWidget *child);

D. List Widget 256
This signal is invoked when a child of the GtkList is about to get selected. This happens mainly on calls togtk list select item(), gtk list select child(), button presses and sometimes indirectly triggered on some elseoccasions where children get added to or removed from the GtkList.
void unselect_child( GtkList *list,
GtkWidget *child );
This signal is invoked when a child of the GtkList is about to get deselected. This happens mainly on calls togtk list unselect item(), gtk list unselect child(), button presses and sometimes indirectly triggered on someelse occasions where children get added to or removed from the GtkList.
D.2 Functions
guint gtk_list_get_type( void );
Returns the ‘GtkList’ type identifier.
GtkWidget *gtk_list_new( void );
Create a new GtkList object. The new widget is returned as a pointer to a GtkWidget object. NULL isreturned on failure.
void gtk_list_insert_items( GtkList *list,
GList *items,
gint position );
Insert list items into the list, starting at position. items is a doubly linked list where each nodes datapointer is expected to point to a newly created GtkListItem. The GList nodes of items are taken over bythe list.
void gtk_list_append_items( GtkList *list,
GList *items);
Insert list items just like gtk list insert items() at the end of the list. The GList nodes of items are takenover by the list.
void gtk_list_prepend_items( GtkList *list,
GList *items);
Insert list items just like gtk list insert items() at the very beginning of the list. The GList nodes of itemsare taken over by the list.
void gtk_list_remove_items( GtkList *list,
GList *items);
Remove list items from the list. items is a doubly linked list where each nodes data pointer is expected topoint to a direct child of list. It is the callers responsibility to make a call to g list free(items) afterwards.Also the caller has to destroy the list items himself.
void gtk_list_clear_items( GtkList *list,
gint start,
gint end );

D. List Widget 257
Remove and destroy list items from the list. A widget is affected if its current position within the list is inthe range specified by start and end.
void gtk_list_select_item( GtkList *list,
gint item );
Invoke the select child signal for a list item specified through its current position within the list.
void gtk_list_unselect_item( GtkList *list,
gint item);
Invoke the unselect child signal for a list item specified through its current position within the list.
void gtk_list_select_child( GtkList *list,
GtkWidget *child);
Invoke the select child signal for the specified child.
void gtk_list_unselect_child( GtkList *list,
GtkWidget *child);
Invoke the unselect child signal for the specified child.
gint gtk_list_child_position( GtkList *list,
GtkWidget *child);
Return the position of child within the list. ”-1” is returned on failure.
void gtk_list_set_selection_mode( GtkList *list,
GtkSelectionMode mode );
Set the selection mode MODE which can be of GTK SELECTION SINGLE, GTK SELECTION BROWSE,GTK SELECTION MULTIPLE or GTK SELECTION EXTENDED.
GtkList *GTK_LIST( gpointer obj );
Cast a generic pointer to ‘GtkList *’. *Note Standard Macros::, for more info.
GtkListClass *GTK_LIST_CLASS( gpointer class);
Cast a generic pointer to ‘GtkListClass*’. *Note Standard Macros::, for more info.
gint GTK_IS_LIST( gpointer obj);
Determine if a generic pointer refers to a ‘GtkList’ object. *Note Standard Macros::, for more info.

D. List Widget 258
D.3 Example
Following is an example program that will print out the changes of the selection of a GtkList, and lets you”arrest” list items into a prison by selecting them with the rightmost mouse button.
/* example-start list list.c */
/* Include the gtk+ header files
* Include stdio.h, we need that for the printf() function
*/
#include <gtk/gtk.h>
#include <stdio.h>
/* This is our data identification string to store
* data in list items
*/
const gchar *list_item_data_key="list_item_data";
/* prototypes for signal handler that we are going to connect
* to the GtkList widget
*/
static void sigh_print_selection( GtkWidget *gtklist,
gpointer func_data);
static void sigh_button_event( GtkWidget *gtklist,
GdkEventButton *event,
GtkWidget *frame );
/* Main function to set up the user interface */
gint main (int argc,
gchar *argv[])
{
GtkWidget *separator;
GtkWidget *window;
GtkWidget *vbox;
GtkWidget *scrolled_window;
GtkWidget *frame;
GtkWidget *gtklist;
GtkWidget *button;
GtkWidget *list_item;
GList *dlist;
guint i;
gchar buffer[64];
/* Initialize gtk+ (and subsequently gdk) */
gtk_init(\&argc, \&argv);
/* Create a window to put all the widgets in
* connect gtk_main_quit() to the "destroy" event of
* the window to handle window manager close-window-events
*/
D. List Widget 259
window=gtk_window_new(GTK_WINDOW_TOPLEVEL);
gtk_window_set_title(GTK_WINDOW(window), "GtkList Example");
gtk_signal_connect(GTK_OBJECT(window),
"destroy",
GTK_SIGNAL_FUNC(gtk_main_quit),
NULL);
/* Inside the window we need a box to arrange the widgets
* vertically */
vbox=gtk_vbox_new(FALSE, 5);
gtk_container_set_border_width(GTK_CONTAINER(vbox), 5);
gtk_container_add(GTK_CONTAINER(window), vbox);
gtk_widget_show(vbox);
/* This is the scrolled window to put the GtkList widget inside */
scrolled_window=gtk_scrolled_window_new(NULL, NULL);
gtk_widget_set_usize(scrolled_window, 250, 150);
gtk_container_add(GTK_CONTAINER(vbox), scrolled_window);
gtk_widget_show(scrolled_window);
/* Create the GtkList widget.
* Connect the sigh_print_selection() signal handler
* function to the "selection_changed" signal of the GtkList
* to print out the selected items each time the selection
* has changed */
gtklist=gtk_list_new();
gtk_scrolled_window_add_with_viewport( GTK_SCROLLED_WINDOW(scrolled_window),
gtklist);
gtk_widget_show(gtklist);
gtk_signal_connect(GTK_OBJECT(gtklist),
"selection_changed",
GTK_SIGNAL_FUNC(sigh_print_selection),
NULL);
/* We create a "Prison" to put a list item in ;) */
frame=gtk_frame_new("Prison");
gtk_widget_set_usize(frame, 200, 50);
gtk_container_set_border_width(GTK_CONTAINER(frame), 5);
gtk_frame_set_shadow_type(GTK_FRAME(frame), GTK_SHADOW_OUT);
gtk_container_add(GTK_CONTAINER(vbox), frame);
gtk_widget_show(frame);
/* Connect the sigh_button_event() signal handler to the GtkList
* which will handle the "arresting" of list items
*/
gtk_signal_connect(GTK_OBJECT(gtklist),
"button_release_event",
GTK_SIGNAL_FUNC(sigh_button_event),
frame);
/* Create a separator */
separator=gtk_hseparator_new();
gtk_container_add(GTK_CONTAINER(vbox), separator);
gtk_widget_show(separator);
/* Finally create a button and connect its "clicked" signal

D. List Widget 260
* to the destruction of the window */
button=gtk_button_new_with_label("Close");
gtk_container_add(GTK_CONTAINER(vbox), button);
gtk_widget_show(button);
gtk_signal_connect_object(GTK_OBJECT(button),
"clicked",
GTK_SIGNAL_FUNC(gtk_widget_destroy),
GTK_OBJECT(window));
/* Now we create 5 list items, each having its own
* label and add them to the GtkList using gtk_container_add()
* Also we query the text string from the label and
* associate it with the list_item_data_key for each list item
*/
for (i=0; i<5; i++) {
GtkWidget *label;
gchar *string;
sprintf(buffer, "ListItemContainer with Label #%d", i);
label=gtk_label_new(buffer);
list_item=gtk_list_item_new();
gtk_container_add(GTK_CONTAINER(list_item), label);
gtk_widget_show(label);
gtk_container_add(GTK_CONTAINER(gtklist), list_item);
gtk_widget_show(list_item);
gtk_label_get(GTK_LABEL(label), \&string);
gtk_object_set_data(GTK_OBJECT(list_item),
list_item_data_key,
string);
}
/* Here, we are creating another 5 labels, this time
* we use gtk_list_item_new_with_label() for the creation
* we can’t query the text string from the label because
* we don’t have the labels pointer and therefore
* we just associate the list_item_data_key of each
* list item with the same text string.
* For adding of the list items we put them all into a doubly
* linked list (GList), and then add them by a single call to
* gtk_list_append_items().
* Because we use g_list_prepend() to put the items into the
* doubly linked list, their order will be descending (instead
* of ascending when using g_list_append())
*/
dlist=NULL;
for (; i<10; i++) {
sprintf(buffer, "List Item with Label %d", i);
list_item=gtk_list_item_new_with_label(buffer);
dlist=g_list_prepend(dlist, list_item);
gtk_widget_show(list_item);
gtk_object_set_data(GTK_OBJECT(list_item),
list_item_data_key,
"ListItem with integrated Label");
}
gtk_list_append_items(GTK_LIST(gtklist), dlist);
/* Finally we want to see the window, don’t we? ;) */

D. List Widget 261
gtk_widget_show(window);
/* Fire up the main event loop of gtk */
gtk_main();
/* We get here after gtk_main_quit() has been called which
* happens if the main window gets destroyed
*/
return(0);
}
/* This is the signal handler that got connected to button
* press/release events of the GtkList
*/
void sigh_button_event( GtkWidget *gtklist,
GdkEventButton *event,
GtkWidget *frame )
{
/* We only do something if the third (rightmost mouse button
* was released
*/
if (event->type==GDK_BUTTON_RELEASE \&\&
event->button==3) {
GList *dlist, *free_list;
GtkWidget *new_prisoner;
/* Fetch the currently selected list item which
* will be our next prisoner ;)
*/
dlist=GTK_LIST(gtklist)->selection;
if (dlist)
new_prisoner=GTK_WIDGET(dlist->data);
else
new_prisoner=NULL;
/* Look for already imprisoned list items, we
* will put them back into the list.
* Remember to free the doubly linked list that
* gtk_container_children() returns
*/
dlist=gtk_container_children(GTK_CONTAINER(frame));
free_list=dlist;
while (dlist) {
GtkWidget *list_item;
list_item=dlist->data;
gtk_widget_reparent(list_item, gtklist);
dlist=dlist->next;
}
g_list_free(free_list);
/* If we have a new prisoner, remove him from the
* GtkList and put him into the frame "Prison".
* We need to unselect the item first.
*/
D. List Widget 262
if (new_prisoner) {
GList static_dlist;
static_dlist.data=new_prisoner;
static_dlist.next=NULL;
static_dlist.prev=NULL;
gtk_list_unselect_child(GTK_LIST(gtklist),
new_prisoner);
gtk_widget_reparent(new_prisoner, frame);
}
}
}
/* This is the signal handler that gets called if GtkList
* emits the "selection_changed" signal
*/
void sigh_print_selection( GtkWidget *gtklist,
gpointer func_data)
{
GList *dlist;
/* Fetch the doubly linked list of selected items
* of the GtkList, remember to treat this as read-only!
*/
dlist=GTK_LIST(gtklist)->selection;
/* If there are no selected items there is nothing more
* to do than just telling the user so
*/
if (!dlist) {
g_print("Selection cleared\n");
return;
}
/* Ok, we got a selection and so we print it
*/
g_print("The selection is a ");
/* Get the list item from the doubly linked list
* and then query the data associated with list_item_data_key.
* We then just print it */
while (dlist) {
GtkObject *list_item;
gchar *item_data_string;
list_item=GTK_OBJECT(dlist->data);
item_data_string=gtk_object_get_data(list_item,
list_item_data_key);
g_print("%s ", item_data_string);
dlist=dlist->next;
}
g_print("\n");
}
/* example-end */

D. List Widget 263
D.4 List Item Widget
The GtkListItem widget is designed to act as a container holding up to one child, providing functions forselection/deselection just like the GtkList widget requires them for its children.
A GtkListItem has its own window to receive events and has its own background color which is usually white.
As it is directly derived from a GtkItem it can be treated as such by using the GTK ITEM(ListItem) macro,see the GtkItem widget for more on this. Usually a GtkListItem just holds a label to identify e.g. a filenamewithin a GtkList – therefore the convenience function gtk list item new with label() is provided. The sameeffect can be achieved by creating a GtkLabel on its own, setting its alignment to xalign=0 and yalign=0.5with a subsequent container addition to the GtkListItem.
As one is not forced to add a GtkLabel to a GtkListItem, you could also add a GtkVBox or a GtkArrowetc. to the GtkListItem.
D.5 Signals
A GtkListItem does not create new signals on its own, but inherits the signals of a GtkItem. *Note GtkItem::,for more info.
D.6 Functions
guint gtk_list_item_get_type( void );
Returns the ‘GtkListItem’ type identifier.
GtkWidget *gtk_list_item_new( void );
Create a new GtkListItem object. The new widget is returned as a pointer to a GtkWidget object. NULLis returned on failure.
GtkWidget *gtk_list_item_new_with_label( gchar *label );
Create a new GtkListItem object, having a single GtkLabel as the sole child. The new widget is returned asa pointer to a GtkWidget object. NULL is returned on failure.
void gtk_list_item_select( GtkListItem *list_item );
This function is basically a wrapper around a call to gtk item select (GTK ITEM (list item)) which willemit the select signal. *Note GtkItem::, for more info.
void gtk_list_item_deselect( GtkListItem *list_item );
This function is basically a wrapper around a call to gtk item deselect (GTK ITEM (list item)) which willemit the deselect signal. *Note GtkItem::, for more info.
GtkListItem *GTK_LIST_ITEM( gpointer obj );
Cast a generic pointer to ‘GtkListItem*’. *Note Standard Macros::, for more info.
GtkListItemClass *GTK_LIST_ITEM_CLASS( gpointer class );
Cast a generic pointer to GtkListItemClass*. *Note Standard Macros::, for more info.
gint GTK_IS_LIST_ITEM( gpointer obj );
Determine if a generic pointer refers to a ‘GtkListItem’ object. *Note Standard Macros::, for more info.

D. List Widget 264
D.7 Example
Please see the GtkList example on this, which covers the usage of a GtkListItem as well.