gravity bag cord blood collection method training … blood collection method training manual...
TRANSCRIPT
Document: Appendix 2 to SOP404a Version 01
Date: 17 November 2009
CordBank Ltd. 2008 Training Manual Page 1 of 13
Gravity Bag
Cord Blood
Collection Method
Training Manual
Document: Appendix 2 to SOP404a Version 01
Date: 17 November 2009
CordBank Ltd. 2008 Training Manual Page 2 of 13
Table of Contents
Chapter
Page
Introduction
3
Requirements for Collection of Cord Blood
3
Collector’s Instructions
5
Important Information for Collectors
11
Attached copies of forms
Form
MacoPharma Bag Diagram
F100a
Data Collection Sheet
W003a
Forms included with training material
Form
Confirmation of Cord Blood Collection Training
F006
CordBank Payment Advice
F015
Document: Appendix 2 to SOP404a Version 01
Date: 17 November 2009
CordBank Ltd. 2008 Training Manual Page 3 of 13
1. Introduction This manual sets the minimum standards for the collection of umbilical cord blood by Registered Health Care Professionals in New Zealand for CordBank Ltd. In New Zealand, blood intended for therapeutic purposes, such as cord blood, is defined as a medicine under the Medicines Act 1981 and therefore is required to meet standards required for the New Zealand Code of Good Manufacturing Practice (GMP).
In accordance with this, the Registered Health Care Professional conducting the collection process must therefore understand and undertake the procedure in a manner that complies with GMP.
The specific collection procedures include: • The preparation of a venepuncture site
• Venepuncture
• The importance of aseptic manipulation
• Identification of the mother and the labeling of blood samples
These activities must be carried out in a manner that ensures the integrity of the stem cells during long-term cryopreservation.
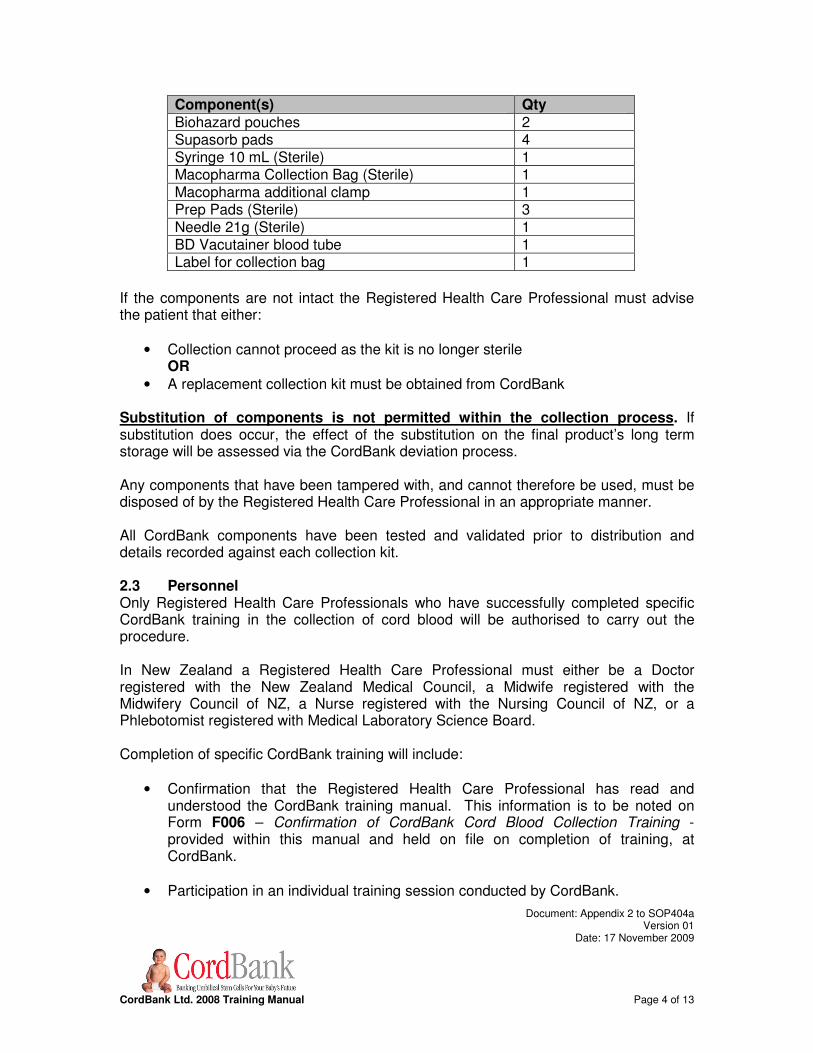
2. Requirements for collection of cord blood 2.1 Premises The premises for the collection of cord blood must have adequate space to work with the umbilical cord and withdraw the blood required. The room must be well lit and have some form of ventilation. 2.2 Collection Equipment The CordBank cord blood collection kit must include all of the items listed in the chart below. The items noted as sterile on the chart must remain intact within their original sterile packaging. The requirement not to tamper with any of the items within the kit is clearly marked on the exterior of the Collection Kit for patient information. However prior to undertaking the collection procedure, the Registered Health Care Professional must visually confirm that the sterile packaging of all components in the cord blood collection kit is intact.
Document: Appendix 2 to SOP404a Version 01
Date: 17 November 2009
CordBank Ltd. 2008 Training Manual Page 4 of 13
Component(s) Qty
Biohazard pouches 2 Supasorb pads 4 Syringe 10 mL (Sterile) 1 Macopharma Collection Bag (Sterile) 1 Macopharma additional clamp 1 Prep Pads (Sterile) 3 Needle 21g (Sterile) 1 BD Vacutainer blood tube 1 Label for collection bag 1
If the components are not intact the Registered Health Care Professional must advise the patient that either:
• Collection cannot proceed as the kit is no longer sterile OR
• A replacement collection kit must be obtained from CordBank Substitution of components is not permitted within the collection process. If substitution does occur, the effect of the substitution on the final product’s long term storage will be assessed via the CordBank deviation process. Any components that have been tampered with, and cannot therefore be used, must be disposed of by the Registered Health Care Professional in an appropriate manner. All CordBank components have been tested and validated prior to distribution and details recorded against each collection kit. 2.3 Personnel Only Registered Health Care Professionals who have successfully completed specific CordBank training in the collection of cord blood will be authorised to carry out the procedure. In New Zealand a Registered Health Care Professional must either be a Doctor registered with the New Zealand Medical Council, a Midwife registered with the Midwifery Council of NZ, a Nurse registered with the Nursing Council of NZ, or a Phlebotomist registered with Medical Laboratory Science Board. Completion of specific CordBank training will include:
• Confirmation that the Registered Health Care Professional has read and understood the CordBank training manual. This information is to be noted on Form F006 – Confirmation of CordBank Cord Blood Collection Training - provided within this manual and held on file on completion of training, at CordBank.
• Participation in an individual training session conducted by CordBank.
Document: Appendix 2 to SOP404a Version 01
Date: 17 November 2009
CordBank Ltd. 2008 Training Manual Page 5 of 13
• CordBank is required by Medsafe to ensure the collector’s training records are current. If more than one year has elapsed since your last cord blood collection, please contact CordBank about re-certification.
Additionally, on completion of training, Registered Health Care Professionals will be able to seek direct advice from CordBank on 0800 CORDBANK 0800 267 322. 2.4 Safety when handling blood samples All blood samples are potentially infectious and should be handled with extreme care. Handle all samples as if capable of transmitting disease. Always wear gloves and follow universal precautions.
3. Collector’s Instructions 3.1 Identification
1. The Registered Health Care Professional must be satisfied that the mother is positively identified prior to the cord blood collection process.
2. Positive identification requires confirmation of the mother’s full name and date of
birth. If the mother is unable to state her full name and date of birth, the Registered Health Care Professional must refer to the information provided on the hospital ID tag – securely attached to the patient’s wrist.
3. Identification must be recorded on the CordBank data collection sheet W003.
The use of hospital labels is permitted where available. 3.2 Maternal Blood Collection Note: It is preferable to perform this prior to birth
1. One 10mL blood tube of maternal blood is required to test for HIV, Hepatitis B
and C, and Syphilis.
2. Sterilise the venepuncture site using the sterile alcohol pad provided.
3. After wiping with the alcohol prep pad the prepared venepuncture site should be allowed to dry of its own accord.
4. To ensure sterility and an aseptic collection, do not touch the site after
preparation and before the needle is inserted.
5. Collect the maternal blood using the sterile 10 ml syringe and 21g needle provided. Once the blood is collected use the needle to pierce the rubber bung in the top of the blood tube, and allow the vacuum to fill the tube with the blood sample.

Document: Appendix 2 to SOP404a Version 01
Date: 17 November 2009
CordBank Ltd. 2008 Training Manual Page 6 of 13
6. Complete the label on blood tube with the mother’s:
•••• Surname
•••• First name
•••• Date of birth
•••• Time & date of collection
•••• NHI number
•••• Collector’s signature Use hospital labels if available.
7. Place labeled blood tube in biohazard bag and place back into the CordBank Collection kit.
3.3 Pre-Collection Recommendations
• Avoid contact with sharp objects
• Inspect over-wrap and pack
• Do not use if the over-wrap or blood bag system show any signs of damage
• Do not use if the solutions are turbid
Document: Appendix 2 to SOP404a Version 01
Date: 17 November 2009
CordBank Ltd. 2008 Training Manual Page 7 of 13
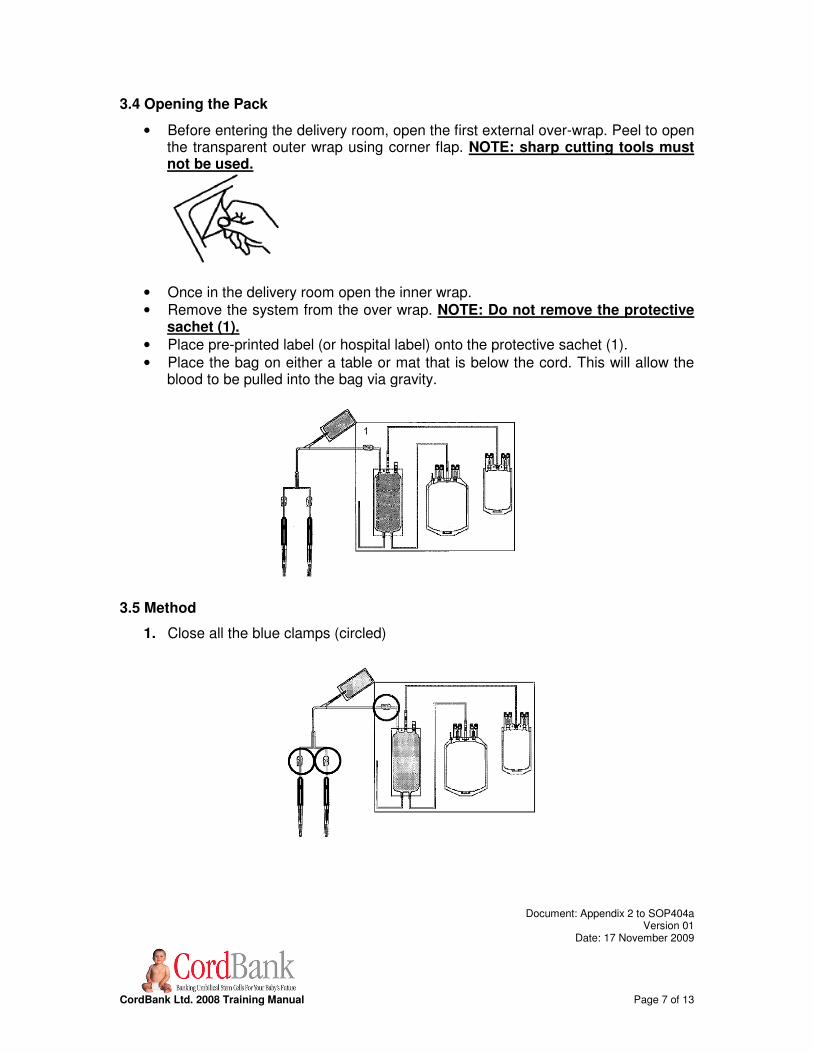
3.4 Opening the Pack
• Before entering the delivery room, open the first external over-wrap. Peel to open the transparent outer wrap using corner flap. NOTE: sharp cutting tools must not be used.
• Once in the delivery room open the inner wrap. • Remove the system from the over wrap. NOTE: Do not remove the protective
sachet (1).
• Place pre-printed label (or hospital label) onto the protective sachet (1).
• Place the bag on either a table or mat that is below the cord. This will allow the blood to be pulled into the bag via gravity.
3.5 Method
1. Close all the blue clamps (circled)
Document: Appendix 2 to SOP404a Version 01
Date: 17 November 2009
CordBank Ltd. 2008 Training Manual Page 8 of 13
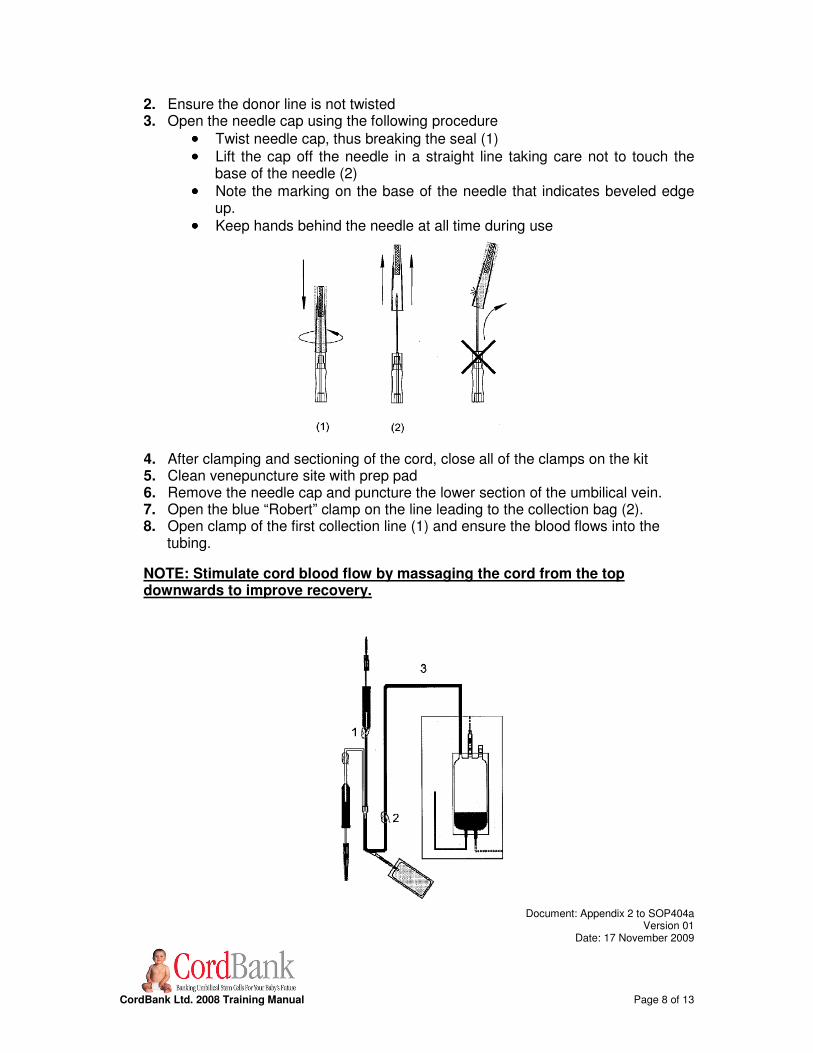
2. Ensure the donor line is not twisted 3. Open the needle cap using the following procedure
•••• Twist needle cap, thus breaking the seal (1)
•••• Lift the cap off the needle in a straight line taking care not to touch the base of the needle (2)
•••• Note the marking on the base of the needle that indicates beveled edge up.
•••• Keep hands behind the needle at all time during use
4. After clamping and sectioning of the cord, close all of the clamps on the kit 5. Clean venepuncture site with prep pad 6. Remove the needle cap and puncture the lower section of the umbilical vein. 7. Open the blue “Robert” clamp on the line leading to the collection bag (2). 8. Open clamp of the first collection line (1) and ensure the blood flows into the
tubing.
NOTE: Stimulate cord blood flow by massaging the cord from the top downwards to improve recovery.
Document: Appendix 2 to SOP404a Version 01
Date: 17 November 2009
CordBank Ltd. 2008 Training Manual Page 9 of 13
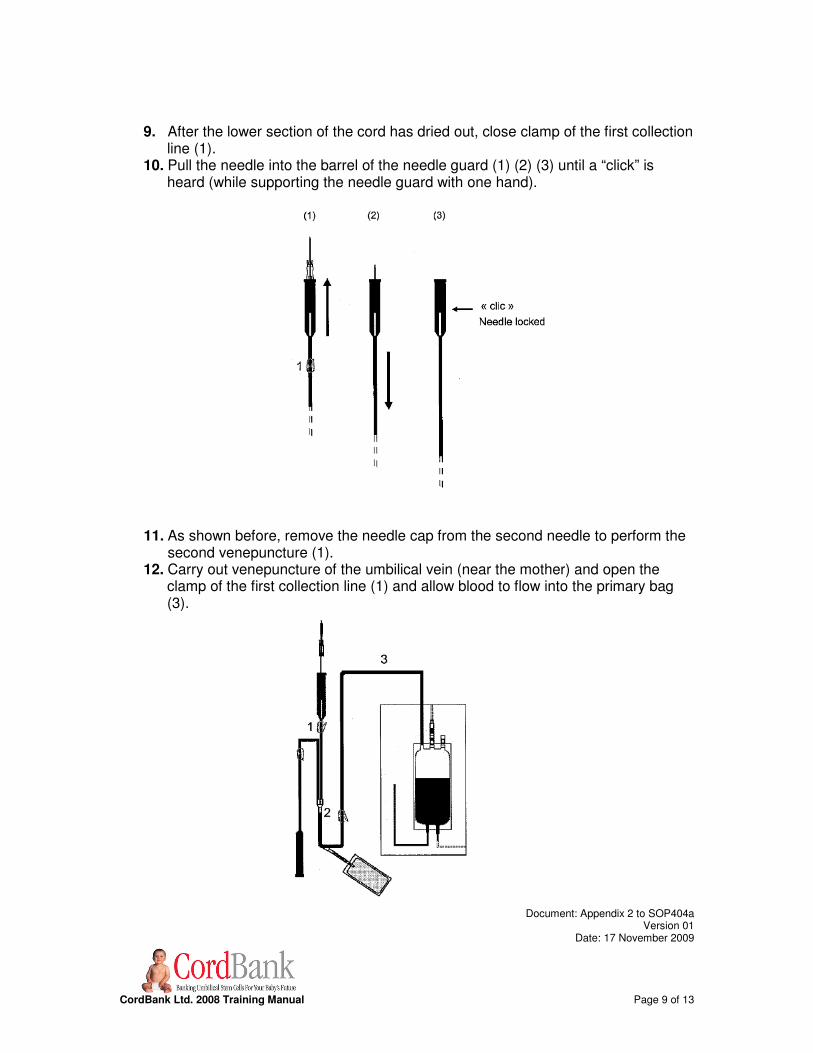
9. After the lower section of the cord has dried out, close clamp of the first collection line (1).
10. Pull the needle into the barrel of the needle guard (1) (2) (3) until a “click” is heard (while supporting the needle guard with one hand).
11. As shown before, remove the needle cap from the second needle to perform the second venepuncture (1).
12. Carry out venepuncture of the umbilical vein (near the mother) and open the clamp of the first collection line (1) and allow blood to flow into the primary bag (3).
Document: Appendix 2 to SOP404a Version 01
Date: 17 November 2009
CordBank Ltd. 2008 Training Manual Page 10 of 13
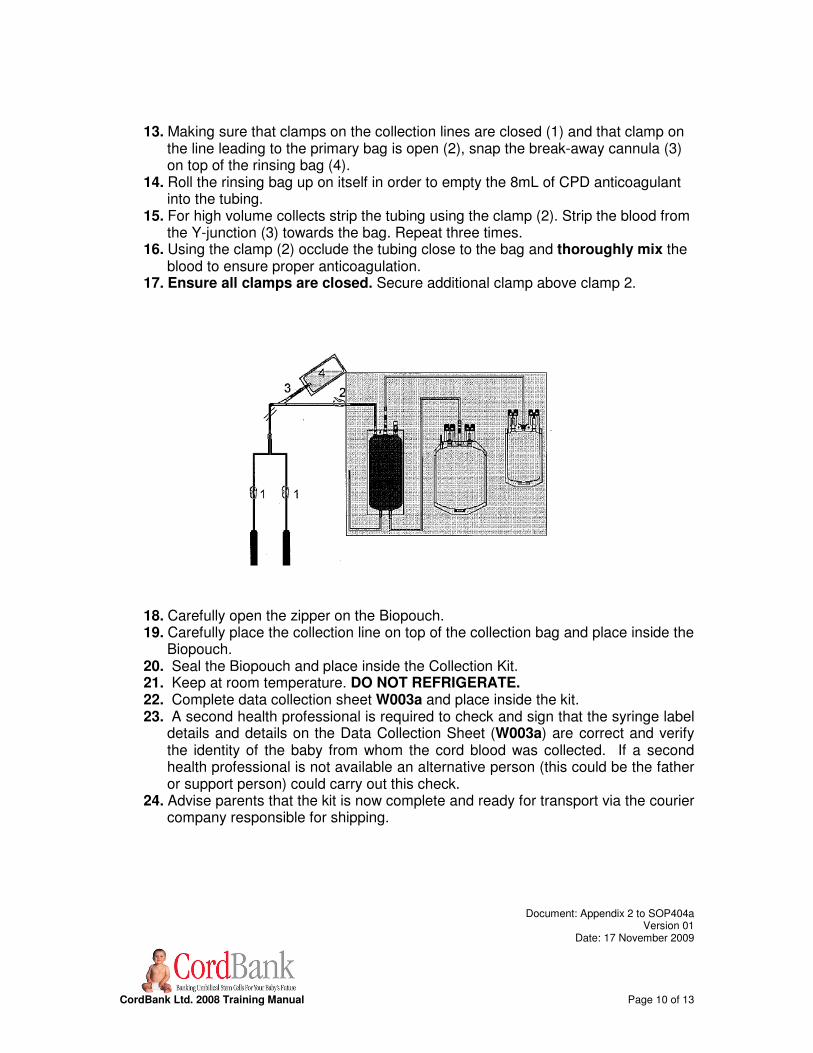
13. Making sure that clamps on the collection lines are closed (1) and that clamp on the line leading to the primary bag is open (2), snap the break-away cannula (3) on top of the rinsing bag (4).
14. Roll the rinsing bag up on itself in order to empty the 8mL of CPD anticoagulant into the tubing.
15. For high volume collects strip the tubing using the clamp (2). Strip the blood from the Y-junction (3) towards the bag. Repeat three times.
16. Using the clamp (2) occlude the tubing close to the bag and thoroughly mix the blood to ensure proper anticoagulation.
17. Ensure all clamps are closed. Secure additional clamp above clamp 2.
18. Carefully open the zipper on the Biopouch. 19. Carefully place the collection line on top of the collection bag and place inside the
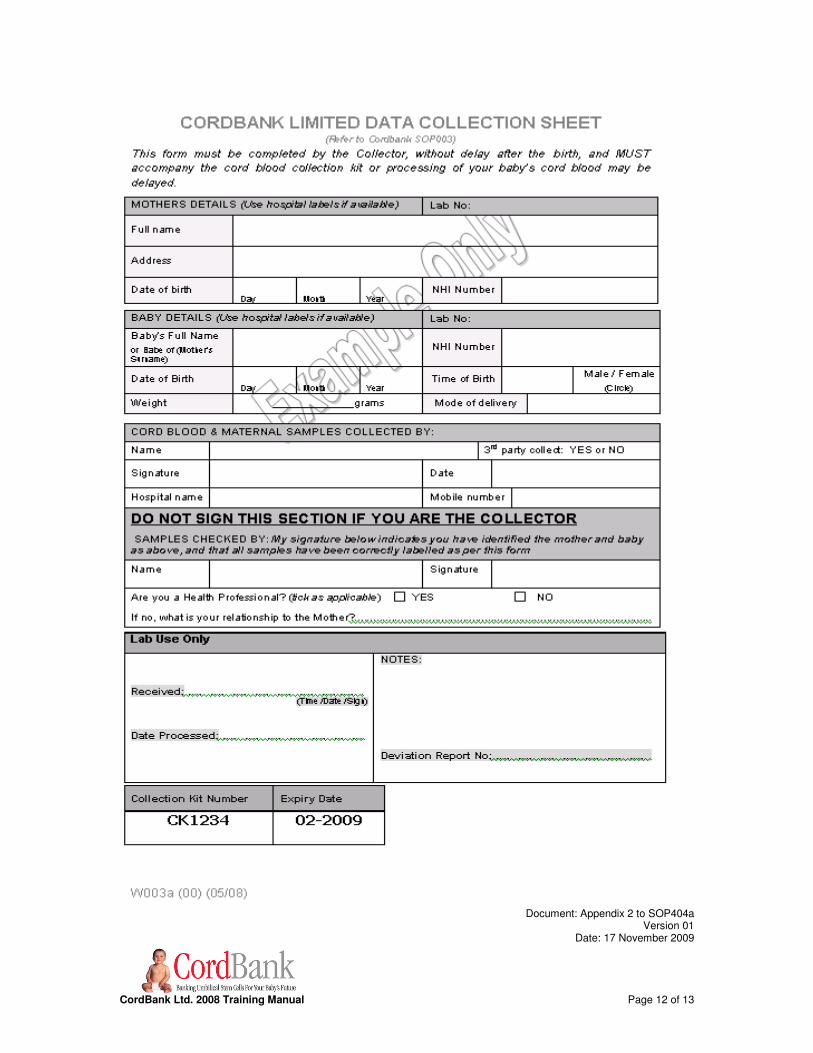
Biopouch. 20. Seal the Biopouch and place inside the Collection Kit. 21. Keep at room temperature. DO NOT REFRIGERATE. 22. Complete data collection sheet W003a and place inside the kit. 23. A second health professional is required to check and sign that the syringe label
details and details on the Data Collection Sheet (W003a) are correct and verify the identity of the baby from whom the cord blood was collected. If a second health professional is not available an alternative person (this could be the father or support person) could carry out this check.
24. Advise parents that the kit is now complete and ready for transport via the courier company responsible for shipping.
Document: Appendix 2 to SOP404a Version 01
Date: 17 November 2009
CordBank Ltd. 2008 Training Manual Page 11 of 13
3.6 Caesarean Sections In the case of C-section, the cord blood collection must take place after the removal of the placenta (ex-utero). The Macopharma bag itself is sterile, but the outer covering is only pasteurized. It is therefore clean, but not sterile, and can not be taken into the green zone. To perform the ex-utero collection, place the Macopharma bag lower than the placenta and cord to perform the collection. This method of collection may take approximately five minutes longer than in-utero collections. If you are doing a caesarian delivery and would rather perform an in-utero collection, CordBank can supply you with a fully sterile collection bag on request, however ex-utero collection is our general recommendation.
IMPORTANT INFORMATION FOR COLLECTORS
Background
The Doctor or Midwife is authorised to make the final decision to collect the cord blood immediately after birth. Doctors or Midwives may decide that, due to complications during the birth or immediately after, it is not in the best interests of mother or child to perform this process. The safety of mother and child must always come first. Who is authorised to collect cord blood Registered Health Care Professionals, who have been specifically trained by CordBank are authorised to collect umbilical cord blood for CordBank. This includes Doctors, Nurses, Midwives and Phlebotomists. Aseptic technique The cord blood needs to be collected using aseptic technique. This involves using sterile gloves and keeping the needle sterile during the collection process. The mother & cord venepuncture sites need to be cleaned prior to the collection of blood, using the sterile alcohol/iodine prep pads provided in the kit. Labeling It is of utmost importance that the cord blood and maternal blood samples are labeled clearly and correctly. The use of hospital labels is permitted where available. The name & signature of a second health professional, or alternative person, is required to check and sign that the syringe label details and details on the Data Collection Sheet (W003a) are completed, are correct and verify the identity of the baby from whom the cord blood was collected. Maximise volume of cord blood collected Every attempt should be made to collect as much blood as possible. It should be possible to collect between 25 - 200mL of cord blood into the bag.
Document: Appendix 2 to SOP404a Version 01
Date: 17 November 2009
CordBank Ltd. 2008 Training Manual Page 12 of 13

Document: Appendix 2 to SOP404a Version 01
Date: 17 November 2009
CordBank Ltd. 2008 Training Manual Page 13 of 13