gigabit ethernet hard drive - verbatim.com · 5. reset button. if the nas drive is having a problem...
TRANSCRIPT
Gigabit Ethernet Hard DriveUser Guide

Contents
Introduction ...................................................................................2Controls, Connectors and Indicators .................................................2
Front Panel Area ...............................................................................2Rear Panel Area ................................................................................3
About the Hard Disk ..........................................................................4Locating NAS Drive on Your Desk ......................................................5Bundled Software ..............................................................................5
Finder.exe ........................................................................................5Backup Software ..............................................................................5TorrentFlux .......................................................................................5
Connecting To Your Network ..............................................5About NAS Drive User Accounts ........................................................7Connecting The NAS Drive To Your LAN ............................................8Web-Based Administration Tool .....................................................10
Administration Login .....................................................................10Basic Settings For Initial Setup ......................................................11
NAS Drive Operation .............................................................17Sharing Files Using Windows .........................................................18
Run Dialogue ................................................................................18Browse Network Neighborhood ....................................................18Search Dialogue ...........................................................................19
Browse My Computer ...................................................................19Sharing Files Using Mac OS X .........................................................19Attaching USB Devices ...................................................................20
Attaching A Printer ........................................................................20Attaching A USB Storage Device ...................................................21
NAS Administration Reference .......................................22Users And Groups .....................................................................................24 User Management.................................................................................. 24 Group Management ..............................................................................25File And Print..............................................................................................26
File Server ................................................................................................26Share Management ................................................................................28Printer Server ...........................................................................................29
System .........................................................................................................29LAN Settings ...........................................................................................29Time Settings ..........................................................................................30Turn Off Server ........................................................................................30Information ..............................................................................................30Disk Usage...............................................................................................31Error Notification ....................................................................................31
Network Service ........................................................................................32DHCP Server ...........................................................................................32Bonjour ....................................................................................................33

iTunes Server ...........................................................................................33Media Server ...........................................................................................33TorrentFlux ...............................................................................................35
Maintenance ..............................................................................................37Disk Utility ...............................................................................................38Firmware Upgrade .................................................................................39Save Configuration .................................................................................40Restore Configuration ............................................................................40Factory Reset ...........................................................................................40Install New Service .................................................................................40
Log File ........................................................................................................41Samba Log ..............................................................................................41FTP Log ....................................................................................................42DHCP Server Log ....................................................................................42System Log ..............................................................................................42Administration Log .................................................................................42
Account Information ................................................................................42Logout .........................................................................................................42
Getting Help ...............................................................................43Limited Warranty Terms .......................................................43Rights ..............................................................................................45GNU General Public License .............................................46FCC Compliance .......................................................................53

IntroductionYour Verbatim Network Attached Storage (NAS) drive is a versatile external hard drive featuring high-performance storage with an Ethernet interface. Once your drive is connected properly to your network, you will be able to use it as you would any hard drive for storing your data and for performing data back-up functions. Before you begin to use the NAS drive there are a few important things to learn about your new product.
Controls, Connectors and IndicatorsFirst familiarize yourself with the control keys and the various connectors on the unit.
Front Panel AreaThe front panel contains only the status LED, as illustrated below.
1. The green LED will come on to indicate the power-on state. During the power down sequence, the LED will flash for about 15 seconds while the drive’s internal software shuts down in an orderly fashion. The LED will then turn off to indicate that the drive is
32
1
1 42 53 6
32
now fully turned off.
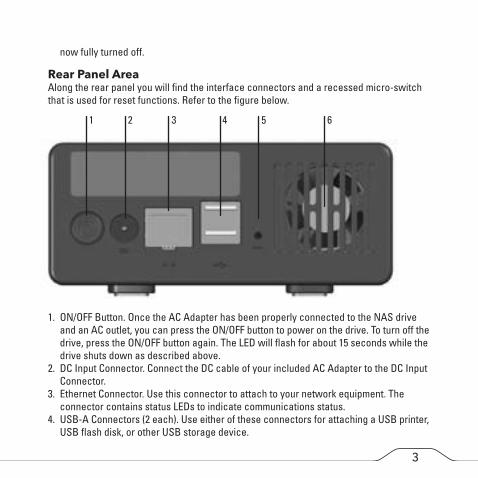
Rear Panel AreaAlong the rear panel you will find the interface connectors and a recessed micro-switch that is used for reset functions. Refer to the figure below.
1. ON/OFF Button. Once the AC Adapter has been properly connected to the NAS drive and an AC outlet, you can press the ON/OFF button to power on the drive. To turn off the drive, press the ON/OFF button again. The LED will flash for about 15 seconds while the drive shuts down as described above.2. DC Input Connector. Connect the DC cable of your included AC Adapter to the DC Input Connector.3. Ethernet Connector. Use this connector to attach to your network equipment. The connector contains status LEDs to indicate communications status. 4. USB-A Connectors (2 each). Use either of these connectors for attaching a USB printer, USB flash disk, or other USB storage device.
5. Reset Button. If the NAS drive is having a problem connecting to the local area network (LAN) or appears to be hung, press the reset button momentarily using the end of a paper clip. This will cause the unit to reset, similar to rebooting your PC. If the problem persists, or if you are unsure of current settings (such as forgetting your administration password), press and hold in the Reset button for 5 seconds. This will restore the factory default settings.6. Fan. The fan is designed to turn on for added cooling whenever the internal temperature rises above the thermal set point. To allow for adequate air flow take care not to block the air vents. Since the spinning disk will generate heat even when no data is being transferred, you can help to prevent the fan from remaining on needlessly by shortening the disk spin-down time (see later under NAS Administration Reference / Advanced / Maintenance / Disk Utility).
About the Hard DiskThe NAS drive internal hard disk comes pre-formatted in EXT2 format for immediate use for network storage.
Note: Capacity dependent on model. 1 MB = 1,000,000 bytes/1 GB = 1,000,000,000 bytes/1 TB = 1,000,000,000,000 bytes. Some capacity used for pre-loaded software, formatting and other functions, and thus is not available for data storage. As a result, and due to differing calculation methods, your operating systems may report as fewer megabytes/gigabytes/terabytes.
Your product’s hard drive is a complex electronic storage system and should be handled with care, as you might treat a sensitive portable computer or other state-of-the-art consumer electronics product. Do not subject it to shock, high temperatures, or strong magnetic fields.
To extend the useful life of your NAS drive, turn the unit OFF when not in use.
54
Locating NAS Drive on Your DeskPlace the NAS drive on a sturdy desk or table that is free from clutter that could block airflow around the unit.
Bundled SoftwareThe included CD-ROM contains copies of the User Guide, as well as three software applications: 1) Finder.exe, 2) Nero backup software and 3) TorrentFlux.
Finder.exeThis is a Windows application that can locate all Verbatim NAS drives on your LAN and display the corresponding IP address of each drive. To run this application, copy the Finder.exe file to your client Windows computer and double-click on the file to launch it.
Backup SoftwareNero backup software is included on CD-ROM. To install this application on one of your client Windows computers, open the Nero folder on the CD and then double click the setupx file to start installation. The Nero Installation window will appear. Follow the setup wizard to install the software. To backup files to your NAS drive using Nero, you must first assign a drive letter to your destination folder, as described later under NAS Drive Operation / Sharing files using Windows / Browse My Computer.
TorrentFluxTorrentFlux is an implementation of the BitTorrent protocol. Installation of this optional network service is described later in NAS Administration Reference / Advanced / Maintenance / Install New Service.
Connecting To Your NetworkInstalling the NAS drive requires that you have an available Ethernet port on a router or switch. Use the supplied CAT-6 Ethernet cable to connect your NAS drive to your LAN.
54
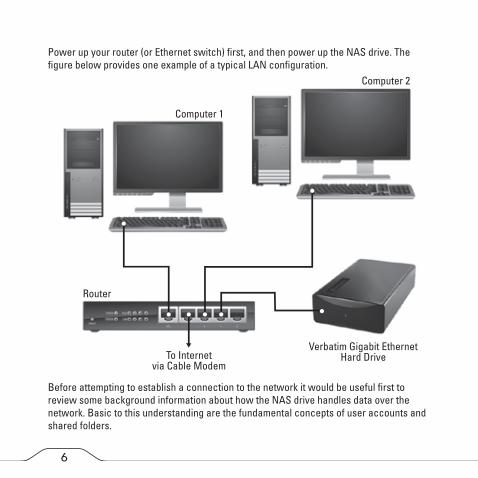
Power up your router (or Ethernet switch) first, and then power up the NAS drive. The figure below provides one example of a typical LAN configuration.
Before attempting to establish a connection to the network it would be useful first to review some background information about how the NAS drive handles data over the network. Basic to this understanding are the fundamental concepts of user accounts and shared folders.
76
Computer 1
Computer 2
Router
To Internetvia Cable Modem
Verbatim Gigabit Ethernet Hard Drive
About NAS Drive User AccountsThe NAS drive keeps track of data stored by its network users by managing the data’s destination folder (also referred to herein as a “shared folder” or simply a “share”). Furthermore, the NAS drive must keep track of who may read from, and write to, each folder. It does this by setting up user accounts and groups. A group is a collection of specific user accounts. When you assign access privileges to a new share you have the option of either making assignments for individual user accounts, or for an entire group of users at once by referring to the group’s name.
The default factory settings provide for two pre-defined user accounts, each with their own unique properties. These user accounts are:
• admin• guest-share
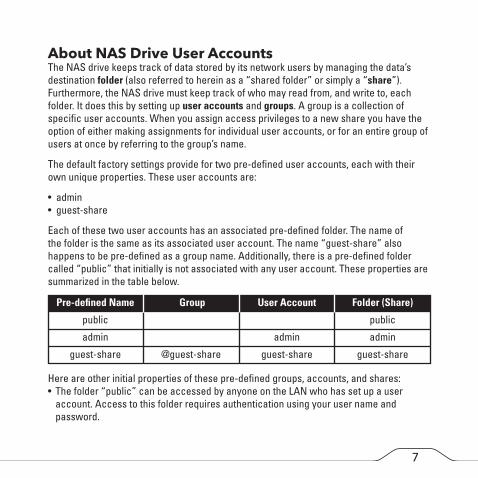
Each of these two user accounts has an associated pre-defined folder. The name of the folder is the same as its associated user account. The name “guest-share” also happens to be pre-defined as a group name. Additionally, there is a pre-defined folder called “public” that initially is not associated with any user account. These properties are summarized in the table below.
Here are other initial properties of these pre-defined groups, accounts, and shares:• The folder “public” can be accessed by anyone on the LAN who has set up a user account. Access to this folder requires authentication using your user name and password.
76
Pre-defined Name Group User Account Folder (Share)
public public
admin admin admin
guest-share @guest-share guest-share guest-share
• The folder “guest-share” can be accessed by anyone on the LAN, even if they have not set up a user account. Access to this folder does not require entering a user name and password. This folder can also be accessed by anonymous FTP.• The group @guest-share contains two members, which are user “admin” and user “guest-share”.• The folder “admin” is a private folder for user “admin”. This means only user “admin” can access this folder.
By using the web-based administration tool you can modify these initial properties.
Before can you can begin storing data (other than as user “admin” or as an anonymous user to the guest-share folder), you must use the web-based administration tool to setup a new user account that defines your User Name and Password. Furthermore, you have the option to define other properties for your user account. For example, each user can optionally be given their own private folder, which is automatically assigned the same name as that user’s User Name. A user can also be given read-only-privileges, or read/write-privileges, to other folders on the drive.
Connecting the NAS Drive to Your LANNow that you have some understanding of user accounts, you are ready to connect your NAS drive to the LAN. Follow these steps. 1. Ensure that your LAN equipment is powered on and that the LAN is operating properly. 2. We recommended that you follow the directions of your LAN equipment to enable a Dynamic Host Configuration Protocol (DHCP) server. This may be referenced in your equipment’s documentation as “Assign IP addresses automatically”. 3. Since you will administer the NAS drive settings using a web browser on your PC or Mac, ensure that this PC or Mac is powered on and connected to the LAN. 4. Connect the included CAT-6 Ethernet cable from the Ethernet port on the NAS drive to an Ethernet switch (100 Base-T or 1000 Base-T), or a wired or wireless router. Make sure that the NAS drive and the client computer are on the same subnet
98
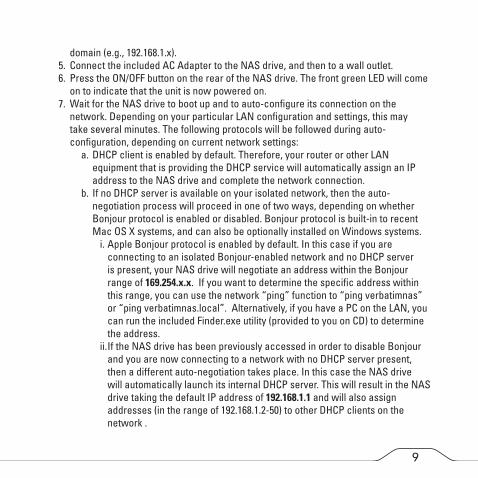
domain (e.g., 192.168.1.x). 5. Connect the included AC Adapter to the NAS drive, and then to a wall outlet. 6. Press the ON/OFF button on the rear of the NAS drive. The front green LED will come on to indicate that the unit is now powered on. 7. Wait for the NAS drive to boot up and to auto-configure its connection on the network. Depending on your particular LAN configuration and settings, this may take several minutes. The following protocols will be followed during auto- configuration, depending on current network settings: a. DHCP client is enabled by default. Therefore, your router or other LAN equipment that is providing the DHCP service will automatically assign an IP address to the NAS drive and complete the network connection. b. If no DHCP server is available on your isolated network, then the auto- negotiation process will proceed in one of two ways, depending on whether Bonjour protocol is enabled or disabled. Bonjour protocol is built-in to recent Mac OS X systems, and can also be optionally installed on Windows systems. i. Apple Bonjour protocol is enabled by default. In this case if you are connecting to an isolated Bonjour-enabled network and no DHCP server is present, your NAS drive will negotiate an address within the Bonjour range of 169.254.x.x. If you want to determine the specific address within this range, you can use the network “ping” function to “ping verbatimnas” or “ping verbatimnas.local”. Alternatively, if you have a PC on the LAN, you can run the included Finder.exe utility (provided to you on CD) to determine the address. ii. If the NAS drive has been previously accessed in order to disable Bonjour and you are now connecting to a network with no DHCP server present, then a different auto-negotiation takes place. In this case the NAS drive will automatically launch its internal DHCP server. This will result in the NAS drive taking the default IP address of 192.168.1.1 and will also assign addresses (in the range of 192.168.1.2-50) to other DHCP clients on the network .
98

1110
8. After successfully connecting to your network you will be able to see the NAS drive on your network. Its default name is “verbatimnas” and it will be located in the network workgroup named “Workgroup”. In Windows go to My Network Places/ Entire Network / Microsoft Windows Network / Workgroup, or in Mac OS X go to Finder / Network / Workgroup. You can open the device to see the following default folders: a. admin b. guest-share c. publicThough you are now ready to begin storing data on your drive, at this point you have only the two default user accounts set up. To set up other user accounts, and to configure other basic system settings, you should continue setup using the web-based administration tool described in the next section.
Web-Based Administration ToolThe web-based administration tool is used to modify all internal settings of your NAS drive. It is accessed using your computer’s web browser (such as Internet Explorer, Safari or Netscape). To access the administration tool, your PC or Mac should be on the same subnet as the NAS drive.
Administration LoginIn most cases you need only to enter the default hostname (i.e., “//verbatimnas” for Windows, or “//verbatimnas.local” for Bonjour) in your browser’s address window to access the administration tool. If for some reason the default hostname was not assigned to the NAS drive’s IP address during auto-configuration, then you can alternatively enter the NAS drive’s IP address into the browser’s address window.
As described previously, your router or other network equipment will have assigned the IP address automatically, or the drive will have taken one of its default addresses (either a Bonjour address 169.254.x.x or the non-Bonjour address 192.168.1.1). If your router
1110
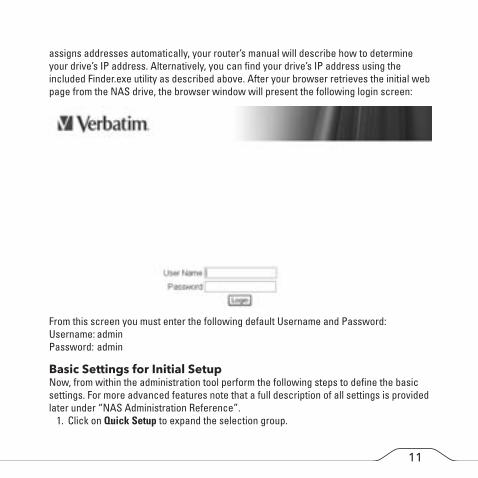
assigns addresses automatically, your router’s manual will describe how to determine your drive’s IP address. Alternatively, you can find your drive’s IP address using the included Finder.exe utility as described above. After your browser retrieves the initial web page from the NAS drive, the browser window will present the following login screen:
From this screen you must enter the following default Username and Password:Username: adminPassword: admin
Basic Settings for Initial SetupNow, from within the administration tool perform the following steps to define the basic settings. For more advanced features note that a full description of all settings is provided later under “NAS Administration Reference”. 1. Click on Quick Setup to expand the selection group.
1312
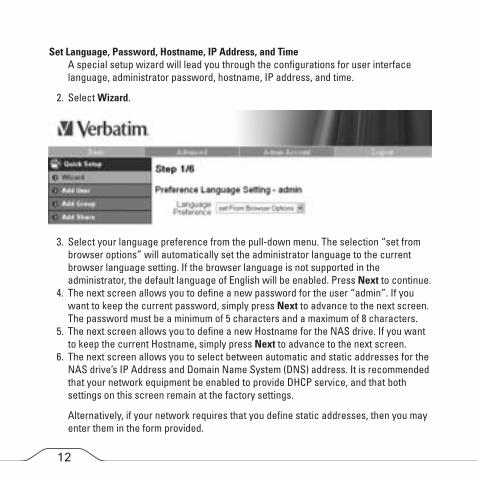
Set Language, Password, Hostname, IP Address, and Time A special setup wizard will lead you through the configurations for user interface language, administrator password, hostname, IP address, and time.
2. Select Wizard.
3. Select your language preference from the pull-down menu. The selection “set from browser options” will automatically set the administrator language to the current browser language setting. If the browser language is not supported in the administrator, the default language of English will be enabled. Press Next to continue. 4. The next screen allows you to define a new password for the user “admin”. If you want to keep the current password, simply press Next to advance to the next screen. The password must be a minimum of 5 characters and a maximum of 8 characters. 5. The next screen allows you to define a new Hostname for the NAS drive. If you want to keep the current Hostname, simply press Next to advance to the next screen. 6. The next screen allows you to select between automatic and static addresses for the NAS drive’s IP Address and Domain Name System (DNS) address. It is recommended that your network equipment be enabled to provide DHCP service, and that both settings on this screen remain at the factory settings.
Alternatively, if your network requires that you define static addresses, then you may enter them in the form provided.
1312
Press Next to continue. 7. The next screen allows you to manually set the date and time, or to use an available Network Time Protocol (NTP) server. It is useful to set the correct date and time because time stamps are used in the various status logs that are described later in this manual. After filling in your selections, press Next. 8. The settings made in the previous steps are summarized on this screen for your review. You may either go back to edit your settings, or press Complete to save the settings as shown.
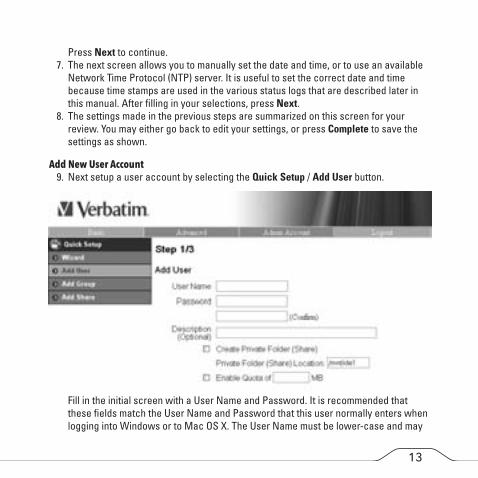
Add New User Account 9. Next setup a user account by selecting the Quick Setup / Add User button.
Fill in the initial screen with a User Name and Password. It is recommended that these fields match the User Name and Password that this user normally enters when logging into Windows or to Mac OS X. The User Name must be lower-case and may
1514
be a maximum of 20 alphanumeric characters, without spaces. The User Name must begin with an alphabetic character.
Note: If your Windows username currently contains a space character, or begins with a number, you may want to modify your Windows username slightly so that it can follow the same format required by the NAS drive. For Mac OS X user accounts, your username is automatically saved without spaces as a field called “Short Name”. In this way the “Short Name” already follows the format required by the NAS drive.
Also fill in the password. The password may be a maximum of 16 alphanumeric characters, without spaces. If you leave the password field blank, the NAS drive will accept this as a null password. This means that you will not need to fill in any password in the future when accessing the NAS drive using this username.
A description of this user may optionally be entered in the field provided.
If you want to create a private folder that only this network user can access, then check the box marked “Create Private Folder”. This folder cannot be accessed by any other user account, except for the “admin” user account. The folder name will automatically be given the same name as User Name. The path of your newly created private folder will automatically be set to /mnt/ide1.
Here you can set a maximum storage limit or quota (in megabytes) for the user. Note that the quota function is not supported if the disk has been formatted to FAT32.
When done with this form, press Next to continue.
10. The next screen allows you to assign this user to an existing group. As described above, the initial factory setting provides for the default group named “@guest- share”. When done with this form, press Next to continue. 11. The final screen for adding a user allows you to assign access privileges to currently
1514
defined shares. Of course, if you checked “Create Private Folder” in step (9), then read/write access has automatically been provided to this user’s private folder.
Though the initial factory setting provides for three default shares (admin, guest- share, and public), only “public” is available for selection for access to new user accounts.
When done with this form, press Complete.
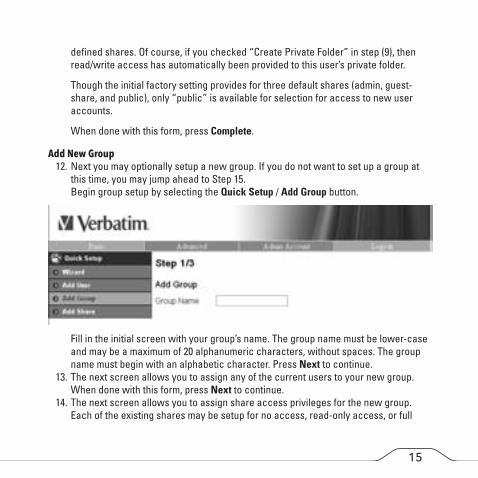
Add New Group 12. Next you may optionally setup a new group. If you do not want to set up a group at this time, you may jump ahead to Step 15. Begin group setup by selecting the Quick Setup / Add Group button.
Fill in the initial screen with your group’s name. The group name must be lower-case and may be a maximum of 20 alphanumeric characters, without spaces. The group name must begin with an alphabetic character. Press Next to continue. 13. The next screen allows you to assign any of the current users to your new group. When done with this form, press Next to continue. 14. The next screen allows you to assign share access privileges for the new group. Each of the existing shares may be setup for no access, read-only access, or full
read/write access. When done with this form, press Complete.
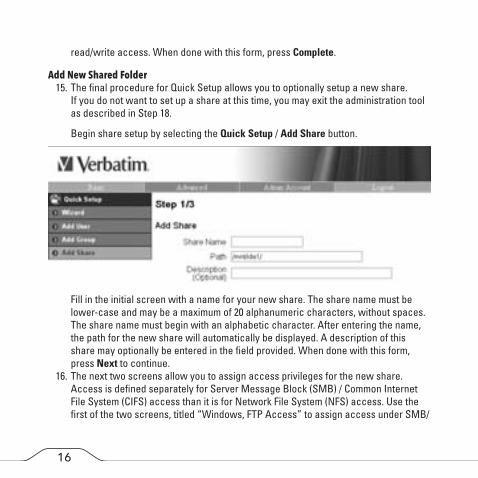
Add New Shared Folder 15. The final procedure for Quick Setup allows you to optionally setup a new share. If you do not want to set up a share at this time, you may exit the administration tool as described in Step 18.
Begin share setup by selecting the Quick Setup / Add Share button.
Fill in the initial screen with a name for your new share. The share name must be lower-case and may be a maximum of 20 alphanumeric characters, without spaces. The share name must begin with an alphabetic character. After entering the name, the path for the new share will automatically be displayed. A description of this share may optionally be entered in the field provided. When done with this form, press Next to continue. 16. The next two screens allow you to assign access privileges for the new share. Access is defined separately for Server Message Block (SMB) / Common Internet File System (CIFS) access than it is for Network File System (NFS) access. Use the first of the two screens, titled “Windows, FTP Access” to assign access under SMB/
1716
1716
CIFS.
You can assign read-write access for all users and groups by checking the box marked “Allow for all”. Alternatively, you can assign no access, read-only access, or read-write access privileges individually for each user and group. Note that group names in the list provided are denoted with the “@” character as the first character in the name.
When done with this form, press Next to continue with assignment of NFS access privileges.
17. The next screen is for NFS access. It will be of interest primarily if you plan to operate Linux machines on your LAN and want to use NFS protocol for file sharing. To enable NFS access to this share from all users, you can check the box marked “Allow for all”. If this box is not checked then you may individually assign NFS access from specific IP addresses, or from specific subnets. When done with this form, press Complete. 18. You have now completed the Basic setup. You may either return to Step 9 to add additional user accounts, groups or shares, continue to set more advanced features as described under “NAS Administration Reference”, or press Logout to leave the administration tool and begin using the NAS drive to store and share your data.
NAS Drive OperationOnce the NAS drive is connected to your network and has been configured for your network environment, it can be accessed from any computer within the same subnet on your LAN. Furthermore, more advanced users may choose to configure name servers (such as WIN servers or DNS servers) in order to access the drive from a different subnet. You will be able to: • Drag and drop files to NAS drive

1918
• Copy and paste data to NAS drive • Make and delete folders • Share files and folders • Back-up your data
How you access the drive will depend on your computer’s operating system. A brief overview for accessing files for both Windows and Mac OS X is provided next. You should consult your computer’s documentation for more detailed explanations of file sharing using your specific operating system.
Sharing files using WindowsThe NAS drive supports Microsoft Common Internet File System (CIFS), also known as Server Message Block (SMB) protocol. The SMB protocol is implemented on the NAS drive using the popular Samba software. Any PC running Windows 2000, Windows XP, or Windows Vista can access shared files on the NAS drive. Once you can view the folder in My Computer or in Windows Explorer, you can drag and drop files to this folder like you can with any folder.
There are several alternative ways to view the NAS shared folders in Windows. For example, you can • Use the Run dialogue box accessed through the Start button in the system tray. • Browse through the Network Neighborhood. • Use the Search dialogue box accessed through the Start button or File Browser. • Look through devices in My Computer.
Run DialogueTo find the NAS drive using this method select Start in the system tray and select Run. In the Open: field provided enter “\\verbatimnas” and then press OK. You may alternatively enter “\\” followed by the NAS drive’s IP address and then press OK.
Browse Network NeighborhoodOpen the File Browser and double-click on Network Neighborhood or My Network
1918
Places. Browse to Workgroup to find the NAS drive shared folders.
Search DialogueSelect Start in the system tray and select Search. Use the Search dialogue to search for Computers. For the computer name to search for enter “verbatimnas” and then press Search Now to find the connected NAS drive. Double-click the NAS drive entry to connect and view its shared folders.
Browse My ComputerOpen My Computer and double-click on My Network Places. Browse to Workgroup to find the NAS drive share folders.
Once you have located the attached NAS drive’s shared folders, you can map a drive letter to a folder. [You must assign a drive letter in order to save files to the NAS drive using the bundled backup software.] To do this, right-click on the folder and select “map network drive”. Fill out the dialogue box that Windows presents (input the logical drive letter and enter the path of a network share directory) and then select Finish. Now you can log in using the Samba User Account that you created following the “Add User” dialogue. The NAS drive will show up in ‘My Computer’ under ‘Network Drives’.
Sharing files using Mac OS XA Mac running Mac OS X can access a connected NAS drive. Click on Network, open the folder “Workgroup” and locate the “verbatimnas” device. Double-click “verbatimnas” to open the connection dialogue box.
When prompted to “Select SMB/CIFS shared volume you want to connect to” use the pull-down menu to select one of the current shares. You will next be prompted to authenticate by entering your username and password. For “username” use the Mac OS “Short Name” that you used to create your account on the NAS drive.After completing authentication your shared folder will appear on your desktop. You can now drag and drop files to this folder as you can for any folder.
2120
Attaching USB DevicesYour NAS drive contains two USB-A ports on the rear panel. A USB-A port can be used to attach either a USB printer or a USB storage device, such as a flash disk. This section describes how to install and use these USB devices while the NAS drive is connected to your LAN.
Attaching a PrinterOnce your USB printer is attached and installed to the connected NAS drive, you can send print jobs to this printer from any user account. Follow these steps to attach and install your USB printer: 1. Attach the USB cable from your USB printer to one of the USB-A connectors on the rear panel of the NAS drive. 2. Power on the printer. 3. The Print Server setting within the web-based administration tool is enabled as the factory default setting. If it has been previously disabled for any reason, enter the administration tool now and check the box labeled Enable under Advanced / File and Print / Printer Server. You may also use this opportunity to enter a description for your printer.
From this point, you must follow the instructions of your computer’s operating system to ensure that the printer is recognized and that the proper printer driver is installed. For reference, the following additional steps apply for Windows 2000, Windows XP and Windows Vista.
4. From your file browser or network places, open the verbatimnas folder and locate the shared printer, which by default will have the name “lp”. 5. Double-click on the “lp” folder and Windows will ask you if you want to install the printer drivers, click “Yes”. 6. The “Select Printer” window will open and prompt you to select your printer brand name, model name and number. After your printer model has been selected, the printer drivers will be installed on your computer. If you cannot find your printer in the
2120
list, you can alternatively insert the driver CD-ROM from your printer manufacturer and follow the dialogue for installing a driver from CD. 7. You can verify that the verbatimnas printer has been installed by going to Advanced/ Printers and Faxes. Under Printers and Faxes you will see the verbatimnas printer icon.
Now your printer is ready to accept print jobs like any other printer on your system.
Attaching a USB Storage DeviceYou may also use one of the two USB-A ports for attaching another USB storage device, like a flash drive. Once your storage device is attached and installed to the connected NAS drive, you can drag and drop files to it like any other storage device.These types of USB storage devices can be attached: • Flash Drive • Hard Drive • Memory Card Reader
Follow these steps to attach and use your USB storage device: 1. Attach the USB cable from your device (or the USB connector attached to your device) to one of the USB-A connectors on the rear panel of the NAS drive. 2. If your device is self-powered, turn on the power to your device. 3. Your device should now be visible through your file browser. If it is not immediately visible it may mean that it is not formatted in a format compatible with the NAS drive. In this case you must take the additional step outlined in Step 4. 4. You must reformat the device using the administration tool before NAS drive will recognize it. BEFORE PROCEEDING, MAKE CERTAIN THAT YOU HAVE SAFELY SAVED ALL OF YOUR DEVICE’S DATA TO ANOTHER STORAGE DEVICE. Enter the administration tool and go to the screen at Advanced / Maintenance / Disk Utility. Highlight your device in the list of devices. Its Mount Point will be /mnt/USBx where x is a sequence number. Select the FAT32 Format Type in the drop-down menu.
2322
Now press the Format button. You will be prompted to confirm. Press YES to continue. After successfully reformatting your device, you can logout of the administration tool and again look for the device in your file browser.
Now you can drag and drop files to your USB storage device like any other storage device on your system. Access to the attached USB storage device is not password protected.
NAS Administration ReferenceThe web-browser-based administration tool provides full access to all configuration settings for the product when used as a NAS device. This section of the manual provides a description for the settings within each of the following main areas: • Setting up read/write access by User and by Group • Setting up File Servers, Print Servers, and Shares • System settings, such as IP Address and Date and Time • Enabling services such as DHCP, Apple Bonjour, and Media Server • Maintenance features, such as hard disk formatting and firmware updating • Enabling data logging features
The menu system of the administration tool is summarized in the following outline:
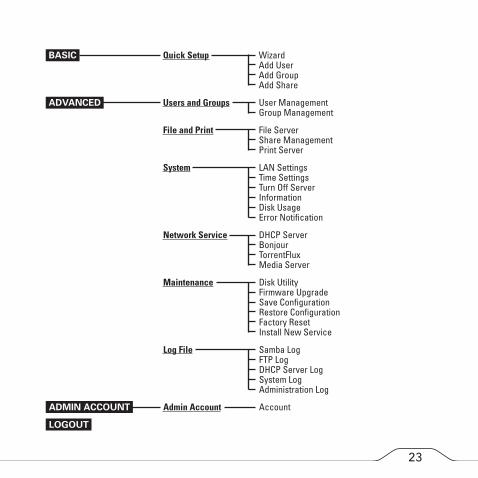
2322
BASIC Quick Setup Wizard Add User Add Group Add Share
ADVANCED Users and Groups User Management Group Management
File and Print File Server Share Management Print Server
System LAN Settings Time Settings Turn Off Server Information Disk Usage Error Notification
Network Service DHCP Server Bonjour TorrentFlux Media Server
Maintenance Disk Utility Firmware Upgrade Save Configuration Restore Configuration Factory Reset Install New Service
Log File Samba Log FTP Log DHCP Server Log System Log Administration Log
ADMIN ACCOUNT Admin Account Account
LOGOUT
2524
Because the Basic / Quick Setup functions (Wizard, Add User, Add Group, and Add Share) have been described previously under “Basic Settings for Initial Setup”, we begin this reference section with a description of the Advanced group of functions.
Users and GroupsThis group of settings provides an alternate way to create a new user account or new group, and also provides a method to modify properties of existing user accounts or groups.
User ManagementEnter the main screen of User Management by selecting Advanced / Users and Groups / User Management. Here you are presented entry fields for User Name and Password. If you want to create a new user account, fill in these fields directly. The User Name must be lower-case and may be a maximum of 20 alphanumeric characters, without spaces. The User Name must begin with an alphabetic character. See further information about User Name, Description, and the “Create Private Folder” check box under by referring back to Step 9 of “Basic Setup for Initial Settings”.
If you want to edit an existing user account, select a user from the Existing User box, and the User Name and Password fields will fill in automatically.After completing this form, press Save to save the changes you have made for this user.
If you want to delete an existing user, first highlight that user’s name in the Existing User box, and then press the Delete User button.
If you want to edit the group assignment properties of a current user, first highlight that user’s name in the Existing User box, and then press the Groups button. If you have created a new user account and want to assign this user to one or more existing groups, then after pressing Save as described above, press the Groups button to proceed to the next screen.
The Groups screen presents a list of the selected user’s assigned groups in the box on
2524
the left. The list of groups in the right box includes groups for which the user is not a member. By selecting group names and pressing either the Add or Remove button you can reassign the user to various existing groups. When done with your assignments, press Save to save your changes.
Note that if you are using the User Management dialogue to create a new user, there may be other properties that you want to set for this user. For example, after creating a new user through Advanced / User Management, share access for that user can be set by leaving User Management and going to File and Print / Share Management. This dialogue is explained later in this reference section.
Group ManagementAs explained earlier, a group is a collection of user accounts. When you assign access privileges to a new share you have the option of making assignments for an entire group of users at once by referring to the group’s name. Enter the main screen of Group Management by selecting Advanced / Users and Groups / Group Management. Here you are presented an entry field for Group Name. If you want to create a new group, fill in this field directly. The Group Name must be lower-case and may be a maximum of 20 alphanumeric characters, without spaces. The Group Name must begin with an alphabetic character.If you want to edit an existing group, select a group from the Existing Groups box, and the Group Name field will fill in automatically.
After completing this form, press Save to save the changes you have made for this group.
If you want to delete an existing group, first highlight that group’s name in the Existing Groups box, and then press the Delete Group button.
If you want to edit the member list of a current group, first highlight that group’s name in the Existing Groups box, and then press the Members button. If you have created a new group and want to assign one or more existing users to this group, then after pressing Save as described above, press the Members button to proceed to the next screen.
2726
The Members screen presents a list of the selected group’s assigned members in the box on the left. The users listed in the right box are not currently members of the group. By selecting user names and pressing either the Add or Remove button you can reassign various users to the group. When done with your assignments, press Save to save your changes.
Note that if you are using the Group Management dialogue to create a new group, there may be other properties that you want to set for this group. For example, after creating a new group through Advanced / Group Management, share access for that group can be set by leaving Group Management and going to File and Print / Share Management. This dialogue is explained later in this reference section.
File and PrintThis group of settings allows for naming the Windows Workgroup, enabling certain server protocols (such as FTP, NFS, and print server), as well as providing full control over the creation and management of folders (shares) on the drive.
File ServerEnter the main screen of File Server Setting by selecting Advanced / File and Print / File Server. This screen presents options for Windows Workgroup and Windows Internet Naming Service (WINS), for enabling File Transfer Protocol (FTP), and Network File System (NFS) server.
Each subgroup of settings is described below. After completing the form you must press Save to save your changes.
Windows SettingWith these settings you can enable or disable the NETBEUI transport protocol, which is required for SMB/CIFS file sharing in Windows. For example, for shared folders to be visible in “My Network Places”, this protocol needs to be running. It is enabled by default.
When Windows Setting is enabled, you can modify the Windows Workgroup name and
2726
description. If a WINS server is available, you may optionally fill in its IP address.
FTP Server SettingYou can enable or disable the FTP server support. If enabled, you can enter the port number you will use for FTP (default is port 21).
Once FTP is enabled, you can remotely login to the NAS drive via FTP using your username and password. You will then have FTP access to those folders for which you have access privileges.
If you login to FTP anonymously and Guest Access is enabled (see below) you will access the guest-share folder.
In order to reach the FTP server through the WAN, a public IP address should be assigned to the NAS, or alternatively you can configure a Network Address Translation (NAT) router to map a public IP address to the NAS drive’s private IP address on the LAN.
NFS Server SettingThe Network File System (NFS) was developed to allow computers to mount a disk volume on a remote computer as if it were on a local hard drive. You can enable or disable NFS Server support.
If you have only Windows PCs on your home network and have no pressing reason to use NFS support to share files, then you can normally leave this box unchecked in order to free up system resources for other servers.
NFS and Samba perform similar functions for file sharing. The main difference is that Windows PCs have Samba-compatible clients and servers as part of their default network support. Conversely, UNIX systems usually come with NFS by default, with Samba being used to provide file sharing with Windows PCs.
Note that the NAS drive has Samba enabled at all times.

2928
Guest Access SettingWhen Guess Access is enabled, anyone on the LAN can access the “guest-share” folder, even if they have not set up a user account. Here you can also optionally set a storage quota (in megabytes), provided that the disk has not been formatted to FAT32, which does not support the quota function.
Also, when Guest Access is enabled, you can access the guest-share folder via FTP by logging into FTP anonymously. When Guess Access is disabled, anonymous FTP is not permitted.
Guest Access is enabled by default.
Share ManagementEnter the main screen of Share Management by selecting Advanced / File and Print / Share Management. Here you are presented entry fields for Share Name and Share Path. If you want to create a new share, fill in these fields directly. The Share Name must be lower-case and may be a maximum of 20 alphanumeric characters, without spaces. The Share Name must begin with an alphabetic character.
A description of this share may optionally be entered in the field provided.If you want to edit an existing share, select a share from the Existing Shares box, and the Share Name, Path, and Description fields will fill in automatically.
After completing this form, press Save to save the changes you have made for this share.
If you want to delete an existing share, first highlight that share name in the Existing Shares box, and then press the Delete Share button.
Once you have highlighted an existing share, or have created and saved a new share, you will want to assign access privileges for that share. Access is defined separately for SMB/CIFS access than it is for NFS access.
To assign SMB/CIFS access privileges for current share, press the Windows, FTP Access
2928
button. To assign NFS access privileges, press the NFS Access button.
Using the screen for SMB/CIFS Access (Windows, FTP Access) you can assign read-write access for all users and groups by checking the box marked “Allow for all”. Alternatively, you can assign no access, read-only access, or read-write access privileges individually for each user and group. When done with this form, press Save to save your changes.
Using the screen for NFS Access you can assign read-write access for all users and groups by checking the box marked “Allow for all”. Alternatively, you can assign access to individual computers by entering the client computer’s IP addresses or a subnet range. When done with this form, press Save to save your changes.
Printer ServerEnter this screen by selecting Advanced / File and Print / Printer Server. Here you may enable or disable the print server function. It is enabled as the factory default. If a printer is attached to one of the USB-A ports as described previously under “Attaching a Printer”, its name will be shown on this screen. You may optionally fill in a description for your printer. When done with this form, press Save to save your changes.
SystemThe System group of settings provides control for IP addressing, date and time settings, control of error notification services, and also displays basic information about the product and its disk usage.
LAN SettingsEnter this screen by selecting Advanced / System / LAN Settings. The top entry field shows the current hostname (factory default is “verbatimnas”). To change the hostname, type in a new name.
Next are IP Address settings. You will normally leave these in the factory default condition, which selects “Obtain IP Address automatically” and “Obtain DNS Server
3130
Address automatically”. With these selections enabled, the NAS drive will act as a DHCP client and attempt to retrieve its IP Address and its DNS Server Address from the DHCP server active on your LAN.
Under some LAN environments you will need to enter fixed addresses in the form provided.
The bottom of this screen displays the Media Access Control (MAC) address of the product.
When done with this form, press Save to save your settings.
Time SettingsEnter this screen by selecting Advanced / System / Time Settings. You may manually enter the date, time, and time zone, or alternatively select a Network Time Protocol (NTP) server available on your LAN. When done with this form, press Save to save your changes.
The Time of Day Clock uses a battery to keep the clock running even while the NAS drive is powered off.
Turn Off ServerIf you have a need to restart or turn off your file server, you may do so using the buttons available through Advanced / System / Turn Off Server. This is a convenient feature if your administration computer is located far away from the NAS drive. Otherwise, you can simply power off the NAS drive to turn off the server.
InformationBasic information about your system, such as the firmware version number and IP address, can be displayed by selecting Advanced / System / Information. There are no user settings on this screen.

3130
Disk UsageBasic information about your hard disk, such as total and free space, can be displayed by selecting Advanced / System / Disk Usage. If you have a USB storage device connected to one of your USB-A ports as described previously under “Attaching a USB Storage Device”, then you will also see information about this device on the screen.
Error NotificationThe NAS drive features a range of features to monitor product status and to report errors. To enable and setup these features, select the screen at Advanced / System / Error Notification. These settings are grouped into four sections, as described below. After completing this form, press Save to save your changes.
Monitoring Services Here you may select which of the following four functions you would like to monitor: • Disk Usage. A message will be generated when storage use reaches approximately 90% of total capacity. • Windows File Sharing Server. A message will be generated as a result of an error detected with the Samba protocol. • FTP Server. A message will be generated as a result of a detected FTP error. • DHCP Server. A message will be generated as a result of an error detected with the DHCP Server.
Check Interval Enter how frequently you would like functions to be checked. The options are hourly or daily.
E-mail Notification NAS drive has the capability to send you an e-mail message containing status information for the functions being monitored. To enable this feature, check the box marked “Enable” and fill in the form provided with the IP address of the mail server that will process your automatic e-mail notices. Also fill in up to five (5) destination mail
3332
addresses for these e-mail notices.
Pop-Up Notification In addition to e-mail notification, the product has the capability to use the Windows Messenger service to display a pop-up message on your computer screen. To enable this feature, check the box marked “Enable” and fill in the form provided with the hostnames of up to five (5) computers that will receive these pop-up notices. This feature requires that your computer’s Messenger service is enabled and running, and that your network administrator has not blocked the service. Pop-Up notification is not supported under Vista or Windows 7.
Network ServiceThe Network Service group of settings provides control over the built-in DHCP server, Bonjour protocol, and Media Server. Additionally, if another service has been installed using the “Install New Service” feature, the menu for this installed service will be shown here.
DHCP ServerMost LAN environments will already have a Dynamic Host Configuration Protocol (DHCP) service running to automatically issue IP addresses for attached devices. For example, your home router equipment will likely provide this service. In the rare case that your equipment does not provide this service, the NAS drive can run its built-in DHCP Server. To access the main screen for DHCP Server enter Advanced / Network Service / DHCP Server.
To enable the DHCP Server, check the box marked “Enable Server”. It is disabled by factory default setting.
A form is provided to optionally control the way addresses will be issued to clients from the NAS drive’s DHCP Server. You may also set the maximum lease duration from the pull-down menu. When done with this form, press Save to save your changes.
3332
If your LAN contains some equipment with fixed IP addresses that you would like the server to avoid when issuing new addresses, you can define these static IP addresses and MAC addresses on the screen accessed by pressing the Static IP button at the bottom of the page. Be sure and save any changes you would like to make when entering static IP addresses.
After the DHCP Server has been running on your LAN, you can periodically check back to this screen and review the addresses that have been issued. To view the address list, press the DHCP Lease List button at the bottom of the page.
BonjourBonjour is Apple’s multi-platform, zero-configuration networking solution. Bonjour lets you create an instant network of computers and smart devices just by connecting them to each other.
Bonjour protocol may be enabled or disabled by selecting the screen at Advanced / Network Service / Bonjour. The factory default setting is enabled. Press Save to save any change to this screen.
iTunes ServerOn this same page you can enable the built-in iTunes Server. Bonjour must be enabled in order to use the iTunes Server. The iTunes Server will allow the client computer to search for and to play music that has been stored on the NAS drive in the /public/music folder. You can use Samba or FTP to copy your music files to this location. You can also use iTunes to download music from the Apple iTunes web site. iTunes is disabled by default.
Media ServerMedia Server (provided by TwonkyMedia) enables you to share your music, pictures and videos with compatible client devices attached to your LAN. Media Server (also known as UPnP AV) protocol may be enabled or disabled by selecting the screen at Advanced
/ Network Service / Media Server. The factory default setting is disabled. Press Save to save any change to this screen.
Only the administrator can access this menu option.
The ports used by the server include UDP ports 1030, 1900, 9080 and the first free TCP port above 9000.
The server supports the following content formats in accordance with the corresponding DLNA 1.5 media profiles: • Audio: LPCM, MP3, WMA, • Images: JPEG • Video: WMV, MPEG2
The server also supports the following additional formats (listed by file extension): • Audio: M4A, M4B, MP4, 3GP, WAV, OGG, FLAC, AAC, MP2, AC3, MPA, MP1, AIF, ASF • Images: PNG, TIF, TIFF, BMP, GIF • Video: MP1, MPG, SPTS, MP4, AVI, VOB, DivX, 3GP, VDR, MPE, DVR-MS, Xvid, M1V, M4V, MOV, MPV, MKV, FLV, MTS • Playlists: M3U, M3U8, PLS, WPL
Once Media Server has been enabled, an additional button is presented that allows you to link to the TwonkyMedia Server user interface in a new browser window. This user interface gives you full access to all Media Server settings. The menu tree of the user interface is summarized below:
Home / Server Status
Basic Setup First Steps Language Server Name Navigation Tree
3534
3534
Sharing Content Locations Rescan in x minutes Clients / Security Internet Radio
Advanced Setup External applications Naming Music Tree Photo Tree Video Tree Network Miscellaneous
Support Maintenance FAQFor more information about the TwonkyMedia Server, refer to additional documentation on the CD-ROM.
TorrentFluxTorrentFlux is an open-source implementation of the BitTorrent protocol, originally written by Bram Cohen. This peer-to-peer file transfer protocol is very efficient at transferring large data files.
TorrentFlux protocol may be enabled or disabled by selecting the screen at Advanced / Network Service / TorrentFlux. The factory default setting is disabled. Press Save to save any change to this screen.
Only the administrator can access TorrentFlux features.
Warning: Verbatim expressly does not encourage or condone the use of this software for illegal activities, such as downloading and/or sharing copyrighted content. The use of this software for illegal purposes can result in serious legal consequences for those who engage in it.
Note that the destination folder for the torrent file is initially set to /mnt/ide1/public
This protocol requires access to certain ports for proper operation. For this reason, ensure that your router or firewall or ISP does not block port 8080 or the default port range of 49160-49300.
Once TorrentFlux has been enabled an additional button is presented that allows you to link to the TorrentFlux user interface in a new browser window. This user interface provides for full access to the various features and settings for this application. For example, you can • Enter the path and name of the seed file into the “Open Torrent File” dialogue box. Optionally, you can browse to the torrent file location using the Browse Button. • Set the maximum bandwidth (kilobytes/s) for download • Set the maximum bandwidth (kilobytes/s) for upload • Add a new seed to the system, using the Add Button • Start a download job, using the Start Button • Stop a download job, using the Stop Button • Delete a job, using the Delete Button • Refresh job status for all jobs, using the Refresh Button
The menu tree of the user interface is summarized below:
Home Torrent File Information: Specify Torrent for Upload Specify URL for the Torrent File
3736
3736
Search for Torrents RSS Torrents Drive Space Server Stats / Who All Directory List My Directory Directory History My Profile Specify user Password Theme Language Cookie management Messages Admin Settings Queue Search Settings Activity Links RSS New User Initiate Backup
For further information, refer to the TorrentFlux web site at www.torrentflux.com .
MaintenanceThe Maintenance group of settings provides control over disk formatting and status, firmware upgrades, and ways to make global changes to all settings.

Disk UtilityEnter this screen by selecting Advanced / Maintenance / Disk Utility. You will be presented with a table that lists the status of all detected storage devices. The first device listed (“/dev/hda/”) will be the main data partition of the NAS hard drive.
If you have another storage device attached to one of the USB-A ports, its status will be displayed on the next row of the table.
From this table you have the option to perform the following actions on a specific storage device using the buttons provided:
File System FormatThe hard drive is preformatted at the factory as EXT2. If you want to change the format to EXT3 or FAT32, make your selection from the pull-down menu, and press Format.
Caution: Formatting the drive will delete all data from your drive and will reset all settings to factory default. Use extreme care to protect any previously stored data before reformatting your drive. Note that the FAT32 format does not support user disk quotas. Furthermore, with EXT2 or EXT3, the drive provides these incremental benefits over FAT32: • Faster data throughput • Ability to allocate user storage quotas • Disk encryption is supported
As mentioned previously, you can always use the passwords associated with your user accounts as one way to safeguard your data from others. To provide an additional level of data security you may optionally choose to enable encryption at the time you format your hard drive. To enable data encryption (available for EXT2 or EXT3 only), check the Encrypt box before you initiate formatting. Once the drive has been formatted with encryption enabled, all future data saved on the drive will be encrypted using the 128-bit loop AES algorithm. Please consider carefully before selecting this feature, because
3938

3938
the encryption/unencryption process results in slower performance. Transfer rates for encryption may reach only 20-30% of what you will achieve using an unencrypted drive. The factory default format is un-encrypted.
Regarding auxiliary storage devices attached to either of your USB-A ports, you may find that you need to reformat your attached device to FAT32 using Disk Utility before your device will mount properly using the NAS drive.
ScanPress the Scan button if you would like to scan your disk for errors. This operation can take a very long time to complete.
UnmountPress the Unmount button if you would like to unmount the auxiliary storage device. This button is disabled for the primary hard disk.
DetailPress the Detail button in order to view a detailed status report for your drive.Also, in case you have made a recent change to a storage device, you can press the Refresh button at the bottom of the table to refresh the table with the most current status.
Finally, the field at the bottom of the Disk Utility screen allows you to set an automatic spin-down time for the hard drive. By spinning down the drive when not in use, you can conserve power, extend the life of the drive, and lower the standby operating temperature (which in turn prevents the cooling fan from running needlessly). The default setting is 30 minutes. Press Save to save your change.
Firmware UpgradeIf a more recent version of the NAS drive’s internal firmware is available, you will want to download and install it. The most recent firmware version may have improved performance or added features that could give you benefits not present in your current version.
Enter this screen by selecting Advanced / Maintenance / Firmware Upgrade. Make a note of your current version number, which is displayed at the top of this screen. Then visit Verbatim’s Technical Support web site (refer to the Getting Help section later in this manual) to check if a more recent version is available. If so, follow the download instructions provided on the site.
Once the upgrade file is available on your computer, browse to it from the Firmware Upgrade screen, and then press the Start Upgrade button.
Save ConfigurationAfter you have completely configured all of the NAS drive’s settings, you may want to save the full configuration for future reference. To do this enter the Save Configuration screen by selecting Advanced / Maintenance / Save Configuration, and then press the Save button. This action will save a configuration file (named “config.tar”) to your specified location.
Restore ConfigurationAfter saving a configuration file as described above, you can later retrieve that file to restore all device settings in a single step. Enter this screen by selecting Advanced / Maintenance / Restore Configuration, and then browse to the saved configuration file and press the Restore button.
Factory ResetYou can return all of the NAS drive’s settings to their factory default state by selecting Advanced / Maintenance / Factory Reset, and pressing the Factory Reset button on this screen.
As described earlier, an alternate way to reset the device to factory settings is to press and hold in the Reset button for more than 5 seconds.
Install New ServiceThe software for most network services is included in the firmware of the NAS controller.
4140
4140
This means that the application programs are saved in the controller’s internal Flash memory. However, some network services and functions can be installed from your PC or from the supplied CD-ROM. This method allows for features to be added in the future, and also allows for a very large application to run from a protected partition of the NAS hard drive even when there is not sufficient space in the internal Flash memory.
One example is the TorrentFlux application, which is an implementation of the BitTorrent protocol. Verbatim has installed the TorrentFlux application onto the hard drive at the factory, so you can find this protocol listed under Advanced / Network Service / TorrentFlux when you power up the NAS drive for the first time. However, if you later decide to uninstall this application, or if you reformat your or hard drive, then you will need to re-install the application again from the included CD-ROM should you want to use TorrentFlux in the future.
To install TorrentFlux, select Advanced / Maintenance / Install New Service and then browse to the location of the TorrentFlux rar file on the CD-ROM. This file’s full name may look like this: torrentflux_1_14_3_2_vrb.rar
Then press “Upload” to install this application to your hard drive. This process will take several minutes to complete.
To run the new application after installation has completed, access the NAS web-based administration tool and navigate to Advanced / Network Service / TorrentFlux and select the button to link to the TorrentFlux user interface.
Log FileThe NAS drive has the ability to record event logs for various activities that occur during operation. Here you can control and display the available event logs. Each log can be individually restarted by cleaning past events and starting with a fresh log.
Samba LogTo view the log of events that have occurred during Samba file sharing, select Advanced /
4342
Log File / Samba Log.
FTP LogTo view the log of events that have occurred during FTP file transfers, select Advanced / Log File / FTP Log.
DHCP Server LogTo view the log of events that have been recorded by the NAS drive’s DHCP Server, select Advanced / Log File / DHCP Server Log.
System LogTo view the log of events that have recorded by the system monitor, select Advanced / Log File / System Log.
Administration LogTo view the log of events that have been recorded by the administration monitor, select Advanced / Log File / Administration Log.
Account InformationThe Admin Account tab provides access to certain information about the user currently logged into the web-based administration tool. Usually this will be the admin user. To view this screen select Personal Info / Admin Account / Account.
The top section provides input fields for changing the password, the administration tool’s language setting, and the optional description text.
The bottom section displays current information about disk usage and the current user’s shared folders.
When done with this form, press Save to save changes.
LogoutAfter completing all of the intended changes for your current session with the administra-
4342
tion tool, you can press the Logout button to end your session.
Getting HelpIf you are experiencing difficulty installing or using your Verbatim product, please visit the main Technical Support website at www.verbatim.com/support.
Limited Warranty TermsThe Verbatim Americas, LLC warranty obligations for this hardware product are limited to the terms set forth below:
Verbatim warrants its products to be free of defects in material and workmanship under normal use and service for a period of 3 years from the date of purchase. Verbatim’s sole obligation with respect to claims of non-conformance made within the warranty period described above shall be, at its option, to repair or replace any item of Equipment that Verbatim, in its sole discretion, determines to be defective, subject to the procedure set forth below.
Verbatim’s warranty obligations hereunder are expressly conditioned upon (i.) the Products being properly installed, used and maintained at all times by Customer;(ii.) the Products not being subject to unusual mechanical stress or unusual electrical or environmental conditions or other acts of God; (iii.) the Products not being subjected to misuse, accident or any unauthorized installation/deinstallation by Customer or other third party; (iv.) the Products not being altered or modified in an unauthorized manner, unless approved in writing or otherwise performed by Verbatim and (v.) Customer promptly installing all Product revisions that have been released for such Products by Verbatim throughout the warranty term. Verbatim does not warrant that the Products will operate in
4544
any specific combination that may be selected for use by Customer or that the operation of the Products will be uninterrupted or error free, or that all non-conformance or defects will be remedied. Additionally, Verbatim shall have no warranty obligations for any failure of the Products to conform to the applicable product specifications resulting from the combination of any Product(s) with hardware and/or software not supplied by Verbatim.If it is determined that any Product(s) reported as defective or non-conforming by Customer during the warranty period is not defective or non-conforming, Verbatim may, at its option, charge Customer for any labor provided and expenses incurred by Verbatim in connection with such determination, at Verbatim’s then current rates.
Verbatim is not liable for any damage to or loss of any programs, data, or other information stored on any media contained within the Verbatim hardware product, or any non-Verbatim product or part not covered by this warranty. Recovery or reinstallation of programs, data or other information is not covered under this Limited Warranty.Verbatim shall not be responsible for unauthorized sale or misrepresentation by unauthorized third party resellers. Verbatim warranties are not transferable with ownership. Products purchased by auction, yard sale, flea market or purchased as demo units may not be covered under Verbatim’s warranty.
THE WARRANTIES OF VERBATIM AND REMEDIES OF CUSTOMER SET FORTH IN THIS SECTION ARE EXCLUSIVE AND ARE GIVEN BY VERBATIM AND ACCEPTED BY CUSTOMER IN LIEU OF ANY AND ALL OTHER WARRANTIES, WHETHER EXPRESSED OR IMPLIED, INCLUDING WITHOUT LIMITATION, ALL WARRANTIES OF MERCHANTABILITY AND FITNESS FOR A PARTICULAR PURPOSE, ALL SUCH OTHER WARRANTIES BEING HEREBY EXPRESSLY AND UNEQUIVOCALLY DISCLAIMED BY VERBATIM AND WAIVED BY CUSTOMER TO THE EXTENT ALLOWED BY LAW (AND TO THE EXTENT NOT WAIVABLE BY LAW, ARE LIMITED TO THE TERM OF THE EXPRESS WARRANTY SET FORTH HEREIN).
VERBATIM IS NOT RESPONSIBLE FOR DIRECT, SPECIAL, INCIDENTAL OR CONSEQUENTIAL DAMAGES RESULTING FROM ANY BREACH OF WARRANTY OR CONDITION, INCLUDING ANY COSTS OF RECOVERING OR REPRODUCING ANY
4544
PROGRAM OR DATA STORED IN OR USED WITH THE VERBATIM PRODUCT. VERBATIM SPECIFICALLY DOES NOT REPRESENT THAT IT WILL BE ABLE TO REPAIR ANY PRODUCT UNDER THIS LIMITED WARRANTY OR MAKE A PRODUCT EXCHANGE WITHOUT RISK TO OR LOSS OF PROGRAMS OR DATA. THIS WARRANTY GIVES YOU SPECIFIC LEGAL RIGHTS, AND YOU MAY ALSO HAVE OTHER RIGHTS WHICH VARY FROM STATE TO STATE. FOR EXAMPLE, SOME STATES DO NOT ALLOW LIMITATIONS ON HOW LONG AN IMPLIED WARRANTY LASTS, OR THE EXCLUSION OR LIMITATION OF INCIDENTAL OR CONSEQUENTIAL DAMAGES, SO THESE RESTRICTIONS MAY NOT APPLY TO YOU.
Return Procedure:The Customer shall obtain a Return Merchandise Authorization (RMA) number from Verbatim prior to returning any Equipment to Verbatim under this warranty by contacting Technical Support (see www.verbatim.com/support). The Customer shall prepay shipping charges for Equipment returned to Verbatim for warranty service, and Verbatim shall pay freight charges for the return of the Equipment to the Customer, excluding customs duties or taxes, if any. All returns require a dated original proof of purchase and a letter explaining the problem. Before you deliver your product for warranty service it is your responsibility to backup all data, including all software programs. You will be responsible for reinstalling all data. Data recovery is not included in the warranty service and Verbatim is not responsible for data that may be lost or damaged during transit or a repair. Verbatim will not be responsible for items returned without an RMA or improperly packaged. Replacement Equipment shall be new or like new in performance and shall be warranted for the remaining duration of the warranty term of the non-conforming Equipment. All replaced Equipment shall become the property of Verbatim. Any claims of defects not made within the warranty period shall be deemed waived by Customer.
RightsCopyright ©2009 Verbatim Americas, LLC. No part of this document, with exception of the
4746
following Gnu license, may be reproduced in any form or by any means, for any purpose, without the express written permission of Verbatim Americas, LLC. All rights reserved. All other brands and product names referenced herein are property of their respective owners.
The embedded firmware for this product is provided under the terms of the Gnu General Public License.
GNU GENERAL PUBLIC LICENSEVersion 2, June 1991 Copyright (C) 1989, 1991 Free Software Foundation, Inc. 51 Franklin Street, Fifth Floor, Boston, MA 02110-1301, USA
Everyone is permitted to copy and distribute verbatim copies of this license document, but changing it is not allowed.
PreambleThe licenses for most software are designed to take away your freedom to share and change it. By contrast, the GNU General Public License is intended to guarantee your freedom to share and change free software--to make sure the software is free for all its users. This General Public License applies to most of the Free Software Foundation’s software and to any other program whose authors commit to using it. (Some other Free Software Foundation software is covered by the GNU Lesser General Public License instead.) You can apply it to your programs, too.
When we speak of free software, we are referring to freedom, not price. Our General Public Licenses are designed to make sure that you have the freedom to distribute copies of free software (and charge for this service if you wish), that you receive source code or can get it if you want it, that you can change the software or use pieces of it in new free
4746
programs; and that you know you can do these things.
To protect your rights, we need to make restrictions that forbid anyone to deny you these rights or to ask you to surrender the rights. These restrictions translate to certain responsibilities for you if you distribute copies of the software, or if you modify it.
For example, if you distribute copies of such a program, whether gratis or for a fee, you must give the recipients all the rights that you have. You must make sure that they, too, receive or can get the source code. And you must show them these terms so they know their rights.
We protect your rights with two steps: (1) copyright the software, and (2) offer you this license which gives you legal permission to copy, distribute and/or modify the software.
Also, for each author’s protection and ours, we want to make certain that everyone understands that there is no warranty for this free software. If the software is modified by someone else and passed on, we want its recipients to know that what they have is not the original, so that any problems introduced by others will not reflect on the original authors’ reputations.
Finally, any free program is threatened constantly by software patents. We wish to avoid the danger that redistributors of a free program will individually obtain patent licenses, in effect making the program proprietary. To prevent this, we have made it clear that any patent must be licensed for everyone’s free use or not licensed at all.
The precise terms and conditions for copying, distribution and modification follow.
TERMS AND CONDITIONS FOR COPYING, DISTRIBUTION AND MODIFICATION
0. This License applies to any program or other work which contains a notice placed by the copyright holder saying it may be distributed under the terms of this General Public License. The “Program”, below, refers to any such program or work, and a “work
4948
based on the Program” means either the Program or any derivative work under copyright law: that is to say, a work containing the Program or a portion of it, either verbatim or with modifications and/or translated into another language. (Hereinafter, translation is included without limitation in the term “modification”.) Each licensee is addressed as “you”.
Activities other than copying, distribution and modification are not covered by this License; they are outside its scope. The act of running the Program is not restricted, and the output from the Program is covered only if its contents constitute a work based on the Program (independent of having been made by running the Program). Whether that is true depends on what the Program does.
1. You may copy and distribute verbatim copies of the Program’s source code as you receive it, in any medium, provided that you conspicuously and appropriately publish on each copy an appropriate copyright notice and disclaimer of warranty; keep intact all the notices that refer to this License and to the absence of any warranty; and give any other recipients of the Program a copy of this License along with the Program. You may charge a fee for the physical act of transferring a copy, and you may at your option offer warranty protection in exchange for a fee.
2. You may modify your copy or copies of the Program or any portion of it, thus forming a work based on the Program, and copy and distribute such modifications or work under the terms of Section 1 above, provided that you also meet all of these conditions: a) You must cause the modified files to carry prominent notices stating that you changed the files and the date of any change. b) You must cause any work that you distribute or publish, that in whole or in part contains or is derived from the Program or any part thereof, to be licensed as a whole at no charge to all third parties under the terms of this License. c) If the modified program normally reads commands interactively when run, you must cause it, when started running for such interactive use in the most ordinary way, to print or display an announcement including an appropriate copyright notice
4948
and a notice that there is no warranty (or else, saying that you provide a warranty) and that users may redistribute the program under these conditions, and telling the user how to view a copy of this License. (Exception: if the Program itself is interactive but does not normally print such an announcement, your work based on the Program is not required to print an announcement.)
These requirements apply to the modified work as a whole. If identifiable sections of that work are not derived from the Program, and can be reasonably considered independent and separate works in themselves, then this License, and its terms, do not apply to those sections when you distribute them as separate works. But when you distribute the same sections as part of a whole which is a work based on the Program, the distribution of the whole must be on the terms of this License, whose permissions for other licensees extend to the entire whole, and thus to each and every part regardless of who wrote it.
Thus, it is not the intent of this section to claim rights or contest your rights to work written entirely by you; rather, the intent is to exercise the right to control the distribution of derivative or collective works based on the Program.
In addition, mere aggregation of another work not based on the Program with the Program (or with a work based on the Program) on a volume of a storage or distribution medium does not bring the other work under the scope of this License.
3. You may copy and distribute the Program (or a work based on it, under Section 2) in object code or executable form under the terms of Sections 1 and 2 above provided that you also do one of the following: a) Accompany it with the complete corresponding machine-readable source c ode, which must be distributed under the terms of Sections 1 and 2 above on a medium customarily used for software interchange; or, b) Accompany it with a written offer, valid for at least three years, to give any third party, for a charge no more than your cost of physically performing source
distribution, a complete machine-readable copy of the corresponding source code, to be distributed under the terms of Sections 1 and 2 above on a medium customarily used for software interchange; or, c) Accompany it with the information you received as to the offer to distribute corresponding source code. (This alternative is allowed only for noncommercial distribution and only if you received the program in object code or executable form with such an offer, in accord with Subsection b above.)
The source code for a work means the preferred form of the work for making modifications to it. For an executable work, complete source code means all the source code for all modules it contains, plus any associated interface definition files, plus the scripts used to control compilation and installation of the executable. However, as a special exception, the source code distributed need not include anything that is normally distributed (in either source or binary form) with the major components (compiler, kernel, and so on) of the operating system on which the executable runs, unless that component itself accompanies the executable.
If distribution of executable or object code is made by offering access to copy from a designated place, then offering equivalent access to copy the source code from the same place counts as distribution of the source code, even though third parties are not compelled to copy the source along with the object code.
4. You may not copy, modify, sublicense, or distribute the Program except as expressly provided under this License. Any attempt otherwise to copy, modify, sublicense or distribute the Program is void, and will automatically terminate your rights under this License. However, parties who have received copies, or rights, from you under this License will not have their licenses terminated so long as such parties remain in full compliance.
5. You are not required to accept this License, since you have not signed it. However, nothing else grants you permission to modify or distribute the Program or its derivative
5150
5150
works. These actions are prohibited by law if you do not accept this License. Therefore, by modifying or distributing the Program (or any work based on the Program), you indicate your acceptance of this License to do so, and all its terms and conditions for copying, distributing or modifying the Program or works based on it.
6. Each time you redistribute the Program (or any work based on the Program), the recipient automatically receives a license from the original licensor to copy, distribute or modify the Program subject to these terms and conditions. You may not impose any further restrictions on the recipients’ exercise of the rights granted herein. You are not responsible for enforcing compliance by third parties to this License.
7. If, as a consequence of a court judgment or allegation of patent infringement or for any other reason (not limited to patent issues), conditions are imposed on you (whether by court order, agreement or otherwise) that contradict the conditions of this License, they do not excuse you from the conditions of this License. If you cannot distribute so as to satisfy simultaneously your obligations under this License and any other pertinent obligations, then as a consequence you may not distribute the Program at all. For example, if a patent license would not permit royalty-free redistribution of the Program by all those who receive copies directly or indirectly through you, then the only way you could satisfy both it and this License would be to refrain entirely from distribution of the Program.
If any portion of this section is held invalid or unenforceable under any particular circumstance, the balance of the section is intended to apply and the section as a whole is intended to apply in other circumstances.
It is not the purpose of this section to induce you to infringe any patents or other property right claims or to contest validity of any such claims; this section has the sole purpose of protecting the integrity of the free software distribution system, which is implemented by public license practices. Many people have made generous contributions to the wide range of software distributed through that system in reliance on consistent application of that system; it is up to the author/donor to decide if he

or she is willing to distribute software through any other system and a licensee cannot impose that choice.
This section is intended to make thoroughly clear what is believed to be a consequence of the rest of this License.
8. If the distribution and/or use of the Program is restricted in certain countries either by patents or by copyrighted interfaces, the original copyright holder who places the Program under this License may add an explicit geographical distribution limitation excluding those countries, so that distribution is permitted only in or among countries not thus excluded. In such case, this License incorporates the limitation as if written in the body of this License.
9. The Free Software Foundation may publish revised and/or new versions of the General Public License from time to time. Such new versions will be similar in spirit to the present version, but may differ in detail to address new problems or concerns.
Each version is given a distinguishing version number. If the Program specifies a version number of this License which applies to it and “any later version”, you have the option of following the terms and conditions either of that version or of any later version published by the Free Software Foundation. If the Program does not specify a version number of this License, you may choose any version ever published by the Free Software Foundation.
10. If you wish to incorporate parts of the Program into other free programs whose distribution conditions are different, write to the author to ask for permission. For software which is copyrighted by the Free Software Foundation, write to the Free Software Foundation; we sometimes make exceptions for this. Our decision will be guided by the two goals of preserving the free status of all derivatives of our free software and of promoting the sharing and reuse of software generally.
NO WARRANTY
5352

5352
11. BECAUSE THE PROGRAM IS LICENSED FREE OF CHARGE, THERE IS NO WARRANTY FOR THE PROGRAM, TO THE EXTENT PERMITTED BY APPLICABLE LAW. EXCEPT WHEN OTHERWISE STATED IN WRITING THE COPYRIGHT HOLDERS AND/OR OTHER PARTIES PROVIDE THE PROGRAM “AS IS” WITHOUT WARRANTY OF ANY KIND, EITHER EXPRESSED OR IMPLIED, INCLUDING, BUT NOT LIMITED TO, THE IMPLIED WARRANTIES OF MERCHANTABILITY AND FITNESS FOR A PARTICULAR PURPOSE. THE ENTIRE RISK AS TO THE QUALITY AND PERFORMANCE OF THE PROGRAM IS WITH YOU. SHOULD THE PROGRAM PROVE DEFECTIVE, YOU ASSUME THE COST OF ALL NECESSARY SERVICING, REPAIR OR CORRECTION.
12. IN NO EVENT UNLESS REQUIRED BY APPLICABLE LAW OR AGREED TO IN WRITING WILL ANY COPYRIGHT HOLDER, OR ANY OTHER PARTY WHO MAY MODIFY AND/ OR REDISTRIBUTE THE PROGRAM AS PERMITTED ABOVE, BE LIABLE TO YOU FOR DAMAGES, INCLUDING ANY GENERAL, SPECIAL, INCIDENTAL OR CONSEQUENTIAL DAMAGES ARISING OUT OF THE USE OR INABILITY TO USE THE PROGRAM (INCLUDING BUT NOT LIMITED TO LOSS OF DATA OR DATA BEING RENDERED INACCURATE OR LOSSES SUSTAINED BY YOU OR THIRD PARTIES OR A FAILURE OF THE PROGRAM TO OPERATE WITH ANY OTHER PROGRAMS), EVEN IF SUCH HOLDER OR OTHER PARTY HAS BEEN ADVISED OF THE POSSIBILITY OF SUCH DAMAGES.
FCC ComplianceThis equipment has been tested and found to comply with the limits for a Class B digital device, pursuant to Part 15 of the FCC Rules. These limits are designed to provide reasonable protection against harmful interference in a residential installation. This equipment generates, uses and can radiate radio frequency energy and, if not installed and used in accordance with the instructions, may cause harmful interference to radio communications. However, there is no guarantee that interference will not occur in a particular installation. If this equipment does cause harmful interference to radio or
television reception, which can be determined by turning the equipment off and on, the user is encouraged to try to correct the interference by one or more of the following measures:
• Reorient or relocate the receiving antenna.• Increase the separation between the equipment and receiver.• Connect the equipment into an outlet on a circuit different from that to which the receiver is connected.• Consult the dealer or an experienced radio/TV technician for help.
5554

5554

© Verbatim Americas, LLC, 2009
RM# 173373A
Verbatim and the V logo are registered trademarks of Verbatim Americas, LLC.