getting started with sap abap erp adapter for ... - oracle · pdf fileit is recommended that...
TRANSCRIPT
Oracle® Fusion MiddlewareGetting Started with SAP ABAP ERP Adapterfor Oracle Data Integrator
12c (12.2.1.3.0)E83370-01August 2017

Oracle Fusion Middleware Getting Started with SAP ABAP ERP Adapter for Oracle Data Integrator, 12c(12.2.1.3.0)
E83370-01
Copyright © 2010, 2017, Oracle and/or its affiliates. All rights reserved.
Primary Authors: Laura Hofman, Joshua Stanley, Aslam Khan, Sonia Somasundaran
This software and related documentation are provided under a license agreement containing restrictions onuse and disclosure and are protected by intellectual property laws. Except as expressly permitted in yourlicense agreement or allowed by law, you may not use, copy, reproduce, translate, broadcast, modify,license, transmit, distribute, exhibit, perform, publish, or display any part, in any form, or by any means.Reverse engineering, disassembly, or decompilation of this software, unless required by law forinteroperability, is prohibited.
The information contained herein is subject to change without notice and is not warranted to be error-free. Ifyou find any errors, please report them to us in writing.
If this is software or related documentation that is delivered to the U.S. Government or anyone licensing it onbehalf of the U.S. Government, then the following notice is applicable:
U.S. GOVERNMENT END USERS: Oracle programs, including any operating system, integrated software,any programs installed on the hardware, and/or documentation, delivered to U.S. Government end users are"commercial computer software" pursuant to the applicable Federal Acquisition Regulation and agency-specific supplemental regulations. As such, use, duplication, disclosure, modification, and adaptation of theprograms, including any operating system, integrated software, any programs installed on the hardware,and/or documentation, shall be subject to license terms and license restrictions applicable to the programs.No other rights are granted to the U.S. Government.
This software or hardware is developed for general use in a variety of information management applications.It is not developed or intended for use in any inherently dangerous applications, including applications thatmay create a risk of personal injury. If you use this software or hardware in dangerous applications, then youshall be responsible to take all appropriate fail-safe, backup, redundancy, and other measures to ensure itssafe use. Oracle Corporation and its affiliates disclaim any liability for any damages caused by use of thissoftware or hardware in dangerous applications.
Oracle and Java are registered trademarks of Oracle and/or its affiliates. Other names may be trademarks oftheir respective owners.
Intel and Intel Xeon are trademarks or registered trademarks of Intel Corporation. All SPARC trademarks areused under license and are trademarks or registered trademarks of SPARC International, Inc. AMD, Opteron,the AMD logo, and the AMD Opteron logo are trademarks or registered trademarks of Advanced MicroDevices. UNIX is a registered trademark of The Open Group.
This software or hardware and documentation may provide access to or information about content, products,and services from third parties. Oracle Corporation and its affiliates are not responsible for and expresslydisclaim all warranties of any kind with respect to third-party content, products, and services unless otherwiseset forth in an applicable agreement between you and Oracle. Oracle Corporation and its affiliates will not beresponsible for any loss, costs, or damages incurred due to your access to or use of third-party content,products, or services, except as set forth in an applicable agreement between you and Oracle.

Contents
Preface
Audience vii
Documentation Accessibility vii
Related Documents vii
Conventions viii
1 Overview of Oracle Data Integrator SAP ERP Knowledge Modules
1.1 Overview 1-1
2 Setting Up the Environment
2.1 Before You Begin 2-1
2.1.1 System Requirements and Certification 2-1
2.1.2 Requesting ODI SAP Component Installation into the SAP System 2-2
2.1.3 Requesting FTP Server Access 2-2
2.1.4 Gathering SAP Connection Information 2-3
2.2 Validating the Shared Folder Setup 2-4
2.3 Validating the FTP Setup 2-4
2.4 Validating SAP Privileges 2-5
2.5 Validating SAP Transport Layer Name 2-6
2.6 Installing Oracle Data Integrator 2-7
2.7 Installing and Configuring the Oracle DB Target 2-7
2.8 Installing and Configuring JCo 2-7
2.9 Configuring Oracle Data Integrator 2-8
2.9.1 Add the Open Tool 2-8
3 Configuring the Topology
3.1 Configuring the File Server for SAP ABAP 3-1
3.2 Configuring the Target Data Server 3-2
3.3 Configuring the SAP Source Server 3-3
3.3.1 Configuring the Data Server 3-4
iii
3.3.2 Configuring the Logical Schema 3-5
4 Creating a New Project
4.1 Creating a New Project 4-1
5 Reverse-Engineering Data Models
5.1 Reverse-Engineering the Oracle Target 5-1
5.2 Reverse-Engineering the SAP Source Datastores 5-2
5.2.1 Creating the Data Model 5-2
5.2.2 Validating the SAP Connection 5-3
5.2.3 Starting the Reverse-Engineering Process 5-5
5.2.4 Using the SAP Metadata Browser 5-5
5.2.4.1 The Tree View 5-7
5.2.4.2 The Search Panel 5-7
5.2.5 Reverse-Engineering Without GUI 5-8
6 Creating and Running the Mapping
6.1 Creating the Mapping 6-1
6.1.1 Create the Mapping 6-1
6.1.2 Define the Source and Target Datastores 6-1
6.1.3 Define Joins between Sources 6-2
6.1.4 Create the Mappings 6-3
6.1.5 Define the Mapping Flow 6-4
6.2 Running the Mapping 6-4
6.2.1 Running the Mapping 6-5
6.2.2 Review the Mapping Execution 6-5
6.2.3 Review the Resulting Data 6-6
7 Going Further with Oracle Data Integrator
7.1 Going further with Oracle Data Integrator 7-1
A SAP ABAP ERP Required Privileges
A.1 Important points to consider A-1
A.2 Authorizations Required for RKM SAP ERP Upload A-2
A.3 Authorizations Required for RKM SAP ERP Execution A-3
A.4 Authorizations Required for LKM SAP ERP Upload A-4
iv
A.5 Authorizations Required for LKM SAP ERP Execution A-5
B SAP Stand-Alone Connection Test
B.1 SAP Stand-Alone Connection Test B-1
C Uninstalling ODI SAP Components
C.1 Updating ODI SAP Components C-1
C.2 Uninstalling ODI SAP Components C-1
v

vi
Preface
The purpose of this document is to provide you with an overview of the possibilitiesoffered by SAP ERP Knowledge Modules and how to use them in Oracle DataIntegrator.
This document provides examples to help you understand how to achieve an ETLproject with Oracle Data Integrator, loading a Data Warehouse with data from SAPsystems, while validating data quality.
This project should take approximately 90 minutes to complete. You may save yourwork in order to pause and resume at any point in the project.
It is recommended that you use Oracle Data Integrator before proceeding with thisguide. A good introduction to Oracle Data Integrator is the guide Data IntegratorGetting Started.
It is recommended that you also review the SAP ABAP chapter of ApplicationAdapters Guide for Oracle Data Integratorfor more information about the SAP ERPKMs.
AudienceThis document is intended for developers and administrators who want to use OracleData Integrator Application Adapters with SAP ERP systems using SAP JCo libraries,as a development tool for their integration processes.
Documentation AccessibilityFor information about Oracle's commitment to accessibility, visit the OracleAccessibility Program website at http://www.oracle.com/pls/topic/lookup?ctx=acc&id=docacc.
Accessible Access to Oracle Support
Oracle customers who have purchased support have access to electronic supportthrough My Oracle Support. For information, visit http://www.oracle.com/pls/topic/lookup?ctx=acc&id=info or visit http://www.oracle.com/pls/topic/lookup?ctx=acc&id=trs if you are hearing impaired.
Related DocumentsFor more information, see the following documents in Oracle Data Integrator Library.
• Release Notes for Oracle Data Integrator
• Understanding Oracle Data Integrator
vii

• Administering Oracle Data Integrator
• Developing Integration Projects with Oracle Data Integrator
• Installing and Configuring Oracle Data Integrator
• Upgrading Oracle Data Integrator
• Application Adapters Guide for Oracle Data Integrator
• Developing Knowledge Modules with Oracle Data Integrator
• Connectivity and Knowledge Modules Guide for Oracle Data IntegratorDeveloper's Guide
• Migrating From Oracle Warehouse Builder to Oracle Data Integrator
• Oracle Data Integrator Tools Reference
• Data Services Java API Reference for Oracle Data Integrator
• Open Tools Java API Reference for Oracle Data Integrator
• Getting Started with SAP ABAP BW Adapter for Oracle Data Integrator
• Java API Reference for Oracle Data Integrator
• Oracle Data Integrator 12c Online Help, which is available in ODI Studio throughthe JDeveloper Help Center when you press F1 or from the main menu byselecting Help, and then Search or Table of Contents.
ConventionsThe following text conventions are used in this document:
Convention Meaning
boldface Boldface type indicates graphical user interface elements associatedwith an action, or terms defined in text or the glossary.
italic Italic type indicates book titles, emphasis, or placeholder variables forwhich you supply particular values.
monospace Monospace type indicates commands within a paragraph, URLs, codein examples, text that appears on the screen, or text that you enter.
Preface
viii
1Overview of Oracle Data Integrator SAPERP Knowledge Modules
This chapter provides an overview of Oracle Data Integrator SAP ERP KnowledgeModules.This chapter includes the following sections.
1.1 OverviewThe Oracle Data Integrator SAP ABAP Knowledge Modules provide integration fromSAP ERP systems using SAP JCo libraries. This set of KMs has the followingfeatures:
• Reads SAP data from SAP ERP system
• Loads this SAP data into Oracle or non-Oracle Staging Area
• Reverse-engineers SAP metadata and proposes a tree browser to pick up only therequired metadata
This adapter includes three knowledge modules:
• RKM SAP ERP: Its main role is to perform customized reverse-engineering ofSAP tables into ODI datastores (Models). The SAP ERP RKM is in charge ofconnecting to the SAP System, which provides the SAP table's metadatainformation, and transforming and writing the resulting metadata into Oracle DataIntegrator's repository.
• The LKM SAP ERP to Oracle (SQLLDR) connects to SAP and retrieves datafrom the SAP tables defined in the SAP Model. It is used in the mappings. TheLKM is in charge of loading source data from a SAP System to an Oracle stagingarea.
• The LKM SAP ERP to SQL connects to SAP and retrieves data from the SAPtables defined in the SAP Model. It is used in the mappings. The LKM is in chargeof loading source data from a SAP System to a non-Oracle staging area.
1-1
Chapter 1
Overview
1-2

2Setting Up the Environment
This chapter describes how to set up your SAP ERP environment for use with OracleData Integrator.This chapter includes the following sections:
2.1 Before You BeginBefore you begin, consider the following:
2.1.1 System Requirements and CertificationBefore performing any installation, you should read the system requirements andcertification documentation to ensure that your environment meets the minimuminstallation requirements for the products you are installing.
The Oracle Data Integrator requirements are listed in Installing and Configuring OracleData Integrator.
The requirements specific to the Oracle Data Integrator SAP ABAP Adapter are:
• Oracle Data Integrator 11.1.1.7.0 or above.
Note:
Most of this documentation also applies to the SAP connectivity in Oracle BI-Applications, which requires Oracle Data Integrator 10g, as specified in moredetail in System Requirements and Supported Platforms for Oracle BusinessIntelligence Applications for SAP.
• A Java Connector (JCo) version compatible with adapter must be used. The list ofsupported JCo versions is available in the Certification Matrix available fromOracle Technology Network (OTN). A minimum version of JCo 3.0.2 is required.
• A JVM version compatible with both Oracle Data Integrator and JCo must be used.A minimum version of JVM 1.5 is required due to JCo pre-requisites.
• The connector supports two transfer modes for transferring data from SAP systemto the ODI agent: data transfer using a Shared Directory and data transfer throughFTP. For details and restrictions, see File Transfer Considerations of ApplicationAdapters Guide for Oracle Data Integrator. Depending on the chosen file transfermode the following requirements must be met:
– Data transfer through a Shared Directory (recommended transfermethod) The LKM SAP ERP to Oracle (SQLLDR) requires a folder that isshared between the SAP system and the ODI agent. The SAP applicationserver transfers the data by writing it out into a folder that is accessible fromthe SAP system and the ODI agent machine. This is typically done by sharinga folder of the ODI agent machine with the SAP system. Note that the shared
2-1
folder does not necessarily have to be located on the ODI agent machine. Ashared folder on a third machine is also possible, as long as the shared folderis accessible to both the ODI agent machine and the SAP system.
Note:
For security reasons, the SAP folders should not be shared with the ODIagent. Share only folders of the ODI agent machine with the SAP system.
The shared folder must be accessible to SAP system and not just to theunderlying operating system. This means that the folder needs to be declaredin SAP transaction AL11 and the folder opens successfully in AL11.
– Data transfer through FTP LKM SAP ERP to Oracle (SQLLDR) requires aFTP server to upload data from the SAP ERP system. This data is either readlocally by the agent executing the mapping (when this agent runs on the FTPserver machine), or remotely (when this agent is located on a differentmachine than the FTP server). This FTP server must be accessible over thenetwork from both the SAP ERP machine and the agent machine.
• For LKM SAP ERP to Oracle (SQLLDR) only: SQL*Loader is required on themachine running the agent the executed mappings using LKM SAP ERP to Oracle(SQLLDR). SQL*Loader is used for loading data extracted from SAP to the Oraclestaging area.
2.1.2 Requesting ODI SAP Component Installation into the SAPSystem
The ODI SAP adapter communicates with the SAP System using a few ODI SAPRFCs. These RFCs are installed by your SAP Basis team using SAP Transportrequests. Please contact your SAP administrators for installing the ODI SAPComponents and assigning the required SAP user authorizations by following theinstructions given in the Installing ODI SAP Components section in ApplicationAdapters Guide for Oracle Data Integrator.
2.1.3 Requesting FTP Server AccessThis section applies only if you plan to transfer data using FTP. You can skip thissection if you use a Shared Directory for the data transfer or if your SAP system isolder than the following:
• SAP ECC6 EHP6 or later
• SAP BW/BI 7.4 or later
The following steps must be performed before any subsequent steps in this guide canbe performed. These steps are typically performed by your SAP Basis team. Failure toperform these setup instructions will lead to FTP failure when running any ODI SAPextraction jobs.
To request FTP server access:
1. Login to SAP server.
Chapter 2Before You Begin
2-2

2. Execute transaction SE16.
3. Enter SAPFTP_SERVERS in the Table Name field and click icon to create entries.
4. Enter IP address of the FTP server in the FTP_SERVER_NAME field.
5. Enter port of the FTP server in the FTP_Server_Port field.
6. Click icon to save.
2.1.4 Gathering SAP Connection InformationIn order to connect to the SAP ERP system, you must request the followinginformation from your SAP administrators:
• SAP ERP System IP Address or Hostname: IP address/ Hostname is thetechnical name given to the host on which SAP is running.
• SAP User: SAP User is the unique user name given to a user for logging on theSAP System.
• SAP Password: Case-sensitive password used by the user to log in.
• SAP Language: Code of the language used when logging in For example: EN forEnglish, DE for German.
• SAP Client Number: The three-digit number assigned to the self-contained unitwhich is called Client in SAP. A Client can be a training, development, testing orproduction client or represent different divisions in a large company.
• SAP System Number: The two-digit number assigned to a SAP instance which isalso called Web Application Server or WAS.
• SAP System ID: The three-character, unique identifier of a SAP system in alandscape.
• SAP Transport Layer Name: This string uniquely identifies a transport layer in aSAP landscape. It allows ODI to create transport requests for later deployment inSAP. Even though there is a default value here, this transport layer name must beprovided by your SAP Basis team. Not doing so may result in significant delaysduring installation.
• SAP Version: The version of the SAP system.
• SAP Character Set: The character set is only required if your SAP system is not aUNICODE system. For a complete list of character sets, see "Locale Data" in theOracle Database Globalization Support Guide. For example, EE8ISO8859P2 forCroatian Data. For UNICODE systems, use UTF8.
Note:
All the connection data listed above (except SAP SNC Connection Propertiesand SAP Router String) are mandatory and should be requested from the SAPAdministrators. You may consider requesting support during connection setupfrom your SAP administrators.
Chapter 2Before You Begin
2-3

2.2 Validating the Shared Folder SetupValidating a shared folder setup applies only if you plan to transfer data using aShared Directory. This section can be skipped, if the FTP transfer is used. Thevalidation of the shared folder setup needs to be performed before any subsequentsteps in this guide can be performed. This validation is typically performed by yourSAP Basis team.
Step 1: Validating folder access from the SAP application server
1. Start the SAPGUI.
2. Use the ODI SAP user and password to connect to the SAP system and client.
3. Go to transaction AL11.
4. Select the shared folder.
5. Double-click the shared folder to test the directory declaration.
This should report a successful connection. If not, please contact your SAP basisteam. Do not continue until this test passes.
Note:
SAP uses the OS user <sid>adm to connect to the directories declared inAL11.
6. Print screen.
Step 2: Validating folder access from the ODI agent machine
1. Log in to the ODI agent machine using the Windows user ID used for executing theODI agent.
2. Open shared directory path in Windows Explorer.
This should list the content of the shared folder. Please make sure that you do NOTneed to enter any credentials. If this does not work or you had to enter credentials,please contact your windows administrator or the system administrator of thesystem your shared folder is physically located on. Do not continue until this testpasses.
3. Print screen.
2.3 Validating the FTP SetupValidating an FTP setup applies only, if you plan to transfer data using FTP. Thissection can be skipped, if you use a Shared Directory for the data transfer. Thevalidation of the FTP setup needs to be performed before any subsequent steps in thisguide can be performed. This validation is typically performed by your SAP Basisteam.
Chapter 2Validating the Shared Folder Setup
2-4
Step 1: Validating SAPFTPA destination
1. Start the SAPGUI.
2. Use the ODI SAP user and password to connect to the SAP system and client.
3. Go to transaction SM59.
4. Expand TCP/IP connections.
5. Open the SAPFTPA destination.
6. Click Test connection.
This should report a successful connection. If not, please contact your SAP basisteam. Do not continue until this test passes.
7. Print screen.
Step 2: Testing FTP connection
1. Go to transaction SE38.
2. View the function module RSFTP002.
3. Hit F8 to run the ABAP program.
4. Enter the FTP userID and password.
5. Enter the FTP server host name or IP address.
6. Enter cd / or cd <ODI target directory>.
7. In the RFC_DESTINATION field, enter SAPFTPA.
8. Hit F8 to run the test.
This should report a successful connection. The message should be similar to thefollowing:
250 CWD successful.
If this test is not successful, please contact your SAP basis team. Do not continueuntil this test passes.
9. Print screen.
2.4 Validating SAP PrivilegesThis section describes how to test some of the key SAP privileges. Proceed with thesubsequent steps in this guide only after successful validation of these tests. Thisvalidation is typically performed by your SAP Basis team.
Perform the following steps to validate whether a SAP user has appropriate dev rightsand owns a dev license key:
1. Start SAPGUI.
2. Use the ODI SAP user and password to connect to the SAP system and client.
3. Go to transaction SE38.
4. Enter any sample program name like ZSAP_TEST in the program name field.
5. Click Create.
Chapter 2Validating SAP Privileges
2-5
6. Perform similar tests for the transaction SE37 and SE11.
If a transaction allows the creation of a program without asking for any key or otherauthorization message, then the SAP user has validated that it has the appropriatedev rights and license key. Otherwise your SAP basis team needs to register the SAPuser in service.sap.com to get the license key and a Basis person can help him withdev rights.
2.5 Validating SAP Transport Layer NameAs the SAP connector creates SAP objects, such as, for example, function modules,into the SAP development system, these changes need to be transported into QA andproduction systems once the development is done. The SAP's change and transportsystem uses the SAP Transport Layer Name to identify the route a change has totake. A transport layer is assigned to each development class and thus to all objects inthat class. The transport layer determines:
• In which SAP System developments or changes to the repository objects aremade
• If objects are transported to other systems within the group when developmentwork has been completed
A consolidation route is created from the development system to the quality assurancesystem through the transport layer Z<SID>. It then becomes the standard transportlayer for customer development and customizing.
A consolidation route is created from the development system to the quality assurancesystem through the transport layer SAP for the transport of SAP Standard objects.
It is important to specify the correct transport layer name before running the RKM SAPERP for the first time. Perform the following steps to identify the list of definedtransport layers in your SAP landscape:
1. Log on in client 000 in the SAP System serving as the transport domain controllervia transaction STMS.
2. Select Overview > Transport Routes. The Display Transport Routes dialog isdisplayed.
3. Select Goto > Graphical Editor.
4. To switch the mode, select Configuration > Display <-> Change.
5. Position the cursor on the SAP System.
6. Select Edit > System > Change. The Change System Attriburtes dialog isdisplayed.
7. Select the StandardTransport Layer tab.
8. Change the transport layer of the SAP System.
9. The result is the list of the different transport Layers.
By default, the RKM option SAP_TRANSPORT_LAYER_NAME is set to SAP. Ask yourSAP basis admin which transport layer you should use. This transport layer namemust be set on the SAP_TRANSPORT_LAYER_NAME RKM option. A wrong orinvalid transport layer name will cause serious delays during the installation process.
Chapter 2Validating SAP Transport Layer Name
2-6
2.6 Installing Oracle Data IntegratorBefore starting with this project, you need to install and configure Oracle DataIntegrator. See theData Integrator Getting Started and the Installing and ConfiguringOracle Data Integrator for more information.
2.7 Installing and Configuring the Oracle DB TargetThis project uses an Oracle database engine as the target and as the staging area forthe mappings. You can download for example Oracle Database 11g Express Editionfrom Oracle Technology Network (OTN). Install and configure this database.
This project targets an Oracle table that can be created using the following script:
-- Create demo target schemaCREATE USER ODI_SAP_DEMO IDENTIFIED BY ODI_SAP_DEMO DEFAULT TABLESPACE USERS TEMPORARY TABLESPACE TEMP;GRANT CONNECT, RESOURCE TO ODI_SAP_DEMO;
-- Create demo target tableCREATE TABLE ODI_SAP_DEMO.W_GEO_DS ( LANGUAGE_KEY CHAR(20), COUNTRY VARCHAR(50), COUNTY VARCHAR(50), STATE_PROV VARCHAR(50), NATIONALITY VARCHAR(50));
ALTER TABLE ODI_SAP_DEMO.W_GEO_DS ADD CONSTRAINT PK_W_GEO_DS PRIMARY KEY (LANGUAGE_KEY);
2.8 Installing and Configuring JCoThe SAP adapter uses Java Connector (JCo) to connect to the SAP system. JCo mustbe configured before proceeding with the project.
To install and configure JCo:
1. Download a supported JCo version for your configuration from http://service.sap.com/connectors. Check the supported JCo version in the CertificationMatrix available at Oracle Technology Network. Note that a minimum version ofJCo 3.0.2 is required.
Note:
• Choose the SAP JCo package matching your operating system and yoursystem architecture (32/64Bit). E.g. if you are running ODI inside a 32-BitJVM, you must download the 32-Bit SAP JCo, even if the CPU and OSare 64-Bit. Mixing 32-bit and 64-bit architecture is not possible due tonative libraries required by SAP JCo and will result in connection failure.
• odi.conf contains the JDK path used for ODI Studio.
Chapter 2Installing Oracle Data Integrator
2-7
2. Unzip the appropriate distribution package into an arbitrary directory <sapjco-install-path>.
3. Follow the installation instructions in <sapjco-install-path>/javadoc/installation.html for the respective platform.
4. Copy sapjco3.jar and sapjco3.dll:
For ODI 10g: Copy sapjco3.jar and sapjco3.dll (or respective binary likelibsapjco3.so) into the oracledi/drivers directory.
For ODI 11g: Copy sapjco3.jar and sapjco3.dll (or respective binary likelibsapjco3.so) into the <ODI_HOME>/odi_misc directory (ODI Studio) and into the<ODI_HOME>/oracledi/agent/drivers directory (Standalone Agent) and into the<WLS_DOMAIN>/lib directory (JEE Agent).
For ODI 12c: Copy sapjco3.jar and sapjco3.dll (or respective binary likelibsapjco3.so) into the <ODI_HOME>/odi/sdk/lib directory (ODI Studio, ODIStandalone Agent) and into the <WLS_DOMAIN>/lib directory (JEE Agent).
5. Restart ODI Studio and any agents.
6. Check the JCo installation. This will be also checked later in this guide.
2.9 Configuring Oracle Data IntegratorPerform the following steps to configure Oracle Data Integrator:
2.9.1 Add the Open ToolThe complete process of installing and adding an Open Tool to ODI is described inOracle Data Integrator Tools Reference. This section details only the SAP ABAPspecific steps.
1. Connect to Designer.
2. Select File > Add/Remove Open Tools…
3. In the Add/remove Open Tools window, enter the following name in the Open Toolclass name field:
oracle.odi.sap.km._OdiSapAbapExecuteStoppable
4. Click Add Open Tool.
5. The Add Open Tools window appears as shown below.
Chapter 2Configuring Oracle Data Integrator
2-8
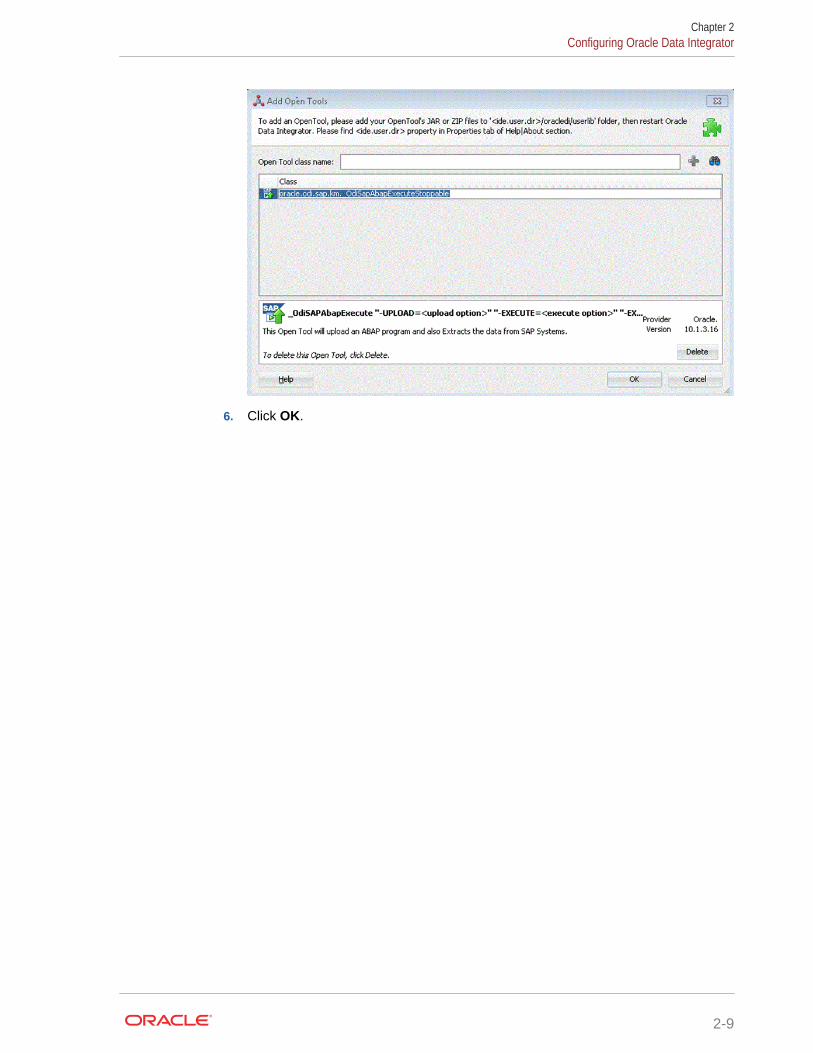
6. Click OK.
Chapter 2Configuring Oracle Data Integrator
2-9

Chapter 2
Configuring Oracle Data Integrator
2-10
3Configuring the Topology
This chapter describes how to configure the topology by using a practical example.This project will integrate the following source and target data:
Source tables T005T and T005U are the tables from SAP containing geographicalinformation.
Target W_GEO_DS is a dimension table in an Oracle database that needs to beloaded from the SAP Sources. This table contains geographical information such asContinent name, Country name, Region, State, County, City and Zip code.
This chapter includes the following sections.
3.1 Configuring the File Server for SAP ABAPPerform the following operations after installing or upgrading your Oracle DataIntegrator version:
1. Connect to Topology Manager.
2. If this SAP ABAP technology does not exist in your Master Repository, import theSAP ABAP technology in Synonym INSERT_UPDATE mode from the /impexpfolder.
3. Perform an upgrade of the Master Repository. Refer to the Installing andConfiguring Oracle Data Integrator guide, for more information on the MasterRepository upgrade process.
4. In Topology Manager, open the JavaBeanShell technology and check on theLanguage tab that the JYTHON language is listed. If not, add it.
5. Create a File data server pointing to an existing FTP/file server into which theextraction file will be pushed from SAP and picked up for SQL*Loader. For usewith FTP transfer, set the following parameters. For use with shared foldertransfer, the settings on this data server do not matter.
• Host (Data Server): FTP server IP host name or IP address.
• User: Username to log into FTP server.
• Password: Password for the user.
6. For use with "LKM SAP ERP to SQL" these additional parameters must beconfigured:
• JDBC driver class: com.sunopsis.jdbc.driver.file.FileDriver
• JDBC URL: jdbc:snps:dbfile?ENCODING=UTF8
The above URL is for SAP UNICODE systems. For non-UNICODE systems,please see details on ENCODING parameter in Creating a File Data Serversection of Connectivity and Knowledge Modules Guide for Oracle DataIntegrator Developer's. Please note the encoding chosen on this URL mustmatch the code page used by the SAP Application Server.
3-1
7. In this File data server create a Physical Schema representing the folder in the Fileserver to which the extraction file will be pushed. For use with FTP transfer, seedetails below. For use with shared folder transfer and for more details, see Transfer using a Shared Directory (recommended) section of Application AdaptersGuide for Oracle Data Integrator Guide.
• Data Schema: Path on the FTP server to upload or download extraction filesfrom the remote location. This path is used when uploading extraction filesfrom the SAP ERP system into the FTP server. It is also used by a remoteagent to download the extraction files. Note that this path must use slashesand must end with a slash character.
• Work Schema: Local path on the FTP server's machine. This path is used byan agent installed on this machine to access the extraction files withoutpassing via the FTP server. This access method is used if theFTP_TRANSFER_METHOD parameter of the LKM SAP ERP to Oracle(SQLLDR)/ LKM SAP ERP to SQL is set to NONE. As Work Schema is an OSfile name, slashes/ backslashes should be used according to OS.
Path names need to end on slash/ backslash. Path names given on Data andWork schemas are not necessarily the same: the FTP service may provideaccess to a FTP directory named /sapfiles while the files can be storedlocally in c:\inetpub\ftproot\sapfiles.
Refer to File Transfer Considerations section of Application Adapters Guide forOracle Data Integrator Guide.
8. If the corresponding Logical Schema called File Server for SAP ABAP does notexist yet, create it. This Logical Schema name is fixed and must be mapped to thePhysical Schema created in the previous step.
3.2 Configuring the Target Data ServerThis section describes how to setup an Oracle Data Server. Please use respectivesettings when configuring a non-Oracle Target Data Server for use with LKM SAPERP to SQL.
1. Connect to Topology Manager.
2. In the Physical Architecture tree view, expand the Technologies node and selectthe Oracle technology.
3. Right-click and select New Data Server.
4. Enter the data server Definition as shown below:
Chapter 3Configuring the Target Data Server
3-2
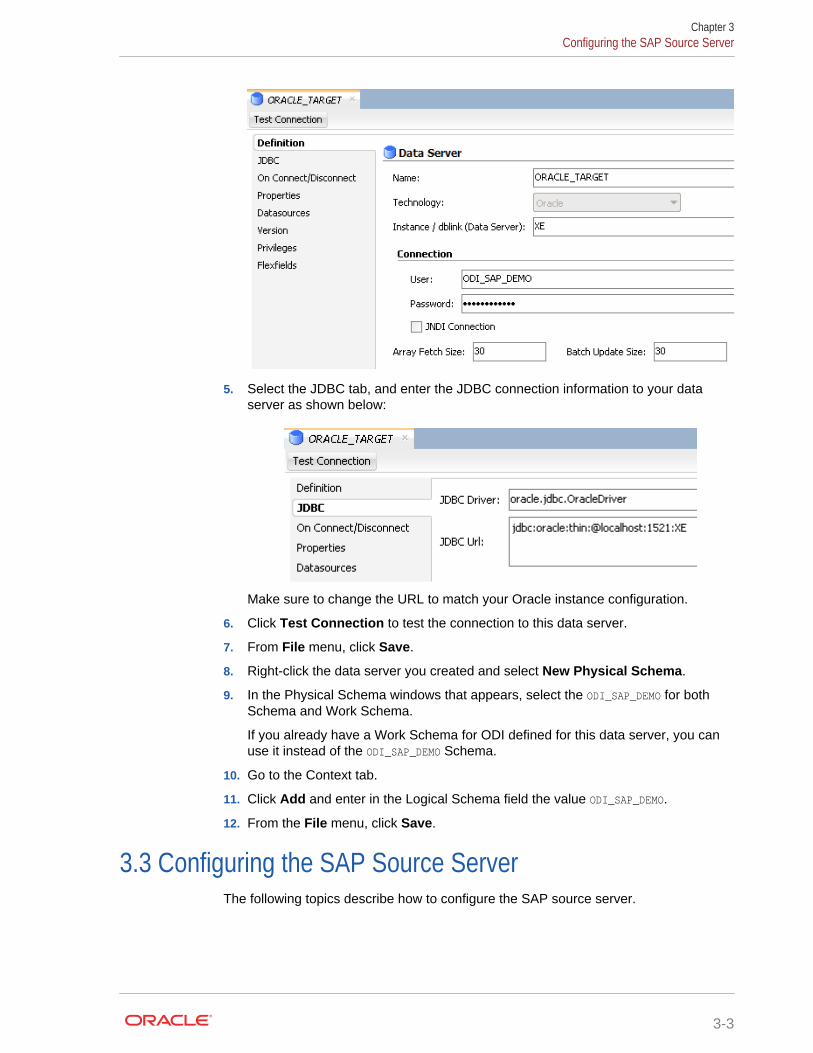
5. Select the JDBC tab, and enter the JDBC connection information to your dataserver as shown below:
Make sure to change the URL to match your Oracle instance configuration.
6. Click Test Connection to test the connection to this data server.
7. From File menu, click Save.
8. Right-click the data server you created and select New Physical Schema.
9. In the Physical Schema windows that appears, select the ODI_SAP_DEMO for bothSchema and Work Schema.
If you already have a Work Schema for ODI defined for this data server, you canuse it instead of the ODI_SAP_DEMO Schema.
10. Go to the Context tab.
11. Click Add and enter in the Logical Schema field the value ODI_SAP_DEMO.
12. From the File menu, click Save.
3.3 Configuring the SAP Source ServerThe following topics describe how to configure the SAP source server.
Chapter 3Configuring the SAP Source Server
3-3
3.3.1 Configuring the Data ServerExcept for the data server name, all the parameters that you provide while defining theSAP Data server should be provided by the SAP Administrators. See Gathering SAPConnection Informationfor more information about these parameters.
1. In the Physical Architecture tree view, expand the Technologies node, select theSAP ABAP technology.
2. Right-click and select New Data Server.
3. Enter the data server definition. Set the parameters for this data server as follows:
• Name: SAP_ERP. The name of the data server as it will appear in ODI.
• Host (Data Server): SAP ERP System IP Address or Hostname.
• User: SAP User, as provided by the SAP Administrator.
• Password: This user's SAP Password. This password is case-sensitive.
4. Set the Flexfield values for this data server in the Flexfields tab:
• SAP Language: Code of the language used when logging in. For example ENfor English, DE for German.
• SAP Client Number: The three-digit number assigned to the self-containedunit which is called Client in SAP. A Client can be a training, development,testing or production client or represent different divisions in a large company.
• SAP System Number: The two-digit number assigned to a SAP instancewhich is also called Web Application Server or WAS.
• SAP System ID: The three-character, unique identifier of a SAP system in alandscape.
• SAP Character Set: The character set is only required if your SAP system isnot a UNICODE system. For a complete list of character sets, see "LocaleData" in the Oracle Database Globalization Support Guide. For example,EE8ISO8859P2 for Croatian Data. For UNICODE systems, use UTF8.
Note:
This FlexField is only used with "LKM SAP BW to Oracle (SQLLDR)". For usewith "LKM SAP BW to SQL" please define the character set using theENCODING parameter in the file driver URL, as described in Configuring theFile Server for SAP ABAPfor non-UNICODE SAP systems.
• SAP ABAP Version: Enter the SAP ABAP version as follows:
– For SAP 4.6C enter 46C
– For SAP 4.7 enter 620
– For SAP ECC 5.0 enter 640
– For SAP ECC 6.0 enter 700
• SAP BW Version & SAP ERP Version: unused in SAP ERP Connector.
5. From the File menu, click Save.
Chapter 3Configuring the SAP Source Server
3-4
Note:
The Test Connection button for validating SAP Connection definition is notsupported for this connection.
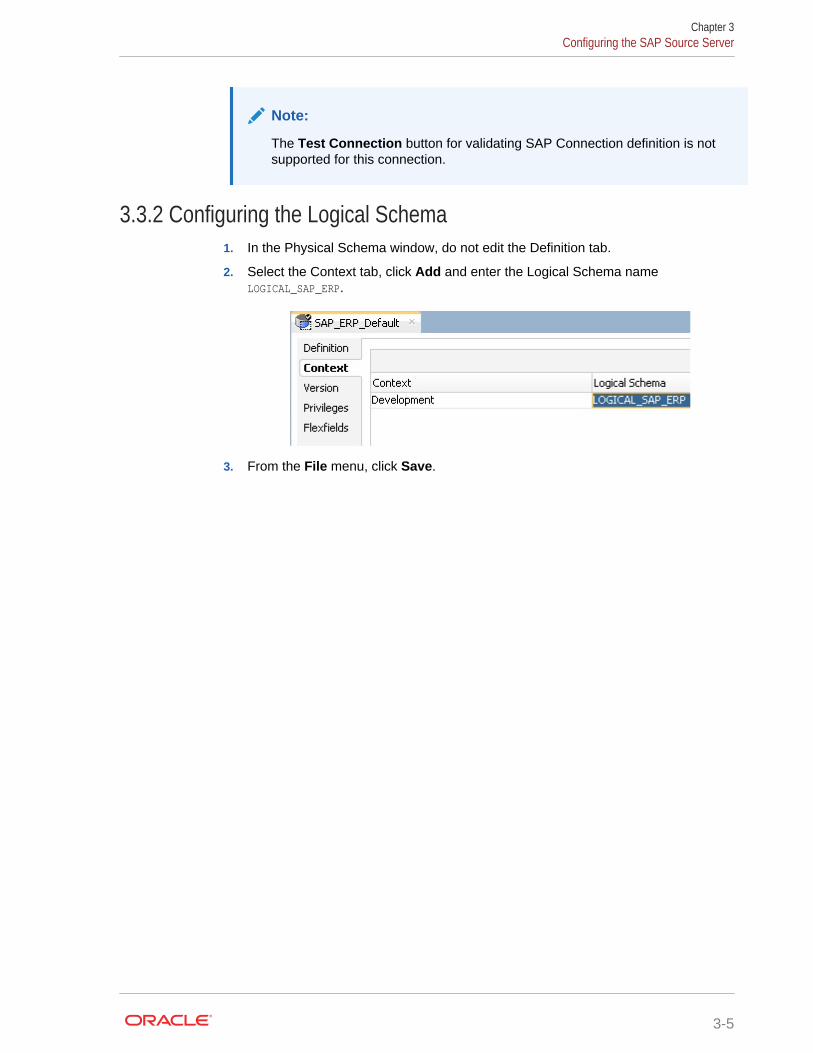
3.3.2 Configuring the Logical Schema1. In the Physical Schema window, do not edit the Definition tab.
2. Select the Context tab, click Add and enter the Logical Schema nameLOGICAL_SAP_ERP.
3. From the File menu, click Save.
Chapter 3Configuring the SAP Source Server
3-5

Chapter 3
Configuring the SAP Source Server
3-6
4Creating a New Project
This chapter describes how to create a new Project for SAP.In order to work with the data servers you have created, you must create a project andimport the appropriate knowledge modules for reverse-engineering the data structuresand integrating the data.
4.1 Creating a New ProjectTo create a new Project for SAP:
1. Connect to Designer.
2. In the Projects tree view click New Project.
3. In the Definition tab, enter SAP Demo for the Project name.
4. From the File menu, click Save to save your project.
5. Expand the SAP Demo Project, select the First Folder node.
6. Rename this folder to SDE_SAP_GeoDimension.
7. Right-click the SAP Demo Project in the Projects tree view.
8. Right-click and select Import > Import Knowledge Modules.
9. Select in the File import directory the directory containing your KMs. By default,they are located in the ../impexp directory.
10. Select the following KMs:
• IKM Oracle Incremental Update
• LKM SAP ERP to Oracle (SQLLDR)
• LKM SAP ERP to SQL
• RKM SAP ERP
• RKM SAP ERP Connection Test
11. Click OK to perform the import.
4-1

Chapter 4
Creating a New Project
4-2
5Reverse-Engineering Data Models
This chapter describes how to reverse-engineer the Oracle target and SAP sourcedata models.This chapter includes the following sections.
5.1 Reverse-Engineering the Oracle TargetTo reverse-engineer the Oracle data model:
1. Connect to Designer.
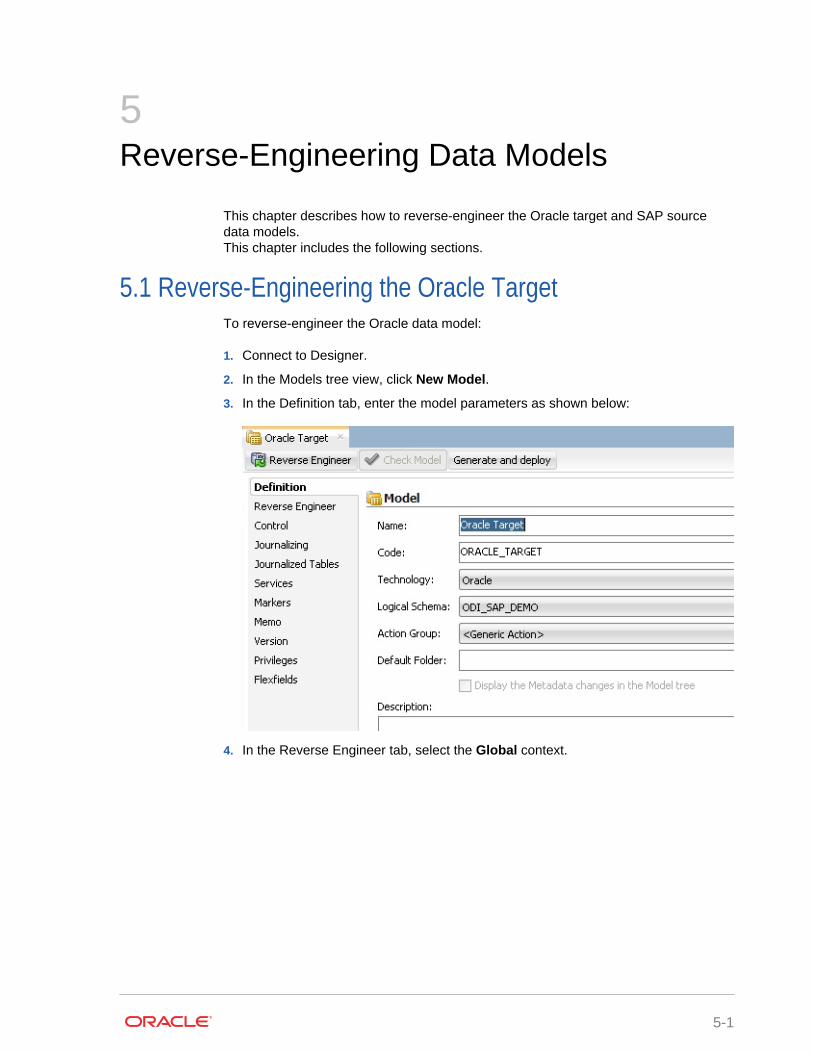
2. In the Models tree view, click New Model.
3. In the Definition tab, enter the model parameters as shown below:
4. In the Reverse Engineer tab, select the Global context.
5-1
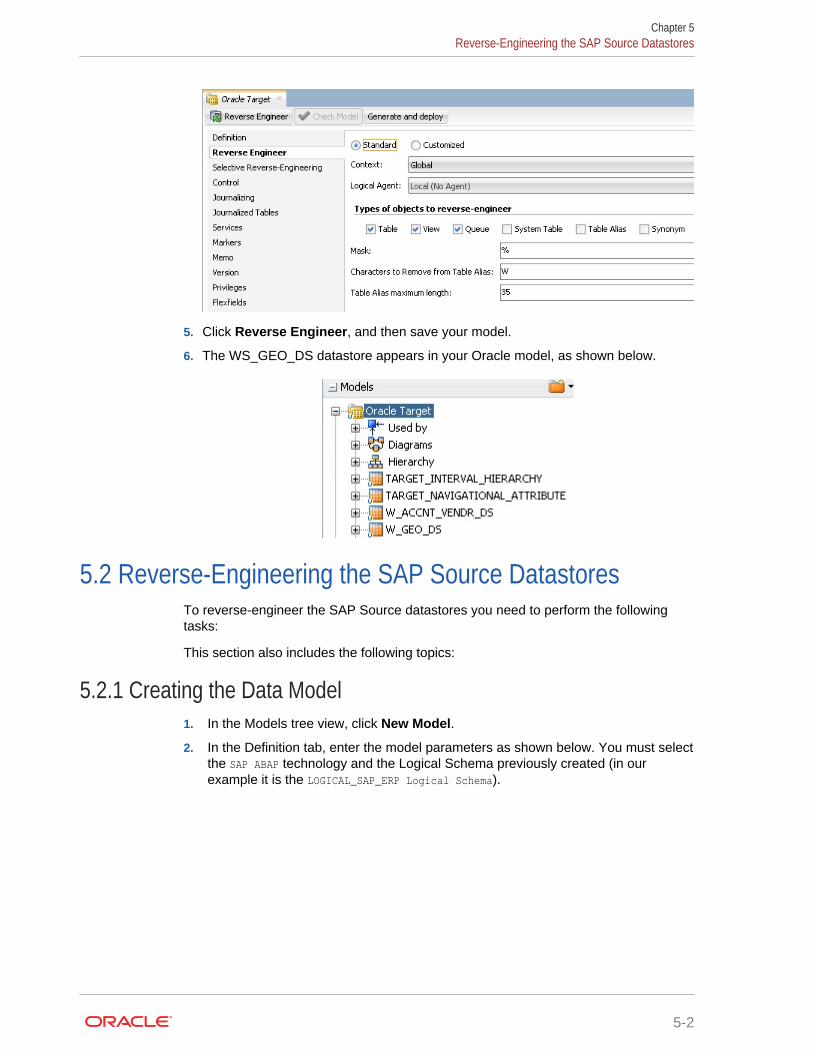
5. Click Reverse Engineer, and then save your model.
6. The WS_GEO_DS datastore appears in your Oracle model, as shown below.
5.2 Reverse-Engineering the SAP Source DatastoresTo reverse-engineer the SAP Source datastores you need to perform the followingtasks:
This section also includes the following topics:
5.2.1 Creating the Data Model1. In the Models tree view, click New Model.
2. In the Definition tab, enter the model parameters as shown below. You must selectthe SAP ABAP technology and the Logical Schema previously created (in ourexample it is the LOGICAL_SAP_ERP Logical Schema).
Chapter 5Reverse-Engineering the SAP Source Datastores
5-2
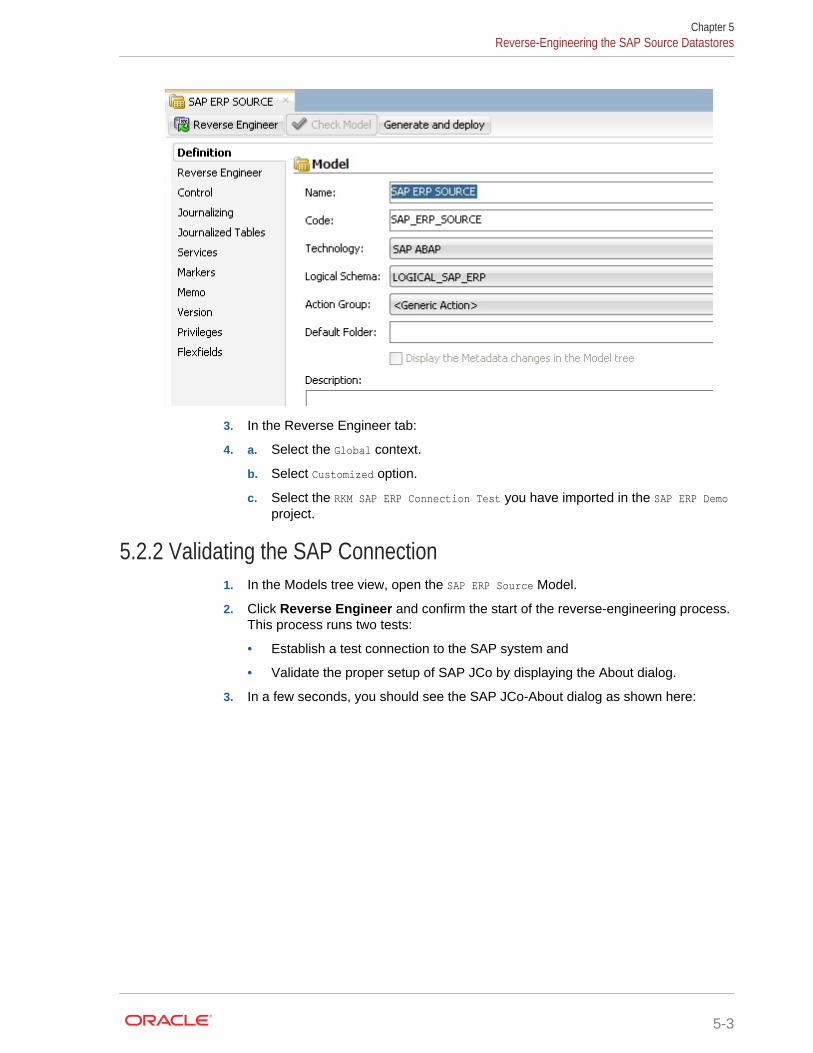
3. In the Reverse Engineer tab:
4. a. Select the Global context.
b. Select Customized option.
c. Select the RKM SAP ERP Connection Test you have imported in the SAP ERP Demoproject.
5.2.2 Validating the SAP Connection1. In the Models tree view, open the SAP ERP Source Model.
2. Click Reverse Engineer and confirm the start of the reverse-engineering process.This process runs two tests:
• Establish a test connection to the SAP system and
• Validate the proper setup of SAP JCo by displaying the About dialog.
3. In a few seconds, you should see the SAP JCo-About dialog as shown here:
Chapter 5Reverse-Engineering the SAP Source Datastores
5-3
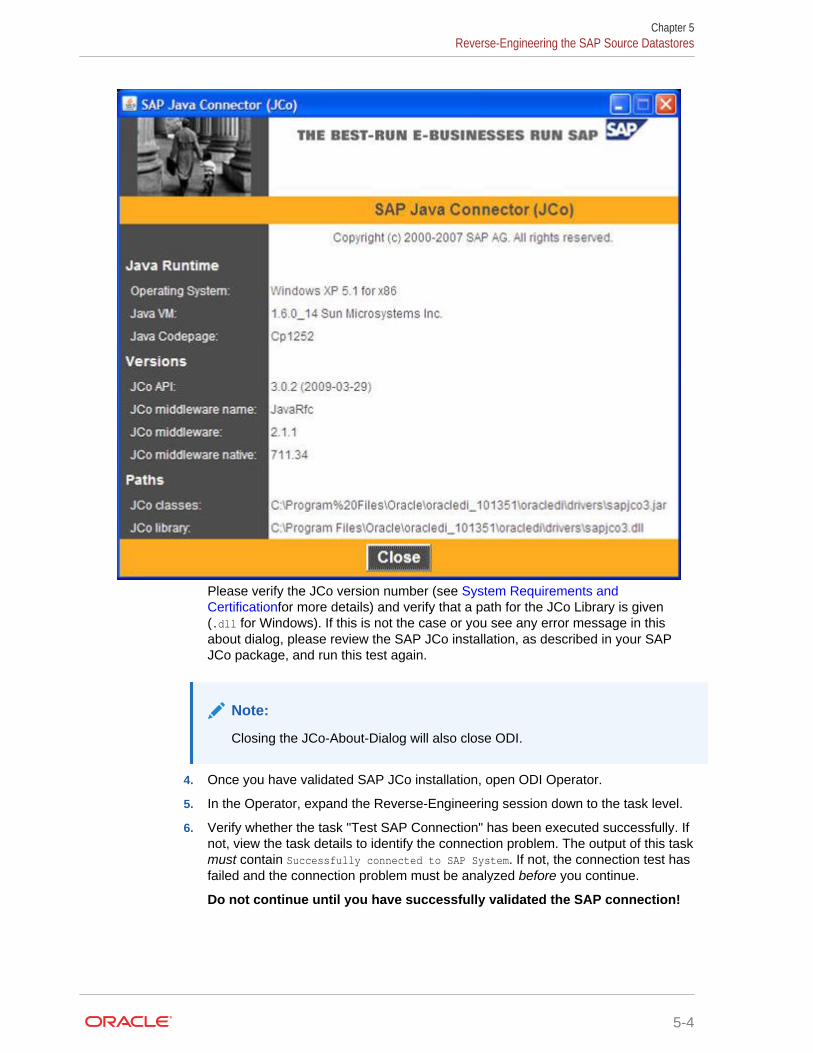
Please verify the JCo version number (see System Requirements andCertificationfor more details) and verify that a path for the JCo Library is given(.dll for Windows). If this is not the case or you see any error message in thisabout dialog, please review the SAP JCo installation, as described in your SAPJCo package, and run this test again.
Note:
Closing the JCo-About-Dialog will also close ODI.
4. Once you have validated SAP JCo installation, open ODI Operator.
5. In the Operator, expand the Reverse-Engineering session down to the task level.
6. Verify whether the task "Test SAP Connection" has been executed successfully. Ifnot, view the task details to identify the connection problem. The output of this taskmust contain Successfully connected to SAP System. If not, the connection test hasfailed and the connection problem must be analyzed before you continue.
Do not continue until you have successfully validated the SAP connection!
Chapter 5Reverse-Engineering the SAP Source Datastores
5-4

Note:
If you want to validate the SAP connectivity independent of ODI, please see SAP Stand-Alone Connection Test.
5.2.3 Starting the Reverse-Engineering ProcessTo start the reverse-engineering process of the SAP ERP datastores:
1. Import TR.
Note:
See also, Installing SAP Transport Request (TR) in the Application AdaptersGuide for Oracle Data Integrator.
2. In the Models tree view, open the SAP ERP Source Model.
3. In the Reverse Engineer tab:
a. Select the Global context.
b. Select the Customized option.
c. Select the RKM SAP ERP you have imported in the SAP ERP Demo project.
d. Set the USE_GUI KM option to true.
e. Set UPLOAD_ABAP_CODE and UPLOAD_ABAP_BASE to False.
Caution:
Make sure that you provide the correct value for the SAP_TRANSPORT_LAYER_NAMEoption.
f. Set other parameters according to your SAP configuration. See the ApplicationAdapters Guide for Oracle Data Integrator for more information on the RKMoptions.
4. From the File menu, click Save to save your changes.
5. Click Reverse Engineer to start the reverse-engineering process.
6. Click OK.
The Sessions Started Dialog is displayed.
7. Click OK.
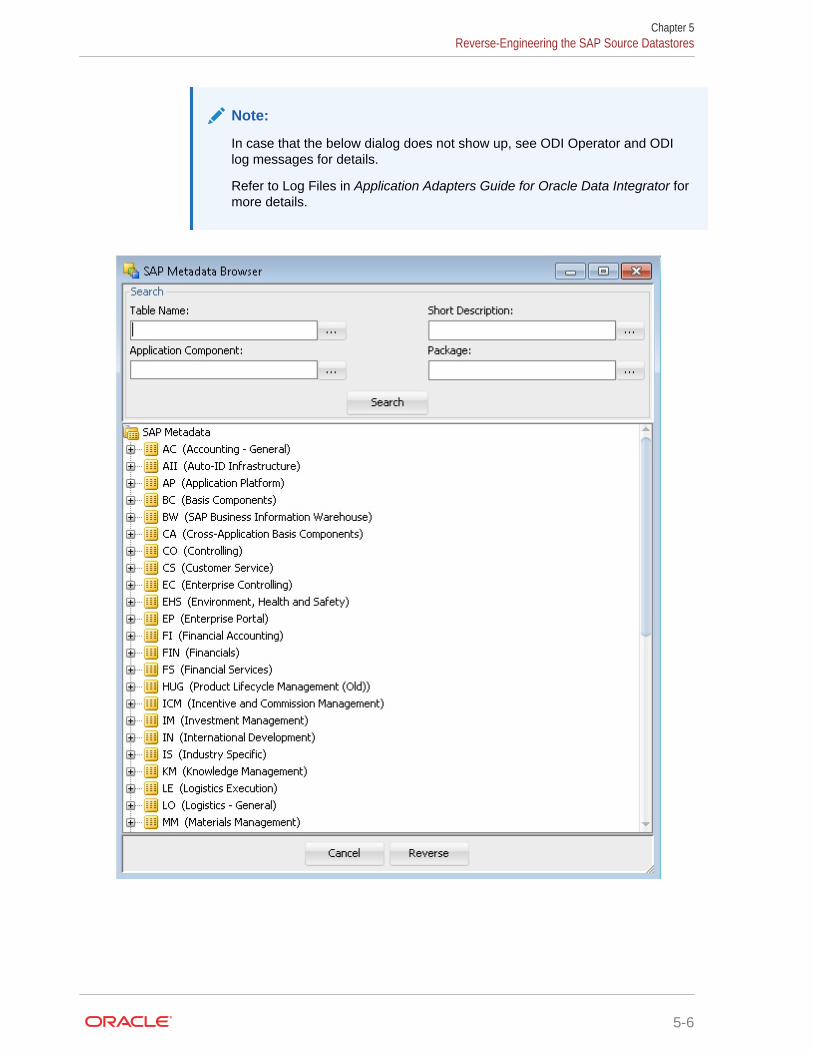
5.2.4 Using the SAP Metadata BrowserAs you have set the USE_GUI option to Yes, the RKM displays in the SAP MetadataBrowser the SAP objects organized in the tree view as shown below.
Chapter 5Reverse-Engineering the SAP Source Datastores
5-5
Note:
In case that the below dialog does not show up, see ODI Operator and ODIlog messages for details.
Refer to Log Files in Application Adapters Guide for Oracle Data Integrator formore details.
Chapter 5Reverse-Engineering the SAP Source Datastores
5-6
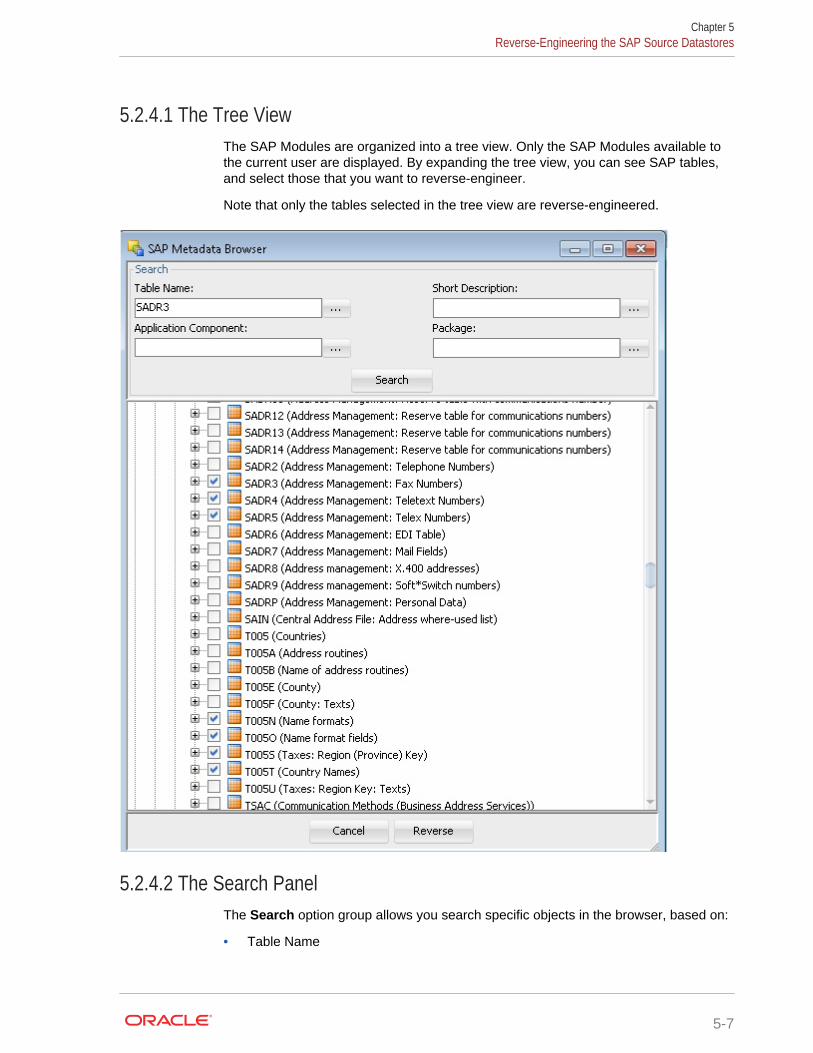
5.2.4.1 The Tree ViewThe SAP Modules are organized into a tree view. Only the SAP Modules available tothe current user are displayed. By expanding the tree view, you can see SAP tables,and select those that you want to reverse-engineer.
Note that only the tables selected in the tree view are reverse-engineered.
5.2.4.2 The Search PanelThe Search option group allows you search specific objects in the browser, based on:
• Table Name
Chapter 5Reverse-Engineering the SAP Source Datastores
5-7
• Short Description
• Application Component
• Package
For the example project, the T005T and T005U country tables are used:
1. Enter T005T in the Table Name field and click Search to find the first table toreverse-engineer. Select this table.
2. Enter T005U in the Table Name field and click Search to find the second table toreverse-engineer. Select this table.
3. Click Reverse.
4. Oracle Data Integrator starts the reverse-engineering process on the selecteddatastores. The reverse-engineered datastores appear under the Model.
5.2.5 Reverse-Engineering Without GUIIf you want to perform a reverse-engineering without using the SAP MetadataBrowser, you can enter the following parameters in the SAP ERP KM options:
• USE_GUI: No
• SAP_TABLES_NAME : T005T, T005U
With this configuration, the tables will be reverse-engineered without displaying theSAP Metadata Browser.
By using the appropriate KM options, you can also select a filter for the reversedtables based on for example a SAP Module or a Package name. You can also specifya table name mask in the Mask field of the Reverse tab to filter table names.
Refer to the Application Adapters Guide for Oracle Data Integrator for moreinformation on the RKM options.
Note:
It is not possible to view the data in the SAP ERP tables from Oracle DataIntegrator.
What happens when you reverse-engineer SAP ERP tables?
First, Oracle Data Integrator uploads in the SAP system ABAP code allowing forretrieving the SAP metadata. This RFC is uploaded only if the UPLOAD_ABAP_CODE andUPLOAD_ABAP_BASE options are selected (these options are typically activated only once).The ABAP programs are generated in the SAP function group given in theSAP_FUNCTION_GROUP_ODI_DEV and SAP_FUNCTION_GROUP_ODI_PROD RKM options.
Once this code is set up on SAP, Oracle Data Integrator is able to retrieve the SAPmetadata and to display it in the SAP Metadata Browser. Selected metadata is thenreverse-engineered from SAP into the Oracle Data Integrator repository. Therepository only contains the description of the SAP metadata, and no data at all.
In addition to the table definitions organized and enriched with user-friendlyinformation, the keys and indexes definitions are also retrieved. The model appearing
Chapter 5Reverse-Engineering the SAP Source Datastores
5-8
in Oracle Data Integrator shows all the information required for performing integrationtasks on the SAP ERP Model.
Chapter 5Reverse-Engineering the SAP Source Datastores
5-9

Chapter 5
Reverse-Engineering the SAP Source Datastores
5-10
6Creating and Running the Mapping
This chapter describes how to create and run the mapping.This chapter includes the following sections.
6.1 Creating the MappingNow that the source and target data models are created, it is possible to create amapping to integrate data from the T005T and T005U SAP tables to the WS_GEO_DS Oracletable.
To create the mapping, perform the following steps:
6.1.1 Create the Mapping1. Open Designer.
2. In the Projects tree view, expand the SAP Demo Project.
3. Expand the SDE_SAP_GeoDimension folder.
4. Select the Mappings node.
5. Right-click and select New Mapping.
6. In the Mapping Definition tab, enter the mapping name:SDE_SAP_GeoDimension.W_GEO_DS.
7. Save the mapping.
6.1.2 Define the Source and Target DatastoresTo define the source and target datastores:
• In the Models tree view, select the WS_GEO_DS datastore from the Oracle TargetModel.
• Drag this datastore into the Target Datastore area of the Logical diagram. (Rightarea of the Logical diagram)
• In the Models tree view, select the T005T Country Names datastore from the SAP ERPSource model.
• Drag this datastore into the Sources area of the Logical diagram.
• Perform the same operation for the T005U Taxes: Region Key datastore from the SAPERP Source model. The Sources area of the Logical diagram should look as shownbelow:
6-1
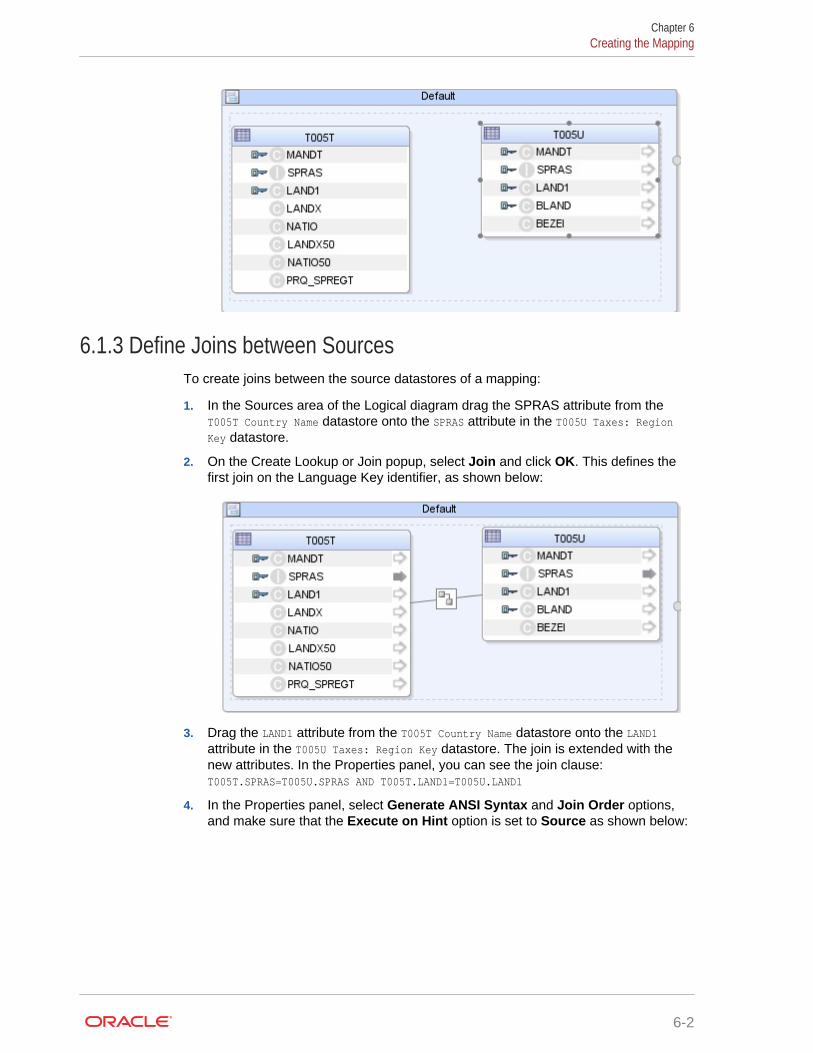
6.1.3 Define Joins between SourcesTo create joins between the source datastores of a mapping:
1. In the Sources area of the Logical diagram drag the SPRAS attribute from theT005T Country Name datastore onto the SPRAS attribute in the T005U Taxes: RegionKey datastore.
2. On the Create Lookup or Join popup, select Join and click OK. This defines thefirst join on the Language Key identifier, as shown below:
3. Drag the LAND1 attribute from the T005T Country Name datastore onto the LAND1attribute in the T005U Taxes: Region Key datastore. The join is extended with thenew attributes. In the Properties panel, you can see the join clause:T005T.SPRAS=T005U.SPRAS AND T005T.LAND1=T005U.LAND1
4. In the Properties panel, select Generate ANSI Syntax and Join Order options,and make sure that the Execute on Hint option is set to Source as shown below:
Chapter 6Creating the Mapping
6-2
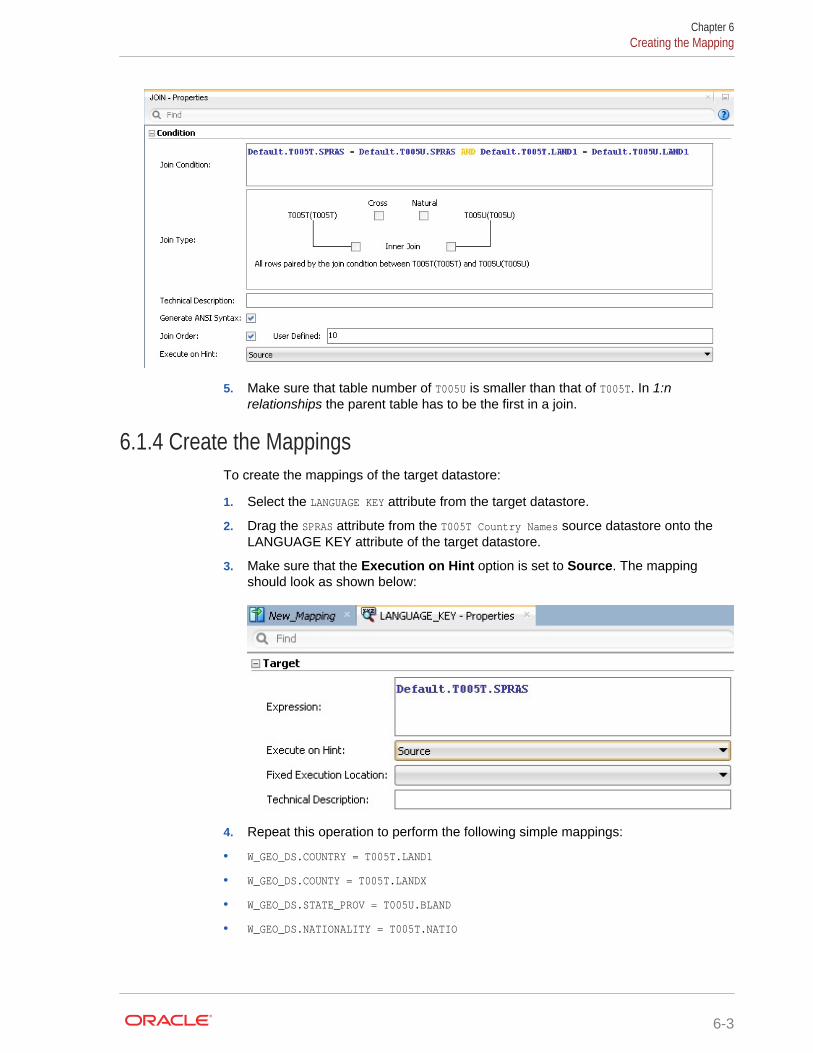
5. Make sure that table number of T005U is smaller than that of T005T. In 1:nrelationships the parent table has to be the first in a join.
6.1.4 Create the MappingsTo create the mappings of the target datastore:
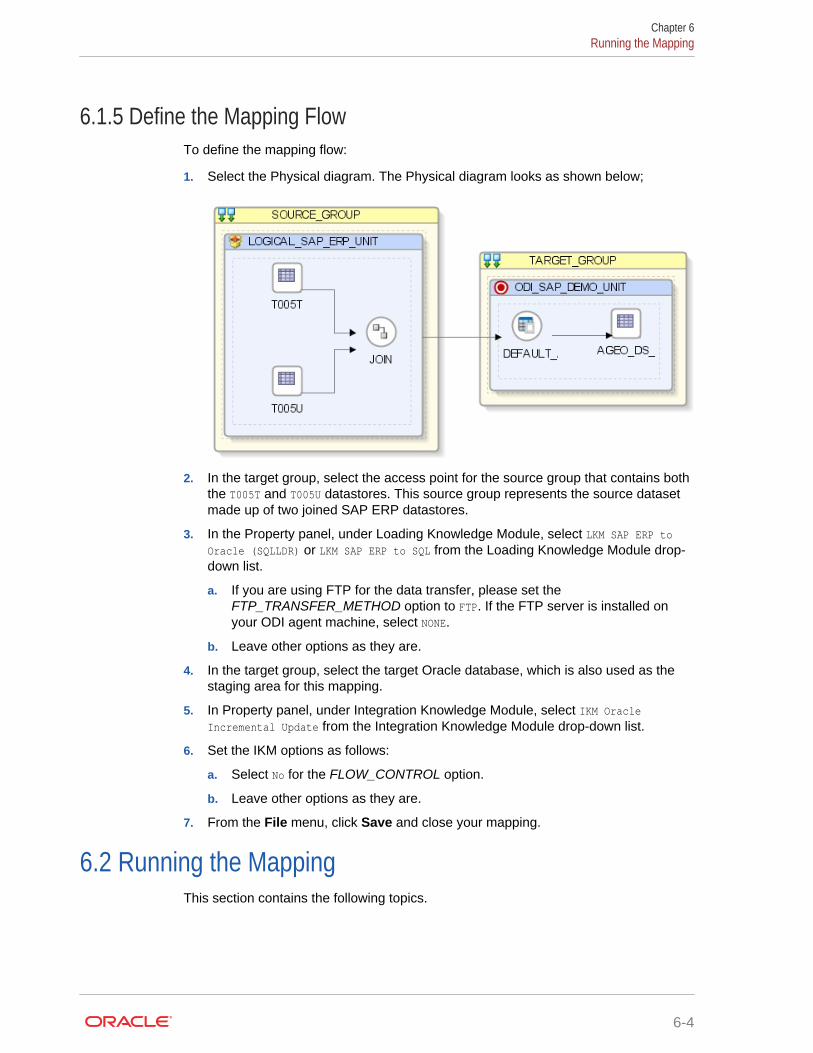
1. Select the LANGUAGE KEY attribute from the target datastore.
2. Drag the SPRAS attribute from the T005T Country Names source datastore onto theLANGUAGE KEY attribute of the target datastore.
3. Make sure that the Execution on Hint option is set to Source. The mappingshould look as shown below:
4. Repeat this operation to perform the following simple mappings:
• W_GEO_DS.COUNTRY = T005T.LAND1
• W_GEO_DS.COUNTY = T005T.LANDX
• W_GEO_DS.STATE_PROV = T005U.BLAND
• W_GEO_DS.NATIONALITY = T005T.NATIO
Chapter 6Creating the Mapping
6-3
6.1.5 Define the Mapping FlowTo define the mapping flow:
1. Select the Physical diagram. The Physical diagram looks as shown below;
2. In the target group, select the access point for the source group that contains boththe T005T and T005U datastores. This source group represents the source datasetmade up of two joined SAP ERP datastores.
3. In the Property panel, under Loading Knowledge Module, select LKM SAP ERP toOracle (SQLLDR) or LKM SAP ERP to SQL from the Loading Knowledge Module drop-down list.
a. If you are using FTP for the data transfer, please set theFTP_TRANSFER_METHOD option to FTP. If the FTP server is installed onyour ODI agent machine, select NONE.
b. Leave other options as they are.
4. In the target group, select the target Oracle database, which is also used as thestaging area for this mapping.
5. In Property panel, under Integration Knowledge Module, select IKM OracleIncremental Update from the Integration Knowledge Module drop-down list.
6. Set the IKM options as follows:
a. Select No for the FLOW_CONTROL option.
b. Leave other options as they are.
7. From the File menu, click Save and close your mapping.
6.2 Running the MappingThis section contains the following topics.
Chapter 6Running the Mapping
6-4
6.2.1 Running the MappingTo run the mapping:
1. In the Projects tree view, expand the SAP Demo Project
2. Expand the SDE_SAP_GeoDimension folder.
3. Expand the Mappings node.
4. Select the SDE_SAP_GeoDimension.W_GEO_DS mapping.
5. Right-click and select Execute.
6. In the Execution window that appears, click OK.
7. Click OK in the Session Started window.
What happens when you run the mapping?
First, Oracle Data Integrator creates an ABAP program that does the following:
• It performs the extraction of the data on the SAP engine. In this example, theextraction joins the two source tables and then returns the joined resultset in anextraction file.
• It uploads the extraction file into a FTP data server. This FTP host is specified viathe File Logical Schema called File Server for SAP ABAP. This Logical Schema ismapped to a Physical Schema and therefore a data server in the given context.This data server contains the connection information for the FTP host.
Then, the ABAP code is uploaded using the OdiSapAbapExecute tool. The ABAPprogram is pushed into the SAP Function group given in the SAP_FUNCTION_GROUP LKMoption. This phase can be suppressed by setting the UPLOAD_ABAP_CODE LKM option toNo.
The ABAP code is executed also by the OdiSapAbapExecute tool. At the end of theABAP code execution, the extraction file is available in the FTP host.
The Oracle Data Integrator agent is able to download this extraction file from the FTPhost, or directly access it, depending on the FTP_TRANSFER_METHOD specified inthe IKM option.
Finally, when the agent accesses the extraction file, it uses SQL*Loader or a JDBCConnection to load this file into the Oracle/non-Oracle staging area. The rest of theintegration process takes place within the Oracle/non-Oracle engine.
6.2.2 Review the Mapping ExecutionTo review the mapping execution:
1. Connect to Operator.
2. In the Operator, select the Session List tree view.
3. Expand the All Executions node in this tree view.
4. The latest session is the first entry of this list.
5. Double click the SDE_SAP_GeoDimension.W_GEO_DS node to see the session detailsand the number of lines processed.
Chapter 6Running the Mapping
6-5
6.2.3 Review the Resulting DataTo review the resulting data:
1. In the Designer, in the Models tree view, expand the Oracle Target Model.
2. Select the W_GEO_DS datastore, right-click and select Data to view the dataintegrated into the target Oracle table.
Chapter 6Running the Mapping
6-6

7Going Further with Oracle Data Integrator
This chapter describes what steps to take next with Oracle Data Integrator.You have now completed a project extracting data from a SAP ERP system!
In this project, you have:
• Set up the environment and topology to work with SAP ERP.
• Created and reverse-engineered a SAP ERP data model
• Created a mapping to load the data from several joined SAP ERP tables into theOracle database.
Note:
In case the execution did not complete successfully, please check the ODIOperator and ODI Logs for details. In addition to this, the following log files willcontain execution information.
– <System Temp Dir or local FTP dir>/ ZODI_<Mapping
Id>_<SrcSet>_<Context>.out
– <System Temp Dir or local FTP dir>/ ZODI_<Mapping
Id>_<SrcSet>_<Context>.err
Refer to Log Files section in Application Adapters Guide for Oracle DataIntegrator for more details.
Refer to the individual KM options and their descriptions as well as to Considerations for SAP ERP Integration section in Application Adapters Guide forOracle Data Integrator, for more information on the SAP ERP KM features andoptions.
7.1 Going further with Oracle Data IntegratorUse the demonstration environment to familiarize yourself with Oracle Data Integrator.You can go further with Oracle Data Integrator by taking advantage of the samplesavailable on the Oracle Technology Network.
7-1

Chapter 7
Going further with Oracle Data Integrator
7-2
ASAP ABAP ERP Required Privileges
This appendix lists the required privileges for accessing the SAP system using OracleData Integrator.An SAP dialog user is required for connecting to the SAP system, for the RKMinstallation and for the LKM execution during development. A SAP RFC user is notsufficient.
During development, this user must have a developer license key. License keys canbe retrieved from http://service.sap.com. Any execution attempts without thisdeveloper license key will lead to failure and may cause the need for clean-upoperations.
For RKM and LKM execution in production, an SAP RFC user is sufficient.
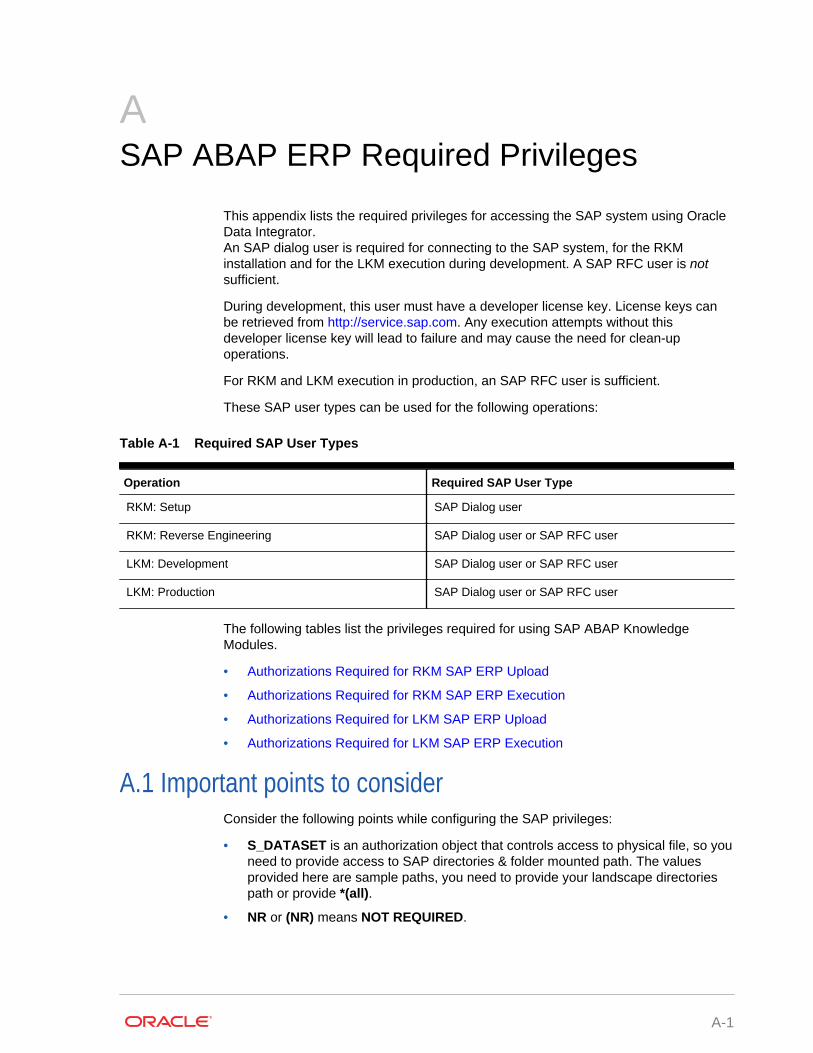
These SAP user types can be used for the following operations:
Table A-1 Required SAP User Types
Operation Required SAP User Type
RKM: Setup SAP Dialog user
RKM: Reverse Engineering SAP Dialog user or SAP RFC user
LKM: Development SAP Dialog user or SAP RFC user
LKM: Production SAP Dialog user or SAP RFC user
The following tables list the privileges required for using SAP ABAP KnowledgeModules.
• Authorizations Required for RKM SAP ERP Upload
• Authorizations Required for RKM SAP ERP Execution
• Authorizations Required for LKM SAP ERP Upload
• Authorizations Required for LKM SAP ERP Execution
A.1 Important points to considerConsider the following points while configuring the SAP privileges:
• S_DATASET is an authorization object that controls access to physical file, so youneed to provide access to SAP directories & folder mounted path. The valuesprovided here are sample paths, you need to provide your landscape directoriespath or provide *(all).
• NR or (NR) means NOT REQUIRED.
A-1
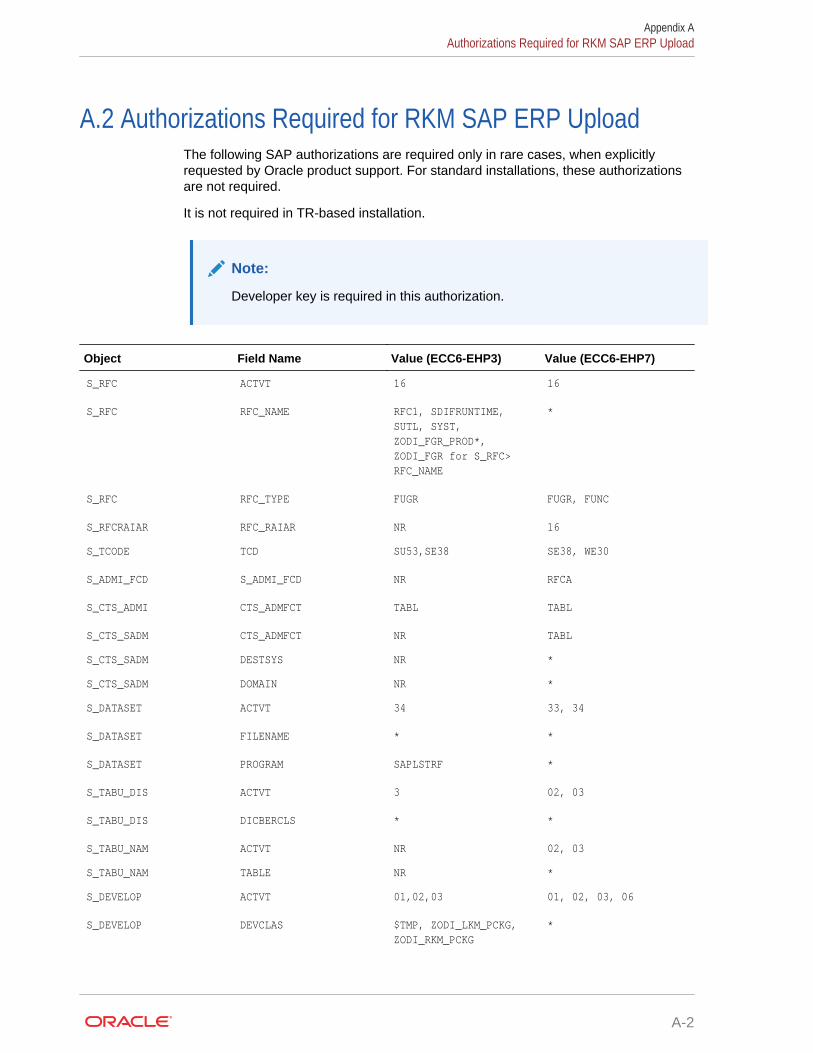
A.2 Authorizations Required for RKM SAP ERP UploadThe following SAP authorizations are required only in rare cases, when explicitlyrequested by Oracle product support. For standard installations, these authorizationsare not required.
It is not required in TR-based installation.
Note:
Developer key is required in this authorization.
Object Field Name Value (ECC6-EHP3) Value (ECC6-EHP7)
S_RFC ACTVT 16 16
S_RFC RFC_NAME RFC1, SDIFRUNTIME,SUTL, SYST,ZODI_FGR_PROD*,ZODI_FGR for S_RFC>RFC_NAME
*
S_RFC RFC_TYPE FUGR FUGR, FUNC
S_RFCRAIAR RFC_RAIAR NR 16
S_TCODE TCD SU53,SE38 SE38, WE30
S_ADMI_FCD S_ADMI_FCD NR RFCA
S_CTS_ADMI CTS_ADMFCT TABL TABL
S_CTS_SADM CTS_ADMFCT NR TABL
S_CTS_SADM DESTSYS NR *
S_CTS_SADM DOMAIN NR *
S_DATASET ACTVT 34 33, 34
S_DATASET FILENAME * *
S_DATASET PROGRAM SAPLSTRF *
S_TABU_DIS ACTVT 3 02, 03
S_TABU_DIS DICBERCLS * *
S_TABU_NAM ACTVT NR 02, 03
S_TABU_NAM TABLE NR *
S_DEVELOP ACTVT 01,02,03 01, 02, 03, 06
S_DEVELOP DEVCLAS $TMP, ZODI_LKM_PCKG,ZODI_RKM_PCKG
*
Appendix AAuthorizations Required for RKM SAP ERP Upload
A-2
Object Field Name Value (ECC6-EHP3) Value (ECC6-EHP7)
S_DEVELOP OBJNAME Z$$$XRFC, ZODI* *
S_DEVELOP OBJTYPE DEVC, FUGR, FUNC, PROG *
S_DEVELOP P_GROUP ''
S_PROGRAM P_ACTION NR BTCSUBMIT, SUBMIT,VARIANT
S_PROGRAM P_GROUP NR *
S_SYS_RWBO ACTVT NR 01, 02, 03, 05, 06, 23
S_SYS_RWBO DESTSYS NR *
S_SYS_RWBO DOMAIN NR ''
S_SYS_RWBO TTYPE NR DTRA
S_TRANSPRT ACTVT 01,03 01, 02, 03, 06
S_TRANSPRT TTYPE DTRA,TASK *
S_IDOCDEFT ACTVT NR 3
S_IDOCDEFT EDI_CIM NR
S_IDOCDEFT EDI_DOC NR
S_IDOCDEFT EDI_TCD NR
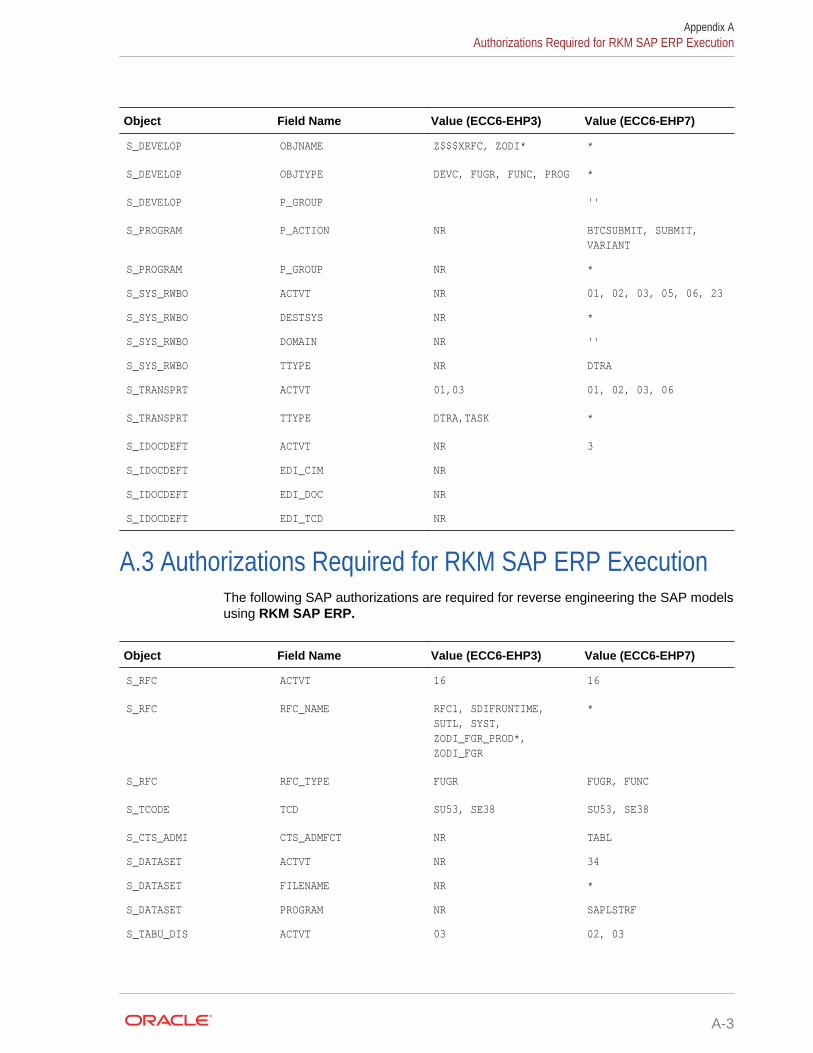
A.3 Authorizations Required for RKM SAP ERP ExecutionThe following SAP authorizations are required for reverse engineering the SAP modelsusing RKM SAP ERP.
Object Field Name Value (ECC6-EHP3) Value (ECC6-EHP7)
S_RFC ACTVT 16 16
S_RFC RFC_NAME RFC1, SDIFRUNTIME,SUTL, SYST,ZODI_FGR_PROD*,ZODI_FGR
*
S_RFC RFC_TYPE FUGR FUGR, FUNC
S_TCODE TCD SU53, SE38 SU53, SE38
S_CTS_ADMI CTS_ADMFCT NR TABL
S_DATASET ACTVT NR 34
S_DATASET FILENAME NR *
S_DATASET PROGRAM NR SAPLSTRF
S_TABU_DIS ACTVT 03 02, 03
Appendix AAuthorizations Required for RKM SAP ERP Execution
A-3
Object Field Name Value (ECC6-EHP3) Value (ECC6-EHP7)
S_TABU_DIS DICBERCLS * *
S_TABU_NAM ACTVT NR 02, 03
S_TABU_NAM TABLE NR *
S_DEVELOP ACTVT NR 01, 02, 03
S_DEVELOP DEVCLASS NR $TMP, ZODI_LKM_PCKG,ZODI_RKM_PCKG
S_DEVELOP OBJNAME NR Z$$$XRFC, ZODI*
S_DEVELOP OBJTYPE NR DEVC, FUGR, FUNC, PROG
S_DEVELOP P_GROUP NR
S_TRANSPRT ACTVT NR 01, 03
S_TRANSPRT TTYPE NR DTRA, TASK
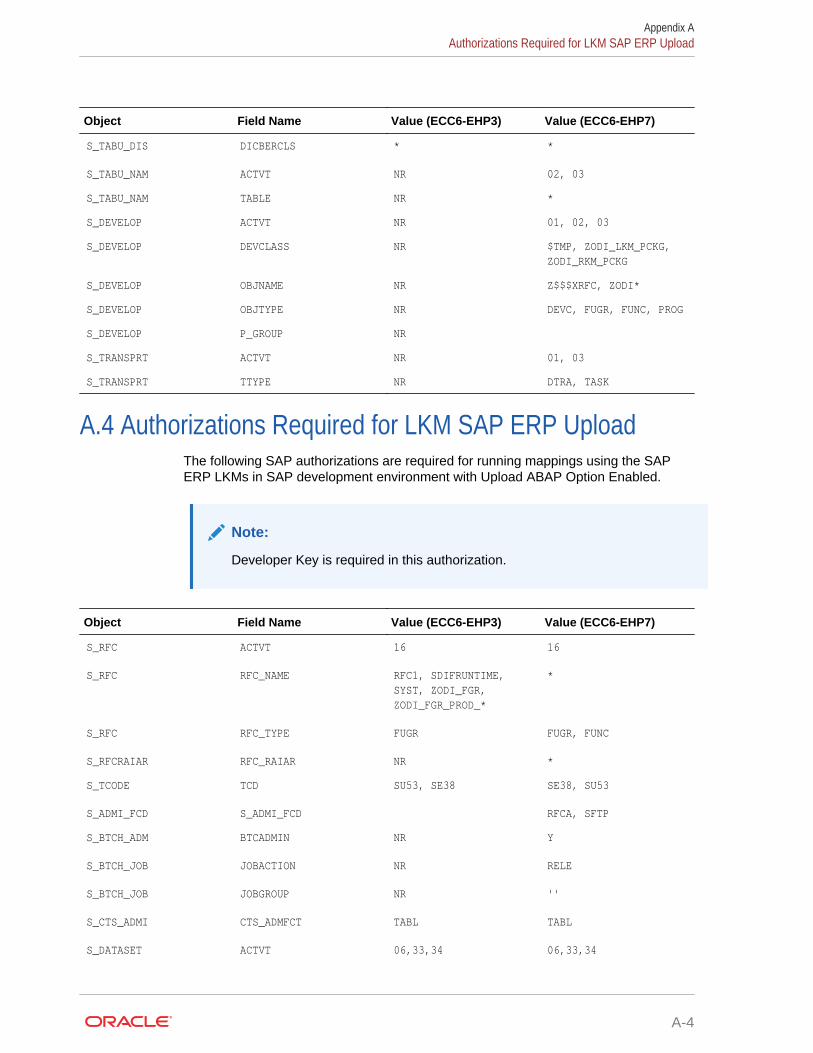
A.4 Authorizations Required for LKM SAP ERP UploadThe following SAP authorizations are required for running mappings using the SAPERP LKMs in SAP development environment with Upload ABAP Option Enabled.
Note:
Developer Key is required in this authorization.
Object Field Name Value (ECC6-EHP3) Value (ECC6-EHP7)
S_RFC ACTVT 16 16
S_RFC RFC_NAME RFC1, SDIFRUNTIME,SYST, ZODI_FGR,ZODI_FGR_PROD_*
*
S_RFC RFC_TYPE FUGR FUGR, FUNC
S_RFCRAIAR RFC_RAIAR NR *
S_TCODE TCD SU53, SE38 SE38, SU53
S_ADMI_FCD S_ADMI_FCD RFCA, SFTP
S_BTCH_ADM BTCADMIN NR Y
S_BTCH_JOB JOBACTION NR RELE
S_BTCH_JOB JOBGROUP NR ''
S_CTS_ADMI CTS_ADMFCT TABL TABL
S_DATASET ACTVT 06,33,34 06,33,34
Appendix AAuthorizations Required for LKM SAP ERP Upload
A-4
Object Field Name Value (ECC6-EHP3) Value (ECC6-EHP7)
S_DATASET FILENAME * *
S_DATASET PROGRAM SAPLSTRF,SAPLZODI_FGR_PROD*
SAPLSLOG, SAPLSTRF,SAPLZODI_FGR_PROD*,SAPLZ*, ZODI*
S_DEVELOP ACTVT 01 01
S_DEVELOP DEVCLASS *
S_DEVELOP OBJNAME ZODI* ZODI*
S_DEVELOP OBJTYPE FUGR, FUNC FUGR, FUNC
S_DEVELOP P_GROUP NR
S_TRANSPRT ACTVT 01 01, 02
S_TRANSPRT TTYPE DTRA,TASK DTRA,TASK
S_APPL_LOG ACTVT NR 6
S_APPL_LOG ALG_OBJECT NR ZODI_APPOBJ
S_APPL_LOG ALG_SUBOBJ NR ZODI_SUBOBJ
S_TABU_DIS ACTVT 3 NR
S_TABU_DIS DICBERCLS * NR
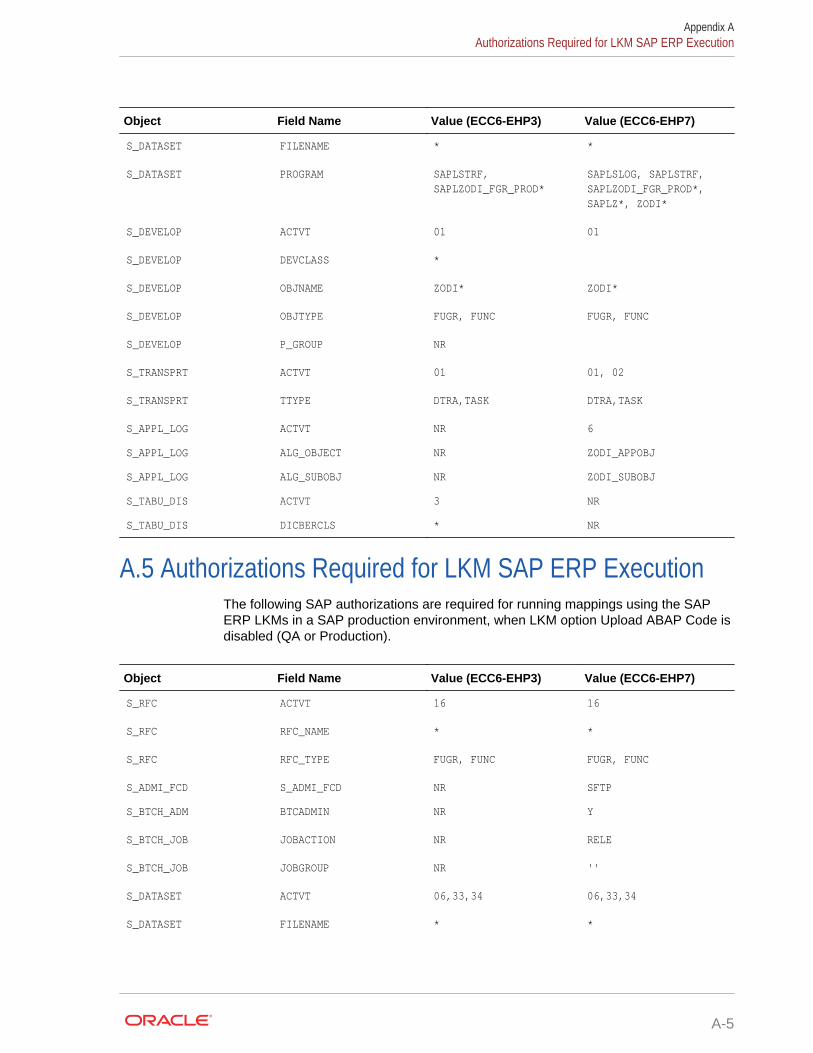
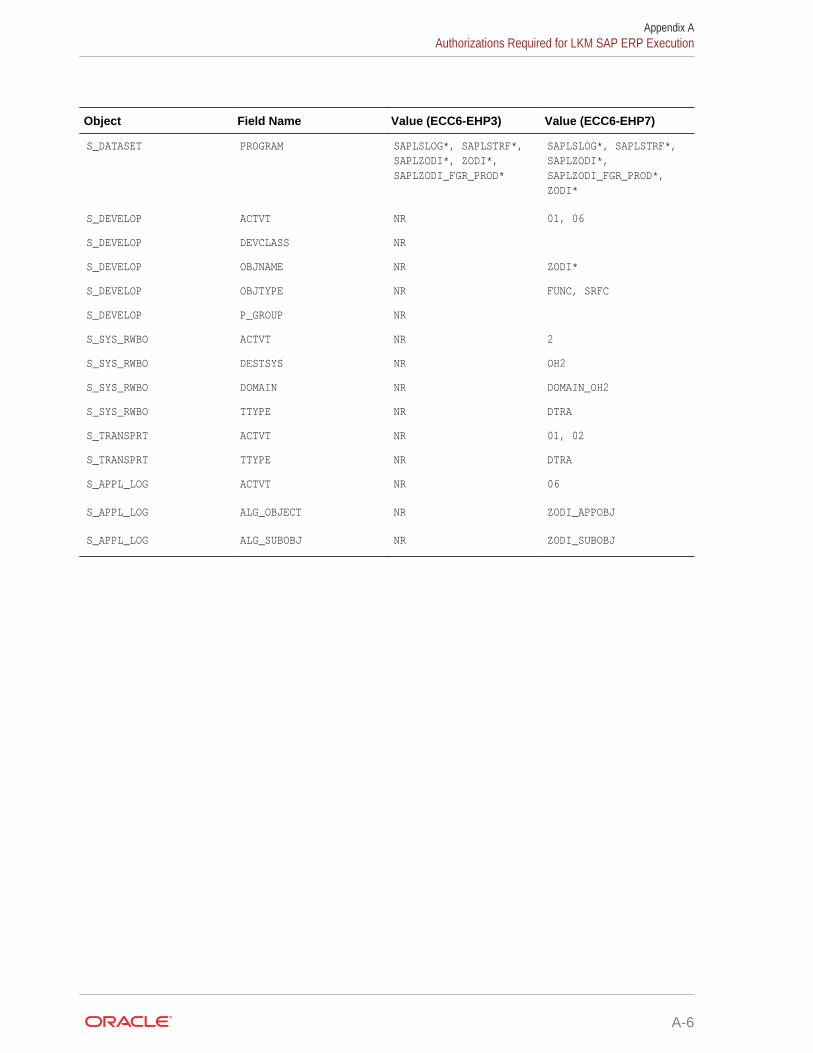
A.5 Authorizations Required for LKM SAP ERP ExecutionThe following SAP authorizations are required for running mappings using the SAPERP LKMs in a SAP production environment, when LKM option Upload ABAP Code isdisabled (QA or Production).
Object Field Name Value (ECC6-EHP3) Value (ECC6-EHP7)
S_RFC ACTVT 16 16
S_RFC RFC_NAME * *
S_RFC RFC_TYPE FUGR, FUNC FUGR, FUNC
S_ADMI_FCD S_ADMI_FCD NR SFTP
S_BTCH_ADM BTCADMIN NR Y
S_BTCH_JOB JOBACTION NR RELE
S_BTCH_JOB JOBGROUP NR ''
S_DATASET ACTVT 06,33,34 06,33,34
S_DATASET FILENAME * *
Appendix AAuthorizations Required for LKM SAP ERP Execution
A-5
Object Field Name Value (ECC6-EHP3) Value (ECC6-EHP7)
S_DATASET PROGRAM SAPLSLOG*, SAPLSTRF*,SAPLZODI*, ZODI*,SAPLZODI_FGR_PROD*
SAPLSLOG*, SAPLSTRF*,SAPLZODI*,SAPLZODI_FGR_PROD*,ZODI*
S_DEVELOP ACTVT NR 01, 06
S_DEVELOP DEVCLASS NR
S_DEVELOP OBJNAME NR ZODI*
S_DEVELOP OBJTYPE NR FUNC, SRFC
S_DEVELOP P_GROUP NR
S_SYS_RWBO ACTVT NR 2
S_SYS_RWBO DESTSYS NR OH2
S_SYS_RWBO DOMAIN NR DOMAIN_OH2
S_SYS_RWBO TTYPE NR DTRA
S_TRANSPRT ACTVT NR 01, 02
S_TRANSPRT TTYPE NR DTRA
S_APPL_LOG ACTVT NR 06
S_APPL_LOG ALG_OBJECT NR ZODI_APPOBJ
S_APPL_LOG ALG_SUBOBJ NR ZODI_SUBOBJ
Appendix AAuthorizations Required for LKM SAP ERP Execution
A-6
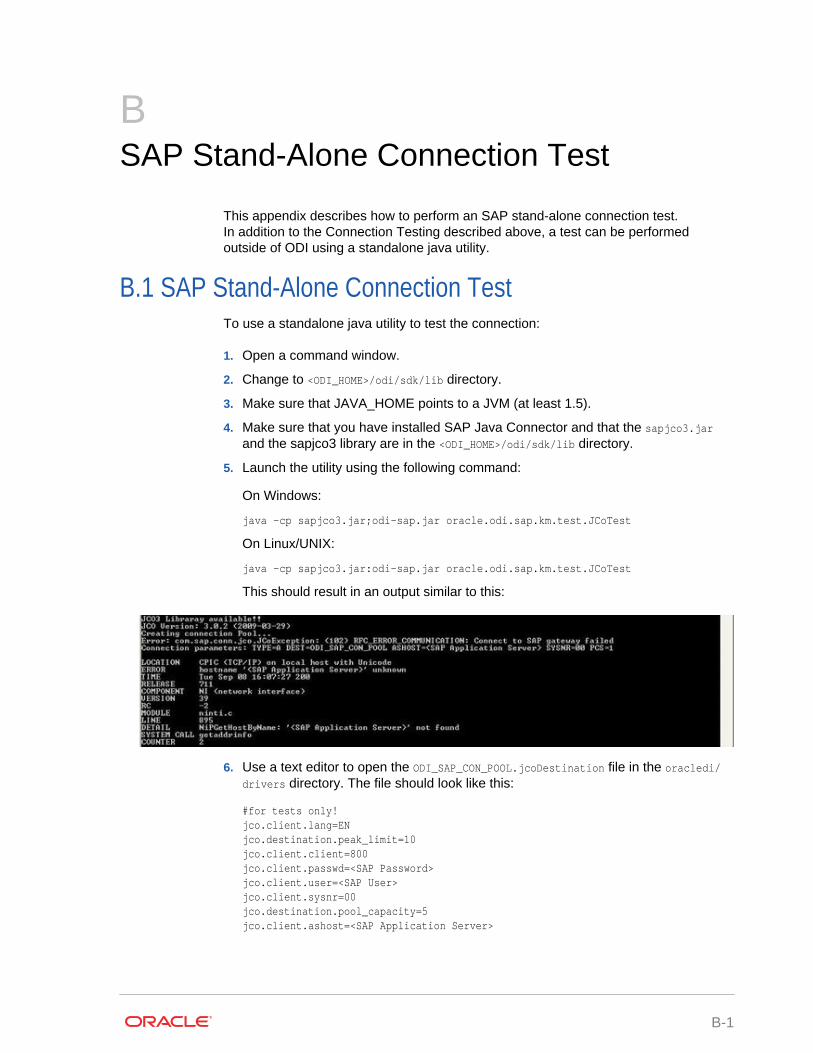
BSAP Stand-Alone Connection Test
This appendix describes how to perform an SAP stand-alone connection test.In addition to the Connection Testing described above, a test can be performedoutside of ODI using a standalone java utility.
B.1 SAP Stand-Alone Connection TestTo use a standalone java utility to test the connection:
1. Open a command window.
2. Change to <ODI_HOME>/odi/sdk/lib directory.
3. Make sure that JAVA_HOME points to a JVM (at least 1.5).
4. Make sure that you have installed SAP Java Connector and that the sapjco3.jarand the sapjco3 library are in the <ODI_HOME>/odi/sdk/lib directory.
5. Launch the utility using the following command:
On Windows:
java -cp sapjco3.jar;odi-sap.jar oracle.odi.sap.km.test.JCoTest
On Linux/UNIX:
java -cp sapjco3.jar:odi-sap.jar oracle.odi.sap.km.test.JCoTest
This should result in an output similar to this:
6. Use a text editor to open the ODI_SAP_CON_POOL.jcoDestination file in the oracledi/drivers directory. The file should look like this:
#for tests only!jco.client.lang=ENjco.destination.peak_limit=10jco.client.client=800jco.client.passwd=<SAP Password>jco.client.user=<SAP User>jco.client.sysnr=00jco.destination.pool_capacity=5jco.client.ashost=<SAP Application Server>
B-1
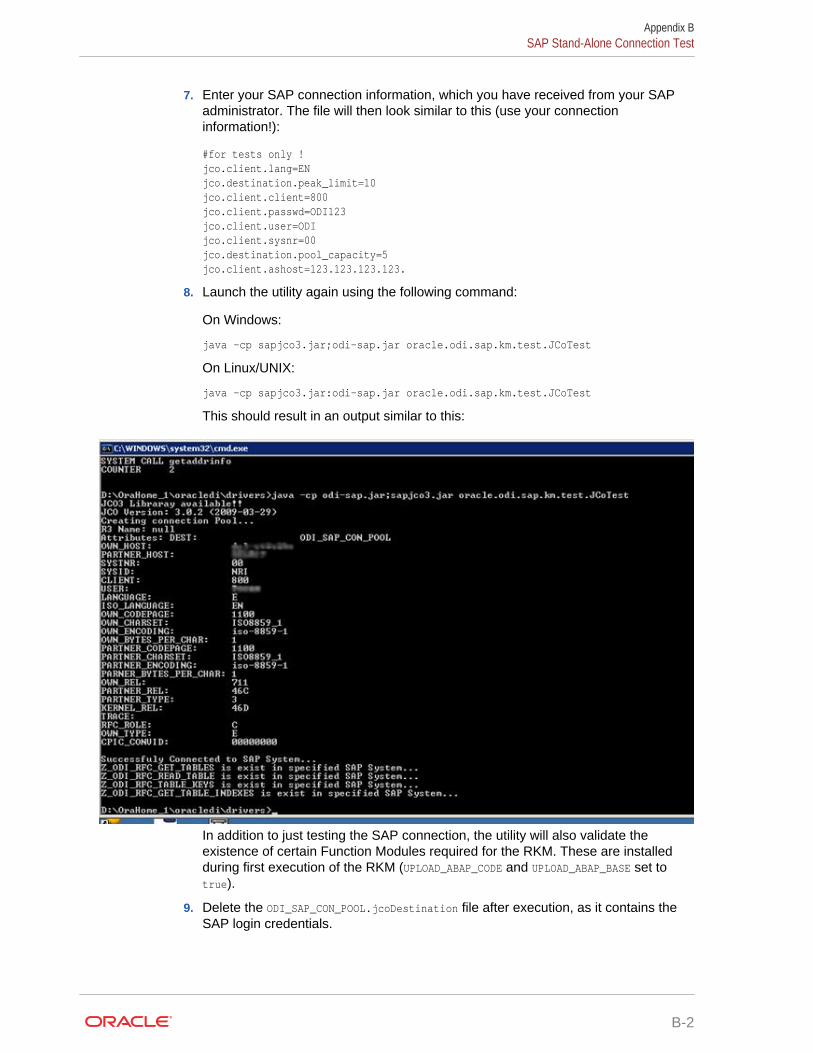
7. Enter your SAP connection information, which you have received from your SAPadministrator. The file will then look similar to this (use your connectioninformation!):
#for tests only !jco.client.lang=ENjco.destination.peak_limit=10jco.client.client=800jco.client.passwd=ODI123jco.client.user=ODIjco.client.sysnr=00jco.destination.pool_capacity=5jco.client.ashost=123.123.123.123.
8. Launch the utility again using the following command:
On Windows:
java -cp sapjco3.jar;odi-sap.jar oracle.odi.sap.km.test.JCoTest
On Linux/UNIX:
java -cp sapjco3.jar:odi-sap.jar oracle.odi.sap.km.test.JCoTest
This should result in an output similar to this:
In addition to just testing the SAP connection, the utility will also validate theexistence of certain Function Modules required for the RKM. These are installedduring first execution of the RKM (UPLOAD_ABAP_CODE and UPLOAD_ABAP_BASE set totrue).
9. Delete the ODI_SAP_CON_POOL.jcoDestination file after execution, as it contains theSAP login credentials.
Appendix BSAP Stand-Alone Connection Test
B-2
CUninstalling ODI SAP Components
This appendix describes how to uninstall ODI components from your SAP system.For removing ODI connectivity from the SAP system, please follow the stepsdescribed in this section.
Please note that this will delete ALL components including generated extractorprograms.
C.1 Updating ODI SAP ComponentsDuring first-time installation the TR installs some ODI objects into the SAP system.This installation consists of two parts: some base objects and some RFCs. Such fullinstallation requires that no ODI SAP objects are installed in the SAP system. See Uninstalling ODI SAP Components if needed.
If the ODI objects installed into your SAP systems have been installed by RKM SAPERP v34 or later / RKM SAP BW v25 or later, there is no need for reinstalling the baseobjects and it is sufficient to update just the RFCs. Reinstalling the RFCs is achievedby executing a reverse engineering run with RKM option UPLOAD_ABAP_BASE set to falseand RKM option UPLOAD_ABAP_CODE set to true.
C.2 Uninstalling ODI SAP ComponentsTo upgrade to a newer ODI SAP Connector release or to permanently remove the ODIconnectivity:
1. Start the SAP GUI.
2. Connect to the SAP systems you want to uninstall.
3. Go to the transaction SE80.
4. Select the package or development class option from the drop down box.
5. Enter ZODI_RKM_PCKG in the package or development class field. Note that for olderinstallations the package name is ZODI_DEVCLASS.
6. Right-click the ZODI_RKM_PCKG object below the object name tab.
7. Select Delete in the drop down menu and delete the development class.
If it does not allow deleting the development class individually, delete all the objectsinside one by one. For the contained Function Group please make sure to delete itin one go and do not delete the Function Group's Function Modules individually.Once all objects have been removed, delete the development class itself.
8. Go to transaction SE10. Select Modifiable and Workbench Requests. ClickDisplay.
9. Select the transport requests which have the ODI Objects and Release them.
10. Now repeat the steps 3 to 7 to delete Development Class.
C-1

11. Go to transaction SE01. Select Modifiable and Workbench Requests. ClickDisplay. Release the Transport Request which has ZODI_RKM_PCKG.
12. Repeat Step 4 to 11 for package ZODI_LKM_PCKG.
Appendix CUninstalling ODI SAP Components
C-2