getting started with purchasing and accounts...
TRANSCRIPT

Getting Started with Purchasing and Accounts Payable
Reissued Manual as of March 2014
This is a new edition of the Getting Started with Purchasing and Accounts Payable manual. This edition replaces the existing manual, and reflects the changes issued on software update SU012354-1805.
The Primary Changes Made
Section Pages Changes Made
“Defining GL Account Parameters”
page 310 Added a chapter with information about the following forms:
• GL Account Parameters (GLAP)
• GL Access Batch Update (GLBU)
• GL Account Authorization (GLAA)
• Create New GL Accounts (GLCN)
• Account Maintenance (GLMT)

Colleague FinanceGetting Started with Purchasing and
Accounts Payable
Release 18March 2014
To be informed of pending updates for this document, see Article 000029435.

Banner®, Colleague®, PowerCampus™, and Luminis® are trademarks of Ellucian Company L.P. or its affiliates and are registered in the U.S. and other countries. Ellucian®, Ellucian Advance™, Ellucian Degree Works™, Ellucian Course Signals™, Ellucian SmartCall™, and Ellucian Recruiter™ are trademarks of Ellucian Company L.P. or its affiliates. Other names may be trademarks of their respective owners.
© 2014 Ellucian Company L.P. and its affiliates.
Contains confidential and proprietary information of Ellucian and its subsidiaries. Use of these materials is limited to Ellucian licensees, and is subject to the terms and conditions of one or more written license agreements between Ellucian and the licensee in question.
In preparing and providing this publication, Ellucian is not rendering legal, accounting, or other similar professional services. Ellucian makes no claims that an institution's use of this publication or the software for which it is provided will guarantee compliance with applicable federal or state laws, rules, or regulations. Each organization should seek legal, accounting and other similar professional services from competent providers of the organization's own choosing.
Prepared by: Ellucian 4375 Fair Lakes Court Fairfax, Virginia 22033 United States of America

Ge
Table of Contents
About This Manual . . . . . . . . . . . . . . . . . . . . . . . . . . . . . . . . . . . . . . . . . . . 25
Who should read this manual? . . . . . . . . . . . . . . . . . . . . . . . . . . . . . . . . . . . . . . . . . 25
Target audience . . . . . . . . . . . . . . . . . . . . . . . . . . . . . . . . . . . . . . . . . . . . . . . . . . . . . . 25
User background . . . . . . . . . . . . . . . . . . . . . . . . . . . . . . . . . . . . . . . . . . . . . . . . . . . . . 25
User goals . . . . . . . . . . . . . . . . . . . . . . . . . . . . . . . . . . . . . . . . . . . . . . . . . . . . . . . . . . 26
What does this manual cover? . . . . . . . . . . . . . . . . . . . . . . . . . . . . . . . . . . . . . . . . . 26
How this manual is organized . . . . . . . . . . . . . . . . . . . . . . . . . . . . . . . . . . . . . . . . . . 27
Where to find more information . . . . . . . . . . . . . . . . . . . . . . . . . . . . . . . . . . . . . . . . 27
Overview of Purchasing/Payables Processing . . . . . . . . . . . . . . . . . . . . 30
In this chapter . . . . . . . . . . . . . . . . . . . . . . . . . . . . . . . . . . . . . . . . . . . . . . . . . . . . . . . 30
Purchasing/Payables setup and daily processing . . . . . . . . . . . . . . . . . . . . . . . . . 30
The purchasing and AP process: Role of the transaction codes . . . . . . . . . . . . . 32
Statuses. . . . . . . . . . . . . . . . . . . . . . . . . . . . . . . . . . . . . . . . . . . . . . . . . . . . . . . . . . . . 37
Understanding Purchasing and Accounts Payable Codes . . . . . . . . . . 38
In this chapter . . . . . . . . . . . . . . . . . . . . . . . . . . . . . . . . . . . . . . . . . . . . . . . . . . . . . . . 38
Where to find the information . . . . . . . . . . . . . . . . . . . . . . . . . . . . . . . . . . . . . . . . . . 39
What are codes? . . . . . . . . . . . . . . . . . . . . . . . . . . . . . . . . . . . . . . . . . . . . . . . . . . . . . 39
Types of codes used in the Purchasing and Accounts Payable Modules. . . . . . . . . . . 40
Code tables . . . . . . . . . . . . . . . . . . . . . . . . . . . . . . . . . . . . . . . . . . . . . . . . . . . . . . . . . 41
Code tables used in the Purchasing and Accounts Payable Modules . . . . . . . . . . . . . 41
Summary AP/PU code table . . . . . . . . . . . . . . . . . . . . . . . . . . . . . . . . . . . . . . . . . . . . . 43
4tting Started with Purchasing and Accounts Payable | Contents
Ge
Descriptions of code tables . . . . . . . . . . . . . . . . . . . . . . . . . . . . . . . . . . . . . . . . . . . . . 46
Code files . . . . . . . . . . . . . . . . . . . . . . . . . . . . . . . . . . . . . . . . . . . . . . . . . . . . . . . . . . 49
Code files used in the Purchasing and Accounts Payable modules. . . . . . . . . . . . . . . 50
Summary code file table . . . . . . . . . . . . . . . . . . . . . . . . . . . . . . . . . . . . . . . . . . . . . . . . 51
Descriptions of code files . . . . . . . . . . . . . . . . . . . . . . . . . . . . . . . . . . . . . . . . . . . . . . . 52
Code tables and code files maintained in Core . . . . . . . . . . . . . . . . . . . . . . . . . . . . 53
Code tables maintained in Colleague Core . . . . . . . . . . . . . . . . . . . . . . . . . . . . . . . . . 53
Descriptions of Colleague Core code tables. . . . . . . . . . . . . . . . . . . . . . . . . . . . . . . . . 55
Code files maintained in Colleague Core . . . . . . . . . . . . . . . . . . . . . . . . . . . . . . . . . . . 57
Descriptions of Colleague Core code files . . . . . . . . . . . . . . . . . . . . . . . . . . . . . . . . . . 58
Defining Codes Used in Purchasing & Accounts Payable . . . . . . . . . . . 59
In this chapter . . . . . . . . . . . . . . . . . . . . . . . . . . . . . . . . . . . . . . . . . . . . . . . . . . . . . . . 59
Where to find the information . . . . . . . . . . . . . . . . . . . . . . . . . . . . . . . . . . . . . . . . . . 60
Forms used . . . . . . . . . . . . . . . . . . . . . . . . . . . . . . . . . . . . . . . . . . . . . . . . . . . . . . . . . 61
Code tables used in both Purchasing and Accounts Payable . . . . . . . . . . . . . . . . 62
Before you begin . . . . . . . . . . . . . . . . . . . . . . . . . . . . . . . . . . . . . . . . . . . . . . . . . . . . . 62
Understanding the Purchasing and Accounts Payable code tables . . . . . . . . . . . . . . . 62
Determining your definitions for the user-maintained code tables. . . . . . . . . . . . . . 62Code tables maintained by Ellucian . . . . . . . . . . . . . . . . . . . . . . . . . . . . . . . . . . . . 64
Defining the Purchasing and Accounts Payable code tables . . . . . . . . . . . . . . . . . . . . 73
Understanding the Purchasing and Accounts Payable code files . . . . . . . . . . . . 74
Overview of code functions . . . . . . . . . . . . . . . . . . . . . . . . . . . . . . . . . . . . . . . . . . . . . 74
Required and optional codes . . . . . . . . . . . . . . . . . . . . . . . . . . . . . . . . . . . . . . . . . . . . 75
The transaction codes . . . . . . . . . . . . . . . . . . . . . . . . . . . . . . . . . . . . . . . . . . . . . . . . . 75
Order for defining codes . . . . . . . . . . . . . . . . . . . . . . . . . . . . . . . . . . . . . . . . . . . . . . . . 76
Defining currency codes . . . . . . . . . . . . . . . . . . . . . . . . . . . . . . . . . . . . . . . . . . . . . . 77
Before you begin . . . . . . . . . . . . . . . . . . . . . . . . . . . . . . . . . . . . . . . . . . . . . . . . . . . . . 77
Understanding currency codes . . . . . . . . . . . . . . . . . . . . . . . . . . . . . . . . . . . . . . . . . . . 78
Where currency codes are used . . . . . . . . . . . . . . . . . . . . . . . . . . . . . . . . . . . . . . . 78How foreign currency codes work . . . . . . . . . . . . . . . . . . . . . . . . . . . . . . . . . . . . . . 78Exchange rates . . . . . . . . . . . . . . . . . . . . . . . . . . . . . . . . . . . . . . . . . . . . . . . . . . . . 79Rules governing currency code definition . . . . . . . . . . . . . . . . . . . . . . . . . . . . . . . . 80
5tting Started with Purchasing and Accounts Payable | Contents

Ge
Tips for currency code definition . . . . . . . . . . . . . . . . . . . . . . . . . . . . . . . . . . . . . . . 81
Components of a currency code. . . . . . . . . . . . . . . . . . . . . . . . . . . . . . . . . . . . . . . . . . 81
Fields on the CEXM form . . . . . . . . . . . . . . . . . . . . . . . . . . . . . . . . . . . . . . . . . . . . 81Description . . . . . . . . . . . . . . . . . . . . . . . . . . . . . . . . . . . . . . . . . . . . . . . . . . . . . 81Exchange Rates. . . . . . . . . . . . . . . . . . . . . . . . . . . . . . . . . . . . . . . . . . . . . . . . . 82Exchange Rate Dates . . . . . . . . . . . . . . . . . . . . . . . . . . . . . . . . . . . . . . . . . . . . 82Add Operator/Add Date . . . . . . . . . . . . . . . . . . . . . . . . . . . . . . . . . . . . . . . . . . . 82Change Operator/Change Date . . . . . . . . . . . . . . . . . . . . . . . . . . . . . . . . . . . . . 82
Procedure for defining a currency code . . . . . . . . . . . . . . . . . . . . . . . . . . . . . . . . . . . . 82
Defining bank codes . . . . . . . . . . . . . . . . . . . . . . . . . . . . . . . . . . . . . . . . . . . . . . . . . 83
Before you begin . . . . . . . . . . . . . . . . . . . . . . . . . . . . . . . . . . . . . . . . . . . . . . . . . . . . . 83
Understanding bank codes. . . . . . . . . . . . . . . . . . . . . . . . . . . . . . . . . . . . . . . . . . . . . . 84
Where bank codes are used . . . . . . . . . . . . . . . . . . . . . . . . . . . . . . . . . . . . . . . . . . 84Defining a bank code for a foreign currency . . . . . . . . . . . . . . . . . . . . . . . . . . . . . . 85Defining EFT information. . . . . . . . . . . . . . . . . . . . . . . . . . . . . . . . . . . . . . . . . . . . . 85Setting up your electronic check reconciliation information in the bank code . . . . . 86Rules governing bank code definition . . . . . . . . . . . . . . . . . . . . . . . . . . . . . . . . . . . 87Tips for bank code definition . . . . . . . . . . . . . . . . . . . . . . . . . . . . . . . . . . . . . . . . . . 88
Components of a bank code. . . . . . . . . . . . . . . . . . . . . . . . . . . . . . . . . . . . . . . . . . . . . 88
Fields on the BKCM form . . . . . . . . . . . . . . . . . . . . . . . . . . . . . . . . . . . . . . . . . . . . 89Description . . . . . . . . . . . . . . . . . . . . . . . . . . . . . . . . . . . . . . . . . . . . . . . . . . . . . 89GL Cash Account . . . . . . . . . . . . . . . . . . . . . . . . . . . . . . . . . . . . . . . . . . . . . . . . 89GL Cash Account Description . . . . . . . . . . . . . . . . . . . . . . . . . . . . . . . . . . . . . . 89Bank Account Number . . . . . . . . . . . . . . . . . . . . . . . . . . . . . . . . . . . . . . . . . . . . 89Transit Routing Number . . . . . . . . . . . . . . . . . . . . . . . . . . . . . . . . . . . . . . . . . . . 89Pre-Numbered Check Stock. . . . . . . . . . . . . . . . . . . . . . . . . . . . . . . . . . . . . . . . 90Last AP Check Number . . . . . . . . . . . . . . . . . . . . . . . . . . . . . . . . . . . . . . . . . . . 90EFT Information . . . . . . . . . . . . . . . . . . . . . . . . . . . . . . . . . . . . . . . . . . . . . . . . . 90Active Status . . . . . . . . . . . . . . . . . . . . . . . . . . . . . . . . . . . . . . . . . . . . . . . . . . . 90Foreign Currency Code . . . . . . . . . . . . . . . . . . . . . . . . . . . . . . . . . . . . . . . . . . . 91Currency Designation. . . . . . . . . . . . . . . . . . . . . . . . . . . . . . . . . . . . . . . . . . . . . 91Currency Exchange GL Acct . . . . . . . . . . . . . . . . . . . . . . . . . . . . . . . . . . . . . . . 91Currency Exchange GL Acct Description . . . . . . . . . . . . . . . . . . . . . . . . . . . . . . 91Reconciliation Info . . . . . . . . . . . . . . . . . . . . . . . . . . . . . . . . . . . . . . . . . . . . . . . 91
Components of bank codes used for e-Check processing . . . . . . . . . . . . . . . . . . . . . . 92
Fields on the ECPD form. . . . . . . . . . . . . . . . . . . . . . . . . . . . . . . . . . . . . . . . . . . . . 92Process E-Checks . . . . . . . . . . . . . . . . . . . . . . . . . . . . . . . . . . . . . . . . . . . . . . . 92U.S. EFT Format . . . . . . . . . . . . . . . . . . . . . . . . . . . . . . . . . . . . . . . . . . . . . . . . 92EFT Subroutine . . . . . . . . . . . . . . . . . . . . . . . . . . . . . . . . . . . . . . . . . . . . . . . . . 93Include Carriage Return for U.S. Banks. . . . . . . . . . . . . . . . . . . . . . . . . . . . . . . 93Organization ID . . . . . . . . . . . . . . . . . . . . . . . . . . . . . . . . . . . . . . . . . . . . . . . . . 93U.S. Blocking Factor . . . . . . . . . . . . . . . . . . . . . . . . . . . . . . . . . . . . . . . . . . . . . 93U.S. Padding Character . . . . . . . . . . . . . . . . . . . . . . . . . . . . . . . . . . . . . . . . . . . 93Include Offset Record for U.S. Banks . . . . . . . . . . . . . . . . . . . . . . . . . . . . . . . . 93Canadian Client Number . . . . . . . . . . . . . . . . . . . . . . . . . . . . . . . . . . . . . . . . . . 94Canadian Processing Centre . . . . . . . . . . . . . . . . . . . . . . . . . . . . . . . . . . . . . . . 94
6tting Started with Purchasing and Accounts Payable | Contents

Ge
Canadian Processing Centre . . . . . . . . . . . . . . . . . . . . . . . . . . . . . . . . . . . . . . . 94
Procedure for defining a bank code . . . . . . . . . . . . . . . . . . . . . . . . . . . . . . . . . . . . . . . 95
Components of bank code reconciliation information . . . . . . . . . . . . . . . . . . . . . . . . . . 96
Fields on the BKCD form. . . . . . . . . . . . . . . . . . . . . . . . . . . . . . . . . . . . . . . . . . . . . 97Output Device . . . . . . . . . . . . . . . . . . . . . . . . . . . . . . . . . . . . . . . . . . . . . . . . . . 97Request Subroutine . . . . . . . . . . . . . . . . . . . . . . . . . . . . . . . . . . . . . . . . . . . . . . 97Reconciliation Server . . . . . . . . . . . . . . . . . . . . . . . . . . . . . . . . . . . . . . . . . . . . . 98Reconciliation Login . . . . . . . . . . . . . . . . . . . . . . . . . . . . . . . . . . . . . . . . . . . . . . 98Reconciliation Password . . . . . . . . . . . . . . . . . . . . . . . . . . . . . . . . . . . . . . . . . . 98Reconciliation Drive . . . . . . . . . . . . . . . . . . . . . . . . . . . . . . . . . . . . . . . . . . . . . . 98Reconciliation Path . . . . . . . . . . . . . . . . . . . . . . . . . . . . . . . . . . . . . . . . . . . . . . 98Reconciliation File Name . . . . . . . . . . . . . . . . . . . . . . . . . . . . . . . . . . . . . . . . . . 98Reconciliation Subroutine . . . . . . . . . . . . . . . . . . . . . . . . . . . . . . . . . . . . . . . . . 98Request Tape Block Size . . . . . . . . . . . . . . . . . . . . . . . . . . . . . . . . . . . . . . . . . . 98Request Tape Record Size . . . . . . . . . . . . . . . . . . . . . . . . . . . . . . . . . . . . . . . . 99Request Tape Subroutine. . . . . . . . . . . . . . . . . . . . . . . . . . . . . . . . . . . . . . . . . . 99Reconciliation Tape Block Size . . . . . . . . . . . . . . . . . . . . . . . . . . . . . . . . . . . . . 99Reconciliation Tape Record Size . . . . . . . . . . . . . . . . . . . . . . . . . . . . . . . . . . . . 99Reconciliation Tape Subroutine . . . . . . . . . . . . . . . . . . . . . . . . . . . . . . . . . . . . . 99
Procedure for defining bank code reconciliation information . . . . . . . . . . . . . . . . . . . . 99
Defining AP types . . . . . . . . . . . . . . . . . . . . . . . . . . . . . . . . . . . . . . . . . . . . . . . . . . . . 100
Before you begin . . . . . . . . . . . . . . . . . . . . . . . . . . . . . . . . . . . . . . . . . . . . . . . . . . . . . 100
Understanding AP types. . . . . . . . . . . . . . . . . . . . . . . . . . . . . . . . . . . . . . . . . . . . . . . . 101
Information provided to transactions by the AP type code . . . . . . . . . . . . . . . . . . . 101AP Source . . . . . . . . . . . . . . . . . . . . . . . . . . . . . . . . . . . . . . . . . . . . . . . . . . . . . 102AP Control GL Account . . . . . . . . . . . . . . . . . . . . . . . . . . . . . . . . . . . . . . . . . . . 102Bank Code (cash account) . . . . . . . . . . . . . . . . . . . . . . . . . . . . . . . . . . . . . . . . . 103Discount GL Account . . . . . . . . . . . . . . . . . . . . . . . . . . . . . . . . . . . . . . . . . . . . . 103Tax Expense GL Account. . . . . . . . . . . . . . . . . . . . . . . . . . . . . . . . . . . . . . . . . . 103
How AP types operate in daily processing . . . . . . . . . . . . . . . . . . . . . . . . . . . . . . . 103Factors to consider in setting up your AP types . . . . . . . . . . . . . . . . . . . . . . . . . . . 104How to use AP types to reflect your procurement procedures . . . . . . . . . . . . . . . . 104
Defining AP types by category of goods purchased . . . . . . . . . . . . . . . . . . . . . 104Defining AP types for branch or shadow procurement offices . . . . . . . . . . . . . . 105Entering AP types into vendor records. . . . . . . . . . . . . . . . . . . . . . . . . . . . . . . . 105
Examples of AP type setup options. . . . . . . . . . . . . . . . . . . . . . . . . . . . . . . . . . . . . 106Example 1: Centralized purchasing and AP functions . . . . . . . . . . . . . . . . . . . . 106Example 2: Decentralized requisition entry, central purchasing and AP functions106Example 3: Decentralized purchasing offices, central AP control GL account and bank account . . . . . . . . . . . . . . . . . . . . . . . . . . . . . . . . . . . . . . . . . . . . . . . . 106Example 4: Purchasing and AP functions completely decentralized . . . . . . . . . 107Example 5: Any size institution with intra-campus shadow procurement functions. . . . . . . . . . . . . . . . . . . . . . . . . . . . . . . . . . . . . . . . . . . . . . . . . . . . . . . 108
Reporting by AP types. . . . . . . . . . . . . . . . . . . . . . . . . . . . . . . . . . . . . . . . . . . . . . . 108Defining your AP types . . . . . . . . . . . . . . . . . . . . . . . . . . . . . . . . . . . . . . . . . . . . . . 108
Steps to develop your AP types . . . . . . . . . . . . . . . . . . . . . . . . . . . . . . . . . . . . . 109
7tting Started with Purchasing and Accounts Payable | Contents

Ge
How to designate 1099 vendors . . . . . . . . . . . . . . . . . . . . . . . . . . . . . . . . . . . . . . . 110Setting Up an Accounts Receivable AP type. . . . . . . . . . . . . . . . . . . . . . . . . . . . . . 110Rules governing AP type definition . . . . . . . . . . . . . . . . . . . . . . . . . . . . . . . . . . . . . 111Tips for AP type definition . . . . . . . . . . . . . . . . . . . . . . . . . . . . . . . . . . . . . . . . . . . . 111
Components of an AP type. . . . . . . . . . . . . . . . . . . . . . . . . . . . . . . . . . . . . . . . . . . . . . 112
Fields on the APTF form . . . . . . . . . . . . . . . . . . . . . . . . . . . . . . . . . . . . . . . . . . . . . 113Description . . . . . . . . . . . . . . . . . . . . . . . . . . . . . . . . . . . . . . . . . . . . . . . . . . . . . 113Source . . . . . . . . . . . . . . . . . . . . . . . . . . . . . . . . . . . . . . . . . . . . . . . . . . . . . . . . 113AP Control GL Acct . . . . . . . . . . . . . . . . . . . . . . . . . . . . . . . . . . . . . . . . . . . . . . 114AP Control GL Acct Description . . . . . . . . . . . . . . . . . . . . . . . . . . . . . . . . . . . . . 114Bank Code . . . . . . . . . . . . . . . . . . . . . . . . . . . . . . . . . . . . . . . . . . . . . . . . . . . . . 114Bank Code GL Acct . . . . . . . . . . . . . . . . . . . . . . . . . . . . . . . . . . . . . . . . . . . . . . 114Bank Code GL Acct Description. . . . . . . . . . . . . . . . . . . . . . . . . . . . . . . . . . . . . 114Discount GL Acct . . . . . . . . . . . . . . . . . . . . . . . . . . . . . . . . . . . . . . . . . . . . . . . . 115Discount GL Acct Description . . . . . . . . . . . . . . . . . . . . . . . . . . . . . . . . . . . . . . 115Tax Expense GL Acct. . . . . . . . . . . . . . . . . . . . . . . . . . . . . . . . . . . . . . . . . . . . . 115Tax Expense GL Acct Description . . . . . . . . . . . . . . . . . . . . . . . . . . . . . . . . . . . 115Organization ID . . . . . . . . . . . . . . . . . . . . . . . . . . . . . . . . . . . . . . . . . . . . . . . . . 115Tax ID . . . . . . . . . . . . . . . . . . . . . . . . . . . . . . . . . . . . . . . . . . . . . . . . . . . . . . . . . 115
Procedure for defining an AP type . . . . . . . . . . . . . . . . . . . . . . . . . . . . . . . . . . . . . . . . 115
Defining staff/volunteer codes . . . . . . . . . . . . . . . . . . . . . . . . . . . . . . . . . . . . . . . . . 117
Before you begin . . . . . . . . . . . . . . . . . . . . . . . . . . . . . . . . . . . . . . . . . . . . . . . . . . . . . 117
Understanding staff/volunteer codes . . . . . . . . . . . . . . . . . . . . . . . . . . . . . . . . . . . . . . 117
Rules governing staff/volunteer code definition. . . . . . . . . . . . . . . . . . . . . . . . . . . . 118Tips for staff/volunteer code definition . . . . . . . . . . . . . . . . . . . . . . . . . . . . . . . . . . . 118
Components of a staff/volunteer code . . . . . . . . . . . . . . . . . . . . . . . . . . . . . . . . . . . . . 118
Noteworthy fields on the SVM form. . . . . . . . . . . . . . . . . . . . . . . . . . . . . . . . . . . . . 119Staff Code . . . . . . . . . . . . . . . . . . . . . . . . . . . . . . . . . . . . . . . . . . . . . . . . . . . . . 119DMI Registry Info (R18 Only) . . . . . . . . . . . . . . . . . . . . . . . . . . . . . . . . . . . . . . . 119Staff Type . . . . . . . . . . . . . . . . . . . . . . . . . . . . . . . . . . . . . . . . . . . . . . . . . . . . . . 119Office Codes . . . . . . . . . . . . . . . . . . . . . . . . . . . . . . . . . . . . . . . . . . . . . . . . . . . 119
Procedure for Defining a staff/volunteer code . . . . . . . . . . . . . . . . . . . . . . . . . . . . . . . 119
Defining tax codes . . . . . . . . . . . . . . . . . . . . . . . . . . . . . . . . . . . . . . . . . . . . . . . . . . . 120
Before you begin . . . . . . . . . . . . . . . . . . . . . . . . . . . . . . . . . . . . . . . . . . . . . . . . . . . . . 120
Understanding tax codes . . . . . . . . . . . . . . . . . . . . . . . . . . . . . . . . . . . . . . . . . . . . . . . 121
How tax codes are used in daily processing . . . . . . . . . . . . . . . . . . . . . . . . . . . . . . 121How rebate tax codes work . . . . . . . . . . . . . . . . . . . . . . . . . . . . . . . . . . . . . . . . . . . 122Some additional concepts about tax codes . . . . . . . . . . . . . . . . . . . . . . . . . . . . . . . 122
The effective date . . . . . . . . . . . . . . . . . . . . . . . . . . . . . . . . . . . . . . . . . . . . . . . 122
Defining your tax codes . . . . . . . . . . . . . . . . . . . . . . . . . . . . . . . . . . . . . . . . . . . . . . . . 125
Tax codes used primarily by U.S. institutions . . . . . . . . . . . . . . . . . . . . . . . . . . . . . 125Defining a standard (simple) tax code . . . . . . . . . . . . . . . . . . . . . . . . . . . . . . . . 125Defining a use tax code . . . . . . . . . . . . . . . . . . . . . . . . . . . . . . . . . . . . . . . . . . . 126
8tting Started with Purchasing and Accounts Payable | Contents
Ge
Defining a rebate tax code . . . . . . . . . . . . . . . . . . . . . . . . . . . . . . . . . . . . . . . . . 127Tax codes for rebated and refunded taxes (Canadian institutions) . . . . . . . . . . . . . 128
Goods and Services Tax (GST) nonrebate tax code . . . . . . . . . . . . . . . . . . . 129Goods and Services Tax (GST) rebate tax codes . . . . . . . . . . . . . . . . . . . . . 130GST Input Tax Credit (ITC) tax codes . . . . . . . . . . . . . . . . . . . . . . . . . . . . . . . . 132Goods and Services Tax (GST) tax codes involving both rebate and ITC.. 133Provincial sales taxes (PST) . . . . . . . . . . . . . . . . . . . . . . . . . . . . . . . . . . . . . . 135Taxes that use compounding . . . . . . . . . . . . . . . . . . . . . . . . . . . . . . . . . . . . . 135
Rules governing tax code definition. . . . . . . . . . . . . . . . . . . . . . . . . . . . . . . . . . . . . 136
Components of a tax code . . . . . . . . . . . . . . . . . . . . . . . . . . . . . . . . . . . . . . . . . . . . . . 136
Fields on the TXCM form . . . . . . . . . . . . . . . . . . . . . . . . . . . . . . . . . . . . . . . . . . . . 137Description . . . . . . . . . . . . . . . . . . . . . . . . . . . . . . . . . . . . . . . . . . . . . . . . . . . . . 137Rebates/Refunds Involved . . . . . . . . . . . . . . . . . . . . . . . . . . . . . . . . . . . . . . . . . 137Rebate/Refund GL Account . . . . . . . . . . . . . . . . . . . . . . . . . . . . . . . . . . . . . . . . 137GL Account Description . . . . . . . . . . . . . . . . . . . . . . . . . . . . . . . . . . . . . . . . . . . 137Use Tax Involved . . . . . . . . . . . . . . . . . . . . . . . . . . . . . . . . . . . . . . . . . . . . . . . . 137Use Tax GL Account . . . . . . . . . . . . . . . . . . . . . . . . . . . . . . . . . . . . . . . . . . . . . 137GL Account Description . . . . . . . . . . . . . . . . . . . . . . . . . . . . . . . . . . . . . . . . . . . 138Allow AP/Pur Entry. . . . . . . . . . . . . . . . . . . . . . . . . . . . . . . . . . . . . . . . . . . . . . . 138Tax Code Category . . . . . . . . . . . . . . . . . . . . . . . . . . . . . . . . . . . . . . . . . . . . . . 138[Tax Code Percentage Information] . . . . . . . . . . . . . . . . . . . . . . . . . . . . . . . . . . 138Effective Date. . . . . . . . . . . . . . . . . . . . . . . . . . . . . . . . . . . . . . . . . . . . . . . . . . . 138Compound Seq . . . . . . . . . . . . . . . . . . . . . . . . . . . . . . . . . . . . . . . . . . . . . . . . . 139Tax Pct . . . . . . . . . . . . . . . . . . . . . . . . . . . . . . . . . . . . . . . . . . . . . . . . . . . . . . . . 139Rebate Pct . . . . . . . . . . . . . . . . . . . . . . . . . . . . . . . . . . . . . . . . . . . . . . . . . . . . . 139Exempt Pct. . . . . . . . . . . . . . . . . . . . . . . . . . . . . . . . . . . . . . . . . . . . . . . . . . . . . 139Copy from Tax Code . . . . . . . . . . . . . . . . . . . . . . . . . . . . . . . . . . . . . . . . . . . . . 139
Procedure for defining a tax code. . . . . . . . . . . . . . . . . . . . . . . . . . . . . . . . . . . . . . . . . 140
Defining units of issue . . . . . . . . . . . . . . . . . . . . . . . . . . . . . . . . . . . . . . . . . . . . . . . . 141
Before you begin . . . . . . . . . . . . . . . . . . . . . . . . . . . . . . . . . . . . . . . . . . . . . . . . . . . . . 141
Understanding units of issue . . . . . . . . . . . . . . . . . . . . . . . . . . . . . . . . . . . . . . . . . . . . 142
Where units of issue are used. . . . . . . . . . . . . . . . . . . . . . . . . . . . . . . . . . . . . . . . . 142Rules governing unit of issue definition. . . . . . . . . . . . . . . . . . . . . . . . . . . . . . . . . . 142Tips for unit of issue definition . . . . . . . . . . . . . . . . . . . . . . . . . . . . . . . . . . . . . . . . . 143
Components of a unit of issue code . . . . . . . . . . . . . . . . . . . . . . . . . . . . . . . . . . . . . . . 143
Procedure for defining a unit of issue code . . . . . . . . . . . . . . . . . . . . . . . . . . . . . . . . . 143
Defining vendor terms . . . . . . . . . . . . . . . . . . . . . . . . . . . . . . . . . . . . . . . . . . . . . . . . 144
Before you begin . . . . . . . . . . . . . . . . . . . . . . . . . . . . . . . . . . . . . . . . . . . . . . . . . . . . . 144
Understanding vendor terms . . . . . . . . . . . . . . . . . . . . . . . . . . . . . . . . . . . . . . . . . . . . 144
How vendor terms codes work . . . . . . . . . . . . . . . . . . . . . . . . . . . . . . . . . . . . . . . . 145Vendor terms and discount method. . . . . . . . . . . . . . . . . . . . . . . . . . . . . . . . . . . . . 146Rules governing vendor terms definition . . . . . . . . . . . . . . . . . . . . . . . . . . . . . . . . . 146Tips for vendor terms definition . . . . . . . . . . . . . . . . . . . . . . . . . . . . . . . . . . . . . . . . 146
Components of a vendor terms code . . . . . . . . . . . . . . . . . . . . . . . . . . . . . . . . . . . . . . 147
9tting Started with Purchasing and Accounts Payable | Contents

Ge
Fields on the VTMF form. . . . . . . . . . . . . . . . . . . . . . . . . . . . . . . . . . . . . . . . . . . . . 147Description . . . . . . . . . . . . . . . . . . . . . . . . . . . . . . . . . . . . . . . . . . . . . . . . . . . . . 147Discount Percent . . . . . . . . . . . . . . . . . . . . . . . . . . . . . . . . . . . . . . . . . . . . . . . . 147Discount Days . . . . . . . . . . . . . . . . . . . . . . . . . . . . . . . . . . . . . . . . . . . . . . . . . . 147Days Due . . . . . . . . . . . . . . . . . . . . . . . . . . . . . . . . . . . . . . . . . . . . . . . . . . . . . . 147Discount Amount . . . . . . . . . . . . . . . . . . . . . . . . . . . . . . . . . . . . . . . . . . . . . . . . 148Add Operator / Add Date . . . . . . . . . . . . . . . . . . . . . . . . . . . . . . . . . . . . . . . . . . 148Change Operator / Change Date . . . . . . . . . . . . . . . . . . . . . . . . . . . . . . . . . . . . 148
Procedure for defining a vendor terms code . . . . . . . . . . . . . . . . . . . . . . . . . . . . . . . . 148
Defining vendor types . . . . . . . . . . . . . . . . . . . . . . . . . . . . . . . . . . . . . . . . . . . . . . . . 149
Before you begin . . . . . . . . . . . . . . . . . . . . . . . . . . . . . . . . . . . . . . . . . . . . . . . . . . . . . 149
Understanding vendor types. . . . . . . . . . . . . . . . . . . . . . . . . . . . . . . . . . . . . . . . . . . . . 149
Examples of vendor types . . . . . . . . . . . . . . . . . . . . . . . . . . . . . . . . . . . . . . . . . . . . 150Rules governing vendor type definition . . . . . . . . . . . . . . . . . . . . . . . . . . . . . . . . . . 150
Components of a vendor type . . . . . . . . . . . . . . . . . . . . . . . . . . . . . . . . . . . . . . . . . . . 150
Procedure for defining a vendor type . . . . . . . . . . . . . . . . . . . . . . . . . . . . . . . . . . . . . . 151
Understanding Commodity/Service Codes . . . . . . . . . . . . . . . . . . . . . . . 152
In this chapter . . . . . . . . . . . . . . . . . . . . . . . . . . . . . . . . . . . . . . . . . . . . . . . . . . . . . . . 152
Where to find the information . . . . . . . . . . . . . . . . . . . . . . . . . . . . . . . . . . . . . . . . . . 152
Overview of commodity/service codes . . . . . . . . . . . . . . . . . . . . . . . . . . . . . . . . . . 153
Standards for commodity codes . . . . . . . . . . . . . . . . . . . . . . . . . . . . . . . . . . . . . . . . . . 153
State commodity lists. . . . . . . . . . . . . . . . . . . . . . . . . . . . . . . . . . . . . . . . . . . . . . . . 154The NIGP commodity file . . . . . . . . . . . . . . . . . . . . . . . . . . . . . . . . . . . . . . . . . . . . 154Ordering the NIGP commodity code list . . . . . . . . . . . . . . . . . . . . . . . . . . . . . . . . . 155
The Colleague commodity code file . . . . . . . . . . . . . . . . . . . . . . . . . . . . . . . . . . . . . . . 156
Defining and maintaining commodity codes . . . . . . . . . . . . . . . . . . . . . . . . . . . . . . 156
Flags for setting up your commodity codes . . . . . . . . . . . . . . . . . . . . . . . . . . . . . . . . . 157
Use description (Yes/No). . . . . . . . . . . . . . . . . . . . . . . . . . . . . . . . . . . . . . . . . . . . . 158MSDS required (Yes/No) . . . . . . . . . . . . . . . . . . . . . . . . . . . . . . . . . . . . . . . . . . . . . 158Bid required (Yes/No) . . . . . . . . . . . . . . . . . . . . . . . . . . . . . . . . . . . . . . . . . . . . . . . 158Fixed asset (single/multi-valued) . . . . . . . . . . . . . . . . . . . . . . . . . . . . . . . . . . . . . . . 158Inventory item (Yes/No) . . . . . . . . . . . . . . . . . . . . . . . . . . . . . . . . . . . . . . . . . . . . . . 159Track price (Yes/No) . . . . . . . . . . . . . . . . . . . . . . . . . . . . . . . . . . . . . . . . . . . . . . . . 159
Commodity LookUp, miscellaneous codes, and buying arrangements . . . . . . . . . . . . 159
Commodity LookUp. . . . . . . . . . . . . . . . . . . . . . . . . . . . . . . . . . . . . . . . . . . . . . . . . 159Miscellaneous codes . . . . . . . . . . . . . . . . . . . . . . . . . . . . . . . . . . . . . . . . . . . . . . . . 160Buying arrangements . . . . . . . . . . . . . . . . . . . . . . . . . . . . . . . . . . . . . . . . . . . . . . . 160
10tting Started with Purchasing and Accounts Payable | Contents

Ge
Linking purchase information through commodity codes . . . . . . . . . . . . . . . . . . . 160
Linking commodity codes to your vendors . . . . . . . . . . . . . . . . . . . . . . . . . . . . . . . . . . 161
Tracking vendor prices per commodity . . . . . . . . . . . . . . . . . . . . . . . . . . . . . . . . . . 161Maintaining your vendor commodity records. . . . . . . . . . . . . . . . . . . . . . . . . . . . . . 162
Linking commodity codes to buyers . . . . . . . . . . . . . . . . . . . . . . . . . . . . . . . . . . . . . . . 163
Linking commodity codes to tax codes. . . . . . . . . . . . . . . . . . . . . . . . . . . . . . . . . . . . . 163
Using the commodity code description as default item description . . . . . . . . . . . . . . . 164
Using commodity prices as default unit prices . . . . . . . . . . . . . . . . . . . . . . . . . . . . 165
Reporting on commodity codes . . . . . . . . . . . . . . . . . . . . . . . . . . . . . . . . . . . . . . . . . . 165
Entering commodity codes directly on purchasing documents. . . . . . . . . . . . . . . . . . . 166
Information flow from commodity codes to documents . . . . . . . . . . . . . . . . . . . . . . 166How commodity code defaults work: An example . . . . . . . . . . . . . . . . . . . . . . . . . . 168
Setting Up Foreign Currency Information . . . . . . . . . . . . . . . . . . . . . . . . 171
In this chapter . . . . . . . . . . . . . . . . . . . . . . . . . . . . . . . . . . . . . . . . . . . . . . . . . . . . . . . 171
Understanding foreign currency information setup . . . . . . . . . . . . . . . . . . . . . . . . 171
Defining a currency code for a foreign currency. . . . . . . . . . . . . . . . . . . . . . . . . . . . . . 171
Defining a bank code for a foreign currency. . . . . . . . . . . . . . . . . . . . . . . . . . . . . . . . . 172
Defining an AP type code for a foreign currency . . . . . . . . . . . . . . . . . . . . . . . . . . . . . 172
Foreign currency setup checklist . . . . . . . . . . . . . . . . . . . . . . . . . . . . . . . . . . . . . . . 173
Setting Up International Information . . . . . . . . . . . . . . . . . . . . . . . . . . . . 176
In this chapter . . . . . . . . . . . . . . . . . . . . . . . . . . . . . . . . . . . . . . . . . . . . . . . . . . . . . . . 176
About international parameters and defaults . . . . . . . . . . . . . . . . . . . . . . . . . . . . . 176
Where to set international parameters and defaults . . . . . . . . . . . . . . . . . . . . . . . . . . . 176
Setting up international parameters and defaults . . . . . . . . . . . . . . . . . . . . . . . . . . . . . 176
Setting up currency-related information . . . . . . . . . . . . . . . . . . . . . . . . . . . . . . . . . 177
Setting Up Tax-Related Information . . . . . . . . . . . . . . . . . . . . . . . . . . . . . 178
In this chapter . . . . . . . . . . . . . . . . . . . . . . . . . . . . . . . . . . . . . . . . . . . . . . . . . . . . . . . 178
Overview of tax-related information setup. . . . . . . . . . . . . . . . . . . . . . . . . . . . . . . . 178
Setting up sales tax information . . . . . . . . . . . . . . . . . . . . . . . . . . . . . . . . . . . . . . . . . . 178
11tting Started with Purchasing and Accounts Payable | Contents
Ge
Setting up tax form information. . . . . . . . . . . . . . . . . . . . . . . . . . . . . . . . . . . . . . . . . . . 179
Tax-Related Information Setup Checklist. . . . . . . . . . . . . . . . . . . . . . . . . . . . . . . . . 180
Setting Up Canadian Information . . . . . . . . . . . . . . . . . . . . . . . . . . . . . . . 183
In this chapter . . . . . . . . . . . . . . . . . . . . . . . . . . . . . . . . . . . . . . . . . . . . . . . . . . . . . . . 183
Overview of Canadian information setup. . . . . . . . . . . . . . . . . . . . . . . . . . . . . . . . . 183
Setting up international parameters and defaults . . . . . . . . . . . . . . . . . . . . . . . . . . . . . 183
Setting up foreign currencies . . . . . . . . . . . . . . . . . . . . . . . . . . . . . . . . . . . . . . . . . . . . 183
Setting up Canadian tax-related information . . . . . . . . . . . . . . . . . . . . . . . . . . . . . . . . 184
Setting up Canadian GST and PST tax information . . . . . . . . . . . . . . . . . . . . . . . . 184Setting up T4A tax form information . . . . . . . . . . . . . . . . . . . . . . . . . . . . . . . . . . . . 185
Canadian information setup checklist . . . . . . . . . . . . . . . . . . . . . . . . . . . . . . . . . . . 186
Setting Up the Purchasing and Accounts Payable Modules . . . . . . . . . 192
In this chapter . . . . . . . . . . . . . . . . . . . . . . . . . . . . . . . . . . . . . . . . . . . . . . . . . . . . . . . 192
Examples of setup configurations . . . . . . . . . . . . . . . . . . . . . . . . . . . . . . . . . . . . . . 192
More information. . . . . . . . . . . . . . . . . . . . . . . . . . . . . . . . . . . . . . . . . . . . . . . . . . . . . . 196
Defining the modules to reflect your procurement processes . . . . . . . . . . . . . . . 196
Factors to consider when setting up the modules . . . . . . . . . . . . . . . . . . . . . . . . . . . . 196
What procurement policies do you want to implement? . . . . . . . . . . . . . . . . . . . . . 197What types of information do you want to incorporate as system-wide defaults? . . 197What are the characteristics of your institution’s procurement processes?. . . . . . . 198
Determining how you should set up the module. . . . . . . . . . . . . . . . . . . . . . . . . . . . . . 198
What system features do you need?. . . . . . . . . . . . . . . . . . . . . . . . . . . . . . . . . . . . 198Do you need to create any new GL accounts? . . . . . . . . . . . . . . . . . . . . . . . . . . . . 201
Purchasing and Accounts Payable modules setup checklists . . . . . . . . . . . . . . . 202
Checklist 1: Required setup overview . . . . . . . . . . . . . . . . . . . . . . . . . . . . . . . . . . . . . 202
Required setup: Detailed overview. . . . . . . . . . . . . . . . . . . . . . . . . . . . . . . . . . . . . . . . 203
Checklist 2: Complete setup overview (all features). . . . . . . . . . . . . . . . . . . . . . . . . . . 205
Complete setup: Detailed overview (all features) . . . . . . . . . . . . . . . . . . . . . . . . . . . . . 206
Purchasing and Accounts Payable modules setup worksheet . . . . . . . . . . . . . . . 211
12tting Started with Purchasing and Accounts Payable | Contents
Ge
Defining Purchasing Parameters and Defaults . . . . . . . . . . . . . . . . . . . . 217
In this chapter . . . . . . . . . . . . . . . . . . . . . . . . . . . . . . . . . . . . . . . . . . . . . . . . . . . . . . . 217
Where to find the information . . . . . . . . . . . . . . . . . . . . . . . . . . . . . . . . . . . . . . . . . . 217
Form used . . . . . . . . . . . . . . . . . . . . . . . . . . . . . . . . . . . . . . . . . . . . . . . . . . . . . . . . . . 218
Before you begin . . . . . . . . . . . . . . . . . . . . . . . . . . . . . . . . . . . . . . . . . . . . . . . . . . . . 218
Understanding the purchasing parameters and defaults . . . . . . . . . . . . . . . . . . . . 219
Parameters and defaults: An example . . . . . . . . . . . . . . . . . . . . . . . . . . . . . . . . . . . . . 219
Components of purchasing parameters and defaults . . . . . . . . . . . . . . . . . . . . . . . . . . 220
The approval parameters . . . . . . . . . . . . . . . . . . . . . . . . . . . . . . . . . . . . . . . . . . . . . . . 221
Requisition approval needed and PO approval needed . . . . . . . . . . . . . . . . . . . . . 222
The requisition parameters . . . . . . . . . . . . . . . . . . . . . . . . . . . . . . . . . . . . . . . . . . . . . . 224
Allow requisition split . . . . . . . . . . . . . . . . . . . . . . . . . . . . . . . . . . . . . . . . . . . . . . . . 224Questions and answers about the requisition splitting parameter . . . . . . . 224
Automatic requisition keys. . . . . . . . . . . . . . . . . . . . . . . . . . . . . . . . . . . . . . . . . . . . 227Questions and answers about the automatic requisition keys parameter . 227
Form prompting defaults. . . . . . . . . . . . . . . . . . . . . . . . . . . . . . . . . . . . . . . . . . . . . . . . 230
How the prompt defaults work . . . . . . . . . . . . . . . . . . . . . . . . . . . . . . . . . . . . . . . . . 231The GL prompt sequence defaults . . . . . . . . . . . . . . . . . . . . . . . . . . . . . . . . . . . . . 232
What distribution method do you use for multiple GL account numbers? . . . . . 232The trade discount prompt defaults . . . . . . . . . . . . . . . . . . . . . . . . . . . . . . . . . . . . . 233The commodity prompt defaults . . . . . . . . . . . . . . . . . . . . . . . . . . . . . . . . . . . . . . . 233The tax code prompt defaults . . . . . . . . . . . . . . . . . . . . . . . . . . . . . . . . . . . . . . . . . 234Summary of prompt defaults . . . . . . . . . . . . . . . . . . . . . . . . . . . . . . . . . . . . . . . . . . 235
The shipping and receiving defaults . . . . . . . . . . . . . . . . . . . . . . . . . . . . . . . . . . . . . . . 236
Default ship to code/address. . . . . . . . . . . . . . . . . . . . . . . . . . . . . . . . . . . . . . . . . . 236Questions and answers about the ship to code default. . . . . . . . . . . . . . . . 237
Redelivery GL account description . . . . . . . . . . . . . . . . . . . . . . . . . . . . . . . . . . . . . 238Accept All Items. . . . . . . . . . . . . . . . . . . . . . . . . . . . . . . . . . . . . . . . . . . . . . . . . . . . 240Tag Assets During Receiving. . . . . . . . . . . . . . . . . . . . . . . . . . . . . . . . . . . . . . . . . . 241
The print subroutine defaults . . . . . . . . . . . . . . . . . . . . . . . . . . . . . . . . . . . . . . . . . . . . 241
Procedure for defining purchasing parameters and defaults . . . . . . . . . . . . . . . . 242
Setting the parameters and defaults: Quick reference . . . . . . . . . . . . . . . . . . . . . . . . . 247
Defining Codes Used Only in Purchasing . . . . . . . . . . . . . . . . . . . . . . . . 250
In this chapter . . . . . . . . . . . . . . . . . . . . . . . . . . . . . . . . . . . . . . . . . . . . . . . . . . . . . . . 250
Where to find the information . . . . . . . . . . . . . . . . . . . . . . . . . . . . . . . . . . . . . . . . . . 250
13tting Started with Purchasing and Accounts Payable | Contents

Ge
Forms used. . . . . . . . . . . . . . . . . . . . . . . . . . . . . . . . . . . . . . . . . . . . . . . . . . . . . . . . . . 251
Code tables used only in purchasing . . . . . . . . . . . . . . . . . . . . . . . . . . . . . . . . . . . . 252
Before you begin . . . . . . . . . . . . . . . . . . . . . . . . . . . . . . . . . . . . . . . . . . . . . . . . . . . . . 252
Understanding the purchasing-only code tables. . . . . . . . . . . . . . . . . . . . . . . . . . . . . . 252
Determining Your Definitions for the User-Maintained Code Tables . . . . . . . . . . . . 253Code tables maintained by Ellucian . . . . . . . . . . . . . . . . . . . . . . . . . . . . . . . . . . . . 255
Defining the purchasing-only code tables. . . . . . . . . . . . . . . . . . . . . . . . . . . . . . . . . . . 257
Defining FOB codes . . . . . . . . . . . . . . . . . . . . . . . . . . . . . . . . . . . . . . . . . . . . . . . . . . 257
Before you begin . . . . . . . . . . . . . . . . . . . . . . . . . . . . . . . . . . . . . . . . . . . . . . . . . . . . . 257
Understanding FOB codes . . . . . . . . . . . . . . . . . . . . . . . . . . . . . . . . . . . . . . . . . . . . . . 257
Where FOB codes are used . . . . . . . . . . . . . . . . . . . . . . . . . . . . . . . . . . . . . . . . . . 258Defining your FOB codes . . . . . . . . . . . . . . . . . . . . . . . . . . . . . . . . . . . . . . . . . . . . 258Rules governing FOB code definition . . . . . . . . . . . . . . . . . . . . . . . . . . . . . . . . . . . 258Tips for FOB code definition . . . . . . . . . . . . . . . . . . . . . . . . . . . . . . . . . . . . . . . . . . 258
Components of an FOB code . . . . . . . . . . . . . . . . . . . . . . . . . . . . . . . . . . . . . . . . . . . . 259
Procedure for Defining an FOB Code. . . . . . . . . . . . . . . . . . . . . . . . . . . . . . . . . . . . . . 259
Defining ship to codes . . . . . . . . . . . . . . . . . . . . . . . . . . . . . . . . . . . . . . . . . . . . . . . . 260
Before you begin . . . . . . . . . . . . . . . . . . . . . . . . . . . . . . . . . . . . . . . . . . . . . . . . . . . . . 260
Understanding ship to codes . . . . . . . . . . . . . . . . . . . . . . . . . . . . . . . . . . . . . . . . . . . . 260
Where ship to codes are used. . . . . . . . . . . . . . . . . . . . . . . . . . . . . . . . . . . . . . . . . 260How ship to codes work . . . . . . . . . . . . . . . . . . . . . . . . . . . . . . . . . . . . . . . . . . . . . 262Determining your ship to codes. . . . . . . . . . . . . . . . . . . . . . . . . . . . . . . . . . . . . . . . 262Rules governing ship to code definition. . . . . . . . . . . . . . . . . . . . . . . . . . . . . . . . . . 263Tips for ship to code definition. . . . . . . . . . . . . . . . . . . . . . . . . . . . . . . . . . . . . . . . . 264
Components of a ship to code . . . . . . . . . . . . . . . . . . . . . . . . . . . . . . . . . . . . . . . . . . . 264
Procedure for defining a ship to code. . . . . . . . . . . . . . . . . . . . . . . . . . . . . . . . . . . . . . 264
Defining ship via codes . . . . . . . . . . . . . . . . . . . . . . . . . . . . . . . . . . . . . . . . . . . . . . . 265
Before you begin . . . . . . . . . . . . . . . . . . . . . . . . . . . . . . . . . . . . . . . . . . . . . . . . . . . . . 265
Understanding ship via codes . . . . . . . . . . . . . . . . . . . . . . . . . . . . . . . . . . . . . . . . . . . 265
Where ship via codes are used . . . . . . . . . . . . . . . . . . . . . . . . . . . . . . . . . . . . . . . . 266Rules governing ship via code definition . . . . . . . . . . . . . . . . . . . . . . . . . . . . . . . . . 266Tips for ship via code definition . . . . . . . . . . . . . . . . . . . . . . . . . . . . . . . . . . . . . . . . 266
Components of a ship via code . . . . . . . . . . . . . . . . . . . . . . . . . . . . . . . . . . . . . . . . . . 267
Procedure for Defining a Ship Via Code. . . . . . . . . . . . . . . . . . . . . . . . . . . . . . . . . . . . 267
Defining Accounts Payable Parameters and Defaults . . . . . . . . . . . . . . 268
In this chapter . . . . . . . . . . . . . . . . . . . . . . . . . . . . . . . . . . . . . . . . . . . . . . . . . . . . . . . 268
14tting Started with Purchasing and Accounts Payable | Contents
Ge
Forms used. . . . . . . . . . . . . . . . . . . . . . . . . . . . . . . . . . . . . . . . . . . . . . . . . . . . . . . . . . 268
Where to find the information . . . . . . . . . . . . . . . . . . . . . . . . . . . . . . . . . . . . . . . . . . 268
Before you begin . . . . . . . . . . . . . . . . . . . . . . . . . . . . . . . . . . . . . . . . . . . . . . . . . . . . 269
Understanding the Accounts Payable Parameters and Defaults . . . . . . . . . . . . . . 270
What parameters do: An example . . . . . . . . . . . . . . . . . . . . . . . . . . . . . . . . . . . . . . . . 271
Components of the AP Parameters Definition (APDE) form . . . . . . . . . . . . . . . . . 272
The voucher approval needed parameter. . . . . . . . . . . . . . . . . . . . . . . . . . . . . . . . . . . 273
Implementing online approvals for vouchers . . . . . . . . . . . . . . . . . . . . . . . . . . . . . . 273Setting the parameter . . . . . . . . . . . . . . . . . . . . . . . . . . . . . . . . . . . . . . . . . . . . . . . 274Changing the parameter setting . . . . . . . . . . . . . . . . . . . . . . . . . . . . . . . . . . . . . . . 274
The discount method parameter. . . . . . . . . . . . . . . . . . . . . . . . . . . . . . . . . . . . . . . . . . 275
How Colleague calculates and processes vendor discounts. . . . . . . . . . . . . . . . . . 275Comparison of discounts lost and discounts taken . . . . . . . . . . . . . . . . . . . . . . . . . 278A caution about changing the discount method after implementation . . . . . . . . . . . 278Setting the Parameter . . . . . . . . . . . . . . . . . . . . . . . . . . . . . . . . . . . . . . . . . . . . . . . 279
Form prompting defaults. . . . . . . . . . . . . . . . . . . . . . . . . . . . . . . . . . . . . . . . . . . . . . . . 279
How the prompt defaults work . . . . . . . . . . . . . . . . . . . . . . . . . . . . . . . . . . . . . . . . . 280The GL prompt sequence default . . . . . . . . . . . . . . . . . . . . . . . . . . . . . . . . . . . . . . 280Setting the default . . . . . . . . . . . . . . . . . . . . . . . . . . . . . . . . . . . . . . . . . . . . . . . . . . 281The trade discount prompt default. . . . . . . . . . . . . . . . . . . . . . . . . . . . . . . . . . . . . . 281
Does your institution use vendors that give trade discounts? . . . . . . . . . . . . . . 281Setting the default . . . . . . . . . . . . . . . . . . . . . . . . . . . . . . . . . . . . . . . . . . . . . . . . . . 281The tax code prompt default . . . . . . . . . . . . . . . . . . . . . . . . . . . . . . . . . . . . . . . . . . 282
Does your institution pay taxes on any of your purchases? . . . . . . . . . . . . . . . . 282Setting the default . . . . . . . . . . . . . . . . . . . . . . . . . . . . . . . . . . . . . . . . . . . . . . . . . . 282The VOIL tax code prompt default. . . . . . . . . . . . . . . . . . . . . . . . . . . . . . . . . . . . . . 283
Does your institution pay taxes on any of its purchases? . . . . . . . . . . . . . . . . . 283Setting the default . . . . . . . . . . . . . . . . . . . . . . . . . . . . . . . . . . . . . . . . . . . . . . . . . . 283
The tax expense distribution parameter . . . . . . . . . . . . . . . . . . . . . . . . . . . . . . . . . . . . 283
How Colleague posts tax expenses based on this parameter. . . . . . . . . . . . . . . . . 284Setting the parameter . . . . . . . . . . . . . . . . . . . . . . . . . . . . . . . . . . . . . . . . . . . . . . . 284
Default acquisition method for fixed asset creation . . . . . . . . . . . . . . . . . . . . . . . . . . . 284
The default acquisition method . . . . . . . . . . . . . . . . . . . . . . . . . . . . . . . . . . . . . . . . 284Setting the default . . . . . . . . . . . . . . . . . . . . . . . . . . . . . . . . . . . . . . . . . . . . . . . . . . 285
Parameters for voucher creation . . . . . . . . . . . . . . . . . . . . . . . . . . . . . . . . . . . . . . . . . 285
The voucher accepted item only parameter . . . . . . . . . . . . . . . . . . . . . . . . . . . . . . 285Setting the parameter . . . . . . . . . . . . . . . . . . . . . . . . . . . . . . . . . . . . . . . . . . . . . . . 285The default voucher done parameter . . . . . . . . . . . . . . . . . . . . . . . . . . . . . . . . . . . 286
Parameters and defaults for check printing . . . . . . . . . . . . . . . . . . . . . . . . . . . . . . . . . 286
The overflow advice parameter . . . . . . . . . . . . . . . . . . . . . . . . . . . . . . . . . . . . . . . . 286Setting the parameter . . . . . . . . . . . . . . . . . . . . . . . . . . . . . . . . . . . . . . . . . . . . . . . 287
15tting Started with Purchasing and Accounts Payable | Contents

Ge
Check printing defaults and definitions . . . . . . . . . . . . . . . . . . . . . . . . . . . . . . . . . . 287Steps done during setup . . . . . . . . . . . . . . . . . . . . . . . . . . . . . . . . . . . . . . . . . . . . . 288Steps done during daily processing. . . . . . . . . . . . . . . . . . . . . . . . . . . . . . . . . . . . . 289Setting the defaults . . . . . . . . . . . . . . . . . . . . . . . . . . . . . . . . . . . . . . . . . . . . . . . . . 291
Procedure for defining accounts payable parameters and defaults . . . . . . . . . . . 291
Setting the parameters and defaults on the APDE form: Quick reference . . . . . . . . . . 295
Components of the AP E-Check Parameters (APEP) form . . . . . . . . . . . . . . . . . . . 297
Allow E-Check payments . . . . . . . . . . . . . . . . . . . . . . . . . . . . . . . . . . . . . . . . . . . . . . . 297
Setting the parameter . . . . . . . . . . . . . . . . . . . . . . . . . . . . . . . . . . . . . . . . . . . . . . . 298
E-Check maximum amount . . . . . . . . . . . . . . . . . . . . . . . . . . . . . . . . . . . . . . . . . . . . . 298
Default E-Check advice method . . . . . . . . . . . . . . . . . . . . . . . . . . . . . . . . . . . . . . . . . . 298
E-Check email advice paragraph . . . . . . . . . . . . . . . . . . . . . . . . . . . . . . . . . . . . . . . . . 299
E-Check paper advice paragraph . . . . . . . . . . . . . . . . . . . . . . . . . . . . . . . . . . . . . . . . . 299
E-Check terms and conditions paragraph . . . . . . . . . . . . . . . . . . . . . . . . . . . . . . . . . . 299
E-Check confirmation email paragraph . . . . . . . . . . . . . . . . . . . . . . . . . . . . . . . . . . . . 299
Setting the parameters and defaults on the APEP form: Quick reference . . . . . . . . . . 300
Defining Codes Used Only in Accounts Payable . . . . . . . . . . . . . . . . . . 301
In This Chapter . . . . . . . . . . . . . . . . . . . . . . . . . . . . . . . . . . . . . . . . . . . . . . . . . . . . . . 301
Where to find the information . . . . . . . . . . . . . . . . . . . . . . . . . . . . . . . . . . . . . . . . . . 301
Code tables used only in Accounts Payable . . . . . . . . . . . . . . . . . . . . . . . . . . . . . . 302
Before you begin . . . . . . . . . . . . . . . . . . . . . . . . . . . . . . . . . . . . . . . . . . . . . . . . . . . . . 302
Understanding the Accounts Payable-only code tables . . . . . . . . . . . . . . . . . . . . . . . . 302
Determining your definitions for the user-maintained code table . . . . . . . . . . . . . . 303Code tables maintained by Ellucian . . . . . . . . . . . . . . . . . . . . . . . . . . . . . . . . . . . . 304
Defining the Accounts Payable code table . . . . . . . . . . . . . . . . . . . . . . . . . . . . . . . . . . 308
Defining GL Account Parameters . . . . . . . . . . . . . . . . . . . . . . . . . . . . . . . 310
In this chapter . . . . . . . . . . . . . . . . . . . . . . . . . . . . . . . . . . . . . . . . . . . . . . . . . . . . . . . 310
Understanding GL parameters . . . . . . . . . . . . . . . . . . . . . . . . . . . . . . . . . . . . . . . . . 310
Forms used. . . . . . . . . . . . . . . . . . . . . . . . . . . . . . . . . . . . . . . . . . . . . . . . . . . . . . . . . . 310
GL account parameters . . . . . . . . . . . . . . . . . . . . . . . . . . . . . . . . . . . . . . . . . . . . . . . 311
Budget requirements . . . . . . . . . . . . . . . . . . . . . . . . . . . . . . . . . . . . . . . . . . . . . . . . . . 312
16tting Started with Purchasing and Accounts Payable | Contents
Ge
Approving journal and budget entries. . . . . . . . . . . . . . . . . . . . . . . . . . . . . . . . . . . . . . 313
Security keys for overrides . . . . . . . . . . . . . . . . . . . . . . . . . . . . . . . . . . . . . . . . . . . . . . 314
Role IDs and batch updates for GL access . . . . . . . . . . . . . . . . . . . . . . . . . . . . . . . . . 314
Procedure for defining GL account parameters . . . . . . . . . . . . . . . . . . . . . . . . . . . . . . 314
GL access . . . . . . . . . . . . . . . . . . . . . . . . . . . . . . . . . . . . . . . . . . . . . . . . . . . . . . . . . . 315
GL account authorization . . . . . . . . . . . . . . . . . . . . . . . . . . . . . . . . . . . . . . . . . . . . . 316
Creating new GL accounts . . . . . . . . . . . . . . . . . . . . . . . . . . . . . . . . . . . . . . . . . . . . 317
Procedure for creating GL accounts . . . . . . . . . . . . . . . . . . . . . . . . . . . . . . . . . . . . . . . 318
GL account maintenance . . . . . . . . . . . . . . . . . . . . . . . . . . . . . . . . . . . . . . . . . . . . . . 318
Procedure for maintaining GL accounts . . . . . . . . . . . . . . . . . . . . . . . . . . . . . . . . . . . . 319
Worksheets . . . . . . . . . . . . . . . . . . . . . . . . . . . . . . . . . . . . . . . . . . . . . . . . . 320
In this appendix . . . . . . . . . . . . . . . . . . . . . . . . . . . . . . . . . . . . . . . . . . . . . . . . . . . . . 320
Worksheets for required setup information . . . . . . . . . . . . . . . . . . . . . . . . . . . . . . . 320
Parameters and defaults for each module . . . . . . . . . . . . . . . . . . . . . . . . . . . . . . . . 323
Purchasing module parameters and defaults . . . . . . . . . . . . . . . . . . . . . . . . . . . . . 323
Accounts Payable module parameters and defaults. . . . . . . . . . . . . . . . . . . . . . . . 324
Required codes. . . . . . . . . . . . . . . . . . . . . . . . . . . . . . . . . . . . . . . . . . . . . . . . . . . . . . 325
AP types . . . . . . . . . . . . . . . . . . . . . . . . . . . . . . . . . . . . . . . . . . . . . . . . . . . . . . . . . . . 326
Bank codes . . . . . . . . . . . . . . . . . . . . . . . . . . . . . . . . . . . . . . . . . . . . . . . . . . . . . . . . . 327
Bank code reconciliation parameters . . . . . . . . . . . . . . . . . . . . . . . . . . . . . . . . . . . . 328
Staff/Volunteer codes . . . . . . . . . . . . . . . . . . . . . . . . . . . . . . . . . . . . . . . . . . . . . . . . . 329
Vendors . . . . . . . . . . . . . . . . . . . . . . . . . . . . . . . . . . . . . . . . . . . . . . . . . . . . . . . . . . . . 330
Vendor information. . . . . . . . . . . . . . . . . . . . . . . . . . . . . . . . . . . . . . . . . . . . . . . . . . . 330
Vendor tax information. . . . . . . . . . . . . . . . . . . . . . . . . . . . . . . . . . . . . . . . . . . . . . . . 333
17tting Started with Purchasing and Accounts Payable | Contents
Ge
Demographic information for a corporate vendor . . . . . . . . . . . . . . . . . . . . . . . . . 334
Demographic information for a person vendor . . . . . . . . . . . . . . . . . . . . . . . . . . . . 335
Worksheets for optional setup information . . . . . . . . . . . . . . . . . . . . . . . . . . . . . . . 336
Optional codes . . . . . . . . . . . . . . . . . . . . . . . . . . . . . . . . . . . . . . . . . . . . . . . . . . . . . . 338
Change reason codes . . . . . . . . . . . . . . . . . . . . . . . . . . . . . . . . . . . . . . . . . . . . . . . . 339
Currency codes . . . . . . . . . . . . . . . . . . . . . . . . . . . . . . . . . . . . . . . . . . . . . . . . . . . . . 340
FOB codes. . . . . . . . . . . . . . . . . . . . . . . . . . . . . . . . . . . . . . . . . . . . . . . . . . . . . . . . . . 341
Item condition codes . . . . . . . . . . . . . . . . . . . . . . . . . . . . . . . . . . . . . . . . . . . . . . . . . 342
Requisition priority codes . . . . . . . . . . . . . . . . . . . . . . . . . . . . . . . . . . . . . . . . . . . . . 343
Ship to codes . . . . . . . . . . . . . . . . . . . . . . . . . . . . . . . . . . . . . . . . . . . . . . . . . . . . . . . 344
Ship via codes . . . . . . . . . . . . . . . . . . . . . . . . . . . . . . . . . . . . . . . . . . . . . . . . . . . . . . 345
Tax codes . . . . . . . . . . . . . . . . . . . . . . . . . . . . . . . . . . . . . . . . . . . . . . . . . . . . . . . . . . 346
Tax code categories . . . . . . . . . . . . . . . . . . . . . . . . . . . . . . . . . . . . . . . . . . . . . . . . . . 347
Tax form box codes . . . . . . . . . . . . . . . . . . . . . . . . . . . . . . . . . . . . . . . . . . . . . . . . . . 348
Tax group codes . . . . . . . . . . . . . . . . . . . . . . . . . . . . . . . . . . . . . . . . . . . . . . . . . . . . . 349
Unit of issue codes. . . . . . . . . . . . . . . . . . . . . . . . . . . . . . . . . . . . . . . . . . . . . . . . . . . 350
Vendor miscellaneous codes . . . . . . . . . . . . . . . . . . . . . . . . . . . . . . . . . . . . . . . . . . 351
Vendor terms codes . . . . . . . . . . . . . . . . . . . . . . . . . . . . . . . . . . . . . . . . . . . . . . . . . . 352
Vendor type codes . . . . . . . . . . . . . . . . . . . . . . . . . . . . . . . . . . . . . . . . . . . . . . . . . . . 353
Commodity-Related codes . . . . . . . . . . . . . . . . . . . . . . . . . . . . . . . . . . . . . . . . . . . . 354
Buying arrangement codes . . . . . . . . . . . . . . . . . . . . . . . . . . . . . . . . . . . . . . . . . . . . 354
Commodity codes . . . . . . . . . . . . . . . . . . . . . . . . . . . . . . . . . . . . . . . . . . . . . . . . . . . 355
Commodity miscellaneous codes 1-5 . . . . . . . . . . . . . . . . . . . . . . . . . . . . . . . . . . . 356
18tting Started with Purchasing and Accounts Payable | Contents

Ge
Validation Code Table Maintenance . . . . . . . . . . . . . . . . . . . . . . . . . . . . . 358
In this appendix . . . . . . . . . . . . . . . . . . . . . . . . . . . . . . . . . . . . . . . . . . . . . . . . . . . . . 358
Setting up validation code tables . . . . . . . . . . . . . . . . . . . . . . . . . . . . . . . . . . . . . . . 358
Before you begin . . . . . . . . . . . . . . . . . . . . . . . . . . . . . . . . . . . . . . . . . . . . . . . . . . . . . 358
Components of a validation code table. . . . . . . . . . . . . . . . . . . . . . . . . . . . . . . . . . . . . 358
Procedure for defining a validation code table . . . . . . . . . . . . . . . . . . . . . . . . . . . . . . . 359
Purchasing/Accounts Payable Utilities . . . . . . . . . . . . . . . . . . . . . . . . . . 361
In this appendix . . . . . . . . . . . . . . . . . . . . . . . . . . . . . . . . . . . . . . . . . . . . . . . . . . . . . 361
Forms used . . . . . . . . . . . . . . . . . . . . . . . . . . . . . . . . . . . . . . . . . . . . . . . . . . . . . . . . . 361
Understanding Purchasing and Accounts Payable rebuild utilities . . . . . . . . . . . 361
The Rebuild Vendor Balance Field (RVBF) utility . . . . . . . . . . . . . . . . . . . . . . . . . . . . . 362
The Update Split Req Fields (USRQ) utility . . . . . . . . . . . . . . . . . . . . . . . . . . . . . . . . . 362
Rebuild Vendor Balances Utility . . . . . . . . . . . . . . . . . . . . . . . . . . . . . . . . . . . . . . . . 362
Before You Begin . . . . . . . . . . . . . . . . . . . . . . . . . . . . . . . . . . . . . . . . . . . . . . . . . . . . . 362
The Rebuild Vendor Balance Field (RVBF) Form. . . . . . . . . . . . . . . . . . . . . . . . . . . . . 362
Procedure for Rebuilding Vendor Balances . . . . . . . . . . . . . . . . . . . . . . . . . . . . . . . . . 365
Update Split Requisition Fields . . . . . . . . . . . . . . . . . . . . . . . . . . . . . . . . . . . . . . . . . 365
The Update Split Req Field (USRQ) Form . . . . . . . . . . . . . . . . . . . . . . . . . . . . . . . . . . 366
Procedure for Updating Split Requisitions . . . . . . . . . . . . . . . . . . . . . . . . . . . . . . . . . . 367
Resolving Unused Requisition Line Item Encumbrance. . . . . . . . . . . . . . . . . . . . . . . . 368
Standard Forms . . . . . . . . . . . . . . . . . . . . . . . . . . . . . . . . . . . . . . . . . . . . . 370
In this appendix . . . . . . . . . . . . . . . . . . . . . . . . . . . . . . . . . . . . . . . . . . . . . . . . . . . . . 370
Understanding standard forms for printing . . . . . . . . . . . . . . . . . . . . . . . . . . . . . . . 370
Default print subroutines. . . . . . . . . . . . . . . . . . . . . . . . . . . . . . . . . . . . . . . . . . . . . . . . 371
Using your own print programs. . . . . . . . . . . . . . . . . . . . . . . . . . . . . . . . . . . . . . . . . . . 372
Deciding how to set up your standard forms . . . . . . . . . . . . . . . . . . . . . . . . . . . . . 373
Planning considerations . . . . . . . . . . . . . . . . . . . . . . . . . . . . . . . . . . . . . . . . . . . . . . . . 374
19tting Started with Purchasing and Accounts Payable | Contents

Ge
Setting up your standard printing forms . . . . . . . . . . . . . . . . . . . . . . . . . . . . . . . . . 374
Procedure for setting up Purchasing and Accounts Payable standard forms. . . . . . . . 374
Procedure for modifying standard forms. . . . . . . . . . . . . . . . . . . . . . . . . . . . . . . . . . . . 375
Modifying check reconciliation subroutines . . . . . . . . . . . . . . . . . . . . . . . . . . . . . . 376
Tape parameters. . . . . . . . . . . . . . . . . . . . . . . . . . . . . . . . . . . . . . . . . . . . . . . . . . . . . . 376
Tape layout . . . . . . . . . . . . . . . . . . . . . . . . . . . . . . . . . . . . . . . . . . . . . . . . . . . . . . . . . . 376
Understanding Codes in Purchasing and AP . . . . . . . . . . . . . . . . . . . . . 378
In this chapter . . . . . . . . . . . . . . . . . . . . . . . . . . . . . . . . . . . . . . . . . . . . . . . . . . . . . . . 378
Understanding codes . . . . . . . . . . . . . . . . . . . . . . . . . . . . . . . . . . . . . . . . . . . . . . . . . 378
Codes in Colleague Finance . . . . . . . . . . . . . . . . . . . . . . . . . . . . . . . . . . . . . . . . . . . . 379
Sharing codes between modules . . . . . . . . . . . . . . . . . . . . . . . . . . . . . . . . . . . . . . 379Codes from Colleague Core . . . . . . . . . . . . . . . . . . . . . . . . . . . . . . . . . . . . . . . . . . 380
Comprehensive list of Colleague Finance codes . . . . . . . . . . . . . . . . . . . . . . . . . . 380
Different types of codes: General guidelines . . . . . . . . . . . . . . . . . . . . . . . . . . . . . . . . 381
About special processing codes (validation codes only) . . . . . . . . . . . . . . . . . . . . . 382
Notes about the table . . . . . . . . . . . . . . . . . . . . . . . . . . . . . . . . . . . . . . . . . . . . . . . . . . 382
Defining Codes in Colleague Finance . . . . . . . . . . . . . . . . . . . . . . . . . . . 401
In this chapter . . . . . . . . . . . . . . . . . . . . . . . . . . . . . . . . . . . . . . . . . . . . . . . . . . . . . . . 401
Accept change codes . . . . . . . . . . . . . . . . . . . . . . . . . . . . . . . . . . . . . . . . . . . . . . . . . . 401
Access statuses . . . . . . . . . . . . . . . . . . . . . . . . . . . . . . . . . . . . . . . . . . . . . . . . . . . . . . 401
Account component types . . . . . . . . . . . . . . . . . . . . . . . . . . . . . . . . . . . . . . . . . . . . . . 402
Active statuses . . . . . . . . . . . . . . . . . . . . . . . . . . . . . . . . . . . . . . . . . . . . . . . . . . . . . . . 402
AP Control statuses . . . . . . . . . . . . . . . . . . . . . . . . . . . . . . . . . . . . . . . . . . . . . . . . . . . 403
AP source codes . . . . . . . . . . . . . . . . . . . . . . . . . . . . . . . . . . . . . . . . . . . . . . . . . . . . . 403
AP types . . . . . . . . . . . . . . . . . . . . . . . . . . . . . . . . . . . . . . . . . . . . . . . . . . . . . . . . . . . . 404
Appraise reasons . . . . . . . . . . . . . . . . . . . . . . . . . . . . . . . . . . . . . . . . . . . . . . . . . . . . . 404
Building/Departments . . . . . . . . . . . . . . . . . . . . . . . . . . . . . . . . . . . . . . . . . . . . . . . . . . 404
Blanket purchase order GL prompt sequences . . . . . . . . . . . . . . . . . . . . . . . . . . . . . . 405
Blanket purchase order statuses . . . . . . . . . . . . . . . . . . . . . . . . . . . . . . . . . . . . . . . . . 405
Blanket purchase order transaction types . . . . . . . . . . . . . . . . . . . . . . . . . . . . . . . . . . 406
Budget statuses . . . . . . . . . . . . . . . . . . . . . . . . . . . . . . . . . . . . . . . . . . . . . . . . . . . . . . 406
Budget responsibility . . . . . . . . . . . . . . . . . . . . . . . . . . . . . . . . . . . . . . . . . . . . . . . . . . 407
20tting Started with Purchasing and Accounts Payable | Contents

Ge
Budget column calculations . . . . . . . . . . . . . . . . . . . . . . . . . . . . . . . . . . . . . . . . . . . . . 407
Budget comparison sources . . . . . . . . . . . . . . . . . . . . . . . . . . . . . . . . . . . . . . . . . . . . . 408
Budget layouts . . . . . . . . . . . . . . . . . . . . . . . . . . . . . . . . . . . . . . . . . . . . . . . . . . . . . . . 408
Budget projection sources . . . . . . . . . . . . . . . . . . . . . . . . . . . . . . . . . . . . . . . . . . . . . . 409
Budget scenario statuses . . . . . . . . . . . . . . . . . . . . . . . . . . . . . . . . . . . . . . . . . . . . . . . 409
Budget sources. . . . . . . . . . . . . . . . . . . . . . . . . . . . . . . . . . . . . . . . . . . . . . . . . . . . . . . 409
Budget types. . . . . . . . . . . . . . . . . . . . . . . . . . . . . . . . . . . . . . . . . . . . . . . . . . . . . . . . . 411
Buying arrangements . . . . . . . . . . . . . . . . . . . . . . . . . . . . . . . . . . . . . . . . . . . . . . . . . . 411
Depreciation (Calc) methods . . . . . . . . . . . . . . . . . . . . . . . . . . . . . . . . . . . . . . . . . . . . 411
Check statuses . . . . . . . . . . . . . . . . . . . . . . . . . . . . . . . . . . . . . . . . . . . . . . . . . . . . . . . 412
Close or void codes . . . . . . . . . . . . . . . . . . . . . . . . . . . . . . . . . . . . . . . . . . . . . . . . . . . 412
Commodity miscellaneous codes 1 - 5. . . . . . . . . . . . . . . . . . . . . . . . . . . . . . . . . . . . . 412
Commodity codes. . . . . . . . . . . . . . . . . . . . . . . . . . . . . . . . . . . . . . . . . . . . . . . . . . . . . 413
Commodity source . . . . . . . . . . . . . . . . . . . . . . . . . . . . . . . . . . . . . . . . . . . . . . . . . . . . 413
Coverage types . . . . . . . . . . . . . . . . . . . . . . . . . . . . . . . . . . . . . . . . . . . . . . . . . . . . . . 414
Currency conversion. . . . . . . . . . . . . . . . . . . . . . . . . . . . . . . . . . . . . . . . . . . . . . . . . . . 414
Discount methods. . . . . . . . . . . . . . . . . . . . . . . . . . . . . . . . . . . . . . . . . . . . . . . . . . . . . 415
Disposal methods . . . . . . . . . . . . . . . . . . . . . . . . . . . . . . . . . . . . . . . . . . . . . . . . . . . . . 415
Financial statement date formats . . . . . . . . . . . . . . . . . . . . . . . . . . . . . . . . . . . . . . . . . 416
Free-on-board codes . . . . . . . . . . . . . . . . . . . . . . . . . . . . . . . . . . . . . . . . . . . . . . . . . . 416
Fixed assets control statuses . . . . . . . . . . . . . . . . . . . . . . . . . . . . . . . . . . . . . . . . . . . . 417
Fixed assets transfer flags . . . . . . . . . . . . . . . . . . . . . . . . . . . . . . . . . . . . . . . . . . . . . . 417
Fixed assets transfer statuses . . . . . . . . . . . . . . . . . . . . . . . . . . . . . . . . . . . . . . . . . . . 418
General ledger component sort fields. . . . . . . . . . . . . . . . . . . . . . . . . . . . . . . . . . . . . . 418
General ledger detail . . . . . . . . . . . . . . . . . . . . . . . . . . . . . . . . . . . . . . . . . . . . . . . . . . 419
General ledger file statuses . . . . . . . . . . . . . . . . . . . . . . . . . . . . . . . . . . . . . . . . . . . . . 419
General ledger file classes . . . . . . . . . . . . . . . . . . . . . . . . . . . . . . . . . . . . . . . . . . . . . . 419
General ledger import summarizations. . . . . . . . . . . . . . . . . . . . . . . . . . . . . . . . . . . . . 419
General Ledger Import Types. . . . . . . . . . . . . . . . . . . . . . . . . . . . . . . . . . . . . . . . . . . . 420
General Ledger Interface Fields . . . . . . . . . . . . . . . . . . . . . . . . . . . . . . . . . . . . . . . . . . 420
General Ledger Prompt Sequences . . . . . . . . . . . . . . . . . . . . . . . . . . . . . . . . . . . . . . . 421
General Ledger Source Codes. . . . . . . . . . . . . . . . . . . . . . . . . . . . . . . . . . . . . . . . . . . 422
Include/Exclude Codes. . . . . . . . . . . . . . . . . . . . . . . . . . . . . . . . . . . . . . . . . . . . . . . . . 422
Inventory Items . . . . . . . . . . . . . . . . . . . . . . . . . . . . . . . . . . . . . . . . . . . . . . . . . . . . . . . 423
Inventory Stores . . . . . . . . . . . . . . . . . . . . . . . . . . . . . . . . . . . . . . . . . . . . . . . . . . . . . . 423
Investment Periods. . . . . . . . . . . . . . . . . . . . . . . . . . . . . . . . . . . . . . . . . . . . . . . . . . . . 423
Item Purchase Order Statuses . . . . . . . . . . . . . . . . . . . . . . . . . . . . . . . . . . . . . . . . . . . 424
Item Work Order Types. . . . . . . . . . . . . . . . . . . . . . . . . . . . . . . . . . . . . . . . . . . . . . . . . 425
21tting Started with Purchasing and Accounts Payable | Contents

Ge
Label Destinations . . . . . . . . . . . . . . . . . . . . . . . . . . . . . . . . . . . . . . . . . . . . . . . . . . . . 425
Lease Types . . . . . . . . . . . . . . . . . . . . . . . . . . . . . . . . . . . . . . . . . . . . . . . . . . . . . . . . . 425
Manual Check Codes . . . . . . . . . . . . . . . . . . . . . . . . . . . . . . . . . . . . . . . . . . . . . . . . . . 426
Net Asset Class Codes. . . . . . . . . . . . . . . . . . . . . . . . . . . . . . . . . . . . . . . . . . . . . . . . . 426
NIGP Modes . . . . . . . . . . . . . . . . . . . . . . . . . . . . . . . . . . . . . . . . . . . . . . . . . . . . . . . . . 427
Optional Modules . . . . . . . . . . . . . . . . . . . . . . . . . . . . . . . . . . . . . . . . . . . . . . . . . . . . . 427
Project Accounting Budget Periods . . . . . . . . . . . . . . . . . . . . . . . . . . . . . . . . . . . . . . . 427
Payment Terms. . . . . . . . . . . . . . . . . . . . . . . . . . . . . . . . . . . . . . . . . . . . . . . . . . . . . . . 428
Physical Inventory Sort . . . . . . . . . . . . . . . . . . . . . . . . . . . . . . . . . . . . . . . . . . . . . . . . . 428
Plant Types. . . . . . . . . . . . . . . . . . . . . . . . . . . . . . . . . . . . . . . . . . . . . . . . . . . . . . . . . . 428
Purchase Order Date-To-Print Codes. . . . . . . . . . . . . . . . . . . . . . . . . . . . . . . . . . . . . . 429
Purchase Order/Stock Issue Statuses . . . . . . . . . . . . . . . . . . . . . . . . . . . . . . . . . . . . . 430
Purchase Order Statuses . . . . . . . . . . . . . . . . . . . . . . . . . . . . . . . . . . . . . . . . . . . . . . . 430
Pool Rules . . . . . . . . . . . . . . . . . . . . . . . . . . . . . . . . . . . . . . . . . . . . . . . . . . . . . . . . . . 431
Pool Types . . . . . . . . . . . . . . . . . . . . . . . . . . . . . . . . . . . . . . . . . . . . . . . . . . . . . . . . . . 431
Physical Plant Employees . . . . . . . . . . . . . . . . . . . . . . . . . . . . . . . . . . . . . . . . . . . . . . 431
Physical Plant Priorities . . . . . . . . . . . . . . . . . . . . . . . . . . . . . . . . . . . . . . . . . . . . . . . . 432
Product Classes . . . . . . . . . . . . . . . . . . . . . . . . . . . . . . . . . . . . . . . . . . . . . . . . . . . . . . 432
Product Codes . . . . . . . . . . . . . . . . . . . . . . . . . . . . . . . . . . . . . . . . . . . . . . . . . . . . . . . 433
Projects Class Types . . . . . . . . . . . . . . . . . . . . . . . . . . . . . . . . . . . . . . . . . . . . . . . . . . 434
Purge Register Types . . . . . . . . . . . . . . . . . . . . . . . . . . . . . . . . . . . . . . . . . . . . . . . . . . 434
Recurring Voucher Statuses . . . . . . . . . . . . . . . . . . . . . . . . . . . . . . . . . . . . . . . . . . . . . 435
Register Types . . . . . . . . . . . . . . . . . . . . . . . . . . . . . . . . . . . . . . . . . . . . . . . . . . . . . . . 435
Requisition Priorities. . . . . . . . . . . . . . . . . . . . . . . . . . . . . . . . . . . . . . . . . . . . . . . . . . . 436
Requisition Statuses . . . . . . . . . . . . . . . . . . . . . . . . . . . . . . . . . . . . . . . . . . . . . . . . . . . 436
Report Format Rounding Factors . . . . . . . . . . . . . . . . . . . . . . . . . . . . . . . . . . . . . . . . . 437
Scenario Column Calculations . . . . . . . . . . . . . . . . . . . . . . . . . . . . . . . . . . . . . . . . . . . 437
Share Distribution Calculation Methods . . . . . . . . . . . . . . . . . . . . . . . . . . . . . . . . . . . . 438
Ship To Codes . . . . . . . . . . . . . . . . . . . . . . . . . . . . . . . . . . . . . . . . . . . . . . . . . . . . . . . 438
Ship Via Codes. . . . . . . . . . . . . . . . . . . . . . . . . . . . . . . . . . . . . . . . . . . . . . . . . . . . . . . 440
Stock Issue Charges. . . . . . . . . . . . . . . . . . . . . . . . . . . . . . . . . . . . . . . . . . . . . . . . . . . 440
SP Import Record Types . . . . . . . . . . . . . . . . . . . . . . . . . . . . . . . . . . . . . . . . . . . . . . . 440
States 1099. . . . . . . . . . . . . . . . . . . . . . . . . . . . . . . . . . . . . . . . . . . . . . . . . . . . . . . . . . 441
State/Organization Combinations for 1099 Processing . . . . . . . . . . . . . . . . . . . . . . . . 441
Stock Issue Statuses . . . . . . . . . . . . . . . . . . . . . . . . . . . . . . . . . . . . . . . . . . . . . . . . . . 442
Statement Debit/Credit Types. . . . . . . . . . . . . . . . . . . . . . . . . . . . . . . . . . . . . . . . . . . . 442
Statement Lines Types . . . . . . . . . . . . . . . . . . . . . . . . . . . . . . . . . . . . . . . . . . . . . . . . . 442
T4A AR/CR. . . . . . . . . . . . . . . . . . . . . . . . . . . . . . . . . . . . . . . . . . . . . . . . . . . . . . . . . . 443
22tting Started with Purchasing and Accounts Payable | Contents

Ge
T4A Deferred Flags . . . . . . . . . . . . . . . . . . . . . . . . . . . . . . . . . . . . . . . . . . . . . . . . . . . 443
T4A Technical Language . . . . . . . . . . . . . . . . . . . . . . . . . . . . . . . . . . . . . . . . . . . . . . . 444
Tax Form Return Status . . . . . . . . . . . . . . . . . . . . . . . . . . . . . . . . . . . . . . . . . . . . . . . . 444
Tax Group Codes . . . . . . . . . . . . . . . . . . . . . . . . . . . . . . . . . . . . . . . . . . . . . . . . . . . . . 445
Tax Types . . . . . . . . . . . . . . . . . . . . . . . . . . . . . . . . . . . . . . . . . . . . . . . . . . . . . . . . . . . 445
Trades. . . . . . . . . . . . . . . . . . . . . . . . . . . . . . . . . . . . . . . . . . . . . . . . . . . . . . . . . . . . . . 446
Units of Issue . . . . . . . . . . . . . . . . . . . . . . . . . . . . . . . . . . . . . . . . . . . . . . . . . . . . . . . . 446
Valuation Methods . . . . . . . . . . . . . . . . . . . . . . . . . . . . . . . . . . . . . . . . . . . . . . . . . . . . 447
Vendor Register Types . . . . . . . . . . . . . . . . . . . . . . . . . . . . . . . . . . . . . . . . . . . . . . . . . 447
Vendor Miscellaneous Codes . . . . . . . . . . . . . . . . . . . . . . . . . . . . . . . . . . . . . . . . . . . . 448
Vendor Terms . . . . . . . . . . . . . . . . . . . . . . . . . . . . . . . . . . . . . . . . . . . . . . . . . . . . . . . . 448
Vendor Types . . . . . . . . . . . . . . . . . . . . . . . . . . . . . . . . . . . . . . . . . . . . . . . . . . . . . . . . 449
Voucher Statuses . . . . . . . . . . . . . . . . . . . . . . . . . . . . . . . . . . . . . . . . . . . . . . . . . . . . . 449
Work Order Chargeback Types . . . . . . . . . . . . . . . . . . . . . . . . . . . . . . . . . . . . . . . . . . 450
Work Order Rates. . . . . . . . . . . . . . . . . . . . . . . . . . . . . . . . . . . . . . . . . . . . . . . . . . . . . 450
Work Order Types. . . . . . . . . . . . . . . . . . . . . . . . . . . . . . . . . . . . . . . . . . . . . . . . . . . . . 451
Work Order Rate Types . . . . . . . . . . . . . . . . . . . . . . . . . . . . . . . . . . . . . . . . . . . . . . . . 451
Work Order GL Use Codes. . . . . . . . . . . . . . . . . . . . . . . . . . . . . . . . . . . . . . . . . . . . . . 452
Work Order Statuses . . . . . . . . . . . . . . . . . . . . . . . . . . . . . . . . . . . . . . . . . . . . . . . . . . 453
23tting Started with Purchasing and Accounts Payable | Contents

Getting Started with Purchasing and Accounts Payable
Introduction

Ge
About This Manual
Who should read this manual?
Anyone who is responsible for setting up the Purchasing and/or the Accounts Payable modules within Colleague Finance should read this manual. If your institution has a number of individuals responsible for the setting up and implementing the Colleague Finance application, you may choose to distribute this document among the individuals with this responsibility. Refer to What does this manual cover? and How this manual is organized in this chapter for suggestions for ways that you might distribute this document to the members of your implementation team.
Target audience
This book is intended for system administrators, IT staff, institution finance officers/managers, and high-level (power) users already familiar with Colleague and Envision.
These users would most likely have responsibility for the following:
• Setting up the Purchasing and Accounts Payable modules at their site.
• Establishing site-specific policies and procedures for data entry and financial information processing.
• Designing and implementing a chart of accounts.
• Posting transactions to the general ledger.
• Supervising or maintaining fixed asset inventory, valuation, and depreciation.
• Setting up and maintaining approvals for requisitions, purchase orders, and vouchers.
This book is not intended for “heads-down” data entry clerks, new Colleague users, or novice end-users.
User background
The user is expected to be familiar with the following concepts and procedures in Colleague:
• How to access a front-end form.
• How to perform a standard LookUp.
• How to enter data in a field or select a value for a field.
25tting Started with Purchasing and Accounts Payable | About This Manual
Ge
• How to save data and finish from a form.
• How to access a detail form.
User goals
After reading this manual, the user should be able to do the following:
• Understand the relationship between the Purchasing and Accounts Payable modules.
• Understand the file structure of the selected module(s).
• Understand code files, code tables, and validation code tables for the selected module(s).
• Understand the effect of parameter settings for the selected module(s).
• Define code values for the selected module(s).
• Define validation code tables for the selected module(s).
• Define parameter settings for the selected module(s).
What does this manual cover?
This manual provides instruction for setting up the modules within Colleague Finance. The instructions provided in this manual do not take into consideration your institution’s policies that may influence how you set up your parameters, codes, and defaults. Wherever possible, we indicate how your policies may have a specific impact on a particular area of the system setup and remind you to consider those policies before proceeding.
26tting Started with Purchasing and Accounts Payable | About This Manual

Ge
How this manual is organized
Where to find more information
Table 2 lists where to find more information about Purchasing and Accounts Payable.
Table 1: How this manual is organized
Part Topic Summary
1 Introduction Provides information about the organization of this manual.
2 Codes Shared by Purchasing and Accounts Payable
Provides information and procedures for setting up codes shared by the Purchasing and Accounts Payable codes.
3 Setup Shared by Purchasing and Accounts Payable
Provides information and procedures for setting up information that is shared by the Purchasing and Accounts Payable modules. Topics covered include foreign currency information, international information, tax-related information, and Canadian information.
4 Setting Up Purchasing and Accounts Payable
Provides information and procedures for setting up the Purchasing and Accounts Payable modules. Topics covered include defaults, parameters, and codes used in the Purchasing module only, and defaults, parameters, and codes used in the Accounts Payable module only.
Worksheets Provides worksheets, information on validation code table maintenance, utilities, standard Purchasing and Accounts Payable forms, Colleague Colleague Finance codes.
Table 2: Sources of information for Colleague Finance
More Information Reference
Detailed information about the forms and fields in the Accounts Payable module
Online help
Instructions for performing basic functions (such as accessing forms, entering data, and accessing online help) using each of the available Colleague interfaces
Guide to User Interfaces
27tting Started with Purchasing and Accounts Payable | About This Manual

Ge
Procedures for using Colleague Finance modules Using Accounts Payable
Using Accounts Receivable & Cash Receipts
Using Fixed Assets
Using Inventory
Using Online Approvals in Colleague Finance
Using Physical Plant
Using Projects Accounting
Using Purchasing
Procedures for processing 1099-MISC and T4A year-end tax information
U.S. Regulatory Reporting
Canadian Regulatory Reporting
Table 2: Sources of information for Colleague Finance (continued)
More Information Reference
28tting Started with Purchasing and Accounts Payable | About This Manual

Getting Started with Purchasing and Accounts Payable
Codes Shared by Purchasing and Accounts Payable

Ge
Overview of Purchasing/Payables Processing
In this chapter
This chapter discusses the procurement process as it is implemented in the Purchasing and Accounts Payable modules.
Table 3 lists the sections in this chapter.
Purchasing/Payables setup and daily processing
Figure 1 illustrates the major tasks involved in setting up the Purchasing and Accounts Payable modules, followed by the major steps in purchasing and payables processing.
Table 3: Topics in this chapter
Topic Page
Purchasing/Payables setup and daily processing 30
The purchasing and AP process: Role of the transaction codes
32
Statuses 37
30tting Started with Purchasing and Accounts Payable | Overview of Purchasing/Payables Processing
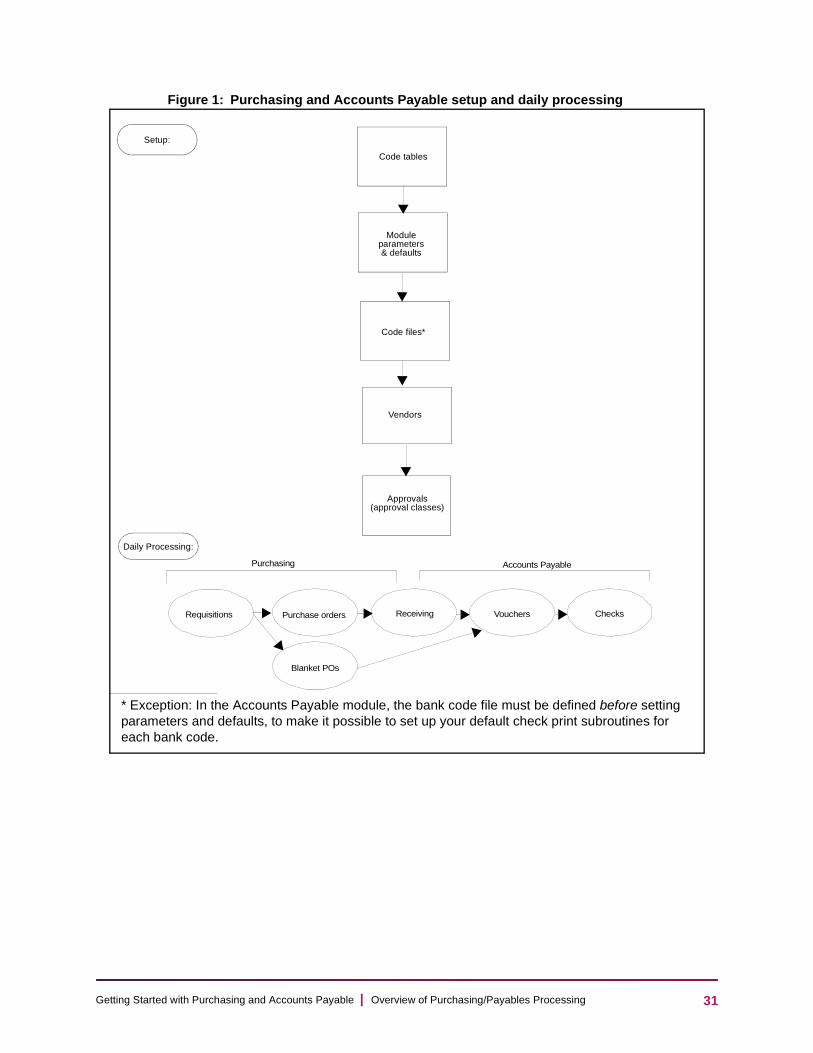
Ge
Figure 1: Purchasing and Accounts Payable setup and daily processing
Setup:
Code tables
Code files*
Approvals(approval classes)
Accounts Payable
Moduleparameters& defaults
Daily Processing:
Vendors
ReceivingPurchase ordersRequisitions Vouchers Checks
Purchasing
Blanket POs
* Exception: In the Accounts Payable module, the bank code file must be defined before setting parameters and defaults, to make it possible to set up your default check print subroutines for each bank code.
31tting Started with Purchasing and Accounts Payable | Overview of Purchasing/Payables Processing
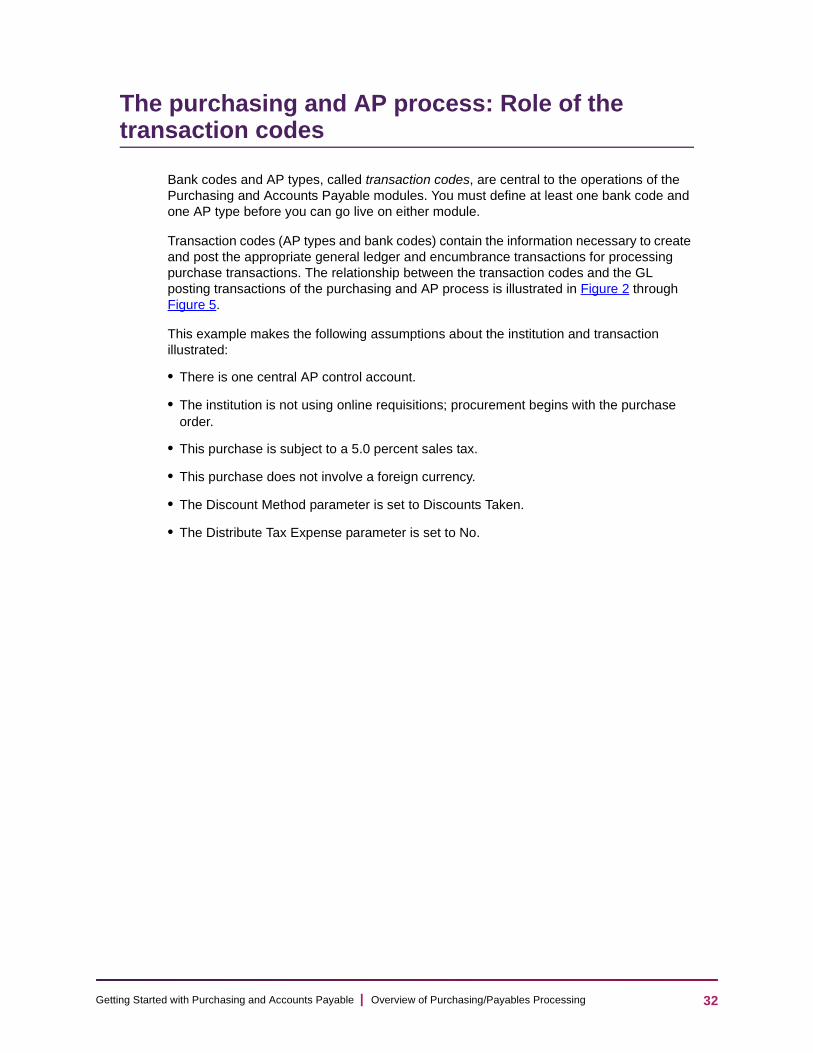
Ge
The purchasing and AP process: Role of the transaction codes
Bank codes and AP types, called transaction codes, are central to the operations of the Purchasing and Accounts Payable modules. You must define at least one bank code and one AP type before you can go live on either module.
Transaction codes (AP types and bank codes) contain the information necessary to create and post the appropriate general ledger and encumbrance transactions for processing purchase transactions. The relationship between the transaction codes and the GL posting transactions of the purchasing and AP process is illustrated in Figure 2 through Figure 5.
This example makes the following assumptions about the institution and transaction illustrated:
• There is one central AP control account.
• The institution is not using online requisitions; procurement begins with the purchase order.
• This purchase is subject to a 5.0 percent sales tax.
• This purchase does not involve a foreign currency.
• The Discount Method parameter is set to Discounts Taken.
• The Distribute Tax Expense parameter is set to No.
32tting Started with Purchasing and Accounts Payable | Overview of Purchasing/Payables Processing
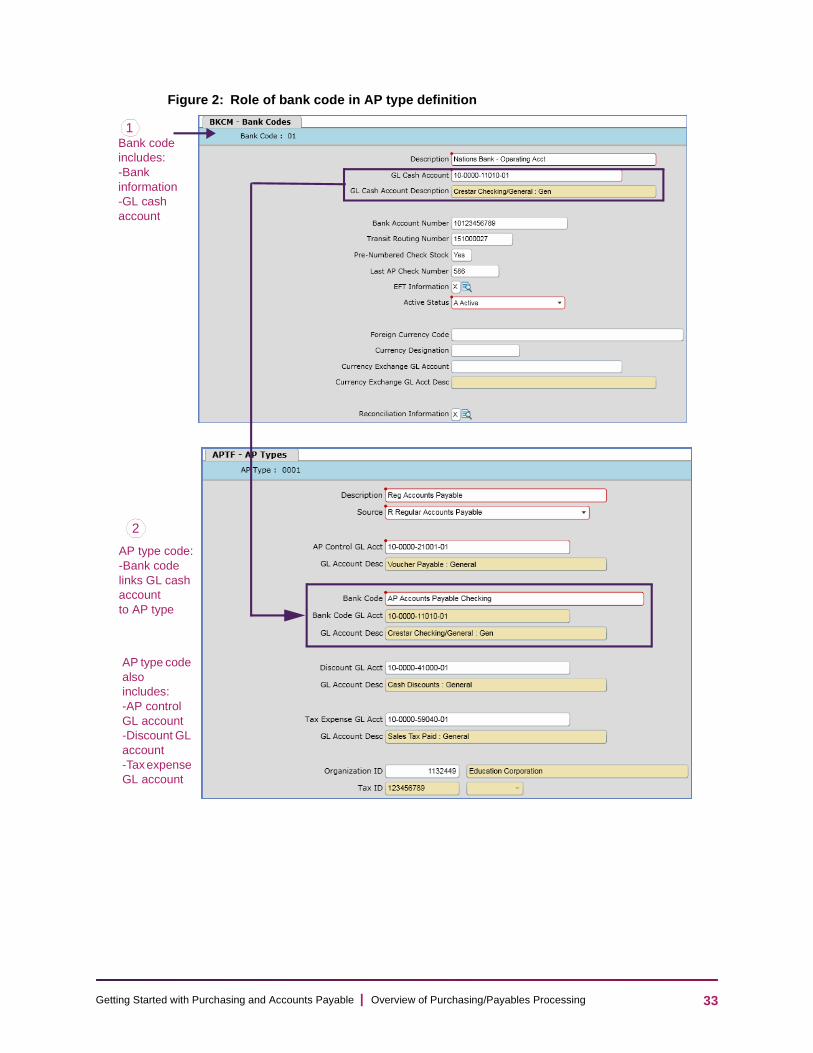
Ge
Figure 2: Role of bank code in AP type definition
Bank code includes: -Bank information -GL cash account
2
AP type code: -Bank code links GL cash account to AP type
AP type code also includes: -AP control GL account -Discount GL account -Tax expense GL account
1
33tting Started with Purchasing and Accounts Payable | Overview of Purchasing/Payables Processing

Ge
Figure 3: Role of AP type in purchase order creation and posting
2 Encumbrance is posted to the GL expense account entered on the POIM form
Detail to POIL and POIM
TransactionsPurchase Order Stage:
Purchases Expense Acct. 10-0000-11010-01 encumbrance
AP type code associates GL accounts with purchase order
1
300.00
34tting Started with Purchasing and Accounts Payable | Overview of Purchasing/Payables Processing
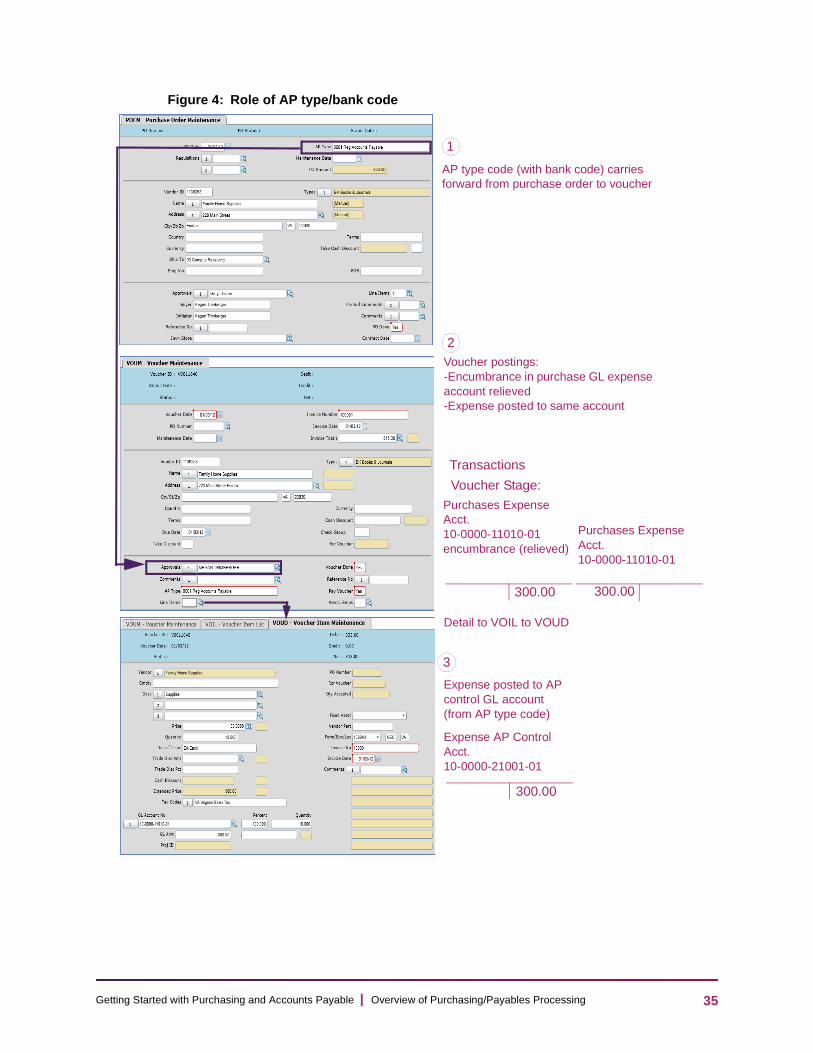
Ge
Figure 4: Role of AP type/bank code
AP type code (with bank code) carries forward from purchase order to voucher
1
3
Voucher postings: -Encumbrance in purchase GL expense account relieved -Expense posted to same account
Expense posted to AP control GL account (from AP type code)
Purchases Expense Acct. 10-0000-11010-01 encumbrance (relieved)
Transactions
Voucher Stage:
Purchases Expense Acct. 10-0000-11010-01
300.00 300.00
Expense AP Control Acct. 10-0000-21001-01
2
Detail to VOIL to VOUD
300.00
35tting Started with Purchasing and Accounts Payable | Overview of Purchasing/Payables Processing

Ge
Figure 5: Role of AP type/bank code through voucher in check creation
AP type code associates GL accounts and bank code with voucher
1
2
Check amount posted to GL cash account (from bank code)
3
Voucher pay postings: -AP type code posts debit to AP control GL account -Tax expense posted to tax expense GL account -Discount revenue posted to discount GL account
Check Stage:
300.00 315.00
15.00
Transactions
AP Control Acct. 10-0000-21001-01
Cash Acct. 10-0000-11001-01
Tax Expense Acct. 10-0000-59040-01
36tting Started with Purchasing and Accounts Payable | Overview of Purchasing/Payables Processing
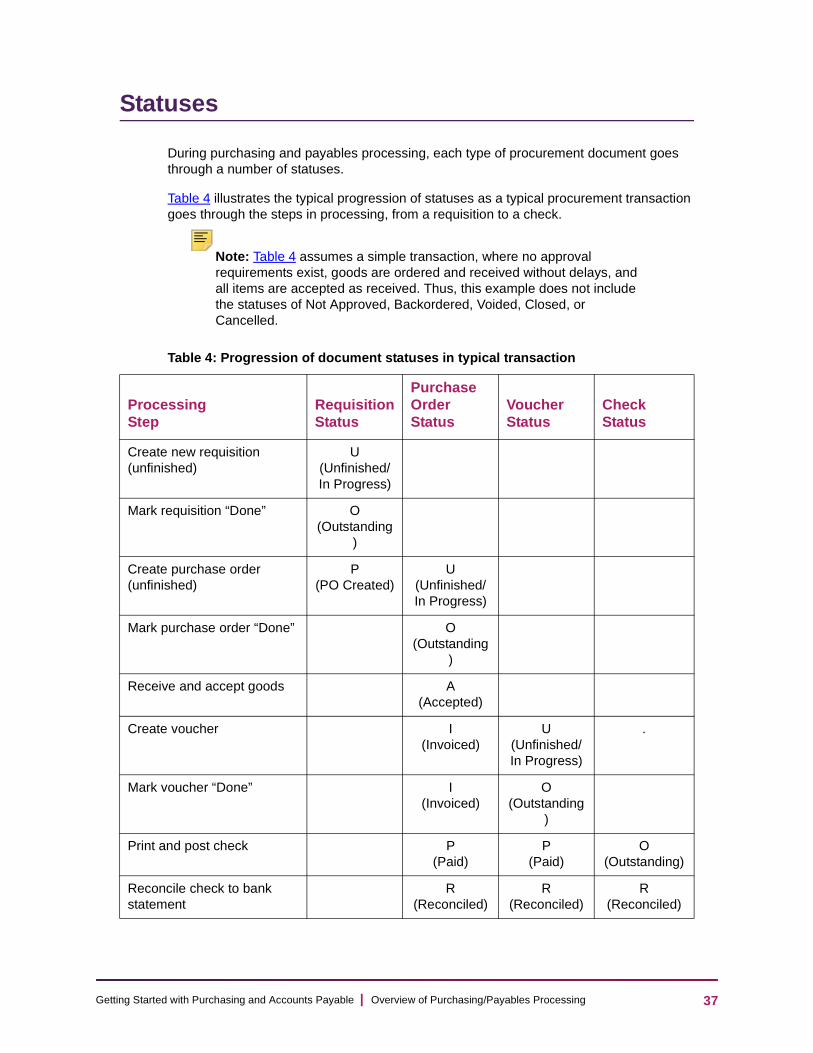
Ge
Statuses
During purchasing and payables processing, each type of procurement document goes through a number of statuses.
Table 4 illustrates the typical progression of statuses as a typical procurement transaction goes through the steps in processing, from a requisition to a check.
Note: Table 4 assumes a simple transaction, where no approval requirements exist, goods are ordered and received without delays, and all items are accepted as received. Thus, this example does not include the statuses of Not Approved, Backordered, Voided, Closed, or Cancelled.
Table 4: Progression of document statuses in typical transaction
Processing Step
Requisition Status
Purchase Order Status
Voucher Status
Check Status
Create new requisition (unfinished)
U (Unfinished/In Progress)
Mark requisition “Done” O (Outstanding
)
Create purchase order (unfinished)
P (PO Created)
U (Unfinished/In Progress)
Mark purchase order “Done” O (Outstanding
)
Receive and accept goods A (Accepted)
Create voucher I (Invoiced)
U (Unfinished/In Progress)
.
Mark voucher “Done” I (Invoiced)
O (Outstanding
)
Print and post check P (Paid)
P (Paid)
O (Outstanding)
Reconcile check to bank statement
R (Reconciled)
R(Reconciled)
R (Reconciled)
37tting Started with Purchasing and Accounts Payable | Overview of Purchasing/Payables Processing
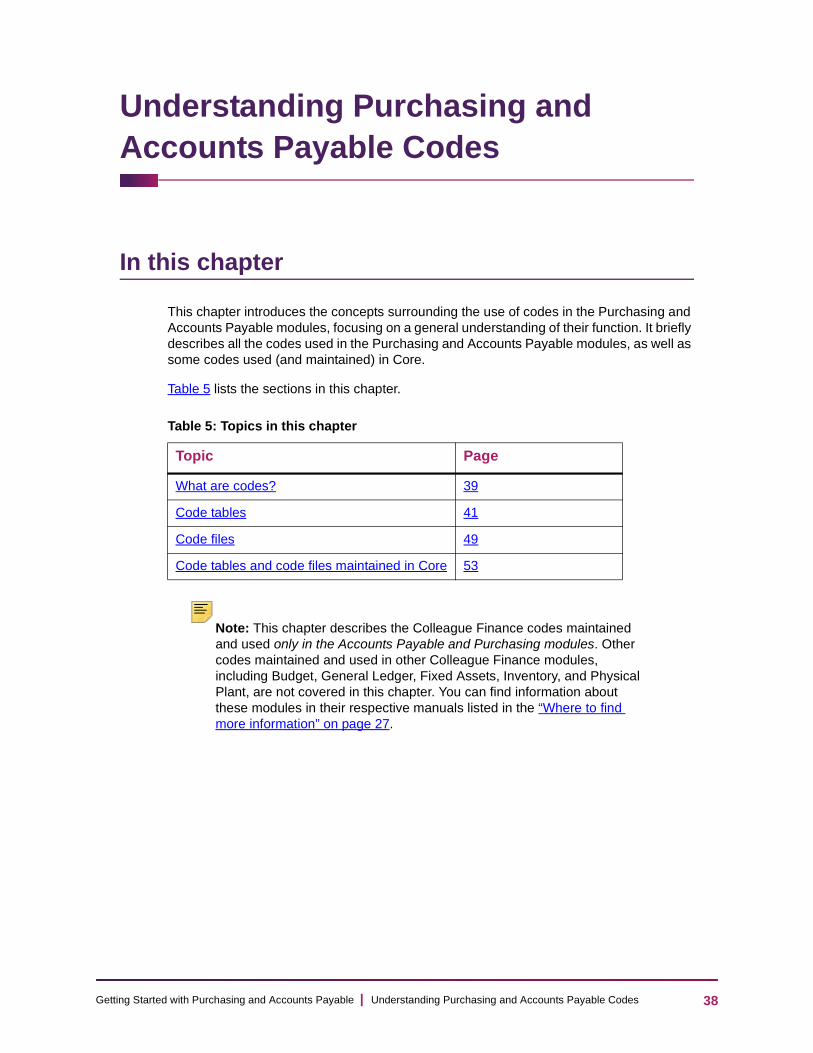
Ge
Understanding Purchasing and Accounts Payable Codes
In this chapter
This chapter introduces the concepts surrounding the use of codes in the Purchasing and Accounts Payable modules, focusing on a general understanding of their function. It briefly describes all the codes used in the Purchasing and Accounts Payable modules, as well as some codes used (and maintained) in Core.
Table 5 lists the sections in this chapter.
Note: This chapter describes the Colleague Finance codes maintained and used only in the Accounts Payable and Purchasing modules. Other codes maintained and used in other Colleague Finance modules, including Budget, General Ledger, Fixed Assets, Inventory, and Physical Plant, are not covered in this chapter. You can find information about these modules in their respective manuals listed in the “Where to find more information” on page 27.
Table 5: Topics in this chapter
Topic Page
What are codes? 39
Code tables 41
Code files 49
Code tables and code files maintained in Core 53
38tting Started with Purchasing and Accounts Payable | Understanding Purchasing and Accounts Payable Codes

Ge
Where to find the information
Table 6 lists where to find the information.
What are codes?
Purchasing and accounts payable tasks involve handling information about vendors, requisitions, purchase orders, vouchers, checks, and items that are ordered, received and expensed. The Purchasing and Accounts Payable modules use codes to efficiently record and maintain this information, and to streamline and simplify selecting and reporting.
A code is a character or group of characters (alphabetic, numeric, or combined alpha and numeric) used to represent a piece, or pieces, of related information which are used by Colleague to process records. Codes provide a “shorthand” method for handling data, because many pieces of information can be grouped together under one code, and a simple one- or two-character abbreviation may represent a much larger body of information.
Table 6: Understanding Purchasing and Accounts Payable Codes Cross-Reference
Topic Reference
Read an introduction to codes concepts
“What are codes?” on page 39.
Learn the difference between code tables and code files
“Code tables” on page 41 and “Code files” on page 49.
Find out if a code table is user-maintainable
Table 7 on page 43.
Find out the codes definition chapter in which a specific code table is covered in detail
Table 7 on page 43.
Read brief descriptions of the code tables
“Descriptions of code tables” on page 46.
Find out the names of Purchasing and AP code files and see other Colleague applications that use these files
Table 9 on page 51.
Read brief descriptions of the code files
“Descriptions of code files” on page 52.
See lists of code tables and code files maintained in Core but useful in Purchasing and Accounts Payable tasks
“Code tables and code files maintained in Core” on page 53.
39tting Started with Purchasing and Accounts Payable | Understanding Purchasing and Accounts Payable Codes
Ge
An everyday example of codes is filling in the blanks on a form. Suppose you are filling out a number of forms regarding a group of vendors to your institution, all of whom offer terms of 2/10 Net 30. Completing the blank for “Terms” would go much faster if you could abbreviate “2/10 Net 30” to, for example, “02” or “210” instead of reentering the entire sequence onto each vendor’s form. Using an abbreviation of a term or concept (such as “02” or “210” for 2/10 Net 30) is using a code.
The information in codes can be as simple as requisition priorities (“1” for high, “2” for medium, or “3” for low), or complex enough to indicate relationships between several items of information. For example, the BANK.CODES code file, described later in this chapter, contains information on a bank account used by your institution, including the bank account number, GL account number, status, and other information, all keyed to one two-character code.
Codes also provide the following advantages for standardizing data entry:
• Increase efficiency and speed of data entry.
• Limit the valid responses a user has for data entry.
• Simplify data entry by storing several related items of information in a single code that can be added to a record in one step.
• Establish standard values for certain data elements, thereby ensuring consistent data entry.
• Provide consistent values, and descriptions of those values, on forms and in reports, thereby ensuring more accurate and meaningful reports.
Types of codes used in the Purchasing and Accounts Payable Modules
In some purchasing and accounts payable processes, a piece of requested information might consist of only one or two parts, for example, a simple code and description. In other cases, however, there might be several interrelated pieces of information that should be assembled together in a more complex relationship, as in the codes designating AP types. In general, to account for this difference in complexity, Colleague uses the following two types of codes:
• Code tables, for simple information (all codes are stored collectively in one file).
• Code files, for information related in more complex ways (each type of code is stored as a separate file).
The following sections cover the differences between code tables and code files, and list and describe each code table and code file used in the Purchasing and Accounts Payable modules.
40tting Started with Purchasing and Accounts Payable | Understanding Purchasing and Accounts Payable Codes

Ge
Code tables
Each of the code tables used in the Purchasing and Accounts Payable modules provides a list of valid choices, or values, for an item of information. Code tables are also called validation tables, validation code tables, or validation codes.
Note: Although all code tables for all Colleague Finance modules are grouped together in one file (CF.VALCODES) for ease of maintenance, the code tables covered in this chapter are only those used in the Accounts Payable and Purchasing modules.
All code tables in Colleague have the same structure, briefly described as follows:
• Code. A series of alphabetic or numeric characters identifying a single item (the code is normally one to four characters)
• Description. A description of what the code does or means
• Minimum Entry. Specifies the minimum characters that must be entered into the system during data entry to distinguish the selected code from the other choices
• Special Processing (see explanation below). A code or command to add a special function when the code is selected
Three of the Purchasing and Accounts Payable code tables, TAX.CATEGORIES, TAX.FORM.RETURN.STATUS, and TAX.GROUP.CODES, are set up to perform “special processing.” Whereas a code in a simple code table may supply only one piece of information for use in sorting or reporting, special processing carries the function of the code table a step further. This special processing code may tell the system where to go next to complete a process begun by the code table, or may feed an item of information to the system to provide additional information.
For example, the TAX.FORM.RETURN.STATUS code table is used in 1099-MISC tax forms processing (performed at the end of each calendar year) to indicate whether a tax return is a new or corrected return. In this code table, the additional processing (activated by the special processing code) calls a subroutine that gives Colleague further instructions on how to calculate the totals for the tax return; for example, whether to subtract (“back out”) the previous figures before adding in the newly generated totals.
Code tables used in the Purchasing and Accounts Payable Modules
Table 7 lists all the code tables used by the Purchasing and Accounts Payable modules. Each column title in the table is listed below, with a description of the information that appears in the column.
• Code Table Name. The name of the code table.
• Used in PU. A check mark () in this column indicates the code table is accessed in the Purchasing module.
41tting Started with Purchasing and Accounts Payable | Understanding Purchasing and Accounts Payable Codes

Ge
• Used in AP. A check mark () in this column indicates the code table is accessed in the Accounts Payable module.
• Major Form(s) Where Used. Lists mnemonics for the major forms that request or display the code table (the code may appear on other forms as well).
• User Can Maintain? A check mark () in this column indicates the code table can be maintained by the user.
• Predefined by Ellucian? A check mark (?) in this column indicates the code table contains some default codes when it is shipped by Ellucian.
• Special Processing? A check mark () in this column indicates the code table contains special processing instructions.
“Descriptions of code tables” on page 46 lists all the code tables used or referred to in the Purchasing and Accounts Payable modules, and gives a brief description of the purpose and function of each.
Note: Table 7 lists only those code tables used in the Accounts Payable and Purchasing modules, even though the CF.VALCODES file contains the code tables for all Colleague Finance modules.
42tting Started with Purchasing and Accounts Payable | Understanding Purchasing and Accounts Payable Codes
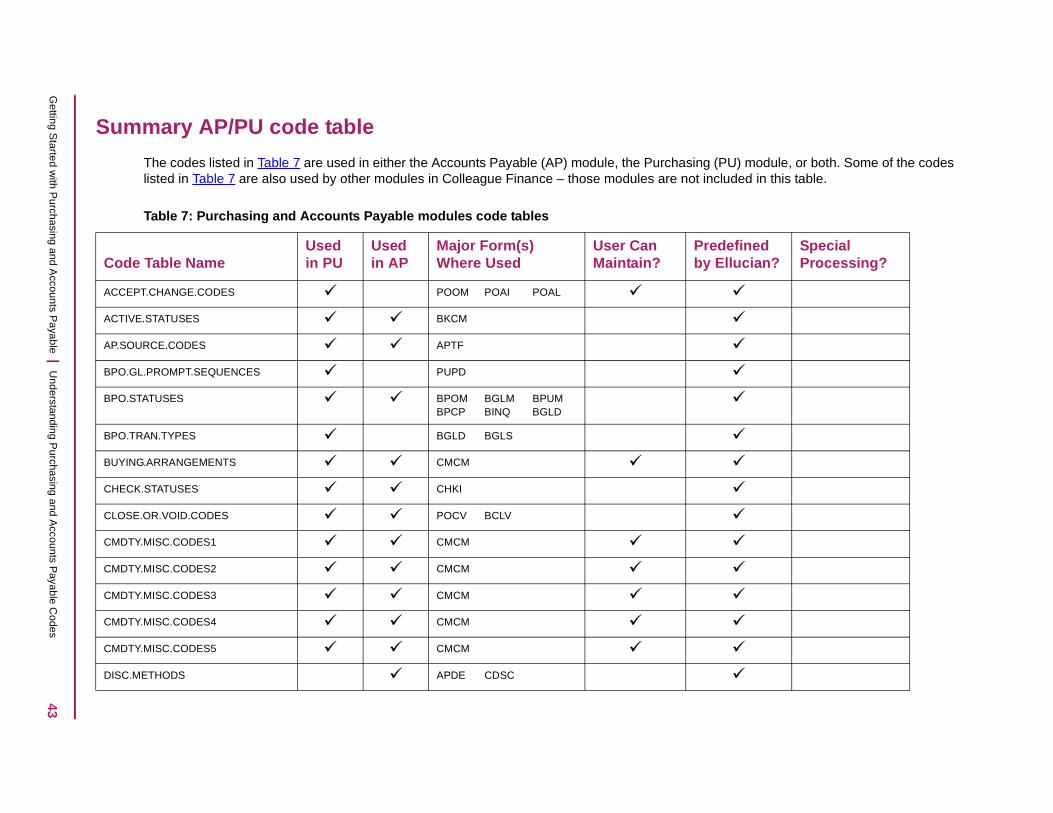
43G
etting Started w
ith Purchasing and A
ccounts Payable | U
nderstanding Purchasing and A
ccounts Payable C
odes
S
(PU) module, or both. Some of the codes cluded in this table.
Cedefined Ellucian?
Special Processing?
A
A
A
B
B
B
B
C
C
C
C
C
C
C
D
ummary AP/PU code table
The codes listed in Table 7 are used in either the Accounts Payable (AP) module, the Purchasinglisted in Table 7 are also used by other modules in Colleague Finance – those modules are not in
Table 7: Purchasing and Accounts Payable modules code tables
ode Table NameUsed in PU
Used in AP
Major Form(s) Where Used
User Can Maintain?
Prby
CCEPT.CHANGE.CODES POOM POAI POAL
CTIVE.STATUSES BKCM
P.SOURCE.CODES APTF
PO.GL.PROMPT.SEQUENCES PUPD
PO.STATUSES BPOM BGLM BPUM BPCP BINQ BGLD
PO.TRAN.TYPES BGLD BGLS
UYING.ARRANGEMENTS CMCM
HECK.STATUSES CHKI
LOSE.OR.VOID.CODES POCV BCLV
MDTY.MISC.CODES1 CMCM
MDTY.MISC.CODES2 CMCM
MDTY.MISC.CODES3 CMCM
MDTY.MISC.CODES4 CMCM
MDTY.MISC.CODES5 CMCM
ISC.METHODS APDE CDSC

44G
etting Started w
ith Purchasing and A
ccounts Payable | U
nderstanding Purchasing and A
ccounts Payable C
odes
F
G
IN
IT
IT
L
M
P
P
P
R
R
R
R
Cedefined Ellucian?
Special Processing?
XA.TRANSFER.FLAGS CMCM RQIM POIM VOUD VIIN
L.PROMPT.SEQUENCES APDE PUPD
CLUDE.EXCLUDE.CODES APGL APCM
EM.CONDITION POOM POOI
EM.PO.STATUSES RIIN POIM PBKH PINQ PIIN POOM POAI POOI PORI POPP
ABEL.DESTINATIONS VNLF VENL
ANUAL.CHECK.CODES CHKI
O.DATE.TO.PRINT.CODES PPRT POSP BPRT BPSP
O.STATUSES VENI POEM POIM POGT PBKH PINQ POAI PORD DINQPGLI POPP
URGE.REG.TYPES VPRG VOPG
C.VOUCHER.STATUSES RCVM ROUD RGLT RVOS
EGISTER.TYPES VREG
EQ.PRIORITIES REQM RINQ
EQ.STATUSES REQM RQIM RQSP RINQ RIIN RETI
Table 7: Purchasing and Accounts Payable modules code tables (continued)
ode Table NameUsed in PU
Used in AP
Major Form(s) Where Used
User Can Maintain?
Prby

45G
etting Started w
ith Purchasing and A
ccounts Payable | U
nderstanding Purchasing and A
ccounts Payable C
odes
R
T
T
V
V
V
W
Cedefined Ellucian?
Special Processing?
UN.MODES MMED
AX.CATEGORIES TXCM
AX.TYPES RTXM RETI POGT PGLI VGLT RGLT
EN.REGISTER.TYPES VENR
ENDOR.MISC.CODES VEND VENR VENY
OU.STATUSES VENI VOUM VOIL VOUD VGLT VINQ
ORK.ORDER.GL.USE.CODES RQIM RIIN POIM PIIN
Table 7: Purchasing and Accounts Payable modules code tables (continued)
ode Table NameUsed in PU
Used in AP
Major Form(s) Where Used
User Can Maintain?
Prby

Ge
Descriptions of code tables
Below are descriptions of each of the code tables listed in Table 8.
Table 8: Code table description
Code Table Description
ACCEPT.CHANGE.CODES Used in goods and services receiving to indicate the reason for a change in the number of accepted items from a purchase order; for example, Miscount.
ACTIVE.STATUSES Used in bank code definition to indicate whether a bank code is active or inactive.
AP.SOURCE.CODES Used in AP type definition to indicate whether the AP type is for regular accounts payable transactions or accounts receivable transactions such as student refund checks and employee advances.
BPO.GL.PROMPT.SEQUENCES Set in the PU Parameters Definition (PUPD) form. They list options for sequencing of cursor prompting on the blanket purchase orders forms.
BPO.STATUSES The possible statuses Colleague may assign to a blanket purchase order during processing, such as In Progress (unfinished), Outstanding, or Voided.
BPO.TRAN.TYPES Used in the general ledger-related forms for blanket purchase orders, to indicate whether a transaction on the BPO is the original transaction, an adjustment, or a voucher transaction.
BUYING.ARRANGEMENTS The codes used to indicate special contractual arrangements your institution may have for purchasing given commodities; for example, a cooperative arrangement, or a county contract.
CHECK.STATUSES The possible statuses Colleague may assign to a check during processing, such as Outstanding, Reconciled, or Void.
CLOSE.OR.VOID.CODES Used on the Purchase Order Close/Void (POCV) and Blanket Purchase Order Close/Void (BCLV) forms to indicate whether the purchase order is being closed or voided.
CMDTY.MISC.CODES1 Codes designated by your institution, to indicate any properties of commodities you want to track.You can later assign these codes to commodities you create. There are five code tables in all, to let you designate several miscellaneous codes. Examples of commodity miscellaneous codes are: biodegradable, recyclable, and hazardous.
CMDTY.MISC.CODES2 Same as CMDTY.MISC.CODES1.
46tting Started with Purchasing and Accounts Payable | Understanding Purchasing and Accounts Payable Codes
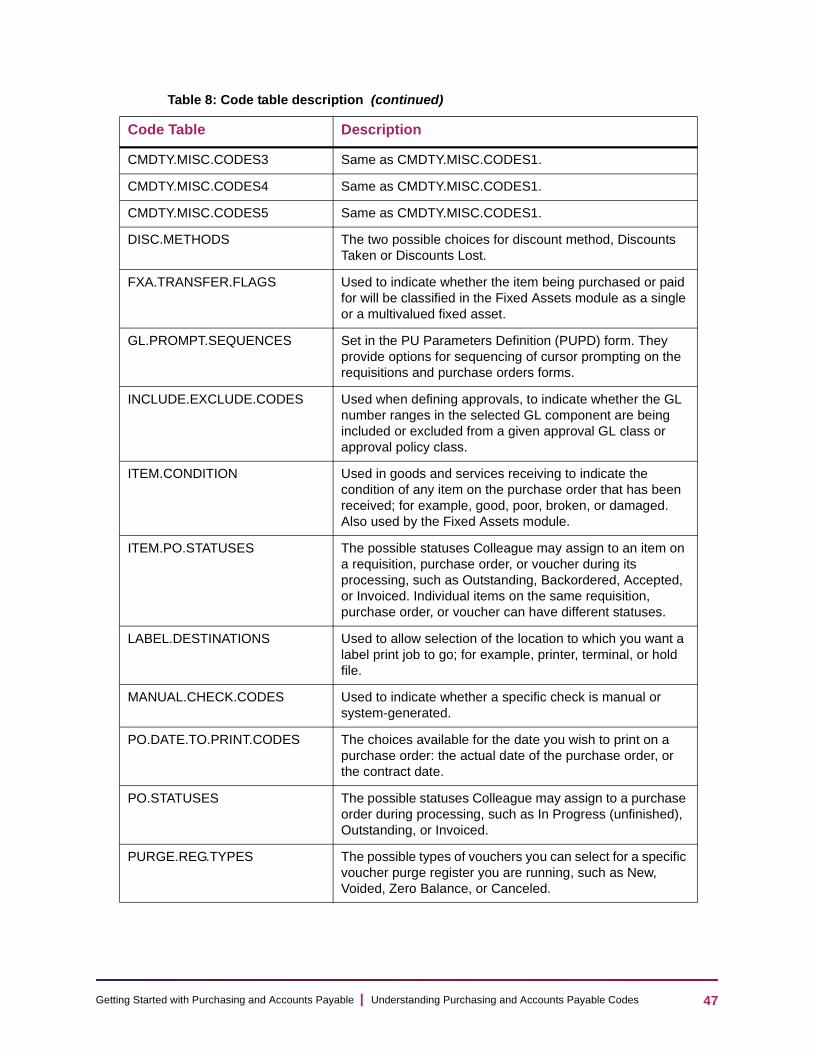
Ge
CMDTY.MISC.CODES3 Same as CMDTY.MISC.CODES1.
CMDTY.MISC.CODES4 Same as CMDTY.MISC.CODES1.
CMDTY.MISC.CODES5 Same as CMDTY.MISC.CODES1.
DISC.METHODS The two possible choices for discount method, Discounts Taken or Discounts Lost.
FXA.TRANSFER.FLAGS Used to indicate whether the item being purchased or paid for will be classified in the Fixed Assets module as a single or a multivalued fixed asset.
GL.PROMPT.SEQUENCES Set in the PU Parameters Definition (PUPD) form. They provide options for sequencing of cursor prompting on the requisitions and purchase orders forms.
INCLUDE.EXCLUDE.CODES Used when defining approvals, to indicate whether the GL number ranges in the selected GL component are being included or excluded from a given approval GL class or approval policy class.
ITEM.CONDITION Used in goods and services receiving to indicate the condition of any item on the purchase order that has been received; for example, good, poor, broken, or damaged. Also used by the Fixed Assets module.
ITEM.PO.STATUSES The possible statuses Colleague may assign to an item on a requisition, purchase order, or voucher during its processing, such as Outstanding, Backordered, Accepted, or Invoiced. Individual items on the same requisition, purchase order, or voucher can have different statuses.
LABEL.DESTINATIONS Used to allow selection of the location to which you want a label print job to go; for example, printer, terminal, or hold file.
MANUAL.CHECK.CODES Used to indicate whether a specific check is manual or system-generated.
PO.DATE.TO.PRINT.CODES The choices available for the date you wish to print on a purchase order: the actual date of the purchase order, or the contract date.
PO.STATUSES The possible statuses Colleague may assign to a purchase order during processing, such as In Progress (unfinished), Outstanding, or Invoiced.
PURGE.REG.TYPES The possible types of vouchers you can select for a specific voucher purge register you are running, such as New, Voided, Zero Balance, or Canceled.
Table 8: Code table description (continued)
Code Table Description
47tting Started with Purchasing and Accounts Payable | Understanding Purchasing and Accounts Payable Codes

Ge
RC.VOUCHER.STATUSES The possible statuses Colleague may assign to a recurring voucher during its processing, such as Outstanding, Voided, or Closed.
REGISTER.TYPES The possible types of vouchers you can select for a specific voucher register you are running. Some examples are Full, Outstanding, Paid, or New.
REQ.PRIORITIES Used to indicate the possible priorities that can be assigned to a requisition; for example, 1 for critical, 2 for important, 3 for desired.
REQ.STATUSES The possible statuses Colleague may assign to a requisition during its processing, such as In Progress (unfinished), Outstanding, or PO Created.
RUN.MODES Used to indicate to the Internal Revenue Service whether you are submitting a 1099-MISC tape in test mode or live mode.
TAX.CATEGORIES Categories of taxes applied to purchases; for example, sales tax.
Special Processing:
Designed especially for the Canadian GST (General Sales Tax) and PST (Provincial Sales Tax) codes, this code allows different tax codes with the same tax category to be totaled in the same line on reports.
TAX.FORM.PROCESSING. STATUS
The codes indicating the possible statuses Colleague may assign to a 1099-MISC or T4A tax form during its processing stages; for example, Generated, Modified, Verified, Unlocked Verified, Certified, Unlocked Certified, or Purged.
TAX.FORM.RETURN.STATUS Codes to indicate the current condition of a 1099-MISC tax return being prepared in a 1099-MISC process. One of these codes may indicate, for example, that changes have been made to a return; in this case the previous return must be “backed out” and the revised form submitted in its place.
Special Processing:
A numeric character, attached to each code, calls the subroutine that completes the process indicated by this code.
Table 8: Code table description (continued)
Code Table Description
48tting Started with Purchasing and Accounts Payable | Understanding Purchasing and Accounts Payable Codes

Ge
Code files
Code files perform the same basic function as code tables: standardizing and validating information. However, code files are more complex and have a more open, flexible structure than code tables.
The design of a code file allows storage of related information as one unit, or “record.” A single record in a given code file may store as few as two or three pieces of information, or as many as ten or twenty individual pieces of information, all of which are related to the same topic. Each individual piece of information is called a “field.”
When you access a code file through LookUp, and enter the code corresponding to a certain individual record within that file (for example, “B1 - State Bank of Louisiana” for a bank code), all the individual fields, or pieces of information that are stored together in that record, will be brought into the form from which you accessed the code file.
TAX.GROUP.CODES Used to differentiate T4A Retirement Allowance tax codes from all other types of T4As and to assure amounts are placed in the correct boxes on the Canadian T4A form.
Special Processing:
An alphabetic character, attached to each code, indicates a subroutine that completes the processing for the code.
TAX.TYPES Used on the requisition, purchase order, and voucher tax information forms to indicate if either rebates or ITC/refunds are a part of the tax information.
VEN.REGISTER.TYPES Used to indicate if the vendor register being produced lists vendors available for purging (P — Available to Purge) or is a listing in which any vendor can be included (A — Any Vendor).
VENDOR.MISC.CODES Used to indicate any special characteristics of vendors that your institution wants to track, for sorting or reporting purposes. Examples are large sales volume vendors, or vendors that give trade discounts.
VOU.STATUSES The possible statuses Colleague may assign to a voucher during its processing, such as Outstanding, Paid, or Reconciled.
WORK.ORDER.GL.USE.CODES Codes to indicate which type of expense account will be charged on the work order that is being associated with a requisition or purchase order. You will need this code only if your institution has the Physical Plant module.
Table 8: Code table description (continued)
Code Table Description
49tting Started with Purchasing and Accounts Payable | Understanding Purchasing and Accounts Payable Codes

Ge
An example of a code file that provides more than one item of information is the VENDOR.TERMS file. This file lists not only the code for vendor cash discount terms and a description of the terms, but also the number of days Colleague must track in order for the discount to be taken from the total check if the invoice is paid by the due date.
An example of a more complex code file that is a critical element in all procurement documents is the AP.TYPES file. It provides information necessary for the entire purchasing and accounts payable process, and is used in posting transactions to the general ledger. The AP.TYPES code file contains the following information:
• The code itself (some examples are “0001,” for Regular Accounts Payable, and “0002,” for a code representing student refunds).
• A description of the AP type associated with the code.
• The source of the AP type (that is, whether the AP type is for regular expense vouchers or for vouchers issued for refunds and advances).
• The AP control GL account number associated with the AP type (that is, the general ledger’s main AP account that totals all subsidiary accounts payable transactions for the given AP type).
• The bank code, as well as the bank code’s GL account number, associated with the AP type.
• The GL account number to be used for cash discounts if your institution is not distributing cash discount amounts to individual line item GL numbers.
• The GL account number to be used for tax expenses if your institution is not distributing tax expense amounts to individual line item GL numbers.
You cannot change any of the information in the code files used in the Purchasing and Accounts Payable modules except through the maintenance form for the code file.
Code files used in the Purchasing and Accounts Payable modules
Colleague Core manages demographic, parameter, and facilities information that serves as a base for all the Colleague applications.
Some code files are shared among Colleague applications. This sharing allows more efficient storing and use of common information.
Table 9 shows the code files maintained and used in the Purchasing and Accounts Payable modules and where those files are maintained and used elsewhere in Colleague. The names of other Colleague applications are arranged across the top, and the code files are listed in alphabetical order in the first column of the table.
The second column displays the mnemonic of the form where this code file is defined.
The symbols in the third through tenth columns indicate the following:
• If the code file is both maintained and used in a module or application, a shaded box
() appears in the applicable column
50tting Started with Purchasing and Accounts Payable | Understanding Purchasing and Accounts Payable Codes

Ge
• If the code file is used in the module or application but cannot be maintained in that module or application, an open box (-) appears in the applicable column
“Descriptions of code files” on page 52 lists all the code files used by the Accounts Payable and Purchasing modules and briefly describes the purpose and function of each file.
Summary code file table
Table 9: Purchasing and Accounts Payable code files
Code File Name Mnemonic
Colleague Financial
Core HR STPU AP FX GL
AP.TAXES TXCM
AP.TYPES APTF
BANK.CODES BKCM
COMMODITY.CODES CMCM
CURRENCY.CONV CEXM
FOBS FOBM
SHIP.TO.CODES STCF
SHIP.VIAS SVIA
STAFF SVM –
STATES.1099 TNST
UNIT.ISSUES UNIM
VENDOR.TERMS VTMF
VENDOR.TYPES VTYF
51tting Started with Purchasing and Accounts Payable | Understanding Purchasing and Accounts Payable Codes
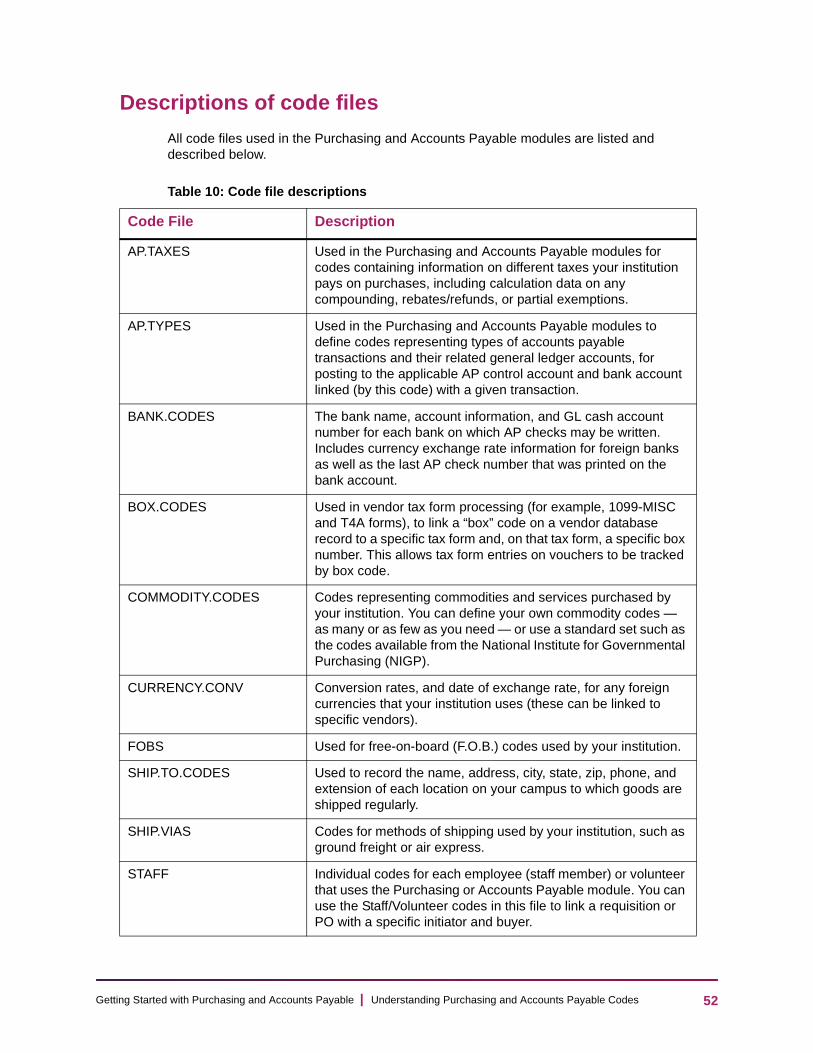
Ge
Descriptions of code files
All code files used in the Purchasing and Accounts Payable modules are listed and described below.
Table 10: Code file descriptions
Code File Description
AP.TAXES Used in the Purchasing and Accounts Payable modules for codes containing information on different taxes your institution pays on purchases, including calculation data on any compounding, rebates/refunds, or partial exemptions.
AP.TYPES Used in the Purchasing and Accounts Payable modules to define codes representing types of accounts payable transactions and their related general ledger accounts, for posting to the applicable AP control account and bank account linked (by this code) with a given transaction.
BANK.CODES The bank name, account information, and GL cash account number for each bank on which AP checks may be written. Includes currency exchange rate information for foreign banks as well as the last AP check number that was printed on the bank account.
BOX.CODES Used in vendor tax form processing (for example, 1099-MISC and T4A forms), to link a “box” code on a vendor database record to a specific tax form and, on that tax form, a specific box number. This allows tax form entries on vouchers to be tracked by box code.
COMMODITY.CODES Codes representing commodities and services purchased by your institution. You can define your own commodity codes — as many or as few as you need — or use a standard set such as the codes available from the National Institute for Governmental Purchasing (NIGP).
CURRENCY.CONV Conversion rates, and date of exchange rate, for any foreign currencies that your institution uses (these can be linked to specific vendors).
FOBS Used for free-on-board (F.O.B.) codes used by your institution.
SHIP.TO.CODES Used to record the name, address, city, state, zip, phone, and extension of each location on your campus to which goods are shipped regularly.
SHIP.VIAS Codes for methods of shipping used by your institution, such as ground freight or air express.
STAFF Individual codes for each employee (staff member) or volunteer that uses the Purchasing or Accounts Payable module. You can use the Staff/Volunteer codes in this file to link a requisition or PO with a specific initiator and buyer.
52tting Started with Purchasing and Accounts Payable | Understanding Purchasing and Accounts Payable Codes
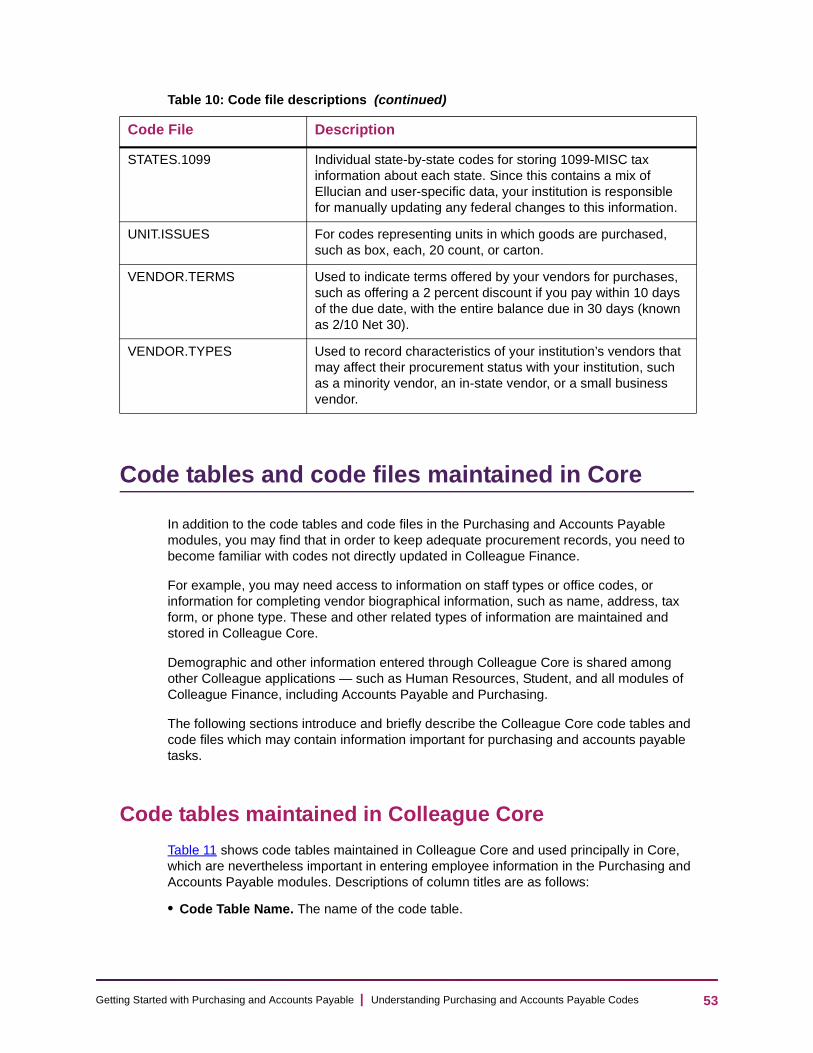
Ge
Code tables and code files maintained in Core
In addition to the code tables and code files in the Purchasing and Accounts Payable modules, you may find that in order to keep adequate procurement records, you need to become familiar with codes not directly updated in Colleague Finance.
For example, you may need access to information on staff types or office codes, or information for completing vendor biographical information, such as name, address, tax form, or phone type. These and other related types of information are maintained and stored in Colleague Core.
Demographic and other information entered through Colleague Core is shared among other Colleague applications — such as Human Resources, Student, and all modules of Colleague Finance, including Accounts Payable and Purchasing.
The following sections introduce and briefly describe the Colleague Core code tables and code files which may contain information important for purchasing and accounts payable tasks.
Code tables maintained in Colleague Core
Table 11 shows code tables maintained in Colleague Core and used principally in Core, which are nevertheless important in entering employee information in the Purchasing and Accounts Payable modules. Descriptions of column titles are as follows:
• Code Table Name. The name of the code table.
STATES.1099 Individual state-by-state codes for storing 1099-MISC tax information about each state. Since this contains a mix of Ellucian and user-specific data, your institution is responsible for manually updating any federal changes to this information.
UNIT.ISSUES For codes representing units in which goods are purchased, such as box, each, 20 count, or carton.
VENDOR.TERMS Used to indicate terms offered by your vendors for purchases, such as offering a 2 percent discount if you pay within 10 days of the due date, with the entire balance due in 30 days (known as 2/10 Net 30).
VENDOR.TYPES Used to record characteristics of your institution’s vendors that may affect their procurement status with your institution, such as a minority vendor, an in-state vendor, or a small business vendor.
Table 10: Code file descriptions (continued)
Code File Description
53tting Started with Purchasing and Accounts Payable | Understanding Purchasing and Accounts Payable Codes

Ge
• Major Form(s) Where Used. Lists the mnemonics for the major forms that display the code table (refer to these forms to see the information supplied by the code within its context).
• User Can Maintain? A check mark () in this column indicates the code table can be maintained by the user.
• Predefined by Ellucian? A check mark () in this column indicates the code table contains some default codes when it is shipped from Ellucian.
Note: For greater detail on any of these code tables, see Getting Started with Colleague Core.
The section following Table 11 lists the Colleague Core code tables and gives a brief description of the purpose and function of each.
Table 11: Core code tables of interest to Purchasing and Accounts Payable
Code Table NameMajor Form(s) Where Used
User Can Maintain?
Predefined by Ellucian?
ADDRESS.CHANGE. SOURCES
ORGP NAE ADR
ADDRESS.ROUTE. CODES
ORGP ADR
ADREL.STATUSES ORGP ADR
ADREL.TYPES ORGP ADR
CORP.NAME.TOKENS N/A
FORMATTED.NAME. TYPES
AORG FNM
INDUSTRY.CLASSES AORG
MAIL.RULES NAE ADR
MARITAL.STATUSES BIO
OFFICE.CODES SVM
PERSON.ORIGIN. CODES
ORGP BIO NAE
PERSONAL.STATUSES BIO
PHONE.TYPES ORGP NAE ADR
PREFIXES BIO NAE
SOURCES ORGP BIO NAE
STAFF.STATUSES SVM
STAFF.TYPES SVM
SUFFIXES BIO NAE
54tting Started with Purchasing and Accounts Payable | Understanding Purchasing and Accounts Payable Codes

Ge
Descriptions of Colleague Core code tables
Table 12 provides a description of each of the Colleague Core code tables used by the Purchasing and Accounts Payable modules.
TAX.FORMS VEND VENR VNPRRQIM RIIN POIM PIINVOUD TFBX TXFM MTID
TIME.ZONES PZIP ADR
Table 12: Colleague Core code table descriptions
Code Table Descriptions
ADDRESS.CHANGE.SOURCES Codes indicating the possible sources of information supplying a change of address to your institution; for example, returned mail, new address form, vendor application form.
ADDRESS.ROUTE.CODES Routing codes used for sorting and targeting mass mail. Each code consists of a superset of zip codes (such as all zip codes in a major metropolitan area).
ADREL.STATUSES Codes to indicate statuses of the addresses you have in your database for a person or corporation; for example, current, former, or last known.
ADREL.TYPES Used to indicate different types of addresses you can list for persons or corporations in your database; for example, business, purchase orders, checks, or addresses for a vendor’s different locations used by your branch offices.
CORP.NAME.TOKENS Portions of corporation names that Colleague removes from a name in your database, to create that company’s “sort name” for indexing and reports; for example, Corporation, Inc., of, the, or Limited,
Table 11: Core code tables of interest to Purchasing and Accounts Payable
Code Table NameMajor Form(s) Where Used
User Can Maintain?
Predefined by Ellucian?
55tting Started with Purchasing and Accounts Payable | Understanding Purchasing and Accounts Payable Codes
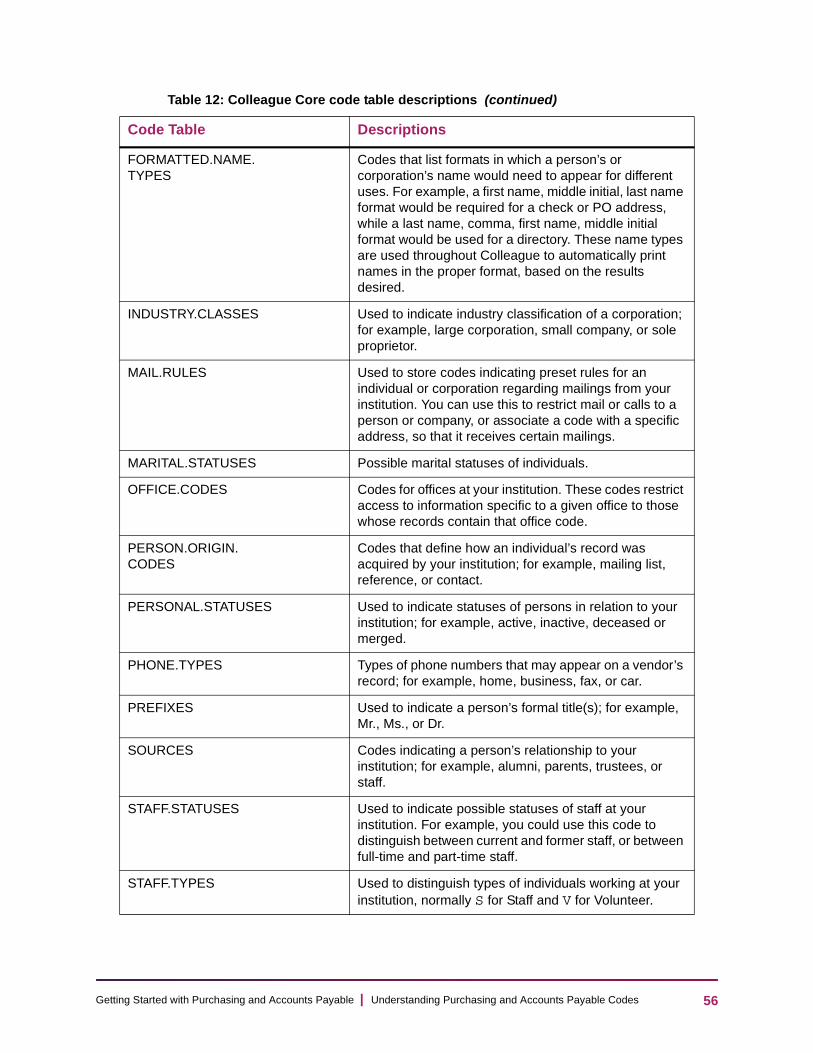
Ge
FORMATTED.NAME. TYPES
Codes that list formats in which a person’s or corporation’s name would need to appear for different uses. For example, a first name, middle initial, last name format would be required for a check or PO address, while a last name, comma, first name, middle initial format would be used for a directory. These name types are used throughout Colleague to automatically print names in the proper format, based on the results desired.
INDUSTRY.CLASSES Used to indicate industry classification of a corporation; for example, large corporation, small company, or sole proprietor.
MAIL.RULES Used to store codes indicating preset rules for an individual or corporation regarding mailings from your institution. You can use this to restrict mail or calls to a person or company, or associate a code with a specific address, so that it receives certain mailings.
MARITAL.STATUSES Possible marital statuses of individuals.
OFFICE.CODES Codes for offices at your institution. These codes restrict access to information specific to a given office to those whose records contain that office code.
PERSON.ORIGIN. CODES
Codes that define how an individual’s record was acquired by your institution; for example, mailing list, reference, or contact.
PERSONAL.STATUSES Used to indicate statuses of persons in relation to your institution; for example, active, inactive, deceased or merged.
PHONE.TYPES Types of phone numbers that may appear on a vendor’s record; for example, home, business, fax, or car.
PREFIXES Used to indicate a person’s formal title(s); for example, Mr., Ms., or Dr.
SOURCES Codes indicating a person’s relationship to your institution; for example, alumni, parents, trustees, or staff.
STAFF.STATUSES Used to indicate possible statuses of staff at your institution. For example, you could use this code to distinguish between current and former staff, or between full-time and part-time staff.
STAFF.TYPES Used to distinguish types of individuals working at your institution, normally S for Staff and V for Volunteer.
Table 12: Colleague Core code table descriptions (continued)
Code Table Descriptions
56tting Started with Purchasing and Accounts Payable | Understanding Purchasing and Accounts Payable Codes
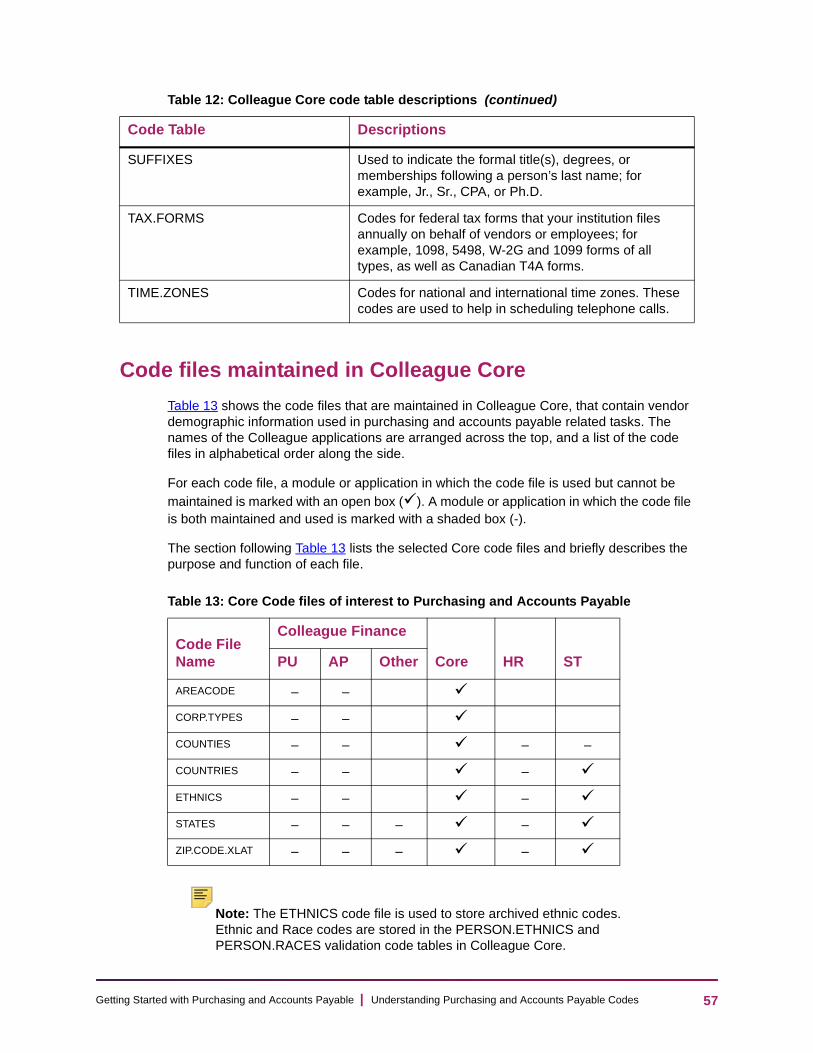
Ge
Code files maintained in Colleague Core
Table 13 shows the code files that are maintained in Colleague Core, that contain vendor demographic information used in purchasing and accounts payable related tasks. The names of the Colleague applications are arranged across the top, and a list of the code files in alphabetical order along the side.
For each code file, a module or application in which the code file is used but cannot be maintained is marked with an open box (). A module or application in which the code file is both maintained and used is marked with a shaded box (-).
The section following Table 13 lists the selected Core code files and briefly describes the purpose and function of each file.
Note: The ETHNICS code file is used to store archived ethnic codes. Ethnic and Race codes are stored in the PERSON.ETHNICS and PERSON.RACES validation code tables in Colleague Core.
SUFFIXES Used to indicate the formal title(s), degrees, or memberships following a person’s last name; for example, Jr., Sr., CPA, or Ph.D.
TAX.FORMS Codes for federal tax forms that your institution files annually on behalf of vendors or employees; for example, 1098, 5498, W-2G and 1099 forms of all types, as well as Canadian T4A forms.
TIME.ZONES Codes for national and international time zones. These codes are used to help in scheduling telephone calls.
Table 13: Core Code files of interest to Purchasing and Accounts Payable
Code File Name
Colleague Finance
Core HR STPU AP Other
AREACODE – –
CORP.TYPES – –
COUNTIES – – – –
COUNTRIES – – –
ETHNICS – – –
STATES – – – –
ZIP.CODE.XLAT – – – –
Table 12: Colleague Core code table descriptions (continued)
Code Table Descriptions
57tting Started with Purchasing and Accounts Payable | Understanding Purchasing and Accounts Payable Codes

Ge
Descriptions of Colleague Core code files
Table 12 provides a brief description of each of the Colleague Core code files used by the Purchasing and Accounts Payable modules.
Note: The ETHNICS code file is used to store archived ethnic codes. Ethnic and Race codes are stored in the PERSON.ETHNICS and PERSON.RACES validation code tables in Colleague Core.
Table 14: Colleague Core code file descriptions
Code File Description
AREACODE Codes indicating telephone area codes. Based on this file, Colleague associates all the applicable area codes with a state code (on the State/Province Definition [STPR] form), making them part of the automatic address validation that is activated when you enter a zip code for an address.
CORP.TYPES Codes used to indicate types of business a corporation may conduct, such as manufacturing, construction, retail, or medical.
COUNTIES Counties, normally in the institution’s geographic area, in which any person or corporation associated with your institution is located. Used to validate county information on demographics forms.
COUNTRIES Countries of the world where people in your database are located. Used to validate country information on demographics forms.
ETHNICS Codes for ethnic groups as your institution classifies them.
STATES The two-character postal abbreviations for states of the U.S. and Canadian provinces, with full state or province names as descriptions.
ZIP.CODE.XLAT Codes cross-referencing zip codes with other demographic information. ZIP.CODE.XLAT is a file used to create multiple links between a given zip code and the appropriate city, state, country, county, time zone, mailing route code, and any chapters of organizations (such as alumni organizations).
58tting Started with Purchasing and Accounts Payable | Understanding Purchasing and Accounts Payable Codes

Ge
Defining Codes Used in Purchasing & Accounts Payable
In this chapter
This chapter explains the concepts and procedures for defining Colleague Finance codes that are used in both the Purchasing and Accounts Payable modules. You can access the forms for defining these codes from either the Purchasing module or the Accounts
Payable module.1
Table 15 lists the sections in this chapter.
The first section, “Code tables used in both Purchasing and Accounts Payable,” describes the two code tables that are user-maintainable, and outlines factors to consider when determining how to set up these code tables for your institution. This section also describes each of the Ellucian-defined Colleague Finance code tables used in both the Purchasing and Accounts Payable modules.
1.The Tax Codes (TXCM) form is accessed from the PU Defaults/Codes Definition (PCD) menu in the Purchasing module, but only from the Tax Codes/Processing (TAX) menu in the Accounts Payable module.
Table 15: Topics in this chapter
Topic Page
Code tables used in both Purchasing and Accounts Payable
62
Understanding the Purchasing and Accounts Payable code files
74
Defining currency codes 77
Defining bank codes 83
Defining AP types 100
Defining staff/volunteer codes 117
Defining tax codes 120
Defining units of issue 141
Defining vendor terms 144
Defining vendor types 149
59tting Started with Purchasing and Accounts Payable | Defining Codes Used in Purchasing & Accounts Payable

Ge
The remaining sections provide instructions for defining the eight code files used in both the Purchasing and Accounts Payable modules, and are presented in alphabetical order by code file name. Each of the sections, beginning with “Defining currency codes” on page 77 and ending with “Defining vendor types” on page 149, contains the following components:
• “Before You Begin” (a list of tasks to complete in preparation for defining the code)
• “Understanding codes” (a discussion of concepts)
• “Components” (a sample of the code definition form and list of fields on it)
• “Procedure” (step-by-step instructions for defining the code)
These sections contain cross-references to other parts of the Using Accounts Payable manual for concepts not covered in this chapter.
Note: The explanations and code file definition procedures in this chapter do not include any discussions of either commodity codes or approvals. Since these two features are optional and are frequently implemented after the initial live date, they are treated in separate parts of this manual. For more information on commodity codes, see “Understanding Commodity/Service Codes” on page 152. For more information on online approvals, see the Using Approvals in Colleague Finance manual.
Where to find the information
Table 16 lists where to find the information.
Table 16: Purchasing and Accounts Payable codes cross-reference
Topic Reference
Learn which Colleague Financial code tables are covered in which chapter of this part
“Code tables used in the Purchasing and Accounts Payable Modules” on page 41.
Learn about the interrelation of transaction code files (AP types and bank codes)
“The purchasing and AP process: Role of the transaction codes” on page 32.
See how different system configurations work in the Purchasing and Accounts Payable modules
“Defining the modules to reflect your procurement processes” on page 196.
Learn how to define any of the user-definable code tables described in this chapter
“Determining your definitions for the user-maintained code tables” on page 62.
60tting Started with Purchasing and Accounts Payable | Defining Codes Used in Purchasing & Accounts Payable

Ge
Forms used
The procedures discussed in this chapter require access to the forms listed in Table 17.
Note: The forms are listed here in the order in which you should define them.
Review information on Ellucian-maintained code tables described in this chapter
“Code tables maintained by Ellucian” on page 64.
Find out more detailed information on progression of document statuses through processing
“Statuses” on page 37.
Learn about the function of a specific code file in this chapter
The “Understanding” portion of the “Defining” section for that code file.
Learn the procedure for defining a specific code file in this chapter
The “Procedure” portion of the “Defining...” section for that code file.
Learn which code tables and files must be defined before you can define other code files and data files
“Order for defining codes” on page 76.
Table 17: Forms used to define Purchasing and Accounts Payable codes
Procedure Form Mnemonic
Defining Currency Codes Currency Exchange CEXM
Defining Bank Codes Bank Codes BKCM
E-Check Parameters ECPD
Defining AP Type Codes AP Types APTF
Defining Vendor Terms Vendor Terms VTMF
Defining Vendor Types Vendor Types VTYF
Defining Tax Codes Tax Codes TXCM
Defining Staff/Volunteer Codes
Staff and Volunteers SVM
Defining Units of Issue Unit Issues Codes UNIM
Table 16: Purchasing and Accounts Payable codes cross-reference (continued)
Topic Reference
61tting Started with Purchasing and Accounts Payable | Defining Codes Used in Purchasing & Accounts Payable

Ge
Code tables used in both Purchasing and Accounts Payable
Before you begin
Before working directly with the Purchasing and Accounts Payable module code tables, a few preparatory steps are recommended to help you benefit from the discussions that follow. You should:
• Review basic codes concepts.
• See “Understanding Purchasing and Accounts Payable Codes” on page 38.
• Become familiar, if you are not already, with the methods and codes your institution currently uses to track purchasing, payables, and vendor information.
Understanding the Purchasing and Accounts Payable code tables
This section provides a brief description of each of the code tables used in both the Purchasing and Accounts Payable modules.
Of the more than 60 code tables used in Colleague Finance, 17 tables are used in both
the Purchasing and Accounts Payable module.1 Only two of these, TAX.CATEGORIES and VENDOR.MISC.CODES, are defined and maintained by your institution. The remaining 15 code tables are defined and maintained by Ellucian and cannot be modified by users.
This section is divided into the following two subsections:
• User-maintained code tables
• Code tables maintained by Ellucian
Determining your definitions for the user-maintained code tables
The two user-defined code tables, TAX.CATEGORIES and VENDOR.MISC.CODES, are both optional.
1.Other code tables are used in either the Purchasing or the Accounts Payable module, but not in both. The code tables for Accounts Payable are covered in Defining Codes Used Only in Accounts Payable To find out which code tables are covered in which chapter, see Table 7 on page 43 of Understanding Purchasing and Accounts Payable Codes
62tting Started with Purchasing and Accounts Payable | Defining Codes Used in Purchasing & Accounts Payable

Ge
Note: These code tables are arranged alphabetically by the code table’s system name (for example, TAX.CATEGORIES).
The descriptions that follow provide the following information about each code table:
• The name(s) of the field(s) validated by the code table.
• Names and mnemonics of some forms where a field validated by the code table appears.
• A brief description of the purpose and function of the code in Colleague.
• Examples of how you might define the code table.
• Notes on any special information you must know about the code table or any of its codes.
Tax Code Category (TAX.CATEGORIES). The Tax Code Category field is displayed in the Tax Codes (TXCM) form and is validated against the TAX.CATEGORIES code table.
The Tax Code Category lets you group two or more tax codes into the same tax code category, so that different tax codes belonging to the same general category will be totaled and printed on the purchase order (PO) as a single tax entry.
This is especially useful if you qualify for rebates on certain taxable items, but the rebate percentages for different items on the same purchase order are not the same; you would need two different tax codes for this, but you would want them to appear as one tax amount on your PO.
For example, if your institution receives rebates on taxes paid for certain selected items but not others, tax code A and tax code B might both designate state (or provincial) sales tax, but tax code A gives a rebate while tax code B does not. You would probably want to see the sum of the tax amounts for tax codes A and B as a single “Tax” entry on your purchase orders and vouchers, regardless of the rebate percentages, yet keep the tax amounts separate for accounting purposes. You could achieve this by assigning the same tax code category to both tax code A and tax code B.
Examples of tax code categories might include
• [your state code] — [your state] sales tax
• LO — Local sales tax (use tax)
• GT — Goods and Services Tax (GST)
• PT — Provincial Sales Tax (PST)
You can enter a maximum of three characters for this code. This code table is optional.
Special Processing Function: The TAX.CATEGORIES code table’s special processing indicates the “tax total” line on the purchase order to which the taxes in this category will be added.
63tting Started with Purchasing and Accounts Payable | Defining Codes Used in Purchasing & Accounts Payable

Ge
Note: Colleague performs no validation of data entered in special processing. You should check your entries carefully to ensure they are correct.
Use the worksheet “Tax code categories” on page 347 to help you develop your institution’s codes for the TAX.CATEGORIES code table.
Misc Code (VENDOR.MISC.CODES). The Misc Code field appears on the Vendor Maintenance (VEND), Vendor Register (VENR), and Vendor Year-To-Date Report (VENY) forms, and is validated against the VENDOR.MISC.CODES code table. You can use miscellaneous vendor codes to track vendor characteristics, or to classify your vendors according to any special criteria your institution has that is not extracted elsewhere in Colleague.
Some examples of miscellaneous vendor codes you might use include the following:
• BPV – Blanket PO only vendor
• SEC – Secondary only vendor
• SUB – Subcontractor
• SC – State contracts
You can enter a maximum of three characters for this code. Miscellaneous vendor codes are optional.
Note: Before you decide what codes, if any, to include in VENDOR.MISC.CODES, be sure to become familiar with the vendor types code file. Vendor type codes may be a more appropriate place to define some vendor characteristics. See “Defining vendor types” on page 149 for more information.
Use the worksheet “Vendor miscellaneous codes” on page 351 to help you develop your codes for vendor miscellaneous codes.
Code tables maintained by Ellucian
The code tables defined and maintained by Ellucian can be divided into two groups: document (and item) status codes, and all other codes.
Status codes identify a range of possible statuses a procurement document passes through during its processing from creation of the document through the completion of its role in the procurement cycle. Every procurement document, and each procurement line item, has a status at every point in the purchasing and accounts payable process. Colleague provides a predefined set of status codes for each document type, and a set of separate status codes for line items.
Note: The status descriptions in this section are brief. For more on the relationships between the statuses of different documents during processing, see “Statuses” on page 37.
64tting Started with Purchasing and Accounts Payable | Defining Codes Used in Purchasing & Accounts Payable

Ge
The nine other code tables maintain other validated information that is accessed in both the Purchasing and the Accounts Payable modules.
Note: Each of the 15 code tables described below is maintained by Ellucian. You cannot make any changes to the codes in these code tables. If you have any questions, or believe that a specific code should be included in any of these tables that is not currently included, contact your system administrator, who will contact Ellucian.
The code tables are listed in Table 18.
Each code description in this section includes the following information about the code table:
• The name(s) of the field(s) validated by the code table.
Table 18: Ellucian-Maintained Purchasing and Accounts Payable Code Tables
Code Table Name Page
ACTIVE.STATUSES 66
AP.SOURCE.CODES 66
BPO.STATUSES 66
CHECK.RUN.TYPES
CHECK.STATUSES 67
CLOSE.OR.VOID.CODES 67
ECHECK.ADVICE.TYPES
ECHECK.PAYEE.ADVICE.TYPES
ECHECK.ACCT.TYPES
FXA.TRANSFER.FLAGS 68
GL.PROMPT.SEQUENCES 69
INCLUDE.EXCLUDE.CODES 70
ITEM.PO.STATUSES 70
LABEL.DESTINATIONS 71
OUTPUT.DEVICES
PO.STATUSES 71
REQ.STATUSES 71
TAX.TYPES 72
VEN.REGISTER.TYPES 72
VOU.STATUSES 72
65tting Started with Purchasing and Accounts Payable | Defining Codes Used in Purchasing & Accounts Payable

Ge
• Names and mnemonics of some forms where a field validated by the code table appears.
• A brief description of the purpose and function of the code in Colleague.
Active Status (ACTIVE.STATUSES). The Active Status field appears on the Bank Code Maintenance (BKCM) form and is validated against the ACTIVE.STATUSES code table.
The codes in this table indicate whether a bank code is active or inactive. Only active bank codes are available to be used in setting up an AP type. A status of “inactive” for a bank code indicates the bank account is either closed or restricted. (Note: The “Active” field on the Vendor Maintenance [VEND] form is a Yes/No field and is not validated by this code table.)
The following are the two codes in the ACTIVE.STATUSES code table:
• A – Active
• I – Inactive
Source (AP.SOURCE.CODES). The Source field is displayed on the AP Types (APTF) form and is validated against the AP.SOURCE.CODES code table. The AP source is a component of the AP type code. The codes in this code table indicate the “source” of the AP type in the general ledger: either the AP controlling account (for regular accounts payable transactions), or the AR controlling account (for refund and advance types of transactions). This code tells Colleague which type of GL control account to charge for transactions using the AP type being defined.
The following are the two codes in the AP.SOURCE.CODES code table:
• R – Regular Accounts Payable
• A – Accounts Receivable
[Blanket Purchase Order] Status (BPO.STATUSES). When you access most forms listed on the Blanket Purchase Order Maintenance (BPM) menu, the form’s header block displays the Status field, indicating the current status of the blanket purchase order (blanket PO). The [Blanket Purchase Order] Status field is validated against the BPO.STATUSES code table, which lists the statuses a blanket purchase order may pass through during its processing.
The following are possible statuses for a blanket purchase order are:
• U – In Progress (Unfinished)
• N – Not Approved1
• O – Outstanding
• V – Voided
• C – Closed
1.The “Not Approved” status appears on procurement documents only if your institution is using the Colleague online approvals feature.
66tting Started with Purchasing and Accounts Payable | Defining Codes Used in Purchasing & Accounts Payable

Ge
Check Run Types (CHECK.RUN.TYPES). The Check Production Types field on the Check Payment Selection (CKSE) form provides the valid options for your check runs. This validation code stores the valid options.
The following are the possible check run types:
• P. Paper Check Vouchers
• E. e-Check Vouchers
• B. Both
[Check] Status (CHECK.STATUSES). The [Check] Status field is displayed on forms on which individual check information is displayed, including the Check Inquiry (CHKI) form and other check processing forms. This field is validated against the CHECK.STATUSES code table.
The codes in this code table identify the possible statuses of a check during its processing in Colleague. Since checks are processed automatically from vouchers, the following are the only three check statuses:
• O — Outstanding
• R — Reconciled
• V — Voided
Close/Void (CLOSE.OR.VOID.CODES). The Close/Void field is displayed on the Purchase Order Close/Void (POCV) and Blanket PO Close/Void (BCLV) forms and is validated against the CLOSE.OR.VOID.CODES code table. (Because closing and voiding are similar transactions, they can be done on the same form.) You use the Close/Void field on these forms to select whether you want to close the selected purchase order or blanket purchase order, or void it.
The following are the codes in this code table:
• C — Close
• V — Void
e-Check Advice Types (ECHECK.ADVICE.TYPES). This validation code table is stored in Core. It is used on the following forms:
• AP E-Check Parameters (APEP)
• E-Check Production (ECHP)
• E-Check Advices (ECAD)
It is used to store the following valid e-check advice types:
• P. Paper
• E. E-Mail only
• EP. E-mail with paper backup
• B. Both
67tting Started with Purchasing and Accounts Payable | Defining Codes Used in Purchasing & Accounts Payable

Ge
• C. Payee Choice
e-Check Payee Advice Types (ECHECK.PAYEE.ADVICE.TYPES). This validation code table is stored in Core. It is used for e-check web processes and the following forms:
• Bank Account Information (BAIE)
• Bank Account Information Hist (BAIH)
It contains the following two values:
• P. Paper
• E. E-mail
e-Check Account Types (ECHECK.ACCT.TYPES). This validation code table is stored in Core. It is used for e-check web processes and the following forms:
• Bank Account Information (BAIE)
• Bank Account Information Hist (BAIH)
It contains the following two values:
• C. Checking
• S. Savings
Fixed Asset (FXA.TRANSFER.FLAGS). The Fixed Asset field appears on several forms in the Purchasing and Accounts Payable modules, including the following:
• Commodity Codes (CMCM)
• Requisition Item Maintenance (RQIM)
• Requisition Item Inquiry (RIIN)
• PO Item Maintenance (POIM)
• Purchase Order Item Inquiry (PIIN)
• Voucher Item Maintenance (VOUD)
• Voucher Item Inquiry (VIIN)
This field is validated against the FXA.TRANSFER.FLAGS code table. The codes in this code table identify a fixed asset as either a single asset that was purchased as an individual line item (“single fixed asset”) — such as a line item for one file cabinet — or multiple assets that were purchased as one line item (“multivalued fixed asset”) — such as a line item for six chairs.
68tting Started with Purchasing and Accounts Payable | Defining Codes Used in Purchasing & Accounts Payable

Ge
Colleague uses this code when transferring information on an accepted line item to the Fixed Assets module. For example, you ordered and received six chairs which were included in a single line item. (You will be transferring the purchased chairs to the Fixed Assets module.) When Colleague transfers the item record of the six chairs from the Accounts Payable module to the Fixed Assets module, your selection of either “S” or “M” from the item record of the purchase order (from this code table) will have stayed with the record throughout its processing, and determines whether the Fixed Assets module will count the item as six separate chairs (six separate fixed assets) or as a single fixed asset.
The codes for the Fixed Asset transfer flags include the following:
• S — Single fixed asset
• M — Multivalued fixed asset
[Prompt Defaults] GL Prompt Sequence (GL.PROMPT.SEQUENCES). The [Prompt Defaults] GL Prompt Sequence field appears on both the PU Parameters Definition (PUPD) form (twice) and the AP Parameters Definition (APDE) form (once). This field lets you set up a custom default for distribution of costs to GL accounts, and is validated against the GL.PROMPT.SEQUENCES code table.
Each of the line item maintenance forms for procurement documents contains a window for entering line item GL account information, called GL Account No. This window also contains fields that, for line items charged to more than one GL account, record your choice between three different methods of cost distribution: amount, percent, and
quantity.1
For the Purchasing module, you can set your preference for requisition and purchase order forms on the PU Parameters Definition (PUPD) form, by selecting a distribution method as your GL Prompt Sequence default. For the Accounts Payable module, you can set GL distribution prompting defaults for voucher forms on the AP Parameters Definition (APDE) form.
In daily processing, when you enter a GL number in the GL Account No window on any of the item maintenance forms, the cursor moves from the GL Account No field to the distribution element you have designated as the default, and skips over the others.
The codes in this code table include the following:
• A – Distribute by amount
• P – Distribute by percent
• Q – Distribute by quantity
For more detailed information on the GL Prompt Sequence default, refer to the following:
• For requisitions and purchase orders (defined on the PU Parameters Definition [PUPD] form), see “Defining Purchasing Parameters and Defaults” in the Using Purchasing manual.
1.The GL prompting options for blanket purchase orders are slightly different from the ones for requisitions, purchase orders, and vouchers. Since the code table for these options is used only in the Purchasing module, it is covered in the Using Purchasing manual.
69tting Started with Purchasing and Accounts Payable | Defining Codes Used in Purchasing & Accounts Payable

Ge
• For vouchers (set up on the AP Parameters Definition [APDE] form), see “The GL prompt sequence default” on page 280.
Include/Exclude (INCLUDE.EXCLUDE.CODES). The Include/Exclude field is displayed on the Approval GL Class Maintenance (APGL) and Approval Policy Class Maintenance (APCM) forms, which are listed on the Approvals (APR) menu in both the Purchasing and Accounts Payable module. This field is validated against the INCLUDE.EXCLUDE.CODES code table.
The codes in this code table are used for defining approvals, to indicate whether the GL account number ranges in the selected GL component are being included or excluded from a given approval GL class or approval policy class.
When you are setting up approvals, you can include or exclude any given GL component from the approval GL class or approval policy class you are defining. If you select “Exclude,” the approval class displayed can approve all documents with any GL component except those components within the specified range. If you select “Include,” the approval class displayed can approve only those documents whose GL components are within the specified range.
The codes in this code table include the following:
• I – Include
• E – Exclude
Item Status (ITEM.PO.STATUSES). The item status field is displayed on most forms in the Purchasing and Accounts Payable modules that display line item information, including both summary forms and detail forms. All item status fields are validated against the ITEM.PO.STATUSES code table.
The possible statuses for an item include the following:
• O – Outstanding
• B – Backordered
• A – Accepted
• I – Invoiced
• P – Paid
• R – Reconciled
• V – Voided
• C – Closed
• H – Hold-on Voucher
70tting Started with Purchasing and Accounts Payable | Defining Codes Used in Purchasing & Accounts Payable

Ge
Output Destination (LABEL.DESTINATIONS). The Output Destination field appears on the Vendor Label Format (VNLF) and Vendor Labels (VENL) forms, and is validated against the LABEL.DESTINATIONS code table. The codes in this table identify the destinations to which a printout of vendor labels can be sent. Your choices include the following:
• P – Printer
• T – Terminal
• H – HOLD File
Output Devices (OUTPUT.DEVICES). This validation code table is stored in Core. It is used on the Bank Code Recon Parameters (BKCD) form. It stores the following two values:
• F. File
• T. Tape
[Purchase Order] Status (PO.STATUSES). When you access most forms listed on the Purchase Orders (POM) menu, the form’s header block displays the current status of the purchase order in the Status or PO Status field. This field is validated against the PO.STATUSES code table.
The codes in the PO.STATUSES code table list the statuses a purchase order may pass through during its processing. The possible statuses for a purchase order include the following:
• U – In Progress (Unfinished)
• N – Not Approved1
• O – Outstanding
• B – Backordered
• A – Accepted
• I – Invoiced
• P – Paid
• R – Reconciled
• V – Voided
• C – Closed
[Requisition] Status (REQ.STATUSES). When you access most forms listed on the Requisitions (REQ) menu, the form’s header block displays the current status of the requisition in the Status field. This field is validated against the REQ.STATUSES code table.
1.The “Not Approved” status appears on procurement documents only if your institution uses the Colleague online approvals feature.
71tting Started with Purchasing and Accounts Payable | Defining Codes Used in Purchasing & Accounts Payable
Ge
The codes in the REQ.STATUSES code table list the statuses a requisition may pass through during its processing. The possible statuses for a requisition include the following:
• U – In Progress (Unfinished)
• N – Not Approved4
• O – Outstanding
• P – PO Created
• G – Request for Goods (RFG) Created
Tax Type (TAX.TYPES). The Tax Type field is displayed on several Purchasing and Accounts Payable module forms that concern taxes, including the following:
• Requisition GL Line Item Tax Maintenance (RTXM)
• Requisition GL Line Item Tax Inquiry (RETI)
• PO GL Line Item Tax Maintenance (POGT)
• PO GL Line Item Tax Inquiry (PGLI)
• [Voucher] GL Line Item Tax Maintenance (VGLT)
• [Recurring Voucher] GL Line Item Tax Maintenance (RGLT)
This field is validated against the TAX.TYPES code table. The codes in this code table identify types of taxes based on whether there is a rebate or a refund involved.
The codes in the TAX.TYPES code table include the following:
• B – Rebate
• F – ITC/Refund1
Register Type (VEN.REGISTER.TYPES). The Register Type field appears on the Vendor Register (VENR) form and is validated against the VEN.REGISTER.TYPES code table.
This code table is used when you are printing a vendor register. The codes indicate whether the vendor register is to select all (or any) vendors, or only those vendors that have been marked as available for purging.
The codes in the VEN.REGISTER.TYPES code table include the following:
• P – Available to purge
• A – Any vendor
[Voucher] Status (VOU.STATUSES). When you access most forms listed on the Voucher Maintenance (VOU) menu, the form’s header block displays the voucher’s current status in the Status field. This field is validated against the VOU.STATUSES code table.
1.ITC is an abbreviation for Input Tax Credit (applicable to Canadian taxes only).
72tting Started with Purchasing and Accounts Payable | Defining Codes Used in Purchasing & Accounts Payable
Ge
The codes in the VOU.STATUSES code table list the statuses a voucher may pass through during its processing. The possible statuses for a voucher include the following:
• N – Not Approved1
• O – Outstanding
• U – Unfinished (In Progress)
• P – Paid
• R – Reconciled
• V – Voided
• X – Cancelled
Defining the Purchasing and Accounts Payable code tables
Colleague Finance code tables used in the Accounts Payable and Purchasing modules can be entered into the system, or maintained, on the Validation Codes (VAL) form, which is available to those whose security class gives them access to the form. In the Purchasing module this form is listed on the Purchasing Defaults / Codes Definition (PCD) menu; in the Accounts Payable module it is listed on the AP Codes and Parameters Definition (APC) menu.
Code table maintenance may be a system administrator function at your institution. If so, see your system administrator for more information on system data entry of code table definitions.
For more information and procedures for adding or maintaining validation code tables, see “Validation Code Table Maintenance” on page 358.
1.The “Not Approved” status appears on procurement documents only if your institution is using the Colleague online approvals feature.
73tting Started with Purchasing and Accounts Payable | Defining Codes Used in Purchasing & Accounts Payable

Ge
Understanding the Purchasing and Accounts Payable code files
Your institution’s procurement policies and practices will have a significant impact on how you set up your Purchasing and Accounts Payable module code files. You may need to set up only a few basic code files, or you may set up and use numerous code files extensively.
This section covers the following topics:
• Overview of code functions. Briefly describes the function of each code file.
• Required and optional codes. Lists the codes required to use the Purchasing and Accounts Payable modules, and those not required.
• The transaction codes. Discusses the relationship between the two major code files, bank codes and AP types, which are required for any processing.
• Order for defining codes. Outlines the order in which the code tables and code files must be created.
Overview of code functions
The eight Colleague Finance code files defined and used in both the Purchasing and Accounts Payable modules contain the following types of information:
• AP types. Code identifying key general ledger accounts for AP and purchasing functions.
• Bank codes. Information on bank account, GL cash account, and AP check number.
• Foreign currency codes. Exchange rate information for any foreign currencies in which you pay any of your vendors.
• Initiator/buyer codes. Identification codes for staff members who use the Purchasing and Accounts Payable modules.
• Tax codes. Codes for sales and use taxes paid by your institution.
• Unit of issue codes. Codes representing units in which items purchased are sold.
• Vendor terms codes. Information related to invoice payment terms offered by vendors.
• Vendor type codes. Vendor characteristics that could affect their procurement status.
The validation and convenience provided by the Purchasing and Accounts Payable code files assists your procurement processing by standardizing user entry and automating the transfer of information for many internal accounting processes and record-keeping requirements.
74tting Started with Purchasing and Accounts Payable | Defining Codes Used in Purchasing & Accounts Payable

Ge
Required and optional codes1
The following codes, called transaction codes, are required for all institutions using the Purchasing and Accounts Payable modules:
• AP types
• Bank codes
Foreign currency codes are required as an additional transaction code if you make purchases in any foreign currencies.
The following codes are required if you are implementing certain optional features:
• Staff codes (if you are using requisitions or buyers)
• Tax codes (if your institution is subject to sales taxes)
Colleague does not require the following for system operation, but they are recommended to take advantage of all Colleague features:
• Unit of issue codes
• Vendor terms codes
• Vendor types codes
The transaction codes
The transaction codes are central to the operations of the Purchasing and Accounts Payable modules. You must define at least one bank code and one AP type before you can go live on either module.
A bank code identifies a bank account you use to pay for purchases. The bank code is linked to your bank’s account number for this account, that bank account’s corresponding GL cash account number, AP check numbering information, and other information.
An individual bank code becomes a component of an AP type code. The AP type code also stores the transaction source the AP type will handle (accounts payable or accounts receivable), as well as AP controlling information such as your institution’s AP control GL account number. AP types are used to relate the proper accounting information to each purchase order and voucher, for proper posting of expense and payment information.
A third code, the foreign currency code, is required only if your institution does business in foreign currencies. This code is incorporated as a component of the bank code (since any transaction in a foreign currency must be made through a bank account handling transactions only in that currency).
1.This list does not include either commodity codes or approvals. Since these two features are optional and are often implemented after the initial live date, they are treated in separate parts of this manual. See “Understanding Commodity/Service Codes” on page 152 and the Using Approvals in Colleague Finance manual.
75tting Started with Purchasing and Accounts Payable | Defining Codes Used in Purchasing & Accounts Payable

Ge
For an illustration of how the transaction codes are involved in processing, see “The purchasing and AP process: Role of the transaction codes” on page 32.
The AP type and bank code setup in Colleague assumes you are using the following standard accounting practices:
• AP control GL account. Colleague assumes you use a single AP controlling account for all accounts payable transactions at your institution, or, if your branch campuses have decentralized accounting authority, then an AP control GL account for each campus.
• Discount method. Colleague uses a standardized method of handling vendor cash discounts as either revenue (for discounts that are taken) or expense (for discounts that are lost), and requires setting an institution-wide parameter to cover all AP operations.
Order for defining codes
Some of the code files used in the Accounts Payable and Purchasing modules are used as components of other code files or data files. For example, the bank code is one component of an AP type code. This relationship is called a dependency: you must define your institution’s bank codes before you can define AP types. Likewise, a vendor terms code becomes a component of a vendor record, and thus must be defined before you define vendors. Because of this dependency, the order in which you define some of the code files is important.
Note: When you are setting up the Purchasing and Accounts Payable modules, you should define all your code tables first, because a number of these are needed to define the code files. See “Determining your definitions for the user-maintained code tables” on page 62 and “Defining the Accounts Payable code table” on page 308 for more detailed information on defining the user-maintained code table needed to run the Accounts Payable module.
Table 19 displays the codes that must exist and have data in them before you can set up certain other code files or data files.
They are listed in the order in which they should be defined. The table provides the following information for each code:
• Name of the code file that must be defined first.
• The form and mnemonic on which this code file is defined.
• The name of the process or file on which definition of the code file is dependent (with form name and mnemonic where defined).
76tting Started with Purchasing and Accounts Payable | Defining Codes Used in Purchasing & Accounts Payable

Ge
Once you have defined the three code files listed in Table 19, the order in which you define the remaining code files is not critical.
Defining currency codes
Note: If your institution does not do business in any foreign currencies, you do not need to define currency codes.
Before you begin
Before setting up your institution’s foreign currency codes, you should:
Review the discussion of currency codes.
• See Understanding currency codes below.
Ensure that all concerned parties have had a chance to give input into the process of selecting your institution’s foreign currency codes.
• Coordinate with the accounts payable and accounting offices to set up foreign currency codes.
Table 19: Code file dependencies for Purchasing and Accounts Payable module setup
Define this code
On this form (mnemonic)
Before defining this code (or other information)
Currency
codes1 (CURRENCY.CONV)
1.You do not need to define currency codes if your institution does not do business in any foreign currencies.
Currency Exchange (CEXM)
Bank codes
Bank codes (BANK. CODES)
Bank Codes (BKCM) AP types
AP types (AP.TYPES)
AP Types (APTF) Vendors, requisitions, purchase orders, blanket purchase orders, vouchers, recurring vouchers
77tting Started with Purchasing and Accounts Payable | Defining Codes Used in Purchasing & Accounts Payable

Ge
Use the worksheets provided in the Appendix to plan your currency codes on paper, before entering any information into the Colleague Finance.
• See the worksheet “Currency codes” on page 340.
Understanding currency codes
Foreign currency codes store information about currency exchange rates and effective dates for any foreign currencies in which your institution does business. Currency exchange rates must be entered in Colleague Finance for any currencies you use other than your local currency.
For example, if you are a U.S. institution and regularly purchase from a Canadian vendor, Colleague Finance must have current information at all times on the exchange rate between U.S. dollars and Canadian dollars. This will ensure that when you pay that vendor, a check cut in Canadian dollars will accurately reflect the exchange rate in effect on the day it is cut.
Currency codes also let you associate a vendor with the applicable foreign currency.
Where currency codes are used
For foreign procurement in the Purchasing and Accounts Payable modules, the following statements are true:
• Currency codes are entered into the bank code definition for a foreign currency bank account.
• Through bank codes, currency codes become a component of any AP type defined for a foreign currency.
• When associated with a foreign vendor in vendor definition, currency codes automatically appear on all procurement documents you create for that vendor.
• Through either the AP type or vendor, currency codes become a component of every requisition, purchase order, blanket purchase o.rder, voucher, and check that is paid in a foreign currency
How foreign currency codes work
By tracking the currency exchange rates in effect for a given purchase date, currency codes handle all the calculations necessary in foreign financial transactions to ensure that the transaction amounts are posted to your general ledger in your local currency, and that the payment amount is printed on the check in the foreign currency.
By using currency codes, Colleague ensures the following:
• Every GL entry is made in the local currency.
• Every check is written in the foreign currency.
78tting Started with Purchasing and Accounts Payable | Defining Codes Used in Purchasing & Accounts Payable

Ge
Exchange rates
The exchange rate indicates what amount of the foreign currency equals one local currency unit (where x = exchange rate, x foreign currency units = 1 local currency unit).
For example, for a Canadian institution, if 0.8 U.S. dollars = 1 Canadian dollar, the exchange rate in Canada for U.S. Dollars would be 0.8. So, if a Canadian institution entered an amount of 100 on a purchase order with a currency code of USA, the local currency amount would be $125 ($100 US /.8). During that same period (until the exchange rate changes), for a U.S. institution, 1 U.S. dollar = 1.25 Canadian dollar; thus the exchange rate in the U.S. for Canadian Dollars would be 1.25.
Using the opposite calculation, if a U.S. institution entered an amount of 100 on a purchase order with a currency code of CAN, the local currency amount would be $80 ($100 CAN/1.25).
If the exchange rate changes while a transaction is in progress, the currency exchange GL account defined in the foreign currency code absorbs the increase or decrease in actual price caused by the exchange rate fluctuation.
How a foreign currency transaction works. Table 20 illustrates two examples of foreign currency transactions, using the same basic purchase transaction but viewing it from both sides of the US - Canadian border.
The example makes the following assumptions:
1. Column 2: A U.S. university buys equipment from a Canadian vendor. Column 3: A Canadian university buys equipment from a U.S. vendor. An item is bought through a purchase order (without a requisition) at $500 Canadian/ $400 US currency.
2. By the time you create the voucher and submit a check, the exchange rate has changed.
3. The foreign currency difference is posted to the currency exchange GL account.
Table 20: Sample purchase transaction with currency exchange fluctuation
Event/AmountUS Inst/Canadian Vendor
Canadian Inst/US Vendor
** Exchange rate in effect at time of purchase order **
$1 US = $1.25 Canadian
$1 Canadian = $0.80 US
Purchase Order Stage:
Extended price on purchase order
500 400
Amount encumbered to GL
400 (500/1.25) 500 (400/.8)
Voucher Stage:
Voucher foreign currency amount
500 400
79tting Started with Purchasing and Accounts Payable | Defining Codes Used in Purchasing & Accounts Payable

Ge
The exchange rate date is the date the exchange rate takes effect. When Colleague converts currency, it records the exchange rate date on the voucher (or other document) on which the conversion occurs, for historical purposes.
Rules governing currency code definition
Remember the following rules for defining currency codes:
• You must set up a unique bank code and a unique AP type for each foreign currency you define.
• If your institution is using foreign currency codes, you must define them before you can do any of the following:
• Define a bank code for each foreign currency.
• Define an AP type for each foreign currency.
• Create a new requisition, PO, or voucher for a purchase in the foreign currency.
• Run AP checks for vendors you pay in the foreign currency.
Voucher local currency amount
400 (500/1.25) 500 (400/.8)
Amount of PO encumbrance relief
400 500
Amount expensed to GL 400 500
Credit to AP control account
400 500
** Change in exchange rate **
To $1 US = $1.23 Canadian
To $1 Canadian = $0.79 US
Check Stage:
Check amount 500 400
Debit to AP control account
400 500
Posted to exchange rate GL account
6.50 (Debit) 6.33 (Credit)
Credit to cash 406.50 (500/1.23) 506.33 (400/.79)
Table 20: Sample purchase transaction with currency exchange fluctuation
Event/AmountUS Inst/Canadian Vendor
Canadian Inst/US Vendor
80tting Started with Purchasing and Accounts Payable | Defining Codes Used in Purchasing & Accounts Payable
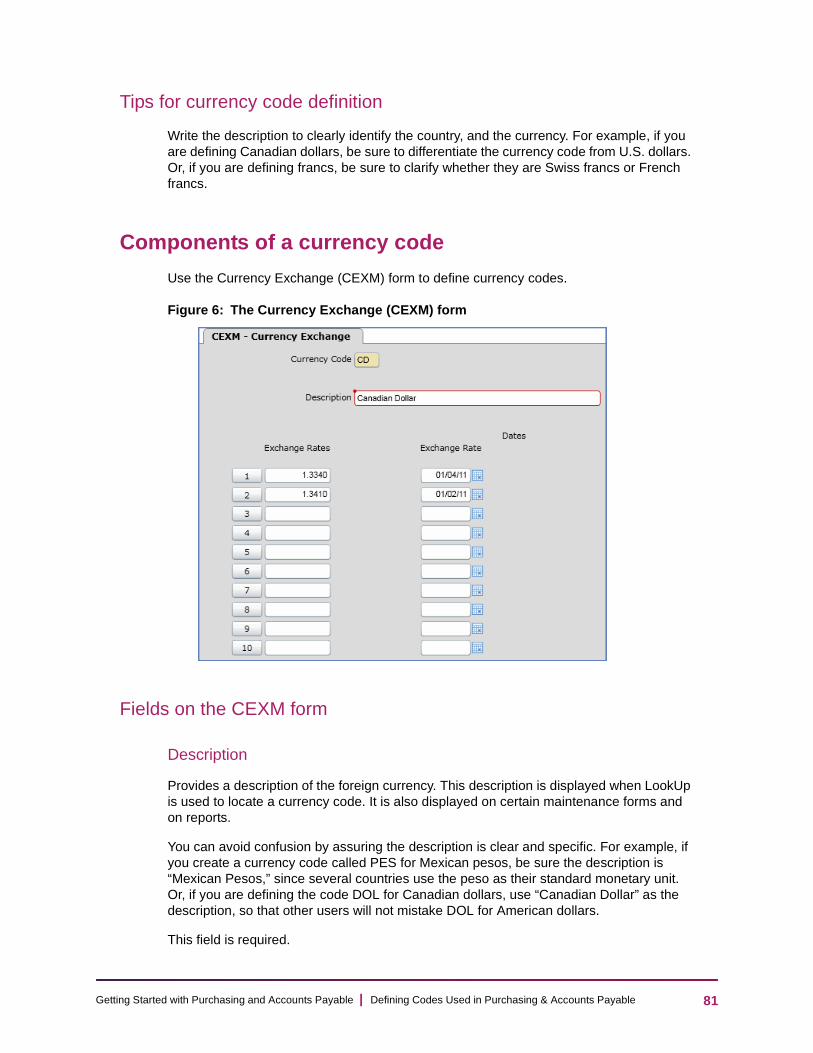
Ge
Tips for currency code definition
Write the description to clearly identify the country, and the currency. For example, if you are defining Canadian dollars, be sure to differentiate the currency code from U.S. dollars. Or, if you are defining francs, be sure to clarify whether they are Swiss francs or French francs.
Components of a currency code
Use the Currency Exchange (CEXM) form to define currency codes.
Figure 6: The Currency Exchange (CEXM) form
Fields on the CEXM form
Description
Provides a description of the foreign currency. This description is displayed when LookUp is used to locate a currency code. It is also displayed on certain maintenance forms and on reports.
You can avoid confusion by assuring the description is clear and specific. For example, if you create a currency code called PES for Mexican pesos, be sure the description is “Mexican Pesos,” since several countries use the peso as their standard monetary unit. Or, if you are defining the code DOL for Canadian dollars, use “Canadian Dollar” as the description, so that other users will not mistake DOL for American dollars.
This field is required.
81tting Started with Purchasing and Accounts Payable | Defining Codes Used in Purchasing & Accounts Payable
Ge
Exchange Rates
Lists the exchange rates that apply to this currency code, in reverse chronological order.
The exchange rate is calculated based on the formula: x foreign currency units = 1 local currency unit.
Exchange Rate Dates
Displays the effective date for this exchange rate.
This date determines the effective date for a given exchange rate. It is the date Colleague uses to create the encumbrance or expense for the affected procurement transaction.
The default is the current date.
Add Operator/Add Date
Displays the ID of the staff member who created this record, and the date the record was created in the CURRENCY.CONV file.
Change Operator/Change Date
Displays the ID of the staff member who most recently changed the exchange rates and/or date of this currency code, and the date that the change was made.
Procedure for defining a currency code1. Complete the steps outlined in “Before you begin” on page 77.
2. Access the Currency Exchange (CEXM) form.
3. At the Currency Code LookUp prompt, enter the ID of the currency code you want to define.
• If you are creating a new currency code record, Colleague displays the following prompt:
Record not found -- Reenter or Add
Enter A to add the new currency code ID. Notice that the new currency code ID appears in the Currency Code field.
• If you want to modify an existing currency code record, enter the ID for that record. You may perform a LookUp to select from a list of existing currency code records.
4. Enter a description of the currency code.
5. Enter exchange rates and their applicable dates.
6. Update this record.
Colleague saves the record and displays the Currency Code LookUp prompt.
82tting Started with Purchasing and Accounts Payable | Defining Codes Used in Purchasing & Accounts Payable

Ge
7. Repeat this procedure for each currency code you want to maintain.
8. When you are finished maintaining currency codes, save your work and exit the CEXM form.
Defining bank codes
This section explains how to define a bank code.
Before you begin
Before setting up your bank codes, you should:
• Review the discussion of bank codes.
• See Understanding bank codes below.
• Ensure that all general ledger account numbers have been defined in Colleague Finance.
• See your accounting office if you have questions about general ledger accounts.
• If your institution deals with any foreign currencies, ensure that currency codes have been defined in the CURRENCY.CONV file.
• See “Defining currency codes” on page 77.
• Decide which bank codes, if any, will be used for e-check processing. If you have U.S bank codes that will be used for e-check processing, contact your financial institution to find out what the preferences are for the following EFT file parameters:
• U.S. Blocking Factor
• U.S. Padding Character
• Include Carriage Return?
• Include Offset Record?
• Ensure that all concerned parties have had a chance to give input into the bank code selection process.
• Work with your personnel and payroll offices to define bank codes.
• Use the worksheet provided in the Appendix to plan your bank codes on paper, before entering any information into Colleague Finance.
• See the worksheet “Bank codes” on page 327.
83tting Started with Purchasing and Accounts Payable | Defining Codes Used in Purchasing & Accounts Payable
Ge
Understanding bank codes
Bank codes let you define each of the bank accounts your institution uses for issuing payments.
A bank code stores the following information:
• Bank account information, including:
• The bank code’s description.
• The account number for this account at the bank where the account is held.
• The bank’s transit routing number.
• The next AP check number available on the account.
• GL account information: the general ledger cash account associated with a bank code.
• Status information: a flag marking the bank code status as either active or inactive.
• Foreign currency information (if applicable), including:
• A foreign currency code.
• A currency designation.
• The GL account designated for currency exchange differences (called the currency exchange GL account).
• Defaults and parameters for e-checks (if applicable), including:
• U.S. EFT Format
• EFT Subroutine
• Organization ID
• U.S. Blocking Factor
• Include Carriage Return for U.S. Banks
• Include Offset Record for U.S. Banks
• Canadian Client Number
• Canadian Processing Centre
Where bank codes are used
The Purchasing and Accounts Payable modules use bank codes for the following major purposes:
• To link to the proper GL cash account to be credited for a purchase.
• Through the AP type code, to link to the applicable AP control GL account.
• To indicate the last AP check number paid on the account.
• To identify the source bank transit routing number for processing.
84tting Started with Purchasing and Accounts Payable | Defining Codes Used in Purchasing & Accounts Payable

Ge
• Optionally, to provide foreign currency information.
• Optionally, to determine if a bank code is used in e-check processing.
You create a bank code for each of your institution’s checking accounts from which you want to issue AP checks. The bank code in turn becomes a component of the AP type code, which Colleague uses to post the GL transactions for each requisition, purchase order, voucher, and check.
You might have only one checking account, or you might have one account for purchasing and one for payroll, or — if you are a multi-campus institution — you might have several bank codes (one for each campus).
For more on the role of bank codes in transaction processing, see “The purchasing and AP process: Role of the transaction codes” on page 32.
Note: You can modify the AP check number that is entered in the bank code definition if necessary. However, only occasional or unusual circumstances should require modification of this number.
Defining a bank code for a foreign currency
If you ever do business in a currency other than your local currency, you will need to create a bank code (and an AP type code) exclusively for transactions in that currency. You must create a separate bank code for every different currency code you are using.
Three fields on the Bank Codes (BKCM) form — Foreign Currency Code, Currency Designation, and Currency Exchange GL Account — are completed only for foreign currency bank codes.
The currency exchange GL account is the GL account where currency conversions are posted. When you are processing a purchase in a foreign currency, the currency exchange rate may fluctuate between the time a purchase order is cut and the time the corresponding voucher is paid. Any currency exchange differences are charged to the currency exchange GL account. The currency exchange rate information, which calculates the equivalent local price from the foreign price, comes from the currency code, which is also part of the bank code definition.
For more detailed information on defining a bank code for a foreign currency, see “Setting Up Foreign Currency Information” on page 171.
Defining EFT information
If you have set the Allow E-Check Payment field on the AP E-Check Parameters (APEP) form to “Yes,” you will need to define your EFT information. Detail on the EFT Information field to access the E-Check Parameters (ECPD) form.
Not all of your bank codes must be set up to process e-checks. If you want to pay some bank codes in paper checks only, you can.
If you do not process e-checks, you are not required to complete the ECPD form for your bank codes.
85tting Started with Purchasing and Accounts Payable | Defining Codes Used in Purchasing & Accounts Payable

Ge
Note: If you have set the global e-checks parameter on the APEP form to “No,” you cannot set the Process E-Checks field on the ECPD form to “Yes.”
Setting up your electronic check reconciliation information in the bank code
If you plan to reconcile your monthly bank statements electronically, you can set up the reconciliation file or tape parameters either as part of your bank codes, or when you are starting the reconciliation process for the first time.
Electronic reconciliation information is entered on the Bank Code Recon Parameters (BKCD) form. You can reach this form in one of the following ways:
• Detail from the BKCM form (Purchasing and Accounts Payable modules). In both the Purchasing and Accounts Payable modules, the BKCD form is available as a detail form from the main bank code definition form, Bank Codes (BKCM).
• From Electronic Check Reconciliation (ECK) menu (Accounts Payable module only). In the Accounts Payable module, you can also access the BKCD form by selecting the Check Reconciliation (REC) menu from the main menu, and then selecting the
Electronic Check Reconciliation (ECK) menu.1 The BKCD form appears on this menu.
The file and tape parameters and subroutines you set up on the BKCD form will be used when you create a request file or tape for your financial institution (if they require a check request file or tape) and when you load the reconciliation file or tape from your financial institution.
Since the banking industry has no standard tape layout for electronic check reconciliation, and since different financial institutions often use different tape information, you will probably need to set up tape block and record sizes and customize the standard subroutines for each different bank code.
• Modifying the request and reconciliation subroutines. The default request tape subroutine is S.REQUEST.AP.CHK and is located in the STANDARD.FORMS file. You may need to change this subroutine based on the requirements of the financial institution. If so, use the following steps:
1. Make a copy of S.REQUEST.AP.CHK.
2. Modify the copy as required.
3. Compile and catalog the copy.
4. Enter the name of the copy as the request tape subroutine name on the BKCD form.
The same three fields are required when loading a reconciliation tape. The default reconciliation tape subroutine is S.LOAD.AP.CHK. You may need to change this subroutine. If so, use the following steps:
1.As with all Colleague forms, you can also access the BKCD form from any menu prompt in the Accounts Payable or Purchasing modules.
86tting Started with Purchasing and Accounts Payable | Defining Codes Used in Purchasing & Accounts Payable

Ge
1. Make a copy of S.LOAD.AP.CHK.
2. Modify the copy as required.
3. Compile and catalog the copy.
4. Enter the copy’s name as the reconciliation tape subroutine name on the BKCD form.
Refer to Standard Forms for details on modifying the STANDARD.FORMS file.
For detailed procedures for electronic check reconciliation, see the Using Accounts Payable manual.
Rules governing bank code definition
When you define your bank codes, remember the following rules:
• You should set up a bank code for every bank account you use for AP checks. In other words, if you have separate bank accounts for different types of purchases, or for separate campuses, you must create a separate bank code for each one.
• Your institution’s general ledger account numbers must be set up before you can define bank codes. This is required even if you are not using Colleague Finance.
• You must define your institution’s bank codes before you can do any of the following:
• Define AP types
• Define vendors
• Create requisitions, purchase orders, blanket purchase orders, vouchers, or checks
If your institution is using electronic check reconciliation:
• Each of your bank codes must also contain the proper processing information and subroutine.
• If you plan on including multiple bank accounts on the same request tape, ensure that the reconciliation information for all bank accounts that will be on the tape has the same block size, record size, and subroutine name.
• If you plan on including multiple bank accounts on the same request file, ensure that the reconciliation information for all bank accounts that will be on the file has the same U.S blocking factor and U.S. padding character. All bank accounts must have the same carriage return and offset record defaults, as well.
If your institution is processing e-checks:
• Ensure that the EFT information has been set up.
87tting Started with Purchasing and Accounts Payable | Defining Codes Used in Purchasing & Accounts Payable
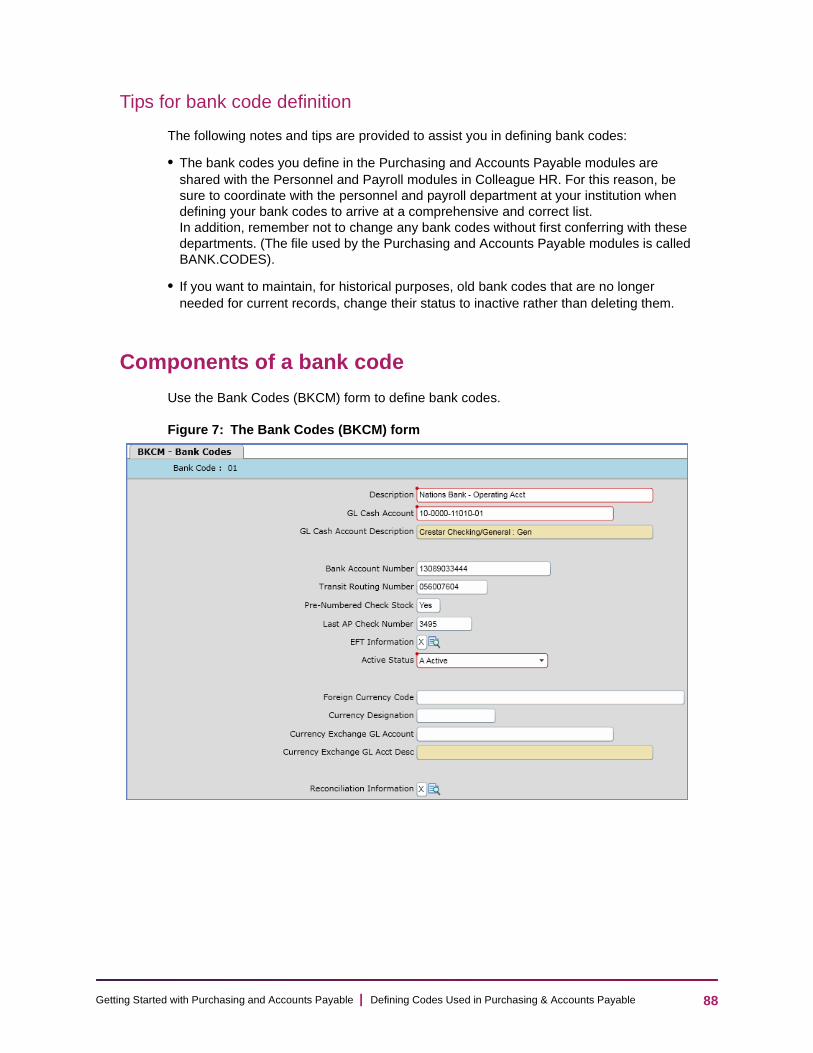
Ge
Tips for bank code definition
The following notes and tips are provided to assist you in defining bank codes:
• The bank codes you define in the Purchasing and Accounts Payable modules are shared with the Personnel and Payroll modules in Colleague HR. For this reason, be sure to coordinate with the personnel and payroll department at your institution when defining your bank codes to arrive at a comprehensive and correct list. In addition, remember not to change any bank codes without first conferring with these departments. (The file used by the Purchasing and Accounts Payable modules is called BANK.CODES).
• If you want to maintain, for historical purposes, old bank codes that are no longer needed for current records, change their status to inactive rather than deleting them.
Components of a bank code
Use the Bank Codes (BKCM) form to define bank codes.
Figure 7: The Bank Codes (BKCM) form
88tting Started with Purchasing and Accounts Payable | Defining Codes Used in Purchasing & Accounts Payable

Ge
Fields on the BKCM form
Description
Provides a description of the bank code. When you use LookUp, this description is displayed to help you select a bank code. It also appears on certain maintenance forms and on reports to identify the bank account.
The description can be up to 30 characters. It should clearly identify the bank and the account indicated by the code.
This field is required.
GL Cash Account
Lists the general ledger cash account number Colleague associates with the bank account being defined. This is the general ledger account to which cash entries are posted when you pay a voucher or void a check. Colleague uses this number in accounts payable transactions to credit the net amount of a check to the proper cash account in the general ledger.
This number must be a valid and active general ledger cash account number in your system at the time the entry is made.
This field is required.
GL Cash Account Description
Lists the description of the selected GL cash account.
Bank Account Number
Lists the bank account number, that is, the account number of the checking account or other demand deposit account from which funds are actually drawn. This account number appears on the check and on some reports and is used during check reconciliation and balancing.
This number is matched during electronic check reconciliation to the check reconciliation tape; if the numbers are different, the reconciliation process may not work correctly. Therefore, you should avoid using delimiters, such as hyphens or slashes, when entering this number.
Transit Routing Number
Lists the bank’s transit routing, or ABA (American Banking Association), number.
This field allows numeric characters only, and automatically zero-fills all numbers to a standard total of nine digits. Colleague does not use the transit routing number.
89tting Started with Purchasing and Accounts Payable | Defining Codes Used in Purchasing & Accounts Payable
Ge
Pre-Numbered Check Stock
Enter Yes in this field to indicate that the check stock for the bank account associated with this bank code is pre-numbered.
The default value for this field is “Yes.” Colleague will assume that the check stock for a bank code is pre-numbered if a value is not entered.
Enter No in this field to indicate that the check stock for the bank account associated with this bank code is not pre-numbered. When the check stock is not pre-numbered, un-numbered alignment checks may be specified to be used when reprinting checks. These un-numbered alignment checks will not be represented in Colleague as a voided checks, and will not increment the check number counter for the bank code.
Last AP Check Number
Identifies the number of the last AP check paid from this bank account.
At the time a check print run is started (using the Check Print [CKPR] process), this number is displayed on the Check Print form so that an operator can verify the first AP check number to be printed. You can manually enter the last check number in this field, to reset the number, if for some reason there is a break in the numbering sequence or the check numbers have changed.
This number is also automatically updated by the Check Print process with the last AP check number printed.
After initial setup, you can modify this number as needed. However, we recommend you do so only in rare instances, such as purchase of new checks or because a range of checks has been voided.
EFT Information
Detail to the E-Check Parameters (ECPD) form to specify or create Electronic Fund Transfer (EFT) information for this bank code.
Active Status
Indicates the status of a bank code. Status can be active (currently available for assignment to an AP type), or inactive (not available for assignment to an AP type), and is used to restrict old bank codes from being used.
This field defaults to “Active” — that is, at the time a new bank code is defined, it is automatically assigned Active status. It becomes “Inactive” only if the bank account is closed or otherwise rendered unusable.
The choices are the codes in the ACTIVE.STATUSES code table.
This field is required.
90tting Started with Purchasing and Accounts Payable | Defining Codes Used in Purchasing & Accounts Payable
Ge
Foreign Currency Code
Indicates the code for a foreign currency that is associated with this bank code. Colleague uses the foreign currency code to verify that the currency on a requisition, purchase order, or voucher is the same as the currency of the bank account associated with the AP type.
You would complete this and the following two fields only for foreign currency accounts where currency conversion would occur on voucher payment.
The foreign currency description appears to the right of the code.
Currency Designation
Indicates the word for this currency type, for example, yen, franc, pounds, or lira, that will be printed on checks cut using this bank code, immediately following the spelled-out check amount.
The check printing program normally prints the currency of the check amount following the spelled-out amount. For example, a check for $250 would have the line “two hundred fifty dollars.” This field is for a word to substitute in place of dollars (or whatever your local currency is) for foreign currency. Some examples would be lira, pounds, yen, and franc. The word in this field is printed on the check.
The currency designation can be up to 10 characters.
This field is required only if a Foreign Currency Code is entered.
Currency Exchange GL Acct
Identifies the general ledger account that is charged or credited by increases and decreases in currency exchange rates in this bank account’s currency.
This account will be used if the exchange rate changes; it absorbs increases or decreases in the exchange rate, and holds the gain or loss in the exchange rate changes.
This field uses LookUp to select valid choices from the general ledger account numbers defined for your institution.
This field is required only if a Foreign Currency Code is entered.
Currency Exchange GL Acct Description
Lists the description of the selected Currency Exchange GL account.
Reconciliation Info
Provides access to the Bank Code Recon Parameters (BKCD) form, the form for adding tape information for electronic check reconciliation for this bank account.
An “X” appears in this field if the bank code already has tape information specified. If no tape information has been entered for the bank code, this field is blank.
91tting Started with Purchasing and Accounts Payable | Defining Codes Used in Purchasing & Accounts Payable

Ge
Components of bank codes used for e-Check processing
Use the E-Check Parameters (ECPD) form to maintain defaults and parameters that are used for e-check processing by bank code.
Figure 8: The E-Checks Parameters (ECPD) form
You can access the ECPD form from the menu or by detailing from the Bank Codes (BKCM) form.
Fields on the ECPD form
All of the fields on the ECPD form are important to understand and are described in this section.
Process E-Checks
Enter Yes to allow processing of e-checks for this bank code.
Enter No if you do not want to allow processing of e-checks for this bank code.
U.S. EFT Format
Enter Yes for U.S. format. Enter No for Canadian Royal Bank format.
Colleague uses the U.S. Automated Clearing House (ACH) EFT file format if you enter “Yes” in this field.
Colleague uses the Canadian Royal Bank format if you enter “No” in this field.
92tting Started with Purchasing and Accounts Payable | Defining Codes Used in Purchasing & Accounts Payable

Ge
EFT Subroutine
This field displays the subroutine used to create an EFT payments file.
If you entered “Yes” in the U.S. EFT Format field, the default subroutine is S.CREATE.US.ACH.FILE.
If you entered “No” in the U.S. EFT Format field, the default subroutine is S.CREATE.CAN.ACH.FILE.
You can enter your own cataloged subroutine if you know that your bank uses a different format (for example, if your institution uses a Canadian bank other than the Canadian Royal Bank).
Include Carriage Return for U.S. Banks
Enter Yes to include a carriage return in the EFT file. Check with your bank to find out if you need to include a carriage return.
Enter No if you do not want to include a carriage return in the EFT file.
Organization ID
Enter the Organization ID associated with this bank code.
Each EFT file sent must have an organization ID and EIN associated with the bank code.
U.S. Blocking Factor
Enter the blocking factor for creating an EFT payment file.
The ACH EFT format requires a blocking factor between 10 and 90 that is divisible by 10. Check with your bank to find out which blocking size they prefer.
This field is only necessary for U.S. bank codes.
U.S. Padding Character
Enter the padding character for creating an EFT file.
The Automatic Clearing House (ACH) EFT format requires an alphanumeric padding character be used in each block of an EFT file. Check with your bank to find out which padding character they prefer.
This field is only necessary for U.S. bank codes.
Include Offset Record for U.S. Banks
Enter Yes to include an offset record in the EFT file.
Enter No if you do not want to include an offset record in the EFT file.
An offset record balances the accounting transaction.
93tting Started with Purchasing and Accounts Payable | Defining Codes Used in Purchasing & Accounts Payable

Ge
This field is only necessary for U.S. bank codes.
Canadian Client Number
Enter the Client Number assigned for Direct Deposits by the Royal Bank.
This field is used for direct deposit in Human Resources for Canadian clients. It may be used for the creation of e-checks for bank codes that use the Canadian EFT file format.
This field contains the client number assigned by the Royal Bank to the employer. The direct deposit file (or tape) sent to this bank contains this client number in the header record. This field can be up to ten alphanumeric characters in length.
Canadian Processing Centre
Enter one of the valid codes for the processing center for direct deposits.
This field is used only by Canadian payroll, and only if the associated bank will be used to process direct deposit files (or tapes). It may be used for the creation of e-checks for bank codes that use the Canadian EFT file format.
This field contains a five digit code that corresponds to the processing center that processes the direct deposit file (or tape) produced by the payroll system. This code is validated by the CAN.RB.PROCESSING.CENTRES validation code table.
This field is used for direct deposit in Human Resources for Canadian clients. It may be used for the creation of e-checks for bank codes that use the Canadian EFT file format.
Canadian Processing Centre
Enter one of the valid codes for the processing center for direct deposits.
This field is of interest to Canadian sites.
This field contains a five digit code which corresponds to the processing center which processes the direct deposit file (or tape) produced by the payroll system. This code is validated by the CAN.RB.PROCESSING.CENTRES validation code table.
This field is used only by Canadian payroll, and only if the associated bank will be used to process direct deposit files (or tapes).
This field is used for direct deposit in Human Resources for Canadian clients. It may be used for the creation of e-checks for bank codes that use the Canadian EFT file format.
94tting Started with Purchasing and Accounts Payable | Defining Codes Used in Purchasing & Accounts Payable

Ge
Procedure for defining a bank code1. Complete the steps outlined in “Before you begin” on page 83.
2. Access the Bank Codes (BKCM) form.
3. At the Bank Code LookUp prompt, enter the ID of the bank code you want to define.
• If you are creating a new bank code, Colleague displays the following prompt:
Record not found -- Reenter or Add
Enter A to add the new bank code. Notice that the new bank code ID is displayed in the form’s header.
• If you want to modify an existing bank code record, enter the ID for that record. You may perform a LookUp to select from a list of existing bank code records.
4. Enter a description of the bank code, including the bank name and account type.The description can be up to 30 characters.
5. Enter the GL Cash Account number for this bank code.
• Colleague verifies that this is an open, authorized GL account number.
• You may perform a GL Account LookUp in this field.
6. Enter the Bank Account Number, Transit Routing Number, Last AP Check Number, and Active Status.
7. Will this bank code be used for e-check processing?
Yes. Detail on the EFT Information field to access the E-Check Parameters (ECPD) form. Continue with Step 8.
No. Skip to Step 11.
8. Enter Yes in the Process E-Checks field.
9. Do you want to set up this bank code for a U.S. or a Canadian bank code?
U.S. In the U.S. EFT Format field, enter Yes for U.S. Automated Clearing House (ACH) EFT format. Fill out the following fields on this form:
• EFT Subroutine
• Include Carriage Return
• Organization ID
• File Header Immediate Origin
• PPD Company Organization
• CCD Company Organization
• U.S. Blocking Factor
• U.S. Padding Character
• Include Offset Record for U.S. Banks
See “Components of bank codes used for e-Check processing” on page 92 and online help for more information.
95tting Started with Purchasing and Accounts Payable | Defining Codes Used in Purchasing & Accounts Payable
Ge
Canadian. In the U.S. EFT Format field, enter No for Canadian Royal Bank format. Fill out the following fields on this form:
• EFT Subroutine
• Include Carriage Return
• Organization ID
• Canadian Client Number
• Canadian Processing Centre
See “Components of bank codes used for e-Check processing” on page 92 and online help for more information.
10. Save and exit from the ECPD form.
Colleague displays the BKCM form again.
11. Are you defining this bank code for a foreign currency?
Yes. Continue with Step 12.
No. Skip to Step 13.
12. Define the foreign currency:
12.1. Enter the Foreign Currency Code. If you don’t know the currency code, use LookUp to find the appropriate code.
– Currency codes are defined on the Currency Exchange (CEXM) form. See “Defining currency codes” on page 77 for more information about currency codes.
12.2. Enter the Currency Designation and Currency Exchange GL Account.
13. Do you want to define tape reconciliation information for this bank code?
Yes. Detail on the Reconciliation Information field to the Bank Code Recon Parameters (BKCD) form. Complete the steps in “Procedure for defining bank code reconciliation information” on page 99.
No. Skip this step and continue with Step 13.
14. Save this bank code record.
Colleague saves this record and displays the Bank Code LookUp prompt.
15. Repeat Step 3 through Step 14 for each bank code record you want to maintain.
16. When you are finished maintaining bank codes, save your work and exit the BKCM form.
Components of bank code reconciliation information
Use the Bank Code Recon Parameters (BKCD) form to define bank code reconciliation information. The fields available for maintenance are determined by your selection in the Output Device field. If you select “File,” only those fields required for reconciliation files are available. If you select “Tape,” only those fields required for reconciliation tapes are available.
96tting Started with Purchasing and Accounts Payable | Defining Codes Used in Purchasing & Accounts Payable
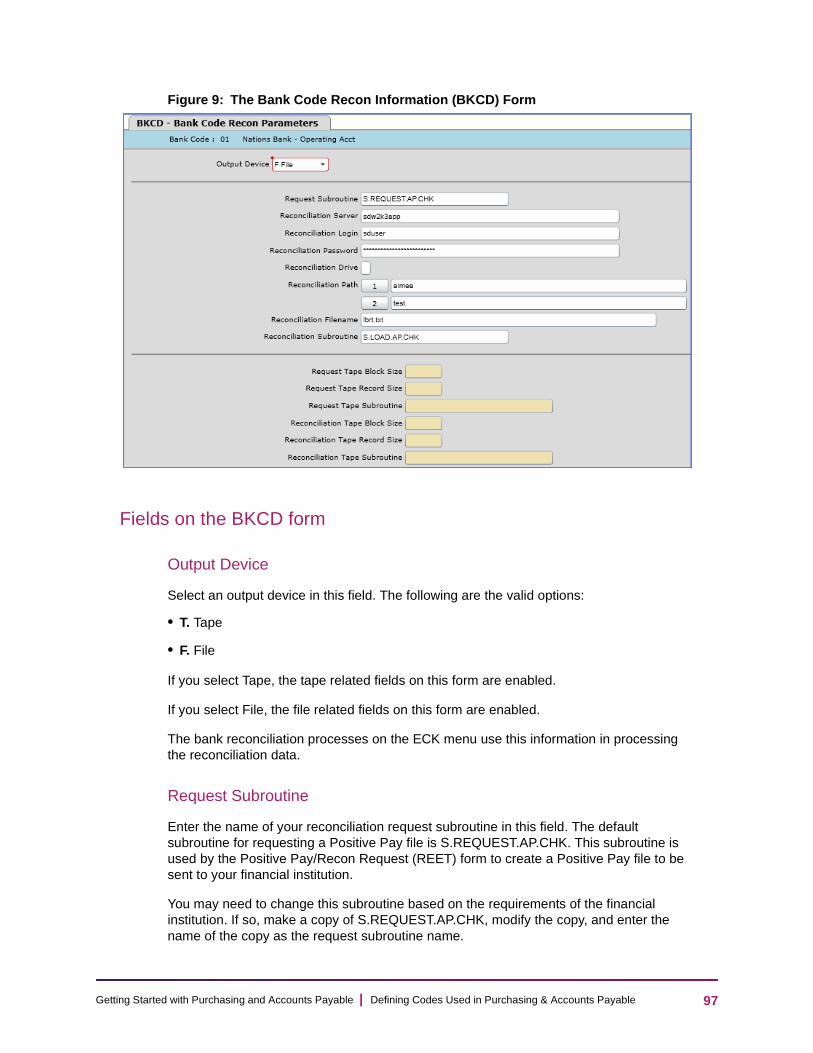
Ge
Figure 9: The Bank Code Recon Information (BKCD) Form
Fields on the BKCD form
Output Device
Select an output device in this field. The following are the valid options:
• T. Tape
• F. File
If you select Tape, the tape related fields on this form are enabled.
If you select File, the file related fields on this form are enabled.
The bank reconciliation processes on the ECK menu use this information in processing the reconciliation data.
Request Subroutine
Enter the name of your reconciliation request subroutine in this field. The default subroutine for requesting a Positive Pay file is S.REQUEST.AP.CHK. This subroutine is used by the Positive Pay/Recon Request (REET) form to create a Positive Pay file to be sent to your financial institution.
You may need to change this subroutine based on the requirements of the financial institution. If so, make a copy of S.REQUEST.AP.CHK, modify the copy, and enter the name of the copy as the request subroutine name.
97tting Started with Purchasing and Accounts Payable | Defining Codes Used in Purchasing & Accounts Payable
Ge
Reconciliation Server
Enter the domain name server (DNS) or Internet Protocol (IP) address for the server in this field.
This is the server where your reconciliation file is stored.
Reconciliation Login
Enter the login ID of the server entered in the Reconciliation Server field.
Reconciliation Password
Enter the password for the login entered in the Reconciliation Login field.
The Reconciliation Login and Reconciliation Password are for the server entered in the Reconciliation Server field.
Reconciliation Drive
Enter the drive letter of the file location in this field. For example, if you store the reconciliation file on the C: drive, enter “C” in this field.
Reconciliation Path
Enter the reconciliation file path name in this field. Each part of the path should be entered as a separate value in the field. For example, if the file path name is C:/Program Files/Datatel/Recon, enter “Program Files” in the first line, “Datatel” in the second, and “Recon” in the third.
The path must be located on the drive that you specified in the Reconciliation Drive field.
Reconciliation File Name
Enter the name of the file from your bank, that contains checks to be reconciled in this field. The file must be located within the drive and path that you specified in the Reconciliation Drive and Reconciliation Path fields.
Reconciliation Subroutine
Enter the name of your reconciliation subroutine in this field. The default subroutine for requesting a Positive Pay file is S.LOAD.AP.CHK. This subroutine will be used by the Load Bank Reconciliation Data (LBRT) form to load data for reconciliation purposes.
Request Tape Block Size
Indicates the block size required by your financial institution, if they require that you send them a check request tape. This can be any number from 0 to 8192.
98tting Started with Purchasing and Accounts Payable | Defining Codes Used in Purchasing & Accounts Payable

Ge
Request Tape Record Size
Indicates the record size required by your financial institution, if they require a check request tape. This can be any number greater than 0.
Request Tape Subroutine
Identifies the custom request tape subroutine required by your financial institution, if they require a check request tape. The default subroutine is S.REQUEST.AP.CHK.
Depending on your financial institution’s requirements, you may need to modify this subroutine. If you need to change it, make a copy of the subroutine (which resides in STANDARD.FORMS), modify, compile, and catalog the copy, and enter the name of the new subroutine here.
Reconciliation Tape Block Size
Indicates the block size used by your financial institution for the reconciliation tape. This can be any number from 0 to 8192.
Reconciliation Tape Record Size
Indicates the tape record size used by your financial institution for the reconciliation tape. This can be any number greater than 0.
Reconciliation Tape Subroutine
Identifies the reconciliation tape subroutine used by your financial institution. The default subroutine is S.LOAD.AP.CHK.
Depending on your financial institution’s requirements, you may need to modify this subroutine. If you need to change it, make a copy of the subroutine (which resides in STANDARD.FORMS), modify, compile, and catalog the copy, and enter the name of the new subroutine here.
Procedure for defining bank code reconciliation information
Note: This procedure is a continuation of the bank code definition procedure beginning on 95.
1. Read the discussion in “Setting up your electronic check reconciliation information in the bank code” on page 86.
2. Define the bank code using the “Procedure for defining a bank code” on page 95.
99tting Started with Purchasing and Accounts Payable | Defining Codes Used in Purchasing & Accounts Payable

Ge
3. Are you defining this bank code’s reconciliation tape information from within the Bank Code record (on the BKCM form) or directly from the menu prompt?
Within the Bank Code record. From the BKCM form, detail on the Reconciliation Information field to the Bank Code Recon Parameters (BKCD) form.
Continue with Step 5.
Directly from the menu. Enter BKCD at the menu prompt to access the Bank Code Recon Parameters (BKCD) form.
Continue with Step 4.
4. At the Bank Codes LookUp prompt, enter the ID of the bank code for which you want to define tape reconciliation information.
If you do not know the bank code ID, perform a LookUp.
5. Complete the fields on the BKCD form.
6. Update this record.
• If you accessed the BKCD form from within a bank code record, Colleague saves the record and returns you to the Bank Codes (BKCM) form.
• If you accessed the BKCD form directly from the menu prompt, Colleague saves the record and displays the Bank Code LookUp prompt.
7. Do you want to define tape reconciliation information for another bank code?
Yes. Repeat this procedure for each bank code.
No. Save your work and exit back to the menu system.
Defining AP types
This section explains how to define an AP type code.
Before you begin
Before setting up AP type codes for your institution, you should:
• Review the illustration of the role of the transaction code files in processing.
• See “The purchasing and AP process: Role of the transaction codes” on page 32.
• Review the discussion of AP types.
• See Understanding AP types below.
• Ensure that all general ledger account numbers have been defined in the Colleague Finance.
• See your accounting office if you have questions about general ledger accounts.
100tting Started with Purchasing and Accounts Payable | Defining Codes Used in Purchasing & Accounts Payable
Ge
• Ensure that you have selected your discount method on the AP Parameters Definition (APDE) form.
• See “The discount method parameter” on page 275.
• Ensure you have indicated your tax distribution preference on the APDE form.
• See “The tax expense distribution parameter” on page 283.
• If your institution does business in any foreign currencies, ensure that currency codes have been defined in the CURRENCY.CONV file.
• See “Defining currency codes” on page 77.
• Ensure that bank codes have been defined in the BANK.CODES file.
• See “Defining bank codes” on page 83.
• Ensure that all concerned parties have had a chance to give input into the process of planning your institution’s AP types.
• The information systems, accounting, purchasing, accounts payable, and accounts receivable offices should work together to define these codes.
• Use the worksheets provided in the Appendix to plan your AP type codes on paper, before entering any of them into Colleague Finance.
• See the worksheet “AP types” on page 326.
Understanding AP types
The AP type code is the Purchasing and Accounts Payable modules’ central code, that keeps the accounts payable-related information together and provides this information to each procurement document that is processed through your system.
AP type codes play a critical role in Colleague’s processing of purchasing and AP transactions. The AP type provides all the links necessary for posting purchasing and AP transactions to the proper general ledger accounts. Throughout your procurement process, it provides posting instructions for creating memo encumbrances for requisitions, encumbrances for purchase orders, expense entries for vouchers, and payment entries for checks.
Information provided to transactions by the AP type code
The AP type code provides the critical financial information for processing your AP transactions, and performs the following distinct functions:
• Through the AP source, differentiates between regular accounts payable transactions — which are designed to pay an obligation to a vendor — and accounts receivable transactions — such as a tuition refund to a student or salary advance to an employee.
• Designates the accounts payable general ledger controlling account number (AP control
GL account) to which all AP transactions with a given AP type will be posted1.
101tting Started with Purchasing and Accounts Payable | Defining Codes Used in Purchasing & Accounts Payable

Ge
• Identifies the bank code (and corresponding cash account) to be used for a transaction with a given AP type.
• Indicates the general ledger account that has been designated for cash discount posting, either a revenue account (for discounts taken) or an expense account (for discounts lost) for a given AP type.
• Identifies the general ledger account designated for posting tax expense (needed only if your institution does not distribute tax expense to individual line item GL accounts) for that AP type.
• Identifies the organization and tax ID for which 1099-MISC and T4A transactions should be reported.
The following sections briefly describe the function of each AP type component.
AP Source
The AP source identifies and restricts the type of transaction you can do with a given AP type. It comes into play at the voucher stage of processing, and controls how you create and process a regular AP voucher, or an AR voucher, by limiting voucher creation and maintenance as follows:
• A voucher with a regular AP type (which has a source of “R,” and will affect the accounts payable balance in the general ledger), is maintained on the Voucher Maintenance (VOUM) form (you cannot access an AP voucher on either the Manual AR Refunds / Advances [VRAM] or the Batch AR Refunds / Advances [VRAB] form).
• A voucher with an accounts receivable AP type (which has a source of “A,” and will affect the accounts receivable balance in the general ledger) is maintained on either the Manual AR Refunds/ Advances (VRAM) or the Batch AR Refunds / Advances (VRAB) form (you cannot access an AR voucher on the Voucher Maintenance [VOUM] form).
The AP source code also determines in what side of the general ledger a given transaction will be booked. The “R” (regular) type transaction will be posted to the line item expense accounts and the AP control GL account, while the “A” (AR) transaction will be posted to the accounts receivable (AR) control GL account and the AR.BALANCE (summary) and AR.ITEMS (detail) files in the General Ledger module.
AP Control GL Account
This GL account links the AP type code to the AP control GL account number, where Colleague posts AP transactions before payment by check. General ledger AP controlling accounts are often called Vouchers Payable. Colleague posts your AP purchases to the AP control GL account as follows:
• Every voucher item expense is posted to this AP control GL account number as a credit.
• This account is then debited when you pay a voucher, and the cash account is credited for the payment.
1.For an accounts receivable AP type code, the entry in this field is a refund or receivable control account number.
102tting Started with Purchasing and Accounts Payable | Defining Codes Used in Purchasing & Accounts Payable

Ge
Bank Code (cash account)
As a component of the AP type, the bank code provides the GL cash account number that will be credited when a check is cut to pay the voucher.
Discount GL Account
The Discount GL Account lists the general ledger (GL) account number that will be debited or credited with the amounts of cash discounts your institution accumulates based on the payment terms of your vendors.
Note: You must fill in this field for every AP type that will handle vendor discounts, or Colleague will not be able to process vendor discounts correctly.
This is the GL account number to which Colleague will post (as revenue) any cash discounts taken if your discount method is “Taken,” or to post (as expense) any discounts not taken (or, “lost”) if your discount method is “Lost.”
The Discount GL Account number in the AP type code is related to the Accounts Payable module parameter called Discount Method, found on the AP Parameters Definition (APDE) form.
Note: You must select a discount method on the APDE form before setting up your AP type codes.
For more information on how Colleague handles cash discounts, see the discussion of “The discount method parameter” on page 275.
Tax Expense GL Account
The tax expense GL account number is related to the Distribute Tax Expense parameter, found on the AP Parameters Definition (APDE) form in the Accounts Payable module. You will only need to complete the Tax Expense GL Account field if you want to accumulate all tax expense in one central account (that is, if you are not distributing tax expense to the voucher expense accounts).
If you set the Distribute Tax Expense parameter on the APDE form to “No,” you should enter in the Tax Expense GL Account field the tax expense GL account that is the expense account reserved for accumulation of tax expenses.
If you set the Distribute Tax Expense parameter to “Yes” and try to complete the Tax Expense GL Account field, Colleague displays an error message and does not let you enter a GL account.
How AP types operate in daily processing
You link AP types to your procurement information by entering an AP type on each procurement document you create (requisitions, purchase orders, or vouchers). The AP type carries forward to all remaining procurement documents created to process that purchase.
103tting Started with Purchasing and Accounts Payable | Defining Codes Used in Purchasing & Accounts Payable

Ge
An AP type is required before you can save any purchase order (even an Unfinished/In Progress purchase order) or voucher.
You are not required to enter an AP type on a requisition. If you do, the AP type is carried forward to any purchase orders created from the requisition.
Factors to consider in setting up your AP types
If your institution has relatively simple procurement procedures and a central procurement office, you could define as few as two AP types, one for regular AP transactions and one for accounts receivable (AR) transactions.
However, if you use different AP control GL (Voucher Payable) accounts for different types of goods purchased, you will need to define a separate AP type for each category of goods. This is because you can enter only one AP control GL account number on each AP type.
In addition, there are two cases in which you will benefit from defining several AP types to reflect the procurement structure in effect at your institution:
• If you have any branch locations with independent procurement functions.
• If you have any “shadow” procurement functions that generate a high purchasing volume and operate their procurement functions independently of your central procurement office — such as a library, bookstore, or dining service.
You can use AP types to segment these independent procurement operations from your central purchasing, providing the flexibility and autonomy your branch or shadow procurement offices need. The next section examines some of these situations in further detail.
How to use AP types to reflect your procurement procedures
As noted above, you can use your AP types to provide the level of organization that will most effectively implement your institution’s procurement practices. Three of the more common solutions are explained below.
Defining AP types by category of goods purchased
If you pay for certain types of goods out of separate voucher payable accounts (AP control GL accounts), you can sort and process these special types of purchases much more easily if you define a different AP type for each category of purchase.
For each type of goods you want to track separately, you would define a separate AP type, with a separate AP control GL account. For example, in addition to one general AP type for regular AP purchases (and one for refunds and advances), you might have a special AP type for computer hardware purchases, an AP type for research expenditures, and an AP type for fixed asset purchases.
These distinct AP types let you process, pay, monitor, post, and report on your institution’s expenditures for as many different types of purchases as you wish.
104tting Started with Purchasing and Accounts Payable | Defining Codes Used in Purchasing & Accounts Payable

Ge
Defining AP types for branch or shadow procurement offices
To segment your branch and shadow procurement functions from the activities of your central procurement office, you can define a separate AP type for each independent procurement facility at your institution. Each AP type can have a unique AP control GL account and bank code, or all can have the same AP control GL account and bank code.
Entering AP types into vendor records
Frequently vendors do business with several of your branch or shadow procurement offices as well as the central business office; or a vendor may supply your institution with more than one type of commodity.
In order to maintain your demographic records without duplication, you should make every effort to avoid entering a given vendor into Core Demographics more than once. If several branch offices deal with a given vendor independently, and each wishes to access only their transaction information on that vendor, you must have a way for each office to identify their own transactions with that vendor.
You can do this through the AP type. The Vendor Definition (VEND) form allows space for as many AP type codes as you want to enter in each of your vendor definitions. Through linking AP types to your vendor records, you increase your ability to
• Break out and track expenditures for different types of goods purchased.
• Clearly distinguish purchases made by one branch (or shadow) office from a given vendor from purchases made by all other branch offices from that same vendor, as well as from purchases made by the central business office from that vendor.
• Allow autonomy in order processing, check cutting, posting, and reporting for all independent branch procurement offices.
For example, you enter the AP type code for branch office A on the vendor record of vendor B, who supplies branch office A as well as other offices at your institution. Since the AP type code “A” is listed on vendor B’s record, branch office A, when running reports on POs, vouchers, or checks, can select by vendor and by AP type, and produce lists restricted to vendor B’s sales to branch office A.
This extra level of sorting capability means that, even for vendors that are used by several of your branch (or shadow) procurement offices, each branch procurement office will be able to break out the transactions with that vendor that were initiated by their office, without needing to sort through transactions that do not belong to them.
Note: The primary purpose for defining more than one AP type for your system, and for associating AP types with your vendor records, is convenience in processing purchase orders, vouchers, and checks, and financial tracking and reporting. Regardless of whether you enter any AP types on a vendor record, Colleague maintains open and unrestricted entry of AP types on your procurement documents, to allow the flexibility needed for procurement functions.
105tting Started with Purchasing and Accounts Payable | Defining Codes Used in Purchasing & Accounts Payable

Ge
This open design means that entering an AP type on a vendor record does not restrict the selection of AP types available for any procurement document you create; nor does it cause the first AP type on a vendor record to default in when you enter a vendor ID on a PO or voucher. The selection available on any requisition, purchase order, and voucher is all AP types that are defined for your institution.
Examples of AP type setup options
The examples in this section describe five different ways of setting up your AP types to reflect your institution’s structure.
Example 1: Centralized purchasing and AP functions
Small Foundation is a private organization with one location and low purchasing volume. All purchasing and AP functions are handled centrally by the business office; no other departments are involved in online procurement. The foundation has one unrestricted payables bank account.
Small Foundation can use its AP type codes to implement a simple accounts payable structure, by defining one general AP type for all its regular AP transactions, and a second for AR transactions.
There is no need to enter any AP types in vendor records, because all the payables processing is done from the central office.
Example 2: Decentralized requisition entry, central purchasing and AP functions
Southern Business School has three academic branch campuses. Faculty and staff on the branch campuses submit requisitions online to the business office, where processing is picked up by the purchasing staff. All other purchasing and AP functions, including bulk ordering, vendor relations, and purchase orders, and all financial functions, are handled centrally by the business office. The school has one central payables bank account.
Like Small Foundation, Southern Business School needs to define only the standard two AP type codes, one for regular AP transactions, and a second for AR transactions, and would not need to enter any AP types in vendor records.
Example 3: Decentralized purchasing offices, central AP control GL account and bank account
City Institute (CI) has a main location and two branch locations, all located in a small city. The institute has a single checking account for all purposes. The central business office has financial responsibility for all accounts payable matters, but each site is responsible for their own procurement functions, including buying from vendors of their choice.
106tting Started with Purchasing and Accounts Payable | Defining Codes Used in Purchasing & Accounts Payable

Ge
City Institute has defined their AP types as follows. They have three different AP type codes, one for each campus. Each AP type has the same bank code and AP control GL account number. This gives the central business office oversight over the financial aspects of the institution’s procurement transactions, but still allows each campus considerable autonomy in making procurement decisions and creating procurement documents (requisitions and purchase orders).
If desired, CI can also allow each branch location to add their own vendors into the system. (Note, however, that if branch campuses add their own vendors, they must remember to do a thorough search of the vendor database to ensure that no duplicate vendor records are created.) By linking AP types to vendor records, they can track additions to the vendor file. Through the AP type, a vendor’s record tracks which site set up that vendor and which site does business with the vendor.
Example 4: Purchasing and AP functions completely decentralized
State University (SU) has seven different campuses, spread throughout the state. Because of the geographic distances, each campus has a different general checking account, and all the campuses are generally autonomous with regard to purchasing and AP responsibility.
Since the Purchasing and Accounts Payable modules are set up centrally and must accommodate all variations within the system as defined, the college’s MIS department and central business office are responsible for all the necessary research and setup of the two modules.
SU has defined its AP types as follows:
• There are seven AP type codes, one for each campus.
• The AP type for each campus stores the bank code set up for that campus’s bank account.
• Each campus also has their own AP control GL account number. This gives each campus complete autonomy in creating their purchasing and AP documents (requisitions, purchase orders, vouchers, and checks). In addition, since each campus has a separate AP type and AP control GL account, the college’s central business office can track expenditures by campus, and generate detailed reporting information on that basis.
• Each individual campus has entered its AP type code on the vendor records of the vendors it does business with, to facilitate selective processing and reporting.
Linking AP types to vendor records will be helpful for State University. Assigning AP types to vendors provides information to the central office for reporting on any specific vendor, including the AP control GL account (and thus the branch office) to which any given purchase from that vendor will be posted, and the bank account from which any given purchase from that vendor will be paid. By virtue of the branch offices’ AP types on the vendor records of “shared” vendors (vendors that sell to more than one branch), and each branch office’s use of the AP type selection criteria for batch processing and reporting, the purchase records of each campus should remain entirely separate.
107tting Started with Purchasing and Accounts Payable | Defining Codes Used in Purchasing & Accounts Payable

Ge
Example 5: Any size institution with intra-campus shadow procurement functions
County College (CC) has three campuses. They have decentralized requisition entry and centralized purchasing and AP processing. However, both the bookstore and the library on the main campus, have a purchasing volume warranting autonomous operations for both the library and bookstore. Each of these functions is considered a “shadow procurement office,” and has been given autonomous purchasing and accounts payable authority, to run their procurement functions independently of the college’s central procurement office.
County College defines a separate AP type for the library and a separate AP type for the bookstore. The AP control GL account and cash account for each of these AP types can be the same, or each can be different. The important thing is that these separate AP types allow the library administrator and the bookstore manager to handle all ordering, processing, payment, posting, and reporting for their purchases independently from the central business office. In addition, CC’s business office, in its oversight capacity, can still report centrally on all the functions of the shadow procurement offices.
The bookstore and library procurement offices would probably also have numerous vendors in common, or shared with the central business office. For example, if both bookstore and library purchase from Green Publishing, the central business office would define a vendor record for Green Publishing once (and only once) in Demographics. Then, the library would enter its AP type (for example, “L”) on Green Publishing’s vendor record, and the bookstore would enter its AP type (for example, “B”) on Green’s vendor record.
In daily processing, the library would enter an AP type of “L” on every purchase order it generated for Green Publishing, and the bookstore would enter an AP type of “B” on every purchase order it created for Green. In all batch processing, such as outstanding PO lists, voucher payment, or check registers, the library could always select only its own procurement documents for Green Publishing, by using as selection criteria, the vendor ID (to select Green), and the AP type “L” (to select only library transactions) on processing and reporting forms. The bookstore would do the same thing, but enter “B” for their AP type instead of “L.” In this way the two shadow procurement offices can share vendor information without duplicating information in the system, and at the same time maintain a high level of efficiency and accuracy in their individual transaction records.
Reporting by AP types
Developing AP types that reflect your purchasing/payables organization is especially beneficial in adding convenience to your reporting. If your institution needs to monitor the procurement activities of several campuses, AP types facilitate this because the AP type is a standard selection field on most Purchasing and Account Payable modules’ processing and reporting forms.
Defining your AP types
The number of AP types you define for your institution should be based on a consideration of your procurement structure, hierarchy, and procedures. A brief analysis will help you arrive at the optimum AP type code setup for your institution.
108tting Started with Purchasing and Accounts Payable | Defining Codes Used in Purchasing & Accounts Payable

Ge
Steps to develop your AP types
Several steps are required to decide how to define your AP types. The high-level setup steps for developing your AP types are as follows:
1. Determine how many AP types you should define to reflect your institution’s practices (use the steps in Table 21 on page 109).
2. If you have branch or shadow procurement offices, determine:
• Whether the branch/shadow AP types you set up should each have unique bank accounts, or the same bank account.
• Whether the branch/shadow AP types you want should have unique AP control GL accounts, or will all have the same one.
• What discount GL account should be entered on each of the branch/shadow AP types you want to set up.
3. Define your bank codes.
4. Define your AP type codes.
If you are going to enter your AP type codes onto vendor records, you should use the following steps:
4.1. Determine which vendors will be assigned which AP type codes.
4.2. Enter the appropriate AP type codes on each affected vendor record.
Deciding How Many AP Types to Define. Table 21 presents the factors to consider in determining how many AP types you should define to reflect your institution’s purchasing structure.
Table 21: Determining Optimum Number of AP Types
Purchasing Structure AP Types to Define
All institutions
Define one type for regular transactions, one or more types for accounts receivable (AR) transactions
If Then
You have any shadow purchasing offices (such as a library, bookstore, or dining service)
Define one AP type for each shadow purchasing office.
If desired, enter the appropriate AP type codes onto the vendor records of vendors that work with those offices.
Your institution has one or more branch locations with independent purchasing functions
Define one AP type for each branch.
If desired, enter the appropriate AP type codes onto the vendor records of vendors that work with those branches.
109tting Started with Purchasing and Accounts Payable | Defining Codes Used in Purchasing & Accounts Payable

Ge
Note: This table does not include setting up AP types for foreign currencies. See “Setting Up Foreign Currency Information” on page 171 for more information.
How to designate 1099 vendors
Because of the Accounts Payable module’s comprehensive tax form processing functionality, you do not need to use AP types for sorting 1099 vendors, or to distinguish 1099 vendors from other vendors. Colleague provides the following features for tax form processing and 1099 vendor identification:
• The field on which Colleague selects 1099 vendors is not the AP Types field, but the Tax Form field (entered on the Vendor Definition [VEND] form and part of a vendor record).
• Vendors are automatically selected for 1099 processing by the 1099-MISC Processing functionality (performed using the forms on the Tax Codes/Processing [TAX] menu).
• The Tax Forms field is a standard selection field on the following vendor reporting forms, all of which appear on the Vendor Maintenance (VEN) menu:
• Vendor Register (VENR)
• Vendor Purge Register (VNPR)
• Vendor Year To Date Report (VENY)
• Vendor Address List (VENA)
See the Using Accounts Payable manual for more information on setting up a 1099 vendor.
Setting Up an Accounts Receivable AP type
In order to process student refunds and (for some institutions) employee reimbursements through your accounts payable books, you must set up an accounts receivable AP type.
An accounts receivable AP type requires the following fields:
• Description
• AP Source code (the code will be “A”)
• AP control GL account number (this is a refund or receivable control account number)
• Bank code
Before you can use an AP type for accounts receivable transactions, you must also set up the following codes (these are defined in the Registration module, part of Colleague Student):
• Accounts Receivable types (AR.TYPES). Indicate types of AR arrangements a school might have, such as student receivable, salary advance receivable, or admissions deposit
110tting Started with Purchasing and Accounts Payable | Defining Codes Used in Purchasing & Accounts Payable

Ge
• Accounts Receivable codes (AR.CODES). Identify the type of obligation (some have a set dollar amount, such as a key deposit or registration fee; others have no set dollar amount, such as laboratory fees, tuition refund, or housing charges — these vary by student)
• Terms (TERMS). Identify school term in which a transaction took place, such as Fall 2000.
Note: These Accounts Receivable codes are required in order to process AR Accounts Payable transactions in Colleague Finance. If you do not have Colleague Student, you must process your AR Accounts Payable vouchers manually.
Rules governing AP type definition
Remember the following rules when defining your AP types:
• Be sure you have selected a discount method on the APDE form before setting up your AP type codes. After you have chosen a discount method, it will be very difficult to change it after beginning AP processing.
• You must define your bank codes before you can define your AP type codes.
• When you define an AP type with a source of “R” (for regular AP transactions), enter your AP control GL (or vouchers payable) account number. When defining an AP type with a source of “A” (for AR transactions), enter the appropriate AR control GL account number (such as accounts receivable, employee receivable, refunds, or advances).
• You can define several AP type codes that list the same bank code (checking account). However, you cannot associate more than one bank account with one AP type.
• You must define a discount GL account for every AP type you create that will handle vendor discounts, regardless of your choice of discount method.
• If your tax distribution parameter is set to “No,” you must define a tax expense GL account for every AP type that will handle taxable transactions.
• You must define at least one AP type before you can mark a purchase order as “Done” and continue its processing. This is because the AP type is a required field for purchase orders (or for vouchers, if your institution begins its online processing at the voucher stage).
Tips for AP type definition
The following notes and tips are provided to assist you in defining AP types:
• If you are defining your AP types to reflect different campuses or business offices, be sure to use a clear and descriptive system in naming your codes. This will help others who use these codes across your institution.
• Be sure your AP type descriptions are clear and meaningful, especially the regular AP type. The description will appear on many Purchasing and Accounts Payable module forms and needs to be clear in order to avoid confusion.
111tting Started with Purchasing and Accounts Payable | Defining Codes Used in Purchasing & Accounts Payable

Ge
Components of an AP type
Use the AP Types (APTF) form to define AP types.
Figure 10: The AP Types (APTF) Form
Figure 11 displays all the codes and general ledger accounts used in AP type definition. These codes and GL accounts must be defined before you can define AP types. The following symbols are used to demonstrate the relationships between code files, GL accounts, and an AP type definition.
Indicates a code file. (Codes that do not have a symbol next to them are code tables that are defined and maintained by Ellucian.)
Indicates a general ledger (GL) account you must define in order to use Purchasing and Accounts Payable functions. A GL account not marked with this symbol is required only if you are using the code it supports.
112tting Started with Purchasing and Accounts Payable | Defining Codes Used in Purchasing & Accounts Payable
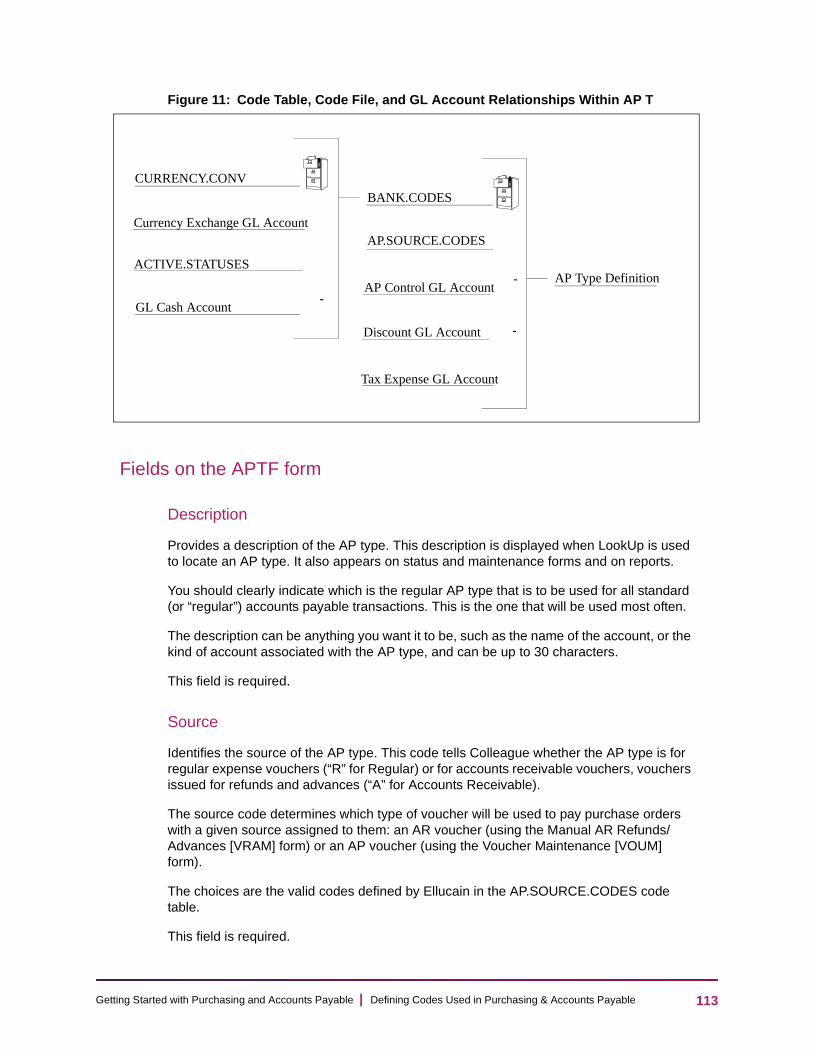
Ge
Figure 11: Code Table, Code File, and GL Account Relationships Within AP T
Fields on the APTF form
Description
Provides a description of the AP type. This description is displayed when LookUp is used to locate an AP type. It also appears on status and maintenance forms and on reports.
You should clearly indicate which is the regular AP type that is to be used for all standard (or “regular”) accounts payable transactions. This is the one that will be used most often.
The description can be anything you want it to be, such as the name of the account, or the kind of account associated with the AP type, and can be up to 30 characters.
This field is required.
Source
Identifies the source of the AP type. This code tells Colleague whether the AP type is for regular expense vouchers (“R” for Regular) or for accounts receivable vouchers, vouchers issued for refunds and advances (“A” for Accounts Receivable).
The source code determines which type of voucher will be used to pay purchase orders with a given source assigned to them: an AR voucher (using the Manual AR Refunds/Advances [VRAM] form) or an AP voucher (using the Voucher Maintenance [VOUM] form).
The choices are the valid codes defined by Ellucain in the AP.SOURCE.CODES code table.
This field is required.
AP Type Definition
AP.SOURCE.CODES
BANK.CODES
ACTIVE.STATUSES
CURRENCY.CONV
-
-
AP Control GL Account
Discount GL Account
Tax Expense GL Account
-GL Cash Account
Currency Exchange GL Account
113tting Started with Purchasing and Accounts Payable | Defining Codes Used in Purchasing & Accounts Payable

Ge
AP Control GL Acct
This field indicates the general ledger accounts payable control account number for the AP type being defined.
The AP control GL account number:
• Is credited with purchase order item encumbrance entries.
• Is debited when PO item encumbrances are relieved.
• Is credited with voucher item expense entries.
• Is debited when a voucher is paid or voided.
The accounts payable control GL account may be called “Vouchers Payable” in some general ledgers.
This field is required.
AP Control GL Acct Description
Lists the description of the AP control GL account assigned to the AP type in the previous field.
Bank Code
Indicates the bank and cash account information to be used by this AP type. This code connects the selected AP type to all bank information needed for processing payments.
The bank code includes the GL cash account used for this bank account, the bank account number and transit routing number, and optional foreign currency information. This code is incorporated into the AP type code.
This field is required.
Bank Code GL Acct
Identifies the general ledger cash account associated with the bank code entered in the previous field.
Bank Code GL Acct Description
Lists the GL account description of the cash account in the field above it.
114tting Started with Purchasing and Accounts Payable | Defining Codes Used in Purchasing & Accounts Payable
Ge
Discount GL Acct
Indicates the GL account number for posting discounts lost or discounts taken.
Your entry in this field is determined by your selection in the Discount Method parameter on the Accounts Payable Parameter Definition (APDE) form. Use an expense account here if your discount method is L - Discounts Lost (this will post, as expense, any cash discounts not taken). Use a revenue account here if your discount method is T - Discounts Taken (this will post, as revenue, any cash discounts taken).
This field is required only if the AP type will be using discounts.
Discount GL Acct Description
Lists the description of the discount GL account assigned to this AP type in the previous field.
Tax Expense GL Acct
Identifies the GL account number designated to receive tax expenses, if they are not distributed. You need to complete this field only if you entered N in the Distribute Tax Expense field on the AP Defaults Maintenance (APDE) form.
If your institution charges tax expenses to a central GL account rather than to individual line item GL accounts, you enter that account number.
If you are distributing taxes, you should leave this field blank.
Tax Expense GL Acct Description
Lists the description of the tax expense GL account assigned to this AP type in the previous field.
Organization ID
Enter an alternate organization ID defined for your institution.
Tax ID
Select an Account Identifier to complete the Canadian Business Number.
This field is provided for Canadian Clients to select an optional Account Identifier to assign to the AP type. U.S. Clients cannot access this field.
Procedure for defining an AP type1. Complete the steps outlined in “Before you begin” on page 100.
2. Access the APTF form.
3. At the AP Types LookUp prompt, enter the ID of the AP type you want to define.
115tting Started with Purchasing and Accounts Payable | Defining Codes Used in Purchasing & Accounts Payable
Ge
• If you are creating a new AP type, Colleague displays the following prompt:
Record not found -- Reenter or Add
Enter A to add the new AP type ID. Notice that the new AP type ID appears in the form’s header.
• If you want to modify an existing AP type record, enter the ID for that record. You may perform a lookup to select from a list of existing AP type records.
4. Complete the Description field.
5. In the AP Source field, select the appropriate source.
AP Source codes are validation codes stored in the AP.SOURCE.CODES record of the CF.VALCODES file. This validation code record is preset by Ellucian, and cannot be modified.
6. Enter the AP Control GL Acct number for this AP type.
7. Enter the Bank Code for this AP type.
• If you don’t know the bank code, use LookUp to find the appropriate code.
• Bank codes are defined on the Bank Codes (BKCM) form. See “Defining bank codes” on page 83 for more information about bank codes.
8. Do any of the vendors for which you will use this AP type offer cash discounts (either method)?
Yes. Continue with Step 9.
No. Skip Step 9 and continue with Step 10.
9. Is your default discount method (set on the AP Parameters Definition [APDE] form) Discounts Lost (L) or Discounts Taken (T)?
Discounts Lost (L). Enter an expense account number in the Discount GL Acct field.
Discounts Taken (T). Enter a revenue account number in the Discount GL Acct field.
10. Does your institution use a central tax expense account rather than distributing taxes (charging taxes to individual line item GL expense accounts)?
Yes. Enter an expense account number in the Tax Expense GL Acct field.
No. Leave the Tax Expense GL Acct field blank and continue with Step 12.
11. Do you want to associate this AP type with a specific Organization ID/Tax ID combination?
Yes. Enter the Organization ID. Colleague automatically displays the Tax ID associated with that Organization ID.
Canadian clients only—Select the Account Identifier that you want to use with this Organization ID.
No. Leave the Organization ID field blank.
The Tax ID field remains blank.
12. Save your work and update from the APTF form.
116tting Started with Purchasing and Accounts Payable | Defining Codes Used in Purchasing & Accounts Payable

Ge
Defining staff/volunteer codes
This section explains how to define a staff/volunteer code (used for initiator/buyer codes).
Before you begin
Before setting up your staff/volunteer codes for the Accounts Payable and Purchasing modules, you should:
• Review the discussion of staff/volunteer codes.
• See Understanding staff/volunteer codes below.
• Ensure that all code tables have been defined in Colleague Core.
• To define the Core code tables, see Getting Started with Colleague Core.
• Ensure that you have included in your institution’s staff/volunteer codes, all staff who will need an initiator or buyer code in order to use the Purchasing and Accounts Payable modules.
• The Correspondence Control module also uses staff/volunteer codes. To set up staff/volunteer codes, coordinate with accounting, personnel, and any other offices that use these codes.
• Use the worksheets provided in the Appendix to plan your staff/volunteer codes on paper, before entering any information into Colleague Finance.
• See the worksheet “Staff/Volunteer codes” on page 329.
Understanding staff/volunteer codes
Staff/volunteer codes are three-character codes used to identify staff at your institution who will be initiators or buyers on requisitions, purchase orders, or blanket purchase orders. You must create a record for every staff member (or volunteer) who will be:
• Initiating requisitions.
• Assigned as a buyer either on purchase orders or blanket purchase orders.
The staff/volunteer code provides an additional level of security for the Purchasing and Accounts Payable modules, by letting you restrict access to your purchasing requests to those staff members who are authorized. You can develop a security level for staff codes by assigning attributes to your Core OFFICE.CODES code table.
The staff/volunteer code file is actually a Core Demographics file. But you can access the definition form for this code file directly from the codes/defaults definition menu of both the Purchasing and the Accounts Payable module.
Note: The Purchasing/Accounts Payable staff/volunteer code is not the same as the system login ID.
117tting Started with Purchasing and Accounts Payable | Defining Codes Used in Purchasing & Accounts Payable

Ge
Rules governing staff/volunteer code definition
When defining your staff/volunteer codes, remember the following rules:
• You must define a staff/volunteer code for any staff member you want to be able to enter requisitions (Initiator code required) or as a buyer to a commodity code or a purchasing document, before the staff member can create requisitions, purchase orders, or vouchers.
• A staff member must already have been set up in Demographics before you can give them a staff/volunteer code. The Staff Lookup will also allow you to use Person LookUp, or enter the system assigned identification number or Social Security number, to find the person’s record.
Tips for staff/volunteer code definition
The typical staff/volunteer code is the initials of the staff member. However, if that three-letter combination has been used for someone else, then you could choose a unique set of three characters as the ID for the second individual.
Components of a staff/volunteer code
Use the Staff and Volunteers (SVM) form to define staff and volunteer codes.
Figure 12: The Staff and Volunteers (SVM) form
118tting Started with Purchasing and Accounts Payable | Defining Codes Used in Purchasing & Accounts Payable
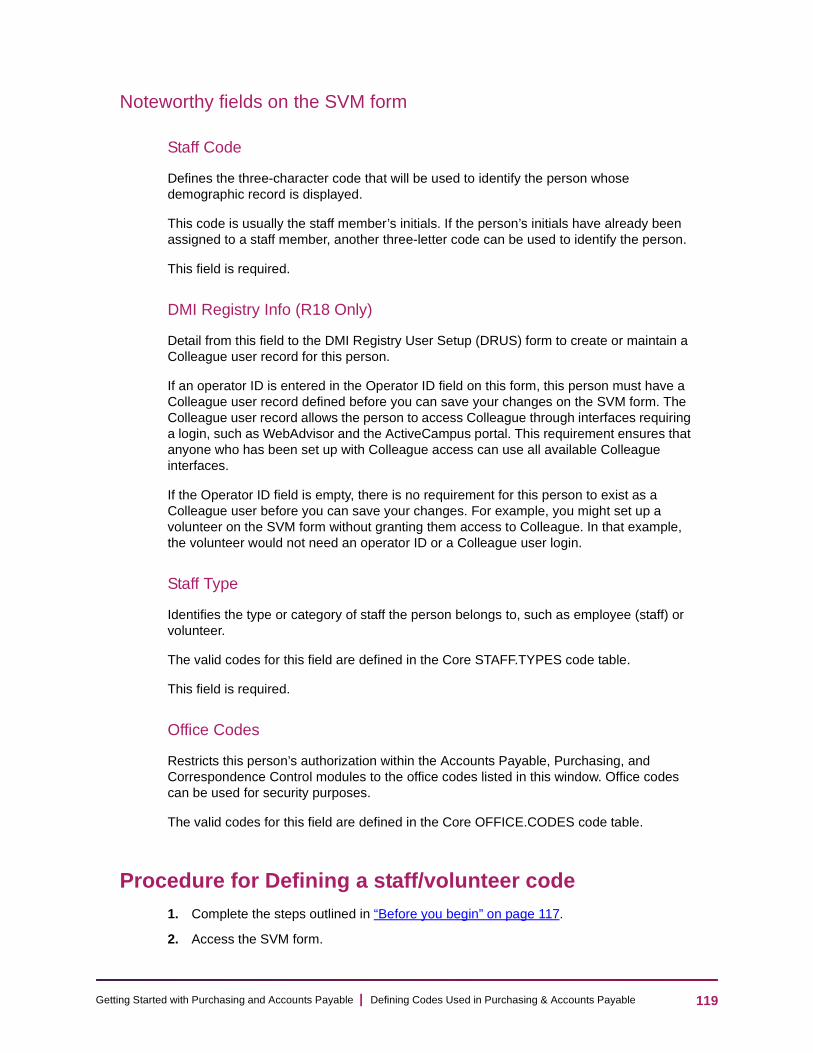
Ge
Noteworthy fields on the SVM form
Staff Code
Defines the three-character code that will be used to identify the person whose demographic record is displayed.
This code is usually the staff member’s initials. If the person’s initials have already been assigned to a staff member, another three-letter code can be used to identify the person.
This field is required.
DMI Registry Info (R18 Only)
Detail from this field to the DMI Registry User Setup (DRUS) form to create or maintain a Colleague user record for this person.
If an operator ID is entered in the Operator ID field on this form, this person must have a Colleague user record defined before you can save your changes on the SVM form. The Colleague user record allows the person to access Colleague through interfaces requiring a login, such as WebAdvisor and the ActiveCampus portal. This requirement ensures that anyone who has been set up with Colleague access can use all available Colleague interfaces.
If the Operator ID field is empty, there is no requirement for this person to exist as a Colleague user before you can save your changes. For example, you might set up a volunteer on the SVM form without granting them access to Colleague. In that example, the volunteer would not need an operator ID or a Colleague user login.
Staff Type
Identifies the type or category of staff the person belongs to, such as employee (staff) or volunteer.
The valid codes for this field are defined in the Core STAFF.TYPES code table.
This field is required.
Office Codes
Restricts this person’s authorization within the Accounts Payable, Purchasing, and Correspondence Control modules to the office codes listed in this window. Office codes can be used for security purposes.
The valid codes for this field are defined in the Core OFFICE.CODES code table.
Procedure for Defining a staff/volunteer code1. Complete the steps outlined in “Before you begin” on page 117.
2. Access the SVM form.
119tting Started with Purchasing and Accounts Payable | Defining Codes Used in Purchasing & Accounts Payable

Ge
3. At the Staff LookUp prompt, enter the Person ID for whom you want to create a staff/volunteer code (or perform a Person LookUp).
• If this person does not have a staff/volunteer record, Colleague displays the following prompt:
Record not on STAFF file. Create a STAFF record (Y/N)?
Enter Y to add the person to the STAFF file. Notice that Colleague displays the person’s name, ID, and city/state/zip in the form’s header.
• If this person already has a staff/volunteer record, Colleague displays the record.
4. Enter a Staff Code for the person. The code can be up to three characters.
5. Complete the fields for a staff/volunteer code.
6. Update this record.
• Colleague saves the record and displays the Staff/Volunteer LookUp prompt.
7. Repeat this procedure for each staff/volunteer code you want to maintain.
8. When you are finished maintaining staff/volunteer codes, save your work and exit the SVM form.
Defining tax codes
This section explains how to define a tax code for taxes on purchases.
Before you begin
Before setting up your tax codes, you should:
• Review the discussion of tax codes.
• See Understanding tax codes below.
• Ensure that all general ledger account numbers have been created in Colleague Finance.
• See your accounting office if you have questions about general ledger accounts.
• Ensure that all code tables have been defined in Colleague Finance.
• For a discussion of the code tables used in tax code definition, see “Understanding the Purchasing and Accounts Payable code tables” on page 62.
• To define the code tables, see “Validation Code Table Maintenance” on page 358.
• Ensure that all concerned parties have had a chance to give input into the tax code definition process.
• Coordinate with the accounting and accounts payable offices to define these codes.
120tting Started with Purchasing and Accounts Payable | Defining Codes Used in Purchasing & Accounts Payable

Ge
• Use the worksheet provided in the Appendix to plan your tax codes on paper, before entering any information into Colleague Finance.
• See the worksheet “Tax codes” on page 346.
Understanding tax codes
If your institution has to pay taxes in addition to the purchase price of any products or services you buy, you can set up tax codes to automatically calculate and track the tax.
Tax codes are used to define tax percentage and other information for all types of federal, state (or provincial), and local sales and use taxes your institution pays. For more complex tax situations, such as use taxes, tax compounding, and rebate and exemption percentages, tax codes let you define and automate the computations your institution needs to comply with the laws of various taxing entities, and set up your tax posting transactions to suit your institution’s requirements.
During setup of the Purchasing and Accounts Payable modules, you create a tax code for each individual tax you pay: state sales tax, local sales or use tax, or, for Canadian institutions, rebatable GST taxes and GST taxes to which Input Tax Credits apply. Through the effective date, the tax code tracks increases in the tax rate over time so that, while storing the information Colleague uses for AP tax calculations, the tax code also keeps historical records of how tax percentages have fluctuated.
How tax codes are used in daily processing
The Tax Codes field appears just above the GL Account No field on the following item maintenance forms in the Purchasing and Accounts Payable modules:
• For requisitions, Requisition Item Maintenance (RQIM)
• For regular purchase orders, PO Item Maintenance (POIM)
• For vouchers, Voucher Item Maintenance (VOUD)
• For recurring vouchers, Recurring Voucher Item Maintenance (ROUD)
For a regular taxable purchase transaction in the U.S., if a line item is subject to tax, you enter the tax code, or codes, directly onto the line item. Colleague then calculates the tax by line item, using the codes you entered, and posts the taxes to the appropriate accounts.
At the requisition and purchase order stages (for regular purchase orders only), Colleague calculates the tax for a line item on which you enter a tax code, based on the tax code’s effective date and tax percentage. This tax amount is printed on the purchase order and, since the tax code carries forward to the voucher, maintains the correct tax percentage, even if the voucher amount turns out to be different from the PO amount (due to backordered or closed items, returns, or price changes).
The tax paid to the vendor is included on the voucher, and postings to any special GL accounts involved (for example, a rebate/refund account, use tax account, or tax expense account if taxes are not being distributed) occur when payment of the purchase expense is posted.
121tting Started with Purchasing and Accounts Payable | Defining Codes Used in Purchasing & Accounts Payable

Ge
Use the following forms to view and change tax code calculations for:
• Requisitions
• Req GL Line Item Tax Maintenance (RTXM)
• Req GL Line Item Tax Inquiry (RETI)
• Purchase orders
• PO GL Line Item Tax Maintenance (POGT)
• PO GL Line Item Tax Inquiry (PGLI)
• Vouchers
• GL Line Item Tax Inquiry (VGLT)
How rebate tax codes work
Tax rebates for educational institutions are used in some states in the U.S. and in other countries such as Canada. If your institution qualifies for tax rebates on certain purchases, you will need to define the appropriate rebate tax codes.
Colleague handles rebate tax code calculations as follows. When you enter a tax code with rebates on a voucher, Colleague splits the total tax amount between the line item expense account and the tax rebate/refund general ledger account (also called the tax offset account), based on the rebate percentage defined for the tax code. The portion that is not a rebate is charged to the expense account; the remaining amount (the rebate) is charged to the rebate/refund general ledger account. This account contains the amount due back to the institution.
Some additional concepts about tax codes
Three fields on the Tax Codes (TXCM) form merit a brief discussion of functionality: Effective Date, Allow AP/Pur Entry, and Tax Code Category. The latter two are applicable only to rebate tax codes.
The effective date
In order to determine the tax rate in effect for a given requisition, purchase order, voucher, or recurring voucher you create, Colleague looks at a specific date for each document as shown in Table 22.
Table 22: Date on Purchasing Documents Checked Against Tax Code Effective Date
DocumentColleague checks this date against tax code effective date
Requisition Requisition date
Purchase order Purchase order date
122tting Started with Purchasing and Accounts Payable | Defining Codes Used in Purchasing & Accounts Payable
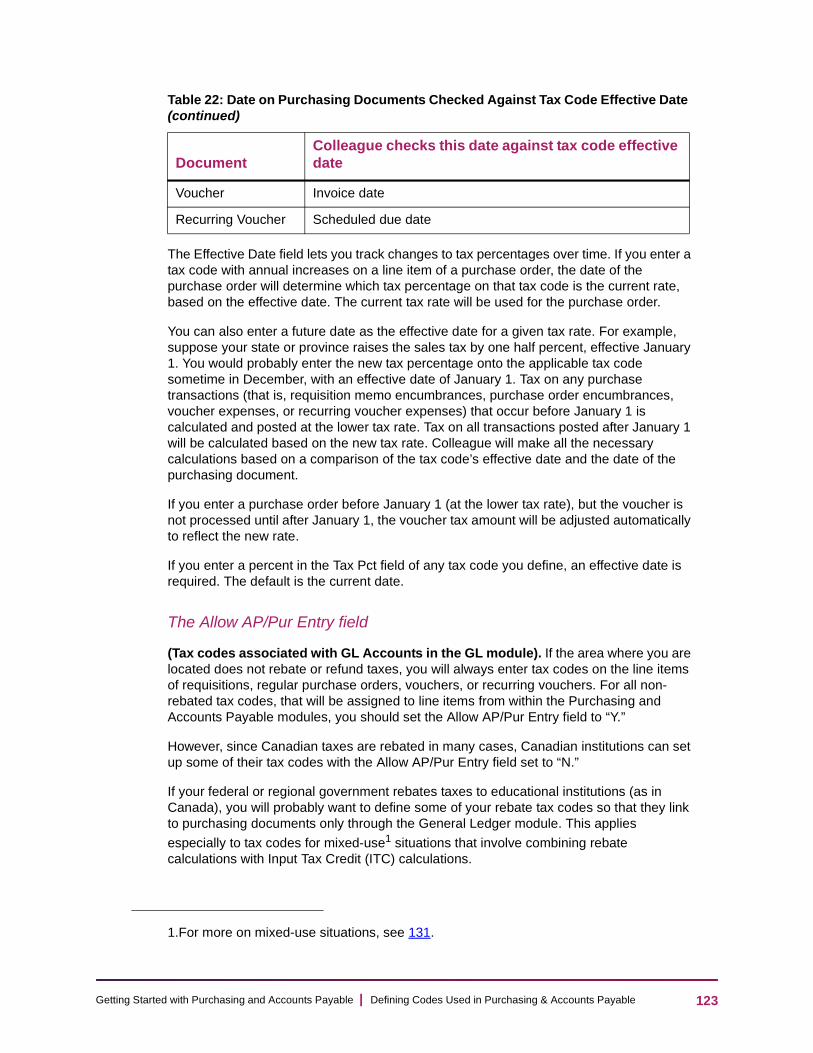
Ge
The Effective Date field lets you track changes to tax percentages over time. If you enter a tax code with annual increases on a line item of a purchase order, the date of the purchase order will determine which tax percentage on that tax code is the current rate, based on the effective date. The current tax rate will be used for the purchase order.
You can also enter a future date as the effective date for a given tax rate. For example, suppose your state or province raises the sales tax by one half percent, effective January 1. You would probably enter the new tax percentage onto the applicable tax code sometime in December, with an effective date of January 1. Tax on any purchase transactions (that is, requisition memo encumbrances, purchase order encumbrances, voucher expenses, or recurring voucher expenses) that occur before January 1 is calculated and posted at the lower tax rate. Tax on all transactions posted after January 1 will be calculated based on the new tax rate. Colleague will make all the necessary calculations based on a comparison of the tax code’s effective date and the date of the purchasing document.
If you enter a purchase order before January 1 (at the lower tax rate), but the voucher is not processed until after January 1, the voucher tax amount will be adjusted automatically to reflect the new rate.
If you enter a percent in the Tax Pct field of any tax code you define, an effective date is required. The default is the current date.
The Allow AP/Pur Entry field
(Tax codes associated with GL Accounts in the GL module). If the area where you are located does not rebate or refund taxes, you will always enter tax codes on the line items of requisitions, regular purchase orders, vouchers, or recurring vouchers. For all non-rebated tax codes, that will be assigned to line items from within the Purchasing and Accounts Payable modules, you should set the Allow AP/Pur Entry field to “Y.”
However, since Canadian taxes are rebated in many cases, Canadian institutions can set up some of their tax codes with the Allow AP/Pur Entry field set to “N.”
If your federal or regional government rebates taxes to educational institutions (as in Canada), you will probably want to define some of your rebate tax codes so that they link to purchasing documents only through the General Ledger module. This applies
especially to tax codes for mixed-use1 situations that involve combining rebate calculations with Input Tax Credit (ITC) calculations.
Voucher Invoice date
Recurring Voucher Scheduled due date
1.For more on mixed-use situations, see 131.
Table 22: Date on Purchasing Documents Checked Against Tax Code Effective Date (continued)
DocumentColleague checks this date against tax code effective date
123tting Started with Purchasing and Accounts Payable | Defining Codes Used in Purchasing & Accounts Payable
Ge
You can link your rebate/ITC tax codes to a purchasing document line item through the GL account number entered for the line item, rather than entering tax codes directly on the line item. This creates a link that transparently connects the tax code’s rebate and refund rates with the purchasing document without the need for AP staff to remember which codes go with which types of purchases, helping minimize data entry errors. You can link a rebate/ITC tax code to the appropriate GL account number from within the General Ledger module (for example, on the GL Account Authorization [GLAA], Account Maintenance [GLMT], or Create New GL Accounts [GLCN] forms).
If you do define any rebate/ITC tax codes and then link them directly to GL account numbers as described above, remember that staff members will not be able to enter those tax codes directly on any Purchasing or Accounts Payable module forms.
Note: Once you save a newly created tax code on the Tax Codes (TXCM) form, you cannot change the Allow AP/Pur Entry field. This is due to the difficulties involved in maintaining historical information.
For more information on rebate and rebate/ITC tax codes, see “Tax codes for rebated and refunded taxes (Canadian institutions)” on page 128. For more on linking rebate tax codes to GL account numbers from within the General Ledger module, see the General Ledger module documentation.
The Tax Code Category Field
The Tax Code Category lets you group two or more tax codes into the same tax code category, so that different tax codes belonging to the same general category will be totaled and printed on the purchase order as a single tax entry.
If you qualify for rebates on certain items, but the rebate percentages for different items on the same purchase order are not the same, you would need two different tax codes. But you would typically want them to appear as one total tax amount on your PO. By assigning each of the two tax codes the same tax code category, you ensure they will be totaled together on the same line of the PO.
For example, if your institution receives rebates on taxes paid for certain selected items but not others, tax code A and tax code B might both be state (or provincial) sales tax, but tax code A gives a rebate while tax code B does not. You would probably want to see the sum of the tax amounts for tax codes A and B as a single “Tax” entry on your purchase orders, regardless of the rebate percentages, yet keep the tax amounts separate for accounting purposes. You could achieve this by assigning the same tax code category to both tax code A and tax code B.
Any tax codes without a tax category print as individual items at the bottom of the purchase order.
You can set up tax code categories for your institution using the TAX.CATEGORIES code table.
124tting Started with Purchasing and Accounts Payable | Defining Codes Used in Purchasing & Accounts Payable

Ge
Defining your tax codes
Depending on your tax situation, your tax code setup may be simple or complex. If your institution is generally tax-exempt, you will probably need to define only a few tax codes to handle exceptional situations. But if you are located in a state with complex tax laws, or in a country other than the U.S., your tax code definition process might involve more steps.
Each type of tax requires different fields, and different items of information, on the Tax Codes (TXCM) form. The subsections on the following pages give detailed information on how to define each of the primary types of tax codes you might require.
Each section briefly describes how processing of the tax code occurs, and gives information for defining the tax code. For all but three of the tax types (which are similar to others explained elsewhere in these sections), the indicated table number lists the fields on the TXCM form you should use to define the tax code, the required and optional fields, and the entry each field should contain for that tax type.
The following tax types are covered in this section:
• Tax codes used primarily by U.S. institutions:
• Standard (simple) tax code — for regular state, county, or local sales tax (all standard types of sales tax) (Table 23)
• Use tax code — for taxes paid to a different jurisdiction (county or local) (Table 23)
• Rebate tax code — for rebatable state sales tax (Table 23)
• Tax codes incorporating rebates and refunds (used primarily by Canadian institutions):
• Goods and Services Tax (GST) nonrebatable tax code (Table 23)
• Goods and Services Tax (GST) rebate tax codes (Table 28)
• GST Input Tax Credit (ITC) tax codes (Table 29)
• Goods and Services Tax (GST) tax codes for mixed use purchases (Table 30)
• Provincial Sales Taxes (PST) tax, including compounded taxes
Note: A “Yes” in the “Required?” column of Table 23 through Table 30 indicates the field is required for that type of tax code. If the column is blank, the corresponding field is not required.
Tax codes used primarily by U.S. institutions
Defining a standard (simple) tax code
For the rare situations where your tax-exempt institution is required to pay taxes, you should define the number of tax codes you need.
125tting Started with Purchasing and Accounts Payable | Defining Codes Used in Purchasing & Accounts Payable

Ge
Table 23 shows how to define a regular state or provincial tax code, with no compounding and no rebates in effect.
Defining a use tax code
In some states, a local jurisdiction may levy an extra tax on purchases, in addition to the regular state or county sales tax, that is assessed and paid directly to that jurisdiction. This might occur, for example, when you purchase goods from an out-of-county vendor, paying 5 percent tax with your voucher payment; and are also required by the county where you are located to pay an additional 0.5 percent tax directly to them.
You would handle this tax situation by defining the second tax as a “use tax,” the term Colleague uses for an additional tax you pay to a taxing authority other than the jurisdiction to which your vendor normally remits taxes. In addition, if you are located in such a state or county, your accounts payable structure must allow for periodic payments of the accumulated tax amounts to the taxing authority.
If your institution is subject to use taxes, you should do the following:
1. Ensure you have defined a GL account to accumulate the use tax amounts.
2. Define a tax code for the use tax, including the use tax GL account in the applicable field.
3. When preparing a voucher for a purchase where the use tax applies, enter the use tax code on all line items (the use tax GL account will be credited when you enter the tax code on a voucher).
4. Periodically create a voucher for remitting the use tax to the taxing authority.
Table 23: How to define a regular state/provincial tax code
Field Name Required? What to Enter
Description Yes Description of tax code
Rebates/Refunds Involved
Yes No
Rebate/Refund GL Account
Use Tax Involved Yes No
Use Tax GL Account
Allow AP/Pur Entry Yes Yes
Tax Code Category
[Tax Information:]
Effective Date Yes Date the tax rate is effective
Tax Percent Yes Tax percentage as of the effective date
126tting Started with Purchasing and Accounts Payable | Defining Codes Used in Purchasing & Accounts Payable

Ge
Note: If you have a tax code with use tax involved, you can enter the tax code only on vouchers. You cannot enter that tax code on purchase orders.
Table 23 shows how to define a tax code for a use tax.
Defining a rebate tax code
Some states in the U.S. offer tax rebates on some purchases. You would define this type of simple rebate tax code with both a tax percent and a rebate percent, as well as a rebate/refund GL account. When you enter this code on a line item, the tax as well as the rebate is calculated, and at the voucher stage the rebate amount is posted to the rebate/refund account.
Table 23 shows how to define a tax code for a state that gives rebates for some items.
Table 24: How to define a use tax code
Field Name Required What to Enter
Description Yes Description of tax code
Rebates/Refunds Involved
Yes No
Rebate/Refund GL Account
Use Tax Involved Yes Yes
Use Tax GL Account GL account number designated for use tax
Allow AP/Pur Entry Yes Yes
Tax Code Category
[Tax Information:]
Effective Date Yes Date the tax rate is effective
Compounding Sequence
Compounding sequence (1, 2), if applicable
Tax Percent Yes Tax percentage as of the effective date
Table 25: How to define a U.S. rebate tax code
Field Name Required What to Enter
Description Yes Description of tax code
127tting Started with Purchasing and Accounts Payable | Defining Codes Used in Purchasing & Accounts Payable
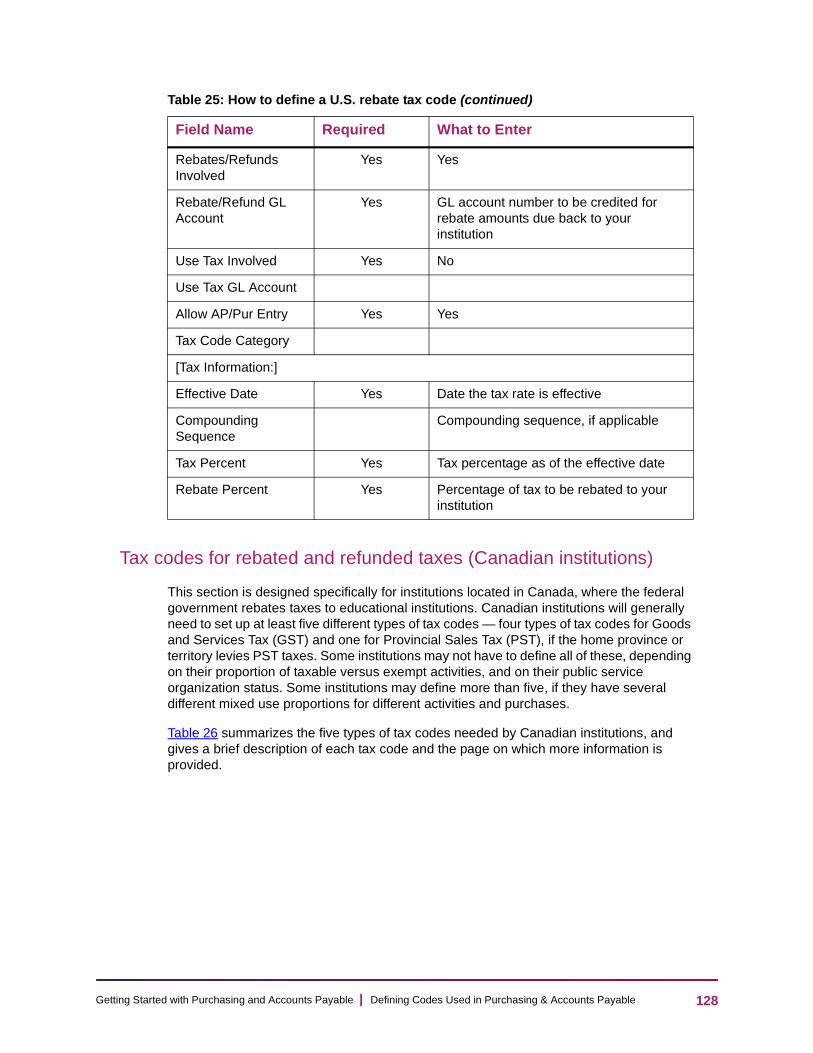
Ge
Tax codes for rebated and refunded taxes (Canadian institutions)
This section is designed specifically for institutions located in Canada, where the federal government rebates taxes to educational institutions. Canadian institutions will generally need to set up at least five different types of tax codes — four types of tax codes for Goods and Services Tax (GST) and one for Provincial Sales Tax (PST), if the home province or territory levies PST taxes. Some institutions may not have to define all of these, depending on their proportion of taxable versus exempt activities, and on their public service organization status. Some institutions may define more than five, if they have several different mixed use proportions for different activities and purchases.
Table 26 summarizes the five types of tax codes needed by Canadian institutions, and gives a brief description of each tax code and the page on which more information is provided.
Rebates/Refunds Involved
Yes Yes
Rebate/Refund GL Account
Yes GL account number to be credited for rebate amounts due back to your institution
Use Tax Involved Yes No
Use Tax GL Account
Allow AP/Pur Entry Yes Yes
Tax Code Category
[Tax Information:]
Effective Date Yes Date the tax rate is effective
Compounding Sequence
Compounding sequence, if applicable
Tax Percent Yes Tax percentage as of the effective date
Rebate Percent Yes Percentage of tax to be rebated to your institution
Table 25: How to define a U.S. rebate tax code (continued)
Field Name Required What to Enter
128tting Started with Purchasing and Accounts Payable | Defining Codes Used in Purchasing & Accounts Payable

Ge
Information and instructions for defining each types of tax code are provided on the following pages.
Goods and Services Tax (GST) nonrebate tax code
You can use the nonrebate GST tax code in conjunction with both rebate and ITC tax codes. If you assign rebate and ITC tax codes to all your line item GL expense accounts in the General Ledger module (and thus would not enter them directly onto purchasing line items), this is the tax code that would be entered onto line items by purchasing staff. You would also use this tax code for purchases that do not qualify for any rebates or refunds.
Table 26: Types of GST and PST Tax Codes to Define (Canadian Institutions)
Type of purchase
Type of GST/PST Used
Description of Tax Code Tax% Rebate%
Exempt% Page
Taxable, 0% exempt purchases
GST non-rebatable
Regular GST code (takes no rebate percentage)
7% 0% 0% -129
Exempt purchases
GST standard rebate for educational institutions
Rebate tax code (generally 67%)
-1
1.If you assign rebate and ITC tax codes to all your GL expense accounts, this field is blank. If not, it is 7 percent.
67% - -130
Taxable purchases with Input Tax Credit (ITC)
GST ITC/Refund
Full tax credit on paid value-added tax
- 100% - -132
Purchases for mixed use (taxable and exempt)
Mixed use (prorata mix of the above two types)
Percentage rebate is based on “reasonable” calculation of mixed use
- 2
2.This percentage will vary based on your institution’s calculation of mixed use (taxable/ exempt activities). An institution may want to define various mixtures, resulting in as many rebate percentages as there are mixtures.
- -133
All purchases Provincial Sales Tax (PST) (if applicable)
Simple or compounded provincial tax percentage
3
3.This percentage varies by province, and may or may not be compounded.
- - -135
129tting Started with Purchasing and Accounts Payable | Defining Codes Used in Purchasing & Accounts Payable
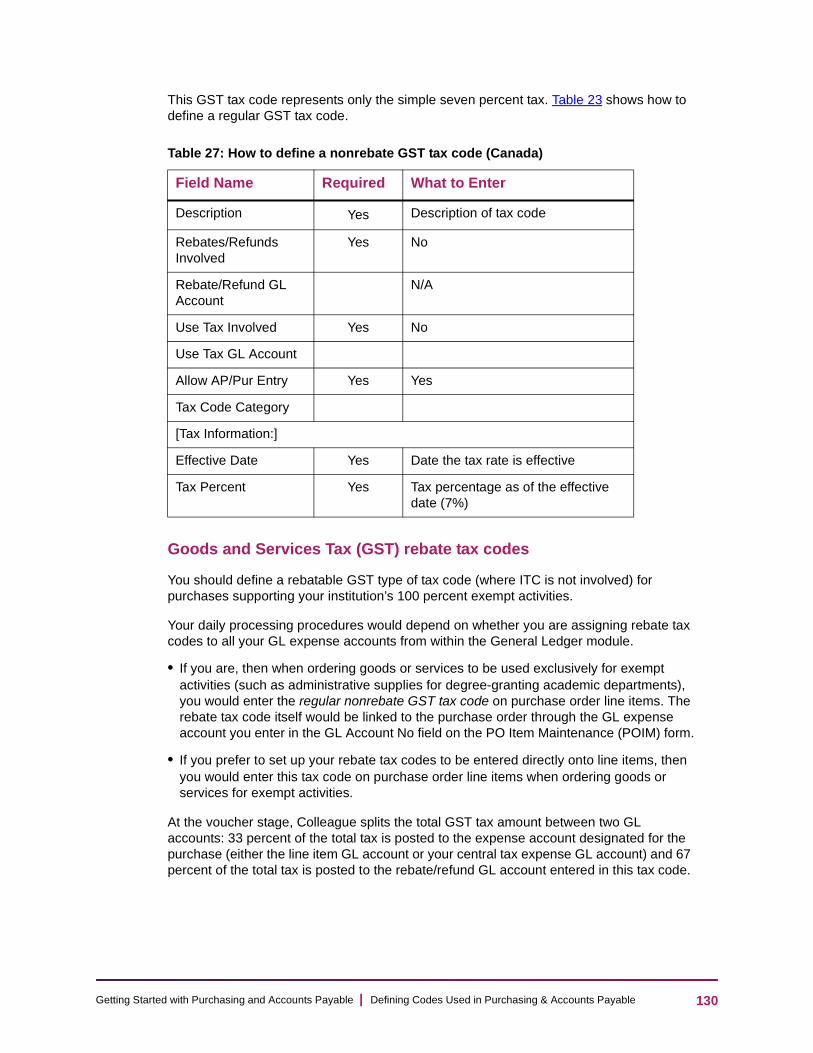
Ge
This GST tax code represents only the simple seven percent tax. Table 23 shows how to define a regular GST tax code.
Goods and Services Tax (GST) rebate tax codes
You should define a rebatable GST type of tax code (where ITC is not involved) for purchases supporting your institution’s 100 percent exempt activities.
Your daily processing procedures would depend on whether you are assigning rebate tax codes to all your GL expense accounts from within the General Ledger module.
• If you are, then when ordering goods or services to be used exclusively for exempt activities (such as administrative supplies for degree-granting academic departments), you would enter the regular nonrebate GST tax code on purchase order line items. The rebate tax code itself would be linked to the purchase order through the GL expense account you enter in the GL Account No field on the PO Item Maintenance (POIM) form.
• If you prefer to set up your rebate tax codes to be entered directly onto line items, then you would enter this tax code on purchase order line items when ordering goods or services for exempt activities.
At the voucher stage, Colleague splits the total GST tax amount between two GL accounts: 33 percent of the total tax is posted to the expense account designated for the purchase (either the line item GL account or your central tax expense GL account) and 67 percent of the total tax is posted to the rebate/refund GL account entered in this tax code.
Table 27: How to define a nonrebate GST tax code (Canada)
Field Name Required What to Enter
Description Yes Description of tax code
Rebates/Refunds Involved
Yes No
Rebate/Refund GL Account
N/A
Use Tax Involved Yes No
Use Tax GL Account
Allow AP/Pur Entry Yes Yes
Tax Code Category
[Tax Information:]
Effective Date Yes Date the tax rate is effective
Tax Percent Yes Tax percentage as of the effective date (7%)
130tting Started with Purchasing and Accounts Payable | Defining Codes Used in Purchasing & Accounts Payable

Ge
You would also use this type of tax code to define tax codes for other than the 67 percent
rebate rate. If you purchase goods for exempt activities that are for mixed use1, you can claim a prorata rebate. For example, if you are an institution with a resident teaching hospital, you might have an administrative office of which half the staff worked for the university and half the staff worked for a hospital. When you order supplies for that administrative office, your rebate would be 75 percent ([67% x 0.5] + [83% x 0.5]).
Table 28 shows how to define a tax code that gives rebates for purchases of exempt items.
1.“Mixed use” here refers to purchases made to support two activities, both of which are exempt (rebate-eligible), but which qualify for different rebate percentages. This is different from the mixed use mentioned on 133.
Table 28: How to define a GST rebate tax code (Canada)
Field Name Required What to Enter
Description Yes Description of tax code
Rebates/Refunds Involved
Yes Yes
Rebate/Refund GL Account
Yes GL account number to be credited for rebate amounts due back to your institution
Use Tax Involved Yes No
Use Tax GL Account
Allow AP/Pur Entry Yes If using this tax code in line items, “Yes”; if entering tax code in General Ledger module, “No.”
Tax Code Category
[Tax Information:]
Effective Date Yes Date the tax rate is effective
Compounding Sequence
Compounding sequence, if applicable
Tax Percent Optional. Enter tax percentage if using this tax code in line items; if entering tax code in General Ledger module, leave blank.
Rebate Percent Yes Rebate percentage (for educational institutions, 67 percent)
131tting Started with Purchasing and Accounts Payable | Defining Codes Used in Purchasing & Accounts Payable

Ge
GST Input Tax Credit (ITC) tax codes
You can define ITC tax codes to calculate and post the taxes you pay, and tax credits you receive, on items used (or consumed) with intent to produce a taxable product; for example, bookstore and cafeteria supplies. These are considered nonexempt activities. This type of GST ITC tax code provides a tax credit on items for which educational institutions cannot claim a rebate, but are entitled to a full refund. It is for purchases that are exclusively for nonexempt, or commercial, activities.
You set up this tax code so that it can be assigned to all the GL expense accounts that are charged for purchase of all types of goods and services for nonexempt activities. Then the purchasing or accounts payable staff enter the regular GST tax code on purchasing line items, and when they enter the GL expense account number for the item, this ITC tax code will, behind the scenes, perform the tax calculations and postings to post the ITC amount to the rebate/refund GL account number designated in this tax code.
Although this tax code is not directly entered onto purchase orders or vouchers, you can view the complete tax information for a PO transaction on the PO GL Line Item Tax Maintenance (POGT) form (detail from the PO Item Maintenance [POIM] form), and for a voucher transaction on the GL Line Item Tax Maintenance (VGLT) form (detail from the Voucher Item Maintenance [VOUD] form).
Table 29 shows how to define a tax code for an ITC tax credit, or refund.
Table 29: How to define a GST ITC tax code (Canada)
Field Name Required What to Enter
Description Yes Description of tax code
Rebates/Refunds Involved
Yes Yes
Rebate/Refund GL Account
Yes GL account number to be credited for ITC refund amounts due back to your institution
Use Tax Involved Yes No
Use Tax GL Account
Allow AP/Pur Entry Yes No
Tax Code Category Leave blank
[Tax Information:]
Effective Date Yes Date the rebate and refund rates are effective
Compounding Sequence
Tax Percent Leave blank
132tting Started with Purchasing and Accounts Payable | Defining Codes Used in Purchasing & Accounts Payable
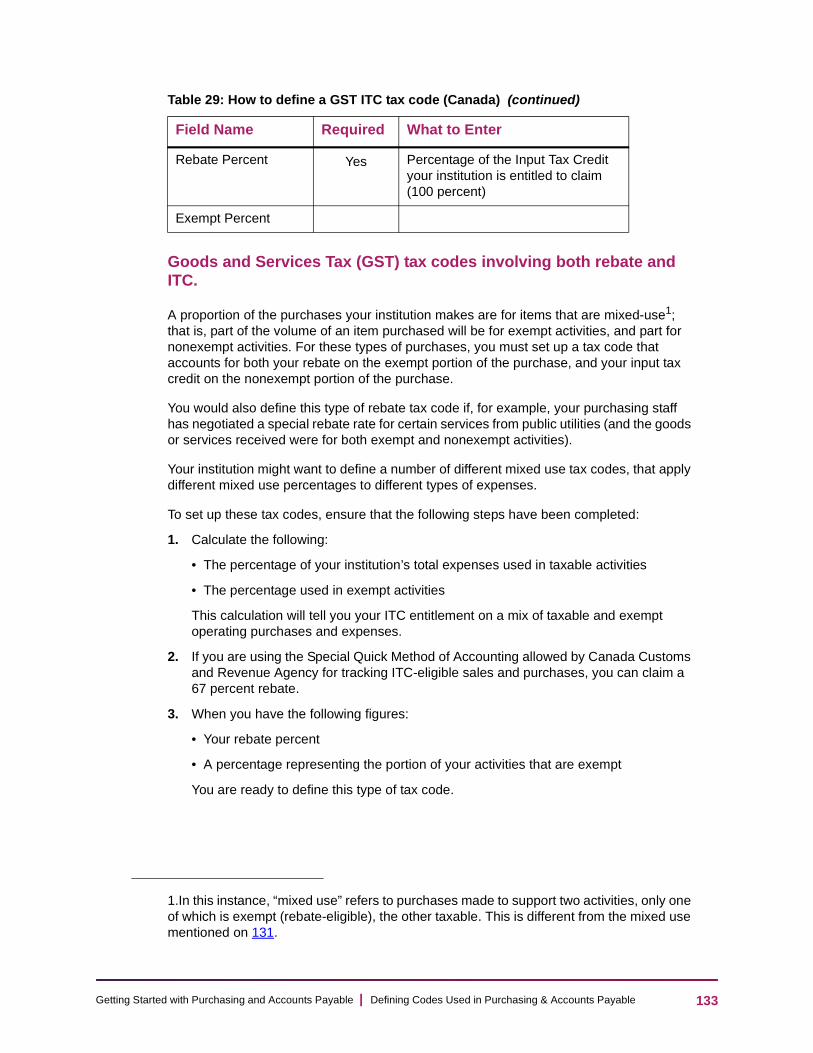
Ge
Goods and Services Tax (GST) tax codes involving both rebate and ITC.
A proportion of the purchases your institution makes are for items that are mixed-use1; that is, part of the volume of an item purchased will be for exempt activities, and part for nonexempt activities. For these types of purchases, you must set up a tax code that accounts for both your rebate on the exempt portion of the purchase, and your input tax credit on the nonexempt portion of the purchase.
You would also define this type of rebate tax code if, for example, your purchasing staff has negotiated a special rebate rate for certain services from public utilities (and the goods or services received were for both exempt and nonexempt activities).
Your institution might want to define a number of different mixed use tax codes, that apply different mixed use percentages to different types of expenses.
To set up these tax codes, ensure that the following steps have been completed:
1. Calculate the following:
• The percentage of your institution’s total expenses used in taxable activities
• The percentage used in exempt activities
This calculation will tell you your ITC entitlement on a mix of taxable and exempt operating purchases and expenses.
2. If you are using the Special Quick Method of Accounting allowed by Canada Customs and Revenue Agency for tracking ITC-eligible sales and purchases, you can claim a 67 percent rebate.
3. When you have the following figures:
• Your rebate percent
• A percentage representing the portion of your activities that are exempt
You are ready to define this type of tax code.
Rebate Percent Yes Percentage of the Input Tax Credit your institution is entitled to claim (100 percent)
Exempt Percent
1.In this instance, “mixed use” refers to purchases made to support two activities, only one of which is exempt (rebate-eligible), the other taxable. This is different from the mixed use mentioned on 131.
Table 29: How to define a GST ITC tax code (Canada) (continued)
Field Name Required What to Enter
133tting Started with Purchasing and Accounts Payable | Defining Codes Used in Purchasing & Accounts Payable
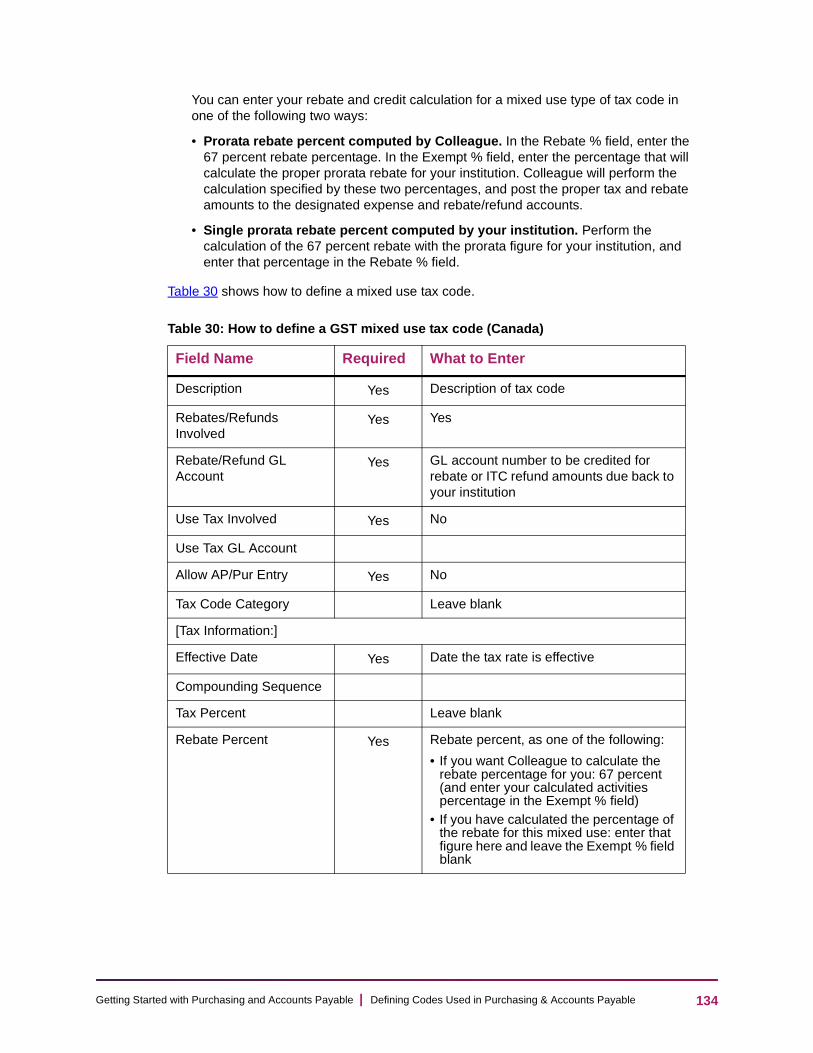
Ge
You can enter your rebate and credit calculation for a mixed use type of tax code in one of the following two ways:
• Prorata rebate percent computed by Colleague. In the Rebate % field, enter the 67 percent rebate percentage. In the Exempt % field, enter the percentage that will calculate the proper prorata rebate for your institution. Colleague will perform the calculation specified by these two percentages, and post the proper tax and rebate amounts to the designated expense and rebate/refund accounts.
• Single prorata rebate percent computed by your institution. Perform the calculation of the 67 percent rebate with the prorata figure for your institution, and enter that percentage in the Rebate % field.
Table 30 shows how to define a mixed use tax code.
Table 30: How to define a GST mixed use tax code (Canada)
Field Name Required What to Enter
Description Yes Description of tax code
Rebates/Refunds Involved
Yes Yes
Rebate/Refund GL Account
Yes GL account number to be credited for rebate or ITC refund amounts due back to your institution
Use Tax Involved Yes No
Use Tax GL Account
Allow AP/Pur Entry Yes No
Tax Code Category Leave blank
[Tax Information:]
Effective Date Yes Date the tax rate is effective
Compounding Sequence
Tax Percent Leave blank
Rebate Percent Yes Rebate percent, as one of the following:
• If you want Colleague to calculate the rebate percentage for you: 67 percent (and enter your calculated activities percentage in the Exempt % field)
• If you have calculated the percentage of the rebate for this mixed use: enter that figure here and leave the Exempt % field blank
134tting Started with Purchasing and Accounts Payable | Defining Codes Used in Purchasing & Accounts Payable
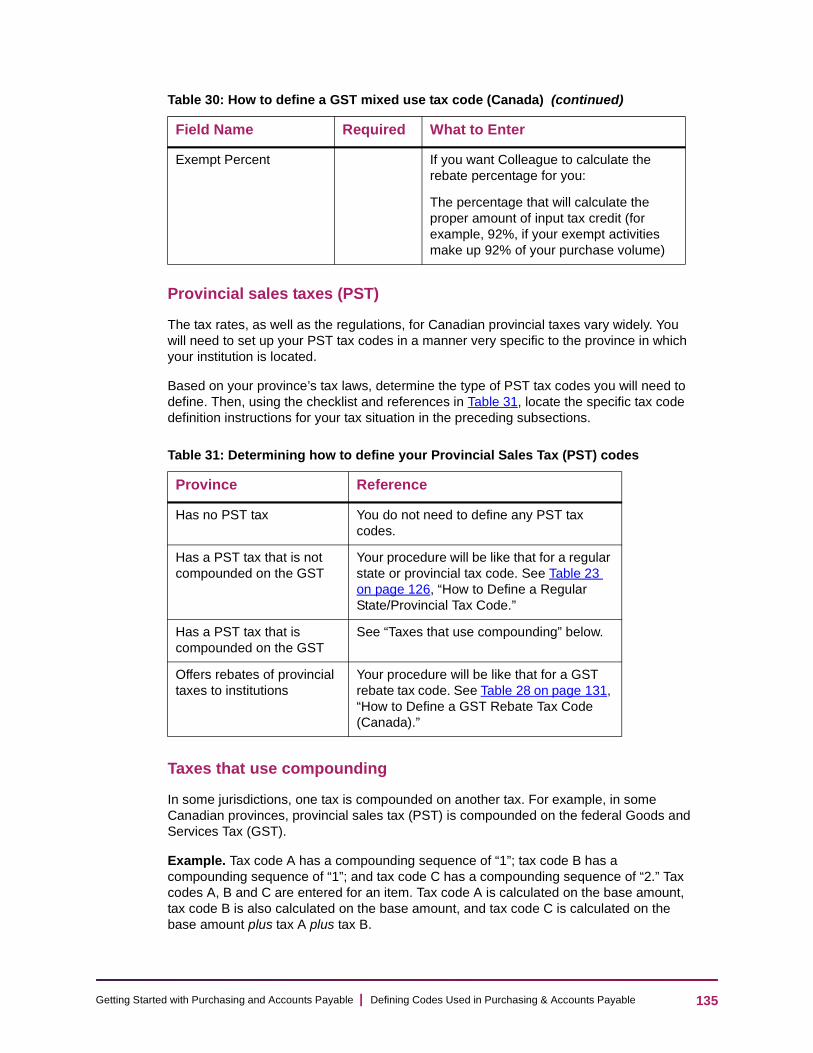
Ge
Provincial sales taxes (PST)
The tax rates, as well as the regulations, for Canadian provincial taxes vary widely. You will need to set up your PST tax codes in a manner very specific to the province in which your institution is located.
Based on your province’s tax laws, determine the type of PST tax codes you will need to define. Then, using the checklist and references in Table 31, locate the specific tax code definition instructions for your tax situation in the preceding subsections.
Taxes that use compounding
In some jurisdictions, one tax is compounded on another tax. For example, in some Canadian provinces, provincial sales tax (PST) is compounded on the federal Goods and Services Tax (GST).
Example. Tax code A has a compounding sequence of “1”; tax code B has a compounding sequence of “1”; and tax code C has a compounding sequence of “2.” Tax codes A, B and C are entered for an item. Tax code A is calculated on the base amount, tax code B is also calculated on the base amount, and tax code C is calculated on the base amount plus tax A plus tax B.
Exempt Percent If you want Colleague to calculate the rebate percentage for you:
The percentage that will calculate the proper amount of input tax credit (for example, 92%, if your exempt activities make up 92% of your purchase volume)
Table 31: Determining how to define your Provincial Sales Tax (PST) codes
Province Reference
Has no PST tax You do not need to define any PST tax codes.
Has a PST tax that is not compounded on the GST
Your procedure will be like that for a regular state or provincial tax code. See Table 23 on page 126, “How to Define a Regular State/Provincial Tax Code.”
Has a PST tax that is compounded on the GST
See “Taxes that use compounding” below.
Offers rebates of provincial taxes to institutions
Your procedure will be like that for a GST rebate tax code. See Table 28 on page 131, “How to Define a GST Rebate Tax Code (Canada).”
Table 30: How to define a GST mixed use tax code (Canada) (continued)
Field Name Required What to Enter
135tting Started with Purchasing and Accounts Payable | Defining Codes Used in Purchasing & Accounts Payable
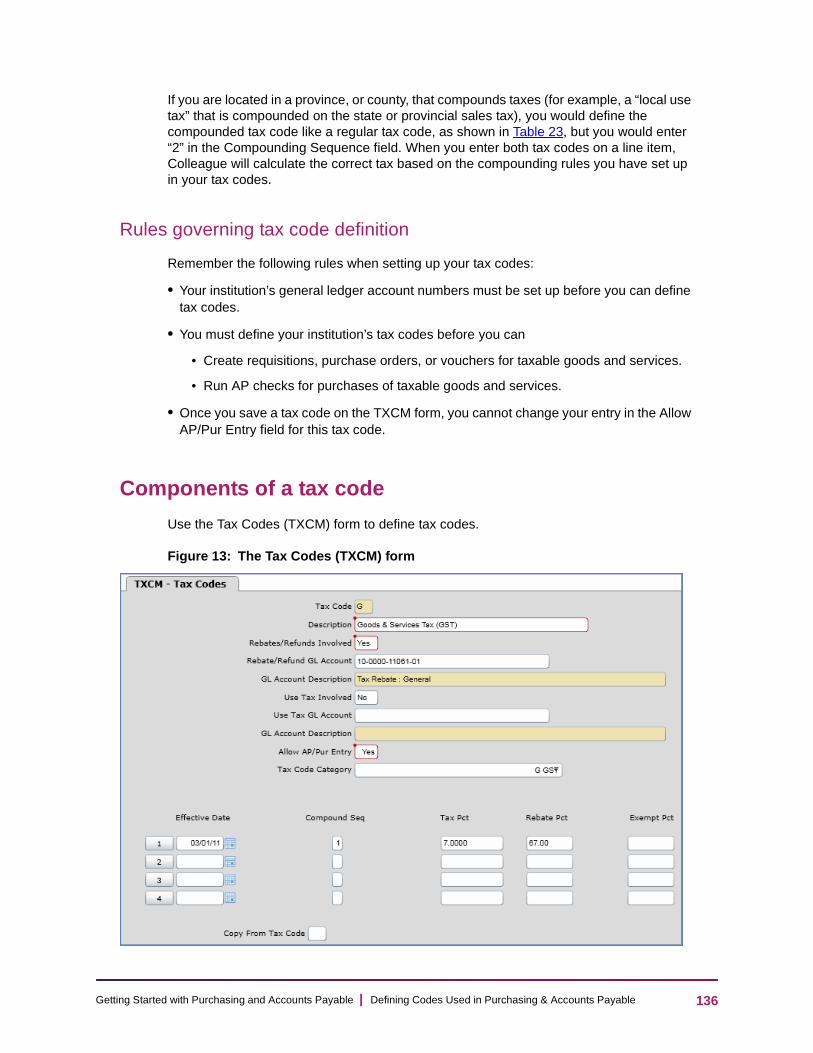
Ge
If you are located in a province, or county, that compounds taxes (for example, a “local use tax” that is compounded on the state or provincial sales tax), you would define the compounded tax code like a regular tax code, as shown in Table 23, but you would enter “2” in the Compounding Sequence field. When you enter both tax codes on a line item, Colleague will calculate the correct tax based on the compounding rules you have set up in your tax codes.
Rules governing tax code definition
Remember the following rules when setting up your tax codes:
• Your institution’s general ledger account numbers must be set up before you can define tax codes.
• You must define your institution’s tax codes before you can
• Create requisitions, purchase orders, or vouchers for taxable goods and services.
• Run AP checks for purchases of taxable goods and services.
• Once you save a tax code on the TXCM form, you cannot change your entry in the Allow AP/Pur Entry field for this tax code.
Components of a tax code
Use the Tax Codes (TXCM) form to define tax codes.
Figure 13: The Tax Codes (TXCM) form
136tting Started with Purchasing and Accounts Payable | Defining Codes Used in Purchasing & Accounts Payable
Ge
Fields on the TXCM form
Description
Provides a description of the tax code. This description is displayed when you use LookUp to select a tax code. It also appears on certain maintenance forms and on certain reports.
The description can be up to 30 characters. It should clearly identify the tax code.
This field is required.
Rebates/Refunds Involved
Displays Y if this tax code has any rebates or refunds associated with it.
Rebates and refunds apply particularly to some states and to the Canadian tax system.
This field is required.
Rebate/Refund GL Account
For a rebate tax code, lists the GL account number that will track tax amounts due back to the institution (also called tax offset account).
If you set the Rebates/Refunds Involved field to No, you must leave this field blank.
This field uses LookUp to select valid choices from the general ledger account numbers defined for your institution.
This field is required if the previous field is Yes.
GL Account Description
Lists a description of the rebate/refund account number identified in the previous field.
Use Tax Involved
Displays Y if this tax code has a use tax associated with it.
Use taxes apply to your institution only if you must pay taxes separately to a jurisdiction other than the one to which your vendor (for example, an out-of-state or out-of-county vendor) pays taxes.
This field is required.
Use Tax GL Account
Lists, for this tax code, the GL account number to which use taxes will be debited.
This field uses LookUp to select valid choices from the general ledger account numbers defined for your institution.
137tting Started with Purchasing and Accounts Payable | Defining Codes Used in Purchasing & Accounts Payable

Ge
This field is required if the previous field is Yes.
GL Account Description
Lists a description of the use tax account number identified in the previous field.
Allow AP/Pur Entry
Indicates whether staff will be able to enter this tax code on requisition, purchase order, or voucher maintenance forms in the Purchasing and Accounts Payable modules.
If you enter N in this field:
• You must set the Rebates/Refunds Involved field to “Y” and enter a rebate/refund GL account.
• You cannot enter a tax percentage amount in the Tax Pct field.
• You must enter a rebate percentage amount in either the Rebate Pct or Exempt Pct field.
• This tax code will be used only for rebate/refund percentages and will not be available for entry on requisitions, POs, or vouchers.
Remember, once you save this tax code record, you cannot change your entry in this field for this tax code. The default setting is “Y.”
This field is required.
Tax Code Category
Identifies the category of tax this code represents. This ensures that tax codes that are the same type, or category, of tax are totaled and printed as a single tax line on the purchase order.
Any tax codes without a tax category will print as an individual item at the bottom of the purchase order.
The choices are the valid codes your institution has defined in the TAX.CATEGORIES code table.
This field is required.
[Tax Code Percentage Information]
Effective Date
Indicates the date the tax information on this line becomes effective. The tax rate that will be used on POs or vouchers will be determined by date of document.
You can enter future dates in this field. A date is required for any entry in the Tax Pct field (the default is the current date).
138tting Started with Purchasing and Accounts Payable | Defining Codes Used in Purchasing & Accounts Payable

Ge
This field is required.
Compound Seq
Identifies the order in which taxes should be compounded on top of each other when more than one tax is applied to a single line item.
For a taxable line item, a tax code with a compounding sequence of “1” is calculated on the base line item amount. A tax code with a compounding sequence of “2” (when two tax codes are applied to a line item) is compounded second; it is calculated on the base amount of the line item plus the amount of tax calculated for the tax code with compounding sequence of “1,” that was added to the item first.
Tax Pct
Indicates the “raw” tax percentage without any rebate or refund considerations. The percentage is entered as an integer.
For example, you would enter a tax of seven percent as 7. This tax percentage, when applied to items, is applied to the base amount of the line item, or to the base amount plus other tax adjustments, depending on the compound sequence number attributed to it.
If the Allow AP/Pur Entry field is set to “N,” you cannot enter a tax percentage amount in this field.
Rebate Pct
Indicates the percentage of an item’s tax amount that is to be returned to the institution. Colleague uses this percentage to calculate the amount of a rebate. It is entered as an integer. For example, you would enter 67 percent as 67.
If the Rebates/Refunds Involved field is set to “Y,” either the Rebate Pct field or the Exempt Pct field is required. You can also enter data in both fields, for ITC/refund tax codes.
If Rebates/Refunds Involved field is set to “N,” leave this field blank.
If the Allow AP/Pur Entry field is set to “N,” you must enter either a rebate percentage amount in this field or an exempt percentage in the next field.
Exempt Pct
Defines the percentage of the tax on an item, if any, that is exempt.
If the Allow AP/Pur Entry field is set to “N,” you must enter either a rebate percentage amount in the previous field or an exempt percentage in this field.
Copy from Tax Code
Allows you to enter the ID of a tax code you wish to copy to this tax code.
139tting Started with Purchasing and Accounts Payable | Defining Codes Used in Purchasing & Accounts Payable

Ge
Procedure for defining a tax code
Complete the steps outlined in “Before you begin” on page 120.
1. Access the TXCM form.
2. At the Tax Code LookUp prompt, enter the ID of the tax code you want to define.
• If you are creating a new tax code, Colleague displays the following prompt:
Record not found -- Reenter or Add
Enter A to add the new tax code ID. Notice that the new tax code ID appears in the form’s header.
Note: If you are copying this tax code from another tax code, you can skip from the Description field to the Copy From Tax Code field and enter a tax code.
• If you want to modify an existing tax code record, enter the ID for that record. You may perform a lookup to select from a list of existing tax code records.
3. Does this tax code incorporate any rebates or refunds?
Enter Y in the Rebates/Refunds Involved field, and enter a tax offset account number in the Rebate/Refund GL Account field.
Enter N in the Rebates/Refunds Involved field. Leave the Rebate/Refund GL Account field blank.
4. Do you want to restrict the use of this tax code to vouchers only?
A tax code whose Use Tax Involved flag is set to “Y” cannot be entered except for vouchers. An error message displays in requisitions, purchase orders, and recurring vouchers indicating that a use tax code cannot be used in these processes. If you enter a use-tax code in a voucher, you will create a credit entry to the account number entered in the Use Tax GL Account field and create a debit entry to the expense GL tax account number. This feature is used when an additional tax for items being paid is to be accessed and paid to a different taxing authority than the one to which the vendor remits taxes. A voucher is then created periodically to pay the taxing authority the amounts that are accumulated in the Use Tax GL Account number.
Enter Y in the Use Tax Involved field, and enter a use tax account number the Use Tax GL Account number field.
Enter N in the Use Tax Involved field. Leave the Use Tax GL Account number field blank.
5. Do you want to allow this tax code to be entered on forms in Purchasing and Accounts Payable?
Enter Y in the Allow AP/Pur Entry field.
Enter N in the Allow AP/Pur Entry field.
6. Select the Tax Code Category.
Tax code categories are validation codes stored in the TAX.CATEGORIES record of the CF.VALCODES file. You may modify this validation code table, as necessary.
140tting Started with Purchasing and Accounts Payable | Defining Codes Used in Purchasing & Accounts Payable

Ge
7. Enter information in the Tax Code Percentage Information window as needed.
If the tax code does not involve rebates or refunds, enter only the Effective Date and Tax Percent.
If the tax code does involve rebates, refunds, or exempt percentages, enter the Effective Date, Compound Sequence, Tax Percent, Rebate Percent, or Exempt Percent, as applicable.
8. Update this record.
The record is saved and the Tax Code LookUp prompt is displayed.
9. Repeat this procedure for each tax code you are defining.
10. Do you want to copy information from an existing tax code record into this tax code record?
Enter the code for the tax record whose information you want to copy in the Copy from Tax Code field.
You can perform a LookUp in this field.
Note: If you choose to copy information from an existing tax code record over this tax code record, Colleague completely overwrites every field in the record you have just created with information from the selected tax code record.
Leave the Copy from Tax Code field blank.
11. When you are finished adding tax codes, save your work and exit the TXCM form.
Defining units of issue
This section explains how to define a unit of issue code.
Before you begin
Before setting up your unit of issue codes, you should do the following:
• Review the discussion of units of issue.
• See Understanding units of issue below.
• Ensure that all concerned parties have given input into the unit of issue code selection process.
• The accounts payable and purchasing offices should work together to define these codes.
• Use the worksheet provided in the Appendix to plan your units of issue on paper, before entering any information into Colleague Finance.
141tting Started with Purchasing and Accounts Payable | Defining Codes Used in Purchasing & Accounts Payable

Ge
• See the worksheet “Unit of issue codes” on page 350.
Understanding units of issue
Unit of issue codes are used throughout the Purchasing and Accounts Payable modules to indicate the type of unit in which a particular item of merchandise is ordered and purchased. You can use the unit of issue to provide detail on how a line item is being ordered.
Examples of units of issue are Box, Each, Carton, 10-count, Case, Dozen, and Gallon.You can enter a unit of issue on all requisitions, purchase orders, and vouchers, although it is not a required field.
Whether you need to record units of issue is determined by the amount of variability in the quantities and sizes of the merchandise a given vendor offers.
Note: Ellucian provides a list of the unit of issue codes developed by the National Institute of Government Purchasing (NIGP). If your institution has other unit of issue codes, the codes furnished by Ellucian will be added to the codes already in your system.
Where units of issue are used
Colleague displays the unit of issue code but does not use it for any processing in the Purchasing and Accounts Payable modules.
However, unit of issue codes are needed if you are using the Inventory module. This module automates the association of the unit of issue with an inventory item’s stock number (which appears as an optional field on the Requisition Item Maintenance [RQIM], the PO Item Maintenance [POIM], and the Voucher Item Maintenance [VOUD] forms, and is necessary to track your inventory after purchase).
Rules governing unit of issue definition
When you define your unit of issue codes, remember the following rules:
• You must define unit of issue codes before you can create requisitions, purchase orders, or vouchers.
• If you are using the Inventory module, you must define units of issue before you can enter stock in the Inventory module.
142tting Started with Purchasing and Accounts Payable | Defining Codes Used in Purchasing & Accounts Payable

Ge
Tips for unit of issue definition
The following notes and tips are provided to help you define unit of issue codes:
• When creating a unit of issue code ID, try to use abbreviations or numbers that can be easily associated with the unit you are defining. For example, you could use EA for each, DZ or 12 for dozen, BX for box, and so on. This association will help others who use the system.
• When writing the description of the unit, be as specific as possible. Use terms that can be understood by others. Avoid ambiguous terms such as “big box” or redundant terms like “single unit.” Use “Four Dozen Count Box” or “Each.” The description in this field should relate to the ID in the Unit Issues field. For example, if you use CT for carton, use “carton” and not “box” to describe the unit of issue.
Components of a unit of issue code
Use the Unit Issues Codes (UNIM) form to define units of issue.
Figure 14: Unit Issues Codes (UNIM) Form
Procedure for defining a unit of issue code1. Complete the steps outlined in “Before you begin” on page 141.
2. Access the UNIM form.
3. At the Unit Issue LookUp prompt, enter the ID of the unit of issue you want to define.
• If you are creating a new unit issue code, Colleague displays the following prompt:
Record not found -- Reenter or Add
Enter A to add the new unit issue ID. Notice that the new unit issue ID appears in the form’s header.
• If you want to modify an existing unit issue record, enter the ID for that record. You may perform a lookup to select from a list of existing unit issue records.
4. Complete the Description field.
5. Update this record.
Colleague saves the record and displays the Unit Issues LookUp prompt.
6. Repeat this procedure for each unit of issue to be defined.
143tting Started with Purchasing and Accounts Payable | Defining Codes Used in Purchasing & Accounts Payable

Ge
7. When you are finished maintaining units of issue, save your work and exit the UNIM form.
Defining vendor terms
This section explains how to define a vendor terms code.
Before you begin
Before setting up vendor terms codes for your institution, you should:
• Review the discussion of vendor terms.
• See Understanding vendor terms below.
• Ensure that you have researched all the types of vendor terms offered by companies from which your institution buys merchandise.
• The accounts payable and purchasing offices should work together to define these codes.
• Use the worksheets provided in the Appendix to plan your vendor terms codes on paper, before entering any information into Colleague Finance.
• See the worksheet “Vendor terms codes” on page 352.
Understanding vendor terms
Vendor terms codes store information related to the terms you are offered for payment of a vendor’s invoice. From these vendor terms, Colleague calculates on every voucher the date an invoice must be paid to obtain a discount.
For example, for the vendor term noted as 2/10 Net 30 (which offers a two percent discount on the total invoice amount if the total is paid within ten days of receipt, with the net invoice total due in 30 days), Colleague calculates the due date as ten days, calculates the discount based on the total voucher amount, and automatically enters the discount on the voucher.
Note: Vendor trade discounts are a different type of arrangement from vendor cash discounts. Trade discounts are deductions from the list price of merchandise that may be allowed by vendors for frequent customers or bulk orders.
144tting Started with Purchasing and Accounts Payable | Defining Codes Used in Purchasing & Accounts Payable

Ge
Because of the due date calculation functionality built into vendor terms codes, you can use this code even for vendors who do not offer a discount but whose invoices are due in 30 days. If you assign this 30-day code to a vendor or place it on a purchase order, Colleague will automatically calculate the 30-day due date and place it in the Due Date field on the voucher. This also facilitates your payment selection and reporting processes, since you can select vouchers based on this calculated due date.
Table 32 shows some sample discount terms and the values for each field in this form.
Note: You can incorporate vendor terms into processing either by assigning them to a vendor when you define the vendor (on the Vendor Definition [VEND] form), or by entering them for a regular or miscellaneous vendor at time of creation of your purchasing documents, on requisition, purchase order, or voucher forms.
How vendor terms codes work
You can link terms to a vendor’s record; the terms will then appear automatically on each purchase order you create for that vendor. When the vendor’s invoice is received in your office, and you create the voucher and enter an Invoice Date on it, Colleague calculates the date by which you must pay it in order to receive the discount. At this voucher stage, Colleague pulls the terms from the vendor’s record into the voucher and the due date is calculated based on the vendor’s terms.
Table 32: Examples of vendor terms
Vendor Term
Discount Pct
Discount Days
Days Due
Discount Amount Functionality
2/10 Net 30
2 10 30 2 percent discount if paid within 10 days; total due in 30 days
1/10 Net 30
1 10 30 1 percent discount if paid within 10 days; total due in 30 days
Utility/25 15 30 25 $25 discount for payment of utility bill within 15 days; total due in 30 days
Net 30 30 30 Due in 30 days, no
discount1
1.Even though this term offers no discount, using this code as a vendor term ensures that Colleague will automatically calculate the due date on vouchers assigned this terms code. Be sure to enter “30” in the Discount Days field.
Cash Only Only cash accepted on delivery (C.O.D.)
145tting Started with Purchasing and Accounts Payable | Defining Codes Used in Purchasing & Accounts Payable

Ge
Terms affect the computation of a cash discount if the voucher is paid within the terms specified.
Vendor terms and discount method
The vendor terms you assign to your different vendors will apply the proper discount to each purchasing transaction in keeping with the discount method you selected.
Your selection for your discount method (Discounts Taken or Discounts Lost) does not directly affect your vendor terms or how you should set them up. Your selection for discount method determines when and how discount amounts are posted to the general ledger. Your payment of your vendors’ invoices and claiming discounts proceeds according to your institution’s procedures, regardless of whether you have selected Discounts Taken or Discounts Lost.
For more on discount method, see “The discount method parameter” on page 275.
Rules governing vendor terms definition
When you define your vendor terms codes, remember the following rules:
• You can enter either a discount percent or a discount amount — not both.
• You can also create a vendor terms code that specifies only the final invoice due date.
• You can enter a discount percent with or without a decimal point. If you use a decimal point followed by three digits, the system rounds off the decimal amount to the nearest one-hundredth. Some examples are shown below.
Tips for vendor terms definition
The following notes and tips are provided to help you define vendor terms codes:
• Be sure you have set up all three components of the vendor terms: discount percent (or amount), discount days, and days due. Colleague cannot calculate the cash discounts on your vouchers unless all three items of information are present.
• Be sure your vendor terms descriptions are clear and meaningful.
Enter Displayed
10 10.00
10.0 10.00
10.25 10.25
9.000 9.00
9.756 9.76
146tting Started with Purchasing and Accounts Payable | Defining Codes Used in Purchasing & Accounts Payable

Ge
Components of a vendor terms code
Use the Vendor Terms (VTMF) form to define vendor terms.
Figure 15: Vendor Terms (VTMF) form
Fields on the VTMF form
Description
Provides a description of the vendor terms. This description is displayed when LookUp is used to locate a vendor terms code. It also appears on status and maintenance forms and on reports.
The description can be up to 30 characters. It should clearly identify the payment terms required by the vendor, when paying their invoices in order to receive a discount.
This field is required.
Discount Percent
Identifies the percent by which a vendor will discount the total invoiced price of goods and services purchased by a customer if the payment is made within the time period specified in the Discount Days field.
You can enter a percent amount with or without a decimal point.
You can enter a discount percent only if you do not enter a discount amount.
Discount Days
Indicates the number of days within which payment for goods and services must be made in order to receive the vendor’s cash discount. For invoices for vendors offering discounts, Colleague calculates the voucher due date based on this number
Days Due
Indicates the maximum number of days allowed for payment of an invoice (typically 30 days).
147tting Started with Purchasing and Accounts Payable | Defining Codes Used in Purchasing & Accounts Payable

Ge
Discount Amount
Identifies a dollar amount by which a vendor will discount the total invoiced price of goods and services purchased by a customer if the payment is made within the time period specified in the Discount Days field.
You can use commas and decimal points when entering a discount amount.
You can enter a discount amount only if you do not enter a discount percent.
Add Operator / Add Date
Displays the ID of the staff member who created this record and the date the record was created.
Change Operator / Change Date
Displays the ID of the staff member who most recently changed information in this record, and the date the record was changed.
Procedure for defining a vendor terms code1. Complete the steps outlined in “Before you begin” on page 144.
2. Access the VTMF form.
3. At the Vendor Terms LookUp prompt, enter the ID of the vendor terms record you want to define.
• If you are creating a new vendor terms record, Colleague displays the following prompt:
Record not found -- Reenter or Add
Enter A to add the new vendor terms ID. Notice that the new vendor terms ID appears in the form’s header.
• If you want to modify an existing vendor terms record, enter the ID for that record. You may perform a lookup to select from a list of existing vendor terms records.
4. Complete the Description field (required).
5. Complete the remaining fields on the form (optional).
6. Update this record.
Colleague saves the record and displays the Vendor Terms LookUp prompt.
7. Repeat this procedure for each vendor terms code to be defined.
8. When you are finished maintaining vendor terms records, save your work and exit the VTMF form.
148tting Started with Purchasing and Accounts Payable | Defining Codes Used in Purchasing & Accounts Payable

Ge
Defining vendor types
This section explains how to define a vendor type code.
Before you begin
Before setting up your institution’s vendor types, you should:
• Review concepts of vendor type codes.
• See Understanding vendor types below.
• Ensure that all concerned parties have had a chance to give input into the process of selecting codes for your institution’s vendor types.
• Coordinate with the accounts payable and purchasing office to set up vendor type codes.
• Use the worksheets provided in the Appendix to plan your vendor type codes on paper, before entering any information into Colleague Finance.
• See the worksheet “Vendor type codes” on page 353.
Understanding vendor types
A vendor type is user-defined and can be used to indicate a unique characteristic of a vendor that could affect the vendor’s purchasing status.
Your institution may have special operating considerations that will affect your use of this field. For example, you might have a vendor that must be designated as minority-owned, or as an in-state or in-county business. This designation can have important reporting consequences for your institution, particularly if you are in the public sector.
You can assign a vendor type to a specific vendor on the Vendor Definition (VEND) form. That vendor type will always be displayed on requisitions, purchase orders, or vouchers created for that vendor.
Colleague uses the vendor type code for informational and reporting purposes only. The vendor type can also be used for sorting and reporting, using the Additional Selection Criteria option available from all the Purchasing and Accounts Payable modules’ reporting forms or using a query language.
149tting Started with Purchasing and Accounts Payable | Defining Codes Used in Purchasing & Accounts Payable

Ge
Examples of vendor types
The vendor type code tracks vendor characteristics to help you comply with local, state, or federal regulations, and for reporting. Some examples of uses for the vendor type code are:
• In-state business or in-county (local) business. If your institution is required to solicit bids for certain purchases giving priority to vendors within your state, or your county, you can identify these vendors as a vendor type.
• Minority owned business. If regulations require purchasing a proportion of your total volume from minority firms, these vendors can be identified as a vendor type.
• Public organization. If your institution has special payment arrangements with vendors that are public sector organizations, you can define a vendor type for these vendors.
• State agency. If your state provides incentives to purchase from state agencies, you can identify state vendors as a vendor type.
Note: For a small business, it may be preferable to record a small business vendor in the Industry Class field on the Additional Organization Info (AORG) form in Core Demographics, rather than here. The Core INDUSTRY.CLASSES code table was set up specifically to identify the size of a business.
Rules governing vendor type definition
When you define your vendor type codes, remember the following rules:
• Use of vendor types is optional.
• If you want to use vendor types to sort your vendors, you must define them before you define any vendors or create any purchasing documents.
Components of a vendor type
Use the Vendor Types (VTYF) form to define vendor types.
Figure 16: Vendor Types (VTYF) form
150tting Started with Purchasing and Accounts Payable | Defining Codes Used in Purchasing & Accounts Payable

Ge
Procedure for defining a vendor type1. Complete the steps outlined in “Before you begin” on page 149.
2. Access the VTYF form.
3. At the Vendor Type LookUp prompt, enter the ID of the vendor type record you want to define.
• If you are creating a new vendor type record, Colleague displays the following prompt:
Record not found -- Reenter or Add
Enter A to add the new vendor type ID. Notice that the new vendor type ID appears in the form’s header.
• If you want to modify an existing vendor type record, enter the ID for that record. You may perform a lookup to select from a list of existing vendor type records.
4. Complete the Description field.
5. Update this record.
6. Repeat this procedure for each vendor type to be defined.
7. When you are finished maintaining vendor types, save your work and exit the VTYF form.
151tting Started with Purchasing and Accounts Payable | Defining Codes Used in Purchasing & Accounts Payable

Ge
Understanding Commodity/Service Codes
In this chapter
This chapter introduces the concepts related to commodity codes, an optional feature available for use in both the Purchasing and Accounts Payable modules, focusing on a general understanding of their function. The chapter briefly describes the functions of commodity codes in purchasing and accounts payable processing, as well as a number of convenient features commodity codes provide.
The chapter is divided into the following sections:
• About commodity/service codes.
• Linking purchase information through commodity codes.
• Additional commodity code features.
Note: Commodity/service codes are an optional feature of your system. You can set them up and begin using them at any time after you have gone live on the Purchasing and Accounts Payable modules.
Where to find the information
Table 33 lists where to find the information in this section
Table 33: Understanding Commodity/Service Codes Cross-Reference
Topic Reference
Read an introduction to commodity codes
“Overview of commodity/service codes” on page 153.
Read a short discussion of types of commodity codes available from outside sources (including NIGP)
“Standards for commodity codes” on page 153.
Read descriptions of the types of information you can link to commodity codes
“Linking purchase information through commodity codes” on page 160.
152tting Started with Purchasing and Accounts Payable | Understanding Commodity/Service Codes

Ge
Overview of commodity/service codes
Commodity/service codes are codes representing classes of products or services you purchase, or “product classes.” A commodity is an item (or class) of merchandise that you pay a vendor for providing to you.
A list of commodity/service codes can include individual items, such as a box of file folders, an executive chair, a computer terminal, or classes of merchandise, such as office supplies. Commodity/service codes can also represent services you receive from vendors, such as painting, carpentry, or other services provided by independent contractors.
A primary key to the success of any purchasing system is a comprehensive list of commodities and services, or commodity file. Such a file can be of considerable value in supporting your procurement functions, by helping you analyze your purchasing practices, decisions, and policies from a long-term, strategic planning point of view. A commodity file can also help you exercise more control over many critical aspects of your purchasing functions, including pricing, value, taxes, buyer assignment, bid or shipping requirements, and fixed asset and inventory identification.
With careful planning, you can use commodity codes to assist you in validating data entry — thereby reducing input errors — and in making the entry of purchasing information faster and more efficient, by allowing users to bring many types of information into a purchasing document in a single step.
Most commodity files are based on a hierarchical organization; that is, the first digit represents a broad grouping of products, and succeeding digits indicate progressively smaller subgroups of products within the broad grouping.
For example, if the broad category, or class, of products is “computer hardware and peripherals for microcomputers,” a number of subgroups would represent different types of computer hardware, such as CPUs, monitors, printers, and modems. Within those subgroups would fall even more specific listings, such as, under monitors, a monochrome, a 14-inch EGA, a 14-inch VGA, and a 17-inch Super VGA. Whereas the code would be a single digit for hardware, it might be three digits for monitors, and five digits for VGA monitors.
Standards for commodity codes
If your institution decides, either immediately or at a future time, to use commodity codes in your purchasing/accounts payable processes, you can use one of the following approaches:
Read an example of processing using commodity codes
“How commodity code defaults work: An example” on page 168.
Table 33: Understanding Commodity/Service Codes Cross-Reference (continued)
Topic Reference
153tting Started with Purchasing and Accounts Payable | Understanding Commodity/Service Codes

Ge
• If your state or another governing body requires your institution to track your purchases using commodity codes, you can use a standardized set of codes.
• You might also use a simpler set of codes developed internally, with size and complexity appropriate for your institution.
If you choose to set up your own codes, you will need to determine your codes based on a careful analysis of your institution’s reporting requirements. If you decide (or are required) to use a standard set of codes, you might use your state’s commodity list, or the National Institute of Governmental Purchasing (NIGP) commodity file.
Regardless of the size of your institution, or your state’s procurement requirements, standard commodity code files offer a number of advantages. This section discusses standard commodity files and how they work.
State commodity lists
Some states have created their own standard commodity organizations. Many others are adopting the NIGP file as their statewide standard for all commodity reporting. Private institutions may also use this standard.
The federal government and numerous states have adopted a commodity organization similar to that of the NIGP file, but with different descriptions.
Your state’s regulations may determine the commodity file that your institution will implement. Colleague’s commodity/service codes feature is designed for maximum flexibility in setting up and using the commodity files best suited to your institution.
The NIGP commodity file
The most prevalent commodity file is the one recommended by the National Institute of Governmental Purchasing (NIGP). This organization has developed a commodity file that is rapidly becoming the standard for all public agencies.
The NIGP code is a multi-level, five-digit code expandable to 11 digits, with each level providing commodity descriptions that are more specific and detailed.
The five-digit code includes 192 commodity classes, 41 service classes, and more than 5,900 item descriptions. If you decide to use the NIGP five-digit commodity codes in the Purchasing and Accounts Payable modules, you will be able to:
• Generate periodic expenditure history by department or institution for fiscal planning, budget execution, and accounting purposes.
• Allow vendors to designate the class-item(s) they wish to supply to the institution.
• Create vendor files by class-items to provide for an automated bidder selection process, a no-bid response report, vendor performance, and a report by vendor type (for example, minority business).
• Create purchase history, buyer workloads, and many other reports.
154tting Started with Purchasing and Accounts Payable | Understanding Commodity/Service Codes

Ge
The 11-digit code contains over 100,000 detailed descriptions from 101 commodity classifications. These more complex codes give you the capability to:
• Develop a specification file for many common use items.
• Identify and order by detailed purchase description the commodities and services purchased under standing contracts or blanket purchase orders.
• List items in contract catalog pages for distribution to ordering departments.
• Establish stock inventory numbers for items in inventory stores.
The design of the NIGP commodity hierarchy is illustrated in the following example.
Example. This eleven-digit commodity code: 615-45-28-075-2 stands for straight cut, letter size, 11 point file folders at 100 per box. Table 34 illustrates how the code number is broken down in hierarchical fashion.
Table 35 shows the breakdown of a commodity code by component. Note that for each component, the number listed indicates a type of the product being differentiated from all other codes at that level (for example, the “Detail” level separates out straight cut letter size file folders from third cut or fifth cut).
Ordering the NIGP commodity code list
The National Institute of Governmental Purchasing publishes their commodity code list in the following two formats, both updated every 12 to 18 months:
Table 34: Breakdown of Components in NIGP Commodity Code
Class Item Group Detail Check Digit
XXX XX XX XXX X
615 45 28 075 2
Table 35: Significance of Hierarchical Number Structure in NIGP Commodity Code
Component
Segment of Number Description
Class 615 OFFICE SUPPLIES, GENERAL
Item 615-45 File Folders, Regular, Legal and Letter Size
Group 615-45-28 Folders, File, Double Top, Letter Size, Manila, Standard Height (overall 11-3/4” X 9-1/2”)
Detail 615-45-28-075-2 Straight Cut, 11 point, 100/box
Check Digit
155tting Started with Purchasing and Accounts Payable | Understanding Commodity/Service Codes

Ge
• Part I, the five-digit series (available in hard copy, floppy diskette, or magnetic tape)
• Part II, the 11-digit series (available on floppy diskette or magnetic tape)
If you want to use the NIGP commodity codes, you must purchase them directly from NIGP.
The Colleague commodity code file
The Colleague commodity code file is designed to provide the detail necessary to analyze the buying procedures of your institution. With the capacity to accommodate all standard commodity files such as the federal commodity list or the NIGP commodity/service code, the Colleague commodity codes feature can effectively support your institution’s purchasing function. The Purchasing and Accounts Payable modules support either a hierarchical code or any other organization your institution prefers.
Besides the code and description, the commodity file maintains information on whether the commodity requires a material safety data sheet (MSDS), should be placed on competitive bid, or is covered by a state contract. In addition, pre-established user fields are available for the unique needs of your institution.
Defining and maintaining commodity codes
Use the Commodity Codes (CMCM) form to create and maintain commodity codes.
A commodity is any item of merchandise or service which you pay a vendor for providing to you, such as a box of file folders, an executive chair, or a computer terminal. A commodity may also be a class of merchandise, such as office supplies.
156tting Started with Purchasing and Accounts Payable | Understanding Commodity/Service Codes
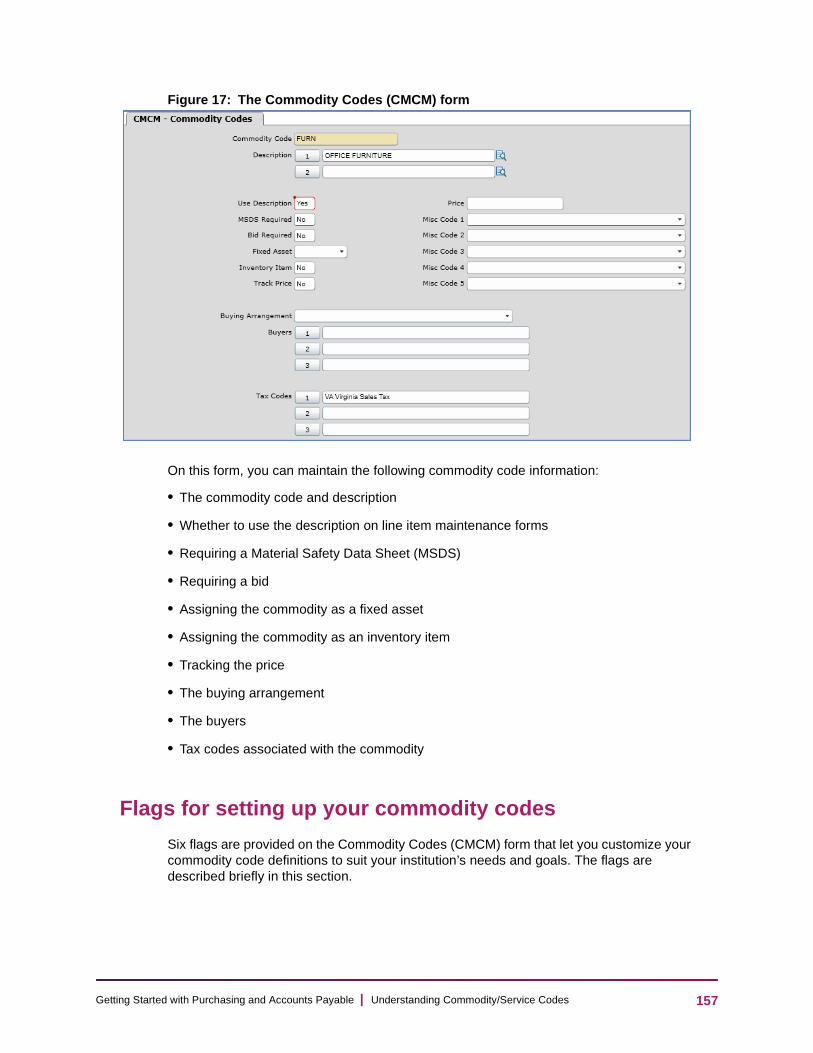
Ge
Figure 17: The Commodity Codes (CMCM) form
On this form, you can maintain the following commodity code information:
• The commodity code and description
• Whether to use the description on line item maintenance forms
• Requiring a Material Safety Data Sheet (MSDS)
• Requiring a bid
• Assigning the commodity as a fixed asset
• Assigning the commodity as an inventory item
• Tracking the price
• The buying arrangement
• The buyers
• Tax codes associated with the commodity
Flags for setting up your commodity codes
Six flags are provided on the Commodity Codes (CMCM) form that let you customize your commodity code definitions to suit your institution’s needs and goals. The flags are described briefly in this section.
157tting Started with Purchasing and Accounts Payable | Understanding Commodity/Service Codes
Ge
Use description (Yes/No)
This flag lets you determine, for each commodity code you set up, whether the description will default into line items. This is the only flag that is required.
Set this flag to “Yes” if you want the commodity description to default into the line item description on line item maintenance forms.
Note: You can still override, delete, or partially modify the defaulted description.
Set this flag to “No” if either of the following apply:
• You want to manually enter the commodity description in line item descriptions.
• The commodity description is too generic to appear on purchase orders.
This flag will set the description defaulting rules for the selected commodity. These rules will be in effect for all line item maintenance forms for requisitions, purchase orders, blanket purchase orders, recurring vouchers or vouchers.
MSDS required (Yes/No)
The U.S. Occupational Safety and Health Administration (OSHA) requires that vendors send form 174, called the Materials Safety Data Sheet (MSDS) either with the shipment or before the shipment of some commodities such as controlled or hazardous substances. The order should not be accepted without the MSDS form.
If you set this flag to “Yes” for a given commodity, and then enter that commodity code on a line item, Colleague will automatically set the Receiving forms to flag that line item when it is received. When you access the Purchase Order Receiving (PORC) form to accept the item, you must detail to the PO Item Order Maintenance (POOM) form to enter a “Yes” in the MSDS Received field, indicating that the MSDS form was received with the shipment.
Bid required (Yes/No)
Because of institutional policy or laws governing public institutions, vendors must submit bids for some commodities before you can purchase the commodity. Use this flag to indicate the commodities that require bids.
Colleague displays the bid requirement flag, but does not otherwise use this information.
Fixed asset (single/multi-valued)
If you set this flag to either “Single” or “Multi-valued” for a given commodity code, and then enter that commodity code on a line item, Colleague will default either “S” or “M” into the Fixed Asset field on the line item.
158tting Started with Purchasing and Accounts Payable | Understanding Commodity/Service Codes
Ge
In turn, a fixed asset code in the line item Fixed Asset field on the line item maintenance forms will set up a link between the Accounts Payable module and the Fixed Assets module for the line item.
You can override the fixed asset indicator on any line item where it defaults in.
If you are uncertain whether a specific commodity is usually a fixed asset, you can set the flag to reflect the typical situation, and change it for specific cases.
Inventory item (Yes/No)
Set this flag to “Yes” if the commodity is usually part of your internal inventory.
The system displays this information but does not use it otherwise.
Track price (Yes/No)
The Track Price flag lets you track the most recent price paid for this commodity.
If you have not set up any standard prices in your vendor commodity files, the actual prices are tracked per commodity. If you enter a commodity code on a line item, Colleague captures the item unit price in the commodities file when you pay the voucher. The actual (most recent) price is then displayed on the Commodity Codes (CMCM) form for each commodity.
If you have assigned standard prices to your vendor commodity records, actual prices and dates are tracked per vendor, per commodity. If you enter a commodity code on a line item, Colleague captures the item unit price in the vendor commodities file when you pay the voucher. Then, when you list a given commodity on the Vendors by Commodity List (VENC) form, each vendor that has been associated with the commodity code is listed, and for each vendor, the last price you paid for that commodity from that vendor is displayed.
Commodity LookUp, miscellaneous codes, and buying arrangements
Commodity LookUp
A hierarchical commodity code structure simplifies the commodity code lookup at the Commodity prompt.
For example, if the initiator of a requisition is familiar with the codes for the major commodity classes applicable to his area, the entry of a code such as “615...” at the Commodity prompt will retrieve all the class-items falling under this overall class code.
This greatly narrows down the search of a large commodity file, since the commodity file is sorted in ascending numerical order.
159tting Started with Purchasing and Accounts Payable | Understanding Commodity/Service Codes

Ge
Miscellaneous codes
Five pre-established user fields, called Commodity Miscellaneous Codes, or Misc Codes, are available for the unique needs of your institution.
Miscellaneous codes are codes designated by your institution, to indicate any properties of commodities your institution wants to track. You can later assign these codes to commodities you create. The five code tables let you designate several miscellaneous codes. Examples of commodity miscellaneous codes are biodegradable, recyclable, or hazardous.
Buying arrangements
The Buying Arrangements field is validated by the BUYING.ARRANGEMENTS code table, which you can define on the Validation Codes (VAL) form in Colleague Finance.
Define codes for this code table to indicate specific types of buying arrangements your institution has for certain commodities, such as a state or country contract, or an institution vendor.
Linking purchase information through commodity codes
Used effectively, commodity codes can simplify data entry and greatly increase your system’s efficiency by:
• Standardizing commodity descriptions.
• Tracking price data on individual commodities, both by commodity and by vendor.
• Systematizing assignment of requisitions to buyers.
• Standardizing assignment and calculation of sales taxes.
• Providing thorough facilities for management reporting.
Each commodity code can be associated with one or more vendors, one or more buyers, and one or more tax codes. These associations become defaults that connect a commodity to a given vendor, buyer, or tax code whenever the commodity code is used.
You can also enter a commodity code directly on line items of a requisition, purchase order, blanket purchase order, voucher, or recurring voucher. In addition, on purchasing documents (requisitions, purchase orders, and blanket purchase orders), you can enter a single commodity code as a default for the entire purchase (this commodity code defaults into all individual line items on the document).
Commodity codes can thus provide your procurement process with some of the following important features:
160tting Started with Purchasing and Accounts Payable | Understanding Commodity/Service Codes

Ge
• The commodity description can be defaulted into a line item description based on the entered commodity code.
• The commodity “standard price” can be defaulted into the unit price field of requisitions, and can be the basis for cost-level approvals.
• A vendor “standard price” for the commodity can be defaulted into unit price fields, and “actual price” can be tracked back to the vendor record, providing the basis for comparative vendor cost analysis.
• The applicable buyer can be defaulted into the requisition based on the type of commodity he normally handles.
• The applicable taxes can be defaulted and calculated for the commodity.
The following subsections provide further detail on linking your commodity codes with vendors, buyers, tax codes, and procurement documents.
Linking commodity codes to your vendors
For each of your individual vendors, you can associate with that vendor a list of commodities for which the vendor has been approved. This lets you exercise more control over vendor choices by associating commodity codes with the vendors from whom you normally buy them.
This association is set up within your vendor records.
Adding vendor price information to this connection lets you track, for each commodity sold by a vendor, that vendor’s standard price (and effective date). This commodity price component of the vendor file also provides historical information on the price most recently paid for the item. You can use the Vendors By Commodity List (VENC) form to compare a vendor’s standard and actual prices for a commodity with those of other vendors from whom you have bought the same commodity.
Price tracking is especially helpful if your purchasing office is required to use competitive bidding procedures for certain commodities, since it allows a greater level of control in purchasing decisions.
The ability to link a vendor to one or more commodity codes lets you “approve” that vendor for purchase of those commodities. This is useful for tracking which vendors are approved for certain product classes (if your institution approves vendors by product class or by individual commodity). If you try to buy a certain commodity from a vendor who is not approved for that commodity, Colleague displays a warning.
Note: You can also define a default commodity price, on the Commodity Codes (CMCM) form. For more on how these differ from vendor standard prices, see 165.
Tracking vendor prices per commodity
The following steps summarize how to set up Colleague to track vendor standard and actual prices for a commodity:
161tting Started with Purchasing and Accounts Payable | Understanding Commodity/Service Codes

Ge
1. Create the commodity code on the Commodity Codes (CMCM) form. Set Track Price to “Yes.”
2. Add the vendor on the Vendor Maintenance (VEND) form and enter the commodity code on the Vendor Commodities Maintenance (VNCL) form. Also on the VNCL form, enter this vendor’s standard price for the commodity.
3. When creating a requisition, purchase order, or voucher, enter the vendor ID, and enter the selected commodity code. The standard price you entered in the vendor commodity record defaults into the line item. (You can change the price if you need to.)
4. When the voucher containing this line item is paid, the price you actually paid for that item is sent back to the vendor commodity file.
5. After you have this vendor history information, you can use the Vendors by Commodity List (VENC) form to view a comparative listing of that vendor’s standard and actual prices for that commodity, with the standard and actual prices paid to other vendors for the same commodity.
Maintaining your vendor commodity records
The vendor file provides the following three forms for setting up and maintaining your vendor commodity records.
Vendor Commodities Maintenance (VNCL). The VNCL form can be accessed either from the Vendor Maintenance (VEN) menu, or as a detail form from the Vendor Maintenance (VEND) form. It is used to maintain information on commodities you have associated with a vendor. The form displays several of the vendor’s commodities at once, and contains basic information on them. You can associate more commodities with this vendor by adding them in the window.
The VNCL form is similar to the Vendor Single Commodity Maintenance (VNCM) form. But this form lists all commodities that have been associated with this vendor, whereas the VNCM form allows you to maintain only a single commodity for a vendor at a time. You would use the VNCL form if you want to maintain multiple commodities for a vendor, or need to see a complete list of the commodities associated with the vendor.
Vendor Single Commodity Maintenance (VNCM). The VNCM form is available from the Vendor Maintenance (VEN) menu. You use this form to maintain information on an individual commodity you have associated with a vendor.
As noted above, the VNCM form performs the same function as the VNCL form; but the VNCM form displays only a single commodity for a vendor at any time. It would be preferable to use the VNCM form in the following cases:
You would use this form to view or modify information on individual commodities of different vendors, or to see more detailed information than that displayed by the VNCL form.
Vendors by Commodity List (VENC). You use the VENC form to display information on all vendors that sell a specific commodity to your institution. The form provides comparative information on standard price and date and actual price and date for each vendor who is associated with the commodity you select. You can also use the VENC form to provide a quick look at the vendors who are approved for a given commodity.
162tting Started with Purchasing and Accounts Payable | Understanding Commodity/Service Codes
Ge
Linking commodity codes to buyers
If your site uses multiple buyers to obtain quotes, negotiate contracts and prices, and make purchases, you can link each commodity code to a specific buyer, or buyers, responsible for that commodity.
When you enter the commodity code on a requisition, purchase order, or voucher, the buyer’s name and staff ID default in to the Buyer field. Note that this feature is especially helpful at the requisition stage, as it groups all the buyer’s requisitions so the buyer can easily view them, on the Requisition Buyer Assignment (RQBA) form, and process them more efficiently.
The following steps summarize the procedure to link a buyer with a given commodity code:
1. Define staff codes for all your buyers on the Staff and Volunteers (SVM) form.
2. Define the commodity code on the Commodity Codes (CMCM) form. Enter the desired buyer code in the Buyers field.
3. When creating a requisition, enter the vendor ID, then enter the commodity code.1 The buyer’s name defaults in the Buyer field on the Requisition Maintenance (REQM) form.
4. By virtue of this connection, the buyer can use the Requisition Buyer Assignment (RQBA) form at any time, to display all requisitions with his name in the Buyer field.
Linking commodity codes to tax codes
You can associate a tax code with a commodity code. This is helpful in situations where your institution may be required to pay sales tax only on certain types of products.
You can link a commodity code with one or more tax codes within the commodity code file. Then, when you create a purchase order on the Purchase Order Maintenance (POEM) form, and enter a commodity code on the Purchase Order Summary List (POIL) form, the commodity code and the associated tax code default into all line items of that purchase order.
Note: If you are creating a requisition, and plan to enter a commodity code with a tax code linked to it, enter an AP type on the requisition. You cannot enter a tax code on a requisition without an AP type.
1.If you are creating a requisition and want to enter a single commodity code for the entire requisition, enter the code on the Requisition Maintenance (REQM) form. If you want to enter a different commodity code for each line item on the requisition, enter a code for each line item on the Requisition Item Maintenance (RQIM) form. If you are creating a purchase order, and want to enter a single commodity code for the entire purchase order, enter the code on the Purchase Order Summary List (POIL) form. If you want to enter a different commodity code for each item on the PO, enter a code for each line item on the PO Item Maintenance (POIM) form.
163tting Started with Purchasing and Accounts Payable | Understanding Commodity/Service Codes
Ge
The following steps summarize the procedure to link a tax code with a given commodity code:
1. Define the tax code on the Tax Codes (TXCM) form.
2. Define the commodity code on the Commodity Codes (CMCM) form. Enter the desired tax code or codes in the Tax Codes field.
3. If your processing starts with requisitions:
3.1. Create a requisition. Be sure to enter the AP type on the REQM form before entering the commodity code.
3.2. Enter the commodity code on the REQM or RQIM form.1
3.3. If you entered the commodity code for the entire requisition, the tax code, or codes, linked to the commodity default into all line items. If you entered the commodity code for a single line item, the tax code, or codes, default into the line item.
4. If your processing starts with purchase orders:
4.1. Create a purchase order. (The AP type is required on a purchase order.)
4.2. Enter the commodity on the POIL or POIM form.1
4.3. If you entered the commodity code for the entire purchase order, the tax code, or codes, linked to the commodity default into all line items. If you entered the commodity code for a single line item, the tax code, or codes, default into the line item
5. Taxes will be calculated on all line items where the tax code has defaulted in.
Using the commodity code description as default item description
You can set up your commodities so that when you enter a commodity code directly on a purchasing document, the code’s description defaults into the Description field on the line item maintenance form (this feature applies to requisitions, purchase orders, blanket
purchase orders, vouchers, or recurring vouchers1).
This feature greatly increases date entry efficiency if you are using hierarchical commodity codes that list items in detail, with information such as the part or order number and a specific description of the merchandise. If you decide to use more generic commodity codes — for example, to delineate only broad categories of goods — you would not benefit from using default item descriptions.
The following steps summarize the procedure to cause an item description to default into line items from the commodity code:
1. Define the commodity on the Commodity Codes (CMCM) form. Enter a detailed description in the Description field. Set the Use Description field to “Yes.”
1.You can enter a commodity code for vouchers and recurring vouchers only on the item maintenance forms.
164tting Started with Purchasing and Accounts Payable | Understanding Commodity/Service Codes

Ge
2. Create a requisition, purchase order, blanket purchase order, or voucher, and enter the commodity code on the applicable form.
3. The commodity code description defaults into the Description field on each line item.
Using commodity prices as default unit prices
You can also have both the description and the standard price default into your purchasing documents from the commodity code. If you entered a price on the Commodity Codes (CMCM) form, the commodity price defaults into the Est Price field on purchasing document line items.
Commodity prices versus vendor standard prices. The commodity price (entered in the Price field on the CMCM form), is a general default price for that commodity, and defaults into line items if there is no vendor standard price. If you enter a vendor on a purchasing document, and then enter a commodity for which a standard price has been associated with that vendor (on the VNCL form), the vendor standard price overrides any existing default commodity price on all purchasing documents on which you enter that vendor and that commodity.
The following steps summarize the procedure to cause a commodity price to default into line items from the commodity code:
1. Define the commodity code on the Commodity Codes (CMCM) form. Enter the price of the commodity in the Price field.
2. Create a requisition, purchase order, blanket purchase order, or voucher, and enter the commodity code on the applicable form.
3. The price of the commodity code defaults into the line item Est Price field.
Reporting on commodity codes
You can also report on your vendors by commodity. The Commodity field is a standard selection field on the following vendor reporting forms, all of which appear on the Vendor Maintenance (VEN) menu:
• Vendor Register (VENR)
• Vendor Purge Register (VNPR)
• Vendor Year To Date Report (VENY)
• Vendor Address List (VENA)
165tting Started with Purchasing and Accounts Payable | Understanding Commodity/Service Codes
Ge
Entering commodity codes directly on purchasing documents
If your commodity reporting requirements are minimal, you can choose a modest implementation of commodity codes. You can define a small number of commodity codes containing only a description. To track general pricing information, you can also define a price for each commodity code.
Information flow from commodity codes to documents
Figure 18 shows the properties of commodity codes that default into purchasing line items. This illustration displays how Colleague fills in the Description, Fixed Asset, Buyer, Est. Price, and Tax Codes fields on a requisition when a commodity code (code number 20460) is entered on the REQM form.
166tting Started with Purchasing and Accounts Payable | Understanding Commodity/Service Codes
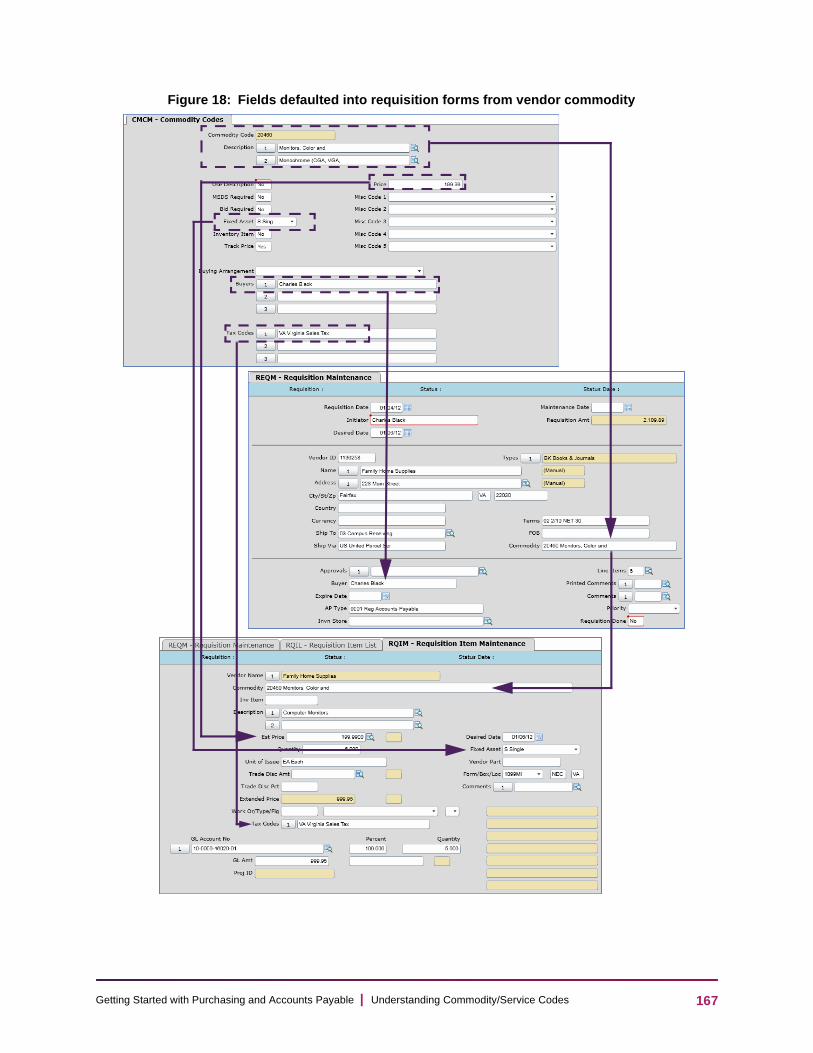
Ge
Figure 18: Fields defaulted into requisition forms from vendor commodity
167tting Started with Purchasing and Accounts Payable | Understanding Commodity/Service Codes
Ge
How commodity code defaults work: An example
This section describes the defaulting of information into purchasing line items, through a typical example. This example uses commodity code 615 (described in an earlier section).
1. Commodity class 615 is assigned to a specific buyer named Paul Johnson. The commodity flags are set so that the item description defaults into line items as “Office Supplies, General” but no standard price will default into the Price field.
2. Since code 615 has been assigned to Johnson, any class-item under class 615 (such as class-item 615-45) does not need to be assigned to a specific buyer. The commodity flags (and the vendor commodity definitions) for class-item 615-45 are set so that the item description defaults in as “File Folders, Regular, Legal and Letter Sizes” and the standard price defaults into the Est Price field on the Requisition Item Maintenance (RQIM) form.
3. When the requisition initiator creates a requisition, she enters commodity code 615 in the Commodity field on the Requisition Maintenance (REQM) form. As a result:
3.1. Paul Johnson is associated with this requisition, and his name is defaulted into the Buyer field. This requisition is now automatically assigned to Paul Johnson for the creation and processing of the subsequent purchase order.
3.2. The commodity “615” code and description are defaulted into each line item created.
3.3. If the defaulted commodity code in one of the line items is later replaced by the class-item commodity code (for example, 615-45), then a more detailed description replaces the defaulted description and the standard price defaults into the Price field.
4. Item prices are defaulted from commodity codes in the following manner:
4.1. The standard price is the price normally charged for this commodity by the vendor specified in the requisition (if a standard price has been entered for the commodity in the vendor record). The standard price is entered for each vendor commodity, using the Vendor Commodities Maintenance (VNCL) form.
4.2. A price can also be specified for the commodity code itself, in the Price field of the Commodity Codes (CMCM) form.
4.3. The price specified in the vendor file for the commodity takes precedence, but if there is no vendor commodity price, then Colleague looks for a price in the commodity code record (entered on the CMCM form). If there is no price in the commodity code record, then no price defaults into line items at all.
4.4. These defaults (or initiator-entered prices, in the absence of default commodity or vendor commodity prices) set the price estimate that is used in the approval cycle and is carried forward to the subsequent purchase order.
5. Paul Johnson can access the Requisition Buyer Assignment (RQBA) form to see the requisition just created. He processes it from here by creating a PO from this requisition.
6. At the PO stage, the defaulted commodity codes produce the following effects:
6.1. The general commodity code (“615”) is carried forward from the requisition to the Commodity field in the Purchase Order Summary List (POIL) form.
168tting Started with Purchasing and Accounts Payable | Understanding Commodity/Service Codes
Ge
6.2. The item commodity codes, descriptions, and prices are carried forward to the applicable fields of the line items on the PO Item Maintenance (POIM) form.
6.3. This means that most of the required fields have defaulted into the purchase order, for subsequent buyer editing and processing.
This accumulation of defaulted information provides the raw material that can be used to analyze the procurement function (using a query language or programmed reports). For example, the institution can now analyze the dollars spent on overall commodity classes, buyer loads by commodity classes, and vendor performance by class-item codes, using the data described in the example.
169tting Started with Purchasing and Accounts Payable | Understanding Commodity/Service Codes
Getting Started with Purchasing and Accounts Payable
Setup Shared by Purchasing and Accounts Payable
Ge
Setting Up Foreign Currency Information
In this chapter
This chapter provides a guide to the procedures necessary for setting up all information related to using foreign currencies in the Purchasing and Accounts Payable modules.
Understanding foreign currency information setup
For institutions that work with vendors in foreign countries, all financial records for transactions in the foreign currency, or currencies, must be kept separate from financial records for transactions in the local currency.
You can do this by adding information on the foreign currency exchange rates and other
currency information to the transaction codes1 used in the Purchasing and Accounts Payable modules to control procurement transactions. For foreign currency transactions, you add the currency code as a third transaction code.
If you ever do business in a currency other than your local currency, you will need to create separate transaction codes for each type of currency in which you do business. These codes include the following:
• A currency code.
• A bank code (incorporates the currency code and other currency information).
• An AP type code (incorporates the bank code, thus including currency information).
Defining a currency code for a foreign currency
The currency code defines the exchange rate for the foreign currency. Each new exchange rate in a currency record has an effective date, letting you accurately track fluctuations in exchange rates.
1.The transaction codes used for all purchasing and accounts payable processing are the bank code and the AP type. See “The purchasing and AP process: Role of the transaction codes” on page 32 for more on transaction codes.
171tting Started with Purchasing and Accounts Payable | Setting Up Foreign Currency Information
Ge
Defining a bank code for a foreign currency
To set up a bank code for a foreign currency, be sure you have created a bank account for transactions in that foreign currency, and set up a GL cash account dedicated exclusively to the foreign currency.
The bank code, defined on the Bank Codes (BKCM) form, actually stores the majority of foreign currency information Colleague uses to process foreign currency transactions. The following three fields on the BKCM form together provide the information needed for transactions involving purchase transactions from a foreign vendor:
• Foreign Currency Code. Provides up-to-date currency exchange rate information, in case the exchange rate changes while a purchase is being processed.
• Currency Designation. Provides the currency description that will follow the spelled-out amount on checks to the foreign vendor (for example, if you want your checks to say “Two hundred Francs,” you would enter “Francs” here).
• Currency Exchange GL Account. Identifies the GL Account you have designated to absorb fluctuations in the currency exchange rates.
The currency exchange GL account is the GL account where currency conversions are posted. When you are making a purchase in a foreign currency, the currency exchange rate may fluctuate between the time the purchase order is cut and the time the corresponding voucher is paid. Any currency exchange differences are charged to the currency exchange GL account. The currency exchange rate information, which calculates the equivalent local price from the foreign price, comes from the currency code.
Defining an AP type code for a foreign currency
When you set up an AP type code for a given foreign currency, you must ensure you have already set up the following pieces of information:
• An AP control GL account exclusively for transactions in that foreign currency.
• A discount GL account dedicated to discounts for purchases bought in that currency.
• If you are not distributing taxes to line item expense accounts, a tax expense GL account for any taxes incurred in the foreign currency.
• A bank code, exclusively for transactions in the foreign currency (as described in the previous subsection).
After the AP type is set up, you can also enter the foreign currency AP type into the vendor record of vendors who deal with you in the foreign currency.
When you enter the foreign currency AP type on a procurement document (or if, having entered it on a vendor record, you enter the vendor ID on a document), the AP type brings the currency information from the currency code and the bank code into the procurement document, where it is used to correctly process all transactions with that procurement document.
172tting Started with Purchasing and Accounts Payable | Setting Up Foreign Currency Information
Ge
Foreign currency setup checklist
The Foreign Currency Setup Checklist is a guideline for planning your completion of all the steps necessary for setting up foreign currencies. This setup process consists of the following five steps:
1. Define GL accounts needed for foreign currency information. For each foreign currency you use, you will need a separate GL account for cash, AP control, currency exchange, discounts, and tax expense (if not distributing).
2. Set up your foreign currency codes. Defines the currency exchange rate information you will need for the foreign currencies your institution will be using.
3. Set up a separate bank code for each foreign currency in which you do business. This will include bank information, currency information, the currency exchange GL account, and the currency designation to be printed on checks.
4. Set up a separate AP type for each foreign currency in which you do business. The AP type includes GL accounts to control the posting of the transaction. These are the AP control, discounts, and tax expense (if not distributing) GL accounts. The AP type also includes the bank code.
5. Assign the foreign currency AP type to your vendors who trade in the foreign currency. Associates the AP type with a specific vendor. Foreign currency information will default into procurement documents and line items when you enter the vendor ID.
The seven columns of Table 36 provide the following information:
• Checkmark: Provides a box where you can place a checkmark when you have completed the indicated step.
• Step: Groups individual substeps of the setup process into the five steps.
• To: Describes the setup task.
• Req?: Displays a “Yes” if the step is required; is left blank if the step is not required.
• Then: Lists the component parts of each setup task (that is, the step shown in the “To” column is broken down into individual tasks).
• Use: Indicates the name and mnemonic of the form (if applicable) where the individual task procedure is performed.
• More Information Provides a cross-reference to the chapter and section in this manual where you will find more information on the individual task.
173tting Started with Purchasing and Accounts Payable | Setting Up Foreign Currency Information
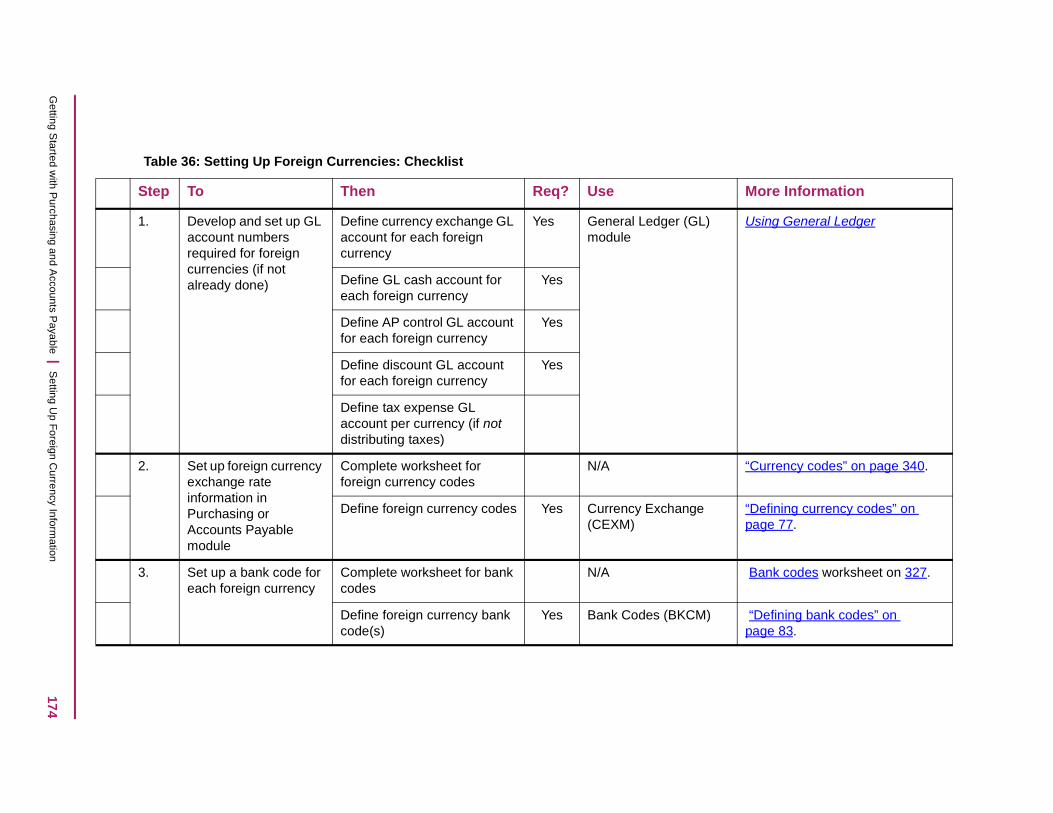
174G
etting Started w
ith Purchasing and A
ccounts Payable | S
etting Up F
oreign Currency Inform
ation
More Information
Using General Ledger
“Currency codes” on page 340.
“Defining currency codes” on page 77.
Bank codes worksheet on 327.
) “Defining bank codes” on page 83.
Table 36: Setting Up Foreign Currencies: Checklist
Step To Then Req? Use
1. Develop and set up GL account numbers required for foreign currencies (if not already done)
Define currency exchange GL account for each foreign currency
Yes General Ledger (GL)module
Define GL cash account for each foreign currency
Yes
Define AP control GL account for each foreign currency
Yes
Define discount GL account for each foreign currency
Yes
Define tax expense GL account per currency (if not distributing taxes)
2. Set up foreign currency exchange rate information in Purchasing or Accounts Payable module
Complete worksheet for foreign currency codes
N/A
Define foreign currency codes Yes Currency Exchange (CEXM)
3. Set up a bank code for each foreign currency
Complete worksheet for bank codes
N/A
Define foreign currency bank code(s)
Yes Bank Codes (BKCM

175G
etting Started w
ith Purchasing and A
ccounts Payable | S
etting Up F
oreign Currency Inform
ation
AP types worksheet on 326.
“Defining AP types” on page 100.
Using Accounts Payable.
More Information
4. Set up an AP type for each foreign currency
Complete worksheet for AP types
N/A
Define foreign currency AP
type code(s)Yes AP Types (APTF)
5. Default vendor foreign currency information into procurement documents
Assign the appropriate foreign currency AP type(s) to the vendors who use foreign currencies
Vendor Maintenance(VEND)
Table 36: Setting Up Foreign Currencies: Checklist (continued)
Step To Then Req? Use

Ge
Setting Up International Information
In this chapter
This section provides a high-level overview of how to set up a Colleague account for international operation, that is, operation outside the U.S. This includes the following types of setup:
• Setting international parameters, dates, or defaults.
• Setting up foreign currencies.
These procedures should meet the specific needs of your institution.
About international parameters and defaults
Ellucian sets parameters and defaults for dates, addresses, and tax information that are standard in the U.S. Use the procedures in this section if you are a non-U.S. institution or would like to change the default and parameter information.
Where to set international parameters and defaults
Set the international parameters and defaults in each main account. Ellucian recommends that you also define or set these parameters in your release installation (INSTALL) account. If you set these parameters and defaults in your release installation account, you will not have to set them in any new accounts (such as development accounts) you create later.
Note, however, that the settings in the release installation account do not overwrite the settings in any existing main accounts.
Setting up international parameters and defaults1. Complete the International Parameters (INTL) form.
Short and long date formats are set.
176tting Started with Purchasing and Accounts Payable | Setting Up International Information

Ge
2. Complete the Dictionary Date Convert (DDCV) form for the following applications in the order given:
• UT
• CORE
• COLL
• CF
• ST
• HR
This step converts all dictionary records which use the date conversion field and the parameters in the INTL form to display all dates in the appropriate format.
3. Complete the Header Block Definition (PHD) form.
Note: If you want to create or change the social security text to appear as “SIN:” in the header information of your forms, change or add SOCIAL SECURITY in the Descriptor window of the Data Fields to Use field and enter SIN: in the Text Before window.
Header information is set for form header blocks.
4. Complete the International Defaults (PID1) form.
Postal code, social ID, city, province, and employer tax number information is set.
For information on the International Parameters (INTL) and the Dictionary Date Convert (DDCV) forms, see Envision Run Time Administration.
For information on the Header Block Definition (PHD) and the International Defaults (PID1) forms, see Getting Started with the Colleague Core.
Setting up currency-related information
Setup procedures for foreign currency-related information are covered in another chapter of this part, “Setting Up Foreign Currency Information” on page 171. See that chapter for detailed setup steps for foreign currencies.
177tting Started with Purchasing and Accounts Payable | Setting Up International Information

Ge
Setting Up Tax-Related Information
In this chapter
This chapter provides a high-level guide to the procedures necessary for setting up all information in the Purchasing and Accounts Payable modules related to taxes.
Note: Tax-related information specific to Canadian institutions is covered in another chapter of this part. Discussions and high-level steps for Canada-specific taxes are covered in “Setting Up Canadian Information” on page 183.
For purchasing/payables applications, “taxes” refers to two distinct areas:
• Federal, state, or local sales or use taxes on purchases.
• Annual processing of federal tax forms for reportable vendors, most frequently 1099-MISC forms (in the U.S.).
For both types of tax-related information, this chapter discusses how to set up your tax information to best accommodate your institution’s particular tax situation. It provides cross-references to procedures in other parts of this manual, including tax-related code tables, GL accounts, tax codes, and preparing the modules for 1099-MISC processing.
Overview of tax-related information setup
Setting up sales tax information
All information related to sales and use taxes and rebates is set up in the following major steps:
1. Define the sales tax-related code table (optional).
2. Verify that tax-related GL accounts exist.
3. Define tax codes.
Defining the sales tax-related code table. You can use the optional TAX.CATEGORIES code table to simplify the way tax items appear on your purchase orders, by breaking different types of taxes into categories.
178tting Started with Purchasing and Accounts Payable | Setting Up Tax-Related Information

Ge
You can set up the TAX.CATEGORIES code tables in the Purchasing and Accounts Payable modules to reflect your institution’s treatment of taxes. This code table is used to group two or more tax codes into the same tax code category, so that different tax codes in the same general category are totaled and printed on a purchase order as a single tax entry.
The TAX.CATEGORIES code table is discussed in “Defining Codes Used in Purchasing & Accounts Payable” on page 59.
Verifying that GL accounts for tax codes exist. Depending on your institution’s tax situation, you may need to set up one or more GL accounts for your taxes. The GL accounts you might need are:
• Rebate/Refund GL Account(s). These are revenue GL accounts to which the amounts of rebated or refunded taxes are posted from vouchers (when you create a rebate tax code, you must specify a rebate/refund GL account).
• Use Tax GL Account. If you pay use tax to the government, this is an expense account to which the amounts of taxes due to the taxing authority are posted from vouchers (when you create a use tax code, you must specify a use tax GL account).
• Tax Expense GL Account. If you are not distributing tax expenses to individual line item GL accounts, but posting them to one central account, you must define a GL account for tax expense (this GL account is not entered in tax codes, but in the AP type code, which is defined on the AP Types [APTF] form).
Defining tax codes. Tax codes are defined on the Tax Codes (TXCM) form.
Create a tax code for any type of tax your institution pays. Tax codes are covered in detail in “Defining tax codes” on page 120.
Setting up tax form information
This section provides general setup information for your 1099 vendors. Complete procedures are located in the U.S. Regulatory Reporting manual, available on Ellucian’s website.
Setting up default tax form information for vendors. The information Colleague needs to process your 1099-MISC forms for annual submission to the Internal Revenue Service (IRS) is compiled directly from individual paid voucher line items. Colleague automatically selects individual line items for electronic 1099-MISC processing by selecting line items with the form name “1099MI” in the Tax Form field. This 1099-MISC information may be added to line items manually, or it can be set up as a default defined in each vendor’s record.
For your 1099-MISC vendors, you can enter the tax form name (“1099MI”) and the tax form box number on a vendor’s record. The Core TAX.FORMS code table lets you assign a specific box number to a given tax form name, so that the box number defaults in when you enter the tax form name. This is helpful if all, or most, of the income reported on your 1099-MISC forms is of the same type, such as non-employee compensation, or is reported in the same box on the 1099-MISC form.
179tting Started with Purchasing and Accounts Payable | Setting Up Tax-Related Information
Ge
Note: The box number indicates the number of the box on the corresponding tax form in which a line item amount should be recorded.
Once you have set up a vendor with a default tax form, then when you enter that vendor’s ID on a procurement document, the form and box number will be defaulted into the Tax Form field in every procurement line item on that document.
Note: This defaulting feature is optional. You can enter 1099-MISC information onto line items manually; you can also modify or delete defaulted information on any line item.
To set up your 1099 vendors with default information, you must define tax form box codes and then enter the appropriate box code in the tax form code in the Core TAX.FORMS code table. Box codes are defined on the Tax Form Box Codes (TFBX) form. See the U.S. Regulatory Reporting manual for instructions on setting up box codes.
Vendor tax form information is added to a vendor’s record on the Vendor Maintenance (VEND) form. A discussion of setting up default vendor tax form information is found in the Using Accounts Payable manual.
See the U.S. Regulatory Reporting manual on Ellucian’s website for information and procedures for preparing for 1099-MISC processing.
Tax-Related Information Setup Checklist
The Tax-Related Information Setup Checklist is a high-level guide for planning your completion of the steps necessary for setting up tax information in the Purchasing and Accounts Payable modules. This setup process consists of the following steps:
1. Set up information related to sales and use taxes. Define tax categories if desired, and set up a tax code for each type of tax you pay.
2. Set up information for 1099-MISC processing. Define tax form box codes, assign to a tax form, and enter the tax form name on 1099-MISC vendor records.
The seven columns of Table 37 provide the following information:
• Checkmark: Provides a box where you can place a checkmark when you have completed the indicated step.
• Step: Groups individual substeps of the setup process into the two steps.
• To: Describes the setup task.
• Req?: Displays a “Yes” if the step is required; is left blank if the step is not required.
• Then: Lists the component parts of each setup task (that is, the step shown in the “To” column is broken down into individual tasks).
• Use: Indicates the name and mnemonic of the form (if applicable) where the individual task procedure is performed.
180tting Started with Purchasing and Accounts Payable | Setting Up Tax-Related Information

181G
etting Started w
ith Purchasing and A
ccounts Payable | S
etting Up T
ax-Related Inform
ation
you will find more information on the
More Information
Tax code categories worksheet on 347.
L) Validation Code Table Maintenance
) l set )
“The Allow AP/Pur Entry field” on page 123.
“Defining a use tax code” on page 126.
“Tax Expense GL Account” on page 103.
Tax codes worksheet on 346.
“Defining tax codes” on page 120.
• More Information: Provides a cross-reference to the chapter and section in this manual whereindividual task.
Table 37: Setting Up Tax-Related Information: Checklist
Step To Then Req? Use
1. Set up sales and use tax-related information:
Define TAX.CATEGORIES code table
Complete worksheet for TAX.CATEGORIES code table
N/A
Define TAX.CATEGORIES code table
Validation Code (VA
Define, or verify existence of, tax-related GL accounts
Define rebate/refund GL account(s)
General Ledger (GLmodule (see GeneraLedger Reference toup new GL accountsDefine use tax GL account(s)
Define tax expense GL account(s)
Define tax codes Complete worksheet for each tax code
N/A
Define a tax code for each type of tax paid
Yes Tax Codes (TXCM)

182G
etting Started w
ith Purchasing and A
ccounts Payable | S
etting Up T
ax-Related Inform
ation
Tax form box codes worksheet on 348.
s U.S. Regulatory Reporting manual.
L) d ,
U.S. Regulatory Reporting manual.
U.S. Regulatory Reporting manual.
More Information
2. Set up information for 1099-MISC processing:
Define tax form box codes for 1099-MISC vendor default information
Complete worksheet for tax form box codes
N/A
Define tax form box codes Tax Form Box Code(TFBX)
Enter box code in tax form code
Validation Code (VA(Important! Accessefrom Colleague Corenot CF)
Define vendor tax form information to default onto line items
Enter default tax form information in 1099-MISC vendor records
Vendor Maintenance(VEND)
Table 37: Setting Up Tax-Related Information: Checklist (continued)
Step To Then Req? Use

Ge
Setting Up Canadian Information
In this chapter
This chapter provides a guide to the procedures necessary for Canadian institutions when setting up the Purchasing and Accounts Payable modules. The special requirements for Canadian setup are in the following three primary areas:
• International parameters and defaults
• Foreign currencies
• Tax-related information, including rebatable and refundable GST taxes and PST taxes
These areas are discussed briefly in the following sections. The “Canadian information setup checklist” on page 186 summarizes the setup activities required specifically for Canadian institutions and, for each step, cross-references parts of this manual pertaining to individual tasks.
Overview of Canadian information setup
Setting up international parameters and defaults
Procedures for configuring your system for operation outside the U.S. involve setting up several parameters and defaults for international use. These are covered in another chapter of this part, “Setting Up International Information” on page 176. See that chapter for detailed steps for setting up international parameters and defaults.
Setting up foreign currencies
Setup procedures for foreign currency codes are covered in another chapter of this part, “Setting Up Foreign Currency Information” on page 171. See that chapter for detailed setup steps for foreign currencies.
183tting Started with Purchasing and Accounts Payable | Setting Up Canadian Information

Ge
Setting up Canadian tax-related information
Colleague incorporates Canada-specific features for two distinct types of tax information:
• Codes for processing taxes on purchases, including calculation of GST rebate, ITC refund, mixed use, and PST taxes
• Codes for annual processing of federal T4A tax forms
Setting up Canadian GST and PST tax information
All information related to sales and use taxes and rebates is set up in the following major steps:
1. Define the sales tax-related code table (optional).
2. Verify that tax-related GL accounts exist.
3. Define tax codes.
Defining the sales tax-related code table. You can use the optional TAX.CATEGORIES code table to simplify the way tax items appear on your purchase orders, by breaking different types of taxes into categories.
You can set up the TAX.CATEGORIES code tables in the Purchasing and Accounts Payable modules to reflect your institution’s treatment of taxes. This code table is used to group two or more tax codes into the same tax code category, so that different tax codes in the same general category are totaled and printed on a purchase order as a single tax entry.
The TAX.CATEGORIES code table is discussed in “Defining Codes Used in Purchasing & Accounts Payable” on page 59.
Verifying that GL accounts for tax codes exist. Depending on your institution’s tax situation, you may need to set up one or more GL accounts for your taxes. The GL accounts you might need include the following:
• Rebate/Refund GL Account(s). These are revenue GL accounts to which the amounts of rebated or refunded taxes are posted from vouchers (when you create a rebate tax code, you must specify a rebate/refund GL account).
• Use Tax GL Account. If you pay use tax to the government, this is an expense account to which the amounts of taxes due to the taxing authority are posted from vouchers (when you create a use tax code, you must specify a use tax GL account).
• Tax Expense GL Account. If you are not distributing tax expenses to individual line item GL accounts, but posting them to one central account, you must define a GL account for tax expense (this GL account is not entered in tax codes, but in the AP type code, which is defined on the AP Types [APTF] form).
Defining tax codes. Tax codes are defined on the Tax Codes (TXCM) form. The fields on the TXCM form specifically related to setting up taxes for Canadian institutions are:
• Rebates/Refunds Involved. Used to indicate if rebates or refunds are involved in the definition of the selected tax code; if this field is set to “Yes,” a number of other fields are also required.
184tting Started with Purchasing and Accounts Payable | Setting Up Canadian Information
Ge
• Rebate/Refund GL Account. Lists, for the selected tax code, the GL account to which rebate or refund amounts will be posted.
• Allow AP/Pur Entry. Indicates whether the selected tax code can be entered on the line item forms of procurement documents (rebate and refund tax codes are usually not entered directly on procurement documents, but linked with a specific GL account in the General Ledger module).
• Rebate Percent. Indicates the percentage of the tax (which is listed in the Tax Percent field) that will be rebated, most commonly 67 percent for educational institutions.
• Exempt Percent. Indicates any percent of the tax that is “exempt,” or eligible for a full refund (due to Input Tax Credit [ITC]).
You can set up any type of tax code your institution needs to properly calculate GST tax rebates, ITC refunds, mixed use rebates, or PST taxes.
Note: Defining tax codes may also include performing calculations to derive the different rebate or refund percentages for which your institution qualifies, based on your individual mix of charitable or public service activities and commercial uses.
Tax codes are covered in detail in “Defining tax codes” on page 120.
Setting up T4A tax form information
Setting up the information you need for automatic processing of T4As, as well as tracking T4A vendors, is performed in the following steps:
1. Define the tax form-related code table.
2. Set up default tax form information for vendors (optional).
3. Other preparation for T4A processing.
Defining the tax form-related code table. The TAX.GROUP.CODES code table validates the Tax Group field, which appears in the Voucher Associated Employees (VOAE) form. This code table is used only for Canadian T4A forms.
The codes in this code table differentiate Canadian T4A Retirement Allowance tax codes from all other types of T4As, and ensure that amounts are placed in the correct boxes on the T4A form. You define as many codes as you need in the TAX.GROUP.CODES code table, to separate different types of employee taxable income by “tax group.”
The TAX.GROUP.CODES code table is discussed in “Defining Codes Used in Purchasing & Accounts Payable” on page 59.
Setting up default tax form information for vendors. The information Colleague needs to process your T4A forms for annual submission to the Canada Revenue Agency (CRA) is compiled directly from individual voucher line items. Colleague automatically selects individual line items for electronic T4A processing by selecting line items with the form name “T4A” in the Tax Form field. This T4A information may be added to line items manually, or it can be set up as a default defined in each vendor’s record.
185tting Started with Purchasing and Accounts Payable | Setting Up Canadian Information

Ge
For your T4A vendors, you can enter the code for the tax form name (“T4A”) from the
TAX.FORMS validation code table in Core, and the tax form box number1 on a vendor’s record. The Core TAX.FORMS code table lets you assign a specific box code to a given tax form name, so that the box number defaults in when you enter the tax form name. This is helpful if all, or most, of the income reported on your T4A forms is of the same type, such as retiring allowance, or is reported in the same box on the T4A form.
Once you have set up a vendor with a default tax form, then when you enter that vendor’s ID on a procurement document, the form and box number will be defaulted into the Tax Form field in every procurement line item on that document.
Note: This defaulting feature is optional. You can enter T4A information onto line items manually; you can also modify defaulted information on any line item, or delete the tax form information from the line item.
If you want to set up your T4A vendors with default information, you must define tax form box codes and then enter the appropriate box code in the tax form code in the Core TAX.FORMS code table.
Box codes are defined on the Tax Form Box Codes (TFBX) form. See the Canadian Regulatory Reporting manual, available on Ellucian’s website, for instructions on setting up box codes.
Vendor tax form information is added to a vendor’s record on the Vendor Maintenance (VEND) form. A discussion of setting up default vendor tax form information is found in the Using Accounts Payable manual.
General setup in preparation for T4A tax form processing. Normally you set up the information needed for T4A tax form processing at the time you run the annual process. (However, if you want to set up your T4A vendors with default information as noted above, you must define tax form box codes before entering default vendor information.)
See the Canadian Regulatory Reporting manual for detailed information and procedures for reporting T4A information.
Canadian information setup checklist
The Canadian Information Setup Checklist is a high-level guide for Canadian institutions to assist in planning your completion of all the Canada-specific steps necessary for setting up the Purchasing and Accounts Payable modules. In addition to these items, you should also work through the set up checklists in the Setting Up Purchasing and Accounts Payable Part.
1.The box number indicates the number of the box on the corresponding tax form in which a line item amount should be recorded.
186tting Started with Purchasing and Accounts Payable | Setting Up Canadian Information

Ge
Canada-specific setup consists of the following four steps:
1. Set up international parameters and defaults. Define your international parameters, dictionary dates, header block definitions, and international defaults.
2. Set up foreign currencies. Define, for each foreign currency, a currency code, bank code, and AP type, and associate the AP type with applicable foreign vendors if desired.
3. Set up information related to sales and use taxes. Define tax categories if desired, and set up a tax code for each type of tax you pay, including rebates and refunds on taxes.
4. Set up information for T4A processing. Define tax group codes, tax form box codes, and enter the tax form name on T4A vendor records.
The seven columns of Table 38 provide the following information:
• Checkmark: Provides a box where you can place a checkmark when you have completed the indicated step.
• Step: Groups individual substeps of the setup process into the four steps.
• To: Describes the setup task.
• Req?: Displays a “Yes” if the step is required; is left blank if the step is not required.
• Then: Lists the component parts of each setup task (that is, the step shown in the “To” column is broken down into individual tasks).
• Use: Indicates the name and mnemonic of the form (if applicable) where the individual task procedure is performed.
• More Information: Provides a cross-reference to the chapter and section in this manual where you will find more information on the individual task.
187tting Started with Purchasing and Accounts Payable | Setting Up Canadian Information

188G
etting Started w
ith Purchasing and A
ccounts Payable | S
etting Up C
anadian Information
More Information
“Setting Up International Information” on page 176.
tion
s
“Setting Up Foreign Currency Information” on page 171.
Table 38: Setting Up Canadian Information: Checklist
Step To Then Req? Use
1. Set up international parameters and defaults
Define international parameters
Yes International Parameters (INTL)
Define dictionary date conversions
Yes Dictionary Date Conversion (DDCV)
Define header blocks for your institution
Yes Header Block Defini(PHD)
Define international defaults Yes International Default(PID1)
2. Set up foreign currencies
Define a currency code, a bank code, and an AP type for each foreign currency
Various forms

189G
etting Started w
ith Purchasing and A
ccounts Payable | S
etting Up C
anadian Information
Tax code categories worksheet on 347.
L) Validation Code Table Maintenance
) “The Allow AP/Pur Entry field” on page 123.
“Defining a use tax code” on page 126.
“Tax Expense GL Account” on page 103.
Tax codes worksheet on 346.
“Defining tax codes” on page 120.
More Information
3. Set up sales and use tax-related information:
Define TAX.CATEGORIES code table
Complete worksheet for TAX.CATEGORIES code table
N/A
Define TAX.CATEGORIES code table
Validation Codes (VA
Define, or verify existence of, tax-related GL accounts
Define rebate/refund GL account(s)
Yes General Ledger (GLmodule
Define use tax GL account(s) Yes
Define tax expense GL account(s)
Define tax codes Complete worksheet for each tax code
N/A
Define a tax code for each type of tax paid, rebated, or refunded
Yes Tax Codes (TXCM)
Table 38: Setting Up Canadian Information: Checklist (continued)
Step To Then Req? Use

190G
etting Started w
ith Purchasing and A
ccounts Payable | S
etting Up C
anadian Information
Tax form box codes worksheet on 348.
s Canadian Regulatory Reporting manual.
L) ed , ce)
Canadian Regulatory Reporting manual.
Canadian Regulatory Reporting manual.
More Information
4. Set up information for T4A processing:
Define tax form box codes for T4A vendor default information
Complete worksheet for tax form box codes
N/A
Define tax form box codes Tax Form Box Code(TFBX)
Enter box code in tax form code
Validation Codes (VA(Important! Accessfrom Colleague Corenot Colleague Finan
Define vendor tax form information to default onto line items
Enter default tax form information in T4A vendor records
Vendor Maintenance(VEND)
Table 38: Setting Up Canadian Information: Checklist (continued)
Step To Then Req? Use

Getting Started with Purchasing and Accounts Payable
Setting Up Purchasing and Accounts Payable

Ge
Setting Up the Purchasing and Accounts Payable Modules
In this chapter
This chapter provides a comprehensive guide to all the procedures necessary for setting up the Purchasing and Accounts Payable modules, from initial preparation to final testing. The chapter is divided into the following sections:
• Examples of setup configurations. Provides four examples of ways to implement the Purchasing and Accounts Payable modules based on institution size and structure
• Defining the module to reflect your procurement processes. Discusses how to analyze your procurement practices to determine how to set up the module for your institution
• Purchasing and Accounts Payable modules setup checklists. Because of the wide variety of possible implementations and optional features in the Purchasing and Account Payable modules, two checklists are provided rather than one:
• Basic setup (required portions only)
• Complete setup (all features)
This chapter describes a few of the many variations you might want to implement in setting up the Purchasing and Accounts Payable modules at your site. Read it carefully to see where your institution fits, and what features would best implement your policies, procurement functions, needs for increased efficiency, accounting practices, and approval infrastructure. You can find more information on the topics covered here in other chapters of this manual.
Note: Because the Purchasing and Accounts Payable modules are highly interdependent, many of their setup functions overlap. This chapter covers all setup functions that can be done in both modules.
Examples of setup configurations
The Purchasing and Accounts Payable modules are designed for maximum flexibility and adaptability. They are built to accommodate a wide variety of procurement practices, for large or small institutions, multicampus institutions with centralized or decentralized procurement authority, institutions that buy out of their country, as well as institutions subject to sales taxes, use taxes, rebates, refunds or credits on taxes, or no taxes.
192tting Started with Purchasing and Accounts Payable | Setting Up the Purchasing and Accounts Payable Modules

Ge
Presented below are some examples of how institutions of different sizes, with different infrastructures, might set up their system.
Several examples are provided:
1. Small, single-campus U.S. institution — simple setup.
2. Medium-sized, multi-campus U.S. institution (moderate volume, decentralized purchasing and decentralized accounts payable operations) — moderately complex setup with multiple bank codes.
3. Medium to large multi-campus U.S. institution (large volume, decentralized purchasing/ centralized AP, perhaps involving rebatable taxes, with state requirements for local vendor bidding/selection, commodity or expense tracking) — complex setup.
4. Canadian institution (all sizes) (subject to rebatable and refundable taxes, using foreign currencies) — Canadian setup.
Example 1. Small, single-campus U.S. institution, low purchase volume, no foreign purchases, decentralized (or centralized) purchasing and centralized AP operations. This example assumes that neither online approvals nor commodity codes are being implemented.
For this type of system, you can work within a relatively simple structure. You would most likely need to define only the following information:
• Bank code. One accounts payable bank code, containing the GL cash account number and bank account information.
• AP types. Two AP types, one for regular accounts payable transactions and one for accounts receivable AP transactions (using this setup, you would use one regular AP type for all regular AP transactions, and one A/R AP type for all accounts receivable-type transactions; both AP type codes would have the same bank code).
• Staff/volunteer codes. A staff/volunteer code for all initiators (all personnel who enter requisitions into Colleague).
• Tax codes. As many tax codes as you need to cover state and local sales or use taxes.
• Term discounts. Select your discount method (in AP parameters) and define vendor terms (required for tracking vendor discounts).
• Vendor codes. Optionally, if you track certain vendor information: vendor types, or your
own vendor tracking codes (called miscellaneous vendor codes)1.
• Units of issue. (Optional).
Example 2. Medium-sized, multiple-campus U.S. institution, moderate purchase volume, independent branch and shadow procurement functions with decentralized purchasing and accounts payable authority for each location, no foreign purchases. This example also assumes that neither online approvals nor commodity codes are being implemented.
For this type of institution, you might set up your modules as follows:
1.To increase efficiency and save entry time, you can also assign AP types to your vendors in vendor definition. For more information see “How to use AP types to reflect your procurement procedures” on page 104.
193tting Started with Purchasing and Accounts Payable | Setting Up the Purchasing and Accounts Payable Modules

Ge
• Bank codes. A number of AP bank codes, one for each AP checking account used by the various locations (or denoting any other bank account segmentations).
• AP types. To accommodate your decentralized branch and shadow procurement offices, you could define a different AP type for each of your locations (your decentralized procurement offices could then assign their AP type to vendors they buy from; this lets them select and report on only their activity with that vendor).
• Accounts Receivable AP types. You might define several accounts receivable AP types, or only one.
• Staff/volunteer codes. Create staff/volunteer codes for all initiators (all personnel who enter requisitions into Colleague).
• Tax codes. Define the tax codes required for state and local sales or use taxes. If some of your locations are taxable in different jurisdictions, set up the tax codes for each site.
• Term discounts. Select your discount method (in AP parameters) and define vendor terms (required for tracking vendor discounts).
• Vendor codes. Define vendor types (optional), or your own optional vendor tracking
codes (miscellaneous vendor codes). Assign them to vendors during vendor definition1.
• Units of issue. (Optional).
Example 3. Medium-sized to large multi-campus U.S. institution, large purchase volume, with decentralized requisition and purchasing authority and centralized accounts payable, as well as regulatory requirements for local vendor bidding and selection, commodity ordering, or expense tracking, and no foreign purchases. Online approvals are also being used.
The setup for this type of institution is more complex. The modules might be defined as follows:
• Bank codes. Based on a central accounts payable office, you might need to define only one accounts payable bank code, containing the central GL cash account number and bank account information, or, you might have several bank codes.
• AP types. To accommodate decentralized branch procurement offices, define a different AP type for each location (the decentralized procurement offices could assign their AP type to vendors they buy from and select and report on only their activity with that vendor).
Note on AP types and bank codes: If your procurement infrastructure is complex — for example, if you separate purchases by type (that is, you pay for certain types of purchases out of dedicated bank accounts) or have branch or shadow procurement offices — you must set up not only a separate bank code for each bank account, but also a different AP type for each separate bank account (note that you can set up multiple AP types for the same bank account, but you cannot set up multiple bank accounts for the same AP type).
1.To increase efficiency and save entry time, you can also assign AP types to your vendors in vendor definition. For more information see “How to use AP types to reflect your procurement procedures” on page 104.
194tting Started with Purchasing and Accounts Payable | Setting Up the Purchasing and Accounts Payable Modules
Ge
• Accounts Receivable AP types. If all of your accounts receivable AP transactions (refunds and advances) are handled by your central accounts payable office, you would define the number of A/R AP types needed for different types of A/R payments.
• Staff/volunteer codes. Set up an initiator code for each employee who will enter requisitions into Colleague, as well as a buyer code for each buyer on your staff.
• Tax codes. Define the required tax codes for state and local sales or use taxes, including rebates, refunds, or taxes paid to another jurisdiction.
• Term discounts. Select your discount method (in AP parameters) and define vendor terms (required for tracking vendor discounts).
• Commodity, bidding, strategic planning features. Define commodity codes (using either NIGP codes, state-mandated codes, or your own codes), unit of issue codes (necessary for pricing and cost calculations and strategic planning), or vendor types (required to select vendors by procurement status, or for preferred vendor reporting).
• Other vendor codes. After deciding which vendor information you want to track, and how to track it, you might set up your own optional vendor tracking codes (called miscellaneous vendor codes), and assign them to vendors during vendor definition.
• Approvals. Define approval GL classes and approval policy classes for your institution, then define an approval ID for each staff member authorized to approve documents. See the Using Online Approvals in Colleague Finance manual for setup information.
Example 4. Canadian institution, any size or infrastructure. Subject to rebatable federal GST tax, provincial PST tax; buys from foreign vendors.
Note: This example covers only setup that is specific to Canadian institutions. Use either example 1, 2 or 3 for setup information based on institution size and infrastructure.
If you are a Canadian institution, your setup would include a number of items in addition to the primary information items from the examples above, as appropriate for your institution. You would need to set up the following information:
• International parameters, dates, and defaults.
• Tax codes:
• A non-rebated GST tax code.
• One or more tax codes for GST tax rebates.
• Usually one tax code for the GST tax on which you claim input tax credits.
• A separate tax code for each mixed use percentage that applies to activities at your institution.
• A tax code for your PST (including any applicable rebates or compounding rules).
• Foreign currency codes.
195tting Started with Purchasing and Accounts Payable | Setting Up the Purchasing and Accounts Payable Modules
Ge
More information
If you need more information on any of the features or items mentioned in this section, or the concepts underlying them, each topic or feature is covered in other sections of this manual.
To locate the section name and page number where you can find more information about a specific feature, code, or concept, refer to “Checklist 1: Required setup overview” on page 202 or “Checklist 2: Complete setup overview (all features)” on page 205.
For information about setting up and using online approvals in the Purchasing and Accounts Payable modules, see the Using Online Approvals in Colleague Finance manual.
Defining the modules to reflect your procurement processes
To define the Purchasing and Accounts Payable modules, you should analyze the way your institution’s procurement activities work. You may want to implement none, some, or all of the optional features available.
This section provides some guidelines for analyzing your current structure and processes and deciding which features of the Purchasing and Accounts Payable modules you will implement.
Factors to consider when setting up the modules
While you are deciding how to set up the Purchasing and Accounts Payable modules, be aware that its operation depends on how you have set up several institution-wide parameters and defaults.
This section presents the following questions you can use to evaluate how to set up your system:
• What procurement policies do you want to implement? You can implement approvals, requisition numbering, discount method, tax expense distribution, all item acceptance by Receiving.
• What types of information do you want to incorporate as system-wide defaults? You can set default prompts, for example, at your standard GL distribution method; a default shipping address; and default check and purchase order printing specifications.
• What are the characteristics of your institution’s procurement processes? The modules can be set up to reflect specific business methods and practices.
196tting Started with Purchasing and Accounts Payable | Setting Up the Purchasing and Accounts Payable Modules
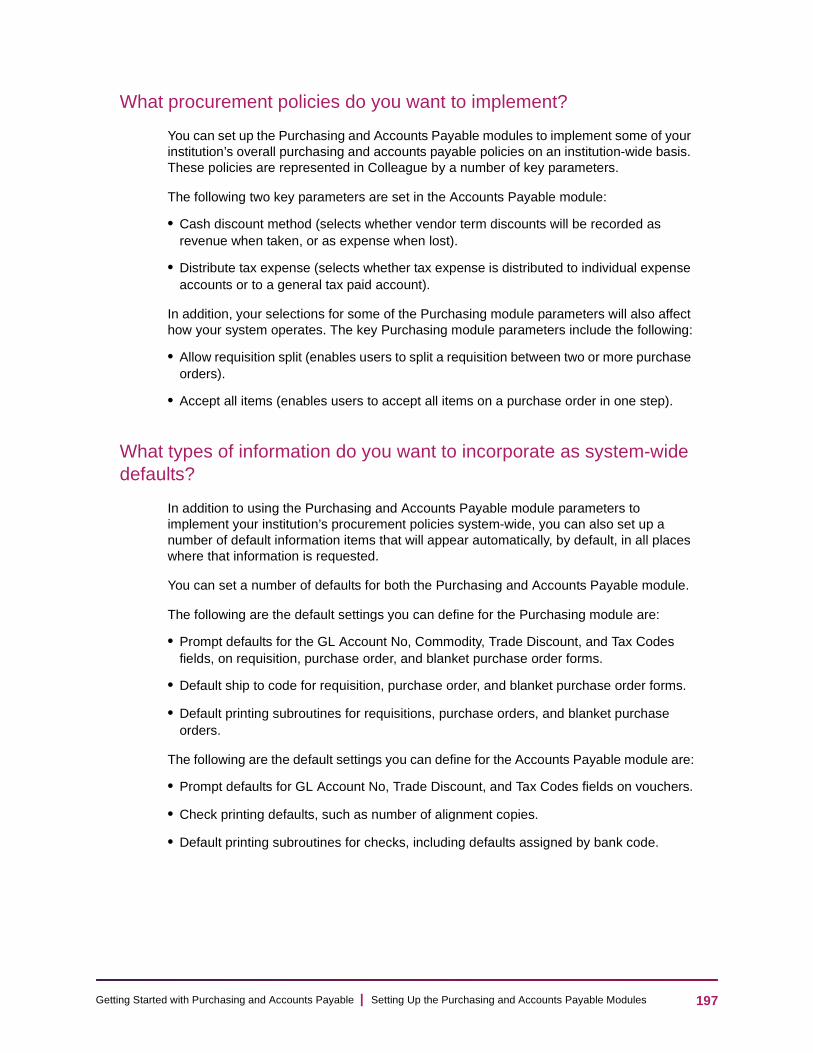
Ge
What procurement policies do you want to implement?
You can set up the Purchasing and Accounts Payable modules to implement some of your institution’s overall purchasing and accounts payable policies on an institution-wide basis. These policies are represented in Colleague by a number of key parameters.
The following two key parameters are set in the Accounts Payable module:
• Cash discount method (selects whether vendor term discounts will be recorded as revenue when taken, or as expense when lost).
• Distribute tax expense (selects whether tax expense is distributed to individual expense accounts or to a general tax paid account).
In addition, your selections for some of the Purchasing module parameters will also affect how your system operates. The key Purchasing module parameters include the following:
• Allow requisition split (enables users to split a requisition between two or more purchase orders).
• Accept all items (enables users to accept all items on a purchase order in one step).
What types of information do you want to incorporate as system-wide defaults?
In addition to using the Purchasing and Accounts Payable module parameters to implement your institution’s procurement policies system-wide, you can also set up a number of default information items that will appear automatically, by default, in all places where that information is requested.
You can set a number of defaults for both the Purchasing and Accounts Payable module.
The following are the default settings you can define for the Purchasing module are:
• Prompt defaults for the GL Account No, Commodity, Trade Discount, and Tax Codes fields, on requisition, purchase order, and blanket purchase order forms.
• Default ship to code for requisition, purchase order, and blanket purchase order forms.
• Default printing subroutines for requisitions, purchase orders, and blanket purchase orders.
The following are the default settings you can define for the Accounts Payable module are:
• Prompt defaults for GL Account No, Trade Discount, and Tax Codes fields on vouchers.
• Check printing defaults, such as number of alignment copies.
• Default printing subroutines for checks, including defaults assigned by bank code.
197tting Started with Purchasing and Accounts Payable | Setting Up the Purchasing and Accounts Payable Modules

Ge
What are the characteristics of your institution’s procurement processes?
Your institution’s procurement processes may have several unique characteristics. These might be in the following areas:
• Purchasing volume.
• Hierarchy and procurement authority structure (approval and requisition authority).
• Independent branch or shadow procurement functions.
• Financial/bank arrangements.
• Vendor tracking requirements.
• Buyer and commodity requirements.
• Shipping and receiving tracking requirements.
• Your tax situation.
• International procurement functions.
The next section gives more information on setting up your system to reflect these characteristics.
Determining how you should set up the module
What system features do you need?
The first column of Table 39 on page 199 lists typical features of procurement systems, from bank accounts and buyers to taxes and vendors. The remaining three columns list the code or codes you need to define, or the step you need to take, to set up that feature in the Accounts Payable (and Purchasing) module.
Note the following about the table:
• This list is in alphabetical order by “Category.”
• For more detail on any of these items, see “Checklist 1: Required setup overview” on page 202 or “Checklist 2: Complete setup overview (all features)” on page 205.
198tting Started with Purchasing and Accounts Payable | Setting Up the Purchasing and Accounts Payable Modules

Ge
Table 39: Codes to be defined for Purchasing and Accounts Payable options
Category Use Define Form
All Use the Purchasing and Accounts Payable modules
AP types, bank codes
AP Types (APTF)
Bank Codes (BKCM)
Use the receiving forms
Item conditions (ITEM. CONDITION code table)
Validation Codes (VAL)
Approvals Plan to use online approvals
Approval defaults Approval Default Maintenance (APPD)
Approval GL classes Approval GL Class Maintenance (APGL)
Approval policy classes
Approval Policy Class Maintenance (APCM)
Approval IDs Approval Maintenance (APPM)
Approval Password Approval Password Maintenance (APPW)
Bank accounts Have several AP checking accounts
The appropriate number of bank codes
Bank Codes (BKCM)
Buyers Want to assign buyers to requisitions or POs
Buyer codes Staff and Volunteers (SVM)
Canadian Purchase from foreign vendors
Foreign currency codes
Currency Exchange (CEXM)
Receive rebates on GST taxes
GST rebate tax codes
Tax Codes (TXCM)
Receive ITC credits on taxes
GST-ITC tax codes
Pay PST taxes PST tax codes
Want taxes to appear on POs by category (not singly)
Tax categories (TAX. CATEGORIES code table)
Validation Codes (VAL)
Commodity codes
Use commodity codes
Commodity codes Commodity Codes (CMCM)
199tting Started with Purchasing and Accounts Payable | Setting Up the Purchasing and Accounts Payable Modules
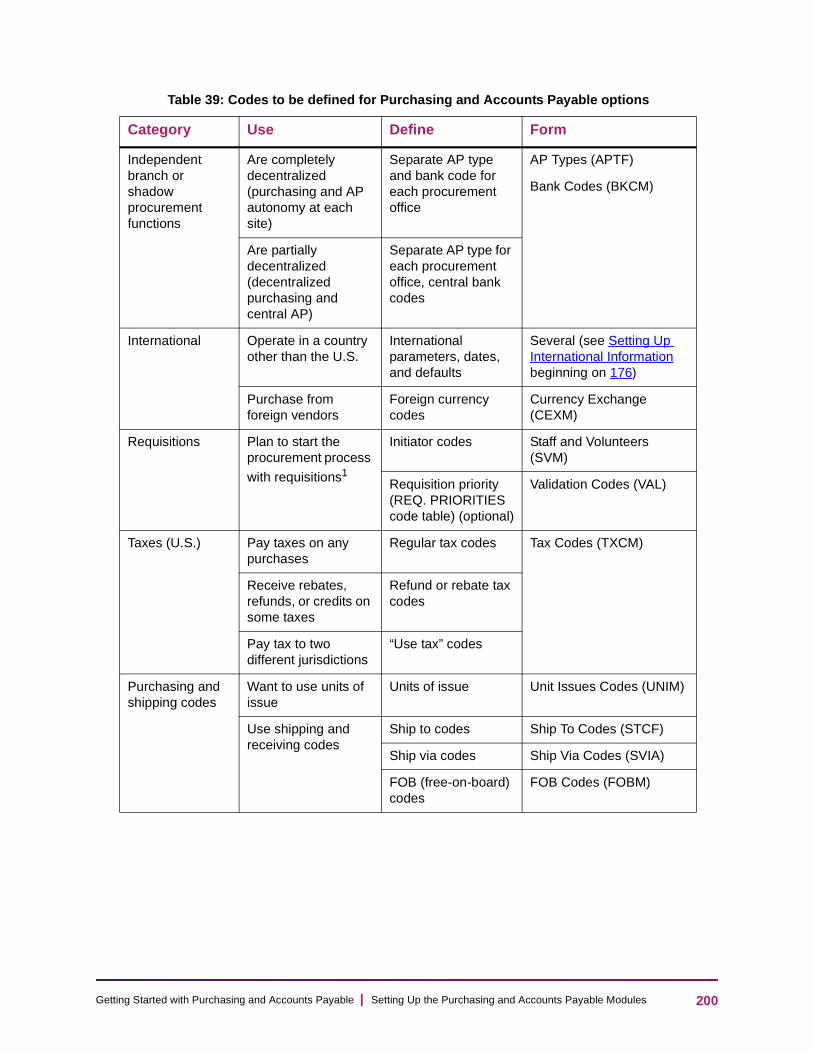
Ge
Independent branch or shadow procurement functions
Are completely decentralized (purchasing and AP autonomy at each site)
Separate AP type and bank code for each procurement office
AP Types (APTF)
Bank Codes (BKCM)
Are partially decentralized (decentralized purchasing and central AP)
Separate AP type for each procurement office, central bank codes
International Operate in a country other than the U.S.
International parameters, dates, and defaults
Several (see Setting Up International Information beginning on 176)
Purchase from foreign vendors
Foreign currency codes
Currency Exchange (CEXM)
Requisitions Plan to start the procurement process
with requisitions1
Initiator codes Staff and Volunteers (SVM)
Requisition priority (REQ. PRIORITIES code table) (optional)
Validation Codes (VAL)
Taxes (U.S.) Pay taxes on any purchases
Regular tax codes Tax Codes (TXCM)
Receive rebates, refunds, or credits on some taxes
Refund or rebate tax codes
Pay tax to two different jurisdictions
“Use tax” codes
Purchasing and shipping codes
Want to use units of issue
Units of issue Unit Issues Codes (UNIM)
Use shipping and receiving codes
Ship to codes Ship To Codes (STCF)
Ship via codes Ship Via Codes (SVIA)
FOB (free-on-board) codes
FOB Codes (FOBM)
Table 39: Codes to be defined for Purchasing and Accounts Payable options
Category Use Define Form
200tting Started with Purchasing and Accounts Payable | Setting Up the Purchasing and Accounts Payable Modules

Ge
Do you need to create any new GL accounts?
Be sure to examine your general ledger before you set up the Purchasing and Accounts Payable modules, to ensure that you have created any new general ledger accounts required to use certain functions.
Table 40 summarizes the GL accounts that should be defined for the different module features:
Vendors Track cash discounts Vendor terms Vendor Terms (VTMF)
Classify vendors by types (to track vendor procurement status)
Vendor types Vendor Types (VTYF)
Want to track your own set of vendor characteristics
Vendor miscellaneous codes (VENDOR.MISC. CODES code table)
Validation Codes (VAL)
1.No special code requirements exist if you start the procurement process with either purchase orders or vouchers.
Table 40: GL accounts needed when defining Purchasing and Accounts Payable
Use Define AccountAccount Type Form
AP types (required) AP Control GL Account(s)
Liability AP Types (APTF)
Discount GL Account(s)
Revenue1
Expense1
Bank codes (required)
GL Cash Account(s) Asset Bank Codes (BKCM)
Currency codes Currency Exchange
GL Account2Expense Currency Exchange (CEXM)
Tax codes (and not distributing tax expense)
Tax Expense GL Account(s)
Expense AP Types (APTF)
Tax codes with rebates or refunds
Rebate/Refund GL Account(s)
Revenue Tax Codes (TXCM)
Tax codes with use taxes
Use Tax GL Account(s)
Expense Tax Codes (TXCM)
Table 39: Codes to be defined for Purchasing and Accounts Payable options
Category Use Define Form
201tting Started with Purchasing and Accounts Payable | Setting Up the Purchasing and Accounts Payable Modules

Ge
You can define GL accounts in the General Ledger module.
Purchasing and Accounts Payable modules setup checklists
Because of the wide variety of possible implementations and optional features in the Purchasing and Account Payable modules, we are providing two setup checklists, as follows:
• Checklist 1: Required setup. Steps for setting up only the required portions of the Purchasing and Accounts Payable modules
• Checklist 2: Complete setup. Steps for setting up all features available with the Purchasing and Accounts Payable modules
Use the setup checklist that best approximates your level of setup complexity.
Note: Each of the two setup checklists is a complete task list. That is, each lists all steps required to set up the module for the corresponding level of complexity.
Checklist 1: Required setup overview
The Basic Setup Checklist is a guide for setting up the Purchasing and Accounts Payable modules with basic functionality. On a broad level, this setup process can be organized into seven primary component steps:
1. Make major implementation decisions. Before setting up the Purchasing and Accounts Payable modules, you must make some informed decisions about how your institution will use the module. The following major areas require implementation discussions and decisions:
1.1. Purchasing module parameters and defaults.
1.2. Accounts Payable module parameters (primarily discount method and tax expense distribution) and defaults.
1.3. How individual code tables and code files will be set up.
1.4. How vendors will be set up.
• Careful application of this step will ensure that the data you enter into the system will reflect your institution’s procurement policies and practices.
1.The GL account type for your discount account is determined by your selection for cash discount method. For more information see “The discount method parameter” on page 275.2.You must have a separate currency exchange GL account, and a separate GL cash account, for each foreign currency you set up.
202tting Started with Purchasing and Accounts Payable | Setting Up the Purchasing and Accounts Payable Modules
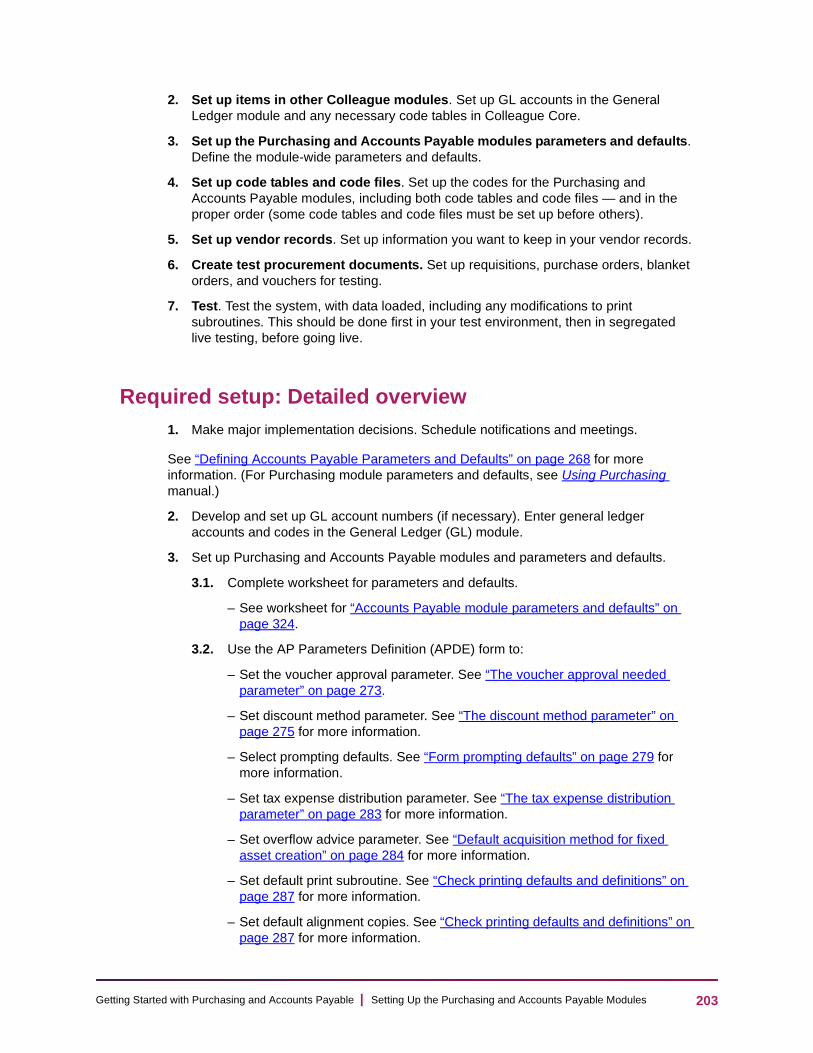
Ge
2. Set up items in other Colleague modules. Set up GL accounts in the General Ledger module and any necessary code tables in Colleague Core.
3. Set up the Purchasing and Accounts Payable modules parameters and defaults. Define the module-wide parameters and defaults.
4. Set up code tables and code files. Set up the codes for the Purchasing and Accounts Payable modules, including both code tables and code files — and in the proper order (some code tables and code files must be set up before others).
5. Set up vendor records. Set up information you want to keep in your vendor records.
6. Create test procurement documents. Set up requisitions, purchase orders, blanket orders, and vouchers for testing.
7. Test. Test the system, with data loaded, including any modifications to print subroutines. This should be done first in your test environment, then in segregated live testing, before going live.
Required setup: Detailed overview 1. Make major implementation decisions. Schedule notifications and meetings.
See “Defining Accounts Payable Parameters and Defaults” on page 268 for more information. (For Purchasing module parameters and defaults, see Using Purchasing manual.)
2. Develop and set up GL account numbers (if necessary). Enter general ledger accounts and codes in the General Ledger (GL) module.
3. Set up Purchasing and Accounts Payable modules and parameters and defaults.
3.1. Complete worksheet for parameters and defaults.
– See worksheet for “Accounts Payable module parameters and defaults” on page 324.
3.2. Use the AP Parameters Definition (APDE) form to:
– Set the voucher approval parameter. See “The voucher approval needed parameter” on page 273.
– Set discount method parameter. See “The discount method parameter” on page 275 for more information.
– Select prompting defaults. See “Form prompting defaults” on page 279 for more information.
– Set tax expense distribution parameter. See “The tax expense distribution parameter” on page 283 for more information.
– Set overflow advice parameter. See “Default acquisition method for fixed asset creation” on page 284 for more information.
– Set default print subroutine. See “Check printing defaults and definitions” on page 287 for more information.
– Set default alignment copies. See “Check printing defaults and definitions” on page 287 for more information.
203tting Started with Purchasing and Accounts Payable | Setting Up the Purchasing and Accounts Payable Modules

Ge
– Define print subroutines for each bank code. See “Check printing defaults and definitions” on page 287 for more information.
– Set up print subroutine definitions. See “Check printing defaults and definitions” on page 287 for more information.
4. Set up Purchasing and Accounts Payable module code tables you plan to use (such as ITEM.CONDITION, TAX.CATEGORIES, REQ.PRIORITIES, and VENDOR.MISC.CODES)
4.1. Complete worksheets for each code table (see Table 66 on page 322 or Table 67 on page 323 for specific code table worksheets.
– See “Determining your definitions for the user-maintained code tables” on page 62 (for codes shared by Purchasing and Accounts Payable), and “Defining the Accounts Payable code table” on page 308 for more information.
4.2. Enter code table data. Use the Validation Codes (VAL) form.
– See Validation Code Table Maintenance for more information.
5. Setup the two transaction code files.
5.1. Complete worksheets for each code file.
– See the worksheets “AP types” on page 326 and “Bank codes” on page 327.
5.2. Define bank codes. Use the Bank Codes (BKCM) form.
– See “Defining bank codes” on page 83 for more information.
5.3. Define AP type codes. Use the AP Types (APTF) form.
– See “Defining AP types” on page 100 for more information.
6. Setup the staff and volunteer code file (if using requisitions).
6.1. Complete worksheets for staff/volunteer codes.
– See the worksheet “Staff/Volunteer codes” on page 329.
6.2. Define staff/volunteer codes. Use the Staff and Volunteers (SVM) form.
– See “Defining staff/volunteer codes” on page 117 for more information.
7. Setup tax codes (if paying taxes).
7.1. Complete worksheets for tax codes.
– See “Setting Up Tax-Related Information” on page 178, and the “Tax Codes” worksheet on 346 for more information.
7.2. Define tax codes. Use the Tax Codes (TXCM) form.
– See “Defining tax codes” on page 120 for more information.
8. Separate person vendors from corporate vendors. Complete worksheets for each vendor.
See Table 66 on page 322 for specific vendor worksheets.
9. Setup vendors that are corporations (organizations).
9.1. Add demographic information for corporate vendors. Use the Organizations Profile (ORGP) form.
204tting Started with Purchasing and Accounts Payable | Setting Up the Purchasing and Accounts Payable Modules
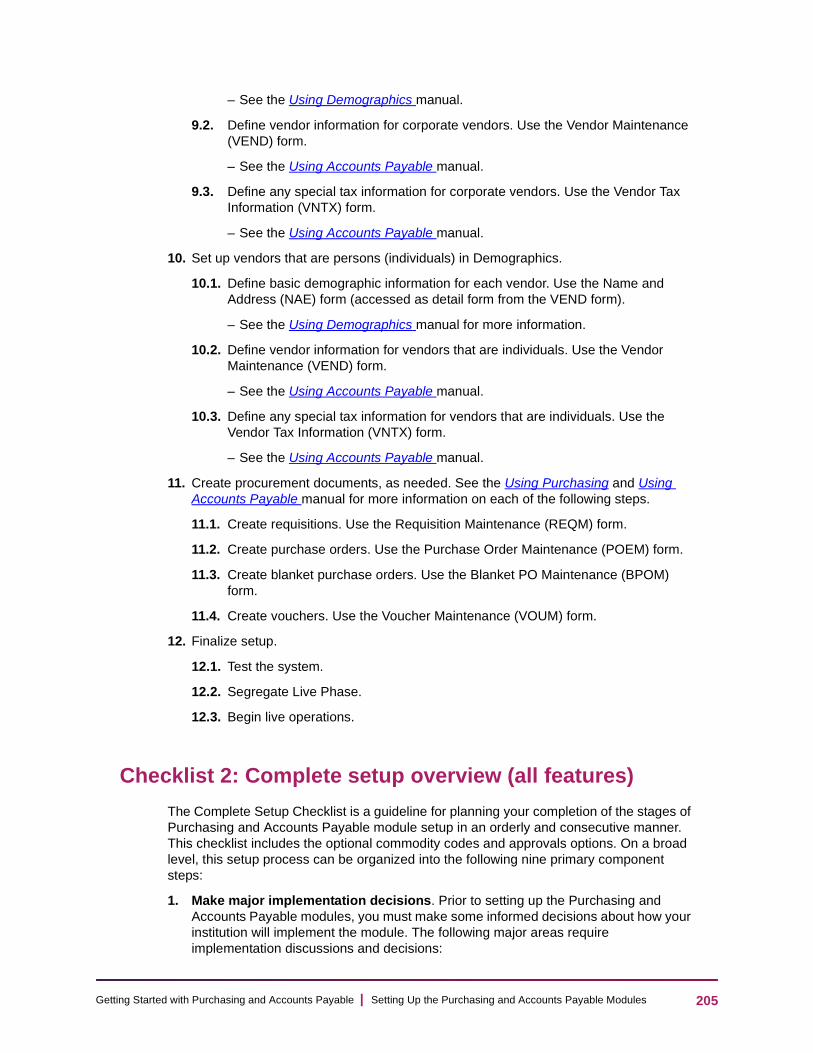
Ge
– See the Using Demographics manual.
9.2. Define vendor information for corporate vendors. Use the Vendor Maintenance (VEND) form.
– See the Using Accounts Payable manual.
9.3. Define any special tax information for corporate vendors. Use the Vendor Tax Information (VNTX) form.
– See the Using Accounts Payable manual.
10. Set up vendors that are persons (individuals) in Demographics.
10.1. Define basic demographic information for each vendor. Use the Name and Address (NAE) form (accessed as detail form from the VEND form).
– See the Using Demographics manual for more information.
10.2. Define vendor information for vendors that are individuals. Use the Vendor Maintenance (VEND) form.
– See the Using Accounts Payable manual.
10.3. Define any special tax information for vendors that are individuals. Use the Vendor Tax Information (VNTX) form.
– See the Using Accounts Payable manual.
11. Create procurement documents, as needed. See the Using Purchasing and Using Accounts Payable manual for more information on each of the following steps.
11.1. Create requisitions. Use the Requisition Maintenance (REQM) form.
11.2. Create purchase orders. Use the Purchase Order Maintenance (POEM) form.
11.3. Create blanket purchase orders. Use the Blanket PO Maintenance (BPOM) form.
11.4. Create vouchers. Use the Voucher Maintenance (VOUM) form.
12. Finalize setup.
12.1. Test the system.
12.2. Segregate Live Phase.
12.3. Begin live operations.
Checklist 2: Complete setup overview (all features)
The Complete Setup Checklist is a guideline for planning your completion of the stages of Purchasing and Accounts Payable module setup in an orderly and consecutive manner. This checklist includes the optional commodity codes and approvals options. On a broad level, this setup process can be organized into the following nine primary component steps:
1. Make major implementation decisions. Prior to setting up the Purchasing and Accounts Payable modules, you must make some informed decisions about how your institution will implement the module. The following major areas require implementation discussions and decisions:
205tting Started with Purchasing and Accounts Payable | Setting Up the Purchasing and Accounts Payable Modules

Ge
1.1. Purchasing module parameters and defaults.
1.2. Accounts Payable module parameters (primarily discount method and tax expense distribution) and defaults.
1.3. How individual code tables and code files will be set up.
1.4. How vendors will be set up.
• Careful application of this step will ensure that the data you enter into the system will reflect your institution’s procurement policies and practices.
2. Set up items in other Colleague modules. Set up GL accounts, if needed, in the General Ledger module, as well as Core code tables.
3. Set up the Purchasing and Accounts Payable module parameters and defaults. Define the module-wide parameters and defaults.
4. Set up code tables and code files. Set up the codes for the Purchasing and Accounts Payable modules, including both code tables and code files — and in the proper order (that is, some code tables and code files must be set up before others).
5. (Optional) Set up commodity codes and related code tables. Set up your selected type of commodity codes, including the code tables related to commodities
6. Set up vendor records. Set up information you want to keep in your vendor records.
7. (Optional) Set up online approvals. Set up the approval classes you will need, as well as approval IDs for all approvers. See the Using Online Approvals in Colleague Finance manual for information.
8. Create test procurement documents. Set up requisitions, purchase orders, blanket purchase orders, and vouchers for testing.
9. Test. Test the system, with data loaded, including any modifications to print subroutines. This should be done first in test, then in segregated live testing, before going live.
Complete setup: Detailed overview (all features)1. Make implementation decisions. Schedule notifications and meetings.
See “Defining Accounts Payable Parameters and Defaults” on page 268 and “Defining Purchasing Parameters and Defaults” on page 217 for more information.
2. Set up GL numbers (if not done already). Enter general ledger accounts and codes in the General Ledger (GL) module.
3. Set up Colleague Core code tables used in the Purchasing and Accounts Payable modules (if not already done). Use the Core VAL form.
3.1. Define address type codes (ADREL.TYPES).
3.2. Define formatted name type (FORMATTED.NAME.TYPES).
3.3. Define person origin codes (PERSON.ORIGIN.CODES).
3.4. Define phone types (PHONE.TYPES).
3.5. Define source codes (SOURCES).
206tting Started with Purchasing and Accounts Payable | Setting Up the Purchasing and Accounts Payable Modules

Ge
3.6. Define Tax forms (TAX.FORMS).
– See Validation Code Table Maintenance for more information.
4. Set up Purchasing and Accounts Payable module parameters and defaults.
4.1. Complete worksheets for parameters and defaults.
– See worksheet for “Accounts Payable module parameters and defaults” on page 324.
4.2. Use the AP Parameters Definition (APDE) form to:
• Set voucher approval parameter. See “The voucher approval needed parameter” on page 273.
• Set discount method parameter. See “The discount method parameter” on page 275 for more information.
• Select prompting defaults. See “Form prompting defaults” on page 279 for more information.
• Set tax expense distribution parameter. See “The tax expense distribution parameter” on page 283 for more information.
• Set overflow advice parameter. See “Default acquisition method for fixed asset creation” on page 284 for more information.
• Set default print subroutine. See “Check printing defaults and definitions” on page 287 for more information.
• Set default alignment copies. See “Check printing defaults and definitions” on page 287 for more information.
• Define print subroutines for each bank code. See “Check printing defaults and definitions” on page 287 for more information.
• Set up print subroutine definitions. See “Check printing defaults and definitions” on page 287 for more information.
5. Set up the Purchasing and Accounts Payable module code tables you plan to use (such as ITEM.CONDITION, TAX.CATEGORIES, REQ.PRIORITIES, and VENDOR.MISC.CODES)
5.1. Complete worksheets for each code table (see Table 66 on page 322 or Table 67 on page 323 for specific code table worksheets.
– See “Determining your definitions for the user-maintained code tables” on page 62 (for codes shared by Purchasing and Accounts Payable), and “Defining the Accounts Payable code table” on page 308 for more information.
5.2. Enter code table data. Use the Validation Codes (VAL) form.
– See Validation Code Table Maintenance for more information.
6. Set up foreign currency information if you are using foreign vendors.
6.1. Complete worksheets for foreign currency.
– See Currency codes worksheet on 340 for more information.
6.2. Define foreign currency codes. Use the Currency Exchange (CEXM) form.
207tting Started with Purchasing and Accounts Payable | Setting Up the Purchasing and Accounts Payable Modules
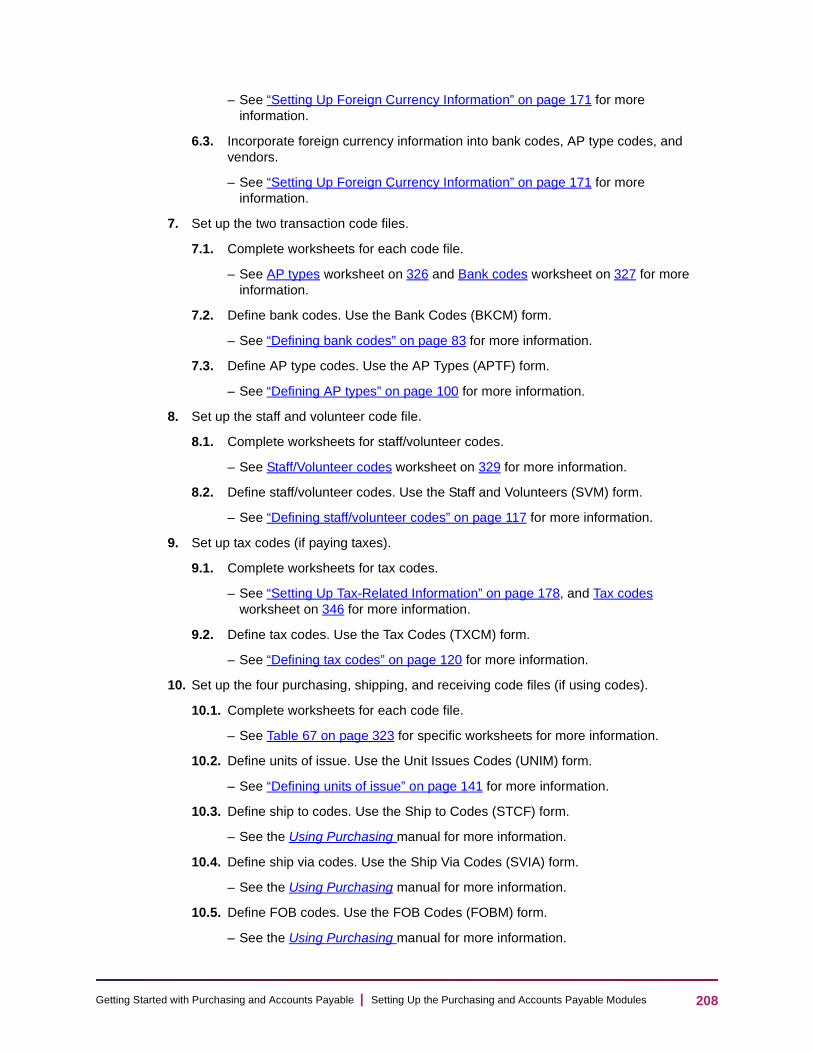
Ge
– See “Setting Up Foreign Currency Information” on page 171 for more information.
6.3. Incorporate foreign currency information into bank codes, AP type codes, and vendors.
– See “Setting Up Foreign Currency Information” on page 171 for more information.
7. Set up the two transaction code files.
7.1. Complete worksheets for each code file.
– See AP types worksheet on 326 and Bank codes worksheet on 327 for more information.
7.2. Define bank codes. Use the Bank Codes (BKCM) form.
– See “Defining bank codes” on page 83 for more information.
7.3. Define AP type codes. Use the AP Types (APTF) form.
– See “Defining AP types” on page 100 for more information.
8. Set up the staff and volunteer code file.
8.1. Complete worksheets for staff/volunteer codes.
– See Staff/Volunteer codes worksheet on 329 for more information.
8.2. Define staff/volunteer codes. Use the Staff and Volunteers (SVM) form.
– See “Defining staff/volunteer codes” on page 117 for more information.
9. Set up tax codes (if paying taxes).
9.1. Complete worksheets for tax codes.
– See “Setting Up Tax-Related Information” on page 178, and Tax codes worksheet on 346 for more information.
9.2. Define tax codes. Use the Tax Codes (TXCM) form.
– See “Defining tax codes” on page 120 for more information.
10. Set up the four purchasing, shipping, and receiving code files (if using codes).
10.1. Complete worksheets for each code file.
– See Table 67 on page 323 for specific worksheets for more information.
10.2. Define units of issue. Use the Unit Issues Codes (UNIM) form.
– See “Defining units of issue” on page 141 for more information.
10.3. Define ship to codes. Use the Ship to Codes (STCF) form.
– See the Using Purchasing manual for more information.
10.4. Define ship via codes. Use the Ship Via Codes (SVIA) form.
– See the Using Purchasing manual for more information.
10.5. Define FOB codes. Use the FOB Codes (FOBM) form.
– See the Using Purchasing manual for more information.
208tting Started with Purchasing and Accounts Payable | Setting Up the Purchasing and Accounts Payable Modules

Ge
11. Set up commodity codes.
11.1. Define code tables related to commodity codes (BUYING.ARRANGEMENTS and CMDTY.MISC.CODES1-5). Use the Validation Codes (VAL) form.
– See Validation Code Table Maintenance for more information.
11.2. Complete worksheets for commodity codes.
– See Table 67 on page 323 for specific worksheets for more information.
11.3. Define commodity codes. Use the Commodity Codes (CMCM) form.
– See “Understanding Commodity/Service Codes” on page 152 for more information.
12. Set up vendors.
12.1. Complete worksheets for person vendors and corporate vendors.
– See Table 67 on page 323 for specific vendor worksheets for more information.
12.2. Add demographic information for vendors that are corporations. Use the Organization Profiles (ORGP) form.
– See the Using Demographics manual for more information.
12.3. Add basic demographic information for vendors that are persons (individuals) in Demographics. Use the Name and Address Entry (NAE) form (accessed as detail form from VEND).
– See the Using Accounts Payable manual.
12.4. Define vendor information for vendors. Use the Vendor Maintenance (VEND) form.
– See the Using Accounts Payable manual.
12.5. Define any special tax information for vendors. Use the Vendor Tax Information (VNTX) form.
– See the Using Accounts Payable manual.
12.6. Associate commodities with vendors. Use the Vendor Commodities Maintenance (VNCL) form.
– See “Linking commodity codes to your vendors” on page 161 for more information.
13. Set up online approvals. See the Using Online Approvals in Colleague Finance manual for more information.
14. Create procurement documents, as needed. See the Using Purchasing and Using Accounts Payable manuals for more information on each of these steps.
14.1. Create requisitions. Use the Requisition Maintenance (REQM) form.
14.2. Create purchase orders. Use the Purchase Order Maintenance (POEM) form.
14.3. Create blanket purchase orders. Use the Blanket PO Maintenance (BPOM) form.
14.4. Create vouchers. Use the Voucher Maintenance (VOUM) form.
209tting Started with Purchasing and Accounts Payable | Setting Up the Purchasing and Accounts Payable Modules

Ge
15. Finalize setup.
15.1. Test the system.
15.2. Segregate Live Phase.
15.3. Begin live operations.
210tting Started with Purchasing and Accounts Payable | Setting Up the Purchasing and Accounts Payable Modules
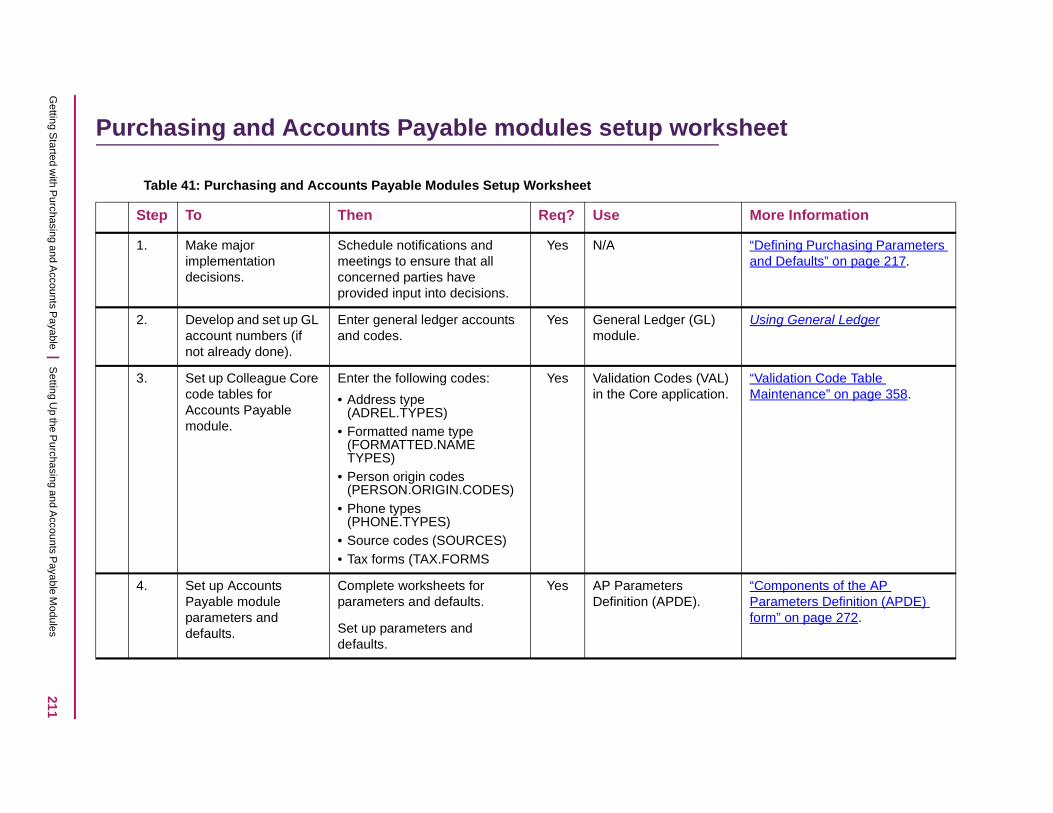
211G
etting Started w
ith Purchasing and A
ccounts Payable | S
etting Up the P
urchasing and Accounts P
ayable Modules
P ksheet
More Information
“Defining Purchasing Parameters and Defaults” on page 217.
) Using General Ledger
AL) ion.
“Validation Code Table Maintenance” on page 358.
“Components of the AP Parameters Definition (APDE) form” on page 272.
urchasing and Accounts Payable modules setup wor
Table 41: Purchasing and Accounts Payable Modules Setup Worksheet
Step To Then Req? Use
1. Make major implementation decisions.
Schedule notifications and meetings to ensure that all concerned parties have provided input into decisions.
Yes N/A
2. Develop and set up GL account numbers (if not already done).
Enter general ledger accounts and codes.
Yes General Ledger (GLmodule.
3. Set up Colleague Core code tables for Accounts Payable module.
Enter the following codes:
• Address type (ADREL.TYPES)
• Formatted name type (FORMATTED.NAME TYPES)
• Person origin codes (PERSON.ORIGIN.CODES)
• Phone types (PHONE.TYPES)
• Source codes (SOURCES)• Tax forms (TAX.FORMS
Yes Validation Codes (Vin the Core applicat
4. Set up Accounts Payable module parameters and defaults.
Complete worksheets for parameters and defaults.
Set up parameters and defaults.
Yes AP Parameters Definition (APDE).
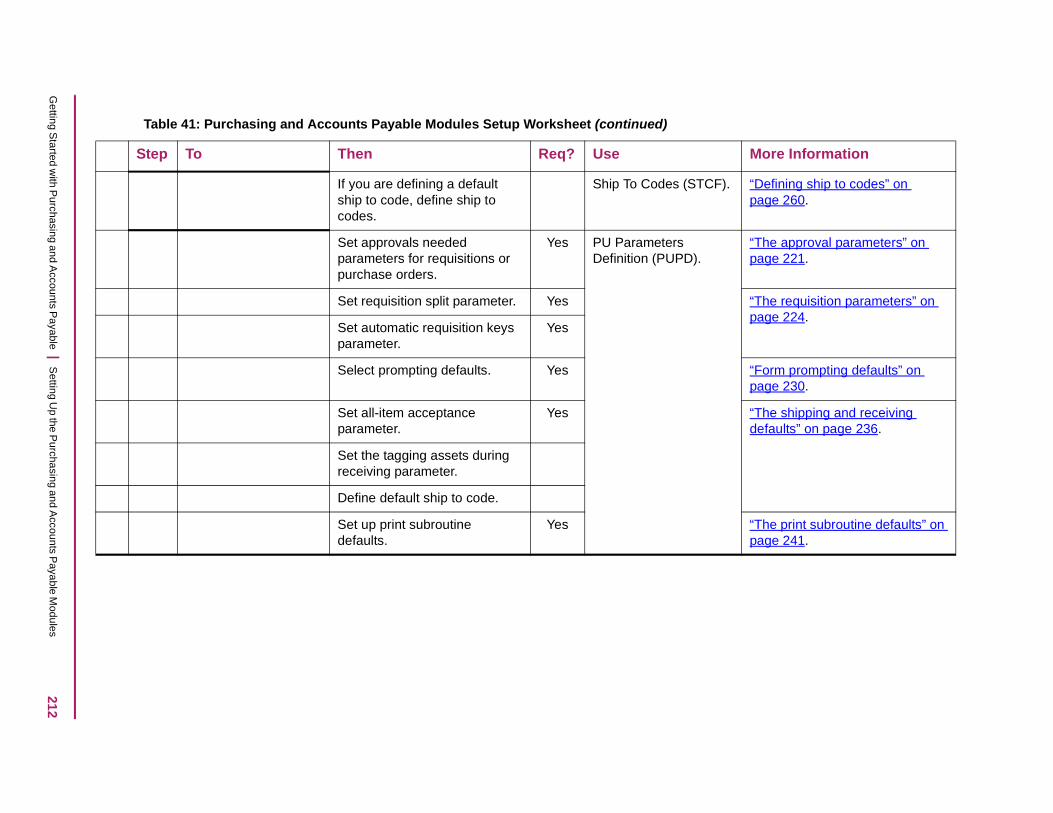
212G
etting Started w
ith Purchasing and A
ccounts Payable | S
etting Up the P
urchasing and Accounts P
ayable Modules
F). “Defining ship to codes” on page 260.
“The approval parameters” on page 221.
“The requisition parameters” on page 224.
“Form prompting defaults” on page 230.
“The shipping and receiving defaults” on page 236.
“The print subroutine defaults” on page 241.
More Information
If you are defining a default ship to code, define ship to codes.
Ship To Codes (STC
Set approvals needed parameters for requisitions or purchase orders.
Yes PU Parameters Definition (PUPD).
Set requisition split parameter. Yes
Set automatic requisition keys parameter.
Yes
Select prompting defaults. Yes
Set all-item acceptance parameter.
Yes
Set the tagging assets during receiving parameter.
Define default ship to code.
Set up print subroutine defaults.
Yes
Table 41: Purchasing and Accounts Payable Modules Setup Worksheet (continued)
Step To Then Req? Use

213G
etting Started w
ith Purchasing and A
ccounts Payable | S
etting Up the P
urchasing and Accounts P
ayable Modules
Determining your definitions for the user-maintained code tables (for codes shared by Purchasing and Accounts Payable) on 62, and “Defining the purchasing-only code tables” on page 257.
AL). Validation Code Table Maintenance
“Currency codes” on page 340.
“Setting Up Foreign Currency Information” on page 171.
“Setting Up Foreign Currency Information” on page 171.
AP types worksheet on 326 and Bank codes worksheet on 327.
). “Defining bank codes” on page 83.
“Defining AP types” on page 100.
Staff/Volunteer codes worksheet on 329.
“Defining staff/volunteer codes” on page 117.
Tax codes worksheet on 346.
More Information
5. Set up Purchasing and Accounts Payable module code tables you plan to use.
Complete worksheets for each code table (see Table 66 on page 322, and Table 68 on page 337, for specific code table worksheets).
N/A
Enter code table data. Validation Codes (V
Set up foreign currency information.
Complete worksheets for foreign currency.
N/A
Define foreign currency codes. Currency Exchange(CEXM).
Incorporate foreign currency information into bank codes, AP type codes, and vendors.
N/A
Set up the two (2) transaction code files.
Complete worksheets for each code file.
N/A
Define bank codes. Yes Bank Codes (BKCM
Define AP type codes. Yes AP Types (APTF).
Set up the staff and volunteer code file (if using requisitions).
Complete worksheets for code file.
N/A
Define staff/volunteer codes. Yes Staff and Volunteers(SVM).
Set up tax codes (if paying taxes).
Complete worksheets for code file.
N/A
Table 41: Purchasing and Accounts Payable Modules Setup Worksheet (continued)
Step To Then Req? Use
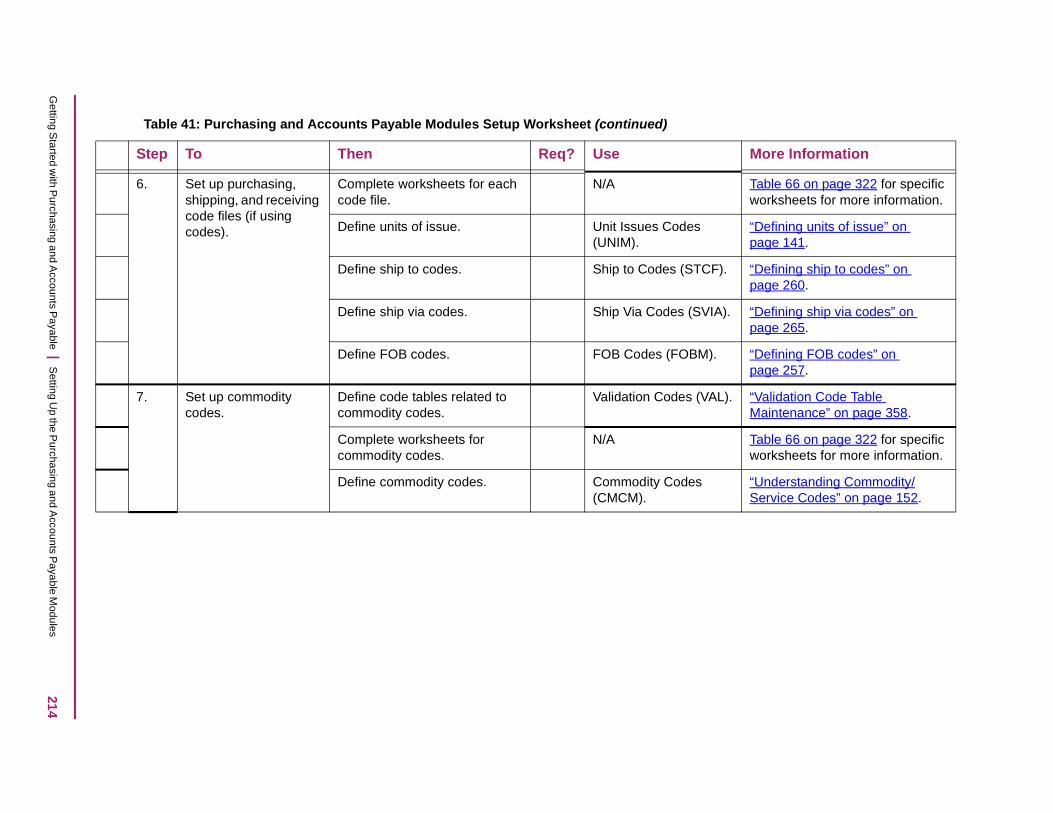
214G
etting Started w
ith Purchasing and A
ccounts Payable | S
etting Up the P
urchasing and Accounts P
ayable Modules
Table 66 on page 322 for specific worksheets for more information.
“Defining units of issue” on page 141.
F). “Defining ship to codes” on page 260.
IA). “Defining ship via codes” on page 265.
). “Defining FOB codes” on page 257.
AL). “Validation Code Table Maintenance” on page 358.
Table 66 on page 322 for specific worksheets for more information.
“Understanding Commodity/Service Codes” on page 152.
More Information
6. Set up purchasing, shipping, and receiving code files (if using codes).
Complete worksheets for each code file.
N/A
Define units of issue. Unit Issues Codes (UNIM).
Define ship to codes. Ship to Codes (STC
Define ship via codes. Ship Via Codes (SV
Define FOB codes. FOB Codes (FOBM
7. Set up commodity codes.
Define code tables related to commodity codes.
Validation Codes (V
Complete worksheets for commodity codes.
N/A
Define commodity codes. Commodity Codes (CMCM).
Table 41: Purchasing and Accounts Payable Modules Setup Worksheet (continued)
Step To Then Req? Use

215G
etting Started w
ith Purchasing and A
ccounts Payable | S
etting Up the P
urchasing and Accounts P
ayable Modules
See Table 66 on page 322 for specific vendor worksheets.
See Using Demographics.
e See Using Accounts Payable.
tion See Using Accounts Payable.
See Using Demographics.
e See Using Accounts Payable.
tion See Using Accounts Payable.
e gue
See Using Online Approvals in Colleague Finance.
More Information
8. Separate person vendors from corporate vendors.
Complete worksheets for each vendor.
N/A
Set up vendors that are corporations (organizations) (if not already completed).
Add demographic inform.ation for corporate vendors.
Organization Profile(ORGP).
Define vendor information for corporate vendors.
Yes Vendor Maintenanc(VEND).
Define any special tax information for corporate vendors.
Vendor Tax Informa(VNTX).
Set up vendors that are persons (individuals) in Demographics (if not already completed).
Define basic demographic information for each vendor.
Name and AddressEntry (NAE).
Define vendor information for vendors that are individuals.
Yes Vendor Maintenanc(VEND).
Define any special tax information for vendors that are individuals.
Vendor Tax Informa(VNTX).
9. Set up approvals. Set up approvals. See the Using OnlinApprovals in ColleaFinance manual
Table 41: Purchasing and Accounts Payable Modules Setup Worksheet (continued)
Step To Then Req? Use

216G
etting Started w
ith Purchasing and A
ccounts Payable | S
etting Up the P
urchasing and Accounts P
ayable Modules
).“Overview of Purchasing/Payables Processing” on page 30.
).
).
More Information
10. Create requisitions, purchase orders, and blanket purchase orders, as needed.
Create requisitions. Requisition Maintenance (REQM
Create purchase orders. Purchase Order Maintenance (POEM
Create blanket purchase orders (if using).
Blanket PO Maintenance (BPOM
11. Test. Yes
Segregated Live Phase.
Yes
Begin Live Operations. Yes
Table 41: Purchasing and Accounts Payable Modules Setup Worksheet (continued)
Step To Then Req? Use
Ge
Defining Purchasing Parameters and Defaults
In this chapter
This chapter explains the concepts and procedures for defining the parameters and defaults you use to customize the Purchasing module for your institution.
These parameters apply only to the Purchasing module. Parameters and defaults for other modules of Colleague Finance in operation at your institution, including General Ledger, Accounts Payable, Budget Management, Budget Request, Fixed Assets, Physical Plant, and Inventory, are set up in each specific module.
The chapter is divided into the following sections:
• Understanding the Purchasing module parameters and defaults.
• Procedure for defining the Purchasing module parameters and defaults.
Note: Some of the procedures discussed in this chapter may be reserved for your system administrator. If you do not have security access to the form used in these procedures (see “Form used” on page 218), check with your system administrator to determine who will perform these tasks.
Note: For a quick reference to setting your parameters and defaults, see “Setting the parameters and defaults: Quick reference” on page 247.
Where to find the information
Table 42 lists where to find the information.
Table 42: Purchasing parameters setup cross-reference
Topic Reference
Learn concepts of parameters “Understanding the purchasing parameters and defaults” on page 219.
217tting Started with Purchasing and Accounts Payable | Defining Purchasing Parameters and Defaults

Ge
Form used
The procedures for defining Purchasing module parameters and defaults, discussed in this chapter, requires access to the PU Parameters Definition (PUPD) form.
Before you begin
Several planning and decision-making processes should be completed before you define the module parameters and defaults within the Purchasing module. You should:
1. Review the concepts of Purchasing parameters and defaults.
See Understanding the purchasing parameters and defaults below.
2. Ensure that all concerned parties have had a chance to give input into the process of defining Purchasing parameters and defaults.
Coordinate with your information systems, purchasing, and accounts payable offices to set up parameters for the Purchasing module.
3. Ensure that ship to codes (SHIP.TO.CODES) have been defined in the Purchasing module.
See “Defining ship to codes” on page 260.
Learn about the approval parameters
“The approval parameters” on page 221.
Learn about the requisition split parameter
“Allow requisition split” on page 224.
Learn about the requisition key options parameter
“Automatic requisition keys” on page 227.
Learn about prompting default options for requisitions, purchase orders, and blanket purchase orders
“Form prompting defaults” on page 230.
Learn about the shipping defaults “The shipping and receiving defaults” on page 236.
Learn about the printing defaults “The print subroutine defaults” on page 241.
See a summary of the parameters and defaults to be set on this form
“Setting the parameters and defaults: Quick reference” on page 247.
Table 42: Purchasing parameters setup cross-reference (continued)
Topic Reference
218tting Started with Purchasing and Accounts Payable | Defining Purchasing Parameters and Defaults

Ge
Understanding the purchasing parameters and defaults
A parameter is a property, or set of properties, determining one or several characteristics of a structure or a system. When you set up parameters for a system, you are defining the limits of certain elements of the system, within which the system will always operate.
A default is “a selection automatically used by a computer program in the absence of a
choice made by the user.”1 For example, one of the defaults you can set up for the Purchasing module is a default shipping address for your institution. Each purchase order created will be printed with this default shipping address, unless you enter a different shipping address on an individual PO. (See 236 for more on the default shipping address.)
Note: Typically, one parameter form is available for each Colleague module you implement. This form lets you specify your institution’s policies, or characteristics about the particular module, thus customizing the module for your own institution.
The Purchasing module parameters and defaults let you control how the module will operate at your institution. They reflect your institution’s preferences about questions such as implementing online approvals for requisitions and purchase orders, cursor prompting on certain forms, and how you want your printed requisitions, POs, and blanket POs to look.
Note: Setting up the Purchasing module parameters and defaults is an integral part of the Purchasing module setup procedure, and involves several important decisions you must make about how you want your system to run. However, if you want to defer these decisions until the Purchasing module is set up, to see how the parameters will affect it, this will not hamper the module’s operation. If you do make changes in the Purchasing module parameters and defaults after initial setup, the new settings will be effective from the date you make the changes.
Parameters and defaults: An example
Defining parameters and defaults for a computer system is similar to the planning involved in building a house (shown in Figure 19). If you were a builder undertaking such a project, you would have to answer questions like the following before purchasing supplies or beginning work:
• What type of heating fuel will be used in the house?
• What type of windows will be installed?
1.Merriam Webster’s Collegiate Dictionary (Tenth Edition).
219tting Started with Purchasing and Accounts Payable | Defining Purchasing Parameters and Defaults

Ge
• What type of security system will be used — will there be locks only on doors and windows or will a complete security alarm system be installed?
• On what type of foundation will the house be built? Will there be a basement?
Figure 19: “Parameters” Involved in Building a House
You would make decisions about these items before doing any building, because these characteristics affect some important elements of the fundamental structure of the house.
Now imagine you are buying a new house, based on the builder’s model home, which is decorated with a beige carpet and cream walls. You might call these the default color selections for this model of home. Yet you might have the option of selecting something different from the default, such as green or blue carpeting and ivory or beige walls.
In a similar way, your selections of Purchasing module parameters and defaults will implement some of your institution’s purchasing policies, and determine some key elements in the operation of your system and how you and your users will interact with it.
Components of purchasing parameters and defaults
The module parameters and defaults are defined on the PU Parameters Definition (PUPD) form.
The options on the PUPD form can be divided into five separate sections by topic: approval parameters, requisition parameters, prompt defaults, shipping and receiving defaults, and printing defaults. These sections of the PUPD form are shown in the sample displayed in Figure 20.
Type ofWindows
Type ofHeating
Fuel
Type ofSecurity
Type ofFoundation
220tting Started with Purchasing and Accounts Payable | Defining Purchasing Parameters and Defaults
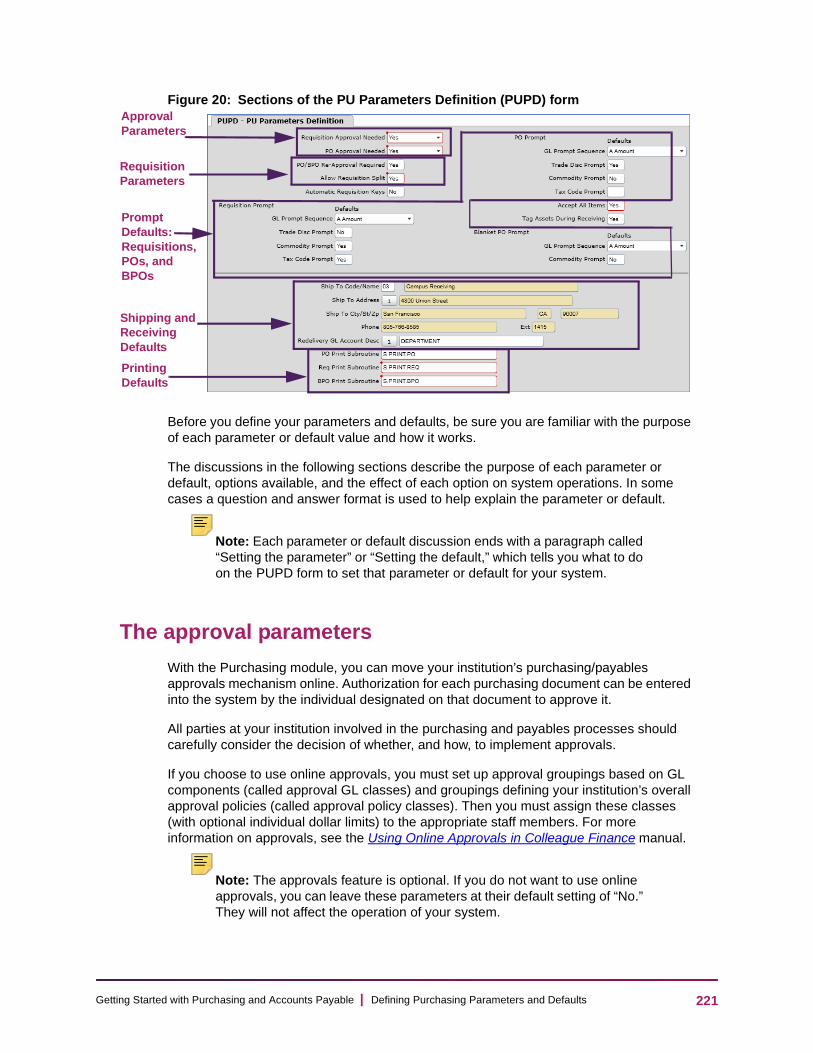
Ge
Figure 20: Sections of the PU Parameters Definition (PUPD) form
Before you define your parameters and defaults, be sure you are familiar with the purpose of each parameter or default value and how it works.
The discussions in the following sections describe the purpose of each parameter or default, options available, and the effect of each option on system operations. In some cases a question and answer format is used to help explain the parameter or default.
Note: Each parameter or default discussion ends with a paragraph called “Setting the parameter” or “Setting the default,” which tells you what to do on the PUPD form to set that parameter or default for your system.
The approval parameters
With the Purchasing module, you can move your institution’s purchasing/payables approvals mechanism online. Authorization for each purchasing document can be entered into the system by the individual designated on that document to approve it.
All parties at your institution involved in the purchasing and payables processes should carefully consider the decision of whether, and how, to implement approvals.
If you choose to use online approvals, you must set up approval groupings based on GL components (called approval GL classes) and groupings defining your institution’s overall approval policies (called approval policy classes). Then you must assign these classes (with optional individual dollar limits) to the appropriate staff members. For more information on approvals, see the Using Online Approvals in Colleague Finance manual.
Note: The approvals feature is optional. If you do not want to use online approvals, you can leave these parameters at their default setting of “No.” They will not affect the operation of your system.
Approval Parameters
Requisition Parameters
Prompt Defaults: Requisitions, POs, and BPOs
Printing Defaults
Shipping and Receiving Defaults
221tting Started with Purchasing and Accounts Payable | Defining Purchasing Parameters and Defaults
Ge
If you implement online approvals for both requisitions and purchase orders, note the following:
• Approvals secured for a requisition carry forward to the purchase order that is created from the requisition.
• You can implement completely different approval requirements for purchase orders and for requisitions, augmenting the level of internal accounting control at the purchase order stage if you need to.
Use the PU Parameters Definition (PUPD) form to tell Colleague at what stage of your procurement cycle you want to use online approvals, that is, to “turn approvals on” for
either requisitions, or purchase orders, or both.1
You set up your Purchasing module approvals in two separate parameters, Requisition Approval Needed and PO Approval Needed. These two parameters are discussed together in the following subsection.
Requisition approval needed and PO approval needed
The Requisition Approval Needed and PO Approval Needed parameters work almost exactly the same way. If you decide to require online approvals for either requisitions or purchase orders, each requisition or purchase order will need to be approved by the person or persons designated on the document before any further processing can occur. In other words, until approval, the next step in the document’s processing cannot be completed.
Table 43 shows the effects of your settings of these parameters on processing of requisitions and purchase orders.
1.In the Accounts Payable module, you can also require approvals at the voucher stage.
222tting Started with Purchasing and Accounts Payable | Defining Purchasing Parameters and Defaults

223G
etting Started w
ith Purchasing and A
ccounts Payable | D
efining Purchasing P
arameters and D
efaults
s and blanket purchase orders.
ne approvals with requisitions, purchase
s a
ted et
t
r.
Note: Your entry for the PO Approval Needed parameter applies to both purchase order
See Using Online Approvals in Colleague Finance for more detailed information about using onliorders, and blanket purchase orders.
Table 43: Effects of approval parameter settings on daily processing
Parameter Setting Approval Required
Requisition Approval Needed Yes or Auto-populate
• Printing• Posting to the ENC.XXXX (year) file (a
memo encumbrance)• Creation of a PO from a requisition
No No restrictions. Any requisition, once marked as “Done,” can be printed, posor made into a purchase order or blankpurchase order.
PO Approval Needed Yes or Auto-populate
• Printing• Posting to the general ledger (as an
encumbrance)1
• Any further processing
1.A purchase order posting transaction also creates a reverse memo encumbrance in the ENC.XXXX file.
No No restrictions. Any PO created, once ihas been marked as “Done,” can be printed, posted, or made into a vouche
Ge
The requisition parameters
Colleague provides two parameters to give you options for processing your requisitions: Allow Requisition Split and Automatic Requisition Keys. The Allow Requisition Split parameter lets you tell Colleague to allow splitting one requisition into two or more purchase orders. The Automatic Requisition Keys parameter lets you decide whether you want to allow users to assign requisition numbers manually, or have Colleague assign them automatically.
Note: If your institution is not using requisitions, you can leave these two parameters at their default setting. They will have no effect on the operation of your system.
The following sections explain each of these parameters in detail.
Allow requisition split
Often the initiator of a requisition does not know from which vendors the specific items he is ordering will be purchased. Your purchasing staff might want to split out a requisition, to take advantage of volume discounts, or to ensure that separate items are ordered from the appropriate vendors. The Allow Requisition Split parameter gives your institution this flexibility.
The following questions and answers are provided to help you make your decision about requisition splitting.
Questions and answers about the requisition splitting parameter
Question: What happens if our institution sets this parameter to “Yes”?
Answer: The requisition splitting parameter lets each line item on a requisition be pulled into a purchase order independently from other line items on the same requisition. Thus, if you set this parameter to “Yes,” a staff member, after entering a requisition number on a purchase order (thereby “pulling it in” to the PO), can delete from the PO any of the line items from the requisition he does not want to keep on that PO. The items deleted from the first PO stay on the requisition and, if he enters that requisition number onto a second PO, will be brought over to the second PO.
Note: To safeguard against accidentally putting the same line item on multiple POs, Colleague does not allow sending the same line item on a requisition to more than one purchase order.
Example. The following example illustrates how requisition splitting works.
Summary. The English department has a new graduate assistant and needs to order some office furniture: a table, chair, bookcase, dictionary, and thesaurus. The secretary of the English department creates a requisition for the needed items (all on one requisition, since she does not know what vendors the items will be purchased from).
224tting Started with Purchasing and Accounts Payable | Defining Purchasing Parameters and Defaults
Ge
When the purchasing department prepares to process the requisition, they decide to send all the line items except the dictionary and the thesaurus to their regular office furniture vendor; but they will create a separate purchase order to a book vendor for the two books.
Individual steps. In this example, the processing would incorporate the following steps:
1. Kelly, the secretary of the English department, creates a requisition for office furniture with five line items: table, chair, bookcase, dictionary, and thesaurus. She saves the requisition, and it is assigned number 0000852.
2. After investigating prices, Pat, the purchasing clerk, creates a purchase order (using “A” for Add) on the Purchase Order Maintenance (POEM) form, and enters the vendor ID of the office furniture vendor in the Vendor ID field. In the Requisitions field, Pat enters “852.” All the line items from requisition 0000852 are pulled over into the new PO.
3. Pat details to the PO Line Item Summary (POIL) form, deletes the line items for the dictionary and thesaurus from this purchase order, returns to the POEM form and saves the purchase order, as PO number P0002477.
4. Staying in the POEM form, Pat creates a second purchase order, enters the book vendor’s ID, and enters the same requisition number as before (“852”) in the Requisitions field. When Pat details to the PO Line Item Summary (POIL) form, the dictionary and thesaurus are the only line items that appear (because the others were removed from the outstanding portion of the requisition when the requisition was used for the first purchase order [PO number P0002477]).
5. Pat then adds any other necessary information to this purchase order, and saves it as P0002478.
The original requisition (0000852) has been split into two purchase orders (P0002477 and P0002478), each one going to a different vendor.
Question: What happens if we set this parameter to “No”?
Answer: If you set this parameter to “No,” then your system will operate as follows:
• Staff who create purchase orders from requisitions will always pull over all the line items from a requisition to a purchase order. In other words, there will always be a one-to-one relationship between each requisition and each purchase order.
• Once a purchase order has been created from a requisition, if you delete line items that came from the requisition, the deleted items are simply deleted from the purchase order, as a normal deletion would be; they will not be available for that PO or any future PO.
• The status of each line item of the requisition will always match the status of the requisition itself. For example, once a requisition has been carried forward to a purchase order, the status for the entire requisition changes to “PO Created” (no part of the requisition is outstanding, and therefore no part of the requisition is available to be made into another purchase order).
Question: What happens when a vendor is entered on a requisition that is split?
225tting Started with Purchasing and Accounts Payable | Defining Purchasing Parameters and Defaults

Ge
Answer: If a vendor ID (or name, if a miscellaneous vendor) was entered on a requisition you want to split between two purchase orders, that vendor ID (or name) will carry forward to each of the two purchase orders. If this vendor is the correct vendor for the first of the two purchase orders, you can delete the existing vendor ID (or name) from the second PO and enter a new vendor ID (or name) on that PO. Or, you can delete the existing vendor on the requisition and add a new vendor to both purchase orders.
Note: Whenever you delete a vendor ID from a requisition or purchase order, or add or change a vendor name or ID on a previously saved requisition or purchase order, Colleague recalculates all line item amounts and GL account number amounts from that requisition or PO, and makes an entry in the general ledger to record the new vendor ID or name. This ensures that the general ledger will post the requisition’s or PO’s financial transactions to the correct vendor. However, amounts for the given requisition or PO will be changed on the general ledger entry only if the extended price or the GL account amounts have changed.
Question: Can a requisition be split into two blanket purchase orders?
Answer: Blanket POs do not support requisition splitting, since the descriptions and prices of all items from a requisition are lost when you pull the requisition into a blanket PO. The total price of all the requisition’s line items becomes the blanket PO’s total amount, but the only information brought forward from the requisition line items themselves are the GL accounts and amounts.
Question: Are there any cautions we should be aware of with requisition splitting?
Answer: Yes. In deciding about this parameter, you should take into account that this option has important ramifications for internal accounting controls. The ability to split requisitions can significantly weaken your institution’s accounting control policies by allowing circumvention of those controls at the purchase order stage.
If this parameter is set to “Yes,” staff members are able to split a large requisition into multiple smaller ones, thus avoiding the PO approval limits. This type of requisition split is a textbook example of what auditors look for to qualify an audit opinion. The Handbook of Internal Accounting Controls, in a discussion of tests of control, describes a case in which a vice president’s approval is required for purchases over $20,000 and a purchase of $30,000 is split across two purchase orders, and says “the effective circumvention of the
[authorization] procedure...suggests the lack of a control environment.”1
Because of this potential for circumvention, we strongly recommend the following:
• Implement requisition splitting only after consulting with senior accounting officials at your institution who are aware of the control ramifications of such a policy.
• If you set this parameter to “Yes,” and are implementing approvals for purchase orders, you should also implement approvals for requisitions. Since Colleague carries forward the approvals on a requisition to any purchase order created from it, duplicate “signing” by the requisition approvers is not required.
1.2nd Edition, © 1991, (Prentice-Hall, ISBN 0-13-388059-1), page 331.
226tting Started with Purchasing and Accounts Payable | Defining Purchasing Parameters and Defaults

Ge
Be aware, however, that if you elect to split requisitions, even the approvals feature does not give failsafe protection against the circumvention of controls through unauthorized splitting. This is because splitting potentially allows redistribution of purchase amounts in such a way as to completely avoid the automated approval policy limits.
Question: What if our institution sets the parameter one way, and then we want to change it back?
Answer: If you normally do not allow requisition splitting but wish to allow it for special circumstances, you can set the parameter temporarily to “Yes” and then change it back to “No” when finished. Only be sure that all line items on all split requisitions have been moved over to purchase orders before you change the parameter back to “No,” or they will be lost.
Setting the parameter. If you want Colleague to allow a single requisition to be split into more than one purchase order, enter Y in the Allow Requisition Split field. If you do not want to allow requisition splitting, enter N in the Allow Requisition Split field.
The default for this parameter is “No.”
Automatic requisition keys
Use the Automatic Requisition Keys parameter to set your institution’s policy for requisition number assignment. The requisition number (or “key”) is the identifying number that appears on each of your requisitions. It is the number that identifies the requisition on Purchasing and Accounts Payable module forms and on LookUp resolution forms.
This parameter lets you choose between the following numbering policy options:
• If you set the parameter to “Yes,” you have two options:
• Let Colleague assign numerically sequential requisition numbers automatically.
• Not assign a number, for a “draft” (or “scratchpad”) requisition (see the question and answer on “scratchpadding” on 228 for more information).
• If you set the parameter to “No,” you have three options:
• Let Colleague assign requisition numbers automatically.
• Not assign a number, for a “draft” (“scratchpad”) requisition.
• Enter requisition numbers manually.
When you set this parameter to “Yes,” the option you are choosing is actually one in which numbering is “restricted to automatic requisition keys.” In contrast, choosing the “No” option leaves your system more open.
These options are explained in further detail in the questions and answers that follow.
Questions and answers about the automatic requisition keys parameter
Question: What is the purpose of the Automatic Requisition Keys parameter?
227tting Started with Purchasing and Accounts Payable | Defining Purchasing Parameters and Defaults

Ge
Answer: The purpose of the Automatic Requisition Keys parameter is to let you decide how numbers will be assigned to requisitions. In addition, if you set it to “Yes,” it can assist you by letting you set an institution-wide policy restricting manual numbering of requisitions. This helps you maintain internal accounting control of requisition creation.
Question: Do I have to set this parameter a certain way to use scratchpadding?
Answer: No. The “scratchpad” (or “draft”) feature is available regardless of how you set this parameter.
“Scratchpadding” is the term for the Purchasing module feature that lets you “draft” a requisition (that is, enter only the initiator and at least one line item with GL account number information) without assigning a requisition number to it immediately. (You might use this feature if you need to check a price or check with another person about quantities to be ordered, or if you originally take information over the telephone and want to finish the requisition later.)
To create a draft (or “scratchpad”) requisition, you would select the “No” Number option when creating the requisition (see Table 44). Colleague assigns an internal system number to this requisition, but the Requisition field (in the header block of the Requisition Maintenance [REQM] form) is blank. Also, when you use LookUp to find it, the Req No column on the Requisition LookUp Resolution form will be blank and you will need to search for the requisition using data items other than the requisition number.
Each time you access the requisition, the same prompt appears (see Table 44), letting you choose whether to assign a number at that time.When you are ready to finalize the requisition and give it a number, you can select either the automatic number assignment option or enter a number manually.
Question: Exactly how does this parameter setting affect requisition number assignment?
Answer: The way you set this parameter affects only the prompts you see if you are creating a requisition.
When you first enter the REQM form, you are prompted to enter the requisition number of an existing requisition or, if creating a new requisition, to enter “A” to add.
Table 44 lists the prompts and the system responses a user will encounter when adding a requisition on the Requisition Maintenance (REQM) form, based on the setting of this parameter. As this table shows, when you are adding a requisition, setting this parameter to “No” gives you both options available with the “Yes” setting — no number, or an automatic number — plus one additional option of entering a number manually.
228tting Started with Purchasing and Accounts Payable | Defining Purchasing Parameters and Defaults

Ge
Table 44: Results of "Yes" and "No" automatic requisition keys parameters
Action
Automatic Requisition Result
If parameter set to “Yes” If parameter set to “No”...
When you access the REQM form
The following prompt appears.
If you enter “A” to add a requisition
The following prompt appears. The following prompt appears.
If you set this parameter to “Yes,” you can respond to the prompt in one of the first two ways below; if you set it to “No,” in one of the three ways below.
1. If you enter “N” (for “N”o number)
The cursor moves to the first field on the form. You can begin entering data.
Then, when you finish entering your data and save the requisition
No requisition number (or “key”) is assigned to the requisition (although it still has a system- generated ID number so that Colleague can find it).
When you access that requisition again, the same prompt appears as above.
2. If you press Enter The following message appears.
Then, when you finish entering your data and save the requisition
Colleague assigns a number to the requisition and the following alert appears.
3. If you manually enter a new requisition number
Not available After a pause, the number you entered appears in the Requisition field (in the header block); you can continue creating the requisition.
229tting Started with Purchasing and Accounts Payable | Defining Purchasing Parameters and Defaults
Ge
Question: We have a requisition numbering system already in place to track the office originating a requisition. Since our staff is familiar with this system, we want to keep using it. Can we do this?
Answer: Yes, you can continue using your own numbering system, by setting this parameter to “No.”
You can choose to assign requisition numbers manually if you want to retain a method of requisition numbering already used in your current system. However, if you do choose this option, remember there is no validation or error checking of the requisition number at time of entry. That is, if an individual entering the data makes a typing mistake when entering a requisition number, and does not correct it before saving it on the system, there is no way to correct the error except by voiding the requisition — and its requisition number — and creating a completely new requisition.
A second caution is that if you discover, after creating a number of requisitions, that the identification numbering system you are using is incomplete or needs to be changed, you will not be able to change the requisition numbers for the requisitions already created in Colleague.
Regarding requisition numbering, if you plan to use both automatic and manual methods, you must set up your manual numbering system as a different system from Colleague. For example, you may have to create a manual numbering sequence that starts with a letter, such as “A,” to avoid confusion with Colleague’s numbering, which is numbered sequentially using ordinal numbers from 0000001 to 9999999.
Question: Does this parameter affect the numbering of purchase orders or vouchers?
Answer: No, the three numbering systems are independent of each other.
Setting the parameter. If you want Colleague to automatically assign sequential requisition numbers, enter Y in the Automatic Requisition Keys field on the PU Parameter Definition (PUPD) form. If you want Colleague to give you the option of assigning your own requisition numbers, enter N in the Automatic Requisition Keys field.
The default for this parameter is “No.”
Form prompting defaults
In the Purchasing module, you can customize your form prompting to accommodate your institution’s purchasing operations. For example, you can tell Colleague to distribute expenses to different GL accounts by amount (rather than by percent or quantity) on purchasing item maintenance forms. Or, you can tell Colleague to bypass tax codes fields at each form where they appear.
An example of the PUPD form with only the prompt default fields displayed is shown below.
230tting Started with Purchasing and Accounts Payable | Defining Purchasing Parameters and Defaults
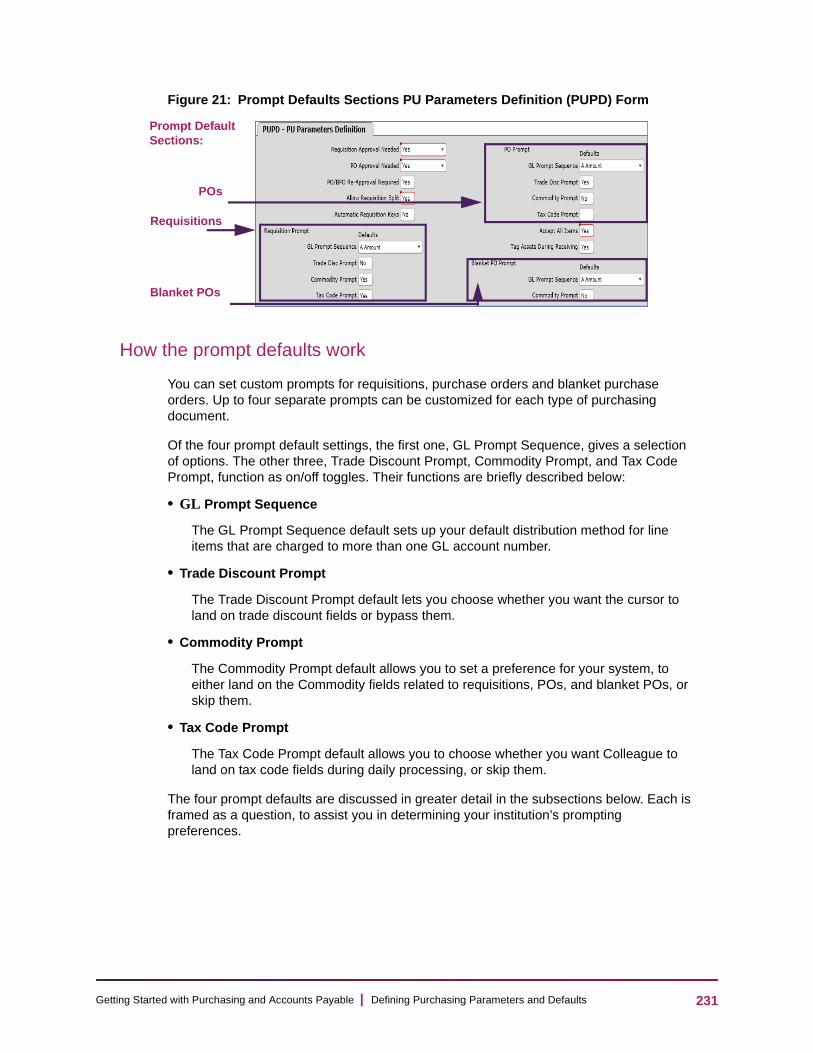
Ge
Figure 21: Prompt Defaults Sections PU Parameters Definition (PUPD) Form
How the prompt defaults work
You can set custom prompts for requisitions, purchase orders and blanket purchase orders. Up to four separate prompts can be customized for each type of purchasing document.
Of the four prompt default settings, the first one, GL Prompt Sequence, gives a selection of options. The other three, Trade Discount Prompt, Commodity Prompt, and Tax Code Prompt, function as on/off toggles. Their functions are briefly described below:
• GL Prompt Sequence
The GL Prompt Sequence default sets up your default distribution method for line items that are charged to more than one GL account number.
• Trade Discount Prompt
The Trade Discount Prompt default lets you choose whether you want the cursor to land on trade discount fields or bypass them.
• Commodity Prompt
The Commodity Prompt default allows you to set a preference for your system, to either land on the Commodity fields related to requisitions, POs, and blanket POs, or skip them.
• Tax Code Prompt
The Tax Code Prompt default allows you to choose whether you want Colleague to land on tax code fields during daily processing, or skip them.
The four prompt defaults are discussed in greater detail in the subsections below. Each is framed as a question, to assist you in determining your institution’s prompting preferences.
Prompt Default Sections:
POs
Requisitions
Blanket POs
231tting Started with Purchasing and Accounts Payable | Defining Purchasing Parameters and Defaults
Ge
The GL prompt sequence defaults
What distribution method do you use for multiple GL account numbers?
When you are distributing the expense for a purchase to two or more different accounts, you will enter two or more GL account numbers on a requisition, purchase order, or blanket purchase order. You would normally use one method of distributing this expense more than any other.
The line item maintenance form for requisitions and POs, and the use maintenance form for blanket POs, each contain a window for entering line item GL account information, called GL Account No. This window also contains fields that, for line items charged to more than one GL account, let you choose between three different methods of cost distribution: amount, percent, and quantity.
You can use the GL Prompt Sequence default to set your preference among the distribution methods. Then, when you enter a GL number in the GL Account No window on any of the item maintenance forms, the cursor moves from the GL Account No to the distribution element you have designated as the default, and skips over the others.
You can choose from the following three distribution methods:
• Amount - if you normally distribute items by amount (this is the most common setting).
• Percent - if you normally distribute items by percent.
• Quantity - if you normally distribute items by quantity1.
Setting the default. For requisitions and purchase orders:
If you want Colleague to prompt at the Amount element in the GL Account No window on requisition and purchase order item maintenance forms, enter A in the respective GL Prompt Sequence field. To prompt for Percent, enter P. To prompt for Quantity, enter Q.
For blanket purchase orders:
If you want Colleague to prompt at the Amount element in the GL Account No window on blanket purchase order item maintenance forms, enter A in the GL Prompt Sequence field. To prompt for Percent, enter P.
For all three types of documents, the default value for this field is “Percent.” That is, if you leave this parameter blank, the cursor moves to the Percent element after you enter the GL account number on a line item maintenance form.
1.The Quantity distribution method is not available for blanket purchase orders.
232tting Started with Purchasing and Accounts Payable | Defining Purchasing Parameters and Defaults

Ge
The trade discount prompt defaults
Does your institution use vendors that give trade discounts?1
The term trade discount is used in Colleague to refer to vendor preferred discounting such as frequent customer discount or price breaks for bulk orders. (This term is different from “cash discounting” for early and on-time payments and is not related to discount methods.)
If most vendors your institution does business with do not give trade discounts, you may prefer that Colleague skip over the fields in the Purchasing module that deal with trade discounts. This field lets you set that preference.
The line item maintenance form for both requisitions and purchase orders contains two fields for entering trade discount information: Trade Disc Amt (if the trade discount is an amount) and Trade Disc Pct (if the trade discount is a percent).
If you set the Trade Discount Prompt default to “Yes,” the cursor will move to both the Trade Disc Amt field and the Trade Disc Pct field on these forms.
If you set this field to “No,” the cursor will bypass both Trade Discount fields.
Note: Whatever you select for this default, you can still access the Trade Disc fields on an item maintenance form manually.
Setting the default. Enter N in the Trade Disc Prompt field for requisitions and for purchase orders if you want to bypass the two trade discount fields when creating requisitions and POs. Enter Y for both requisitions and purchase orders if you want Colleague to prompt at the Trade Disc fields.
The default for this field is “Yes.” That is, if you leave this field blank, Colleague will prompt for the trade discount fields on the item maintenance forms in normal sequence, as if the parameter were set to “Yes.”
The commodity prompt defaults
Does your institution use any commodity codes in purchasing processing?
If your institution is required to incorporate commodity/service codes in your purchasing procedures, or if you have developed a set of commodity codes to streamline your purchase tracking procedures, you may want Colleague to prompt for commodity codes. For more detailed information on commodity codes, see “Understanding Commodity/Service Codes” on page 152.
The Commodity field appears on several forms, letting you associate a commodity with either an entire requisition, PO, or blanket PO, or with individual line items. The Commodity Prompt default lets you choose whether to have the cursor land on a Commodity field wherever one is displayed throughout the Purchasing module.
1.The Trade Discount prompting default is not available for blanket purchase orders.
233tting Started with Purchasing and Accounts Payable | Defining Purchasing Parameters and Defaults
Ge
If you set the Commodity Prompt default to “Yes,” the cursor will move to the Commodity field on these forms.
If you set this field to “No,” the cursor bypasses the Commodity field on all forms where it appears.
Note: Regardless of your selection for this default, you can still manually access the Commodity field on any form where it appears.
Setting the default. Enter Y in the Commodity Prompt field for requisitions, purchase orders, or blanket purchase orders if you want Colleague to prompt at the respective Commodity fields. Enter N if you want Colleague to skip the Commodity fields.
The default for this field is “No.” That is, if you leave this field blank, Colleague will skip over the Commodity field on all forms where it appears, as if the parameter were set to “No.”
The tax code prompt defaults
Does your institution pay taxes on any of your purchases?1
If your institution is tax-exempt and deals with sales tax only rarely, you can set up your system to skip over all occurrences of the Tax Codes field on requisition and PO item maintenance forms.
The line item maintenance form for requisitions and purchase orders contains the Tax Codes field, for entering tax code information for a line item. If you set the Tax Code Prompt default to “Yes,” the cursor will move to the Tax Codes field on these forms when you press enter in the previous field(s).
If you set this field to “No,” the cursor will bypass the Tax Codes field on all purchasing line item maintenance forms.
Note: You should set the requisition and purchase order Tax Code Prompt defaults to “Yes” only if the majority of your requisitions and purchase orders have sales tax associated with them.
Note: Regardless of your selection for this default, you can still manually access the Tax Codes field on any form where it appears.
Setting the default. Enter Y in the Tax Code Prompt field for requisitions and purchase orders if you want Colleague to prompt at the Tax Codes fields in requisition and purchase order item maintenance forms. Enter N if you want Colleague to skip the Tax Codes fields.
1.The Tax Codes prompting default is not available for blanket purchase orders. This is because for blanket purchase orders, the user would typically add the tax expense to a given line item at time of vouchering.
234tting Started with Purchasing and Accounts Payable | Defining Purchasing Parameters and Defaults

Ge
The default for this field is “No.” That is, if you leave this field blank, Colleague will skip over the Tax Codes field on all forms where it appears, as if the parameter were set to “No.”
Summary of prompt defaults
Table 45 displays a summary of the prompt default options available in the Purchasing module for each type of purchasing document, and the form where each applicable field appears.
Table 45: Prompt Default Parameters for Purchasing Documents
Prompt Default Name
Purchasing Document Type Affected
Form / Field Name Where Affected Field(s) Appear
Options Available
GL Prompt Sequence
Requisitions Requisition Item Maintenance (RQIM)/ (“Percent,” “Quantity,” “GL Amt”)
A - Amount P - Percent Q - Quantity
Purchase orders PO Item Maintenance (POIM)/ (“Percent,” “Quantity,” “GL Amt”)
Blanket purchase orders Blanket PO GL Maintenance (BGLM)/ (“Percent,” “Amount”)
A - Amount P - Percent
Trade Discount Requisitions Requisition Item Maintenance (RQIM))/ (“Trade Disc Amt,” “Trade Disc Pct”)
Y - Yes N - No
Purchase orders PO Item Maintenance (POIM)/ (“Trade Disc Amt,” “Trade Disc Pct”)
Commodity Requisitions Requisition Maintenance
(REQM)1, Requisition Item Maintenance
(RQIM)1
Y - Yes N - No
Purchase orders Purchase Order Summary List
(POIL)1, PO Item Maintenance (POIM)1
Blanket purchase orders Blanket PO Maintenance
(BPOM)1, Blanket PO Use Maintenance
(BPUM)1
235tting Started with Purchasing and Accounts Payable | Defining Purchasing Parameters and Defaults
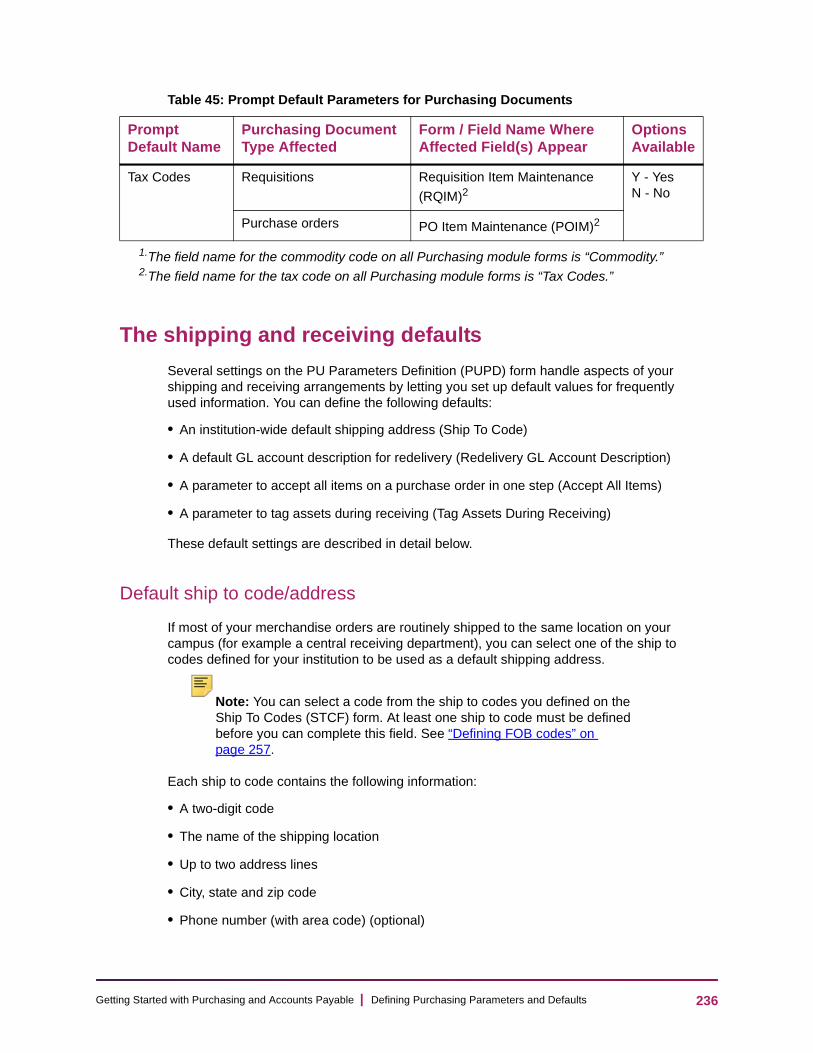
Ge
The shipping and receiving defaults
Several settings on the PU Parameters Definition (PUPD) form handle aspects of your shipping and receiving arrangements by letting you set up default values for frequently used information. You can define the following defaults:
• An institution-wide default shipping address (Ship To Code)
• A default GL account description for redelivery (Redelivery GL Account Description)
• A parameter to accept all items on a purchase order in one step (Accept All Items)
• A parameter to tag assets during receiving (Tag Assets During Receiving)
These default settings are described in detail below.
Default ship to code/address
If most of your merchandise orders are routinely shipped to the same location on your campus (for example a central receiving department), you can select one of the ship to codes defined for your institution to be used as a default shipping address.
Note: You can select a code from the ship to codes you defined on the Ship To Codes (STCF) form. At least one ship to code must be defined before you can complete this field. See “Defining FOB codes” on page 257.
Each ship to code contains the following information:
• A two-digit code
• The name of the shipping location
• Up to two address lines
• City, state and zip code
• Phone number (with area code) (optional)
Tax Codes Requisitions Requisition Item Maintenance
(RQIM)2Y - Yes N - No
Purchase orders PO Item Maintenance (POIM)2
1.The field name for the commodity code on all Purchasing module forms is “Commodity.”2.The field name for the tax code on all Purchasing module forms is “Tax Codes.”
Table 45: Prompt Default Parameters for Purchasing Documents
Prompt Default Name
Purchasing Document Type Affected
Form / Field Name Where Affected Field(s) Appear
Options Available
236tting Started with Purchasing and Accounts Payable | Defining Purchasing Parameters and Defaults
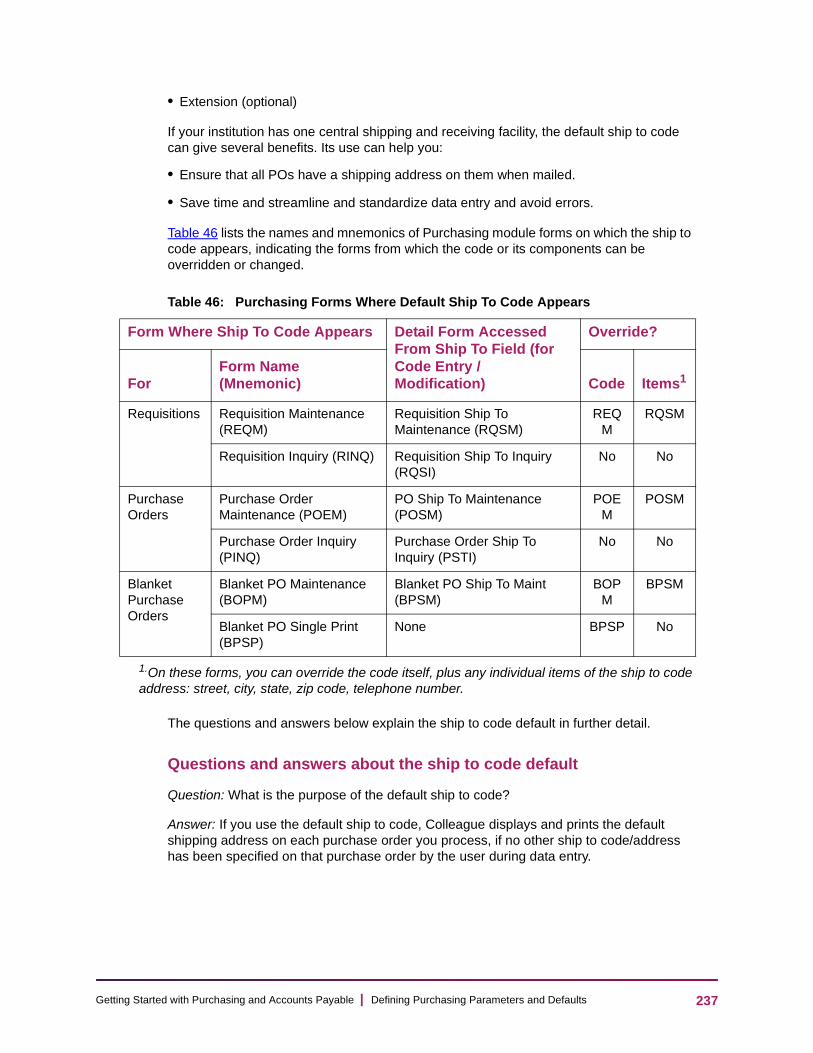
Ge
• Extension (optional)
If your institution has one central shipping and receiving facility, the default ship to code can give several benefits. Its use can help you:
• Ensure that all POs have a shipping address on them when mailed.
• Save time and streamline and standardize data entry and avoid errors.
Table 46 lists the names and mnemonics of Purchasing module forms on which the ship to code appears, indicating the forms from which the code or its components can be overridden or changed.
The questions and answers below explain the ship to code default in further detail.
Questions and answers about the ship to code default
Question: What is the purpose of the default ship to code?
Answer: If you use the default ship to code, Colleague displays and prints the default shipping address on each purchase order you process, if no other ship to code/address has been specified on that purchase order by the user during data entry.
Table 46: Purchasing Forms Where Default Ship To Code Appears
Form Where Ship To Code Appears Detail Form Accessed From Ship To Field (for Code Entry / Modification)
Override?
ForForm Name (Mnemonic) Code Items1
1.On these forms, you can override the code itself, plus any individual items of the ship to code address: street, city, state, zip code, telephone number.
Requisitions Requisition Maintenance (REQM)
Requisition Ship To Maintenance (RQSM)
REQM
RQSM
Requisition Inquiry (RINQ) Requisition Ship To Inquiry (RQSI)
No No
Purchase Orders
Purchase Order Maintenance (POEM)
PO Ship To Maintenance (POSM)
POEM
POSM
Purchase Order Inquiry (PINQ)
Purchase Order Ship To Inquiry (PSTI)
No No
Blanket Purchase Orders
Blanket PO Maintenance (BOPM)
Blanket PO Ship To Maint (BPSM)
BOPM
BPSM
Blanket PO Single Print (BPSP)
None BPSP No
237tting Started with Purchasing and Accounts Payable | Defining Purchasing Parameters and Defaults
Ge
Question: How does the default ship to code work?
Answer: When you have entered a default ship to code for your institution on the PU Parameters Definition (PUPD) form, the code itself and its description (for example, “03 Campus Receiving”) appears in the Ship To field on both maintenance and inquiry forms for requisitions, purchase orders, and blanket purchase orders, as well as on the ship-to code detail forms. It is used as the shipping address if no alternative ship to code has been entered on the document.
In each form where a Ship To Code field requests shipping information, you can override this default by entering any of the ship to codes defined for your institution.
If you are using the default ship to code, a staff member will need to enter a ship to code on a purchase order only if they are creating a purchase order for goods they do not want to go to the central receiving area.
Question: We have a number of different shipping and receiving locations on our campus. How should we complete this field?
Answer: If goods are regularly delivered to many different locations at your institution, we recommend you leave this field blank.
Setting the default. If you want a standard shipping address to be printed as a default on all requisitions, purchase orders, and blanket purchase orders, enter the ship to code in this field.
Redelivery GL account description
The Redelivery GL Account Description default lets you use your institution’s GL account structure to help your receiving staff (those responsible for redelivery of accepted goods) to identify the originators of orders. This is accomplished by letting you set up your own specifications for how a purchase order’s GL account description will appear on redelivery forms.
A standard module-wide GL account description sequence is set up in the General Ledger module for the entire Purchasing module. That standard description sequence determines, throughout the Purchasing module, the GL account description that will normally appear for a GL account when a description appears on a form.
However, the GL account description that will help your receiving office redeliver received goods might include components different from the standard Purchasing module GL account description, or list them in a different order. The Redelivery GL Account Description window lets you specify components of your GL account structure that are more descriptive of the originator’s physical location on campus, helping the receiving staff locate the person to which to deliver accepted goods.
The Redelivery GL Account Description default window has room for a total of six GL components, although only one of them is displayed on the PUPD form at a time.
238tting Started with Purchasing and Accounts Payable | Defining Purchasing Parameters and Defaults

Ge
Example. Assume the standard Purchasing module GL description was set up to be OBJECT : DEPARTMENT. Thus, the Hearing and Speech Department, located on the main campus, might have a standard miscellaneous office supplies account that is called “Desk Supplies: East Campus” throughout the Purchasing module. But, for redelivery the most important information is “Hearing and Speech: East Campus.” So you would set up the Redelivery GL Account Description as DEPARTMENT : LOCATION.
The following figures illustrate this example. The purchase order in this example has two line items, one for pens and one for pencils. Also, this order of supplies is being split by the Hearing and Speech Department and the Educational Administration Department, both located on the east campus.
Figure 22 displays a sample of the Purchase Order Item Inquiry (PIIN) form with the standard module-wide GL account description. The GL Description field (lower right corner of the form) uses the standard Purchasing module description components (OBJECT : DEPARTMENT) to form its description (Desk Supplies : East Campus).
Figure 22: GL Account Description field, Purchase Order Item Inquiry (PIIN)
After the pens and pencils have been ordered and received, they must be redelivered to the Hearing and Speech and Educational Administration departments.
Figure 23 displays the Purchase Order Redelivery Inquiry (PORI) form for this same purchase order, at time of receipt of the goods. The GL Acct Description field shows the proper GL account number, formatted according to the GL component structure set up in the Redelivery GL Account Description field: DEPARTMENT : LOCATION (Hearing and Speech: East Campus and Education Administration: East Campus), with the corresponding quantities of pencils and pens (out of the total item quantity) that is to be delivered to each department.
239tting Started with Purchasing and Accounts Payable | Defining Purchasing Parameters and Defaults

Ge
Figure 23: GL Account Description Field, PO Redelivery Inquiry (PORI) form
Setting the default. To set up a redelivery GL account description, enter the desired GL account components in this field. You can include a maximum of six GL component pieces for the description (but only one displays on the form at a time; enter through to see them one after the other).
If you leave this field blank, the default GL description for the Purchasing module is used as the redelivery GL account description.
Accept All Items
The Accept All Items parameter enables you to mark all items on a purchase order as “Accepted” in a single step, rather than accepting them one at a time.
Received goods are accepted on the Purchase Order Receiving (PORC) form. If you set the Accept All Items parameter to “Yes” on the PU Parameters Definition (PUPD) form, the Accept All Items field in the PORC form is activated, and can be used. You will be able to return through to the Accept All Items field and accept all the line items on a purchase order by setting it to “Yes.”
Note: Even if you set this parameter to “Yes,” you will still be able to accept items individually if desired.
If you set the parameter to “No,” the Accept All Items field will not be available, and acceptance of goods must be confirmed individually on the PORC form, for each line item on the purchase order. If you try to enter “Yes” in the Accept All Items field on the PORC form, an error message will appear.
240tting Started with Purchasing and Accounts Payable | Defining Purchasing Parameters and Defaults

Ge
Setting the parameter. To allow accepting all items on a purchase order in one step, enter Y in the Accept All Items field on the PUPD form. To set up your system so that all items must be accepted individually, enter N in the Accept All Items field.
The default for this parameter is “No.”
Tag Assets During Receiving
The Tag Assets During Receiving parameter allows you to indicate whether tagging information can be entered before the asset is transferred to the Fixed Assets module.
Setting the parameter. To allow assets to be tagged during receiving, enter Yes in the Tag Assets During Receiving field on the PUPD form. To set up your system so that items cannot be entered before the asset is transferred to the Fixed Assets module, enter No in the Tag Assets During Receiving field.
The default for this parameter is “No.”
The print subroutine defaults
Ellucian provides standard subroutines for printing your requisitions, purchase orders, and blanket purchase orders, in either batch or single print. These module-wide defaults control the way your requisitions, purchase orders and blanket purchase orders appear when they are printed.
The print subroutines provided by Ellucian are shown in Table 47.
If you write your own printing subroutine for either requisitions, purchase orders, or blanket purchase orders (or modify Ellucian’s), be sure to enter its name in the proper Print Subroutine field on the PUPD form so that Colleague will use the correct subroutine for printing.
Note: If you choose to create a custom subroutine for printing, you must catalog and compile it first or Colleague will not be able to recognize the program.
If you want to use the Ellucian default print subroutines for requisitions, purchase orders, and blanket purchase orders, leave these fields as they are.
For more detailed information on modifying standard forms for the Purchasing module, see “Standard Forms” on page 370
Table 47: Default printing subroutines for purchasing documents
Purchasing Document Default Print Subroutine
Requisitions S.PRINT.REQ
Purchase Orders S.PRINT.PO
Blanket Purchase Orders S.PRINT.BPO
241tting Started with Purchasing and Accounts Payable | Defining Purchasing Parameters and Defaults

Ge
Setting the defaults. If you want to use your own subroutines as defaults for printing requisitions, purchase orders, and blanket purchase orders, enter the subroutine names in these three fields. If you want to use the standard Ellucian printing subroutines, leave the default values in these fields.
Procedure for defining purchasing parameters and defaults
Because several of the data entry fields on the PUPD form request a yes or no answer, and the answers may be dictated by your institution’s policies or preferences, we provide the information below as a guideline for setting these parameters and defaults.
Table 48: Fields on the PU Parameters Definition (PUPD) form
Form Area Field Usage Default
Approval Parameters
Requisition Approval Needed
Indicates whether online approval of requisitions is required at your institution.
This parameter is where you “turn on” approvals for requisitions.
No
PO Approval Needed Indicates whether online approval of purchase orders is required at your institution.
This parameter is where you “turn on” approvals for purchase orders.
No
Requisition Parameters
Allow Requisition Split
Defines whether your institution will allow staff to split a single requisition into one or more purchase orders.
If you want to allow splitting of requisitions, enter Y in this field. If you do not want to allow splitting of requisitions, enter N in this field.
No
Automatic Requisition Keys
Indicates your institution’s preference for assigning numbers to requisitions. If you want Colleague to assign requisition numbers automatically, enter Y in this field. If you want to let users assign requisition numbers manually, enter N in this field.
No
242tting Started with Purchasing and Accounts Payable | Defining Purchasing Parameters and Defaults

Ge
Requisition Prompt Defaults
GL Prompt Sequence Defines where the cursor will land in the GL Account No field on the Requisition Item Maintenance (RQIM) form after you have entered the GL account number for a line item. Your selection here identifies your institution’s preference for which distribution method you will use as a module-wide default when distributing expenditures to multiple GL account numbers.
The selections from which you can choose are:
• A (Amount) — the cursor will automatically land in the GL Amt field
• P (Percent) — the cursor will automatically land in the Percent field
• Q (Quantity) — the cursor will automatically land in the Quantity field
The valid choices are the codes defined in the GL.PROMPT.SEQUENCES code table.
Percent
Trade Disc Prompt Defines your institution’s preference for whether the cursor will automatically land in the Trade Disc field on the Requisition Item Maintenance (RQIM) form.
If you want the cursor to land in the Trade Disc field, enter Y in this field. If you want the cursor to skip the Trade Disc field, enter N in this field.
Yes
Commodity Prompt Defines your institution’s preference for whether the cursor will automatically land in the Commodity field on the Requisition Maintenance (REQM) and Requisition Item Maintenance (RQIM) forms.
If you want the cursor to land in the Commodity field, enter Y in this field. If you want the cursor to skip the Commodity field, enter N in this field.
No
Table 48: Fields on the PU Parameters Definition (PUPD) form (continued)
Form Area Field Usage Default
243tting Started with Purchasing and Accounts Payable | Defining Purchasing Parameters and Defaults
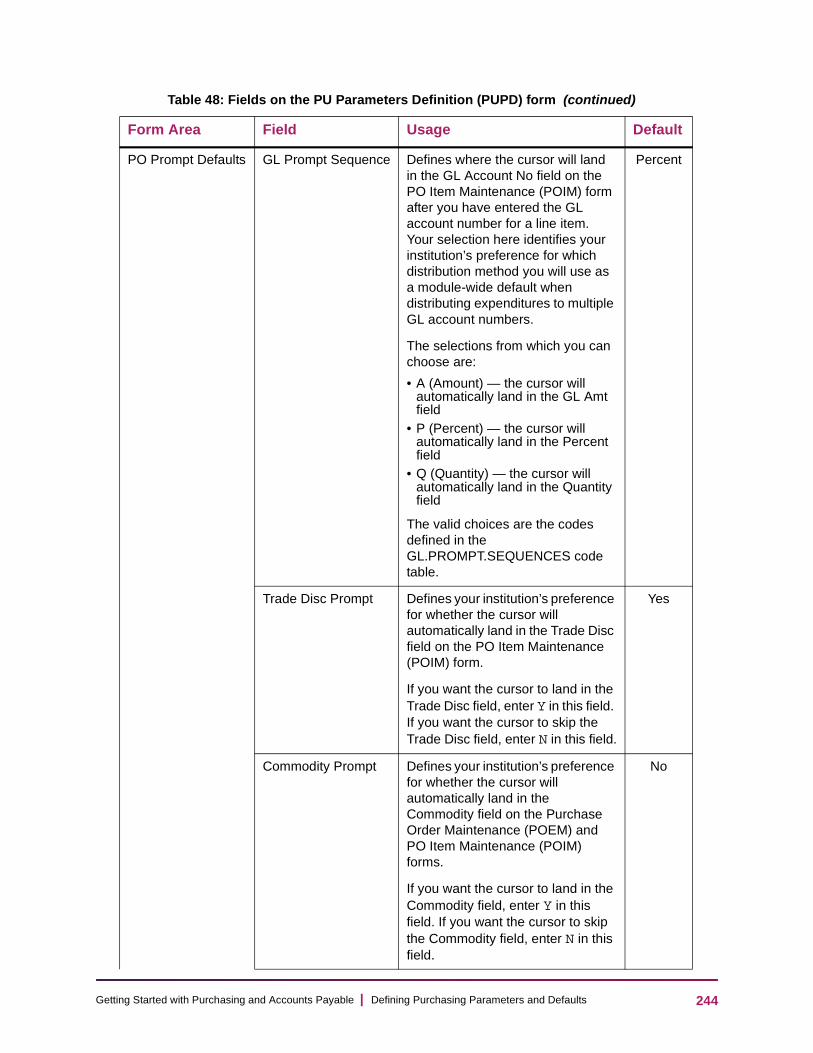
Ge
PO Prompt Defaults GL Prompt Sequence Defines where the cursor will land in the GL Account No field on the PO Item Maintenance (POIM) form after you have entered the GL account number for a line item. Your selection here identifies your institution’s preference for which distribution method you will use as a module-wide default when distributing expenditures to multiple GL account numbers.
The selections from which you can choose are:
• A (Amount) — the cursor will automatically land in the GL Amt field
• P (Percent) — the cursor will automatically land in the Percent field
• Q (Quantity) — the cursor will automatically land in the Quantity field
The valid choices are the codes defined in the GL.PROMPT.SEQUENCES code table.
Percent
Trade Disc Prompt Defines your institution’s preference for whether the cursor will automatically land in the Trade Disc field on the PO Item Maintenance (POIM) form.
If you want the cursor to land in the Trade Disc field, enter Y in this field. If you want the cursor to skip the Trade Disc field, enter N in this field.
Yes
Commodity Prompt Defines your institution’s preference for whether the cursor will automatically land in the Commodity field on the Purchase Order Maintenance (POEM) and PO Item Maintenance (POIM) forms.
If you want the cursor to land in the Commodity field, enter Y in this field. If you want the cursor to skip the Commodity field, enter N in this field.
No
Table 48: Fields on the PU Parameters Definition (PUPD) form (continued)
Form Area Field Usage Default
244tting Started with Purchasing and Accounts Payable | Defining Purchasing Parameters and Defaults
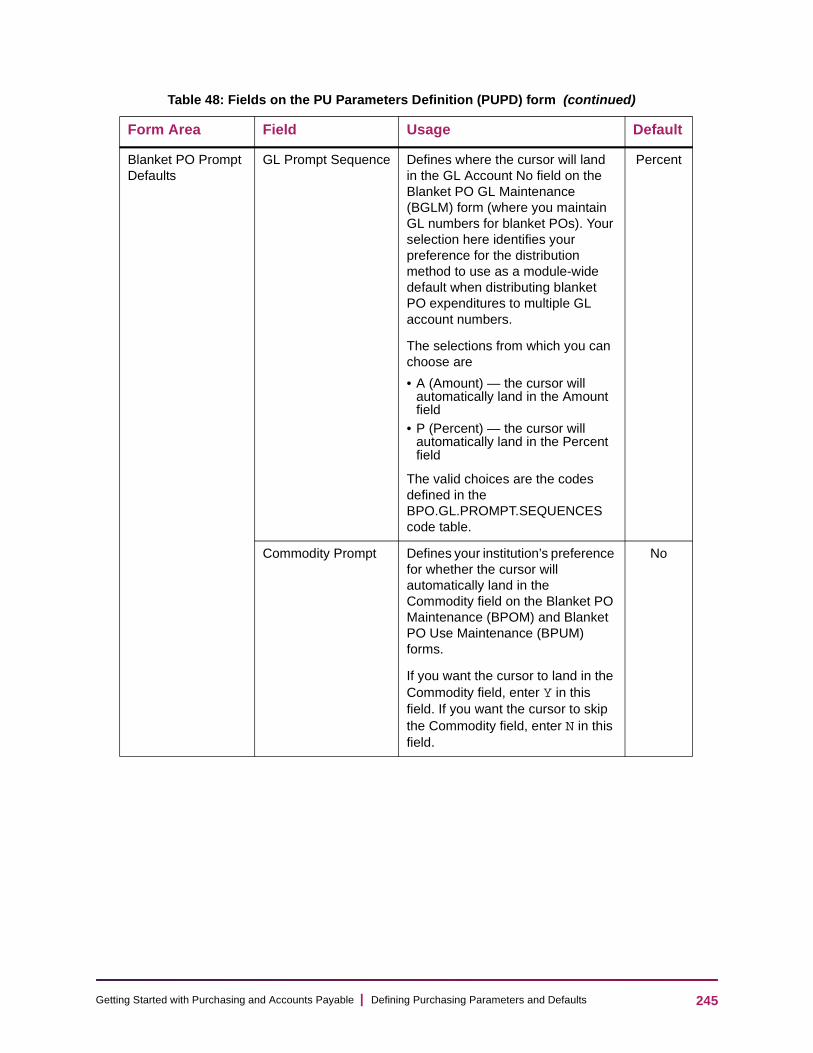
Ge
Blanket PO Prompt Defaults
GL Prompt Sequence Defines where the cursor will land in the GL Account No field on the Blanket PO GL Maintenance (BGLM) form (where you maintain GL numbers for blanket POs). Your selection here identifies your preference for the distribution method to use as a module-wide default when distributing blanket PO expenditures to multiple GL account numbers.
The selections from which you can choose are
• A (Amount) — the cursor will automatically land in the Amount field
• P (Percent) — the cursor will automatically land in the Percent field
The valid choices are the codes defined in the BPO.GL.PROMPT.SEQUENCES code table.
Percent
Commodity Prompt Defines your institution’s preference for whether the cursor will automatically land in the Commodity field on the Blanket PO Maintenance (BPOM) and Blanket PO Use Maintenance (BPUM) forms.
If you want the cursor to land in the Commodity field, enter Y in this field. If you want the cursor to skip the Commodity field, enter N in this field.
No
Table 48: Fields on the PU Parameters Definition (PUPD) form (continued)
Form Area Field Usage Default
245tting Started with Purchasing and Accounts Payable | Defining Purchasing Parameters and Defaults
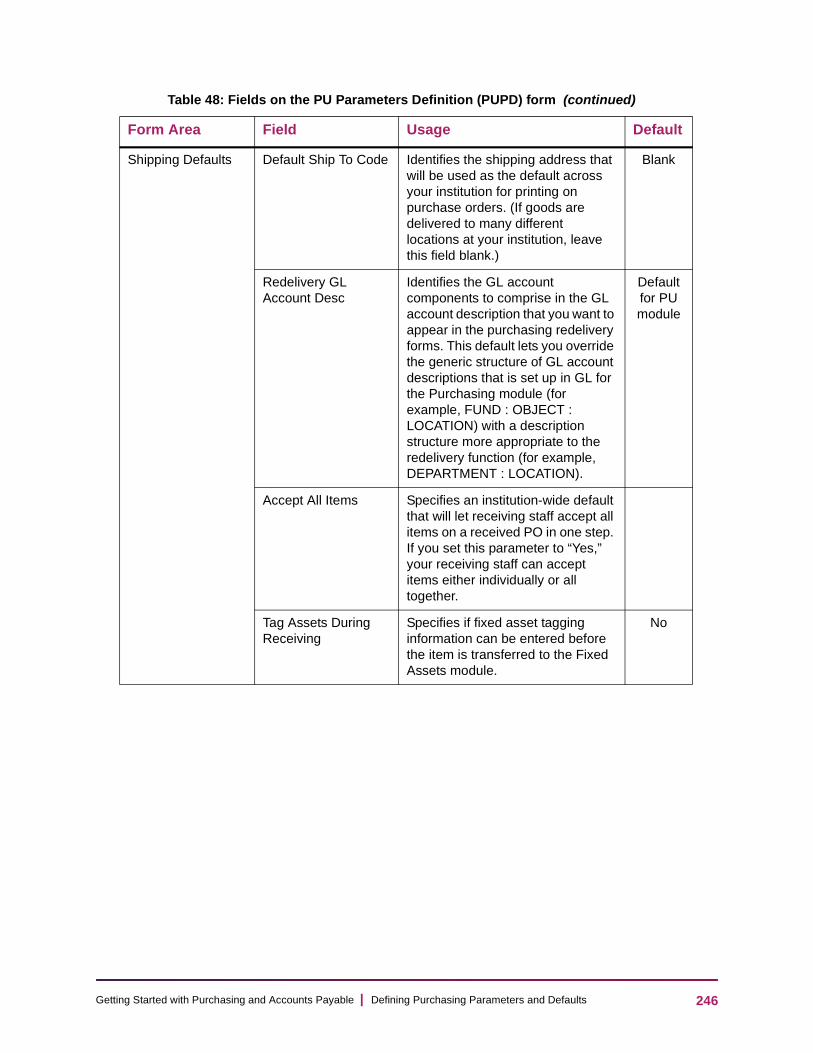
Ge
Shipping Defaults Default Ship To Code Identifies the shipping address that will be used as the default across your institution for printing on purchase orders. (If goods are delivered to many different locations at your institution, leave this field blank.)
Blank
Redelivery GL Account Desc
Identifies the GL account components to comprise in the GL account description that you want to appear in the purchasing redelivery forms. This default lets you override the generic structure of GL account descriptions that is set up in GL for the Purchasing module (for example, FUND : OBJECT : LOCATION) with a description structure more appropriate to the redelivery function (for example, DEPARTMENT : LOCATION).
Default for PU module
Accept All Items Specifies an institution-wide default that will let receiving staff accept all items on a received PO in one step. If you set this parameter to “Yes,” your receiving staff can accept items either individually or all together.
Tag Assets During Receiving
Specifies if fixed asset tagging information can be entered before the item is transferred to the Fixed Assets module.
No
Table 48: Fields on the PU Parameters Definition (PUPD) form (continued)
Form Area Field Usage Default
246tting Started with Purchasing and Accounts Payable | Defining Purchasing Parameters and Defaults
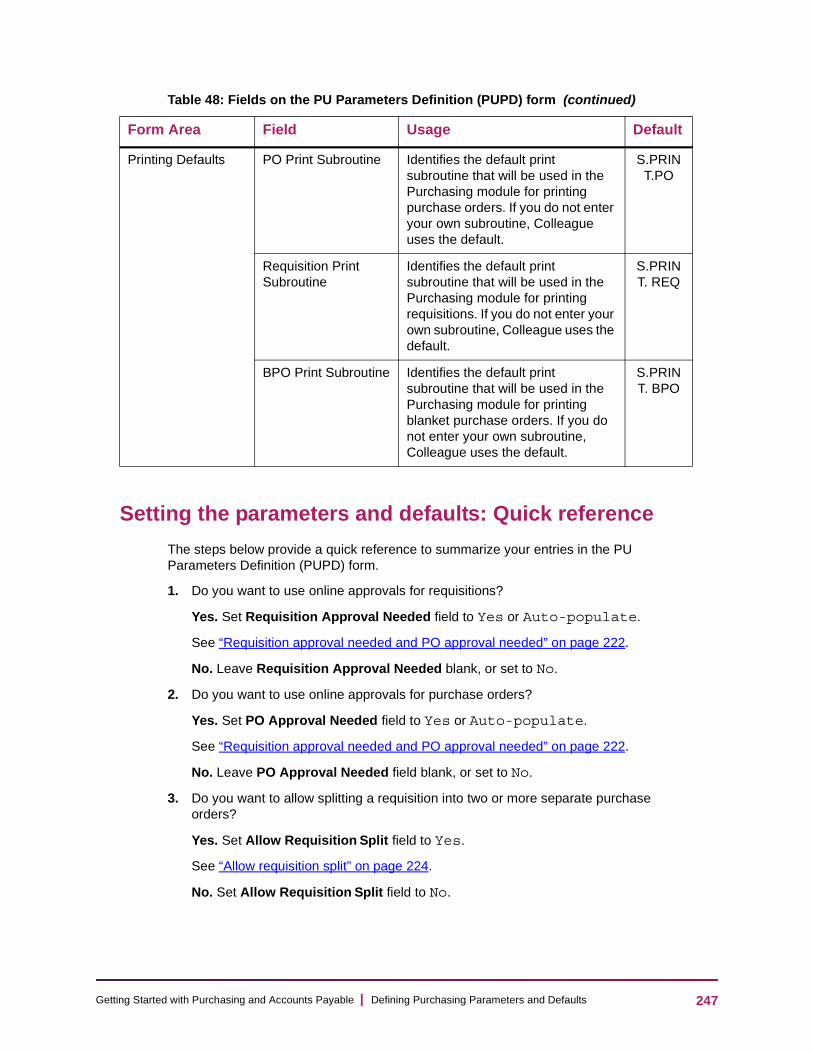
Ge
Setting the parameters and defaults: Quick reference
The steps below provide a quick reference to summarize your entries in the PU Parameters Definition (PUPD) form.
1. Do you want to use online approvals for requisitions?
Yes. Set Requisition Approval Needed field to Yes or Auto-populate.
See “Requisition approval needed and PO approval needed” on page 222.
No. Leave Requisition Approval Needed blank, or set to No.
2. Do you want to use online approvals for purchase orders?
Yes. Set PO Approval Needed field to Yes or Auto-populate.
See “Requisition approval needed and PO approval needed” on page 222.
No. Leave PO Approval Needed field blank, or set to No.
3. Do you want to allow splitting a requisition into two or more separate purchase orders?
Yes. Set Allow Requisition Split field to Yes.
See “Allow requisition split” on page 224.
No. Set Allow Requisition Split field to No.
Printing Defaults PO Print Subroutine Identifies the default print subroutine that will be used in the Purchasing module for printing purchase orders. If you do not enter your own subroutine, Colleague uses the default.
S.PRINT.PO
Requisition Print Subroutine
Identifies the default print subroutine that will be used in the Purchasing module for printing requisitions. If you do not enter your own subroutine, Colleague uses the default.
S.PRINT. REQ
BPO Print Subroutine Identifies the default print subroutine that will be used in the Purchasing module for printing blanket purchase orders. If you do not enter your own subroutine, Colleague uses the default.
S.PRINT. BPO
Table 48: Fields on the PU Parameters Definition (PUPD) form (continued)
Form Area Field Usage Default
247tting Started with Purchasing and Accounts Payable | Defining Purchasing Parameters and Defaults
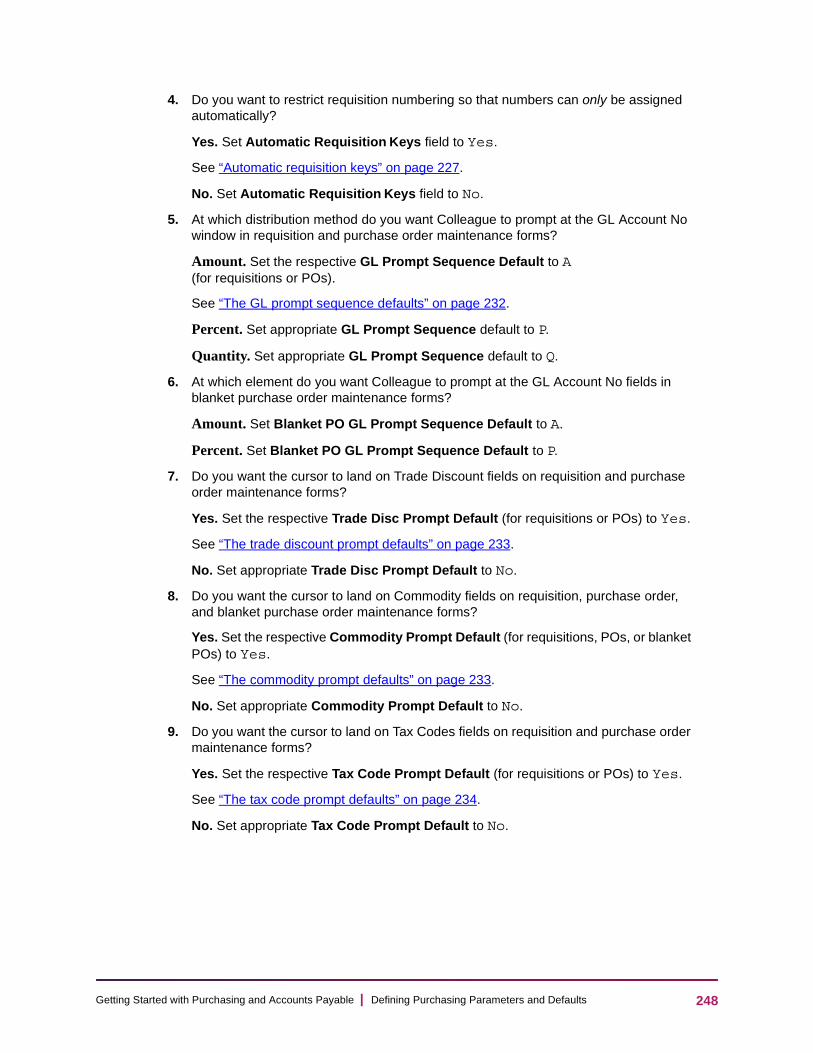
Ge
4. Do you want to restrict requisition numbering so that numbers can only be assigned automatically?
Yes. Set Automatic Requisition Keys field to Yes.
See “Automatic requisition keys” on page 227.
No. Set Automatic Requisition Keys field to No.
5. At which distribution method do you want Colleague to prompt at the GL Account No window in requisition and purchase order maintenance forms?
Amount. Set the respective GL Prompt Sequence Default to A (for requisitions or POs).
See “The GL prompt sequence defaults” on page 232.
Percent. Set appropriate GL Prompt Sequence default to P.
Quantity. Set appropriate GL Prompt Sequence default to Q.
6. At which element do you want Colleague to prompt at the GL Account No fields in blanket purchase order maintenance forms?
Amount. Set Blanket PO GL Prompt Sequence Default to A.
Percent. Set Blanket PO GL Prompt Sequence Default to P.
7. Do you want the cursor to land on Trade Discount fields on requisition and purchase order maintenance forms?
Yes. Set the respective Trade Disc Prompt Default (for requisitions or POs) to Yes.
See “The trade discount prompt defaults” on page 233.
No. Set appropriate Trade Disc Prompt Default to No.
8. Do you want the cursor to land on Commodity fields on requisition, purchase order, and blanket purchase order maintenance forms?
Yes. Set the respective Commodity Prompt Default (for requisitions, POs, or blanket POs) to Yes.
See “The commodity prompt defaults” on page 233.
No. Set appropriate Commodity Prompt Default to No.
9. Do you want the cursor to land on Tax Codes fields on requisition and purchase order maintenance forms?
Yes. Set the respective Tax Code Prompt Default (for requisitions or POs) to Yes.
See “The tax code prompt defaults” on page 234.
No. Set appropriate Tax Code Prompt Default to No.
248tting Started with Purchasing and Accounts Payable | Defining Purchasing Parameters and Defaults
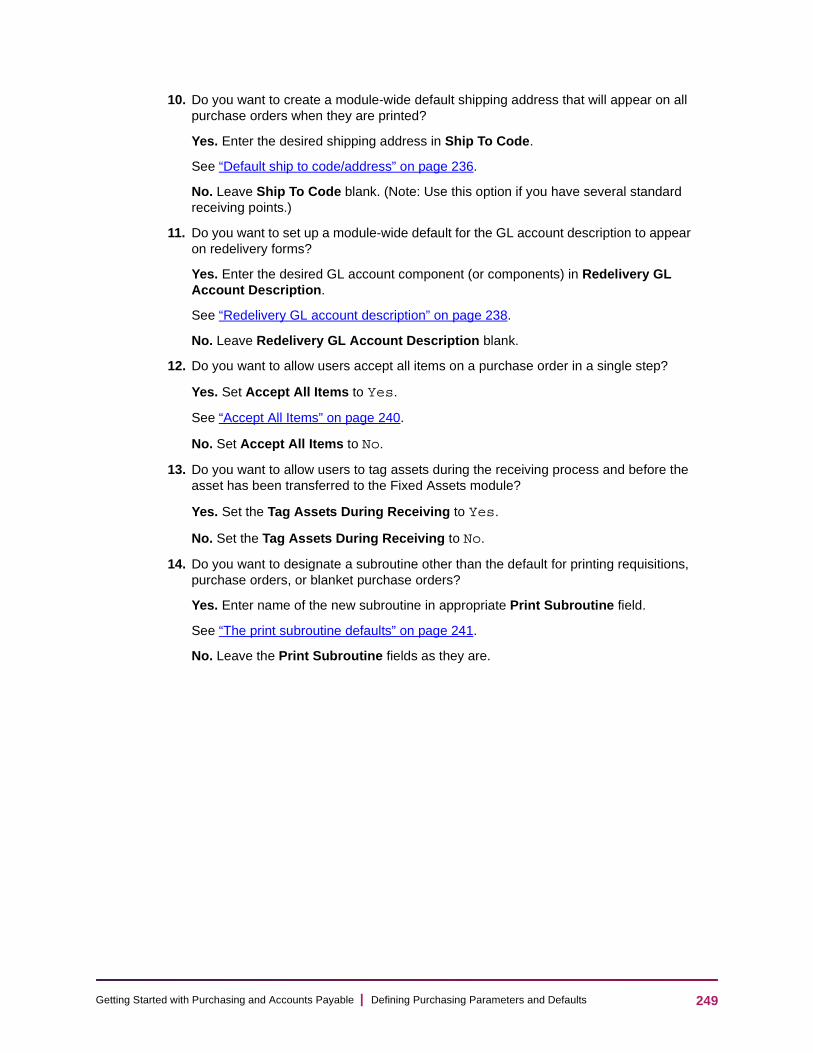
Ge
10. Do you want to create a module-wide default shipping address that will appear on all purchase orders when they are printed?
Yes. Enter the desired shipping address in Ship To Code.
See “Default ship to code/address” on page 236.
No. Leave Ship To Code blank. (Note: Use this option if you have several standard receiving points.)
11. Do you want to set up a module-wide default for the GL account description to appear on redelivery forms?
Yes. Enter the desired GL account component (or components) in Redelivery GL Account Description.
See “Redelivery GL account description” on page 238.
No. Leave Redelivery GL Account Description blank.
12. Do you want to allow users accept all items on a purchase order in a single step?
Yes. Set Accept All Items to Yes.
See “Accept All Items” on page 240.
No. Set Accept All Items to No.
13. Do you want to allow users to tag assets during the receiving process and before the asset has been transferred to the Fixed Assets module?
Yes. Set the Tag Assets During Receiving to Yes.
No. Set the Tag Assets During Receiving to No.
14. Do you want to designate a subroutine other than the default for printing requisitions, purchase orders, or blanket purchase orders?
Yes. Enter name of the new subroutine in appropriate Print Subroutine field.
See “The print subroutine defaults” on page 241.
No. Leave the Print Subroutine fields as they are.
249tting Started with Purchasing and Accounts Payable | Defining Purchasing Parameters and Defaults
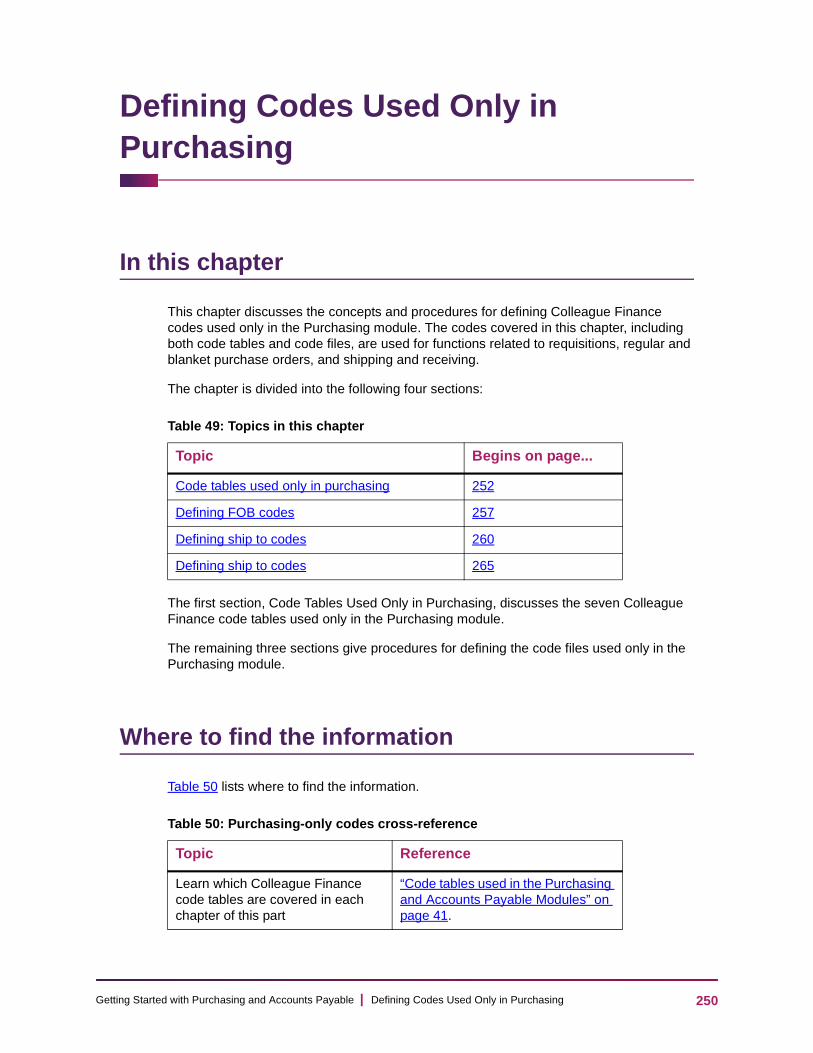
Ge
Defining Codes Used Only in Purchasing
In this chapter
This chapter discusses the concepts and procedures for defining Colleague Finance codes used only in the Purchasing module. The codes covered in this chapter, including both code tables and code files, are used for functions related to requisitions, regular and blanket purchase orders, and shipping and receiving.
The chapter is divided into the following four sections:
The first section, Code Tables Used Only in Purchasing, discusses the seven Colleague Finance code tables used only in the Purchasing module.
The remaining three sections give procedures for defining the code files used only in the Purchasing module.
Where to find the information
Table 50 lists where to find the information.
Table 49: Topics in this chapter
Topic Begins on page...
Code tables used only in purchasing 252
Defining FOB codes 257
Defining ship to codes 260
Defining ship to codes 265
Table 50: Purchasing-only codes cross-reference
Topic Reference
Learn which Colleague Finance code tables are covered in each chapter of this part
“Code tables used in the Purchasing and Accounts Payable Modules” on page 41.
250tting Started with Purchasing and Accounts Payable | Defining Codes Used Only in Purchasing
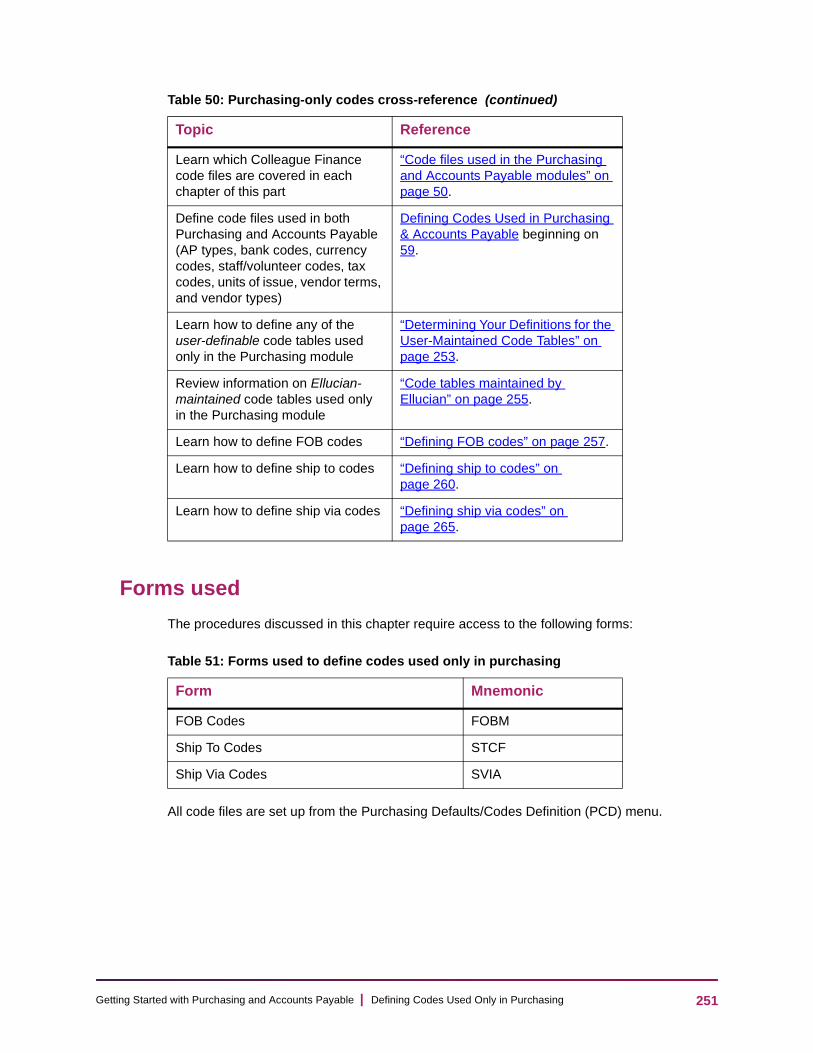
Ge
Forms used
The procedures discussed in this chapter require access to the following forms:
All code files are set up from the Purchasing Defaults/Codes Definition (PCD) menu.
Learn which Colleague Finance code files are covered in each chapter of this part
“Code files used in the Purchasing and Accounts Payable modules” on page 50.
Define code files used in both Purchasing and Accounts Payable (AP types, bank codes, currency codes, staff/volunteer codes, tax codes, units of issue, vendor terms, and vendor types)
Defining Codes Used in Purchasing & Accounts Payable beginning on 59.
Learn how to define any of the user-definable code tables used only in the Purchasing module
“Determining Your Definitions for the User-Maintained Code Tables” on page 253.
Review information on Ellucian-maintained code tables used only in the Purchasing module
“Code tables maintained by Ellucian” on page 255.
Learn how to define FOB codes “Defining FOB codes” on page 257.
Learn how to define ship to codes “Defining ship to codes” on page 260.
Learn how to define ship via codes “Defining ship via codes” on page 265.
Table 51: Forms used to define codes used only in purchasing
Form Mnemonic
FOB Codes FOBM
Ship To Codes STCF
Ship Via Codes SVIA
Table 50: Purchasing-only codes cross-reference (continued)
Topic Reference
251tting Started with Purchasing and Accounts Payable | Defining Codes Used Only in Purchasing

Ge
Code tables used only in purchasing
Before you begin
Before working directly with the Purchasing module code tables, a few preparatory steps are recommended to help you benefit from the discussions that follow. You should:
1. Review basic Purchasing and Accounts Payable codes concepts.
See Understanding Purchasing and Accounts Payable Codes on 38.
2. Become familiar, if you are not already, with the codes and conventions used at your institution to handle shipping and inventory tracking information.
Understanding the purchasing-only code tables
This section is divided into the following two subsections:
• Determining your definitions for the user-maintained code tables
• Code tables maintained by Ellucian
Seven Colleague Finance code tables are used only in the Purchasing module.1 Three of these code tables are defined and maintained by your institution; four are maintained by Ellucian and cannot be modified by users. The code tables are used in purchasing procedures including processing of requisitions, POs and blanket POs, and receiving.
Table 52 lists the code tables covered in this chapter. A check mark indicates you can maintain the code table; a blank indicates the code table is predefined by Ellucian.
1.Twenty-six other code tables are used in either the Accounts Payable module or in both, and six are used for commodity codes. The code tables used in both Purchasing and Accounts Payable are covered in Defining Codes Used in Purchasing & Accounts Payable To find out which code tables are covered in which chapter, see Table 7 of Understanding Purchasing and Accounts Payable Codes
Table 52: The Purchasing-only Code Tables
Code TableUser Maintains? Code Table
User Maintains?
ACCEPT.CHANGE. CODES
Yes PO.DATE.TO.PRINT.CODES
BPO.GL.PROMPT. SEQUENCES
REQ.PRIORITIES Yes
BPO.TRAN.TYPES WORK.ORDER.GL. USE.CODES
252tting Started with Purchasing and Accounts Payable | Defining Codes Used Only in Purchasing
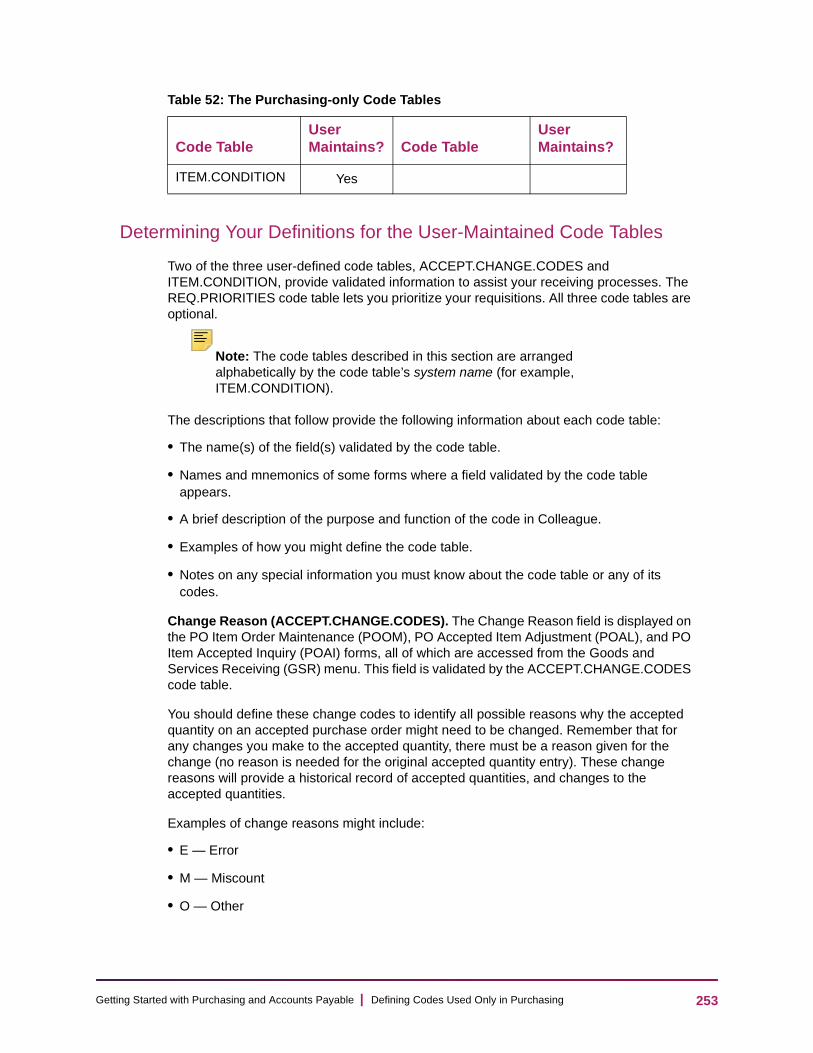
Ge
Determining Your Definitions for the User-Maintained Code Tables
Two of the three user-defined code tables, ACCEPT.CHANGE.CODES and ITEM.CONDITION, provide validated information to assist your receiving processes. The REQ.PRIORITIES code table lets you prioritize your requisitions. All three code tables are optional.
Note: The code tables described in this section are arranged alphabetically by the code table’s system name (for example, ITEM.CONDITION).
The descriptions that follow provide the following information about each code table:
• The name(s) of the field(s) validated by the code table.
• Names and mnemonics of some forms where a field validated by the code table appears.
• A brief description of the purpose and function of the code in Colleague.
• Examples of how you might define the code table.
• Notes on any special information you must know about the code table or any of its codes.
Change Reason (ACCEPT.CHANGE.CODES). The Change Reason field is displayed on the PO Item Order Maintenance (POOM), PO Accepted Item Adjustment (POAL), and PO Item Accepted Inquiry (POAI) forms, all of which are accessed from the Goods and Services Receiving (GSR) menu. This field is validated by the ACCEPT.CHANGE.CODES code table.
You should define these change codes to identify all possible reasons why the accepted quantity on an accepted purchase order might need to be changed. Remember that for any changes you make to the accepted quantity, there must be a reason given for the change (no reason is needed for the original accepted quantity entry). These change reasons will provide a historical record of accepted quantities, and changes to the accepted quantities.
Examples of change reasons might include:
• E — Error
• M — Miscount
• O — Other
ITEM.CONDITION Yes
Table 52: The Purchasing-only Code Tables
Code TableUser Maintains? Code Table
User Maintains?
253tting Started with Purchasing and Accounts Payable | Defining Codes Used Only in Purchasing

Ge
You can use the worksheet in “Change reason codes” on page 339 for assistance in developing your change reason codes.
Item Condition (ITEM.CONDITION). The Accepted Item Condition field is displayed on the PO Item Order Maintenance (POOM) and PO Item Order Inquiry (POOI) forms. The Rejected Item Condition field also appears on both the POOM and POOI form. Both fields are validated by the ITEM.CONDITION code table.
The codes in the ITEM.CONDITION code table indicate possible conditions of ordered items when they are received. The purpose of the codes in this code table is to document both the condition of an accepted item when it is received (to provide documentation in the event the item fails to function properly at a later time) and to document the condition of a rejected item when it is received (to provide documentation for the reason why the item was returned to the vendor).
Examples of item condition codes might include the following:
• EXC — Excellent
• VGD — Very good
• GD — Good
• FR — Fair
• PR — Poor
• BRK — Broken
• DMG — Damaged
• SDM — Slightly damaged
• RPL — Needs replacing
• OTH — Other
You can use the worksheet in “Item condition codes” on page 342 to help define your item condition codes.
Requisition Priority (REQ.PRIORITIES). The Priority field is displayed on the Requisition Maintenance (REQM) and Requisition Inquiry (RINQ) forms, and is validated against the REQ.PRIORITIES code table. The codes in this code table define the range of possible priorities your institution assigns to requisitions, to assist in timely processing of constituent requests.
For example, you might define your requisition priorities as follows:
• 1 — Critical; top priority
• 2 — Important; required
• 3 — Desired; makes job easier
• F — Future; will be needed
• E — Existing supply renewal
254tting Started with Purchasing and Accounts Payable | Defining Codes Used Only in Purchasing

Ge
You can use the worksheet in “Requisition priority codes” on page 343 for assistance in developing requisition priorities for your institution.
Code tables maintained by Ellucian
The Ellucian-maintained code tables used only in the Purchasing module relate to blanket purchase orders, purchase order printing, and work order expenses.
Note: Each of the four code tables described below is maintained by Ellucian. You cannot make any changes to the codes in these code tables. If you have any questions, or believe that a specific code should be included in any of these tables that is not currently included, contact your System Administrator, who will contact Ellucian.
Each code description in this section includes the following information about the code table:
• The name(s) of the field(s) validated by the code table.
• Names and mnemonics of some forms where a field validated by the code table appears.
• A brief description of the purpose and function of the code in Colleague.
[Blanket PO Prompt Defaults] GL Prompt Sequence (BPO.GL.PROMPT.SEQUENCES). The GL Prompt Sequence field for blanket PO prompt defaults appears on the PU Parameters Definition (PUPD) form. This field is validated against the BPO.GL.PROMPT.SEQUENCES code table.
When you distribute expenses on a blanket PO to more than one GL account, you might
have a preference for entering the distribution as either an amount or a percent.1 You set up this preference on the PUPD form, using the options in this code table.
Once you have set this default on the PUPD form, then when you enter a GL number in the GL Account No window on the Blanket PO GL Maintenance (BGLM) form, the cursor moves from the GL Account No field to either the Amount field or the Percent field, based on the prompting sequence you selected on the PUPD form.
The codes in this code table are as follows:
• A — Distribute by amount
• P — Distribute by percent
1.The GL prompting options for requisitions, purchase orders, and vouchers include options for Amount and Percent as well as an option for Quantity. Since the prompt options code table for these document types is used in both the Purchasing and Accounts Payable module, it is covered in “Defining Codes Used in Purchasing & Accounts Payable” on page 59
255tting Started with Purchasing and Accounts Payable | Defining Codes Used Only in Purchasing

Ge
Transaction History Types (BPO.TRAN.TYPES). The Transaction History Type field is displayed on the Blanket PO GL History Summary (BGLS) and Blanket PO GL History Detail (BGLD) forms, and is validated against the BPO.TRAN.TYPES code table. The codes in this code table indicate the three possible types of transactions that are used to build a transaction history for a blanket PO.
The three blanket PO transaction history types are as follows:
• O — Original: The original transaction is the transaction in which an original encumbrance amount was specified for the selected GL account on a given blanket PO (there is only one original transaction type for each GL account)
• A — Adjustment: Adjustment transactions record how many times, and for how much, the encumbrance amount for the selected GL account on a blanket PO was changed
• V — Voucher: Voucher transactions provide details on vouchers that have been created on the blanket PO and have expensed the selected GL account (the Voucher transaction type is generated by voucher maintenance)
PO Date to Print (PO.DATE.TO.PRINT.CODES). The Date to Print field is displayed on the Purchase Order Print (PPRT), Purchase Order Single Print (POSP), Blanket PO Print (BPRT), and Blanket PO Single Print (BPSP) forms, the forms on which you set up batch and single print runs for purchase orders and blanket POs. This field is validated against the PO.DATE.TO.PRINT code table.
The codes in this code table identify the two possible dates you can select to print on purchase orders and blanket POs. For each print run, you select the date you want to print.
The codes are as follows:
• P — Purchase order date (from the PO Date field on the Purchase Order Maintenance [POEM] form)
• C — Contract date (from the Contract Date field on the POEM form)
[Work Order/]Type (WORK.ORDER.GL.USE.CODES). The [Work Order/]Type field appears on the Requisition Item Maintenance (RQIM), Requisition Item Inquiry (RIIN), PO Item Maintenance (POIM), and PO Item Inquiry (PIIN) forms. The Type field is displayed on the same line and to the right of the Work Order field and is validated against the WORK.ORDER.GL.USE.CODES code table.
The codes in this code table define the types of work order-related GL accounts you can select when creating requisitions and purchase orders to be charged to a work order.
You will use this code table only if your institution is using the Physical Plant module. These codes represent the following three different types of general ledger account numbers that can be associated with a work order:
• D — Department expense account (DEPT.EXP.ACCT in WORK.ORDERS file)
• P — Plant expense account (PLANT.EXP.ACCT in WORK.ORDERS file)
• C — Physical plant control account (PP.CONTROL.ACCT in WO.TYPES code file)
256tting Started with Purchasing and Accounts Payable | Defining Codes Used Only in Purchasing
Ge
Defining the purchasing-only code tables
Colleague Finance code tables used in the Purchasing and Accounts Payable modules can be entered into the system, or maintained, on the Validation Codes (VAL) form. This form can be accessed from the Purchasing Defaults / Codes Definition (PCD) menu (for those whose security class gives them access to the form).
Code table maintenance may be a system administrator function at your institution. If so, see your system administrator for more information on system data entry of code table definitions.
For more information and procedures for adding or maintaining code tables, see “Validation Code Table Maintenance” on page 358.
Defining FOB codes
This section explains how to define an FOB code.
Before you begin
Before setting up your FOB codes, you should:
1. Review the discussion of FOB codes.
• See Understanding FOB codes below.
2. Become familiar, if you are not already, with the FOB codes your institution uses that should be entered in the Purchasing module.
• Coordinate with the purchasing office to define the codes.
3. Use the worksheet provided in “FOB codes” on page 341 to plan your FOB codes on paper, before entering any information into Colleague Finance.
Understanding FOB codes
The term F.O.B. (“free on board”) indicates the arrangement for shipping cost liability made between vendor and customer. FOB codes represent the point in shipping at which the buyer is responsible for the goods in transit. A vendor, particularly a foreign vendor, will generally agree to pay shipping costs (including insurance) up to a certain point, at which point the institution becomes responsible for the costs.
The most common use of this practice is in overseas shipping, where costs might be handled by the vendor up to the local harbor (for example, Miami, Boston, or San Francisco). In this case, the institution would be responsible for all shipping and insurance costs incurred in transporting the goods from the local harbor to the final destination.
FOB codes are optional.
257tting Started with Purchasing and Accounts Payable | Defining Codes Used Only in Purchasing

Ge
Where FOB codes are used
FOB codes are displayed primarily on requisition and purchase order maintenance forms in the Purchasing module. Table 53 lists the Purchasing module forms, with mnemonics, on which the FOB field appears. A “Yes” in the second column indicates the FOB code on that form can be entered or modified (if column 3 is blank, the field can only be viewed on that form):
Defining your FOB codes
Your institution may use several types of FOB arrangements with your various vendors.
The two most common examples of FOB codes are as follows:
• SH — FOB Shipping Point (the title to the goods passes to the buyer once the goods leave the shipping point)
• DE — FOB Destination (the title to the goods passes to the buyer when goods arrive at the buyer’s location)
Rules governing FOB code definition
You must define FOB codes before you can assign them to requisitions, purchase orders, or blanket purchase orders.
Tips for FOB code definition
For the description, enter the name of the location where free on board stops; that is, where your institution becomes responsible for shipping costs, including any insurance.
Table 53: Purchasing module forms where FOB field is displayed
Form (Mnemonic) Where FOB Field Appears
Code Can Be Entered/Modified?
Requisition Maintenance (REQM) Yes
Purchase Order Maintenance (POEM) Yes
Purchase Order Single Print (POSP)
Blanket PO Maintenance (BPOM) Yes
258tting Started with Purchasing and Accounts Payable | Defining Codes Used Only in Purchasing

Ge
Components of an FOB code
FOB codes are defined using the FOB Codes (FOBM) form.
Figure 24: FOB Codes (FOBM) Form
Procedure for Defining an FOB Code
Follow these steps to define an FOB code:
1. Complete the steps outlined in “Before you begin” on page 257.
2. Access the FOBM form.
3. Do you want to add a new FOB code or modify an existing FOB code?
Add a new FOB code. Continue with Step 4.
Modify an existing FOB code. Enter the appropriate code at the FOB LookUp prompt, or use the LookUp feature to select the desired code.
Continue with Step 5.
4. Enter the new code at the FOB LookUp prompt.
• Since the code does not exist in the FOBS file, a prompt is displayed:Record not found -- Enter (A) to Add or RETURN to Reenter
• Enter A to add the new code.
– Notice that the new FOB code ID is displayed in the form header block.
5. Enter a description of the FOB code.
6. Save the record.
7. Repeat this procedure for each FOB code you want to maintain.
8. When you are finished adding FOB codes, save your work and exit the FOBM form.
259tting Started with Purchasing and Accounts Payable | Defining Codes Used Only in Purchasing

Ge
Defining ship to codes
This section explains how to define a ship to code.
Before you begin
Before setting up your ship to codes, you should:
1. Review the discussion of ship to codes.
See Understanding ship to codes below.
2. Become familiar, if you are not already, with your institution’s shipping and receiving locations, that should be entered as ship to codes.
Coordinate with the purchasing office to define the codes.
3. Use the worksheet provided in “Ship to codes” on page 344 to plan your ship to codes on paper, before entering any information into the Purchasing module.
Understanding ship to codes
Ship to codes are optional Purchasing module codes that let you define a separate address for each of the locations at your institution to which purchased goods are shipped. You can then assign the desired ship to code to each of your requisitions, purchase orders, and blanket purchase orders.
A ship to code includes
• Name of the person or location to which goods are shipped.
• Address of the location (can be a maximum of two lines).
• City, state, and zip code of location (city and state are validated against zip code).
• Telephone number (with validated area code) and extension.
Where ship to codes are used
You can enter a ship to code in the Ship To field on the following forms in the Purchasing module:
• For a requisition, on Requisition Maintenance (REQM).
• For a purchase order, on Purchase Order Maintenance (POEM).
260tting Started with Purchasing and Accounts Payable | Defining Codes Used Only in Purchasing

Ge
• For a blanket purchase order, on Blanket PO Maintenance (BPOM).
Note: You can also set up a default ship to code on the PU Parameters Definition (PUPD) form. Use a default ship to code if your institution has only one shipping and receiving location. For more information, see “Default ship to code/address” on page 236 of Defining Purchasing Parameters and Defaults
For purchasing documents that have been created and saved, you can view ship to code information in the Ship To field on the following inquiry-only forms:
• For a requisition, on Requisition Inquiry (RINQ).
• For a purchase order, on Purchase Order Inquiry (PINQ).
• For printing an individual purchase order, on Purchase Order Single Print (POSP).
On the REQM, RINQ, POEM, PINQ, and BPOM forms, a one line field displays only the code and description. On these forms, however, the Ship To field also provides access to a detail form where you can modify, or simply view, your shipping information for an individual purchasing document. For each type of document, the detail form displays the following:
• In form header block: purchasing document number, status and date, and vendor name.
• In body: ship to code (name, complete address, city/state/zip, and phone number).
On the Purchase Order Single Print (POSP) form, the complete shipping location is displayed, including the name, address, city, state, and zip code.
Table 54 lists the Purchasing module forms, with mnemonics, on which the Ship To field appears. A “Yes” in the second column indicates the Ship To field allows access to a detail form. The third column lists, for each form, the name and mnemonic of the form accessed by the DETAIL key; and the fourth column indicates whether the detail form is for modifying or is for display only
Table 54: Ship To fields and detail forms available from Purchasing module forms
Form (Mnemonic) Where Ship To Field Appears
Detail?
Detail Form (Mnemonic) Accessed from Ship To Field
Modify/ Display-Only
Requisition Maintenance (REQM)
Yes Requisition Ship To Maintenance (RQSM)
Modify
Requisition Inquiry (RINQ) Yes Requisition Ship To Inquiry (RQSI) Display-Only
Purchase Order Maintenance (POEM)
Yes PO Ship To Maintenance (POSM) Modify
Purchase Order Inquiry (PINQ)
Yes Purchase Order Ship To Inquiry (PSTI)
Display-Only
Purchase Order Single Print (POSP)
N/A N/A
261tting Started with Purchasing and Accounts Payable | Defining Codes Used Only in Purchasing

Ge
The inventory stores code file also allows entry of ship to information, but you do not use a ship to code; the shipping information in the inventory stores code must be entered manually.
How ship to codes work
Ship to codes work slightly differently when you have defined an institution-wide default ship to code, rather than having purchasing staff enter shipping information on each document as needed.
If you use a default ship to code. If you have set up a default ship to code on the PU Parameters Definition (PUPD) form, that default ship to code will be displayed on all purchasing documents you create. In cases where you need to change the code from the default, you can enter the desired ship to code in the Ship To field on the REQM, POEM, or BPOM form, or modify parts of an existing ship to code on the corresponding detail form.
If you do not use a default ship to code. If your institution’s sites have different shipping locations, and therefore are not using a default ship to code, staff can enter a ship to code on each requisition, purchase order, or blanket purchase order. If any changes need to be made to a selected ship to code for that specific purchase document, staff can make changes to the information in the code by accessing the corresponding ship to detail form.
Note: If you make any changes to a ship to code on the RQSM, POSM, or BPSM forms, these changes do not affect the ship to code in the file. The changes will apply only to the shipping information on the purchase document where the changes were made.
Determining your ship to codes
Your ship to codes, and how many you need to define, will be determined by the number of receiving locations at your institution, and the arrangements you have for delivery of goods to your offices and departments. You can set up your ship to code structure in the way that best suits your institution:
• If your institution is fairly small, and all deliveries come to the same location, you can define a ship to code for that location, then set up that ship to code as your institution-wide default ship to code on the PU Parameters Definition (PUPD) form.
• If your institution has several sites, or several receiving locations, you should not set up a default ship to code. Instead, you can define a separate code for each of your receiving locations and let staff assign the codes to individual purchasing documents as needed.
Blanket PO Maintenance (BPOM)
Yes Blanket PO Ship To Maint (BPSM) Modify
Table 54: Ship To fields and detail forms available from Purchasing module forms
Form (Mnemonic) Where Ship To Field Appears
Detail?
Detail Form (Mnemonic) Accessed from Ship To Field
Modify/ Display-Only
262tting Started with Purchasing and Accounts Payable | Defining Codes Used Only in Purchasing
Ge
Examples of some ship to codes are as follows:
• Central loading/receiving dock
• Warehouse
• Bookstore
• Central Library
• Main Dining Hall
• Computer Center
• Main/North/South Branch Office/Campus
Using Colleague to validate your address data. Several validation processes in ship to code definition help speed your data entry and avoid errors:
• When you enter a name for your ship to code, you can enter it in lower case; Colleague converts each major word to an initial capital. (If you want to preserve your capitalization as typed, enter an equal (=) sign before you begin typing.)
• When you are entering the city, state and zip code, enter the zip code first; this will access the Colleague database to verify the city and state. If the zip code has previously been entered in your system with a city and state, that zip code’s city and state
information will appear in the proper fields.1
• If you enter a state, you can use the standard two-digit U.S. state (or six-digit Canadian province) codes.
• When you enter an area code for your shipping phone number, Colleague verifies that the area code is valid for the state you entered in the state field. If the area code is not in effect in the state listed in this ship to code, a warning message is displayed.
Rules governing ship to code definition
Remember the following rules when defining your ship to codes:
• In order to save a ship to code, you must define at least a code, a name, and one line of the address.
• You must define ship to codes before you can:
• Set up a default ship to code on the PU Parameters Definition (PUPD) form.
• Assign a ship to code to a requisition, purchase order, or blanket PO.
1.If the zip code you enter has not been previously used in your system, Colleague will not find a city and state associated with it. In this case, enter the city, state and zip code manually. The city and state will be saved and associated with the zip code, and will be available for use the next time the zip code is used.
263tting Started with Purchasing and Accounts Payable | Defining Codes Used Only in Purchasing
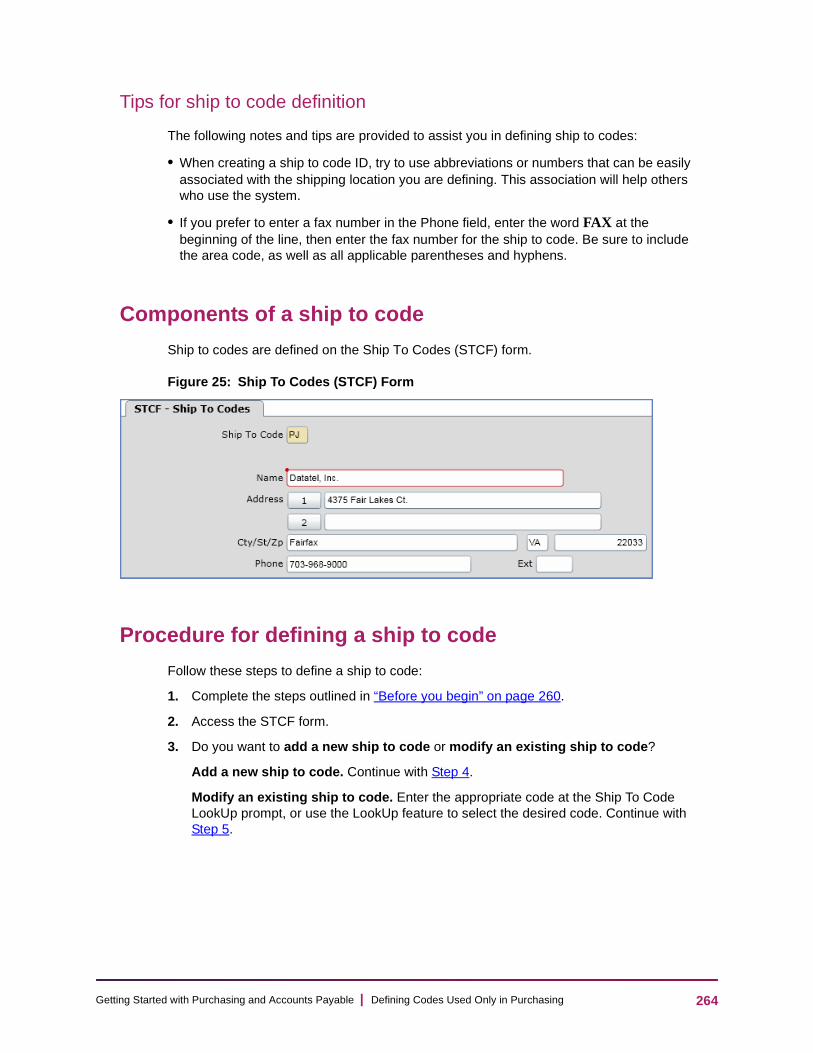
Ge
Tips for ship to code definition
The following notes and tips are provided to assist you in defining ship to codes:
• When creating a ship to code ID, try to use abbreviations or numbers that can be easily associated with the shipping location you are defining. This association will help others who use the system.
• If you prefer to enter a fax number in the Phone field, enter the word FAX at the beginning of the line, then enter the fax number for the ship to code. Be sure to include the area code, as well as all applicable parentheses and hyphens.
Components of a ship to code
Ship to codes are defined on the Ship To Codes (STCF) form.
Figure 25: Ship To Codes (STCF) Form
Procedure for defining a ship to code
Follow these steps to define a ship to code:
1. Complete the steps outlined in “Before you begin” on page 260.
2. Access the STCF form.
3. Do you want to add a new ship to code or modify an existing ship to code?
Add a new ship to code. Continue with Step 4.
Modify an existing ship to code. Enter the appropriate code at the Ship To Code LookUp prompt, or use the LookUp feature to select the desired code. Continue with Step 5.
264tting Started with Purchasing and Accounts Payable | Defining Codes Used Only in Purchasing
Ge
4. Enter the new code at the Ship To Code LookUp prompt.
• Since the code does not exist in the SHIP.TO.CODES file, a prompt is displayed:Record not found -- Enter (A) to Add or RETURN to Reenter
• Enter A to add the new code.
– Notice that the new ship to code ID is displayed in the form header block.
5. Enter the name and at least one line of an address.
• If the ship to code does not need any additional information, continue with Step 8.
6. At the Cty field, if the zip code exists in your system, enter the zip for the ship to code.
• The city, state, and zip code associated with this zip code are displayed in the corresponding fields.
7. Complete the remaining fields on this form.
8. Save this record.
9. Repeat this procedure for each ship to code you want to maintain.
10. When you are finished adding ship to codes, save your work and exit the STCF form.
Defining ship via codes
This section explains how to define ship via codes.
Before you begin
Before setting up your ship via codes, you should:
1. Review the discussion of ship via codes.
See Understanding ship via codes below.
2. Become familiar, if you are not already, with the shipping methods your institution uses that should be entered as ship via codes.
Coordinate with the purchasing office to define the codes.
3. Use the worksheet provided in “Ship via codes” on page 345 to plan your ship via codes on paper, before entering any information into the HR system.
Understanding ship via codes
Ship via codes are optional Purchasing module codes representing methods of shipment by which goods you purchase are shipped to you. These may include overnight delivery, air freight, or local vendor truck delivery.
265tting Started with Purchasing and Accounts Payable | Defining Codes Used Only in Purchasing

Ge
Where ship via codes are used
In the Purchasing module, you assign a ship via code to individual requisitions, purchase orders, and blanket purchase orders. The ship via code remains associated with a purchasing document through the receiving process.
At the time the goods are received, the Arrived Via field on the Purchase Order Receiving (PORC) form also uses the same ship via codes to indicate how the goods arrived at their destination. When goods are returned to the vendor, the Return Via field is also validated by the ship via codes.
The Ship Via field does not appear on any inquiry forms for purchasing documents.
Rules governing ship via code definition
You must define ship via codes before you can assign them to requisitions, purchase orders, or blanket purchase orders.
Tips for ship via code definition
The following notes and tips are provided to assist you in defining ship via codes:
• When creating a ship via code ID, try to use abbreviations that can be easily associated with the shipping method you are defining. For example, you could use AF for air freight, FX for Federal Express, VT for local vendor’s truck, and so on. This association will help others who use the system.
Table 55: Fields validated by ship via codes on Purchasing module forms
Purchasing Stage Form (Mnemonic) Where
Ship Via Field Appears Field NameCode Can Be Entered/Maintained?
Requisitions Requisition Maintenance (REQM) Ship Via Yes
Purchase Orders
Purchase Order Maintenance (POEM)
Ship Via Yes
Purchase Order Single Print (POSP)
Ship Via
Blanket POs Blanket PO Maintenance (BPOM) Ship Via Yes
Receiving Purchase Order Receiving (PORC)
Arrived Via Yes
PO Item Order Maintenance (POOM)
Return Via Yes
PO Item Order Inquiry (POOI) Return Via
266tting Started with Purchasing and Accounts Payable | Defining Codes Used Only in Purchasing
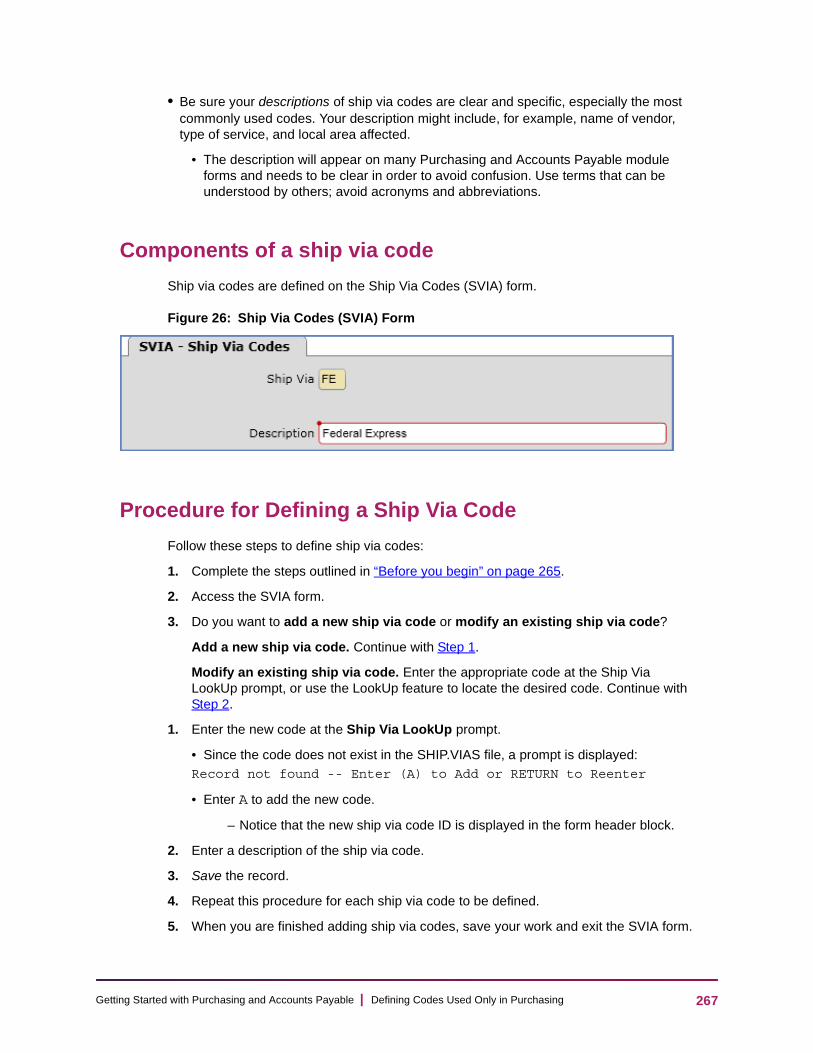
Ge
• Be sure your descriptions of ship via codes are clear and specific, especially the most commonly used codes. Your description might include, for example, name of vendor, type of service, and local area affected.
• The description will appear on many Purchasing and Accounts Payable module forms and needs to be clear in order to avoid confusion. Use terms that can be understood by others; avoid acronyms and abbreviations.
Components of a ship via code
Ship via codes are defined on the Ship Via Codes (SVIA) form.
Figure 26: Ship Via Codes (SVIA) Form
Procedure for Defining a Ship Via Code
Follow these steps to define ship via codes:
1. Complete the steps outlined in “Before you begin” on page 265.
2. Access the SVIA form.
3. Do you want to add a new ship via code or modify an existing ship via code?
Add a new ship via code. Continue with Step 1.
Modify an existing ship via code. Enter the appropriate code at the Ship Via LookUp prompt, or use the LookUp feature to locate the desired code. Continue with Step 2.
1. Enter the new code at the Ship Via LookUp prompt.
• Since the code does not exist in the SHIP.VIAS file, a prompt is displayed:Record not found -- Enter (A) to Add or RETURN to Reenter
• Enter A to add the new code.
– Notice that the new ship via code ID is displayed in the form header block.
2. Enter a description of the ship via code.
3. Save the record.
4. Repeat this procedure for each ship via code to be defined.
5. When you are finished adding ship via codes, save your work and exit the SVIA form.
267tting Started with Purchasing and Accounts Payable | Defining Codes Used Only in Purchasing

Ge
Defining Accounts Payable Parameters and Defaults
In this chapter
This chapter explains the concepts and procedures for defining the parameters and defaults you use to customize the Accounts Payable module for your institution.
The parameters discussed in this chapter apply only to the Accounts Payable module. Parameters and defaults for other modules of Colleague Finance in operation at your institution, including General Ledger, Budget Management, Budget Request, Purchasing, Fixed Assets, Physical Plant, and Inventory Control, are set up in each specific module.
This chapter is divided into the following sections:
• Understanding the Accounts Payable Parameters and Defaults
• Procedure for defining accounts payable parameters and defaults
Some of the procedures discussed in this chapter may be reserved for your system administrator. If you do not have security access to the form used in these procedures, check with your system administrator to determine who will perform these tasks.
Forms used
The procedures discussed in this chapter require access to the AP Parameters Definition (APDE) form and the AP E-Check Parameters (APEP) form.
Where to find the information
Table 56 lists where to find the information.
Table 56: Accounts Payable parameters setup cross-reference
Topic Reference
Learn concepts of parameters and defaults
“Understanding the Accounts Payable Parameters and Defaults” on page 270.
268tting Started with Purchasing and Accounts Payable | Defining Accounts Payable Parameters and Defaults

Ge
Before you begin
Several planning and decision-making processes should be completed before you define the module parameters and defaults within the Accounts Payable module.
Learn about the approval parameters
“The voucher approval needed parameter” on page 273.
Learn about the discount method parameter
“The discount method parameter” on page 275.
Learn about prompting default options for vouchers and recurring vouchers
“Form prompting defaults” on page 279.
Learn about the tax expense distribution parameter
“The tax expense distribution parameter” on page 283.
Learn about the default acquisition method for fixed asset creation
“Default acquisition method for fixed asset creation” on page 284
Learn about the parameters for voucher creation
“Parameters for voucher creation” on page 285
Learn about the parameters and defaults related to check printing
“Default acquisition method for fixed asset creation” on page 284.
See a summary of the parameters and defaults to be set on the APDE form
“Setting the parameters and defaults on the APDE form: Quick reference” on page 295.
Table 57: Preliminary steps for defining Accounts Payable parameters
Action Discussion
Review the concepts related to the parameters and defaults for the Accounts Payable module.
See “Understanding the Accounts Payable Parameters and Defaults” on page 270.
Ensure that bank codes have been defined in the BANK.CODES file.
See “Defining bank codes” on page 83.
Ensure that decisions have been made on the print subroutines your institution will use to print AP checks.
Coordinate with the AP and accounting offices. For details on setting up standard forms, see “Standard Forms” on page 370
Table 56: Accounts Payable parameters setup cross-reference (continued)
Topic Reference
269tting Started with Purchasing and Accounts Payable | Defining Accounts Payable Parameters and Defaults
Ge
Understanding the Accounts Payable Parameters and Defaults
A parameter is a property, or set of properties, determining one or several characteristics of a structure or a system. When you set up parameters for a system, you are defining the limits of certain elements of the system, within which the system will always operate.
A default is “a selection automatically used by a computer program in the absence of a
choice made by the user.”1 For example, one of the defaults you can set up for the Accounts Payable module is “default alignment copies.” This indicates to Colleague the number of checks that will be voided at the beginning of each print run, if you do not specify another number for a specific check run. (See 289 for more on default alignment copies.)
Note: Typically, one parameter form is available for each Colleague module you implement. This form lets you specify your institution’s policies, or characteristics about the particular module, thus customizing the module for your own institution.
The Accounts Payable module parameters and defaults let you control how the module will operate at your institution. They reflect your institution’s preferences about questions such as implementing online approvals for vouchers and recurring vouchers, cursor prompting on certain forms, whether or not you want to use e-checks, and how you want your printed checks to look.
Determine if your institution will use e-checks. If your institution will use e-checks, ensure that decisions have been made regarding the maximum amount, default e-check advice method, advice paragraphs, terms and conditions, and confirmation e-mail paragraph.
Coordinate with the AP and accounting office.
Ensure that all concerned parties have had a chance to give input into the process of defining Accounts Payable parameters and defaults.
Coordinate with your accounting, accounts payable, and purchasing offices to set up parameters for the Accounts Payable module.
1.Merriam Webster’s Collegiate Dictionary (Tenth Edition).
Table 57: Preliminary steps for defining Accounts Payable parameters (continued)
Action Discussion
270tting Started with Purchasing and Accounts Payable | Defining Accounts Payable Parameters and Defaults
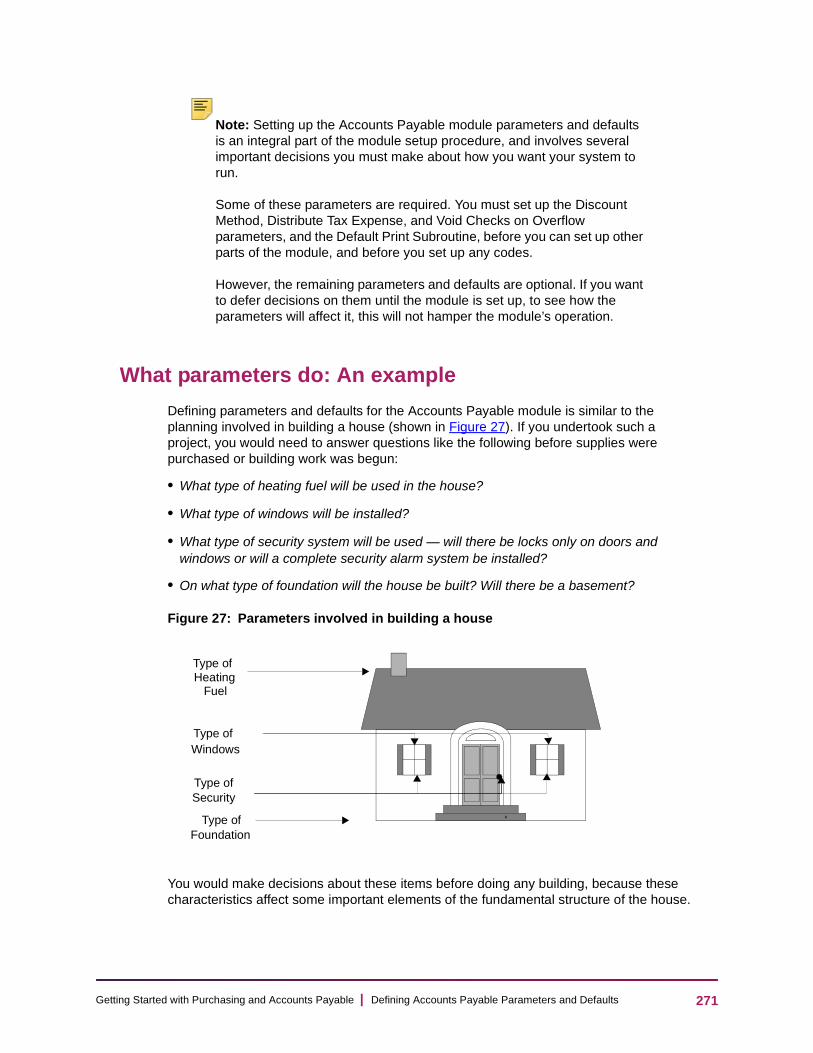
Ge
Note: Setting up the Accounts Payable module parameters and defaults is an integral part of the module setup procedure, and involves several important decisions you must make about how you want your system to run. Some of these parameters are required. You must set up the Discount Method, Distribute Tax Expense, and Void Checks on Overflow parameters, and the Default Print Subroutine, before you can set up other parts of the module, and before you set up any codes. However, the remaining parameters and defaults are optional. If you want to defer decisions on them until the module is set up, to see how the parameters will affect it, this will not hamper the module’s operation.
What parameters do: An example
Defining parameters and defaults for the Accounts Payable module is similar to the planning involved in building a house (shown in Figure 27). If you undertook such a project, you would need to answer questions like the following before supplies were purchased or building work was begun:
• What type of heating fuel will be used in the house?
• What type of windows will be installed?
• What type of security system will be used — will there be locks only on doors and windows or will a complete security alarm system be installed?
• On what type of foundation will the house be built? Will there be a basement?
Figure 27: Parameters involved in building a house
You would make decisions about these items before doing any building, because these characteristics affect some important elements of the fundamental structure of the house.
Type ofWindows
Type ofHeating
Fuel
Type ofSecurity
Type ofFoundation
271tting Started with Purchasing and Accounts Payable | Defining Accounts Payable Parameters and Defaults

Ge
In addition, if the house being built was a new house based on a builder’s model home, it might be decorated with a beige carpet and cream walls. You could call these the default color selections for this model of home. Yet you might have the option of selecting something different from the default, such as taupe or blue carpeting and ivory or white walls.
In a similar way, your selections of Accounts Payable module parameters and defaults will implement some of your institution’s procurement policies, and determine some key elements in the operation of your system and how you and your users will interact with it.
Components of the AP Parameters Definition (APDE) form
The Accounts Payable module parameters and defaults are defined on the AP Parameters Definition (APDE) form.
Figure 28: The AP Parameters Definition (APDE) form
Before you define your parameters and defaults, be sure you are familiar with the purpose of each parameter or default value and how it works.
The discussions in the following sections describe the purpose of each parameter or default, the options available, and the effect of each option on system operations.
Note: Each discussion of a parameter or default includes a paragraph called “Setting the parameter” or “Setting the default,” which tells you what to do on the APDE form to set that parameter or default for your system.
272tting Started with Purchasing and Accounts Payable | Defining Accounts Payable Parameters and Defaults
Ge
The voucher approval needed parameter
With the Purchasing and Accounts Payable modules, you can move your institution’s purchasing and payables approval mechanism online. Authorization for each procurement document can be entered into the system by the individual designated on that document to approve the document.
If you are using the Purchasing module, you can set it up to require approvals for requisitions or purchase orders, or both. You can also set up the Voucher Approval parameter in Accounts Payable to require approvals at the voucher stage. For more information on the procurement document approval parameters, see Using Online Approvals in Colleague Finance.
Note: The approvals feature is optional. If you do not want to use online approvals, you can leave these parameters at their default setting of “No.” They will not affect the operation of your system.
All parties at your institution involved in the purchasing and payables processes should carefully consider the decision of whether, how, and at what stage to implement approvals.
If you choose to use online approvals for requisitions, purchase orders, or vouchers, you must set up approval groupings based on GL components (called approval GL classes) and groupings defining your institution’s overall approval policies (called approval policy classes). Then you must assign these classes (with optional individual dollar limits) to the appropriate staff members. For more information on setting up approvals, see the Using Online Approvals in Colleague Finance manual.
Use the Voucher Approval Needed field on the AP Parameters Definition (APDE) form to tell Colleague whether you want your purchases to be subject to approval at the voucher stage. In other words, this is where you “turn approvals on” for vouchers.
Implementing online approvals for vouchers
If you decide to require online approvals for vouchers, each voucher will need to be approved before the voucher can be:
• Printed
• Posted to the General Ledger
• Processed for payment
This means that until approved, the next step in the voucher’s processing cannot be completed.
If you decide not to require approvals for vouchers, any voucher created at your institution can be printed, posted, or paid, with no restrictions.
Note: Your selection for the Voucher Approval Needed parameter applies to regular vouchers, recurring vouchers, and Accounts Receivable vouchers.
273tting Started with Purchasing and Accounts Payable | Defining Accounts Payable Parameters and Defaults

Ge
If you are using the Purchasing module and have implemented online approvals for either requisitions or purchase orders, it is important to note that approvals secured for a requisition carry forward to any purchase orders or blanket purchase orders created from that requisition. Likewise, any approvals secured for a purchase order or blanket purchase order carry forward to any vouchers that are created from that PO or BPO.
You can implement completely different approval requirements for purchase orders and for vouchers, augmenting the level of internal accounting control at the voucher stage if you wish to.
Setting the parameter
Select one of the following approvals settings:
• N – No. This setting means that your institution does not require online approvals for vouchers. “N” is the default setting for this parameter.
• Y – Yes. This setting means that your institution requires online approvals for vouchers. Sufficient online approvals, based on approval rules defined by your institution, must be obtained before the voucher can be saved to “Outstanding” status.
• A – Auto-populate. This setting means that when the voucher is finished (the Voucher Done field is set to Yes), Colleague will determine, based on your institution's approvals rules, who can approve this document and then automatically populate those approval IDs in the Next Approvals field. You can manually edit this list.
Note: These parameter settings are stored in the APPROVALS.MODE validation code table in the CF.VALCODES file. This validation code table is maintained by Ellucian and cannot be modified by users.
If you set this field to either “Yes” or “Auto-populate,” Colleague can automatically start the online approval process. If the operator who sets the Voucher Done field to “Yes” has sufficient approval authority for that voucher, Colleague automatically enters that operator's approval ID in the Approvals field. You can manually remove this approval, if necessary.
Changing the parameter setting
If you initially set this field to “No” and then change it to “Yes” or “Auto-populate” after some vouchers have already been created, those existing vouchers will be subjected to the approval process if they are maintained. For example, if you created a voucher when no approvals were required, this voucher could have a status of “Outstanding.” If you then activate approvals by setting this Voucher Approval Needed field to “Yes” or “Auto-populate,” the status of that voucher may change to “Not Approved” when you maintain that voucher on the Voucher Maintenance (VOUM) form.
274tting Started with Purchasing and Accounts Payable | Defining Accounts Payable Parameters and Defaults
Ge
The discount method parameter
The Discount Method parameter relates to your institution’s policy regarding posting of vendors’ term discounts, and has important ramifications for your system’s operations. Your selection for this parameter controls how discount amounts are posted to the general ledger.
You select your discount method based on whether you want your voucher expenditures to be posted to the general ledger net of the cash discount (“Discounts Lost” method) or at the full amount (gross method) of the expenditures, without the cash discount (“Discounts Taken” method).
Note: Since the calculation processes for cash discounts are essential to proper AP accounting, Colleague cannot begin operation until you have selected your discount method. You must set this parameter before running the Accounts Payable module.
How Colleague calculates and processes vendor discounts
Colleague automates the calculation and posting of your discounts from vendors for early payment of invoices. Discounts are processed at the voucher stage using the following information defined as part of module setup:
• Enter T (Taken) or L (Lost) in the Discount Method parameter to indicate whether your discounts will be tracked as discounts taken or discounts lost.
• Define a Discount GL Account number in your AP type codes (on the AP Types [APTF] form) to set up the GL account where discounts will be posted.
• Set up your vendors’ discount terms as vendor terms codes (defined on the Vendor Terms [VTMF] form and optionally assigned to vendors on the Vendor Maintenance [VEND] form).
During daily processing the following information is used to determine, for each voucher, the discount to be taken:
• When creating a procurement document, you can bring a vendor terms code into the document by entering it directly on the document, or by entering the ID of a vendor that has been associated with the vendor terms code.
• Every time you create a voucher containing vendor terms:
• Colleague uses the vendor terms code to calculate (from the invoice date) the due date required to get the discount, and displays it in the Due Date field on the Voucher Maintenance (VOUM) form.
• Colleague calculates the voucher total on the assumption that the discount will be taken (if the Take Discount field is set to Yes).
• Also on the VOUM form, you can set the Take Discount field to No if you do not plan to take the discount (the field is set by default to Yes).
275tting Started with Purchasing and Accounts Payable | Defining Accounts Payable Parameters and Defaults

Ge
• Later, when processing checks from vouchers, you can change the Take Discount flag from Yes to No for any voucher:
• for a selection of vouchers, on the Payment Flags Maintenance (PYFM) form (the form that follows the Voucher Pay Flag Selection [VPFS] form)
• for an individual voucher being processed manually, on the Manual Voucher Payment (VOUP) form
Note: Colleague will take the discount regardless of the payment date; that is, Colleague will not automatically disallow a discount if payment is made after the term specified. You can decide for every voucher, whether you want to take the discount or not, regardless of the date you pay it.
At check processing time, your setting for discount method (T or L) determines how the discount will be posted. At that point any discount is posted to the discount GL account listed in the AP type code on the voucher.
Discounts taken. If you use the discounts taken method, payments and corresponding discounts are processed as follows:
1. Colleague pays the voucher amount and posts it to the GL expense account designated in the voucher, at the gross amount. (The gross amount is the voucher amount without taking the cash discount amount.)
2. If you take the cash discount, Colleague credits the discount GL account number (a revenue account in this case) for the amount of the cash discount taken.
3. If you do not take the discount, Colleague makes no entry in the discount GL account, but debits the line item GL expense account and credits the AP control account, as in a simple AP posting transaction.
Discounts lost. If you use the discounts lost method, payments and corresponding discounts are processed as follows:
1. Any vendor discount is subtracted from the voucher amount at the point of voucher creation, and the net voucher amount is posted to the GL expense account designated on the voucher. (The net amount is the voucher amount less the cash discount amount.)
2. If you take the discount, no adjusting entries are needed. Colleague debits the line item GL expense account for the discounted amount, and credits the AP control account for the same net amount, as in a simple AP transaction.
3. If you pay the full voucher amount, with no discount, the cash discount is “lost” and Colleague debits the discount GL account number (an expense account in this case) for the amount of the cash discount lost. The amount of the lost discount is then added back into the check amount, so that the proper amount is posted to the cash account.
Example. "Figure 29" on page 277 illustrates how each type of discount method would treat a transaction involving a payment of a $100.00 invoice to a vendor offering terms of 2/10 Net 30
276tting Started with Purchasing and Accounts Payable | Defining Accounts Payable Parameters and Defaults

Ge
Figure 29: Example: Voucher and check posting entries based on discount
Discounts Taken [T] = Voucher recorded @ gross
A
B
Posting to GL at voucher entry process
Posting to GL at check print time
If discount is not taken:
If discount is taken:
Office Supplies
100.00
100.00
Office Supplies
98.00
98.00
100.00
Discounts Taken
2.00
98.00
98.00
100.00
100.00
98.00
Discounts Lost
2.00
Discounts Lost [L] = Voucher recorded @ net
98.00
100.00
277tting Started with Purchasing and Accounts Payable | Defining Accounts Payable Parameters and Defaults
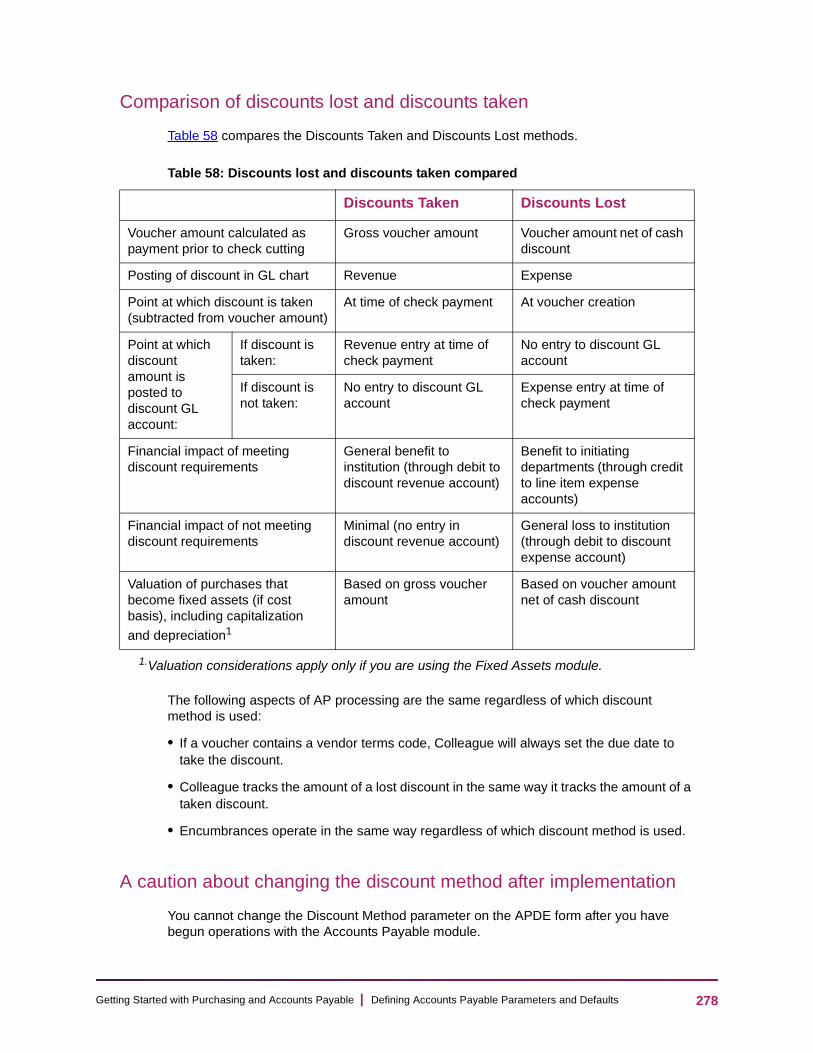
Ge
Comparison of discounts lost and discounts taken
Table 58 compares the Discounts Taken and Discounts Lost methods.
The following aspects of AP processing are the same regardless of which discount method is used:
• If a voucher contains a vendor terms code, Colleague will always set the due date to take the discount.
• Colleague tracks the amount of a lost discount in the same way it tracks the amount of a taken discount.
• Encumbrances operate in the same way regardless of which discount method is used.
A caution about changing the discount method after implementation
You cannot change the Discount Method parameter on the APDE form after you have begun operations with the Accounts Payable module.
Table 58: Discounts lost and discounts taken compared
Discounts Taken Discounts Lost
Voucher amount calculated as payment prior to check cutting
Gross voucher amount Voucher amount net of cash discount
Posting of discount in GL chart Revenue Expense
Point at which discount is taken (subtracted from voucher amount)
At time of check payment At voucher creation
Point at which discount amount is posted to discount GL account:
If discount is taken:
Revenue entry at time of check payment
No entry to discount GL account
If discount is not taken:
No entry to discount GL account
Expense entry at time of check payment
Financial impact of meeting discount requirements
General benefit to institution (through debit to discount revenue account)
Benefit to initiating departments (through credit to line item expense accounts)
Financial impact of not meeting discount requirements
Minimal (no entry in discount revenue account)
General loss to institution (through debit to discount expense account)
Valuation of purchases that become fixed assets (if cost basis), including capitalization
and depreciation1
1.Valuation considerations apply only if you are using the Fixed Assets module.
Based on gross voucher amount
Based on voucher amount net of cash discount
278tting Started with Purchasing and Accounts Payable | Defining Accounts Payable Parameters and Defaults

Ge
If you realize, after beginning operations, that you need to change the discount method, you can do so on the Change Discount Method (CDSC) form. However, you should do this only if absolutely necessary and only under very controlled circumstances.
Although you can change the discount method, changing it can cause serious problems in the general ledger. Changing the discount method when there are vouchers in your system that have a status of either “Outstanding,” “Not Approved,” or “Paid” will result in incorrect general ledger entries for the affected vouchers.
To prevent GL data from being corrupted, the CDSC procedure verifies that no vouchers exist that have any of those statuses. If one or more such vouchers exists, the CDSC procedure will not continue and the discount method will not be changed.
If you need to change the discount method, you should take the following precautions:
1. Inform users that while the CDSC procedure is running, the vouchers file is locked. No vouchers can be created or maintained for the duration of the procedure.
2. When the discount method has been changed, instruct all users to exit out of and re-enter Colleague, so that the change will become effective for their work session. (If all users do not exit the system, the possibility of incorrect general ledger entries will exist if someone enters a voucher under the original discount method and pays the voucher under the changed discount method.)
Note: The CDSC procedure may be time-consuming, since it selects the entire VOUCHERS file.
Setting the Parameter
If you want your voucher expenditures to be posted to the general ledger at the full amount of the expenditure, without the cash discount, enter T (for “Discounts Taken”) in the Discount Method field. If you want your voucher expenditures posted to the general ledger net of the cash discount, enter L (for “Discounts Lost”) in the Discount Method field.
Note: You must set the Discount Method parameter before you can operate the Accounts Payable module. Even if your institution does not take advantage of vendor discounts, you must still define your discount method and enter a discount GL account number in your AP type codes.
This parameter does not have a default setting.
Form prompting defaults
In the Accounts Payable module, you can customize your form prompting to accommodate certain aspects of your institution’s AP operations. For example, you can set up Colleague so that your default GL distribution is by amount (rather than by percent or quantity) on the item maintenance forms for vouchers and recurring vouchers. Or, you can tell Colleague to bypass tax codes fields on each form where they appear.
279tting Started with Purchasing and Accounts Payable | Defining Accounts Payable Parameters and Defaults
Ge
How the prompt defaults work
You can customize prompting at some fields on voucher and recurring voucher item maintenance forms.
Of the three prompt default settings, the first one, GL Prompt Sequence, gives a selection of options. The other two, Trade Discount Prompt and Tax Code Prompt, function as on/off toggles. Their functions are briefly described below:
• GL Prompt Sequence. The GL Prompt Sequence default sets up your default distribution method for line items that are charged to more than one GL account number
• Trade Discount Prompt. The Trade Discount Prompt default lets you choose whether you want the cursor to land on trade discount fields during daily processing, or skip them
• Tax Code Prompt. The Tax Code Prompt default allows you to choose whether you want Colleague to land on tax code fields during daily processing, or bypass them
Note: Even if you choose to skip these fields by default, the fields still appear on the applicable forms, and you can still manually access the field if necessary. Use the appropriate field navigation techniques for your user interface.
Each of the three prompt defaults is discussed in greater detail below. Each discussion is framed as a question, to assist you in determining your institution’s prompting preferences.
The GL prompt sequence default
What distribution method do you use for multiple GL account numbers?
When you are distributing the expense for a purchase to different accounts, you will enter two or more GL account numbers on a voucher or blanket purchase order. You would normally use one method of distributing this expense more than any other.
The line item maintenance forms for vouchers (the Voucher Item Maintenance [VOUD] and Recurring Voucher Item Maintenance [ROUD] forms) each contain a window for entering line item GL account information, called GL Account No. This window also contains fields that, for line items charged to more than one GL account, let you choose between three different methods of cost distribution: amount, percent, and quantity.
You can use the GL Prompt Sequence default to set your preference among the distribution methods. Then, when you enter a GL number in the GL Account No window on either of the item maintenance forms, the cursor goes directly to the default distribution element, and skips over the others.
You can choose from the following three distribution methods:
• Amount – if you normally distribute items by amount (this is the most common setting)
• Percent – if you normally distribute items by percent
• Quantity – if you normally distribute items by quantity
280tting Started with Purchasing and Accounts Payable | Defining Accounts Payable Parameters and Defaults

Ge
Note: If at any time you want to enter a different distribution type on an item maintenance form, simply go to the appropriate field and enter the information. Colleague does not prevent you from using a “non-default” distribution method.
Setting the default
If you want Colleague to prompt at the Percent element in the GL Account No window on voucher item maintenance forms, enter P in the GL Prompt Sequence field. To prompt for Amount, enter A. To prompt for Quantity, enter Q.
If you do not specify a default method, Colleague will use Percent as the default method.
The trade discount prompt default
Does your institution use vendors that give trade discounts?
The term trade discount is used in Colleague to refer to vendor preferred discounting such as frequent customer discount or price breaks for bulk orders. (This term is different from “cash discounting” for early and on-time payments, and is not related to discount methods.)
If most vendors your institution does business with do not give trade discounts, you may prefer that Colleague skip over the fields in the Accounts Payable module that deal with trade discounts. This field lets you set that preference.
The Voucher Item Maintenance (VOUD) form contains two fields for trade discount information: Trade Disc Amt (Trade Discount Amount) and Trade Disc Pct (Trade Discount Percent).
If you set the Trade Discount Prompt default to “Yes,” the cursor will stop in both the Trade Disc Amt field and the Trade Disc Pct field on the VOUD form.
If you set this field to “No,” the cursor will bypass both Trade Discount fields.
Note: If you select “No,” you can still manually access the Trade Disc fields on the VOUD form when necessary. Simply go to the appropriate field and enter the information. Use any of the normal form navigation techniques for your user interface. Colleague does not prevent you from accessing the Trade Disc fields when you need them.
Setting the default
Enter N in the Trade Disc Prompt field if you want to bypass the fields requesting this information when creating vouchers on the VOUD form. Enter Y if you want Colleague to prompt at the Trade Disc fields.
281tting Started with Purchasing and Accounts Payable | Defining Accounts Payable Parameters and Defaults
Ge
The default for this field is “Yes.” That is, if you leave this field blank, Colleague will prompt for the trade discount fields on the VOUD form in normal sequence, as if the parameter were set to “Yes.”
Note: This default has no effect on recurring voucher forms.
The tax code prompt default
Does your institution pay taxes on any of your purchases?
If your institution is tax-exempt, and deals with sales tax only rarely, you can set up your system to skip over the Tax Codes field on the Voucher Item Maintenance (VOUD) and Recurring Voucher Item Maintenance (ROUD) forms.
The item maintenance forms for both types of vouchers contain the Tax Codes field, for entering tax code information for a line item. If you set the Tax Code Prompt default to “Yes,” the cursor will automatically stop in the Tax Codes field on these forms.
If you set this field to “No,” the cursor will bypass the Tax Codes field on all voucher item maintenance forms.
Note: You should set the voucher Tax Code Prompt defaults to “Yes” only if many of your vouchers have sales tax associated with them.
Note: Regardless of your selection for this default, you can still access the Tax Codes field whenever necessary on any form where it appears. Simply go to the field and enter the required information. Use any of the normal form navigation techniques for your user interface.
Setting the default
Enter Y in the Tax Code Prompt field for vouchers if you want Colleague to prompt at the Tax Codes fields on voucher item maintenance forms. Enter N if you want Colleague to skip the Tax Codes fields.
The default for this field is “No.” That is, if you leave this field blank, Colleague will skip over the Tax Codes field on all forms where it appears, as if the parameter were set to “No.”
282tting Started with Purchasing and Accounts Payable | Defining Accounts Payable Parameters and Defaults
Ge
The VOIL tax code prompt default
Does your institution pay taxes on any of its purchases?
If your institution is tax-exempt, and deals with taxes only rarely, you can set up your system to skip over the tax code fields on the Voucher Item List (VOIL) form. If you set the VOIL Tax Code Prompt to “Yes,” the cursor will land on the Customs Inv and the Taxes fields on the VOIL form. If you set this field to “No,” the cursor will bypass these two fields on the VOIL form.
Note: Regardless of your selection for this default, you can still access the Tax Codes field whenever necessary on any form where it appears. Simply go to the field and enter the required information. Use any of the normal form navigation techniques for your user interface.
Note: Regardless of your selection for this default, you can still access the tax code fields using the appropriate field navigation techniques for your user interface.
Setting the default
Enter Y in the VOIL Tax Code Prompt field if you want Colleague to prompt at the Customs Inv and the Taxes fields on the Voucher Item List (VOIL) form. Enter N if you want Colleague to skip these fields.
If you leave this field blank, the cursor lands on the VOIL tax code fields as if this field were set to “Yes.”
The tax expense distribution parameter
If any of your institution’s purchases are subject to tax, you can set a parameter to implement your institution’s policy for posting of tax expenses. You can choose one of the following options:
• charge the tax expense to individual line item GL expense accounts, so that each department would be responsible for its own taxes
• accumulate all institution-wide tax expenses in a central GL expense account, from which you could remit payments to your taxing jurisdiction (the primary case in which you would not distribute taxes would be if your institution qualifies for rebates of taxes paid)
Select your preference for tax expense posting in the Distribute Tax Expense parameter.
283tting Started with Purchasing and Accounts Payable | Defining Accounts Payable Parameters and Defaults

Ge
How Colleague posts tax expenses based on this parameter
Distributing tax expense (parameter set to “Yes”). If you want to distribute tax expenses (that is, if you set this parameter to “Yes”), the GL account numbers you enter on line items of requisitions, purchase orders, and vouchers will be charged for any tax expense on an item. This means the tax expense is charged to the GL accounts representing the departments initiating the purchases.
Accumulating tax expense centrally (parameter set to “No”). If you do not want to distribute tax expenses, and prefer to accumulate them in a central account (that is, if you set this parameter to “No”), you must enter the GL account number for accumulating tax expense into each of your AP type definition(s). See “Understanding AP types” on page 101.
If you do want to collect tax amounts in a central GL account, ensure that you have
• defined one or more GL account numbers for tax expenses
• entered a tax expense GL account for each AP type (on APTF form)
Setting the parameter
If you want Colleague to distribute tax expenses to line item GL expense accounts, enter Y in the Distribute Tax Expense field. If you want to accumulate all taxes in a central GL account for tax expense, enter N in the Distribute Tax Expense field.
The default for this parameter is “No.”
Default acquisition method for fixed asset creation
The Fixed Assets module interfaces with the Accounts Payable module to facilitate the creation of fixed assets initiated in the Accounts Payable module. The AP module enables you to designate line items created on accounts payable vouchers as fixed assets. Once these line items are “flagged” on the Voucher Item Maintenance (VOUD) form they become eligible for selection as part of the Transfer from Accounts Payable process.
The default acquisition method
If you have the Fixed Assets module and you plan to use the transfer process to create fixed assets that were initiated through the Accounts Payable module, you can indicate a default acquisition method in this field. The acquisition method entered in this field defaults into the Acquisition Method field on the Asset Maintenance (ASST) form for all fixed assets created using the Transfer from Accounts Payable process. Acquisition methods are created on the Acquisition Method Definition (ACQD) form.
284tting Started with Purchasing and Accounts Payable | Defining Accounts Payable Parameters and Defaults
Ge
Setting the default
Enter the acquisition method that you want to default onto all fixed assets created using the Transfer from Accounts Payable process in this field. The acquisition method that you enter must have been created on the Acquisition Method Definition (ACQD) form. If you do not have the Fixed Assets module, leave this field blank.
This parameter does not have a default setting.
Parameters for voucher creation
The Accounts Payable module provides two parameters you can use to ensure that your AP vouchers are created according to your specifications.
The voucher accepted item only parameter
This parameter establishes whether only accepted purchase order line items may be vouchered or whether both accepted and outstanding purchase order line items may be vouchered. If you set this parameter to “Yes,” vouchers may be created for only accepted purchase order line items. If you try to voucher a purchase order with an unaccepted (i.e., outstanding) line item and this parameter is set to “Yes,” you will receive an error message. If you set this parameter to “No,” both accepted and outstanding purchase order line items may be vouchered. The voucher cannot be completed until all of the line items have been accepted.
Note: If you do not use the Blanket PO Use Maintenance (BPUM) form to create item orders against a blanket PO, the setting of this parameter does not affect vouchering against blanket PO’s. However, if you use the BPUM form to create item orders against a blanket PO and you set this parameter to “Yes,” only items accepted on the BPUM form can be vouchered. If you use the BPUM form to create item orders against a blanket PO and you set this parameter to “No,” both outstanding and accepted items can be vouchered. The voucher cannot be completed until all the items have been accepted.
Setting the parameter
If you want to voucher only accepted purchase order line items, enter “Y” in this field. If you want to voucher both accepted and outstanding purchase order line items, enter “N” in this field.
If you leave this parameter blank, vouchers may be created for both outstanding and accepted purchase order line items. The voucher cannot be completed until all of the line items have been accepted.
285tting Started with Purchasing and Accounts Payable | Defining Accounts Payable Parameters and Defaults

Ge
The default voucher done parameter
This parameter determines whether the Voucher Done field on the Voucher Maintenance (VOUM) form defaults to “Yes” or “No.” If you enter “Yes” in this field, the Voucher Done field on VOUM defaults to “Yes.” If this parameter is set to “Yes,” when you file a voucher, Colleague performs an edit check. For example, if you create a voucher for an outstanding purchase order line item, Colleague issues the following warning when you save a record on the VOUM form:
Not all line items have been accepted, so the voucher remains unfinished
Colleague then sets the Voucher Done flag to “No.” If you file a voucher with the Voucher Done flag set to “No,” you must remember to manually change the field to “Yes” when the voucher is complete. If you do not change the value in this field to “Yes,” the voucher does not become outstanding.
If you enter “No” in this field, the Voucher Done field defaults to “No.”
This parameter does not have a default setting.
Note: Because of the automatic edit check, it is recommended that you set the Voucher Done flag to “Yes.”
Parameters and defaults for check printing
The Accounts Payable module provides several institution-wide parameters and defaults you can use to ensure that your AP checks are printed according to your specifications.
You must set one parameter to establish how Colleague will print overflow check advice information. In addition, you must set up two defaults: a default check print subroutine and a default number of alignment copies. You must define a print subroutine for each bank code, as well as a form image, and printer, for each check print subroutine you define.
These module-wide defaults control the way your checks appear when they are printed. Two of these, the check overflow advice parameter and the default print subroutine, are required. The other three are optional, but you should complete them in order to print your checks correctly.
The following subsections discuss first the parameter, then the printing defaults and definitions.
The overflow advice parameter
When you print checks from the Check Print (CKPR) form, the check header or stub information that needs to be printed for some of the checks may take up more lines than are available on the header or stub provided with the check forms.
286tting Started with Purchasing and Accounts Payable | Defining Accounts Payable Parameters and Defaults

Ge
You can set up Colleague to handle this situation in one of the following two ways:
• If you want to print overflow advice information on successive checks, you would set the Void Checks on Overflow parameter to “Yes.” The check print subroutine will use as many check stubs as it needs to print all the overflow information for a particular check immediately following that check. Colleague will void all the checks that are attached to the stubs on which this overflow information is printed.
• If you do not want to print overflow advice information on checks, you can set the Void Checks on Overflow parameter to “No.” The check print subroutine will print the overflow information on the stock paper that will be mounted when the check register is produced at the end of the check run. When you handle advice overflow in this way, checks do not need to be unnecessarily voided.
Setting the parameter
If you want Colleague to void consecutive checks in a check run in order to print check advices, enter Y in the Void Checks on Overflow field. If you want Colleague to store overflow check advice information in a hold file for printing after the check run is completed, enter N in the Void Checks on Overflow field.
The default for this parameter is “No.”
Check printing defaults and definitions
Colleague lets you set a number of defaults for printing your checks, including
• a default check print subroutine, to provide a check format for checks printed on any bank codes with no print subroutine defined in the Checks Bank Code / Subroutine field
• a default number of alignment copies for all AP check runs
• a default print subroutine for each bank code you use for AP checks, so that each bank account is linked to a subroutine to specify how checks paid on that account will look
• for each print subroutine defined, a form image and printer for that subroutine
Ellucian provides two standard subroutines for printing your AP checks, and one for your AR checks. You can modify any of the subroutines to match the check format for any of your bank codes.
How Colleague controls the check printing process. Figure 30 provides a high-level illustration of the sources of check printing information. The mnemonic in each box indicates the form where the information is defined.
287tting Started with Purchasing and Accounts Payable | Defining Accounts Payable Parameters and Defaults

Ge
Figure 30: How Colleague uses print subroutines to print checks
The steps below summarize how Colleague processes check print runs as illustrated in Figure 30, and where Colleague gets its information for printing. The steps are divided into steps done during setup of the module and those done during daily processing.
Steps done during setup
1. Define one or more bank codes on the Bank Codes (BKCM) form.
2. Define one or more AP types and link a bank code with each (on the AP Types [APTF] form).
3. On the AP Parameters Definition (APDE) form:
3.1. Enter each bank code your institution has defined, and enter next to it a print subroutine to be used for that bank code
3.2. Define a module-wide default print subroutine for any checks printed for bank codes with no print program defined
3.3. For every print subroutine you link to a bank code or use as the default, define
– a form image
– a form name for the printer on which checks using this subroutine will be printed
106789
January 17, 1997
Seven hundred and fifty dollars and zero cents
Voucher
Vendor: Acme Paper Co
Item: Paper
Price: $ 300.00
Bank code: 001 FNB Gnl
AP type: 01
Vd tms: 2/10N30
Due date: 1/19/97
V date: 1/9/97
Discount: $ 6.00
Check Printed (on CKPR)
Voucher Created (on VOUM)
Vouchers selected for Bank Code to be paid (on CKSE)
Bank Code (defined on BKCM)
Print Subroutine linked to Bank Code (on APDE)
Form Image/Printer defined for Print Subroutine (on APDE)
Setup Daily Processing
288tting Started with Purchasing and Accounts Payable | Defining Accounts Payable Parameters and Defaults

Ge
Steps done during daily processing
1. When you create a purchase order (on the Purchase Order Maintenance [POEM] form) or a voucher (on the Voucher Maintenance [VOUM] form), you must enter an AP type (which contains a bank code).
2. When the voucher is ready to pay, run the check printing procedures. When you reach the Check Print (CKPR) process, Colleague uses the print subroutine that is linked to
the bank code to print checks for this check run.1
For information about check printing procedures, see the Using Accounts Payable manual.
The four check printing defaults are discussed in the following subsections.
Default Print Subroutine. The default print subroutine is the print program Colleague will use for checks drawn on a bank code for which you have not designated a Bank Code Check Print Subroutine. This ensures that no check you print on your system will be without a print subroutine.
Ellucian’s default check print subroutine is S.PRT.AP.CHK1. If you want to designate a different print program for your default print subroutine, see Standard Forms
Be sure that you have also entered a form image and form name for this default subroutine in the Print Definitions field at the bottom of the APDE form.
Default Alignment Copies. You can set up an institution-wide default for the number of alignment copies for your check printing (that is, the number of checks that will be voided for alignment purposes at the beginning of each check run). The number you enter is used to calculate the End Alignment Check No field on the Check Print (CKPR) form.
The alignment check number is calculated for each check print run in the following manner.
The number in the Start Alignment Check No field on the Check Print (CKPR) form, plus the number you enter in this field (x), minus 1, will yield the number that will automatically be displayed in the End Alignment Check No field.
Or:
[Start Alignment Check No] + x - 1 = [End Alignment Check No]
Example. You have set your Default Alignment Copies to “3.” Then you print checks using the Check Print (CKPR) form. When you access the CKPR form, “500” appears in the Start Alignment Check No field (the last check number used is automatically displayed).
1.If the checks being printed are for a bank code that does not have a print subroutine linked to it, the default print subroutine is used for that check run.
289tting Started with Purchasing and Accounts Payable | Defining Accounts Payable Parameters and Defaults
Ge
Colleague would calculate your End Alignment Check number and place it in the End Alignment Check No field as follows:
500 + 3 = 503 - 1 = 502 (End Alignment Check No)
Note: You can override this default number at check print time, if needed, by entering a different number in the End Alignment Check No field on the Check Print (CKPR) form.
Bank Code Print Subroutines. For each of your institution’s AP bank codes, you should define a check print subroutine matched to its specific requirements.
The check stock, and style of checks, may vary from one bank account to another. For checks printed for and drawn on a given bank account, the check printing subroutines tell Colleague where to print the date on the checks, the amount, the name of the receiver (or payee), and other information needed on the check and its stub.
If all the checks your institution uses to make AP payments have the same design and appearance, you can assign the same check print subroutine to all your bank codes. However, if the check stock, or check style, for different bank codes differ from one another, you must designate different check print subroutines for each bank code so that each type of checks is printed correctly. If needed or desired, you can specify a different print subroutine for each bank code.
Definitions for Check Print Subroutines. For each printing subroutine you enter in the Default Print Subroutine or Checks Bank Code/Subroutine fields on the APDE form, you must make sure you have also entered a definition of the subroutine in the [Print Definitions] window at the bottom of the APDE form.
A print subroutine definition consists of
• The subroutine name. The name of each subroutine must be unique. If you modify any of the default subroutines provided by Ellucian, you must rename them.
• The form image for the subroutine. Each check print subroutine has a form image associated with it. It shows the print format of a check, with information such as where the date, amount, receiver, and check stub information will appear on the final check. The alignment check process uses this image to align the check run.
• The printer form name for the subroutine. The print subroutine must be told on which of your defined printers the checks in a print run should be printed. The form listed here is the one that will be used when you use the associated print routine to print checks. You set this up by entering in the print routine definition, the name of the “form” the routine will use. You can create printer records on the Peripheral Options Default (PDEF) form.
On the APDE form, for both the Default Print Subroutine field and the [Print Definitions] window at the bottom of the form, the Ellucian standard subroutine name (S.PRT.AP.CHK1) appears as the default. In addition, the Ellucian standard form image (S.PRT.AP.CHK1.IMAGE) and form name (CHK.PRNT) are listed as the default on the first line of the Form Image and Printer elements in the [Print Definitions] window.
290tting Started with Purchasing and Accounts Payable | Defining Accounts Payable Parameters and Defaults

Ge
You must set up a print definition for each check print subroutine you enter on the APDE form. Each subroutine must have a form image and a print program form associated with it.
Note: If you choose to create a custom subroutine for printing, you must compile and catalog it first or Colleague will not be able to use it.
Setting the defaults
To set your print subroutine defaults, use the following steps:
1. Determine what will be your institution’s default print subroutine.
2. For each bank code your institution has defined, decide the print subroutine you will use.
3. Decide which form image and printer you will use for each of the print subroutines you have defined.
If you want to use your own subroutines as defaults for printing checks, enter the subroutine names in these three fields. If you want to use the standard Ellucian printing subroutines, leave the default values in these fields.
For more information on modifying print programs, see Standard Forms
Procedure for defining accounts payable parameters and defaults
Access the APDE form provided you have the appropriate security access. Because several of the data entry fields on this form request a yes or no answer, and the answers may be dictated by your institution’s policies or preferences, we provide the information below as a guideline for setting these parameters and defaults.
Table 59: Fields on the AP Parameters Definition (APDE) form
Field Usage Default
Voucher Approval Needed
Indicates whether online approval of vouchers and recurring vouchers is required at your institution.
To “turn on” approvals for vouchers, enter Y or A in this field.
No
291tting Started with Purchasing and Accounts Payable | Defining Accounts Payable Parameters and Defaults
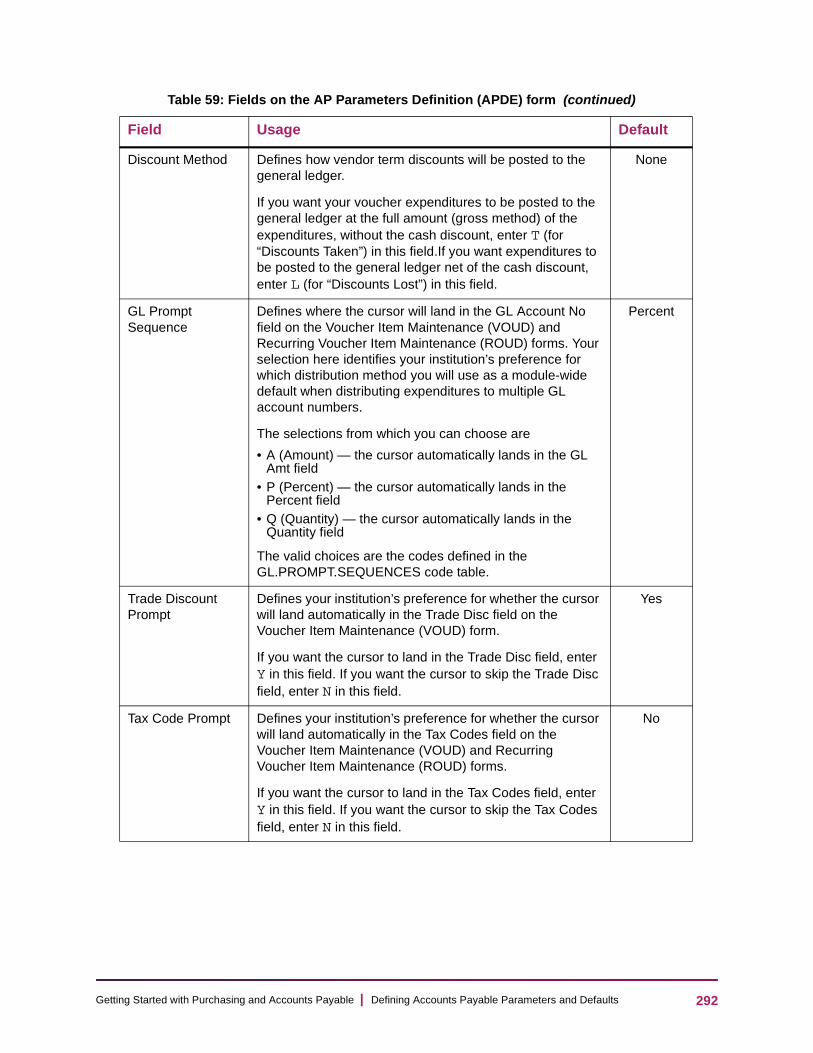
Ge
Discount Method Defines how vendor term discounts will be posted to the general ledger.
If you want your voucher expenditures to be posted to the general ledger at the full amount (gross method) of the expenditures, without the cash discount, enter T (for “Discounts Taken”) in this field.If you want expenditures to be posted to the general ledger net of the cash discount, enter L (for “Discounts Lost”) in this field.
None
GL Prompt Sequence
Defines where the cursor will land in the GL Account No field on the Voucher Item Maintenance (VOUD) and Recurring Voucher Item Maintenance (ROUD) forms. Your selection here identifies your institution’s preference for which distribution method you will use as a module-wide default when distributing expenditures to multiple GL account numbers.
The selections from which you can choose are
• A (Amount) — the cursor automatically lands in the GL Amt field
• P (Percent) — the cursor automatically lands in the Percent field
• Q (Quantity) — the cursor automatically lands in the Quantity field
The valid choices are the codes defined in the GL.PROMPT.SEQUENCES code table.
Percent
Trade Discount Prompt
Defines your institution’s preference for whether the cursor will land automatically in the Trade Disc field on the Voucher Item Maintenance (VOUD) form.
If you want the cursor to land in the Trade Disc field, enter Y in this field. If you want the cursor to skip the Trade Disc field, enter N in this field.
Yes
Tax Code Prompt Defines your institution’s preference for whether the cursor will land automatically in the Tax Codes field on the Voucher Item Maintenance (VOUD) and Recurring Voucher Item Maintenance (ROUD) forms.
If you want the cursor to land in the Tax Codes field, enter Y in this field. If you want the cursor to skip the Tax Codes field, enter N in this field.
No
Table 59: Fields on the AP Parameters Definition (APDE) form (continued)
Field Usage Default
292tting Started with Purchasing and Accounts Payable | Defining Accounts Payable Parameters and Defaults
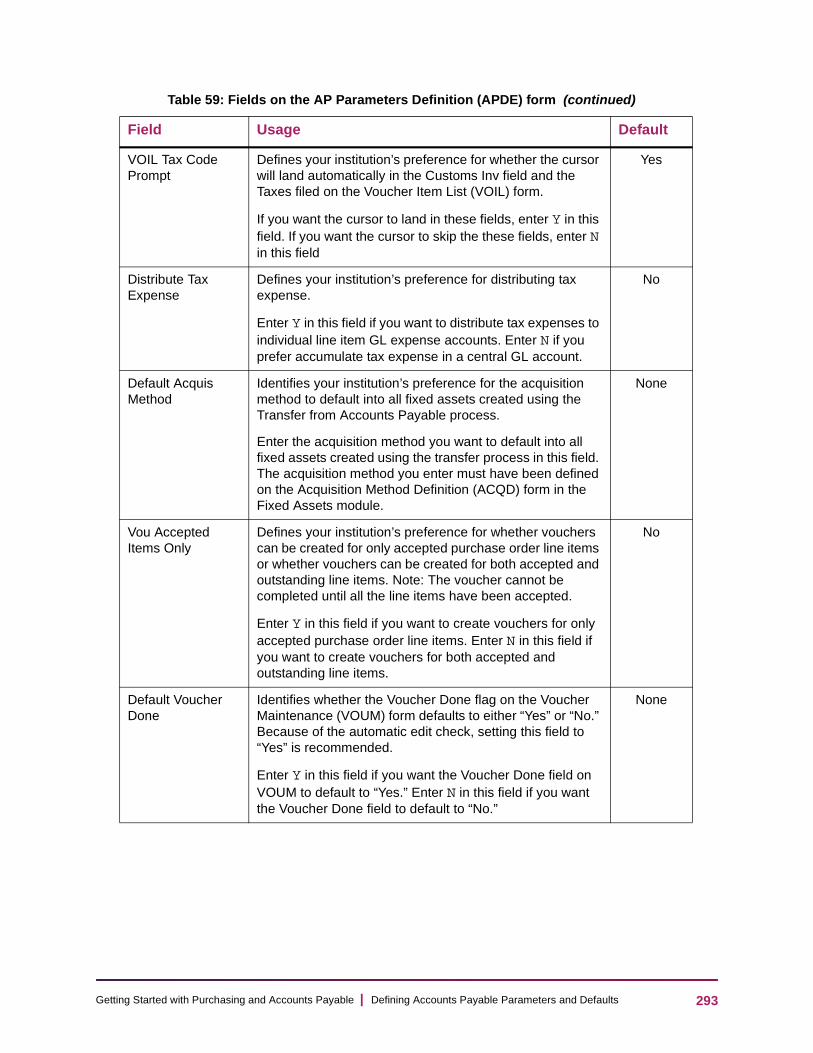
Ge
VOIL Tax Code Prompt
Defines your institution’s preference for whether the cursor will land automatically in the Customs Inv field and the Taxes filed on the Voucher Item List (VOIL) form.
If you want the cursor to land in these fields, enter Y in this field. If you want the cursor to skip the these fields, enter N in this field
Yes
Distribute Tax Expense
Defines your institution’s preference for distributing tax expense.
Enter Y in this field if you want to distribute tax expenses to individual line item GL expense accounts. Enter N if you prefer accumulate tax expense in a central GL account.
No
Default Acquis Method
Identifies your institution’s preference for the acquisition method to default into all fixed assets created using the Transfer from Accounts Payable process.
Enter the acquisition method you want to default into all fixed assets created using the transfer process in this field. The acquisition method you enter must have been defined on the Acquisition Method Definition (ACQD) form in the Fixed Assets module.
None
Vou Accepted Items Only
Defines your institution’s preference for whether vouchers can be created for only accepted purchase order line items or whether vouchers can be created for both accepted and outstanding line items. Note: The voucher cannot be completed until all the line items have been accepted.
Enter Y in this field if you want to create vouchers for only accepted purchase order line items. Enter N in this field if you want to create vouchers for both accepted and outstanding line items.
No
Default Voucher Done
Identifies whether the Voucher Done flag on the Voucher Maintenance (VOUM) form defaults to either “Yes” or “No.” Because of the automatic edit check, setting this field to “Yes” is recommended.
Enter Y in this field if you want the Voucher Done field on VOUM to default to “Yes.” Enter N in this field if you want the Voucher Done field to default to “No.”
None
Table 59: Fields on the AP Parameters Definition (APDE) form (continued)
Field Usage Default
293tting Started with Purchasing and Accounts Payable | Defining Accounts Payable Parameters and Defaults

Ge
Void Checks on Overflow
Indicates your institution’s preference regarding overflow advice information in check print runs.
Enter Y in this field if you prefer to have Colleague void successive checks to allow printing of overflow check advice information immediately following the check. Enter N to specify that overflow check advice information will be stored cumulatively and printed after the conclusion of the check print run.
No
Default Print Subroutine
Identifies the default print subroutine that will be used in the Accounts Payable module for printing checks.
If you do not enter your own subroutine, Colleague uses the default.
S.PRT.AP.
CHK1
Default Alignment Copies
Defines the number of alignment copies Colleague will use as the default for all check print runs.
You can override this default on the Check Print (CKPR) form.
1
Checks Bank Code / Subroutine
Checks Bank Code Lists the bank code associated with the print subroutine on this line. Each of your institution’s bank codes should be linked to a print subroutine that will print checks with the proper formatting for that bank code’s check stock and check styles.
This field uses LookUp to select valid choices from the bank codes defined for your institution (on the Bank Codes Maintenance [BKCM] form).
None
Checks Print Subroutine
Defines the print subroutine that will be used in the Accounts Payable module for printing checks for the bank code on this line.
None
Print Definitions
Print Subroutine Lists the print subroutine associated with the print definition on this line.
S.PRT.AP.
CHK1
Form Image Indicates the record in the FORM.IMAGES file that will be used as the form image for checks printed using the subroutine on this line.
S.PRT.AP.
CHK1.IMAGE
Printer Identifies the record in the CF.PRINTERS file that will be used as the check print form name for checks printed using the subroutine on this line.
CHK.PRNT
E-Payment Parameters1
Table 59: Fields on the AP Parameters Definition (APDE) form (continued)
Field Usage Default
294tting Started with Purchasing and Accounts Payable | Defining Accounts Payable Parameters and Defaults

Ge
Setting the parameters and defaults on the APDE form: Quick reference
Table 60 gives a quick reference to summarize your entries in the AP Parameters Definition (APDE) form.
Credit Card Refund E-Mail Para
Detail on this field to add comments to the e-mail credit card refund notice. These comments will appear above the standard block of refund information in the body of every credit card refund e-mail advice.
None
E-Payment E-Mail Types
Select the e-mail type(s) that the system should use to send an e-mail refund notification to an account holder.
E-Mail Return Address
Use this field to designate the internet e-mail return address for e-payment refund e-mail notifications.
AP E-Check Parameters
Detail on this field to access the AP E-Check Parameters (APEP) form. Use the APEP form to define global e-check parameters. An “X” is displayed in this field if information exists in the APEP form.
1.For information about using the E-Payment parameter fields on the APDE form, see Using E-Commerce.
Table 60: Quick reference for defining Accounts Payable parameters and defaults
If Your Answer to This Question Is Then Reference
Do you want to use online approvals for vouchers?
Yes Set Voucher Approval Needed to Yes or Auto-populate.
273.
No Leave Voucher Approval Needed blank, or set to No.
Do you want to track your early payment cash discounts as revenue (Discounts Taken)?
Yes Set Discount Method to T. 275.
No Set Discount Method to L.
How do you want Colleague to prompt for GL distribution method at the GL Account No window in the voucher and recurring voucher item maintenance forms?
Amount
Set the GL Prompt Sequence default to A.
280.
Percent
Set the GL Prompt Sequence default to P.
Quantity
Set the GL Prompt Sequence default to Q.
Table 59: Fields on the AP Parameters Definition (APDE) form (continued)
Field Usage Default
295tting Started with Purchasing and Accounts Payable | Defining Accounts Payable Parameters and Defaults
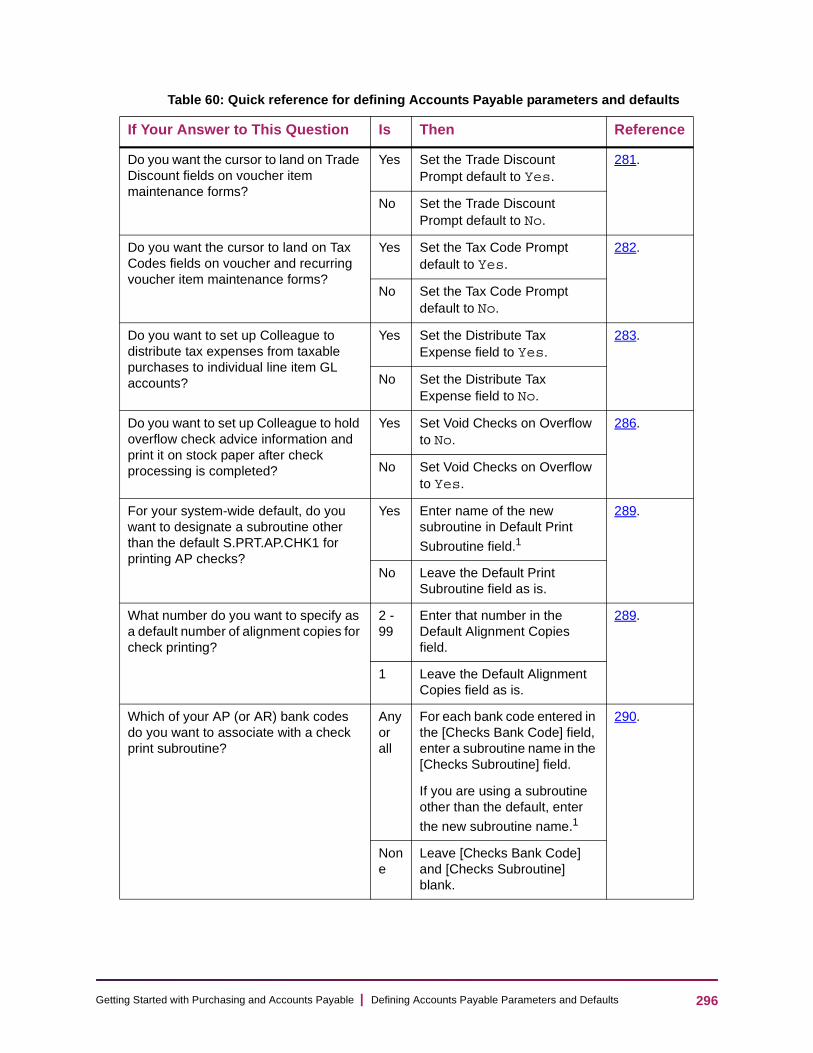
Ge
Do you want the cursor to land on Trade Discount fields on voucher item maintenance forms?
Yes Set the Trade Discount Prompt default to Yes.
281.
No Set the Trade Discount Prompt default to No.
Do you want the cursor to land on Tax Codes fields on voucher and recurring voucher item maintenance forms?
Yes Set the Tax Code Prompt default to Yes.
282.
No Set the Tax Code Prompt default to No.
Do you want to set up Colleague to distribute tax expenses from taxable purchases to individual line item GL accounts?
Yes Set the Distribute Tax Expense field to Yes.
283.
No Set the Distribute Tax Expense field to No.
Do you want to set up Colleague to hold overflow check advice information and print it on stock paper after check processing is completed?
Yes Set Void Checks on Overflow to No.
286.
No Set Void Checks on Overflow to Yes.
For your system-wide default, do you want to designate a subroutine other than the default S.PRT.AP.CHK1 for printing AP checks?
Yes Enter name of the new subroutine in Default Print
Subroutine field.1
289.
No Leave the Default Print Subroutine field as is.
What number do you want to specify as a default number of alignment copies for check printing?
2 - 99
Enter that number in the Default Alignment Copies field.
289.
1 Leave the Default Alignment Copies field as is.
Which of your AP (or AR) bank codes do you want to associate with a check print subroutine?
Any or all
For each bank code entered in the [Checks Bank Code] field, enter a subroutine name in the [Checks Subroutine] field.
If you are using a subroutine other than the default, enter
the new subroutine name.1
290.
None
Leave [Checks Bank Code] and [Checks Subroutine] blank.
Table 60: Quick reference for defining Accounts Payable parameters and defaults
If Your Answer to This Question Is Then Reference
296tting Started with Purchasing and Accounts Payable | Defining Accounts Payable Parameters and Defaults
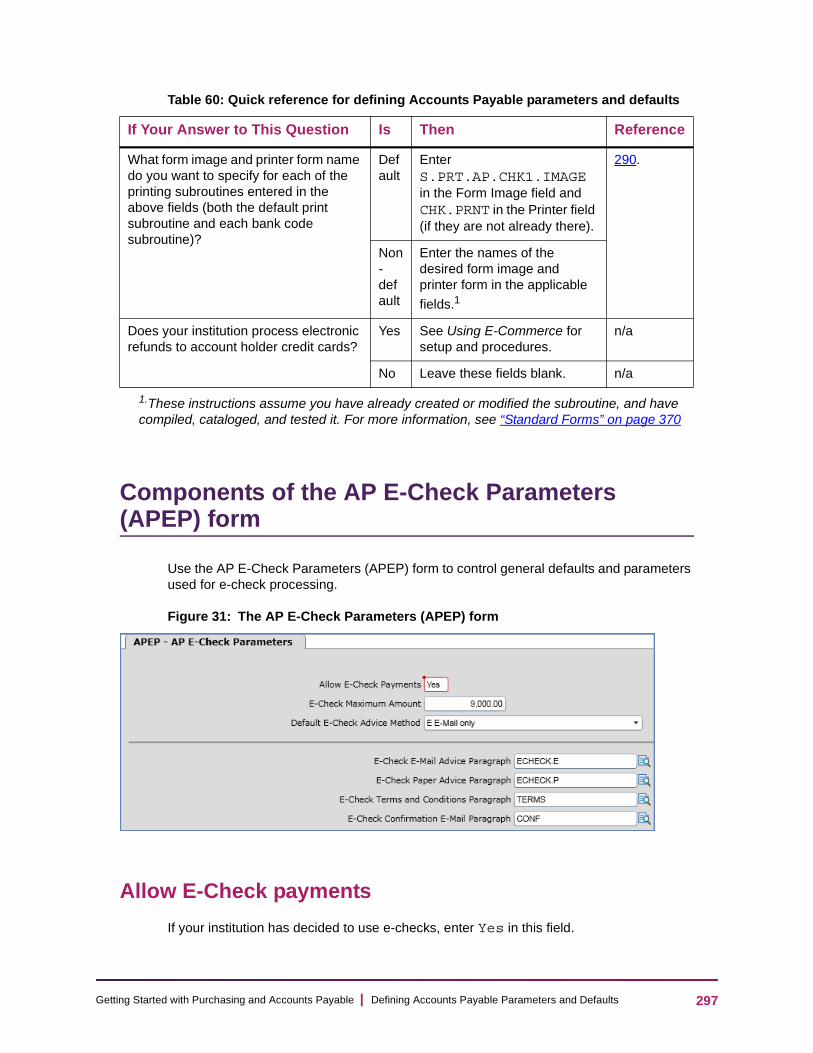
Ge
Components of the AP E-Check Parameters (APEP) form
Use the AP E-Check Parameters (APEP) form to control general defaults and parameters used for e-check processing.
Figure 31: The AP E-Check Parameters (APEP) form
Allow E-Check payments
If your institution has decided to use e-checks, enter Yes in this field.
What form image and printer form name do you want to specify for each of the printing subroutines entered in the above fields (both the default print subroutine and each bank code subroutine)?
Default
Enter S.PRT.AP.CHK1.IMAGE in the Form Image field and CHK.PRNT in the Printer field (if they are not already there).
290.
Non- default
Enter the names of the desired form image and printer form in the applicable
fields.1
Does your institution process electronic refunds to account holder credit cards?
Yes See Using E-Commerce for setup and procedures.
n/a
No Leave these fields blank. n/a
1.These instructions assume you have already created or modified the subroutine, and have compiled, cataloged, and tested it. For more information, see “Standard Forms” on page 370
Table 60: Quick reference for defining Accounts Payable parameters and defaults
If Your Answer to This Question Is Then Reference
297tting Started with Purchasing and Accounts Payable | Defining Accounts Payable Parameters and Defaults
Ge
If your institution has decided not to use e-checks, enter No in this field.
Setting the parameter
If you enter “Yes” in this field, you can make payments by e-check. However, if you can set up e-check defaults and parameters by bank code on the E-Check parameters (ECPD) form. If you want to process paper checks only for one or more individual bank codes, use the ECPD form.
See “Components of bank codes used for e-Check processing” on page 92 for more information on the ECPD form.
If you enter “No” in this field, you can not make payments by e-check. Colleague will also ensure that you do not set up any of your bank codes e-checks.
E-Check maximum amount
Enter the maximum amount for which an e-check can be processed. e-Check amounts greater than the amount defined in this field can be processed as paper checks.
If you leave this field blank, there is no limit to the amount for which an e-check can be processed.
Default E-Check advice method
Enter the e-check advice method for sending payee advices. This field stores the default e-check advice method chosen by your institution.
An advice is a notification of a payment.
The default methods include following:
• P – Paper. All advices are printed.
• E – E-Mail only. Only those payees with e-mail addresses receive e-mail advices. Any payees without e-mail addresses will not receive an advice.
• EP – E-Mail with paper backup. Those payees with e-mail addresses receive e-mail advices. Any payees without e-mail addresses will receive a paper advice.
• B – Both. Payees receive both e-mail and paper advices. Any payees without e-mail addresses will only receive a paper advice.
• C – Payee Choice. Advices are produced by the method specified by the payee. You can specify advice preferences on the Bank Account Info Entry (BAIE) form or on web forms.
298tting Started with Purchasing and Accounts Payable | Defining Accounts Payable Parameters and Defaults

Ge
E-Check email advice paragraph
Enter the paragraph ID to be issued with all email advices.
The default paragraph ECHECK.E is available for use with email advices.
To define your own subroutine, type in the subroutine name and detail on this field to access the Define Custom Paragraphs (DPAR) form.
E-Check paper advice paragraph
Enter the paragraph ID to be issued with all paper advices.
The default paragraph ECHECK.P is available for use with paper advices.
To define your own subroutine, detail on this field to access the Define Custom Paragraphs (DPAR) form.
E-Check terms and conditions paragraph
Specify a terms and conditions paragraph to use on Bank Information web forms in WebAdvisor.
The paragraph entered in this field displays on the US and Canadian Bank Information web forms. The paragraph should include the terms and conditions the user must accept before submitting new bank information.
You can use it to add any additional message or information including additional contact information.
E-Check confirmation email paragraph
Specify the paragraph to include on confirmation e-mails.
The paragraph entered in this field is included on the bottom of the confirmation e-mail sent to users after they have updated bank information on the web.
You can use it to add any additional message or information including additional contact information.
299tting Started with Purchasing and Accounts Payable | Defining Accounts Payable Parameters and Defaults

Ge
Setting the parameters and defaults on the APEP form: Quick reference
Table 61 gives a quick reference to summarize your entries in the AP E-Check Parameters (APEP) form.
Table 61: Quick reference for defining Accounts Payable parameters and defaults
If Your Answer to This Question Is Then Reference
Do you want to process e-checks? Yes Enter Yes in the Allow E-Check Payments field.
297
No Enter No in the Allow E-Check Payments field.
Do you want to set a maximum amount to process as an e-check?
Yes Enter the maximum amount in the E-Check Maximum Amount field.
298
No Leave the E-Check Maximum amount field blank
What default method do you want to use for your e-check advices?
Paper Select P. Paper. 298
E-Mail Select E. E-Mail.
E-Mail with paper backup
Select EP. E-Mail with paper backup.
Both Select B. Both.
Payee Choice
Select C. Payee Choice.
Do you want to define your own subroutine for the e-check e-mail advice paragraph?
Yes Type in the subroutine name and detail to the Define Custom Paragraphs (DPAR) form.
299
No Leave the default paragraph in the E-Check E-Mail Advice Paragraph field.
Do you want to define your own subroutine for the paper e-mail advice paragraph?
Yes Type in the subroutine name and detail to the Define Custom Paragraphs (DPAR) form.
299
No Leave the default paragraph in the E-Check Paper Advice Paragraph field.
300tting Started with Purchasing and Accounts Payable | Defining Accounts Payable Parameters and Defaults

Ge
Defining Codes Used Only in Accounts Payable
In This Chapter
This chapter discusses Colleague Finance codes used only in the Accounts Payable module.
The major section of this chapter, Understanding the Accounts Payable-only Code Tables, discusses the ten code tables that are used primarily in the Accounts Payable module. This section explains the function of each code table and where it is used.
Note: The two code files used only in the Accounts Payable module, tax form box codes and 1099 state information, are both part of the 1099-MISC preparation. Procedures for defining both code files are in the U.S. Regulatory Reporting manual, available on Ellucian’s website.
Where to find the information
Table 62 lists where to find the information.
Table 62: Accounts Payable codes cross-reference
Topic Reference
Learn which Colleague Finance code tables are covered in each chapter of this part
“Code tables used in the Purchasing and Accounts Payable Modules” on page 41.
Learn which Colleague Finance code files are covered in each chapter of this part
“Code files used in the Purchasing and Accounts Payable modules” on page 50.
Learn how to define 1099 state information
U.S. Regulatory Reporting manual
Learn how to define a tax form box code
U.S. Regulatory Reporting manual
301tting Started with Purchasing and Accounts Payable | Defining Codes Used Only in Accounts Payable

Ge
Code tables used only in Accounts Payable
Before you begin
Before working directly with the Accounts Payable module code tables, a few preparatory steps are recommended to help you benefit from the discussions that follow. You should:
• Review basic Colleague Finance codes concepts.
• See “Understanding Purchasing and Accounts Payable Codes” on page 38.
• If your institution prepares T4A information, become familiar (if you are not already) with the methods and codes currently used at your institution to group employee T4A tax types.
Understanding the Accounts Payable-only code tables
Nine Colleague Finance code tables are used only in the Accounts Payable module.1 Only one of these, TAX.GROUP.CODES, can be defined and maintained by your institution. The remaining eight are defined and maintained by Ellucian and cannot be modified by users.
Learn how to define any of the user-definable code tables used only in the Accounts Payable module
“Determining your definitions for the user-maintained code table” on page 303.
Review information on Ellucian-maintained code tables used only in the Accounts Payable module
“Code tables maintained by Ellucian” on page 304.
1.Twenty-two other code tables are used in either the Purchasing module or in both, and six are used for commodity codes. The code tables used in both Purchasing and Accounts Payable are covered in Defining Codes Used in Purchasing & Accounts Payable To find out which code tables are covered in which chapter, see Table 7 on page 43.
Table 62: Accounts Payable codes cross-reference (continued)
Topic Reference
302tting Started with Purchasing and Accounts Payable | Defining Codes Used Only in Accounts Payable
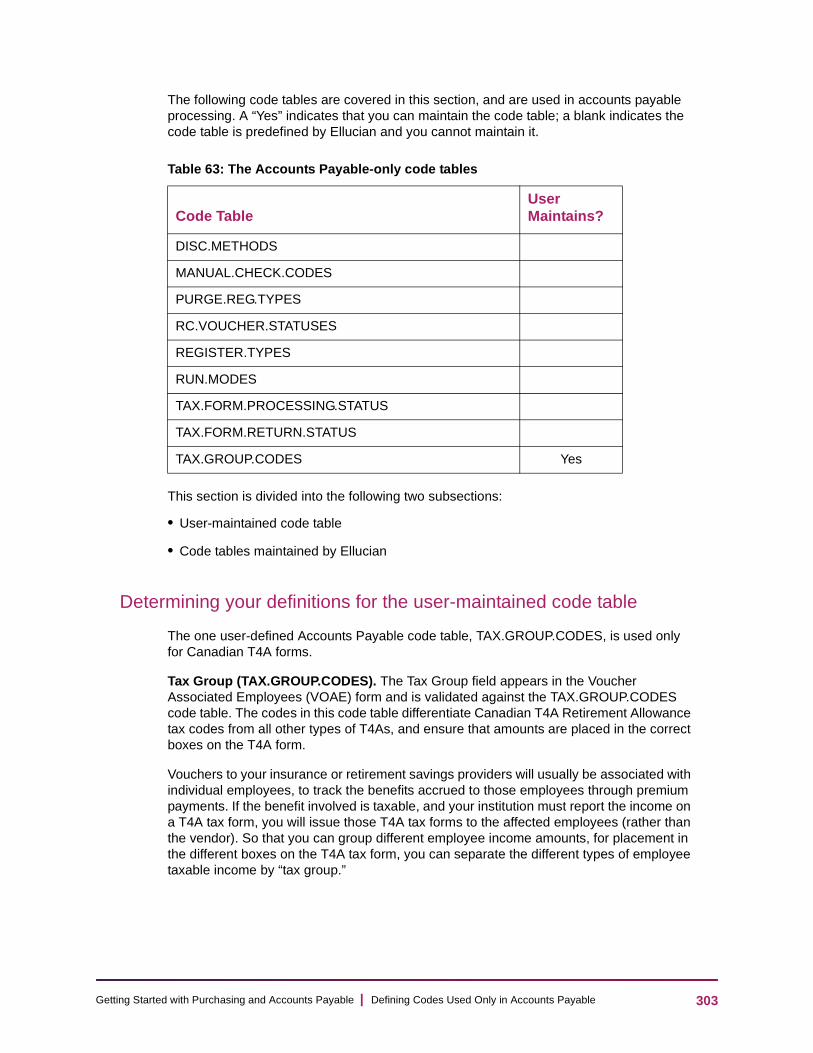
Ge
The following code tables are covered in this section, and are used in accounts payable processing. A “Yes” indicates that you can maintain the code table; a blank indicates the code table is predefined by Ellucian and you cannot maintain it.
This section is divided into the following two subsections:
• User-maintained code table
• Code tables maintained by Ellucian
Determining your definitions for the user-maintained code table
The one user-defined Accounts Payable code table, TAX.GROUP.CODES, is used only for Canadian T4A forms.
Tax Group (TAX.GROUP.CODES). The Tax Group field appears in the Voucher Associated Employees (VOAE) form and is validated against the TAX.GROUP.CODES code table. The codes in this code table differentiate Canadian T4A Retirement Allowance tax codes from all other types of T4As, and ensure that amounts are placed in the correct boxes on the T4A form.
Vouchers to your insurance or retirement savings providers will usually be associated with individual employees, to track the benefits accrued to those employees through premium payments. If the benefit involved is taxable, and your institution must report the income on a T4A tax form, you will issue those T4A tax forms to the affected employees (rather than the vendor). So that you can group different employee income amounts, for placement in the different boxes on the T4A tax form, you can separate the different types of employee taxable income by “tax group.”
Table 63: The Accounts Payable-only code tables
Code TableUser Maintains?
DISC.METHODS
MANUAL.CHECK.CODES
PURGE.REG.TYPES
RC.VOUCHER.STATUSES
REGISTER.TYPES
RUN.MODES
TAX.FORM.PROCESSING.STATUS
TAX.FORM.RETURN.STATUS
TAX.GROUP.CODES Yes
303tting Started with Purchasing and Accounts Payable | Defining Codes Used Only in Accounts Payable
Ge
For example, suppose you are paying a voucher for employee retirement benefits. If employee John Brown receives a benefit from this voucher, his name appears on a line of the Employee ID/Name window on the Voucher Associated Employees (VOAE) form for this voucher. Since the income received by Mr. Brown is taxable, he will be sent a T4A form at the end of the year. To ensure that the retirement income being reported will be placed in the Retirement box on the T4A form, you would enter T4A Retirement Income in the Tax Group field on the VOAE form.
The typical tax group codes you would define are
• RET — T4A Retirement Income
• OTH — T4A Other Income
Special Processing Function: This code table is connected to the T4A preparation process, in which it acts as the link to tell Colleague the box on the T4A form in which this amount should be placed. The special processing code calls a subroutine, which puts the amount on this line in the correct box on the form.
Note: Colleague Finance performs no validation of data entered in special processing. You should check your entries carefully to ensure they are correct.
You can use worksheet “Tax group codes” on page 349 to help you determine your codes for the TAX.GROUP.CODES code table.
Code tables maintained by Ellucian
The Ellucian-maintained code tables used only in the Accounts Payable module relate to setting the module parameters and defaults, recurring voucher statuses, printing manual checks, running voucher registers, and 1099-MISC processing.
This subsection describes each field validated by a code table (with the name of the corresponding validation code table in uppercase letters), and briefly discusses the purpose of each.
Note: Each of the nine code tables described below is maintained by Ellucian. You cannot make any changes to the codes in these code tables. If you have any questions, or believe that a specific code should be included in any of these tables that is not currently included, contact your System Administrator, who will contact Ellucian.
Each code description in this section includes the following information about the code table:
• The name(s) of the field(s) validated by the code table
• Names and mnemonics of some forms where a field validated by the code table appears
• A brief description of the purpose and function of the code in Colleague
304tting Started with Purchasing and Accounts Payable | Defining Codes Used Only in Accounts Payable
Ge
Discount Method (DISC.METHODS). The Discount Method field is displayed on the AP Parameters Definition (APDE) form, and the Current Discount Method field appears on the Change Discount Method (CDSC) form.
Both these fields are validated against the DISCOUNT.METHODS code table. The codes in this code table define the two possible discount methods you can choose, Discounts Taken or Discounts Lost.
The codes in this code table are
• T — Discounts Taken
• L — Discounts Lost
For more information on discount methods, see “Defining Accounts Payable Parameters and Defaults” on page 268.
Manual Check (MANUAL.CHECK.CODES). The Manual Check field is displayed on the Check Inquiry (CHKI) form, which is accessed directly from the Accounts Payable main menu. It is validated against the MANUAL.CHECK.CODES code table.
The manual check codes identify two pieces of information about checks: first, whether a check is a manual check (that is, has been processed for payment on the Manual Voucher Payment (VOUP) form instead of in a batch); and second, if a manual check, whether it has actually been printed, or has not yet been printed. Colleague uses the information from this code table for further check processing; it is always used for display-only purposes.
The codes in this code table are
• N — No
• Y — Yes; Not Printed
• P — Yes; Printed
Purge Register Types (PURGE.REG.TYPES). The Register Type field appears on the Voucher Purge Register (VPRG) form, accessed from the Accounts Payable Vouchers (VOU) menu. The field is validated against the PURGE.REG.TYPES code table. The codes in this code table indicate the choices for the types of vouchers you can select for a specific voucher purge.
You can run any of the following five different types of voucher purge registers:
• N — New. Selects only those vouchers that
• have a status of “Approved” or “Voided”
• were previously approved but had their due dates changed after approval
• have not been previously printed on a new voucher register
• V — Voided. Selects only those vouchers that currently have a status of “Voided”
• Z — Zero balance. Selects only those vouchers that currently have a zero balance
• X — Canceled. Selects only those vouchers that currently have a status of “Canceled”
305tting Started with Purchasing and Accounts Payable | Defining Codes Used Only in Accounts Payable

Ge
• Y — Canceled or Voided. Selects only those vouchers that currently have a status of either “Canceled” or “Voided”
[Recurring Voucher] Status (RC.VOUCHER.STATUSES). When you access most maintenance forms on the Recurring Vouchers (RCV) menu, the form’s header block displays, in the Status field, the recurring voucher’s current status. This field is validated against the RC.VOUCHER.STATUSES code table.
The codes in the RC.VOUCHER.STATUSES code table list the statuses a recurring voucher may pass through during its processing. The possible statuses for a recurring voucher are:
• N — Not Approved1
• O — Outstanding
• V — Voided
• C — Closed
• X — Canceled
Register Types (REGISTER.TYPES). The Register Type field appears on the Vendor Register (VREG) form, accessed from the Accounts Payable Vouchers (VOU) menu. The field is validated against the REGISTER.TYPES code table. The codes in this code table indicate the choices for the types of vouchers you can select for a specific voucher register.
You can run any of the following eight types of voucher registers:
• F — Full. Selects all vouchers that meet the selection criteria
• O — Outstanding. Selects only those vouchers that currently have a status of “Outstanding”
• P — Paid. Selects only those vouchers that currently have a status of “Paid”
• N — New. Selects only those vouchers that
• have a status of “Approved” or “Voided”
• were previously approved but had their due dates changed after approval
• have not been previously printed on a new voucher register
• V — Voided. Selects only those vouchers that currently have a status of “Voided”
• Z — Zero balance. Selects only those vouchers that currently have a zero balance
• X — Canceled. Selects only those vouchers that currently have a status of “Canceled”
• Y — Canceled or Voided. Selects only those vouchers that currently have a status of either “Canceled” or “Voided”
1.The “Not Approved” status appears on recurring vouchers only if your institution is using the Colleague online approvals feature.
306tting Started with Purchasing and Accounts Payable | Defining Codes Used Only in Accounts Payable
Ge
[Run Mode] (RUN.MODES). No field validated by the RUN.MODES code table is displayed on any form, but the code table is used in the 1099-MISC media production process. When you enter “Y” or “N” in the Test field on the 1099-MISC Media Production (MMED) form, the process assigns one of the codes in this code table to the 1099-MISC process you are currently running.
The Internal Revenue Service (IRS) allows you to submit a test to verify the layout of the forms you will submit. You must mark the tape as a test tape if you want to submit a test tape to the IRS. This code table is used behind the scenes to mark a tape as a test tape.
The codes in this code table are
• L — Live
• T — Test
[Tax Form Processing] Status (TAX.FORM.PROCESSING.STATUS). The [Tax Form Processing] Status field appears on numerous forms that deal with 1099-MISC processing, including 1099-MISC Status Change (MISC), 1099-MISC Generation (MGEN), 1099-MISC Form Print (MFRM), 1099-MISC Certification (MCER), and 1099-MISC Detail Report (MDET), all of which are accessed from the 1099-MISC Processing (TMP) menu; and, for Canadian T4A forms, the T4AStatus Change (TASC), T4A Generation (TAGN), T4A Form Print (TAFM), and T4A Detail Report (TADR), all of which are accessed from the T4A Processing (TFP) menu.
The Status field on these forms is validated against the TAX.FORM.PROCESSING.STATUS code table. The codes in this code table indicate the statuses Colleague may assign to a 1099-MISC or T4A tax form during its processing stages.
The status codes used for 1099-MISC tax form processing are
• GEN — Generated
• MOD — Modified
• VER — Verified
• CER — Certified
• UNC — Unlocked Certified
• UNV — Unlocked Verified
• PUR — Purged
The status codes used for T4A tax form processing are
• GEN — Generated
• MOD — Modified
• FRO — Frozen
• SUB — Submitted
• REO — Reopened
307tting Started with Purchasing and Accounts Payable | Defining Codes Used Only in Accounts Payable
Ge
• UNF — Unfrozen
• PUR — Purged
• NA — Not Available
[Tax Form Return] Status (TAX.FORM.RETURN.STATUS). The Return Type field appears on the 1099-MISC Analytical Report (MANA) form (accessed from the 1099-MISC Processing [TMP] menu) and on the T4A Analytical Report (TAAR) form (accessed from the T4A Processing [TMP] menu). The field is validated against the TAX.FORM.RETURN.STATUS code table.
The codes in this code table indicate the possible statuses, or stages, a tax form may pass through after generation, through the modification and error correction process, until it is ready to be sent to the revenue authority (Internal Revenue Service or Revenue Canada). For example, one of these codes may indicate that changes have been made to a return; in this case the previous return must be “backed out” and the revised form submitted in its place.
The possible status codes for tax form processing returns are
• N — New
• G — 1 Step Correction
• C — 2 Step Correction
• U — Unchanged
Special Processing Function: The special processing code for this code table is a numeric character, attached to each code, which calls the subroutine that completes the process indicated by this code.
Defining the Accounts Payable code table
Colleague Finance code tables used in the Purchasing and Accounts Payable modules can be entered into the system, or maintained, on the Validation Codes (VAL) form. This form can be accessed from the AP Codes and Parameters Definition (APC) menu (for those whose security class gives them access to the form).
Code table maintenance may be a system administrator function at your institution. If so, see your system administrator for more information on system data entry of code table definitions.
For more information and procedures for adding or maintaining code tables, see Validation Code Table Maintenance.
308tting Started with Purchasing and Accounts Payable | Defining Codes Used Only in Accounts Payable
Getting Started with Purchasing and Accounts Payable
General Ledger Account Parameters and Maintenance

Ge
Defining GL Account Parameters
In this chapter
This chapter describes how to set up, access, create, and maintain GL accounts.
Table 64 lists the topics in this chapter.
Understanding GL parameters
It is necessary to have access and use several forms to set up GL account numbers before you create accounts in the General Ledger module.
Forms used
Table 65 lists the forms used to set up, access, create, and maintain GL accounts.
Table 64: Topics in This Chapter
Topic Page
Understanding GL parameters 310
GL account parameters 311
GL access 315
GL account authorization 316
Creating new GL accounts 317
GL account maintenance 318
Table 65: Forms Used
Form Description
GL Account Parameters (GLAP) Set up GL account parameters.
GL Access Batch Update (GLBU) Update GL account security for GL account numbers.
310tting Started with Purchasing and Accounts Payable | Defining GL Account Parameters

Ge
GL account parameters
You can set up GL account parameters to do the following:
• Require budget journal entries to balance.
• Require an override to post transactions to closed months.
• Require funds availability checking before accepting an expense transaction.
• Designate the number of months before the future month date message is displayed.
• Designate whether the future month warning is to override the future year warning.
• Require online approvals for general journal entries.
• Require online approvals for budget journal entries.
• Require special security to allow backposting to closed months.
• Require special security to allow general journal entries to be posted with funds out-of-balance.
• Require special security to post when available funds are exceeded.
• Require special security to post to a frozen account.
• Designate the role for full GL account access.
• Require batch updates to GL account access.
Use the GL Account Parameters (GLAP) form to set up your GL account parameters.
GL Account Authorization (GLAA) Create and update individual GL account numbers
Create New GL Accounts (GLCN) Create and update sets of general ledger accounts.
Account Maintenance (GLMT) Maintain specific parts of existing GL account numbers.
Table 65: Forms Used
Form Description
311tting Started with Purchasing and Accounts Payable | Defining GL Account Parameters

Ge
Figure 32: The GL Account Parameters (GLAP) form
Budget requirements
Use the top section of this form to indicate the following:
• If you want to require budget journals to balance, enter “Yes” in the Require Budget Journals to Balance field.
• If you want to require an override to post to closed months, enter “Yes” in the Require Override for Closed Months field. If you do not want allow overrides to post to closed months, enter “No” in this field. You then cannot post to a closed month.
• If you want to check for available funds, enter “Yes” in the Check Available Funds for Expenses field.
• The number of months that you want to lapse before the user receives a warning about future dates being entered.
For example, if you enter 0, only those transactions with dates in the current month (as defined by the month-end close process) are accepted without a date override. If you enter 1, transactions with dates in the current month plus one additional month are accepted without a date override. For example, if the current month is April and you enter 1, transactions with dates in both April and May can be entered without the future date warning message being displayed. You can enter any number from 0 to 11. It is recommended that you enter 1, because the month-end close process is normally not run on the last day of the month. You can then make entries to close out last month, and enter transactions for the current calendar month without the warning message being displayed.
312tting Started with Purchasing and Accounts Payable | Defining GL Account Parameters
Ge
• If you want the user to be allowed to override the future year warning with a date warning message instead, enter “Yes” in the Date Warning to Override Year Warning field. If you do not want to override the future year warning with a date message, enter “No.”
If you enter “Yes,” the user is allowed to override the future year date warning messages, which occur near the end of the fiscal year. Until the number of months have lapsed that you entered in Number of Months in Future Date Warning field, neither the future month nor the future year warning messages are displayed when a transaction date is entered. For example, if your fiscal year ends June 30, the Future Date Warning field contains 2, and your current month is May, you can enter transactions with dates in May, June and July without seeing a warning message. Transactions with dates in August or later require an override to be accepted.
If you enter “No,” the user sees the warning message any time a transaction date is in a future year.
Approving journal and budget entries
The approval fields determine whether journal and budget entries need to be approved before they are posted to the general ledger.
The journal entry approval is used with the following forms:
• General Journal Entry (GLJE)
• Manual Journal Entry (GLJM)
• Reversing Journal Entry (GLJR)
The budget entry approval is used with the Budget Entry (GLBE) form.
If your institution does not want to require online approvals for journal and budget entries, you would select “No” in the Journal Entry and Budget Entry Approval Needed field.
If your institution does want to require online approvals for journal and budget entries, you need to enter “Yes” in the Journal Entry and Budget Entry Approval Needed fields.
This setting means that your institution requires online approvals for budget entries. Sufficient online approvals, based on approval rules defined by your institution, must be obtained before the budget entry can be saved to “Complete” status.
If you set the Journal Entry Done or Budget Entry Done fields to “Auto-populate,” the following will happen when users use the GLJE, GLJM, GLJR, and GLBE forms:
• When the journal entry or budget entry is finished (the Journal Entry Done or Budget Entry Done field is set to “Yes,” Colleague does the following:
• Looks at your institution’s approval rules
• Determines who can approve the document
• Automatically populates those approval IDs in the Next Approvals field
The user can manually edit this list.
313tting Started with Purchasing and Accounts Payable | Defining GL Account Parameters

Ge
Security keys for overrides
Using the Allow Backposting to Closed Months and Allow Journals with FUNDS out of Balance fields, you can enter a security key to permit posting to prior closed months and allow journal funds to be out-of-balance.
The string must be added to the user's security class to allow that user to post to closed periods or enter out-of-balance funds. The parameter flag set in the Require Override for Closed Months field determines whether a password override is required to post to closed months. You can never post to a closed year.
Note: Use the Record Security Setup (SCDE) form to assign security keys used in an application or a module to one or more security classes defined on the Security Class Definition (SCD) form.
Use the Post when Available Funds are Exceeded and Post when Account has been FROZEN fields to enter a security code to permit posting when an account is overdrawn and when posting to an account that is frozen.
Note: The security key must be present in the user's security class to allow the functions for the forms in this section. If you do not enter a security key, any user can post to an overdrawn account or post to an account that is frozen.
Role IDs and batch updates for GL access
You must enter a role ID to designate full access to all of the available GL accounts.
If “Yes” is entered in the Perform Batch Updates of GL Access field, the GL Account Security Access is not updated after you create or modify GL accounts on the GLAA, GLMT, and GLCN forms. Instead, you must run the GL Access Batch Update (GLBU) form to update the GL Account Security Access for GL accounts. If you do not use the GLBU process to update the GL Account Security Access and you have entered “Yes” in the Perform Batch Updates of GL Access field, your GL Account Security Access can quickly become out of sync.
If “No” is entered in the Perform Batch Updates of GL Access field, the GLAA, GLMT, and GLCN forms update the GL Account Security Access immediately after you save from the form. This process can take several minutes to update.
Procedure for defining GL account parameters
Follow this procedure to define GL account parameters.
4. Access the GL Account Parameters (GLAP) form.
5. In the top section of the form, enter the following:
• Whether to require budget journals to balance before the user exits a budget form.
314tting Started with Purchasing and Accounts Payable | Defining GL Account Parameters

Ge
• Whether to require an override to post to closed months.
• Whether to have Colleague check for available funds before the user exits a budget form.
• The number of months to have lapse before the user receives a warning about future dates being entered.
• Whether to override the future year warning with a date message instead.
6. In the Journal Entry Approval Needed field, enter Yes, No, or Auto-populate based on your institutions preferences.
7. In the Budget Entry Approval Needed field, enter Yes, No, or Auto-populate based on your institution’s preferences.
8. In the Security Keys for Overrides fields, enter the security keys to override the specific situations. If you leave any of these fields blank, any user with access to the forms will be able to override that situation.
9. In the Full Access Role ID field, enter the role ID that is allowed to access all accounts. You must define this role on the GL Role Definition (GLRD) form.
10. In the Perform Batch Update of GL Access field, enter Yes if you want the user to use the GL Access Batch Update (GLBU) process after changes have been made on the GL Account Authorization (GLAA), Account Maintenance (GLMT), and Create New GL Accounts (GLCN) forms.
Enter No if you do not want the GLAA, GLMT, and GLCN forms to be updated in batch using the GLBU form and would rather they be updated upon exiting the form.
11. Save your work and exit the form.
GL access
If you want to be able to update GL account security for GL account numbers, you can use the GL Access Batch Update (GLBU) form.
If you have created account numbers or added or modified tags, you must use the GL Access Batch Update (GLBU) form if you have entered “Yes” in the Perform Batch Update of GL Access field on the GL Account Parameters (GLAP) form.
You can add GL account numbers and change GL account tags on existing GL account numbers on the following forms:
• The GL Account Authorization (GLAA) form.
• The Account Maintenance (GLMT) form.
• The Create New GL Accounts (GLCN) form.
After you have made all of the additions and modifications on these forms, use the GLBU form to update the GL account security.
315tting Started with Purchasing and Accounts Payable | Defining GL Account Parameters

Ge
If you enter “No” in the Perform Batch Update of GL Access field on the GLAP form, the GL account security is updated immediately and you do not need to run the GLBU form.
Figure 33: The GL Access Batch Update (GLBU) form
GL account authorization
If you need to create individual GL account numbers, use the GL Account Authorization (GLAA) form.
To create general ledger account numbers, all components of the GL number must contain values and descriptions. You can use the GLAA form to do the following:
• If a major component or any of its subcomponents do not have descriptions, you can enter the descriptions by detailing to the GL Account Descriptions (GLDM) form and then returning to this form.
• You can enter a user-defined GL tag to group like accounts.
• You can assign a Net Asset Class code to accounts, if applicable.
• You can activate or inactivate the account number.
• You can add comments about the GL account number.
• You can enter ledger IDs and statuses for new accounts. For existing accounts, you can maintain their statuses.
Note: When you have completed all the information for an account number, update to save the account that was defined, and return to the last component entered. This allows you to change the last component while retaining the values in the other components.
The number of digits in each account number component is represented by pound signs (##). You enter a value for each component of the account number or detail directly to the GL Account Descriptions (GLDM) form. If the value exists, the description is displayed automatically.
316tting Started with Purchasing and Accounts Payable | Defining GL Account Parameters
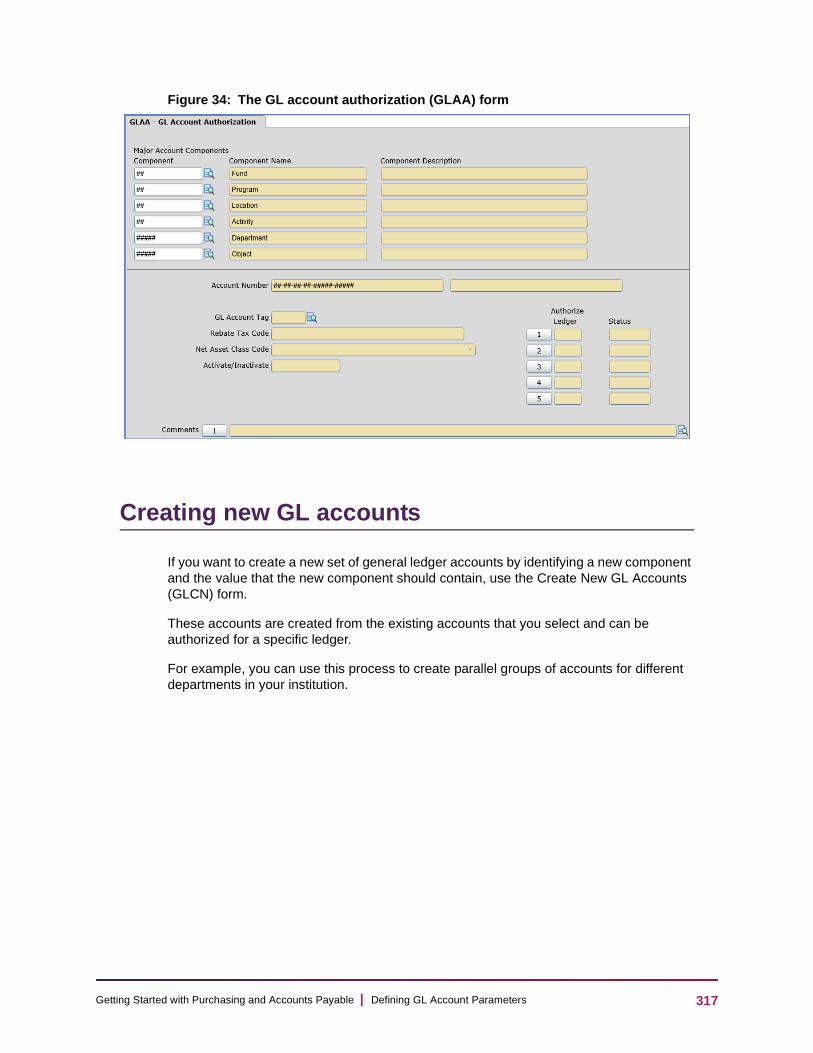
Ge
Figure 34: The GL account authorization (GLAA) form
Creating new GL accounts
If you want to create a new set of general ledger accounts by identifying a new component and the value that the new component should contain, use the Create New GL Accounts (GLCN) form.
These accounts are created from the existing accounts that you select and can be authorized for a specific ledger.
For example, you can use this process to create parallel groups of accounts for different departments in your institution.
317tting Started with Purchasing and Accounts Payable | Defining GL Account Parameters

Ge
Figure 35: The Create New GL Accounts (GLCN) form
Procedure for creating GL accounts
Follow this procedure to create a GL account.
1. Access the Create New GL Accounts (GLCN) form.
2. In the New Component to be created field, select the component that you want to create.
3. In the New value to be used field, enter the value that you want to be used with this component.
4. In the Authorize Accounts field, you must enter Yes to authorize or No to not authorize the accounts.
5. Complete the rest of the fields on the GLCN form.
6. Save your work and exit the form.
GL account maintenance
If you want to maintain GL account attributes, use the Account Maintenance (GLMT) form.
You can do the following on the GLMT form:
• Assign a GL Account Tag as an identifier to group GL accounts.
• Assign a Net Asset Class to the account for reporting purposes.
318tting Started with Purchasing and Accounts Payable | Defining GL Account Parameters

Ge
• Record a Prior Account Number to help track account number changes from another system and to help maintain an audit trail.
• Make the account Active or Inactive for posting.
• Enter comments about the GL account number.
• Update the fund balance to which a revenue or expense account will close in the year-end close process.
• Authorize, Open, or Freeze an account for any open year.
A change to the GL Account Tag field for an existing GL account requires an update to the GL account security.
Figure 36: The Account Maintenance (GLMT) form
Procedure for maintaining GL accounts
Follow this procedure to maintain GL accounts.
1. Access the Account Maintenance (GLMT) form.
2. At the GL Account LookUp prompt, enter the GL account number that you want to maintain.
3. Complete the fields on the GLMT form.
4. Save your work and exit the form.
319tting Started with Purchasing and Accounts Payable | Defining GL Account Parameters

Ge
Worksheets
In this appendix
This appendix provides worksheets you can use for help in setting up the Purchasing and Accounts Payable modules. The worksheets are divided into the following sections and subsections:
• Worksheets for required setup information:
• Parameters and defaults for each module
• Required codes (bank codes, AP types, and staff/volunteer codes [required for requisitions only])
• Vendors
• Worksheets for optional setup information:
• Optional codes (code tables and code files)
• Commodity-related codes
Worksheets for required setup information
Table 66 lists the worksheets provided in this section, for setup of required codes and information. There is a worksheet for every user-definable code in the Purchasing and Accounts Payable modules. The worksheets are arranged in alphabetical order by worksheet name.
The table displays the following for each code:
• The name of the worksheet for defining the item (Note: In the case of code files, the worksheet name uses the most common field name that is validated by the code file)
• Whether the worksheet is for a parameter/default, code file, vendor file, or demographics file
• If a worksheet is for a code file, the maximum length allowed for defining the code
• The page number in this appendix on which the worksheet is found
• The chapter, section, or subsection name and page number where the specific item is discussed
320tting Started with Purchasing and Accounts Payable | Worksheets
Ge
Note: Some fields on the worksheets in this appendix have “Yes/No” responses, or are validated by a Ellucian-maintained code table. In each case where a field requires a prescribed validated response, all possible choices are listed on that line in the worksheet, so you can circle the selection you want. For example, the Source field in the AP types file is validated by the SOURCES code table, which has only two possible values: “A” and “R.” The Source line in the AP Types worksheet (326) lists the two choices, from which you can mark your selection. You can make as many copies of these worksheets as you need.
321tting Started with Purchasing and Accounts Payable | Worksheets
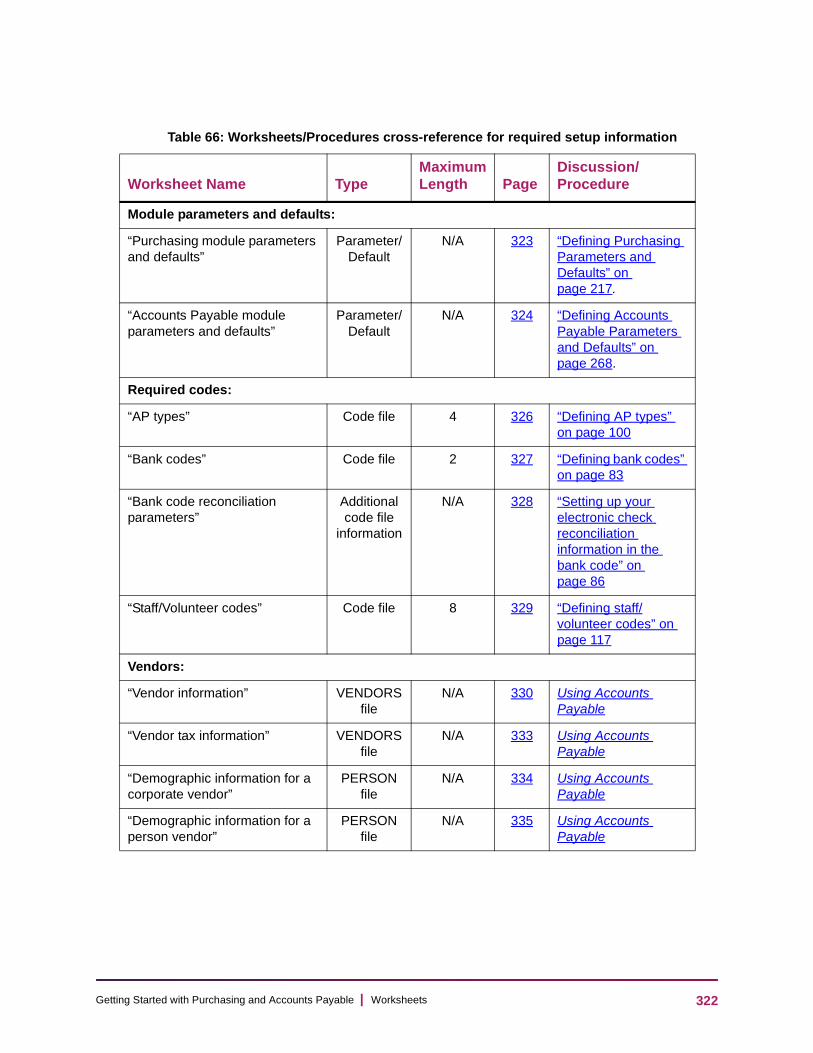
Ge
Table 66: Worksheets/Procedures cross-reference for required setup information
Worksheet Name TypeMaximum Length Page
Discussion/Procedure
Module parameters and defaults:
“Purchasing module parameters and defaults”
Parameter/Default
N/A 323 “Defining Purchasing Parameters and Defaults” on page 217.
“Accounts Payable module parameters and defaults”
Parameter/Default
N/A 324 “Defining Accounts Payable Parameters and Defaults” on page 268.
Required codes:
“AP types” Code file 4 326 “Defining AP types” on page 100
“Bank codes” Code file 2 327 “Defining bank codes” on page 83
“Bank code reconciliation parameters”
Additional code file
information
N/A 328 “Setting up your electronic check reconciliation information in the bank code” on page 86
“Staff/Volunteer codes” Code file 8 329 “Defining staff/volunteer codes” on page 117
Vendors:
“Vendor information” VENDORS file
N/A 330 Using Accounts Payable
“Vendor tax information” VENDORS file
N/A 333 Using Accounts Payable
“Demographic information for a corporate vendor”
PERSON file
N/A 334 Using Accounts Payable
“Demographic information for a person vendor”
PERSON file
N/A 335 Using Accounts Payable
322tting Started with Purchasing and Accounts Payable | Worksheets

Ge
Parameters and defaults for each module
The worksheets on the following pages are for setting up the parameters and defaults for the Purchasing and Accounts Payable modules. They are called:
• Purchasing Module Parameters and Defaults
• Accounts Payable Module Parameters and Defaults
Purchasing module parameters and defaults
Use this worksheet to define the parameters and defaults for operation of the Purchasing module at your institution.
When you have completed this worksheet, you can set up the parameters and defaults on the PU Parameters Definition (PUPD) form.
Table 67: Purchasing module parameters and defaults
Field Value
Requisition Approval Needed
No Yes Auto-populate
PO Approval Needed No Yes Auto-populate
Allow Requisition Split Yes / No
Automatic Requisition Keys
Yes / No
Prompt Defaults: Requisitions Purchase Orders Blanket POs
GL Prompt Sequence
Amount / Percent / Quantity
Amount / Percent / Quantity
Amount / Percent
Trade Disc Prompt Yes / No Yes / No N/A
Commodity Prompt Yes / No Yes / No Yes / No
Tax Code Prompt Yes / No Yes / No N/A
Default Ship To Code:
Ship To Code/Name
Ship To Address
Ship to CSZ
323tting Started with Purchasing and Accounts Payable | Worksheets

Ge
Accounts Payable module parameters and defaults
Use this worksheet to define the parameters and defaults for operation of the Accounts Payable module at your institution.
When you have completed this worksheet, you can set up the parameters and defaults on the AP Parameters Definition (APDE) form.
Ship to Phone/Ext
Accept All Items Yes / No
Tag Assets During Receiving
Yes / No
Redelivery GL Account Description (GL Component)
PO Print Subroutine S.PRINT.REQ (default) /
Req Print Subroutine S.PRINT.PO (default) /
BPO Print Subroutine S.PRINT.BPO (default) /
Worksheet A-1: Accounts Payable module parameters and defaults
Field Value
Voucher Approval Needed
Yes / No
Discount Method Taken / Lost
GL Prompt Sequence Amount / Percent / Quantity
Trade Disc Prompt Yes / No
Tax Code Prompt Yes / No
Transmitter Control Code
Payer Name Control Code
Distribute Tax Expense Yes / No
Table 67: Purchasing module parameters and defaults
Field Value
324tting Started with Purchasing and Accounts Payable | Worksheets
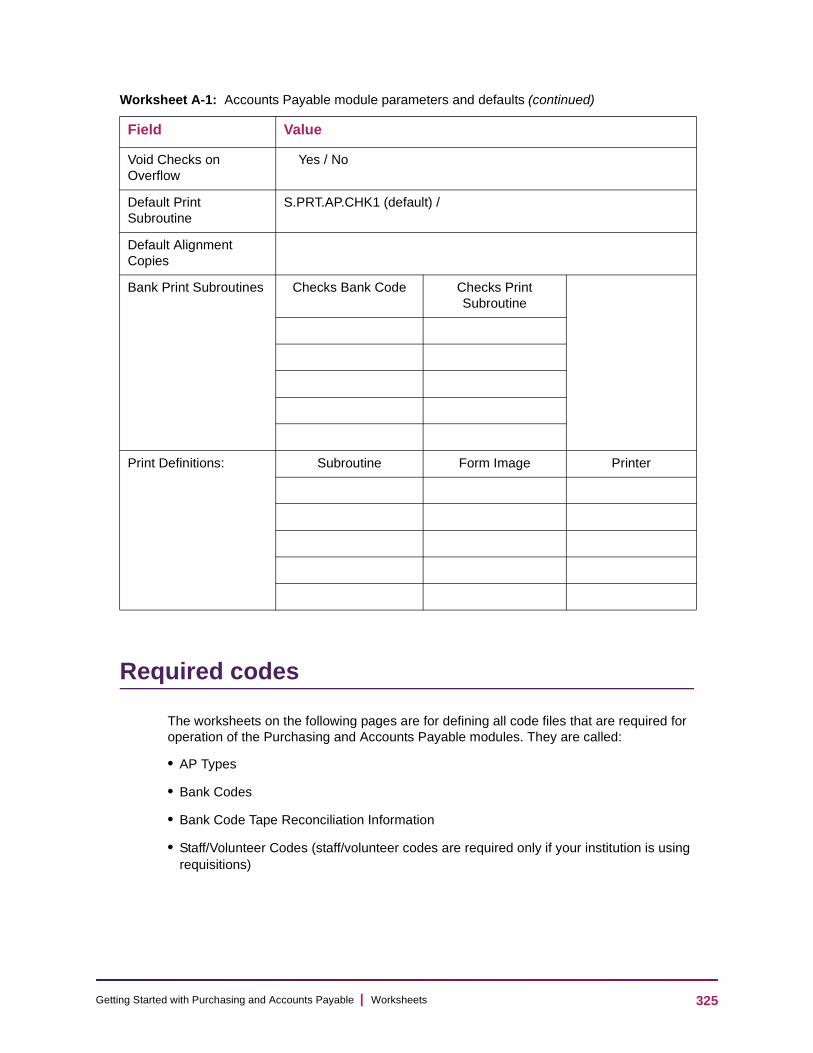
Ge
Required codes
The worksheets on the following pages are for defining all code files that are required for operation of the Purchasing and Accounts Payable modules. They are called:
• AP Types
• Bank Codes
• Bank Code Tape Reconciliation Information
• Staff/Volunteer Codes (staff/volunteer codes are required only if your institution is using requisitions)
Void Checks on Overflow
Yes / No
Default Print Subroutine
S.PRT.AP.CHK1 (default) /
Default Alignment Copies
Bank Print Subroutines Checks Bank Code Checks Print Subroutine
Print Definitions: Subroutine Form Image Printer
Worksheet A-1: Accounts Payable module parameters and defaults (continued)
Field Value
325tting Started with Purchasing and Accounts Payable | Worksheets

Ge
AP types
Use copies of this worksheet to define the AP type codes you will use at your institution.
You can build the AP.TYPES code file on the AP Types (APTF) form from the information on this worksheet.
Worksheet A-2: AP types
AP Type Code ID:
FieldValue
Description
Source R (Regular Accounts Payable) / A (Accounts Receivable)
AP Control GL Account
Account Number
Description
Discount GL Account
Account Number
Description
Tax Expense GL Account
Account Number
Description
Organization ID Code Description
Tax ID Permanent Tax ID
Account Identifier (Canadian Clients only)
326tting Started with Purchasing and Accounts Payable | Worksheets

Ge
Bank codes
Use copies of this worksheet to define your bank codes, which will be associated with AP types.
You can build the BANK.CODES code file on the Bank Codes (BKCM) form from the information on this worksheet.
Worksheet A-3: Bank codes
Bank Code ID:
Field Value
Description
GL Cash Account Account Number Description
Bank Account Number
Transit Routing Number
Last AP Check Number
[updated after initial entry by the AP check print process]
Active Status Active / Inactive
Foreign Currency Code
Code Description
Currency Designation
Currency Exchange GL Account
Account Number Description
Tape Reconciliation Info
[“X” displayed from the BKCD form if information exists] (see next worksheet)
327tting Started with Purchasing and Accounts Payable | Worksheets
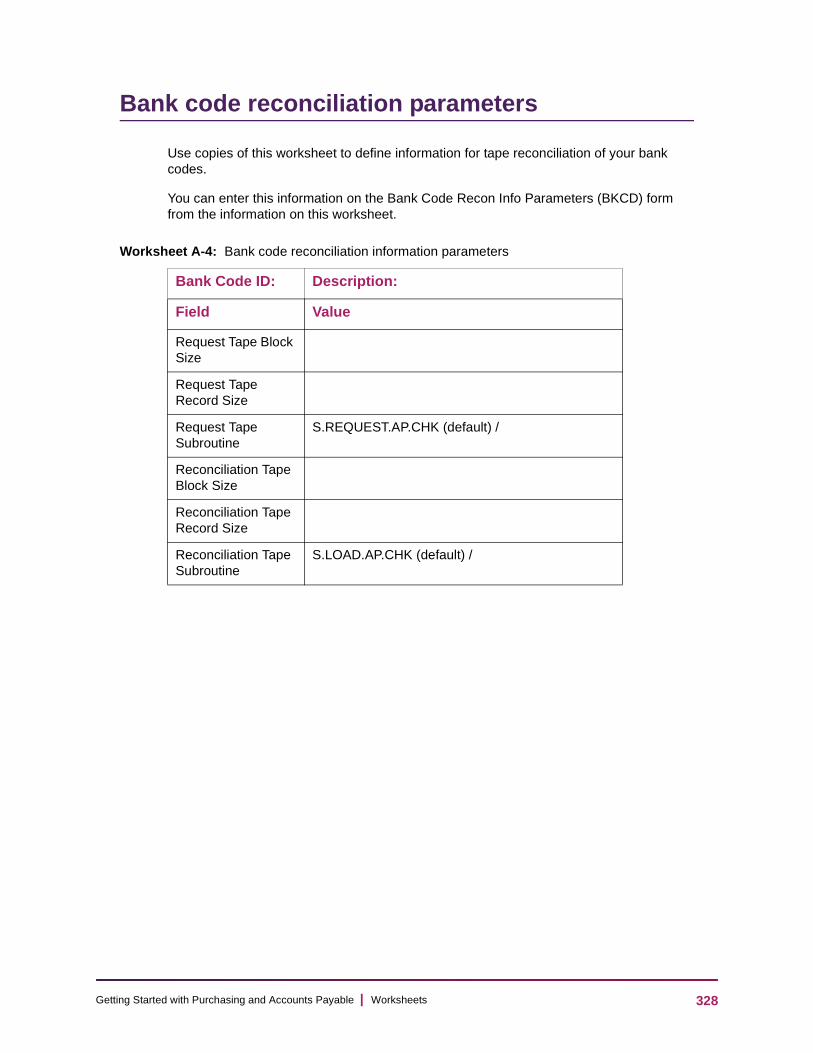
Ge
Bank code reconciliation parameters
Use copies of this worksheet to define information for tape reconciliation of your bank codes.
You can enter this information on the Bank Code Recon Info Parameters (BKCD) form from the information on this worksheet.
Worksheet A-4: Bank code reconciliation information parameters
Bank Code ID: Description:
Field Value
Request Tape Block Size
Request Tape Record Size
Request Tape Subroutine
S.REQUEST.AP.CHK (default) /
Reconciliation Tape Block Size
Reconciliation Tape Record Size
Reconciliation Tape Subroutine
S.LOAD.AP.CHK (default) /
328tting Started with Purchasing and Accounts Payable | Worksheets
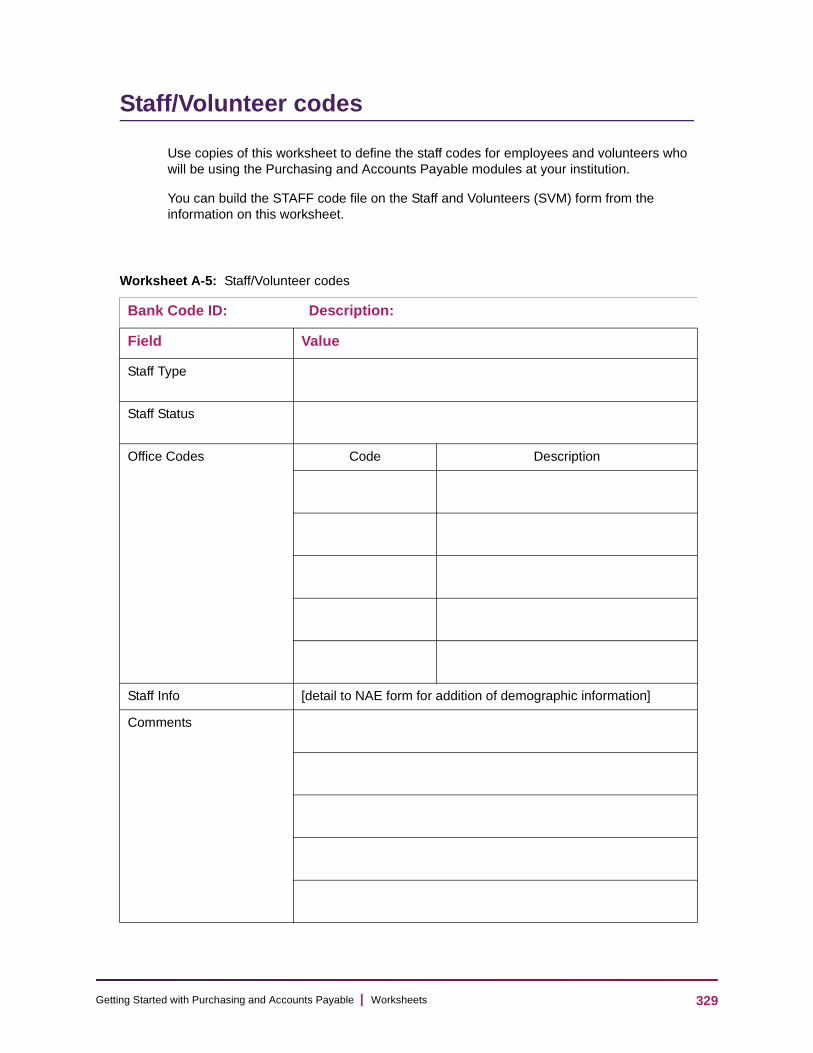
Ge
Staff/Volunteer codes
Use copies of this worksheet to define the staff codes for employees and volunteers who will be using the Purchasing and Accounts Payable modules at your institution.
You can build the STAFF code file on the Staff and Volunteers (SVM) form from the information on this worksheet.
Worksheet A-5: Staff/Volunteer codes
Bank Code ID: Description:
Field Value
Staff Type
Staff Status
Office Codes Code Description
Staff Info [detail to NAE form for addition of demographic information]
Comments
329tting Started with Purchasing and Accounts Payable | Worksheets

Ge
Vendors
The worksheets on the following pages are for defining vendors and related information, including demographic information for both persons and corporations. They are called:
• Vendor Information
• Vendor Tax Information
• Demographic Information for a Corporate Vendor
• Demographic Information for a Person Vendor
Vendor information
Use copies of this worksheet to define your vendor information.
All fields on this form are optional except the Active status field and the Approved Vendor field, which both default to “Yes” for new records. However, you must still create a vendor record for every vendor you want to track in the system. Miscellaneous vendors are permitted but not recommended.
You can enter the information from this worksheet on the Vendor Maintenance (VEND) form.
Worksheet A-6: Vendor information
Vendor ID: Vendor Name:
Field Value
AP Types Code Description
Terms Code Description
330tting Started with Purchasing and Accounts Payable | Worksheets

Ge
Vendor Types Code Description
Miscellaneous Codes Code Description
Active Active / Inactive
Stop Payment
Approved Vendor
Approval Notes
Alternate ID
Institution ID
Tax Form Form Description
Currency Code Description
Annual Sales $ .
Worksheet A-6: Vendor information (continued)
Vendor ID: Vendor Name:
Field Value
331tting Started with Purchasing and Accounts Payable | Worksheets
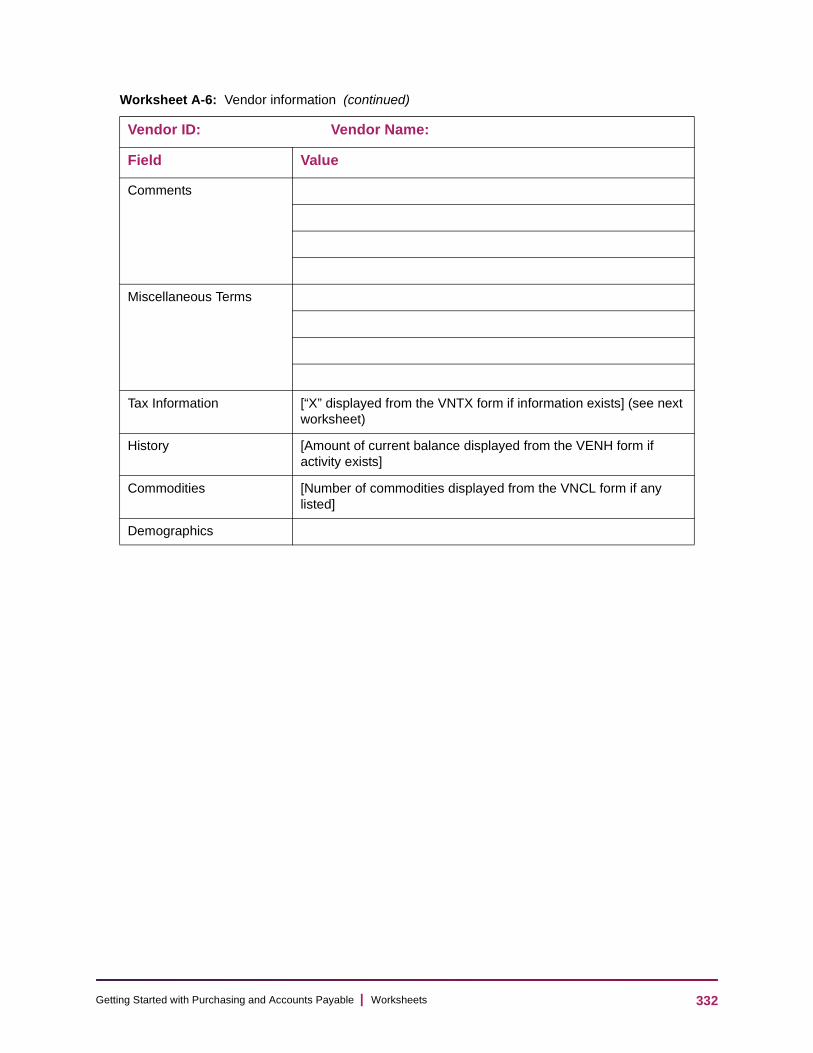
Ge
Comments
Miscellaneous Terms
Tax Information [“X” displayed from the VNTX form if information exists] (see next worksheet)
History [Amount of current balance displayed from the VENH form if activity exists]
Commodities [Number of commodities displayed from the VNCL form if any listed]
Demographics
Worksheet A-6: Vendor information (continued)
Vendor ID: Vendor Name:
Field Value
332tting Started with Purchasing and Accounts Payable | Worksheets

Ge
Vendor tax information
Use copies of this worksheet to define information on specific 1099 and T4A tax issues for your vendors.
You can enter this information on the Vendor Tax Information (VNTX) form.
All fields on the VNTX form are optional.
Worksheet A-7: Vendor tax information
Vendor ID: Vendor Name:
Field Value
1099-MISC Information
Second Notice Flag
Yes / No
Withholding Flag Yes / No
Direct Sales Flag Yes / No
T4A Information
Deferred Flag Yes / No
Pension Number
333tting Started with Purchasing and Accounts Payable | Worksheets

Ge
Demographic information for a corporate vendor
Use copies of this worksheet to enter demographic information for your corporate vendors. All fields on this form are optional except the Name and Sort Name fields. The name you enter in the Name field defaults into the Sort Name field.
Enter the information from this worksheet on the Organization Profiles (ORGP) form.
Worksheet A-8: Demographic information for corporate vendors
Vendor ID: Vendor Name:
Field Value
Source
Origin
Name
Mail Label
Sort Name
Other Names
Address
CSZ
Country
County
Address Type
Phone(s) Number Ext Type
EIN
Additional Business Information
334tting Started with Purchasing and Accounts Payable | Worksheets

Ge
Demographic information for a person vendor
Use copies of this worksheet to enter demographic information for your individual vendors.
Enter the information from this worksheet on the Name and Address Entry (NAE) form.
Worksheet A-9: Demographic information for person vendors
Vendor ID: Vendor Name:
Field Value
Prefix
Name LFM Person ID
Suffix
SSN - -
Sex
Address
Cty/St/Zp
Country
Phone(s) Number Ext Type
Source
Origin
Birth Date
Mail Rules
Pref Name
Mail Name
Other LFM
335tting Started with Purchasing and Accounts Payable | Worksheets
Ge
Worksheets for optional setup information
Table 68 lists the worksheets provided in this section, for setup of optional codes and information. There is a worksheet for every user-definable code in the Purchasing and Accounts Payable modules. The worksheets are arranged in alphabetical order by worksheet name.
The table displays the following for each code:
• The name of the worksheet for defining the item (Note: In the case of code tables and code files, the worksheet name uses the most common field name that is validated by the code table or code file)
• Whether the worksheet is for a code table, code file, or approval rule
• If a worksheet is for a code table or code file, the maximum length allowed for defining the code
• The page number in this appendix on which the worksheet is found
• The chapter, section, or subsection name and page number where the specific item is discussed
In addition, note the following information about the worksheets:
• For code tables, the first line of each worksheet displays an example of how the code table would be filled in.
• For code files, no example is provided. To see examples and details for code files, refer to the applicable discussion/procedure chapter as listed in Table 68.
Note: Some fields on the worksheets in this appendix have “Yes/No” responses, or are validated by a Ellucian-maintained code table. In each case where a field requires a prescribed validated response, all possible choices are listed on that line in the worksheet, so you can circle the selection you want. For example, the Rebates/Refunds Involved field in the TAX.CODES code file is validated by either “Yes” or “No.” The Rebates/Refunds Involved line in the Tax codes worksheet (346) lists the two choices, from which you can mark your selection. You can make as many copies of these worksheets as you need. Each worksheet is printed on its own page to facilitate multiple reproduction.
Some fields on the worksheets in this appendix have “Yes/No” responses, or are validated by a Ellucian-maintained code table. In each case where a field requires a prescribed validated response, all possible choices are listed on that line in the worksheet, so you can circle the selection you want. For example, the Rebates/Refunds Involved field in the TAX.CODES code file is validated by either “Yes” or “No.” The Rebates/Refunds Involved line in the Tax codes worksheet (346) lists the two choices, from which you can mark your selection.
336tting Started with Purchasing and Accounts Payable | Worksheets
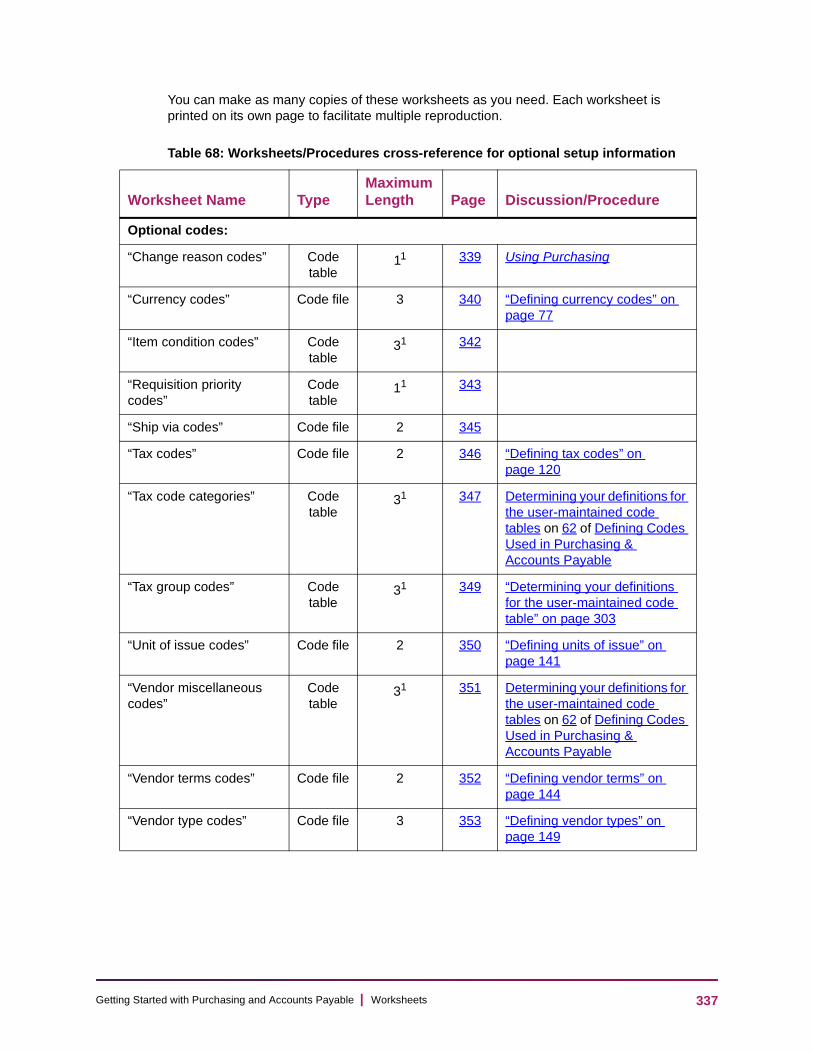
Ge
You can make as many copies of these worksheets as you need. Each worksheet is printed on its own page to facilitate multiple reproduction.
Table 68: Worksheets/Procedures cross-reference for optional setup information
Worksheet Name TypeMaximum Length Page Discussion/Procedure
Optional codes:
“Change reason codes” Code table
11 339 Using Purchasing
“Currency codes” Code file 3 340 “Defining currency codes” on page 77
“Item condition codes” Code table
31 342
“Requisition priority codes”
Code table
11 343
“Ship via codes” Code file 2 345
“Tax codes” Code file 2 346 “Defining tax codes” on page 120
“Tax code categories” Code table
31 347 Determining your definitions for the user-maintained code tables on 62 of Defining Codes Used in Purchasing & Accounts Payable
“Tax group codes” Code table
31 349 “Determining your definitions for the user-maintained code table” on page 303
“Unit of issue codes” Code file 2 350 “Defining units of issue” on page 141
“Vendor miscellaneous codes”
Code table
31 351 Determining your definitions for the user-maintained code tables on 62 of Defining Codes Used in Purchasing & Accounts Payable
“Vendor terms codes” Code file 2 352 “Defining vendor terms” on page 144
“Vendor type codes” Code file 3 353 “Defining vendor types” on page 149
337tting Started with Purchasing and Accounts Payable | Worksheets
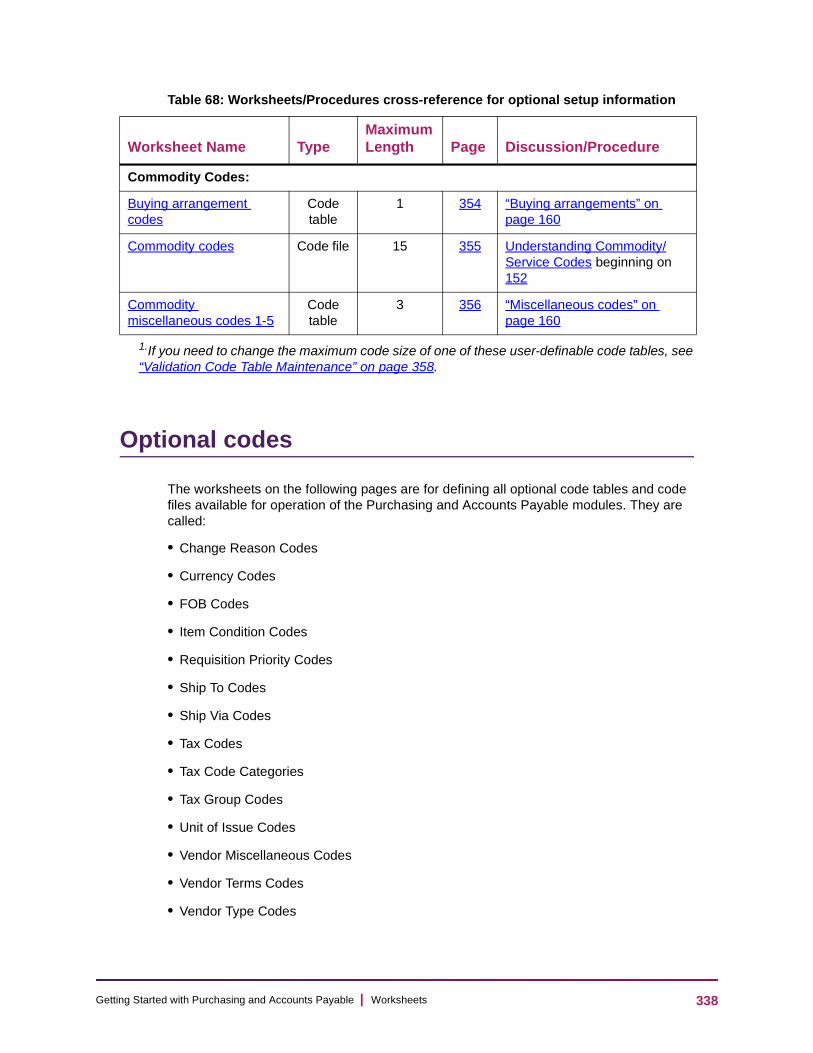
Ge
Optional codes
The worksheets on the following pages are for defining all optional code tables and code files available for operation of the Purchasing and Accounts Payable modules. They are called:
• Change Reason Codes
• Currency Codes
• FOB Codes
• Item Condition Codes
• Requisition Priority Codes
• Ship To Codes
• Ship Via Codes
• Tax Codes
• Tax Code Categories
• Tax Group Codes
• Unit of Issue Codes
• Vendor Miscellaneous Codes
• Vendor Terms Codes
• Vendor Type Codes
Commodity Codes:
Buying arrangement codes
Code table
1 354 “Buying arrangements” on page 160
Commodity codes Code file 15 355 Understanding Commodity/Service Codes beginning on 152
Commodity miscellaneous codes 1-5
Code table
3 356 “Miscellaneous codes” on page 160
1.If you need to change the maximum code size of one of these user-definable code tables, see “Validation Code Table Maintenance” on page 358.
Table 68: Worksheets/Procedures cross-reference for optional setup information
Worksheet Name TypeMaximum Length Page Discussion/Procedure
338tting Started with Purchasing and Accounts Payable | Worksheets
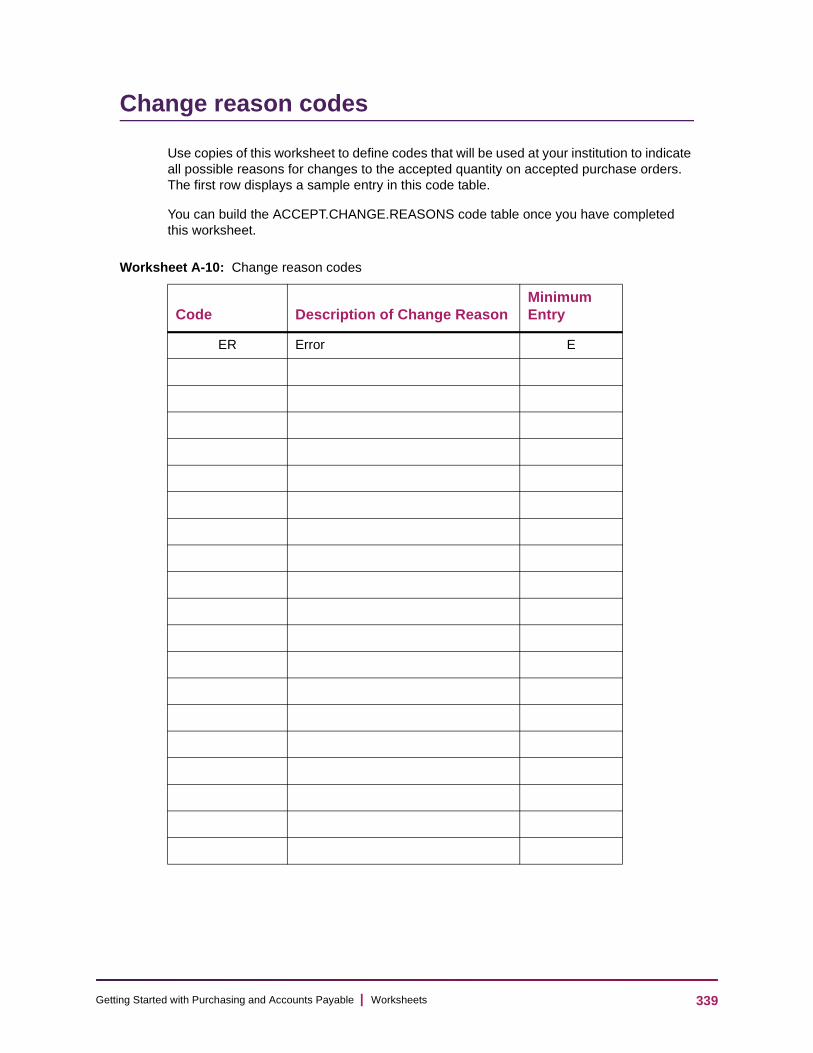
Ge
Change reason codes
Use copies of this worksheet to define codes that will be used at your institution to indicate all possible reasons for changes to the accepted quantity on accepted purchase orders. The first row displays a sample entry in this code table.
You can build the ACCEPT.CHANGE.REASONS code table once you have completed this worksheet.
Worksheet A-10: Change reason codes
Code Description of Change ReasonMinimum Entry
ER Error E
339tting Started with Purchasing and Accounts Payable | Worksheets

Ge
Currency codes
Use copies of this worksheet to define a code for any foreign currencies in which your institution does business.
Once you have completed this worksheet, you can build the CURRENCY.CONV code file on the Currency Exchange (CEXM) form.
Worksheet A-11: Currency codes
Currency Code ID:
Field Value
Description
Exchange Rates Rate Effective Date
340tting Started with Purchasing and Accounts Payable | Worksheets

Ge
FOB codes
Use copies of this worksheet to define your institution’s FOB (free-on-board) codes, which can be associated with requisitions or purchase orders.
You can build the FOBS code file on the FOB Codes (FOBM) form from the information on this worksheet.
Worksheet A-12: FOB Codes
FOB Code ID Description
341tting Started with Purchasing and Accounts Payable | Worksheets

Ge
Item condition codes
Use copies of this worksheet to define all possible conditions of ordered items when they are received. The first row displays a sample entry in this code table.
You can build the ITEM.CONDITION code table once you have completed this worksheet.
Worksheet A-13: Item condition codes
Code Description of Item ConditionMinimum Entry
DMG Damaged DMG
342tting Started with Purchasing and Accounts Payable | Worksheets

Ge
Requisition priority codes
Use copies of this worksheet to define the list of requisition priorities you will use at your institution to prioritize ordering of goods. The first row displays a sample entry in this code table.
You can build the REQ.PRIORITIES code table once you have completed this worksheet.
Worksheet A-14: Requisition priority codes
CodeDescription of Requisition Priority
Minimum Entry
1 Critical; top priority 1
343tting Started with Purchasing and Accounts Payable | Worksheets
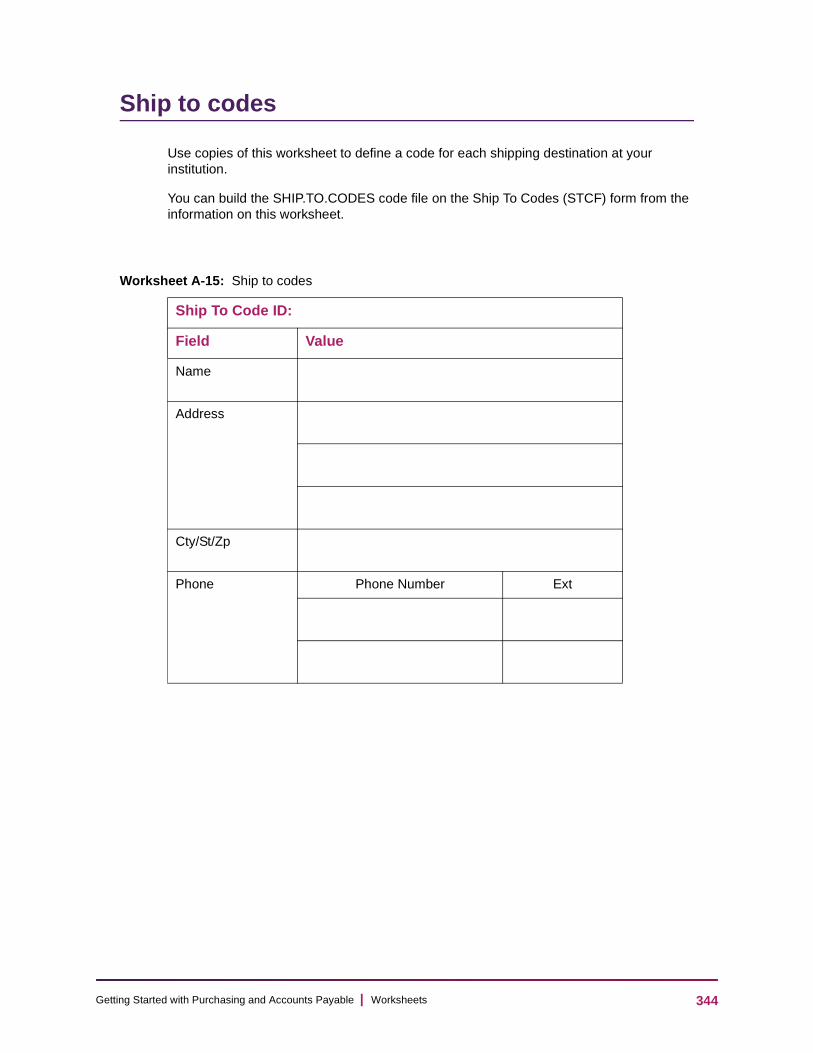
Ge
Ship to codes
Use copies of this worksheet to define a code for each shipping destination at your institution.
You can build the SHIP.TO.CODES code file on the Ship To Codes (STCF) form from the information on this worksheet.
Worksheet A-15: Ship to codes
Ship To Code ID:
Field Value
Name
Address
Cty/St/Zp
Phone Phone Number Ext
344tting Started with Purchasing and Accounts Payable | Worksheets

Ge
Ship via codes
Use copies of this worksheet to define codes you will use at your institution for shipping methods.
You can build the SHIP.VIAS code file on the Ship Via Codes (SVIA) form from the information on this worksheet.
Worksheet A-16: Ship via codes
Ship Via Code ID Description
345tting Started with Purchasing and Accounts Payable | Worksheets
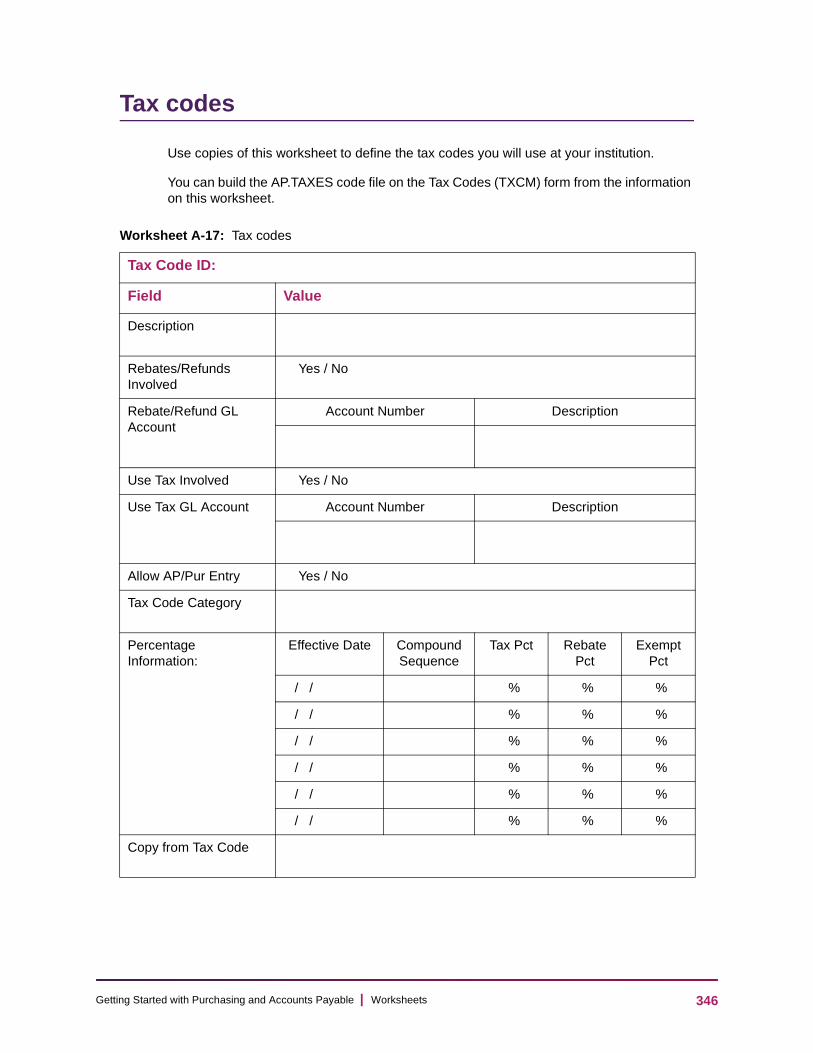
Ge
Tax codes
Use copies of this worksheet to define the tax codes you will use at your institution.
You can build the AP.TAXES code file on the Tax Codes (TXCM) form from the information on this worksheet.
Worksheet A-17: Tax codes
Tax Code ID:
Field Value
Description
Rebates/Refunds Involved
Yes / No
Rebate/Refund GL Account
Account Number Description
Use Tax Involved Yes / No
Use Tax GL Account Account Number Description
Allow AP/Pur Entry Yes / No
Tax Code Category
Percentage Information:
Effective Date Compound Sequence
Tax Pct Rebate Pct
Exempt Pct
/ / % % %
/ / % % %
/ / % % %
/ / % % %
/ / % % %
/ / % % %
Copy from Tax Code
346tting Started with Purchasing and Accounts Payable | Worksheets

Ge
Tax code categories
Use copies of this worksheet to define categories in which you want to group tax codes on purchase orders for totaling. The first row displays a sample entry in this code table.
The TAX.CATEGORIES code table can be built once you have completed this worksheet.
Worksheet A-18: Tax code categories
CodeDescription of Tax Code Category
Minimum Entry
Special Processing:
Line on POs Where Totaled
GST GST Tax G 2
347tting Started with Purchasing and Accounts Payable | Worksheets
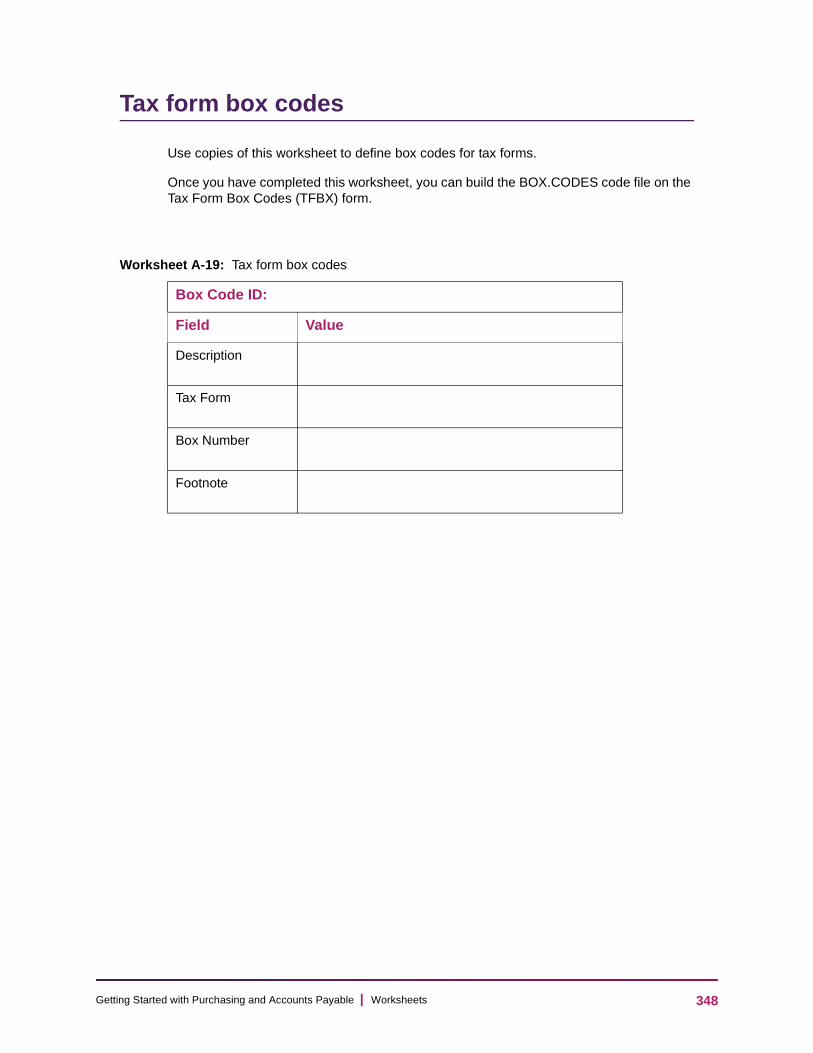
Ge
Tax form box codes
Use copies of this worksheet to define box codes for tax forms.
Once you have completed this worksheet, you can build the BOX.CODES code file on the Tax Form Box Codes (TFBX) form.
Worksheet A-19: Tax form box codes
Box Code ID:
Field Value
Description
Tax Form
Box Number
Footnote
348tting Started with Purchasing and Accounts Payable | Worksheets
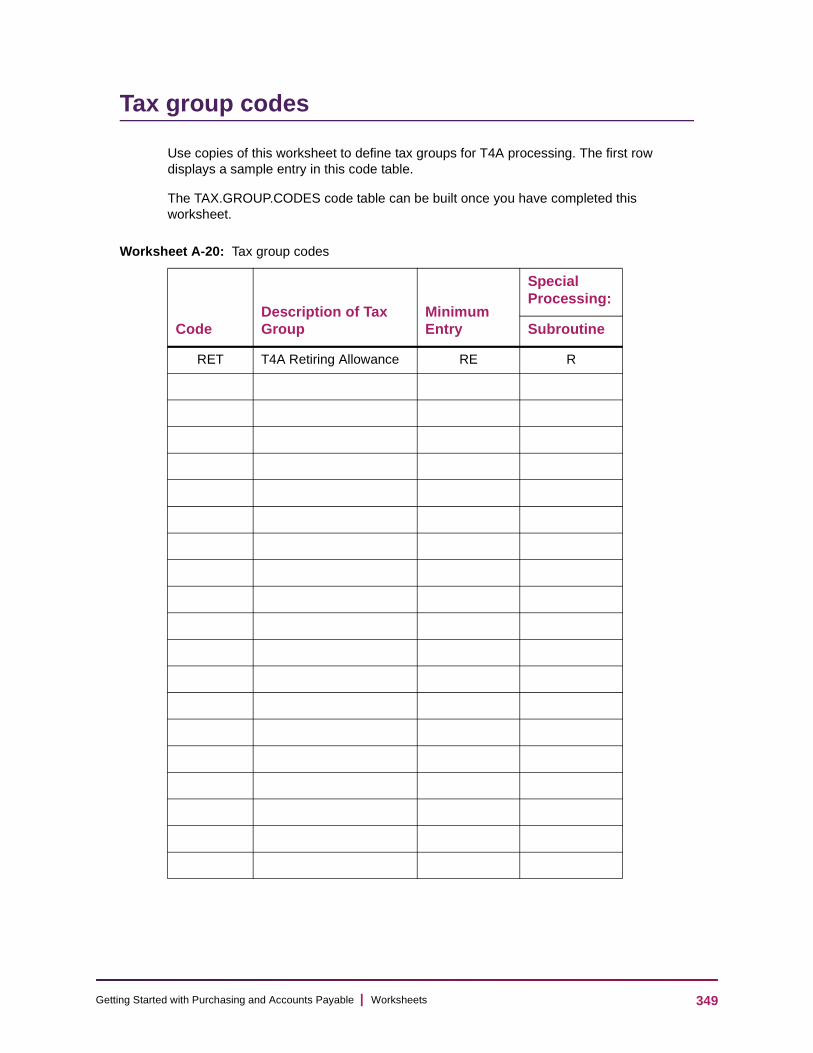
Ge
Tax group codes
Use copies of this worksheet to define tax groups for T4A processing. The first row displays a sample entry in this code table.
The TAX.GROUP.CODES code table can be built once you have completed this worksheet.
Worksheet A-20: Tax group codes
CodeDescription of Tax Group
Minimum Entry
Special Processing:
Subroutine
RET T4A Retiring Allowance RE R
349tting Started with Purchasing and Accounts Payable | Worksheets

Ge
Unit of issue codes
Use copies of this worksheet to define units in which goods are ordered and purchased.
Once you have completed this worksheet, you can build the UNIT.ISSUES code file on the Unit Issues Codes (UNIM) form.
Worksheet A-21: Unit of issue codes
Unit Issue Code ID Description
EA Each
350tting Started with Purchasing and Accounts Payable | Worksheets
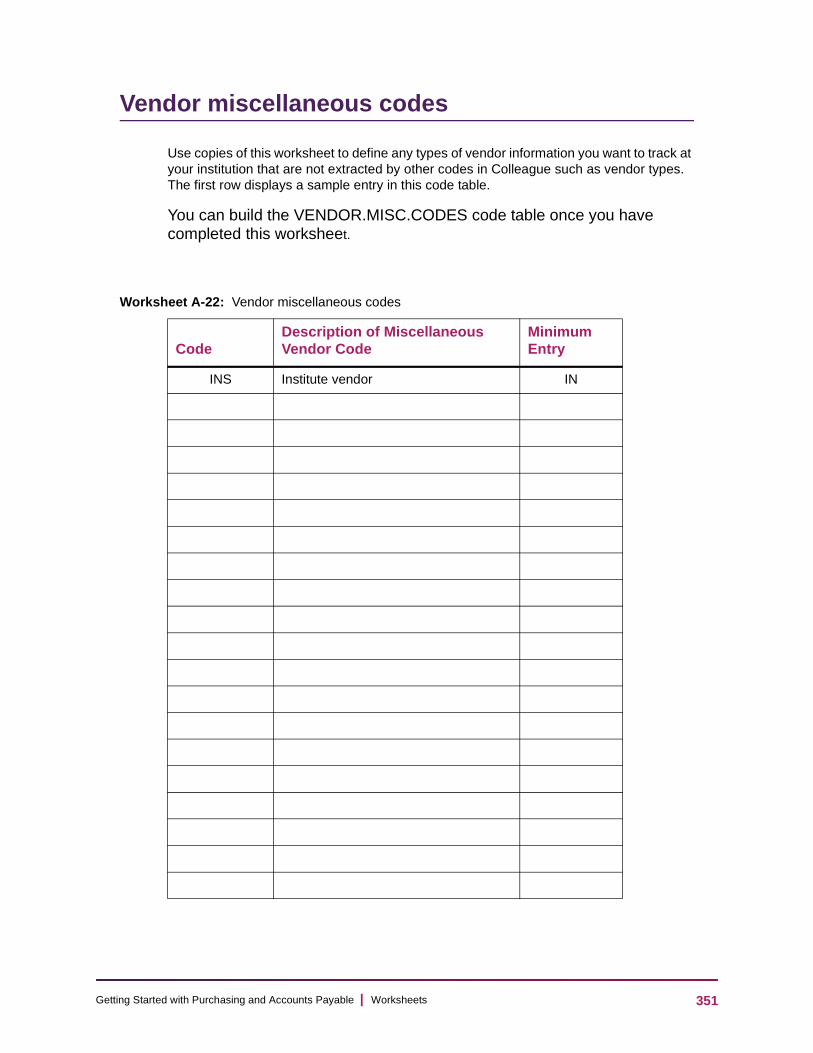
Ge
Vendor miscellaneous codes
Use copies of this worksheet to define any types of vendor information you want to track at your institution that are not extracted by other codes in Colleague such as vendor types. The first row displays a sample entry in this code table.
You can build the VENDOR.MISC.CODES code table once you have completed this worksheet.
Worksheet A-22: Vendor miscellaneous codes
CodeDescription of Miscellaneous Vendor Code
Minimum Entry
INS Institute vendor IN
351tting Started with Purchasing and Accounts Payable | Worksheets
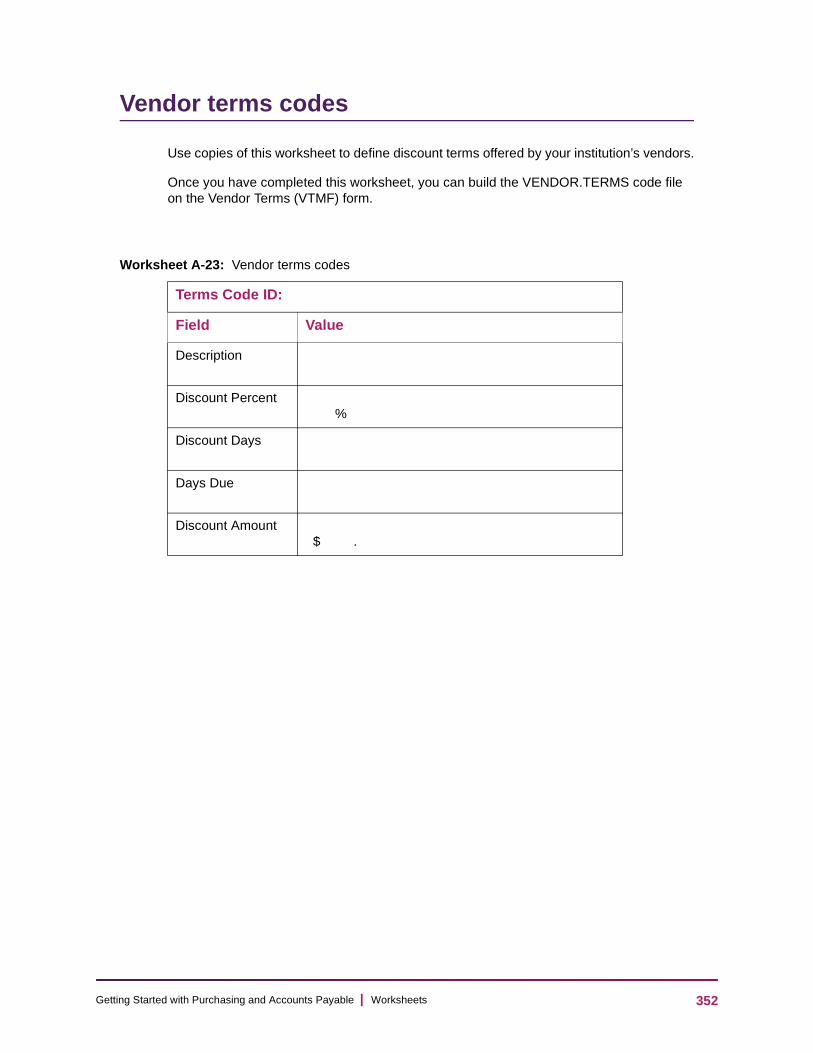
Ge
Vendor terms codes
Use copies of this worksheet to define discount terms offered by your institution’s vendors.
Once you have completed this worksheet, you can build the VENDOR.TERMS code file on the Vendor Terms (VTMF) form.
Worksheet A-23: Vendor terms codes
Terms Code ID:
Field Value
Description
Discount Percent %
Discount Days
Days Due
Discount Amount $ .
352tting Started with Purchasing and Accounts Payable | Worksheets

Ge
Vendor type codes
Use copies of this worksheet to define vendor types you want to track at your institution.
Once you have completed this worksheet you can build the VENDOR.TYPES code file on the Vendor Types (VTYF) form.
Worksheet A-24: Vendor type codes
Vendor Type Code ID Description
353tting Started with Purchasing and Accounts Payable | Worksheets
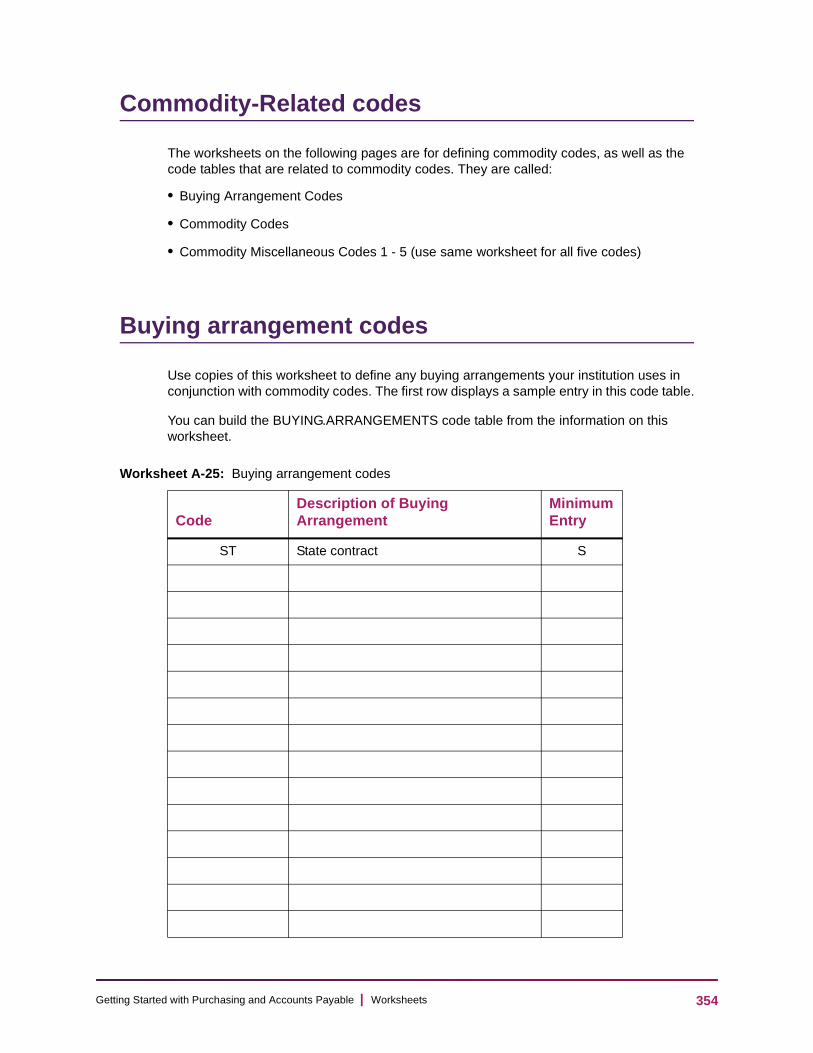
Ge
Commodity-Related codes
The worksheets on the following pages are for defining commodity codes, as well as the code tables that are related to commodity codes. They are called:
• Buying Arrangement Codes
• Commodity Codes
• Commodity Miscellaneous Codes 1 - 5 (use same worksheet for all five codes)
Buying arrangement codes
Use copies of this worksheet to define any buying arrangements your institution uses in conjunction with commodity codes. The first row displays a sample entry in this code table.
You can build the BUYING.ARRANGEMENTS code table from the information on this worksheet.
Worksheet A-25: Buying arrangement codes
CodeDescription of Buying Arrangement
Minimum Entry
ST State contract S
354tting Started with Purchasing and Accounts Payable | Worksheets

Ge
Commodity codes
Use copies of this worksheet to define your institution’s commodity codes.
You can build the COMMODITY.CODES code file from the information on this worksheet.
Worksheet A-26: Commodity codes
Commodity Code ID:
Field Value
Description
Use Description Yes / No
MSDS Required Yes / No
Bid Required Yes / No
Fixed Asset S (Single) / M (Multivalued)
Inventory Item Yes / No
Track Price Yes / No
Buying Arrangement
Buyers Staff ID Name
Worksheet A-25: Buying arrangement codes
CodeDescription of Buying Arrangement
Minimum Entry
355tting Started with Purchasing and Accounts Payable | Worksheets
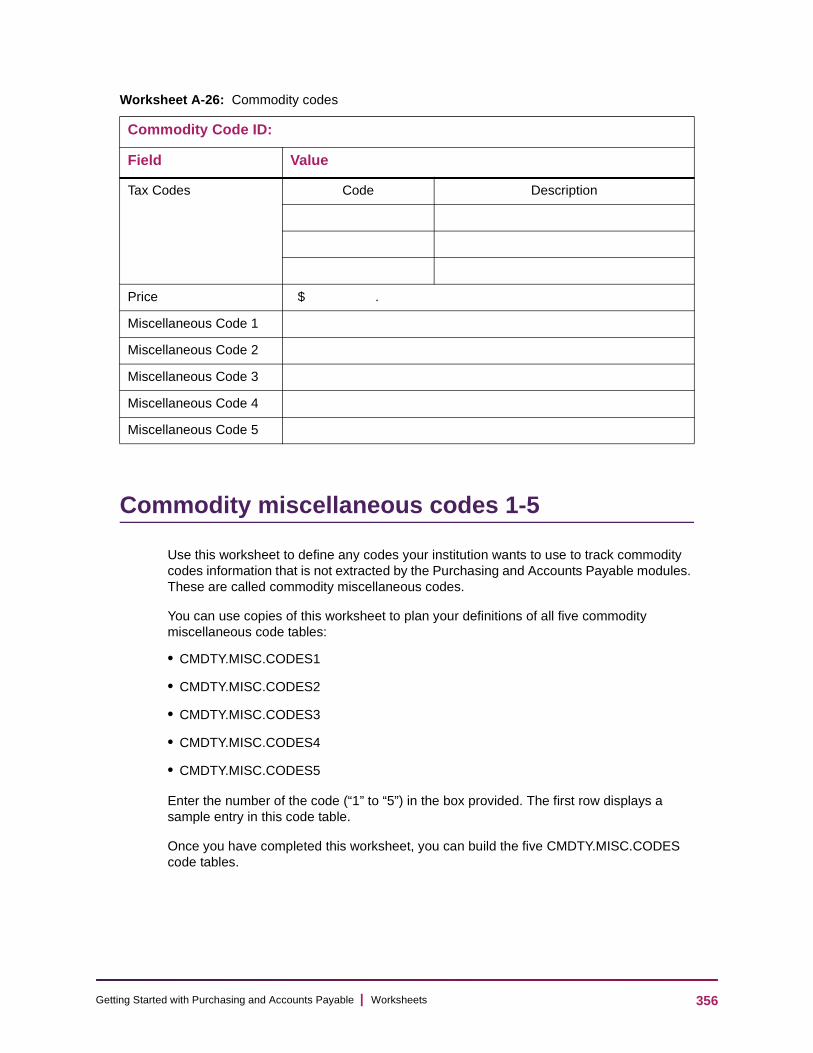
Ge
Commodity miscellaneous codes 1-5
Use this worksheet to define any codes your institution wants to use to track commodity codes information that is not extracted by the Purchasing and Accounts Payable modules. These are called commodity miscellaneous codes.
You can use copies of this worksheet to plan your definitions of all five commodity miscellaneous code tables:
• CMDTY.MISC.CODES1
• CMDTY.MISC.CODES2
• CMDTY.MISC.CODES3
• CMDTY.MISC.CODES4
• CMDTY.MISC.CODES5
Enter the number of the code (“1” to “5”) in the box provided. The first row displays a sample entry in this code table.
Once you have completed this worksheet, you can build the five CMDTY.MISC.CODES code tables.
Tax Codes Code Description
Price $ .
Miscellaneous Code 1
Miscellaneous Code 2
Miscellaneous Code 3
Miscellaneous Code 4
Miscellaneous Code 5
Worksheet A-26: Commodity codes
Commodity Code ID:
Field Value
356tting Started with Purchasing and Accounts Payable | Worksheets

Ge
Commodity Miscellaneous Code #:
Worksheet A-27: Commodity miscellaneous codes 1-5
CodeDescription of Commodity Miscellaneous Code
Minimum Entry
BIO Biodegradable BIO
357tting Started with Purchasing and Accounts Payable | Worksheets

Ge
Validation Code Table Maintenance
In this appendix
This appendix provides information on defining and maintaining validation code table (“validation code”) information for the Purchasing and Accounts Payable modules.
Setting up validation code tables
You can use this procedure to define any validation code tables you will need to implement the Purchasing and Accounts Payable modules at your institution.
Before you begin
Before working directly with the Purchasing and Accounts Payable module validation code tables, a few preparatory steps are recommended. You should:
5. Review basic codes concepts.
• See Understanding Purchasing and Accounts Payable Codes beginning on 38.
6. Become familiar, if you are not already, with the methods and codes your institution currently uses to track purchasing, payables, and vendor information.
7. Ensure that all concerned parties have had a chance to give input into the process of planning your institution’s code tables.
• The information systems, accounting, purchasing, and accounts payable offices should work together to define these codes.
8. Use the worksheets provided in “Worksheets” on page 320 to plan your validation code tables on paper, before entering any of them into Colleague Finance.
Components of a validation code table
Validation code tables are defined on the Validation Codes (VAL) form.
358tting Started with Purchasing and Accounts Payable | Validation Code Table Maintenance

Ge
Figure 37: The Validation Codes (VAL) form
Procedure for defining a validation code table1. Complete the steps outlined in “Before you begin” on page 358.
2. Enter VAL at any menu prompt.
• Colleague displays the Validation Codes form.
Note: Each application in the Colleague system has its own set of validation code tables (CF.VALCODES, CORE.VALCODES, HR.VALCODES, ST.VALCODES). If you want to define or modify validation codes in Colleague Core, you must access the VAL form from within Colleague Core.
3. Enter the ID of the code table you want to define.
• Colleague displays the ID of the code table in the header of the VAL form.
• You may perform a LookUp to select from a list of validation code tables.
4. Enter an individual code for this code table. For example, if you are creating a code table for item conditions, enter a code for each condition you want to define, such as BRK for Broken or GD for Good.
5. Enter the Description for this code.
6. Enter the minimum characters required to identify the code. For example, if you named a code STATE (for a state contract), you could use this field to indicate a minimum number of acceptable characters that can be entered for this code, by entering SC in this field. You will only have to enter SC in a code field to identify this code.
359tting Started with Purchasing and Accounts Payable | Validation Code Table Maintenance

Ge
7. Do you want to define special processing for this code table?
Yes. Enter the special processing information.1 Space is provided for two special processing codes.
No. Leave the special processing fields blank. Continue with Step 8.
8. Do you want to change the maximum code size for this table?
Yes. Enter the code size in the Maximum Code Size field.
No. Skip this step and continue with Step 10.
9. Do you want Colleague to zero-pad numeric code values?
Yes. Enter Y in the Zero Fill Numbers (Y/N) field.
No. Enter N in the Zero Fill Numbers (Y/N) field.
10. Repeat this procedure until all the codes you want are defined for this code table. When you are finished, save your work and exit the VAL form.
1.Only two Colleague Finance code tables used in the Purchasing and Accounts Payable modules require special processing: TAX.CATEGORIES and TAX.GROUP.CODES (the two user-defined tax-related codes). For more information, see “Code tables used in the Purchasing and Accounts Payable Modules” on page 41.
360tting Started with Purchasing and Accounts Payable | Validation Code Table Maintenance

Ge
Purchasing/Accounts Payable Utilities
In this appendix
This chapter provides a detailed explanation for each of the Purchasing/Accounts Payable utility forms. It includes the following sections:
• Rebuild Vendor Balances Utility
• Update Split Requisition Fields
Forms used
The procedure in this chapter requires access to the following forms:
Understanding Purchasing and Accounts Payable rebuild utilities
The Purchasing and Accounts Payable modules contain four processes called “Rebuild Utilities.” The utilities enable users to repair data that may be out of sync or otherwise corrupt.
The utilities are:
• The Rebuild Vendor Balance Field (RVBF) utility
• The Update Split Req Fields (USRQ) utility
Table 69: Forms used to maintain vendor balances
Form Mnemonic
Rebuild Vendor Balance Field RVBF
Update Split Req Fields USRQ
361tting Started with Purchasing and Accounts Payable | Purchasing/Accounts Payable Utilities
Ge
The Rebuild Vendor Balance Field (RVBF) utility
The Rebuild Vendor Balance Field (RVBF) Utility rebuilds inaccurate vendor balances.
For more information, see “Rebuild Vendor Balances Utility” on page 362.
The Update Split Req Fields (USRQ) utility
The Update Split Req Fields (USRQ) Utility populates the REQ.NOTPO.ITEMS.ID and REQ.UNFI.PO.ITEMS.ID data elements with information from the ITEMS file.
For more information, see “Update Split Requisition Fields” on page 365.
Rebuild Vendor Balances Utility
The Rebuild Vendor Balance Field Utility may be run periodically to verify the accuracy of your vendor balances and to rebuild them as necessary if you suspect a current vendor balance is incorrect.
Before You Begin
Before rebuilding your vendor balances, be aware the Rebuild Vendor Balance (RVBF) process locks the VENDORS file and should be run on a quiet system.
Colleague locks the VENDORS file to be sure the balance is completely accurate. If the VENDORS file is not locked, changes to the vendor balance can be made while the RVBF process is calculating, which can cause an incorrect vendor balance.
The Rebuild Vendor Balance Field (RVBF) Form
If you suspect your current vendor balance is incorrect, you can use the Rebuild Vendor Balance Field (RVBF) form to calculate the actual current vendor balance. The vendor balance is the total of all the Outstanding vouchers for a given vendor. In other words, the vendor balance is the total amount of money your institution owes a vendor.
When you rebuild the vendor balance, Colleague automatically collects all Outstanding vouchers for a vendor, totals them, and updates the Vendor Balance field on the Vendor History Maintenance (VENH) form.
See "Figure 39" on page 364 for an illustration.
You can run the RVBF form to do one of the following:
• Generate the report without rebuilding vendor balances (Report Option Only mode)
362tting Started with Purchasing and Accounts Payable | Purchasing/Accounts Payable Utilities
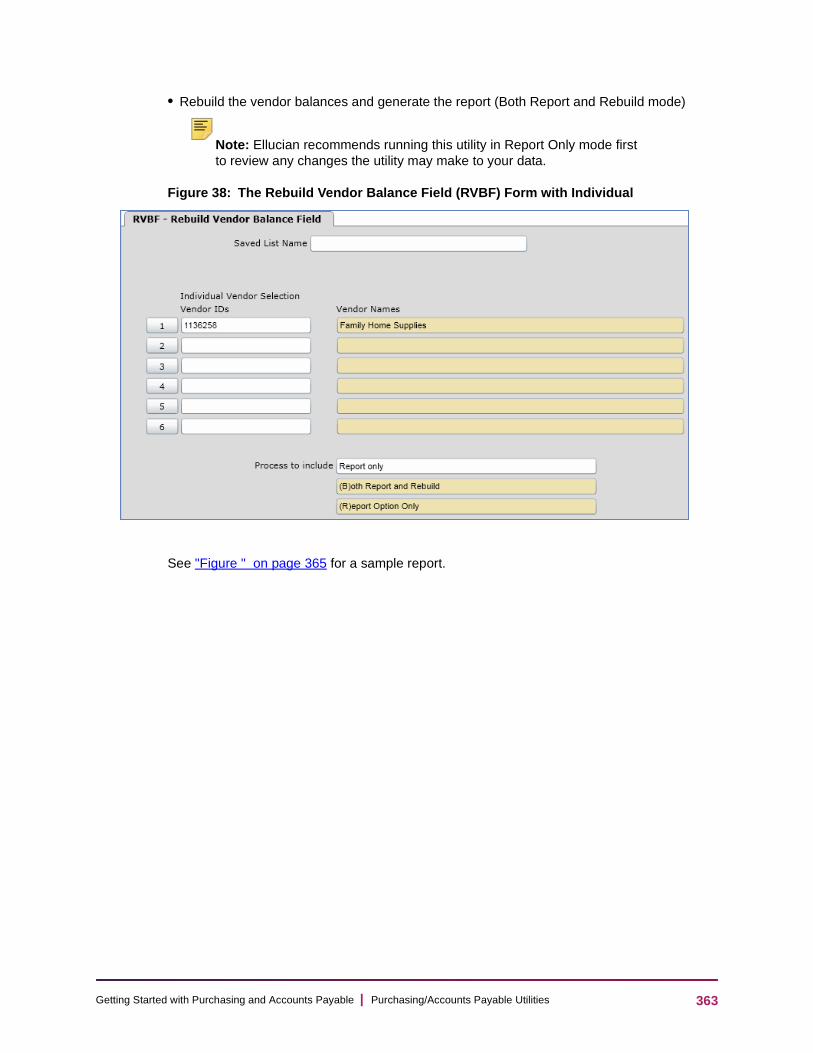
Ge
• Rebuild the vendor balances and generate the report (Both Report and Rebuild mode)
Note: Ellucian recommends running this utility in Report Only mode first to review any changes the utility may make to your data.
Figure 38: The Rebuild Vendor Balance Field (RVBF) Form with Individual
See "Figure " on page 365 for a sample report.
363tting Started with Purchasing and Accounts Payable | Purchasing/Accounts Payable Utilities

Ge
Figure 39: The Effect of Rebuilding a Vendor Balance
Current Vendor Balance for Thorne’s Astronomical Supply
Run RVBF for Thorne’s Astronomical Supply
New Vendor Balance for Thorne’s Astronomical Supply
364tting Started with Purchasing and Accounts Payable | Purchasing/Accounts Payable Utilities
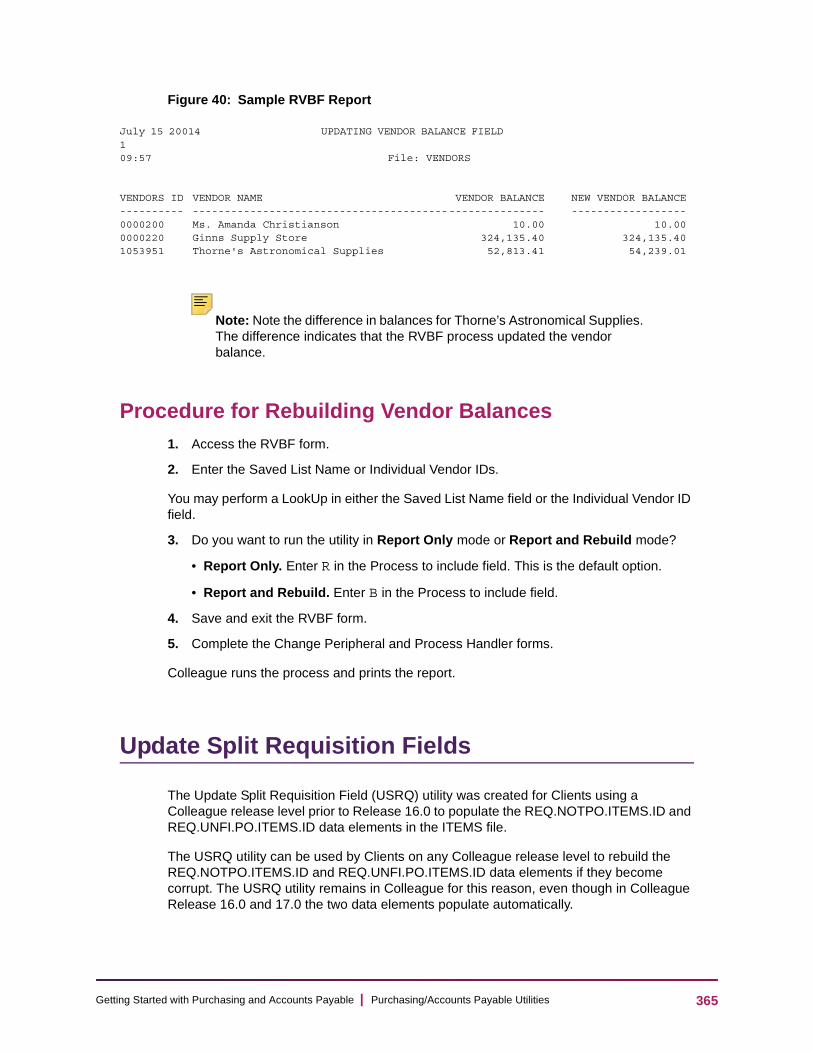
Ge
Figure 40: Sample RVBF Report
July 15 20014 UPDATING VENDOR BALANCE FIELD 109:57 File: VENDORS
VENDORS ID VENDOR NAME VENDOR BALANCE NEW VENDOR BALANCE---------- ------------------------------------------------------- ------------------0000200 Ms. Amanda Christianson 10.00 10.000000220 Ginns Supply Store 324,135.40 324,135.401053951 Thorne's Astronomical Supplies 52,813.41 54,239.01
Note: Note the difference in balances for Thorne’s Astronomical Supplies. The difference indicates that the RVBF process updated the vendor balance.
Procedure for Rebuilding Vendor Balances1. Access the RVBF form.
2. Enter the Saved List Name or Individual Vendor IDs.
You may perform a LookUp in either the Saved List Name field or the Individual Vendor ID field.
3. Do you want to run the utility in Report Only mode or Report and Rebuild mode?
• Report Only. Enter R in the Process to include field. This is the default option.
• Report and Rebuild. Enter B in the Process to include field.
4. Save and exit the RVBF form.
5. Complete the Change Peripheral and Process Handler forms.
Colleague runs the process and prints the report.
Update Split Requisition Fields
The Update Split Requisition Field (USRQ) utility was created for Clients using a Colleague release level prior to Release 16.0 to populate the REQ.NOTPO.ITEMS.ID and REQ.UNFI.PO.ITEMS.ID data elements in the ITEMS file.
The USRQ utility can be used by Clients on any Colleague release level to rebuild the REQ.NOTPO.ITEMS.ID and REQ.UNFI.PO.ITEMS.ID data elements if they become corrupt. The USRQ utility remains in Colleague for this reason, even though in Colleague Release 16.0 and 17.0 the two data elements populate automatically.
365tting Started with Purchasing and Accounts Payable | Purchasing/Accounts Payable Utilities
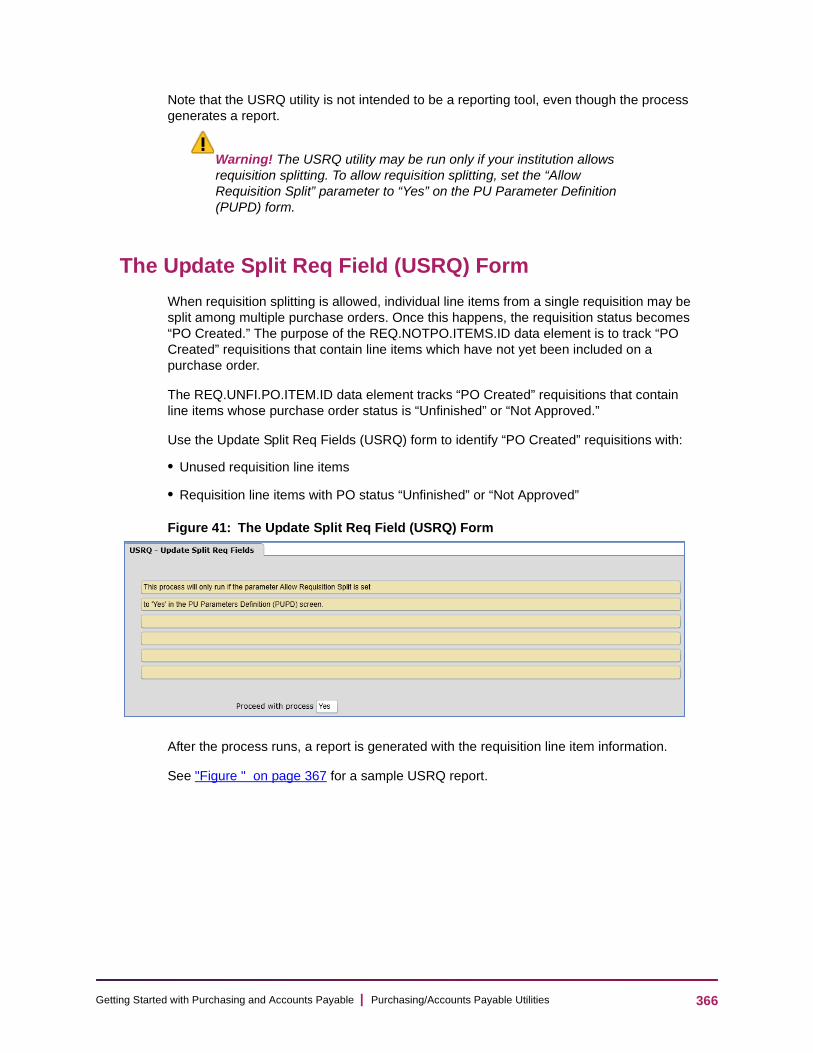
Ge
Note that the USRQ utility is not intended to be a reporting tool, even though the process generates a report.
Warning! The USRQ utility may be run only if your institution allows requisition splitting. To allow requisition splitting, set the “Allow Requisition Split” parameter to “Yes” on the PU Parameter Definition (PUPD) form.
The Update Split Req Field (USRQ) Form
When requisition splitting is allowed, individual line items from a single requisition may be split among multiple purchase orders. Once this happens, the requisition status becomes “PO Created.” The purpose of the REQ.NOTPO.ITEMS.ID data element is to track “PO Created” requisitions that contain line items which have not yet been included on a purchase order.
The REQ.UNFI.PO.ITEM.ID data element tracks “PO Created” requisitions that contain line items whose purchase order status is “Unfinished” or “Not Approved.”
Use the Update Split Req Fields (USRQ) form to identify “PO Created” requisitions with:
• Unused requisition line items
• Requisition line items with PO status “Unfinished” or “Not Approved”
Figure 41: The Update Split Req Field (USRQ) Form
After the process runs, a report is generated with the requisition line item information.
See "Figure " on page 367 for a sample USRQ report.
366tting Started with Purchasing and Accounts Payable | Purchasing/Accounts Payable Utilities

Ge
Figure 42: Sample USRQ Report
July 15 2002 UPDATING REQ.NOTPO.ITEMS.ID AND REQ.UNFI.PO.ITEMS.ID FIELDS 110:12 File: REQUISITIONS
REQ NOS REQ IDS CUR STATUS REQUISITION ITEMS UnPO'd ITEMS.ID Unfi'd PO ITEMS.ID------- ------- ---------- ----------------- --------------- -----------------
-0000827 853 P 14934 14934
14935 149350000831 859 P 14987 149870000833 861 P 14993 149930000844 891 P 15869 158690000849 912 P 16023 160230000854 919 P 16094 160940000866 936 P 16564 165640000871 948 P 16688 166880000916 1059 P 17560 175600000929 1101 P 17974 17976
1797517976
0000930 1102 P 17982 1798317983
0000931 1103 P 17985 1798617986
0000932 1104 P 17988 1798917989
0000933 1105 P 17990 1799117991
0000934 1110 P 18019 180201802018387
0000938 1115 P 18031 1803118032
0000943 1157 P 18130 1813118131
0000969 1222 P 18430 1843018431 18431
Procedure for Updating Split Requisitions1. Access the USRQ form.
The Allow Requisition Split parameter on the PU Parameters Definition (PUPD) form must be set to “Yes” to access the USRQ form. If your institution does not allow requisition splitting, you cannot access the USRQ form.
2. Do you want to proceed with the process?
Enter Yes in the Proceed with process field.
Save and exit the USRQ form, and continue with Step 3.
Enter N in the Proceed with process field.
Colleague prompts you to either Cancel the form or Return to the process.
• Select Cancel to exit the USRQ form and return to the menu.
367tting Started with Purchasing and Accounts Payable | Purchasing/Accounts Payable Utilities
Ge
• Select Return to return to the USRQ form.
3. Complete the Change Peripheral form.
Colleague runs the process and prints the report.
Resolving Unused Requisition Line Item Encumbrance
Requisition line items create memo encumbrances. If the USRQ process finds any unused and unneeded requisition line items, you can relieve the memo encumbrances by following these steps:
1. Create a new purchase order that includes all of the unwanted requisition line items.
2. Use the Purchase Order Close/Void (POCV) form to close the new purchase order.
See Using Purchasing for information about closing purchase orders.
368tting Started with Purchasing and Accounts Payable | Purchasing/Accounts Payable Utilities

Ge
369tting Started with Purchasing and Accounts Payable | Purchasing/Accounts Payable Utilities
Ge
Standard Forms
In this appendix
This appendix provides information on modifying standard forms for the Purchasing and Accounts Payable modules. The appendix is divided into the following sections:
• Understanding standard forms for printing
• Deciding how to set up your standard forms
• Setting up your standard printing forms
• Modifying check reconciliation subroutines
Note: Colleague Finance also uses standard subroutines to format 1099-MISC and T4A printer forms and magnetic media. This appendix does not cover those subroutines, since they are standardized according to federal government specifications. For more information on the standard forms for 1099-MISC or T4A processing, see the U.S. Regulatory Reporting manual or your system administrator.
Understanding standard forms for printing
Many modules have standard forms that are used to print standard output (for example, invoices, checks, or receipts). To ensure that these materials are printed in a standardized fashion, Ellucian provides at least one standard print program for each type of output.
The forms programs are stored and delivered in the STANDARD.FORMS file. Ellucian also delivers the source code to several alternate print programs that are available in the STANDARD.FORMS file.
To set up the Purchasing and Accounts Payable module print subroutines for your institution, you can select default subroutines (defaults are provided by Ellucian) and make changes to them if desired, or write your own subroutines and enter their names on the appropriate parameter definition form:
• For checks, the AP Parameters Definition (APDE) form.
• For requisitions, POs, and blanket POs, the PU Parameters Definition (PUPD) form.
370tting Started with Purchasing and Accounts Payable | Standard Forms

Ge
Default print subroutines
The standard Purchasing and Accounts Payable module subroutines provided by Ellucian for printing establish module-wide defaults to control the way your documents will appear when printed.
Each default print subroutine is listed in Table , together with the printing process that uses it.
In addition, Colleague Finance is delivered with the FORM.IMAGES and CF.PRINTERS files, which store components of the standard and alternate print definitions.
Table 70: Default print subroutines used in Purchasing and Accounts Payable
Process Form/Mnemonic Default Subroutine Name
Print requisitions Requisition Print (RQPT) S.PRINT.REQ
Requisition Single Print (RQSP)
Print purchase orders Purchase Order Print (PPRT) S.PRINT.PO
Purchase Order Single Print (POSP)
Print blanket purchase orders
Blanket PO Print (BPRT) S.PRINT.BPO
Blanket PO Single Print (BPSP)
Print regular AP checks
Check Print (CKPR) S.PRT.AP.CHK1
S.PRT.AP.CHK2
Print AR checks S.PRT.AR.CHK
371tting Started with Purchasing and Accounts Payable | Standard Forms

Ge
Table 71 lists the printing parameters (form images and form names) provided by Ellucian, and the name and function of each program.
Using your own print programs
You can also define your own subroutines. The next sections give more detail on the steps involved in setting up your own print programs.
Table 71: Default print program form images and form names
FilenameSubroutine Type Program Name Program Function
FORM. IMAGES
Alignment programs
S.PRINT.REQ. IMAGE
Default requisition alignment print program
S.PRINT.PO.IMAGE
Default purchase order alignment print program
S.PRINT.BPO. IMAGE
Default blanket PO alignment print program
S.PRT.AP.CHK1. IMAGE
Default AP check alignment print program
S.PRT.AP.CHK2. IMAGE
Another AP check alignment print program
S.PRT.AR.CHK. IMAGE
AR refund AP check alignment print program
CF. PRINTERS
Default form names
RQPT, RQSP Requisition print program form name
PPRT, POSP Purchase order print program form name
BPRT, BPSP Blanket purchase order print program form name
CHK.PRNT Default AP check print form name
VPRT Voucher print program form name
AP.CHK1, AP.CHK2, AR.CHK, CHECK.PRINT
Other AP check print form names
372tting Started with Purchasing and Accounts Payable | Standard Forms
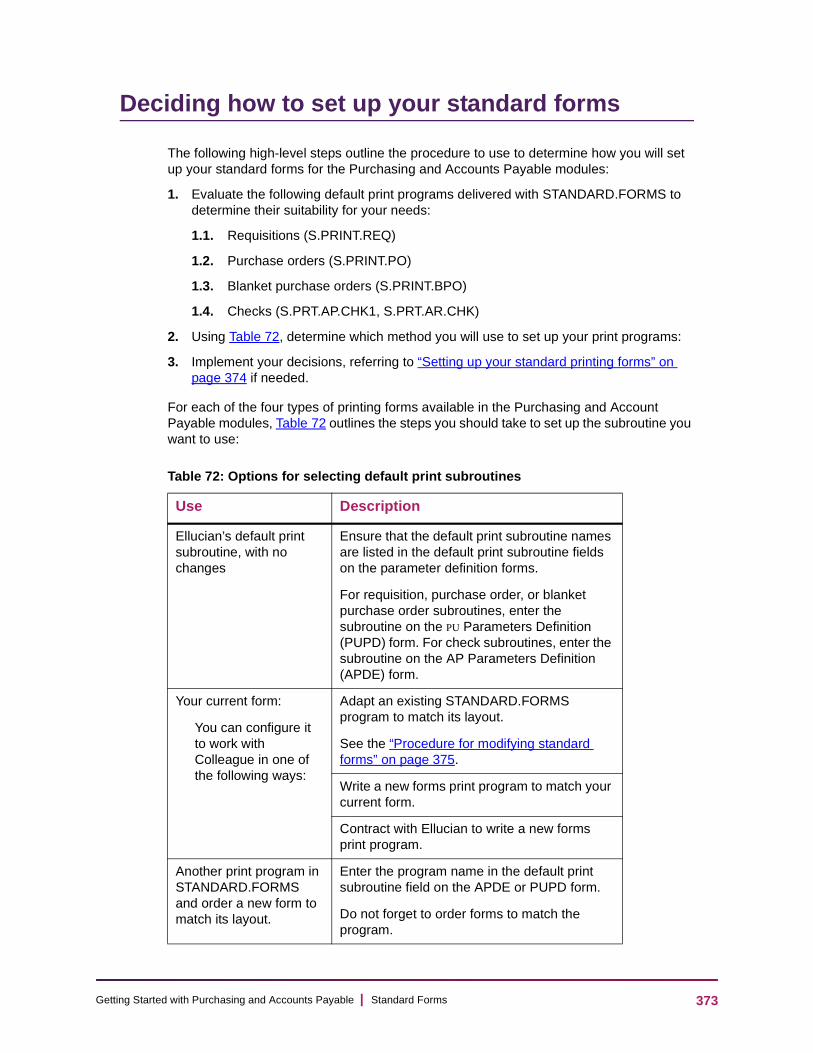
Ge
Deciding how to set up your standard forms
The following high-level steps outline the procedure to use to determine how you will set up your standard forms for the Purchasing and Accounts Payable modules:
1. Evaluate the following default print programs delivered with STANDARD.FORMS to determine their suitability for your needs:
1.1. Requisitions (S.PRINT.REQ)
1.2. Purchase orders (S.PRINT.PO)
1.3. Blanket purchase orders (S.PRINT.BPO)
1.4. Checks (S.PRT.AP.CHK1, S.PRT.AR.CHK)
2. Using Table 72, determine which method you will use to set up your print programs:
3. Implement your decisions, referring to “Setting up your standard printing forms” on page 374 if needed.
For each of the four types of printing forms available in the Purchasing and Account Payable modules, Table 72 outlines the steps you should take to set up the subroutine you want to use:
Table 72: Options for selecting default print subroutines
Use Description
Ellucian’s default print subroutine, with no changes
Ensure that the default print subroutine names are listed in the default print subroutine fields on the parameter definition forms.
For requisition, purchase order, or blanket purchase order subroutines, enter the subroutine on the PU Parameters Definition (PUPD) form. For check subroutines, enter the subroutine on the AP Parameters Definition (APDE) form.
Your current form:
You can configure it to work with Colleague in one of the following ways:
Adapt an existing STANDARD.FORMS program to match its layout.
See the “Procedure for modifying standard forms” on page 375.
Write a new forms print program to match your current form.
Contract with Ellucian to write a new forms print program.
Another print program in STANDARD.FORMS and order a new form to match its layout.
Enter the program name in the default print subroutine field on the APDE or PUPD form.
Do not forget to order forms to match the program.
373tting Started with Purchasing and Accounts Payable | Standard Forms

Ge
Note: If you choose to create a custom subroutine for printing, you must catalog and compile it first or Colleague will not be able to recognize the program. See “Procedure for modifying standard forms” on page 375 for details.
Planning considerations
Depending on the option you choose, remember to allow adequate time for the following:
• Turn-around time for custom programming, whether your programmers or Ellucian writes the program.
• Testing the print program on the form.
Setting up your standard printing forms
This section provides high-level procedures for the following stages of setting up print subroutines:
• Setting up standard forms in the Purchasing and Accounts Payable modules.
• Modifying standard forms in the STANDARD.FORMS file.
Procedure for setting up Purchasing and Accounts Payable standard forms
Follow these steps to set up printing for the Purchasing and Accounts Payable modules. Note that this is a high-level procedure.
1. Modify any of the SETPTR options as desired, on the Peripheral Options Defaults (PDEF) form.
2. If you are using the standard print subroutines. Continue with Step 3.
A completely new forms print program, and order forms to match
Write the new print program (or contract with Ellucian to write it).
When programming is completed, enter the subroutine name in the appropriate field on the APDE or PUPD form.
Do not forget to order forms to match the program.
Table 72: Options for selecting default print subroutines (continued)
Use Description
374tting Started with Purchasing and Accounts Payable | Standard Forms

Ge
2.1. If you are modifying any of the standard print subroutines. See the “Procedure for modifying standard forms” on page 375.
– Continue with Step 3.
3. On the AP Parameters Definition (APDE) form, ensure that the desired default check printing information for your site has been entered in the following fields:
3.1. Default Print Subroutine
3.2. Default Alignment Copies
3.3. Checks Bank Code/Subroutine
3.4. Print Subroutine Definitions
4. On the PU Parameters Definition (PUPD) form, ensure that the desired default printing information for your site has been entered in the following fields:
4.1. PO Print Subroutine
4.2. Req Print Subroutine
4.3. BPO Print Subroutine
5. Test all print processes in your test account and also in your live account.
Procedure for modifying standard forms
For any subroutines in the STANDARD.FORMS file, complete the following steps to modify one of Ellucian’s standard print subroutines.
1. Make a copy of the Ellucian standard subroutine.
2. Rename the copy (you should use a different name from the name of the standard subroutine).
3. Make your modifications and save the subroutine.
4. Compile the modified subroutine.
5. Catalog the subroutine.
6. Enter the new subroutine name in the applicable field on the appropriate form.
• For requisition, purchase order, or blanket purchase order subroutines, enter the subroutine on the PU Parameters Definition (PUPD) form.
• For voucher or check subroutines, enter the subroutine on the AP Parameters Definition (APDE) form.
7. Test run a print run in the test account, using the new subroutine.
8. Copy the new subroutine to your live account and test again.
375tting Started with Purchasing and Accounts Payable | Standard Forms

Ge
Modifying check reconciliation subroutines
Default subroutines for electronic check reconciliation are located in the STANDARD.FORMS file. For each bank code for which you will be reconciling checks electronically, you can assign the desired subroutine to the bank code in the Bank Code Reconciliation Tape Information (BKCD) form.
If you need to customize the reconciliation subroutines, remember when doing so, not to change S.LOAD.AP.CHK or S.REQUEST.AP.CHK. Make copies of these subroutines and modify the copies.
There are two sections of the subroutines that will probably need modification (although there may be others): the tape parameters and the tape layout.
Tape parameters
In the internal subroutine called CUSTOMER.INITIALIZATION, a variable called X.MTU.PARAMETERS is built, which is used when performing tape input/output. This variable is two characters in Unidata and the default value of this variable is 10.
• 0: No conversion (ASCII assumed)
• 1: EBCDIC conversion
• 2: invert high bit
• 3: swap bytes
The second bit is unit number (0-9).
Tape layout
Figure 73 has the default layout.
Both S.LOAD.AP.CHK and S.REQUEST.AP.CHK assume that each record has the above format. This may need to be changed. Go to the internal subroutine CUSTOMER.INITIALIZATION and modify the following variables as needed:
• X.BANK.ACCOUNT.START
Table 73: Default tape layout
Field Start End Length
Account Number 1 17 17
Check Number 18 24 7
Check Amount 25 34 10
Check Date (MMDDYY) 35 40 6
376tting Started with Purchasing and Accounts Payable | Standard Forms

Ge
• X.BANK.ACCOUNT.LENGTH
• X.CHECK.NUMBER.START
• X.CHECK.NUMBER.LENGTH
• X.CHECK.AMOUNT.START
• X.CHECK.AMOUNT.LENGTH
• X.CHECK.DATE.START
• X.CHECK.DATE.LENGTH
For S.LOAD.AP.CHK, the check date variables are not needed.
If your bank requires other information, or requires header or trailer records, you will need to do more complicated modifications. The code has been documented as best as possible to assist in these modifications.
377tting Started with Purchasing and Accounts Payable | Standard Forms
Ge
Understanding Codes in Purchasing and AP
In this chapter
This chapter introduces the concepts surrounding the use of codes in Colleague Finance, focusing on a basic understanding of their function.
The chapter is divided into the following sections:
• Understanding codes (brief discussion of purpose and function of codes)
• Comprehensive list of Colleague Finance codes (a table indicating the module or modules in which each code is used)
Understanding codes
A code is a character or group of characters (alphabetic, numeric, or combined alpha and numeric) used to represent a piece, or pieces, of related information. Codes provide a shortcut method for handling data by letting you group together many pieces of information under one code; in this way, a one- or two-character abbreviation can be used to represent a much larger body of information.
The information in codes can be as simple as the name of a building on your campus, or complex enough to indicate relationships between several items of information. For example, you use an AR code to provide detailed information to Colleague about how revenue associated with charges and credits is distributed to an accounts receivable account.
Codes are also extremely helpful in standardizing data entry, providing the following advantages:
• Establishing standard values for certain data elements, ensuring uniformity of data.
• Limiting the valid responses a user has for data entry.
• Increasing data entry efficiency and speed.
• Simplifying data entry by storing several related pieces of information in a single code that can be added to a record in one step.
• Providing consistent values, and descriptions of those values, on forms and in reports, thereby ensuring more accurate and meaningful reporting.
378tting Started with Purchasing and Accounts Payable | Understanding Codes in Purchasing and AP

Ge
Codes in Colleague Finance
Codes are used extensively throughout Colleague Finance to ensure that information listed below is consistent across your entire system.
• Departments and divisions
• Schools
• Buildings and rooms
• Locations
• Ethnicities
• Races
• Counties, states, and countries
• Handicaps and special health needs
• Veteran statuses
• Information for completing biographical information, such as name, address, citizenship, prefixes and suffixes of names, or educational background
• Correspondence and communications information
Sharing codes between modules
Because of the integrated functionality of Colleague Finance, many types of information are shared between modules within Colleague Finance as well as Colleague Core, Colleague Student, and Colleague Human Resources. The codes provide information useful at numerous points in system processing.
In many cases a single code is used by several modules across Colleague Finance. For example, instructional method codes are used as one of the selection criteria in Texas state reporting and in the following modules:
• Curriculum Management (CU) module – defined and used as part of course and section offering information.
• Faculty Information (FI) module – plays a part in faculty section assignment.
• Registration (RG) and Academic Records (AC) modules – displayed with course section information.
When you define the codes for your area of work, be sure to become familiar with codes that are used in your subject area of Colleague Finance but that are “owned” by other modules. You should know whom to contact at your institution to ensure that the necessary values are added to the codes that you will need to use but are not maintained in your subject area of the another system.
379tting Started with Purchasing and Accounts Payable | Understanding Codes in Purchasing and AP
Ge
Codes from Colleague Core
In addition to financial information, Colleague Finance also uses many types of information maintained and used primarily in Colleague Core. Some of the major types of Core information include the following:
• Departments and divisions
• Schools
• Buildings and rooms
• Locations
• Ethnicities
• Races
• Counties, states, and countries
• Handicaps and special health needs
• Veteran statuses
• Information for completing biographical information, such as name, address, citizenship, prefixes and suffixes of names, or educational background
• Correspondence and communications information
All this information is stored in Colleague Core, using codes. These Core codes include codes related to the functions of Core modules such as Person Demographics, Organization Information, Facilities Profile, Scheduling, Activities and Events, and Communications Management. Core forms are frequently accessed from other systems’ forms or from menus those other systems.
Because of this interdependency, you should become familiar with codes used by other Colleague and Benefactor modules. When defining your institution’s codes, you should also know whom to contact to ensure that the values necessary to other office’s uses of the codes are added to the codes owned by Colleague Core.
Comprehensive list of Colleague Finance codes
Table 74 on page 382 provides an alphabetical list of all codes within Colleague Finance. Mnemonics representing the names of the financial modules and Colleague applications are arranged across the top, and the codes are listed in alphabetical order along the left side of the table.
This table provides the following information about each code:
• The actual name by which Colleague recognizes the code (for example, ACQUISITION.METHODS).
• The mnemonic of the form used to maintain the code (appears beneath each code name).
380tting Started with Purchasing and Accounts Payable | Understanding Codes in Purchasing and AP

Ge
• If the code is user-maintainable, the module that “owns” the code.
• Other modules and applications where the code is used.
Every code that is user-maintainable is “owned” by one module — even though the code may be used by several different modules, the module most closely related to the code’s subject matter is classified as the owner of the code.
The table includes all codes used in any module of Colleague Finance, including those pre-defined by Ellucian (and not user-maintainable).
For each code, the symbols in the module columns indicate the following:
• A shaded box () indicates the primary module or application where you can maintain the code; that is, the module that “owns” the code based on the code’s subject matter and functions within Colleague Core.
• An open box () indicates any modules or applications that use the code but are not primarily responsible for the code’s subject matter.
• An open circle () indicates the modules or applications that use a Ellucian pre-defined code (these codes can be modified only with the assistance of a Ellucian representative).
For more detailed information and explanations of the codes in this table,
• See “Defining Codes in Colleague Finance” on page 401 of this manual.
• See the online help for any code defined on an individual form.
• See the Purpose field on the Validation Codes (VAL) form for validation codes.
Different types of codes: General guidelines
Listed on the line following each code in Table 74 is a mnemonic indicating where that code is defined. The mnemonics are of two different kinds: some codes have the mnemonic VAL, followed by either “CF” or “Core;” others have four-letter mnemonics (such as “APTF” for AP.TYPES).
Note the following differences in the methods of defining these two different types of codes.
• Codes maintained on the VAL form. Codes set up on the Validation Codes (VAL) form are called validation codes. Validation codes are stored as part of either Colleague Finance or Colleague Core — never both. The two groups of codes (CF and Core) are defined on two different VAL forms:
• Codes whose mnemonic in the table is “VAL/CF” are stored in the CF.VALCODES file, and can be accessed on the VAL form from anywhere in the CF application
• Codes whose mnemonic in the table is “VAL/Core” are stored in the CORE.VALCODES file, and can be accessed on the VAL form only when you exit Colleague Finance and enter Colleague Core
381tting Started with Purchasing and Accounts Payable | Understanding Codes in Purchasing and AP
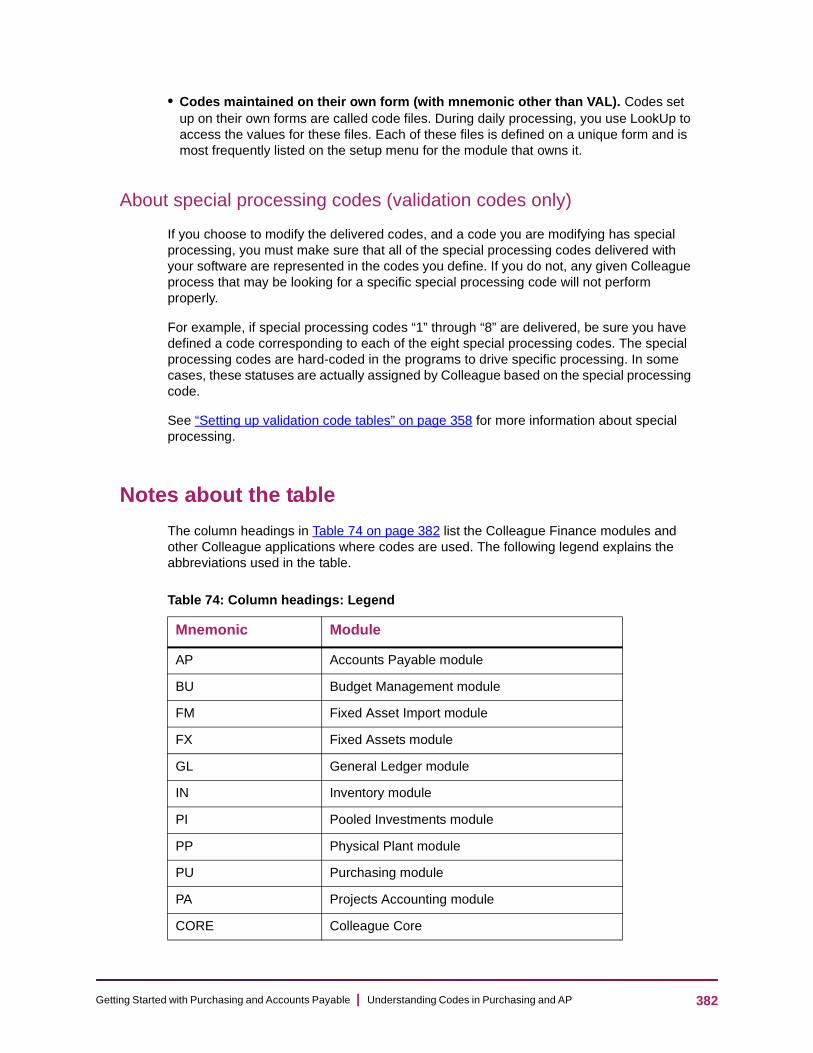
Ge
• Codes maintained on their own form (with mnemonic other than VAL). Codes set up on their own forms are called code files. During daily processing, you use LookUp to access the values for these files. Each of these files is defined on a unique form and is most frequently listed on the setup menu for the module that owns it.
About special processing codes (validation codes only)
If you choose to modify the delivered codes, and a code you are modifying has special processing, you must make sure that all of the special processing codes delivered with your software are represented in the codes you define. If you do not, any given Colleague process that may be looking for a specific special processing code will not perform properly.
For example, if special processing codes “1” through “8” are delivered, be sure you have defined a code corresponding to each of the eight special processing codes. The special processing codes are hard-coded in the programs to drive specific processing. In some cases, these statuses are actually assigned by Colleague based on the special processing code.
See “Setting up validation code tables” on page 358 for more information about special processing.
Notes about the table
The column headings in Table 74 on page 382 list the Colleague Finance modules and other Colleague applications where codes are used. The following legend explains the abbreviations used in the table.
Table 74: Column headings: Legend
Mnemonic Module
AP Accounts Payable module
BU Budget Management module
FM Fixed Asset Import module
FX Fixed Assets module
GL General Ledger module
IN Inventory module
PI Pooled Investments module
PP Physical Plant module
PU Purchasing module
PA Projects Accounting module
CORE Colleague Core
382tting Started with Purchasing and Accounts Payable | Understanding Codes in Purchasing and AP

Ge
Note: Table 74 provides summary information only. For greater detail on any of these codes, see “Defining Codes in Colleague Finance” on page 401, as well as online help.
ST Colleague Student
HR Colleague Human Resources
Table 74: Column headings: Legend
Mnemonic Module
383tting Started with Purchasing and Accounts Payable | Understanding Codes in Purchasing and AP

384G
etting Started w
ith Purchasing and A
ccounts Payable | U
nderstanding Codes in P
urchasing and AP
C(
Other Applications
PACORE ST HR
A(
A(
A(
A(
A(
A(
A(
A(
A(
A(
ode Name Mnemonic For Defining)
Colleague Finance Modules
AP BU FM FX GL IN PI PP PU
CCEPT.CHANGE.CODES VAL/CF)
CCESS.STATUSES VAL/CORE)
CCT.COMPONENT.TYPES VAL/CF)
CQUISITION.METHODS ACQD)
CQUISITION.TYPES VAL/CORE)
CTIVE.STATUSES VAL/CF)
DDRESS.TYPES VAL/CORE)
LT.ID.TYPES VAL/CORE)
P.CONTROL.STATUSES VAL/CF)
P.SOURCE.CODES VAL/CF)
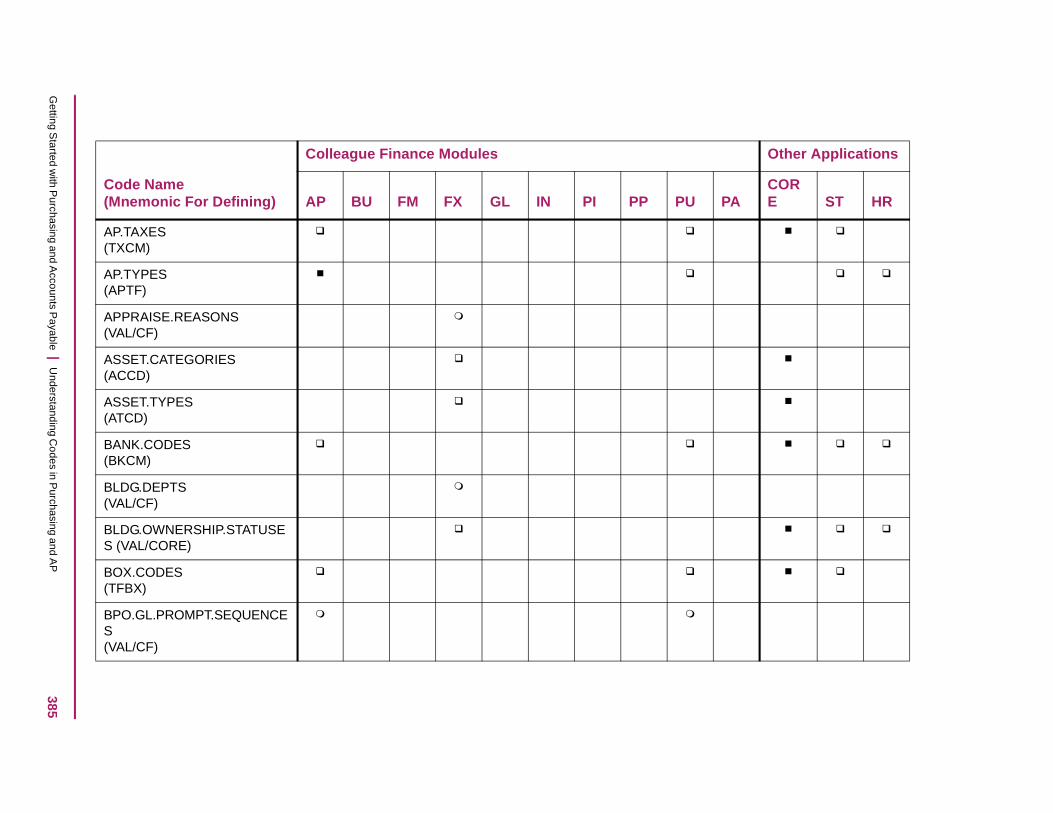
385G
etting Started w
ith Purchasing and A
ccounts Payable | U
nderstanding Codes in P
urchasing and AP
A(
A(
A(
A(
A(
B(
B(
BS
B(
BS(
C(
Other Applications
PACORE ST HR
P.TAXES TXCM)
P.TYPES APTF)
PPRAISE.REASONS VAL/CF)
SSET.CATEGORIES ACCD)
SSET.TYPES ATCD)
ANK.CODES BKCM)
LDG.DEPTS VAL/CF)
LDG.OWNERSHIP.STATUSE (VAL/CORE)
OX.CODES TFBX)
PO.GL.PROMPT.SEQUENCE
VAL/CF)
ode Name Mnemonic For Defining)
Colleague Finance Modules
AP BU FM FX GL IN PI PP PU

386G
etting Started w
ith Purchasing and A
ccounts Payable | U
nderstanding Codes in P
urchasing and AP
B(
B(
B(
B(
BC
BS
B(
BS
BS
B(
B(
C(
Other Applications
PACORE ST HR
PO.STATUSES VAL/CF)
PO.TRAN.TYPES VAL/CF)
U.STATUSES VAL/CF)
UD.RESP BRSP)
UDGET.COLUMN. ALCULATIONS (VAL/CF)
UDGET.COMPARISON. OURCES (VAL/CF)
UDGET.LAYOUTS VAL/CF)
UDGET.PROJECTION. OURCES (VAL/CF)
UDGET.SCENARIO. TATUSES (VAL/CF)
UDGET.SOURCES VAL/CF)
UDGET.TYPES VAL/CF)
ode Name Mnemonic For Defining)
Colleague Finance Modules
AP BU FM FX GL IN PI PP PU
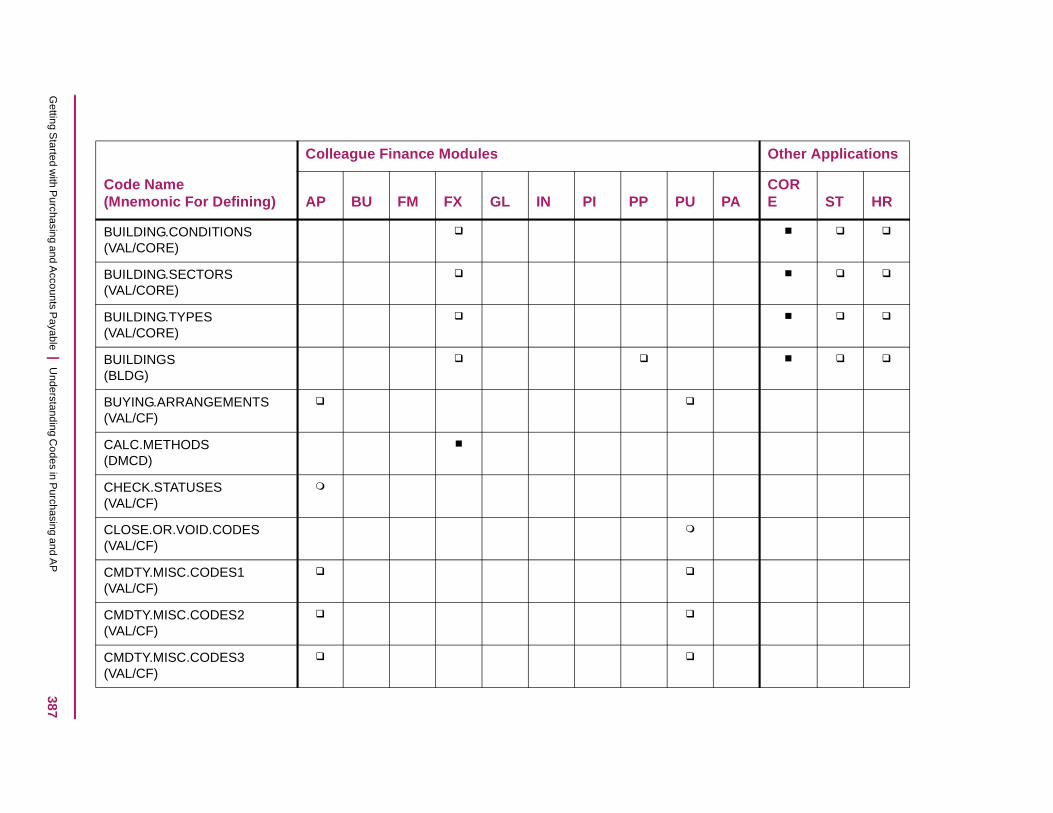
387G
etting Started w
ith Purchasing and A
ccounts Payable | U
nderstanding Codes in P
urchasing and AP
B(
B(
B(
B(
B(
C(
C(
C(
C(
C(
C(
C(
Other Applications
PACORE ST HR
UILDING.CONDITIONS VAL/CORE)
UILDING.SECTORS VAL/CORE)
UILDING.TYPES VAL/CORE)
UILDINGS BLDG)
UYING.ARRANGEMENTS VAL/CF)
ALC.METHODS DMCD)
HECK.STATUSES VAL/CF)
LOSE.OR.VOID.CODES VAL/CF)
MDTY.MISC.CODES1 VAL/CF)
MDTY.MISC.CODES2 VAL/CF)
MDTY.MISC.CODES3 VAL/CF)
ode Name Mnemonic For Defining)
Colleague Finance Modules
AP BU FM FX GL IN PI PP PU

388G
etting Started w
ith Purchasing and A
ccounts Payable | U
nderstanding Codes in P
urchasing and AP
C(
C(
C(
C(
C(
C(
C(
C(
C(
C(
D(
C(
Other Applications
PACORE ST HR
MDTY.MISC.CODES4 VAL/CF)
MDTY.MISC.CODES5 VAL/CF)
OMMODITY.CODES CMCM)
OMMODITY.SOURCE VAL/CF)
ONSTRUCTION.TYPES VAL/CORE)
ORP.STATUSES VAL/CORE)
OUNTIES CNTY)
OUNTRIES CTRY)
OVERAGE.TYPES VAL/CF)
URRENCY.CONV CEXM)
EPTS DEPT)
ode Name Mnemonic For Defining)
Colleague Finance Modules
AP BU FM FX GL IN PI PP PU

389G
etting Started w
ith Purchasing and A
ccounts Payable | U
nderstanding Codes in P
urchasing and AP
D(
D(
E(
F(
F(
F(
F(
F(
F(
GD(
C(
Other Applications
PACORE ST HR
ISC.METHODS VAL/CF)
ISPOSAL.METHODS ADCD)
QUIPMENT EQPM)
IN.STMT.DATE.FORMATS VAL/CF)
OBS FOBM)
ORMATTED.NAME.TYPES VAL/CORE)
XA.CONTROL.STATUSES VAL/CF)
XA.TRANSFER.FLAGS VAL/CF)
XA.TRANSFER.STATUSES VAL/CF)
L.COMPONENT.SORT.FIELS
VAL/CF)
ode Name Mnemonic For Defining)
Colleague Finance Modules
AP BU FM FX GL IN PI PP PU
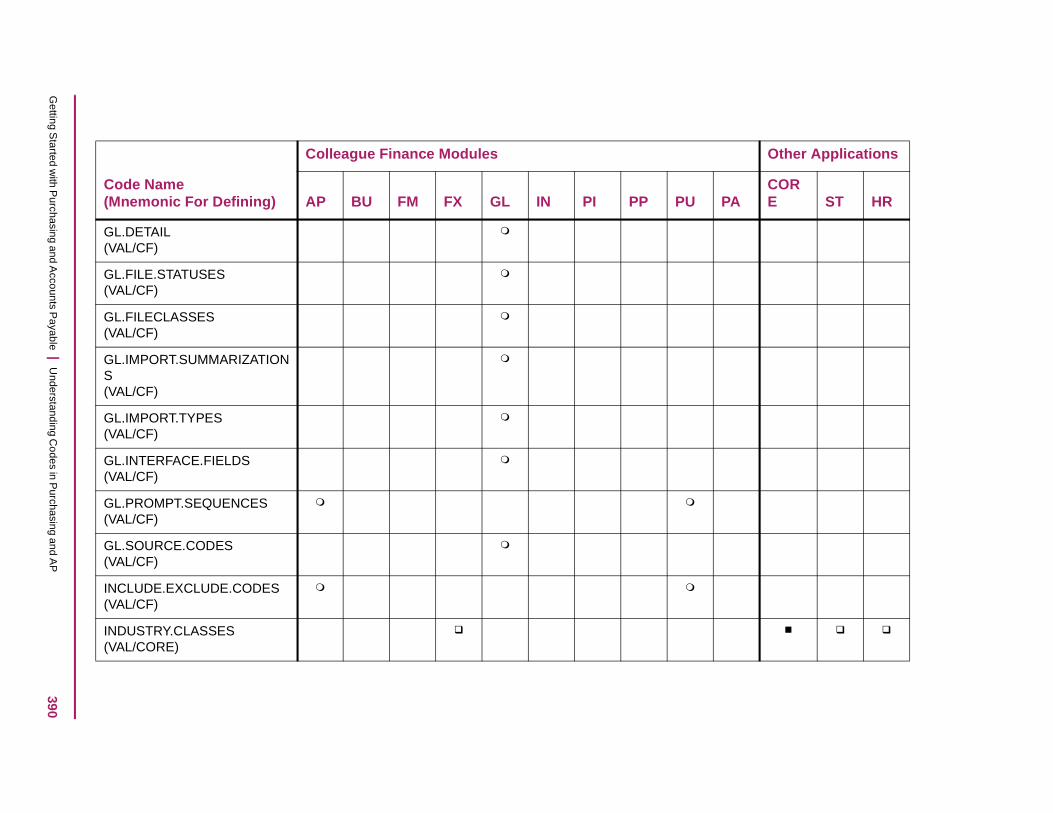
390G
etting Started w
ith Purchasing and A
ccounts Payable | U
nderstanding Codes in P
urchasing and AP
G(
G(
G(
GS(
G(
G(
G(
G(
IN(
IN(
C(
Other Applications
PACORE ST HR
L.DETAIL VAL/CF)
L.FILE.STATUSES VAL/CF)
L.FILECLASSES VAL/CF)
L.IMPORT.SUMMARIZATION
VAL/CF)
L.IMPORT.TYPES VAL/CF)
L.INTERFACE.FIELDS VAL/CF)
L.PROMPT.SEQUENCES VAL/CF)
L.SOURCE.CODES VAL/CF)
CLUDE.EXCLUDE.CODES VAL/CF)
DUSTRY.CLASSES VAL/CORE)
ode Name Mnemonic For Defining)
Colleague Finance Modules
AP BU FM FX GL IN PI PP PU
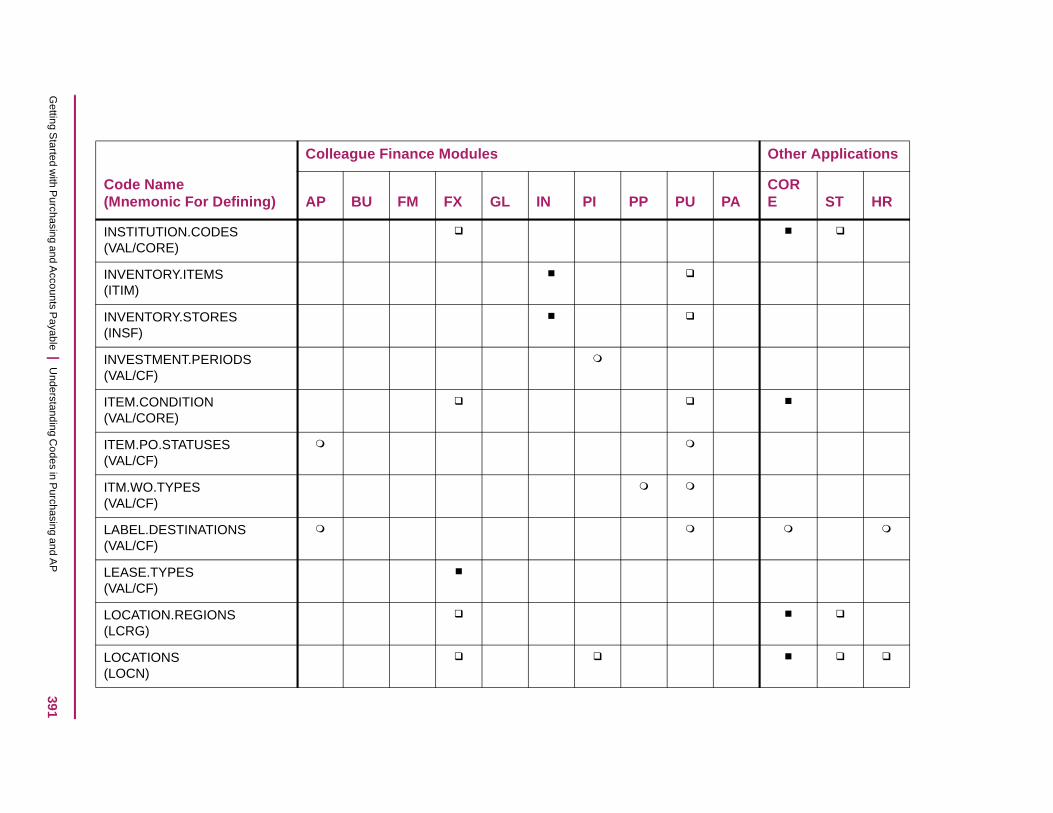
391G
etting Started w
ith Purchasing and A
ccounts Payable | U
nderstanding Codes in P
urchasing and AP
IN(
IN(
IN(
IN(
IT(
IT(
IT(
L(
L(
L(
L(
C(
Other Applications
PACORE ST HR
STITUTION.CODES VAL/CORE)
VENTORY.ITEMS ITIM)
VENTORY.STORES INSF)
VESTMENT.PERIODS VAL/CF)
EM.CONDITION VAL/CORE)
EM.PO.STATUSES VAL/CF)
M.WO.TYPES VAL/CF)
ABEL.DESTINATIONS VAL/CF)
EASE.TYPES VAL/CF)
OCATION.REGIONS LCRG)
OCATIONS LOCN)
ode Name Mnemonic For Defining)
Colleague Finance Modules
AP BU FM FX GL IN PI PP PU

392G
etting Started w
ith Purchasing and A
ccounts Payable | U
nderstanding Codes in P
urchasing and AP
M(
M(
M(
N(
N(
O(
O(
P(
P(
P(
P(
C(
Other Applications
PACORE ST HR
AIL.RULES VAL/CORE)
ANUAL.CHECK.CODES VAL/CF)
ISC.CODES VAL/CORE)
ET.ASSET.CLASS VAL/CF)
IGP.MODES VAL/CF)
FFICE.CODES VAL/CORE)
PT.MODULES VAL/CF)
A.BGT.PERIODS VAL/CF)
AY.TERMS VAL/CF)
ERSON.EMAIL.TYPES VAL/CORE)
ERSON.ORIGIN.CODES VAL/CORE)
ode Name Mnemonic For Defining)
Colleague Finance Modules
AP BU FM FX GL IN PI PP PU
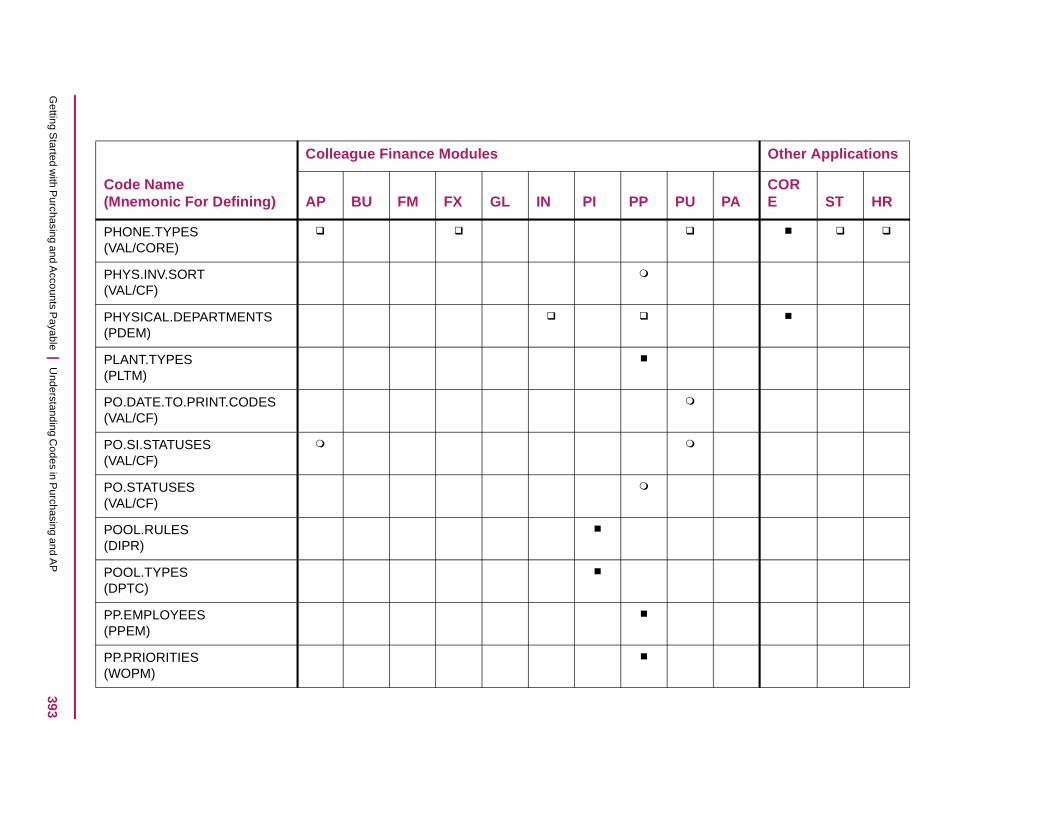
393G
etting Started w
ith Purchasing and A
ccounts Payable | U
nderstanding Codes in P
urchasing and AP
P(
P(
P(
P(
P(
P(
P(
P(
P(
P(
P(
C(
Other Applications
PACORE ST HR
HONE.TYPES VAL/CORE)
HYS.INV.SORT VAL/CF)
HYSICAL.DEPARTMENTS PDEM)
LANT.TYPES PLTM)
O.DATE.TO.PRINT.CODES VAL/CF)
O.SI.STATUSES VAL/CF)
O.STATUSES VAL/CF)
OOL.RULES DIPR)
OOL.TYPES DPTC)
P.EMPLOYEES PPEM)
P.PRIORITIES WOPM)
ode Name Mnemonic For Defining)
Colleague Finance Modules
AP BU FM FX GL IN PI PP PU

394G
etting Started w
ith Purchasing and A
ccounts Payable | U
nderstanding Codes in P
urchasing and AP
P(
P(
P(
P(
P(
P(
P(
R(
R(
R(
R(
C(
Other Applications
PACORE ST HR
REFIXES VAL/CORE)
RIVACY.CODES VAL/CORE)
RODUCT.CLASSES PCLM)
RODUCT.CODES PCOM)
ROJECT.TYPES VAL/CORE)
ROJECTS.CLASS.TYPES VAL/CF)
URGE.REG.TYPES VAL/CF)
C.VOUCHER.STATUSES VAL/CF)
EGISTER.TYPES VAL/CF)
EQ.PRIORITIES VAL/CF)
EQ.STATUSES VAL/CF)
ode Name Mnemonic For Defining)
Colleague Finance Modules
AP BU FM FX GL IN PI PP PU

395G
etting Started w
ith Purchasing and A
ccounts Payable | U
nderstanding Codes in P
urchasing and AP
R(
R(
R(
R(
R(
R(
R(
R(
R(
R(
R(
C(
Other Applications
PACORE ST HR
OOM.CATEGORIES VAL/CORE)
OOM.CHARACTERISTICS VAL/CORE)
OOM.CHOICES VAL/CORE)
OOM.RATE.CLASSES VAL/CORE)
OOM.TYPES RTYP)
OOM.USAGES RMUD)
OOM.WINGS VAL/CORE)
OOMS RMSM)
OOMS.MISC1 VAL/CORE)
OOMS.MISC2 VAL/CORE)
OOMS.MISC3 VAL/CORE)
ode Name Mnemonic For Defining)
Colleague Finance Modules
AP BU FM FX GL IN PI PP PU

396G
etting Started w
ith Purchasing and A
ccounts Payable | U
nderstanding Codes in P
urchasing and AP
R(
R(
R(
R(
R(
RS(
R(
SC
S(
S(
C(
Other Applications
PACORE ST HR
OOMS.MISC4 VAL/CORE)
OOMS.MISC5 VAL/CORE)
OOMS.MISC6 VAL/CORE)
OOMS.MISC7 VAL/CORE)
OOMS.MISC8 VAL/CORE)
PTFMT.ROUNDING.FACTOR
VAL/CF)
UN.MODES VAL/CF)
CENARIO.COLUMN. ALCULATIONS (VAL/CF)
HARE.CALCS DDCM)
HIP.TO.CODES STCF)
ode Name Mnemonic For Defining)
Colleague Finance Modules
AP BU FM FX GL IN PI PP PU

397G
etting Started w
ith Purchasing and A
ccounts Payable | U
nderstanding Codes in P
urchasing and AP
S(
S(
S(
S(
S(
S(
S(
S(
S(
S(
S(
C(
Other Applications
PACORE ST HR
HIP.VIAS SVIA)
I.CHARGES VAL/CF)
OURCES VAL/CORE)
P.IMPORT.REC.TYPES VAL/CF)
TAFF.STATUSES VAL/CORE)
TAFF.TYPES VAL/CORE)
TATES STPR)
TATES.1099 TNST)
TI.STATUSES VAL/CF)
TMT.DB.CR.TYPES VAL/CF)
TMT.LINES.TYPES VAL/CF)
ode Name Mnemonic For Defining)
Colleague Finance Modules
AP BU FM FX GL IN PI PP PU
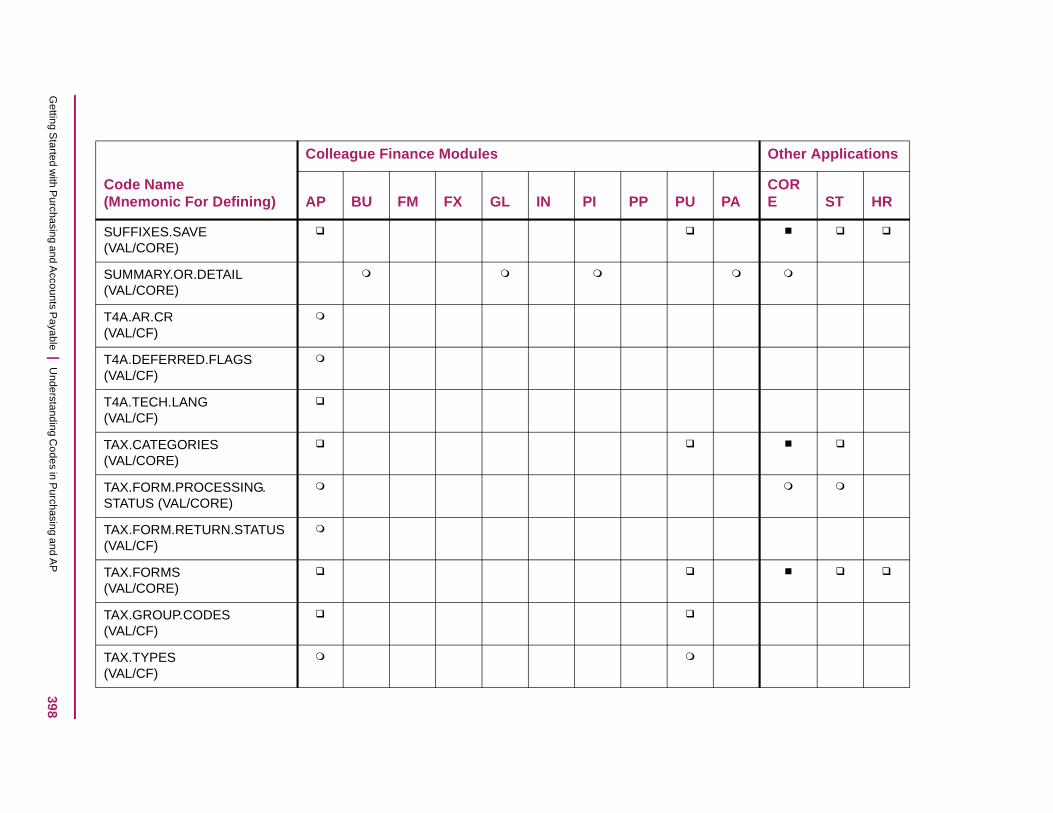
398G
etting Started w
ith Purchasing and A
ccounts Payable | U
nderstanding Codes in P
urchasing and AP
S(
S(
T(
T(
T(
T(
TS
T(
T(
T(
T(
C(
Other Applications
PACORE ST HR
UFFIXES.SAVE VAL/CORE)
UMMARY.OR.DETAIL VAL/CORE)
4A.AR.CR VAL/CF)
4A.DEFERRED.FLAGS VAL/CF)
4A.TECH.LANG VAL/CF)
AX.CATEGORIES VAL/CORE)
AX.FORM.PROCESSING. TATUS (VAL/CORE)
AX.FORM.RETURN.STATUS VAL/CF)
AX.FORMS VAL/CORE)
AX.GROUP.CODES VAL/CF)
AX.TYPES VAL/CF)
ode Name Mnemonic For Defining)
Colleague Finance Modules
AP BU FM FX GL IN PI PP PU

399G
etting Started w
ith Purchasing and A
ccounts Payable | U
nderstanding Codes in P
urchasing and AP
T(
U(
V(
V(
V(
V(
V(
V(
W(
W(
W(
C(
Other Applications
PACORE ST HR
RADES TRDM)
NIT.ISSUES UNIM)
ALUATION.METHODS AVCD)
EN.REGISTER.TYPES VAL/CF)
ENDOR.MISC.CODES VAL/CF)
ENDOR.TERMS VTMF)
ENDOR.TYPES VTYF)
OU.STATUSES VAL/CF)
O.CB.TYPES VAL/CF)
O.RATES WORM)
O.TYPES WOTM)
ode Name Mnemonic For Defining)
Colleague Finance Modules
AP BU FM FX GL IN PI PP PU

400G
etting Started w
ith Purchasing and A
ccounts Payable | U
nderstanding Codes in P
urchasing and AP
W(
WS(
W(
Z(
C(
Other Applications
PACORE ST HR
OR.TYPES VAL/CF)
ORK.ORDER.GL.USE.CODE
VAL/CF)
ORKORDER.STATUSES VAL/CF)
IP.CODE.XLAT PCDX)
ode Name Mnemonic For Defining)
Colleague Finance Modules
AP BU FM FX GL IN PI PP PU

Ge
Defining Codes in Colleague Finance
In this chapter
This chapter provides information for defining the codes that are stored in Colleague Finance. The information in this chapter is provided in alphabetical order by code name. Refer to Table 74 on page 382 for a comprehensive list of codes used in Colleague Finance.
Accept change codes
Accept change codes are used in goods and services receiving to indicate the reason for a change in the number of accepted items from a purchase order. Examples of accept change codes might include:
• E – Error
• M – Miscount
• O – Other
Accept change codes are used on the following forms:
• Purchase Order Accepted Items Inquiry (POAI)
• PO Item Order Maintenance (POOM)
• PO Accepted Item Adjustment (POAL)
You can define and maintain accept change codes using the Validation Codes (VAL) form. These codes are stored in the ACCEPT.CHANGE.CODES record of the CF.VALCODES file.
Access statuses
Local, state, and federal laws and regulations require that some (if not all) buildings must have a minimum of accessible entrances and exits for the disabled. You can use access codes to identify which buildings and rooms on your campus (or elsewhere) have certain types of access. Some examples of accesses could be:
• Handicapped Access
• Wheelchair Access
• No Handicap Access
401tting Started with Purchasing and Accounts Payable | Defining Codes in Colleague Finance

Ge
• Unknown
You can define and maintain access codes on the Validation Codes (VAL) form. Building access codes are stored in the ACCESS.STATUSES record of the CORE.VALCODES file.
Account component types
Account component types codes link the external account name used by your institution for the major account component to an internal name used by standard Colleague for the component. For example, the external name used by an institution department or cost center, corresponds to the internal Colleague name unit (UN) or function (FU). It is mandatory that you use fund (FD), unit (UN), and object (OB).
Account component type codes are:
• FD – Fund
• FC – Function
• OB – Object
• UN – Unit
• SO – Source 5
• LO – Location
The following forms use account component types codes:
• Posting Budget to GL (PTGL)
• Create New GL Accounts (GLCN)
• Account Structure Maintenance (GLAS)
• General Ledger Parameters Account Number Descriptions (GLDM)
• Equity Unit Update (EUUP)
Account component types codes are defined and delivered by Ellucian in the ACCT.COMPONENT.TYPES record of the CF.VALCODES file.
Acquisition methods are defined on the Acquisition Method Definition (ACQD) form and stored in ACQUISITION.METHODS file.
Active statuses
You can use active status codes to specify whether a bank code associated with a bank account is active or inactive. Active status codes are used on the Bank Codes Maintenance (BKCM) form in Colleague Core and Colleague Finance and on the Bank Codes Definition (BANK) form in Colleague HR.
402tting Started with Purchasing and Accounts Payable | Defining Codes in Colleague Finance

Ge
Active status codes are defined and delivered by Ellucian and stored in the ACTIVE.STATUSES record in the CORE.VALCODES file.
AP Control statuses
AP control status codes are used throughout the Purchasing and Accounts Payable modules to indicate the status of procurement documents as they progress through the procurement process. AP control status codes validate statuses for requisitions, purchase orders, blanket purchase orders, and vouchers.
The following are AP control status codes:
• CP1 – Selection
• CP2 – Pay Flag Maint
• CP2A – Pay Flag Review
• CP3 – Print Report
• CP4 – Checks Printed
• CP7 – Accepted
• CP5 – Restart
• CP6 – Checks Posted
AP control statuses are defined and delivered by Ellucian and stored in the AP.CONTROL.STATUSES record of the CF.VALCODES file.
AP source codes
AP source codes are used in AP type definition to indicate whether the AP type is for regular accounts payable transactions or accounts receivable transactions such as student refund checks and employee advances.
The Source field is displayed on the AP Types (APTF) form. The AP source is a component of the AP type code. The codes in this code table indicate the “source” of the AP type in the general ledger: either the AP controlling account (for regular accounts payable transactions), or the AR controlling account (for refund and advance types of transactions). This code tells Colleague which type of GL control account to charge for transactions using the AP type being defined.
The following are the two codes delivered in the AP.SOURCE.CODES code table:
• R – Regular Accounts Payable
• A – Accounts Receivable
AP source codes are defined and delivered by Ellucian and stored in the AP.SOURCE.CODES record of the CF.VALCODES file.
403tting Started with Purchasing and Accounts Payable | Defining Codes in Colleague Finance
Ge
AP types
The AP type code is the Purchasing and Accounts Payable modules’ central code that keeps the accounts payable-related information together and provides this information to each purchasing document that is processed through your system. AP type codes play a critical role in Colleague’s processing of purchasing and AP transactions. The AP type provides all the links necessary for posting purchasing and AP transactions to the proper general ledger accounts. Throughout the procurement process, the AP type code provides posting instructions for creating memo encumbrances for requisitions, encumbrances for purchase orders, expense entries for vouchers, and payment entries for checks.
When you set up Colleague to reflect your institution’s procurement procedures, you link AP types to your purchasing information by entering an AP type on each purchasing document you create (requisitions, purchase orders, or vouchers). The AP type carries forward to all remaining purchasing documents created to process that purchase. An AP type is required before you can save any purchase order (even an Unfinished/In Progress purchase order) or voucher.
AP Type codes are created and maintained on the AP Types (APTF) form. AP type codes are stored in the AP.TYPES file.
Appraise reasons
Appraise reasons codes are used to indicate the reason that a fixed asset was appraised.
Sample entries might include the following:
• IN – Insurance requirement
• DO – Donated asset
Appraise reason codes are entered on the Asset Valuation Maintenance (VALM) form in the Fixed Asset module.
You can define and maintain appraise reason codes using the Validation Codes (VAL) form. These codes are stored in the APPRAISE.REASONS record of the CF.VALCODES file.
Building/Departments
Building/departments codes indicate whether you want the Fixed Assets Equipment Report (FXER) form to total information according to asset type and building or asset type and department.
The following are Building/departments codes:
• B – Building
• D – Department
Building/departments codes are defined and delivered by Ellucian and are stored in the BLDG.DEPTS record of the CF.VALCODES file.
404tting Started with Purchasing and Accounts Payable | Defining Codes in Colleague Finance

Ge
Blanket purchase order GL prompt sequences
Blanket purchase order GL prompt sequence codes provide options for sequencing of cursor prompting on the blanket purchase order forms. You specify the BPO prompting sequence on the BPU Parameters Definition (PUPD) form.
The codes in this table are as follows:
• A (Amount) – the cursor will automatically land in the Amount field.
• P (Percent) – the cursor will automatically land in the Percent field.
Once you have set the default BPO prompt sequence on the PUPD form, your entry of a GL number in the GL Account No window on the Blanket PO GL Maintenance (BGLM) form, is followed by the cursor moving from the GL Account No field to either the Amount field or the Percent field, based on the prompting sequence you specified.
Blanket purchase order statuses
Blanket purchase order statuses indicate the current status of a blanket purchase order in the Purchasing module. Valid blanket purchase order statuses are as follows:
• U – In Progress (Unfinished)
• N – Not Approved
• O – Outstanding
• V – Voided
• C – Closed
Blanket purchase order status codes are used on the following forms:
• Blanket PO Maintenance (BPOM)
• Blanket PO Use Maintenance (BPUM)
• Blanket PO Copy (BPCP)
• Blanket PO GL Maintenance (BGLM)
• Blanket PO Inquiry (BINQ)
• Blanket PO GL Hist Detail (BGLD)
• Blanket PO GL Hist Summary (BGLS)
Blanket purchase order status codes are defined and delivered by Ellucian and stored in the BPO.STATUSES record of the CF.VALCODES file.
405tting Started with Purchasing and Accounts Payable | Defining Codes in Colleague Finance

Ge
Blanket purchase order transaction types
Blanket purchase order transaction types are used in the general-ledger related forms for blanket purchase orders to indicate whether a transaction on the BPO is the original transaction, an adjustment, or a voucher transaction.
Blanket purchase order transaction type codes are used on the following forms:
• Blanket PO GL Hist Detail (BGLD)
• Blanket PO GL Hist Summary (BGLS)
The following codes are delivered in the BPO.TRANS.TYPES code table.
• O – Original
• A – Adjustment
• V – Voucher
Blanket purchase order transaction type codes are defined and delivered by Ellucian and stored in the BPO.TRANS.TYPES record of the CF.VALCODES file.
Budget statuses
Budget status codes indicate a budget’s status as it is processed in Colleague.
Sample entries include the following:
• N – New Budget
• V – Version Copy
• A – Approved Budget
• C – Closed Budget
• P – Posted Budget
• W – Working Budget
• X – Budget Not On-Line
Budget status codes are displayed on the following fields:
• Budget Identification (BCID)
• Define Base and Comparables (BCDB)
• Responsibility Verification (BRSP)
• Reinstate a Posted Budget (RAPB)
Budget status codes are defined and delivered by Ellucian and stored in the BU.STATUSES record of the CF.VALCODES file.
406tting Started with Purchasing and Accounts Payable | Defining Codes in Colleague Finance

Ge
Budget responsibility
Note: Budget Officer IDs must be created using the GL Budget Officer Maintenance (GLOM) form prior to the identification of Budget Units and their associated budget line items.
Budget responsibility codes are used throughout the budget module to establish an Identifier (Responsibility ID) for each budget unit and identify the budget officer ID responsible for the budget unit. GL account numbers are assigned to the budget unit using the Definition of Responsibility field. You can detail on the Definition of Responsibility field to access the forms to define GL accounts, or to enter a list name for GL accounts associated with the budget unit.
Budget Responsibility Identification in effect defines an organizational structure for use in the budgeting process. It may be the same as the organizational chart for the institution or it may be different depending on the individuals who help to create budget line items and their amounts. Individuals who do not perform budget data entry or who do not control information in the budget process should not be included in the budget responsibility tree.
Budget responsibility codes are defined on the Responsibility Identification (BRSP) form and stored in the BUD.RESP file.
Budget column calculations
Budget column calculation codes are used to indicate the calculations that should be performed for a specific budget column.
Sample entries include the following:
• BA – Basic Amount
• S – Scenario Totals
• PB – Position Budget
• TB – Total Budget Amount
• C1 – Comp 1 Amount
• C2 – Comp 2 Amount
• C3 – Comp 3 Amount
• L – Limit Amount
• P – Prior Version Amount
• F – Formula Last Used
• $ – Dollar Variance
• % – Percent Variance
• CON – Contingency Amount
407tting Started with Purchasing and Accounts Payable | Defining Codes in Colleague Finance

Ge
Budget column calculation codes are specified for a budget on the Budget Identification (BCID) form. The calculation codes are displayed on the following forms:
• Officer Worksheet Line Items (OWLI)
• Reporting Unit Line Items (RULI)
• Responsibility Worksheet Line (RWLI)
Budget column calculation codes are defined and delivered by Ellucian and stored in the BUDGET.COLUMN.CALCULATIONS record of the CF.VALCODES file.
Budget comparison sources
Budget comparison source codes indicate sources of budget figures.
The following are examples of budget comparison source codes:
• AC – Actuals
• OB – Orig. Budget
• AB – Adj. Budget
• CV – Curr. Version
• AL – Alloc. Budget
• EA – Enc. Actuals
Budget comparison source codes are used on the following forms:
• Update Annualized Comparables (BCUC)
• Budget Comparison Report (BCMP)
Budget comparison sources codes are defined and delivered by Ellucian and stored in the BUDGET.COMPARISON.SOURCES record of the CF.VALCODES file.
Budget layouts
The following are examples of budget layouts:
• M – Monthly
• Y – Yearly Total
• Q – Quarterly
• A – Account List
• I – Itemized
Budget layout codes are defined and delivered by Ellucian in the BUDGET.LAYOUTS record of the CF.VALCODES file.
408tting Started with Purchasing and Accounts Payable | Defining Codes in Colleague Finance

Ge
Budget projection sources
Budget projection source codes indicate the source of figures used in the Budget Projection Report (BGPR). Examples of budget projection source codes include the following:
• AC – Actuals
• OB – Original Budget
• AB – Adjusted Budget
• AL – Allocated Budget
• EA – Encumbered Actuals
Budget projection sources codes are defined and delivered by Ellucian and stored in the BUDGET.PROJECTION.SOURCES record of the CF.VALCODES file.
Budget scenario statuses
Budget scenario statuses codes indicate whether a budget scenario is active or inactive. Sample codes include the following:
• A – Activate
• I – Inactivate
• N – Not Active
An entry of “I” or “N” inactivates a scenario and removes all amounts previously added to line items in Worksheet Line Items. The words “N – NOT ACTIVE” are displayed in the Status field.
An entry of “A” activates a scenario and includes amounts budgeted in the scenario in the total budget and scenario line item amounts in the Budget Worksheet Line Items. The words “A – ACTIVE” are displayed in the Status field.
Budget scenario statuses codes are displayed on the following forms:
• Budget Scenario (BGTS)
• Modify Active Budget Scenario (MABS)
Budget scenario statuses codes are defined and delivered by Ellucian and stored in the BUDGET.SCENARIO.STATUSES record of the CF.VALCODES file.
Budget sources
Budget source codes are used specifically for budgets. The following are the budget source codes used in Colleague:
409tting Started with Purchasing and Accounts Payable | Defining Codes in Colleague Finance
Ge
• AC – Actuals. Actuals are calculated by totaling the monthly debits minus the sum of the monthly credits. If the year identified for the comparable figure is a partial year, the amount is calculated in the same way through the current period and then annualized. Budget pool accounts are calculated in the same way except that the amount displayed for the umbrella is the total of all actuals posted for the entire pool.
• OB – Original Budget. Original budget is the amount posted to the account at the beginning of the year by the Budget Management (BU) module or by the opening entry for General Ledger Budget Journal Entry (GLBE). It does not include adjustments or contingency amounts. The Original Budget for budget pools is the original amount posted to the umbrella account only. No budget amounts posted to a poolee account number are taken into consideration.
• AB – Adjusted Budget The adjusted budget amount is the total of the original posted budget plus any adjustments posted during the year that modify the original budget. Only budget amounts posted to the umbrella account in a budget pool are used in the Adjusted Budget. Budget amounts posted to a poolee account are not taken into consideration.
• EA – Encumbered Actuals. Encumbered actuals are the sum of the posted actuals for the year plus any encumbrances for the year. This figure is derived from the following formula:
encumbrance open balance + the sum of the monthly encumbrance debits - the sum of monthly encumbrances relieved + the sum of the actuals monthly debits - the sum of the actuals monthly credits.
Budget pool accounts use the sum of the amounts posted to all members of the budget pool and are included in the comparable debits - the sum of monthly encumbrances relieved + the sum of the actuals monthly debits - the sum of the actuals monthly credits.
Budget pool accounts use the sum of the amounts posted to all members of the budget pool and are included in the comparable columns in the umbrella account.
• AL – Allocated Budget The allocated budget amount is equal to the original approved budget amount plus any adjustments and/or contingent amounts. For budget pool accounts, the allocated budget represents the budgeted amount in the control or umbrella account only. Budget amounts posted to a poolee account are not taken into consideration.
Budget sources codes are displayed on the following forms:
• Generate a Budget (BCGB)
• Update Annualized Comparables (BCUC)
• Define Base and Comparables (BCDB)
• Base Budget Projection (BCBP)
Budget sources codes are defined and delivered by Ellucian and stored in the BUDGET.SOURCES record of the CF.VALCODES file.
410tting Started with Purchasing and Accounts Payable | Defining Codes in Colleague Finance
Ge
Budget types
You can define and maintain budget type codes using the Validation Codes (VAL) form. These codes are stored in the BUDGET.TYPES record of the CF.VALCODES file.
Examples of budget type codes might include:
• OP – Operating
• CAP – Capitol
Buying arrangements
Buying arrangements codes are used to indicate special contractual arrangements your institution may have for purchasing given commodities; for example, a cooperative arrangement or a county contract.
Buying arrangements codes are used on the Commodity Codes (CMCM) form.
Buying arrangements codes are defined and delivered by Ellucian and stored in the BUYING.ARRANGEMENTS record of the CF.VALCODES file.
Depreciation (Calc) methods
Depreciation methods codes enable you to define a number of methods for depreciating fixed assets. You can choose from several methods for defining depreciation methods:
• You can use one of three Ellucian-provided non-modifiable subroutines:
• Straight Line — S.CALC.FXA.SL
• Sum-of-the-Years-Digits — S.CALC.FXA.SY
• Declining Balance — S.CALC.FXA.DB
• You can use a fourth, user-modifiable subroutine, Use Allowance (Sherman-Dergis), S.CALC.FXA.SUB1. You can modify only the inflation index and the fiscal year indicators for this subroutine.
• You can also create your own globally or locally catalogued depreciation method subroutines and identify them using this form.
Depreciation method codes are used on the following forms:
• Asset Depreciation Report (FXDR)
• Fixed Asset Value Projection (FXVP)
• Fixed Assets Inquiry (FXIN)
• Acquisition Information Maint (ACQM)
Depreciation method codes are defined on the Depreciation Method Codes Definition (DMCD) and stored in the CALC.METHODS file.
411tting Started with Purchasing and Accounts Payable | Defining Codes in Colleague Finance

Ge
Check statuses
Check statuses codes identify the possible statuses of a check during its processing in Colleague. Because checks are processed automatically from vouchers, the three check statuses are:
• O – Outstanding
• R – Reconciled
• V – Voided
The [Check] Status field is displayed on forms on which individual check information is displayed, including the Check Inquiry (CHKI) form and the Check Void Entry (CKVE) form.
Check status codes are defined and delivered by Ellucian and stored in the CHECK.STATUSES record of the CF.VALCODES file.
Close or void codes
Close or void codes are used on the Purchase Order Close/Void (POCV) and Blanket PO Close/Void (BCLV) forms to indicate whether the purchase order is being closed or voided. (Because closing and voiding are similar transactions, they can be done on the same form.) You use the Close/Void field on these forms to select whether you want to close the selected purchase order or blanket purchase order, or void it.
The following are valid close or void codes:
• C – Close
• V – Void
Close or void codes are defined and delivered by Ellucian and stored in the CLOSE.OR.VOID.CODES record of the CF.VALCODES file.
Commodity miscellaneous codes 1 - 5
Commodity miscellaneous codes are designated by your institution to indicate any properties of commodities you want to track. You can later assign these codes to commodity codes you create. Five commodity miscellaneous codes are available for use by your institution. Examples of commodity miscellaneous codes include biodegradable, recyclable, and hazardous.
Commodity miscellaneous codes are displayed in the Commodity Codes (CMCM) form.
You can define and maintain commodity miscellaneous codes using the Validation Codes (VAL) form. These codes are stored in the following records of the record of the CF.VALCODES file:
• CMDTY.MISC.CODES1
412tting Started with Purchasing and Accounts Payable | Defining Codes in Colleague Finance
Ge
• CMDTY.MISC.CODES2
• CMDTY.MISC.CODES3
• CMDTY.MISC.CODES4
• CMDTY.MISC.CODES5
Commodity codes
Commodity codes represent commodities and services purchased by your institution. You can define your own commodity codes—as many or as few as you need—or use a standard set such as a state list of codes or the codes available from the National Institute for Governmental Purchasing (NIGP).
A comprehensive list of commodities and services, or commodity file can be of considerable value in supporting your procurement functions by helping you analyze your purchasing practices, decisions, and policies from a long-term, strategic planning point of view. A commodity file can also help you exercise more control over many critical aspects of your purchasing functions, including pricing, value, taxes, buyer assignment, bid or shipping requirements, and fixed asset and inventory identification. With careful planning, you can use commodity codes to assist you in validating data entry — thereby reducing input errors — and in making the entry of purchasing information faster and more efficient, by allowing users to bring many types of information into a purchasing document in a single step. Most commodity files are based on a hierarchical organization; that is, the first digit represents a broad grouping of products, and succeeding digits indicate progressively smaller subgroups of products within the broad grouping.
Commodity codes are used by maintenance forms throughout the Purchasing and Accounts Payable modules.
Commodity codes are created and maintained using the Commodity Codes (CMCM) form and are stored in the COMMODITY.CODES file.
For more information on setting up commodity codes, see “Defining and maintaining commodity codes” on page 156.
Commodity source
Examples of commodity source codes might include:
• M – Manual
• N – NIGP
You can define and maintain commodity source codes using the Validation Codes (VAL) form. These codes are stored in the COMMODITY.SOURCE record of the CF.VALCODES file.
413tting Started with Purchasing and Accounts Payable | Defining Codes in Colleague Finance
Ge
Coverage types
Coverage types codes indicate the types of insurance coverage provided by a specific insurance policy on the Insurance Policy Maintenance (INPM) in the Fixed Assets module.
Examples of coverage types codes might include the following:
• LI – Liability
• COLL – Collision
• DL – Directors Liability
• FIRE – Fire
• THEFT – Theft
You can define and maintain coverage types codes using the Validation Codes (VAL) form. These codes are stored in the COVERAGE.TYPES record of the CF.VALCODES file.
Currency conversion
Foreign currency codes store information about currency exchange rates and effective dates for any foreign currencies in which your institution does business. Currency exchange rates must be entered in Colleague Finance for any currencies you use other than your local currency.
For example, if you are a U.S. institution and regularly purchase from a Canadian vendor, Colleague Finance must have current information at all times on the exchange rate between U.S. dollars and Canadian dollars. This will ensure that when you pay that vendor, a check cut in Canadian dollars will accurately reflect the exchange rate in effect on the day it is cut. Currency codes also let you associate a vendor with the applicable foreign currency.
Examples of currency codes might include the following:
• EUR – Euro
• SWF – Swiss Franc
• BPS – British Pound Sterling
• CAN – Canadian Dollars
• PES – Mexican Peso
Currency conversion codes are used on maintenance forms throughout the Purchasing and Accounts Payable modules.
Currency conversion codes are created and maintained using the Currency Exchange (CEXM) form and are stored in the CURRENCY.CONV file.
414tting Started with Purchasing and Accounts Payable | Defining Codes in Colleague Finance

Ge
Discount methods
Discount methods codes define the two possible discount methods you can choose for accounts payable processing: Discounts Taken or Discounts Lost.
Examples of discount methods codes include
• T – Discounts Taken
• L – Discounts Lost
The Discount Method parameter relates to your institution’s policy regarding posting of vendors’ term discounts, and has important ramifications for your system’s operations. Your selection for this parameter controls how discount amounts are posted to the general ledger.
You select your discount method based on whether you want your voucher expenditures to be posted to the general ledger net of the cash discount (“Discounts Lost” method) or at the full amount (gross method) of the expenditures, without the cash discount (“Discounts Taken” method)
The Discount Method field is displayed on the AP Parameters Definition (APDE) form, and the Current Discount Method field appears on the Change Discount Method (CDSC) form.
Note: Since the calculation processes for cash discounts are essential to proper AP accounting, Colleague cannot begin operation until you have selected your discount method. You must set this parameter before running the Accounts Payable module.
Discount methods codes are defined and delivered by Ellucian and stored in the DISC.METHODS record of the CF.VALCODES file.
Disposal methods
Disposal methods codes indicate the disposal method for a fixed asset. Disposal method codes are used on the Fixed Asset Disposal Maint (FXDM) form.
Examples of disposal method codes include:
• SO – Sold
• TR – Trade In
• SL – Salvaged
• DE – Destroyed
• LO – Lost
• ST – Stolen
Disposal methods codes are created and maintained on the Disposal Codes Definition (ADCD) form and are stored in the DISPOSAL.METHODS file.
415tting Started with Purchasing and Accounts Payable | Defining Codes in Colleague Finance
Ge
Financial statement date formats
Financial statement date format codes indicate the manner in which the date is indicated on financial statements produced by the Statement Format Maintenance (SFMT) form. The Statement Format Maintenance (SFMT) form is used to enter line information and create custom financial reports.
Examples of financial statement date formats include the following:
• 1 – As of ...
• 2 – At ...
• 3 – For the period/year ended 3
• 4 – Date
Financial statement date formats codes are defined and delivered by Ellucian and stored in the FIN.STMT.DATE.FORMATS record of the CF.VALCODES file.
Free-on-board codes
Free-On-Board (F.O.B.) codes indicate the point at which the buyer is responsible for the goods in transit. The term F.O.B. (“free on board”) indicates the arrangement for shipping cost liability made between vendor and customer.
If the terms are F.O.B. (“free-on-board”) shipping point, the title to the goods passes to the buyer once the goods leave the shipping point. If the terms are F.O.B. destination, the title to the goods passes to the buyer when goods arrive at the buyer's location.
Some examples of F.O.B. codes are as follows:
• SH – F.O.B. Shipping Point
• DE – F.O.B. Destination
F.O.B. codes are used on the following forms:
• Purchase Order Single Print (POSP)
• Blanket PO Single Print (BPSP)
• Purchase Order Maintenance (POEM)
• Requisition Maintenance (REQM)
• Blanket PO Maintenance (BPOM)
F.O.B. codes are defined and maintained on the FOB Maintenance (FOBM) form and stored in the FOBS file.
416tting Started with Purchasing and Accounts Payable | Defining Codes in Colleague Finance

Ge
Fixed assets control statuses
Fixed assets control statuses codes describe the status of an asset activity.
Examples of fixed assets control statuses codes might include the following:
• REG – Register
• CAP – Capitalized
• DEP – Depreciated
• DISP – Disposed
• INU – In Use
• CLR – Cleared
• PST – Ready to Post
• POST – Posting
Fixed assets control statuses codes are displayed on most fixed asset maintenance forms to indicate the status of the asset.
Define and maintain fixed assets control statuses codes using the Validation Codes (VAL) form. These codes are stored in the FXA.CONTROL.STATUSES record in the CF.VALCODES file.
Fixed assets transfer flags
Fixed assets transfer flag codes identify a fixed asset as either a single asset that was purchased as an individual line item (“single fixed asset”) — such as a line item for one file cabinet — or multiple assets that were purchased as one line item (“multivalued fixed asset”) — such as a line item for six chairs.
Colleague uses this code when transferring information on an accepted line item to the Fixed Assets module. For example, you ordered and received six chairs which were included in a single line item. (You will be transferring the purchased chairs to the Fixed Assets module.) When Colleague transfers the item record of the six chairs from the Accounts Payable module to the Fixed Assets module, your selection of either “S” or “M” from the item record of the purchase order (from this code table) will have stayed with the record throughout its processing, and determines whether the Fixed Assets module will count the item as six separate chairs (six separate fixed assets) or as a single fixed asset.
The codes for the fixed asset transfer flags include the following:
• S – Single fixed asset
• M – Multivalued fixed
The Fixed Asset field appears on several forms in the Purchasing and Accounts Payable modules, including:
• Commodity Codes (CMCM)
417tting Started with Purchasing and Accounts Payable | Defining Codes in Colleague Finance

Ge
• Requisition Item Maintenance (RQIM)
• Requisition Item Inquiry (RIIN)
• PO Item Maintenance (POIM)
• Purchase Order Item Inquiry (PIIN)
• Voucher Item Maintenance (VOUD)
• Voucher Item Inquiry (VIIN)
Fixed asset transfer flag codes are defined and delivered by Ellucian and stored in the FXA.TRANSFER.FLAGS record of the CF.VALCODES file.
Fixed assets transfer statuses
Fixed assets transfer status codes are defined and delivered by Ellucian in the FXA.TRANSFER.STATUSES record in the CF.VALCODES file.
Fixed assets transfer statuses codes include the following:
• R – Ready for Transfer
• I – In Use
• T – Transferred
General ledger component sort fields
General ledger component sort fields codes are used by the Web GL Budget (WGLB) form to enable you to specify sort criteria for sorting GL account numbers.
Any codes you create in this table must be valid dictionary items 10 characters or less in the GL.ACCTS file.
Example general ledger component sort field codes might include the following:
• FUND – Fund
• FUNCTION – Function
• OBJECT – Object
• FUND.GROUP – Fund Group
You can define and maintain general ledger component sort field codes using the Validation Codes (VAL) form. These codes are stored in the GL.COMPONENT.SORT.FIELDS record of the CF.VALCODES file.
418tting Started with Purchasing and Accounts Payable | Defining Codes in Colleague Finance
Ge
General ledger detail
General ledger detail codes enable you to detail to a specific web form. General ledger detail codes include the following:
• BGT – Budget Detail
• REQ – Requisition Detail
• ENC – Encumbrance Detail
• ACT – Actuals Detail
General ledger detail codes are defined and delivered by Ellucian and stored in the GL.DETAIL record of the CF.VALCODES file.
General ledger file statuses
General ledger file statuses codes indicate the status of general ledger files. The following are the valid general ledger file statuses.
• A – Authorized (Budget)
• O – Open
• F – Frozen
• C – Closed
• Y – Year End in Progress
General ledger file statuses codes are defined and delivered by Ellucian and stored in the GL.FILE.STATUSES record of the CF.VALCODES file.
General ledger file classes
General ledger file classes codes are defined and delivered by Ellucian and stored in the GL.FILECLASSES record of the CF.VALCODES file
General ledger import summarizations
GL import summarizations codes enable you to specify on the GL Import Definition (GLID) form the level of detail you want in the postings records for imported GL information
GL import summarizations codes include the following:
• N – Detail
• R – Summary By Reference
• D – Summary By Date
419tting Started with Purchasing and Accounts Payable | Defining Codes in Colleague Finance

Ge
General ledger file classes codes are defined and delivered by Ellucian and stored in the GL.IMPORT.SUMMARIZATIONS record of the CF.VALCODES file.
General Ledger Import Types
General ledger import types codes enable you to indicate the manner in which you want to run the GL Import (GLIM) form.
General ledger import type codes include the following:
• R – Report Only
• U – Update from Report
• I – Immediate Update
If you enter [R]eport, Colleague uses the selected import definition to validate the contents of the flat file. If the file contents is successfully validated, Colleague generates a Validation Report and moves the import records into the GL.INTERFACES.HOLD file where they wait for you to run the actual import. If validation is not successful, Colleague generates an Error Report. You must successfully run a file through the report mode before you can run it in import mode.
If you enter [U]pdate, Colleague moves the import records from GL.INTERFACES.HOLD to GL.POSTINGS, where they wait for you to run the Post GL Transactions (PGLT) form and the Post GL Import Transactions (PGLM) form. Colleague issues either a Postings Report or an Error Report depending on whether the import was successful. You cannot run a file in import mode until after you have run the same flat file in report mode.
If you enter [I]mmediate Update, Colleague runs the report process first, and if there are no errors, immediately runs the import process.
General ledger import types codes are defined and delivered by Ellucian and stored in the GL.IMPORT.TYPES record of the CF.VALCODES file.
General Ledger Interface Fields
General ledger interface fields correspond to the maintenance fields on the GL Import Definition (GLID) form. From the GLID form, you can detail to the GL Import Field Maintenance (GLIF) form, on which you can maintain the start position and field length, and specify a subroutine for the field.
General ledger interface fields include the following:
• SC – Source Code
• GL – GL Account No
• DR – Debit Amount
• CR – Credit Amount
• DS – Description
420tting Started with Purchasing and Accounts Payable | Defining Codes in Colleague Finance

Ge
• RF – Reference No
• TD – Transaction Date
• ID – Account ID
• TE – Term
• PR – Project Number
General ledger interface fields are defined and delivered by Ellucian and stored in the GL.INTERFACE.FIELDS record of the CF.VALCODES file.
General Ledger Prompt Sequences
General ledger prompt sequence codes specify for line items charged to more than one GL account, three different methods of cost distribution: amount, percent, and quantity.The codes in this table validate the [Prompt Defaults] GL Prompt Sequence field, which appears on both the PU Parameters Definition (PUPD) form (twice) and the AP Parameters Definition (APDE) form (once). These fields enable you to specify GL prompting sequences for requisitions, purchase orders, and vouchers.
For the Purchasing module, you can set GL distribution prompting defaults for requisition and purchase order forms on the PU Parameters Definition (PUPD) form.
For the Accounts Payable module, you can set GL distribution prompting defaults for voucher forms on the AP Parameters Definition (APDE) form.
In daily processing, when you enter a GL number in the GL Account No window on any of the item maintenance forms, the cursor moves from the GL Account No field to the distribution element you have designated as the default, and skips over the others.
The codes in this code table include the following:
• A – Distribute by amount
• P – Distribute by percent
• Q – Distribute by quantity
GL prompt sequence codes are defined and delivered by Ellucian and stored in the GL.PROMPT.SEQUENCES record of the CF.VALCODES file.
For detailed information on the GL Prompt Sequence default, refer to the following:
For requisitions and purchase orders (defined on the PU Parameters Definition [PUPD] form), see “Procedure for defining purchasing parameters and defaults” on page 242.
For vouchers (set up on the AP Parameters Definition [APDE] form), see “Procedure for defining accounts payable parameters and defaults” on page 291.
421tting Started with Purchasing and Accounts Payable | Defining Codes in Colleague Finance
Ge
General Ledger Source Codes
General ledger source codes are defined and delivered by Ellucian and stored in the GL.SOURCE.CODES record of the CF.VALCODES file.
General ledger source codes are used by the following forms:
• GL Import Definition (GLID)
• YE Summary Trial Balance (YSTB)
• GL Trial Balance (GLTB)
• Condense GL Activity (CGLA)
• Expand GL Activity (EGLA)
• List GL Activity (LGLA)
• GL Balance Verification Aids (GLVA)
• Post GL Transactions (PGLT)
• List GL Postings (LPST)
Include/Exclude Codes
Include/Exclude codes are used for defining approvals, to indicate whether the GL account number ranges in the selected GL component are being included or excluded from a given approval GL class or approval policy class.
The codes in this code table include the following:
• I – Include
• E – Exclude
The Include/Exclude field is displayed on the Approval GL Class Maintenance (APGL) and Approval Policy Class Maintenance (APCM) forms, which are listed on the Approvals (APR) menu in both the Purchasing and Accounts Payable module. This field is validated against the INCLUDE.EXCLUDE.CODES code table. When you are setting up approvals, you can include or exclude any given GL component from the approval GL class or approval policy class you are defining. If you select “Exclude,” the approval class displayed can approve all documents with any GL component except those components within the specified range. If you select “Include,” the approval class displayed can approve only those documents whose GL components are within the specified range.
Include/exclude codes are defined and delivered by Ellucian and stored in the INCLUDE.EXCLUDE.CODES record of the CF.VALCODES file.
422tting Started with Purchasing and Accounts Payable | Defining Codes in Colleague Finance
Ge
Inventory Items
Inventory item codes represent groups of like items that share the same description information, product class, product code, and unit issue definitions. For example, you might set up large, medium, and small binder clips as three separate inventory items. In this example, all large binder clips are considered to be one item and you maintain quantities of this item (1 box, 5 boxes, etc.) in your inventory stores. You can add an inventory item to as many inventory stores as you want.
Inventory item codes might include the following:
• 010 – Large binder clips
• 011 – Medium binder clips
• 012 – Small binder clips
Inventory item codes are displayed in the header block of most inventory maintenance forms.
Inventory item codes are defined on the Inventory Item (ITIM) form and are stored in the INVENTORY.ITEMS file.
Inventory Stores
Inventory store codes represent the locations within your institution where inventory items are kept. Inventory stores can be anything from a supply closet to a warehouse; however, the inventory store must have a mailing address so it can receive shipments of inventory items. Individual inventory stores also have three unique GL account numbers assigned to each store:
• Inventory Control account – An asset account used to track the money spent by each inventory store to purchase and replenish the store’s stock of inventory items.
• Inventory Adjustment account – An expense account number used to track inventory items that are returned to the inventory store.
• Inventory Cost Recovery account – A revenue account used to track any income resulting from inventory item price markup. If an inventory store sells an item for a price higher than it paid for the item, the excess income is posted to the Inventory Cost Recovery GL account.
Inventory store codes are displayed in the header block of most inventory maintenance forms.
Inventory store codes are defined on the Inventory Stores (INSF) form and are stored in the INVENTORY.STORES file.
Investment Periods
Investment periods codes indicate the duration of the investment period and are used in the distribution cycle.
423tting Started with Purchasing and Accounts Payable | Defining Codes in Colleague Finance

Ge
Investment period codes include the following:
Investment period codes validate the Period Duration field on the Distribute Invest Pool Activity (DIPD) form and the Distribute Cash Pool Activity (DCPA) form in the Pooled Investments module. Investment periods codes affect the percentages applied to distribution calculations during distribution.
Investment period codes are defined and delivered by Ellucian and stored in the INVESTMENT.PERIODS record of the CF.VALCODES file.
Item Purchase Order Statuses
Item purchase order statuses indicate the possible statuses Colleague may assign to a line item on a requisition, purchase order, or voucher during its processing.
The possible statuses for an item include the following:
• O – Outstanding
• B – Backordered
• A – Accepted
• I – Invoiced
• P – Paid
• R – Reconciled
• V – Voided
• C – Closed
• H – Hold-on Voucher
An item status field is displayed on most forms in the Purchasing and Accounts Payable modules that display line item information, including both summary forms and detail forms.
Table 75: Investment Period Codes
Code Description Special Processing
D Daily 365
L Leap Year Daily 366
W Weekly 52
M Monthly 12
Q Quarterly 4
S Semiannually 2
A Annually 1
424tting Started with Purchasing and Accounts Payable | Defining Codes in Colleague Finance

Ge
Item purchase order statuses are defined and delivered by Ellucian and stored in the ITEM.PO.STATUSES record of the CF.VALCODES file.
Item Work Order Types
Item work order type codes indicate whether the line item associated with a work order is for materials or contract labor.
Item work order type codes include the following:
• M – Materials
• L – Labor
Item work order type codes validate the [Work Order] Flg field on the PO Item Maintenance (POIM) form and the Requisition Item Maintenance (RQIM) form. The information in the [Work Order] Flg field is passed to the Work Order Materials (WOMU) form in the Physical Plant module, and displays on the material line item. The default entry for the [Work Order] Flg field is “Materials.”
Item work order types are defined and delivered by Ellucian and stored in the ITM.WO.TYPES record of the CF.VALCODES file.
Label Destinations
Label destination codes define where you want labels to be printed. The common destinations are printer, terminal, and hold file for viewing and printing at a later time.
This table contains the following codes:
• P – Printer
• T – Terminal
• H – HOLD File
The codes in this table validate the Output Destination fields on the following forms:
• Vendor Labels (VENL)
• Vendor Label Format (VNLF)
Label destination codes are defined and delivered by Ellucian and stored in the LABEL.DESTINATIONS record of the CF.VALCODES file.
Lease Types
Lease types codes indicate if a lease is an operating lease or a capital lease.
Lease types codes include the following:
425tting Started with Purchasing and Accounts Payable | Defining Codes in Colleague Finance

Ge
• O – Operating Lease
• C – Capital Lease
Lease type codes validate the Lease Type field on the Lease Maintenance (LSEM) form in the Fixed Assets module.
Lease type codes are defined and delivered by Ellucian and stored in the LEASE.TYPES record of the CF.VALCODES file.
Manual Check Codes
Manual check codes identify two pieces of information about checks: first, whether a check is a manual check (that is, has been processed for payment on the Manual Voucher Payment (VOUP) form instead of in a batch); and second, if a manual check, whether it has actually been printed, or has not yet been printed. Colleague uses the information from this code table for further check processing; it is always used for display-only purposes.
The codes in this code table are:
• N – No
• Y – Yes; Not Printed
• P – Yes; Printed
The Manual Check field is displayed on the Check Inquiry (CHKI) form, which is accessed directly from the Accounts Payable main menu.
Manual Check codes are defined and delivered by Ellucian and stored in the MANUAL.CHECK.CODES record of the CF.VALCODES file.
Net Asset Class Codes
Net asset class codes categorize general ledger accounts. The following net asset class codes are shipped by Ellucian and must not be deleted or modified to comply with GASB requirements.
• UN – Unrestricted Net Assets
• PR – Permanently Restricted
• TR – Temporarily Restricted
• RN – Restricted Non-Expendable
• RE – Restricted Expendable
• IC – Invested in Capital Asset
Net asset class codes are displayed in the header block of most General Ledger maintenance forms.
426tting Started with Purchasing and Accounts Payable | Defining Codes in Colleague Finance
Ge
You can define additional net asset class codes using the Validation Codes (VAL) form. These codes are stored in the NET.ASSET.CLASS record of the CF.VALCODES file.
NIGP Modes
NIGP mode codes include the following:
• W – wIntegrate
• N – NIGP
NIGP mode codes are defined and delivered by Ellucian in the NIGP.MODES record of the CF.VALCODES file.
Optional Modules
Optional module codes indicate the Colleague optional modules that are available for installation. Optional module codes validate the Installed Optional Modules field on the GL Account Parameters (GLAP) form.
Optional module codes include the following:
• BGT – Budget Management Module
• FXA – Fixed Assets Module
• INV – Inventory Module
• PI – Pooled Investments Module
• PP – Physical Plant Module
Optional modules codes are displayed on the GL Account Parameters (GLAP) form.
Optional module codes are defined and delivered by Ellucian and stored in the OPT.MODULES record of the CF.VALCODES file.
Project Accounting Budget Periods
Project accounting budget periods are provided by Colleague at runtime to allow you to select a budget period for a specific project.
Colleague provides the codes at runtime. The validation code table is stored empty.
Project accounting budget period codes are used by the following forms:
• Budget Period Dates (PABP)
• Budget Period Dates Inquiry (PABI)
427tting Started with Purchasing and Accounts Payable | Defining Codes in Colleague Finance

Ge
Project accounting budget period codes are defined and delivered by Ellucian and stored in the PA.BGT.PERIODS record of the CF.VALCODES file.
Payment Terms
Payment terms codes indicate term of payment for leases, insurance policies, and service contracts in the Fixed Assets module.
Payment term codes might include the following codes:
• A – Annual
• MO – Monthly
• SM – Semiannual
Payment terms codes validate the Payment Term field on the following forms:
• Lease Maintenance (LSEM)
• Insurance Policy Maintenance (INPM)
• Service/Warranty Maintenance (SERM)
Define and maintain payment terms codes using the Validation Codes (VAL) form. These codes are stored in the PAY.TERMS record of the CF.VALCODES file.
Physical Inventory Sort
Physical inventory sort codes validate the Sort Order field on the Physical Inv Count Worksheet (PICW) report and enable you to specify how to sort the inventory store’s physical inventory items on the worksheet.
Physical inventory sort codes include the following:
• P – Product Class
• B – Bin Location
• I – Inventory Item
Purchase order date-to-print codes are defined and delivered by Ellucian and stored in the PHYS.INV.SORT record of the CF.VALCODES file.
Plant Types
Plant types codes represent the different general areas of your institution that may request work through the Physical Plant module. Each plant type is associated with a GL account number that may be directly charged for materials and contract labor expenses incurred through work orders assigned to that plant type.
428tting Started with Purchasing and Accounts Payable | Defining Codes in Colleague Finance

Ge
Examples of plant types codes might include the following:
• 001 – Equipment Repair Instruction
• 002 – Equipment Repair, Office
• 003 – Equipment Repair, Maintenance
• 004 – Equipment Repair, Vehicles
• 005 – Equipment Repair, Machinery
• 006 – Building Repair
• 007 – Preventive Maintenance
• 008 – Facilities Maintenance
• 009 – Equipment Repair, Misc.
• FMC – Facilities Main Campus
Physical plant type codes are used on the following forms:
• Work Order Inquiry (WRKI)
• Physical Plant Web Parameters (PPWP)
• Work Order Entry (WORE)
Plant types codes are defined on the Plant Types (WOTM) form and stored in the PLANT.TYPES file.
Purchase Order Date-To-Print Codes
PO date-to-print codes indicate the date that you want to print on a purchase order. Valid codes are:
• P – the PO date
• C – the contract date
PO date to print codes enable you to print a date on the purchase order that is different from the GL transaction date. PO date to print codes are used on the following forms:
• Purchase Order Single Print (POSP)
• Purchase Order Print (PPRT)
• Blanket PO Single Print (BPSP)
• Blanket Purchase Order Print (BPRT)
Purchase order date-to-print codes are defined and delivered by Ellucian and stored in the PO.DATE.TO.PRINT record of the CF.VALCODES file.
429tting Started with Purchasing and Accounts Payable | Defining Codes in Colleague Finance
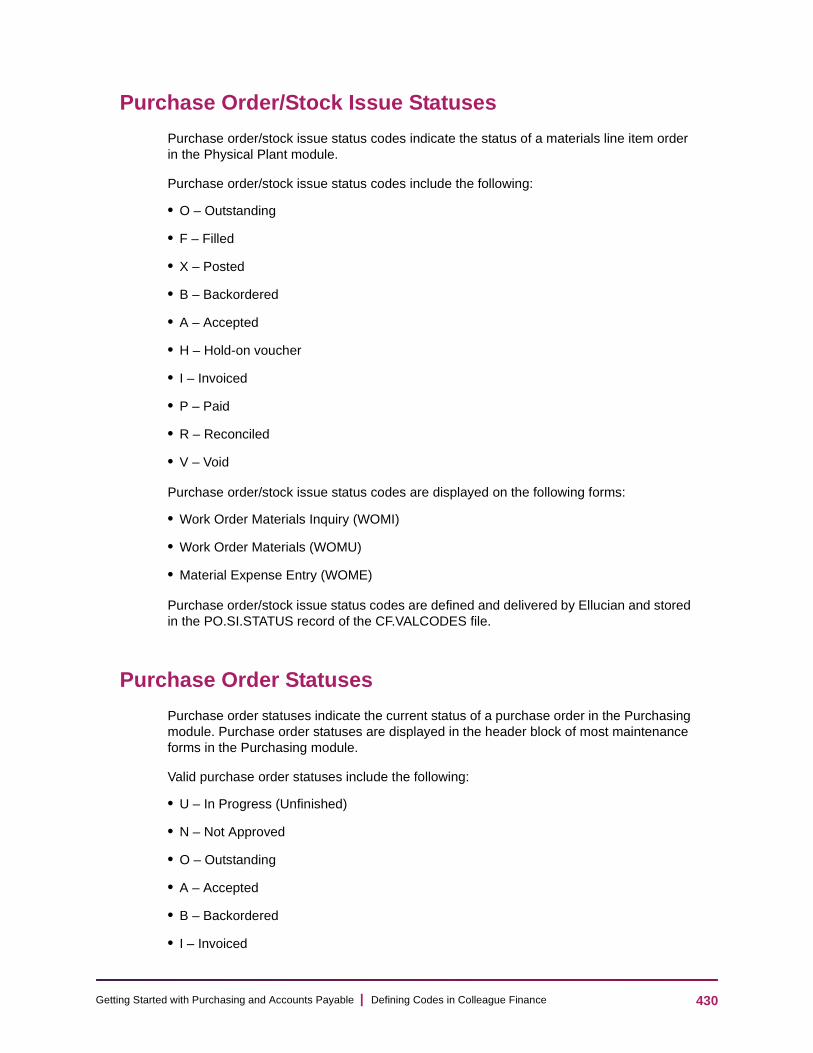
Ge
Purchase Order/Stock Issue Statuses
Purchase order/stock issue status codes indicate the status of a materials line item order in the Physical Plant module.
Purchase order/stock issue status codes include the following:
• O – Outstanding
• F – Filled
• X – Posted
• B – Backordered
• A – Accepted
• H – Hold-on voucher
• I – Invoiced
• P – Paid
• R – Reconciled
• V – Void
Purchase order/stock issue status codes are displayed on the following forms:
• Work Order Materials Inquiry (WOMI)
• Work Order Materials (WOMU)
• Material Expense Entry (WOME)
Purchase order/stock issue status codes are defined and delivered by Ellucian and stored in the PO.SI.STATUS record of the CF.VALCODES file.
Purchase Order Statuses
Purchase order statuses indicate the current status of a purchase order in the Purchasing module. Purchase order statuses are displayed in the header block of most maintenance forms in the Purchasing module.
Valid purchase order statuses include the following:
• U – In Progress (Unfinished)
• N – Not Approved
• O – Outstanding
• A – Accepted
• B – Backordered
• I – Invoiced
430tting Started with Purchasing and Accounts Payable | Defining Codes in Colleague Finance
Ge
• P – Paid
• R – Reconciled
• V – Voided
• C – Closed
Purchase order statuses are defined and delivered by Ellucian and stored in the PO.STATUSES record of the CF.VALCODES file.
Pool Rules
The pool rules code is limited to ten alphanumeric characters. This code is used to attach the related pool rules to specific investment or cash pools. These rules are used extensively during the distribution cycle.
Pool rules codes are defined on the Define Investment Pool Rules (DIPR) form and stored in the POOL.RULES file.
Pool Types
The pool type code is used in calculating distribution of income, gains or losses, and reinvestment of appreciation from the pool to the equity (investing or endowment) units, who are members of the pool. The pool type code also determines whether calculations are extended to two, four, or five decimal places when investment pool distributions are made. All calculations are then rounded to two decimal places when posting and updating the general ledger.
Examples of pool type codes might include the following:
• 01 - Endowment
• 02 - Trust
• 03 - Cash
Pool type codes are associated with investment pools on the Define Investment Pool (DINP) form.
Pool types codes are defined on the Define Pool Type Code (DPTC) form and stored in the POOL.TYPES file.
Physical Plant Employees
Physical plant employee codes use records from the STAFF file to record a physical plant employee’s primary trade and primary work order rate. When an employee is assigned to a work order, the employee’s trade and rate information default onto the work order.
431tting Started with Purchasing and Accounts Payable | Defining Codes in Colleague Finance
Ge
Physical plant employee codes are stored in the physical plant employees (PP.EMPLOYEES) file, which is a subsidiary of the STAFF file. Physical plant employees must have a record in the STAFF file, because Colleague uses the employee’s Staff (Person) ID as the key to the PP.EMPLOYEES file. When an employee is assigned to a work order, the employee’s trade and rate information default onto the work order.
Physical plant employee codes are used on the Labor Expense Entry (WOLE) form.
Physical plant employee codes are defined on the Physical Plant Employees (PPEM) form and are stored in the PP.EMPLOYEES file, which is a subsidiary of the STAFF file.
Physical Plant Priorities
Physical plant priorities codes indicate the priorities that are available to be assigned to a work order. Work order priorities codes include a priority code, description, and a days-to-completion value, which indicates the time period in which the work is expected to be completed.
Physical plant priorities codes are displayed on most work order maintenance forms in the Physical Plant module.
Examples of physical plant priorities codes and descriptions include the following:
• 1 – Immediate Service
• 2 – Within 24 Hours
• 3 – Within 3 Days
• 4 – Within 4 Days
• 5 – One Week
Physical plant priorities codes are defined on the Work Order Priorities (WOPM) form, and are stored in the PP.PRIORITIES file.
Note: The PP.PRIORITIES file also contains ten user fields (not shown). These user fields are named PPPR.USERx, where x is a sequential number from 1 to 10.
Product Classes
Product classes codes are used to sort inventory items into general categories.
Examples of product classes codes might include the following:
• 100 – Office Supplies
• 200 – Art Supplies
• 300 – Cleaning/Janitorial Supplies
432tting Started with Purchasing and Accounts Payable | Defining Codes in Colleague Finance
Ge
• 400 – Computer Supplies
Product classes codes are used on the following forms:
• Inventory Price Book (INPB)
• Inventory Status (INSR)
• Inventory Valuation (INVR)
• Inventory Items (ITIM)
• Classic Inventory (CIFM)
• Physical Inv Count Entry (PICE)
Product classes codes are defined on the Product Classes (PCLM) form and are stored in the PRODUCT.CLASSES file.
Product Codes
Product codes are specific categories of inventory items, such as “ballpoint pens” or “60 watt light bulbs.” Product codes are a subset of product classes codes.
For example, you may have a product class of “Office Supplies,” and several product codes within that product class such as “folders,” “paper clips,” and “legal pads.”
Examples of product codes might include the following:
• 301 – Furniture Polish
• 302 – Mops
• 303 – Floor Cleaner
• 304 – Scrubbing Brushes
• 305 – Buckets - 5 Gallon
Product codes are used on the following forms:
• Inventory Price Book (INPB)
• Inventory Status (INSR)
• Inventory Valuation (INVR)
• Inventory Items (ITIM)
• Classic Inventory (CIFM)
• Physical Inv Count Entry (PICE)
Product codes are defined on the Product Codes (PCOM) form and are stored in the PRODUCT.CODES file.
433tting Started with Purchasing and Accounts Payable | Defining Codes in Colleague Finance
Ge
Projects Class Types
Projects class types are used to distinguish between different types of item codes in the Projects Accounting module.
Project class type codes include the following:
• R – Revenue
• E – Expense
• L – Liability
• A – Asset
• F – Fund Balance
Project class type codes are associated with project items in the GL Class Type field on the Item Codes (PAIC) form. The class type determines both the types of GL accounts that may be entered on a project line item, and also to which field on the project line item the amounts are to be accumulated.
The project class type code associated with a given project item is displayed in the GL Class field on the following forms:
• Budget Line Items (PABL)
• Budget Line Items Inquiry (PALI)
Project class type codes are defined and delivered by Ellucian and stored in the PROJECTS.CLASS.TYPES record of the CF.VALCODES file.
Purge Register Types
Purge register type codes specify the type of voucher purge register that you want to create on the Voucher Purge Register (VPRG) form. Colleague will only select those vouchers whose statuses match the register type you enter (along with any other selection criteria you select). The register types codes are as follows:
• F – Full. Selects all vouchers
• O – Outstanding. Selects only those vouchers whose status is currently outstanding
• P – Paid. Selects only those vouchers whose status is paid
• N – New. Selects only those vouchers that are approved or voided, or vouchers that were approved by had their due dates changed after approval
• V – Voided. Selects only those vouchers that are currently voided
• Z – Zero Balance. Selects only those vouchers with a zero balance
• X – Canceled. Selects only those vouchers whose status is canceled
• Y – Canceled or Voided. Selects only those vouchers whose status is either canceled or voided
434tting Started with Purchasing and Accounts Payable | Defining Codes in Colleague Finance

Ge
Purge register type codes are defined and delivered by Ellucian and stored in the PURGE.REG.TYPES record of the CF.VALCODES file.
Recurring Voucher Statuses
Recurring voucher statuses indicate the current status of a recurring voucher during processing in the Accounts Payable module. Valid recurring voucher statuses are as follows:
• N – Not Approved
• O – Outstanding
• V – Voided
• C – Closed
• X – Canceled
Recurring voucher status codes are used in the header block of most forms available on the Recurring Vouchers (RCV) menu to indicate the recurring voucher’s current status.
Recurring voucher statuses codes are defined and delivered by Ellucian and stored in the RC.VOUCHER.STATUSES record of the CF.VALCODES file.
Register Types
Register types codes indicate the choices for the types of vouchers you can select for a specific voucher register type. The Register Type field, which is validated by this code table, appears on the Vendor Register (VREG) form.
You can run any of the following eight types of voucher registers:
• F – Full. Selects all vouchers that meet the selection criteria
• O – Outstanding. Selects only those vouchers that currently have a status of “Outstanding”
• P – Paid. Selects only those vouchers that currently have a status of “Paid”
• N – New. Selects only those vouchers that
• Have a status of “Approved” or “Voided”
• Were previously approved but had their due dates changed after approval
• Have not been previously printed on a new voucher register
• V – Voided. Selects only those vouchers that currently have a status of “Voided”
• Z – Zero balance. Selects only those vouchers that currently have a zero balance
• X – Canceled. Selects only those vouchers that currently have a status of “Canceled”
435tting Started with Purchasing and Accounts Payable | Defining Codes in Colleague Finance

Ge
• Y – Canceled or Voided. Selects only those vouchers that currently have a status of either “Canceled” or “Voided'
Register type codes are defined and delivered by Ellucian and stored in the REGISTER.TYPES record of the CF.VALCODES file.
Requisition Priorities
Requisition priorities codes define the range of possible priorities your institution assigns to requisitions, to assist in timely processing of constituent requests.
Requisition priorities codes are defined by your institution. Sample entries might include the following:
• 1 – Critical; top priority
• 2 – Important; required
• 3 – Desired; makes job easier
• F – Future; will be needed
• E – Existing supply renewal
The Priority field, which is validated by this code table, is displayed on the Requisition Maintenance (REQM) and Requisition Inquiry (RINQ) forms.
You can define and maintain requisition priorities codes using the Validation Codes (VAL) form. These codes are stored in the REQ.PRIORITIES record of the CF.VALCODES file.
Requisition Statuses
Requisition statuses indicate the current status of a requisition in the Purchasing module.
Valid requisition statuses are as follows:
• U – In Progress (Unfinished)
• N – Not Approved
• O – Outstanding
• P – PO Created
• G – RFG Created
The Req Status field, which is validated by this code table, is displayed on the following forms:
• Requisition Maintenance (REQM)
• Requisition Inquiry (RINQ)
• Requisition Item Maintenance (RQIM)
436tting Started with Purchasing and Accounts Payable | Defining Codes in Colleague Finance

Ge
• Requisition Item Inquiry (RIIN)
• Requisition Single Print (RQSP)
• Req GL Line Item Tax Inq (RETI)
Requisition statuses are defined and delivered by Ellucian and stored in the REQ.STATUSES record of the CF.VALCODES file.
Report Format Rounding Factors
Report format rounding factor codes indicate the manner in which you want to round dollar amounts for general ledger reports.
Valid report format rounding factors include the following:
• C – Cents
• D – Dollars
• T – Thousands of Dollars
Report format rounding factor codes are used on the Report Format Maintenance (RFMT) form.
Report format rounding factor codes are defined and delivered by Ellucian and stored in the RPTFMT.ROUNDING.FACTORS record of the CF.VALCODES file.
Scenario Column Calculations
Scenario column calculations indicate the amounts Colleague is to use for specific budget column calculations.
Valid scenario column calculations codes and their descriptions are as follows:
• BA – Basic Amount
• PB – Position Budget
• C1 – Comp 1 Amount
• C2 – Comp 2 Amount
• C3 – Comp 3 Amount
• P – Prior Version Amount
• F – Formula Last Used
Scenario column calculations codes are used internally by the Modify Active Budget Scenario (MABS) form.
Scenario column calculations codes are defined and delivered by Ellucian and stored in the SCENARIO.COLUMN.CALCULATIONS record of the CF.VALCODES file.
437tting Started with Purchasing and Accounts Payable | Defining Codes in Colleague Finance

Ge
Share Distribution Calculation Methods
Share distribution calculation methods codes are codes with associated subroutines that set a value of a share for investment into a budget pool and calculate the number and value of shares during the distribution cycle. The codes and subroutines are also used to determine which invested dollar amount is the basis for the current distribution of income, gains and losses, reinvested appreciation, and expenses.
The Ellucian provided codes and subroutine pairs are listed below:
Note: You cannot modify the Ellucian-provided codes and subroutines. You have the option to define your own codes and/or subroutines to better meet your needs.
• 01 – Beginning Value: The beginning share value is the share value for the pool as of the last posted distribution. The beginning distribution value is the number of shares in the investment pool as of the end of the last distribution cycle.
• 02 – Ending Value: The ending share value is determined and entered by the user during the distribution process. The ending distribution value is the number of shares in the investment pool at the beginning of the distribution cycle plus any changes in the number of shares which occurred as a result of any new investment activity during the current distribution cycle.
• 03 – Average Value: The average share value is calculated by adding the beginning share value and the ending share value together and dividing by 2. The average distribution value is calculated by adding the number of shares at the beginning of the cycle and the number of shares at the end of the cycle together and dividing by 2.
• 04 – Average Daily Balance: The average daily balance calculation can be used only in the cash pool distribution process. It is calculated based on the amount and length of time the deposits to the cash pool remain invested.
You can define a code and create your own subroutine to be used during the distribution cycle if none of the above options fit your needs.
Both the Distr. Invest. Pool Activity (DIPA) and the Distribute Cash Pool Activity (DCPA) forms use these calculation codes and subroutines.
Share distribution calculation methods are defined on the Define Distr Calc Method (DDCM) form and are stored in the SHARE.CALCS file.
Ship To Codes
Ship to codes are optional Purchasing module codes that let you define a separate address for each of the locations at your institution to which purchased goods are shipped. You can then assign the desired ship to code to each of your requisitions, purchase orders, and blanket purchase orders. A ship to code includes:
• Name of the person or location to which goods are shipped.
• Address of the location (can be a maximum of two lines).
438tting Started with Purchasing and Accounts Payable | Defining Codes in Colleague Finance

Ge
• City, state, and zip code of location (city and state are validated against zip code).
• Telephone number (with validated area code) and extension.
Example ship to codes might include the following:
• 01 – West Campus
• 02 – Computer Center
• 03 – Campus Receiving
• DS – District Service Center
• LB – Central Library
You can enter a ship to code in the Ship To field on the following forms in the Purchasing module:
• For a requisition, on the Requisition Maintenance (REQM) form.
• For a purchase order, on Purchase Order Maintenance (POEM) form.
• For a blanket purchase order, on Blanket PO Maintenance (BPOM) form.
For purchasing documents that have been created and saved, you can view ship to code information in the Ship To field on the following inquiry-only forms:
• For a requisition, on the Requisition Inquiry (RINQ) form.
• For a purchase order, on the Purchase Order Inquiry (PINQ) form.
• For printing an individual purchase order, on the Purchase Order Single Print (POSP) form.
On the REQM, RINQ, POEM, PINQ, and BPOM forms, a one line field displays only the code and description. On these forms, however, the Ship To field also provides access to a detail form where you can modify, or simply view, your shipping information for an individual purchasing document. For each type of document, the detail form displays the following:
• In form header block: purchasing document number, status and date, and vendor name.
• In body: ship to code (name, complete address, city/state/zip, and phone number).
On the Purchase Order Single Print (POSP) form, the complete shipping location is displayed, including the name, address, city, state, and zip code.
Note: You can also set up a default ship to code on the PU Parameters Definition (PUPD) form. Use a default ship to code if your institution has only one shipping and receiving location. For more information, see “Default ship to code/address” on page 236.
Ship To codes are created and maintained using the Ship To Codes (STCF) form and stored in the SHIP.TO.CODES file.
439tting Started with Purchasing and Accounts Payable | Defining Codes in Colleague Finance
Ge
Ship Via Codes
Ship via codes are optional Purchasing module codes representing methods of shipment by which goods you purchase are shipped to you. These may include overnight delivery, air freight, or local vendor truck delivery.
In the Purchasing module, you assign a ship via code to individual requisitions, purchase orders, and blanket purchase orders. The ship via code remains associated with a purchasing document through the receiving process.
At the time the goods are received, the Arrived Via field on the Purchase Order Receiving (PORC) form also uses the same ship via codes to indicate how the goods arrived at their destination. When goods are returned to the vendor, the Return Via field is also validated by the ship via codes.
Ship Via codes are created and maintained using the Ship Via Codes (SVIA) form and are stored in the SHIP.VIAS file.
Stock Issue Charges
Stock issue charge codes indicate, for stock issues associated with a work order, the work order GL account type to which the stock issue should be charged. Stock issues may be directly charged to one of three work order GL account types, which these stock issue charge codes represent:
• C – Material Ctl Acct (the materials control account)
• D – Department (the department expense account)
• P – Plant (the plant expense account)
If the work order does not contain a department expense account, Colleague automatically selects the plant expense account from the work order for the stock issue charge. The materials control account is not an option if the work order does not contain a department expense account.
Stock issue charge codes are entered on Stock Issues (STIM) form and on the Stock Issues Return (SKIR) form, for those stock issues that are associated with a work order.
Stock issue charge codes are defined and delivered by Ellucian and stored in the SI.CHARGES record of the CF.VALCODES file.
SP Import Record Types
SP import record types codes define the record layout of the sequential imported ASCII file created by the Windows-based ecGrant software on the Import Parameter Form (PAIP) form.
Each line in the ASCII file is tagged with a “record type” that indicates the kind of information in that line. For example, the first line for each project contains general
440tting Started with Purchasing and Accounts Payable | Defining Codes in Colleague Finance

Ge
information such as the project number, title, start and end dates, etc., and is tagged with the record type [HEAD].
SP import record type codes include the following:
• HEAD – Header Record
• PERD – Budget Period Record
• PDCS – Project Detail Cost Share
• DETL – Detail Record
• DTTL – Detail Total Record
• GTTL – Grand Total Record
• END – End Record
SP import record types codes are defined and delivered by Ellucian and stored in the SP.IMPORT.REC.TYPES record of the CF.VALCODES file.
States 1099
The STATES.1099.ORG file to complies with Ellucian’s multiple EIN code construct. The STATES.1099.ORG file in Colleague Finance contains a two part key of state and organization ID. The state values correspond to the STATES file.
Use the 1099 State Information (TNST) form to add enter all of the state/organization combinations needed to process 1099 work files. The STATES.1099.ORG file delivered unpopulated.
Each voucher that is marked for 1099 processing contains a location code, which is a state. This information is printed on the 1099 form in box 17. So, there must be a value for that state and organization ID in the STATES.1099.ORG file in order for the voucher to be included in the 1099 work files.
State/Organization Combinations for 1099 Processing
Every voucher marked for 1099 processing contains a location code, which is a state. Colleague must have a value for that state and organization ID in order to include the voucher in the 1099 work files.
All of the state/organization combinations needed to process 1099 work files must be entered into the STATES.1099.ORG file. Use the 1099 State Information (TNST) form to add data to the STATES.1099.ORG file. Ellucian does not deliver any data in this file.
The STATES.1099.ORG file contains a two part key. The two parts are state and organization ID. The state values correspond to the values stored in the STATES file.
441tting Started with Purchasing and Accounts Payable | Defining Codes in Colleague Finance
Ge
Stock Issue Statuses
Stock issue statuses codes indicate the valid statuses for a stock issue.
Stock issue status codes include the following:
• O – Outstanding
• F – Filled
• X – Posted
Stock issue statuses codes are used on the following forms:
• Stock Item FIFO Inquiry (SIFI)
• Stock Issues (STIM)
• Stock Issue Items Maintenance (SIIM)
• Stock Issue Return (SKIR)
• Stock Return Quantity (SKQR)
Stock issue statuses codes are defined and delivered by Ellucian and stored in the STI.STATUSES record of the CF.VALCODES file.
Statement Debit/Credit Types
Statement debit/credit type codes are used to indicate whether a line in a financial statement is a debit line (a line that normally contains accounts that have debit balances) or a credit line (a line that normally contains accounts that have credit balances). Credit/debit type information is needed for the correct calculation of dollar amounts for statement line items, including both detail and total line types.
Statement credit/debit type codes include the following:
• D – Debit
• C – Credit
Statement debit/credit type codes are used on the Statement Format Maintenance (SFMT) form in the General Ledger module.
Statement debit/credit type codes are defined and delivered by Ellucian and stored in the STMT.DB.CR.TYPES record of the CF.VALCODES file.
Statement Lines Types
Statement line type codes indicate the manner in which a statement line is formatted.
Statement line type codes are:
442tting Started with Purchasing and Accounts Payable | Defining Codes in Colleague Finance

Ge
• D – Detail
• H – Header
• T – Total
Statement line type codes are used on the Statement Format Maintenance (SFMT) form in the General Ledger module.
Statement line type codes are defined and delivered by Ellucian and stored in the STMT.LINES.TYPES record of the CF.VALCODES file.
T4A AR/CR
T4A AR/CR codes allows Canadian institutions to specify the accounting method they use to record tuition assistance on the T4A Set Up (TASU) form.
T4A AR/CR codes include the following:
• A – AR
• C – CR
T4A AR/CR codes are defined and delivered by Ellucian and stored in the T4A.AR.CR record of the CF.VALCODES file.
T4A Deferred Flags
T4A deferred flag codes identify the classification of installment or annuity payments under a Deferred Profit Sharing Plan (DPSP). These codes have been specified by the Canada Customs and Revenue Agency for reporting on T4A magnetic media.
T4A deferred flag codes include the following:
• 0 – Not Required
• 1 – Active Deferred
• 2 – Revoked Deferred
T4A deferred codes are entered on the Vendor Tax Information (VNTX) form, which is available as a detail form from the Tax Information field on the Vendor Maintenance (VEND) form.
T4A deferred flags codes are defined and delivered by Ellucian and stored in the T4A.DEFERRED.FLAGS record of the CF.VALCODES file.
443tting Started with Purchasing and Accounts Payable | Defining Codes in Colleague Finance

Ge
T4A Technical Language
T4A technical language codes allow Canadian institutions to specify wether a technical contact speaks English or French for reporting on T4A magnetic media to the Canada Customs and Revenue Agency.
T4A technical codes include the following:
• E – English
• F – French
T4A technical language codes are entered on the T4A Institutional Contacts (TAIC) form.
T4A technical language codes are defined and delivered by Ellucian and stored in the T4A.TECH.LANG record of the CF.VALCODES file.
Tax Form Return Status
Tax form return status codes indicate the possible statuses, or stages, a tax form may pass through after generation, through the modification and error correction process, until it is ready to be sent to the revenue authority (Internal Revenue Service or Revenue Canada).
For example, these codes are used in 1099-MISC tax forms processing (performed at the end of each calendar year) to indicate whether a tax return is a new or corrected return. In this code table, the additional processing (activated by the special processing code) calls a subroutine that gives Colleague further instructions on how to calculate the totals for the tax return; for example, whether to subtract (“back out”) the previous figures before adding in the newly generated totals.
The Return Type field, which is validated by this code table, appears on the 1099-MISC Analytical Report (MANA) form and on the T4A Analytical Report (TAAR) form.
The possible status codes for tax form returns include the following:
• N – New
• G – 1 Step Correction
• C – 2 Step Correction
• U – Unchanged
Special Processing Function: The special processing code for this code table is a numeric character, attached to each code, which calls the subroutine that completes the process indicated by this code.
Tax form return status codes are defined and delivered by Ellucian and stored in the TAX.FORM.RETURN.STATUS record of the CF.VALCODES file.
444tting Started with Purchasing and Accounts Payable | Defining Codes in Colleague Finance

Ge
Tax Group Codes
Tax group codes are user-defined codes that differentiate Canadian T4A Retirement Allowance tax codes from all other types of T4As, and ensure that amounts are placed in the correct boxes on the T4A form.Tax group codes are used only for Canadian T4A forms.You define as many codes as you need in the TAX.GROUP.CODES code table, to separate different types of employee taxable income by “tax group.”
In T4A processing, vouchers to your insurance or retirement savings providers will usually be associated with individual employees to track the benefits accrued to those employees through premium payments. If the benefit involved is taxable, and your institution must report the income on a T4A tax form, you will issue those T4A tax forms to the affected employees (rather than the vendor). So that you can group different employee income amounts for placement in the different boxes on the T4A tax form, you can separate the different types of employee taxable income by “tax group.”
The typical tax group codes you would define include the following:
• RET – T4A Retirement Income
• OTH – T4A Other Income
Tax group codes are associated with employees on the Voucher Associated Employee (VOAE) form in the Accounts Payable module.
Special Processing Function: This code table is connected to the T4A preparation process, in which it acts as the link to tell Colleague the box on the T4A form in which this amount should be placed. The special processing code calls a subroutine, which puts the amount on this line in the correct box on the form.
Colleague Finance performs no validation of data entered in special processing. You should check your entries carefully to ensure they are correct.
Note: You can define and maintain tax group codes using the Validation Code (VAL) form. These codes are stored in the TAX.GROUP.CODES record of the CF.VALCODES file.
Tax Types
Tax type codes identify types of taxes based on whether there is a rebate or a refund involved.
The codes in the TAX.TYPES code table include the following:
• B – Rebate
• F – ITC/Refund 6
The Tax Type field is displayed on several Purchasing and Accounts Payable module forms that concern taxes, including the following:
• Requisition GL Line Item Tax Maintenance (RTXM)
445tting Started with Purchasing and Accounts Payable | Defining Codes in Colleague Finance

Ge
• Requisition GL Line Item Tax Inquiry (RETI)
• PO GL Line Item Tax Maintenance (POGT)
• PO GL Line Item Tax Inquiry (PGLI)
• [Voucher] GL Line Item Tax Maintenance (VGLT)
• [Recurring Voucher] GL Line Item Tax Maintenance (RGLT)
Tax types are defined and delivered by Ellucian and stored in the TAX.TYPES record of the CF.VALCODES file.
Trades
Trades codes represent categories of labor professions that are assigned to physical plant employees and to work orders.
Examples of trades codes might include:
• PAIN – Painter
• ELEC – Electrician
• PLUM – Plumber
• HAND – Handyman
• LAND – Landscaper
Trades codes are used on most work order forms, and on most physical plant employee forms.
You can define and maintain trades codes on the Trades (TRDM) form. Trades codes are stored in the TRADES file.
Units of Issue
Unit of issue codes are used throughout the Purchasing, Accounts Payable, and Inventory modules to indicate the type of unit in which a particular item of merchandise is ordered and purchased. You can use the unit of issue to provide detail on how a line item is being ordered.
Examples of units of issue codes include the following:
• BX – Box
• EA – Each
• CT – Carton
• CA – Case
• DZ – Dozen
446tting Started with Purchasing and Accounts Payable | Defining Codes in Colleague Finance

Ge
• GL – Gallon
You can enter a unit of issue on all requisitions, purchase orders, and vouchers, although it is not a required field. Whether you need to record units of issue is determined by the amount of variability in the quantities and sizes of the merchandise a given vendor offers.
Ellucian provides a list of the unit of issue codes developed by the National Institute of Government Purchasing (NIGP). If your institution has other unit of issue codes, the codes furnished by Ellucian will be added to the codes already in your system.
Unit of issue codes are created and maintained using the Unit Issues Codes (UNIM) form and are stored in the UNIT.ISSUES file.
Valuation Methods
Valuation method codes are used on the Asset Valuation Maintenance (VALM) form to identify the method used to place a dollar value on the asset tracked through the Fixed Assets module.
Examples of valuation methods codes might include the following:
• AP – Appraisal
• BB – Blue Book Value
• MV – Market Value
• PP – Purchase Price
• SW – Scrap Weight Value
Valuation method codes are created and maintained using the Valuation Code Definition (AVCD) form and are stored in the VALUATION.METHODS file.
Vendor Register Types
Vendor register types are used when you are printing a vendor register to indicate whether the vendor register is to select all (or any) vendors, or only those vendors that have been marked as available for purging.
Vendor register type codes are used in the Register Type field on the Vendor Register (VENR) form.
The codes in the VEN.REGISTER.TYPES code table are:
• P – Available to purge
• A – Any vendor
Vendor register types are defined and delivered by Ellucian and stored in the VEN.REGISTER.TYPES record of the CF.VALCODES file.
447tting Started with Purchasing and Accounts Payable | Defining Codes in Colleague Finance

Ge
Vendor Miscellaneous Codes
Vendor miscellaneous codes are used to indicate any special characteristics of vendors that your institution wants to track, for sorting or reporting purposes.
Examples are large sales volume vendors, or vendors that give trade discounts.
Fields validated by vendor miscellaneous codes are displayed on the following forms:
• Vendor Maintenance (VEND)
• Vendor Register (VENR)
• Vendor Year to Date Report (VENY)
You can define and maintain vendor miscellaneous codes using the Validation Code (VAL) form. These codes are stored in the VENDOR.MISC.CODES record of the CF.VALCODES file.
Vendor Terms
Vendor terms codes store information related to the terms you are offered for payment of a vendor’s invoice. From these vendor terms, Colleague calculates on every voucher the date an invoice must be paid to obtain a discount.
For example, for the vendor term noted as 2/10 Net 30 (which offers a two percent discount on the total invoice amount if the total is paid within ten days of receipt, with the net invoice total due in 30 days), Colleague calculates the due date as ten days, calculates the discount based on the total voucher amount, and automatically enters the discount on the voucher.
Because of the due date calculation functionality built into vendor terms codes, you can use this code even for vendors who do not offer a discount but whose invoices are due in 30 days. If you assign this 30-day code to a vendor or place it on a purchase order, Colleague automatically calculates the 30-day due date and places it in the Due Date field on the voucher. This also facilitates your payment selection and reporting processes, since you can select vouchers based on this calculated due date.
Examples of vendor terms codes include the following:
• 01 – 1/10 NET 30
• 02 – 2/10 NET 30
• 03 – 3-10-30
• 30 – Net 30 Days
• 43 – Negotiated Terms
• CA – Cash Only
Vendor terms codes are displayed on most forms in the Purchasing and Accounts Payable modules. Vendor terms codes are associated with specific vendors on the Vendor Maintenance (VEND) form.
448tting Started with Purchasing and Accounts Payable | Defining Codes in Colleague Finance
Ge
Vendor terms codes are created and maintained on the Vendor Terms (VTMF) form and are stored in the VENDOR.TERMS file.
Vendor Types
Vendor type codes indicate a unique characteristic of a vendor that could affect the vendor’s purchasing status. Your institution may have special operating considerations that will affect your use of this code file. For example, you might have a vendor that must be designated as minority-owned, or as an in-state or in-county business. This designation can have important reporting consequences for your institution, particularly if you are in the public sector.
You can assign a vendor type to a specific vendor on the Vendor Definition (VEND) form. That vendor type displayed on requisitions, purchase orders, or vouchers created for that vendor.
Examples of vendor type codes might include the following:
• MB – Minority-owned business
• SB – Small business
• LB – Local business
• TR – Travel services
• JA – Janitorial supplies
Colleague uses the vendor type code for informational and reporting purposes only. The vendor type can also be used for sorting and reporting, when you use the Additional Selection Criteria option available from all the Purchasing and Accounts Payable modules’ reporting forms or use a query language statement.
Vendor type codes are created and maintained on the Vendor Types (VTYF) form and are stored in the VENDOR.TYPES file.
Voucher Statuses
Voucher statuses indicate the current status of a voucher in the Accounts Payable module in Colleague Finance and of an AR voucher in the Accounts Receivable module of Colleague Student. Valid voucher statuses are as follows:
• U – In Progress (Unfinished)
• N – Not Approved
• O – Outstanding
• P – Paid
• R – Reconciled
• V – Voided
449tting Started with Purchasing and Accounts Payable | Defining Codes in Colleague Finance

Ge
• X – Canceled
When you access most forms listed on the Voucher Maintenance (VOU) menu, the form’s header block displays the voucher’s current status in the Status field. The Status field is validated against this code table.
Voucher statuses are defined and delivered by Ellucian and stored in the VOU.STATUSES record of the CORE.VALCODES file.
Work Order Chargeback Types
Work order chargeback codes are used to indicate whether the Work Order Chargeback (WOCB) form should select assigned or completed work orders:
• Assigned – the WOCB form selects work orders with pending labor and materials expenses and whose status is “Assigned.” For assigned work orders you can run the process in “Report Mode” only.
• Completed – the WOCB form selects work orders with pending labor and materials expenses and whose status is “Completed.” These expenses are available for posting to the general ledger.
Work order chargeback type codes are defined and delivered by Ellucian and stored in the WO.CB.TYPES record of the CF.VALCODES file.
Work Order Rates
Work order rates codes represent the are the hourly dollar amounts paid for labor on a work order. These rates are associated with physical plant employees on the Physical Plant Employees (PPEM) form, and default onto the Labor Expense Entry (WOLE) form when you assign an employee to a labor item.
Examples of work order rates codes include the following:
• 0001 – Step 1
• 0002 – Step 2
• 0003 – Step 3
• 0004 – Step 4
• 0005 – Step 5
Use the Work Order Rates (WORM) form to create and maintain work order rates codes. These codes are stored in the WO.RATES file.
450tting Started with Purchasing and Accounts Payable | Defining Codes in Colleague Finance
Ge
Work Order Types
Work order types codes categorize the kinds of work managed through the Physical Plant module. Each work must have an associated work order type. Work order types supply the following information:
• A labor GL account – This is a contra-expense type account used by the Physical Plant department to recover labor costs charged back to the requesting department.
• A materials GL account – This is an asset type account used as a clearing account for material item costs.
• A print subroutine – If you do not enter one, Colleague uses a standard Ellucian-supplied batch print routine.
Examples of work order types might include the following:
• 01 – General Unrestrd
• 10 – General Maintenance
• 15 – General Repairs
• CP – Carpentry
• IC – Computer Installation
• SM – Security Maintenance
Work order types are associated with work orders on the Work Order Entry (WORE) form. The work order type associated with a specific work order is displayed on most work order maintenance forms in the Physical Plant module. In addition, work order type codes are displayed on the following purchasing forms:
• PO Item Maintenance (POIM)
• Requisition Item Maintenance (RQIM)
Work order type codes are defined on the Work Order Types (WOTM) form and stored in the WO.TYPES file.
Work Order Rate Types
Work order rate type codes are used to categorize the various labor rates associated with work orders. A rate type code is a required component of a work order rate record. You must define at least one rate type code before you can create a work order rate record.
Examples of work order rate type codes might include the following:
• UL – Unskilled Labor
• SL – Skilled Labor
• SI – Student Intern
• OC – Outside Contractor
451tting Started with Purchasing and Accounts Payable | Defining Codes in Colleague Finance

Ge
• JRNY – Journeyman
• MSTR – Master
• APPR – Apprentice
Work order rate types codes are used on the following forms:
• Work Order Rates (WORM)
• Labor Expense Entry (WOLE)
You can define and maintain work order rate type codes using the Validation Code (VAL) form. These codes are stored in the WOR.TYPES record of the CF.VALCODES file.
Work Order GL Use Codes
Work order GL use codes define the types of work order-related GL accounts you can select when creating requisitions and purchase orders to be charged to a work order.
Use this code table only if your institution is using the Physical Plant module. These codes represent the following three different types of general ledger account numbers that can be associated with a work order:
• D – Department expense account (DEPT.EXP.ACCT in WORK.ORDERS file)
• P – Plant expense account (PLANT.EXP.ACCT in WORK.ORDERS file)
• C – Physical plant control account (PP.CONTROL.ACCT in WO.TYPEScode file)
Work order GL use codes are displayed in the [Work Order/]Type field on the following requisition and purchase order forms:
• Requisition Item Maintenance (RQIM)
• Requisition Item Inquiry (RIIN)
• PO Item Maintenance (POIM)
• PO Item Inquiry (PIIN)
When you enter a code, the GL account associated with the code in the WORKORDERS file will be defaulted to the PO GL number with a 100% distribution. However, if the work order department expense account is blank, the plant expense account is used. This field will be skipped and no entry will be allowed.
You cannot override a defaulted GL account number. The GL account is verified; if it is invalid, you will need to enter a new work order number. Neither the GL account number nor its distribution can be changed. If you do not enter this code, you can enter only one GL account in the GL window. The distribution will be 100%, and this account can be changed as long as the line item is outstanding.
Work order GL use codes are defined and delivered by Ellucian and stored in the WORK.ORDER.GL.USE.CODES record of the CF.VALCODES file.
452tting Started with Purchasing and Accounts Payable | Defining Codes in Colleague Finance

Ge
Work Order Statuses
Table 76 illustrates the different statuses a work order may have, and explains what actions may be performed for each status.
• R – Requested
• A – Assigned
• C – Completed
• X – Posted
Table 76: Work Order Statuses
When the Work Order Status Is You Can You Cannot
Requested • Maintain any information on the WORE form.
• Access the WOAM form.
• Create and maintain labor line items on the WOLU and WOLE forms.
• Create material line items through the POIM and STIM forms.
• Purge the work order.
Assigned • Maintain any information on the WORE form.
• Maintain the Start Date on the WOAM form.
• Create and maintain labor line items on the WOLU and WOLE forms.
Note: The work order must have a Start Date.
• Create and maintain material line items through the POIM and STIM forms.
• Change the work order status back to “Requested” by deleting the Start Date and the Assigned Date on the WOAM form.
• Perform chargebacks.• Purge the work order.
Completed • Maintain any information on the WORE form.
• Create and maintain labor line items on the WOLU and WOLE forms.
• Perform chargebacks.• Change work order status back to
“Assigned” by deleting the Completed Date on the WOAM form.
• Purge the work order if it cannot be posted (does not contain a department expense account).
• Create and maintain material line items through the POIM and STIM forms.
453tting Started with Purchasing and Accounts Payable | Defining Codes in Colleague Finance
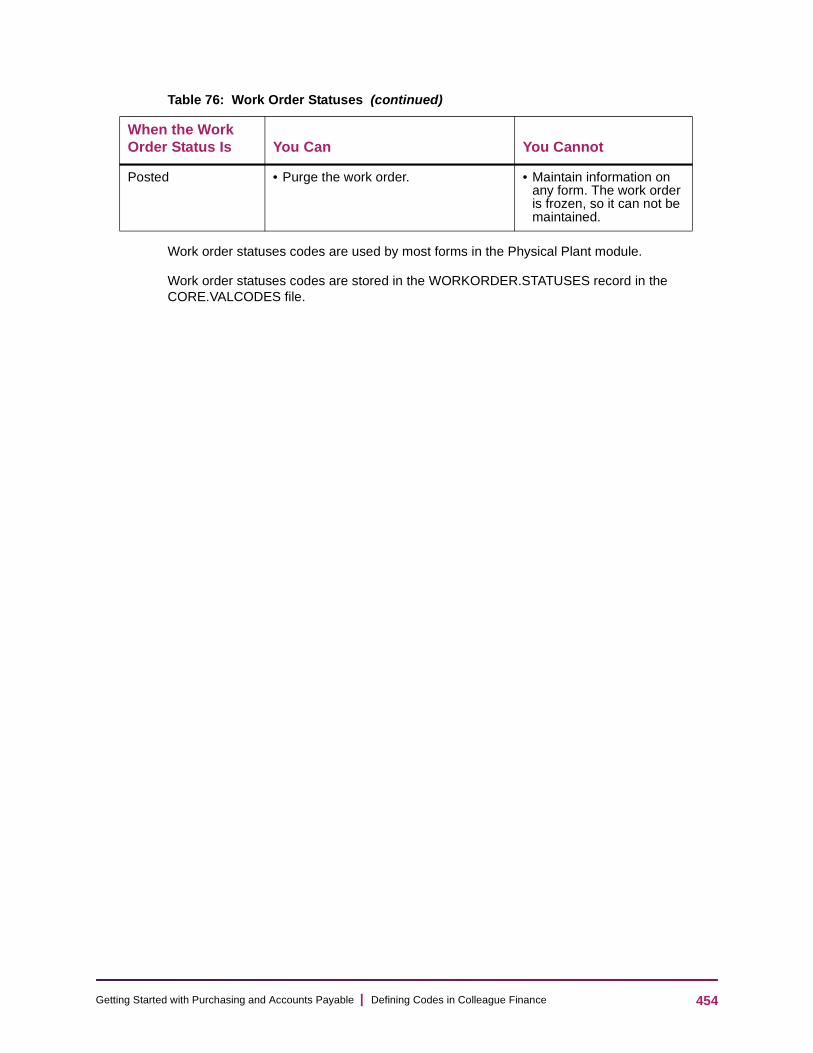
Ge
Work order statuses codes are used by most forms in the Physical Plant module.
Work order statuses codes are stored in the WORKORDER.STATUSES record in the CORE.VALCODES file.
Posted • Purge the work order. • Maintain information on any form. The work order is frozen, so it can not be maintained.
Table 76: Work Order Statuses (continued)
When the Work Order Status Is You Can You Cannot
454tting Started with Purchasing and Accounts Payable | Defining Codes in Colleague Finance