getting started guide - the global leader in dds. your...
TRANSCRIPT
Using Wireshark™
with
RTI® Connext
Getting Started GuideVersion 1.2.3.20120229
© 2005-2012 Real-Time Innovations, Inc. All rights reserved.
Printed in U.S.A. First printing. Feb. 2012.
TrademarksReal-Time Innovations and RTI are registered trademarks of Real-Time Innovations, Inc. All other trademarks used in this document are the property of their respective owners.
Copy and Use RestrictionsNo part of this publication may be reproduced, stored in a retrieval system, or transmitted in any form (including electronic, mechanical, photocopy, and facsimile) without the prior written permission of Real-Time Innovations, Inc.RTI Connext software is furnished under and subject to the RTI software license agreement. The software may be used or copied only under the terms of the license agreement.Wireshark is Open Source software released under the terms of the GNU General Public License (version 2) as published by the Free Software Foundation.
Technical Support Real-Time Innovations, Inc. 232 E. Java Drive Sunnyvale, CA 94089 Phone: (408) 990-7444 Email: [email protected] Website: https://support.rti.com/
Contents
1 Introduction.................................................................................................1-11.1 Available Documentation..........................................................................................................1-31.2 Reading Guide ............................................................................................................................1-31.3 How to Get Support...................................................................................................................1-4
2 Installation...................................................................................................2-12.1 Before Installation.......................................................................................................................2-12.2 Installing Wireshark on Windows Systems ............................................................................2-22.3 Installing Wireshark on Linux (Red Hat) Systems ................................................................2-22.4 Installing Wireshark on Linux (Debian) Systems ..................................................................2-22.5 Installing Wireshark on Solaris Systems .................................................................................2-32.6 Uninstalling Wireshark..............................................................................................................2-3
3 Starting Wireshark.......................................................................................3-1
4 Capturing RTPS Packets .............................................................................4-1
5 Analyzing RTPS Packets .............................................................................5-15.1 RTPS Submessage Types ...........................................................................................................5-25.2 Displaying Packets .....................................................................................................................5-2
5.2.1 Using a Display Filter....................................................................................................5-45.2.2 Color-Coding Packets .................................................................................................5-10
5.3 Analyzing Packets from Connext Applications...................................................................5-115.3.1 Analyzing the User Data Sample Trace....................................................................5-125.3.2 Analyzing the Discovery Data Sample Trace ..........................................................5-16
iii

6 Practical Uses with RTI Applications..........................................................6-16.1 Debugging Discovery Problems.............................................................................................. 6-16.2 Visualizing Your System........................................................................................................... 6-36.3 Providing Information to RTI Support................................................................................... 6-5
iv
1. Introd
uctio
n
Chapter 1 Introduction
Wireshark is a network-packet analyzer that supports many network protocols, includ-ing Real-Time Publish-Subscribe (RTPS), the wire protocol used by RTI® Connext (for-merly RTI Data Distribution Service) middleware.
Wireshark can be used to capture and analyze RTPS packets from Connext applications. It supports RTPS 2.1 (and lower) and is specifically tailored to make RTPS packet analysis easier by including:
❏ A set of predefined filters to quickly select different groups of packets from the RTPS protocol.
❏ A column in the Packet List that shows the GUID Prefix for each RTPS packet. (This value uniquely identifies a DomainParticipant within a Domain.)
❏ Coloring rules that highlight important RTPS packets. Packets not strictly related to Connext traffic are grayed-out.
Network packet and traffic analyzers are used during application development and dis-tributed system configuration to monitor the packets over the network. You can use fil-ters to capture specific types of packets, then analyze the captured packets.
This manual will help you use Wireshark to analyze RTPS packets. This analysis will give you information on two levels:
❏ A high-level look at the RTPS submessages that are flowing between your Con-next applications.
❏ A detailed look at the contents of individual packets.
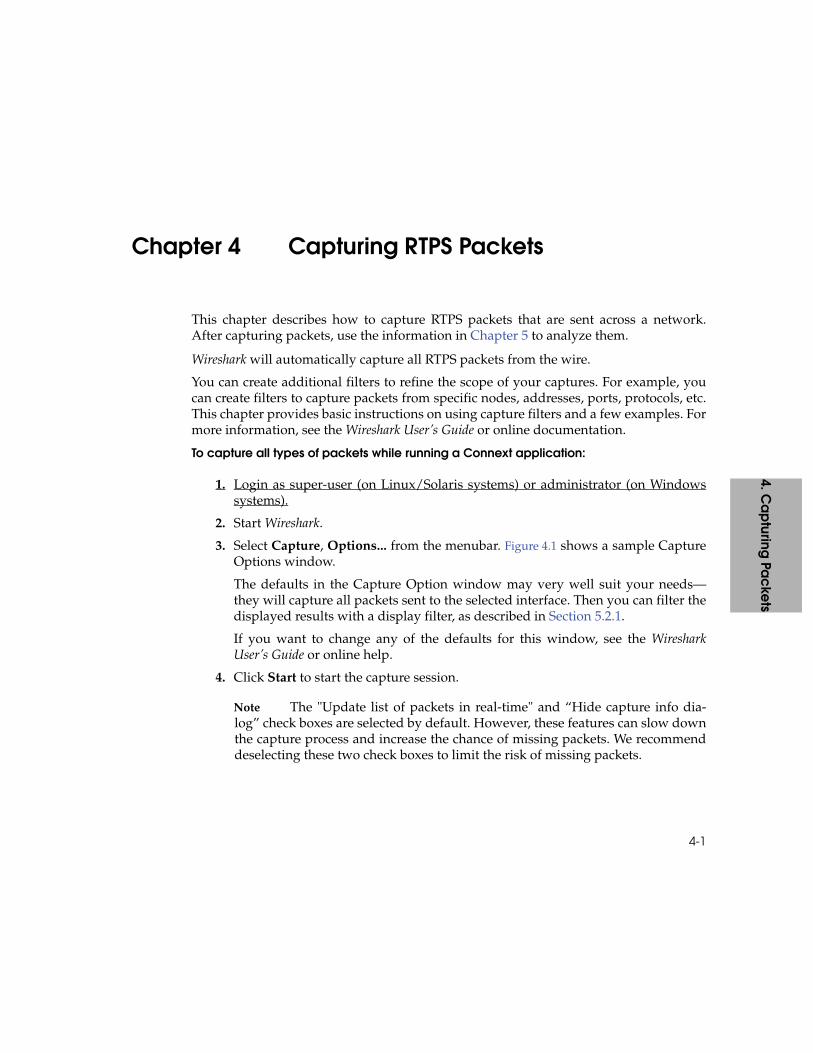
Wireshark’s main window makes it easy to see both views. Figure 1.1 shows the main window and points out some important features.
1-1
Introduction
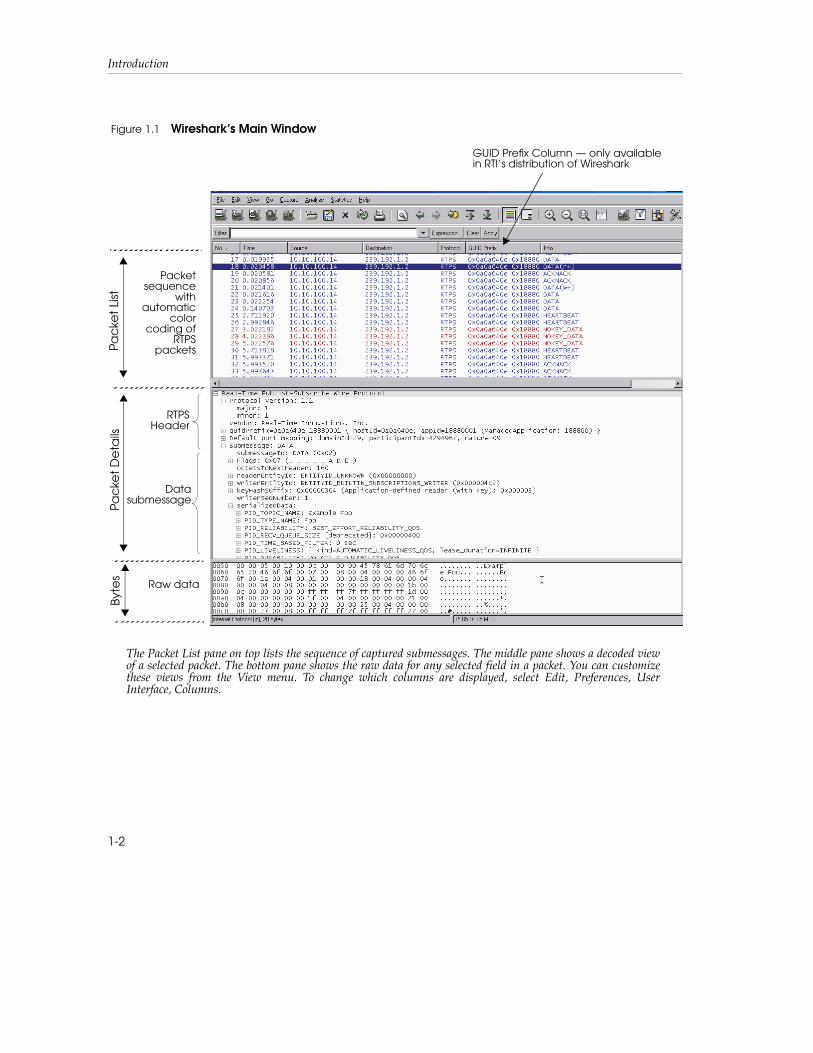
GUID Prefix Column — only available in RTI’s distribution of Wireshark
Figure 1.1 Wireshark’s Main Window
The Packet List pane on top lists the sequence of captured submessages. The middle pane shows a decoded view of a selected packet. The bottom pane shows the raw data for any selected field in a packet. You can customize these views from the View menu. To change which columns are displayed, select Edit, Preferences, User Interface, Columns.
RTPS Header
Data submessage
Byte
sPa
cke
t D
eta
ilsPa
cke
t Li
st
Raw data
Packet sequence
with automatic
color coding of
RTPS packets
1-2
Available Documentation 1. Introd
uctio
n
1.1 Available Documentation❏ RTI Wireshark Release Notes. Please see RTI_Wireshark_ReleaseNotes.pdf for system requirements, installation instructions, and other important information.
❏ Connext User’s Manual. This document provides details on the Connext API and describes how RTPS packets are used by Connext-based applications. In particu-lar, you should review the Discovery chapter. Open <NDDSHOME>/doc/pdf/RTI_Connext_UsersManual.pdf, where <NDDSHOME> is where you installed Connext.
❏ RTPS Specification. Please see http://www.omg.org/spec/DDSI/2.1/.
❏ Wireshark online help. There is extensive online help included with Wireshark. Select Help, Contents from the menubar for a detailed user’s guide in HTML format.
❏ Wireshark User’s Guide. This PDF document describes how to use Wireshark’s fea-tures. It is not included in the installation, but can be downloaded from Wire-shark’s website (www.wireshark.org/docs). Note that it may pertain to a slightly different version of Wireshark.
1.2 Reading GuideWe suggest that you read the documentation in the following order:
❏ Read this chapter to become familiar with the system requirements.
❏ Read the RTI Wireshark Release Notes.
❏ Follow the steps in Chapter 2: Installation.
❏ Read Chapter 4: Capturing RTPS Packets for a quick overview of how to capture RTPS packets.
❏ Read Chapter 5: Analyzing RTPS Packets to learn how to analyze each type of RTPS packet by looking at sample files of captured RTPS packets. During this process, you will need to reference the Real-Time Publish-Subscribe Wire Protocol Specification.
❏ Read Chapter 6: Practical Uses with RTI Applications for ideas on how to use Wireshark during Connext application development.
1-3
Introduction
❏ Consult the Wireshark online help and user’s guide for information on other fea-tures.
1.3 How to Get SupportTechnical support for Wireshark is provided by RTI; send e-mail to [email protected].
Wireshark is an open source product. For information about Wireshark support, please visit www.wireshark.org.
1-4

2. Installa
tion
Chapter 2 Installation
Wireshark is included with RTI Connext Messaging (formerly RTI Data Distribution Service, Professional Edition). Use the installation instructions in this chapter only if you are installing Wireshark independently (not as part of Connext Messaging).
To install Wireshark, you need to login as super-user on Linux and Solaris systems, or as administrator on Windows systems.
You will also need super-user/administrator access to capture packets. (With normal user access, you will be able to run Wireshark, but only to view previously-saved capture files.)
2.1 Before InstallationIf you have Ethereal, Wireshark, or RTI Protocol Analyzer with Wireshark installed, we highly recommend that you remove them before installing RTI’s distribution of Wire-shark.
To uninstall on a Linux (Red Hat) system:
rpm -e wireshark
To uninstall on a Linux (Debian) system:
dpkg -r wireshark wireshark-common
To uninstall on a Solaris system:
pkgrm wireshark
2-1

Installation
2.2 Installing Wireshark on Windows Systems1. Right-click on the distribution file, Wireshark-<version>-Win32.exe, and select
Run as Administrator.
2. Wireshark requires WinPcap 4.0.2. If WinPcap 4.0.2 is not already installed, it will be installed with Wireshark. If it is already installed, you will be asked if you want to re-install WinPcap or skip the WinPcap installation. You can safely skip re-installing WinPcap.
2.3 Installing Wireshark on Linux (Red Hat) SystemsInstall Wireshark using the Red Hat Package Manager (RPM):
1. Login as super-user.
2. cd <location of the distribution file>
3. rpm -i Wireshark-<version>-<architecture>.rpm
For more information on installing RPMs, please see http://www.rpm.org.
2.4 Installing Wireshark on Linux (Debian) SystemsInstall Wireshark using Debian packages. Note that two packages need to be installed:
1. Login as super-user.
2. cd <location of the distribution files>
3. dpkg -i Wireshark_common-<version>-<architecture>.deb
4. dpkg -i Wireshark-<version>-<architecture>.deb
A separate package, Tshark-<version>-<architecture>.deb, is available for install-ing the terminal-based (non-GUI) version of Wireshark.
For more information on Debian packages, please see http://packages.debian.org.
2-2

Installing Wireshark on Solaris Systems2. Insta
llatio
n
2.5 Installing Wireshark on Solaris SystemsBefore Installation:
❏ Make sure you have installed the required packages listed in Section 1.1 in the Release Notes.
❏ Make sure you have modified the font cache configuration file and rebuilt the font cache (see Section 1.1.1 in the Release Notes).
❏ Make sure you have root privileges.
1. cd <location of the distribution file>
2. gunzip Wireshark-<version>-<architecture>.gz
3. pkgadd –d Wireshark-<version>-<architecture>
2.6 Uninstalling WiresharkTo uninstall Wireshark:
❏ On Windows systems: From the Start menu, select Control Panel, Add/Remove Programs (or Programs and Features), Wireshark.
❏ On Linux (Red Hat) systems: While logged in as root, enter: rpm -e wireshark
❏ On Linux (Debian) systems: While logged in as root, enter: dpkg -r wireshark-common wireshark
❏ On Solaris systems: While logged in as root, enter: pkgrm wireshark
2-3

Installation
2-4
3. Ca
pturing
Packe
ts
Chapter 3 Starting Wireshark
Important! To capture packets from the network, you must run Wireshark as root/administrator.
On Linux systems:
# /usr/bin/wireshark &
On Solaris systems:
# /usr/local/bin/wireshark &
On Windows systems:
Use the Start menu to select Wireshark.
3-1

Starting Wireshark
3-2
4. Ca
pturing
Packe
ts
Chapter 4 Capturing RTPS Packets
This chapter describes how to capture RTPS packets that are sent across a network. After capturing packets, use the information in Chapter 5 to analyze them.
Wireshark will automatically capture all RTPS packets from the wire.
You can create additional filters to refine the scope of your captures. For example, you can create filters to capture packets from specific nodes, addresses, ports, protocols, etc. This chapter provides basic instructions on using capture filters and a few examples. For more information, see the Wireshark User’s Guide or online documentation.
To capture all types of packets while running a Connext application:
1. Login as super-user (on Linux/Solaris systems) or administrator (on Windows systems).
2. Start Wireshark.
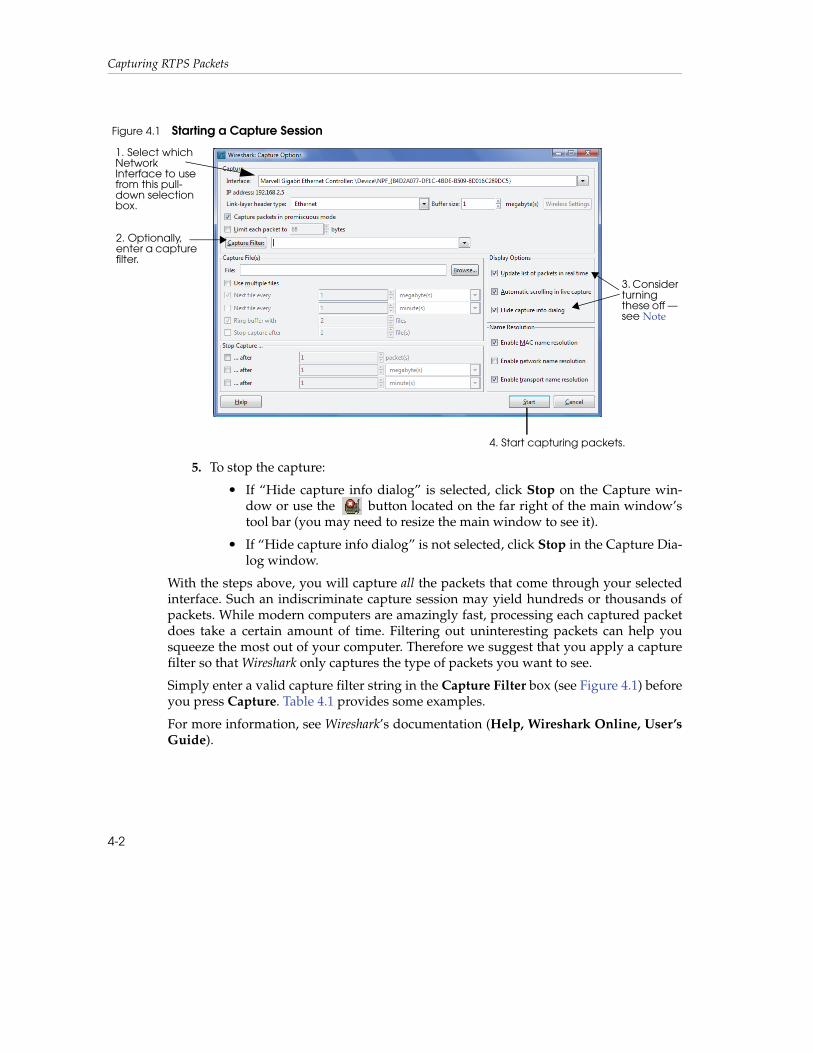
3. Select Capture, Options... from the menubar. Figure 4.1 shows a sample Capture Options window.
The defaults in the Capture Option window may very well suit your needs—they will capture all packets sent to the selected interface. Then you can filter the displayed results with a display filter, as described in Section 5.2.1.
If you want to change any of the defaults for this window, see the Wireshark User’s Guide or online help.
4. Click Start to start the capture session.
Note The "Update list of packets in real-time" and “Hide capture info dia-log” check boxes are selected by default. However, these features can slow down the capture process and increase the chance of missing packets. We recommend deselecting these two check boxes to limit the risk of missing packets.
4-1
Capturing RTPS Packets
5. To stop the capture:
• If “Hide capture info dialog” is selected, click Stop on the Capture win-dow or use the button located on the far right of the main window’s tool bar (you may need to resize the main window to see it).
• If “Hide capture info dialog” is not selected, click Stop in the Capture Dia-log window.
With the steps above, you will capture all the packets that come through your selected interface. Such an indiscriminate capture session may yield hundreds or thousands of packets. While modern computers are amazingly fast, processing each captured packet does take a certain amount of time. Filtering out uninteresting packets can help you squeeze the most out of your computer. Therefore we suggest that you apply a capture filter so that Wireshark only captures the type of packets you want to see.
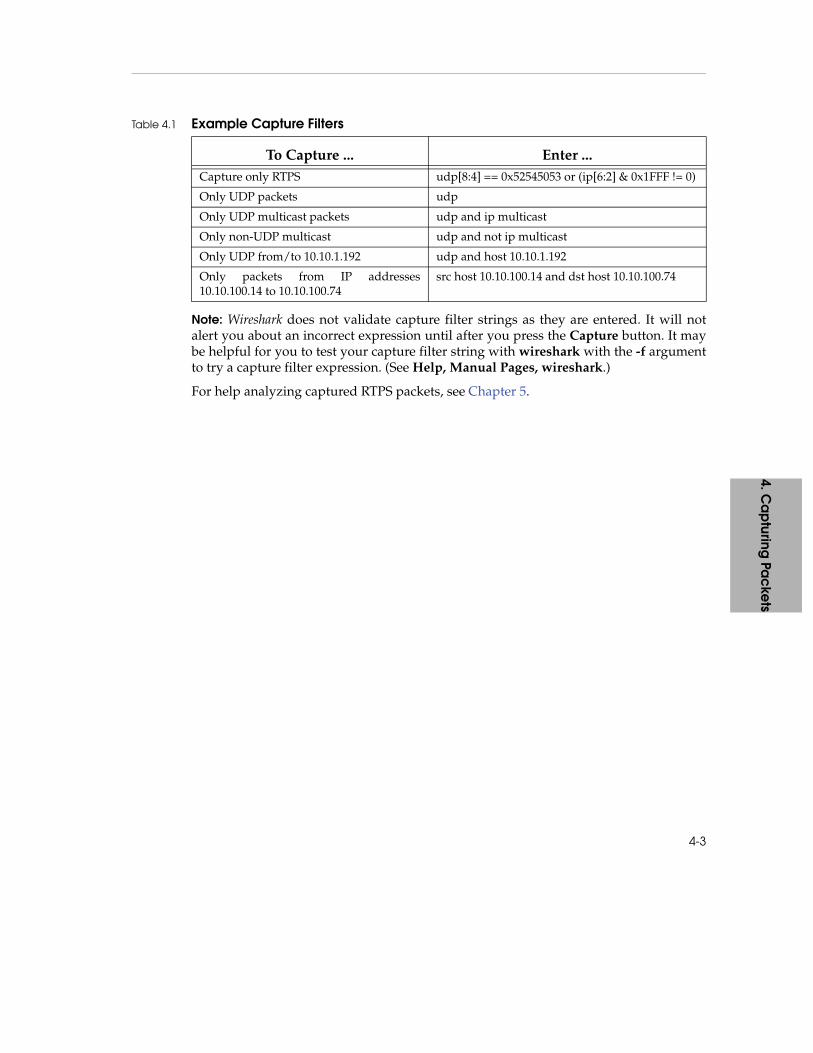
Simply enter a valid capture filter string in the Capture Filter box (see Figure 4.1) before you press Capture. Table 4.1 provides some examples.
For more information, see Wireshark’s documentation (Help, Wireshark Online, User’s Guide).
Figure 4.1 Starting a Capture Session
1. Select which Network Interface to use from this pull-down selection box.
4. Start capturing packets.
2. Optionally, enter a capture filter.
3. Consider turning these off — see Note
4-2
4. Ca
pturing
Packe
ts
Note: Wireshark does not validate capture filter strings as they are entered. It will not alert you about an incorrect expression until after you press the Capture button. It may be helpful for you to test your capture filter string with wireshark with the -f argument to try a capture filter expression. (See Help, Manual Pages, wireshark.)
For help analyzing captured RTPS packets, see Chapter 5.
Table 4.1 Example Capture Filters
To Capture ... Enter ...Capture only RTPS udp[8:4] == 0x52545053 or (ip[6:2] & 0x1FFF != 0)
Only UDP packets udp
Only UDP multicast packets udp and ip multicast
Only non-UDP multicast udp and not ip multicast
Only UDP from/to 10.10.1.192 udp and host 10.10.1.192
Only packets from IP addresses 10.10.100.14 to 10.10.100.74
src host 10.10.100.14 and dst host 10.10.100.74
4-3

Capturing RTPS Packets
4-4
5. Ana
lyzing Pa
ckets
Chapter 5 Analyzing RTPS Packets
This chapter will help you interpret the submessages within captured RTPS packets. There are two levels of analysis that you may be interested in:
❏ A high-level understanding of what is transpiring during a sequence of captured RTPS packets.
This chapter will help you learn to “read” a sequence of packets by walking through the provided sample capture files. You may also find it helpful to review the Discovery chapter in the Connext User’s Manual.
❏ A more in-depth understanding of an individual packet’s contents.
This chapter will show you how to display the decoded contents of individual packets. Wireshark decodes each RTPS packet and shows you the value for each field in the packet’s structure.
While the low-level details of a packet’s contents are beyond the scope of this manual, this information is available in the Real-Time Publish-Subscribe Wire Pro-tocol Specification (see Available Documentation (Section 1.1)).
This chapter includes the following sections:
❏ RTPS Submessage Types (Section 5.1)
❏ Displaying Packets (Section 5.2)
❏ Analyzing Packets from Connext Applications (Section 5.3)
5-1
Analyzing RTPS Packets
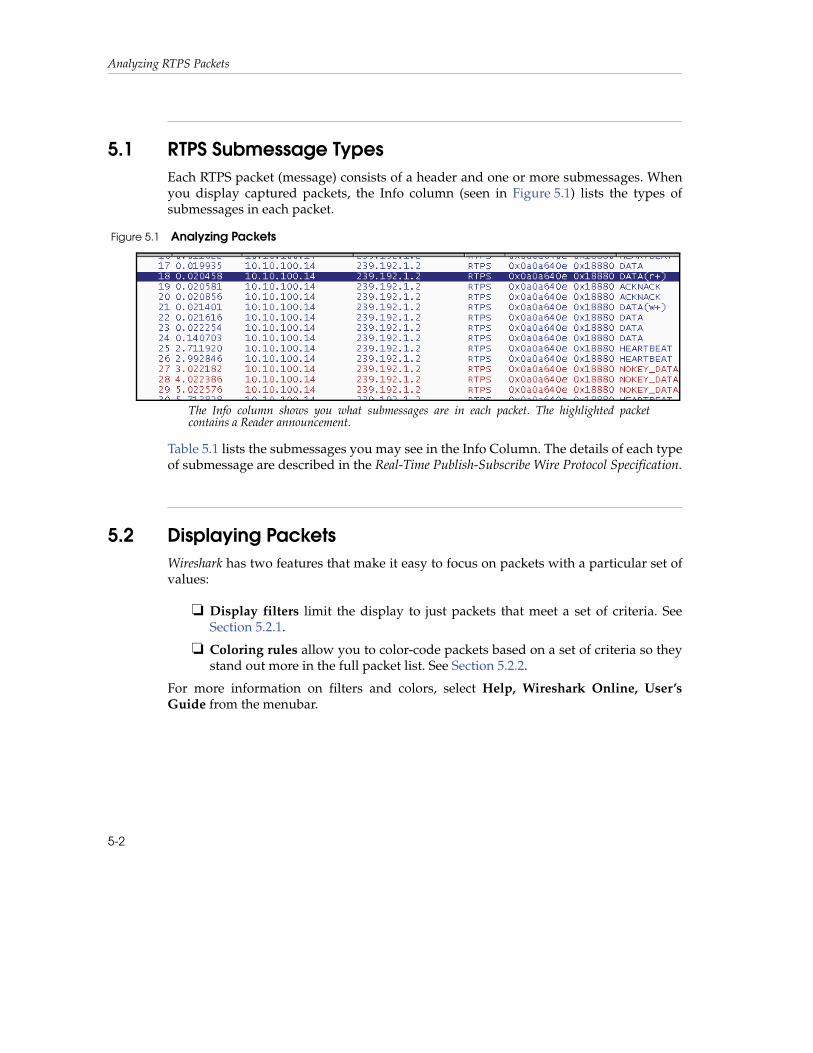
5.1 RTPS Submessage TypesEach RTPS packet (message) consists of a header and one or more submessages. When you display captured packets, the Info column (seen in Figure 5.1) lists the types of submessages in each packet.
Table 5.1 lists the submessages you may see in the Info Column. The details of each type of submessage are described in the Real-Time Publish-Subscribe Wire Protocol Specification.
5.2 Displaying PacketsWireshark has two features that make it easy to focus on packets with a particular set of values:
❏ Display filters limit the display to just packets that meet a set of criteria. See Section 5.2.1.
❏ Coloring rules allow you to color-code packets based on a set of criteria so they stand out more in the full packet list. See Section 5.2.2.
For more information on filters and colors, select Help, Wireshark Online, User’s Guide from the menubar.
Figure 5.1 Analyzing Packets
The Info column shows you what submessages are in each packet. The highlighted packet contains a Reader announcement.
5-2
Displaying Packets5. A
nalyzing
Packe
ts
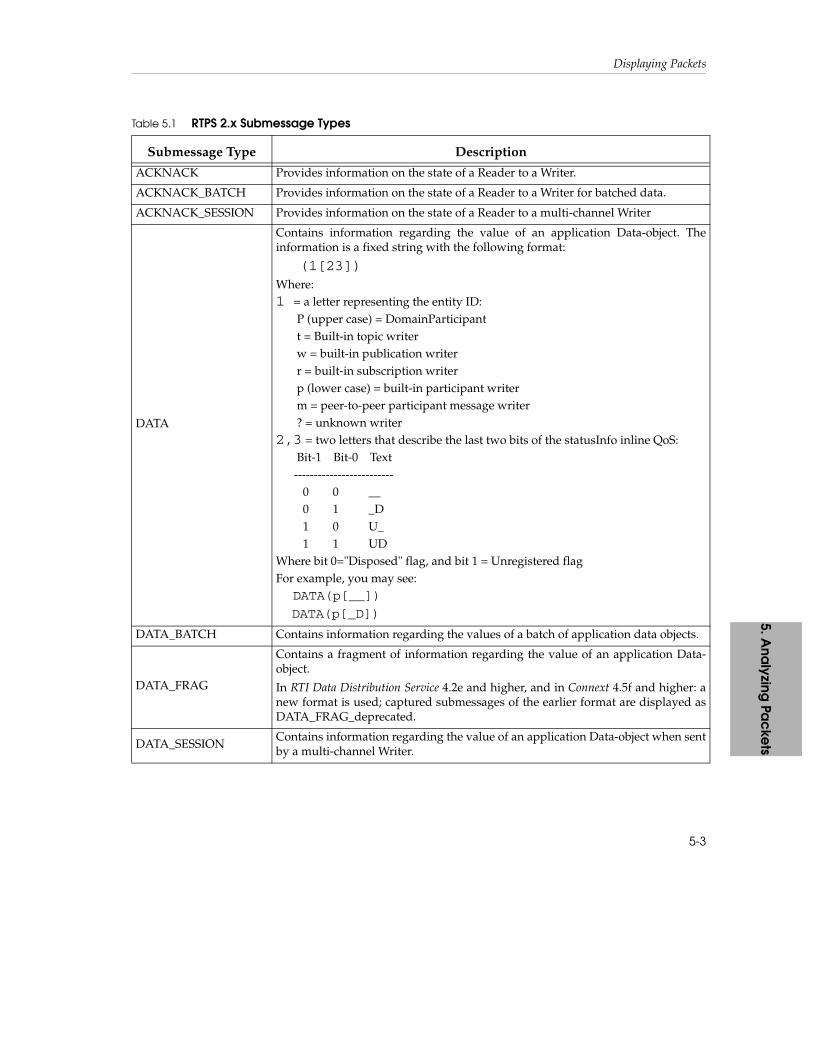
Table 5.1 RTPS 2.x Submessage Types
Submessage Type Description
ACKNACK Provides information on the state of a Reader to a Writer.
ACKNACK_BATCH Provides information on the state of a Reader to a Writer for batched data.
ACKNACK_SESSION Provides information on the state of a Reader to a multi-channel Writer
DATA
Contains information regarding the value of an application Data-object. The information is a fixed string with the following format:
(1[23])Where:1 = a letter representing the entity ID: P (upper case) = DomainParticipant t = Built-in topic writer w = built-in publication writer r = built-in subscription writer p (lower case) = built-in participant writer m = peer-to-peer participant message writer ? = unknown writer2,3 = two letters that describe the last two bits of the statusInfo inline QoS: Bit-1 Bit-0 Text ------------------------- 0 0 __ 0 1 _D 1 0 U_ 1 1 UDWhere bit 0="Disposed" flag, and bit 1 = Unregistered flagFor example, you may see: DATA(p[__])
DATA(p[_D])
DATA_BATCH Contains information regarding the values of a batch of application data objects.
DATA_FRAG
Contains a fragment of information regarding the value of an application Data-object.
In RTI Data Distribution Service 4.2e and higher, and in Connext 4.5f and higher: a new format is used; captured submessages of the earlier format are displayed as DATA_FRAG_deprecated.
DATA_SESSIONContains information regarding the value of an application Data-object when sent by a multi-channel Writer.
5-3
Analyzing RTPS Packets
5.2.1 Using a Display Filter
A display filter only shows packets that match a certain set of criteria. You may want to start by showing only RTPS packets. Wireshark provides a display filter for just this pur-pose. There are also predefined filters for displaying just discovery (meta) traffic, or just user data traffic.
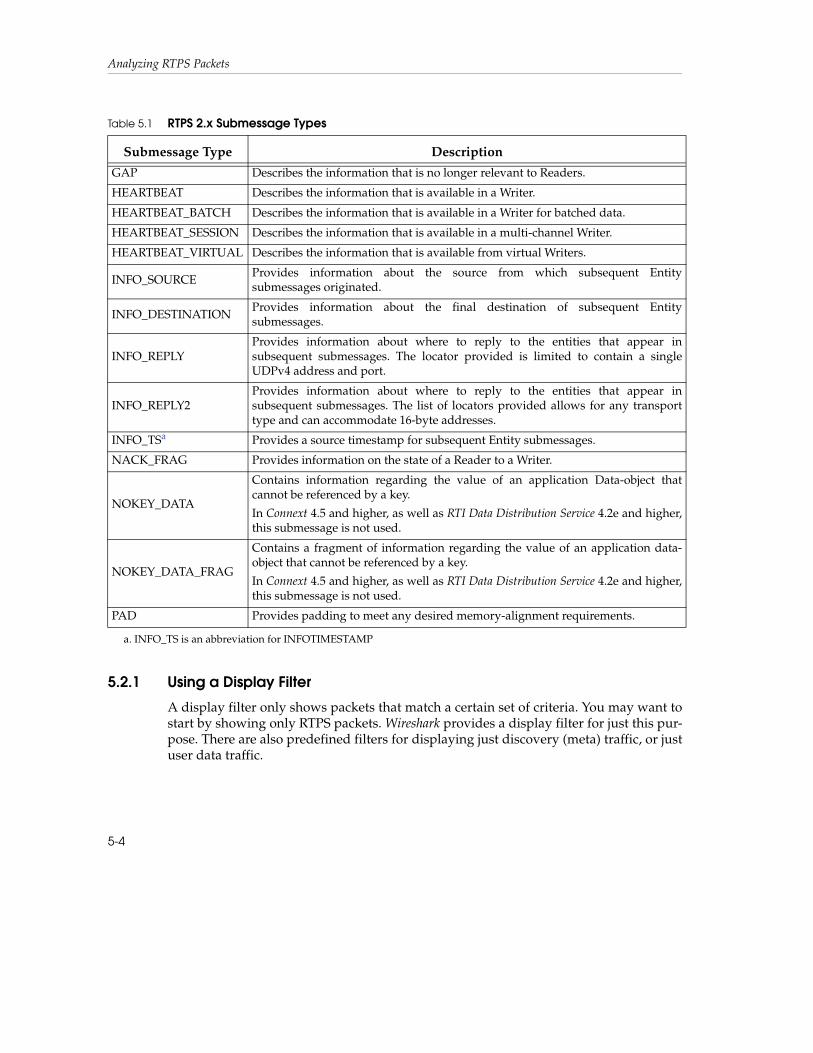
GAP Describes the information that is no longer relevant to Readers.
HEARTBEAT Describes the information that is available in a Writer.
HEARTBEAT_BATCH Describes the information that is available in a Writer for batched data.
HEARTBEAT_SESSION Describes the information that is available in a multi-channel Writer.
HEARTBEAT_VIRTUAL Describes the information that is available from virtual Writers.
INFO_SOURCEProvides information about the source from which subsequent Entity submessages originated.
INFO_DESTINATION Provides information about the final destination of subsequent Entity submessages.
INFO_REPLY Provides information about where to reply to the entities that appear in subsequent submessages. The locator provided is limited to contain a single UDPv4 address and port.
INFO_REPLY2 Provides information about where to reply to the entities that appear in subsequent submessages. The list of locators provided allows for any transport type and can accommodate 16-byte addresses.
INFO_TSa Provides a source timestamp for subsequent Entity submessages.
NACK_FRAG Provides information on the state of a Reader to a Writer.
NOKEY_DATA
Contains information regarding the value of an application Data-object that cannot be referenced by a key.
In Connext 4.5 and higher, as well as RTI Data Distribution Service 4.2e and higher, this submessage is not used.
NOKEY_DATA_FRAG
Contains a fragment of information regarding the value of an application data-object that cannot be referenced by a key.
In Connext 4.5 and higher, as well as RTI Data Distribution Service 4.2e and higher, this submessage is not used.
PAD Provides padding to meet any desired memory-alignment requirements.
a. INFO_TS is an abbreviation for INFOTIMESTAMP
Table 5.1 RTPS 2.x Submessage Types
Submessage Type Description
5-4

Displaying Packets5. A
nalyzing
Packe
ts
To display RTPS packets only:
1. In the main window, clear anything you have in the filter text box with the Clearbutton, then click the Filter button.
2. Select the preconfigured filter named “Only RTPS packets.”
3. Click OK to close the Filter Expression window.
Figure 5.2 Selecting a Display Filter
1. Select a predefined filter.
2. Click OK
5-5
Analyzing RTPS Packets
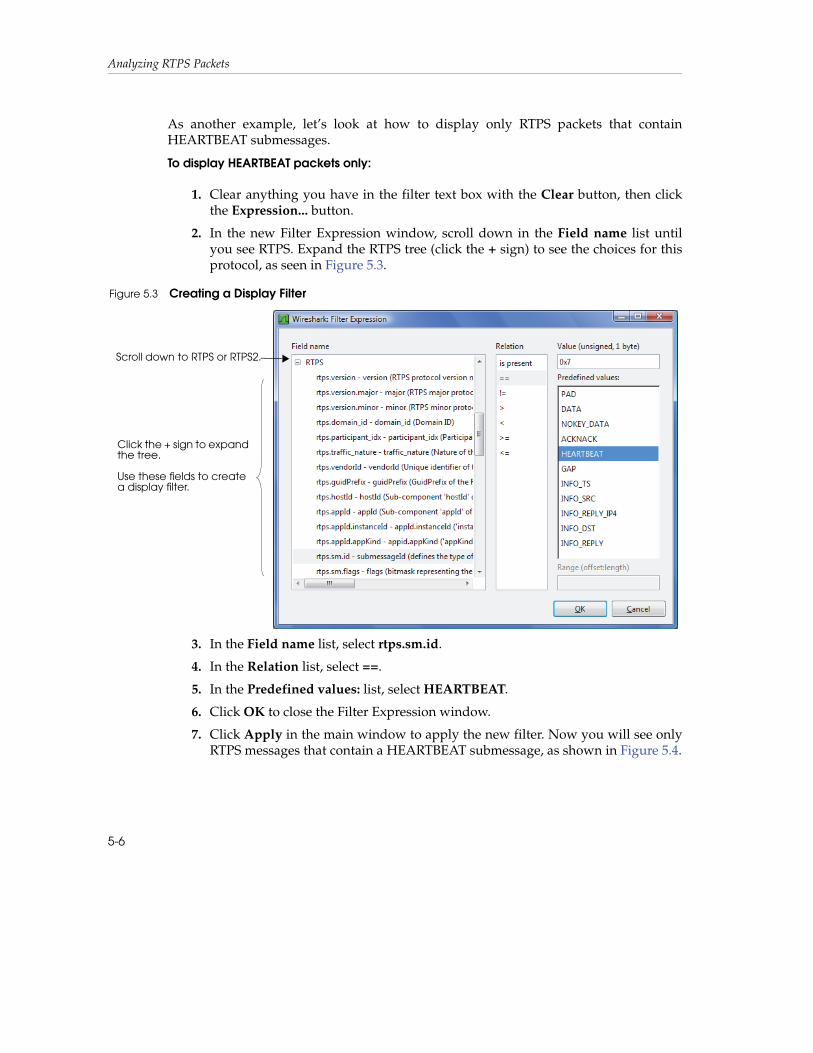
As another example, let’s look at how to display only RTPS packets that contain HEARTBEAT submessages.
To display HEARTBEAT packets only:
1. Clear anything you have in the filter text box with the Clear button, then click the Expression... button.
2. In the new Filter Expression window, scroll down in the Field name list until you see RTPS. Expand the RTPS tree (click the + sign) to see the choices for this protocol, as seen in Figure 5.3.
3. In the Field name list, select rtps.sm.id.
4. In the Relation list, select ==.
5. In the Predefined values: list, select HEARTBEAT.
6. Click OK to close the Filter Expression window.
7. Click Apply in the main window to apply the new filter. Now you will see only RTPS messages that contain a HEARTBEAT submessage, as shown in Figure 5.4.
Figure 5.3 Creating a Display Filter
Scroll down to RTPS or RTPS2.
Click the + sign to expand the tree. Use these fields to create a display filter.
5-6
Displaying Packets5. A
nalyzing
Packe
ts
Wireshark also allows you to save filter expressions for future use. For more information, see the Wireshark User’s Guide or online help.
Displaying RTPS and RTPS2 Messages:
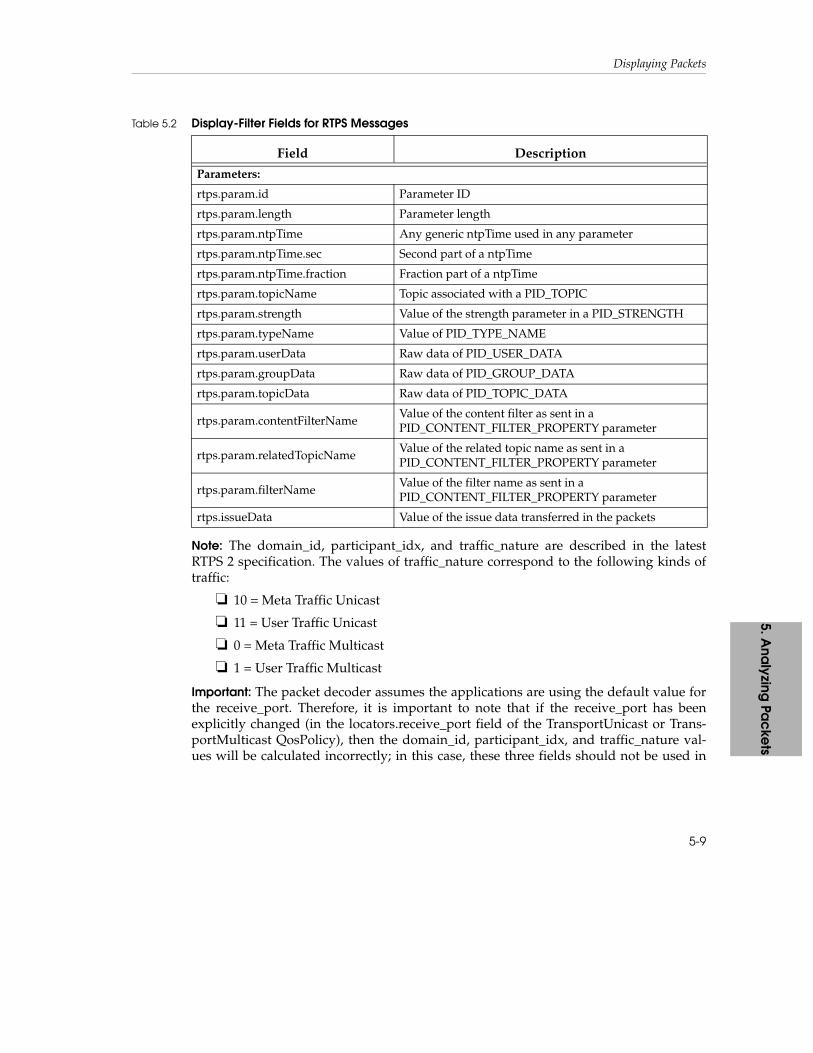
Table 5.2 briefly describes the meaning of each field that can be used in a display filter for RTPS. To display packets for RTPS2, change the prefix from “rtps” to “rtps2.” (These fields can also be used in coloring rules, see Section 5.2.2.) To display both RTPS and RTPS2, rules must include both versions logically OR’ed together. For details on the meaning of these fields, see the Real-Time Publish-Subscribe Wire Protocol Specification (see Available Documentation (Section 1.1)).
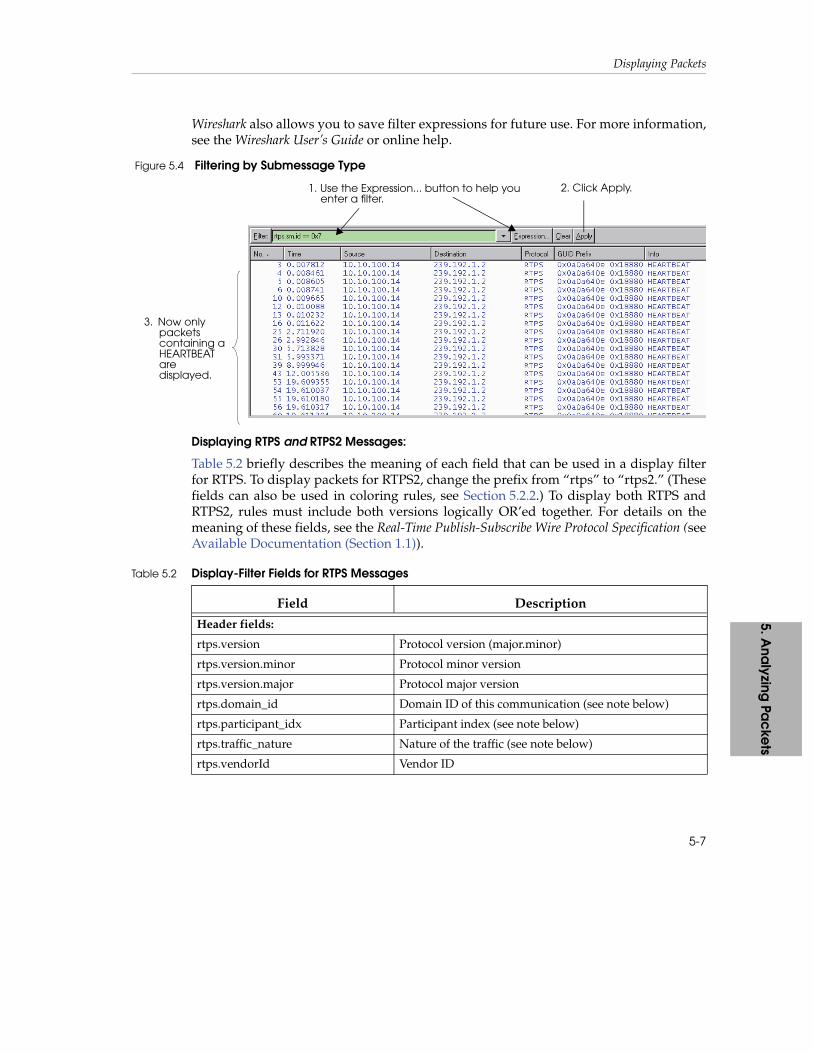
Figure 5.4 Filtering by Submessage Type
1. Use the Expression... button to help you enter a filter.
2. Click Apply.
3. Now only packets containing a HEARTBEAT are displayed.
Table 5.2 Display-Filter Fields for RTPS Messages
Field Description
Header fields:
rtps.version Protocol version (major.minor)
rtps.version.minor Protocol minor version
rtps.version.major Protocol major version
rtps.domain_id Domain ID of this communication (see note below)
rtps.participant_idx Participant index (see note below)
rtps.traffic_nature Nature of the traffic (see note below)
rtps.vendorId Vendor ID
5-7
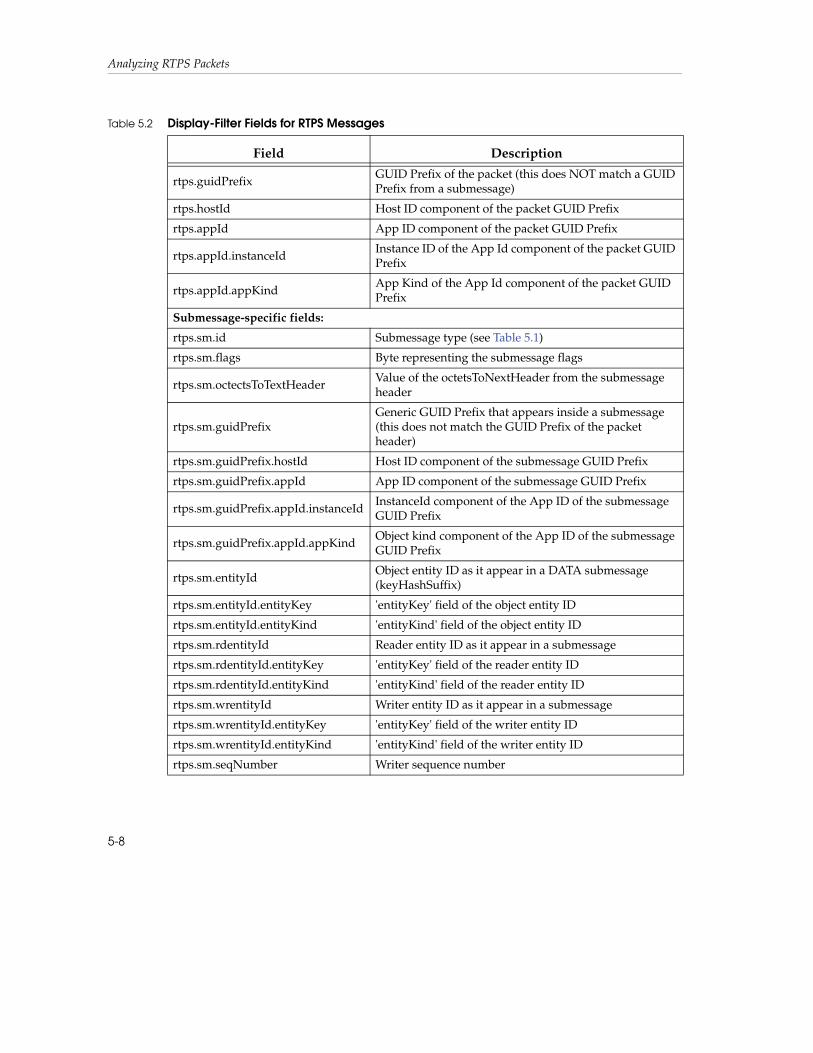
Analyzing RTPS Packets
rtps.guidPrefixGUID Prefix of the packet (this does NOT match a GUID Prefix from a submessage)
rtps.hostId Host ID component of the packet GUID Prefix
rtps.appId App ID component of the packet GUID Prefix
rtps.appId.instanceIdInstance ID of the App Id component of the packet GUID Prefix
rtps.appId.appKindApp Kind of the App Id component of the packet GUID Prefix
Submessage-specific fields:
rtps.sm.id Submessage type (see Table 5.1)
rtps.sm.flags Byte representing the submessage flags
rtps.sm.octectsToTextHeaderValue of the octetsToNextHeader from the submessage header
rtps.sm.guidPrefixGeneric GUID Prefix that appears inside a submessage (this does not match the GUID Prefix of the packet header)
rtps.sm.guidPrefix.hostId Host ID component of the submessage GUID Prefix
rtps.sm.guidPrefix.appId App ID component of the submessage GUID Prefix
rtps.sm.guidPrefix.appId.instanceIdInstanceId component of the App ID of the submessage GUID Prefix
rtps.sm.guidPrefix.appId.appKindObject kind component of the App ID of the submessage GUID Prefix
rtps.sm.entityIdObject entity ID as it appear in a DATA submessage (keyHashSuffix)
rtps.sm.entityId.entityKey 'entityKey' field of the object entity ID
rtps.sm.entityId.entityKind 'entityKind' field of the object entity ID
rtps.sm.rdentityId Reader entity ID as it appear in a submessage
rtps.sm.rdentityId.entityKey 'entityKey' field of the reader entity ID
rtps.sm.rdentityId.entityKind 'entityKind' field of the reader entity ID
rtps.sm.wrentityId Writer entity ID as it appear in a submessage
rtps.sm.wrentityId.entityKey 'entityKey' field of the writer entity ID
rtps.sm.wrentityId.entityKind 'entityKind' field of the writer entity ID
rtps.sm.seqNumber Writer sequence number
Table 5.2 Display-Filter Fields for RTPS Messages
Field Description
5-8
Displaying Packets5. A
nalyzing
Packe
ts
Note: The domain_id, participant_idx, and traffic_nature are described in the latest RTPS 2 specification. The values of traffic_nature correspond to the following kinds of traffic:
❏ 10 = Meta Traffic Unicast
❏ 11 = User Traffic Unicast
❏ 0 = Meta Traffic Multicast
❏ 1 = User Traffic Multicast
Important: The packet decoder assumes the applications are using the default value for the receive_port. Therefore, it is important to note that if the receive_port has been explicitly changed (in the locators.receive_port field of the TransportUnicast or Trans-portMulticast QosPolicy), then the domain_id, participant_idx, and traffic_nature val-ues will be calculated incorrectly; in this case, these three fields should not be used in
Parameters:
rtps.param.id Parameter ID
rtps.param.length Parameter length
rtps.param.ntpTime Any generic ntpTime used in any parameter
rtps.param.ntpTime.sec Second part of a ntpTime
rtps.param.ntpTime.fraction Fraction part of a ntpTime
rtps.param.topicName Topic associated with a PID_TOPIC
rtps.param.strength Value of the strength parameter in a PID_STRENGTH
rtps.param.typeName Value of PID_TYPE_NAME
rtps.param.userData Raw data of PID_USER_DATA
rtps.param.groupData Raw data of PID_GROUP_DATA
rtps.param.topicData Raw data of PID_TOPIC_DATA
rtps.param.contentFilterNameValue of the content filter as sent in a PID_CONTENT_FILTER_PROPERTY parameter
rtps.param.relatedTopicNameValue of the related topic name as sent in a PID_CONTENT_FILTER_PROPERTY parameter
rtps.param.filterNameValue of the filter name as sent in a PID_CONTENT_FILTER_PROPERTY parameter
rtps.issueData Value of the issue data transferred in the packets
Table 5.2 Display-Filter Fields for RTPS Messages
Field Description
5-9

Analyzing RTPS Packets
display filters nor assumed to be correct in the decoded packet view. We expect this (changing of the receive_port) to be a rare occurrence.
5.2.2 Color-Coding Packets
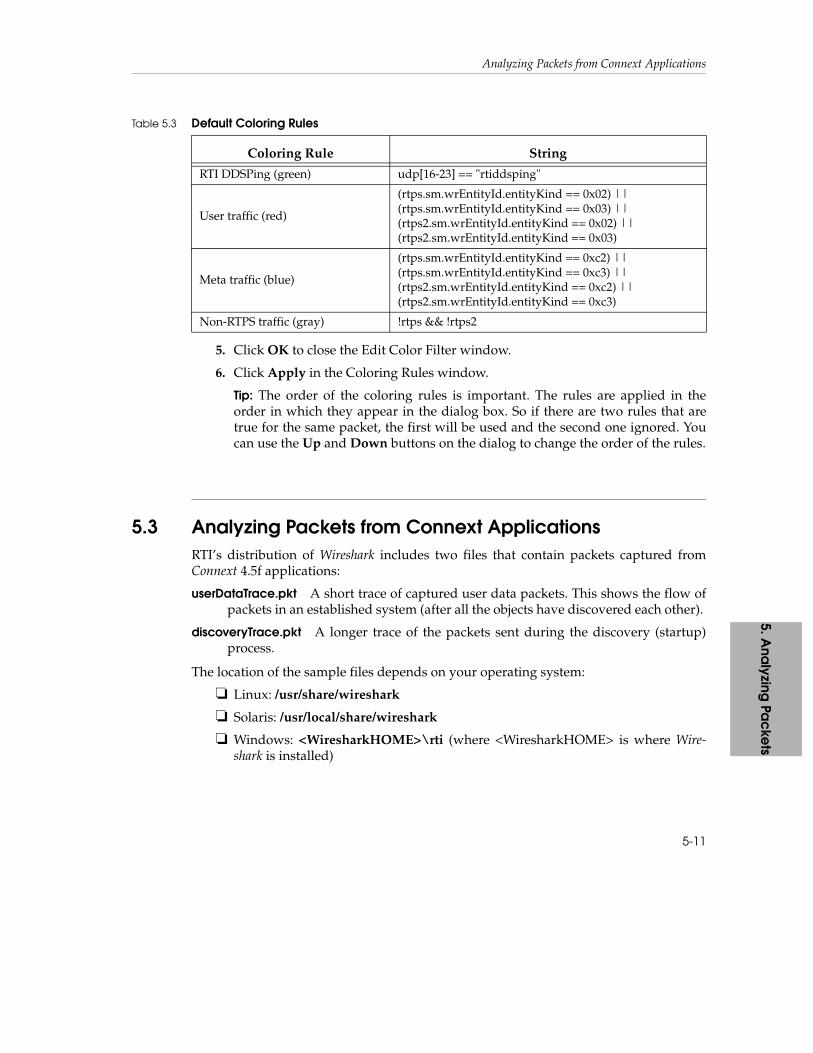
Wireshark allows you to display packets in different colors. Coloring rules are based on the same criteria used to create display filters (described in Section 5.2.1). For instance, you can show discovery-related packets in blue and user-data packets in green. Unlike display filters, coloring rules do not hide captured packets.
Wireshark includes RTPS-related coloring rules that are automatically enabled; they are listed in Table 5.3. (You can turn them off, change the colors, or edit them in other ways. See the Wireshark User’s Guide for details.) To understand the elements in the strings, refer to the Real-Time Publish-Subscribe Wire Protocol Specification (see Available Docu-mentation (Section 1.1)). Figure 5.5 shows a sample display.
To create a new coloring rule:
1. Select View, Coloring Rules..., then click the New button to open an Edit Color Filter window.
2. Enter a name for the color filter, such as HeartBeatPackets.
3. Enter a color filter expression using the same syntax as for a display filter. If you need help, click the Expression... button. For examples, see Table 5.3.
4. Select foreground (text) and background colors for packets that match the filter expression.
Tip: To select a color, click in the color-selection triangle; use the colored circle to quickly change the contents of the triangle.
Figure 5.5 Using Coloring Rules
Coloring rules make is easy to see different types of submessages.
5-10
Analyzing Packets from Connext Applications5. A
nalyzing
Packe
ts
5. Click OK to close the Edit Color Filter window.
6. Click Apply in the Coloring Rules window.
Tip: The order of the coloring rules is important. The rules are applied in the order in which they appear in the dialog box. So if there are two rules that are true for the same packet, the first will be used and the second one ignored. You can use the Up and Down buttons on the dialog to change the order of the rules.
5.3 Analyzing Packets from Connext ApplicationsRTI’s distribution of Wireshark includes two files that contain packets captured from Connext 4.5f applications:
userDataTrace.pkt A short trace of captured user data packets. This shows the flow of packets in an established system (after all the objects have discovered each other).
discoveryTrace.pkt A longer trace of the packets sent during the discovery (startup) process.
The location of the sample files depends on your operating system:
❏ Linux: /usr/share/wireshark
❏ Solaris: /usr/local/share/wireshark
❏ Windows: <WiresharkHOME>\rti (where <WiresharkHOME> is where Wire-shark is installed)
Table 5.3 Default Coloring Rules
Coloring Rule String
RTI DDSPing (green) udp[16-23] == "rtiddsping"
User traffic (red)
(rtps.sm.wrEntityId.entityKind == 0x02) || (rtps.sm.wrEntityId.entityKind == 0x03) || (rtps2.sm.wrEntityId.entityKind == 0x02) || (rtps2.sm.wrEntityId.entityKind == 0x03)
Meta traffic (blue)
(rtps.sm.wrEntityId.entityKind == 0xc2) || (rtps.sm.wrEntityId.entityKind == 0xc3) || (rtps2.sm.wrEntityId.entityKind == 0xc2) || (rtps2.sm.wrEntityId.entityKind == 0xc3)
Non-RTPS traffic (gray) !rtps && !rtps2
5-11

Analyzing RTPS Packets
By looking at these sample files, you will learn how to:
❏ Load a captured sequence of packets from a file.
❏ Understand the flow of RTPS messages by looking at a sample sequence.
❏ View the contents of individual RTPS packets.
5.3.1 Analyzing the User Data Sample Trace
Use the File, Open... command to open the file, userDataTrace.pkt (see Section 5.3 for its location).
The sample file contains a sequence of RTPS packets that illustrate the protocol when two applications use reliable communications to send/receive data.
This scenario involves two hosts, each running a Connext application:
❏ Host 1 (10.20.1.86) is running a Connext publishing application, App1.
❏ Host 2 (10.10.30.100) is running a Connext subscribing application, App2
❏ The QoS for the writer and the reader have been set up to use Reliable communi-cations.
❏ App1 writes user data every 4 seconds.
To create the sample capture file, Wireshark started capturing packets on the subscrib-ing host after the discovery process completed, using the following capture filter:
rtps2 && (ip.src == 10.10.30.100 || ip.dst == 10.10.30.100)
Figure 5.6 shows the packets captured by Wireshark, which includes three types of RTPS packets:
❏ Data from the writer to the reader
❏ Acknowledgements from the reader to the writer
❏ Heartbeats sent regularly from the writer to the reader
5-12
Analyzing Packets from Connext Applications5. A
nalyzing
Packe
ts
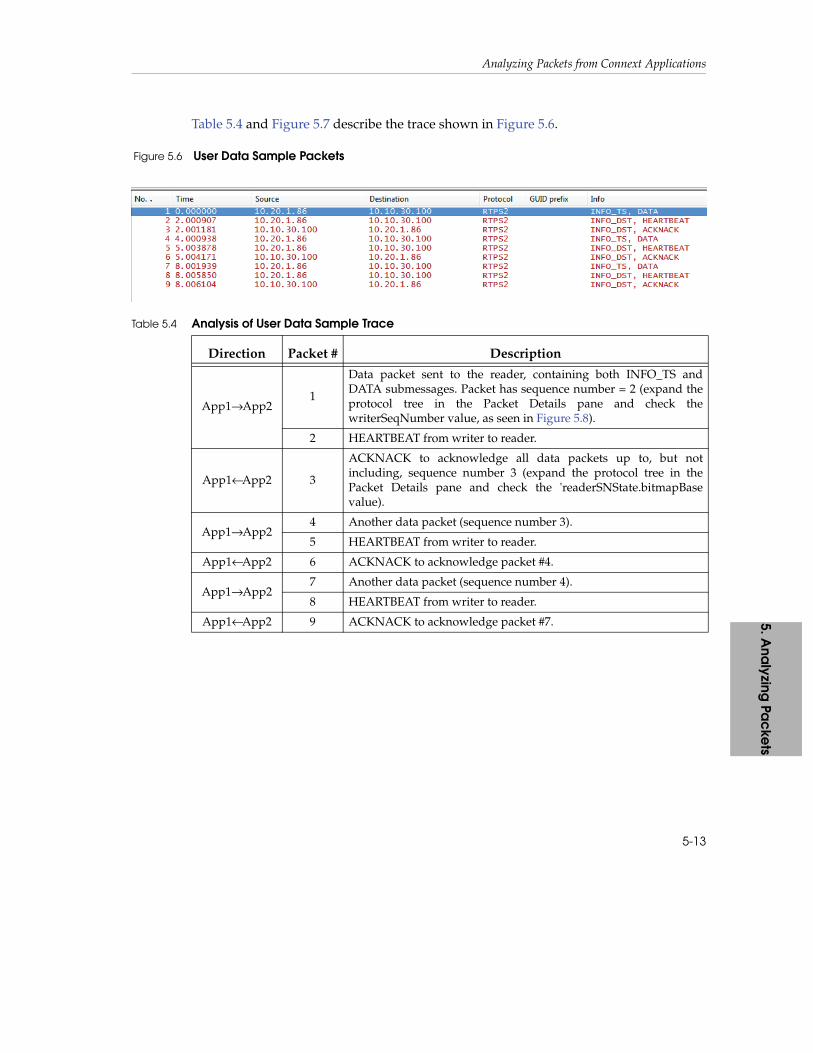
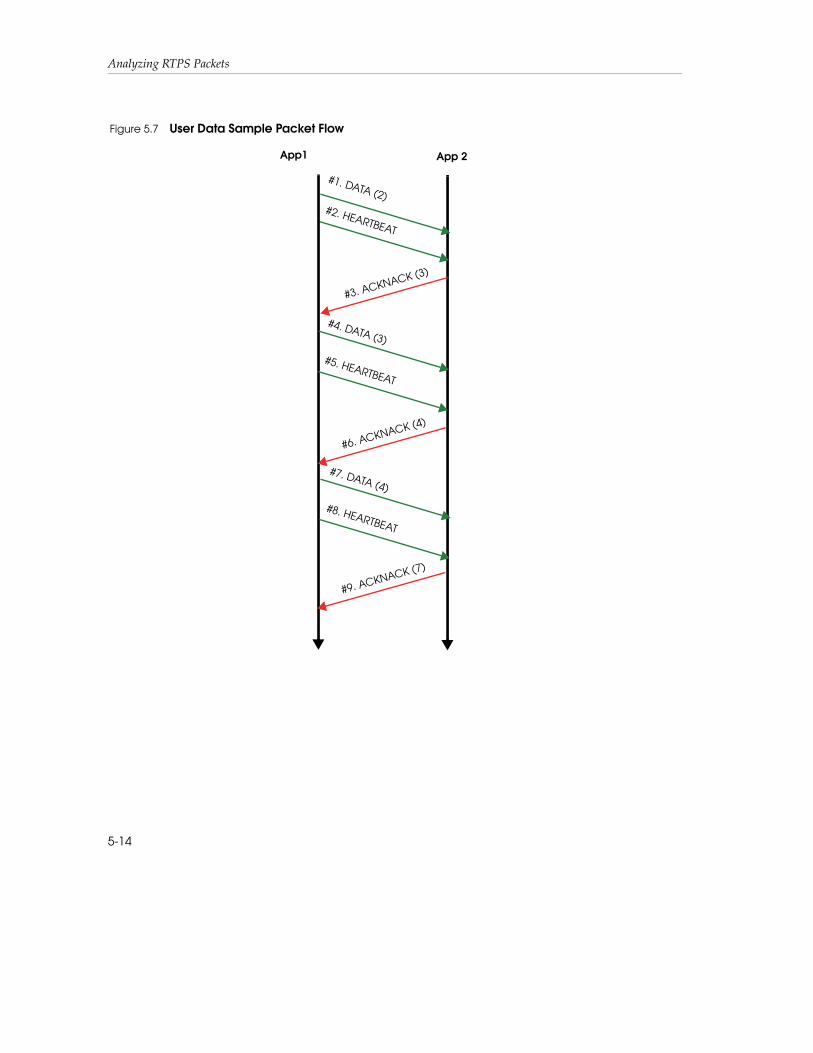
Table 5.4 and Figure 5.7 describe the trace shown in Figure 5.6.
Table 5.4 Analysis of User Data Sample Trace
Direction Packet # Description
App1→ App21
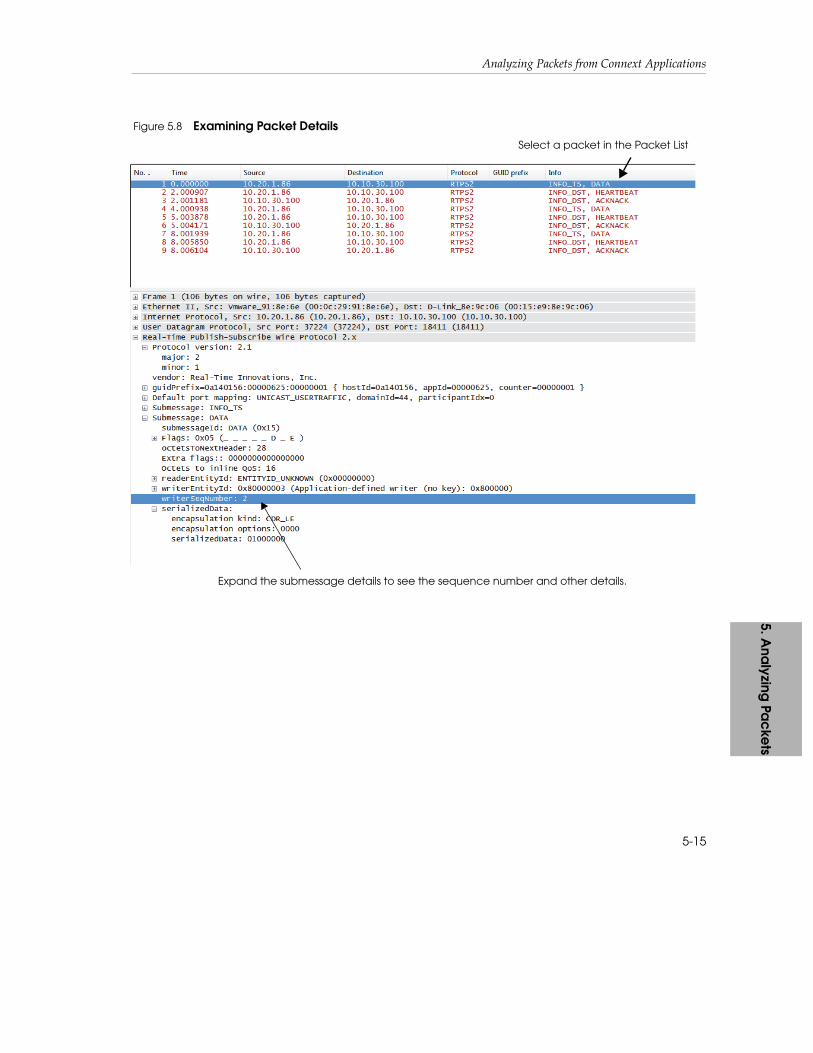
Data packet sent to the reader, containing both INFO_TS and DATA submessages. Packet has sequence number = 2 (expand the protocol tree in the Packet Details pane and check the writerSeqNumber value, as seen in Figure 5.8).
2 HEARTBEAT from writer to reader.
App1← App2 3
ACKNACK to acknowledge all data packets up to, but not including, sequence number 3 (expand the protocol tree in the Packet Details pane and check the 'readerSNState.bitmapBase value).
App1→ App24 Another data packet (sequence number 3).
5 HEARTBEAT from writer to reader.
App1← App2 6 ACKNACK to acknowledge packet #4.
App1→ App27 Another data packet (sequence number 4).
8 HEARTBEAT from writer to reader.
App1← App2 9 ACKNACK to acknowledge packet #7.
Figure 5.6 User Data Sample Packets
5-13
Analyzing RTPS Packets
Figure 5.7 User Data Sample Packet Flow
#1. DATA (2)
#3. ACKNACK (3)
App1 App 2
#2. HEARTBEAT
#4. DATA (3)
#5. HEARTBEAT
#6. ACKNACK (4)
#7. DATA (4)
#8. HEARTBEAT
#9. ACKNACK (7)
5-14
Analyzing Packets from Connext Applications5. A
nalyzing
Packe
ts
Figure 5.8 Examining Packet Details
Expand the submessage details to see the sequence number and other details.
Select a packet in the Packet List
5-15
Analyzing RTPS Packets
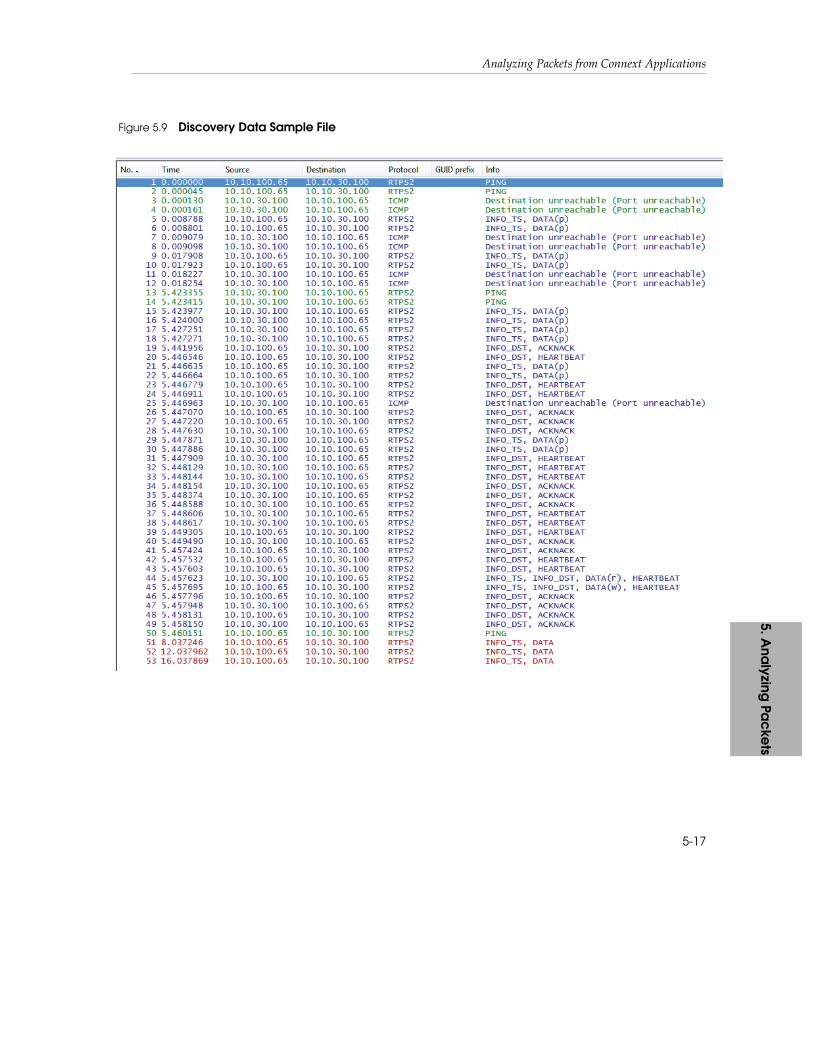
5.3.2 Analyzing the Discovery Data Sample Trace
Use the File, Open... command to open the file, discoveryTrace.pkt (see Section 5.3 for its location).
The sample file contains a sequence of RTPS packets that illustrate the protocol when two applications use best-effort communications to send/receive data.
This scenario involves two hosts, each running one Connext application.
❏ Host 1 (10.10.100.65) is running a Connext publishing application, App1.
❏ Host 2 (10.10.30.100) is running a Connext subscribing application, App2.
❏ Both applications have a maximum participant index of 1 and have each other in their initial_peer_list.
❏ All but one QoS are at default values; this default includes the use of automatic discovery via the default UDPv4 transport. The one non-default QoS is having both applications’ initial_participant_announcements set to 1, as this reduces the number of redundant announcements in the example trace.
Wireshark was set up to start capturing packets before either application was started. The publishing application was started first, followed (about 6 seconds later) by the sub-scribing application. Figure 5.9 shows the packets captured by Wireshark.
Let’s walk through the RTPS packets to understand what occurred in this sequence. Table 5.5 describes what happened (non-RTPS packets are omitted). In the table, the term “meta DATA” refers to DATA packets containing meta (discovery) data (as opposed to user data).
5-16
Analyzing Packets from Connext Applications5. A
nalyzing
Packe
ts
F
igure 5.9 Discovery Data Sample File5-17
Analyzing RTPS Packets
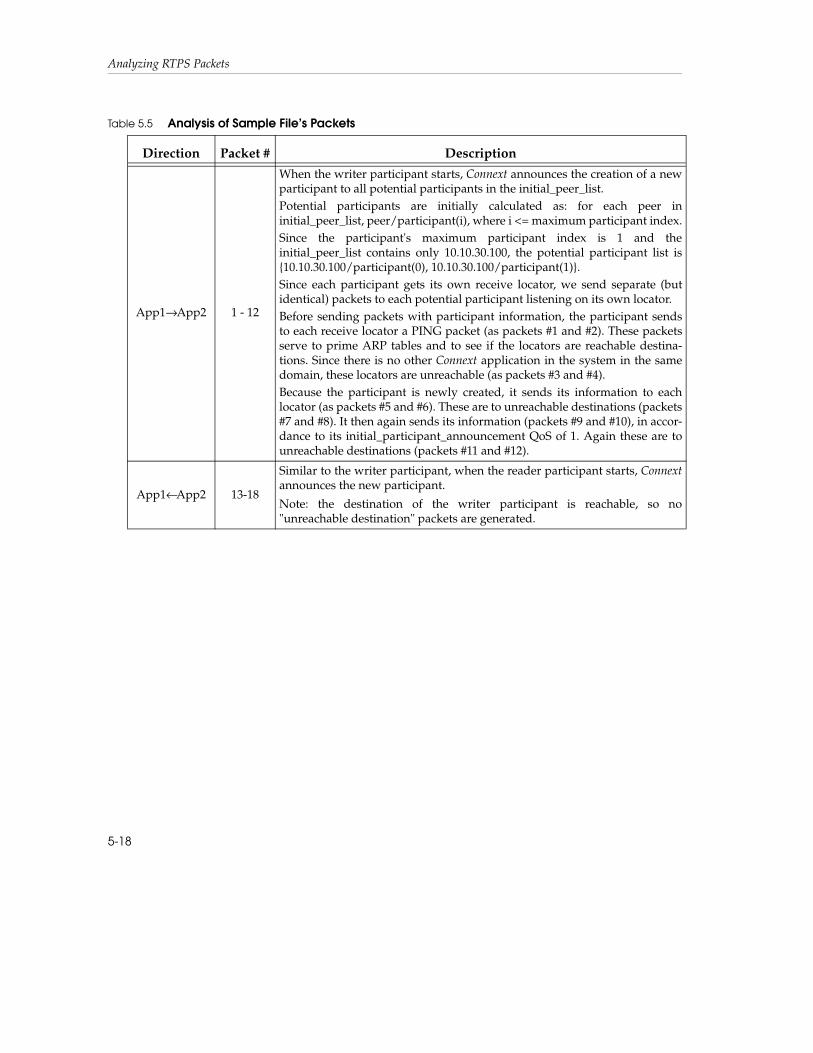
Table 5.5 Analysis of Sample File’s Packets
Direction Packet # Description
App1→ App2 1 - 12
When the writer participant starts, Connext announces the creation of a new participant to all potential participants in the initial_peer_list.Potential participants are initially calculated as: for each peer in initial_peer_list, peer/participant(i), where i <= maximum participant index.Since the participant's maximum participant index is 1 and the initial_peer_list contains only 10.10.30.100, the potential participant list is {10.10.30.100/participant(0), 10.10.30.100/participant(1)}.Since each participant gets its own receive locator, we send separate (but identical) packets to each potential participant listening on its own locator.Before sending packets with participant information, the participant sends to each receive locator a PING packet (as packets #1 and #2). These packets serve to prime ARP tables and to see if the locators are reachable destina-tions. Since there is no other Connext application in the system in the same domain, these locators are unreachable (as packets #3 and #4).Because the participant is newly created, it sends its information to each locator (as packets #5 and #6). These are to unreachable destinations (packets #7 and #8). It then again sends its information (packets #9 and #10), in accor-dance to its initial_participant_announcement QoS of 1. Again these are to unreachable destinations (packets #11 and #12).
App1← App2 13-18
Similar to the writer participant, when the reader participant starts, Connext announces the new participant.
Note: the destination of the writer participant is reachable, so no "unreachable destination" packets are generated.
5-18
Analyzing Packets from Connext Applications5. A
nalyzing
Packe
ts
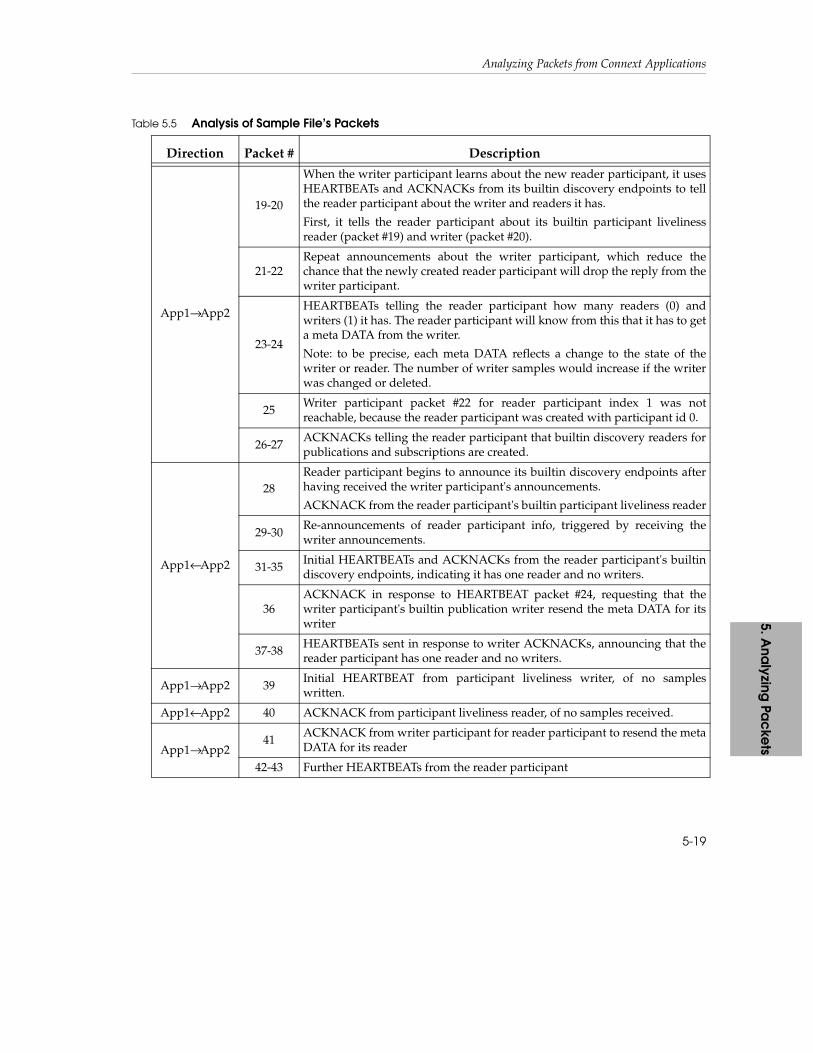
App1→ App2
19-20
When the writer participant learns about the new reader participant, it uses HEARTBEATs and ACKNACKs from its builtin discovery endpoints to tell the reader participant about the writer and readers it has.
First, it tells the reader participant about its builtin participant liveliness reader (packet #19) and writer (packet #20).
21-22Repeat announcements about the writer participant, which reduce the chance that the newly created reader participant will drop the reply from the writer participant.
23-24
HEARTBEATs telling the reader participant how many readers (0) and writers (1) it has. The reader participant will know from this that it has to get a meta DATA from the writer.
Note: to be precise, each meta DATA reflects a change to the state of the writer or reader. The number of writer samples would increase if the writer was changed or deleted.
25Writer participant packet #22 for reader participant index 1 was not reachable, because the reader participant was created with participant id 0.
26-27ACKNACKs telling the reader participant that builtin discovery readers for publications and subscriptions are created.
App1← App2
28Reader participant begins to announce its builtin discovery endpoints after having received the writer participant's announcements.
ACKNACK from the reader participant's builtin participant liveliness reader
29-30Re-announcements of reader participant info, triggered by receiving the writer announcements.
31-35Initial HEARTBEATs and ACKNACKs from the reader participant's builtin discovery endpoints, indicating it has one reader and no writers.
36ACKNACK in response to HEARTBEAT packet #24, requesting that the writer participant's builtin publication writer resend the meta DATA for its writer
37-38HEARTBEATs sent in response to writer ACKNACKs, announcing that the reader participant has one reader and no writers.
App1→ App2 39Initial HEARTBEAT from participant liveliness writer, of no samples written.
App1← App2 40 ACKNACK from participant liveliness reader, of no samples received.
App1→ App241
ACKNACK from writer participant for reader participant to resend the meta DATA for its reader
42-43 Further HEARTBEATs from the reader participant
Table 5.5 Analysis of Sample File’s Packets
Direction Packet # Description
5-19
Analyzing RTPS Packets
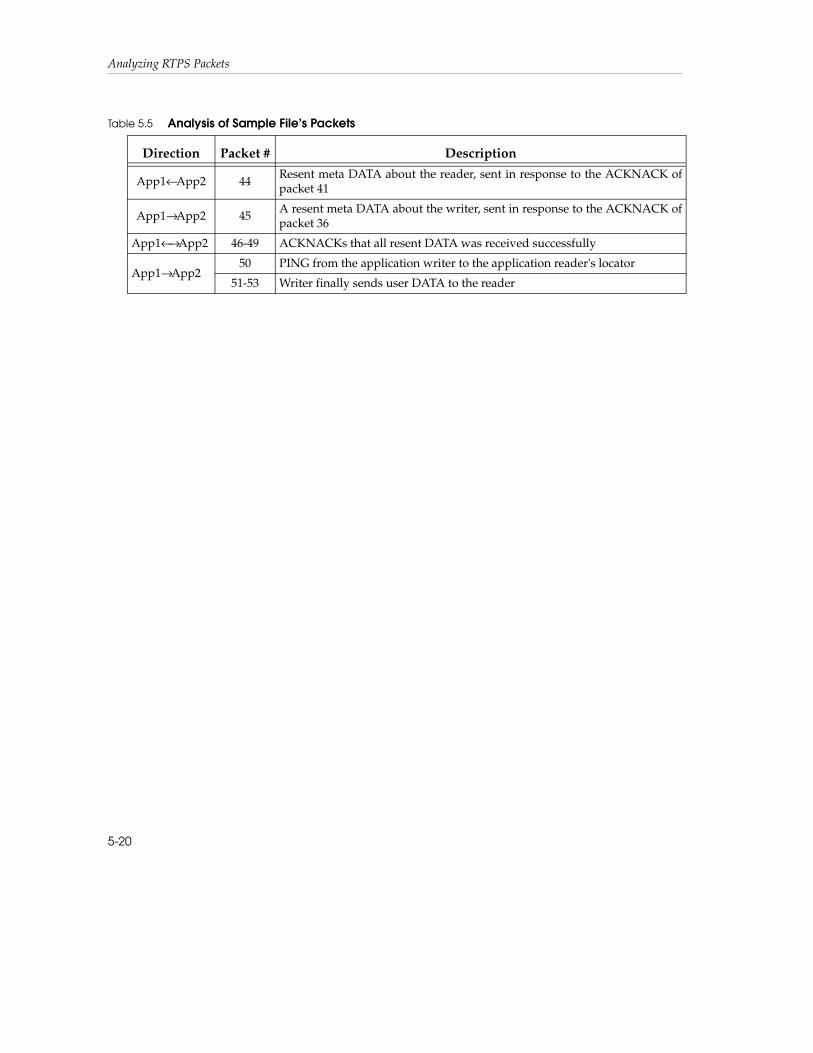
App1← App2 44Resent meta DATA about the reader, sent in response to the ACKNACK of packet 41
App1→ App2 45A resent meta DATA about the writer, sent in response to the ACKNACK of packet 36
App1←→ App2 46-49 ACKNACKs that all resent DATA was received successfully
App1→ App250 PING from the application writer to the application reader's locator
51-53 Writer finally sends user DATA to the reader
Table 5.5 Analysis of Sample File’s Packets
Direction Packet # Description
5-20
6. Prac
tica
l Use
s
Chapter 6 Practical Uses with RTI Applications
This chapter offers a few suggestions on how Wireshark can be used during Connext application development:
❏ Debugging Discovery Problems (Section 6.1)
❏ Visualizing Your System (Section 6.2)
❏ Providing Information to RTI Support (Section 6.3)
6.1 Debugging Discovery ProblemsWhile many object discovery problems are difficult to diagnose, others are quite obvi-ous once you use the right diagnostic tools. By inspecting all RTPS packets with Wire-shark, you may be able to narrow the problem down to one of the following:
❏ The participants are not discovering each other. In this case, you will see periodic sending of DATA packets, but no response from the other host that is not being discovered.
❏ The participants have discovered each other, but their contained readers/writers are not getting hooked up correctly. In this case, you may see HEARTBEAT and ACKNACK packets for the reserved meta-data representing the reader and writer from one participant to another, but the other participant is not respond-ing back in accordance to the RTPS protocol.
❏ The objects have all discovered each other, but the writer is not sending user-data. In this case, you will see the discovery protocol complete successfully, but not see DATA packets containing user data from the writer.
6-1
Practical Uses with RTI Applications
When a participant containing a writer sends meta data to other participants, and those other participants respond with ACKNACK packets to acknowledge those discovery packets, all you can say is that the declaration for that writer was received by all participants in the system. But just because a participant is writ-ing DATA packets does not necessarily mean it is writing your application’s user data. Connext also uses DATA packets to propagate internal object information. When in doubt, check the traffic_nature field in the decoded packet to see how the packet is being used.
A subscriber reciprocally declares its reader object with another DATA packet to all concerned participants. This happens before the writer application starts pub-lishing user data. Connext uses separate built-in objects to announce and dis-cover readers vs. writers, so it's important to check the writerEntityId of the DATA packet to confirm that the participants in question have discovered the reader/writer correctly.
Lastly, it's important to check whether the topic and type declared in the meta data of the reader matches that in the meta data of the writer. Assuming that nei-ther party is deliberately ignoring certain DDS entities (e.g. participant, topic, reader, writer), if all these were acknowledged (with ACKNACK packets), the reader participant should at this point be ready to accept user data from the writer, and the writer will send the data to the reader. Exactly when the data will appear on the wire will depend on when the writer writes the next sample, as well as the QoS of both the reader and writer.
❏ The writer is writing your data, but the reader is not able to access that data when it calls read() or take(). In this case, you should check your QoS settings. Compare the writer's QoS against the reader's. Perhaps the minimum_separationin the TimeBasedFilter QosPolicy of the reader is inadvertently filtering out received issues.
❏ Once a writer is writing user data to a data reader, the initial discovery phase is over. But there can be an "anti-discovery" problem: depending on the Liveliness QoS, Connext may purge a remote entity that it considers to be stale. Regardless of what kind of liveliness setting you use, the main idea is to ensure that your participant and its entities renew their liveliness (automatically or manually) within the declared duration. A classic symptom of communication ceasing due to a liveliness expiration is that a participant stops sending its periodic partici-pant DATA packet. (See the Connext User’s Manual or online documentation for information about the Liveliness QosPolicy.)
NOTE: Connext can log more detailed information about what it is doing at higher verbosity settings. See the Connext User’s Manual’s Troubleshooting chap-ter for more information on setting verbosity.
6-2
Visualizing Your System 6. Prac
tica
l Use
s
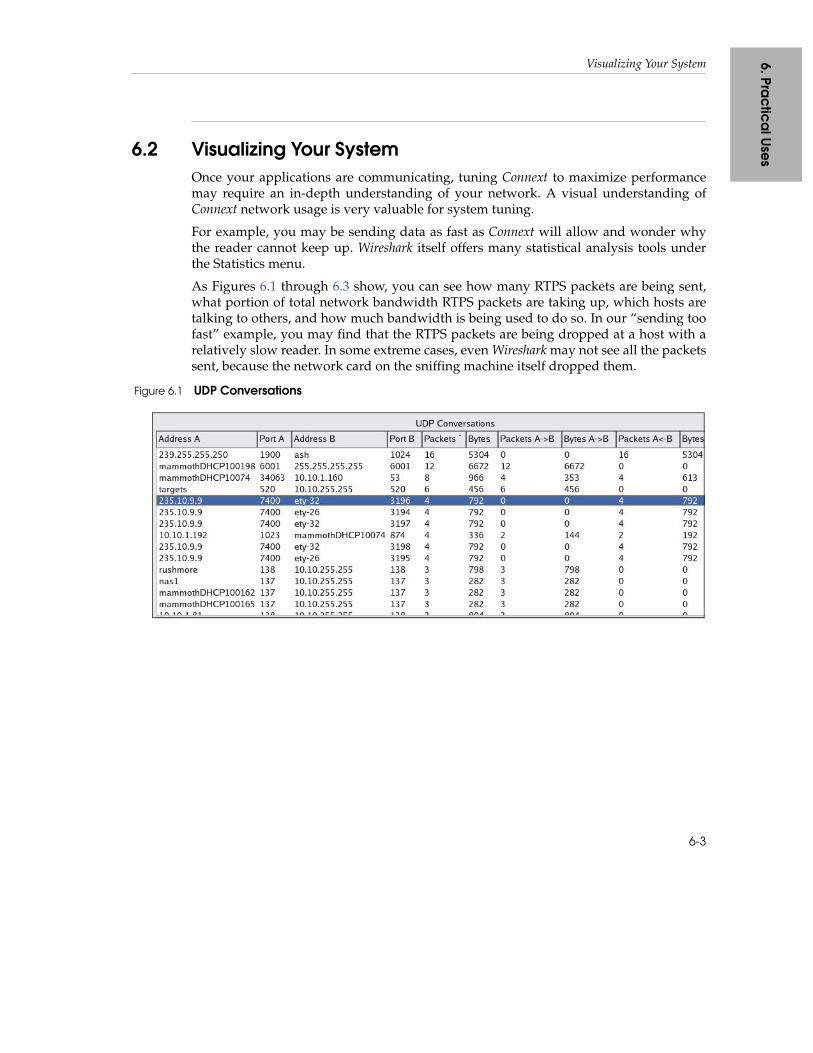
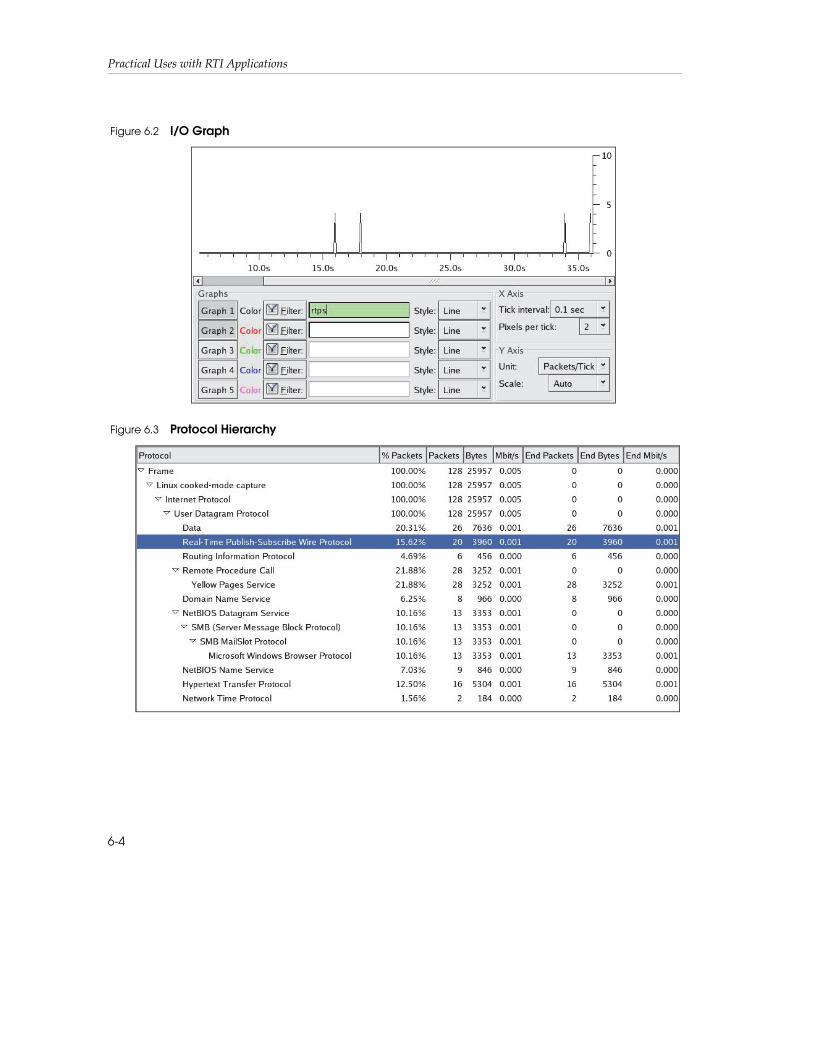
6.2 Visualizing Your System Once your applications are communicating, tuning Connext to maximize performance may require an in-depth understanding of your network. A visual understanding of Connext network usage is very valuable for system tuning.For example, you may be sending data as fast as Connext will allow and wonder why the reader cannot keep up. Wireshark itself offers many statistical analysis tools under the Statistics menu.
As Figures 6.1 through 6.3 show, you can see how many RTPS packets are being sent, what portion of total network bandwidth RTPS packets are taking up, which hosts are talking to others, and how much bandwidth is being used to do so. In our “sending too fast” example, you may find that the RTPS packets are being dropped at a host with a relatively slow reader. In some extreme cases, even Wireshark may not see all the packets sent, because the network card on the sniffing machine itself dropped them.
Figure 6.1 UDP Conversations
6-3
Practical Uses with RTI Applications
Figure 6.2 I/O Graph
Figure 6.3 Protocol Hierarchy
6-4
Providing Information to RTI Support 6. Prac
tica
l Use
s
6.3 Providing Information to RTI SupportIf you ever need to contact RTI support for an issue related to Connext, the captured packets will help RTI support diagnose the problem faster (especially when accompa-nied by a Connext log created with a high verbosity setting).See the Connext User’s Manual’s Troubleshooting chapter for more information on set-ting verbosity.
6-5

Practical Uses with RTI Applications
6-6