gcc jaguar cuttingplotter - llumen.bellumen.be/mmlabkul/files/tutorialgcc_en.pdf · 3 tutorial gcc...
TRANSCRIPT

GCC Jaguar CuttingplotterUser Guide & Maintenance Manual
2Tutorial GCC Cuttingplotter
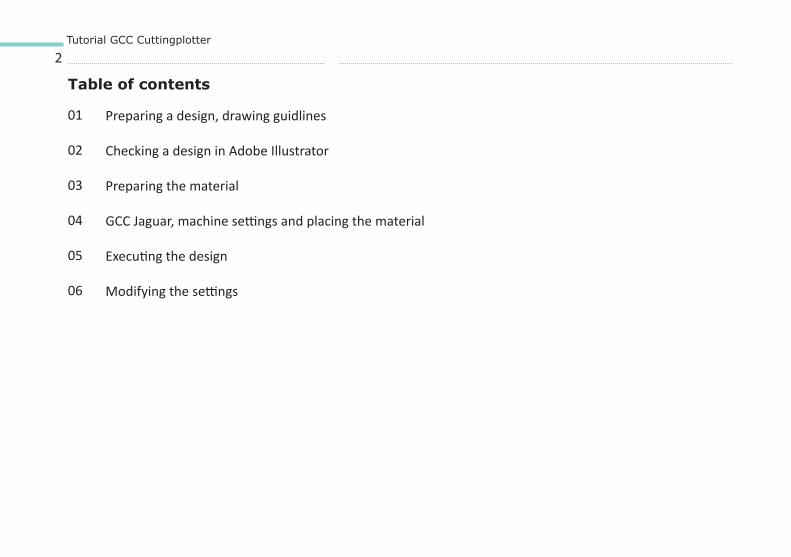
Preparing a design, drawing guidlines
Checking a design in Adobe Illustrator
Preparing the material
GCC Jaguar, machine settings and placing the material
Executing the design
Modifying the settings
01
02
03
04
05
06
Table of contents
3Tutorial GCC Cuttingplotter
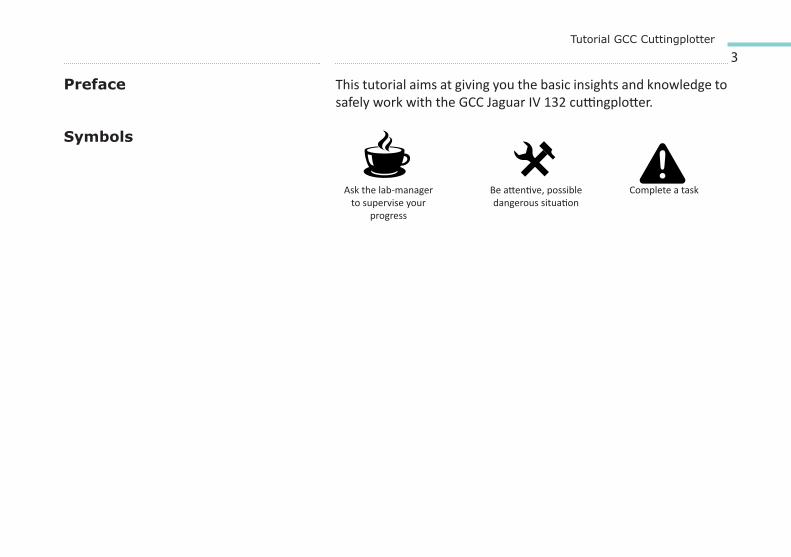
This tutorial aims at giving you the basic insights and knowledge to safely work with the GCC Jaguar IV 132 cuttingplotter.
Preface
Symbols
Ask the lab-manager to supervise your
progress
Be attentive, possible dangerous situation
Complete a task
01 Preparing a design Drawing guidlinesUsing Illustrator to check the designs before opening them in CutPro
5Tutorial BRM lasercutter
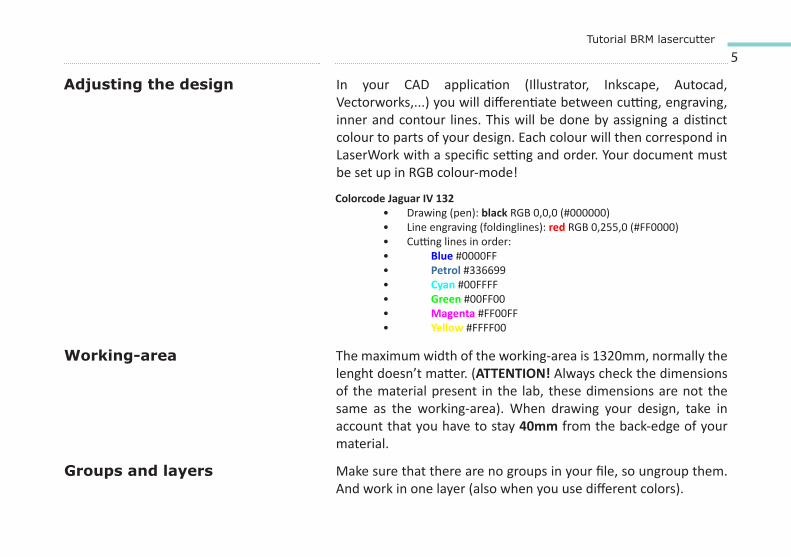
In your CAD application (Illustrator, Inkscape, Autocad, Vectorworks,...) you will differentiate between cutting, engraving, inner and contour lines. This will be done by assigning a distinct colour to parts of your design. Each colour will then correspond in LaserWork with a specific setting and order. Your document must be set up in RGB colour-mode!
Adjusting the design
Colorcode Jaguar IV 132• Drawing (pen): black RGB 0,0,0 (#000000)• Line engraving (foldinglines): red RGB 0,255,0 (#FF0000) • Cutting lines in order: • Blue #0000FF• Petrol #336699• Cyan #00FFFF• Green #00FF00• Magenta #FF00FF• Yellow #FFFF00
Working-area The maximum width of the working-area is 1320mm, normally the lenght doesn’t matter. (ATTENTION! Always check the dimensions of the material present in the lab, these dimensions are not the same as the working-area). When drawing your design, take in account that you have to stay 40mm from the back-edge of your material.
Groups and layers Make sure that there are no groups in your file, so ungroup them. And work in one layer (also when you use different colors).
6Tutorial GCC Cuttingplotter
Lineweight
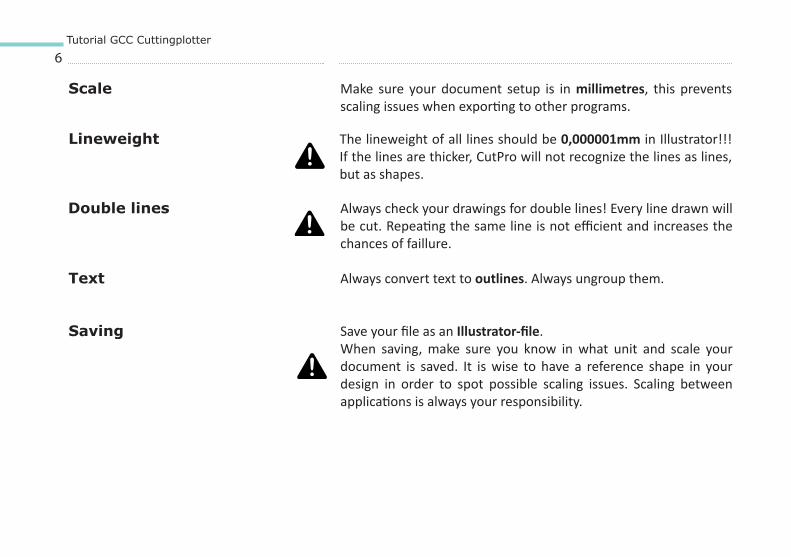
Scale Make sure your document setup is in millimetres, this prevents scaling issues when exporting to other programs.
The lineweight of all lines should be 0,000001mm in Illustrator!!! If the lines are thicker, CutPro will not recognize the lines as lines, but as shapes.
Saving
Text
Double lines Always check your drawings for double lines! Every line drawn will be cut. Repeating the same line is not efficient and increases the chances of faillure.
Always convert text to outlines. Always ungroup them.
Save your file as an Illustrator-file.When saving, make sure you know in what unit and scale your document is saved. It is wise to have a reference shape in your design in order to spot possible scaling issues. Scaling between applications is always your responsibility.
7Tutorial GCC Cuttingplotter
Saving your file in different CAD programs:
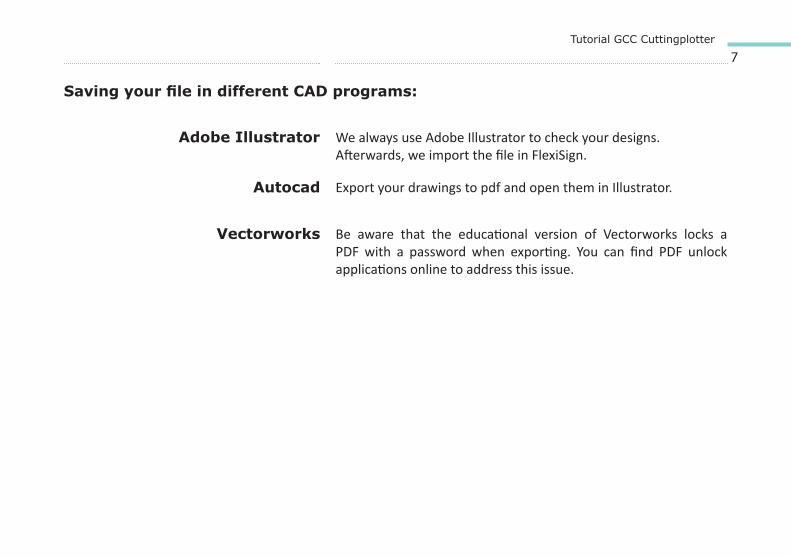
We always use Adobe Illustrator to check your designs. Afterwards, we import the file in FlexiSign.
Export your drawings to pdf and open them in Illustrator.
Be aware that the educational version of Vectorworks locks a PDF with a password when exporting. You can find PDF unlock applications online to address this issue.
Adobe Illustrator
Autocad
Vectorworks
02 Checking a design inIllustratorMaking a design cut-ready
9Tutorial GCC Cuttingplotter
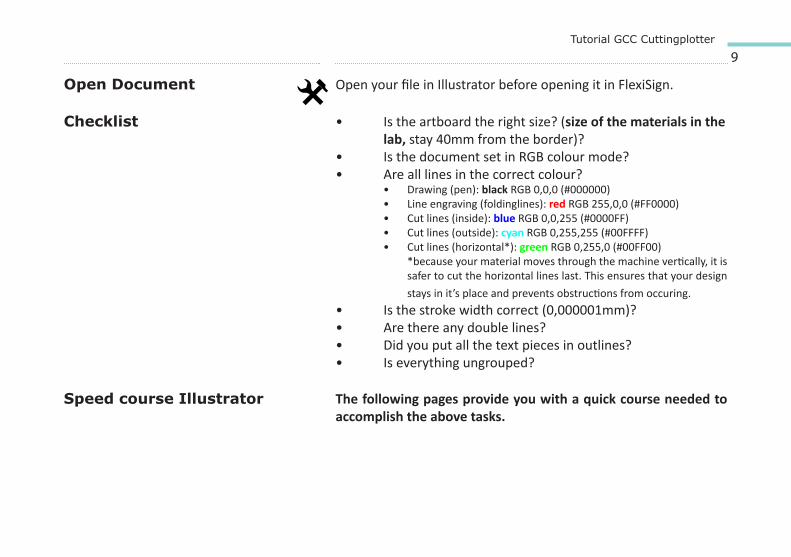
Open your file in Illustrator before opening it in FlexiSign.
• Is the artboard the right size? (size of the materials in the lab, stay 40mm from the border)? • Is the document set in RGB colour mode?• Are all lines in the correct colour?
• Drawing (pen): black RGB 0,0,0 (#000000)• Line engraving (foldinglines): red RGB 255,0,0 (#FF0000) • Cut lines (inside): blue RGB 0,0,255 (#0000FF) • Cut lines (outside): cyan RGB 0,255,255 (#00FFFF)• Cut lines (horizontal*): green RGB 0,255,0 (#00FF00)
*because your material moves through the machine vertically, it is safer to cut the horizontal lines last. This ensures that your design stays in it’s place and prevents obstructions from occuring.
• Is the stroke width correct (0,000001mm)?• Are there any double lines?• Did you put all the text pieces in outlines?• Is everything ungrouped?
The following pages provide you with a quick course needed to accomplish the above tasks.
Open Document
Checklist
Speed course Illustrator
10Tutorial GCC Cuttingplotter
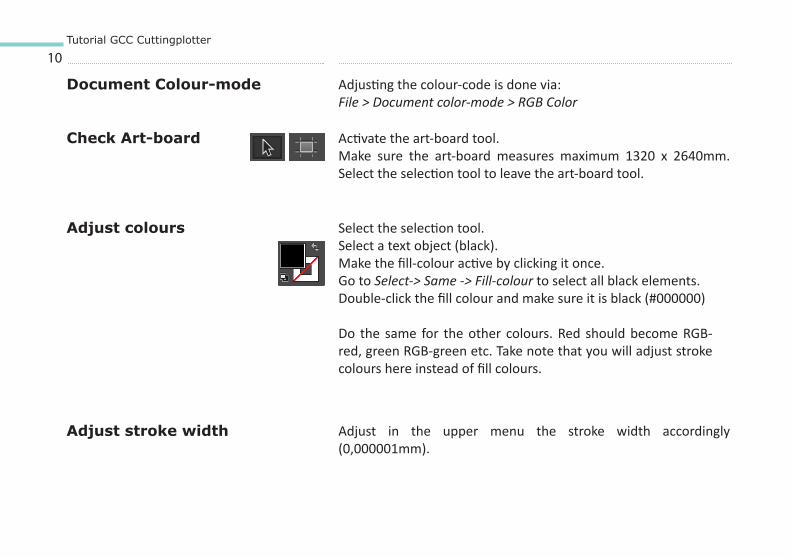
Adjusting the colour-code is done via:File > Document color-mode > RGB Color
Activate the art-board tool.Make sure the art-board measures maximum 1320 x 2640mm. Select the selection tool to leave the art-board tool.
Select the selection tool.Select a text object (black).Make the fill-colour active by clicking it once.Go to Select-> Same -> Fill-colour to select all black elements.Double-click the fill colour and make sure it is black (#000000)
Do the same for the other colours. Red should become RGB-red, green RGB-green etc. Take note that you will adjust stroke colours here instead of fill colours.
Adjust in the upper menu the stroke width accordingly (0,000001mm).
Document Colour-mode
Check Art-board
Adjust colours
Adjust stroke width
11Tutorial GCC Cuttingplotter
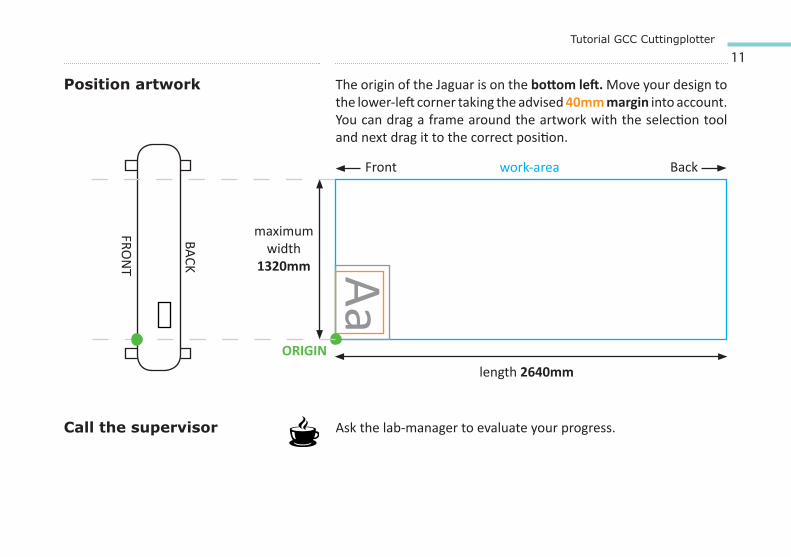
The origin of the Jaguar is on the bottom left. Move your design to the lower-left corner taking the advised 40mm margin into account. You can drag a frame around the artwork with the selection tool and next drag it to the correct position.
Ask the lab-manager to evaluate your progress.
Position artwork
Call the supervisorAa
Front Back
length 2640mm
work-area
ORIGIN
maximum width
1320mm
FRON
T
BACK
03 Preparing the material
13Tutorial GCC Cuttingplotter
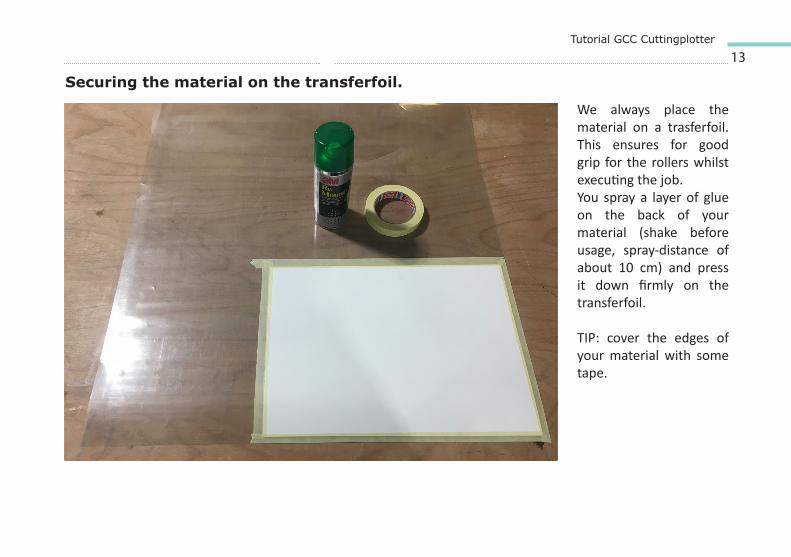
Securing the material on the transferfoil.
We always place the material on a trasferfoil. This ensures for good grip for the rollers whilst executing the job.You spray a layer of glue on the back of your material (shake before usage, spray-distance of about 10 cm) and press it down firmly on the transferfoil.
TIP: cover the edges of your material with some tape.
04 GCC JaguarMachine settings
15Tutorial GCC Cuttingplotter
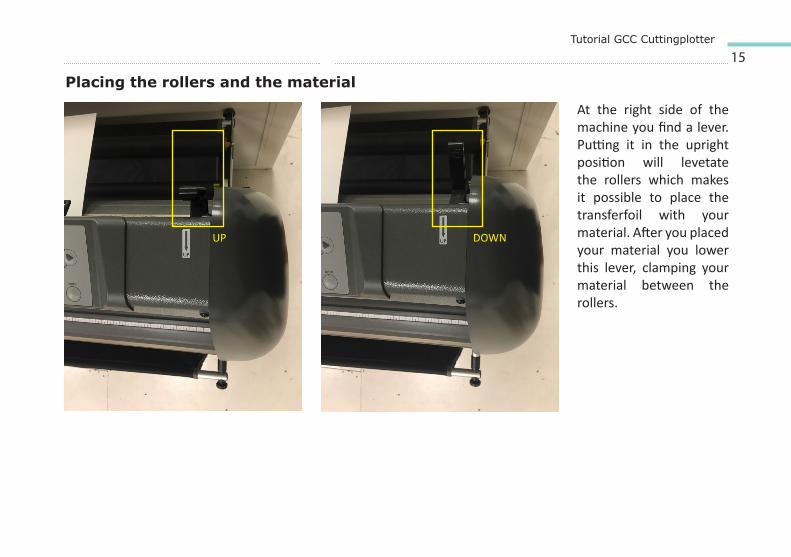
Placing the rollers and the material
UP DOWN
At the right side of the machine you find a lever. Putting it in the upright position will levetate the rollers which makes it possible to place the transferfoil with your material. After you placed your material you lower this lever, clamping your material between the rollers.
16Tutorial GCC Cuttingplotter
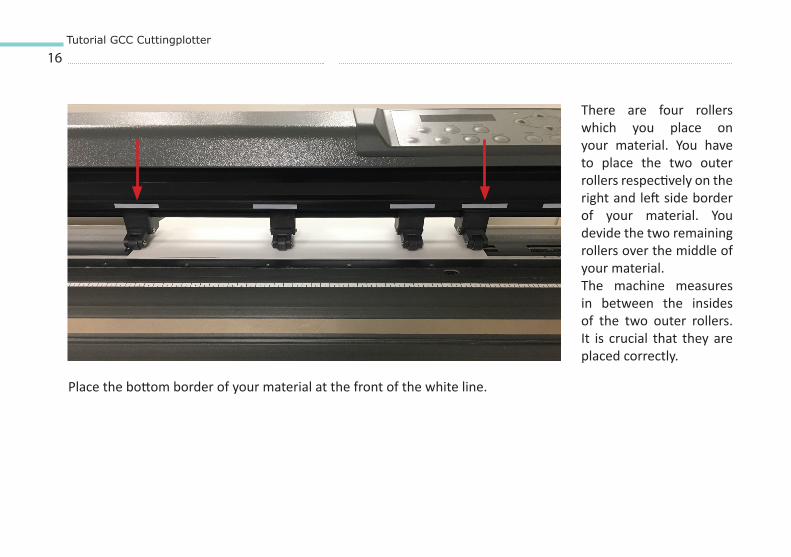
There are four rollers which you place on your material. You have to place the two outer rollers respectively on the right and left side border of your material. You devide the two remaining rollers over the middle of your material.The machine measures in between the insides of the two outer rollers. It is crucial that they are placed correctly.
Place the bottom border of your material at the front of the white line.
17Tutorial GCC Cuttingplotter
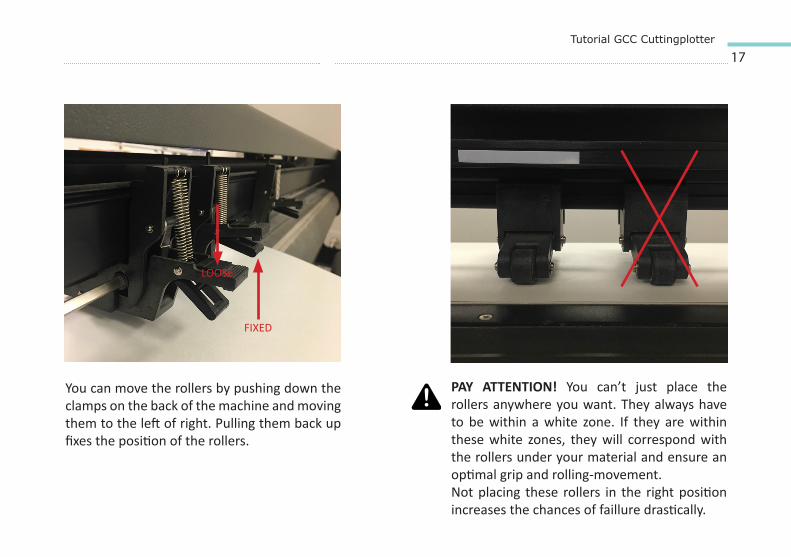
PAY ATTENTION! You can’t just place the rollers anywhere you want. They always have to be within a white zone. If they are within these white zones, they will correspond with the rollers under your material and ensure an optimal grip and rolling-movement.Not placing these rollers in the right position increases the chances of faillure drastically.
You can move the rollers by pushing down the clamps on the back of the machine and moving them to the left of right. Pulling them back up fixes the position of the rollers.
FIXED
LOOSE
18Tutorial GCC Cuttingplotter
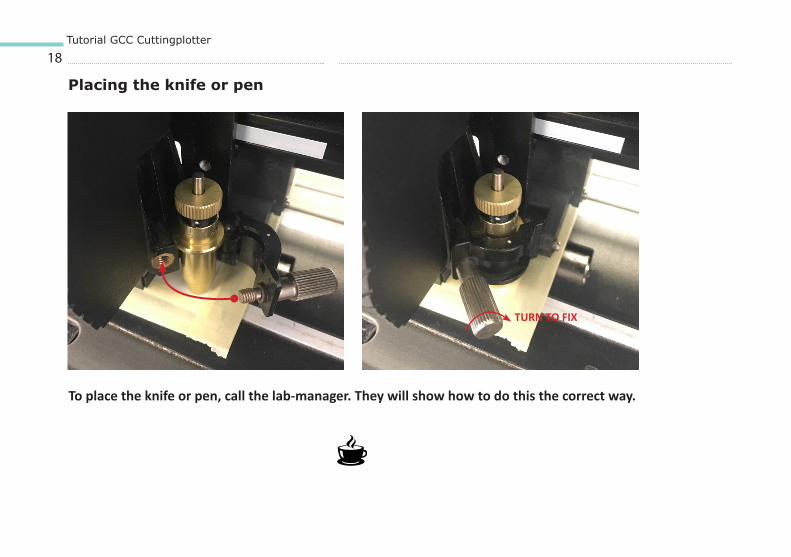
Placing the knife or pen
To place the knife or pen, call the lab-manager. They will show how to do this the correct way.
TURN TO FIX
19Tutorial GCC Cuttingplotter
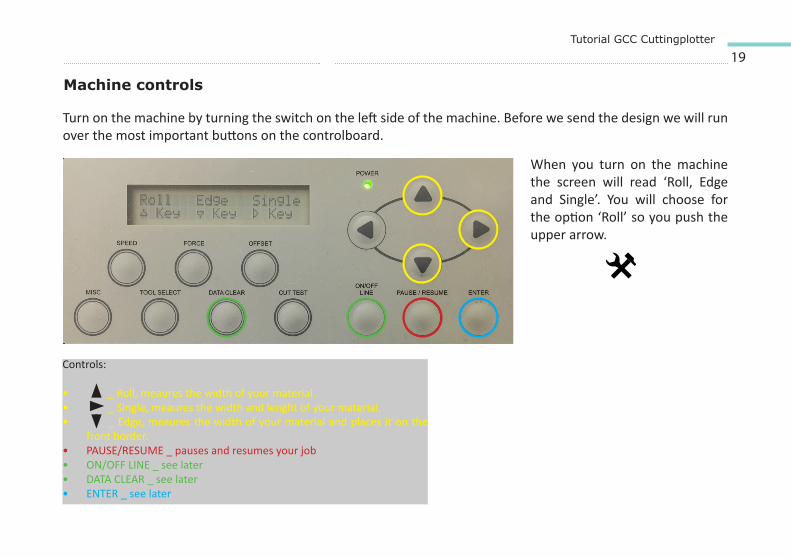
Machine controls
Turn on the machine by turning the switch on the left side of the machine. Before we send the design we will run over the most important buttons on the controlboard.
Controls:
• _ Roll, meaures the width of your material.• _ Single, meaures the width and lenght of your material.• _ Edge, meaures the width of your material and places it on the
front border.• PAUSE/RESUME _ pauses and resumes your job• ON/OFF LINE _ see later• DATA CLEAR _ see later• ENTER _ see later
When you turn on the machine the screen will read ‘Roll, Edge and Single’. You will choose for the option ‘Roll’ so you push the upper arrow.
05 Executing the design

21Tutorial GCC Cuttingplotter
Now that you finished and saved your design, we can import it into the cuttingplotter-software: FlexiSign. Search for the icon below on the desktop or in the toolbar on the bottom of the screen, and open the program.
Follow the instructions to safely complete this tutorial. When in doubt, ask for help from the lab-manager.
Opening and executing the design
22Tutorial GCC Cuttingplotter
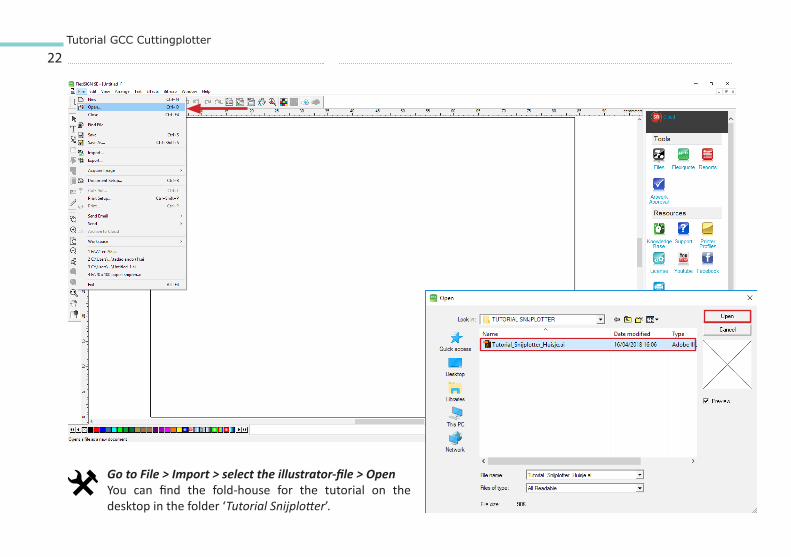
Go to File > Import > select the illustrator-file > OpenYou can find the fold-house for the tutorial on the desktop in the folder ‘Tutorial Snijplotter’.
23Tutorial GCC Cuttingplotter
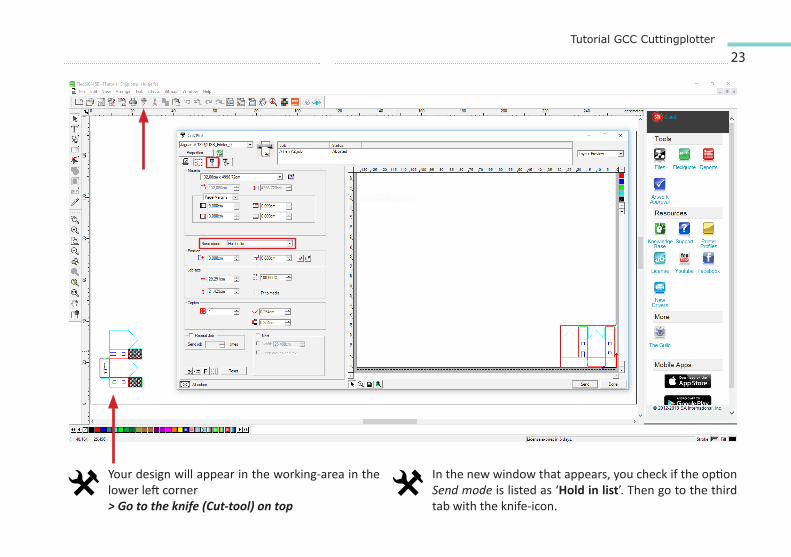
Your design will appear in the working-area in the lower left corner> Go to the knife (Cut-tool) on top
In the new window that appears, you check if the option Send mode is listed as ‘Hold in list’. Then go to the third tab with the knife-icon.
24Tutorial GCC Cuttingplotter
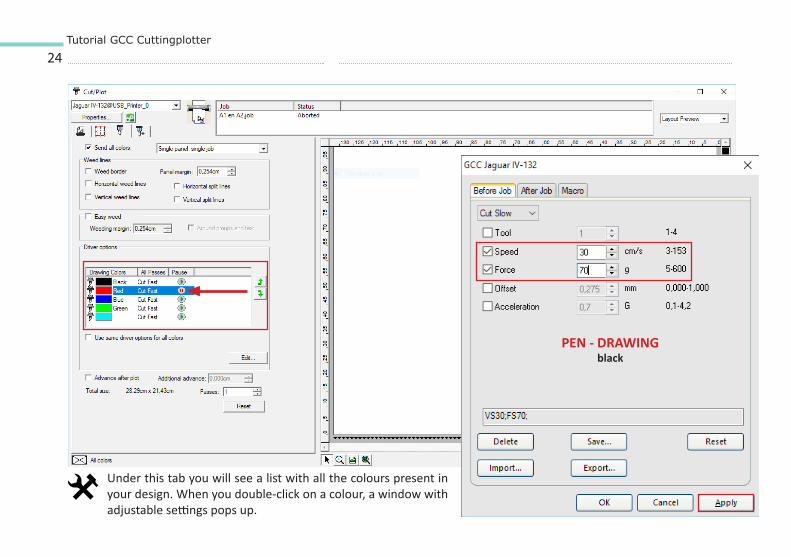
Under this tab you will see a list with all the colours present in your design. When you double-click on a colour, a window with adjustable settings pops up.
PEN - DRAWINGblack

25Tutorial GCC Cuttingplotter
Check if the settings for ‘Speed’ and ‘Force’ are the same as displayed above. In the last chapter of this tutorial we will go into detail on how to change these settings according to your material.After adjusting the settings choose Apply > OK
MES - ENGRAVINGred
MES - CUTTINGbluecyan
green
26Tutorial GCC Cuttingplotter
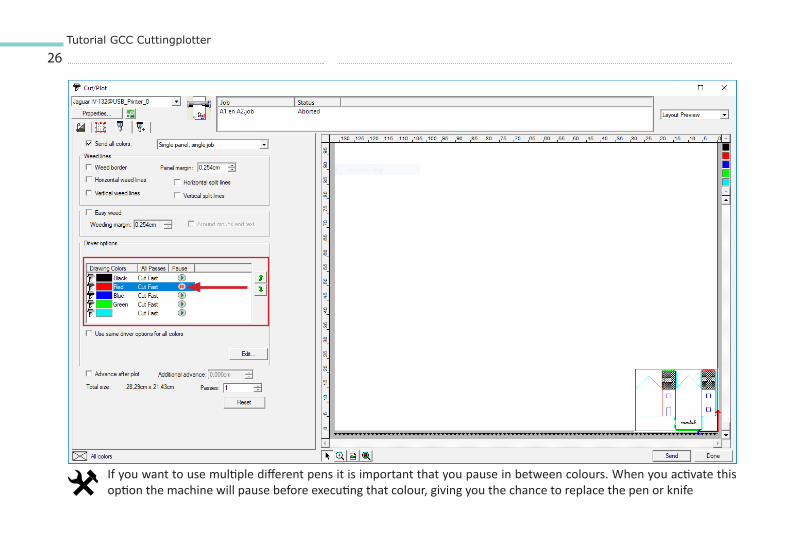
If you want to use multiple different pens it is important that you pause in between colours. When you activate this option the machine will pause before executing that colour, giving you the chance to replace the pen or knife
27Tutorial GCC Cuttingplotter
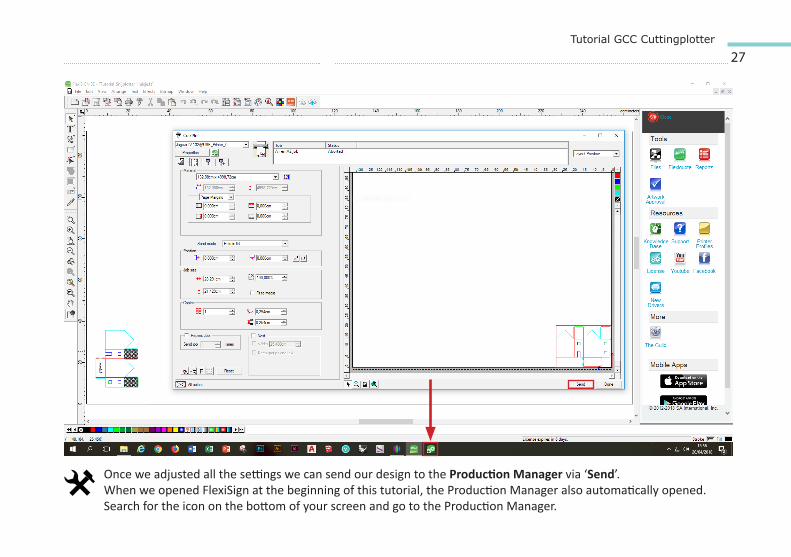
Once we adjusted all the settings we can send our design to the Production Manager via ‘Send’.When we opened FlexiSign at the beginning of this tutorial, the Production Manager also automatically opened.Search for the icon on the bottom of your screen and go to the Production Manager.
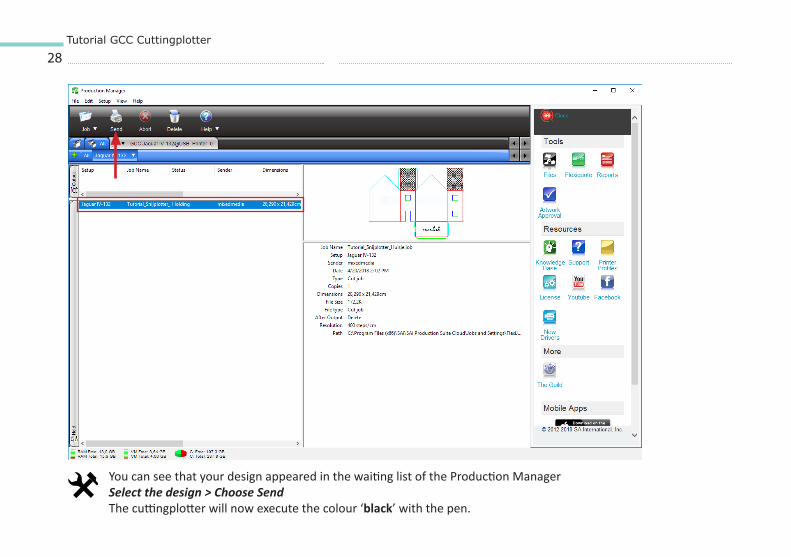
28Tutorial GCC Cuttingplotter
You can see that your design appeared in the waiting list of the Production ManagerSelect the design > Choose SendThe cuttingplotter will now execute the colour ‘black’ with the pen.
29Tutorial GCC Cuttingplotter
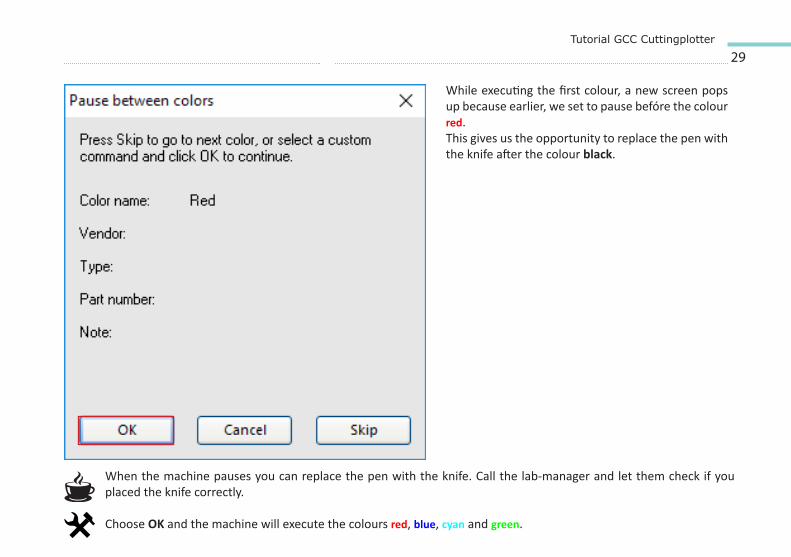
When the machine pauses you can replace the pen with the knife. Call the lab-manager and let them check if you placed the knife correctly.
Choose OK and the machine will execute the colours red, blue, cyan and green.
While executing the first colour, a new screen pops up because earlier, we set to pause befóre the colour red.This gives us the opportunity to replace the pen with the knife after the colour black.
30Tutorial GCC Cuttingplotter
Once you executed all the colours, and the design is finished, you can remove the transferfoil from the machine by pulling the lever as described on page 15. When you leave the machine keep the lever in the upright position so the rollers stay raised.
The next chapter explains how you can change the settings according to your material and other files.

31Tutorial GCC Cuttingplotter
06 Modifying the settings
33Tutorial GCC Cuttingplotter
Paperweight In this chapter we will explain what settings you can modify and how, according to your material.
It’s important you know how ‘thick’ your material is. This is usualy expressed in an X-amount of grams. So don’t forget to ask for the paperweight when you buy single sheets of paper in the store.
34Tutorial GCC Cuttingplotter
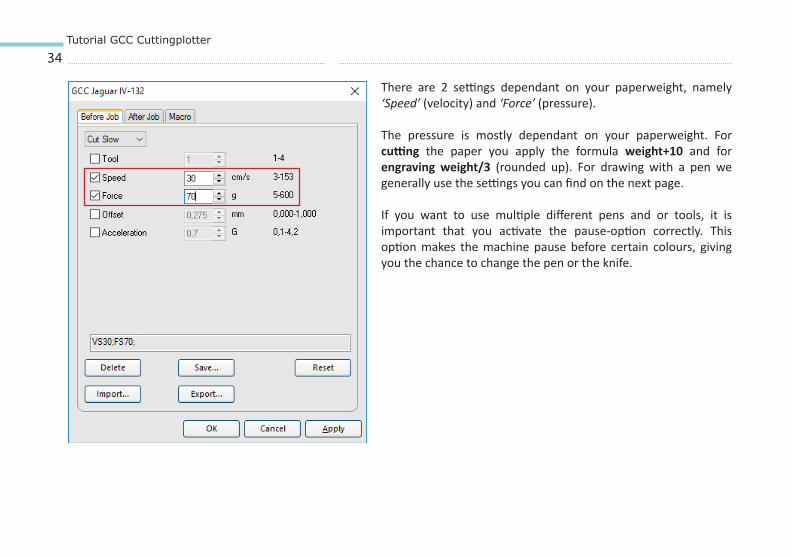
There are 2 settings dependant on your paperweight, namely ‘Speed’ (velocity) and ‘Force’ (pressure).
The pressure is mostly dependant on your paperweight. For cutting the paper you apply the formula weight+10 and for engraving weight/3 (rounded up). For drawing with a pen we generally use the settings you can find on the next page.
If you want to use multiple different pens and or tools, it is important that you activate the pause-option correctly. This option makes the machine pause before certain colours, giving you the chance to change the pen or the knife.
35Tutorial GCC Cuttingplotter
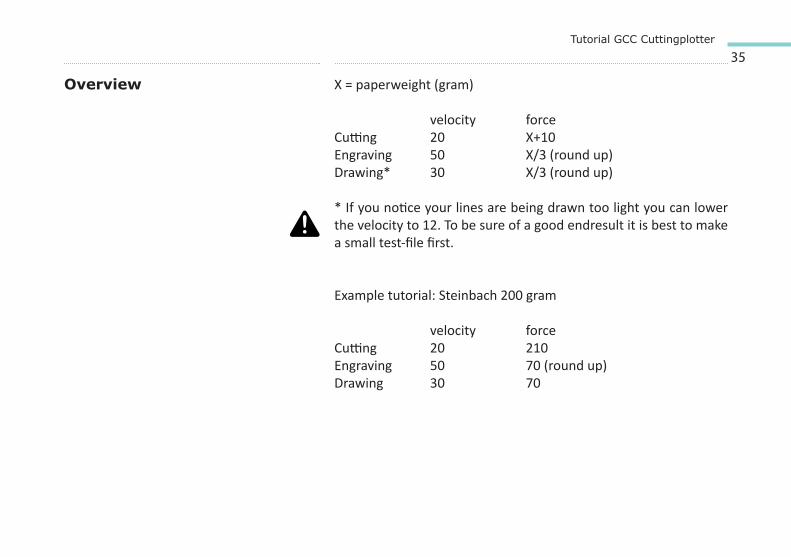
X = paperweight (gram)
velocity forceCutting 20 X+10Engraving 50 X/3 (round up)Drawing* 30 X/3 (round up)
* If you notice your lines are being drawn too light you can lower the velocity to 12. To be sure of a good endresult it is best to make a small test-file first.
Example tutorial: Steinbach 200 gram
velocity forceCutting 20 210Engraving 50 70 (round up)Drawing 30 70
Overview