g1 - number sense
TRANSCRIPT

NumberSenseCOMPANION
MEASUREMENT, GEOMETRY AND DATA HANDLINGG1
Teacher GuideEnglish
ISBN
978-1-920427-41-2
ABOUT THE NUMBERSENSE COMPANION TEACHER GUIDE FOR FOUNDATION PHASE
The NumberSense Mathematics Programme consists of the NumberSense Workbooks, the NumberSense Companion Series and a range of resources to support the effective learning of mathematics from Grade R to Grade 7. The NumberSense Workbooks address the Number and Pattern components of the curriculum while the NumberSense Companion Series deals with Measurement, Space and Shape (Geometry) and Data Handling.
There are two NumberSense Workbooks for Grade R. Grade R teachers are expected to mediate the activities in the workbooks with the children. There are 12 workbooks altogether for Grade 1 to Grade 3 with four workbooks for each grade. This requires that a page be done each day for a workbook to be completed each term. In the Foundation Phase, the workbooks are used to consolidate the daily mat work sessions.
There are also 12 workbooks for Grade 4 to Grade 7 with three to four workbooks per year. Children complete pages in the workbooks in preparation for the focus group sessions with the teacher.
The NumberSense Companion Teacher Guides for Grades R to 3 describe classroom-based activities for developing Measurement, Space and Shape (Geometry) and Data Handling. The activities in the NumberSense Companion Teacher Guides for Grades R to 3 assume that teachers also have the NumberSense Activity cards and the corresponding range of resources.
In Grades 4 to 7, the NumberSense Companion Workbooks provide learning materials for the children while the Teacher Guides for the Grade 4 to 7 NumberSense Companion Workbooks provide page by page support (including answers) for teachers.
The Foundation Phase NumberSense Companion Teacher Guide
The NumberSense Companion Teacher Guide for the Foundation Phase has been designed to support teachers in creating learning opportunities for children to develop geometric and spatial reasoning, measuring skills and the ability to critically analyse data.
The Teacher Guide assumes that teachers have a number of resources, in particular the activity cards that are available individually or as a set in the NumberSense Companion Activity Kit.
This Teacher Guide is a first draft that will continually be updated and teachers are encouraged to visit the NumberSense website (www.NumberSense.co.za) frequently to ensure that they have the latest version. While the Teacher Guide remains under development, teachers can download the various drafts at no charge from www.NumberSense.co.za.
Children can engage with most of the activities described in this Teacher Guide independent of the teacher. The role of the teacher is to reflect on each activity with the children to ensure that learning takes place.
Teachers guide__Grade 1_INTRO.indd 1 2018-05-09 03:30:38 PM
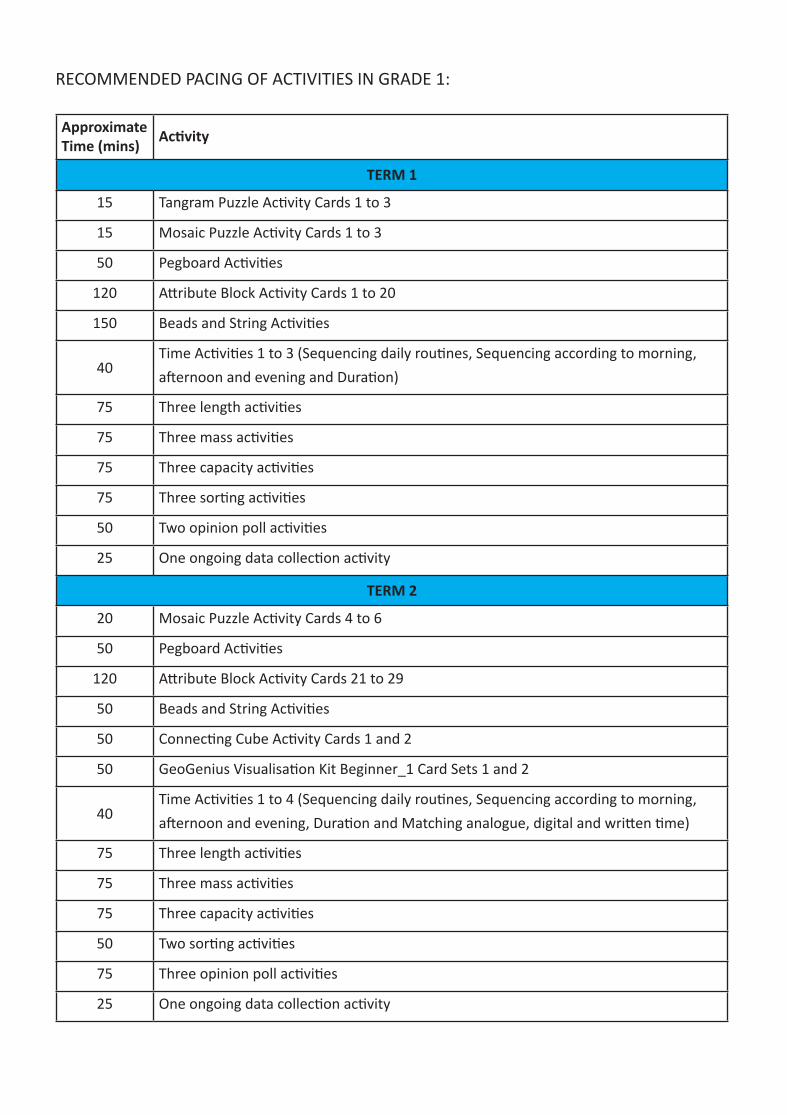
RECOMMENDED PACING OF ACTIVITIES IN GRADE 1:
Approximate Time (mins) Activity
TERM 1
15 Tangram Puzzle Activity Cards 1 to 3
15 Mosaic Puzzle Activity Cards 1 to 3
50 Pegboard Activities
120 Attribute Block Activity Cards 1 to 20
150 Beads and String Activities
40Time Activities 1 to 3 (Sequencing daily routines, Sequencing according to morning, afternoon and evening and Duration)
75 Three length activities
75 Three mass activities
75 Three capacity activities
75 Three sorting activities
50 Two opinion poll activities
25 One ongoing data collection activity
TERM 2
20 Mosaic Puzzle Activity Cards 4 to 6
50 Pegboard Activities
120 Attribute Block Activity Cards 21 to 29
50 Beads and String Activities
50 Connecting Cube Activity Cards 1 and 2
50 GeoGenius Visualisation Kit Beginner_1 Card Sets 1 and 2
40Time Activities 1 to 4 (Sequencing daily routines, Sequencing according to morning, afternoon and evening, Duration and Matching analogue, digital and written time)
75 Three length activities
75 Three mass activities
75 Three capacity activities
50 Two sorting activities
75 Three opinion poll activities
25 One ongoing data collection activity
Teachers guide__Grade 1_INTRO.indd 2 2018-05-09 03:30:39 PM
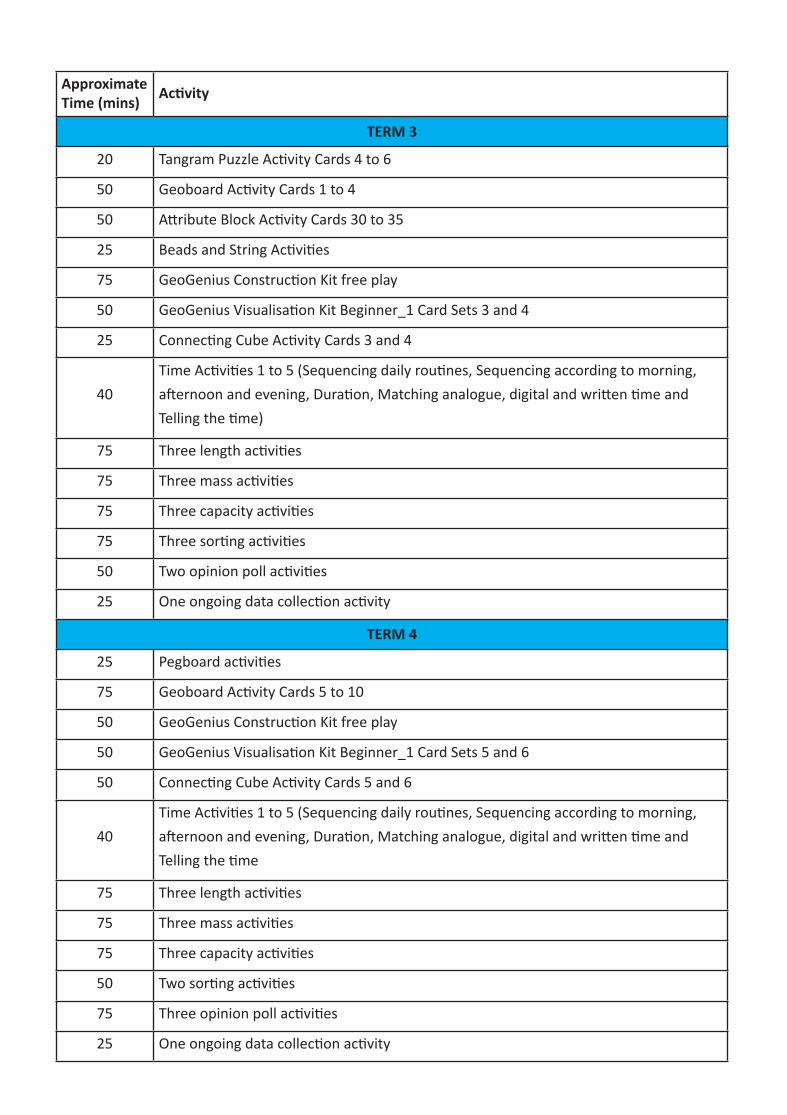
Approximate Time (mins) Activity
TERM 3
20 Tangram Puzzle Activity Cards 4 to 6
50 Geoboard Activity Cards 1 to 4
50 Attribute Block Activity Cards 30 to 35
25 Beads and String Activities
75 GeoGenius Construction Kit free play
50 GeoGenius Visualisation Kit Beginner_1 Card Sets 3 and 4
25 Connecting Cube Activity Cards 3 and 4
40Time Activities 1 to 5 (Sequencing daily routines, Sequencing according to morning, afternoon and evening, Duration, Matching analogue, digital and written time and Telling the time)
75 Three length activities
75 Three mass activities
75 Three capacity activities
75 Three sorting activities
50 Two opinion poll activities
25 One ongoing data collection activity
TERM 4
25 Pegboard activities
75 Geoboard Activity Cards 5 to 10
50 GeoGenius Construction Kit free play
50 GeoGenius Visualisation Kit Beginner_1 Card Sets 5 and 6
50 Connecting Cube Activity Cards 5 and 6
40Time Activities 1 to 5 (Sequencing daily routines, Sequencing according to morning, afternoon and evening, Duration, Matching analogue, digital and written time and Telling the time
75 Three length activities
75 Three mass activities
75 Three capacity activities
50 Two sorting activities
75 Three opinion poll activities
25 One ongoing data collection activity
Teachers guide__Grade 1_INTRO.indd 3 2018-05-09 03:30:39 PM

Teachers guide__Grade 1_INTRO.indd 4 2018-05-09 03:30:39 PM

1
INTRODUCTION
“Geometry begins with play” (van Hiele, 1999).
The activities described in this section of the study guide are informed by the research of Pierre van Hiele. According to van Hiele (1986), there are five levels of geometric thought that are sequential and hierarchical. These include visualisation, description, abstraction, deduction and rigour (although it is unlikely that children in the early grades will move beyond the descriptive level). For children to function at any given level, they must have developed confidence at the preceding level. Progression from one level to another is largely based on instruction and experience rather than age or physical development.
For a child at the visual level of geometric thinking, figures and shapes are identified in terms of what they ‘look like’. If asked why a square is a square, a child will say that it is a square because it looks like one. However, if the square is tilted so that its sides appear to be at a 45˚ angle, then the child may not recognise the shape as a square, instead, they may call it a diamond.
Children at the descriptive level of geometric thinking recognise the properties of shapes. Children at this developmental level may identify a shape as a square because the shape has four sides that are the same length, or because the angles are right angles. However, at this level, the properties are not yet logically ordered or related. Children at this developmental level may identify a shape as an equilateral triangle because the shape has three sides that are equal in length, or because the shape has three angles that are equal in size. However, they don’t recognise a relationship between the properties and cannot yet see a relationship between the equal angles and the equal sides of the equilateral triangle.
Recognising the relationships between the different properties of shapes happens during the deductive level of geometric thinking. Children at this developmental level are able to deduce some unknown properties of a shape, from the known properties of the shape.
Teachers of children in the early grades typically work with children who are usually at the visual level of geometric thinking. The teacher’s role is to create learning situations that develop the children's confidence in moving from the visual to the descriptive level of geometric thinking. Such learning situations can even lead to the informal deductive level.
Van Hiele described five kinds of activities that promote the transition from one level to the next. These activities are as follows:
1. Free play (inquiry phase): Children are given materials that encourages them to explore and become aware of certain structures.
2. Focused play (direct orientation): Tasks are presented in such a way that the characteristic structures of the objects gradually appear to children.
3. Explicitation: The teacher introduces terminology.
Space and Shape (Geometry)
Teachers guide__Grade 1_Web_20180417.indd 1 2018-05-31 02:40:54 PM
2
4. More focused play (free orientation): The teacher presents tasks that can be completed in different ways and supports children in developing an awareness of what they have already noticed.
5. Integration (seldom included in geometric activities in the early years): Children are given opportunities to synthesize what they have learned (van Hiele, 1999).
In light of the activities described by van Hiele, developing geometric thinking in the early grades is reliant on play and playing with resources. Many resources can be made (like tangram puzzles) or collected (beads to put on string). Some resources have to be purchased.
This section of the teacher guide has been developed with the assumption that the teacher has a range of geometric resources in her classroom. By encouraging the children to use these resources in a range of carefully structured learning situations, teachers support children's growing awareness of the geometric and other properties of shapes and objects.
To conclude, the role of the teacher in developing children’s geometric thinking is to:
• Organise the learning situations (activities) described in this guide so as to direct the children’s attention to the geometric properties of shapes and objects.
• Introduce terminology.
• Engage the children in reflective discussion on the activities, encouraging explanations that incorporate appropriate geometric terms.
Teachers guide__Grade 1_Web_20180417.indd 2 2018-05-31 02:40:54 PM
3
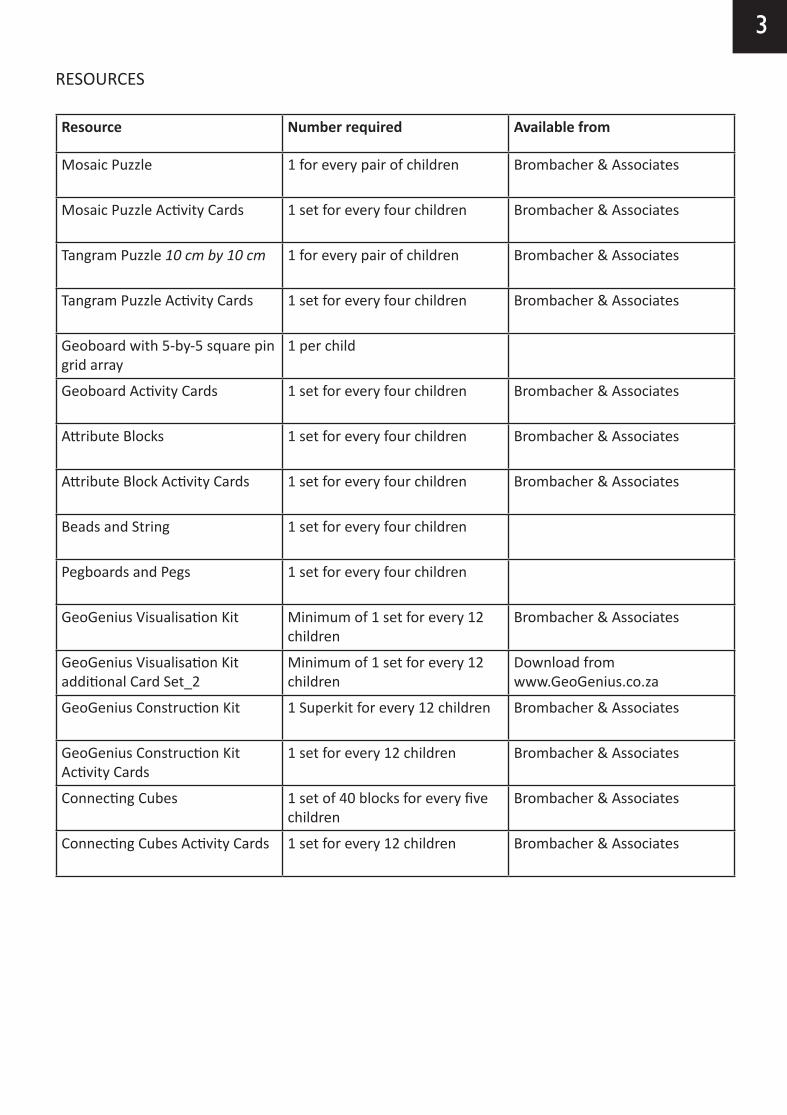
RESOURCES
Resource Number required Available from
Mosaic Puzzle 1 for every pair of children Brombacher & Associates
Mosaic Puzzle Activity Cards 1 set for every four children Brombacher & Associates
Tangram Puzzle 10 cm by 10 cm 1 for every pair of children Brombacher & Associates
Tangram Puzzle Activity Cards 1 set for every four children Brombacher & Associates
Geoboard with 5-by-5 square pin grid array
1 per child
Geoboard Activity Cards 1 set for every four children Brombacher & Associates
Attribute Blocks 1 set for every four children Brombacher & Associates
Attribute Block Activity Cards 1 set for every four children Brombacher & Associates
Beads and String 1 set for every four children
Pegboards and Pegs 1 set for every four children
GeoGenius Visualisation Kit Minimum of 1 set for every 12 children
Brombacher & Associates
GeoGenius Visualisation Kit additional Card Set_2
Minimum of 1 set for every 12 children
Download from www.GeoGenius.co.za
GeoGenius Construction Kit 1 Superkit for every 12 children Brombacher & Associates
GeoGenius Construction Kit Activity Cards
1 set for every 12 children Brombacher & Associates
Connecting Cubes 1 set of 40 blocks for every five children
Brombacher & Associates
Connecting Cubes Activity Cards 1 set for every 12 children Brombacher & Associates
Teachers guide__Grade 1_Web_20180417.indd 3 2018-05-31 02:40:54 PM
4
TANGRAM PUZZLE ACTIVITIES
In this activity we expect children to develop:
• Confidence in recognising, identifying and describing 2-D shapes (the focus of the activities is on triangles and rectangles)
• An increased awareness of the properties of, and relationships between, the edges and angles of 2-D shapes
For this activity you will need:
• Tangram Puzzles (For these activity cards the Tangram Puzzle should be 10 cm by 10 cm)
• Tangram Activity Cards 1 to 6
Teacher’s role:
Give the children a Tangram Puzzle Activity Card and Tangram Puzzle. Tell the children to complete the instructions on the card. The children are able to work on these cards independently of the teacher and may work individually or in pairs. The children should not pack away until the teacher has seen that they have successfully completed the activity or recorded their results appropriately.
When possible, the teacher should take the opportunity to observe how the children use the pieces and informally assess how the children think and talk about the shapes. The teacher should discuss the activity with the children after they have completed it. The real learning lies in the reflective discussion that the teacher facilitates.
In the first Activity Card, the children are to select the appropriate piece from the Tangram Puzzle and fit that piece on its shape.
In Activity Cards 2 to 4, the children are to select the appropriate pieces from the Tangram Puzzle and fit the pieces together on the shapes on the card.
In Activity Cards 5 and 6, the children are not able to fit the pieces onto the shapes, but need to build the same shape next to the image.
Draw the children’s attention to the edges and vertices of the shapes by asking:
• How many edges does this shape have?• How many corners (vertices) does this shape have?• What is the same about these shapes?• What is different about these shapes?
Teachers guide__Grade 1_Web_20180417.indd 4 2018-05-31 02:40:54 PM

5
What to expect from the children:
The main focus of these activities is for the children to play and gradually start to recognise some of the properties of polygons.
The children may start to notice that some pieces will fit either side up, while other pieces (the parallelogram) will only fit one way up. The children will also start to focus on matching edges that are equal in length and angles that are equal in size.
The children should know the names 'triangle' and 'rectangle' and recognise them as such. They may be able to explain that they know that triangles are triangles because they have three edges or three corners (vertices), whereas the other shapes all have four edges. The rectangle, however, is different to the other shapes with four sides because it has square corners (right-angles).
The children may notice similarities and differences between the rectangles and the other shapes. The children may describe the rectangles as being different to the five-sided shape (pentagon) because it has only four edges and that it is different to the parallelogram because the corners are square (i.e. right angles). The children do not have to know the name 'parallelogram' yet and could just say 'the other four-sided shape'.
The children should notice that the rectangle, trapezium and parallelogram have four edges and four corners (vertices), the rectangle has square corners (right angles), and the trapezium and parallelogram have sharp and blunt corners.
Teachers guide__Grade 1_Web_20180417.indd 5 2018-05-31 02:40:54 PM

6
MOSAIC PUZZLE ACTIVITIES
In this activity we expect children to develop:
• Confidence in recognising, identifying and describing 2-D shapes (the focus of the activities is on triangles and rectangles)
• An increased awareness of the properties of, and relationships between, the edges and angles of 2-D shapes
Teacher’s role:
Give the children a Mosaic Puzzle Activity Card and a Mosaic Puzzle. Tell the children to complete the instructions on the card. The children are able to work on these cards independently of the teacher and may work individually or in pairs. The children should not pack away until the teacher has seen that they have successfully completed the activity or recorded their results appropriately.
When possible, the teacher should take the opportunity to observe how the children use the pieces and informally assess how the children think and talk about the shapes. The teacher should discuss the activity with the children after they have completed it. The real learning lies in the reflective discussion that the teacher facilitates.
In Activity Cards 1 and 2, the children are to select pieces according to shape, size and colour, then place these shapes on the card by matching edges and angles. The children will slide and turn, and in some cases, flip the shapes to fit.
In Activity Cards 3 and 4, the children are to select several pieces and join them on the card.
In Activity Cards 5 and 6, the children are required to join shapes that they can choose by shape and colour. The shapes are not the same size as the shapes on the card, so they have to build next to the card.
Draw the children’s attention to the edges and vertices of the shapes by asking:
• How many edges does this shape have?• How many corners (vertices) does this shape have?• What is the same about these shapes?• What is different about these shapes?
For this activity you will need:
• Mosaic Puzzles
• Mosaic Puzzle Activity Cards 1 to 6
Teachers guide__Grade 1_Web_20180417.indd 6 2018-05-31 02:40:54 PM
7
What to expect from the children:
The main focus of these activities is for the children to play and gradually start to recognise some of the properties of polygons.
The children may start to notice that some pieces will fit either side up, while other pieces (5 and 6) will only fit one way up. The children start to focus on matching edges that are equal in length and angles that are equal in size.
The children should know the names 'rectangle' and 'triangle' and recognise them as such. They may be able to explain that they know that the triangles are triangles because they have three edges or three corners (vertices), whereas the other shapes all have four edges. The rectangle, however, is different to the other shapes with four sides because it has square corners (right-angles).
Teachers guide__Grade 1_Web_20180417.indd 7 2018-05-31 02:40:54 PM
8
GEOBOARD ACTIVITIES
In this activity we expect children to develop:
• Confidence in recognising, identifying and describing 2-D shapes (the focus of the activities is on triangles and rectangles)
• An increased awareness of the properties of, and relationships between, the edges and angles of 2-D shapes
For this activity you will need:
• Geoboards (minimum 5-by-5 square pin grid array)
• Elastic bands in varying colours and sizes
• Geoboard Activity Cards 1 to 10
• Pages of square-dotted paper (see print master at the end of the guide)
Teacher’s role:
Give the children a Geoboard Activity Card and a 5-by-5 geoboard with elastic bands. If the children have larger geoboards, you may want to restrict their use to 5-by-5 pins, otherwise there will be too many solutions for some of the investigations. Tell the children to complete the instructions on the card. The children are able to work on these cards independently of the teacher and should not pack away until the teacher has seen that they have successfully completed the activity or recorded their results appropriately.
The children will need square-dotted paper and a pencil for recording their solutions. The nature of the work on geoboards means that important learning often goes unrecorded. In these tasks, the children are required to record what they do on the geoboard onto square-dotted paper so that the properties of the shapes can be discussed. It is recommended that the children stick this square-dotted paper into their mathematics jotters.
The teacher should discuss the activity with the children after they have completed it. The real learning lies in the reflective discussion that the teacher facilitates.
In Activity Cards 1 to 4, the children are to copy interesting and fun shapes. This allows the children to develop the skill of putting the elastic bands over the pegs, encourages fine motor coordination and draws their attention to the number of edges and vertices (corners) of shapes.
In Activity Card 5, the children are to make triangles and focus on their properties and in Activity
Teachers guide__Grade 1_Web_20180417.indd 8 2018-05-31 02:40:55 PM
9
Card 6, the children are to make quadrilaterals and focus on their properties.
In Activity Cards 7, 9 and 10, the children’s attention is drawn to what is the same and what is different. To convince the children that shapes are the same (or different), the children may need to trace the shape onto tracing paper and lay the tracing paper over the other shape. These activities help children to focus on the length of the edges and the size of the angles at the vertices.
What to expect from the children:
The children should start to recognise the properties of triangles and rectangles, e.g., triangles have three edges and three corners (vertices), rectangles (squares included) have four edges and four corners (vertices). Activity Card 5 in particular focuses on triangles. There are many shapes that the children may mistakenly think are triangles just from “the look” of them. They should, however, start to discuss the number of edges and corners.
The children may describe right angles as being 'square' corners, and although this terminology is not mathematically correct, it conveys the meaning and is acceptable from young children. Theteacher, however, should use the correct vocabulary.
Activity Card 5 solutions: 2. All the shapes have three edges (or sides) and three vertices (or corners).
3. These shapes are called triangles.
4. The triangles are different in shape and size; their edges are not all the same length and their angles (corners) are different sizes.
Activity Card 6 solutions:2. All the shapes have four edges (or sides) and four vertices (or corners).
3. A, B and D are rectangles. (Children may not recognise A as a rectangle, but it is included here for accuracy).
4. The shapes are different in shape and size; their edges are not all the same length and their angles (corners) are different sizes. Some of them have opposite sides that are parallel (going the same way) and others have opposite sides that are not parallel (not going the same way).
Activity Card 7 solutions:3. Harriet and Sabelo’s rectangles are the same. The one has just been turned around.
Activity Card 8 solutions:Shapes A, C, H and I are triangles because they have three edges and three vertices (corners).
Teachers guide__Grade 1_Web_20180417.indd 9 2018-05-31 02:40:55 PM
10
Activity Card 9 solutions:3. Sabelo and Harriet’s triangles are the same. It is the same size and shape, the one has just been
flipped over.
Activity Card 10 solutions: 3. Sabelo and Harriet’s triangles are the same. Both traingles are the same size and shape but the one
has been flipped over or turned around.
Teachers guide__Grade 1_Web_20180417.indd 10 2018-05-31 02:40:55 PM

11
ATTRIBUTE BLOCK ACTIVITIES
Teacher’s role:
Before the children start to do the activities on the cards, allow for several sessions of free play where the children can make their own pictures with the blocks. Let the children touch and feel the pieces to become familiar with the different shapes, sizes, thicknesses and colours.
Give the children an Attribute Block Activity Card and a set of blocks. Tell the children to complete the instructions on the card. The children are able to work on these cards independently of the teacher and the children may work individually or in pairs. The children should not pack away until the teacher has seen that they have successfully completed the activity or recorded their results appropriately.
The teacher should observe how the children use the blocks and informally assess how the children think and talk about the shapes. The teacher should discuss the activity with the children after they have completed it. The real learning lies in the reflective discussion that the teacher facilitates.
The cards are divided into five sets. In Set 1 (Activity Cards 1 to 6), the children are to select blocks that are different shapes and sizes of the same colour and which fit the blocks on the card. The children can use thick or thin pieces in these activities as the focus is on developing their ability to match and sort shapes. The children can then be asked to repeat the activity using the other colours.
In Set 2 (Activity Cards 7 to 14), the children are to make the pictures, using the small blocks, by placing them on the card to match the shapes. In Activity Cards 7 to 11, the children use blocks that are the same colour, before introducing the different colours in Activity Cards 12 to 14.
In this activity we expect children to develop:
• Confidence in recognising, identifying and describing shapes
• An increased awareness of the properties of, and relationships between, the edges and angles of shapes
For this activity you will need:
• Attribute Blocks (one set per four children)
• Attribute Block Activity Cards 1 to 35 (one set per four children)
• Mathematics jotters and pencils for recording
Teachers guide__Grade 1_Web_20180417.indd 11 2018-05-31 02:40:55 PM
12
The children can use either thick or thin pieces. With these cards, the children develop matching and sorting skills and begin to explore how shapes can be joined together. Ask the children to repeat the activity with the same shapes but in a different colour. Ask the children to then repeat the activity using the large blocks that do not fit on the card. This is more demanding because they can no longer check their work by fitting the shapes - they need to develop a sense of “sameness” that involves an evaluation of the properties of the shape.
In Set 3 (Activity Cards 15 to 20), the children are to compose fun pictures using the blocks. Matching, sorting and joining shapes are still the focus of the activities but the blocks no longer fit on the card. The children need to build the pictures next to the image. Blocks of different sizes, shapes, colours and thickness are combined to make the pictures. The children can be asked to trace around the resulting shapes in their jotters to create a record of their work.
In Set 4 (Activity Cards 21 to 24), the focus is on making and extending patterns. The children are to join and sort shapes as well as recognise the geometric patterns. The children are to use the thick and thin pieces to complete these activities. The blocks will no longer fit on the card so the children need to make the pattern with the blocks next to the image, trace it in their mathematics jotter and then use the blocks to further extend the pattern. NOTE: Completing the activities on each of these cards may take more time than the earlier cards in the series.
In Set 5 (Activity Cards 25 to 40), the children are to sort and match blocks of various colours and sizes in order to see how one shape can be composed by joining other shapes. The children need to consider side lengths and angles to determine how the shapes fit together. The children should start to see that a larger shape can be made either by using smaller shapes or by using shapes of varying sizes. Thick or thin pieces can be used in Activity Cards 25 to 39, however thickness has to be considered in Activity Card 40.
Activity Cards 35 to 40 are optional for Grade 1. Once the children have completed the cards, they can redo them two or three times. By revisiting the important concepts, the children’s fluency and confidence will improve each time they complete the cards.
What to expect from the children:
The attribute blocks allow the children the opportunity to experience shapes and investigate their similarities and differences. At first it might be difficult for children to sort and identify the blocks and to distinguish among the many shapes and colours. During free play, the children should explore the blocks and become aware of the shapes, colours, sizes and thicknesses.
The children might form their own prototypes of shapes based on colour or size. For example, they may think that triangles can only be blue or small. The children then need to engage in sorting and matching activities to start to realise that colour, thickness and size are irrelevant to
Teachers guide__Grade 1_Web_20180417.indd 12 2018-05-31 02:40:55 PM
13
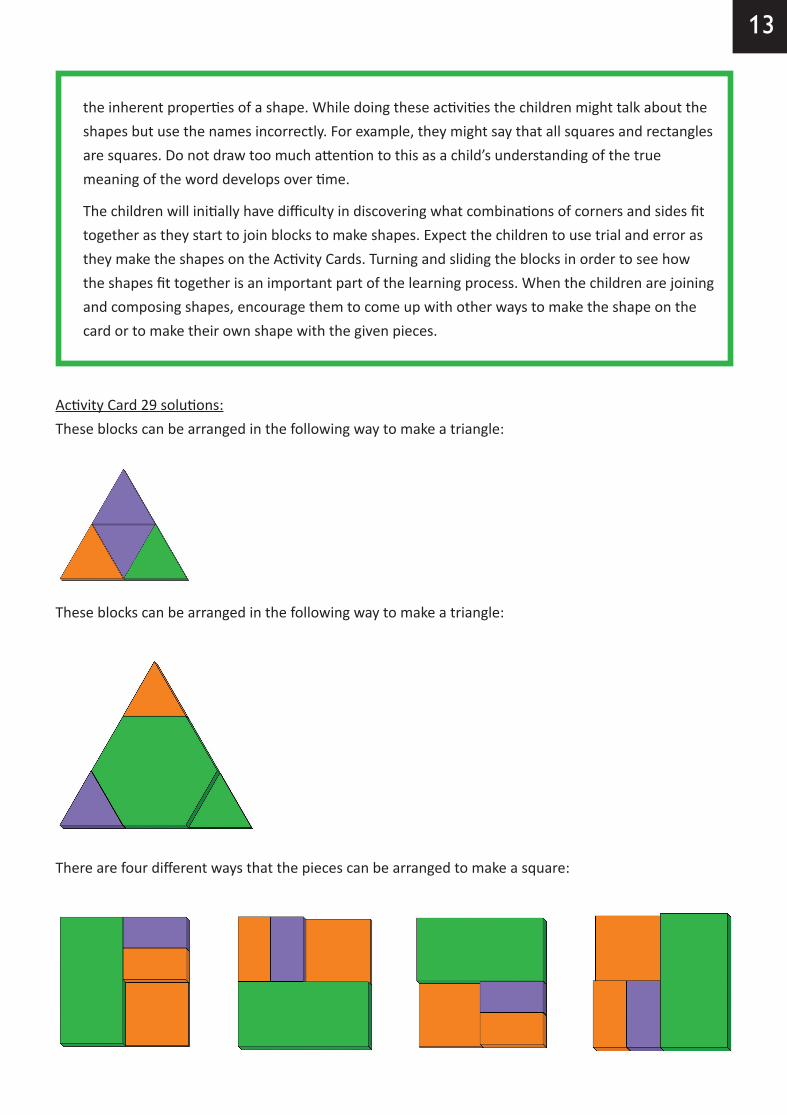
Activity Card 29 solutions:These blocks can be arranged in the following way to make a triangle:
These blocks can be arranged in the following way to make a triangle:
There are four different ways that the pieces can be arranged to make a square:
the inherent properties of a shape. While doing these activities the children might talk about the shapes but use the names incorrectly. For example, they might say that all squares and rectangles are squares. Do not draw too much attention to this as a child’s understanding of the true meaning of the word develops over time.
The children will initially have difficulty in discovering what combinations of corners and sides fit together as they start to join blocks to make shapes. Expect the children to use trial and error as they make the shapes on the Activity Cards. Turning and sliding the blocks in order to see how the shapes fit together is an important part of the learning process. When the children are joining and composing shapes, encourage them to come up with other ways to make the shape on the card or to make their own shape with the given pieces.
Teachers guide__Grade 1_Web_20180417.indd 13 2018-05-31 02:41:03 PM
14
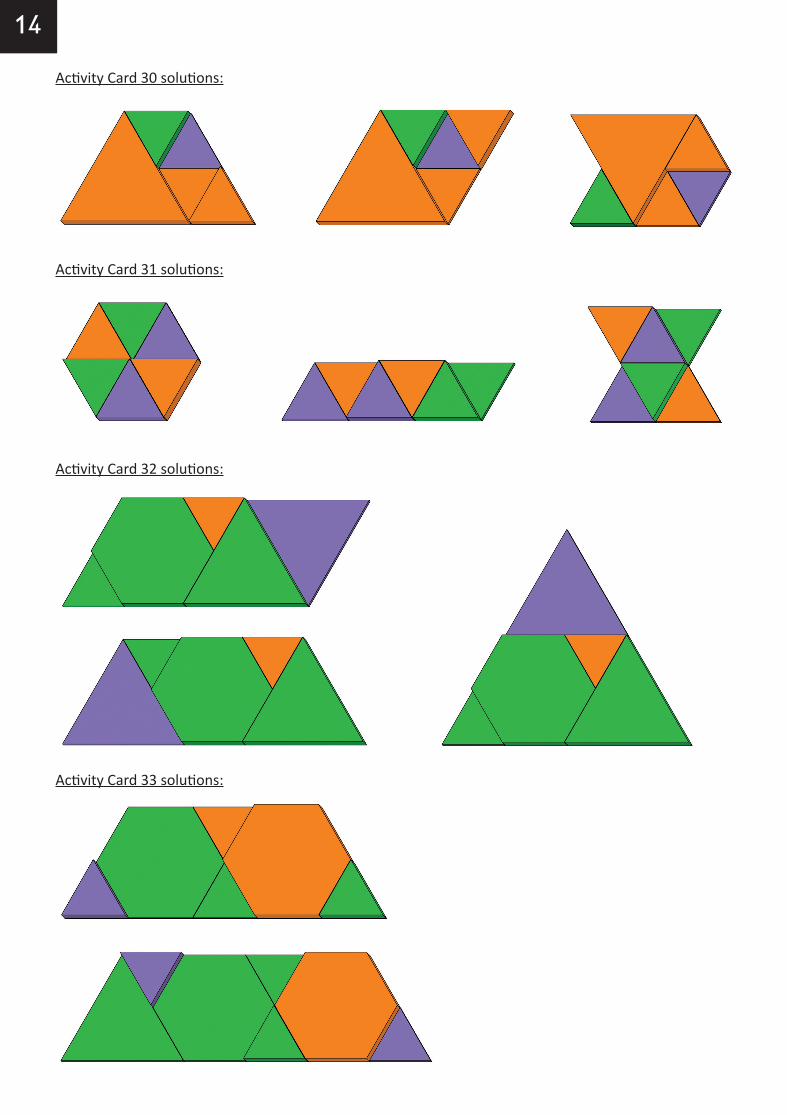
Activity Card 30 solutions:
Activity Card 31 solutions:
Activity Card 32 solutions:
Activity Card 33 solutions:
Teachers guide__Grade 1_Web_20180417.indd 14 2018-05-31 02:41:21 PM

15
Activity Card 33 solutions continued:
Activity Card 34 solutions:Four triangles:
Other shapes:
Children can also make their own irregular shapes.
Teachers guide__Grade 1_Web_20180417.indd 15 2018-05-31 02:41:47 PM
16
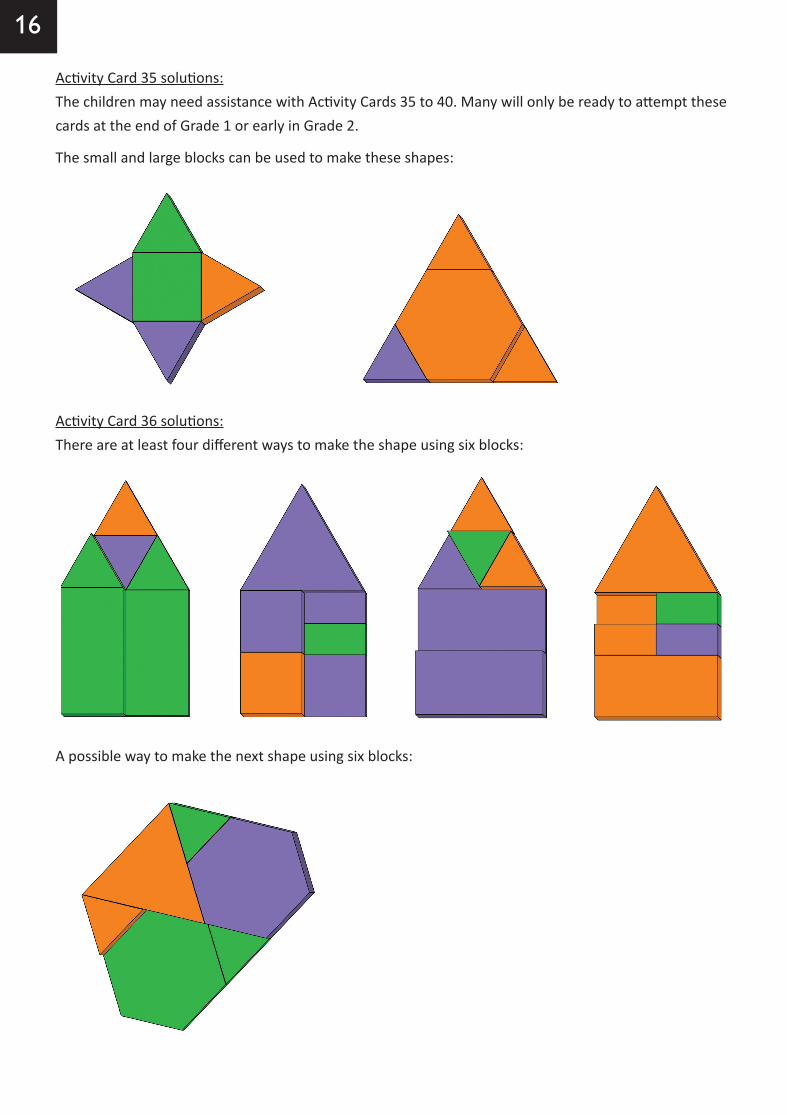
Activity Card 35 solutions:The children may need assistance with Activity Cards 35 to 40. Many will only be ready to attempt these cards at the end of Grade 1 or early in Grade 2.
The small and large blocks can be used to make these shapes:
Activity Card 36 solutions:There are at least four different ways to make the shape using six blocks:
A possible way to make the next shape using six blocks:
Teachers guide__Grade 1_Web_20180417.indd 16 2018-05-31 02:42:02 PM
17
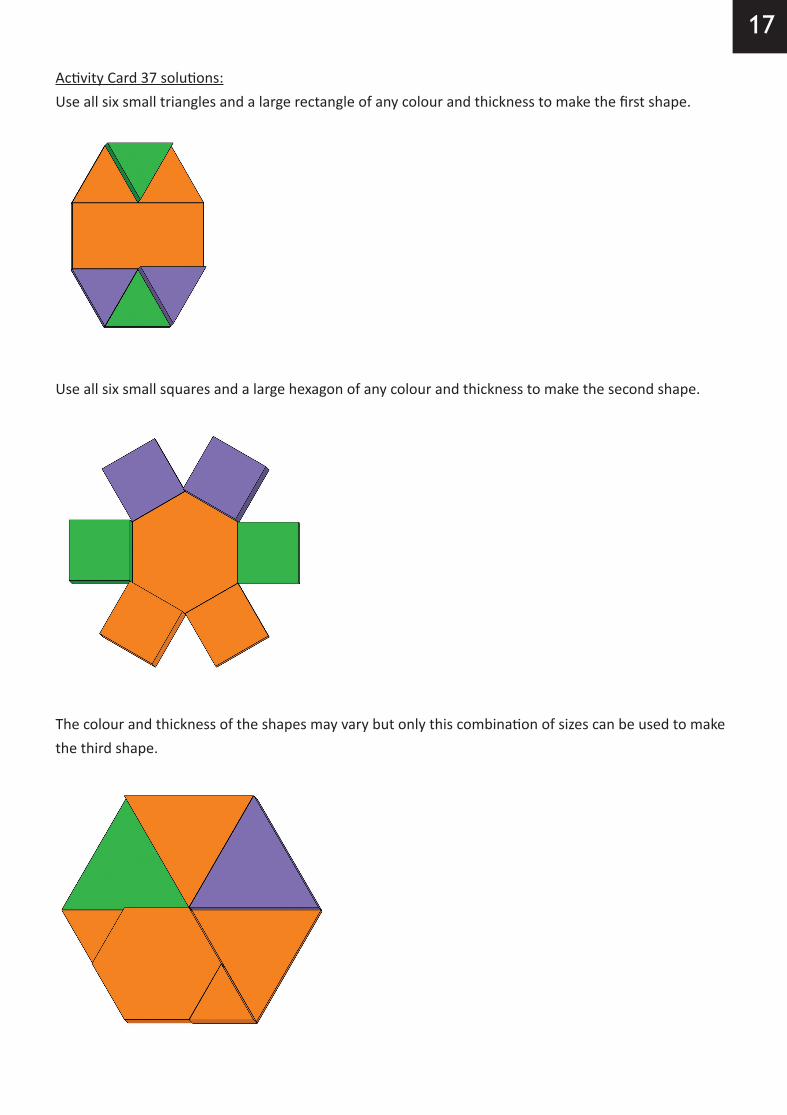
Activity Card 37 solutions:Use all six small triangles and a large rectangle of any colour and thickness to make the first shape.
Use all six small squares and a large hexagon of any colour and thickness to make the second shape.
The colour and thickness of the shapes may vary but only this combination of sizes can be used to make the third shape.
Teachers guide__Grade 1_Web_20180417.indd 17 2018-05-31 02:42:09 PM

18
Activity Card 38 solutions:The position and arrangement of the small and large blocks may change but only this combination of eight blocks can be used to make a rectangle.
The colour and thickness may vary but only these combinations of shapes andsizes can be used to make the kite and trapezium.
Activity Card 39 solutions:The colour and thickness of the shapes may vary but only this combination of sizes can be used to make the shapes.
Nine block rhombus:
Teachers guide__Grade 1_Web_20180417.indd 18 2018-05-31 02:42:22 PM
19
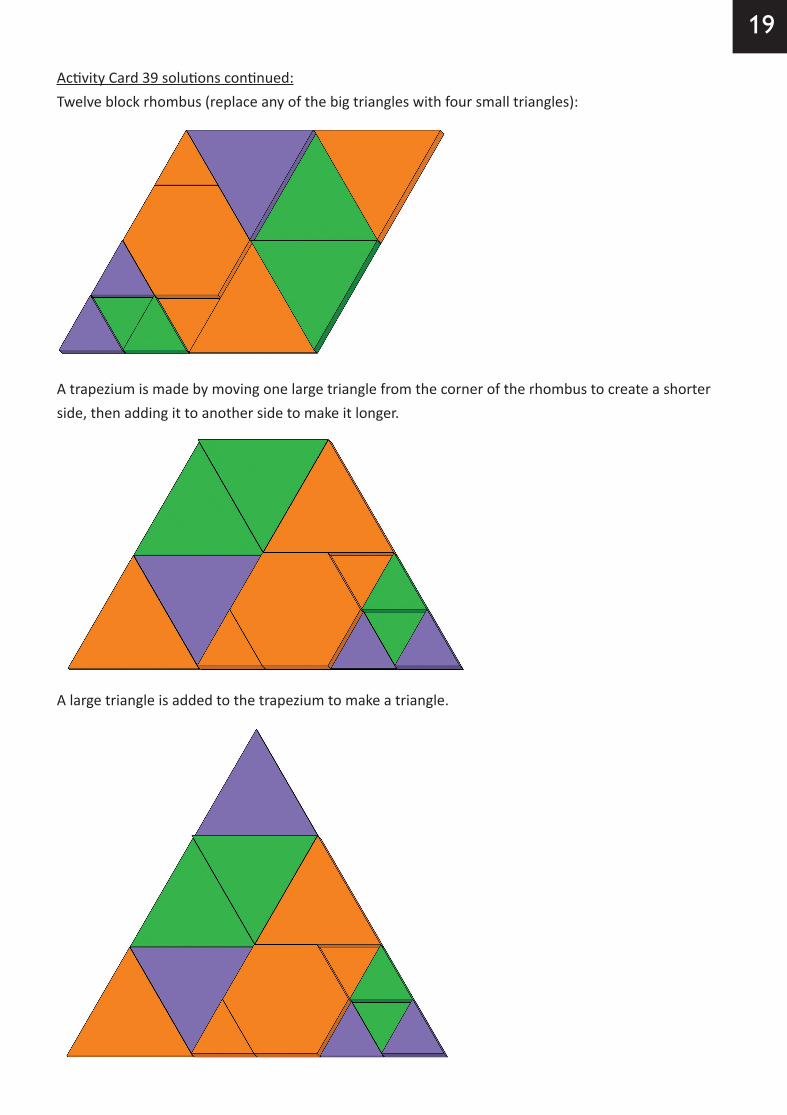
Activity Card 39 solutions continued:Twelve block rhombus (replace any of the big triangles with four small triangles):
A trapezium is made by moving one large triangle from the corner of the rhombus to create a shorter side, then adding it to another side to make it longer.
A large triangle is added to the trapezium to make a triangle.
Teachers guide__Grade 1_Web_20180417.indd 19 2018-05-31 02:42:35 PM
20
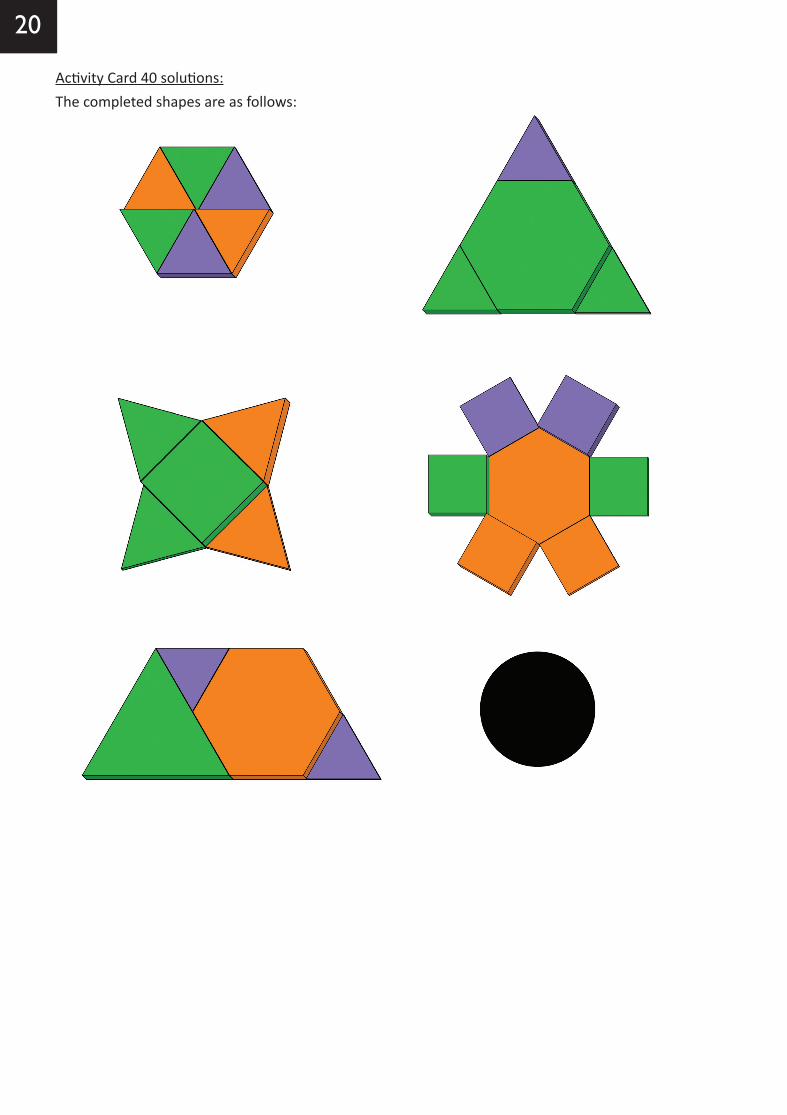
Activity Card 40 solutions:The completed shapes are as follows:
Teachers guide__Grade 1_Web_20180417.indd 20 2018-05-31 02:42:45 PM

21
GEOGENIUS VISUALISATION KIT ACTIVITIES
Teacher’s role:
Arrange the children participating in this activity into groups of four. The desks should be arranged so that all four children in the group can face the middle of the table.
General GeoGenius Visualisation Kit instructions (also see the instruction book that comes with the kit):
The grid is placed in the middle of the table. For the card set that is being used, each child is given the card that corresponds to their view. Working together, the children in the group select the appropriate block(s) and arrange/rearrange them on the grid until the arrangement of blocks corresponds to the view on each view card. Each child should only look at their own card while the group works together to complete the task.
Initially as the children get used to working with the kit, the teacher may want to place the grid on top of a box in the middle of the table so that the grid is at the children’s eye level. Alternatively,the children could kneel down to look at the grid from eye level.
In this activity we expect children to develop:
• Confidence in recognising, identifying and describing 3-D shapes (the focus of the activities is on prisms and spheres)
• Confidence in recognising 3-D objects from different positions
• Confidence in following directions to position 3-D objects in relation to each other
For this activity you will need:
• GeoGenius Visualisation Kit (at least one kit per 4 children)
• Beginner_1 Card Sets 1 to 6. These come with the GeoGenius Visualisation Kit
• Blank view cards. These come with the GeoGenius Visualisation Kit. More can be printed from www.GeoGenius.co.za or the Instruction Guide found in the kit.
Teachers guide__Grade 1_Web_20180417.indd 21 2018-05-31 02:42:47 PM

22
In the beginning, the children may struggle to accept that their cards do not show depth. The children often want to move the block(s) towards themselves so that they are up against the edge of the grid on the side that they are facing. To help them deal with this, the teacher could ask the children how they think the card would look different if the block was further back or further forward on the grid.
Allow opportunity for the children to complete blank viewing cards. To do this, tell the group to choose any one block in the GeoGenius Visualisation Kit and place it on the Visualisation grid. Give each child a blank view card. Each child in the group should then draw their view (A, B, C or D) of the block on the grid. They should label their view A, B, C or D. When they are done, the children should remove their block from the grid.
Swap viewing cards between the groups so that each group gets another group's set of cards. Ask the groups to use the cards drawn by the other children to position the block that that group chose on the grid. The groups may pick up errors. If so, ask them to justify how they can be sure that it is an error. Return the cards back to the original groups to correct errors if necessary.
When each child in the group is satisfied that the arrangement corresponds to the view on their card, lead a reflective discussion that includes answering the specific questions provided for each set of cards.
What to expect from the children:
Specific questions for each of the cards are provided for the teacher. The answers that the children are expected to give are suggested in green text after each question.
Questions for reflective discussion with expected answers:
Beginner 1 Set 1:
• Does the block look the same on all four cards? Yes, the shape is a 2-by-2 square but it is not always in the same position.
• Is the block in the same position on all four cards? No. In View C, the block is further right than in View A, in View B the block is far left, but in View D the block is far right.
• Is it possible to place the block on the grid in such a way that every view will be the same in terms of shape and position? If the block is restricted to the gridlines, then no, it is not possible. If the block is not restricted to the gridlines and can be placed exactly in the middle of the grid, then yes, it is
possible.
Teachers guide__Grade 1_Web_20180417.indd 22 2018-05-31 02:42:47 PM
23
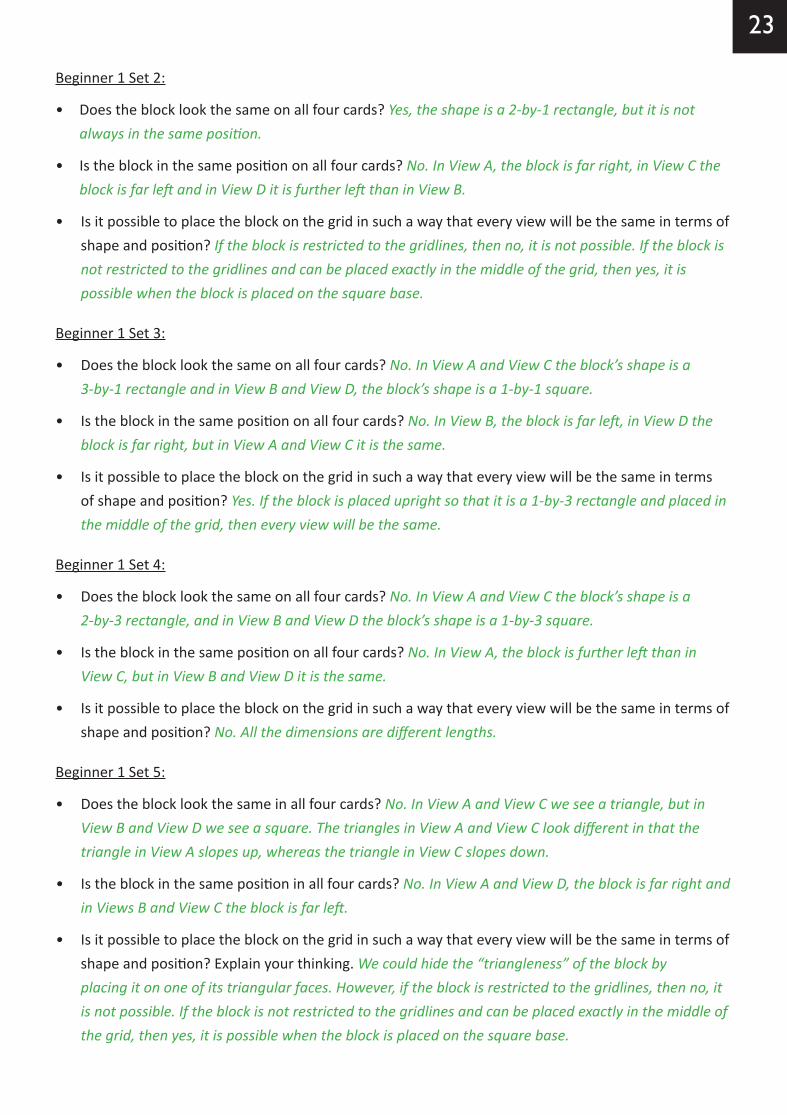
Beginner 1 Set 2:
• Does the block look the same on all four cards? Yes, the shape is a 2-by-1 rectangle, but it is not always in the same position.
• Is the block in the same position on all four cards? No. In View A, the block is far right, in View C the block is far left and in View D it is further left than in View B.
• Is it possible to place the block on the grid in such a way that every view will be the same in terms of shape and position? If the block is restricted to the gridlines, then no, it is not possible. If the block is not restricted to the gridlines and can be placed exactly in the middle of the grid, then yes, it is
possible when the block is placed on the square base.
Beginner 1 Set 3:
• Does the block look the same on all four cards? No. In View A and View C the block’s shape is a 3-by-1 rectangle and in View B and View D, the block’s shape is a 1-by-1 square.
• Is the block in the same position on all four cards? No. In View B, the block is far left, in View D the block is far right, but in View A and View C it is the same.
• Is it possible to place the block on the grid in such a way that every view will be the same in terms of shape and position? Yes. If the block is placed upright so that it is a 1-by-3 rectangle and placed in the middle of the grid, then every view will be the same.
Beginner 1 Set 4:
• Does the block look the same on all four cards? No. In View A and View C the block’s shape is a 2-by-3 rectangle, and in View B and View D the block’s shape is a 1-by-3 square.
• Is the block in the same position on all four cards? No. In View A, the block is further left than in View C, but in View B and View D it is the same.
• Is it possible to place the block on the grid in such a way that every view will be the same in terms of shape and position? No. All the dimensions are different lengths.
Beginner 1 Set 5:
• Does the block look the same in all four cards? No. In View A and View C we see a triangle, but in View B and View D we see a square. The triangles in View A and View C look different in that the triangle in View A slopes up, whereas the triangle in View C slopes down.
• Is the block in the same position in all four cards? No. In View A and View D, the block is far right and in Views B and View C the block is far left.
• Is it possible to place the block on the grid in such a way that every view will be the same in terms of shape and position? Explain your thinking. We could hide the “triangleness” of the block by
placing it on one of its triangular faces. However, if the block is restricted to the gridlines, then no, it is not possible. If the block is not restricted to the gridlines and can be placed exactly in the middle of the grid, then yes, it is possible when the block is placed on the square base.
Teachers guide__Grade 1_Web_20180417.indd 23 2018-05-31 02:42:47 PM

24
Beginner 1 Set 6:
• Does the block look the same in all four cards? No. In View A and View C we see a triangle, but in View B and View D we see a square. The triangles in View A and View C look different in that the triangle in View A slopes down, whereas the triangle in View C slopes up.
• Is the block in the same position in all four cards? No. In View B the block is far left, in View D the block is far right and in View C the block is further right than in View A.
• Is it possible to place the block on the grid in such a way that every view will be the same in terms of shape and position? Explain your thinking. No, as some of the dimensions are different lengths.
Teachers guide__Grade 1_Web_20180417.indd 24 2018-05-31 02:42:47 PM

25
GEOGENIUS CONSTRUCTION KIT ACTIVITIES
In this activity we expect children to develop:
• Confidence in building given 3-D objects using concrete materials
• Confidence in observing and building given 3-D objects using concrete materials
For this activity you will need:
• GeoGenius Construction Kit (at least one Super Kit per 5 children)
Teacher’s role:
Each child will need selected pieces from a GeoGenius Construction Kit and elastic bands. Tell the children to make something by joining the pieces. They can either make anything they like or they can copy something that the teacher has already made. The children may work in pairs or individually. The advantage of working in pairs is that the children can talk about what they are doing. The disadvantage of working in pairs is that only one child can actually do the building at a time.
In these activities, the children create polyhedra using pieces from the GeoGenius Construction Kit.If the children have not had the opportunity to play with this kit before, the teacher may need to help them by showing them how to use elastic bands to join the tabs.
While the children are working, the teacher could ask them:
• Which shape did you start with?• Could you have started with a different shape?• How did you decide which shapes to join together?• Can you see any patterns in the shapes that you are joining?
Make time for constructions to be taken apart and packed away neatly so that the kit can be used again.
Teachers guide__Grade 1_Web_20180417.indd 25 2018-05-31 02:42:47 PM
26
What to expect from the children:
The main focus of these activities is for the children to play and gradually develop an awareness of the properties of polyhedra.
The children are not expected to use formal mathematical vocabulary yet.
Teachers guide__Grade 1_Web_20180417.indd 26 2018-05-31 02:42:47 PM

27
CONNECTING CUBES ACTIVITIES
In this activity we expect children to develop:
• Confidence in building given 3-D objects using building blocks
• Opportunities to describe one 3-D object in relation to another
For this activity you will need:
• 40 connecting cubes per child
• Connecting Cubes Activity Cards 1 to 6
Teacher’s role:
Give each child an Activity Card and up to 40 connecting cubes. Tell the children to follow the instructions on the card. The children are able to work on these cards independently of the teacher and can work individually or in pairs. In these activities, the children are not expected to build the structures using the same colour connecting cubes as in the picture.
When possible, the teacher should take the opportunity to observe how the children join the connecting cubes and informally assess how the children think about the objects. The teacher should discuss the activity with the children after they have completed it. The real learning lies in the reflective discussion that the teacher facilitates.
It is important that the children start to recognise that holding a shape in a different position does not make it a different shape. For example, the two green shapes in the picture are the same and the four orange shapes inthe picture are the same:
In Activity Cards 1 to 6, the children are to use up to five blocks to build shapes and analyse which shapes are the same. The children are also expected to consider the possibility that some blocks could be hidden in the 2-D representation. In Activity Card 2, the children are to investigate how many different shapes they can make with 3, 4 and 5 connecting cubes.
Teachers guide__Grade 1_Web_20180417.indd 27 2018-05-31 02:42:47 PM
28
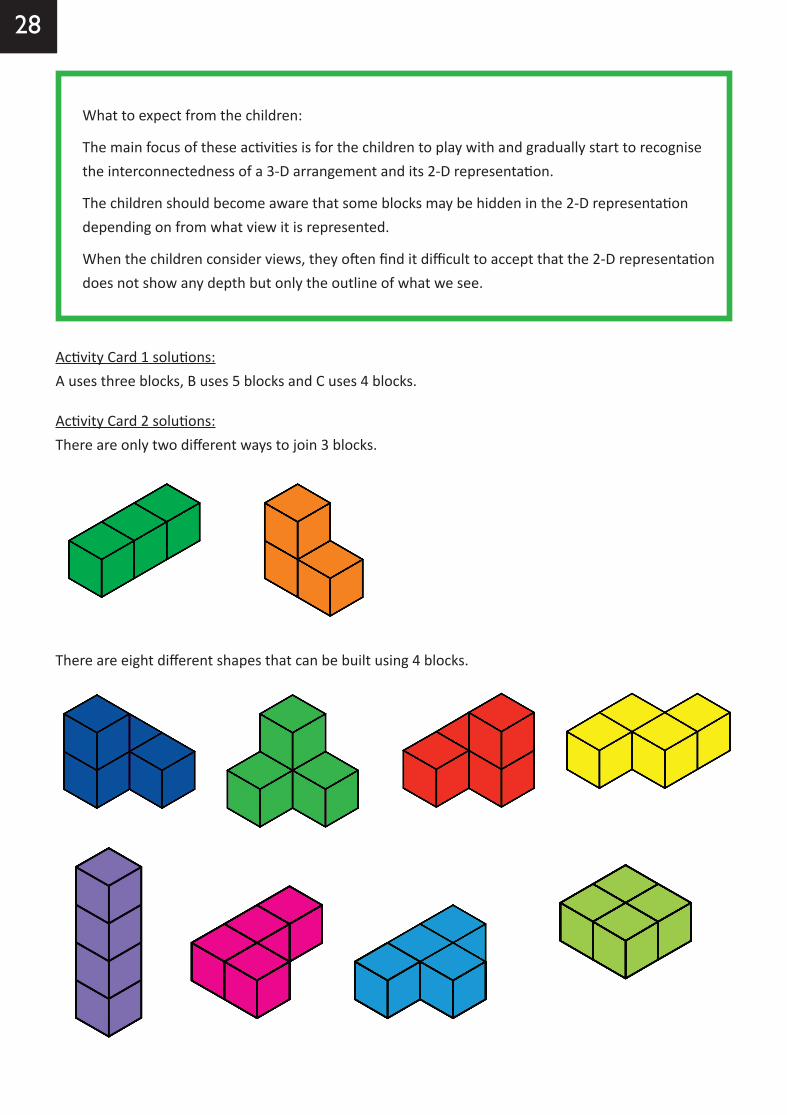
Activity Card 1 solutions:A uses three blocks, B uses 5 blocks and C uses 4 blocks.
Activity Card 2 solutions:There are only two different ways to join 3 blocks.
There are eight different shapes that can be built using 4 blocks.
What to expect from the children:
The main focus of these activities is for the children to play with and gradually start to recognise the interconnectedness of a 3-D arrangement and its 2-D representation.
The children should become aware that some blocks may be hidden in the 2-D representation depending on from what view it is represented.
When the children consider views, they often find it difficult to accept that the 2-D representation does not show any depth but only the outline of what we see.
Teachers guide__Grade 1_Web_20180417.indd 28 2018-05-31 02:42:49 PM
29
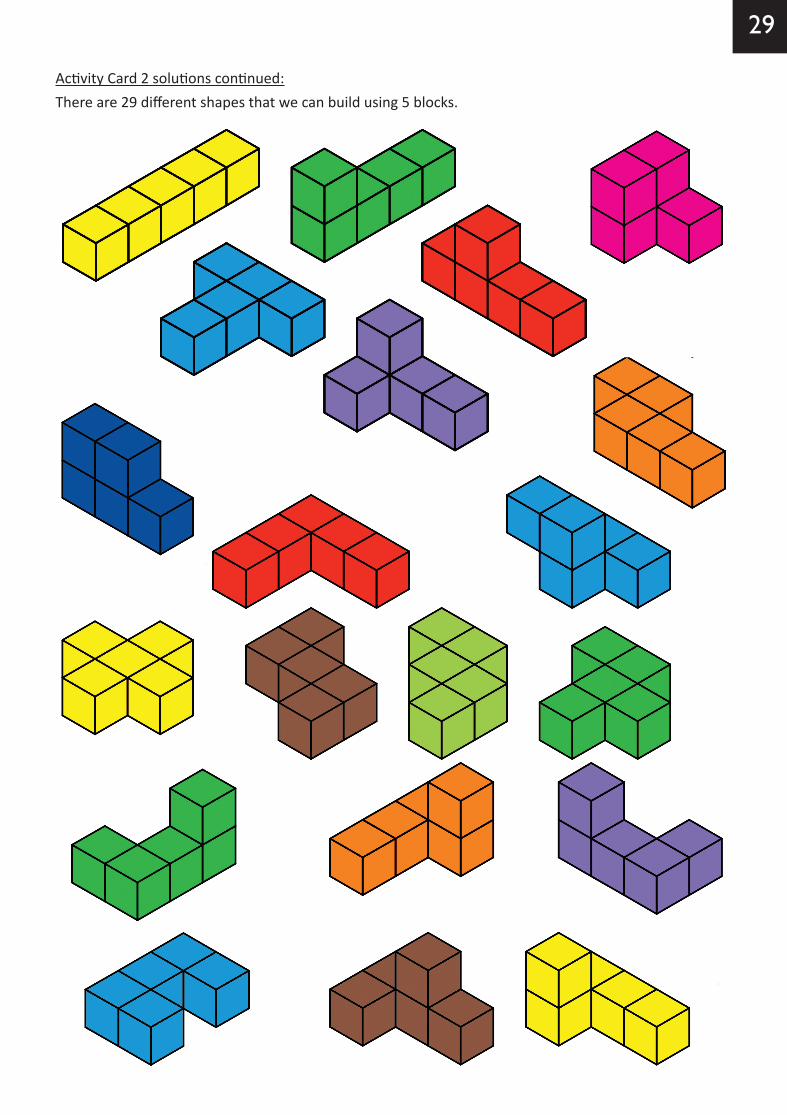
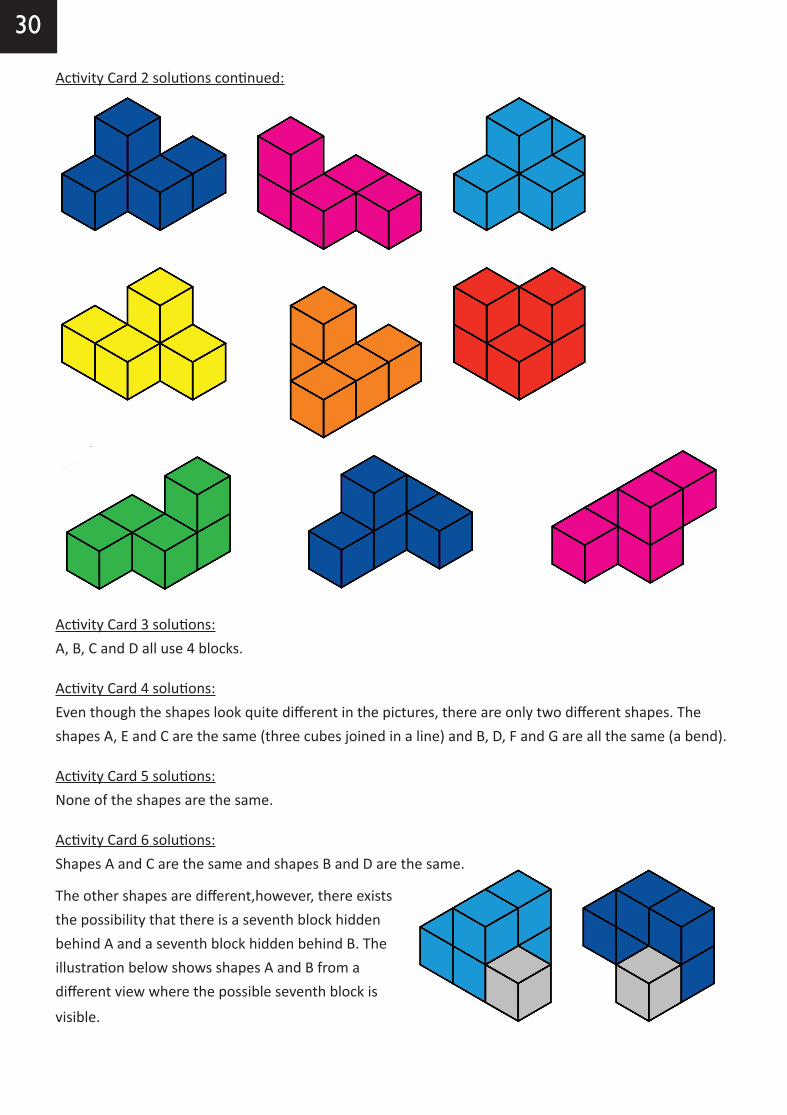
Activity Card 2 solutions continued:There are 29 different shapes that we can build using 5 blocks.
Teachers guide__Grade 1_Web_20180417.indd 29 2018-05-31 02:42:51 PM
30
Activity Card 3 solutions:A, B, C and D all use 4 blocks.
Activity Card 4 solutions:Even though the shapes look quite different in the pictures, there are only two different shapes. The shapes A, E and C are the same (three cubes joined in a line) and B, D, F and G are all the same (a bend).
Activity Card 5 solutions:None of the shapes are the same.
Activity Card 6 solutions:Shapes A and C are the same and shapes B and D are the same.
The other shapes are different,however, there exists the possibility that there is a seventh block hidden behind A and a seventh block hidden behind B. The illustration below shows shapes A and B from a different view where the possible seventh block is
visible.
Activity Card 2 solutions continued:
Teachers guide__Grade 1_Web_20180417.indd 30 2018-05-31 02:42:52 PM

31
PEGBOARD ACTIVITIES
In this activity we expect children to develop:
• Confidence in observing and copying given shapes and objects using concrete materials
• An awareness of line symmetry
• Confidence in following directions to move or place objects in relation to each other
For this activity you will need:
• Coloured pegs and pegboards
• Pegboard Activity Cards (NumberSense will be supplying these in the future. Please source from toy shops or online)
Teacher’s role:
Allow the children to work individually or in pairs. Provide each child with a pegboard, pegs and one activity card. Instruct the children to complete the task set on the card and to leave the pegboard for you to review after they have completed the task.
The children are able to work on this activity independently and the activity can be set as work for the children to complete while the teacher is busy with other children on the mat. Try to keep a record of which card each child has completed.
Where possible, take the opportunity to observe how the children use the pegboard. Use this opportunity to assess their thinking and their geometric and related vocabulary.
When the child has completed the task, the teacher can ask questions such as:
• Which colours have you used?
• What shape/picture have you made?
• Which colour pegs are on the left/right of the picture?
• Which colour peg is before/after the blue peg?
Teachers guide__Grade 1_Web_20180417.indd 31 2018-05-31 02:42:52 PM
32
What to expect from the children:
Encourage the use of language that is meaningful to the children. At this stage, mathematical vocabulary is not expected. Introduce the correct vocabulary later, during discussion.
Allocate enough time for the children to carry out these activities where fine-motor, visual perceptual and visual motor skills can be developed.
Teachers guide__Grade 1_Web_20180417.indd 32 2018-05-31 02:42:53 PM
33
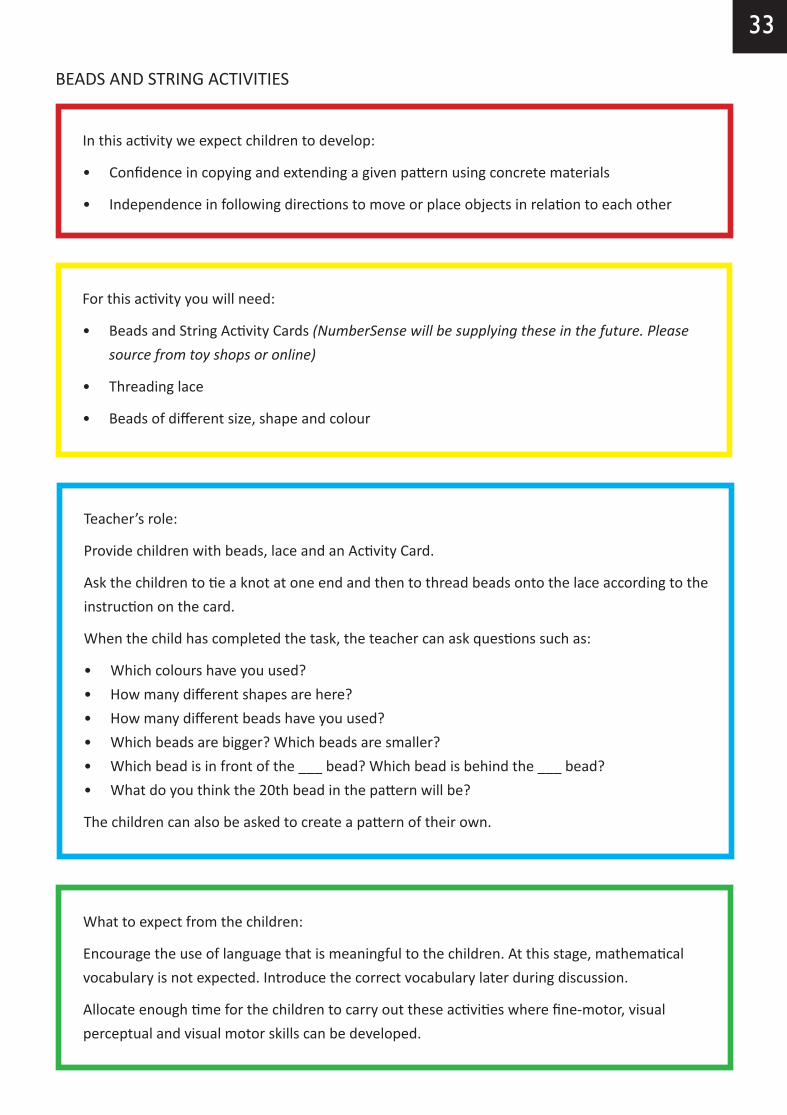
BEADS AND STRING ACTIVITIES
In this activity we expect children to develop:
• Confidence in copying and extending a given pattern using concrete materials
• Independence in following directions to move or place objects in relation to each other
For this activity you will need:
• Beads and String Activity Cards (NumberSense will be supplying these in the future. Please source from toy shops or online)
• Threading lace
• Beads of different size, shape and colour
Teacher’s role:
Provide children with beads, lace and an Activity Card.
Ask the children to tie a knot at one end and then to thread beads onto the lace according to the instruction on the card.
When the child has completed the task, the teacher can ask questions such as:
• Which colours have you used?• How many different shapes are here?• How many different beads have you used?• Which beads are bigger? Which beads are smaller?• Which bead is in front of the ___ bead? Which bead is behind the ___ bead?• What do you think the 20th bead in the pattern will be?
The children can also be asked to create a pattern of their own.
What to expect from the children:
Encourage the use of language that is meaningful to the children. At this stage, mathematical vocabulary is not expected. Introduce the correct vocabulary later during discussion.
Allocate enough time for the children to carry out these activities where fine-motor, visual perceptual and visual motor skills can be developed.
Teachers guide__Grade 1_Web_20180417.indd 33 2018-05-31 02:42:53 PM

34
INTRODUCTION
Human beings have always had, and continue to have, a fascination with and a need to compare, measure and quantify. In this section, we want children to experience measurement as part of our natural desire to compare and contrast, doing so with increasing sophistication as they move through the early years of development.
Measurement involves the comparison of an attribute of an object or situation with a unit that has the same attribute: length with centimetres or metres; mass with grams and kilograms and so on. This section has been grouped into a part that deals with time and another that deals with the attributes capacity, mass (or weight), length, area and volume.
The study of measurement in the activities of these teacher guides also provides a very useful context for collecting data which can be meaningfully analysed to draw conclusions, i.e. a link to Data Handling.
RESOURCES
See resources under separate Time and Capacity, Mass (Weight), Length and Area sections.
Measurement
Teachers guide__Grade 1_Web_20180417.indd 34 2018-05-31 02:42:53 PM

35
The main focus in the early years is to develop children’s understanding of how the world is organised through time. This happens by providing children with a concrete experience of time on an everyday basis.
Children in Grade R and at the beginning of Grade 1, who have not yet been exposed to the structured school environment, would mostly have developed an understanding of social time at home – “I go to bed when mom says so” or “When I finish my drawing, I will have juice”. At this age, children are in the pre-operational stage, according to Piaget, and they cannot engage in logical thought, separate ideas, make mental representations of ideas or reverse the sequences of events. This limits their understanding of time.
As children start attending school (5-7 years old), learning about time should be aimed at developing formalised ideas about time and the understanding that, culturally and socially, life is structured through time. The focus is on learning the language of time, and talking about time in the context of the routines at school. Learning time words: before, after, morning, afternoon, evening, tomorrow, yesterday, last week, early, late, longer and shorter is of particular importance. Sequencing events is another important part of learning about time that is supported by the learning of the language of time.
At this stage one can start to associate schedules with clock time: “Break is at 10 o’ clock”, “School starts at 8 o’ clock”, etc. Children at this age will have difficulty understanding elapsed time and time in the future. Awareness of when events occur is still limited. For instance, a child might not know today is their birthday unless someone tells them.
Children in Grade 2 and 3 (age 8 -9) are beginning to move towards the concrete operational stage. They have a better understanding of so-called physical time that is measured with clocks and watches. They are also ready to start keeping track of time using clocks and watches and to learn about units of time.
At first, telling the time using an analogue clock is very confusing for children. The numerals on an analogue clock have dual meanings. Not only do they refer to the hour, but also to multiples of five minutes. Having a clock on the classroom wall that the teacher points to regularly during the day and says “It is now eight o’ clock” etc. plays an important role in the development of an understanding of time.
Although children are able to think more logically at this point, working with the time concept should still be concrete and related to their day-to-day experience of time. Children can be given hands on activities such as using stop watches to time the baking of a cake, how long it takes to eat lunch, etc. in order to develop the time concept and its measurement in a concrete way.
Time cards
It is with this background in mind, that we have developed a set of cards that can be used to facilitate the learning of time in the Foundation Phase. Teaching with the cards as a resource takes the approach that the learning of time is experiential with a strong focus on developing children’s ability to sequence
Measurement: Time
Teachers guide__Grade 1_Web_20180417.indd 35 2018-05-31 02:42:53 PM
36
events and on learning the language of time. It aims to develop children’s understanding of time as a real world experience.
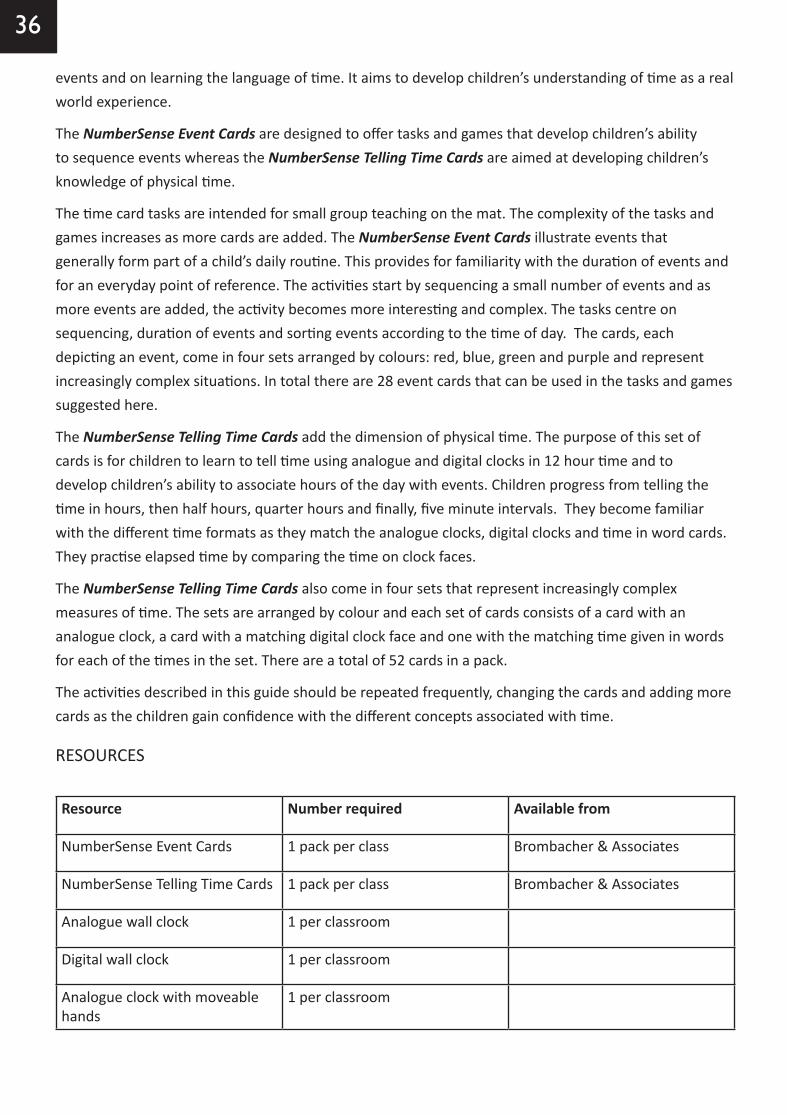
The NumberSense Event Cards are designed to offer tasks and games that develop children’s ability to sequence events whereas the NumberSense Telling Time Cards are aimed at developing children’s knowledge of physical time.
The time card tasks are intended for small group teaching on the mat. The complexity of the tasks and games increases as more cards are added. The NumberSense Event Cards illustrate events that generally form part of a child’s daily routine. This provides for familiarity with the duration of events and for an everyday point of reference. The activities start by sequencing a small number of events and as more events are added, the activity becomes more interesting and complex. The tasks centre on sequencing, duration of events and sorting events according to the time of day. The cards, each depicting an event, come in four sets arranged by colours: red, blue, green and purple and represent increasingly complex situations. In total there are 28 event cards that can be used in the tasks and games suggested here.
The NumberSense Telling Time Cards add the dimension of physical time. The purpose of this set of cards is for children to learn to tell time using analogue and digital clocks in 12 hour time and to develop children’s ability to associate hours of the day with events. Children progress from telling the time in hours, then half hours, quarter hours and finally, five minute intervals. They become familiar with the different time formats as they match the analogue clocks, digital clocks and time in word cards. They practise elapsed time by comparing the time on clock faces.
The NumberSense Telling Time Cards also come in four sets that represent increasingly complex measures of time. The sets are arranged by colour and each set of cards consists of a card with an analogue clock, a card with a matching digital clock face and one with the matching time given in words for each of the times in the set. There are a total of 52 cards in a pack.
The activities described in this guide should be repeated frequently, changing the cards and adding more cards as the children gain confidence with the different concepts associated with time.
RESOURCES
Resource Number required Available from
NumberSense Event Cards 1 pack per class Brombacher & Associates
NumberSense Telling Time Cards 1 pack per class Brombacher & Associates
Analogue wall clock 1 per classroom
Digital wall clock 1 per classroom
Analogue clock with moveable hands
1 per classroom
Teachers guide__Grade 1_Web_20180417.indd 36 2018-05-31 02:42:53 PM

37
ACTIVITY 1: SEQUENCING DAILY ROUTINES
In this activity we expect children to develop:
• Confidence in ordering recurring events in their daily lives
• The ability to discuss their daily routines using words such as before and after
For this activity you will need:
• The red NumberSense Event Cards
Teacher’s role:
• Work with one group of children at a time on the mat. This activity can be included as a component in the daily mat routine once a week.
• Shuffle the cards and select 4 to 8 of the red cards.
• Place the cards on the mat in no particular sequence. See the example below:
• Ask the children to describe what is happening in each card.
• Ask the children to arrange the cards according to the sequence in which the events on the cards occur during a typical day.
• Ask the children to explain why they placed the cards in the sequence that they did. You could ask questions such as:
o What do you do first?
o What happens before this picture? And after this one?
o What time of the day does it happen?
I brush my teeth. I go to bed. I play sport. I go to school.
Teachers guide__Grade 1_Web_20180417.indd 37 2018-05-31 02:42:54 PM

38
o Do we all do things in the same order? Is there something you do differently to your friend?
o What else do you do in the day? When do you do it? Before or after which of these events?
o Which event(s) happen in the afternoon? And in the evening?
• Repeat the activity frequently, changing the cards and adding more cards as children gain confidence in sequencing the events on the cards.
When sequencing the events on the cards, bear in mind that children may not all have the same daily routine, or their routine might follow a different sequence, so allow for this variation when discussing their solutions.
What to expect from the children:
Sequencing is an essential aspect in the development of the time concept. Children in Grade R to Grade 2 have had little formal experience with the concept of time. The structured school environment is their first experience of daily life being organised by and around time. This activity is aimed at developing children’s ability to sequence events and uses children’s daily routines as a familiar starting point.
The focus here is not only to place events in the correct order, but to gradually learn “time words” such as: before, after, in the day, at night, in the morning, in the afternoon, during the evening and so on.
While children may be able to sequence the events in the order that they occur, based on their experience of what they do each day, they may not yet be able to link the time of day to each event.
Linking the events on the cards to the time of day is introduced in later activities and grades. For now, it is important that children are given frequent opportunities to describe and sequence the events on the cards and to use the “time words” (listed above) in their descriptions.
Teachers guide__Grade 1_Web_20180417.indd 38 2018-05-31 02:42:54 PM

39
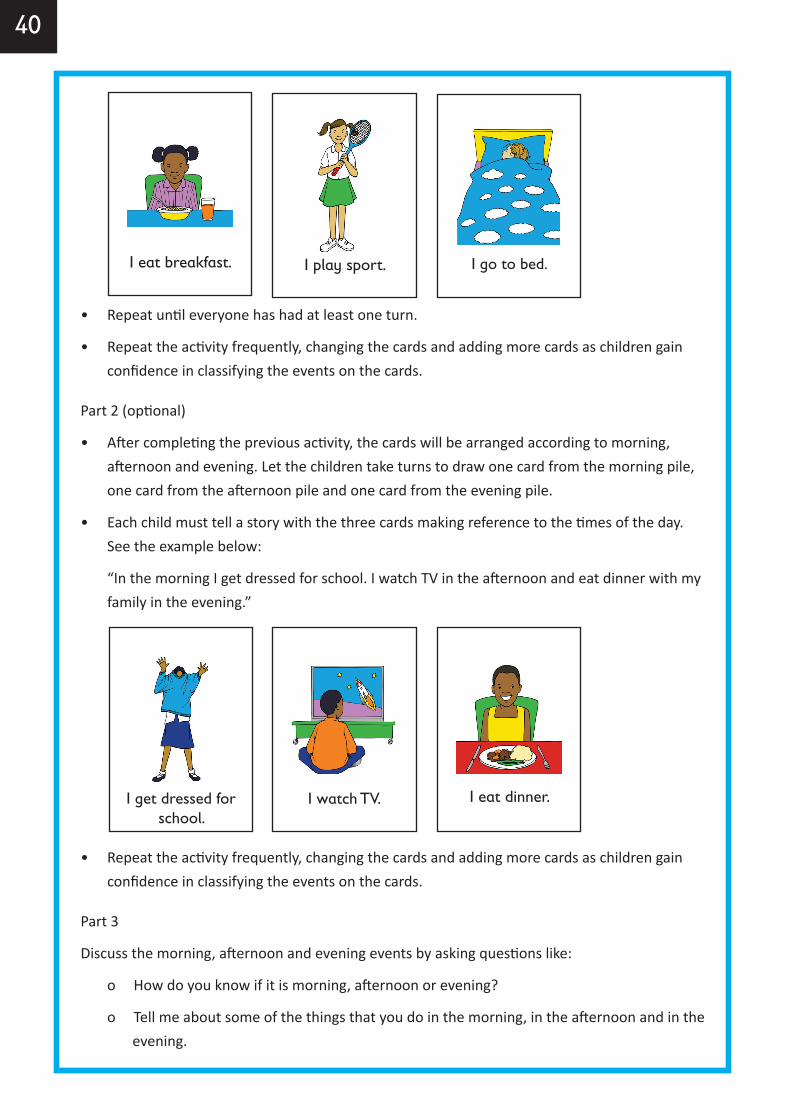
ACTIVITY 2: SEQUENCING ACCORDING TO MORNING, AFTERNOON AND EVENING
In this activity we expect children to develop:
• Fluency in ordering events according to morning, afternoon and evening
• Increased knowledge of vocabulary that expresses how they link their activities to the time of the day
• Greater awareness of how their actions are structured according to time
For these activities you will need:
• The red and/or blue NumberSense Event Cards
Teacher’s role:
Part 1
• Work with one group of children at a time on the mat. This activity can be included as a component in the daily mat routine once a week.
• In the pack of NumberSense Event Cards, you will find three Time of Day Cards (morning, afternoon and evening) with a grey background. Place the morning, afternoon and evening cards on the mat.
• Shuffle the rest of the cards in the pack.
• Let the children take turns to draw a card from the pack.
• Ask the child to say whether the event occurs in the morning, in the afternoon or in the evening and let them put down their card under the appropriate “time of day” card (see the example below).
Teachers guide__Grade 1_Web_20180417.indd 39 2018-05-31 02:42:56 PM
40
• Repeat until everyone has had at least one turn.
• Repeat the activity frequently, changing the cards and adding more cards as children gain confidence in classifying the events on the cards.
Part 2 (optional)
• After completing the previous activity, the cards will be arranged according to morning, afternoon and evening. Let the children take turns to draw one card from the morning pile, one card from the afternoon pile and one card from the evening pile.
• Each child must tell a story with the three cards making reference to the times of the day. See the example below:
“In the morning I get dressed for school. I watch TV in the afternoon and eat dinner with my family in the evening.”
• Repeat the activity frequently, changing the cards and adding more cards as children gain confidence in classifying the events on the cards.
Part 3
Discuss the morning, afternoon and evening events by asking questions like:
o How do you know if it is morning, afternoon or evening?
o Tell me about some of the things that you do in the morning, in the afternoon and in the evening.
I eat breakfast. I play sport. I go to bed.
I eat dinner.I get dressed for school.
I watch TV.
Teachers guide__Grade 1_Web_20180417.indd 40 2018-05-31 02:42:58 PM
41
What to expect from the children:
In this activity children become increasingly aware of the different times of the day which is an important step towards learning about time.
By linking the events on these cards to the different times of the day (morning, afternoon and evening) children are increasing their “time” vocabulary.
Children are starting to orientate themselves in time. Children become aware of the notion of structuring their actions according to a certain point in time.
Continue to encourage children to use “time” words and to describe their actions using these words.
In sequencing the events, children might initially still sequence events without taking the time of day (morning, afternoon and evening) into account.
o Do you do the same things every day of the week?
o How are Saturdays, Sundays and school holidays different?
Teachers guide__Grade 1_Web_20180417.indd 41 2018-05-31 02:42:58 PM

42
ACTIVITY 3: DURATION
In this activity we expect children to develop:
• Awareness of the duration of events
• The ability to compare the duration of two or more events
• Confidence in ordering events according to duration
• Vocabulary to describe the duration of events using words such as: faster, slower, longer and shorter
For these activities you will need:
• The red NumberSense Event Cards
Teacher’s role:
• Work with one group of children at a time on the mat. This activity can be included as a component in the daily mat routine once a week.
• Select the red NumberSense Event Cards.
• Shuffle the cards.
• Let the children take turns drawing two cards from the pack. Let them place the cards side by side. For example:
• Ask each child to say which of the two events on the cards takes longer. Let the child order the two cards according to duration.
• Ask children to explain how they know that the one event takes longer than the other.
• Encourage children to use time words such as slow, quick, short, fast and long as well as slower, faster, quicker and longer etc. to describe the duration of the events.
• When stating which activity takes longer, encourage them to do so using sentences such as “going home takes longer than eating dinner”.
• Put the cards back in the pack, reshuffle and repeat the activity.
• Repeat the activity frequently, changing the cards, and as the children gain confidence in comparing the duration of the events on the cards, increase the number of cards in the set that you use.
I eat lunch. I wake up.
Teachers guide__Grade 1_Web_20180417.indd 42 2018-05-31 02:42:58 PM

43
What to expect from the children:
In this activity children develop awareness that events have duration. Understanding duration of events is an important part of learning about time and how life is organised around it. The focus is not just on learning about duration, but also on learning the vocabulary to describe duration. This includes words such as fast, slow, longer and shorter. Continue to encourage children to use these words.
Note that even if two events take almost the same time, this can form part of the discussion. For example, eating dinner and eating lunch might take the same amount of time for some children, but be different for others. You could ask questions like:
• Why does it take longer for your friend to eat lunch than it does for you?
• Why does dinner take longer than lunch at your house?
• It takes longer for your friend to walk home than it does for you to walk home. Why is that?
• Are there any events that take all of us the same time to complete?
When ordering the duration of the events on the cards, bear in mind that children may not all have the same daily routine, or that the events of their routines do not all take the same time. Allow for this variation when discussing their solutions.
Teachers guide__Grade 1_Web_20180417.indd 43 2018-05-31 02:42:59 PM
44
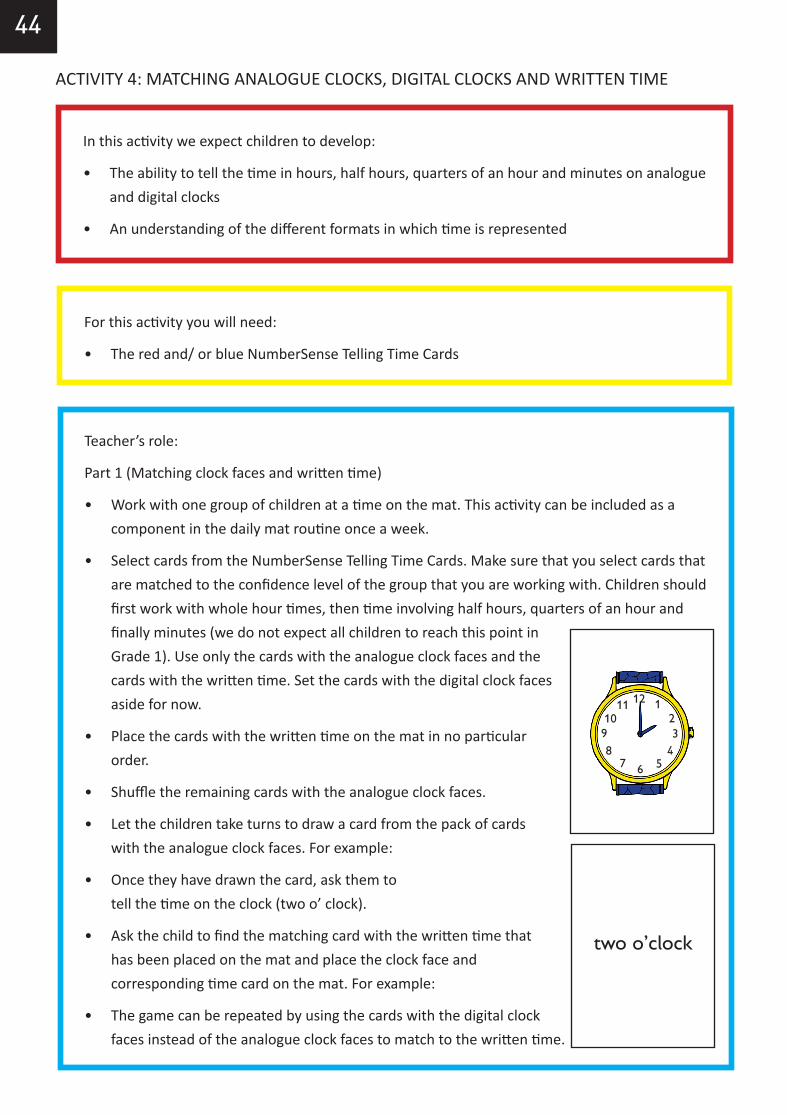
Teacher’s role:
Part 1 (Matching clock faces and written time)
• Work with one group of children at a time on the mat. This activity can be included as a component in the daily mat routine once a week.
• Select cards from the NumberSense Telling Time Cards. Make sure that you select cards that are matched to the confidence level of the group that you are working with. Children should first work with whole hour times, then time involving half hours, quarters of an hour and finally minutes (we do not expect all children to reach this point in Grade 1). Use only the cards with the analogue clock faces and the cards with the written time. Set the cards with the digital clock faces aside for now.
• Place the cards with the written time on the mat in no particular order.
• Shuffle the remaining cards with the analogue clock faces.
• Let the children take turns to draw a card from the pack of cards with the analogue clock faces. For example:
• Once they have drawn the card, ask them to tell the time on the clock (two o’ clock).
• Ask the child to find the matching card with the written time that has been placed on the mat and place the clock face and corresponding time card on the mat. For example:
• The game can be repeated by using the cards with the digital clock faces instead of the analogue clock faces to match to the written time.
ACTIVITY 4: MATCHING ANALOGUE CLOCKS, DIGITAL CLOCKS AND WRITTEN TIME
In this activity we expect children to develop:
• The ability to tell the time in hours, half hours, quarters of an hour and minutes on analogue and digital clocks
• An understanding of the different formats in which time is represented
For this activity you will need:
• The red and/ or blue NumberSense Telling Time Cards
two o’clock
1211
9
5
10 2
78 4
3
1
6
Teachers guide__Grade 1_Web_20180417.indd 44 2018-05-31 02:42:59 PM

45
Part 2 (Matching analogue clock faces to digital clock faces)
• Select cards from the NumberSense Telling Time Cards. Make sure that you select cards that are matched to the confidence level of the group that you are working with. Children should first work with whole hour times, then time involving half hours, then quarters of an hour and finally minutes. Use only the cards with the analogue clock faces and the cards with the digital clock faces. Set the cards with the written time aside.
• Place the cards with the digital clock faces on the mat in no particular order.
• Shuffle the cards with the analogue clock faces.
• Let the children take turns to draw a card from the pack of cards with the analogue clock faces. For example:
• Once they have drawn the card, ask them to tell the time on the clock (half past three).
• Ask the child to find the matching card with the digital clock face that has been placed on the mat.
• The game can be played the other way around by placing the analogue clock faces on the mat and having the children match the cards with digital clock faces instead.
What to expect from the children:
Telling the time on a clock is very confusing at first. For this reason it is important that the children are used to their teacher pointing to the clock on the classroom wall and saying “it is two o’clock” etc. at regular intervals during the day. Only after they have experienced this for several weeks/months will they be ready for these activities. Ideally there will be a large analogue clock next to a large digital clock that the teacher can refer to.
This can be a challenging set of activities for children as they are converting between digital time, analogue time and written time. Because of the frequent references that the teacher has made to the clock on the wall in the class in the weeks before starting these activities, it is hoped that the children will gain confidence quickly.
1211
9
5
10 2
78 4
3
1
6
Teachers guide__Grade 1_Web_20180417.indd 45 2018-05-31 02:43:00 PM
46
Teacher’s role:
Part 1
• Work with one group of children at a time on the mat. This activity can be included as a component in the daily mat routine once a week.
• Select cards from the NumberSense Telling Time Cards and the NumberSense Event Cards. Make sure that you select cards that are matched to the confidence level of the group that you are working with. Children should first work with whole hour times, then time involving half hours, then quarters of an hour and finally minutes.
• Select the Event Cards that you will use and place them on the mat. From the Telling Time Cards select either the Analogue Time Cards, the Digital Time Cards or the Written Time Cards. Put the remaining Telling Time Cards away.
• Let the children take turns to select an Event Card, to say at what time the event typically takes place and to select the corresponding Telling Time Card.
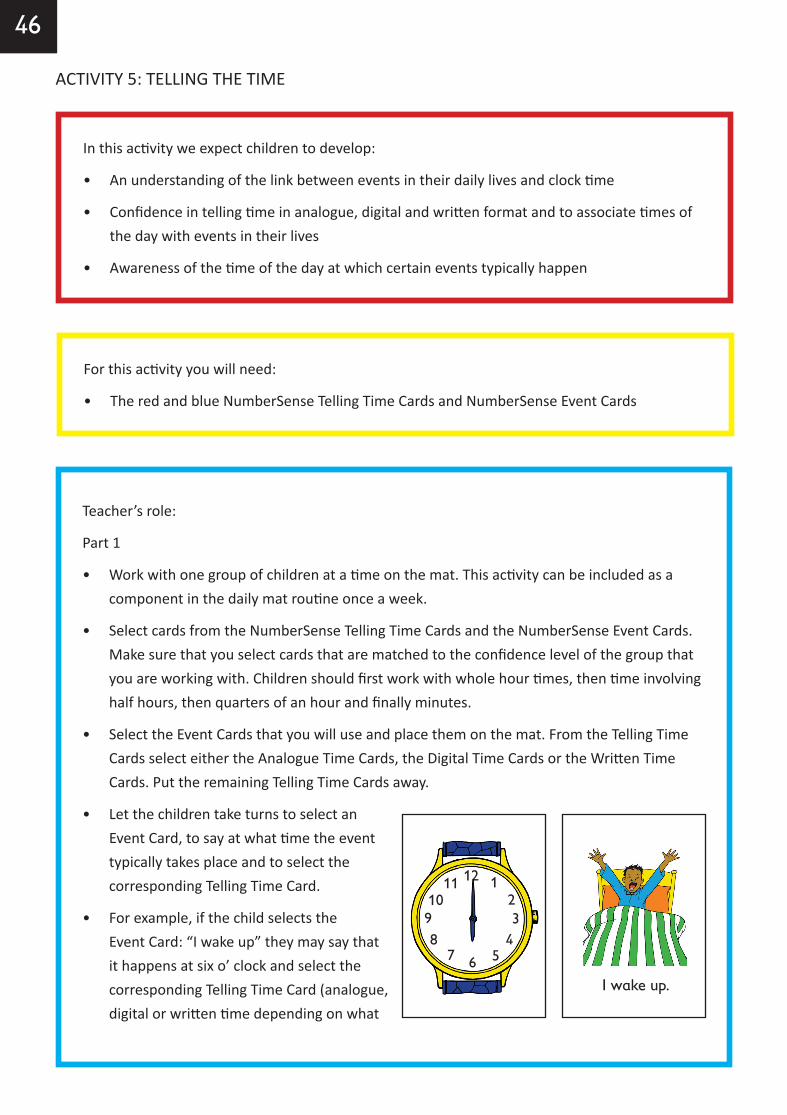
• For example, if the child selects the Event Card: “I wake up” they may say that it happens at six o’ clock and select the corresponding Telling Time Card (analogue, digital or written time depending on what
ACTIVITY 5: TELLING THE TIME
In this activity we expect children to develop:
• An understanding of the link between events in their daily lives and clock time
• Confidence in telling time in analogue, digital and written format and to associate times of the day with events in their lives
• Awareness of the time of the day at which certain events typically happen
For this activity you will need:
• The red and blue NumberSense Telling Time Cards and NumberSense Event Cards
I wake up.
1211
9
5
10 2
78 4
3
1
6
Teachers guide__Grade 1_Web_20180417.indd 46 2018-05-31 02:43:02 PM
47
the teacher has selected) that shows six o’ clock. The child then puts the two cards down next to each other on the mat.
Part 2
• Select cards from the NumberSense Telling Time Cards. Make sure that you select cards that are matched to the confidence level of the group that you are working with. Children should first work with whole hour times, then time involving half hours, then quarters of an hour and finally minutes.
• Use the cards with the analogue clock faces. Put the cards down on the mat in no particular order.
• Ask “At what time does ….?” type questions and let the children take turns to answer the question and select the corresponding Telling Time Card. Involve the rest of the group in a discussion on whether or not the child’s answer is reasonable. Possible questions include:
o At what time do you eat breakfast?
o What time of the day do you go to bed?
o At what time does school close?
o At what time is break?
o At what time will you go to bed this evening etc.?
• The game can be repeated using the Digital Time Cards and Written Time Cards.
• As an extension to the activity, ask children to give the time of the event in more than one format. Use two types (for example, the cards with the analogue clock and digital clock faces) or all three types of cards (analogue clocks, digital clocks and time in words) to play the game this way.
Part 3
• Select cards from the NumberSense Telling Time Cards. Make sure that you select cards that are matched to the confidence level of the group that you are working with. Children should first work with whole hour times, then time involving half hours, then quarters of an hour and finally minutes.
• Use analogue clock faces. Put the cards down on the mat in no particular order.
• Let the children take turns to select a card (or work with the card that you provide to them). Each child must read the time on the card out loud and think of an activity that they do at this time of the day. Involve the rest of the group in a discussion on whether or not the child’s answer is reasonable.
Teachers guide__Grade 1_Web_20180417.indd 47 2018-05-31 02:43:02 PM
48
What to expect from the children:
Children might not yet be aware of, or be able to connect the time of day and events that occur. Before attempting this activity, make sure children are confident in telling the time using digital and analogue clocks (Activity 4). Ideally, there should be a large analogue clock next to a large digital clock on the wall of the classroom that the teacher refers to frequently. The teacher should regularly point to both clocks on the wall, ask children what time it is and to describe what they are doing. Ask questions like:
• What time is it now? What are we doing now?
• Can you remember what time you came to school?
• What time do we go home?
• It is now 10 o’ clock. What do we usually do now?
• What happens at two o’ clock?
Through these discussions children begin to understand how events in life can be described in terms of the time at which they occur. They also come to realise that, generally, life is organised by time. Eventually they will develop the ability to manage their lives in terms of time.
When children say the time at which events occur, lead a discussion about how they know. They could respond by saying, for example, that their mothers tell them, or that they look at the clock to know. If they look at the clock, ask them to describe the clock face at that time.
It is an important developmental step for children to link events to the time of day. They should be given frequent opportunities to experience and describe the times of the day at which events typically take place and also to list events that typically take place at different times of the day.
o For example, you can ask, “What happens at nine o’ clock?” Encourage the child to respond using a full sentence. For example, "At nine o’ clock I like to have a snack".
• The game can be repeated using the Digital Time Cards and Written Time Cards.
• As an extension to the activity, use two types (for example, the cards with the analogue clock and digital clock faces) or all three types of cards (analogue clocks, digital clocks and written time). Or, ask the children to draw a card (for example, an analogue clock face) and its matching Digital Time Card or Written Time Card and to state what they do at that time.
Teachers guide__Grade 1_Web_20180417.indd 48 2018-05-31 02:43:02 PM

49
Measurement: Capacity, Mass (Weight), Length and Area
The development of an understanding of measurement follows a similar progression irrespective of the attribute (capacity, volume, mass, length or area) being measured.
1. First, children must develop an awareness of the attribute. This is achieved through comparing, ordering and matching different objects with the attribute.
2. Next, children must learn to quantify the attribute accurately, using units which develop from non-standard and informal units to more formal units.
3. Finally, the children come to use standard units and perform calculations in measurement contexts.
Developing an awareness of attributes
To support children in developing an awareness of the different measurable and comparable attributes that an object has, the early activities in this guide focus on children comparing objects by filling them in order to develop an awareness of volume/capacity, using a balance to compare objects in terms of their weight, and comparing the lengths of objects by both direct comparison and using informal length units.
Quantifying attributes
Objects can often be compared in terms of one or other attribute by means of direct comparison; for example by holding them next to each other or picking them up to feel which is heavier and which is lighter. As the difference in the attribute being compared becomes smaller, so it becomes harder to compare the objects by direct comparison and it helps to be able to quantify the attribute. Initially this is done using informal units.
Quantifying the attribute also helps to answer questions such as: How much more does the larger object hold? How much heavier is the larger object? How much longer is the larger object? In the early activities in this guide, children quantify (measure) attributes using non-standard, but familiar units such as cups, paper clips, unifix cubes, beans, marbles and toothpicks. The activities are carefully structured to help children develop an awareness of how the choice of measuring units can impact on both the efficiency (ease) with which the attribute is measured and the precision of the measure.
Throughout the activities, children should be encouraged to estimate before measuring. Initially these estimates may be no more than guesses. Estimating involves the children in developing a sense of the “muchness” of the unit. Children should also reflect on the appropriateness of the units used to measure an attribute. For example, using a cup to determine the volume of a bucket is probably more sensible than using a tablespoon.
The activities also support the development of the awareness that using non-standard units (e.g. hand spans, arm lengths and paces for length) creates difficulties and that there is value in using standardised units.
Teachers guide__Grade 1_Web_20180417.indd 49 2018-05-31 02:43:02 PM

50
Using standard units and calculations
The value of using standardised units often follows from the experiences of different people using different informal and non-standard units to measure and compare the attributes of objects. That said, children should also realise that the choice of standard unit is for the most part arbitrary and the metric system, as we know it, is no more than a widely accepted convention to use specific units to measure certain attributes.
The activities in this guide provide the practical experience and opportunity for children to develop an understanding of measurement in a meaningful way. The progression of the activities has been deliberately planned so that, with the appropriate facilitation and guidance of the teacher, the activities reveal the mathematics in a meaningful way.
RESOURCES
• Assortment of objects /containers that can be filled, weighed, and whose length(s) can be measured. The container assortment should include containers that are similar in some regards, but different in others – for example similar in height, but different in capacity. We want the children to compare
objects in terms of their different attributes. If the objects are too obviously different then the measurement activity becomes unimportant and children lose interest. The table on the following page has a list of suggested objects/containers.
• A range of informal non-standard units of measurement. These should include objects (units) that are different in size, weight and shape so that the children gain experience in filling, weighing and measuring large objects with different (smaller and larger) units. We want children to develop awareness that while a smaller unit may result in a more accurate measurement, measuring the attribute with the small unit is also more time-consuming. By contrast, the larger the measuring unit the less accurate the measurement, even if measuring the attribute was more time-efficient. The table on the following page has a list of suggested measuring units.
• A balance scale. If you do not have a balance scale, it is easy to make.
Teachers guide__Grade 1_Web_20180417.indd 50 2018-05-31 02:43:05 PM
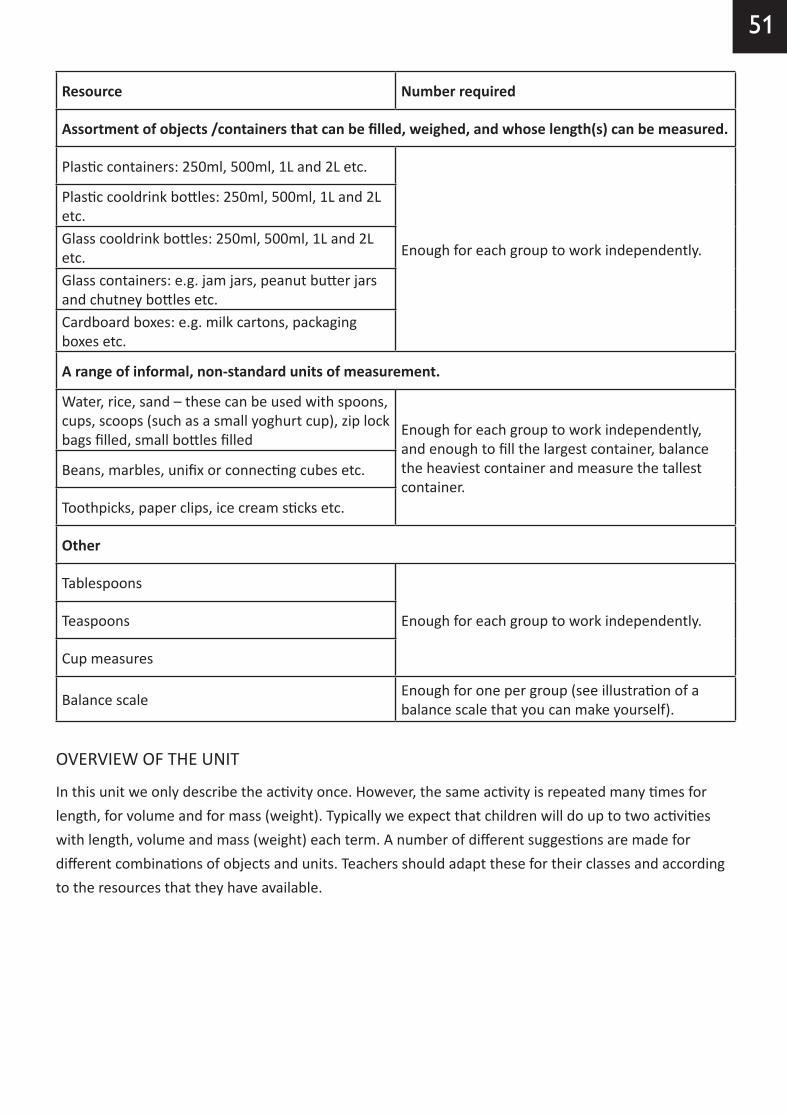
51
Resource Number required
Assortment of objects /containers that can be filled, weighed, and whose length(s) can be measured.
Plastic containers: 250ml, 500ml, 1L and 2L etc.
Enough for each group to work independently.
Plastic cooldrink bottles: 250ml, 500ml, 1L and 2L etc.Glass cooldrink bottles: 250ml, 500ml, 1L and 2L etc.Glass containers: e.g. jam jars, peanut butter jars and chutney bottles etc. Cardboard boxes: e.g. milk cartons, packaging boxes etc.
A range of informal, non-standard units of measurement.
Water, rice, sand – these can be used with spoons, cups, scoops (such as a small yoghurt cup), zip lock bags filled, small bottles filled
Enough for each group to work independently, and enough to fill the largest container, balance the heaviest container and measure the tallest container.
Beans, marbles, unifix or connecting cubes etc.
Toothpicks, paper clips, ice cream sticks etc.
Other
Tablespoons
Enough for each group to work independently.Teaspoons
Cup measures
Balance scale Enough for one per group (see illustration of a balance scale that you can make yourself).
OVERVIEW OF THE UNIT
In this unit we only describe the activity once. However, the same activity is repeated many times for length, for volume and for mass (weight). Typically we expect that children will do up to two activities with length, volume and mass (weight) each term. A number of different suggestions are made for different combinations of objects and units. Teachers should adapt these for their classes and according to the resources that they have available.
Teachers guide__Grade 1_Web_20180417.indd 51 2018-05-31 02:43:05 PM

52
LENGTH, MASS AND CAPACITY ACTIVITIES
In these activities we expect children to develop:
• Confidence in estimating, measuring, comparing and ordering objects in terms of capacity, mass and length using non-standard measures (e.g. spoons, cups, bricks, sandbags, hand spans, footsteps etc.)
For this activity you will need:
• Resources from the resources list as appropriate to each activity
• A recording table for each activity
Teacher’s role:
It is vital that the children actively participate in the filling, weighing and measuring experiences with a range of containers and measuring units. Furthermore, they should have many opportunities to do this throughout the year.
Managing these activities:
• Select the objects that the children will work with.
• Determine the attribute (capacity, mass [weight] and length) that the children will measure and the unit that they will use to do the measuring.
• Develop a recording table for the children to record their results on. Below you will find a number of examples with some notes on each one. Each of these suggestions should be treated as a separate activity completed on a different day. You should adapt these examples to the objects to be measured and the units that are available in your class.
• NOTE: Children should complete each measurement to the nearest whole number of the measuring unit. At this stage we don’t want children worrying about parts of the measuring unit.
• Lead a reflective discussion with the children after they have completed the activity. Suggested questions to guide the reflection include:
o Which container holds/weighs the most? Which container is the tallest?
o Which holds/weighs the least? Which container is the shortest?
o Did you know these answers before you completed the table? How could you have known?
o Did you all get the same results? If not, why not?
Teachers guide__Grade 1_Web_20180417.indd 52 2018-05-31 02:43:05 PM

53
What to expect from the children:
These activities allow for repeated practical experiences with filling, weighing and measuring various containers, using a range of units.
The focus here is on the children gaining experience and confidence in filling, weighing and measuring a variety of containers/objects, using a variety of units. Through these practical activities the children will experience measuring larger containers with smaller units, as well as measuring smaller containers with larger units.
Children should develop an awareness of the different measurable and comparable attributes (capacity/volume, weight/mass and length) that an object can have. They should also develop an awareness of the suitability of the measuring unit – larger units are quicker, but less accurate and not as suitable for smaller containers. However smaller units are more time-consuming (especially as the size of the container increases) but more accurate.
In making comparisons, the children should develop the awareness of the attribute that is being measured. They should also begin to notice that the tallest container may not necessarily hold or weigh the most and that the heaviest container may not be the tallest or hold the most etc. It is important that the children actively experience filling, weighing and measuring activities and that they have many opportunities to do so throughout the year.
Suggested capacity activities
1. How many cups of water fill each container?
Fill 2L cooldrink bottle chutney jar L cooldrink bottle
cups of water
Teacher notes on capacity example 1:
These containers are very different in capacity and children should be able to guess/estimate which holds the most/least without doing any filling. The reason we still use this example is to provide children with the opportunity to practise filling and so develop their fine motor skills.
2. How many marbles fill each container?
Fill peanut butter jar yoghurt tub ice cream tub
marbles
12
Teachers guide__Grade 1_Web_20180417.indd 53 2018-05-31 02:43:05 PM

54
Teacher notes on capacity example 2:
These containers are less different in capacity than the containers in capacity example 1. Children should still be able to guess/estimate which holds the most/least without doing any filling. However, there may be some doubt about the peanut butter jar and yoghurt tub which look similar in capacity. This starts to highlight the value of actually filling the containers to avoid doubt.
3. How many cubes fill each container?
Fill chutney jar 1L milk carton peanut butter jar
cubes
Teacher notes on capacity example 3:
All three of the containers look similar in capacity. The reflective discussion should start to reveal the need for a measuring unit to determining which container holds the most/least – we can no longer rely on just looking at the container.
Suggested mass/weighing activities
1. How many marbles balance each container?
Weight 2L cooldrink bottle chutney jar L cooldrink bottle
marbles
Teacher notes on mass (weight) example 1:
These containers are obviously different in weight and children should be able to guess/estimate which weighs the most/least without doing any weighing. The reason we still use this example is to provide children with the opportunity to practise weighing.
2. How many beans balance each container?
Weight peanut butter jar yoghurt tub ice cream tub
beans
12
Teachers guide__Grade 1_Web_20180417.indd 54 2018-05-31 02:43:06 PM

55
Teacher notes on mass (weight) example 2:
These containers are less different in weight than the containers in weighing example 1. Children should still be able to guess/estimate which is the heaviest/lightest without doing any weighing. However, there may be some doubt about the yoghurt tub and the ice cream tub which are similar in weight. This starts to highlight the value of actually filling the containers to avoid doubt.
3. How many cubes balance each container?
Weight chutney jar 1L milk carton peanut butter jar
cubes
Teacher notes on mass (weight) example 3:
Two of the three containers appear to be similar in terms of weight. The reflective discussion should start to reveal the need for a measuring unit to determining which container weighs the most/least – we can no longer rely on just picking up the containers.
Suggested length activities
1. How many paper clips arranged end to end are the same length as each container?
Length peanut butter jar yoghurt tub ice cream tub
paper clips
Teacher notes on length example 1:
These containers are different in length (height) and children should be able to guess/estimate which is the tallest/shortest by direct comparison. The reason we still use this example is to provide children with the opportunity to measure length and so develop their fine motor skills.
2. How many cubes arranged end to end are the same length as each container?
Length 2L cooldrink bottle chutney jar L cooldrink bottle
cubes
12
Teachers guide__Grade 1_Web_20180417.indd 55 2018-05-31 02:43:06 PM

56
Teacher notes on length example 2:
Two of these containers are less different in length (height) than the containers in length example 1. Children should still be able to guess/estimate which is the longest/shortest without doing any mea-suring. However, there may be some doubt about the chutney jar and the L cooldrink bottle which are similar in length (height). This starts to highlight the value of actually measuring the lengths of the containers to avoid doubt. That said, using cubes as the unit of length may not be small enough to discriminate between the lengths (heights) of the chutney jar and the L cooldrink bottle which starts to raise awareness of the role of the measuring units.
3. How many toothpicks arranged end to end are the same length as each container?
Length chutney jar 1L milk carton peanut butter jar
toothpicks
Teacher notes on length example 3:
Two of the three the containers appear to be similar in terms of length (height). The reflective discussion should start to reveal the need for a measuring unit to determine which container is the longest (tallest) if we cannot see clearly which is longest/shortest. Using toothpicks as the unit of length we may not be able to discriminate between the lengths (heights) of the containers because the toothpicks are too long. This starts to raise awareness about the importance of choosing appropriate measuring units.
12
12
Teachers guide__Grade 1_Web_20180417.indd 56 2018-05-31 02:43:06 PM

NumberSenseCOMPANION
MEASUREMENT, GEOMETRY AND DATA HANDLINGG1
Teacher GuideEnglish
ISBN
978-1-920427-41-2