full hd camera · blueeyes technology 1 operation manual blueeyes icam full hd camera thank you...
TRANSCRIPT
iCam
Full HD Camera
Operation Manual VER 2.1.18-B2143
2015/08/14

BlueEyes Technology 1 www.BlueEyes.tw
Operation manual
BlueEyes iCam Full HD Camera
Thank you for using the product of BlueEyes Technology.
The manual will introduce the product of BlueEyes Technology. Please read the manual
before you start using the product.
Though the information in the manual has been verified before publish, the actual
specification should be based on the actual shipment. BlueEyes Technology doesn’t
have to guarantee, proclaim or declare for the content, along with other purpose. In
addition, the product specification and information that mentioned in the manual is for
reference only. The content might be update at any time without notice. If there is any
mistake of the information, including software, firmware, and hardware that mentioned
in the manual BlueEyes Technology has no responsibility for the mistake.
Please reach BlueEyes website to get the upgrade of the product specification, our
company will not notice you. If you want to get the latest product information, operation
manual, firmware, or you have any question to the products of BlueEyes Technology,
please contact your local agent or go to the official website of BlueEyes Technology for
further information.
It is not allowed to copy/ use the content or to change the information and publishing of
the manual without BlueEyes Technology’s written consent.
Copyright 2015 BlueEyes Technology Inc. All Rights Reserved.
BlueEyes Technology Corp.
Add: 7F-3, No.200, Sec. 4, Wenxin Rd., North District,
Taichung City 40462, Taiwan
TEL: +886 4 2297 0977 / +886 982 842 977
Fax: +886 4 2297 0957
E-mail:[email protected]
Website: www.BlueEyes.com.tw
BlueEyes Technology 2 www.BlueEyes.tw
Index
1. Outline .................................................................................................................................... 4
1.1 Instruction ..................................................................................................................................................... 4
1.2 Features ........................................................................................................................................................ 4
1.3 Composition .................................................................................................................................................. 5
2. Safety and precautions ........................................................................................................... 6
3. Device Description ................................................................................................................. 7
3.1 Back Panel ..................................................................................................................................................... 7
3.2 Fixed iCam camera ........................................................................................................................................ 8
3.3 Scanning iCam camera .................................................................................................................................. 8
3.4 LED Indicator (Separately Sold) .................................................................................................................... 9
3.5 Live Video .................................................................................................................................................... 11
4. Location of camera ............................................................................................................... 12
4.1 Location of camera ..................................................................................................................................... 12
5. Adjusting lenses ................................................................................................................... 15
5.1 Lens of iCam ................................................................................................................................................ 15
5.2 IRIS (O←→C) ................................................................................................................................................ 15
5.3 Advices for classroom lighting improvement ............................................................................................. 16
5.4 Zoom (W←→T) ............................................................................................................................................ 16
5.5 Focus (∞←→N) ............................................................................................................................................. 17
6. Cleaning and Maintaining the Lens ...................................................................................... 17
7. Setting .................................................................................................................................. 19
7.1 Video Setting ............................................................................................................................................... 19
7.2 Camera Setting ........................................................................................................................................... 22
7.3 Privacy Mask Setting ................................................................................................................................... 25
7.4 Audio Setting .............................................................................................................................................. 27
7.5 Network Setting .......................................................................................................................................... 29
7.6 Solving Color Cast when rotating................................................................................................................ 30
8. Watermark ............................................................................................................................ 32
8.1 Trademark of education institute ............................................................................................................... 32
8.2 Making Trademark Picture ......................................................................................................................... 32
8.3 Upload Watermark ..................................................................................................................................... 33
8.4 Notices ........................................................................................................................................................ 35
9. QR code ............................................................................................................................... 36

BlueEyes Technology 3 www.BlueEyes.tw
9.1 About QR code ............................................................................................................................................ 36
9.2 Make QR code ............................................................................................................................................. 36
9.3 Upload QR code .......................................................................................................................................... 39
9.4 Notices ........................................................................................................................................................ 41
10. Motion detection of iFollow ................................................................................................. 42
10.1 Enable and set the motion detection ....................................................................................................... 42
10.2 Notices ...................................................................................................................................................... 44
11. Q&A .................................................................................................................................... 45
Q1: Can the camera be on for 24 hours? ......................................................................................................... 45
Q2: How to adjust if the image is blurred? ....................................................................................................... 45
Q3: Why the words on the board trembling? .................................................................................................. 45
Q4: How to clean the lens? ............................................................................................................................... 45
Q5: How long does it take to start up the camera? ......................................................................................... 45
Q6: Ripple shows when using projector or digital board ................................................................................. 45
Q7: The video file cut into one or several pieces ............................................................................................. 46
Q8: How to restore to default? ........................................................................................................................ 46
Q9: How to reduce background noise .............................................................................................................. 47

BlueEyes Technology 4 www.BlueEyes.tw
1. Outline
1.1 Instruction
Most of the recording systems use traditional security camera, so the quality was very bad.
The students have to look closely to see the words on the blackboard. This kind of camera is
not suitable for education institute environment.
BlueEyes Technology develops the Full HD Camera especially for the education institute
environment, and registrated the trademark as iCam®. Now we have the third generation
iCam. It not only reserves the high quality of shooting, but also upgrades the sound receiver. In
order to enhance the characters on the whiteboards, digital boards, and projectors, iCam can
detect the external environment automatically and make the characters clearer. Watching the
iCam videos is like watching Blu-ray movies in the movie theaters.
1.2 Features
– The only camera designed for educational facilities – full HD camera for lecture
recording
– Full HD 1080P. The quality is 24 times better than the traditional camera
– Designed for whiteboards, digital boards, projectors, and touch-panel TV,
enhance sharpness of images.
– Recording indicator makes teachers easy to see if the recording is on.
– Full-time audio and video synchronization
– TAMRON mega-pixel compatible varifocal lenses
– SONY Exmor Back-illuminated sensor
– Texas Instruments DaVinci video processor (DSP)
– LED indicator
– Built-in microphone
– Built-in privacy masking feature
– Embedded watermark/ QR Code copyright protection
– Made in Taiwan
– Industrial grade. It can be operated for 24 hours without overheating.
Note: iCam is not normal network camera. It is Full HD camera designed for education institutes.
More information and features, please check official website of BlueEyes Technology:
http://www.blueeyes.com.tw/iLearning_iCam.php
BlueEyes Technology 5 www.BlueEyes.tw
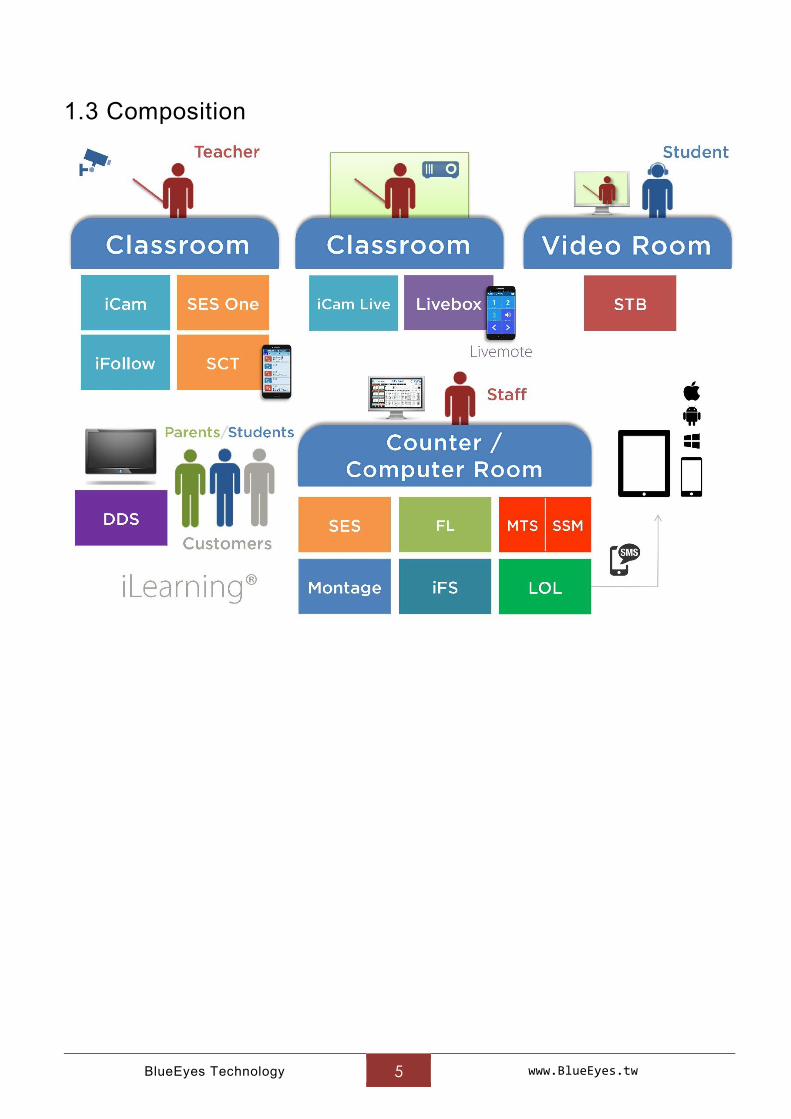
1.3 Composition

BlueEyes Technology 6 www.BlueEyes.tw
2. Safety and precautions
– Please do not leave or install the device in damp, direct sunlight, hot or confined
spaces.
– Do not put anything that would fall into the machine on top of the machine.
– Do not place the machine on an unstable place. It may fall down, resulting in an
injury.
– Please use this machine in a place with good ventilation. Do not block the heat
dissipation vents. Poor heat dissipation can lead to a rise internal temperatures
and cause malfunctions
– Use dry rag to clean the machine. Do not use solvent.
– We will not be liable for any damage caused by the use of third party power
supplies in this machine
– Never plug the machine into a power socket that is shared with other equipment
(extension load/cord, 2- or 3-way adapter, etc.). This may result in fire or
electrical shock or fire.
– Please do not disassemble, re-design or maintain the device by yourself.
– The processors and accessories all pass the safety test of CE and FCC.
Please plug the cables of iCam when thundering to avoid lightning strikes. Lightning
strike is natural disaster so it is not in our warranty.
http://www.BlueEyes.com.tw/warranty.php
BlueEyes Technology 7 www.BlueEyes.tw
3. Device Description
3.1 Back Panel
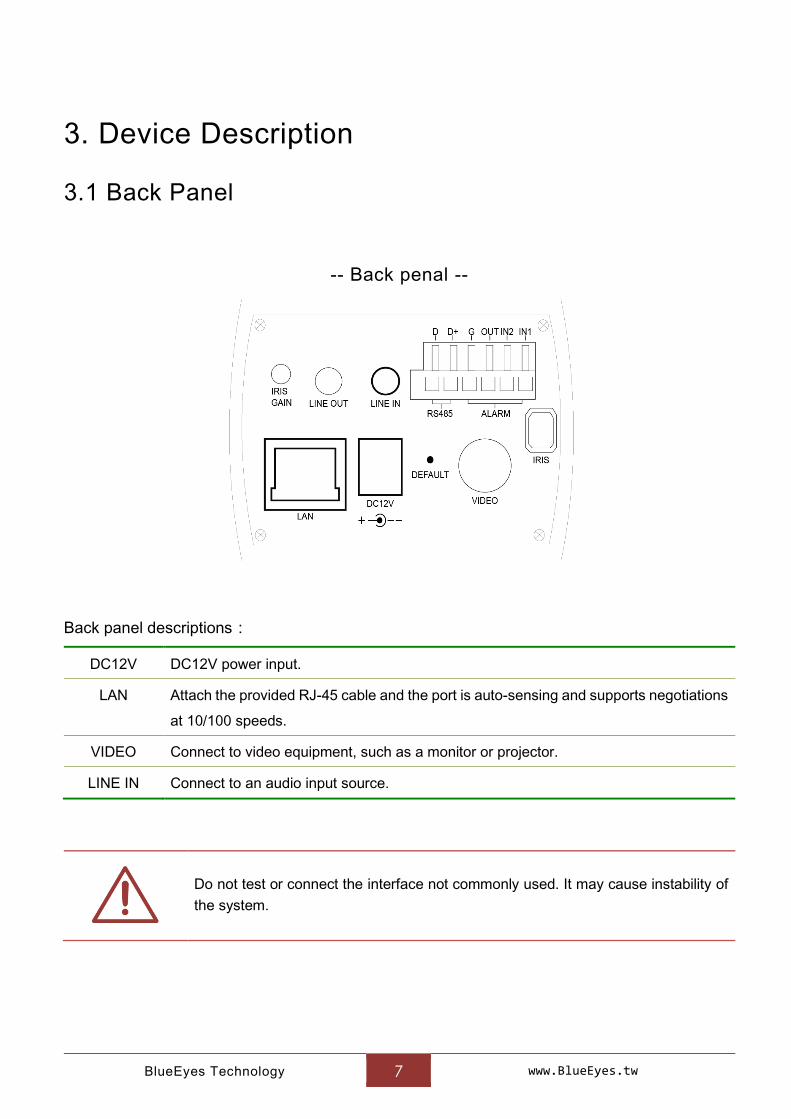
-- Back penal --
Back panel descriptions:
DC12V DC12V power input.
LAN Attach the provided RJ-45 cable and the port is auto-sensing and supports negotiations
at 10/100 speeds.
VIDEO Connect to video equipment, such as a monitor or projector.
LINE IN Connect to an audio input source.
Do not test or connect the interface not commonly used. It may cause instability of
the system.

BlueEyes Technology 8 www.BlueEyes.tw
3.2 Fixed iCam camera
Fixed iCam camera diagram:
3.3 Scanning iCam camera
Scanning iCam camera diagram:
– The small monitor can suck on the direction controller. If you worry that it is not
steady enough, you can stick directly on the monitor.
– There are two control buttons on the direction controller of the scanning iCam
camera, and the left and right controller is for SES. If you worry that the students
might drop it on the floor, you can stick it in the table with double-sided tape or
silicone as some of the education institutes do.
– Use flexible wire for network cable, video cable and audio cable to avoid fixed screw
loosening or interfaces dropping after long use.
– Put termination plug at the end of the left and right turn.
– After installing, you must rotate to the end and see the image simultaneously to
BlueEyes Technology 9 www.BlueEyes.tw
make sure the cables would not be pulled or the fixed screw of the camera would
not loosen when rotating.
– Use [single tone]for audio cable
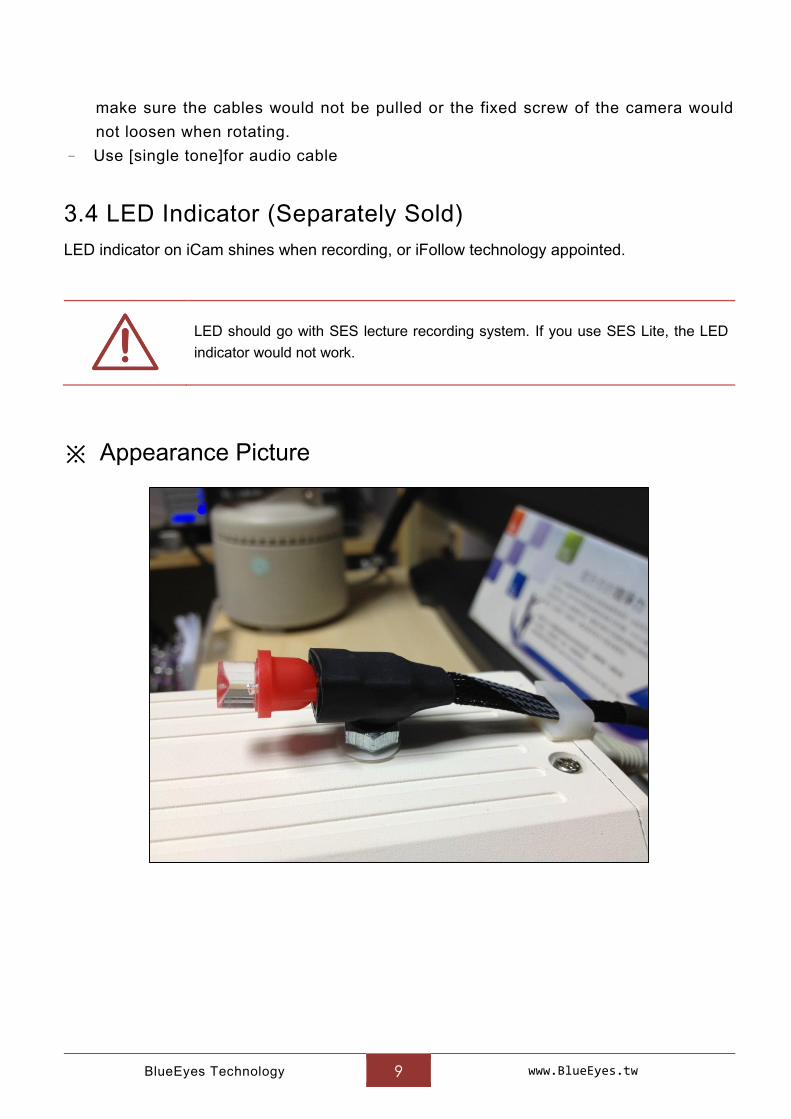
3.4 LED Indicator (Separately Sold)
LED indicator on iCam shines when recording, or iFollow technology appointed.
LED should go with SES lecture recording system. If you use SES Lite, the LED
indicator would not work.
※ Appearance Picture
BlueEyes Technology 10 www.BlueEyes.tw
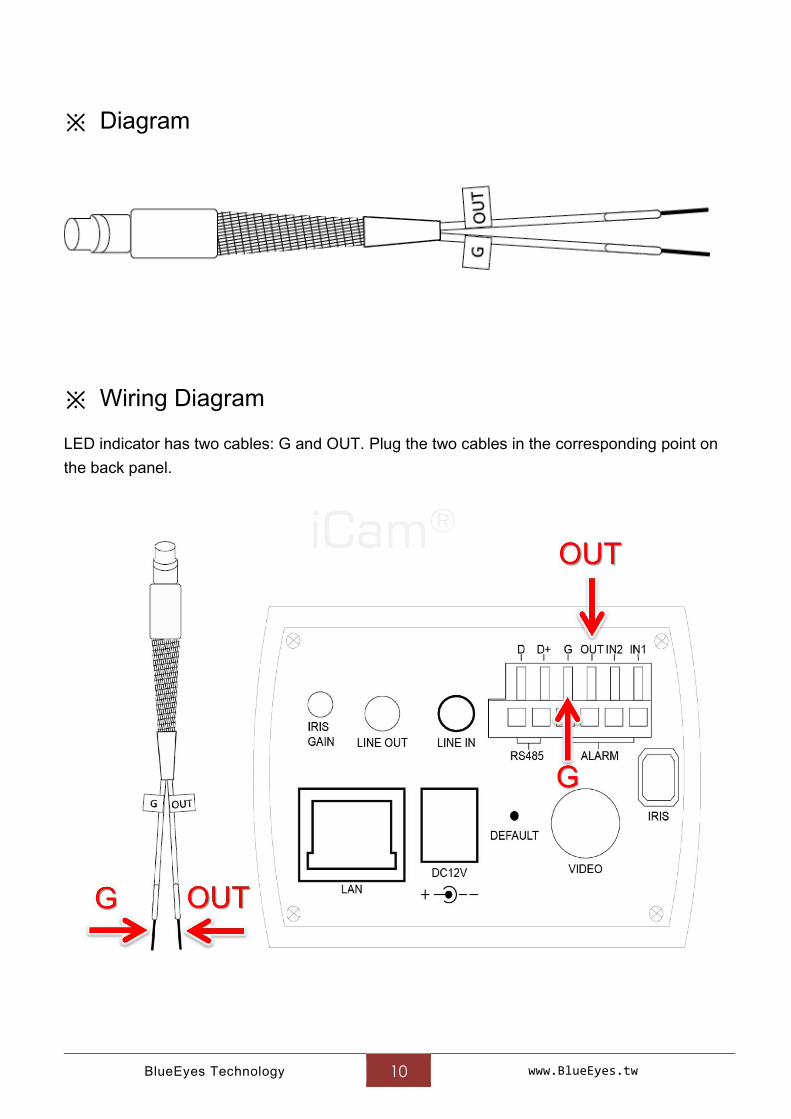
※ Diagram
※ Wiring Diagram
LED indicator has two cables: G and OUT. Plug the two cables in the corresponding point on
the back panel.
BlueEyes Technology 11 www.BlueEyes.tw
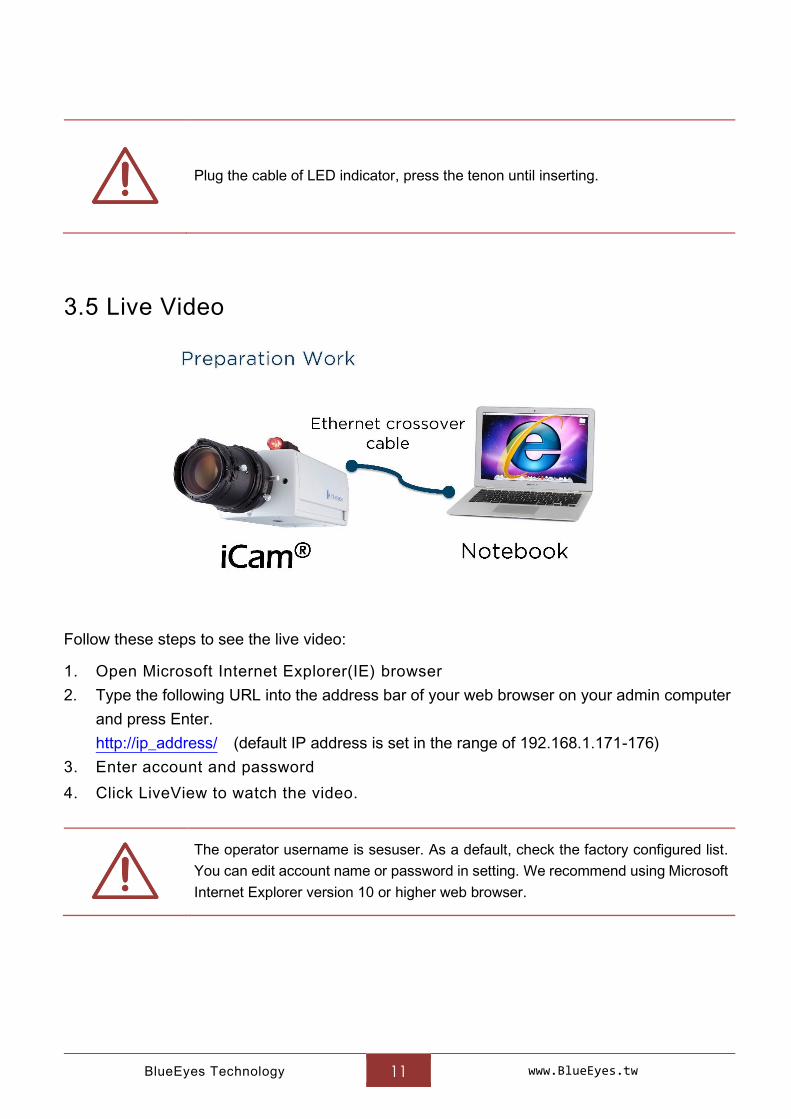
Plug the cable of LED indicator, press the tenon until inserting.
3.5 Live Video
Follow these steps to see the live video:
1. Open Microsoft Internet Explorer(IE) browser
2. Type the following URL into the address bar of your web browser on your admin computer
and press Enter.
http://ip_address/ (default IP address is set in the range of 192.168.1.171-176)
3. Enter account and password
4. Click LiveView to watch the video.
The operator username is sesuser. As a default, check the factory configured list.
You can edit account name or password in setting. We recommend using Microsoft
Internet Explorer version 10 or higher web browser.
BlueEyes Technology 12 www.BlueEyes.tw
4. Location of camera
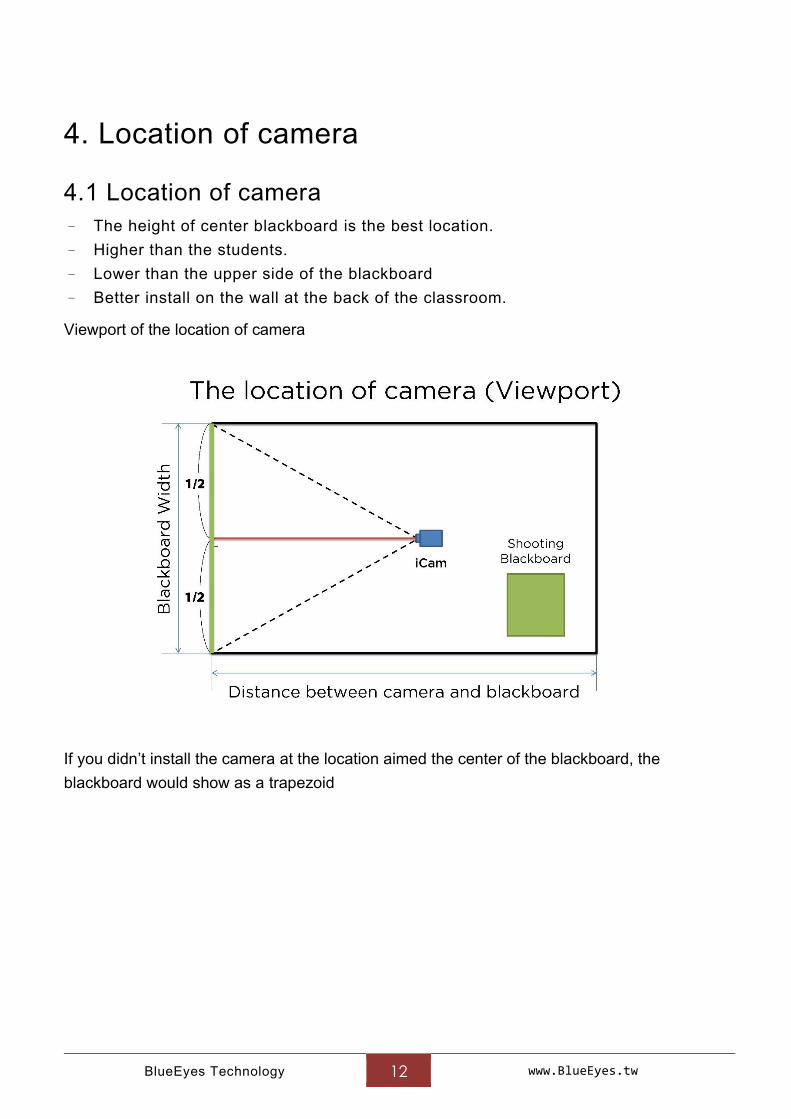
4.1 Location of camera
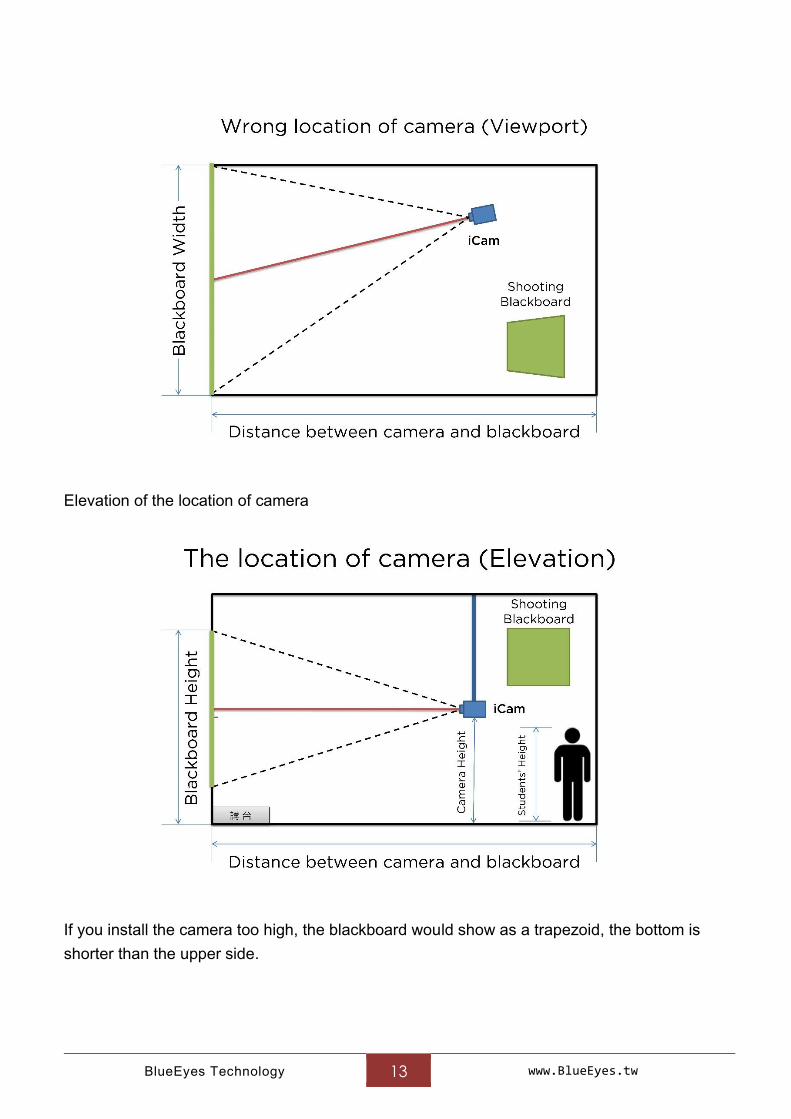
– The height of center blackboard is the best location.
– Higher than the students.
– Lower than the upper side of the blackboard
– Better install on the wall at the back of the classroom.
Viewport of the location of camera
If you didn’t install the camera at the location aimed the center of the blackboard, the
blackboard would show as a trapezoid
BlueEyes Technology 13 www.BlueEyes.tw
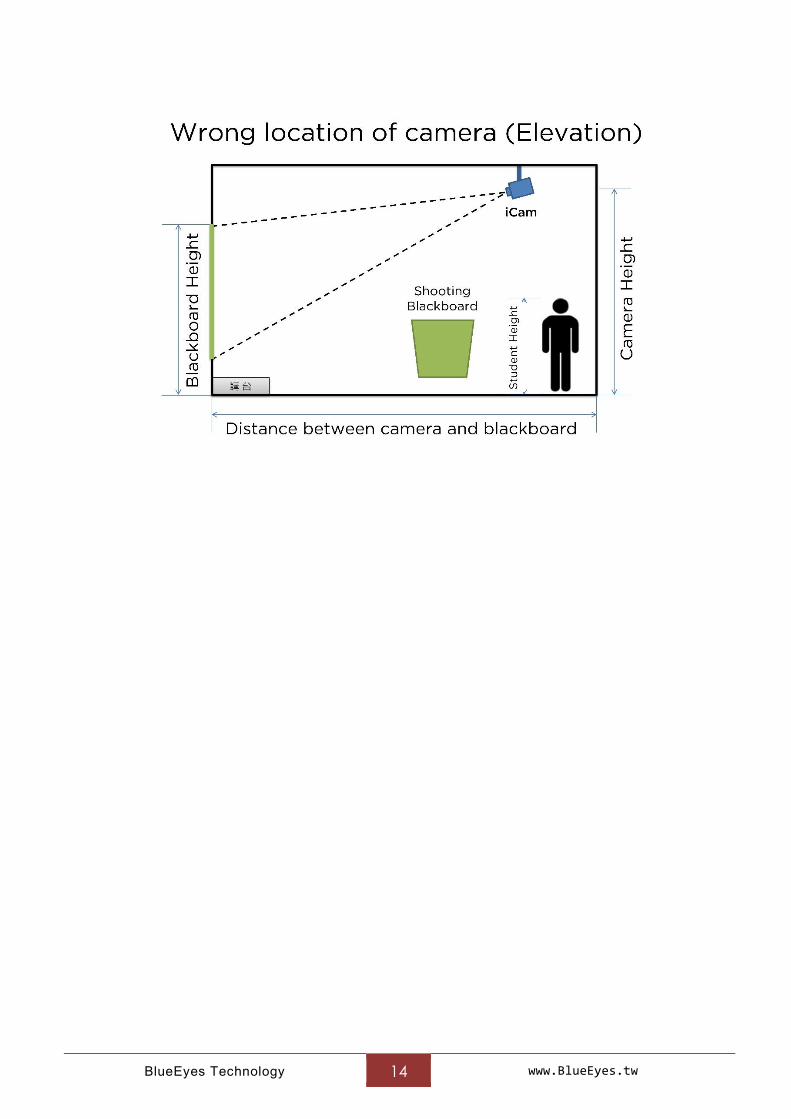
Elevation of the location of camera
If you install the camera too high, the blackboard would show as a trapezoid, the bottom is
shorter than the upper side.
BlueEyes Technology 14 www.BlueEyes.tw
BlueEyes Technology 15 www.BlueEyes.tw
5. Adjusting lenses
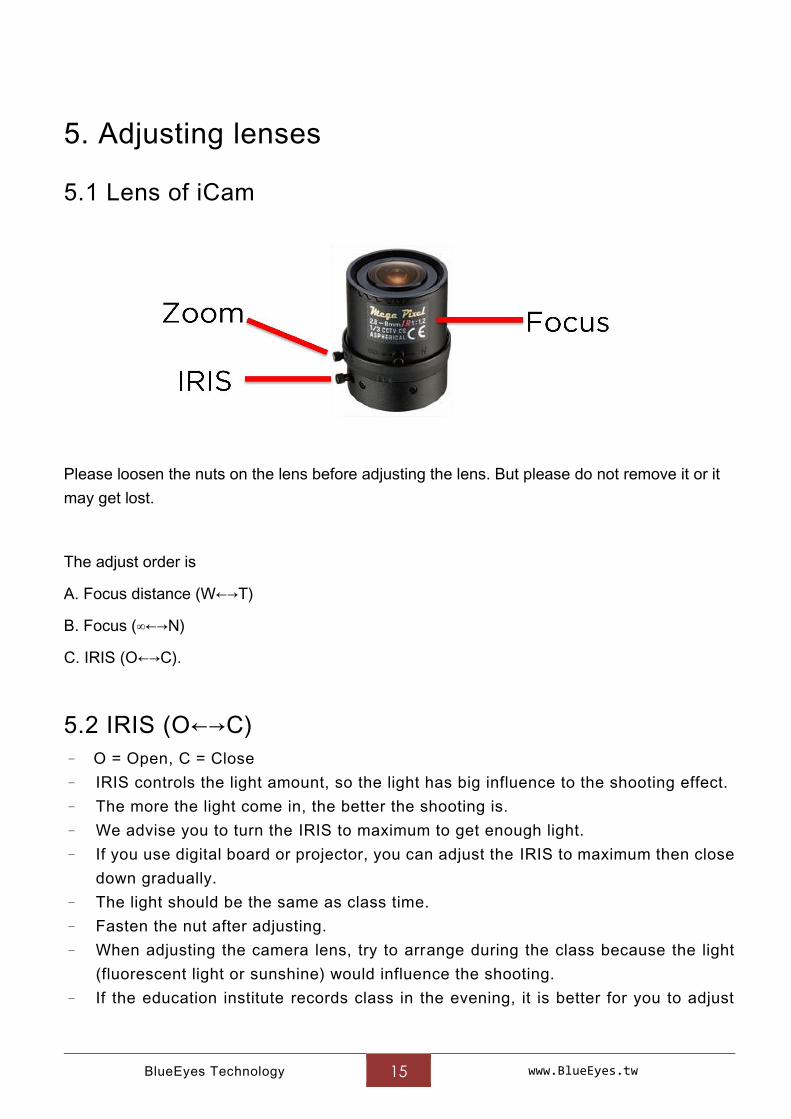
5.1 Lens of iCam
Please loosen the nuts on the lens before adjusting the lens. But please do not remove it or it
may get lost.
The adjust order is
A. Focus distance (W←→T)
B. Focus (∞←→N)
C. IRIS (O←→C).
5.2 IRIS (O←→C)
– O = Open, C = Close
– IRIS controls the light amount, so the light has big influence to the shooting effect.
– The more the light come in, the better the shooting is.
– We advise you to turn the IRIS to maximum to get enough light.
– If you use digital board or projector, you can adjust the IRIS to maximum then close
down gradually.
– The light should be the same as class time.
– Fasten the nut after adjusting.
– When adjusting the camera lens, try to arrange during the class because the light
(fluorescent light or sunshine) would influence the shooting.
– If the education institute records class in the evening, it is better for you to adjust
BlueEyes Technology 16 www.BlueEyes.tw
lens in the evening.
– Steady light is very important for shooting.
5.3 Advices for classroom lighting improvement
– Use antidazzle lamp
– Add antidazzle division
– Use thick curtain to block sunlight. Turn on the light even it is daytime.
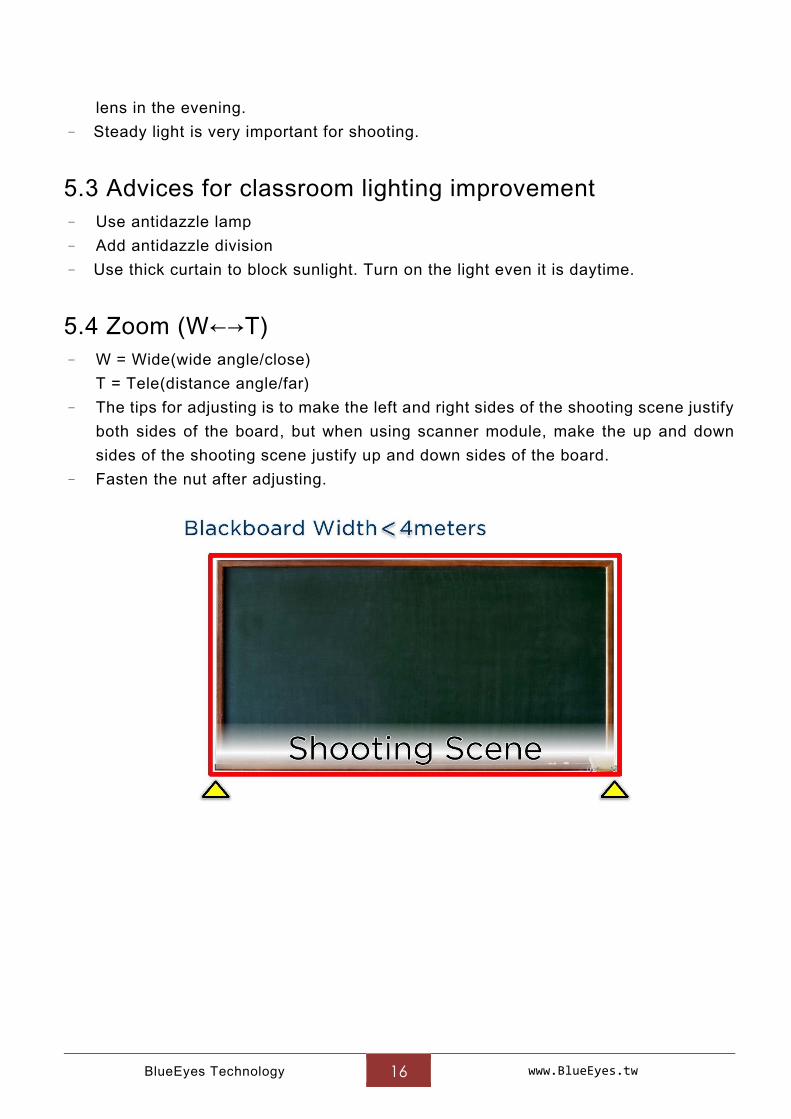
5.4 Zoom (W←→T)
– W = Wide(wide angle/close)
T = Tele(distance angle/far)
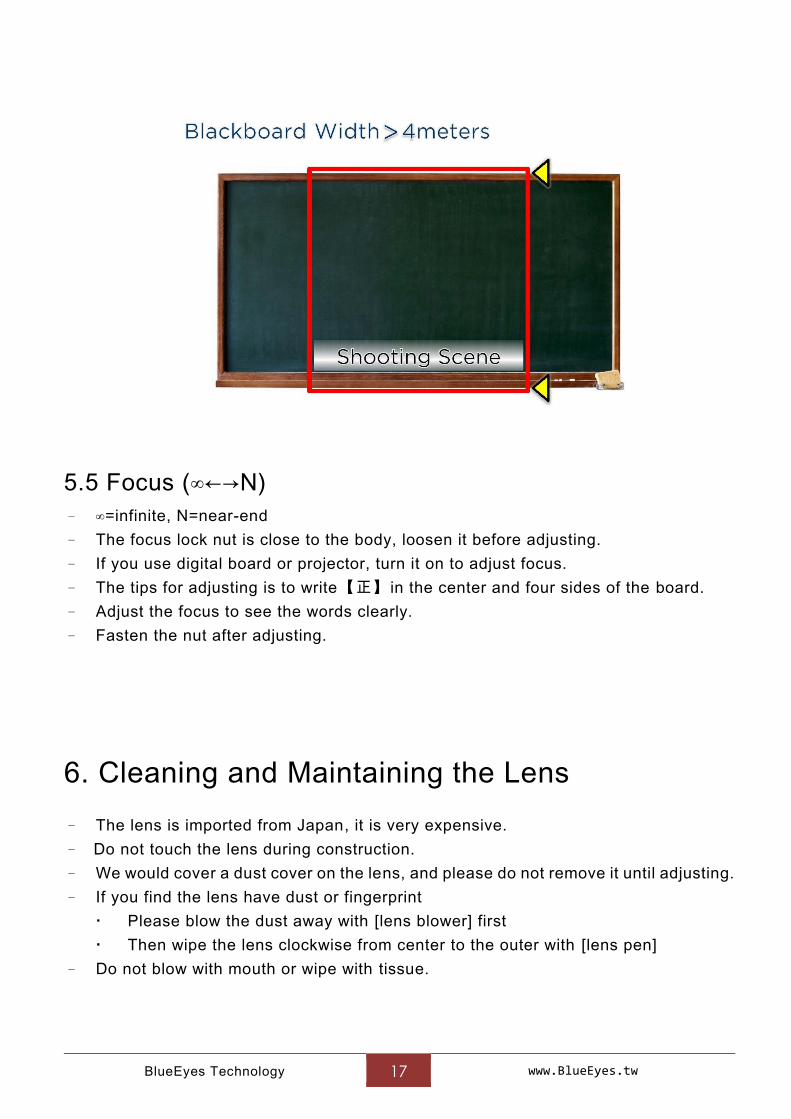
– The tips for adjusting is to make the left and right sides of the shooting scene justify
both sides of the board, but when using scanner module, make the up and down
sides of the shooting scene justify up and down sides of the board.
– Fasten the nut after adjusting.
BlueEyes Technology 17 www.BlueEyes.tw
5.5 Focus (∞←→N)
– ∞=infinite, N=near-end
– The focus lock nut is close to the body, loosen it before adjusting.
– If you use digital board or projector, turn it on to adjust focus.
– The tips for adjusting is to write【正】 in the center and four sides of the board.
– Adjust the focus to see the words clearly.
– Fasten the nut after adjusting.
6. Cleaning and Maintaining the Lens
– The lens is imported from Japan, it is very expensive.
– Do not touch the lens during construction.
– We would cover a dust cover on the lens, and please do not remove it until adjusting.
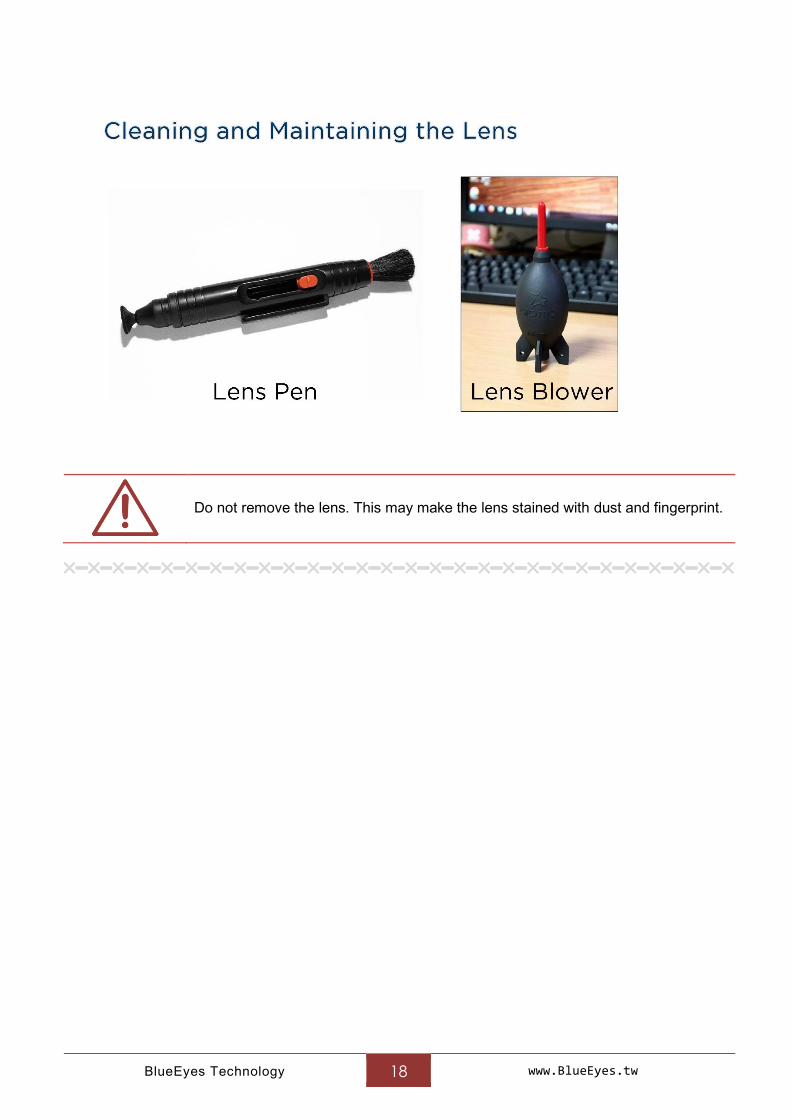
– If you find the lens have dust or fingerprint
Please blow the dust away with [lens blower] first
Then wipe the lens clockwise from center to the outer with [lens pen]
– Do not blow with mouth or wipe with tissue.
BlueEyes Technology 18 www.BlueEyes.tw
Do not remove the lens. This may make the lens stained with dust and fingerprint.
╳━╳━╳━╳━╳━╳━╳━╳━╳━╳━╳━╳━╳━╳━╳━╳━╳━╳━╳━╳━╳━╳━╳━╳━╳━╳━╳━╳
BlueEyes Technology 19 www.BlueEyes.tw
7. Setting
7.1 Video Setting
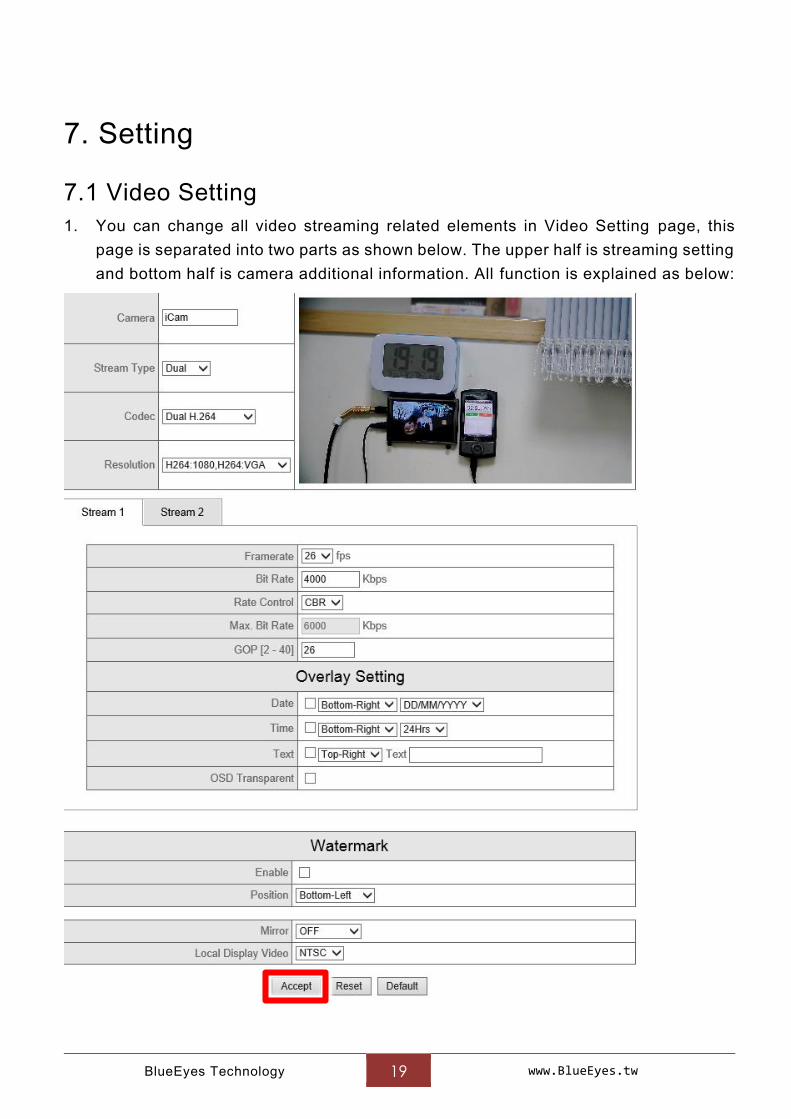
1. You can change all video streaming related elements in Video Setting page, this
page is separated into two parts as shown below. The upper half is streaming setting
and bottom half is camera additional information. All function is explained as below:
BlueEyes Technology 20 www.BlueEyes.tw
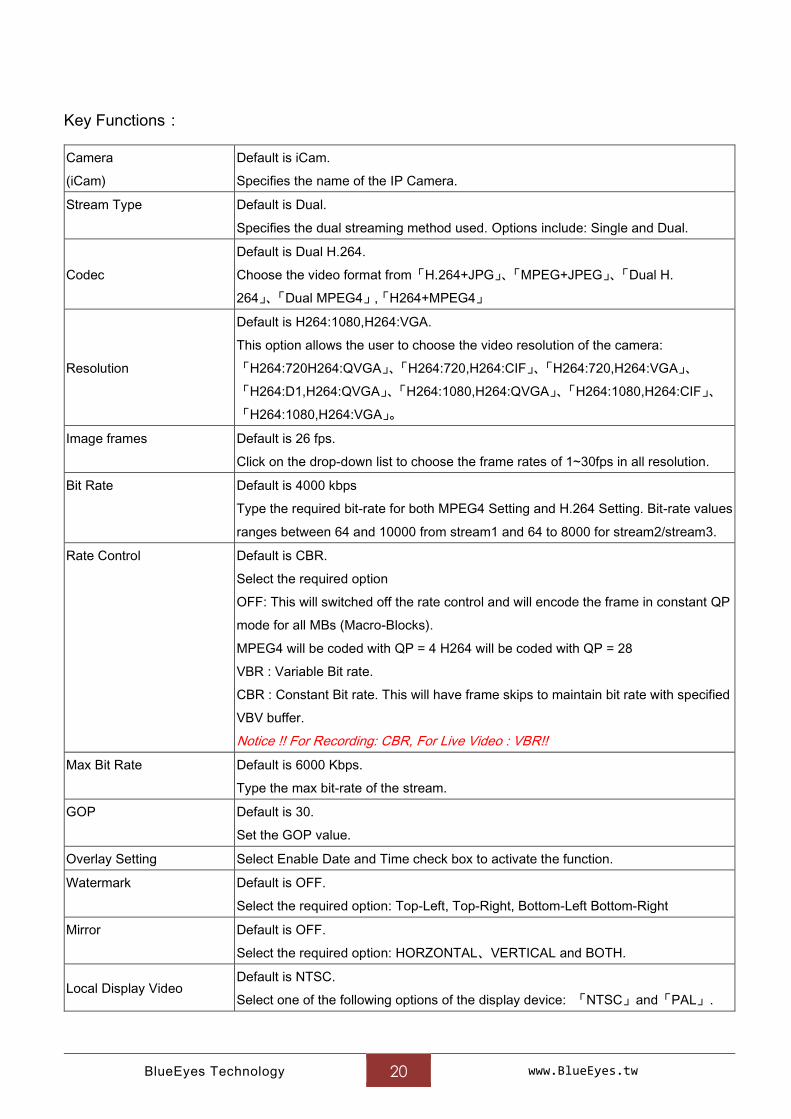
Key Functions:
Camera
(iCam)
Default is iCam.
Specifies the name of the IP Camera.
Stream Type Default is Dual.
Specifies the dual streaming method used. Options include: Single and Dual.
Codec
Default is Dual H.264.
Choose the video format from「H.264+JPG」、「MPEG+JPEG」、「Dual H.
264」、「Dual MPEG4」,「H264+MPEG4」
Resolution
Default is H264:1080,H264:VGA.
This option allows the user to choose the video resolution of the camera:
「H264:720H264:QVGA」、「H264:720,H264:CIF」、「H264:720,H264:VGA」、
「H264:D1,H264:QVGA」、「H264:1080,H264:QVGA」、「H264:1080,H264:CIF」、
「H264:1080,H264:VGA」。
Image frames Default is 26 fps.
Click on the drop-down list to choose the frame rates of 1~30fps in all resolution.
Bit Rate Default is 4000 kbps
Type the required bit-rate for both MPEG4 Setting and H.264 Setting. Bit-rate values
ranges between 64 and 10000 from stream1 and 64 to 8000 for stream2/stream3.
Rate Control Default is CBR.
Select the required option
OFF: This will switched off the rate control and will encode the frame in constant QP
mode for all MBs (Macro-Blocks).
MPEG4 will be coded with QP = 4 H264 will be coded with QP = 28
VBR : Variable Bit rate.
CBR : Constant Bit rate. This will have frame skips to maintain bit rate with specified
VBV buffer.
Notice !! For Recording: CBR, For Live Video : VBR!!
Max Bit Rate Default is 6000 Kbps.
Type the max bit-rate of the stream.
GOP Default is 30.
Set the GOP value.
Overlay Setting Select Enable Date and Time check box to activate the function.
Watermark Default is OFF.
Select the required option: Top-Left, Top-Right, Bottom-Left Bottom-Right
Mirror Default is OFF.
Select the required option: HORZONTAL、VERTICAL and BOTH.
Local Display Video Default is NTSC.
Select one of the following options of the display device: 「NTSC」and「PAL」.

BlueEyes Technology 21 www.BlueEyes.tw
iCam is set already. Do not edit the default unless you are trained and understand
the way and the meanings of editing.
We recommend using Microsoft Internet Explorer version 10 or higher web browser.

BlueEyes Technology 22 www.BlueEyes.tw
7.2 Camera Setting
BlueEyes Technology 23 www.BlueEyes.tw
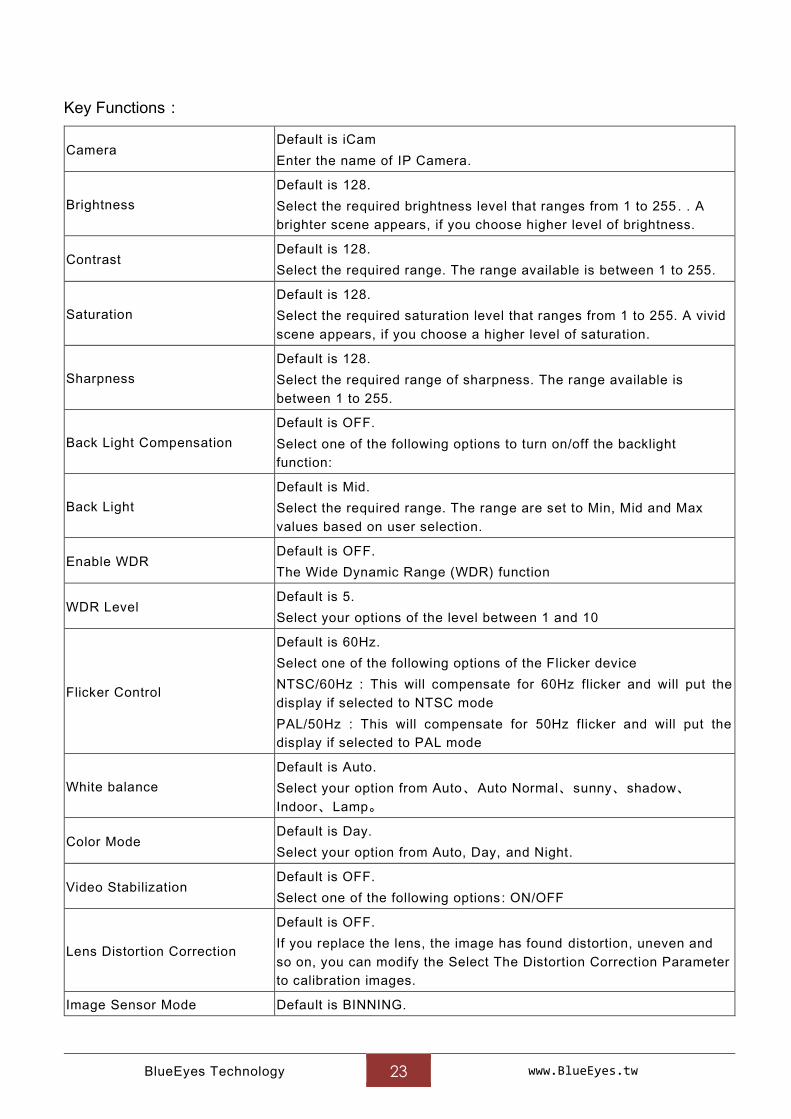
Key Functions:
Camera Default is iCam
Enter the name of IP Camera.
Brightness
Default is 128.
Select the required brightness level that ranges from 1 to 255 . . A
brighter scene appears, if you choose higher level of brightness.
Contrast Default is 128.
Select the required range. The range available is between 1 to 255.
Saturation
Default is 128.
Select the required saturation level that ranges from 1 to 255. A vivid
scene appears, if you choose a higher level of saturation.
Sharpness
Default is 128.
Select the required range of sharpness. The range available is
between 1 to 255.
Back Light Compensation
Default is OFF.
Select one of the following options to turn on/off the backlight
function:
Back Light
Default is Mid.
Select the required range. The range are set to Min, Mid and Max
values based on user selection.
Enable WDR Default is OFF.
The Wide Dynamic Range (WDR) function
WDR Level Default is 5.
Select your options of the level between 1 and 10
Flicker Control
Default is 60Hz.
Select one of the following options of the Flicker device
NTSC/60Hz : This will compensate for 60Hz flicker and will put the
display if selected to NTSC mode
PAL/50Hz : This will compensate for 50Hz flicker and will put the
display if selected to PAL mode
White balance
Default is Auto.
Select your option from Auto、Auto Normal、sunny、shadow、
Indoor、Lamp。
Color Mode Default is Day.
Select your option from Auto, Day, and Night.
Video Stabilization Default is OFF.
Select one of the following options: ON/OFF
Lens Distortion Correction
Default is OFF.
If you replace the lens, the image has found distortion, uneven and
so on, you can modify the Select The Distortion Correction Parameter
to calibration images.
Image Sensor Mode Default is BINNING.
BlueEyes Technology 24 www.BlueEyes.tw
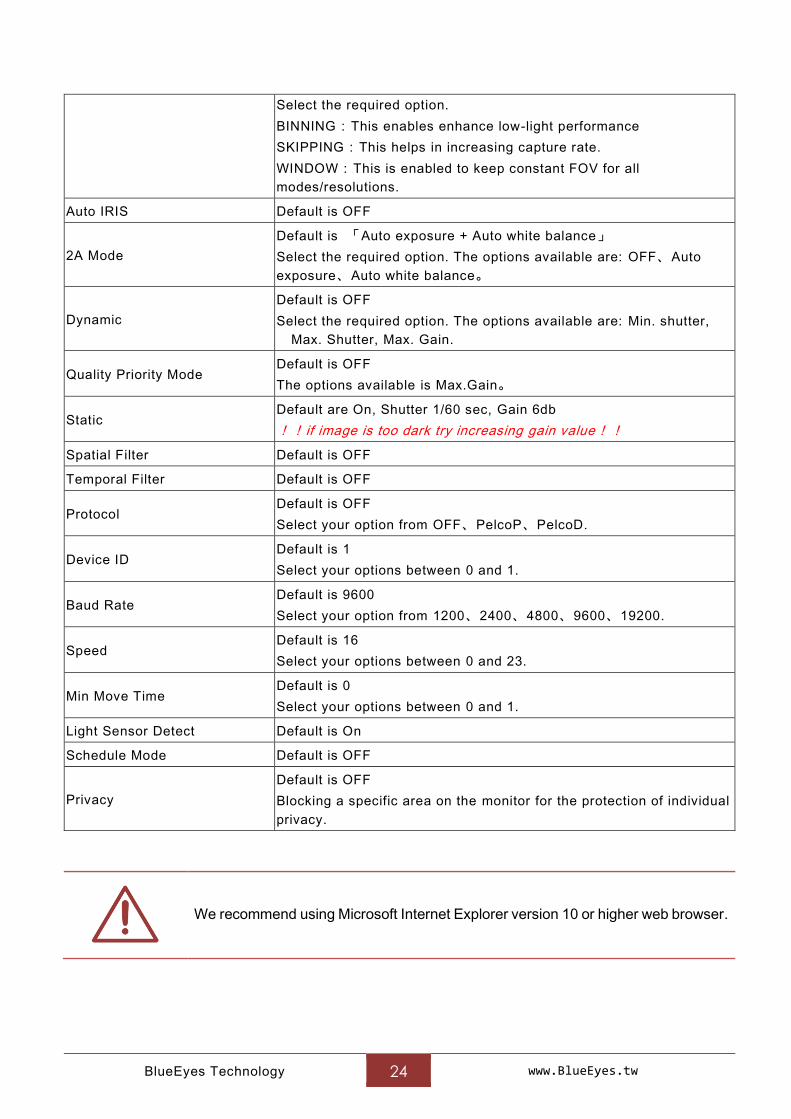
Select the required option.
BINNING:This enables enhance low-light performance
SKIPPING:This helps in increasing capture rate.
WINDOW:This is enabled to keep constant FOV for all modes/resolutions.
Auto IRIS Default is OFF
2A Mode
Default is 「Auto exposure + Auto white balance」
Select the required option. The options available are: OFF、Auto
exposure、Auto white balance。
Dynamic
Default is OFF
Select the required option. The options available are: Min. shutter,
Max. Shutter, Max. Gain.
Quality Priority Mode Default is OFF
The options available is Max.Gain。
Static Default are On, Shutter 1/60 sec, Gain 6db
!! if image is too dark try increasing gain value!!
Spatial Filter Default is OFF
Temporal Filter Default is OFF
Protocol Default is OFF
Select your option from OFF、PelcoP、PelcoD.
Device ID Default is 1
Select your options between 0 and 1.
Baud Rate Default is 9600
Select your option from 1200、2400、4800、9600、19200.
Speed Default is 16
Select your options between 0 and 23.
Min Move Time Default is 0
Select your options between 0 and 1.
Light Sensor Detect Default is On
Schedule Mode Default is OFF
Privacy
Default is OFF
Blocking a specific area on the monitor for the protection of individual
privacy.
We recommend using Microsoft Internet Explorer version 10 or higher web browser.
BlueEyes Technology 25 www.BlueEyes.tw
7.3 Privacy Mask Setting
In order to protect the privacy of the students in the front rolls who shown in the video,
we develop the “Privacy Mask Setting.” You can choose an area where students’ faces
appear, then the area you choose would not appear on the video. The steps of setting
are as below:
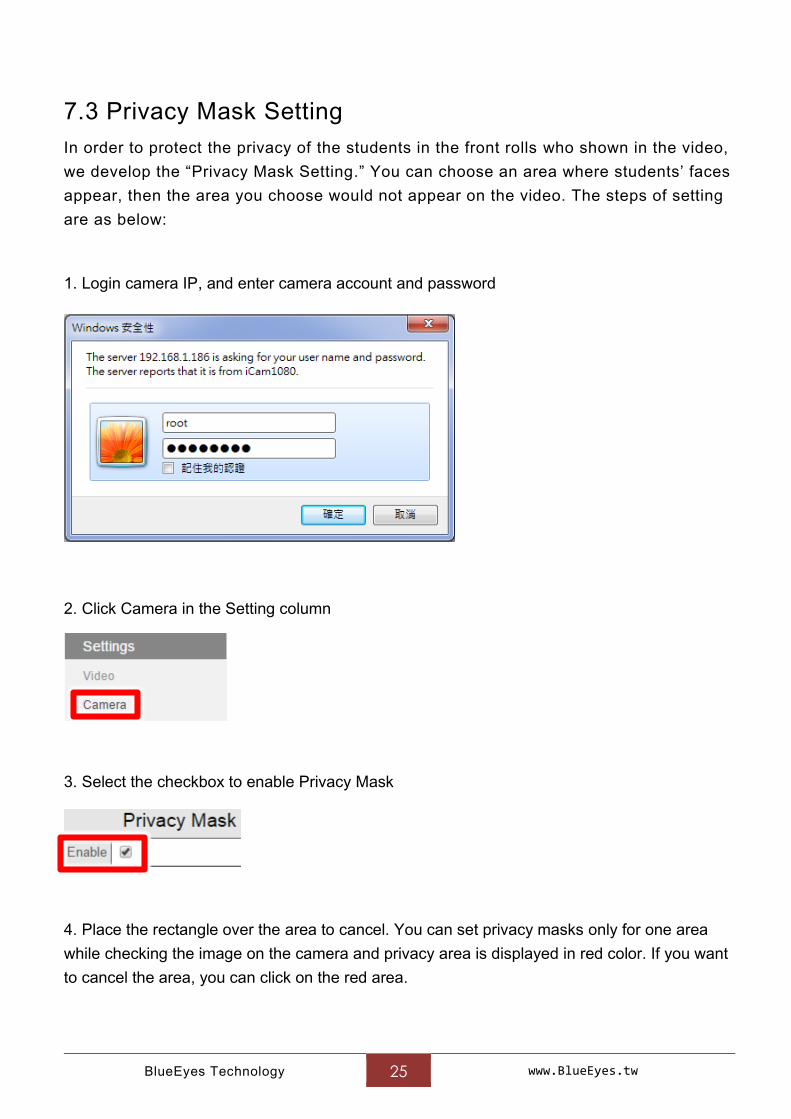
1. Login camera IP, and enter camera account and password
2. Click Camera in the Setting column
3. Select the checkbox to enable Privacy Mask
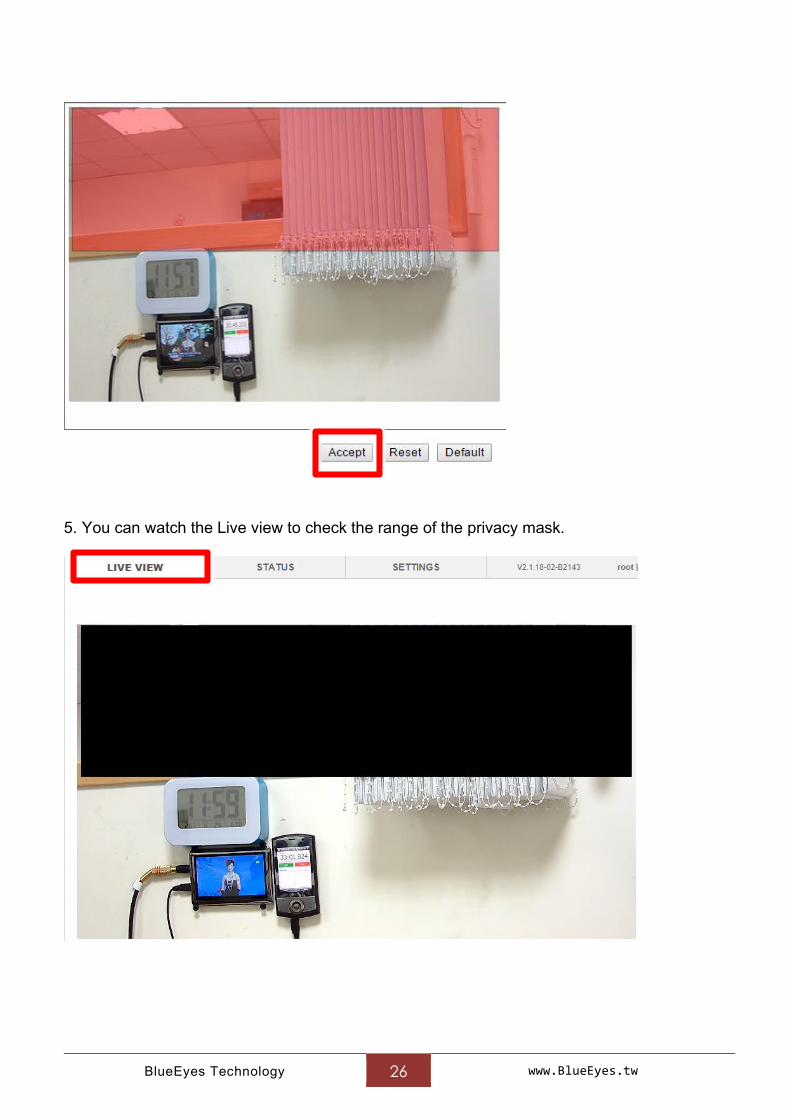
4. Place the rectangle over the area to cancel. You can set privacy masks only for one area
while checking the image on the camera and privacy area is displayed in red color. If you want
to cancel the area, you can click on the red area.
BlueEyes Technology 26 www.BlueEyes.tw
5. You can watch the Live view to check the range of the privacy mask.
BlueEyes Technology 27 www.BlueEyes.tw
We recommend using Microsoft Internet Explorer version 10 or higher web browser,
and do not join the "Compatibility View Settings"
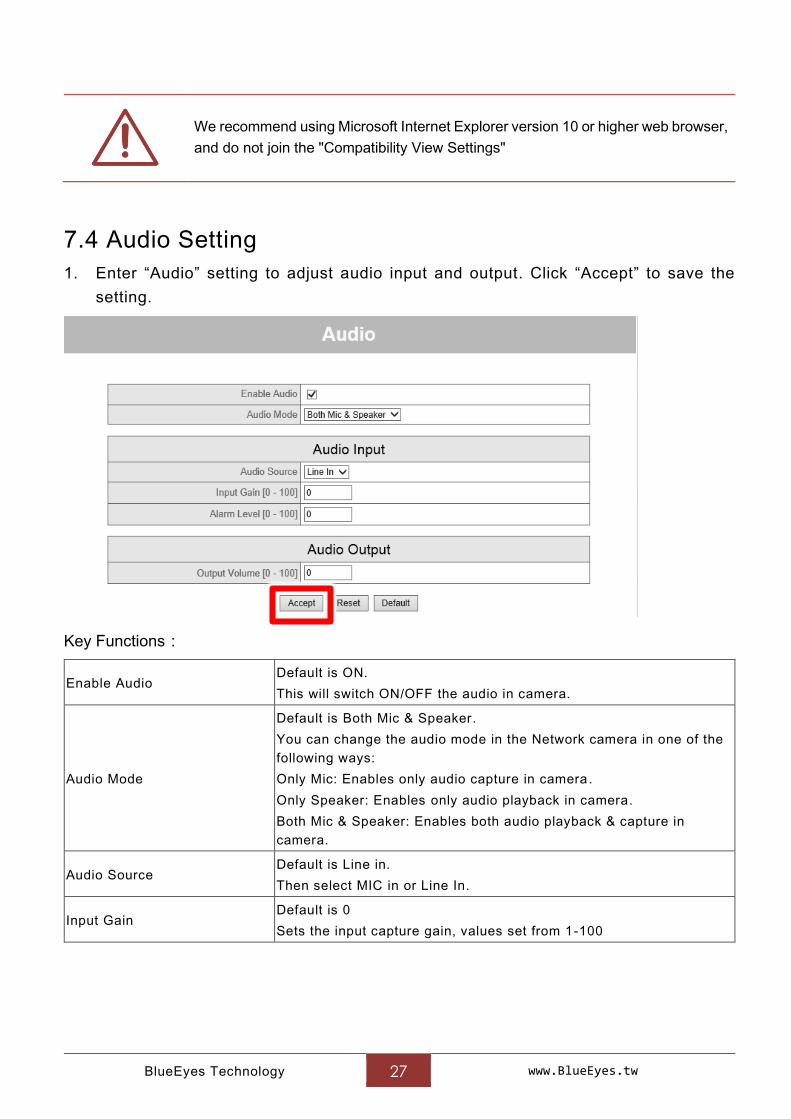
7.4 Audio Setting
1. Enter “Audio” setting to adjust audio input and output. Click “Accept” to save the
setting.
Key Functions:
Enable Audio Default is ON.
This will switch ON/OFF the audio in camera.
Audio Mode
Default is Both Mic & Speaker.
You can change the audio mode in the Network camera in one of the
following ways:
Only Mic: Enables only audio capture in camera .
Only Speaker: Enables only audio playback in camera.
Both Mic & Speaker: Enables both audio playback & capture in
camera.
Audio Source Default is Line in.
Then select MIC in or Line In.
Input Gain Default is 0
Sets the input capture gain, values set from 1-100

BlueEyes Technology 28 www.BlueEyes.tw
We recommend using Microsoft Internet Explorer version 10 or higher
web browser.
BlueEyes Technology 29 www.BlueEyes.tw
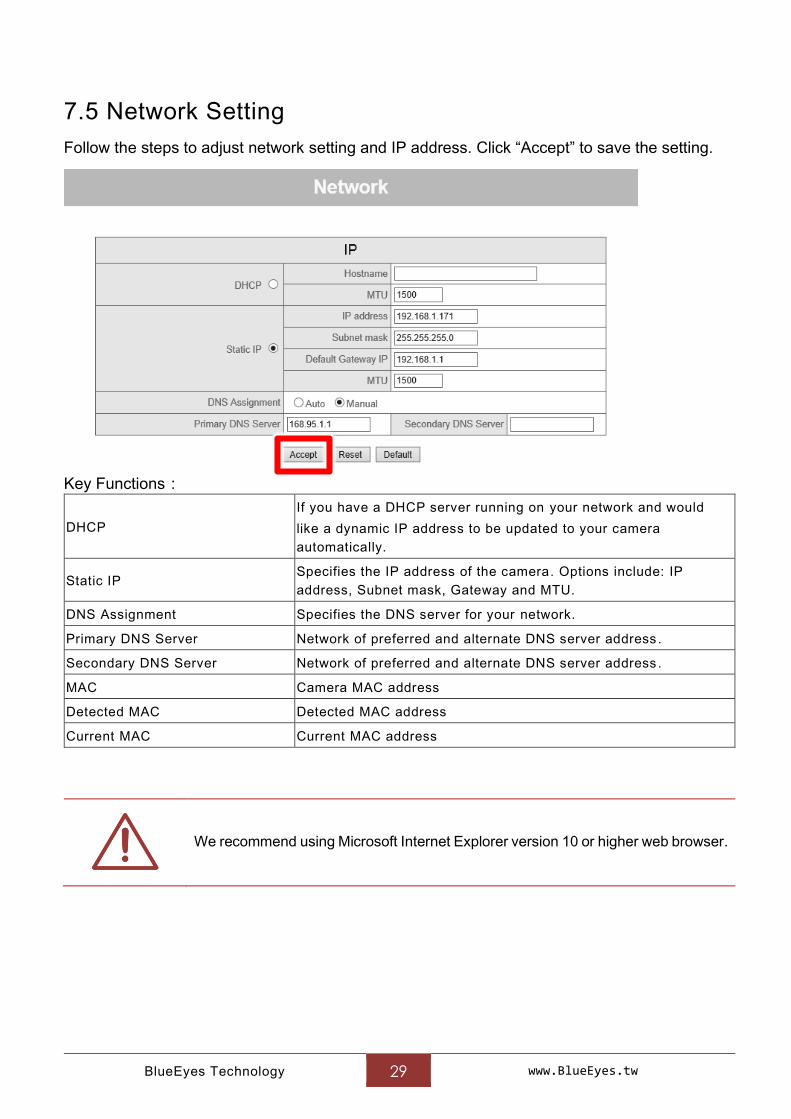
7.5 Network Setting
Follow the steps to adjust network setting and IP address. Click “Accept” to save the setting.
Key Functions:
DHCP
If you have a DHCP server running on your network and would
like a dynamic IP address to be updated to your camera
automatically.
Static IP Specifies the IP address of the camera. Options include: IP
address, Subnet mask, Gateway and MTU.
DNS Assignment Specifies the DNS server for your network.
Primary DNS Server Network of preferred and alternate DNS server address .
Secondary DNS Server Network of preferred and alternate DNS server address .
MAC Camera MAC address
Detected MAC Detected MAC address
Current MAC Current MAC address
We recommend using Microsoft Internet Explorer version 10 or higher web browser.
BlueEyes Technology 30 www.BlueEyes.tw
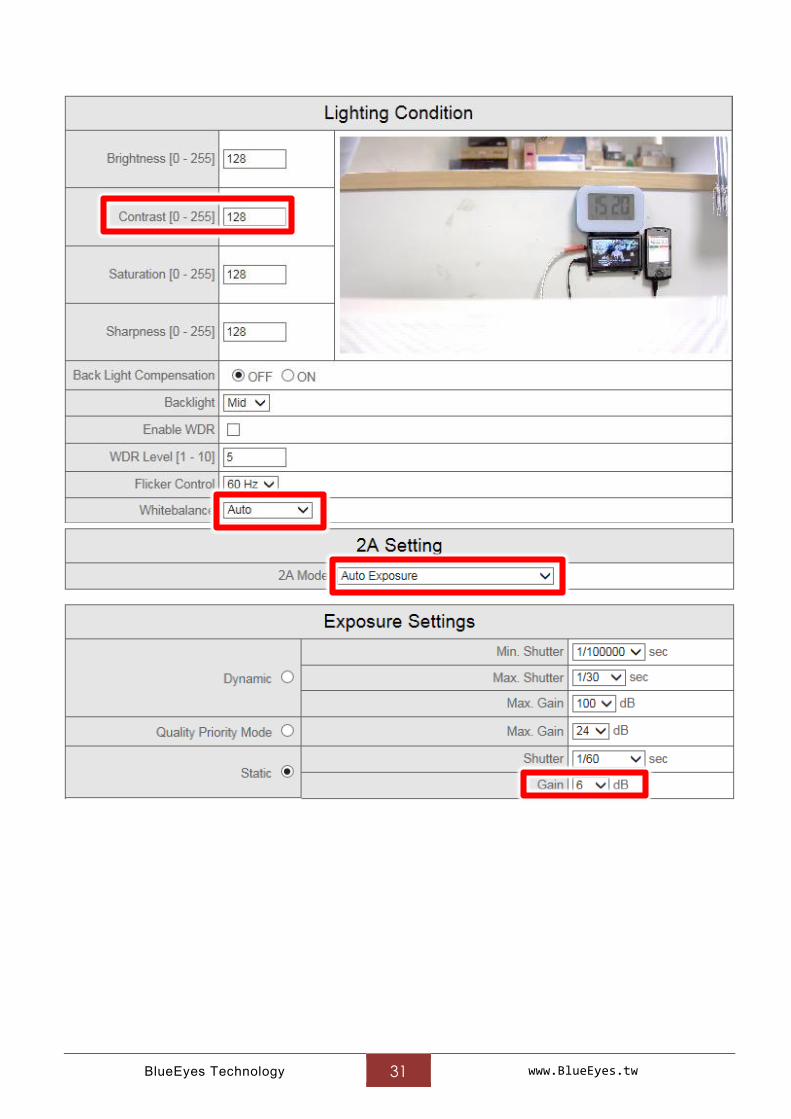
7.6 Solving Color Cast when rotating
When iCam is set on the scanner module, it would rotate to follow the teacher. This kind of
shooting may cause color cast. This is because the changes of light would make the White
Balance over adjusted.
To solve this problem, please turn the AWB off.
Reference set point
Contrast: 220 High contrast can make students easier to recognize
handwriting of different colors.
White balance: Lamp
When set as “Lamp”, it would have blue color cast and it
may be slightly different what you see from naked eyes.
Blue color cast improves the readability of the writing
board.
2A Mode: Auto exposure The default is Auto exposure+ AWB. Choose only Auto
exposure is to turn the AWB off.
Electronic Shutter: Static, Gain
0dB
The electronic shutter is fixed on 1/60, close to common
shooting. Shorten the time of shooting, like 1/120, to
prevent after images. But you should have more light
amount or it would have noise. Shutter time raise to 1/30
so the quality would be better. But it may have smear
when moving.
When you change [Contrast], please uncheck [Enable WDR].
BlueEyes Technology 31 www.BlueEyes.tw
BlueEyes Technology 32 www.BlueEyes.tw
8. Watermark
8.1 Trademark of education institute
Many education institutes want to mark their name on the videos. You can upload the
trademark and name on iCam.
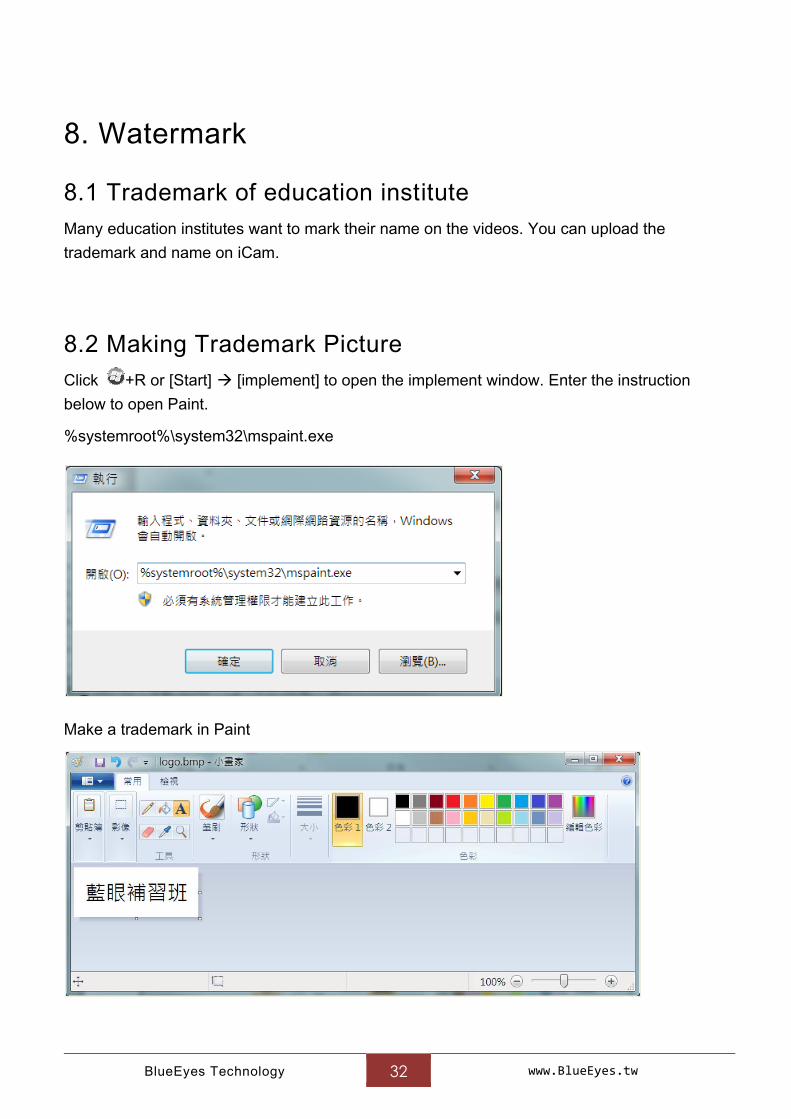
8.2 Making Trademark Picture
Click +R or [Start] [implement] to open the implement window. Enter the instruction
below to open Paint.
%systemroot%\system32\mspaint.exe
Make a trademark in Paint
BlueEyes Technology 33 www.BlueEyes.tw
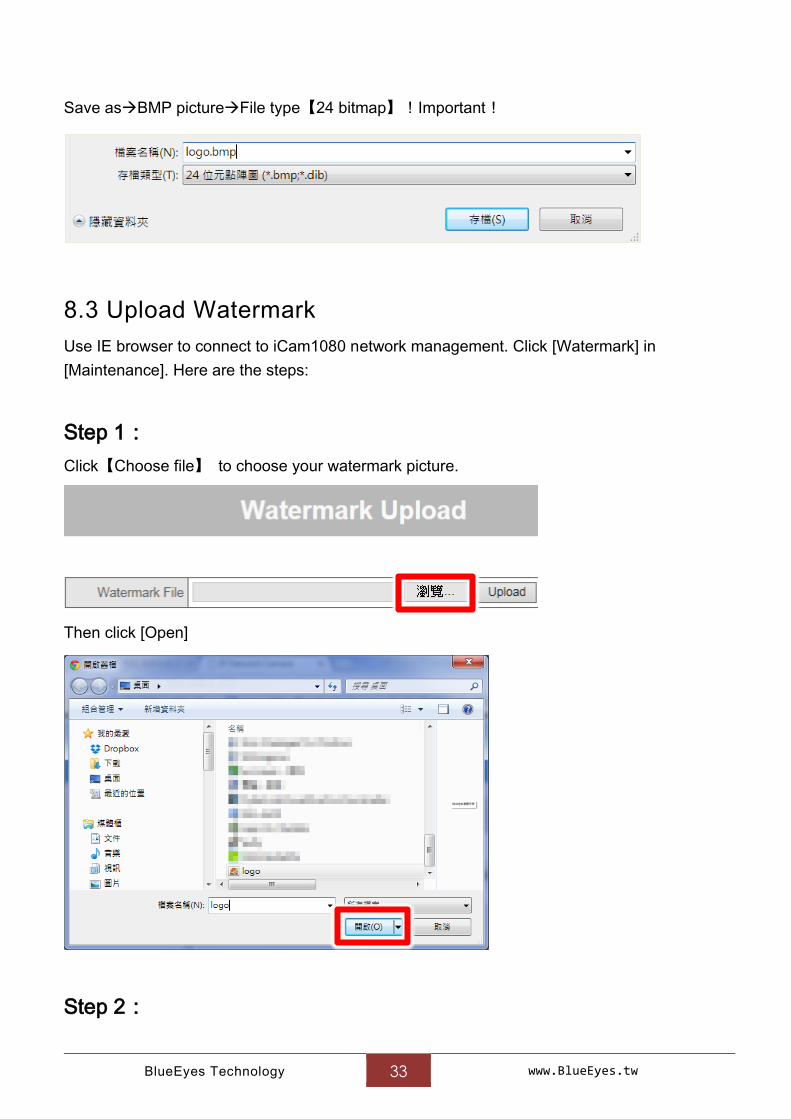
Save asBMP pictureFile type【24 bitmap】!Important!
8.3 Upload Watermark
Use IE browser to connect to iCam1080 network management. Click [Watermark] in
[Maintenance]. Here are the steps:
Step 1:
Click【Choose file】 to choose your watermark picture.
Then click [Open]
Step 2:

BlueEyes Technology 34 www.BlueEyes.tw
Click 【Upload】 to upload the picture.
Step 3:
It would show like this if it uploads successfully. You can see the watermark on the live video.
Step 4:
You can choose which corner you want to put the watermark. Please choose the position of
the watermark in Watermark【Position】.
You should check enable the watermark so the watermark would show
on the monitor.
We recommend using Microsoft Internet Explorer version 10 or higher
web browser.
BlueEyes Technology 35 www.BlueEyes.tw
8.4 Notices
File name is BMP file
24 bitmap
Length and width can be individually divisible by 4 (Pixels)
Leave the white blank to avoid color confusion
The minimum length and width is 100px
Place it on bottom-left

BlueEyes Technology 36 www.BlueEyes.tw
9. QR code
9.1 About QR code
QR code is the most common encoding. Some education institutes would make the official
websites or video copyright website into QR code. Then print the QR code on the video.
9.2 Make QR code
Please download the QRcode Tool through the website below.
http://www.blueeyes.com.tw/download/QRCode.zip
A Please choose Unicode(UTF-8) to type in words.
B Please type in the website or words you want to show after scanning QRcode.
C Every time you enter words or websites, you have to click it again.
D You can check with your cellphone to see if the QRcode is correct.
A
B
C D
E

BlueEyes Technology 37 www.BlueEyes.tw
E Save the file as BMP File(*.bmp)
Or there are many websites to make free QRcode:
http://goqr.me/
A Select the URL page
B Enter the website you want for QRcode.
C Select 【not stored】
D Click Download to download QRcode
A B
C D

BlueEyes Technology 38 www.BlueEyes.tw
E The white boarder of the QRcode is better to be 5px. It may be difficult to scan if the
boarder is too thin or too thick.
F The length and width of the QRcode should be divided by 4 or it would be out of
shape. Choose 200px is better.
G Download as PNG, but it has to be BMP file when uploading.
Click +R or [Start] [implement] to open the implement window. Enter the instruction
below to open Paint.
%systemroot%\system32\mspaint.exe
Open the QRcode file in Paint:
E F G
BlueEyes Technology 39 www.BlueEyes.tw
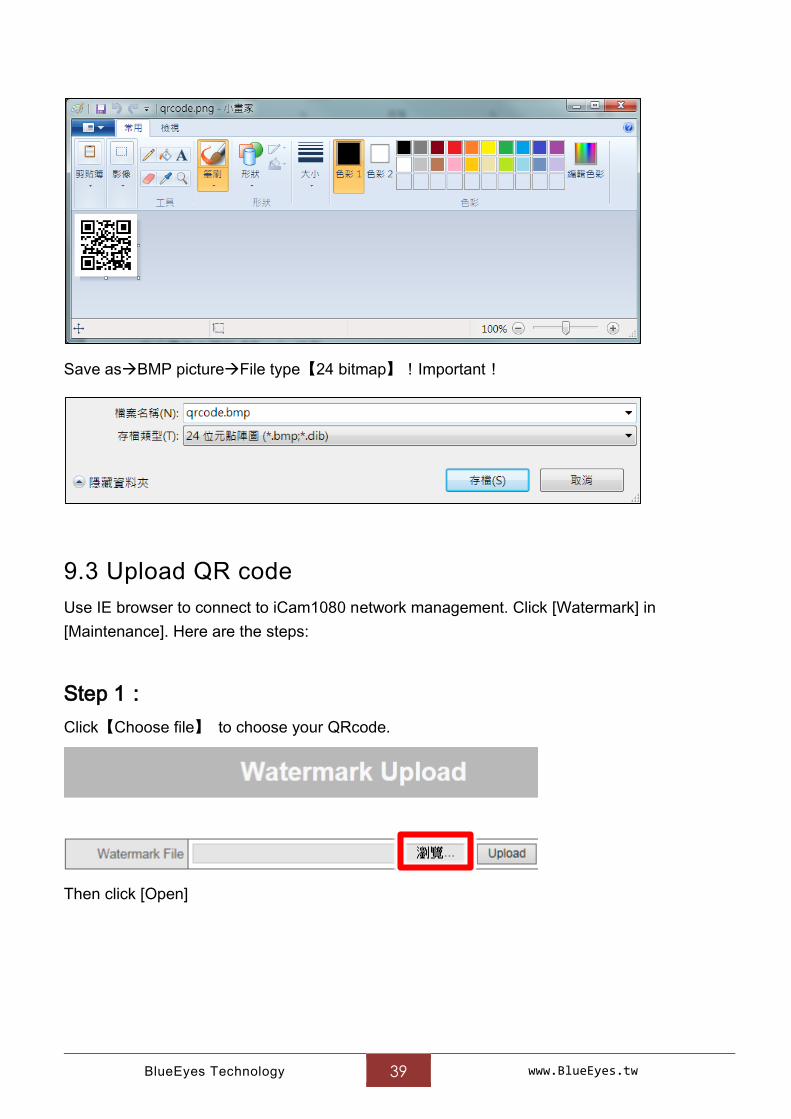
Save asBMP pictureFile type【24 bitmap】!Important!
9.3 Upload QR code
Use IE browser to connect to iCam1080 network management. Click [Watermark] in
[Maintenance]. Here are the steps:
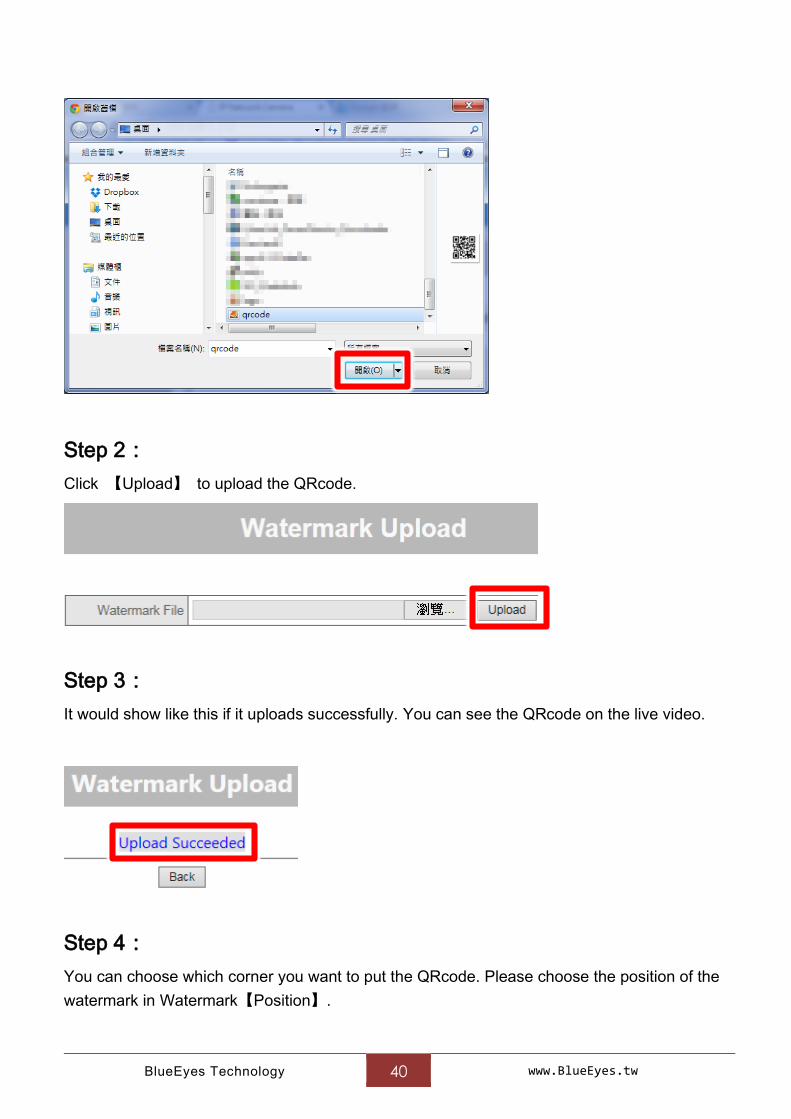
Step 1:
Click【Choose file】 to choose your QRcode.
Then click [Open]
BlueEyes Technology 40 www.BlueEyes.tw
Step 2:
Click 【Upload】 to upload the QRcode.
Step 3:
It would show like this if it uploads successfully. You can see the QRcode on the live video.
Step 4:
You can choose which corner you want to put the QRcode. Please choose the position of the
watermark in Watermark【Position】.
BlueEyes Technology 41 www.BlueEyes.tw
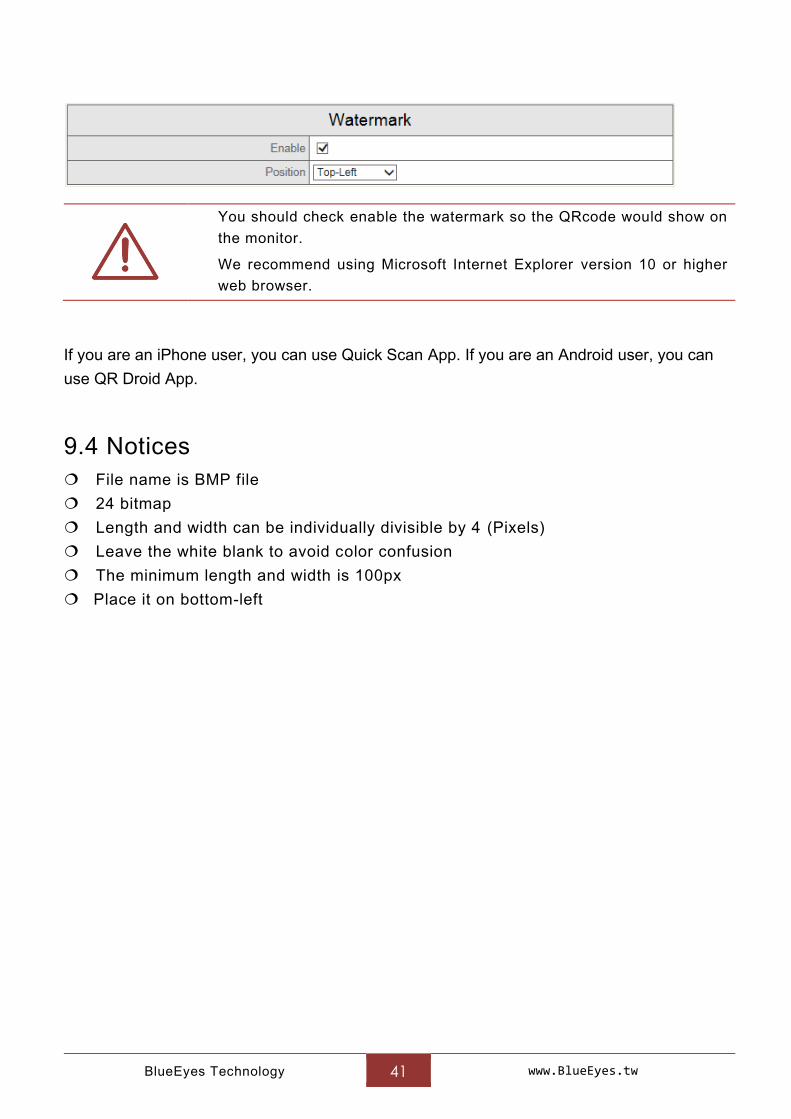
You should check enable the watermark so the QRcode would show on
the monitor.
We recommend using Microsoft Internet Explorer version 10 or higher
web browser.
If you are an iPhone user, you can use Quick Scan App. If you are an Android user, you can
use QR Droid App.
9.4 Notices
File name is BMP file
24 bitmap
Length and width can be individually divisible by 4 (Pixels)
Leave the white blank to avoid color confusion
The minimum length and width is 100px
Place it on bottom-left

BlueEyes Technology 42 www.BlueEyes.tw
10. Motion detection of iFollow
10.1 Enable and set the motion detection
Step1: Open IE browser. Enter camera IP address, account and password.
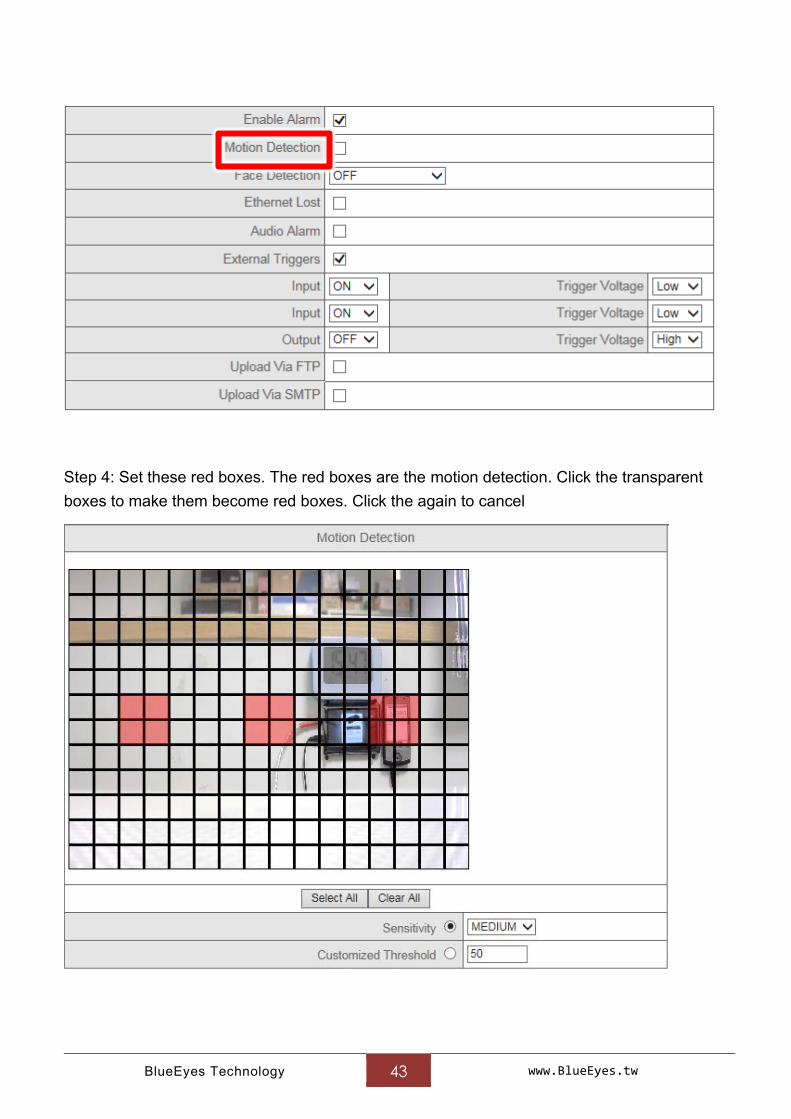
Step 2: Click “Alarm” on the left side of “Setting”
Step 3: Click enable “Motion detection”
BlueEyes Technology 43 www.BlueEyes.tw
Step 4: Set these red boxes. The red boxes are the motion detection. Click the transparent
boxes to make them become red boxes. Click the again to cancel
BlueEyes Technology 44 www.BlueEyes.tw
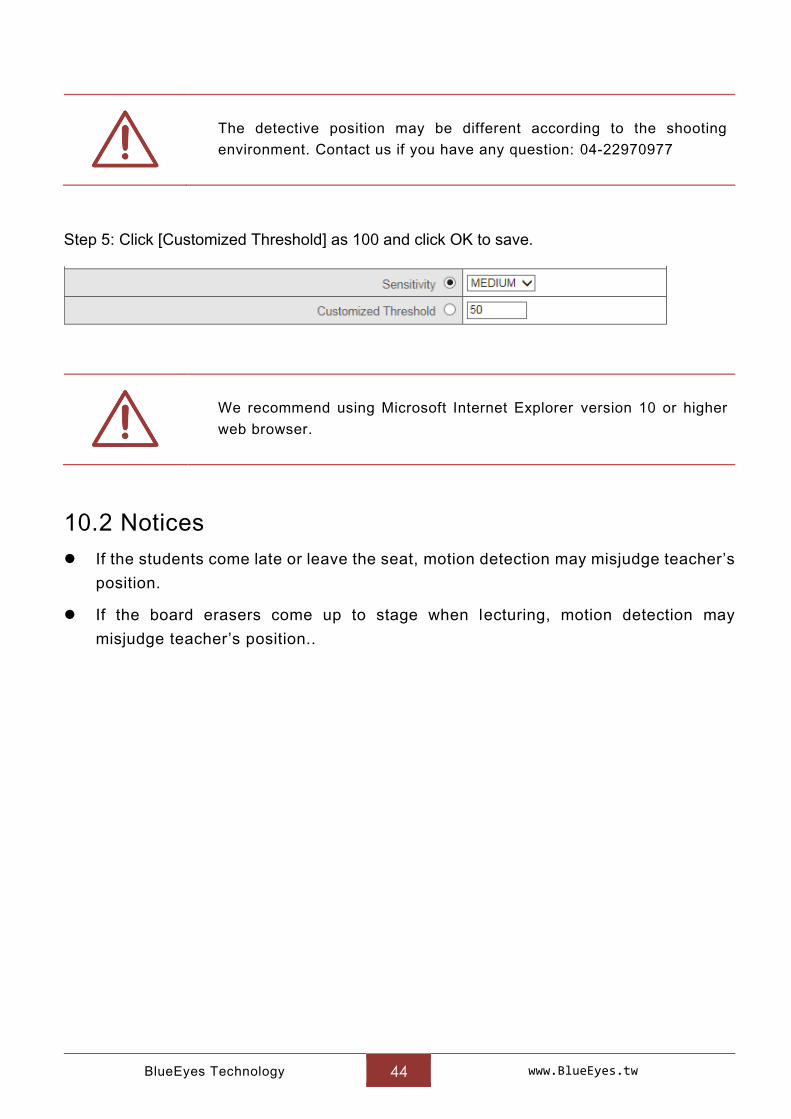
The detective position may be different according to the shooting
environment. Contact us if you have any question: 04-22970977
Step 5: Click [Customized Threshold] as 100 and click OK to save.
We recommend using Microsoft Internet Explorer version 10 or higher
web browser.
10.2 Notices
If the students come late or leave the seat, motion detection may misjudge teacher’s
position.
If the board erasers come up to stage when lecturing, motion detection may
misjudge teacher’s position..
BlueEyes Technology 45 www.BlueEyes.tw
11. Q&A
Q1: Can the camera be on for 24 hours?
Ans. Yes.
iCam is industrial grade. It can be operated for 24 hours without overheating.
Power consumption is very low and will not cause your tariff burden.
Q2: How to adjust if the image is blurred?
Ans. Please refer to the manual on Chapter 5.5 to adjust the lens focus.
Q3: Why the words on the board trembling?
Ans. These might be the reasons:
If iCam is installed on the wooden wall or calcium silicate, it may cause word
trembling. iCam should be installed on the wall that is solid and not easy to shake.
Wooden wall or calcium silicate would shake when opening and shutting the door or
turning on the air conditioners.
1. It would happen the same thing when installed the iCam on the ceiling T grid. Use
telescopic support and install it on the cement ceiling above the ceiling T grid.
Q4: How to clean the lens?
Ans. Please refer to the manual on Chapter 6 to see Cleaning and Maintaining the
Lens.
Q5: How long does it take to start up the camera?
Ans. Normally it takes about 50 seconds, no longer than one minute.
Q6: Ripple shows when using projector or digital board
Ans. When you use early version of projector or digital board, you might find ripple
on the video. That is because the light amount is not enough.
BlueEyes Technology 46 www.BlueEyes.tw
1. Adjust IRIS of iCam lens. Turn the IRIS to O (Open) to make more light
come in.
2. Change the exposure mode to indoor, Gain as 0db. If you find that the
scene is over-exposure, turn the IRIS to C (Close) to adjust the light
amount until the words are clear.
Q7: The video file cut into one or several pieces
Ans. If you find that the recording of SES/SES Lite cut into one or several pieces,
it might be the reasons below:
1. If you use scanner module, it might be network disconnect when rotating.
We advise you to use the longer network cable and use better crystal RJ45
module plug.
2. If iCam/ SES/ SES Lite uses the same network segment as other
computers, it may cause IP conflict. WE advise you change the network
segment of other computers.
3. There are 8 wires in network cable. If one of them is broken, the internet
would not be steady. Restart the network switch again would be better,
and after long use, the network would become slower or disconnected.
We advise you use lan tester to recheck the internet.
Q8: How to restore to default?
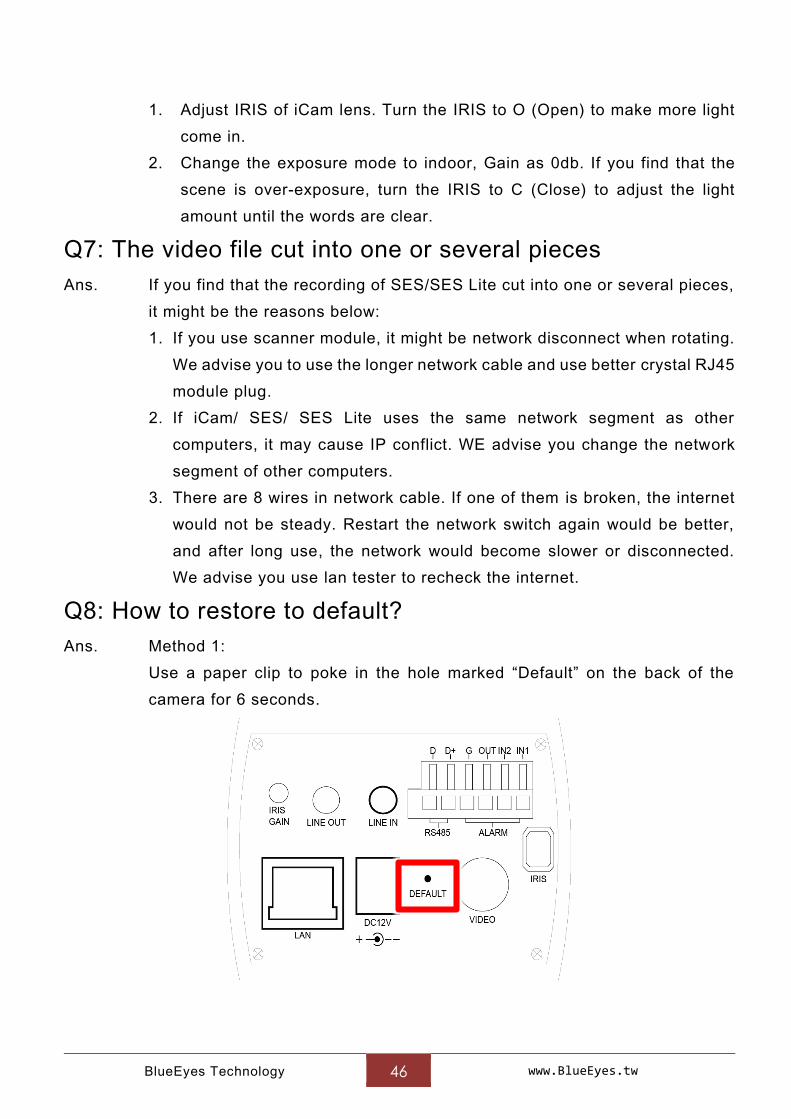
Ans. Method 1:
Use a paper clip to poke in the hole marked “Default” on the back of the
camera for 6 seconds.
BlueEyes Technology 47 www.BlueEyes.tw
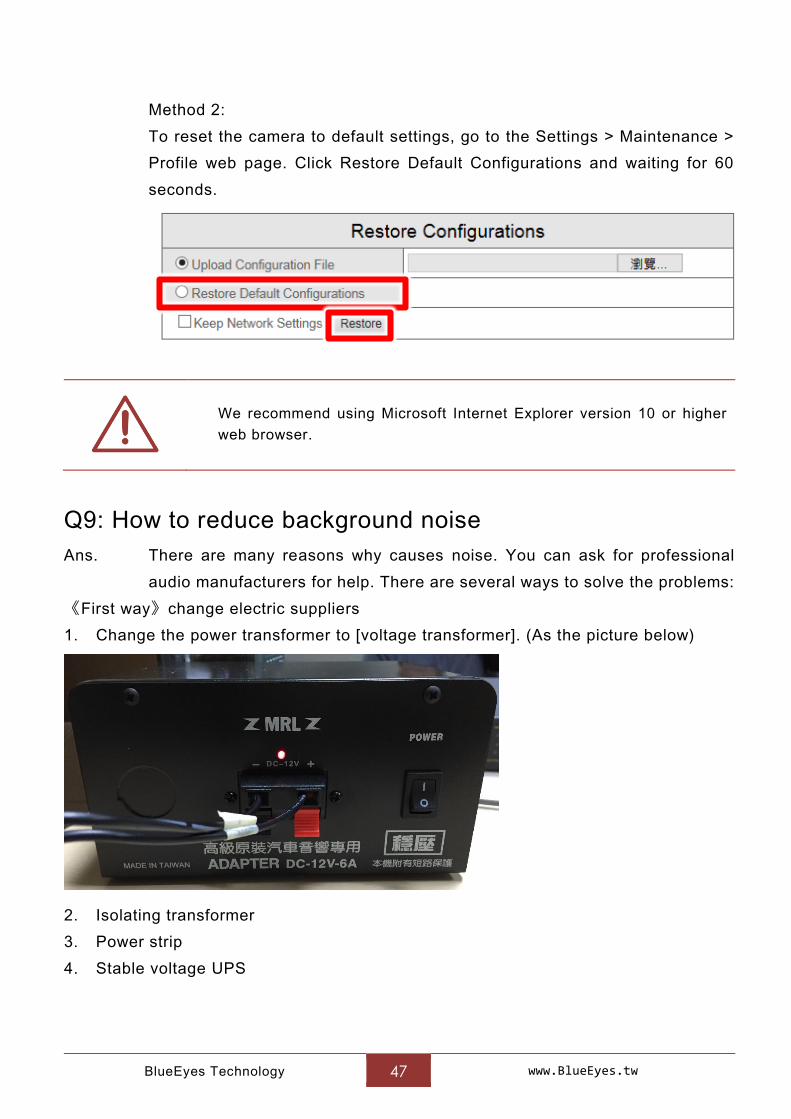
Method 2:
To reset the camera to default settings, go to the Settings > Maintenance >
Profile web page. Click Restore Default Configurations and waiting for 60
seconds.
We recommend using Microsoft Internet Explorer version 10 or higher
web browser.
Q9: How to reduce background noise
Ans. There are many reasons why causes noise. You can ask for professional
audio manufacturers for help. There are several ways to solve the problems:
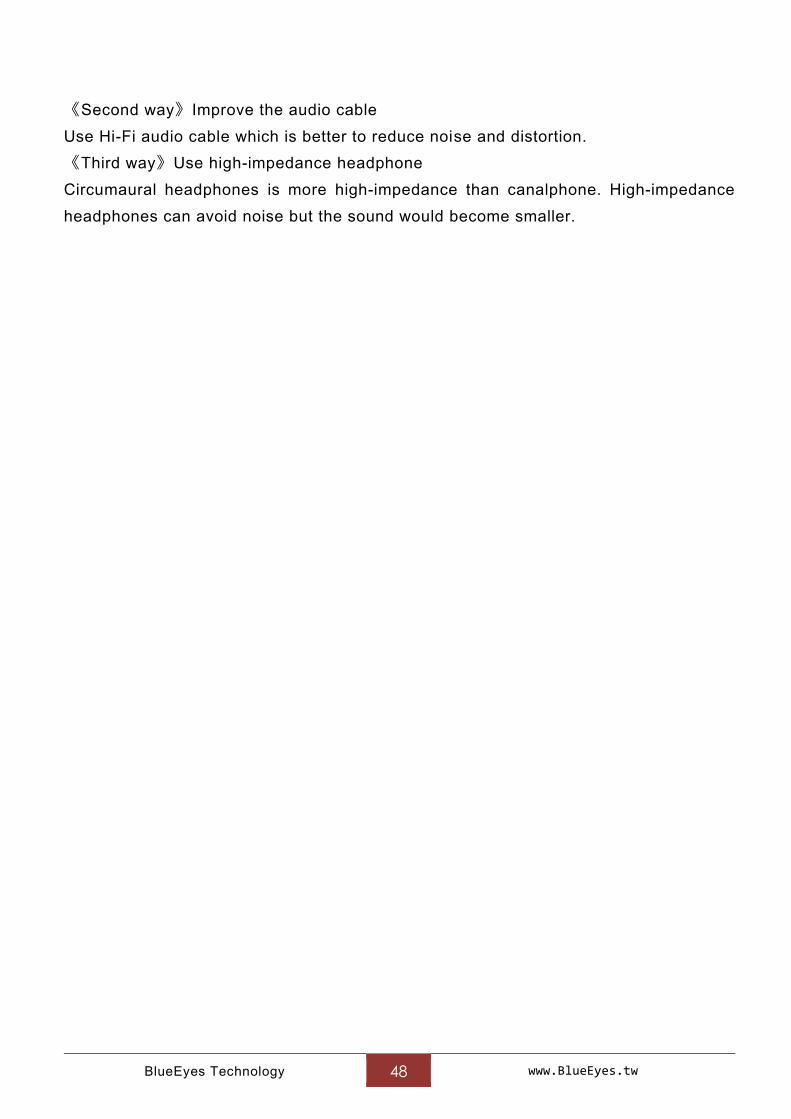
《First way》change electric suppliers
1. Change the power transformer to [voltage transformer]. (As the picture below)
2. Isolating transformer
3. Power strip
4. Stable voltage UPS
BlueEyes Technology 48 www.BlueEyes.tw
《Second way》Improve the audio cable
Use Hi-Fi audio cable which is better to reduce noise and distortion.
《Third way》Use high-impedance headphone
Circumaural headphones is more high-impedance than canalphone. High-impedance
headphones can avoid noise but the sound would become smaller.

BlueEyes Technology 49 www.BlueEyes.tw
Note

BlueEyes Technology 50 www.BlueEyes.tw
Note

© 2015 BlueEyes Technology Corporation. All rights reserved. PRINTED IN TAIWAN This paper is for informational purposes only. BlueEyes is registered trademarks or trademarks of BlueEyes Technology Corporation. Other
product or company names mentioned herein may be the trademarks of their respective owners.