full circle - mclibre · 2014-07-05 · full circle magazine specials full circle magazine the...
TRANSCRIPT

THE INDEPENDENT MAGAZINE FOR THE UBUNTU LINUX COMMUNITY
PROGRAMMING SERIES SPECIAL EDITION
PROGRAMPROGRAM IN PYTHONIN PYTHON Volume Volume SixNine Parts 3Parts 432-39-583
Full Circle
Full Circle Magazine is neither ailiated, with nor endorsed by, Canonical Ltd.
Full Circle Magazine Specials
full circle magazine
The articles contained in this magazine are released under the Creative Commons Attribution-Share Alike 3.0Unported license. This means you can adapt, copy, distribute and transmit the articles but only under the following conditions:
You must attribute the work to the original author in some way (at least a name, email or URL) and to this magazine by name ('full circle magazine') and the URL www.fullcirclemagazine.org (but not attribute the article(s) in any way that suggests that they endorse you or your use of the work). If you alter, transform, or build upon this work, you must distribute the resulting work under the same, similar or a compatible license.Full Circle Magazine is entirely independent of Canonical, the sponsor of Ubuntu projects and the views and opinions in the magazine should in no way be assumed to have Canonical endorsement.
Please note: this Special Edition is provided with absolutely no warranty whatsoever; neither the contributors nor Full Circle Magazine accept any responsibility or liability for loss or damage resulting from readers choosing to apply this content to theirs or others computers and equipment.
About Full Circle
Full Circle is a free, independent, magazine dedicated to the Ubuntu family of Linux operating systems. Each month, it contains helpful how-to articles and reader- submitted stories.
Full Circle also features a companion podcast, the Full Circle Podcast which covers the magazine, along with other news of interest.
Welcome to another 'single-topic special'
In response to reader requests, we are assembling the content of some of our serialised articles into dedicated editions.
For now, this is a straight reprint of the series 'Programming in Python', Parts 49-53 from issues #79 through #84, allowing peerless Python professor Gregg Walters #83 as time of for good behaviour.
Please bear in mind the original publication date; current versions of hardware and software may difer from those illustrated, so check your hardware and software versions before attempting to emulate the tutorials in these special editions. You may have later versions of software installed or available in your distributions' repositories.
Enjoy!
Find Us
Website: http://www.fullcirclemagazine.org/
Forums: http://ubuntuforums.org/forumdisplay.php?f=270
IRC: #fullcirclemagazine on chat.freenode.net
Editorial Team
Editor: Ronnie Tucker (aka: RonnieTucker) [email protected]
Webmaster: Rob Keria (aka: admin / linuxgeekery- [email protected]
Editing & ProofreadingMike Kennedy, Lucas Westermann,Gord Campbell, Robert Orsino,Josh Hertel, Bert Jerred
Our thanks go to Canonical and the many translation teams around the world.
full circle magazine #79 8 contents ^
HHOOWW--TTOOWritten by Greg Walters PPrrooggrraammmmiinngg IInn PPyytthhoonn -- PPaarrtt 4499
While I was working this week,
a very wise person by the
name of Michael W. suggested that
I should consider what happens
with floating-point numbers and
equality.
Take for example a simple
calculation: 1.1 + 2.2
The answer, you say, is 3.3! Any
school-kid who has dealt with
fractions knows that. Well, tell
your computer. If you start up the
Python Interactive Shell and at the
prompt type
(1.1+2.2) == 3.3
you might be surprised that the
shell responds
“False”
WHAT?!!?!?
Now, confused, you type at the
prompt:
>>>1.1+2.2
And the shell responds back:
3.3000000000000003
You stare at the screen in
disbelief and first think “I must
have typed something wrong”.
Then you realize that you didn’t. So
you type:
>>>2.2+3.3
5.5
Now you are even more
confused and you think to yourself
“Ok. This is either a bug or some
kind of sick Easter egg.” No, it’s
neither a bug nor an Easter egg.
It’s real. While I knew about this a
very long time ago, it had slipped
into the cobwebs hidden in the
dark recesses of my old mind, so I
had to bring it up here. What we
are seeing is the joy of binary
floating-point numbers.
We all know that ⅓ equates to
.33333333333333333… for ever
and a day, but take, for example,
the fraction 1/10. Everyone knows
that 1/10 is equal to .1, right? If you
use the interactive shell you can
see that:
>>>1/10
0
Oh, right. We have to have at
least one of the values a floating-
point value to show any decimal
points since an integer/integer
returns an integer. So we try again.
>>>1/10.0
0.1
Ok. Reality is back. No, not
really. Python is simply showing
you a rounded version of the
answer. So, how do we see the
“real” answer? We can use the
decimal library to see what’s really
happening.
>>> from decimal import *
>>> Decimal(1/10.0)
Decimal('0.1000000000000000055511151231257827021181583404541015625')
WOW. So let’s try our original
formula and see what that would
show:
>>> Decimal(1.1+2.2)
Decimal('3.300000000000000266453525910037569701671600341796875')
It seems to just be getting
worse and worse. So what is really
happening?
This is called Representation
Error, and exists in almost every
modern programming language
(Python, C, C++, Java, and even
Fortran and more), and on almost
every modern computer. This is
because these machines use IEEE-
754 floating-point arithmetic
which (on most machines and OS
platforms) maps to an IEEE-754
double-precision number. This
double-precision number has a
precision of 53 bits. So, our 0.1,
when represented in this 53-bit
double-precision, turns into:
0.00011001100110011001100110011001100110011001100110011010
That’s close to .1, but not close
enough to avoid issues.
So what do we do about it?
Well, the quick answer is that you
probably can live with it for 90% of
full circle magazine #79 9 contents ^
HOWTO - PYTHON PT49
the things we have to do out there
in the real world – by using the
round() method. While you have to
decide on the number of decimal
points that you must have in your
world to carry the precision that
you need, for the most part, this
will be an acceptable workaround.
I honestly don’t remember if we
have gone over the round method,
so I’ll briefly go over it. The syntax
is very simple:
round(v,d)
where v is the value you want to
round and d is the number of
decimals (maximum) you want
after the decimal point. According
to the Python documentation,
“Values are rounded to the closest
multiple of 10 to the power of
minus n digits; if two multiples are
equally close, rounding is done
away from 0”. All that being said, if
the number is 1.4144, and we
round it to 3 decimal places, the
returned value will be 1.414. If the
number is 1.4145 it would be
returned as 1.415.
For example, let’s use the value
of pi that comes from the math
library. (You must import the math
library before you can do this, by
the way.)
>>> math.pi
3.141592653589793
Now, if we wanted to round
that value down to 5 decimal
places, we would use:
>>> round(math.pi,5)
3.14159
That is the “standard” value of
pi that most everyone knows off
the top of their head. That’s great.
However, if we set the number of
decimal places to be returned to 4,
look what happens.
>>> round(math.pi,4)
3.1416
All that sounds good until you
run into a value like 2.675 and try
to round it to 2 decimal places. The
assumption (since it is exactly
halfway between 2.67 and 2.68) is
that the returned value will be
2.68. Try it.
>>> round(2.675,2)
2.67
That might cause a problem. It
goes back to the initial issue we
have been talking about. The
actual conversion to a binary
floating-point number that is 53
bits long, the number becomes:
2.6749999999999998223653160599749535221893310546875
which then rounds down to
2.67.
The bottom line here is when
trying to compare floating-point
numbers, be aware that some
things just don’t translate well.
See you next time!
Greg Walters is owner of RainyDaySolutions, LLC, a consulting companyin Aurora, Colorado, and has beenprogramming since 1972. He enjoyscooking, hiking, music, and spendingtime with his family. His website iswww.thedesignatedgeek.net.
The Ubuntu Podcast covers all
the latest news and issues facing
Ubuntu Linux users and Free
Software fans in general. The
show appeals to the newest user
and the oldest coder. Our
discussions cover the
development of Ubuntu but
aren’t overly technical. We are
lucky enough to have some
great guests on the show, telling
us first hand about the latest
exciting developments they are
working on, in a way that we can
all understand! We also talk
about the Ubuntu community
and what it gets up to.
The show is presented by
members of the UK’s Ubuntu
Linux community. Because it is
covered by the Ubuntu Code of
Conduct it is suitable for all.
The show is broadcast live every
fortnight on a Tuesday evening
(British time) and is available for
download the following day.
podcast.ubuntu-uk.org
full circle magazine #80 8 contents ^
HH OOWW--TTOOWritten by Greg Walters PPrroogg rraa mm mm iinn gg II nn PPyytthh oonn -- PPaa rrtt 5500
T his month, I thought I ’d talk
about a couple of lesser known
functions, maketrans and translate.
We’ll start with the translate
method. The translate method
returns a copy of a string – with all
characters in the translate table
replaced, or has the characters in
the optional parameter
deletechars removed from the
string. Here’s the syntax.
s =str.translate(table[,deletecharacters])
Before we get to the table
portion of the method, let’s look at
the delete portion. Let’s say that
you have the string “The time has
come”. And you want to delete all
the vowels (for some weird reason)
from that string. You can code it
like this:
astr = “The time has come”
astr.translate(None,’aeiou’)
will return:
“Th tm hs cm”
Notice that we included None as
the translate table. While this part
is cool, it gets better. There is a
function called maketrans. It takes
an input string and an output string
as parameters and returns a table
that is used as the first parameter
into the translate method. Here
(top right) is a very simple example.
It returns:
“Th2 t3m2 h1s c4m2”
Let’s look at what this does. We
assign intable to a string of vowels
as before. outtable is assigned the
numbers 1 ,2,3,4,5 as a string. When
we make the call to maketrans, our
actual trantable is as follows
(shown below. The “\x” means that
it is hexadecimal char) :
If you look at it carefully, you’ll
see that the lowercase vowel
letters are replaced with the
numbers we specified:
1bcd2fgh3jklmn4pqrst5vwxyz
If you look even closer, you’ll
see that there actually 256 entries
starting with “\x00” and ending
with “\xff”. So the table contains
the entire 256 possible ascii
character set. So, when the
translate method gets the table, it
iterates (or walks through) each
character, getting that characters
value in Hex, and then finds that
value in the translate table and
substitutes it in the output string.
The Hex representation of our
original astr string (‘The time has
come’) is shown below.
So now it should be making
sense.
Now the purpose of this whole
thing. Think back to your schooling
where you learned about Julius
Ceasar. Whenever he wanted to
send a message of a confidential
intable = ‘aeiou’outtable = ‘12345’trantable = maketrans(intable,outtable)astr = “The time has come”astr.translate(trantable)
'\x00\x01\x02\x03\x04\x05\x06\x07\x08\t\n\x0b\x0c\r\x0e\x0f\x10\x11\x12\x13\x14\x15\x16\x17\x18\x19\x1a\x1b\x1c\x1d\x1e\x1f !"#$%&\'()*+,-./0123456789:;<=>?@ABCDEFGHIJKLMNOPQRSTUVWXYZ[\\]^_`1bcd2fgh3jklmn4pqrst5vwxyz{|}~\x7f\x80\x81\x82\x83\x84\x85\x86\x87\x88\x89\x8a\x8b\x8c\x8d\x8e\x8f\x90\x91\x92\x93\x94\x95\x96\x97\x98\x99\x9a\x9b\x9c\x9d\x9e\x9f\xa0\xa1\xa2\xa3\xa4\xa5\xa6\xa7\xa8\xa9\xaa\xab\xac\xad\xae\xaf\xb0\xb1\xb2\xb3\xb4\xb5\xb6\xb7\xb8\xb9\xba\xbb\xbc\xbd\xbe\xbf\xc0\xc1\xc2\xc3\xc4\xc5\xc6\xc7\xc8\xc9\xca\xcb\xcc\xcd\xce\xcf\xd0\xd1\xd2\xd3\xd4\xd5\xd6\xd7\xd8\xd9\xda\xdb\xdc\xdd\xde\xdf\xe0\xe1\xe2\xe3\xe4\xe5\xe6\xe7\xe8\xe9\xea\xeb\xec\xed\xee\xef\xf0\xf1\xf2\xf3\xf4\xf5\xf6\xf7\xf8\xf9\xfa\xfb\xfc\xfd\xfe\xff'
\x54\x68\x65\x20\x74\x69\x6d\x65\x20\x68\x61\x73\x20\x63\x6f\x6d\x65T h e t i m e h a s c o m e
full circle magazine #80 9 contents ^
HOWTO - PYTHON PT50
matter, he would use a cipher that
would shift all the letters of the
alphabet three characters to the
right. So, using todays english
alphabet:ABCDEFGHIJKLMNOPQRSTUVWXYZabcdefghijklmnopqrstuvwxyz
becomes:DEFGHIJKLMNOPQRSTUVWXYZabcdefghijklmnopqrstuvwxyzABC
While this seems very simple by
today’s standards, when I was a
school kid, we used this all the time
to send messages to each other.
We used a different index into the
string to start the encryption
string, the logic behind it was the
same.
No one knows how effective
this actually was for good old
Julius. One would think that if
someone intercepted the message,
they would have thought that it
was in some foreign language. We
can only speculate.
We can easily use the translate
method and the maketrans helper
function to allow us to have fun
with this. Let’s say we want to
make a simple program that allows
us to enter a string of “plain text”
and get back an encrypted string
using the same side right method
that Caesar used. For simplicity
sake, let’s only use uppercase
characters (shown top right).
Everything in the above code is
pretty much what we’ve covered
above or in earlier Python articles,
but I ’ll go over it quickly.
The first two lines are the in and
out strings. We’ve just shifted the
characters and wrapped around to
create the out string. The next two
lines create a table for encoding
and one for decoding. Line 5
prompts the user to enter a string
to encode. We then encode that
string (EncString) in the next line.
To decode it, we simply use the
translate method on the encoded
string to get the plain text back.
Finally we print both strings out.
Here’s the output of the program.
Enter the plaintext string ->THE TIME HAS COMEEncoded string is -WKH WLPH KDV FRPHDecoded string is -THE TIME HAS COME
Just like back in school. But let’s
flesh it out just a bit to make it a
bit more usable. The code is almost
the same with a few exceptions.
First, we have added a space to the
end of the intab string and in
between the “Z” and the “A” in the
outtab string. This helps keep the
actual words from being too
obvious in the encrypted string.
The next change is where we ask if
the user wants to encode or
decode the string. Finally we added
an if statement to control what we
print (shown bottom right).
The output from the program is:Encode or Decode (E or D) -> EEnter the string -> THE TIME HAS
COMEEncoded string is -WKHCWLPHCKDVCFRPH
And to test the decode side of
things:Encode or Decode (E or D) -> DEnter the string ->WKHCWLPHCKDVCFRPHDecoded string is - THE TIME HASCOME
Well, hopefully you are starting
to get ideas about how to use this
new information in your own code.
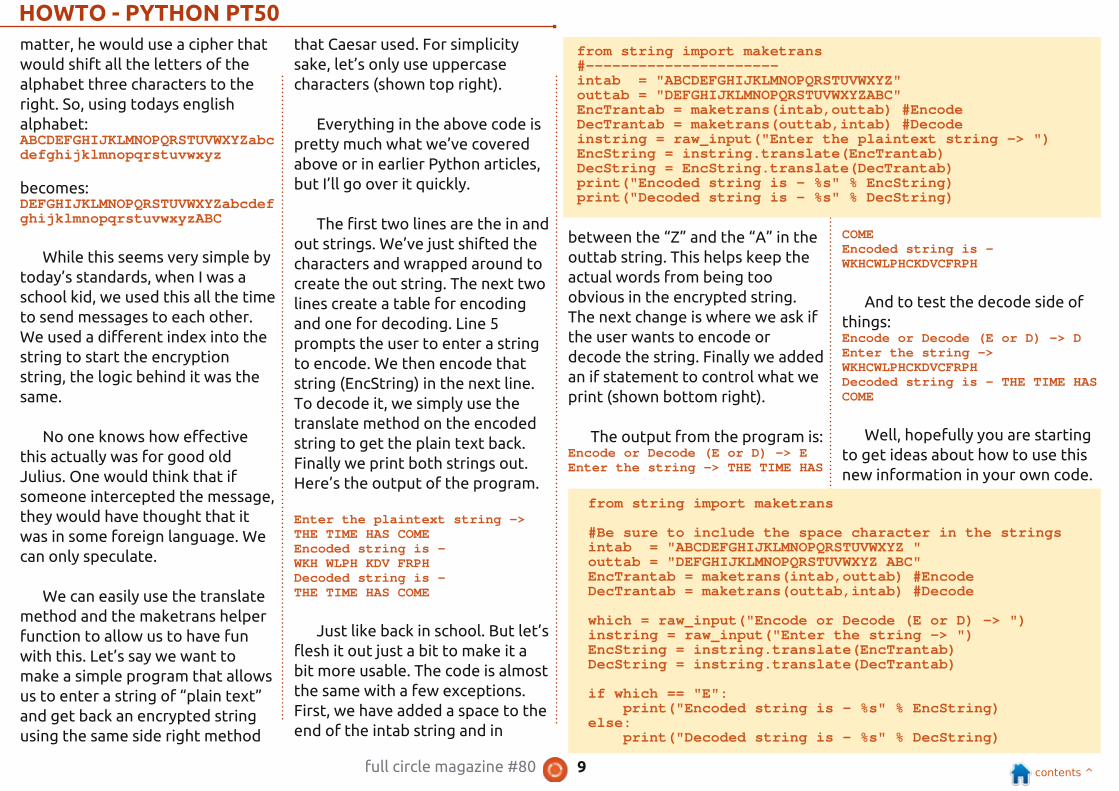
from string import maketrans#----------------------intab = "ABCDEFGHIJKLMNOPQRSTUVWXYZ"outtab = "DEFGHIJKLMNOPQRSTUVWXYZABC"EncTrantab = maketrans(intab,outtab) #EncodeDecTrantab = maketrans(outtab,intab) #Decodeinstring = raw_input("Enter the plaintext string -> ")EncString = instring.translate(EncTrantab)DecString = EncString.translate(DecTrantab)print("Encoded string is - %s" % EncString)print("Decoded string is - %s" % DecString)
from string import maketrans
#Be sure to include the space character in the stringsintab = "ABCDEFGHIJKLMNOPQRSTUVWXYZ "outtab = "DEFGHIJKLMNOPQRSTUVWXYZ ABC"EncTrantab = maketrans(intab,outtab) #EncodeDecTrantab = maketrans(outtab,intab) #Decode
which = raw_input("Encode or Decode (E or D) -> ")instring = raw_input("Enter the string -> ")EncString = instring.translate(EncTrantab)DecString = instring.translate(DecTrantab)
if which == "E":print("Encoded string is - %s" % EncString)
else:print("Decoded string is - %s" % DecString)

full circle magazine #81 9 contents ^
HHOOWW--TTOOWritten by Greg Walters PPrrooggrraammmmiinngg II nn PPyytthhoonn -- PPaarrtt 5511
T his month, I ’m going to discuss
a product that is new to me,
but has apparently been around for
a number of years. It’s called
NextReports from Advantage
Software Factory, and you can get
it free from http://www.next-
reports.com/ . Not only that, but
it’s open source and it runs under
Windows and Linux!
Before I start telling you about
the product, let me get on my
soapbox and vent for a moment or
two. For a long time, I ’ve been
working with databases and
reports. One of the things that I ’ve
had issues with is that while there
are free database solutions out
there, like SQLite and MySql, there
was precious little available that
was free for report designer tools.
More times than not, any reports
either had to be done with very
expensive software tools, or the
developer had to roll his own.
Some tools were available, but
were lacking. When it came to
charting, well, you pretty much had
no choice but to use the expensive
stuff. Believe me, I ’ve looked for
years for really good free reporting
tools, and I ’m not sure how I have
missed this package for so many
years (version 2.1 was released in
March of 2009 and they are
currently up to version 6.3) . But
now that I ’ve found it, I ’m
absolutely pumped about it.
Now that I ’ve stepped down
from my soap box, I can begin to
sing its praises. It is a suite of three
parts, a reports designer, a report
engine and a report server. All I
have had a chance to play with is
the reports designer, but if the
designer is any indication of the
power, ease and flexibility of the
rest of the suite, this thing is a
winner.
This month, we are going to
concentrate on the designer.
Because of some constraints on my
time, I ’m working on a Windows
machine, but everything that I
show can be done in Linux (so
please forgive me in advance).
One of the first things you
should know is that it supports
databases like Oracle, MySql,
SQLite, MSSQL and more.
Everything is based on queries and
a really good thing is that only
SELECT type queries are allowed.
This means that nothing in the
source database can be changed by
accident. You can enter your own
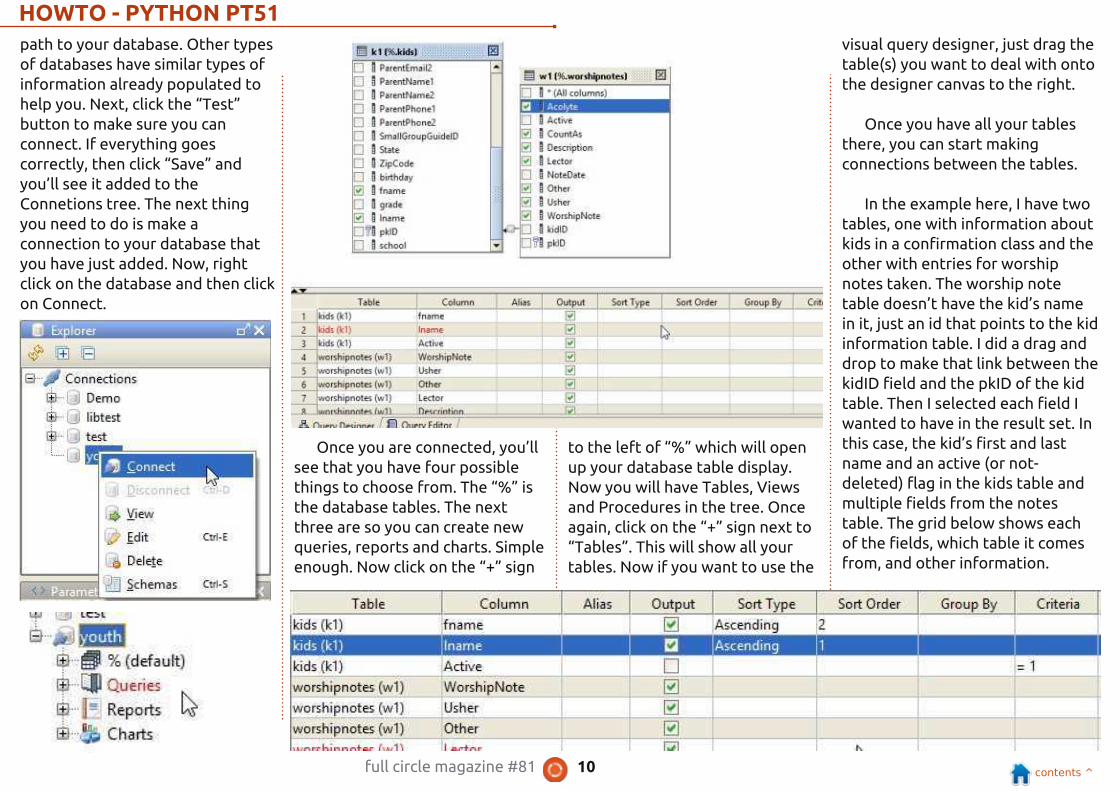
queries or use a visual designer.
The screenshot shows how nice
a UI it is. Things are pretty intuitive
and it won’t take you long to be
productive at this. Let’s take a look
at the steps to get going.
Start with File | New | Data
Source. Next, name your source
whatever you want to call it.
Now tell NextReports what kind
of database it is in the dropdown
called “Type:”. You can skip over
the Driver section and go to the
URL: section. This is where you put
the path to the database. If you are
using, for example, a SQLite
database, this will be filled in for
you: “jdbc:sqlite:<dbfile-path>”.
Replace the <dbfile-path> with the
full circle magazine #81 1 0 contents ^
HOWTO - PYTHON PT51
path to your database. Other types
of databases have similar types of
information already populated to
help you. Next, click the “Test”
button to make sure you can
connect. If everything goes
correctly, then click “Save” and
you’ll see it added to the
Connetions tree. The next thing
you need to do is make a
connection to your database that
you have just added. Now, right
click on the database and then click
on Connect.
Once you are connected, you’ll
see that you have four possible
things to choose from. The “%” is
the database tables. The next
three are so you can create new
queries, reports and charts. Simple
enough. Now click on the “+” sign
to the left of “%” which will open
up your database table display.
Now you will have Tables, Views
and Procedures in the tree. Once
again, click on the “+” sign next to
“Tables”. This will show all your
tables. Now if you want to use the
visual query designer, just drag the
table(s) you want to deal with onto
the designer canvas to the right.
Once you have all your tables
there, you can start making
connections between the tables.
In the example here, I have two
tables, one with information about
kids in a confirmation class and the
other with entries for worship
notes taken. The worship note
table doesn’t have the kid’s name
in it, just an id that points to the kid
information table. I did a drag and
drop to make that link between the
kidID field and the pkID of the kid
table. Then I selected each field I
wanted to have in the result set. In
this case, the kid’s first and last
name and an active (or not-
deleted) flag in the kids table and
multiple fields from the notes
table. The grid below shows each
of the fields, which table it comes
from, and other information.

full circle magazine #81 1 1 contents ^
HOWTO - PYTHON PT51
As you can see, we can set
criteria like “Active = 1 ”, choose to
display a field or not, and set sort
type and sort order. Once you are
satisfied with this, you can click on
the tab below and see your actual
SQL query.
To test your query, simply click
on the “running man” and you will
(hopefully if you did it correctly)
get the query results in a grid
below the editor. If you want to
add manual lines you can. For
example, I want to combine the
kids first and last names (fname
and lname) into a full name. We can
do that by putting a line after the
“k1 .lname,” line like this:
k1.fname || “ “ || k1.lnameas FullName,
The “| | ” characters are
concatenation characters so we
will have the two fields with a
space between in a field named
“FullName”. Don’t forget the
comma at the end. Once you have
your query the way you want it,
click on the save button to save the
query. You will be asked what you
want to call it.
Next, click on the Query item in
the tree and right click on the
query you just created. Select
“New Report from Query”. The
query designer canvas goes away
and is replaced by the report
designer.
On the left is the properties
window for any given field or the
entire report. On the right is the
report designer itself. Notice that
it looks like a spreadsheet. Each
row is considered a “band” and
holds information for that report
row. In the case of this example,
we have four rows, two header
rows, one detail row and a footer
row. You can add or delete rows as
needed. This method is not quite as
free-form as some other report
designers, but makes for a very
nice and clean report.
The two header rows hold our
report title and column headers.
The detail row has each field we
will be reporting on and the footer
row is the report footer. Let’s take
a look at how the report looks as a
default. Click on the button at the
full circle magazine #81 1 2 contents ^
HOWTO - PYTHON PT51
top of the bar marked “To Html” to
see the report. (I blurred the kids
last names, that’s not an issue in
the generator.)
For a report with almost no
work, that’s really nice. But let’s
pretty it up a bit. Let’s create a
group that puts all of the data for
any given kid under the kid’s name.
Right click on the first column
of the data row. Select Group and
then Add.
You will be presented with a
new window asking which of the
fields you want to create the group
upon. In this case, I select FullName
and then click the Ok button. Now
we have a grouping break. We can
also get rid of the three fields
(fname, lname and FullName) in
the detail section, since we’ll be
displaying the name in the group
band. SImply right-click on them
and select “Delete Cell”. Now you
can resize the three empty cells on
the left to make the gap less
obvious.
Taking a quick peek at what the
report looks like now will show you
that the information for each kid is
all nicely grouped together.
That’s nicer, but now let’s do
something kind of fun. All the 1 s
and 0s obviously stand for yes and
no. That’s rather boring for a
report, so let’s add an advanced
conditional statement for each of
those fields that will show a box
with a check for Yes (or 1 ) and an
empty box for No (or 0). It’s really
easy to do, but makes your report
look like you spent days on it. By
using the Wingdings font from
Windows, the two characters we
want are 0x6F(01 68) for an empty
box and 0xFE (0254) for a checked
box.
Before I go on, the one thing
that Windows does better than
Linux (that I have found) is the use
of the Alt+NumPad entry of special
characters. Linux doesn’t allow
that. There was a work around that
used Ctrl+Shift+U then the unicode
value for the character you
wanted. However, that doesn’t
work on all machines. The easiest
way I ’ve found to do this on Linux,
is to open Character Map, use the
search function to find the unicode
character you want, double-click
the character to copy it to the
“Text to copy:” box, then click the
“Copy” and then paste it into your
document. The unicode characters
for them are 261 0 (empty box) and
261 1 (checked box) using the
WingDings 2 font. I ’m sure there
are many other easier ways to deal
with this, but I ’m shy on time. (Be
sure you have Common selected in
the Script list.)
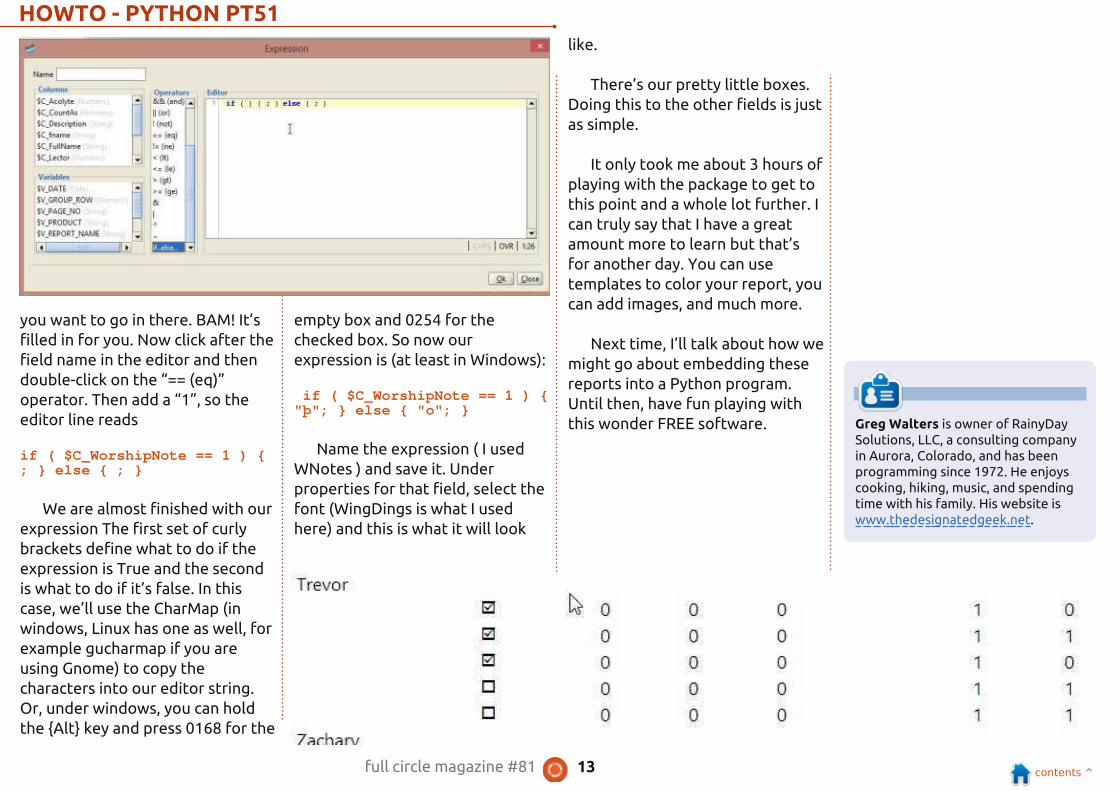
We’ll start with the
WorshipNotes field. On the detail
row, right click on the field you
want to do. In this case it’s marked
$C{WorshipNote}. Choose Insert,
then Expression. Yet another
wonderful thing that NextReports
gives us it the ability to do pretty
much everything with as little
typing as possible. Look in the
center of window where it says
Operators. Double click on the
“if..else..” selection, and it will fill
that into the editor for you as a
template so you don’t make a
mistake.
Now, we want to put the
WorshipNotes field in the
parentheses of the editor. Simply
click in between the two
parentheses to place the cursor
and then double-click on the field
full circle magazine #81 1 3 contents ^
Greg Walters is owner of RainyDaySolutions, LLC, a consulting companyin Aurora, Colorado, and has beenprogramming since 1 972. He enjoyscooking, hiking, music, and spendingtime with his family. His website iswww.thedesignatedgeek.net.
HOWTO - PYTHON PT51
you want to go in there. BAM! It’s
filled in for you. Now click after the
field name in the editor and then
double-click on the “== (eq)”
operator. Then add a “1 ”, so the
editor line reads
if ( $C_WorshipNote == 1 ) {; } else { ; }
We are almost finished with our
expression The first set of curly
brackets define what to do if the
expression is True and the second
is what to do if it’s false. In this
case, we’ll use the CharMap (in
windows, Linux has one as well, for
example gucharmap if you are
using Gnome) to copy the
characters into our editor string.
Or, under windows, you can hold
the {Alt} key and press 01 68 for the
empty box and 0254 for the
checked box. So now our
expression is (at least in Windows):
if ( $C_WorshipNote == 1 ) {"þ"; } else { "o"; }
Name the expression ( I used
WNotes ) and save it. Under
properties for that field, select the
font (WingDings is what I used
here) and this is what it will look
like.
There’s our pretty little boxes.
Doing this to the other fields is just
as simple.
It only took me about 3 hours of
playing with the package to get to
this point and a whole lot further. I
can truly say that I have a great
amount more to learn but that’s
for another day. You can use
templates to color your report, you
can add images, and much more.
Next time, I ’ll talk about how we
might go about embedding these
reports into a Python program.
Until then, have fun playing with
this wonder FREE software.
full circle magazine #82 1 1 contents ^
HH OOWW--TTOOWritten by Greg Walters PPrroogg rraa mm mm iinn gg II nn PPyytthh oonn -- PPaa rrtt 5522
B efore we get started on this
month’s actual python subject,
let me toot my own horn for just a
minute. In late December and early
January, my first book on Python
was published by Apress. It is
named "The Python Quick Syntax
Reference", and is available from a
number of places. You can find it
on the Apress site
(http://www.apress.com/9781 4302
64781 ), Springer.com
(http://www.springer.com/comput
er/book/978-1 -4302-6478-1 ) and
Amazon
(http://www.amazon.com/The-
Python-Quick-Syntax-
Reference/dp/1 430264780) as well
as others. It is, as the title suggests,
a syntax reference that will help
those of us who program in other
languages as well as Python, to
remember how a certain command
works and the requirements for
that command. Please help a poor
old programmer make a living by
buying the book, if you can.
Now on to bigger and better
things.
While I was working on my
latest book for Apress, I
rediscovered a SQL command that I
didn't discuss when we were
working with SQL databases a long
time ago, so I thought I 'd share the
information with you. It is the
CREATE TABLE AS SELECT
command, which allows us to pull a
query from one table (or joined
tables) and create another table on
the fly. The general syntax is:
CREATE TABLE [IF NOT EXISTS]{New Table Name} AS SELECT{query}
The part in square brackets (IF
NOT EXISTS) is totally optional,
which will create the table only if it
doesn’t exist already. The part in
curly brackets, however, is not. The
first is the new table name and the
second is the query that you want
to use to pull data and create the
new table.
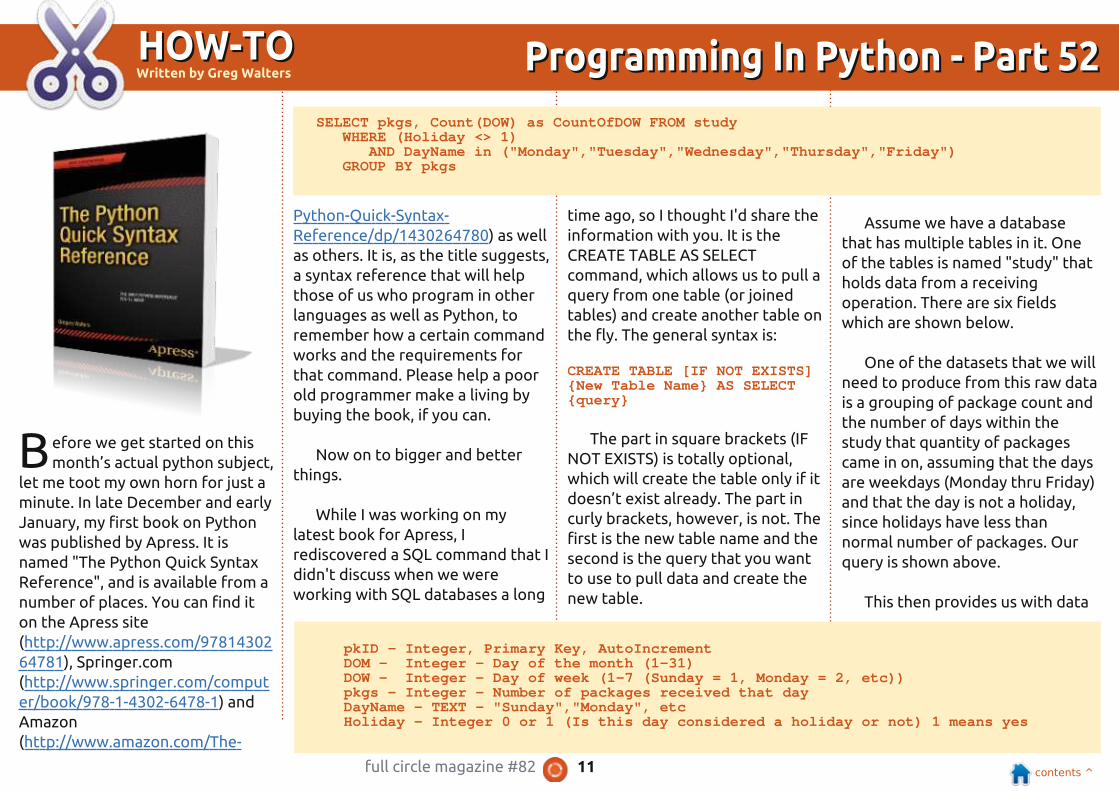
Assume we have a database
that has multiple tables in it. One
of the tables is named "study" that
holds data from a receiving
operation. There are six fields
which are shown below.
One of the datasets that we will
need to produce from this raw data
is a grouping of package count and
the number of days within the
study that quantity of packages
came in on, assuming that the days
are weekdays (Monday thru Friday)
and that the day is not a holiday,
since holidays have less than
normal number of packages. Our
query is shown above.
This then provides us with data
pkID - Integer, Primary Key, AutoIncrementDOM - Integer - Day of the month (1-31)DOW - Integer - Day of week (1-7 (Sunday = 1, Monday = 2, etc))pkgs - Integer - Number of packages received that dayDayName - TEXT - "Sunday","Monday", etcHoliday - Integer 0 or 1 (Is this day considered a holiday or not) 1 means yes
SELECT pkgs, Count(DOW) as CountOfDOW FROM studyWHERE (Holiday <> 1)
AND DayName in ("Monday","Tuesday","Wednesday","Thursday","Friday")GROUP BY pkgs
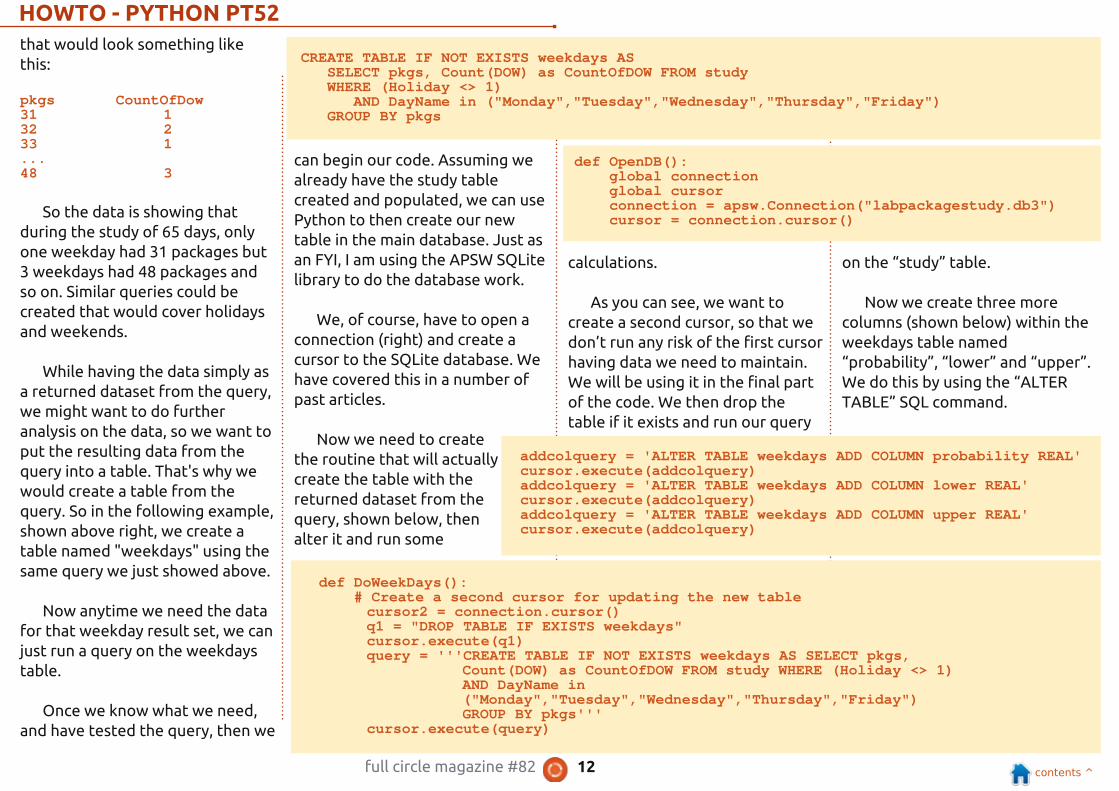
full circle magazine #82 1 2 contents ^
HOWTO - PYTHON PT52
that would look something like
this:
pkgs CountOfDow31 132 233 1...48 3
So the data is showing that
during the study of 65 days, only
one weekday had 31 packages but
3 weekdays had 48 packages and
so on. Similar queries could be
created that would cover holidays
and weekends.
While having the data simply as
a returned dataset from the query,
we might want to do further
analysis on the data, so we want to
put the resulting data from the
query into a table. That's why we
would create a table from the
query. So in the following example,
shown above right, we create a
table named "weekdays" using the
same query we just showed above.
Now anytime we need the data
for that weekday result set, we can
just run a query on the weekdays
table.
Once we know what we need,
and have tested the query, then we
can begin our code. Assuming we
already have the study table
created and populated, we can use
Python to then create our new
table in the main database. Just as
an FYI , I am using the APSW SQLite
library to do the database work.
We, of course, have to open a
connection (right) and create a
cursor to the SQLite database. We
have covered this in a number of
past articles.
Now we need to create
the routine that will actually
create the table with the
returned dataset from the
query, shown below, then
alter it and run some
calculations.
As you can see, we want to
create a second cursor, so that we
don’t run any risk of the first cursor
having data we need to maintain.
We will be using it in the final part
of the code. We then drop the
table if it exists and run our query
on the “study” table.
Now we create three more
columns (shown below) within the
weekdays table named
“probability”, “lower” and “upper”.
We do this by using the “ALTER
TABLE” SQL command.
CREATE TABLE IF NOT EXISTS weekdays ASSELECT pkgs, Count(DOW) as CountOfDOW FROM studyWHERE (Holiday <> 1)
AND DayName in ("Monday","Tuesday","Wednesday","Thursday","Friday")GROUP BY pkgs
def OpenDB():global connectionglobal cursorconnection = apsw.Connection("labpackagestudy.db3")cursor = connection.cursor()
def DoWeekDays():# Create a second cursor for updating the new tablecursor2 = connection.cursor()q1 = "DROP TABLE IF EXISTS weekdays"cursor.execute(q1)query = '''CREATE TABLE IF NOT EXISTS weekdays AS SELECT pkgs,
Count(DOW) as CountOfDOW FROM study WHERE (Holiday <> 1)AND DayName in("Monday","Tuesday","Wednesday","Thursday","Friday")GROUP BY pkgs'''
cursor.execute(query)
addcolquery = 'ALTER TABLE weekdays ADD COLUMN probability REAL'cursor.execute(addcolquery)addcolquery = 'ALTER TABLE weekdays ADD COLUMN lower REAL'cursor.execute(addcolquery)addcolquery = 'ALTER TABLE weekdays ADD COLUMN upper REAL'cursor.execute(addcolquery)
full circle magazine #82 1 3 contents ^
Greg Walters is owner of RainyDaySolutions, LLC, a consulting companyin Aurora, Colorado, and has beenprogramming since 1 972. He enjoyscooking, hiking, music, and spendingtime with his family. His website iswww.thedesignatedgeek.net.
HOWTO - PYTHON PT52
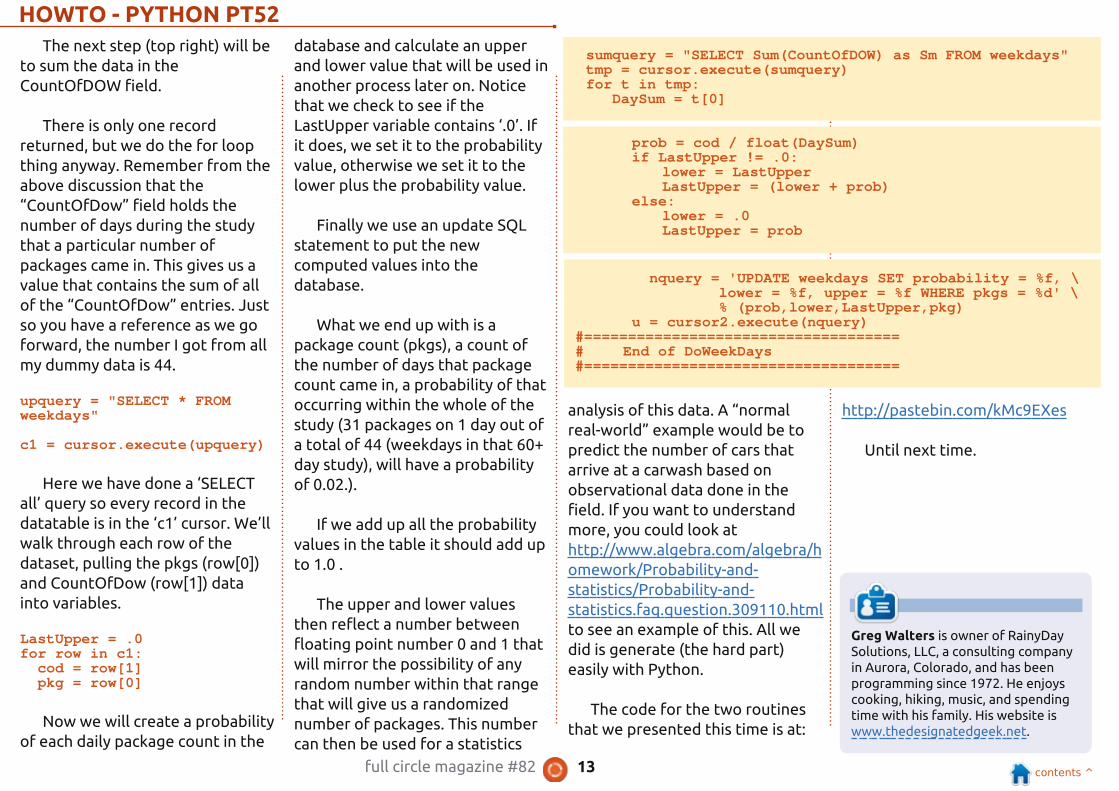
The next step (top right) will be
to sum the data in the
CountOfDOW field.
There is only one record
returned, but we do the for loop
thing anyway. Remember from the
above discussion that the
“CountOfDow” field holds the
number of days during the study
that a particular number of
packages came in. This gives us a
value that contains the sum of all
of the “CountOfDow” entries. Just
so you have a reference as we go
forward, the number I got from all
my dummy data is 44.
upquery = "SELECT * FROMweekdays"
c1 = cursor.execute(upquery)
Here we have done a ‘SELECT
all’ query so every record in the
datatable is in the ‘c1 ’ cursor. We’ll
walk through each row of the
dataset, pulling the pkgs (row[0] )
and CountOfDow (row[1 ] ) data
into variables.
LastUpper = .0for row in c1:cod = row[1]pkg = row[0]
Now we will create a probability
of each daily package count in the
database and calculate an upper
and lower value that will be used in
another process later on. Notice
that we check to see if the
LastUpper variable contains ‘.0’. If
it does, we set it to the probability
value, otherwise we set it to the
lower plus the probability value.
Finally we use an update SQL
statement to put the new
computed values into the
database.
What we end up with is a
package count (pkgs), a count of
the number of days that package
count came in, a probability of that
occurring within the whole of the
study (31 packages on 1 day out of
a total of 44 (weekdays in that 60+
day study), will have a probability
of 0.02.) .
If we add up all the probability
values in the table it should add up
to 1 .0 .
The upper and lower values
then reflect a number between
floating point number 0 and 1 that
will mirror the possibility of any
random number within that range
that will give us a randomized
number of packages. This number
can then be used for a statistics
analysis of this data. A “normal
real-world” example would be to
predict the number of cars that
arrive at a carwash based on
observational data done in the
field. If you want to understand
more, you could look at
http://www.algebra.com/algebra/h
omework/Probability-and-
statistics/Probability-and-
statistics.faq.question.3091 1 0.html
to see an example of this. All we
did is generate (the hard part)
easily with Python.
The code for the two routines
that we presented this time is at:
http://pastebin.com/kMc9EXes
Until next time.
sumquery = "SELECT Sum(CountOfDOW) as Sm FROM weekdays"tmp = cursor.execute(sumquery)for t in tmp:
DaySum = t[0]
prob = cod / float(DaySum)if LastUpper != .0:
lower = LastUpperLastUpper = (lower + prob)
else:lower = .0LastUpper = prob
nquery = 'UPDATE weekdays SET probability = %f, \lower = %f, upper = %f WHERE pkgs = %d' \% (prob,lower,LastUpper,pkg)
u = cursor2.execute(nquery)#====================================# End of DoWeekDays#====================================

full circle magazine #84 1 4 contents ^
HHOOWW--TTOOWritten by Greg D. Walters PPrrooggrraamm II nn PPyytthhoonn -- PPaarrtt 5533
T his month, I thought I would
create a routine that makes a
license key from an email. We all
know the reason for having a
license key, and if you ever need to
have a quick and dirty set of
routines to do it, you can use this.
Remember, Python is a scripting
language, so the source is always
readable. There are ways around
this; we’ll discuss them in another
article. Let’s take a look at the
“gross” logic behind the code,
before we actually dive into the
code.
First, we will ask for an email
address and then break it into two
parts, the local part (the part
before the “@” character) and the
domain part (the part after the “@”
character). There are very specific
rules for email address validity, and
it can get very complicated. For our
purposes, we will only use some of
the rules and only on the local part.
You can do a web search on the
actual rule set. In our code, we will
only look at:
• lowercase characters
• upper case characters
• numbers between 0 and 9
• special characters (!#$%&'*+-
/=?^_` {| }~.)
• period characters are allowed, but
may not be repeated next to each
other (..., etc)
Once we have validated the
email, we then will create a
“checksum character” which is
based on the ascii value of each
character in the entire email
address, and then divide it by the
number of characters in the email
address. For example, let’s use a
mythical email address of
[email protected]. If we
walk through the email address, we
can get the ascii value of each
character by using the ord()
function. When we add up each of
the ascii values, we get a sum of
1 670, then we divide that by the
length of the email address (23);
we get 72. Remember we are using
integer division here, so our result
will be an integer.
Now that we have our checksum
value, we subtract 68 from that
(ascii ‘D’) to create an offset. We
use this offset when we encode
each character in the email. Just to
make things a bit harder to decode,
we put the length (with offset) as
character position 2 and the
checksum as character position 4.
So for the email
[email protected] we get
a license key of:
j[vHihnsriwDwsqitpegi2gsq
Lets get started with the code.
Since this is the 53rd article in the
series, I won’t be quite as verbose
from here on out.
First our imports.
import sys
Now (as shown above right) we
will create a string that will include
all of our “legal” characters for the
IsValidEmail function. I ’ve split it
into 3 strings so it fits nicely for the
magazine. We combine them in the
IsValidEmail routine. We also set a
global variable ‘Offset’ to 0. This
will be the value that we add (later
on) to each character when we
create the encoded string.
Now for our first function. This
(below) is the IsValidEmail routine.
Basically we pass the email in the
variable s, and an optional debug
flag. We use the debug flag, as we
have done in the past, to provide
localvalid1 = "abcdefghijklmnopqrstuvwxyz"localvalid2 = "ABCDEFGHIJKLMNOPQRSTUVWXYZ1234567890"localvalid3 = "!#$%&'*+-/=?^_`{|}~."Offset = 0
def IsValidEmail(s,debug=0):email = spos = email.rfind("@")local = email[:pos]domain = email[pos+1:]if debug == 1:
print localprint domain
isgood = Falselocalvalid = localvalid1 + localvalid2 + localvalid3

full circle magazine #84 1 5 contents ^
HOWTO - PYTHON PART 53
some print statements to see how
things are going. Usually we would
simply pass a 1 as the second
parameter if we want to see the
progress verbosely.
First we assign the passed in
email address to the variable
‘email’ and find the ‘@’ character
that separates the local from the
domain portions of the email. We
then assign the local portion of the
email to (I think it’s appropriate)
‘local’, and the domain portion to
‘domain’. We then set the boolean
isgood flag to False and finally
create the ‘localvalid’ string from
the 3 shorter strings we set up
earlier.
Next (top right) we simply walk
through each character in the local
portion of the email against the list
of valid characters using the in
keyword. If any character in the
local portion of the email fails the
test, we break out of the for loop,
setting the ‘isgood’ flag to False.
Finally, we look for any set of
period characters that are
contiguous. We use the string.find
routine that will match anything
that is like ‘..’ or ‘...’ and so on.
Being a lazy programmer, I used
only a single “double dot” check
that works for anything more.
r = email.find("..")if r > -1:
isgood = False
The last thing we do in the
routine is return the value of the
‘isgood’ flag.
return isgood
The next routine (bottom right)
is the CheckSum routine which is
fairly short. We walk each
character in the email and create a
running sum of the ascii value of
each using the built-in ‘ord’ type
conversion. As I stated earlier, we
take that sum and divide it by the
length of the email address. We
return the checksum value and the
character represented by that
checksum.
Now for the EncodeKey routine.
While it looks simple, it requires
some concentration so pay
attention! We assign the Offset
variable to global status so we can
change it within the function and
so it can be used in other functions.
We then set the Offset variable to
the checksum minus 68. As in the
example presented at the
beginning of the article, it would
be 72-68 which equals 4. We then
step through each character of the
email address adding the offset to
the ascii value of that character.
For the ‘f’ in ‘fredjones’, it would be
1 02 + 4 or 1 06 which equates to ‘i ’.
Using the counter variable ‘cntr’,
we then determine what we add to
the ‘NewEmail’ string we build up
character by character. Notice in
the code that we go from 0 to the
length of the email, so character 0
is ‘f’, character 1 is ‘r’ and so on.
Now comes the part that might
confuse some of you. If cntr is a
value of 1 (‘r’) , we insert the
character for the length of the
email + 68 and then the offset
character, which using our example
would be iYt. The next time we go
through the loop, cntr will equal 2,
but we already have 3 characters in
the email. That’s where we want to
insert the checksum character (‘F’)
and then the third character offset.
From there, we simply add each
offset character to the string, and
when the loop is done, we return
the key (top right).
# Check Local Partfor cntr in range(0,len(local)):
if local[cntr] in localvalid:if debug == 1:
print local[cntr],ord(local[cntr]),"True"isgood = True
else:if debug == 1:
print local[cntr],ord(local[cntr]),"False"isgood = Falsebreak
def CheckSum(s,debug = 0):sum = 0email = s.upper()for cntr in range(0,len(email)):
if debug == 1:print email[cntr],ord(email[cntr])
sum += ord(email[cntr])cs = sum/len(email)if debug == 1:
print('Sum = %d' % sum)print('ChkSum = %d' % cs)print('ChkSum = %s' % chr(cs))
return cs,chr(cs)

full circle magazine #84 1 6 contents ^
HOWTO - PYTHON PART 53
The DecodeKey routine (bottom
right) basically reverses the
process we used in the EncodeKey
routine. One thing you might
notice here is that in the first ‘if
debug’ statement of this function, I
used ‘!= 0’ rather than ‘== 1 ’, simply
to remind you that the two can be
interchangeable.
The DoIt function (below) asks
for an email address using
‘raw_input’, then calls the
functions in order to create the
license key.
Lastly, we call the DoIt routine.
if __name__ == "__main__":DoIt()
Now, obviously the output is
not super-encrypted, and if
someone were to put in a fair
amount of time, they could figure
out what we used to create the key
fairly easily. However, it should
give you enough of a starting point
that you could simply modify the
code to make it much harder to
break. You could, for example, use
a random number rather than the
‘D’ (68). If you do that, set a seed in
the code so that it will always
generate the same random
number. You could also go a bit
deeper and put the offset value
somewhere into the license key,
maybe the last character so you
could use that as the decryption
offset.
As always, the full source is
available at
http://pastebin.com/MH9nVTNK.
Until next time, enjoy.
Greg Walters is owner of RainyDaySolutions, LLC, a consulting companyin Aurora, Colorado, and has beenprogramming since 1 972. He enjoyscooking, hiking, music, and spendingtime with his family. His website iswww.thedesignatedgeek.net.
def EncodeKey(s, csum, debug = 0):global Offsetemail = sOffset = csum - 68if debug == 1:
print("Offset is %d" % Offset)NewEmail = ""for cntr in range(0,len(email)):
ch = ord(email[cntr]) + Offsetif cntr == 1:
NewEmail = NewEmail + (chr(len(email)+68)) +chr(ch)
elif cntr == 2:NewEmail = NewEmail + chr(csum) + chr(ch)
else:NewEmail = NewEmail + chr(ch)
if debug == 1:print cntr, NewEmail
return NewEmail
def DecodeKey(s,debug = 0):global Offseteml = ""for cntr in range(0,len(s)):
if debug != 0:print cntr,s[cntr],ord(s[cntr])-
Offset,chr(ord(s[cntr])-Offset)if cntr == 0:
eml = eml + chr(ord(s[cntr])-Offset)elif cntr == 1:
emllen = ord(s[cntr])-Offsetelif cntr == 3:
csumchr=s[cntr]else:
eml = eml + chr(ord(s[cntr])-Offset)if debug == 1:
print emlreturn eml
def DoIt():email = raw_input("Please enter email address -> ")isok = IsValidEmail(email,0)if isok == True:
csum,csumchr = CheckSum(email)ke = EncodeKey(email,csum,0)print("License Key = %s" % ke)print("Original email = %s" % DecodeKey(ke,0))