full circle · 2013-08-13 · full circle magazine #60 18 how-to written by mark crutch inkscape -...
TRANSCRIPT

THE INDEPENDENT MAGAZINE FOR THE UBUNTU LINUX COMMUNITY
INKSCAPE SERIES SPECIAL EDITION
INKSCAPEINKSCAPEVolume Volume OneOne Parts 1Parts 1-7-7
Full Circle
Full Circle Magazine is neither affiliated, with nor endorsed by, Canonical Ltd.
Full Circle Magazine Specials
full circle magazine
The articles contained in this magazine are released under the Creative Commons Attribution-Share Alike 3.0 Unported license. This means you can adapt, copy, distribute and transmit the articles but only under the following conditions: You
must attribute the work to the original author in some way (at least a name, email or URL) and to this magazine by name ('full circle magazine') and the URL www.fullcirclemagazine.org (but not attribute the article(s) in any way that suggests that they endorse you or your use of the work). If you alter, transform, or build upon this work, you must distribute the resulting work under the same, similar or a compatible license.Full Circle Magazine is entirely independent of Canonical, the sponsor of Ubuntu projects and the views and opinions in the magazine should in no way be assumed to have Canonical endorsement.
Please note: this Special Edition is provided with absolutely no warranty whatsoever; neither the contributors nor Full Circle Magazine accept any responsibility or liability for loss or damage resulting from readers choosing to apply this content to theirs or others computers and equipment.
About Full Circle
Full Circle is a free, independent, magazine dedicated to the Ubuntu family of Linux operating systems. Each month, it contains helpful how-to articles and reader- submitted stories.
Full Circle also features a companion podcast, the Full Circle Podcast which covers the magazine, along with other news of interest.
Welcome to another 'single-topic special'Another serial, another compilation of articles for your convenience.
Here is a straight reprint of the Inkscape series, Parts 1-7 from issues #60 through #67, from self-confessed non-artist Mark Crutch – if he can do it, so can you!
Please bear in mind the original publication date; current versions of hardware and software may differ from those illustrated, so check your hardware and software versions before attempting to emulate the tutorials in these special editions. You may have later versions of software installed or available in your distributions' repositories.
Enjoy!
Find Us
Website: http://www.fullcirclemagazine.org/
Forums: http://ubuntuforums.org/forumdisplay.php?f=270
IRC: #fullcirclemagazine on chat.freenode.net
Editorial Team
Editor: Ronnie Tucker (aka: RonnieTucker) [email protected]
Webmaster: Rob Kerfia (aka: admin / linuxgeekery- [email protected]
Editing & ProofreadingMike Kennedy, David Haas, Gord Campbell, Robert Orsino
Our thanks go to Canonical and the many translation teams around the world.

full circle magazine #60 18 �������� �
HHOOWW--TTOOWritten by Mark Crutch IInnkkssccaappee -- TThhee SSVVGG FFiillee FFoorrmmaatt
Imagine giving instructions tosomeone in order for them todraw a picture of a house. Thechances are that you would
describe geometric shapes andtheir relative positions. “Draw a bigred rectangle about half the widthof the page, roughly in the middleand a little wider than it is tall. Nowput a grey triangle on top of itthat’s a little wider so it overhangsat the edges...” The sameinstructions would work for anysize of canvas from a postagestamp to a billboard.
You’ve just imagined the worldof vector graphics.
When you take a photo orcreate an image in GIMP, you’reworking with raster graphics –sometimes called bitmaps (not thesame as the .bmp file format –although that is an example of abitmap graphic). A raster graphic(or bitmap) is essentially a list ofpixel colors, which tells thecomputer to draw a red pixel, thena blue one, then a green one... andso on, pixel-by-pixel, line-by-line,until the last pixel is reached.
Vector graphics, on the otherhand, consist of a series ofinstructions. “Draw a red circle witha radius of 10 units, centered atcoordinates X,Y. Now draw a blueline from the top left corner of thepage to the bottom right.” That redcircle could have a radius of 10inches, or it could be 10 miles,meaning that, unlike raster images,vector graphics can be scaled withno loss of quality.
A small circle scaled up as a bitmap image(above left), and as a vector image (aboveright).
Just as there are many rasterformats – JPEG, GIF, PNG, BMP toname just a few – so there are alsomany vector formats. Most of themhave grown from proprietaryapplications, such as AutoCAD’sDWG, or Adobe Illustrator’s AI, but
one in particular is an open format,defined by the W3C – the samestandards body that’s responsiblefor the HTML format that drivesthe web. Vector graphics are, bytheir very nature, scalable – butthat didn’t stop them trying tomake absolutely sure you knowwhat you’re getting with theirformat: they called it “ScalableVector Graphics”, or SVG.
SVG files are plain textcontaining nested collections of
“tags” in a similar manner to HTMLfiles. There's a <circle> tag, a <line>tag, and so on. They can bemodified using any text editor,though as an image becomes moreand more complex it's usuallyeasier to use a drawing program toedit them. Probably the bestknown software for this is Inkscape(www.inkscape.org) which can befound in the repositories of mostLinux distributions, Ubuntuincluded, and is available also forWindows and MacOS. Inkscape

full circle magazine #60 19 �������� �
HOWTO - INKSCAPEuses SVG as its primary file format,which makes it a great tool forcreating or editing SVG files, butwhich also places a limitation onthe program's capabilities. Withserious work now underway ondefining version 2.0 of the SVGformat, Inkscape should, hopefully,be able to make some ground onits proprietary competition overthe coming years.
The HTML-like structure of SVGfiles, together with their origins atthe W3C, have made them theofficial standard for vectorgraphics in the web world. It hastaken a long time, but most webbrowsers now natively support SVGfiles, and it's possible to mix themdirectly into HTML files – ideal forinline graphs or maps. Thehierarchical structure of tags is alsoopen to being modified byJavascript in the same way asHTML content, allowing for anyonewith some web development skillsto create interactive graphics. As isoften the case, however, specificsupport varies between browsers,and some more advanced featuresof the SVG format may not displayin the same way in all of them.
So SVG is great for diagrams,interactive charts, and even artistic
works, but it's got one other trickup its sleeve which elevates itbeyond the inherent smoothnessand simplicity of pure vectorgraphics: it also has some supportfor raster images. At the simplestlevel, it's possible to include araster image in an SVG file, thendraw lines and circles over it, or clipit into an odd shape using an SVGpath. But raster images can also beused as fill patterns in SVG files:Inkscape ships with a few of themby default, and I've personally usedthe sand texture (which looks likethe noise or snow on an un-tunedtelevision) to help simulate stone,ash, bricks, and even a cornfield!
Going further still, SVG has aconcept of filters – mathematicaloperations that can be combinedand applied to the rasterised pixelsin your final image. The image isstill made up of vectors, but oncethose vectors have been drawn,filters can create all sorts of grungyraster effects which would usuallyrequire a program like GIMP orPhotoshop. Just look at how a littlefiltering can turn some semi-random vector blobs into anexplosive fireball:
Some simple vector blobs...
...brought to life with some SVGfilters
Whether you want to draw iconsfor an application using Inkscape,graphs for a website usingJavascript, or abstract art using atext editor, SVG is a powerful andflexible format that promises evenmore in the years to come. So graba copy of Inkscape using yourpackage manager and get drawing.
Useful Links:Inkscape: http://www.inkscape.orgInkscape User Forum:http://www.inkscapeforum.comTango SVG Icons:http://tango.freedesktop.org/W3C SVGWorking Group:http://www.w3.org/Graphics/SVG/
Next month we'll have our firsttouch of Inkscape. Stay tuned!
Mark has been using Linux since1994, and uses Inkscape to createtwo webcomics, 'The Greys' and'Monsters, Inked' which can both befound at:http://www.peppertop.com/

full circle magazine #61 24 �������� �
HHOOWW--TTOOWritten by Mark Crutch IInnkkssccaappee -- PPtt11
Before you skip on pastthis tutorial thinking it'snot for you, I'm going tolet you in on a little
secret: I can't draw. If you give mea pencil and paper, or sit me infront of The GIMP with anexpensive graphics tablet, then I'lleasily be bested by a four-year-old.Yet, somehow, I'm one of theartists for a regular webcomic. So,how does a fat-fingered cavepainter like me manage to produceartistic works? I use Inkscape.
Inkscape is no replacement foran artistic eye, or three years at artschool, but, if your problem islargely one of hand-eyecoordination, then it offers yousomething that pencils and TheGIMP don't. It gives you theopportunity to tweak and modifyevery line and shape that you draw- until you're happy with the result.If your hand-drawn lines are close,but not quite what you'd imagined,Inkscape gives you the time andtools to alter them, rather thanhaving to throw them away and tryagain. So, before you dismiss thistutorial because you're not a
natural artist, why not have a tryanyway – you might surpriseyourself. If art comes naturally toyou, then you've already got ahead start, but, hopefully, you'll beable to pick up some Inkscape-specific tricks and tips along theway.
Let's begin by getting a copy ofInkscape. It's in the repositories ofmost desktop Linux distributions,so just use your normal packageinstaller. These tutorials will bebased on the 0.48 series, which hasbeen the stable version for sometime now.
On first launching Inkscape,you'll be presented with a blankworking area, surrounded by avariety of toolbars, and a menu barat the top of the window (or at thetop of the screen if you're usingUnity on a recent Ubuntu release).The exact arrangement of thetoolbars can be modified to alimited degree: you can show andhide them using the View >Show/Hide menu, and you canswitch between three predefinedlayouts using the Default, Custom,and Wide options at the bottom ofthe View menu. For these tutorials,I'll be using the Custom layout(which is badly named, as it doesn'tlet you customise it at all), with allthe toolbars visible, and resultingin a main window that lookssomething like that shown left.
Now, let's drawsomething. From theToolbox (which runs
down the left regardless of yourscreen layout), click on the Circlesand Ellipses tool (left).
Move your cursor back into theworking area and you should
full circle magazine #61 25 �������� �
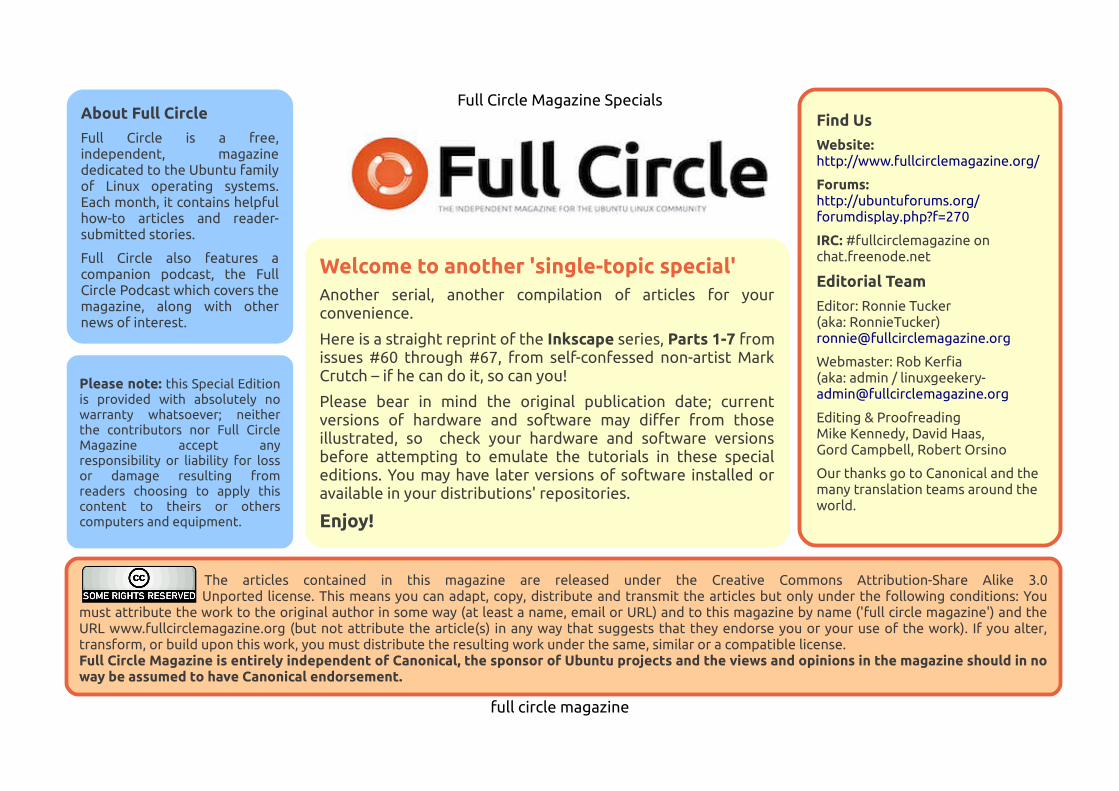
HOWTO - INKSCAPEnotice that the pointer haschanged to indicate that you'reusing the Circle tool. In theworking area is an outline thatrepresents your page – althoughInkscape will happily let you drawoutside its boundaries - whichprovides you with a large area forrough work, reference images oranything else that you don't wantto appear on your printed page orexported image. Click within thepage, and drag to the right anddownwards to create an ellipse,releasing the mouse button whenyou're happy with its size andshape. Yours will probably be adifferent color, but we'll sort thatout shortly.
Your ellipse should have adotted line around it, indicatingthat it's currently selected. Manyoperations in Inkscape only workon the objects that are currentlyselected. The quickest way to de-select everything is to click on ablank section of the working area,away from any of the objects
you've drawn. To re-select yourellipse just click on it with theCircles and Ellipsis tool still active.
As well as the dotted line, youshould see two small squares and asmall circle on the edge of yourellipse. These are referred to as“handles”, and are a graphical wayfor you to modify some of theproperties of your objects. Trymoving one of the square handlesby dragging it with the mouse: itchanges the radius of the ellipse inone direction. The second squarehandle changes on the otherradius.
The circle is a little different –it's actually a pair of circles on topof each other. They allow you toturn your circle into a segment oran arc. Try dragging one round theoutline of the ellipse. Now dragthe other. Inkscape tries to guesswhether you want a segment or anarc, so will flip between the twomodes as you move the handles.You can switch between themmanually using the buttons on theTool Control Bar, just above thedrawing area. Clicking on the thirdbutton will put the handles on topof each other once more, returningyou to a full ellipse.
Let's give your ellipse a littlecolor. Select it and look down tothe bottom-left of the Inkscapewindow. There you will find a pairof colored swatches labelled Filland Stroke. Fill shows the colorthat is used to draw the inside ofyour ellipse, while Stroke showsthe color that is used to draw itsoutline. You can right-click on thenumber next to the Stroke swatchto pick from a few standard sizes ifyour stroke is too thick or thin.
Above those two swatches,you'll find a whole load moreswatches stretching the width ofthe window. This is referred to asthe color palette. Click on a swatchin the palette to set the fill color ofthe currently selected object, andSHIFT-click to set the stroke color.At the far left of the palette is aswatch with a cross through itwhich can be used to set the fill orstroke to transparent. Try settingthe fill to transparent and givingthe stroke a color. Now play withthe circular handles and theSegment and Arc buttons – itshould be a bit clearer why thelatter is so named.
Finally let's movethe ellipse around onthe page. For this you'llneed to click on the
Select tool, which is the firstbutton in the toolbox and lookslike an arrow (left).
With this tool enabled, you canmove an object simply by clickingand dragging it. When an object isselected using the Select tool,you'll see a dotted line around it,but rather than the small squareand circular handles we saw whenthe Circle tool was active, you'll

full circle magazine #61 26 �������� �
Mark has been using Linux since1994, and uses Inkscape to createtwo webcomics, 'The Greys' and'Monsters, Inked' which can both befound at:http://www.peppertop.com/
HOWTO - INKSCAPEsee some arrow-shaped handlesarranged around the outside ofthe dotted line.
Dragging these arrows will letyou change the width and heightof the ellipse. Although they mayseem to have the same effect asthe small square handles you usedearlier, they're subtly different. Tryclicking on the ellipse a secondtime, as though you're trying toselect it again. The handles changeto a different collection of arrows,and a small cross appears in thecenter of the object.
By dragging the arrows at thecorners you can rotate your object.The handles at the sides let youskew it. Try playing with them toget a feel for how they work. You
can drag the little cross around tochange the center of rotation;SHIFT-click on it to return it to themiddle of the object. A single clickon the ellipse will switch back andforth between the resize androtate modes.
A double-click will switch you tothe Circle tool, letting you gainaccess to the small square andcircular handles once more. Tryrotating an ellipse using the Selecttool, then double-click to accessthe square handles and change theellipse using them. Back to theSelect tool and change the widthand height using the arrowhandles. See, I told you they weredifferent!
If you draw a few more circlesand ellipses and move themaround, you'll soon find that theycan overlap or obscure each otheras though they're stacked on topof one another. When you select anobject with the Select tool, you'llfind a group of four icons which letyou move your objects up anddown so that they appear in frontof or behind other objects. Thefirst and last buttons will makeyour object jump to the back orfront of the stack, whereas thesecond and third let you nudge the
object down and up by oneposition at a time.
Sometimes you might need toget a closer view of the objects youcreate – or zoom out for anoverview. We'll cover that in detailin a later article, but for now youcan simply use the plus (+) andminus (-) keys on your keyboard tozoom in and out, and use thescrollbars to move your viewaround.
Now you know how to createellipses, segments, and arcs,change their colors, and adjust thethickness of the stroke. You canmove them around on the pageand nudge them up and down inthe stack of objects you've created.You can zoom in and out and movearound the canvas. Next time we'llintroduce some other shapes, buteven with just ellipses, segments,and arcs, you can start to makesome simple images: although it'snot really the right season for it,how about drawing a snowman.
Finally, you should save your
work using the File > Save (or SaveAs...) menu. There's a pop-up menuin the save dialogue that lets youchoose between various formats.For now just choose Inkscape SVG,the first item on the list – I'll coversome of the other options in afuture instalment.

full circle magazine #62 18�������� �
HHOOWW--TTOOWritten by Mark Crutch IInnkkssccaappee -- PPtt22
Lastmonth, we learnedhow to draw ellipses usingthe Circle tool. But youmay have noticed that we
didn't actually draw any circles,despite the tool's name. You mayhave got close by adjusting anellipse by eye, but that's not quitethe same as drawing a perfectcircle. The secret to drawing aperfect circle is actually the secretto making the best use of Inkscapein general: you need to use thekeyboard.
Inkscape has a huge number ofkeyboard shortcuts and modifiers.Last month, I mentioned using thePlus and Minus keys to zoom in andout, but there are hundreds morelisted on the Inkscape Keys andMouse Reference – the URL is atthe end of this article, but you canalso get to it directly via the Helpmenu in Inkscape. Such a largenumber of shortcuts can beoverwhelming, so I'm just going tointroduce them a few at a time,starting with the CTRL and SHIFTkeys.
These keys serve different
purposes depending on whatyou're doing in Inkscape at thetime that you press them, but, verybroadly speaking, they usuallyhave the following effects:CTRL: Lock or snap some aspect ofthe operationSHIFT: Affect the center orstarting point for an operation
An “operation” in this caserefers to drawing, rotating,skewing, or otherwisemanipulating an object. Let’s lookat each of these keyboardmodifiers when used with ourCircles and Ellipses tool.
Select the Circle tool by clickingits icon, or by pressing the “e” key(for ellipse) or the F5 key. Nowhold down CTRL while you drag anellipse out onto the canvas. You'll
find that you can no longersmoothly adjust the width andheight of the ellipse, but ratherthat it snaps to fixed ratios of 1:1,1:2, 3:1, and so on. So the answerto the question of how to draw acircle is simply to hold down CTRLwhilst drawing an ellipse.
As well as locking the ratiowhen you first draw an object, theCTRL key can also be used to snapyour subsequent edits to definedvalues. Try selecting your ellipsewith the Circle tool active, then
move the small circular controlhandles (to turn your ellipse into asegment or arc) while holding theCTRL key. You'll find that thehandles snap to particular angles,defaulting to 15°. You can changethat value via the File > InkscapePreferences > Steps dialog, whereyou can choose from a selection ofother angles via a drop down list,although the default is a goodchoice for most uses.
Now try selecting anellipse using the Select
full circle magazine #62 19�������� �
HOWTO - INKSCAPE Pt2tool (previous page, pointer icon),then clicking a second time toenable the rotation and skewinghandles. Hold down CTRL as yourotate your object, and you'll findthat the same snapping actionoccurs. It also happens forskewing, but that's a little lessobvious with an ellipse, so we'llcome back to that one a little later.
Click on the ellipse again toswitch back to the move and scalehandles. If you try dragging yourellipse around, you'll find that theCTRL key locks you to onlyhorizontal or vertical movements.Now, try resizing with the arrowhandles, and you'll discover thatthe CTRL key locks the aspect ratioof your ellipse – you can make itbigger and smaller, but it will keepthe same ratio of width to height.
If you use a mouse with awheel, then the CTRL key hasanother feature: hold it down asyou scroll the mouse wheel inorder to quickly zoom in and out ofyour document. While you'replaying with the mouse wheel, tryusing it to click and drag thecanvas around – a much faster wayto pan around your drawing thanusing the scroll bars.
Now let's consider the SHIFTkey. Try holding it down whiledrawing a new ellipse. Notice thatit's being drawn relative to thecenter of the ellipse, rather thanthe corner. One of the mostcommon uses for the SHIFT key inInkscape is to change the startingor reference point for anoperation.
Select an ellipse using theSelect tool, then hold SHIFT as youresize it with the arrow handles.Notice how the reference point foryour actions has switched to thecenter of the ellipse. Try pressingand releasing SHIFT while you're inthe middle of resizing the ellipse tomake it more obvious. You don'thave to press these modifiers rightat the start of an operation, youcan press and release them at anypoint. The only thing that mattersis whether they're pressed whenyou release the mouse button.
Click the ellipse to switch torotation mode, and hold SHIFTwhile you rotate or skew using thehandles. You should see the smallcross that indicates the rotationcenter jump to the opposite corneror side from the handle you'removing, and your ellipse will rotateor skew around that reference
point.
You can also combine the CTRLand SHIFT keys. Press both as youdraw with the Circle tool in orderto create a perfect circle drawn outfrom its center point, or while yourotate your ellipse to rotate it in15° steps around the oppositecorner from the rotation handle.
Let's finish this month with anew shape: there's only so muchyou can draw with circles andellipses so we'll create somerectangles and squares instead.
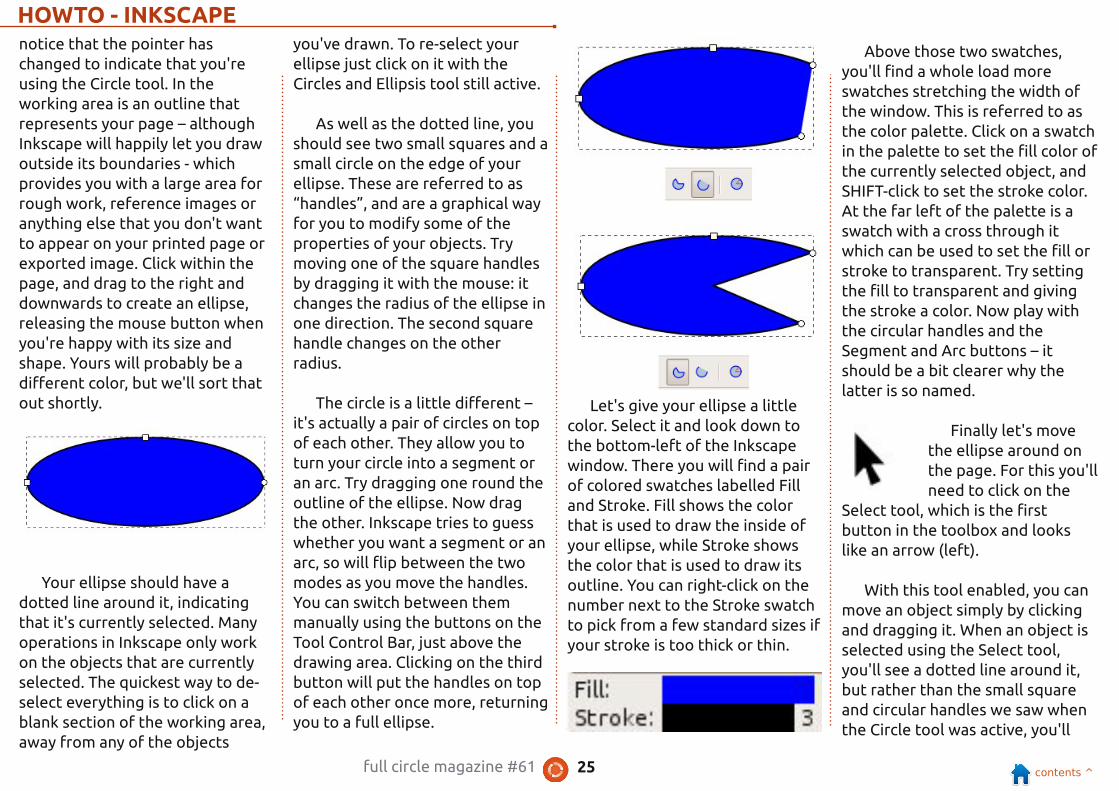
For this, we'll use theRectangle tool (shownleft. Press F4 or “r”). Start
by clicking on the button in thetoolbox, then drag your shape outon the drawing canvas, just asyou've been doing with ellipses.You should now have a nicerectangle:
Notice how your rectangle has
small square and circular handles,like those on the ellipses. The twosquare handles are used to adjustthe width and height. Hold SHIFTas you move them to constrainyour changes to just one directionor the other. The circle handle, likethat on an ellipse, is actually a pairof handles on top of one another.Move just one of them (or holdCTRL whilst moving either ofthem), and you'll get nicesymmetrically-rounded corners toyour rectangle – like a quarter of acircle. Move both of them andyou'll get an elliptically-roundedcorner instead. If you want to goback to perfect 90° corners, simplySHIFT-click one of the circularhandles, or use the button at theend of the Tool Control bar (justabove the canvas).

full circle magazine #62 20 �������� �
Mark has been using Linux since1994, and uses Inkscape to createtwo webcomics, 'The Greys' and'Monsters, Inked' which can both befound at:http://www.peppertop.com/
HOWTO - INKSCAPE Pt2
The CTRL and SHIFT keys workin a very similar way with theRectangle tool as they do with theCircle tool: hold down CTRL whileyou draw your rectangle toconstrain it to fixed ratios if youwant to create a perfect square, orhold down SHIFT if you want todraw from the center outwardsrather than corner to corner.
Of course you can change thecolor of the fill and stroke for yourrectangles – just as we did withellipses last month. You can alsouse the Select tool to move, resize,rotate, and skew them – and if youhold down CTRL while skewing arectangle, it's a lot more obviouswhat's happening than it is with anellipse.
Now that you can createrectangles and squares, why notenhance that snowman you drewlast month by adding a hat andpipe?
Useful Links:Keys and Mouse Reference:http://inkscape.org/doc/keys048.html
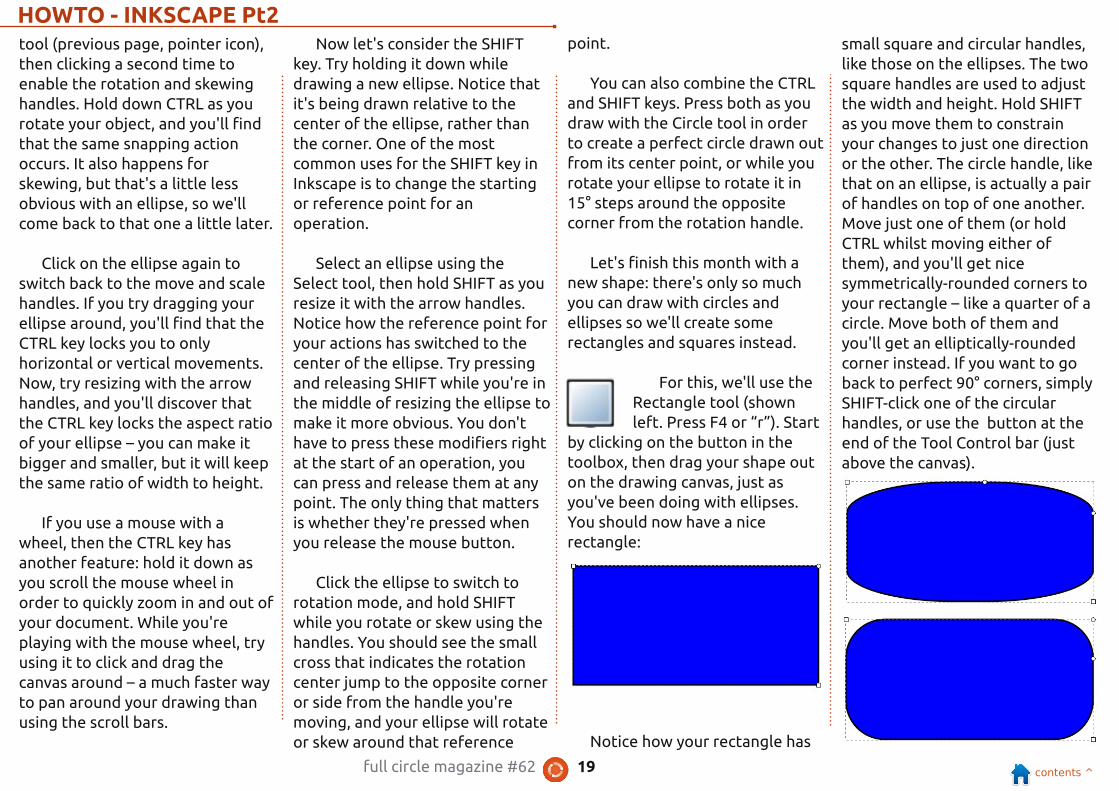
CCOODDEEWWOORRDD
Solutions are on the second last page.
Every number in the grid is 'code' for a letter of thealphabet. Thus the number '2' may correspond to theletter 'L', for instance. All - except the difficult codewordpuzzles - come with a few letters to start you off
Puzzles are copyright, and kindly provided by,The Puzzle Club - www.thepuzzleclub.com

full circle magazine #63 19�������� �
HHOOWW--TTOOWritten by Mark Crutch IInnkkssccaappee -- PPtt33
Here's a riddle for you:when is a circle not acircle? More specifically,which of these two
circles is a circle, and which oneisn't?
They may look the same, butthey're not. If you double-click oneach of them to make their edithandles visible, you can start tosee a difference.
The one on the left is the truecircle, created by holding downCTRL while drawing an ellipse. Theother is a square, created byholding CTRL while drawing a
rectangle, which has had itscorners rounded using the smallcircle handles.
Often it's quite obvious whattype of object you're working within Inkscape, but as your drawingsbecome more complex, and as youbegin to use more and more tools,it's easy to lose track. Somefeatures only work with particulartypes of objects, so it's handy to beable to tell at a glance exactlywhat you've got selected. Inkscapereveals that information – and awhole lot more – in the status barat the bottom of the window.Here's the relevant part of thestatus bar when each of these“circles” is selected with the Selecttool:
From that information it's quiteobvious that the two circles aredifferent. But that image has beenedited a little; the text actuallyreads “Ellipse in layer Layer 1. Click
selection to toggle scale/rotationhandles.” The status line is tellingyou that clicking your selectedobject will toggle between thescale handles and the rotation &skew handles.
In fact much of what has beenverbosely described in theprevious two articles can be foundwritten far more succinctly inInkscape's status line. With theCircle tool selected you're told to“Drag to create an ellipse. Dragcontrols to make an arc orsegment. Click to select.” In thiscase “drag controls” is Inkscape'sterminology for moving the smallsquare and circle handles. A similarline when the Rectangle tool isselected suggests you can “Dragcontrols to round corners andresize.”
Hovering the mouse pointerover the various handles alsoprovides valuable information inthe status line, including this gemwhen you use the circle handles on
an ellipse: “...drag inside the ellipsefor arc, outside for segment.” So ifyou were wondering aboutInkscape's seemingly randomswitching between segments andarcs, it turns out not to be randomafter all. Keep the pointer insidethe boundary of the ellipse if youwant to create an arc, and outsideif you want to create a segment –although you can always switchusing the toolbar buttons if youend up with the wrong type ofobject.
As well as these handy tips, thestatus bar also houses a few otherthings that you should becomefamiliar with if you want to makethe most of your time withInkscape. At the far left are the filland stroke swatches that wereintroduced back in the first part ofthis series. In theory you can clickand drag on them in order tochange their colors, but I've alwaysfound that to be an imprecise andawkward approach. Next monthwe'll look at the Fill and Stroke

full circle magazine #63 20 �������� �
HOWTO - INKSCAPE Pt3dialog which is a much better wayto pick colors that aren't present inyour color palette.
The stroke thickness offers anequally useless facility to click anddrag in order to change its value.For most quick changes a right-click on the number to bring up thecontext menu is a much betteroption.
The spin-box labelled with acryptic “O:” lets you set the opacityof your selected objects. It's shownas a percentage, so 100 is the normfor a completely opaque colorwhilst 0 will render your objectscompletely transparent. Inkscapehas lots of ways to make yourobjects transparent, which can bea real problem for new users. Youcan set a value in this box by typingdirectly, by using the up and downbuttons at the side, or by right-clicking to bring up a rather coarsefive-step context menu. I usuallyuse the context menu, at least as astarting point, and, if nothing else,it provides a fast way to get backto 100% opacity when you're indanger of losing your transparentobjects.
The eye and lock icons, and thepop-up menu that follows them,
are all related to layers. I'll becovering layers in a later article,but there are three things worthknowing about them at this stage:
• If you're familiar with layers inGIMP or another graphics program,layers in Inkscape work in a similarway.
• Clicking the eye button is anotherof the many ways to make yourobjects disappear from the screen– in this case by hiding the layerthey're drawn on. The icon changesto a closed eye in this case and youcan simply click it again to displaythe layer once more.
• If the lock icon looks like a closedpadlock, then your layer is lockedand you won't be able to drawanything new onto it. Click the iconagain to unlock it.
To the right of the status text isa pair of fields which show the Xand Y coordinates of your mousepointer, relative to the bottom-leftcorner of the page boundary. Youcan't modify these in any way,other than by moving your mouse,as they're just there for
information. Be warned, however,that Inkscape's choice of thebottom-left of the page as theorigin point is different to the SVGspecification's use of the top-leftcorner – it's not a distinction thatwill affect most people, but it doesmean that if you're a programmertype who wants to edit the SVG filedirectly, these values are almostuseless to you.
The last Inkscape-specificwidget in the status bar is a zoomspin-box which shows you thecurrent zoom level, lets you set aspecific value by typing or usingthe up and down buttons or pickfrom a few standards via a contextmenu. There are so many otherzoom tools, including the CTRLplus scroll wheel and the +/- keyswhich I've described previously,that I doubt you'll ever use thiswidget. Finally there's a handle toresize the window.
Let's finish this month byintroducing another drawing toolto your arsenal: the Stars andPolygons tool. It's got an icon inthe tool box and can also beactivated using the asterisk key
(easy to remember because itlooks a little like a star) or SHIFT-F9. Dragging out a shape on thecanvas will produce either a convexpolygon or a concave, star-like,
polygon. You can switch betweenthe two modes using the first twobuttons on the tool control bar.
Depending on which modeyou're using, you'll see either oneor two small diamond-shapedhandles. These let you adjust thesize, rotation and, for concavepolygons, the spoke ratio. Byholding various modifier keys asyou move them, you can alsoadjust several other parameters(have a look at the status bar forthe details) – although I usuallyprefer to change them using thespin-boxes in the tool control bar.
The only parameter that can'tbe changed via the diamond
full circle magazine #63 21 �������� �
Mark has been using Linux since1994, and uses Inkscape to createtwo webcomics, 'The Greys' and'Monsters, Inked' which can both befound at:http://www.peppertop.com/
HOWTO - INKSCAPE Pt3handles is the number of cornerson your polygon, but the otheradvantage to using the spin-boxesis that, like the spin-boxes on thestatus bar, they each have acontext menu that you can accesswith a right-click. These contextmenus are tailored to each spin-box separately, with descriptivetitles to provide you with a littleinsight into the effect they'll have.
The best way to get a feel forthe Star tool is simply to play withit. Try different combinations ofvalues in the spin-boxes. If yourobjects start to get a little out ofcontrol just click the button at theright of the tool control bar – theone that looks like a small broom –in order to 'clean up' theparameters back to sensibledefaults. To give you some idea ofwhat you can achieve simply bytweaking the parameters for theStar tool, this image contains sixidentical polygons which differonly in the settings in their spin-boxes:
To go back to the question thatstarted this article, you now have athird way to create a 'circle' – drawa convex polygon with a largenumber of corners. It's not aparticularly good way to draw acircle, and it's certainly notefficient, but it does reinforce thefact that objects in Inkscape aren'talways what they seem. Keep aneye on the status text.
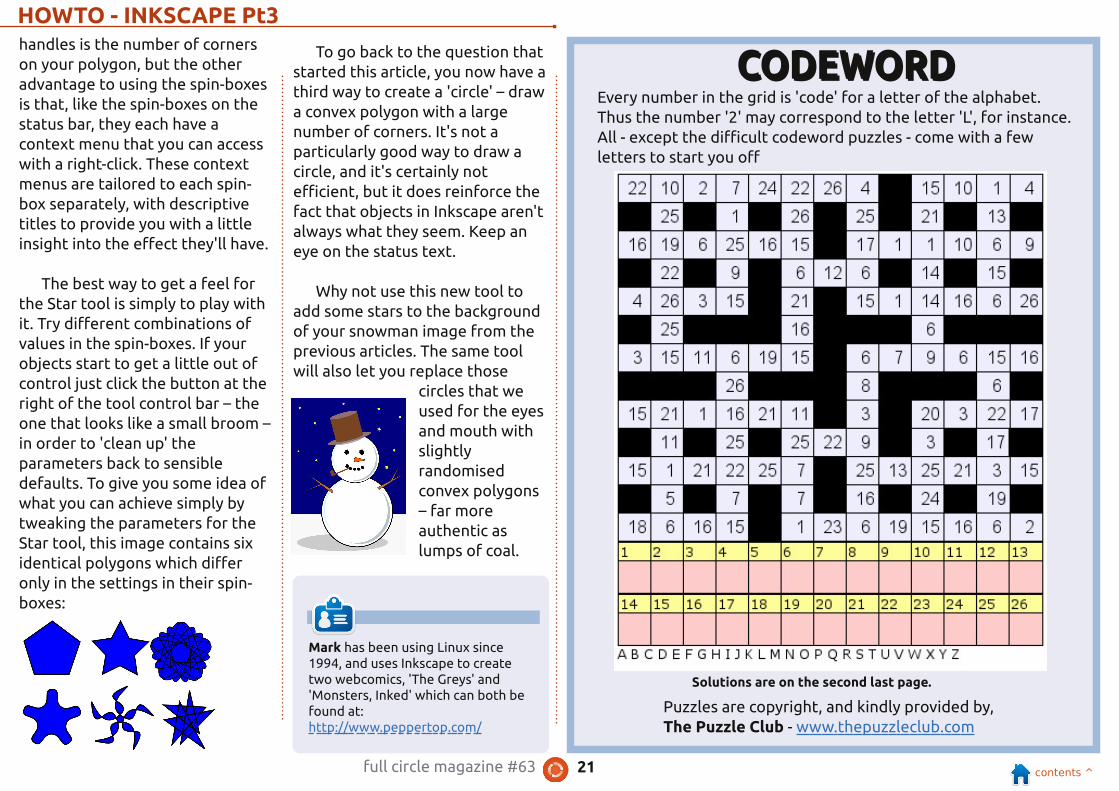
Why not use this new tool toadd some stars to the backgroundof your snowman image from theprevious articles. The same toolwill also let you replace those
circles that weused for the eyesand mouth withslightlyrandomisedconvex polygons– far moreauthentic aslumps of coal.
CCOODDEEWWOORRDD
Solutions are on the second last page.
Every number in the grid is 'code' for a letter of the alphabet.Thus the number '2' may correspond to the letter 'L', for instance.All - except the difficult codeword puzzles - come with a fewletters to start you off
Puzzles are copyright, and kindly provided by,The Puzzle Club - www.thepuzzleclub.com

full circle magazine #64 17�������� �
HHOOWW--TTOOWritten by Mark Crutch IInnkkssccaappee -- PPtt44
Thismonth, we're going tolook at setting colors forour objects. So far we'veapplied colors to the fill
and stroke of our objects byclicking and SHIFT-clicking on thepalette at the bottom of thescreen. You can also set either totransparent by using the leftmostpalette entry – the one with across through it. You've probablyalready discovered the scroll barthat usually lives between thepalette and the status bar, andwhich lets you scroll through thefull collection of colors in thepalette, but have you noticed thetiny little button to the right of thepalette area – the one that lookslike a small “<” character? Clickingon that presents you with a pop-upmenu of palette options (far right).
Most of this menu is taken upby a list of palettes you can use.Try switching between a few ofthem to see how they look. Thenplay with the Size and Width sub-menus to find a swatch size thatyou're comfortable with. Finally,try the Wrap checkbox to seewhether you prefer to see all of
your palette at once (even if ittakes up more vertical space), orare happy to use the scrollbarwhen you need to access the moredistant colors.
If you want to use your ownpalette – perhaps to fit in with acorporate color scheme or tointegrate with other icons in anapplication – you can drop a GIMPpalette file (.gpl) into your.inkscape/palettes directory, orinto /usr/share/inkscape/palettesif you want it to be available to allusers on your computer.
The palette is greatfor quickly selecting acolor for your fill or
stroke, but what if you want acolor that's not present in thepalette? That's where the Fill &Stroke dialog comes in. There arevarious ways to open the dialog,including the button on theCommands toolbar, selecting anobject then picking 'Fill and Stroke'from the right-click context menu,pressing CTRL-SHIFT-F, or simplyclicking on the current fill andstroke swatches at the bottom-left
of the window. You may dock thedialog to the right-hand side of theInkscape window, or move it into awindow of its own, by dragging itusing the grey title bar at the top.
At the top of the dialog arethree tabs for setting the Fill, theStroke Paint, and the Stroke Style.The first two offer almost identicaloptions, so we'll just discuss theFill tab and you can extrapolatefrom there.

full circle magazine #64 18�������� �
HOWTO - INKSCAPE Pt4Immediately below the tab is a
row of buttons which are used todetermine what type of paint isused for the fill or stroke. At theleft is a button for 'No Paint' whichlooks like a cross and has the sameeffect as using the crossed swatchat the left of the palette in themain drawing window. If both thefill and stroke are set to No Paint,then your object will be completelyinvisible.
The second button lets youchoose a single color for your fill orstroke. In that respect, it's thesame as selecting from the palette,except that you have much finercontrol over the color. Choosingthis button presents you with yetmore tabs offering a few differentmethods for picking your color.Don't be fooled though: Inkscapeuses RGB (Red, Green, Blue) valuesin its files even if you select a colorvia the HSL or CMYK tabs. This isone example of Inkscape beingrestricted by the capabilities of theSVG format. The CMS tab is only ofuse if you set up a colormanagement system on yourcomputer, and is outside the scopeof this series.
Whichever color picker youchoose, you'll find a slider at the
bottom labelled with an 'A'. This isthe 'alpha channel', which is justanother term for opacity. If thisslider is moved to the far left, thenyour fill or stroke will becompletely transparent. To the farright, it's completely opaque.Anywhere in between will make itpartially transparent. This imagedemonstrates the same twoobjects with the stroke fullyopaque, but the top object's fillalpha being set at the 0, 128 and255 levels (above).
As with the No Paint option,setting the alpha channel for boththe fill and stroke to zero willrender your object completelyinvisible. If the fill or stroke ispartially transparent, the colorswatches in the bottom-left cornerof the status bar in the mainwindow will show a two-partarrangement: the left half showsthe color with the alpha appliedover a checkerboard effect, whilethe right half shows an opaqueversion of the same color. You can
easily make a translucent fill orstroke completely opaque via thecontext menu on the swatch.
The third and fourth buttons letyou use a gradient for your fill orstroke. Gradients will be thesubject of next month's article, soremember that these buttonsexist, but we'll skip over them fornow.
The next button lets you paintyour fill or stroke using a pattern.Inkscape ships with a variety ofstripes and polka dots which areavailable via a pop-up menu whenyou select this option. Mostpatterns are black or white, withjust one color pattern(Camouflage) and three grayscalebitmap images that can be used aspatterns, right at the bottom ofthe list. It is possible to create yourown patterns and to adjust the sizeand scale of the built-in patterns,but those are subjects for anotherday.
Also being put off for laterarticles are the Unset Paint buttonthat looks like a question mark andthe two splodges on the right ofthe Fill tab.
The third main tab on the Filland Stroke dialog is labelled asStroke Style. While the StrokePaint tab is used to set the color,gradient or pattern that is used forthe stroke, this tab lets youmanage all the other parameters.Most of these settings can beadjusted only by using this dialog,so it's worth becoming familiarwith it.
full circle magazine #64 19�������� �
HOWTO - INKSCAPE Pt4
At the top is a spin-box forsetting the width of the stroke,and an associated pop-up menu forpicking the units that the width ismeasured in. These duplicate thefunctionality available from theright-click menu on the status bar,but offer a greater choice of unitsand finer control over the width.SVG currently allows the stroke toonly straddle the outline of theobject, half inside and half outsideit. You can see this clearly byreducing the alpha channel on athick stroke – notice that the fillshows through the inner half ofthe stroke. It's worthremembering, as Inkscape novicesoften wonder why increasing thestroke also reduces the area insidetheir shapes.
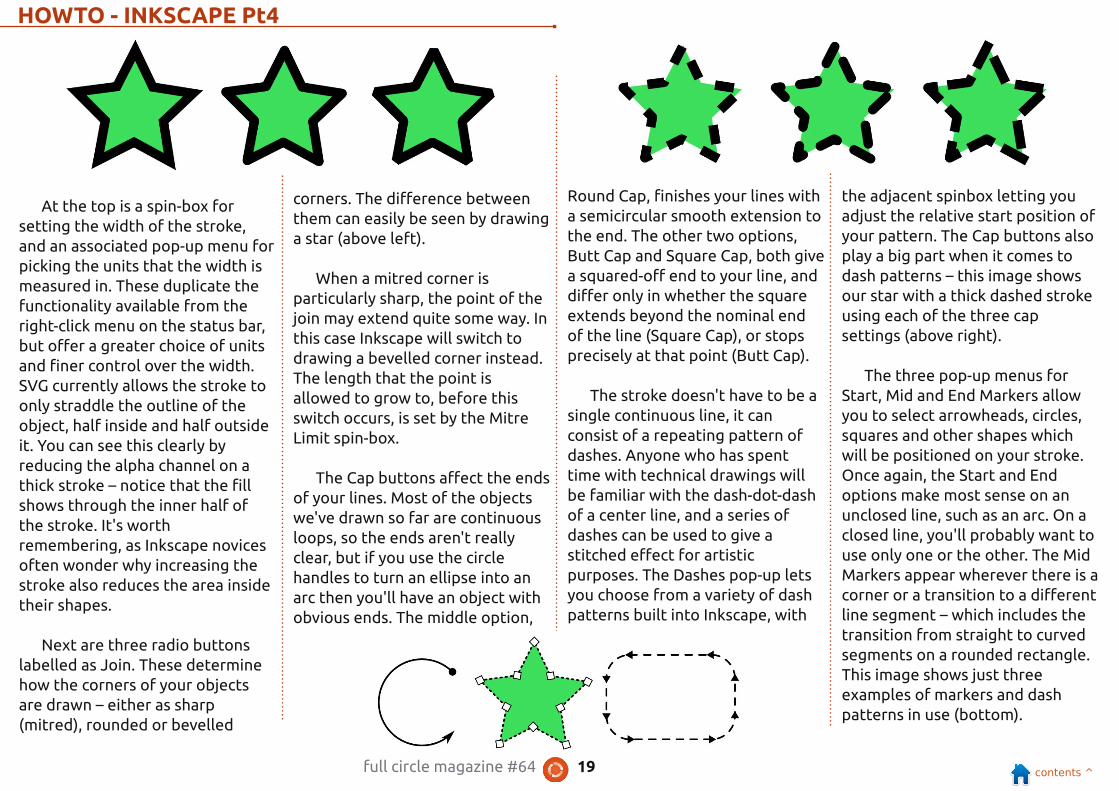
Next are three radio buttonslabelled as Join. These determinehow the corners of your objectsare drawn – either as sharp(mitred), rounded or bevelled
corners. The difference betweenthem can easily be seen by drawinga star (above left).
When a mitred corner isparticularly sharp, the point of thejoin may extend quite some way. Inthis case Inkscape will switch todrawing a bevelled corner instead.The length that the point isallowed to grow to, before thisswitch occurs, is set by the MitreLimit spin-box.
The Cap buttons affect the endsof your lines. Most of the objectswe've drawn so far are continuousloops, so the ends aren't reallyclear, but if you use the circlehandles to turn an ellipse into anarc then you'll have an object withobvious ends. The middle option,
Round Cap, finishes your lines witha semicircular smooth extension tothe end. The other two options,Butt Cap and Square Cap, both givea squared-off end to your line, anddiffer only in whether the squareextends beyond the nominal endof the line (Square Cap), or stopsprecisely at that point (Butt Cap).
The stroke doesn't have to be asingle continuous line, it canconsist of a repeating pattern ofdashes. Anyone who has spenttime with technical drawings willbe familiar with the dash-dot-dashof a center line, and a series ofdashes can be used to give astitched effect for artisticpurposes. The Dashes pop-up letsyou choose from a variety of dashpatterns built into Inkscape, with
the adjacent spinbox letting youadjust the relative start position ofyour pattern. The Cap buttons alsoplay a big part when it comes todash patterns – this image showsour star with a thick dashed strokeusing each of the three capsettings (above right).
The three pop-up menus forStart, Mid and End Markers allowyou to select arrowheads, circles,squares and other shapes whichwill be positioned on your stroke.Once again, the Start and Endoptions make most sense on anunclosed line, such as an arc. On aclosed line, you'll probably want touse only one or the other. The MidMarkers appear wherever there is acorner or a transition to a differentline segment – which includes thetransition from straight to curvedsegments on a rounded rectangle.This image shows just threeexamples of markers and dashpatterns in use (bottom).
full circle magazine #64 20 �������� �
Mark has been using Linux since1994, and uses Inkscape to createtwo webcomics, 'The Greys' and'Monsters, Inked' which can both befound at:http://www.peppertop.com/
HOWTO - INKSCAPE Pt4One big caveat with markers is
that they will appear in black,regardless of the color of yourstroke. Fortunately Inkscape doesship with an extension that tweaksthe necessary SVG internals foryou, so making the colors match isas simple as selecting your marker-laden object, and then heading upto the menu bar to chooseExtensions > Modify Path > ColorMarkers to Match Stroke. Evenusing this extension, however,markers are always opaque,regardless of the alpha setting ofyour stroke.
The last part of the Fill andStroke dialog to explain is the pairof sliders at the bottom – to adjustthe Blur and Opacity. The former isa convenient shortcut for addingthe Gaussian Blur filter to anobject. SVG filters are a major topicof their own that we'll look at in alater article, but, for now, it'senough to know that increasingthis slider will cause your object tobecome blurred. The more youincrease it, the more blurred yourobject will be. Don't go toooverboard: usually a small valuewill give you a good effect, whilstlarger values just dissipate yourobject into mist. Be aware thatusing filters will slow the speed at
which Inkscape redraws the screen,especially if you're zoomed inclosely.
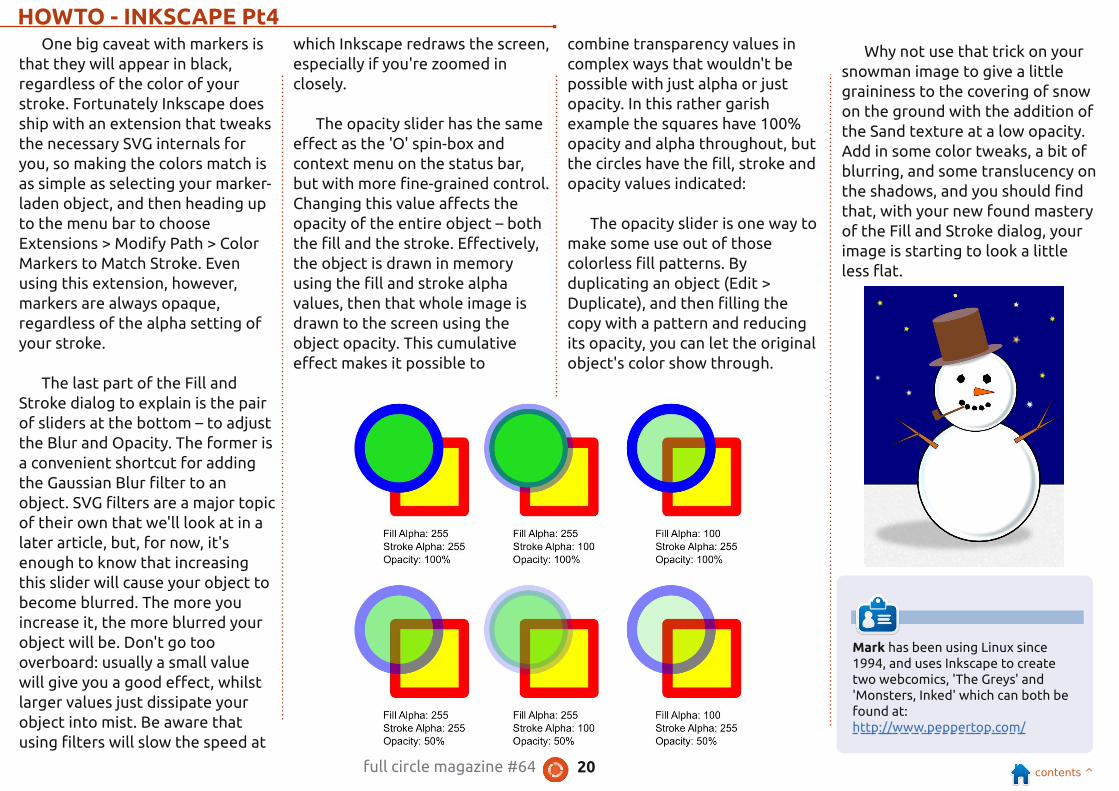
The opacity slider has the sameeffect as the 'O' spin-box andcontext menu on the status bar,but with more fine-grained control.Changing this value affects theopacity of the entire object – boththe fill and the stroke. Effectively,the object is drawn in memoryusing the fill and stroke alphavalues, then that whole image isdrawn to the screen using theobject opacity. This cumulativeeffect makes it possible to
combine transparency values incomplex ways that wouldn't bepossible with just alpha or justopacity. In this rather garishexample the squares have 100%opacity and alpha throughout, butthe circles have the fill, stroke andopacity values indicated:
The opacity slider is one way tomake some use out of thosecolorless fill patterns. Byduplicating an object (Edit >Duplicate), and then filling thecopy with a pattern and reducingits opacity, you can let the originalobject's color show through.
Why not use that trick on yoursnowman image to give a littlegraininess to the covering of snowon the ground with the addition ofthe Sand texture at a low opacity.Add in some color tweaks, a bit ofblurring, and some translucency onthe shadows, and you should findthat, with your new found masteryof the Fill and Stroke dialog, yourimage is starting to look a littleless flat.

full circle magazine #65 18�������� �
HHOOWW--TTOOWritten by Mark Crutch IInnkkssccaappee -- PPaarrtt 55
Lastmonth, I introducedthe Fill and Stroke dialogas a method for settingflat colors or patterns on
your objects. The SVG specificationalso allows for gradients to beused, but, unfortunately, describesonly two types: linear and radial. Ifyou've used gradients in othergraphics programs, you may beused to far more variety, butInkscape is bound by thelimitations of the SVG specificationso, for now at least, two gradienttypes are all you have. Inkscape hasseparate buttons for these in theFill and Stroke Paint tabs of thedialog: as you mightexpect, one looks like alinear gradient:
and the other looks like aradial gradient:
Whichever one you choose,you'll be faced with the same userinterface within the dialog (aboveright).
The first item is a pop-up list ofthe gradients that already existwithin your document. The
currently selected gradient, at thetop of the list, will be the new onethat you're in the process ofcreating. If you prefer to use anexisting gradient, then you cansimply select another one from thelist. Each gradient gets given auser-unfriendly name, such as the“linearGradient3791” in thescreenshot. Unfortunately,Inkscape doesn't provide apractical user interface formodifying this name, so, once youhave more than a handful of
gradients in a document, it canquickly become an unwieldy listwhich gives little indication ofwhere each one is used in yourimage.
Your new gradient will alwaystake the same basic form: it has astart color which is set to a fullyopaque version of your current fillcolor (or to black if there is no fillcolor set), and it has an end colorwhich is the same as the start color– but with its alpha value set tozero. The result is a gradientrunning from an opaque color to atransparent color which runs fromleft to right for a linear gradient,and from the center outwards for aradial gradient:
If you double-click on yourobject – so that you enter editingmode and can see the smallhandles we've explored in previous
articles – you'll also find that twoor three new handles haveappeared, joined by lines andindicating the start and end pointsof your gradients as square andcircular handles respectively. Youcan drag these handles around –even outside the boundary of yourobject – in order to change theposition and angle of yourgradient. For radial gradients, thetwo end points can be movedindependently, allowing you tohave circular or elliptical gradients.
When you click on one of thegradient handles, you'll notice thatthe Fill and Stroke dialog switchesback to the Flat Color mode, withthe selected color also reflected inthe swatches in the bottom-leftcorner of the main Inskcapewindow. The color you can see isthat of the selected end point of
full circle magazine #65 19�������� �
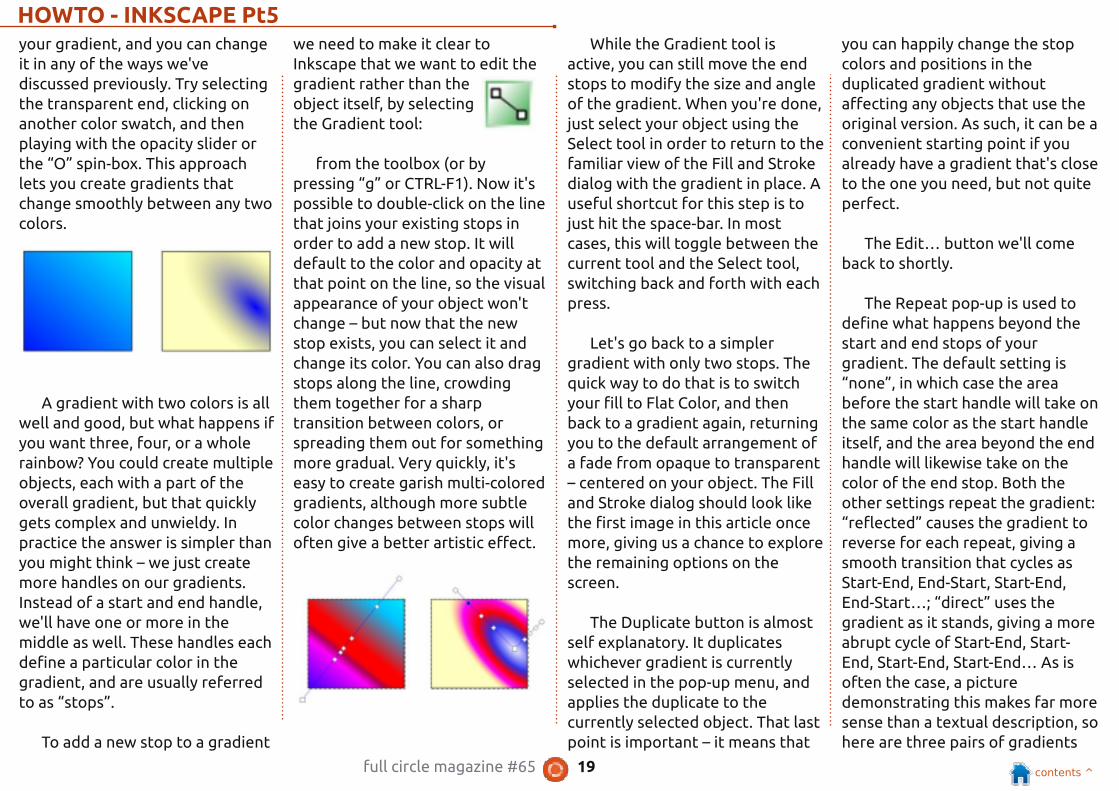
HOWTO - INKSCAPE Pt5your gradient, and you can changeit in any of the ways we'vediscussed previously. Try selectingthe transparent end, clicking onanother color swatch, and thenplaying with the opacity slider orthe “O” spin-box. This approachlets you create gradients thatchange smoothly between any twocolors.
A gradient with two colors is allwell and good, but what happens ifyou want three, four, or a wholerainbow? You could create multipleobjects, each with a part of theoverall gradient, but that quicklygets complex and unwieldy. Inpractice the answer is simpler thanyou might think – we just createmore handles on our gradients.Instead of a start and end handle,we'll have one or more in themiddle as well. These handles eachdefine a particular color in thegradient, and are usually referredto as “stops”.
To add a new stop to a gradient
we need to make it clear toInkscape that we want to edit thegradient rather than theobject itself, by selectingthe Gradient tool:
from the toolbox (or bypressing “g” or CTRL-F1). Now it'spossible to double-click on the linethat joins your existing stops inorder to add a new stop. It willdefault to the color and opacity atthat point on the line, so the visualappearance of your object won'tchange – but now that the newstop exists, you can select it andchange its color. You can also dragstops along the line, crowdingthem together for a sharptransition between colors, orspreading them out for somethingmore gradual. Very quickly, it'seasy to create garish multi-coloredgradients, although more subtlecolor changes between stops willoften give a better artistic effect.
While the Gradient tool isactive, you can still move the endstops to modify the size and angleof the gradient. When you're done,just select your object using theSelect tool in order to return to thefamiliar view of the Fill and Strokedialog with the gradient in place. Auseful shortcut for this step is tojust hit the space-bar. In mostcases, this will toggle between thecurrent tool and the Select tool,switching back and forth with eachpress.
Let's go back to a simplergradient with only two stops. Thequick way to do that is to switchyour fill to Flat Color, and thenback to a gradient again, returningyou to the default arrangement ofa fade from opaque to transparent– centered on your object. The Filland Stroke dialog should look likethe first image in this article oncemore, giving us a chance to explorethe remaining options on thescreen.
The Duplicate button is almostself explanatory. It duplicateswhichever gradient is currentlyselected in the pop-up menu, andapplies the duplicate to thecurrently selected object. That lastpoint is important – it means that
you can happily change the stopcolors and positions in theduplicated gradient withoutaffecting any objects that use theoriginal version. As such, it can be aconvenient starting point if youalready have a gradient that's closeto the one you need, but not quiteperfect.
The Edit… button we'll comeback to shortly.
The Repeat pop-up is used todefine what happens beyond thestart and end stops of yourgradient. The default setting is“none”, in which case the areabefore the start handle will take onthe same color as the start handleitself, and the area beyond the endhandle will likewise take on thecolor of the end stop. Both theother settings repeat the gradient:“reflected” causes the gradient toreverse for each repeat, giving asmooth transition that cycles asStart-End, End-Start, Start-End,End-Start…; “direct” uses thegradient as it stands, giving a moreabrupt cycle of Start-End, Start-End, Start-End, Start-End… As isoften the case, a picturedemonstrating this makes far moresense than a textual description, sohere are three pairs of gradients

full circle magazine #65 20 �������� �
Mark has been using Linux since1994, and uses Inkscape to createtwo webcomics, 'The Greys' and'Monsters, Inked' which can both befound at:http://www.peppertop.com/
HOWTO - INKSCAPE Pt5demonstrating “none,” “reflected”and “direct” modes using thegradients shown in the top pair:
Now we'll return to that Edit…button. If you click it, you'll bringup a gradient editor window. Thisis an alternative interface forediting gradients: you can add andremove stops, change theirposition within the gradient, andalter their colors – exactly thesame features that are available byediting using the Gradient tool onthe canvas except that the editorwon't help you to change theposition and angle of yourgradients within your objects. The
gradient editor dialog has beenofficially deprecated though, andwill likely be removed in a futurerelease in favor of some additionsto the on-canvas editing, so I won'tgo into any more detail about it.
Throughout this article I'vetalked about editing the fill. Butyou can also apply a gradient toyour object's stroke. Here we havetwo thick-stroked rectangles, onewith a linear gradient for thestroke, and the other with a radialgradient:
Being able to use a gradient forthe stroke can be a usefulworkaround for one of SVG's (andtherefore Inkscape's) limitations:strokes are always a fixed width.This restriction makes it difficult todraw lines that taper out, but usinga stroke that fades to transparentcan often give a similar visualeffect, especially with thin lines:
There is one feature that cropsup when using both fill and strokegradients which can sometimesfeel more like a bug: Inkscape likesto 'help' by snapping the handlesof gradients together so that youcan manipulate them as one. In thisexample, I've drawn a square witha yellow fill and blue stroke, thenclicked the linear gradient buttonsin the Fill and Stroke dialog. Itlooks like there'sonly one pair ofgradient handles,but that's becauseone set is on top ofthe other.
If you wish to modify just the fillor the stroke gradient, the obviousthing to do would be to grab thevisible handles and move them outof the way to reveal the secondpair below, right? If you try that,you'll find that Inkscape'spropensity forsnapping gradienthandles togethermeans that bothsets of handlesmove as one.
The solution to this conundrumis simply to hold the SHIFT buttonas you drag the handles around.
This will let youseparate them, andprevent themsnapping backtogether if they gettoo close to oneanother.
Now that you can creategradients, perhaps it's time toreplace the simple blurred shadingon your snowman with some radialgradients, to give him a little moredepth. Don't forget lineargradients for his nose, arms, hatand pipe.As afinishingtouch, anicelyshaded skyis usuallymoreinterestingthan a flatplane.

full circle magazine #66 20 �������� �
HHOOWW--TTOOWritten by Mark Crutch IInnkkssccaappee -- PPaarrtt 66
This instalment is going tointroduce the mostpowerful of Inkscape'sdrawing primitives: Paths.
I say 'introduce' because paths canbe created, used and manipulatedin many different ways, so we'llcome back to them time and timeagain as these tutorials progress.
But, this month, we'llkeep it simple and startwith the Line tool
(SHIFT+F6, or “b”).
Select the tool, click once onthe canvas, then move the cursorto another part of the canvasbefore double-clicking to finishyour path.
You've just created the simplesttype of path there is: a straightline. Try giving the stroke a colorand thickness using the Fill andStroke dialog or the tools on thestatus bar that we've coveredpreviously. Now, switch to theSelection tool (remember you canjust hit SPACE as a fast shortcut),and confirm that you can resize,rotate and shear it just as you
would expect. Double-click on theline to switch to the editing modeand you'll notice something a littleout of the ordinary: whereas adouble-click on a rectangle, ellipseor star will switch to theappropriate tool, double-clicking
on a path switchesinstead to the Node tool(shown left) .
You'll become familiar with theNode tool soon enough, but, fornow, just select the Line tool again.This time, click in several places onthe canvas before finishing offwith a double-click. You've justcreated a path with multiple linesegments. The chances are thatyou've got an 'open' path – one inwhich the two ends are separate.
If you draw another multi-segment path, but double-click
back at your starting point, you'llcreate a 'closed' path. Thedifference between them becomesapparent when you add a fill – andit should remind you of the effectwe got when creating arcs back atthe start of this series.
As you can see, if you apply a fillto an open path it will be drawn asthough there's a straight line thatcloses the path. That cansometimes be a handy feature,however it works only whenthere's a single break in the path –as soon as you introduce another(we'll see how to do that nextmonth), the fill disappears entirely.
Let's return to the Node tool bydouble-clicking on one of thepaths, or by pressing the F2 or “n”keys. The double-click will switchtools and select your path; if youopted for the keyboard shortcut,you might have to click on yourpath to ensure it's selected. Youshould see a small diamond-shaped handle marking eachtransition between line segments.These are called 'nodes' and, asyou might imagine, the Node tool
is what we'll use to manipulatethem.
Try draggingone of thenodes aroundwith the mouse.Now hold downSHIFT as youclick on severalnodes to select
them – they are colored yellowwhen they're selected – and dragall of them around as one. Do youwant to move the nodes at eitherend of a segment? Simply click onthe line that joins them. Hold downSHIFT as you do so to add bothnodes to an existing selection. Youcan also press “!” (SHIFT-1 on mykeyboard) to invert the selection,which can be especially usefulwhen dealing with very complexpaths. Finally, try dragging a'rubber band' selection box oversome of your nodes by clicking onthe canvas and, keeping the mousebutton pressed, dragging out arectangle that covers some of yournodes. Release the mouse buttonand the nodes within the box willbe selected (or added to your
full circle magazine #66 21 �������� �
HOWTO - INKSCAPE Pt6selection, if you also held SHIFT).
Of course there's more that youcan do with nodes than just movethem around. Select a few then
enable the 'ShowTransformation Handles'button (shown left) on
the tool control bar. You'll see thefamiliar move/resize handlesaround your nodes; clicking on oneof the selected nodes will switchto the rotate/skew handlesinstead. These operate in the sameway as the handles you get withthe Selection tool, but thetransformations are applied to theselected nodes rather than thewhole object.
Think back to the previousarticle when you were editinggradients directly on the canvas.Adding a new gradient stop was assimple as double-clicking on theline where you wanted it toappear. Adding a new node to apath is similar: just double-click on
the path. If you want it exactlyhalfway along a segment, thenselect the nodes at either end(remember, a click on the segmentitself will do that), and press theINSERT key or click on the buttonon the tool control bar. The newnode will automatically be addedto your selection, so you canrepeatedly press INSERT or click
the button, shown left, toadd several nodes to a linesegment.
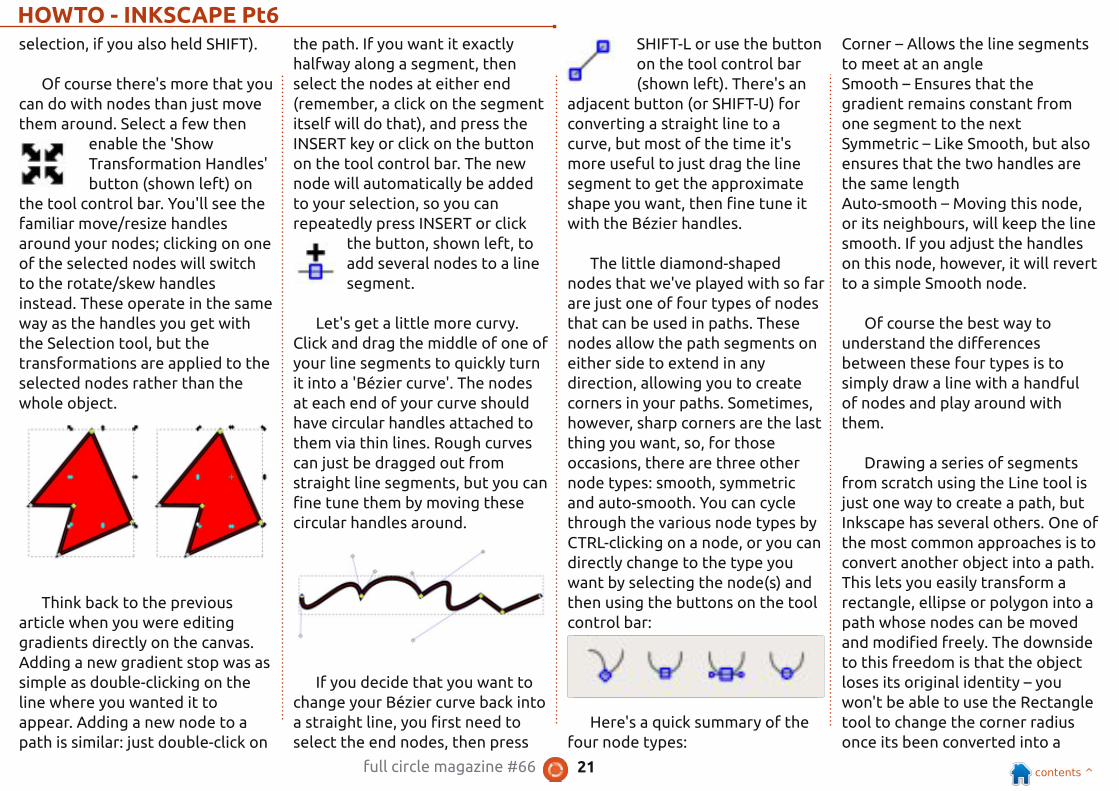
Let's get a little more curvy.Click and drag the middle of one ofyour line segments to quickly turnit into a 'Bézier curve'. The nodesat each end of your curve shouldhave circular handles attached tothem via thin lines. Rough curvescan just be dragged out fromstraight line segments, but you canfine tune them by moving thesecircular handles around.
If you decide that you want tochange your Bézier curve back intoa straight line, you first need toselect the end nodes, then press
SHIFT-L or use the buttonon the tool control bar(shown left). There's an
adjacent button (or SHIFT-U) forconverting a straight line to acurve, but most of the time it'smore useful to just drag the linesegment to get the approximateshape you want, then fine tune itwith the Bézier handles.
The little diamond-shapednodes that we've played with so farare just one of four types of nodesthat can be used in paths. Thesenodes allow the path segments oneither side to extend in anydirection, allowing you to createcorners in your paths. Sometimes,however, sharp corners are the lastthing you want, so, for thoseoccasions, there are three othernode types: smooth, symmetricand auto-smooth. You can cyclethrough the various node types byCTRL-clicking on a node, or you candirectly change to the type youwant by selecting the node(s) andthen using the buttons on the toolcontrol bar:
Here's a quick summary of thefour node types:
Corner – Allows the line segmentsto meet at an angleSmooth – Ensures that thegradient remains constant fromone segment to the nextSymmetric – Like Smooth, but alsoensures that the two handles arethe same lengthAuto-smooth – Moving this node,or its neighbours, will keep the linesmooth. If you adjust the handleson this node, however, it will revertto a simple Smooth node.
Of course the best way tounderstand the differencesbetween these four types is tosimply draw a line with a handfulof nodes and play around withthem.
Drawing a series of segmentsfrom scratch using the Line tool isjust one way to create a path, butInkscape has several others. One ofthe most common approaches is toconvert another object into a path.This lets you easily transform arectangle, ellipse or polygon into apath whose nodes can be movedand modified freely. The downsideto this freedom is that the objectloses its original identity – youwon't be able to use the Rectangletool to change the corner radiusonce its been converted into a

full circle magazine #66 22 �������� �
Mark has been using Linux since1994, and uses Inkscape to createtwo webcomics, 'The Greys' and'Monsters, Inked' which can both befound at:http://www.peppertop.com/
HOWTO - INKSCAPE Pt6path, or the Star tool to adjust thenumber of sides to your polygon.You also won't be able to convertyour path back to the originalobject type, even if you haven'tmade any changes to the nodes:conversion is a strictly one-wayaffair.
With those warnings in mind,let's draw some objects andconvert them to paths. To startwith, you just need to create a fewshapes, following the instructionsin the earlier instalments of thisseries. An ellipse, rectangle,rounded rectangle, and a star, forexample. Then select each objectand use the Path > Object to Pathcommand at the top of the menu(or CTRL-SHIFT-C if you prefer).Double-click on each path so thatyou can see where Inkscape hascreated corner nodes, and whereit's created smooth nodes.
Try manipulating these paths:move some nodes, change them
from corner to smooth and back,drag the line segments, and adjustthe Bézier handles. Add somenodes with a double-click or byselecting a segment and pressingINSERT. Of course you can alsodelete nodes by selecting themand pressing DELETE (or clicking
the button, shown left, inthe tool control bar), butthere's a bit of a catch to
that: Inkscape will try to preservethe original shape of the path asbest it can, even though there arenow fewer nodes. If you want it to
just delete the nodewithout trying topreserve the shapethen you need topress CTRL-DELETE.The differencebecomes clear whenyou want to justremove one cornerfrom a rectangle:
If you go too far with your nodeediting (or with anything else inInkscape), you can always use theEdit > Undo menu (CTRL-Z) to rollback your changes. Inkscapemaintains a history of all the editsyou make in a session, so you canUndo repeatedly if you want to.Take a look at Edit > Undo Historyif you really want to travel back in
time.
On the whole, Inkscape is afairly stable program, but it willoccasionally crash. In myexperience, this happens mostwhen you're editing paths, andusually when you try to use theUndo facility. Fortunately, it alsodoes a pretty good job of savingyour work to a backup file if it can.If Inkscape presents you with adialog to tell you that it's crashedthen usually that will show thepath and name of the backup file.Generally, the file is in the samedirectory as your drawing – or inyour home directory if you haven'tsaved your drawing yet – and willhave a name that's based on yourfile's name but with a numeric dateand time string appended to it.Usually you can just open thebackup file, save it with a differentname, and carry on working asthough nothing had happened. Aswith all computer files, however, itpays to backup regularly – I usuallystart each of my Inkscape sessionsby using File > Save As… to createa copy of my image with a slightlydifferent name so that I can neverlose too much work to an Inkscapecrash.
Now that you can convert
Inkscape's shapes into paths it'stime to make your snowman look alittle less pristine. Convert hiselliptical head and body, then adda few nodes and move themslightly to produce the lumps,bumps and asymmetry of a typicalsnowman. You can also add a bitmore character to his carrot noseby drawing cuts and marks and bymaking it a little wonky in parts.The horizon benefits from a littlewaviness to imply drifting snow.Although you could create moretwiggy arms and crush his hat, I'mgoing to leave those alone for nowand deal withthem nextmonth whenI'll cover somemethods forcreating andmanipulatingcomplex pathsquickly andeasily.

full circle magazine #67 28 �������� �
HHOOWW--TTOOWritten by Mark Crutch IInnkkssccaappee -- PPaarrtt 77
Atthe end of last month'sarticle, I promised thatwe would take a look atthe too pristine hat
that's adorning our now-lumpysnowman. The hat was added wayback in the second instalment ofthis series, when all we could drawwere ellipses and rectangles, and isa good example of how a fewcarefully chosen objects can foolthe eye into seeing shapes thataren't really there. Here's how itlooks when removed from thesnowman's head and rotated alittle:
There's obviously an ellipse atthe top, and another for the brim,but what of the main body of thehat? With your new knowledge
from last month, it would be easyto create by just converting arectangle to a path, and curvingthe top and bottom segments, butthis version pre-dates that insightby several months. Exploding thehat into its constituent partsmakes things a little clearer:
The body is just a rectanglewith an ellipse peeking out frombeneath it. By giving themmatching gradients we couldcreate the illusion of a singleobject. The curve at the topdoesn't exist at all, it's just anoptical effect created by puttingthe rectangle behind the ellipsethat forms the top of the hat.
Fooling the eye for artisticeffect can be very useful, but, inthis case, it was really just aworkaround for our lack ofInkscape skills. It would be better ifthe body of the hat was just oneobject with one gradient. Ourcomplete hat would then consistof an ellipse for the top, an ellipsefor the brim, and a path for thebody. We could do that byconverting the rectangle to a pathand changing the bottom edge to aBézier curve:
But we've already got the shapewe want in the outline formed bythe rectangle and ellipse. What wereally want to do is to combine
those objects into a single path. Inorder for Inkscape to know whichitems we want to combine, ourfirst step is to select them both.Switch to the selection tool, clickon the rectangle, and then holddown SHIFT while clicking on theellipse. The status bar should tellyou that you have “2 objects oftypes Rectangle, Ellipse” selected.If not, use Edit > Deselect (or justclick on the background, awayfrom any other objects) in order toclear your selection, then try again.Once you're happy that you've gotthe right two objects selected, usethe Path > Union menu entry(CTRL-+) to combine your objectsinto a single path:

full circle magazine #67 29 �������� �
HOWTO - INKSCAPE Pt7
If you zoom in closely you'llnotice that our new path isn't quiteas perfect as we would like. Somemisalignment of the ellipse to therectangle has resulted in extranodes being created that we'llneed to manually edit using theNode tool. Creating paths fromother objects in this way can be afast way to get the basic outline ofa shape, but usually you'll need todo some manual editingafterwards.
As well as adding shapestogether to form a single path, wecan also subtract them, cutting oneshape out from another. Lookingat the top of the hat, we could usethe ellipse to cut away a curvedsection. You don't need to be amathematical genius tounderstand that 1-2 doesn't giveyou the same result as 2-1.
Similarly subtracting a rectanglefrom an ellipse won't give you thesame result as subtracting anellipse from a rectangle, soInkscape needs some way ofknowing which object is the onewe're removing, and which is theone we're removing it from. This isdone using the stacking order.
The stacking order was brieflymentioned back in the first part ofthis series: objects within Inkscapecan sit 'on top of' each other, withones at the top of the stackobscuring those below (assumingthey're all fully opaque). Whenyou've got an object selected usingthe Selection tool you can move itup and down the stack using thesefour buttons on the tool controlbar:
To cut one object from another,the shape that is being removed
must be on top of the other object– in our case the ellipse needs tobe on top of the rectangle-with-a-curved-base. It's probably alreadyon top in the stack, but it doesn'thurt to get into the habit of alwaysmoving your cutting object on top
of the object to be cut. This is easyto achieve by selecting the ellipseand using the last of the fourbuttons to bring it right to the topof the stacking order. Now youneed to position the ellipse to cutout the shape you want – in thiscase overhanging the edge of therectangle. With that done it's asimple case of selecting bothobjects and using Path >Difference menu entry (or CTRLand the minus key) to subtract theellipse from the rectangle:
Unfortunately there are acouple of problems with the result:the first is that, once again, wehave some rogue nodes that willneed to be manually tidied up; thesecond is that our ellipse has nowcompletely disappeared! That's aside effect of the Path >Difference operation: the objectyou are cutting out is also removedin the process.
Press CTRL-Z (or use Edit >Undo) to restore your ellipse backto its pre-cut status. Now selectjust the ellipse and use Edit >Duplicate (CTRL-D). This will createa copy of the selected object(s) atexactly the same location on thecanvas, but at the top of the stack.It's worth getting used to thekeyboard shortcut for this as it's aparticularly useful feature – it notonly gives you a disposable copy ofyour cutting object to use, but alsosaves you having to manually moveit to the top of the stack. It evenleaves the new object selected, soyou just have to SHIFT-click on theobject to be cut, then use Path >Difference. Now our formerrectangle has a curved base and acurved top, and we still have anellipse to form the lid.
full circle magazine #67 30 �������� �
Mark has been using Linux since1994, and uses Inkscape to createtwo webcomics, 'The Greys' and'Monsters, Inked' which can both befound at:http://www.peppertop.com/
HOWTO - INKSCAPE Pt7But still there's a problem. A
close look at the join between thecurved rectangle and the lid showsa thin line showing through fromthe canvas or objects below.Inkscape uses “anti-aliasing” whenit draws your objects. This tries toapproximate edges that don't fallprecisely on pixel boundaries bydrawing a thin, translucent line togive the visual impression of asmooth curve. Usually it workswell, but when two suchboundaries meet it can lead to aslight gap where you don't reallywant one.
There are a couple of solutionsto this anti-aliasing issue: we couldadd a stroke to one or both of theobjects to cover up the gap, butthat's not always appropriate anddoesn't help if the problem objectsalready have strokes; alternativelywe could avoid relying on ourobjects perfectly abutting oneanother by making one of themoverlap the edge of the other. Inthis case we don't really need therectangle to have a curved top –we already had the visual effectwe were looking for with theellipse sitting on top of therectangle.
Let's CTRL-Z back to our
straight-topped hat. It may seemthat we've gone round in circles,but, along the way, you've learnedabout Path > Difference, the visualissues that anti-aliasing cansometimes cause, and the fact thatsometimes it's better to drawsomething that looks right, even ifits underlying structure isn't aspure or correct as you might like.Before finally reassembling the hatit might be worth adding somecreases and crumples using thepath tools from last month:
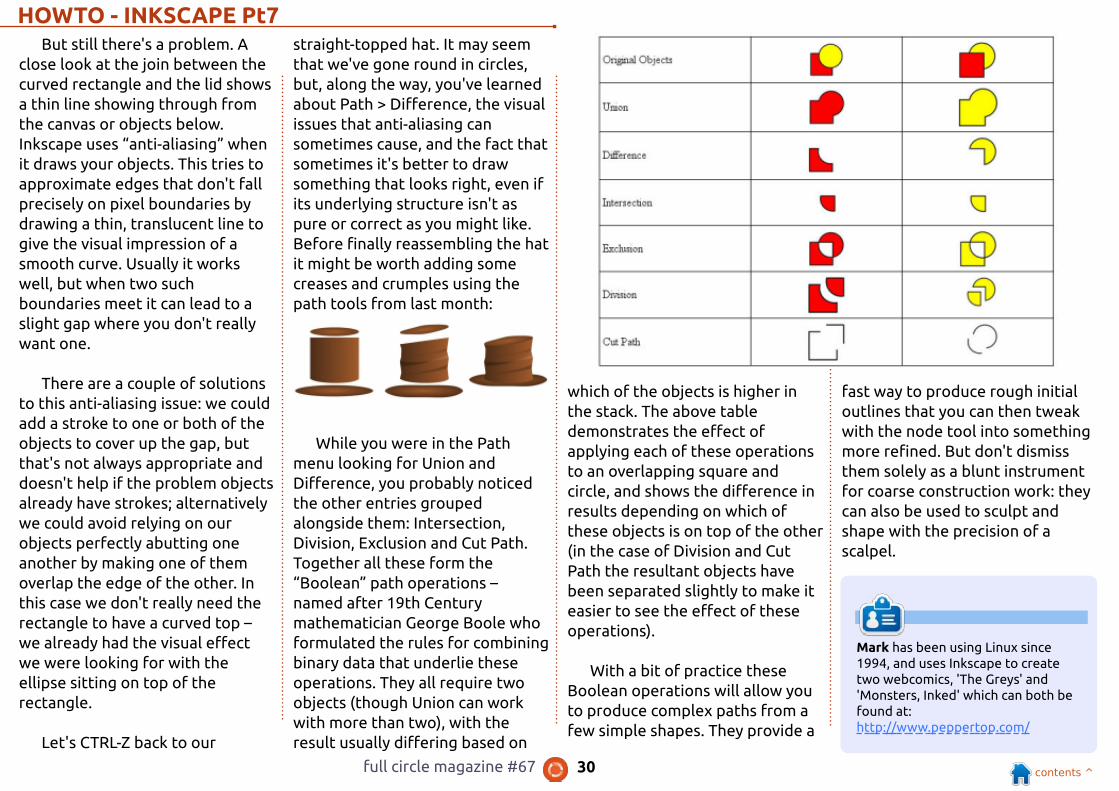
While you were in the Pathmenu looking for Union andDifference, you probably noticedthe other entries groupedalongside them: Intersection,Division, Exclusion and Cut Path.Together all these form the“Boolean” path operations –named after 19th Centurymathematician George Boole whoformulated the rules for combiningbinary data that underlie theseoperations. They all require twoobjects (though Union can workwith more than two), with theresult usually differing based on
which of the objects is higher inthe stack. The above tabledemonstrates the effect ofapplying each of these operationsto an overlapping square andcircle, and shows the difference inresults depending on which ofthese objects is on top of the other(in the case of Division and CutPath the resultant objects havebeen separated slightly to make iteasier to see the effect of theseoperations).
With a bit of practice theseBoolean operations will allow youto produce complex paths from afew simple shapes. They provide a
fast way to produce rough initialoutlines that you can then tweakwith the node tool into somethingmore refined. But don't dismissthem solely as a blunt instrumentfor coarse construction work: theycan also be used to sculpt andshape with the precision of ascalpel.