free baby crochet patterns - interweave · 2020-01-23 · contents | free baby crochet patterns...
TRANSCRIPT
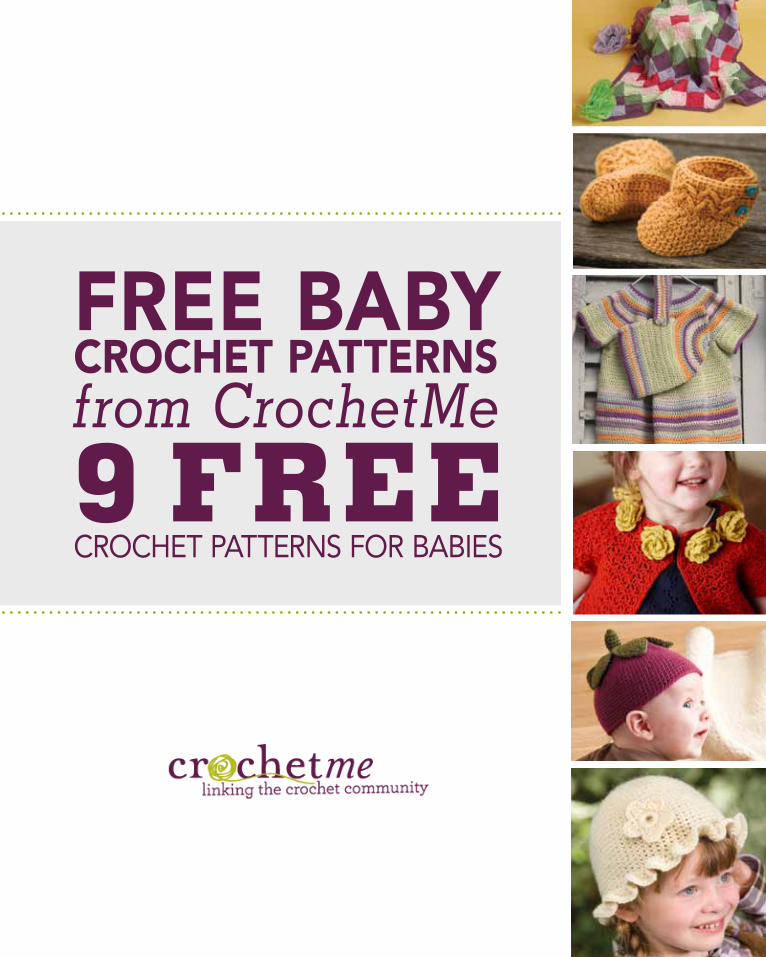
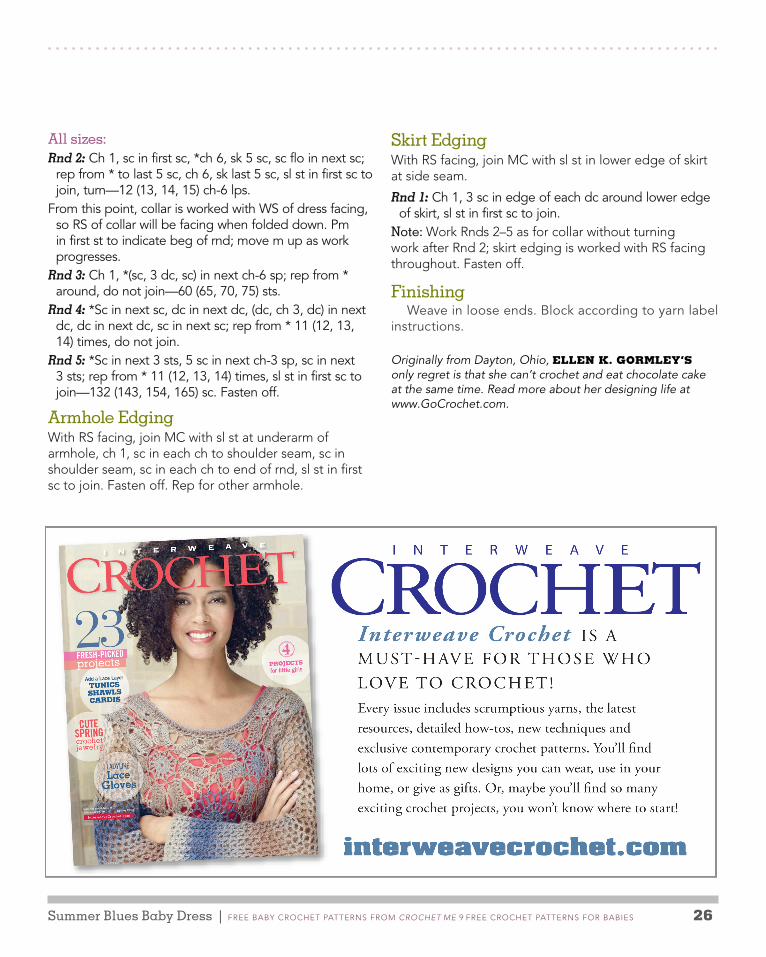
FREE BABY CRoChEt pAttERns from CrochetMe
9 FREECroChet Patterns for babies
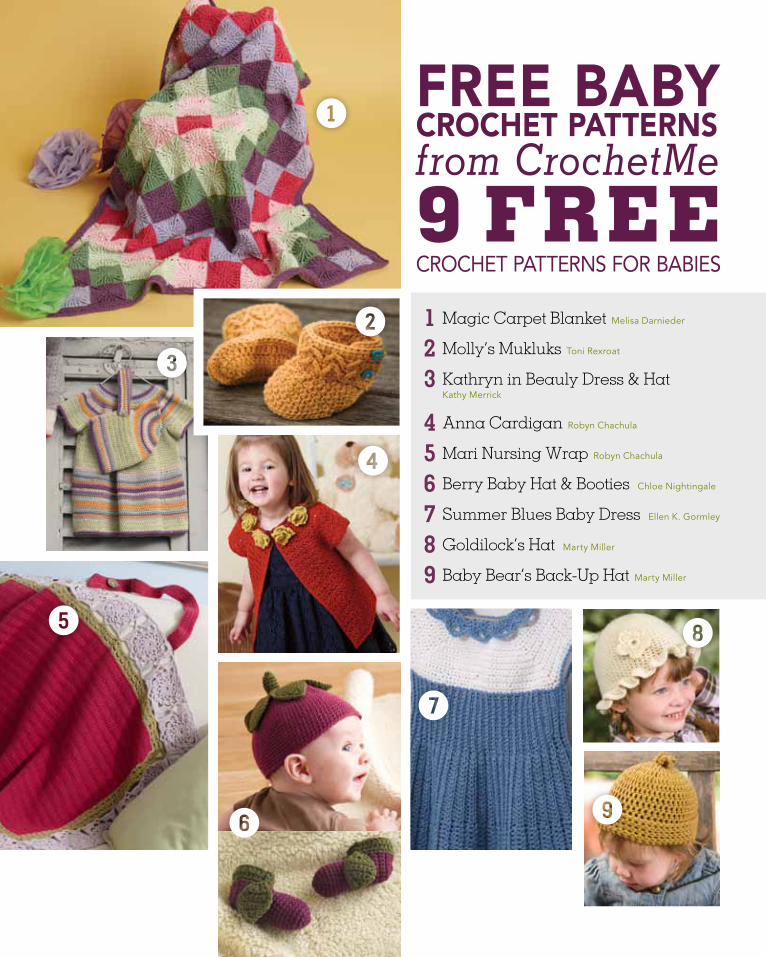
1 Magic Carpet Blanket Melisa Darnieder
2 Molly’s Mukluks Toni Rexroat
3 Kathryn in Beauly Dress & Hat Kathy Merrick
4 Anna Cardigan Robyn Chachula
5 Mari Nursing Wrap Robyn Chachula
6 Berry Baby Hat & Booties Chloe Nightingale
7 Summer Blues Baby Dress Ellen K. Gormley
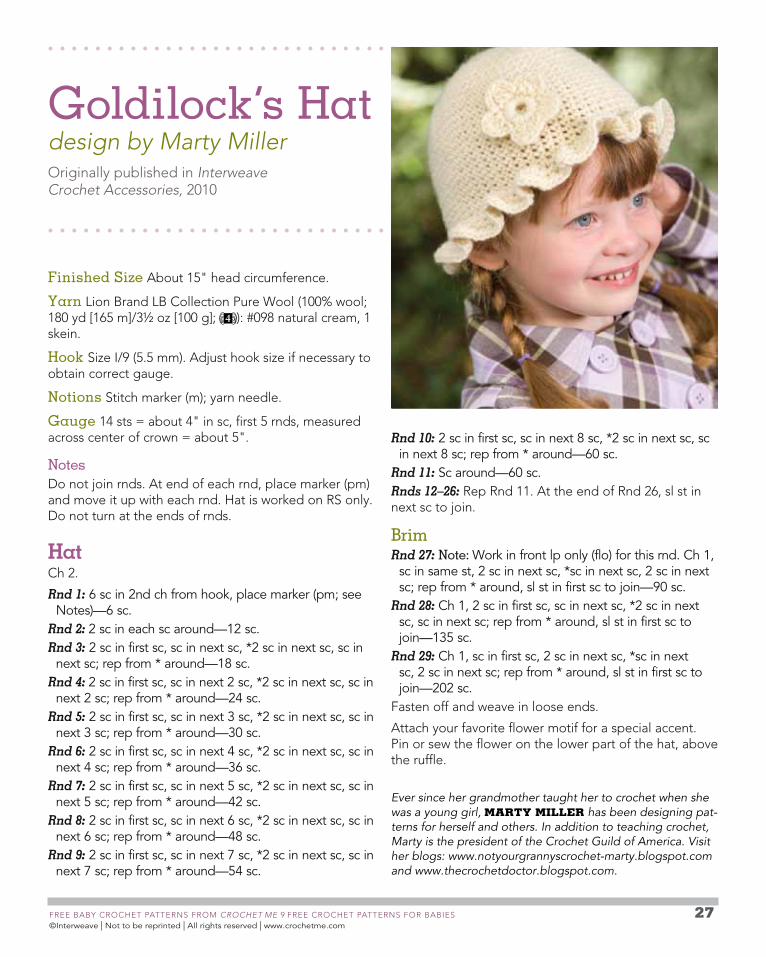
8 Goldilock’s Hat Marty Miller
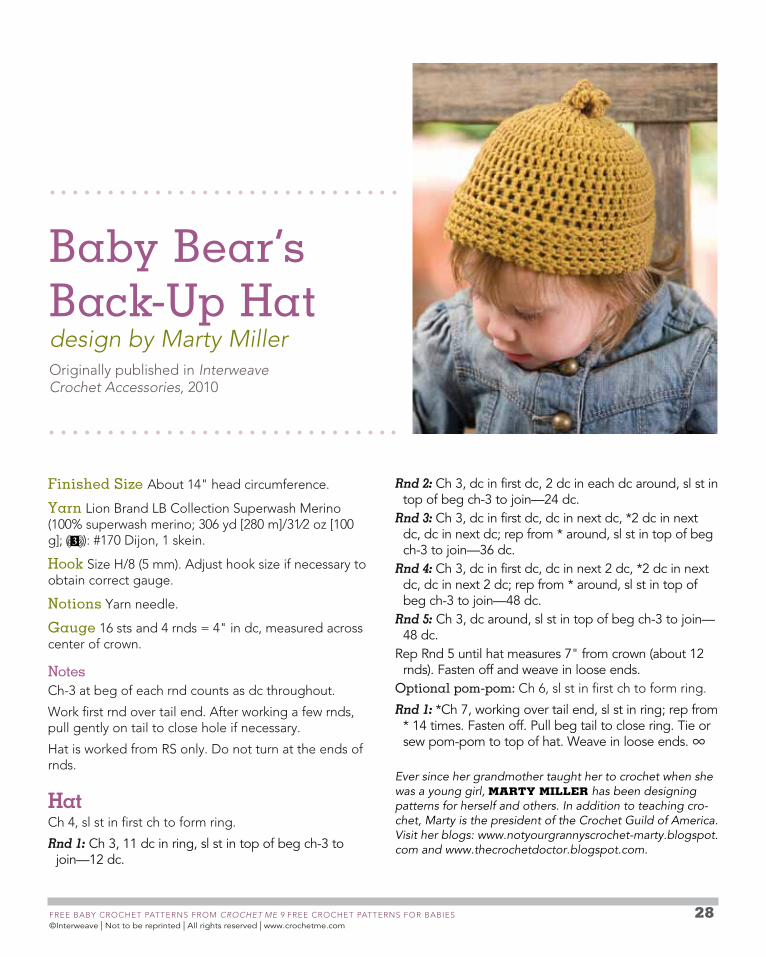
9 Baby Bear’s Back-Up Hat Marty Miller
FREE BABY CRoChEt pAttERns from CrochetMe
9 FREECroChet Patterns for babies
6
3
4
2
1
5 8
9
7
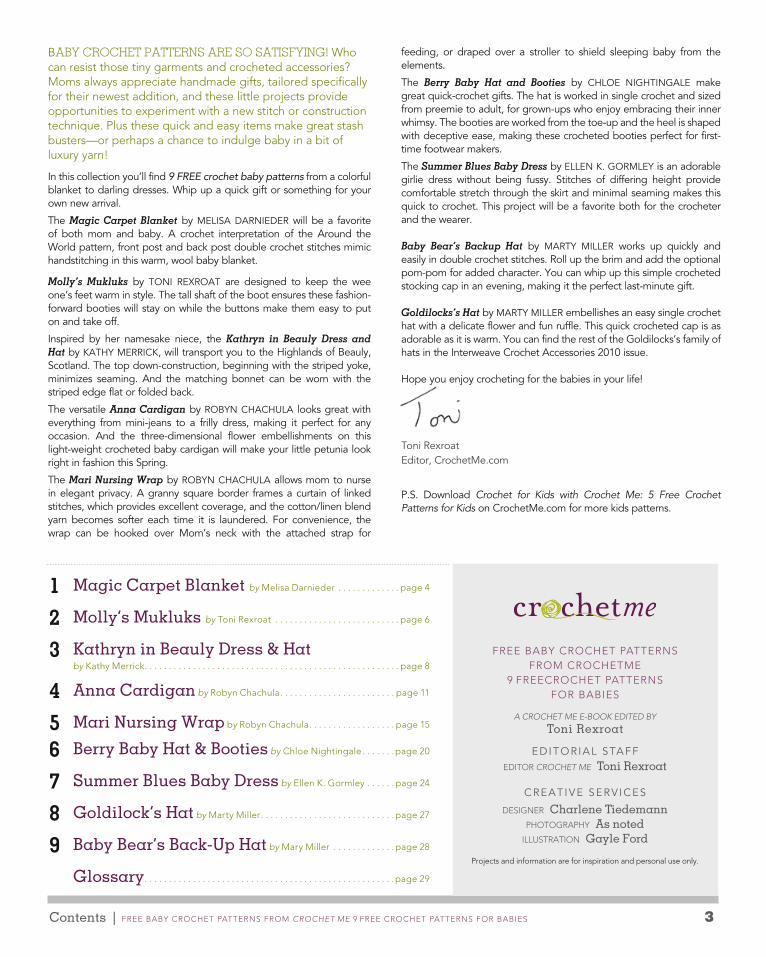
Contents | FREE BABY CRoChEt pAttERns FRom CroChet Me 9 FREE CRoChEt pAttERns FoR BABiEs 3
FREE BABY CRoChEt pAttERns FRom CRoChEtmE
9 FREECRoChEt pAttERns FoR BABiEs
A CroChet Me e-Book edited By
Toni Rexroat
EDiToRial STaffEditoR CroChet Me Toni Rexroat
CREaTivE SERv iCES
dEsignER Charlene TiedemannphotogRAphY As noted
illustRAtion Gayle Ford
projects and information are for inspiration and personal use only.
BABy CroCHet pAtterNS Are So SAtiSfyiNG! Who can resist those tiny garments and crocheted accessories? moms always appreciate handmade gifts, tailored specifically for their newest addition, and these little projects provide opportunities to experiment with a new stitch or construction technique. plus these quick and easy items make great stash busters—or perhaps a chance to indulge baby in a bit of luxury yarn!
in this collection you’ll find 9 free crochet baby patterns from a colorful blanket to darling dresses. Whip up a quick gift or something for your own new arrival.
The Magic Carpet Blanket by MEliSa DaRNiEDER will be a favorite of both mom and baby. a crochet interpretation of the around the World pattern, front post and back post double crochet stitches mimic handstitching in this warm, wool baby blanket.
Molly’s Mukluks by ToNi RExRoaT are designed to keep the wee one’s feet warm in style. The tall shaft of the boot ensures these fashion-forward booties will stay on while the buttons make them easy to put on and take off.
inspired by her namesake niece, the Kathryn in Beauly Dress and Hat by KaThy MERRiCK, will transport you to the highlands of Beauly, Scotland. The top down-construction, beginning with the striped yoke, minimizes seaming. and the matching bonnet can be worn with the striped edge flat or folded back.
The versatile Anna Cardigan by RoByN ChaChula looks great with everything from mini-jeans to a frilly dress, making it perfect for any occasion. and the three-dimensional flower embellishments on this light-weight crocheted baby cardigan will make your little petunia look right in fashion this Spring.
The Mari Nursing Wrap by RoByN ChaChula allows mom to nurse in elegant privacy. a granny square border frames a curtain of linked stitches, which provides excellent coverage, and the cotton/linen blend yarn becomes softer each time it is laundered. for convenience, the wrap can be hooked over Mom’s neck with the attached strap for
feeding, or draped over a stroller to shield sleeping baby from the elements.
The Berry Baby Hat and Booties by ChloE NiGhTiNGalE make great quick-crochet gifts. The hat is worked in single crochet and sized from preemie to adult, for grown-ups who enjoy embracing their inner whimsy. The booties are worked from the toe-up and the heel is shaped with deceptive ease, making these crocheted booties perfect for first-time footwear makers.
The Summer Blues Baby Dress by EllEN K. GoRMlEy is an adorable girlie dress without being fussy. Stitches of differing height provide comfortable stretch through the skirt and minimal seaming makes this quick to crochet. This project will be a favorite both for the crocheter and the wearer.
Baby Bear’s Backup Hat by MaRTy MillER works up quickly and easily in double crochet stitches. Roll up the brim and add the optional pom-pom for added character. you can whip up this simple crocheted stocking cap in an evening, making it the perfect last-minute gift.
Goldilocks’s Hat by MaRTy MillER embellishes an easy single crochet hat with a delicate flower and fun ruffle. This quick crocheted cap is as adorable as it is warm. you can find the rest of the Goldilocks’s family of hats in the interweave Crochet accessories 2010 issue.
hope you enjoy crocheting for the babies in your life!
Toni RexroatEditor, CrochetMe.com
P.S. Download Crochet for Kids with Crochet Me: 5 Free Crochet Patterns for Kids on CrochetMe.com for more kids patterns.
1 Magic Carpet Blanket by melisa darnieder . . . . . . . . . . . . . page 4
2 Molly’s Mukluks by toni Rexroat . . . . . . . . . . . . . . . . . . . . . . . . . . page 6
3 Kathryn in Beauly Dress & Hat
by Kathy merrick . . . . . . . . . . . . . . . . . . . . . . . . . . . . . . . . . . . . . . . . . . . . . . . . . . . . . page 8
4 Anna Cardigan by Robyn Chachula . . . . . . . . . . . . . . . . . . . . . . . . page 11
5 Mari Nursing Wrap by Robyn Chachula . . . . . . . . . . . . . . . . . . page 15
6 Berry Baby Hat & Booties by Chloe nightingale . . . . . . . page 20
7 Summer Blues Baby Dress by Ellen K. gormley . . . . . . page 24
8 Goldilock’s Hat by marty miller . . . . . . . . . . . . . . . . . . . . . . . . . . . . page 27
9 Baby Bear’s Back-Up Hat by mary miller . . . . . . . . . . . . . page 28
Glossary . . . . . . . . . . . . . . . . . . . . . . . . . . . . . . . . . . . . . . . . . . . . . . . . . . . .page 29

FREE BABY CRoChEt pAttERns FRom CroChet Me 9 FREE CRoChEt pAttERns FoR BABiEs 4 ©interweave | Not to be reprinted | all rights reserved | www.crochetme.com
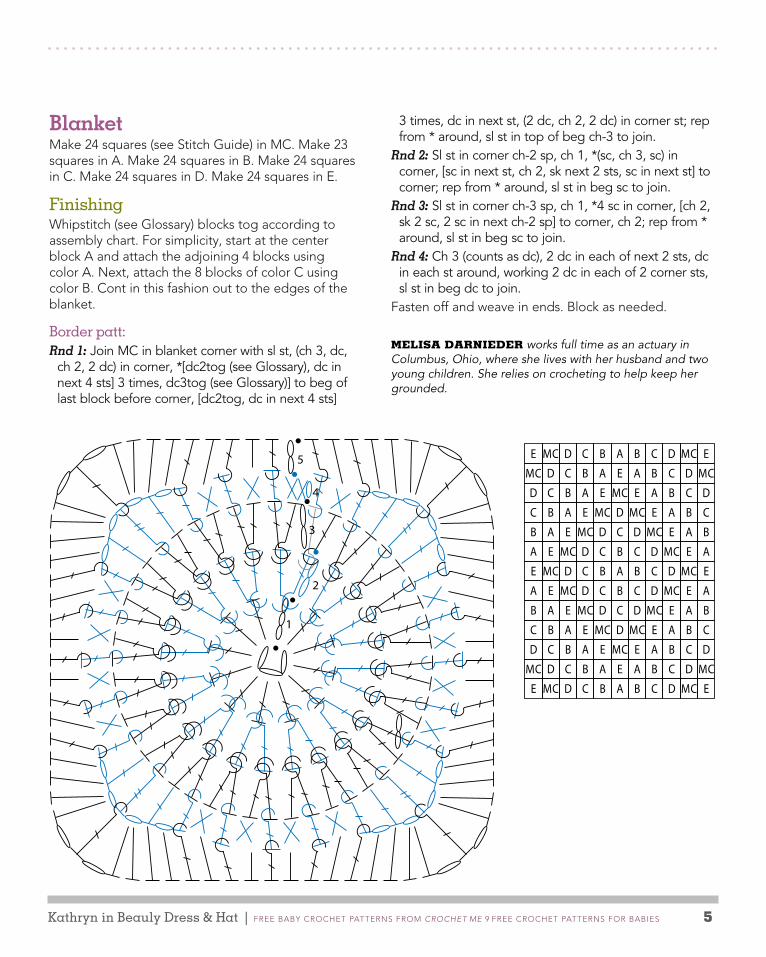
Magic Carpet Blanket
design by Melisa darniederoriginally published in
interweave Crochet spring 2011
JoE
Co
CA
Stitch GuideSquare
Ch 3, sl st in first ch to form ring.
Rnd 1: Ch 3 (counts as dc), 11 dc in ring, sl st in top of beg ch-3 to join—12 dc.
Rnd 2: Ch 2, beg in first st (beg ch-3 from previous rnd), (BPdc [see Glossary], fPdc [see Glossary]) around each dc, sl st in first BPdc to join—24 dc.
Rnd 3: Ch 2, beg in next fPdc, [BPdc, fPdc] around each post st (see Notes), sl st in top of beg ch-2 to join—48 dc.
Rnd 4: Ch 1, sc in same st as join, [sc in next st, fPdc around next fPdc] 3 times, *ch 1, dc in next st, ch 1, fPtr around next fPdc, ch 1, dc in next st, ch 1, fPdc around next fPdc**, [sc in next st, fPdc around next fPdc] 4 times; rep from * 2 times; rep from * to **, sl st in 2nd sc to join.
Rnd 5: Ch 2, [fPdc around next fPdc, hdc in next st] 2 times, *fPdc around next fPdc, hdc in next ch-1 sp, hdc in next dc, 2 hdc in next ch-1 sp, ch 1, fPdc around corner fPtr, ch 1, 2 hdc in next ch-1 sp, hdc in next dc, hdc in next ch-1 sp, **[fPdc around next fPdc, hdc in next st] 4 times; rep from * two times; rep from * to **, fPdc around last fPdc, sl st in top of beg ch-2 to join. fasten off.
THiS HAND-CRoCHeTeD qUilT uses front post and back post double crochets to mimic handstitched lines in this trip Around the World pattern. the thick, warm blanket works equally well as a play mat for having tea with a few friends. Washable yarn means it cleans up easily.
Finished Size About 54" wide and 64" long.
Yarn debbie macomber Blossom street Collection Rosebud (100% superwash extrafine merino; 137 yd [125 m]/13⁄4 oz [50 g]; ): #504 petunia (dark purple; mC), 6 balls; #501 bleeding heart (dark pink; A), #502 sweetpea (light pink; B), #500 tendril (light green; C), #507 clover (dark green; d), and #503 lilac (light purple; E), 4 balls each. Yarn distributed by universal Yarn.
Hook size h/8 (5 mm). Adjust hook size if necessary to obtain correct gauge.
Notions Yarn needle.
Gauge Block patt measures about 31⁄2" blocked.
Noteson Rnd 3 of block patt, the last set of [Bpdc, Fpdc] will be worked around the last Bpdc of Rnd 2 tog with the beg ch-2 of Rnd 2. this helps to hide the beg ch-2 sts.
Kathryn in Beauly Dress & Hat | FREE BABY CRoChEt pAttERns FRom CroChet Me 9 FREE CRoChEt pAttERns FoR BABiEs 5
Blanketmake 24 squares (see stitch guide) in mC. make 23 squares in A. make 24 squares in B. make 24 squares in C. make 24 squares in d. make 24 squares in E.
FinishingWhipstitch (see glossary) blocks tog according to assembly chart. For simplicity, start at the center block A and attach the adjoining 4 blocks using color A. next, attach the 8 blocks of color C using color B. Cont in this fashion out to the edges of the blanket.
Border patt:Rnd 1: Join MC in blanket corner with sl st, (ch 3, dc,
ch 2, 2 dc) in corner, *[dc2tog (see Glossary), dc in next 4 sts] 3 times, dc3tog (see Glossary)] to beg of last block before corner, [dc2tog, dc in next 4 sts]
1
2
3
4
5 E MC D C B A B C D MC E
MC D C B A E A B C D MC
D C B A E MC E A B C D
C B A E MC D MC E A B C
B A E MC D C D MC E A B
A E MC D C B C D MC E A
E MC D C B A B C D MC E
A E MC D C B C D MC E A
B A E MC D C D MC E A B
C B A E MC D MC E A B C
D C B A E MC E A B C D
MC D C B A E A B C D MC
E MC D C B A B C D MC E
3 times, dc in next st, (2 dc, ch 2, 2 dc) in corner st; rep from * around, sl st in top of beg ch-3 to join.
Rnd 2: Sl st in corner ch-2 sp, ch 1, *(sc, ch 3, sc) in corner, [sc in next st, ch 2, sk next 2 sts, sc in next st] to corner; rep from * around, sl st in beg sc to join.
Rnd 3: Sl st in corner ch-3 sp, ch 1, *4 sc in corner, [ch 2, sk 2 sc, 2 sc in next ch-2 sp] to corner, ch 2; rep from * around, sl st in beg sc to join.
Rnd 4: Ch 3 (counts as dc), 2 dc in each of next 2 sts, dc in each st around, working 2 dc in each of 2 corner sts, sl st in beg dc to join.
Fasten off and weave in ends. Block as needed.
MElisa DaRniEDER works full time as an actuary in Columbus, Ohio, where she lives with her husband and two young children. She relies on crocheting to help keep her grounded.
FREE BABY CROCHET PATTERNS FROM CROCHET ME 9 FREE CROCHET PATTERNS FOR BABIES 6 ©Interweave | Not to be reprinted | All rights reserved | www.crochetme.com
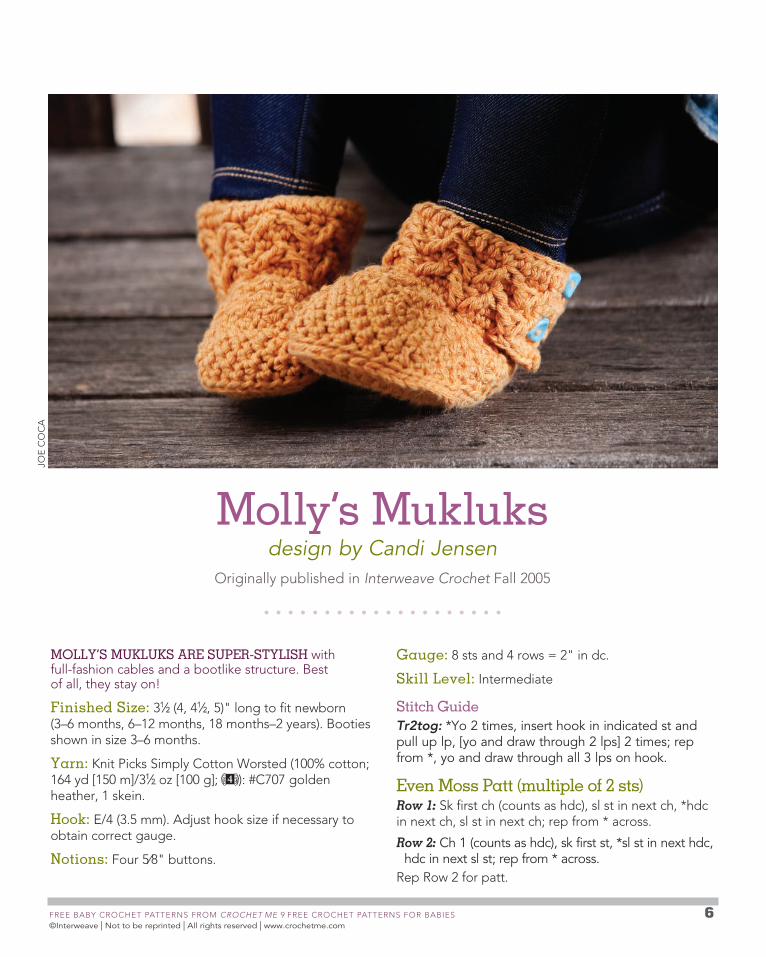
Molly’s Mukluksdesign by Candi Jensen
Originally published in Interweave Crochet Fall 2005
MOLLY’S MUKLUKS ARE SUPER-STYLISH with full-fashion cables and a bootlike structure. Best of all, they stay on!
Finished Size: 31⁄2 (4, 41⁄2, 5)" long to fit newborn (3–6 months, 6–12 months, 18 months–2 years). Booties shown in size 3–6 months.
Yarn: Knit Picks Simply Cotton Worsted (100% cotton; 164 yd [150 m]/31⁄2 oz [100 g]; ): #C707 golden heather, 1 skein.
Hook: E/4 (3.5 mm). Adjust hook size if necessary to obtain correct gauge.
Notions: Four 5⁄8" buttons.
Gauge: 8 sts and 4 rows = 2" in dc.
Skill Level: Intermediate
Stitch GuideTr2tog: *Yo 2 times, insert hook in indicated st and pull up lp, [yo and draw through 2 lps] 2 times; rep from *, yo and draw through all 3 lps on hook.
Even Moss Patt (multiple of 2 sts)Row 1: Sk first ch (counts as hdc), sl st in next ch, *hdc in next ch, sl st in next ch; rep from * across.
Row 2: Ch 1 (counts as hdc), sk first st, *sl st in next hdc, hdc in next sl st; rep from * across.
Rep Row 2 for patt.
JOE
CO
CA
Molly’s Mukluks | FREE BABY CRoChEt pAttERns FRom CroChet Me 9 FREE CRoChEt pAttERns FoR BABiEs 7
Quiver Patt (multiple of 4 sts + 3)Note: always work in ch st not in ch-1 sp.Row 1: Ch 1 (does not count as st throughout), sc in
first 3 sc, *ch 1, sk next sc, sc in next 3 sc; rep from * across, turn.
Row 2: Ch 1, hdc in first sc and in each sc and ch across, turn.
Row 3: Ch 1, sc in first hdc, tr in first skipped st from 2 rows below, sk next hdc, sc in next hdc, ch 1, sk next hdc, sc in next hdc, *tr2tog (see above) over previous skipped sc from 2 rows below and next skipped sc from 2 rows below, sk next hdc, sc in next hdc, ch 1, sk next hdc, sc in next hdc; rep from * to last 2 hdc, tr in previous skipped st from 2 rows below, sk next hdc, sc in last hdc, turn.
Rows 4–5: Rep Rows 2–3.Rep Rows 2–5 for patt.
BootieSole (make 2)Ch 9 (11, 13, 15).Rnd 1: 3 dc in 2nd ch from hook, dc in next 6 (8, 10, 12)
ch, 6 dc in last ch, rotate work; working in bottom ridge lp, dc in next 6 (8, 10, 12) ch, 3 dc in next ch, sl st in beg dc to join—24 (28, 32, 36) dc.
Rnd 2: Ch 2 (counts as dc), dc in first dc, 2 dc in next dc, dc in next 8 (10, 12, 14) dc, 2 dc in each of next 4 dc, dc in each dc to last 2 dc, 2 dc in each of last 2 dc—32 (36, 40, 44) dc. fasten off and weave in ends.
Toe Cap (make 2)Ch 9.Row 1: (RS) Sl st in 2nd ch from hook, *hdc in next ch,
sl st in next ch; rep from * to last ch, hdc in last ch, turn—8 sts.
Row 2: Ch 1, sl st in first hdc, *hdc in next sl st, sl st in next hdc; rep from * across, turn.
Rows 3–6: Rep Row 2.Row 7: Rep Row 2, but do not turn, ch 23 (23, 27, 27), sl
st in other end of row 7, being careful not to twist ch.Shape sides: Rnd 1: (RS) Ch 1, beg Row 2 of even moss patt (see
Stitch Guide): work 7 sts in row-ends down edge of toe cap, 7 sts in bottom ridge lps of toe cap, 7 sts in row-ends up opposite edge of toe cap, and in each ch, sl st in first st to join, place marker (pm) in sl st to mark beg
of rnd, do not turn—44 (44, 48, 48) sts.Rnds 2–6: Note: Beg working in a spiral without joining.
Work in even moss patt. Join sides to sole: With WS tog, pin sole and sides tog
at middle of front and back and the middle of each side. Working through both thicknesses, sc sides and sole tog. Note: you will need to sc multiple sts from side to sole. fasten off and weave in ends.
Right BootieRow 1: (RS) With RS facing and toe to right, sk first 3 sts
of opening from toe cap, join with sc in next bottom ridge lp of opening, sc in each bottom ridge lp around to toe cap, work 7 sc across toe cap, sc in bottom ridge lp of next 2 sts, esc (see Glossary) in last st, fsc 7 (see Glossary) for button tab—37 (37, 41, 41) sts. fasten off.
Row 2: With RS facing, join yarn in first st of opening, work Row 1 of quiver patt (see Stitch Guide) to last 2 sts, sc in last 2 sts, turn.
Row 3 (buttonhole row): Ch 1, hdc in first 2 sts, ch 1, sk next st, hdc in next st, cont in Row 2 of quiver patt.
Rows 4–6: Work Rows 3–5 of quiver patt always working 2 sts of button tab edge in sc or hdc.
Row 7: Rep buttonhole row. fasten off and weave in ends.
left BootieRow 1: (RS) fsc 7 for button tab, with toe to left and RS
facing, sc in 4th back ridge lp of opening from toe cap, sc in next 3 sts to toe cap, work 7 sc across toe cap, sc in bottom ridge lp of rem sts around. fasten off and weave in ends.
Row 2: With RS facing, join yarn in first st of button tab, ch 1 (does not count as st), sc in first 2 sc, work Row 2 of quiver patt.
Row 3 (buttonhole row): Work Row 2 of quiver patt to last 4 sts, hdc in next st, ch 1, sk next st, hdc in next 2 sts, turn.
Rows 4–6: Work Rows 3–5 of quiver patt always working 2 sts of button tab edge in sc or hdc.
Row 7: Rep buttonhole row. Sew buttons opposite buttonholes.
TOni REXROaT is editor of Crochet Me. She loves the feeling of finishing a project, so she is especially fond of baby patterns. CC), 1 ball each.
FREE BABY CRoChEt pAttERns FRom CroChet Me 9 FREE CRoChEt pAttERns FoR BABiEs 8 ©interweave | Not to be reprinted | all rights reserved | www.crochetme.com
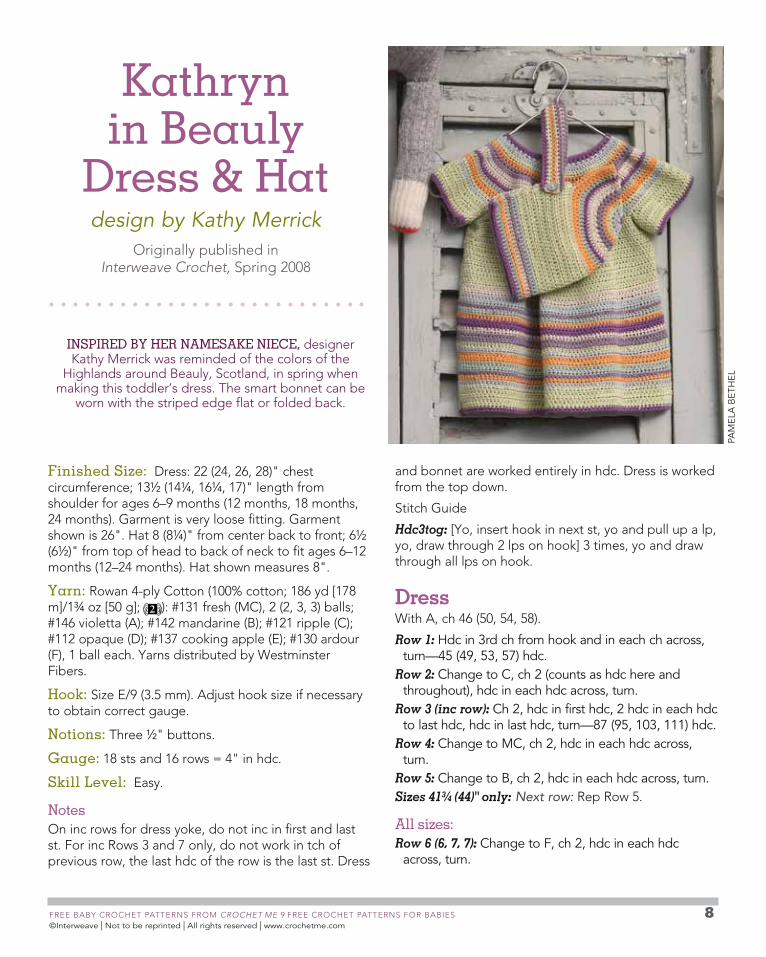
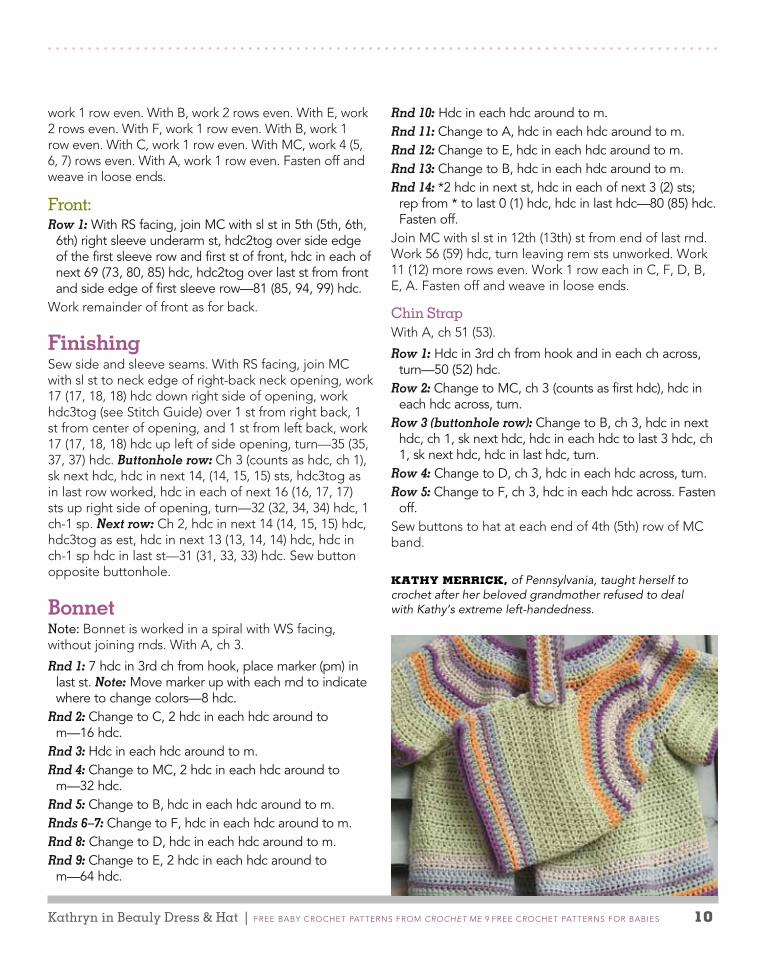
iNSpiReD BY HeR NAMeSAKe NieCe, designer Kathy merrick was reminded of the colors of the
highlands around Beauly, scotland, in spring when making this toddler’s dress. the smart bonnet can be
worn with the striped edge flat or folded back.
Kathryn in Beauly
Dress & Hatdesign by Kathy Merrick
originally published in interweave Crochet, spring 2008
pAm
ElA
BE
thE
l
Finished Size: dress: 22 (24, 26, 28)" chest circumference; 13½ (14¼, 16¼, 17)" length from shoulder for ages 6–9 months (12 months, 18 months, 24 months). garment is very loose fitting. garment shown is 26". hat 8 (8¼)" from center back to front; 6½ (6½)" from top of head to back of neck to fit ages 6–12 months (12–24 months). hat shown measures 8".
Yarn: Rowan 4-ply Cotton (100% cotton; 186 yd [178 m]/1¾ oz [50 g]; ): #131 fresh (mC), 2 (2, 3, 3) balls; #146 violetta (A); #142 mandarine (B); #121 ripple (C); #112 opaque (d); #137 cooking apple (E); #130 ardour (F), 1 ball each. Yarns distributed by Westminster Fibers.
Hook: size E/9 (3.5 mm). Adjust hook size if necessary to obtain correct gauge.
Notions: three ½" buttons.
Gauge: 18 sts and 16 rows = 4" in hdc.
Skill level: Easy.
Noteson inc rows for dress yoke, do not inc in first and last st. For inc Rows 3 and 7 only, do not work in tch of previous row, the last hdc of the row is the last st. dress
and bonnet are worked entirely in hdc. dress is worked from the top down.
stitch guide
Hdc3tog: [Yo, insert hook in next st, yo and pull up a lp, yo, draw through 2 lps on hook] 3 times, yo and draw through all lps on hook.
DressWith A, ch 46 (50, 54, 58).
Row 1: hdc in 3rd ch from hook and in each ch across, turn—45 (49, 53, 57) hdc.
Row 2: Change to C, ch 2 (counts as hdc here and throughout), hdc in each hdc across, turn.
Row 3 (inc row): Ch 2, hdc in first hdc, 2 hdc in each hdc to last hdc, hdc in last hdc, turn—87 (95, 103, 111) hdc.
Row 4: Change to MC, ch 2, hdc in each hdc across, turn.
Row 5: Change to B, ch 2, hdc in each hdc across, turn.Sizes 41¾ (44)" only: Next row: Rep Row 5.
All sizes:Row 6 (6, 7, 7): Change to f, ch 2, hdc in each hdc
across, turn.
Kathryn in Beauly Dress & Hat | FREE BABY CRoChEt pAttERns FRom CroChet Me 9 FREE CRoChEt pAttERns FoR BABiEs 9
pAm
ElA
BE
thE
l
Row 7 (7, 8, 8) (inc row): Rep Row 3—171 (187, 203, 219) hdc.
Rows 8–9 (9, 10, 10): Change to D, ch 2, hdc in each hdc across, turn.
Row 10 (10, 11, 11): Change to a, ch 2, hdc in each hdc across, turn.
Row 11 (11, 12, 12): Change to E, ch 2, hdc in each hdc across, turn.
Sizes 41¾ (44)" only: Next row: With E, ch 2, hdc across, turn.
All sizes:Rows 12–13 (13, 15, 15): Change to B, ch 2, hdc in each
hdc across, turn.Row 14 (14, 16, 16): Change to MC, ch 2, hdc in each hdc
across, turn.Row 15 (15, 17, 17) (inc row): Change to C, hdc in each
of next 0 (3, 1, 4) hdc, 2 hdc in next hdc, *hdc in each of next 4 hdc, 2 hdc in next hdc; rep from * to last 0 (3, 1, 4) hdc, hdc in each of rem st(s)—206 (224, 244, 262) hdc. fasten off.
divide for front, back, sleeves as foll:
Right sleeve:Row 1: (RS) Change to MC, ch 5 (5, 6, 6) for underarm,
sk next 35 (37, 41, 43) sts for right back, sl st in next st, ch 2, hdc in each of next 32 (37, 40, 44) hdc for right sleeve, ch 7 (7, 8, 8) for underarm, turn.
Row 2: hdc in 3rd ch from hook and in each ch and hdc across turn—42 (47, 52, 56) hdc.
Rows 3–6 (7, 8, 9): Ch 2, hdc in each hdc across, turn.Row 7 (8, 9, 10): Change to a, ch 2, hdc in each hdc
across. fasten off.
left sleeve:Row 1: (RS) With RS facing, beg at front edge of right
sleeve, join MC with sl st, ch 5 (5, 6, 6) for underarm, sk next 71 (75, 82, 87) hdc for front, sl st in next st, ch 2, hdc in each of next 32 (37, 40, 44) hdc for left sleeve, ch 7 (7, 8, 8) for underarm, turn.
Rows 2–7 (8, 9, 10): Work as for right sleeve.
Back:Row 1: With RS facing, join MC with sl st in 5th (5th,
6th, 6th) left-sleeve-underarm st, hdc in each ch across
underarm, hdc2tog (see Glossary) over side edge of first sleeve row and first st of left back, hdc in each of next 33 (37, 40, 43) hdc to end of row; join with right back: hdc in each of next 34 (36, 40, 42) hdc across right back to join back of yoke, hdc2tog over last st from right back and side edge of first sleeve row—81 (85, 94, 99) hdc.
Work even until piece measures 3¼ (3¾, 4¼, 4¾)" from underarm. With d, work 2 rows even. With C, work 2 rows even. With F, work 1 row even. With E, work 1 (1, 2, 2) row(s) even. With B, work 1 (1, 2, 2) row(s) even. With A, work 2 rows even. With d, work 1 row even. With F, work 2 rows even. With mC, work 1 row even. With C,
18 (19, 21, 22)" 45.5 (48.5, 53.5, 56) cm
9¾ (10½ 12, 12¾)" 25 (26.5, 30.5, 32) cm
5 (5¼, 6, 6½)" 12.5 (13.5, 15, 16.5) cm
5 (5½, 6, 6¼)" 12.5 (14, 15, 16) cm
Front & Back
Kathryn in Beauly Dress & Hat | FREE BABY CRoChEt pAttERns FRom CroChet Me 9 FREE CRoChEt pAttERns FoR BABiEs 10
work 1 row even. With B, work 2 rows even. With E, work 2 rows even. With F, work 1 row even. With B, work 1 row even. With C, work 1 row even. With mC, work 4 (5, 6, 7) rows even. With A, work 1 row even. Fasten off and weave in loose ends.
Front:Row 1: With RS facing, join MC with sl st in 5th (5th, 6th,
6th) right sleeve underarm st, hdc2tog over side edge of the first sleeve row and first st of front, hdc in each of next 69 (73, 80, 85) hdc, hdc2tog over last st from front and side edge of first sleeve row—81 (85, 94, 99) hdc.
Work remainder of front as for back.
Finishingsew side and sleeve seams. With Rs facing, join mC with sl st to neck edge of right-back neck opening, work 17 (17, 18, 18) hdc down right side of opening, work hdc3tog (see stitch guide) over 1 st from right back, 1 st from center of opening, and 1 st from left back, work 17 (17, 18, 18) hdc up left of side opening, turn—35 (35, 37, 37) hdc. Buttonhole row: Ch 3 (counts as hdc, ch 1), sk next hdc, hdc in next 14, (14, 15, 15) sts, hdc3tog as in last row worked, hdc in each of next 16 (16, 17, 17) sts up right side of opening, turn—32 (32, 34, 34) hdc, 1 ch-1 sp. Next row: Ch 2, hdc in next 14 (14, 15, 15) hdc, hdc3tog as est, hdc in next 13 (13, 14, 14) hdc, hdc in ch-1 sp hdc in last st—31 (31, 33, 33) hdc. sew button opposite buttonhole.
BonnetNote: Bonnet is worked in a spiral with Ws facing, without joining rnds. With A, ch 3.
Rnd 1: 7 hdc in 3rd ch from hook, place marker (pm) in last st. Note: Move marker up with each rnd to indicate where to change colors—8 hdc.
Rnd 2: Change to C, 2 hdc in each hdc around to m—16 hdc.
Rnd 3: hdc in each hdc around to m.Rnd 4: Change to MC, 2 hdc in each hdc around to
m—32 hdc.Rnd 5: Change to B, hdc in each hdc around to m.Rnds 6–7: Change to f, hdc in each hdc around to m.Rnd 8: Change to D, hdc in each hdc around to m.Rnd 9: Change to E, 2 hdc in each hdc around to
m—64 hdc.
Rnd 10: hdc in each hdc around to m.Rnd 11: Change to a, hdc in each hdc around to m.Rnd 12: Change to E, hdc in each hdc around to m.Rnd 13: Change to B, hdc in each hdc around to m.Rnd 14: *2 hdc in next st, hdc in each of next 3 (2) sts;
rep from * to last 0 (1) hdc, hdc in last hdc—80 (85) hdc. fasten off.
Join mC with sl st in 12th (13th) st from end of last rnd. Work 56 (59) hdc, turn leaving rem sts unworked. Work 11 (12) more rows even. Work 1 row each in C, F, d, B, E, A. Fasten off and weave in loose ends.
Chin StrapWith A, ch 51 (53).
Row 1: hdc in 3rd ch from hook and in each ch across, turn—50 (52) hdc.
Row 2: Change to MC, ch 3 (counts as first hdc), hdc in each hdc across, turn.
Row 3 (buttonhole row): Change to B, ch 3, hdc in next hdc, ch 1, sk next hdc, hdc in each hdc to last 3 hdc, ch 1, sk next hdc, hdc in last hdc, turn.
Row 4: Change to D, ch 3, hdc in each hdc across, turn.Row 5: Change to f, ch 3, hdc in each hdc across. fasten
off.sew buttons to hat at each end of 4th (5th) row of mC band.
KaThy MERRicK, of Pennsylvania, taught herself to crochet after her beloved grandmother refused to deal with Kathy’s extreme left-handedness.
FREE BABY CRoChEt pAttERns FRom CroChet Me 9 FREE CRoChEt pAttERns FoR BABiEs 11 ©interweave | Not to be reprinted | all rights reserved | www.crochetme.com
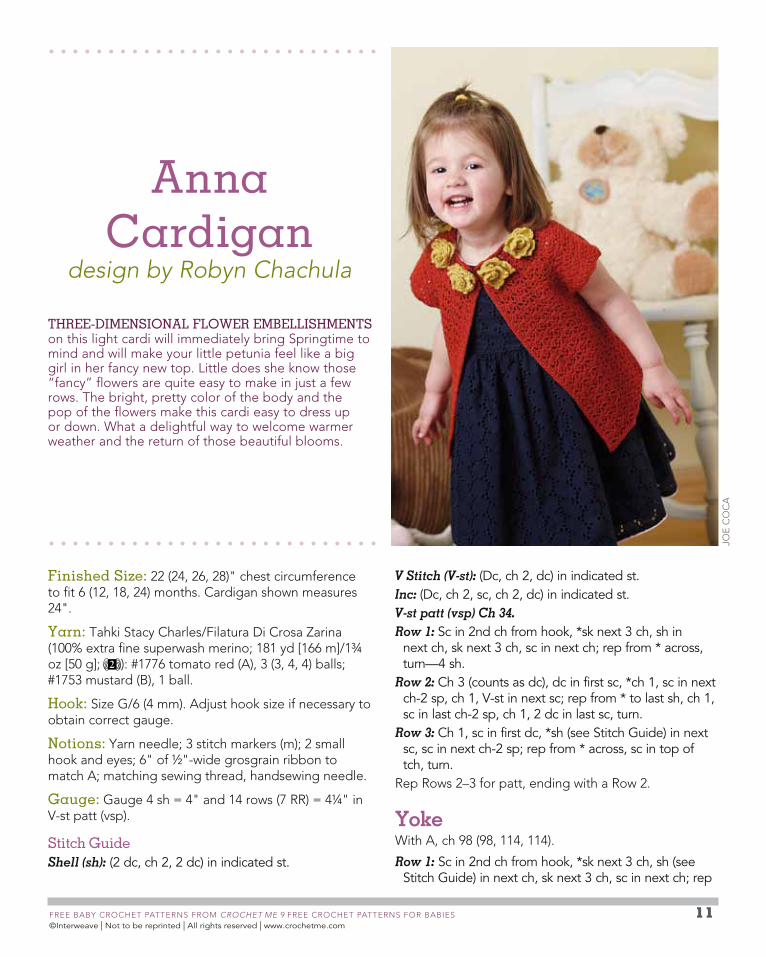
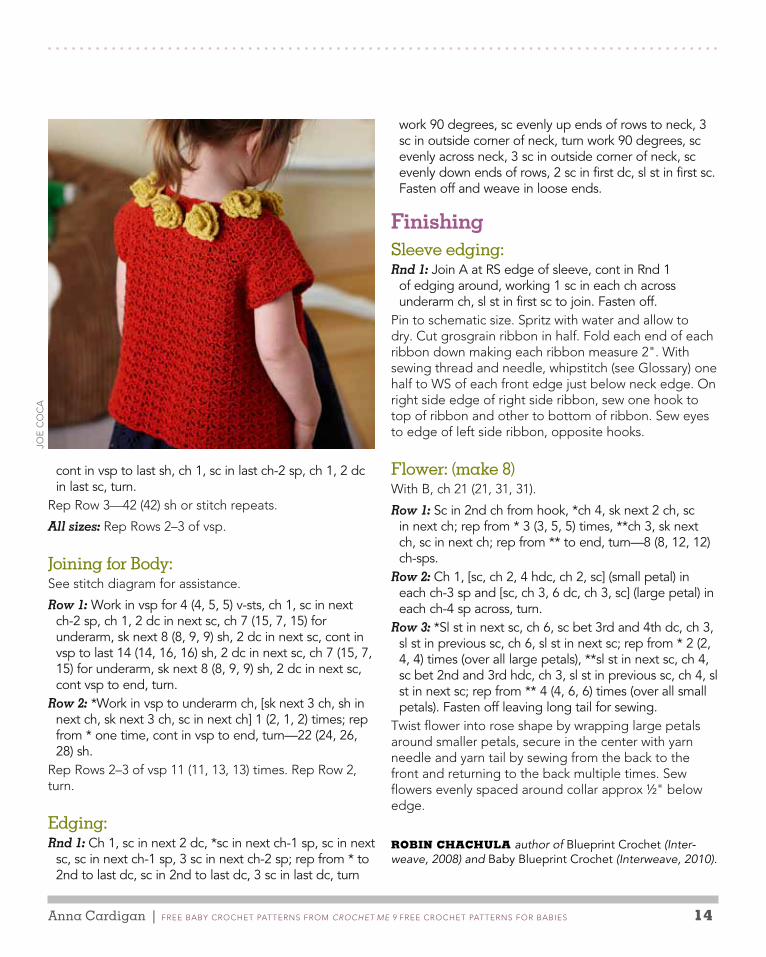
Anna Cardigan
design by robyn Chachula
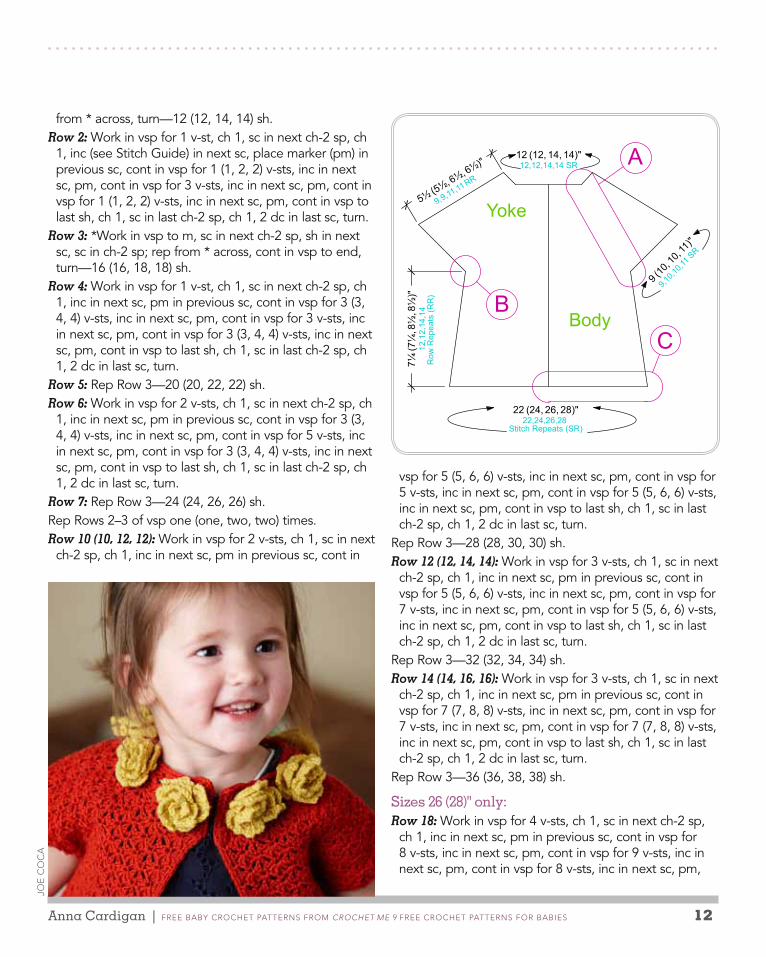
THRee-DiMeNSioNAl FloWeR eMBelliSHMeNTS on this light cardi will immediately bring springtime to mind and will make your little petunia feel like a big girl in her fancy new top. little does she know those “fancy” flowers are quite easy to make in just a few rows. the bright, pretty color of the body and the pop of the flowers make this cardi easy to dress up or down. What a delightful way to welcome warmer weather and the return of those beautiful blooms.
JoE
Co
CA
Finished Size: 22 (24, 26, 28)" chest circumference to fit 6 (12, 18, 24) months. Cardigan shown measures 24".
Yarn: tahki stacy Charles/Filatura di Crosa Zarina (100% extra fine superwash merino; 181 yd [166 m]/1¾ oz [50 g]; ): #1776 tomato red (A), 3 (3, 4, 4) balls; #1753 mustard (B), 1 ball.
Hook: size g/6 (4 mm). Adjust hook size if necessary to obtain correct gauge.
Notions: Yarn needle; 3 stitch markers (m); 2 small hook and eyes; 6" of ½"-wide grosgrain ribbon to match A; matching sewing thread, handsewing needle.
Gauge: gauge 4 sh = 4" and 14 rows (7 RR) = 4¼" in V-st patt (vsp).
Stitch GuideShell (sh): (2 dc, ch 2, 2 dc) in indicated st.
V Stitch (V-st): (Dc, ch 2, dc) in indicated st.Inc: (Dc, ch 2, sc, ch 2, dc) in indicated st.V-st patt (vsp) Ch 34.Row 1: Sc in 2nd ch from hook, *sk next 3 ch, sh in
next ch, sk next 3 ch, sc in next ch; rep from * across, turn—4 sh.
Row 2: Ch 3 (counts as dc), dc in first sc, *ch 1, sc in next ch-2 sp, ch 1, v-st in next sc; rep from * to last sh, ch 1, sc in last ch-2 sp, ch 1, 2 dc in last sc, turn.
Row 3: Ch 1, sc in first dc, *sh (see Stitch Guide) in next sc, sc in next ch-2 sp; rep from * across, sc in top of tch, turn.
Rep Rows 2–3 for patt, ending with a Row 2.
Yoke With A, ch 98 (98, 114, 114).
Row 1: Sc in 2nd ch from hook, *sk next 3 ch, sh (see Stitch Guide) in next ch, sk next 3 ch, sc in next ch; rep
Anna Cardigan | FREE BABY CRoChEt pAttERns FRom CroChet Me 9 FREE CRoChEt pAttERns FoR BABiEs 12
JoE
Co
CA
vsp for 5 (5, 6, 6) v-sts, inc in next sc, pm, cont in vsp for 5 v-sts, inc in next sc, pm, cont in vsp for 5 (5, 6, 6) v-sts, inc in next sc, pm, cont in vsp to last sh, ch 1, sc in last ch-2 sp, ch 1, 2 dc in last sc, turn.
Rep Row 3—28 (28, 30, 30) sh.Row 12 (12, 14, 14): Work in vsp for 3 v-sts, ch 1, sc in next
ch-2 sp, ch 1, inc in next sc, pm in previous sc, cont in vsp for 5 (5, 6, 6) v-sts, inc in next sc, pm, cont in vsp for 7 v-sts, inc in next sc, pm, cont in vsp for 5 (5, 6, 6) v-sts, inc in next sc, pm, cont in vsp to last sh, ch 1, sc in last ch-2 sp, ch 1, 2 dc in last sc, turn.
Rep Row 3—32 (32, 34, 34) sh.Row 14 (14, 16, 16): Work in vsp for 3 v-sts, ch 1, sc in next
ch-2 sp, ch 1, inc in next sc, pm in previous sc, cont in vsp for 7 (7, 8, 8) v-sts, inc in next sc, pm, cont in vsp for 7 v-sts, inc in next sc, pm, cont in vsp for 7 (7, 8, 8) v-sts, inc in next sc, pm, cont in vsp to last sh, ch 1, sc in last ch-2 sp, ch 1, 2 dc in last sc, turn.
Rep Row 3—36 (36, 38, 38) sh.
Sizes 26 (28)" only:Row 18: Work in vsp for 4 v-sts, ch 1, sc in next ch-2 sp,
ch 1, inc in next sc, pm in previous sc, cont in vsp for 8 v-sts, inc in next sc, pm, cont in vsp for 9 v-sts, inc in next sc, pm, cont in vsp for 8 v-sts, inc in next sc, pm,
Yoke
Body
A
CB
12 (12, 14, 14)"12,12,14,14 SR
5½ (5½, 6½, 6½)"
9,9,11,11
RR
22 (24, 26, 28)"22,24,26,28
Stitch Repeats (SR)
7¼ (7
¼, 8
½, 8
½)"
12,1
2,14
,14
Row
Rep
eats
(RR
)
9 (10
, 10,
11)"
9,10,1
0,11 S
R
from * across, turn—12 (12, 14, 14) sh.Row 2: Work in vsp for 1 v-st, ch 1, sc in next ch-2 sp, ch
1, inc (see Stitch Guide) in next sc, place marker (pm) in previous sc, cont in vsp for 1 (1, 2, 2) v-sts, inc in next sc, pm, cont in vsp for 3 v-sts, inc in next sc, pm, cont in vsp for 1 (1, 2, 2) v-sts, inc in next sc, pm, cont in vsp to last sh, ch 1, sc in last ch-2 sp, ch 1, 2 dc in last sc, turn.
Row 3: *Work in vsp to m, sc in next ch-2 sp, sh in next sc, sc in ch-2 sp; rep from * across, cont in vsp to end, turn—16 (16, 18, 18) sh.
Row 4: Work in vsp for 1 v-st, ch 1, sc in next ch-2 sp, ch 1, inc in next sc, pm in previous sc, cont in vsp for 3 (3, 4, 4) v-sts, inc in next sc, pm, cont in vsp for 3 v-sts, inc in next sc, pm, cont in vsp for 3 (3, 4, 4) v-sts, inc in next sc, pm, cont in vsp to last sh, ch 1, sc in last ch-2 sp, ch 1, 2 dc in last sc, turn.
Row 5: Rep Row 3—20 (20, 22, 22) sh.Row 6: Work in vsp for 2 v-sts, ch 1, sc in next ch-2 sp, ch
1, inc in next sc, pm in previous sc, cont in vsp for 3 (3, 4, 4) v-sts, inc in next sc, pm, cont in vsp for 5 v-sts, inc in next sc, pm, cont in vsp for 3 (3, 4, 4) v-sts, inc in next sc, pm, cont in vsp to last sh, ch 1, sc in last ch-2 sp, ch 1, 2 dc in last sc, turn.
Row 7: Rep Row 3—24 (24, 26, 26) sh.Rep Rows 2–3 of vsp one (one, two, two) times. Row 10 (10, 12, 12): Work in vsp for 2 v-sts, ch 1, sc in next
ch-2 sp, ch 1, inc in next sc, pm in previous sc, cont in
Anna Cardigan | FREE BABY CRoChEt pAttERns FRom CroChet Me 9 FREE CRoChEt pAttERns FoR BABiEs 13
One
Row
R
epea
t
1
3
5
7
2
4
6
8
One Stitch Pattern Repeat
V-st Stitch Pattern
910
1
3
5
7
2
4
6
A. Yoke Increase
21
B. Body Joining
5, 6 SR
21
5, 6 SR
Medium/ X-Large Joining
Small/ Large Joining
C. Edging
1
4, 4, 6, 6 Petals 4, 4, 6, 6 Petals
D. Flower
slip stitch
double crochet
single crochet
half double crochet
double treble
3dc-cl
chain
treble crochet
2dc-cl sc in middle bar
sc spike
dc2tog
4dc-cl hdc2tog
sc2tog
3hdc-cl TSS
TPS
TSS dec
FPdc
BPdc
hdc-flp
hdc-blp
dc in middle bar
extended single crochet
slip stitch
double crochet
single crochet
half double crochet
double treble
3dc-cl
chain
treble crochet
2dc-cl sc in middle bar
sc spike
dc2tog
4dc-cl hdc2tog
sc2tog
3hdc-cl TSS
TPS
TSS dec
FPdc
BPdc
hdc-flp
hdc-blp
dc in middle bar
extended single crochet
Anna Cardigan | FREE BABY CRoChEt pAttERns FRom CroChet Me 9 FREE CRoChEt pAttERns FoR BABiEs 14
cont in vsp to last sh, ch 1, sc in last ch-2 sp, ch 1, 2 dc in last sc, turn.
Rep Row 3—42 (42) sh or stitch repeats.
All sizes: Rep Rows 2–3 of vsp.
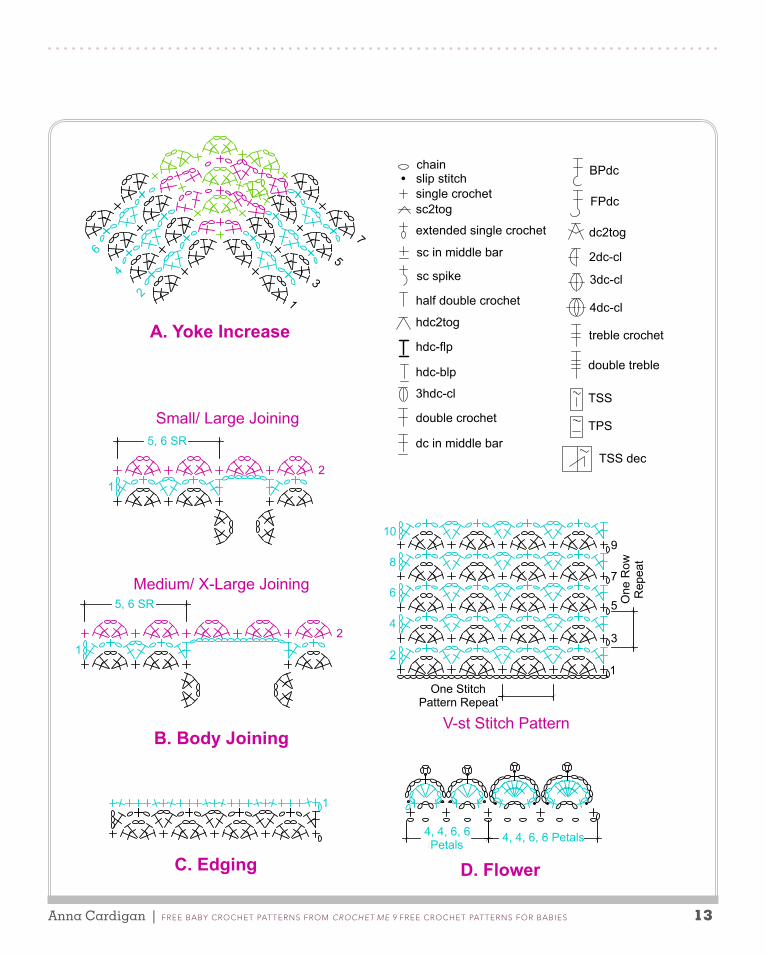
Joining for Body:see stitch diagram for assistance.
Row 1: Work in vsp for 4 (4, 5, 5) v-sts, ch 1, sc in next ch-2 sp, ch 1, 2 dc in next sc, ch 7 (15, 7, 15) for underarm, sk next 8 (8, 9, 9) sh, 2 dc in next sc, cont in vsp to last 14 (14, 16, 16) sh, 2 dc in next sc, ch 7 (15, 7, 15) for underarm, sk next 8 (8, 9, 9) sh, 2 dc in next sc, cont vsp to end, turn.
Row 2: *Work in vsp to underarm ch, [sk next 3 ch, sh in next ch, sk next 3 ch, sc in next ch] 1 (2, 1, 2) times; rep from * one time, cont in vsp to end, turn—22 (24, 26, 28) sh.
Rep Rows 2–3 of vsp 11 (11, 13, 13) times. Rep Row 2, turn.
edging:Rnd 1: Ch 1, sc in next 2 dc, *sc in next ch-1 sp, sc in next
sc, sc in next ch-1 sp, 3 sc in next ch-2 sp; rep from * to 2nd to last dc, sc in 2nd to last dc, 3 sc in last dc, turn
work 90 degrees, sc evenly up ends of rows to neck, 3 sc in outside corner of neck, turn work 90 degrees, sc evenly across neck, 3 sc in outside corner of neck, sc evenly down ends of rows, 2 sc in first dc, sl st in first sc. fasten off and weave in loose ends.
FinishingSleeve edging:Rnd 1: Join a at RS edge of sleeve, cont in Rnd 1
of edging around, working 1 sc in each ch across underarm ch, sl st in first sc to join. fasten off.
pin to schematic size. spritz with water and allow to dry. Cut grosgrain ribbon in half. Fold each end of each ribbon down making each ribbon measure 2". With sewing thread and needle, whipstitch (see glossary) one half to Ws of each front edge just below neck edge. on right side edge of right side ribbon, sew one hook to top of ribbon and other to bottom of ribbon. sew eyes to edge of left side ribbon, opposite hooks.
Flower: (make 8)With B, ch 21 (21, 31, 31).
Row 1: Sc in 2nd ch from hook, *ch 4, sk next 2 ch, sc in next ch; rep from * 3 (3, 5, 5) times, **ch 3, sk next ch, sc in next ch; rep from ** to end, turn—8 (8, 12, 12) ch-sps.
Row 2: Ch 1, [sc, ch 2, 4 hdc, ch 2, sc] (small petal) in each ch-3 sp and [sc, ch 3, 6 dc, ch 3, sc] (large petal) in each ch-4 sp across, turn.
Row 3: *Sl st in next sc, ch 6, sc bet 3rd and 4th dc, ch 3, sl st in previous sc, ch 6, sl st in next sc; rep from * 2 (2, 4, 4) times (over all large petals), **sl st in next sc, ch 4, sc bet 2nd and 3rd hdc, ch 3, sl st in previous sc, ch 4, sl st in next sc; rep from ** 4 (4, 6, 6) times (over all small petals). fasten off leaving long tail for sewing.
twist flower into rose shape by wrapping large petals around smaller petals, secure in the center with yarn needle and yarn tail by sewing from the back to the front and returning to the back multiple times. sew flowers evenly spaced around collar approx ½" below edge.
RObin chachula author of Blueprint Crochet (Inter-weave, 2008) and Baby Blueprint Crochet (Interweave, 2010).
JoE
Co
CA

FREE BABY CRoChEt pAttERns FRom CroChet Me 9 FREE CRoChEt pAttERns FoR BABiEs 15 ©interweave | Not to be reprinted | all rights reserved | www.crochetme.com
Mari Nursing Wrapdesign by robin Chachula
FoR SoMe MoMS, pRivACY iS iMpoRTANT when nursing. this simple wrap shields the baby behind a curtain of linked stitches while letting mom peek in on baby at the granny square border. the wrap can easily be hooked over the neck with the attached strap for feeding or draped over a stroller for sleeping. the light cotton/linen blend yarn used here becomes softer each time it is laundered, making this a pleasant and coanvenient addition to a nursing mama’s daily routine.
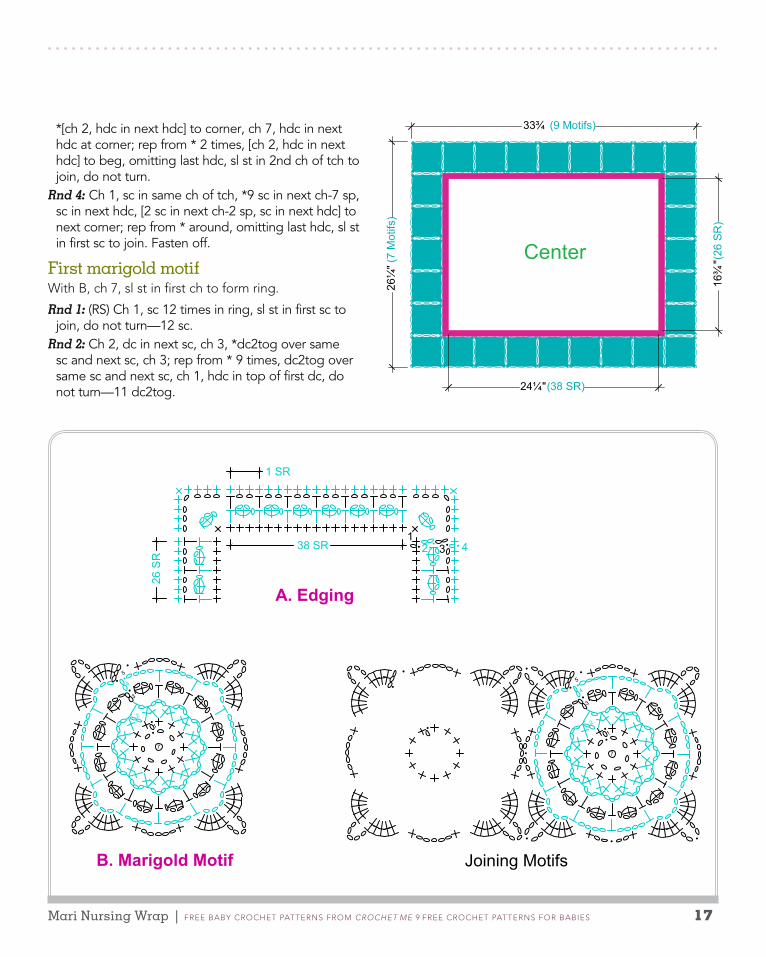
Finished Size: 33¾" wide and 26¼" long.
Yarn: Verde Collection Allegoro (70% organic cotton, 30% linen; 152 yd [139 m]/1¾ oz [50 g]; ): #5634 best berry (A), 4 balls; #5619 lupine pink (B), 3 balls; #5650 cerignola (C), 1 ball. Yarn distributed by Classic Elite Yarns.
JoE
Co
CA
Hook: size g/6 (4 mm). Adjust hook size if necessary to obtain correct gauge.
Notions: Yarn needle; 1⅛" button.
Gauge: 9 sts and 10 rows [6 stitch Repeats (sR) by 5 Row Repeats (RR)] = 4"; marigold motif = 3¾" square.
Skill level: intermediate.
Stitch Guide:linked Treble Crochet (l-tr)Set-up st: insert hook in 2nd ch from hook, yo and pull
up lp, insert hook in 3rd ch from hook, yo and pull up lp, insert hook in 5th ch from hook (or next st), yo and pull up lp (4 lps on hook), yo and draw through 2 lps on hook, yo and draw through next 2 lps, yo and draw

Mari Nursing Wrap | FREE BABY CRoChEt pAttERns FRom CroChet Me 9 FREE CRoChEt pAttERns FoR BABiEs 16
JoE
Co
CA
through last 2 lps—first l-tr made. Next st: insert hook in upper horizontal bar of previous st, yo and pull up lp, insert hook in lower horizontal bar, yo and pull up lp, insert hook in next ch (or st), yo and pull up lp, (4 lps on hook), yo and draw through 2 lps on hook, yo and draw through next 2 lps, yo and draw through last 2 lps.
Dc2tog: [yo, insert hook in next st, yo and pull up lp, yo, draw through 2 lps on hook] 2 times, yo and draw through rem 3 lps on hook.
2DC-CL: [yo, insert hook in st, yo and pull up lp, yo and draw through 2 lps on hook] 2 times, yo and draw through rem 3 lps on hook.
Wrap CenterWith a, ch 119.Row 1: (RS) l-tr (see Stitch Guide) in 5th ch from hook
(4 skipped ch counts as l-tr), l-tr in each ch across, turn—115 l-tr.
Row 2: Ch 1, sc-flo in each l-tr across, turn.Row 3: Ch 4, l-tr in each sc across, turn. Rep Rows 2–3 eighteen times. Rep Row 2.
edgingChange to C.Rnd 1: Ch 1, 3 sc in first sc, sc in each sc to last sc, 3
sc in last sc, turn work 90 degrees (now beg working in row-ends), work 77 sc along edge, turn work 90 degrees, work 3 sc in first foundation ch, sc in each ch to last ch, work 3 sc in last ch, turn work 90 degrees, work 77 sc along edge, sl st in first sc to join, do not turn—392 sc.
Rnd 2: Ch 5, 2dc-cl (see Stitch Guide) in 3rd ch from hook, sk next sc, hdc in next sc, *ch 3, 2dc-cl in 3rd ch from hook, sk next 2 sc, hdc in next sc *; rep from * to * 37 times, ch 3, 2dc-cl in 3rd ch from hook, sk next sc, hdc in next sc, rep from * to * 26 times, ch 3, 2dc-cl in 3rd ch from hook, sk next sc, hdc in next sc, rep from * to * 38 times, ch 3, 2dc-cl in 3rd ch from hook, sk next sc, hdc in next sc, rep from * to * 25 times, ch 3, 2dc-cl in 3rd ch from hook, sl st in 2nd ch of tch to join, do not turn—132 2dc-cl.
Rnd 3: Ch 9 (counts as hdc and ch-7 sp), hdc in next hdc,
Mari Nursing Wrap | FREE BABY CRoChEt pAttERns FRom CroChet Me 9 FREE CRoChEt pAttERns FoR BABiEs 17
*[ch 2, hdc in next hdc] to corner, ch 7, hdc in next hdc at corner; rep from * 2 times, [ch 2, hdc in next hdc] to beg, omitting last hdc, sl st in 2nd ch of tch to join, do not turn.
Rnd 4: Ch 1, sc in same ch of tch, *9 sc in next ch-7 sp, sc in next hdc, [2 sc in next ch-2 sp, sc in next hdc] to next corner; rep from * around, omitting last hdc, sl st in first sc to join. fasten off.
First marigold motifWith B, ch 7, sl st in first ch to form ring.
Rnd 1: (RS) Ch 1, sc 12 times in ring, sl st in first sc to join, do not turn—12 sc.
Rnd 2: Ch 2, dc in next sc, ch 3, *dc2tog over same sc and next sc, ch 3; rep from * 9 times, dc2tog over same sc and next sc, ch 1, hdc in top of first dc, do not turn—11 dc2tog.
2
1
7
3
4
5
B. Marigold Motif
2
1
7
3
4
5
Joining Motifs
7
2
1
7
3
4
5
C. Joining Motifs
A. Edging
138 SR 2 3 4
26 S
R
1 SR
Center
26¼
" (7
Mot
ifs)
33¾ (9 Motifs)
24¼" (38 SR)
16¾
" (26
SR
)
Mari Nursing Wrap | FREE BABY CRoChEt pAttERns FRom CroChet Me 9 FREE CRoChEt pAttERns FoR BABiEs 18
slip stitch
double crochet
single crochet
half double crochet
double treble
3dc-cl
chain
treble crochet
2dc-cl sc in middle bar
sc spike
dc2tog
4dc-cl hdc2tog
sc2tog
3hdc-cl TSS
TPS
TSS dec
FPdc
BPdc
hdc-flp
hdc-blp
dc in middle bar
extended single crochet
slip stitch
double crochet
single crochet
half double crochet
double treble
3dc-cl
chain
treble crochet
2dc-cl sc in middle bar
sc spike
dc2tog
4dc-cl hdc2tog
sc2tog
3hdc-cl TSS
TPS
TSS dec
FPdc
BPdc
hdc-flp
hdc-blp
dc in middle bar
extended single crochet
C. Joining Motifs

Mari Nursing Wrap | FREE BABY CRoChEt pAttERns FRom CroChet Me 9 FREE CRoChEt pAttERns FoR BABiEs 19
Rnd 3: Ch 5 (counts as hdc), 2dc-cl in 3rd ch from hook, *hdc in next ch-3 sp, ch 3, 2dc-cl in 3rd ch from hook; rep from * around, sl st in 2nd ch of tch, do not turn—12 2dc-cl.
Rnd 4: Ch 6 (counts as hdc and ch-4 sp), *hdc in next hdc, ch 4; rep from * around, sl st in 2nd ch of tch, do not turn—12 hdc.
Rnd 5: Sl st in ch-4 sp, ch 3 (counts as dc), (4 dc, ch 5, 5 dc) in same ch-4 sp, *sc in next ch-4 sp, ch 5, sc in next ch-4 sp, (5 dc, ch 5, 5 dc) in next ch-4 sp; rep from * 2 times, sc in next ch-4 sp, ch 5, sc in next ch-4 sp, sl st in top of tch. fasten off.
Second and successive motifs (make 26)Join all adjoining ch-5 sp corners and sides, as well as to edge of body as directed in instruction and diagram.
Rnd 5: Sl st in first ch-4 sp, ch 3 (counts as dc), 4 dc in same ch-4 sp, ch 2, sl st in ch-5 sp of adjoining motif (aM), ch 2, 5 dc in same ch-4 sp of working motif (WM), sc in next ch-4 sp, ch 2, sl st in ch-5 sp of aM, ch 2, sc in next ch-4 sp of WM, 5 dc in next ch-4 sp, ch 2, sl st in next ch-5 sp of aM, sl st in sc shown on diagram, ch 2, 5 dc in same ch-4 sp of WM, sc in next ch-4 sp, ch 2, sl st in next sc shown on diagram (9 sc from corner or 9 sc from last sl st on side), ch 2, sc in next ch-4 sp, 5 dc in next ch-4 sp, ch 2, sl st to next sc shown on diagram (9 sc from last sl st), ch 2, 5 dc in same ch-4 sp, *sc in next ch-4 sp, ch 5, sc in next ch-4 sp *, (sc, ch 5, sc) in next ch-4 sp, rep from * to *, sl st in top of tch. fasten off.
last motifJoin to previous motif, first motif, and body.
Rnd 5: Sl st in first ch-4 sp, ch 3 (counts as dc), 4 dc in same ch-4 sp, ch 2, sl st in ch-5 sp of adjoining motif (aM), ch 2, 5 dc in same ch-4 sp of working motif (WM), sc in next ch-4 sp, ch 2, sl st in ch-5 sp of aM, ch 2, sc in next ch-4 sp of WM, 5 dc in next ch-4 sp, ch 2, sl st in next ch-5 sp of aM, sl st in sc shown on diagram, ch 2, 5 dc in same ch-4 sp, sc in next ch-4 sp, ch 2, sl st in next sc shown on diagram (9 sc from corner or 9 sc from last sl st on side), ch 2, sc in next ch-4 sp, 5 dc in next ch-4 sp, ch 2, sl st in next sc shown on diagram (9 sc from last sl st), ch 2, 5 dc in same ch-4 sp, sc in next ch-4 sp, ch 2, sl st in first motif's ch-5 sp, ch 2, sc
in next ch-4 sp, 5 dc in next ch-4 sp, ch 2, sl st in first motif’s next ch-5 sp, ch 2, 5 dc in same ch-4 sp, sc in next ch-4 sp, ch 5, sc in next ch-4 sp, sl st in top of tch. fasten off.
Finishing pin wrap to schematic size. spray with water and allow to dry. Note: to make wrap even softer, machine wash multiple times, according to yarn package directions, then pin to schematic size to dry. Remember to test this on swatch first, before trying on the completed wrap.
long strap With A, ch 87.
Row 1: Sc in 2nd ch from hook and each ch across, turn—86 sc.
Row 2: Ch 1, sc across, turn.Rep Row 2.Row 4: Ch 1, *sc in next 4 sc, ch 4, sk next 4 sc; rep
from * 2 times, sc in each rem sc to end, turn—3 buttonholes made.
Row 5: Ch 1, sc across, turn.Rep Row 2 two times. fasten off.
Short strap With C, ch 11.Row 1: Sc in 2nd ch from hook and each ch across,
turn—10 sc.Row 2: Ch 1, sc across, turn.Rep Row 2 five times.
Join strap and buttonpin non-buttonhole end of long strap to long side of wrap, to beg of 4th motif,12" from right-hand edge. With yarn needle and A, whipstitch (see glossary) long strap to motif. pin short strap to end of 4th motif 12" from left-hand edge on same long side of wrap. With yarn needle and C, whipstitch short strap to motif. sew button to end of short C strap on Rs.
RObin chachula author of Blueprint Crochet (Inter-weave, 2008) and Baby Blueprint Crochet (Interweave, 2010).
FREE BABY CRoChEt pAttERns FRom CroChet Me 9 FREE CRoChEt pAttERns FoR BABiEs 20 ©interweave | Not to be reprinted | all rights reserved | www.crochetme.com
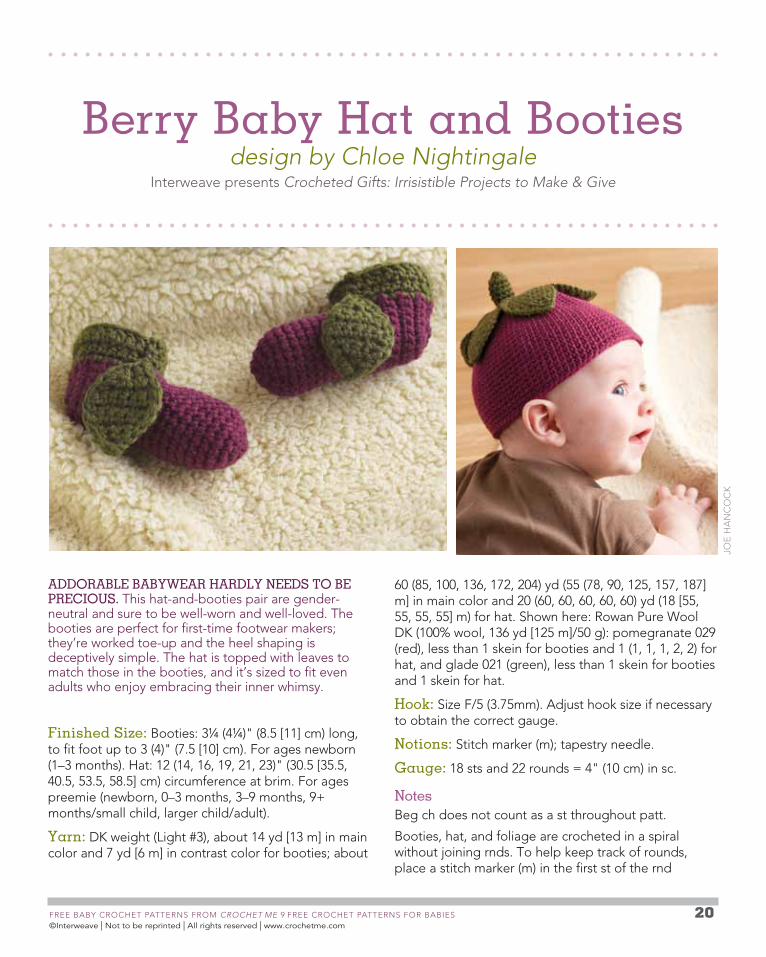
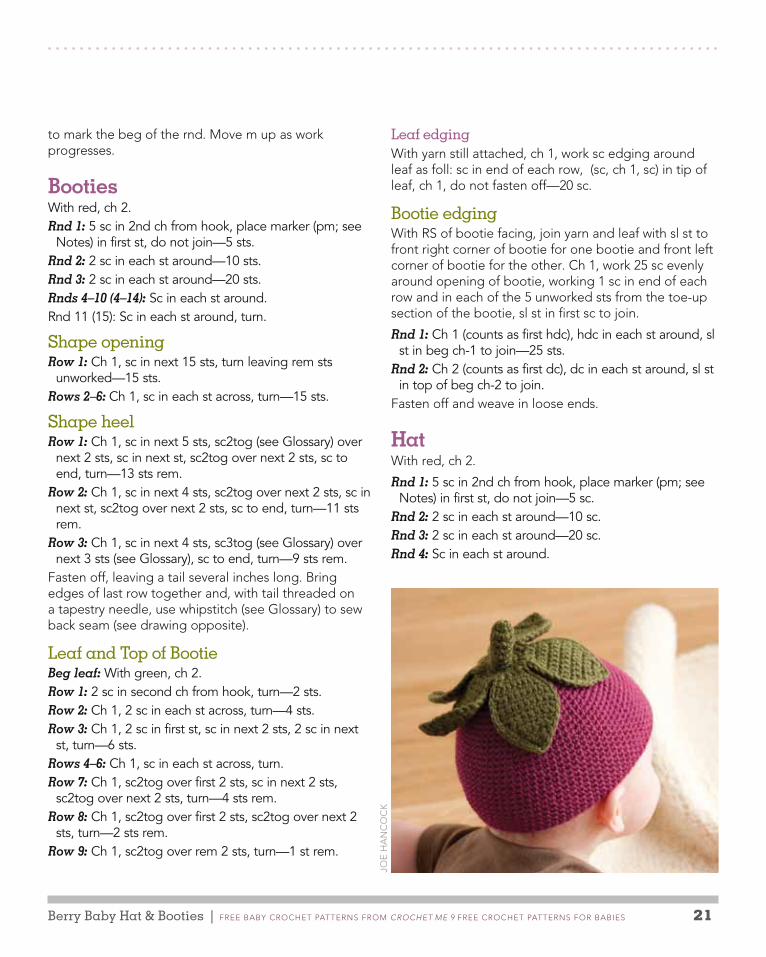
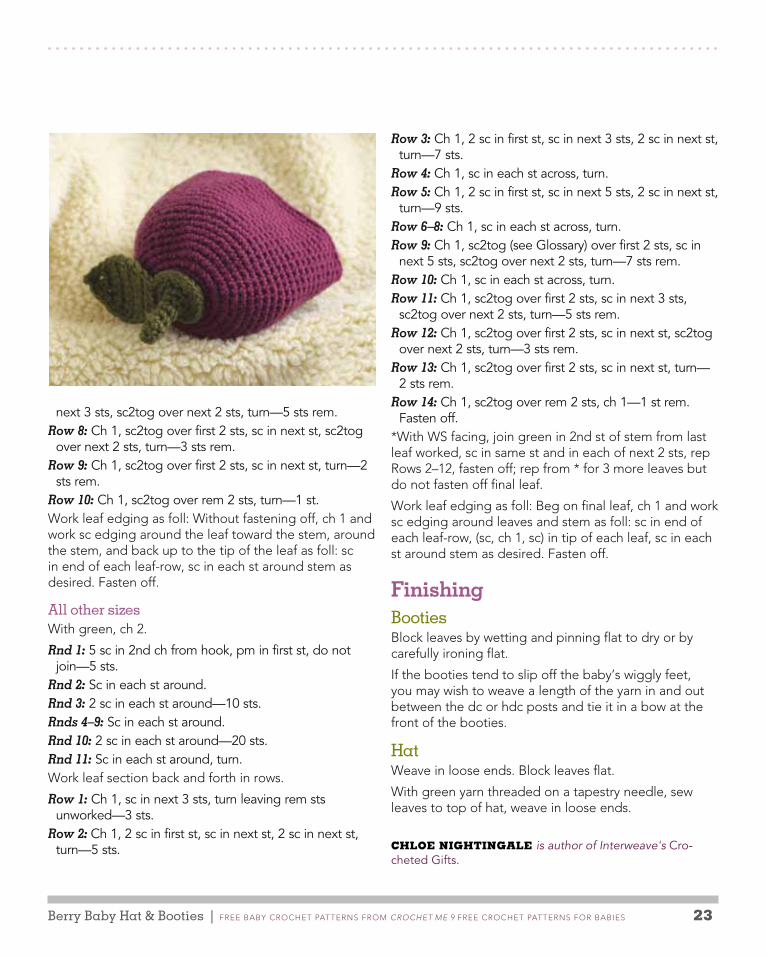
ADDoRABle BABYWeAR HARDlY NeeDS To Be pReCioUS. this hat-and-booties pair are gender-neutral and sure to be well-worn and well-loved. the booties are perfect for first-time footwear makers; they’re worked toe-up and the heel shaping is deceptively simple. the hat is topped with leaves to match those in the booties, and it’s sized to fit even adults who enjoy embracing their inner whimsy.
Finished Size: Booties: 3¼ (4¼)" (8.5 [11] cm) long, to fit foot up to 3 (4)" (7.5 [10] cm). For ages newborn (1–3 months). hat: 12 (14, 16, 19, 21, 23)" (30.5 [35.5, 40.5, 53.5, 58.5] cm) circumference at brim. For ages preemie (newborn, 0–3 months, 3–9 months, 9+ months/small child, larger child/adult).
Yarn: dK weight (light #3), about 14 yd [13 m] in main color and 7 yd [6 m] in contrast color for booties; about
60 (85, 100, 136, 172, 204) yd (55 (78, 90, 125, 157, 187] m] in main color and 20 (60, 60, 60, 60, 60) yd (18 [55, 55, 55, 55] m) for hat. shown here: Rowan pure Wool dK (100% wool, 136 yd [125 m]/50 g): pomegranate 029 (red), less than 1 skein for booties and 1 (1, 1, 1, 2, 2) for hat, and glade 021 (green), less than 1 skein for booties and 1 skein for hat.
Hook: size F/5 (3.75mm). Adjust hook size if necessary to obtain the correct gauge.
Notions: stitch marker (m); tapestry needle.
Gauge: 18 sts and 22 rounds = 4" (10 cm) in sc.
NotesBeg ch does not count as a st throughout patt.
Booties, hat, and foliage are crocheted in a spiral without joining rnds. to help keep track of rounds, place a stitch marker (m) in the first st of the rnd
Berry Baby Hat and Bootiesdesign by Chloe Nightingale
interweave presents Crocheted Gifts: irrisistible Projects to Make & Give
JoE
hA
nC
oC
K
Berry Baby Hat & Booties | FREE BABY CRoChEt pAttERns FRom CroChet Me 9 FREE CRoChEt pAttERns FoR BABiEs 21
to mark the beg of the rnd. move m up as work progresses.
Booties With red, ch 2.Rnd 1: 5 sc in 2nd ch from hook, place marker (pm; see
Notes) in first st, do not join—5 sts.Rnd 2: 2 sc in each st around—10 sts.Rnd 3: 2 sc in each st around—20 sts.Rnds 4–10 (4–14): Sc in each st around.Rnd 11 (15): Sc in each st around, turn.
Shape openingRow 1: Ch 1, sc in next 15 sts, turn leaving rem sts
unworked—15 sts.Rows 2–6: Ch 1, sc in each st across, turn—15 sts.
Shape heel Row 1: Ch 1, sc in next 5 sts, sc2tog (see Glossary) over
next 2 sts, sc in next st, sc2tog over next 2 sts, sc to end, turn—13 sts rem.
Row 2: Ch 1, sc in next 4 sts, sc2tog over next 2 sts, sc in next st, sc2tog over next 2 sts, sc to end, turn—11 sts rem.
Row 3: Ch 1, sc in next 4 sts, sc3tog (see Glossary) over next 3 sts (see Glossary), sc to end, turn—9 sts rem.
Fasten off, leaving a tail several inches long. Bring edges of last row together and, with tail threaded on a tapestry needle, use whipstitch (see glossary) to sew back seam (see drawing opposite).
leaf and Top of BootieBeg leaf: With green, ch 2.Row 1: 2 sc in second ch from hook, turn—2 sts.Row 2: Ch 1, 2 sc in each st across, turn—4 sts.Row 3: Ch 1, 2 sc in first st, sc in next 2 sts, 2 sc in next
st, turn—6 sts.Rows 4–6: Ch 1, sc in each st across, turn.Row 7: Ch 1, sc2tog over first 2 sts, sc in next 2 sts,
sc2tog over next 2 sts, turn—4 sts rem.Row 8: Ch 1, sc2tog over first 2 sts, sc2tog over next 2
sts, turn—2 sts rem.Row 9: Ch 1, sc2tog over rem 2 sts, turn—1 st rem.
leaf edgingWith yarn still attached, ch 1, work sc edging around leaf as foll: sc in end of each row, (sc, ch 1, sc) in tip of leaf, ch 1, do not fasten off—20 sc.
Bootie edgingWith Rs of bootie facing, join yarn and leaf with sl st to front right corner of bootie for one bootie and front left corner of bootie for the other. Ch 1, work 25 sc evenly around opening of bootie, working 1 sc in end of each row and in each of the 5 unworked sts from the toe-up section of the bootie, sl st in first sc to join.
Rnd 1: Ch 1 (counts as first hdc), hdc in each st around, sl st in beg ch-1 to join—25 sts.
Rnd 2: Ch 2 (counts as first dc), dc in each st around, sl st in top of beg ch-2 to join.
Fasten off and weave in loose ends.
HatWith red, ch 2.
Rnd 1: 5 sc in 2nd ch from hook, place marker (pm; see Notes) in first st, do not join—5 sc.
Rnd 2: 2 sc in each st around—10 sc.Rnd 3: 2 sc in each st around—20 sc.Rnd 4: Sc in each st around.
JoE
hA
nC
oC
K
Berry Baby Hat & Booties | FREE BABY CRoChEt pAttERns FRom CroChet Me 9 FREE CRoChEt pAttERns FoR BABiEs 22
Rnd 5: 2 sc in each st around—40 sc.Rnds 6–7: Sc in each st around.
preemie size onlyRnd 8: *2 sc in next st, sc in next 3 sts; rep from *
around—50 sts.Rnds 9–13: Sc in each st around.Rnd 14: *2 sc in next st, sc in next 9 sts; rep from *
around—55 sts.Rnd 15: Sc in each st around.Rep Rnd 15 ten more times or to desired length, sl st in next st. Fasten off.
Newborn size onlyRnd 8: *2 sc in next st, sc in next st; rep from *
around—60 sts.Rnds 9–14: Sc in each st around.Rnd 15: *2 sc in next st, sc in next 11 sts; rep from *
around—65 sts.Rnd 16: Sc in each st around.Rep Rnd 16 twelve more times or to desired length, sl st in next st. Fasten off.
0–3 month size onlyRnd 8: *2 sc in next st, sc in next st; rep from *
around—60 sts.Rnds 9–14: Sc in each st around.Rnd 15: *2 sc in next st, sc in next 3 sts; rep from *
around—75 sts.Rnd 16: Sc in each st around.Rep Rnd 16 fourteen more times or to desired length, sl st in next st. Fasten off.
3–9 month size onlyRnd 8: *2 sc in next st, sc in next st; rep from *
around—60 sts.Rnds 9–13: Sc in each st around.Rnd 14: *2 sc in next st, sc in next 2 sts; rep from *
around—80 sts.Rnd 15–20: Sc in each st around.Rnd 21: *2 sc in next st, sc in next 15 sts; rep from *
around—85 sts.Rnd 22: Sc in each st around.Rep Rnd 22 twelve more times or to desired length, sl st in next st. Fasten off.
9+ month/child size onlyRnd 8: *2 sc in next st, sc in next st; rep from *
around—60 sts.Rnds 9–13: Sc in each st around.Rnd 14: *2 sc in next st, sc in next st; rep from *
around—90 sts.Rnds 15–20: Sc in each st around. Rnd 21: *2 sc in next st, sc in next 17 sts; rep from *
around—95 sts.Rnd 22: Sc in each st around.Rep Rnd 22 sixteen more times or to desired length, sl st in next st. Fasten off.
older child/adult size onlyRnd 8: *2 sc in next st, sc in next st; rep from *
around—60 sts.Rnds 9–13: Sc in each st around.Rnd 14: *2 sc in next st, sc in next st; rep from *
around—90 sts.Rnds 15–20: Sc in each st around.Rnd 21: *2 sc in next st, sc in next 5 sts; rep from *
around—105 sts.Rnd 22: Sc in each st around.Rep Rnd 22 twenty more times or to desired length, sl st in next st. Fasten off.
leavespreemie size onlyWith green, ch 2.Rnd 1: 5 sc in 2nd ch from hook, pm in first st, do not
join—5 sc.Rnds 2–6: Sc in each st around.Rnd 7: 2 sc in each st around—10 sc.Rnd 8: 2 sc in each st around, turn—20 sc.Work leaf section back and forth in rows.
Row 1: Ch 1, sc in next 3 sts, turn leaving rem sts unworked—3 sc.
Row 2: Ch 1, 2 sc in first st, sc in next st, 2 sc in next st, turn—5 sc.
Row 3: Ch 1, 2 sc in first st, sc in next 3 sts, 2 sc in next st, turn—7 sc.
Row 4–6: Ch 1, sc in each st across, turn.Row 7: Ch 1, sc2tog (see Glossary) over first 2 sts, sc in
Berry Baby Hat & Booties | FREE BABY CRoChEt pAttERns FRom CroChet Me 9 FREE CRoChEt pAttERns FoR BABiEs 23
next 3 sts, sc2tog over next 2 sts, turn—5 sts rem.Row 8: Ch 1, sc2tog over first 2 sts, sc in next st, sc2tog
over next 2 sts, turn—3 sts rem.Row 9: Ch 1, sc2tog over first 2 sts, sc in next st, turn—2
sts rem.Row 10: Ch 1, sc2tog over rem 2 sts, turn—1 st.Work leaf edging as foll: Without fastening off, ch 1 and work sc edging around the leaf toward the stem, around the stem, and back up to the tip of the leaf as foll: sc in end of each leaf-row, sc in each st around stem as desired. Fasten off.
All other sizesWith green, ch 2.
Rnd 1: 5 sc in 2nd ch from hook, pm in first st, do not join—5 sts.
Rnd 2: Sc in each st around.Rnd 3: 2 sc in each st around—10 sts.Rnds 4–9: Sc in each st around.Rnd 10: 2 sc in each st around—20 sts.Rnd 11: Sc in each st around, turn.Work leaf section back and forth in rows.
Row 1: Ch 1, sc in next 3 sts, turn leaving rem sts unworked—3 sts.
Row 2: Ch 1, 2 sc in first st, sc in next st, 2 sc in next st, turn—5 sts.
Row 3: Ch 1, 2 sc in first st, sc in next 3 sts, 2 sc in next st, turn—7 sts.
Row 4: Ch 1, sc in each st across, turn.Row 5: Ch 1, 2 sc in first st, sc in next 5 sts, 2 sc in next st,
turn—9 sts.Row 6–8: Ch 1, sc in each st across, turn.Row 9: Ch 1, sc2tog (see Glossary) over first 2 sts, sc in
next 5 sts, sc2tog over next 2 sts, turn—7 sts rem.Row 10: Ch 1, sc in each st across, turn.Row 11: Ch 1, sc2tog over first 2 sts, sc in next 3 sts,
sc2tog over next 2 sts, turn—5 sts rem.Row 12: Ch 1, sc2tog over first 2 sts, sc in next st, sc2tog
over next 2 sts, turn—3 sts rem.Row 13: Ch 1, sc2tog over first 2 sts, sc in next st, turn—
2 sts rem.Row 14: Ch 1, sc2tog over rem 2 sts, ch 1—1 st rem.
fasten off. *With Ws facing, join green in 2nd st of stem from last leaf worked, sc in same st and in each of next 2 sts, rep Rows 2–12, fasten off; rep from * for 3 more leaves but do not fasten off final leaf.
Work leaf edging as foll: Beg on final leaf, ch 1 and work sc edging around leaves and stem as foll: sc in end of each leaf-row, (sc, ch 1, sc) in tip of each leaf, sc in each st around stem as desired. Fasten off.
FinishingBootiesBlock leaves by wetting and pinning flat to dry or by carefully ironing flat.
if the booties tend to slip off the baby’s wiggly feet, you may wish to weave a length of the yarn in and out between the dc or hdc posts and tie it in a bow at the front of the booties.
Hat Weave in loose ends. Block leaves flat.
With green yarn threaded on a tapestry needle, sew leaves to top of hat, weave in loose ends.
chlOE niGhTinGalE is author of Interweave's Cro-cheted Gifts.

FREE BABY CRoChEt pAttERns FRom CroChet Me 9 FREE CRoChEt pAttERns FoR BABiEs 24 ©interweave | Not to be reprinted | all rights reserved | www.crochetme.com
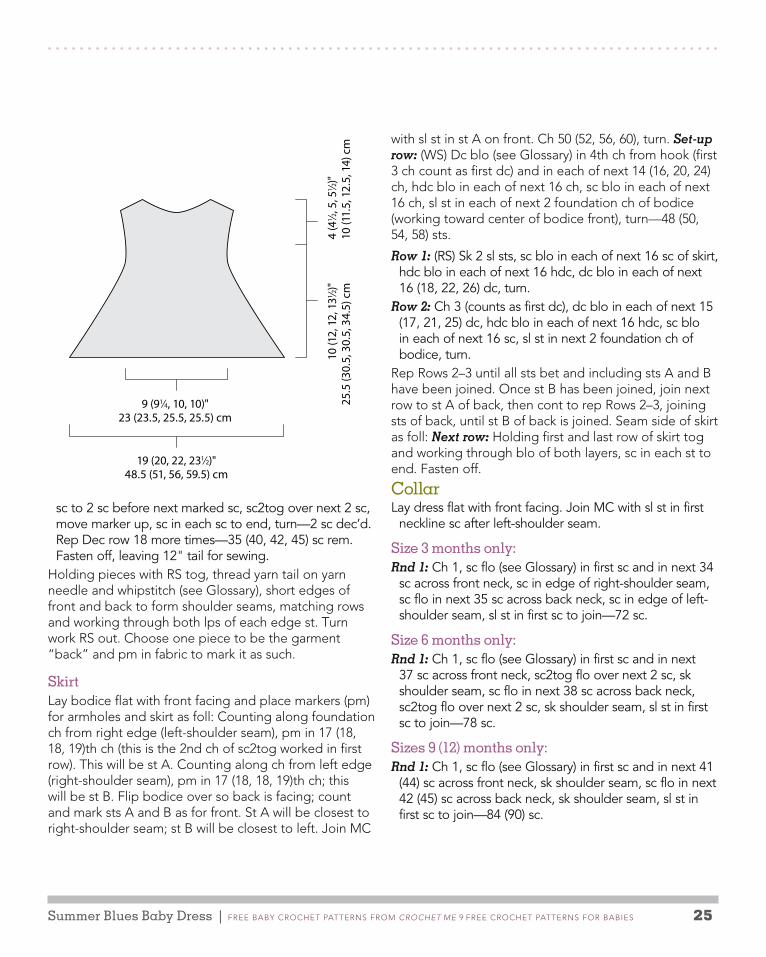
Summer Blues Baby Dress design by ellen k. Gormleyoriginally published in interweave Crochet, summer 2008
WiTH MiNiMAl SeAMiNG AND SiMple STiTCHeS, this summer dress is adorable without being fussy. using stitches of different heights gives comfortable stretch to the skirt, and cotton-blend yarn makes it cool against the skin.
Finished Size: 19 (191⁄2, 20, 20)" chest circumference to fit 3 (6, 9, 12) months. garment shown fits 12 months; 2" of ease is suggested.
Yarn: halcyon Yarn Casco Bay Cotton sport, (100% cotton; 425 yd [388 m]/31⁄2 oz [100 g]; ): #124 blue (mC), 1 (1, 2, 2) cones; #101 white (CC), 1 cone.
Hook: size g/6 (4 mm). Adjust hook size if necessary to obtain the correct gauge.
Notions: stitch markers (m); yarn needle.
Gauge: 19 sts and 23 rows = 4" in sc.
Skill level: Easy.
NotesBodice is worked in 2 pieces from the bottom up, then seamed before working skirt. skirt is crocheted from side to side and is attached to bodice as it is worked.
Bodice Front and Back (make 2)With CC, ch 76 (81, 83, 86).
Row 1: (RS) Working in bottom ridge lp of ch, sc in 2nd ch from hook and in each of next 14 (15, 15, 16) ch, place marker (pm) in sc just made, sc2tog (see Glossary) over next 2 ch, sc in each of next 41 (44, 46, 47) ch, sc2tog over next 2 ch, sc in next ch, pm in sc just made, sc in each ch to end, turn—73 (78, 80, 83) sc.
Moving m up as work progresses, shape bodice as foll:
Dec row: Ch 1, sc in each sc to first marked sc, sc2tog over marked sc and next sc, move m up, sc in each
pAm
ElA
BE
thE
l
Summer Blues Baby Dress | FREE BABY CRoChEt pAttERns FRom CroChet Me 9 FREE CRoChEt pAttERns FoR BABiEs 25
19 (20, 22, 231⁄2)" 48.5 (51, 56, 59.5) cm
9 (91⁄4, 10, 10)" 23 (23.5, 25.5, 25.5) cm
10 (1
2, 1
2, 1
31 ⁄2)"
25.5
(30.
5, 3
0.5,
34.
5) c
m4
(41 ⁄2,
5, 5
1 ⁄2)"
10 (1
1.5,
12.
5, 1
4) c
m
sc to 2 sc before next marked sc, sc2tog over next 2 sc, move marker up, sc in each sc to end, turn—2 sc dec’d. Rep Dec row 18 more times—35 (40, 42, 45) sc rem. fasten off, leaving 12" tail for sewing.
holding pieces with Rs tog, thread yarn tail on yarn needle and whipstitch (see glossary), short edges of front and back to form shoulder seams, matching rows and working through both lps of each edge st. turn work Rs out. Choose one piece to be the garment “back” and pm in fabric to mark it as such.
Skirtlay bodice flat with front facing and place markers (pm) for armholes and skirt as foll: Counting along foundation ch from right edge (left-shoulder seam), pm in 17 (18, 18, 19)th ch (this is the 2nd ch of sc2tog worked in first row). this will be st A. Counting along ch from left edge (right-shoulder seam), pm in 17 (18, 18, 19)th ch; this will be st B. Flip bodice over so back is facing; count and mark sts A and B as for front. st A will be closest to right-shoulder seam; st B will be closest to left. Join mC
with sl st in st A on front. Ch 50 (52, 56, 60), turn. Set-up row: (Ws) dc blo (see glossary) in 4th ch from hook (first 3 ch count as first dc) and in each of next 14 (16, 20, 24) ch, hdc blo in each of next 16 ch, sc blo in each of next 16 ch, sl st in each of next 2 foundation ch of bodice (working toward center of bodice front), turn—48 (50, 54, 58) sts.
Row 1: (RS) Sk 2 sl sts, sc blo in each of next 16 sc of skirt, hdc blo in each of next 16 hdc, dc blo in each of next 16 (18, 22, 26) dc, turn.
Row 2: Ch 3 (counts as first dc), dc blo in each of next 15 (17, 21, 25) dc, hdc blo in each of next 16 hdc, sc blo in each of next 16 sc, sl st in next 2 foundation ch of bodice, turn.
Rep Rows 2–3 until all sts bet and including sts A and B have been joined. once st B has been joined, join next row to st A of back, then cont to rep Rows 2–3, joining sts of back, until st B of back is joined. seam side of skirt as foll: Next row: holding first and last row of skirt tog and working through blo of both layers, sc in each st to end. Fasten off.
Collarlay dress flat with front facing. Join MC with sl st in first
neckline sc after left-shoulder seam.
Size 3 months only:Rnd 1: Ch 1, sc flo (see Glossary) in first sc and in next 34
sc across front neck, sc in edge of right-shoulder seam, sc flo in next 35 sc across back neck, sc in edge of left-shoulder seam, sl st in first sc to join—72 sc.
Size 6 months only:Rnd 1: Ch 1, sc flo (see Glossary) in first sc and in next
37 sc across front neck, sc2tog flo over next 2 sc, sk shoulder seam, sc flo in next 38 sc across back neck, sc2tog flo over next 2 sc, sk shoulder seam, sl st in first sc to join—78 sc.
Sizes 9 (12) months only:Rnd 1: Ch 1, sc flo (see Glossary) in first sc and in next 41
(44) sc across front neck, sk shoulder seam, sc flo in next 42 (45) sc across back neck, sk shoulder seam, sl st in first sc to join—84 (90) sc.
Summer Blues Baby Dress | FREE BABY CRoChEt pAttERns FRom CroChet Me 9 FREE CRoChEt pAttERns FoR BABiEs 26
All sizes:Rnd 2: Ch 1, sc in first sc, *ch 6, sk 5 sc, sc flo in next sc;
rep from * to last 5 sc, ch 6, sk last 5 sc, sl st in first sc to join, turn—12 (13, 14, 15) ch-6 lps.
from this point, collar is worked with WS of dress facing, so RS of collar will be facing when folded down. Pm in first st to indicate beg of rnd; move m up as work progresses.
Rnd 3: Ch 1, *(sc, 3 dc, sc) in next ch-6 sp; rep from * around, do not join—60 (65, 70, 75) sts.
Rnd 4: *Sc in next sc, dc in next dc, (dc, ch 3, dc) in next dc, dc in next dc, sc in next sc; rep from * 11 (12, 13, 14) times, do not join.
Rnd 5: *Sc in next 3 sts, 5 sc in next ch-3 sp, sc in next 3 sts; rep from * 11 (12, 13, 14) times, sl st in first sc to join—132 (143, 154, 165) sc. fasten off.
Armhole edgingWith Rs facing, join mC with sl st at underarm of armhole, ch 1, sc in each ch to shoulder seam, sc in shoulder seam, sc in each ch to end of rnd, sl st in first sc to join. Fasten off. Rep for other armhole.
Skirt edgingWith Rs facing, join mC with sl st in lower edge of skirt at side seam.
Rnd 1: Ch 1, 3 sc in edge of each dc around lower edge of skirt, sl st in first sc to join.
Note: Work Rnds 2–5 as for collar without turning work after Rnd 2; skirt edging is worked with Rs facing throughout. Fasten off.
FinishingWeave in loose ends. Block according to yarn label
instructions.
Originally from Dayton, Ohio, EllEn K. GORMlEy’s only regret is that she can’t crochet and eat chocolate cake at the same time. Read more about her designing life at www.GoCrochet.com.
FREE BABY CRoChEt pAttERns FRom CroChet Me 9 FREE CRoChEt pAttERns FoR BABiEs 27 ©interweave | Not to be reprinted | all rights reserved | www.crochetme.com
Goldilock’s Hat design by Marty Milleroriginally published in interweave Crochet Accessories, 2010
Finished Size About 15" head circumference.
Yarn lion Brand lB Collection pure Wool (100% wool; 180 yd [165 m]/3½ oz [100 g]; ): #098 natural cream, 1 skein.
Hook size i/9 (5.5 mm). Adjust hook size if necessary to obtain correct gauge.
Notions stitch marker (m); yarn needle.
Gauge 14 sts = about 4" in sc, first 5 rnds, measured across center of crown = about 5".
Notesdo not join rnds. At end of each rnd, place marker (pm) and move it up with each rnd. hat is worked on Rs only. do not turn at the ends of rnds.
HatCh 2.
Rnd 1: 6 sc in 2nd ch from hook, place marker (pm; see Notes)—6 sc.
Rnd 2: 2 sc in each sc around—12 sc.Rnd 3: 2 sc in first sc, sc in next sc, *2 sc in next sc, sc in
next sc; rep from * around—18 sc.Rnd 4: 2 sc in first sc, sc in next 2 sc, *2 sc in next sc, sc in
next 2 sc; rep from * around—24 sc.Rnd 5: 2 sc in first sc, sc in next 3 sc, *2 sc in next sc, sc in
next 3 sc; rep from * around—30 sc.Rnd 6: 2 sc in first sc, sc in next 4 sc, *2 sc in next sc, sc in
next 4 sc; rep from * around—36 sc.Rnd 7: 2 sc in first sc, sc in next 5 sc, *2 sc in next sc, sc in
next 5 sc; rep from * around—42 sc.Rnd 8: 2 sc in first sc, sc in next 6 sc, *2 sc in next sc, sc in
next 6 sc; rep from * around—48 sc.Rnd 9: 2 sc in first sc, sc in next 7 sc, *2 sc in next sc, sc in
next 7 sc; rep from * around—54 sc.
Rnd 10: 2 sc in first sc, sc in next 8 sc, *2 sc in next sc, sc in next 8 sc; rep from * around—60 sc.
Rnd 11: Sc around—60 sc.Rnds 12–26: Rep Rnd 11. At the end of Rnd 26, sl st in next sc to join.
BrimRnd 27: Note: Work in front lp only (flo) for this rnd. Ch 1,
sc in same st, 2 sc in next sc, *sc in next sc, 2 sc in next sc; rep from * around, sl st in first sc to join—90 sc.
Rnd 28: Ch 1, 2 sc in first sc, sc in next sc, *2 sc in next sc, sc in next sc; rep from * around, sl st in first sc to join—135 sc.
Rnd 29: Ch 1, sc in first sc, 2 sc in next sc, *sc in next sc, 2 sc in next sc; rep from * around, sl st in first sc to join—202 sc.
Fasten off and weave in loose ends.
Attach your favorite flower motif for a special accent. pin or sew the flower on the lower part of the hat, above the ruffle.
Ever since her grandmother taught her to crochet when she was a young girl, MaRTy MillER has been designing pat-terns for herself and others. In addition to teaching crochet, Marty is the president of the Crochet Guild of America. Visit her blogs: www.notyourgrannyscrochet-marty.blogspot.com and www.thecrochetdoctor.blogspot.com.
FREE BABY CRoChEt pAttERns FRom CroChet Me 9 FREE CRoChEt pAttERns FoR BABiEs 28 ©interweave | Not to be reprinted | all rights reserved | www.crochetme.com
Finished Size About 14" head circumference.
Yarn lion Brand lB Collection superwash merino (100% superwash merino; 306 yd [280 m]/31⁄2 oz [100 g]; ): #170 dijon, 1 skein.
Hook size h/8 (5 mm). Adjust hook size if necessary to obtain correct gauge.
Notions Yarn needle.
Gauge 16 sts and 4 rnds = 4" in dc, measured across center of crown.
NotesCh-3 at beg of each rnd counts as dc throughout.
Work first rnd over tail end. After working a few rnds, pull gently on tail to close hole if necessary.
hat is worked from Rs only. do not turn at the ends of rnds.
HatCh 4, sl st in first ch to form ring.
Rnd 1: Ch 3, 11 dc in ring, sl st in top of beg ch-3 to join—12 dc.
Rnd 2: Ch 3, dc in first dc, 2 dc in each dc around, sl st in top of beg ch-3 to join—24 dc.
Rnd 3: Ch 3, dc in first dc, dc in next dc, *2 dc in next dc, dc in next dc; rep from * around, sl st in top of beg ch-3 to join—36 dc.
Rnd 4: Ch 3, dc in first dc, dc in next 2 dc, *2 dc in next dc, dc in next 2 dc; rep from * around, sl st in top of beg ch-3 to join—48 dc.
Rnd 5: Ch 3, dc around, sl st in top of beg ch-3 to join—48 dc.
Rep Rnd 5 until hat measures 7" from crown (about 12 rnds). fasten off and weave in loose ends.
optional pom-pom: Ch 6, sl st in first ch to form ring.
Rnd 1: *Ch 7, working over tail end, sl st in ring; rep from * 14 times. fasten off. Pull beg tail to close ring. Tie or sew pom-pom to top of hat. Weave in loose ends. ∞
Ever since her grandmother taught her to crochet when she was a young girl, MaRTy MillER has been designing patterns for herself and others. In addition to teaching cro-chet, Marty is the president of the Crochet Guild of America. Visit her blogs: www.notyourgrannyscrochet-marty.blogspot.com and www.thecrochetdoctor.blogspot.com.
Baby Bear’s Back-Up Hat design by Marty Milleroriginally published in interweave Crochet Accessories, 2010

Glossary | FREE BABY CRoChEt pAttERns FRom CroChet Me 9 FREE CRoChEt pAttERns FoR BABiEs 29
Glossaryabbreviations beg begin(s); beginning
bet between
blo back loop only
CC contrasting color
ch(s) chain
cm centimeter(s)
cont continue(s); continuing
dc double crochet
dec(s)(’d) decrease(s); decreasing; decreased
est established
fdc foundation double crochet
flo front loop only
foll follows; following
fsc foundation single crochet
g gram(s)
hdc half double crochet
inc(s)(’d) increase(s); increasing; increased
k knit
lp(s) loop(s)
MC main color
m marker
mm millimeter(s)
patt(s) pattern(s)
pm place marker
p purl
rem remain(s); remaining
rep repeat; repeating
rev sc reverse single crochet
rnd(s) round(s)
RS right side
sc single crochet
sk skip
sl slip
sl st slip(ped) stitch
ss slip stitch
sp(s) space(es)
st(s) stitch(es)
tch turning chain
tog together
tr treble crochet
WS wrong side
yd yard
yo yarn over hook
* repeat starting point
* * repeat all instructions between asterisks
( ) alternate measurements and/or
instructions
[ ] work bracketed instructions a specified
number of times
Glossary | FREE BABY CRoChEt pAttERns FRom CroChet Me 9 FREE CRoChEt pAttERns FoR BABiEs 30
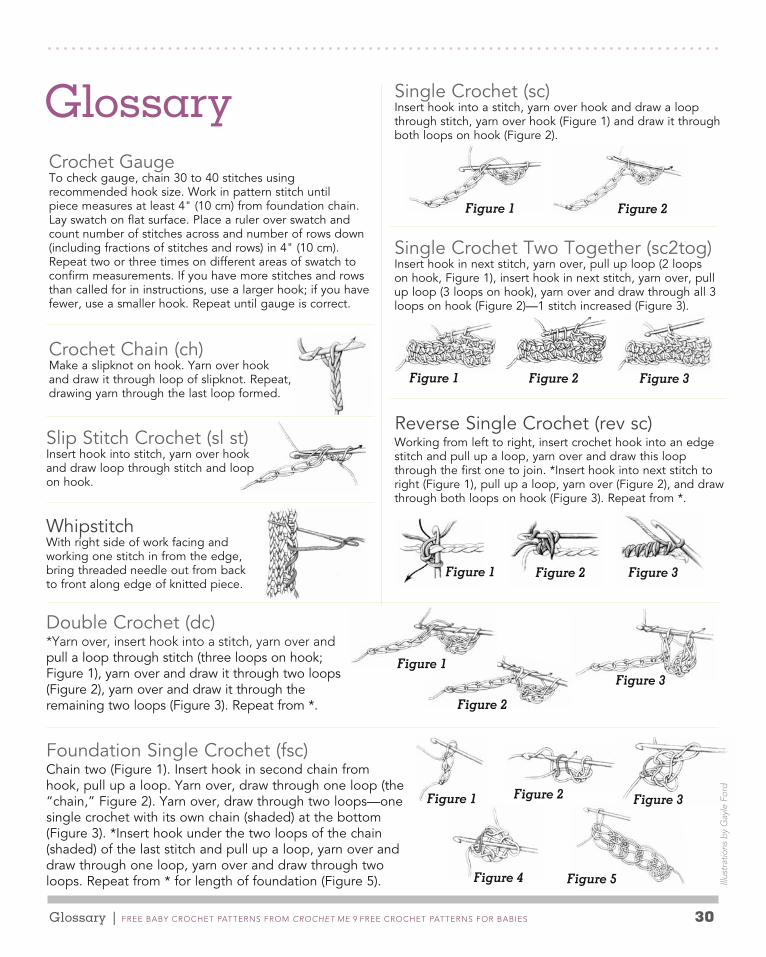
Glossary
Double Crochet (dc)*Yarn over, insert hook into a stitch, yarn over and pull a loop through stitch (three loops on hook; figure 1), yarn over and draw it through two loops (figure 2), yarn over and draw it through the remaining two loops (figure 3). Repeat from *. Figure 2
Figure 3Figure 1
Crochet GaugeTo check gauge, chain 30 to 40 stitches using recommended hook size. Work in pattern stitch until piece measures at least 4" (10 cm) from foundation chain. lay swatch on flat surface. Place a ruler over swatch and count number of stitches across and number of rows down (including fractions of stitches and rows) in 4" (10 cm). Repeat two or three times on different areas of swatch to confirm measurements. if you have more stitches and rows than called for in instructions, use a larger hook; if you have fewer, use a smaller hook. Repeat until gauge is correct.
Slip Stitch Crochet (sl st)insert hook into stitch, yarn over hook and draw loop through stitch and loop on hook.
Crochet Chain (ch) Make a slipknot on hook. yarn over hook and draw it through loop of slipknot. Repeat, drawing yarn through the last loop formed.
Single Crochet (sc)insert hook into a stitch, yarn over hook and draw a loop through stitch, yarn over hook (figure 1) and draw it through both loops on hook (figure 2).
Figure 1 Figure 2
Figure 1 Figure 3Figure 2
Working from left to right, insert crochet hook into an edge stitch and pull up a loop, yarn over and draw this loop through the first one to join. *insert hook into next stitch to right (figure 1), pull up a loop, yarn over (figure 2), and draw through both loops on hook (figure 3). Repeat from *.
Reverse Single Crochet (rev sc)
Single Crochet Two Together (sc2tog) insert hook in next stitch, yarn over, pull up loop (2 loops on hook, figure 1), insert hook in next stitch, yarn over, pull up loop (3 loops on hook), yarn over and draw through all 3 loops on hook (figure 2)—1 stitch increased (figure 3).
Figure 3Figure 2Figure 1
foundation Single Crochet (fsc) Chain two (figure 1). insert hook in second chain from hook, pull up a loop. yarn over, draw through one loop (the “chain,” figure 2). yarn over, draw through two loops—one single crochet with its own chain (shaded) at the bottom (figure 3). *insert hook under the two loops of the chain (shaded) of the last stitch and pull up a loop, yarn over and draw through one loop, yarn over and draw through two loops. Repeat from * for length of foundation (figure 5).
Figure 2 Figure 3
Figure 5Figure 4
Figure 1
illus
trat
ions
by
Gay
le F
ord
WhipstitchWith right side of work facing and working one stitch in from the edge, bring threaded needle out from back to front along edge of knitted piece.
Glossary | FREE BABY CRoChEt pAttERns FRom CroChet Me 9 FREE CRoChEt pAttERns FoR BABiEs 31
Glossary
illus
trat
ions
by
Gay
le F
ord
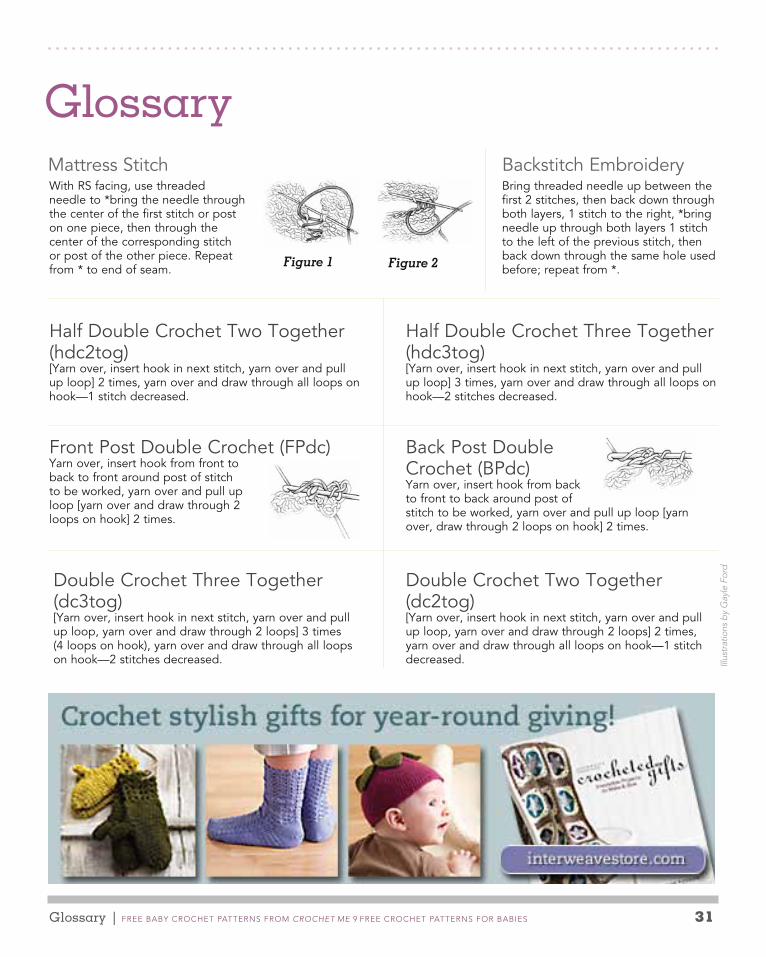
With RS facing, use threaded needle to *bring the needle through the center of the first stitch or post on one piece, then through the center of the corresponding stitch or post of the other piece. Repeat from * to end of seam.
Bring threaded needle up between the first 2 stitches, then back down through both layers, 1 stitch to the right, *bring needle up through both layers 1 stitch to the left of the previous stitch, then back down through the same hole used before; repeat from *.
Mattress Stitch
Figure 2Figure 1
Backstitch Embroidery
half Double Crochet Two Together (hdc2tog)[yarn over, insert hook in next stitch, yarn over and pull up loop] 2 times, yarn over and draw through all loops on hook—1 stitch decreased.
half Double Crochet Three Together (hdc3tog)[yarn over, insert hook in next stitch, yarn over and pull up loop] 3 times, yarn over and draw through all loops on hook—2 stitches decreased.
Back Post Double Crochet (BPdc) yarn over, insert hook from back to front to back around post of stitch to be worked, yarn over and pull up loop [yarn over, draw through 2 loops on hook] 2 times.
front Post Double Crochet (fPdc)yarn over, insert hook from front to back to front around post of stitch to be worked, yarn over and pull up loop [yarn over and draw through 2 loops on hook] 2 times.
Double Crochet Two Together (dc2tog)[yarn over, insert hook in next stitch, yarn over and pull up loop, yarn over and draw through 2 loops] 2 times, yarn over and draw through all loops on hook—1 stitch decreased.
Double Crochet Three Together (dc3tog)[yarn over, insert hook in next stitch, yarn over and pull up loop, yarn over and draw through 2 loops] 3 times (4 loops on hook), yarn over and draw through all loops on hook—2 stitches decreased.