four ways to shingle a valley€¦ · 66 fine homebuilding peel and stick, one side at a time....
TRANSCRIPT
64 FINE HOMEBUILDING
Four Ways to Shingle a ValleyA custom builder shows three conventional ways and one new method
to weatherproof this crucial roof detail
BY MIKE GUERTIN
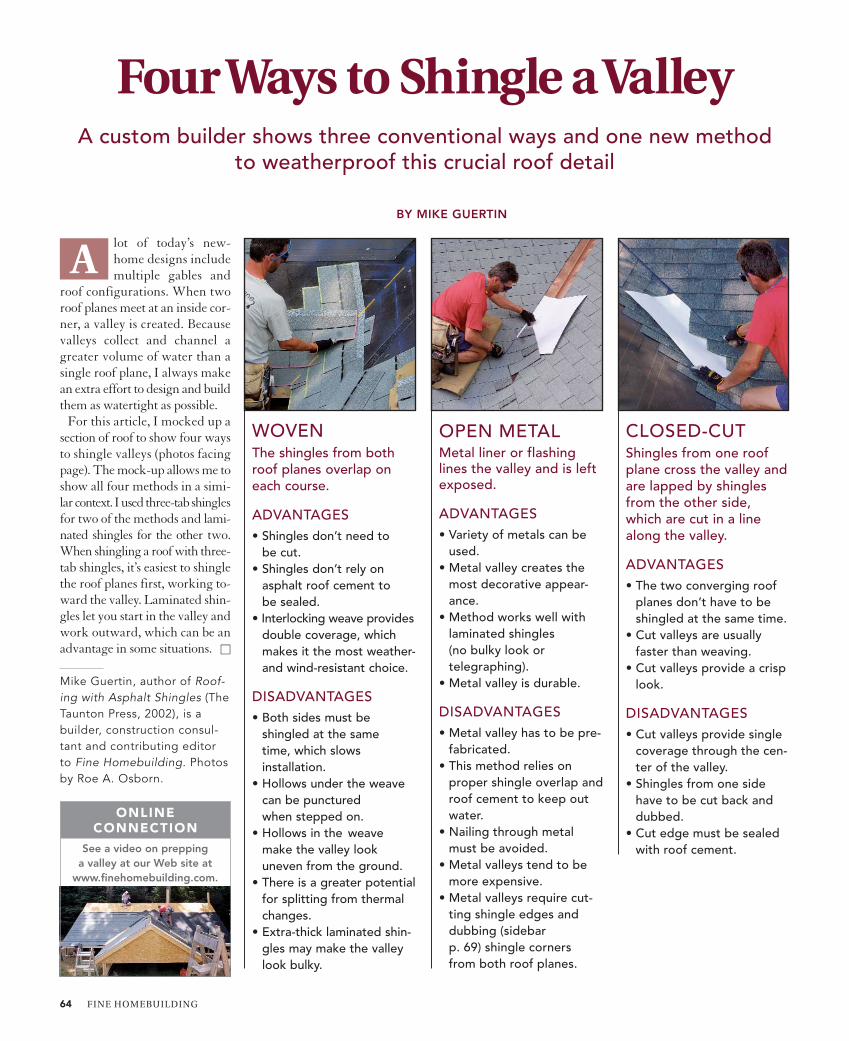
OPEN METAL Metal liner or flashinglines the valley and is leftexposed.
ADVANTAGES• Variety of metals can be
used.• Metal valley creates the
most decorative appear-ance.
• Method works well with laminated shingles (no bulky look or telegraphing).
• Metal valley is durable.
DISADVANTAGES• Metal valley has to be pre-
fabricated.• This method relies on
proper shingle overlap androof cement to keep out water.
• Nailing through metal must be avoided.
• Metal valleys tend to be more expensive.
• Metal valleys require cut-ting shingle edges and dubbing (sidebar p. 69) shingle corners from both roof planes.
WOVEN The shingles from bothroof planes overlap oneach course.
ADVANTAGES• Shingles don’t need to
be cut.• Shingles don’t rely on
asphalt roof cement to be sealed.
• Interlocking weave providesdouble coverage, whichmakes it the most weather-and wind-resistant choice.
DISADVANTAGES• Both sides must be
shingled at the same time, which slows installation.
• Hollows under the weave can be punctured when stepped on.
• Hollows in the weave make the valley look uneven from the ground.
• There is a greater potentialfor splitting from thermal changes.
• Extra-thick laminated shin-gles may make the valley look bulky.
CLOSED-CUT Shingles from one roofplane cross the valley andare lapped by shinglesfrom the other side,which are cut in a linealong the valley.
ADVANTAGES• The two converging roof
planes don’t have to be shingled at the same time.
• Cut valleys are usually faster than weaving.
• Cut valleys provide a crisp look.
DISADVANTAGES• Cut valleys provide single
coverage through the cen-ter of the valley.
• Shingles from one side have to be cut back and dubbed.
• Cut edge must be sealed with roof cement.
lot of today’s new-home designs includemultiple gables and
roof configurations. When tworoof planes meet at an inside cor-ner, a valley is created. Becausevalleys collect and channel agreater volume of water than asingle roof plane, I always makean extra effort to design and buildthem as watertight as possible.
For this article, I mocked up asection of roof to show four waysto shingle valleys (photos facingpage). The mock-up allows me toshow all four methods in a simi-lar context. I used three-tab shinglesfor two of the methods and lami-nated shingles for the other two.When shingling a roof with three-tab shingles, it’s easiest to shinglethe roof planes first, working to-ward the valley. Laminated shin-gles let you start in the valley andwork outward, which can be anadvantage in some situations. �
Mike Guertin, author of Roof-ing with Asphalt Shingles (TheTaunton Press, 2002), is abuilder, construction consul-tant and contributing editorto Fine Homebuilding. Photosby Roe A. Osborn.
A
See a video on prepping a valley at our Web site at
www.finehomebuilding.com.
ONLINE CONNECTION
NEW: LONGISLAND VALLEYSThis new method startsout like a cut valley, butinstead of lapping andcutting the shingles onthe second side, you formthe “cut” line with a rowof shingles turned onedge that run up the valley.
ADVANTAGES• This method looks like a
cut valley without cutting shingle edges or dubbing corners.
• This technique is fasterthan any other valley-shingling method.
DISADVANTAGES• This method works only
with laminated shingles.• Long Island valley sys-
tem is not yet approvedby shingle manufacturers.
Preparing a roof: All valleys startthe sameRegardless of the shinglingmethod, every successful valleyinstallation begins with properroof preparation. Taking theright steps before applying theshingles not only goes a longway toward preventing roofleaks, but it also helps to cush-ion the shingles (or metal val-ley) against the ragged edgesof the roof sheathing at thecenterline of the valley.
In the past, I’ve used severaldifferent methods to prepare avalley, including lining the valleywith aluminum-coil flashing orroll roofing, and even cement-ing together layers of #30 feltpaper with asphalt roof cement(a messy job). Today, fortunate-ly, we have a simpler and moreeffective material at our dispos-al: waterproof shingle underlay-ment (WSU). Examples are GraceIce & Water Shield (W. R. Grace;www.na.graceconstruction.com),Weatherwatch (GAF;www.gaf.com) and Mois-tureWrap (Tamko;www.tamko.com). These peel-and-stick membranes sealaround nails and are pretty easyto work with. A release sheeton the back keeps the mem-brane from adhering until youremove it.
I begin the prep work bysweeping off any sawdust orother debris. I also set anysheathing nails that stick upfrom the roof plane and couldpuncture or wear through theWSU or shingles. As with anyasphalt-shingling job, I install a9-in. to 12-in. strip of WSUalong the eaves’ edges, and I crosslap the strips at the val-ley. These strips go under thedrip edge.
I overlap the inside corner ofthe drip edge at the valley to
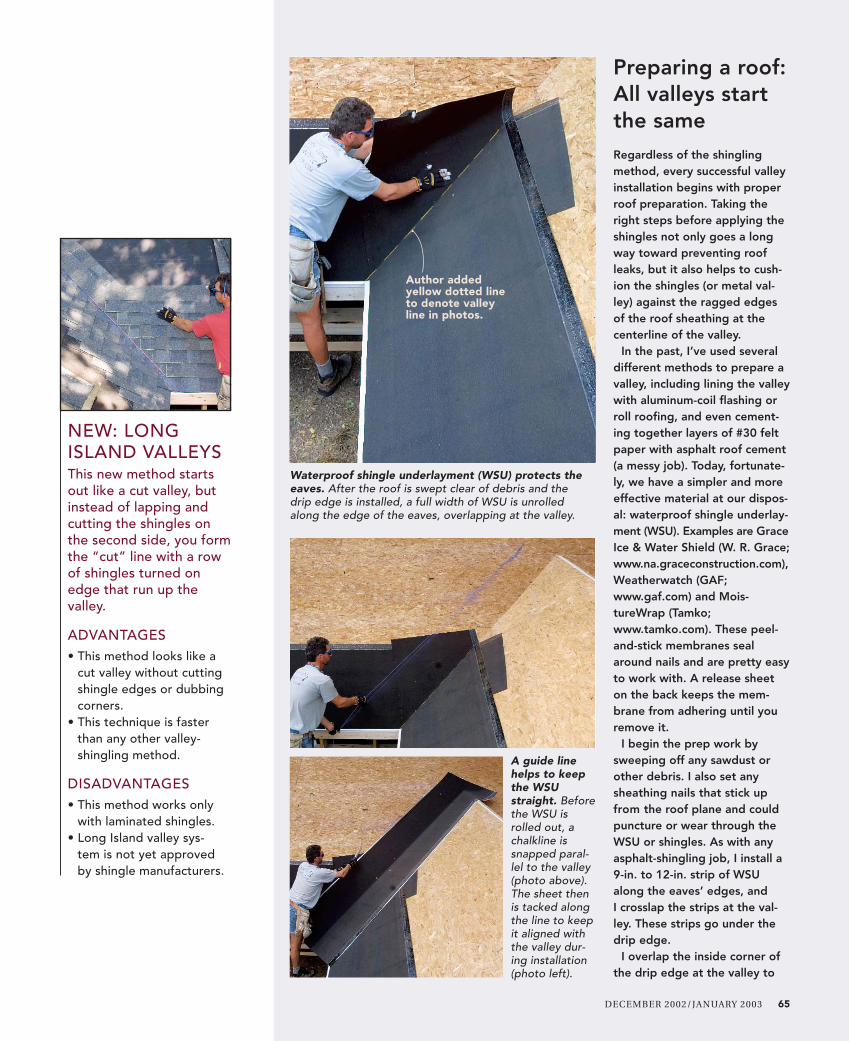
A guide linehelps to keepthe WSUstraight. Beforethe WSU isrolled out, achalkline issnapped paral-lel to the valley(photo above).The sheet thenis tacked alongthe line to keepit aligned withthe valley dur-ing installation(photo left).
Waterproof shingle underlayment (WSU) protects theeaves. After the roof is swept clear of debris and thedrip edge is installed, a full width of WSU is unrolledalong the edge of the eaves, overlapping at the valley.
DECEMBER 2002/JANUARY 2003 65
Author addedyellow dotted lineto denote valleyline in photos.
66 FINE HOMEBUILDING
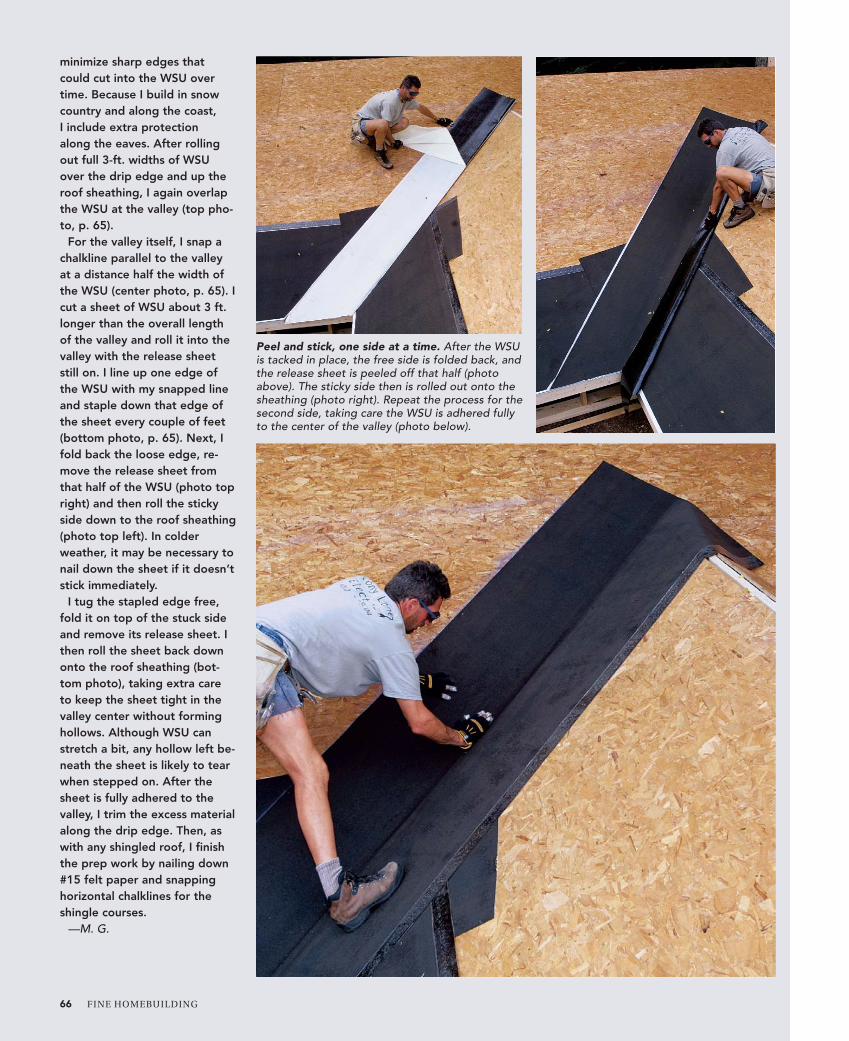
Peel and stick, one side at a time. After the WSUis tacked in place, the free side is folded back, andthe release sheet is peeled off that half (photoabove). The sticky side then is rolled out onto thesheathing (photo right). Repeat the process for thesecond side, taking care the WSU is adhered fullyto the center of the valley (photo below).
minimize sharp edges thatcould cut into the WSU overtime. Because I build in snowcountry and along the coast, I include extra protection along the eaves. After rollingout full 3-ft. widths of WSUover the drip edge and up theroof sheathing, I again overlapthe WSU at the valley (top pho-to, p. 65).
For the valley itself, I snap achalkline parallel to the valleyat a distance half the width ofthe WSU (center photo, p. 65). Icut a sheet of WSU about 3 ft.longer than the overall lengthof the valley and roll it into thevalley with the release sheetstill on. I line up one edge ofthe WSU with my snapped lineand staple down that edge ofthe sheet every couple of feet(bottom photo, p. 65). Next, Ifold back the loose edge, re-move the release sheet fromthat half of the WSU (photo topright) and then roll the stickyside down to the roof sheathing(photo top left). In colderweather, it may be necessary tonail down the sheet if it doesn’tstick immediately.
I tug the stapled edge free,fold it on top of the stuck sideand remove its release sheet. Ithen roll the sheet back downonto the roof sheathing (bot-tom photo), taking extra careto keep the sheet tight in thevalley center without forminghollows. Although WSU canstretch a bit, any hollow left be-neath the sheet is likely to tearwhen stepped on. After thesheet is fully adhered to thevalley, I trim the excess materialalong the drip edge. Then, aswith any shingled roof, I finishthe prep work by nailing down#15 felt paper and snappinghorizontal chalklines for theshingle courses.
—M. G.
DECEMBER 2002/JANUARY 2003 67
Woven valleys seem tohave fallen out of favor
in most regions of the coun-try, mainly because they arethe slowest to install. But wo-ven valleys are the mostweather-resistant, and unlikeother valleys, they don’t re-quire sealing with messy roof-ing cement.
You can weave a valleyworking either into or out ofit. However, working out ofthe valley requires laminatedshingles, the multiple layers ofwhich can make a woven val-ley look very bulky. On theother hand, working three-tabshingles out of the valleywould make aligning theirslots almost impossible. Forthe purposes of this article, I’lldescribe the weaving processworking into the valley withthree-tab shingles.
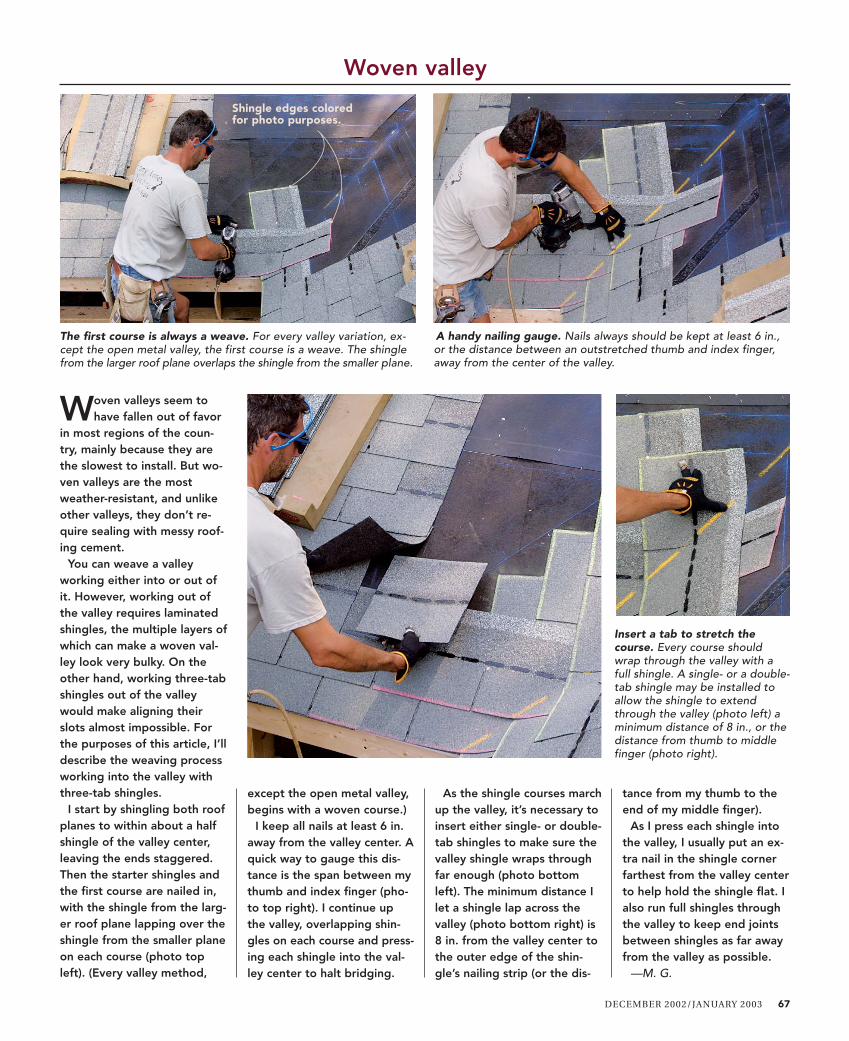
I start by shingling both roofplanes to within about a halfshingle of the valley center,leaving the ends staggered.Then the starter shingles andthe first course are nailed in,with the shingle from the larg-er roof plane lapping over theshingle from the smaller planeon each course (photo topleft). (Every valley method,
except the open metal valley,begins with a woven course.)
I keep all nails at least 6 in.away from the valley center. Aquick way to gauge this dis-tance is the span between mythumb and index finger (pho-to top right). I continue upthe valley, overlapping shin-gles on each course and press-ing each shingle into the val-ley center to halt bridging.
As the shingle courses marchup the valley, it’s necessary toinsert either single- or double-tab shingles to make sure thevalley shingle wraps throughfar enough (photo bottomleft). The minimum distance Ilet a shingle lap across thevalley (photo bottom right) is8 in. from the valley center tothe outer edge of the shin-gle’s nailing strip (or the dis-
tance from my thumb to theend of my middle finger).
As I press each shingle intothe valley, I usually put an ex-tra nail in the shingle cornerfarthest from the valley centerto help hold the shingle flat. Ialso run full shingles throughthe valley to keep end jointsbetween shingles as far awayfrom the valley as possible.
—M. G.
The first course is always a weave. For every valley variation, ex-cept the open metal valley, the first course is a weave. The shinglefrom the larger roof plane overlaps the shingle from the smaller plane.
A handy nailing gauge. Nails always should be kept at least 6 in.,or the distance between an outstretched thumb and index finger,away from the center of the valley.
Woven valley
Insert a tab to stretch thecourse. Every course shouldwrap through the valley with afull shingle. A single- or a double-tab shingle may be installed toallow the shingle to extendthrough the valley (photo left) aminimum distance of 8 in., or thedistance from thumb to middlefinger (photo right).
Shingle edges coloredfor photo purposes.
68 FINE HOMEBUILDING
Open metal valley
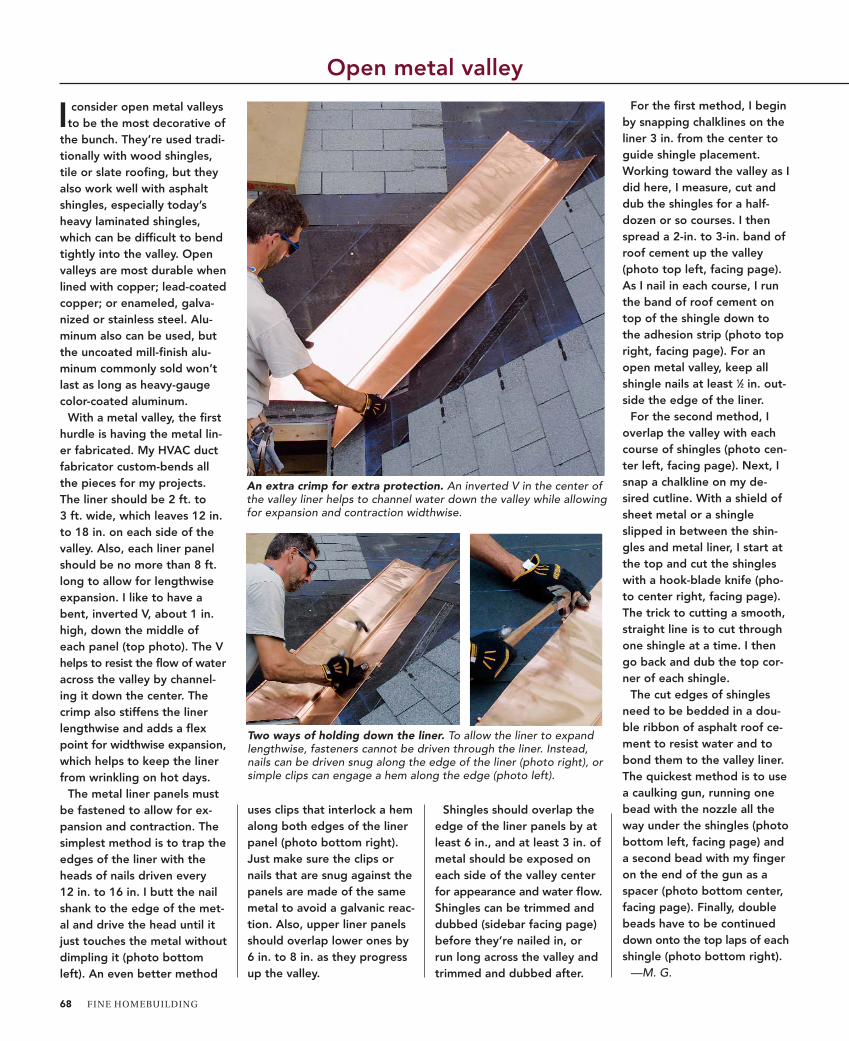
I consider open metal valleysto be the most decorative of
the bunch. They’re used tradi-tionally with wood shingles,tile or slate roofing, but theyalso work well with asphaltshingles, especially today’sheavy laminated shingles,which can be difficult to bendtightly into the valley. Openvalleys are most durable whenlined with copper; lead-coatedcopper; or enameled, galva-nized or stainless steel. Alu-minum also can be used, butthe uncoated mill-finish alu-minum commonly sold won’tlast as long as heavy-gaugecolor-coated aluminum.
With a metal valley, the firsthurdle is having the metal lin-er fabricated. My HVAC ductfabricator custom-bends allthe pieces for my projects.The liner should be 2 ft. to 3 ft. wide, which leaves 12 in.to 18 in. on each side of thevalley. Also, each liner panelshould be no more than 8 ft.long to allow for lengthwiseexpansion. I like to have abent, inverted V, about 1 in.high, down the middle ofeach panel (top photo). The Vhelps to resist the flow of wateracross the valley by channel-ing it down the center. Thecrimp also stiffens the linerlengthwise and adds a flexpoint for widthwise expansion,which helps to keep the linerfrom wrinkling on hot days.
The metal liner panels mustbe fastened to allow for ex-pansion and contraction. Thesimplest method is to trap theedges of the liner with theheads of nails driven every 12 in. to 16 in. I butt the nailshank to the edge of the met-al and drive the head until itjust touches the metal withoutdimpling it (photo bottomleft). An even better method
uses clips that interlock a hemalong both edges of the linerpanel (photo bottom right).Just make sure the clips ornails that are snug against thepanels are made of the samemetal to avoid a galvanic reac-tion. Also, upper liner panelsshould overlap lower ones by6 in. to 8 in. as they progressup the valley.
Shingles should overlap theedge of the liner panels by atleast 6 in., and at least 3 in. ofmetal should be exposed oneach side of the valley centerfor appearance and water flow.Shingles can be trimmed anddubbed (sidebar facing page)before they’re nailed in, orrun long across the valley andtrimmed and dubbed after.
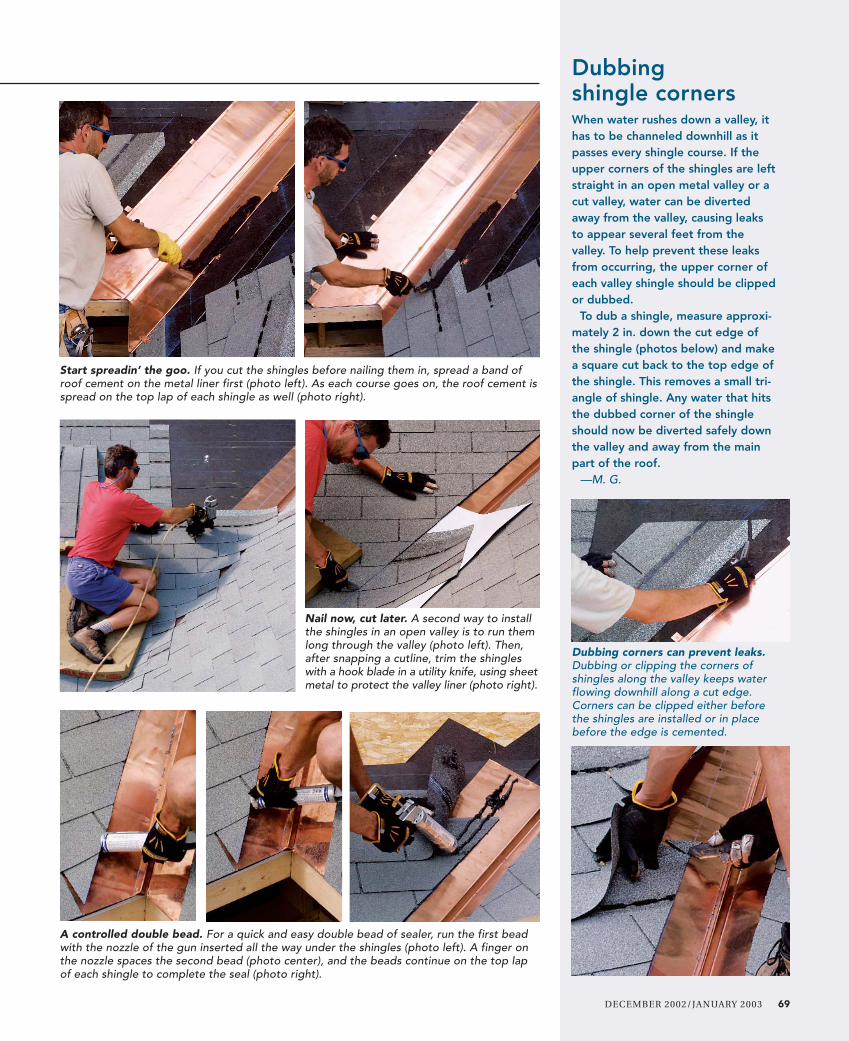
For the first method, I beginby snapping chalklines on theliner 3 in. from the center toguide shingle placement.Working toward the valley as Idid here, I measure, cut anddub the shingles for a half-dozen or so courses. I thenspread a 2-in. to 3-in. band ofroof cement up the valley(photo top left, facing page).As I nail in each course, I runthe band of roof cement ontop of the shingle down tothe adhesion strip (photo topright, facing page). For anopen metal valley, keep allshingle nails at least 1⁄2 in. out-side the edge of the liner.
For the second method, Ioverlap the valley with eachcourse of shingles (photo cen-ter left, facing page). Next, Isnap a chalkline on my de-sired cutline. With a shield ofsheet metal or a shingleslipped in between the shin-gles and metal liner, I start atthe top and cut the shingleswith a hook-blade knife (pho-to center right, facing page).The trick to cutting a smooth,straight line is to cut throughone shingle at a time. I thengo back and dub the top cor-ner of each shingle.
The cut edges of shinglesneed to be bedded in a dou-ble ribbon of asphalt roof ce-ment to resist water and tobond them to the valley liner.The quickest method is to usea caulking gun, running onebead with the nozzle all theway under the shingles (photobottom left, facing page) anda second bead with my fingeron the end of the gun as aspacer (photo bottom center,facing page). Finally, doublebeads have to be continueddown onto the top laps of eachshingle (photo bottom right).
—M. G.
An extra crimp for extra protection. An inverted V in the center ofthe valley liner helps to channel water down the valley while allowingfor expansion and contraction widthwise.
Two ways of holding down the liner. To allow the liner to expandlengthwise, fasteners cannot be driven through the liner. Instead,nails can be driven snug along the edge of the liner (photo right), orsimple clips can engage a hem along the edge (photo left).
DECEMBER 2002/JANUARY 2003 69
Dubbing shingle cornersWhen water rushes down a valley, ithas to be channeled downhill as itpasses every shingle course. If theupper corners of the shingles are leftstraight in an open metal valley or acut valley, water can be divertedaway from the valley, causing leaksto appear several feet from the valley. To help prevent these leaksfrom occurring, the upper corner ofeach valley shingle should be clippedor dubbed.
To dub a shingle, measure approxi-mately 2 in. down the cut edge ofthe shingle (photos below) and makea square cut back to the top edge ofthe shingle. This removes a small tri-angle of shingle. Any water that hitsthe dubbed corner of the shingleshould now be diverted safely downthe valley and away from the mainpart of the roof.
—M. G.
Dubbing corners can prevent leaks.Dubbing or clipping the corners ofshingles along the valley keeps waterflowing downhill along a cut edge.Corners can be clipped either beforethe shingles are installed or in placebefore the edge is cemented.
Start spreadin’ the goo. If you cut the shingles before nailing them in, spread a band ofroof cement on the metal liner first (photo left). As each course goes on, the roof cement isspread on the top lap of each shingle as well (photo right).
Nail now, cut later. A second way to installthe shingles in an open valley is to run themlong through the valley (photo left). Then,after snapping a cutline, trim the shingleswith a hook blade in a utility knife, using sheetmetal to protect the valley liner (photo right).
A controlled double bead. For a quick and easy double bead of sealer, run the first beadwith the nozzle of the gun inserted all the way under the shingles (photo left). A finger onthe nozzle spaces the second bead (photo center), and the beads continue on the top lapof each shingle to complete the seal (photo right).
70 FINE HOMEBUILDING
For the next two shinglingmethods, closed-cut and
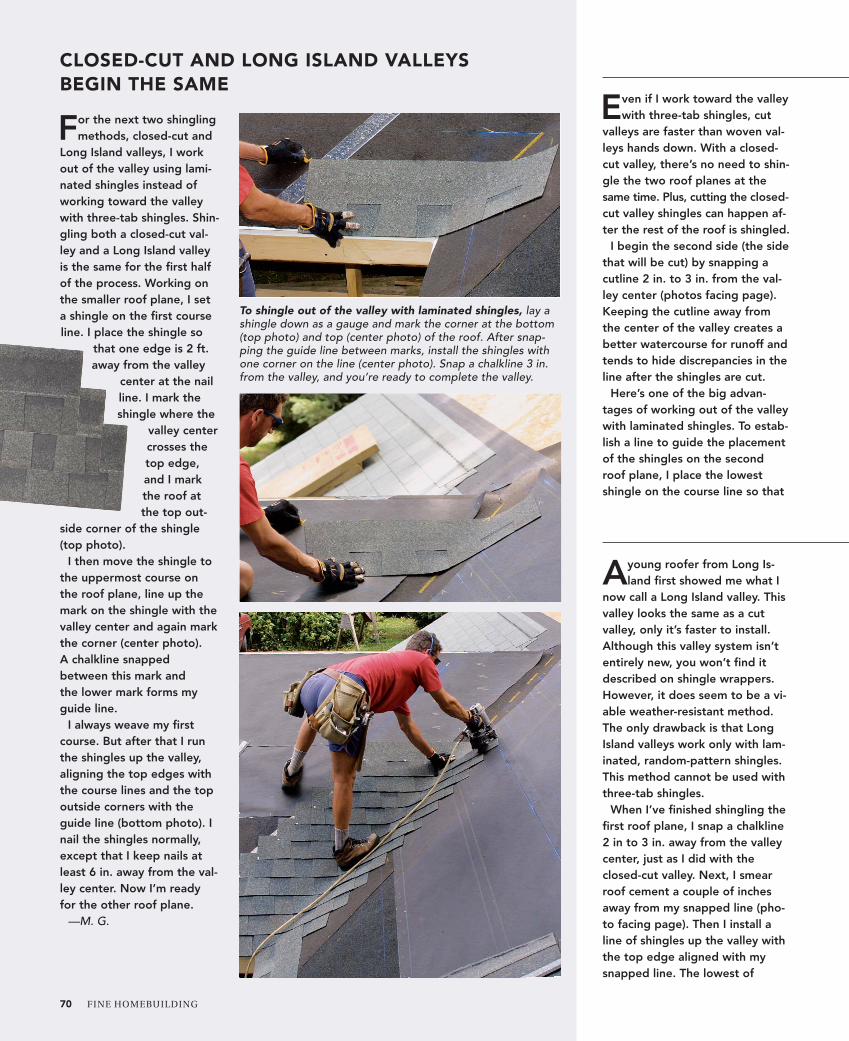
Long Island valleys, I workout of the valley using lami-nated shingles instead ofworking toward the valleywith three-tab shingles. Shin-gling both a closed-cut val-ley and a Long Island valleyis the same for the first halfof the process. Working onthe smaller roof plane, I seta shingle on the first courseline. I place the shingle so
that one edge is 2 ft.away from the valley
center at the nailline. I mark theshingle where the
valley centercrosses thetop edge,and I markthe roof atthe top out-
side corner of the shingle(top photo).
I then move the shingle tothe uppermost course onthe roof plane, line up themark on the shingle with thevalley center and again markthe corner (center photo). A chalkline snapped between this mark and the lower mark forms myguide line.
I always weave my firstcourse. But after that I runthe shingles up the valley,aligning the top edges withthe course lines and the topoutside corners with theguide line (bottom photo). Inail the shingles normally,except that I keep nails atleast 6 in. away from the val-ley center. Now I’m readyfor the other roof plane.
—M. G.
Even if I work toward the valleywith three-tab shingles, cut
valleys are faster than woven val-leys hands down. With a closed-cut valley, there’s no need to shin-gle the two roof planes at thesame time. Plus, cutting the closed-cut valley shingles can happen af-ter the rest of the roof is shingled.
I begin the second side (the sidethat will be cut) by snapping acutline 2 in. to 3 in. from the val-ley center (photos facing page).Keeping the cutline away fromthe center of the valley creates abetter watercourse for runoff andtends to hide discrepancies in theline after the shingles are cut.
Here’s one of the big advan-tages of working out of the valleywith laminated shingles. To estab-lish a line to guide the placementof the shingles on the secondroof plane, I place the lowestshingle on the course line so that
Ayoung roofer from Long Is-land first showed me what I
now call a Long Island valley. Thisvalley looks the same as a cutvalley, only it’s faster to install.Although this valley system isn’tentirely new, you won’t find itdescribed on shingle wrappers.However, it does seem to be a vi-able weather-resistant method.The only drawback is that LongIsland valleys work only with lam-inated, random-pattern shingles.This method cannot be used withthree-tab shingles.
When I’ve finished shingling thefirst roof plane, I snap a chalkline2 in to 3 in. away from the valleycenter, just as I did with theclosed-cut valley. Next, I smearroof cement a couple of inchesaway from my snapped line (pho-to facing page). Then I install aline of shingles up the valley withthe top edge aligned with mysnapped line. The lowest of
To shingle out of the valley with laminated shingles, lay ashingle down as a gauge and mark the corner at the bottom(top photo) and top (center photo) of the roof. After snap-ping the guide line between marks, install the shingles withone corner on the line (center photo). Snap a chalkline 3 in.from the valley, and you’re ready to complete the valley.
CLOSED-CUT AND LONG ISLAND VALLEYSBEGIN THE SAME
DECEMBER 2002/JANUARY 2003 71
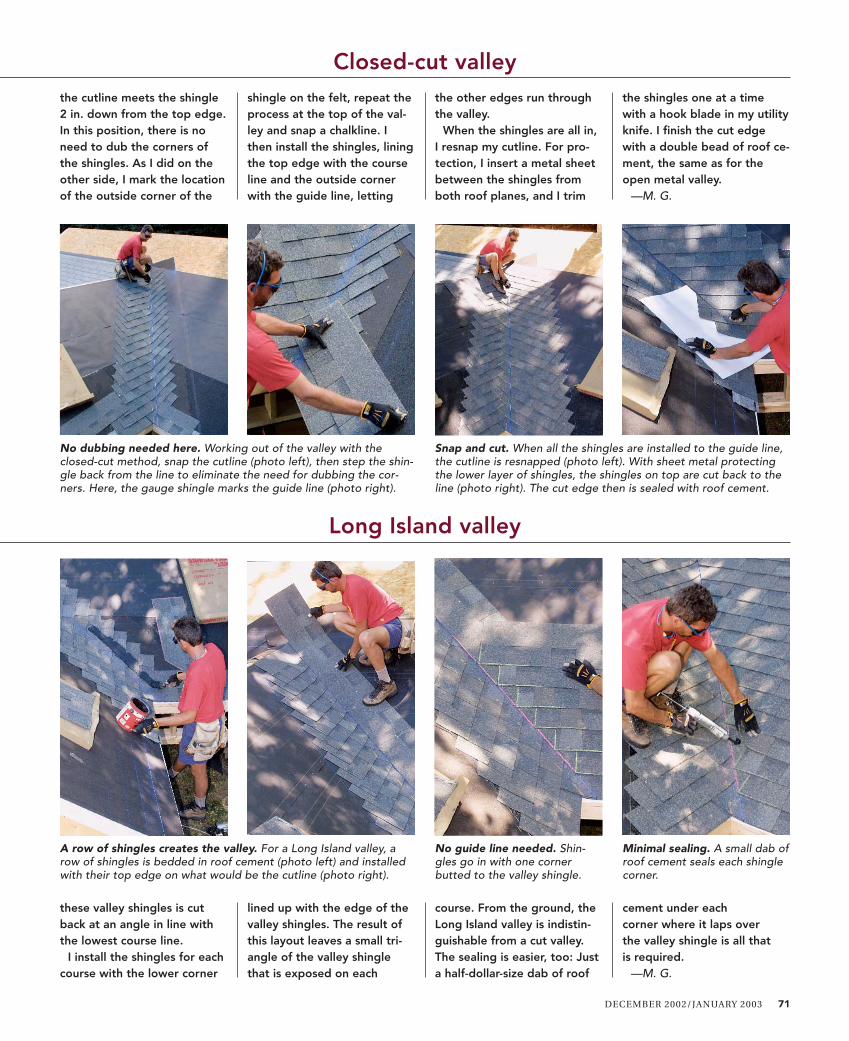
the cutline meets the shingle2 in. down from the top edge.In this position, there is noneed to dub the corners ofthe shingles. As I did on theother side, I mark the locationof the outside corner of the
shingle on the felt, repeat theprocess at the top of the val-ley and snap a chalkline. Ithen install the shingles, liningthe top edge with the courseline and the outside cornerwith the guide line, letting
the other edges run throughthe valley.
When the shingles are all in,I resnap my cutline. For pro-tection, I insert a metal sheetbetween the shingles fromboth roof planes, and I trim
the shingles one at a timewith a hook blade in my utilityknife. I finish the cut edgewith a double bead of roof ce-ment, the same as for theopen metal valley.
—M. G.
these valley shingles is cutback at an angle in line withthe lowest course line.
I install the shingles for eachcourse with the lower corner
lined up with the edge of thevalley shingles. The result ofthis layout leaves a small tri-angle of the valley shinglethat is exposed on each
course. From the ground, theLong Island valley is indistin-guishable from a cut valley.The sealing is easier, too: Justa half-dollar-size dab of roof
cement under each corner where it laps over the valley shingle is all that is required.
—M. G.
A row of shingles creates the valley. For a Long Island valley, arow of shingles is bedded in roof cement (photo left) and installedwith their top edge on what would be the cutline (photo right).
No guide line needed. Shin-gles go in with one cornerbutted to the valley shingle.
Minimal sealing. A small dab ofroof cement seals each shinglecorner.
No dubbing needed here. Working out of the valley with theclosed-cut method, snap the cutline (photo left), then step the shin-gle back from the line to eliminate the need for dubbing the cor-ners. Here, the gauge shingle marks the guide line (photo right).
Snap and cut. When all the shingles are installed to the guide line,the cutline is resnapped (photo left). With sheet metal protectingthe lower layer of shingles, the shingles on top are cut back to theline (photo right). The cut edge then is sealed with roof cement.
Closed-cut valley
Long Island valley