for learning sql install oracle, sql server and mysql on laptop side-by-side.pdf
DESCRIPTION
For Learning SQL Install Oracle, SQL Server and MySQL on Laptop side-by-side.pdfTRANSCRIPT

For Oracle - SQL
Oracle - Oracle SQL .................................................................................................................................. 2
Installation of SQL Developer .................................................................................................................. 6
Setting SQL Developer Interface to English ............................................................................................. 8
Connecting Oracle Database using SQL Developer ............................................................................... 11
Set the Service to Manual ..................................................................................................................... 14
For MySQL - SQL
MySQL - SQL Installation ....................................................................................................................... 16
Change the Path of Installation ............................................................................................................. 17
Connecting to MySQL Workbench ........................................................................................................ 19
Set the Service to Manual ..................................................................................................................... 23
For Microsoft T-SQL
MS SQL Server - T-SQL ........................................................................................................................... 24
Connecting SQL Server Database .......................................................................................................... 29
Set the Service to Manual ..................................................................................................................... 30
Connecting all the installed databases using SQL Developer ................................................................ 31
MySQL Driver Installation ...................................................................................................................... 31
MS SQL Server Driver Installation ......................................................................................................... 32
Final Snapshots after Installations ........................................................................................................ 33
What is the purpose of these Installations ?
You can experience the SQL from Oracle, MySQL and Microsoft SQL in a one go. For example
create a table in Oracle and check how this table created on MySQL and MS SQL Server
With a bare minimum of 4 Gb RAM Laptop or Virtual Machine you can install all the three
very smartly
If you install on a Laptop, you can start the databases when you need and use your memory
efficiently
Learning to do a clean and good installation. The "Set the Service to Manual" explains further
If your aim is gathering good SQL knowledge and/or you think of ETL Development , it is good
to have an experience of SQL from the three popular databases

If you have three Drives you can allocate each drive for a specific software or at least one extra drive is well and good
If you do not, even though we can perform a good installation !
In my case I installed all the 3 databases on a separate single drive
On Windows .Net is very important. If your installation is on a Laptop make sure you have .Net 3.5 installed. Run the Windows Update or recheck for it
In the MS SQL Express Advanced 2008 R2 section you can see the download links for .Net if you install on a Virtual Machine
Oracle - Oracle SQL
Download link :
You need to register with Oracle to download the software on Oracle.
http://www.oracle.com/index.html
Now move the mouse to "Downloads". You see Oracle Database 11g Express Edition
Accept license and Download :
Oracle Database Express Edition 11g Release 2 for Windows x64 and
Click on SQL Developer to download "Oracle SQL Developer 4.0.3. For 64 bit including Java" go for -> Windows 64-bit -zip file includes the JDK 7
Unzip and double click the "setup" to start the installation
Click on Run to start the installation
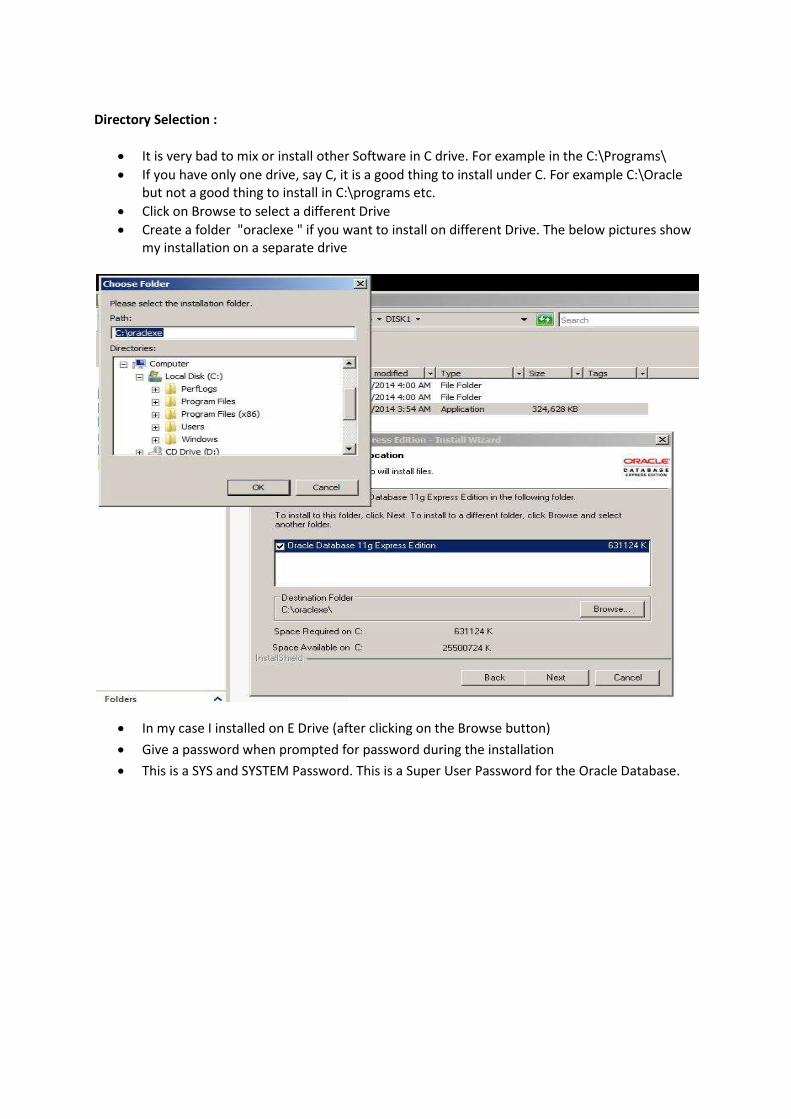
Directory Selection :
It is very bad to mix or install other Software in C drive. For example in the C:\Programs\
If you have only one drive, say C, it is a good thing to install under C. For example C:\Oracle but not a good thing to install in C:\programs etc.
Click on Browse to select a different Drive
Create a folder "oraclexe " if you want to install on different Drive. The below pictures show my installation on a separate drive
In my case I installed on E Drive (after clicking on the Browse button)
Give a password when prompted for password during the installation
This is a SYS and SYSTEM Password. This is a Super User Password for the Oracle Database.

Set up Finish. Navigate to see the Database files
Open SQL Window to learn basic shutdown and startup of a Oracle Database using
commands


Installation of SQL Developer
Say for an example when you downloaded SQL Developer it is saved in Downloads folder.
Unzip it and open it
Copy or move this folder to C Drive. You can see that in the below screenshots

Open the SQL Developer Folder and go here
Right click on this and create a short cut to Desktop (send to Desktop)

Open SQL Developer from desktop now and click on "run" and click on "no" when the
message to migrate older version is asked.
Setting SQL Developer Interface to English
If you live in non English country it is possible the interface will be switched to non English
Below is the configuration file to change the SQL Developer interface to English
Do not open this file with "notepad" but better to open with "WordPad"

Add the below lines at the end of the file.
Save and close the file
If you get any Java related Error then one more path has to be saved here. The steps for this
are below

Click on OK
Now navigate the Folder "SQL Developer" on your laptop. On my laptop it was as below
Note this path and save it in this file in same way you did for changing the interface to English
language previously
Save and close the file. Below is another SQL Developer Configuration File. Just for
Information

Connecting Oracle Database using SQL Developer
Right click on Connections

Click on "Test" after giving the details to see the connection status "success" and then check
box "save password". Finally click on Save to save this connection.
To connect click on "connect"
Expand this connection "sys-conn" and finally "other users"
Right click on "HR" to open "edit user" and give password and unlock account. Finally Apply.
Example below shows granting the DBA Role to this user. Click on SQL to see the SQL
Statement. Further see other roles and privileges

Click on Apply to give the DBA Grant
Verify by using SQL Window
The User "HR" is able to connect to database.
Create a new connection for this user in SQL Developer

Shutdown the database now using SQL Command window that we did in previous step.
Set the Service to Manual
We put this Oracle Service to "manual" so that the database is not started automatically.
Open Task Manger and click on "Services" (You can open Task Manager by right click on the
Time, which is at the bottom right on your laptop)
Click on any Service name and press the "o" key ( you save time in searching a Service )

Right click on this now and set it Manual and press Apply button
Now set the other two Services to manual

When you need it work with Oracle you start the "listener" first and then "Service".
Both are important to connect to Oracle database.
MySQL - SQL Installation
Download Link :
http://dev.mysql.com/downloads/mysql/
Using Oracle account you can download.
Using Microsoft Installer is the recommended way to install on Windows.
Note : MySQL Installer is 32 bit, but will install both 32 bit and 64 bit binaries.
In my case it was :
Double click to start installation.
Click on "install MySQL products"
Accept license
Check the box "skip the check for updates " to avoid updating

Change the Path of Installation Remember :
It is a very bad installation to install in C:\programfiles or in C:\programs.
If you have another drive just change "C" to other drive name. In my case I put in E. The below screen shows it.
If you have only C then just delete "Program files". In this way C:\MySQL\ and C:\MySQL\MySQL Server 5.6\
Click on Next and Execute
Click on Next

Go for defaults
Click on execute and watch for the water level rise and later on click next
Give a password for MySQL Root password and see the Service name
Click on Next for Examples

Click on execute and watch for the water level rise and later on click next
Allow to start MySQL Workbench and finally click on Finish to complete the installation
Connecting to MySQL Workbench
Click on Root and check the box "save password in vault"
Click on options Files in the left pane and see the location of the Configuration File

Verify the installed files

Below is the data directory of MySQL
The Configuration File

Create a MySQL Workbench short on the Desktop. Right click on in it and select "send to
Desktop shortcut"
Shutdown theMySQL Server now using MySQLWorkbench

Set the Service to Manual
We put this Service to manual so that it does not start up when the laptop is started.
Open Task Manger and click on "Services" (You can open Task Manager by right click on the
Time, which is at the bottom right on your laptop)
Click on any Service name and press the "m" key ( you save time in searching a Service)
Right click on this now and set it Manual and press Apply button.
When you want to use MySQL you have to just start the Service by clicking on "start"

MS SQL Server - T-SQL Below is the installation for MS SQL Server Express Advanced 2008 R2
Prerequisite is .Net 3.5 SP1. If you are installing on a Laptop the Windows update would install it for you. Just run the Windows Update
If you are installing on a Virtual Machine then download it
Download link for .Net 3.5 SP1
http://www.microsoft.com/en-us/download/details.aspx?id=25150
It is of 231 MB size and full package. This is a offline installer of .Net 3.5 SP1. Although I had
installed .Net framework 4 it still threw error
Download link for MS SQL Server Advanced 2008 R2
The SS Express Advanced comes with the Management Studio. This is an important tool
http://www.microsoft.com/en-us/download/details.aspx?id=25174
Select " SQLEXPRADV_x64_ENU" for 64 bit laptop

Takes some time to open up. Click on run to start the installation
Click on "New Installation.. "

We have to go with the default directories here. It is Microsoft Software !
If you try to change the directory path it throws Error ! and installation does not proceed
further.
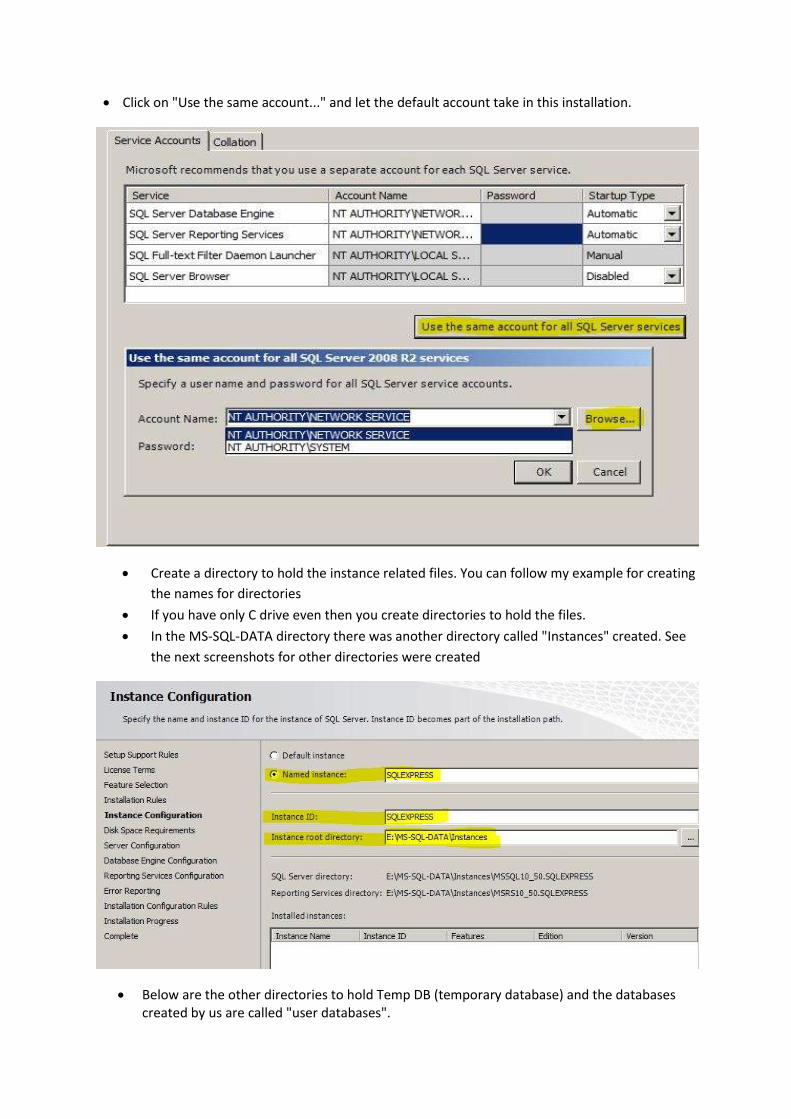
Click on "Use the same account..." and let the default account take in this installation.
Create a directory to hold the instance related files. You can follow my example for creating
the names for directories
If you have only C drive even then you create directories to hold the files.
In the MS-SQL-DATA directory there was another directory called "Instances" created. See
the next screenshots for other directories were created
Below are the other directories to hold Temp DB (temporary database) and the databases created by us are called "user databases".

The installation will be finished in few minutes.
Open the SQL Server Management Studio (in short it is called SSMS)

Connecting SQL Server Database
We connect to Database Engine. Below you can see the instance name "SQLEXPRESS" which
was installed on the Server or computer called "WIN-ORASYS1"
Click on Connect

Right click on Databases to create a new database. Just give a name to create a user
database
Click Refresh to see the newly created user database
After the disconnect from instance you can set the Service to Manual so that SQL Server
does not start up automatically for you
Set the Service to Manual
Open Task Manger and click on "Services" (You can open Task Manager by right click on the
Time, which is at the bottom right on your laptop)
Click on any Service name and press the "s" key (you save time in searching a Service). We
set all the SQL Services to Manual
Right click on the service and set it to Manual. Do not forget to press Apply.

All the SQL Services are set to manual
Connecting all the installed databases using SQL Developer
In order to connect the other databases using SQL Developer we need to install 3rd party
drivers
Download Link for MySQL Driver
http://dev.mysql.com/downloads/connector/j/
Download Link for MS SQL Server Driver (download this zip file)
http://sourceforge.net/projects/jtds/files/jtds/
MySQL Driver Installation
Run this downloaded driver to get it installed
It will be installed and saved in
Make a note of this location and Jar File, which is highlighted below

MS SQL Server Driver Installation
Unzip the folder and move or copy the folder to Program Files (x86). In my case it was
Make a note of this location and Jar File, which is highlighted
Open SQL Developer
Click on Tools and open Preferences. Expand Database and click on Third Party JDBC Drivers
Click on Add Entry. Now select the location of MySQL Jar and MS SQL Jar(jtds-1.3.1.jar). Both
are highlighted in the above screenshots .
In SQL Developer, right click on Connections and you should see this
Click on, for example MySQL , a MySQL Tab to make a connection to MySQL Database from
SQL Developer

Final Snapshots after Installations
