fios tv remote dvr - verizon
TRANSCRIPT

FiOS TV Remote DVR

2 FiOS TV Remote DVR
Table of Contents GETTING STARTED ......................................................................................................................... 3
COMMON TERMS................................................................................................................................ 3 REQUIREMENTS.................................................................................................................................. 3 ACCESSING FIOS TV ......................................................................................................................... 4
Obtaining an Authorization Code................................................................................................. 5 ON DEMAND....................................................................................................................................... 6
ACCESSING ON DEMAND ................................................................................................................... 6 BROWSING AND BOOKMARKING VIDEOS ........................................................................................... 6
DVR....................................................................................................................................................... 7 CHECKING THE DVR MENU OPTIONS................................................................................................ 7 CREATE NEW RECORDING - BROWSE................................................................................................. 7 CREATE NEW RECORDING - SEARCH ................................................................................................. 8 VIEW SCHEDULED RECORDINGS ........................................................................................................ 9
More Info/Cancel Recording ........................................................................................................ 9 VIEW RECORDED PROGRAMS........................................................................................................... 10 DELETE RECORDED PROGRAMS....................................................................................................... 10
TV LISTINGS .................................................................................................................................... 11 ACCESSING TV LISTINGS ................................................................................................................. 11 NAVIGATING TV LISTINGS .............................................................................................................. 11
SEARCH............................................................................................................................................. 12 SEARCH BY KEYWORD..................................................................................................................... 12
Search Results Folders ............................................................................................................... 12 Using the Options Filter with Keyword Search.......................................................................... 12
SEARCH - BROWSE BY CATEGORY ................................................................................................... 13 Navigating Browse by Category................................................................................................. 13
PARENTAL CONTROLS ................................................................................................................ 14 ACCESSING PARENTAL CONTROLS................................................................................................... 14 CHANGE THE STATUS OF PARENTAL CONTROLS.............................................................................. 14 VIEW CURRENT SETTINGS ............................................................................................................... 14
SUPPORTED DEVICES................................................................................................................... 15 MOTOROLA .................................................................................................................................. 15 LG ................................................................................................................................................... 15 SAMSUNG ..................................................................................................................................... 15
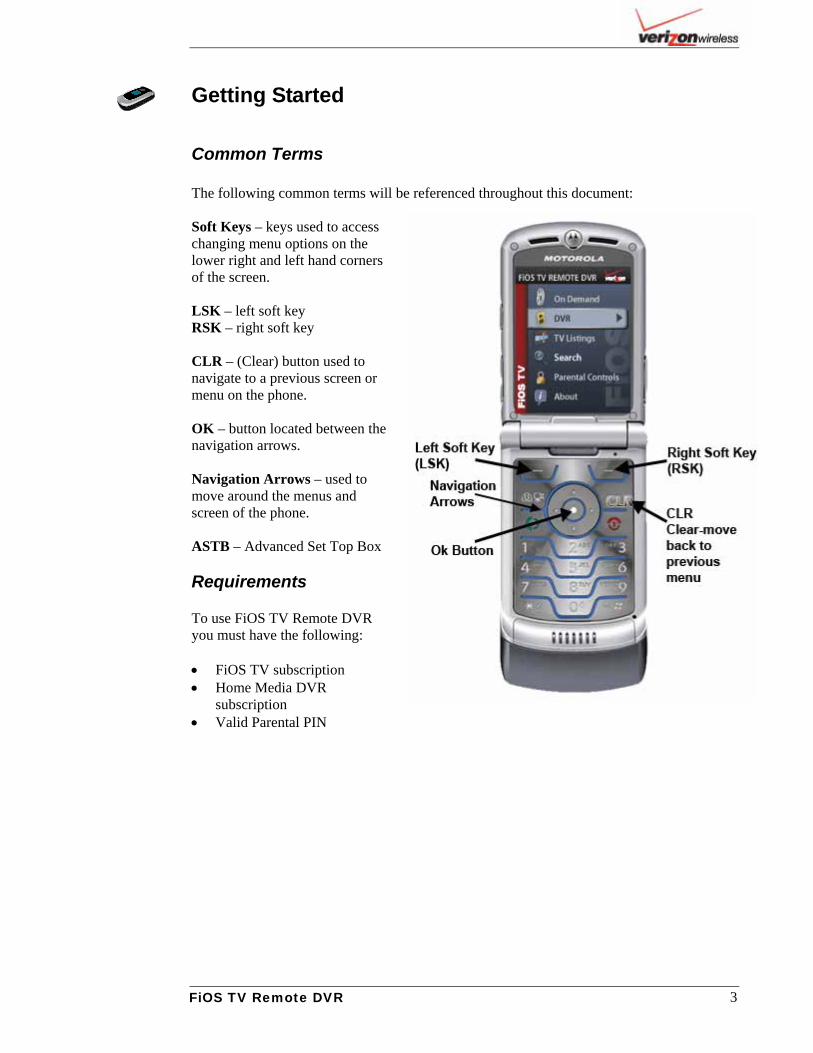
Getting Started
Common Terms The following common terms will be referenced throughout this document: Soft Keys – keys used to access changing menu options on the lower right and left hand corners of the screen. LSK – left soft key RSK – right soft key CLR – (Clear) button used to navigate to a previous screen or menu on the phone. OK – button located between the navigation arrows. Navigation Arrows – used to move around the menus and screen of the phone. ASTB – Advanced Set Top Box Requirements To use FiOS TV Remote DVR you must have the following: • FiOS TV subscription • Home Media DVR
subscription • Valid Parental PIN
3 FiOS TV Remote DVR
Accessing FiOS TV
Figure 1
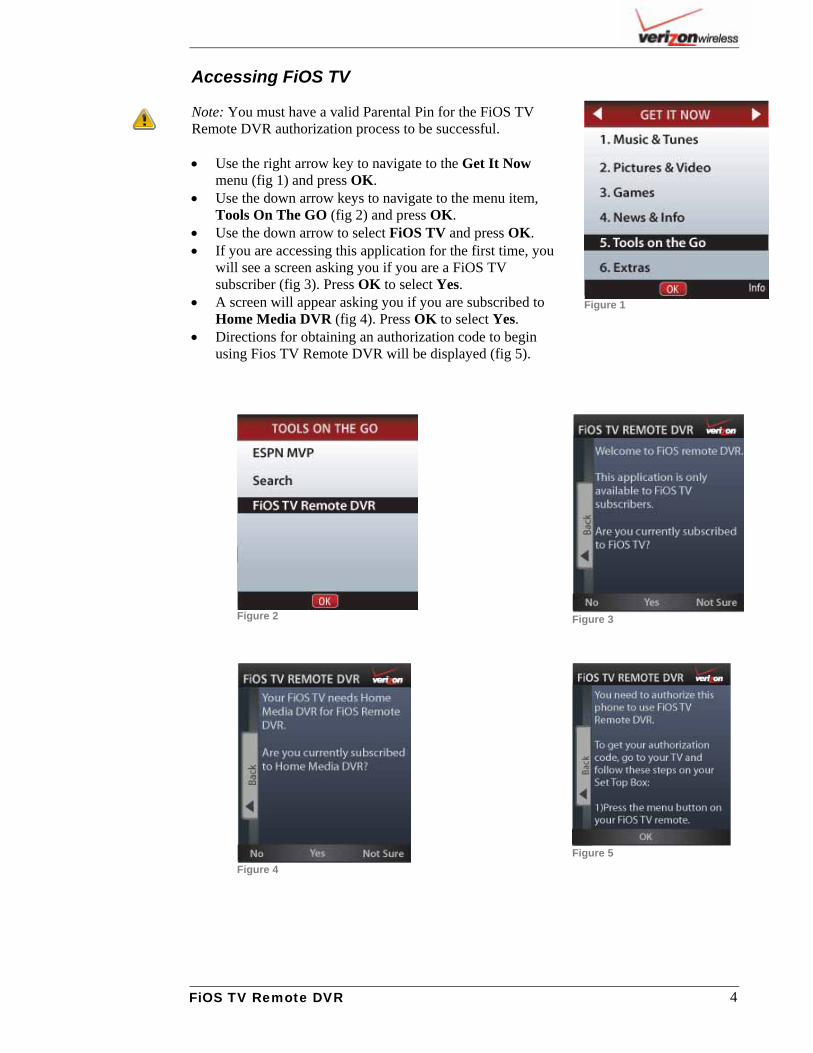
Note: You must have a valid Parental Pin for the FiOS TV Remote DVR authorization process to be successful. • Use the right arrow key to navigate to the Get It Now
menu (fig 1) and press OK. • Use the down arrow keys to navigate to the menu item,
Tools On The GO (fig 2) and press OK. • Use the down arrow to select FiOS TV and press OK. • If you are accessing this application for the first time, you
will see a screen asking you if you are a FiOS TV subscriber (fig 3). Press OK to select Yes.
• A screen will appear asking you if you are subscribed to Home Media DVR (fig 4). Press OK to select Yes.
• Directions for obtaining an authorization code to begin using Fios TV Remote DVR will be displayed (fig 5).
Figure 3
Figure 2
Figure 5
Figure 4
4 FiOS TV Remote DVR

Obtaining an Authorization Code Authorization codes are obtained from your ASTB.
Figure 6
Step by step directions will be displayed on your ASTB as follows:
1. Press the menu button on your FiOS TV remote. 2. Use your Down arrow button to select Settings and
press OK. 3. Select FiOS TV Remote DVR and press OK. 4. Select Mobile Phone Access and press OK. 5. Enter your Parental PIN in the textbox and press OK. 6. Enter your cell phone number and press OK. 7. The screen will display an authorization code. 8. From the authorization screen on your cell phone (fig 6),
enter the code from your ASTB and press OK. 9. A screen with an alert that your authorization was
successful will appear (fig 7). Press any key to continue.
Figure 7
10. A loading screen will be displayed (fig 8). 11. When the application has finished loading, the FiOS
TV Remote DVR main menu will appear (fig 9).
Figure 8
Figure 9
5 FiOS TV Remote DVR

On Demand
Figure 10
This feature allows you to browse through and bookmark Videos on Demand (VOD) for viewing on your TV later.
Accessing On Demand From the main menu, select On Demand (fig 10) and press OK. The Video on Demand menu (fig 11) will be displayed with the following items: • Featured – lists the current Featured selections from Verizon. • Browse – browse the entire On Demand listings by category. • Search – keyword search of On Demand Listings. • Bookmarks – view On Demand items you have bookmarked.
Browsing and Bookmarking Videos
Figure 11
• Select Browse on the VOD main menu and press OK. VODs are arranged in folders according to category. Press the down arrow to view additional category folders, or select a category and press OK or the right arrow to drill down into the folders (fig 12) until you reach the individual videos. • To view more detail about the video, select the title and press
OK. Press CLR or the left arrow to return to the VOD list. • Press the LSK to bookmark a selected video (fig 13). • Press the RSK to access Poster View, images associated with the
video.
Figure 12
Figure 13
6 FiOS TV Remote DVR

DVR Checking the DVR Menu Options
Figure 14
From the main menu, select the DVR menu option (fig 14). The DVR Menu displays the following options:
• Create New Recording. • Recorded Programs. • View Schedule.
Figure 15
Create New Recording - Browse • From the menu, select DVR to display the DVR menu (fig 15). • Select Create New Recording to display the Create New Recording menu.
The following options are displayed (fig 16):
2. Browse TV Listings. 3. Search TV Listings.
Figure 16
Select Browse TV Listings and press OK to display the TV Listing (fig 17). • Using the arrow keys, scroll through the listing to find an item
you wish to record. • Press the RSK to open the Options Menu. • Select Record from the menu and press OK. • After the Scheduling Recording animation has finished, the
selection will be scheduled on the Set Top Box. Note: Press the LSK to display a menu to filter listings by:
7 FiOS TV Remote DVR
Figure 1 7 (TV Listings)
1. Favorites 2. HD Channels 3. All Channels

Create New Recording - Search
Figure 18
• From the main menu, select DVR to display the DVR menu. • Select Create New Recording to display the Create New Recording menu.
The following options are displayed (fig 18):
1. Browse TV Listing. 2. Search TV Listing.
• Select Search TV Listings (fig 19) to display the search
screen.
Figure 19
• In the text entry box enter some text relative to your search. As you enter text, results will be displayed below the entry box.
• Using the arrow keys, select the program from the list. • Use the LSK to open the Options menu to use the
following filters:
1. Show All 2. Filter by Live 3. Filter by PPV 4. Filter by VOD
Note: If you wish to enter numbers into the search entry, use the RSK to open the Entry Mode menu to toggle between alpha and numeric entries.
Figure 20
• Search results will be displayed as individual entries
or grouped in category folders (fig 20). • Use the arrow keys to scroll through the search
results. Press OK to make a selection.
Figure 21
• Once you have made an individual selection (fig 21), use the LSK to activate the Record function.
8 FiOS TV Remote DVR

View Scheduled Recordings
Figure 22
• From the main menu, select DVR, and press OK. • Navigate to View Schedule (fig 22) and press
OK. • An animation will be displayed while the
schedule is retrieved. • The Schedule screen will be displayed (fig 23).
Figure 23
Note: If the number of programs recorded exceeds the size of the screen, use the up/down arrow keys to navigate between the pages. • Select a date on the screen to display the programs
scheduled to be recorded for that day (fig 23). • Recordings associated with the selected date will
be displayed (fig 24).
More Info/Cancel Recording • To view additional information about a program,
cancel a recording, cancel a series or resolve a conflict, press the RSK to open Options. • The Options menu will be displayed enabling you to
view additional information about the item or cancel the scheduled recording.
Figure 24
9 FiOS TV Remote DVR
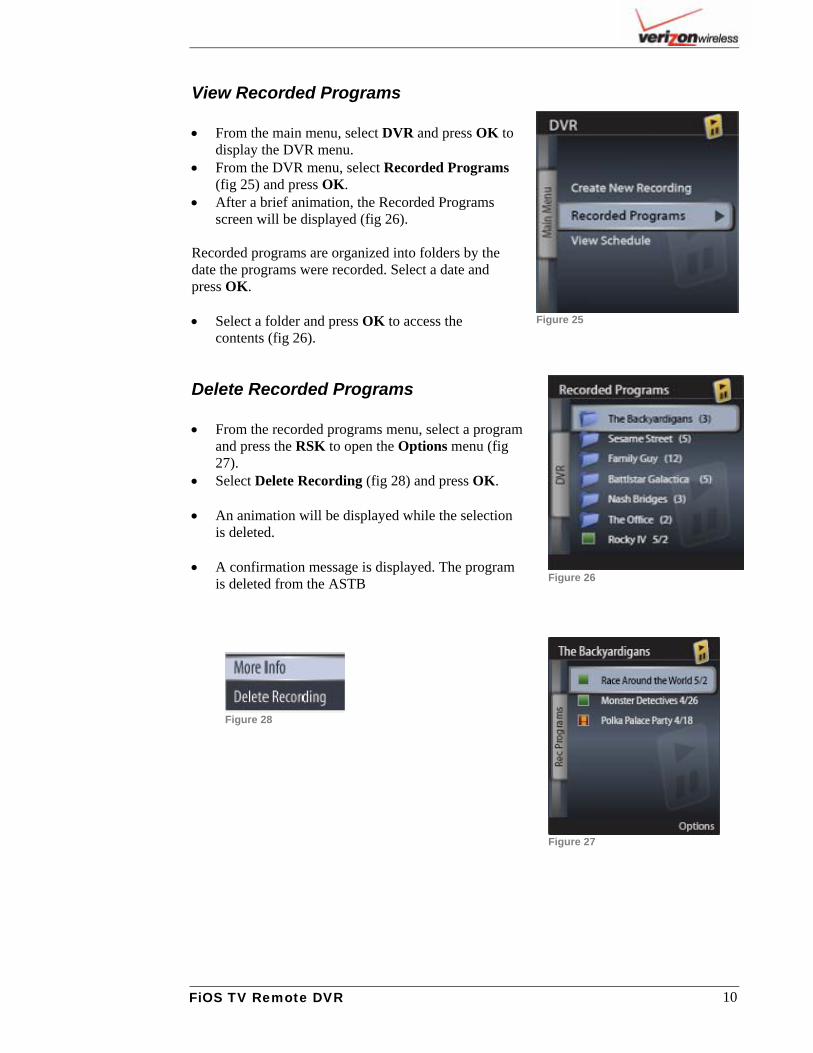
View Recorded Programs
Figure 25
• From the main menu, select DVR and press OK to display the DVR menu.
• From the DVR menu, select Recorded Programs (fig 25) and press OK.
• After a brief animation, the Recorded Programs screen will be displayed (fig 26).
Recorded programs are organized into folders by the date the programs were recorded. Select a date and press OK. • Select a folder and press OK to access the
contents (fig 26).
Figure 26
Delete Recorded Programs • From the recorded programs menu, select a program
and press the RSK to open the Options menu (fig 27).
• Select Delete Recording (fig 28) and press OK. • An animation will be displayed while the selection
is deleted. • A confirmation message is displayed. The program
is deleted from the ASTB
Figure 27
Figure 28
10 FiOS TV Remote DVR
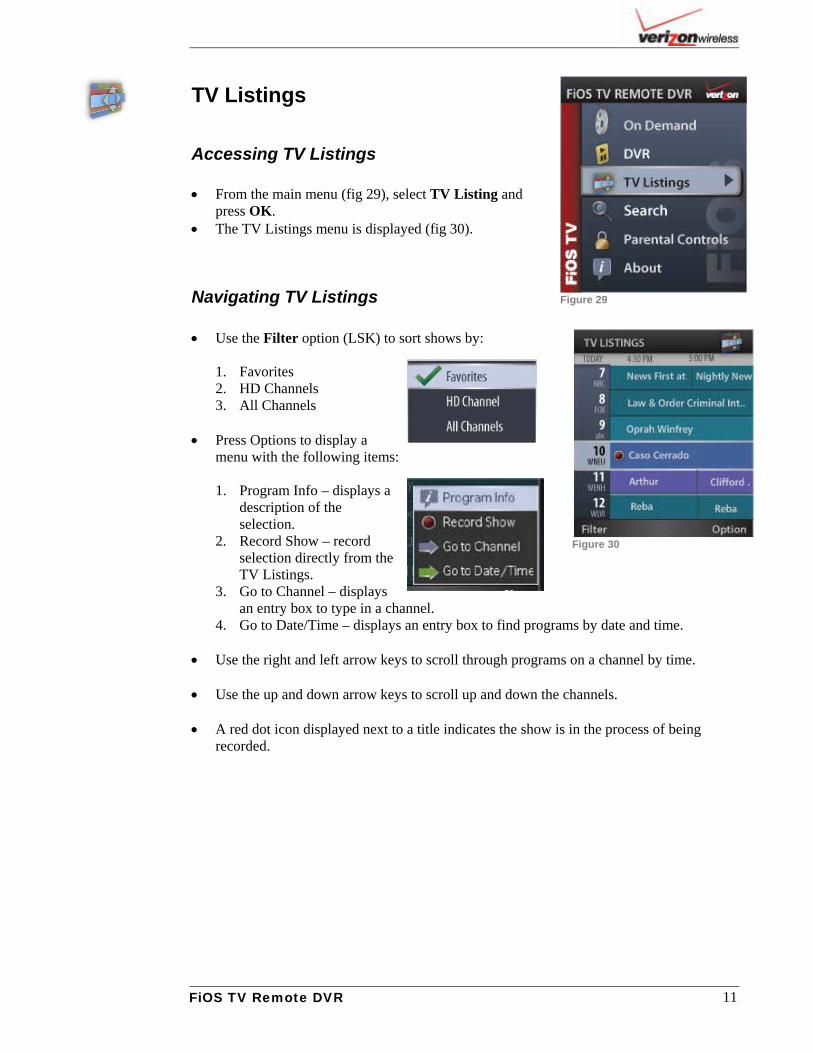
Figure 29
TV Listings
Accessing TV Listings • From the main menu (fig 29), select TV Listing and
press OK. • The TV Listings menu is displayed (fig 30).
Navigating TV Listings
Figure 30
• Use the Filter option (LSK) to sort shows by:
1. Favorites 2. HD Channels 3. All Channels
• Press Options to display a menu with the following items:
1. Program Info – displays a
description of the selection.
2. Record Show – record selection directly from the TV Listings.
3. Go to Channel – displays an entry box to type in a channel.
4. Go to Date/Time – displays an entry box to find programs by date and time. • Use the right and left arrow keys to scroll through programs on a channel by time. • Use the up and down arrow keys to scroll up and down the channels. • A red dot icon displayed next to a title indicates the show is in the process of being
recorded.
11 FiOS TV Remote DVR

Search
Figure 31
From the main menu (fig 31) select Search then, OK to access the Search facility.
Search by Keyword • From the Search screen (fig 32), select Search by Keyword
and press OK. • A new screen with a text entry box will be displayed (fig 33). • Use the phone’s keypad to type in a word related to your
search. As letters are entered into the box, results will begin displaying below the text box (fig 34).
• Press the LSK to access the Entry Mode menu to toggle between entering numbers and letters.
• Icons will differentiate results as TV, PPV, VOD or Actor.
Figure 32
Search Results Folders If the search reveals a number of results with the same asset name, the items will be displayed in folders.
Using the Options Filter with Keyword Search Use the RSK to select Options. The options menu is displayed with the following items:
1. Show All 2. Filter by Live TV
Figure 33
3. Filter by PPV 4. Filter by VOD
Figure 34
12 FiOS TV Remote DVR

Search - Browse by Category • From the Search menu (fig 35), select Browse by Category
and press OK.
Figure 35
• The Browse screen will appear (fig 36).
Navigating Browse by Category • From the Browse screen (fig 36), select TV Listings, Video
on Demand or Pay Per View and press OK. • The relevant screen is displayed with categories arranged by
folder (fig 37). • Listing can be found by:
1. Selecting a folder and pressing OK to drill down to individual items.
2. Pressing the LSK (Keyword option) to display the text entry box to search by keyword (fig 38).
Figure 36
Figure 37
Figure 38
13 FiOS TV Remote DVR

Parental Controls
Figure 39
Accessing Parental Controls • From the FiOS TV main menu (fig 39), select Parental
Controls and press OK. • Enter your 4 digit PIN number in the entry box (fig 40)
and press OK. The “verifying” animation will be displayed and the Parental Control main menu is displayed. The Parental Control menu (fig 41) is displayed with the status set (On/Off).
Change the Status of Parental Controls
Figure 40
Parental Controls are set on the ASTB. You cannot control access to the TV from your phone without establishing these settings on the ASTB first. Once you have set up your choice of Parental Controls on the ASTB, you can elect to turn your settings on and off remotely from your cell phone. Use the right arrow key or press OK to toggle between changing the status to On or Off. (fig 41).
View Current Settings
Figure 41
Select View Current Settings and press OK. The View ratings screen appears. The settings established from your ASTB are displayed (fig 42).
Figure 42
14 FiOS TV Remote DVR
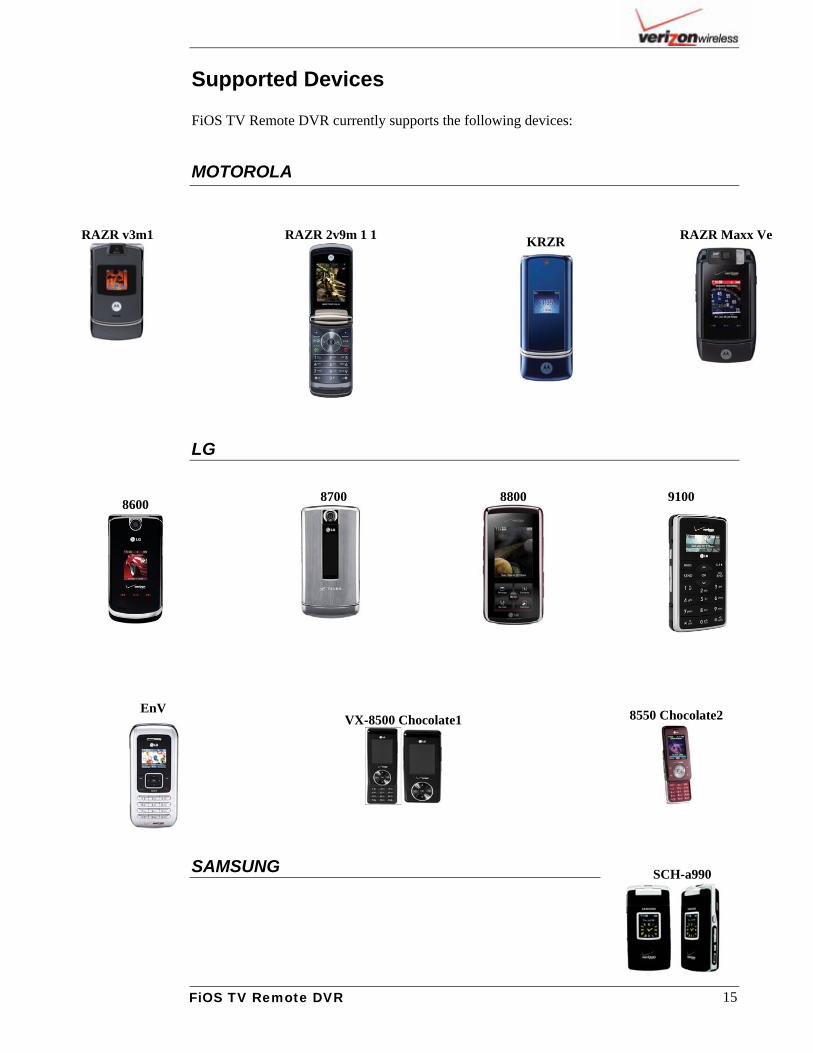
Supported Devices
FiOS TV Remote DVR currently supports the following devices:
MOTOROLA RAZR v3m1
15 FiOS TV Remote DVR
RAZR 2v9m 1 1
RAZR Maxx Ve
KRZR
LG
8700 8800 9100 8600
EnV
8550 Chocolate2
VX-8500 Chocolate1
SAMSUNG SCH-a990

16 FiOS TV Remote DVR