finished tenor banjo - harpkit.com · banjo to get this first string to hang properly above the...
TRANSCRIPT
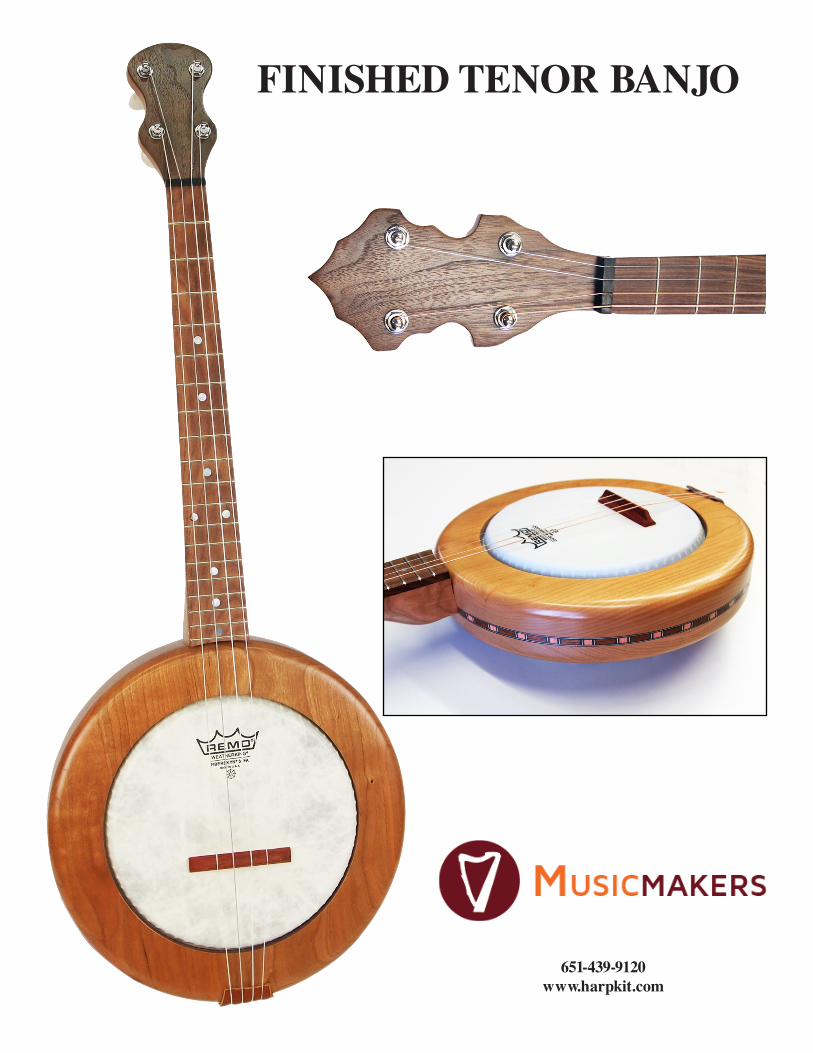
FINISHED TENOR BANJO
651-439-9120www.harpkit.com
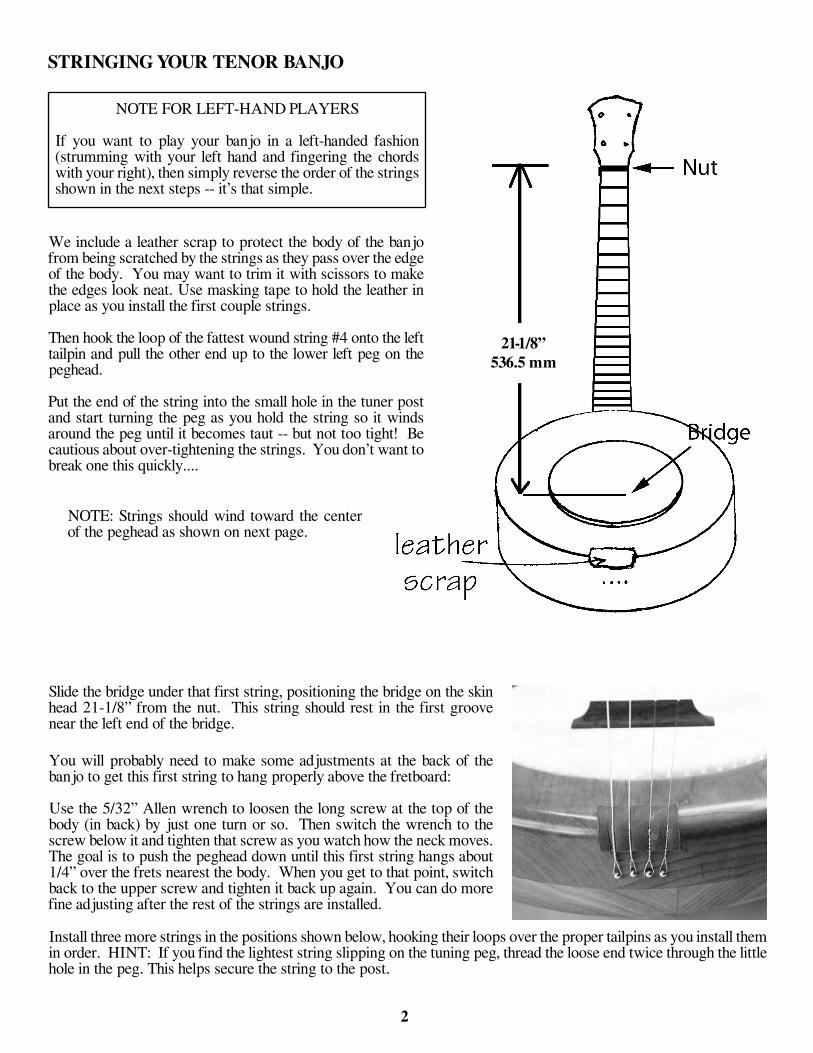
STRINGING YOUR TENOR BANJO
2
We include a leather scrap to protect the body of the banjo from being scratched by the strings as they pass over the edge of the body. You may want to trim it with scissors to make the edges look neat. Use masking tape to hold the leather in place as you install the first couple strings.
Then hook the loop of the fattest wound string #4 onto the left tailpin and pull the other end up to the lower left peg on the peghead.
Put the end of the string into the small hole in the tuner post and start turning the peg as you hold the string so it winds around the peg until it becomes taut -- but not too tight! Be cautious about over-tightening the strings. You don’t want to break one this quickly....
21-1/8”536.5 mm
NOTE: Strings should wind toward the center of the peghead as shown on next page.
NOTE FOR LEFT-HAND PLAYERS
If you want to play your banjo in a left-handed fashion (strumming with your left hand and fingering the chords with your right), then simply reverse the order of the strings shown in the next steps -- it’s that simple.
Slide the bridge under that first string, positioning the bridge on the skin head 21-1/8” from the nut. This string should rest in the first groove near the left end of the bridge.
You will probably need to make some adjustments at the back of the banjo to get this first string to hang properly above the fretboard:
Use the 5/32” Allen wrench to loosen the long screw at the top of the body (in back) by just one turn or so. Then switch the wrench to the screw below it and tighten that screw as you watch how the neck moves. The goal is to push the peghead down until this first string hangs about 1/4” over the frets nearest the body. When you get to that point, switch back to the upper screw and tighten it back up again. You can do more fine adjusting after the rest of the strings are installed.
Install three more strings in the positions shown below, hooking their loops over the proper tailpins as you install them in order. HINT: If you find the lightest string slipping on the tuning peg, thread the loose end twice through the little hole in the peg. This helps secure the string to the post.
ACCESSORY ITEMS AVAILABLE FOR THE BANJO
FINISHKIT Musicmaker’s finishing kit with instructionsSTRAP-2 Shoulder strap & 2 mounting buttons BANJBAG Padded carrying bag for banjo
See our website (www.harpkit.com) or current catalog for prices.
3
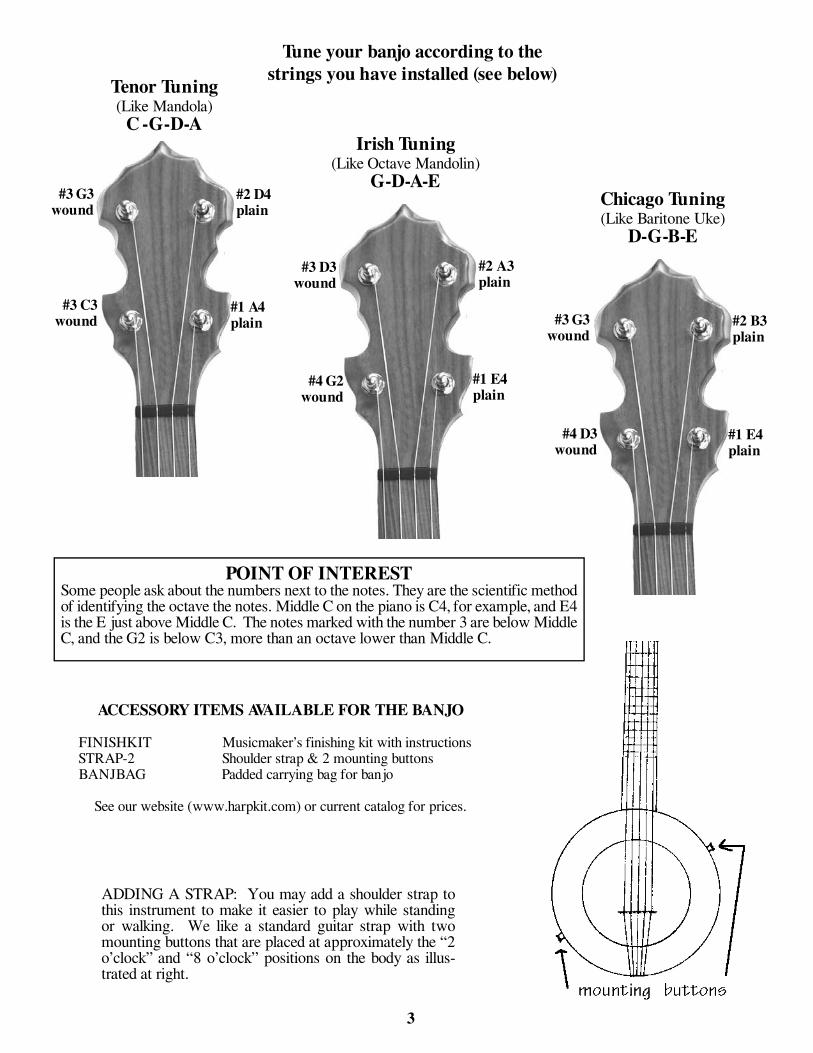
Tune your banjo according to the strings you have installed (see below)
Tenor Tuning(Like Mandola)
C -G-D-A
#4 D3 wound
#3 G3 wound
#2 B3 plain
#1 E4 plain
Chicago Tuning(Like Baritone Uke)
D-G-B-E
#3 G3 wound
#2 D4 plain
Irish Tuning(Like Octave Mandolin)
G-D-A-E
#4 G2 wound
#3 D3 wound
#1 E4 plain
#2 A3plain
#3 C3 wound
#1 A4 plain
ADDING A STRAP: You may add a shoulder strap to this instrument to make it easier to play while standing or walking. We like a standard guitar strap with two mounting buttons that are placed at approximately the “2 o’clock” and “8 o’clock” positions on the body as illus-trated at right.
POINT OF INTEREST Some people ask about the numbers next to the notes. They are the scientific method of identifying the octave the notes. Middle C on the piano is C4, for example, and E4 is the E just above Middle C. The notes marked with the number 3 are below Middle C, and the G2 is below C3, more than an octave lower than Middle C.
4
MUSICMAKERSPO BOX 2117
STILLWATER, MN 55082
651-439-9120www.harpkit.com
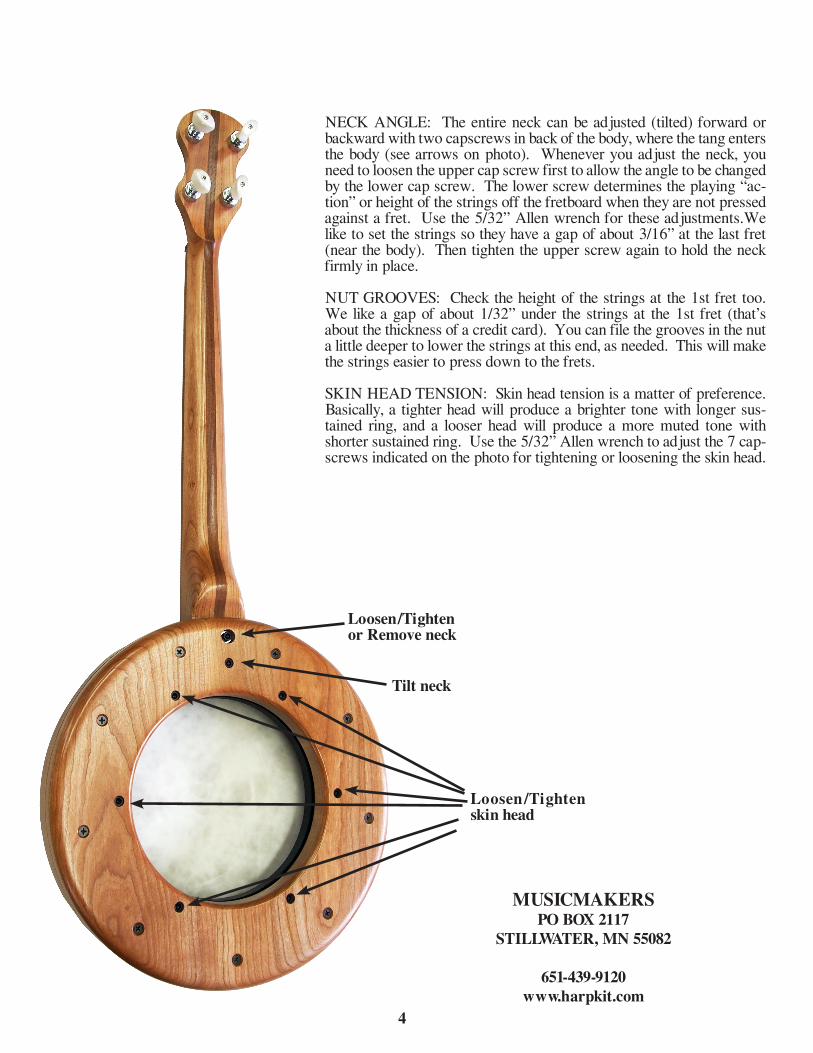
NECK ANGLE: The entire neck can be adjusted (tilted) forward or backward with two capscrews in back of the body, where the tang enters the body (see arrows on photo). Whenever you adjust the neck, you need to loosen the upper cap screw first to allow the angle to be changed by the lower cap screw. The lower screw determines the playing “ac-tion” or height of the strings off the fretboard when they are not pressed against a fret. Use the 5/32” Allen wrench for these adjustments.We like to set the strings so they have a gap of about 3/16” at the last fret (near the body). Then tighten the upper screw again to hold the neck firmly in place.
NUT GROOVES: Check the height of the strings at the 1st fret too. We like a gap of about 1/32” under the strings at the 1st fret (that’s about the thickness of a credit card). You can file the grooves in the nut a little deeper to lower the strings at this end, as needed. This will make the strings easier to press down to the frets.
SKIN HEAD TENSION: Skin head tension is a matter of preference. Basically, a tighter head will produce a brighter tone with longer sus-tained ring, and a looser head will produce a more muted tone with shorter sustained ring. Use the 5/32” Allen wrench to adjust the 7 cap-screws indicated on the photo for tightening or loosening the skin head.
Loosen/Tighten or Remove neck
Tilt neck
Loosen /Tighten skin head