fiery express 4 - help.efi.comhelp.efi.com/fieryexpress/fiery_express_4.6/supp... · supplementary...
TRANSCRIPT
SUPPLEMENTARY GUIDE FOR FIERY EXPRESS 4.6 1
SUPPLEMENTARY GUIDE FOR FIERY EXPRESS 4.6This document describes the main changes that have been implemented since the release of Fiery eXpress 4.1. It explains new and improved features, and also provides details of settings that have been rearranged in the user interface.
RebrandingEFI eXpress has been renamed to Fiery eXpress. Although this document refers to Fiery eXpress throughout, be aware that some older help documents may still use the product name EFI eXpress.
This latest version of the software combines EFI eXpress for Proofing, EFI eXpress for Photo and EFI eXpress for Advanced Proofing into a single product with the name Fiery eXpress. Fiery eXpress has the same feature set as the former EFI eXpress for Advanced Proofing.
System requirementsFiery eXpress 4.6 supports the following operating systems:
Windows • Windows 7, 8.1, 10
Macintosh • Mac OS X 10.9, 10.10, 10.11
SUPPLEMENTARY GUIDE FOR FIERY EXPRESS 4.6 2
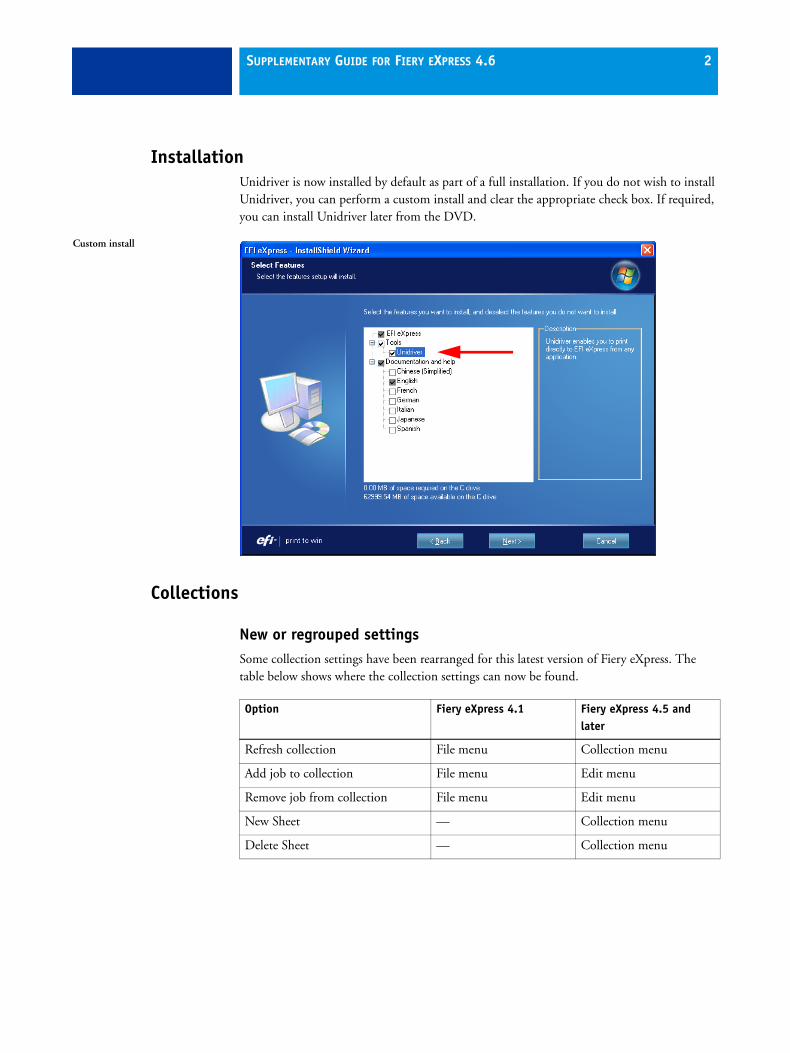
InstallationUnidriver is now installed by default as part of a full installation. If you do not wish to install Unidriver, you can perform a custom install and clear the appropriate check box. If required, you can install Unidriver later from the DVD.
Collections
New or regrouped settingsSome collection settings have been rearranged for this latest version of Fiery eXpress. The table below shows where the collection settings can now be found.
Custom install
Option Fiery eXpress 4.1 Fiery eXpress 4.5 and later
Refresh collection File menu Collection menu
Add job to collection File menu Edit menu
Remove job from collection File menu Edit menu
New Sheet — Collection menu
Delete Sheet — Collection menu
SUPPLEMENTARY GUIDE FOR FIERY EXPRESS 4.6 3
The new Collection menu contains the following commands:
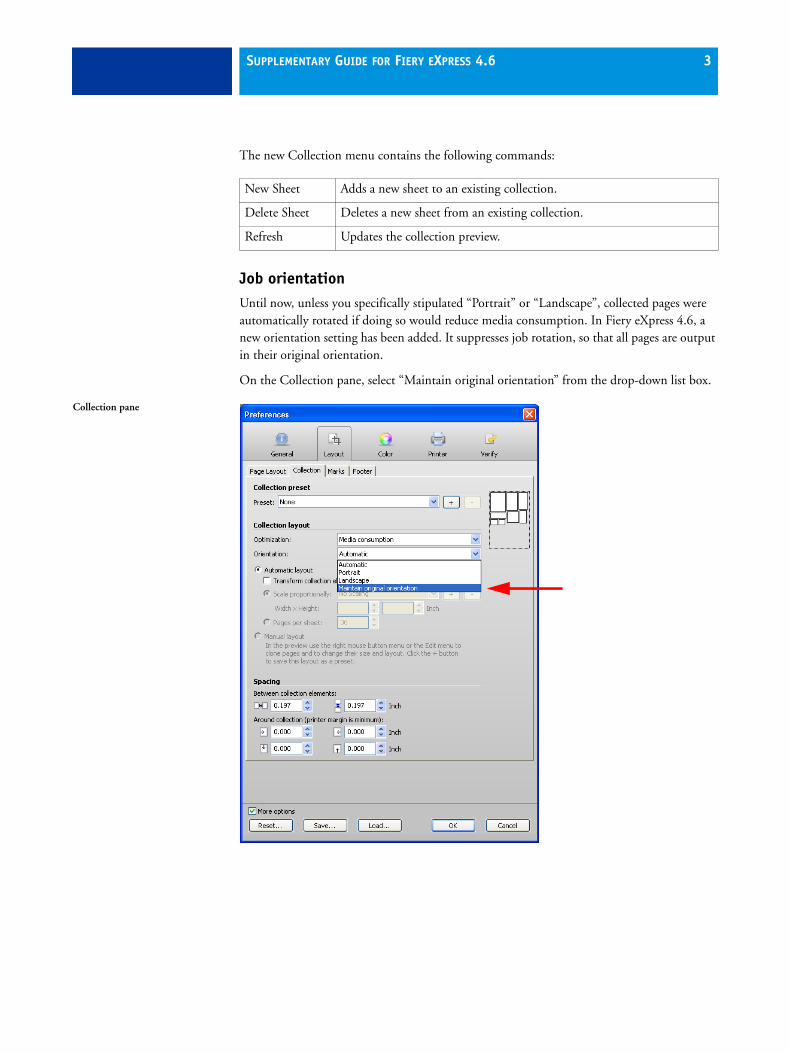
Job orientationUntil now, unless you specifically stipulated “Portrait” or “Landscape”, collected pages were automatically rotated if doing so would reduce media consumption. In Fiery eXpress 4.6, a new orientation setting has been added. It suppresses job rotation, so that all pages are output in their original orientation.
On the Collection pane, select “Maintain original orientation” from the drop-down list box.
New Sheet Adds a new sheet to an existing collection.
Delete Sheet Deletes a new sheet from an existing collection.
Refresh Updates the collection preview.
Collection pane
SUPPLEMENTARY GUIDE FOR FIERY EXPRESS 4.6 4
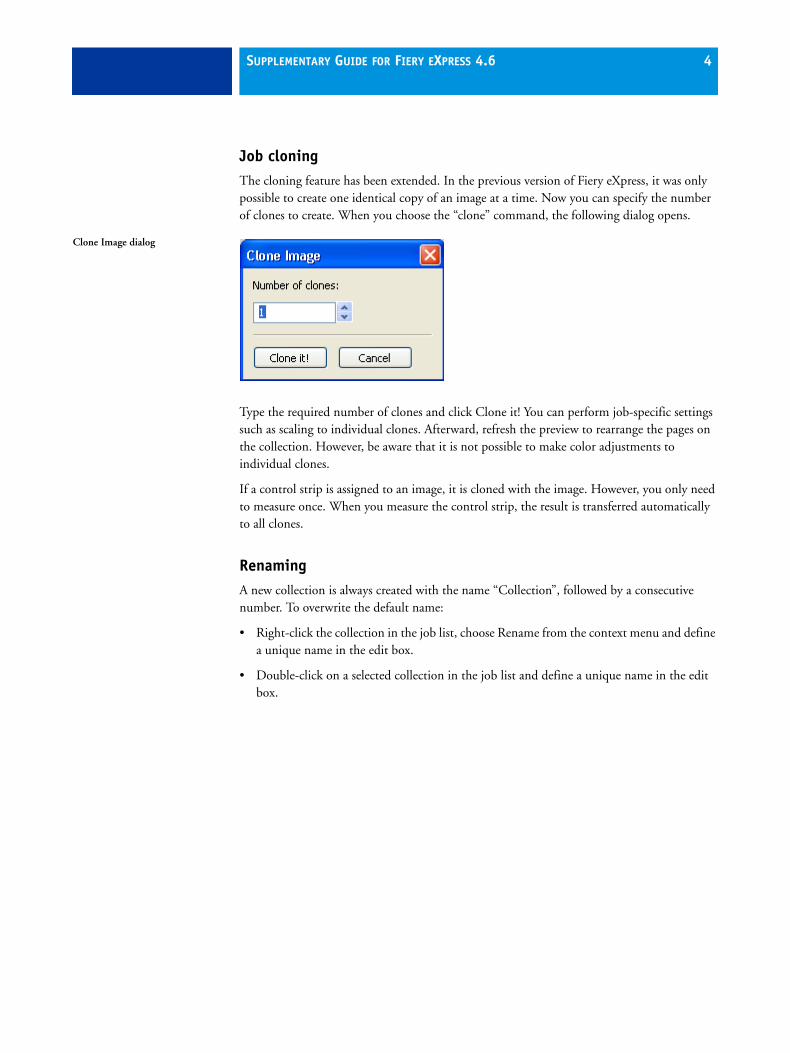
Job cloningThe cloning feature has been extended. In the previous version of Fiery eXpress, it was only possible to create one identical copy of an image at a time. Now you can specify the number of clones to create. When you choose the “clone” command, the following dialog opens.
Type the required number of clones and click Clone it! You can perform job-specific settings such as scaling to individual clones. Afterward, refresh the preview to rearrange the pages on the collection. However, be aware that it is not possible to make color adjustments to individual clones.
If a control strip is assigned to an image, it is cloned with the image. However, you only need to measure once. When you measure the control strip, the result is transferred automatically to all clones.
RenamingA new collection is always created with the name “Collection”, followed by a consecutive number. To overwrite the default name:
• Right-click the collection in the job list, choose Rename from the context menu and define a unique name in the edit box.
• Double-click on a selected collection in the job list and define a unique name in the edit box.
Clone Image dialog
SUPPLEMENTARY GUIDE FOR FIERY EXPRESS 4.6 5
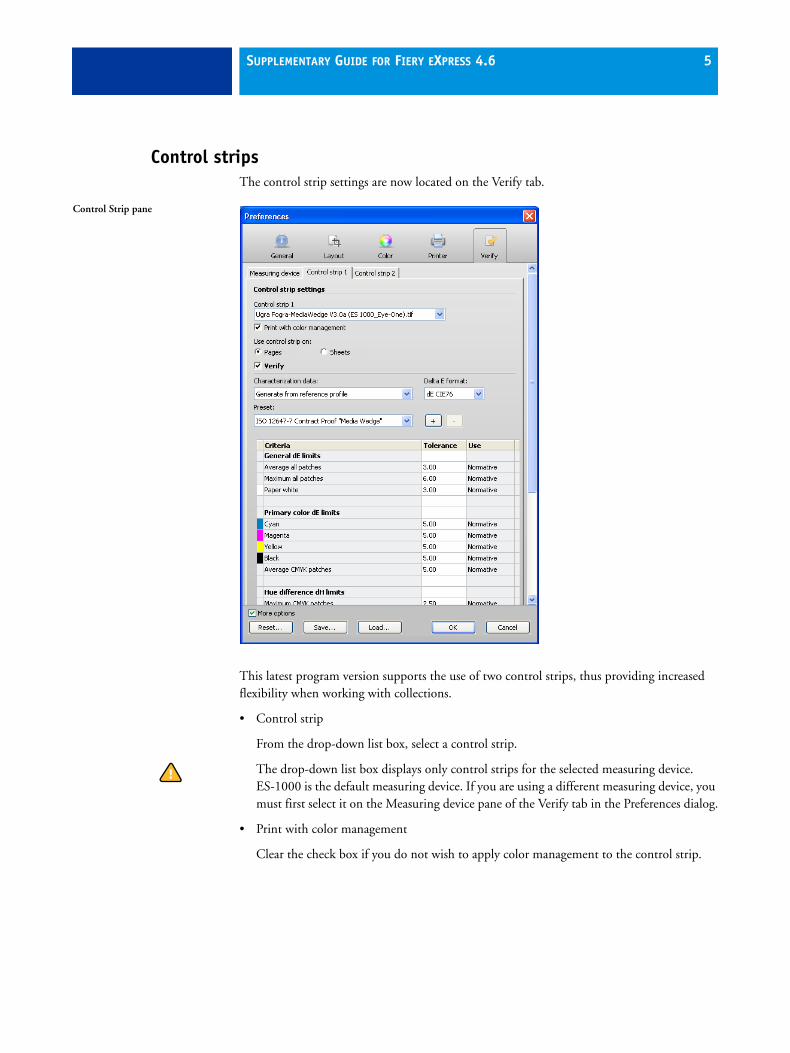
Control stripsThe control strip settings are now located on the Verify tab.
This latest program version supports the use of two control strips, thus providing increased flexibility when working with collections.
• Control strip
From the drop-down list box, select a control strip.
The drop-down list box displays only control strips for the selected measuring device. ES-1000 is the default measuring device. If you are using a different measuring device, you must first select it on the Measuring device pane of the Verify tab in the Preferences dialog.
• Print with color management
Clear the check box if you do not wish to apply color management to the control strip.
Control Strip pane

SUPPLEMENTARY GUIDE FOR FIERY EXPRESS 4.6 6
• Use control strip on
Select “Pages” to output a control strip for a single job. Select “Sheets” to output a control strip for a collection. In a collection, you can combine the use of two control strips to output one for each collected job (page) and another for the collection as a whole (sheet).
For multi-page jobs, the control strip is applied to all pages. It is not possible to select a different control strip for each page.
Color Verifier WizardNew in Fiery eXpress 4.6 is a special tool for verifying the color consistency of your jobs.
How does the Verify workflow work?Tolerance values define the maximum error margin that is acceptable when verifying the color accuracy of a printout against a reference. For example, if you have defined an average delta E value of 3, a measured delta E of 2.5 would be accepted as color accurate and would generate a “passed” result. On the other hand, a delta E measurement of 3.2 would produce a “not passed” result.
Control strip
1 For collected pages2 For collection sheet
1
1
2
1
SUPPLEMENTARY GUIDE FOR FIERY EXPRESS 4.6 7
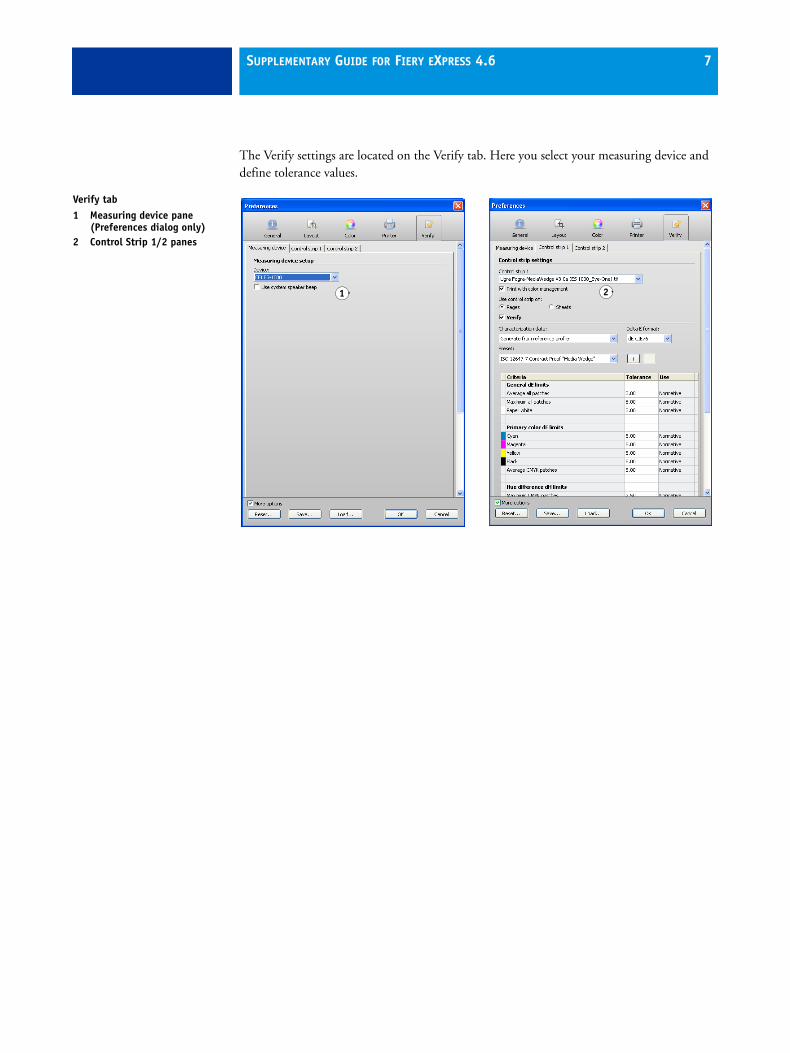
The Verify settings are located on the Verify tab. Here you select your measuring device and define tolerance values.
Verify tab1 Measuring device pane
(Preferences dialog only)2 Control Strip 1/2 panes
1 2
SUPPLEMENTARY GUIDE FOR FIERY EXPRESS 4.6 8
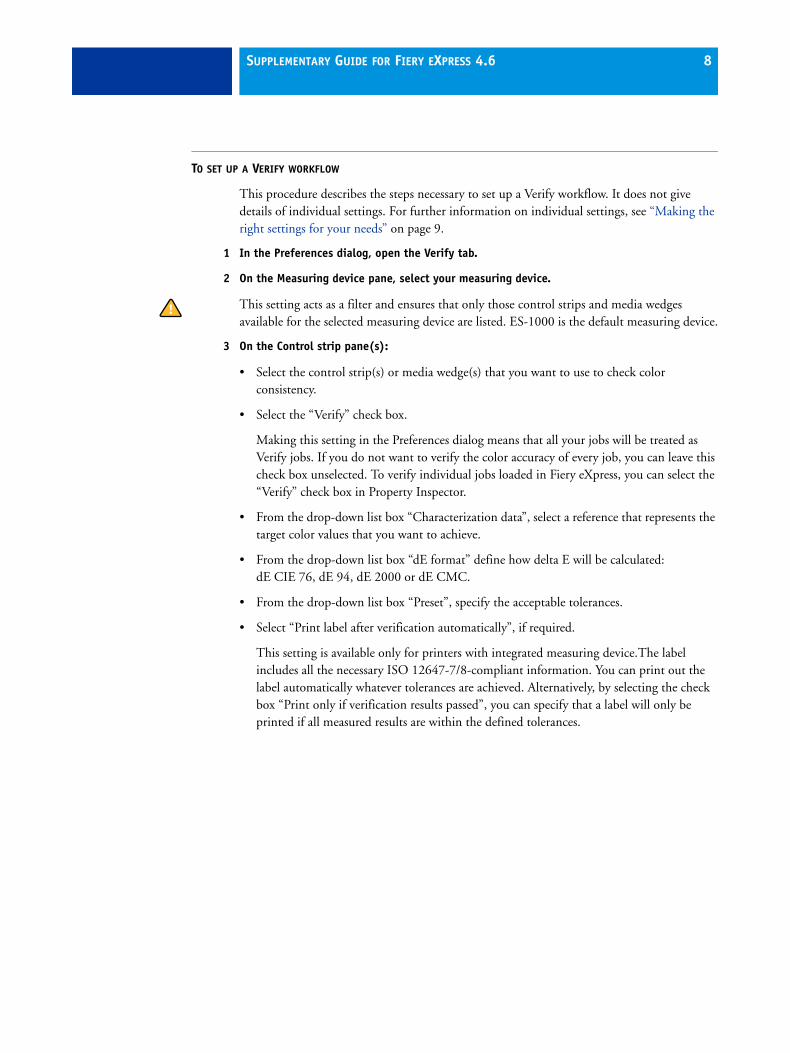
TO SET UP A VERIFY WORKFLOW
This procedure describes the steps necessary to set up a Verify workflow. It does not give details of individual settings. For further information on individual settings, see “Making the right settings for your needs” on page 9.
1 In the Preferences dialog, open the Verify tab.
2 On the Measuring device pane, select your measuring device.
This setting acts as a filter and ensures that only those control strips and media wedges available for the selected measuring device are listed. ES-1000 is the default measuring device.
3 On the Control strip pane(s):
• Select the control strip(s) or media wedge(s) that you want to use to check color consistency.
• Select the “Verify” check box.
Making this setting in the Preferences dialog means that all your jobs will be treated as Verify jobs. If you do not want to verify the color accuracy of every job, you can leave this check box unselected. To verify individual jobs loaded in Fiery eXpress, you can select the “Verify” check box in Property Inspector.
• From the drop-down list box “Characterization data”, select a reference that represents the target color values that you want to achieve.
• From the drop-down list box “dE format” define how delta E will be calculated: dE CIE 76, dE 94, dE 2000 or dE CMC.
• From the drop-down list box “Preset”, specify the acceptable tolerances.
• Select “Print label after verification automatically”, if required.
This setting is available only for printers with integrated measuring device.The label includes all the necessary ISO 12647-7/8-compliant information. You can print out the label automatically whatever tolerances are achieved. Alternatively, by selecting the check box “Print only if verification results passed”, you can specify that a label will only be printed if all measured results are within the defined tolerances.

SUPPLEMENTARY GUIDE FOR FIERY EXPRESS 4.6 9
For Fogra Proof Certification or to achieve an ISO 12647-7-compliant proof you must also select a job ticket on the Footer pane. The job ticket must contain details of:
• The name of the proofing software
• The colorant
• The type of substrate
• The printing condition to be simulated
• The color profiles used
• The time and date of the printout
The job ticket “ISO compliant (12647-7/8)” is provided for this purpose.
Making the right settings for your needs
Control strip
The choice of control strip depends on your ultimate aim. You can use the Color Verifier Option to:
• Achieve Fogra Proof certification
• Achieve an ISO 12647-7-compliant proof
• Output a color-accurate replica from an EFI Remote Container (RPF file) that was created at a remote location
The table below shows which control strips are suitable for each type of reference:
Type of control strip Target colors of reference
Reference profile
SWOP/ GRACoL
Fogra character-ization data
EFI Color Verifier Chart Yes No No
IDEAlliance ISO 12647-7 Yes Yes No
Ugra Fogra-MediaWedge Yes No Yes
SUPPLEMENTARY GUIDE FOR FIERY EXPRESS 4.6 10
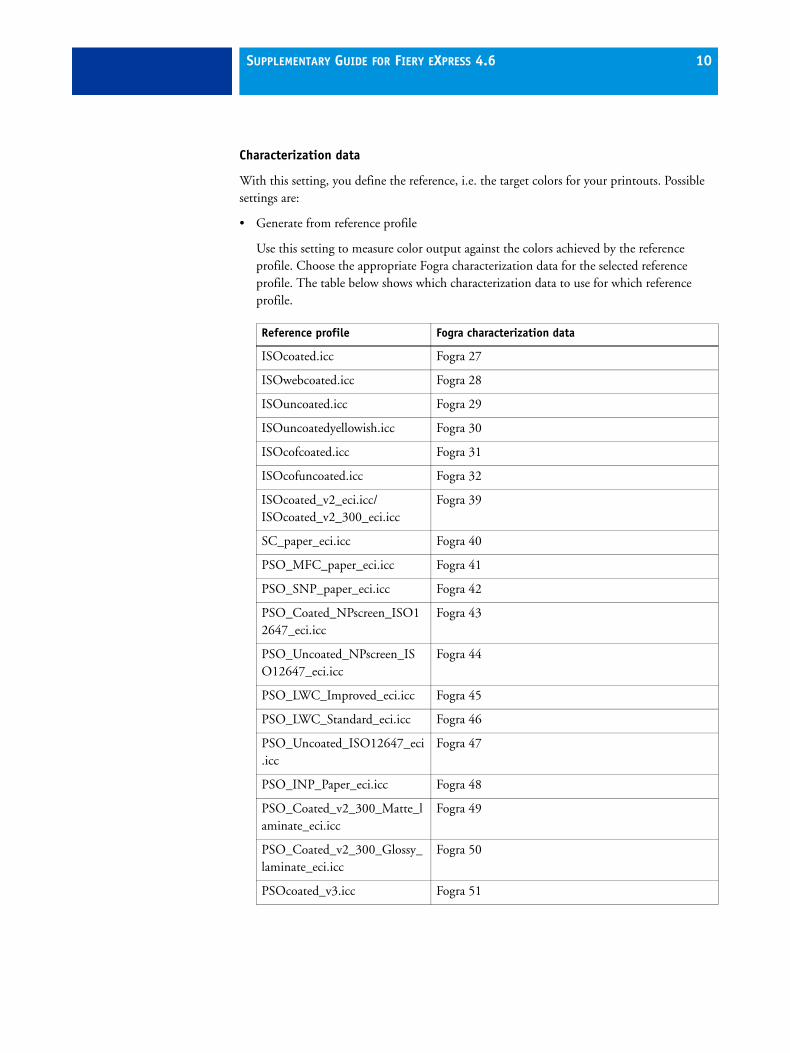
Characterization data
With this setting, you define the reference, i.e. the target colors for your printouts. Possible settings are:
• Generate from reference profile
Use this setting to measure color output against the colors achieved by the reference profile. Choose the appropriate Fogra characterization data for the selected reference profile. The table below shows which characterization data to use for which reference profile.
Reference profile Fogra characterization data
ISOcoated.icc Fogra 27
ISOwebcoated.icc Fogra 28
ISOuncoated.icc Fogra 29
ISOuncoatedyellowish.icc Fogra 30
ISOcofcoated.icc Fogra 31
ISOcofuncoated.icc Fogra 32
ISOcoated_v2_eci.icc/ ISOcoated_v2_300_eci.icc
Fogra 39
SC_paper_eci.icc Fogra 40
PSO_MFC_paper_eci.icc Fogra 41
PSO_SNP_paper_eci.icc Fogra 42
PSO_Coated_NPscreen_ISO12647_eci.icc
Fogra 43
PSO_Uncoated_NPscreen_ISO12647_eci.icc
Fogra 44
PSO_LWC_Improved_eci.icc Fogra 45
PSO_LWC_Standard_eci.icc Fogra 46
PSO_Uncoated_ISO12647_eci.icc
Fogra 47
PSO_INP_Paper_eci.icc Fogra 48
PSO_Coated_v2_300_Matte_laminate_eci.icc
Fogra 49
PSO_Coated_v2_300_Glossy_laminate_eci.icc
Fogra 50
PSOcoated_v3.icc Fogra 51

SUPPLEMENTARY GUIDE FOR FIERY EXPRESS 4.6 11
This list is regularly updated with the software. See the readme file on EFI\Fiery eXpress\Modules\IT8_CharacterizationData for the latest information.
• Fogra characterization data
For Ugra/Fogra media wedges, you can select a set of Fogra characterization data to define a standardized printing condition. See the Fogra website for further information.
You can also verify the color output of a job that was created in Fiery XF and saved as an EFI Remote Container (RPF file). When you load an RPF job, the measurement results of the first verification in Fiery XF are used as the basis for the color comparison in Color Verifier Wizard. In the Property Inspector the characterization data setting displays “Open Measurement File”. If the Remote Container does not contain a measurement file, the reference file is automatically used instead.
If the RPF job was created with a dynamic wedge in Fiery XF, a generic media wedge is displayed in the preview of Fiery eXpress. However, the actual colors from the dynamic wedge are submitted to the Color Verifier Wizard for measuring.
Preset
After you have chosen the type of characterization data, you must now specify how much tolerance constitutes a “pass” result. The tolerance corresponds to the amount of deviation from the reference.
PSOuncoated_V3_FOGRA52.icc
Fogra 52
PSR_LWC_PLUS_V2_PT.icc PSR_LWC_PLUS_V2
PSR_LWC_STD_V2_PT.icc PSR_LWC_STD_V2
PSRgravureMF.icc PSRgravureMF
PSR_SC_STD_V2_PT.icc PSR_SC_STD_V2
ISOnewspaper26v4.icc IFRA26
PaC.Space_CMYK_gravure_V1a.icc
PaC.Space
GRACoL_2006_Coated1v2.icc GRACoLCoated1_ISO12647-7_ ControlStrip2009_Ref
SWOP2006_Coated3v2.icc SWOPCoated3_ISO12647-7_ ControlStrip2009_Ref
SWOP2006_Coated5v2.icc SWOPCoated5_ISO12647-7_ ControlStrip2009_Ref
Reference profile Fogra characterization data

SUPPLEMENTARY GUIDE FOR FIERY EXPRESS 4.6 12
A certain amount of deviation is almost unavoidable as, due to differing printing conditions (printer, ink, media, etc.), it is generally impossible to obtain 100% identical prints on two different output devices.
You can select a set of predefined target tolerances or define your own.
• Predefined presets
Predefined presets for recognized standards are available. They can be applied either for daily proof production (verification based on an ISO 12647-7 or 12647-8-compliant media wedge) or for certification purposes (such as FograCert).
Delta T tolerances can be measured only for the primary colors, e.g. 100% cyan or 50% magenta. It is not possible to calculate delta T values for colors composed of a mixture of cyan, magenta, yellow and black.
Predefined preset Use for:
ISO 12647-7 Contract Proof “Media Wedge”
ISO/DIS-12647-7:2016 Contract Proof “Media Wedge”
ISO 12647-7 (contract proofing)
PSO_Coated_v3 (Offset)
PSO_Uncoated_v3_FOGRA52_ (Offset)
PSO_Coated_v3_(Offset)_Verify
PSO_Uncoated_v3_FOGRA52_ (Offset) Verify
ISO 12647-7 (contract proofing)
For use with media with optical brighteners
For ISO verification, use the M1 measuring condition
ISO 12647-8 Validation Print “Media Wedge” NWIP
ISO 12647-8 (FograCert validation printing)
The ISO 12647-8 Validation Print “Media Wedge” NWIP preset applies the tolerance limits that Fogra used to use for FograCert Validation Print Certification.
This standard has been replaced by ISO 12647-8 Validation Print “Media Wedge” CD2. The values are current at the time of going to press, and are expected to be the tolerance limits defined for the release version of ISO 12647-8.
ISO 12647-8 Validation Print “Media Wedge” CD2
G7 Contract Proof “Media Wedge” G7-compliant verification of proof jobs

SUPPLEMENTARY GUIDE FOR FIERY EXPRESS 4.6 13
• Custom
You can define your own tolerance limits and save them as a custom preset. The values displayed in the “Tolerance” column are editable. Custom presets provide an easy way to save the latest norms or your individual requirements (house standard).
Furthermore, you can assign a “normative” or “informative” characteristic to each tolerance value. To change the setting, click in the appropriate cell in the “Usage” column to open a drop-down list box. The settings affect job verification as follows:
Once you have defined the required tolerance limits, click Save and define a unique name.
Verifying color accuracyOnce you have created a Verify workflow, you can go ahead and verify the color accuracy of jobs that you load in Fiery eXpress.
If you are using the printer’s built-in measuring device, the color patches are measured automatically at the printer. You do not have to perform the steps below. After measuring, the result is sent back automatically to Fiery eXpress with the status “Verified” or “Verification failed”. See “Analysing the results” on page 18 for further information.
TO VERIFY THE COLOR CONSISTENCY OF A JOB WITH AN AUXILIARY MEASURING DEVICE
1 Print the job.
After printing, the job status changes to “Can be Verified”.
Normative Normative values are evaluated. If any of the measurements lie outside the specified range of tolerance, Color Verifier Wizard will indicate that the result is not satisfactory and the job will fail the verification.
Informative Informative values are evaluated for reference purposes only and have no effect on whether the job passes or fails the verification. Only normative tolerances are taken into account, i.e. a job can be successfully verified, even if an informative value exceeds the defined tolerance limits.
Off If you select "Off", the tolerance limit is not evaluated and is not included in the evaluation.

SUPPLEMENTARY GUIDE FOR FIERY EXPRESS 4.6 14
2 Highlight the job in the job list. In Property Inspector, open the Control Strip pane and click the Verify button.
The Color Verifier Wizard starts.
There are two display modes: tile or cascade. You can change the display mode by selecting the appropriate radio button.
3 Make sure that the measuring device is properly connected.
Color Verifier Wizard: First screen
Color Verifier Wizard: Tile mode
SUPPLEMENTARY GUIDE FOR FIERY EXPRESS 4.6 15
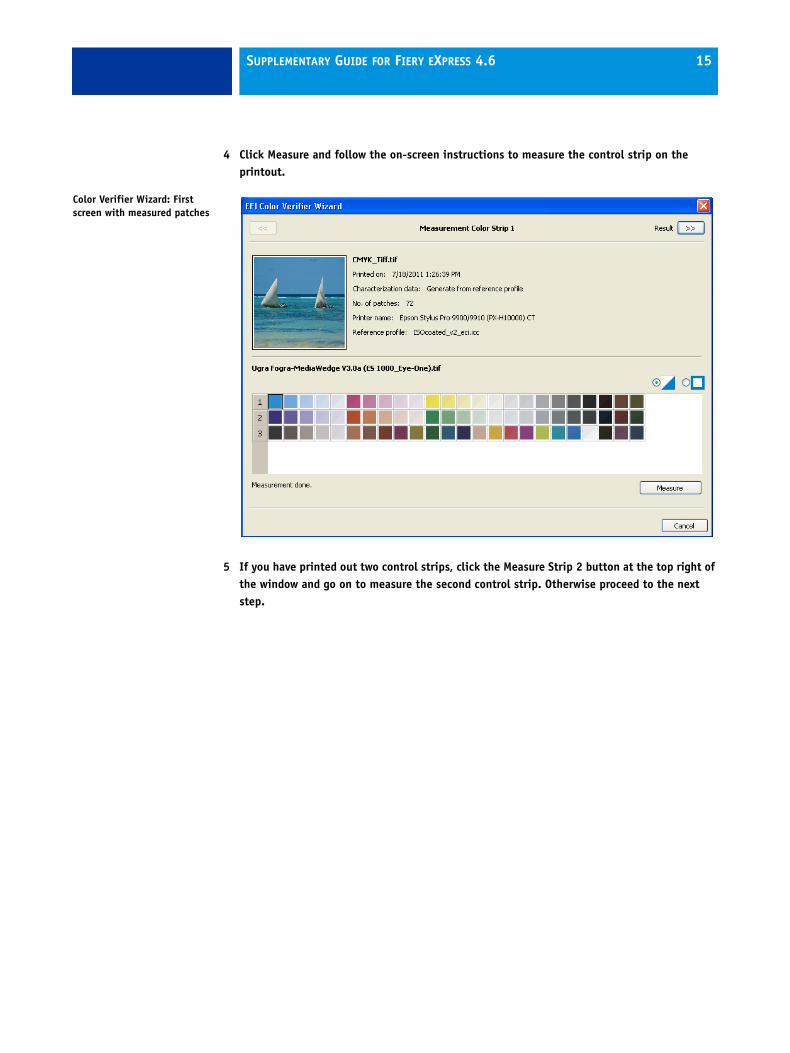
4 Click Measure and follow the on-screen instructions to measure the control strip on the printout.
5 If you have printed out two control strips, click the Measure Strip 2 button at the top right of the window and go on to measure the second control strip. Otherwise proceed to the next step.
Color Verifier Wizard: First screen with measured patches

SUPPLEMENTARY GUIDE FOR FIERY EXPRESS 4.6 16
6 At the top right of the window, click >> to display the result.
A “passed” result indicates that the colors of the measured control strip were within the defined tolerances. A “not passed” result means that some of the defined tolerances were exceeded.
You can display a more detailed view of the results by clicking Detailed Result. The detailed view compares the defined tolerances with the measured results.
Color Verifier Wizard: Result screen

SUPPLEMENTARY GUIDE FOR FIERY EXPRESS 4.6 17
You can print a label or a report of the results by clicking the appropriate buttons.
In the label, you can edit the line “Approved by” to insert the name of the person who has approved the color accuracy of the printout.
7 At the top right of the window, click Finish >>.
8 When prompted, confirm that you want to save the results.
The job is sent back to Fiery eXpress with the status “Verified” or “Verification failed”.
If you do not save the results, they are not submitted to Fiery eXpress and the job status in the job list stays at “Can be Verified”.
Color Verifier Wizard: Result screen1 Label2 Report
1
2
SUPPLEMENTARY GUIDE FOR FIERY EXPRESS 4.6 18
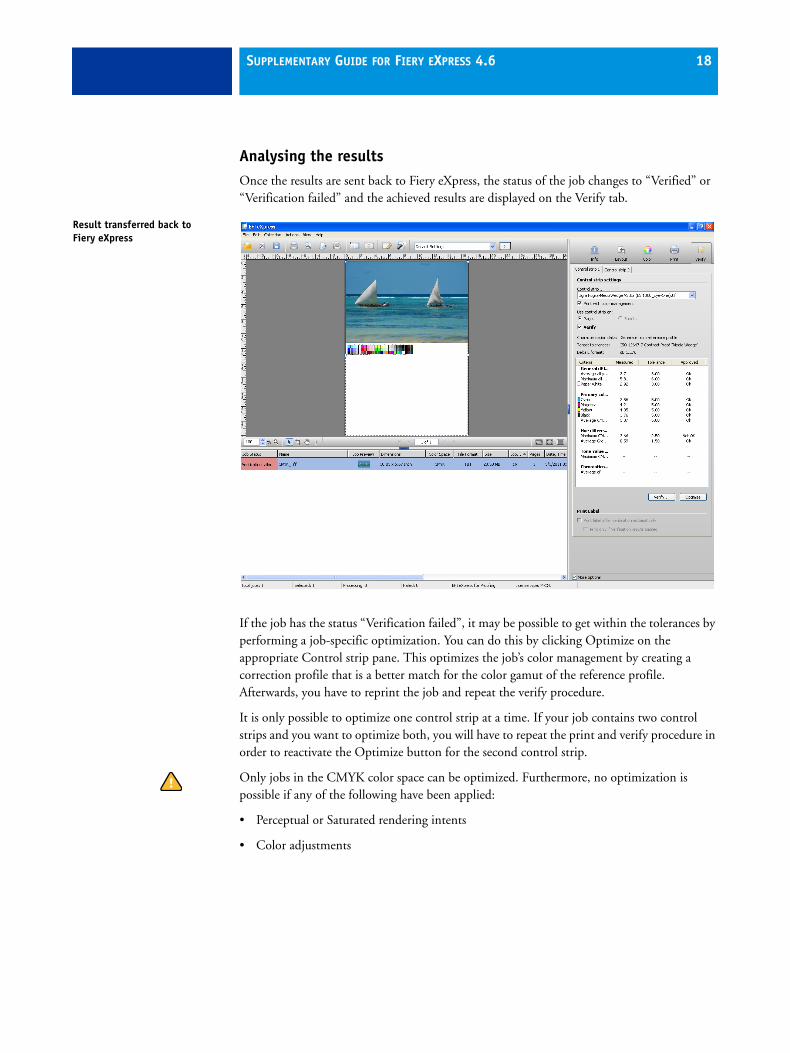
Analysing the resultsOnce the results are sent back to Fiery eXpress, the status of the job changes to “Verified” or “Verification failed” and the achieved results are displayed on the Verify tab.
If the job has the status “Verification failed”, it may be possible to get within the tolerances by performing a job-specific optimization. You can do this by clicking Optimize on the appropriate Control strip pane. This optimizes the job’s color management by creating a correction profile that is a better match for the color gamut of the reference profile. Afterwards, you have to reprint the job and repeat the verify procedure.
It is only possible to optimize one control strip at a time. If your job contains two control strips and you want to optimize both, you will have to repeat the print and verify procedure in order to reactivate the Optimize button for the second control strip.
Only jobs in the CMYK color space can be optimized. Furthermore, no optimization is possible if any of the following have been applied:
• Perceptual or Saturated rendering intents
• Color adjustments
Result transferred back to Fiery eXpress

SUPPLEMENTARY GUIDE FOR FIERY EXPRESS 4.6 19
Job scalingThe following enhancements have been made to the scaling settings on the Page Layout pane:
• The scaling settings are now more clearly arranged in two separate drop-down list boxes: the first one contains the types of scaling; the second one contains the presets (default and custom) that are pertinent to the selected scaling type. Presets are available for percentual and numerical scaling only.
• The “Scale Percentually” and “Scale Numerically” settings have been extended to permit height and width to be scaled non-proportionally.
– For proportional scaling: make sure that the chain button is selected. You can define either the image width or the image height. The other value changes automatically.
– For non-proportional scaling: make sure that the chain button is cleared. You can define both the image width and height.
Applying preference settingsNew in this latest product version is the possibility to select different sets of preference settings quickly and easily. If you have saved a set of preferences as an EPF file, you can select it from the drop-down list box in the toolbar.
Once you have selected an EPF file, it becomes the new default for all subsequent jobs that you load.
EPF files are saved by default in the Preferences folder. Clicking the right arrow (>) button next to the drop-down list box opens the Preferences folder to enable you to delete or rename the files.
Selecting Preferences
SUPPLEMENTARY GUIDE FOR FIERY EXPRESS 4.6 20
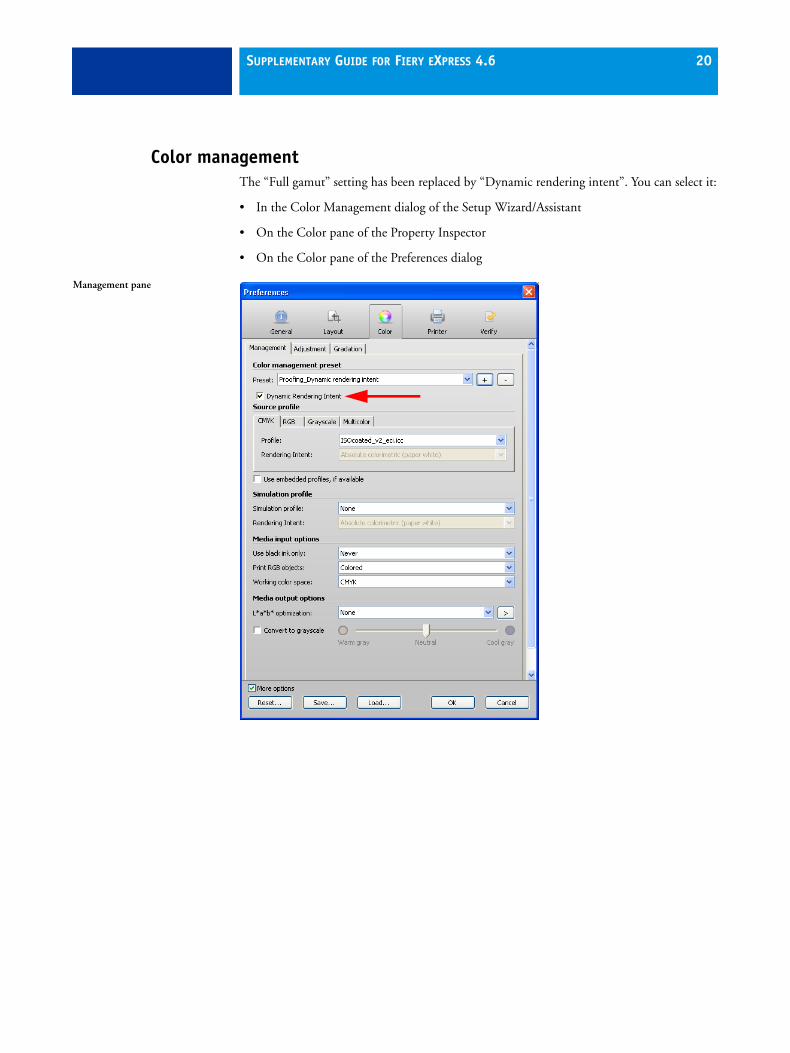
Color managementThe “Full gamut” setting has been replaced by “Dynamic rendering intent”. You can select it:
• In the Color Management dialog of the Setup Wizard/Assistant
• On the Color pane of the Property Inspector
• On the Color pane of the Preferences dialog
Management pane
SUPPLEMENTARY GUIDE FOR FIERY EXPRESS 4.6 21
With this setting, Fiery eXpress analyzes the colors of the job and determines whether they can be accurately reproduced on the selected output device. Based on this analysis, the most appropriate rendering intent for the job is automatically selected.
The simulation profile takes precedence over the source profile. If a simulation profile is assigned to the job, only the rendering intent of the simulation profile will be affected by this setting. If no simulation profile is available, rendering intents for the source profiles are selected.
If the dynamic rendering intent setting is applied in the Property Inspector, the most appropriate rendering intents are selected as soon as you click Save.
A job preview is always created, regardless of whether the preview setting is activated for the workflow or not.
Job color analysis Rendering intent Description
All colors within the reproducible gamut of the output device
Relative colorimetric
This rendering intent reproduces the exact colors of the job and no gamut compression is necessary.
Some colors outside the reproducible gamut of the output device
Perceptual This rendering intent compresses the colors of the print job so that all can be printed without any gamut clipping taking place.

SUPPLEMENTARY GUIDE FOR FIERY EXPRESS 4.6 22
PANTONE support
PANTONE PLUS® spot color libraryIn Fiery eXpress for Proofing you can switch from using the standard internal PANTONE spot color table to PANTONE PLUS® — a new spot color library that includes contemporary metallic, pastel and neon colors. When selected, the PANTONE PLUS color library is applied to all PANTONE spot color definitions in Fiery eXpress.
You will find the setting on the Application pane in the Preferences dialog. Select the check box to output print jobs that were created using the new PANTONE PLUS series of colors. You need to restart Fiery eXpress for the new spot color library to take effect.
PANTONE FASHION + HOME spot color libraryFiery eXpress 4.6 provides support for PANTONE’s FASHION + HOME palette. The new colors are included in the standard internal PANTONE spot color library of Fiery eXpress.
Application pane

SUPPLEMENTARY GUIDE FOR FIERY EXPRESS 4.6 23
Using spot colors to simulate output on colored substratesIf your printer supports additional inks, such as Clear or White, you can select “PRINTER” as the ink source. This ensures that the printer ink is used. Color management for that color is by-passed during job processing. In this latest version of Fiery eXpress, this feature has been extended to enable you to map a printer ink to an “inverted” setting.
“Inverted” printer inks are recognizable by the letters “INV” after their name. If you select an inverted setting, the inversely proportional amount ink is applied, i.e. 0% color instead of 100% ink, 100% color instead of 0% ink or 70% color instead of 30% ink. In this way, you can use spot colors to simulate the final production run on a white or colored substrate.
This setting is useful in the packaging industry where gold or silver metallic colors are often used. However, some special effects can only successfully be achieved if your printer supports the appropriate ink colors.
Spot colors pane
SUPPLEMENTARY GUIDE FOR FIERY EXPRESS 4.6 24
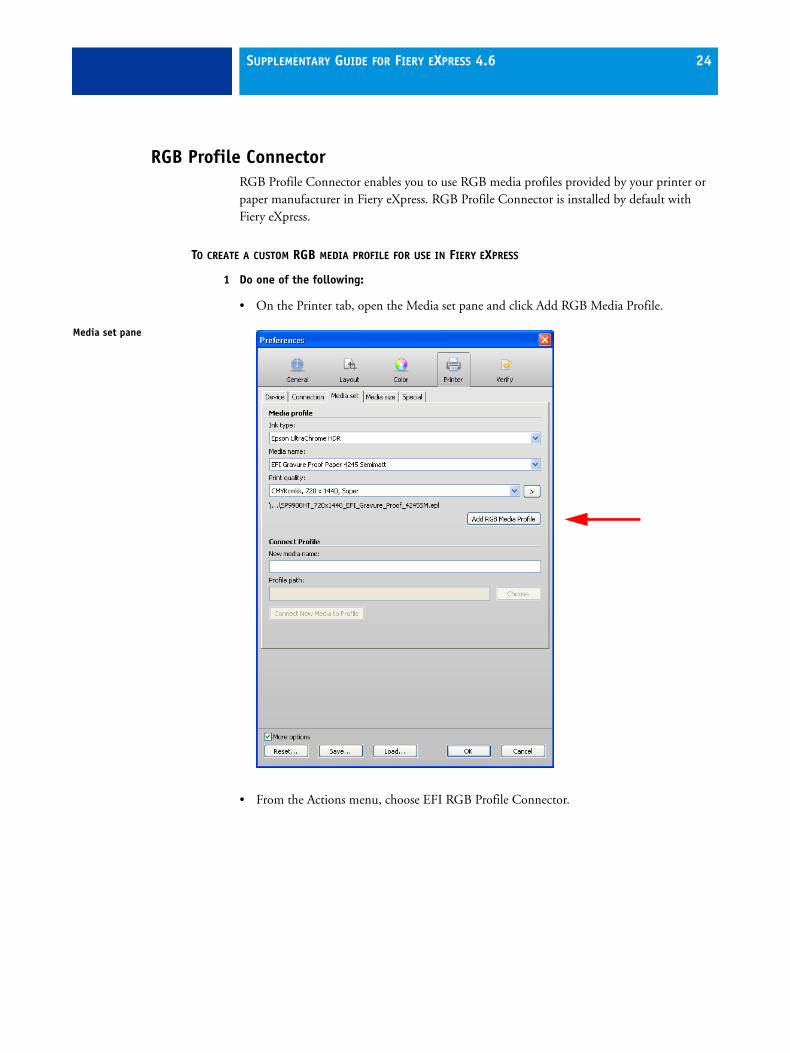
RGB Profile ConnectorRGB Profile Connector enables you to use RGB media profiles provided by your printer or paper manufacturer in Fiery eXpress. RGB Profile Connector is installed by default with Fiery eXpress.
TO CREATE A CUSTOM RGB MEDIA PROFILE FOR USE IN FIERY EXPRESS
1 Do one of the following:
• On the Printer tab, open the Media set pane and click Add RGB Media Profile.
• From the Actions menu, choose EFI RGB Profile Connector.
Media set pane

SUPPLEMENTARY GUIDE FOR FIERY EXPRESS 4.6 25
The EFI RGB Profile Connector dialog opens.
2 From the appropriate drop-down list boxes, select your RGB printer model and the type of ink inserted.
3 From the drop-down list box, select the media type that best matches the media for which the RGB media profile was created.
The media type information is usually provided in a separate file with the profile.
4 Define a media name.
By default, the media name is the same as the selected media type. You can leave the name unchanged or define a custom media name. The media profile will be available for selection in Fiery eXpress under the name you define here.
5 From the appropriate drop-down list boxes, select the resolution, print mode and print direction for which the RGB media profile was created.
This information is usually provided in a separate file with the media profile or can be obtained from the download website.
6 Click Choose and browse to your custom RGB media profile.
7 Click Install.
The new RGB media profile is copied to the EFI Media Profiles\My Profiles folder. To apply it in Fiery eXpress, go to the Print tab > Media set pane and select the media name you defined from the drop-down list box.
EFI RGB Profile Connector dialog

SUPPLEMENTARY GUIDE FOR FIERY EXPRESS 4.6 26
Print commandFiery eXpress 4.6 provides the following two new settings for defining a page range and the number of copies to be printed:
• In the File menu, choose Print Setup.
• In the job list, right-click on the job and choose Print Setup from the context menu.
Setting up Fiery eXpress as a virtual printerThis section describes an additional setting which is necessary for TCP/IP or SMB printing in the following configuration:
In this configuration, problems can arise if the two computers are located in different subnets. Although the virtual printer can be selected in the graphics application, the jobs do not get loaded in Fiery eXpress.
The remedy to the problem requires you to make a setting in CUPS version 1.4.4 or newer. Version 1.4.4 is installed by default on all Macintosh computers running OS X 10.6.4 or higher.
Be aware that the problem cannot be solved using an older version of CUPS.
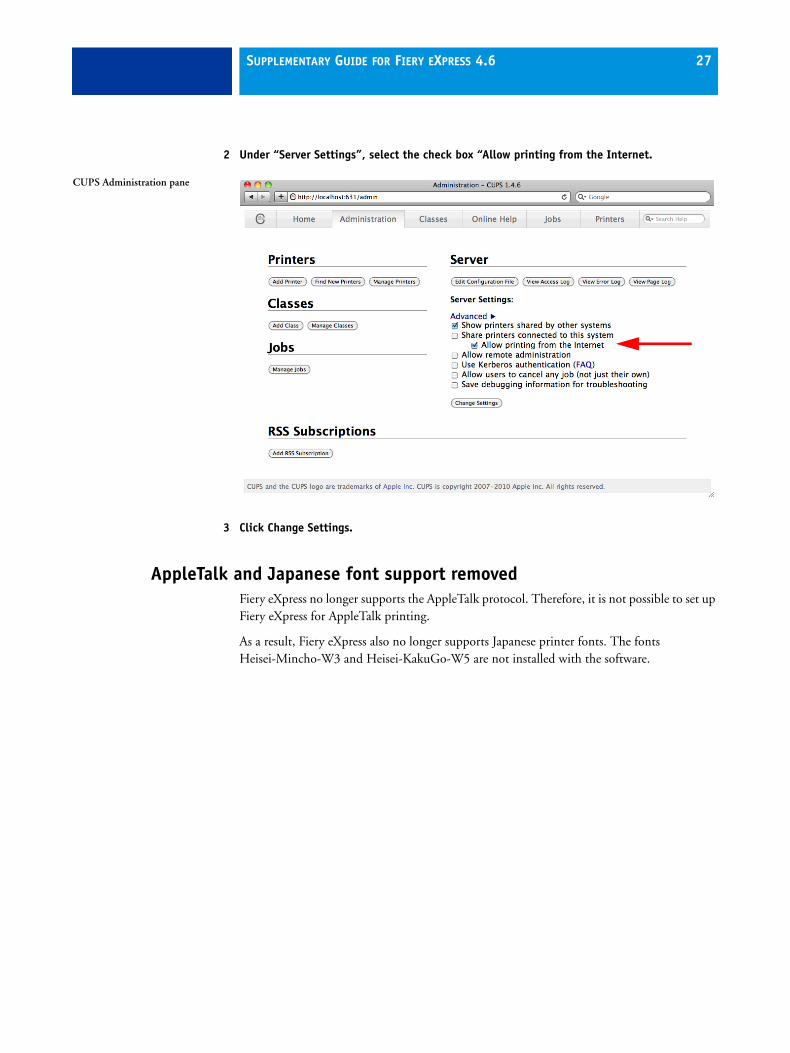
TO PRINT ACROSS NETWORK SUBNETS
1 On Macintosh, start the Web browser and type http://localhost:631/admin.
The Common UNIX Printing System window opens at the Administration tab.
Fiery eXpress is installed on: Mac OS X 10.9 and later
The graphics application is installed on: Windows 7 and later
SUPPLEMENTARY GUIDE FOR FIERY EXPRESS 4.6 27
2 Under “Server Settings”, select the check box “Allow printing from the Internet.
3 Click Change Settings.
AppleTalk and Japanese font support removedFiery eXpress no longer supports the AppleTalk protocol. Therefore, it is not possible to set up Fiery eXpress for AppleTalk printing.
As a result, Fiery eXpress also no longer supports Japanese printer fonts. The fonts Heisei-Mincho-W3 and Heisei-KakuGo-W5 are not installed with the software.
CUPS Administration pane