ferro five series - gb industrial battery five ® series ... addition, check the tag on the charger...
TRANSCRIPT

FERRO FIVE® SERIESMOTIVE POWER CHARGERSInstallation and operating instructions for singlephase and three-phase chargers
FERRO FIVE® FR, EFR, LIBERTY®, and REVOLUTION™
SERIES chargers withRANGER II®, COMPUCHARGE®
or SCOUT® controls
5-720

DANGERSHOCK HAZARD
DO NOT TOUCHUNINSULATED BATTERY
TERMINALS OR CONNECTORS
WARNINGARC HAZARD
CONNECT OR DISCONNECT BATTERY PLUG ONLY
WHEN CHARGE CYCLE IS COMPLETE
DANGERHIGH VOLTAGE
DISCONNECT CHARGER FROM AC VOLTAGE SUPPLY
AND BATTERY BEFORE SERVICING OR DISMANTLING
WARNING!
Battery chargers present an electrical hazard tothose who work with or service them. Although specific “CAUTIONS” and “WARNINGS” are includedthroughout the text of this manual, it is essential that extreme care be taken at all times to ensure a safe working environment.
WARNINGA battery on charge gives off a mixture of oxygenand hydrogen gas, which is explosive. Ventilate thecharger room to prevent gas accumulation. C&Dchargers are convection cooled. To provide ampleventilation to carry off excess heat, keep chargersat least four inches from a wall and from otherchargers and obstructions.
CAUTIONElectrical connections can work loose during shipping. Check all connections for tightnessbefore connecting the charger to the AC supply voltage.
WARNING
Check all warning labels!
The charger should be connected to a fused safety disconnect switch or to a circuit breaker. Besure the protective device and the incoming ACcables to the charger meet the local electricalcodes and they match the current and voltagerequirements of the charger or chargers. Thecharger nameplate shows AC volts, phase and current requirements at nominal line and rated output and recommended external fusing. In addition, check the tag on the charger for properinput voltage.
CAUTIONLIFT ALL FOUR
CORNERS
CAUTIONDO NOT ATTEMPT TO
RECONNECT VOLTAGE WITHOUT READING
INSTRUCTIONS
CAUTION1. ALL THREE PHASES ON VOLTAGE CHANGEOVER
TERMINALS MUST BE RECONNECTED WHEN CHANGING VOLTAGE.
2. AC FUSES MUST BE CHANGED WHEN CHANGING VOLTAGE. SEE LABEL IN CHARGER.
THIS CHARGERCONNECTED FOR120V - 208V - 240V480V - 575VOTHER
JN-95
HIGHVOLTAGE
3-4-56-7-8
10-12-1520-25-3035-40-45
50-60
208VOLTS
3-4-56-7-8
10-12-1520-25-3035-40-45
50-60
LOWVOLTAGE
3-4-56-7-8
10-12-1520-25-3035-40-45
50-60
CAUTIONPHASE FUSE RATING
CAUTION
Make sure the charger positive terminal is connected to the charger connector terminalmarked (+) and the negative terminal to the one marked (-).
GROUND CONNECTION

TABLE OF CONTENTS
Contents Page
Receiving andinstallation Section 1 Receiving and installation 1
1.1 Receiving 11.2 Identification 1-21.3 Storage 21.4 Location 2-31.5 Mechanical installation 31.6 Electrical connection 31.7 Input voltage changeover 3-41.8 AC input voltage cables 41.9 Grounding 41.10 DC cables and cable connectors 41.11 Maintenance 5
RANGER II® control Section 2 RANGER II control 52.1 Description 52.2 Basic settings 62.2.1 Real-time or fixed increment starting 62.2.2 Automatic equalizing 6-72.2.3 Automatic watering 72.2.4 Setting cool time 72.2.5 Monitoring water flow 72.2.6 Main power override 72.2.7 Water control override 7-82.2.8 Setting the number of cells 82.2.9 Selecting the shunt size 82.2.10 Setting the rated output current 82.2.11 Setting the charge mode 82.2.12 Setting the date 82.2.13 Setting the correct time 92.2.14 Setting the day of the week 92.2.15 Activating daylight savings time 92.2.16 Activating and setting the address 92.2.17 Setting the baud rate 92.3 Operations 92.3.1 Manual starting 9-102.3.2 Stopping the charge manually 102.3.3 Manual equalizing 102.3.4 Operation after loss of AC power (warm start) 102.3.5 Charge data retrieval 102.4 Special features with SMARTBATTERY®II 112.4.1 Installing a SMARTBATTERY II communications board 112.4.2 Retrieving data from SMARTBATTERY II modules 11-122.5 Communications port 12
COMPUCHARGE® control Section 3 COMPUCHARGE control 133.1 Description 133.2 Operation 13-143.3 Basic settings 143.3.1 Setting the precharge delay 143.3.2 Activating cold storage 143.3.3 Setting the number of cells 153.3.4 Automatic equalizing 153.3.5 Manual equalizing 153.3.6 Automatic watering 15
SCOUT® control Section 4 SCOUT control 164.1 Description 164.2 Basic settings 164.2.1 Setting the number of cells 16

Contents Page
SCOUT control Section 4.3 Operation 17(continued) 4.3.1 Basic operation 17
4.3.2 Changing the five-second, factory-set delay 174.3.3 Changing the maximum charging time 184.3.4 Manual equalizing 184.3.5 Automatic equalizing 184.3.6 Cold applications 18
Operation Section 5 Operation 195.1 Operating characteristics 195.2 Recommended charging procedures 20
Options Section 6 Options 216.1 Remote control 216.2 Series connected charging cables 216.3 Parallel connected charging cables 216.4 Automatic watering systems 216.5 Computerized management system 226.5.1 RANGER® MANAGEMENT SYSTEM 1000 226.5.2 RANGER® MANAGEMENT SYSTEM 2000 226.6 Other options 22
Troubleshooting Section 7 Troubleshooting 227.1 Procedure 227.2 Component testing 24-257.3 Replacing components 257.4 FERRO FIVE REVOLUTION: Troubleshooting a charger
with no output 297.5 FERRO FIVE REVOLUTION: Troubleshooting a charger
with output too high 307.6 FERRO LIBERTY: Troubleshooting a charger when output
does not increase 317.7 Troubleshooting a charger that will not start 327.8 Troubleshooting a charger that produces
no DC output 337.9 Troubleshooting a charger that will not stop 347.10 Troubleshooting a single-phase charger with
low DC output 357.11 Troubleshooting a three-phase charger with
low DC output 36
Parts lists Section 8 Parts list 378.1 FERRO FIVE FR SERIES
120/208/240 and 480 VAC inputs 378.2 FERRO FIVE FR SERIES
575 VAC input 388.3 FERRO FIVE EFR SERIES
120/208/240 and 480 VAC inputs 39
Wiring diagrams Section 9 Wiring diagrams 409.1 Wiring diagram guide for FR, LIBERTY, 40
and REVOLUTION charger models9.2 Wiring diagram guide for EFR charger models 419.3 FR wiring diagrams 42-489.4 LIBERTY wiring diagrams 49-559.5 REVOLUTION wiring diagrams 56-59

LIST OF ILLUSTRATIONS
Contents Page
Figure 1.1 Nameplate 11.2 FERRO FIVE FR, EFR, LIBERTY and REVOLUTION SERIES chargers 21.3 Cabinet dimensions 31.4 AC voltage rating label 41.5 AC fuse rating chart 4
Figure 2.1 RANGER II control 5
Figure 3.1 COMPUCHARGE control 133.2 Precharge delay 143.3 Cold storage 143.4 Number of cells 153.5 Automatic equalize 15
Figure 4.1 SCOUT control 164.2 Printed circuit board panel with configuration jumpers circled 164.3 Close up of jumpers for changing cells 164.4 Delay time jumpers 174.5 Automatic equalize switch 18
Figure 5.1 FERRO FIVE efficiency and power factor curve 195.2 Typical ferroresonant charger curve 19
Figure 6.1 RANGER remote control option 216.2 RANGER® WATERING SYSTEM module mounted on charger 216.3 Wall mounting brackets 22
Figure 7.1 Component location, FERRO FIVE chargers, single-phase 267.2 Component location, FERRO FIVE chargers, three-phase 27-28
TABLES
Contents Page
Table 1.1 AC input power codes 11.2 Allowable AC input ranges 4
Table 7.1 Test instruments and tools for troubleshooting 247.2 Diode connection torque valves 25

1
1 RECEIVING AND INSTALLATION
Inspect your C&D charger for anyshipping and handling damage assoon as it arrives. Describe anydamage on the receiving slip andimmediately notify the shipper.Verify the model and serialnumbers printed on the packing listagainst the nameplate (Figure 1.1).If they disagree, contact your C&Drepresentative before proceedingwith installation. Use caution whenmoving chargers. Do not drop orotherwise abuse them.
A five-element model numberidentifies each C&D charger. Each element describes a different chargerperformance characteristic.The modelnumber of a FERRO FIVE chargerdescribes its basic operating charac-teristics. A typical model number is:
Model: The first element in thenumbering system identifies themodel. In this example, an FRcharger.
Cells charged: This entry indicatesthe number of lead-acid cells thesystem can charge. In this example,a six-cell lead-acid battery.
AC input: Letter codes listed inTable 1.1 describe the voltage, phaseand frequency of the AC input current.In the example, the letters CE define a charger that requires a 240 or 480VAC, single-phase, 60 Hz input. The number 5 placed between any
letters, C5E for example, denotes 50 Hz operation. Models with a CE or HK designation also include a tapfor 208 VAC.
DC Ah: For EFR SERIES chargers,this is the largest size battery,discharged to 80 percent, that canbe charged in eight hours. For FRseries chargers, this is the largestsize battery, discharged to 100percent, that can be charged in eighthours. In this case, a 255 Ah battery.
Charge control: The last element in the numbering system identifies the control:
E indicates the optional RANGER II control.
F indicates RANGER II withLIBERTY option.
G indicates RANGER II with REVOLUTION option.
M indicates the optional COMPUCHARGE control.
S indicates the optional SCOUT control.
T is the standard electro-mechanical timer.
JM indicates a disconnect switch.
R indicates remote control.
Suffix letters may be combined. A charger designated MJM containsboth a COMPUCHARGE control and a disconnect switch.
1.1 Receiving
1.2 Identification
CAUTIONLIFT ALL FOUR
CORNERS
MODEL
SERIAL SPEC. T.˚C.50
VOLTS AMPS CELLSDC OUTPUT
8 HOUR RATED CAPACITY AH
12 HOUR RATED CAPACITY TO AH
AC INPUT
VOLTS PHASE
AMPS HZ
RECM. LINE FUSES
JM-280
FR18HK750
MP1 012320 204172
36 135 18
750 LH
751 1100
208/240/480 3
19/17/8.5 60
30/25/12
Industrial Batteries and Chargers1400 UNION MEETING ROAD • BLUE BELL PA 19422
MMF
mfg
MF
G D
AT
EJ
AN
. 1
99
9
FR 6 CE 255 MChargecontrol
DC ampere-hours
AC inputCells charged
Model
FIGURE 1.1-Nameplate
TABLE 1.1
Code Input Power Phase Cycles(VAC) (Hz)
S 380 1 50C5E 208/240/480 1 50M 575 1 60Z 380 3 50
H5K 208/240/480 3 50L 575 3 60
Code Input Power Phase Cycles(VAC) (Hz)
A 120 1 60B 208 1 60C 240 1 60E 480 1 60G 208 3 60H 240 3 60K 480 3 60
AC INPUT POWER CODES

2
1.2 Identification (continued)
EFR CHARGERFR CHARGERS
FIGURE 1.2-FERRO FIVE FR, EFR, LIBERTY and REVOLUTION SERIES chargers
1.3 Storage Keep the charger in its original shippingcontainer until you are ready to proceedwith installation. The unit can be safely
stored in any clean, dry area where temperatures remain between 40˚F and 120˚F (5˚C and 49˚C).
1.4 Location Battery charging produces heat and apotentially explosive mixture of odorlessoxygen and hydrogen gases. Safeoperation requires a clean, dry, well-ventilated area, where the temperatureremains between 60˚F and100˚F (16˚Cand 32˚C).
C&D chargers are convection-cooled.Chargers require a MINIMUM of fourinches of clearance between the floor,walls, chargers, and other obstructionsfor adequate air circulation.
EXPLOSIVE, COMBUSTIBLE ORFLAMMABLE MATERIALS SHOULDNOT BE PERMITTED IN THE CHARGING ROOM. NEVER MOUNTA CHARGER ON OR ABOVE COMBUSTIBLE MATERIALS.
To prevent the accumulation of explosive concentrations of hydrogenand oxygen, the charging area shouldhave sufficient ventilation to prevent formation of one percent, by volume, of hydrogen. It is important to notehydrogen is generated at different
rates during various times in the chargecycle. Most of the gas forms during thelast two to three hours of the charge,when the average cell potentialexceeds 2.37 volts. Every pint of waterdissociated during recharge releases 23 cubic feet of hydrogen gas to theatmosphere. To calculate hydrogenformation, determine the number ofpints of water needed to correctly re-level cells after charging, then multiply the number by 23. Thus, alead-acid motive power battery thatrequires 1.5 pints of water to relevel, will produce 34.5 cubic (1.5 x 23) feet of hydrogen.
An approximation technique may beused to estimate hydrogen productionfrom C&D batteries charged by chargersequipped with COMPUCHARGE,SCOUT and automatic Start/Stop controls. It is estimated a total of 0.24cubic feet of hydrogen gas will evolvefrom each cell per 100 ampere-hours of capacity.
REVOLUTION CHARGERLIBERTY CHARGER

3
1.4 Location (continued)
Chargers can be bolted to noncom-bustible floors or steel benches. Formaximum space saving, up to threeunits can be stacked. Consult
Figure 1.3 for charger cabinet dimensions. Wall mounting requires the optional brackets described inSection 6.6.
Cells x Capacity x = Cubic feet of hydrogen/charge cycle
18 x 720 x = 31.1 Cubic feet of hydrogen/charge cycle
1.5 Mechanical installation
1.6 Electrical connection Each charger requires a fused safety disconnect switch or a circuit breaker.Use a line protection device rated for therecommended line fuse value shown onthe charger nameplate (Figure 1.1).
Electrical installations must be performed by a qualified electrician and satisfy all local, national and federalelectrical codes. It is vital to the reliableoperation of the charger that it be provided a good earth ground.
1.7 Input voltage changeover The voltage circled on the AC voltagerating label (Figure 1.4) must matchthe available line voltage. If the voltagesare different, it will be necessary tochange AC line fuses, AC phase fusesand the connection terminal on both theferroresonant power and control transformers. Consult the voltagechangeover instruction label inside the cabinet door. BE SURE THECHARGER IS DISCONNECTED FROM
ITS AC POWER SUPPLY BEFORE ATTEMPTING THIS MODIFICATION.
NOTE: AC voltage changeover must be made at the terminals of both theferroresonant power transformer andthe control transformer.
Input voltage changeover CANNOT BE PERFORMED on chargers manufactured for 575 VAC only operation.
FIGURE 1.3-Cabinet dimensions
B
J
EC
DA
F
G
DA
H
J
EC
BAC Cable
Entrance Hole1.094 (27.79 mm)
DC CableEntrance Hole
1.75 (44.45 mm)
Clearance Holes0.56" (14.22 mm) diameter
AC CableEntrance Hole
1.094 (27.79 mm)F
Clearance Holes0.56" (14.22 mm) diameter
CABINETS 3517 AND 3518
DIMENSIONAL DRAWINGS
CABINET 3519
0.24
100
0.24
100
CAUTIONElectrical connections can work loose during shipping. Check all connectionsfor tightness before connecting the charger to the AC supply voltage.
For example, an 18-cell batteryrated at 720 ampere-hours:
CABINET A B C D E F G H J
NO. inches mm inches mm inches mm inches mm inches mm inches mm inches mm inches mm inches mm
3517 32.22 818 24.00 610 21.81 554 30 762 19 483 11.00 279 2.81 71.4 4.38 111 1.50 38.13519 18.22 463 24.00 610 21.81 554 16 406 19 483 4.00 102 2.81 71.4 4.38 111 1.50 38.13518 43.22 1098 32.00 813 28.81 752 41 1041 26 660 16.50 419 2.81 71.4 4.38 111 1.50 38.1

4
1.7 Input voltage changeover(continued)
1.8 AC input voltage cables
CAUTIONDO NOT ATTEMPT TO
RECONNECT VOLTAGE WITHOUT READING
INSTRUCTIONS
CAUTIONBe sure the charger positive terminal is connected to the charger connector terminal marked (+) and the negative terminal to the one marked (-).
THIS CHARGERCONNECTED FOR120V - 208V - 240V480V - 575VOTHER
JN-95
HIGHVOLTAGE
3-4-56-7-8
10- 12 -1520-25-3035-40-45
50-60
208VOLTS
3-4-56-7-8
10-12-1520- 25 -3035-40-45
50-60
LOWVOLTAGE
3-4-56-7-8
10-12-1520-25- 3035-40-45
50-60
CAUTIONAC FUSE RATING
FIGURE 1.4-AC voltage rating label(voltage circled)
Customers or electrical contractorsmust furnish the AC connection. Cablesshould be sized for the recommendedline fuse values shown on the chargernameplate. Allowable variations fromnominal AC line voltages appear in Table 1.2.
1.9 Grounding The AC system and the charger enclosure connect to ground from thetagged stud, located in the lower leftfront of the enclosure. It is imperative
to dependable performance of thecharger that it be provided a reliableearth ground.
1.10 DC cables and cable connectors
C&D ships each charger with astandard, eight-foot long DC outputcable that terminates with anappropriate cable connector. As anoption, other lengths are available.If it is necessary to install longercables, they must be properly sizedto prevent overheating and ensurecompliance with electrical codes.DC CABLE LENGTHS FROM 15 TO25 FEET SHOULD BE ONE CABLESIZE LARGER THAN THE STANDARDCABLE. CABLE LENGTHS FROM 25TO 35 FEET SHOULD BE TWO CABLESIZES LARGER. DC CABLE LENGTHS
SHOULD NOT EXCEED 35 FEET.When specifying replacement cableconnectors, it is important toremember C&D single-phase chargersproduce higher peak currents than similarly rated C&D three-phase systems. The maximum DC current flowing from a single-phase charger is typically 1.3 times the panel ammeter reading.
C&D recommends higher capacity SB-350 connectors be specified asretrofit equipment for all single-phasechargers rated at over 135 amperes.
Nominal charger voltage
120208240480575
ACvoltageranges
106 - 127184 - 220212 - 254424 - 508508 - 600*
ALLOWABLE AC INPUT RANGES
*Certain kinds of control and protective equipmenthave a maximum voltage limit of 600V. The manufacturer or power supplier, or both, should beconsulted to assure proper application.TABLE 1.2
FIGURE 1.5-AC fuse rating chart as itwould be marked for an FR18HK750.Circles indicate the proper fuses for each voltage.
CAUTIONDue to the high currents involved it is imperative that connectors be properlymaintained. See your C&D representative for more information.

5
WARNINGBattery chargers present an electrical hazard to those who work with or service them. Read and understand all warnings and cautions in this manual as well as those affixed to the charger. Exercise extreme care to assure asafe working environment.
2 RANGER IICONTROL
The RANGER II control uses a “plain-English,” menu-driven display pro-gram. When the charger is idle, thedisplay shows the number of cells, thecurrent date and the time.
Features of the RANGER II controlinclude:
• Bright, two-line vacuum fluorescent display–visible in ambient light
• “Plain English,” menu-driven display–for fast set-up, preview and change of equalize, delayed start and other charge parameters
• Delayed start–turn-on time delay is selectable from five seconds to 12 hours in one second intervals and time of day start
• Real-time 24-hour clock–with automatic adjustment for daylight savings time. Fully Year 2000 compliant
• Automatic or manual equalize– automatic equalize selectable from one to 50 cycles or day of the week; manual equalize selectable from front panel
• Automatic three-day refresh cycle-if battery is connected for more than 72 hours, a brief boost charge isprovided to maintain battery in fully charged condition
• Automatic charge termination–when voltages stabilize indicating full charge or if battery overheats
• User programmable cool down step
• Adaptable to low maintenance and sealed modes
• A variety of cell and shunt sizes– selectable for six through 36-cell batteries and four shunt sizes
• Output for optional automatic watering device
• Advanced features with SMARTBATTERY II:
• Equalize by battery cycles
• Watering by cycles
Manual equalize and charger reportscan be accessed by pressing the Scrollkey. Refer to Sections 2.3.3 and 2.3.5for specific information.
2.1 Description
Turn off charger beforeconnecting or
disconnecting battery
Do not touchuninsulated battery
terminals or connections
Disconnect chargerfrom AC supply and battery
before servicing or dismantling
RANGER® II CONTROL
FIGURE 2.1-RANGER II control
SCROLL KEY
DISPLAY
ARROW KEYS
OPERATINGINSTRUCTIONS
1.11 Maintenance Battery chargers work most efficientlyand deliver better service life with goodheat dissipation. Periodic cleaning withdry, low-pressure air will remove accumulated dust to assure good heattransfer to the surrounding air. At least
twice a year, check input and output circuit connections to make sure theyare tight. Otherwise, there are no maintenance adjustments to the FERROFIVE SERIES chargers.

6
2.2.2 Automatic equalizing The RANGER II control can be set toautomatically equalize the battery forevery one to 50 cycles or to equalize allbatteries charged on a particular day ofthe week.
Automatic equalize can be set throughthe programmable parameters (seeSection 2.2). Use the Scroll key until thedisplay reads.
Press the Arrow keys to select either thenumber of cycles, the day of the week,never, or always. Depending on yourselection the following screens willappear:
If you have selected never or always,the next menu will be:
To return to the idle display, press theStop key or the Scroll key to continueentering parameters. When equalizationis scheduled, “C:(E)” is displayed.
PP: Equlz mode [ ]➔
➔2.2.1 Real-time or fixed
increment starting
IMPORTANT: When using real-timestarting or fixed increment delay starting, be sure to allow for at leasteight hours of charging before the battery is used again.
Delayed starting lets you delay the time when the charge begins in order to take advantage of lower, off-peakutility rates, or to spread out peakdemand loads.
NOTE: When using real-time start, ifyou connect a battery within four hours
after the preset start time has passed,the battery will still be charged after ashort delay. This allows for unusual situations, such as extended-shift wherethe battery would not be available untilafter the preset time.
Real-time or fixed delay starts can beselected from the programmable parameters menu.
Use the Arrow keys to select either“Start at real time” or “Fixed delaymode.” If you have selected “Start atreal time,” press the Scroll key, and usethe Arrow keys to enter the start time inHH:MM. If you have selected “Startafter delay,” press the Scroll key, anduse the Arrow keys to enter the delay in HH:MM:SS.
PP: Delay [ ]➔
➔
2.2 Basic Settings Basic control settings such as numberof cells, shunt size, delay before start-ing, etc. are set from the front panelusing a “hidden” menu with restrictedaccess. Before operating your charger,check to be sure these initial settingshave not been changed.
Should you need to change any ofthese settings, you may access themthrough the RANGER II control panel.The battery must be disconnected inorder to enter the parameters menu.
To access this menu, press bothArrow keys at the same time whenthe seconds portion of the time display indicates :01 changing to :02.
The Scroll key is used to move
from selection to selection, and theArrow keys are used to enter informa-tion. Begin by using the Arrow key toselect “parameters,” then press theScroll key to view the first parameter. To return to the idle display, press the Stop key. All parameters are automatically saved and overwrite existing parameters.
NOTE: An internal, nonrechargeablelithium battery permits the RANGER IIcontrol to retain programmed operatingparameters in memory even when thecharger is disconnected from an ACline. This battery has an expected service life of more than 10 years, and, when required, should be replaced by C&D. In the event of battery malfunction, contact your local C&D representative.
PP: Delay mode [ ]➔
➔
PP: Equlz cycl [ ]➔
➔
PP: Equlz mode [ ]➔
➔
or
PP: Water Mode [ ]➔
➔

Provisions for automatic watering have been made within the RANGER II control. NOTE: If a charge mode otherthan conventional has been selected,these do not apply and the menus will not appear. It can be set to always, never,and if a communications board has beenadded for SMARTBATTERY II, every 5cycles or every 10 cycles. To select auto-matic watering, scroll through the programmable parameters until the display shows:
Use the Arrow keys to select watering options.
NOTE: If the automatic watering parameter is set to every 5 cycles or every 10 cycles and a battery without SMARTBATTERY II is connected,
the RANGER II will always water the battery.
Once watering has been activated, it isimportant that it remain activated longenough to ensure all cells have been fullywatered. In order to limit possible over-flow due to damage or malfunction, theRANGER II only maintains water flow fora limited duration. This time is factory setat one minute, but can be adjusted.
To adjust automatic watering time, pressthe Scroll key until the display reads:
PP: Set WTR tm [ ]
7
2.2.3 Automatic watering
PP: Water mode [ ]➔
➔
➔
➔
Use the Arrow keys to set the length of the watering cycle. The wateringcycle can last from 15 seconds to three minutes.
2.2.2 Automatic equalizing(continued)
If you have selected number of cycles or day of the week, press the Scroll keyand use the Arrow keys to enter theappropriate information. Equalizing cycles can be programmed for two to 50 cycles.
NOTE: When a RANGER II charger programmed to equalize by cycles isconnected to a SMARTBATTERY II it will equalize by battery cycles. Otherwise, it will equalize by charger cycles.
PP: Set cool time2.2.4 Setting cool time After the charge is completed, the
charger will pause for a preset period oftime to allow the battery to cool. Select atime from one minute to eight hours.
PP: Flow check [ ]➔
➔
To monitor the flow of water during awatering cycle, use the Arrow keys toselect “enable.”
When the flow check is enabled, thewater flow is checked soon after the
watering triac is turned on. If no flow isdetected, the triac is turned off and afault appears “(- Flo)”. The flow is alsochecked at the end of the wateringcycle, and if flow is still detected, thefault will appear “(+ Flo)”. All flow faultsappear after the postcharge display. The fault is cleared by disconnectingthe battery.
2.2.5 Monitoring water flow
2.2.6 Main power override
Under certain conditions, such as troubleshooting or recovery of anoverdischarged battery, it is useful to be able to override the logic of the maincontrol board and force the charger to
turn on. Press the Arrow key to activatethis feature. When activated, this featureenergizes the main contactor and onlychecks for a connected battery. Thecontactor will be energized for a maximum of three minutes to precludedamage to a charger or battery causedby excessive charging with defective ormismatched equipment.
PP: ctl MAIN [ ]➔
➔
The water control override feature allowsthe watering output to be forced on for anindefinite period for troubleshooting.
It should not be left in the ON position foran extended period of time. Use the Arrowkeys to turn it on and off.
2.2.7 Water control overridePP: CTL WATER [ ]➔
➔

2.2.8 Setting the number of cells
The number of cells for the charger andthe RANGER II control are designed tomatch. After entering the programmingmenu, as explained above, scrollthrough the selections until the above
display appears. Use the Arrow keys toset the number of cells to match thecharger nameplate rating. You mayenter from six to 36 cells in one cellincrements.
2.2.9 Selecting the shunt size
The RANGER II control is matched to itsshunt size at the C&D factory. Thereshould be no need to change the shuntsize unless a replacement control boardis installed.
Should you need to change the shuntsize, refer to the parts lists on pages 34,35, 36. Use the Arrow keys to set theshunt at 100 mV to 100, 200, 300, or500 amperes.
Press the Scroll key to set theshunt size.
PP: Set SHUNT [ ]➔➔
2.2.10 Setting the rated outputcurrent
Set the rated current of the charger as itis indicated on the charger nameplate.
Use the Arrow keys to enter rated current from 0 to 500 amperes in fiveampere increments.
Press the Scroll key to set ratedoutput current.
PP: Rated AMPS [ ]➔
➔
8
2.2.7 Water control override (continued)
PP: CTL STAGE 2 [ ]➔
➔
Use the Arrow keys to turn the secondstage ON or OFF for troubleshootingpurposes. Watering mode functions,including flow check, are not availablein non-conventional modes.
PP: Set CELLS [ ]➔➔
2.2.11 Setting the charge mode
Select the proper setting according tothe type of battery being charged. Thissetting must be consistent with thecharger circuitry. Any FR can function in conventional mode but only a FERROFIVE LIBERTY SERIES charger canfunction in LM mode and only a FERROFIVE REVOLUTION SERIES charger canfunction in VR mode. The ready screenwill indicate the mode in use.
If the charger is set for conventionalmode:
If the charger is set for Flooded LowMaintenance mode:
If the charger is set for REVOLUTIONmode:
PP: Charge Mode [ ]➔
➔
READY (STD): ## cells
READY (LM): ## cells
READY (VR): ## cells
2.2.12 Setting the date
The current date is set by pressing the Arrow keys until the current date
is displayed. The display is in MM/DD/YY format.
Press the Scroll key to set the current date.
PP: Set DATE [ ]➔➔
If charge mode is set for other thanconventional, the CTL water display willbe replaced by the following:
9
2.2.13 Setting the correct time
The RANGER II charger has a 24-hourclock, which allows charger operation tobegin at a preset time or at a fixed delayfrom time of connection. It also allowsthe charger to report the actual time,date and when the charge was begunand completed. The 24-hour clock is
set when it leaves the factory; howeverit may need to be adjusted if you live ina different time zone than the factory.The correct time must be set beforeplacing the charger in operation. Set thecurrent time HH:MM:SS by pressing theArrow keys until the current time isshown.
Press the Scroll key to set the correct time.
PP: Set TIME [ ]➔
➔
2.2.14 Setting the day of the week
By keeping track of weekdays,RANGER II can perform equalizingcharges on the day most convenient forthe user. For example, you can program
the RANGER II so all Friday chargesinclude an equalizing charge. Refer toSection 2.2.6. Using the Arrow keys, set the current day of the week.
Press the Scroll key to set the day of the week.
PP: Set DAY [ ]➔
➔
2.2.15 Activating daylight savings time
If the charger will be operated in an area using Daylight Savings Time, theautomatic daylight savings time featurecan be activated to automatically adjustthe clock to daylight savings time andback to standard time on the proper days.
To activate this feature, press an Arrowkey until “Auto daylight time” appearson the display. If you do not need day-light savings time, press an Arrow keyuntil “Always STD time” appears on the display.
To activate daylight savings time, pressthe Scroll key.
PP: Set DST [ ]➔
➔
2.2.16 Activating and settingthe address
If RMS system is in use, set the address forthis charger ON. On the RANGER NET™, ifno RMS system is in use set to net inactive.
PP: Set NET [ ]➔
➔
2.2.17 Setting the baud rate If the network is activated, set the baudrate for RANGER NET. See RMSManual for appropriate baud rate.
PP: Set Baud [ ]➔
➔
1. CONNECT THE CHARGER TO THEAC SUPPLY LINE. The digital displaywill show the number of cells for whichthe charger has been set as well as thecharge mode selected (see 2.2.11) andthe time of day.
2. CONNECT THE BATTERY. Thecharge cycle will begin within five seconds, if no other delay time hasbeen selected. The RANGER II controldisplay will show the time remaininguntil the start of charge. If the battery isfully charged, the charger will movefrom charging to post-charge, or ifmanual equalize is selected, to equalize.When the charge begins, the display willshow the elapsed time charging, volt-age and current in amperes. When the
battery is 80 percent charged, an“(80%)” will appear after the elapsedtime display.
If manual or automatic equalize isselected, an “(E)” will appear in theupper left hand corner. When voltageand current have stabilized “(EXT)” willappear after the elapsed time display.When equalization has begun, an“(EQU)” will appear on the display afterthe elapsed time.
When the charge is complete, theRANGER II will show the ampere-hoursand kilowatt-hours returned to the battery.
2.3 Operations
2.3.1 Manual starting

10
2.3.5 Charge data retrieval When a charge is completed, theRANGER II control can display theampere-hours and kilowatt-hoursrequired for the charge, followed by the word “complete.” Pressing the Scroll key will enable the user to accessinformation about starting time anddate, open circuit battery voltage, starting and ending battery voltage,starting and ending battery current,ampere-hours and kilowatt-hours ofcharge, length of charge, ending timeand date, and the number of non-equalized cycles. If the battery beingcharged has a SMARTBATTERY IIinstalled and the charger is equipped forSMARTBATTERY II communications,
additional removed data will be available:ampere-hours moved on discharge andon charge temperatures. Press theScroll key until the display reads:
This data can be retrieved and shownon the display during or after the charge cycle.
In the event of an error during thecharge cycle, a “plain English” errormessage is displayed. Refer to Section 7, Troubleshooting.
MNU: Charge rpt [ ]➔
➔
2.3.1 Manual starting(continued)
In the event of a charging problem orerror, an error message will be displayed.Refer to Section 7, Troubleshooting, formore information on error messages.
NOTE: This error message will clear if the battery is disconnected.This infor-mation and other charge parameters are also available during the charge and can be accessed by pressing theScroll key twice.
To interrupt the charge before it is complete, press the Stop button.
CAUTIONAlways be sure charger is turned off—either manually or automatically—before disconnecting the battery from the charger. Otherwise, hazardous arcing will occur.
In the course of the normal charge/discharge cycle, a motive power battery develops inequalities of voltage and specific gravity among its cells. Equalizing batteries at regular intervals will restore cell equality, assuring rated performance.
Manual equalizing is activated by pressing the Scroll key at anytimebefore or during a charge. The normal equalization program is
overridden, and so this feature can beused to equalize a fully charged battery.
To activate manual equalize, press an Arrow key. To deactivate manualequalize, press an Arrow key again.After 60 seconds, the display will return to the idle charger display.
MNU: Manual EQU [ ]➔
➔
If the charger has been started manually, it will return to its previousoperating mode as soon as power isrestored and continue charging the battery until the charge cycle is completed. If the charger is set for real-time start and the power is discontinued and then restored beforethe selected start time, charger operation is unaffected.
If the charger is set for real-time startand the power loss occurs 1) after startor 2) before start and extends into thepreselected charge period, the charger
will resume operation as soon as poweris restored and continue the chargingsequence until the charge cycle is completed. An exception to this wouldbe if the power outage lasted into thenext day (beyond 24:00, midnight), inwhich case the charger would notrestart until the preset hour that day. To reduce the possibility of tripping abreaker in multiple charger installations,the RANGER II control distributescharger starts randomly. The minimumdelay time is 15 seconds and the maxi-mum delay time is 3 minutes and 30seconds.
2.3.2 Stopping the charge manually
2.3.3 Manual equalizing
2.3.4 Operation after loss of AC power (warm start)

11
2.4.2 Retrieving data from SMARTBATTERY II modules
When entering the programmable parameters, a choice is given betweenthe programmable parameters and the SMARTBATTERY II menu.
The SMARTBATTERY II terminal menu is used to retrieve information from
the SMARTBATTERY II attached to a RANGER II control. If the RANGER II cannot communicate with the SMARTBATTERY II, COMerr is displayedon the interface. If COMerr is displayed,contact your local C&D representative.
2.4.1 Installing a SMARTBATTERY II communications board
The RANGER II control is designed to interface with a SMARTBATTERY II,enabling you to get data such as depthof discharge information, start and end of charge temperatures, minimum voltsper cell, low volts per cell and more.
In order for a RANGER II control to interface with SMARTBATTERY II, the
charger must have a communicationsboard installed.
The communications board is installedby inserting it into the RANGER II board at expansion slot A. Firmly seat thecommunications board onto the RANGER II board. (Be sure to discon-nect both AC power and the batteryduring this procedure.)
A RANGER II charger connected with a SMARTBATTERY II module will operatein the same manner as described inSections 2.1 through 2.4, except for theenhancements noted below.
While the charger is charging a batterywith SMARTBATTERY II connected, theRANGER II control checks the SMARTBATTERY II module to see that the last charge was full and the batteryis discharged. It then calculates and displays the percent charged. If theSMARTBATTERY II indicates the battery is already fully charged, the charge cycle is terminated within two minutes.
The display will indicate the percentcharge. The charger may enter a cooling cycle if the SMARTBATTERY IImodule indicates temperatures within acertain range; if it does so it is indicatedon the display as C:Cooling xx°F, withthe hours, minutes and seconds. Whenthe battery temperature is less than105°F, the RANGER II resumes thecharge cycle and will enter the equalizemode, if necessary.
After equalization or watering, theRANGER II checks the SMARTBATTERY IIagain for temperature. It may enter thecooling stage again, indicating it on the display.
Because the SMARTBATTERY II keeps track of battery cycles, you can equalizeand water the battery by battery cycles,not charger cycles. If equalization isselected, the display will show “c:E.”During equalization, the percent chargeis displayed. You may specify equalizingparameters as indicated in Section 2.2.2 on Page 6.
When a SMARTBATTERY II module is connected to a RANGER II charger, thewatering options are always, never,every five battery cycles or every 10 battery cycles.
NOTE: A SMARTBATTERY II capable, RANGER II control programmed forwatering by battery cycles will alwaysperform the watering cycle if connectedto a battery without SMARTBATTERY II.Changing watering parameters is alsodescribed in Section 2.2.7 on Page 8.
2.4 Special features with SMARTBATTERY II

12
2.5 Communications port RANGER II controls are designed to be able to interface with a computerizedmanagement system. The uniqueRANGER NET fiber optic communica-tions bus establishes a link with the RMS-2000, enabling a user to havecomplete charging information on afleet of FERRO FIVE SERIES chargers with RANGER II controls.
The network address should be set to inactive unless there is an RMS. This will hide the baud rate menu. For information on setup and using anRMS, see the RMS operating manual.
For more information on the RMS-1000or RMS-2000, ask your local C&D representative for a brochure.
Menu display Description
BT: Present T [C] The current temperature of the battery.87°F
BT: Dischrg data [C] Shows minimum volts per cell, ampere-hours2.37V 329AH 14.21 removed and time in discharge. When this
information is retrieved, the equivalent informationin the charge summary report is replaced withthis new data.
BT: Discharges [C] The number of discharge cycles from the1000 cycles SMARTBATTERY II. When this information is retrieved,
the equivalent information in the charge summaryreport is replaced with this new data.
BT: Low VPC [C] The number of low volts per cell cycles and25 cycles 2.5% the percent of the total.
BT: Lo DOD cycls [C] The number of low depth of discharge cycles for< 250, 30-70% 700 30% (indicated by “<”) and 30 to 70% categories.
BT: Hi DOD cycls [C] The number of high depth of discharge cycles70-90% 45, > 5 for 70-90% and > 90% (indicated by “>”).
BT: SOC T cycls [C] The number of cycles in each of three start of< 250, 500, > 250 charge temperature categories: < 60˚F
(indicated by “<”), 60˚F-100˚F, and > 100˚F(indicated by “>”).
BT: EOC T cycls [C] The number of cycles in each of the three end of< 250, 500, > 250 charge temperature categories: < 60˚F
(indicated by “<”), 60˚F-100˚F, and > 100˚F(indicated by “>”).
BT: Power cycls [C] The number of times the power to the2 SMARTBATTERY II has been cycled.
BT: Status [C] The version of the SMARTBATTERY II software.SW Version 1.00
The following information is displayed;the Scroll key is used to move throughthe menu items.
2.4.2 Retrieving data from SMARTBATTERY II modules(continued)

13
3 COMPUCHARGE CONTROL
3.1 Description COMPUCHARGE continually monitors the changes in voltage and current overtime to determine the proper length ofcharge. This efficient method preventsundercharging and overcharging, keeping energy costs down and maximizing battery life.
Other COMPUCHARGE features are:
• Zero current shut off—within five seconds of detecting battery disconnect
• Battery voltage sensing—the charger will only start if connected to a battery with proper voltage
• Battery refresh—every three days
• Turn on time delay—five seconds to seven hours, 45 minutes, in 15 minute increments
• LED display—easy to read in ambient light
• Automatic equalize—never, every seven days, 1, 2, 3, 4, 5, 6 or 7 cycles
Turn off charger beforeconnecting or
disconnecting battery
Do not touchuninsulated battery
terminals or connections
Disconnect chargerfrom AC supply and battery
before servicing or dismantling
COMPUCHARGE®
CONTROL
FIGURE 3.1-COMPUCHARGE control
STOP
MANUAL EQUALIZEinitiate manualequalize
LED DISPLAY1/2-inch, visiblein ambient light
SCROLL KEYaccess additionalinformation
3.2 Operation The operating panel of theCOMPUCHARGE control is a sealed membrane with a five character, 1⁄2 inchLED display, a Stop key, an Equal keyand a Scroll key.
When the charger is idle, theCOMPUCHARGE display will show thenumber of cells for which the charger is set.
Charging begins when the battery isconnected. COMPUCHARGE checks to be sure the charger is connected to abattery with the proper voltage. If thematch is correct, the display will show a countdown until the charge starts. If a mismatch is detected, an errorcode— “bU E”—will appear. (Refer to Section 7, Troubleshooting, for more information.)
If equalize is scheduled, either auto-matically or by pressing the Equal key, a dot will appear on the displayafter the last character on the right. Ifautomatic equalize is selected, this dotwill flash; if manual equalize is selected,it will not flash. After the user-selectedstart up delay, the charge cycle begins.(For safety reasons, the minimum delay
is five seconds, which is set at the factory.) The current from the chargecycle is shown on the display during the charge.
COMPUCHARGE monitors the changein voltage and current to determine theexact time of charge. When the chargeis greater than 80% complete, the lastletter on the display will flash.
Pressing the Scroll key at any time during the charge cycle will reveal voltage of the battery (“99.9U”). Pressingthe Scroll key twice reveals ampere-hours returned (“999r”). The display willreturn to normal if left unattended or ifthe Scroll key is pressed a third time.
Charging continues until cell electrolyteis completely mixed and the battery ischarged to the rated capacity. If the battery remains connected to the charger for more than three days,COMPUCHARGE will automatically activate a refresh charge.
Sometimes, cells nearing the end oftheir operating life and mistreated batteries are unable to accept a complete charge without overheating.

14
If COMPUCHARGE detects a voltagerise that has not stabilized after 12 hours,the charge cycle is stopped and an errormessage appears on the display.
When AC power is interrupted during a charge, charging will restart after arandomly timed start up delay, notexceeding two minutes.
WARNINGIf it is necessary to disconnect the battery during the charge, press the Stopkey before removing the battery cable. FAILURE TO TAKE THIS PRECAUTIONCAN CAUSE A SERIOUS ARC HAZARD AND A POTENTIALLY SERIOUSPERSONAL INJURY.
3.3 Basic settings3.3.1 Setting the precharge delay
The precharge delay should be set totake advantage of lower utility rates orshift changes. To change the precharge delay:
1) Disconnect the AC power supply at the circuit breaker or fused safety disconnect.
2) Open the cabinet and locate the printed circuit board mounted behind the control panel.
3) Locate the bank of pins.
4) Move the jumpers to the desired setting, referring to Figure 3.2.
5) Close the cabinet and reconnect the AC power supply.
3.3.2 Activating cold storage Users in cold storage applications canset the COMPUCHARGE to adjust itscharge termination to extend the chargesomewhat for these applications. Batterystarting temperatures of below 55˚F areconsidered cold storage. To select thisoption, add a jumper to the “tempnorm” and “temp cold” pins.
1) Disconnect the AC power supply at the circuit breaker or fused safety disconnect.
2) Open the cabinet and locate the printed circuit board mounted behind the control panel.
3) Locate the bank of pins.
4) Move the jumpers to the desired setting, referring to Figure 3.3.
5) Close the cabinet and reconnect the AC power supply.
FIGURE 3.2-Precharge delay
FIGURE 3.3-Cold storage
Note: The COMPUCHARGE delay is designed to give users maximum flexibility in deciding the delay. Therefore, whenmultiple jumpers are put on the pins, the times are additive. Thus, if jumpers are on both one hour and 15 minute pins,the total time is one hour and 15 minutes. Extra jumpers are located on the upper right corner of the board, as shown.
3.2 Operation(contimued)
15
3.3.3 Setting the number of cells The COMPUCHARGE control is setup to work with a variable number ofcells–6, 9, 12, 15, 16, 18, 20, 24, 32,and 36.
To change the number of cells:
1) Disconnect the AC power supply at the circuit breaker or fused safety disconnect.
2) Open the cabinet and locate the printed circuit board mounted directly behind the control panel.
3) Locate the bank of pins on the left that starts with “6 cells” (10th pin down).
4) Move the jumper(s) to the desired number of cells, referring to Figure 3.4. The default setting is 18 cells.
5) Close the cabinet and reconnect the AC power supply.
COMPUCHARGE can be set to automatically equalize: never, every 7 days, or every 1, 2, 3, 4, 5, 6, or 7 cycles.
To change the automatic equalize setting:
1) Disconnect the AC power supply at the circuit breaker or fused safety disconnect.
2) Open the cabinet and locate the printed circuit board behind the control panel.
3) Locate the bank of pins that begin with “EQU.”
4) Referring to Figure 3.5, use the jumpers to select the equalize setting. The default is “NEVER.”
5) Close the cabinet and reconnect the AC power supply.
Note: The equalization cycles are designed for maximumflexibility so multiple jumpers placed in the banks ending in“cyc” are additive. Thus, a jumper on the pin marked “EQU1 cyc” and a jumper on the pin marked “EQU 2 cyc” wouldresult in equalization every three cycles. But a single jumperon the pin marked “EQU 1 cyc” would result in equalizationevery cycle. The extra jumpers are located on the printedcircuit board. “NEVER” will take precedence over all othersettings and the days setting takes precedence over thecycles setting.
Note: For 9, 15, 16, 20 and 32 cell batteries, multiplejumpers are required. The extra jumpers are located on theupper right corner of the board and should be installed inthe following configurations:
3.3.4 Automatic equalizing
To begin manual equalize, the operator connects the battery andpresses the Equal key.
3.3.5 Manual equalizing
The COMPUCHARGE control has provisions for automatic watering. The watering cycle lasts for 3 minutes. If equalize is also selected,
COMPUCHARGE will first initiate thewatering cycle and then the equalize cycle.
3.3.6 Automatic watering
Cells Jumpers on Cells Jumpers on
9 6 and 12 cell 20 18 and 24 cell15 12 and 18 cell 32 24 and 36 cell16 6,12 and 18 cell
FIGURE 3.5-Automatic equalize
FIGURE 3.4-Number of cells

16
4.1 Description The SCOUT is a microprocessor-basedcontrol that reduces the chance forovercharging by continually monitoringbattery voltage. When it reaches gassingvoltage, the system activates a timer,which will allow sufficient charge time tocomplete the recharge.
Other SCOUT features include:
• Automatic start—helps prevent operator errors
• Maximum charge time—helps prevent overheating
• Safety features—checks for correct battery before charge begins
• Automatic equalization
• dV/dt termination—prevents overcharging, undercharging and overheating
Disconnect chargerfrom AC supply and battery
before servicing or dismantling
Turn off charger beforeconnecting or
disconnecting battery
Do not touchuninsulated battery
terminals or connections
SCOUT ®
CHARGER CONTROL
FIGURE 4.1-SCOUT control
4.2 Basic settings4.2.1 Setting the number of cells
The SCOUT control is set up to workwith a variable number of cells–6, 12,18, 24, and 36. The SCOUT is shippedfrom the factory to be matched to thecharger. Adjustment of this feature isneeded only when the printed circuitboard has been replaced.
To change the number of cells:
1) Disconnect the AC power supply at the circuit breaker or fused safety disconnect.
2) Open the cabinet and locate the printed circuit board mounted directlybehind the control panel.
3) Locate the configuration jumpers as shown in Figure 4.2.
4) Move the jumpers to the desired number of cells, as shown in Figure 4.3.
5) Close the cabinet and reconnect the AC power supply.FIGURE 4.2-Printed circuit board panel with configuration jumpers circled
FIGURE 4.3-Close up of jumpers for changing cells
5 36 cells4 24 cells3 18 cells2 12 cells
4 SCOUT CONTROL

17
FIGURE 4.4-Delay time jumpers
10 30s delay 11 1hr delay 12 4hr delay
4.3 Operation4.3.1 Basic operation
The operating panel of a FERRO FIVESERIES charger equipped with theSCOUT control contains an LED displayand keypad for operator interface. AnLED indicates the charger is ready tooperate, another LED indicates the battery is being charged and a third LED indicates when gassing voltage isreached. An Equal key activates theequalization charge mode and a Stopkey allows the charger to be turned offduring a charge.
Chargers equipped with the SCOUT control do not have start switches.Charging automatically begins five seconds after the operator connects the battery, unless another delay isspecified by the user (refer to Section 4.3.2).
When no battery is connected, the greenLED will flash briefly every four secondsto indicate the charger is ready to begincharge. Once a battery is connected, thered LED will flash and glow steadily
when the charge is in progress. Whenthe battery is 80 percent charged, theyellow LED is lit, and the red LED will be extinguished. When the charge iscomplete, the green LED will glow.
If equalize is selected, the charge isextended by three hours. The red LED will flash when the battery is connected and during the charge.During equalization, the yellow LED will flash and will continue to do sothroughout the equalize cycle. When the charge is complete, the green LED will flash.
When an improperly sized battery isconnected, the charger will not start.Refer to Section 7, Troubleshooting.
In the event of an accidental disconnect,the system will shut down automatically,protecting charger components.
If AC power is interrupted, charging willbegin after a randomly timed startupdelay, not exceeding three minutes,
WARNINGIf it is necessary to disconnect the battery during the charge, press the Stop keybefore disconnecting the battery. FAILURE TO TAKE THIS PRECAUTION CANCAUSE A SERIOUS ARC HAZARD AND A POTENTIALLY SERIOUSPERSONAL INJURY.
SCOUT controls are shipped with a preset, five-second safety delay. Thedelay can be changed to 30 seconds,one hour or four hours.
To lengthen the factory-set delay:
1) Disconnect the AC power supply at the circuit breaker or fused disconnect.
2) Open the cabinet and locate the printed circuit board mounted directly behind the control panel.
3) Locate the bank of configuration jumpers as shown in Figure 4.2.
4) Move the jumpers to the desired time pattern: 30 seconds, one hour or four hours. Refer to Figure 4.4.
5) Reconnect the AC power supply.
4.3.2 Changing the five-second,factory-set delay

18
4.3.3 Changing maximum charging time
The maximum charging time is set from the factory at 12 hours. Thisfeature should not need adjustment for
use with FERRO FIVE FR SERIES orFERRO FIVE EFR SERIES chargers.
4.3.4 Manual equalizing To administer an equalization charge,the operator connects the battery, waitsfor the red LED to flash or glow, thenpresses the Equal key. At the
conclusion of an equalization charge,the system automatically returns to thedaily charge mode.
4.3.5 Automatic equalizing The SCOUT control can be set to auto-matically equalize: never, every seventhcycle or every tenth cycle. To activateautomatic equalization:
1) Disconnect the AC power supply at the circuit breaker or fused safety disconnect.
2) Open the cabinet and locate the printed circuit board mounted directlybehind the control panel.
3) Locate the bank of configuration jumpers shown in Figure 4.2.
4) Move the switches to the desired equalization cycle as shown in Figure 4.5.
5) Close the cabinet and reconnect the AC power supply.
4.3.6 Cold applications An additional 30 minute charge extension may be programmed for cold
applications using special combinationsof the maximum charge time jumpers.
12 & 24 hour ➔ 12 hour with 30 minute extension
No jumpers ➔ 24 hour with 30 minute extension
FIGURE 4.5-Automatic equalize switch
JP8 EQU 10c 7 EQU 7c 6 EQU never

19
FIGURE 5.1-Typical efficiency and power factorperformance for FERRO FIVE SERIES chargers
FIGURE 5.2-Typical ferroresonant charger curve
5 OPERATION
5.1 Operating characteristics As with all electrical apparatus, FERRO FIVE operating economics areinfluenced by electric utility rates, theuser’s choice of single-phase or three-phase power, and the electrical efficiencyand power factor of the charger.
Electric utility rates are significantlylower during off-peak periods. However,to take advantage of these rates youmay need a separate electric meter for
the off-peak service connection. Yourlocal utility representative can help youdetermine the type of off-peak programthat best fits your application.
Efficiency is the measure of the usefulenergy the charger makes available tothe cell, as measured at the chargeroutput. It is determined by the equation:
As the graph in Figure 5.1 illustrates,FERRO FIVE SERIES chargers achieve89 percent efficiency. This means thatfor every kilowatt of AC input, they willdeliver 890 watts of DC output to thebattery and lose only 110 watts of ener-gy as wasted heat.
The power factor is the ratio of the true power and the apparent power a charger actually requires to operate. The equation for determining power factor is:
Percent efficiency = x 100Output power (kW)
Input power (kW)
Power factor (PF) = True power = Watts AC
Apparent power (Volts AC) x (Current AC)
As a battery is placed on charge, there is an inrush of current to the battery. Charging increases battery voltage, and as the difference betweenthe applied voltage and the battery voltage decreases, the flow of the
charger current also decreases. Duringthe final hours of the charge cycle, thecharging rate is significantly reduced.Figure 5.2 shows typical ferroresonantcharging characteristics.
100
80
60
40
20
0
0 20 40 60 80 100
POWER FACTOR
EFFICIENCY
C&D MODEL NO. FR18HK1000SERIAL NO. NONE18 CELL, 900 AH. BATTERY
PERCENT LOAD
PE
RC
EN
T
POWER FACTOR &MACHINE EFFICIENCY
50420AC WATTS
55200AC VOLT AMPS
42600DC WATTS
POWER FACTOR = AC WATTS = 50420/55200 = 91.9%
AC VOLT AMPS
AC VOLT AMPS
AC WATTS
CONVERSION EFFICIENCY = DC WATTS = 42600/55200 = 77.2%
MACHINE EFFICIENCY = DC WATTS = 42600/50420 = 84.5%
C&D MODEL NO. FR18HK1000SERIAL NO. NONE18 CELL, 900 AH. BATTERY
ELAPSED CHARGING TIME
20
5.2 Recommended charging procedures
Chargers require little attention beyond periodic removal of dustbuildup and inspection for loose connections. Proper charging procedures are important to preventdamage to chargers, batteries and operators.
Proper charging procedures requirelead-acid batteries receive:
• watering at the end of the charge, as needed, to maintain proper electrolyte level and concentration;
• an equalizing charge approximately every fifth charge to correct voltage imbalances among cells; (except FERRO FIVE LIBERTY SERIES and FERRO FIVE REVOLUTION SERIES which do not require equalizing charges.)
• periodic cleaning to remove corrosive spills;
• freshening charges if batteries remainout of service for three or more days.
• periodic inspection of their DC connectors to assure that they still make a good low resistance connection and have exposed metal which would present a hazard.
Operators should only connect batteriesto chargers with matching voltage andsufficient power output. The chargerpower must be OFF before batteries are connected or disconnected.
Motive power batteries are designed tobe discharged daily but should not bedischarged by more than 80 percent oftheir capacity during an eight-hour workshift. This allows sufficient time for themto charge and cool before they arereturned to service and extends cycle life.

21
6 OPTIONS
6.1 Remote control In some industrial settings, it is desirable to control chargers from acentral location, such as a chargingmezzanine. FERRO FIVE SERIESchargers can be assembled with remotecontrol boxes. Systems equipped withremote control units function identicallyto the panel-mounted charger controlsdescribed in this manual.
6.2 Series connectedcharging cables
C&D series connected charging cablesprovide a safe, convenient way tocharge identically discharged batteriesof the same size connected in series.The cables have either two plugs or two receptacles, both of which must
be connected before the charger will operate.
C&D offers series connected chargingcables for all FERRO FIVE SERIES systems. They can be user-installed.
6.3 Parallel connectedcharging cables
Parallel connected charging cablesmake it possible to charge two batteriesin parallel. The option consists of anextra set of cables which terminate ineither a plug or receptacle and a fuse toprotect against reverse connection of one battery.
In order to deliver an eight-hour chargeto two batteries in parallel, the chargermust be rated equal to or higher thanthe sum of the ampere-hour capacitiesof both batteries.
Ideally, similarly discharged batteriesshould be placed on the charger at the same time. If this is not possible,
press the Stop key (or turn the electro-mechanical timer to OFF) before connecting the second battery. Forchargers equipped with RANGER II,COMPUCHARGE or other automatic controls, both batteries must beremoved before restarting the charger.Use the turn-on time delay feature ofthe control to allow enough time tosafely connect both batteries before the charger starts automatically.Chargers equipped with the electro-mechanical timer must be reset to theeight-hour mark. To avoid overheating,the progress of the charge should becarefully monitored.
6.4 Automatic watering systems The C&D RANGER WATERING SYSTEMmodule interfaces with the RANGER IIcontrol to automatically activate watering systems at the proper point inthe charging cycle. Because it mountswithin the existing footprint of thecharger, no extra room between chargers is required.
FIGURE 6.2-RANGER WATERING SYSTEMmodule mounted on charger
FIGURE 6.1- RANGER remote control option
22
6.5 Computerized management system
RMS 1000 computer system is avail-able to operators to achieve optimalrotation of batteries for maximum life,
and provides centralized annunciation of charger alarm conditions.
6.6 Other options Fungus proofing: The internal components of FERRO FIVE SERIESchargers used in high-moisture environ-ments can be factory treated with aspecial fungus-resistant varnish. Thisoption is only available on originalequipment.
Export service: C&D manufactureschargers intended for export service inaccordance with ANSI 42.25. Cabinetsare fitted with a vapor barrier.
Lead tagging: C&D can affix
information tags on wiring and cables. Lengths over six-feet are tagged on both ends. A single tag is attached at the middle of shorter lengths.
Lifting eyes: Factory-installed liftingeyes make it possible to move FERROFIVE SERIES chargers using a sling.
Wall mounting bracket: C&D offerswall mounting brackets as a user-installed option. See Figure 6.3 for dimensions.
FIGURE 6.3-Wall mounting brackets
7 TROUBLESHOOTING
7.1 Procedure The following charts are designed tohelp a qualified technician diagnose andremedy malfunctions in the RANGER II,SCOUT and COMPUCHARGE controls.In all cases, acknowledge the errormessage by pressing the Stop key.
NOTE: For RANGER II chargers, the abort condition clears when the batteryis disconnected.
Principally, the chart covers the control;more extensive troubleshooting instruc-tions for the charger are presented inSections 7.4 through 7.8. Also refer tothe wiring diagrams in Section 9.
IMPORTANT: This equipment must be serviced by qualified personnelfamiliar with both local and nationalelectrical codes.
WARNING: Line voltages are presentwithin the battery charger cabinet.When performing the following trouble-shooting procedures, be sure to observeall appropriate safety precautions.ALWAYS BE SURE THE CHARGER IS TURNED OFF BEFORE DISCONNECTING A BATTERY.
6.5.1 RANGER MANAGEMENTSYSTEM 1000
The RMS-2000, a computerized management system, is available formonitoring large RANGER Series andRANGER II Series installations. The easy-to-install system alerts the operator to abnormal battery operatingconditions, helping to prevent costly battery damage caused by overdis-charge and hot batteries. A variety of
standard reports facilitates usage andmaintenance reviews. The two-wayRANGER NET communications networkgives centralized control over operatingparameters, such as delayed start andautomatic equalize. For more informationon the RMS-2000, request a brochurefrom your local C&D representative.
6.5.2 RANGER MANAGEMENTSYSTEM 2000

23
DISPLAY CAUSE ACTION
ABORT: discnect bat 1. Battery not matched to charger a. Verify battery and charger match.Wrong battery size (wrong number of cells)
2. Battery has short-circuited cells a. The charger can be “forced” on from this conditionor overdischarged by holding the “up” arrow until the voltage reads
an acceptable level.
3. Control board not matched to charger a. Check and reset board settings to match chargeroutput voltage. Verify other settings.
ABORT: discnect bat 1. Battery is too large for charger a. Place battery on charger of proper size.Charge > 12 hrs 2. Control board failure a. If problem is repeated, contact C&D.
ABORT: discnect bat 1. Hot battery a. Allow several hours for cool-down beforeHot battery flt restarting charge.
ABORT: discnect PWR 1. DC current continued to flow after a. Check line contactor and replace if necessary.OFF, but charging contactor turned off
ABORT: discnect bat 1. Charge terminated by operator a. Resume charge if necessary.Operator STOP
ABORT: discnect bat 1. Operator disconnected battery a. Reconnect battery and resume charge.Zero current flt 2. Charger problem a. Refer to flowcharts on Pages 29 through 33.
ABORT: press {Stop} 1. Charger parameters lost a. Remove and then restore AC power; re-enterNVRAM is trashed parameters. If problem recurs, call C&D.
WDT RST: Restarting 1. Watchdog timer reset has occurred. a. If problem recurs, call C&D.The charger will automatically restart.
ABORT: press [Stop] 1. Real-time clock must be replaced a. Call C&D.Replace RTC (lobat)
ABORT: press [Stop] 1. Control program found in an a. Disconnect and reconnect charger. If problemState machine flt unknown state persists, contact C&D.
RANGER II CONTROL TROUBLESHOOTING CHART A
ERROR CODE DESCRIPTION ACTION
bU E 1. Battery voltage does not match the number of a. Check the battery to be sure it is the correct size.cells programmed If it is and the battery voltage is low, pressing the
Equal key will force the charger on. To clear thismessage, disconnect the battery.
uS E - or - uT E 1. The charger microprocessor needs to reset itself a. Charger will reset itself after five seconds. It will begin from the Ready state.
bd E 1. During charge, the battery was disconnected a. Charger will reset itself after five seconds. It will begin from the Ready state.
hotE 1. The battery temperature is too high a. Let the battery cool down before connecting it to the charger. To clear this message, disconnectthe battery.
12hE 1. The battery has been on charge more than 12 hours a. To clear this message, disconnect the battery.
StPE 1. During the charge, user pressed the Stop key a. To clear this message, disconnect the battery.
COMPUCHARGE CONTROL TROUBLESHOOTING CHART B

24
RED FLASHING CAUSE ACTIONRAPIDLY AND:
Yellow LED is lit 1. The wrong size battery has been a. Disconnect the battery and check the jumperconnected setting configuration for the number of cells.
If necessary, change the number of cells by moving the jumpers and then cycle the power for the charger.
2. Battery is overdischarged b. Press the Equal key to force the charger on.While the key is pressed, the charger will remainon. After battery voltage rises, release Equalkey, disconnect and reconnect the battery. The charger should start automatically in the normal manner.
Green LED is lit 1. The maximum charging time has been exceeded a. Disconnect the battery.
Both yellow and green 1. The Stop key has been pressed a. Disconnect the battery.LEDs are lit
All LEDs are lit constantly 1. Watchdog timer has reset a. Disconnect AC power from the charger, wait 30 seconds and reapply. If problem persists, call C&D.
Green and yellow flashing 1. Low vpc at start of charge a. Check charger fuses (all phases) to assure proper current flow.
SCOUT CONTROL TROUBLESHOOTING CHART C
TEST INSTRUMENTS AND TOOLS FOR TROUBLESHOOTING
7.2 Component testing A visual inspection can often revealmany problems. In new chargers, lookfor connections that may have loosenedduring shipment. In previously operatingsystems, look for the whitish powderresidue created by burning varnish, or abroken, melted or discolored wire.
When troubleshooting three-phasechargers, be sure to test all three sets of components.
Always read and follow all warninglabels and turn off the charger beforetouching, removing or installing components.
C&D supports FERRO FIVE SERIESchargers with prompt field service andovernight delivery of most components.If you do not know the name of yournearest C&D representative contact:
C&D TECHNOLOGIES1400 Union Meeting RoadP.O. Box 3053Blue Bell, PA 19422-0858 USA(215) 619-2700Fax (215) 619-7899
• 0 to 200 mV scale VOM that reads up to 600 VAC and 250 VDC with minimum accuracy of 0.5 percent
• Clamp-on ammeter
• SB-175 or SB-350 shorting connector
• Wrench set
• Screwdriver set
• Jumper cables with alligator clips
Diode replacement requires a supply of thermal joint compound and a torquewrench capable of achieving the values in Table 7.2.
TABLE 7.1
25
7.2 Component testing(continued)
AMMETER: Confirm reading with a calibrated millivolt meter connectedacross the charger shunt.
CAPACITORS:
Test capacitors with a calibrated ohmmeter. Different sizes of capacitorsrequire different ohmmeter range settings. Begin with the highest setting.Before testing, disconnect both leads toisolate the capacitor from the chargercircuit. Be sure to reverse the leads for each check.
• A good capacitor deflects the ohmmeter needle toward zero then steadily rises toward infinite resistance.
• An open capacitor immediately shows infinite resistance.
• A shorted capacitor remains at zero resistance.
CONTROL TRANSFORMER: Outputshould be between 22 and 26 VAC.
DIODES: Test diodes with the ohmmeter set at either the 10X or 100Xscale. Before testing, disconnect one
lead to isolate the diode from the charger circuit.
• A good diode shows low resistance when tested in one direction and high resistance when the ohmmeter probes are reversed.
• An open diode shows very high resistance in both directions.
• A shorted diode shows zero or low resistance in both directions.
FUSES: Remove the fuse from the fuseholder and test it with an ohmmeter setto any scale.
• A good fuse shows zero resistance.
• An open or “blown” fuse shows infinite resistance.
RESISTORS: Test resistors with anohmmeter. Different values of resistorsrequire different ohmmeter range settings. Begin with the highest setting.Before testing, disconnect both leads to isolate the resistor from the charger circuit.
• A good resistor shows a specific value.
• An open resistor shows an infinite resistance.
• A shorted resistor shows zero resistance.
7.3 Replacing components Ammeters, ammeter shunts, capacitors, control transformers, fuses, line contactors, line contactorcoils, electromechanical timer, powertransformers and resistors can be user-replaced. Simply mate the leads of the replacement component withtheir appropriate connectors.
Printed circuit boards in RANGER II,COMPUCHARGE, SCOUT and automatic Start/Stop controls do notcontain user-repairable parts. The entire printed circuit board must be replaced.A printed circuit board repair shop isoperated by C&D. Contact your localC&D agent for this service.
C&D recommends replacing the entirerectifier assembly rather than individualdiodes. Users attempting diode replacement MUST observe the following procedure:
1) Disconnect the charger from the AC line and battery.
2) Remove the rectifier assembly.
3) Clamp the heat sink portion of theassembly in a vise.
4) Remove the faulty diode.
5) Coat the mating surfaces of the diode and the heat sink with a suitable thermal joint compound.
6) Place the diode on the heat sink and hand tighten the diode connection hardware.
7) Torque diode connections to values shown in Table 7.2.
8) Remove excess thermal joint compound.
9) Reinstall the assembly and reconnect leads.
DIODE CONNECTION TORQUE VALUES
1/4" studs 025 +2/-2 in-lb 1/2" studs 137 +4/-4 in-lb3/8" studs 112 +4/-3 in-lb 3/4" studs 260 +5/-3 in-lb
TABLE 7.2
CAUTIONBefore testing, be sure the capacitoris discharged.

26
DC FUSE
CONTROLBOARD HARNESS
RECTIFIERASSEMBLY
AMMETER SHUNT
AC FUSES
CONTROL TRANSFORMER
AC INPUT TERMINALS
LINE CONTACTOR
TOP
FRONT BACK
FIGURE 7.1- Component location, FERRO FIVE SERIES chargers, single-phase
CAPACITOR
PRIMARY COIL
RESONANT RESISTORS
FERRORESONANTTRANSFORMER
TRANSFORMER
SECONDARY COIL
RESONANT CAPACITORS
RESONANT RESISTOR
27
FRONT
BACK
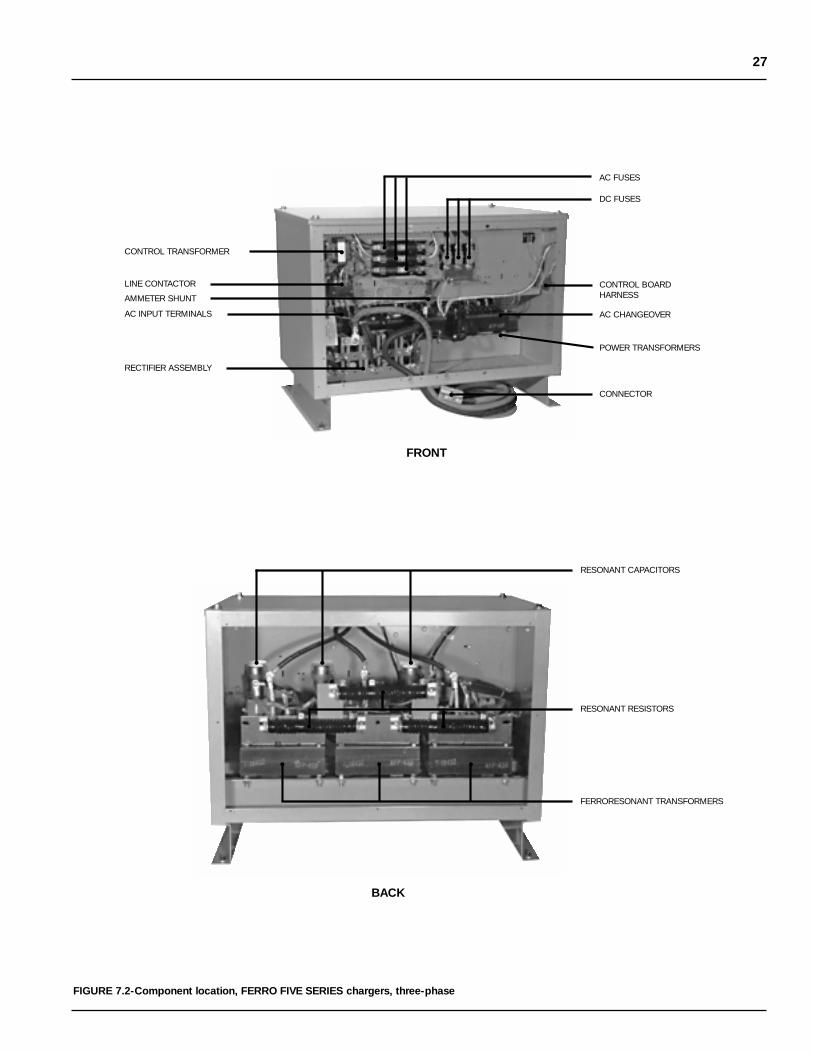
FIGURE 7.2-Component location, FERRO FIVE SERIES chargers, three-phase
AC CHANGEOVER
CONTROL TRANSFORMER
RECTIFIER ASSEMBLY
AC INPUT TERMINALS
LINE CONTACTOR
AMMETER SHUNT
CONTROL BOARDHARNESS
POWER TRANSFORMERS
CONNECTOR
DC FUSES
AC FUSES
RESONANT CAPACITORS
RESONANT RESISTORS
FERRORESONANT TRANSFORMERS

28
FIGURE 7.2 (Continued)-Component location, FERRO FIVE SERIES chargers, three-phase
TOP
29
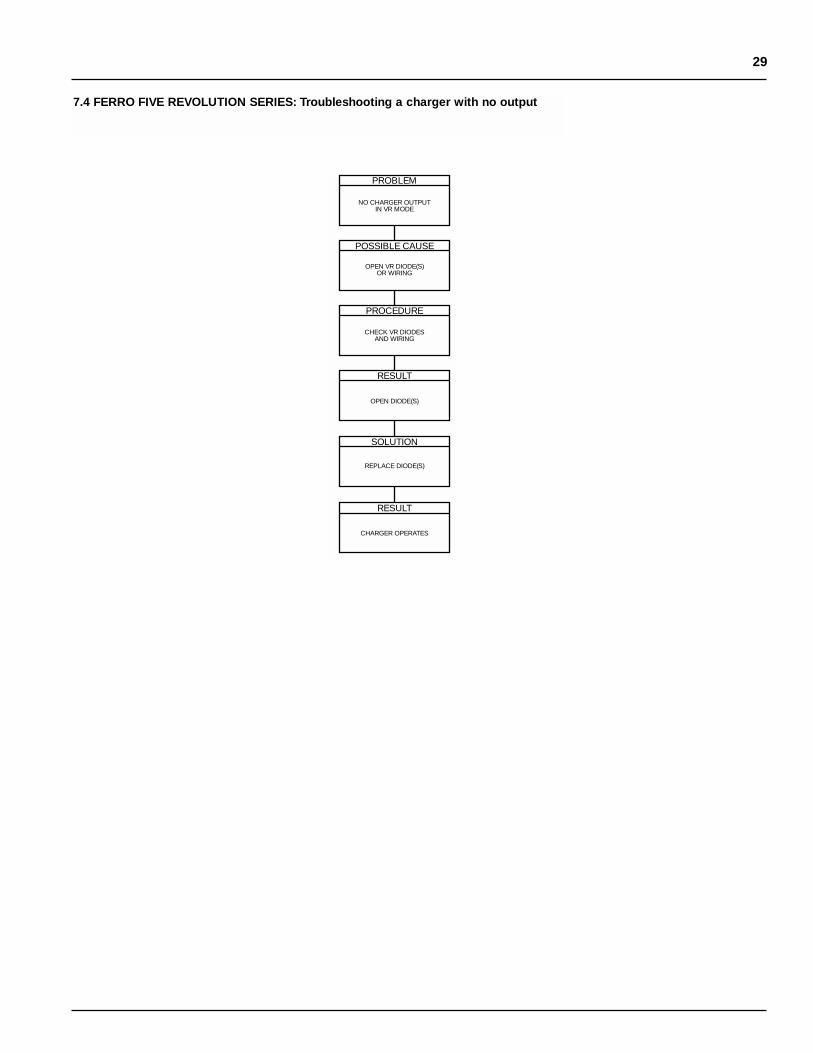
7.4 FERRO FIVE REVOLUTION SERIES: Troubleshooting a charger with no output
POSSIBLE CAUSE
SOLUTION
REPLACE DIODE(S)
PROCEDURE
CHECK VR DIODESAND WIRING
RESULT
OPEN DIODE(S)
RESULT
CHARGER OPERATES
OPEN VR DIODE(S)OR WIRING
PROBLEM
NO CHARGER OUTPUTIN VR MODE

30
7.5 FERRO FIVE REVOLUTION SERIES: Troubleshooting a charger with output too high
POSSIBLE CAUSE
BAD RANGER BOARD
POSSIBLE CAUSE
VR CONTACTORNOT ENERGIZED
POSSIBLE CAUSE
RANGER BOARD NOTSET TO VR MODE
POSSIBLE CAUSE
SHORTED DIODEASSEMBLY
PROBLEM
CHARGER OUTPUT TOOHIGH IN VR MODE
PROCEDURE
CHECK WIRING AND FOR 24VAC AT CONTACTOR COIL
PROCEDURE
SET RANGER BOARDTO VR MODE
PROCEDURE
CHECK DIODE(S)
PROCEDURE
CHECK FOR 24 VACAT TB4
RESULT
VOLTAGE OK
RESULT
ALREADY SET TOVR MODE
GO TO CAUSE 2
RESULT
DIODE(S) BAD
RESULT
VOLTAGE OKGO TO CAUSE 3
SOLUTION
REPLACE CONTACTOR
SOLUTION
REPLACE DIODE(S)
RESULT
OUTPUT STILL HIGHGO TO CAUSE 4
RESULT
CHARGER OPERATES
1 2 3 4

31
7.6 FERRO FIVE LIBERTY SERIES: Troubleshooting a charger when output does not increase
PROBLEM
CHARGER OUTPUT DOES NOTINCREASE IN LM MODE
POSSIBLE CAUSE
BAD RANGER BOARD
POSSIBLE CAUSE
BOOST CONTACTOR(S)NOT ENERGIZED
POSSIBLE CAUSE
RANGER BOARD NOT SETTO LM MODE
POSSIBLE CAUSE
BAD BOOST CAPACITOR ORBOOST RESISTOR
PROCEDURE
CHECK WIRING AND FOR 24 VACAT CONTACTOR COIL(S)
PROCEDURE
SET RANGER BOARDTO LM MODE
PROCEDURE
CHECK BOOST CAPACITOR(S)AND RESISTOR(S)
PROCEDURE
CHECK FOR 24 VACAT TB4
RESULT
VOLTAGE(S) OK
RESULT
ALREADY SET TOLM MODE
GO TO CAUSE 2
SOLUTION
REPLACE IF DEFECTIVE
RESULT
VOLTAGE OKGO TO CAUSE 3
SOLUTION
REPLACE CONTACTOR(S)
RESULT
OUTPUT STILL LOWGO TO CAUSE 5
RESULT
CONTACTOR ENERGIZES,OUTPUT STILL LOW
GO TO CAUSE 4
POSSIBLE CAUSE
OPEN BOOST DIODE(S)
PROCEDURE
CHECK BOOST DIODES
SOLUTION
REPLACE IF OPEN(OR SHORT)
RESULT
CHARGER OUTPUTOK
1 2 3 4 5

32
PROBLEM
CHARGER WON’T STARTCHARGING
POSSIBLE CAUSE
NO AC INPUT
RESULT
CHARGER STARTSCHARGING
SOLUTION
RESET BREAKER ORREPLACE FUSE ON
AC LINE
RESULT
CHARGER WON’T STARTCHARGING
POSSIBLE CAUSE
DEFECTIVE LINECONTACTOR COIL (LCC)
SOLUTION
CHECK FOR LINE VOLTAGEACROSS YEL. & BLUE WIRE
TERMINALS ON LINECONTACTOR (LC)
RESULT
LINE VOLTAGE PRESENT;LINE CONTACTOR (LC)
WON’T CLOSE
RESULTLINE VOLTAGE PRESENT;
LINE CONTACTOR (LC) CLOSES;CHARGER WON’T START
CHARGING
RESULTNO VOLTAGE PRESENT;
LINE CONTACTOR (LC) WON’TCLOSE; CHARGER WON’T
START CHARGING
POSSIBLE CAUSE
DEFECTIVE DIODE INRECTIFIER ASSY. (SR)
POSSIBLE CAUSE
BLOWN AC FUSE (F1)*OR DC FUSE (F2)*
POSSIBLE CAUSE
DEFECTIVE LINECONTACTOR (LCC) COIL
POSSIBLE CAUSE
DEFECTIVE TIMERCONTACTS (T)
PROCEDURE
DISCONNECT LEADS FROMPOWER TRANSFORMER (PXF)*
TO RECTIFER ASSY. (SR); CHECKDIODE WITH OHMMETER
PROCEDURE
REMOVE FUSE FROMFUSE HOLDER AND
CHECK WITH OHMMETER
SOLUTION
CHECK VOLTAGE ACROSSORN. & BLU. WIRE
TERMINALS OF CONTROLTRANSFORMER (CXF)
SOLUTION
REPLACE TIMER ASSEMBLY(T AND M)
SOLUTION
REPLACE RECTIFIERASSEMBLY (SR) OR DEFECTIVE
DIODE AND RECONNECTLEADS
SOLUTION
REPLACE DEFECTIVEFUSE
RESULT
VOLTAGE IS NOT BETWEEN22 - 26 VOLTS
RESULT
VOLTAGE IS NOTBETWEEN 22 - 26 VOLTS
RESULT
CHARGER STARTSCHARGING
RESULT
CHARGER STARTSCHARGING
RESULT
CHARGER STARTSCHARGING
POSSIBLE CAUSE
DEFECTIVE LINECONTACTOR COIL (LCC)
POSSIBLE CAUSE
DEFECTIVE CONTROLTRANSFORMER (CXF)
POSSIBLE CAUSE
CHARGER CONNECTED FORWRONG VOLTAGE
SOLUTION
REPLACE LINECONTACTOR ASSEMBLY (LC)
SOLUTION
REPLACE CONTROLTRANSFORMER (CXF)
SOLUTION
CHECK AND RECONFIGURECONNECTIONS AT CHANGE-
OVER BLOCK (TB)*
RESULT
CHARGER STARTSCHARGING
RESULT
CHARGER STARTSCHARGING
RESULT
CHARGER STARTSCHARGING
7.7 Troubleshooting a charger that will not start
NOTE: In the following troubleshooting flow charts, components are designated by letters and numbers in parentheses. In three-phase chargers, there are three of all components marked with an asterisk (*). You must test all three when troubleshooting. In cases where component replacement is indicated, use only components with the same part number as the original. Refer to Section 8, Parts list.

33
7.8 Troubleshooting a charger that produces no DC output
PROBLEM
CHARGER DELIVERSNO DC OUTPUT
POSSIBLE CAUSE
BLOWN DC OUTPUTFUSE (F2)*
POSSIBLE CAUSE
REVERSED POLARITYOF CHARGER/BATTERYCABLE CONNECTORS
POSSIBLE CAUSE
SHORT-CIRCUITED DIODEIN RECTIFIER
ASSEMBLY (SR)*
SOLUTION
CORRECT POLARITY OFCHARGER/BATTERY
CABLE CONNECTORS
PROCEDURE
DISCONNECT LEADS FROMPOWER TRANSFORMER (PXF) TORECTIFIER ASSEMBLY (SR) AND
CHECK DIODE WITH OHMMETER
RESULT
CHARGER DELIVERSRATED DC OUTPUT
SOLUTION
REPLACE RECTIFIERASSEMBLY (SR); RECONNECT
LEADS; START CHARGER
RESULT
CHARGER DELIVERSRATED DC OUTPUT

34
7.9 Troubleshooting a charger that will not stop
PROBLEM
CHARGER WON’T SHUTOFF AT END OFCHARGE CYCLE
POSSIBLE CAUSE
DEFECTIVE TIMERCONTACTS (T)
POSSIBLE CAUSE
DEFECTIVE CONTROLBOARD (CB)
SOLUTION
REPLACE TIMERASSEMBLY (T & M)
SOLUTION
REPLACE CONTROLBOARD (CB)
RESULT
CHARGER SHUTSOFF AT END OFCHARGE CYCLE
RESULT
CHARGER SHUTSOFF AT END OFCHARGE CYCLE

35
7.10 Troubleshooting a single-phase charger with low DC output
PROBLEM
SINGLE-PHASE CHARGERDELIVERS LOW OUTPUT
CURRENT/VOLTAGE
POSSIBLE CAUSE
DEFECTIVE PANELAMMETER
POSSIBLE CAUSE
LOOSE CONNECTIONIN DC OUTPUT WIRING
POSSIBLE CAUSE
OPEN DIODE INRECTIFIER ASSEMBLY (SR)
POSSIBLE CAUSE
OPEN CAPACITOR (C)IN RESONANT (PXF)
CIRCUIT
1 2 3 4
SOLUTION
VERIFY READINGWITH PORTABLE
AMMETER
SOLUTION
TIGHTEN ALL DCOUTPUT CONNECTIONS
SOLUTIONDISCONNECT LEADS FROM
POWER TRANSFORMER (PXF)TO RECTIFIER ASSEMBLY (SR);
CONNECT OHMMETER ACROSSDIODE TERMINALS
SOLUTIONDISCONNECT CAPACITOR
LEADS; CONNECT OHMMETERACROSS CAPACITOR
TERMINALS
RESULT
BOTH METERS READTHE SAME CURRENT
RESULT
CHARGER DELIVERSLOW OUTPUT CURRENT
RESULTOHMMETER READS
INFINITE RESISTANCEOR ZERO
CONCLUSION
PANEL AMMETERIS GOOD; GO TO
STEP 2
CONCLUSION
DC OUTPUT CONNECTIONSARE O.K.;
GO TO STEP 3
SOLUTION
REPLACE CAPACITOR;RECONNECT LEADS;
START CHARGER
RESULT
CHARGER DELIVERSRATED OUTPUT
CURRENT
RESULT
OHMMETER READS VERYHIGH RESISTANCE INBOTH DIRECTIONS
RESULT
OHMMETER READS VERYHIGH RESISTANCE IN ONE
DIRECTION, VERY LOWIN THE OTHER
SOLUTION
REPLACE RECTIFIERASSEMBLY (SR); RECONNECT
LEADS; START CHARGER
CONCLUSION
DIODE IS GOOD;GO TO STEP 4
RESULT
CHARGER DELIVERSRATED OUTPUT
CURRENT

36
7.11 Troubleshooting a three-phase charger with low DC output
PROBLEM
THREE-PHASE CHARGERDELIVERS OUTPUT CURRENTONE-THIRD OR TWO-THIRDS
THAT OF ITS RATING†
POSSIBLE CAUSE
ONE OR TWO OF THE THREEPOWER TRANSFORMER (PXF)
CIRCUITS IS NOTOPERATING
SOLUTION
ISOLATE INOPERATIVEPOWER TRANSFORMER (PXF)
CIRCUIT(S) ANDTROUBLESHOOT IT
PROCEDURECONNECT AMMETER PROBE
ACROSS DC FUSE (F2)* LEADSFROM POWER TRANSFORMER
(PXF)* TO CHECK FORCHARGING CURRENT
RESULTSCIRCUIT(S) WITH NO OUTPUT
CURRENT IS FAULTY ANDREQUIRES FURTHERTROUBLESHOOTING
POSSIBLE CAUSE
BLOWN DC OUTPUTFUSE (F2)*
POSSIBLE CAUSE
OPEN CAPACITOR (C) INPOWER TRANSFORMER
(PXF)* CIRCUIT
POSSIBLE CAUSE
BLOWN AC INPUTFUSE (F1)*
POSSIBLE CAUSE
OPEN DIODE INRECTIFIER ASSEMBLY (SR)
ACTION
REFER TOTROUBLESHOOTING
CHART B
ACTION
REFER TOTROUBLESHOOTING
CHART C
ACTION
REFER TOTROUBLESHOOTING
CHART C
POSSIBLE CAUSE
FUSE FAILUREDUE TO FATIGUE
POSSIBLE CAUSE
SHORT-CIRCUITEDPOWER TRANSFORMER (PXF)
POSSIBLE CAUSE
SHORT-CIRCUITEDDIODE IN RECTIFIER
ASSEMBLY (SR)
ACTION
REPLACE FUSE(F1)*
ACTION
REFER TOTROUBLESHOOTING
CHART B
ACTION
REFER TOTROUBLESHOOTING
CHART B
1 2 3 4
†Three-phase chargers have three power transformer circuits so they can deliver an output current (lower) even with one or two circuits inoperative. TROUBLESHOOTING TIP: If output current is approximately two-thirds of rated output, one power transformer circuit is inoperative. If output current is approximately one-third of rated current, two power transformer circuits are inoperative.

37
8 PARTS LIST
AMMETER LINE CONTACTOR AC FUSE DC FUSE RECTIFIER CONTROLS
MODEL SCALE P/N POLE RATING P/N 120 208/240 480 RATING P/N AMPS PIV P/N CXFPILOT
TIMERTIMER
SCOUTCOMPU
JM- JR- JL- JS- JT-LIGHT
JR-ADAPTER
NBC-CHARGE
JL- NBC- NBC-
FR6AC255 100 381 2 30 510 12 7/6 100 630 125 300 225 253 698 509 2765 2468 2746FR6CE255 100 381 2 30 510 7/6 03 100 630 125 300 225 254 698 509 2765 2468 2746FR6AC375 200 327 2 30 510 20 10/10 200 620 125 300 225 253 698 509 2765 2468 2746FR6CE375 200 327 2 30 510 10/10 05 200 620 125 300 225 254 698 509 2765 2468 2746FR6AC450 200 327 2 30 510 25 15/12 200 620 125 300 225 253 698 509 2765 2468 2746FR6CE450 200 327 2 30 510 15/12 06 200 620 125 300 225 254 698 509 2765 2468 2746FR6CE510 200 327 2 30 510 15/12 06 200 620 125 300 225 254 698 509 2765 2468 2746FR6CE640 200 327 2 30 510 20/15 07 325 625 185 300 206 254 698 509 2765 2468 2746FR6CE750 300 328 2 30 510 20/20 10 325 625 185 300 206 254 698 509 2765 2468 2746FR6HK830 300 328 3 30 513 7/6 03 200 620 185 300 182 254 698 509 2765 2468 2746FR6HK1000 300 328 3 30 513 10/10 05 200 620 345 300 208 254 698 509 2765 2468 2746FR6HK1125 300 328 3 30 513 12/10 05 200 620 345 300 208 254 698 509 2765 2468 2746FR6HK1700 500 328 3 30 513 15/12 07 200 620 345 300 208 254 698 509 2765 2468 2746
FR9CE255 100 381 2 30 510 8/8 04 100 630 125 300 225 254 698 509 2765 2468 2746FR9CE640 200 327 2 30 510 25/20 10 325 625 185 300 206 254 698 509 2765 2468 2746FR9HK830 300 328 3 30 513 10/10 05 200 620 185 300 182 254 698 509 2765 2468 2746FR9HK1160 300 328 3 30 513 15/12 07 200 620 345 300 208 254 698 509 2765 2468 2746
FR12CE255 100 381 2 30 510 15/12 06 100 630 125 300 225 254 698 509 2765 2468 2746FR12CE375 200 327 2 30 510 20/20 10 200 620 125 300 225 254 698 509 2765 2468 2746FR12CE450 200 327 2 30 510 20/20 10 200 620 125 300 225 254 698 509 2765 2468 2746FR12CE550 200 327 2 30 510 25/25 12 200 620 125 300 225 254 698 509 2765 2468 2746FR12CE640 200 327 2 30 510 35/30 15 325 625 185 300 206 254 698 509 2765 2468 2746FR12CE750 300 328 2 40 511 40/35 20 325 625 185 300 206 254 698 509 2765 2468 2746FR12HK550 200 327 3 30 513 8/8 05 100 630 185 300 182 254 698 509 2765 2468 2746FR12HK640 200 327 3 30 513 10/10 05 200 620 185 300 182 254 698 509 2765 2468 2746FR12HK850 300 328 3 30 513 15/12 07 200 620 185 300 182 254 698 509 2765 2468 2746FR12HK1000 300 328 3 30 513 15/15 08 200 620 345 300 208 254 698 509 2765 2468 2746FR12HK1200 300 328 3 30 513 20/20 10 200 620 345 300 208 254 698 509 2765 2468 2746
FR15HK830 300 328 3 30 513 15/15 08 200 620 185 300 182 254 698 509 2765 2468 2746FR15HK1200 300 328 3 30 513 25/20 10 200 620 345 300 208 254 698 509 2765 2468 2746
FR16HK830 300 328 3 30 513 20/15 08 200 620 185 300 182 254 698 509 2765 2468 2746FR16HK1200 300 328 3 40 514 25/20 10 200 620 345 300 208 254 698 509 2765 2468 2746
FR18CE255 100 381 2 30 510 20/20 10 100 630 125 300 225 254 698 509 2765 2468 2746FR18CE450 200 327 2 30 510 30/25 12 200 620 125 300 225 254 698 509 2765 2468 2746FR18CE510 200 327 2 30 510 35/30 15 200 620 125 300 225 254 698 509 2765 2468 2746FR18CE640 200 327 2 40 511 45/40 20 325 625 185 300 651 254 698 509 2765 2468 2746FR18CE750 200 327 3 60 616 60 30 325 625 185 300 206 254 698 509 2765 2468 2746FR18CE850 300 328 3 60 616 60 30 325 625 250 600 790 254 698 509 2765 2468 2746FR18HK640 200 327 3 30 513 15/15 06 200 620 185 300 182 254 698 509 2765 2468 2746FR18HK750 200 327 3 30 513 20/15 08 200 620 185 300 182 254 698 509 2765 2468 2746FR18HK850 300 328 3 30 513 20/15 10 200 620 185 300 182 254 698 509 2765 2468 2746FR18HK1000 300 328 3 30 513 25/20 10 200 620 345 300 208 254 698 509 2765 2468 2746FR18HK1200 300 328 3 40 514 30/25 15 200 620 345 300 208 254 698 509 2765 2468 2746FR18HK1360 300 328 3 40 514 30/30 15 200 620 345 300 208 254 698 509 2765 2468 2746FR18HK1600 500 382 3 50 515 35/30 15 200 620 345 300 208 254 698 509 2765 2468 2746FR18HK2175 500 382 3 40 514 25 325 625 590 300 657 254 698 509 2765 2468 2746
FR20HK800 300 328 3 30 513 20/15 10 200 620 185 300 182 254 698 509 2765 2468 2746
FR24CE225 100 381 2 30 510 20 10 200 620 125 300 225 254 698 509 2765 2468 2746FR24CE510 200 327 2 40 511 50/40 20 200 620 185 600 789 254 698 509 2765 2468 2746FR24BC750 200 327 3 90 615 80/70 325 625 185 600 789 254 698 509 2765 2468 2746FR24HK510 200 327 3 30 513 20/15 8 200 620 185 600 196 254 698 509 2765 2468 2746FR24HK640 200 327 3 30 513 20/15 10 200 620 185 600 196 254 698 509 2765 2468 2746FR24HK750 200 327 3 30 513 25/20 10 200 620 185 600 196 254 698 509 2765 2468 2746FR24HK900 300 328 3 40 514 30/30 15 200 620 345 600 209 254 698 509 2765 2468 2746FR24HK1100 300 328 3 40 514 35/30 15 200 620 345 600 209 254 698 509 2765 2468 2746FR24HK1360 300 328 3 40 514 35/30 15 200 620 345 600 209 254 698 509 2765 2468 2746
FR36CE450 200 327 3 60 616 60/50 30 200 620 185 600 788 254 698 509 2765 2468 2746FR36HK450 200 327 3 30 513 20/20 10 200 620 185 600 196 254 698 509 2765 2468 2746FR36HK550 200 327 3 40 514 25/25 12 200 620 185 600 196 254 698 509 2765 2468 2746FR36HK750 200 327 3 40 514 30/30 15 200 620 185 600 196 254 698 509 2765 2468 2746FR36K935 300 328 3 30 513 20 200 620 345 600 209 254 698 509 2765 2468 2746FR36K1600 500 382 3 50 515 35 200 620 350 600 209 254 698 509 2765 2468 2746
8.1 FERRO FIVE FR SERIES 120/208/240 and 480 VAC inputs
RANGERII
NBC-
2382238223822382238223822382238223822382238223822382
2382238223822382
23822382238223822382238223822382238223822382
23822382
23822382
23822382238223822382238223822382238223822382238223822382
2382
238223822382238223822382238223822382
238223822382238223822382

38
8.2 FERRO FIVE FR SERIES 575 VAC input
AMMETER LINE CONTACTOR AC FUSE DC FUSE RECTIFIER CONTROLS
MODEL SCALE P/N POLE RATING P/N 480 575 RATING P/N AMPS PIV P/N CXFPILOT
TIMERTIMER
SCOUTCOMPU RANGER
JM- JR- JL- JS- JT-LIGHT
JR-ADAPTER
NBC-CHARGE II
JL- NBC- NBC- NBC-
FR6M255 100 381 2 30 510 03 100 630 125 300 225 255 698 509 2765 2468 2746 2382FR6M375 200 327 2 30 510 05 200 620 125 300 225 255 698 509 2765 2468 2746 2382FR6M450 200 327 2 30 510 05 200 620 125 300 225 255 698 509 2765 2468 2746 2382FR6M510 200 327 2 30 510 05 200 620 125 300 225 255 698 509 2765 2468 2746 2382FR6M640 200 327 2 30 510 06 325 625 185 300 206 255 698 509 2765 2468 2746 2382FR6M750 300 328 2 30 510 06 325 625 185 300 206 255 698 509 2765 2468 2746 2382FR6L830 300 328 3 30 513 03 200 620 185 300 182 255 698 509 2765 2468 2746 2382FR6L1000 300 328 3 30 513 03 200 620 345 300 208 255 698 509 2765 2468 2746 2382FR6L1125 300 328 3 30 513 03 200 620 345 300 208 255 698 509 2765 2468 2746 2382FR6L1700 500 328 3 30 513 05 200 620 345 300 208 255 698 509 2765 2468 2746 2382
FR9M640 200 327 2 30 510 10 325 625 185 300 206 255 698 509 2765 2468 2746 2382FR9L830 300 328 3 30 513 03 200 620 185 300 182 255 698 509 2765 2468 2746 2382FR9L1160 300 328 3 30 513 05 200 620 345 300 208 255 698 509 2765 2468 2746 2382
FR12M255 100 381 2 30 510 06 100 630 125 300 225 255 698 509 2765 2468 2746 2382FR12M375 200 327 2 30 510 06 200 620 125 300 225 255 698 509 2765 2468 2746 2382FR12M450 200 327 2 30 510 06 200 620 125 300 225 255 698 509 2765 2468 2746 2382FR12M550 200 327 2 30 510 10 200 620 125 300 225 255 698 509 2765 2468 2746 2382FR12M640 200 327 2 30 510 10 325 625 185 300 206 255 698 509 2765 2468 2746 2382FR12L550 200 327 3 30 513 03 100 630 185 300 182 255 698 509 2765 2468 2746 2382FR12L640 200 327 3 30 513 03 200 620 185 300 182 255 698 509 2765 2468 2746 2382FR12L850 300 328 3 30 513 03 200 620 185 300 182 255 698 509 2765 2468 2746 2382FR12L1000 300 328 3 30 513 05 200 620 345 300 208 255 698 509 2765 2468 2746 2382FR12L1200 300 328 3 30 513 05 200 620 345 300 208 255 698 509 2765 2468 2746 2382
FR15L830 300 328 3 30 513 05 200 620 185 300 182 255 698 509 2765 2468 2746 2382FR15L1200 300 328 3 30 513 10 200 620 345 300 208 255 698 509 2765 2468 2746 2382
FR16L830 300 328 3 30 513 05 200 620 185 300 182 255 698 509 2765 2468 2746 2382FR16L1200 300 328 3 40 514 10 200 620 345 300 208 255 698 509 2765 2468 2746 2382
FR18M255 100 381 2 30 510 010 100 630 125 300 225 255 698 509 2765 2468 2746 2382FR18M450 200 327 2 30 510 010 200 620 125 300 225 255 698 509 2765 2468 2746 2382FR18M510 200 327 2 30 510 015 200 620 125 300 225 255 698 509 2765 2468 2746 2382FR18M640 200 327 2 40 511 020 325 625 185 300 651 255 698 509 2765 2468 2746 2382FR18EM750 200 327 3 60 616 30 025 325 625 185 300 785 255 698 509 2765 2468 2746 2382FR18EM850 300 328 3 60 616 30 025 325 625 250 600 785 255 698 509 2765 2468 2746 2382FR18L750 200 327 3 30 513 005 200 620 185 300 182 255 698 509 2765 2468 2746 2382FR18L850 300 328 3 30 513 005 200 620 185 300 182 255 698 509 2765 2468 2746 2382FR18L1000 300 328 3 30 513 006 200 620 345 300 208 255 698 509 2765 2468 2746 2382FR18L1200 300 328 3 40 514 010 200 620 345 300 208 255 698 509 2765 2468 2746 2382FR18L1360 300 328 3 40 514 010 200 620 345 300 208 255 698 509 2765 2468 2746 2382FR18L1600 500 382 3 50 515 200 620 345 300 208 255 698 509 2765 2468 2746 2382FR18L2175 500 382 3 40 514 325 625 590 300 657 255 698 509 2765 2468 2746 2382
FR20L800 300 328 3 30 513 06 200 620 185 300 182 255 698 509 2765 2468 2746 2382
FR24EM510 200 327 2 40 511 35 30 200 620 185 600 789 255 698 509 2765 2468 2746 2382FR24EM750 200 327 3 90 615 35 30 325 625 185 600 790 255 698 509 2765 2468 2746 2382FR24L510 200 327 3 30 513 05 200 620 185 600 196 255 698 509 2765 2468 2746 2382FR24L750 200 327 3 40 513 06 200 620 185 600 196 255 698 509 2765 2468 2746 2382FR24L900 300 328 3 40 514 10 200 620 345 600 209 255 698 509 2765 2468 2746 2382FR24L1100 300 328 3 40 514 10 200 620 345 600 209 255 698 509 2765 2468 2746 2382FR24L1360 300 328 3 40 514 10 200 620 345 600 209 255 698 509 2765 2468 2746 2382
FR36EM450 200 327 3 60 616 30 25 200 620 185 600 789 255 698 509 2765 2468 2746 2382FR36L450 200 327 3 30 513 06 200 620 185 600 196 255 698 509 2765 2468 2746 2382FR36L550 200 327 3 40 514 10 200 620 185 600 196 255 698 509 2765 2468 2746 2382FR36L750 200 327 3 40 514 10 200 620 185 600 196 255 698 509 2765 2468 2746 2382FR36L935 300 328 3 30 513 15 200 620 345 600 209 255 698 509 2765 2468 2746 2382
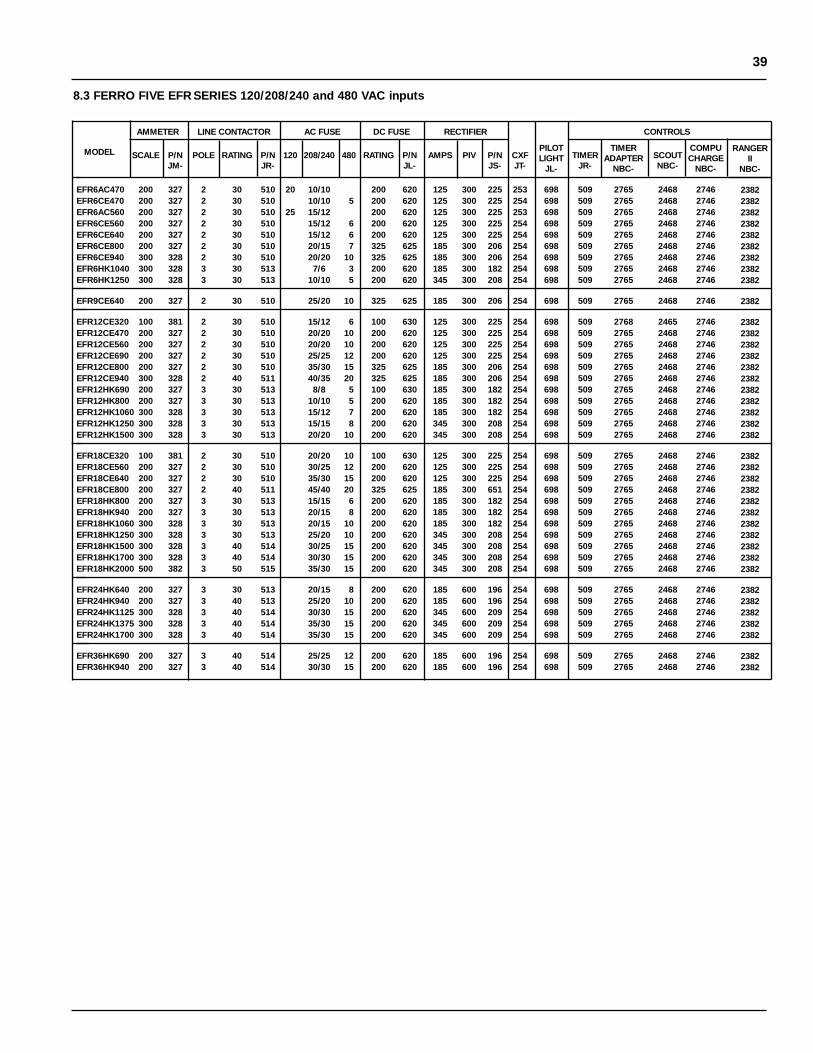
39
8.3 FERRO FIVE EFR SERIES 120/208/240 and 480 VAC inputs
AMMETER LINE CONTACTOR AC FUSE DC FUSE RECTIFIER CONTROLS
MODEL SCALE P/N POLE RATING P/N 120 208/240 480 RATING P/N AMPS PIV P/N CXFPILOT
TIMERTIMER
SCOUTCOMPU
JM- JR- JL- JS- JT-LIGHT
JR-ADAPTER
NBC-CHARGE
JL- NBC- NBC-
EFR6AC470 200 327 2 30 510 20 10/10 200 620 125 300 225 253 698 509 2765 2468 2746EFR6CE470 200 327 2 30 510 10/10 05 200 620 125 300 225 254 698 509 2765 2468 2746EFR6AC560 200 327 2 30 510 25 15/12 200 620 125 300 225 253 698 509 2765 2468 2746EFR6CE560 200 327 2 30 510 15/12 06 200 620 125 300 225 254 698 509 2765 2468 2746EFR6CE640 200 327 2 30 510 15/12 06 200 620 125 300 225 254 698 509 2765 2468 2746EFR6CE800 200 327 2 30 510 20/15 07 325 625 185 300 206 254 698 509 2765 2468 2746EFR6CE940 300 328 2 30 510 20/20 10 325 625 185 300 206 254 698 509 2765 2468 2746EFR6HK1040 300 328 3 30 513 7/6 03 200 620 185 300 182 254 698 509 2765 2468 2746EFR6HK1250 300 328 3 30 513 10/10 05 200 620 345 300 208 254 698 509 2765 2468 2746
EFR9CE640 200 327 2 30 510 25/20 10 325 625 185 300 206 254 698 509 2765 2468 2746
EFR12CE320 100 381 2 30 510 15/12 06 100 630 125 300 225 254 698 509 2768 2465 2746EFR12CE470 200 327 2 30 510 20/20 10 200 620 125 300 225 254 698 509 2765 2468 2746EFR12CE560 200 327 2 30 510 20/20 10 200 620 125 300 225 254 698 509 2765 2468 2746EFR12CE690 200 327 2 30 510 25/25 12 200 620 125 300 225 254 698 509 2765 2468 2746EFR12CE800 200 327 2 30 510 35/30 15 325 625 185 300 206 254 698 509 2765 2468 2746EFR12CE940 300 328 2 40 511 40/35 20 325 625 185 300 206 254 698 509 2765 2468 2746EFR12HK690 200 327 3 30 513 8/8 05 100 630 185 300 182 254 698 509 2765 2468 2746EFR12HK800 200 327 3 30 513 10/10 05 200 620 185 300 182 254 698 509 2765 2468 2746EFR12HK1060 300 328 3 30 513 15/12 07 200 620 185 300 182 254 698 509 2765 2468 2746EFR12HK1250 300 328 3 30 513 15/15 08 200 620 345 300 208 254 698 509 2765 2468 2746EFR12HK1500 300 328 3 30 513 20/20 10 200 620 345 300 208 254 698 509 2765 2468 2746
EFR18CE320 100 381 2 30 510 20/20 10 100 630 125 300 225 254 698 509 2765 2468 2746EFR18CE560 200 327 2 30 510 30/25 12 200 620 125 300 225 254 698 509 2765 2468 2746EFR18CE640 200 327 2 30 510 35/30 15 200 620 125 300 225 254 698 509 2765 2468 2746EFR18CE800 200 327 2 40 511 45/40 20 325 625 185 300 651 254 698 509 2765 2468 2746EFR18HK800 200 327 3 30 513 15/15 06 200 620 185 300 182 254 698 509 2765 2468 2746EFR18HK940 200 327 3 30 513 20/15 08 200 620 185 300 182 254 698 509 2765 2468 2746EFR18HK1060 300 328 3 30 513 20/15 10 200 620 185 300 182 254 698 509 2765 2468 2746EFR18HK1250 300 328 3 30 513 25/20 10 200 620 345 300 208 254 698 509 2765 2468 2746EFR18HK1500 300 328 3 40 514 30/25 15 200 620 345 300 208 254 698 509 2765 2468 2746EFR18HK1700 300 328 3 40 514 30/30 15 200 620 345 300 208 254 698 509 2765 2468 2746EFR18HK2000 500 382 3 50 515 35/30 15 200 620 345 300 208 254 698 509 2765 2468 2746
EFR24HK640 200 327 3 30 513 20/15 08 200 620 185 600 196 254 698 509 2765 2468 2746EFR24HK940 200 327 3 40 513 25/20 10 200 620 185 600 196 254 698 509 2765 2468 2746EFR24HK1125 300 328 3 40 514 30/30 15 200 620 345 600 209 254 698 509 2765 2468 2746EFR24HK1375 300 328 3 40 514 35/30 15 200 620 345 600 209 254 698 509 2765 2468 2746EFR24HK1700 300 328 3 40 514 35/30 15 200 620 345 600 209 254 698 509 2765 2468 2746
EFR36HK690 200 327 3 40 514 25/25 12 200 620 185 600 196 254 698 509 2765 2468 2746EFR36HK940 200 327 3 40 514 30/30 15 200 620 185 600 196 254 698 509 2765 2468 2746
RANGERII
NBC-
238223822382238223822382238223822382
2382
23822382238223822382238223822382238223822382
23822382238223822382238223822382238223822382
23822382238223822382
23822382

40
FR6AC255FR6CE255FR6AC375FR6CE375FR6AC450FR6CE450FR6CE510FR6CE640FR6CE750FR6HK510FR6HK830FR6HK1000FR6HK1125FR6HK1700
FR9CE255FR9CE640FR9HK830FR9HK1160
FR12CE255FR12AC375FR12CE375FR12AC450FR12CE450FR12CE550FR12CE640FR12CE750FR12HK550FR12HK640FR12HK750FR12HK850FR12HK1000FR12HK1200
FR15HK830FR15HK1200
FR16HK830FR16HK1200
FR18CE255FR18CE450FR18CE510FR18CE640FR18CE750FR18CE850FR18HK640FR18HK750FR18HK850FR18HK1000FR18HK1200FR18HK1360FR18HK1600FR18K2175
FR20HK800
FR24CE255FR24CE330FR24CE510FR24BC750FR24HK330FR24HK510FR24HK640FR24HK750FR24HK900FR24HK1100FR24HK1360
FR36CE450FR36HK450FR36HK550FR36HK750FR36K935FR36K1600
NBC-2243NBC-2244NBC-2243NBC-2244NBC-2243NBC-2244NBC-2244NBC-2244NBC-2244NBC-2247NBC-2247NBC-2247NBC-2247NBC-2247
NBC-2244NBC-2244NBC-2247NBC-2247
NBC-2244NBC-2243NBC-2244NBC-2243NBC-2244NBC-2244NBC-2244NBC-2244NBC-2247NBC-2247NBC-2247NBC-2247NBC-2247NBC-2247
NBC-2247NBC-2247
NBC-2247NBC-2247
NBC-2244NBC-2244NBC-2244NBC-2244NBC-2244NBC-2244NBC-2247NBC-2247NBC-2247NBC-2247NBC-2247NBC-2247NBC-2247NBC-2249
NBC-2247
NBC-2244NBC-2244NBC-2244NBC-2244NBC-2247NBC-2247NBC-2247NBC-2247NBC-2247NBC-2247NBC-2247
NBC-2244NBC-2247NBC-2247NBC-2247NBC-2249NBC-2249
FR LIBERTY
NANANANANAKBC-5702KBC-5686NANANANANANANA
NANANANA
KBC-5702KBC-5702KBC-5702KBC-5702KBC-5702KBC-5686KBC-5686KBC-5686KBC-5704KBC-5704KBC-5704KBC-5704KBC-5704NA
NANA
NANA
NANANAKBC-5686KBC-5686KBC-5686KBC-5704KBC-5704KBC-5704KBC-5704KBC-5687KBC-5687NANA
NA
NAKBC-5686KBC-5686NAKBC-5704KBC-5704KBC-5704KBC-5704KBC-5687KBC-5687KBC-5687
NANANANANANA
REVOLUTION
NANANANANAKBC-5717KBC-5717NANANANANANANA
NANANANA
KBC-5717NANAKBC-5718KBC-5717KBC-5717KBC-5717KBC-5717KBC-5719KBC-5719KBC-5719KBC-5719KBC-5719NA
NANA
NANA
NANAKBC-5717KBC-5717KBC-5717KBC-5717KBC-5719KBC-5719KBC-5719KBC-5719KBC-5719NANANA
NA
NAKBC-5717KBC-5717NANAKBC-5719KBC-5719KBC-5719KBC-5719NANA
NANANANANANA
MODEL NO.
FR6M255FR6M375FR6EM450FR6EM510FR6M640FR6M750FR6L830FR6L1000FR6L1125FR6L1700
FR9M640FR9L830FR9L1160
FR12EM255FR12EM375FR12EM450FR12EM550FR12EM640FR12EM750FR12KL550FR12KL640FR12KL750FR12KL850FR12KL1000FR12L1200
FR15L830FR15L1200
FR16L830FR16L1200
FR18M255FR18M450FR18EM510FR18EM640FR18EM750FR18EM850FR18KL640FR18KL750FR18KL850FR18KL1000FR18KL1200FR18KL1360FR18L1600FR18L2175
FR20L800
FR24EM330FR24EM510FR24KL330FR24KL510FR24KL640FR24KL750FR24KL900FR24KL1100FR24KL1360
FR36EM450FR36L450FR36L550FR36L750FR36L935
NBC-2245NBC-2245NBC-2246NBC-2246NBC-2245NBC-2245NBC-2249NBC-2249NBC-2249NBC-2249
NBC-2245NBC-2249NBC-2249
NBC-2246NBC-2246NBC-2246NBC-2246NBC-2246NBC-2246NBC-2248NBC-2248NBC-2248NBC-2248NBC-2248NBC-2249
NBC-2249NBC-2249
NBC-2249NBC-2249
NBC-2245NBC-2245NBC-2246NBC-2246NBC-2246NBC-2246NBC-2248NBC-2248NBC-2248NBC-2248NBC-2248NBC-2248NBC-2249NBC-2249
NBC-2249
NBC-2246NBC-2246NBC-2248NBC-2248NBC-2248NBC-2248NBC-2248NBC-2248NBC-2248
NBC-2246NBC-2249NBC-2249NBC-2249NBC-2249
NANAKBC-5703NANANANANANANA
NANANA
KBC-5703KBC-5703KBC-5703NANANAKBC-5705KBC-5705KBC-5705KBC-5705KBC-5705NA
NANA
NANA
NANANANANANAKBC-5705KBC-5705KBC-5705KBC-5705KBC-5691KBC-5691NANA
NA
NANAKBC-5705KBC-5705KBC-5705KBC-5705KBC-5691KBC-5691KBC-5691
NANANANANA
NANAKBC-5722KBC-5722NANANANANANA
NANANA
KBC-5722NAKBC-5722KBC-5722KBC-5722KBC-5722KBC-5721KBC-5721KBC-5721KBC-5721KBC-5721NA
NANA
NANA
NANAKBC-5722KBC-5722KBC-5722KBC-5722KBC-5721KBC-5721KBC-5721KBC-5721KBC-5721NANANA
NA
KBC-5722KBC-5722NAKBC-5721KBC-5721KBC-5721KBC-5721NANA
NANANANANA
FR LIBERTY REVOLUTIONMODEL NO.
9.1 Wiring diagram guide for FERRO FIVE FR, LIBERTY, and REVOLUTION SERIES charger models
Notes:1. For standard FR, KL diagram is NVC-2248 and L diagram is NBC-22492. For standard FR, EM diagram is NBC-2246 and M diagram is NBC-22453. For FERRO FIVE LIBERTY SERIES and FERRO FIVE REVOLUTION SERIES, KL and L
diagrams are the same, except L has only 575 VAC input4. For FERRO FIVE LIBERTY SERIES and FERRO FIVE REVOLUTION SERIES, EM and M
diagrams are the same, except M has only 575 VAC input5. Both L and KL, or M and EM versions may exist for models listed
9 WIRING DIAGRAMS

41
EFR6AC470EFR6CE470EFR6CE560EFR6CE640EFR6CE800EFR6CE940EFR6HK1040EFR6HK1250
EFR9CE640
EFR12CE320EFR12CE470EFR12CE560EFR12CE690EFR12CE800EFR12CE940EFR12HK690EFR12HK800EFR12HK1060EFR12HK1250EFR12HK1500
EFR18CE320EFR18CE560EFR18CE640EFR18CE800EFR18HK940EFR18HK1060EFR18HK1250EFR18HK1500EFR18HK1700EFR18HK2000
EFR24HK640EFR24HK940EFR24HK1125EFR24HK1375EFR24HK1700
EFR36HK690EFR36HK940
NBC-2243NBC-2244NBC-2244NBC-2244NBC-2244NBC-2244NBC-2247NBC-2247
NBC-2244
NBC-2244NBC-2244NBC-2244NBC-2244NBC-2244NBC-2244NBC-2247NBC-2247NBC-2247NBC-2247NBC-2247
NBC-2244NBC-2244NBC-2244NBC-2244NBC-2247NBC-2247NBC-2247NBC-2247NBC-2247NBC-2247
NBC-2247NBC-2247NBC-2247NBC-2247NBC-2247
NBC-2247NBC-2247
MODELNO.
EFR
9.2 Wiring diagram guide for FERRO FIVE EFR SERIES models

42
9.3 Wiring diagrams for FERRO FIVE FR SERIES

43
9.3 Wiring diagrams for FERRO FIVE FR SERIES (continued)

44
9.3 Wiring diagrams for FERRO FIVE FR SERIES (continued)

45
9.3 Wiring diagrams for FERRO FIVE FR SERIES (continued)

46
9.3 Wiring diagrams for FERRO FIVE FR SERIES (continued)

47
9.3 Wiring diagrams for FERRO FIVE FR SERIES (continued)

48
9.3 Wiring diagrams for FERRO FIVE FR SERIES (continued)

49
9.4 Wiring diagrams for FERRO FIVE LIBERTY SERIES

50
9.4 Wiring diagrams for FERRO FIVE LIBERTY SERIES (continued)

51
9.4 Wiring diagrams for FERRO FIVE LIBERTY SERIES (continued)

52
9.4 Wiring diagrams for FERRO FIVE LIBERTY SERIES (continued)

53
9.4 Wiring diagrams for FERRO FIVE LIBERTY SERIES (continued)

54
9.4 Wiring diagrams for FERRO FIVE LIBERTY SERIES (continued)

55
9.4 Wiring diagrams for FERRO FIVE LIBERTY SERIES (continued)

56
9.5 Wiring diagrams for FERRO FIVE REVOLUTION SERIES
CH
AN
GE
OV
ER
INS
TRU
CTI
ON
S
STE
P 1
- R
EM
OV
E A
LL C
HA
NG
EO
VE
R J
UM
PE
RS
FR
OM
TB
1 A
ND
CX
F.
STE
P 2
- FO
R 2
08 V
AC
INP
UT
ON
TB
1, C
ON
NE
CT
TER
MIN
ALS
1 &
4,
2 &
5 A
ND
5 &
7.
ON
CX
F, C
ON
NE
CT
TER
MIN
ALS
H1
& H
3 an
d H
2 &
H4.
FOR
240
VA
C IN
PU
TO
N T
B1,
CO
NN
EC
T TE
RM
INA
LS 1
& 4
, 3
& 6
AN
D 6
& 7
.O
N C
XF,
CO
NN
EC
T TE
RM
INA
LS H
1 &
H3
AN
D H
2 &
H4.
FOR
480
VA
C IN
PU
TO
N T
B1,
CO
NN
EC
T TE
RM
INA
LS 3
& 4
AN
D 6
& 7
.O
N C
XF,
CO
NN
EC
T TE
RM
INA
LS H
2 &
H3.
CA
UTI
ON
AC
FU
SE
S M
US
T B
E C
HA
NG
ED
WH
EN
CH
AN
GIN
G
VO
LTA
GE
. S
EE
LA
BE
L IN
CH
AR
GE
R.
LEG
EN
D
AS
A
MM
ETE
R S
HU
NT
HS
H
EAT
SIN
KB
C
CO
NTA
CTO
RK
1 C
ON
TRO
L B
OA
RD
C1,
C2
CA
PAC
ITO
RLC
LI
NE
CO
NTR
AC
TOR
CE
MF
DIO
DE
AS
SE
MB
LYP
XF
PO
WER
TR
AN
SFO
RM
ERC
XF
CO
NTR
OL
TRA
NS
FOR
ME
RR
R
RE
SO
NA
NT
RE
SIS
TOR
D1,
D2
DIO
DE
SR
S
ILIC
ON
RE
CTI
FIE
RF1
FU
SE
, A
C P
HA
SE
TB1
TER
MIN
AL
BLO
CK
F2
FUS
E,
DC
CAT
HO
DE
TB4
TER
MIN
AL
BLO
CK
,C
US
TOM
ER
CO
NN
EC
TIO
N
(OP
TIO
NA
L)
NO
TE 1
CO
NTR
OL
WIR
ING
IS #
18 G
AU
GE
WIR
E.
NO
TE 2
CO
NN
EC
T G
RO
UN
D W
IRE
TO
BO
AR
D G
RO
UN
D O
N R
AN
GE
R 2
NO
TE 3
ON
LY O
NE
OP
TIO
N C
AN
BE
CO
NN
EC
TED
TO
TB
4

57
9.5 Wiring diagrams for FERRO FIVE REVOLUTION SERIES (continued)
CH
AN
GE
OV
ER
INS
TRU
CTI
ON
S
STE
P 1
- R
EM
OV
E A
LL C
HA
NG
EO
VE
R J
UM
PE
RS
FR
OM
TB
1 A
ND
CX
F.
STE
P 2
- FO
R 2
08 V
AC
INP
UT
ON
TB
1, C
ON
NE
CT
TER
MIN
ALS
2 &
4 A
ND
5 &
7.
ON
CX
F, C
ON
NE
CT
TER
MIN
ALS
H2
& H
3.
FOR
120
VA
C IN
PU
TO
N T
B1,
CO
NN
EC
T TE
RM
INA
LS 1
& 4
, 3
& 5
AN
D 5
& 7
.O
N C
XF,
CO
NN
EC
T TE
RM
INA
LS H
1 &
H3
AN
D H
2 &
H4.
FOR
240
VA
C IN
PU
TO
N T
B1,
CO
NN
EC
T TE
RM
INA
LS 3
& 4
AN
D 5
& 7
.O
N C
XF,
CO
NN
EC
T TE
RM
INA
LS H
2 &
H3.
CA
UTI
ON
AC
FU
SE
S M
US
T B
E C
HA
NG
ED
WH
EN
CH
AN
GIN
G
VO
LTA
GE
. S
EE
LA
BE
L IN
CH
AR
GE
R.
LEG
EN
D
AS
A
MM
ETE
R S
HU
NT
HS
H
EAT
SIN
KB
C
CO
NTA
CTO
RK
1 C
ON
TRO
L B
OA
RD
C1,
C2
CA
PAC
ITO
RLC
LI
NE
CO
NTA
CTO
RC
EM
F D
IOD
E A
SS
EM
BLY
PX
F P
OW
ER T
RA
NS
FOR
MER
CX
F C
ON
TRO
L TR
AN
SFO
RM
ER
RR
R
ES
ON
AN
T R
ES
ISTO
RD
1, D
2 D
IOD
ES
R
SIL
ICO
N R
EC
TIFI
ER
F1
FUS
E,
AC
PH
AS
ETB
1 TE
RM
INA
L B
LOC
KF2
FU
SE
, D
C C
ATH
OD
ETB
4 TE
RM
INA
L B
LOC
K,
CU
STO
ME
R C
ON
NE
CTI
ON
C
US
TOM
ER
CO
NN
EC
TIO
N
(OP
TIO
NA
L)
NO
TE 1
CO
NTR
OL
WIR
ING
IS #
18 G
AU
GE
WIR
E.
NO
TE 2
CO
NN
EC
T G
RO
UN
D W
IRE
TO
BO
AR
D G
RO
UN
D O
N R
AN
GE
R 2
NO
TE 3
ON
LY O
NE
OP
TIO
N C
AN
BE
CO
NN
EC
TED
TO
TB
4

58
9.5 Wiring diagrams for FERRO FIVE REVOLUTION SERIES (continued)
LEG
EN
D
AS
A
MM
ETE
R S
HU
NT
HS
H
EAT
SIN
K A
SS
EM
BLY
C1-
C6
CA
PAC
ITO
RK
1 C
ON
TRO
L B
OA
RD
CC
C
ON
TAC
TOR
LC
LIN
E C
ON
TAC
TOR
(N
OR
MA
LLY
CLO
SE
D)
PX
F1-P
XF3
P
OW
ER T
RA
NS
FOR
MER
CE
MF
DIO
DE
AS
SE
MB
LYR
R1-
RR
3 R
ES
ON
AN
T R
ES
ISTO
RC
XF
CO
NTR
OL
TRA
NS
FOR
MER
SR
S
ILIC
ON
RE
CTI
FIE
RF1
FU
SE
, A
C P
HA
SE
T1-T
2 TE
RM
INA
L, D
IOD
E A
SS
EM
BLY
F2
FUS
E,
DC
CAT
HO
DE
TB1
TER
MIN
AL
BLO
CK
TB
1 TE
RM
INA
L B
LOC
K,
(OP
TIO
NA
L)
NO
TE 1
CO
NTR
OL
WIR
ING
IS #
18 G
AU
GE
WIR
E.
NO
TE 2
CO
NN
EC
T G
RO
UN
D W
IRE
TO
BO
AR
D G
RO
UN
D O
N R
AN
GE
R 2
WIR
E N
UM
BE
RS
US
ED
: 1-
17,
20-3
0, 3
4, 3
5, 3
7-39
, 41
, 42
, 44
-47,
50,
51,
54-5
6, 5
9, 6
0, 7
2-78
.
CH
AN
GE
OV
ER
INS
TRU
CTI
ON
S
STE
P 1
- R
EM
OV
E A
LL C
HA
NG
EO
VE
R J
UM
PE
RS
FR
OM
TB
1, T
B2,
TB
3 A
ND
CX
F.
STE
P 2
- FO
R 2
08 V
AC
INP
UT
ON
TB
1, T
B2
AN
D T
B3
CO
NN
EC
T TE
RM
INA
LS 1
& 4
, 2
& 5
A
ND
5 &
7.
ON
CX
F C
ON
NE
CT
TER
MIN
ALS
H1
& H
3 an
d H
2 &
H4.
FOR
240
VA
C IN
PU
TO
N T
B1,
TB
2 A
ND
TB
3 C
ON
NE
CT
TER
MIN
ALS
1 &
4,
3 &
6
AN
D 6
& 7
.O
N C
XF
CO
NN
EC
T TE
RM
INA
LS H
1 &
H3
AN
D H
2 &
H4.
FOR
480
VA
C IN
PU
TO
N T
B1,
TB
2 A
ND
TB
3 C
ON
NE
CT
TER
MIN
ALS
3 &
4 A
ND
6 &
7.
ON
CX
F C
ON
NE
CT
TER
MIN
ALS
H2
& H
3.
CA
UTI
ON
1. A
LL 3
PH
AS
ES
ON
VO
LTA
GE
CH
AN
GE
OV
ER
BO
AR
D M
US
T B
E
RE
CO
NN
EC
TED
WH
EN
CH
AN
GIN
G V
OLT
AG
E.
2. A
C F
US
ES
MU
ST
BE
CH
AN
GE
D W
HE
N C
HA
NG
ING
VO
LTA
GE
. S
EE
LA
BE
L IN
CH
AR
GE
R.

59
9.5 Wiring diagrams for FERRO FIVE REVOLUTION SERIES (continued)
LEG
EN
D
AS
A
MM
ETE
R S
HU
NT
LC
LIN
E C
ON
TAC
TOR
C1-
C6
CA
PAC
ITO
RP
XF1
-PX
F3
PO
WE
R T
RA
NS
FOR
ME
RC
C
CO
NTA
CTO
RR
R1-
RR
3 R
ES
ON
AN
T R
ES
ISTO
R(N
OR
MA
LLY
CLO
SE
D)
PX
F1-P
XF3
P
OW
ER
TR
AN
SFO
RM
ER
CE
MF
DIO
DE
AS
SE
MB
LYS
R
SIL
ICO
N R
EC
TIFI
ER
CXF
C
ON
TRO
L TR
ANSF
OR
MER
T1-T
2TE
RM
INA
L, D
IOD
E
F1
FUS
E,
AC
PH
AS
EA
SS
EM
BLY
F2
FUS
E,
DC
CAT
HO
DE
TB
1 TE
RM
INA
L B
LOC
K
HS
H
EAT
SIN
K A
SS
EM
BLY
TB4
TER
MIN
AL
BLO
CK
,K
1 C
ON
TRO
L B
OA
RD
(OP
TIO
NA
L)
NO
TE 1
CO
NTR
OL
WIR
ING
IS #
18 G
AU
GE
WIR
E.
NO
TE 2
CO
NN
EC
T G
RO
UN
D W
IRE
TO
BO
AR
D G
RO
UN
D O
N R
AN
GE
R 2
OTH
ER
WIS
E C
ON
NE
CT
TO L
OW
ER
LE
FT D
OO
R S
TUD
.
WIR
E N
UM
BE
RS
US
ED
: 1-
17,
20-3
0, 3
4, 3
5, 3
7-39
, 41
, 42
, 44
-47,
50,
51,
54-
56,
59,
60,
72-7
8.
* S
ING
LE V
OLT
AG
E C
ON
NE
CTI
ON
:
RE
D L
EA
D O
N T
RA
NS
FOR
ME
R P
RIM
AR
Y IS
NO
T P
RO
VID
ED
.
FOR
480
VO
LT U
NIT
S C
ON
NE
CT
RE
D W
IRE
TO
CX
F H
2.FO
R 5
75 V
OLT
UN
ITS
CO
NN
EC
T R
ED
WIR
E T
O C
XF
H3.
V D
UA
L V
OLT
AG
E C
HA
NG
EO
VE
R IN
STR
UC
TIO
NS
:
FOR
480
VO
LT IN
PU
T C
ON
NE
CT
– TE
RM
INA
LS 2
& 4
ON
TB
1, T
B2,
TB
3.C
ON
NE
CT
RE
D W
IRE
TO
CX
F TE
RM
INA
LS H
2.
FOR
575
VO
LT IN
PU
T C
ON
NE
CT
– TE
RM
INA
LS 3
& 4
ON
TB
1, T
B2,
TB
3.C
ON
NE
CT
RE
D W
IRE
TO
CX
F TE
RM
INA
LS H
3.
NO
TE:
ALL
CO
NTR
OL
WIR
ING
IS #
18.
CA
UTI
ON
1. A
LL P
HA
SE
S O
N V
OLT
AG
E C
HA
NG
EO
VE
R B
LOC
KS
MU
ST
BE
R
EC
ON
NE
CTE
D W
HE
N C
HA
NG
ING
VO
LTA
GE
.2.
AC
FU
SE
S M
US
T B
E C
HA
NG
ED
WH
EN
CH
AN
GIN
G V
OLT
AG
E.
SE
E L
AB
EL
IN C
HA
RG
ER
.

60
9.5 Wiring diagrams for FERRO FIVE REVOLUTION SERIES (continued)
DU
AL
VO
LTA
GE
CH
AN
GE
OV
ER
INS
TRU
CTI
ON
S
FOR
480
VO
LT IN
PU
T: C
ON
NE
CT
TER
MIN
ALS
2 &
4 O
N T
B1
AN
D R
ED
WIR
ETO
CX
F H
2.
FOR
575
VO
LT IN
PU
T: C
ON
NE
CT
TER
MIN
ALS
3 &
4 O
N T
B1
AN
D R
ED
WIR
ETO
CX
F H
3.
CA
UTI
ON
AC
FU
SE
S M
US
T B
E C
HA
NG
ED
WH
EN
CH
AN
GIN
G V
OLT
AG
E.
SE
E L
AB
EL
IN C
HA
RG
ER
.
LEG
EN
D
AS
A
MM
ETE
R S
HU
NT
K1
CO
NTR
OL
BO
AR
DB
C
CO
NTA
CTO
RLC
LI
NE
CO
NTA
CTO
RC
1, C
2 C
APA
CIT
OR
PX
F P
OW
ER T
RA
NS
FOR
MER
CE
MF
DIO
DE
AS
SE
MB
LYR
R
RE
SO
NA
NT
RE
SIS
TOR
CX
F C
ON
TRO
L TR
AN
SFO
RM
ER
SR
S
ILIC
ON
RE
CTI
FIE
RD
1, D
2 D
IOD
ETB
1 TE
RM
INA
L B
LOC
KF1
FU
SE
, A
C P
HA
SE
RR
R
ES
ON
AN
T R
ES
ISTO
RF2
FU
SE
, D
C C
ATH
OD
ES
R
SIL
ICO
N R
EC
TIFI
ER
HS
H
EAT
SIN
KTB
4 TE
RM
INA
L B
LOC
K,
CU
STO
ME
R
CO
NN
EC
TIO
N
(OP
TIO
NA
L)
NO
TE 1
CO
NTR
OL
WIR
ING
IS #
18 G
AU
GE
WIR
E.
NO
TE 2
CO
NN
EC
T G
RO
UN
D W
IRE
TO
BO
AR
D G
RO
UN
D O
N R
AN
GE
R 2
NO
TE 3
ON
LY O
NE
OP
TIO
N C
AN
BE
CO
NN
EC
TED
TO
TB
4W
IRE
NU
MB
ER
S U
SE
D:
3-12
, 34
, 35
, 37
-39,
41,
42,
44-
47,
50,
51,
59,
60,
70,
71,
73-7
5.

1400 UNION MEETING RD.P.O. BOX 3053BLUE BELL, PA 19422-0858 USA(215) 619-2700 • FAX (215) 619-7899
Printed in U.S.A. 5-720 ©1999-C&D TECHNOLOGIES, INC. 1022-5M 899HVG
Specifications are subject to change without notice. Contact your nearest C&D TECHNOLOGIES,INC. sales office for the latest specifications. All statements, information and data given herein arebelieved to be accurate and reliable but are presented without guaranty, warranty, or responsibility ofany kind, express or implied. Statements or suggestions concerning possible use of our products aremade without representation or warranty that any such use is free of patent infringement, and are notrecommendations to infringe any patent. The user should not assume that all safety measures areindicated, or that other measures may not be required. Unless made explicitly in writing to the customer, C&D TECHNOLOGIES, INC. makes no representations or warranties regarding whetherany product/technology purchased and/or specifications and/or literature regarding same are themost current or advanced version thereof; and C&D TECHNOLOGIES, INC. assumes no obligationto inform its customers of any revisions and/or improvements to such product, technology, specifications, and/or literature.
C&D TECHNOLOGIES, INC. owns all trademarks and registered trademarks of products listed.