featuring rapture collection - pat bravo · fabric e rpt-1704 1/4 yd. ... together to form a...
TRANSCRIPT
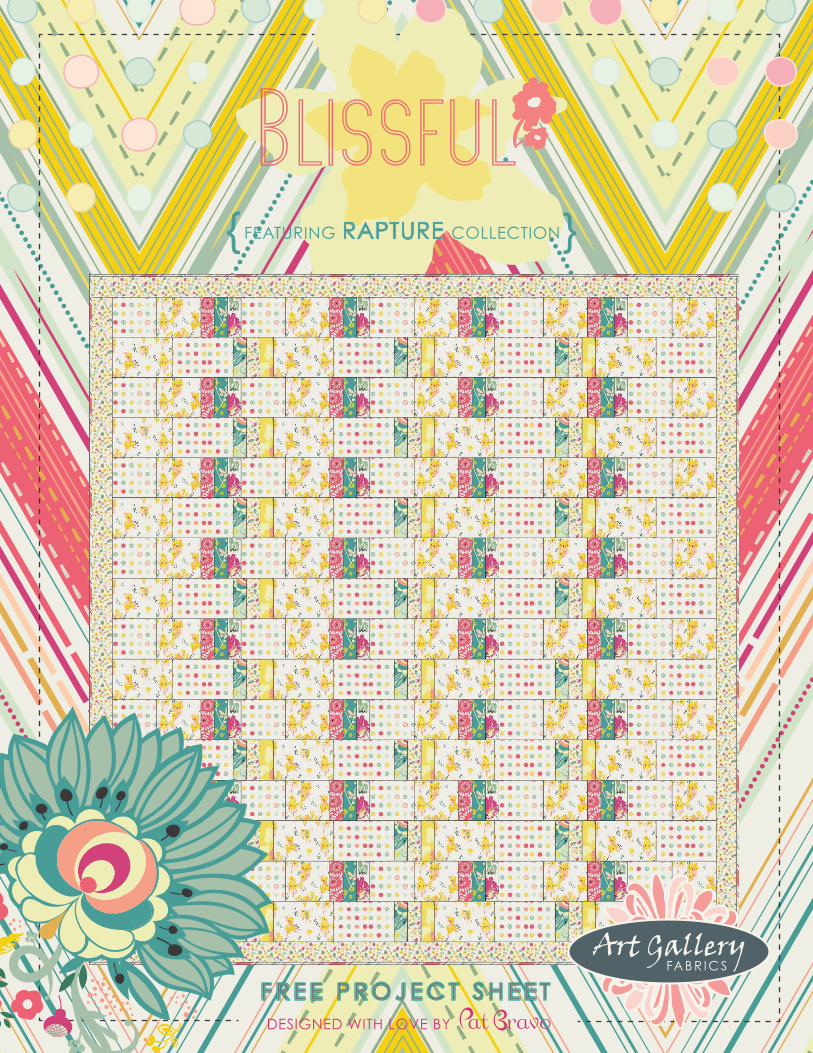
F R E E P R O J E C T S H E E TF R E E P R O J E C T S H E E TDESIGNED WITH LOVE BY
{FEATURING RAPTURE COLLECTION}
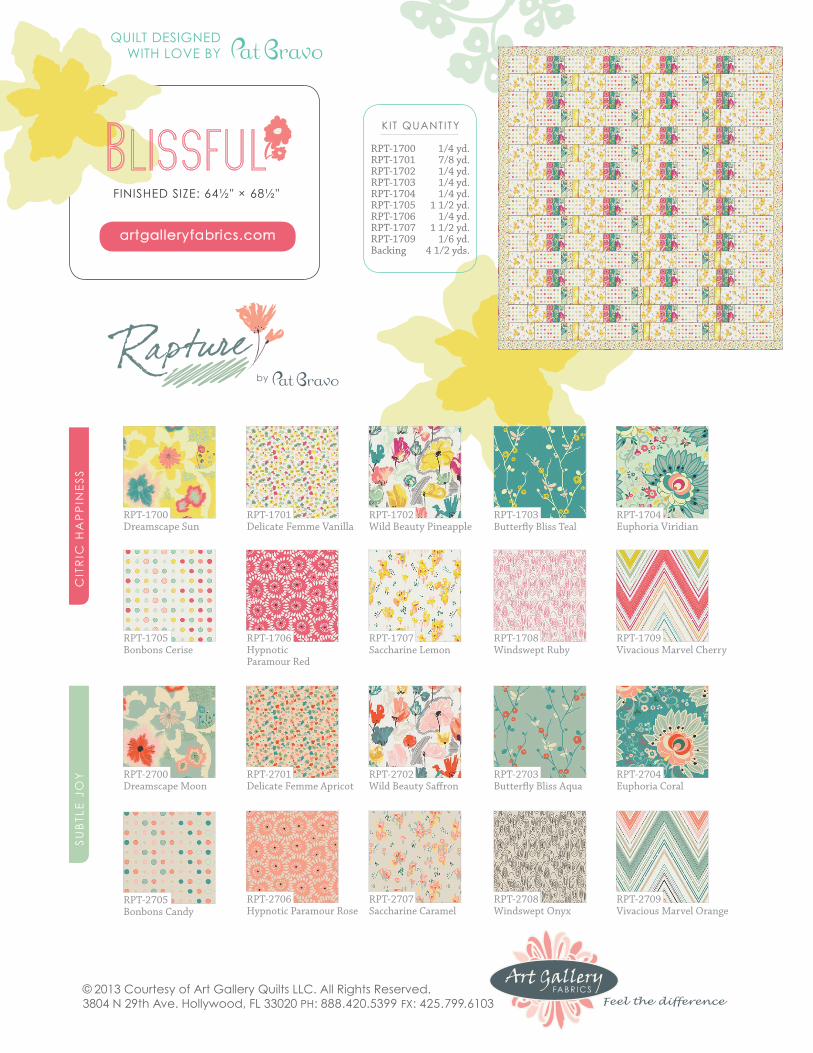
QUILT DESIGNEDWITH LOVE BY
FINISHED SIzE: 64½" × 68½"
artgalleryfabrics.com
SU
BTL
E J
OY
CIT
RIC
HA
PP
INE
SS
RPT-1700Dreamscape Sun
RPT-2700Dreamscape Moon
RPT-1701Delicate Femme Vanilla
RPT-2701Delicate Femme Apricot
RPT-1702Wild Beauty Pineapple
RPT-2702Wild Beauty Saffron
RPT-1703Butterfly Bliss Teal
RPT-2703Butterfly Bliss Aqua
RPT-1706Hypnotic Paramour Red
RPT-1707Saccharine Lemon
RPT-1708Windswept Ruby
RPT-1709Vivacious Marvel Cherry
RPT-2706Hypnotic Paramour Rose
RPT-2707Saccharine Caramel
RPT-2708Windswept Onyx
RPT-2709Vivacious Marvel Orange
RPT-1704Euphoria Viridian
RPT-2704Euphoria Coral
RPT-1705Bonbons Cerise
RPT-2705Bonbons Candy
RPT-1700RPT-1701RPT-1702RPT-1703RPT-1704RPT-1705RPT-1706RPT-1707RPT-1709Backing
1/4 yd.7/8 yd.1/4 yd.1/4 yd.1/4 yd.
1 1/2 yd.1/4 yd.
1 1/2 yd.1/6 yd.
4 1/2 yds.
KIT QUANTITY
by
© 2013 Courtesy of Art Gallery Quilts LLC. All Rights Reserved.3804 N 29th Ave. Hollywood, FL 33020 PH: 888.420.5399 FX: 425.799.6103
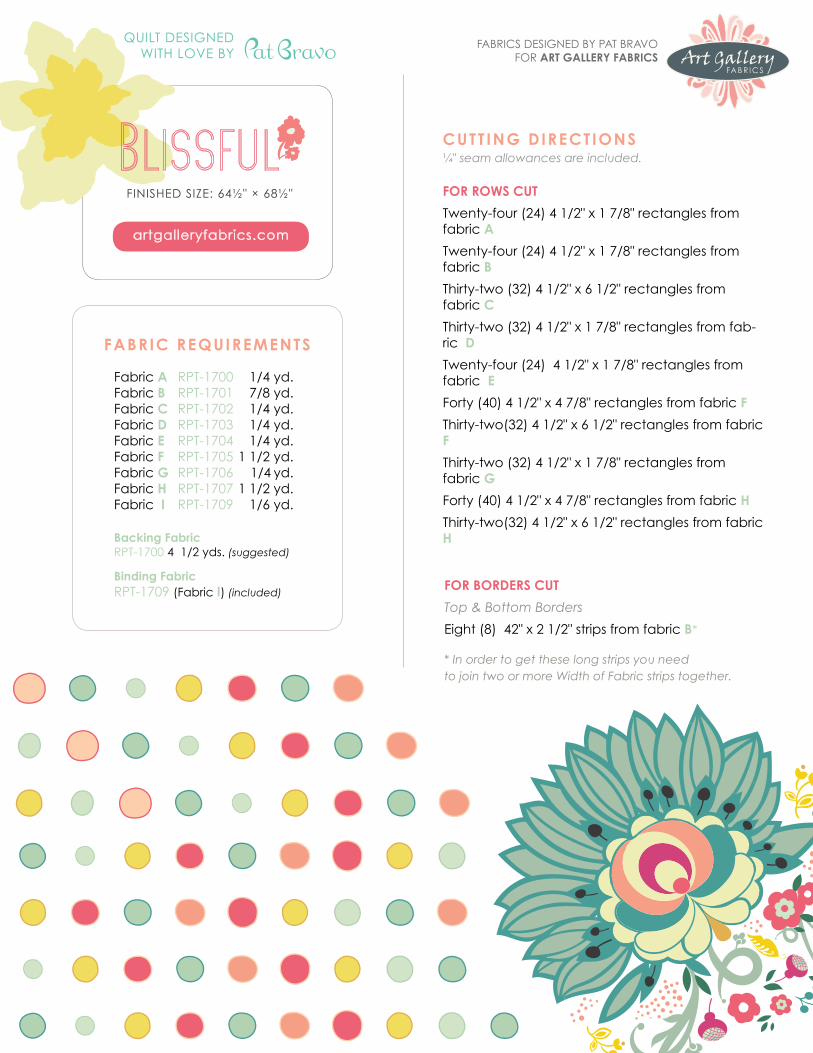
FABRIC REQUIREMENTS
Fabric A RPT-1700 1/4 yd. Fabric B RPT-1701 7/8 yd. Fabric C RPT-1702 1/4 yd. Fabric D RPT-1703 1/4 yd.Fabric E RPT-1704 1/4 yd. Fabric F RPT-1705 1 1/2 yd. Fabric G RPT-1706 1/4 yd. Fabric H RPT-1707 1 1/2 yd. Fabric I RPT-1709 1/6 yd.
Backing Fabric RPT-1700 4 1/2 yds. (suggested)
Binding Fabric
RPT-1709 (Fabric I) (included)
CUTT ING DIRECTIONS¼" seam allowances are included.
FOR ROWS CUT
Twenty-four (24) 4 1/2" x 1 7/8" rectangles from fabric A
Twenty-four (24) 4 1/2" x 1 7/8" rectangles from fabric B
Thirty-two (32) 4 1/2" x 6 1/2" rectangles from fabric C
Thirty-two (32) 4 1/2" x 1 7/8" rectangles from fab-ric D
Twenty-four (24) 4 1/2" x 1 7/8" rectangles from fabric E
Forty (40) 4 1/2" x 4 7/8" rectangles from fabric F
Thirty-two(32) 4 1/2" x 6 1/2" rectangles from fabric F
Thirty-two (32) 4 1/2" x 1 7/8" rectangles from fabric G
Forty (40) 4 1/2" x 4 7/8" rectangles from fabric H
Thirty-two(32) 4 1/2" x 6 1/2" rectangles from fabric H
FABRICS DESIGNED BY PAT BRAVOFOR ART GALLERY FABRICS
FOR BORDERS CUT
Top & Bottom Borders
Eight (8) 42" x 2 1/2" strips from fabric B*
* In order to get these long strips you needto join two or more Width of Fabric strips together.
QUILT DESIGNEDWITH LOVE BY
FINISHED SIzE: 64½" × 68½"
artgalleryfabrics.com
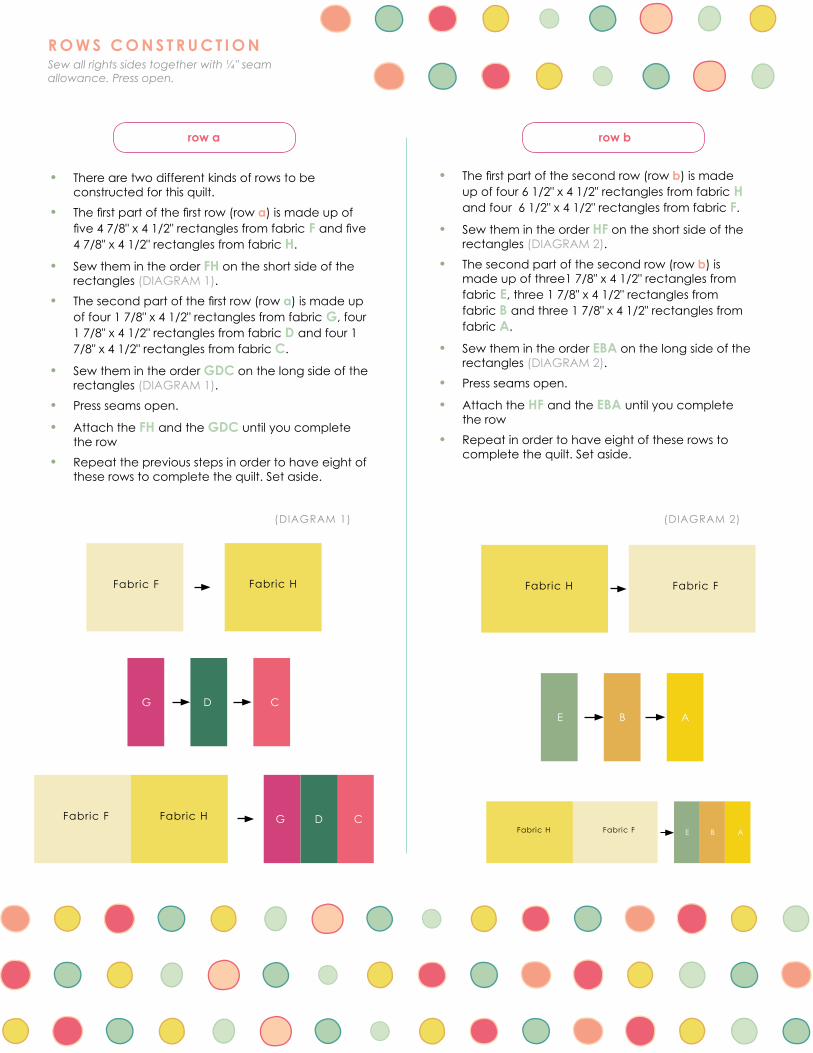
R O W S C O N S T R U C T I O N
row a row b
• There are two different kinds of rows to be constructed for this quilt.
• Thefirstpartofthefirstrow(rowa) is made up of five47/8"x41/2"rectanglesfromfabric F andfive4 7/8" x 4 1/2" rectangles from fabric H.
• Sew them in the order FH on the short side of the rectangles (DIAGRAM 1).
• Thesecondpartofthefirstrow(rowa) is made up of four 1 7/8" x 4 1/2" rectangles from fabric G, four 1 7/8" x 4 1/2" rectangles from fabric D and four 1 7/8" x 4 1/2" rectangles from fabric C.
• Sew them in the order GDC on the long side of the rectangles (DIAGRAM 1).
• Press seams open.
• Attach the FH and the GDC until you complete the row
• Repeat the previous steps in order to have eight of these rows to complete the quilt. Set aside.
• Thefirstpartofthesecondrow(rowb) is made up of four 6 1/2" x 4 1/2" rectangles from fabric H and four 6 1/2" x 4 1/2" rectangles from fabric F.
• Sew them in the order HF on the short side of the rectangles (DIAGRAM 2).
• The second part of the second row (row b) is made up of three1 7/8" x 4 1/2" rectangles from fabric E, three 1 7/8" x 4 1/2" rectangles from fabric B and three 1 7/8" x 4 1/2" rectangles from fabric A.
• Sew them in the order EBA on the long side of the rectangles (DIAGRAM 2).
• Press seams open.
• Attach the HF and the EBA until you complete the row
• Repeat in order to have eight of these rows to complete the quilt. Set aside.
(DIAGRAM 1) (DIAGRAM 2)
Fabric FFabric HFabric F Fabric H
G D CE B A
G D CFabric F Fabric HFabric FFabric H E B A
Sew all rights sides together with ¼" seam allowance. Press open.
A S S E M B L I N G T H E T O PSew all rights sides together with ¼" seam allowance. Press open.
• Follow the cover photo to help you in the assembling of this quilt.
• Start from the left following a horizontal order.
• Press seams open as you sew.
• Begin with a row a sewing it to one row b, Continue alternating rows a and b until you are done with 16 rows.
• After you end up attaching the16 rows proceed with the 42" x 2 1/2" strips from fabric B.
• Sew four 84" x 2 1/2 strips.
• Attach one 84" strip horizontally to the top of the quilt, another border strip at the bottom.
• Trim the excess fabric following the line of the top.
• Repeat the previous step with the two remaining strips, attaching them to the sides of the top.
Sew right sides together.
•Place BACKING FABRIC on a large surface wrong side
up. Stretch it with masking tape against that surface.
•Place BATTING on top of backing fabric.
•Place TOP on top of the batting with right side facing
up. Smooth away wrinkles using your hands.
•Pin all layers together and baste with basting thread,
using long stitches. You can also use safety pins to join
the layers.
Q U I L T A S S E M B L Y
•Machine or hand quilt starting at the center and
working towards the corners. Remember that quilting
motifs are a matter of personal preference. Have fun
choosing yours!
•Afteryoufinish,trimexcessofanyfabricorbatting,
squaring the quilt to proceed to bind it.
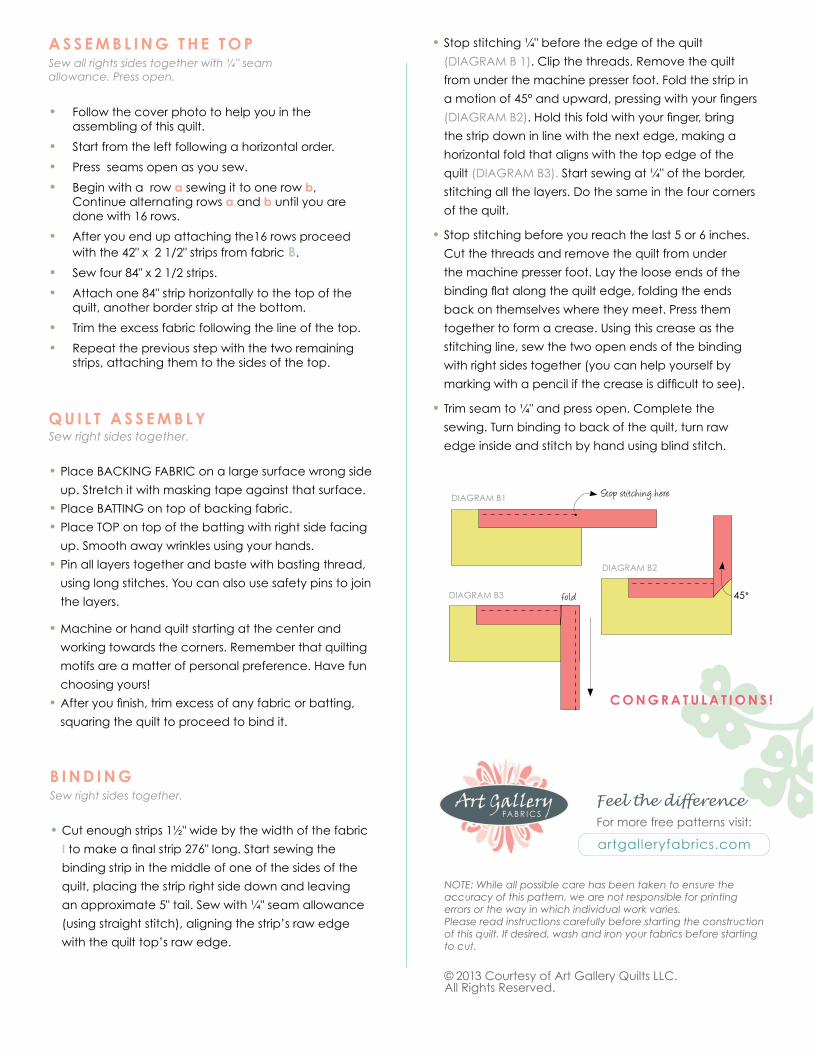
•Stop stitching ¼" before the edge of the quilt
(DIAGRAM B 1). Clip the threads. Remove the quilt
from under the machine presser foot. Fold the strip in
amotionof45°andupward,pressingwithyourfingers
(DIAGRAM B2).Holdthisfoldwithyourfinger,bring
the strip down in line with the next edge, making a
horizontal fold that aligns with the top edge of the
quilt (DIAGRAM B3). Start sewing at ¼" of the border,
stitching all the layers. Do the same in the four corners
of the quilt.
•Stop stitching before you reach the last 5 or 6 inches.
Cut the threads and remove the quilt from under
the machine presser foot. Lay the loose ends of the
bindingflatalongthequiltedge,foldingtheends
back on themselves where they meet. Press them
together to form a crease. Using this crease as the
stitching line, sew the two open ends of the binding
with right sides together (you can help yourself by
markingwithapencilifthecreaseisdifficulttosee).
•Trim seam to ¼" and press open. Complete the
sewing. Turn binding to back of the quilt, turn raw
edge inside and stitch by hand using blind stitch.
Sew right sides together.
B I N D I N G
C O N G R A T U L A T I O N S !
NOTE: While all possible care has been taken to ensure the accuracy of this pattern, we are not responsible for printing errors or the way in which individual work varies.Please read instructions carefully before starting the construction of this quilt. If desired, wash and iron your fabrics before starting to cut.
© 2013 Courtesy of Art Gallery Quilts LLC.All Rights Reserved.
For more free patterns visit:
artgalleryfabrics.com•Cut enough strips 1½" wide by the width of the fabric
Itomakeafinalstrip276"long.Startsewingthe
binding strip in the middle of one of the sides of the
quilt, placing the strip right side down and leaving
an approximate 5" tail. Sew with ¼" seam allowance
(using straight stitch), aligning the strip’s raw edge
with the quilt top’s raw edge.
45˚
DIAGRAM B2
DIAGRAM B1Stop stitching here
DIAGRAM B3 fold