fbx exporter user guide
DESCRIPTION
A guide on how to export FBX in DSTRANSCRIPT
DAZ Studio™ FBX Exporter User Documentation
Revision A, DCN 001 10 June 2008
TRADEMARK & COPYRIGHT NOTICE The DAZ Studio™ software and logo are a copyright of ©2002-2007 DAZ 3D, Inc. The DAZ 3D™ logo is a copyright of ©2005 DAZ 3D, Inc. DAZ® is a registered trademark of DAZ 3D, Inc. The FBX Exporter software is a copyright of ©2005-2008 DAZ 3D, Inc. All other product names mentioned in this manual and other documentation are for identification purposes only. Trademarks, registered or not, listed herein are the exclusive property of their respective owners.


FBX Exporter 10 June 2008
Revision History Revision Description Date
- Initial release 10/19/07
A Includes the following changes:
1. Conversion to RoboHelp format
2. Addition of Index
3. Added graphics and updated text, including missing text
03/14/08
DCN 001 Includes the following changes:
1. Added the ability to export LOD levels and UV sets as part of the FBX export.
06/10/08
©2008 DAZ 3D, Inc. iii
FBX Exporter 10 June 2008
©2008 DAZ 3D, Inc. iv
Table of Contents What is the FBX Exporter?.............................................................................................. 5
Features ...................................................................................................................... 5
Installation - Macintosh & Windows................................................................................. 5
Using the FBX Exporter................................................................................................... 6
General Options Tab ................................................................................................... 7
Export File Type....................................................................................................... 7
Scene Components.................................................................................................. 8
LOD Levels Tab......................................................................................................... 12
UV Sets Tab .............................................................................................................. 13
Exporting for Lightwave................................................................................................. 13
Custom FBX Root Node ............................................................................................ 13
Texturing.................................................................................................................... 14
Very Long Surface Names......................................................................................... 14
Missing Surfaces ....................................................................................................... 14
Unassigned Textures................................................................................................. 15
Index ............................................................................................................................. 17
FBX Exporter 10 June 2008
What is the FBX Exporter? The FBX Exporter provides support for the industry standard FBX 3D format used by Autodesk, and supported by most other major 3D applications. Exporting in the FBX format provides you access to an industry-wide 3D format, and allows you to use your DAZ content in products such as Motion Builder, Maya, LightWave, 3D Studio Max, Cinema4D and others. This plug-in exports FBX version 5 or 6 (exporting version 5 is an option in the export option dialog). The application used to import the file must be capable of reading FBX versions 5 or 6.
Features • Exports in standard FBX format, or using a customized export for LightWave
users. • Supports binary or plain text file formats • Limits the export to selected items only, or export the entire scene • Exports by object type. Supported types include cameras, lights, props, and
figures. • Single and multi-layered texturing options • Exports all texture images to destination folder • Exports morphs • Includes skeleton and weightmaps • Can weld the geometry prior to exporting to make one solid mesh • Exports animation • Supports Embedding Textures for file sharing with remote users • Includes support for the older FBX 5.0 format for backward compatibility with
older applications
Installation - Macintosh & Windows To install the FBX Exporter on either a Macintosh or Windows system:
1. Make sure DAZ Studio is closed before installing the plug-in. 2. Double-click on the DAZ Studio FBX Exporter installer icon to start the
installation. 3. If a previous version of the plug-in is already installed, you will be prompted to
remove the current version to prevent possible conflicts. Click on Yes to continue.
4. Read the Welcome screen and click on Next. 5. Read the Software License Agreement and click on the radio button next to I
accept the agreement, then click on Next to continue.
©2008 DAZ 3D, Inc. 5
FBX Exporter 10 June 2008
6. Read the Ready to Install text and click on Next. 7. Once the plug-in has been installed, read the Important notes and click on Next. 8. In the Completing install dialog, click on the checkbox next to Launch DAZ
Studio if you want to use the program immediately; click on the checkbox next to View the <plug-in> Readme then on Finish to close the installer and view the readme.
Using the FBX Exporter To export from DAZ Studio using the FBX Exporter:
1. Load your figure, clothing, and props into DAZ Studio and apply textures as needed.
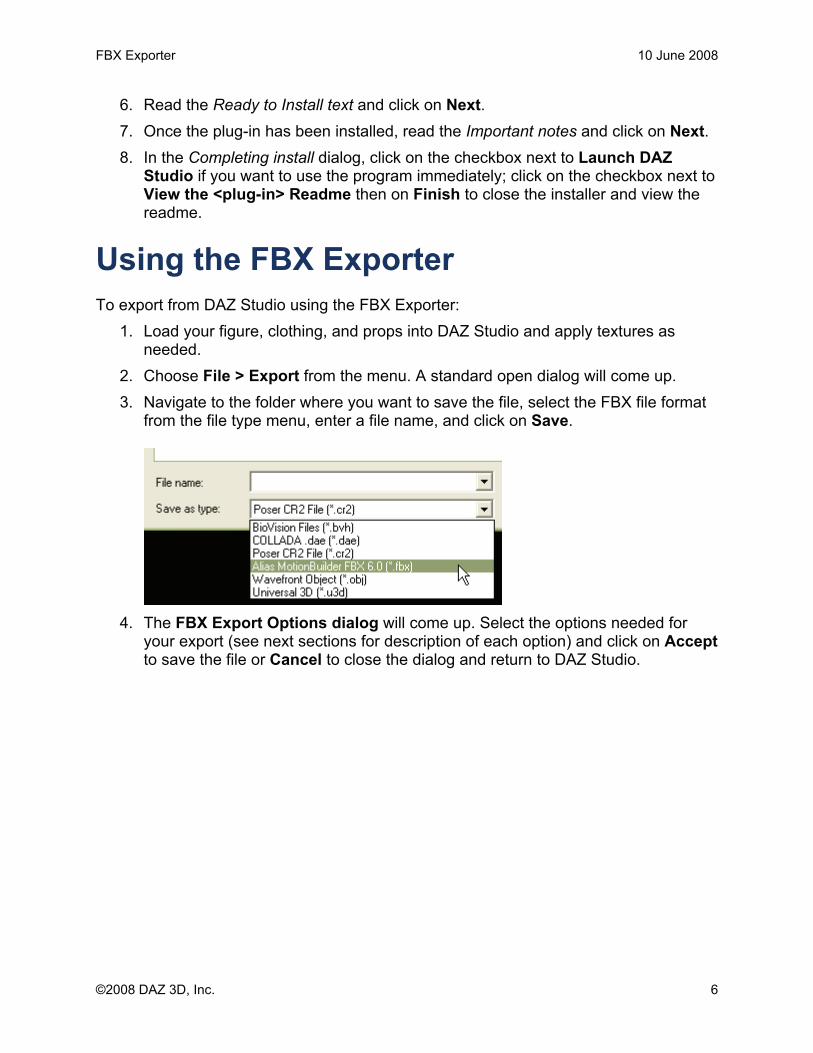
2. Choose File > Export from the menu. A standard open dialog will come up. 3. Navigate to the folder where you want to save the file, select the FBX file format
from the file type menu, enter a file name, and click on Save.
4. The FBX Export Options dialog will come up. Select the options needed for
your export (see next sections for description of each option) and click on Accept to save the file or Cancel to close the dialog and return to DAZ Studio.
©2008 DAZ 3D, Inc. 6
Exporting for Lightwave
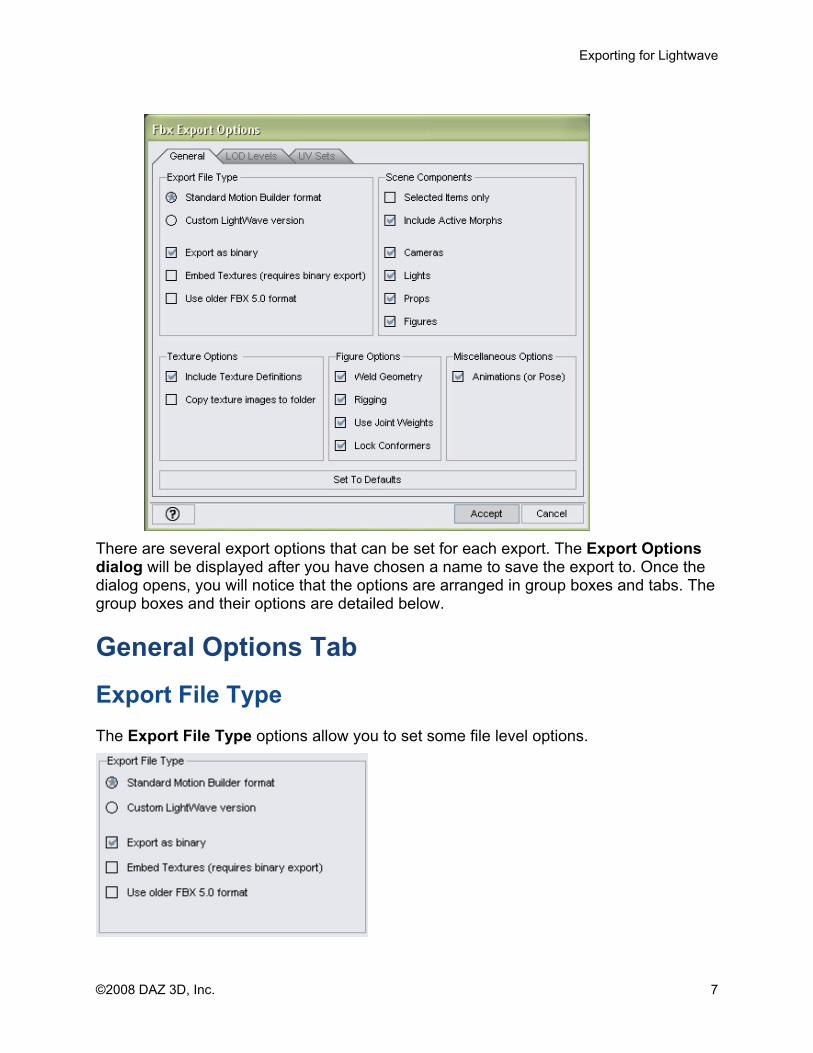
There are several export options that can be set for each export. The Export Options dialog will be displayed after you have chosen a name to save the export to. Once the dialog opens, you will notice that the options are arranged in group boxes and tabs. The group boxes and their options are detailed below.
General Options Tab
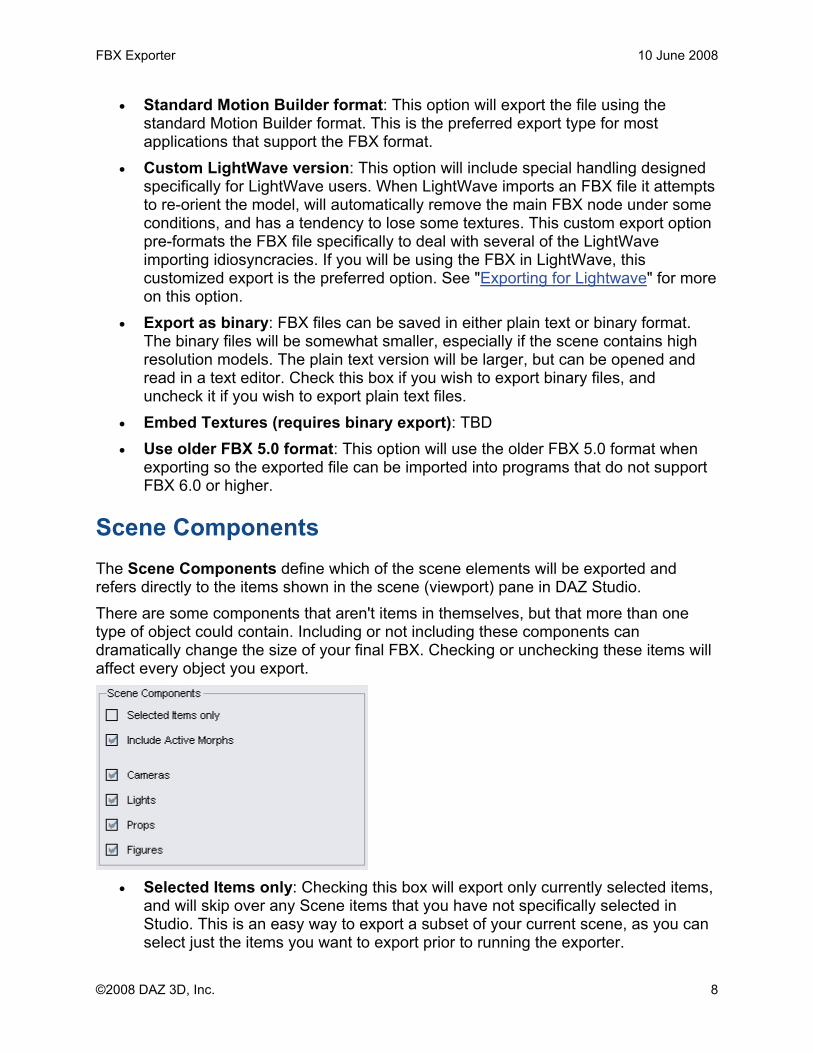
Export File Type The Export File Type options allow you to set some file level options.
©2008 DAZ 3D, Inc. 7
FBX Exporter 10 June 2008
• Standard Motion Builder format: This option will export the file using the standard Motion Builder format. This is the preferred export type for most applications that support the FBX format.
• Custom LightWave version: This option will include special handling designed specifically for LightWave users. When LightWave imports an FBX file it attempts to re-orient the model, will automatically remove the main FBX node under some conditions, and has a tendency to lose some textures. This custom export option pre-formats the FBX file specifically to deal with several of the LightWave importing idiosyncracies. If you will be using the FBX in LightWave, this customized export is the preferred option. See "Exporting for Lightwave" for more on this option.
• Export as binary: FBX files can be saved in either plain text or binary format. The binary files will be somewhat smaller, especially if the scene contains high resolution models. The plain text version will be larger, but can be opened and read in a text editor. Check this box if you wish to export binary files, and uncheck it if you wish to export plain text files.
• Embed Textures (requires binary export): TBD • Use older FBX 5.0 format: This option will use the older FBX 5.0 format when
exporting so the exported file can be imported into programs that do not support FBX 6.0 or higher.
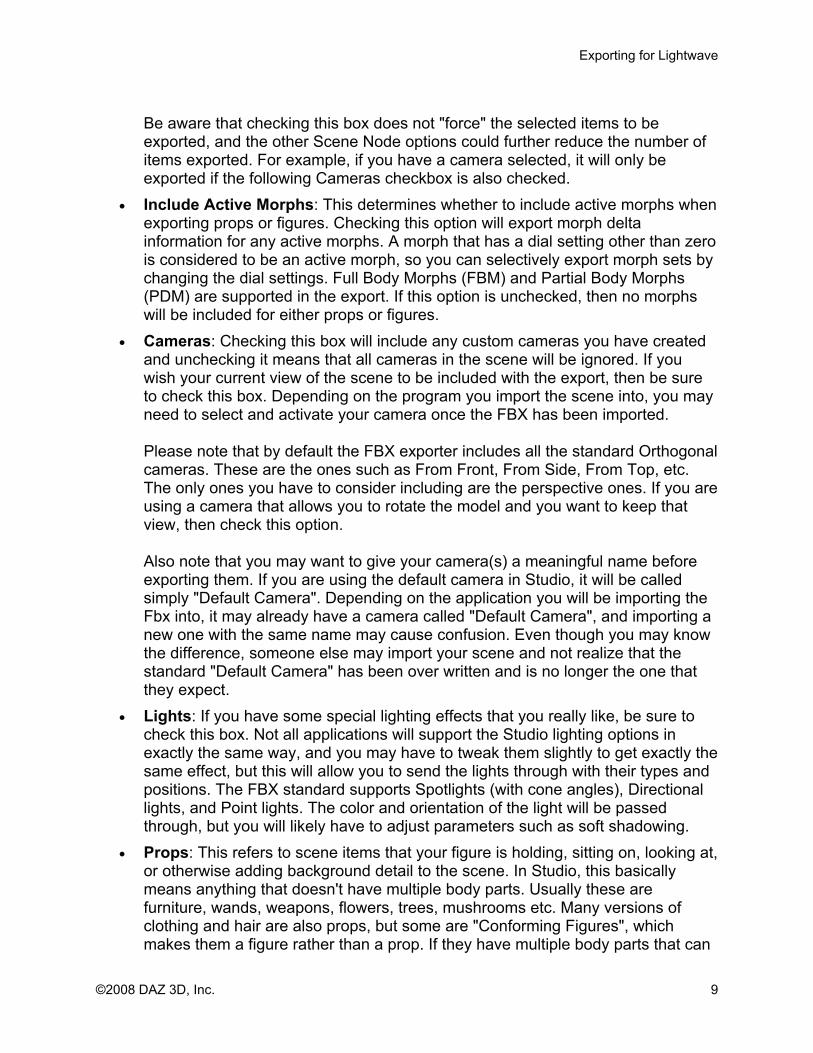
Scene Components The Scene Components define which of the scene elements will be exported and refers directly to the items shown in the scene (viewport) pane in DAZ Studio. There are some components that aren't items in themselves, but that more than one type of object could contain. Including or not including these components can dramatically change the size of your final FBX. Checking or unchecking these items will affect every object you export.
• Selected Items only: Checking this box will export only currently selected items,
and will skip over any Scene items that you have not specifically selected in Studio. This is an easy way to export a subset of your current scene, as you can select just the items you want to export prior to running the exporter.
©2008 DAZ 3D, Inc. 8
Exporting for Lightwave
Be aware that checking this box does not "force" the selected items to be exported, and the other Scene Node options could further reduce the number of items exported. For example, if you have a camera selected, it will only be exported if the following Cameras checkbox is also checked.
• Include Active Morphs: This determines whether to include active morphs when exporting props or figures. Checking this option will export morph delta information for any active morphs. A morph that has a dial setting other than zero is considered to be an active morph, so you can selectively export morph sets by changing the dial settings. Full Body Morphs (FBM) and Partial Body Morphs (PDM) are supported in the export. If this option is unchecked, then no morphs will be included for either props or figures.
• Cameras: Checking this box will include any custom cameras you have created and unchecking it means that all cameras in the scene will be ignored. If you wish your current view of the scene to be included with the export, then be sure to check this box. Depending on the program you import the scene into, you may need to select and activate your camera once the FBX has been imported. Please note that by default the FBX exporter includes all the standard Orthogonal cameras. These are the ones such as From Front, From Side, From Top, etc. The only ones you have to consider including are the perspective ones. If you are using a camera that allows you to rotate the model and you want to keep that view, then check this option. Also note that you may want to give your camera(s) a meaningful name before exporting them. If you are using the default camera in Studio, it will be called simply "Default Camera". Depending on the application you will be importing the Fbx into, it may already have a camera called "Default Camera", and importing a new one with the same name may cause confusion. Even though you may know the difference, someone else may import your scene and not realize that the standard "Default Camera" has been over written and is no longer the one that they expect.
• Lights: If you have some special lighting effects that you really like, be sure to check this box. Not all applications will support the Studio lighting options in exactly the same way, and you may have to tweak them slightly to get exactly the same effect, but this will allow you to send the lights through with their types and positions. The FBX standard supports Spotlights (with cone angles), Directional lights, and Point lights. The color and orientation of the light will be passed through, but you will likely have to adjust parameters such as soft shadowing.
• Props: This refers to scene items that your figure is holding, sitting on, looking at, or otherwise adding background detail to the scene. In Studio, this basically means anything that doesn't have multiple body parts. Usually these are furniture, wands, weapons, flowers, trees, mushrooms etc. Many versions of clothing and hair are also props, but some are "Conforming Figures", which makes them a figure rather than a prop. If they have multiple body parts that can
©2008 DAZ 3D, Inc. 9
FBX Exporter 10 June 2008
be posed, they will usually be a figure rather than a prop. Check this box if you would like these prop objects to be passed through in the exporter.
• Figures: In general, this refers to any figure with multiple body parts, and that you can pose by modifying the joint dials. These are of course the largest items in your scene, and sometimes you may want to export just a nice backdrop or 3D scene. Check this option if you wish your figures to be exported and uncheck it if you just want to send out the background scene out for later use. There are additional options for figures listed in the Figure Options section.
Texture Options
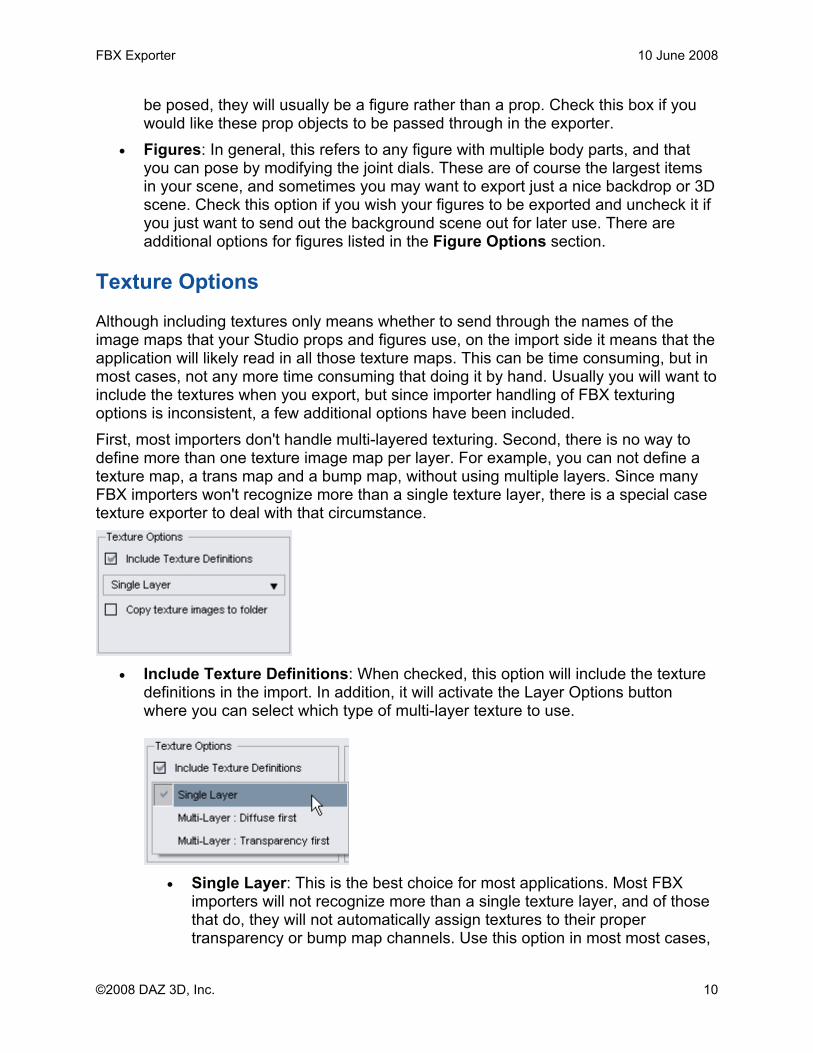
Although including textures only means whether to send through the names of the image maps that your Studio props and figures use, on the import side it means that the application will likely read in all those texture maps. This can be time consuming, but in most cases, not any more time consuming that doing it by hand. Usually you will want to include the textures when you export, but since importer handling of FBX texturing options is inconsistent, a few additional options have been included. First, most importers don't handle multi-layered texturing. Second, there is no way to define more than one texture image map per layer. For example, you can not define a texture map, a trans map and a bump map, without using multiple layers. Since many FBX importers won't recognize more than a single texture layer, there is a special case texture exporter to deal with that circumstance.
• Include Texture Definitions: When checked, this option will include the texture
definitions in the import. In addition, it will activate the Layer Options button where you can select which type of multi-layer texture to use.
• Single Layer: This is the best choice for most applications. Most FBX
importers will not recognize more than a single texture layer, and of those that do, they will not automatically assign textures to their proper transparency or bump map channels. Use this option in most most cases,
©2008 DAZ 3D, Inc. 10

Exporting for Lightwave
unless you are sure that your app supports multi-layered texturing when importing an FBX file. You may have an application that supports multi-layered texturing, but that is not a guarantee that the FBX importer also supports it.
The second two options provide support for the multi-layered texture capabilities of FBX. These are not intended to solve what a specific importer will do, but they are intended to make it easier for you to manually apply the textures where they need to go. The three types of textures supported are Diffuse images maps, Transparency maps, and Bump maps.
• Multi-Layer: Diffuse first: This option will create a multi-layered texture and assign the Diffuse image to the first FBX layer. The Diffuse image is generally the most important image map, so it will be placed first in the hierarchy.
• Multi-Layer: Transparency first: This option will place the Transparency map first in the hierarchy. Some applications will prefer the Transparency map to be the first texture and will then apply the Diffuse and Bump map images to the non-transparent areas.
• Copy texture images to folder: When selected, this option will make a copy of the texture images and place them in the folder where the FBX file is being saved to. This makes it easier to locate the textures after importing the file into your selected program.
Figure Options
Figure Options are special options that only apply to figures within the scene.
• Weld Geometry: This will weld the bones to their parents, which will reduce the
overall number of vertices in the model.
©2008 DAZ 3D, Inc. 11
FBX Exporter 10 June 2008
• Rigging: This option refers to the skeleton and joint information for figures. Checking this option will export the skeleton for the figure and, assuming your FBX importer application has support for rigging, you will be able to pose the figure. If you are just interested in the model geometry, then you can uncheck this box.
• Use Joint Weights: TBD • Lock Conformers: TBD
Animation Options
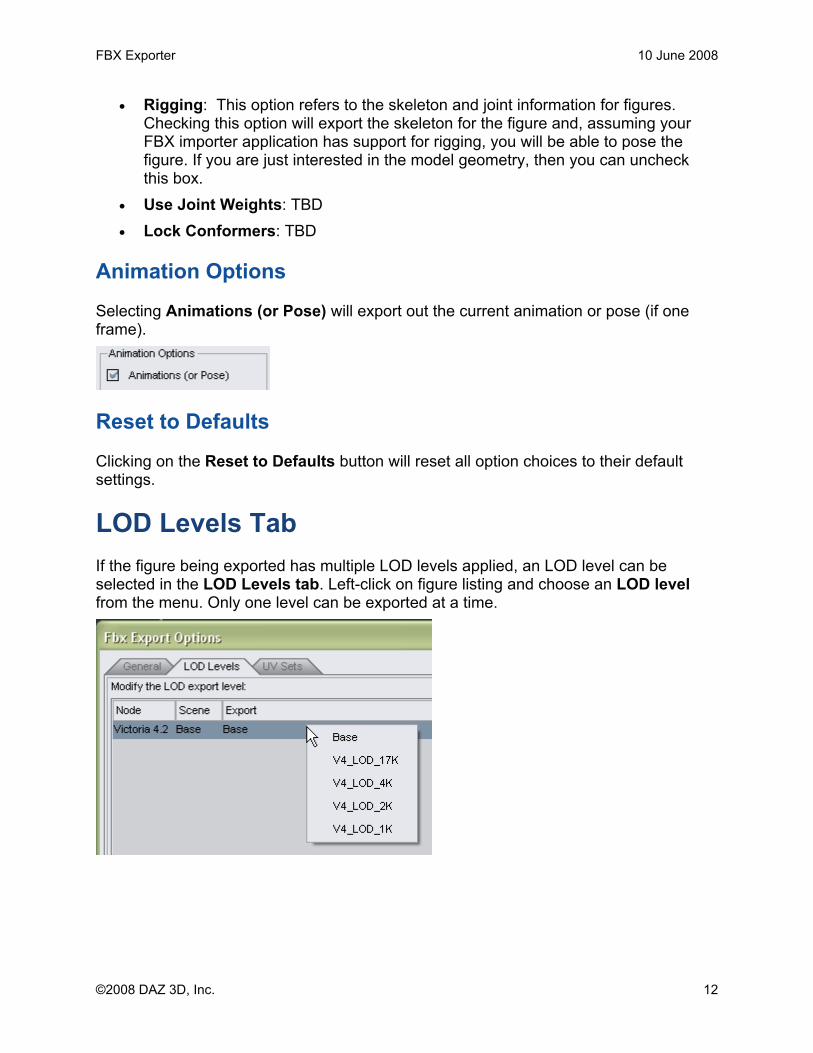
Selecting Animations (or Pose) will export out the current animation or pose (if one frame).
Reset to Defaults
Clicking on the Reset to Defaults button will reset all option choices to their default settings.
LOD Levels Tab If the figure being exported has multiple LOD levels applied, an LOD level can be selected in the LOD Levels tab. Left-click on figure listing and choose an LOD level from the menu. Only one level can be exported at a time.
©2008 DAZ 3D, Inc. 12
Exporting for Lightwave
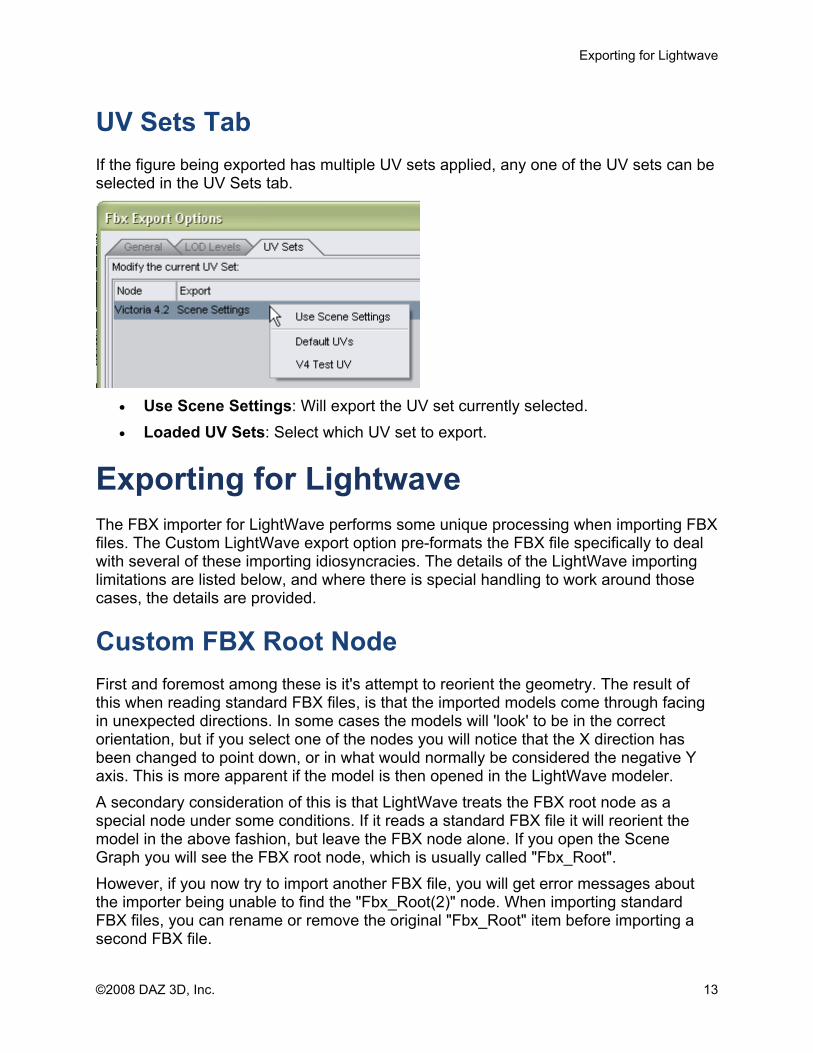
UV Sets Tab If the figure being exported has multiple UV sets applied, any one of the UV sets can be selected in the UV Sets tab.
• Use Scene Settings: Will export the UV set currently selected. • Loaded UV Sets: Select which UV set to export.
Exporting for Lightwave The FBX importer for LightWave performs some unique processing when importing FBX files. The Custom LightWave export option pre-formats the FBX file specifically to deal with several of these importing idiosyncracies. The details of the LightWave importing limitations are listed below, and where there is special handling to work around those cases, the details are provided.
Custom FBX Root Node First and foremost among these is it's attempt to reorient the geometry. The result of this when reading standard FBX files, is that the imported models come through facing in unexpected directions. In some cases the models will 'look' to be in the correct orientation, but if you select one of the nodes you will notice that the X direction has been changed to point down, or in what would normally be considered the negative Y axis. This is more apparent if the model is then opened in the LightWave modeler. A secondary consideration of this is that LightWave treats the FBX root node as a special node under some conditions. If it reads a standard FBX file it will reorient the model in the above fashion, but leave the FBX node alone. If you open the Scene Graph you will see the FBX root node, which is usually called "Fbx_Root". However, if you now try to import another FBX file, you will get error messages about the importer being unable to find the "Fbx_Root(2)" node. When importing standard FBX files, you can rename or remove the original "Fbx_Root" item before importing a second FBX file.
©2008 DAZ 3D, Inc. 13
FBX Exporter 10 June 2008
The third aspect of this special handling for the FBX root node, is that the importer will automatically remove it for you if it is properly formatted. This pre-formatting of the main FBX node, (internal geometry structures,) is one of the primary advantages to using the Custom LightWave export. For the Custom LightWave export, this pre-formatting has been included in the export, and when the LightWave importer reads the FBX, it will treat the file as if it was one of it's own. The result being that the model will be properly oriented, the axis' will be facing in their expected directions, the main FBX node will be removed, you will be able to import multiple FBXs, and the scene elements will in general appear as anticipated. This is not the only task that the Custom LightWave export performs, but if you are using LightWave for modeling purposes, it is probably the most important and time saving.
Texturing LightWave only supports single layer textures. This means LightWave will not open or display multi-layered textures, even if the FBX contains them. There is no work around for this at the moment, although there is the possibility that the importer will be revised in the future. The Single Layer texture export assigns texture images in the following order: Diffuse, Transparency, and Bump map. Therefore, if the Studio material has a Diffuse image map, it will be assigned to the surface as the texture image. If the Studio Material has no Diffuse image map, it will then check for a Transparency map, and assign that it exists. The most common occurrence of this is for EyeLash and EyeBrow materials. Finally if the Studio Material has neither a Diffuse or Transparency map, it will assign the Bump map image if it exists.
Very Long Surface Names The FBX format defines textures using two sub types: One is called a Material and refers to the basic color attributes; the second is called a Texture and refers to the image map components of a texture. When these are read into LightWave they are merged together using a hyphen, and the dual name can be quite long. At present, there is no workaround for this naming convention since it is within the importer itself.
Missing Surfaces When LightWave merges the FBX Material and Texture elements, it can loose an entire surface if it has a Material but no associated Texture image. This has the effect of the surface becoming completely transparent, but also unfortunately removes it completely from the surfaces list, so you can not manually edit it.
©2008 DAZ 3D, Inc. 14
Exporting for Lightwave
©2008 DAZ 3D, Inc. 15
For these cases the Custom export creates a 'null' texture image and attaches it to the surface. You will notice this on the import if you get a message saying "Failed to read texture: 'null'" Click the OK button to ignore the message, but be aware it simply means this surface originally had no texture image. Although the warning message is perhaps not the most desirable result, it is preferable to the entire surface disappearing from your list.
Unassigned Textures LightWave performs some special processing on the first texture it reads for any object. The result being that the first texture read is not assigned to the surface, even though the texture image is read and is available on the drop lists. Note that this refers to the first texture it reads, and not to the first texture shown in the Surfaces list, since this list is sorted alphabetically after reading all the surfaces. You can manually assign the proper texture by selecting it from the drop list.

FBX Exporter 10 June 2008
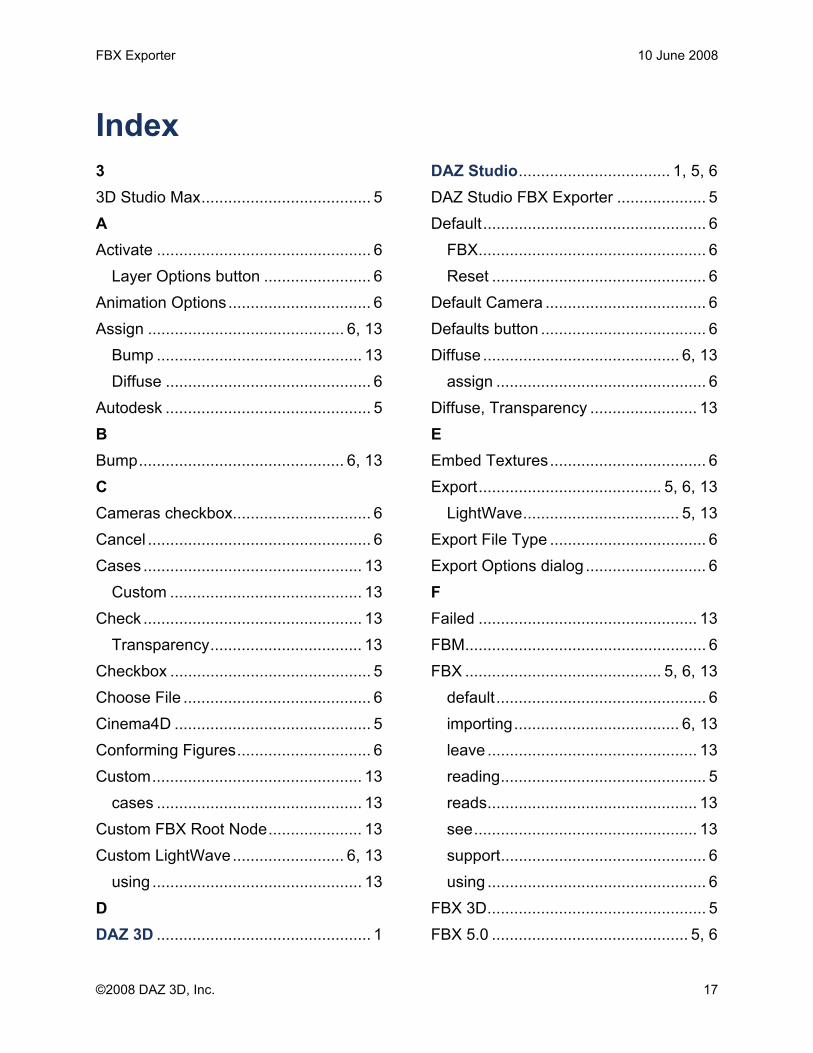
Index 3
3D Studio Max...................................... 5 A
Activate ................................................ 6 Layer Options button ........................ 6
Animation Options................................ 6 Assign ............................................ 6, 13
Bump .............................................. 13 Diffuse .............................................. 6
Autodesk .............................................. 5 B
Bump.............................................. 6, 13 C
Cameras checkbox............................... 6 Cancel .................................................. 6 Cases ................................................. 13
Custom ........................................... 13 Check ................................................. 13
Transparency.................................. 13 Checkbox ............................................. 5 Choose File .......................................... 6 Cinema4D ............................................ 5 Conforming Figures.............................. 6 Custom............................................... 13
cases .............................................. 13 Custom FBX Root Node..................... 13 Custom LightWave......................... 6, 13
using ............................................... 13 D
DAZ 3D ................................................ 1
DAZ Studio.................................. 1, 5, 6 DAZ Studio FBX Exporter .................... 5 Default.................................................. 6
FBX................................................... 6 Reset ................................................ 6
Default Camera .................................... 6 Defaults button ..................................... 6 Diffuse ............................................ 6, 13
assign ............................................... 6 Diffuse, Transparency ........................ 13 E
Embed Textures................................... 6 Export......................................... 5, 6, 13
LightWave................................... 5, 13 Export File Type ................................... 6 Export Options dialog ........................... 6 F
Failed ................................................. 13 FBM...................................................... 6 FBX ............................................ 5, 6, 13
default............................................... 6 importing..................................... 6, 13 leave ............................................... 13 reading.............................................. 5 reads............................................... 13 see.................................................. 13 support.............................................. 6 using ................................................. 6
FBX 3D................................................. 5 FBX 5.0 ............................................ 5, 6
©2008 DAZ 3D, Inc. 17
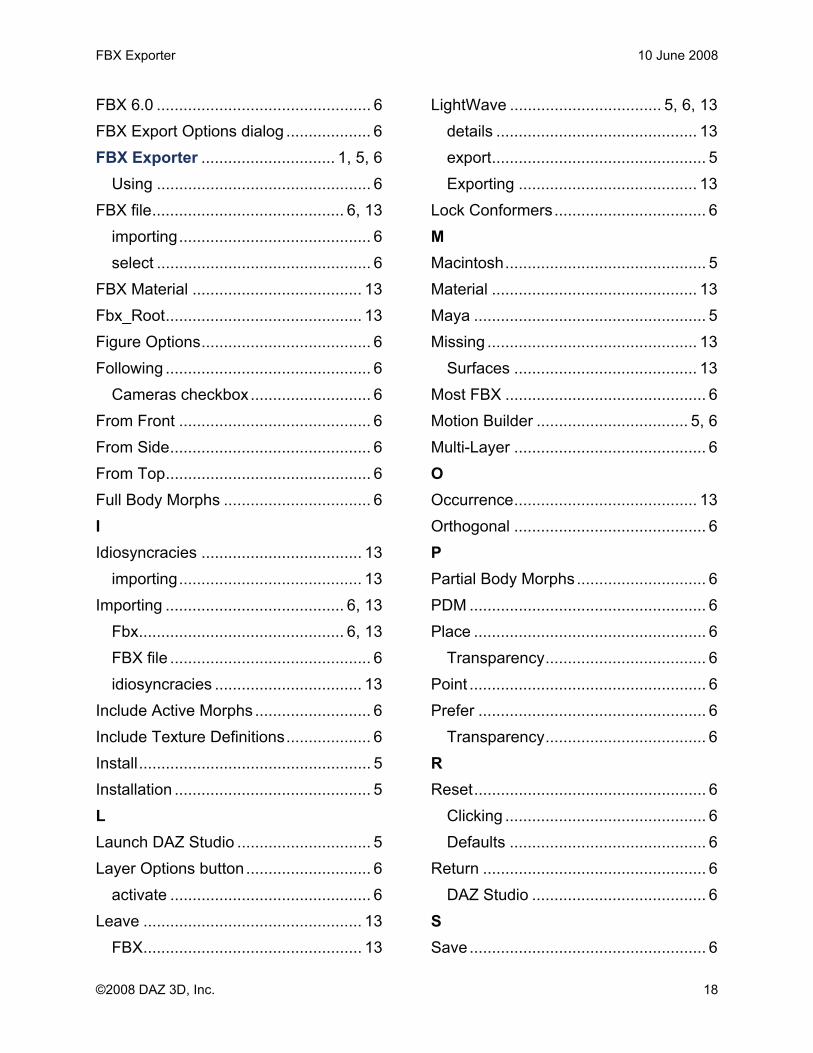
FBX Exporter 10 June 2008
FBX 6.0 ................................................ 6 FBX Export Options dialog ................... 6 FBX Exporter .............................. 1, 5, 6
Using ................................................ 6 FBX file........................................... 6, 13
importing........................................... 6 select ................................................ 6
FBX Material ...................................... 13 Fbx_Root............................................ 13 Figure Options...................................... 6 Following .............................................. 6
Cameras checkbox........................... 6 From Front ........................................... 6 From Side............................................. 6 From Top.............................................. 6 Full Body Morphs ................................. 6 I Idiosyncracies .................................... 13
importing......................................... 13 Importing ........................................ 6, 13
Fbx.............................................. 6, 13 FBX file ............................................. 6 idiosyncracies ................................. 13
Include Active Morphs .......................... 6 Include Texture Definitions................... 6 Install.................................................... 5 Installation ............................................ 5 L
Launch DAZ Studio .............................. 5 Layer Options button............................ 6
activate ............................................. 6 Leave ................................................. 13
FBX................................................. 13
LightWave .................................. 5, 6, 13 details ............................................. 13 export................................................ 5 Exporting ........................................ 13
Lock Conformers.................................. 6 M
Macintosh............................................. 5 Material .............................................. 13 Maya .................................................... 5 Missing ............................................... 13
Surfaces ......................................... 13 Most FBX ............................................. 6 Motion Builder .................................. 5, 6 Multi-Layer ........................................... 6 O
Occurrence......................................... 13 Orthogonal ........................................... 6 P
Partial Body Morphs............................. 6 PDM ..................................................... 6 Place .................................................... 6
Transparency.................................... 6 Point ..................................................... 6 Prefer ................................................... 6
Transparency.................................... 6 R Reset.................................................... 6
Clicking ............................................. 6 Defaults ............................................ 6
Return .................................................. 6 DAZ Studio ....................................... 6
S
Save..................................................... 6
©2008 DAZ 3D, Inc. 18
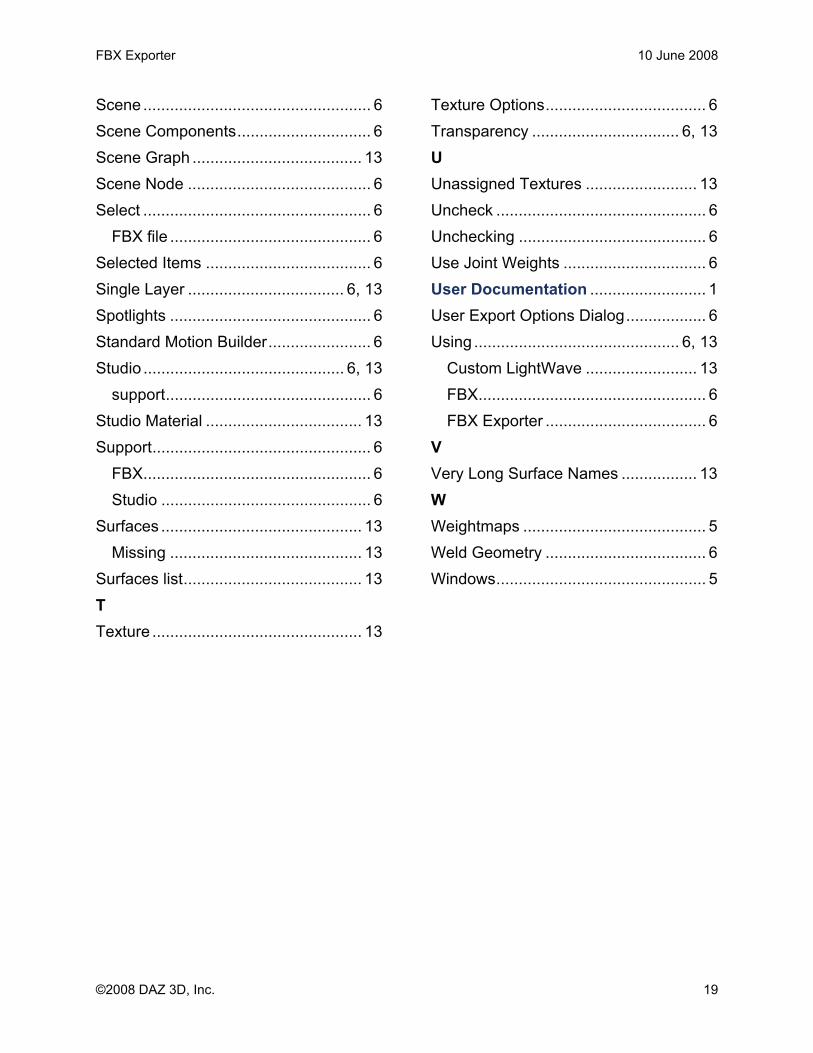
FBX Exporter 10 June 2008
©2008 DAZ 3D, Inc. 19
Scene ................................................... 6 Scene Components.............................. 6 Scene Graph ...................................... 13 Scene Node ......................................... 6 Select ................................................... 6
FBX file ............................................. 6 Selected Items ..................................... 6 Single Layer ................................... 6, 13 Spotlights ............................................. 6 Standard Motion Builder....................... 6 Studio ............................................. 6, 13
support.............................................. 6 Studio Material ................................... 13 Support................................................. 6
FBX................................................... 6 Studio ............................................... 6
Surfaces ............................................. 13 Missing ........................................... 13
Surfaces list........................................ 13 T
Texture ............................................... 13
Texture Options.................................... 6 Transparency ................................. 6, 13 U
Unassigned Textures ......................... 13 Uncheck ............................................... 6 Unchecking .......................................... 6 Use Joint Weights ................................ 6 User Documentation .......................... 1 User Export Options Dialog.................. 6 Using .............................................. 6, 13
Custom LightWave ......................... 13 FBX................................................... 6 FBX Exporter .................................... 6
V
Very Long Surface Names ................. 13 W
Weightmaps ......................................... 5 Weld Geometry .................................... 6 Windows............................................... 5