faq s7 communication over mpi - siemens · 2015-01-23 · faq s7 communication over mpi s7...
TRANSCRIPT
FAQ S7 communication over MPI
S7 communication over MPI
FAQ
S7 communication over MPI
entry ID: 16518346
V1.0 15.02.2008 2/26
Cop
yrig
ht ©
Sie
men
s A
G 2
008
All
right
s re
serv
ed
Gui
de_S
7_M
PI_
e.do
c
Table of Contents
Table of Contents ......................................................................................................... 2
Question ........................................................................................................................ 2 How do I create an S7 connection for the SIMATIC NET-OPC Server over MPI with the SIMATIC NET PC Software? .................................................. 2
Answer........................................................................................................................... 2 The instructions and notes listed in this document provide a detailed answer to this question. ............................................................................... 2
1 Assignment of tasks....................................................................................... 3 1.1 Condition........................................................................................................... 3
2 Configuration of the PC station..................................................................... 4 2.1 Download the configuration into PC station.................................................... 16 2.2 Start of the OPC Scout ................................................................................... 19
3 History ........................................................................................................... 26
This entry is from the Internet offer of Siemens AG, Automation and Drives, Service & Support. Clicking the link below directly displays the download page of this document.
http://support.automation.siemens.com/WW/view/en/16518346
Question
How do I create an S7 connection for the SIMATIC NET-OPC Server over MPI with the SIMATIC NET PC Software?
Answer
The instructions and notes listed in this document provide a detailed answer to this question.
S7 communication over MPI
entry ID: 16518346
V1.0 15.02.2008 3/26
Cop
yrig
ht ©
Sie
men
s A
G 2
008
All
right
s re
serv
ed
Gui
de_S
7_M
PI_
e.do
c
1 Assignment of tasks
In this example a CP 5611 is used that implements S7 communication over the OPC server with an S7 controller on the MPI bus.
NOTE The method described in these instructions also applies to the communications processors. CP 5613, CP 5511, and CP 5512.
1.1 Condition
It is assumed that one of the two following configuration tools is installed:
• NCM PC NCM PC is supplied with the SIMATIC NET CD and allows you to create PC projects and open STEP 7 projects. It is, however, not possible to edit S7 blocks in the STEP 7 project with this software.
• STEP 7 STEP 7 is a separate software package with which you can create S7-400, S7-300 and PC projects. S7 blocks can be edited with this software.
Only one of these tools can be installed.
In chapter 2 “Configuration of the PC station” is described the configuration of PC station so that you can use the S7 communication via MPI to exchange data between PC station and S7 station.
S7 communication over MPI
entry ID: 16518346
V1.0 15.02.2008 4/26
Cop
yrig
ht ©
Sie
men
s A
G 2
008
All
right
s re
serv
ed
Gui
de_S
7_M
PI_
e.do
c
2 Configuration of the PC station
After successful completion of the hardware and software installation of the SIMATIC NET CD and the configuration tool and after restarting your computer, you start NCM PC or STEP 7 with "Start (in Windows XP: All Programs ) SIMATIC SIMATIC Manager or SIMATIC NCM PC Manager or using the desktop icon of the same name.
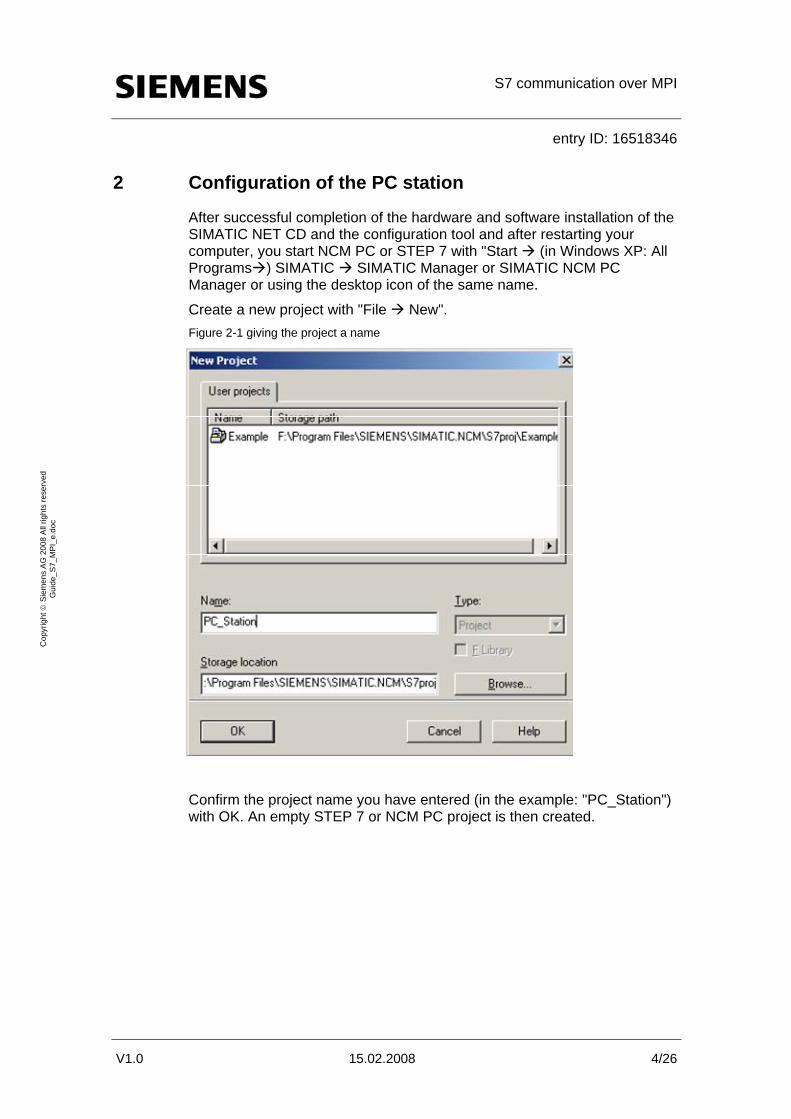
Create a new project with "File New". Figure 2-1 giving the project a name
Confirm the project name you have entered (in the example: "PC_Station") with OK. An empty STEP 7 or NCM PC project is then created.
S7 communication over MPI
entry ID: 16518346
V1.0 15.02.2008 5/26
Cop
yrig
ht ©
Sie
men
s A
G 2
008
All
right
s re
serv
ed
Gui
de_S
7_M
PI_
e.do
c
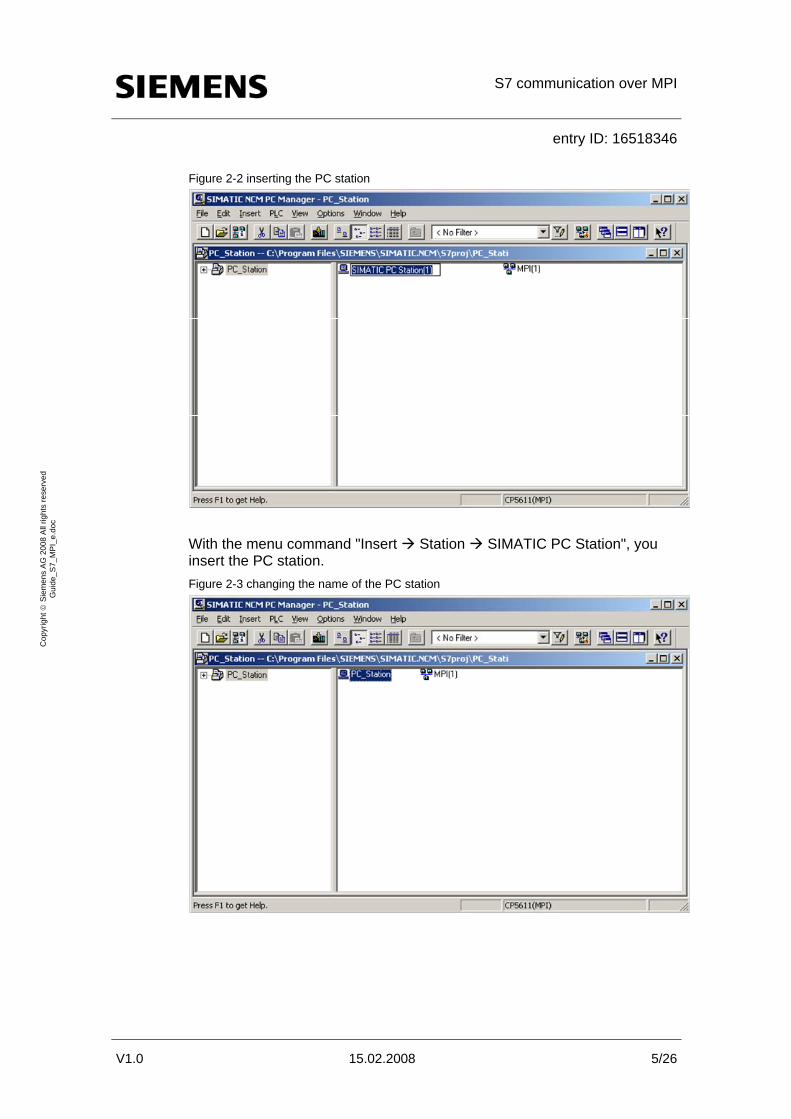
Figure 2-2 inserting the PC station
With the menu command "Insert Station SIMATIC PC Station", you insert the PC station. Figure 2-3 changing the name of the PC station
S7 communication over MPI
entry ID: 16518346
V1.0 15.02.2008 6/26
Cop
yrig
ht ©
Sie
men
s A
G 2
008
All
right
s re
serv
ed
Gui
de_S
7_M
PI_
e.do
c
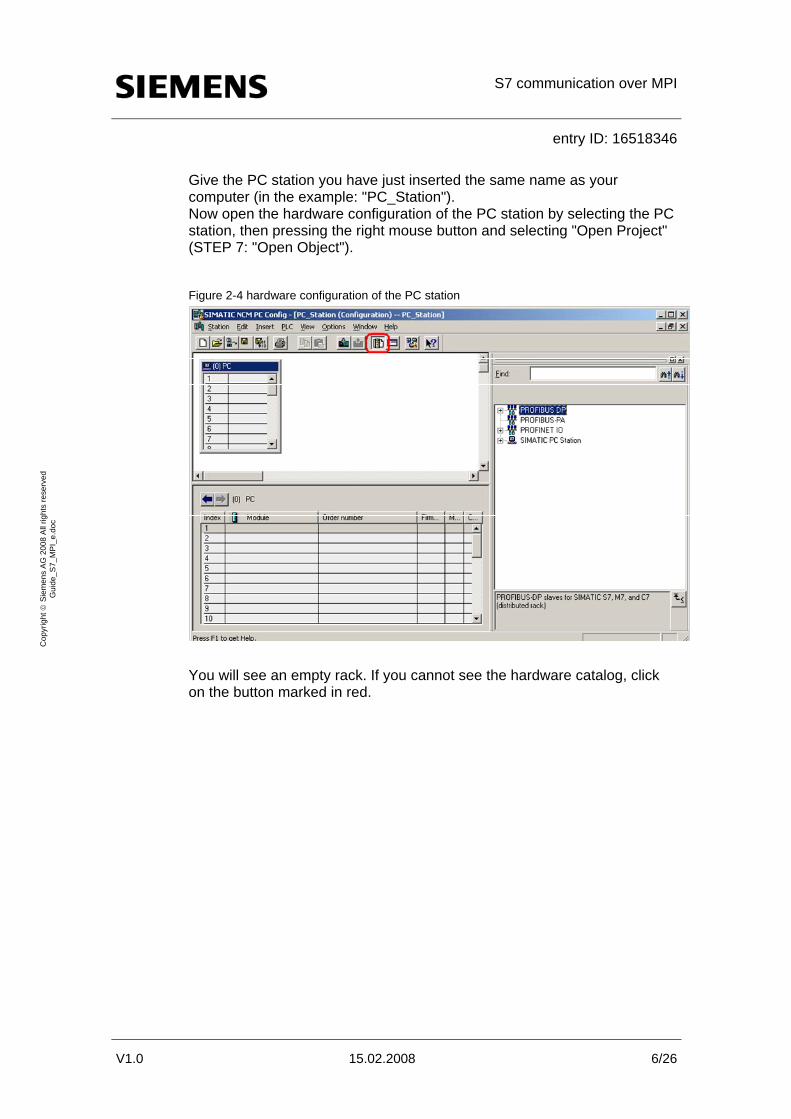
Give the PC station you have just inserted the same name as your computer (in the example: "PC_Station"). Now open the hardware configuration of the PC station by selecting the PC station, then pressing the right mouse button and selecting "Open Project" (STEP 7: "Open Object").
Figure 2-4 hardware configuration of the PC station
You will see an empty rack. If you cannot see the hardware catalog, click on the button marked in red.

S7 communication over MPI
entry ID: 16518346
V1.0 15.02.2008 7/26
Cop
yrig
ht ©
Sie
men
s A
G 2
008
All
right
s re
serv
ed
Gui
de_S
7_M
PI_
e.do
c
Figure 2-5 selecting the modules from the hardware catalog
Platzieren Sie jetzt Ihr PC- Baugruppen in diesen Rack (z. B. per Drag & Drop).
Now place your PC modules in this rack (for example by dragging them from the hardware catalog). If you use a CP5613 (or CP5512 or CP5511) you will select the CP5611 (or CP5512 or CP5511).
The following dialog appears automatically after you insert the module in the PC station.
S7 communication over MPI
entry ID: 16518346
V1.0 15.02.2008 8/26
Cop
yrig
ht ©
Sie
men
s A
G 2
008
All
right
s re
serv
ed
Gui
de_S
7_M
PI_
e.do
c
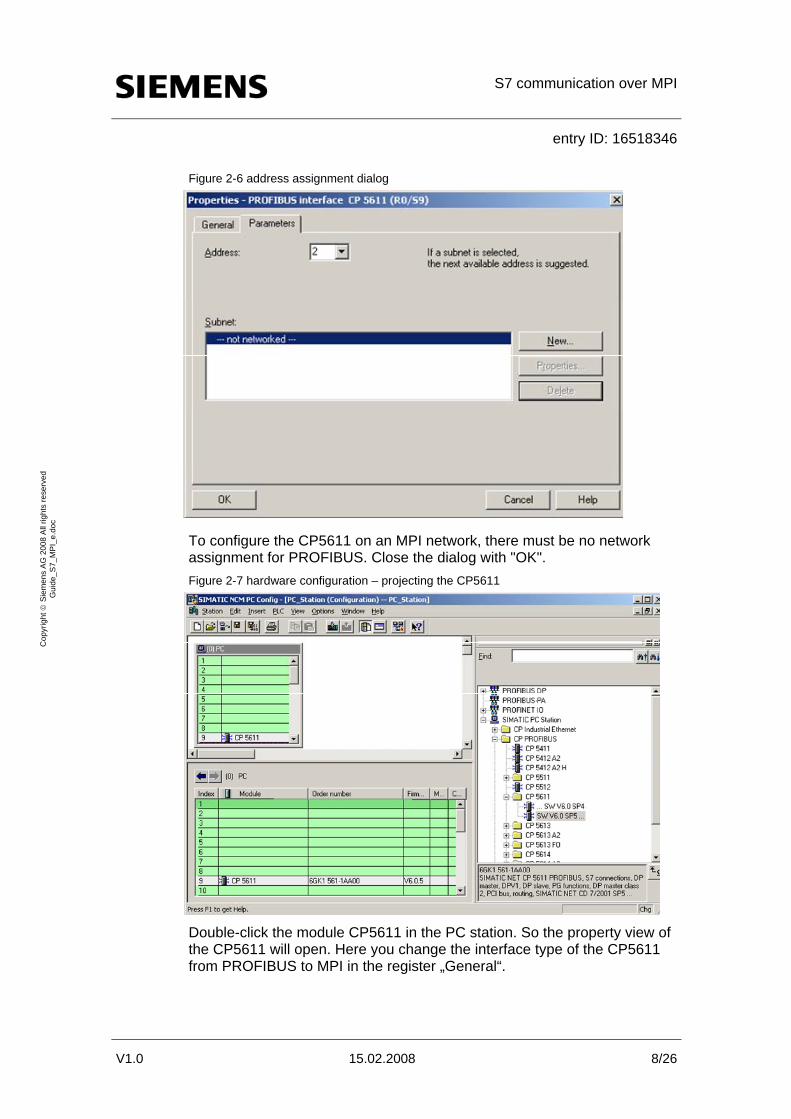
Figure 2-6 address assignment dialog
To configure the CP5611 on an MPI network, there must be no network assignment for PROFIBUS. Close the dialog with "OK". Figure 2-7 hardware configuration – projecting the CP5611
Double-click the module CP5611 in the PC station. So the property view of the CP5611 will open. Here you change the interface type of the CP5611 from PROFIBUS to MPI in the register „General“.
S7 communication over MPI
entry ID: 16518346
V1.0 15.02.2008 9/26
Cop
yrig
ht ©
Sie
men
s A
G 2
008
All
right
s re
serv
ed
Gui
de_S
7_M
PI_
e.do
c
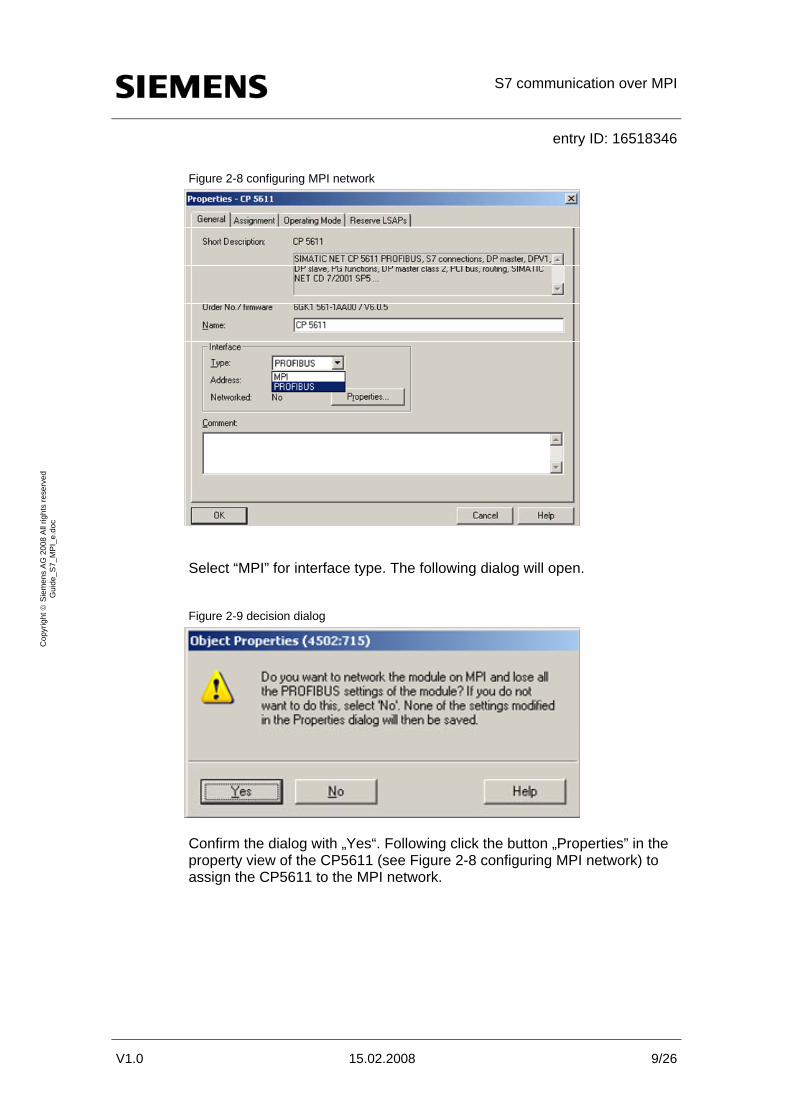
Figure 2-8 configuring MPI network
Select “MPI” for interface type. The following dialog will open.
Figure 2-9 decision dialog
Confirm the dialog with „Yes“. Following click the button „Properties” in the property view of the CP5611 (see Figure 2-8 configuring MPI network) to assign the CP5611 to the MPI network.
S7 communication over MPI
entry ID: 16518346
V1.0 15.02.2008 10/26
Cop
yrig
ht ©
Sie
men
s A
G 2
008
All
right
s re
serv
ed
Gui
de_S
7_M
PI_
e.do
c
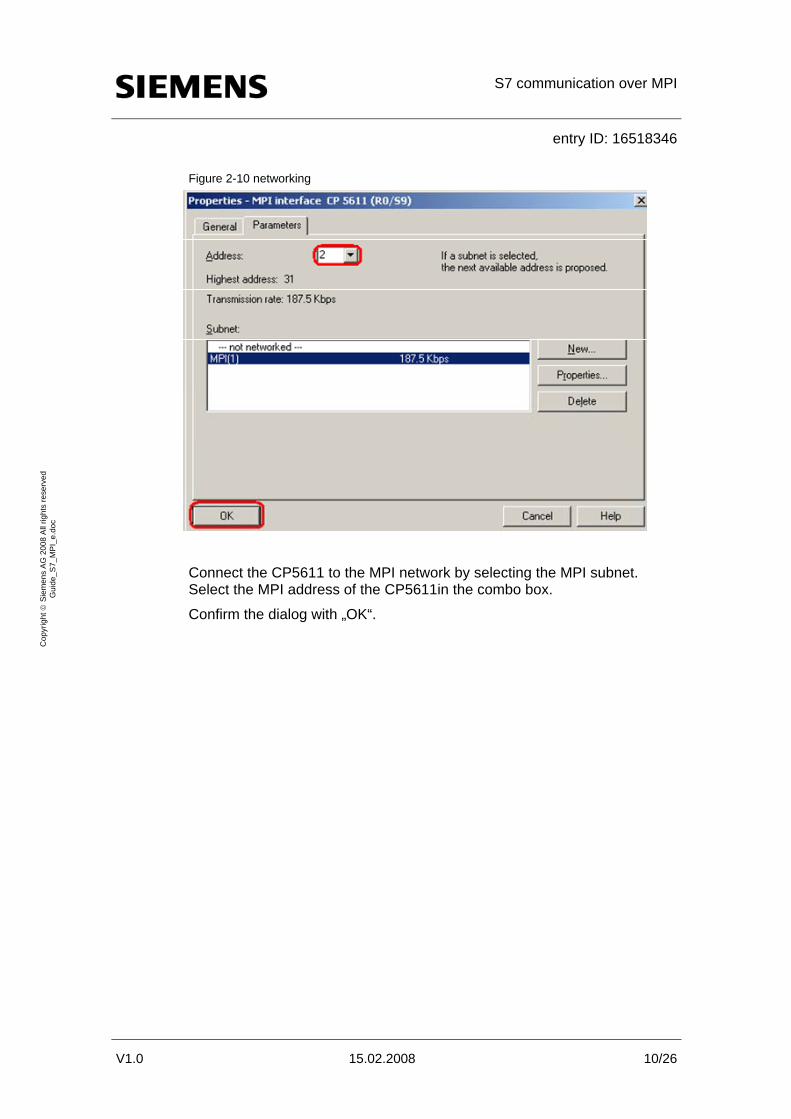
Figure 2-10 networking
Connect the CP5611 to the MPI network by selecting the MPI subnet. Select the MPI address of the CP5611in the combo box.
Confirm the dialog with „OK“.
S7 communication over MPI
entry ID: 16518346
V1.0 15.02.2008 11/26
Cop
yrig
ht ©
Sie
men
s A
G 2
008
All
right
s re
serv
ed
Gui
de_S
7_M
PI_
e.do
c
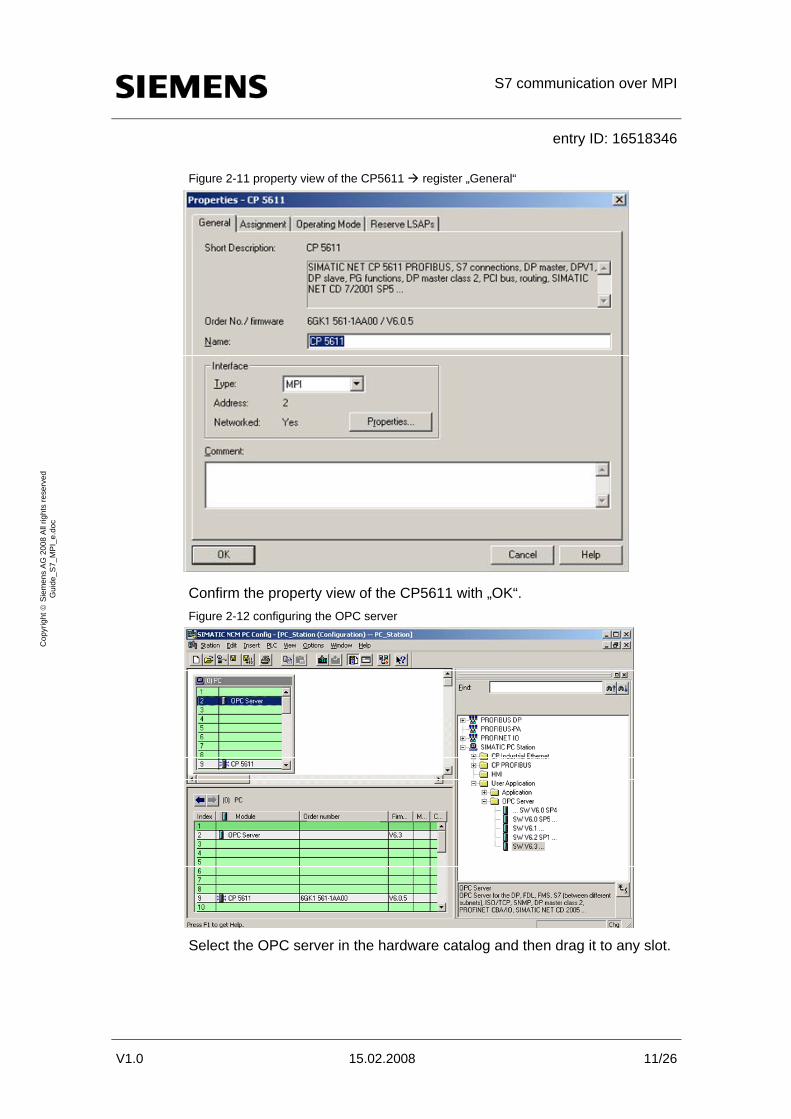
Figure 2-11 property view of the CP5611 register „General“
Confirm the property view of the CP5611 with „OK“. Figure 2-12 configuring the OPC server
Select the OPC server in the hardware catalog and then drag it to any slot.
S7 communication over MPI
entry ID: 16518346
V1.0 15.02.2008 12/26
Cop
yrig
ht ©
Sie
men
s A
G 2
008
All
right
s re
serv
ed
Gui
de_S
7_M
PI_
e.do
c
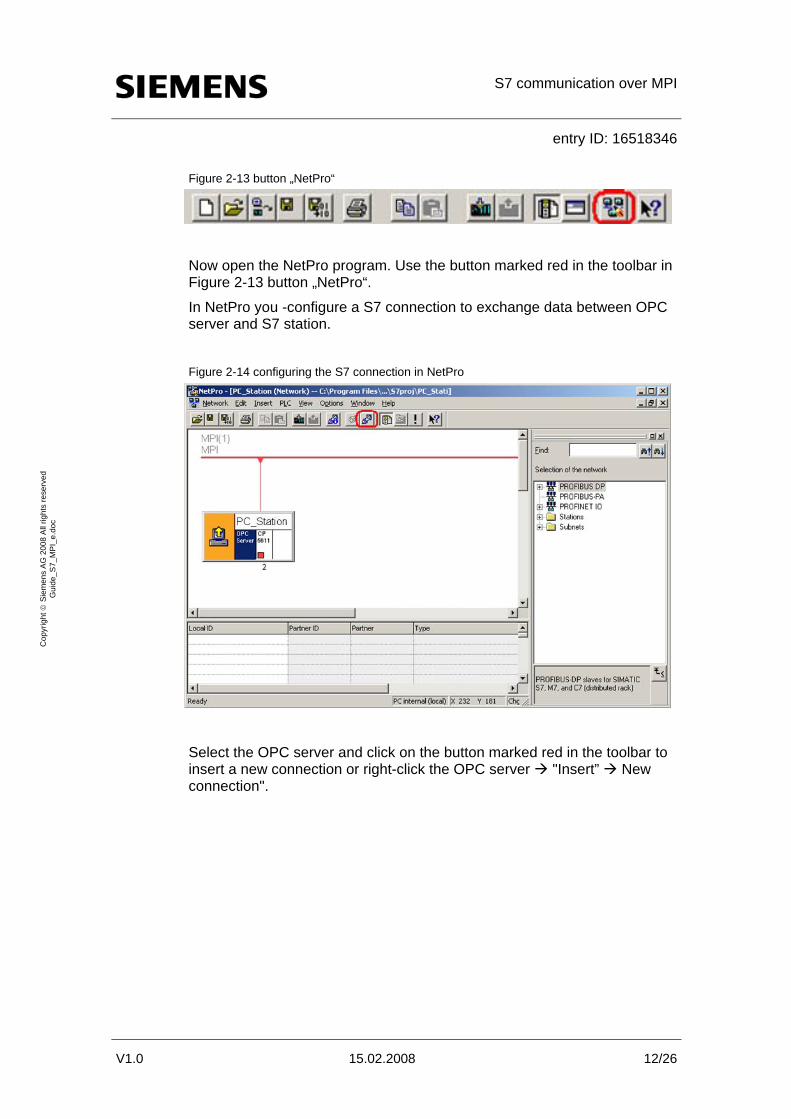
Figure 2-13 button „NetPro“
Now open the NetPro program. Use the button marked red in the toolbar in Figure 2-13 button „NetPro“.
In NetPro you -configure a S7 connection to exchange data between OPC server and S7 station.
Figure 2-14 configuring the S7 connection in NetPro
Select the OPC server and click on the button marked red in the toolbar to insert a new connection or right-click the OPC server "Insert” New connection".
S7 communication over MPI
entry ID: 16518346
V1.0 15.02.2008 13/26
Cop
yrig
ht ©
Sie
men
s A
G 2
008
All
right
s re
serv
ed
Gui
de_S
7_M
PI_
e.do
c
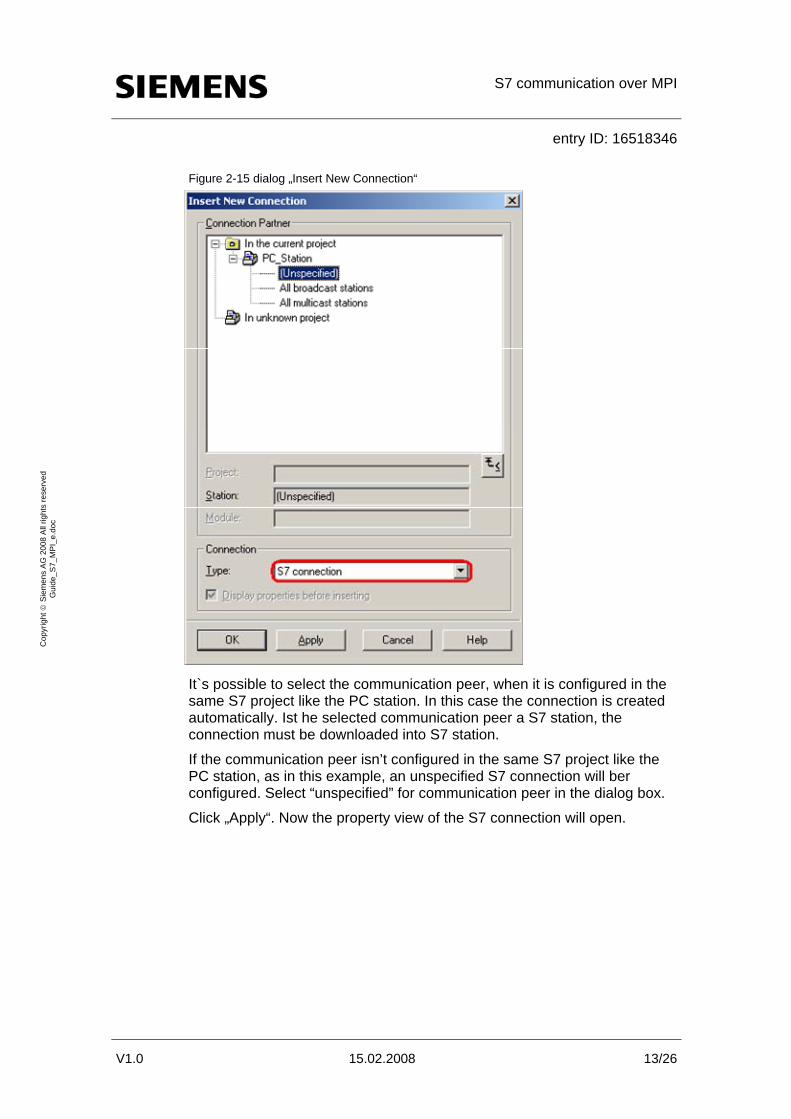
Figure 2-15 dialog „Insert New Connection“
It`s possible to select the communication peer, when it is configured in the same S7 project like the PC station. In this case the connection is created automatically. Ist he selected communication peer a S7 station, the connection must be downloaded into S7 station.
If the communication peer isn’t configured in the same S7 project like the PC station, as in this example, an unspecified S7 connection will ber configured. Select “unspecified” for communication peer in the dialog box.
Click „Apply“. Now the property view of the S7 connection will open.
S7 communication over MPI
entry ID: 16518346
V1.0 15.02.2008 14/26
Cop
yrig
ht ©
Sie
men
s A
G 2
008
All
right
s re
serv
ed
Gui
de_S
7_M
PI_
e.do
c
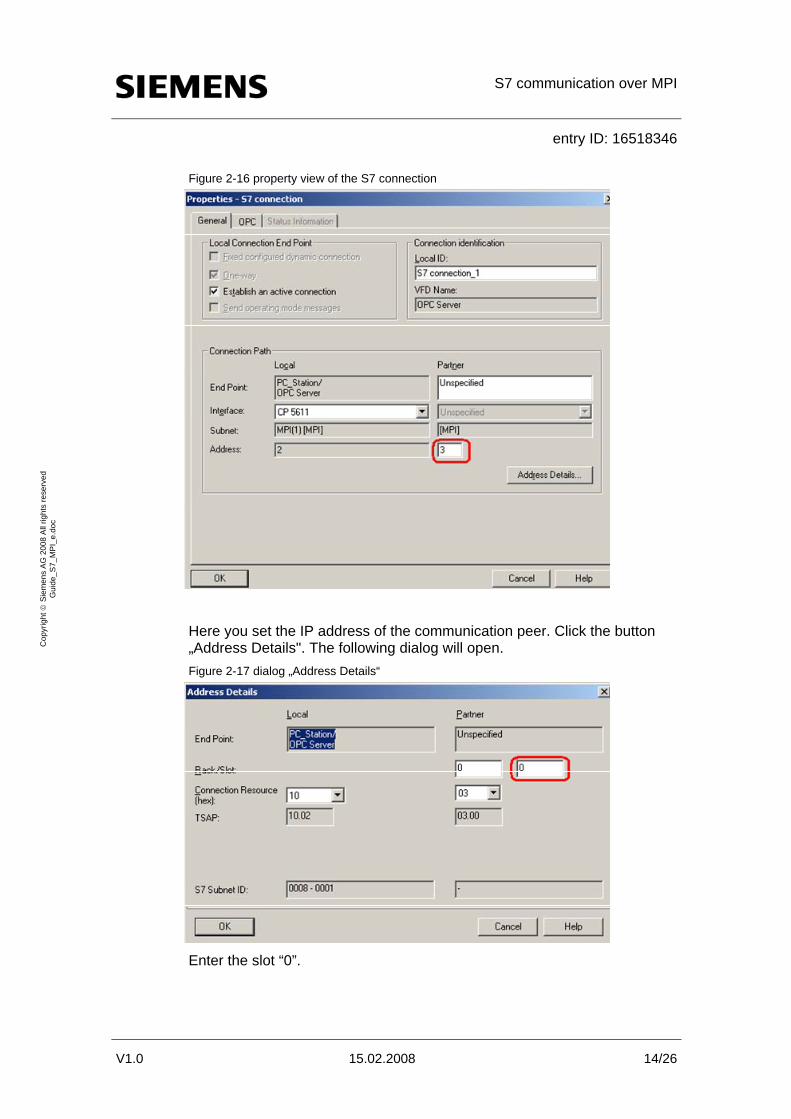
Figure 2-16 property view of the S7 connection
Here you set the IP address of the communication peer. Click the button „Address Details". The following dialog will open. Figure 2-17 dialog „Address Details“
Enter the slot “0”.
S7 communication over MPI
entry ID: 16518346
V1.0 15.02.2008 15/26
Cop
yrig
ht ©
Sie
men
s A
G 2
008
All
right
s re
serv
ed
Gui
de_S
7_M
PI_
e.do
c
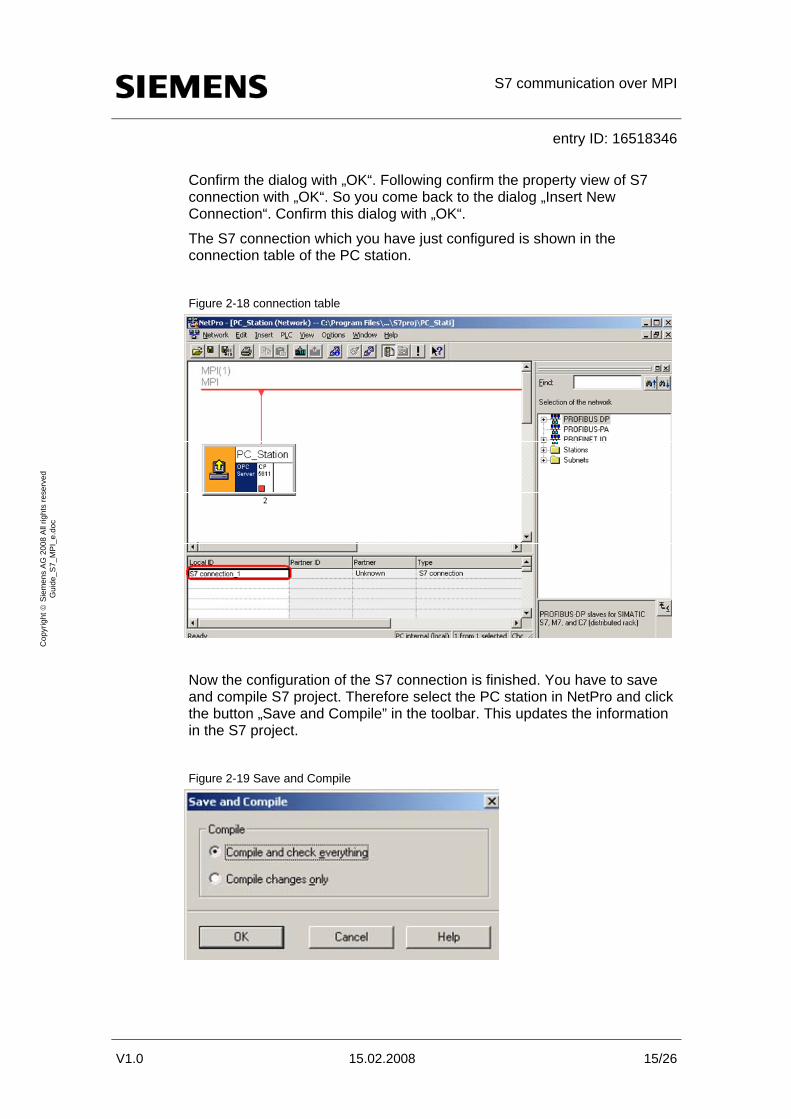
Confirm the dialog with „OK“. Following confirm the property view of S7 connection with „OK“. So you come back to the dialog „Insert New Connection“. Confirm this dialog with „OK“.
The S7 connection which you have just configured is shown in the connection table of the PC station.
Figure 2-18 connection table
Now the configuration of the S7 connection is finished. You have to save and compile S7 project. Therefore select the PC station in NetPro and click the button „Save and Compile” in the toolbar. This updates the information in the S7 project.
Figure 2-19 Save and Compile
S7 communication over MPI
entry ID: 16518346
V1.0 15.02.2008 16/26
Cop
yrig
ht ©
Sie
men
s A
G 2
008
All
right
s re
serv
ed
Gui
de_S
7_M
PI_
e.do
c
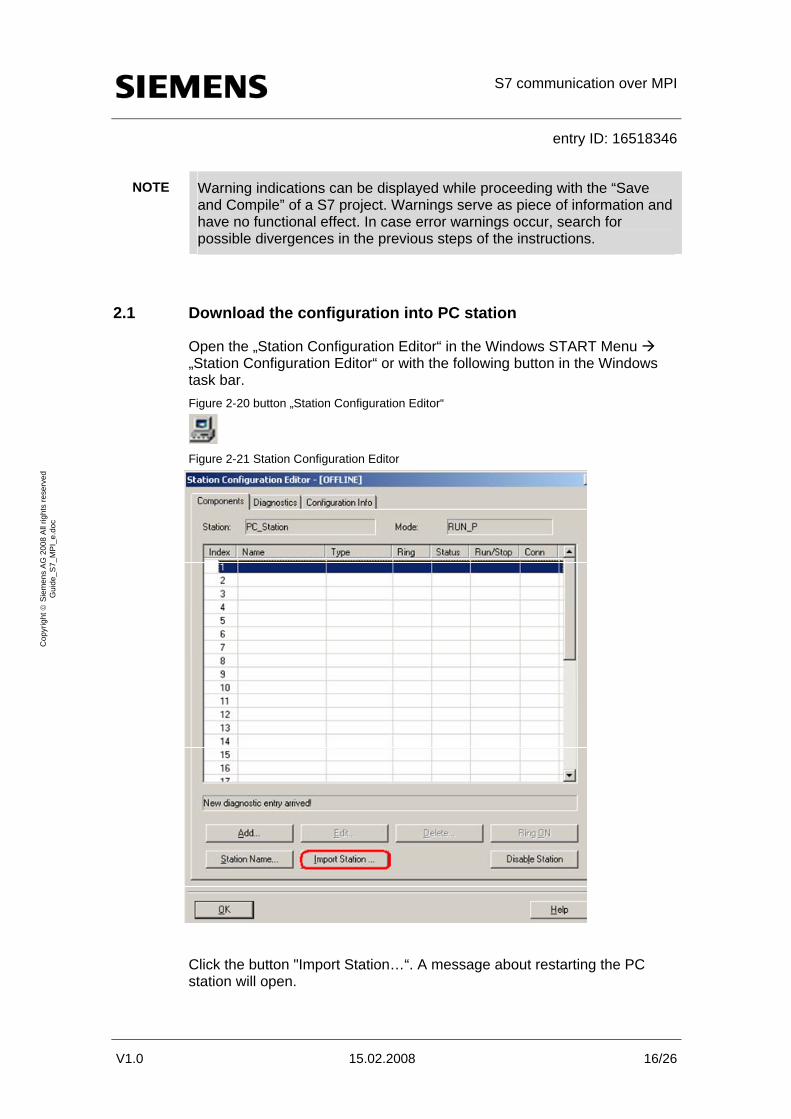
NOTE Warning indications can be displayed while proceeding with the “Save and Compile” of a S7 project. Warnings serve as piece of information and have no functional effect. In case error warnings occur, search for possible divergences in the previous steps of the instructions.
2.1 Download the configuration into PC station
Open the „Station Configuration Editor“ in the Windows START Menu „Station Configuration Editor“ or with the following button in the Windows task bar. Figure 2-20 button „Station Configuration Editor“
Figure 2-21 Station Configuration Editor
Click the button "Import Station…“. A message about restarting the PC station will open.
S7 communication over MPI
entry ID: 16518346
V1.0 15.02.2008 17/26
Cop
yrig
ht ©
Sie
men
s A
G 2
008
All
right
s re
serv
ed
Gui
de_S
7_M
PI_
e.do
c
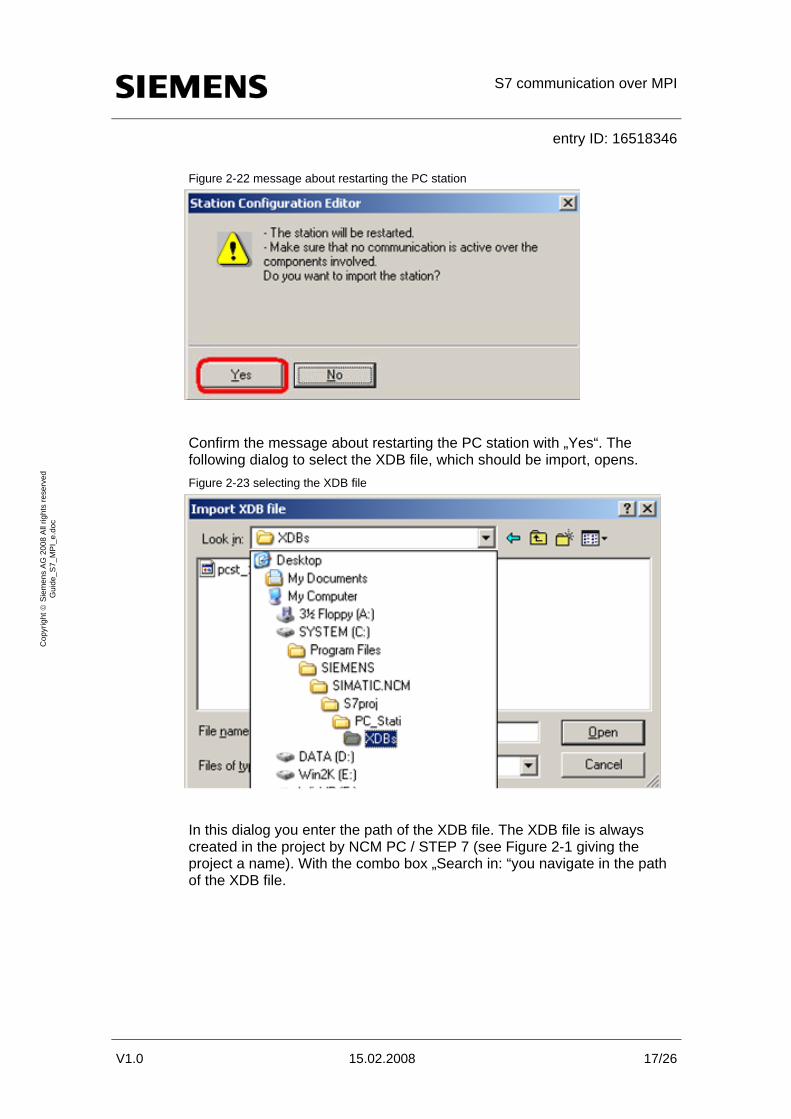
Figure 2-22 message about restarting the PC station
Confirm the message about restarting the PC station with „Yes“. The following dialog to select the XDB file, which should be import, opens. Figure 2-23 selecting the XDB file
In this dialog you enter the path of the XDB file. The XDB file is always created in the project by NCM PC / STEP 7 (see Figure 2-1 giving the project a name). With the combo box „Search in: “you navigate in the path of the XDB file.
S7 communication over MPI
entry ID: 16518346
V1.0 15.02.2008 18/26
Cop
yrig
ht ©
Sie
men
s A
G 2
008
All
right
s re
serv
ed
Gui
de_S
7_M
PI_
e.do
c
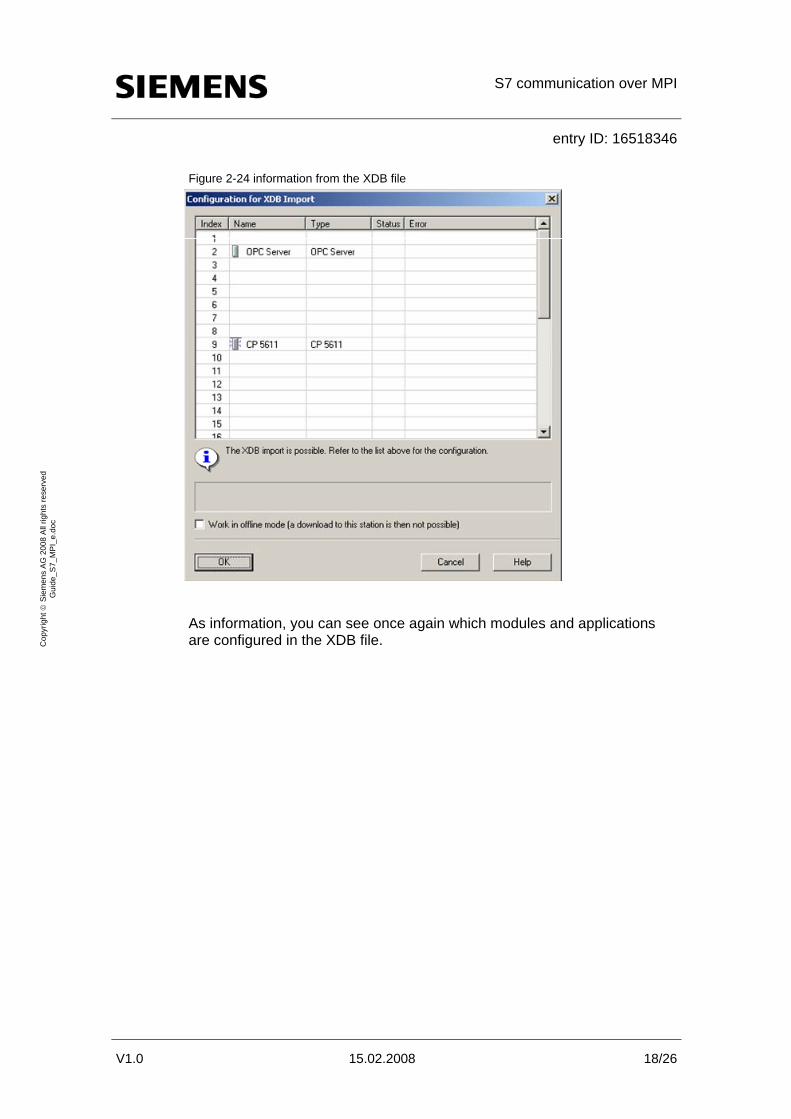
Figure 2-24 information from the XDB file
As information, you can see once again which modules and applications are configured in the XDB file.
S7 communication over MPI
entry ID: 16518346
V1.0 15.02.2008 19/26
Cop
yrig
ht ©
Sie
men
s A
G 2
008
All
right
s re
serv
ed
Gui
de_S
7_M
PI_
e.do
c
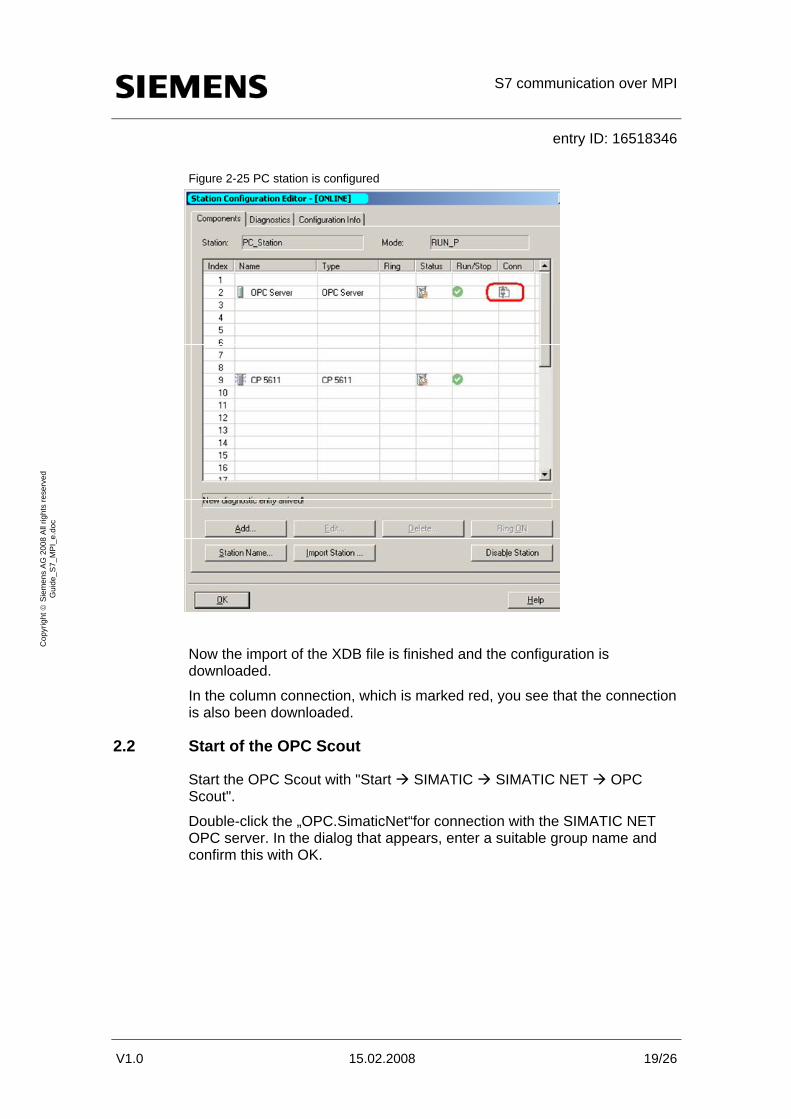
Figure 2-25 PC station is configured
Now the import of the XDB file is finished and the configuration is downloaded.
In the column connection, which is marked red, you see that the connection is also been downloaded.
2.2 Start of the OPC Scout
Start the OPC Scout with "Start SIMATIC SIMATIC NET OPC Scout".
Double-click the „OPC.SimaticNet“for connection with the SIMATIC NET OPC server. In the dialog that appears, enter a suitable group name and confirm this with OK.

S7 communication over MPI
entry ID: 16518346
V1.0 15.02.2008 20/26
Cop
yrig
ht ©
Sie
men
s A
G 2
008
All
right
s re
serv
ed
Gui
de_S
7_M
PI_
e.do
c
Figure 2-26 connecting with the OPC server and enter a group name
Double-click the OPC group which you have created. The "OPC-Navigator" opens. You will now see your protocols in the OPC Navigator. Double-click on "S7". The connection name you configured in NetPro appears.
S7 communication over MPI
entry ID: 16518346
V1.0 15.02.2008 21/26
Cop
yrig
ht ©
Sie
men
s A
G 2
008
All
right
s re
serv
ed
Gui
de_S
7_M
PI_
e.do
c
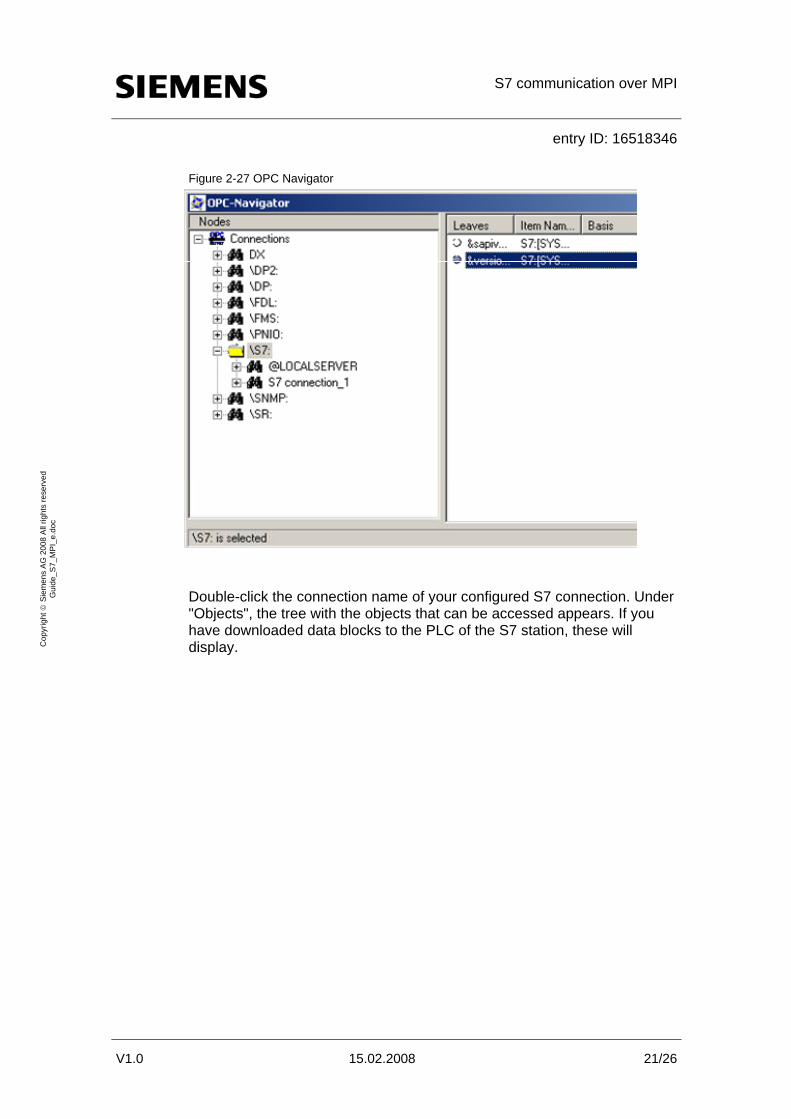
Figure 2-27 OPC Navigator
Double-click the connection name of your configured S7 connection. Under "Objects", the tree with the objects that can be accessed appears. If you have downloaded data blocks to the PLC of the S7 station, these will display.
S7 communication over MPI
entry ID: 16518346
V1.0 15.02.2008 22/26
Cop
yrig
ht ©
Sie
men
s A
G 2
008
All
right
s re
serv
ed
Gui
de_S
7_M
PI_
e.do
c
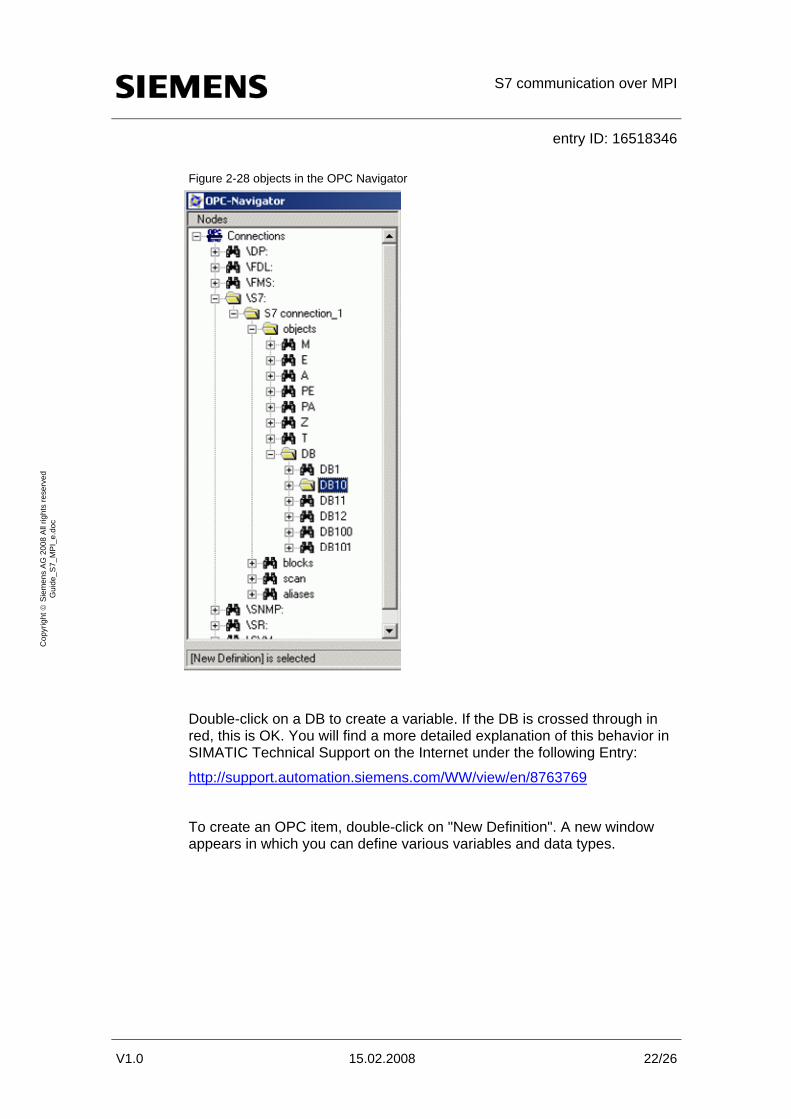
Figure 2-28 objects in the OPC Navigator
Double-click on a DB to create a variable. If the DB is crossed through in red, this is OK. You will find a more detailed explanation of this behavior in SIMATIC Technical Support on the Internet under the following Entry:
http://support.automation.siemens.com/WW/view/en/8763769
To create an OPC item, double-click on "New Definition". A new window appears in which you can define various variables and data types.
S7 communication over MPI
entry ID: 16518346
V1.0 15.02.2008 23/26
Cop
yrig
ht ©
Sie
men
s A
G 2
008
All
right
s re
serv
ed
Gui
de_S
7_M
PI_
e.do
c
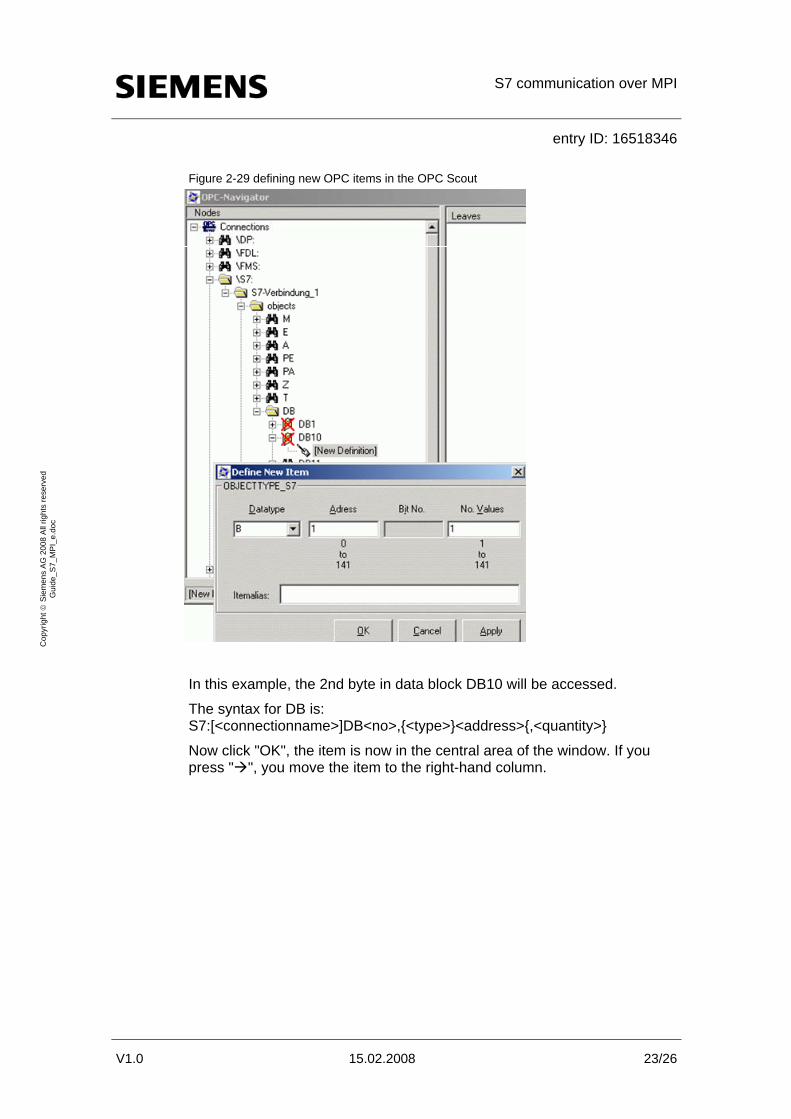
Figure 2-29 defining new OPC items in the OPC Scout
In this example, the 2nd byte in data block DB10 will be accessed.
The syntax for DB is: S7:[<connectionname>]DB<no>,{<type>}<address>{,<quantity>}
Now click "OK", the item is now in the central area of the window. If you press " ", you move the item to the right-hand column.
S7 communication over MPI
entry ID: 16518346
V1.0 15.02.2008 24/26
Cop
yrig
ht ©
Sie
men
s A
G 2
008
All
right
s re
serv
ed
Gui
de_S
7_M
PI_
e.do
c
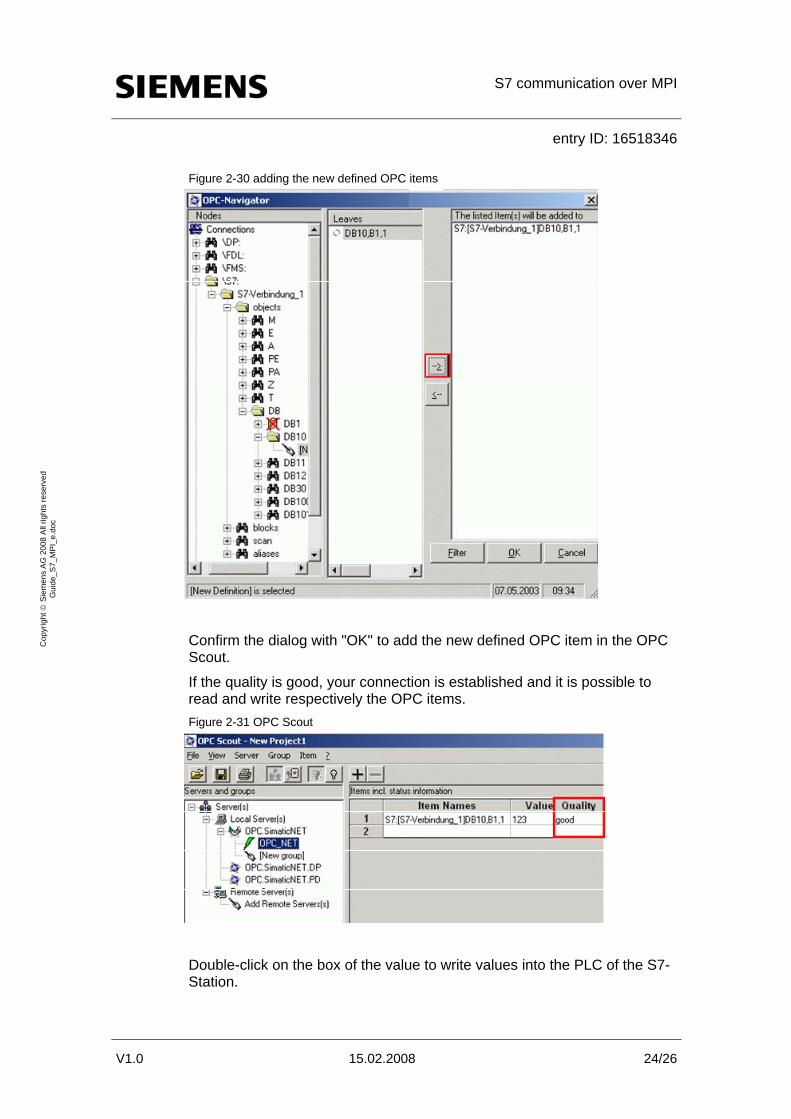
Figure 2-30 adding the new defined OPC items
Confirm the dialog with "OK" to add the new defined OPC item in the OPC Scout.
If the quality is good, your connection is established and it is possible to read and write respectively the OPC items. Figure 2-31 OPC Scout
Double-click on the box of the value to write values into the PLC of the S7-Station.
S7 communication over MPI
entry ID: 16518346
V1.0 15.02.2008 25/26
Cop
yrig
ht ©
Sie
men
s A
G 2
008
All
right
s re
serv
ed
Gui
de_S
7_M
PI_
e.do
c
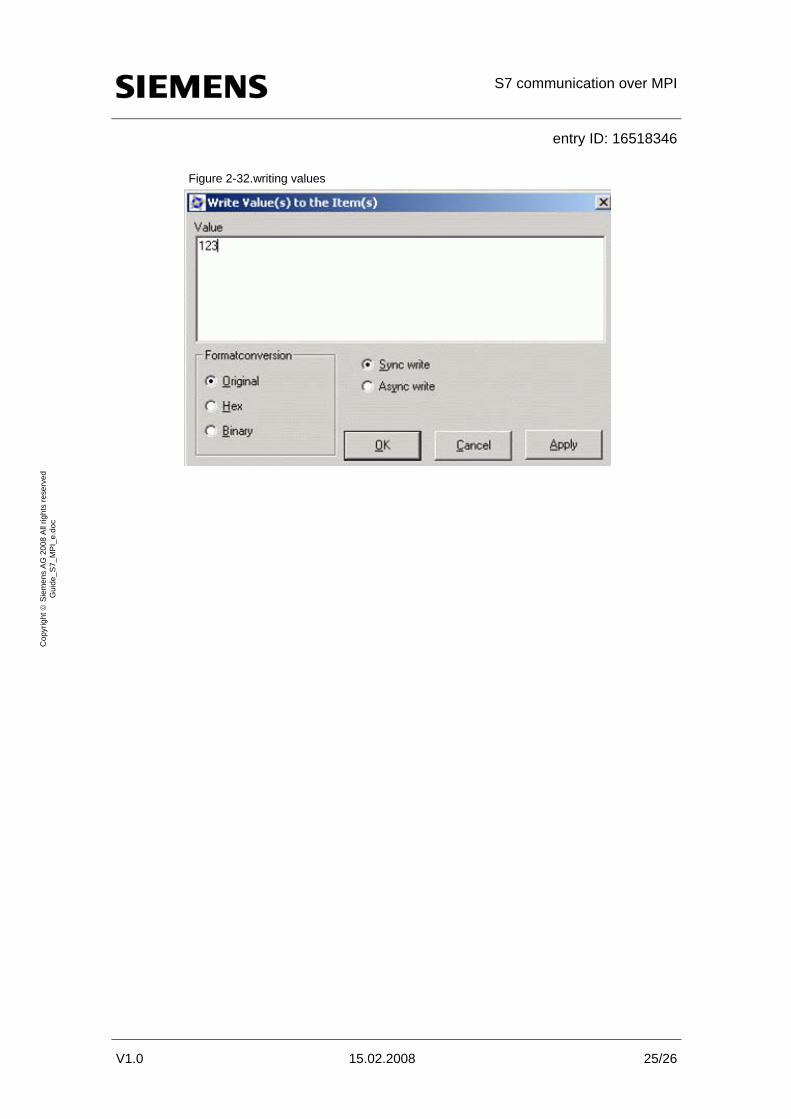
Figure 2-32.writing values

S7 communication over MPI
entry ID: 16518346
V1.0 15.02.2008 26/26
Cop
yrig
ht ©
Sie
men
s A
G 2
008
All
right
s re
serv
ed
Gui
de_S
7_M
PI_
e.do
c
3 History
Version Date Changes
V 1.0 15.02.2008 First issue