f9 v5 installation for citrix server - f9 financial solutions v5 installation on citrix...
TRANSCRIPT
1 Copyright © 2015 Infor. All rights reserved. The word and design marks set forth herein are trademarks and/or registered trademarks of Infor and/or related affiliates
and subsidiaries. All other trademarks listed herein are the property of their respective owners. www.infor.com.
F9 V5 Installation for Citrix Server
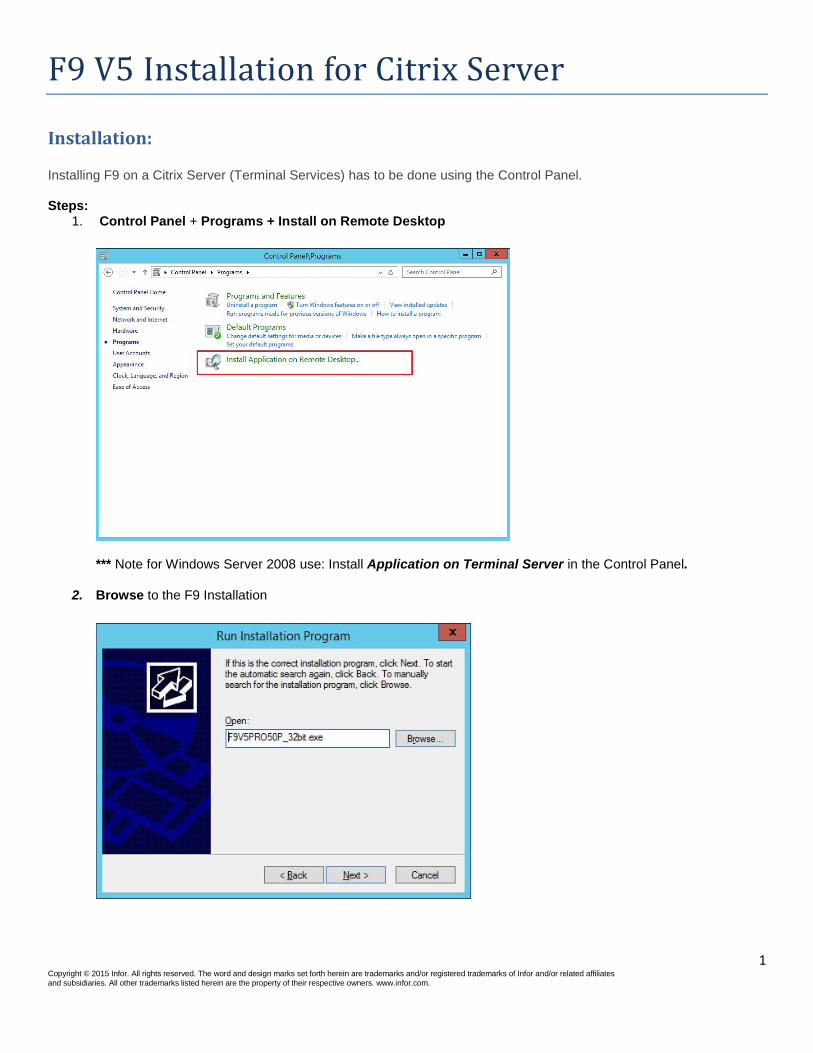
Installation: Installing F9 on a Citrix Server (Terminal Services) has to be done using the Control Panel.
Steps: 1. Control Panel + Programs + Install on Remote Desktop
*** Note for Windows Server 2008 use: Install Application on Terminal Server in the Control Panel.
2. Browse to the F9 Installation

2 Copyright © 2015 Infor. All rights reserved. The word and design marks set forth herein are trademarks and/or registered trademarks of Infor and/or related affiliates
and subsidiaries. All other trademarks listed herein are the property of their respective owners. www.infor.com.
3. Click Run
4. After the F9 Installation completes, F9 users have to be given rights to the F9 installation folder (default C:\F9V5).
5. If also installing F9 Viewer, please follow the same steps (1-5) above.
3 Copyright © 2015 Infor. All rights reserved. The word and design marks set forth herein are trademarks and/or registered trademarks of Infor and/or related affiliates
and subsidiaries. All other trademarks listed herein are the property of their respective owners. www.infor.com.
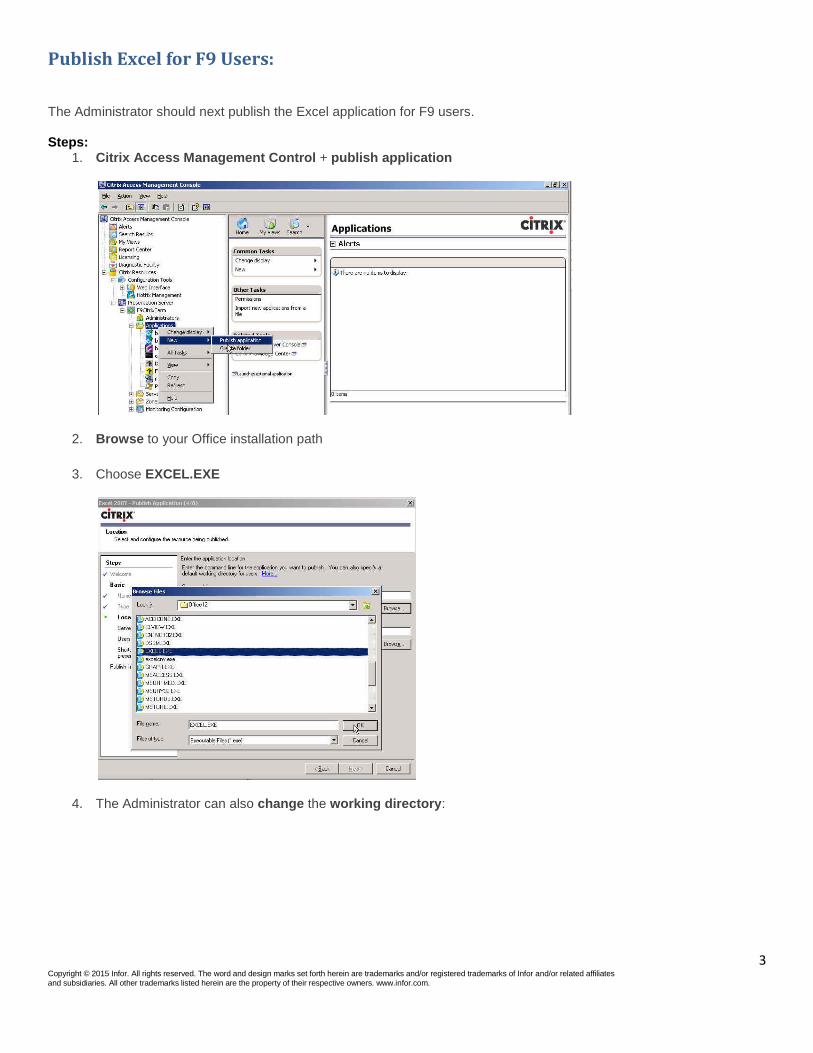
Publish Excel for F9 Users:
The Administrator should next publish the Excel application for F9 users.
Steps: 1. Citrix Access Management Control + publish application
2. Browse to your Office installation path
3. Choose EXCEL.EXE
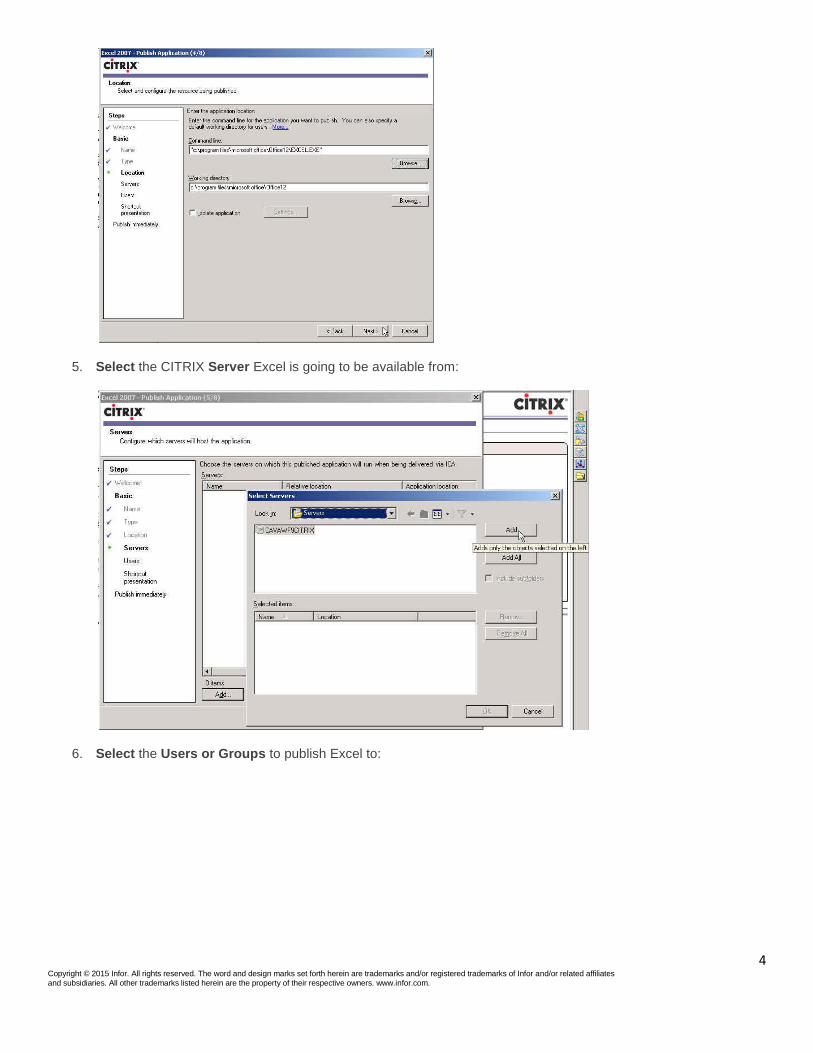
4. The Administrator can also change the working directory:
4 Copyright © 2015 Infor. All rights reserved. The word and design marks set forth herein are trademarks and/or registered trademarks of Infor and/or related affiliates
and subsidiaries. All other trademarks listed herein are the property of their respective owners. www.infor.com.
5. Select the CITRIX Server Excel is going to be available from:
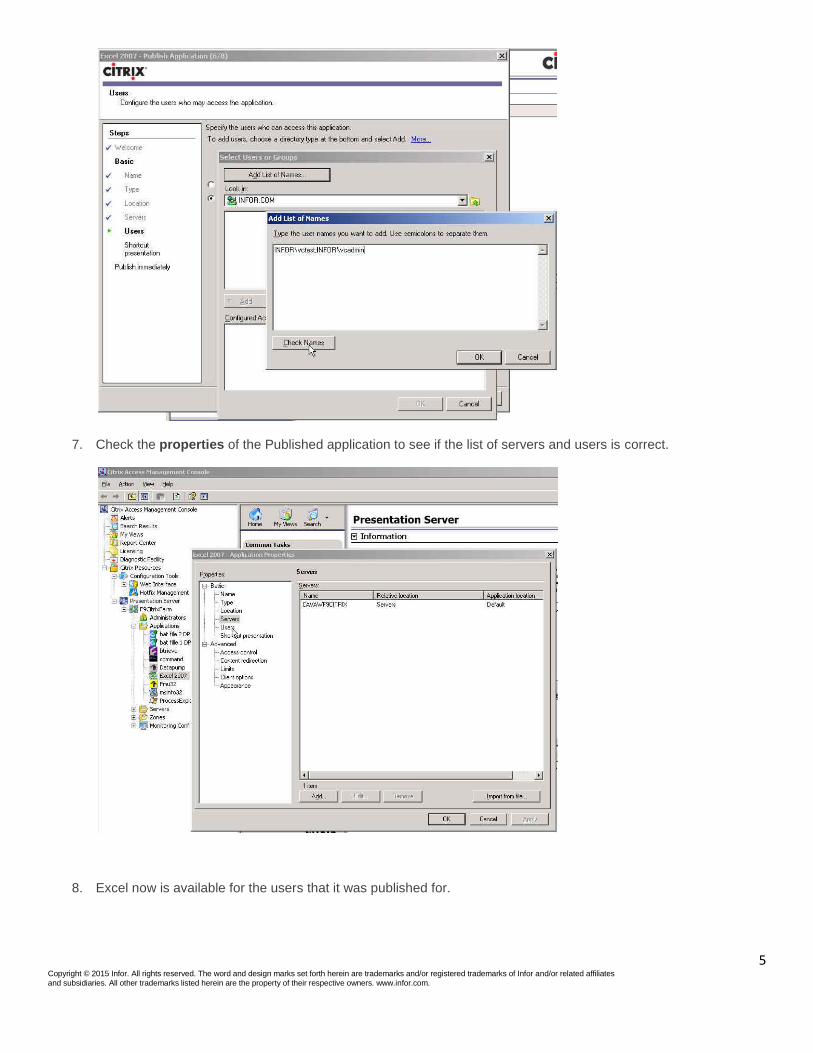
6. Select the Users or Groups to publish Excel to:
5 Copyright © 2015 Infor. All rights reserved. The word and design marks set forth herein are trademarks and/or registered trademarks of Infor and/or related affiliates
and subsidiaries. All other trademarks listed herein are the property of their respective owners. www.infor.com.
7. Check the properties of the Published application to see if the list of servers and users is correct.
8. Excel now is available for the users that it was published for.

6 Copyright © 2015 Infor. All rights reserved. The word and design marks set forth herein are trademarks and/or registered trademarks of Infor and/or related affiliates
and subsidiaries. All other trademarks listed herein are the property of their respective owners. www.infor.com.
Attach F9: After the installation steps are finished, the F9 Excel add-in has to be attached using an account with Administrator rights. Steps:
1. Browse to file: EXCEL.EXE 2. Right-Click + Run as Administrator 3. F9 should display in the Excel Ribbon 4. Close Excel
Once F9 has been attached it will become available for all F9 users. If the F9 Viewer was also installed, there will be two tabs that display initially.
7 Copyright © 2015 Infor. All rights reserved. The word and design marks set forth herein are trademarks and/or registered trademarks of Infor and/or related affiliates
and subsidiaries. All other trademarks listed herein are the property of their respective owners. www.infor.com.
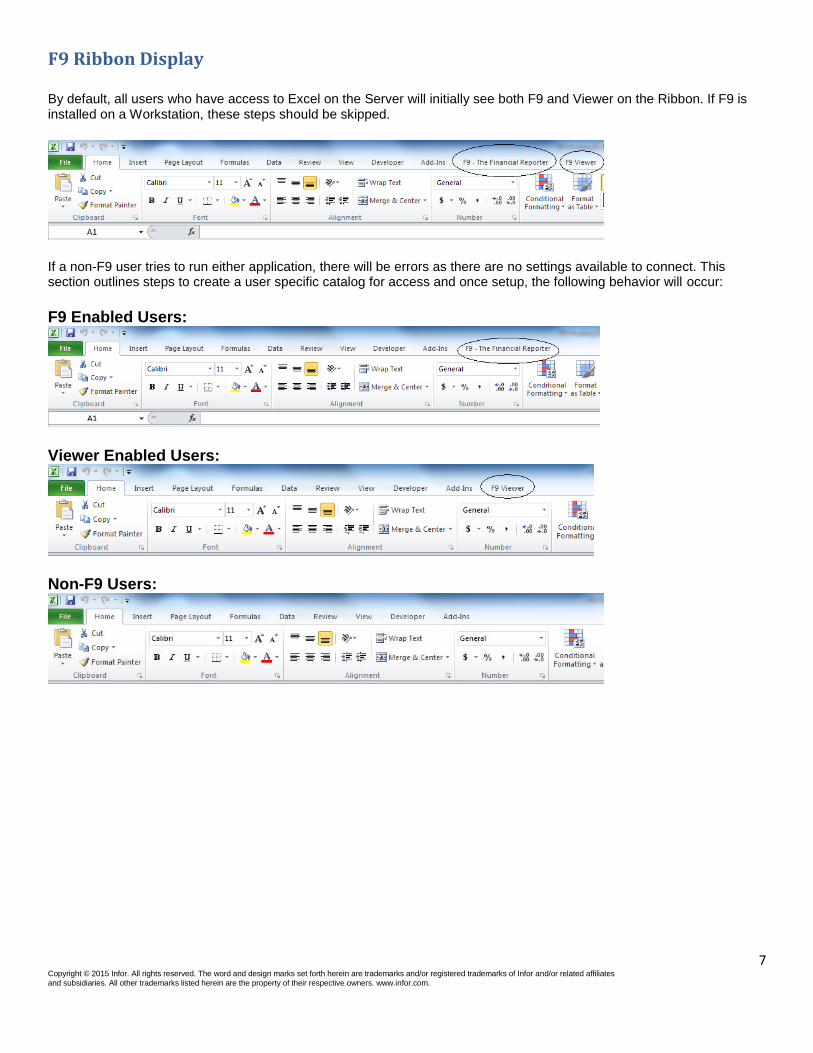
F9 Ribbon Display By default, all users who have access to Excel on the Server will initially see both F9 and Viewer on the Ribbon. If F9 is installed on a Workstation, these steps should be skipped.
If a non-F9 user tries to run either application, there will be errors as there are no settings available to connect. This section outlines steps to create a user specific catalog for access and once setup, the following behavior will occur:
F9 Enabled Users:
Viewer Enabled Users:
Non-F9 Users:
8 Copyright © 2015 Infor. All rights reserved. The word and design marks set forth herein are trademarks and/or registered trademarks of Infor and/or related affiliates
and subsidiaries. All other trademarks listed herein are the property of their respective owners. www.infor.com.
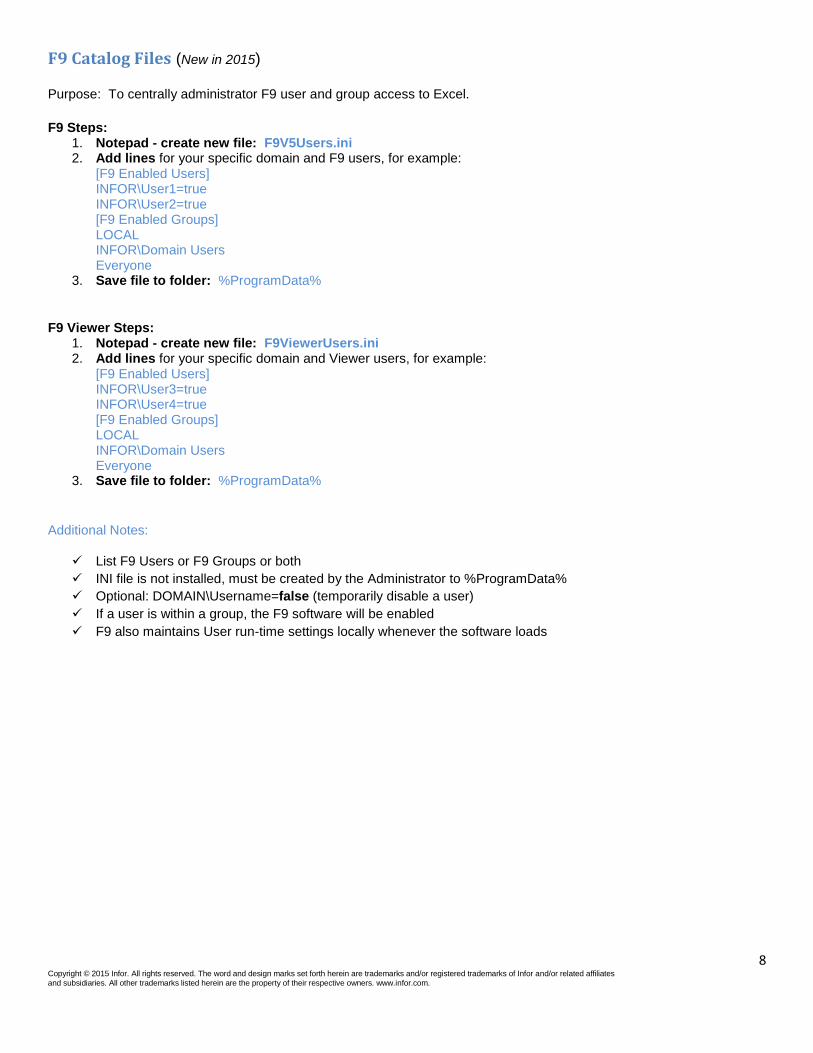
F9 Catalog Files (New in 2015) Purpose: To centrally administrator F9 user and group access to Excel.
F9 Steps:
1. Notepad - create new file: F9V5Users.ini 2. Add lines for your specific domain and F9 users, for example:
[F9 Enabled Users] INFOR\User1=true INFOR\User2=true [F9 Enabled Groups] LOCAL INFOR\Domain Users Everyone
3. Save file to folder: %ProgramData%
F9 Viewer Steps: 1. Notepad - create new file: F9ViewerUsers.ini 2. Add lines for your specific domain and Viewer users, for example:
[F9 Enabled Users] INFOR\User3=true INFOR\User4=true [F9 Enabled Groups] LOCAL INFOR\Domain Users Everyone
3. Save file to folder: %ProgramData%
Additional Notes:
List F9 Users or F9 Groups or both
INI file is not installed, must be created by the Administrator to %ProgramData%
Optional: DOMAIN\Username=false (temporarily disable a user)
If a user is within a group, the F9 software will be enabled
F9 also maintains User run-time settings locally whenever the software loads