ev ifu 453564149521 - philips
TRANSCRIPT

ECGVue Instructions for Use
ECG Management System
TraceMasterVue


TraceMasterVueECG Management System
ECGVUE INSTRUCTIONS FOR USE
Edition 1July 2009

Notice
About This Edition
PN 453564149521Edition 1Printed in USA
Edition History
Edition 1, July 2009
Applicable to TraceMasterVue version C.02 and later.
Philips Medical Systems shall not be liable for errors contained herein or for incidental or consequential damages in connection with the furnishing, performance, or use of this material.
Copyright
Copyright © 2009Koninklijke Philips Electronics N.V. All rights are reserved. Andover, MA 01810-1099 USA(978)687-1501
Warranty
Philips Medical Systems makes no warranty of any kind with regard to this material, included, but not limited to, the implied warranties or merchantability and fitness for a particular purpose.
Responsibility of Manufacturer
Philips Medical Systems only considers itself responsible for any effects on safety, reliability and performance of the M5100A TraceMasterVue server if:
– assembly operations, exten-sions, readjustments, modifica-tions or repairs are done by persons authorized by Philips Medical Systems, and
– the electrical installation of the relevant room or vehicle complies with the IEC or national requirements, and
– the instrument is used according to the instructions for use presented in this manual.
European Directives
This product consists of hardware and software. The hardware carries the CE mark based on the declarations provided in the User’s Guide for the IT hardware.
The software is a class 1 medical device under the Medical Device Directive 93/42/EEC and carries the
mark accordingly.
WARNING
As with all electronic equipment, Radio Frequency (RF) interference between the TraceMasterVue system and any existing RF transmitting or receiving equipment at the installation site, including electrosurgical equipment, should be evaluated carefully and any limitations noted before the equipment is placed in service.
Radio frequency generation from electrosurgical equipment and close proximity transmitters may seriously degrade performance.
Philips Medical Systems assumes no liability for failure resulting from RF interference between Philips Medical Systems medical electronics and any radio frequency generating equipment at levels exceeding those established by applicable standards.
CAUTION
In the U.S. Federal Law restricts this product to sale on or by the order of a physician. Use of accessories other than those recommended by Philips Medical Systems may compromise product performance.
THIS PRODUCT IS NOT INTENDED FOR HOME USE.
This product consists of devices that may contain mercury, which must be recycled or disposed of in accordance with local, state, or federal laws. Within this system, the backlight lamps in the monitor display contain mercury.
Philips strongly recommends that your site not use patient identification numbers that are related to any other forms of identity, such as social security number or driver's license number. Using unique patient identification numbers is part of best practices for any information technology system as a way to help health care providers and patients avoid identity theft.
Global Medical Device Nomenclature (GMDN)
The 5-digit GMDN code adjacent to the symbol is defined in the EN ISO 15225.
To ensure accuracy, all measurements of the online waveforms must be made using the electronic calipers supplied within ECGVue.
Faxed waveforms do not meet the requirements of American National Standard ANSI/AAMI EC11:1991 for display of diagnostic electrocardiograms, and may not be suitable for diagnosis. Faxed reports contain information on the border to differentiate them from printed reports.
Trademarks
Microsoft Windows 2003 server is a registered trademark of Microsoft Corporation.
Internet Explorer is a registered trademark of Microsoft Corporation.
Java is a US trademark of Sun Microsystems.
Adobe Reader is a trademark of Adobe Corporation.
Datamed is a registered trademark of Engineering Solutions, Inc.
All other product names are the property of their respective owners.
GMDN 16009

Contents
Chapter 1. About ECGVue and the TraceMasterVue ECG Management System
Indications for Use . . . . . . . . . . . . . . . . . . . . . . . . . . . . . . . . . . . . . . . . . . . . . . . . . . . . . . 1-1What’s New . . . . . . . . . . . . . . . . . . . . . . . . . . . . . . . . . . . . . . . . . . . . . . . . . . . . . . . . . . . . . . . 1-3
Changes to System Settings . . . . . . . . . . . . . . . . . . . . . . . . . . . . . . . . . . . . . . . . . . . . . . . 1-4Changes in TraceMasterVue C.02 . . . . . . . . . . . . . . . . . . . . . . . . . . . . . . . . . . . . . . . 1-4
TraceMasterVue Components . . . . . . . . . . . . . . . . . . . . . . . . . . . . . . . . . . . . . . . . . . . . . . . . . 1-5TraceMasterVue ECG Viewer/Editor, ECGVue. . . . . . . . . . . . . . . . . . . . . . . . . . . . . . . . 1-5TraceMasterVue and ECGVue System Requirements . . . . . . . . . . . . . . . . . . . . . . . . . . . 1-5How To Use this Guide. . . . . . . . . . . . . . . . . . . . . . . . . . . . . . . . . . . . . . . . . . . . . . . . . . . 1-6Conventions Used in this Guide . . . . . . . . . . . . . . . . . . . . . . . . . . . . . . . . . . . . . . . . . . . . 1-7
ECGVue Basics . . . . . . . . . . . . . . . . . . . . . . . . . . . . . . . . . . . . . . . . . . . . . . . . . . . . . . . . . . . . 1-8Basic Concepts . . . . . . . . . . . . . . . . . . . . . . . . . . . . . . . . . . . . . . . . . . . . . . . . . . . . . . . . . 1-8ECGVue Interface. . . . . . . . . . . . . . . . . . . . . . . . . . . . . . . . . . . . . . . . . . . . . . . . . . . . . . . 1-9Understanding the ECGVue Use Model. . . . . . . . . . . . . . . . . . . . . . . . . . . . . . . . . . . . . . 1-9
About States . . . . . . . . . . . . . . . . . . . . . . . . . . . . . . . . . . . . . . . . . . . . . . . . . . . . . . . 1-10Actions that Trigger State Changes . . . . . . . . . . . . . . . . . . . . . . . . . . . . . . . . . . . . . 1-11About Automated Workflow Rules . . . . . . . . . . . . . . . . . . . . . . . . . . . . . . . . . . . . . 1-13
About User IDs and Permissions . . . . . . . . . . . . . . . . . . . . . . . . . . . . . . . . . . . . . . . . . . 1-13Logging into ECGVue . . . . . . . . . . . . . . . . . . . . . . . . . . . . . . . . . . . . . . . . . . . . . . . . . . 1-14
Important Notes about Logging into the Application . . . . . . . . . . . . . . . . . . . . . . . 1-14Changing the Windows Password . . . . . . . . . . . . . . . . . . . . . . . . . . . . . . . . . . . . . . 1-16About Security and Automatic Disconnection . . . . . . . . . . . . . . . . . . . . . . . . . . . . 1-16
Setting the Application Language . . . . . . . . . . . . . . . . . . . . . . . . . . . . . . . . . . . . . . . . . 1-16Actions You Can Perform on ECGs and Studies . . . . . . . . . . . . . . . . . . . . . . . . . . . . . . . . . 1-17
Getting Help While Using ECGVue. . . . . . . . . . . . . . . . . . . . . . . . . . . . . . . . . . . . . . . . 1-19About the Views . . . . . . . . . . . . . . . . . . . . . . . . . . . . . . . . . . . . . . . . . . . . . . . . . . . . . . . . . . 1-20
About the Waveform Display . . . . . . . . . . . . . . . . . . . . . . . . . . . . . . . . . . . . . . . . . . . . . 1-22Important Notes about the Waveform Display . . . . . . . . . . . . . . . . . . . . . . . . . . . . 1-23
Navigating the Views and Actions . . . . . . . . . . . . . . . . . . . . . . . . . . . . . . . . . . . . . . . . . 1-24Keyboard Shortcuts for Navigation . . . . . . . . . . . . . . . . . . . . . . . . . . . . . . . . . . . . . 1-25
ECGVue Instructions for Use i

Table of Contents
About Interpretive Statements. . . . . . . . . . . . . . . . . . . . . . . . . . . . . . . . . . . . . . . . . . . . . . . . .1-27Statement Types . . . . . . . . . . . . . . . . . . . . . . . . . . . . . . . . . . . . . . . . . . . . . . . . . . . . . . . .1-27Statement Display, Content, and Placement. . . . . . . . . . . . . . . . . . . . . . . . . . . . . . . . . . .1-28
About Inboxes and Assigning ECGs . . . . . . . . . . . . . . . . . . . . . . . . . . . . . . . . . . . . . . . . . . .1-30Assigning ECGs . . . . . . . . . . . . . . . . . . . . . . . . . . . . . . . . . . . . . . . . . . . . . . . . . . . . . . . .1-31
About ECGVue Documentation . . . . . . . . . . . . . . . . . . . . . . . . . . . . . . . . . . . . . . . . . . . . . . .1-31Getting Help . . . . . . . . . . . . . . . . . . . . . . . . . . . . . . . . . . . . . . . . . . . . . . . . . . . . . . . . . . . . . .1-32
Chapter 2. Working with PDF Reports (Multimodality Options)
Overview . . . . . . . . . . . . . . . . . . . . . . . . . . . . . . . . . . . . . . . . . . . . . . . . . . . . . . . . . . . . . . . . . .2-2Working with Password-Protected PDF Reports . . . . . . . . . . . . . . . . . . . . . . . . . . . . . . . .2-3
Working with Studies . . . . . . . . . . . . . . . . . . . . . . . . . . . . . . . . . . . . . . . . . . . . . . . . . . . . . . . .2-3Where to Find Information about Working with Studies . . . . . . . . . . . . . . . . . . . . . . . . . .2-4What You Can and Cannot Do with Studies . . . . . . . . . . . . . . . . . . . . . . . . . . . . . . . . . . .2-5
About PDF Study File Naming Conventions . . . . . . . . . . . . . . . . . . . . . . . . . . . . . . . . . . . . . .2-6Holter, Stress, and Defibrillator Export File Naming Conventions . . . . . . . . . . . . . . . . . .2-6Quinton Q-Stress Study Export File Naming Conventions . . . . . . . . . . . . . . . . . . . . . . . .2-7GE Case Stress Study Export File Naming Conventions . . . . . . . . . . . . . . . . . . . . . . . . . .2-8
Important Notes about Performing Searches for GE Case Studies in ECGVue . . . . .2-9
Chapter 3. Searching for and Selecting Reports
Overview . . . . . . . . . . . . . . . . . . . . . . . . . . . . . . . . . . . . . . . . . . . . . . . . . . . . . . . . . . . . . . . . . .3-1Importing Reports from External Media. . . . . . . . . . . . . . . . . . . . . . . . . . . . . . . . . . . . . . . . . .3-3Performing a Search . . . . . . . . . . . . . . . . . . . . . . . . . . . . . . . . . . . . . . . . . . . . . . . . . . . . . . . . .3-3
Canceling a Search . . . . . . . . . . . . . . . . . . . . . . . . . . . . . . . . . . . . . . . . . . . . . . . . . . . . . . .3-4Retrieving ECGs by Scanning Barcodes . . . . . . . . . . . . . . . . . . . . . . . . . . . . . . . . . . . . . .3-4Performing a Quick Search . . . . . . . . . . . . . . . . . . . . . . . . . . . . . . . . . . . . . . . . . . . . . . . .3-4Performing a Custom (Advanced) Search . . . . . . . . . . . . . . . . . . . . . . . . . . . . . . . . . . . . .3-9Including Previous Last Names in Searches . . . . . . . . . . . . . . . . . . . . . . . . . . . . . . . . . .3-10Searching for Deleted Reports . . . . . . . . . . . . . . . . . . . . . . . . . . . . . . . . . . . . . . . . . . . . .3-11Searching for Reports with Unidentified Locations. . . . . . . . . . . . . . . . . . . . . . . . . . . . .3-11Including Order Information in Searches . . . . . . . . . . . . . . . . . . . . . . . . . . . . . . . . . . . . .3-12Including PDF Studies in Searches . . . . . . . . . . . . . . . . . . . . . . . . . . . . . . . . . . . . . . . . .3-12Including Converted GE/Marquette Cardiograph ECGs in Searches . . . . . . . . . . . . . . .3-14
Selecting Reports to Work with . . . . . . . . . . . . . . . . . . . . . . . . . . . . . . . . . . . . . . . . . . . . . . .3-14Limits on the Number of Reports to Work with. . . . . . . . . . . . . . . . . . . . . . . . . . . . . . . .3-15About Batch Processing . . . . . . . . . . . . . . . . . . . . . . . . . . . . . . . . . . . . . . . . . . . . . . . . . .3-16
ii ECGVue Instructions for Use

Table of Contents
Chapter 4. Viewing and Editing Reports
Working with Single or Multiple Reports . . . . . . . . . . . . . . . . . . . . . . . . . . . . . . . . . . . . . . . . 4-3Viewing ECGs and Studies . . . . . . . . . . . . . . . . . . . . . . . . . . . . . . . . . . . . . . . . . . . . . . . . . . . 4-3
About Statement View . . . . . . . . . . . . . . . . . . . . . . . . . . . . . . . . . . . . . . . . . . . . . . . . . . . 4-4Changing the Default View . . . . . . . . . . . . . . . . . . . . . . . . . . . . . . . . . . . . . . . . . . . . 4-4
About Summary View . . . . . . . . . . . . . . . . . . . . . . . . . . . . . . . . . . . . . . . . . . . . . . . . . . . 4-5Working with ECGs and Studies . . . . . . . . . . . . . . . . . . . . . . . . . . . . . . . . . . . . . . . . . . . 4-5
Displaying Patient Reports . . . . . . . . . . . . . . . . . . . . . . . . . . . . . . . . . . . . . . . . . . . . 4-6About ECG and Study Tabs . . . . . . . . . . . . . . . . . . . . . . . . . . . . . . . . . . . . . . . . . . . . 4-7About Editable vs. Read-only Fields . . . . . . . . . . . . . . . . . . . . . . . . . . . . . . . . . . . . . 4-8Setting Report Display Options . . . . . . . . . . . . . . . . . . . . . . . . . . . . . . . . . . . . . . . . . 4-9
Reviewing and Editing ECGs and Studies . . . . . . . . . . . . . . . . . . . . . . . . . . . . . . . . . . . . . . . 4-9About Saving Changes . . . . . . . . . . . . . . . . . . . . . . . . . . . . . . . . . . . . . . . . . . . . . . . . . . 4-10
Editing Patient Information and Demographics . . . . . . . . . . . . . . . . . . . . . . . . . . . . . . . . . . 4-11Editing Patient Identification or Location . . . . . . . . . . . . . . . . . . . . . . . . . . . . . . . . . . . 4-11Editing an ECG Date or Time . . . . . . . . . . . . . . . . . . . . . . . . . . . . . . . . . . . . . . . . . . . . 4-12Editing Patient Demographic Information . . . . . . . . . . . . . . . . . . . . . . . . . . . . . . . . . . . 4-13
Editing Interpretive Statements . . . . . . . . . . . . . . . . . . . . . . . . . . . . . . . . . . . . . . . . . . . . . . . 4-13Accessing Statement Editing Tools . . . . . . . . . . . . . . . . . . . . . . . . . . . . . . . . . . . . . . . . 4-13Notes about Editing Statements . . . . . . . . . . . . . . . . . . . . . . . . . . . . . . . . . . . . . . . . . . . 4-15Customizing Your Statement Editing Preferences . . . . . . . . . . . . . . . . . . . . . . . . . . . . . 4-16
Configuring How Interpretive Statements Are Displayed. . . . . . . . . . . . . . . . . . . . 4-17Configuring Code and Field Matching Options . . . . . . . . . . . . . . . . . . . . . . . . . . . 4-18Specifying Favorite Codes . . . . . . . . . . . . . . . . . . . . . . . . . . . . . . . . . . . . . . . . . . . . 4-19About Statement Aliasing . . . . . . . . . . . . . . . . . . . . . . . . . . . . . . . . . . . . . . . . . . . . 4-22
Adding Statements and Remarks . . . . . . . . . . . . . . . . . . . . . . . . . . . . . . . . . . . . . . . . . . 4-24Statement Editing Commands . . . . . . . . . . . . . . . . . . . . . . . . . . . . . . . . . . . . . . . . . 4-24Adding Coded Statements . . . . . . . . . . . . . . . . . . . . . . . . . . . . . . . . . . . . . . . . . . . . 4-25Rotating the Position of Modifiers in a Statement. . . . . . . . . . . . . . . . . . . . . . . . . . 4-29Adding Uncoded Statements . . . . . . . . . . . . . . . . . . . . . . . . . . . . . . . . . . . . . . . . . . 4-30Adding Remarks . . . . . . . . . . . . . . . . . . . . . . . . . . . . . . . . . . . . . . . . . . . . . . . . . . . 4-31
Editing Statements and Remarks . . . . . . . . . . . . . . . . . . . . . . . . . . . . . . . . . . . . . . . . . . 4-32Editing Measurements . . . . . . . . . . . . . . . . . . . . . . . . . . . . . . . . . . . . . . . . . . . . . . . . . . 4-33
Comparing ECGs Using the Serial Comparison Algorithm . . . . . . . . . . . . . . . . . . . . . . . . . 4-36Comparing ECGs Using the Serial Comparison Algorithm . . . . . . . . . . . . . . . . . . . . . 4-36
Undoing a Serial Comparison . . . . . . . . . . . . . . . . . . . . . . . . . . . . . . . . . . . . . . . . . 4-37Using Waveform View . . . . . . . . . . . . . . . . . . . . . . . . . . . . . . . . . . . . . . . . . . . . . . . . . . . . . 4-38
Setting Number of ECGs to Display in Waveform View . . . . . . . . . . . . . . . . . . . . 4-39Setting ECG Orientation in Waveform View. . . . . . . . . . . . . . . . . . . . . . . . . . . . . . 4-39Selecting the ECGs to Display. . . . . . . . . . . . . . . . . . . . . . . . . . . . . . . . . . . . . . . . . 4-39Showing the Superimposed Representative Beat View . . . . . . . . . . . . . . . . . . . . . . 4-40Showing or Hiding Interpretive Statements. . . . . . . . . . . . . . . . . . . . . . . . . . . . . . . 4-41
Verifying ECGs . . . . . . . . . . . . . . . . . . . . . . . . . . . . . . . . . . . . . . . . . . . . . . . . . . . . . . . . . . . 4-41About Verification Status . . . . . . . . . . . . . . . . . . . . . . . . . . . . . . . . . . . . . . . . . . . . . . . . 4-41Verifying an ECG . . . . . . . . . . . . . . . . . . . . . . . . . . . . . . . . . . . . . . . . . . . . . . . . . . . . . . 4-42
ECGVue Instructions for Use iii
Table of Contents
Confirming ECGs . . . . . . . . . . . . . . . . . . . . . . . . . . . . . . . . . . . . . . . . . . . . . . . . . . . . . . . . . .4-42ECG Confirmation Methods and Status . . . . . . . . . . . . . . . . . . . . . . . . . . . . . . . . . . . . . .4-42
ECG Confirmed by Confirming Cardiologist . . . . . . . . . . . . . . . . . . . . . . . . . . . . . .4-43ECG Confirmed on Behalf of a Confirming Cardiologist. . . . . . . . . . . . . . . . . . . . .4-43About Electronic Signature . . . . . . . . . . . . . . . . . . . . . . . . . . . . . . . . . . . . . . . . . . . .4-43About Confirmation Status . . . . . . . . . . . . . . . . . . . . . . . . . . . . . . . . . . . . . . . . . . . .4-44
Configuring Display of Confirmed ECGs . . . . . . . . . . . . . . . . . . . . . . . . . . . . . . . . . . . .4-44Confirming an ECG . . . . . . . . . . . . . . . . . . . . . . . . . . . . . . . . . . . . . . . . . . . . . . . . . . . . .4-45
Editing a Confirmed ECG . . . . . . . . . . . . . . . . . . . . . . . . . . . . . . . . . . . . . . . . . . . . .4-46Deleting and Restoring Reports . . . . . . . . . . . . . . . . . . . . . . . . . . . . . . . . . . . . . . . . . . . . . . .4-46
Chapter 5. About Reports
Using Report View . . . . . . . . . . . . . . . . . . . . . . . . . . . . . . . . . . . . . . . . . . . . . . . . . . . . . . . . . .5-2Setting Grid Line Display Preferences in Report View . . . . . . . . . . . . . . . . . . . . . . . . . . .5-3About the Adobe Reader Viewer . . . . . . . . . . . . . . . . . . . . . . . . . . . . . . . . . . . . . . . . . . . .5-4
Installing or Re-installing Acrobat Reader from the TraceMasterVue Server . . . . . .5-4About the Reader Tools . . . . . . . . . . . . . . . . . . . . . . . . . . . . . . . . . . . . . . . . . . . . . . . .5-5
Navigating Reports . . . . . . . . . . . . . . . . . . . . . . . . . . . . . . . . . . . . . . . . . . . . . . . . . . . . . . .5-9Accessing Documentation and Keyboard Shortcuts for Adobe Reader . . . . . . . . . . .5-9
About Clinical Reports . . . . . . . . . . . . . . . . . . . . . . . . . . . . . . . . . . . . . . . . . . . . . . . . . . . . . .5-10Important Notes about Reports. . . . . . . . . . . . . . . . . . . . . . . . . . . . . . . . . . . . . . . . . . . . .5-10About Printing/Faxing Reports. . . . . . . . . . . . . . . . . . . . . . . . . . . . . . . . . . . . . . . . . . . . .5-11About the Standard 12-Lead Report . . . . . . . . . . . . . . . . . . . . . . . . . . . . . . . . . . . . . . . . .5-12
Standard 12-Lead Report Formats . . . . . . . . . . . . . . . . . . . . . . . . . . . . . . . . . . . . . . .5-12Standard 12-Lead Report Markings. . . . . . . . . . . . . . . . . . . . . . . . . . . . . . . . . . . . . .5-12
About the 12-Lead + Rhythm Strip Report . . . . . . . . . . . . . . . . . . . . . . . . . . . . . . . . . . .5-20About the Superimposed Beat Report . . . . . . . . . . . . . . . . . . . . . . . . . . . . . . . . . . . . . . .5-21About the Representative Beat Report . . . . . . . . . . . . . . . . . . . . . . . . . . . . . . . . . . . . . . .5-22
Selecting the Representative Beats to Superimpose . . . . . . . . . . . . . . . . . . . . . . . . .5-23About the Extended Measurements Report . . . . . . . . . . . . . . . . . . . . . . . . . . . . . . . . . . .5-24Special Lead Configurations . . . . . . . . . . . . . . . . . . . . . . . . . . . . . . . . . . . . . . . . . . . . . .5-24
Extended Leads: V3R, V4R, V7, and V8 (Balance) . . . . . . . . . . . . . . . . . . . . . . . . .5-25Extended Leads: V3R, V4R (Right Chest) . . . . . . . . . . . . . . . . . . . . . . . . . . . . . . . .5-25Extended Leads: V3R, V4R, V7 (Pediatric) . . . . . . . . . . . . . . . . . . . . . . . . . . . . . . .5-26Extended Leads: V7, V8, V9 (Posterior) . . . . . . . . . . . . . . . . . . . . . . . . . . . . . . . . . .5-27Extended Leads: VX1, VX2, VX3, and VX4 (Generic Research) . . . . . . . . . . . . . .5-27About the 15-Lead Report . . . . . . . . . . . . . . . . . . . . . . . . . . . . . . . . . . . . . . . . . . . . .5-28About the 16-Lead Report . . . . . . . . . . . . . . . . . . . . . . . . . . . . . . . . . . . . . . . . . . . . .5-30
About Management Reports . . . . . . . . . . . . . . . . . . . . . . . . . . . . . . . . . . . . . . . . . . . . . . . . . .5-32About Audit Logs and Tracking Changes. . . . . . . . . . . . . . . . . . . . . . . . . . . . . . . . . . . . . . . .5-33
iv ECGVue Instructions for Use

Table of Contents
Chapter 6. Distributing Reports
Previewing Reports . . . . . . . . . . . . . . . . . . . . . . . . . . . . . . . . . . . . . . . . . . . . . . . . . . . . . . . . . 6-1Printing Reports. . . . . . . . . . . . . . . . . . . . . . . . . . . . . . . . . . . . . . . . . . . . . . . . . . . . . . . . . . . . 6-2Faxing ECGs . . . . . . . . . . . . . . . . . . . . . . . . . . . . . . . . . . . . . . . . . . . . . . . . . . . . . . . . . . . . . . 6-4Exporting Reports . . . . . . . . . . . . . . . . . . . . . . . . . . . . . . . . . . . . . . . . . . . . . . . . . . . . . . . . . . 6-5
Exporting Reports as HL7 . . . . . . . . . . . . . . . . . . . . . . . . . . . . . . . . . . . . . . . . . . . . . . . . 6-6Exporting Reports in DICOM Format . . . . . . . . . . . . . . . . . . . . . . . . . . . . . . . . . . . . . . . 6-6
Appendix A. Working with Converted ECGs
Transferring ECGs from GE/Marquette Cardiographs to TraceMasterVue . . . . . . . . . . . . . . A-1Transferring ECGs from GE/Marquette Cardiographs to TraceMasterVue Using Diskette or SD Card . . . . . . . . . . . . . . . . . . . . . . . . . . . . . . . . . . . . . . . . . . . . . . . . . . . . . . . . . . . . . . A-2
Data Mapping . . . . . . . . . . . . . . . . . . . . . . . . . . . . . . . . . . . . . . . . . . . . . . . . . . . . . . . . . . . . . A-3
Appendix B. Using the Tutorial
About the Tutorial . . . . . . . . . . . . . . . . . . . . . . . . . . . . . . . . . . . . . . . . . . . . . . . . . . . . . . . . . . B-1Demo ECG Characteristics . . . . . . . . . . . . . . . . . . . . . . . . . . . . . . . . . . . . . . . . . . . . . . . . . . . B-2Running the Tutorial . . . . . . . . . . . . . . . . . . . . . . . . . . . . . . . . . . . . . . . . . . . . . . . . . . . . . . . . B-3
Glossary
Index
ECGVue Instructions for Use v

Table of Contents
vi ECGVue Instructions for Use

1
1About ECGVue and the TraceMasterVueECG Management System
TraceMasterVue automates the processing and storage of ECG data from multiple sources such as cardiographs and bedside monitors. It also provides a variety of tools to analyze, view, edit, and compare ECGs, as well as generate reports in various formats.
TraceMasterVue is an integral part of the clinical environment, interfacing with the cardiology clinical staff, data sources, hospital information systems, and optionally, order management systems. ECGVue, the ECG viewing and editing module of the system (also referred to as the client), is available on connected PCs in your clinical setting, and is also accessible over the Internet from your home or other web-enabled PC.
In addition to providing enhanced online measurement and ECG editing tools, TraceMasterVue continues to support a patient-focused care approach by allowing you to define rules that automate the handling and processing of ECGs.
This guide provides an overview of how to use the application.
Indications for UseThe TraceMasterVue ECG management system is a computer system that allows viewing, manual editing, printing, and archiving of digitally stored ECG data.
1-1

About ECGVue and the TraceMasterVue ECG Management System
This chapter provides the following information:Indications for Use . . . . . . . . . . . . . . . . . . . . . . . . . . . . . . . . . . . . . . . . . . .1-1
What’s New . . . . . . . . . . . . . . . . . . . . . . . . . . . . . . . . . . . . . . . . . . . . . . . . . . . .1-3Changes to System Settings . . . . . . . . . . . . . . . . . . . . . . . . . . . . . . . . . . . .1-4
Changes in TraceMasterVue C.02 . . . . . . . . . . . . . . . . . . . . . . . . . . . .1-4TraceMasterVue Components . . . . . . . . . . . . . . . . . . . . . . . . . . . . . . . . . . . . . .1-5
TraceMasterVue ECG Viewer/Editor, ECGVue. . . . . . . . . . . . . . . . . . . . .1-5TraceMasterVue and ECGVue System Requirements . . . . . . . . . . . . . . . .1-5How To Use this Guide. . . . . . . . . . . . . . . . . . . . . . . . . . . . . . . . . . . . . . . .1-6Conventions Used in this Guide . . . . . . . . . . . . . . . . . . . . . . . . . . . . . . . . .1-7
ECGVue Basics . . . . . . . . . . . . . . . . . . . . . . . . . . . . . . . . . . . . . . . . . . . . . . . . .1-8Basic Concepts . . . . . . . . . . . . . . . . . . . . . . . . . . . . . . . . . . . . . . . . . . . . . .1-8ECGVue Interface. . . . . . . . . . . . . . . . . . . . . . . . . . . . . . . . . . . . . . . . . . . .1-9Understanding the ECGVue Use Model. . . . . . . . . . . . . . . . . . . . . . . . . . .1-9
About States . . . . . . . . . . . . . . . . . . . . . . . . . . . . . . . . . . . . . . . . . . . .1-10Actions that Trigger State Changes . . . . . . . . . . . . . . . . . . . . . . . . . .1-11About Automated Workflow Rules . . . . . . . . . . . . . . . . . . . . . . . . . .1-13
About User IDs and Permissions . . . . . . . . . . . . . . . . . . . . . . . . . . . . . . .1-13Logging into ECGVue . . . . . . . . . . . . . . . . . . . . . . . . . . . . . . . . . . . . . . .1-14
Important Notes about Logging into the Application . . . . . . . . . . . .1-14Changing the Windows Password . . . . . . . . . . . . . . . . . . . . . . . . . . .1-16About Security and Automatic Disconnection . . . . . . . . . . . . . . . . .1-16
Setting the Application Language . . . . . . . . . . . . . . . . . . . . . . . . . . . . . .1-16Actions You Can Perform on ECGs and Studies . . . . . . . . . . . . . . . . . . . . . .1-17
Getting Help While Using ECGVue. . . . . . . . . . . . . . . . . . . . . . . . . . . . .1-19About the Views . . . . . . . . . . . . . . . . . . . . . . . . . . . . . . . . . . . . . . . . . . . . . . .1-20
About the Waveform Display . . . . . . . . . . . . . . . . . . . . . . . . . . . . . . . . . .1-22Important Notes about the Waveform Display . . . . . . . . . . . . . . . . .1-23
Navigating the Views and Actions . . . . . . . . . . . . . . . . . . . . . . . . . . . . . .1-24Keyboard Shortcuts for Navigation . . . . . . . . . . . . . . . . . . . . . . . . . .1-25
About Interpretive Statements. . . . . . . . . . . . . . . . . . . . . . . . . . . . . . . . . . . . .1-27Statement Types . . . . . . . . . . . . . . . . . . . . . . . . . . . . . . . . . . . . . . . . . . . .1-27Statement Display, Content, and Placement . . . . . . . . . . . . . . . . . . . . . . .1-28
About Inboxes and Assigning ECGs . . . . . . . . . . . . . . . . . . . . . . . . . . . . . . .1-30Assigning ECGs . . . . . . . . . . . . . . . . . . . . . . . . . . . . . . . . . . . . . . . . . . . .1-31
About ECGVue Documentation . . . . . . . . . . . . . . . . . . . . . . . . . . . . . . . . . . .1-31Getting Help . . . . . . . . . . . . . . . . . . . . . . . . . . . . . . . . . . . . . . . . . . . . . . . . . .1-32
1-2 ECGVue Instructions for Use

What’s New
What’s NewThe M5100 TraceMasterVue ECG Management System C.02 introduces some new features, options, and product enhancements.
Product Enhancements
Redesigned and enhanced Statement view in the ECGVue (and PharmaVue) client application.
Workflow enhancements. Inclusion of new ECG signature fields or options, including the ability to key off of user fields 2 through 4, additional study Type and Source options, and Patient Age (All, adult (16 and older), or pediatric).
Miscellaneous enhancements, including:
– The Help > About menu option now shows the installed TraceMasterVue Edition and other purchased options.
– Changes in order reconciliation to prevent multiple ECGs being reconciled to a single order.
– Support for localized 0B criteria.
– Added a patient’s date of birth (when available) to the patient name/ID heading in the Search Results list.
– Updated the WebAPI to support retrieval of PDF studies and ECGs. The Test client has also been updated.
– Support for import of ECGs that have multiple interpretation sections (standard, TPI, ACI-TIPI). This was added to allow import of Philips HeartStart MRx defibrillator ECGs that use the XML schema version 1.04.02. Note that, at this time, only the standard interpretations are maintained in the imported file.
– Ability to specify XML schema version when exporting ECGs using the Enterprise Manager, which now bypasses the export schema version specified in the registry. This enhancement is primarily targeted at improving troubleshooting information and allowing more control over batch exports.
– Ability to delete multiple ECGs at one time (batch delete)
Reorganized the documentation set provided with TraceMasterVue. See the TraceMasterVue Documentation and Training CD for details. You can also see the new organization by clicking Help in any of the TraceMasterVue applications.
ECGVue Instructions for Use 1-3

About ECGVue and the TraceMasterVue ECG Management System
New Installation and Hardware Options
Availability of software-only option, where the TraceMasterVue database and application files can be installed on customer-supplied hardware that conforms to specific requirements. The software and options are controlled by a software key and a new Activation Wizard.
Scalable blade hardware platform with high availability. Support for three-tier architecture (client, application, and database layers), where each tier can reside on independent and dedicated hardware. Can scale capacity and performance by incrementally adding hardware.
Support for New Formats
Support for importing GE 5000/5500 series cardiograph, in native format, into TraceMasterVue. These ECGs are stored in the database and are fully editable. Available with the Multivendor Cardiograph Support option.
Support for export of DICOM format ECGs.
Extended support for additional PDF formats. Like other PDF reports, they are not editable (you can, however, change the associated location information).
– Stress studies from the GE CASE Stress system, available with the Multimodality with GE Case Stress Reports.
– PDF images, include ECGs from Physio and Zoll defibrillators, available with the PDF Image Support option.
For additional details, refer to the What’s New, accessible through the ECGVue application Help menu.
Changes to System Settings
Changes in TraceMasterVue C.02
The following settings were updated in TraceMasterVue C.02. Some of the default settings can be changed; contact your TraceMasterVue administrator for details.
Statement view has been updated to present a larger waveform.
Summary view has been updated. Fields in the Additional Data section have been reordered.
1-4 ECGVue Instructions for Use

TraceMasterVue Components
TraceMasterVue ComponentsThe TraceMasterVue ECG Management system comprises a suite of applications, including ECG management tools (ECGVue, the Report Manager, and optionally, OrderVue) and system tools. The system tools are accessed primarily by the TraceMasterVue administrator and Philips representatives.
For detailed information, see the TraceMasterVue Components and Documentation Reference, accessible through the ECGVue Help menu.
TraceMasterVue ECG Viewer/Editor, ECGVueThe TraceMasterVue ECG viewer/editor, ECGVue, allows you to review, edit, and confirm ECGs.
You can export single ECGs directly from ECGVue; the formats available depend on which options you have purchased. To export multiple ECGs at the same time (as a batch), use the TraceMasterVue Enterprise Manager utility, available on the TraceMasterVue server (must have administrator privileges).
With the purchase of one or more of the Multimodality options, you can import, store, review, and print Holter, stress, and defibrillator reports (hereinafter referred to collectively as reports or studies), in PDF. For details, see Chapter 2, “Working with PDF Reports (Multimodality Options).”
ECGVue is available on PCs connected to your facility’s LAN, and can also be accessed over the Internet from your home or other web-enabled PC. The application comprises several basic screens, called views, a free-floating Statement Editor, and an Action bar for working with ECGs.
For an overview of ECGVue, see “ECGVue Basics” on page 1-8. For detailed information about using ECGVue to view and edit ECGs, refer to the rest of this guide.
TraceMasterVue and ECGVue System RequirementsFor detailed information, see the TraceMasterVue Components and Documentation Reference, accessible through the ECGVue Help menu.
ECGVue Instructions for Use 1-5

About ECGVue and the TraceMasterVue ECG Management System
How To Use this GuideThis guide is organized as follows:
1 About ECGVue and the TraceMasterVue ECG Management System. This chapter. Describes the components of the TraceMasterVue system, and provides an overview of ECGVue, including how to log in and navigate the different ECG views, as well as what actions you can perform on ECGs. Also provides an overview of the new Multimodality options.
2 Working with PDF Reports (Multimodality Options). Describes the Multimodality options and how to work with studies in the application.
3 Searching for and Selecting Reports. Describes how to retrieve reports to work with.
4 Viewing and Editing Reports. Provides an overview of how you can work with ECGs and studies, including editing statements and patient information, as well as assigning and confirming ECGs.
5 About Reports. Provides an overview of the clinical and management reports available with TraceMasterVue.
6 Distributing Reports. Provides an overview of exporting reports for submission to the FDA, printing, faxing, emailing, and copying reports.
A Working with Converted ECGs. For Multivendor Cardiograph and DICOM Export options only. Describes how to import GE/Marquette ECGs to TraceMasterVue. Also describes how fields are mapped between GE ECGs and Philips XML, as well as from Philips XML to DICOM format.
B Using the Tutorial. Describes how to run the tutorial.
Glossary. Defines common terms and concepts.
1-6 ECGVue Instructions for Use

TraceMasterVue Components
Conventions Used in this GuideThe documentation and training materials for TraceMasterVue use the following conventions.
CAUTION Caution statements describe conditions or actions that may result in damage to equipment or software.
NOTE Notes provide additional important information about a topic.
TIP Tips provide suggestions for alternative ways of performing tasks.
Item How Displayed
Menu itemButton name
Menu items and button names appear in a bold no-serif font.
Example: Click Search.
Field names Application field names appear in a no-serif font.
Example: Type the patient name into the Name field.
Menu selections Menu selections are displayed in the order in which each menu option is selected, separated by a >.
Example: To access the online Help system, you must select the Contents menu item from the Help menu or click the Help button. This is displayed as follows in the user documentation:
To access the online Help system, click Help > Contents or click Help in the Action bar.
Features and descriptions that apply both to ECGs and to studies
Multimodality options only. If you have one or more of the Multimodality options installed, you can import and review PDF reports generated by various devices. These reports are generally referred to as studies. (For details, see Chapter 2, “Working with PDF Reports (Multimodality Options).”
In the TraceMasterVue documentation, when a feature is being described that applies both to ECGs and studies, we will often use the term report to indicate that the feature applies to both.
ECGVue Instructions for Use 1-7

About ECGVue and the TraceMasterVue ECG Management System
ECGVue BasicsThe following sections provide a general overview of the system.
TIP To just get started searching for ECGs, skip ahead to Chapter 3, “Searching for and Selecting Reports.”
Basic Concepts
Table 1-1 Basic concepts
Topic Description See ...
“Understanding the ECGVue Use Model”
Provides an overview of how TraceMasterVue fits into your daily processes and how it helps you manage ECG workflow.
page 1-9
“About User IDs and Permissions”
Describes how to log into the client application, and provides basic information about user access and privileges.
page 1-13
“Actions You Can Perform on ECGs and Studies”
Lists the actions you can perform on ECGs, and, if you have one or more of the Multimodality options, on studies.
page 1-17
“Working with PDF Reports (Multimodality Options)”
Applicable if you have one or more of the Multimodality options. Describes how to work with these studies within ECGVue.
page 2-1
“About Audit Logs and Tracking Changes”
Provides an overview of how TraceMasterVue keeps track of changes to ECGs.
page 5-33
“Contacting Technical Support”
Provides the Web URL and phone numbers for contacting the Philips Response Center.
TraceMasterVue Troubleshooting Guide
Appendix B, “Using the Tutorial”
Shows you how to use the online tutorial to familiarize yourself with key aspects of the application.
page B-1
1-8 ECGVue Instructions for Use

ECGVue Basics
ECGVue InterfaceThe following table allows you to quickly look up information about different aspects of the user interface.
Understanding the ECGVue Use ModelAfter ECGs are acquired, they are transferred to the ECG management system (EMS), TraceMasterVue. Once they are stored on TraceMasterVue, ECGs are available to be overread by qualified physicians, either online or in printed form. The physician either edits directly online using ECGVue, or passes the edits to a Head Technician to enter the edits online. Once the ECG is reviewed and approved, it is confirmed, either by the overreading physician or a designated representative with the required authority and permissions. The ECG can then be printed or faxed, and is then archived in the database.
If you have one or more of the Multimodality options, Holter and Stress reports can be exported from their respective systems, and can be imported into TraceMasterVue automatically or manually. You can then refer to these studies as you review ECGs, for reference. The studies can be printed, as well as stored in the database. Depending on the options you purchased, you can also import other studies, including Physio and Zoll defibrillator ECGs (NEW), and GE Case stress (NEW) and Quinton Q-Stress studies.
Table 1-2 Interface overview
Topic Description See ...
“Setting the Application Language”
Describes how to change the language setting for ECGVue.
page 1-16
“About the Views” Describes the application views and their uses.
page 1-20
“About the Waveform Display” Describes the components of the waveform display, which is present on the Summary, Statement, and Waveform views.
page 1-22
“Navigating the Views and Actions”
Describes how to get around the application. It also includes a table showing keyboard shortcuts for navigation.
page 1-24
“About Interpretive Statements”
Provides a brief overview of how TraceMasterVue displays interpretive statements and how you can work with them.
page 1-27
“Getting Help While Using ECGVue”
Describes how to access application documentation.
page 1-19
ECGVue Instructions for Use 1-9
About ECGVue and the TraceMasterVue ECG Management System
When you retrieve one or more ECGs and/or studies to review and edit, all other reports (if any) for each patient are available for reference, using a single mouse click.
If you have the OrderVue option, once orders are entered into the HIS and the associated ECG is acquired, the system attempts to automatically reconcile ECGs to orders based on one or more configured primary keys (name, gender, patient ID, among others). If the reconciliation is successful, the result is exported back to the HIS. For those orders that cannot be automatically reconciled, ECGVue offers a manual process. For details, see the Using OrderVue with TraceMasterVue Guide.
Each step in the process places the report in a particular state.
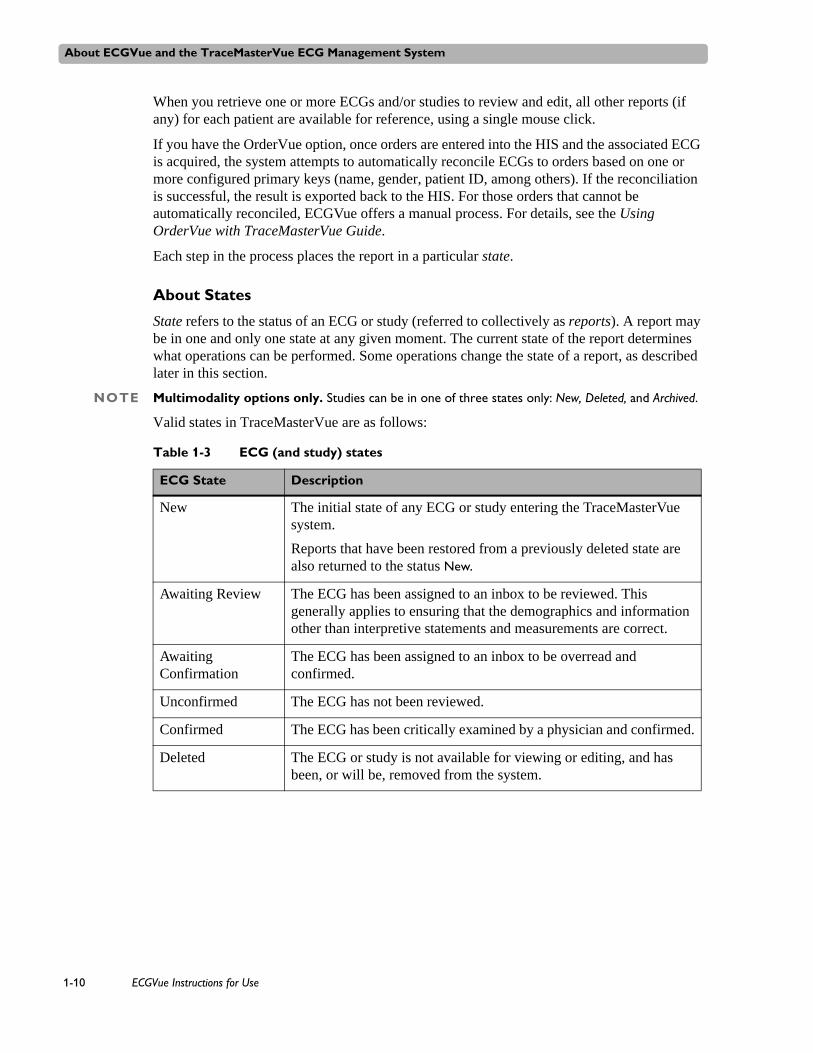
About States
State refers to the status of an ECG or study (referred to collectively as reports). A report may be in one and only one state at any given moment. The current state of the report determines what operations can be performed. Some operations change the state of a report, as described later in this section.
NOTE Multimodality options only. Studies can be in one of three states only: New, Deleted, and Archived.
Valid states in TraceMasterVue are as follows:
Table 1-3 ECG (and study) states
ECG State Description
New The initial state of any ECG or study entering the TraceMasterVue system.
Reports that have been restored from a previously deleted state are also returned to the status New.
Awaiting Review The ECG has been assigned to an inbox to be reviewed. This generally applies to ensuring that the demographics and information other than interpretive statements and measurements are correct.
Awaiting Confirmation
The ECG has been assigned to an inbox to be overread and confirmed.
Unconfirmed The ECG has not been reviewed.
Confirmed The ECG has been critically examined by a physician and confirmed.
Deleted The ECG or study is not available for viewing or editing, and has been, or will be, removed from the system.
1-10 ECGVue Instructions for Use

ECGVue Basics
The state of a report changes over its lifecycle, either manually, automatically via configured workflow rules, or both.
Actions that Trigger State Changes
Various actions trigger state changes, as described in the following table.
Archived The ECG or study is stored in the TraceMasterVue database but does not necessarily follow the standard ECG workflow; that is, it is not overread, then confirmed.
In general, this state is used for MIDA and EASI ECGs, or ECGs from sources other than cardiographs, such as defibrillators and bedside monitors. In addition, this state is used for PDF studies, if you have one or more of the Multimodality options.
If you have the appropriate permissions, you can view, edit, and delete ECGs that are Archived, but they cannot be confirmed.
Table 1-4 Actions that trigger state changes
Action State Change
Import an ECG or study into the system
When a report enters the system, the New state is assigned.
Assign ECG to an Awaiting Review type inbox
When you assign a New ECG to an Awaiting Review type inbox, the state changes to Awaiting Review.
If you are changing an ECG assignment from one Awaiting Review type inbox to another, it remains in the same state.
The inbox type is determined when the inbox is created by your TraceMasterVue administrator.
Assign ECG to an Awaiting Confirmation type inbox
When you either assign a New ECG or reassign an ECG that is in an Awaiting Review type inbox to an Awaiting Confirmation type inbox, the state changes to Awaiting Confirmation.
If you are changing an ECG assignment from one Awaiting Confirmation type inbox to another, it remains in the same state.
The inbox type is determined when the inbox is created by your TraceMasterVue administrator.
Table 1-3 ECG (and study) states (continued)
ECG State Description
ECGVue Instructions for Use 1-11

About ECGVue and the TraceMasterVue ECG Management System
Verify an ECG When you verify a New ECG (one that just entered the system), the state changes to Awaiting Confirmation.
When you verify an ECG that was in the Awaiting Review state (generally because it was assigned to an Awaiting Review type inbox), the state changes to Awaiting Confirmation.
If already in the Awaiting Confirmation state, remains in the same state.
NOTE This feature is not supported in Basic Edition.
Confirm ECG When you either confirm a New ECG, or an ECG assigned to an Awaiting Review or Awaiting Confirmation type inbox, the state changes to Confirmed.
Unconfirm ECG When you unconfirm an ECG, the state changes from Confirmed to Awaiting Confirmation.
Uncompare ECG When you uncompare a previously serially compared ECG, the ECG is returned to the state it was in immediately prior to comparison.
NOTE This feature is not supported in Basic Edition.
Delete a report from the system
Depending on how your system is configured, reports may or may not be immediately removed from the database. At a minimum, a deleted report is removed from the pool of reports that can be viewed or edited.
When you delete a report, the state changes to Deleted. You cannot delete an ECG that is Confirmed.
Restore a report A restored report is removed from the Deleted state and returned to New status. These reports can now be viewed, and ECGs can be edited.
Depending on how reports are deleted at your site (marked as Deleted and removed from the database at a later time or deleted immediately), you may not be able to restore a specific deleted report. Contact your TraceMasterVue administrator with questions.
Table 1-4 Actions that trigger state changes (continued)
Action State Change
1-12 ECGVue Instructions for Use

ECGVue Basics
About Automated Workflow Rules
TraceMasterVue allows you to define rules that automate the handling and processing of ECGs and studies (referred to collectively as reports).
Each report stored in the TraceMasterVue database has a signature, that is, a defining set of characteristics that includes (among others) the acquiring location, source, and ECG type, as well as patient ID and ECG state.
The administrator at your site can configure automated rules that perform certain actions on any reports that match a specific signature profile.
NOTE Serial comparison is available in Basic Edition as an option.
For example, rules might be defined specifying that:
When an ECG is stored (acquired into the system), it is also compared to the most recent eligible previous ECG
When a serial comparison is performed, the ECG is also printed
When an ECG is confirmed, it is also printed on a particular printer and exported to a specified location
When a new ECG enters the system, it is assigned to a particular inbox for review
ECGs of a particular type from a specified department are automatically serially compared, printed, and assigned
Contact your system administrator to discuss the types of rules that would best address the ECG processing needs at your site.
About User IDs and PermissionsECGVue uses the same login ID and password that you use to log into your Windows system.
You use your regular Windows user ID and password to log into the client application; however, before you can log in, you must be enabled as an ECGVue user. Your application permissions are associated with your user ID, and define what you can access and what you can do in the system. To become an authorized ECGVue user, contact the TraceMasterVue administrator at your site. For more information about what you are authorized to access within ECGVue, contact your TraceMasterVue administrator.
The permissions associated with your user ID determine:
Which tasks you can perform.
Example: If you do not have the necessary permissions to use certain functionality, such as unconfirming a confirmed ECG or deleting ECGs, those buttons and menu items will be grayed out and unavailable to you.
Which institutions and departments you have access to.
Example: When you perform a search to retrieve ECGs, the results are limited to those institutions and departments within the search criteria to which you have access.
ECGVue Instructions for Use 1-13

About ECGVue and the TraceMasterVue ECG Management System
Which inboxes you have access to.
Example: If an ECG is assigned to an inbox to which you do not have access permissions, that ECG will not appear in any search results (with the exception described below). You can only retrieve ECGs that are either unassigned or are assigned to inboxes to which you have access.
Note however that if your user ID has ECG Manager or System Administrator privileges, all ECGs are retrieved during a search, regardless of inbox affiliation.
Which patient reports you have access to.
Example: You may only have permission to work with certain patients’ ECGs.
Whether you can confirm ECGs on behalf of a confirming physician.
You can view your permissions and security settings in the User Security Info box, accessed through the Tools menu. For details, see the TraceMasterVue Troubleshooting Guide.
Logging into ECGVueECGVue runs as a TraceMasterVue client on individual PCs. You can run it from the server, as well, although this is not recommended.
Important Notes about Logging into the Application
Since TraceMasterVue uses the existing Windows security and authorization setup, it is possible for you to lock yourself out of your operating system by trying to log into any TraceMasterVue module, including the client application, using the wrong user name and password combination. Check with your system administrator about the number of incorrect logins allowed on your network before being locked out.
You are prompted to reset your Windows password if it has expired or must be reset after initial login or a configured period of time has elapsed. Text on the Change Password dialog box specifies why the password must be reset. This change applies to your Windows system as well as to the ECGVue application.
ECGVue supports a single server login from a remote client. That is, you can only connect to a single TraceMasterVue server from a given client system.
Basic Edition only. When the TraceMasterVue server exceeds the allowed number of concurrent client connections, you will not be able to log into the application, and a message to this effect will be displayed. If this occurs, wait a few minutes and try logging in again, and if still unsuccessful, contact your TraceMasterVue administrator.
Depending on the settings enabled at your site, you may be automatically logged out of the system after a certain period of inactivity. For details, see “About Security and Automatic Disconnection” on page 1-16.
If the Remember Me option is enabled at your site, you can set the application to remember your login information on a specific computer. For security reasons, only consider this option if you are the only user of your system.
1-14 ECGVue Instructions for Use

ECGVue Basics
To log in
1 Double-click the TM ECGVue Application icon on your desktop.
The splash screen appears, and after a short time interval, the Login screen.
NOTE If the Remember me on this computer check box is not displayed on your login screen, the option is not enabled at your site.
2 Type your user name, password, and domain (for the TraceMasterVue server or the domain on which your user account is defined).
3 (Optional if enabled on your system) To save your login information, select the Remember me on this computer check box.
NOTE The availability of this option is configured by your TraceMasterVue administrator. If this option never appears on your Login screen, it is disabled at your site.
Selecting this option stores your password in encrypted form on the computer you logged in on. The next time you log in on the same computer, all of the fields are pre-filled.
If you later clear the check box, the information is flushed from the system and you are once again prompted for your user information upon login.
4 Click Login.
NOTES If your password has expired for some reason, the Change Password dialog box appears. See “Changing the Windows Password” on page 1-16, for details on resetting it.
Basic Edition only. If the maximum number of client connections has already been reached, you will receive an alert message stating that you cannot log in at this time, and the application will close. Try logging in again at a later time.
If login is successful, the Search page opens.
You can now specify the search criteria to locate and retrieve the reports to work with, as described in Chapter 3, “Searching for and Selecting Reports.”
The rest of this chapter describes the application terms and interface, as well as providing an overview of actions you can perform on ECGs and studies.
ECGVue Instructions for Use 1-15

About ECGVue and the TraceMasterVue ECG Management System
Changing the Windows Password
If you get the Change Password dialog box when attempting to log into ECGVue, as described in step 4 above, reset your Windows password by filling in the fields and clicking OK.
CAUTION Remember that this also changes your Windows system password, so the next time you log into your Windows system, you will need to use this new password.
About Security and Automatic Disconnection
To enhance system security, TraceMasterVue can be set to automatically log out users that have been inactive in the application for a specified period of time. The time interval is determined by your TraceMasterVue administrator.
When enabled, once your inactivity time period is 30 seconds short of the scheduled disconnection, the application starts a final count down that is displayed in the application title bar. The title bar will show the text, “No activity. Logout in N seconds,” where N is the remaining time in the count down.
By simply clicking in the application, for example, clicking a button in the Action bar, during this time period, the inactivity counter is reset and the count down stops.
If you do not interact with the application for the set period of time, the system logs you out and displays the Login page. The title bar shows the text, “Logged out due to inactivity”.
Setting the Application LanguageECGVue is available in the following languages:
English
Italian
Spanish
Dutch
French
Norwegian
NEW Swedish
1-16 ECGVue Instructions for Use

Actions You Can Perform on ECGs and Studies
By default, ECGVue is displayed in the same language as the locale specified on your operating system (Start > Settings > Control Panel > Regional and Language Options). If that language is not available, the application is displayed in English.
You can change the application language, if desired.
To display ECGVue in a different language
1 Double-click the ECGVue icon, and log in.
2 Click View > Language, and select the desired language.
3 (Optional) To set this language as the default (regardless of the specified locale on your system), select Set as Default Language.
The application is now displayed in the newly selected language.
NOTE Interpretive statements are always displayed in the language in which the ECG was acquired.
Actions You Can Perform on ECGs and StudiesYou can perform the following actions on one or more ECGs and studies (unless otherwise noted), depending on the permissions granted to you. This guide describes each of these actions in detail.
NOTE References to studies only apply if you have one or more of the Multimodality options installed.
Table 1-5 Actions you can perform on ECGs and studies
What you can do with ECGs and reports See ...
Import (manually) ECGs and/or studies “Importing Reports from External Media” on page 3-3
Retrieve ECGs by scanning barcodes “Retrieving ECGs by Scanning Barcodes” on page 3-4
Search for ECGs and/or studies by virtually any criteria, including:
Patient name or ID
Patient name alias (if reports are available under multiple last names for a single patient)
Institution/department where the ECG was acquired
Date range
Confirmed or unconfirmed status
Confirming physician
Severity
Lead configuration, including MIDA or EASI
State, including New or Deleted
Whether it is a STAT ECG
Chapter 3, “Searching for and Selecting Reports”
ECGVue Instructions for Use 1-17

About ECGVue and the TraceMasterVue ECG Management System
Search for ECGs and/or studies by virtually any criteria, including:
OrderVue option only. ECGs without matching order, and ECGs with order information included
Multimodality options only. Retrieve studies only, retrieve studies and ECGs, or retrieve ECGs only
Chapter 3, “Searching for and Selecting Reports”
Select ECGs/studies to review and edit. “Selecting Reports to Work with” on page 3-14
Verify the ECG.
This step generally occurs after all the demographic information has been reviewed and corrected, as necessary. Marking an ECG as verified changes its state to Awaiting Confirmation.
NOTE This feature is not supported in Basic Edition.
“Verifying ECGs” on page 4-41
Assign ECGs to somebody to review, verify, edit, or confirm.
“About Inboxes and Assigning ECGs” on page 1-30
OrderVue option only. Review orders and reconcile unmatched ECGs.
NEW Ability to unreconcile an ECG-order pair in case an incorrect pair was matched.
Using OrderVue with TraceMasterVue Guide, provided on the OrderVue Documentation CD.
Compare the current ECG with the most recent previous ECG (serial comparison). Alternatively, remove serial comparison data.
NOTE This feature is available in Basic Edition as an option.
“Comparing ECGs Using the Serial Comparison Algorithm” on page 4-36
Edit ECGs, including patient demographics, measurements, and interpretive statements
Chapter 4, “Viewing and Editing Reports”
Edit location information for ECGs and studies
NOTE For PDF studies, you can only edit location information; all other fields are read-only.
“Editing Patient Identification or Location” on page 4-11
View ECG waveforms Available in the Summary, Statement, and Waveform views. You can also review the waveforms as they will print in Report view.
See also “About the Waveform Display” on page 1-22
Table 1-5 Actions you can perform on ECGs and studies (continued)
What you can do with ECGs and reports See ...
1-18 ECGVue Instructions for Use

Actions You Can Perform on ECGs and Studies
Getting Help While Using ECGVueTraceMasterVue provides these Instructions for Use in PDF, available within the application.
To access online Help
1 Within the application, click the Help button in the Action bar.
The menu page appears, providing links to the product documentation that is available online. The Instructions for Use is available, and when selected, is displayed within Adobe Reader on your screen, with the Table of Contents displayed as bookmarks in the left-hand pane for easy navigation.
2 Click the links to access information about each topic.
For details about all the documentation available with TraceMasterVue, see the TraceMasterVue Components and Documentation Reference.
View ECG rhythm strip “About the Waveform Display” on page 1-22
View a superimposed 12-lead representative beat ECG “Using Waveform View” on page 4-38
View two waveforms on a single screen
Saving changes to reports “About Saving Changes” on page 4-10
Confirm ECGs “Confirming ECGs” on page 4-42
Print or fax ECGs and studies
Report view now shows ECG reports and studies within an embedded Adobe Reader viewer.
Chapter 6, “Distributing Reports”
Export ECGs to Philips XML format, or any of the following formats, depending on which options are purchased and installed at your site: PDF, TIFF, and DICOM (export from server only, not through ECGVue).
You can export reports directly from the client application (from the File > Export menu), or from the TraceMasterVue server using either an automated workflow rule or using the Enterprise Manager application for exporting multiple reports at one time. Contact your TraceMasterVue administrator for details.
“Exporting Reports” on page 6-5
For an overview of the actions applicable to working with PDF studies, see Chapter 2, “Working with PDF Reports (Multimodality Options).”
Table 1-5 Actions you can perform on ECGs and studies (continued)
What you can do with ECGs and reports See ...
ECGVue Instructions for Use 1-19

About ECGVue and the TraceMasterVue ECG Management System
About the ViewsECGVue provides several basic screens (called views), Quick and Advanced Search pages, a free-floating Statement Editor, and an Action bar for working with ECGs:
Table 1-6 Application views
Page/View Description
Search page Allows you to quickly identify and retrieve those ECGs and/or studies that you want to work with.
Several predefined Quick searches are available, as is the ability to perform a detailed and specific search, using the Advanced Search tab.
To display the Search page
Click Search in the Action bar.
OrderVue option only. An Orders search tab is also available. For details, see the Using OrderVue with TraceMasterVue Guide, provided on the OrderVue Documentation CD.
Statement view The default view. Focuses primarily on the interpretive statements associated with an ECG. Displays the statement list, and provides easy access to statement codes, modifiers, and variable fields for efficient editing. Also displays the waveforms, measurements, and a subset of patient demographics.
NEW In vC.02, Statement view has been updated to increase the waveform display.
To display an ECG in Statement view
Click the Statement button in the Action bar or press Ctrl-2 on the keyboard.
NOTE Studies are only displayed in Report view. Statement view is not applicable.
For more details, see “About Statement View” on page 4-4.
1-20 ECGVue Instructions for Use

About the Views
Summary view Displays a comprehensive overview of a patient’s ECG data, including patient information and demographics, measurements, interpretive statements, and waveforms. With appropriate permissions, you can edit most of the information presented in this view.
To display an ECG in Summary view
Click the Summary button in the Action bar or press Ctrl-1 on the keyboard.
For more details, see “About Summary View” on page 4-5.
NOTE Studies are only displayed in Report view. Summary view is not applicable.
OrderVue option only. This view provides the Match Order button to allow you to reconcile ECGs and orders. For details, see the Using OrderVue with TraceMasterVue Guide, provided on the OrderVue Documentation CD.
Waveform view Allows you to easily compare two ECGs on the same screen, as well as focus in greater detail on the waveforms for a single ECG. You can also display a superimposed representative beat view, and configure how many and which leads to display. This view also provides flexible display options, allowing you to customize the screen to best meet your needs.
To display an ECG in Waveform view
Click the Waveform button in the Action bar or press Ctrl-3 on the keyboard.
NOTE Studies are only displayed in Report view. Waveform view is not applicable.
For more details, see “Using Waveform View” on page 4-38.
Report view Allows you to preview the ECG report as it will appear in print, as well as print the report. If you have one or more of the Multimodality options, all studies are displayed in Report view.
To display a report in Report view
Click the Report button in the Action bar or press Ctrl-4 on the keyboard.
For more details, see “Using Report View” on page 5-2.
Table 1-6 Application views (continued)
Page/View Description
ECGVue Instructions for Use 1-21

About ECGVue and the TraceMasterVue ECG Management System
About the Waveform DisplayThe ECG waveform is obtained at the cardiograph or monitor and is read into TraceMasterVue as a part of the patient’s ECG report. The TraceMasterVue system enhances the editing process by providing diagnostic tools to allow you to view and make measurements of waveforms on your screen.
NOTE Waveform data may be compressed (lossless compression) to minimize disk space requirements, but there is no change in quality due to the compression.
You can view the ECG waveforms in the following views: Summary, Statement, Waveform, and Report. In Report view, you see the waveforms as they will print. In this view, you can use the embedded Adobe Reader zoom function to enlarge the waveforms for detailed review, if desired.
CAUTION To ensure accuracy, all measurements of the online waveforms must be made using the electronic calipers supplied within ECGVue.
Faxed waveforms do not meet the requirements of American National Standard ANSI/AAMI EC11:1991 for display of diagnostic electrocardiograms, and may not be suitable for diagnosis.
Statement Editor (Edit button)
Provides most of the functionality of the Statement view, but allows you to edit the interpretive statements from any view. Like the Statement view, displays the statement list and provides easy access to editing functions.
To edit an ECG from any view
Click the Edit button in the Action bar. The statement editor window appears on top of the existing view.
NOTE The Statement Editor is available in Basic Edition with the Serial Comparison option.
Action bar The button bar across the top of the window. Provides access to all the views and actions you can perform within the application, including saving changes, performing serial comparison, assigning and confirming ECGs, as well as displaying the Statement Editor from any view.
NOTE Serial comparison is available in Basic Edition as an option. Verification is not supported in Basic Edition.
Table 1-6 Application views (continued)
Page/View Description
1-22 ECGVue Instructions for Use

About the Views
The waveform is displayed on a grid with the following information:
Leads.
You can specify which leads to display, as well as the format to use, and whether to show rhythm. For details on setting options, see “Setting Report Display Options” on page 4-9.
Calibration pulses are shown, as appropriate.
Insto marks indicating lead boundaries for 3x4 and 6x2 ECG report formats.
If the display shows a yellow horizontal line dividing one waveform from another, the time period for the two waveforms is different.
The electronic calipers allow you to take precise waveform measurements online.
You can show or hide the calipers, as well as specify which lines to show. For details, see page 4-35.
NOTE When using the electronic calipers, we recommend that you fully zoom into the waveform to make measurements at the highest possible resolution.
Figure 1-1 Waveform display in the Statement, Summary, and Waveform views
Important Notes about the Waveform Display
You can customize display options, zoom in or out of the waveforms, and make measurements using the electronic calipers.
When using the electronic calipers, we recommend that you fully zoom into the waveform to make measurements at the highest possible resolution.
All waveform data is stored using the full fidelity of the ECG taken at acquisition time, including the number of leads and the sampling rate. For cardiographs, this is usually 10 seconds of ECG per lead taken at 500 Hz.
Use the Format dialog box to select the leads to display and to specify filters to apply, if any.
Format button
Caliper button
Slider
Electronic calipers
ECGVue Instructions for Use 1-23

About ECGVue and the TraceMasterVue ECG Management System
Move the slider at the bottom of the waveform area to scroll through the full 10 seconds for each lead.
When you zoom in to the waveform, move the scroll bars at the bottom and right of the waveform area to view the portions of the waveform that do not fit on the screen.
In Waveform view, you can configure the 1+ view (superimposed representative beats) to display any one or more leads.
You can change the color of the ECG trace and of the waveform grid (View > Color Scheme).
Navigating the Views and ActionsEach application view and action is a single click away. The buttons to access the different views and perform actions on ECGs (and studies, if you have one or more of the Multimodality options) are in the Action bar at the top of the page.
The Search page provides direct access to most actions, which you can perform on a single ECG or on a batch of multiple ECGs at one time.
Figure 1-2 ECGVue Search page Action bar
NOTE The Barcode button is not available in Basic Edition.
Figure 1-3 shows the Action bar for the main views of the application.
Figure 1-3 ECGVue Action bar
NOTE The Verify and Compare buttons are not available in Basic Edition.
If you have the OrderVue option, the Match Order button is available in Summary view. The button is either a green check mark (for reconciled ECG/orders), a red X (for unreconciled ECGs/orders), or a yellow question mark (indicating order data has changed in a primary field).
1-24 ECGVue Instructions for Use

About the Views
For details, refer to the Using OrderVue with TraceMasterVue Guide, provided on the OrderVue Documentation CD.
Figure 1-4 Match Order button in Summary view (OrderVue option only)
Keyboard Shortcuts for Navigation
Several keyboard shortcuts are provided to help you easily navigate the application without using the mouse.
To use keyboard shortcuts
Click anywhere on the application page.
The keyboard shortcuts are now available for use.
NOTE If a given button is not available to you, the action is either not supported by the ECG that is displayed (for example, it cannot be compared with another ECG, so the Compare button is greyed out) or you do not have permission to perform the action. If you think you should have permission to perform a given action, talk with your TraceMaster administrator.
Table 1-7 Keyboard shortcuts for navigation
Shortcut Key Button on Action Bar
Description For details, see...
F1 Help Display the online help system. “About ECGVue Documentation” on page 1-31
F2 Search Display the Search page from any view. Chapter 3, “Searching for and Selecting Reports”
F3 Barcode On the Search page, enter barcode mode so you can scan barcodes to retrieve ECGs.
NOTE This feature is not supported in Basic Edition.
“Retrieving ECGs by Scanning Barcodes” on page 3-4
F4 Review On the Search page, load the selected reports into the application and display the first report in the default view.
“Viewing ECGs and Studies” on page 4-3
ECGVue Instructions for Use 1-25

About ECGVue and the TraceMasterVue ECG Management System
F5 Save Save changes to the selected report. “About Saving Changes” on page 4-10
F6 Print Print the selected report. “Printing Reports” on page 6-2
F7 Assign Assign the selected ECG to an inbox. “About Inboxes and Assigning ECGs” on page 1-30
F8 Verify Mark the selected ECG as Verified.
NOTE This feature is not supported in Basic Edition.
“Verifying ECGs” on page 4-41
F9 Edit Display the floating Statement Editor window so you can edit interpretive statements for the selected ECG.
NOTE The Statement Editor is available in Basic Edition with the Serial Comparison option.
“Viewing and Editing Reports” on page 4-1
F10 Compare/Uncompare
Toggle initiating a serial comparison between the selected ECG and the most recent applicable previous ECG, and “uncomparing” a previously compared ECG.
NOTE The Statement Editor is available in Basic Edition with the Serial Comparison option.
“Comparing ECGs Using the Serial Comparison Algorithm” on page 4-36
F11 Confirm/Unconfirm
Toggles between confirming or unconfirming the selected ECG. If this button is unavailable to you, you do not have permission to perform this action.
“Confirming ECGs” on page 4-42
Ctrl-1 Summary Display the selected ECG in Summary view. “About the Views” on page 1-20
Ctrl-2 Statement Display the selected ECG in Statement view.
This is the default view.
“About the Views” on page 1-20
Ctrl-3 Waveform Display the selected ECG in Waveform view. “About the Views” on page 1-20
Table 1-7 Keyboard shortcuts for navigation (continued)
Shortcut Key Button on Action Bar
Description For details, see...
1-26 ECGVue Instructions for Use

About Interpretive Statements
About Interpretive StatementsClinical statements present clinical diagnostic information that is the result of analysis and interpretation of the ECG.
This information is generated when the ECG is acquired at the cardiograph, or at the IntelliVue Central Station when acquired from a bedside monitor. These statements appear on the screen, as well as on printed reports. You can modify, delete, and add clinical statements.
Most TraceMasterVue versions support serial comparison of ECGs. Many serial comparison settings are configurable. For details, see “Comparing ECGs Using the Serial Comparison Algorithm” on page 4-36.
Statement TypesEach statement represents a diagnosis that is of one of the following types:
Ctrl-4 Report Display the selected report in Report view.
Once in Report view, click the down arrow to select the report to display.
“About the Views” on page 1-20
Table 1-7 Keyboard shortcuts for navigation (continued)
Shortcut Key Button on Action Bar
Description For details, see...
Statement Type Description
Coded statements Standard diagnoses, such as SR (sinus rhythm), that are acquired from the cardiograph and used in TraceMasterVue. Making a change to a coded statement turns it into an uncoded statement.
Coded statements are identified by the code associated with the diagnosis.
NOTE Basic Edition only supports text-based statement editing. Code-based editing is available with the Serial Comparison option.
ECGVue Instructions for Use 1-27

About ECGVue and the TraceMasterVue ECG Management System
Statement Display, Content, and PlacementThe statement, as it appears formatted for reading, consists of the text of the modifiers followed by the text of the left-hand side (LHS), with appropriate substitution of variable values.
When editing the statements, you can insert coded and uncoded statements in any order within the Statement block (although traditionally, the statements with the most clinical significance appear first), and remarks in any order within the Remarks block.
You can use custom statements, defined at your site, which replace the factory-defined statements, or you can use statement aliases, which simply map the factory-defined code and/or statement text to codes and statements you prefer to use. In addition, you can define your own list of Favorite statements, so that the Statement Editor in ECGVue shows only those statements you have marked as Favorites.
The system can be configured to display or hide interpretive statements, short form measurements, and severity. This feature has been added so that reports displayed in, and printed from, ECGVue can be made to match the output of the PageWriter cardiographs, where it is possible to suppress these elements. If this information is hidden, it is not removed from the ECG; it is simply removed from view. This setting is configured globally for your site. For details, talk to your TraceMasterVue administrator.
For additional details about interpretive statements and working with them, see “Editing Interpretive Statements” on page 4-13.
Uncoded statements
Statements that are not identified by an associated diagnostic code. Often in the form of additional text that you can enter; useful when additional diagnostic information is necessary and the appropriate explanation does not exist as a coded statement.
Uncoded statements are identified by the prefix STMT.
Remarks Non-diagnostic comments that you enter as needed. Remarks can contain up to 1024 characters.
Remarks are identified by the prefix REMK.
Statement Type Description
1-28 ECGVue Instructions for Use

About Interpretive Statements
The components of the statement are color coded, as follows. Note that the color listed refers to all color schemes except for Black Leather.
Table 1-8 Statement components, described
Coded Statement Component (color)
Description
Quality statement modifier (blue)
Quality statements are nondiagnostic statements inserted by the Philips 12-Lead Algorithm to alert the reader of conditions that may have affected the ECG results. They are preceded by a dollar sign ($).
After the ECG is confirmed, TraceMasterVue deletes quality statements. You cannot edit or delete a quality statement.
Example. A $ appears next to the statement if a lead was not connected properly when the ECG was taken.
Code (black) Identifies a coded statement. Each criteria version uses the standard set of codes that apply to that version.
TraceMasterVue arrives at your site with codes already installed for adult criteria versions 06, 07, 08, 09, and 0A, and for pediatric criteria versions P2, P3, P4, and 0A.
The criteria version used appears in the Summary view above the statement list, next to the label Interpretation.
Example. In the criteria version 0A, VBIG is the code for ventricular bigeminy.
Serial comparison modifiers (blue)
Indicates how the ECG compares to another of the patient’s ECGs.
Each coded statement can contain one serial comparison modifier. For details, see the Serial Comparison Algorithm Reference Guide.
Diagnosis (purple) Contains the basic diagnostic information for a coded statement. Also known as the left-hand side (LHS).
You cannot edit the diagnostic information for coded statements. If you do, they become uncoded statements.
Reasons (pink) Identifies the reason the statement was selected by the interpretive program. Also known as the right-hand side (RHS).
You cannot edit this text directly. Reasons appear on the printed report only. Reasons do not appear on printed reports of confirmed ECGs.
Modifiers (blue) Listed before the diagnosis.
Each coded statement can have up to three modifiers.
Variables (bold pink) Some coded statements have variables. Options are numbers, lead names, lead group names.
ECGVue Instructions for Use 1-29

About ECGVue and the TraceMasterVue ECG Management System
About Inboxes and Assigning ECGs
An important concept in TraceMasterVue is the inbox. Inboxes are “containers” to which ECGs are assigned, for easy retrieval of a particular group of ECGs. Depending on the workflow of a particular institution, inboxes might be set up for individuals or by function.
For example, if, at your institution, physicians overread and confirm any ECGs that are in the queue while they are on duty, TraceMasterVue might have an inbox labeled “For Review” rather than (or in addition to) inboxes for individual physicians. As another example, say a physician on a given shift is responsible for reviewing all incoming ECGs for the third and fourth floors of the facility. The system could assign these ECGs to an inbox labeled “3/4 Review.”
Assigning an ECG to an inbox allows a configured set of users to have quick access to the associated ECGs; it also allows automated workflow rules to perform defined actions on ECGs based on the inbox to which they are assigned.
Inboxes are associated with one of two ECG states:
Awaiting Review. Inboxes with this state are holding ECGs that need to be overread.
Awaiting Confirmation. Inboxes with this state are holding ECGs that need final overread and confirmation.
ECGs assigned to an inbox have their state changed to the associated type. These assignments can then be used as part of automated workflow rules. Inboxes are also associated with locations, that is, institutions, facilities, and departments, as well as with users (and groups of users).
So, for example, a rule could be defined that routes incoming stat ECGs from a particular floor or department to an inbox monitored by the physician responsible for overreading those ECGs. It is also possible to notify the owner(s) of an inbox that ECGs have arrived.
You can view ECGs assigned to inboxes that either match the permissions assigned to your user ID or to which you have specifically been granted access. That is, if you only have permission to access ECGs in Institutions A and B, you will have access to the contents of inboxes associated with Institutions A and B, but not to those in Institution C. Further, if you are granted permission only to the inbox, For Review, associated with Institution A, you will have access only to that inbox within the institution.
NOTE If an ECG is assigned to an inbox to which you do not have access permissions, that ECG will not appear in any search results (except as noted below). You can only retrieve ECGs that are either unassigned or are assigned to inboxes to which you have access. Note however that if your user ID has ECG Manager or System Administrator privileges, all ECGs are retrieved during a search, regardless of inbox affiliation.
ECGs are assigned to inboxes either manually or automatically by workflow rules set up by the TraceMasterVue administrator. For example, the administrator might set up a rule to automatically assign newly acquired ECGs to an Awaiting Review inbox.
You can easily search for all ECGs assigned to a particular inbox using the Quick Search page. For more information, see “Performing a Quick Search” on page 3-4.
Multimodality options only. You cannot assign PDF reports to inboxes.
1-30 ECGVue Instructions for Use

About ECGVue Documentation
Assigning ECGsYou can manually assign unconfirmed ECGs to a specific inbox in either of two ways:
From the Search Results list after performing a Quick Search or Advanced Search
From this page, you can quickly assign one or more selected ECGs to a specific inbox.
From the Summary, Statement, and Report views
From these views, you can assign the ECG you are reviewing to a specific inbox.
To assign one or more ECGs to a specific inbox, from the Search page
After performing a search on the Quick Search or Advanced Search page and retrieving the desired ECG(s):
1 Select the check box next to the ECG(s) you want to assign; then click Assign in the Action bar.
The Assign dialog box appears.
2 Click the arrow in the drop down list and choose the inbox to assign the ECG(s) to; then click OK.
ECGVue associates the selected ECG(s) with the specified inbox.
To assign the selected ECG to a specific inbox, from the Summary, Statement, and Report views
While viewing an unconfirmed ECG in the Summary, Statement, or Waveform view:
1 At any time, click Assign in the Action bar at the top of the view.
The Assign dialog box appears.
2 Click the arrow in the drop down list and choose the inbox to assign the ECG to; then click OK.
ECGVue associates the selected ECG with the specified inbox. If an email address is associated with the inbox, the system sends an email message to that address indicating that new ECGs have arrived.
About ECGVue DocumentationPhilips Medical Systems provides detailed instructional and reference materials to help you get the most out of your TraceMasterVue system. For details, refer to the TraceMasterVue Components and Documentation Reference.
ECGVue Instructions for Use 1-31
About ECGVue and the TraceMasterVue ECG Management System
Getting HelpWhen you encounter a problem when working with reports using ECGVue, address the issue in the following order:
Search the Instructions for Use for information relating to the area in which you are having a problem.
Review the TraceMasterVue Troubleshooting Guide to determine whether your issue is addressed.
Ask your TraceMasterVue administrator.
Contact the Philips Response Center, either on the Web, or via telephone.
www.medical.philips.com/main/services/response_center
1-32 ECGVue Instructions for Use

2
2Working with PDF Reports(Multimodality Options)
Introduced with release C.01, the Multimodality option allows you to import PDF reports from Philips Holter and the following Stress systems: Philips StressVue and Quinton Q-Stress (with the additional Q-Stress option). These reports can then be displayed and reviewed within the client application, ECGVue. Automated workflow rules can also be defined that include studies to smoothly integrate them into your regular process workflow.
NEW Introduced with release C.02, we have expanded the types of studies that can be imported into the database, and viewed in ECGVue.
With new options, you can now import, view, and archive the following types of PDF reports:
Stress studies from the GE CASE Stress system
ECGs (ECG images in PDF) from Physio and Zoll defibrillators
For additional information about options, see the TraceMasterVue Components and Documentation Reference.
In TraceMasterVue, these PDF reports are referred to as studies.
This chapter provides the following information:Overview . . . . . . . . . . . . . . . . . . . . . . . . . . . . . . . . . . . . . . . . . . . . . . . . . . . . . .2-2
Working with Password-Protected PDF Reports . . . . . . . . . . . . . . . . . . . .2-3Working with Studies . . . . . . . . . . . . . . . . . . . . . . . . . . . . . . . . . . . . . . . . . . . .2-3
Where to Find Information about Working with Studies . . . . . . . . . . . . . .2-4What You Can and Cannot Do with Studies. . . . . . . . . . . . . . . . . . . . . . . .2-5
About PDF Study File Naming Conventions . . . . . . . . . . . . . . . . . . . . . . . . . .2-6Holter, Stress, and Defibrillator Export File Naming Conventions . . . . . .2-6Quinton Q-Stress Study Export File Naming Conventions . . . . . . . . . . . .2-7GE Case Stress Study Export File Naming Conventions . . . . . . . . . . . . . .2-7
Important Notes about Performing Searches for GE Case Studies in ECGVue. . . . . . . . . . . . . . . . . . . . . . . . . . . . . . . . . . . . . . . .2-8
2-1

Working with PDF Reports (Multimodality Options)
OverviewThe Multimodality options allow you to import PDF reports (called studies) from Philips Holter and Philips StressVue, as well as Quinton Q-Stress (with additional option).
NEW Release C.02 extends support for additional PDF formats, including stress studies from the GE CASE Stress system, and ECGs from Physio and Zoll defibrillators.
NOTE In the TraceMasterVue documentation, when a feature is being described that applies both to ECGs and to studies, we will generally use the term “report” to encompass both.
Here is how it works.
Once a study is acquired, reviewed, and confirmed on the acquisition platform, it is exported in PDF. The study can be exported using either or a combination of the following methods:
Export to a specified shared directory on the TraceMasterVue server, where the TraceMasterVue system is configured to import any files using the defined naming convention in that shared directory into the database. There is a 25MB file size limit for imported files.
Export to a location of the your choice, copy the files to an external medium, such as USB memory stick, and manually copy the files to the specified shared directory on the TraceMasterVue server. Files using the defined naming convention are then automatically imported into the database. There is a 25MB file size limit for imported files.
Export to a location of your choice, copy the files to an external medium, such as USB memory stick, and manually import the files, one at a time, into the TraceMasterVue database through the ECGVue client application. There is a 3MB file size limit for this method.
NOTE You cannot import Quinton Q-Stress studies through the ECGVue application. You must place files into the appropriate import folder on the TraceMasterVue server.
You use ECGVue to search for and retrieve these studies. These reports are imported and stored as PDF files, and are displayed in the Report view using Adobe Reader. You can review and print the reports, but you cannot edit or confirm them within the TraceMasterVue system. However, you can change the location with which the study is associated, if needed.
When selecting one or more ECGs and/or studies to review for a given patient using ECGVue, all available information for that patient is available at your fingertips, for easy reference.
On the server side, studies, like ECGs, can be included in automated workflow rules to enhance your process workflow.
The following diagram illustrates the study workflow.
2-2 ECGVue Instructions for Use

Working with Studies
Working with Password-Protected PDF ReportsThe report acquired on a Holter or stress system, or on a defibrillator, and exported to PDF with a password can be imported into the TraceMasterVue system. When the PDF file is about to be displayed in ECGVue, Adobe Reader prompts the user to enter the password. Upon entry of the correct password, the PDF contents are displayed.
NOTE Password-protected PDF files can not be part of automated workflow rules, as there is no user interaction to enter the password.
Working with StudiesThe TraceMasterVue user documentation incorporates information about reviewing studies alongside information about reviewing ECGs.
For quick pointers to sections of the manuals that reference studies, see Table 2-1.
For information about functions that are not supported for studies, see “What You Can and Cannot Do with Studies” on page 2-5.
NEW Support for defibrillator ECGs in PDF, as well as support for GE Case stress studies is only available with additional options. For details, see the TraceMasterVue Components and Documentation Reference. For information about configuring these options, see the Configuring External Devices Guide.
Export from supported Stress systems as PDF, import into TMVue
Export from Holter as PDF, import into TMVue
Display in ECGVue, can update location
Display in ECGVue, can update location
Can print
Can print
Export from defibrillator as PDF, import into TMVue
ECGVue Instructions for Use 2-3

Working with PDF Reports (Multimodality Options)
Where to Find Information about Working with StudiesRefer to the following table to quickly access information.
NOTE If you are reading this guide online, you can click the cross references to view the information.
Table 2-1 Where to find information about working with studies
For Information on ... See Section ...
Overview of Holter, stress, Physio and Zoll defibrillator, and ECG image support in TraceMasterVue
“Overview” on page 2-2
Naming conventions for different studies “About PDF Study File Naming Conventions” on page 2-6
Manually importing studies into ECGVue “Importing Reports from External Media” on page 3-3
Searching for studies “Including PDF Studies in Searches” on page 3-12
Quick Search (search for studies by patient ID, date, or location)
“Performing a Quick Search” on page 3-4
Advanced Search (search for studies, using more selective criteria)
“Performing a Custom (Advanced) Search” on page 3-9
“Including Previous Last Names in Searches” on page 3-10
“Searching for Deleted Reports” on page 3-11
Selecting studies to work with “Selecting Reports to Work with” on page 3-14
“Limits on the Number of Reports to Work with” on page 3-15
“Working with Single or Multiple Reports” on page 4-3
Reviewing studies “Viewing ECGs and Studies” on page 4-3
Changing location associated with a study “Editing Patient Identification or Location” on page 4-11
Printing studies
NOTES
You cannot print studies from the Search page, only from Report view.
You cannot fax studies at this time.
“Previewing Reports” on page 6-1
“Printing Reports” on page 6-2
2-4 ECGVue Instructions for Use

Working with Studies
What You Can and Cannot Do with StudiesStudies from various devices, including Philips Holter, stress systems, and defibrillators are provided in PDF within TraceMasterVue primarily as a source of additional information about a patient, as well as for long term storage.
Exporting studies “Exporting Reports” on page 6-5
Deleting studies
Restoring previously deleted studies
“Deleting and Restoring Reports” on page 4-46
Table 2-2 Supported and unsupported features for Holter and Stress studies
Supported for Studies Unsupported for Studies and ECG Images
Perform quick and advanced searches to retrieve ECGs, ECGs and studies, or just studies
Studies associated with a given patient are available for reference within the ECGVue application, as tabs (same as ECGs). The tabs are color coded.
Review the study within ECGVue’s Report view, using Adobe Reader
Change the location associated with a study within the ECGVue Report view
Print a study
Export a study (in PDF)
Delete or possibly restore a study
Define automated workflow rules related to changing state (to New or Archived), storing, and exporting studies (in PDF)
Editing any field other than location
Confirming the study
Verifying a study
Comparing studies
Faxing studies using automated workflow rules
Printing studies using automated workflow rules
Importing studies through the client application
Table 2-1 Where to find information about working with studies (continued)
For Information on ... See Section ...
ECGVue Instructions for Use 2-5
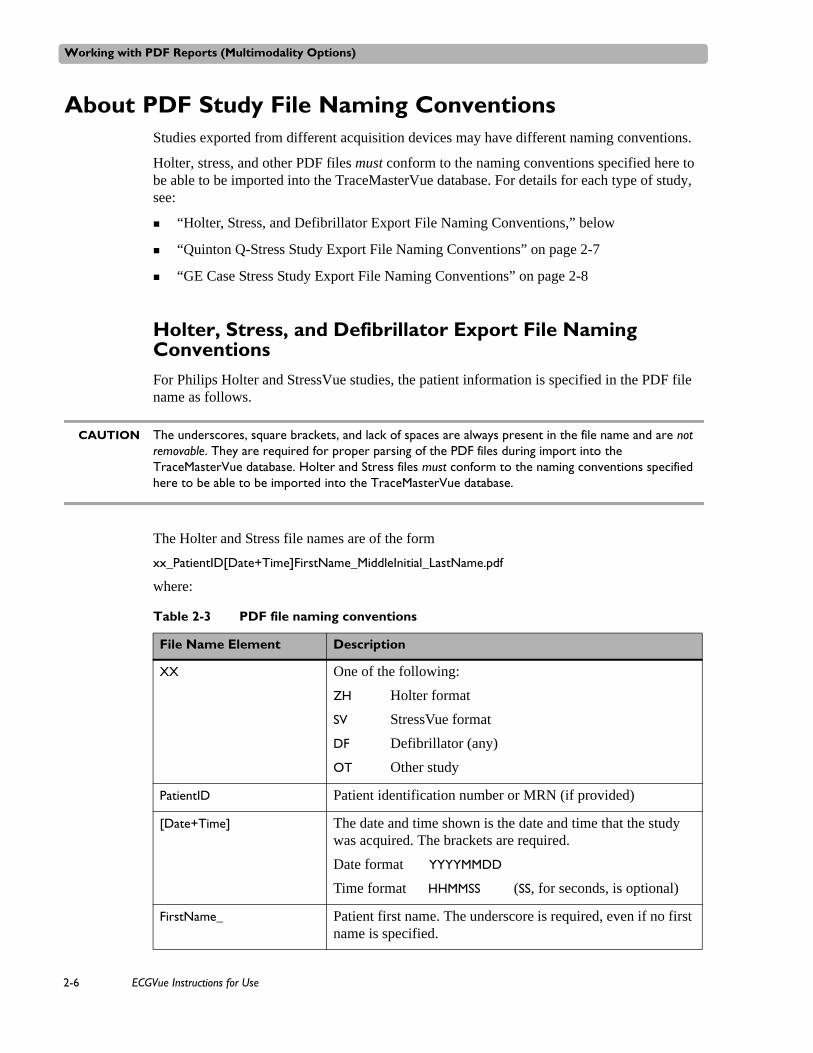
Working with PDF Reports (Multimodality Options)
About PDF Study File Naming ConventionsStudies exported from different acquisition devices may have different naming conventions.
Holter, stress, and other PDF files must conform to the naming conventions specified here to be able to be imported into the TraceMasterVue database. For details for each type of study, see:
“Holter, Stress, and Defibrillator Export File Naming Conventions,” below
“Quinton Q-Stress Study Export File Naming Conventions” on page 2-7
“GE Case Stress Study Export File Naming Conventions” on page 2-8
Holter, Stress, and Defibrillator Export File Naming ConventionsFor Philips Holter and StressVue studies, the patient information is specified in the PDF file name as follows.
CAUTION The underscores, square brackets, and lack of spaces are always present in the file name and are not removable. They are required for proper parsing of the PDF files during import into the TraceMasterVue database. Holter and Stress files must conform to the naming conventions specified here to be able to be imported into the TraceMasterVue database.
The Holter and Stress file names are of the form
xx_PatientID[Date+Time]FirstName_MiddleInitial_LastName.pdf
where:
Table 2-3 PDF file naming conventions
File Name Element Description
XX One of the following:
ZH Holter format
SV StressVue format
DF Defibrillator (any)
OT Other study
PatientID Patient identification number or MRN (if provided)
[Date+Time] The date and time shown is the date and time that the study was acquired. The brackets are required.
Date format YYYYMMDD
Time format HHMMSS (SS, for seconds, is optional)
FirstName_ Patient first name. The underscore is required, even if no first name is specified.
2-6 ECGVue Instructions for Use

About PDF Study File Naming Conventions
Quinton Q-Stress Study Export File Naming Conventions
Quinton Q-Stress studies are exported as a set of two files: the PDF report and a configuration file.
File names are of the form
06-07-2004_15-43-03.pdf06-07-2004_15-43-03.xml
Both files have the same name, but different extensions. The file name does not contain any patient-identifying information.
The following information will be extracted from the Q-Stress configuration file during import:
Patient ID
Patient last name
Patient first name
Patient middle name
Acquisition date
Acquisition time
MiddleInitial_ Patient middle initial. The underscore is required, even if no middle name is specified.
LastName Patient last name
Table 2-3 PDF file naming conventions (continued)
File Name Element Description
ECGVue Instructions for Use 2-7

Working with PDF Reports (Multimodality Options)
GE Case Stress Study Export File Naming ConventionsFor GE Case stress studies, the patient information is specified in the PDF file name as follows.
CAUTION The field separators, #, must be present. They are required for proper parsing of the PDF files during import into the TraceMasterVue database. GE Case stress files must conform to the naming conventions specified here to be able to be imported into the TraceMasterVue database.
Note also that GE Case stress files do not support a patient middle name. For details, see “Important Notes about Performing Searches for GE Case Studies in ECGVue” on page 2-9.
The GE Case stress file names are of the form
PatientID#LastName#FirstName#YYYY_MM_DD#HH_MM_SS.pdf
where:
Table 2-4 PDF file naming conventions
File Name Element Description
PatientID Patient identification number or MRN (if provided), alphanumeric
# Field separator (required)
LastName Patient last name
# Field separator (required)
This separator is not required if FirstName is omitted. That is:
PatientID#LastName#YYYY_MM_DD#HH_MM_SS.pdf
FirstName Patient first name (optional)
# Field separator (required)
YYYY_MM_DD Acquisition year, month, day
# Field separator (required)
HH_MM[_SS] Acquisition hour, minutes
Seconds (optional). When omitted, the file name could be either of the following:
PatientID#LastName#YYYY_MM_DD#HH_MM.pdf
PatientID#LastName#FirstName#YYYY_MM_DD#HH_MM.pdf
2-8 ECGVue Instructions for Use

About PDF Study File Naming Conventions
Important Notes about Performing Searches for GE Case Studies in ECGVue
NOTE This information applies only if you have the Multivendor Cardiograph option installed at your site.
The GE Case stress system does not support middle names, whereas TraceMasterVue does.
If multiple versions of a name are associated with a single patient ID, TraceMasterVue will create a primary entry. Any records that match that patient ID and show a name different from the primary entry are associated with the patient ID and show the nonmatching patient name in parentheses.
In the following example, the primary patient name is John M. Holford, patient ID 61602. The GE Case stress study (first in the list) shows the acquisition name, John Holford, in parentheses, as it is not an exact match for the primary record. You see also that there is another ECG that was acquired without using the middle initial, where the name is also shown in parentheses.
ECGVue Instructions for Use 2-9

Working with PDF Reports (Multimodality Options)
2-10 ECGVue Instructions for Use

3
3Searching for and Selecting Reports
ECGVue makes it easy for you to retrieve the specific reports you want to work with.
This chapter provides the following information:Overview . . . . . . . . . . . . . . . . . . . . . . . . . . . . . . . . . . . . . . . . . . . . . . . . . . . . . .3-1Importing Reports from External Media . . . . . . . . . . . . . . . . . . . . . . . . . . . . . .3-3Performing a Search . . . . . . . . . . . . . . . . . . . . . . . . . . . . . . . . . . . . . . . . . . . . .3-3
Canceling a Search . . . . . . . . . . . . . . . . . . . . . . . . . . . . . . . . . . . . . . . . . . .3-4Retrieving ECGs by Scanning Barcodes . . . . . . . . . . . . . . . . . . . . . . . . . .3-4Performing a Quick Search. . . . . . . . . . . . . . . . . . . . . . . . . . . . . . . . . . . . .3-4Performing a Custom (Advanced) Search . . . . . . . . . . . . . . . . . . . . . . . . .3-9Including Previous Last Names in Searches. . . . . . . . . . . . . . . . . . . . . . .3-10Searching for Deleted Reports . . . . . . . . . . . . . . . . . . . . . . . . . . . . . . . . .3-11Searching for Reports with Unidentified Locations . . . . . . . . . . . . . . . . .3-11Including Order Information in Searches . . . . . . . . . . . . . . . . . . . . . . . . .3-12Including PDF Studies in Searches. . . . . . . . . . . . . . . . . . . . . . . . . . . . . .3-12Including Converted GE/Marquette Cardiograph ECGs in Searches . . .3-14
Selecting Reports to Work with. . . . . . . . . . . . . . . . . . . . . . . . . . . . . . . . . . . .3-14Limits on the Number of Reports to Work with . . . . . . . . . . . . . . . . . . . .3-15About Batch Processing . . . . . . . . . . . . . . . . . . . . . . . . . . . . . . . . . . . . . .3-16
OverviewThe Search page provides the following tabs for quick access to search parameters:
The Quick Search page provides rapid access to ECGs that match commonly specified criteria, for example, ECGs from a specific location, assigned to specific inboxes, or all unconfirmed ECGs acquired within a certain period of time. You can also retrieve studies, if you have one or more of the Multimodality options.
The Advanced Search page provides maximum flexibility in determining which ECGs (and/or studies) to retrieve, allowing you to define specific search criteria, including user-defined fields.
3-1

Searching for and Selecting Reports
In addition, if you have one or more of the options listed in the table below, you can search for and retrieve the listed reports.
The Search pages also provide instant access to various actions that you can perform on one or more reports; for example, confirming, printing, or reassigning ECGs.
NOTES To be able to view studies in ECGVue, you must have Adobe Acrobat Reader version 8.1 or later installed on your PC. The supported version is available for installation from the TraceMasterVue server.
When a feature is being described that applies both to ECGs and studies, we will often use the term report to indicate that the feature applies to both.
If specifying a location as part of a search is not retrieving reports you expect to see, check the Unidentified Institution/Facility/Department listings. Incoming reports that have location entries that do not exactly match those specified in TraceMasterVue are assigned to Unidentified Institution, Facility, or Department, depending on which location entry does not match.
Studies are not associated with orders.
Table 3-1 Reports available with TraceMasterVue options
With this option ... You can ...
OrderVue Perform order-related searches using the Order Search tab.
Clinical Interface Retrieve ECGs from Philips IntelliVue monitors and HeartStart MRx defibrillators. These ECGs are fully editable.
Multimodality Retrieve Philips Holter and StressVue reports in PDF.
You can edit the location associated with a report.
Multimodality with Quinton Retrieve Philips Holter and StressVue reports, as well as Quinton Q-Stress reports in PDF.
You can edit the location associated with a report.
NEW Multimodality with GE Case
Retrieve Philips Holter and StressVue reports, as well as GE Case stress reports in PDF.
You can edit the location associated with a report.
NEW Multivendor Cardiographs Retrieve ECGs from GE Mac 5000/5500 cardiographs.
These ECGs are fully editable.
NEW PDF Image Retrieve Physio and Zoll defibrillator reports in PDF.
You can edit the location associated with a report.
3-2 ECGVue Instructions for Use

Importing Reports from External Media
Importing Reports from External MediaYou can view or import some ECGs and studies into TraceMasterVue from external media, including diskette and USB memory stick. Basically, the limiting factor is the media supported by your client PC.
Performing a SearchECGVue provides maximum flexibility in searching for ECGs and studies. The Quick Search tab provides one-click access to commonly used criteria, allowing you to rapidly find exactly those reports you want to work with. If the quick options do not meet your current needs, use the Advanced Search tab to specify custom search criteria.
NOTES The reports retrieved depend on the permissions granted to your user ID. Only those reports that you have permission to view are displayed in the list.
If your site has a large database, ECG and study searches may take longer. If ECGs and/or studies are being imported into the database at the same time that you are conducting a search, the system may display a search error. Retry the search at a later time.
To ... Do this ...
Display an ECG in ECGVue without importing it into the database
NOTE This method applies only to ECGs acquired on PageWriter TC70 and Touch cardiographs. It is used just to review files that are on some external medium. You cannot work with these files, nor can you print them.
1 Select File > Open.
2 Navigate to the file to view, and double-click it.
If the file is an ECG, it is displayed in the default view (usually Statement).
If the file is a Holter or Stress study, it is displayed in Report view.
To save an ECG or study into the TraceMasterVue database.
NOTE You cannot import the following file types using this method:
Quinton Q-Stress PDFs
ECGs from GE cardiographs
You must copy the files to appropriate import folders on the server and have them imported into the database. Talk to your administrator for help. For details about importing GE ECGs, see Appendix A, “Working with Converted ECGs.”
1 Select File > Import.
2 Navigate to the file to import, and double-click it.
The file must be under 3MB in size. You can import a single file at a time.
The file is imported into the database without being displayed in the client application.
3 After importing the reports, retrieve them using the Search function (as described in the following sections). You can then work with the report as desired.
ECGVue Instructions for Use 3-3

Searching for and Selecting Reports
Canceling a SearchYou can cancel a search that is taking place. When you initiate a search, the Search button changes to a Cancel button.
To cancel a search
While a search is in progress, click Cancel.
The application stops the search process. You can now change the parameters and initiate a new search.
Retrieving ECGs by Scanning BarcodesIf your site supports bar code use, you can use a key wand or bar code scanner to read the bar code printed on an ECG report to retrieve that patient’s ECG reports.
The bar code encodes the location, patient ID, and date and time the ECG was acquired.
To retrieve ECGs by bar code
1 In the Action bar on the Search page, click Barcode (or press F3 on the keyboard).
The Scan Barcodes box appears. As you scan bar codes, the encoded numbers appear in the read-only field. This is just for display purposes; do not type in this field.
2 Scan as many bar codes as needed using either a key wand or scanner, as follows:
– If using a key wand, hold the wand as you would a pencil and place the tip of the wand on the white space at the beginning of the bar code.
Press down lightly and move the wand smoothly across the entire bar code.
– If using a scanner, place the bar code no more than 4 inches away from the scanner, and pass the beam smoothly across the code.
3 When you are finished, click Done.
The reports retrieved for the scanned patient names appear in the Search Results list.
You can now select the ECGs to work with. See “Selecting Reports to Work with” on page 3-14.
Performing a Quick SearchThe Quick Search page gives you one-click access to commonly performed searches. If these options do not meet your needs, use the Advanced Search, where you can search by virtually any field.
For each Quick Search type, you can specify how to restrict the search. For example, when searching for Unconfirmed ECGs, you can specify the location with which the desired ECGs are associated, as well as the age of the ECGs to find, and whether you want STAT ECGs only.
3-4 ECGVue Instructions for Use

Performing a Search
Figure 3-1 Quick Search types
NOTES If you have the OrderVue option, you can retrieve up-to-the minute order information with each of these searches, if desired. For details, see “Including Order Information in Searches” on page 3-12.
If you have one or more of the Multimodality options, you can retrieve PDF studies for review. For details, see “Including PDF Studies in Searches” on page 3-12.
The following quick searches are available:
Table 3-1 Quick Search types
Search Type Description
Unconfirmed ECGs Find unconfirmed ECGs by location, acquisition date range, and/or STAT status.
You can include order status information and/or other studies, if the options are installed, by selecting the appropriate check box.
NOTE ECGs in PDF studies are not retrieved in this search. You must select the Include other studies option to retrieve them.
Confirmed ECGs Find confirmed ECGs by location and/or acquisition date range.
You can include order status information if the option is installed.
ECGs for a specified patient Find ECGs by patient name and/or ID.
You can now also choose whether to include other possible last names for the same patient ID. This allows you to retrieve previous reports for the patient under a prior last name.
You can include order status information and/or other studies, if the options are installed, by selecting the appropriate check box.
ECGs assigned to a specific inbox Find ECGs associated with an inbox. For details about inboxes, see page 1-30.
You can include order status information and/or other studies, if the options are installed, by selecting the appropriate check box.
ECGVue Instructions for Use 3-5

Searching for and Selecting Reports
To perform a quick search
NOTE The order-related options and the studies option are only included if you have purchased and installed the applicable options. The examples here show these options present.
1 If you are not already on the Search page, click Search in the Action bar (page 1-20) to display the Quick Search page.
ECGs for a specific location Find ECGs associated with a specific institution/facility and/or specific acquisition date range.
You can include order status information and/or other studies, if the options are installed, by selecting the appropriate check box.
OrderVue option only. ECGs without matching order
Find ECGs without an associated order. Available only if you have the OrderVue option.
Order status information is included in the search.
For details, see “Including Order Information in Searches” on page 3-12.
NEW Multimodality options only. Depending on which options are enabled at your site, find PDF reports for review.
For details, see “Including PDF Studies in Searches” on page 3-12.
You can include ECGs in the search, as well as whether to include other possible last names for the same patient ID. This allows you to retrieve previous reports for the patient under a prior last name.
Table 3-1 Quick Search types (continued)
Search Type Description
3-6 ECGVue Instructions for Use

Performing a Search
2 On the Quick Search page, click the desired search type in the list.
By default, the first time you access the Search page within a session, Unconfirmed ECGs is selected. The next time you access the Search page, the last selection you made is pre-selected.
If you have the OrderVue option and wish to include order information, select either the ECGs without matching orders search type or select the Include order status check box. For details, see “Including Order Information in Searches” on page 3-12.
If you have one or more of the Multimodality options and wish to search for studies or include studies with an ECG search, select the Other Studies search type (for studies only) or select the Include other studies check box to retrieve ECGs and studies. For details, see “Including PDF Studies in Searches” on page 3-12.
3 If the selection requires it, type the specific parameters for the search.
For example, type the location information or patient name, or specify the date range.
TIP To retrieve only high priority, STAT ECGs when searching for unconfirmed ECG, click the Stat check box, when available.
4 Click Search.
The matching results appear in the Search Results list. The status bar at the bottom right of the page shows the total number of reports retrieved, as well as the total number of patients listed.
By default, the list displays the matching reports organized by patient; all reports associated with a patient are presented as a group.
Figure 3-2 Search results, by patient
ECGVue Instructions for Use 3-7

Searching for and Selecting Reports
New If the ECG has a date of birth specified for the patient, the date of birth appears in the blue patient ID/name heading.
5 To display the results in a sortable list, in either ascending or descending order:
a Click the ECG tab at the bottom of the page.
b Click the column headings to sort the list by that column.
Click the heading again to change from ascending to descending order, and vice versa.
c To return to the patient-centered list, click the Patient tab.
Figure 3-3 Search results, by ECG
You can now select reports to review or edit. See “Selecting Reports to Work with” on page 3-14.
Sortable column headings
3-8 ECGVue Instructions for Use

Performing a Search
Performing a Custom (Advanced) SearchThe Advanced Search page allows you to perform more complex searches for ECGs that match one or more specified criteria. Use this option when one of the quick search options is not sufficient to locate the desired ECGs or studies.
NOTES If you have the OrderVue option, you can include up-to-the minute order information in the search. For details, see page 3-12.
With one or more of the Multimodality options, you can include PDF reports in your search. For details, see page 3-12.
You can search for ECGs using any combination of the following criteria:
To perform a custom, advanced search
NOTE The order-related options (Include order status information and ECGs without Matching Order check boxes) are only included if you have purchased and installed the OrderVue option. The examples here show these options present.
1 If you are not already on the Search page, click Search in the Action bar (page 1-20); then click the Advanced Search tab.
2 On the Advanced Search page, specify the criteria to search for.
If you have the OrderVue option, and wish to include order information, see “Including Order Information in Searches” on page 3-12.
Inbox
Patient name or ID
Include other possible last names for the same patient ID. This allows you to retrieve previous reports for the patient under a prior last name.
STAT ECGs
Institution/Facility/Dept.
Date range of ECG acquisition
State, including New and Deleted
Severity, including normal, borderline, and abnormal
Source, including PageWriter TC, Touch, and Trim cardiographs
NEW With the Multimodality options, also includes PDF studies
NEW With the Multivendor Cardiograph option, includes ECGs from GE/Marquette cardiographs (converted to Philips XML) (see Appendix A)
User field values
ECGs without matching orders (OrderVue option)
Include order status information (OrderVue option)
ECG Type, including standard 12-lead, 15- and 16-lead, MIDA, EASI
NEW With the Multimodality options, also includes PDF studies
ECGVue Instructions for Use 3-9

Searching for and Selecting Reports
NEW If you have one or more of the Multimodality options, and wish to search for PDF reports, ensure the Source and Type fields are set to the appropriate settings. For example, to retrieve only Holter studies, select Holter as the Source field. For more details, see “Including PDF Studies in Searches” on page 3-12.
3 Click Search.
The matching results appear in the Search Results list.
You can now select reports to review or edit. See “Selecting Reports to Work with” on page 3-14.
Including Previous Last Names in SearchesYou can easily retrieve reports for patients who have had a last name change and have reports in the system under the old last name.
Each patient is associated with a patient ID. When looking for previous names, the system first matches the specified patient last name, then retrieves the patient ID associated with that name, and finally, matches additional reports to any other last name associated with that same patient ID.
For example, if a patient named Frances Llew used to have a different last name, and has the patient ID 12345, when you search for reports for Frances Llew and select the Include previous last names option, the system retrieves reports associated with Frances Llew, and then retrieves any additional reports that are associated with the ID 12345.
This is also the case for patients whose name may have been entered with or without a middle name at some point. The system will store one form of the name as the main entry, and will show diverging names, with the same patient ID, in parentheses.
To include previous names in a search
1 Do either of the following:
– For a Quick Search, select the Search for Specific Patient type, and type the patient name in the name fields.
– For an Advanced Search, specify the patient’s name in the name fields.
Last name is required.
2 Select the Include previous last names check box, and press Search.
Reports that match the listed patient name, as well as any additional reports associated with that patient’s ID, appear in the Search Results list.
You can now select reports to review or edit. See “Selecting Reports to Work with” on page 3-14.
3-10 ECGVue Instructions for Use

Performing a Search
Searching for Deleted ReportsWhen you delete a report in ECGVue (File > Delete), it is generally not immediately removed from the TraceMasterVue database. Rather, it is marked as Deleted and is no longer available for review or edit. It is, however, possible that your administrator has changed the setting to immediately remove reports marked as Deleted. Ask your administrator how the system is configured.
When reports are marked for deletion, the administrator at your site will periodically remove these reports from the database.
It is possible to retrieve and restore deleted reports, if the report is still in the database and you have the appropriate permissions.
To search for deleted reports
1 In Search view, click the Advanced Search tab.
2 In the State field, select Deleted from the dropdown list. Select any additional parameters, as well.
3 Click Search.
All matching reports appear in the Search Results list.
If you have the appropriate permissions, and wish to restore one or more of these reports, you can do so. For details, see “Deleting and Restoring Reports” on page 4-46.
Searching for Reports with Unidentified LocationsIf specifying a location as part of a search is not retrieving reports you expect to see, check the Unidentified Institution, Facility, or Department listings. Incoming reports that have location entries that do not exactly match those specified in TraceMasterVue are assigned to Unidentified Institution, Facility, or Department, depending on which location entry does not match.
To perform a quick search for reports with missing or incorrect location information
1 In Search view, click the Quick Search tab.
2 In the Search Type list, select ECGs for a specific location.
To include PDF studies as well, select the Include other studies check box.
3 In the Institution, Facility, or Department dropdown lists, select Unidentified.
For example, if you know that the institution was incorrectly specified, select Unidentified Institution in the Institution dropdown list. To find reports that have a facility within a specific institution that does not match, select the institution, and in the Facility field, select Unidentified Facility. To find reports that have a department that is incorrectly listed, specify the institution and facility, and select Unidentified in the Facility field.
4 Click Search.
All matching reports appear in the Search Results list. You can select the reports whose locations you need to update, and make the changes as needed. For details, see “Editing Patient Identification or Location” on page 4-11.
ECGVue Instructions for Use 3-11

Searching for and Selecting Reports
To search for specific reports by location using advanced search
1 In Search view, click the Advanced Search tab.
2 In the Institution, Facility, or Department dropdown lists, select Unidentified.
For example, if you know that the institution was incorrectly specified, select Unidentified Institution in the Institution dropdown list. To find reports that have a facility within a specific institution that does not match, select the institution, and in the Facility field, select Unidentified Facility.
3 Specify any additional parameters to further narrow the search.
4 Click Search.
All matching reports appear in the Search Results list. You can select the reports whose locations you need to update, and make the changes as needed. For details, see “Editing Patient Identification or Location” on page 4-11.
Including Order Information in SearchesIf you have the OrderVue option, you can retrieve order information using the ECGVue application. You can:
Select ECGs without matching order to retrieve ECGs that are not associated with any orders. This is useful to help you determine which accounts may require administrative follow up.
Select Include order status information to retrieve order reconciliation status for any ECGs. This is particularly useful if your site verifies the data in ECGs before sending them to the cardiologist to be overread. You can now easily determine which ECGs need to be reviewed prior to overread.
Use the Order Search tab to review orders that meet any combination of the specified parameters, such as order number, date range, name, and so forth. You can also select and retrieve the ECGs that are associated with these orders.
For detailed information about performing order-related searches, refer to the Using OrderVue with TraceMasterVue guide. See your administrator for assistance.
Including PDF Studies in SearchesNEW If you have one or more of the Multimodality options, you can view and store PDF reports
from a variety of sources. For details, see Chapter 2, “Working with PDF Reports (Multimodality Options).”
These reports are available in PDF format and are displayed in Report view, within the embedded Adobe Reader viewer. You cannot edit these reports, except for changing the associated location information, if needed.
3-12 ECGVue Instructions for Use

Performing a Search
When you review an individual ECG or study for a patient, all available ECGs for that patient are provided, as reference, on individual tabs within ECGVue. For studies to also be available for reference, you must select the Include other studies check box on the Search page when retrieving reports.
However, only those reports that are specifically selected in the Search results list can be edited; the rest, if any, are provided as read-only files for reference.
Remember that when you search for and select studies to review, they are displayed in Report view, within the embedded Adobe Reader viewer. You can print studies from this view.
You can specify a search to retrieve Studies only, ECGs and studies, or ECGs only.
NOTE ECG reports in PDF are classified as studies in TraceMasterVue. You have to specify the Studies only or ECGs and studies search types to retrieve these reports.
Make the following selections to narrow down the search:
On the Quick Search tab, select the Other Studies search type to retrieve Holter, stress, and defibrillator studies that match the specified criteria.
– To also retrieve ECGs, select the Include ECGs check box.
– To also retrieve reports for the patient under a prior last name (page 3-10), select the Include previous last names check box.
To retrieve PDF reports in addition to ECGs, select the Include Studies check box.
On the Advanced Search tab, you have several options using the Source and Type fields.
– If you leave the Type and Source fields set to ALL, any search you perform will retrieve all matching ECGs and studies.
– To only retrieve Holter reports, set:
– To only retrieve Stress reports, set:
– NEW To retrieve other reports, set either of the following, as appropriate.
Source or Type: Holter
Source or Type: Stress
Source or Type: Defibrillator, Other Studies
X
ECGVue Instructions for Use 3-13

Searching for and Selecting Reports
Including Converted GE/Marquette Cardiograph ECGs in Searches
NEW If you have the Multivendor Cardiographs option, you can review, edit, and store ECGs that were imported from GE/Marquette Mac 5000/5500 cardiographs.
These reports converted into Philips XML upon import to the database, and can be edited just as any other ECG. For detailed information about the conversion process and field mapping, see Appendix A, “Working with Converted ECGs.”
Imported ECGs from these sources are assigned the following Source and Type values:
Make the following selections to narrow down the search:
On the Quick Search tab, select any of the ECG searches to retrieve converted GE cardiograph ECGs that match the specified criteria.
Once retrieved, the Type column will show Other Vendor System.
On the Advanced Search tab, you have several options using the Source and Type fields.
– If you leave the Type and Source fields set to ALL, any search you perform will retrieve all matching ECGs and studies.
– To only retrieve GE cardiograph ECGs, set either:
Selecting Reports to Work withNOTE Only those patient reports that you have permission to view or edit appear in the Search Results list.
After performing a search, ECGVue lists all the matching reports to which you have access permissions in the Search Results list. Note that the list may show multiple entries for a single patient. You explicitly select the specific ECGs to edit or confirm from the reports displayed in the Search Results list.
GE Cardiograph ECGs Source: Other ECGS
Type: Other Manufacturer System
Source: Other ECGsType: Other Manufacturer System
3-14 ECGVue Instructions for Use
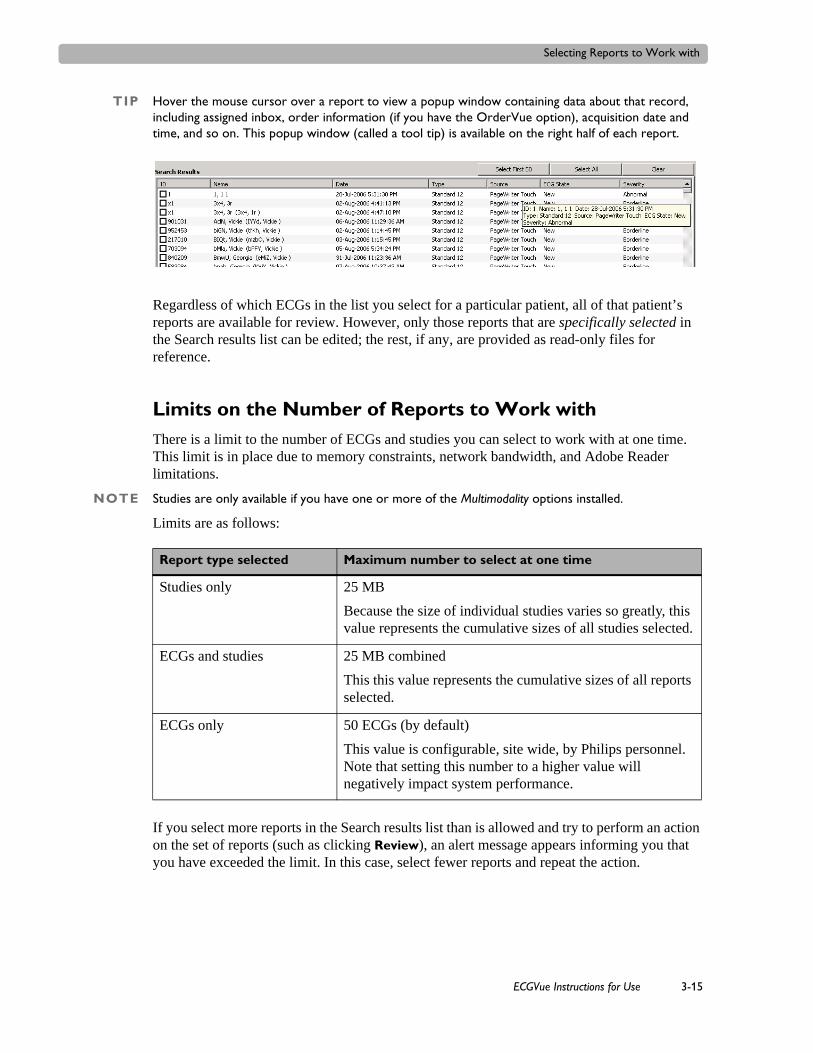
Selecting Reports to Work with
TIP Hover the mouse cursor over a report to view a popup window containing data about that record, including assigned inbox, order information (if you have the OrderVue option), acquisition date and time, and so on. This popup window (called a tool tip) is available on the right half of each report.
Regardless of which ECGs in the list you select for a particular patient, all of that patient’s reports are available for review. However, only those reports that are specifically selected in the Search results list can be edited; the rest, if any, are provided as read-only files for reference.
Limits on the Number of Reports to Work withThere is a limit to the number of ECGs and studies you can select to work with at one time. This limit is in place due to memory constraints, network bandwidth, and Adobe Reader limitations.
NOTE Studies are only available if you have one or more of the Multimodality options installed.
Limits are as follows:
If you select more reports in the Search results list than is allowed and try to perform an action on the set of reports (such as clicking Review), an alert message appears informing you that you have exceeded the limit. In this case, select fewer reports and repeat the action.
Report type selected Maximum number to select at one time
Studies only 25 MB
Because the size of individual studies varies so greatly, this value represents the cumulative sizes of all studies selected.
ECGs and studies 25 MB combined
This this value represents the cumulative sizes of all reports selected.
ECGs only 50 ECGs (by default)
This value is configurable, site wide, by Philips personnel. Note that setting this number to a higher value will negatively impact system performance.
ECGVue Instructions for Use 3-15

Searching for and Selecting Reports
About Batch ProcessingYou can also perform several operations on the entire set of selected reports (referred to as batch processing) directly from the Search page. The individual elements within a batch are treated as separate transactions; if any one item fails, the entire batch is not rejected. After the entire batch has been processed, a notification message may be sent (depending on how your system is configured) summarizing the results of the operation.
Note that reports are processed in the order presented in the Search Results list, from top to bottom, as they are sorted. For example, if they are sorted by name, they will be processed in name order; if sorted by date, they will be processed in date order.
The following batch operations are supported in Search view:
Confirm all the selected ECGs at one time
Assign all the selected ECGs to someone else (to a specific inbox)
Print all the selected ECGs and studies on a single printer
Fax all the selected ECGs to a single fax number
Export all the selected reports in a single format
Delete all the selected reports at one time
In general, the most common action you will take after selecting reports is to review them, by clicking the Review button.
NOTE The only supported actions on studies from the Search page is Review, Print, or Export (from the File menu).
To select reports
1 Perform a search to retrieve reports (page 3-3).
In the Search Results list, the client application displays all the records that match the specified criteria that you have permission to access.
2 Select the check boxes to the left of the patient ID for each report that you want to work with.
You must explicitly select the reports that you want to edit, compare, or confirm. The status bar shows the number of records you have selected.
3-16 ECGVue Instructions for Use

Selecting Reports to Work with
Now you can choose what to do with the selected records, as described next.
To perform operations on the selected reports
Click the appropriate action button (or press the shortcut function key on the keyboard, shown in parentheses). Choices include (depending on your permissions):
Review (F4)
Click this button to load the selected reports into ECGVue for review and/or editing and confirming. See “Viewing ECGs and Studies” on page 4-3 and “Reviewing and Editing ECGs and Studies” on page 4-9.
Confirm (F11)
Click this button to confirm the selected ECGs as a batch directly from this page, without viewing them first. This action is appropriate if the ECGs have already been previously reviewed, but not confirmed.
NOTE If re-authentication for confirmation is enabled at your site, you are prompted, once, to re-enter your user credentials (user name, password, domain) to successfully confirm the batch of ECGs.
For more information, see “Confirming ECGs” on page 4-42.
Assign (F7)
Click this button to assign the selected ECGs as a batch to a specified inbox. See “About Inboxes and Assigning ECGs” on page 1-30.
Print/Fax (F6)
Click this button to print or fax the selected reports as a batch directly from this page, without viewing them first. All the selected reports are printed on the same printer or faxed to the same number. See Chapter 6, “Distributing Reports.”
NOTE Multimodality options only. You cannot fax studies, nor can you print studies from the Search page. To print, select and display studies in Report view, then click Print on the Action bar.
ECGVue Instructions for Use 3-17

Searching for and Selecting Reports
NEW Delete
Click this button to delete the selected ECGs. You are prompted to confirm deletion.
3-18 ECGVue Instructions for Use

4
4Viewing and Editing Reports
The TraceMasterVue ECG viewer and editor, ECGVue, allows you to retrieve ECGs and studies stored in the TraceMasterVue database, and then view or edit these ECGs, based on the permissions granted to your user ID.
This chapter provides detailed information about reviewing, editing, and verifying ECGs, as well as performing serial comparison between ECGs, and assigning and finalizing ECGs.
Multimodality options only. If you have one or more of the Multimodality options, you can review Philips Holter and stress reports, and/or Zoll and Physio defibrillator reports, in PDF. For details, see “Viewing ECGs and Studies” on page 4-3.
In TraceMasterVue, these PDF reports are referred to as studies. In the TraceMasterVue documentation, when a feature is being described that applies both to ECGs and studies, we will often use the term report to indicate that the feature applies to both.
NOTE To be able to view studies in ECGVue, you must have Adobe Acrobat Reader version 8.1 or later installed on your PC. See your TraceMasterVue administrator about installing the correct version. (It is shipped with the system and is stored on the server.)
This chapter provides the following information:Working with Single or Multiple Reports . . . . . . . . . . . . . . . . . . . . . . . . . . . . .4-3Viewing ECGs and Studies . . . . . . . . . . . . . . . . . . . . . . . . . . . . . . . . . . . . . . . .4-3
About Statement View . . . . . . . . . . . . . . . . . . . . . . . . . . . . . . . . . . . . . . . .4-4Changing the Default View . . . . . . . . . . . . . . . . . . . . . . . . . . . . . . . . .4-4
About Summary View . . . . . . . . . . . . . . . . . . . . . . . . . . . . . . . . . . . . . . . .4-5Working with ECGs and Studies . . . . . . . . . . . . . . . . . . . . . . . . . . . . . . . .4-5
Displaying Patient Reports. . . . . . . . . . . . . . . . . . . . . . . . . . . . . . . . . .4-6About ECG and Study Tabs . . . . . . . . . . . . . . . . . . . . . . . . . . . . . . . . .4-7About Editable vs. Read-only Fields . . . . . . . . . . . . . . . . . . . . . . . . . .4-8Setting Report Display Options . . . . . . . . . . . . . . . . . . . . . . . . . . . . . .4-9
Reviewing and Editing ECGs and Studies . . . . . . . . . . . . . . . . . . . . . . . . . . . .4-9About Saving Changes . . . . . . . . . . . . . . . . . . . . . . . . . . . . . . . . . . . . . . .4-10
Editing Patient Information and Demographics . . . . . . . . . . . . . . . . . . . . . . .4-11Editing Patient Identification or Location . . . . . . . . . . . . . . . . . . . . . . . .4-11Editing an ECG Date or Time. . . . . . . . . . . . . . . . . . . . . . . . . . . . . . . . . .4-12Editing Patient Demographic Information . . . . . . . . . . . . . . . . . . . . . . . .4-13
4-1

Viewing and Editing Reports
Editing Interpretive Statements . . . . . . . . . . . . . . . . . . . . . . . . . . . . . . . . . . . .4-13Accessing Statement Editing Tools . . . . . . . . . . . . . . . . . . . . . . . . . . . . .4-13Notes about Editing Statements . . . . . . . . . . . . . . . . . . . . . . . . . . . . . . . .4-15Customizing Your Statement Editing Preferences . . . . . . . . . . . . . . . . . .4-16
Configuring How Interpretive Statements Are Displayed. . . . . . . . .4-17Configuring Code and Field Matching Options. . . . . . . . . . . . . . . . .4-18Specifying Favorite Codes . . . . . . . . . . . . . . . . . . . . . . . . . . . . . . . . .4-19About Statement Aliasing . . . . . . . . . . . . . . . . . . . . . . . . . . . . . . . . .4-22
Adding Statements and Remarks . . . . . . . . . . . . . . . . . . . . . . . . . . . . . . .4-24Statement Editing Commands . . . . . . . . . . . . . . . . . . . . . . . . . . . . . .4-24Adding Coded Statements . . . . . . . . . . . . . . . . . . . . . . . . . . . . . . . . .4-25Rotating the Position of Modifiers in a Statement . . . . . . . . . . . . . . .4-29Adding Uncoded Statements . . . . . . . . . . . . . . . . . . . . . . . . . . . . . . .4-30Adding Remarks. . . . . . . . . . . . . . . . . . . . . . . . . . . . . . . . . . . . . . . . .4-31
Editing Statements and Remarks . . . . . . . . . . . . . . . . . . . . . . . . . . . . . . .4-32Editing Measurements . . . . . . . . . . . . . . . . . . . . . . . . . . . . . . . . . . . . . . .4-33
Comparing ECGs Using the Serial Comparison Algorithm . . . . . . . . . . . . . .4-36Comparing ECGs Using the Serial Comparison Algorithm . . . . . . . . . .4-36
Undoing a Serial Comparison . . . . . . . . . . . . . . . . . . . . . . . . . . . . . .4-37Using Waveform View . . . . . . . . . . . . . . . . . . . . . . . . . . . . . . . . . . . . . . . . . .4-38
Setting Number of ECGs to Display in Waveform View . . . . . . . . .4-39Setting ECG Orientation in Waveform View. . . . . . . . . . . . . . . . . . .4-39Selecting the ECGs to Display . . . . . . . . . . . . . . . . . . . . . . . . . . . . . .4-39Showing the Superimposed Representative Beat View . . . . . . . . . . .4-40Showing or Hiding Interpretive Statements. . . . . . . . . . . . . . . . . . . .4-41
Verifying ECGs . . . . . . . . . . . . . . . . . . . . . . . . . . . . . . . . . . . . . . . . . . . . . . . .4-41About Verification Status . . . . . . . . . . . . . . . . . . . . . . . . . . . . . . . . . . . . .4-41Verifying an ECG . . . . . . . . . . . . . . . . . . . . . . . . . . . . . . . . . . . . . . . . . . .4-42
Confirming ECGs . . . . . . . . . . . . . . . . . . . . . . . . . . . . . . . . . . . . . . . . . . . . . .4-42ECG Confirmation Methods and Status . . . . . . . . . . . . . . . . . . . . . . . . . .4-42
ECG Confirmed by Confirming Cardiologist . . . . . . . . . . . . . . . . . .4-43ECG Confirmed on Behalf of a Confirming Cardiologist . . . . . . . . .4-43About Electronic Signature . . . . . . . . . . . . . . . . . . . . . . . . . . . . . . . .4-43About Confirmation Status . . . . . . . . . . . . . . . . . . . . . . . . . . . . . . . .4-44
Configuring Display of Confirmed ECGs . . . . . . . . . . . . . . . . . . . . . . . .4-44Confirming an ECG . . . . . . . . . . . . . . . . . . . . . . . . . . . . . . . . . . . . . . . . .4-45
Editing a Confirmed ECG . . . . . . . . . . . . . . . . . . . . . . . . . . . . . . . . .4-46Deleting and Restoring Reports . . . . . . . . . . . . . . . . . . . . . . . . . . . . . . . . . . .4-46
4-2 ECGVue Instructions for Use

Working with Single or Multiple Reports
Working with Single or Multiple ReportsECGVue allows you to perform certain actions on a single report, or on multiple reports at the same time (referred to as batch processing).
Multimodality options only. You can also select one or more studies to review or print.
To perform an action on one or more reports
1 After retrieving reports on the Search page, click the check boxes next to the records to work with. For an example, see page 3-16.
2 In the Action bar, click the button for the action to perform on the selected records.
To review and/or edit reports, click Review.
To perform a batch operation on the set of ECGs (for example, to assign the ECGs to an inbox, confirm the entire set of ECGs without review, or to print/fax the set of ECGs to a single printer or fax machine), click the appropriate button in the Action bar.
To export reports, click File > Export and select the format.
For details on the available options, see page 3-14.
NOTE The buttons available in the Action bar depend on your access permissions and the TraceMasterVue Edition and options installed at your site. If a button does not appear in the bar, you do not have permission to perform that action or it is not supported in your edition of TraceMasterVue.
Viewing ECGs and StudiesThe ECGVue client application allows you to review (and with appropriate permissions, edit and confirm) ECGs and studies at a computer that has access to your facility’s network.
ECGVue provides access to all the reports in the database to which you have access permission. In most cases, you select the patient and reports to view in the Search Results list, then click Review (or press F4 on the keyboard). The most recent selected ECG for the first patient in the list is displayed in Statement view.
Statement view is the default view for ECGs. You can change this setting, however, and choose any view as the default. See “Changing the Default View” on page 4-4.
New Multimodality options only. Depending on which options are enabled at your site, you can also review Philips Holter and StressVue studies, as well as Quinton Q-Stress and GE Case studies, in addition to Physio and Zoll defibrillator reports. These studies are converted to PDF upon export from the acquisition device. They are displayed in Report view within the embedded Adobe Reader viewer. You can change the location associated with a study, but you cannot edit any other information.
To be able to view studies in ECGVue, you must have Adobe Acrobat Reader version 8.1 or later installed on your PC. Ensure the correct version of Adobe Reader is installed on your system. If it is not, reinstall it from the TraceMasterVue server. Contact your TraceMasterVue administrator.
ECGVue Instructions for Use 4-3

Viewing and Editing Reports
About Statement ViewStatement view focuses primarily on the interpretive statements associated with an ECG. This view displays the statement list, and provides easy access to statement codes, modifiers, and variable fields for efficient editing. It also displays the waveforms, measurements, and a subset of patient demographics.
Figure 4-1 Statement view, illustrated
Changing the Default View
By default, ECGs you select to view or edit are displayed in Statement view. You can change this setting to be any view in the application.
To change the default view
1 After logging into the application, display an ECG in the view to set as the default.
For example, to set Waveform view as the default, click Waveform in the Action bar.
2 Select View > Set as Default View.
The next time you select an ECG to view or edit from the Search Results list, the ECG is displayed in the selected view.
4-4 ECGVue Instructions for Use

Viewing ECGs and Studies
About Summary ViewSummary view displays a comprehensive overview of a patient’s ECG data, including patient information and demographics, measurements, interpretive statements, and waveforms. This view provides easy access to editing patient demographics, for users with appropriate permissions.
You can change the waveform display, as desired, including showing the waveforms in a different format. For details, see “About the Waveform Display” on page 1-22.
To display an ECG in Summary view
Click Summary in the Action bar.
Figure 4-2 Summary view
OrderVue option only. If you have the OrderVue option, the Summary view also displays the Match Order button (circled), allowing you to reconcile ECGs and orders.
You can edit ECGs from this view by clicking the Edit button in the Action bar to display the floating Statement Editor. For details, see “Accessing Statement Editing Tools” on page 4-13.
NOTE With Basic Edition, the floating Statement Editor is only available with purchase of the Serial Comparison option.
Working with ECGs and StudiesThis section highlights the different ways to work with ECGs and studies, and how the views organize each patient’s reports.
In addition to navigating your selected reports, it is also important to understand how to work with the tabbed report display, and how to distinguish editable from read-only fields.
ECGVue Instructions for Use 4-5

Viewing and Editing Reports
Displaying Patient Reports
The following procedures show you how to move between a single patient’s reports, and how to view a different patient’s reports.
Before proceeding, ensure you have retrieved the desired set of reports, and clicked Review in the Search page. This loads the selected ECGs into your system, and displays reports for the first patient in your selection.
By default, ECGs are shown in Statement view. Studies are always shown in Report view, within the Adobe Reader viewer.
To display the selected ECG in a different view
Click the desired view button in the Action bar (or the associated function key on the keyboard).
The ECG is displayed in the selected view. Studies are always shown in Report view. For details, see “About the Views” on page 1-20.
To view different reports for the selected patient
Click the tab for the report to display. See “About ECG and Study Tabs,” in the next section.
To view reports for a different patient
Click the arrow on the right side of the Name field, and select the desired patient ID from the list.
View buttons
ECG tabs
4-6 ECGVue Instructions for Use

Viewing ECGs and Studies
About ECG and Study Tabs
The tabs provide access to the available ECGs for the selected patient, and show the date and time the associated ECG was acquired. Click a tab to view the ECG in the selected view.
New Multimodality options only. With these options, you can also view Holter, stress, and/or defibrillator studies when you select either the Other Studies quick search item or the Include Other Studies check box on the Search page. The tabs show the same information for studies.
The figure below shows tab headers for ECGs and studies.
The tab headers are displayed as follows:
The red bar at the top of a tab indicates the currently active report. When you have multiple reports loaded into the view, the red bar provides a clear indicator of which report data you are viewing.
Tab headers in bold text indicate an editable report. These are the ECGs that you specifically selected in the Search Results list on the Search page.
An asterisk (*) at the end of a header indicates that the report has been edited, but changes have not yet been saved. You must click Save (or press F5 on the keyboard) to make the changes permanent.
Tab headers in regular font indicate read-only reports; you cannot edit these reports.
Tabs are organized in date-acquisition order, from left to right, starting with the most recent report on left.
Click a tab to display the associated ECG or study.
New Multimodality options only.
– Tab headers for studies are displayed as follows:
– If the header of a study is in bold text, it indicates the associated location can be edited. These are studies that you specifically selected in the Search Results list on the Search page.
Tab headers
Holter studyStress studyECGs
Type of Study Prefix Color
Holter Purple font Preceded by the letters H
Stress Orange font Preceded by the letter S
Defibrillator Blue font Preceded by the letter D
Other study Green font Preceded by the letter O
ECGVue Instructions for Use 4-7

Viewing and Editing Reports
About Editable vs. Read-only Fields
The client application displays field values and ECG/study tabs differently, depending on whether you can change the content. In addition, users with certain permissions may only be able to edit a subset of fields (for example, a Verifier user or Reviewer may only be able to edit demographic data, but not measurements).
Table 4-2 Field types in the application
Field Type Example Description
Gray/dark background in a field
Field is read-only; it cannot be edited. Examples of read-only fields include State, Type, and Priority.
White background in a field
Field is editable and can be changed.
Field with dropdown arrow
Field provides a dropdown list of options to choose from; click the arrow and select the desired entry.
Ellipses button Fields with ellipses on the right provide a dialog box; click the button to display the dialog box and specify options.
Red bar over tab header
Date and time in tab header
The red bar indicates the currently selected ECG. When you have multiple ECGs and/or studies available to review, this red bar makes it easy to identify the report you are currently reviewing.
Each tab header shows the acquisition date and time.
Tab header in bold font
Bold font indicates a report that can be edited. These reports are those that you explicitly selected in the Search Results list on the Search page.
Regular font indicates a report that is only available for reference. Confirmed and archived ECGs, as well as ECGs not explicitly selected on the Search page, cannot be edited.
4-8 ECGVue Instructions for Use

Reviewing and Editing ECGs and Studies
Setting Report Display Options
The waveform display is highly configurable for each ECG. This section highlights some of the settings you can change:
Set format and lead configuration
Set rhythm strip options
Specify filters
You configure all these settings on a per-ECG basis using the Format dialog box.
NOTE These settings apply only to the display of the ECG within the application. ECG reports are always printed using the settings configured on the acquiring device.
To set waveform display settings
1 Click the Format button in the top-right corner of the waveform display.
The Format dialog box appears.
2 Choose the desired options and click OK.
The contents of the Lead Configuration dropdown list depend on the type of ECG being displayed, as follows:
– When displaying 12-lead ECGs, the list includes 3x4, pan 12, 6x2, and 12x1 options.
– When displaying 15-lead ECGs, the list also includes 3x5 options.
– When displaying 16-lead ECGs, the list also includes 3x5 and 4x4 options.
To move between the lead and filter settings, click the Leads and Filters tabs, as appropriate.
For details about each option, see “About Clinical Reports” on page 5-10 and the Philips 12-Lead Algorithm Physician Guide.
Reviewing and Editing ECGs and StudiesIf you have the appropriate user permissions, you can edit reports. Depending on your permissions, some or all of the following fields in a report are editable:
Multimodality options only. If you have the appropriate permissions and you have explicitly selected one or more studies in the Search Results list, you can edit the location associated with the selected studies.
Regardless of your permissions, you can only edit a report if you selected the check box for that report in the Search Results list. The tabs of these selected reports appear in bold font to show that they are editable. For details, see “About ECG and Study Tabs” on page 4-7.
Patient identification (name, ID) Patient demographics
Location Severity
ECG measurements Interpretive statements
Diagnosis, medication, and requesting MD Custom field values
ECGVue Instructions for Use 4-9

Viewing and Editing Reports
You can select multiple reports at one time to review, however, there is a limit to how many. For details, “Limits on the Number of Reports to Work with” on page 3-15.
NOTES To ensure accuracy, verify the patient information, including patient ID and name, associated with the ECG or study prior to editing or storing ECGs.
Holter, stress, and defibrillator studies are presented in the format in which they were acquired. The studies are converted to PDF upon export from the acquisition device, and maintain their appearance and content when imported into TraceMasterVue. The only addition is the location information associated with the import folder.
To edit/review ECGs and studies
1 Search for the reports to work with. For details, see “Performing a Search,” starting on page 3-3.
The Status bar at the bottom of the page displays the number of reports retrieved.
2 Select the check boxes next to the reports to edit.
TIP To select multiple reports for a single patient, click the patient’s name in the list. This selects all of that patient’s reports.
The Status bar at the bottom of the page displays the number of reports selected.
3 Click Review.
NOTES If you selected more than 50 ECGs, the system displays a message indicating that you have exceeded the limit and prompting you whether to automatically select the first 50. Clicking Yes produces the same effect as clicking Select First 50 in step 2.
Multimodality options only. If you selected more than 25MB worth of studies (with or without ECGs), the system displays a message indicating that you need to select fewer reports.
ECGVue displays the most current selected report for the first patient in the list in your default view (generally Statement view for ECGs, always Report view for studies).
You can view other reports for the selected patient, as well as view reports for the other patients you selected on the Search page. See “Viewing ECGs and Studies” on page 4-3 for details. You can also change the default view, as described on page 4-4.
The following sections provide an overview of the editing process.
About Saving ChangesAny changes you make to a report are made to a copy of the report, and are not saved to the database until you click Save on the Action bar. This includes any statements generated during a manual serial comparison.
To save changes to the database
After making changes to an ECG or study, click Save on the Action bar.
The changes to the report are saved to the database.
4-10 ECGVue Instructions for Use

Editing Patient Information and Demographics
Editing Patient Information and DemographicsYou can edit patient ID and name, as well as the location associated with the report. You can also edit patient demographic information.
NOTES If you have Verifier authorization, you can only edit patient demographic data. This role does not have permission to edit statements, measurements, and other data.
The Verify feature is not supported in Basic Edition.
Editing Patient Identification or LocationYou can edit this information on an ECG from any of the following views: Statement, Summary, and Waveform.
CAUTION Philips strongly recommends that your site not use patient identification numbers that are related to any other forms of identity, such as social security number or driver's license number. Using unique patient identification numbers is part of best practices for any information technology system as a way to help healthcare providers and patients avoid identity theft.
New Multimodality options only. PDF studies are only displayed in Report view. You can edit the location in that view. See page 4-12.
To edit the patient ID
1 From any view, click in the Patient ID field and select the existing value; then type the new ID.
The change applies to the currently selected ECG.
2 Click Save (or press F5 on the keyboard) to save the changes in the TraceMasterVue database.
To edit the patient name
1 Click to the right of the Name field.
The Name dialog box appears.
2 Type the last, first, and optionally, middle, name, and click OK.
To discard your changes, click Cancel.
3 Click Save (or press F5 on the keyboard) to save the changes in the TraceMasterVue database.
The change applies to the selected ECG. The patient name is not changed for other ECGs associated with this patient. However, when you perform a search for ECGs for this patient, and select the Include previous last names check box, all associated ECGs are retrieved.
ECGVue Instructions for Use 4-11

Viewing and Editing Reports
To change the location associated with an ECG or study
The Location field is a combination of the Facility and Dept fields within a preconfigured Institution.
1 Click the down arrow at the right of the Location field.
A dropdown list of all configured institutions and associated facilities and departments appears.
2 Click the department (the lowest-level entry) to associate it with this report.
Clicking an entry that has a plus or minus sign next to it expands or collapses the list of associated facilities or departments.
3 Click Save (or press F5 on the keyboard) to save the changes in the TraceMasterVue database.
Editing an ECG Date or TimeYou can change the date and/or time associated with a specific ECG. In general, you will only change this information if a batch of ECGs is known to have the wrong date/time stamp. For example, a cardiograph’s battery might be allowed to run out, and the date and time are not reset when it is recharged and the cart is put back in service.
Date and time information is displayed in Summary view.
To edit the date and/or time
Date and time information is displayed in Summary view.
1 In the Action bar, click Summary to display the ECG in Summary view.
2 Type the desired information into one or both of the Date and Time fields.
3 Click Save (or press F5 on the keyboard) to save the changes in the TraceMasterVue database.
Department (lowest level)
Facility
Institution
4-12 ECGVue Instructions for Use

Editing Interpretive Statements
Editing Patient Demographic InformationYou can edit patient demographic information within either Summary or Statement view.
To edit demographics fields
1 Display the ECG in either Summary or Statement view.
2 Do either of the following, as appropriate:
– Click the down arrow in the field to change and select the desired option from the dropdown list.
– Type the text in the field.
3 Click Save (or press F5 on the keyboard) to save the changes in the TraceMasterVue database.
Editing Interpretive StatementsFor information about how statements are presented in ECGVue, see “About Interpretive Statements” on page 1-27.
For information on serial comparison modifiers, and on performing a serial comparison on ECGs, see “Comparing ECGs Using the Serial Comparison Algorithm” on page 4-36.
Accessing Statement Editing ToolsUse either of two methods for updating statements:
Click Stmt (or click anywhere in the window and press Ctrl-2 on the keyboard) in the Action bar to display the ECG to edit in Statement view. See Figure 4-3.
From any of the three ECG views (Summary, Statement, Waveform), click Edit (or press F9 on the keyboard) to display the floating Statement Editor while keeping the ECG in the same view. See Figure 4-4.
NOTE With Basic Edition, the Statement Editor is only available with purchase of the Serial Comparison option.
ECGVue Instructions for Use 4-13

Viewing and Editing Reports
Figure 4-3 Statement view
Figure 4-4 Floating Statement Editor
Interpretation window
4-14 ECGVue Instructions for Use

Editing Interpretive Statements
Notes about Editing StatementsNOTE With Basic Edition, you can view codes associated with the statements that are part of the report;
however, you cannot edit the codes. Basic Edition only supports text-based statement editing. Any new statements you add, or changes you make to an existing statement, carry the prefix *-STMT-, indicating the statement is uncoded. Remarks are also supported. With Basic Edition, purchase of the Serial Comparison option also enables code-based statement editing.
Adding Statements and Remarks
You can add or modify statements using the keyboard, the mouse, or a combination of the two.
Statements you add or modify are identified with an asterisk (*) in front of the statement. The asterisk remains even after you save the changes, and simply indicates that this statement was not system generated.
Add coded and uncoded statements in the Statement list above the <end of statements> line.
Uncoded statements have the prefix -STMT-.
You can add a statement by right-clicking an existing line in the Interpretation window. The application opens a statement above the cursor and starts matching codes as you type. If you have Favorites enabled (page 4-19), the application matches codes from your Favorites list.
Add remarks between the <end of statements> and <end of remarks> lines.
Remarks have the prefix -REMK-.
Modifying Statements
Statements you add or modify are identified with an asterisk (*) in front of the statement. The asterisk remains even after you save the changes, and simply indicates that this statement was not system generated.
Once you start modifying a coded statement, it automatically becomes an uncoded statement.
The client uses smart logic for modifier and variable editing. You do not have to tab through the full list of modifier fields (1-3) or variable fields (1-4) to edit a statement. The editor presents additional modifier fields (2 or 3) only if a modifier is already present or is added. It does the same with variables.
When editing statements that contain a modifier as part of the statement text, ensure that you do not overwrite an existing modifier. Be sure to check that any new entries are added to empty modifier fields. A modifier associated with a statement is loaded into the Modifier 1 field; when adding additional modifiers, be sure to first tab to the next available field.
You can then use the Rotate Modifier button to move the new entry to a different position in the statement. For details, see page 4-29.
ECGVue Instructions for Use 4-15

Viewing and Editing Reports
When an ECG is imported that contains custom elements that are not defined on the current TraceMasterVue system, they are displayed on the report as follows:
– When a statement contains an undefined custom modifier, the statement shows the text [ ??? ] in place of the custom modifier.
– An undefined custom coded statement is identified by the following text:
*** Converted by editor - bad stmt code: <code> ***
– An undefined custom severity is not displayed on the report.
Contact your TraceMasterVue administrator to ensure that all necessary custom statements and modifiers are defined on the system.
Saving Changes, Customizing Settings
Please review your changes carefully before saving, and before confirming ECGs.
Remember to click Save in the Action bar when finished to save your changes to the database.
You can customize how statements are displayed and some other editing features to better fit your workflow. For details, see “Customizing Your Statement Editing Preferences,” next.
Customizing Your Statement Editing PreferencesYou can customize various aspects of how ECGVue displays statements and remarks, as well as how it displays code and field matches (page 4-18) when you are adding or editing statements. You can also create a custom list of coded statements that you frequently use, and display them in a Favorites list. (For details on Favorites, see page 4-19.) All of these options are set using the View menu.
In addition, if enabled for your site, statement aliasing allows your TraceMasterVue administrator to map codes and statements in a selected criteria version (for example, 0A) to your own site-specific nomenclature. For details, see “About Statement Aliasing” on page 4-22.
4-16 ECGVue Instructions for Use

Editing Interpretive Statements
Configuring How Interpretive Statements Are Displayed
You can set the following statement display options within the ECGVue application:
Show or hide statement codes
Show or hide reason statements (also known as the right-hand side statements, RHS)
To display or hide statement codes
Select View > Show Statement Codes.
A check mark next to the option indicates it is enabled. This setting remains in place for all ECGs until you change it.
The top image in the following example shows codes on; the bottom image, codes off.
To display or hide the reason (RHS) statements
Select View > Show Statement RHS.
A check mark next to the option indicates it is enabled. This setting remains in place for all ECGs until you change it.
The top image, below, shows RHS displayed; the second image, RHS off.
ECGVue Instructions for Use 4-17

Viewing and Editing Reports
Configuring Code and Field Matching Options
ECGVue allows you to “edit in place” — you can simply click an existing statement in the Interpretation window and start typing; the application adds a statement above the selected line.
NOTE With Basic Edition, you can view codes associated with the statements that are part of the report; however, you cannot edit the codes. Basic Edition only supports text-based statement editing. Any new statements you add, or changes you make to an existing statement, carry the prefix *-STMT-, indicating the statement is uncoded. Remarks are also supported. However, with the purchase of the Serial Comparison option, code-based editing is enabled in Basic Edition.
The application provides intelligent matching for the code and modifier fields. As you type each letter in the statement code and modifier fields, the application pre-selects matching codes and modifiers, changing the selection with each character you type. For example, if you are intending to type the code AFIB, when you type A, the application shows the first code beginning with A; as you type the F, the application shows the first code containing AF, and so on.
You have the option to have the application either just list the selection in the field, or show a dropdown list in the field with the options in alphabetical order. When using the dropdown list, you can then use the arrow keys to select the desired entry. The image on the left, below, shows the dropdown list enabled; the image on the right, disabled.
NOTE When Favorites are enabled, only those codes that are in your Favorites list are matched.
In addition, you can specify whether to display editing tips below the Interpretation window when a statement is selected. The figure below shows an example of an editing tip.
Dropdown enabled
Dropdown disabled
4-18 ECGVue Instructions for Use

Editing Interpretive Statements
To set editing preferences
1 Click View > Customize.
The Customize View dialog box appears, with the Statement Editing tab displayed.
2 Select the radio buttons for the desired options, then click OK.
The available options are:
– Dropdown statement list
This list displays statement codes in alphabetical order. When enabled, you can type the first few letters of the code, and then navigate the code list using the arrow keys.
– Dropdown statement modifier lists
This list displays modifiers in alphabetical order. When enabled, you can type the first few letters of the modifier, and then navigate the list using the arrow keys.
– Dropdown statement Serial Comparison modifier lists
This list displays serial comparison modifiers in alphabetical order. When enabled, you can type the first few letters of the modifier, and then navigate the list using the arrow keys.
– Show tip information while editing statements
NOTE For details on setting ECG confirmation options on the ECG Confirm tab, see “Configuring Display of Confirmed ECGs” on page 4-44.
Proceed with adding or editing statements and remarks, as needed.
To display editing tips below the Interpretation window
In the Customize View dialog box (View > Customize), select the check box next to Show help line while editing statements.
When enabled, information is displayed that describes your current editing options. For example:
<Del> to delete statement, <Enter> to modify statement. Type any character to insert a new statement.
The text specifies to press the Delete key on the keyboard to delete a statement, and to press the Enter key to start editing mode and change a statement. You can also simply start typing to add a new coded or uncoded statement. When disabled, this line does not appear.
Specifying Favorite Codes
You can select any subset of the statements in the selected criteria version for display in a Favorites list. This allows you to work with a much shorter list of codes, making it easy for you to find often used statements. When enabled, as you add or edit coded statements, only those you have specified as Favorites are displayed in the code List view. If you have Favorites enabled, the application matches codes from your Favorites list.
ECGVue Instructions for Use 4-19

Viewing and Editing Reports
NOTES ECGVue only shows Favorites in the Statement Code dialog box List view. When you type a code directly into the Interpretation window, the application pre-selects entries based on all of the statements in the selected criteria, not just your favorites.
If you are working with multiple patients’ ECGs, remember that Favorites apply to a single criteria version. If the display in the code List view is empty and you have previously enabled and defined Favorites, check the criteria version for the selected ECG. You select Favorites for each criteria version.
With Basic Edition, you can view codes associated with the statements that are part of the report; however, you cannot edit the codes. Basic Edition only supports text-based statement editing. Any new statements you add, or changes you make to an existing statement, carry the prefix *-STMT-, indicating the statement is uncoded. Remarks are also supported.
However, with the purchase of the Serial Comparison option, code-based editing is enabled in Basic Edition.
You enable or disable display of Favorites in the View menu.
To enable or disable Favorites
Click View > Use Favorite Statements.
A check mark next to the option indicates it is enabled. This setting remains in place until you change it.
When Use Favorite Statements is enabled, the Statement Codes dialog box provides an Edit button in List view.
4-20 ECGVue Instructions for Use

Editing Interpretive Statements
To select codes to include in the Favorite Statements list
1 Ensure that Use Favorite Statements is enabled, as described above.
2 In Statement view, click next to the Code field.
The Statement Code dialog box appears.
3 Click the List tab.
The codes are displayed in List view, in alphabetical order. However, the first time you set Favorites, the list will be empty, as shown next.
Once you establish Favorites, only those entries appear in the list.
NOTE Note the criteria version you are working with. The Favorites you are specifying apply to this version only. If desired, create your set of Favorites for each of your commonly used criteria versions.
4 Click Edit.
A check box appears to the left of each code/statement set. Additional buttons also appear on the right side of the dialog box for manipulating entries.
ECGVue Instructions for Use 4-21

Viewing and Editing Reports
5 Click the check boxes for the codes to include in your Favorites list.
To remove a selection you made, click the check box again to remove the check mark.
To cancel the editing process without saving changes, click Cancel to return to List view.
TIPS To select most, but not all, statements, click Select All, then clear the check boxes just for those codes you do not wish to include. Similarly, if you previously selected a large number of statements and now wish to only include a few, click Clear All, and just select the check boxes for the codes to retain as Favorites.
To view all statements in List view, disable Favorites by clicking View > Use Favorite Statements, and ensuring the check mark is removed from the menu item.
6 Click Save.
Only those code/statement sets you selected now appear in the List view for the selected criteria version.
NOTE Favorites only appear in List view, not in Categorized.
7 To make additional changes, such as to add or delete statements, click Edit and repeat the process.
8 To close the dialog box, click again.
About Statement Aliasing
NOTE Statement aliasing is not supported in Basic Edition.
The TraceMasterVue system supports several criteria versions (08, 09, 0A, 0B, and so on), as well as custom statements that might be added at your site. You may, however, prefer to use different codes and/or statement (the LHS, or left hand side) text to describe what is essentially the same condition. For example, for the 0A criteria statement, SR sinus rhythm, you might be used to using NSR, Normal sinus rhythm.
If enabled for your site, statement aliasing allows your TraceMasterVue administrator to map codes and statements in a selected criteria version (for example, 0A) and language to your own site-specific nomenclature. Unlike with custom statements, which are not subject to the Philips 12-Lead algorithm or serial comparison, statement aliasing merely substitutes your own site’s preferred codes and/or text to describe the same conditions as the standard statements in the selected criteria.
4-22 ECGVue Instructions for Use

Editing Interpretive Statements
NOTES It is important that the LHS text, if modified, reflect the same condition as described in the criteria, since these statements are generated by the Philips 12-Lead Algorithm. The aliasing process simply maps the statements in the criteria to your site’s custom wording.
The LHS defined at the factory may contain variables. Statement aliasing does not support variables at this time. The alias LHS will replace the factory LHS, and will not present any variables.
It is not necessary to define an alias for all statements within the criteria. When an alias is defined, that statement is displayed. If an alias is not defined for a given statement, the statement defined for the criteria is used.
This setting is applied globally. That is, if enabled at your site, the aliases used are applied across all systems at the site, for all users.
In addition, everywhere that statements are displayed, including in Statement View, in the Code list, in Report view, and on printed reports, the aliases are displayed (in place of the standard code and/or text).
The administrator can enable either of the following three options:
Use code aliases only
In this case, your site-specific codes are associated with the standard text defined in the selected criteria version.
Use LHS aliases only
In this case, your site-specific statement text (LHS) is mapped to the standard code defined in the selected criteria version.
Use code and LHS aliases
In this case, your site-specific codes and LHS text are mapped to those defined in the selected criteria.
Example
The following examples show how you might map selected statements in the 0A criteria.
0A code and/or statement text Defined alias
Code and text change
SR Sinus rhythm NSR Normal sinus rhythm
PRAA Probable right atrial abnormality PRAE Probable right atrial enlargement
Code change only
AMI44 Consider anterior infarct CAMI Consider anterior infarct
LQTB Borderline prolonged QT interval BLQT Borderline prolonged QT interval
Statement change only
LBBB Left bundle branch block LBBB Complete left bundle branch block
REPNS Nonspecific repolarization abnormalities
REPNS Nonspecific ST-T changes
ECGVue Instructions for Use 4-23

Viewing and Editing Reports
Adding Statements and RemarksYou can add statements using the keyboard or the mouse, or a combination of the two. The following sections describe how to add:
Coded statements
Uncoded statements (page 4-30)
Remarks (page 4-31)
The next section describes the keyboard commands for editing statements. For details on editing statements, see “Editing Statements and Remarks” on page 4-32.
Statement Editing Commands
Use the keyboard to navigate statement editing as follows. These commands apply to all statement editing processes.
Table 4-1 Statement editing commands
Key Description
Space bar orShift-Insert
Insert a new uncoded statement or remark above the currently selected line (depending on whether the selection is a statement or a remark).
Start typing orIns orRight-click
Insert a new coded statement above the currently selected line.
Tab Cycle forward through fields when adding or editing a statement or remark. Use the Tab key to skip a field, as needed.
Shift-Tab Cycle backward through fields (move the cursor to the previous field).
Esc Cancel editing of the current statement and return to the Interpretation window.
Arrow keys Within the Interpretation window, use the Up/Down arrow keys to move up and down between statements and remarks.
Within a field/code dropdown list (if enabled, page 4-16), use the Up/Down arrow keys to move up and down through the list to highlight the desired code or modifier. Press Enter to finalize the selection.
Enter Within a field/code dropdown list, selects the highlighted entry and inserts it into the current statement.
Within a statement, accepts the specified values and adds the statement, or completes the editing process, and returns to the Interpretation window.
Backspace or Delete Clear the last character typed. Continue pressing the key to clear the field.
4-24 ECGVue Instructions for Use

Editing Interpretive Statements
Adding Coded Statements
NOTE With Basic Edition, you can view codes associated with the statements that are part of the report; however, you cannot edit the codes. Basic Edition only supports text-based statement editing. Any new statements you add, or changes you make to an existing statement, carry the prefix *-STMT-, indicating the statement is uncoded. Remarks are also supported.
However, with the purchase of the Serial Comparison option, code-based editing is enabled in Basic Edition.
To add coded statements, just click in the Interpretation window above the End of Statements line and start typing. As you press Enter to accept a value for a field, the application automatically moves to the next field until the entire statement is specified.
The application cycles through coded statement fields in the following order: Code, Modifier1, Modifier2, Modifier3, and, if serial comparison was performed on the ECG, Serial Comparison Modifier1, Serial Comparison Modifier2, Serial Comparison Modifier3. In addition, if the statement has variables, the application cycles through Variable1 – Variable4 after the modifiers.
ECGVue uses smart logic to modifier and variable editing. You do not have to tab through the full list of modifier fields (1-3) or variable fields (1-4) to edit a statement. The editor presents additional modifier fields (2 or 3) only if a modifier is already present or is added. It does the same with variables.
You can add a coded statement using any of the following methods:
Typing directly into the Interpretation window
Right-clicking the line above which to add the statement
Pressing Insert on the keyboard
Selecting the desired statement from a popup Code list (page 4-27)
The Code list allows you to display either a subset of statements organized by category, all of the statements in alphabetical order, or your favorite statements in alphabetical order.
Using the Insert Code button (page 4-28)
To add a coded statement by typing directly into the Interpretation window
1 In the Interpretation window, click any line above the <end of statements> line and do any of the following:
– Start typing the code for the statement to add.
– Press Ins, then start typing the code.
– Right-click the mouse on any line to add a statement above it.
ECGVue automatically starts pre-selecting codes that match the characters you type. Depending on which options are selected in the Customize View dialog box, the application either pre-selects the first code that matches the characters you are typing (on the left below) or displays matches in a dropdown list (on the right, below).
NOTE When Favorites are enabled, only those codes that are in your Favorites list are matched.
ECGVue Instructions for Use 4-25
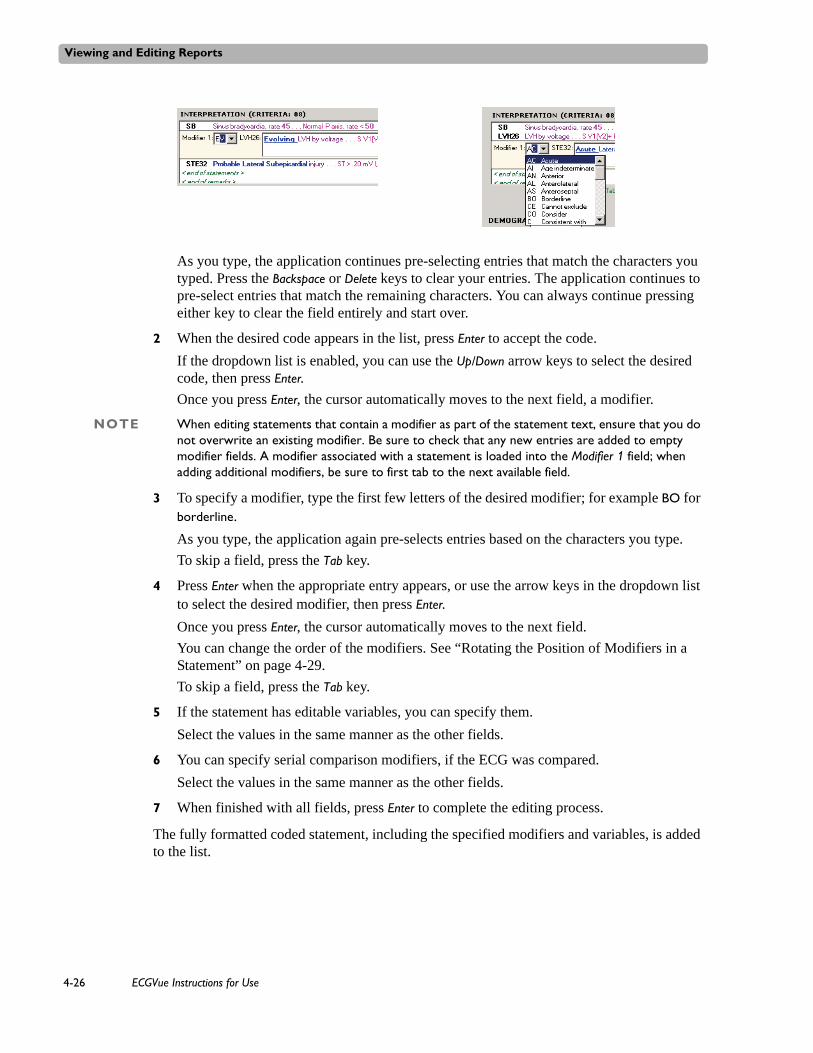
Viewing and Editing Reports
As you type, the application continues pre-selecting entries that match the characters you typed. Press the Backspace or Delete keys to clear your entries. The application continues to pre-select entries that match the remaining characters. You can always continue pressing either key to clear the field entirely and start over.
2 When the desired code appears in the list, press Enter to accept the code.
If the dropdown list is enabled, you can use the Up/Down arrow keys to select the desired code, then press Enter.
Once you press Enter, the cursor automatically moves to the next field, a modifier.
NOTE When editing statements that contain a modifier as part of the statement text, ensure that you do not overwrite an existing modifier. Be sure to check that any new entries are added to empty modifier fields. A modifier associated with a statement is loaded into the Modifier 1 field; when adding additional modifiers, be sure to first tab to the next available field.
3 To specify a modifier, type the first few letters of the desired modifier; for example BO for borderline.
As you type, the application again pre-selects entries based on the characters you type.
To skip a field, press the Tab key.
4 Press Enter when the appropriate entry appears, or use the arrow keys in the dropdown list to select the desired modifier, then press Enter.
Once you press Enter, the cursor automatically moves to the next field.
You can change the order of the modifiers. See “Rotating the Position of Modifiers in a Statement” on page 4-29.
To skip a field, press the Tab key.
5 If the statement has editable variables, you can specify them.
Select the values in the same manner as the other fields.
6 You can specify serial comparison modifiers, if the ECG was compared.
Select the values in the same manner as the other fields.
7 When finished with all fields, press Enter to complete the editing process.
The fully formatted coded statement, including the specified modifiers and variables, is added to the list.
4-26 ECGVue Instructions for Use

Editing Interpretive Statements
To add a coded statement using the Code list
1 In the Interpretation window, click the line above which to add a new statement (above the <end of statements> line), and click next to the Code field.
The Code list appears.
The list displays codes in any of the following ways:
– High-level category (the default view)
Category view only shows a subset of statements for version 0A criteria. If you are using a different criteria version, use List view.
NOTE If you are using custom criteria, the Category view is empty.
– Alphabetical listing (click the List tab)
This view shows all of the statements for the selected criteria version, in addition to any custom statements defined at your site. Note that custom statements only appear in List view; they are not displayed in Category view.
– Favorite codes
You can specify any subset of statements in the selected criteria version as favorites for display. This allows you to work with a much shorter list of codes, making it easy for you to find often used codes. For details, see “Specifying Favorite Codes” on page 4-19.
NOTE If statement aliasing is enabled at your site, the Code list shows the aliased statements where defined, in each view: Category, List, and Favorites. For details, see “About Statement Aliasing” on page 4-22.
2 Locate and double-click the desired code in the list.
The fully formatted statement appears in the statement list.
3 Click a Modifier field in the statement and select the desired entry from the list; then press Enter on the keyboard to accept the selection.
To add a new modifier, press the Tab key to display the next Modifier field.
To skip a field, press Tab.
You can change the order of the modifiers. See “Rotating the Position of Modifiers in a Statement” on page 4-29.
4 If appropriate, click a Variable value and select the desired entry from the list.
To skip a field, press Tab.
5 If appropriate, select a different serial comparison modifier from the SC field.
When you click in the window after entering all this information, the fully formatted statement appears in the Interpretation window.
6 Click Save to save your changes.
ECGVue Instructions for Use 4-27

Viewing and Editing Reports
To add a coded statement using the mouse and the Insert Code button
1 In the Interpretation window, click the line above which to add a new statement (above the <end of statements> line), and click Insert Code.
A blank statement line appears, with the cursor in the Code field.
NOTE To add an uncoded statement, press Tab to move the cursor to the Text field (or click in the Text field) and type the desired statement text. For details on adding uncoded statements, see page 4-30.
2 Start typing the code for the statement to add.
Depending on which options are selected in the Customize View dialog box, the application either pre-selects the first that matches the characters you are typing (on the left) or displays matches in a dropdown list (on the right).
As you type, the application continues pre-selecting entries that match the characters you typed. Press the Backspace or Delete keys to clear your entries. The application continues to pre-select entries that match the remaining characters. You can always continue pressing either key to clear the field entirely and start over.
3 Follow steps 2 through 7 on page page 4-26.
4-28 ECGVue Instructions for Use

Editing Interpretive Statements
Rotating the Position of Modifiers in a Statement
Each statement can have up to three modifiers in three sequential fields: Modifier 1, Modifier 2, and Modifier 3. You can now easily change the relative position of any modifier in the statement. The Rotate Modifier button, located below the Modifier field label in Edit mode, moves the selected modifier to the next position, in ascending order.
To change the position of a modifier in a statement
1 Add or edit modifiers, as needed. Press the Tab key to move between the Modifier 1, 2, and 3 fields.
2 Click the modifier to move to a different position, then click the Rotate Modifier button as often as needed to move it to the desired position.
Because this button only moves the modifier one position over, if you have three modifiers in the statement, you may have to repeat this step with other modifiers selected to finalize the statement.
3 When finished rearranging the modifiers, continue editing the statement, or press Enter to exit Edit mode. Remember to save your changes.
EXAMPLE
For example, take the following statement, to which you want to add the modifier Consider, in front of the modifier, Anterior:
STELVH ANTERIOR ST ELEVATION, PROBABLY DUE TO LVH
To add the modifier:
1 Double-click the statement to make it editable.
2 Press Tab to display the Modifier 2 field.
3 Type CO for Consider, and press Enter. The statement now looks like this:
STELVH ANTERIOR CONSIDER ST ELEVATION, PROBABLY DUE TO LVH
4 To move the modifier in front of Anterior, click the modifier Consider to select it, then press the Rotate Modifier button. This moves the Consider modifier ahead of the Anterior modifier.
STELVH CONSIDER ANTERIOR ST ELEVATION, PROBABLY DUE TO LVH
5 Finally, press Enter to stop editing the statement.
ECGVue Instructions for Use 4-29

Viewing and Editing Reports
Adding Uncoded Statements
You add uncoded statements above the <end of statements> line in the Interpretation window. Uncoded statements are identified by the prefix -STMT-.
You can add an uncoded statement using any of the following methods:
With the cursor in the Interpretation window, typing directly into the Interpretation window
With the cursor in the Interpretation window, pressing the Space bar or the Shift-Ins keys
Using the Insert Text button
These methods all insert the statement above the cursor location.
Note that once you edit a coded statement, it automatically becomes an uncoded statement.
To add an uncoded statement
1 In the Interpretation window, click the line above which to add a new uncoded statement and do any of the following:
– Start typing text.
– Press Shift-Ins or the Space bar.
– Click the Insert Text button to the right of the Interpretation window.
A blank statement line appears, with the cursor in the Text field.
NOTE If you have Basic Edition, the Code field does not appear as shown above. Only the Text field is displayed.
2 Type the statement text into the field, and when finished, press Enter.
The statement is added to the list, with the prefix -STMT-. You can enter up to 1024 characters in the field.
3 Click Save to save your changes.
4-30 ECGVue Instructions for Use

Editing Interpretive Statements
Adding Remarks
You add remarks between the <end of statements> and <end of remarks> in the Interpretation window. Remarks are identified by the prefix -REMK-.
You can add a remark using any of the following methods:
With the cursor in the Interpretation window, typing directly into the Interpretation window
With the cursor in the Interpretation window, pressing the Space bar or the Ins keys
Using the Insert Text button
To add a remark directly into the Interpretation window
1 In the Interpretation window, click a line between the <end of statements> and <end of remarks> lines above which to add a new remark, and do any of the following:
– Start typing text.
– Press Ins or the Space bar.
– Click the Insert Text button to the right of the Interpretation window.
A blank remark line appears.
2 Type the remark; then press Enter.
The remark is added to the list, with the prefix *-REMK-. You can enter up to 1024 characters in the field.
3 Click Save to save your changes.
ECGVue Instructions for Use 4-31

Viewing and Editing Reports
Editing Statements and RemarksYou can easily edit existing statements and remarks. If you edit a coded statement, it becomes an uncoded statement, indicated by the prefix -STMT-.
You can edit entries using any of the following methods:
Editing the statement in place, in the Interpretation window
Using the Edit button
To edit a statement or remark
The figure below shows the line to edit selected.
1 In the Interpretation window, do any of the following to start the editing process:
– Double-click the line to edit.
– Click the line to edit and press Enter.
– Click the line to edit and click Edit.
The statement appears in edit mode, with the first modifiable field ready for editing. In the example shown, the Modifier field is presented first.
Note that the modifier in the statement is underlined, indicating that this field is currently loaded for editing.
2 To change the modifier, start typing the first letters.
As you type, the application pre-selects entries to match.
3 Press Enter when the desired entry appears, or, if a dropdown list is available, use the arrow keys to locate the entry, then press Enter.
4 To skip a field, or to add a field that was not present in the original statement, for example, a new modifier, press the Tab key to cycle through the fields until the desired field is displayed.
For example, if you have a single modifier and wish to add a second one, press the Tab key until the text field for Modifier 2 appears. Then type the desired entry and press Enter.
4-32 ECGVue Instructions for Use

Editing Interpretive Statements
5 Continue selecting fields to edit using either of the following methods:
– Press Tab to cycle through the fields until the desired field is displayed.
– In the LHS statement area, click the field to edit.
For example, as shown next, you could click the PR value to change it. Notice that the editable field changes to Variable 1 and the value is selected and ready to change. Note that the variable value in the statement is underlined, indicating that this field is currently loaded for editing.
6 When finished, press Enter to accept the changes and return to the Interpretation window.
The changes appear in the statement or remark.
7 Click Save to save your changes.
Editing MeasurementsTo edit measurements, change the numeric values in the individual measurement fields directly. Use the electronic caliper to measure portions of the waveform, as needed.
Table 4-2 Editable measurements (in Summary view)
Editable measurements (Summary view)
Description/Limits
PR interval 0-999 milliseconds
QRSD interval 0-999 milliseconds
HR The heart rate (HR) measurement is provided as a standalone measurement on all reports.
Changes in the heart rate affect the RR interval, as well as the QTcb and QTcf values.
QT segment 0-999 milliseconds
QTc Corrected QT. This is the QT measurement corrected for heart rate, and shows what the QT would be at a heart rate of 60 bpm. The value is calculated by the system using the following formula (known as the Bazett formula), and cannot be edited.
QTc= QT / SQRT(HR/60)
P axis -90 to +270 degrees, or blank for indeterminate
To mark the P axis as indeterminate, leave the field blank.
ECGVue Instructions for Use 4-33

Viewing and Editing Reports
CAUTION To ensure accuracy, all measurements of the online waveforms must be made using the electronic caliper supplied within ECGVue.
The following procedures describe how to view measurements on the waveform display, as well as how to edit them.
“To zoom into the display and navigate the waveforms,” below
“To view measurement values using the electronic calipers” on page 4-35
“To show or hide specific caliper lines” on page 4-36
“To edit measurement values” on page 4-35
To zoom into the display and navigate the waveforms
You can zoom into the display to view any portion of the waveform, or the caliper, if displayed.
TIP When fully zoomed in (300%), hold the mouse down anywhere on the display and move the mouse in any direction to scroll through the display. This allows you to quickly and easily move around the waveforms while in close up mode.
To quickly zoom in to the closest view of the caliper, double-click the caliper.
To return to the normal display size, double-click again.
To zoom into the display at predefined intervals (default, 150, 200, 300%), click in the display. Each click magnifies the view one more interval until you are at maximum zoom. The display zooms into the area around the cursor position.
QRS axis -90 to +270 degrees, or blank for indeterminate
To mark the QRS axis as indeterminate, leave the field blank.
T axis -90 to +270 degrees, or blank for indeterminate
To mark the T axis as indeterminate, leave the field blank.
Table 4-2 Editable measurements (in Summary view) (continued)
Editable measurements (Summary view)
Description/Limits
200%
default view
4-34 ECGVue Instructions for Use

Editing Interpretive Statements
To shrink the display at predefined intervals, right-click the mouse in the display. Each click shrinks the view one more interval until you are at the default display size.
To quickly zoom to 200%, double-click anywhere in the display; to return to normal view, double-right-click in the display.
Try out these steps to become familiar with operation.
To edit measurement values
Type the desired values into the appropriate measurement fields.
Type a question mark (?) if the value is indeterminate. Remember to save your changes when finished.
To view measurement values using the electronic calipers
1 Display the ECG in Summary view.
2 Click the Caliper button on the waveform to display the calipers.
Ensure that the desired caliper lines are displayed (see below). To change which lines are displayed, see the next page.
3 Move the individual caliper lines to the desired location on the waveform, positioning the R vertical line on the start of the R wave.
You can quickly zoom into the caliper by double-clicking it, to display it at 400%. Double-click again to return to 100% view.
4 When the caliper lines are where you want them, note the new measurement values and type them into the related Measurement fields.
150%
200% Full zoom
ECGVue Instructions for Use 4-35

Viewing and Editing Reports
To show or hide specific caliper lines
1 Right-click on any portion of the electronic caliper on the waveform to display the Configure Caliper dialog box.
2 Select the lines and measurements to show, then click OK.
The caliper is updated immediately.
Comparing ECGs Using the Serial Comparison Algorithm
NOTES Serial comparison of ECGs is not supported in Basic Edition, unless you have purchased the Serial Comparison option. Contact your Philips representative for details.
ECGs analyzed with the 0B criteria version cannot be serially compared.
Serial comparison is a method of comparing two ECGs to detect significant clinical changes between the two. It provides more information regarding progression or regression of an abnormal condition than reviewing a single ECG, as the algorithm detects significant changes in rhythm and morphology relative to a previous ECG. The resulting analysis allows you to focus on pathological ECG changes.
The TraceMasterVue system allows you to perform a serial comparison of ECGs manually (using the Compare button) or automatically (for example, upon entry into the database) via workflow rules configured at your site by the administrator.
NOTE You can also perform a visual comparison between two ECGs by displaying them simultaneously on the screen in Waveform view. This method does not involve the serial comparison algorithm. For details, see “Using Waveform View” on page 4-38.
For detailed information about the algorithm used, how it analyzes statements in the current and valid previous ECGs, modifiers used, and requirements a previous ECG must meet to be used in comparison, see the Serial Comparison Algorithm Reference Guide.
Comparing ECGs Using the Serial Comparison AlgorithmNOTE Automatic comparison of ECGs is not supported in Basic Edition unless you have purchased the Serial
Comparison option.
You can perform a comparison between the current ECG and the most recent ECG that meets the configured criteria. TraceMasterVue can also be configured to automatically perform serial comparison when a certain action takes place, for example, specific ECGs enter the system. For details, contact your system administrator.
For detailed information about the algorithm used, how it analyzes statements in the current and valid previous ECGs, modifiers used, and requirements a previous ECG must meet to be used in comparison, see the Serial Comparison Algorithm Reference Guide.
You can also perform a visual comparison between two ECGs by displaying them both on the screen at the same time in Waveform view. For details, see “Using Waveform View” on page 4-38.
4-36 ECGVue Instructions for Use

Comparing ECGs Using the Serial Comparison Algorithm
To perform a manual serial comparison between two ECGs
1 Search for and display the ECG to compare for a specific patient.
This is the ECG that TraceMasterVue will compare to the most recent previous ECG (that meets the comparison criteria) for this patient.
2 Click Compare in the Action bar.
TraceMasterVue searches for the most recent previous ECG that matches the configured criteria, and performs the serial comparison. TraceMasterVue adds modifiers to the interpretive statements in the current ECG describing the differences between the two ECGs. The serial comparison algorithm also adds and/or deletes statements, as appropriate.
Note that the button label changes to Uncompare. You can undo the comparison, if necessary, as described in the next section.
3 To save the serial comparison statements with the ECG, click Save in the Action bar.
Undoing a Serial Comparison
There may be occasions when you wish to recompare an ECG that has already been serially compared. For example, the ECG to which it was compared by have been invalid, or not the ECG you wanted to compare to, or a more recent, more representative ECG was acquired that you wish to compare to.
The Compare button in the Action bar changes to Uncompare when an ECG is selected that was serially compared.
NOTE If the Uncompare button is not available, you do not have the permissions required to undo a serial comparison.
When undoing a comparison, the system removes the serial comparison modifiers that were added to the ECG, as well as any edits that were made to the statements after serial comparison was performed. The ECG is returned to the state it was in immediately prior to comparison. After saving the changes, you can perform a new serial comparison on the ECG, if desired.
To undo a serial comparison
1 Display the ECG to “uncompare”.
2 Click Uncompare in the Action bar.
The application reverts to the interpretive statements that were present prior to the serial comparison, and makes the ECG available for recomparison.
3 To save the changes to the ECG to the database, click Save in the Action bar.
The Compare button is enabled in the Action bar. You can perform another serial comparison on the ECG, if desired.
ECGVue Instructions for Use 4-37
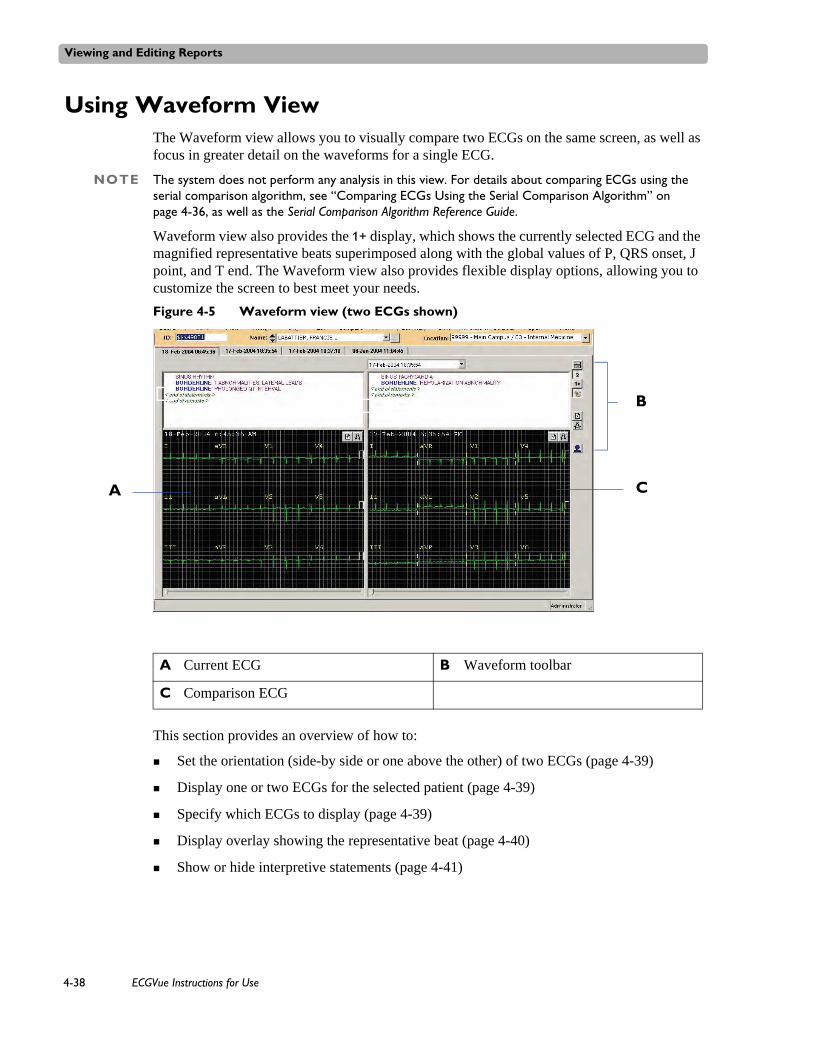
Viewing and Editing Reports
Using Waveform ViewThe Waveform view allows you to visually compare two ECGs on the same screen, as well as focus in greater detail on the waveforms for a single ECG.
NOTE The system does not perform any analysis in this view. For details about comparing ECGs using the serial comparison algorithm, see “Comparing ECGs Using the Serial Comparison Algorithm” on page 4-36, as well as the Serial Comparison Algorithm Reference Guide.
Waveform view also provides the 1+ display, which shows the currently selected ECG and the magnified representative beats superimposed along with the global values of P, QRS onset, J point, and T end. The Waveform view also provides flexible display options, allowing you to customize the screen to best meet your needs.
Figure 4-5 Waveform view (two ECGs shown)
This section provides an overview of how to:
Set the orientation (side-by side or one above the other) of two ECGs (page 4-39)
Display one or two ECGs for the selected patient (page 4-39)
Specify which ECGs to display (page 4-39)
Display overlay showing the representative beat (page 4-40)
Show or hide interpretive statements (page 4-41)
A
B
C
A Current ECG B Waveform toolbar
C Comparison ECG
4-38 ECGVue Instructions for Use

Using Waveform View
Setting Number of ECGs to Display in Waveform View
You can view one or two ECGs for the selected patient on the screen in Waveform view. The selected ECG is always shown on the left or on the top, depending on the orientation. The right side (or bottom) displays the previous ECG (relative to the selected ECG).
To display one or two ECGs
Click the 2 button in the Waveform toolbar (page 4-38).
The waveform display toggles between showing a single ECG or two ECGs.
– When you show one ECG, the application displays the currently selected ECG.
– When you show two ECGs, the application displays the currently selected ECG on the left side or top of the page; you can then select the second ECG to display.
Setting ECG Orientation in Waveform View
Applies only when two ECGs are displayed.
To set ECG orientation
Click the Orientation button on the Waveform toolbar (page 4-38).
The waveform display toggles between showing the waveforms side by side or one above the other. The selected ECG is always shown on the left or on the top, depending on the orientation. The right side (or bottom) displays the previous ECG (relative to the selected ECG).
Selecting the ECGs to Display
By default, the ECG displayed when you switched to Waveform view is shown on the left (or top), and the next previous ECG is shown on the right (or bottom).
To select the ECGs to display in the Waveform view
1 To select a different primary ECG to display, click the appropriate ECG tab header.
ECGVue displays the primary (reference) ECG on the left or top of the page, depending on the selected orientation.
ECGVue Instructions for Use 4-39

Viewing and Editing Reports
2 To select the second ECG to display, click the ECG dropdown list above the comparison ECG.
ECGVue displays this comparison ECG on the right or bottom of the page, depending on the selected orientation.
3 If desired, continue selecting different ECGs from the dropdown list.
The new selection replaces the previously displayed ECG.
4 To change the primary (reference) ECG, click a different ECG tab.
ECGVue now displays the new ECG on the left or the top of the page.
Showing the Superimposed Representative Beat View
The waveform display shows the originally acquired ECG on the left, and on the right, the superimposed, representative beats. By default, all leads are included. You can specify which leads to display by clicking the Select Leads button in the top right corner of the waveform window.
NOTE The representative beat display (on the right) is shown in double standard resolution. That is, the vertical resolution is 50 V/small box; the horizontal resolution is 40 msec/small box.
To display the superimposed representative beat view
1 Select the ECG to display.
2 Click the 1+ button in the toolbar.
Select Leads button
4-40 ECGVue Instructions for Use
Verifying ECGs
3 To change the leads to display, click the Select Leads button.
The Select Leads dialog box appears.
4 Select the leads to display in the Representative Beat view and click OK.
Only those leads you selected to display are shown.
Showing or Hiding Interpretive Statements
1 Select the ECG to display.
2 Click the Show/Hide Statements button.
The waveform display toggles between showing the interpretive statements with the waveforms, and hiding the statements, showing only the waveforms.
Verifying ECGsNOTE The Verify feature is not supported in Basic Edition.
In some workflows, specific information in an ECG is verified before being passed on for overread and confirmation. This step provides an extra check that all the demographic data is correct, and if it is not, to correct it. In general, it is a tech with Verifier permissions who performs this review and ensures the demographic data is correct.
Once any corrections have been made and the ECG is ready to be overread, it can be marked as Verified; this action changes the ECG state to Awaiting Confirmation. For details, see “About States” on page 1-10.
About Verification StatusAn ECG report’s confirmation status appears in the Summary and Report views.
When you verify a New ECG (one that just entered the system), the state changes to Awaiting Confirmation.
When you verify an ECG that was in the Awaiting Review state (generally because it was assigned to an Awaiting Review type inbox), the state changes to Awaiting Confirmation.
If already in the Awaiting Confirmation state, remains in the same state.
ECGVue Instructions for Use 4-41

Viewing and Editing Reports
Verifying an ECG
To mark an ECG as verified
1 Select and display the ECG to review.
2 Review the ECG and validate demographic information, making changes if needed.
3 Click Save in the Action bar to save the changes to the database.
If you click Verify before saving changes, you are prompted to save changes first.
4 Click Verify to mark the ECG as verified.
This action also changes the ECG state to Awaiting Confirmation.
The ECG is now ready to be overread and confirmed.
Confirming ECGsConfirming an ECG report:
Assigns an overreading physician’s name to the ECG report
Indicates that the report has been reviewed and approved by a physician, and does not require any further edits
TraceMasterVue allows authorized users, typically cardiologists and designated users with specified permissions to confirm an ECG.
NOTE Reasons (RHS) are not printed on confirmed reports.
The following sections describe ECG confirmation methods and status, as well as the procedure for confirming one or more ECGs.
ECG Confirmation Methods and StatusECGs can be confirmed in either of two ways, each of which is described in more detail below:
By a confirming cardiologist who reviewed the ECG
By a user authorized to review ECGs and confirm on behalf of a confirming cardiologist
TraceMasterVue determines which users are authorized to confirm ECGs based on the permissions associated with the user’s login ID and associated Windows groups. The system administrator at your site determines the Windows groups that your user ID is associated with.
4-42 ECGVue Instructions for Use

Confirming ECGs
ECG Confirmed by Confirming Cardiologist
If the logged-in user has permission to directly confirm an ECG, TraceMasterVue identifies the confirming person as follows:
Upon clicking Confirm, the user is prompted to verify that they want to proceed; upon clicking OK, the ECG is confirmed.
If your system is configured to require re-authorization prior to confirming the ECG, you will be prompted to enter your password.
By default, the ECG report bears the label Confirmed by, followed by the logged-in user's name.
Confirmed by: Dr. Eugene Glass
NOTE The exact label text is configured by your TraceMasterVue administrator.
The Audit log contains an entry identifying the confirming user name.
ECG Confirmed on Behalf of a Confirming Cardiologist
At some institutions, other individuals, such as the ECG Manager or Head Technician, might be authorized to review and confirm ECGs on behalf of a physician.
When the logged-in user has permission to confirm on behalf of a physician, confirming an ECG has the following results:
Upon clicking Confirm, the user is presented with a list of confirming physicians to choose from; after selecting a physician and clicking OK, the ECG is confirmed.
If your system is configured to require re-authorization prior to confirming the ECG, you will be prompted to enter your password.
By default, the ECG report bears the label Confirmed for, followed by the name of the physician selected from the list.
Confirmed for: Dr. Eugene Glass
NOTE The exact label text is configured by your TraceMasterVue administrator.
The Audit log User ID column identifies the logged-in user who actually performed the confirmation operation.
Depending on how the system is configured, TraceMasterVue may automatically send notification (via email) of ECGs awaiting confirmation to confirming users.
About Electronic Signature
Confirming an ECG using ECGVue constitutes an electronic signature when performed by an authorized physician who has completed and signed an authorization form that states that they allow their electronic signature to be used in place of their handwritten signature.
This is a legally binding document that must be kept on file within the institution.
ECGVue Instructions for Use 4-43
Viewing and Editing Reports
About Confirmation Status
An ECG report’s confirmation status appears in the Summary and Report views.
NOTE The exact label text may be slightly different, depending on how your system is configured. If you are unsure about the exact meaning of the confirmation label at your site, contact your TraceMasterVue administrator.
In the Summary and Report views, unconfirmed ECGs display a message indicating that the report is preliminary, for example, PRELIMINARY, MD MUST REVIEW.
The exact label text is configured by your TraceMasterVue administrator.
As described in the previous section, an ECG report confirmed by the confirming cardiologist displays the text Confirmed by and the physician’s name.
As described in the previous section, an ECG report confirmed by a user on behalf of a cardiologist displays the text Confirmed for and the physician’s name.
Configuring Display of Confirmed ECGsAs you work through a large number of ECGs, reviewing, editing, and confirming them, your workspace can get cluttered with ECGs that you have already processed.
You can configure ECGVue to immediately remove from your view the ECGs that you have confirmed.
To set confirmed ECG display options
1 Click View > Customize.
The Customize View dialog box appears. This dialog box allows you to define some statement editing options, as well as how to handle confirmed ECGs.
2 Click the ECG Confirm tab, and select the desired display option; then click OK.
This setting remains in place until you change it.
Available options are:
– Ask each time whether the ECG should be kept or removed
Select this option to have ECGVue prompt you, upon confirmation, whether to continue to display the confirmed ECG. You must make your selection for every ECG you confirm.
– Always remove the ECG from the current review list
Select this option to have ECGVue always remove the confirmed ECG from view.
– Always keep the ECG in the current review list
Select this option to have ECGVue retain the confirmed ECG in the current list.
4-44 ECGVue Instructions for Use

Confirming ECGs
Confirming an ECGAuthorized users can directly confirm ECGs or confirm ECGs on behalf of a confirming physician, depending on their permissions. All actions are reported in the Audit log.
ECGs can be confirmed from the following locations:
From the Search page, you can confirm a batch of selected ECGs without displaying each one first. Use this option if the ECGs have already been reviewed and overread. For details about this method, see “Selecting Reports to Work with” on page 3-14.
If user authentication is required at your site for ECG confirmation, you are prompted once to provide your password for each batch of ECGs you confirm. Authentication settings are specified by your TraceMasterVue administrator.
From any other view (Summary, Statement, Waveform), you can confirm the selected ECG.
If user authentication is required at your site for ECG confirmation, you are prompted to provide your password for ECG you confirm.
NOTE If you have the OrderVue option, while you can confirm unreconciled ECGs, the results will not be transmitted to the HIS until the ECG and associated order are reconciled.
To confirm an ECG
1 With the ECG displayed (in any view), click Confirm in the Action bar.
2 Depending on your user group and permissions, one of the following occurs:
– If you are logged in as a confirming physician, you are prompted to verify that you want to continue. Go to step 4.
– If you are logged in as a user authorized to confirm on a physician’s behalf, the list of confirming physicians appears. Proceed to step 3.
3 Select the confirming physician from the list, and click OK.
Note that this selection remains in place until you change it; that is, the next time you confirm an ECG on behalf of a physician, the selection you make now is preselected.
4 Click OK.
If confirming physician authentication is enabled at your site, you are prompted to provide your password. Authentication is configured by your TraceMasterVue administrator.
5 If prompted, type your password, and click OK.
ECGVue marks the selected ECGs as confirmed, updating the report as follows, and reporting the information in the Audit log:
– If you confirmed the ECG in your own name, the confirmed ECG displays the text Confirmed by : physician name.
– If you confirmed the ECG on behalf of someone else, the confirmed ECG displays the text Confirmed for: physician name.
ECGVue Instructions for Use 4-45

Viewing and Editing Reports
NOTE The exact text displayed may be slightly different, depending on how your system is configured. If you are unsure about the exact meaning of the label at your site, contact your TraceMasterVue administrator.
Depending on your confirmed ECG settings (page 4-44), the ECG may be removed from your workspace, and no longer be displayed (this is the default setting).
The Search results list is also cleared; perform a new search to retrieve additional ECGs. If you confirmed an individual ECG from a different view, ECGVue saves any edits you made to the ECG, marks it as confirmed, and displays the first ECG for the next patient in the list.
Editing a Confirmed ECG
In general, once an ECG has been confirmed, it cannot be edited. However, this is a setting specified by your TraceMasterVue administrator.
If you have been given permission to edit confirmed ECGs, the Unconfirm button is available in the Action bar when a confirmed ECG is displayed. If this button is not available to you, contact your TraceMasterVue administrator if you need to edit a confirmed ECG.
As is the case with other operations on an ECG, TraceMasterVue maintains an audit trail of this activity.
Deleting and Restoring ReportsIf you have the appropriate permissions, you can delete reports, and possibly restore previously deleted reports. “Possibly” because depending on when in the process you are trying to restore a report that has been marked as Deleted, it may no longer be in the TraceMasterVue database.
Studies are available with one or more of the Multimodality options. See Chapter 2, “Working with PDF Reports (Multimodality Options).”
To delete a report
1 Search for and retrieve the ECGs and/or studies to delete.
2 Click Review in the Action bar.
Depending on the type of report selected (ECG, Holter or Stress study) and the order in which they appear in the Search Results screen, the first selection is loaded into view.
– If this selection is a study, the Review page appears showing the selected study.
– If the selection is an ECG, the default view appears showing the selected ECG.
3 Select File > Delete.
You are prompted to confirm the deletion.
4 Click OK.
The report is either deleted from the database outright, or is marked as deleted (the reports are then removed as part of a regularly scheduled automated cleanup task). This setting is
4-46 ECGVue Instructions for Use

Deleting and Restoring Reports
configured by the TraceMasterVue administrator. If your site marks reports as deleted, you can possibly restore deleted ECGs if needed, as described next.
To restore a previously deleted report
1 Search for and retrieve the report(s) to restore.
For details, see “Searching for Deleted Reports” on page 3-11.
2 In the Search Results list, select the check box next to the report(s) to restore, and click Review.
The report is loaded into the application and is displayed in your default view.
3 Verify that this is the report to restore, then, in the menu bar, click File > Restore.
4 When prompted, confirm that you wish to restore the report.
The file is restored to full visibility, with the status of New.
Similarly, in earlier TraceMasterVue installations (versions A.02 and earlier), you could not re-import an ECG marked as Deleted in the database. With versions B.01 and later, when an ECG identical to an ECG marked as Deleted is imported, the ECG in the database is permanently deleted and the incoming ECG is successfully imported with status New.
ECGVue Instructions for Use 4-47

Viewing and Editing Reports
4-48 ECGVue Instructions for Use

5
5About Reports
TraceMasterVue provides a number of clinical ECG reports, including Standard 12-Lead, Superimposed Beat, Representative Beat, Morphology, and Extended Measurements reports.
Administrators can also access management reports, that provide useful information for management reports that help you monitor ECG activity and track billing information. Additionally, TraceMasterVue reports the actions you perform (to provide an audit trail) and reports any errors and stores them in logs that the TraceMasterVue administrator can review to check the status of the system if you experience a problem.
If you have one or more of the Multimodality options, you can retrieve Holter, stress, and/or defibrillator reports, in PDF, for review. To be able to view these studies in ECGVue, you must have Adobe Acrobat Reader version 8.1 or later installed on your PC. However, it is not required if you are only reviewing ECGs.
This chapter provides an overview of TraceMasterVue clinical and management reports:Using Report View . . . . . . . . . . . . . . . . . . . . . . . . . . . . . . . . . . . . . . . . . . . . . .5-2
Setting Grid Line Display Preferences in Report View . . . . . . . . . . . . . . .5-3About the Adobe Reader Viewer . . . . . . . . . . . . . . . . . . . . . . . . . . . . . . . .5-4
Installing or Re-installing Acrobat Reader from the TraceMasterVue Server5-4About the Reader Tools . . . . . . . . . . . . . . . . . . . . . . . . . . . . . . . . . . . .5-5
Navigating Reports . . . . . . . . . . . . . . . . . . . . . . . . . . . . . . . . . . . . . . . . . . .5-9Accessing Documentation and Keyboard Shortcuts for Adobe Reader5-9
About Clinical Reports . . . . . . . . . . . . . . . . . . . . . . . . . . . . . . . . . . . . . . . . . .5-10Important Notes about Reports . . . . . . . . . . . . . . . . . . . . . . . . . . . . . . . . .5-10About Printing/Faxing Reports . . . . . . . . . . . . . . . . . . . . . . . . . . . . . . . . .5-11About the Standard 12-Lead Report . . . . . . . . . . . . . . . . . . . . . . . . . . . . .5-12
Standard 12-Lead Report Formats . . . . . . . . . . . . . . . . . . . . . . . . . . .5-12Standard 12-Lead Report Markings . . . . . . . . . . . . . . . . . . . . . . . . . .5-12
About the 12-Lead + Rhythm Strip Report . . . . . . . . . . . . . . . . . . . . . . .5-20About the Superimposed Beat Report . . . . . . . . . . . . . . . . . . . . . . . . . . .5-21About the Representative Beat Report . . . . . . . . . . . . . . . . . . . . . . . . . . .5-22
Selecting the Representative Beats to Superimpose . . . . . . . . . . . . .5-23About the Extended Measurements Report . . . . . . . . . . . . . . . . . . . . . . .5-24Special Lead Configurations. . . . . . . . . . . . . . . . . . . . . . . . . . . . . . . . . . .5-24
Extended Leads: V3R, V4R, V7, and V8 (Balance) . . . . . . . . . . . . .5-25Extended Leads: V3R, V4R (Right Chest) . . . . . . . . . . . . . . . . . . . .5-25Extended Leads: V3R, V4R, V7 (Pediatric) . . . . . . . . . . . . . . . . . . .5-26Extended Leads: V7, V8, V9 (Posterior) . . . . . . . . . . . . . . . . . . . . . .5-27
5-1

About Reports
Extended Leads: VX1, VX2, VX3, and VX4 (Generic Research) . .5-27About the 15-Lead Report . . . . . . . . . . . . . . . . . . . . . . . . . . . . . . . . .5-28About the 16-Lead Report . . . . . . . . . . . . . . . . . . . . . . . . . . . . . . . . .5-30
About Management Reports . . . . . . . . . . . . . . . . . . . . . . . . . . . . . . . . . . . . . .5-32About Audit Logs and Tracking Changes . . . . . . . . . . . . . . . . . . . . . . . . . . . .5-33
Using Report ViewReport view allows you to preview the ECG report as it will appear in print, as well as print the report. If you have one or more of the Multimodality options, all studies are displayed in Report view.
Report view displays all reports as PDF files within Adobe Reader, which is embedded within ECGVue. Among other features, Adobe Reader offers page navigation, customizable zoom, search, and thumbnails for multipage reports.
The TraceMasterVue administrator can configure reports at your site to match the ECG report settings on connected PageWriter cardiographs. For example, controlling the presence or absence of interpretive statements, short form measurements, and/or severity on the ECG report based on the settings at the transmitting cardiographs. Discuss enabling this option with your TraceMasterVue administrator.
NOTES If barcodes are enabled on reports, they do not appear on the report in Report view. They appear on the printed report only.
If the client application cannot open Adobe Reader for some reason, you will still be able to view ECGs in Report view. You will not, however, be able to view PDF studies. Refer to the TraceMasterVue Troubleshooting Guide for possible solutions.
Figure 5-1 Report view
NOTE Barcodes, if enabled at your site, are not displayed in Report view. They are present, however, on the printed report.
Adobe Reader tools
5-2 ECGVue Instructions for Use

Using Report View
To preview an ECG before printing or faxing
With the ECG displayed in any view, click Report in the Action bar.
The system generates a temporary PDF version of the ECG and displays it in Report view within the embedded Adobe Reader application. Navigate the report as described in “About the Adobe Reader Viewer” on page 5-4.
To review a PDF study (Multimodality options only)
In any view, click the tab for the study, or select a study from the Search Results list.
Studies are always displayed in Report view. Navigate the report as described in “About the Adobe Reader Viewer” on page 5-4.
To view a different report
While in Report view, click the tab for the ECG or study to display. Navigate the report as described in “About the Adobe Reader Viewer” on page 5-4.
To view a different kind of ECG report
NOTE Your system may display only a subset of these reports, depending on which TraceMasterVue Edition is installed at your site. Also, these report types do not apply to PDF studies.
1 Click the down arrow to the right of the Report button in the Action bar to display a popup menu listing report options.
2 Choose the desired report.
The selected report is displayed in Report view. You can navigate the report as described next.
Setting Grid Line Display Preferences in Report ViewThere may be times when you wish to print to pre-lined grid paper, or to fax to a machine that uses paper with a grid. ECGVue allows you to disable grid lines in Report view, and therefore, on the printed or faxed report.
To disable or enable grid lines in Report view
Select View > Show Report Gridlines.
A check mark next to the option indicates it is enabled. This setting remains in place for all ECGs until you change it. The top image, below, shows grid lines displayed; the second image, grid lines off.
ECGVue Instructions for Use 5-3

About Reports
About the Adobe Reader ViewerAdobe Reader, by Adobe Inc., is a free PDF viewer. It is embedded in ECGVue and is accessed by clicking Report in the Action bar. The version shipping with TraceMasterVue is 8.1.
CAUTION Do not install any updates from Adobe onto your ECGVue system. Your TraceMasterVue administrator will inform you when updates have been tested and approved for use on your system.
Certain operations performed in Report view, within Adobe Reader, are not captured in the Audit and Tracking logs. These operations include saving, printing, and emailing ECG reports.
The following sections provide a brief overview of the application, and how to use it to review reports. For detailed information about all the buttons on the tool bar and advanced features, refer to the Reader online help, or go to the Adobe website, at www.adobe.com.
Installing or Re-installing Acrobat Reader from the TraceMasterVue Server
If you do not have Adobe Acrobat Reader version 8.1 installed on your system, it can be downloaded from the TraceMasterVue server.
CAUTION We do not recommend downloading Reader from the Adobe website, as TraceMasterVue has been approved for use with Reader version 8.1 at this time. The approved version of the application is available on the TraceMasterVue server.
Contact your TraceMasterVue administrator for instructions specific to your site.
5-4 ECGVue Instructions for Use

Using Report View
About the Reader Tools
The Reader window has two distinct areas: the Document pane, where the file pages are shown, and the Navigation pane, on the left, which provides browsing tools. In addition, Reader provides two tool bars and a right-click context menu.
The top Navigation tool bar is described in the following table.
Table 5-1 Adobe Reader tool bar
Button Name Icon Description
Page navigation
The leftmost button displays the first page of the report. The two arrow buttons display the previous or next page, respectively. The rightmost button displays the last page of the report.
Page n of m Shows the number of the displayed page, as well as the total number of pages in the report. If you know the page you wish to view, simply type it in the white box.
Marquee zoom Click the button to select it; the cursor changes to a magnifying class with a plus sign in it.
You can enlarge a section of the report or the entire report.
Dynamic zoom Click the button to select it; the cursor changes to a magnifying glass with a plus and minus in it.
Use the mouse wheel or move the mouse to incrementally enlarge or reduce the size of the report.
Zoom out, Zoom in
Click the buttons to enlarge or reduce the page size using preset levels.
ECGVue Instructions for Use 5-5

About Reports
CAUTION Within Adobe Reader, it is possible to customize the buttons on the top horizontal toolbar by right-clicking on the toolbar.
CHANGES TO THIS TOOLBAR ARE NOT SUPPORTED BY TRACEMASTERVUE.
We strongly recommend that you do not enable the Email button and do not email PDF reports. Emailing PDF reports presents a few known risks: 1. The action is not entered into the Audit log; there is no record of the event. 2. Emailing a PDF report exposes the patient data unless you encrypt the file.
TraceMasterVue does not currently support emailing PDF reports from within the ECGVue application. Reports can be emailed as part of an automated workflow rule, however. Contact your TraceMasterVue administrator for details.
Page scrolling Click to fill the document pane and scroll through pages continuously.
Click to fill the document pane and scroll through pages one page at a time.
Click to scroll through pages continuously.
Click to scroll through pages one at a time.
Side by side display
Click to display two pages, side by side.
Find field In the field, type the text to look for. Click the dropdown arrow to specify parameters for the search (for example, Whole word only, case sensitive, and so on).
Table 5-1 Adobe Reader tool bar
Button Name Icon Description
5-6 ECGVue Instructions for Use

Using Report View
The Navigation pane on the left of the page also features buttons, which provides access to thumbnails of the report pages and to online help.
In addition to the tool bars, Reader also provides popup menus when you right-click anywhere in the Document pane. The contents of the menu change depending on the current state of the report. Some of the commands are not supported or are not applicable in ECGVue. The following table describes those commands you might find useful. For more detailed information about any of the commands, refer to the Reader online help.
Table 5-2 Adobe Reader Navigation pane tool bar
Button Name Icon Description
Thumbnails Click to display a small thumbnail of each page in the report. Simply click a thumbnail to display that page. Mostly used to navigate long studies.
Search Displays a search box where you can type the text to look for. Very similar to the Find field in the top tool bar.
Online Help Click to access Reader online help.
Attachments and Comments
These features are not supported.
Table 5-3 Adobe Reader context menu commands
Menu Item Shortcut Description
Hand tool When you are zoomed into an image, selecting the Hand tool allows you to move the page around the screen, so that you can look at other sections of the report.
Marquee zoom Provides quick access to the Marquee zoom tool so you can enlarge a specific section of the report.
Previous view Alt-Left arrow If you have changed the view (for example, by zooming into the report), this option returns you to the immediately preceding view.
Fit page Ctrl-0 Reduce the size of the page so that the entire page fits in the Document pane.
Fit visible Ctrl-2 Expand the size of the page to fill the Document pane. Part of the report will not be visible. Use the Hand tool to move the page around in this mode.
ECGVue Instructions for Use 5-7
About Reports
Print Ctrl-P Print the report.
NOTE To get the best quality print, we strongly recommend printing the report using the ECGVue Print button on the Action bar. This ensures that the waveforms are printed at their accurate true size, with maximum clarity. As an added benefit, printing is faster from the Action bar.
CAUTION Do not print PDF reports from a standalone Reader or Acrobat application. We cannot ensure that waveforms are printed at their accurate size or with adequate clarity.
Search Shift-Ctrl-F Allows you to perform a full text search. Similar in function to the Find button on the top tool bar.
Table 5-3 Adobe Reader context menu commands
Menu Item Shortcut Description
5-8 ECGVue Instructions for Use
Using Report View
Navigating ReportsUse the Reader tool bar buttons to navigate the report, as needed. Tables 5-1 and 5-2 show each button and describe how it works.
Accessing Documentation and Keyboard Shortcuts for Adobe Reader
Adobe Reader provides comprehensive online help. The Reader documentation provides a list of keyboard shortcuts useful for navigating reports.
To access Reader documentation and keyboard shortcuts
1 In Reader, click the green Help button in the left Navigation pane.
2 From the list, click Complete Reader 8.1 Help.
The Reader online help appears in its own viewer.
3 For shortcuts, click the Keyboard Shortcuts link.
To do this ... Do the following ...
To view thumbnails for a multipage report
In the left Navigation pane, click the Thumbnail button.
You can then click a thumbnail to jump to that page in the report. See table 5-2 for details.
To go from page to page in a report
Either display and click thumbnails as described previously, or click the Forward, Back, First page, and/or Last page buttons in the top tool bar.
See table 5-1 for details.
To magnify a section of a report Click the Marquee Zoom button in the top tool bar and drag the mouse over the section of ECG to enlarge.
You can then move around the page in zoom mode using the Hand tool (right-click and select Hand tool from the popup menu).
See table 5-1 for details.
To magnify or reduce the size of the entire page
Click the Dynamic Zoom button or the incremental Zoom In/Zoom Out buttons on the top tool bar.
You can then move around the page in zoom mode using the Hand tool (right-click and select Hand tool from the popup menu).
See table 5-1 for details.
ECGVue Instructions for Use 5-9

About Reports
About Clinical ReportsTraceMasterVue supports the following clinical reports, using either AAMI or IEC ECG lead labels.
Standard 12-Lead (with and without rhythm strips) (page 5-12)
15- and 16-Lead (with and without rhythm strips) (pages 5-28 and 5-30)
Superimposed Beat (page 5-21)
Representative Beat (page 5-22)
Extended Measurements: Morphology analysis and Rhythm analysis (page 5-24)
Multimodality options only. TraceMasterVue supports import, display, storage, print, and export of PDF studies. For details, see Chapter 2, “Working with PDF Reports (Multimodality Options).”
For additional information about the different report types, see the listed page and the Philips 12-Lead Algorithm Physician Guide.
Important Notes about Reports To ensure patient safety, all patient data presented on a report is for the single patient
identified on the report.
Reports always use the current ECG data that is in the system.
The report type appears on the printed report above the waveform, on the right side.
In some cases, TraceMasterVue prints a second report page.
This occurs when the length of the data in certain fields exceeds the available space on the first page, or when certain fields of the report, such as user fields 7 or 8, contain data. Overflow fields are noted on the first page with the character > appended to the end. See Figure 5-2 on page 5-20 for an example.
When an ECG is imported that contains custom elements that are not defined on the current TraceMasterVue system, they are displayed on the report as follows:
– When a statement contains an undefined custom modifier, the statement shows the text [ ??? ] in place of the custom modifier.
– An undefined custom coded statement is identified by the following text:
*** Converted by editor - bad stmt code: <code> ***
– An undefined custom severity is not displayed on the report.
Contact your TraceMasterVue administrator to ensure that all necessary custom statements and modifiers are defined on the system.
5-10 ECGVue Instructions for Use

About Clinical Reports
About Printing/Faxing ReportsYou can easily preview how a report will look when printed or faxed.
You can print reports manually, as well as configure workflow rules to print reports automatically, for example, when an ECG is confirmed. The TraceMasterVue administrator defines these rules.
TraceMasterVue allows you to specify a default report style to use for printing reports. Note that printing to a remote site also follows the schedule configured for that site. You can set preferences for displaying grid lines in Report view, as well.
Multimodality options only. You can print PDF studies, but faxing is not supported.
For details about printing and faxing ECGs, see Chapter 6, “Distributing Reports.”
ECGVue Instructions for Use 5-11

About Reports
About the Standard 12-Lead ReportThe 12-Lead report includes an analysis report with the ECG waveform. This report can consist of either of the following, reported at 25 or 50 millimeters per second (m/s):
Three channels of 2.5 or 5 second leads
Six channels of 5 second leads
Twelve channels of 10 second leads
One representative complex from each of the 12 leads, over three 10-second rhythm strips
Standard 12-Lead Report Formats
The standard 12-lead report comprises a report header above the waveform data, in the standard 3-channel, 2.5-second lead length format. Lead labels are based on information received and stored with the ECG; in addition, TraceMasterVue supports the Cabrera arrangement of leads and labels specified by the American Heart Association (AHA).
Standard 12-Lead Report Markings
The following figure and table describe the components of a 12-lead report, with and without rhythm strips. The letters in the Mark column refer to the sections on the annotated report example.
For additional examples and details, see the Philips 12-Lead Algorithm Physician Guide.
Format Description
3x4 Three rows, each containing four 2.5-second leads.
6x2 Six rows, each containing two 5-second leads.
12x1 12 rows, each containing the full 10 seconds of data for each lead.
The TraceMasterVue database stores these ECGs, and can display them in the client in this format. However, this format report is printed as 3x4 3R.
Pan 12 The Pan-12 report shows a one-second representative complex for each Cabrera lead and three pre-selected rhythm strips at the bottom.
The TraceMasterVue database stores these ECGs, and can display them in the ECGVue in this format. However, this format report is printed as 3x4 3R.
By default, the rhythm leads are set to the default Pan 12 lead labels. However, you can change which leads are displayed.
5-12 ECGVue Instructions for Use

About Clinical Reports
Figure 5-1 Standard 12-Lead report (3x4, 3R), illustrated
B
A C
JIH
F
G
K
L
M
QPON
E
D
R
S
Edited
Table 5-4 12-Lead report markings
Mark (from Figure 5-1)
Description
A Patient identification and demographics
Includes patient ID, name, age, gender, race, height, and weight.
B Rx and Dx codes This section shows the medication and diagnosis codes.
C Department, Room, Operator, Requesting MD, Order, and other user fields
These values appear in the Additional Data section of the report in Summary view. Depending on the fields specified on the cardiograph or in ECGVue, this section may include the fields shown in the example, as well as any defined user fields.
D Measurements These measurements provide standard interval and duration measurements in milliseconds, and limb lead axis measurements in degrees. These are the values measured from the representative beat pattern in the ECG.
ECGVue Instructions for Use 5-13

About Reports
E Interpretive statements Shows the interpretive statements associated with the report.
If the ECG was serially compared to a previous ECG, the statements will include serial comparison modifiers.
Complete interpretive statements may include a reason statement that summarizes the criteria that generated the interpretive statement.
The interpretive statements may include quality statements (preceded by the $ sign) that describe a signal quality problem that occurred during reporting, such as $ ARTIFACT IN LEAD(S) I, III, aVL.
NOTESFor each of these situations, the solution is to ensure the custom entries are defined on all TraceMasterVue systems in use.
When a statement contains a custom modifier that is not defined on the TraceMasterVue system, the statement shows the text, [ ??? ] in place of the custom modifier.
When a report contains a custom coded statement that is not defined on the system, the following message is displayed: *** Converted by editor - bad stmt code: <code> ***
When a report contains a custom severity that is not defined on the system, no severity is shown on the report.
F Severity Overall severity of the ECG.
G Previous ECG If the ECG was serially compared to a previous ECG, this line identifies the comparison ECG date, confirmation status, and overall severity.
If the ECG was not serially compared, but a previous ECG exists for this patient, this line shows the date, time, severity & signature of this ECG.
The default labels, Compared to or Previous ECG, indicate which information is displayed.
H Location Shows the institution and facility where the ECG was acquired. The department appears in section C.
Table 5-4 12-Lead report markings (continued)
Mark (from Figure 5-1)
Description
5-14 ECGVue Instructions for Use

About Clinical Reports
I Confirmation status Shows whether the ECG has been confirmed. If unconfirmed, displays the text PRELIMINARY, MD MUST REVIEW (the exact text depends on how your system is configured).
If confirmed, identifies the confirming physician.
The text Confirmed By indicates that the physician listed confirmed the ECG.
The text Confirmed For indicates that another user (identified in the Audit log) confirmed the ECG on behalf of the listed physician.
J Report type Identifies the report type. For example, Representative Beat, Standard 12-Lead.
K Lead label Identifies the waveform for each lead.
L Insto mark (time separator)
The time separator marks indicate whether the ECG data is displayed simultaneously or time-sequentially. The data for each lead is always acquired simultaneously.
A double line | | indicates that the ECG data for each lead is displayed simultaneously. The starting point of each lead is the same time, even though they may appear to start at different times on the printed report.
A single line | indicates that the ECG data for each lead is displayed over a continuous period of time. For example, on a 3x4 grid all signals start at 0 in the first column, 2.5 seconds in the second column, 5.0 seconds in the third column, and 7.5 seconds in the fourth column.
M Calibration pulse Shows the hypothetical deflection of the trace in response to a 1 mV calibration pulse applied to the acquisition circuitry.
The shape of the calibration pulse reflects the scaling of the trace.
If the calibration pulse is square , the preportial (V) leads and limb leads were reported at the same scale.
If the calibration pulse is stepped , the preportial (V) leads were reported at half the scale of the limb leads.
Table 5-4 12-Lead report markings (continued)
Mark (from Figure 5-1)
Description
ECGVue Instructions for Use 5-15

About Reports
N Device ID Identifies the individual device that was used to acquire the ECG.
O Speed and sensitivity settings
Settings at which the ECG was acquired, provided at the cardiograph.
Speed. The speed at which the ECG was printed. Options are: 25mm/sec or 50 mm/sec.
Limb lead sensitivity setting. Options are: 5, 10, or 20 mm/mV.
Preportial lead sensitivity setting. Options are 2.5, 5, 10, or 20 mm/mV.
P Filters Shows the filters applied to the waveforms by the acquiring device.
If no information is presented, all filter settings are unknown.
If any filter settings are known, the settings are identified as described in the online help.
NOTES
For details, click the Search button in the ECGVue online help and type Filters.
ECGs copied to cardiographs for printing can contain filter indicators that do not match the original ECG in TraceMasterVue.
For example, .05 may appear on the report as .15; 150 may appear as 100. Refer to the original ECG for the most accurate settings.
Table 5-4 12-Lead report markings (continued)
Mark (from Figure 5-1)
Description
5-16 ECGVue Instructions for Use

About Clinical Reports
Q Algorithm and criteria version
Identifies the algorithm, measurement, and criteria versions used for analysis. Also identifies the serial comparison algorithm version. For example:
Criteria versions
Shows the installed criteria version. The statements associated with the installed criteria appear in the code list in ECGVue Statement view and Statement Editor.
Analysis occurs on the acquiring device, not in TraceMasterVue.
Algorithm version
Shows the current version of the serial comparison algorithm used by TraceMasterVue.
Statement version
Shows the current version of the interpretive statements generated by the serial comparison algorithm.
An example is provided on the next page.
For example, the following entry, PH080A (S21), is defined as follows:
PH is Philips
08 is the version of the measurement program
0A is the criteria version installed on the cardiograph
S indicates that the ECG was serially compared
2 is the serial comparison statement version
1 is the serial comparison algorithm version
Table 5-4 12-Lead report markings (continued)
Mark (from Figure 5-1)
Description
ECGVue Instructions for Use 5-17

About Reports
R Borderline statement suppression, critical values, and pacer detection settings
Borderline suppression options are no setting, B, and b.
Critical value options are no setting and C.
Lead reversal detection are no setting and L.
Pacer detection options are no setting, P?, and P.
The options are described at left.
Shows the borderline statement suppression, lead reversal, critical value, and pacing detection settings associated with the report.
NOTE Borderline suppression, lead reversal, and critical value flags are only shown if this setting is supported and enabled in the acquiring cardiograph.
For example, the following entry, PH090A BCLP, is defined as follows:
PH090A is defined on previous page
B is the borderline suppression flag
C is the critical value flag
L is the lead reversal detection flag
P is the pacer detection flag
Borderline Statement Suppression
Borderline suppression flags indicate whether the acquiring cardiograph suppresses these statements. Borderline statements are divided into two groups: borderline and low certainty borderline. For detailed information and a comprehensive listing of borderline statements, refer to the cardiograph Instructions for Use. Options are:
No setting. Borderline suppression was disabled.
Exclude low certainty statements. Shown as b.
Indicates that the cardiograph is configured to suppress low certainty borderline statements. For example, LVHQ, Consider left ventricular hypertrophy.
Exclude all borderline statements. Shown as B.
Indicates that the cardiograph is configured to suppress all borderline statements. For example, MSTEAL, Minimal ST elevation, anterolateral leads.
Table 5-4 12-Lead report markings (continued)
Mark (from Figure 5-1)
Description
5-18 ECGVue Instructions for Use

About Clinical Reports
R Borderline statement suppression, critical values, and pacer detection settings (continued)
Critical Values
The critical value flag indicates whether the acquiring cardiograph has critical value identification enabled. For detailed information about critical values, refer to the cardiograph Instructions for Use. Options are:
No setting. Critical value identification is disabled on the cardiograph.
C indicates that critical value indication is enabled on the cardiograph.
Lead Reversal Detection
The lead reversal flag indicates whether the acquiring cardiograph has lead reversal detection enabled (using the Check Lead Placement setting). For detailed information about lead reversal detection, refer to the cardiograph Instructions for Use. Options are:
No setting. Lead reversal detection is disabled on the cardiograph.
L indicates that Check Lead Placement setting is enabled on the cardiograph.
Pacer Detection Settings
Not known if paced. Shown as P?
Normally used for both paced and non-paced patients. Indicates that pacemaker pulse detection is on and is at normal sensitivity.
Non paced. No code is displayed if this is the setting.
Pacemaker pulse detection is off. Generally used when there are false pacemaker pulse detections from noise, or if incorrect interpretive statements or inappropriate paced ECG complexes appear on the report.
Paced. Shown as P
Pacemaker pulse detection is on and is set at a higher sensitivity.
S Edited indicator If one or more changes were made to interpretation statements, the text Edited appears on the report.
Table 5-4 12-Lead report markings (continued)
Mark (from Figure 5-1)
Description
ECGVue Instructions for Use 5-19

About Reports
Figure 5-2 12-Lead 3x4, 1R Report (page two)
About the 12-Lead + Rhythm Strip ReportThe 12-Lead with Rhythm Strip (12-Lead + RS) report is available when 3-channel ECGs with 2.5 second leads contain an optional rhythm strip. This report type has three formats:
Single rhythm channel on the same page (4 channel, 1 page)
This format shows one channel of the three available rhythm strips. The single channel is selected based on information sent from the cardiograph.
Three rhythm channels on the same page (6 channel, 1 page)
Three rhythm channels on a second page (3 channel, 2 pages)
Normally, the waveform fits on one page with the following exceptions:
ECGs reported at 50 mm/sec (doubles the page count)
Legacy ECGs reported with 5 second lead-lengths on older model PageWriter cardiographs
ECGs with three rhythm strips on a second page
The format is preconfigured for the ECG location, depending on whether the ECG is confirmed or unconfirmed.
Rhythm strips on PageWriter XL and PageWriter 200 and 300 series cardiographs are acquired simultaneously with the 12 leads. Rhythm strips from ECGs acquired on older model PageWriter cardiographs are acquired after the 12-leads. A solid bar indicates this discontinuity, and separates the 12-lead portion from the rhythm strip.
The markings on the report are the same as on a standard 12-Lead report.
5-20 ECGVue Instructions for Use

About Clinical Reports
About the Superimposed Beat ReportThe Superimposed Beat report includes a summary of acquisition, patient, visit, and measurement data. The waveform area displays a representative beat for each lead, organized in a 2x6 format, as well as a superimposed representative beats view.
The superimposed representative beat view is always shown in 50 mm/sec.
The report header displays information organized into four sections: Acquisition Data, Patient Data, Visit Data, and Measurement Data. Each section displays the information shown below, when available.
Figure 5-3 Superimposed Beat report
Section in Header Description
Acquisition Data Institution
Facility
Department
User field 1
User field 2
Patient Data Name
Patient ID
Date of birth
Age
Sex
Visit Data Order number
ECG acquisition date and time
User field 3
User field 4
User field 5
Measurement Data All global measurements
ECGVue Instructions for Use 5-21

About Reports
About the Representative Beat ReportThe Representative Beat report includes an analysis report with a representative beat for each lead. The header section is the same as that for the Standard 12-Lead report. The waveform displays the representative beat from each of the 12 leads, organized in a 3x4 format.
This report can consist of either of the following, reported at 25 or 50 millimeters per second (m/s):
Three channels of 2.5 or 5 second leads
Six channels of 5 second leads
Figure 5-4 Representative Beat report
5-22 ECGVue Instructions for Use

About Clinical Reports
Selecting the Representative Beats to Superimpose
Use the Representative Beat Selection dialog box, accessible from the Waveform view, to choose one or more rep. beats (up to the full 12) to display in the superimposed view on the right of the waveform display. Clear the check box to hide that lead’s data.
To select leads for the superimposed display
1 Display the desired ECG in Waveform view.
2 In the toolbar on the right, click the 1+ button to show the superimposed view next to the standard ECG.
3 Click the Rep Beat icon on the 1+ waveform display.
The Representative Beat Selection dialog box appears.
4 Select the leads to include in the superimposed view, then click OK.
The display is refreshed to reflect the new selection.
ECGVue Instructions for Use 5-23

About Reports
About the Extended Measurements ReportThe Extended Measurements report gives a complete listing of the measurements made to derive an ECG interpretation. This report comprises two separate reports, individually listed in the Report Types dropdown list:
Morphology analysis
Rhythm analysis
Physicians use these reports to examine the logic of a given interpretation.
Refer to the Philips 12-Lead Algorithm Physician Guide for examples.
Special Lead ConfigurationsTraceMasterVue now supports import and storage of 15- and 16-lead reports. The extended leads (four leads in addition to the standard twelve) can be used as described here.
Table 5-5 Lead placement
Lead Location
V3R Midway between locations V1 and V4R, right chest
V4R Mid-clavicular line in the fifth intercostal space, right chest
V6R Mid axillary line on the same horizontal level as V4R and V5R, right chest
V7 Left posterior axillary line, V6 level
V8 Under left mid-scapular line, V6 level
V9 Left paraspinal border, V6 level
5-24 ECGVue Instructions for Use

About Clinical Reports
Extended Leads: V3R, V4R, V7, and V8 (Balance)
The V3R, V4R, V7, and V8 lead locations are positioned to investigate the right and posterior walls of the heart for both children and adults.
These leads are also useful in evaluating adult patients suspected of having an inferior infarct involving the right or posterior wall of the heart. These additional leads may reveal changes indicative of injury that may be difficult to distinguish in the standard 12 leads.
Extended Leads: V3R, V4R (Right Chest)
These leads are primarily used to detect ST elevation myocardial infarction in the right ventricle of the heart. See the image above for placement.
ECGVue Instructions for Use 5-25
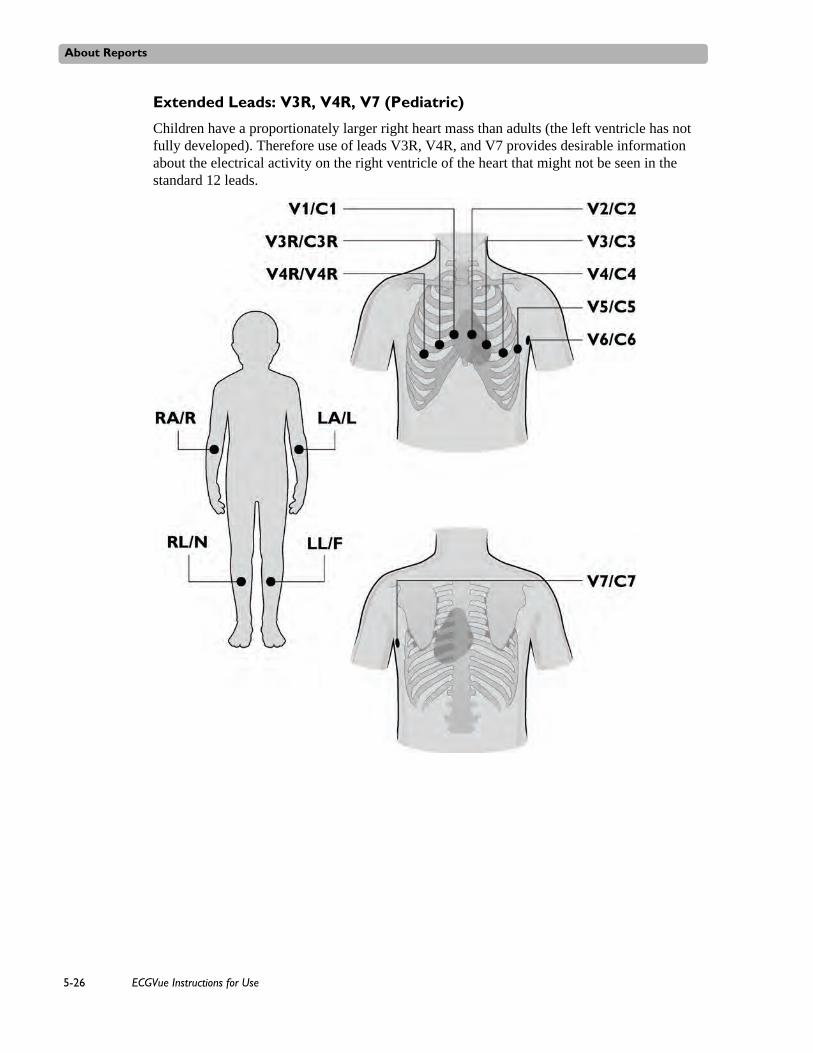
About Reports
Extended Leads: V3R, V4R, V7 (Pediatric)
Children have a proportionately larger right heart mass than adults (the left ventricle has not fully developed). Therefore use of leads V3R, V4R, and V7 provides desirable information about the electrical activity on the right ventricle of the heart that might not be seen in the standard 12 leads.
5-26 ECGVue Instructions for Use

About Clinical Reports
Extended Leads: V7, V8, V9 (Posterior)
These leads are primarily used to detect ST segment elevation myocardial infarction in the posterior wall of the heart.
Extended Leads: VX1, VX2, VX3, and VX4 (Generic Research)
Researchers have the flexibility (opportunity) to label the four additional leads as VX1, VX2, VX3, and VX4. These are also called the Generic Research lead types. The lead locations are determined entirely by the researcher. They are all unipolar leads using the same Wilson pole as reference as used by the standard chest leads V1 through V6.
ECGVue Instructions for Use 5-27

About Reports
About the 15-Lead Report
The standard 15-lead report comprises a report header above the waveform data, in the standard 3 row, 2-second lead length format. Lead labels are based on information received and stored with the ECG; in addition, TraceMasterVue supports the Cabrera arrangement of leads and labels specified by the American Heart Association (AHA).
You can change how the report is displayed in ECGVue. For details, see “Setting Report Display Options” on page 4-9.
Format Description
3x4 Shows 3 rows by 4 columns showing 2.5 second of lead data for the 12 standard leads.
3x4 1R Shows 3 rows by 4 columns showing 2.5 second of lead data for the 12 standard leads.
Shows 10 seconds of data for a single selected rhythm lead, which can be an extended lead.
3x4 3R Shows 3 rows by 4 columns showing 2.5 second of lead data for the 12 standard leads.
Shows 10 seconds of data for each of the three selected rhythm leads, which can be extended leads.
3x5 Shows 3 rows by 5 columns showing 2 seconds worth of lead data for the 15 leads.
3x5 1R Shows 3 rows by 5 columns showing 2 seconds worth of lead data for the 15 leads.
Shows 10 seconds of data for a single selected rhythm lead. This can be an extended lead.
3x5 3R Shows 3 rows by 5 columns showing 2 seconds worth of lead data for the 15 leads.
Shows 10 seconds of data for three selected rhythm leads, which can be extended leads.
Pan 12 The Pan-12 report shows a one-second representative complex for each Cabrera lead and three pre-selected rhythm strips at the bottom.
The TraceMasterVue database stores these ECGs, and can display them in the ECGVue in this format. However, this format report is printed as 3x4 3R.
By default, the rhythm leads are set to the default Pan 12 lead labels. However, you can change which leads are displayed.
12x1 12 rows, each containing the full 10 seconds of data for each lead.
The TraceMasterVue database stores these ECGs, and can display them in the client in this format. However, this format report is printed as 3x4 3R.
5-28 ECGVue Instructions for Use

About Clinical Reports
The following examples show the printed report.
Figure 5-5 3x5 format
To print a 15-lead report
1 In ECGVue, click Report in the Action bar to display the report as it will be printed.
2 In the Report Format dropdown list to the right of the report, ensure Standard 12 Lead is selected.
3 Click Print.
The report prints in the same format as it was acquired.
NOTE If the reporting speed is 50mm, the report format of the printed report is 3x4 3R.
ECGVue Instructions for Use 5-29

About Reports
About the 16-Lead Report
The 16-lead report comprises a report header above the waveform data, in the standard four row, 2.5-second lead length format. Lead labels are based on information received and stored with the ECG; in addition, TraceMasterVue supports the Cabrera arrangement of leads and labels specified by the American Heart Association (AHA).
Format Description
3x4 Shows 3 rows by 4 columns showing 2.5 second of lead data for the 12 standard leads.
3x4 1R Shows 3 rows by 4 columns showing 2.5 second of lead data for the 12 standard leads.
Shows 10 seconds of data for a single selected rhythm lead, which can be an extended lead.
3x4 3R Shows 3 rows by 4 columns showing 2.5 second of lead data for the 12 standard leads.
Shows 10 seconds of data for each of the three selected rhythm leads, which can be extended leads.
3x5 Shows 3 rows by 5 columns showing 2 seconds worth of lead data for the 15 leads.
3x5 1R Shows 3 rows by 5 columns showing 2 seconds worth of lead data for the 15 leads.
Shows 10 seconds of data for a single selected rhythm lead, which can be an extended lead.
3x5 3R Shows 3 rows by 5 columns showing 2 seconds worth of lead data for the 15 leads.
Shows 10 seconds of data for each of the three selected rhythm leads, which can be extended leads.
Pan 12 The Pan-12 report shows a one-second representative complex for each Cabrera lead and three pre-selected rhythm strips at the bottom.
The TraceMasterVue database stores these ECGs, and can display them in the ECGVue in this format. However, this format report is printed as 3x4 3R.
By default, the rhythm leads are set to the default Pan 12 lead labels. However, you can change which leads are displayed.
12x1 12 rows, each containing the full 10 seconds of data for each lead.
The TraceMasterVue database stores these ECGs, and can display them in the client in this format. However, this format report is printed as 3x4 3R.
4x4 Four rows, containing four 2.5-second leads.
5-30 ECGVue Instructions for Use

About Clinical Reports
You can change how the report is displayed in ECGVue. For details, see “Setting Report Display Options” on page 4-9.
The following examples show the printed report.
Figure 5-6 4x4 report, page 1
4x4 1R Four rows, containing four 2.5-second leads.
10 sec for single rhythm lead, which can be extended.
4x4 3R Four rows, containing four 2.5-second leads.
10 sec for three rhythm leads, which can be extended.
Format Description
ECGVue Instructions for Use 5-31

About Reports
Figure 5-7 4x4 report, page 2
To print a 16-lead report
1 In ECGVue, click Report in the Action bar to display the report as it will be printed.
2 In the Report Format dropdown list to the right of the report, ensure Standard 12 Lead is selected.
3 Click Print.
The report prints in the same format as it was acquired.
Note that 4x4 reports always print on two pages.
About Management ReportsThe TraceMasterVue Report Manager application provides access to the management reports, and runs as a separate application both on client systems (if installed) and on the TraceMasterVue server. You must have the appropriate permissions to access this application.
TraceMasterVue also provides an additional billing report from within the System Manager utility, which resides on the TraceMasterVue server. Contact your TraceMasterVue administrator for details.
All reports collect current information from ECGs stored in the main database and any archived databases.
For details about using the application, see the Report Manager Instructions for Use, available on the TraceMasterVue server (talk to your system administrator) as well as through the Help button in the Report Manager application.
5-32 ECGVue Instructions for Use

About Audit Logs and Tracking Changes
About Audit Logs and Tracking ChangesTraceMasterVue maintains an audit trail of all changes, additions, and deletions to a report. This includes changes to data fields, such as location, age, severity, and measurements, as well as changes in state, such as confirming an ECG. TraceMasterVue also tracks all system configuration actions that are associated with acquisition and storage.
The Audit / Tracking functionality maintains two logs:
The Tracking log contains information about events that do not change data. The contents of this log are configured by the administrator at your site.
The Audit log contains information about events that change the data associated with an ECG or study, as well as events that change the state of an ECG or study, for example, confirming or editing report.
This information is accessible to the TraceMasterVue administrator at your site.
ECGVue Instructions for Use 5-33

About Reports
5-34 ECGVue Instructions for Use

6
6Distributing Reports
ECGVue offers several methods for viewing and distributing ECGs and studies, depending on the options purchased and installed at your site:
Fax
Export:
– Philips XML
– TIFF
– HL7 (indirectly)
– DICOM
You can preview reports in Report view before printing or sending. Report view shows the report as it will appear on paper. If you have one or more of the Multimodality options, PDF reports are always displayed in Report view.
For details about the view, and about clinical and management report types and formats, see Chapter 5, “About Reports.”
This chapter provides the following information:Previewing Reports . . . . . . . . . . . . . . . . . . . . . . . . . . . . . . . . . . . . . . . . . . . . . .6-1Printing Reports. . . . . . . . . . . . . . . . . . . . . . . . . . . . . . . . . . . . . . . . . . . . . . . . .6-2Faxing ECGs . . . . . . . . . . . . . . . . . . . . . . . . . . . . . . . . . . . . . . . . . . . . . . . . . . .6-4Exporting Reports . . . . . . . . . . . . . . . . . . . . . . . . . . . . . . . . . . . . . . . . . . . . . . .6-5
Exporting Reports as HL7 . . . . . . . . . . . . . . . . . . . . . . . . . . . . . . . . . . . . .6-6Exporting Reports in DICOM Format . . . . . . . . . . . . . . . . . . . . . . . . . . . .6-6
Previewing ReportsReport view displays the ECG report as it will appear in print or when faxed. For ECGs, you can specify whether to display or hide grid lines in this view (page 5-3), as well as select the type of report to view. For details on report types, see Chapter 5, “About Reports.”
NOTE Multimodality options only. PDF studies are always displayed in Report view. You can print, but not fax, studies. If ECGVue cannot load the Adobe Reader application, you will not be able to view PDF studies. You will, however, be able to review ECGs. For help, see the TraceMasterVue Troubleshooting Guide.
6-1

Distributing Reports
Figure 6-1 Report view
To preview a report
1 On the Search page, search for and display the report to preview.
Multimodality options only. When you select a study to review, it automatically appears in Report view. Skip to step 4.
2 Click Report.
ECGVue displays the report as it will print (or fax).
3 If needed, change the type of ECG report to print from the Report Type list at the top left of the report.
4 To print or fax the report, click Print.
Before you can fax a report, you must have a fax machine properly connected and configured. Contact your system administrator for assistance.
Multimodality options only. You can print, but not fax, studies.
Printing ReportsTo print reports, you must have a printer supported by the TraceMasterVue system. Contact your TraceMasterVue administrator with questions.
CAUTION Do not print PDF reports from a standalone Reader or Acrobat application. We cannot ensure that waveforms are printed at their accurate size or with adequate clarity.
In addition to printing reports manually using ECGVue, TraceMasterVue can be configured to print (and/or fax) ECGs automatically upon occurrence of specified events using workflow
6-2 ECGVue Instructions for Use

Printing Reports
rules. For example, a rule can be defined to print an ECG upon arrival into the database, or upon confirmation. For details, contact your TraceMasterVue administrator.
NOTES If a printer is not already configured for your site and you click Print, the Fax Wizard appears. Ensure that your system has access to a printer before printing.
Multimodality options only. Automated printing and faxing of PDF studies is not supported.
In ECGVue, you can print reports as follows:
Automatically, such as upon confirmation, if the appropriate workflow rules are configured at your site by the TraceMasterVue administrator
Print one or more ECGs (not studies) from the Search page
Print the currently selected ECG or study from Report view
To print one or more ECGs from the Search page
After performing a search and retrieving one or more ECGs:
1 Select the check boxes for the ECG(s) to print.
2 Click Print in the Action bar.
The Select Report dialog box appears.
3 Choose the type of report to print, then click OK.
The standard Windows Print dialog box appears.
4 Specify the desired printer and settings, then click OK.
The selected reports are sent to the specified printer.
NOTE If the printer is remote, the reports are printed at the next scheduled printing time.
To print the selected ECG or PDF study from Report view
1 If you are printing a PDF study, display the study to print in Report view, and proceed to step 2.
If you are printing an ECG, with the ECG displayed in Report view, select the type of report to print from the Report Type dropdown list to the right of the Report button in the Action bar.
ECGVue Instructions for Use 6-3

Distributing Reports
2 Click Print in the Action bar.
The standard Windows Print dialog box appears.
3 Specify the desired printer and settings, then click OK.
The report is sent to the specified printer.
NOTE If the printer is remote, the report is printed at the next scheduled printing time.
Faxing ECGsECGVue allows you to fax reports using the standard Windows Fax functionality. If configured at your site, a fax machine is simply another printer option in the Windows Print dialog box.
CAUTION Faxed waveforms do not meet the requirements of American National Standard ANSI/AAMI EC11:1991 for display of diagnostic electrocardiograms, and may not be suitable for diagnosis. Faxed reports contain information on the border to differentiate them from printed reports.
You fax reports in the same way as printing reports, except that instead of selecting a printer, you select a fax machine.
In addition to faxing ECGs manually using ECGVue, TraceMasterVue can be configured to fax (and/or print) ECGs automatically upon occurrence of specified events using automated workflow rules. For example, a rule can be defined to print an ECG upon arrival into the database, or upon confirmation. For details, contact your TraceMasterVue administrator.
Your TraceMasterVue administrator configures whether grid lines are present on faxed reports.
NOTES Multimodality options only. Automated printing and faxing of PDF studies is not supported.
Before faxing an ECG report, verify that your PC is connected to a modem, and that it is configured with the appropriate fax sites.
The method for faxing an ECG report differs slightly depending on which view you are in:
Search page
Report view (page 6-5)
To fax one or more ECGs from the Search page
After performing a search and retrieving one or more ECGs:
1 Select the check boxes next to the ECG(s) to fax.
2 Click Print in the Action bar.
The Select Report to Print dialog box appears.
3 Choose the type of report to fax, then click OK.
The standard Windows Print dialog box appears.
6-4 ECGVue Instructions for Use

Exporting Reports
4 In the Printer Name field, select the appropriate fax device, and click OK.
For questions about the appropriate fax device to select, talk to your TraceMasterVue administrator.
The Windows Fax Wizard appears.
5 Follow the instructions on each page of the Wizard, specifying the number to fax the report to, and selecting a cover page, if appropriate; when done, click Finish.
For details about using the Fax Wizard, refer to your Windows online help system, accessible by clicking Start > Help, and searching for Fax.
ECGVue faxes the selected report(s).
NOTE Only black and white faxing is supported, even on a color fax machine.
To fax the selected ECG from Report view
1 With the ECG displayed in Report view, click the down arrow to the right of the Report button in the Action bar, and select the type of report to fax.
2 Click Print in the Action bar.
The standard Windows Print dialog box appears.
3 Follow steps 4 and 5 of the previous procedure, “To fax one or more ECGs from the Search page” on page 6-4.
Exporting ReportsECGVue allows you to export reports to any accessible external media, such as diskettes, memory sticks, or a drive on the network. You can export up to 500 records. If you have the appropriate permissions, you can export ECGs in Philips XML format from ECGVue.
If you have additional export options (PDF, TIFF, DICOM) installed at your site, you can export ECGs in those formats, as well. With the Multimodality options, you can also export studies in PDF.
If you have the DICOM Export option, you can export Philips ECGs in DICOM format. For details, see Appendix A, “Working with Converted ECGs.”
The Export command is available in the File menu, in all views except the Search page.
Export to different formats is also available on the TraceMasterVue server using either an automated workflow rule or the Enterprise Manager utility. Talk to your administrator if you need automated or large batch export of ECGs.
The administrator can configure TraceMasterVue to automatically export reports in these formats when a certain action occurs, for example, when an ECG is confirmed.
If you need to export more than 500 ECGs at one time, use the Enterprise Manager utility on the server.
ECGVue Instructions for Use 6-5

Distributing Reports
To export files to diskette or other drive
1 From any view, display the report to export.
If you are exporting from the Search page, select the check boxes for the reports to export.
2 Click File > Export.
The Export File dialog box appears. This dialog box is a standard Windows Export/Save dialog box.
NOTE If the Export command is not available, contact your TraceMasterVue administrator. You do not have authorization to export ECGs.
3 Select the format in which to export all of the selected reports.
Multimodality option only. The only option for exporting PDF studies is PDF. If you select a combination of studies and ECGs, the only available export format is PDF.
NOTE You cannot export to DICOM from the client. This type of export is performed by the TraceMasterVue administrator, on the server.
4 Navigate to the diskette drive or network-accessible drive and directory in which to save the exported ECG file, and click Open.
The report is exported, in Philips XML format*, to the specified location using the following naming convention:
PatientID_PatientName_Date_Time.File_Type
Date of acquisition is in the form YYYY-MM-DD. Time of acquisition is in the form HH-MM-SS. File_Type is the appropriate extension for the file: xml, pdf, or tif, depending on the selected export format.
For example, an ECG for Jon Aargaard, ID $$8768655, taken on January 2, 2004, at 10:04 pm, would be exported to Philips XML as follows:
$$$8768655_AARGAARD-JON_2004-1-2_22-4-29.xml
Contact your TraceMasterVue administrator to configure automated rules for export.
Exporting Reports as HL7TraceMasterVue supports export of ECGs and studies as HL7 by way of third-party message mapping tools. This type of export is performed by the TraceMasterVue administrator, using automated workflow rules.
Exporting Reports in DICOM FormatIf you have the DICOM Export option, you can export Philips ECGs in DICOM format. For details, see Appendix A, “Working with Converted ECGs.”
6-6 ECGVue Instructions for Use

A
.
Appendix AWorking with Converted ECGs
TraceMasterVue vC.02 supports the import of ECGs from GE cardiographs (currently, Mac 5000/5500) using the Multivendor Cardiograph option. Upon import, these ECGs are converted to Philips XML (XML 1.04), and are fully editable. Once in the database, you can work with these ECGs in the same manner as any other ECG report.
In addition, with the DICOM Export option, you can export ECGs and have them converted to DICOM format. For more details about both formats, refer to the Theory of Operation Reference
NOTE It is possible that ECGs imported from GE cardiographs may not be able to be retrieved at a PageWriter cardiograph via interactive query.
This appendix provides the following information:Transferring ECGs from GE/Marquette Cardiographs to TraceMasterVue . . A-1
Transferring ECGs from GE/Marquette Cardiographs to TraceMasterVue Using Diskette or SD Card . . . . . . . . . . . . . . . . . . . . . . A-2
Data Mapping . . . . . . . . . . . . . . . . . . . . . . . . . . . . . . . . . . . . . . . . . . . . . . . . . A-3
Transferring ECGs from GE/Marquette Cardiographs to TraceMasterVue
ECGs can be transferred from GE/Marquette MAC 5000/5500 cardiographs using any of several methods, including through a serial connection, network connection (wired or wireless), diskette (MAC 5000), or SD card (MAC 5500).
For the serial- and network-connected systems, you do not have to do anything to be able to view the ECGs in ECGVue. The ECGs are seamlessly transferred to the TraceMasterVue system upon export from the cardiograph, converted to Philips XML, and imported into the database.
For diskette or SD card transfer, however, you must use the following process to transfer ECGs to TraceMasterVue.
A-1

Working with Converted ECGs
Transferring ECGs from GE/Marquette Cardiographs to TraceMasterVue Using Diskette or SD Card
If your GE cardiograph supports SD cards or diskettes, you can manually transfer ECGs from the cardiograph to TraceMasterVue.
To transfer ECGs using external media, you must have access to the designated shared folder on the TraceMasterVue server. You will copy the files from the media to the shared folder, then the DatamedFT translator will convert the files to Philips XML, and TraceMasterVue services will handle importing the file into the database. You can then search for and review these files from within ECGVue.
NOTE You cannot import GE/Marquette cardiograph ECGs directly into the database using ECGVue.
Before you begin, talk to your TraceMasterVue administrator for information about how and where to transfer files on the server. The user ID with which you log onto the server must have write access to the DatamedFT folder.
For an overview of the Multivendor Cardiograph option and supported file formats, see the Theory of Operation Guide
To transfer files from the GE/Marquette cardiograph to TraceMasterVue using diskette or SD card
1 Insert the media into the appropriate slot on the cardiograph and download the ECGs to transfer.
2 After copying files, insert the media into a computer that has network access to the TraceMasterVue server.
Be sure to log in with a user ID that has permission to copy files to the DatamedFT folder on the server. Contact your TraceMasterVue administrator for details.
3 Copy the ECG files to the appropriate DatamedFT folder on the server.
The DatamedFT translator converts the ECGs to Philips XML 1.04 and passes them to the import folder. The TraceMasterVue import service imports the converted files into the database. This process should take no more than a minute.
4 Log into ECGVue, and on the Search page, select whichever search type you need.
These converted ECGs are treated the same as any other ECG in the database. All search types for ECGs (unconfirmed, confirmed, by date, by patient) are supported.
For details about how individual fields are mapped between the cardiograph and TraceMasterVue, see the chapter, “About DICOM Export and MultiVendor Cardiograph ECGs,” in the Theory of Operation Guide.
A-2 ECGVue Instructions for Use

Data Mapping
Data Mapping
For detailed information about how data is mapped between incoming GE ECGs and TraceMasterVue’s Philips XML format, as well as how data is mapped between Philips XML and DICOM, see the chapter, “About DICOM Export and MultiVendor Cardiograph ECGs,” in the Theory of Operation Guide.
ECGVue Instructions for Use A-3

Working with Converted ECGs
A-4 ECGVue Instructions for Use

B
Appendix AUsing the Tutorial
TraceMasterVue ships with a browser-based (HTML) tutorial for ECGVue users. The tutorial comprises seven modules, each of which can be completed at any time. The ECGVue tutorial is a set of HTML files that can be accessed through any browser.
This appendix provides the following information:About the Tutorial . . . . . . . . . . . . . . . . . . . . . . . . . . . . . . . . . . . . . . . . . . . . . . .B-1Demo ECG Characteristics . . . . . . . . . . . . . . . . . . . . . . . . . . . . . . . . . . . . . . . .B-2Running the Tutorial . . . . . . . . . . . . . . . . . . . . . . . . . . . . . . . . . . . . . . . . . . . . .B-3
About the TutorialThis tutorial is designed for use together with the application. Login information is provided in the first lesson of the tutorial.
Each lesson provides a set of exercises for you to try within the application. Demonstration ECGs are identified with the $$$ prefix; you use these ECGs during the tutorial lessons.
For details on setting up the tutorial or refreshing the ECGs used in the tutorial, contact your TraceMasterVue administrator.
Figure B-1 Tutorial Table of Contents
B-1

Using the Tutorial
Figure B-2 Tutorial content page example
Demo ECG CharacteristicsThe demonstration ECGs in the system have the following distinguishing characteristics:
The patient ID is preceded by three dollar signs ($$$)
The institution code is 999
These symbols make it easy to distinguish the demo data from your live patient ECGs.
A
B
C
D
E
F
A Contents button. Click to access the main table of contents for the entire tutorial
B Click links to access other sections in this lesson
C Click link to move to the next lesson (chapter)
D Main content of the lesson
E Exercises for you to work through, using the ECGVue application
F Next and Previous buttons to page through the lesson
B-2 ECGVue Instructions for Use

Running the Tutorial
Running the Tutorial
To run the tutorial
1 Click Help in the Action bar, then click Tutorial on the help page.
The Welcome page of the ECGVue tutorial appears.
2 Click the arrow buttons at the top right of the screen to move through the pages. You can access the beginning of the lessons on page 2.
Click the Contents button to display the main table of contents, where all of the lessons are accessible.
3 When prompted in the tutorial, launch ECGVue, and log in using the user name and password provided in the tutorial.
4 When you are finished, simply log out of the application, and close the browser windows displaying the tutorial.
To reset the demo ECGs and remove all the changes you made, talk to your administrator.
ECGVue Instructions for Use B-3

Using the Tutorial
B-4 ECGVue Instructions for Use

1Glossary
Term Definition
12-lead ECG The standard three-channel, four-lead group representation of the ECG.
A
analysis criteria Rules used by the computerized analysis program to interpret ECGs.
affinity group An affinity group associates substantially equivalent statement diagnoses together under one name. Thus, any statement in a particular affinity group is essentially the same as any other statement within the same group differing only in degree of severity. Affinity groups are used by the serial comparison program in comparing statements between ECGs.
analysis report Also known as text report and diagnostic report. The portion of an ECG report that contains the patient identification information and the diagnostic statements. It does not include the waveform.
analyzed ECG An ECG whose waveform has been measured and diagnosed and an interpretation reported, by the ECG System/cardiograph analysis program or manually by a physician.
archived ECGs ECGs stored in the TracemasterVue database that do not necessarily follow the standard ECG workflow. That is, they are not overread, then confirmed.
B
baseline ECGs An ECG used for comparison with another ECG for the same patient.
baud rate A measure of the speed at which data is transferred between two devices through a serial port, such as a cardiograph and the ECG Management system.
C
Cabrera report An alternative limb lead order in which aVR is inverted and shown as -aVR. Lead order is aVL, I, -aVR, II, aVF, III, V1 - V6.
calibration pulse A 200 ms, 1 mV square wave pulse which appears on the printed report. Calibration pulse shows the sensitivity at which the ECG was reported and may show the effect of the filters.
ECGVue Instructions for Use Glos-1

Table of Contents
Caliper Calipers are a type of electronic tool that can be applied to waveform data in order to make various types of measurements. The user must be able to create, move, and delete calipers. A default caliper will be defined by the system but it can be extended and customized by the user. As each new caliper is created, it will retain the properties of the previous one but can be changed if desired. Multiple calipers can be created and applied to a given waveform.
cardiograph A device that reports an ECG. Also known as a cart.
coded statement See statements, coded.
COM ports Communication port. See port.
comparison See serial comparison.
confirmed ECG An ECG report that has been overread by an MD, then “signed” with the MD’s name. Confirmed ECGs are considered “final” reports and treated differently than ECGs which are not confirmed.
confirming MD The medical doctor (MD) who overreads an ECG and whose name appears on the report after you confirm it.
copy The process of transferring ECG files to another site, location, or to a flexible disk. Copy will not produce a paper report.
criteria version Also known as ECG Criteria. A set of rules used by the program which produces an analysis report and severity code for an ECG based on the ECG measurements. The criteria have been refined and improved, hence each release is given a new name or version.
D
database A set of tables holding all stored information on the system; for example, the patient database contains all ECG components (waveform, report information, measurements).
delete Removes ECGs from the database.
department The location identifies where an ECG was acquired, and comprises three levels: institution, facility, and department. Location information is organized as a hierarchy, with institutions containing one or more facilities, which in turn can comprise one or more departments. A department is the lowest level of the hierarchy, and is always associated with a facility.
department code A code used to identify a department within an institution. See location code.
Term Definition
Glos-2 ECGVue Instructions for Use

Table of Contents
digital certificate An electronic document that establishes your credentials when doing business or other transactions on the Web. It is issued by a certification authority (CA). It contains your name, a serial number, expiration dates, a copy of the certificate holder’s public key (used for encrypting messages and digital signatures), as well as the digital signature of the certificate-issuing authority so that a recipient can verify that the certificate is real.
direct connect A cardiograph and a system connected by a cable. Same as direct connection.
direct connect cable A special cable for connecting a cardiograph and a system to allow direct transmission of ECGs through a serial port. In some cases, direct connect cables may be permanently installed within the walls of an institution.
direct connect port The port to which a local ECG node can be connected for transmission of ECGs. A direct connect cable must be used in this case.
diskette (also floppy) A disk that can be inserted in the disk drive to store ECGs.
E
ECG Also known as EKG. Acronym for electrocardiogram, which is the mathematical and graphical representation of the heart’s electrical activity. Usually used in a collective way to refer to the ECG components: the waveform, the optional rhythm strip, and the analysis report.
ECG criteria See criteria version.
ECG waveform The line drawn by a cardiograph or other reporting device to represent the heart’s electrical activity.
error log A listing on the system of notifications, cautions, and errors that occur during system processing.
extended measurements report The report which contains the complete measurements used to derive an ECG interpretation.
F
facility The location identifies where an ECG was acquired, and comprises three levels: institution, facility, and department. Location information is organized as a hierarchy, with institutions containing one or more facilities, which in turn can comprise one or more departments.
facility code A code to identify a facility associated with an institution, such as a branch clinic. See location code.
Term Definition
ECGVue Instructions for Use Glos-3
Table of Contents
format How ECG waveforms are arranged on the printed ECG report.
function keys The line of keys lettered F1 to F12 at the top of the keyboard.
H
Holter The Philips Holter system scans a patient’s recorded heart beats, analyzes them, and provides a report that a cardiologist can use to make diagnostic determinations. This application is used in conjunction with a recorder that acquires a patient’s ECG on a continuous basis for 24 hours or more.
I
inbox A “container” to which ECGs are assigned. Inboxes are set up to match the way your site works. Depending on your function and your site's workflow, you might have your own inbox, or you might access a set of shared inboxes to review and/or confirm ECGs.
institution code A code to identify an organization such as a hospital for the system. It has associated department codes. See location code.
institution The name to identify an organization, associated with a specific code.
insto mark Reset mark indicating the change between lead groups.
interactive query An operation mode that allows a cardiograph user to call the system and receive an ECG or reports for printing. The process of listing ECGs to be sent to a cardiograph via query.
L
LaserJet The printer used to print ECG reports from the system.
location code Identifies the source of an ECG, for example, 55210 might indicate: 552 - Good Sam Hospital; 10 - Emergency Room. Used with legacy PageWriter XL-series cardiographs. In TraceMasterVue, this is generally referred to as the location.
M
measurements The amplitudes, durations, areas, and intervals which characterize the ECG waveform.
measurement matrix The internal file format which holds the complete measurements from the analysis program. Used to create the extended measurements report.
modem The device attached to the system which allows two devices to communicate over the telephone system.
Term Definition
Glos-4 ECGVue Instructions for Use

Table of Contents
modem port The port to which a modem can be connected for transmission of ECGs to or from a remote cardiograph or system over the telephone system.
modifier A qualifying adjective that may be added to or deleted from a criteria statement on an analysis report to change or clarify the original analysis statement. For example, in the statement LEFT VENTRICULAR HYPERTROPHY, the modifier PROBABLE may be added to create the statement PROBABLE LEFT VENTRICULAR HYPERTROPHY.
Multimodality A set of options that provide the ability to import Holter and/or stress reports in PDF.
O
online ECG An ECG that is stored on the system. This ECG can be stored on the main database, on an archive volume on the main hard disk, or on extended archive volumes on an auxiliary hard disk. You have immediate access to online ECGs.
operator The person who operates the ECG Management system. Also known as a technician (or “tech”).
P
password A specific code word that limits access to the system to those who know the code word.
port As in datacomm port. Also known as serial port. The plug or jack on the system or cardiograph to which a cable or modem can be connected for transmitting ECGs.
R
remark Remarks are used to add non-diagnostic comments to the ECG report.
report Same as ECG, but it usually refers to just the text portion of the ECG. See analysis report.
research leads Optional leads that can be positioned wherever needed in addition to standard, 12 lead set. Research leads are unipolar.
rhythm strip Term for ten second reporting of a particular lead or leads that is printed at the bottom of an ECG report. The rhythm strip may be taken after the 12-lead ECG (PageWriter I and II), or simultaneously with the 12-lead ECG (PageWriter XL).
Term Definition
ECGVue Instructions for Use Glos-5

Table of Contents
S
serial comparison The process of comparing the analysis of a patient’s ECG to the analysis of a previous ECG for that patient, to further qualify or modify the current diagnosis based on the absence or presence of diagnostic statements in the previous ECG. This may be done by a computer program or manually by a physician. Also known as comparison.
severity Each ECG report is measured by how close to normal it is. This measurement is indicated on the ECG report by the severity field; for example, Borderline.
severity code Short code associated with each severity statement.
short form measurements A limited set of measurements for the ECG report. They appear in the left part of the report.
single complex per lead A special report format created on the 5630I system which may be present on TraceMaster if patient files were transferred.
source In the Search screens, shows the source of the associated report. For example, could be PageWriter TC cardiograph, Holter, and so on. The Search Results list shows the source in List view. On the Advanced Search tab, you can search for reports by source.
statement codes The abbreviation (up to six characters) for a Philips Medical Systems criteria statement.
statement modifiers See modifier.
statement reasons The right hand side of an Philips Medical Systems criteria statement that contains a short synopsis of the criteria or reasons used by the criteria program to select the statement.
statement Clinically related information about the ECG.
statement, coded Pre-worded diagnostic statements identifying a particular clinical attribute of the ECG. When an ECG is analyzed, analysis statements are generated by the cardiograph. These statements will appear on the ECG report and may be edited, deleted, or added.
statement, uncoded Uncoded statements are used for additional diagnostic information when an appropriate coded statement does not exist.
stress The software component is a PC-based diagnostic tool for use in the exercise stress testing laboratory. ECG data obtained during stress testing is acquired, processed, recorded, analyzed, output, and archived. The stress system interfaces to, and controls, a compatible treadmill or ergometer.
Term Definition
Glos-6 ECGVue Instructions for Use

Table of Contents
study Imported Holter, stress, or defibrillator report, in PDF. Available with one or more of the Multimodality options only.
T
text report See analysis report.
trace See waveform.
transmission See copy.
type In the Search screens, shows the type of the associated report. For example, could be Standard 12 lead ECG, Holter, and so on. The Search Results list shows the type in List view. On the Advanced Search tab, you can search for reports by type.
V
variable Many coded analysis statements have variable fields used for entering numeric values. For example, in the statement NORMAL
SINUS RHYTHM, RATE 88, the value 88 is a variable that can be edited.
W
waveform Also known as a trace. The graphic representation of an ECG wave. Consists of 12 leads plus an optional rhythm strip.
Term Definition
ECGVue Instructions for Use Glos-7

Table of Contents
Glos-8 ECGVue Instructions for Use

Index
#
12-lead report, about 5‐12
A
accessing online Help 1‐19
Action bar, about 1‐22
advanced search, performing 3‐9
application screens (views), about 1‐20
assigning ECGs to inbox, about 1‐30
audit and tracking logs, about 5‐33
automated rules. See workflow rules
B
batch processing ECGs, about 3‐16
C
calibration pulse and scaling 5‐15
calipersspecifying which lines to display 4‐36
using 4‐35
changing ECG views 4‐6
clinical reportsabout 5‐10
markings on, overview 5‐12
See also reports
coded statements, adding 4‐25
comparing ECGsserial comparison, performing 4‐36
side by side comparison, performing 4‐38
confirming ECGs 4‐43, 4‐45about 4‐42
editing confirmed 4‐46
on behalf of confirming MD 4‐43
status, about 4‐44
unconfirming 4‐46
conventions used in the Instructions for Use 1‐7
D
date and time, editing 4‐12
default view, changing 4‐4
deleting reports 4‐46
demographic fields, editing 4‐13
documentation, overview of 1‐31
E
ECGsactions you can perform on 1‐17
assigning to inbox, about 1‐30
changing selected patient 4‐6
changing views 4‐6
comparing serially 4‐36
confirming, overview 4‐42
displaying different ECG for same patient 4‐6
editing 4‐9
exporting 6‐5
faxing 6‐4
inboxes, about 1‐30
maximum number to select 3‐15
printing report 6‐2
reviewing multiple 4‐9
saving changes 4‐10
selecting from Search Results list 3‐14
selecting one or more 4‐3
serial comparison, performing 4‐36
tabs in the application, about 4‐7
verifying 4‐41, 4‐42viewing 4‐3
ECGVue tutorialdemo information in database B‐2
running B‐1
ECGVue views, about 1‐20
editing ECGsabout 4‐9
commands for 4‐24
date and time 4‐12
demographics fields 4‐13
editing patient info and demographics 4‐11
interpretive statements 4‐13, 4‐24location info 4‐12
patient ID 4‐11
patient name 4‐11
quick reference 4‐24
saving changes 4‐10
electronic calipers, using 4‐33
electronic signature, about 4‐43
exporting ECGsabout 6‐5
supported formats 6‐5
Extended Measurements report, about 5‐24
F
faxing ECG reportsabout 5‐11, 6‐4from Report view 6‐5
from Search page 6‐4
file naming conventions, PDF reportsGE Case stress 2‐8
Holter 2‐6
Quinton Q-stress 2‐7
G
GE Case stress reportfile naming conventions 2‐8
GE filestransferring from cardiograph to
TraceMasterVue using SD card/diskette A‐2
viewing in ECGVue/PharmaVue A‐2
Index-1

Index
H
Holter report, file naming conventions 2‐6
I
importing ECGs 3‐3
inboxesabout 1‐30
assigning ECGs to, about 1‐30
indications for use 1‐1
insto mark, about 5‐15
Instructions for Useconventions used in 1‐7
organization of 1‐6
interpretive statementsconfiguring how displayed in the
application 4‐17
showing or hiding statement codes 4‐17
See also statements
L
location, changing for an ECG 4‐12
logging into ECGVue 1‐14
M
management reports, about 5‐32
maximum number of records to select 3‐15
measurementsediting 4‐33
viewing using electronic calipers 4‐33
measurements, editing 4‐35
N
navigating views 1‐24
O
online help, about 1‐19
Orders option, about A‐1
organization of the Instructions for Use 1‐6
P
patient ID, editing 4‐11
patient name, editing 4‐11
patient, changing selected 4‐6
PDF report file naming conventionsGE Case stress 2‐8
Quinton Q-stress 2‐7
previewing ECG report 6‐1
printing ECG reportsabout 6‐2
automatically 6‐3
from Report view 6‐3
from Search page 6‐3
printing reports, about 5‐11
Q
quick search, performing 3‐4
Quinton Q-stress reportfile naming conventions 2‐7
R
reason statements, showing or hiding in the application 4‐17
remarksadding 4‐31
editing 4‐32
Report viewabout 1‐21, 6‐1previewing reports 6‐1
reports12-Lead, about 5‐12
clinical 12-lead, about 5‐10
deleting 4‐46
Extended Measurements, about 5‐24
faxing 5‐11, 6‐4management, about 5‐32
notes about 5‐10
previewing 6‐1
printing 6‐2
printing, about 5‐11
Representative Beat, about 5‐22
restoring previously deleted 4‐46
Superimposed Beat, about 5‐21
Representative Beat reportabout 5‐22
representative beat, displaying in Waveform view 4‐40
restoring previously deleted reports 4‐46
retrieving ECGs. See searching for ECGs
RHS, showing or hiding in the application 4‐17
S
saving changes to ECGs 4‐10
Search page, about 1‐20
searching for ECGsadvanced search 3‐9
by barcode 3‐4
custom 3‐9
overview 3‐3
quick search 3‐4
using multiple criteria 3‐9
Select First 50 button, about 4‐10
selecting ECGs to work with 3‐14
selecting one or more ECGs 4‐3
serial comparisonuncomparing an ECG 4‐37
undoing 4‐37
state of ECGabout 1‐10
changing 1‐11
statement codes, showing or hiding 4‐17
Statement Editorabout 1‐22
accessing 4‐13
Statement viewabout 1‐20
displaying 4‐13
statementsaccessing editing tools 4‐13
adding coded 4‐25
adding remarks 4‐31
adding uncoded 4‐30
editing 4‐13, 4‐32notes about editing 4‐15
types of 1‐27
Summary viewabout 1‐21, 4‐5displaying ECG in 4‐5
Superimposed Beat report, about 5‐21
Index-2 ECGVue Instructions for Use

Index
T
tutorial, running B‐1
U
uncoded statements, adding 4‐30
uncomparing an ECG 4‐37
unconfirming an ECG 4‐46
undoing a serial comparison 4‐37
user permissions, about 1‐13
V
Verifier role 4‐42
verifying ECGs 4‐41
viewing ECGs 4‐3
changing selected patient 4‐6
changing views 4‐6
displaying different ECG for same patient 4‐6
on diskette or PC card 3‐3
views in ECGVue, about 1‐20
W
waveform displayabout 1‐22
setting options 4‐9
zooming in and out 4‐34
See also Waveform view
Waveform viewabout 1‐21
displaying representative beat 4‐40
selecting ECG to display 4‐39
selecting ECGs to display in 4‐39
setting side-by-side or stacked ECG display 4‐39
using 4‐38
workflow rules, about 1‐13
Z
zooming in and out of waveform display 4‐34
ECGVue Instructions for Use Index-3

Index
Index-4 ECGVue Instructions for Use


Philips Medical Systems3000 Minuteman RoadAndover, MA 01810 USA
TraceMasterVue ECG Management SystemECGVue Instructions for Use453564149521Printed in USAJuly 2009
453564149521