eternity 4 eternity 5 manual - ibuttonlock.com 4 eternity 5 manual access control solution . page 2...
TRANSCRIPT

Eternity 4 Eternity 5
Manual
ACCESS CONTROL SOLUTION

Page 2 of 36
TABLE OF CONTENTS
SECTION 1 GENERAL OVERVIEW ............................................................................................................................... 4 I. Foreword ................................................................................................................................................................. 4
About This Manual ..................................................................................................................................................... 4 Safety Warnings and Cautions .................................................................................................................................... 4 Design Change Disclaimer.......................................................................................................................................... 4 Reproduction Disclaimer ............................................................................................................................................ 4 Technical Support ....................................................................................................................................................... 4
II. Important information............................................................................................................................................. 4 Manufacture Default Code Setting: ............................................................................................................................ 4 LED and Audio Indicator:........................................................................................................................................... 4 Important Keys: .......................................................................................................................................................... 4
III. General Lock Spec.................................................................................................................................................. 5 IV. Eternity IV Datasheet (Heavy Duty keypad Lock) ............................................................................................... 6
Hardware Spec ............................................................................................................................................................ 6 Functions..................................................................................................................................................................... 6 Ordering Information .................................................................................................................................................. 6 Door Prep .................................................................................................................................................................... 7 Parts List ..................................................................................................................................................................... 7 Eternity IV Installation Instruction ............................................................................................................................. 8
V. Eternity V Datasheet (Medium Duty keypad Lock) ............................................................................................. 9 Hardware Spec ............................................................................................................................................................ 9 Software Spec ............................................................................................................................................................. 9 Mortise Spec ............................................................................................................................................................... 9 Ordering Information: ................................................................................................................................................. 9 Eternity-V-Installation .............................................................................................................................................. 11 Eternity-V-Mortise-Installation ................................................................................................................................ 13
SECTION 2 ETERNITY SOFTWARE GUIDE.............................................................................................................. 16 1. SOFTWARE SETUP ..................................................................................................................................................... 16
Operating System...................................................................................................................................................... 16 Installing 1-Wire USB Driver First........................................................................................................................... 16 Installing the iKeypad Software................................................................................................................................ 16 Login ......................................................................................................................................................................... 16 Change System Password ......................................................................................................................................... 17
2. ACCESS CONTROL MANAGEMENT I.......................................................................................................................... 17 I. Lock Setup ............................................................................................................................................................ 17
New Lock Set Up...................................................................................................................................................... 17 Edit An Existing Lock............................................................................................................................................... 18
II. User Setup............................................................................................................................................................. 19 Onsite User Setting ................................................................................................................................................... 19
Add/Edit user information............................................................................................................................. 19 Assign Onsite user to lock ............................................................................................................................ 20
Copy Lock Setting .................................................................................................................................................... 20 Remote User Code Setting........................................................................................................................................ 21
Create remote Access Code .......................................................................................................................... 21 Terminate a lost Access Code:...................................................................................................................... 21 One Time Service code ................................................................................................................................. 22
3. ACCESS CONTROL MANAGEMENT II ......................................................................................................................... 22 III. Time Setting ......................................................................................................................................................... 22
Time Shift Setting ..................................................................................................................................................... 22 Timed Operation Setting........................................................................................................................................... 22

Page 3 of 36
Activation / Expiration Date Setting ......................................................................................................................... 23 Exception Date Setting.............................................................................................................................................. 24
IV. Mission Management............................................................................................................................................ 24 Set Parameter Key..................................................................................................................................................... 24 Set Time Key ............................................................................................................................................................ 25 Get Information Key ................................................................................................................................................. 25 Lockout Key.............................................................................................................................................................. 26 One-Off key/One-Off Code ...................................................................................................................................... 26
One-Off Key ................................................................................................................................................. 26 One-Off Code................................................................................................................................................ 26
V. Audit Trial ............................................................................................................................................................ 27 VI. History .................................................................................................................................................................. 28
Lock Audit History ................................................................................................................................................... 28 Access Code history.................................................................................................................................................. 29 Operator Log............................................................................................................................................................. 29
SECTION 3 NON-SOFTWARE GUIDE ......................................................................................................................... 29 I. General Information:............................................................................................................................................. 30 II. Manufacture Default Setting: ............................................................................................................................... 30 III. Steps to setup a new lock (please follow the order) ............................................................................................. 30 IV. Types to operate the lock:..................................................................................................................................... 30 V. Terms: ................................................................................................................................................................... 31 VI. Functions .............................................................................................................................................................. 31
Weekly Chart ............................................................................................................................................................ 33 • How to program schedule with an “user code”............................................................................................. 33
4. ENDING TIME............................................................................................................................................................. 34 SECTION 4 CASE STUDY ............................................................................................................................................... 34
University Park Business Center, Denton, TX.............................................................................................................. 34 SECTION 5 TROUBLE SHOOTING GUIDE ................................................................................................................ 35 WARRANTY REGISTRATION FORM ......................................................................................................................... 36

Page 4 of 36
Section 1 General Overview I. Foreword
About This Manual This manual is designed for users of Eternity 4 and Eternity 5. All installation, setup, operational information, procedures, screen captures, and other relevant materials are contained in this manual. Safety Warnings and Cautions When handling a printed circuit board (PCB), guard against possible static discharges by touching a grounded object BEFORE touching the board. Static shock could cost unexpected damage of the board. Design Change Disclaimer Due to design changes and product improvements, information in this manual is subject to change without notice. assumes no responsibility for any errors that may appear in this manual. Reproduction Disclaimer Neither this manual nor any part of it may be reproduced, photocopied, or electronically transmitted in any way without the written permission of . Technical Support When you experience any difficulty installing or operating the Eternity software, please contact your local distributor or at 1-866-241-9874.
II. Important information Manufacture Default Code Setting: 1. Default Setting for Login User Name / Password is: dallas / ibutton 2. Operator Password: The default operator password is 00000000 (8 digit Zeros) 3. System Password: The default System password is 000000 (6 digit Zeros) LED and Audio Indicator: 1. Program Mode: LED indicating GREEN, audio end with two beeps (Successful) 2. Program Mode: LED indicating Red, audio end with one beep (Fail) 3. Key Access Mode: LED indicating GREEN, audio end with two beeps (Valid Access) 4. Key Access Mode: LED indicating Red, audio end with one beep (Fail) 5. Unlock Mode: LED flashing GREEN, lock is in unlock mode 6. Lock Mode: LED flashing RED, lock is in lock mode Important Keys: 1. DS1982/DS1990- User Key (Default key-fob color from : red, yellow, black, orange) 2. DS1994/DS1904- It contains an on board real time clock to reset the lock internal clock. (Default key-fob color from :
Green) 3. DS1977- Program Key. (Default key-fob color from : Purple) 4. DS1996- Firmware Upgrade Key (Default key-fob color from : Blue)

Page 5 of 36
III. General Lock Spec This page shows the similar specifications of the Eternity 4 and Eternity 5. Keypad: 12 all weather numeric keypad Keypad Functions: Permanent codes, Temporary codes, one-time service codes Power Supply: 4 standard AA batteries with a weatherized battery pack for all weather conditions Power Supply Life Expectancy: 10,000 operations, low battery warning when system drops below 4.8 volts Memory Retention: Flash memory never looses memory even without power Programming / Communication Method: iButton key-fob, no annoying wires Functions: Time zones for lock function (automatically unlock or lock), fully programmable exception dates (holidays), temporary dates, and time zones for iButton key-fobs. Finishes: Stainless, or Brass. Handles: Reversible Lever Audit Trail: 4000-event audit trail. iButton Users: 500 Temporary Codes: No limit Permanent Codes: 300 One Time service code: 10 Anti-tamper: Red-warming light stays on for 60 seconds after 3 consecutive invalid code entries Key Bypass: Standard on all units Door Preparation: Standard ANSI A115 Series Prep, optional by adding additional 5/8” through-bolt holes to add stability to the lock and increase security. Strike Plate: ANSI Standard 115.3. Square corner, 1-1/8 x 2-3/4 inch T strike with 1-1/4 lip-to-center dimension. Latch: 2 3/4 inch backset standard (2 3/8 inch backset optional), solid brass with 1/2-inch throw 1-inch diameter bore is required. Materials: Zinc Alloy Temperature: 0°F-120°F (-18°C-50°C) Exposure: All weather conditions Accessibility Standard: Meets ADA standards Americans with disabilities act. Lock Back Time: 1 – 25 seconds (default is 5 seconds) Working Voltage: 4.8-6.4V Low Battery Warning: 4.8V or lower Door Thickness: 1 3/8" to 2" Keyway: Schlage C 6

Page 6 of 36
IV. Eternity IV Datasheet (Heavy Duty keypad Lock) Hardware Spec
Functions
Ordering Information PART DESCRIPTION E4IKSC01 E-IV TM + Keypad Satin Chrome Lockset SW Version E4IKSC02 E-IV TM + Keypad Satin Chrome Lockset No SW Version ECYLSC6M Eternity Schlage C 6-Pin Master Key Cylinder ACCESSORIES DESCRIPTION D1977K DS1977 Programming Key D1994K DS1994 Internal Clock Key D1990K DS1990 iButton User Key UIBPCR iButton Reader (iButton PC Receptor) USBPCA USB PC Adapter EternitySWCD Eternity Lock Management Software CD
PARAMETER DETAIL Lock Weight 6 Lb Working Current <10 mA Idle Current 5 µA Lock Back Time 5 (1 – 25) Seconds Working Voltage 4.8-6.4V Low Battery Warning 4.8V or lower Power Source 4 AA Alkaline Batteries Keypad Weather Proof Keypad Handle Reversible Lever Door Thickness 1 3/8" to 2" Keyway Schlage C 6 Packed Weight Packed Size CTN Weight CTN Size
DESCRIPTION SOFTWARE NON-SOFTWARE Audit Trail Yes (3000 entries) N/A iButton Key Users 800 (Combine iButton and code) 300 (Combine iButton and code) Keycode Users See above See above Timed Operation Yes Yes Auto Lock/Auto Unlock 16 time schedules Fixed time schedule (7 days a week) Passage Mode 16 time schedules Single time schedule Time Shift User 16 time schedules Single time schedule Remote Access Yes Yes Storehouse/Classroom Mode Yes Yes One Time Use Yes Yes iButton User Yes Yes Permanent Code User Yes Yes Remote Code User Yes Yes One-Touch Lock from Inside Yes Yes Daylight Saving Yes Yes Lock Out Function Yes Yes User Key Assignment Method Software + Programming Key Keypad Software Package Yes (Optional)
Pack List: 1. Front Handle 2. Back Handle 3. Front Lock 4. Back Lock 5. Accessory Box • Latch • Cylinder • Screws

Page 7 of 36
Door Prep Parts List
1 iButton Reader 9 Inside Mounting Plate 2 Keypad 10 Batteries Housing Cover 3 Outside Lock Housing 11 Inside Lock Housing 4 Outside Lever 12 Inside lever 5 Override Cylinder 13 Spindle 6 Outside Gasket 14 Strike Plate 7 Latch 15 Dust Boot 8 Inside Gasket

Page 8 of 36
Eternity IV Installation Instruction Step 1. Install the latch
• Insert the latch into 1″ hole on edge of the door.
• Secure the latch in place with two screws.
Fig. 1 Step 2. Install outside lock housing
• Place the outside gasket (if required) on back of the outside lock housing prior to the assembly; align the gasket along the edge of the lock housing.
• Insert the square spindle into the center hub and turn the spindle until it locks. Ensure that the Dot on center hub is point to left.
• Place the outside lock
housing against the door, feed the power plug through the 2 1/8 inch door hole.
Fig. 3 Step 3. Install inside mounting plate
• Place the inside gasket (if required) on the mounting plate, and align the inside gasket with the position hole.
• Feed the power plug through the small hole on the mounting plate.
• Place the mounting plate against the door, and secure the mounting plate attach to outside lock housing with three screws.
Fig. 4
Step 4. Install inside lock housing
• Plug the power cable into the inside lock housing.
• Place inside lock housing on top of the mounting plate,
• Ensure the square spindle into inside lever hub. Secure the inside lock housing with two screws.
Fig. 5 Step 5. Install inside lever door handle. Fig. 6 Step 6. Install outside lever door handle
• Ensure override shaft inside the cylinder housing is in vertical position (use flat screw driver to adjust the position when needed)
Fig. 7
• Place the key cylinder into the outside lever door handle, insert the manual key to the cylinder and turn clockwise 90 degrees.
• Guide the cylinder into the cylinder housing and snap the lever door handle into the lever catch pin
• Turn the manual key counter clockwise 90 degree and pull the key out
Step 7. Install Strike plate
• Inset the dust boot into the doorframe.
• Place the strike plate over the dust boot.
• Secure the plate in place with two screws.
Fig. 8

Page 9 of 36
V. Eternity V Datasheet (Medium Duty keypad Lock)
Hardware Spec PARAMETER DETAIL Weight (Lock only) 4.2 Lbs Working Current 250 mA Idle Current 15 µA Motor Running Time 0.4 Second Working Voltage 4.2-6.4V Low Battery Warning 4.2V Power Source 4 AA Alkaline Battery Keypad Weather Proof Keypad Handle Non handed Door Thickness 1 3/8" to 2" Keyway SC 6 Pin Dimension (1ps) 10 x 8 x 4 ½” Dimension (8pcs/box) 16 x 10 ½ x 19” Package Weight (1) 5 Lbs Weight (8pcs/Box) 40 Lbs
Software Spec
Description Software Non-software Audit Trail Yes. 4,000 No Users 800 299 Timed Operation Yes Yes Remote Access Yes Yes Storehouse/Classroom Mode Yes Yes One Time User Yes Yes Software Package Yes No Lock from Inside No No Set Up Method Software Keypad Daylight Saving Yes Yes Lock Out Function Yes Yes
Mortise Spec
3/4" throw heavy duty deadbolt with anti-saw hardened pins Rustproof heavy duty 2 3/8" backset lock case Individual spring to prevent lever sag, easily reversible Forged brass lever handles exceed requirements of ADA Auxiliary latch bolt Heavy Duty 1/2" latch bolt with anti-friction latch, easily reversible Interconnected Deadbolt Mortise: While unlocked turn the handle up to enable (lock) the deadbolt, or turn the handle down to disable (unlock) the deadbolt
Ordering Information:
PART DESCRIPTION PART DESCRIPTION E5-SW E5 Software Lock D-1977 Programming Key E5-NS E5 Non-Software Lock D-1994/1904 Clock Key D-MC Master Cylinder D-1990 User Key USBPCA/UIBPCR Programming Encoder IKeypad Software CD
Interconnected Deadbolt Mortise Turn handle up to lock
Regular Latch Deadbolt

Page 10 of 36
Major Lock Parts
1. Rear Handle 2. Rear Lock housing Screws 3. Rear Housing 4. Battery Plate Screw 5. Battery Plate 6. Rear Rubber Gasket 7. Door 8. Latch 9. Latch Screws 10. Dust Boot 11. Strike Plate 12. Front Lock Fastener Post 13. Square Shaft 14. Front Rubber Gasket 15. Front Lock Housing 16. Position Pin 17. Upper Fastener Post (optional) 18. Attachment Screw (optional) 19. iButton Reader 20. Keypad 21. Override Key Cylinder 22. Front Handle
Accessory Parts List
1. Battery Plate Screw (3)
2. Back Cover Screw (2)
3. Screws (4) 4. Square Shaft (1) 5. Position Pin (1) 6. Fastener Extension (2) 7. Upper Fastener Extension
8. Latch (1)
9. Strike Plate (1)
10. Dust Boot (1) 11. Override Key (2)
12. SC4 Cylinder (1)
13. iButton key (Optional)
Back View Installation
22
21
19
20
Front View Installation

Page 11 of 36
Eternity-V-Installation
Step 1 Insert the latch into door hole. Secure the latch with two screws.
Step 2 Insert the square shaft (A) into the center hub (B) (Fig 1). Insert the position pin into the hole on the center hub to secure the square shaft. Bend the end of position pin around the center hub to secure the pin in place. (Fig 2)
Step 4 Place the front lock housing onto the door, with the rubber gasket (E) between the door and lock housing. Feed the power plug (F) through the hole (Fig 4).
Step 3 Screw in and tighten the two fastener extensions (C) into the front lock fastener posts located on both side of the center hub. Attach and tighten the upper fastener extension (D) if needed (Fig 3). Note: The upper fastener extension (D) is optional.
Fig 2
Fig 1 Enlarged Fig 1
A
B
Fig 4
F
E
Fig 3
C
D (optional)
C

Page 12 of 36
Step 6 Install batteries, and plug in the power cable. Secure the back lock housing onto the battery plate. Fasten with 2 screws. Press both catch pin in and snap the rear handle into drive shift (Fig 6)
Step 5 Attach the battery plate onto the door, with the rubber gasket between the door and battery plate. Make sure the power plug go through the hole on the plate. Secure the battery plate to front lock fastener post with 2 screws. Fasten upper fastener post (Optional) (Fig 5)
Step 8 Put strike box in doorframe, and then strike plate over it. (Fig 8)
Step 7 Place the override cylinder into front handle housing, insert override key through the hole into cylinder. Turn the override key 90° clockwise. Press both catch pin in and snap the front handle into drive shift. Turn override key 90° counter clockwise and pull the key out. (Fig 7)
Fig 8
Fig 7
Fig 5
Fig 6

Page 13 of 36
Eternity-V-Mortise-Installation
Step 2 Insert the square shaft (A) into the center hub (B). (Fig 1) Insert the position pin into the hole on the center hub to secure the square shaft. Bend the end of position pin around the center hub to secure the pin in place. (Fig 2)
Fig 2
Fig 1 Enlarged Fig 1
A
B
Step 3 Screw in and tighten the two fastener extensions (C) into the front lock fastener posts, located on both side of the center hub. Attach and tighten the upper fastener extension (D) (Fig 3) Note: The upper fastener extension (D) is optional.
Fig 3
D (optional)
C
Step 4 Place the front lock housing onto the door, with the rubber gasket (E) between the door and lock housing. Feed the power plug (F) through the hole (Fig 4).
Fig 4
F
E
Step 1 Insert the lock case into mortise pocket. Secure the lock case with two screws.

Page 14 of 36
Fig 8
Step 8 Install the dust boot with strike plate onto it. (Fig 8)
Step 6 Install batteries, and plug in the power cable. Secure the back lock housing onto the battery plate. Fasten with 2 screws. Press both catch pin in and snap the rear handle into drive shift (Fig 6)
Fig 6
Step 5 Attach the battery plate onto the door, with the rubber gasket between the door and battery plate. Make sure the power plug go through the hole on the plate. Secure the battery plate with 3 screws; fasten to front lock fastener extension post and upper fastener post (Fig 5) Note: upper fastener post is optional.
Fig 5
Step 7 Place the override cylinder into front handle housing, insert override key through the hole into cylinder. Turn the override key 90° clockwise. Press both catch pin in and snap the front handle into drive shift. Turn override key 90° counter clockwise and pull the key out. (Fig 7)
Fig 7

Page 15 of 36
Major Lock Parts 1. Rear Handle 2. Rear Lock housing Screws 3. Rear Housing 4. Battery Plate Screw 5. Battery Plate 6. Rear Rubber Gasket 7. Door 8. Lock case (Mortise) 9. Latch Screws 10. Dust Boot 11. Strike Plate 12. Front Lock Fastener Post 13. Square Shaft 14. Front Rubber Gasket 15. Front Lock Housing 16. Position Pin 17. Upper Fastener Post (optional) 18. Attachment Screw (optional) 19. iButton Reader 20. Keypad 21. Override Key Cylinder 22. Front Handle
Accessory Parts List 1. Battery Plate Screw (3)
2. Back Cover Screw (2)
3. Screws (4) 4. Square Shaft (1) 5. Position Pin (1) 6. Fastener Extension (2) 7. Upper Fastener
Extension 8. Mortise (1) 9. Strike Plate (1)
10. Dust Boot (1) 11. Override Key (2)
12. SC4 Cylinder (1) 13. Allan Wrench (1) (Optional) 14. Allan Screws (2) (Optional)
15. iButton key (Optional)
Back View Installation
22
21
19
20
Front View Installation

Page 16 of 36
Section 2 Eternity Software Guide
1. Software Setup The Eternity Software works the same for both Eternity 4 and Eternity 5. Operating System Eternity software is compatible with Microsoft Windows 98/2000/XP/Vista. All software must be installed using Windows administrator account, but all level Windows users can use the program. Failure to install the applications may result in error messages and an incomplete installation. For Vista users, you may need to run the application each time as an administrator. Installing 1-Wire USB Driver First
1. Insert installation CD. Note: On most computers, the Autorun program should launch automatically. If it does not,
select Start/Run, browse to CD-ROM drive, select the Autorun file. 2. Select 1-Wire USB Driver Installation, the Setup Wizard will guide you through the steps. 3. The License Agreement screen displays. 4. Select I Agree, and then Install to start installation. 5. Select Finish. The 1-Wire USB Driver Installation is complete. 6. Plug the 1-Wire USB device into the usb port on your computer Installing the iKeypad Software 1. Select Eternity Software Installation. The Auto installer will guide you through the steps and create the shortcut –
“Eternity4-ikpad.exe” on your desktop. 2. Select Next until the installation finishes. Login

Page 17 of 36
License Name: Input the name of your company User Name: dallas Password: ibutton Default User Name and Password can be modified but can’t be deleted. Change System Password The default system password is 000000(6 Zeros). It is mandatory to change and remember the facility system password when the user is ready to use this software. It is highly recommended that the system password need to be changed from the default setting for security purpose.
2. Access Control Management I
I. Lock Setup New Lock Set Up Click New Lock Setup Mission button from Mission Management Tab.
This mission will accomplish:
Initialize the lock back to the manufacture default setting. Sets the system password, and real time to the lock. Set Daylight Saving enable or disable Set Lock Mode to normal open or normal close Set LED Blinking or idle

Page 18 of 36
Steps to set up a new lock mission Snap the program key (DS1977) onto the USB blue dot receptor, login to the software and click on the New Lock
Setup icon, and click issue key. Click ok to clear the pop up warning message box. Now take the program key to the lock, hold the reset button on the lock until there are two beeps and a solid green
light; while the led is solid green, touch the program key to the iButton reader on the lock, and there will be two beeps to show that it worked. The lock information will now be on the program key.
Snap the program key back onto the USB blue dot receptor, and click the “Read Key” icon. New lock id number will appear in the retrieve window. Now click the Add Lock icon. (If the lock already exists in the system, the “exist in database” will show “True”, and you can't add the same lock to the system).
Type in a lock name, location, status, and lock type, then click the save button.
Lock Setting is an alternative way to add existing locks to the system. We recommend users keep the lock ID
in file after the new lock setup so that you can manually input lock profile into the system when needed.
Edit An Existing Lock
Select Lock from lock list, click “Modify” button.
In this screen the upper window shows the lock list and the bottom window shows the valid key list for the selected lock.
• Serial ID: The Serial ID can be found from the manufacture package. Serial ID can be also obtained by using the New Lock Setup mission.
Lock status: By manufacture default, the lock status is “No Limit Storeroom Mode.” To change the lock status, Click “Modify”, and then click on underlined “Lock Status”, Time Operation Setting screen will pop up. Highlight the group number, click “Select” button.

Page 19 of 36
II. User Setup Onsite User Setting
Add/Edit user information To add/edit iButton / key code user, click “Add” button in the key setting menu, and following screen will pop up:
To add iButton user, click ok and snap a user iButton key into the encoder. Click on the empty field of “Serial ID”,
the iButton key ID will be detected by the system and automatically entered. If the user key already exists in the system, the software will pop up a warning. No duplicate keys are allowed in one system.
To add key code user, check the “Key Code User” and click ok. Type in user code under Key Code field. Enter the
User profile as follows: • First name: Input the first name of the key owner. • Last name: Input the last name of the key owner. • Status: Active or Inactive (reserve for future use) User. We suggest not deleting any existing user for security reason.
User can change the key status from Active to Inactive for a lost key or employee that left.
• Department: User can either select the pre-input Department name from the pull down list, or input a new name in
the field. The new name will be saved to the Department list once the data saved. • Title, address: Can be entered as the key owner profile; photo of the owner can be uploaded to the program. (These are optional information fields) After input all the users, click “Save” button and all user keys/codes will be stored.

Page 20 of 36
Assign Onsite user to lock Single-lock key Assignment Mission:
This mission is to assign iButton keys and user codes to one lock.
o Select lock from lock list o Change the time shift if needed o Click to change the ‘Selected’ Column for the assigned users to the lock o Snap in programming key o Click “Issue Key” o Complete the mission by touching the programming key to the lock reader, wait till you hear a double beep.
Multiple Lock Assignment This mission is to assign key list to multiple locks. Up to 25 locks can be assigned to each programming key.
Copy Lock Setting This is a very useful tool when multiple locks have identical setting such as key list and/or timetable. After enroll all the locks and users into the system, Set timetable and assign keys/codes to one lock, then use this lock as model lock.
Double click on the field of “Select Model Lock”, and select the lock from the pop up screen. Check the “Selected” boxes and issue the program key. Complete the mission by touching the programming key to each selected lock reader, wait till hear a double beep.
Step1: Select Model Lock from lock list
Step2: Select “Same Key List” or/and “Same Time Table” to be copied
Step3: Select the lock from the list

Page 21 of 36
Remote User Code Setting
Create remote Access Code Click on the “Remote Code” icon, the following screen will show:
Click on Lock Name field, the list of existing locks window will pop up, selects the lock from the list. Fill in the Guest First, and last name. Select the starting date and ending date you want the temporary codes to have access to the lock. You can select pre
defined check in/out time from the list (up to 4 set of check in/out time) Click on the “create code” icon. The 10 digits numerical Access Code will be generated by the software. If the remote
code duration time is more than 30 days, then the access code will be 12 digits. Enter the Access code followed by the # key to unlock the door.
Up to 4 Access Code can be created on each time period. Here are the steps to set a sub-access code (only one allowed per access code)
Press the “*” key till a solid green light appears on the iButton reader. Enter the Access code followed by the # key on the lock keypad. The green light will be flashing. While the light is flashing, punch in a desired code (1 to 6 digits) followed by the “#” key. Now both the access code and sub-access code will open the lock.
Terminate a lost Access Code:
Guest lost the access code, or access code been released to un-authorized party. Going to the lock is required to delete an access code. Below are the detailed steps for deleting an access code.
Click on the “Remote Code” icon. Select the “Delete Code” tab. Input the correct information or click on “Query” to see the previous access codes and select one or more to delete.
Snap in the programming key and click “Issue Key” Touch the programming key to the lock reader until you hear two beeps. The access and sub-access code are now
deleted.
Terminate a lost Access Code Remotely (without software): * 071502 # {access code} # {access code} # Example: To delete the remote code 123456789012, do the following: * 071502 # 123456789012 # 123456789012 #

Page 22 of 36
One Time Service code
Up to 16 one-time service codes can be generated during the same time window. Note: the access codes and service codes are accurate to the hour. Setting an ending time of 3:30 will prevent the code from working any time after 3:00 on that date.
3. Access control Management II
III. Time Setting Time shift, activation/expiration, and exception date settings can be applied to keys by doing a key assignment and selecting the desired settings. Time Shift Setting This function is used to set the restriction time zones for user keys, which prevents unauthorized or unwanted personnel from entering the facility during off-hours. The beginning time and ending time of each day can be added based on user group’s permission. There are 16 Time Shift Groups in total and up to 7 settings in each group. The first group is No Limit. This is a default setting for each new key and it cannot be modified. To add or modify each time zone in a time group: Simply select the group number from the left side window, and click on Add or Modify or Delete button to edit the settings in the right side window. Here is the example for Time Shift Group 2 This company wants to set the Group 2 Shift to access from Monday to Friday 8:00am to 7:00pm, and no access on Saturday and Sunday.
Once the setting is done, click the save button to save the changes. Timed Operation Setting This function is used to set the lock automatically unlocked, locked, storehouse mode, or classroom mode at the setting time. There are 16 Timed Operation Groups in total, and up to 16 settings in each group. The first setting by default is No Limit Classroom Mode (The lock will stay at Passage mode all the time.) The second setting by default is No Limit Storehouse Mode (the lock will stay locked mode all the time). There are four lock statuses the user can choose:

Page 23 of 36
• Storehouse Mode: In this mode, the Lock will lock back in a few seconds (0.1-25.5 seconds). • Classroom Mode: In this mode, the lock does not lock back. The use of a valid iButton or code simply makes the
lock go from unlocked to locked or locked to unlocked. • Lock Mode: In this mode, the lock will automatically lock at the setting time. • Unlock Mode: In this mode, the lock will automatically unlock at the setting time.
The timed operation setting is applied in the “Lock Setting” menu by changing the “Lock Status” section.
Activation / Expiration Date Setting This function is used to set the activation date and expiration date of valid keys. The first group is a default setting as No Limit setting. The rest of groups can be set an activation date and expiration date.

Page 24 of 36
Exception Date Setting This function is used to set restrict access during periods such as holidays, facility shutdowns, vacations. The first group set as No Limit default setting. The holidays can be set as a single day or multiple days. The selected user iButton keys or codes will be restricted from access for all of the exception dates.
IV. Mission Management Click “Mission Management” on the main screen and select “Maintenance Mission” from the drop down menu. Set Parameter Key This mission will set lock parameters, such as LED “Blink”, lock passing time, adjust lock time, and enable “Daylight Saving”. To set the lock parameters, snap the program key into the encoder, press the “Issue Key” button, and then press the program key to the lock until it beeps twice to set the parameters.

Page 25 of 36
Set Time Key This step uses the DS1904 or DS1994 to set the real time of the lock Tip: Other than DS1904/1994 real time key, the DS1977 program key can also set the time of the lock. But program key will cause time delay since programming the mission key and programming the lock will take time. We recommend using the DS 1904/1994 real time key if the programming process takes more than 3 minutes. To set the time, snap the program key into the encoder, press the “Issue Key” button, and then press the program key to the lock until it beeps twice to set the time.
Get Information Key Get Information mission is a useful tool to retrieve the existing lock information, such as: Key list, lock time, Time Setting, lock ID, or Batteries voltage. To get the lock information, snap the program key into the encoder, press the “Issue Key” button, and then press the program key to the lock. The lock will make a series of quick beeps, and when it is done it will do two final beeps; remove the program key and snap it into the encoder. Press the “Read Key” button to read the information.

Page 26 of 36
Lockout Key Lockout forbids all assigned keys/codes from operating the lock. Apply any Lockout key to put the lock in Lockout Mode, and apply again to release the Lockout Mode. To apply the key, snap the program key into the encoder, select open door or close door, press the “Issue Key” button, and then press the program key to the lock to set the Lockout Mode. There are two types of Lockout Modes.
Lockout and Open: Lock will stay unlocked and lockout all users. Lockout and Close: Lock will stay locked and lockout all users.
Multiple locks can be selected in one key.
One-Off key/One-Off Code These are two type of One Time User: one time service key (DS-1977) or codes (up to 10)
One-Off Key Step1: Select locks from Lock List. Step2: Issue key. This key will immediately work on the selected lock one time only. (No need set up on the lock)
One-Off Code Entering 10 One off code in the list, use DS1977 key to issue a programming key and assign the codes to each lock. To set the codes, snap the program key into the encoder, press the “Issue Key” button, and then press the program key to the lock until the lock beeps twice to set the codes. Use code# to open lock.

Page 27 of 36
V. Audit Trial Click “Mission Management” on the main screen toolbars and select “Advanced Mission” from the drop down menu, select “Get Audit Trial”:
1. Snap the program key to the encoder and click on “Issue Key” button. 2. A “Write Get Audit Trail key OK” message will pop up. Click OK to close the screen. 3. Unplug the program key and touch the lock’s iButton reader, you will hear a long series of chirps followed by
two beeps. 4. Snap the program key back to the encoder and click “Read key” button. The read key screen will pop up; the
audit trail records will roll up on the screen. 5. Click ‘Save Data” button, the audit trail records will be saved in the Database.

Page 28 of 36
VI. History Lock Audit History Click “History” and choose “Lock Audit History” from drop down menu, the following screen will pop up:
Here’s how to view the saved data: 1. On “Query By” give the time window of the audit records, and check the key words. 2. On “Order By” check the key words of the records order. 3. Click “Query” button, the records will show on the screen.

Page 29 of 36
4. Click “Export” to save a copy of the audit trail and records the information to an Excel file. Access Code history All the remote temporary codes and one-time service codes will be saved for future reference
Operator Log When select “Operator Log”, the following screen will show:
Using the same method to manage the operator log, and audit the operators’ activity.
Section 3 Non-software Guide This section is for the use of either the Eternity 4 or Eternity 5 without software. If you use the software to setup the lock, then you can no longer use these functions without resetting the lock. Likewise, if you use the programming code to manually setup the lock, you can not use the software with the lock unless you reset and do a new lock setup mission.
Page 30 of 36
I. General Information: • Exit Setting: Enter * to exit the setting procedure, or wait for 10 seconds • Low Battery warning: When the voltage drops below 4.8V, after entering a valid code, the red LED will flash and beep
five times. • Unlock: Green light flashing twice and Beeps twice. • Lock: Red Light flashing three times, and beeps three times. • Reset: To set the lock back to default (123456), press and hold the reset button for about 10 seconds (3 beeps with LED
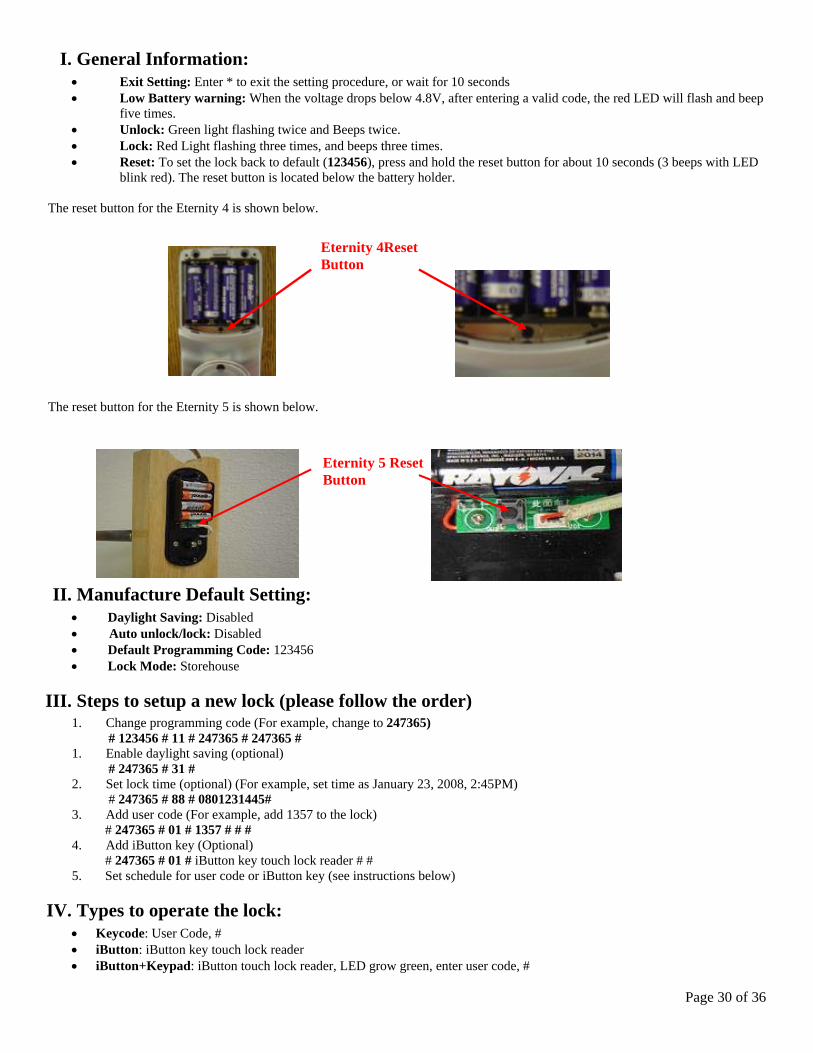
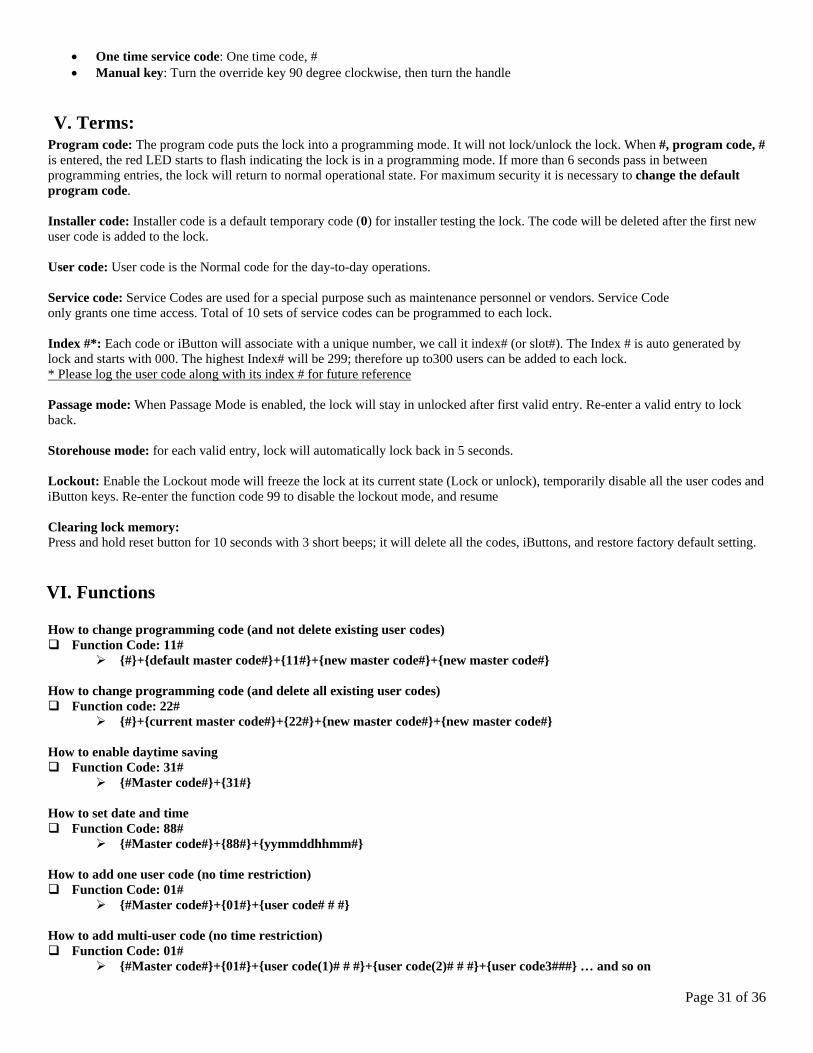
blink red). The reset button is located below the battery holder. The reset button for the Eternity 4 is shown below. The reset button for the Eternity 5 is shown below.
II. Manufacture Default Setting: • Daylight Saving: Disabled • Auto unlock/lock: Disabled • Default Programming Code: 123456 • Lock Mode: Storehouse
III. Steps to setup a new lock (please follow the order) 1. Change programming code (For example, change to 247365) # 123456 # 11 # 247365 # 247365 # 1. Enable daylight saving (optional) # 247365 # 31 # 2. Set lock time (optional) (For example, set time as January 23, 2008, 2:45PM) # 247365 # 88 # 0801231445# 3. Add user code (For example, add 1357 to the lock) # 247365 # 01 # 1357 # # # 4. Add iButton key (Optional) # 247365 # 01 # iButton key touch lock reader # # 5. Set schedule for user code or iButton key (see instructions below)
IV. Types to operate the lock: • Keycode: User Code, # • iButton: iButton key touch lock reader • iButton+Keypad: iButton touch lock reader, LED grow green, enter user code, #
Eternity 4Reset Button
Eternity 5 Reset Button
Page 31 of 36
• One time service code: One time code, # • Manual key: Turn the override key 90 degree clockwise, then turn the handle
V. Terms: Program code: The program code puts the lock into a programming mode. It will not lock/unlock the lock. When #, program code, # is entered, the red LED starts to flash indicating the lock is in a programming mode. If more than 6 seconds pass in between programming entries, the lock will return to normal operational state. For maximum security it is necessary to change the default program code. Installer code: Installer code is a default temporary code (0) for installer testing the lock. The code will be deleted after the first new user code is added to the lock. User code: User code is the Normal code for the day-to-day operations. Service code: Service Codes are used for a special purpose such as maintenance personnel or vendors. Service Code only grants one time access. Total of 10 sets of service codes can be programmed to each lock. Index #*: Each code or iButton will associate with a unique number, we call it index# (or slot#). The Index # is auto generated by lock and starts with 000. The highest Index# will be 299; therefore up to300 users can be added to each lock. * Please log the user code along with its index # for future reference Passage mode: When Passage Mode is enabled, the lock will stay in unlocked after first valid entry. Re-enter a valid entry to lock back. Storehouse mode: for each valid entry, lock will automatically lock back in 5 seconds. Lockout: Enable the Lockout mode will freeze the lock at its current state (Lock or unlock), temporarily disable all the user codes and iButton keys. Re-enter the function code 99 to disable the lockout mode, and resume Clearing lock memory: Press and hold reset button for 10 seconds with 3 short beeps; it will delete all the codes, iButtons, and restore factory default setting.
VI. Functions How to change programming code (and not delete existing user codes)
Function Code: 11# {#}+{default master code#}+{11#}+{new master code#}+{new master code#}
How to change programming code (and delete all existing user codes)
Function code: 22# {#}+{current master code#}+{22#}+{new master code#}+{new master code#}
How to enable daytime saving
Function Code: 31# {#Master code#}+{31#}
How to set date and time
Function Code: 88# {#Master code#}+{88#}+{yymmddhhmm#}
How to add one user code (no time restriction)
Function Code: 01# {#Master code#}+{01#}+{user code# # #}
How to add multi-user code (no time restriction)
Function Code: 01# {#Master code#}+{01#}+{user code(1)# # #}+{user code(2)# # #}+{user code3###} … and so on

Page 32 of 36
How to add one user access code (with time restriction)
Function Code: 01# {#Master code#}+{01#}+{user code#}+{yymmddhhmm#(start time)}+{yymmddhhmm#(ending time)}
How to add multi-user code (with time restriction)
Function Code: 01# {#Master code#}+{01#}+{user code#(1)}+{yymmddhhmm#(start)}+{yymmddhhmm#(ending time)} + {user
code#(2)}+{yymmddhhmm#(start)}+{yymmddhhmm#(ending)} …and so on How to add one iButton key (no time restriction)
Function Code: 01# {#Master code#}+{01#}+{touch iButton # #}
How to add multi-user iButton key (no time restriction)
Function Code: 01# {#Master code#}+{01#}+{iButton(1)# #}+{iButton(2)# #} …and so on
How to add user code + iButton key as dual user (no time restriction)
Function Code: 01# {#Master code#}+{01#}+{user code#}+{touch iButton# #}
(To access door: touch “iButton key” + “user code #”) How to add one iButton key (with time restriction)
Function Code: 01# {#Master code#}+{01#}+touch {iButton}+{yymmddhhmm#(start time)}+{yymmddhhmm#(ending time)}
How to add multi-iButton key (with time restriction)
Function Code: 01# {#Master code#}+{01#}+touch {iButton key(1)}+{yymmddhhmm#(start)}+{yymmddhhmm#(end time)}+ touch
{iButton key(2)}+{yymmddhhmm#(start)}+{yymmddhhmm#(end time)} …and so on How to disable one user code or iButton key with index#
Function Code: 02# {#Master code#}+{02#}+{index #}
How to enable one user code or iButton key with index#
Function Code: 03# {#Master code#}+{03#}+{index code#}
How to enable passage mode and schedule (lock back when the passage mode end)
Function Code: 15# {#Program#}+{15#}+{Schedule}+{#}+{begin time & ending time#}
How to disable passage mode
Function Code: 16# {#Master#}+{16#}
How to enable LED blink light (on & off)
Function Code: 18# {#Master code#}+{18#}
How to disable daytime saving
Function Code: 32# {#Master code#}+{32#}
How to set up one time service code (up to 10 service codes)
Function Code: 33# {#Master code#}+{33#}+{service code(1)#}+ {service code(2)#}+… and so on

Page 33 of 36
How to delete user code or iButton key with index # Function Code: 44#
{#Master code#}+{44#}+{index#} How to delete one user code / iButton key (without index number)
Function Code: 46# {#Master code#}+{46#}+{user code#} (or iButton key)
How to de-active user code / iButton key (without index number)
Function Code: 48# {#Master code#}+{48#}+{user code} (or iButton key)
How to In-active user code or iButton key without index number
Function Code: 47# {#Master code}+{47#}+{user code} (or iButton key)
How to enable auto-unlock function
Function Code: 64# {#Master code#}+{64#}
How to setup auto-unlock time (it will auto unlock the door everyday at assigned time)
Function Code: 63# {#Master code#}+{63#}+{HHMM#}
How to disable auto-unlock function
Function Code: 65# {#Master code#}+{65#}
How to enable auto-lock function
Function Code: 67# {#Master code#}+{67#}
How to setup auto-lock time (it will auto lock the door everyday at assigned time)
Function Code: 66# {#Master code#}+{66#}+{HHMM#}
How to disable auto-lock function
Function Code: 68# {#Master code#}+{68#}
How to enable / disable Lock-out (lock out all users if enabled)
Function Code: 99# {#Master#}+{99#}
How to program schedule week & time
Function Code: (45#) 1st enable daylight saving 2nd set up date & time (use 88# function code) 3rd adding user code or iButton key in advance (see above how to add user code & iButton) 4th program schedule (as below)
Weekly Chart Sun Mon Tue Wed Thu Fri Sat
0 1 2 3 4 5 6 Formula: {#master code#}+{function code#}+{user code# or iButton}+{select week number#}+{begin time & ending time#} • How to program schedule with an “user code”
Example: {#23456# + 45# + 2222# + 135# + 08301730#}

Page 34 of 36
#23456# 45# 2222# 135# 0830 1730# Master code Function code User code Mon/Wed/Fri Beginning time
4. Ending time
0800=8:00AM 1730=5:30PM
Section 4 Case Study University Park Business Center, Denton, TX Problem: The Luxury Home Builders is one of the largest custom home / office builders in north Texas. One of the examples is the University Park Business Center. Since the business center is designed for leasing to various business owners, Contractors, and local churches, access control becomes a big issue for them. Solution: iButton Lock and Door Controller. The Builder selected iButton lock for its versatility, increased security features, and ease of key management. With addition of Eternity Lock Management system, security has vastly improved. The inherent problems of maintaining a mechanical key system, including re-keying and changing core, are tasks relegated to the past. Base on the builder’s requirement, we divided the whole project into 5 different applications: Main Entry: Set Lock to Classroom mode at 8:00AM, Monday to Friday, and set the lock back to storehouse mode, and lock the lock at 5:00PM, Monday to Friday. Step 1: Time Setting, set the Timed Operation group 3 from Monday to Friday, 8:00am classroom mode. 4:59pm to Storehouse mode. 5:00pm, Lock mode. Here is the timetable for the lock: Begin Time Lock Status Sun Mon Tue Wed Thu Fri Sat 8:00:00 AM Classroom Mode True True True True True 4:59:00 PM Storehouse Mode True True True True True 5:00:00 PM Lock Mode True True True True True *Saturday and Sunday will stay on Storehouse Mode base on the last action of the lock. Step 2: Edit Lock property at Lock Setting. Change the Lock Status to Timed Operation Group3. Step 3: Select maintenance mission and Set Time Table Key and select the Entry lock from field Step 4: Issue Program Key. Step 5: Take Program Key to the Entry lock. Touch and hold it to the Reader. You will hear a series of chirps followed by two beeps. Passage Door: Between the two buildings, the passage door will stay open during the office hours, and stay in storehouse mode after hours and Weekends. Only the property owner and facility manager have the unlimited right. Here is the setting for the lock: Begin Time Lock Status Sun Mon Tue Wed Thu Fri Sat 7:59:00 AM Classroom Mode True True True True True 8:00:00 AM Unlock Mode True True True True True 4:59:00 PM Storehouse Mode True True True True True 5:00:00 PM Lock Mode True True True True True *Saturday and Sunday will stay closed. Exit Door: Only the property owner and facility manager have the right to enter these doors from outside. Conference and Activity Rooms: The local Church rent the rooms for the evening and weekend Bible study and worship. From 6:30PM to 10:00PM, Monday to Friday, Saturday from 1:00PM to 10 PM, and Sunday from 8:00AM to 9:00PM.

Page 35 of 36
Step 1: Time Setting, set Time Shift 3 from Monday to Friday, 6:30PM to 10:00PM, Saturday from 1:00PM to 10:00PM, and Sunday from 8:00AM to 9:00PM. Here is the timetable for the keys: Begin Time End Time Day of Week 6:30:00PM 10:00:00PM Monday 6:30:00PM 10:00:00PM Tuesday 6:30:00PM 10:00:00PM Wednesday 6:30:00PM 10:00:00PM Thursday 6:30:00PM 10:00:00PM Friday 1:00:00PM 10:00:00PM Saturday 8:00:00AM 09:00:00PM Sunday Step 2: Edit the Keys property in Key Setting. Set the Time Shift group to Time Shift 3. (Set expiration date if needed) Step 3: Use Key Management Mission, assign Keys to Locks. Step 4: Issue Program Key. Step 5: Take Program Key to the Lock. Touch and hold to the Reader. You will hear a series of chirps followed by two beeps. Office Rooms: Base on the usage of the offices, we set different timetables for each individual office and time shift for the users, also we set Expiration Date to the contractors’ keys.
Section 5 Trouble Shooting Guide Problem
Possible Reason Solution
iButton Key is not working
It’s a time restrict key
1. Check Time Shift setting 2. Use “Get Lock Information Key” to see if this key is in the list, and if the internal clock is correct
Red light is on, and three beeps
Batteries low 1.Change Batteries and 2. Reset the lock time
Green light is on and two beeps, but motor is not running
No power to lock motor
Make sure the motor wire is firmly connected to the PCB
Temporary Key Code is not working
Access code is expired or lock time off
Check the expiration date on the access code and time inside lock
Lock doesn’t accept any valid iButton key
Lock is in Lockout Mode
Issue a new Lockout Key to release the lockout mode
Will changing battery erase the key list
NO The key list and timetable are stored inside the flash memory, disconnecting the batteries can’t erase the non-volatile, solid-state flash memory.
After changing the battery. Temporary code stop working
Internal Time is lost
Do a Time Key to adjust internal time
If you need additional support, please contact your local distributor or at 1-866-241-9874

Page 36 of 36
Warranty Registration Form Customer Information: Date Purchased: Purchase From (company name): Model: Serial Number: First Name: Last Name: Daytime Phone: E-mail: Shipping Address: City: State: Zip Code:
--------------------------------- -------------------------------- --------------------------- Mail Registration Form to:
Inc Attn: Registration Dept
PO Box 250128 Plano, TX 75025 ____________
Warranty and RMA Guidelines
Receiving Your Order 1. Upon receipt of your new merchandise, please inspect carefully as to the contents and condition. All claims for damaged or missing items MUST be reported to within five (5) business days upon receipt of merchandise. In the event your package arrives damaged, it is the responsibility of the customer to contact the carrier to inspect the package to assure full refund/replacement. All packaging MUST be retained until the problem has been resolved. 2. Carefully unpack and inspect all merchandise. Please DO NOT damage the manufacturer's packaging. DO NOT throw away any material included with the package until you are absolutely certain the product has not been damaged. We cannot accept merchandise for return with incomplete or damaged or missing collateral material. 3. Maintain your Invoice. Read all instruction manuals BEFORE testing your equipment. 4. accepts neither responsibility nor liability for any consequential or incidental damages resulting from the installation or operation of any merchandise purchased from us. Return/Exchange Policy NO RETURNS WILL BE ACCEPTED WITHOUT R.M.A# (Return Merchandise Authorization Number) You can return or exchange, excluding any shipping and handling charge, within a period of thirty (30) days for lock merchandise and fourteen (14) days for accessories, if you are not satisfied with the products. If defective, items may be exchanged for the same model only. Special Order items are not returnable. will not accept any returns or exchanges on Batteries, Memory Chips, User Keys or any other consumable products. Inc. Basically does not take ADVANCE SHIP or CROSS SHIP unless otherwise approved by authorization within 1 year of purchase. Prior to returning any item, YOU MUST call Customer Service for pre-approval RMA number. All merchandise purchased from is sold in its original factory packaging with all contents as supplied to us by the manufacturer. Items can be returned only if in original packaging, same new condition as sold with literature/instructions. Place the manufacturer's box into a shipping box. Please do not put any stickers or labels on the original manufacturer's packaging. Please ship the items back to us with freight prepaid. do not responsible for lost or damaged packages. Attach a copy of original invoice with freight pre-paid for Warranty / RMA service. If any of the above conditions are not met, reserves the right to either refuse the return or to charge a restocking fee for not less then 15%. Warranties Most items sold by are covered by a manufacturer's one-year parts warranty from the purchasing day. (Labor is not included). Technical Assistance Hotline: 866-241-9874 As part of our continuing commitment to all our customers, 's technically proficient sales associates can guide you in determining what products best solve your situations. With their combined experience, we're confident that our Tech-Associates have the background and talent to help you narrow your choices to the precise items that best suit your particular requirement. WARRANTY DOES NOT INCLUDE LABOR, TRAVEL CHARGES, OR ANY OTHER COSTS INCURRED FOR REPAIR, REMOVAL, INSTALLATION, SERVICING, DIAGNOSING OR HANDLING OF EITHER DEFECTIVE PARTS OR REPLACEMENT PARTS