essential photo techniques - media.8ch.net · photography and start getting great shots ......
TRANSCRIPT
How to:� Control depth-of-field� Use the rule-of-thirds� Get sharper results� Make the most of flash…and lots more!
techniquesPhoto
explained
Essential
IN ASSOCIATION WITH
PM APRIL SUPP-001:Layout 1 19/2/09 16:06 Page 1
emember when you first started taking pictures? I can.I went out with my first SLR (a Miranda Automex III) with somany photographic techniques racing around my head thatI didn’t know which one to use when. Inevitably, I ended up
with a right load of dross!It’s for that very reason that when we hatched a plan for this
second in a series of three beginner-friendly supplements, wewanted to cover all the key photographic techniques that no self-respecting snapper should be without. Contained within these pagesare, among other things, the secrets to depth-of-field, the facts youneed to know for great composition and a demystification ofapertures and shutter speeds. If you’re new to picture-taking,this supplement will have you taking better picturesin no time. If you’re an old photographic hand,this is a great opportunity to brush up onyour techniques.When you’ve read it, please let
us know what you think. You cancontact me via email, [email protected], but I’d alsoencourage you to visit ournew-look website. Register atwww.photographymonthly.com andyou’ll be able to upload pictures toyour own gallery, comment in ourforums and pick up a whole loadof extra tips and techniques.You can also download our first
supplement, MasterYour DSLR inMinutes, if you missed it on thenews-stand.I’ll see you next month.
Roger Payne, Editor
WelcomeR
Use this supplement to master the basics ofphotography and start getting great shots
Photography Monthly,The Mill, Bearwalden BusinessPark, Wendens Ambo, SaffronWalden, Essex CB11 4GBPhone: 01799 544246 editorial01799 544219 advertising
EMAIL:[email protected]
WRITTEN & ILLUSTRATED BYLiz Walker and Julian LassCOVER IMAGE Colin VarndellART EDITOR Kevin ReedSUB EDITOR Lisa Clatworthy
AD DIRECTOR Sam Scott-Smith
� Photography Monthly is published on thesecond Thursday of every month by ArchantSpecialist, The Mill, Bearwalden Business Park,Saffron Walden, Essex CB11 4GB. � No part ofthis magazine can be used without prior writtenpermission of Archant Specialist. ISSN 1473-4966.� Photography Monthly is a Registered TradeMark of Archant Specialist Ltd. � Editorial contentdoes not necessarily reflect the views of thepublisher. � The publisher accepts noresponsibility for errors contained within thepublication. � All advertisements that arepublished in the pages of Photography Monthlymagazine, the creative content of which, in wholeor part, has been written, designed or producedby employees of Archant, remains the copyrightof Archant and may not be reproduced withoutthe written consent of Archant.
PM APRIL SUPP-003:Layout 1 19/2/09 16:10 Page 3
4 PHOTOGRAPHY MONTHLY
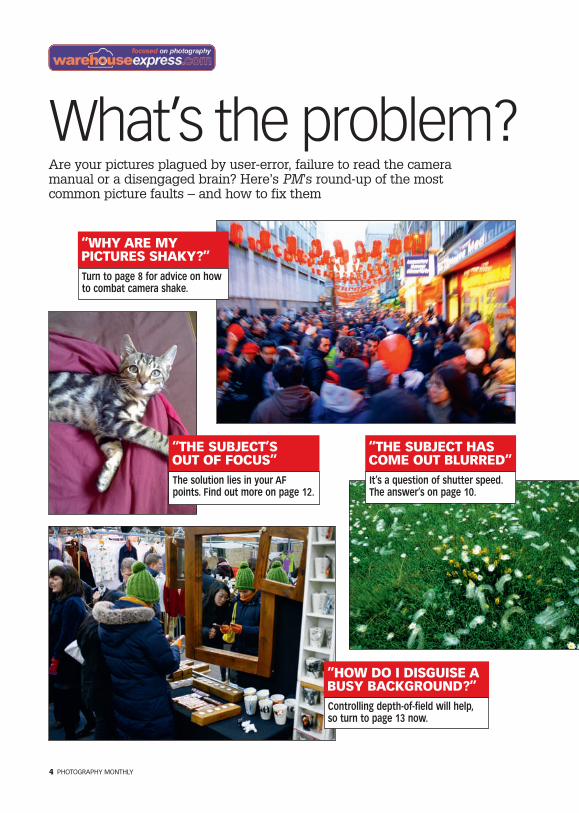
What’s the problem?Are your pictures plagued by user-error, failure to read the cameramanual or a disengaged brain? Here’s PM’s round-up of the mostcommon picture faults – and how to fix them
“WHY ARE MYPICTURES SHAKY?”Turn to page 8 for advice on howto combat camera shake.
“THE SUBJECT HASCOME OUT BLURRED”It’s a question of shutter speed.The answer’s on page 10.
“THE SUBJECT’SOUT OF FOCUS”The solution lies in your AFpoints. Find out more on page 12.
“HOW DO I DISGUISE ABUSY BACKGROUND?”Controlling depth-of-field will help,so turn to page 13 now.
PM APRIL SUPP-004-007:Layout 1 19/2/09 10:14 Page 4
PHOTOGRAPHY MONTHLY 5
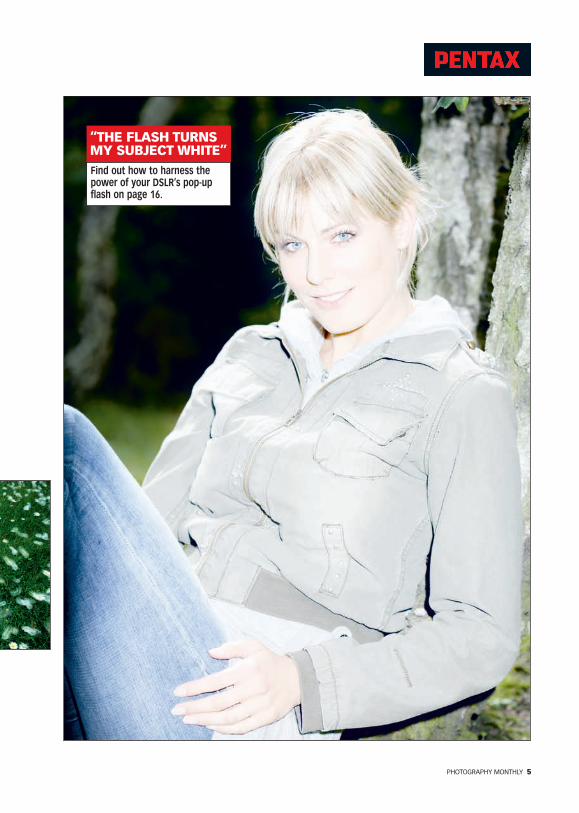
“THE FLASH TURNSMY SUBJECT WHITE”Find out how to harness thepower of your DSLR’s pop-upflash on page 16.
PM APRIL SUPP-004-007:Layout 1 19/2/09 10:14 Page 5
6 PHOTOGRAPHY MONTHLY
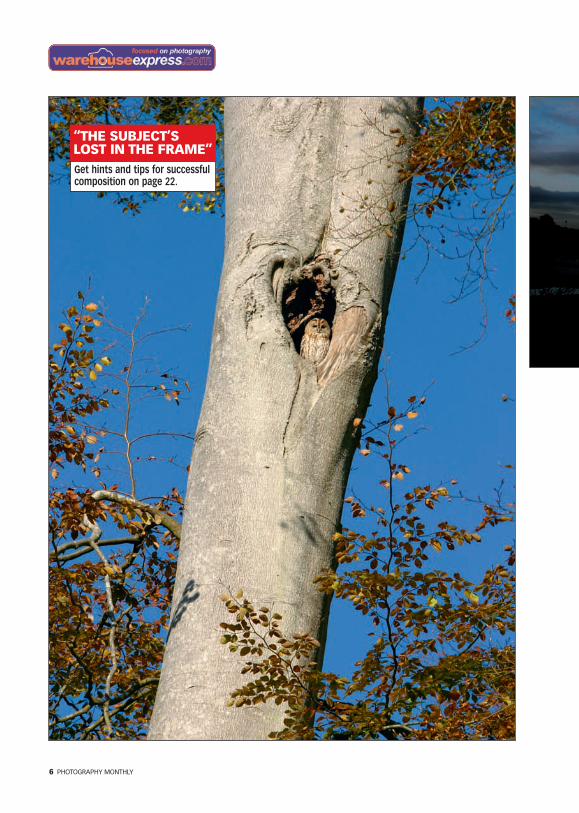
“THE SUBJECT’SLOST IN THE FRAME”Get hints and tips for successfulcomposition on page 22.
PM APRIL SUPP-004-007:Layout 1 19/2/09 10:15 Page 6
PHOTOGRAPHY MONTHLY 7
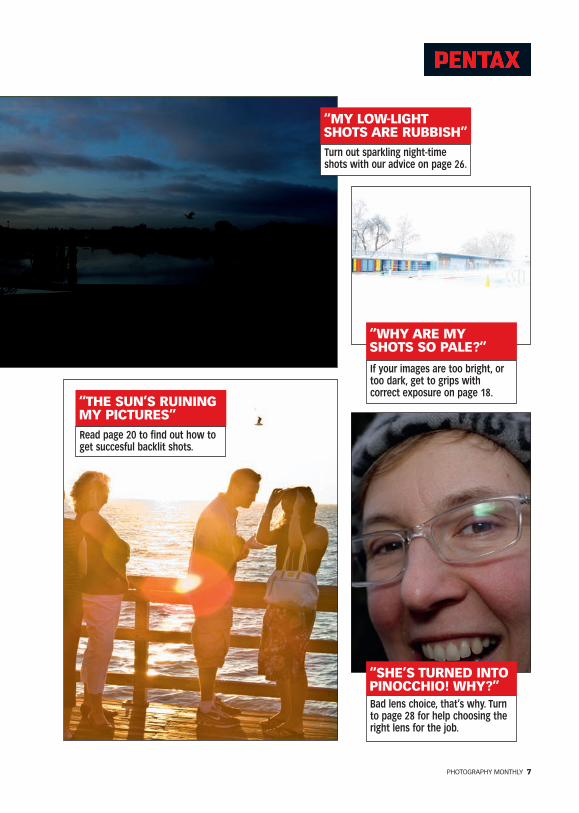
“WHY ARE MYSHOTS SO PALE?”
If your images are too bright, ortoo dark, get to grips withcorrect exposure on page 18.
“MY LOW-LIGHTSHOTS ARE RUBBISH”Turn out sparkling night-timeshots with our advice on page 26.
“THE SUN’S RUININGMY PICTURES”Read page 20 to find out how toget succesful backlit shots.
“SHE’S TURNED INTOPINOCCHIO! WHY?”Bad lens choice, that’s why. Turnto page 28 for help choosing theright lens for the job.
PM APRIL SUPP-004-007:Layout 1 19/2/09 10:15 Page 7
8 PHOTOGRAPHY MONTHLY
When it comes to taking sharper pictures, it’s useful to know the differencebetween shots suffering from camera shake and those showing signs ofsubject movement or poor focusing.� Camera shake: movement blur occurs across the entire picture area,usually in one direction.
� Subject movement: scene is relatively sharp – with only the subjectlooking soft or blurred (see page 10)
� Poor focusing: main subject is out of focus. Focus point is locked ontoanother part of the image – possibly the background (see page 12).
Say goodbye tocamera shake
What causes camera shake?If you see signs of camera shake inyour pictures it simply means you’reusing a shutter speed that’s too slow tohold the camera steady.Most people can hold an average-
sized DSLR and standard 18-55mmzoom steady at around 1/60sec orfaster. Any slower (say, 1/4sec) andyou’ll start to see camera shake. Thisbecomes more pronounced the longerthe exposure and the longer the lens.If you switch to using a longer lens,
you have a greater risk of camera
shake – not least because telephotozooms (eg. 55-200mm) and superzooms(eg. 18-200mm) tend to weigh more,but also, they magnify the blurry effectsof camera shake more, too.Most modern DSLRs offer some form
of image stabilisation mechanism (seepanel below right), promising up tothree f-stops greater camerasteadiness. This means, with imagestabilisation, you should be able to getsteadier shots at around 1/6sec, using astandard 18-55mm lens.
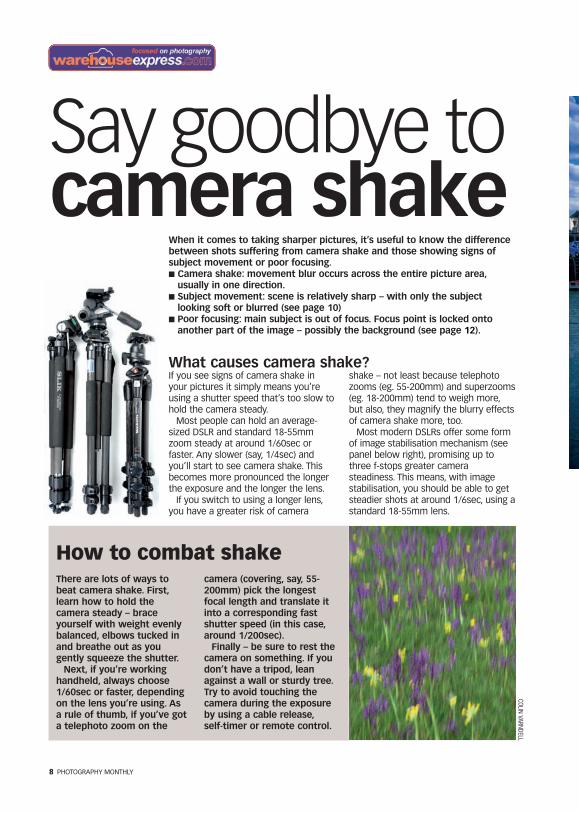
There are lots of ways tobeat camera shake. First,learn how to hold thecamera steady – braceyourself with weight evenlybalanced, elbows tucked inand breathe out as yougently squeeze the shutter.Next, if you’re working
handheld, always choose1/60sec or faster, dependingon the lens you’re using. Asa rule of thumb, if you’ve gota telephoto zoom on the
camera (covering, say, 55-200mm) pick the longestfocal length and translate itinto a corresponding fastshutter speed (in this case,around 1/200sec).Finally – be sure to rest the
camera on something. If youdon’t have a tripod, leanagainst a wall or sturdy tree.Try to avoid touching thecamera during the exposureby using a cable release,self-timer or remote control.
How to combat shake
COLINVARNDELL
PM APRIL SUPP-008-009:Layout 1 19/2/09 10:18 Page 8
PHOTOGRAPHY MONTHLY 9
Manufacturers have devised twomain ways to combat camera shake.
� Mechanical image stabilisation usesan in-camera system (as in Sony’sAlpha cameras) where, as cameramovement is detected, the camera’ssensor moves to compensate –maintaining image projection ontothe image plane. The advantage hereis that the image is stabilizedregardless of which lens is used.
� Optical image stabilisation (eg.Nikon’s Vibration Reduction andCanon’s Image Stabilising lenses).This works by varying the optical path
to the sensor – using a floatingelement inside the lens itself. This ismoved by electromagnets to keepthe lens aligned with the vibrationdetected using gyroscopic sensors.Some lenses have a secondary modethat combats vertical shake only –useful when panning (see page 11).
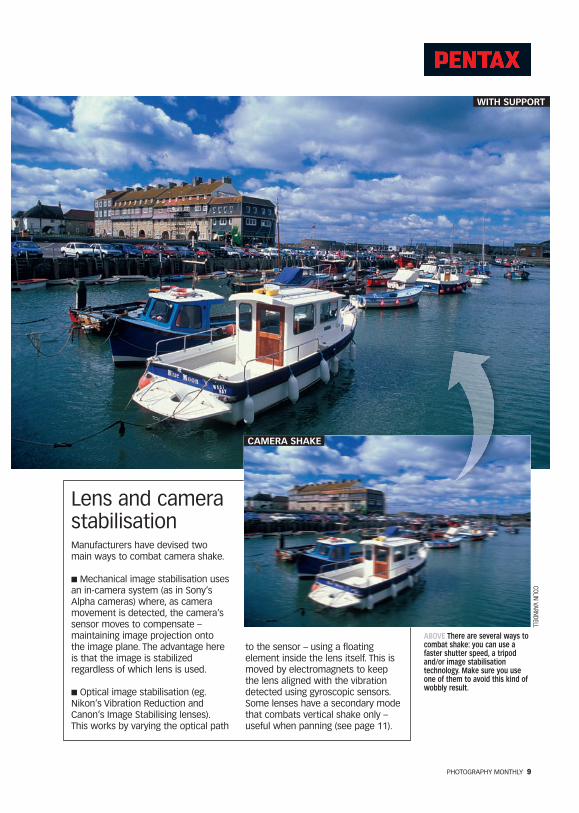
Lens and camerastabilisation
ABOVE There are several ways tocombat shake: you can use afaster shutter speed, a tripodand/or image stabilisationtechnology. Make sure you useone of them to avoid this kind ofwobbly result.
CAMERA SHAKE
WITH SUPPORT
COLINVARNDELL
PM APRIL SUPP-008-009:Layout 1 19/2/09 10:18 Page 9
10 PHOTOGRAPHY MONTHLY
Freezing actionLocate the camera’s exposure modedial and select ‘Tv’ or ‘S’. This refers toshutter-priority mode, which will allowyou to select any shutter speed youwant, while the camera willautomatically select the correctcorresponding aperture to ward offunder- or overexposure (see page 18).Now, try to assess how fast your
subject moves. Action can generally begrouped into four categories (see thechart opposite) with correspondingshutter speeds to freeze it – 1/8000secbeing the fastest shutter speedavailable on modern DSLRs. If you takea picture and find the subject is blurred,keep selecting a faster shutter speeduntil you can freeze it sharp. It’s usuallyjust a matter of trial and error, zoomingin on the image on your LCD monitor toassess sharpness.You may find you can’t select a
fast enough shutter speed tofreeze the action – perhaps thecamera will tell you ‘shutterspeed too fast’ or the shutterspeed will start flashing. Thismeans there’s insufficient light tomake a correct exposure (seepage 18) or that your lensdoesn’t have a sufficiently widemaximum aperture to make a correctexposure. If this happens, try increasingthe ISO setting from ISO 100 to ISO 200or 400.
Blurring movementUsing a deliberately long exposure(sometimes called a ‘time exposure’)turns a moving subject into a blur. Thistechnique works brilliantly with naturalsubjects such as waterfalls, waves andtrees, but also looks great at dusk, formoving cars and fireworks (see p26).
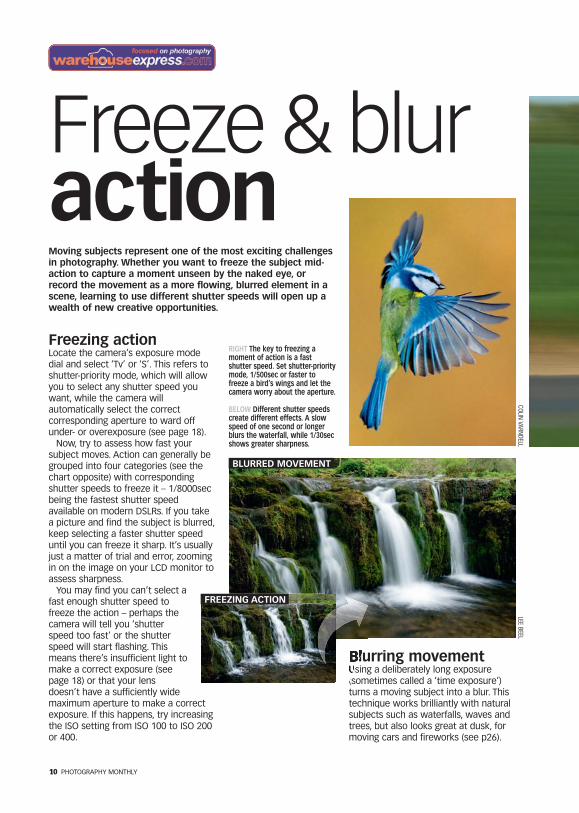
RIGHT The key to freezing amoment of action is a fastshutter speed. Set shutter-prioritymode, 1/500sec or faster tofreeze a bird’s wings and let thecamera worry about the aperture.
BELOW Different shutter speedscreate different effects. A slowspeed of one second or longerblurs the waterfall, while 1/30secshows greater sharpness.
Moving subjects represent one of the most exciting challengesin photography. Whether you want to freeze the subject mid-action to capture a moment unseen by the naked eye, orrecord the movement as a more flowing, blurred element in ascene, learning to use different shutter speeds will open up awealth of new creative opportunities.
Freeze & bluraction
BLURRED MOVEMENT
FREEZING ACTION
COLINVARNDELL
LEEBEEL
PM APRIL SUPP-010-015:Layout 1 19/2/09 16:12 Page 10

PHOTOGRAPHY MONTHLY 11
For best results you’ll need a tripod tokeep your DSLR stock-still during theexposure and make sure the rest of thescene stays nice and crisp. Selectshutter-priority and the slowest shutterspeed available. If the shutter speedflashes, there’s too much light available,so reduce the ISO setting if possible. Ifit’s still too bright, wait for light levels todrop or invest in a neutral density filter.
PanningFreezing a moving subject mid-action isall very well, but can lead to static,boring images. Panning is a moreadvanced technique that introduces anelement of movement-blur to thebackground, while keeping the subjectreasonably sharp.The technique works best with
subjects that move across the picture.Stand with your feet hip-width apartand keep your elbows tucked in. Now,with shutter-priority set, select a slightlyslower shutter speed than you would to
freeze the subject. As the subjectenters the viewfinder, gently squeezethe shutter, smoothly turning your body(like a golf swing) to follow the subjectmovement during the exposure.The viewfinder will black out as you
press the shutter, but if you follow thesubject at the right speed and sameorientation as the line of movement,you’ll end up with an image where thesubject is fairly sharp but thebackground is transformed by thestreaks of your own movement.
ABOVE Grab a piece of the action.To get a sense of movement in ashot, follow the subject throughthe frame. This technique iscalled panning – and practicemakes perfect!
FAST FREEZE PAN BLURMotorsport 1/2000sec 1/1000sec 1/500secBirds in flight 1/500sec 1/250sec 1/125sec
MEDIUMChild on bicycle 1/250sec 1/125sec 1/60secFootball in the park 1/250sec 1/125sec 1/60sec
SLOWPedestrian 1/125sec 1/60sec 1/30secWaterfall/waves 1/125sec n/a 1/8sec
ESTIMATED SHUTTER SPEEDS
PETERATKINSON/DEEPING
CAMERA
CLUB
PM APRIL SUPP-010-015:Layout 1 19/2/09 16:13 Page 11

12 PHOTOGRAPHY MONTHLY
Types of autofocusDSLRs offer three types of autofocus:� Single-shot autofocus allows you tolock the focus for a single image bykeeping the shutter button pressedhalfway down. This is ideal if you wantto compose your subject off-centre inthe frame, as you can lock the focus onthe main subject then recompose.� Continuous focus directs the camerato keep adjusting focus on a movingsubject, as long as you keep it underthe AF focus points and the shutterbutton pressed halfway. This is bestused for action or fast-moving subjects.� Auto-Servo or AI Focus allows thecamera to automatically change fromsingle-shot to continuous focus if itdetects movement in frame.
Soft resultsIf your image looks blurry, it could bedown to the autofocus focusing on thewrong thing – especially if the subject isblurred but the background is sharp. Itcould also be down to a dirty lens or aslow shutter speed, so give your lensesa good clean and make sure the shutterspeed is above 1/60sec, if you don’thave image stabilisation lenses.Remember that to maintain the correctexposure when you increase theshutter speed, you’ll need to choose awider aperture, or raise the ISO speed.
Switch to manualSometimes it’s best to turn yourautofocus off and use manual focus;look for a switch saying ‘AF/MF’ on thecamera body or on the lens barrel.
When a subject is stationary and off-centre, for example, it’s sometimeseasier to set the focus using AF andthen switch to MF to prevent the AF‘hunting’ for the subject. Also, whenyou’re shooting right up close to yoursubject or using a macro lens, depth-of-
field can be so shallow you’re better offswitching to MF and rocking back andforth till the subject comes into focus.Another reason to switch to MF is
that when shooting timid wildlife, thenoise your AF motor makes can startlethe subject. Instead, choose manualfocus, rather than watch your subjecttake flight.
DSLRs use autofocus to measure thedistance between the camera andsubject. Your camera displays littlesquares or brackets in theviewfinder that indicate the areas ituses to focus. When you focus thecamera, you need to place thesesquares over the intended subject.Most DSLRs have between three
and 11 focus points to choose from.A top DSLR may have up to 51 AFpoints (!), but many professionalsprefer to select just the centre ones– because it allows for more control.
UseAF points
“Most DSLRs have upto 11 focus points. A topDSLR may have 51!”
ABOVE For tricky scenes, selectthe focus point yourself. ModernDSLRs allow you to choose whichof the focus points are active;they’re usually identified byanother colour in the viewfinder.
COLIN
VARN
DELL
PM APRIL SUPP-010-015:Layout 1 19/2/09 16:14 Page 12
PHOTOGRAPHY MONTHLY 13
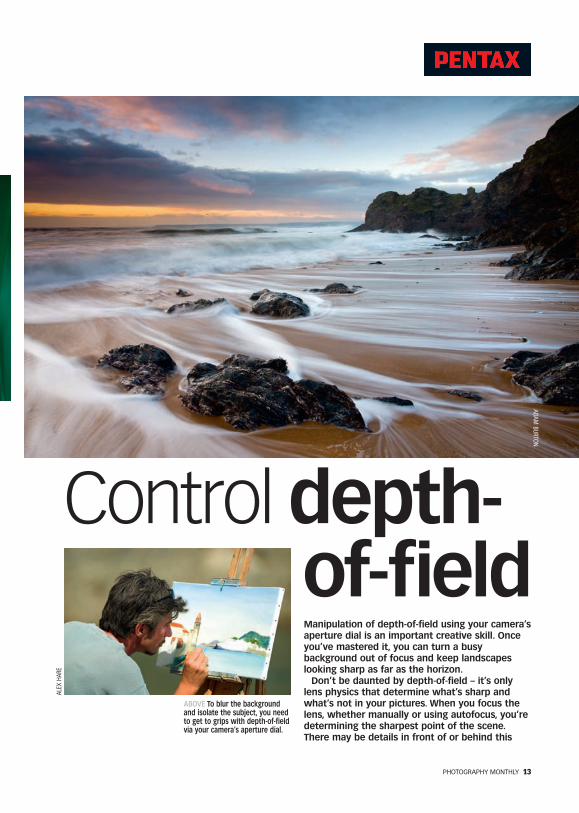
Manipulation of depth-of-field using your camera’saperture dial is an important creative skill. Onceyou’ve mastered it, you can turn a busybackground out of focus and keep landscapeslooking sharp as far as the horizon.Don’t be daunted by depth-of-field – it’s only
lens physics that determine what’s sharp andwhat’s not in your pictures. When you focus thelens, whether manually or using autofocus, you’redetermining the sharpest point of the scene.There may be details in front of or behind this
Controldepth-of-field
ABOVE To blur the backgroundand isolate the subject, you needto get to grips with depth-of-fieldvia your camera’s aperture dial.
ADAMBURTON
ALEX
HARE
PM APRIL SUPP-010-015:Layout 1 19/2/09 10:27 Page 13
14 PHOTOGRAPHY MONTHLY
Focusing at thehyperfocal distance
point that are also acceptably sharp:this sharpness zone in the image iscalled depth-of-field.Another way of putting this is
to say that depth-of-field is thedistance between the nearest sharpobject and the farthest sharp objectfrom the camera.Depth-of-field depends on three
main factors:� the focal length of your lens� the camera-to-subject distance� the f-stop or aperture you choose.
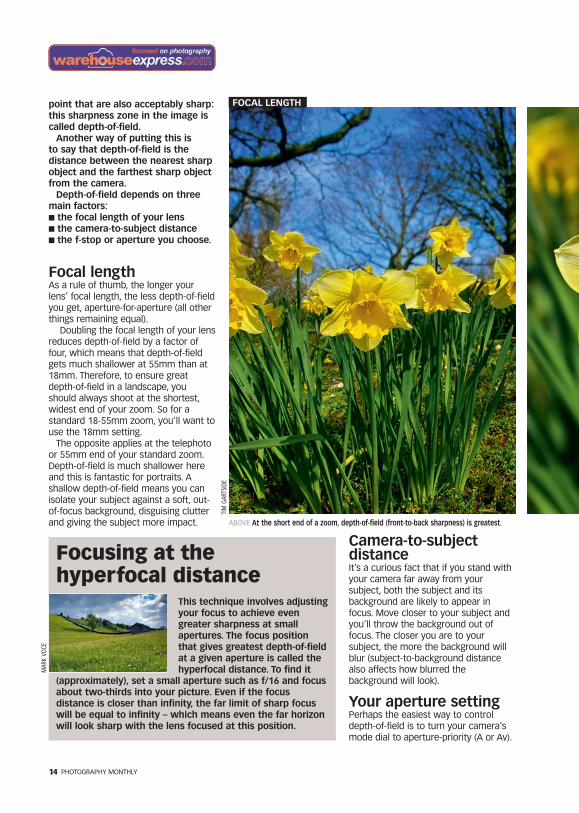
Focal lengthAs a rule of thumb, the longer yourlens’ focal length, the less depth-of-fieldyou get, aperture-for-aperture (all otherthings remaining equal).
Doubling the focal length of your lensreduces depth-of-field by a factor offour, which means that depth-of-fieldgets much shallower at 55mm than at18mm. Therefore, to ensure greatdepth-of-field in a landscape, youshould always shoot at the shortest,widest end of your zoom. So for astandard 18-55mm zoom, you’ll want touse the 18mm setting.The opposite applies at the telephoto
or 55mm end of your standard zoom.Depth-of-field is much shallower hereand this is fantastic for portraits. Ashallow depth-of-field means you canisolate your subject against a soft, out-of-focus background, disguising clutterand giving the subject more impact.
Camera-to-subjectdistanceIt’s a curious fact that if you stand withyour camera far away from yoursubject, both the subject and itsbackground are likely to appear infocus. Move closer to your subject andyou’ll throw the background out offocus. The closer you are to yoursubject, the more the background willblur (subject-to-background distancealso affects how blurred thebackground will look).
Your aperture settingPerhaps the easiest way to controldepth-of-field is to turn your camera’smode dial to aperture-priority (A or Av).
This technique involves adjustingyour focus to achieve evengreater sharpness at smallapertures. The focus positionthat gives greatest depth-of-fieldat a given aperture is called thehyperfocal distance. To find it
(approximately), set a small aperture such as f/16 and focusabout two-thirds into your picture. Even if the focusdistance is closer than infinity, the far limit of sharp focuswill be equal to infinity – which means even the far horizonwill look sharp with the lens focused at this position.
ABOVE At the short end of a zoom, depth-of-field (front-to-back sharpness) is greatest.
FOCAL LENGTH
MAR
KVO
CE
TIM
GARTSIDE
PM APRIL SUPP-010-015:Layout 1 19/2/09 10:27 Page 14
PHOTOGRAPHY MONTHLY 15
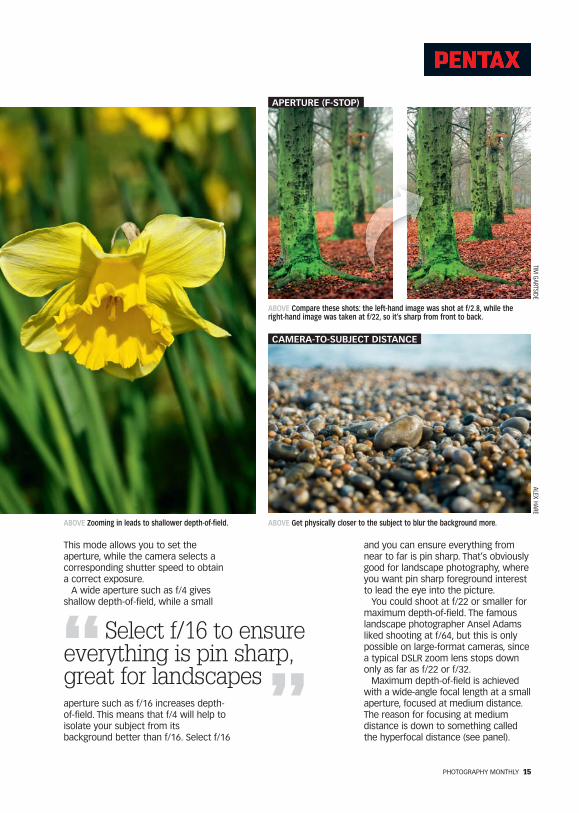
This mode allows you to set theaperture, while the camera selects acorresponding shutter speed to obtaina correct exposure.A wide aperture such as f/4 gives
shallow depth-of-field, while a small
aperture such as f/16 increases depth-of-field. This means that f/4 will help toisolate your subject from itsbackground better than f/16. Select f/16
“Select f/16 to ensureeverything is pin sharp,great for landscapes”
and you can ensure everything fromnear to far is pin sharp. That’s obviouslygood for landscape photography, whereyou want pin sharp foreground interestto lead the eye into the picture.You could shoot at f/22 or smaller for
maximum depth-of-field. The famouslandscape photographer Ansel Adamsliked shooting at f/64, but this is onlypossible on large-format cameras, sincea typical DSLR zoom lens stops downonly as far as f/22 or f/32.Maximum depth-of-field is achieved
with a wide-angle focal length at a smallaperture, focused at medium distance.The reason for focusing at mediumdistance is down to something calledthe hyperfocal distance (see panel).
ABOVE Zooming in leads to shallower depth-of-field. ABOVE Get physically closer to the subject to blur the background more.
ABOVE Compare these shots: the left-hand image was shot at f/2.8, while theright-hand image was taken at f/22, so it’s sharp from front to back.
APERTURE (F-STOP)
CAMERA-TO-SUBJECT DISTANCE
TIMGARTSIDE
ALEXHARE
PM APRIL SUPP-010-015:Layout 1 19/2/09 16:19 Page 15
16 PHOTOGRAPHY MONTHLY
Fill-in flashThis mode makes the flash fireregardless of whether you’re indoors oroutdoors, in bright sunlight or in shade.If it’s a sunny day and you’re taking a
portrait, harsh shadows are cast underthe eyes and nose. Fill-in flash canlighten the shadows, resulting in a morebalanced-looking picture. To select fill-inflash, manually pop the flash into its upposition when you’re taking a picture.Your DSLR may feature flash exposure
compensation for subtler fill-in effects.The button is indicated by the lightningsymbol next to the +/- exposurecompensation symbol. Dial in -1 or -2flash exposure compensation to reducethe amount of flash required.
Red-eye reductionIf you’ve ever taken a picture ofsomeone with a built-in flash unit, you’llhave already come across red-eye. Thisoccurs because the flash reflectsstraight off the subject’s retina insidethe eye and the result is an all-too-familiar demonic countenance. In red-eye reduction mode, the camera eithersends out a beam or else fires severalpre-flashes a moment before exposure,causing the pupils to contract and thusreducing the amount of light reflectedback. You may need to warn yoursubject beforehand though – a red-eyereduction strobe may confuse them!
Flash-and-timeIf you’re taking portraits in low light,you can opt to make a long exposure
alongside the fill-in flash – a techniqueknown as flash-and-time, slow syncflash or sometimes, night portrait mode.This results in a more even balancebetween your flash-lit main subject andthe background, lit by ambient light.First switch to manual exposure mode(M), take a meter reading and select ashutter and aperture combination thatwill expose the existing light levelscorrectly. Now pop up the flash.
Modifying your flashThere are some pitfalls to using yourDSLR’s built-in flash unit. Firstly, if yoursubject stands right up against a wall,the flash will cast dark, well-definedshadows immediately behind the them.To avoid this, bring them a few stepsaway from the wall.
Alternatively, place a diffusionmaterial in front of the flash to softenthe light, such as a piece of tissuepaper or a shop-bought diffuser. Yourcamera’s through the lens (TTL) light
meter will automatically compensatefor the diffuser.Despite all these modes, there are
times when you want to turn the flashoff because you like the quality of theexisting light. This is especially trueearly in the morning or evening – justremember to use a tripod instead.
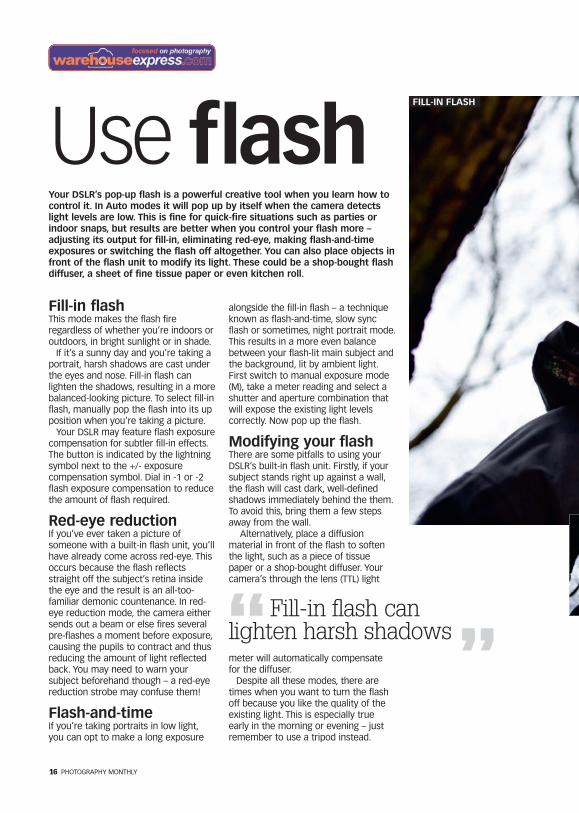
Your DSLR’s pop-up flash is a powerful creative tool when you learn how tocontrol it. In Auto modes it will pop up by itself when the camera detectslight levels are low. This is fine for quick-fire situations such as parties orindoor snaps, but results are better when you control your flash more –adjusting its output for fill-in, eliminating red-eye, making flash-and-timeexposures or switching the flash off altogether. You can also place objects infront of the flash unit to modify its light. These could be a shop-bought flashdiffuser, a sheet of fine tissue paper or even kitchen roll.
Use flashFILL-IN FLASH
“Fill-in flash canlighten harsh shadows”
PM APRIL SUPP-016-019:Layout 1 19/2/09 16:16 Page 16

PHOTOGRAPHY MONTHLY 17
Your camera’s built-inflash is a great way tostart with flashphotography, butbuying a dedicatedflashgun for your DSLRallows for even greaterpower and control.By taking the
dedicated flashgun outof the camera’shotshoe you can gaineven greater flexibility– but you will need
the correctsynchronisationcord (or ‘synclead’), for yourcamera andflashgun. Theadvantage isthat you canpreciselyangle thedirection of the flashfor more flatteringresults, and combatred-eye with ease.
ABOVE Selecting fill-in flashremoves shadows from faces,brightening portraits and creatinga more balanced-looking image.
NO FLASH
Buying a dedicated flashgun
A flashgunoffers morecontrol.
JULIANLASS
PM APRIL SUPP-016-019:Layout 1 19/2/09 10:34 Page 17
18 PHOTOGRAPHY MONTHLY
Aperture-priority modeTo become more aware of exposure, it’sbest to experiment with the semi-automatic modes, aperture-priority (Aor Av) and shutter-priority (S or Tv). Inaperture-priority, you select theaperture while the camera chooses thecorrect shutter speed, and vice versa inshutter-priority. These modes are greatfor learning how shutter speeds andaperture values relate to each other.Try this small experiment. In aperture-
priority, set f/16 and look at the front ofthe lens. As you take a shot, you shouldbe able to see the aperture windowinside close down to a small hole. Nowselect a wide aperture such as f/4. Youwon’t see the aperture close downmuch at all, which shows f/4 is a wideaperture. A wide aperture lets in morelight than a small aperture. Setting awide aperture is useful for low-lightshooting (see page 26), while selectinga small aperture is good for increasingthe depth-of-field (see page 13).
Fast and slow lensesSome lenses have a maximum apertureof f/2 or even f/1.4. These are ‘fast’lenses, because they allow you toselect a faster shutter speed in lowlight. Most zooms supplied with DSLRshave a maximum aperture of f/3.5,which though wide compared to f/16 isslow when compared to a fast lens.
Thinking in f-stopsBoth apertures and shutter speeds aremeasured in ‘stops’ and it’s useful tolearn the standard sequences by heart.� The aperture sequence is usuallymore restricted as it’s determined bythe speed of the lens in use. Fromwidest to narrowest, the sequencegoes: f/2, f/4, f/5.6, f/8, f/11, f/16 andf/22. DSLRs also allow you to choosehalf or third values between these‘f-stops’. For example, the aperturehalfway between f/5.6 and f/8 is f/6.7.� The shutter speed sequence, fromslowest to fastest, goes: 30 seconds, 15,8, 4, 2, 1, 1/2sec, 1/4, 1/8, 1/15, 1/30,1/60, 1/125, 1/250, 1/500, 1/1000,1/2000, 1/4000 and 1/8000. As withapertures, your DSLR selects values
between these full stops, so 1/90sec ishalfway between 1/60sec and 1/125sec.Each f-stop increase in aperture
represents a halving of the light, so bystopping down from f/4 to f/5.6 you’rereducing the amount of light enteringthe lens by a half. If you use aperture-priority, the camera compensates bydoubling the exposure length, goingdown a stop from 1/500sec to 1/250sec.
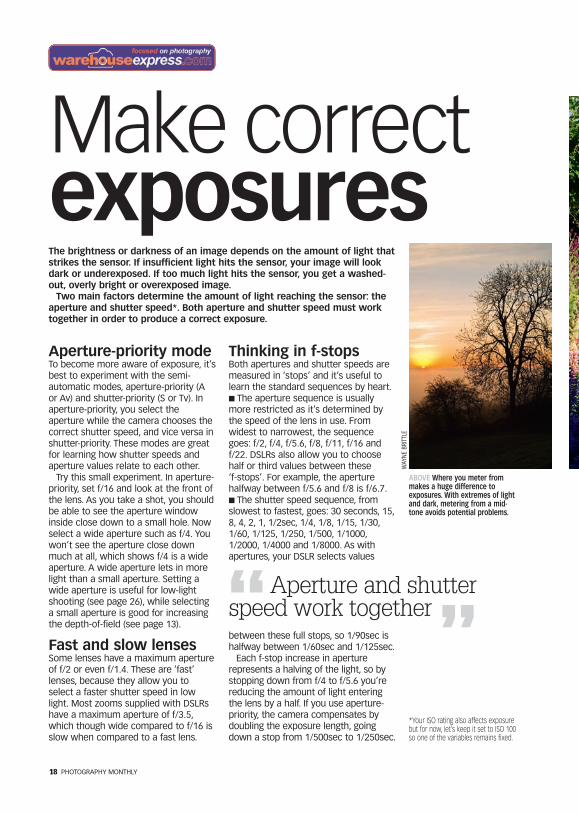
The brightness or darkness of an image depends on the amount of light thatstrikes the sensor. If insufficient light hits the sensor, your image will lookdark or underexposed. If too much light hits the sensor, you get a washed-out, overly bright or overexposed image.Two main factors determine the amount of light reaching the sensor: the
aperture and shutter speed*. Both aperture and shutter speed must worktogether in order to produce a correct exposure.
Make correctexposures
“Aperture and shutterspeed work together”
ABOVE Where you meter frommakes a huge difference toexposures. With extremes of lightand dark, metering from a mid-tone avoids potential problems.
*Your ISO rating also affects exposurebut for now, let’s keep it set to ISO 100so one of the variables remains fixed.
WAY
NEBR
ITTLE
PM APRIL SUPP-016-019:Layout 1 19/2/09 10:34 Page 18
PHOTOGRAPHY MONTHLY 19
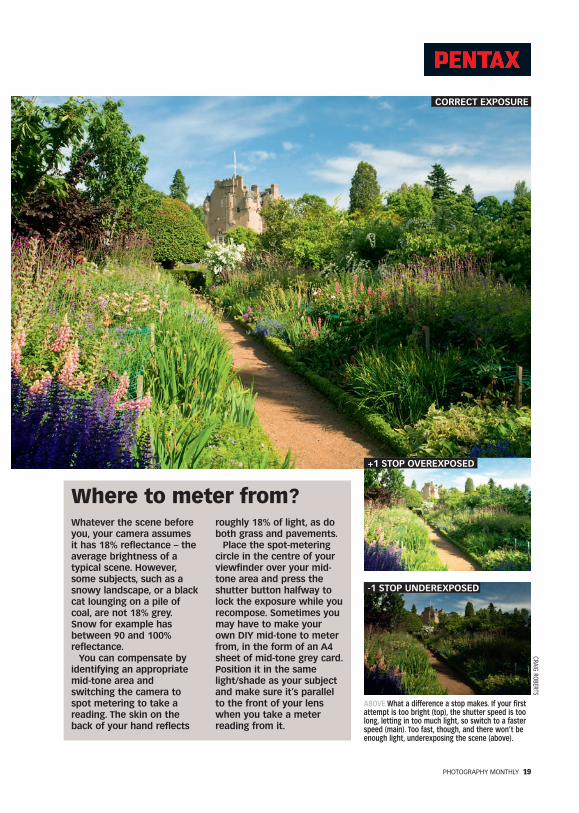
Whatever the scene beforeyou, your camera assumesit has 18% reflectance – theaverage brightness of atypical scene. However,some subjects, such as asnowy landscape, or a blackcat lounging on a pile ofcoal, are not 18% grey.Snow for example hasbetween 90 and 100%reflectance.You can compensate by
identifying an appropriatemid-tone area andswitching the camera tospot metering to take areading. The skin on theback of your hand reflects
roughly 18% of light, as doboth grass and pavements.Place the spot-metering
circle in the centre of yourviewfinder over your mid-tone area and press theshutter button halfway tolock the exposure while yourecompose. Sometimes youmay have to make yourown DIY mid-tone to meterfrom, in the form of an A4sheet of mid-tone grey card.Position it in the samelight/shade as your subjectand make sure it’s parallelto the front of your lenswhen you take a meterreading from it.
Where to meter from?
ABOVE What a difference a stop makes. If your firstattempt is too bright (top), the shutter speed is toolong, letting in too much light, so switch to a fasterspeed (main). Too fast, though, and there won’t beenough light, underexposing the scene (above).
+1 STOP OVEREXPOSED
CORRECT EXPOSURE
-1 STOP UNDEREXPOSED
CRAIGROBERTS
PM APRIL SUPP-016-019:Layout 1 19/2/09 16:17 Page 19
20 PHOTOGRAPHY MONTHLY
Combat flareEver spotted ghostly images in yourshots, or rainbow-coloured rings? This iscalled lens flare and it’s oftenhexagonal in shape as this is the shapeof the lens aperture.When you’re using Live View, lens
flare sometimes appears as a stripeacross the LCD, but doesn’t record likethat. It’s caused by sunlight hitting thefront lens element. You can minimise itby using an inexpensive lens hood, orshading the lens with a hand or card,known in the trade as a ‘flag’. You canalso reduce it by keeping the front ofyour lenses spotlessly clean andremoving dust and greasy fingermarks.If you’re using a lens hood, be sure to
buy the correct one for your lens toavoid vignetting. This is when the hoodsneaks into frame, appearing as darkshadows in the corners; it occursmainly with wide-angle lenses.
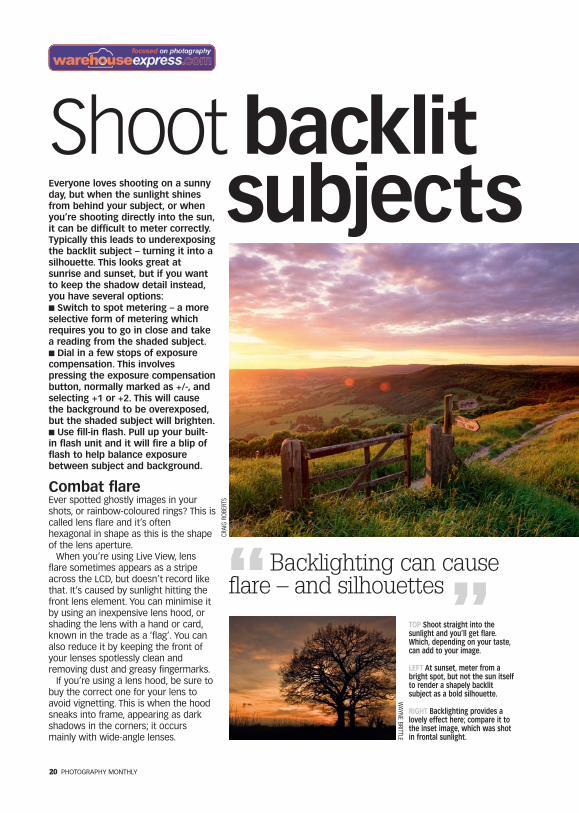
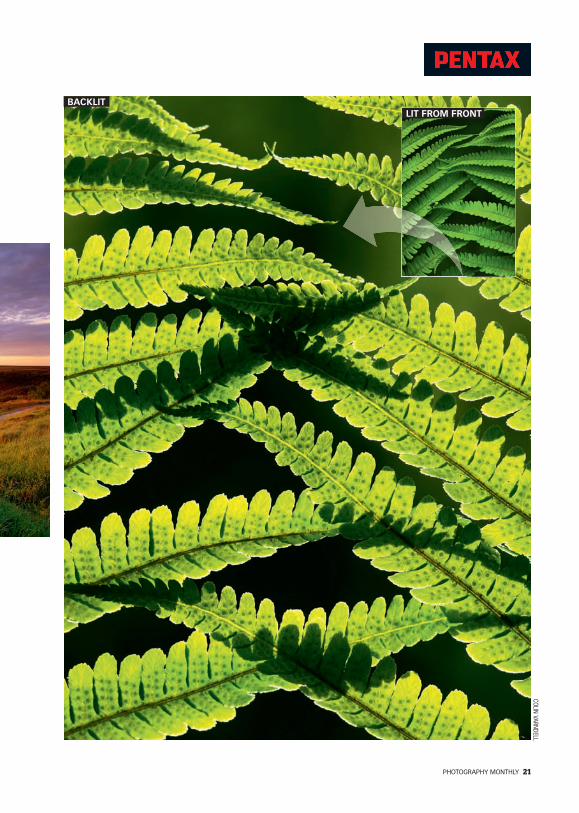
Everyone loves shooting on a sunnyday, but when the sunlight shinesfrom behind your subject, or whenyou’re shooting directly into the sun,it can be difficult to meter correctly.Typically this leads to underexposingthe backlit subject – turning it into asilhouette. This looks great atsunrise and sunset, but if you wantto keep the shadow detail instead,you have several options:� Switch to spot metering – a moreselective form of metering whichrequires you to go in close and takea reading from the shaded subject.� Dial in a few stops of exposurecompensation. This involvespressing the exposure compensationbutton, normally marked as +/-, andselecting +1 or +2. This will causethe background to be overexposed,but the shaded subject will brighten.� Use fill-in flash. Pull up your built-in flash unit and it will fire a blip offlash to help balance exposurebetween subject and background.
Shootbacklitsubjects
“Backlighting can causeflare – and silhouettes”TOP Shoot straight into the
sunlight and you’ll get flare.Which, depending on your taste,can add to your image.
LEFT At sunset, meter from abright spot, but not the sun itselfto render a shapely backlitsubject as a bold silhouette.
RIGHT Backlighting provides alovely effect here; compare it tothe inset image, which was shotin frontal sunlight.
CRAIGRO
BERT
S
WAYNE
BRITTLE
PM APRIL SUPP-020-021:Layout 1 19/2/09 16:20 Page 20
PHOTOGRAPHY MONTHLY 21
BACKLITLIT FROM FRONT
COLINVARNDELL
PM APRIL SUPP-020-021:Layout 1 19/2/09 10:38 Page 21
22 PHOTOGRAPHY MONTHLY
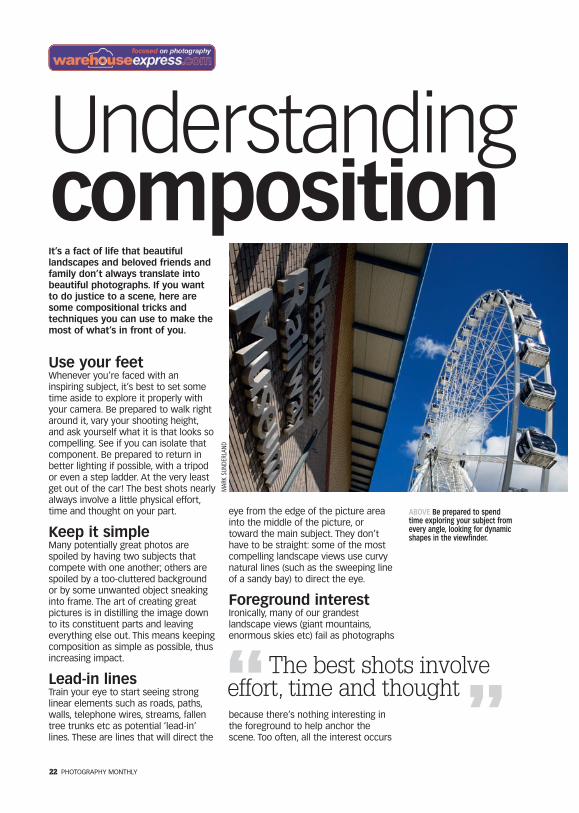
Use your feetWhenever you’re faced with aninspiring subject, it’s best to set sometime aside to explore it properly withyour camera. Be prepared to walk rightaround it, vary your shooting height,and ask yourself what it is that looks socompelling. See if you can isolate thatcomponent. Be prepared to return inbetter lighting if possible, with a tripodor even a step ladder. At the very leastget out of the car! The best shots nearlyalways involve a little physical effort,time and thought on your part.
Keep it simpleMany potentially great photos arespoiled by having two subjects thatcompete with one another; others arespoiled by a too-cluttered backgroundor by some unwanted object sneakinginto frame. The art of creating greatpictures is in distilling the image downto its constituent parts and leavingeverything else out. This means keepingcomposition as simple as possible, thusincreasing impact.
Lead-in linesTrain your eye to start seeing stronglinear elements such as roads, paths,walls, telephone wires, streams, fallentree trunks etc as potential ‘lead-in’lines. These are lines that will direct the
eye from the edge of the picture areainto the middle of the picture, ortoward the main subject. They don’thave to be straight: some of the mostcompelling landscape views use curvynatural lines (such as the sweeping lineof a sandy bay) to direct the eye.
Foreground interestIronically, many of our grandestlandscape views (giant mountains,enormous skies etc) fail as photographs
because there’s nothing interesting inthe foreground to help anchor thescene. Too often, all the interest occurs
It’s a fact of life that beautifullandscapes and beloved friends andfamily don’t always translate intobeautiful photographs. If you wantto do justice to a scene, here aresome compositional tricks andtechniques you can use to make themost of what’s in front of you.
Understandingcomposition
ABOVE Be prepared to spendtime exploring your subject fromevery angle, looking for dynamicshapes in the viewfinder.
“The best shots involveeffort, time and thought”
MAR
KSU
NDER
LAND
PM APRIL SUPP-022-025:Layout 1 19/2/09 10:42 Page 22

The rule of thirds has been employed to bring visualharmony to images since Georgian times. The rule statesthat a picture should be divided into an imaginary grid ofnine equal parts by equally-spaced lines, two horizontal andtwo vertical. Important compositional elements – thehorizon, a lone tree, a boat at sea – should be placed alongthese lines or their intersection for greatest impact.
Split the image into thirds
PHOTOGRAPHY MONTHLY 23
ABOVE Add some interest to theforeground of your landscapeshots. Boulders, stepping stonesand flowers can all be pressedinto service.
far away on the distant horizon so thereseems to be nothing in particular tolook at. This is especially true in wide-angle landscapes where the short focallength seems to push the horizon evenfurther away. Foreground interest actsas a stepping stone into the scene,making it seem less remote, alsoproviding a sense of scale for thosedistant mountains.
CRAIGROBERTS
ADAMBURTON
PM APRIL SUPP-022-025:Layout 1 19/2/09 10:42 Page 23
a vertical or horizontal subject lookmore eye-catching, looming across theframe to form a diagonal line.In a similar way, for portraiture and
still lifes, many professionals try tophotograph their subjects in groups ofthree or five, for instance positioningthe faces so they make a subliminaltriangle shape rather than a moreregimented straight line.
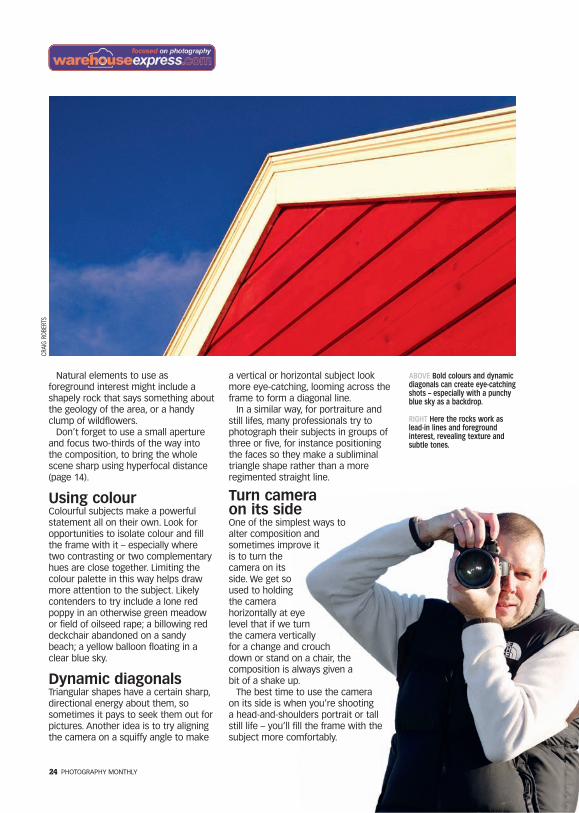
Turn cameraon its sideOne of the simplest ways toalter composition andsometimes improve itis to turn thecamera on itsside. We get soused to holdingthe camerahorizontally at eyelevel that if we turnthe camera verticallyfor a change and crouchdown or stand on a chair, thecomposition is always given abit of a shake up.The best time to use the camera
on its side is when you’re shootinga head-and-shoulders portrait or tallstill life – you’ll fill the frame with thesubject more comfortably.
24 PHOTOGRAPHY MONTHLY
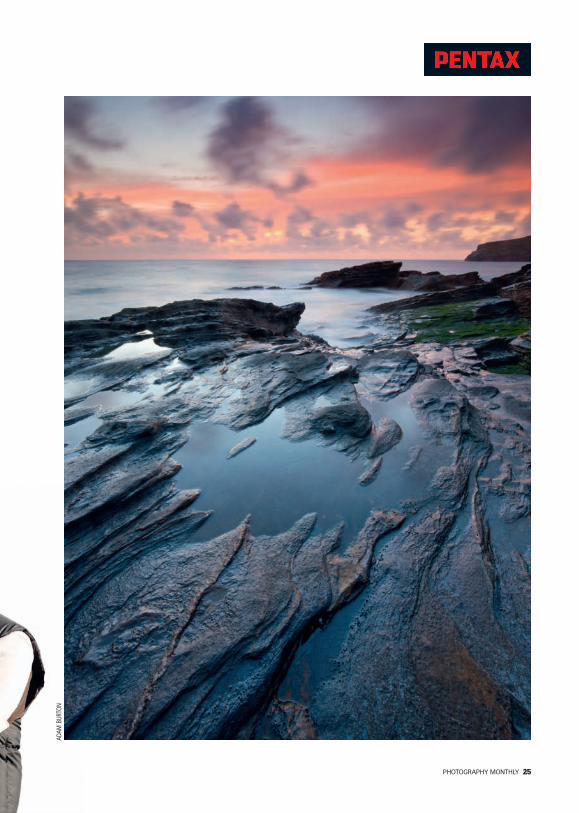
Natural elements to use asforeground interest might include ashapely rock that says something aboutthe geology of the area, or a handyclump of wildflowers.Don’t forget to use a small aperture
and focus two-thirds of the way intothe composition, to bring the wholescene sharp using hyperfocal distance(page 14).
Using colourColourful subjects make a powerfulstatement all on their own. Look foropportunities to isolate colour and fillthe frame with it – especially wheretwo contrasting or two complementaryhues are close together. Limiting thecolour palette in this way helps drawmore attention to the subject. Likelycontenders to try include a lone redpoppy in an otherwise green meadowor field of oilseed rape; a billowing reddeckchair abandoned on a sandybeach; a yellow balloon floating in aclear blue sky.
Dynamic diagonalsTriangular shapes have a certain sharp,directional energy about them, sosometimes it pays to seek them out forpictures. Another idea is to try aligningthe camera on a squiffy angle to make
ABOVE Bold colours and dynamicdiagonals can create eye-catchingshots – especially with a punchyblue sky as a backdrop.
RIGHT Here the rocks work aslead-in lines and foregroundinterest, revealing texture andsubtle tones.
CRAIGRO
BERTS
PM APRIL SUPP-022-025:Layout 1 19/2/09 16:25 Page 24
PHOTOGRAPHY MONTHLY 25
ADAM
BURT
ON
PM APRIL SUPP-022-025:Layout 1 19/2/09 10:43 Page 25
26 PHOTOGRAPHY MONTHLY
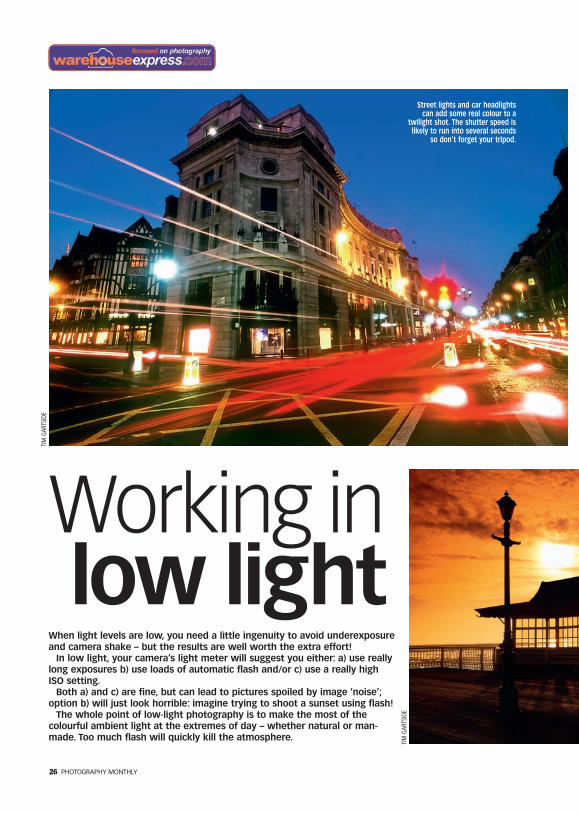
When light levels are low, you need a little ingenuity to avoid underexposureand camera shake – but the results are well worth the extra effort!In low light, your camera’s light meter will suggest you either: a) use really
long exposures b) use loads of automatic flash and/or c) use a really highISO setting.Both a) and c) are fine, but can lead to pictures spoiled by image ‘noise’;
option b) will just look horrible: imagine trying to shoot a sunset using flash!The whole point of low-light photography is to make the most of the
colourful ambient light at the extremes of day – whether natural or man-made. Too much flash will quickly kill the atmosphere.
Working inlow light
Street lights and car headlightscan add some real colour to a
twilight shot. The shutter speed islikely to run into several seconds
so don’t forget your tripod.
TIM
GART
SIDE
TIM
GART
SIDE
PM APRIL SUPP-026-029:Layout 1 19/2/09 10:47 Page 26
PHOTOGRAPHY MONTHLY 27
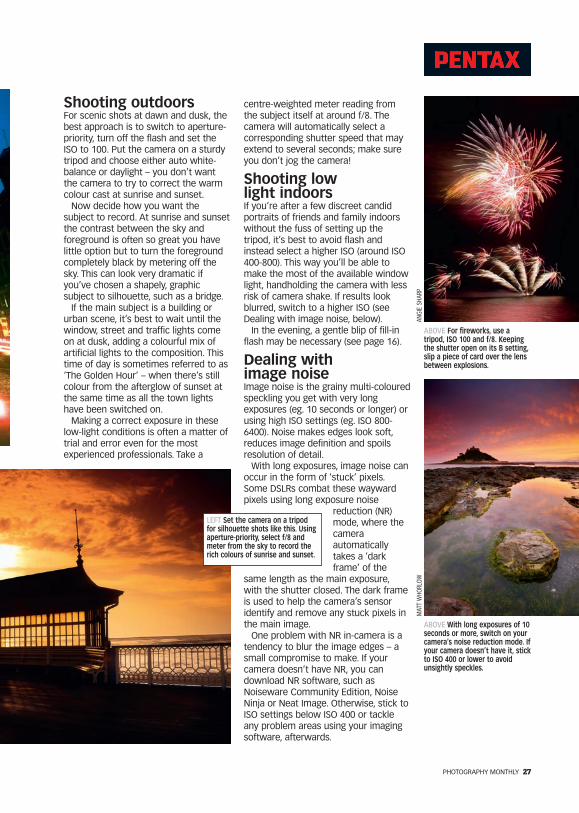
Shooting outdoorsFor scenic shots at dawn and dusk, thebest approach is to switch to aperture-priority, turn off the flash and set theISO to 100. Put the camera on a sturdytripod and choose either auto white-balance or daylight – you don’t wantthe camera to try to correct the warmcolour cast at sunrise and sunset.Now decide how you want thesubject to record. At sunrise and sunsetthe contrast between the sky andforeground is often so great you havelittle option but to turn the foregroundcompletely black by metering off thesky. This can look very dramatic ifyou’ve chosen a shapely, graphicsubject to silhouette, such as a bridge.If the main subject is a building orurban scene, it’s best to wait until thewindow, street and traffic lights comeon at dusk, adding a colourful mix ofartificial lights to the composition. Thistime of day is sometimes referred to as‘The Golden Hour’ – when there’s stillcolour from the afterglow of sunset atthe same time as all the town lightshave been switched on.Making a correct exposure in theselow-light conditions is often a matter oftrial and error even for the mostexperienced professionals. Take a
centre-weighted meter reading fromthe subject itself at around f/8. Thecamera will automatically select acorresponding shutter speed that mayextend to several seconds; make sureyou don’t jog the camera!
Shooting lowlight indoorsIf you’re after a few discreet candidportraits of friends and family indoorswithout the fuss of setting up thetripod, it’s best to avoid flash andinstead select a higher ISO (around ISO400-800). This way you’ll be able tomake the most of the available windowlight, handholding the camera with lessrisk of camera shake. If results lookblurred, switch to a higher ISO (seeDealing with image noise, below).In the evening, a gentle blip of fill-inflash may be necessary (see page 16).
Dealing withimage noiseImage noise is the grainy multi-colouredspeckling you get with very longexposures (eg. 10 seconds or longer) orusing high ISO settings (eg. ISO 800-6400). Noise makes edges look soft,reduces image definition and spoilsresolution of detail.With long exposures, image noise canoccur in the form of ‘stuck’ pixels.Some DSLRs combat these waywardpixels using long exposure noise
reduction (NR)mode, where thecameraautomaticallytakes a ‘darkframe’ of the
same length as the main exposure,with the shutter closed. The dark frameis used to help the camera’s sensoridentify and remove any stuck pixels inthe main image.One problem with NR in-camera is atendency to blur the image edges – asmall compromise to make. If yourcamera doesn’t have NR, you candownload NR software, such asNoiseware Community Edition, NoiseNinja or Neat Image. Otherwise, stick toISO settings below ISO 400 or tackleany problem areas using your imagingsoftware, afterwards.
ABOVE With long exposures of 10seconds or more, switch on yourcamera’s noise reduction mode. Ifyour camera doesn’t have it, stickto ISO 400 or lower to avoidunsightly speckles.
LEFT Set the camera on a tripodfor silhouette shots like this. Usingaperture-priority, select f/8 andmeter from the sky to record therich colours of sunrise and sunset.
ABOVE For fireworks, use atripod, ISO 100 and f/8. Keepingthe shutter open on its B setting,slip a piece of card over the lensbetween explosions.
MATTWHORLOW
ANGIESHARP
PM APRIL SUPP-026-029:Layout 1 19/2/09 16:23 Page 27
28 PHOTOGRAPHY MONTHLY
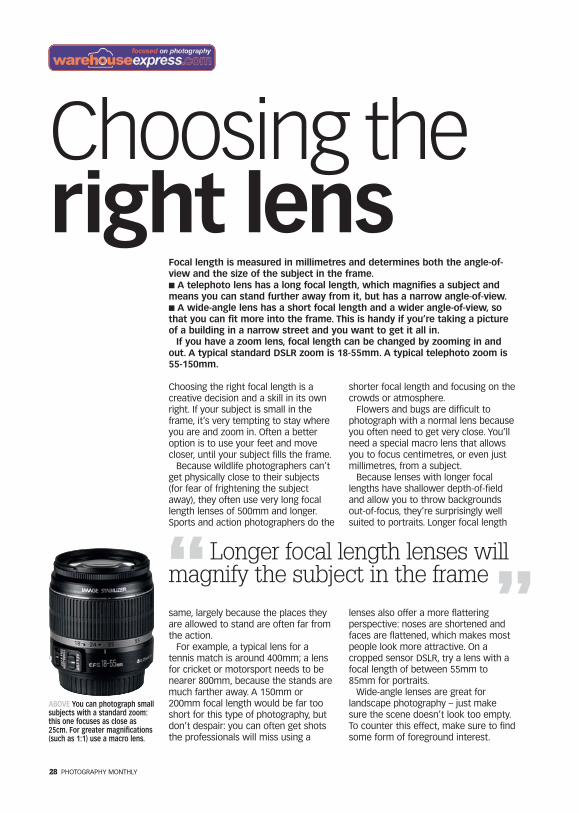
Choosing the right focal length is acreative decision and a skill in its ownright. If your subject is small in theframe, it’s very tempting to stay whereyou are and zoom in. Often a betteroption is to use your feet and movecloser, until your subject fills the frame.Because wildlife photographers can’tget physically close to their subjects(for fear of frightening the subjectaway), they often use very long focallength lenses of 500mm and longer.Sports and action photographers do the
same, largely because the places theyare allowed to stand are often far fromthe action.For example, a typical lens for atennis match is around 400mm; a lensfor cricket or motorsport needs to benearer 800mm, because the stands aremuch farther away. A 150mm or200mm focal length would be far tooshort for this type of photography, butdon’t despair: you can often get shotsthe professionals will miss using a
shorter focal length and focusing on thecrowds or atmosphere.Flowers and bugs are difficult tophotograph with a normal lens becauseyou often need to get very close. You’llneed a special macro lens that allowsyou to focus centimetres, or even justmillimetres, from a subject.Because lenses with longer focallengths have shallower depth-of-fieldand allow you to throw backgroundsout-of-focus, they’re surprisingly wellsuited to portraits. Longer focal length
lenses also offer a more flatteringperspective: noses are shortened andfaces are flattened, which makes mostpeople look more attractive. On acropped sensor DSLR, try a lens with afocal length of between 55mm to85mm for portraits.Wide-angle lenses are great forlandscape photography – just makesure the scene doesn’t look too empty.To counter this effect, make sure to findsome form of foreground interest.
Focal length is measured in millimetres and determines both the angle-of-view and the size of the subject in the frame.� A telephoto lens has a long focal length, which magnifies a subject andmeans you can stand further away from it, but has a narrow angle-of-view.� A wide-angle lens has a short focal length and a wider angle-of-view, sothat you can fit more into the frame. This is handy if you’re taking a pictureof a building in a narrow street and you want to get it all in.
If you have a zoom lens, focal length can be changed by zooming in andout. A typical standard DSLR zoom is 18-55mm. A typical telephoto zoom is55-150mm.
Choosing theright lens
“Longer focal length lenses willmagnify the subject in the frame”
ABOVE You can photograph smallsubjects with a standard zoom:this one focuses as close as25cm. For greater magnifications(such as 1:1) use a macro lens.
PM APRIL SUPP-026-029:Layout 1 19/2/09 16:23 Page 28
PHOTOGRAPHY MONTHLY 29
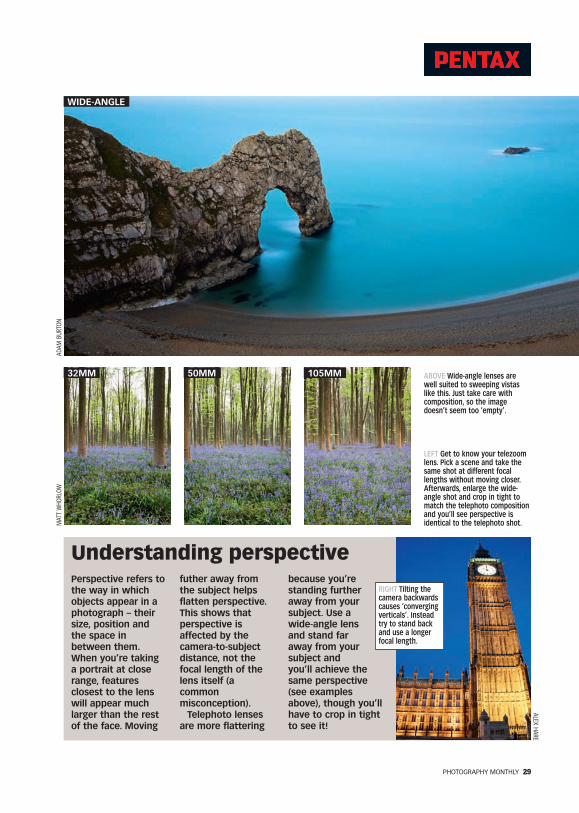
Perspective refers tothe way in whichobjects appear in aphotograph – theirsize, position andthe space inbetween them.When you’re takinga portrait at closerange, featuresclosest to the lenswill appear muchlarger than the restof the face. Moving
futher away fromthe subject helpsflatten perspective.This shows thatperspective isaffected by thecamera-to-subjectdistance, not thefocal length of thelens itself (acommonmisconception).Telephoto lensesare more flattering
because you’restanding furtheraway from yoursubject. Use awide-angle lensand stand faraway from yoursubject andyou’ll achieve thesame perspective(see examplesabove), though you’llhave to crop in tightto see it!
RIGHT Tilting thecamera backwardscauses ‘convergingverticals’. Insteadtry to stand backand use a longerfocal length.
Understanding perspective
ABOVE Wide-angle lenses arewell suited to sweeping vistaslike this. Just take care withcomposition, so the imagedoesn’t seem too ‘empty’.
LEFT Get to know your telezoomlens. Pick a scene and take thesame shot at different focallengths without moving closer.Afterwards, enlarge the wide-angle shot and crop in tight tomatch the telephoto compositionand you’ll see perspective isidentical to the telephoto shot.
WIDE-ANGLE
32MM 50MM 105MM
ADAM
BURT
ONM
ATT
WHO
RLOW
ALEXHARE
PM APRIL SUPP-026-029:Layout 1 19/2/09 16:24 Page 29