esf transnational platform short database user guide · esf-database-guide-v09.docx 1 esf...
TRANSCRIPT
esf-database-guide-v09.docx 1
ESF Transnational Platform Short Database User Guide
Version 9 – 19 January 2016 Contact: Yves Boisselier, AEIDL – [email protected]
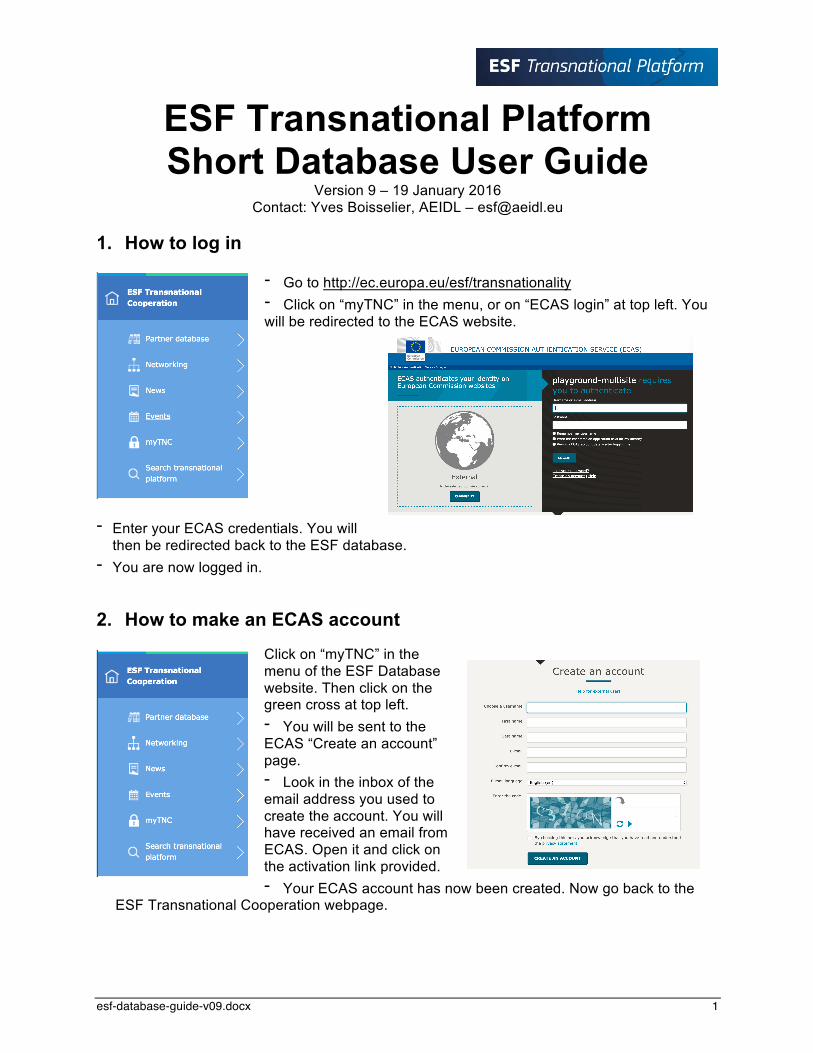
1. How to log in
- Go to http://ec.europa.eu/esf/transnationality - Click on “myTNC” in the menu, or on “ECAS login” at top left. You will be redirected to the ECAS website.
- Enter your ECAS credentials. You will then be redirected back to the ESF database.
- You are now logged in.
2. How to make an ECAS account
Click on “myTNC” in the menu of the ESF Database website. Then click on the green cross at top left. - You will be sent to the ECAS “Create an account” page. - Look in the inbox of the email address you used to create the account. You will have received an email from ECAS. Open it and click on the activation link provided. - Your ECAS account has now been created. Now go back to the
ESF Transnational Cooperation webpage.
esf-database-guide-v09.docx 2
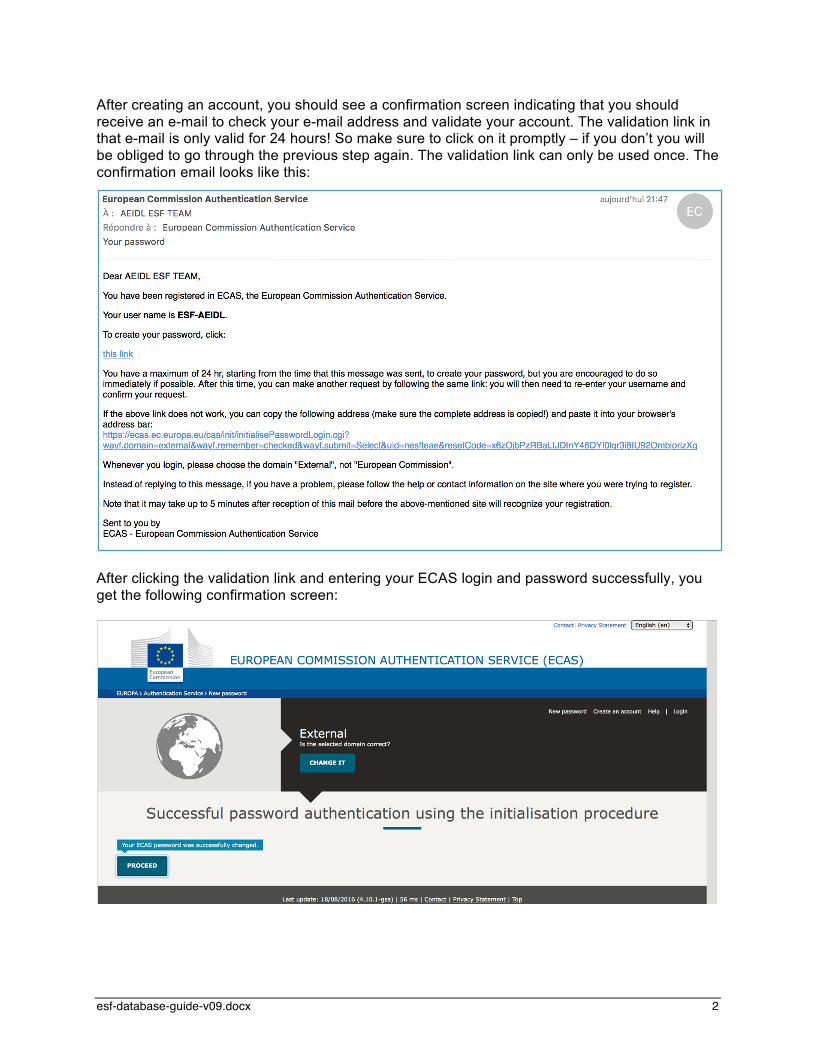
After creating an account, you should see a confirmation screen indicating that you should receive an e-mail to check your e-mail address and validate your account. The validation link in that e-mail is only valid for 24 hours! So make sure to click on it promptly – if you don’t you will be obliged to go through the previous step again. The validation link can only be used once. The confirmation email looks like this:
After clicking the validation link and entering your ECAS login and password successfully, you get the following confirmation screen:
esf-database-guide-v09.docx 3
3. Connecting your ECAS account to a user profile, an organisation or a project on the ESF Transnational Platform
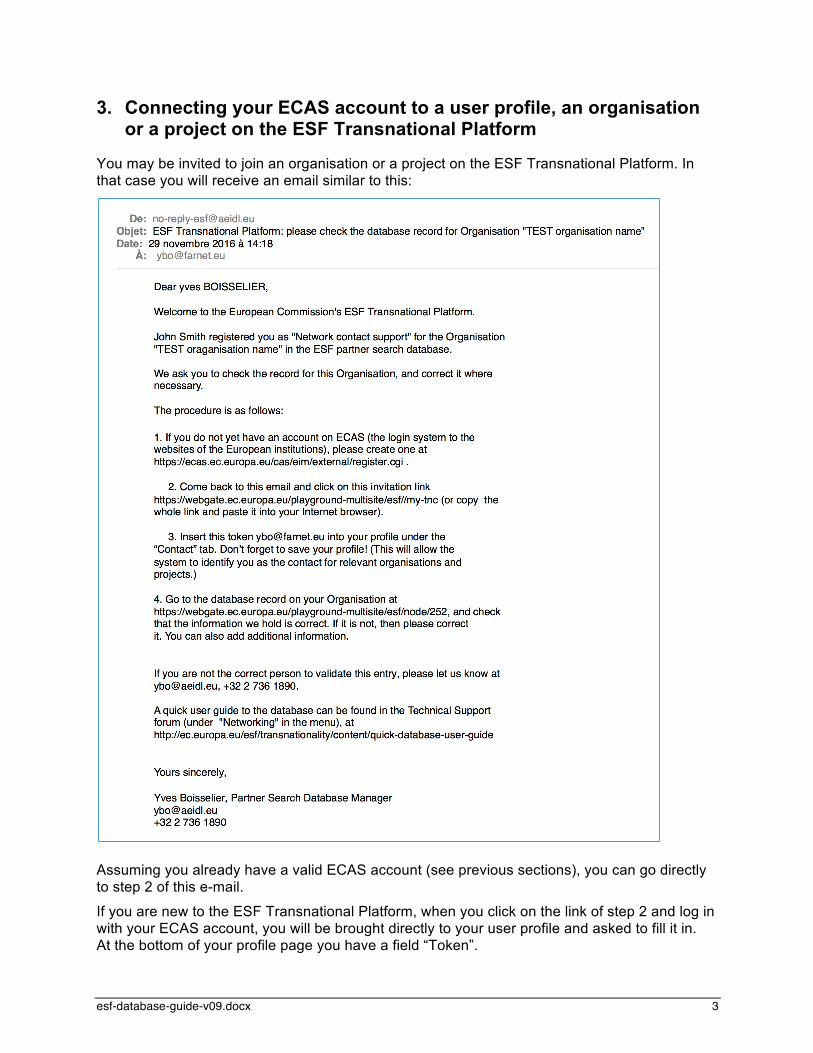
You may be invited to join an organisation or a project on the ESF Transnational Platform. In that case you will receive an email similar to this:
Assuming you already have a valid ECAS account (see previous sections), you can go directly to step 2 of this e-mail.
If you are new to the ESF Transnational Platform, when you click on the link of step 2 and log in with your ECAS account, you will be brought directly to your user profile and asked to fill it in. At the bottom of your profile page you have a field “Token”.
esf-database-guide-v09.docx 4
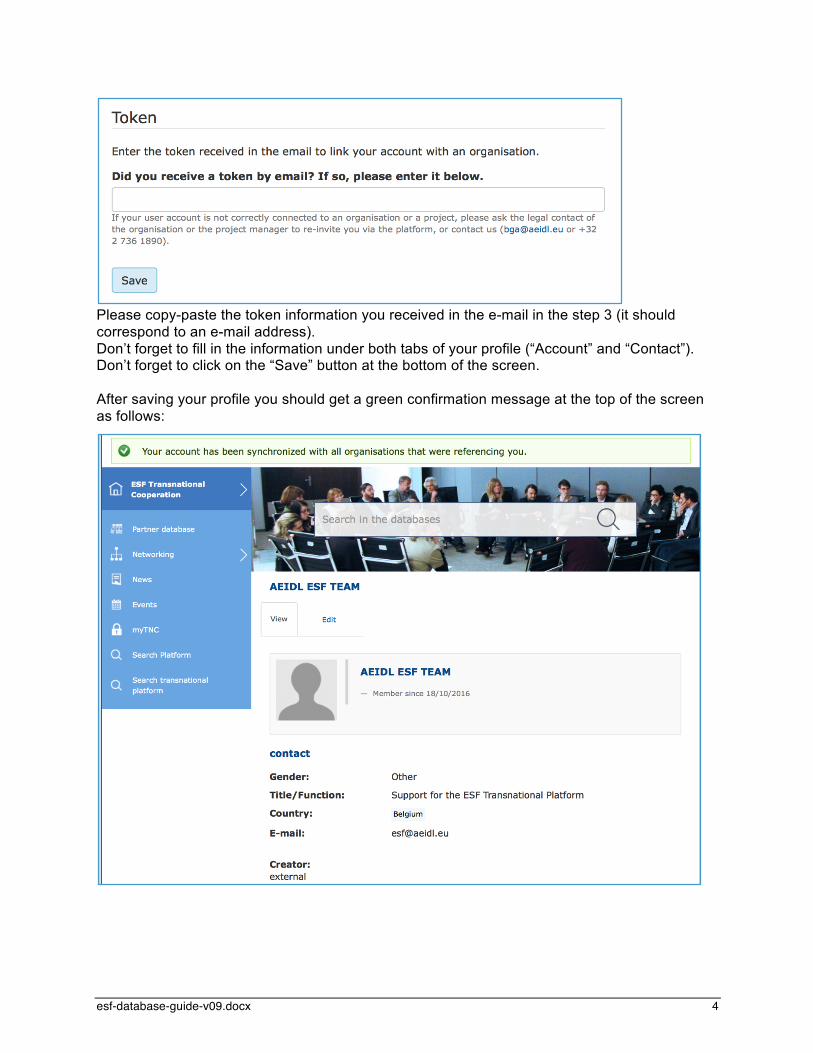
Please copy-paste the token information you received in the e-mail in the step 3 (it should correspond to an e-mail address). Don’t forget to fill in the information under both tabs of your profile (“Account” and “Contact”). Don’t forget to click on the “Save” button at the bottom of the screen. After saving your profile you should get a green confirmation message at the top of the screen as follows:

esf-database-guide-v09.docx 5
4. How to update your personal profile
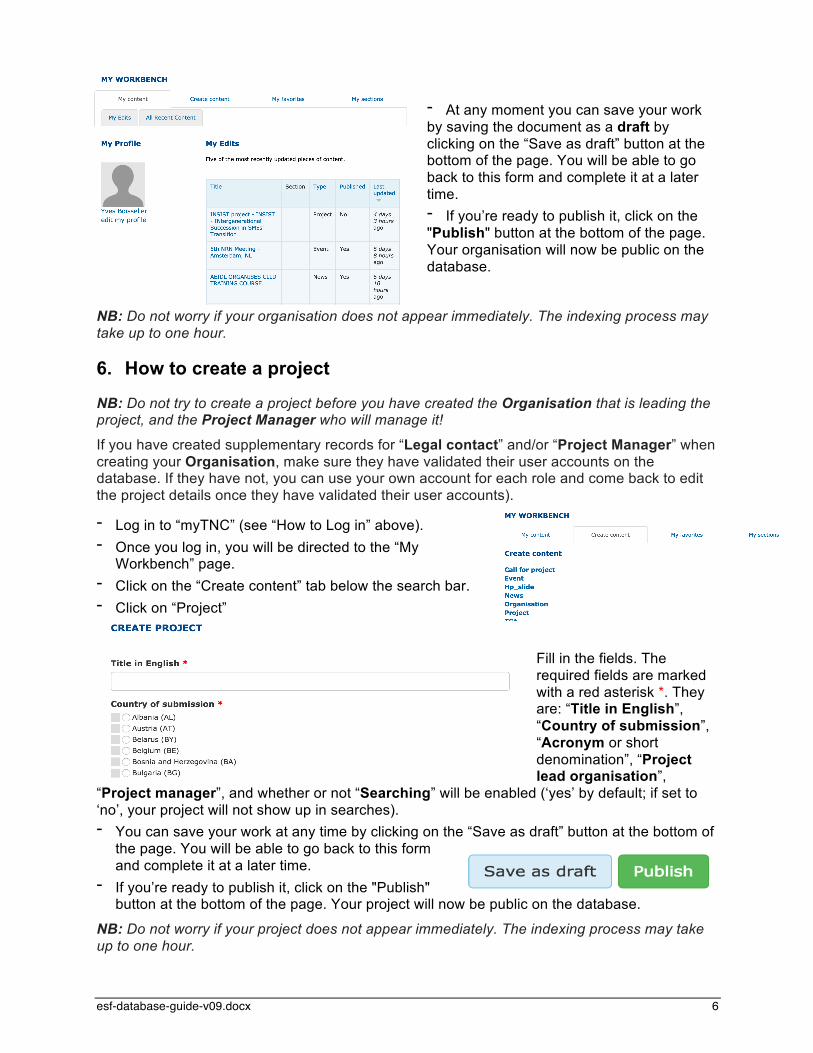
- Log in to “myTNC” (see “How to Login” above). - Once you log in, you will be directed to the “My
Workbench” page. - Click on “Edit my profile”. You can then upload a photo. In the “Contact” tab you can enter your personal details such as telephone numbers and Skype address. - Click on the “Save” button.
5. How to create an organisation
- Log in to “myTNC” (see “How to Login” above). - Once you log in, you will be directed to the “My
Workbench” page. - Click on the “Create content” tab below the search bar - Click on “Organisation” - Fill in the fields. The required
fields are marked with a red asterisk *. They are: “Type of organisation”, “Name in English”, “Country”, “Acronym or short denomination”, “Name in national language”, a legal contact and their role (they must have an account or create an account in the future to receive notifications).
- if you wish, add supplement-ary contact persons (especially the legal contact and the project manager of the project you want to create later, if these persons are not yet registered in the database).
esf-database-guide-v09.docx 6
- At any moment you can save your work by saving the document as a draft by clicking on the “Save as draft” button at the bottom of the page. You will be able to go back to this form and complete it at a later time. - If you’re ready to publish it, click on the "Publish" button at the bottom of the page. Your organisation will now be public on the database.
NB: Do not worry if your organisation does not appear immediately. The indexing process may take up to one hour.
6. How to create a project
NB: Do not try to create a project before you have created the Organisation that is leading the project, and the Project Manager who will manage it!
If you have created supplementary records for “Legal contact” and/or “Project Manager” when creating your Organisation, make sure they have validated their user accounts on the database. If they have not, you can use your own account for each role and come back to edit the project details once they have validated their user accounts).
- Log in to “myTNC” (see “How to Log in” above). - Once you log in, you will be directed to the “My
Workbench” page. - Click on the “Create content” tab below the search bar. - Click on “Project”
Fill in the fields. The required fields are marked with a red asterisk *. They are: “Title in English”, “Country of submission”, “Acronym or short denomination”, “Project lead organisation”,
“Project manager”, and whether or not “Searching” will be enabled (‘yes’ by default; if set to ‘no’, your project will not show up in searches). - You can save your work at any time by clicking on the “Save as draft” button at the bottom of
the page. You will be able to go back to this form and complete it at a later time.
- If you’re ready to publish it, click on the "Publish" button at the bottom of the page. Your project will now be public on the database.
NB: Do not worry if your project does not appear immediately. The indexing process may take up to one hour.
esf-database-guide-v09.docx 7
7. How to Create a Managing Authority or a Call
- Please contact AEIDL
8. How to create a TCA (Transnational Cooperation Agreement)
- See the user guide in the Technical support forum: https://ec.europa.eu/esf/transnationality/content/short-tca-user-guide-online-tool
* *
*
Editing rights for additional contacts
Several users can be added to organisations or to projects to provide them editing rights:
• contacts added to a project can edit the data of the project (and related TCAs)
• contacts added to an organisation can edit the data of the organisation and of the related projects and TCAs.
This is to enable Organisations and Projects to manage access rights flexibly.
The supplementary contacts should be operational people to whom you want to grant editorial rights.
If you wish to make details of contacts available to the general public, it is best to include them in the project description or via web links you can add within the text fields of the organisation or project profile.
Avoiding spamming the various contact persons
To avoid spamming all the contacts at the same time and to help you manage the notification e-mails that are sent when the database is updated, only the Legal contact (and in some cases the Project manager) is informed. The legal contact should arrange for the distribution of such notifications within your organisation.
Functional ECAS accounts
We recommend you to create a “functional” ECAS account for the Legal contact. This can help you to separate your private ECAS account usage from the project/organisation usage (especially when the Legal contact is "out of the office” for a long period).
You can thus create a functional e-mail address – for instance using the acronym of your organisation – and set your own e-mail system up to forward messages to the right individuals. In this way, you can distribute the notifications among the people who need to take action on these notifications, without disturbing other staff members.