epic and epic 100 user guide
TRANSCRIPT

© 2012 GigaPan SystemsGigaPan and the GigaPan logo are registered trademarks of Carnegie Mellon University licensed for use by GigaPan Systems.
© 2012 Carnegie Mellon University All rights reserved.
EPIC and EPIC 100 User Guide

GigaPan User Guide2
1. Introduction 11.1 What is the GigaPan System? 11.2 GigaPan EPIC Parts 31.3 GigaPan EPIC 100 Parts 41.4 EPIC Special Features 51.5 EPIC 100 Extra Features 5 2. Setting up the GigaPan EPIC 62.1 Get your equipment ready 62.2 Install Batteries 62.3 Mount the GigaPan EPIC on a tripod 72.4 Mount your camera 82.5 Adjust mounting tray/operating arm 82.6 Align your camera to the GigaPan EPIC 82.7 Set-up your camera 92.8 Finding your camera’s nodal point 11 3. Using the GigaPan EPIC 133.1 Start a new panorama 133.2 Repeat your last panorama 143.3 Navigating the EPIC Menu 15
4. Exploring GigaPan.com 174.1 View and share 174.2 Embed your panorama 184.3 Place your panorama on Google Earth 19
5. Troubleshooting 225.1 My photos are blurry 225.2 My camera is missing pictures 225.3 I want to remove the checklist before every panorama 225.4 My panoramas are distorted or misaligned 23
6. Tips and tricks 246.1 Shoot more than you need 246.2 Shooting in different environments 256.3 Create Games: Hide & Seek 286.4 Panoramas in Motion: Capturing a Crowd 296.5 Shooting a 360 degree panorama 29
GigaPan User Guide1
1. Introduction
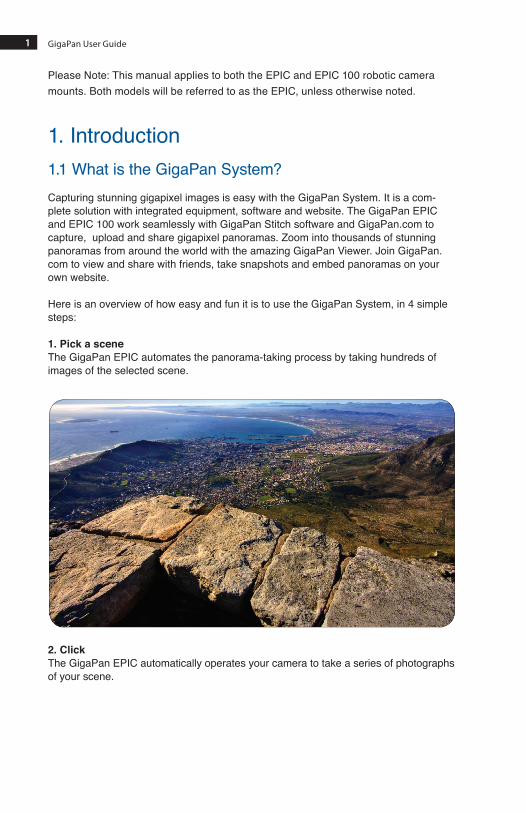
Capturing stunning gigapixel images is easy with the GigaPan System. It is a com-plete solution with integrated equipment, software and website. The GigaPan EPIC and EPIC 100 work seamlessly with GigaPan Stitch software and GigaPan.com to capture, upload and share gigapixel panoramas. Zoom into thousands of stunning panoramas from around the world with the amazing GigaPan Viewer. Join GigaPan.com to view and share with friends, take snapshots and embed panoramas on your own website.
Here is an overview of how easy and fun it is to use the GigaPan System, in 4 simple steps:
1. Pick a sceneThe GigaPan EPIC automates the panorama-taking process by taking hundreds of images of the selected scene.
2. Click The GigaPan EPIC automatically operates your camera to take a series of photographs of your scene.
1.1 What is the GigaPan System?
Please Note: This manual applies to both the EPIC and EPIC 100 robotic camera mounts. Both models will be referred to as the EPIC, unless otherwise noted.
2
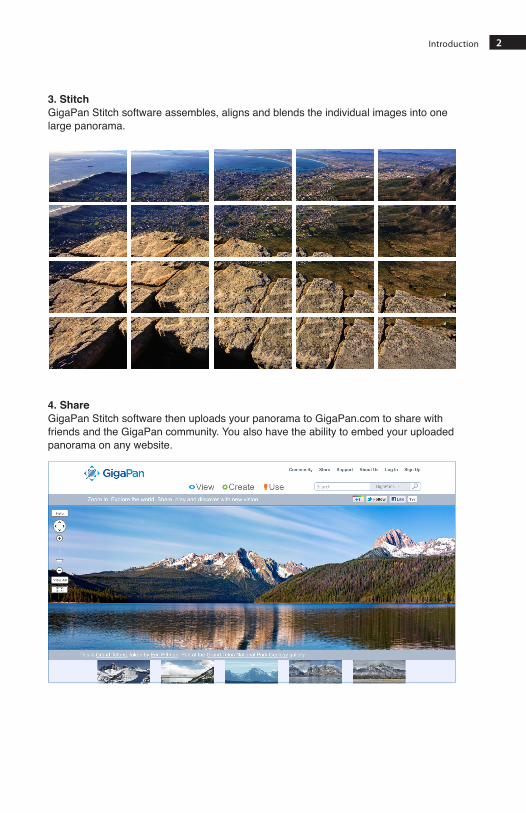
3. StitchGigaPan Stitch software assembles, aligns and blends the individual images into one large panorama.
4. Share GigaPan Stitch software then uploads your panorama to GigaPan.com to share with friends and the GigaPan community. You also have the ability to embed your uploaded panorama on any website.
Introduction

GigaPan User Guide3
1.2 GigaPan EPIC Parts
Bubble Level
Directional Keys
Platform Thumbscrew
Camera Mounting Screw
Power/OK
Battery Chamber
Camera Mounting Plate
Arm Scale
Button-Pusher Arm
Button-Pusher Arm
Platform Thumbscrew
Button-Pusher
Cancel (X)
4Introduction
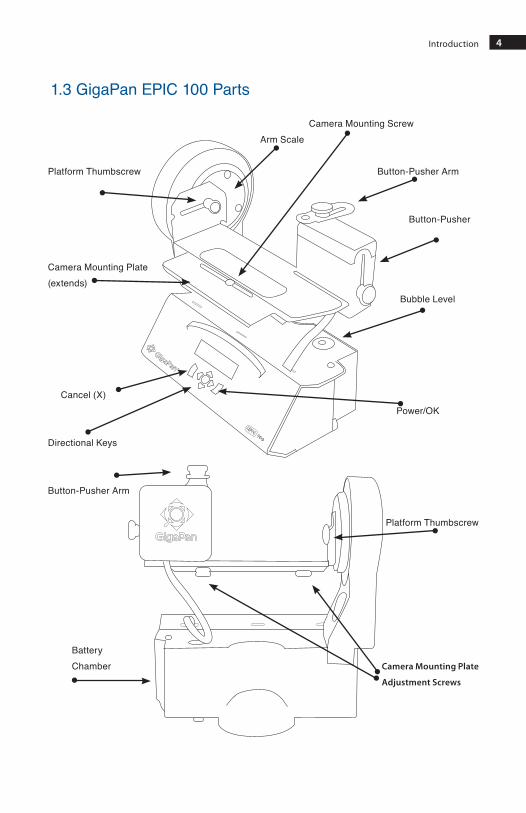
1.3 GigaPan EPIC 100 Parts
Bubble Level
Directional Keys
Platform Thumbscrew
Camera Mounting Screw
Battery Chamber
Camera Mounting Plate(extends)
Arm Scale
Button-Pusher Arm
Button-Pusher Arm
Platform Thumbscrew
Button-Pusher
Camera Mounting Plate
Adjustment Screws
Power/OKCancel (X)
GigaPan User Guide5
The EPIC 100 has all the same great capabilities as the EPIC, plus several extra features, including:
Designed for use with a broad range of large and small point-and-shoot digital cameras
An extendable metal plate on the camera base •to accommodate larger camerasA greater elevation of the camera plate from the •EPIC 100 body of 33.5 mm to allow for a greater range for camera pitch (tilt or elevation)The gearing for the pitch is 15:1 (versus 5:1 for •the EPIC) allowing for greater holding torque and finerprecisionmovements
Multiple Shutter - Setting allows GigaPan EPIC 100 to take up to 9 pictures at each image location (See Chapter 3.4 for more information)
Digital Remote Shutter - EPIC 100 supports remote shutter actuation through the remote shutter port available on most DSLR cameras (See Chapter 3.4 for more information)
1.5 EPIC 100 Extra Features
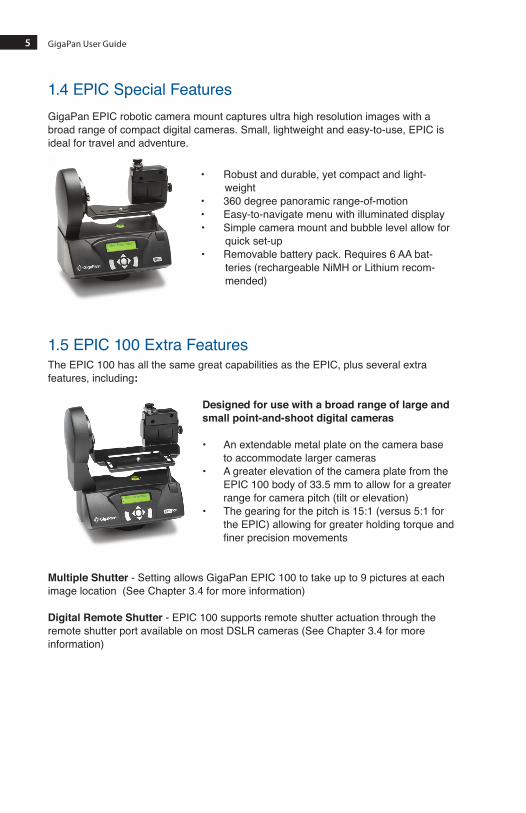
1.4 EPIC Special Features
Robust and durable, yet compact and light-•weight360 degree panoramic range-of-motion•Easy-to-navigate menu with illuminated display•Simple camera mount and bubble level allow for •quick set-upRemovable battery pack. Requires 6 AA bat-•teries (rechargeable NiMH or Lithium recom-mended)
GigaPan EPIC robotic camera mount captures ultra high resolution images with a broad range of compact digital cameras. Small, lightweight and easy-to-use, EPIC is ideal for travel and adventure.
6
2. Setting up the GigaPan EPICCarefully follow the steps below to capture the highest quality panoramas.
2.1 Get your equipment readyTo start shooting panoramas with your GigaPan EPIC, you will need:• Atripod,fittedwithastandard1/4-20tripodscrew• 6AArechargeableNIMHorLithiumbatteriesrecommended(Bepreparedwithaspare
set of batteries, especially if using alkaline)• DigitalCamera(seecompatiblecameralistatwww.GigaPanSystems.com)• Camerabatteryand/orcharger• Amemorycard(atleast4GB)Make sure you have enough memory on your memory
card to take the number of pictures the panorama requires• Amemorycardreader,oryourcamera’sUSBcable
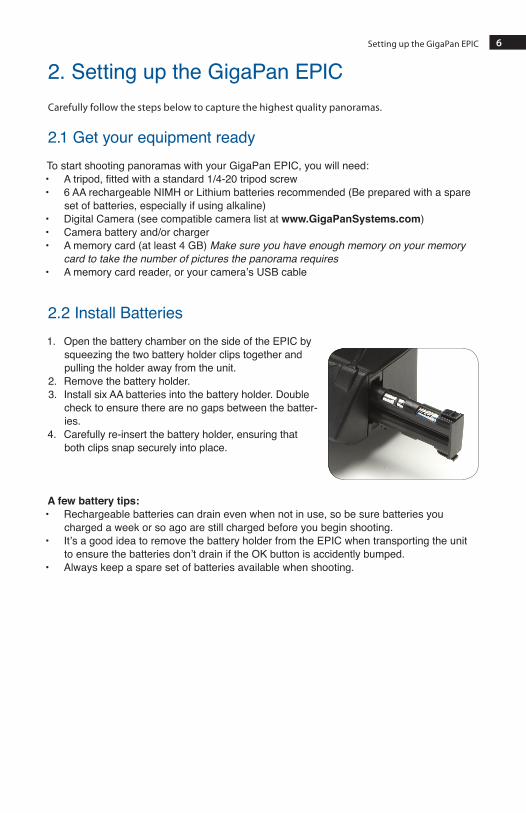
2.2 Install Batteries1. Open the battery chamber on the side of the EPIC by
squeezing the two battery holder clips together and pulling the holder away from the unit.
2. Remove the battery holder. 3. Install six AA batteries into the battery holder. Double
check to ensure there are no gaps between the batter-ies.
4. Carefully re-insert the battery holder, ensuring that both clips snap securely into place.
A few battery tips:• Rechargeablebatteriescandrainevenwhennotinuse,sobesurebatteriesyou
charged a week or so ago are still charged before you begin shooting.• It’sagoodideatoremovethebatteryholderfromtheEPICwhentransportingtheunit
to ensure the batteries don’t drain if the OK button is accidently bumped.• Alwayskeepasparesetofbatteriesavailablewhenshooting.
Setting up the GigaPan EPIC
GigaPan User Guide7
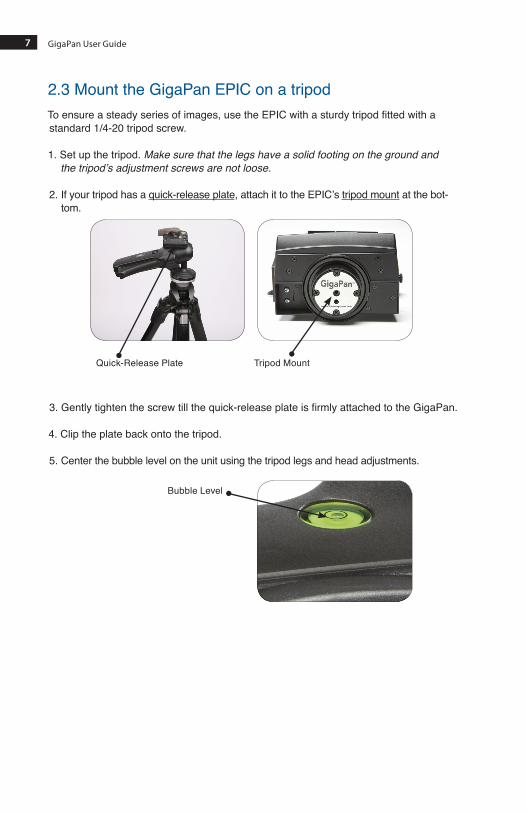
Toensureasteadyseriesofimages,usetheEPICwithasturdytripodfittedwithastandard 1/4-20 tripod screw.
1. Set up the tripod. Make sure that the legs have a solid footing on the ground and the tripod’s adjustment screws are not loose.
2. If your tripod has a quick-release plate, attach it to the EPIC’s tripod mount at the bot-tom.
3.Gentlytightenthescrewtillthequick-releaseplateisfirmlyattachedtotheGigaPan.
4. Clip the plate back onto the tripod.
5. Center the bubble level on the unit using the tripod legs and head adjustments.
2.3 Mount the GigaPan EPIC on a tripod
Quick-Release Plate Tripod Mount
Bubble Level
8Setting up the GigaPan EPIC
2.4 Mount your camera
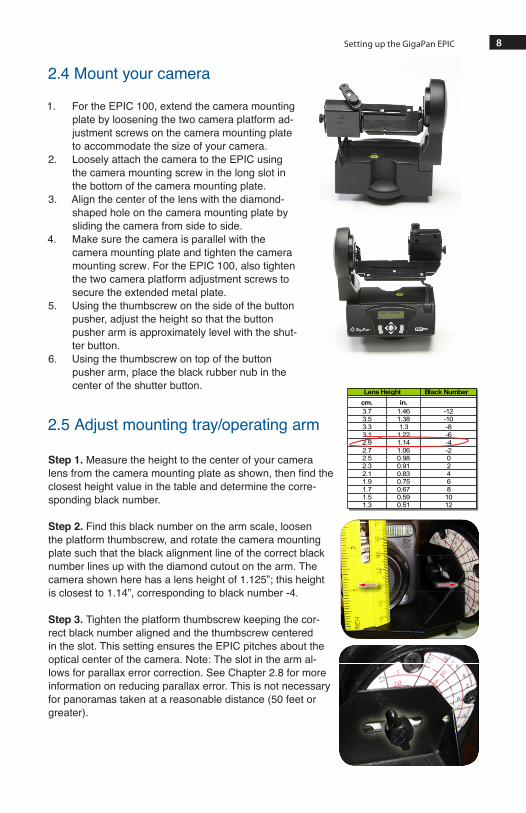
For the EPIC 100, extend the camera mounting 1. plate by loosening the two camera platform ad-justment screws on the camera mounting plate to accommodate the size of your camera.Loosely attach the camera to the EPIC using 2. the camera mounting screw in the long slot in the bottom of the camera mounting plate. Align the center of the lens with the diamond-3. shaped hole on the camera mounting plate by sliding the camera from side to side. Make sure the camera is parallel with the 4. camera mounting plate and tighten the camera mounting screw. For the EPIC 100, also tighten the two camera platform adjustment screws to secure the extended metal plate.Using the thumbscrew on the side of the button 5. pusher, adjust the height so that the button pusher arm is approximately level with the shut-ter button. Using the thumbscrew on top of the button 6. pusher arm, place the black rubber nub in the center of the shutter button.
2.5 Adjust mounting tray/operating arm
Step 1. Measure the height to the center of your camera lensfromthecameramountingplateasshown,thenfindtheclosest height value in the table and determine the corre-sponding black number.
Step 2. Find this black number on the arm scale, loosen the platform thumbscrew, and rotate the camera mounting plate such that the black alignment line of the correct black number lines up with the diamond cutout on the arm. The camera shown here has a lens height of 1.125”; this height is closest to 1.14”, corresponding to black number -4.
Step 3. Tighten the platform thumbscrew keeping the cor-rect black number aligned and the thumbscrew centered in the slot. This setting ensures the EPIC pitches about the optical center of the camera. Note: The slot in the arm al-lows for parallax error correction. See Chapter 2.8 for more information on reducing parallax error. This is not necessary for panoramas taken at a reasonable distance (50 feet or greater).
Black Numbercm. in.3.7 1.46 -123.5 1.38 -103.3 1.3 -83.1 1.22 -62.9 1.14 -42.7 1.06 -22.5 0.98 02.3 0.91 22.1 0.83 41.9 0.75 61.7 0.67 81.5 0.59 101.3 0.51 12
Lens Height
GigaPan User Guide9
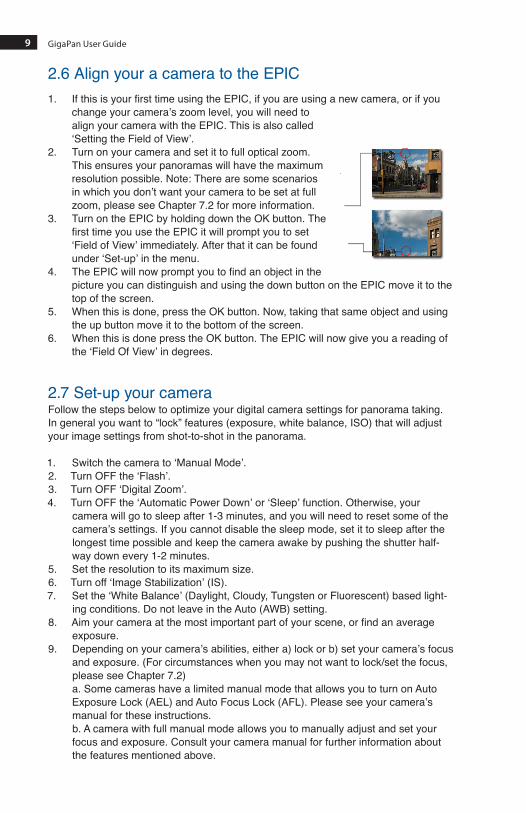
2.6 Align your a camera to the EPICIfthisisyourfirsttimeusingtheEPIC,ifyouareusinganewcamera,orifyou1. change your camera’s zoom level, you will need to align your camera with the EPIC. This is also called ‘Setting the Field of View’. Turn on your camera and set it to full optical zoom. 2. This ensures your panoramas will have the maximum resolution possible. Note: There are some scenarios in which you don’t want your camera to be set at full zoom, please see Chapter 7.2 for more information.Turn on the EPIC by holding down the OK button. The 3. firsttimeyouusetheEPICitwillpromptyoutoset‘Field of View’ immediately. After that it can be found under ‘Set-up’ in the menu. TheEPICwillnowpromptyoutofindanobjectinthe4. picture you can distinguish and using the down button on the EPIC move it to the top of the screen. When this is done, press the OK button. Now, taking that same object and using 5. the up button move it to the bottom of the screen. When this is done press the OK button. The EPIC will now give you a reading of 6. the ‘Field Of View’ in degrees.
Follow the steps below to optimize your digital camera settings for panorama taking. In general you want to “lock” features (exposure, white balance, ISO) that will adjust your image settings from shot-to-shot in the panorama.
Switch the camera to ‘Manual Mode’.1. Turn OFF the ‘Flash’.2. Turn OFF ‘Digital Zoom’.3. Turn OFF the ‘Automatic Power Down’ or ‘Sleep’ function. Otherwise, your 4. camera will go to sleep after 1-3 minutes, and you will need to reset some of the camera’s settings. If you cannot disable the sleep mode, set it to sleep after the longest time possible and keep the camera awake by pushing the shutter half-way down every 1-2 minutes.Set the resolution to its maximum size. 5. Turn off ‘Image Stabilization’ (IS).6. Set the ‘White Balance’ (Daylight, Cloudy, Tungsten or Fluorescent) based light-7. ing conditions. Do not leave in the Auto (AWB) setting.Aimyourcameraatthemostimportantpartofyourscene,orfindanaverage8. exposure. Depending on your camera’s abilities, either a) lock or b) set your camera’s focus 9. and exposure. (For circumstances when you may not want to lock/set the focus, please see Chapter 7.2) a. Some cameras have a limited manual mode that allows you to turn on Auto Exposure Lock (AEL) and Auto Focus Lock (AFL). Please see your camera’s manual for these instructions. b. A camera with full manual mode allows you to manually adjust and set your focus and exposure. Consult your camera manual for further information about the features mentioned above.
2.7 Set-up your camera
10Setting up the GigaPan EPIC
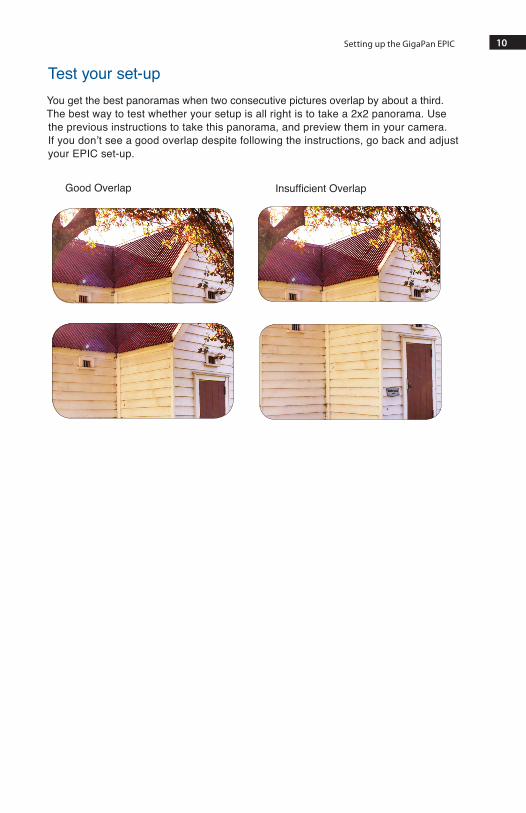
Test your set-upYou get the best panoramas when two consecutive pictures overlap by about a third. The best way to test whether your setup is all right is to take a 2x2 panorama. Use the previous instructions to take this panorama, and preview them in your camera. If you don’t see a good overlap despite following the instructions, go back and adjust your EPIC set-up.
Good Overlap InsufficientOverlap
GigaPan User Guide11
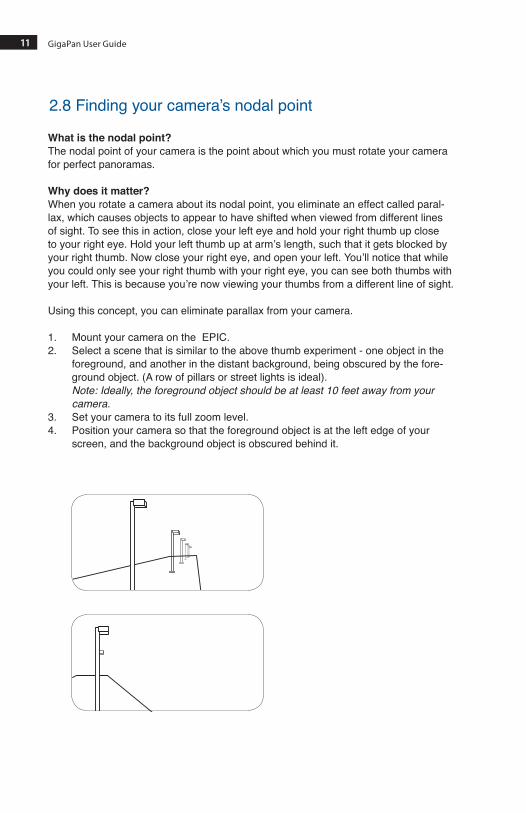
What is the nodal point?The nodal point of your camera is the point about which you must rotate your camera for perfect panoramas.
Why does it matter?When you rotate a camera about its nodal point, you eliminate an effect called paral-lax, which causes objects to appear to have shifted when viewed from different lines of sight. To see this in action, close your left eye and hold your right thumb up close to your right eye. Hold your left thumb up at arm’s length, such that it gets blocked by your right thumb. Now close your right eye, and open your left. You’ll notice that while you could only see your right thumb with your right eye, you can see both thumbs with your left. This is because you’re now viewing your thumbs from a different line of sight.
Using this concept, you can eliminate parallax from your camera.
Mount your camera on the EPIC.1. Select a scene that is similar to the above thumb experiment - one object in the 2. foreground, and another in the distant background, being obscured by the fore-ground object. (A row of pillars or street lights is ideal). Note: Ideally, the foreground object should be at least 10 feet away from your camera. Set your camera to its full zoom level.3. Position your camera so that the foreground object is at the left edge of your 4. screen, and the background object is obscured behind it.
2.8 Finding your camera’s nodal point
12Setting up the GigaPan EPIC
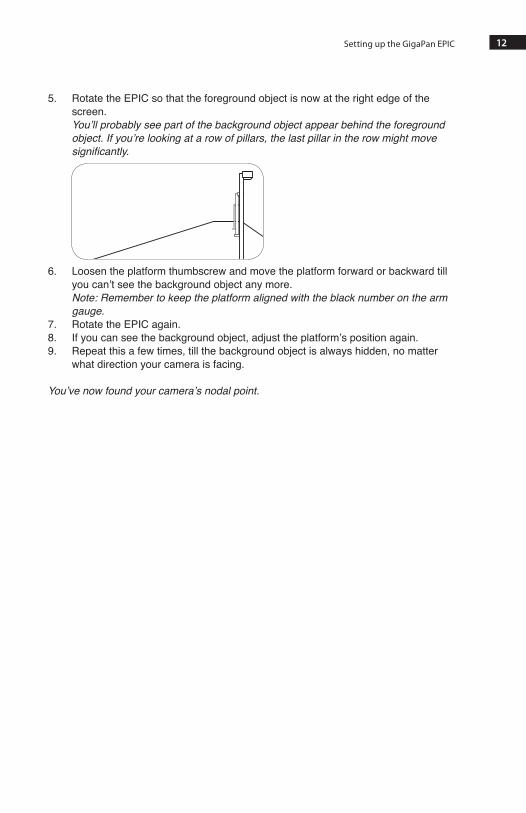
Rotate the EPIC so that the foreground object is now at the right edge of the 5. screen. You’ll probably see part of the background object appear behind the foreground object. If you’re looking at a row of pillars, the last pillar in the row might move significantly.
Loosen the platform thumbscrew and move the platform forward or backward till 6. you can’t see the background object any more. Note: Remember to keep the platform aligned with the black number on the arm gauge.Rotate the EPIC again.7. If you can see the background object, adjust the platform’s position again. 8. Repeat this a few times, till the background object is always hidden, no matter 9. what direction your camera is facing.
You’ve now found your camera’s nodal point.
GigaPan User Guide13
Taking panoramas with the EPIC is easy—just point it to the top-left and bottom-right corners of your scene to get started.
Turn the EPIC on by holding down the Power/OK button. 1. The first menu item is ‘New Panorama’.Press OK to select ‘New Panorama2. ’. The EPIC will prompt you through the fol-lowing steps.Set your camera to its full zoom level and press OK.3. Use the directional keys to point the camera to the top left corner of your scene, 4. and press OK when you’re ready.Now use the directional keys to point the camera to the bottom right corner of 5. your scene, and press OK when you’re ready. While you’re doing this, you’ll be able to see how many horizontal and vertical pictures the EPIC is going to take.The EPIC will let you preview the panorama before it begins. Press OK if you 6. want it to, or press X to continue without a preview.You’llnowneedtoconfirmifyouwanttogoaheadwiththepanorama. 7. The EPIC will run you through a checklist before it starts taking pictures.Watch the scene while the EPIC takes your panorama.8. If someone steps into your frame, or if your camera misses a picture, press X to 9. pause the panorama and use the directional keys to go back to an earlier camera position.
3. Using the GigaPan EPIC3.1 Start a new panorama

14Using the GigaPan EPIC
3.2 Repeat your last panorama
The EPIC saves the data for your last panorama until you switch it off, so you can repeatitandcorrectitifsomethingwentwrongwithyourfirsttry,orifyoujustwanttotry the same panorama with a different camera setting.
Turn the EPIC on.1. Use the directional keys to navigate to ‘Last Panorama2. ’ in the main menu and press OK.The EPIC will let you preview the panorama before it begins. Press OK if you 3. want it to, or press X to continue without a preview.Use the directional keys to point the camera to the top left corner of your scene, 4. and press OK when you’re ready.You can use the directional keys to choose which photo the EPIC will start re-5. peating the panorama from, if you don’t want to start at the original top-left corner.
The rest of the process is the same as any other panorama. For instructions on how to shoot a 360 degree panorama, please see Chapter 7.
GigaPan User Guide15
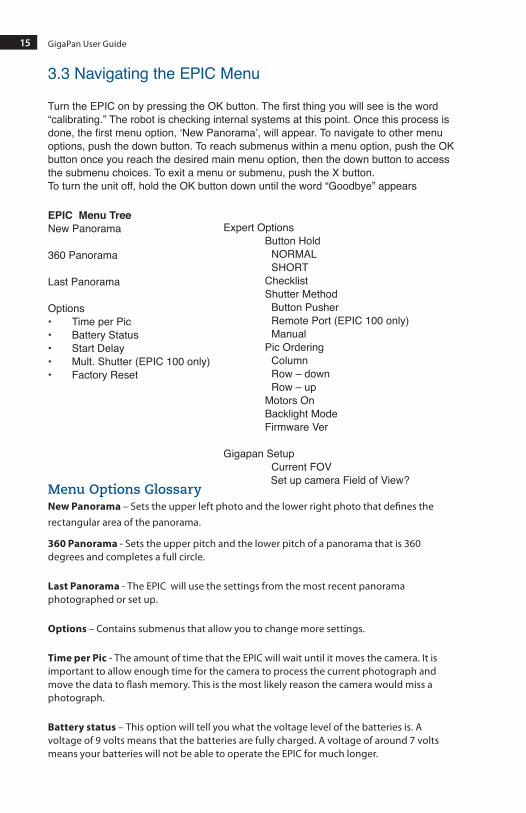
TurntheEPIConbypressingtheOKbutton.Thefirstthingyouwillseeistheword“calibrating.” The robot is checking internal systems at this point. Once this process is done,thefirstmenuoption,‘NewPanorama’, will appear. To navigate to other menu options, push the down button. To reach submenus within a menu option, push the OK button once you reach the desired main menu option, then the down button to access the submenu choices. To exit a menu or submenu, push the X button.To turn the unit off, hold the OK button down until the word “Goodbye” appears
3.3 Navigating the EPIC Menu
EPIC Menu TreeNew Panorama
360 Panorama
Last Panorama
OptionsTime per Pic•Battery Status•Start Delay•Mult. Shutter (EPIC 100 only)•Factory Reset•
Menu Options GlossaryNew Panorama – Sets the upper left photo and the lower right photo that defines the rectangular area of the panorama.
360 Panorama - Sets the upper pitch and the lower pitch of a panorama that is 360 degrees and completes a full circle.
Last Panorama - The EPIC will use the settings from the most recent panorama photographed or set up.
Options – Contains submenus that allow you to change more settings.
Time per Pic - The amount of time that the EPIC will wait until it moves the camera. It is important to allow enough time for the camera to process the current photograph and move the data to flash memory. This is the most likely reason the camera would miss a photograph.
Battery status – This option will tell you what the voltage level of the batteries is. A voltage of 9 volts means that the batteries are fully charged. A voltage of around 7 volts means your batteries will not be able to operate the EPIC for much longer.
Expert Options Button Hold NORMAL SHORT Checklist Shutter Method Button Pusher Remote Port (EPIC 100 only) Manual Pic Ordering Column Row – down Row – up Motors On Backlight Mode Firmware Ver
Gigapan Setup Current FOV Set up camera Field of View?

16Using the GigaPan EPIC
Start Delay - Enables a timer delay before each panorama capture begins.
Multiple Shutter (EPIC 100 only) - This option allows you to take multiple pictures at each position during the capture of your panorama. You can take up to 9 pictures at each position. (see Chapter 3.4 for more information)
Factory Reset – This option will reset certain options to their default values. The Time Per Pic, Pic Ordering, Shutter Method, Button Hold and vertical field of view will be reset.
Expert Options - These options will not be used as often by most users, so they are placed in a submenu.
Button Hold – This option may be set to Normal or Short. If Short is selected, the duration of time that the shutter button is depressed is reduced.
Check List – If this option is set to ON, a checklist of things that need to be done in order to successfully create a technically good image are presented to the user before the panorama is taken.
Shutter Method – This option allows you to choose how the unit will operate your camera’s shutter. The settings are Button Pusher, Remote Port and Manual. Button Pusher is the normal, default method. If the Manual method is used, the user must manually actuate the shutter and press the OK button on the EPIC to advance to the next photograph. Remote Port is available for the EPIC 100 only, see Chapter 3.4 for more information.
Pic Ordering – This option allows you to specify the general order for taking photographs in your panorama. The settings are column, row–down, and row–up. If the column setting is chosen, the EPIC will photograph the panorama one column at a time starting from the left side. The EPIC will travel from the top of a column downwards taking photographs. When the EPIC reaches the bottom of the panorama, it will move to the next column and start from the top. If the row–down setting is chosen, the EPIC will take the panorama as a set of rows. The EPIC will start at the top row and photograph from left to right. When the EPIC reaches the right side it will move downwards to the next row. If the row–up setting is chosen the EPIC will shoot rows from the left side of the bottom row and move upwards to the next row until it has photographed all of the rows in the panorama.
Motors On - This option allows you to turn the stepper motors off so that you can move the arm and EPIC about while it is powered on.
Backlight Mode - This setting allows you to choose when the back light is in use. The options are Power Save, Always Off, Always On.
Firmware Ver – This will display the version number of the firmware for the EPIC.
GigaPan Setup – This option will allow you to change the vertical field of view when you change cameras or lenses. See “Align your camera to the GigaPan EPIC” in Chapter 2.6 for details on determining the field of view.
GigaPan User Guide17
4. Exploring GigaPan.com
4.1 View and Share
Enjoy thousands of brilliant gigapixel panoramas from around the world. Share, discuss, snapshot and more.
At GigaPan.com, you can:Explore thousands of GigaPans from around the world, take snapshots, comment and •share.Discover amazing ways GigaPans are being used to communicate, promote, document •and provide an amazing new vision.Learn how to create your own GigaPans, groups and galleries.•
Exploring Gigapan.com

18
4.2 Embed your panorama
You can easily embed your panoramas on another website with all the functionality of the GigaPan Viewer to pan and zoom.
Log in to GigaPan.com, and select ‘My Home’ then ‘My GigaPans’ to view your 1. panorama.Choose a panorama, and click on the ‘Embed’ link below it to access the Embedding 2. Wizard.Copy the HTML code paste it into your website or blog.3.
NOTE: To embed a panorama owned by someone else, please contact the author for per-missionandacopyoftheembedcode.Clickontheauthor’snametoviewhisorherprofile,and select ‘Send a message’. You must be logged in to your GigaPan.com account to send a message.
GigaPan User Guide19 Exploring Gigapan.com
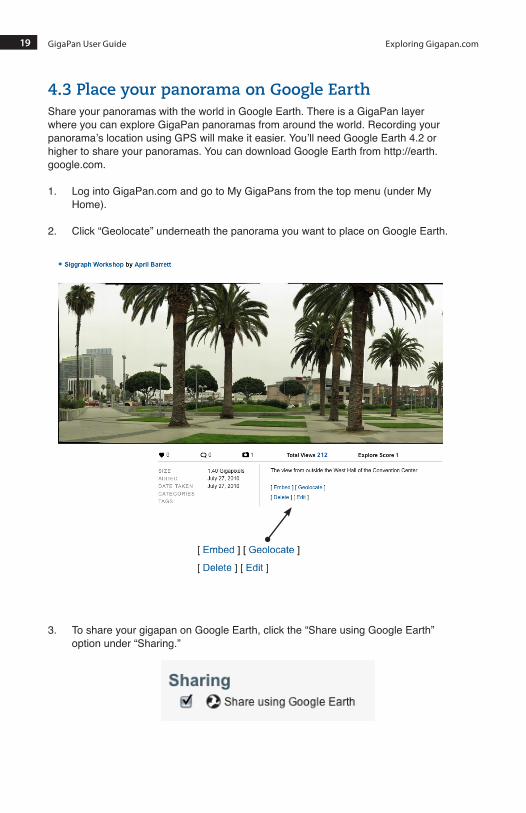
4.3 Place your panorama on Google EarthShare your panoramas with the world in Google Earth. There is a GigaPan layer where you can explore GigaPan panoramas from around the world. Recording your panorama’s location using GPS will make it easier. You’ll need Google Earth 4.2 or higher to share your panoramas. You can download Google Earth from http://earth.google.com.
Log into GigaPan.com and go to My GigaPans from the top menu (under My 1. Home).
Click “Geolocate” underneath the panorama you want to place on Google Earth. 2.
To share your gigapan on Google Earth, click the “Share using Google Earth” 3. option under “Sharing.”
20
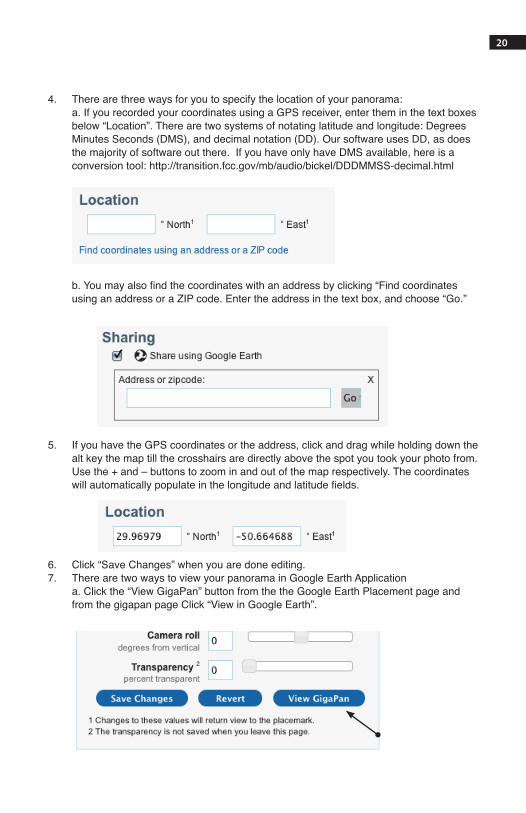
There are three ways for you to specify the location of your panorama: 4. a. If you recorded your coordinates using a GPS receiver, enter them in the text boxes below “Location”. There are two systems of notating latitude and longitude: Degrees Minutes Seconds (DMS), and decimal notation (DD). Our software uses DD, as does the majority of software out there. If you have only have DMS available, here is a conversion tool: http://transition.fcc.gov/mb/audio/bickel/DDDMMSS-decimal.html
b.Youmayalsofindthecoordinateswithanaddressbyclicking“Findcoordinatesusing an address or a ZIP code. Enter the address in the text box, and choose “Go.”
If you have the GPS coordinates or the address, click and drag while holding down the 5. alt key the map till the crosshairs are directly above the spot you took your photo from. Use the + and – buttons to zoom in and out of the map respectively. The coordinates willautomaticallypopulateinthelongitudeandlatitudefields.
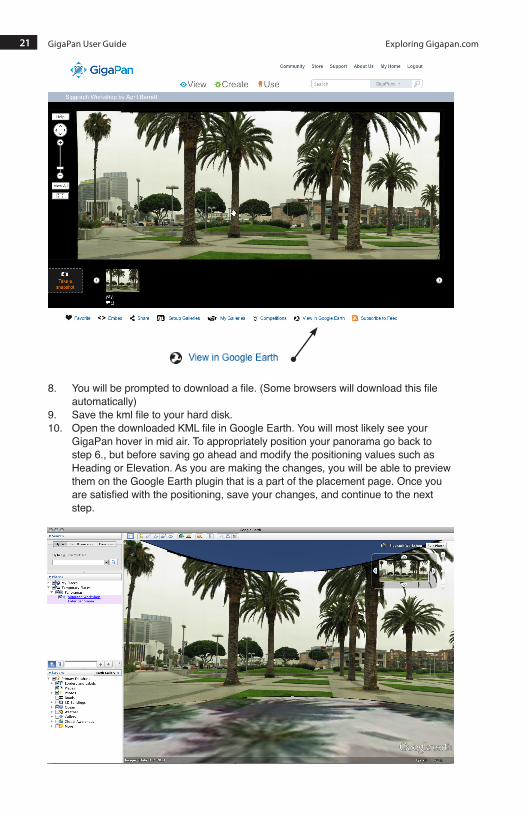
Click “Save Changes” when you are done editing.6. There are two ways to view your panorama in Google Earth Application 7. a. Click the “View GigaPan” button from the the Google Earth Placement page and from the gigapan page Click “View in Google Earth”.
GigaPan User Guide21 Exploring Gigapan.com
Youwillbepromptedtodownloadafile.(Somebrowserswilldownloadthisfile8. automatically)Savethekmlfiletoyourharddisk.9. OpenthedownloadedKMLfileinGoogleEarth.Youwillmostlikelyseeyour10. GigaPan hover in mid air. To appropriately position your panorama go back to step 6., but before saving go ahead and modify the positioning values such as Heading or Elevation. As you are making the changes, you will be able to preview them on the Google Earth plugin that is a part of the placement page. Once you aresatisfiedwiththepositioning,saveyourchanges,andcontinuetothenextstep.
22
5. Troubleshooting
5.1 My photos are blurry
Read on to find out how to fix common problems with the GigaPan EPIC. If you don’t find your solution here, contact technical support at GigaPan.com.
There could be several causes for blurry photos:
The moving platform might not have “settled“ before the picture is taken. 1. a. To get around this, turn on your camera’s self-timer function and set it to 2 seconds.
(Several cameras have a 2-sec self-timer built in). The button-pusher might not be holding down the camera button long enough. 2. a. Navigate to ‘Options’ > ‘Expert Options’ > ‘Button Hold’ in the EPIC Menu. b. Use the directional keys to increase the time that the button-pusher will hold the
camera button down. The platform might be moving before your camera has taken and stored the picture. 3. a. Navigate to ‘Options’ > ‘Time Per Pic ‘in the EPIC Menu. b. Use the directional keys to increase the time that the EPIC will wait before moving.
This is especially useful for night-time panoramas.
5.2 My camera is missing picturesThere are two reasons for your camera to miss pictures:
The EPIC’s platform is moving faster than your camera can take pictures. 1. a. Navigate to ‘Options’ > ‘Time Per Pic’ in the EPIC Menu. b. Use the directional keys to increase the time that the EPIC will wait before moving. The button-pusher isn’t pushing your camera’s button down long enough. 2. a. Navigate to ‘Options’ > ‘Expert Options’ > ‘Button Hold’ in the EPIC Menu. b. Use the directional keys to increase the time that the button-pusher will hold the
camera button down.
5.3 I want to remove the checklist before every panoramaTo turn off the checklist before every panorama, navigate to ‘Options ‘> ‘Expert Options’ > ‘Checklist’ and use the directional keys to turn the checklist on or off.

GigaPan User Guide23 Troubleshooting
5.4 My panoramas are distorted or misalignedThere could be several causes for distorted or misaligned panoramas:
Check your setup for errors. 1. a. Go through the Set-up steps in Chapter 2.
Note: Remember that you must repeat this every time you change the camera you’re using. b. Make sure that your camera is tightly mounted on the EPIC unit. c.MakesurethattheEPICisfirmlymountedonyourtripod. d. Make sure that your tripod is on steady ground. e. Make sure that nothing disturbs the EPIC while it’s taking photographs.
Make adjustments for vertical or horizontal lines in your panorama. 2. GigaPan Stitch software aligns the larger elements of photos, and thus might ignore vertical or horizontal lines such as poles and window frames. a. Try to avoid taking panoramas with too many vertical lines in the fore-ground. b. Try using a third-party tool to stitch your panorama.Check and adjust the platform’s forward-back position. If you’re taking macro 3. panoramas (that is, really close to the subject), you’ll need to adjust the position of the platform, so that the EPIC rotates your camera about its “nodal point”). a. Turn to Chapter 2.8: Finding your camera’s nodal point. Note: This is a time-consuming process, and should only be used when necessary. However, it may be necessary for panoramas that have subjects that are both close and far away, and macro panoramas.
24
6. Tips and tricks
6.1 Shoot more than you need
Here are some tips and tricks to make the most of your panoramas. Also, check out the creative ideas and advanced tips to go beyond the basics with your shots.
What you should shoot
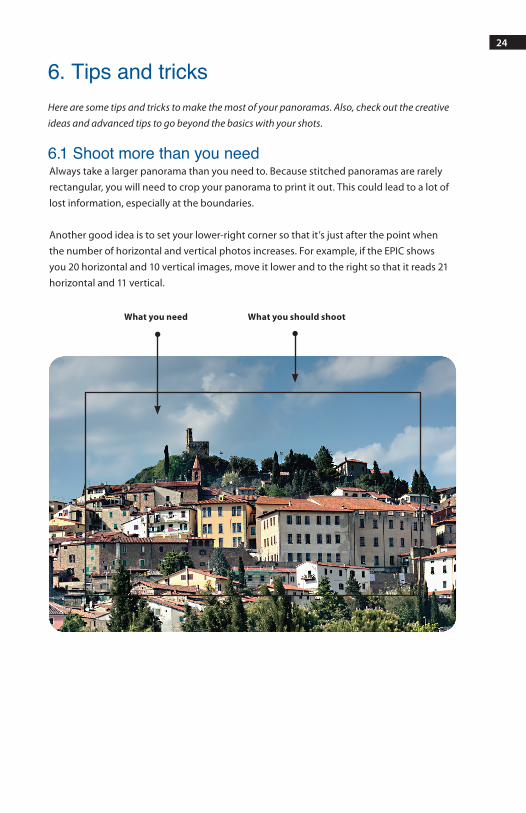
Always take a larger panorama than you need to. Because stitched panoramas are rarely rectangular, you will need to crop your panorama to print it out. This could lead to a lot of lost information, especially at the boundaries.
Another good idea is to set your lower-right corner so that it’s just after the point when the number of horizontal and vertical photos increases. For example, if the EPIC shows you 20 horizontal and 10 vertical images, move it lower and to the right so that it reads 21 horizontal and 11 vertical.
What you need
GigaPan User Guide25 Tips and Tricks
6.2 Shooting in different environments
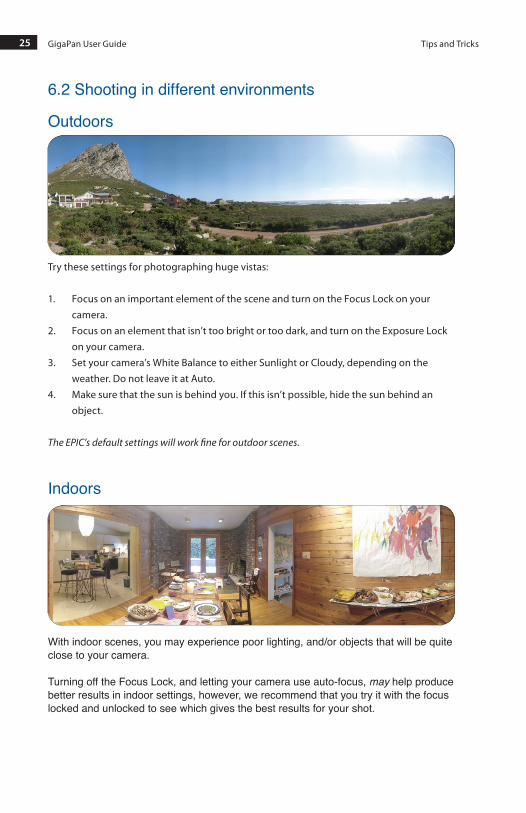
Outdoors
Indoors
Try these settings for photographing huge vistas:
Focus on an important element of the scene and turn on the Focus Lock on your 1. camera. Focus on an element that isn’t too bright or too dark, and turn on the Exposure Lock 2. on your camera.Set your camera’s White Balance to either Sunlight or Cloudy, depending on the 3. weather. Do not leave it at Auto. Make sure that the sun is behind you. If this isn’t possible, hide the sun behind an 4. object.
The EPIC’s default settings will work fine for outdoor scenes.
With indoor scenes, you may experience poor lighting, and/or objects that will be quite close to your camera.
Turning off the Focus Lock, and letting your camera use auto-focus, may help produce better results in indoor settings, however, we recommend that you try it with the focus locked and unlocked to see which gives the best results for your shot.

26
Night shots
Here are a few tips for shooting panoramas at night. The key is to Increase the exposure time for each photo and make sure that the EPIC and your camera are free from vibrations.
If your camera has Image Stabilization, turn the feature off. 1. Increase the exposure setting for your camera. Preview the effect in the camera’s screen 2. until you’re satisfied. Change the ISO setting to 200 or less. This will prevent your pictures from becoming grainy.3. In the EPIC Menu, navigate to ‘Options’ > ‘Time Per Pic’.4. Use the directional keys to increase the time to at least 5 seconds. 5. Navigate to ‘Options ‘> ‘Expert Options’ > ‘Button Hold’.6. Use the directional keys to increase the time to 2-3 seconds.7. Before you begin your final panorama, take a 2x2 panorama to test your setup. 8. In your camera’s screen, make sure that every shot is clear even at the highest zoom level.9.
In the EPIC Menu, navigate to ‘Options’ > ‘Time Per Pic’.1. Use the directional keys to increase the time to at least 3 seconds. 2. Navigate to ‘Options’ > ‘Expert Options’ > ‘Button Hold’.3. Use the directional keys to increase the time to 1.5 seconds.4. Before you begin your final panorama, take a 2x2 panoramam to test your setup. 5. In your camera’s screen, make sure that every shot is clear even at the highest zoom 6. level.
GigaPan User Guide27 Tips and Tricks
City scenes
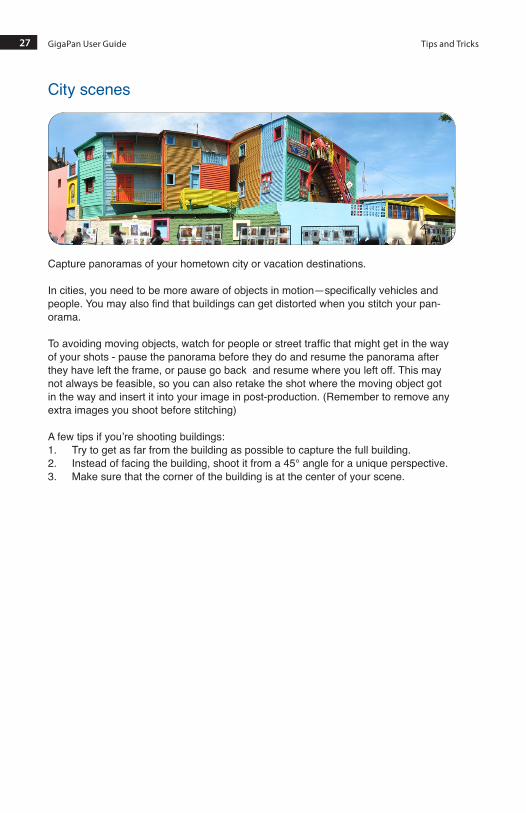
Capture panoramas of your hometown city or vacation destinations.
Incities,youneedtobemoreawareofobjectsinmotion—specificallyvehiclesandpeople.Youmayalsofindthatbuildingscangetdistortedwhenyoustitchyourpan-orama.
Toavoidingmovingobjects,watchforpeopleorstreettrafficthatmightgetinthewayof your shots - pause the panorama before they do and resume the panorama after they have left the frame, or pause go back and resume where you left off. This may not always be feasible, so you can also retake the shot where the moving object got in the way and insert it into your image in post-production. (Remember to remove any extra images you shoot before stitching)
A few tips if you’re shooting buildings:Try to get as far from the building as possible to capture the full building. 1. Instead of facing the building, shoot it from a 45° angle for a unique perspective.2. Make sure that the corner of the building is at the center of your scene.3.

28
6.3 Create Games: Hide & SeekMake your panorama fun to explore by hiding interesting objects, and create a list of thesethingsforyourfriendstofind.
You can either hide items in your scene before shooting the panorama, or insert im-ages into your panorama in post-production.
Just follow these instructions when you are uploading your panorama to turn it into a fun hide & seek game:
When you upload your panorama to GigaPan.com, click on ‘Edit’.1. Check the ‘Is a Game’ box.2. List the objects you’ve hidden in your panorama comments.3.
GigaPan User Guide29 Tips and Tricks
6.5 Shooting a 360 degree panorama
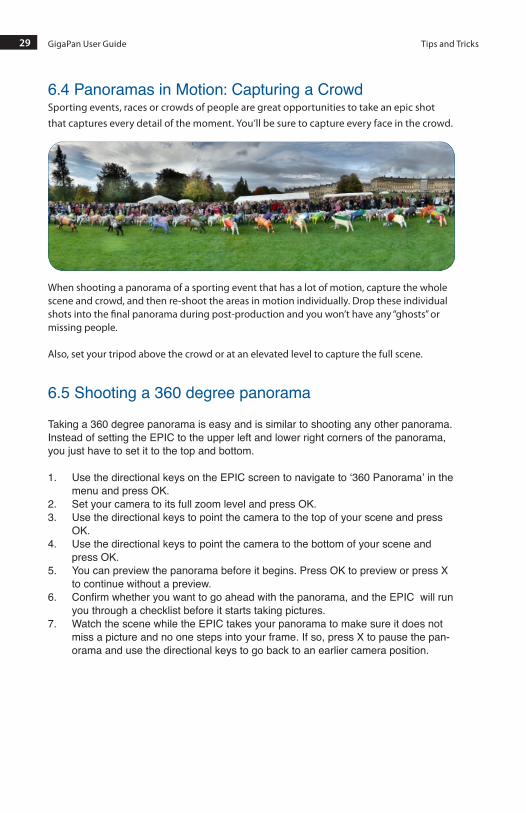
6.4 Panoramas in Motion: Capturing a CrowdSporting events, races or crowds of people are great opportunities to take an epic shot that captures every detail of the moment. You’ll be sure to capture every face in the crowd.
When shooting a panorama of a sporting event that has a lot of motion, capture the whole scene and crowd, and then re-shoot the areas in motion individually. Drop these individual shots into the final panorama during post-production and you won’t have any “ghosts” or missing people.
Also, set your tripod above the crowd or at an elevated level to capture the full scene.
Taking a 360 degree panorama is easy and is similar to shooting any other panorama. Instead of setting the EPIC to the upper left and lower right corners of the panorama, you just have to set it to the top and bottom.
Use the directional keys on the EPIC screen to navigate to ‘360 Panorama’ in the 1. menu and press OK.Set your camera to its full zoom level and press OK.2. Use the directional keys to point the camera to the top of your scene and press 3. OK.Use the directional keys to point the camera to the bottom of your scene and 4. press OK.You can preview the panorama before it begins. Press OK to preview or press X 5. to continue without a preview.Confirmwhetheryouwanttogoaheadwiththepanorama,andtheEPICwillrun6. you through a checklist before it starts taking pictures.Watch the scene while the EPIC takes your panorama to make sure it does not 7. miss a picture and no one steps into your frame. If so, press X to pause the pan-orama and use the directional keys to go back to an earlier camera position.