enterprise vault whitepaper - veritasvox.veritas.com/legacyfs/online/veritasdata/ev... · during...
TRANSCRIPT
This document is provided for informational purposes only. All warranties relating to the information in this document, either express or implied, are disclaimed to the maximum extent allowed by law. The information in this document is subject to change without notice. Copyright © 2013 Symantec Corporation. All rights reserved. Symantec, the Symantec logo and Enterprise Vault are trademarks or registered trademarks of Symantec Corporation or its affiliates in the U.S. and other countries. Other names may be trademarks of their respective owners
Enterprise Vault Whitepaper
Migrating and Consolidating File
Servers with Enterprise Vault This whitepaper discusses migrating and consolidating file servers that
have content archived with Enterprise Vault
If you have any feedback or questions about this document please
email them to [email protected] stating the document title.
This document applies to the following version(s) of Enterprise Vault:
9.0.x & 10.0.x
Enterprise Vault Whitepaper – Migrating and Consolidating File Servers with Enterprise Vault
i
Document Control
Contributors
Who Contribution
Evan Barrett Author
Darren Locke Content
Revision History
Version Date Changes
1 February 2011 Initial release
2 May 2012 Updates for EV 9.0.4 and 10.0.2
3 February 2013 Minor updates
4 March 2013 High level steps for migrating placeholders from one
platform to another
Related Documents
Document Title Version / Date

Enterprise Vault Whitepaper – Migrating and Consolidating File Servers with Enterprise Vault
ii
Table of Contents Introduction 1
New Consolidation Feature with Enterprise Vault 9.0 1 Placeholder Migration 1 Performance 3
Cross Platform Migrations and Moves 4 Methods for Migrating and Consolidating Data on File Servers 4
Using Enterprise Vault as a Mechanism to Reduce the Amount of Data to Consolidate or Migrate 4 Using Volume Replication 4 Using the FSAUtility Move Option 5 Using the FSAUtility Placeholder Migration Option 6 In Summary 8
Consolidation and Migration Scenarios 9 Decommissioning Hardware 9 Server Consolidation 9 Scenario #1 – Consolidating Branch Offices 9
Current Environment 9 Proposed Solution 10
Scenario #2 – Easing Migration to New Hardware by Implementing Enterprise Vault 11 Current Environment 11 Solution 11
Scenario #3 – Opening a New Branch Office 13 Current Environment 13 Solution 14
Appendices APPENDIX A – Renaming a File Server
APPENDIX B – Migrating from Devices that Do Not Support Placeholders
Introduction
New Consolidation Feature with Enterprise Vault 9.0
Enterprise Vault 9.0 offers a new feature with the FSAUtility.exe program, Placeholder Migration.
Placeholder Migration
The new Placeholder Migration option provides enhanced support for file server consolidation for when
an old file server may be decommissioned or for when volumes need to be re-organized. With previous
versions of Enterprise Vault, the Move option was the only method available which not only moved the
placeholders, but also required the existing archived files to be moved to a new archive. Speed of
migration was determined by the size of the archived files, not by the number of placeholders to migrate.
The Placeholder Migration option for FSAUtility provides an optimized version of the Move option. When
using this new option, data is not migrated within the archive. Thus the speed of moving archived files
with the Placeholder Migration compared to that of the Move option can be dramatically faster as there is
no shuffling of data within Enterprise Vault and only placeholders on the file system are migrated from the
source to the destination. To use the new Placeholder Migration option, both source and target volumes
need to be managed by the same EV server and the same Vault Store. Internet shortcuts are not eligible
for migration.
To use Placeholder Migrations, FSAUtility requires the following format:
FSAUtility –pm –s <source_folder> -d <destination_folder> [-f] [-cs] [-csf] [0|1] [-i]
Where:
-pm – Indicates Placeholder Migration
-s – Indicates source
<source_folder> - The source folder that contains placeholders to be migrated
-d – Indicates destination
<destination_folder> - The destination folder for the migrated placeholders
-f – Optional. Overwrites files or placeholders at the destination
-cs – Optional. Copy folder security descriptors unless the folder already exists at the destination.
Cannot be used with –csf
-csf – Optional. Forcefully copy folder security descriptors, even for existing items. Cannot be
used with –cs
0|1 – Optional. Log settings. 0 for successful and failed actions. 1 for only failed actions
(default)
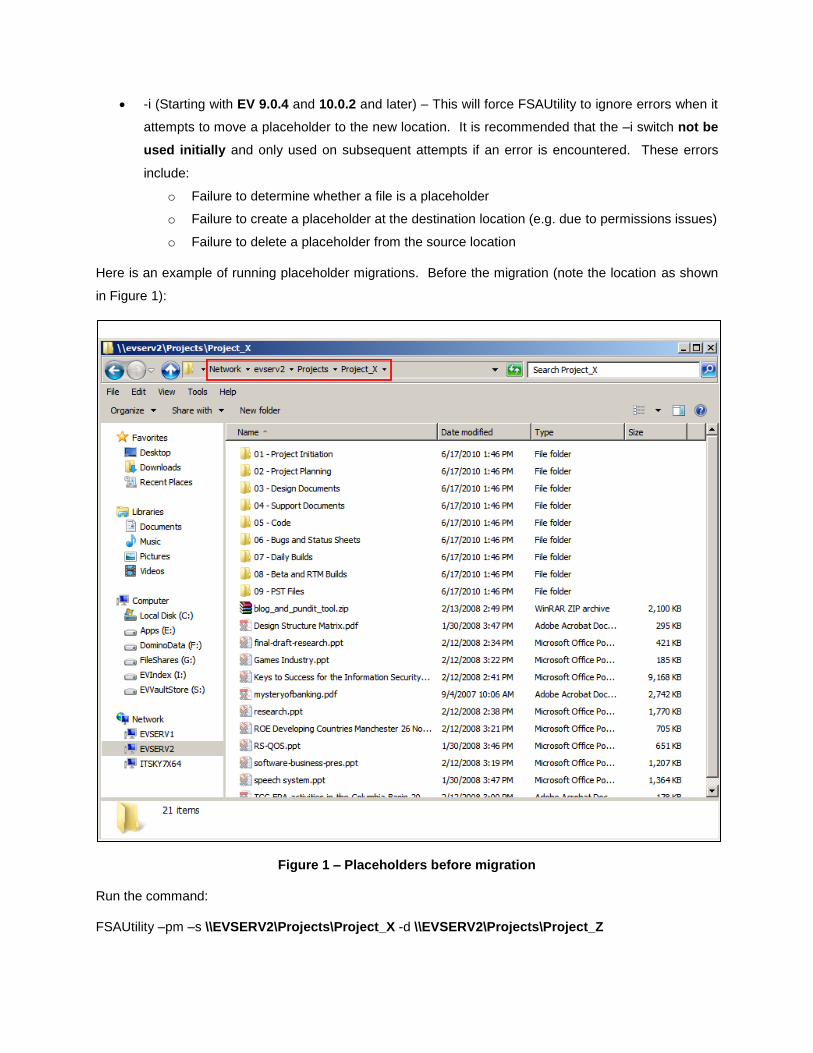
-i (Starting with EV 9.0.4 and 10.0.2 and later) – This will force FSAUtility to ignore errors when it
attempts to move a placeholder to the new location. It is recommended that the –i switch not be
used initially and only used on subsequent attempts if an error is encountered. These errors
include:
o Failure to determine whether a file is a placeholder
o Failure to create a placeholder at the destination location (e.g. due to permissions issues)
o Failure to delete a placeholder from the source location
Here is an example of running placeholder migrations. Before the migration (note the location as shown
in Figure 1):
Figure 1 – Placeholders before migration
Run the command:
FSAUtility –pm –s \\EVSERV2\Projects\Project_X -d \\EVSERV2\Projects\Project_Z
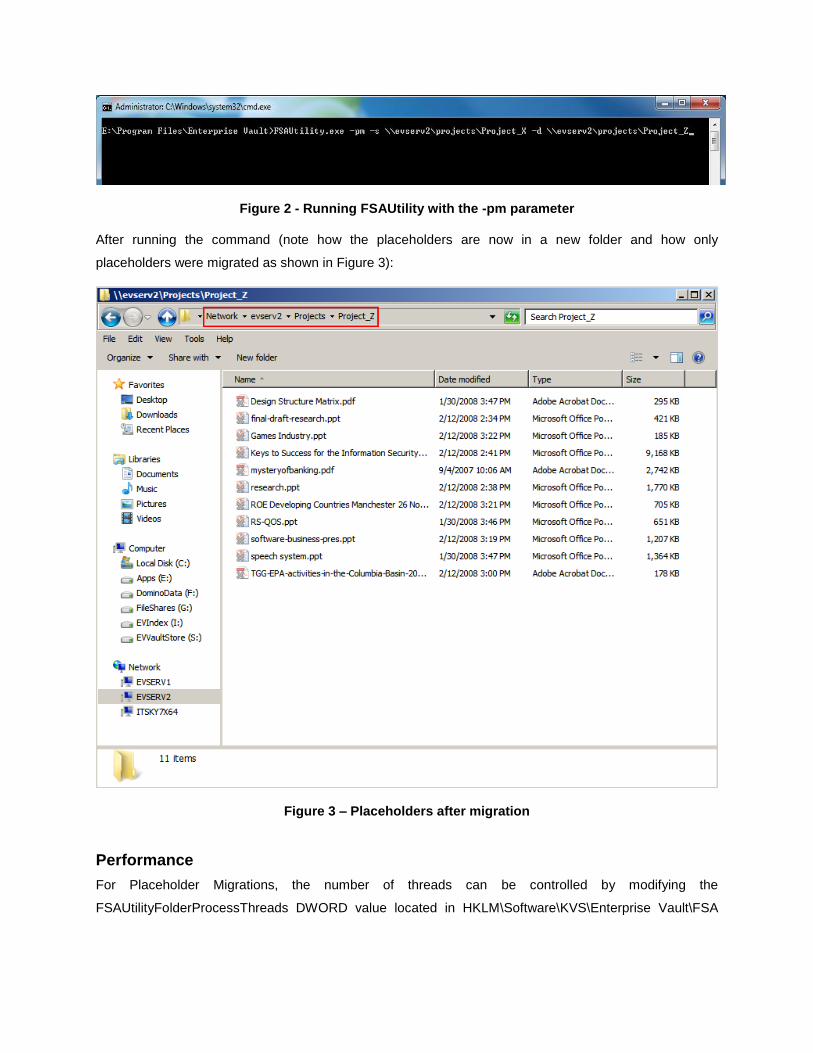
Figure 2 - Running FSAUtility with the -pm parameter
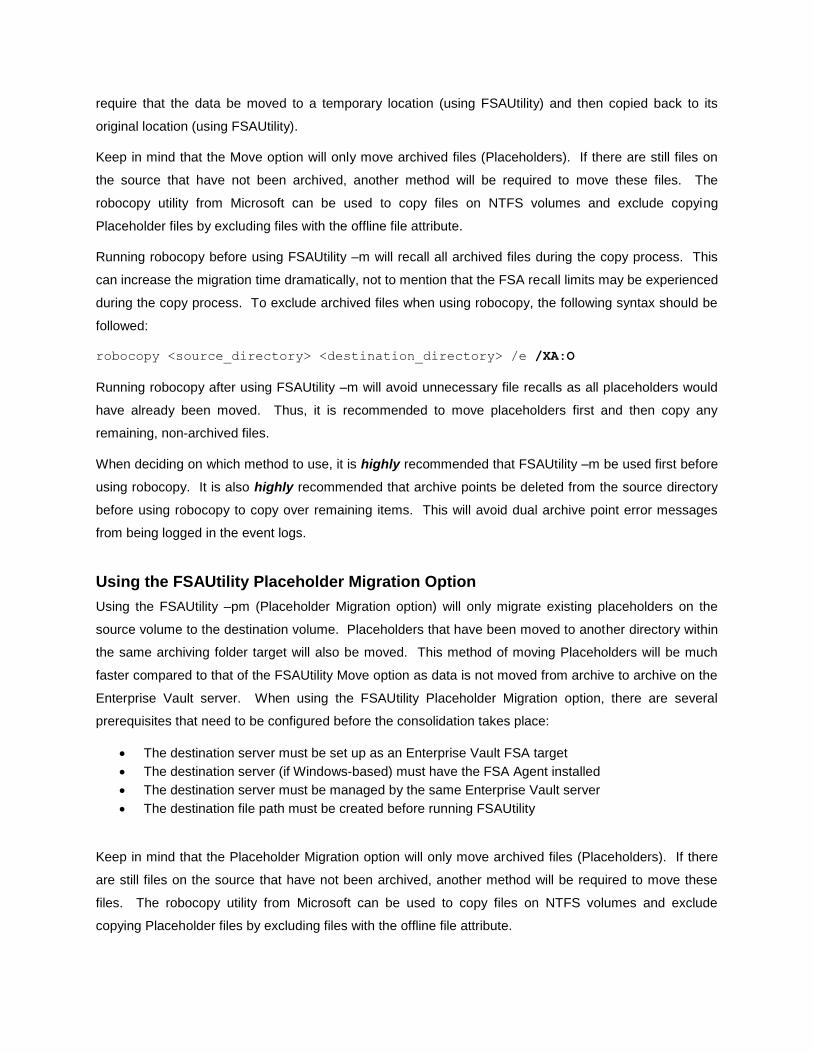
After running the command (note how the placeholders are now in a new folder and how only
placeholders were migrated as shown in Figure 3):
Figure 3 – Placeholders after migration
Performance
For Placeholder Migrations, the number of threads can be controlled by modifying the
FSAUtilityFolderProcessThreads DWORD value located in HKLM\Software\KVS\Enterprise Vault\FSA

(32-bit operating systems) or HKLM\Software\Wow6432Node\KVS\Enterprise Vault\FSA (64-bit operating
systems).
Increasing the thread count can speed up the processing of placeholder migrations, particularly when
there are numerous amounts of subfolders, but does have its drawbacks. Keep in mind that this will also
require additional resources on the Enterprise Vault server. If the Enterprise Vault server also performs
other archiving functions (such as Exchange archiving), increasing the thread count can slow down the
overall performance of the server especially if the server has a limited amount of processing cores.
Proper timing of placeholder migrations should be done in order not to conflict with existing, scheduled
archiving tasks.
Cross Platform Migrations and Moves
The FSAUtility –m and –pm functionality can be used to migrate or move archived data between
supported platforms (such as Windows to NetApp, NetApp to Celera, Celera to Windows, or NAS devices
with CIFS enabled to Windows). It should be noted that by simply copying Placeholders (using robocopy
or Windows Explorer for example) between platforms will not work as these tools will recall archived files.
FSAUtility –m or –pm will be required.
Methods for Migrating and Consolidating Data on File Servers
Using Enterprise Vault as a Mechanism to Reduce the Amount of Data to
Consolidate or Migrate
Organizations looking to reduce the amount of time and data needed to consolidate or migrate existing
data to new or existing hardware can implement Enterprise Vault File System Archiving. By archiving
large, older, or less accessed data before proceeding with migration or consolidation operations, the
amount of data can be greatly reduced and will result in a reduced amount of time needed to complete
the consolidation or migration operation. As a bonus, less disk space will be required on the migration
target volume compared to that of the source volume.
Archived data is compressed and single instanced. The result is a smaller storage footprint compared to
not archiving data. Data is also indexed allowing end users to be able to search for files via Enterprise
Vault search utilities or, in legal discovery situations, with Discovery Accelerator.
Using Volume Replication
When utilizing volume-level replication technology (such as Symantec’s Veritas Volume Replicator or
hardware replication), placeholders and non-archived data can be easily replicated as well as the

corresponding Archive Point information. Volume-level replication ignores file system structures and
replicates at the volume block level and as such will not trigger placeholder recalls during replication.
If replication is configured well before the scheduled decommissioning of the source server, data will be
instantly available on the destination server. Once the FSA Agent has been installed on the destination
server and has been configured as an FSA target, a user can easily recall an archived file on the
destination server without any further involvement from the system administrator.
With volume replication, the whole volume must be replicated. There may be some instances where an
organization has more than one volume containing files on the source file server and wish to migrate all
source volumes to one volume on the destination server. Thus, volume replication may not be the best
method in this situation.
There are many file replication utilities available today. However, many of these solutions only replicate
at the file level and not at the volume level. These solutions will not work when considering replication
methodology for server consolidations. An example of such an application is Microsoft’s DFS-R
technology. Ensure that your replication application replicates at the volume level.
Using the FSAUtility Move Option
Using the FSAUtility –m (Move option) will copy all archived files from a source server (regardless if there
is a Placeholder or not) and place them on the destination server. The Move option also has the ability
to move data between different hardware platforms. For example, Placeholders can be migrated from a
Windows server to a NetApp or Celerra device or vice versa. If there are large amounts of archived data,
this process can take some time to complete as data is being moved between archives on the Enterprise
Vault server (or servers). When using the FSAUtility Move option for file share consolidation, there are a
few necessary prerequisites that need to be configured:
The destination server must have the share and folder configured before the move operation
The destination server must be set up as an Enterprise Vault FSA target
The destination server must have the volume name configured as an FSA target with an Archive
Point defined
The destination system does not need to use the Vault Store as the source server
The destination server (if Windows-based) must have the FSA Agent installed
One benefit of using the –m option is the ability to move data that was originally archived with an older
version of Enterprise Vault (previous to version 8.0) where Optimized Single Instance Storage (OSIS) was
not available or in an existing Enterprise Vault 8.0+ environment where OSIS was not enabled. By
moving the archived data to a Vault Store that is part of a Vault Store Group where sharing is enabled,
the size of the archived data on the Enterprise Vault server may be reduced due to the deduplication
capabilities of OSIS. It should be noted that to recognize the benefits of OSIS on an existing archive will
require that the data be moved to a temporary location (using FSAUtility) and then copied back to its
original location (using FSAUtility).
Keep in mind that the Move option will only move archived files (Placeholders). If there are still files on
the source that have not been archived, another method will be required to move these files. The
robocopy utility from Microsoft can be used to copy files on NTFS volumes and exclude copying
Placeholder files by excluding files with the offline file attribute.
Running robocopy before using FSAUtility –m will recall all archived files during the copy process. This
can increase the migration time dramatically, not to mention that the FSA recall limits may be experienced
during the copy process. To exclude archived files when using robocopy, the following syntax should be
followed:
robocopy <source_directory> <destination_directory> /e /XA:O
Running robocopy after using FSAUtility –m will avoid unnecessary file recalls as all placeholders would
have already been moved. Thus, it is recommended to move placeholders first and then copy any
remaining, non-archived files.
When deciding on which method to use, it is highly recommended that FSAUtility –m be used first before
using robocopy. It is also highly recommended that archive points be deleted from the source directory
before using robocopy to copy over remaining items. This will avoid dual archive point error messages
from being logged in the event logs.
Using the FSAUtility Placeholder Migration Option
Using the FSAUtility –pm (Placeholder Migration option) will only migrate existing placeholders on the
source volume to the destination volume. Placeholders that have been moved to another directory within
the same archiving folder target will also be moved. This method of moving Placeholders will be much
faster compared to that of the FSAUtility Move option as data is not moved from archive to archive on the
Enterprise Vault server. When using the FSAUtility Placeholder Migration option, there are several
prerequisites that need to be configured before the consolidation takes place:
The destination server must be set up as an Enterprise Vault FSA target
The destination server (if Windows-based) must have the FSA Agent installed
The destination server must be managed by the same Enterprise Vault server
The destination file path must be created before running FSAUtility
Keep in mind that the Placeholder Migration option will only move archived files (Placeholders). If there
are still files on the source that have not been archived, another method will be required to move these
files. The robocopy utility from Microsoft can be used to copy files on NTFS volumes and exclude
copying Placeholder files by excluding files with the offline file attribute.
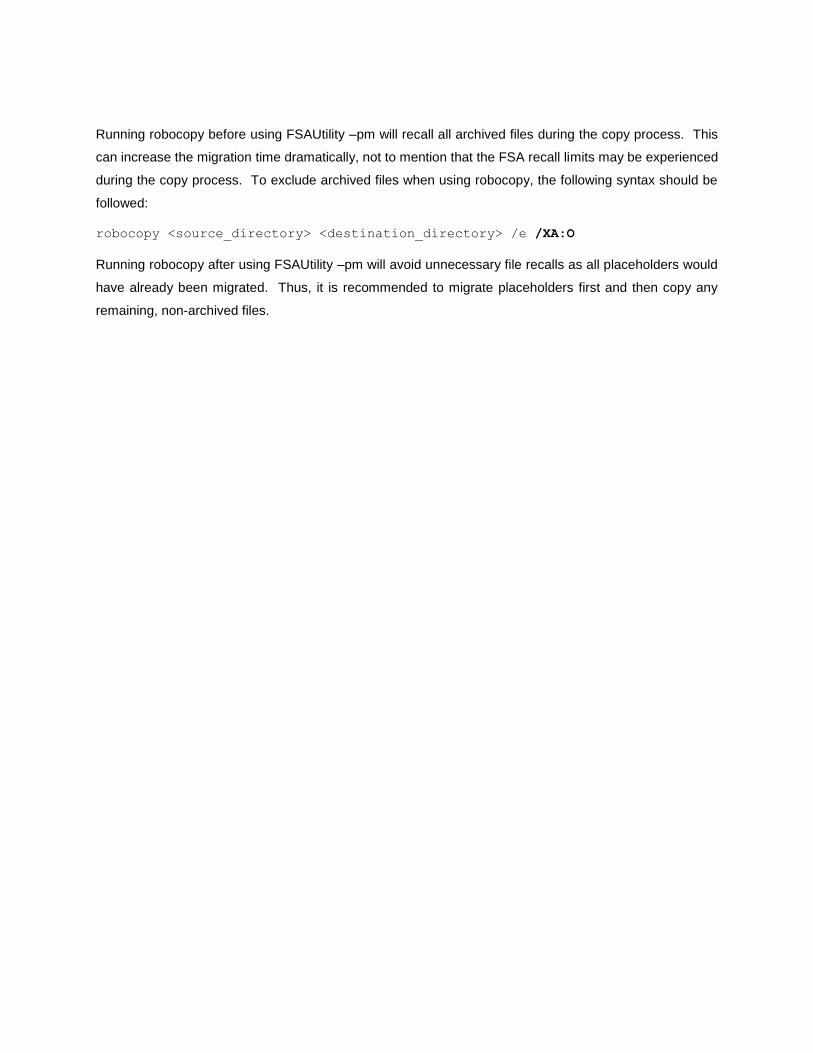
Running robocopy before using FSAUtility –pm will recall all archived files during the copy process. This
can increase the migration time dramatically, not to mention that the FSA recall limits may be experienced
during the copy process. To exclude archived files when using robocopy, the following syntax should be
followed:
robocopy <source_directory> <destination_directory> /e /XA:O
Running robocopy after using FSAUtility –pm will avoid unnecessary file recalls as all placeholders would
have already been migrated. Thus, it is recommended to migrate placeholders first and then copy any
remaining, non-archived files.
In Summary
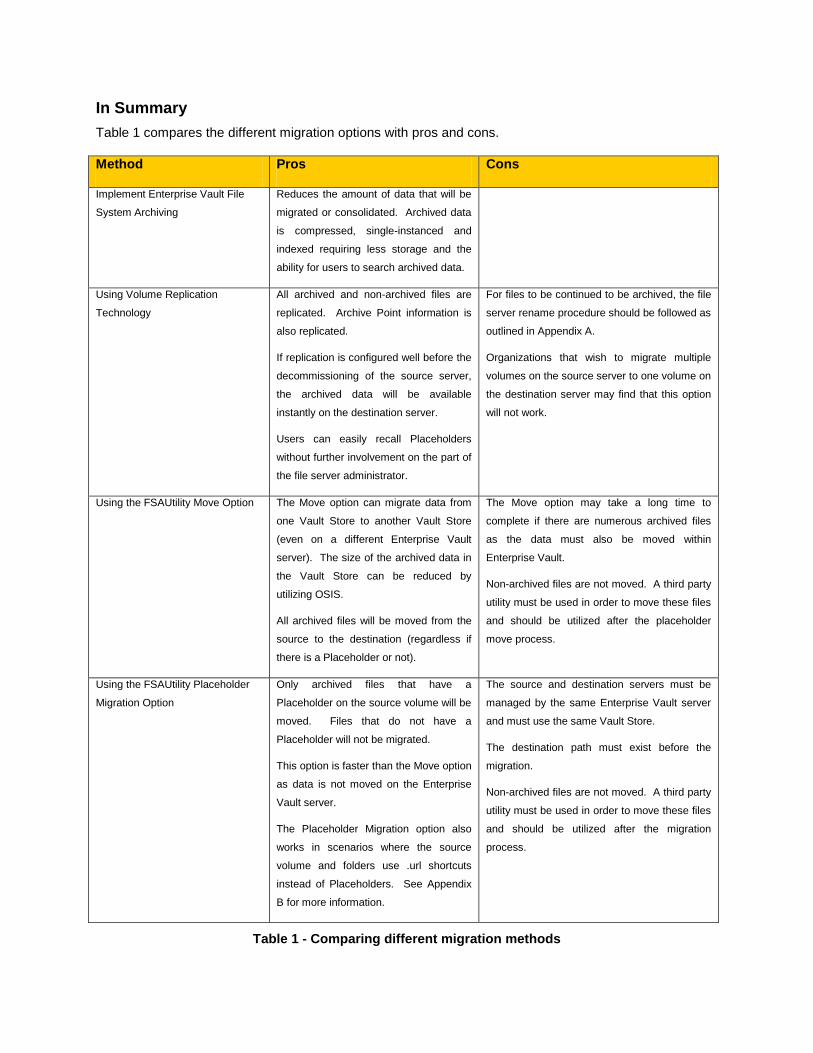
Table 1 compares the different migration options with pros and cons.
Method Pros Cons
Implement Enterprise Vault File
System Archiving
Reduces the amount of data that will be
migrated or consolidated. Archived data
is compressed, single-instanced and
indexed requiring less storage and the
ability for users to search archived data.
Using Volume Replication
Technology
All archived and non-archived files are
replicated. Archive Point information is
also replicated.
If replication is configured well before the
decommissioning of the source server,
the archived data will be available
instantly on the destination server.
Users can easily recall Placeholders
without further involvement on the part of
the file server administrator.
For files to be continued to be archived, the file
server rename procedure should be followed as
outlined in Appendix A.
Organizations that wish to migrate multiple
volumes on the source server to one volume on
the destination server may find that this option
will not work.
Using the FSAUtility Move Option The Move option can migrate data from
one Vault Store to another Vault Store
(even on a different Enterprise Vault
server). The size of the archived data in
the Vault Store can be reduced by
utilizing OSIS.
All archived files will be moved from the
source to the destination (regardless if
there is a Placeholder or not).
The Move option may take a long time to
complete if there are numerous archived files
as the data must also be moved within
Enterprise Vault.
Non-archived files are not moved. A third party
utility must be used in order to move these files
and should be utilized after the placeholder
move process.
Using the FSAUtility Placeholder
Migration Option
Only archived files that have a
Placeholder on the source volume will be
moved. Files that do not have a
Placeholder will not be migrated.
This option is faster than the Move option
as data is not moved on the Enterprise
Vault server.
The Placeholder Migration option also
works in scenarios where the source
volume and folders use .url shortcuts
instead of Placeholders. See Appendix
B for more information.
The source and destination servers must be
managed by the same Enterprise Vault server
and must use the same Vault Store.
The destination path must exist before the
migration.
Non-archived files are not moved. A third party
utility must be used in order to move these files
and should be utilized after the migration
process.
Table 1 - Comparing different migration methods

Consolidation and Migration Scenarios
Decommissioning Hardware
Organizations from time to time will replace older file server hardware with new hardware or move to a
virtualized environment such as VMware. Thus these organizations may face difficulties when needing to
move data from one server to another. What are some of the options that organizations utilizing
Enterprise Vault File System Archiving have today to migrate data?
Data replication – Organizations can use various data replication technologies such as software-
based (e.g. Veritas Volume Replicator) or hardware-based (hardware snapshots) to replicate data
at the disk volume level
Using the FSAUtility Move option
Using the FSAUtility Placeholder Migration option
Server Consolidation
There are several use cases for organizations when it comes to server consolidations and migrations.
Organizations may have numerous file servers that actively being archived by Enterprise Vault. To save
on hardware costs, these organizations may wish to consolidate many servers to one or two physical or
virtual servers or even migrate from a Windows file share to another device such as a NetApp or EMC
Celerra or vice versa. Other organizations may wish to consolidate the number of file shares on an
existing server or simply move files around on an existing volume. While others may have one very
heavily utilized file server and wish to split out files shares to two or more file servers.
In these events, the Enterprise Vault FSAUtility application can help facilitate the move by using one of
the following methods:
Move option
Placeholder Migration option
Scenario #1 – Consolidating Branch Offices
Current Environment
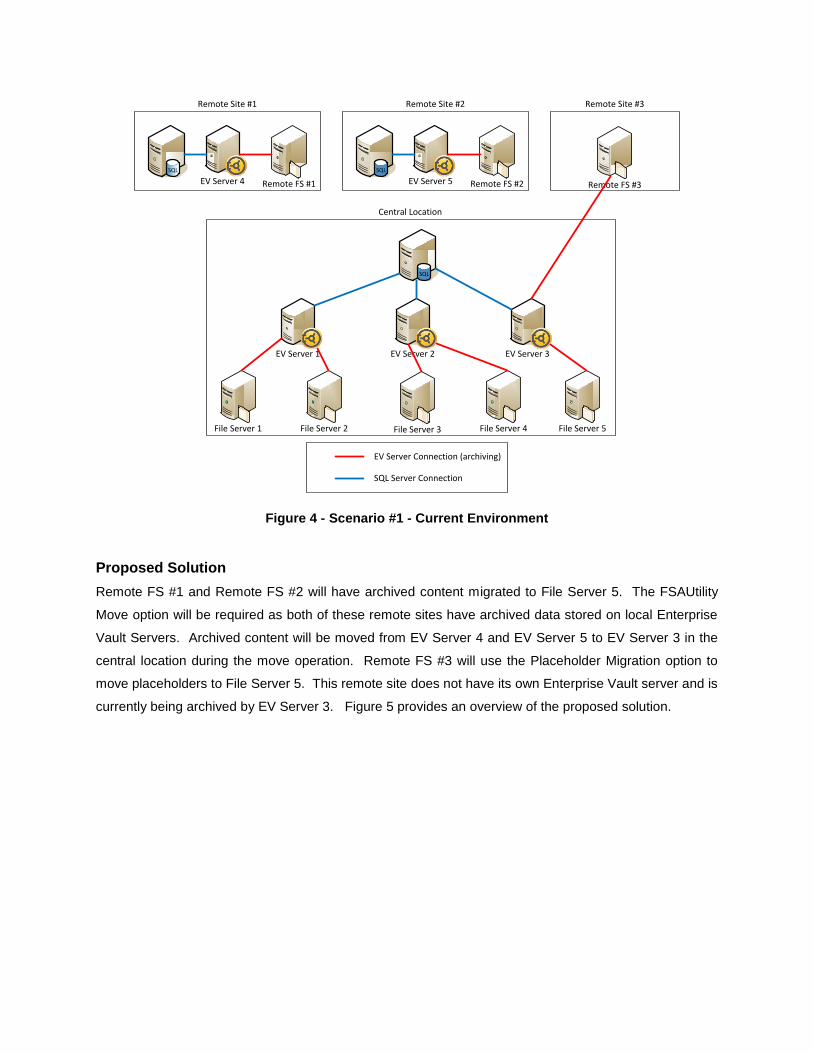
This particular organization has three remote locations and one centralized office. Two of the remote
locations have one file server and one Enterprise Vault server each. The third site has one file server
which is archived by an Enterprise Vault server at the central location. File server data at all the remote
locations is roughly 250GB. The central location has five file servers and three Enterprise Vault servers.
File server data at the central location is roughly 9TB (with File Server 5 only having 1TB of data). The IT
staff is looking to consolidate file and Enterprise Vault servers by removing all servers from the remote
locations. Figure 4 illustrates the current environment.
EV Server 1 EV Server 3EV Server 2
EV Server 4 EV Server 5Remote FS #1 Remote FS #2 Remote FS #3
File Server 1 File Server 2 File Server 3 File Server 4 File Server 5
Remote Site #1 Remote Site #2 Remote Site #3
Central Location
SQL
SQL SQL
EV Server Connection (archiving)
SQL Server Connection
Figure 4 - Scenario #1 - Current Environment
Proposed Solution
Remote FS #1 and Remote FS #2 will have archived content migrated to File Server 5. The FSAUtility
Move option will be required as both of these remote sites have archived data stored on local Enterprise
Vault Servers. Archived content will be moved from EV Server 4 and EV Server 5 to EV Server 3 in the
central location during the move operation. Remote FS #3 will use the Placeholder Migration option to
move placeholders to File Server 5. This remote site does not have its own Enterprise Vault server and is
currently being archived by EV Server 3. Figure 5 provides an overview of the proposed solution.

EV Server 1 EV Server 3EV Server 2
EV Server 4 EV Server 4Remote FS #1 Remote FS #2 Remote FS #3
File Server 1 File Server 2 File Server 3 File Server 4
File Server 5
Remote Site #1 Remote Site #2 Remote Site #3
Central Location
SQL
SQL SQL
EV Server Connection (archiving)
SQL Server Connection
Consolidation via Move Option
Consolidation via Placeholder Migration
Figure 5 - Scenario #1 - Proposed Solution
After all moves and migrations of archived content have been completed, the two remote Enterprise Vault
servers and the three remote file servers can be retired. The remote SQL servers can also be retired or
reallocated for other database applications.
Scenario #2 – Easing Migration to New Hardware by Implementing Enterprise
Vault
Current Environment
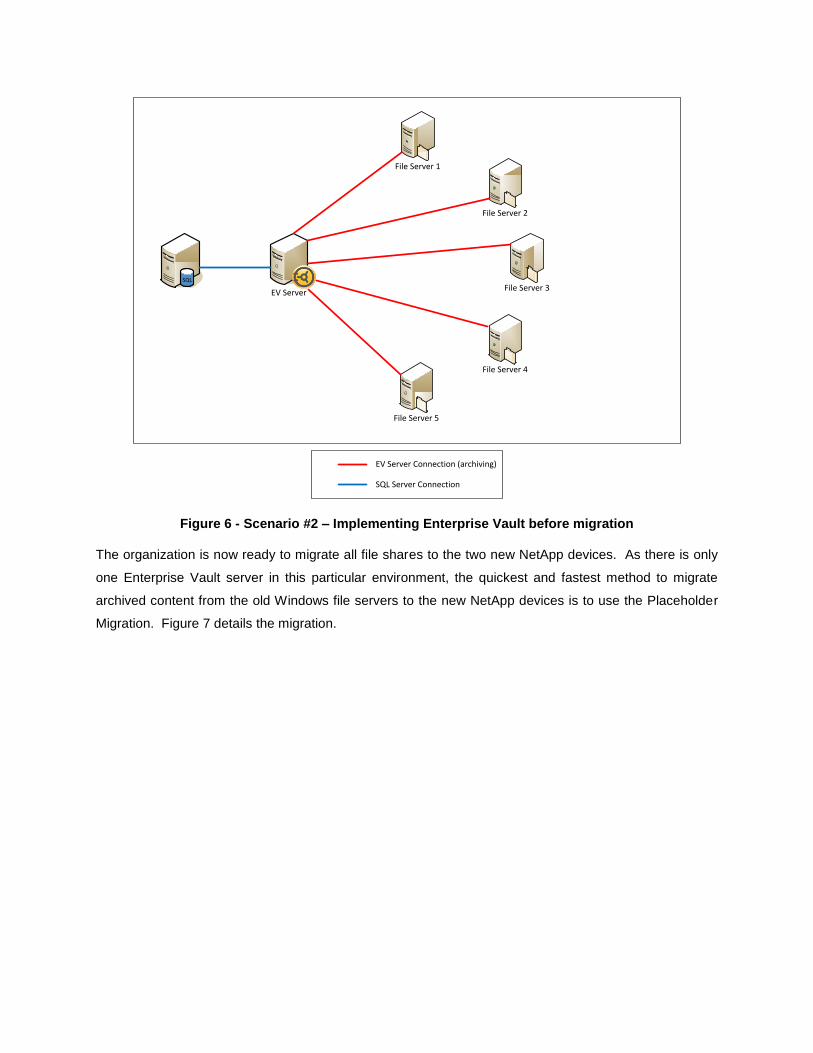
The organization currently has five Windows file servers in one datacenter and is looking to consolidate
all file shares on to two new NetApp devices. Enterprise Vault is not installed.
Solution
The organization implements Enterprise Vault to archive the existing five Windows files servers using one
Enterprise Vault server. After Enterprise Vault archives data, the amount of unarchived data has been
greatly reduced. Figure 6 illustrates the environment after installing Enterprise Vault to archive existing
data on the Windows file servers.
EV Server
File Server 1
File Server 2
File Server 3
File Server 4
File Server 5
SQL
EV Server Connection (archiving)
SQL Server Connection
Figure 6 - Scenario #2 – Implementing Enterprise Vault before migration
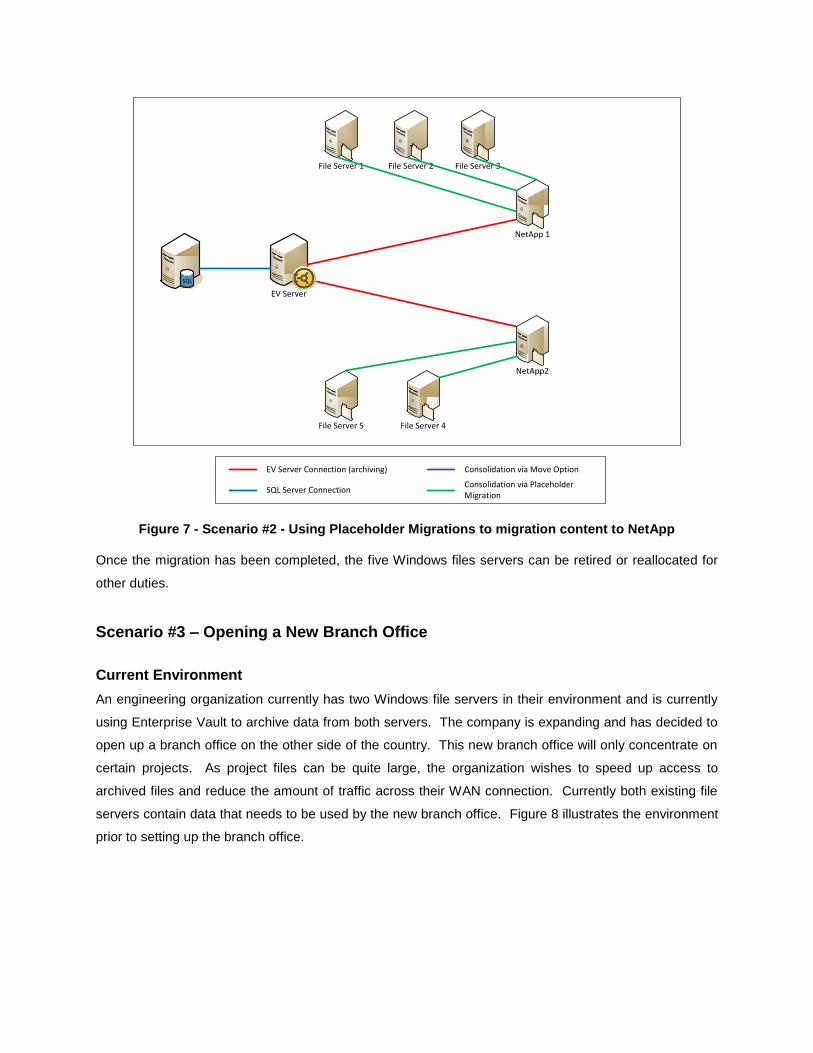
The organization is now ready to migrate all file shares to the two new NetApp devices. As there is only
one Enterprise Vault server in this particular environment, the quickest and fastest method to migrate
archived content from the old Windows file servers to the new NetApp devices is to use the Placeholder
Migration. Figure 7 details the migration.
EV Server
File Server 1 File Server 2 File Server 3
File Server 4File Server 5
SQL
NetApp 1
NetApp2
EV Server Connection (archiving)
SQL Server Connection
Consolidation via Move Option
Consolidation via Placeholder Migration
Figure 7 - Scenario #2 - Using Placeholder Migrations to migration content to NetApp
Once the migration has been completed, the five Windows files servers can be retired or reallocated for
other duties.
Scenario #3 – Opening a New Branch Office
Current Environment
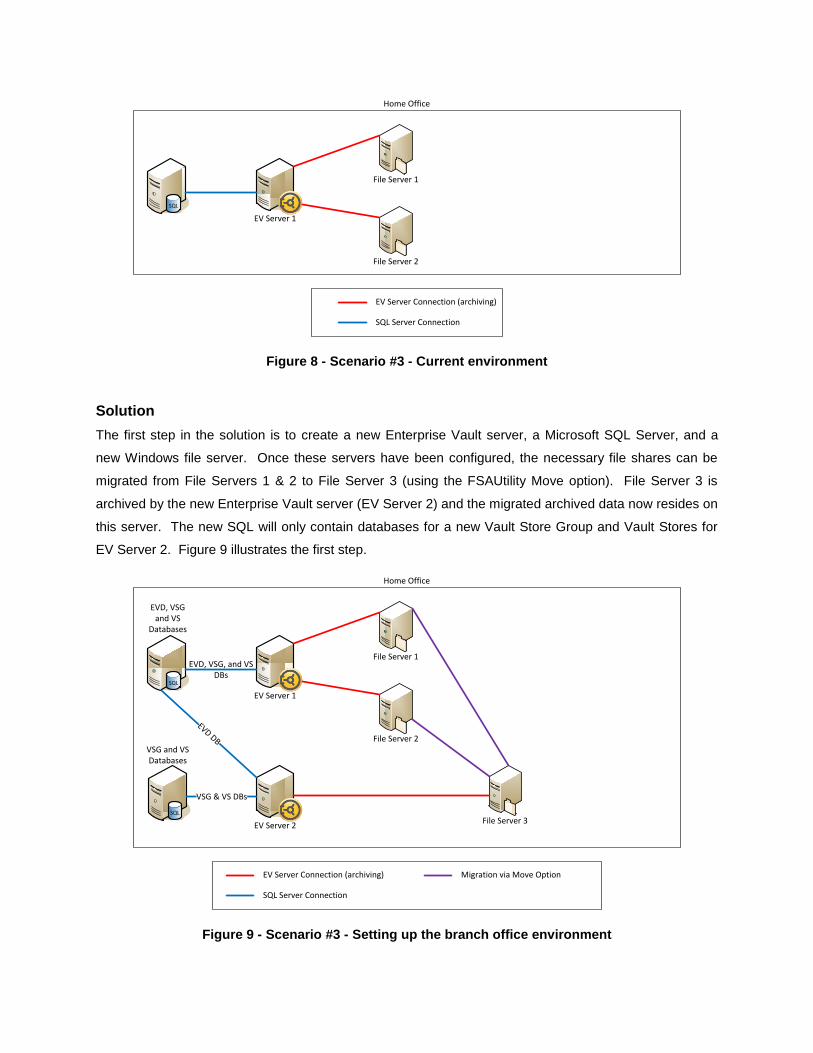
An engineering organization currently has two Windows file servers in their environment and is currently
using Enterprise Vault to archive data from both servers. The company is expanding and has decided to
open up a branch office on the other side of the country. This new branch office will only concentrate on
certain projects. As project files can be quite large, the organization wishes to speed up access to
archived files and reduce the amount of traffic across their WAN connection. Currently both existing file
servers contain data that needs to be used by the new branch office. Figure 8 illustrates the environment
prior to setting up the branch office.
Home Office
EV Server 1
SQL
File Server 1
File Server 2
EV Server Connection (archiving)
SQL Server Connection
Figure 8 - Scenario #3 - Current environment
Solution
The first step in the solution is to create a new Enterprise Vault server, a Microsoft SQL Server, and a
new Windows file server. Once these servers have been configured, the necessary file shares can be
migrated from File Servers 1 & 2 to File Server 3 (using the FSAUtility Move option). File Server 3 is
archived by the new Enterprise Vault server (EV Server 2) and the migrated archived data now resides on
this server. The new SQL will only contain databases for a new Vault Store Group and Vault Stores for
EV Server 2. Figure 9 illustrates the first step.
Home Office
EV Server 1
SQL
File Server 1
File Server 2
EVD, VSG, and VS DBs
EV Server 2File Server 3
EVD DB
EV Server Connection (archiving)
SQL Server Connection
Migration via Move Option
SQL
EVD, VSG and VS
Databases
VSG & VS DBs
VSG and VS Databases
Figure 9 - Scenario #3 - Setting up the branch office environment
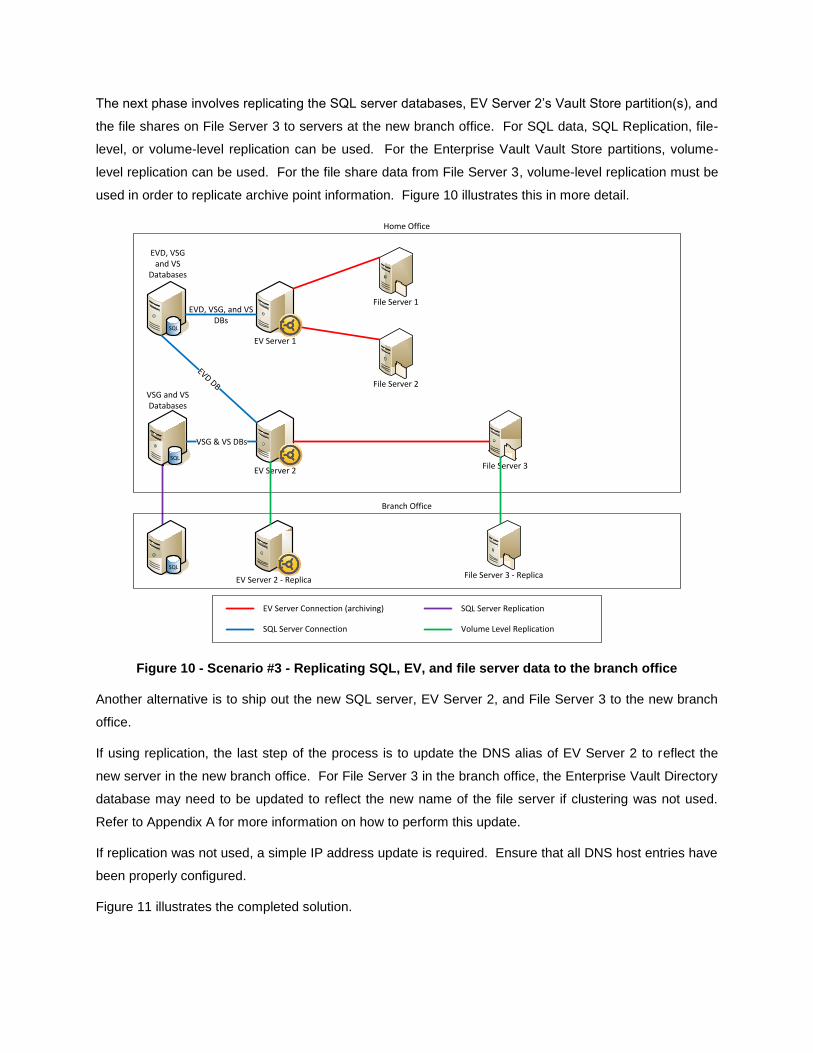
The next phase involves replicating the SQL server databases, EV Server 2’s Vault Store partition(s), and
the file shares on File Server 3 to servers at the new branch office. For SQL data, SQL Replication, file-
level, or volume-level replication can be used. For the Enterprise Vault Vault Store partitions, volume-
level replication can be used. For the file share data from File Server 3, volume-level replication must be
used in order to replicate archive point information. Figure 10 illustrates this in more detail.
Home Office
EV Server 1
SQL
File Server 1
File Server 2
EVD, VSG, and VS DBs
EV Server 2File Server 3
EVD DB
EV Server Connection (archiving)
SQL Server Connection
SQL Server Replication
SQL
EVD, VSG and VS
Databases
VSG & VS DBs
VSG and VS Databases
Branch Office
EV Server 2 - ReplicaFile Server 3 - Replica
SQL
Volume Level Replication
Figure 10 - Scenario #3 - Replicating SQL, EV, and file server data to the branch office
Another alternative is to ship out the new SQL server, EV Server 2, and File Server 3 to the new branch
office.
If using replication, the last step of the process is to update the DNS alias of EV Server 2 to reflect the
new server in the new branch office. For File Server 3 in the branch office, the Enterprise Vault Directory
database may need to be updated to reflect the new name of the file server if clustering was not used.
Refer to Appendix A for more information on how to perform this update.
If replication was not used, a simple IP address update is required. Ensure that all DNS host entries have
been properly configured.
Figure 11 illustrates the completed solution.

Home Office
EV Server 1
SQL
File Server 1
File Server 2
EVD, VSG, and VS DBs
EVD DB
EVD, VSG and VS
Databases
VSG & VS DBs
VSG and VS Databases
Branch Office
EV Server 2File Server 3
SQL
EV Server Connection (archiving)
SQL Server Connection
Figure 11 - Scenario #3 - After migration
Users in the branch office will now be able to access necessary archived files in a timely manner. Access
to archived and non-archived files will not have to take place over the WAN connection. The only
Enterprise Vault network activity on the WAN will be the access of the Enterprise Vault Directory
database by EV Server 2 and the uploading of FSA Reporting data (if configured).
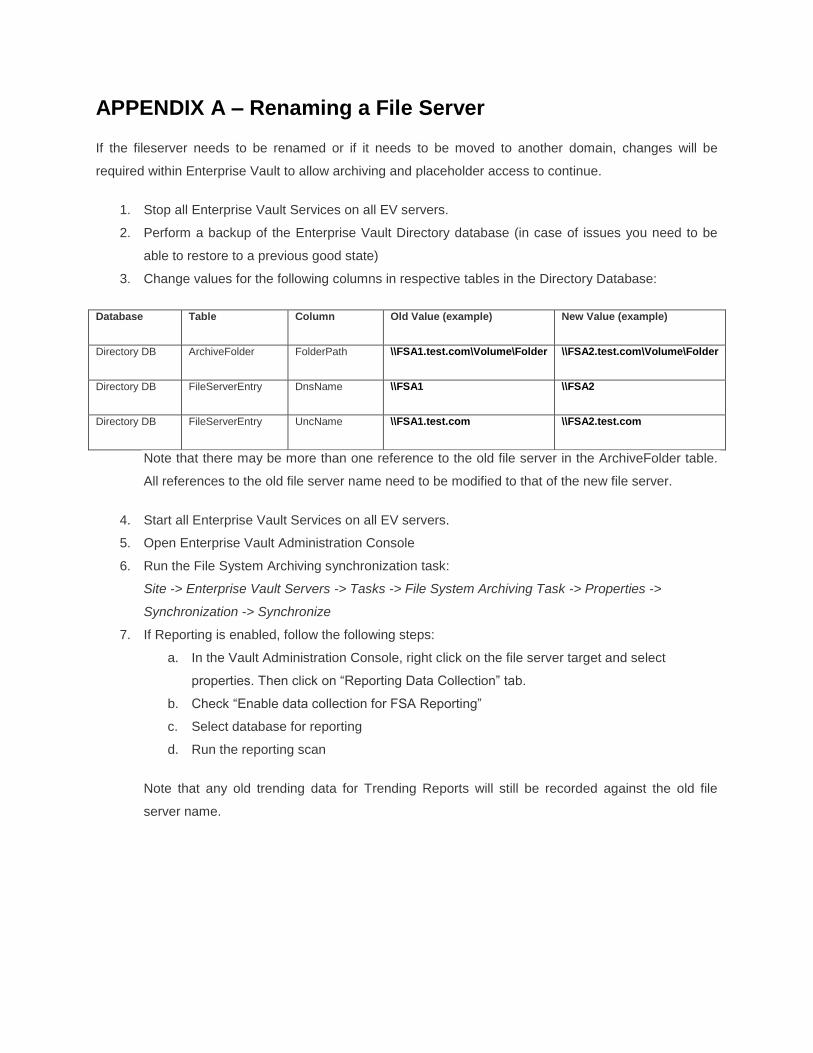
APPENDIX A – Renaming a File Server
If the fileserver needs to be renamed or if it needs to be moved to another domain, changes will be
required within Enterprise Vault to allow archiving and placeholder access to continue.
1. Stop all Enterprise Vault Services on all EV servers.
2. Perform a backup of the Enterprise Vault Directory database (in case of issues you need to be
able to restore to a previous good state)
3. Change values for the following columns in respective tables in the Directory Database:
Database Table Column Old Value (example) New Value (example)
Directory DB ArchiveFolder FolderPath \\FSA1.test.com\Volume\Folder \\FSA2.test.com\Volume\Folder
Directory DB FileServerEntry DnsName \\FSA1 \\FSA2
Directory DB FileServerEntry UncName \\FSA1.test.com \\FSA2.test.com
Note that there may be more than one reference to the old file server in the ArchiveFolder table.
All references to the old file server name need to be modified to that of the new file server.
4. Start all Enterprise Vault Services on all EV servers.
5. Open Enterprise Vault Administration Console
6. Run the File System Archiving synchronization task:
Site -> Enterprise Vault Servers -> Tasks -> File System Archiving Task -> Properties ->
Synchronization -> Synchronize
7. If Reporting is enabled, follow the following steps:
a. In the Vault Administration Console, right click on the file server target and select
properties. Then click on “Reporting Data Collection” tab.
b. Check “Enable data collection for FSA Reporting”
c. Select database for reporting
d. Run the reporting scan
Note that any old trending data for Trending Reports will still be recorded against the old file
server name.

Appendix B – Migrating from Devices that Do Not Support
Placeholders
In the following scenario, a customer has archived content from a NAS device that supports CIFS, but
does not support Placeholders. The customer has been able to archive files and leave behind Internet
shortcuts (.url files). The customer now wishes to migrate from their NAS device to a Windows file server
and enable Placeholders. The following steps can be used to migrate in this situation.
1. Ensure that the volume has been configured on the destination file server and configured for
sharing (such as G$ or Documents)
2. Log into the Enterprise Vault server as the Enterprise Vault Service Account (VSA)
3. Open the Enterprise Vault Administration Console (VAC)
4. Add the destination server as an FSA target
5. Ensure that a File System Archiving Volume policy exists that allows for the creation of
Placeholders (versus Internet shortcuts)
6. Add the volume target for the destination server (such as \\<dest_server>\<dest_volume>) as
configured in Step 1. Do not create folder targets at this time. Ensure to use assign an FSA
Volume policy that allows Placeholders.
7. On the Enterprise Vault server, open a command line window
8. Navigate to the Enterprise Vault installation directory
9. Execute the following command:
fsautility.exe –pm –s \\<source_server>\<source_volume>\<folder> -d
\\<dest_server>\<dest_volume>\<folder>
e.g.:
fsautility –pm –s \\oldserver\oldvolume\Accounting -d
\\newserver\Documents\Accounting
10. Manually archive the destination volume target using the VAC.
a. Right-clicking on the target
b. Selecting Run Now…

c. Click on OK
d. Ensure the checkbox for “Run the task for the creation of shortcuts only” is checked
e. Click on OK
11. Once the archiving task has completed, go back to the command line session on the Enterprise
Vault. Execute the following command which will create Placeholders:
fsautility –c –s \\<dest_server>\<dest_volume> -f
12. Create folder target in the VAC for the destination folder
13. Remove source folder target using the VAC. It will be necessary to stop the FSA task associated
with the source volume/folder before deleting.
14. Copy any remaining unarchived files using robocopy:
robocopy \\<source_server>\<source_volume>\<source_folder>
\\<dest_server>\<dest_volume>\<dest_folder> /e /XF *.url
The /XF *.url switch will exclude .url shortcuts.
15. Repeat steps 7-14 for any other remaining target folders.

About Symantec:
Symantec is a global leader in providing storage, security and systems management solutions to help consumers and organizations secure and manage their information-driven world.
Our software and services protect against more risks at more points, more completely and efficiently, enabling confidence wherever information is used or stored.
For specific country offices and contact numbers, please visit our Web site: www.symantec.com
Symantec Corporation World Headquarters 350 Ellis Street Mountain View, CA 94043 USA +1 (650) 527 8000 +1 (800) 721 3934
Copyright © 2013 Symantec Corporation. All rights reserved. Symantec and the Symantec logo are trademarks or registered trademarks of Symantec Corporation or its affiliates in the U.S. and other countries. Other names may be trademarks of their respective owners.