enovia vplm basic concepts vplm... · 2010-03-03 · send to catia v5 .....138 send to catia v5 as...
TRANSCRIPT

ENOVIA VPLM Basic Concepts ENOVIA® V5R19
TABLE OF CONTENTS
Introduction . . . . . . . . . . . . . . . . . . . . . . . . . . . . . . . . . . . . . . . . . . . . . . . . . . . . . . . . . . . . . . 1ENOVIA VPLM . . . . . . . . . . . . . . . . . . . . . . . . . . . . . . . . . . . . . . . . . . . . . . . . . . . . 2Manual Format . . . . . . . . . . . . . . . . . . . . . . . . . . . . . . . . . . . . . . . . . . . . . . . . . . . . . . 3Logging into ENOVIA VPLM . . . . . . . . . . . . . . . . . . . . . . . . . . . . . . . . . . . . . . . . . . 4ENOVIA Portal Screen . . . . . . . . . . . . . . . . . . . . . . . . . . . . . . . . . . . . . . . . . . . . . . . 6Portal Toolbar . . . . . . . . . . . . . . . . . . . . . . . . . . . . . . . . . . . . . . . . . . . . . . . . . . . . . . 7Workbook Toolbar . . . . . . . . . . . . . . . . . . . . . . . . . . . . . . . . . . . . . . . . . . . . . . . . . . . 8
Customizing the ENOVIA Portal . . . . . . . . . . . . . . . . . . . . . . . . . . . . . . . . . . . . . . . . . . . . 15Customizing Workbooks . . . . . . . . . . . . . . . . . . . . . . . . . . . . . . . . . . . . . . . . . . . . . 15Creating Custom Workbooks . . . . . . . . . . . . . . . . . . . . . . . . . . . . . . . . . . . . . . . . . . 21General ENOVIA Navigation . . . . . . . . . . . . . . . . . . . . . . . . . . . . . . . . . . . . . . . . . 25General Settings . . . . . . . . . . . . . . . . . . . . . . . . . . . . . . . . . . . . . . . . . . . . . . . . . . . . 30
Product Class Editor . . . . . . . . . . . . . . . . . . . . . . . . . . . . . . . . . . . . . . . . . . . . . . . . . . . . . . 37Standard Toolbar . . . . . . . . . . . . . . . . . . . . . . . . . . . . . . . . . . . . . . . . . . . . . . . . . . . 41Product Class Editor Toolbar . . . . . . . . . . . . . . . . . . . . . . . . . . . . . . . . . . . . . . . . . . 42Properties Pane . . . . . . . . . . . . . . . . . . . . . . . . . . . . . . . . . . . . . . . . . . . . . . . . . . . . . 44
1 – Domain . . . . . . . . . . . . . . . . . . . . . . . . . . . . . . . . . . . . . . . . . . . . . . . . . . 442 – Characteristics . . . . . . . . . . . . . . . . . . . . . . . . . . . . . . . . . . . . . . . . . . . . 45
Product Editor . . . . . . . . . . . . . . . . . . . . . . . . . . . . . . . . . . . . . . . . . . . . . . . . . . . . . . . . . . . 63Where Used . . . . . . . . . . . . . . . . . . . . . . . . . . . . . . . . . . . . . . . . . . . . . . . . . . . . . . . 80Locks . . . . . . . . . . . . . . . . . . . . . . . . . . . . . . . . . . . . . . . . . . . . . . . . . . . . . . . . . . . . 84Find . . . . . . . . . . . . . . . . . . . . . . . . . . . . . . . . . . . . . . . . . . . . . . . . . . . . . . . . . . . . . 86Locate Part . . . . . . . . . . . . . . . . . . . . . . . . . . . . . . . . . . . . . . . . . . . . . . . . . . . . . . . . 89Hide & Show Documents . . . . . . . . . . . . . . . . . . . . . . . . . . . . . . . . . . . . . . . . . . . . 92Collapse / Show . . . . . . . . . . . . . . . . . . . . . . . . . . . . . . . . . . . . . . . . . . . . . . . . . . . 104Presentation Filters . . . . . . . . . . . . . . . . . . . . . . . . . . . . . . . . . . . . . . . . . . . . . . . . . 109Contexts . . . . . . . . . . . . . . . . . . . . . . . . . . . . . . . . . . . . . . . . . . . . . . . . . . . . . . . . . 113Generic Components . . . . . . . . . . . . . . . . . . . . . . . . . . . . . . . . . . . . . . . . . . . . . . . 120
Part Editor . . . . . . . . . . . . . . . . . . . . . . . . . . . . . . . . . . . . . . . . . . . . . . . . . . . . . . . . . . . . . 127Accessing the Part Editor from the Product Editor . . . . . . . . . . . . . . . . . . . . . . . . 135
Interoperability . . . . . . . . . . . . . . . . . . . . . . . . . . . . . . . . . . . . . . . . . . . . . . . . . . . . . . . . . . 137Send To CATIA V5 . . . . . . . . . . . . . . . . . . . . . . . . . . . . . . . . . . . . . . . . . . . . . . . . 138Send To CATIA V5 as Assembly . . . . . . . . . . . . . . . . . . . . . . . . . . . . . . . . . . . . . 143Sending Generic Components to CATIA V5 . . . . . . . . . . . . . . . . . . . . . . . . . . . . 147Send Documents & Part References to CATIA V5 . . . . . . . . . . . . . . . . . . . . . . . . 152Opening Non-CATIA documents . . . . . . . . . . . . . . . . . . . . . . . . . . . . . . . . . . . . . 155ENOVIA Interoperability Tools . . . . . . . . . . . . . . . . . . . . . . . . . . . . . . . . . . . . . . . 158CATIA Interoperability Tools . . . . . . . . . . . . . . . . . . . . . . . . . . . . . . . . . . . . . . . . 164
Table of Contents, Page i© Wichita State University

ENOVIA VPLM Basic Concepts ENOVIA® V5R19
DMU Filters . . . . . . . . . . . . . . . . . . . . . . . . . . . . . . . . . . . . . . . . . . . . . . . . . . . . . . . . . . . . 171Attributes Filter . . . . . . . . . . . . . . . . . . . . . . . . . . . . . . . . . . . . . . . . . . . . . . . . . . . 172Configuration Filter . . . . . . . . . . . . . . . . . . . . . . . . . . . . . . . . . . . . . . . . . . . . . . . . 175Discipline Filter . . . . . . . . . . . . . . . . . . . . . . . . . . . . . . . . . . . . . . . . . . . . . . . . . . . 183Volume Filter . . . . . . . . . . . . . . . . . . . . . . . . . . . . . . . . . . . . . . . . . . . . . . . . . . . . . 184Zone Filter . . . . . . . . . . . . . . . . . . . . . . . . . . . . . . . . . . . . . . . . . . . . . . . . . . . . . . . 189Simultaneous DMU Filters . . . . . . . . . . . . . . . . . . . . . . . . . . . . . . . . . . . . . . . . . . 192
ENOVIA Search Tree . . . . . . . . . . . . . . . . . . . . . . . . . . . . . . . . . . . . . . . . . . . . . . . . . . . . 195
Ownership . . . . . . . . . . . . . . . . . . . . . . . . . . . . . . . . . . . . . . . . . . . . . . . . . . . . . . . . . . . . . 203Locks . . . . . . . . . . . . . . . . . . . . . . . . . . . . . . . . . . . . . . . . . . . . . . . . . . . . . . . . . . . 203Owner . . . . . . . . . . . . . . . . . . . . . . . . . . . . . . . . . . . . . . . . . . . . . . . . . . . . . . . . . . . 205Transferring Ownership . . . . . . . . . . . . . . . . . . . . . . . . . . . . . . . . . . . . . . . . . . . . . 206
Problems . . . . . . . . . . . . . . . . . . . . . . . . . . . . . . . . . . . . . . . . . . . . . . . . . . . . . . . . . . . . . . 209Problem 1 . . . . . . . . . . . . . . . . . . . . . . . . . . . . . . . . . . . . . . . . . . . . . . . . . . . . . . . . 209
Appendix A - ENOVIA Portal Settings . . . . . . . . . . . . . . . . . . . . . . . . . . . . . . . . . . . . . . . 211General Settings . . . . . . . . . . . . . . . . . . . . . . . . . . . . . . . . . . . . . . . . . . . . . . . . . . . 211Product Editor Settings . . . . . . . . . . . . . . . . . . . . . . . . . . . . . . . . . . . . . . . . . . . . . 212Part Editor Settings . . . . . . . . . . . . . . . . . . . . . . . . . . . . . . . . . . . . . . . . . . . . . . . . 216
Table of Contents, Page ii ©Wichita State University

ENOVIA VPLM Basic Concepts ENOVIA® V5R19
Introduction
ENOVIA VPLM Basic Concepts
Upon completion of this course the student should have a full understanding of thefollowing topics:
- Log in and Log out of ENOVIA VPLM
- Understand the different object types of ENOVIA and their function
- Understand and utilize different applications within ENOVIA VPLM
- Understand the Product Class Structure
- Understand the Product Structure
- Send product definition data from ENOVIA to CATIA
- Search the database
Introduction, Page 1© Wichita State University

ENOVIA VPLM Basic Concepts ENOVIA® V5R19
ENOVIA VPLM
ENOVIA VPLM (Enterprise inNOvation VIA Virtual Product Lifecycle Management) canbest be defined as a database that holds all the data related to a deliverable product. Thisdata can be in the form of CAD files, engineering documents, trade studies, etc. SinceENOVIA holds all data pertinent to a product, it also acts as the interoperability agentbetween the ENOVIA database and the associated application the data is derived from. Thisallows for a single source for data storage and retrieval.
ENOVIA VPLM as a whole can be considered an object-oriented database. This means thatall “things” put in the database are treated as a single object with attributes. Being anobject-oriented database allows ENOVIA VPLM to hold all different types of files. Allobjects in ENOVIA VPLM will have a specific object type. There are a number of keyobject types that will be discussed throughout this book.
ENOVIA VPLM (ENOVIA for short) as an application is actually made up of four differentparts. There is an ENOVIA database which holds all the meta data and attributes for all thedocuments, files, and parts stored in the vault. The database also manages users,permissions, and other ENOVIA specific objects such as product classes, actions, changeorders, and other additional items. The ENOVIA vault is the physical file storage locationheld on the server. The vault will contain an encrypted form of all the data managed by thedatabase. The third part of ENOVIA VPLM is the ENOVIA server itself. The serverprocess is what manages communication between the client, the database and the vault. You never access the database or vault directly, you always communicate with the ENOVIAserver. The last part of ENOVIA VPLM is the client. The client is what you will useanytime you want to interact with the ENOVIA database or vault.
ENOVIA is also one of many tools utilized to manage a product’s lifecycle. Thismanagement process is termed Product Life cycle Management (PLM). All product datamanaged by ENOVIA is placed into a life cycle stage, and then as the data matures, the lifecycle is promoted. Once the part is ready for production, the product data will be passedthrough a release process to facilitate the final checks of that part. As a part gets changedfor future needs, new revisions are created and again, the process will start over. Eventuallythe product data will be placed into retirement, where again, ENOVIA will handle theretirement of the product and all related documents. All told, ENOVIA will manage aproduct from the initial conceptual drawings and sketches, through 3D modeling, until theretirement of the product.
Introduction, Page 2 ©Wichita State University

ENOVIA VPLM Basic Concepts ENOVIA® V5R19
Manual Format
It is important to understand the format of the manual in order to use it most effectively. This manual is designed to be used along with an instructor; however, you will need to do alot of reading as well, in order to fully understand ENOVIA VPLM. The exercises in thisbook will list steps for you to complete, along with explanations that try to inform you whatyou have just done and what you are getting ready to do. The actual steps are in bold typeand the information that follows the steps is for your benefit. Anything that appears initalics refers to a message ENOVIA provides—this includes information in pull-downmenus, pop-up windows and other messages.
An example of a step and its explanation are shown below (note: normally the lines will notbe there):
Select a location to the right of the origin. This specifies the other end point of the line. You will continue specifying locations in order to complete your profile. It should appearsimilar to the diagram shown below.
As you can see, the desired action blends in with the text except that it appears in bold. Theinformation following the step explains what that step accomplished and where you aregoing next. It is important for you to read this information to help in your understanding ofENOVIA.
Also, you will find that the exercises build upon themselves. Later exercises often assumeyou know how to do certain steps which have been covered in earlier exercises. If you didnot quite pick up what you needed to know from an exercise, you will probably wish toreview it several times before moving on to the more advanced sections. As you progressthrough the manual, it expects that you are learning and therefore you are able to do a lotmore with fewer steps. Eventually, you are expected to be able to perform actions withoutany steps.
Introduction, Page 3© Wichita State University

ENOVIA VPLM Basic Concepts ENOVIA® V5R19
Customizing the ENOVIA Portal
Customizing Workbooks
Adding or removing the visible workbooks is a good fundamental customization that can beperformed. By creating a custom workbook, you will have a storage location forbookmarks, as well as the ability to create a custom set of tools to help aid you in your dayto day ENOVIA work.
With the third mouse button, select on the WorkBook toolbar. This will display thecontextual menu for the workbooks. Take a moment to look them over.
Note: You select on one of the icons to get all of the options. If you right mouse select on ablank area, you will only receive a partial list.
New Workbook This will create a new workbook to allow you to savebookmarks or place links in the workbook
Customize Workbooks This will allow you to turn off or remove workbooks from theworkbook toolbar
Save Workbooks This commits all changes to the ENOVIA server
Delete This will delete the selected workbook
Change Icon This will allow you to change the icon of the selectedworkbook
Reset This resets the selected workbook back to its originalconfiguration
Share This will share the workbook so that others may be able toutilize the same workbook configuration
Customizations, Page 15© Wichita State University

ENOVIA VPLM Basic Concepts ENOVIA® V5R19
With the workbook contextual menu up, select Customize Workbooks. This will displaythe Customize WorkBook List window.
The list on the left is the available workbooks that you can add to your current workbooklist.
Uncheck the Visible checkbox for all items except ENOVIA Home and ENOVIA SearchTree. Select OK when done. This will change your ENOVIA Portal to only show theENOVIA Home and ENOVIA Search Tree workbooks.
Customizations, Page 16 ©Wichita State University

ENOVIA VPLM Basic Concepts ENOVIA® V5R19
Right select on the Workbooks toolbar, then select Customize Workbooks. Again, theCustomize WorkBook List will appear.
Turn on visibility for the Remote File Tree, Declarative File Tree, and Local File Tree. Select OK when done. This will turn on the three file trees.
Since the ENOVIA Home and ENOVIA Search Tree are the two most important, yougenerally want just those two workbooks available. You can also remove the workbooks toremove them from the list.
Customizations, Page 17© Wichita State University

ENOVIA VPLM Basic Concepts ENOVIA® V5R19
Go to the Customize WorkBook List window. Remember, you will have to right click onthe Workbook toolbar, then select on Customize Workbooks.
Select on the Remote File Tree workbook from the current workbook list. This willactivate the Remove button.
Select Remove, then select OK when done. This will remove the Remote File Tree fromthe list of current workbooks.
Go to the Customize Workbook List window, then select on Remote File Tree from theDefault Workbook List. When you select on items from the Default WorkBook List, theAdd-> button will activate.
Customizations, Page 18 ©Wichita State University

ENOVIA VPLM Basic Concepts ENOVIA® V5R19
Select Add->. This will add the Remote File Tree back to the list of current workbooks. Notice something different?
When items are added back to the workbook list, they will be uniquely named with thecurrent username, and a dash number at the end. The item will also appear at the bottom ofthe list.
Right click on the Local File Tree from the current workbook list. This will bring upthe contextual menu for the items in the workbook list.
Select Move Up. This will move the Local File Tree above the Declarative File Tree.
Note: You can also drag the various workbooks up and down in the list to re-arrange them.
Customizations, Page 19© Wichita State University

ENOVIA VPLM Basic Concepts ENOVIA® V5R19
Since the ENOVIA Home and ENOVIA Search Tree are the two most importantworkbooks, you will want to go ahead and turn off all workbooks except those two.
Turn off all workbooks but the ENOVIA Home and ENOVIA Search Tree and selectOK. How you do this is up to you. You can either turn off visibility or you can removethem from the list. You should only end up with the two icons in your ENOVIA Portalwhen done.
Since the ENOVIA Home and ENOVIA Search Tree are the most used workbooks, it isgenerally a good idea not to clutter the workbook area with unnecessary workbooks. If youfind that you ever need another workbook, you can always turn the visibility of thatworkbook back on or add the necessary workbenches if they were removed from the currentworkbench list.
Customizations, Page 20 ©Wichita State University

ENOVIA VPLM Basic Concepts ENOVIA® V5R19
Creating Custom Workbooks
There are times when you want to create a workbook just for items you use frequently. Thisis where a custom workbook comes in handy. You can also create new items in theworkbook, such as bookmarks.
Right click on the Workbook toolbar, then select New WorkBook. This will create anew workbook in the list. As soon as you create the workbook, you can rename it. For themoment, you will look at renaming the workbook after creation.
Select anywhere in the blank area on the WorkBook toolbar. This will create the newworkbook. Notice that the icon is the same as the ENOVIA Home icon. This can be acause for confusion.
Right click on your new workbook, then select Change Icon. This will allow you tochange the icon to something unique.
This book will utilize the yellow worker icon. You may choose to use something else. Ifyou do, please remember that your icon will not match the icon used in the book.
Select the yellow worker icon. Select OK when done. This will give the workbooka unique icon. Remember, you may choose to use a different icon, however, your icon willnot match the icon used in the book.
Customizations, Page 21© Wichita State University

ENOVIA VPLM Basic Concepts ENOVIA® V5R19
Now that the icon is unique, take a quick look at renaming it.
Right click on the new workbook, then select Rename from the contextual menu. Thiswill display the rename field so you may enter a new name.
Change the name to My Custom WorkBook and select Enter on the keyboard. Thiswill give your workbook a different name.
Select on your custom workbook. Notice there is a Links folder, however, there are nolinks available.
When a custom workbook is created, you will have to add links as necessary. Most customworkbooks are used for bookmarks and other non-generic items. Since you are not ready tocreate bookmarks just yet, you will add a few links from the ENOVIA Home workbook intoyour custom links workbook.
Customizations, Page 22 ©Wichita State University

ENOVIA VPLM Basic Concepts ENOVIA® V5R19
Select on the ENOVIA Home workbook. Expand the Engineering Life Cycle folder. Ifyou remember from the introduction, the Engineering Life Cycle branch holds most of thetools for working directly with the data in the ENOVIA database.
Right click on Product Classes. This will display the contextual menu for the ProductClass Editor. Since all of the applications within the ENOVIA Home workbook work thesame way, take a moment to look at the various options available.
Activate Launches the application
Modify Bookmark Modifies the path the link points to. You do not ever want to modifythe bookmark on a default application, otherwise you might not beable to run the application. Modifying the bookmark is reserved forcustom ENOVIA applications, or custom links placed in theworkbook.
Copy / Cut Copies or cuts the link from the workbook. Once copied or cut, it canbe pasted back into another folder.
Delete Removes the item from the list. This option is similar to a cut,however, it does not allow for a paste.
Rename Renames the application. Keep in mind, if you rename yourapplications, although it may make more sense to you, they will differfrom the defaults, and thus may make support more difficult.
Customizations, Page 23© Wichita State University
ENOVIA VPLM Basic Concepts ENOVIA® V5R19
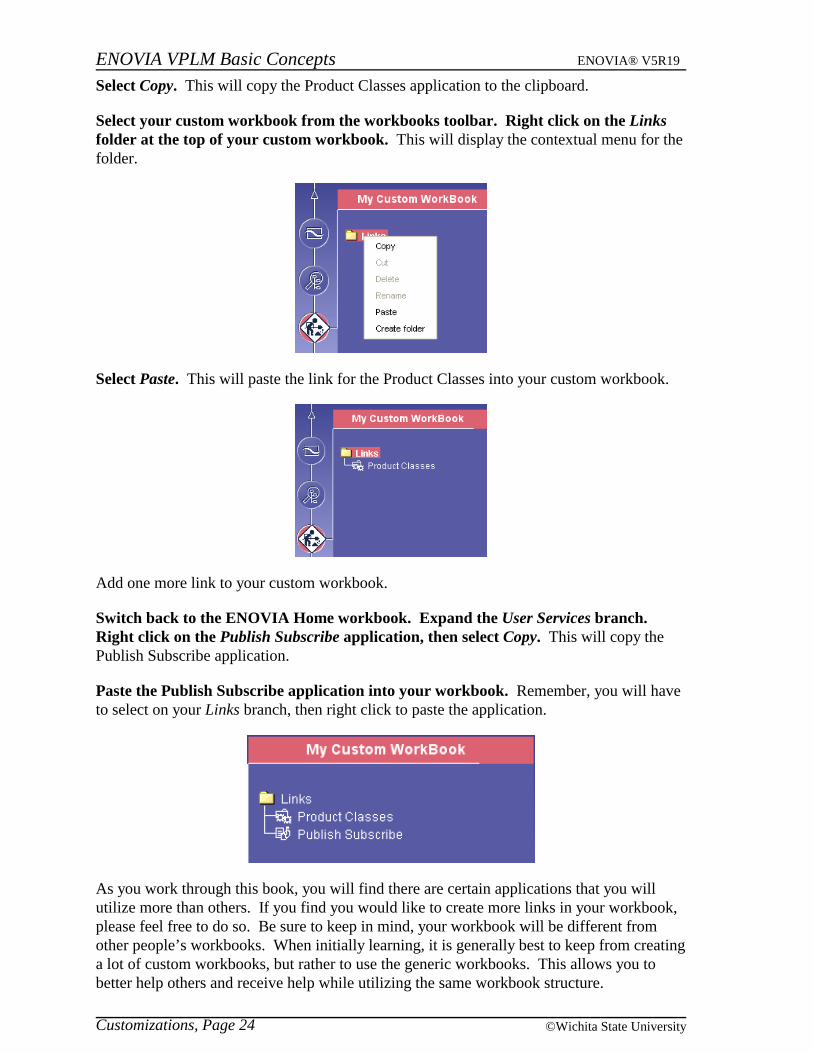
Select Copy. This will copy the Product Classes application to the clipboard.
Select your custom workbook from the workbooks toolbar. Right click on the Linksfolder at the top of your custom workbook. This will display the contextual menu for thefolder.
Select Paste. This will paste the link for the Product Classes into your custom workbook.
Add one more link to your custom workbook.
Switch back to the ENOVIA Home workbook. Expand the User Services branch. Right click on the Publish Subscribe application, then select Copy. This will copy thePublish Subscribe application.
Paste the Publish Subscribe application into your workbook. Remember, you will haveto select on your Links branch, then right click to paste the application.
As you work through this book, you will find there are certain applications that you willutilize more than others. If you find you would like to create more links in your workbook,please feel free to do so. Be sure to keep in mind, your workbook will be different fromother people’s workbooks. When initially learning, it is generally best to keep from creatinga lot of custom workbooks, but rather to use the generic workbooks. This allows you tobetter help others and receive help while utilizing the same workbook structure.
Customizations, Page 24 ©Wichita State University

ENOVIA VPLM Basic Concepts ENOVIA® V5R19
General ENOVIA Navigation
Now you are ready to take a look at some general navigation in ENOVIA. It is useful to beable to adjust window pane sizes, as well as adjust the number of windows visible.
Select on the ENOVIA Home workbook, then expand the Engineering Life Cyclebranch. Since the Engineering Life Cycle branch is where you will perform most of yourwork, you will look at activating and closing a few of the applications found there.
Right click on the Product Classes application, then select Activate. The product classesapplication will be discussed in the next section, for now, you are just working on openingand closing applications. This will launch the product classes application into the activeapplication zone.
Customizations, Page 25© Wichita State University

ENOVIA VPLM Basic Concepts ENOVIA® V5R19
With the application active, now take a look at manipulating the display to make theapplication more visible.
Select the Collapse icon in the portal toolbar. This will collapse the portal toolbarand the active workbook to allow for more room for the active application.
Many times, you will find it useful to collapse the portal toolbar to have extra space for theapplications running.
Select the Expand icon in the portal toolbar. This will expand the portal toolbar andthe active workbook back out.
You can also just change the size of your active workbook area by dragging the dividingbar. You will try that next.
Customizations, Page 26 ©Wichita State University
ENOVIA VPLM Basic Concepts ENOVIA® V5R19
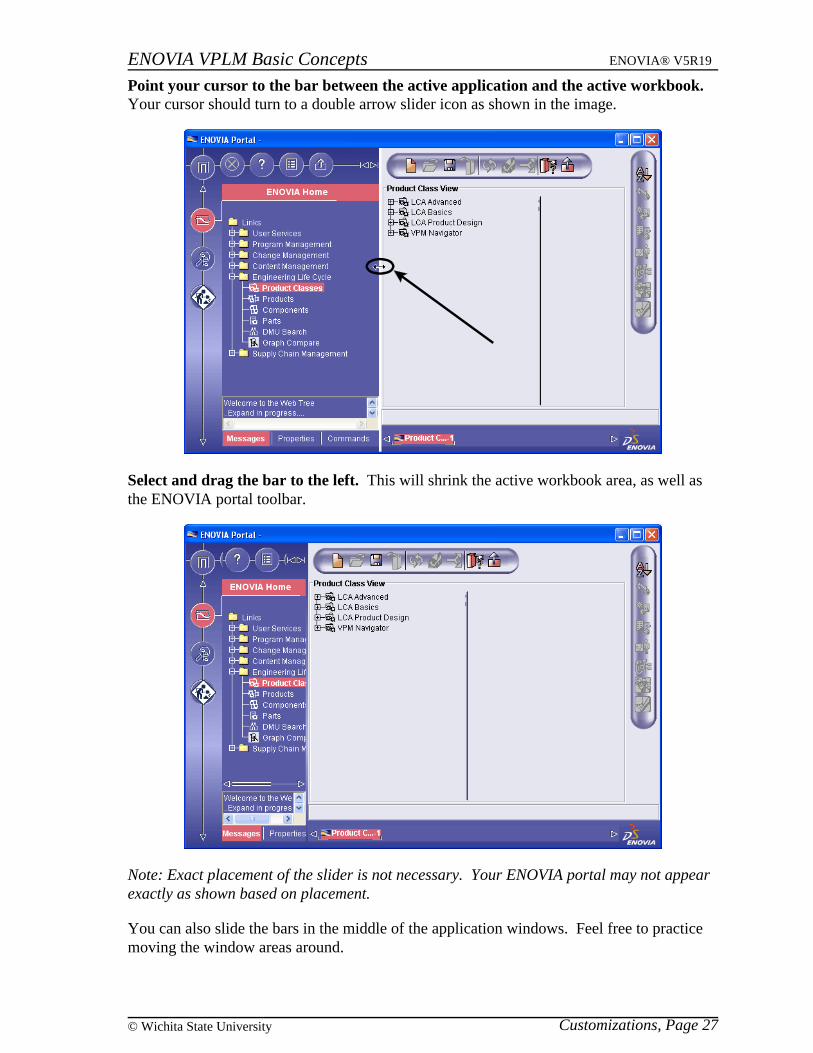
Point your cursor to the bar between the active application and the active workbook.Your cursor should turn to a double arrow slider icon as shown in the image.
Select and drag the bar to the left. This will shrink the active workbook area, as well asthe ENOVIA portal toolbar.
Note: Exact placement of the slider is not necessary. Your ENOVIA portal may not appearexactly as shown based on placement.
You can also slide the bars in the middle of the application windows. Feel free to practicemoving the window areas around.
Customizations, Page 27© Wichita State University

ENOVIA VPLM Basic Concepts ENOVIA® V5R19
Slide the active workbook area back out until all the text in the ENOVIA Homeworkbook is visible. It is generally a good idea to be able to read all of the text.
Activate the products application. All you will need to do is right click on the productsbranch under the Engineering Life Cycle folder then select activate. This will activate theproduct editor and place it on top of the product class editor.
Notice the product editor is placed in the active application windows area at the bottom ofthe ENOVIA Portal screen. A running list of all active applications are kept here.
Notice the name of the applications are shortened. The names will always be decreased tothe same size, regardless of how large you make your ENOVIA screen.
Customizations, Page 28 ©Wichita State University

ENOVIA VPLM Basic Concepts ENOVIA® V5R19
Select the Product Class Editor from the active application window area. This isshown in the image below.
This will change your active application back to the product class editor. You can switchbetween as many applications as necessary.
Now you will take a look at some of the general portal settings.
Customizations, Page 29© Wichita State University

ENOVIA VPLM Basic Concepts ENOVIA® V5R19
General Settings
The general settings allow you to change some of the fundamental and generic settings forENOVIA.
Select the Settings icon from the ENOVIA portal toolbar and select General. Thiswill display the general settings for the ENOVIA portal.
Take a moment to look at some of the settings.
Number of views Defines the number of active applications displayedsimultaneously. You can only choose between one and twoviews.
Layout Defines the layout of the views, either horizontal or vertical
Sound Turns sounds on or off in ENOVIA
Home URL This defines the web page that ENOVIA launches when youselect the ENOVIA home icon
Start with Home Page Defines if the home page will be displayed on startup or not
Unit for Distances Defines the default units ENOVIA will use
Default date style Defines how dates will be displayed
Context information Displays information about the currently logged in user,server, project, and other session information
Proxy Configuration Allows the configuration of a proxy server to be defined. Thisis for using ENOVIA outside of a company firewall and proxyserver.
Embedded Browser Defines the browser used when in ENOVIA
Customizations, Page 30 ©Wichita State University

ENOVIA VPLM Basic Concepts ENOVIA® V5R19
Change the Number of views to 2. This will change the active application area to showtwo windows.
Select OK when done. This will change the window to show both the product class editorand the product editor simultaneously.
The size of each window can be adjusted by dragging the solid bar between the two activeapplications.
Activate the Components application from the ENOVIA Home workbook. Noticewhich window it covered up.
The component editor is in the left hand window. Now watch what happens when youlaunch another editor.
Customizations, Page 31© Wichita State University

ENOVIA VPLM Basic Concepts ENOVIA® V5R19
Activate the Parts application from the ENOVIA Home workbook. The parts editoractivates on top of the product editor (the right hand window).
Select on the product editor (Product E...-1) from the active application windows area. If you remember right, the product editor was on the right hand pane before you activatedthe part editor.
Notice where the product editor is now? The product editor is in the left hand applicationarea. Why did the window move from the right window to the left window? When workingwith two windows, ENOVIA will always replace the inactive window with the newapplication. This means that since the product editor is active (highlighted in the activeapplication windows area), the next window selected, or the next application activated willreplace the part editor since it is not active. Test this theory.
Customizations, Page 32 ©Wichita State University
ENOVIA VPLM Basic Concepts ENOVIA® V5R19
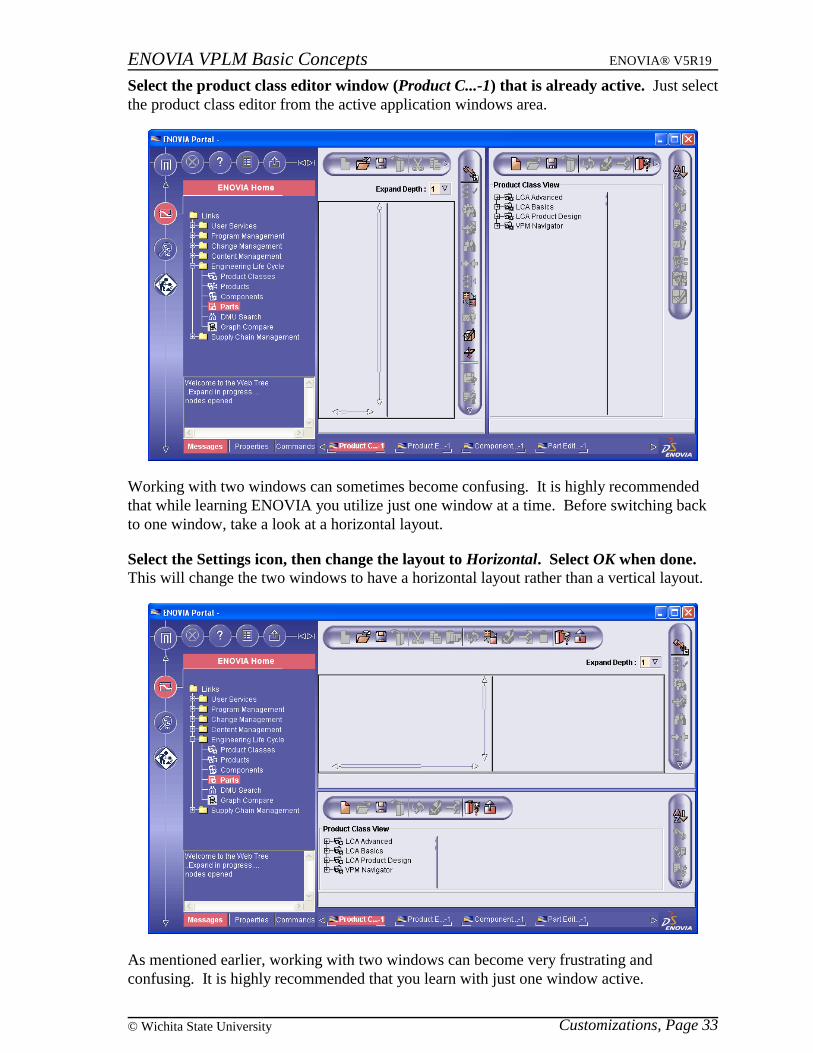
Select the product class editor window (Product C...-1) that is already active. Just selectthe product class editor from the active application windows area.
Working with two windows can sometimes become confusing. It is highly recommendedthat while learning ENOVIA you utilize just one window at a time. Before switching backto one window, take a look at a horizontal layout.
Select the Settings icon, then change the layout to Horizontal. Select OK when done. This will change the two windows to have a horizontal layout rather than a vertical layout.
As mentioned earlier, working with two windows can become very frustrating andconfusing. It is highly recommended that you learn with just one window active.
Customizations, Page 33© Wichita State University

ENOVIA VPLM Basic Concepts ENOVIA® V5R19
Change the Number of views back to one. While in the ENOVIA Portal Settingswindow, you should also take the opportunity to change your Unit for Distances toinch. This will save you from having to change the units later in this book.
Be sure to select OK when finished. A Warning window appears.
Select OK. Now you are ready to close the active windows.
Select, then right click on the part editor window(Part Edit...-1). You must select on thepart editor first, otherwise, you will be closing the active application (in this case theproduct class editor). This will display the contextual menu for the window.
Close Closes the window and exits the application
Customizations, Page 34 ©Wichita State University

ENOVIA VPLM Basic Concepts ENOVIA® V5R19
Rename Renames the window. If you rename an active application, thenew name will only exist for the life of the application. If youclose the window, the new name will be gone. This is also thecase if you close ENOVIA. It is not recommended that youspend a lot of time renaming your windows since they will notstay renamed.
Collapse When the window tiling functionality is added to ENOVIA,this will collapse, or minimize the active window.
Bookmark in Workbook Allows you to bookmark the window in a workbook
Select Close. This will close the window.
Close all the other windows. This will take you back to a blank active application area.
At this point, you are ready to start utilizing ENOVIA to access product classes andproducts.
Customizations, Page 35© Wichita State University