engine overhaul service warning - mellens.net engine overhaul - 1.8l (bp) 4-cylinder - mx-5 miata...
TRANSCRIPT
2003-05 ENGINE
Overhaul - 1.8L (BP) 4-Cylinder - MX-5 Miata
ENGINE OVERHAUL SERVICE WARNING
ENGINE MOUNTING/DISMOUNTING
MOUNTING
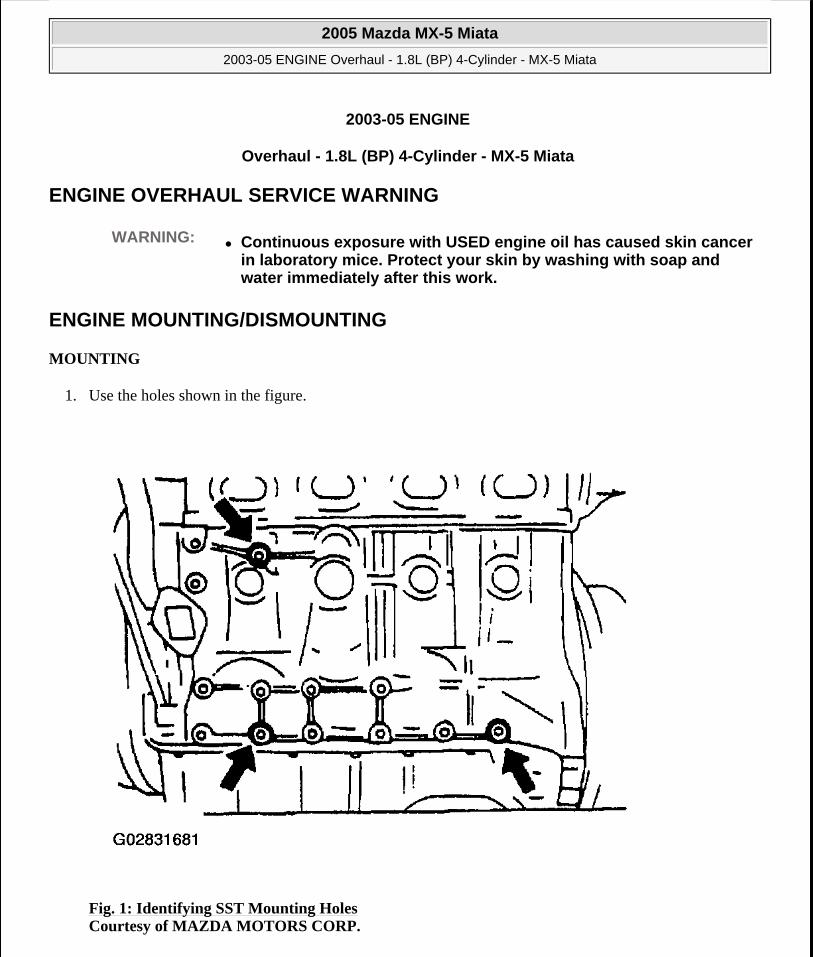
1. Use the holes shown in the figure.
Fig. 1: Identifying SST Mounting Holes Courtesy of MAZDA MOTORS CORP.
WARNING: Continuous exposure with USED engine oil has caused skin cancer in laboratory mice. Protect your skin by washing with soap and water immediately after this work.
2005 Mazda MX-5 Miata
2003-05 ENGINE Overhaul - 1.8L (BP) 4-Cylinder - MX-5 Miata
2005 Mazda MX-5 Miata
2003-05 ENGINE Overhaul - 1.8L (BP) 4-Cylinder - MX-5 Miata
Microsoft
Saturday, July 04, 2009 10:58:09 AM Page 1 © 2005 Mitchell Repair Information Company, LLC.
Microsoft
Saturday, July 04, 2009 10:58:16 AM Page 1 © 2005 Mitchell Repair Information Company, LLC.

2. Install the SST (arms) to the cylinder block holes as shown, and hand-tighten the SST (bolts).
Fig. 2: Installing SST Arms To Cylinder Block Courtesy of MAZDA MOTORS CORP.
3. Assemble the SST (bolts, nuts, and plate) in the specified positions.
2005 Mazda MX-5 Miata
2003-05 ENGINE Overhaul - 1.8L (BP) 4-Cylinder - MX-5 Miata
Microsoft
Saturday, July 04, 2009 10:58:09 AM Page 2 © 2005 Mitchell Repair Information Company, LLC.
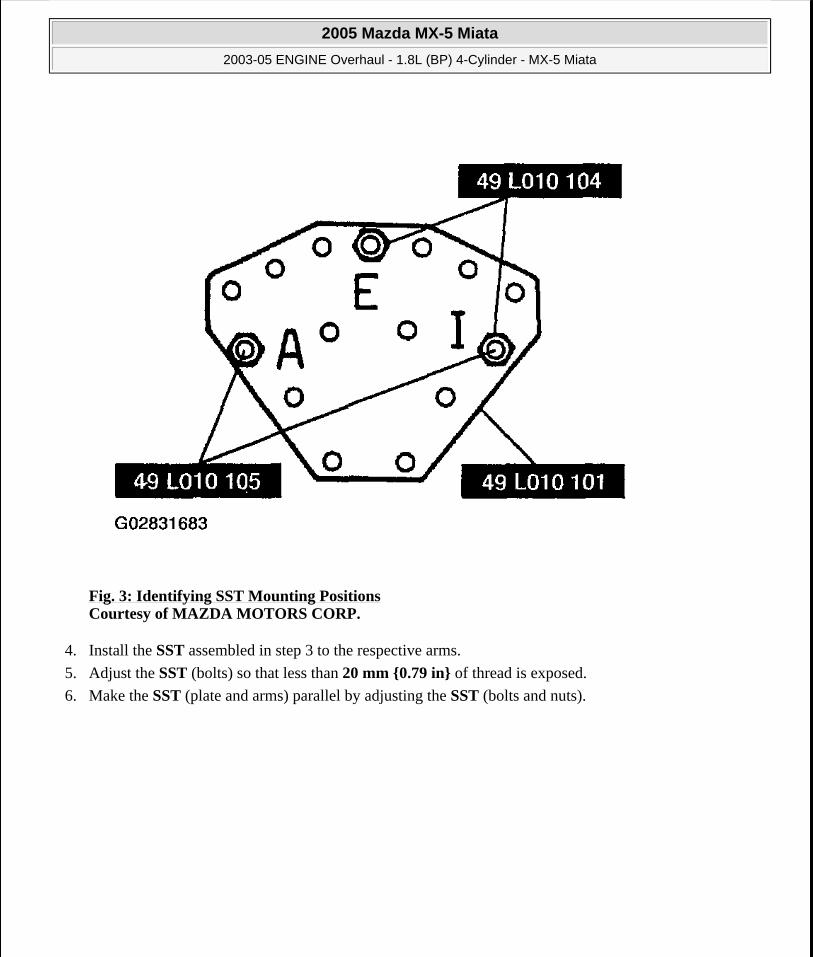
Fig. 3: Identifying SST Mounting Positions Courtesy of MAZDA MOTORS CORP.
4. Install the SST assembled in step 3 to the respective arms.
5. Adjust the SST (bolts) so that less than 20 mm {0.79 in} of thread is exposed.
6. Make the SST (plate and arms) parallel by adjusting the SST (bolts and nuts).
2005 Mazda MX-5 Miata
2003-05 ENGINE Overhaul - 1.8L (BP) 4-Cylinder - MX-5 Miata
Microsoft
Saturday, July 04, 2009 10:58:09 AM Page 3 © 2005 Mitchell Repair Information Company, LLC.

Fig. 4: Adjusting SST Plate & Arms Courtesy of MAZDA MOTORS CORP.
7. Tighten the SST (bolts and nuts) to affix the SST firmly.
8. Mount the engine on the SST (engine stand).
WARNING: The self-locking brake system of the engine stand may not be effective when the engine is held in an unbalanced position. This could lead to sudden, rapid movement of the engine and mounting stand handle and cause serious injury. Never keep the engine in an unbalanced position, and always hold the rotation handle firmly turning the engine.
2005 Mazda MX-5 Miata
2003-05 ENGINE Overhaul - 1.8L (BP) 4-Cylinder - MX-5 Miata
Microsoft
Saturday, July 04, 2009 10:58:09 AM Page 4 © 2005 Mitchell Repair Information Company, LLC.

Fig. 5: Mounting Engine To Engine Stand Courtesy of MAZDA MOTORS CORP.
9. Drain the engine oil.
10. Install the oil drain plug.
Tightening Torque
30-41 N.m {3.0-4.2 kgf.m, 22-30 ft.lbf}
DISMOUNTING
Dismount in the reverse order of mounting.
ENGINE DISASSEMBLY/ASSEMBLY
2005 Mazda MX-5 Miata
2003-05 ENGINE Overhaul - 1.8L (BP) 4-Cylinder - MX-5 Miata
Microsoft
Saturday, July 04, 2009 10:58:09 AM Page 5 © 2005 Mitchell Repair Information Company, LLC.

TIMING BELT DISASSEMBLY/ASSEMBLY
1. Disassemble in the order indicated in the figure.
Fig. 6: Disassembling/Assembling Timing Belt Courtesy of MAZDA MOTORS CORP.
2. Assemble in the reverse order of disassembly.
Crankshaft Pulley Disassembly Note
Hold the crankshaft using the SST .
2005 Mazda MX-5 Miata
2003-05 ENGINE Overhaul - 1.8L (BP) 4-Cylinder - MX-5 Miata
Microsoft
Saturday, July 04, 2009 10:58:09 AM Page 6 © 2005 Mitchell Repair Information Company, LLC.

Fig. 7: Holding Crankshaft Courtesy of MAZDA MOTORS CORP.
Pulley Boss Disassembly Note
1. Turn the crankshaft clockwise and align the timing marks of the pulleys.
NOTE: For the crankshaft side, face the locating pin on the pulley boss straight up.
2005 Mazda MX-5 Miata
2003-05 ENGINE Overhaul - 1.8L (BP) 4-Cylinder - MX-5 Miata
Microsoft
Saturday, July 04, 2009 10:58:09 AM Page 7 © 2005 Mitchell Repair Information Company, LLC.
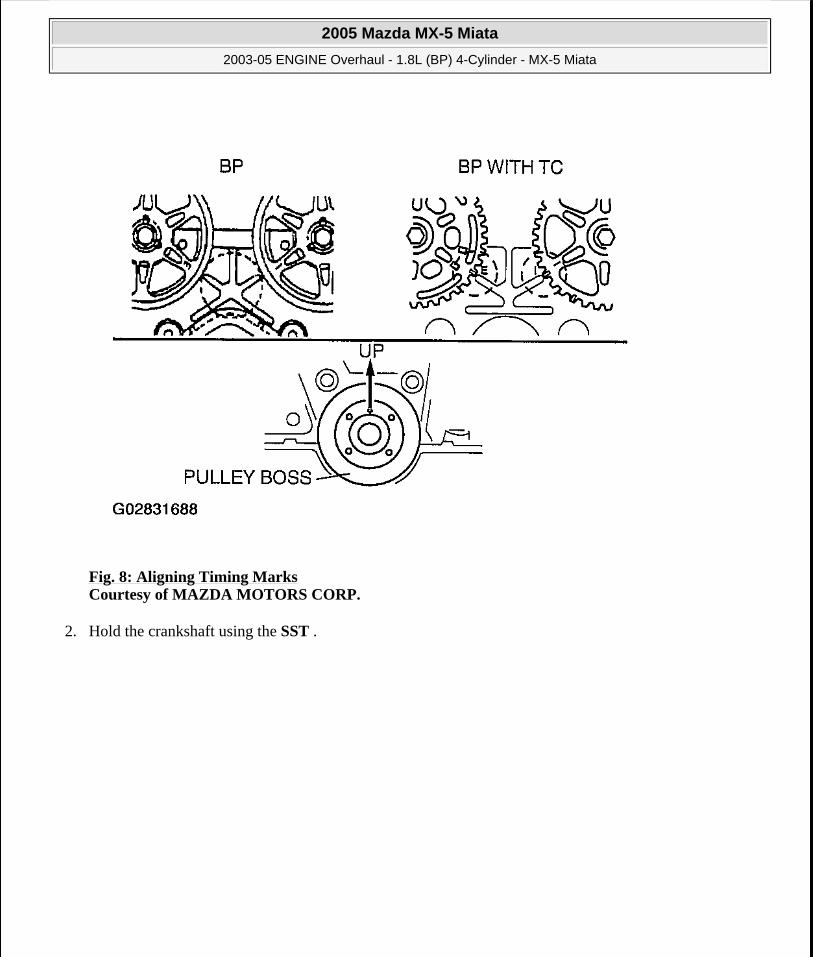
Fig. 8: Aligning Timing Marks Courtesy of MAZDA MOTORS CORP.
2. Hold the crankshaft using the SST .
2005 Mazda MX-5 Miata
2003-05 ENGINE Overhaul - 1.8L (BP) 4-Cylinder - MX-5 Miata
Microsoft
Saturday, July 04, 2009 10:58:09 AM Page 8 © 2005 Mitchell Repair Information Company, LLC.

Fig. 9: Holding Crankshaft Courtesy of MAZDA MOTORS CORP.
Timing Belt Disassembly Note
1. Mark the timing belt rotation on the belt for proper reinstallation.
CAUTION: The following will damage the belt and shorten its life; Forcefully twisting it, turning it inside out, or allowing oil or grease on it.
2005 Mazda MX-5 Miata
2003-05 ENGINE Overhaul - 1.8L (BP) 4-Cylinder - MX-5 Miata
Microsoft
Saturday, July 04, 2009 10:58:09 AM Page 9 © 2005 Mitchell Repair Information Company, LLC.
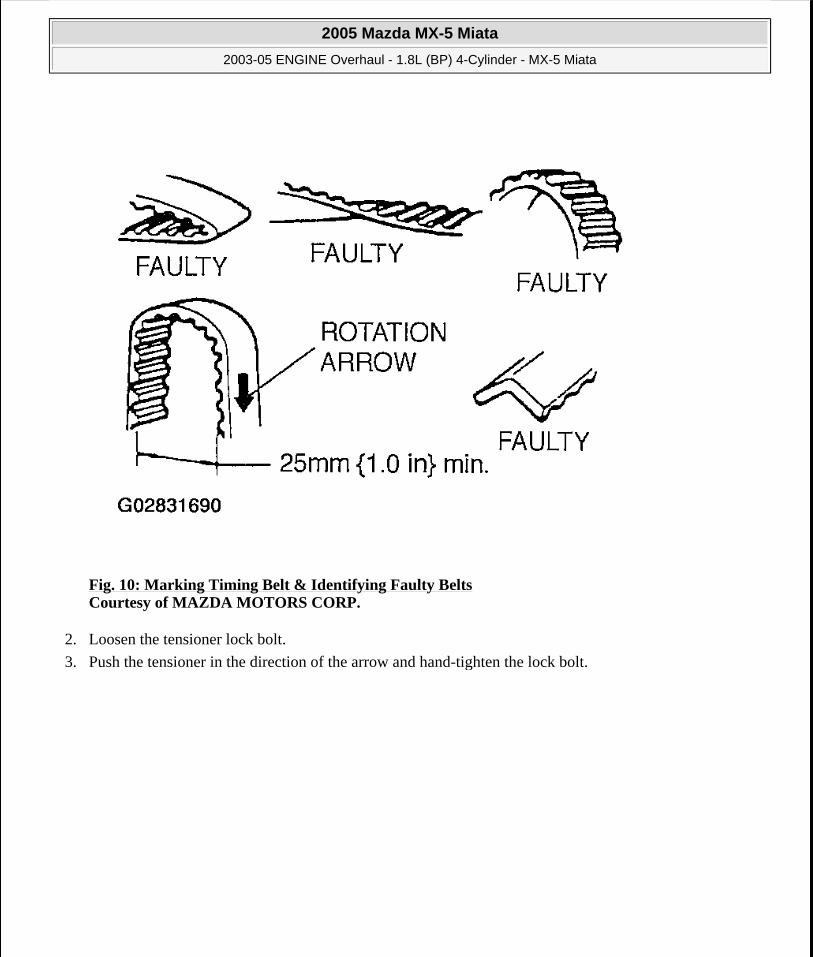
Fig. 10: Marking Timing Belt & Identifying Faulty Belts Courtesy of MAZDA MOTORS CORP.
2. Loosen the tensioner lock bolt.
3. Push the tensioner in the direction of the arrow and hand-tighten the lock bolt.
2005 Mazda MX-5 Miata
2003-05 ENGINE Overhaul - 1.8L (BP) 4-Cylinder - MX-5 Miata
Microsoft
Saturday, July 04, 2009 10:58:09 AM Page 10 © 2005 Mitchell Repair Information Company, LLC.
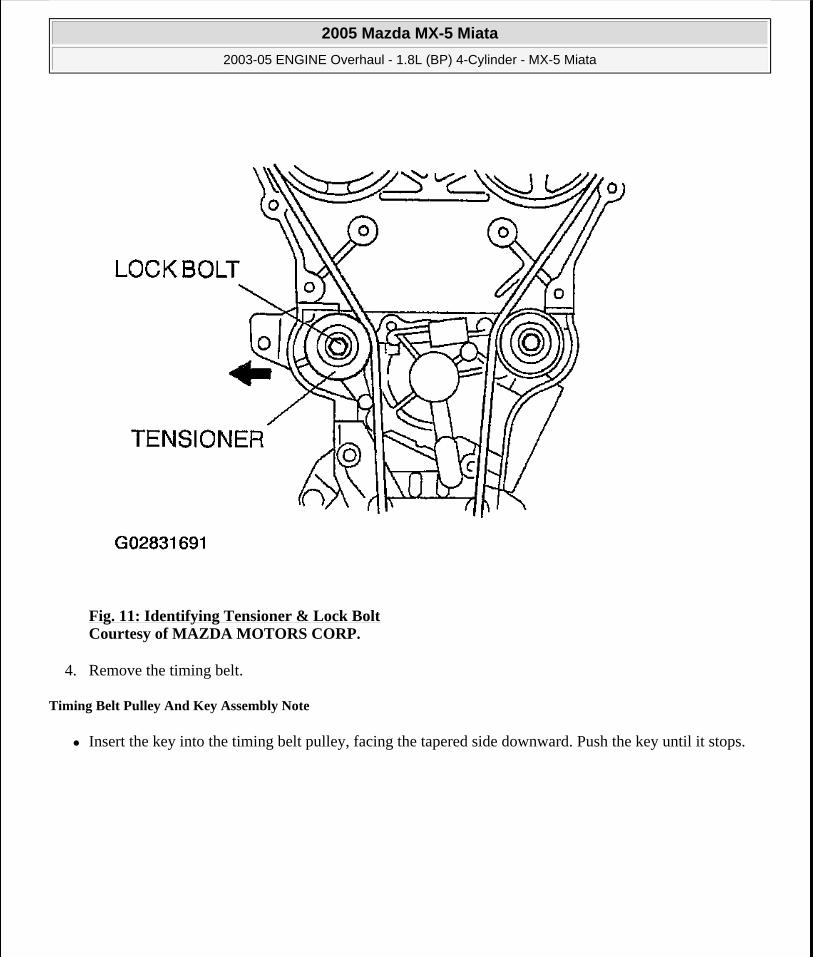
Fig. 11: Identifying Tensioner & Lock Bolt Courtesy of MAZDA MOTORS CORP.
4. Remove the timing belt.
Timing Belt Pulley And Key Assembly Note
Insert the key into the timing belt pulley, facing the tapered side downward. Push the key until it stops.
2005 Mazda MX-5 Miata
2003-05 ENGINE Overhaul - 1.8L (BP) 4-Cylinder - MX-5 Miata
Microsoft
Saturday, July 04, 2009 10:58:09 AM Page 11 © 2005 Mitchell Repair Information Company, LLC.
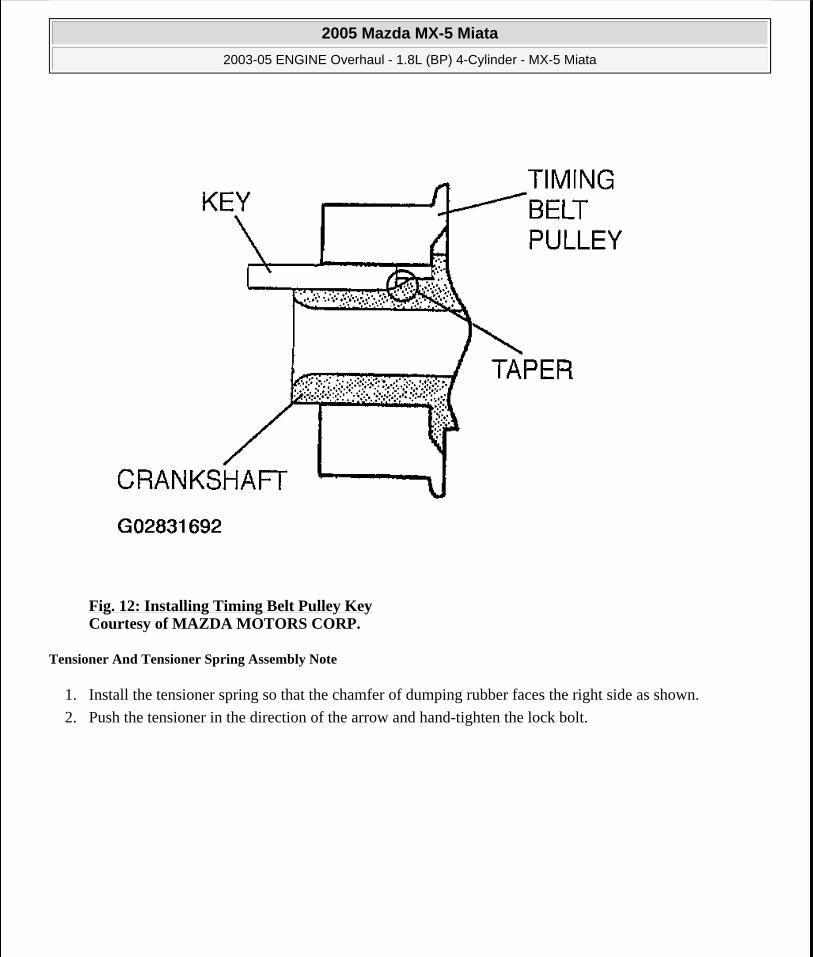
Fig. 12: Installing Timing Belt Pulley Key Courtesy of MAZDA MOTORS CORP.
Tensioner And Tensioner Spring Assembly Note
1. Install the tensioner spring so that the chamfer of dumping rubber faces the right side as shown.
2. Push the tensioner in the direction of the arrow and hand-tighten the lock bolt.
2005 Mazda MX-5 Miata
2003-05 ENGINE Overhaul - 1.8L (BP) 4-Cylinder - MX-5 Miata
Microsoft
Saturday, July 04, 2009 10:58:09 AM Page 12 © 2005 Mitchell Repair Information Company, LLC.
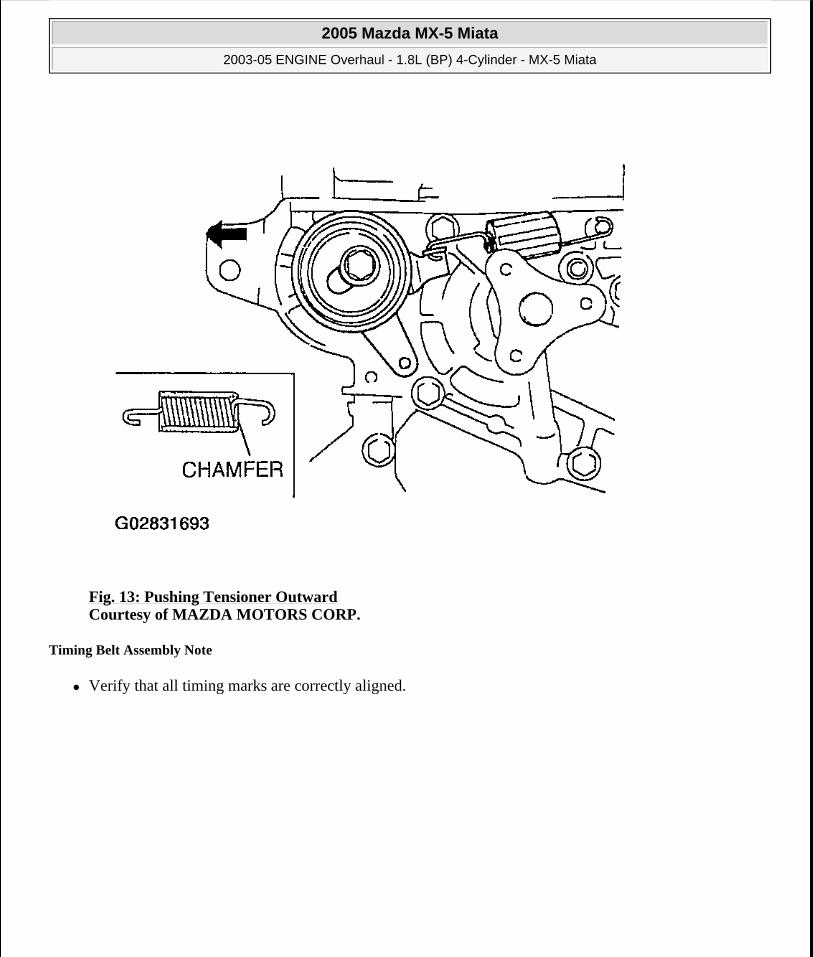
Fig. 13: Pushing Tensioner Outward Courtesy of MAZDA MOTORS CORP.
Timing Belt Assembly Note
Verify that all timing marks are correctly aligned.
2005 Mazda MX-5 Miata
2003-05 ENGINE Overhaul - 1.8L (BP) 4-Cylinder - MX-5 Miata
Microsoft
Saturday, July 04, 2009 10:58:09 AM Page 13 © 2005 Mitchell Repair Information Company, LLC.

Fig. 14: Aligning Timing Marks Courtesy of MAZDA MOTORS CORP.
Pulley Boss Assembly Note
1. Install the pulley boss and pulley lock bolt. Turn the crankshaft clockwise 1 and 5/6 times, and verify that the timing mark and the tension set mark A are aligned.
2005 Mazda MX-5 Miata
2003-05 ENGINE Overhaul - 1.8L (BP) 4-Cylinder - MX-5 Miata
Microsoft
Saturday, July 04, 2009 10:58:09 AM Page 14 © 2005 Mitchell Repair Information Company, LLC.
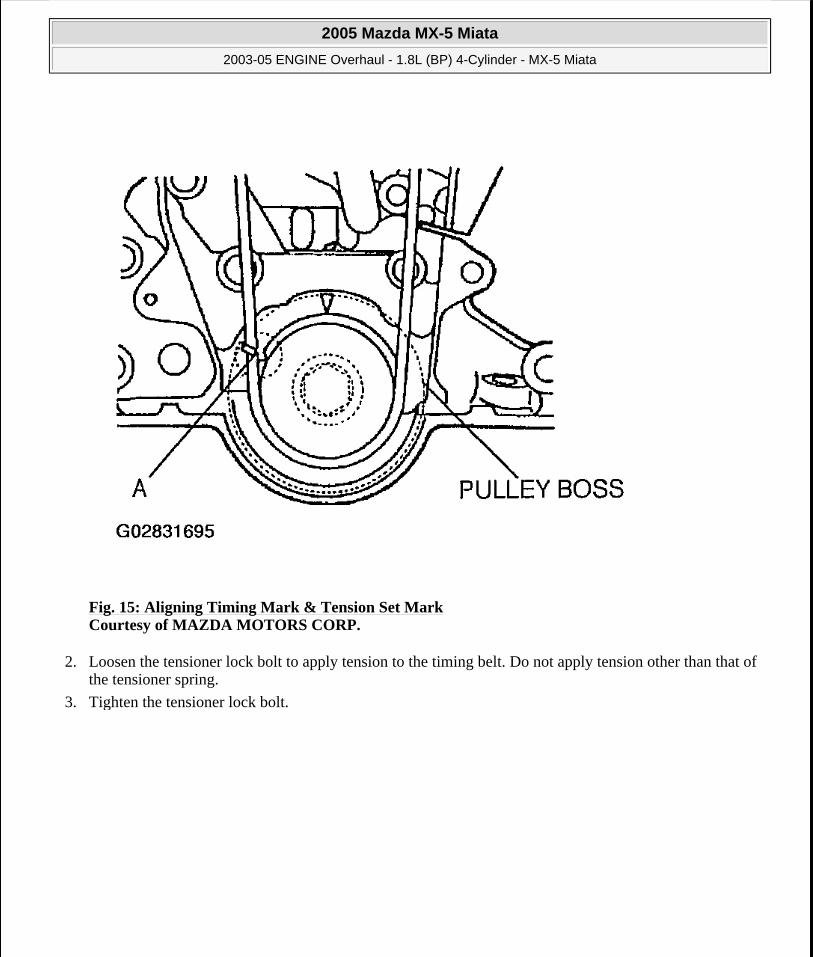
Fig. 15: Aligning Timing Mark & Tension Set Mark Courtesy of MAZDA MOTORS CORP.
2. Loosen the tensioner lock bolt to apply tension to the timing belt. Do not apply tension other than that of the tensioner spring.
3. Tighten the tensioner lock bolt.
2005 Mazda MX-5 Miata
2003-05 ENGINE Overhaul - 1.8L (BP) 4-Cylinder - MX-5 Miata
Microsoft
Saturday, July 04, 2009 10:58:09 AM Page 15 © 2005 Mitchell Repair Information Company, LLC.

Fig. 16: Identifying Tensioner Lock Bolt Courtesy of MAZDA MOTORS CORP.
NOTE: For the crankshaft side, face the locating pin on the pulley boss straight up.
2005 Mazda MX-5 Miata
2003-05 ENGINE Overhaul - 1.8L (BP) 4-Cylinder - MX-5 Miata
Microsoft
Saturday, July 04, 2009 10:58:09 AM Page 16 © 2005 Mitchell Repair Information Company, LLC.
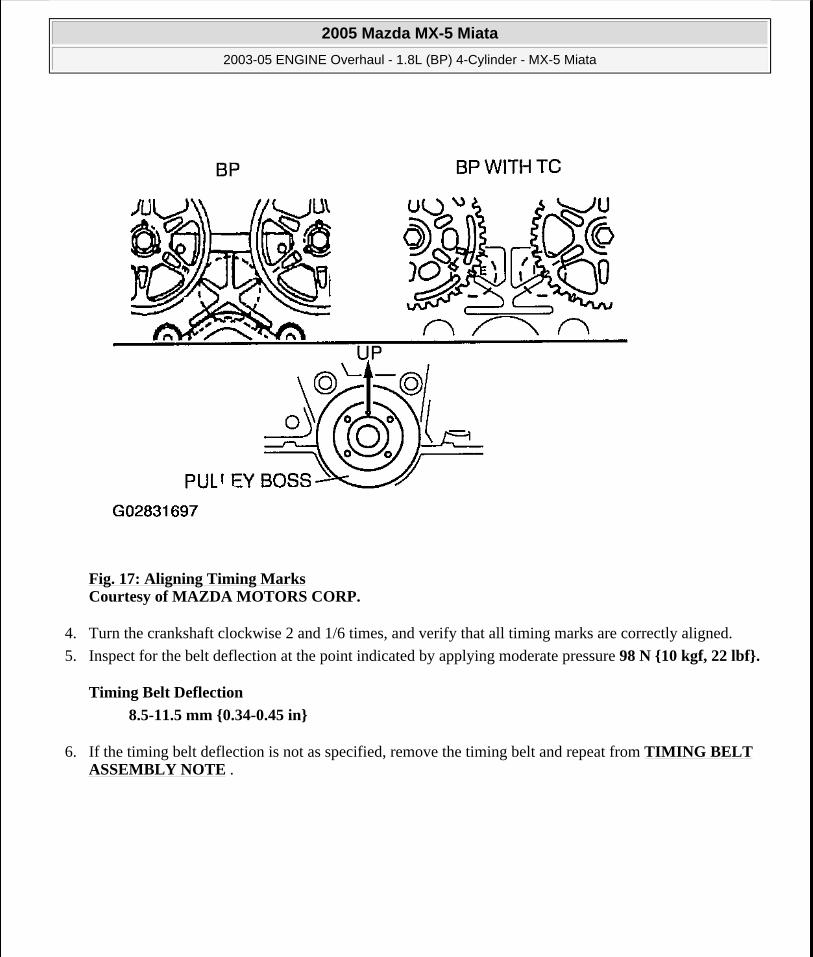
Fig. 17: Aligning Timing Marks Courtesy of MAZDA MOTORS CORP.
4. Turn the crankshaft clockwise 2 and 1/6 times, and verify that all timing marks are correctly aligned.
5. Inspect for the belt deflection at the point indicated by applying moderate pressure 98 N {10 kgf, 22 lbf}.
Timing Belt Deflection
8.5-11.5 mm {0.34-0.45 in}
6. If the timing belt deflection is not as specified, remove the timing belt and repeat from TIMING BELT ASSEMBLY NOTE .
2005 Mazda MX-5 Miata
2003-05 ENGINE Overhaul - 1.8L (BP) 4-Cylinder - MX-5 Miata
Microsoft
Saturday, July 04, 2009 10:58:09 AM Page 17 © 2005 Mitchell Repair Information Company, LLC.
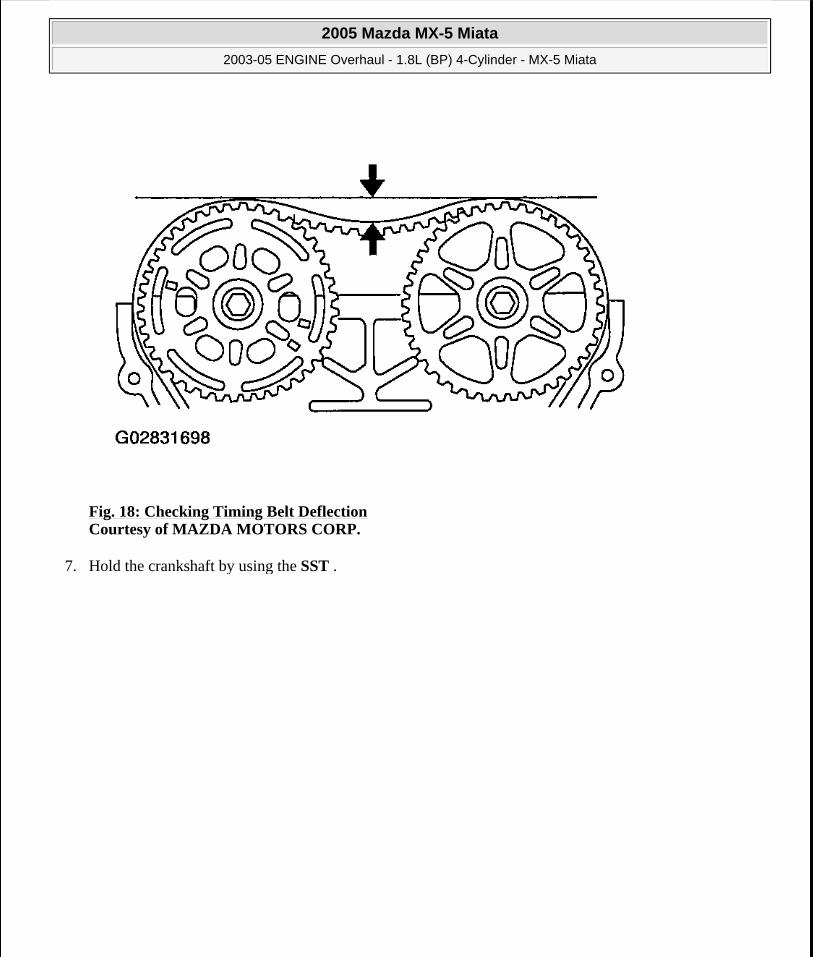
Fig. 18: Checking Timing Belt Deflection Courtesy of MAZDA MOTORS CORP.
7. Hold the crankshaft by using the SST .
2005 Mazda MX-5 Miata
2003-05 ENGINE Overhaul - 1.8L (BP) 4-Cylinder - MX-5 Miata
Microsoft
Saturday, July 04, 2009 10:58:09 AM Page 18 © 2005 Mitchell Repair Information Company, LLC.

Fig. 19: Holding Crankshaft Courtesy of MAZDA MOTORS CORP.
Crankshaft Pulley Assembly Note
Hold the crankshaft by using the SST .
2005 Mazda MX-5 Miata
2003-05 ENGINE Overhaul - 1.8L (BP) 4-Cylinder - MX-5 Miata
Microsoft
Saturday, July 04, 2009 10:58:09 AM Page 19 © 2005 Mitchell Repair Information Company, LLC.
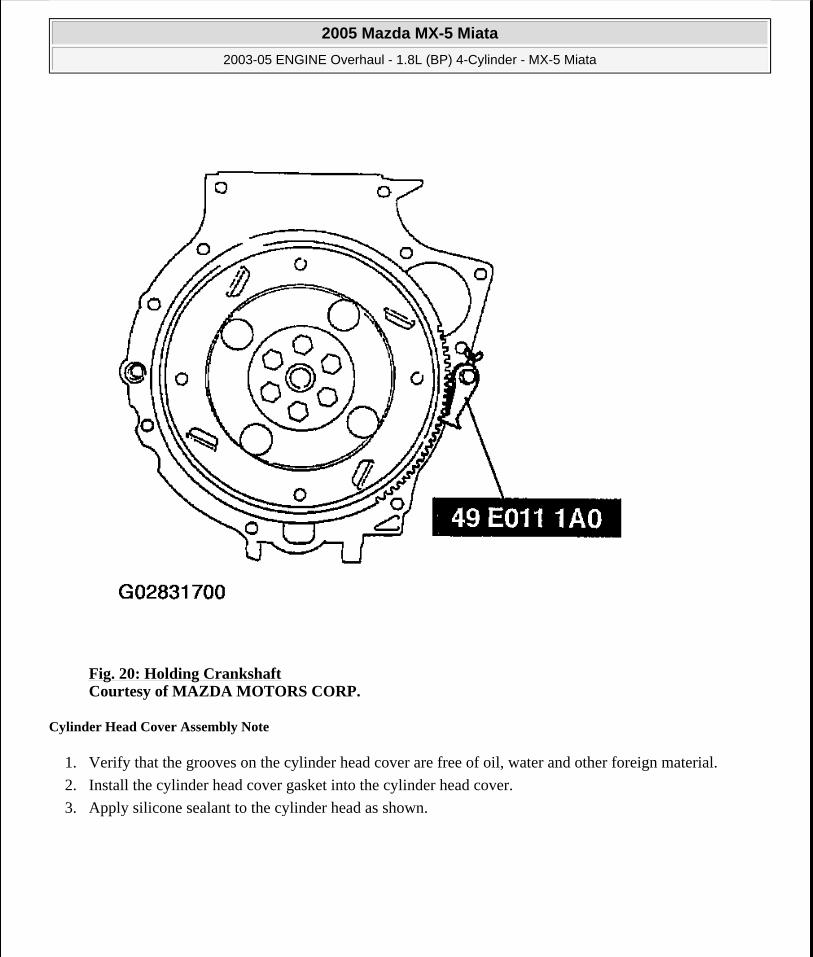
Fig. 20: Holding Crankshaft Courtesy of MAZDA MOTORS CORP.
Cylinder Head Cover Assembly Note
1. Verify that the grooves on the cylinder head cover are free of oil, water and other foreign material.
2. Install the cylinder head cover gasket into the cylinder head cover.
3. Apply silicone sealant to the cylinder head as shown.
2005 Mazda MX-5 Miata
2003-05 ENGINE Overhaul - 1.8L (BP) 4-Cylinder - MX-5 Miata
Microsoft
Saturday, July 04, 2009 10:58:09 AM Page 20 © 2005 Mitchell Repair Information Company, LLC.
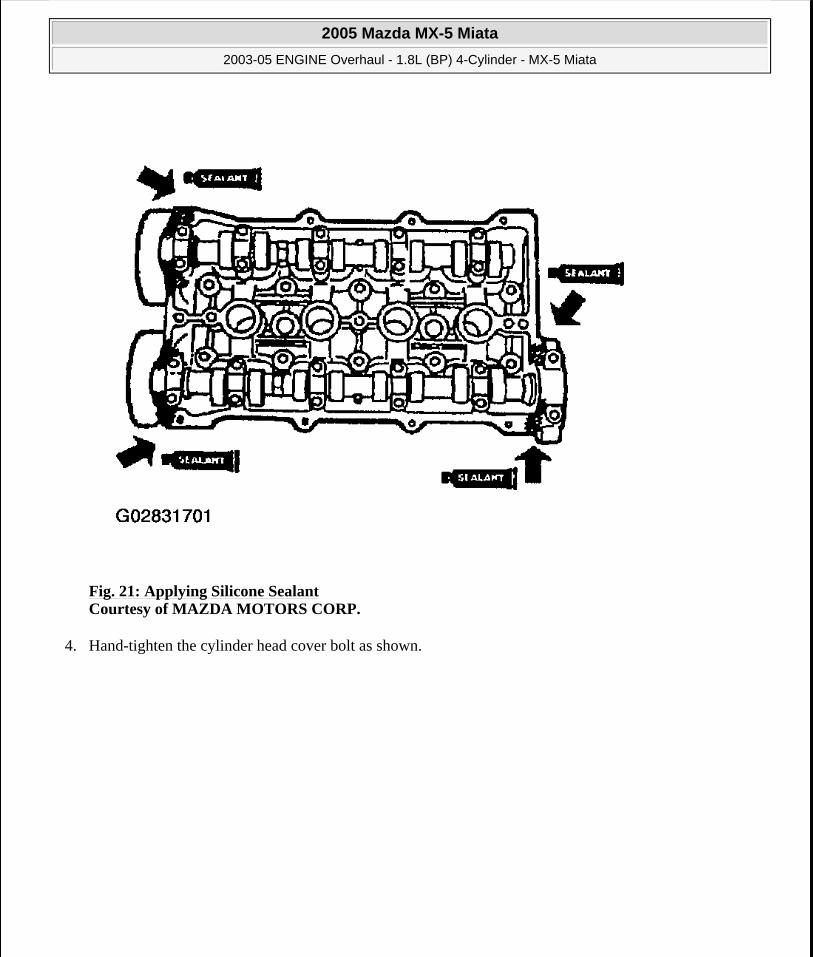
Fig. 21: Applying Silicone Sealant Courtesy of MAZDA MOTORS CORP.
4. Hand-tighten the cylinder head cover bolt as shown.
2005 Mazda MX-5 Miata
2003-05 ENGINE Overhaul - 1.8L (BP) 4-Cylinder - MX-5 Miata
Microsoft
Saturday, July 04, 2009 10:58:09 AM Page 21 © 2005 Mitchell Repair Information Company, LLC.
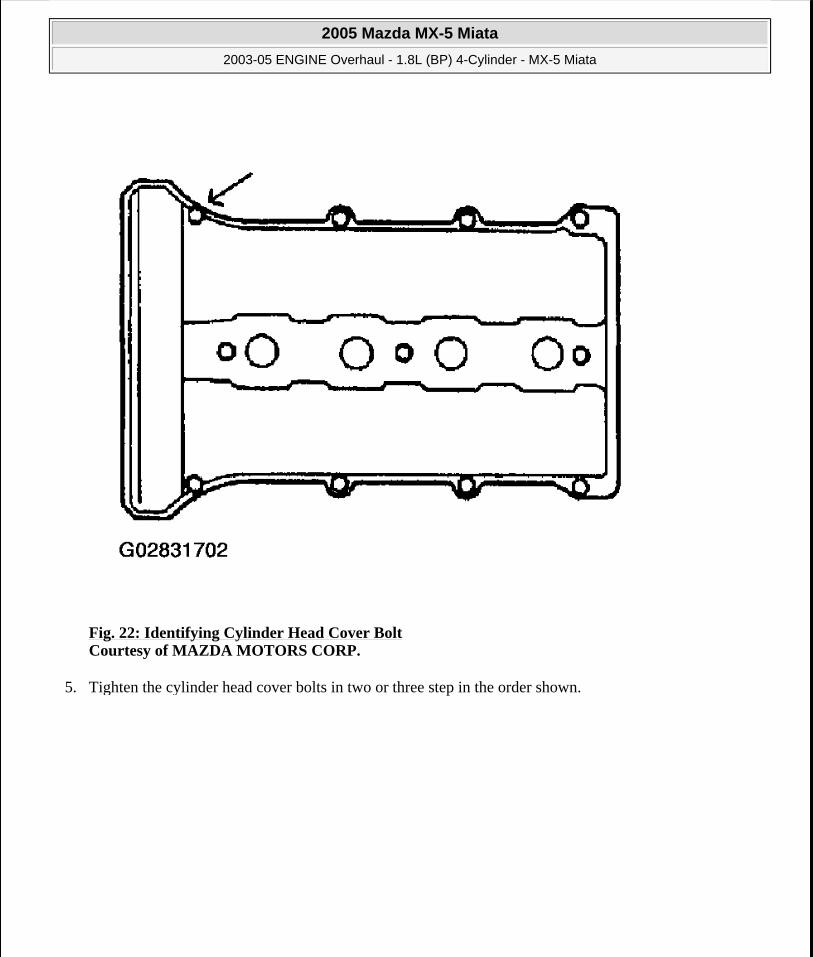
Fig. 22: Identifying Cylinder Head Cover Bolt Courtesy of MAZDA MOTORS CORP.
5. Tighten the cylinder head cover bolts in two or three step in the order shown.
2005 Mazda MX-5 Miata
2003-05 ENGINE Overhaul - 1.8L (BP) 4-Cylinder - MX-5 Miata
Microsoft
Saturday, July 04, 2009 10:58:09 AM Page 22 © 2005 Mitchell Repair Information Company, LLC.
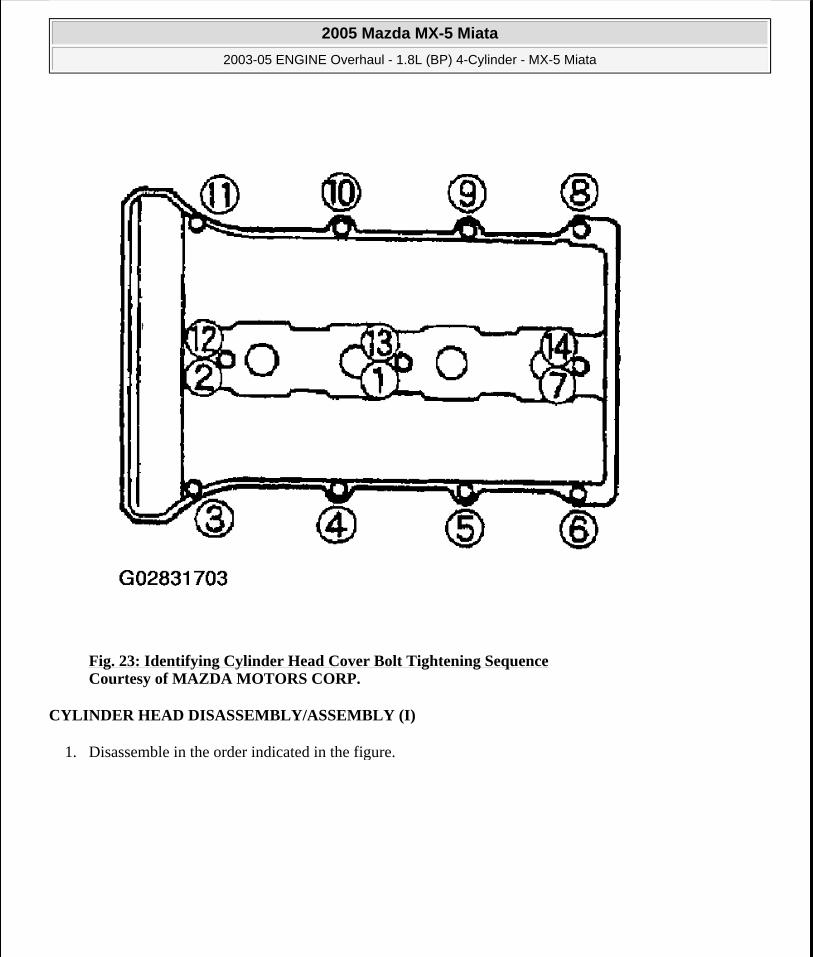
Fig. 23: Identifying Cylinder Head Cover Bolt Tightening Sequence Courtesy of MAZDA MOTORS CORP.
CYLINDER HEAD DISASSEMBLY/ASSEMBLY (I)
1. Disassemble in the order indicated in the figure.
2005 Mazda MX-5 Miata
2003-05 ENGINE Overhaul - 1.8L (BP) 4-Cylinder - MX-5 Miata
Microsoft
Saturday, July 04, 2009 10:58:09 AM Page 23 © 2005 Mitchell Repair Information Company, LLC.

Fig. 24: Disassembling/Assembling Cylinder Head Courtesy of MAZDA MOTORS CORP.
2. Assemble in the reverse order of disassembly.
Camshaft Pulley Disassembly Note
Hold the camshaft by using a wrench on the cast hexagon as shown, and loosen the camshaft pulley lock bolt.
2005 Mazda MX-5 Miata
2003-05 ENGINE Overhaul - 1.8L (BP) 4-Cylinder - MX-5 Miata
Microsoft
Saturday, July 04, 2009 10:58:09 AM Page 24 © 2005 Mitchell Repair Information Company, LLC.
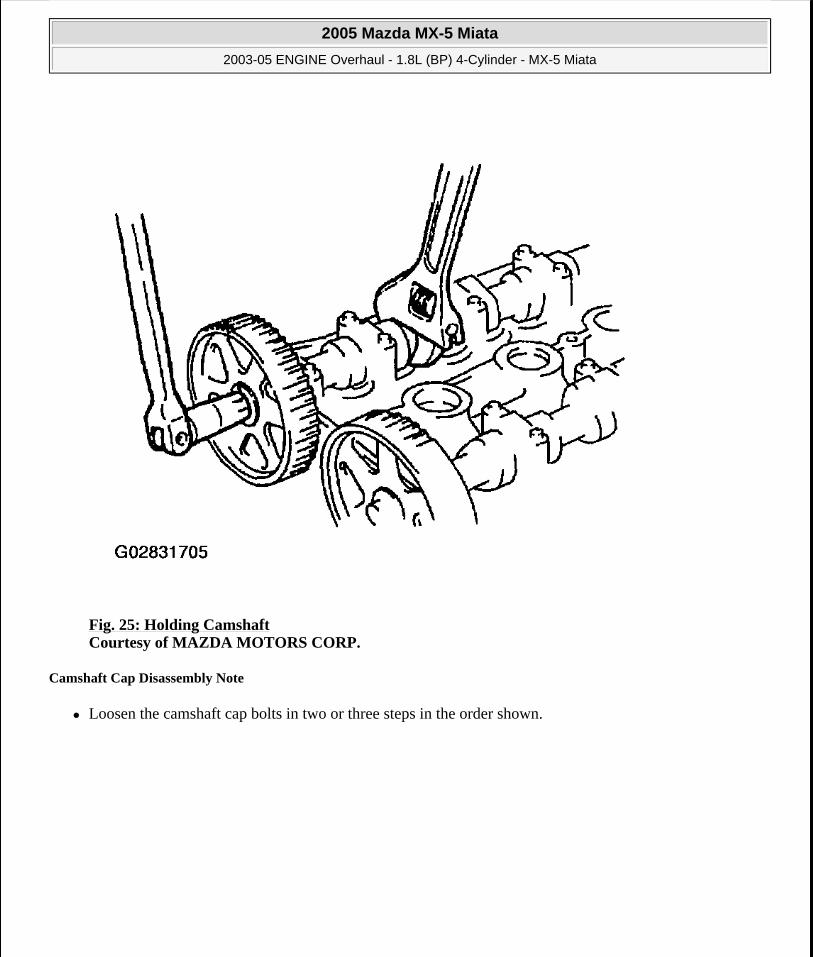
Fig. 25: Holding Camshaft Courtesy of MAZDA MOTORS CORP.
Camshaft Cap Disassembly Note
Loosen the camshaft cap bolts in two or three steps in the order shown.
2005 Mazda MX-5 Miata
2003-05 ENGINE Overhaul - 1.8L (BP) 4-Cylinder - MX-5 Miata
Microsoft
Saturday, July 04, 2009 10:58:09 AM Page 25 © 2005 Mitchell Repair Information Company, LLC.
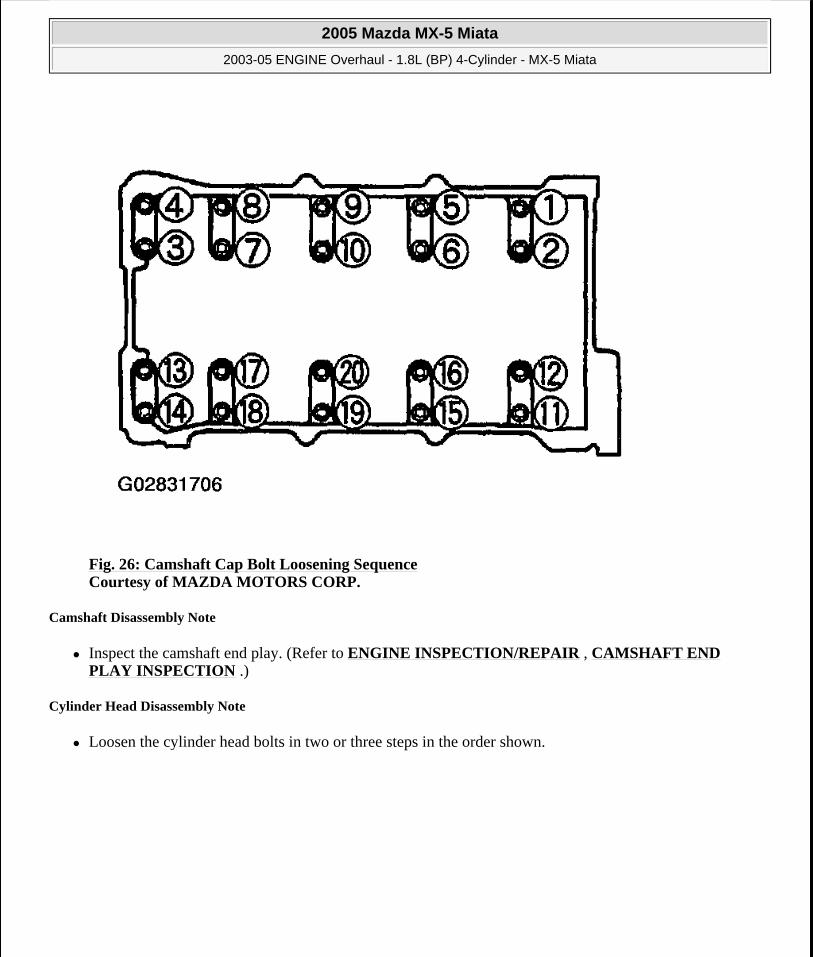
Fig. 26: Camshaft Cap Bolt Loosening Sequence Courtesy of MAZDA MOTORS CORP.
Camshaft Disassembly Note
Inspect the camshaft end play. (Refer to ENGINE INSPECTION/REPAIR , CAMSHAFT END PLAY INSPECTION .)
Cylinder Head Disassembly Note
Loosen the cylinder head bolts in two or three steps in the order shown.
2005 Mazda MX-5 Miata
2003-05 ENGINE Overhaul - 1.8L (BP) 4-Cylinder - MX-5 Miata
Microsoft
Saturday, July 04, 2009 10:58:09 AM Page 26 © 2005 Mitchell Repair Information Company, LLC.

Fig. 27: Cylinder Head Bolt Loosening Sequence Courtesy of MAZDA MOTORS CORP.
Cylinder Head Assembly Note
Install the bolts and tighten them in two or three steps in the order shown.
Fig. 28: Cylinder Head Bolt Tightening Sequence Courtesy of MAZDA MOTORS CORP.
Camshaft Assembly Note
CAUTION: Because there is little camshaft thrust clearance, the camshaft must be held horizontally while it is installed. Otherwise, excessive force will be applied to the thrust area, causing burr on the thrust receiving area of the cylinder head journal. To avoid this, the following
2005 Mazda MX-5 Miata
2003-05 ENGINE Overhaul - 1.8L (BP) 4-Cylinder - MX-5 Miata
Microsoft
Saturday, July 04, 2009 10:58:09 AM Page 27 © 2005 Mitchell Repair Information Company, LLC.
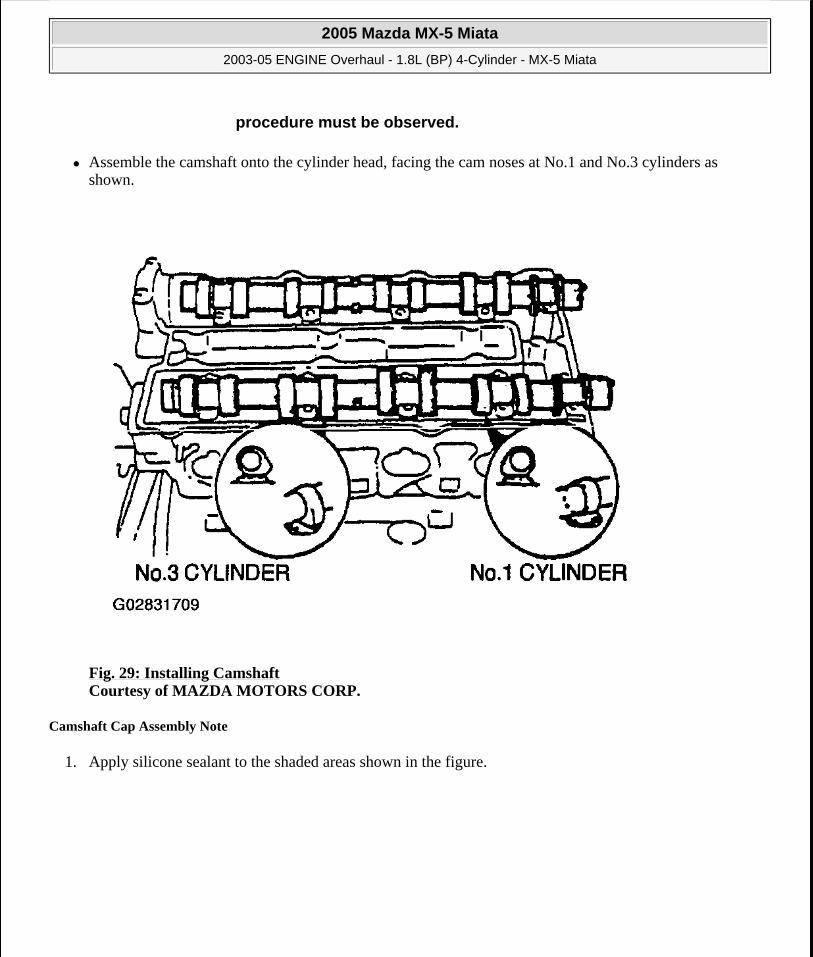
Assemble the camshaft onto the cylinder head, facing the cam noses at No.1 and No.3 cylinders as shown.
Fig. 29: Installing Camshaft Courtesy of MAZDA MOTORS CORP.
Camshaft Cap Assembly Note
1. Apply silicone sealant to the shaded areas shown in the figure.
procedure must be observed.
2005 Mazda MX-5 Miata
2003-05 ENGINE Overhaul - 1.8L (BP) 4-Cylinder - MX-5 Miata
Microsoft
Saturday, July 04, 2009 10:58:09 AM Page 28 © 2005 Mitchell Repair Information Company, LLC.
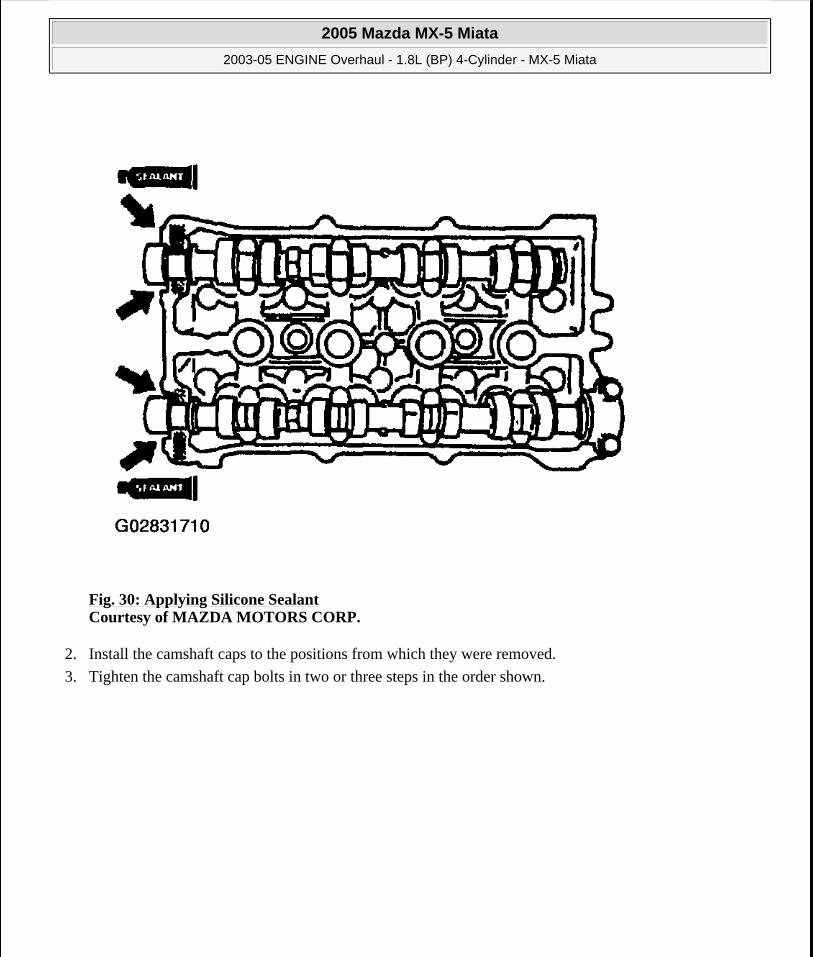
Fig. 30: Applying Silicone Sealant Courtesy of MAZDA MOTORS CORP.
2. Install the camshaft caps to the positions from which they were removed.
3. Tighten the camshaft cap bolts in two or three steps in the order shown.
2005 Mazda MX-5 Miata
2003-05 ENGINE Overhaul - 1.8L (BP) 4-Cylinder - MX-5 Miata
Microsoft
Saturday, July 04, 2009 10:58:09 AM Page 29 © 2005 Mitchell Repair Information Company, LLC.

Fig. 31: Camshaft Cap Bolt Tightening Sequence Courtesy of MAZDA MOTORS CORP.
4. Apply clean engine oil to the lip of the new camshaft oil seal.
5. Push the oil seal slightly in by hand.
6. Press the oil seal in evenly by using the SST .
2005 Mazda MX-5 Miata
2003-05 ENGINE Overhaul - 1.8L (BP) 4-Cylinder - MX-5 Miata
Microsoft
Saturday, July 04, 2009 10:58:09 AM Page 30 © 2005 Mitchell Repair Information Company, LLC.

Fig. 32: Installing Oil Seal Courtesy of MAZDA MOTORS CORP.
Camshaft Pulley
1. Install the camshaft pulleys with the "I" mark (intake side) or the "E" mark (exhaust side) straight up.
2005 Mazda MX-5 Miata
2003-05 ENGINE Overhaul - 1.8L (BP) 4-Cylinder - MX-5 Miata
Microsoft
Saturday, July 04, 2009 10:58:09 AM Page 31 © 2005 Mitchell Repair Information Company, LLC.
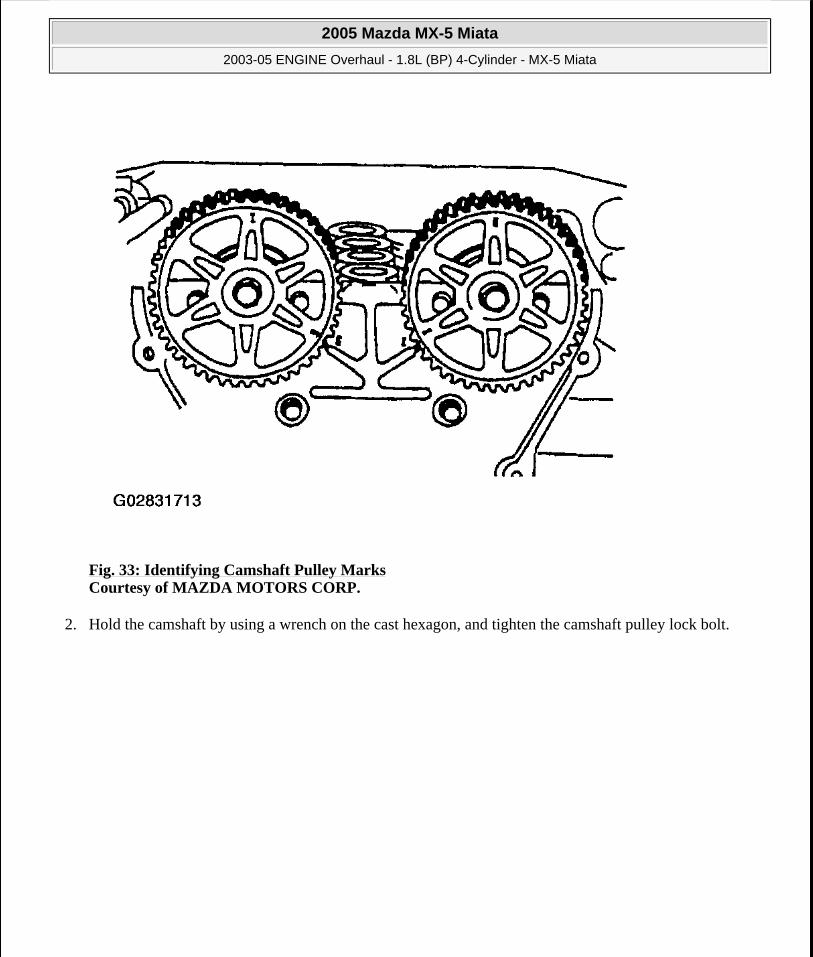
Fig. 33: Identifying Camshaft Pulley Marks Courtesy of MAZDA MOTORS CORP.
2. Hold the camshaft by using a wrench on the cast hexagon, and tighten the camshaft pulley lock bolt.
2005 Mazda MX-5 Miata
2003-05 ENGINE Overhaul - 1.8L (BP) 4-Cylinder - MX-5 Miata
Microsoft
Saturday, July 04, 2009 10:58:09 AM Page 32 © 2005 Mitchell Repair Information Company, LLC.

Fig. 34: Holding Camshaft Courtesy of MAZDA MOTORS CORP.
CYLINDER HEAD DISASSEMBLY/ASSEMBLY (II)
1. Disassemble in the order indicated in the figure.
2005 Mazda MX-5 Miata
2003-05 ENGINE Overhaul - 1.8L (BP) 4-Cylinder - MX-5 Miata
Microsoft
Saturday, July 04, 2009 10:58:09 AM Page 33 © 2005 Mitchell Repair Information Company, LLC.

2005 Mazda MX-5 Miata
2003-05 ENGINE Overhaul - 1.8L (BP) 4-Cylinder - MX-5 Miata
Microsoft
Saturday, July 04, 2009 10:58:10 AM Page 34 © 2005 Mitchell Repair Information Company, LLC.
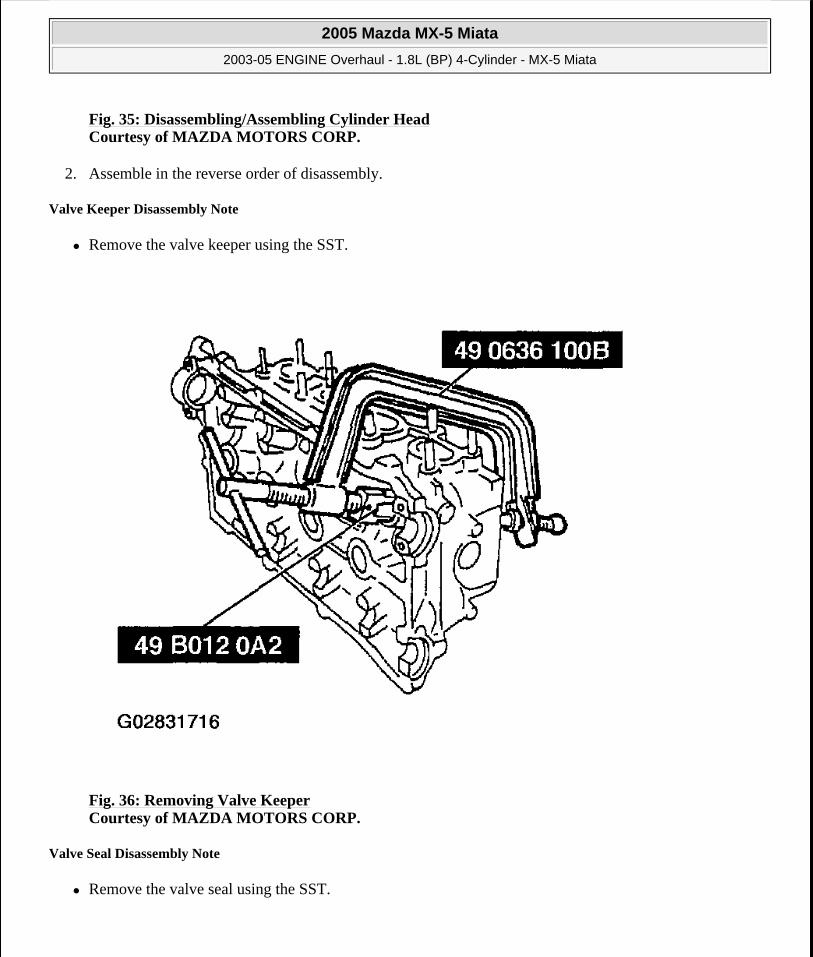
Fig. 35: Disassembling/Assembling Cylinder HeadCourtesy of MAZDA MOTORS CORP.
2. Assemble in the reverse order of disassembly.
Valve Keeper Disassembly Note
Remove the valve keeper using the SST.
Fig. 36: Removing Valve Keeper Courtesy of MAZDA MOTORS CORP.
Valve Seal Disassembly Note
Remove the valve seal using the SST.
2005 Mazda MX-5 Miata
2003-05 ENGINE Overhaul - 1.8L (BP) 4-Cylinder - MX-5 Miata
Microsoft
Saturday, July 04, 2009 10:58:10 AM Page 35 © 2005 Mitchell Repair Information Company, LLC.
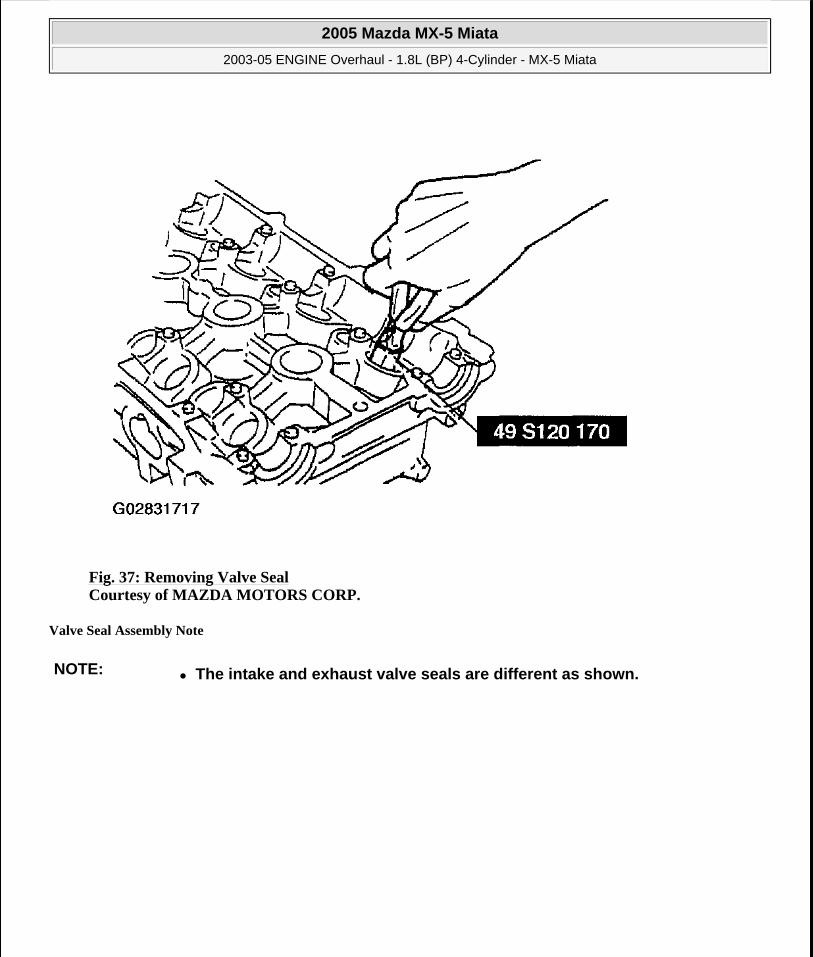
Fig. 37: Removing Valve Seal Courtesy of MAZDA MOTORS CORP.
Valve Seal Assembly Note
NOTE: The intake and exhaust valve seals are different as shown.
2005 Mazda MX-5 Miata
2003-05 ENGINE Overhaul - 1.8L (BP) 4-Cylinder - MX-5 Miata
Microsoft
Saturday, July 04, 2009 10:58:10 AM Page 36 © 2005 Mitchell Repair Information Company, LLC.
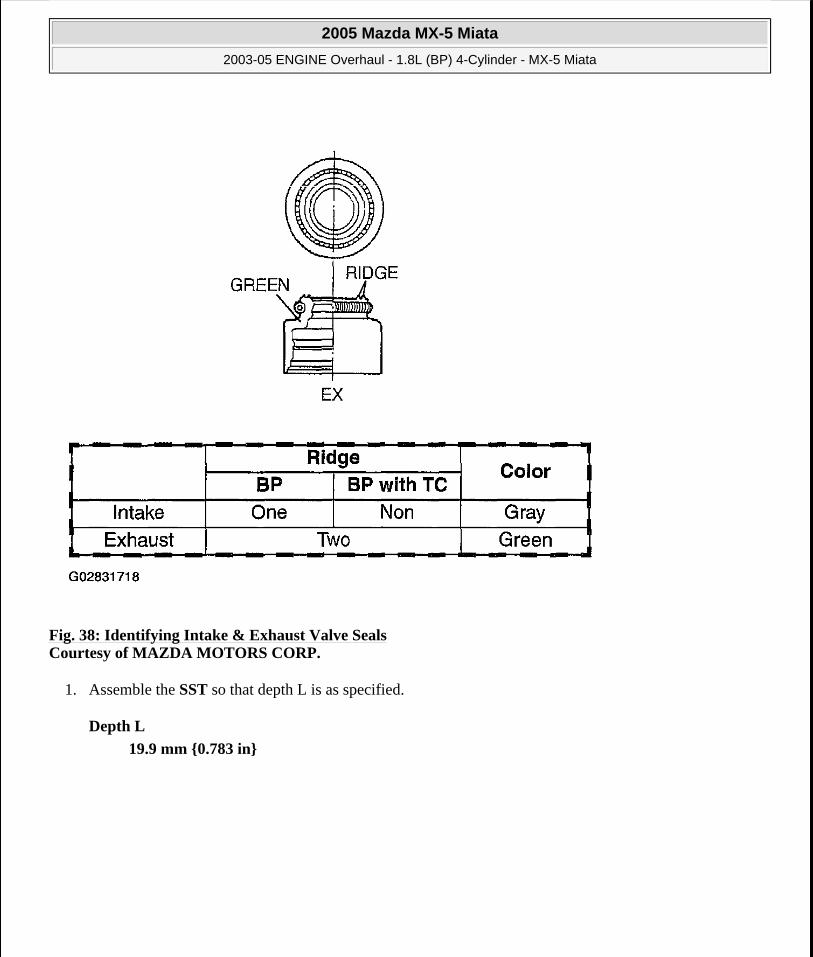
Fig. 38: Identifying Intake & Exhaust Valve Seals Courtesy of MAZDA MOTORS CORP.
1. Assemble the SST so that depth L is as specified.
Depth L
19.9 mm {0.783 in}
2005 Mazda MX-5 Miata
2003-05 ENGINE Overhaul - 1.8L (BP) 4-Cylinder - MX-5 Miata
Microsoft
Saturday, July 04, 2009 10:58:10 AM Page 37 © 2005 Mitchell Repair Information Company, LLC.
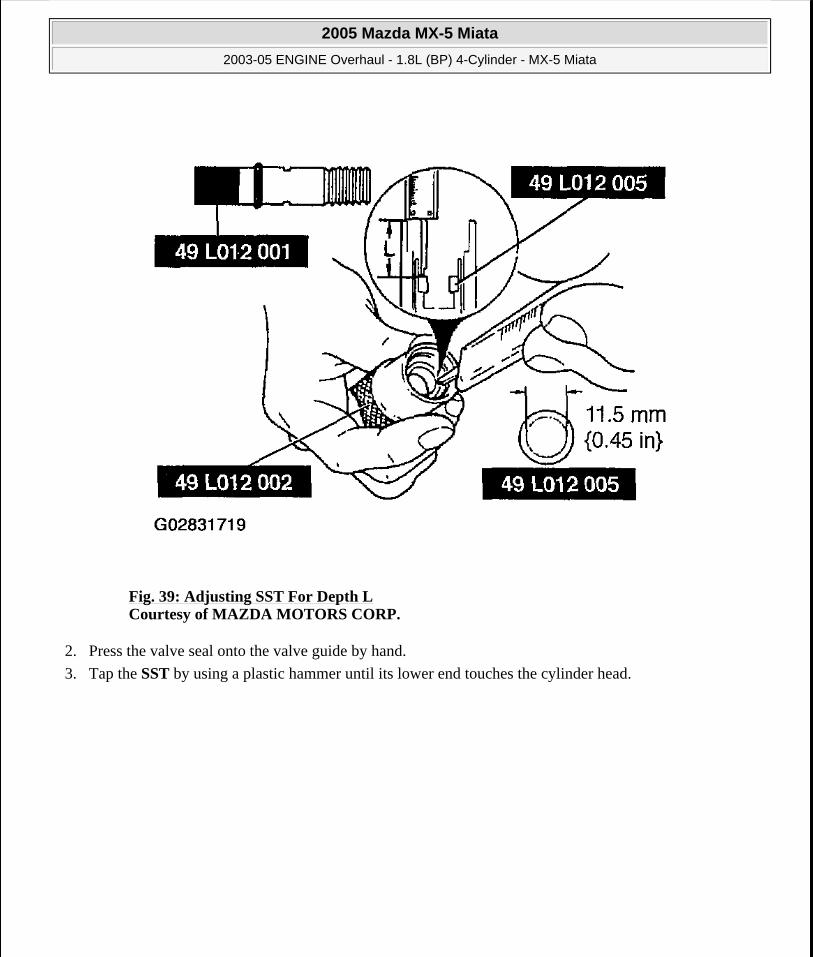
Fig. 39: Adjusting SST For Depth L Courtesy of MAZDA MOTORS CORP.
2. Press the valve seal onto the valve guide by hand.
3. Tap the SST by using a plastic hammer until its lower end touches the cylinder head.
2005 Mazda MX-5 Miata
2003-05 ENGINE Overhaul - 1.8L (BP) 4-Cylinder - MX-5 Miata
Microsoft
Saturday, July 04, 2009 10:58:10 AM Page 38 © 2005 Mitchell Repair Information Company, LLC.
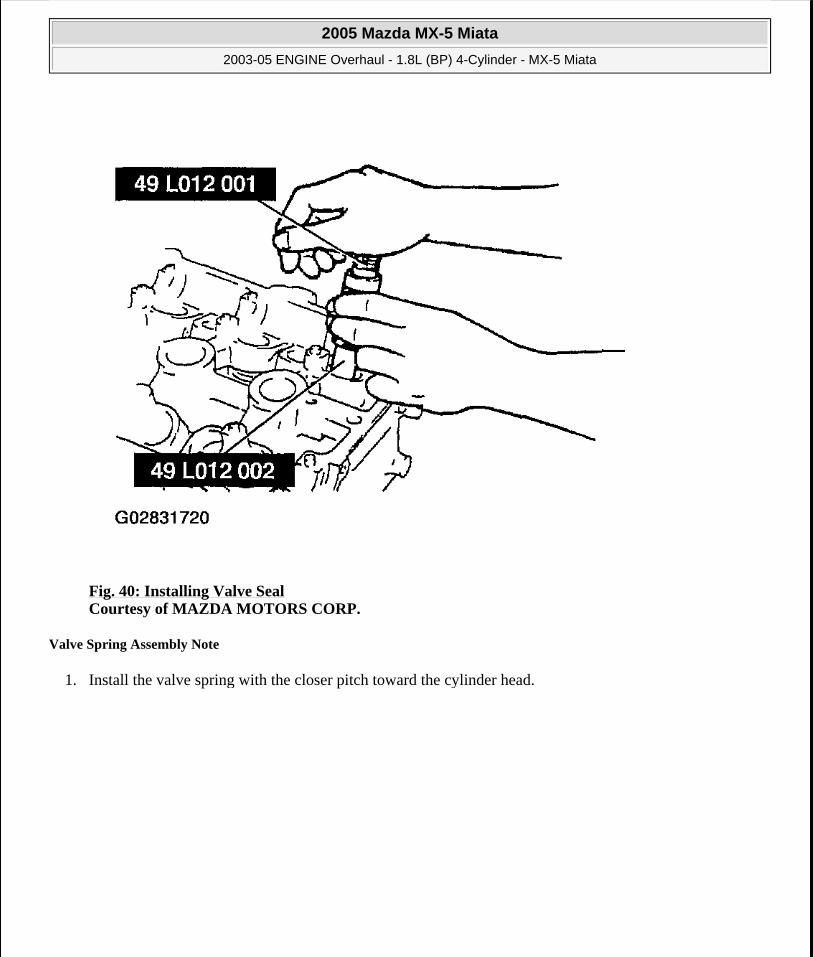
Fig. 40: Installing Valve Seal Courtesy of MAZDA MOTORS CORP.
Valve Spring Assembly Note
1. Install the valve spring with the closer pitch toward the cylinder head.
2005 Mazda MX-5 Miata
2003-05 ENGINE Overhaul - 1.8L (BP) 4-Cylinder - MX-5 Miata
Microsoft
Saturday, July 04, 2009 10:58:10 AM Page 39 © 2005 Mitchell Repair Information Company, LLC.
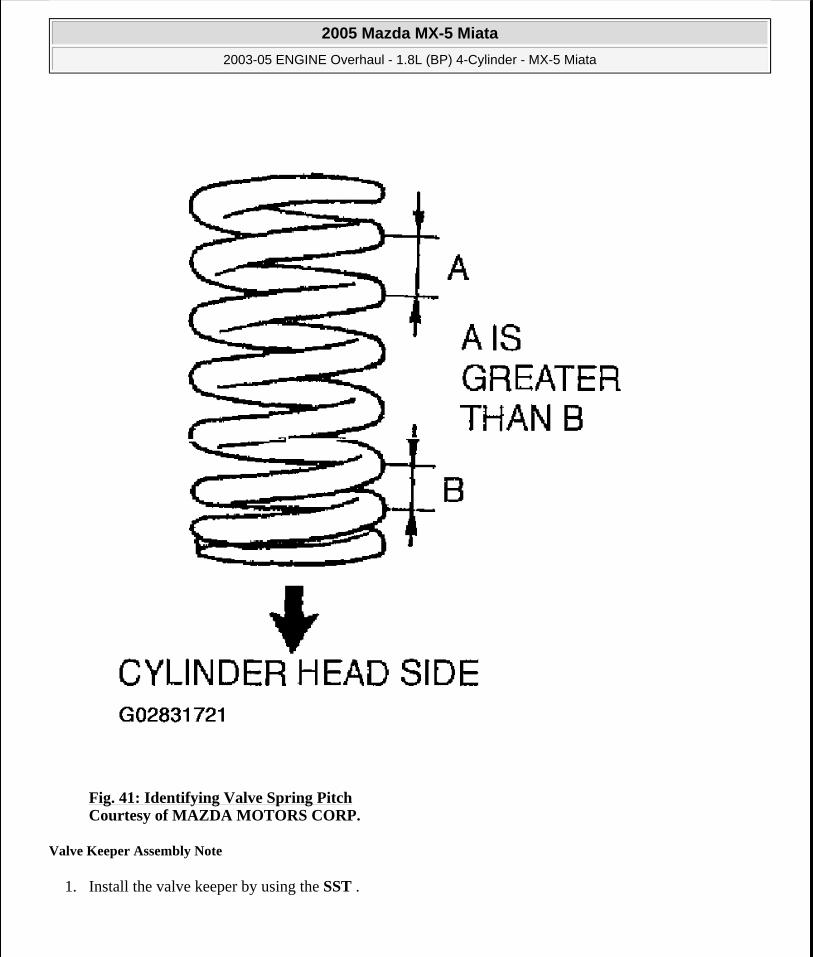
Fig. 41: Identifying Valve Spring Pitch Courtesy of MAZDA MOTORS CORP.
Valve Keeper Assembly Note
1. Install the valve keeper by using the SST .
2005 Mazda MX-5 Miata
2003-05 ENGINE Overhaul - 1.8L (BP) 4-Cylinder - MX-5 Miata
Microsoft
Saturday, July 04, 2009 10:58:10 AM Page 40 © 2005 Mitchell Repair Information Company, LLC.
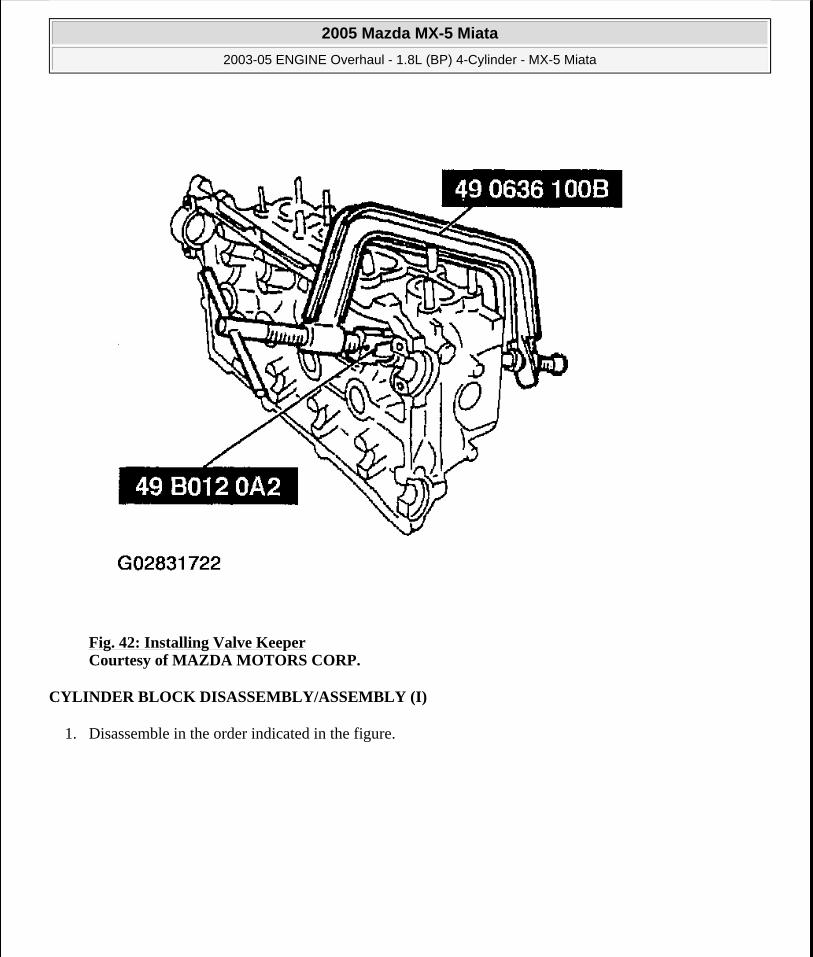
Fig. 42: Installing Valve Keeper Courtesy of MAZDA MOTORS CORP.
CYLINDER BLOCK DISASSEMBLY/ASSEMBLY (I)
1. Disassemble in the order indicated in the figure.
2005 Mazda MX-5 Miata
2003-05 ENGINE Overhaul - 1.8L (BP) 4-Cylinder - MX-5 Miata
Microsoft
Saturday, July 04, 2009 10:58:10 AM Page 41 © 2005 Mitchell Repair Information Company, LLC.
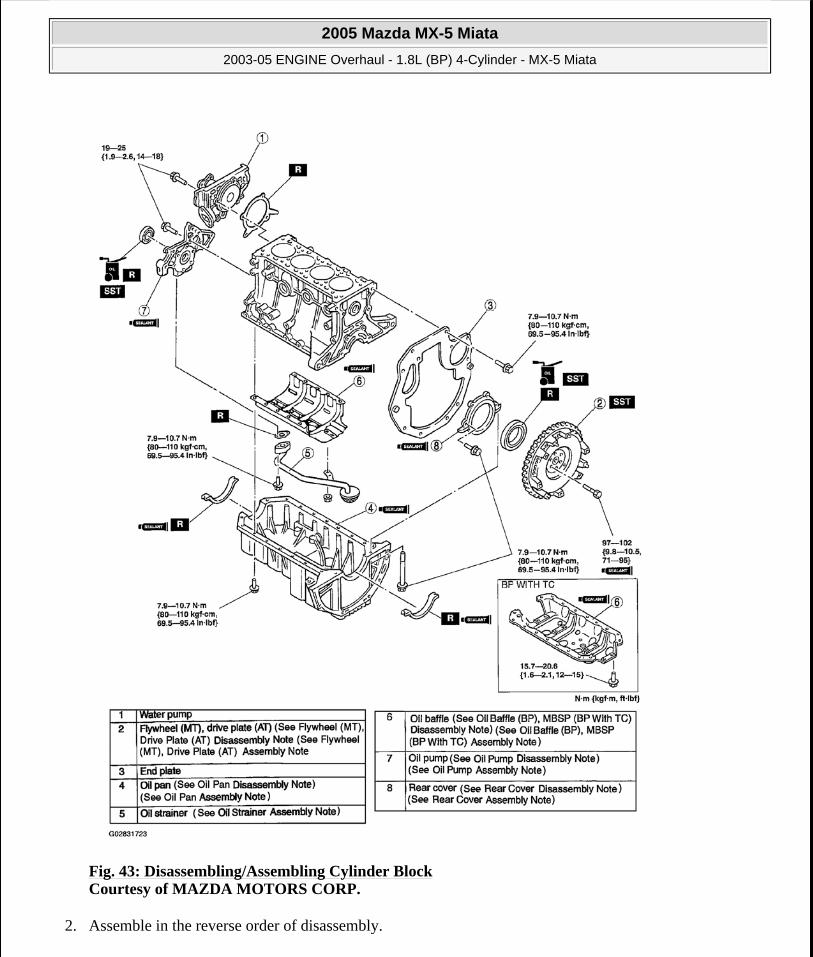
Fig. 43: Disassembling/Assembling Cylinder Block Courtesy of MAZDA MOTORS CORP.
2. Assemble in the reverse order of disassembly.
2005 Mazda MX-5 Miata
2003-05 ENGINE Overhaul - 1.8L (BP) 4-Cylinder - MX-5 Miata
Microsoft
Saturday, July 04, 2009 10:58:10 AM Page 42 © 2005 Mitchell Repair Information Company, LLC.
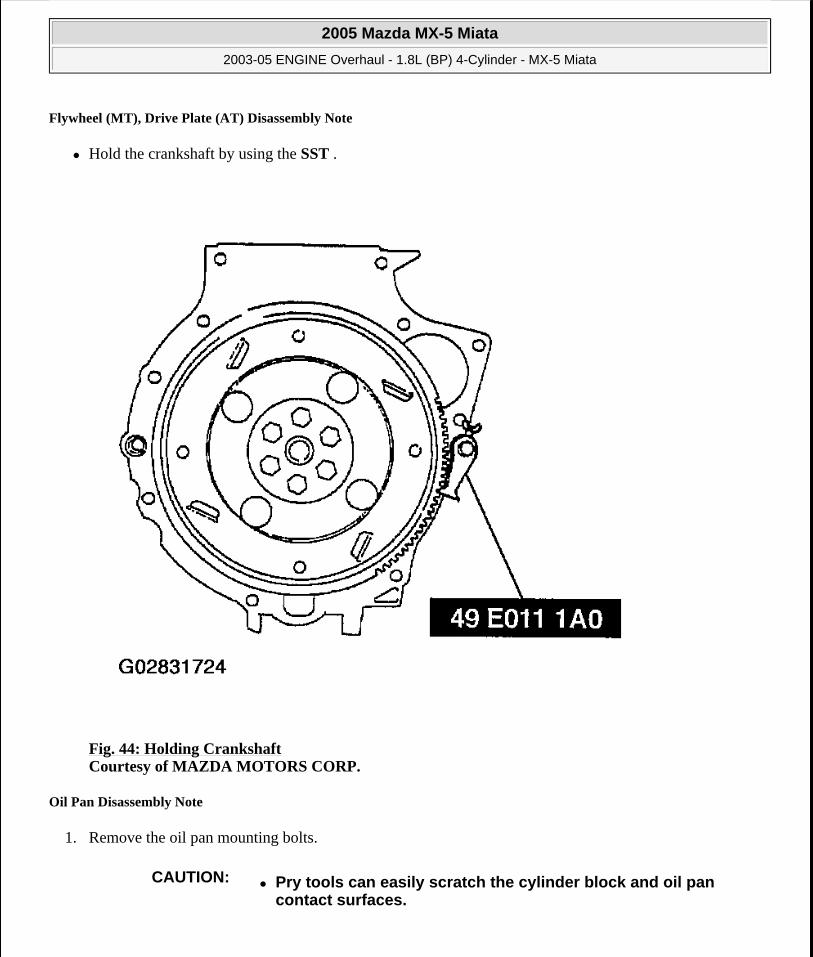
Flywheel (MT), Drive Plate (AT) Disassembly Note
Hold the crankshaft by using the SST .
Fig. 44: Holding Crankshaft Courtesy of MAZDA MOTORS CORP.
Oil Pan Disassembly Note
1. Remove the oil pan mounting bolts.
CAUTION: Pry tools can easily scratch the cylinder block and oil pan contact surfaces.
2005 Mazda MX-5 Miata
2003-05 ENGINE Overhaul - 1.8L (BP) 4-Cylinder - MX-5 Miata
Microsoft
Saturday, July 04, 2009 10:58:10 AM Page 43 © 2005 Mitchell Repair Information Company, LLC.

Fig. 45: Identifying Screwdriver Insertion Points Courtesy of MAZDA MOTORS CORP.
2. Insert a screwdriver only at the points shown.
Oil Baffle Disassembly Note
1. Insert a screwdriver between the cylinder block and the oil baffle to separate them.
2. Remove the oil baffle.
2005 Mazda MX-5 Miata
2003-05 ENGINE Overhaul - 1.8L (BP) 4-Cylinder - MX-5 Miata
Microsoft
Saturday, July 04, 2009 10:58:10 AM Page 44 © 2005 Mitchell Repair Information Company, LLC.
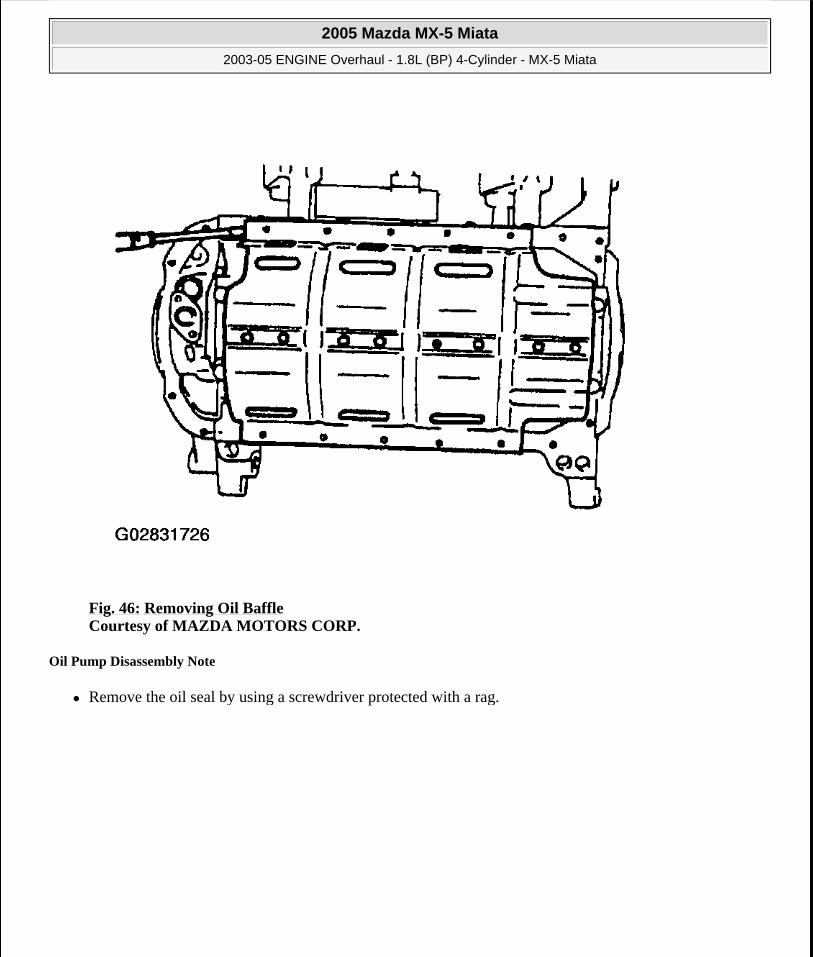
Fig. 46: Removing Oil Baffle Courtesy of MAZDA MOTORS CORP.
Oil Pump Disassembly Note
Remove the oil seal by using a screwdriver protected with a rag.
2005 Mazda MX-5 Miata
2003-05 ENGINE Overhaul - 1.8L (BP) 4-Cylinder - MX-5 Miata
Microsoft
Saturday, July 04, 2009 10:58:10 AM Page 45 © 2005 Mitchell Repair Information Company, LLC.

Fig. 47: Removing Oil Pump Oil Seal Courtesy of MAZDA MOTORS CORP.
Rear Cover Disassembly Note
Remove the oil seal by using a screwdriver protected with a rag.
2005 Mazda MX-5 Miata
2003-05 ENGINE Overhaul - 1.8L (BP) 4-Cylinder - MX-5 Miata
Microsoft
Saturday, July 04, 2009 10:58:10 AM Page 46 © 2005 Mitchell Repair Information Company, LLC.
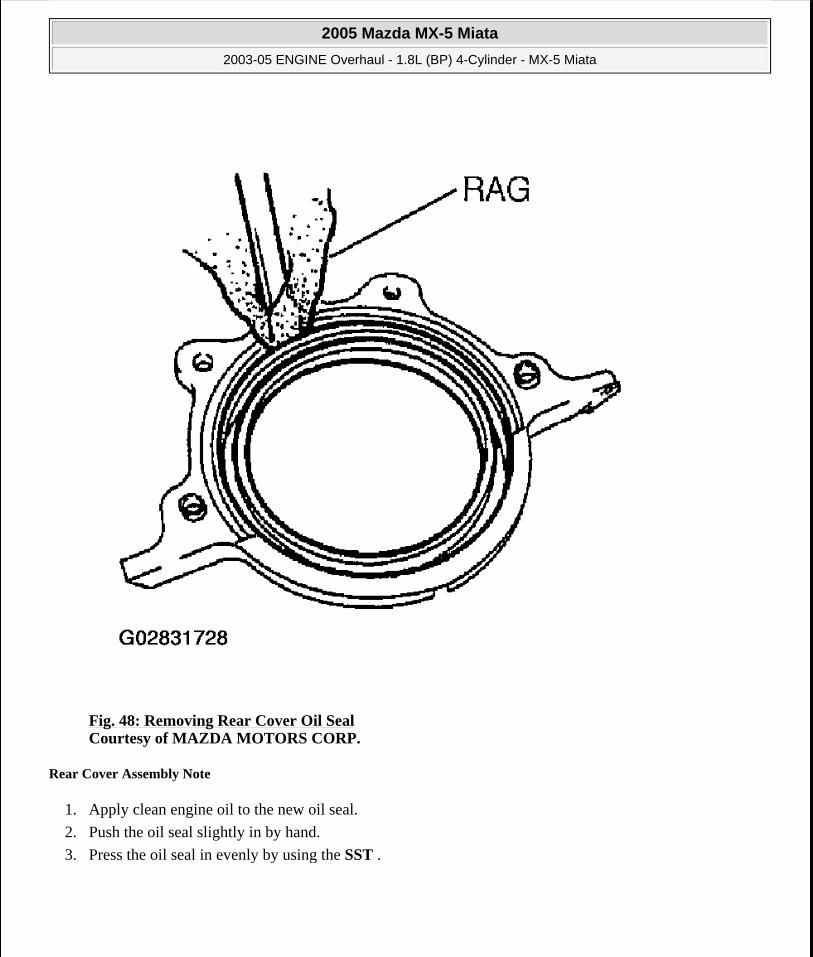
Fig. 48: Removing Rear Cover Oil Seal Courtesy of MAZDA MOTORS CORP.
Rear Cover Assembly Note
1. Apply clean engine oil to the new oil seal.
2. Push the oil seal slightly in by hand.
3. Press the oil seal in evenly by using the SST .
2005 Mazda MX-5 Miata
2003-05 ENGINE Overhaul - 1.8L (BP) 4-Cylinder - MX-5 Miata
Microsoft
Saturday, July 04, 2009 10:58:10 AM Page 47 © 2005 Mitchell Repair Information Company, LLC.
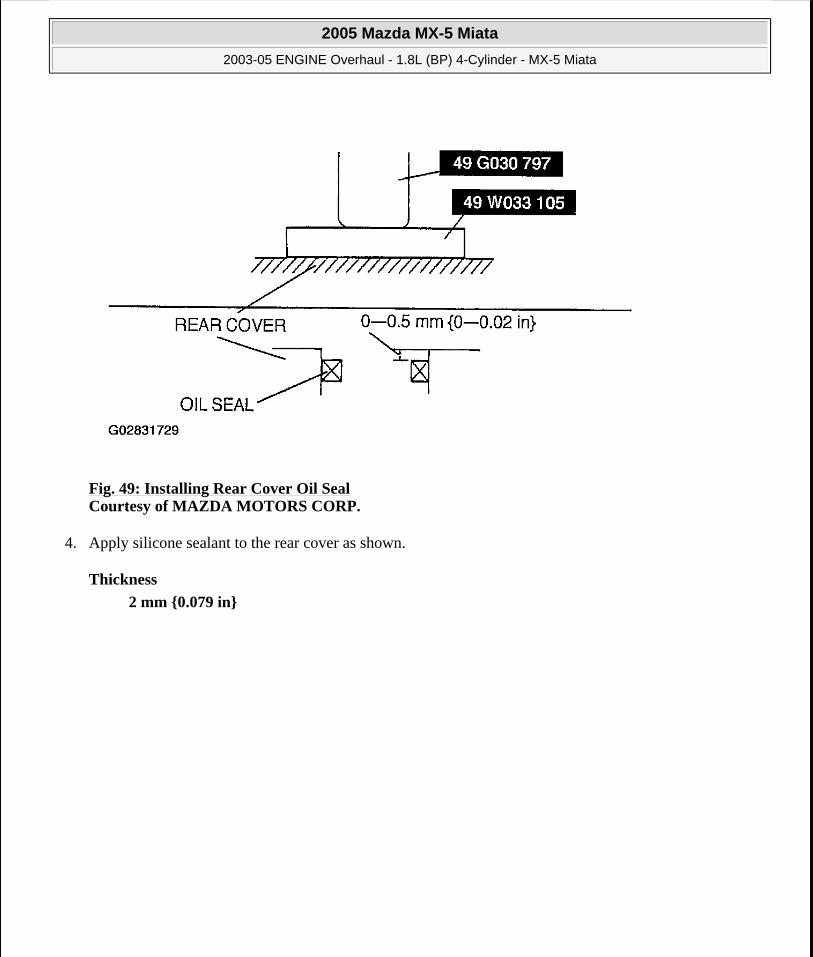
Fig. 49: Installing Rear Cover Oil Seal Courtesy of MAZDA MOTORS CORP.
4. Apply silicone sealant to the rear cover as shown.
Thickness
2 mm {0.079 in}
2005 Mazda MX-5 Miata
2003-05 ENGINE Overhaul - 1.8L (BP) 4-Cylinder - MX-5 Miata
Microsoft
Saturday, July 04, 2009 10:58:10 AM Page 48 © 2005 Mitchell Repair Information Company, LLC.

Fig. 50: Applying Silicone Sealant To Rear Cover Courtesy of MAZDA MOTORS CORP.
5. Install the rear cover.
6. Cut away the portion of the silicone sealant that projects from the rear cover toward the oil pan side.
Oil Pump Assembly Note
1. Apply clean engine oil to a new oil seal.
2. Push the oil seal slightly in by hand.
3. Press the oil seal in evenly using the SST .
2005 Mazda MX-5 Miata
2003-05 ENGINE Overhaul - 1.8L (BP) 4-Cylinder - MX-5 Miata
Microsoft
Saturday, July 04, 2009 10:58:10 AM Page 49 © 2005 Mitchell Repair Information Company, LLC.

Fig. 51: Installing Oil Pump Seal Courtesy of MAZDA MOTORS CORP.
4. Install the new O-ring.
5. Apply silicone sealant to the oil pump as shown.
2005 Mazda MX-5 Miata
2003-05 ENGINE Overhaul - 1.8L (BP) 4-Cylinder - MX-5 Miata
Microsoft
Saturday, July 04, 2009 10:58:10 AM Page 50 © 2005 Mitchell Repair Information Company, LLC.
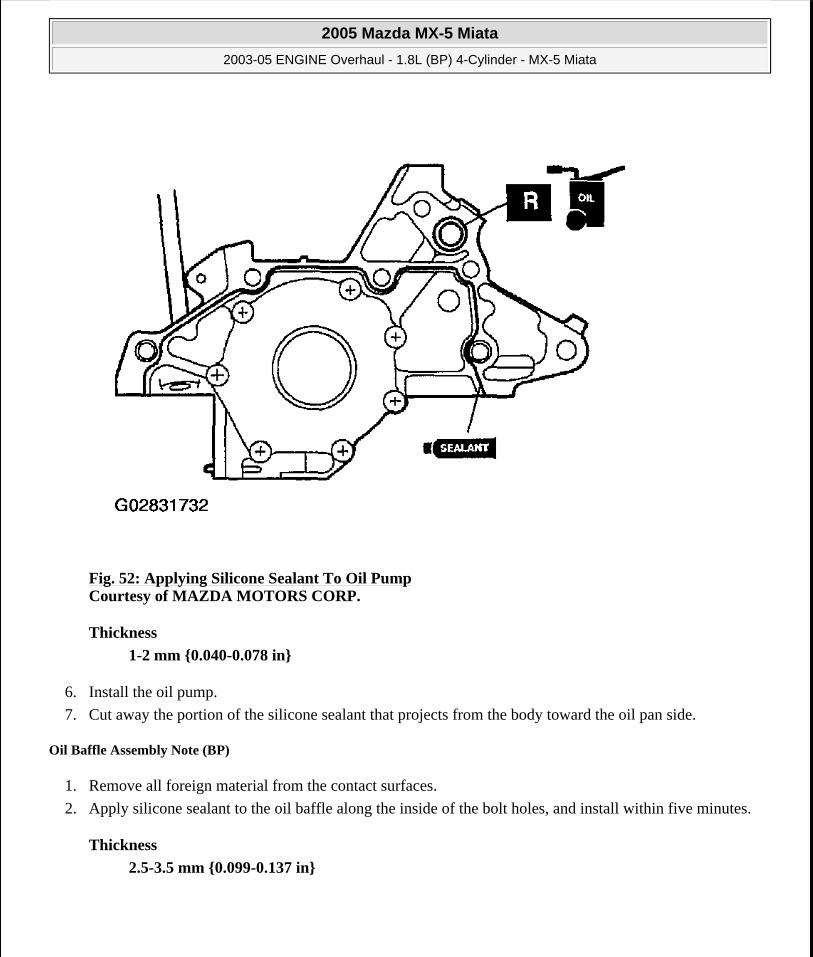
Fig. 52: Applying Silicone Sealant To Oil Pump Courtesy of MAZDA MOTORS CORP.
Thickness
1-2 mm {0.040-0.078 in}
6. Install the oil pump.
7. Cut away the portion of the silicone sealant that projects from the body toward the oil pan side.
Oil Baffle Assembly Note (BP)
1. Remove all foreign material from the contact surfaces.
2. Apply silicone sealant to the oil baffle along the inside of the bolt holes, and install within five minutes.
Thickness
2.5-3.5 mm {0.099-0.137 in}
2005 Mazda MX-5 Miata
2003-05 ENGINE Overhaul - 1.8L (BP) 4-Cylinder - MX-5 Miata
Microsoft
Saturday, July 04, 2009 10:58:10 AM Page 51 © 2005 Mitchell Repair Information Company, LLC.
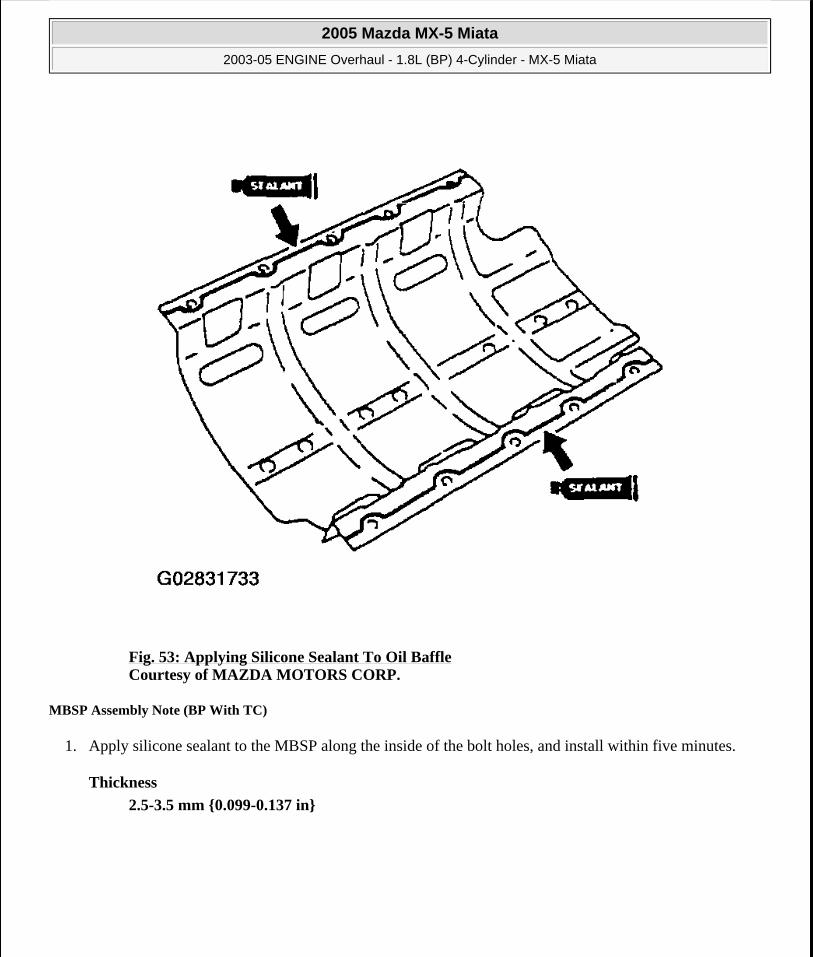
Fig. 53: Applying Silicone Sealant To Oil Baffle Courtesy of MAZDA MOTORS CORP.
MBSP Assembly Note (BP With TC)
1. Apply silicone sealant to the MBSP along the inside of the bolt holes, and install within five minutes.
Thickness
2.5-3.5 mm {0.099-0.137 in}
2005 Mazda MX-5 Miata
2003-05 ENGINE Overhaul - 1.8L (BP) 4-Cylinder - MX-5 Miata
Microsoft
Saturday, July 04, 2009 10:58:10 AM Page 52 © 2005 Mitchell Repair Information Company, LLC.
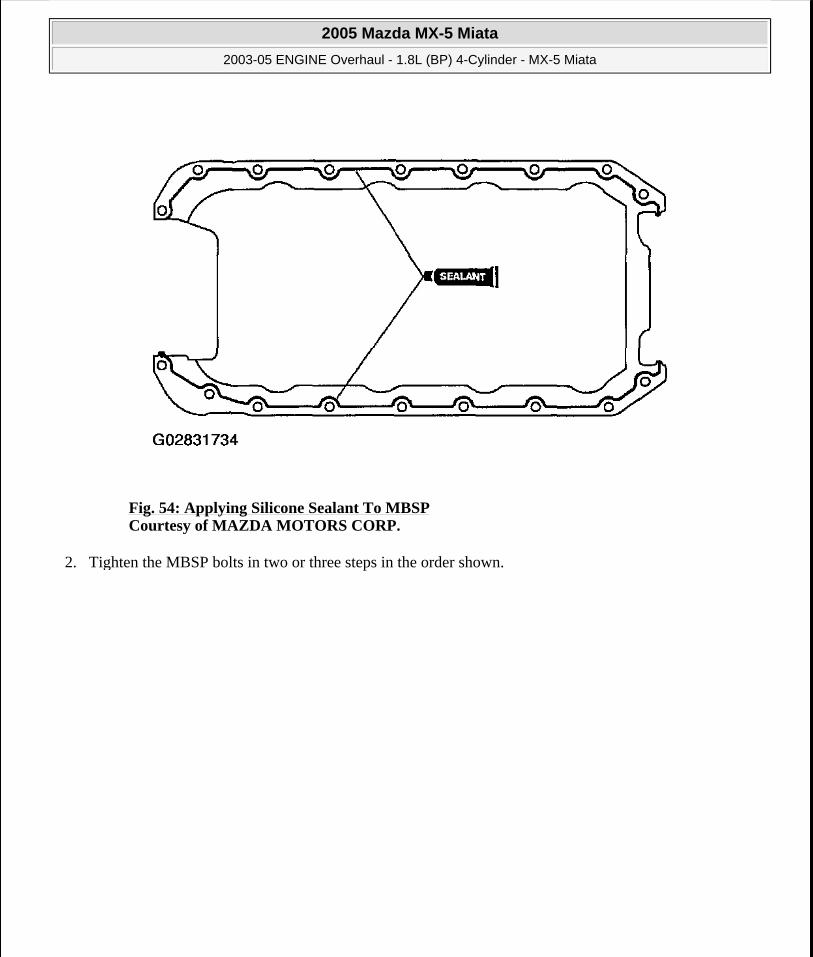
Fig. 54: Applying Silicone Sealant To MBSP Courtesy of MAZDA MOTORS CORP.
2. Tighten the MBSP bolts in two or three steps in the order shown.
2005 Mazda MX-5 Miata
2003-05 ENGINE Overhaul - 1.8L (BP) 4-Cylinder - MX-5 Miata
Microsoft
Saturday, July 04, 2009 10:58:10 AM Page 53 © 2005 Mitchell Repair Information Company, LLC.
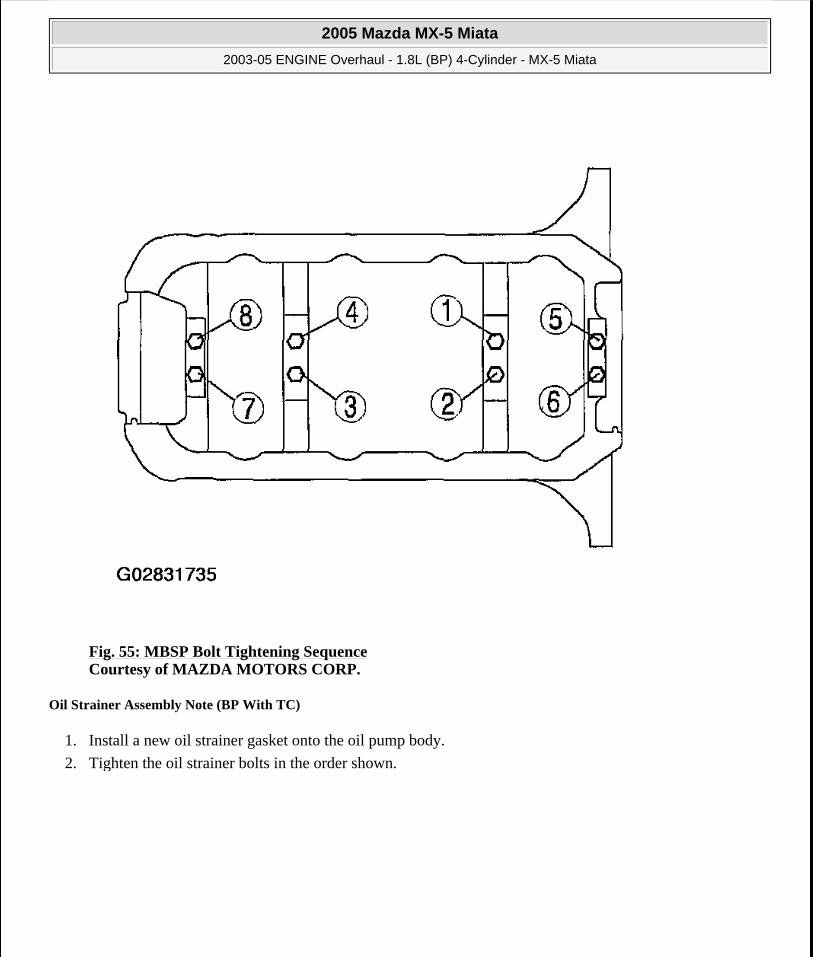
Fig. 55: MBSP Bolt Tightening Sequence Courtesy of MAZDA MOTORS CORP.
Oil Strainer Assembly Note (BP With TC)
1. Install a new oil strainer gasket onto the oil pump body.
2. Tighten the oil strainer bolts in the order shown.
2005 Mazda MX-5 Miata
2003-05 ENGINE Overhaul - 1.8L (BP) 4-Cylinder - MX-5 Miata
Microsoft
Saturday, July 04, 2009 10:58:10 AM Page 54 © 2005 Mitchell Repair Information Company, LLC.
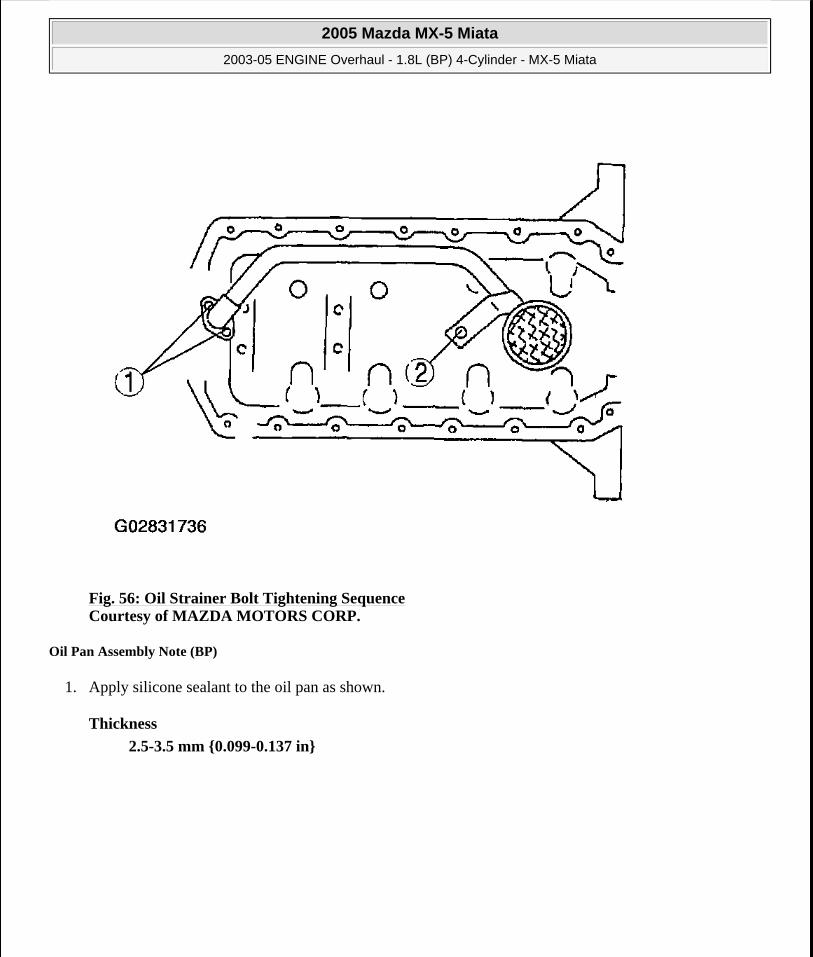
Fig. 56: Oil Strainer Bolt Tightening Sequence Courtesy of MAZDA MOTORS CORP.
Oil Pan Assembly Note (BP)
1. Apply silicone sealant to the oil pan as shown.
Thickness
2.5-3.5 mm {0.099-0.137 in}
2005 Mazda MX-5 Miata
2003-05 ENGINE Overhaul - 1.8L (BP) 4-Cylinder - MX-5 Miata
Microsoft
Saturday, July 04, 2009 10:58:10 AM Page 55 © 2005 Mitchell Repair Information Company, LLC.
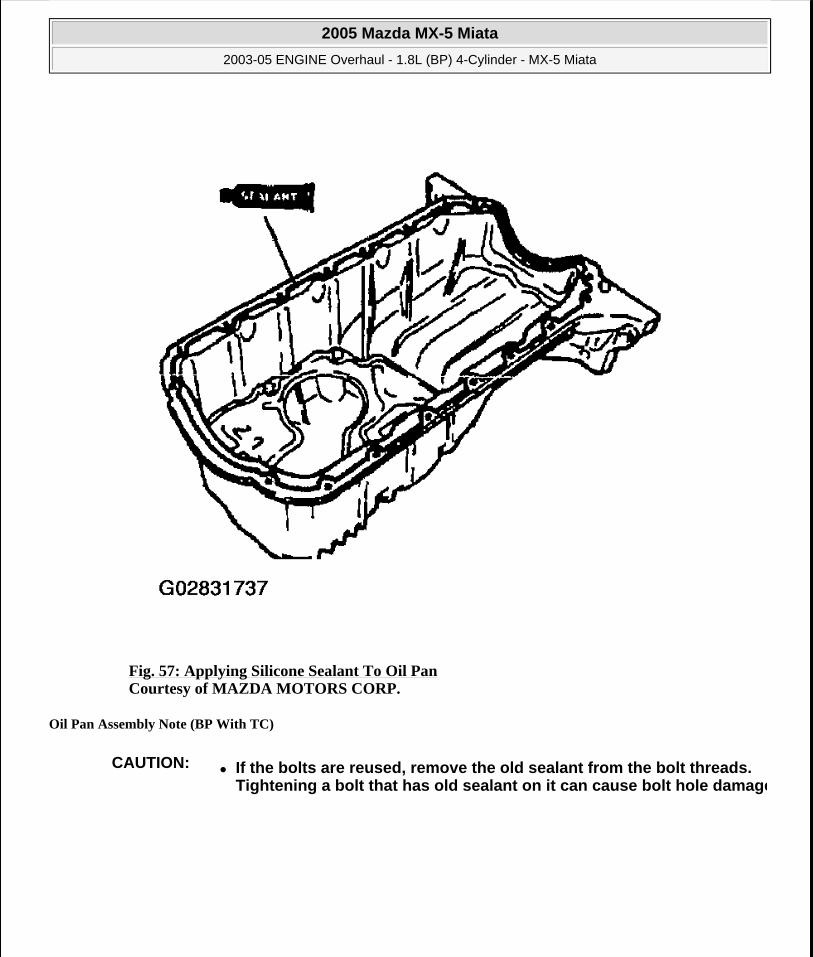
Fig. 57: Applying Silicone Sealant To Oil Pan Courtesy of MAZDA MOTORS CORP.
Oil Pan Assembly Note (BP With TC)
CAUTION: If the bolts are reused, remove the old sealant from the bolt threads. Tightening a bolt that has old sealant on it can cause bolt hole damage
2005 Mazda MX-5 Miata
2003-05 ENGINE Overhaul - 1.8L (BP) 4-Cylinder - MX-5 Miata
Microsoft
Saturday, July 04, 2009 10:58:10 AM Page 56 © 2005 Mitchell Repair Information Company, LLC.
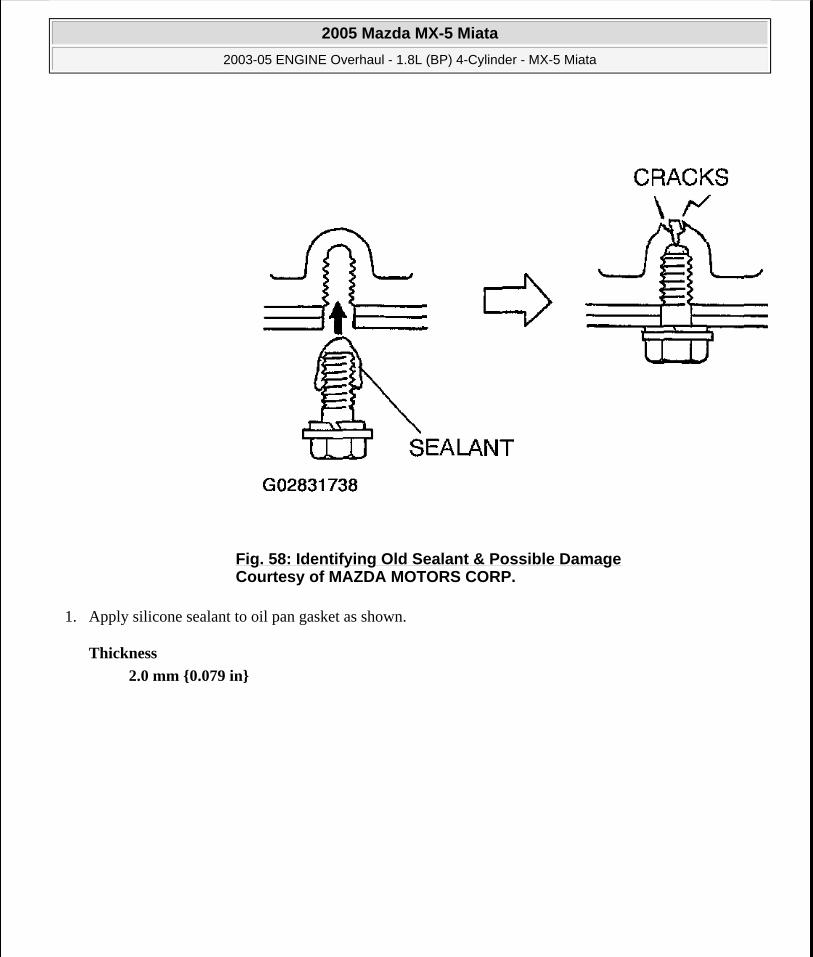
1. Apply silicone sealant to oil pan gasket as shown.
Thickness
2.0 mm {0.079 in}
Fig. 58: Identifying Old Sealant & Possible Damage Courtesy of MAZDA MOTORS CORP.
2005 Mazda MX-5 Miata
2003-05 ENGINE Overhaul - 1.8L (BP) 4-Cylinder - MX-5 Miata
Microsoft
Saturday, July 04, 2009 10:58:10 AM Page 57 © 2005 Mitchell Repair Information Company, LLC.

Fig. 59: Applying Silicone Sealant To Oil Pan Gaskets Courtesy of MAZDA MOTORS CORP.
2. Install oil pan gaskets onto the oil pump body and the rear cover with the projections in the notches as shown.
2005 Mazda MX-5 Miata
2003-05 ENGINE Overhaul - 1.8L (BP) 4-Cylinder - MX-5 Miata
Microsoft
Saturday, July 04, 2009 10:58:10 AM Page 58 © 2005 Mitchell Repair Information Company, LLC.

Fig. 60: Identifying Oil Pump/Rear Cover Body Notches Courtesy of MAZDA MOTORS CORP.
3. Apply silicone sealant onto the area of oil pan gasket indicated by A and B.
Thickness
2.0 mm {0.079 in}
2005 Mazda MX-5 Miata
2003-05 ENGINE Overhaul - 1.8L (BP) 4-Cylinder - MX-5 Miata
Microsoft
Saturday, July 04, 2009 10:58:10 AM Page 59 © 2005 Mitchell Repair Information Company, LLC.

Fig. 61: Applying Silicone Sealant To Oil Pan Gasket Courtesy of MAZDA MOTORS CORP.
4. Apply silicone sealant to the shaded areas shown.
2005 Mazda MX-5 Miata
2003-05 ENGINE Overhaul - 1.8L (BP) 4-Cylinder - MX-5 Miata
Microsoft
Saturday, July 04, 2009 10:58:10 AM Page 60 © 2005 Mitchell Repair Information Company, LLC.

Fig. 62: Applying Silicone Sealant To Shaded Areas Courtesy of MAZDA MOTORS CORP.
5. Apply silicone sealant to the oil pan along the inside of the bolt holes, and install within five minutes.
Thickness
2.5-3.5 mm {0.099-0.137 in}
2005 Mazda MX-5 Miata
2003-05 ENGINE Overhaul - 1.8L (BP) 4-Cylinder - MX-5 Miata
Microsoft
Saturday, July 04, 2009 10:58:10 AM Page 61 © 2005 Mitchell Repair Information Company, LLC.
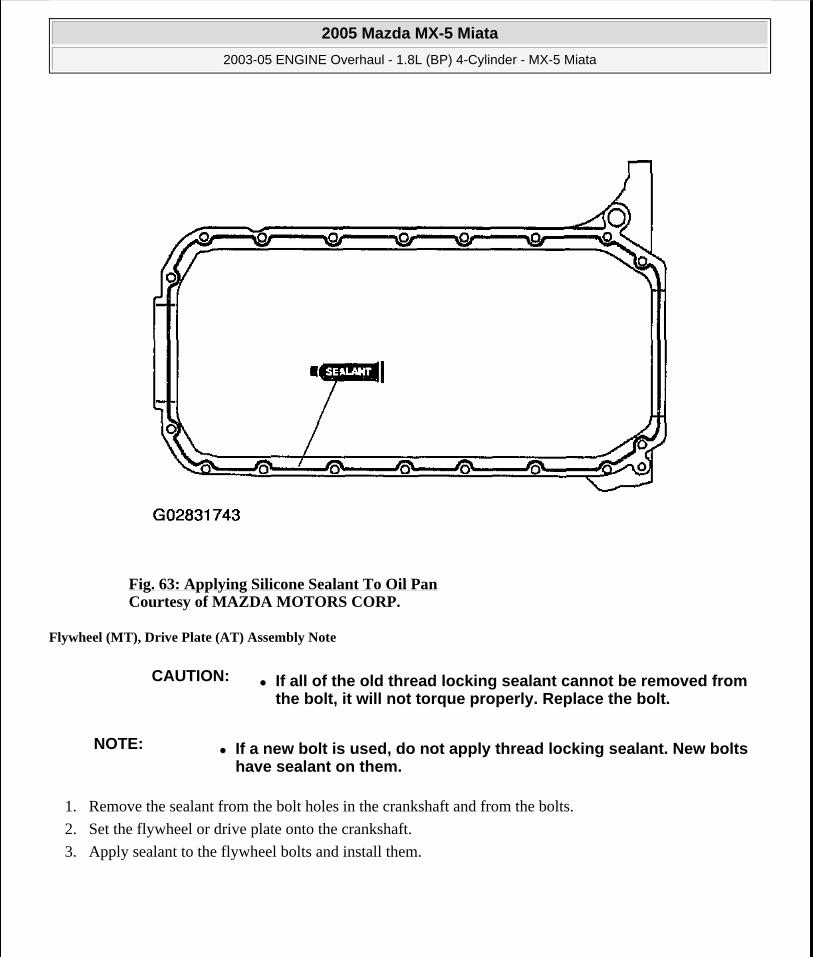
Fig. 63: Applying Silicone Sealant To Oil Pan Courtesy of MAZDA MOTORS CORP.
Flywheel (MT), Drive Plate (AT) Assembly Note
1. Remove the sealant from the bolt holes in the crankshaft and from the bolts.
2. Set the flywheel or drive plate onto the crankshaft.
3. Apply sealant to the flywheel bolts and install them.
CAUTION: If all of the old thread locking sealant cannot be removed from the bolt, it will not torque properly. Replace the bolt.
NOTE: If a new bolt is used, do not apply thread locking sealant. New bolts have sealant on them.
2005 Mazda MX-5 Miata
2003-05 ENGINE Overhaul - 1.8L (BP) 4-Cylinder - MX-5 Miata
Microsoft
Saturday, July 04, 2009 10:58:10 AM Page 62 © 2005 Mitchell Repair Information Company, LLC.
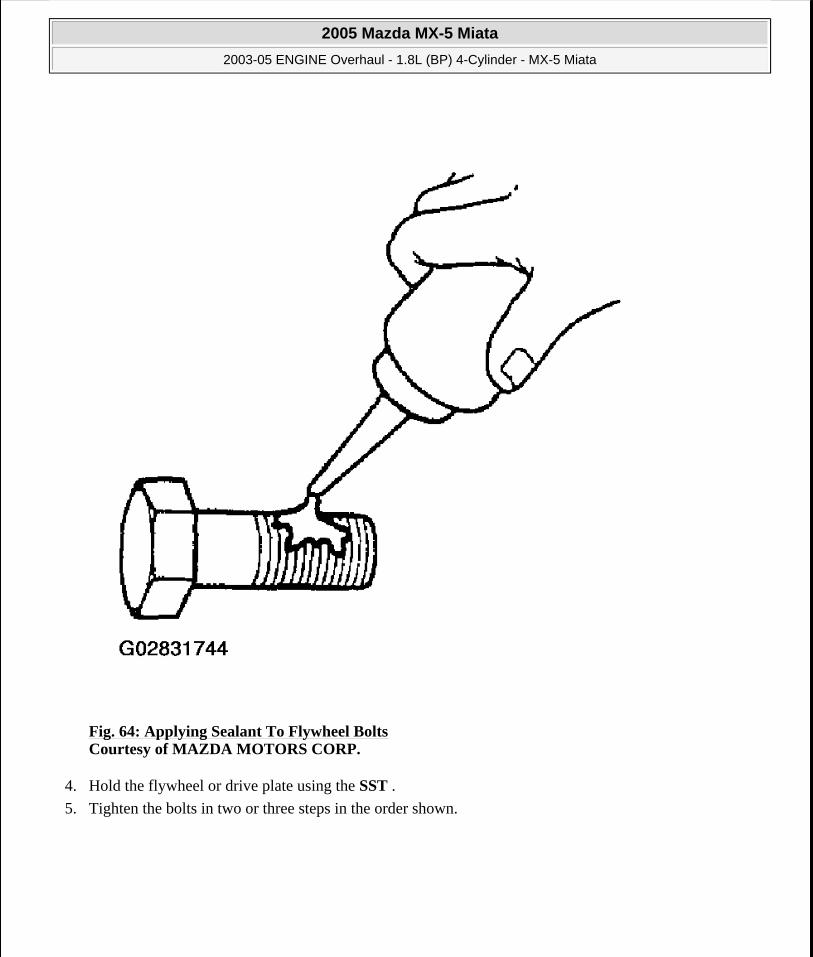
Fig. 64: Applying Sealant To Flywheel Bolts Courtesy of MAZDA MOTORS CORP.
4. Hold the flywheel or drive plate using the SST .
5. Tighten the bolts in two or three steps in the order shown.
2005 Mazda MX-5 Miata
2003-05 ENGINE Overhaul - 1.8L (BP) 4-Cylinder - MX-5 Miata
Microsoft
Saturday, July 04, 2009 10:58:10 AM Page 63 © 2005 Mitchell Repair Information Company, LLC.

Fig. 65: Flywheel Bolt Tightening Sequence Courtesy of MAZDA MOTORS CORP.
Water Pump Assembly Note
1. Verify that the rubber seal is securely fixed onto the water pump.
2005 Mazda MX-5 Miata
2003-05 ENGINE Overhaul - 1.8L (BP) 4-Cylinder - MX-5 Miata
Microsoft
Saturday, July 04, 2009 10:58:10 AM Page 64 © 2005 Mitchell Repair Information Company, LLC.

Fig. 66: Installing Rubber Seal To Water Pump Courtesy of MAZDA MOTORS CORP.
2. If not as specified, remove the rubber seal and reinstall it with the bonding agent.
CYLINDER BLOCK DISASSEMBLY/ASSEMBLY (II)
1. Disassemble in the order indicated in the figure.
2005 Mazda MX-5 Miata
2003-05 ENGINE Overhaul - 1.8L (BP) 4-Cylinder - MX-5 Miata
Microsoft
Saturday, July 04, 2009 10:58:10 AM Page 65 © 2005 Mitchell Repair Information Company, LLC.

Fig. 67: Disassembling/Assembling Cylinder Block Courtesy of MAZDA MOTORS CORP.
2. Assemble in the reverse order of disassembly.
Piston And Connecting Rod Disassembly Note
1. Inspect the connecting rod side clearance. (Refer to ENGINE INSPECTION/REPAIR , CONNECTING ROD SIDE CLEARANCE INSPECTION .)
2005 Mazda MX-5 Miata
2003-05 ENGINE Overhaul - 1.8L (BP) 4-Cylinder - MX-5 Miata
Microsoft
Saturday, July 04, 2009 10:58:10 AM Page 66 © 2005 Mitchell Repair Information Company, LLC.

2. Use the handle of a hammer to remove the piston and connecting rod through the top of the cylinder block.
Fig. 68: Removing Piston & Connecting Rod Courtesy of MAZDA MOTORS CORP.
3. Inspect the piston and connecting rod. (Refer to ENGINE INSPECTION/REPAIR , PISTON AND CONNECTING ROD INSPECTION .)
4. Remove the piston rings by using a piston ring expander.
2005 Mazda MX-5 Miata
2003-05 ENGINE Overhaul - 1.8L (BP) 4-Cylinder - MX-5 Miata
Microsoft
Saturday, July 04, 2009 10:58:10 AM Page 67 © 2005 Mitchell Repair Information Company, LLC.
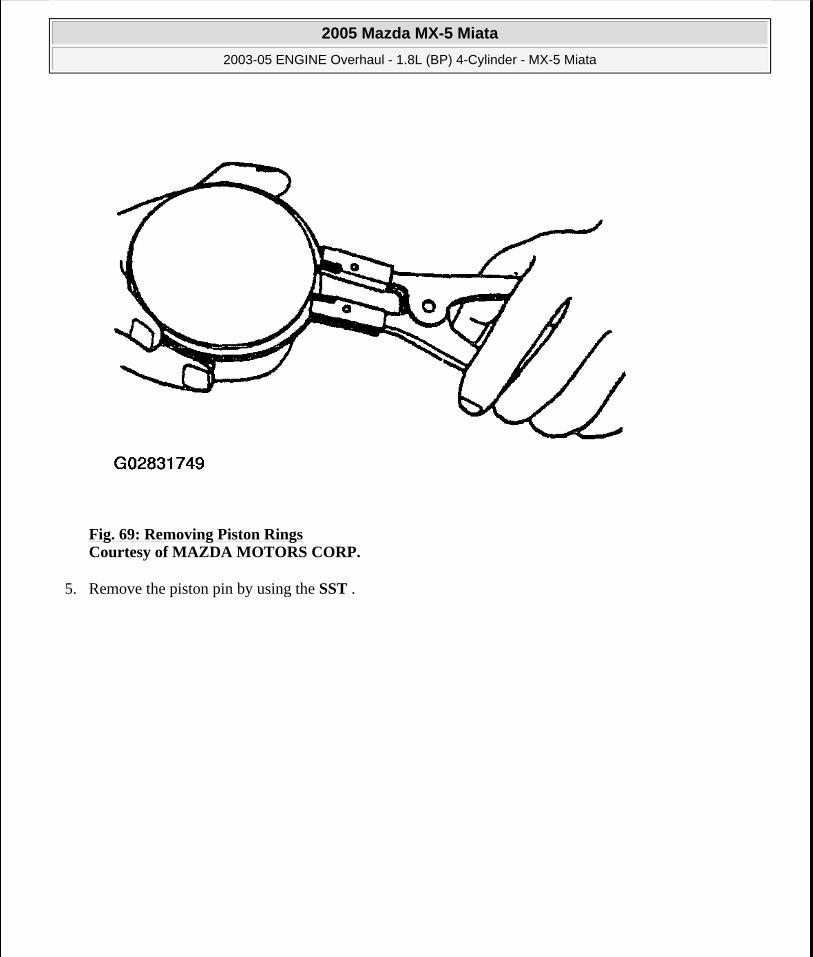
Fig. 69: Removing Piston Rings Courtesy of MAZDA MOTORS CORP.
5. Remove the piston pin by using the SST .
2005 Mazda MX-5 Miata
2003-05 ENGINE Overhaul - 1.8L (BP) 4-Cylinder - MX-5 Miata
Microsoft
Saturday, July 04, 2009 10:58:10 AM Page 68 © 2005 Mitchell Repair Information Company, LLC.
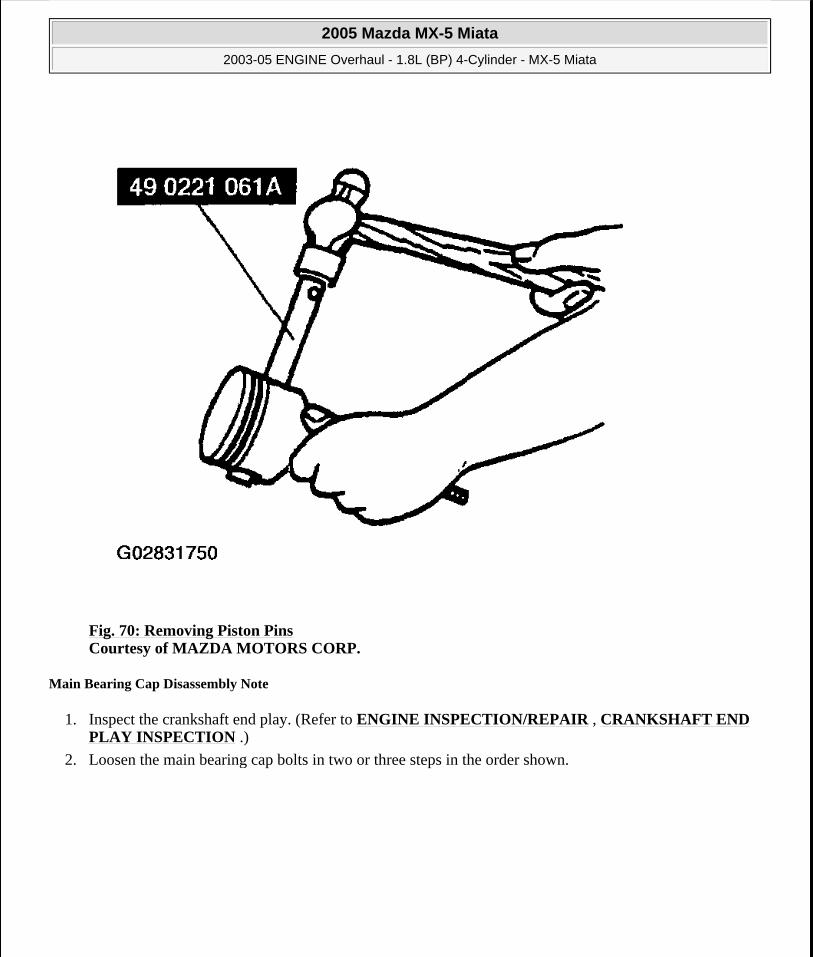
Fig. 70: Removing Piston Pins Courtesy of MAZDA MOTORS CORP.
Main Bearing Cap Disassembly Note
1. Inspect the crankshaft end play. (Refer to ENGINE INSPECTION/REPAIR , CRANKSHAFT END PLAY INSPECTION .)
2. Loosen the main bearing cap bolts in two or three steps in the order shown.
2005 Mazda MX-5 Miata
2003-05 ENGINE Overhaul - 1.8L (BP) 4-Cylinder - MX-5 Miata
Microsoft
Saturday, July 04, 2009 10:58:10 AM Page 69 © 2005 Mitchell Repair Information Company, LLC.
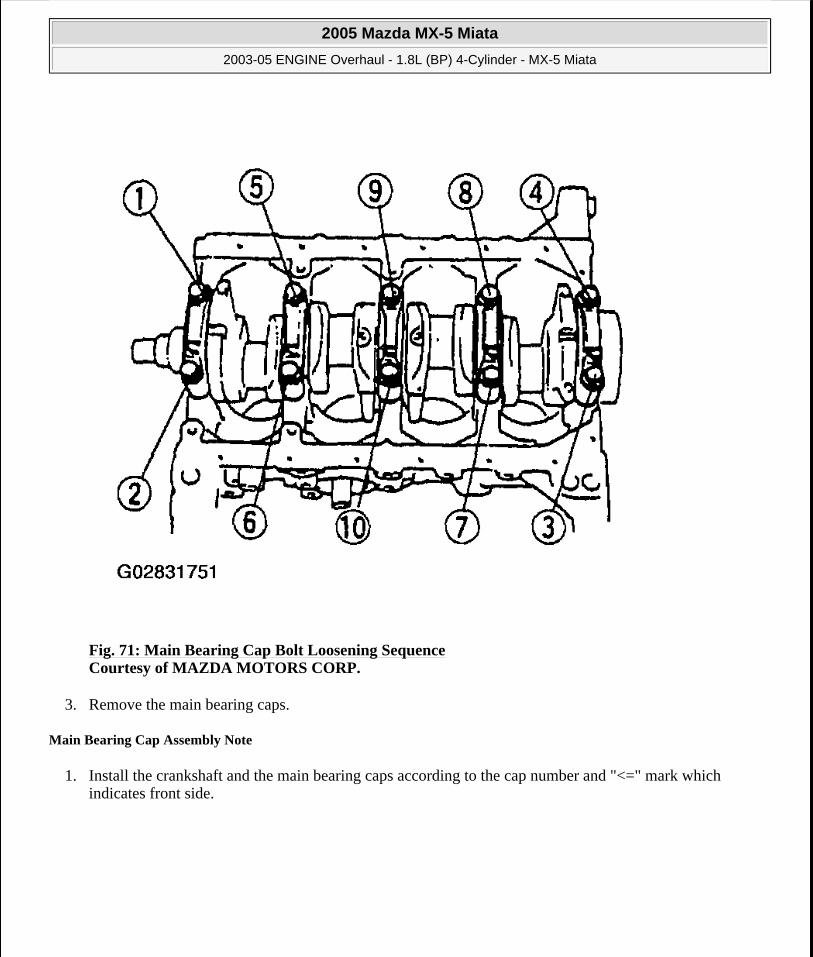
Fig. 71: Main Bearing Cap Bolt Loosening Sequence Courtesy of MAZDA MOTORS CORP.
3. Remove the main bearing caps.
Main Bearing Cap Assembly Note
1. Install the crankshaft and the main bearing caps according to the cap number and "<=" mark which indicates front side.
2005 Mazda MX-5 Miata
2003-05 ENGINE Overhaul - 1.8L (BP) 4-Cylinder - MX-5 Miata
Microsoft
Saturday, July 04, 2009 10:58:10 AM Page 70 © 2005 Mitchell Repair Information Company, LLC.
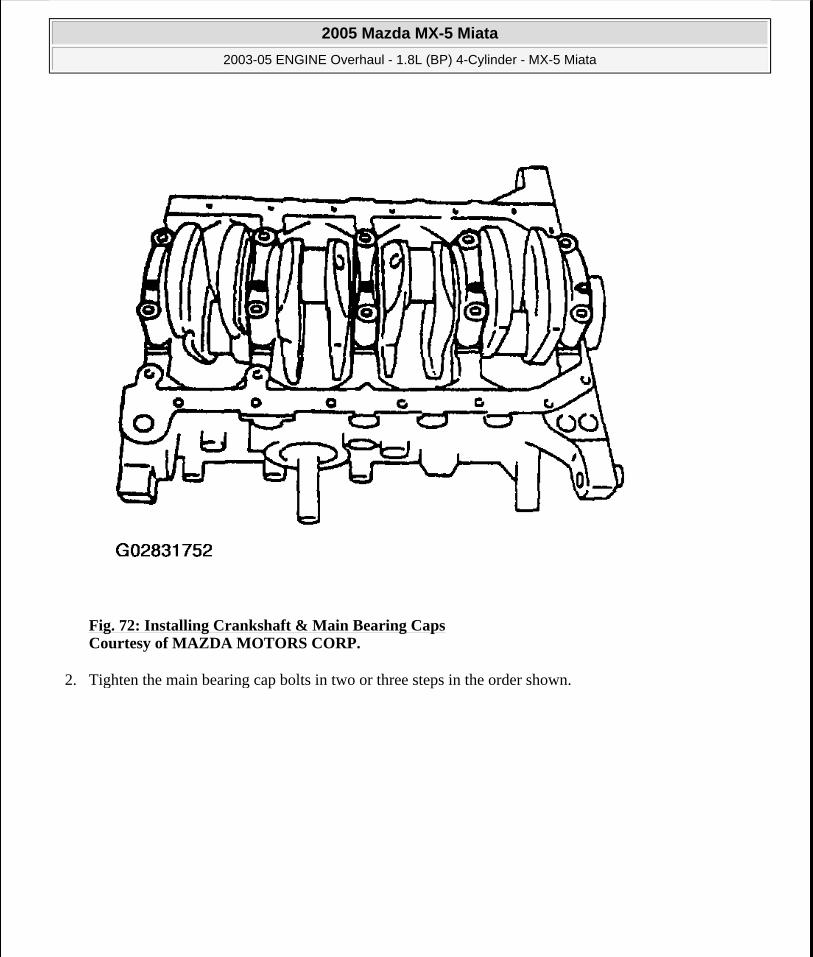
Fig. 72: Installing Crankshaft & Main Bearing Caps Courtesy of MAZDA MOTORS CORP.
2. Tighten the main bearing cap bolts in two or three steps in the order shown.
2005 Mazda MX-5 Miata
2003-05 ENGINE Overhaul - 1.8L (BP) 4-Cylinder - MX-5 Miata
Microsoft
Saturday, July 04, 2009 10:58:10 AM Page 71 © 2005 Mitchell Repair Information Company, LLC.

Fig. 73: Main Bearing Cap Bolt Tightening Sequence Courtesy of MAZDA MOTORS CORP.
Piston And Connecting Rod Assembly Note
1. Install one piston pin clip into the clip groove in the piston.
2. Assemble the piston and the connecting rod.
3. Apply clean engine oil to the piston pin.
4. Install the piston pin from the side opposite the clip.
5. Tap the piston pin in with the SST until the pin contacts the clip. If the pin cannot be installed easily, replace the connecting rod.
2005 Mazda MX-5 Miata
2003-05 ENGINE Overhaul - 1.8L (BP) 4-Cylinder - MX-5 Miata
Microsoft
Saturday, July 04, 2009 10:58:10 AM Page 72 © 2005 Mitchell Repair Information Company, LLC.
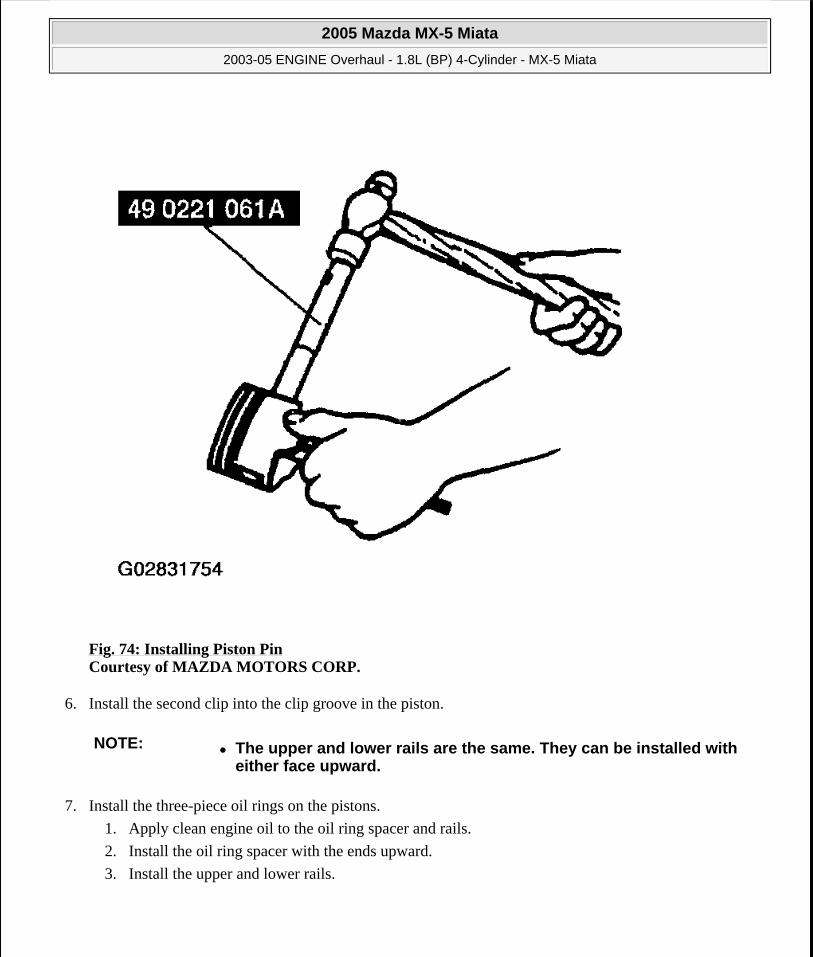
Fig. 74: Installing Piston Pin Courtesy of MAZDA MOTORS CORP.
6. Install the second clip into the clip groove in the piston.
7. Install the three-piece oil rings on the pistons.
1. Apply clean engine oil to the oil ring spacer and rails.
2. Install the oil ring spacer with the ends upward.
3. Install the upper and lower rails.
NOTE: The upper and lower rails are the same. They can be installed with either face upward.
2005 Mazda MX-5 Miata
2003-05 ENGINE Overhaul - 1.8L (BP) 4-Cylinder - MX-5 Miata
Microsoft
Saturday, July 04, 2009 10:58:10 AM Page 73 © 2005 Mitchell Repair Information Company, LLC.
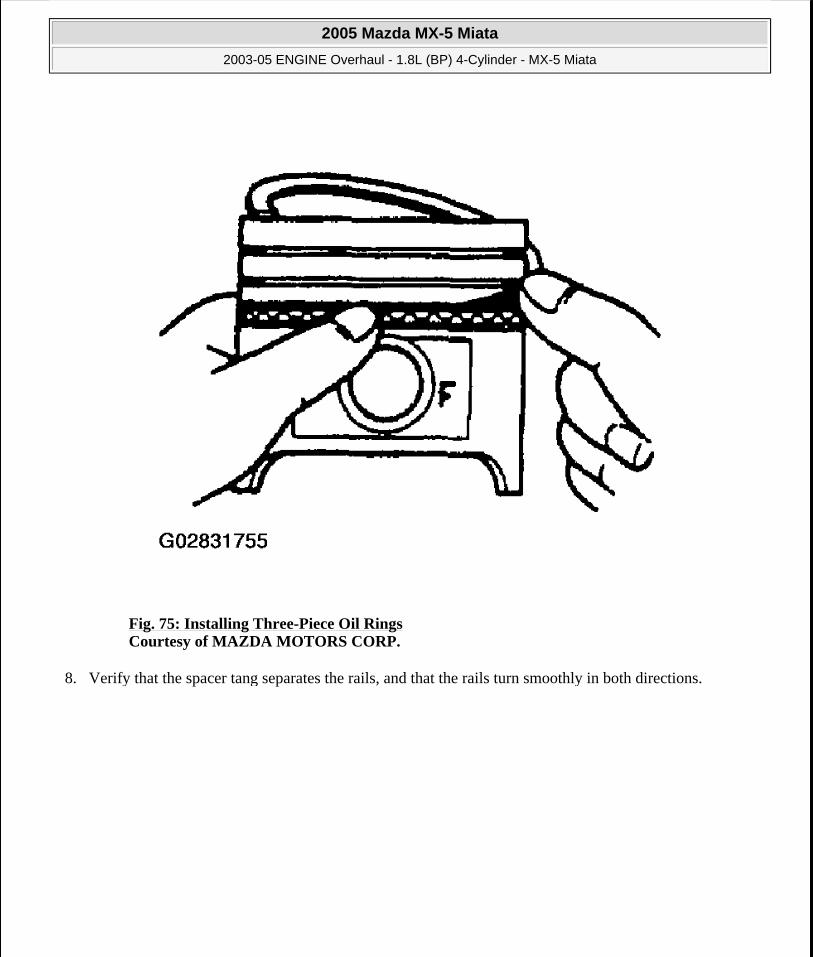
Fig. 75: Installing Three-Piece Oil Rings Courtesy of MAZDA MOTORS CORP.
8. Verify that the spacer tang separates the rails, and that the rails turn smoothly in both directions.
2005 Mazda MX-5 Miata
2003-05 ENGINE Overhaul - 1.8L (BP) 4-Cylinder - MX-5 Miata
Microsoft
Saturday, July 04, 2009 10:58:10 AM Page 74 © 2005 Mitchell Repair Information Company, LLC.
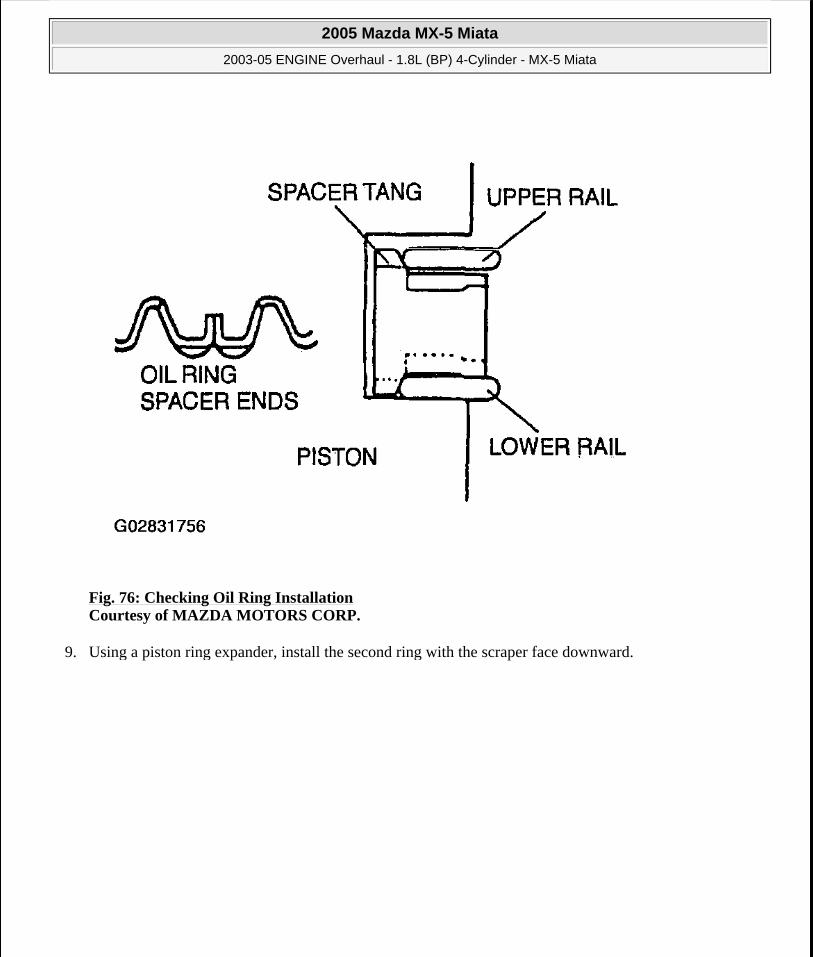
Fig. 76: Checking Oil Ring Installation Courtesy of MAZDA MOTORS CORP.
9. Using a piston ring expander, install the second ring with the scraper face downward.
2005 Mazda MX-5 Miata
2003-05 ENGINE Overhaul - 1.8L (BP) 4-Cylinder - MX-5 Miata
Microsoft
Saturday, July 04, 2009 10:58:10 AM Page 75 © 2005 Mitchell Repair Information Company, LLC.

Fig. 77: Installing Second Ring Courtesy of MAZDA MOTORS CORP.
10. Using a piston ring expander, install the top ring with the chamfer facing upward.
11. Apply clean engine oil to the top and second piston rings.
12. Position the end gaps of the rings as shown.
2005 Mazda MX-5 Miata
2003-05 ENGINE Overhaul - 1.8L (BP) 4-Cylinder - MX-5 Miata
Microsoft
Saturday, July 04, 2009 10:58:10 AM Page 76 © 2005 Mitchell Repair Information Company, LLC.
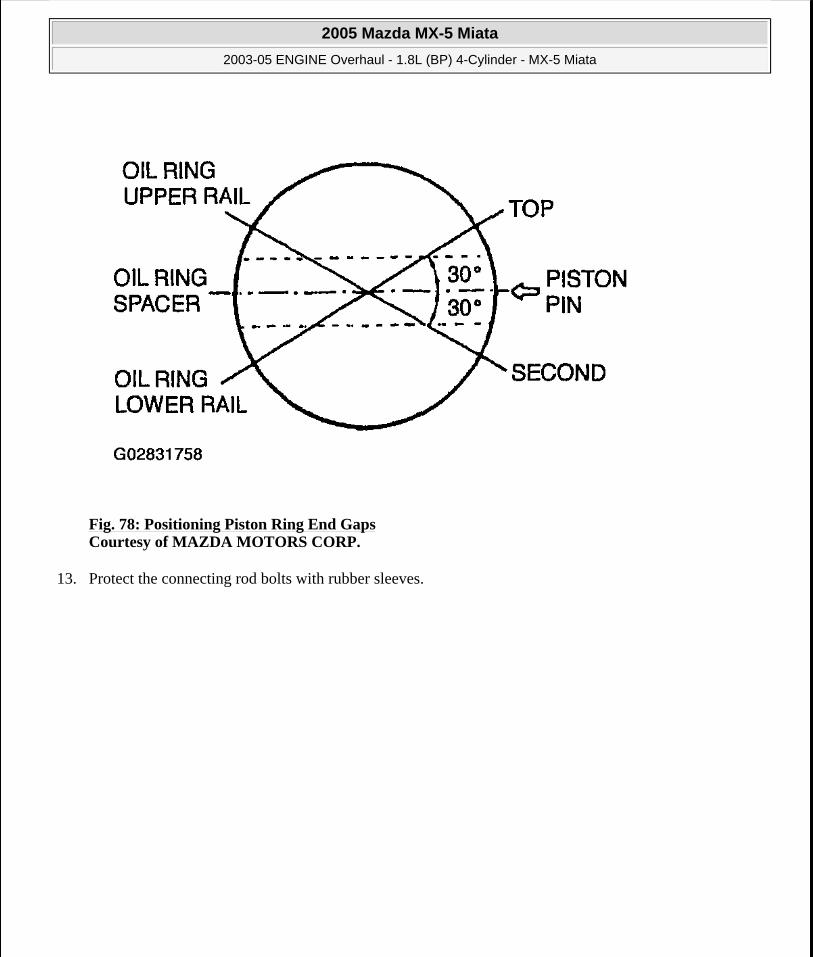
Fig. 78: Positioning Piston Ring End Gaps Courtesy of MAZDA MOTORS CORP.
13. Protect the connecting rod bolts with rubber sleeves.
2005 Mazda MX-5 Miata
2003-05 ENGINE Overhaul - 1.8L (BP) 4-Cylinder - MX-5 Miata
Microsoft
Saturday, July 04, 2009 10:58:10 AM Page 77 © 2005 Mitchell Repair Information Company, LLC.
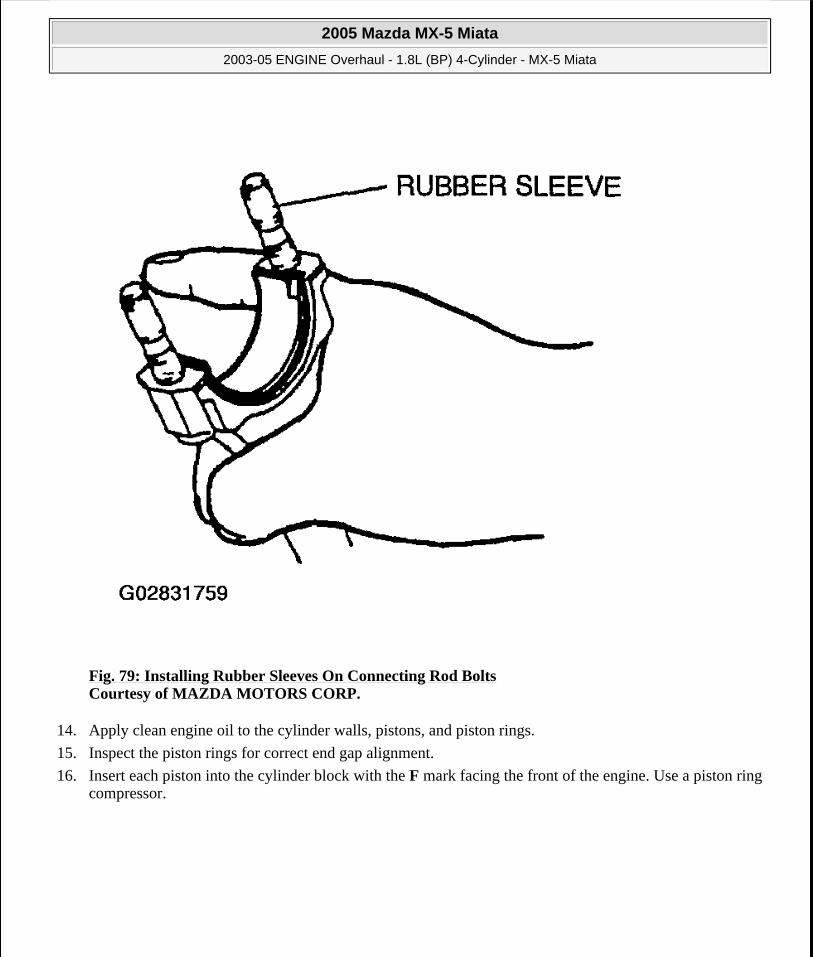
Fig. 79: Installing Rubber Sleeves On Connecting Rod Bolts Courtesy of MAZDA MOTORS CORP.
14. Apply clean engine oil to the cylinder walls, pistons, and piston rings.
15. Inspect the piston rings for correct end gap alignment.
16. Insert each piston into the cylinder block with the F mark facing the front of the engine. Use a piston ring compressor.
2005 Mazda MX-5 Miata
2003-05 ENGINE Overhaul - 1.8L (BP) 4-Cylinder - MX-5 Miata
Microsoft
Saturday, July 04, 2009 10:58:10 AM Page 78 © 2005 Mitchell Repair Information Company, LLC.
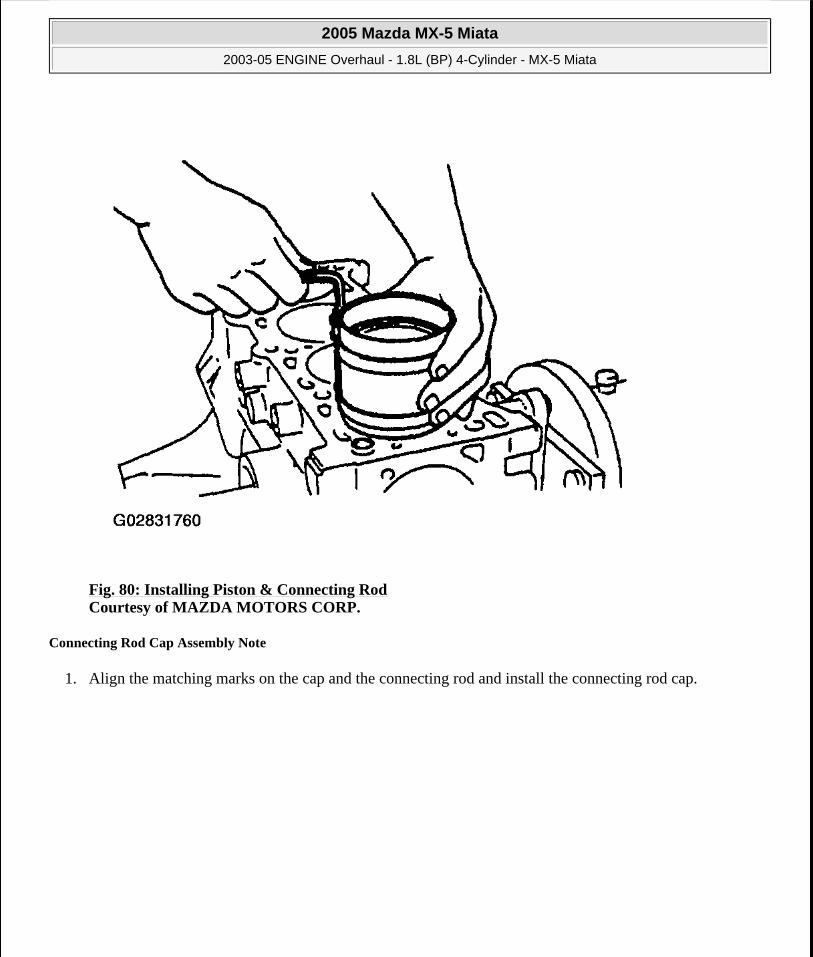
Fig. 80: Installing Piston & Connecting Rod Courtesy of MAZDA MOTORS CORP.
Connecting Rod Cap Assembly Note
1. Align the matching marks on the cap and the connecting rod and install the connecting rod cap.
2005 Mazda MX-5 Miata
2003-05 ENGINE Overhaul - 1.8L (BP) 4-Cylinder - MX-5 Miata
Microsoft
Saturday, July 04, 2009 10:58:10 AM Page 79 © 2005 Mitchell Repair Information Company, LLC.
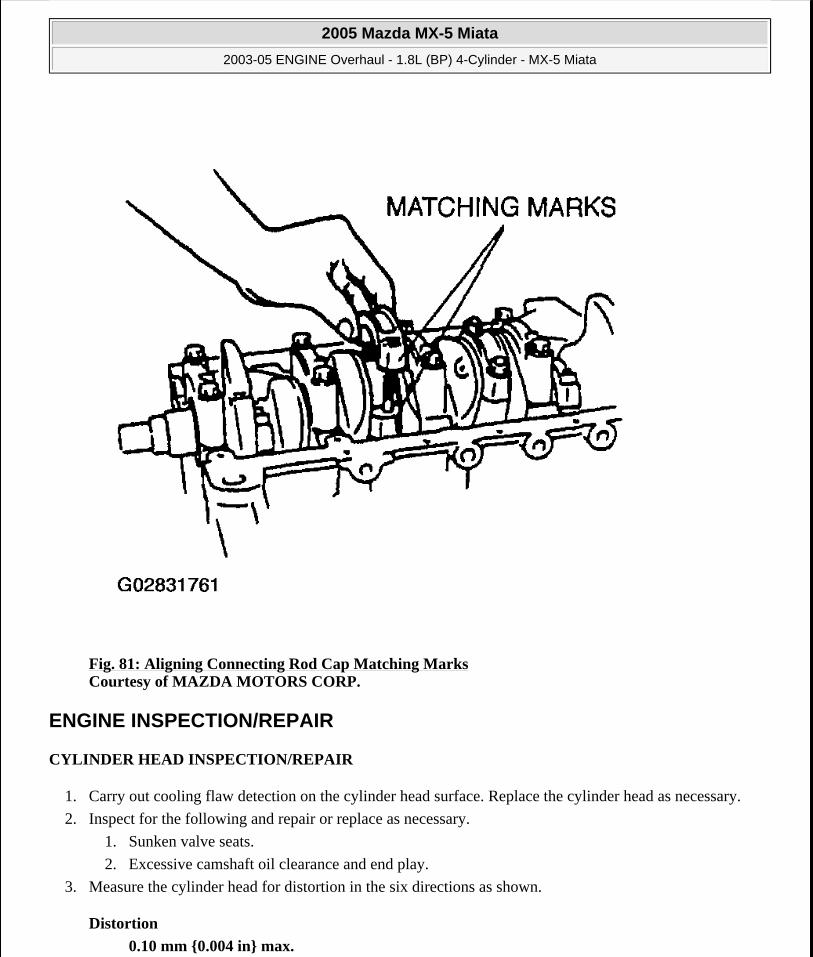
Fig. 81: Aligning Connecting Rod Cap Matching Marks Courtesy of MAZDA MOTORS CORP.
ENGINE INSPECTION/REPAIR
CYLINDER HEAD INSPECTION/REPAIR
1. Carry out cooling flaw detection on the cylinder head surface. Replace the cylinder head as necessary.
2. Inspect for the following and repair or replace as necessary.
1. Sunken valve seats.
2. Excessive camshaft oil clearance and end play.
3. Measure the cylinder head for distortion in the six directions as shown.
Distortion
0.10 mm {0.004 in} max.
2005 Mazda MX-5 Miata
2003-05 ENGINE Overhaul - 1.8L (BP) 4-Cylinder - MX-5 Miata
Microsoft
Saturday, July 04, 2009 10:58:10 AM Page 80 © 2005 Mitchell Repair Information Company, LLC.

Fig. 82: Cylinder Head Distortion Measurement Directions Courtesy of MAZDA MOTORS CORP.
4. If the cylinder head distortion exceeds the maximum, repair by grinding height or replace the cylinder head. If the cylinder head height is not as specified, replace it.
Standard Height
133.8-134.0 mm {5.268-5.275 in}
Grinding
0.10 mm {0.004 in} max.
5. Measure the manifold contact surface distortion as shown.
Distortion
0.15 mm {0.006 in} max.
2005 Mazda MX-5 Miata
2003-05 ENGINE Overhaul - 1.8L (BP) 4-Cylinder - MX-5 Miata
Microsoft
Saturday, July 04, 2009 10:58:10 AM Page 81 © 2005 Mitchell Repair Information Company, LLC.

Fig. 83: Manifold Contact Surface Distortion Measurements Courtesy of MAZDA MOTORS CORP.
6. If the distortion exceeds the specification, grind the surface or replace the cylinder head.
Grinding
0.20 mm {0.008 in} max.
VALVE INSPECTION
1. Measure the valve head margin thickness of each valve. Replace the valve as necessary.
Margin Thickness
IN: 0.9 mm {0.035 in} min.
EX: 1.0 mm {0.039 in} min.
2005 Mazda MX-5 Miata
2003-05 ENGINE Overhaul - 1.8L (BP) 4-Cylinder - MX-5 Miata
Microsoft
Saturday, July 04, 2009 10:58:10 AM Page 82 © 2005 Mitchell Repair Information Company, LLC.
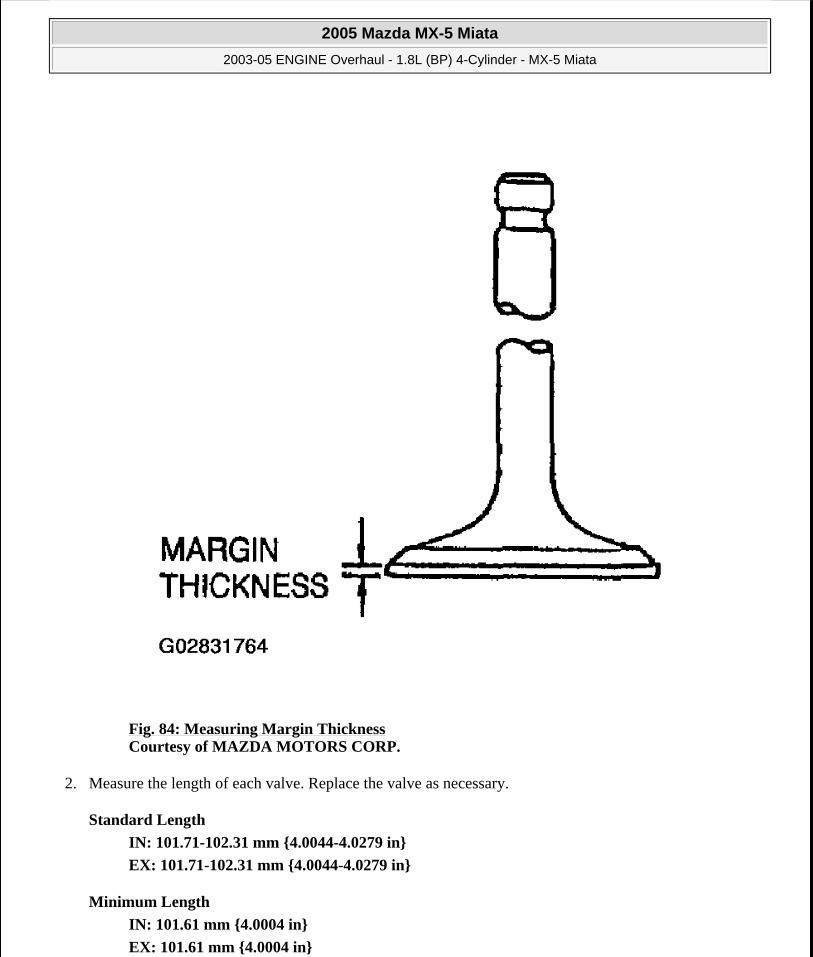
Fig. 84: Measuring Margin Thickness Courtesy of MAZDA MOTORS CORP.
2. Measure the length of each valve. Replace the valve as necessary.
Standard Length
IN: 101.71-102.31 mm {4.0044-4.0279 in}
EX: 101.71-102.31 mm {4.0044-4.0279 in}
Minimum Length
IN: 101.61 mm {4.0004 in}
EX: 101.61 mm {4.0004 in}
2005 Mazda MX-5 Miata
2003-05 ENGINE Overhaul - 1.8L (BP) 4-Cylinder - MX-5 Miata
Microsoft
Saturday, July 04, 2009 10:58:10 AM Page 83 © 2005 Mitchell Repair Information Company, LLC.
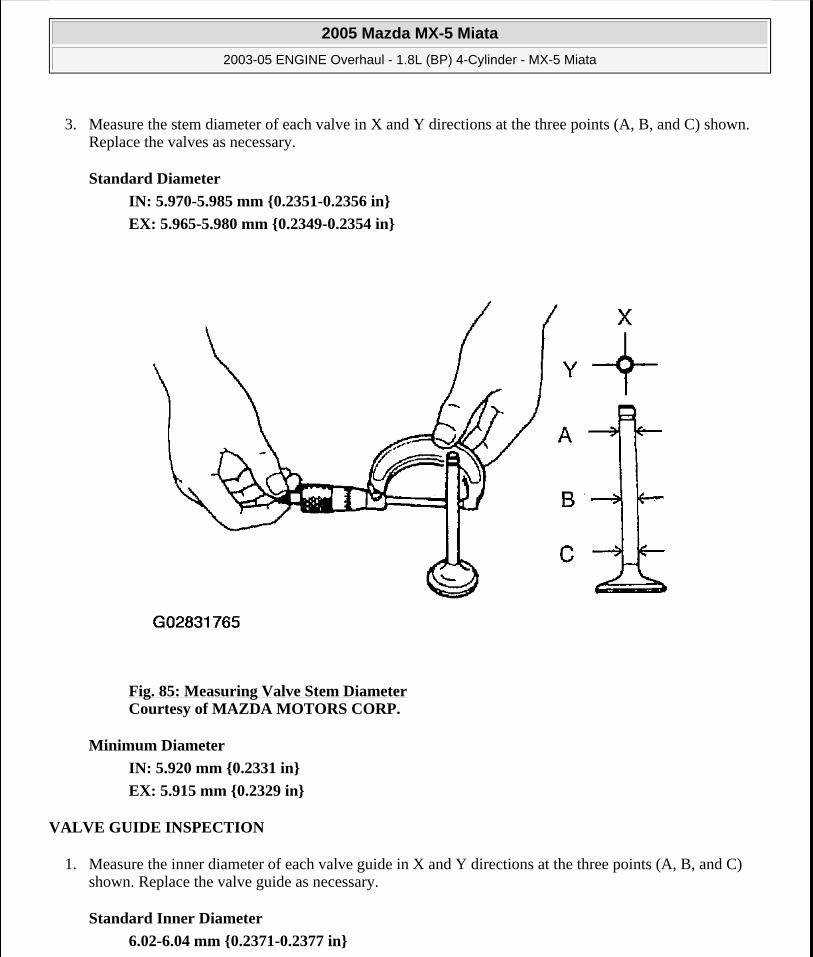
3. Measure the stem diameter of each valve in X and Y directions at the three points (A, B, and C) shown. Replace the valves as necessary.
Standard Diameter
IN: 5.970-5.985 mm {0.2351-0.2356 in}
EX: 5.965-5.980 mm {0.2349-0.2354 in}
Fig. 85: Measuring Valve Stem Diameter Courtesy of MAZDA MOTORS CORP.
Minimum Diameter
IN: 5.920 mm {0.2331 in}
EX: 5.915 mm {0.2329 in}
VALVE GUIDE INSPECTION
1. Measure the inner diameter of each valve guide in X and Y directions at the three points (A, B, and C) shown. Replace the valve guide as necessary.
Standard Inner Diameter
6.02-6.04 mm {0.2371-0.2377 in}
2005 Mazda MX-5 Miata
2003-05 ENGINE Overhaul - 1.8L (BP) 4-Cylinder - MX-5 Miata
Microsoft
Saturday, July 04, 2009 10:58:10 AM Page 84 © 2005 Mitchell Repair Information Company, LLC.

Fig. 86: Measuring Valve Guide Inner Diameter Courtesy of MAZDA MOTORS CORP.
2. Measure the protrusion height (dimension A) of each valve guide without the lower valve spring seat. Replace the valve guide as necessary.
Standard Height
18.3-18.9 mm {0.721-0.744 in}
2005 Mazda MX-5 Miata
2003-05 ENGINE Overhaul - 1.8L (BP) 4-Cylinder - MX-5 Miata
Microsoft
Saturday, July 04, 2009 10:58:11 AM Page 85 © 2005 Mitchell Repair Information Company, LLC.

Fig. 87: Measuring Valve Guide Protrusion Height Courtesy of MAZDA MOTORS CORP.
VALVE GUIDE REPLACEMENT
Valve Guide Removal
Remove the valve guide from the combustion chamber side by using the SST .
NOTE: Intake and exhaust valve guides are different.
2005 Mazda MX-5 Miata
2003-05 ENGINE Overhaul - 1.8L (BP) 4-Cylinder - MX-5 Miata
Microsoft
Saturday, July 04, 2009 10:58:11 AM Page 86 © 2005 Mitchell Repair Information Company, LLC.
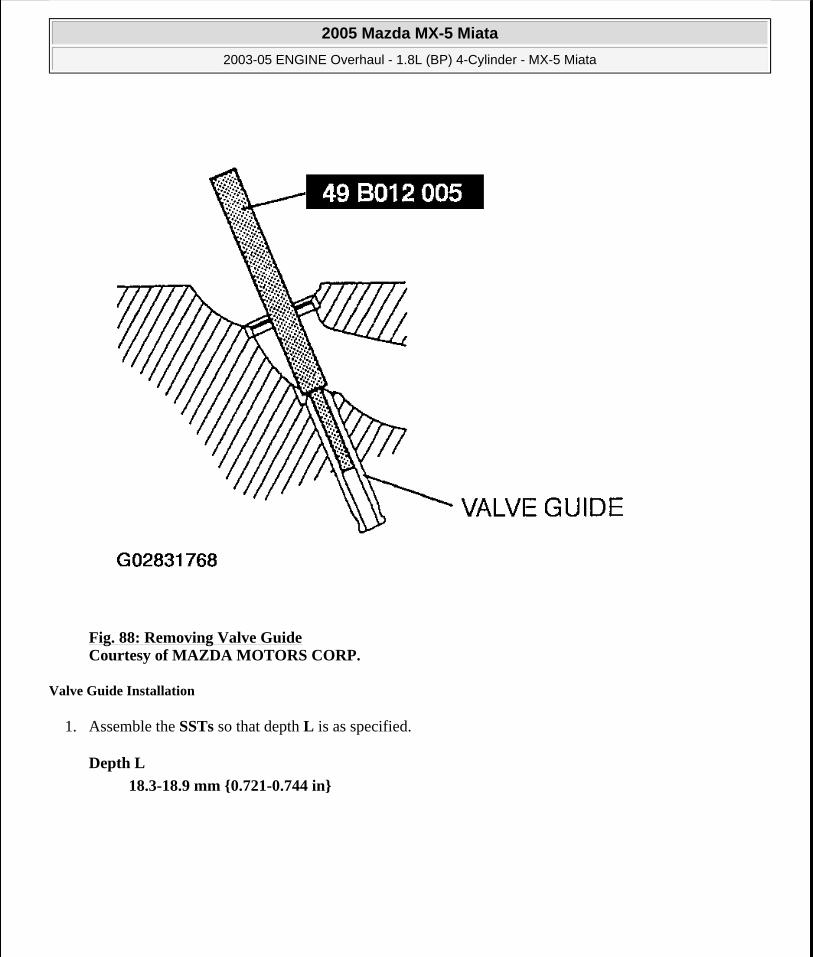
Fig. 88: Removing Valve Guide Courtesy of MAZDA MOTORS CORP.
Valve Guide Installation
1. Assemble the SSTs so that depth L is as specified.
Depth L
18.3-18.9 mm {0.721-0.744 in}
2005 Mazda MX-5 Miata
2003-05 ENGINE Overhaul - 1.8L (BP) 4-Cylinder - MX-5 Miata
Microsoft
Saturday, July 04, 2009 10:58:11 AM Page 87 © 2005 Mitchell Repair Information Company, LLC.
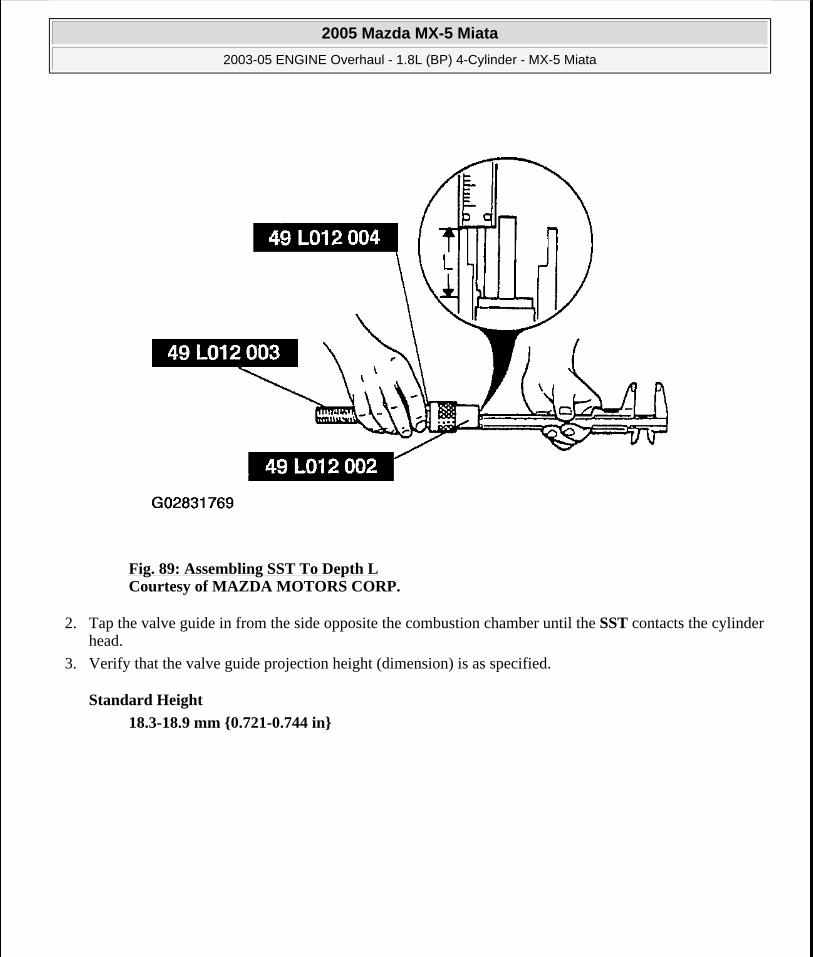
Fig. 89: Assembling SST To Depth L Courtesy of MAZDA MOTORS CORP.
2. Tap the valve guide in from the side opposite the combustion chamber until the SST contacts the cylinder head.
3. Verify that the valve guide projection height (dimension) is as specified.
Standard Height
18.3-18.9 mm {0.721-0.744 in}
2005 Mazda MX-5 Miata
2003-05 ENGINE Overhaul - 1.8L (BP) 4-Cylinder - MX-5 Miata
Microsoft
Saturday, July 04, 2009 10:58:11 AM Page 88 © 2005 Mitchell Repair Information Company, LLC.
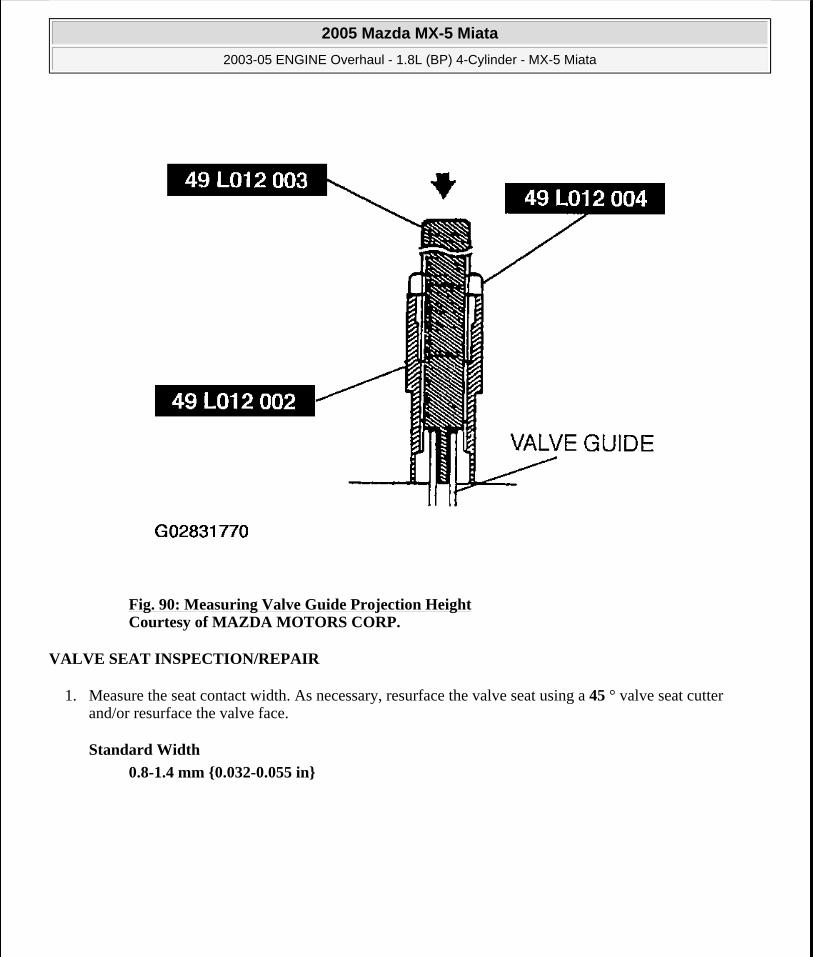
Fig. 90: Measuring Valve Guide Projection Height Courtesy of MAZDA MOTORS CORP.
VALVE SEAT INSPECTION/REPAIR
1. Measure the seat contact width. As necessary, resurface the valve seat using a 45 ° valve seat cutter and/or resurface the valve face.
Standard Width
0.8-1.4 mm {0.032-0.055 in}
2005 Mazda MX-5 Miata
2003-05 ENGINE Overhaul - 1.8L (BP) 4-Cylinder - MX-5 Miata
Microsoft
Saturday, July 04, 2009 10:58:11 AM Page 89 © 2005 Mitchell Repair Information Company, LLC.
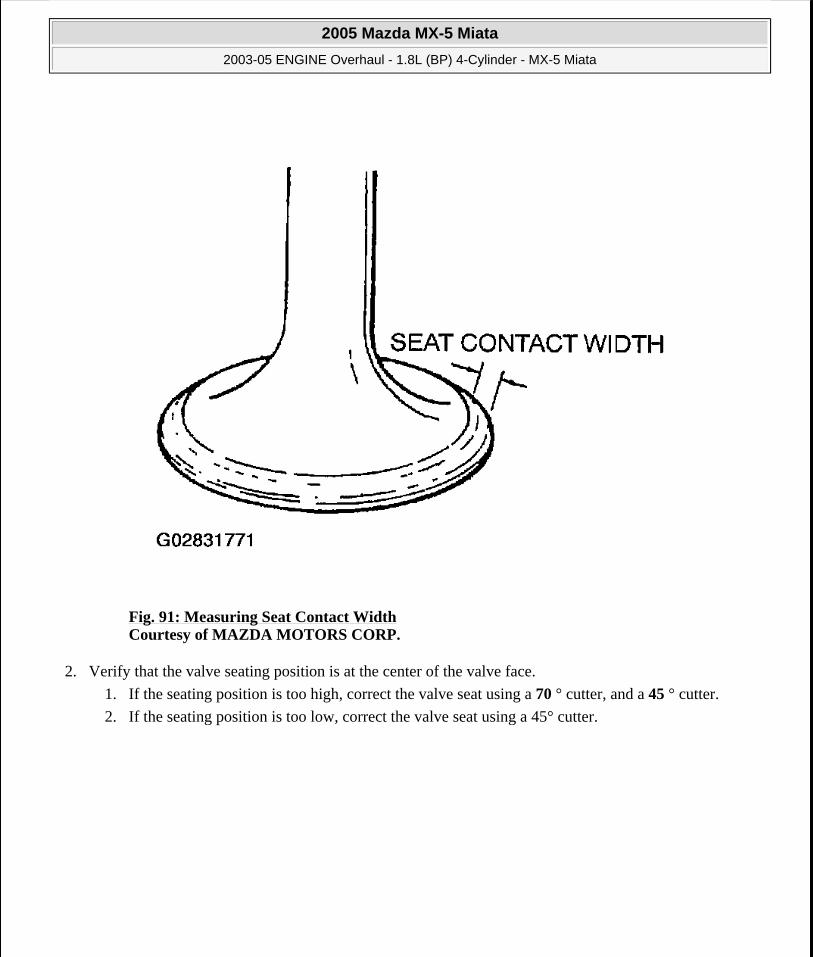
Fig. 91: Measuring Seat Contact Width Courtesy of MAZDA MOTORS CORP.
2. Verify that the valve seating position is at the center of the valve face.
1. If the seating position is too high, correct the valve seat using a 70 ° cutter, and a 45 ° cutter.
2. If the seating position is too low, correct the valve seat using a 45° cutter.
2005 Mazda MX-5 Miata
2003-05 ENGINE Overhaul - 1.8L (BP) 4-Cylinder - MX-5 Miata
Microsoft
Saturday, July 04, 2009 10:58:11 AM Page 90 © 2005 Mitchell Repair Information Company, LLC.
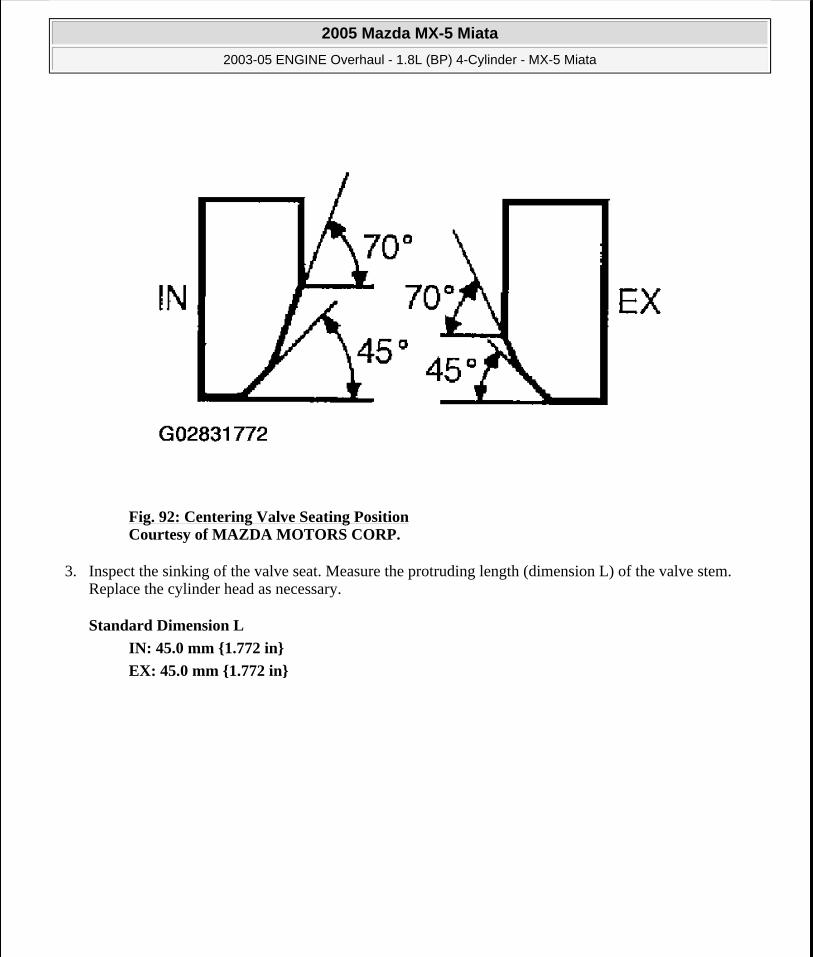
Fig. 92: Centering Valve Seating Position Courtesy of MAZDA MOTORS CORP.
3. Inspect the sinking of the valve seat. Measure the protruding length (dimension L) of the valve stem. Replace the cylinder head as necessary.
Standard Dimension L
IN: 45.0 mm {1.772 in}
EX: 45.0 mm {1.772 in}
2005 Mazda MX-5 Miata
2003-05 ENGINE Overhaul - 1.8L (BP) 4-Cylinder - MX-5 Miata
Microsoft
Saturday, July 04, 2009 10:58:11 AM Page 91 © 2005 Mitchell Repair Information Company, LLC.
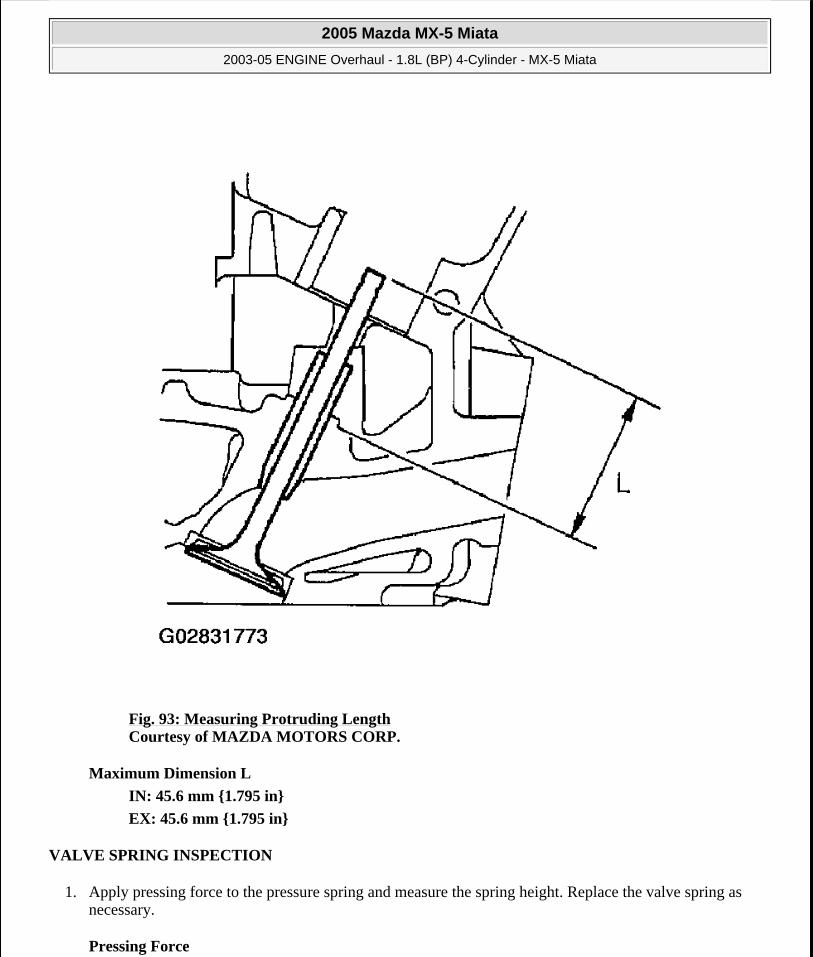
Fig. 93: Measuring Protruding Length Courtesy of MAZDA MOTORS CORP.
Maximum Dimension L
IN: 45.6 mm {1.795 in}
EX: 45.6 mm {1.795 in}
VALVE SPRING INSPECTION
1. Apply pressing force to the pressure spring and measure the spring height. Replace the valve spring as necessary.
Pressing Force
2005 Mazda MX-5 Miata
2003-05 ENGINE Overhaul - 1.8L (BP) 4-Cylinder - MX-5 Miata
Microsoft
Saturday, July 04, 2009 10:58:11 AM Page 92 © 2005 Mitchell Repair Information Company, LLC.
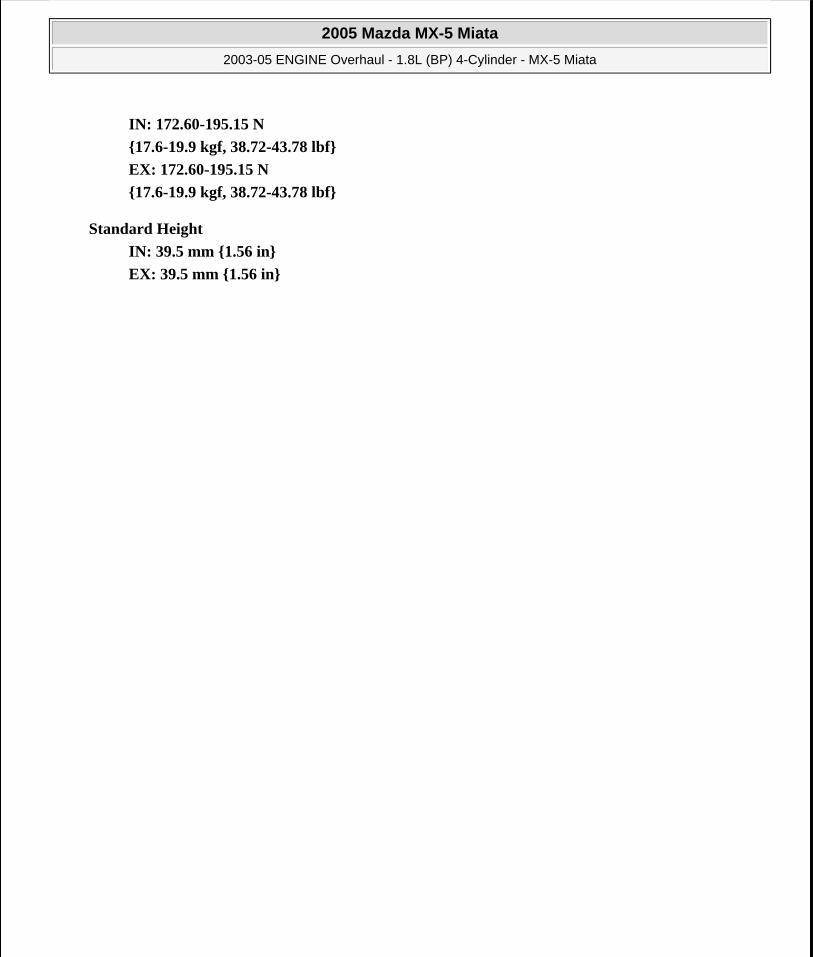
IN: 172.60-195.15 N
{17.6-19.9 kgf, 38.72-43.78 lbf}
EX: 172.60-195.15 N
{17.6-19.9 kgf, 38.72-43.78 lbf}
Standard Height
IN: 39.5 mm {1.56 in}
EX: 39.5 mm {1.56 in}
2005 Mazda MX-5 Miata
2003-05 ENGINE Overhaul - 1.8L (BP) 4-Cylinder - MX-5 Miata
Microsoft
Saturday, July 04, 2009 10:58:11 AM Page 93 © 2005 Mitchell Repair Information Company, LLC.

2005 Mazda MX-5 Miata
2003-05 ENGINE Overhaul - 1.8L (BP) 4-Cylinder - MX-5 Miata
Microsoft
Saturday, July 04, 2009 10:58:11 AM Page 94 © 2005 Mitchell Repair Information Company, LLC.

Fig. 94: Measuring Spring Height Under Pressing ForceCourtesy of MAZDA MOTORS CORP.
2. Measure the out-of-square of the valve spring. Replace the valve spring as necessary.
Fig. 95: Measuring Valve Spring Out-Of-Square
2005 Mazda MX-5 Miata
2003-05 ENGINE Overhaul - 1.8L (BP) 4-Cylinder - MX-5 Miata
Microsoft
Saturday, July 04, 2009 10:58:11 AM Page 95 © 2005 Mitchell Repair Information Company, LLC.
Courtesy of MAZDA MOTORS CORP.
VALVE SPRING OUT-OF-SQUARE SPECIFICATIONS
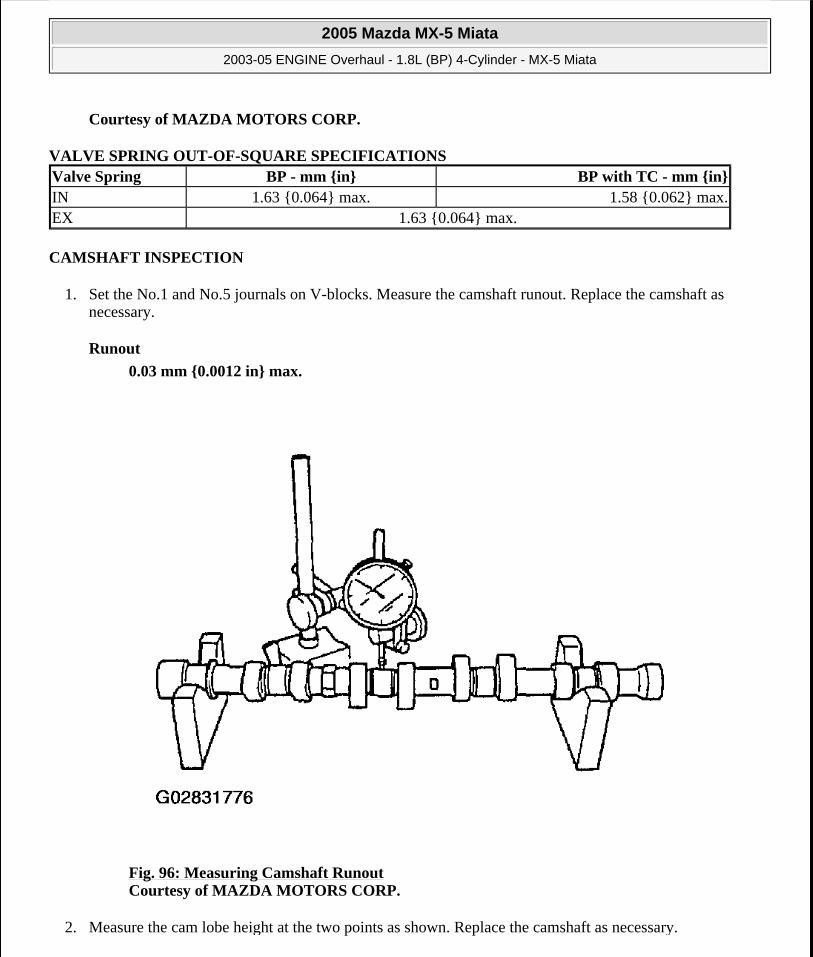
CAMSHAFT INSPECTION
1. Set the No.1 and No.5 journals on V-blocks. Measure the camshaft runout. Replace the camshaft as necessary.
Runout
0.03 mm {0.0012 in} max.
Fig. 96: Measuring Camshaft Runout Courtesy of MAZDA MOTORS CORP.
2. Measure the cam lobe height at the two points as shown. Replace the camshaft as necessary.
Valve Spring BP - mm {in} BP with TC - mm {in}IN 1.63 {0.064} max. 1.58 {0.062} max.EX 1.63 {0.064} max.
2005 Mazda MX-5 Miata
2003-05 ENGINE Overhaul - 1.8L (BP) 4-Cylinder - MX-5 Miata
Microsoft
Saturday, July 04, 2009 10:58:11 AM Page 96 © 2005 Mitchell Repair Information Company, LLC.
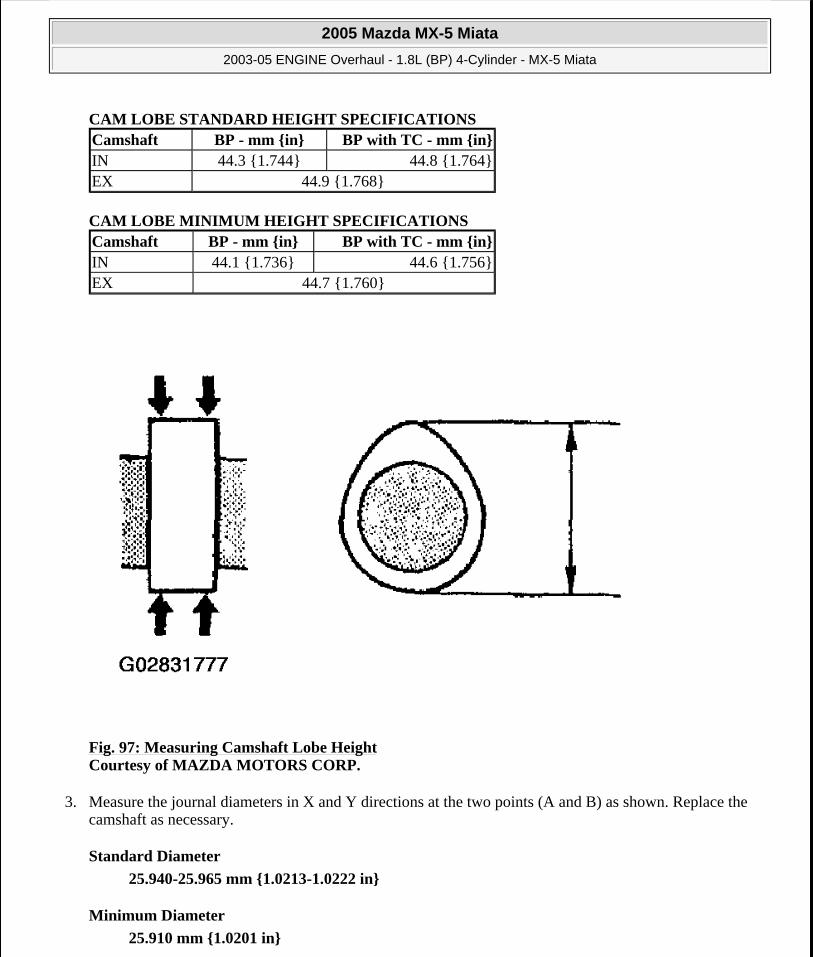
CAM LOBE STANDARD HEIGHT SPECIFICATIONS
CAM LOBE MINIMUM HEIGHT SPECIFICATIONS
Fig. 97: Measuring Camshaft Lobe Height Courtesy of MAZDA MOTORS CORP.
3. Measure the journal diameters in X and Y directions at the two points (A and B) as shown. Replace the camshaft as necessary.
Standard Diameter
25.940-25.965 mm {1.0213-1.0222 in}
Minimum Diameter
25.910 mm {1.0201 in}
Camshaft BP - mm {in} BP with TC - mm {in}IN 44.3 {1.744} 44.8 {1.764}EX 44.9 {1.768}
Camshaft BP - mm {in} BP with TC - mm {in}IN 44.1 {1.736} 44.6 {1.756}EX 44.7 {1.760}
2005 Mazda MX-5 Miata
2003-05 ENGINE Overhaul - 1.8L (BP) 4-Cylinder - MX-5 Miata
Microsoft
Saturday, July 04, 2009 10:58:11 AM Page 97 © 2005 Mitchell Repair Information Company, LLC.
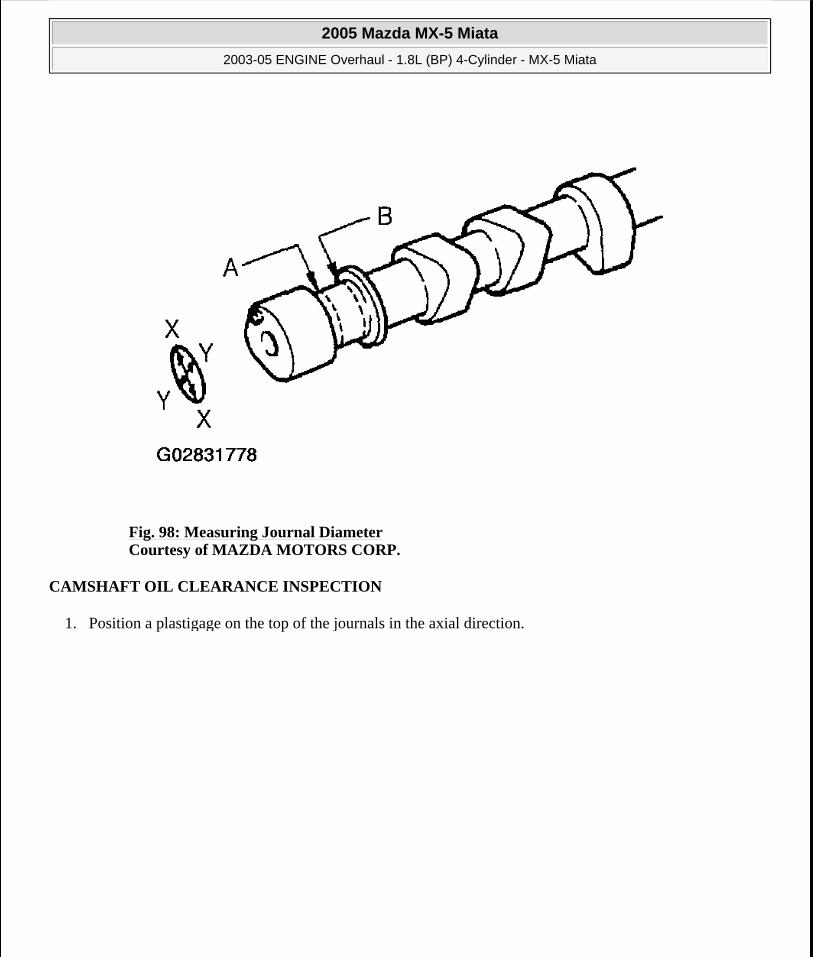
Fig. 98: Measuring Journal Diameter Courtesy of MAZDA MOTORS CORP.
CAMSHAFT OIL CLEARANCE INSPECTION
1. Position a plastigage on the top of the journals in the axial direction.
2005 Mazda MX-5 Miata
2003-05 ENGINE Overhaul - 1.8L (BP) 4-Cylinder - MX-5 Miata
Microsoft
Saturday, July 04, 2009 10:58:11 AM Page 98 © 2005 Mitchell Repair Information Company, LLC.
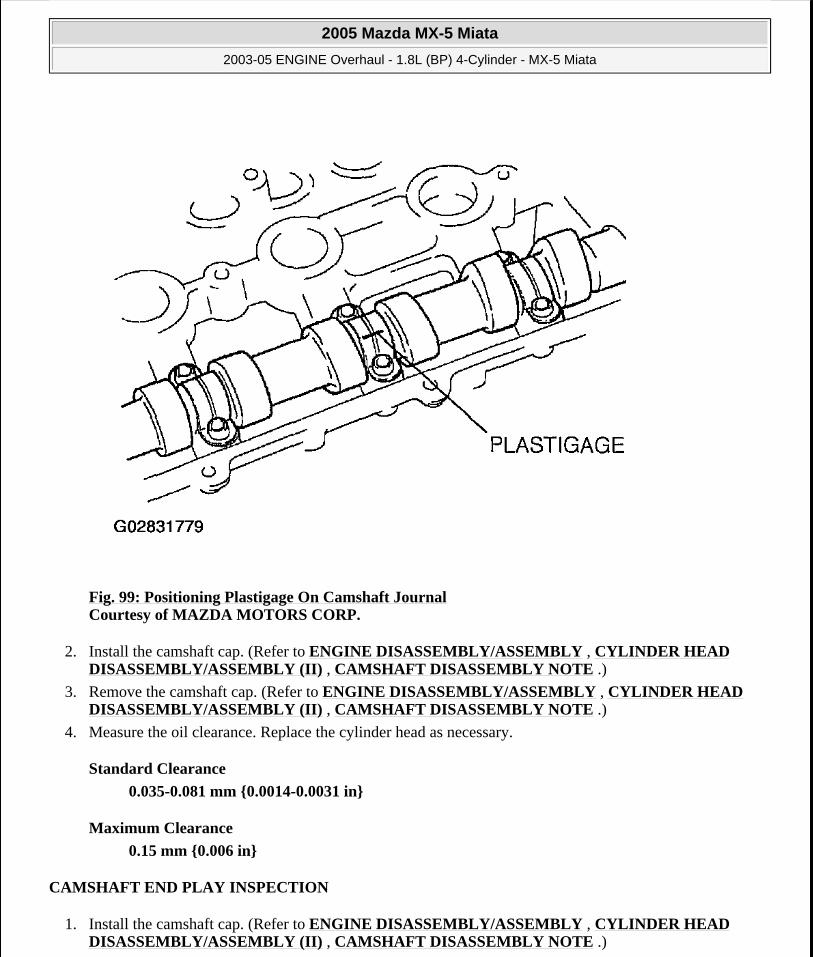
Fig. 99: Positioning Plastigage On Camshaft Journal Courtesy of MAZDA MOTORS CORP.
2. Install the camshaft cap. (Refer to ENGINE DISASSEMBLY/ASSEMBLY , CYLINDER HEAD DISASSEMBLY/ASSEMBLY (II) , CAMSHAFT DISASSEMBLY NOTE .)
3. Remove the camshaft cap. (Refer to ENGINE DISASSEMBLY/ASSEMBLY , CYLINDER HEAD DISASSEMBLY/ASSEMBLY (II) , CAMSHAFT DISASSEMBLY NOTE .)
4. Measure the oil clearance. Replace the cylinder head as necessary.
Standard Clearance
0.035-0.081 mm {0.0014-0.0031 in}
Maximum Clearance
0.15 mm {0.006 in}
CAMSHAFT END PLAY INSPECTION
1. Install the camshaft cap. (Refer to ENGINE DISASSEMBLY/ASSEMBLY , CYLINDER HEAD DISASSEMBLY/ASSEMBLY (II) , CAMSHAFT DISASSEMBLY NOTE .)
2005 Mazda MX-5 Miata
2003-05 ENGINE Overhaul - 1.8L (BP) 4-Cylinder - MX-5 Miata
Microsoft
Saturday, July 04, 2009 10:58:11 AM Page 99 © 2005 Mitchell Repair Information Company, LLC.
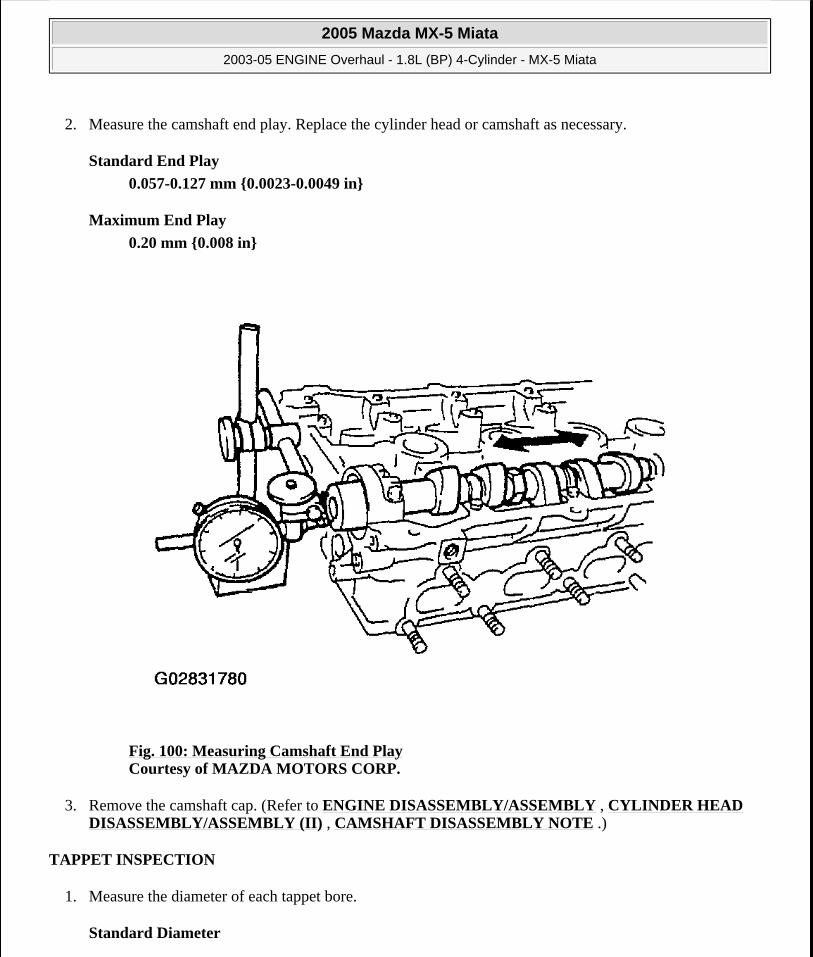
2. Measure the camshaft end play. Replace the cylinder head or camshaft as necessary.
Standard End Play
0.057-0.127 mm {0.0023-0.0049 in}
Maximum End Play
0.20 mm {0.008 in}
Fig. 100: Measuring Camshaft End Play Courtesy of MAZDA MOTORS CORP.
3. Remove the camshaft cap. (Refer to ENGINE DISASSEMBLY/ASSEMBLY , CYLINDER HEAD DISASSEMBLY/ASSEMBLY (II) , CAMSHAFT DISASSEMBLY NOTE .)
TAPPET INSPECTION
1. Measure the diameter of each tappet bore.
Standard Diameter
2005 Mazda MX-5 Miata
2003-05 ENGINE Overhaul - 1.8L (BP) 4-Cylinder - MX-5 Miata
Microsoft
Saturday, July 04, 2009 10:58:11 AM Page 100 © 2005 Mitchell Repair Information Company, LLC.

30.000-30.025 mm {1.1811-1.1820 in}
Fig. 101: Measuring Tappet Bore Diameter Courtesy of MAZDA MOTORS CORP.
2. Measure the diameter of each tappet.
Standard Diameter
29.959-29.975 mm {1.1795-1.1801 in}
2005 Mazda MX-5 Miata
2003-05 ENGINE Overhaul - 1.8L (BP) 4-Cylinder - MX-5 Miata
Microsoft
Saturday, July 04, 2009 10:58:11 AM Page 101 © 2005 Mitchell Repair Information Company, LLC.
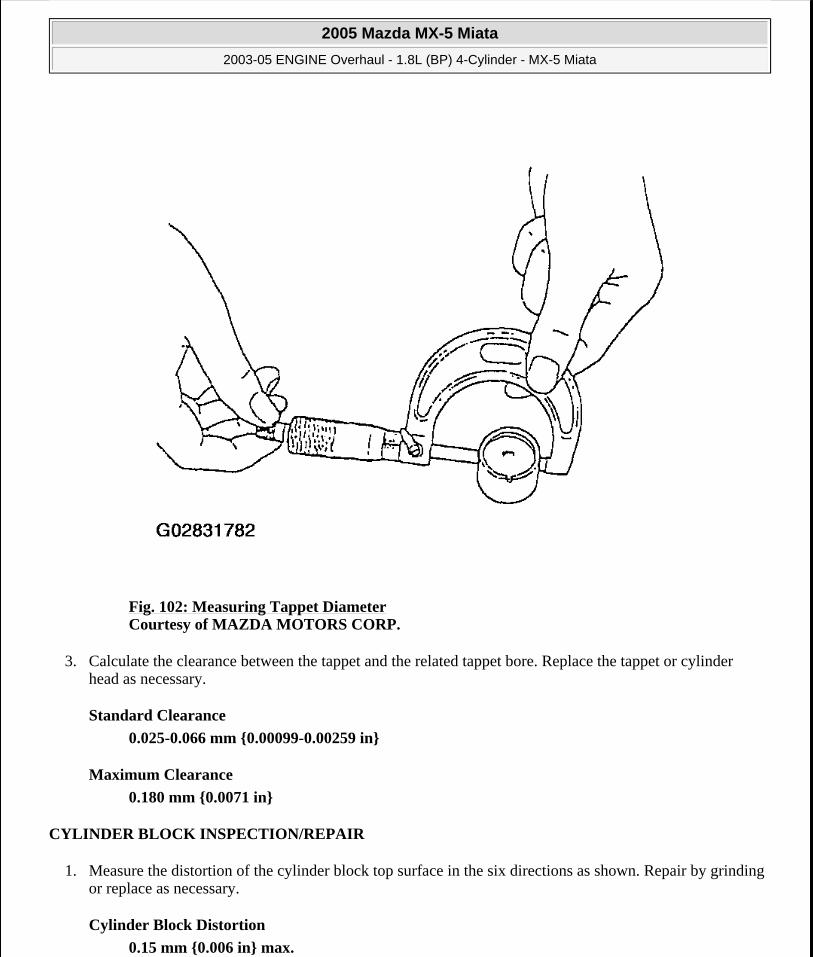
Fig. 102: Measuring Tappet Diameter Courtesy of MAZDA MOTORS CORP.
3. Calculate the clearance between the tappet and the related tappet bore. Replace the tappet or cylinder head as necessary.
Standard Clearance
0.025-0.066 mm {0.00099-0.00259 in}
Maximum Clearance
0.180 mm {0.0071 in}
CYLINDER BLOCK INSPECTION/REPAIR
1. Measure the distortion of the cylinder block top surface in the six directions as shown. Repair by grinding or replace as necessary.
Cylinder Block Distortion
0.15 mm {0.006 in} max.
2005 Mazda MX-5 Miata
2003-05 ENGINE Overhaul - 1.8L (BP) 4-Cylinder - MX-5 Miata
Microsoft
Saturday, July 04, 2009 10:58:11 AM Page 102 © 2005 Mitchell Repair Information Company, LLC.

Fig. 103: Cylinder Block Top Surface Distortion Measurement Directions Courtesy of MAZDA MOTORS CORP.
Cylinder Block Height
221.5 mm {8.720 in}
Grinding
0.20 mm {0.008 in} max.
2. Measure the cylinder bores in X and Y directions at 35 mm {1.38 in} below the top surface.
2005 Mazda MX-5 Miata
2003-05 ENGINE Overhaul - 1.8L (BP) 4-Cylinder - MX-5 Miata
Microsoft
Saturday, July 04, 2009 10:58:11 AM Page 103 © 2005 Mitchell Repair Information Company, LLC.
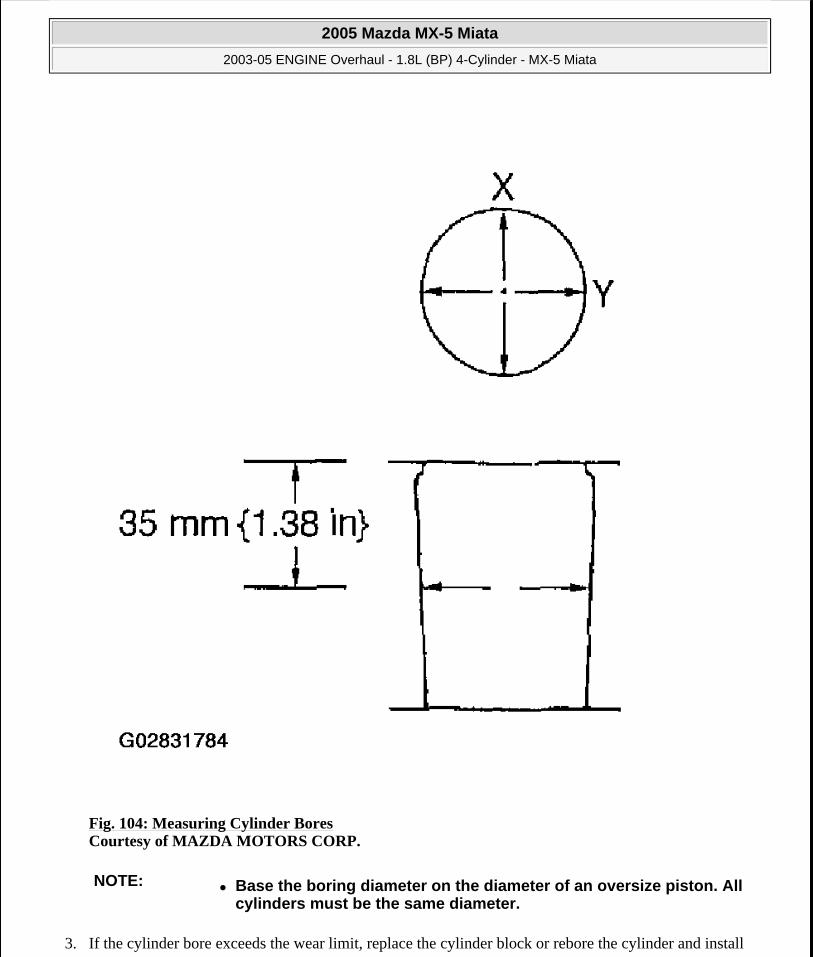
Fig. 104: Measuring Cylinder Bores Courtesy of MAZDA MOTORS CORP.
3. If the cylinder bore exceeds the wear limit, replace the cylinder block or rebore the cylinder and install
NOTE: Base the boring diameter on the diameter of an oversize piston. All cylinders must be the same diameter.
2005 Mazda MX-5 Miata
2003-05 ENGINE Overhaul - 1.8L (BP) 4-Cylinder - MX-5 Miata
Microsoft
Saturday, July 04, 2009 10:58:11 AM Page 104 © 2005 Mitchell Repair Information Company, LLC.

the oversize pistons so that the specified piston-to-cylinder clearance is obtained.
CYLINDER BORE
CYLINDER BORE SPECIFICATIONS
Wear Limit
0.15 mm {0.006 in}
OIL JET INSPECTION
1. Apply compressed air to oil jet valve A and verify that air passes through oil jet valve B. If not, replace the oil jet valve.
Size - mm {in} Diameter - mm {in}Standard 83.000-83.019 {3.2678-3.2684}0.25 {0.01} oversize 83.250-83.269 {3.2776-3.2783}0.50 {0.02} oversize 83.500-83.519 {3.2874-3.2881}
2005 Mazda MX-5 Miata
2003-05 ENGINE Overhaul - 1.8L (BP) 4-Cylinder - MX-5 Miata
Microsoft
Saturday, July 04, 2009 10:58:11 AM Page 105 © 2005 Mitchell Repair Information Company, LLC.
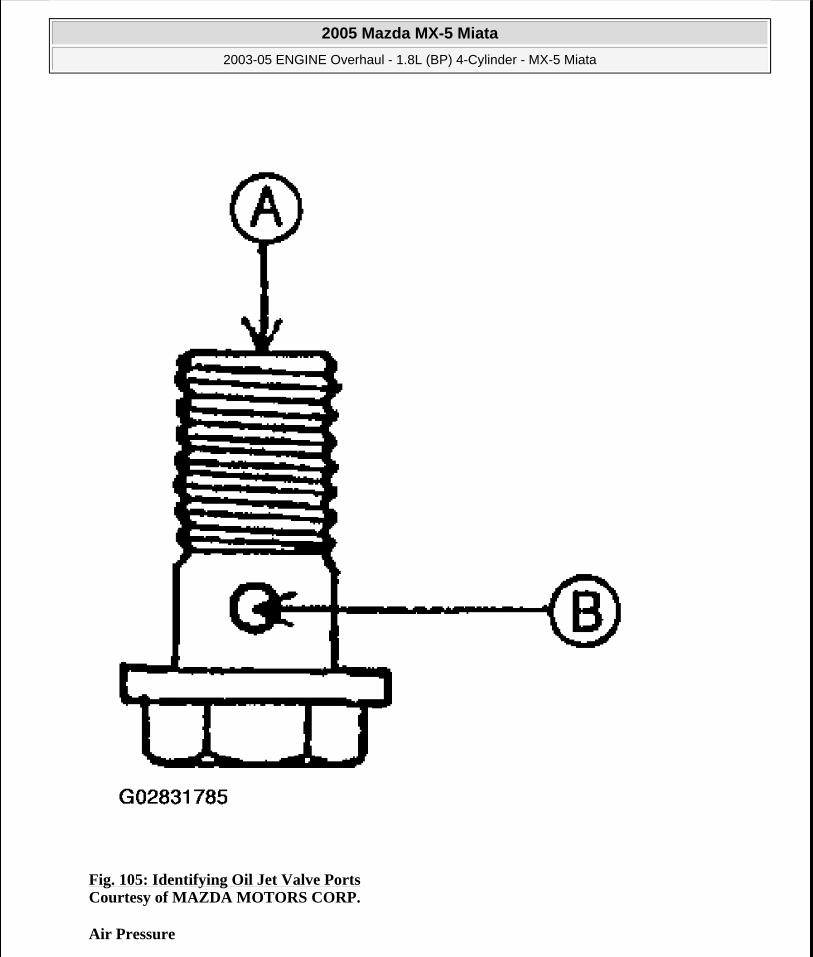
Fig. 105: Identifying Oil Jet Valve Ports Courtesy of MAZDA MOTORS CORP.
Air Pressure
2005 Mazda MX-5 Miata
2003-05 ENGINE Overhaul - 1.8L (BP) 4-Cylinder - MX-5 Miata
Microsoft
Saturday, July 04, 2009 10:58:11 AM Page 106 © 2005 Mitchell Repair Information Company, LLC.
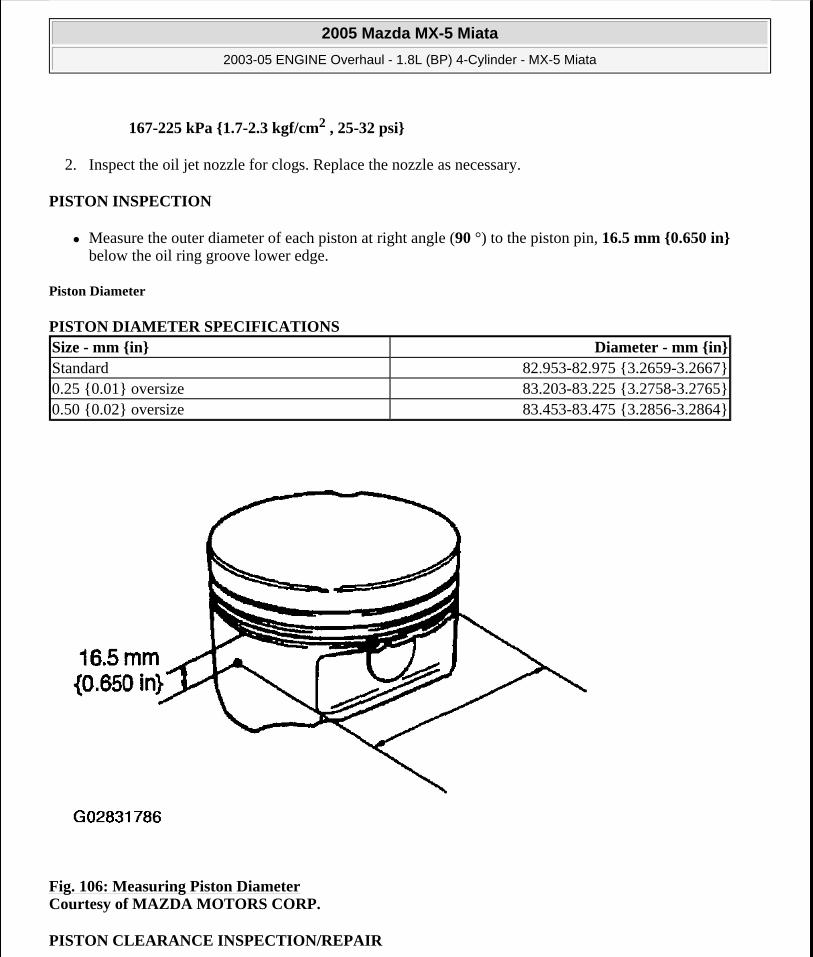
167-225 kPa {1.7-2.3 kgf/cm2 , 25-32 psi}
2. Inspect the oil jet nozzle for clogs. Replace the nozzle as necessary.
PISTON INSPECTION
Measure the outer diameter of each piston at right angle (90 °) to the piston pin, 16.5 mm {0.650 in} below the oil ring groove lower edge.
Piston Diameter
PISTON DIAMETER SPECIFICATIONS
Fig. 106: Measuring Piston Diameter Courtesy of MAZDA MOTORS CORP.
PISTON CLEARANCE INSPECTION/REPAIR
Size - mm {in} Diameter - mm {in}Standard 82.953-82.975 {3.2659-3.2667}0.25 {0.01} oversize 83.203-83.225 {3.2758-3.2765}0.50 {0.02} oversize 83.453-83.475 {3.2856-3.2864}
2005 Mazda MX-5 Miata
2003-05 ENGINE Overhaul - 1.8L (BP) 4-Cylinder - MX-5 Miata
Microsoft
Saturday, July 04, 2009 10:58:11 AM Page 107 © 2005 Mitchell Repair Information Company, LLC.
1. Calculate the piston-to-cylinder clearance.
Replace the piston or rebore the cylinders to fit oversize piston as necessary.
Standard Clearance
0.025-0.066 mm {0.0010-0.0025 in}
Maximum Clearance
0.15 mm {0.006 in}
2. If the piston is replaced, the piston rings must also be replaced.
PISTON RING CLEARANCE INSPECTION
1. Measure the piston ring-to-ring land clearance around the entire circumference. Replace the piston and piston ring as necessary.
Standard Clearance
Top : 0.030-0.065 mm {0.0012-0.0025 in}
Second : 0.030-0.070 mm {0.0012-0.0027 in}
Oil : 0.07-0.16 mm {0.003-0.006 in}
Maximum Clearance
Top, Second : 0.15 mm {0.006 in}
Oil : 0.20 mm {0.008 in}
2005 Mazda MX-5 Miata
2003-05 ENGINE Overhaul - 1.8L (BP) 4-Cylinder - MX-5 Miata
Microsoft
Saturday, July 04, 2009 10:58:11 AM Page 108 © 2005 Mitchell Repair Information Company, LLC.

Fig. 107: Measuring Piston Ring-To-Ring Land Clearance Courtesy of MAZDA MOTORS CORP.
2. Insert the piston ring into the cylinder by hand and use the piston to push it to the bottom of the ring travel.
2005 Mazda MX-5 Miata
2003-05 ENGINE Overhaul - 1.8L (BP) 4-Cylinder - MX-5 Miata
Microsoft
Saturday, July 04, 2009 10:58:11 AM Page 109 © 2005 Mitchell Repair Information Company, LLC.
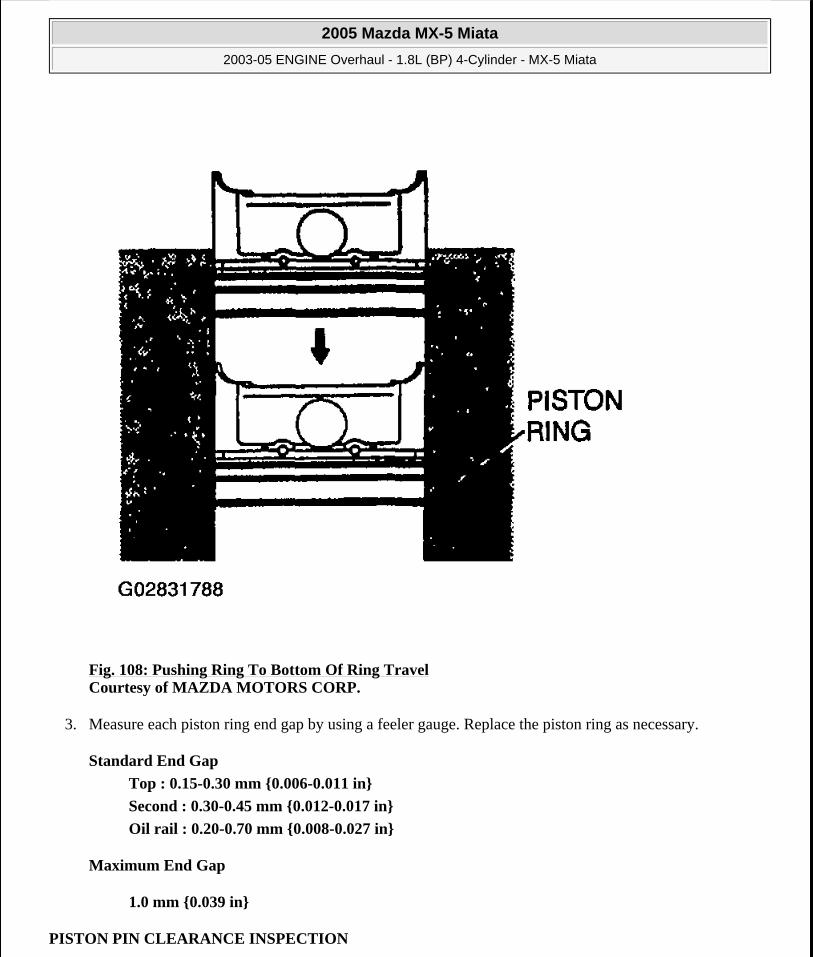
Fig. 108: Pushing Ring To Bottom Of Ring Travel Courtesy of MAZDA MOTORS CORP.
3. Measure each piston ring end gap by using a feeler gauge. Replace the piston ring as necessary.
Standard End Gap
Top : 0.15-0.30 mm {0.006-0.011 in}
Second : 0.30-0.45 mm {0.012-0.017 in}
Oil rail : 0.20-0.70 mm {0.008-0.027 in}
Maximum End Gap
1.0 mm {0.039 in}
PISTON PIN CLEARANCE INSPECTION
2005 Mazda MX-5 Miata
2003-05 ENGINE Overhaul - 1.8L (BP) 4-Cylinder - MX-5 Miata
Microsoft
Saturday, July 04, 2009 10:58:11 AM Page 110 © 2005 Mitchell Repair Information Company, LLC.
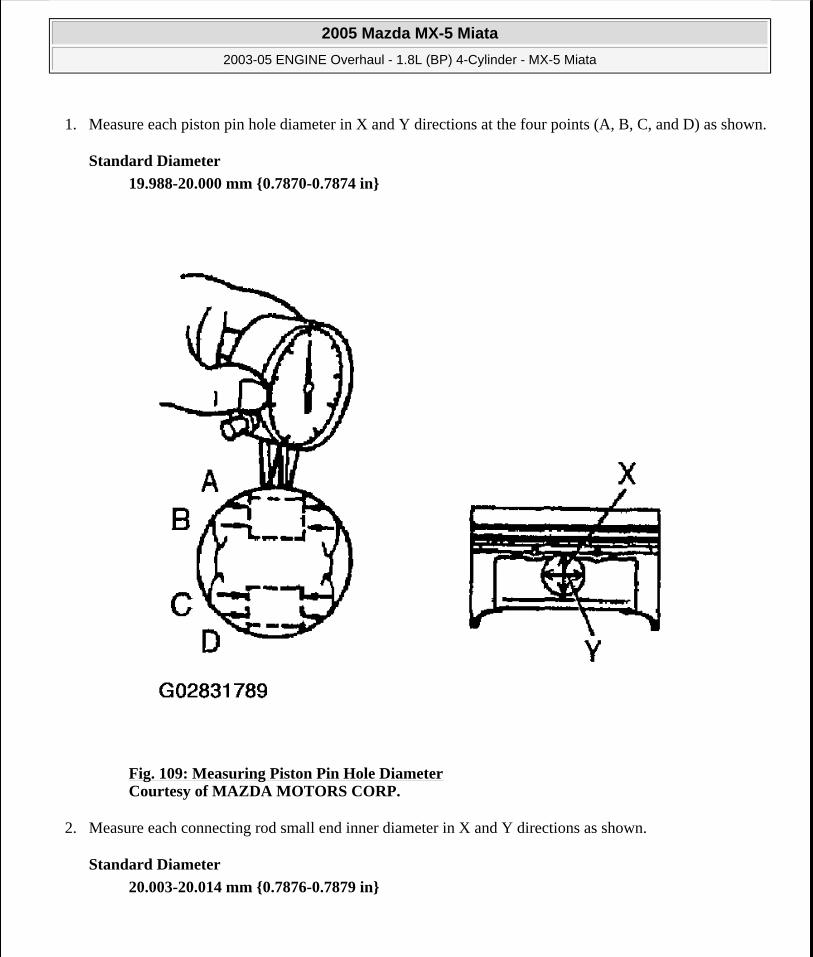
1. Measure each piston pin hole diameter in X and Y directions at the four points (A, B, C, and D) as shown.
Standard Diameter
19.988-20.000 mm {0.7870-0.7874 in}
Fig. 109: Measuring Piston Pin Hole Diameter Courtesy of MAZDA MOTORS CORP.
2. Measure each connecting rod small end inner diameter in X and Y directions as shown.
Standard Diameter
20.003-20.014 mm {0.7876-0.7879 in}
2005 Mazda MX-5 Miata
2003-05 ENGINE Overhaul - 1.8L (BP) 4-Cylinder - MX-5 Miata
Microsoft
Saturday, July 04, 2009 10:58:11 AM Page 111 © 2005 Mitchell Repair Information Company, LLC.

Fig. 110: Measuring Connecting Rod Small End Inner Diameter Courtesy of MAZDA MOTORS CORP.
3. Measure each piston pin diameter in X and Y directions at the four points (A, B, C, and D) as shown.
Standard Diameter
19.987-19.993 mm {0.7869-0.7871 in}
2005 Mazda MX-5 Miata
2003-05 ENGINE Overhaul - 1.8L (BP) 4-Cylinder - MX-5 Miata
Microsoft
Saturday, July 04, 2009 10:58:11 AM Page 112 © 2005 Mitchell Repair Information Company, LLC.
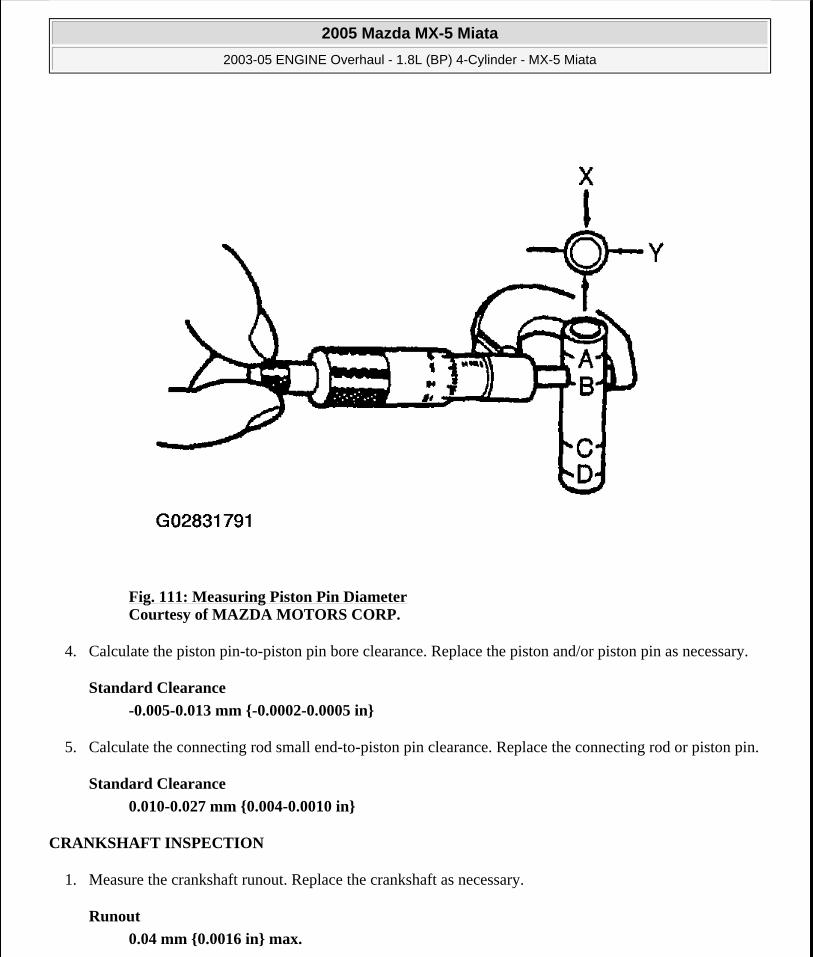
Fig. 111: Measuring Piston Pin Diameter Courtesy of MAZDA MOTORS CORP.
4. Calculate the piston pin-to-piston pin bore clearance. Replace the piston and/or piston pin as necessary.
Standard Clearance
-0.005-0.013 mm {-0.0002-0.0005 in}
5. Calculate the connecting rod small end-to-piston pin clearance. Replace the connecting rod or piston pin.
Standard Clearance
0.010-0.027 mm {0.004-0.0010 in}
CRANKSHAFT INSPECTION
1. Measure the crankshaft runout. Replace the crankshaft as necessary.
Runout
0.04 mm {0.0016 in} max.
2005 Mazda MX-5 Miata
2003-05 ENGINE Overhaul - 1.8L (BP) 4-Cylinder - MX-5 Miata
Microsoft
Saturday, July 04, 2009 10:58:11 AM Page 113 © 2005 Mitchell Repair Information Company, LLC.
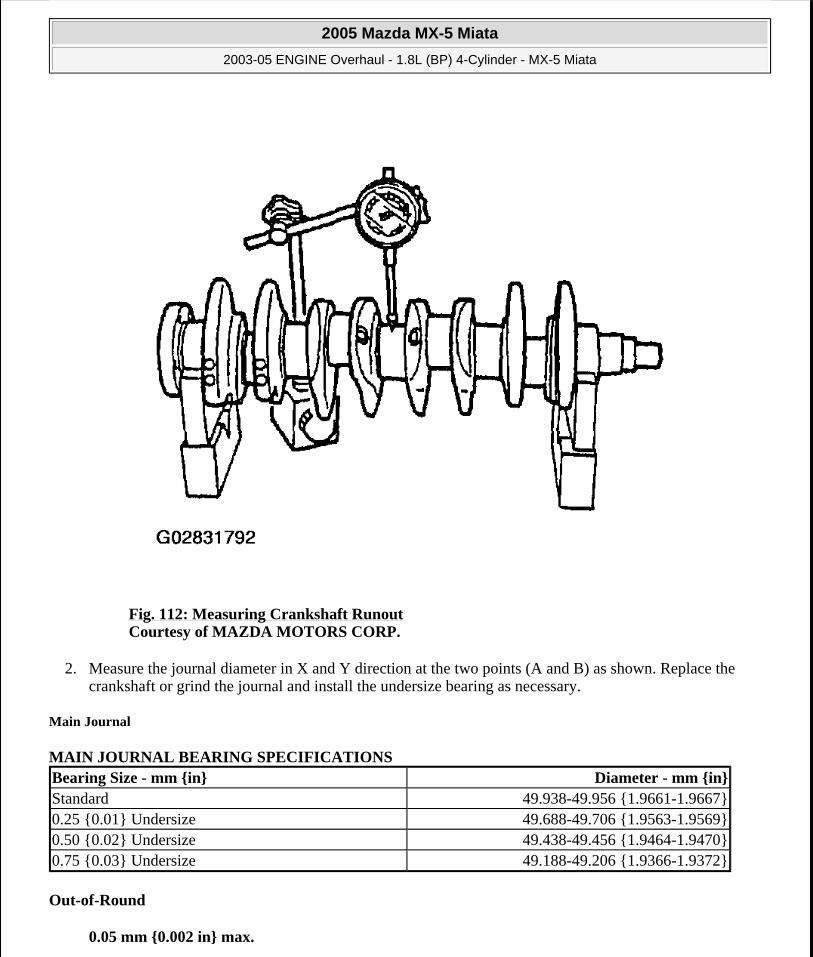
Fig. 112: Measuring Crankshaft Runout Courtesy of MAZDA MOTORS CORP.
2. Measure the journal diameter in X and Y direction at the two points (A and B) as shown. Replace the crankshaft or grind the journal and install the undersize bearing as necessary.
Main Journal
MAIN JOURNAL BEARING SPECIFICATIONS
Out-of-Round
0.05 mm {0.002 in} max.
Bearing Size - mm {in} Diameter - mm {in}Standard 49.938-49.956 {1.9661-1.9667}0.25 {0.01} Undersize 49.688-49.706 {1.9563-1.9569}0.50 {0.02} Undersize 49.438-49.456 {1.9464-1.9470}0.75 {0.03} Undersize 49.188-49.206 {1.9366-1.9372}
2005 Mazda MX-5 Miata
2003-05 ENGINE Overhaul - 1.8L (BP) 4-Cylinder - MX-5 Miata
Microsoft
Saturday, July 04, 2009 10:58:11 AM Page 114 © 2005 Mitchell Repair Information Company, LLC.

Crank Pin
CRANK PIN BEARING SPECIFICATIONS
Out-of-Round
0.05 mm {0.002 in} max.
Fig. 113: Measuring Journal Out Of Round Courtesy of MAZDA MOTORS CORP.
Bearing Size - mm {in} Diameter - mm {in}Standard 44.940-44.956 {1.7693-1.7699}0.25 {0.01} Undersize 44.690-44.706 {1.7595-1.7600}0.50 {0.02} Undersize 44.440-44.456 {1.7497-1.7502}0.75 {0.03} Undersize 44.190-44.206 {1.7398-1.7403}
2005 Mazda MX-5 Miata
2003-05 ENGINE Overhaul - 1.8L (BP) 4-Cylinder - MX-5 Miata
Microsoft
Saturday, July 04, 2009 10:58:11 AM Page 115 © 2005 Mitchell Repair Information Company, LLC.
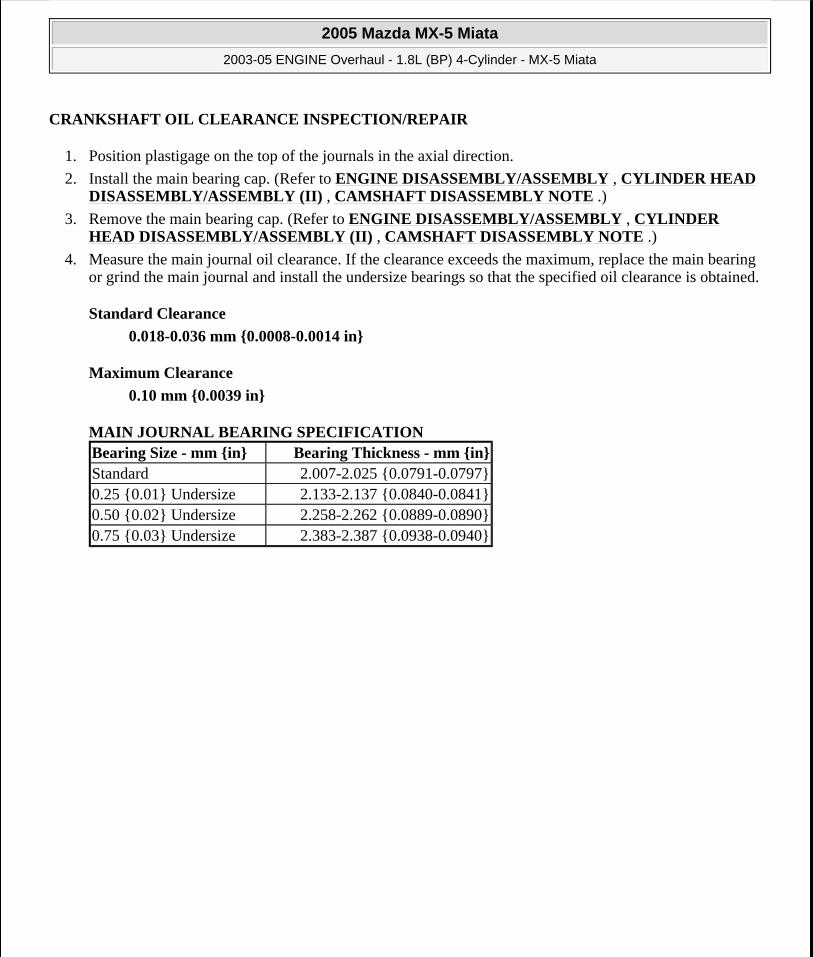
CRANKSHAFT OIL CLEARANCE INSPECTION/REPAIR
1. Position plastigage on the top of the journals in the axial direction.
2. Install the main bearing cap. (Refer to ENGINE DISASSEMBLY/ASSEMBLY , CYLINDER HEAD DISASSEMBLY/ASSEMBLY (II) , CAMSHAFT DISASSEMBLY NOTE .)
3. Remove the main bearing cap. (Refer to ENGINE DISASSEMBLY/ASSEMBLY , CYLINDER HEAD DISASSEMBLY/ASSEMBLY (II) , CAMSHAFT DISASSEMBLY NOTE .)
4. Measure the main journal oil clearance. If the clearance exceeds the maximum, replace the main bearing or grind the main journal and install the undersize bearings so that the specified oil clearance is obtained.
Standard Clearance
0.018-0.036 mm {0.0008-0.0014 in}
Maximum Clearance
0.10 mm {0.0039 in}
MAIN JOURNAL BEARING SPECIFICATION Bearing Size - mm {in} Bearing Thickness - mm {in}Standard 2.007-2.025 {0.0791-0.0797}0.25 {0.01} Undersize 2.133-2.137 {0.0840-0.0841}0.50 {0.02} Undersize 2.258-2.262 {0.0889-0.0890}0.75 {0.03} Undersize 2.383-2.387 {0.0938-0.0940}
2005 Mazda MX-5 Miata
2003-05 ENGINE Overhaul - 1.8L (BP) 4-Cylinder - MX-5 Miata
Microsoft
Saturday, July 04, 2009 10:58:11 AM Page 116 © 2005 Mitchell Repair Information Company, LLC.
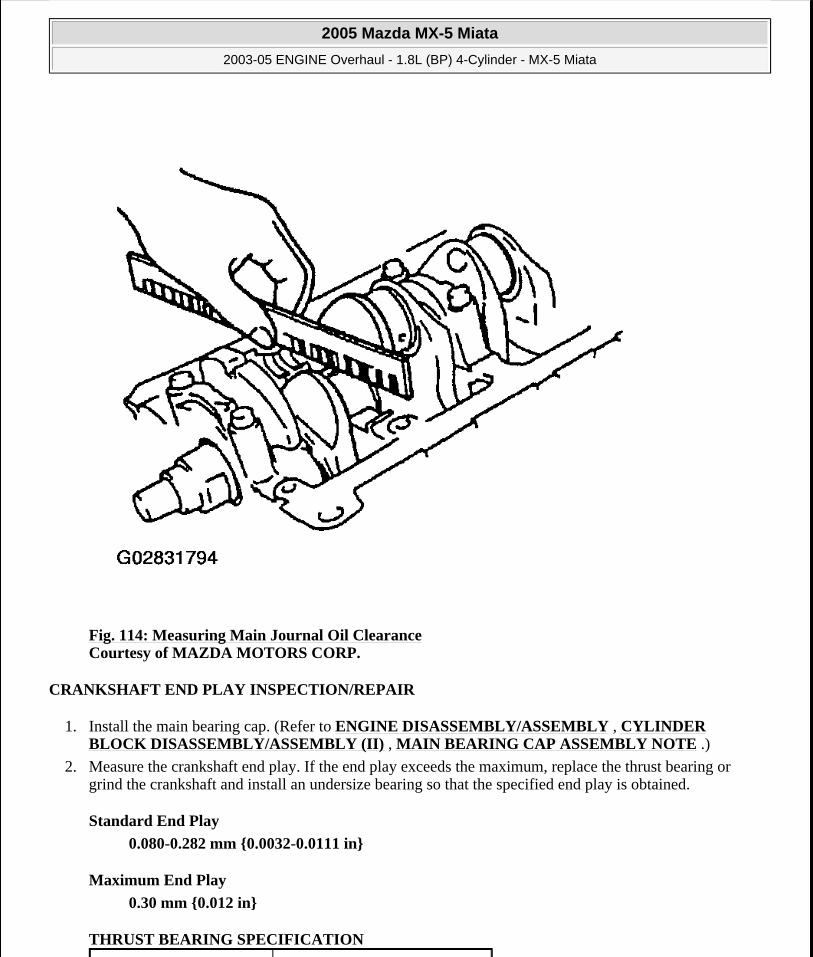
Fig. 114: Measuring Main Journal Oil Clearance Courtesy of MAZDA MOTORS CORP.
CRANKSHAFT END PLAY INSPECTION/REPAIR
1. Install the main bearing cap. (Refer to ENGINE DISASSEMBLY/ASSEMBLY , CYLINDER BLOCK DISASSEMBLY/ASSEMBLY (II) , MAIN BEARING CAP ASSEMBLY NOTE .)
2. Measure the crankshaft end play. If the end play exceeds the maximum, replace the thrust bearing or grind the crankshaft and install an undersize bearing so that the specified end play is obtained.
Standard End Play
0.080-0.282 mm {0.0032-0.0111 in}
Maximum End Play
0.30 mm {0.012 in}
THRUST BEARING SPECIFICATION
2005 Mazda MX-5 Miata
2003-05 ENGINE Overhaul - 1.8L (BP) 4-Cylinder - MX-5 Miata
Microsoft
Saturday, July 04, 2009 10:58:11 AM Page 117 © 2005 Mitchell Repair Information Company, LLC.
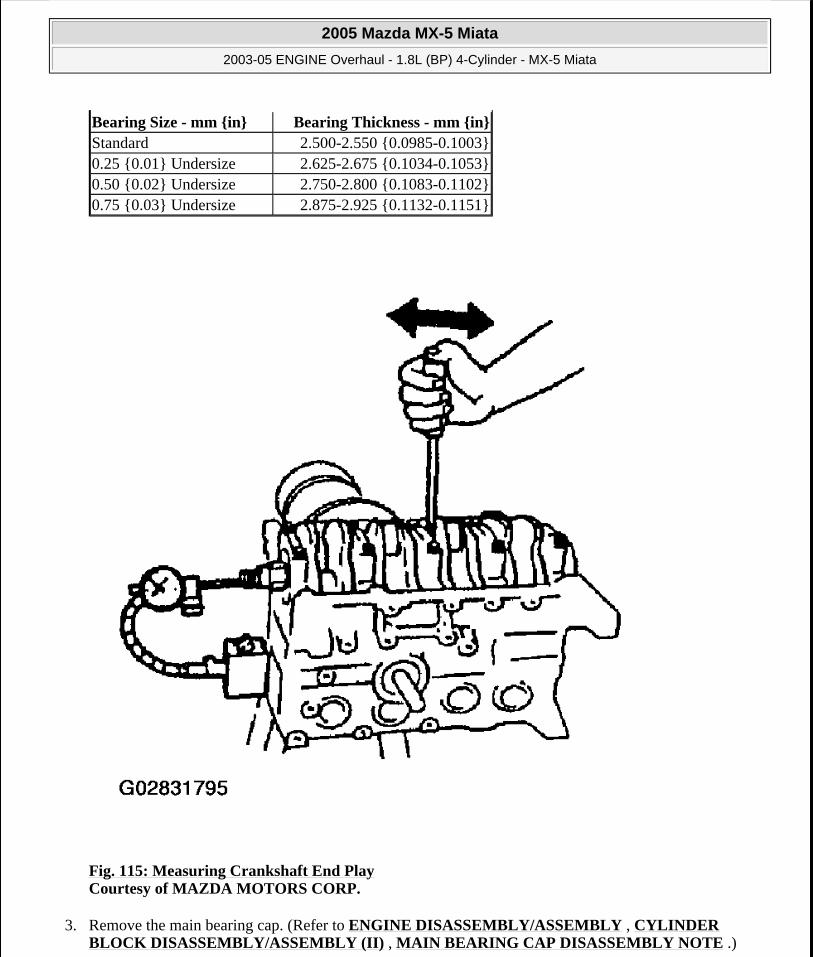
Fig. 115: Measuring Crankshaft End Play Courtesy of MAZDA MOTORS CORP.
3. Remove the main bearing cap. (Refer to ENGINE DISASSEMBLY/ASSEMBLY , CYLINDER BLOCK DISASSEMBLY/ASSEMBLY (II) , MAIN BEARING CAP DISASSEMBLY NOTE .)
Bearing Size - mm {in} Bearing Thickness - mm {in}Standard 2.500-2.550 {0.0985-0.1003}0.25 {0.01} Undersize 2.625-2.675 {0.1034-0.1053}0.50 {0.02} Undersize 2.750-2.800 {0.1083-0.1102}0.75 {0.03} Undersize 2.875-2.925 {0.1132-0.1151}
2005 Mazda MX-5 Miata
2003-05 ENGINE Overhaul - 1.8L (BP) 4-Cylinder - MX-5 Miata
Microsoft
Saturday, July 04, 2009 10:58:11 AM Page 118 © 2005 Mitchell Repair Information Company, LLC.
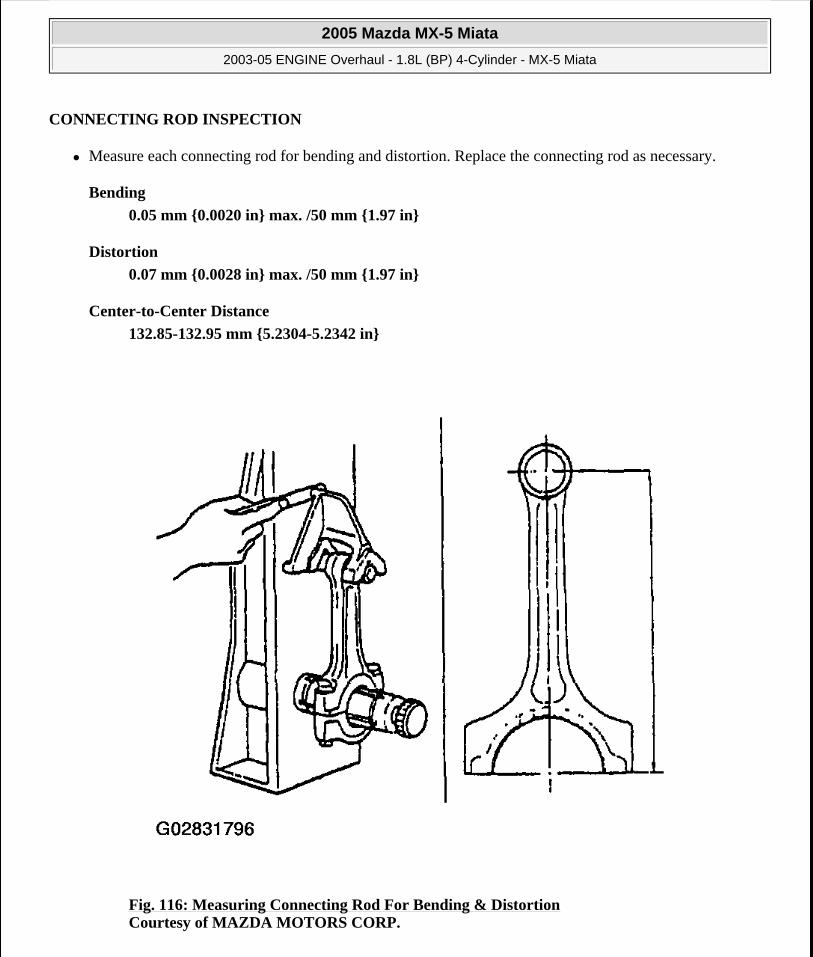
CONNECTING ROD INSPECTION
Measure each connecting rod for bending and distortion. Replace the connecting rod as necessary.
Bending
0.05 mm {0.0020 in} max. /50 mm {1.97 in}
Distortion
0.07 mm {0.0028 in} max. /50 mm {1.97 in}
Center-to-Center Distance
132.85-132.95 mm {5.2304-5.2342 in}
Fig. 116: Measuring Connecting Rod For Bending & Distortion Courtesy of MAZDA MOTORS CORP.
2005 Mazda MX-5 Miata
2003-05 ENGINE Overhaul - 1.8L (BP) 4-Cylinder - MX-5 Miata
Microsoft
Saturday, July 04, 2009 10:58:11 AM Page 119 © 2005 Mitchell Repair Information Company, LLC.
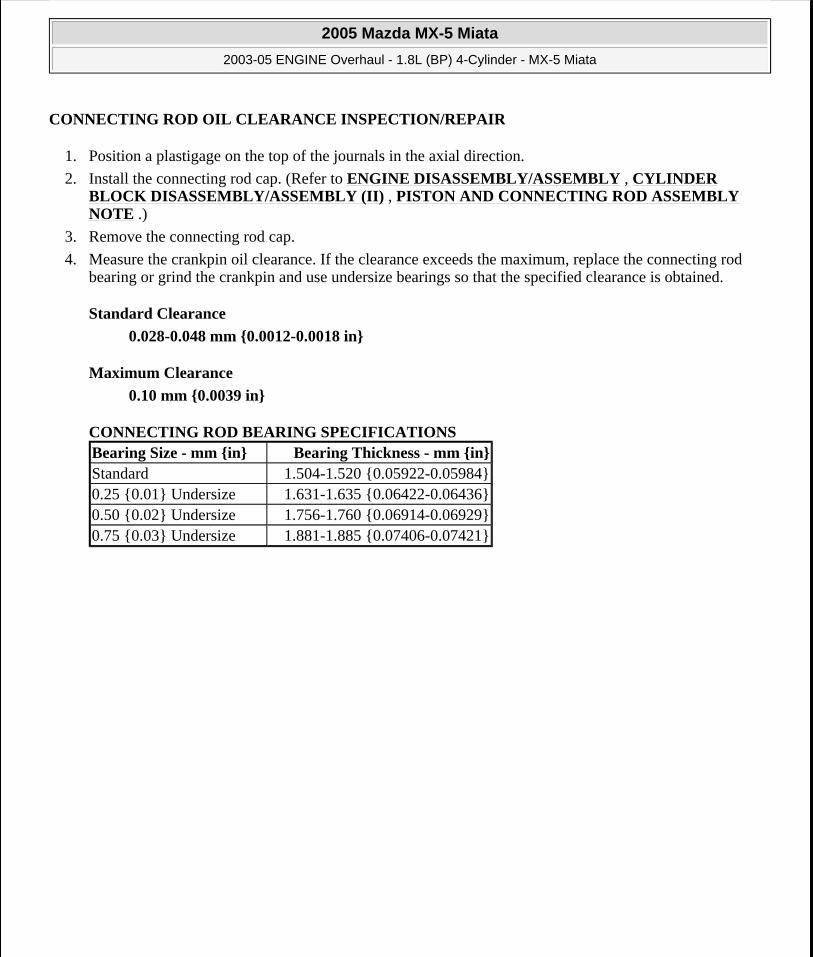
CONNECTING ROD OIL CLEARANCE INSPECTION/REPAIR
1. Position a plastigage on the top of the journals in the axial direction.
2. Install the connecting rod cap. (Refer to ENGINE DISASSEMBLY/ASSEMBLY , CYLINDER BLOCK DISASSEMBLY/ASSEMBLY (II) , PISTON AND CONNECTING ROD ASSEMBLY NOTE .)
3. Remove the connecting rod cap.
4. Measure the crankpin oil clearance. If the clearance exceeds the maximum, replace the connecting rod bearing or grind the crankpin and use undersize bearings so that the specified clearance is obtained.
Standard Clearance
0.028-0.048 mm {0.0012-0.0018 in}
Maximum Clearance
0.10 mm {0.0039 in}
CONNECTING ROD BEARING SPECIFICATIONS Bearing Size - mm {in} Bearing Thickness - mm {in}Standard 1.504-1.520 {0.05922-0.05984}0.25 {0.01} Undersize 1.631-1.635 {0.06422-0.06436}0.50 {0.02} Undersize 1.756-1.760 {0.06914-0.06929}0.75 {0.03} Undersize 1.881-1.885 {0.07406-0.07421}
2005 Mazda MX-5 Miata
2003-05 ENGINE Overhaul - 1.8L (BP) 4-Cylinder - MX-5 Miata
Microsoft
Saturday, July 04, 2009 10:58:11 AM Page 120 © 2005 Mitchell Repair Information Company, LLC.

Fig. 117: Measuring Crank Pin Rod Oil Clearance Courtesy of MAZDA MOTORS CORP.
CONNECTING ROD SIDE CLEARANCE INSPECTION
1. Install the connecting rod cap. (Refer to ENGINE DISASSEMBLY/ASSEMBLY , CYLINDER BLOCK DISASSEMBLY/ASSEMBLY (II) , PISTON AND CONNECTING ROD ASSEMBLY NOTE .)
2. Measure the connecting rod large end side clearance. Replace the connecting rod and cap as necessary.
Standard Clearance
0.110-0.262 mm {0.005-0.010 in}
Maximum Clearance
0.30 mm {0.012 in}
2005 Mazda MX-5 Miata
2003-05 ENGINE Overhaul - 1.8L (BP) 4-Cylinder - MX-5 Miata
Microsoft
Saturday, July 04, 2009 10:58:11 AM Page 121 © 2005 Mitchell Repair Information Company, LLC.

Fig. 118: Measuring Connecting Rod Clearance Courtesy of MAZDA MOTORS CORP.
3. Remove the connecting rod cap.
PISTON AND CONNECTING ROD INSPECTION
Inspect the oscillation torque as shown. If the large end does not drop by its own weight, replace the piston or the piston pin.
2005 Mazda MX-5 Miata
2003-05 ENGINE Overhaul - 1.8L (BP) 4-Cylinder - MX-5 Miata
Microsoft
Saturday, July 04, 2009 10:58:11 AM Page 122 © 2005 Mitchell Repair Information Company, LLC.
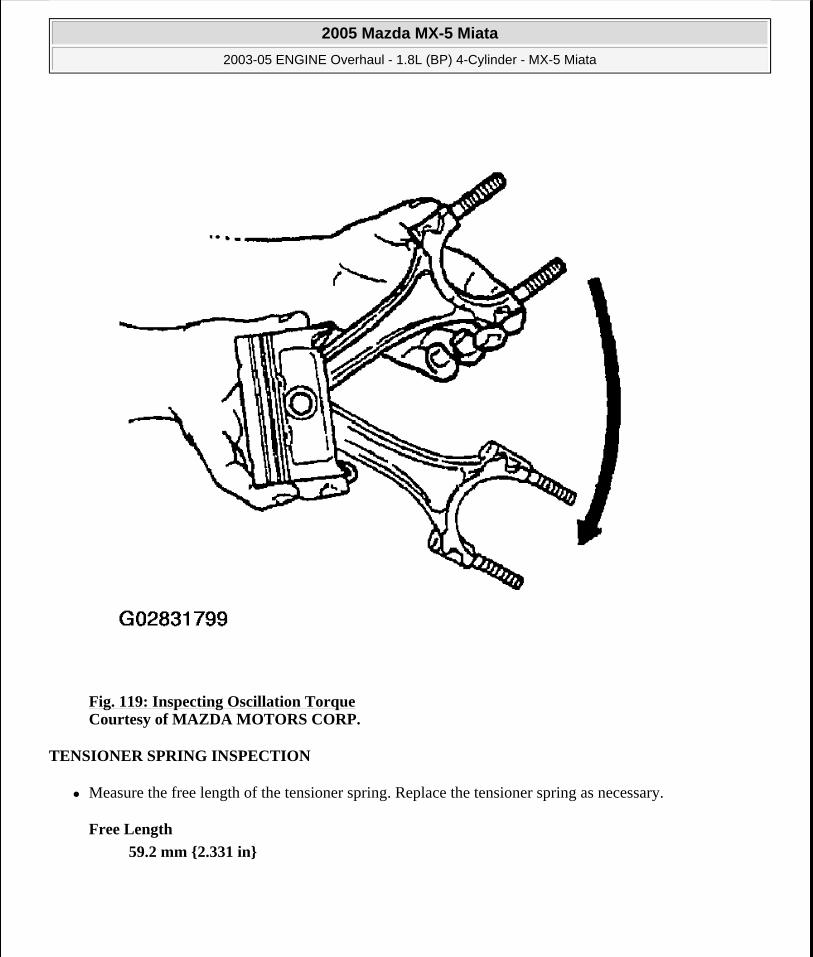
Fig. 119: Inspecting Oscillation Torque Courtesy of MAZDA MOTORS CORP.
TENSIONER SPRING INSPECTION
Measure the free length of the tensioner spring. Replace the tensioner spring as necessary.
Free Length
59.2 mm {2.331 in}
2005 Mazda MX-5 Miata
2003-05 ENGINE Overhaul - 1.8L (BP) 4-Cylinder - MX-5 Miata
Microsoft
Saturday, July 04, 2009 10:58:11 AM Page 123 © 2005 Mitchell Repair Information Company, LLC.
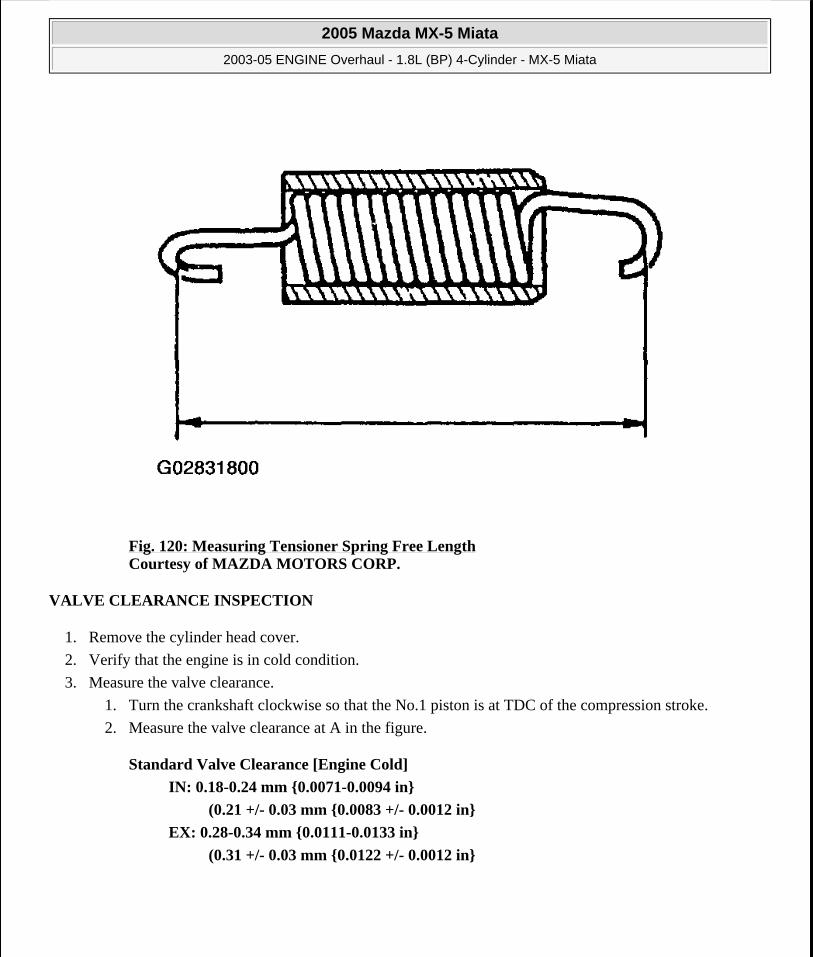
Fig. 120: Measuring Tensioner Spring Free Length Courtesy of MAZDA MOTORS CORP.
VALVE CLEARANCE INSPECTION
1. Remove the cylinder head cover.
2. Verify that the engine is in cold condition.
3. Measure the valve clearance.
1. Turn the crankshaft clockwise so that the No.1 piston is at TDC of the compression stroke.
2. Measure the valve clearance at A in the figure.
Standard Valve Clearance [Engine Cold]
IN: 0.18-0.24 mm {0.0071-0.0094 in}
(0.21 +/- 0.03 mm {0.0083 +/- 0.0012 in}
EX: 0.28-0.34 mm {0.0111-0.0133 in}
(0.31 +/- 0.03 mm {0.0122 +/- 0.0012 in}
2005 Mazda MX-5 Miata
2003-05 ENGINE Overhaul - 1.8L (BP) 4-Cylinder - MX-5 Miata
Microsoft
Saturday, July 04, 2009 10:58:11 AM Page 124 © 2005 Mitchell Repair Information Company, LLC.

Fig. 121: Identifying Measurement Points Courtesy of MAZDA MOTORS CORP.
2005 Mazda MX-5 Miata
2003-05 ENGINE Overhaul - 1.8L (BP) 4-Cylinder - MX-5 Miata
Microsoft
Saturday, July 04, 2009 10:58:11 AM Page 125 © 2005 Mitchell Repair Information Company, LLC.

Fig. 122: Measuring Valve Clearance Courtesy of MAZDA MOTORS CORP.
3. If the valve clearance exceeds the standard, replace the adjustment shim. (Refer to VALVE CLEARANCE ADJUSTMENT .)
4. Turn the crankshaft 360° clockwise so that the No.4 piston is at TDC of the compression stroke.
5. Measure the valve clearance at B in the figure.
Standard Valve Clearance [Engine Cold]
IN: 0.18-0.24 mm {0.0071-0.0094 in}
(0.21 +/- 0.03 mm {0.0083 +/- 0.0012 in}
EX: 0.28-0.34 mm {0.0111-0.0133 in}
(0.31 +/- 0.03 mm {0.0122 +/- 0.0012 in}
6. If the valve clearance exceeds the standard, replace the adjustment shim. (Refer to VALVE
2005 Mazda MX-5 Miata
2003-05 ENGINE Overhaul - 1.8L (BP) 4-Cylinder - MX-5 Miata
Microsoft
Saturday, July 04, 2009 10:58:11 AM Page 126 © 2005 Mitchell Repair Information Company, LLC.
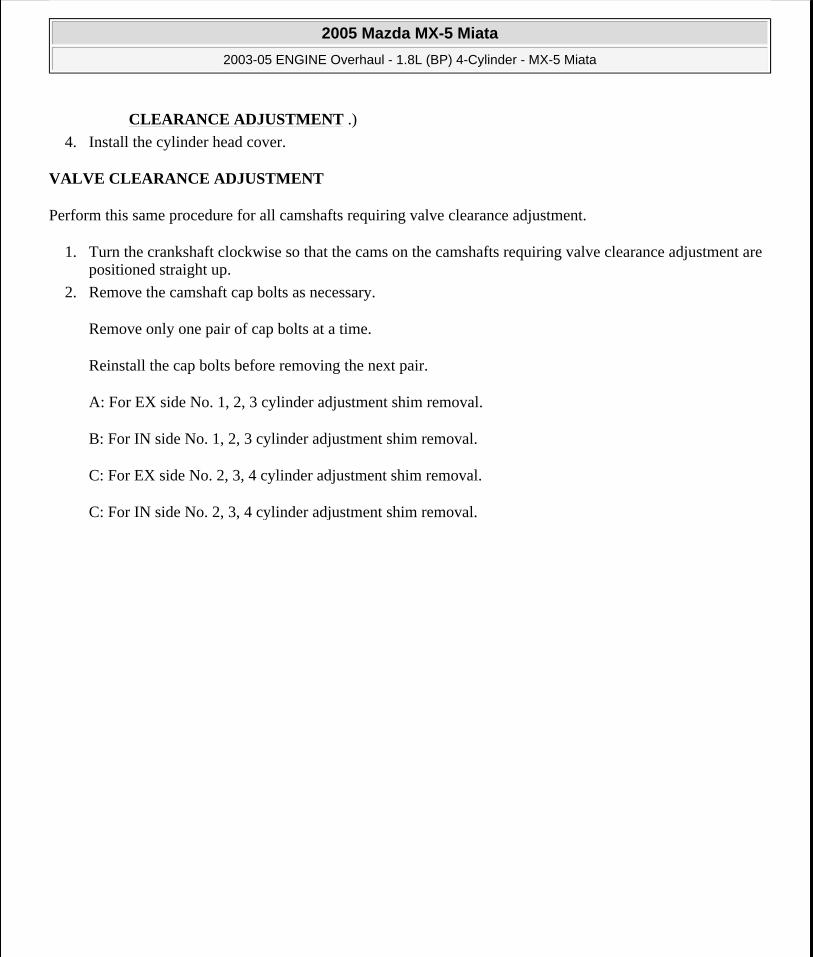
CLEARANCE ADJUSTMENT .)
4. Install the cylinder head cover.
VALVE CLEARANCE ADJUSTMENT
Perform this same procedure for all camshafts requiring valve clearance adjustment.
1. Turn the crankshaft clockwise so that the cams on the camshafts requiring valve clearance adjustment are positioned straight up.
2. Remove the camshaft cap bolts as necessary.
Remove only one pair of cap bolts at a time.
Reinstall the cap bolts before removing the next pair.
A: For EX side No. 1, 2, 3 cylinder adjustment shim removal.
B: For IN side No. 1, 2, 3 cylinder adjustment shim removal.
C: For EX side No. 2, 3, 4 cylinder adjustment shim removal.
C: For IN side No. 2, 3, 4 cylinder adjustment shim removal.
2005 Mazda MX-5 Miata
2003-05 ENGINE Overhaul - 1.8L (BP) 4-Cylinder - MX-5 Miata
Microsoft
Saturday, July 04, 2009 10:58:11 AM Page 127 © 2005 Mitchell Repair Information Company, LLC.

Fig. 123: Valve Adjustment Identification Courtesy of MAZDA MOTORS CORP.
3. Install the SSTs on the camshaft using the camshaft cap bolt holes.
Tightening Torque
11.3-14.2 N.m {115-145 kgf.cm, 100-125 in.lbf}
NOTE: For EX side No.2, 3 cylinder adjustment shim removal, remove bolts either A or C.
For IN side No.2, 3 cylinder adjustment shim removal, remove bolts either B or D.
2005 Mazda MX-5 Miata
2003-05 ENGINE Overhaul - 1.8L (BP) 4-Cylinder - MX-5 Miata
Microsoft
Saturday, July 04, 2009 10:58:12 AM Page 128 © 2005 Mitchell Repair Information Company, LLC.

Fig. 124: Installing Camshaft SSTs Courtesy of MAZDA MOTORS CORP.
2005 Mazda MX-5 Miata
2003-05 ENGINE Overhaul - 1.8L (BP) 4-Cylinder - MX-5 Miata
Microsoft
Saturday, July 04, 2009 10:58:12 AM Page 129 © 2005 Mitchell Repair Information Company, LLC.

Fig. 125: Installing Camshaft SSTs Courtesy of MAZDA MOTORS CORP.
4. Align the marks on the SSTs (shaft and shaft clamp).
5. Tighten bolts A to secure the SST (shaft).
2005 Mazda MX-5 Miata
2003-05 ENGINE Overhaul - 1.8L (BP) 4-Cylinder - MX-5 Miata
Microsoft
Saturday, July 04, 2009 10:58:12 AM Page 130 © 2005 Mitchell Repair Information Company, LLC.

Fig. 126: Identifying SST Bolt A Courtesy of MAZDA MOTORS CORP.
6. Face the SST (body) outside of the cylinder head, and mount it on the SST (shaft) at the point of the adjustment shim to be replaced.
2005 Mazda MX-5 Miata
2003-05 ENGINE Overhaul - 1.8L (BP) 4-Cylinder - MX-5 Miata
Microsoft
Saturday, July 04, 2009 10:58:12 AM Page 131 © 2005 Mitchell Repair Information Company, LLC.

Fig. 127: Mounting SST Courtesy of MAZDA MOTORS CORP.
7. Face the notch of the tappet so that a fine screwdriver can be installed.
2005 Mazda MX-5 Miata
2003-05 ENGINE Overhaul - 1.8L (BP) 4-Cylinder - MX-5 Miata
Microsoft
Saturday, July 04, 2009 10:58:12 AM Page 132 © 2005 Mitchell Repair Information Company, LLC.

Fig. 128: Identifying Tappet Notch Courtesy of MAZDA MOTORS CORP.
8. Set the SST on the tappet by its notch.
9. Tighten bolt B to secure the SST (body).
CAUTION: Cylinder head can be damaged when the tappet is pressed down.
2005 Mazda MX-5 Miata
2003-05 ENGINE Overhaul - 1.8L (BP) 4-Cylinder - MX-5 Miata
Microsoft
Saturday, July 04, 2009 10:58:12 AM Page 133 © 2005 Mitchell Repair Information Company, LLC.
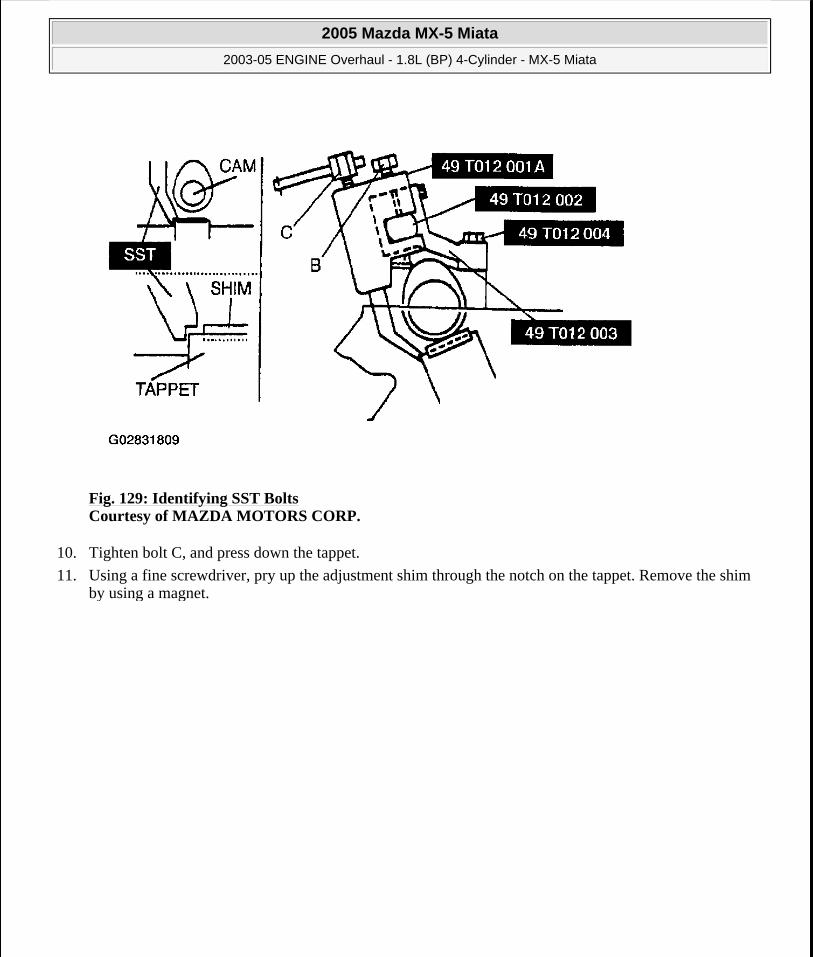
Fig. 129: Identifying SST Bolts Courtesy of MAZDA MOTORS CORP.
10. Tighten bolt C, and press down the tappet.
11. Using a fine screwdriver, pry up the adjustment shim through the notch on the tappet. Remove the shim by using a magnet.
2005 Mazda MX-5 Miata
2003-05 ENGINE Overhaul - 1.8L (BP) 4-Cylinder - MX-5 Miata
Microsoft
Saturday, July 04, 2009 10:58:12 AM Page 134 © 2005 Mitchell Repair Information Company, LLC.

Fig. 130: Prying Up Adjustment Shim Courtesy of MAZDA MOTORS CORP.
12. Select proper adjustment shim.
New Adjustment Shim
= Removed Shim Thickness + Measured Valve Clearance - Standard Valve Clearance (IN: 0.21 mm {0.0111 in}, EX: 0.31 mm {0.0122 in})
13. Push the selected shim into the tappet.
14. Loosen bolt C to allow the tappet to move up.
15. Loosen bolt B and remove the SST (body).
16. Remove the SSTs and tighten the camshaft cap bolts.
Tightening Torque
11.3-14.2 N.m {115-145 kgf.cm, 100-125 in.lbf}
17. Inspect for the valve clearance. (Refer to VALVE CLEARANCE ADJUSTMENT , VALVE CLEARANCE INSPECTION .)
TORQUE SPECIFICATIONS
2005 Mazda MX-5 Miata
2003-05 ENGINE Overhaul - 1.8L (BP) 4-Cylinder - MX-5 Miata
Microsoft
Saturday, July 04, 2009 10:58:12 AM Page 135 © 2005 Mitchell Repair Information Company, LLC.
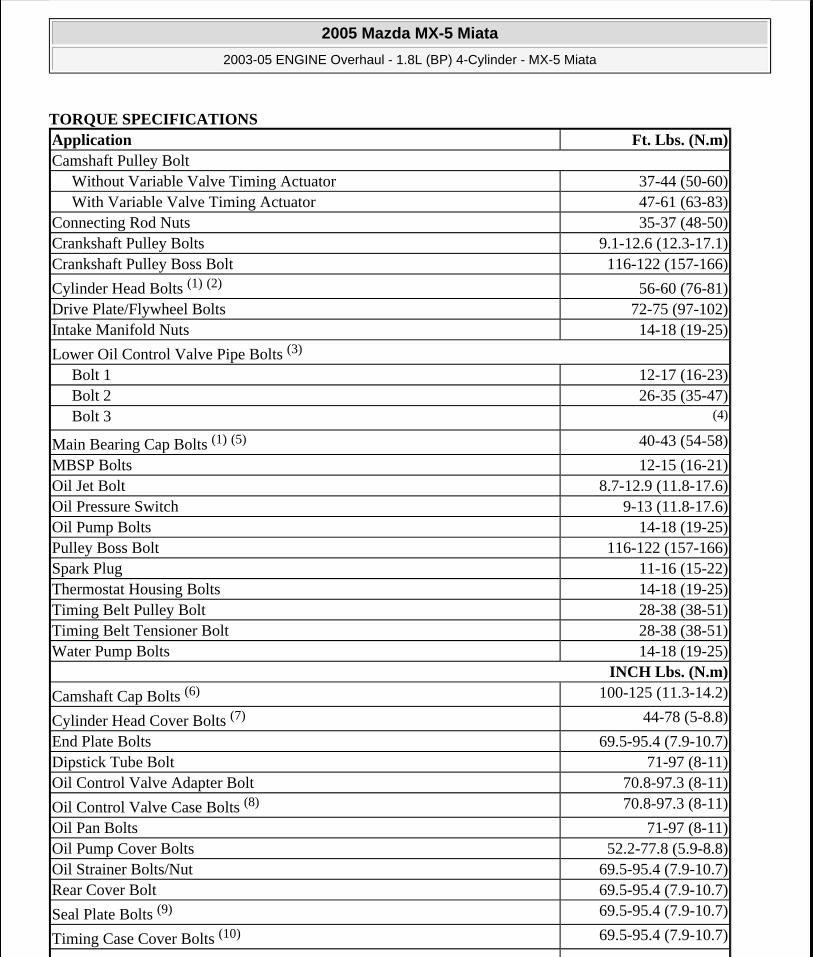
TORQUE SPECIFICATIONS Application Ft. Lbs. (N.m)Camshaft Pulley Bolt
Without Variable Valve Timing Actuator 37-44 (50-60)With Variable Valve Timing Actuator 47-61 (63-83)
Connecting Rod Nuts 35-37 (48-50)Crankshaft Pulley Bolts 9.1-12.6 (12.3-17.1)Crankshaft Pulley Boss Bolt 116-122 (157-166)
Cylinder Head Bolts (1) (2) 56-60 (76-81)Drive Plate/Flywheel Bolts 72-75 (97-102)Intake Manifold Nuts 14-18 (19-25)
Lower Oil Control Valve Pipe Bolts (3) Bolt 1 12-17 (16-23)Bolt 2 26-35 (35-47)Bolt 3 (4)
Main Bearing Cap Bolts (1) (5) 40-43 (54-58)
MBSP Bolts 12-15 (16-21)Oil Jet Bolt 8.7-12.9 (11.8-17.6)Oil Pressure Switch 9-13 (11.8-17.6)Oil Pump Bolts 14-18 (19-25)Pulley Boss Bolt 116-122 (157-166)Spark Plug 11-16 (15-22)Thermostat Housing Bolts 14-18 (19-25)Timing Belt Pulley Bolt 28-38 (38-51)Timing Belt Tensioner Bolt 28-38 (38-51)Water Pump Bolts 14-18 (19-25)
INCH Lbs. (N.m)
Camshaft Cap Bolts (6) 100-125 (11.3-14.2)
Cylinder Head Cover Bolts (7) 44-78 (5-8.8)
End Plate Bolts 69.5-95.4 (7.9-10.7)Dipstick Tube Bolt 71-97 (8-11)Oil Control Valve Adapter Bolt 70.8-97.3 (8-11)
Oil Control Valve Case Bolts (8) 70.8-97.3 (8-11)
Oil Pan Bolts 71-97 (8-11)Oil Pump Cover Bolts 52.2-77.8 (5.9-8.8)Oil Strainer Bolts/Nut 69.5-95.4 (7.9-10.7)Rear Cover Bolt 69.5-95.4 (7.9-10.7)
Seal Plate Bolts (9) 69.5-95.4 (7.9-10.7)
Timing Case Cover Bolts (10) 69.5-95.4 (7.9-10.7)
2005 Mazda MX-5 Miata
2003-05 ENGINE Overhaul - 1.8L (BP) 4-Cylinder - MX-5 Miata
Microsoft
Saturday, July 04, 2009 10:58:12 AM Page 136 © 2005 Mitchell Repair Information Company, LLC.
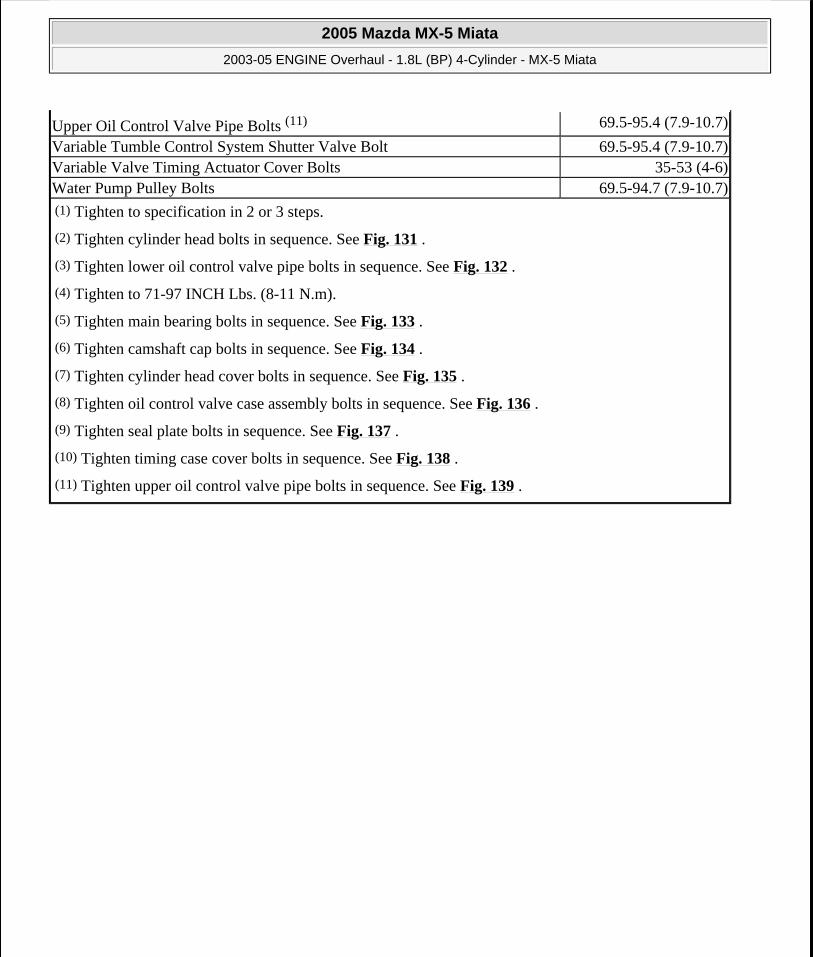
Upper Oil Control Valve Pipe Bolts (11) 69.5-95.4 (7.9-10.7)
Variable Tumble Control System Shutter Valve Bolt 69.5-95.4 (7.9-10.7)Variable Valve Timing Actuator Cover Bolts 35-53 (4-6)Water Pump Pulley Bolts 69.5-94.7 (7.9-10.7)(1) Tighten to specification in 2 or 3 steps.
(2) Tighten cylinder head bolts in sequence. See Fig. 131 .
(3) Tighten lower oil control valve pipe bolts in sequence. See Fig. 132 .
(4) Tighten to 71-97 INCH Lbs. (8-11 N.m).
(5) Tighten main bearing bolts in sequence. See Fig. 133 .
(6) Tighten camshaft cap bolts in sequence. See Fig. 134 .
(7) Tighten cylinder head cover bolts in sequence. See Fig. 135 .
(8) Tighten oil control valve case assembly bolts in sequence. See Fig. 136 .
(9) Tighten seal plate bolts in sequence. See Fig. 137 .
(10) Tighten timing case cover bolts in sequence. See Fig. 138 .
(11) Tighten upper oil control valve pipe bolts in sequence. See Fig. 139 .
2005 Mazda MX-5 Miata
2003-05 ENGINE Overhaul - 1.8L (BP) 4-Cylinder - MX-5 Miata
Microsoft
Saturday, July 04, 2009 10:58:12 AM Page 137 © 2005 Mitchell Repair Information Company, LLC.
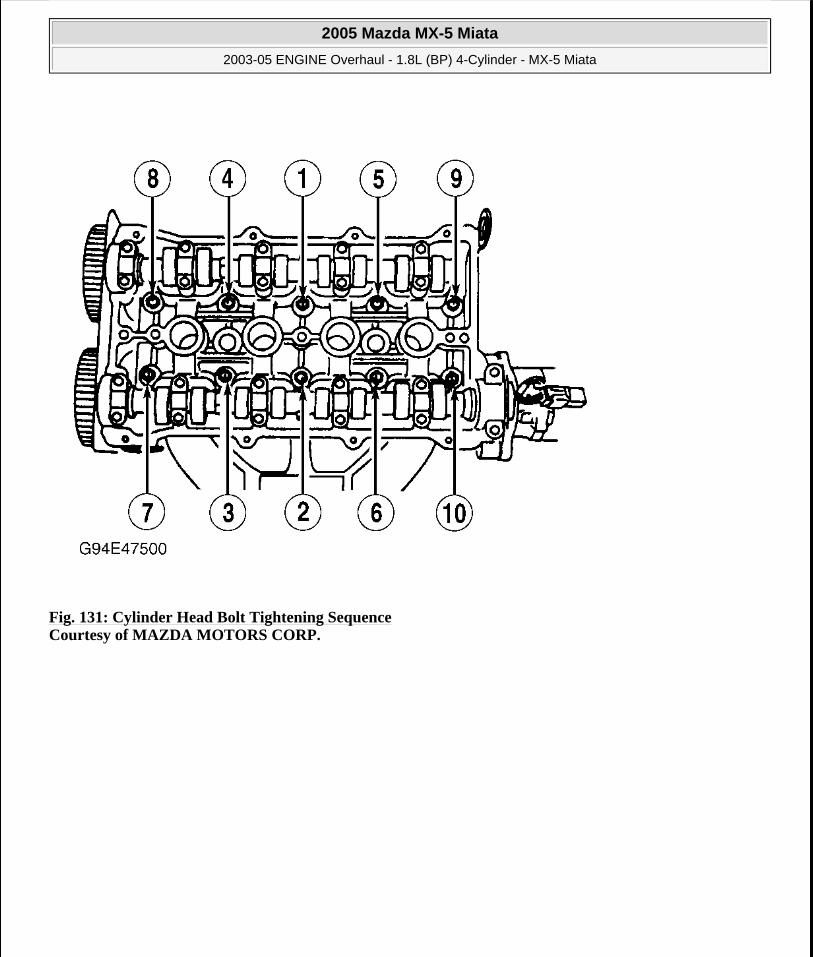
Fig. 131: Cylinder Head Bolt Tightening Sequence Courtesy of MAZDA MOTORS CORP.
2005 Mazda MX-5 Miata
2003-05 ENGINE Overhaul - 1.8L (BP) 4-Cylinder - MX-5 Miata
Microsoft
Saturday, July 04, 2009 10:58:12 AM Page 138 © 2005 Mitchell Repair Information Company, LLC.

Fig. 132: Lower Oil Control Valve Pipe Bolt Tightening Sequence Courtesy of MAZDA MOTORS CORP.
2005 Mazda MX-5 Miata
2003-05 ENGINE Overhaul - 1.8L (BP) 4-Cylinder - MX-5 Miata
Microsoft
Saturday, July 04, 2009 10:58:12 AM Page 139 © 2005 Mitchell Repair Information Company, LLC.
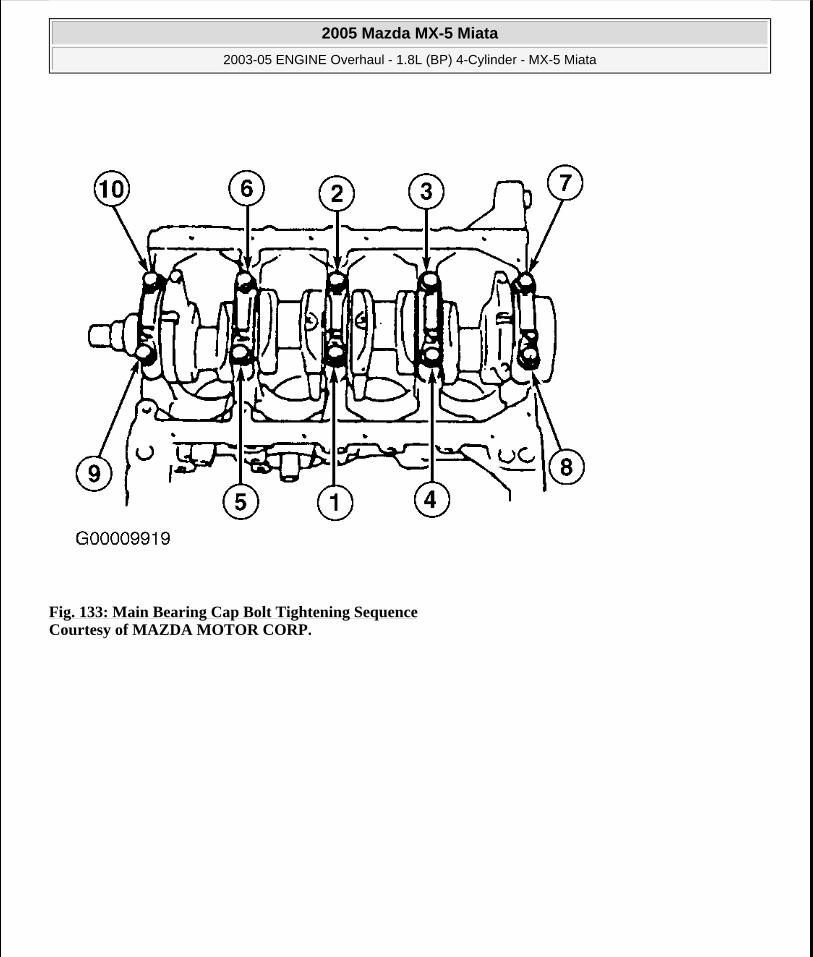
Fig. 133: Main Bearing Cap Bolt Tightening Sequence Courtesy of MAZDA MOTOR CORP.
2005 Mazda MX-5 Miata
2003-05 ENGINE Overhaul - 1.8L (BP) 4-Cylinder - MX-5 Miata
Microsoft
Saturday, July 04, 2009 10:58:12 AM Page 140 © 2005 Mitchell Repair Information Company, LLC.

Fig. 134: Camshaft Cap Bolt Tightening Sequence Courtesy of MAZDA MOTORS CORP.
2005 Mazda MX-5 Miata
2003-05 ENGINE Overhaul - 1.8L (BP) 4-Cylinder - MX-5 Miata
Microsoft
Saturday, July 04, 2009 10:58:12 AM Page 141 © 2005 Mitchell Repair Information Company, LLC.
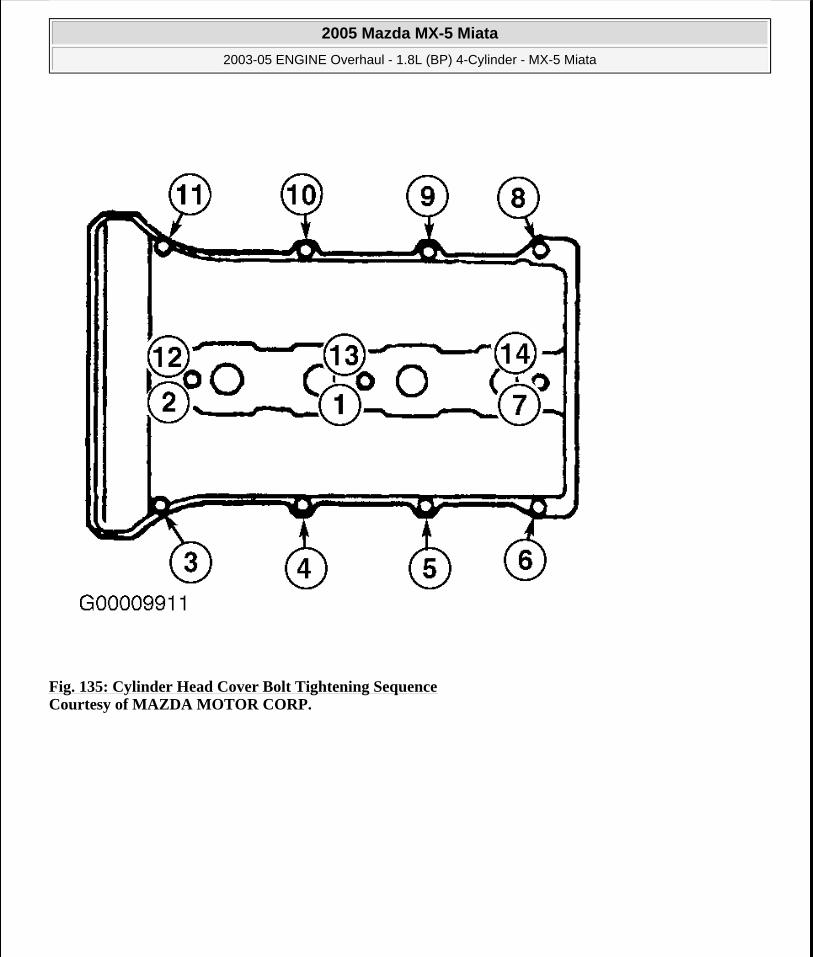
Fig. 135: Cylinder Head Cover Bolt Tightening Sequence Courtesy of MAZDA MOTOR CORP.
2005 Mazda MX-5 Miata
2003-05 ENGINE Overhaul - 1.8L (BP) 4-Cylinder - MX-5 Miata
Microsoft
Saturday, July 04, 2009 10:58:12 AM Page 142 © 2005 Mitchell Repair Information Company, LLC.
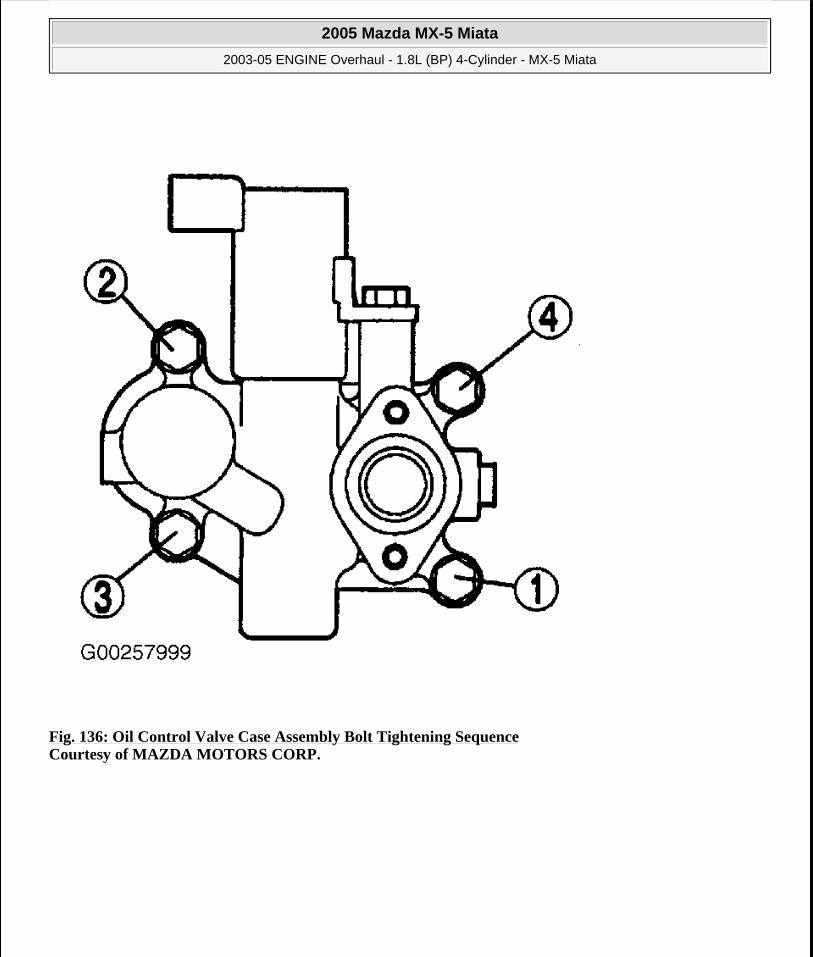
Fig. 136: Oil Control Valve Case Assembly Bolt Tightening Sequence Courtesy of MAZDA MOTORS CORP.
2005 Mazda MX-5 Miata
2003-05 ENGINE Overhaul - 1.8L (BP) 4-Cylinder - MX-5 Miata
Microsoft
Saturday, July 04, 2009 10:58:12 AM Page 143 © 2005 Mitchell Repair Information Company, LLC.
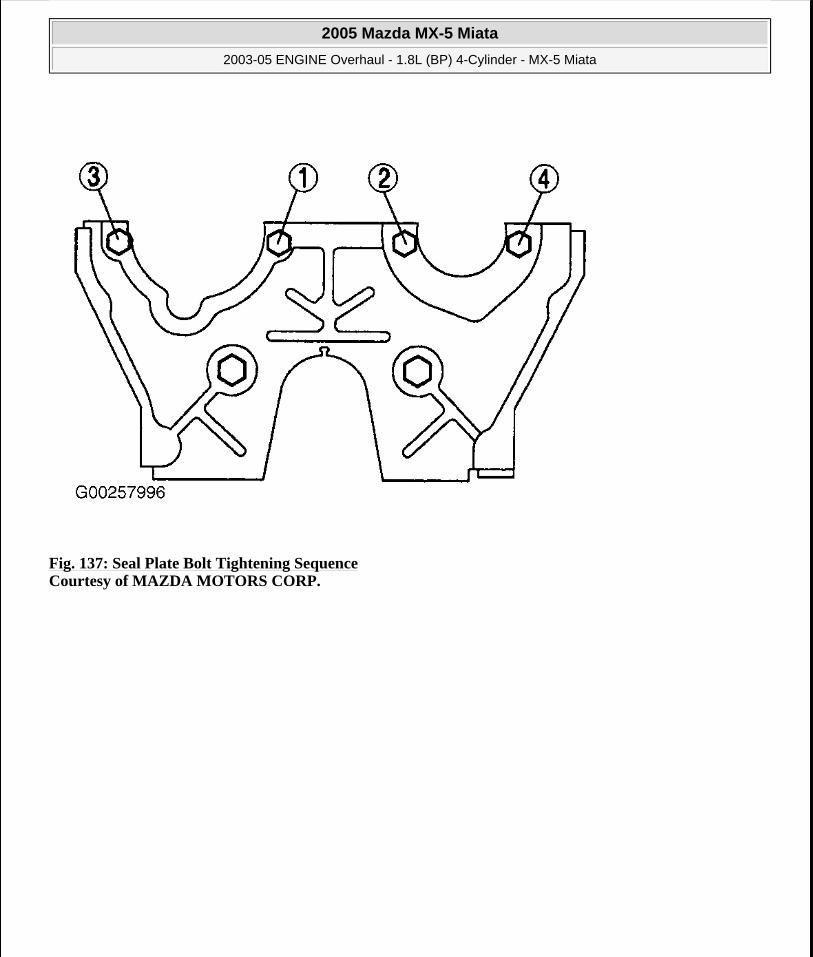
Fig. 137: Seal Plate Bolt Tightening Sequence Courtesy of MAZDA MOTORS CORP.
2005 Mazda MX-5 Miata
2003-05 ENGINE Overhaul - 1.8L (BP) 4-Cylinder - MX-5 Miata
Microsoft
Saturday, July 04, 2009 10:58:12 AM Page 144 © 2005 Mitchell Repair Information Company, LLC.

Fig. 138: Timing Case Cover Bolt Tightening Sequence Courtesy of MAZDA MOTORS CORP.
2005 Mazda MX-5 Miata
2003-05 ENGINE Overhaul - 1.8L (BP) 4-Cylinder - MX-5 Miata
Microsoft
Saturday, July 04, 2009 10:58:12 AM Page 145 © 2005 Mitchell Repair Information Company, LLC.
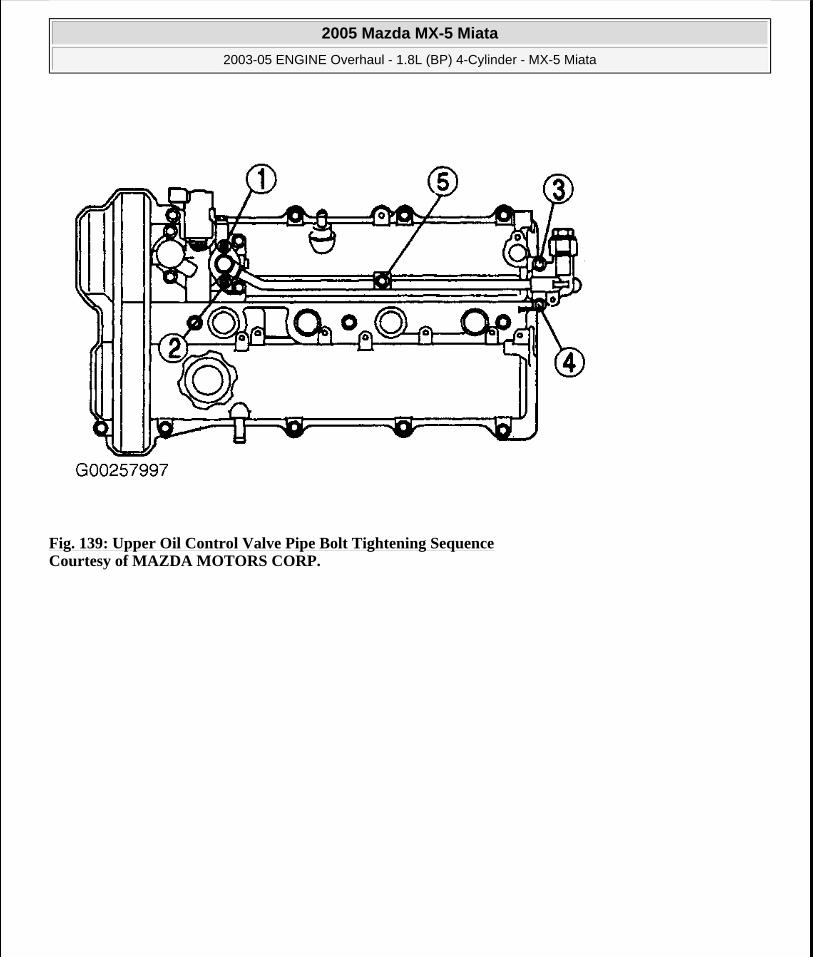
Fig. 139: Upper Oil Control Valve Pipe Bolt Tightening Sequence Courtesy of MAZDA MOTORS CORP.
2005 Mazda MX-5 Miata
2003-05 ENGINE Overhaul - 1.8L (BP) 4-Cylinder - MX-5 Miata
Microsoft
Saturday, July 04, 2009 10:58:12 AM Page 146 © 2005 Mitchell Repair Information Company, LLC.