end cap isometric drawing step by step guide · draw lines 10mm up from each corner of the 19mm...
TRANSCRIPT
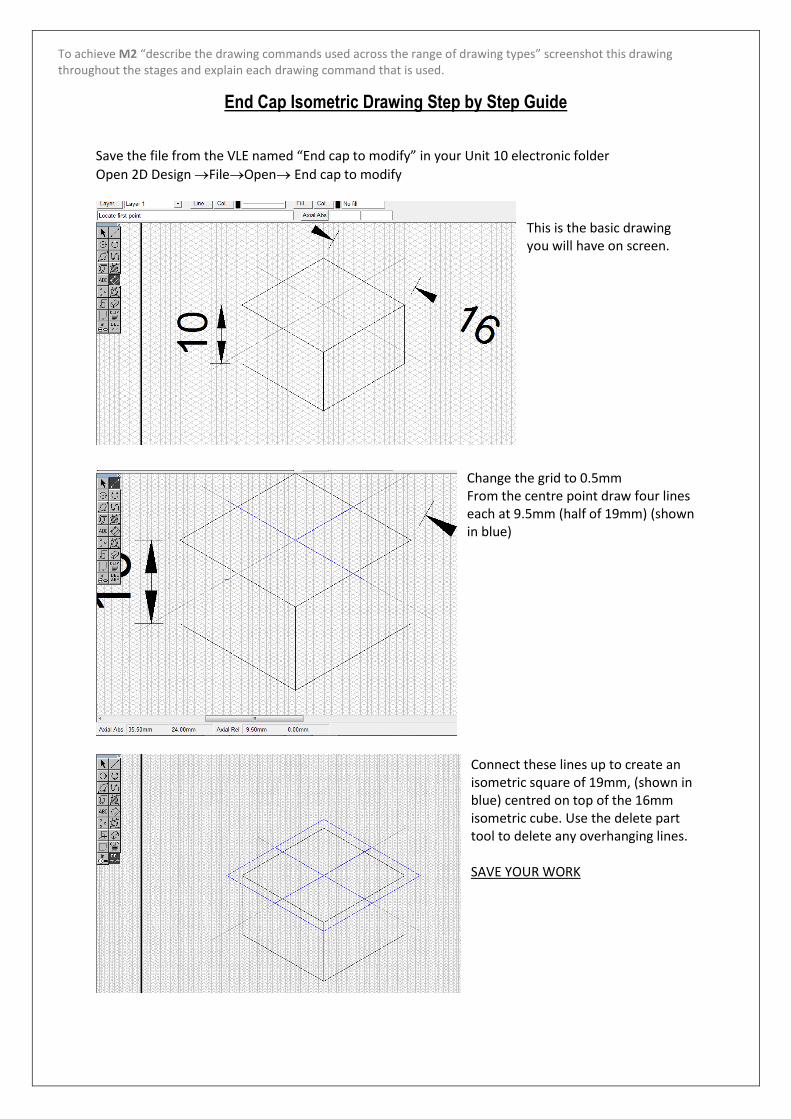
To achieve M2 “describe the drawing commands used across the range of drawing types” screenshot this drawing throughout the stages and explain each drawing command that is used.
End Cap Isometric Drawing Step by Step Guide
Save the file from the VLE named “End cap to modify” in your Unit 10 electronic folder
Open 2D Design FileOpen End cap to modify This is the basic drawing you will have on screen.
Change the grid to 0.5mm From the centre point draw four lines each at 9.5mm (half of 19mm) (shown in blue)
Connect these lines up to create an isometric square of 19mm, (shown in blue) centred on top of the 16mm isometric cube. Use the delete part tool to delete any overhanging lines. SAVE YOUR WORK

To achieve M2 “describe the drawing commands used across the range of drawing types” screenshot this drawing throughout the stages and explain each drawing command that is used.
Draw lines 10mm up from each corner of the 19mm isometric square to create an isometric cube (shown in blue) centred on top of the 16mm isometric cube.
Measure 0.5mm in from the 19mm square, using the grid. Draw an inner square which will measure 18mm (this is to show the 1mm chamfer).
Your drawing should look like the one above; the next step is to make the End Cap round. SAVE YOUR WORK
Notice the isometric square forms a parallelogram. Select the shapes tool and select the ellipsoid to fit inside a parallelogram option.

To achieve M2 “describe the drawing commands used across the range of drawing types” screenshot this drawing throughout the stages and explain each drawing command that is used.
Place the cursor in the corner of the bottom isometric square and drag the cursor to the next corner. Next drag the tool up to the parallel line of the square and click to form your isometric circle. Notice all four edges of the isometric square meet the four sides of the circle.
Repeat this process, drawing an ellipse in every isometric square. SAVE YOUR WORK To achieve M2 “describe the drawing commands used across the range of drawing types” screenshot the use of the ellipse tool and explain why you are using it.
Add contour lines from the corner of every isometric square (shown here in orange)
Delete the isometric squares to leave only the construction lines and ellipses. SAVE YOUR WORK

To achieve M2 “describe the drawing commands used across the range of drawing types” screenshot this drawing throughout the stages and explain each drawing command that is used.
Turn off the grid lock. Select the line tool and zoom in to position 1 as shown. Once you have clicked on position 1, select the step lock tool and drag the cursor to position 2. Repeat this to connect up all of the ellipses to form a solid shape.
To achieve M2 “describe the drawing commands used across the range of drawing types” screenshot the use of the step lock tool and explain why you are using it.
Turn all outlines to black,
thick and 0.5mm Adjust all other lines
appropriately.
SAVE YOUR WORK
You can now change the scale to 1:4 and complete the page by editing the template. SAVE YOUR WORK as “End Cap Complete” (Keep the original file also as this is saved as scale 1:1) Extension Activity Open your competed end cap drawing (scale 1:1) Create an orthographic drawing and place your isomeric view on the page as an added view. You will need to change the grid back to “orthogonal”.
1
2