edius for final cut pro editors - grass valley · application note edius for final cut pro editors ...
TRANSCRIPT

EDIUS for Final Cut Pro Editors Gavin Lucas, Onscreentraining www.onscreentraining.com
October 2013

APPLICATION NOTE EDIUS FOR FINAL CUT PRO EDITORS
2www.grassvalley.com
Waiting for table of contents

APPLICATION NOTE EDIUS FOR FINAL CUT PRO EDITORS
3www.grassvalley.com
About This Overview
T hese notes give you everything you need to translate your existing Apple Final Cut Pro (FCP) editing skills into Grass Valley, a Belden Brand, EDIUS editing skills. You will find EDIUS quick and easy to learn, with several features that go beyond the tools FCP offers.
This document is intended specifically for FCP editors and is based on EDIUS 7. However, users of any editing system will find this infor-mation valuable as a quick way of getting to know EDIUS, without long explanations of technologies you are already familiar with.
Tip: As a perfect addition to this guide, if you visit www.onscreentraining.com you can find an free video tutorial for Mac OS X, Win-dows and Apple iPad that covers many relevant EDIUS 7 basics and techniques in detail.
Similarities and DifferencesBoth systems have:
• Similar basic window layouts
• Certain shared key commands such as “I” for mark in and “O” for mark out, and JKL navigation
• Applying effects via drag-and-drop
• 3- and 4-point editing
• Mono and stereo audio tracks
• A browser window with sub-sections for storing and organizing media files
Only EDIUS has:
• Combined video+audio tracks (VA tracks)
• Dedicated title tracks for graphic and stills media
• Native, real-time support for almost any media format without needing to transcode
• A dedicated Source Browser for browsing file-based camera media (like P2)
• A dedicated marker palette with functions to export and import markers
• Monitor overlays with audio level
• A seamless interface, with no wasted space
Summary
Anyone who has worked with Final Cut Pro will find their way around EDIUS 7 easily due to the similarity of many editing functions and the comparable program layout.
Editors who have experience with Final Cut Pro will appreciate radically improved performance in certain areas, especially when dealing with real time native editing of a wide range of video formats.

APPLICATION NOTE EDIUS FOR FINAL CUT PRO EDITORS
4www.grassvalley.com
The Most Important Final Cut Pro Elements and their Counterparts in EDIUSIn this section we will look at certain familiar features of FCP and compare features and discuss the differences with their counterparts in EDIUS.
Here we have the standard EDIUS layout that appears when starting the program (the standard single monitor layout).
Immediately we can see that the layout has a lot of similarities. We could say that both interfaces are divided into three main sections.
1. The region in which material (clips, video, audio, images) is stored and organized.
2. The preview section.
3. The timeline, in which the clips are arranged.

APPLICATION NOTE EDIUS FOR FINAL CUT PRO EDITORS
5www.grassvalley.com
The Most Important Final Cut Pro Elements and their Counterparts in EDIUS (cont.)
EDIUS Asset Bin Window — equivalent to the FCP Browser
EDIUS Player and Recorder Window — equivalent to the Final Cut Viewer and Canvas
In FCP we have two preview windows. The Viewer to see the clips we wish to insert and Canvas to show the contents of the timeline.
EDIUS also has two preview windows that fulfill the same functions. The left hand Player Window that holds the clips and the right hand Record Window which shows the timeline contents.
Note: In EDIUS, you can set up the interface via the View➞Single Mode mode option in the menu, so that there is a single preview window. This window displays the currently active media and switches between Player and Record mode. This is ideal when working with a smaller display, for example on a laptop. By calling up the Dual Mode from the view menu, you can easily recall the dual preview display option again.
In EDIUS, this window is called the “Bin Win-dow” or simply the “Bin.”
In EDIUS we can also right mouse click to im-port video, audio image, or other material.
We can also create sub-folders to help with the organizing and sorting of our material. In FCP these folders are labeled “Bin” whereas in EDI-US they are simply called folders.
These folders can also be interconnected.

APPLICATION NOTE EDIUS FOR FINAL CUT PRO EDITORS
6www.grassvalley.com
The Most Important Final Cut Pro Elements and their Counterparts in EDIUS (cont.)
The EDIUS Timeline & the Final Cut Pro Timeline
As they are very similar in layout, arranging and editing clips in the Timeline is more or less the same in both programs.
However in relation to the FCP Timeline, the EDIUS Timeline offers certain extra possibilities and functions that could be helpful in various editing situations, for example:
• Combined video and audio tracks (VA tracks) are perfect for fast editing. Video and audio are placed on the same track and so moving the audio in relation to the video cannot hap-pen by mistake
• Special Title tracks for graphics and titles. Material in these tracks is always superimposed on the video material.
• Sync Locks. In various editing operations, the sync lock allows you to decide when moving tracks, which tracks should be in-cluded in these operations (for example, when trimming, inserting and erasing clips). In contrast to the FCP lock function (that is obviously also available within EDIUS), you can still edit those tracks that have their sync lock deactivated
In FCP, in the upper right hand corner, there are additional buttons that can influence the work mode. A similar feature is also available within EDIUS with the timeline modes in the top left hand corner of the Timeline. In the “Working with the Timeline” chapter, we will discuss some of these functions and differ-ences.

APPLICATION NOTE EDIUS FOR FINAL CUT PRO EDITORS
7www.grassvalley.com
Further EDIUS WorkspacesIn addition to the previously mentioned workspaces, EDIUS offers further workspaces and windows:
Toolbar
Much as in Final Cut Pro, we also have a Toolbar in EDIUS.
However, unlike the toolbar in FCP which has its own window, the EDIUS toolbar is integrated into the Timeline. We will describe some of the most important of these tools later.
Information Palette
This window will display the most important properties of the currently selected object (for ex-ample a clip in the Bin or on the Timeline). In addition to this, the information palette also shows which effects are applied to that clip and these effects can be called up and edited from within this palette. The Layouter (that rotates and scales in 2D or 3D) is a standard effect that is always active on video and image clips.
Docked Windows
As in FCP, EDIUS has certain windows and interfaces that are integrated into other windows as clickable Tabs.

APPLICATION NOTE EDIUS FOR FINAL CUT PRO EDITORS
8www.grassvalley.com
Further EDIUS Workspaces (cont.)
Also, just as in FCP, these Tabs can be posi-tioned freely as windows via drag-and-drop.
Effect Palette
In this palette, we have an overview of all the available EDIUS effects and these are divided into various categories such as, Transitions, Clip Effects, Audio Effects, etc.
Using drag-and-drop, these effects can be placed on their target clip or clip transition.
The number of windows docked in the standard layout depends on whether EDIUS has one or two monitors attached. In the single monitor mode, the following windows are docked:

APPLICATION NOTE EDIUS FOR FINAL CUT PRO EDITORS
9www.grassvalley.com
Further EDIUS Workspaces (cont.)
Marker Palette
This type of window will be new to FCP users.
Here, we have a list of all used markers, switch-able between sequence and clip markers.
Using the Import and Export functions, these markers can be transferred between sequences and projects or can be edited offline as a sep-arate list.
Source Browser
The EDIUS Source Browser allows you to ac-cess many sources, such as cameras, that allow us to store their recordings directly as data (XD-CAM, P2, AVCHD, etc.). You can also use the Source Browser to import audio CDs, DVD-Vid-eo and Blu-ray material.
Note: In dual monitor mode, some of these in-terfaces are already present as individual win-dows.
Tip: All of the EDIUS palette windows can be shown or hidden simultaneously via the “h” key-board command.
Tip: You can reset the entire EDIUS interface to its default settings at any time by going to the View menu and under Window Layout, selecting Normal. This is extremely useful in case certain windows have been closed or moved, or if the layout has been rearranged by mistake.

APPLICATION NOTE EDIUS FOR FINAL CUT PRO EDITORS
10www.grassvalley.com
Some Further Basics Related to the EDIUS Workflow and Interface
EDIUS Button Menus
As in FCP, certain buttons within EDIUS have extended function-ality. By this we mean that certain buttons have sub-functions and these buttons are marked with an extra drop down triangle.
Unlike FCP, these sub-functions are called up via a form of sub-menu. The buttons themselves remain unchanged.
Expandable Buttons on Smaller Displays
If the screen resolution is not large enough or a window is too small so that all of the buttons within a toolbar cannot be displayed, then EDIUS displays a double arrow sym-bol. By clicking on this symbol, the extra buttons can be displayed. This means that even on small displays, you can access all the toolbars buttons. This makes EDIUS ideal for mobile editing.
Timeline Modes
EDIUS offers a variety of Timeline Modes and these influence the way you can work and edit in the timeline. Certain operations that require the use of a tool in FCP can be performed with a timeline mode in EDIUS.
The following modes are available:
Insert/Overwrite Mode – This decides how EDIUS reacts when inserting clips
Ripple Mode – Any gaps that appear when removing or trimming clips will be closed up automatically
Group/Link Mode – Related audio/video clips are marked together much like the “Linked Selection” option in FCP
In the Timeline Workflow chapter, we will discuss the various Timeline modes in more detail.
Inputting Value
Inputting values, for example timecode, works in an identical manner to that of FCP; however EDIUS does offer the possibility to select a value field and then use the mouse wheel to adjust the value.

APPLICATION NOTE EDIUS FOR FINAL CUT PRO EDITORS
11www.grassvalley.com
Here you can click on “New Preset” or use the “Project Wizard” to add settings.
Tip: If you have already started a project and realize that the project settings are not what you require, you can, at any time, change these settings from the Settings Menu and Project Settings.
EDIUS WorkflowIn the following chapter we will present certain EDIUS work methods.
Tip: By visiting www.onscreentraining.com there is a free EDIUS 7 video tutorial available for Mac, PC and iPad. It shows in a clear and detailed manner many of the important features and functions of EDIUS 7. It is recommended that new users watch this tutorial.
Starting a New Project
If a new EDIUS project is created, you can select some preferred settings, such as resolution, via the project templates that were created when first starting EDIUS. If the desired settings are not available, you can use the “Customize” option to change the settings as required.
Of course you can also create and store templates (presets) at a later time. You can do this via the Settings Menu and then under System Settings, select Project Presets.

APPLICATION NOTE EDIUS FOR FINAL CUT PRO EDITORS
12www.grassvalley.com
EDIUS Workflow (cont.)Importing Media
There are various methods with which to import material from different media.
Direct Import of Files
Data that is either located on the hard drive or another attached storage medium can be imported into the Asset Bin via the following methods:
• Double clicking in an empty region of the right hand side of the Asset Bin
• Right mouse click in the right hand side of the Asset Bin and choose “Add File”
Tip: Windows key commands when selecting data:
• Press Control key – selects multiple files
• Press Shift key – selects a row of neighboring files
Tip: When importing with the “Add File...” function, the “Transfer to Project Folder” option can be selected. With this option active, the files required for the project will be available even after the imported data media has been removed (for example when importing from an external hard drive).
• Using the Ctrl+O command
• Clicking the open button in the Asset Bin

APPLICATION NOTE EDIUS FOR FINAL CUT PRO EDITORS
13www.grassvalley.com
EDIUS Workflow (cont.)
Notes on Format Conversion
A Final Cut Pro user is certainly used to the fact that before they can easily use a variety of formats in Final Cut Pro, they have to be converted.
This step is not required in EDIUS as it can work with a wide variety of formats at full performance and in real time, without the need to translate formats first. This is true for both video and audio data.
If your PC suffers from poor performance for any reason, you can convert clips into the HQ or HQX formats.
Importing via the Source Browser
To import data from camera media such as P2, XDCAM, or AVCHD, EDIUS uses the Source Browser. The contents of whichever source is attached to your computer will be displayed in the Source Browser as clips. Without first having to import the data into your computer, you can use the Source Browser to first view, play and transfer the desired material to your computer via the “Add and Transfer to Bin” function. In so doing, the required data is copied to your proj-ect folder and the import media (for example, a camera) can be removed.
The “Add and Transfer to Bin” function creates copies of the se-lected data into the Project folder and transfers them into the Bin as Clips.
Tip: You can also import material from audio CDs, DVDs and Blu-ray using the Source Browser.

APPLICATION NOTE EDIUS FOR FINAL CUT PRO EDITORS
14www.grassvalley.com
EDIUS Workflow (cont.)Working with the Asset Bin
The EDIUS Asset Bin works in much the same way as the Browser in FCP.
When you first create a project, you will have just one bin folder, called “root.” This is the start of your media organization. Create a sub-folder by right-clicking on the folder list and choosing New Folder.
You can move folders around just like desktop folders, by drag-ging-and-dropping.
Just as with FCP, you can create multiple copies of clips that link to the same media file. In fact, you can use regular copy and paste commands, including Ctrl-C and Ctrl-V to make duplicates of clips.
You can have multiple concurrent Search fold-ers, making it easy to locate new clips as they are added to your project.
You can also press F3 to display a quick search bar that searches inside the current bin folder.
EDIUS has a unique search feature that creates dynamic Search results folders. To access this feature:
• Press Ctrl-F
• Click on the Search button at the top of the Asset Bin
• Right click on the folder panel and choose Search

APPLICATION NOTE EDIUS FOR FINAL CUT PRO EDITORS
15www.grassvalley.com
EDIUS Workflow (cont.)Additional Tools
The Asset Bin has a Tools menu button with the same con-tents as the regular Tools menu.
These special tools include:
Disc Burner: Burns copies of previously created DVD/Blu-ray Disc image files or folders. You can export a sequence directly to DVD/Blu-ray Disc from EDIUS using the Export menu.
XDCAM EX Clip Browser: If Sony’s Clip Browser is installed, this links to it.
EDIUS Watch: Creates special watch folders. Media added to these folders is automatically imported to your project.
MPEG TS Writer: Creates .m2t HDV transport streams very quickly, for output to HDV
Tip: in both the right and left parts of the Asset Bin, a menu can be called up by right mouse clicking, offering further context related options.
Preview and Trim Asset Bin Clips in Player
If, like in FCP, you double click on a clip within the Bin, then this pre-view window (the Player window) will be displayed.
In the Player window there are various available functions, such as the viewing and trimming of clips. In and Out points can be created, just as in FCP, via the relevant buttons or with the “I” and “O” keys.
If you are viewing long clips in the Player window, mark a sec-tion with In and Out marks, then click the Expand Focus but-ton to zoom the navigation bar to your selection. This makes scrubbing and locating clips much easier.
Like Final Cut Pro, you can click and drag In and Out marks in the Player window navigator, though there is no need to use the ALT mod-ifier key.
Just as with analog fast forward and rewind, EDIUS has Shuttle con-trollers. The further you drag to the right or left, the faster the video will play forwards or backwards — just like a physical shuttle controller.
There is also a powerful mouse-gesture control system.
Click and drag inside the viewing panel of the Player or Recorder windows to get the following results:
• Drag Left to Right – Mark In
• Drag Right to Left – Mark Out
• Drag Top to Bottom – Edit into Timeline (using track patching and Insert/Overwrite mode)
Using the right mouse button, if you drag in circles on the image, the mouse will behave like a Jog controller, allowing very precise analog playback of digital media with smooth, natural-sounding audio.
Tip: If you let the mouse pointer hover over a button for a short while, then its function will be displayed as a tooltip help message.
Note: Unlike in FCP, functions to adjust Clip layouts or animation are not located in the Player window. EDIUS has the Layouter for this purpose and we will cover this later.

APPLICATION NOTE EDIUS FOR FINAL CUT PRO EDITORS
16www.grassvalley.com
EDIUS Workflow (cont.)
Preview Monitor Overlays
The View menu gives access to several types of overlay information you can display on the Player and Recorder windows (select via menu View➞Overlay):
• Clip/Device: Displays the current clip name (or video deck preset if when capturing)
• Safe Area: Displays the Safe Action and Safe Title zones
• Center Cross: Splits the screen into four equal sections for layout
• Marker: Displays the text of any markers
• Zebra: Just like in-camera zebra, shows highlights and shadows
On-Screen Display
Under the View menu, there is an option to toggle the display of an On-screen Status — and you can choose to display this just on your com-puter monitor or also on your external client monitor.
The Status displays current timecode, playback status and audio level.
Adding Clips to a Sequence
In the following section, we will cover a series of editing basics and situations. FCP users will notice that many situations are solved the same way in EDIUS, with only some situations requiring a slightly dif-ferent technique.
Tip: in relation to editing, I’d like to mention once again that the free EDIUS 7 basic video tutorial is available from www.onscreentraining.com and many of the topics that we are discussing here are covered in the tutorial, in much more detail.
Adding Clips to a Sequence
To add clips to a sequence, you can, in much the same way as in FCP, progress as follows:
1) Double click on a clip in the Asset Bin to open it in the Player win-dow (or select the clip and press Enter)
2) Add In and Out marks by clicking on the Add In Point or Add Out Point buttons or by pressing the “I” or “O” keys
3) Set up your track patching, just as you would with Final Cut Pro – see below
4) Set your edit position on the Timeline, or use an In mark
5) Click on the Insert or Overwrite button

APPLICATION NOTE EDIUS FOR FINAL CUT PRO EDITORS
17www.grassvalley.com
EDIUS Workflow (cont.)
You can also drag-and-drop directly from the Player Preview window or from the Asset Bin.
How clips are placed and what happens when a clip is either trimmed or deleted from the time-line, depends on the Timeline mode settings – in “working with the timeline” we will discuss this.
Tip: If you perform a drag-and-drop function with the right mouse button, a context menu appears when the mouse button is released and this offers all relevant options (for example Insert, Overwrite and Replace). Due to this, all options are available to the user without having to specify a specific timeline mode first.
Track Patching / Source Channel Mapping
EDIUS and Final Cut Pro both use track patching to position clips that are edited into a sequence.
There are perhaps some minor differences:
• EDIUS allows you to toggle source audio between stereo and dual mono modes on the timeline. To toggle the mode, right click on the source audio button and choose Audio Source Channel
• EDIUS has combined video and audio tracks (VA tracks) in which both video and audio tracks are placed together on a single track. (The audio section can, at any moment, be placed in its own audio track)

APPLICATION NOTE EDIUS FOR FINAL CUT PRO EDITORS
18www.grassvalley.com
EDIUS Workflow (cont.)Working with the Timeline
In this section we will discuss some of the most important Timeline basics and editing situations.
One main difference between Timeline editing in Final Cut Pro and in EDIUS are the Timeline modes.
In Final Cut Pro, specific editing operations require that the relevant tool is selected, (for example the Trim Tool), in EDIUS this is solved using the relevant Timeline modes (insert+ripple)
For FCP users, the following Timeline Modes are new:
These Timeline modes will be familiar as they are similar to those in Final Cut:
Toggle Insert/Overwrite mode
In Overwrite mode, clip segments overwrite other clips on the Timeline when inserted or moved.
In Insert mode, clip segments shuffle around each other non-destructively.
Set Ripple mode
This applies different Timeline behavior when you are in Insert mode — the options do not apply if you are in Overwrite mode.
Set Group/Link Mode
Enables or disables the automatic selection of linked video and audio segments. This is the same as the Link Selection in Final Cut Pro.
Snap to Event
This is the same as the Snapping mode in Final Cut Pro. By holding the Shift key, the Snap function can be temporarily deactivated, despite the Snap mode being active.
APPLICATION NOTE EDIUS FOR FINAL CUT PRO EDITORS
19www.grassvalley.com
EDIUS Workflow (cont.)Zoom control
The zoom control is one method with which to zoom in on the Timeline and is available at the top left section of the Timeline. The following options are avail-able within the zoom control:
• Adjusting the zoom settings via the slider
• Adjusting the zoom settings by using the left and right arrows
• Selecting the zoom options from the drop down menu (the small arrow below)
• Clicking in the legend to zoom to the entire project
Removing Clips from a Sequence
To Remove a Clip Segment from a Sequence, you can:
• Select it and press the Delete key
• Click on the Delete shortcut button at the top of the Timeline
• Right click on it and choose Delete or Ripple Delete
• Use one of the Timeline Delete button submenu options to choose a different delete type or partial delete
It is important to have the correct insert/overwrite and ripple mode active when performing operations:
• Insert on + Ripple on: Following clips are moved along (no gaps are left)
• Insert on + Ripple off: Following clips are not moved along (gaps are left)
• Insert off + any Ripple mode: Following clips are not moved along (gaps are left)
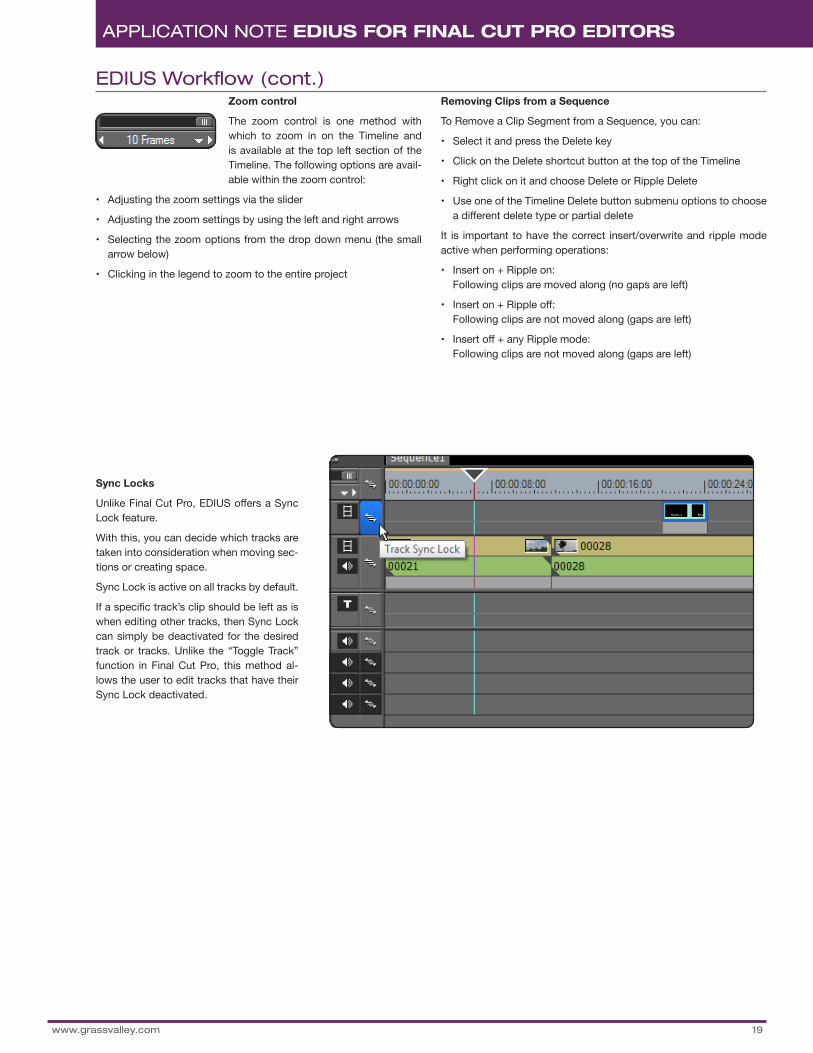
Sync Locks
Unlike Final Cut Pro, EDIUS offers a Sync Lock feature.
With this, you can decide which tracks are taken into consideration when moving sec-tions or creating space.
Sync Lock is active on all tracks by default.
If a specific track’s clip should be left as is when editing other tracks, then Sync Lock can simply be deactivated for the desired track or tracks. Unlike the “Toggle Track” function in Final Cut Pro, this method al-lows the user to edit tracks that have their Sync Lock deactivated.

APPLICATION NOTE EDIUS FOR FINAL CUT PRO EDITORS
20www.grassvalley.com
EDIUS Workflow (cont.)
Track Headers
Let’s take a closer look at the track headers.
• Name – The name of the track (right click to choose rename from the menu)
• Video mute – Mute/unmute the video track
• Expand/shrink Audio – Show/hide audio waveform and Volume and Pan rubber-band
• Vol/Pan Keyframe – Switch between Volume and Pan rubber-band
• Expand/shrink Mixer – Show/hide mixer segment (for overlay filters and opacity rub-ber-band)
• Mixer Keyframe – Toggle opacity rubber-band
The options available can vary because EDIUS supports several kinds of tracks.
You can add or delete tracks by right-clicking on any of the track header buttons.
About Clip Segments
Unlike Final Cut Pro, clips in EDIUS contain var-ious sections. By using the Expand function (the triangle in the track header) these section can be called up and edited.
In doing so, you can edit the Clip Opacity, the Volume, or the Panning of a specific clip seg-ment with the rubber band.
Combined Video/Audio tracks (VA tracks)
EDIUS allows you to combine all media types on special Video/Audio tracks. This makes it very clear which audio is associated with which video, but can confuse new users who are not familiar with Video/Audio tracks.

APPLICATION NOTE EDIUS FOR FINAL CUT PRO EDITORS
21www.grassvalley.com
Trim Mode
As with Final Cut Pro, EDIUS has a comparable trim mode, in which all trim options can be performed from a specific window.
Select Trim Mode from the Mode menu or press F6 to call this option up.
You can close the Trim Window with either the F6 key or by clicking on the X in the top right corner of the Trim window.
Note: The X in the top right hand corner is part of the Main window and closes EDIUS.
EDIUS Workflow (cont.)Trimming
Trimming clips in EDIUS is performed somewhat differently than within Final Cut, in that the various Trim modes are not called up via Tools, but via either key combinations or by selecting the relevant Trim handles.
Here are some basic mouse-based Trim options with the relevant key combinations:
• Mouse over the clip edge until a square bracket appears, then drag-and-drop to trim (In/Out Trim)
• Mouse on the border of two clips until two outward facing square brackets appear and then drag-and-drop to move the clip border (Slide)
• Press Ctrl+Alt, click in the middle of the clip and trim the clip via drag-and-drop (Slip)
• Press Ctrl+Shift, click in the middle of the clip and trim the clip via drag-and-drop (Roll)
Note: Timeline modes and Sync Lock dictate how the remainder of the Timeline reacts to trimming
Quick Trim via the Keyboard
Here, we have a fast and elegant method with which to trim the In and Out points of a clip:
1) Select the clip.
2) Position the playline at the point you wish to trim the in or out point of the clip to. Now press N to trim the IN point or press M to trim the OUT point.
3) Optional: Press Alt+N or Alt+M to trim in forced Ripple mode. By doing so, the Timeline insert & ripple mode is not taken into consideration.

APPLICATION NOTE EDIUS FOR FINAL CUT PRO EDITORS
22www.grassvalley.com
EDIUS Workflow (cont.)
Titles
Creating Titles in EDIUS has various differences when compared to doing so in Final Cut Pro.
To create a new title, you can click in an empty part of the Asset Bin, a Video track, or a Title track with the right mouse button and select New Clip ➞ QuickTitler.
By doing so, QuickTitler (the supplied Title gen-erator) opens in its own window and is ready for inputting text.

APPLICATION NOTE EDIUS FOR FINAL CUT PRO EDITORS
23www.grassvalley.com
EDIUS Workflow (cont.)A short QuickTitler example:
1) Insert a short text.
2) Click outside of the text frame to end the text input.
3) The text frame can now be moved with the mouse, using drag-and-drop.
4) Double clicking on the text activates text input once more.
5) From the QuickTitler menu and choosing View ➞ Title Object Layout Bar, you can activate a window to the lower right with which you can place the Title at certain standard layout positions.
6) Click on the Diskette symbol to save the text and to close the QuickTitler.
In order to optimize performance, the preview resolution in QuickTitler is reduced.
Click on the preview icon or press F3 to show the preview in full resolution.
Tip: With Shift+Ctrl+F3, you can specify that the resolution is permanently set to full.
Further options
Naturally, the QuickTitler offers many more features and possibilities that we cannot go into in detail in the scope of this guide. Obviously these features are described in detail in the complete manual or in the video tutorials that are available.
For example, at www.onscreentraining.com there is a complete video tutorial that covers all of the titler functions in great depth.
Tip: The VisTitle title generator is also available within EDIUS and this offers many more possibilities in order to create professional animations.

APPLICATION NOTE EDIUS FOR FINAL CUT PRO EDITORS
24www.grassvalley.com
EDIUS Workflow (cont.)Transitions
Drag-and-drop transition effects in EDIUS function exactly as they do in Final Cut Pro.
To apply a transition effect to multiple clips, lasso to select them and drag-and-drop the effect you want, as usual.
Set the Timeline position slider near an edit and press Ctrl-P to add the default transition on the selected track.
EDIUS allows you to adjust the duration of transitions just as you would adjust the length of a clip segment — by trimming. Simply click and drag one end of a transition on the Timeline to adjust the duration.
Another method is to select the transition and press Alt-U to type in the time exactly.
There are options in the User settings that tell EDIUS whether or not to automatically add an audio crossfade when you add a video tran-sition.
Removing a transition is simply a matter of selecting it and pressing Delete.
You access individual settings (including keyframing) for transitions by selecting the transition you want and double clicking on its entry in the Information palette.

APPLICATION NOTE EDIUS FOR FINAL CUT PRO EDITORS
25www.grassvalley.com
EDIUS Workflow (cont.)
This sometimes confuses new EDIUS editors, particularly when working with combined Video/Audio tracks, where a clip behaves like a com-plete clip on a single track.
Tip: If you select a clip and effects you have applied do not show up in on the Information palette, double check that you have the correct part of the clip selected. A blue outline appears on the selected part of the clip.
Combining Effects
To combine multiple effects, drag them onto a clip and you will see them as a list on the Information palette.
You can enable and disable individual effects by clicking on the effect check box on the Information palette.
You can change the order effects are applied, like in the filter palette of Final Cut Pro, by dragging-and-dropping to move them up or down the list.
Color Correction
Color correction effects are applied like any other — by dragging-and-dropping the chosen effect from the Effect list.
Like in Final Cut Pro, a vectorscope and waveform are available at any time by clicking on the Vectorscope/Waveform button at the top of the Timeline or by selecting Vectorscope/Waveform on the View menu. Unlike in Final Cut Pro, the performance of EDIUS is hardly affected when vectorscope and waveform are displayed.
Effects
As in Final Cut Pro, you can drag-and-drop ef-fects from the EDIUS effects library directly onto clips.
When you add an effect by dragging-and-drop-ping it onto a clip segment, be sure to drop the effect onto the correct part of the clip:
• Video effects should be added to the video part of a clip
• Audio effects should be added to the audio or audio part of a clip
• Keying or blending effects should be added to the Mixer part of the clip
The separation of the video, audio and mix-er parts of clips also applies when looking for effect settings. The Information palette shows effects that are applied to the selected part of the clip.

APPLICATION NOTE EDIUS FOR FINAL CUT PRO EDITORS
26www.grassvalley.com
EDIUS Workflow (cont.)The Layouter
Unlike other effects, the Layouter is, by default, always active on all video, title and graphic clips (not audio). When a clip is selected, the Lay-outer is shown in the information palette.
The Layouter is a powerful tool, especially when combined with video filter effects like the Track Matte and Mask, which can selectively mask regions of video or apply effects to regions.
If you are familiar with cropping, position, rotation and color selection controls, you will enjoy using the Layouter.
There are just a small number of features you may not be familiar with already.
To use keyframing, put a check in the box for each setting you wish to keyframe.
You can also check the Layouter box at the top to turn on keyframing for every setting.
If you expand an individual keyframe setting, you will find keyframe con-trols similar to those found in the keyframe area of the Final Cut Pro Filters section.
The Layouter is opened by either double-click-ing it in the information palette or via the F7 key.
The Layouter allows you to easily adjust and an-imate various aspects of the layout, for example:
• Cropping and scaling
• 2D and 3D position and rotation
• Adding borders

APPLICATION NOTE EDIUS FOR FINAL CUT PRO EDITORS
27www.grassvalley.com
EDIUS Workflow (cont.)
Audio
The EDIUS 7 audio mixer allows you to not only adjust the level and panning of complete tracks and clips, but also offers the dynamic drawing of level or pan envelopes over multiple clip borders.
The audio mixer is called up via the View menu and the Audio Mixer option or from the interface above the Time-line.
While most of the options will be familiar to you, unless you also use an audio editing system, you may not be familiar with the Latch/Touch/Write modes that the EDIUS audio mixer includes for the live creation of audio rubber banding — audio keyframes.
Each track shown in the audio mixer has the following modes:
• Track: Adjusts overall level for the whole track
• Clip: Adjusts overall level for the current clip
• Off: Makes no new changes to audio level, though the mixer will still display audio level for the track
• Latch: This is the way the Media Composer audio mixer records audio level keyframes. If audio level keyframes exist, the fader will animate, following them. When you take control of the fader, new replacement keyframes are added. When you release the fader, it stays where you left it, overwriting existing keyframes with the new level until you stop playback
• Touch: Follows existing audio keyframes just like Latch mode. However, when you release the fader, after applying an adjustment, it will go back to following existing keyframes, rather than overwriting them
• Write: Does not follow existing keyframes at all. With this mode you can set the fader before you begin and when you press record, existing keyframes will be ignored and overwritten

APPLICATION NOTE EDIUS FOR FINAL CUT PRO EDITORS
28www.grassvalley.com
EDIUS Workflow (cont.)Audio Rubber Band Editing
Obviously a Clip’s audio rubber band can be edited directly in an audio track.
Make sure that the waveform section of the audio track is open (the small triangle in the track header) and that VOL is active in the track header.
The following options are available for adjusting the rubber band with a mouse:
• Click on the audio rubber band with the mouse to create a new keyframe
• Move a keyframe with drag-and-drop
• Click and hold the mouse on the audio rubber band between two keyframes whilst holding the shift key, to adjust the envelope between neighboring keyframes
• Right click on a keyframe or the audio rubber band for further options
Adding Audio Filters
Audio filters are applied and adjusted like any other effects in EDIUS — find the effect you want in the Effect palette and drag-and-drop to apply it. Always be sure to drop the effect onto the Audio part of the clip segment or it won’t be applied.

APPLICATION NOTE EDIUS FOR FINAL CUT PRO EDITORS
29www.grassvalley.com
OUTPUT
The Export button menu at the bottom right corner of the Recorder Preview win-dow has all of the output options you might need to play out to tape or export your se-quence to a file, DVD, or Blu-ray Disc.
The same export options are also under the File menu.
Output to Tape
If you want to crash record, you can usually simply hit record on your video deck and play your sequence because EDIUS always plays sequences and effects at full quality.
If you choose “Print to Tape” or “Print to Tape (Display Timecode)...” which burns in timecode, you can use regular deck controls to mark a cut point on your tape and frame accurately insert edit.
Output to File
“Print to File...” brings up the Print to File window, with a wide range of media formats you can export to. The settings that apply to each
of the presets should be familiar to you.
The advanced settings, along with many additional presets, are un-available until you tick the Enable Conversion box, which allows EDI-US to change the frame rate and frame size.
If you check the Display Timecode box, EDIUS will burn timecode into the output automatically — very useful for client review.
Note: you change the start timecode for your sequence in the se-quence settings.
Batch Export
If you select “Add to Batch List” rather than “Export,” EDIUS will add the job to the Batch Export window, which you also access under the Export menu.
EDIUS will not begin processing the Batch of encoding jobs until you manually tell it to.
The Batch Export window has buttons to add extra jobs, allowing you to quickly build a list of output versions.
Output to DVD/Blu-ray Disc
EDIUS has a comprehensive integrated DVD/Blu-ray Disc authoring application called Disc Burner, accessed by clicking on the Export menu and choosing “Burn to Disc...”
You can create single-layer and dual-layer DVDs and Blu-ray Discs, straight from the Timeline, without creating any intermediary files for a separate DVD authoring application.
If you simply want to burn a disc with your current sequence, go to the Write tab and click on Create Disc. EDIUS will burn the DVD/Blu-ray Disc with an automatically generated menu that links to your sequence.
Note that the Movie tab has an “Add File” button, to browse to a media file and include it on the disc. “Add Sequence” allows you to choose any combination of sequences in your current project for inclusion.
Clicking on the “Setting” button for a movie title, under the Movie tab, gives access to the encoding settings.
The Style tab has a significant number of prebuilt menu designs to choose from. Use the tabs at the bottom of the window to browse them. Whichever style you choose, EDIUS automatically links buttons and add text based on your project and sequence names.
The Edit tab allows you to apply detailed adjustments to the menu designs.
Under the Write tab, there is a check box to “Enable Detailed” set-tings. These include the option to create a disc image (you can use the Disc Burner under the EDIUS Tools menu to create multiple cop-ies of an existing image).

Belden, Belden Sending All The Right Signals and the Belden logo are trademarks or registered trademarks of Belden Inc. or its affiliated companies in the United States and other jurisdictions. Grass Valley and EDIUS are trademarks or registered trademarks of Grass Valley. Belden Inc., Grass Valley and other parties may also have trademark rights in other terms used herein.Copyright © 2014 Grass Valley. All rights reserved. Specifications subject to change without notice.
WWW.GRASSVALLEY.COMJoin the Conversation at GrassValleyLive on Facebook, Twitter, YouTube and Grass Valley - A Belden Brand on LinkedIn.
GVB-1-0023A-EN-AN
30
APPLICATION NOTE EDIUS FOR FINAL CUT PRO EDITORS
Important SettingsThe standard settings are likely to allow you to jump in and get to work with EDIUS. It is likely your system has already been configured, with shortcuts to any connected video decks you will use and storage drives organized and ready to use.
Under the System Settings, you will find the User Profile manage-ment options. This allows you to create multiple user profiles, export and import them (export and import by right-clicking on the profile entries). To change the current profile, choose “Change Profile...” on the Settings menu.
User settings give many detailed options to tweak and tune EDIUS to operate exactly as you want it to. Note, in particular, the User Inter-face category, that includes Button and Keyboard Shortcut options.
EDIUS allows you to switch Project settings at any time, and to keep multiple user-defined presets ready to use, so you can toggle be-tween different resolutions. Use the Project settings to choose a dif-ferent Preset or make specific changes to the current settings.
Project presets are created in the System Settings.
SummaryThe core EDIUS editing experience is very similar to editing with Final Cut Pro.
Once you get used to the buttons being different colors and the new naming conventions, you will find that many of the things you know about editing in Final Cut Pro are still useful in EDIUS.
Many experienced Final Cut Pro editors fall in love with the speed and ease of use that EDIUS gives.
The best way to build your confidence is to start cutting... Happy editing!
Further InformationFor further information about EDIUS, Grass Valley hardware and software, and further training, visit www.grassvalley.com.