e460 getting started 2gdlp01.c-wss.com/gds/8/0300021238/02/e460_gs2_en-fr_v2.pdf · do the...
TRANSCRIPT

XXXXXXXX © CANON INC. 2015
2
(A)
(B)
(D)
(C)
FRANÇAIS
1.Downloadsetupfile. 2. Select connection method.Select a printer connection method and click Next.
Follow the on-screen instructions to proceed the setting.
3. Install software.When the screen below appears, select the software you want to install and click Next.
Follow the on-screen instructions to proceed the setting.
Now your computer is connected to printer.
a Access the following URL in your web browser. Windows PC users: you can also open the file from the setup CD-ROM.
The screen in h will appear when you open the file from the CD-ROM. Perform the remaining steps in the same way as on the website.
Wireless LAN ConnectionConnect the printer to your computer without any cables.
USB ConnectionConnect the printer to your computer with a USB cable. This is the easiest way. You only can connect one printer.
b Click Set Up.
c Select the region where you purchased the product.d Select your product.e Click Connecting to Computer, Smartphone or Tablet.
f Select your operating system.g Click Download to download the setup file.* If a download security warning appears, allow your web
browser to continue downloading.
h Open the downloaded file and click Next.
You can connect the printer to a PC/smartphone/tablet and install software.
Have you finished all the steps in the Getting Started 1?Please read this manual after completing the printer setup in the Getting Started 1.
NOTE
ENGLISH Using wireless router
Not using/having wireless router
Proceed to connect printer to • Using wireless router
• Not using/having wireless router (Connecting printer to device directly)
* If you connect your device to the printer directly, you may be unable to access the Internet with your device or may be charged for an Internet connection.
Turn on Wi-Fi on your smartphone or tablet before you start.2.Checkyournetworkconfiguration.
1. Install Canon PRINT Inkjet/SELPHY to your smartphone/tablet.
Proceed to right side.
Smartphone or Tablet
PC
* This procedure is described based on Canon PRINT Inkjet/SELPHY 2.0.0. In other versions, follow the application instructions to complete the setup.
: Search "Canon PRINT" in App Store. : Search "Canon PRINT" in Google Play.
Or access the website by scanning the code on the right.
Getting Started 2
a Tap Settings on the home screen.
a Tap Settings on the home screen.
c Tap PRINT you have installed.
c Tap PRINT you have installed.
b Tap Canon_ij_XXXX on the Wi-Fi setting.
b Tap Canon_ij_XXXX on the Wi-Fi setting.
If Canon_ij_XXXX does not appear on the list, see NOTE to setup the printer and wait until Canon_ij_XXXX appears.XXXX varies depending on your printer.
The extended survey screen appears on the first startup.
The extended survey screen appears on the first startup.
If Canon_ij_XXXX does not appear on the list, see NOTE to setup the printer and wait until Canon_ij_XXXX appears.XXXX varies depending on your printer.
The license agreement screen appears on the first startup.
If the screen in b does not appear, see NOTE to setup the printer and wait until the screen appears.
If none of these screens appears, see "If Select Router screen appears".
If the printer is not detected and the Alarm lamp is lit on the printer, press the Color or Black button and start over from a.
If the printer is not detected and the Alarm lamp is lit on the printer, press the Color or Black button and start over from a.
d Tap the printer icon on the top left of the screen.
d Tap the printer icon on the top left of the screen.
h Tap OK. i Select the SSID of your wireless router connected to your device.
j When a password entry screen appears, enter the password for your wireless router and tap OK.
k Wait for a while until the printer is detected.
l When the printer is detected, tap your printer's model name.
m Enter the printer name as needed and tap OK.
n When the printer information appears on the screen, the setup is complete.
e Tap Register Printer.
e Tap Register Printer.
f Tap Printer Setup.
f Tap Printer Setup.
g Tap Connect via wireless router (recommended).
g Tap Direct Connection.
j Tap Settings on the home screen.
m Tap PRINT.h Tap OK. i Check the SSID and password and tap Copy Password.
o Wait for a while until the printer is detected.
n Tap Done.k Tap the same SSID as checked in i.
l Paste the password and tap Join.
p When the printer is detected, tap your printer's model name.
q Enter the printer name as needed and tap OK.
r When the printer information appears on the screen, the setup is complete.
If Canon_ij_XXXX does not appear: If a message saying "Printer is not registered. Perform printer setup?" does not appear at Canon PRINT
Inkjet/SELPHY startup:Do the following on the printer.
a Tap PRINT you have installed.
b Tap Yes.
Make sure the SSID of the desired wireless router appears and tap Yes.
Enter the password of the wireless router and tap OK.
Tap Yes. Tap OK.
Do the following if this screen appears.• When the SSID of the desired wireless router
appears, tap it. Make sure your device is connected to the same SSID.
• If the SSID of the desired wireless router does not appear or you are not sure, tap If no target wireless router.
If Select Router screen appears:
c Follow the on-screen instruction. d Wait for a while until the printer is detected.
e When the printer is detected, tap your printer's model name.
f Enter the printer name as needed and tap OK.
g When the printer information appears on the screen, the setup is complete.
PC (Windows/Mac OS)
Smartphone/Tablet (iOS/Android)
a Hold down the Wi-Fi button (A) on the printer until the Alarm lamp (B) flashes 2 times, and then release the Wi-Fi button after the second flash.
b Make sure the Wi-Fi lamp (C) is flashing fast and the ON lamp (D) is lit.
Do the following to use Google Cloud Print.a Press the Stop button on the printer.b Connect the printer to your network.
c Register the printer to Google Cloud Print.
Using Google Cloud Print
Online Manual
QT6-0409-V02 PRINTED IN XXXXXXXXIMPRIME XX XXXXXXXX
2
(A)
(B)
(D)
(C)
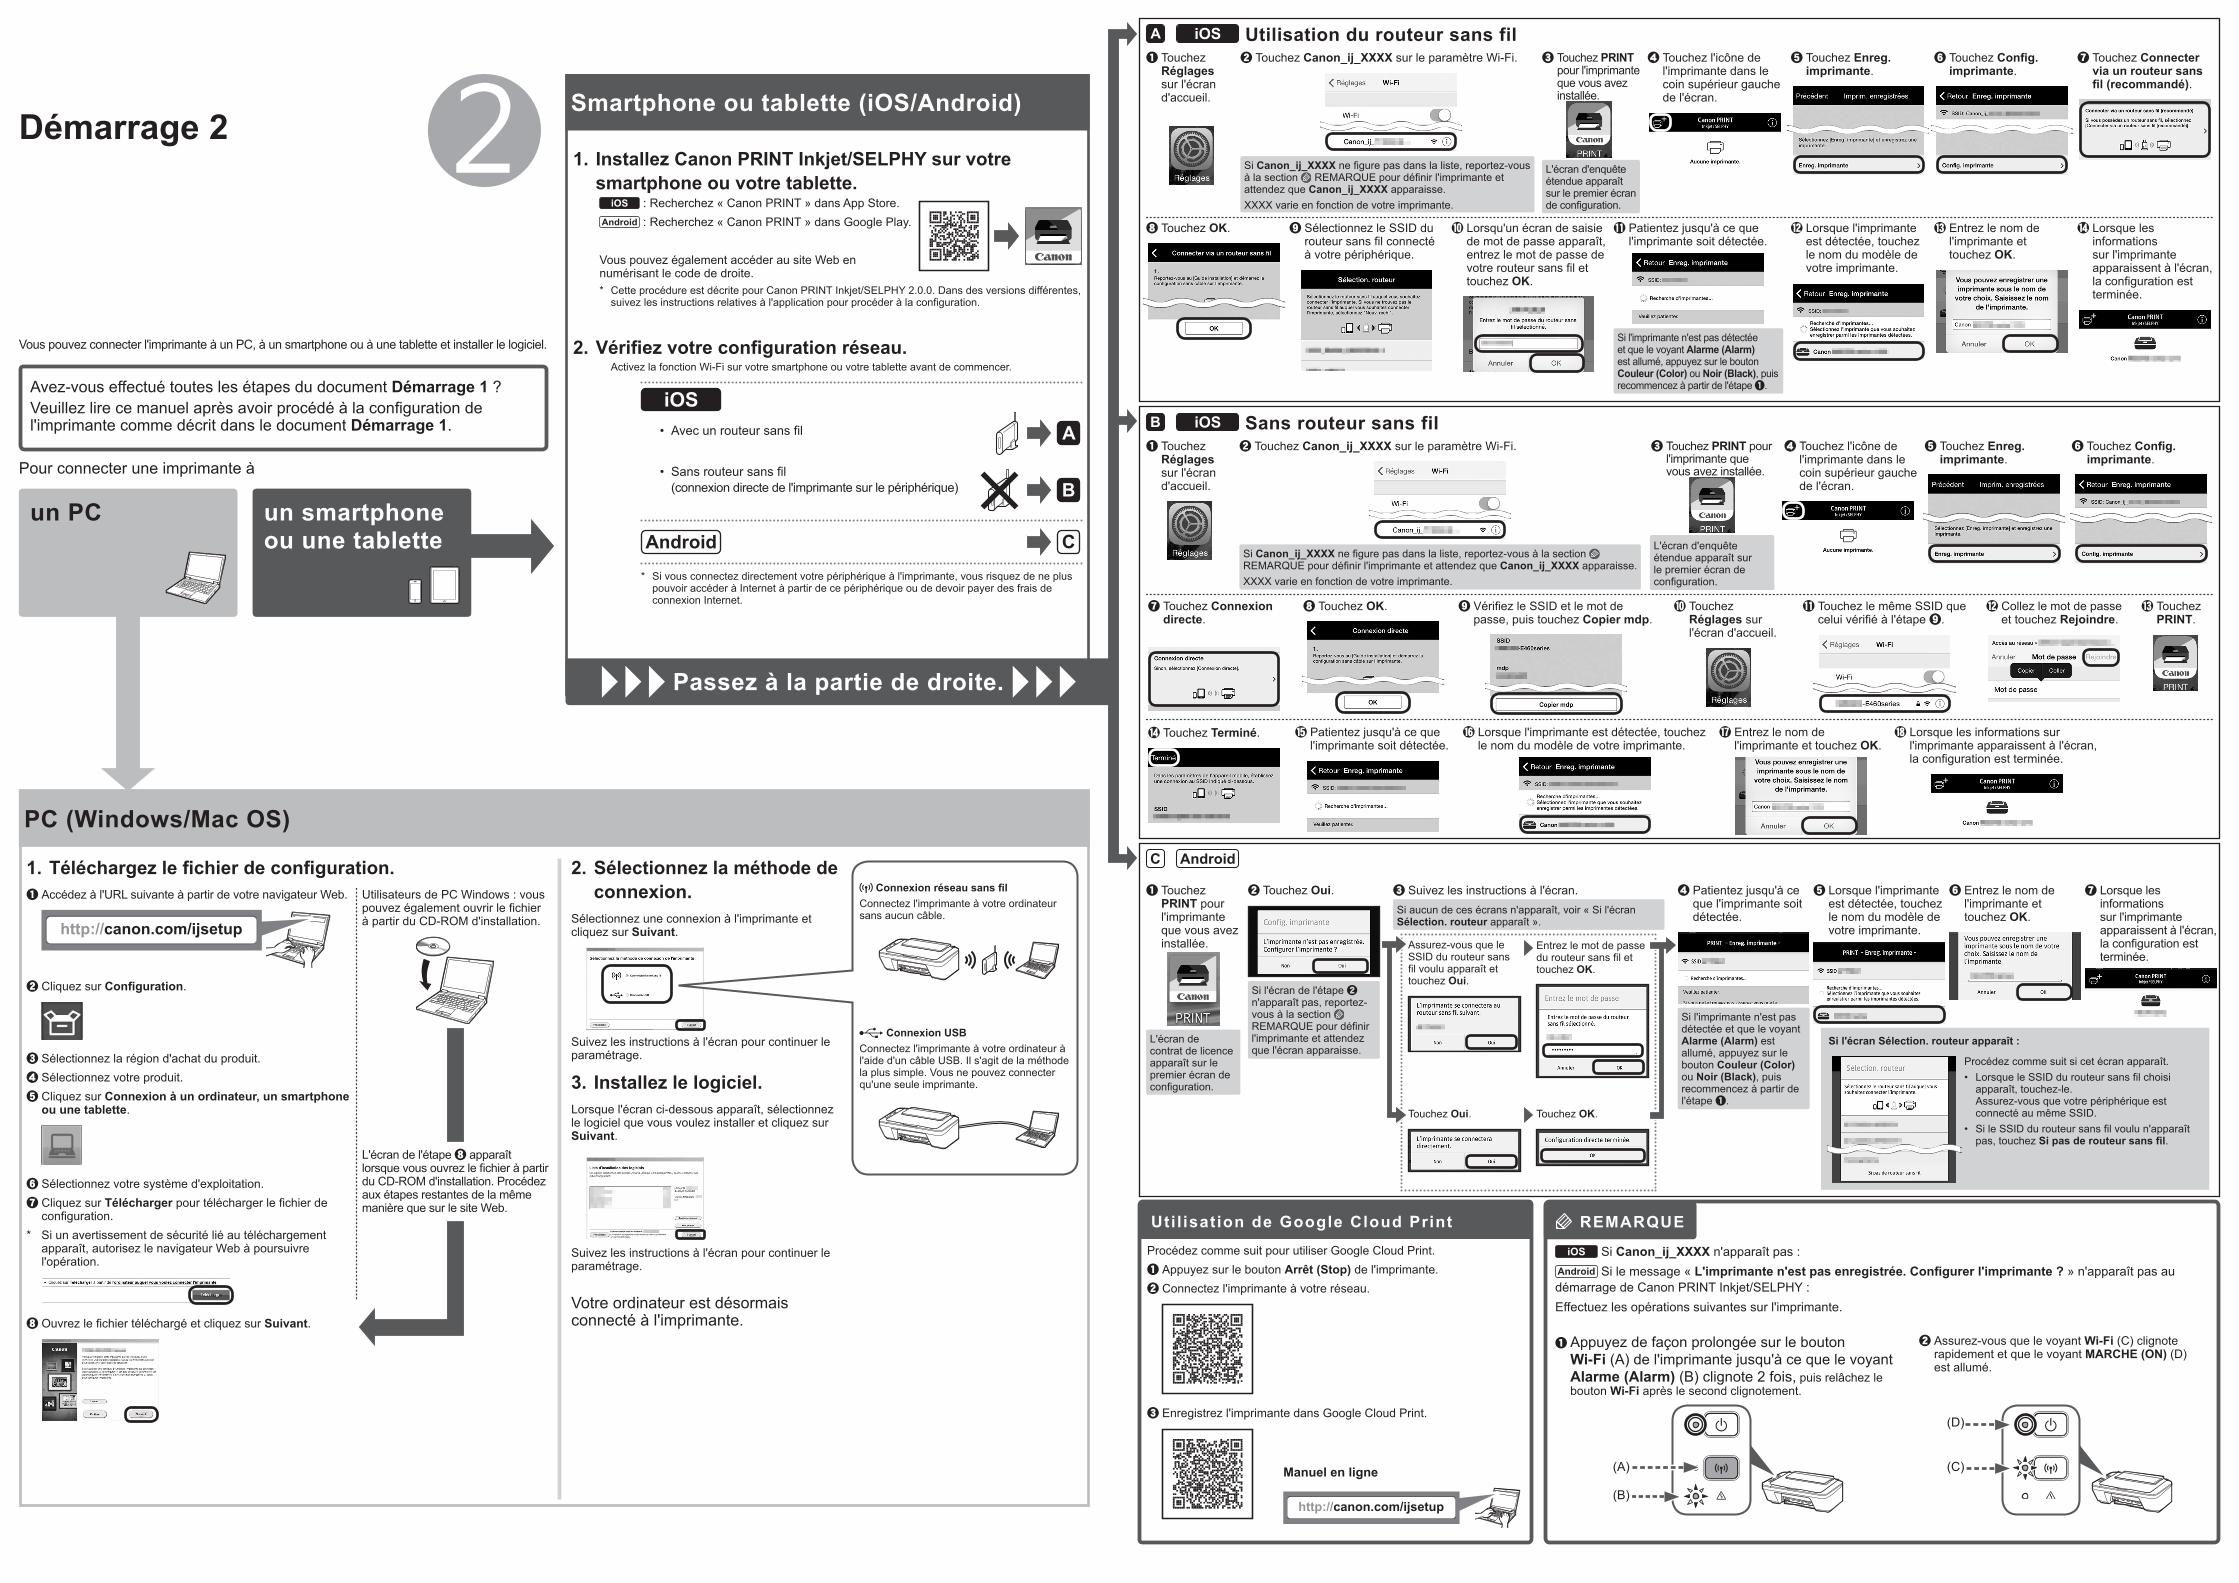
1.Téléchargezlefichierdeconfiguration. 2. Sélectionnez la méthode de connexion.
Sélectionnez une connexion à l'imprimante et cliquez sur Suivant.
Suivez les instructions à l'écran pour continuer le paramétrage.
3. Installez le logiciel.Lorsque l'écran ci-dessous apparaît, sélectionnez le logiciel que vous voulez installer et cliquez sur Suivant.
Suivez les instructions à l'écran pour continuer le paramétrage.
Votre ordinateur est désormais connecté à l'imprimante.
a Accédez à l'URL suivante à partir de votre navigateur Web. Utilisateurs de PC Windows : vous pouvez également ouvrir le fichier à partir du CD-ROM d'installation.
L'écran de l'étape h apparaît lorsque vous ouvrez le fichier à partir du CD-ROM d'installation. Procédez aux étapes restantes de la même manière que sur le site Web.
ConnexionréseausansfilConnectez l'imprimante à votre ordinateur sans aucun câble.
Connexion USBConnectez l'imprimante à votre ordinateur à l'aide d'un câble USB. Il s'agit de la méthode la plus simple. Vous ne pouvez connecter qu'une seule imprimante.
b Cliquez sur Configuration.
c Sélectionnez la région d'achat du produit.d Sélectionnez votre produit.e Cliquez sur Connexion à un ordinateur, un smartphone
ou une tablette.
f Sélectionnez votre système d'exploitation.g Cliquez sur Télécharger pour télécharger le fichier de
configuration.* Si un avertissement de sécurité lié au téléchargement
apparaît, autorisez le navigateur Web à poursuivre l'opération.
h Ouvrez le fichier téléchargé et cliquez sur Suivant.
Vous pouvez connecter l'imprimante à un PC, à un smartphone ou à une tablette et installer le logiciel.
Avez-vous effectué toutes les étapes du document Démarrage 1 ?Veuillez lire ce manuel après avoir procédé à la configuration de l'imprimante comme décrit dans le document Démarrage 1.
REMARQUE
Utilisation du routeur sans fil
Sans routeur sans fil
Pour connecter une imprimante à
• Avec un routeur sans fil
• Sans routeur sans fil (connexion directe de l'imprimante sur le périphérique)
* Si vous connectez directement votre périphérique à l'imprimante, vous risquez de ne plus pouvoir accéder à Internet à partir de ce périphérique ou de devoir payer des frais de connexion Internet.
Activez la fonction Wi-Fi sur votre smartphone ou votre tablette avant de commencer.2.Vérifiezvotreconfigurationréseau.
1. Installez Canon PRINT Inkjet/SELPHY sur votre smartphone ou votre tablette.
Passez à la partie de droite.
un smartphone ou une tablette
un PC
* Cette procédure est décrite pour Canon PRINT Inkjet/SELPHY 2.0.0. Dans des versions différentes, suivez les instructions relatives à l'application pour procéder à la configuration.
: Recherchez « Canon PRINT » dans App Store. : Recherchez « Canon PRINT » dans Google Play.
Vous pouvez également accéder au site Web en numérisant le code de droite.
Démarrage 2
a Touchez Réglages sur l'écran d'accueil.
a Touchez Réglages sur l'écran d'accueil.
c Touchez PRINT pour l'imprimante que vous avez installée.
c Touchez PRINT pour l'imprimante que vous avez installée.
b Touchez Canon_ij_XXXX sur le paramètre Wi-Fi.
b Touchez Canon_ij_XXXX sur le paramètre Wi-Fi.
Si Canon_ij_XXXX ne figure pas dans la liste, reportez-vous à la section REMARQUE pour définir l'imprimante et attendez que Canon_ij_XXXX apparaisse.XXXX varie en fonction de votre imprimante.
L'écran d'enquête étendue apparaît sur le premier écran de configuration.
L'écran d'enquête étendue apparaît sur le premier écran de configuration.
Si Canon_ij_XXXX ne figure pas dans la liste, reportez-vous à la section REMARQUE pour définir l'imprimante et attendez que Canon_ij_XXXX apparaisse.XXXX varie en fonction de votre imprimante.
L'écran de contrat de licence apparaît sur le premier écran de configuration.
Si l'écran de l'étape b n'apparaît pas, reportez-vous à la section REMARQUE pour définir l'imprimante et attendez que l'écran apparaisse.
Si aucun de ces écrans n'apparaît, voir « Si l'écran Sélection. routeur apparaît ».
Si l'imprimante n'est pas détectée et que le voyant Alarme (Alarm) est allumé, appuyez sur le bouton Couleur (Color) ou Noir (Black), puis recommencez à partir de l'étape a.
Si l'imprimante n'est pas détectée et que le voyant Alarme (Alarm) est allumé, appuyez sur le bouton Couleur (Color) ou Noir (Black), puis recommencez à partir de l'étape a.
d Touchez l'icône de l'imprimante dans le coin supérieur gauche de l'écran.
d Touchez l'icône de l'imprimante dans le coin supérieur gauche de l'écran.
h Touchez OK. i Sélectionnez le SSID du routeur sans fil connecté à votre périphérique.
j Lorsqu'un écran de saisie de mot de passe apparaît, entrez le mot de passe de votre routeur sans fil et touchez OK.
k Patientez jusqu'à ce que l'imprimante soit détectée.
l Lorsque l'imprimante est détectée, touchez le nom du modèle de votre imprimante.
m Entrez le nom de l'imprimante et touchez OK.
n Lorsque les informations sur l'imprimante apparaissent à l'écran, la configuration est terminée.
e Touchez Enreg. imprimante.
e Touchez Enreg. imprimante.
f Touchez Config.imprimante.
f Touchez Config.imprimante.
g Touchez Connecter via un routeur sans fil(recommandé).
g Touchez Connexion directe.
j Touchez Réglages sur l'écran d'accueil.
m Touchez PRINT.
h Touchez OK. i Vérifiez le SSID et le mot de passe, puis touchez Copier mdp.
o Patientez jusqu'à ce que l'imprimante soit détectée.
n Touchez Terminé.
k Touchez le même SSID que celui vérifié à l'étape i.
l Collez le mot de passe et touchez Rejoindre.
p Lorsque l'imprimante est détectée, touchez le nom du modèle de votre imprimante.
q Entrez le nom de l'imprimante et touchez OK.
r Lorsque les informations sur l'imprimante apparaissent à l'écran, la configuration est terminée.
Si Canon_ij_XXXX n'apparaît pas : Si le message « L'imprimanten'estpasenregistrée.Configurerl'imprimante? » n'apparaît pas au
démarrage de Canon PRINT Inkjet/SELPHY :Effectuez les opérations suivantes sur l'imprimante.
a Touchez PRINT pour l'imprimante que vous avez installée.
b Touchez Oui.
Assurez-vous que le SSID du routeur sans fil voulu apparaît et touchez Oui.
Entrez le mot de passe du routeur sans fil et touchez OK.
Touchez Oui. Touchez OK.
Procédez comme suit si cet écran apparaît.• Lorsque le SSID du routeur sans fil choisi
apparaît, touchez-le. Assurez-vous que votre périphérique est connecté au même SSID.
• Si le SSID du routeur sans fil voulu n'apparaît pas, touchez Si pas de routeur sans fil.
Si l'écran Sélection. routeur apparaît :
c Suivez les instructions à l'écran. d Patientez jusqu'à ce que l'imprimante soit détectée.
e Lorsque l'imprimante est détectée, touchez le nom du modèle de votre imprimante.
f Entrez le nom de l'imprimante et touchez OK.
g Lorsque les informations sur l'imprimante apparaissent à l'écran, la configuration est terminée.
PC (Windows/Mac OS)
Smartphone ou tablette (iOS/Android)
a Appuyez de façon prolongée sur le bouton Wi-Fi (A) de l'imprimante jusqu'à ce que le voyant Alarme (Alarm) (B) clignote 2 fois, puis relâchez le bouton Wi-Fi après le second clignotement.
b Assurez-vous que le voyant Wi-Fi (C) clignote rapidement et que le voyant MARCHE (ON) (D) est allumé.
Procédez comme suit pour utiliser Google Cloud Print.a Appuyez sur le bouton Arrêt (Stop) de l'imprimante.b Connectez l'imprimante à votre réseau.
c Enregistrez l'imprimante dans Google Cloud Print.
Util isation de Google Cloud Print
Manuel en ligne